INTRODUCTION
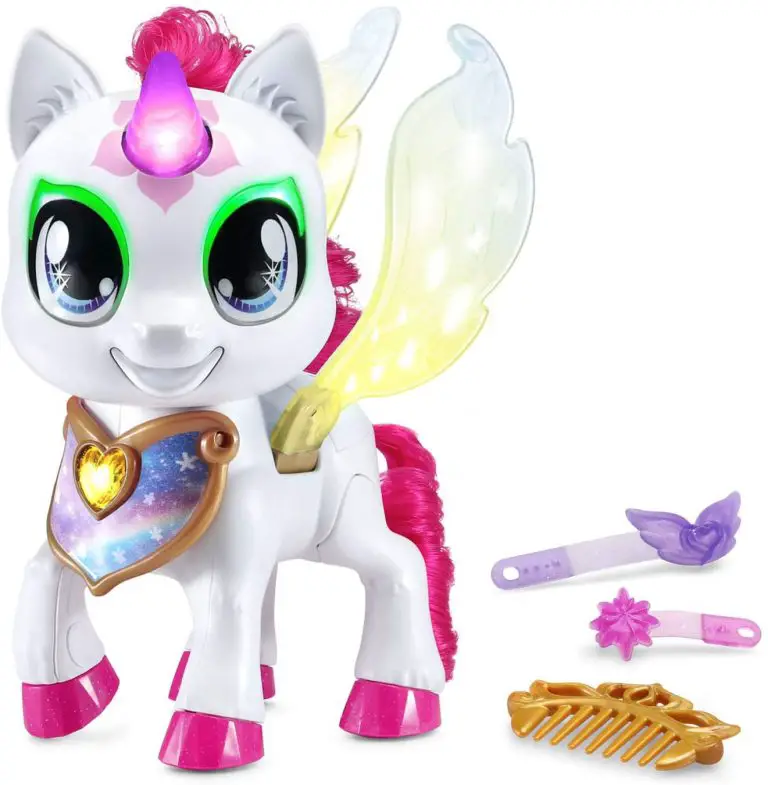
Thank you for purchasing the Myla’s Sparkling Friends™ Mia!
Hi, I’m Mia, welcome to my colorful world of magic! Press my charm to choose a color, then touch my horn, eyes or wings to decorate them with that color. Let’s have fun together!

INCLUDED IN THIS PACKAGE
- Myla’s Sparkling Friends™ Mia
- Two hair clips
- One comb
- Parent’s guide
WARNING: All packing materials such as tape, plastic sheets, packaging locks, removable tags, cable ties, cords and packaging screws are not part of this toy and should be discarded for your child’s safety.
NOTE: Please keep this parent’s guide as it contains important information.
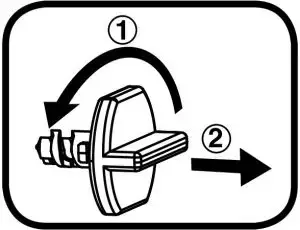
Unlock the Packaging Locks
- Rotate the packaging lock counterclockwise several times.
- Pull out the packaging lock and discard.

NOTE: There are two cable ties at the bottom of the wings. These ties are packaging materials and should be discarded for your child’s safety.
 Warning:
Choking Hazard: Small parts. Not for children under 3 years.
GETTING STARTED
The batteries included are for demo purposes only. Please replace the low capacity Try Me batteries with new batteries for the best performance. Slide the Demo/Off/On Switch to the ON position to start.
NOTE:
Playing at close range for a prolonged period of time may cause fatigue or discomfort. We recommend that children take a 15-minute break for every hour of play.
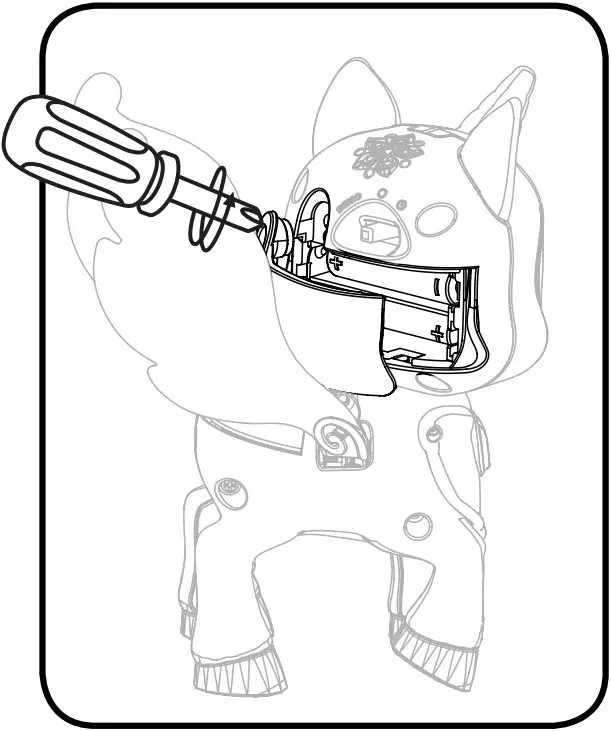
Battery Removal and Installation

- Make sure the unit is turned OFF.
- Locate the battery cover on the back of the unit, use a screwdriver to loosen the screw and open the battery box.
- Remove old batteries by pulling up on one end of each battery.
- Install 2 new AAA (AM-4/LR03) batteries following the diagram inside the battery box. (The use of new alkaline batteries is recommended for maximum performance).
- Replace the battery cover and tighten the screw to secure.
BATTERY NOTICE
- Use new alkaline batteries for maximum performance.
- Use only batteries of the same or equivalent type as recommended.
- Do not mix different types of batteries: alkaline, standard (carbonzinc) or rechargeable, or new and used batteries.
- Do not use damaged batteries.
- Insert batteries with the correct polarity(+ and -).
- Do not short-circuit the battery terminals.
- Remove exhausted batteries from the toy.
- Remove batteries during long periods of non-use.
- Do not dispose of batteries in fire.
- Do not charge non-rechargeable batteries.
- Remove rechargeable batteries from the toy before charging (if removable).
- Rechargeable batteries are only to be charged under adult supervision.
PRODUCT FEATURES
- Demo/Off/On Switch
To turn the unit ON, slide the Demo/Off/On Switch to the ON position. To turn the unit OFF, slide the Demo/Off/On Switch to the OFF position. - Automatic Shut Off
To preserve battery life, Mia will automatically power down after several seconds without input. The unit can be turned on again by pressing the horn button, mouth button or charm button.
NOTE: If the unit powers down while playing, please install a new set of batteries.
ACTIVITIES
- Color Mia
Mia lights up in the colors you choose for her. Press Mia’s Charm Button to choose a color. Then, touch her eyes, horn and wings to add the selected color to them. - Mia’s Mood
Mia expresses her mood through color. Press her Light-Up Horn Button to see how she feels. Then, touch her eyes or wings for some additional color commentary. - Color Fun

Mia likes to pick a lucky color for you. Press her Wing Sensor and she’ll select a lucky color and tell you how that color makes her feel. - Tell Mia Your Wishes

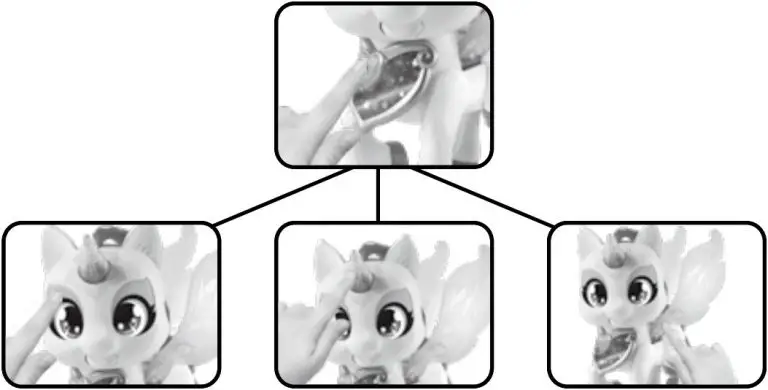
Mia wants you to share your wishes and dreams with her. Cover and hold one of Mia’s Eye Sensors and she’ll ask you to tell her your wishes. Keep her Eye Sensor covered as you tell her. Uncover her Eye Sensor and she’ll tell you how much she loves your wishes. - Musical Mia

Mia loves to sing. Tap Mia’s Mouth Button, and she will sing, hum or even surprise you with a kiss! Careful, sometimes she even burps! - Flying Fun

Mia loves to fly! Help her flap her wings by pressing her Leg Lever. She’ll make magical sounds and cheer as she pretends to zoom through the sky. - Cuddle and Care


Every unicorn needs love. Pet Mia’s Eye Sensors or Wing Sensor to take care of her and get some fun surprises.
CARE & MAINTENANCE
- Keep the unit clean by wiping it with a slightly damp cloth.
- Keep the unit out of direct sunlight and away from any direct heat sources.
- Remove the batteries when the unit is not in use for an extended period of time.
- Do not drop the unit on a hard surface and do not expose the unit to excess moisture.
TROUBLESHOOTING
If for some reason the unit stops working or malfunctions, please follow these steps:
- Turn the unit Off.
- Interrupt the power supply by removing the batteries.
- Let the unit stand for a few minutes, then replace the batteries.
- Turn the unit On. The unit will now be ready to play again.
- If the unit still does not work, install a new set of new batteries.
IMPORTANT NOTE:
If the problem persists, please call our Consumer Services Department at 1-800-521-2010 in the U.S. 1-877-352-8697 in Canada, or visit our website vtechkids.com and fill out our Contact Us form located under the Customer Support link. Creating and developing VTech products is accompanied by a responsibility that we take very seriously. We make every effort to ensure the accuracy of the information, which forms the value of our products. However, errors sometimes can occur. It is important for you to know that we stand behind our products and encourage you to contact us with any problems and/or suggestions you might have. A service representative will be happy to help you.
CAUTION:
Changes or modifications not expressly approved by the party responsible for compliance could void the user’s authority to operate the equipment.
NOTE:
This equipment has been tested and found to comply with the limits for a Class B digital device, pursuant to Part 15 of the FCC Rules. These limits are designed to provide reasonable protection against harmful interference in a residential installation. This equipment generates, uses and can radiate radio frequency energy and, if not installed and used in accordance with the instructions, may cause harmful interference to radio communications. However, there is no guarantee that interference will not occur in a particular installation. If this equipment does cause harmful interference to radio or television reception, which can be determined by turning the equipment off and on, the user is encouraged to try to correct the interference by one or more of the following measures:
- Reorient or relocate the receiving antenna.
Increase the separation between the equipment and receiver.
Connect the equipment into an outlet on a circuit different from that to which the receiver is connected. - Consult the dealer or an experienced radio/TV technician for help.
Supplier’s Declaration of Conformity
- Trade Name: VTech®
- Model: 5308
- Product Name: Myla’s Sparkling Friends™ Mia
- Responsible Party: VTech Electronics North America, LLC
- Address: 1156 W. Shure Drive, Suite 200, Arlington Heights, IL 60004
- Website: vtechkids.com
THIS DEVICE COMPLIES WITH PART 15 OF THE FCC RULES. OPERATION IS SUBJECT TO THE FOLLOWING TWO CONDITIONS: (1) THIS DEVICE MAY NOT CAUSE HARMFUL INTERFERENCE, AND (2) THIS DEVICE MUST ACCEPT ANY INTERFERENCE RECEIVED, INCLUDING INTERFERENCE THAT MAY CAUSE UNDESIRED OPERATION.
CAN ICES-3 (B)/NMB-3(B)
Visit our website for more information about our products, downloads, resources and more.
Read our complete warranty policy online at vtechkids.com/warranty

TM & © 2020 VTech Holdings Limited.
All rights reserved.
Printed in China.
91-003822-000 US C
DM223
DM223-2
Digital Audio Monitor

![]()
User’s manual
CONGRATULATIONS
on purchasing your new VTech product. Before using this product, please read Important safety instructions.
This manual has all the feature operations and troubleshooting necessary to install and operate your new VTech product. Please review this manual thoroughly to ensure proper installation and operation of this innovative and feature-rich VTech product.
For support, shopping, and everything new at VTech, visit our website at www.vtechphones.com.


 1 set for DM223;
2 sets for DM223-2

1 CONNECT AND CHARGE THE BATTERY
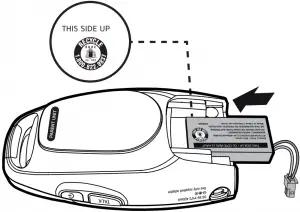
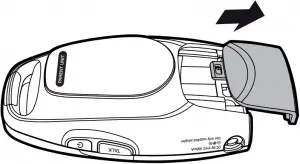
Install the parent unit battery
The parent unit runs on rechargeable battery or AC power. To continuously monitor your baby, keep the parent unit connected to AC power. With the battery alone, the parent unit can cordlessly run for a short time only.
 NOTES
NOTES
- Use only the battery supplied with this product.
- If the parent unit will not be used for a long time, disconnect and remove the battery to prevent possible leakage.
1

2
 NOTE
NOTE
Make sure the label THIS SIDE UP is facing up while inserting the battery.
3 4

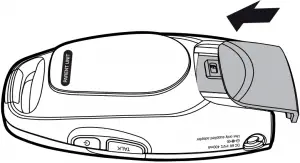
Replace the battery
To replace the battery, unplug the battery connector from the socket, and then pull the battery out of the battery compartment. Follow the steps above to install the battery.
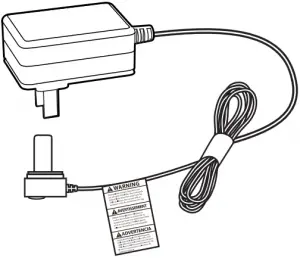
Connect the baby monitor
 NOTES
NOTES
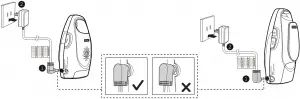
- Use only the power adapters supplied with this product.
- Make sure the baby monitor is not connected to an electric outlet that is controlled by a switch.
- Connect the power adapters in a vertical or floor mount position only. The adapters’ prongs are not designed to hold the weight of baby monitor, so do not connect them to any ceiling, under-the-table, or cabinet outlets. Otherwise, the adapters may not properly connect to the outlets.
- Make sure the parent unit, the baby unit and the power adapter cords are out of reach of children.
- With audio reminder feature preset to ON, the parent unit plays an audio reminder when it is connected to a baby unit.
Charge the parent unit battery
When you have connected the parent unit and installed its battery for the first time or after power outage, the parent unit powers on automatically. The battery icon indicates the battery status (see the following table).
![]() NOTES
NOTES
- The parent unit battery is fully charged after 11 hours of continuous charging.
- It takes longer to charge the battery when the parent unit is turned on. To shorten the charging time, turn the parent unit off while charging.
- The standby time varies depending on the sensitivity level you set, your actual use and the age of the battery.
| BATTERY INDICATORS | BATTERY STATUS | ACTION |
| The battery icon is off. | No battery is installed but operates using AC power.
-OR- Abnormal battery is detected. |
Install the parent unit battery. Charge without interruption (at least 30 minutes). |
The screen displays LOW BATTERY and  light flashes. light flashes. |
The battery has very little charge and may be used for only a short time. | Charge without interruption (about 30 minutes). |
| The battery icon becomes solid |
The battery is fully charged. | To keep the battery charged, connect it to AC power when not in use. |
2 BEFORE USE
NOTE
- This baby monitor is intended as an aid. It is not a substitute for proper adult supervision, and should not be used as such.
Test your audio monitor
You may test the baby monitor before initial use, and at regular times thereafter.
 Caution
- For hearing protection, make sure the parent unit is more than 6.5 feet (2 meters) away from the baby unit. If you hear any high-pitched noise, move the parent unit further until the noise stops. You can also press VOL.
 on the parent unit to lower or mute the noise.
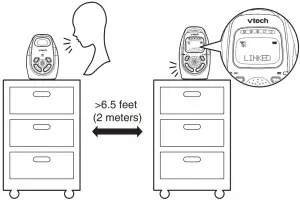

- Make sure your baby unit and parent unit are on.
- Speak towards the microphone of the baby unit. You will hear the sound at the parent unit, and see the visual sound indicators light up.
![]() NOTE
NOTE
- When the parent unit displays NOT LINKED and
 flashes, move the parent unit closer to the baby unit (observe the minimum distance of 6.5 feet/ 2 meters).
 TIP
TIP
- Increase the speaker volume of the parent unit if you cannot hear the sounds transmitted from the baby unit.
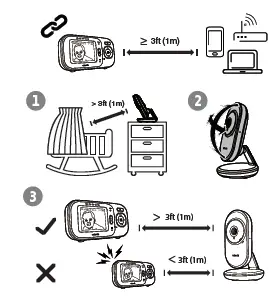
Positioning the baby monitor
 Caution
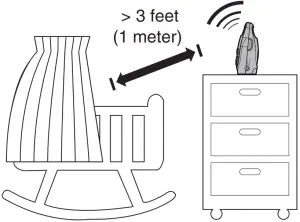
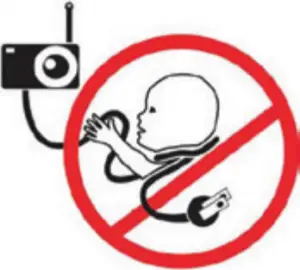
- Keep the baby units out of the reach of your baby. Never place or mount the baby units inside the baby’s crib or playpen.
- Place the baby units more than 3 feet (1 meter) away from your baby.
- Place the parent unit more than 6.5 feet (2 meters) away from the baby unit.
1 2
Caution
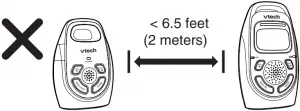
- The default volume of your parent unit is level 3. If you experience high-pitched screeching noise from your baby monitor while positioning:
– Make sure your baby unit and parent unit are more than 6.5 feet (2 meters) apart, OR
– Turn down the volume of your parent unit.
Operating range
The operating range of the baby monitor is up to 1,000 feet (300 meters) outdoors. The actual operating range may vary depending on the environmental conditions, and other interferences such as walls, doors, and other obstructions.
3 USING THE BABY MONITOR
 Power on or off the baby unit
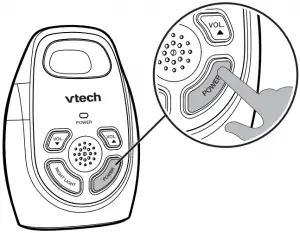
- Press POWER to power on the baby unit. The power light turns on.
- POWER to power off the baby unit. The power light turns off.

Power on or off the parent unit
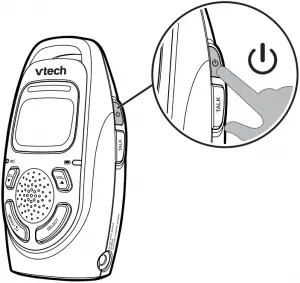
 to power on the parent unit. The screen turns on.
- again to power off the parent unit. The screen turns off.
![]() NOTE
NOTE
- The parent unit powers on automatically once it is connected to power socket or battery installed. The baby unit also powers on automatically once connected to power socket.
Adjust the speaker volume for baby unit
- Press VOL.
 or VOL. on the baby unit at any time.
![]() NOTE
NOTE
- The speaker of baby unit cannot be muted.
Adjust the speaker volume for parent unit
You can adjust the speaker volume from VOLUME 1 to VOLUME 5, or turn it off. The speaker volume is preset to VOLUME 3.
- Press VOL. or VOL. when the parent unit is not in use.
When the speaker volume is set to VOLUME OFF, the screen displays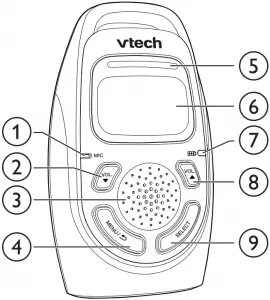 .
.
Adjust the sound sensitivity of the baby unit
You can choose to hear sounds from the baby unit all the time, or to hear sounds that exceed a certain level. You can use the parent unit to adjust the microphone sensitivity of your baby unit. The higher the sensitivity level, the more sensitive the baby unit is in detecting sounds for transmitting to the parent unit. The VOX sensitivity level is preset to HIGHEST.
| VOX Sensitivity level | Highest | High | Medium | Low | Lowest |
| Description | The parent unit speaker is constantly on, and you will hear all sounds (including background noises) from your baby’s room. | The parent unit speaker turns on for soft babbling and louder sounds from your baby. It remains quiet when your baby sleeps soundly. | The parent unit speaker turns on for loud babbling and louder sounds from your baby. It remains quiet when your baby makes soft sounds. | The parent unit speaker turns on for crying and louder sounds from your baby. It remains quiet when your baby makes soft sounds. | The parent unit speaker turns on for loud crying or screeching sounds from your baby. It remains quiet when your baby makes soft sounds. |
- Press MENU/
 when the parent unit is not in use.
 - Press SELECT to select VOX LEVEL.
- Press VOL. or VOL. to choose the desired sensitivity level.
- Press SELECT to confirm your selection. The screen displays SAVED and you hear a confirmation tone.
![]() NOTE
NOTE
- To enter the VOX Level menu of the parent unit, the baby unit must be turned on.
Sound alert
If you want the parent unit alerts you with sound, especially when the baby unit detects loud sounds, you can turn on the sound alert feature. This feature is preset to OFF.
Once this feature is on,  is shown on LCD display. When the visual sound indicator hits the red light range, i.e. the baby unit detects loud sounds, your parent unit beeps and flashes.
- Press MENU/ when the parent unit is not in use.
- Press VOL. or VOL. to choose SOUND ALERT, then press SELECT.
- Press VOL. or VOL. to choose ON or OFF.
- Press SELECT to confirm your selection. The screen displays SAVED and you hear a confirmation tone.
![]() NOTE
NOTE
- The sound alert setting on each parent unit is independent.
Vibration alert
You can set your parent unit to vibrate and alert you, whenever the baby unit detects loud sounds. This feature is preset to OFF.
Once this feature is on,  is shown on LCD display. When the visual sound indicator hits the red light range, i.e. the baby unit detects loud sounds, your parent unit vibrates and flashes.
- Press MENU/ when the parent unit is not in use.
- Press VOL. or VOL. to choose VIBE ALERT, then press SELECT.
- Press VOL. or VOL. to choose ON or OFF.
- Press SELECT to confirm your selection. The screen displays SAVED and you hear a confirmation tone.
![]() NOTES
NOTES
- Each time you set the vibration alert to ON, the parent unit vibrates briefly after you press SELECT.
- The vibration alert setting on each parent unit is independent.
Nightlight
Both your parent unit(s) and baby unit allow you to turn on or off the nighlight on the baby unit.
Turn on/off the nightlight using the baby unit:
- Press NIGHT LIGHT to turn on the nightlight.
- Press NIGHT LIGHT again to turn off the nightlight.
Turn on/off the nightlight using the parent unit:
- Press MENU/ when the parent unit is not in use.
- Press VOL. or VOL. to choose NIGHTLIGHT, then press SELECT.
- Press VOL. or VOL. to choose ON or OFF.
- Press SELECT to confirm your selection. The screen displays SAVED and you hear a confirmation tone.
![]() NOTES
NOTES
- When the nightlight is turned on, the parent unit displays
 .
. - The nightlight on baby unit operates even when the parent unit battery is out of charge or has been turned off.
- If the parent unit lost link, the nightlight icon on its LCD display will disappear, regardless of the nightlight status.
Language
You can select a language (English, Spanish or French) to be used in all screen displays. The language is preset to English.
- Press MENU/ when the parent unit is not in use.
- Press VOL. or VOL. to choose LANGUAGE, then press SELECT.
- Press VOL. or VOL. to choose ENGLISH, ESPANOL, or FRANCAIS.
- Press SELECT to confirm your selection. The screen displays SAVED and you hear a confirmation tone.
![]() NOTE
NOTE
- The language setting on each parent unit is independent.
Audio Reminder
With audio reminder feature preset to ON, the parent unit plays an audio reminder when it is connected to a baby unit. It reminds you to place the baby unit at least 3 feet (1 meter) away from your baby, and keep the cords out of the reach of children.
- Press MENU/ when the parent unit is not in use.
- Press VOL. or VOL. to choose REMINDER, then press SELECT.
- Press VOL. or VOL. to choose ON or OFF.
- Press SELECT to confirm your selection, and you hear a confirmation tone.
![]() NOTES
NOTES
- You can press VOL. or VOL. to adjust the volume when the parent unit is playing the reminder.
- If the speaker volume of the parent unit is turned off, it will change to the default volume level when the parent unit plays the reminder.
Set default
Use this feature to restore to the default settings. Restoring the default settings on one parent unit will also reset the shared settings for VOX sensitivity level of the other parent unit.
- Press MENU/ when the parent unit is not in use.
- Press VOL. or VOL. to choose SET DEFAULT, then press SELECT.
- Press VOL. or VOL. to choose YES or NO.
- When you choose YES, press SELECT to confirm your selection, and you hear a confirmation tone.
-OR-
When you choose NO, press SELECT to confirm your selection. The screen displays the previous menu.
Talk to the baby unit
You can broadcast messages from a parent unit to the baby unit and the other parent unit. If you have two parent units, you can use both of them at the same time to talk to the baby unit.
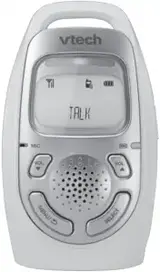
- TALK on the side of the parent unit. The screen displays TALK when the voice connection to the baby unit is made.
- Speak towards the MIC on the parent unit. Your voice is broadcast to the baby unit and the other parent unit.
![]() NOTES
NOTES
- If you have two parent units, and you use one of them to talk to your baby, your voice will be broadcast to both the baby unit and the other parent unit. The other parent unit displays TALKBACK. However, no sound will transmit from the baby unit to any parent unit during broadcasting.
- If speaker volume of the parent unit has been turned off before the talk, it will change to default volume level after the talk finished.
Find/page the parent unit
Use this feature to locate misplaced parent units.
- Press PAGE on the baby unit. All idle parent units ring and display PAGING.
- To end paging, press any key on the parent unit, or press PAGE on the baby unit.
![]() NOTES
NOTES
- Paging rings all parent units even if the speaker volume of parent unit is set to VOLUME OFF.
- The baby unit cannot page any parent unit that is turned off, out of range, or talking to the baby unit.


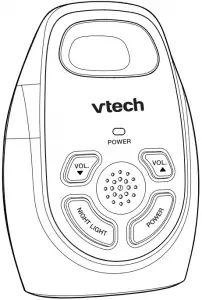
- VOL.
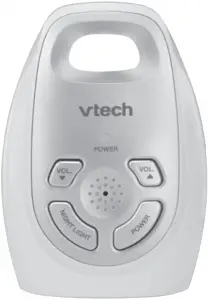
• Press to decrease the speaker volume. - Microphone
- NIGHT LIGHT
• Press to turn the nightlight on or off. - Nightlight
• On when nightlight is turned on manually or triggered by sound.
• Off when nightlight is turned off manually or after 15 minutes of silence. - POWER light
• On when the baby unit is turned on. - VOL.
• Press to increase the speaker volume. - POWER
• Press to power on, the power light turns on.
• to power off, the power light turns off. - PAGE
• Press to start or stop paging parent unit. - Power jack
- Speaker


- Microphone
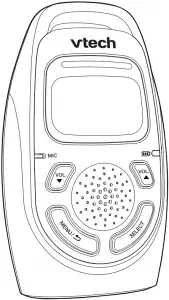
- VOL.
• Press to decrease the speaker volume.
• While in a menu, press to scroll down. - Speaker
- MENU/
• Press to enter the menu while idle.
• While in a menu, press to return to the previous screen.
• Press to return to idle screen. - Visual sound indicator

The visual sound indicator has two functions. One is to show the sound level detected by the baby unit. The other one is to show the volume level during speaker volume setting.
Sound level detected by the baby unit
• One to three green lights indicate a moderate sound level detected by the baby unit.
• Additional red lights indicate a higher sound level detected by the baby unit (e.g. baby crying loudly).
Speaker volume level
•One to three green lights indicate Level 1 to Level 3 of the speaker volume setting.
• Additional red lights indicate Level 4 to Level 5 of the speaker volume setting. - LCD panel
 Battery level indicator
• Light on when the battery is being charged.
• Light flashes when the battery is low and needs charging.
• Light off when no battery is installed, or abnormal battery is detected.- VOL.
• Press to increase the speaker volume.
• While in a menu, press to scroll up. - SELECT
• While in a menu, press to choose an item, or save a setting. - (On/off)
• to power on, the screen turns on.
• to power off, the screen turns off.
• While in a menu, press to return to idle screen. - TALK
• to talk to the baby unit; release to stop talking.
• While in a menu, press to return to idle screen. - Power jack
- Belt clip
- Battery compartment cover
Status icons
![]() Connection status
Connection status
• ![]() displays when strong signal strength is detected between the baby unit and the parent unit.
displays when strong signal strength is detected between the baby unit and the parent unit.
•![]() displays when moderate signal strength is detected between the baby unit and the parent unit.
displays when moderate signal strength is detected between the baby unit and the parent unit.
•![]() displays when the weak signal strength is detected between the baby unit and the parent unit.
displays when the weak signal strength is detected between the baby unit and the parent unit.
•![]() flashes when the link between the baby unit and the parent unit is lost.
flashes when the link between the baby unit and the parent unit is lost.
![]()
Nightlight
• Displays when the nightlight is turned on.
![]()
Sound alert
• Displays when the sound alert of the parent unit is turned on.
• Flashes when there are loud sounds detected from the baby unit.
![]()
Vibration alert
• Displays when the vibration alert of the parent unit is turned on.
• Flashes when there are loud sounds detected from the baby unit.
![]()
Volume off
• Displays when the patient unit speaker volume is turned off.
![]()
Battery status
• ![]() animates when the battery is charging.
animates when the battery is charging.
• ![]() displays solid when the battery is fully charged.
displays solid when the battery is fully charged.
• ![]() flashes when the battery is in low level and needs charging.
flashes when the battery is in low level and needs charging.
• No battery icon displays when there is no battery installed.
Parent unit display screen messages
![]()
• The link between the parent unit and the baby unit is established.
![]()
• The parent unit uses only the rechargeable battery pack and it needs to be recharged.
![]()
• The link between the parent unit and the baby unit is lost continuously for over 10 seconds.
![]()
• Your selection has been saved.
![]()
• The parent unit is out of range of the baby unit, or the baby unit is out of power.
![]()
• You are using the parent unit to talk to your baby.
![]()
• Someone is using the other parent unit to talk to the baby, and the voice is also broadcasting to your parent unit. No sound will transmit from the baby unit to any parent unit during broadcasting.
• For DM223-2 only
GENERAL PRODUCT CARE
To keep this product working well and looking good, follow these guidelines:
- Avoid putting it near heating appliances and devices that generate electrical noise (for example, motors or fluorescent lamps).
- DO NOT expose it to direct sunlight or moisture.
- Avoid dropping the product or treating it roughly.
- Clean with a soft cloth.
- DO NOT immerse the parent unit and the baby unit in water and do not clean them under the tap.
- DO NOT use cleaning spray or liquid cleaners.
- Make sure the baby unit and parent unit are dry before you connect them to the mains again.
STORAGE
When you are not going to use the baby monitor for some time, remove the rechargeable battery from the parent unit. Store the parent unit, the baby unit and the adapters in a cool and dry place.
FREQUENTLY ASKED QUESTIONS
Below are the questions most frequently asked about the baby monitor. If you cannot find the answer to your question, visit our website at www.vtechphones.com or call 1 (800) 595-9511 for customer service.
Why does the baby monitor not respond normally?
Try the following (in the order listed) for common cure:
- Disconnect the power to the baby unit and the parent unit.
- Remove the batteries in the parent unit. Then, install the batteries again.
- Wait a few minutes before connecting power back to the baby unit and the parent unit.
- Turn on the baby unit and the parent unit.
- Wait for the parent unit to synchronize with the baby unit. Allow up to one minute for this to take place.
Why doesn’t the screen of the parent unit go on when I switch on the unit?
Perhaps the rechargeable battery of the parent unit is empty and the parent unit is not connected to the power. Insert the appliance plug into the parent unit and put the adapter in a wall socket.
Why doesn’t the power light of the baby unit go on when I switch on the unit?
Perhaps the baby unit is not connected to the power. Connect the baby unit to the power.
Why does the baby monitor produce a high-pitched noise?
The units may be too close to each other. Make sure the parent unit and the baby unit are more than 6.5 feet (2 meters) away from each other.
Why does the parent unit react too quickly to other sounds?
The baby unit also detects other sounds than those of your baby. Adjust the VOX sensitivity level to a lower level or adjust the speaker volume on the parent unit.
Why don’t I hear a sound/Why can’t I hear my baby cry?
The volume of the parent unit may have set too low. Press VOL.![]() to increase the volume level.
to increase the volume level.
You may have set a low VOX sensitivity level. See Adjust the sound sensitivity of the baby unit to change the setting.
Why does the parent unit beep?
If the sound alert feature is on, there is sound detected from the baby unit.
The baby unit may be out of range. Move the parent unit closer to the baby unit (but not less than 6.5 feet).
If the parent unit is powered by the provided battery, it may not have enough charge for the parent unit to perform normally. Charge the battery in the parent unit for up to 11 hours.
Why can’t I establish a connection? Why is the connection lost every now and then? Why are there sound interruptions?
The baby unit may be out of range. Move the parent unit closer to the baby unit (but not less than 6.5 feet).
Other electronic products may cause interference with your baby monitor. Try installing your baby monitor as far away from these electronic devices as possible.
Why doesn’t the battery icon shown on LCD display even I have properly installed the battery?
The battery may not be working. Contact our customer service to purchase a new battery.
IMPORTANT SAFETY INSTRUCTIONS
When using your equipment, basic safety precautions should always be followed to reduce the risk of fire, electric shock and injury, including the following:
- Follow all warnings and instructions marked on the product.
- Adult setup is required.
- This product is not a substitute for adult supervision of the infant. Supervising the infant is the parent’s or caregiver’s responsibility. This product could cease operating, and therefore you should not assume it will continue working properly for any given period of time. Further, this is not a medical device and should not be used as such. This product is intended to assist you in supervising your baby.
- Do not use this product near water. For example, do not use it next to a bath tub, wash bowl, kitchen sink, laundry tub or swimming pool, or in a wet basement or shower.
- CAUTION: Use only the batteries indicated in this manual. There may be a risk of explosion if a wrong type of battery is used for the parent unit. Use only the supplied rechargeable battery or replacement battery pack (BT166342/BT266342) for the parent unit. Do not dispose of batteries in a fire. They may explode. Dispose of used battery according to the information in The RBRC® seal.
- Use only the adapters included with this product. Incorrect adapter polarity or voltage can seriously damage the product.
Baby unit power adapter: Output: 6V DC 400mA;
Parent unit power adapter: Output: 6V DC 400mA. - The power adapters are intended to be correctly oriented in a vertical or floor mount position. The prongs are not designed to hold the plug in place if it is plugged into a ceiling, under-the-table or cabinet outlet.
- For pluggable equipment, the socket-outlet shall be installed near the equipment and shall be easily accessible.
- Unplug this product from the wall outlet before cleaning. Do not use liquid or aerosol cleaners. Use a damp cloth for cleaning.
- Unplug the power cords before replacing batteries.
- Do not cut off the power adapters to replace them with other plugs, as this causes a hazardous situation.
- Do not allow anything to rest on the power cords. Do not install this product where the cords may be walked on or crimped.
- This product should be operated only from the type of power source indicated on the marking label. If you are not sure of the type of power supply in your home, consult your dealer or local power company.
- Do not overload wall outlets or use an extension cord.
- Do not place this product on an unstable table, shelf, stand or other unstable surfaces.
- This product should not be placed in any area where proper ventilation is not provided. Slots and openings in the back or bottom of this product are provided for ventilation. To protect them from overheating, these openings must not be blocked by placing the product on a soft surface such as a bed, sofa or rug. This product should never be placed near or over a radiator or heat register.
- Never push objects of any kind into this product through the slots because they may touch dangerous voltage points or create a short circuit. Never spill liquid of any kind on the product.
- To reduce the risk of electric shock, do not disassemble this product, but take it to an authorized service facility. Opening or removing parts of the product other than specified access doors may expose you to dangerous voltages or other risks. Incorrect reassembling can cause electric shock when the product is subsequently used.
- You should test the sound reception every time you turn on the units or move one of the components.
- Periodically examine all components for damage.
- Be aware of possible loss of privacy while using public airwaves. Conversations may be picked up by other nursery monitors, cordless phones, scanners, etc.
- Children should be supervised to ensure that they do not play with the product.
- The product is not intended for use by persons (including children) with reduced physical, sensory or mental capabilities, or lack of experience and knowledge, unless they have been given supervision or instruction concerning use of the appliance by a person responsible for their safety.
SAVE THESE INSTRUCTIONS
Cautions
- Use and store the product at a temperature between 32°F and 104°F.
- Do not expose the product to extreme cold, heat or direct sunlight. Do not put the product close to a heating source.
- Batteries should not be exposed to excessive heat such as bright sunshine or fire.
 Warning–Strangulation Hazard–Children have STRANGLED in cords. Keep this cord out of the reach of children (more than 3 ft (0.9 m) away). Do not remove this tag.

5. Never place the baby unit inside the baby’s crib or playpen. Never cover the baby unit or parent unit with anything such as a towel or a blanket.
6. Other electronic products may cause interference with your baby monitor. Try installing your baby monitor as far away from these electronic devices as possible: wireless routers, radios, cellular telephones, intercoms, room monitors, televisions, personal computers, kitchen appliances and cordless telephones.
Precautions for users of implanted cardiac pacemakers
Cardiac pacemakers (applies only to digital cordless devices):
Wireless Technology Research, LLC (WTR), an independent research entity, led a multidisciplinary evaluation of the interference between portable wireless devices and implanted cardiac pacemakers. Supported by the U.S. Food and Drug Administration, WTR recommends to physicians that:
Pacemaker patients
- Should keep wireless devices at least six inches from the pacemaker.
- Should NOT place wireless devices directly over the pacemaker, such as in a breast pocket, when it is turned ON.
WTR’s evaluation did not identify any risk to bystanders with pacemakers from other persons using wireless devices.
Electromagnetic fields (EMF)
This VTech product complies with all standards regarding electromagnetic fields (EMF). If handled properly and according to the instructions in this user’s manual, the product is safe to be used based on scientific evidence available today.
The RBRC® SEAL

The RBRC® seal on the nickel-metal battery indicates that VTech Communications, Inc. is voluntarily participating in an industry program to collect and recycle these batteries at the end of their useful lives, when taken out of service within the United States and Canada.
The RBRC® program provides a convenient alternative to placing used nickel-metal batteries into the trash or municipal waste, which may be illegal in your area.
VTech’s participation in RBRC® makes it easy for you to drop off the spent battery at local retailers participating in the RBRC® program or at authorized VTech product service centers. Please call 1 (800) 8 BATTERY® for information on Ni-MH battery recycling and disposal bans/restrictions in your area. VTech’s involvement in this program is part of its commitment to protecting our environment and conserving natural resources.
RBRC® and 1 (800) 8 BATTERY® are registered trademarks of the Rechargeable Battery Recycling Corporation.
FCC AND IC REGULATIONS
FCC Part 15
This equipment has been tested and found to comply with the requirements for a Class B digital device under Part 15 of the Federal Communications Commission (FCC) rules. These requirements are intended to provide reasonable protection against harmful interference in a residential installation. This equipment generates, uses and can radiate radio frequency energy and, if not installed and used in accordance with the instructions, may cause harmful interference to radio communications. However, there is no guarantee that interference will not occur in a particular installation. If this equipment does cause harmful interference to radio or television reception, which can be determined by turning the equipment off and on, the user is encouraged to try to correct the interference by one or more of the following measures:
- Reorient or relocate the receiving antenna.
- Increase the separation between the equipment and receiver.
- Connect the equipment into an outlet on a circuit different from that to which the receiver is connected.
- Consult the dealer or an experienced radio/TV technician for help.
WARNING: Changes or modifications to this equipment not expressly approved by the party responsible for compliance could void the user’s authority to operate the equipment.
This device complies with Part 15 of the FCC rules. Operation is subject to the following two conditions: (1) this device may not cause harmful interference, and (2) this device must accept any interference received, including interference that may cause undesired operation.
To ensure safety of users, the FCC has established criteria for the amount of radio frequency energy that can be safely absorbed by a user or bystander according to the intended usage of the product. This product has been tested and found to comply with the FCC criteria. The baby unit shall be installed and used such that parts of all persons’ body are maintained at a distance of approximately 8 in (20 cm) or more. The transmitter and antenna of the parent unit shall be held at least 1 in (2.5 cm) from your face.
This Class B digital apparatus complies with Canadian requirement:
CAN ICES-3 (B)/NMB-3(B)
Industry Canada
This device complies with Industry Canada licence-exempt RSS standard(s).
Operation is subject to the following two conditions: (1) this device may not cause harmful interference, and (2) this device must accept any interference, including interference that may cause undesired operation.
The term “IC:” before the certification/registration number only signifies that the Industry Canada technical specifications were met.
This product meets the applicable Innovation, Science and Economic Development Canada technical specifications.
RF radiation exposure statement
The baby unit complies with FCC RF radiation exposure limits set forth for an uncontrolled environment. The baby unit should be installed and operated with a minimum distance of 8 in (20 cm) between the baby unit and all persons’ body. For body worn operation, this parent unit has been tested and meets the FCC RF exposure guidelines when used with the accessories supplied or designated for this product. Use of other accessories may not ensure compliance with FCC RF exposure guidelines. This transmitter must not be co-located or operating in conjunction with any other antenna or transmitter. This equipment complies also with Industry Canada RSS-102 with respect to Canada’s Health Code 6 for Exposure of Humans to RF Fields.
CALIFORNIA ENERGY COMMISSION BATTERY CHARGING TESTING MODE
This baby monitor meets the California Energy Commission (CEC) regulations for energy consumption. Your baby monitor is set up to comply with the energy-conserving standards right out of the box. Follow the instructions to install and charge the battery. The CEC battery charging testing mode is activated while charging. Even if the parent unit is paired to baby units, the CEC battery charging testing mode is activated while it is powered off and charging.
LIMITED WARRANTY
What does this limited warranty cover?
The manufacturer of this VTech Product warrants to the holder of a valid proof of purchase (“Consumer” or “you”) that the Product and all accessories provided in the sales package (“Product”) are free from defects in material and workmanship, pursuant to the following terms and conditions, when installed and used normally and in accordance with the Product operating instructions. This limited warranty extends only to the Consumer for Products purchased and used in the United States of America and Canada.
What will VTech do if the Product is not free from defects in materials and workmanship during the limited warranty period (“Materially Defective Product”)?
During the limited warranty period, VTech’s authorized service representative will repair or replace at VTech’s option, without charge, a Materially Defective Product. If we repair the Product, we may use new or refurbished replacement parts. If we choose to replace the Product, we may replace it with a new or refurbished Product of the same or similar design. We will retain defective parts, modules, or equipment. Repair or replacement of the Product, at VTech’s option, is your exclusive remedy. VTech will return the repaired or replacement Products to you in working condition. You should expect the repair or replacement to take approximately 30 days.
How long is the limited warranty period?
The limited warranty period for the Product extends for ONE (1) YEAR from the date of purchase. If VTech repairs or replaces a Materially Defective Product under the terms of this limited warranty, this limited warranty also applies to the repaired or replacement Product for a period of either (a) 90 days from the date the repaired or replacement Product is shipped to you or (b) the time remaining on the original one-year warranty; whichever is longer.
What is not covered by this limited warranty?
This limited warranty does not cover:
- Product that has been subjected to misuse, accident, shipping or other physical damage, improper installation, abnormal operation or handling, neglect, inundation, fire, water or other liquid intrusion; or
- Product that has been damaged due to repair, alteration or modification by anyone other than an authorized service representative of VTech; or
- Product to the extent that the problem experienced is caused by signal conditions, network reliability, or cable or antenna systems; or
- Product to the extent that the problem is caused by use with non-VTech accessories; or
- Product whose warranty/quality stickers, product serial number plates or electronic serial numbers have been removed, altered or rendered illegible; or
- Product purchased, used, serviced, or shipped for repair from outside the United States of America or Canada, or used for commercial or institutional purposes (including but not limited to Products used for rental purposes); or
- Product returned without a valid proof of purchase (see item 2 below); or
- Charges for installation or set up, adjustment of customer controls, and installation or repair of systems outside the unit.
How do you get warranty service?
To obtain warranty service in the USA, please visit our website at www.vtechphones.com or call 1 (800) 595-9511. In Canada, go to www.vtechcanada.com or call 1 (800) 267-7377.
NOTE: Before calling for service, please review the user’s manual – a check of the Product’s controls and features may save you a service call.
Except as provided by applicable law, you assume the risk of loss or damage during transit and transportation and are responsible for delivery or handling charges incurred in the transport of the Product(s) to the service location. VTech will return repaired or replaced Product under this limited warranty. Transportation, delivery or handling charges are prepaid. VTech assumes no risk for damage or loss of the Product in transit. If the Product failure is not covered by this limited warranty, or proof of purchase does not meet the terms of this limited warranty, VTech will notify you and will request that you authorize the cost of repair prior to any further repair activity. You must pay for the cost of repair and return shipping costs for the repair of Products that are not covered by this limited warranty.
What must you return with the Product to get warranty service?
- Return the entire original package and contents including the Product to the VTech service location along with a description of the malfunction or difficulty; and
- Include a “valid proof of purchase” (sales receipt) identifying the Product purchased (Product model) and the date of purchase or receipt; and
- Provide your name, complete and correct mailing address, and telephone number.
Other limitations
This warranty is the complete and exclusive agreement between you and VTech. It supersedes all other written or oral communications related to this Product. VTech provides no other warranties for this Product. The warranty exclusively describes all of VTech’s responsibilities regarding the Product. There are no other express warranties. No one is authorized to make modifications to this limited warranty and you should not rely on any such modification. State/Provincial Law Rights: This warranty gives you specific legal rights, and you may also have other rights, which vary from state to state or province to province.
Limitations: Implied warranties, including those of fitness for a particular purpose and merchantability (an unwritten warranty that the Product is fit for ordinary use) are limited to one year from the date of purchase. Some states/provinces do not allow limitations on how long an implied warranty lasts, so the above limitation may not apply to you. In no event shall VTech be liable for any indirect, special, incidental, consequential, or similar damages (including, but not limited to lost profits or revenue, inability to use the Product or other associated equipment, the cost of substitute equipment, and claims by third parties) resulting from the use of this Product. Some states/provinces do not allow the exclusion or limitation of incidental or consequential damages, so the above limitation or exclusion may not apply to you.
Please retain your original sales receipt as proof of purchase.
TECHNICAL SPECIFICATIONS
Frequency control Crystal controlled PLL synthesizer
Transmit frequency Baby unit: 1921.536-1928.448 MHz, Parent unit: 1921.536-1928.448 MHz
Channels 5
LCD 35 (x) x 21.2 (y) mm B&W LCD
Nominal effective range Maximum power allowed by FCC and IC. Actual operating range may vary according to environmental conditions at the time of use.
Power requirement Parent unit: 2.4 V Ni-MH battery, Baby unit power adapter:, Output: 6V DC 400mA, Parent unit power adapter:, Output: 6V DC 400mA
![]()

Specifications are subject to change without notice.
© 2019 VTech Communications, Inc.
All rights reserved. 02/19. DM223-X_CIB_V6
Document order number: 91-008851-070-100
Go to www.vtechphones.com to register your product for enhanced warranty support and the latest VTech product news.
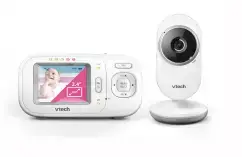
VM320 VM320-2
Video Monitor
User’s manual
Congratulations
on purchasing your new VTech product. Before using this product, please read Important safety instructions. This manual has all the feature operations and troubleshooting necessary to install and operate your new VTech product. Please review this manual thoroughly to ensure proper installation and operation of this innovative and feature-rich VTech product. For support, shopping, and everything new at VTech, visit our website at www.vtechphones.com.
What’s in the box
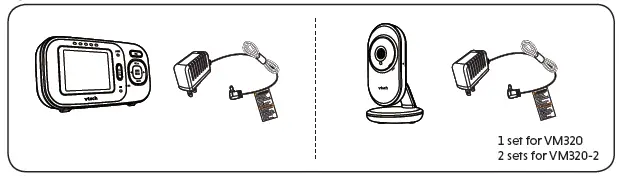
1 Connect and charge the battery
- The rechargeable battery is pre-installed in your parent unit.
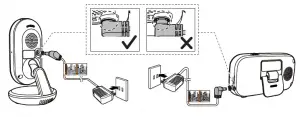
- Use only the power adapters supplied with this product.
- Make sure the baby monitor is not connected to a switch controlled electric outlet.
- Connect the power adapters in a vertical or floor mount position only. The adapters’ prongs are not
designed to hold the weight of baby monitor, so do not connect them to any ceiling, under-the-table, or cabinet outlets. Otherwise, the adapters may not properly connect to the outlets. - Make sure the parent unit, the baby unit and the power adapter cords are out of reach of children.
Connect the baby monitor
1 set for VM320 2 sets for VM320-2
Charge the parent unit battery
When you have connected and turned on the parent unit, the battery will be charged automatically. The battery icon indicates the battery status (see the following table).
Notes
- The parent unit battery is fully charged after 11 hours of continuous charging.
- It takes longer to charge the battery when the parent unit is turned on. To shorten the charging time,
turn the parent unit off while charging. - The standby time varies depending on the volume level you set and your actual use.
|
|
|
|
|
|
|
|
|
|
|
|


2 Before use
Note
- This baby monitor is intended as an aid. It is not a substitute for proper adult supervision, and should not be used as such.
Test your baby monitor
You may test the baby monitor before initial use, and at regular times thereafter.
Caution
· For hearing protection, make sure the parent unit is more than 3 feet (1 meter) away from both baby units. If you hear any highpitched noise, move the parent unit further until the noise stops. You can also press VOL on the parent unit to reduce the noise.

- Make sure your baby unit and parent unit are on.
- The parent unit displays images from the baby unit.
· Speak towards the microphone of the baby unit. You will hear the sound at the parent unit. - If you have two baby units, view the image from one of them by switching cameras via
menu. Then, repeat step 2.
Note
· When the parent unit displays No link to Camera, and the POWER LED light flashes, move the parent unit closer to the baby units (observe the minimum distance of 3 feet / 1 meter).
Tip
· Increase the speaker volume of the parent unit if you cannot hear the sounds transmitted from the baby units.
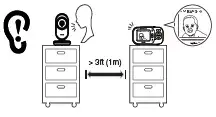
Positioning the baby monitor
Caution
· Keep the baby unit out of the reach of your baby. Never place or mount the baby unit inside the baby’s crib or playpen.
Note
· To avoid interference from other electronic devices, place your baby monitor at least 3 feet (1 meter) away from devices such as wireless routers, microwaves, cell phones and computers.
- Place the baby units more than 3 feet (1 meter) away from your baby.

- Adjust the angle of the baby unit camera to aim at your baby.
- Place the parent unit more than 3 feet (1 meter) away from the baby units to avoid screeching noise.
Caution
- The default volume of your parent unit is level 3, and the maximum volume is level 5. If you experience high-pitched screeching noise from your baby monitor while positioning:
– Make sure your baby units and parent unit are more than 3 feet (1 meter) apart, OR
– Turn down the volume of your parent unit.
Operating range
The operating range of the baby monitor is up to 1000 feet (300 meters) outdoors. The actual operating range may vary depending on the environmental conditions and other interferences such as walls, doors and other obstructions.
3 Using the baby monitor
Power on or off the baby unit
- Slide the ON/OFF switch to ON to turn on the baby unit. The POWER LED light turns on.
- Slide the ON/OFF switch to OFF to turn off the baby unit. The POWER LED light turns off.
Power on or off the parent unit
- Slide the ON/OFF switch to ON to turn on the parent unit. The screen and the POWER LED light turns on.
- Slide the ON/OFF switch to OFF to turn off the parent unit. The screen and the POWER LED light turns off.
Adjust speaker volume
For parent unit: · Press VOL /VOL on the parent unit to adjust the speaker volume.
Note
· The parent unit will be muted automatically when the parent unit is talking to the baby unit. When it is muted, appears on the screen.
For baby unit: The baby unit speaker volume determines the lullaby volume and talkback volume transmitted from parent unit. The volume can be adjusted in the parent unit.
1. Press 2. Press 3. Press 4. Press
when the parent unit is idle. or to choose , then press or .
or to choose . or to choose the volume level of the baby unit, then press
to confirm.
Adjust LCD brightness
You can change the brightness of the parent unit screen from Level 1 to Level 5. The LCD brightness is preset to Level 3.
1. Press when the parent unit is idle. 2. Press or to choose , then press or . 3. Press or to choose the desired level of brightness, then press
to confirm your selection.
* Monitoring mode for VM320-2 only
Every time the parent unit is turned on, it displays a baby unit in SINGLE-CAM mode. If there are more two baby units in your system, you can also monitor your baby in PATROL mode.
SINGLE-CAM The screen displays image of a single baby unit in full screen.
PATROL A single cam view that transitions to a different baby unit every 10 seconds.
To switch from SINGLE-CAM to PATROL mode:
1. Press when the parent unit is idle. 2. Press or to choose , then press or to open the submenu. 3. Press or to select to enter PATROL mode to alternately view the image from one baby
unit to the next one in every 10 seconds.
To switch from PATROL to SINGLE-CAM mode:
- Press when the parent unit is idle.
- Press or to choose , then press or to open the submenu.
- Press or to select a camera number to enter SINGLE-CAM mode.
Note
· If one or more paired baby units are powered off or disconnected during patrolling, the parent unit will keep searching until its power has run out or a baby unit is connected once again.
Specifications are subject to change without notice. © 2020 VTech Communications, Inc. All rights reserved. 07/20. VM320-X_CIB_V3
3 Using the baby monitor (Con’t)
Lullaby
The baby monitor has two lullabies and two soothing sounds for you to comfort your baby. You can play the lullabies or soothing sounds on the baby unit using the parent unit. 1. Press MENU when the parent unit is idle. 2. Press or to choose , then press or . 3. Press to choose , then press or . 4. Press or to choose a lullaby or a soothing sound, or choose to stop playing. 5. Press SELECT to confirm your selection.
Notes
· The selected lullaby plays for 30 minutes and stops automatically. · The lullaby playback on the baby unit will be paused when receiving talkback from the parent unit.
Screen off timer
You can set the screen off time for the parent unit when there is no key press for a specific time interval. When the screen is turned off, you can still hear sound from the baby unit.
1. Press when the parent unit is idle.
2. Press or to choose , then press or to open the submenu.
3. Press or to choose the desired time period to automatically turn off screen ( / – 5 min./ – 30 min. / – 60min.), then press to confirm your selection.
Adjust the sound sensitivity of the baby unit
You can choose to hear sounds from the baby unit all the time, or to hear sounds that exceed a certain level. You can use the parent unit to adjust the microphone sensitivity of your baby unit. The higher the sensitivity level, the more sensitive the baby unit is in detecting sounds for transmitting to the parent unit. The VOX sensitivity level is preset to the highest level (Level 5).
VOX Sensitivity level
Level 5
Level 4
Level 3
Level 2
Level 1
Sensitivity Highest VOX High VOX
Medium VOX Low VOX
Lowest VOX
sensitivity level sensitivity level sensitivity level sensitivity level sensitivity level
Description
The parent unit speaker is constantly on, and you will hear all sounds (including background noises) from your baby’s room.
The parent unit speaker turns on for soft babbling and louder sounds from your baby. It remains quiet when your baby sleeps soundly.
The parent unit speaker turns on for loud babbling and louder sounds from your baby. It remains quiet when your baby makes soft sounds.
The parent unit speaker turns on for crying and louder sounds from your baby. It remains quiet when your baby makes soft sounds.
The parent unit speaker turns on for loud crying or screeching sounds from your baby. It remains quiet when your baby makes soft sounds.
- Press when the parent unit is idle.
- Press or to choose , then press or to open the submenu.
- Press or to choose the desired sensitivity level, then press to confirm your selection.
Note
· As long as the Sound-activated screen setting is ON, the screen will turn on automatically when VOX sensitivity is triggered, despite it was off earlier.
Tip
· If you want to use a sound machine or white noise machine for natural white noise while using this baby monitor to check on your baby, you can: – Lower the volume of your sound machine or white noise machine; or – Lower the sensitivity level of your baby monitor to medium (level 3) or below. Default level is the highest level.
Turn on or off the sound activation
When sound activation is on, as long as no sound is detected within 50 seconds, the parent unit screen will turn off automatically to save power.
When your baby unit detects a sound, which exceeds the selected sensitivity level, the sound activation triggers the parent unit screen to turn on automatically. When no sound is detected within 50 seconds, the screen will be off again.
- Press when the parent unit is idle.
- Press or to choose , then press or
- Press or to choose or , then press to open the submenu. to confirm your selection.
Note
· If the sound sensitivity is set to the highest level, the parent unit screen may remain on continuously even though sound activation is on. This depends on whether the baby unit detects any sounds.
Zoom
You can zoom in while viewing images from the baby unit.
- Press when the parent unit is idle.
- Press or to choose then press or to open the submenu.
- Press or to choose or , then press to confirm your selection.
Talk
You can use the TALK function of the parent unit to comfort your baby.
- Press and hold TALK on the parent unit.
- Speak towards the microphone on the parent unit. Your voice is broadcast to the baby unit.
- Release the TALK key to stop the broadcast.
Note
· The parent unit speaker is muted during voice broadcast. Sound transmission from the baby unit resumes after TALK is released.
Monitor the temperature
Your baby unit monitors the temperature of your baby’s room with its built-in temperature sensor. If the detected temperature is out of the preset temperature range, the parent unit will display an alert message.
Set temperature range You can set the desired minimum and maximum room temperature alert ranges.
- Press when the parent unit is idle.
- Press or to choose , then press .
- Press or to choose , then press or .
- Press or to choose or , then press .
- Press or to choose the desired minimum or maximum temperature, then press to confirm your selection.
Temperature alert tone You can turn on the temperature alert tone so that the parent unit will emit an alert tone if the detected temperature is out of range.
- Press when the parent unit is idle.
- Press or to choose , then press .
- Press or to choose , then press or .
- Press or to choose or , then press to confirm your selection.
Temperature format You can choose to display the temperature in Fahrenheit (oF) or Celsius (oC).
- Press when the parent unit is idle.
- Press or to choose , then press .
- Press or to choose , then press or .
- Press or to choose or , then press to confirm your selection.
Baby unit overview
- Pair hole
· Your baby units and parent unit provided are already paired. - POWER LED light · On when the baby unit is turned on and is paired to the parent unit.
· Flashes when the baby unit is not being viewed; or when the link to the parent unit is lost. - Microphone
- Camera
- Infrared LEDs
- Light sensor
- ON/OFF switch
· Slide to turn on or off the baby unit. - Speaker
- Power jack
- Wall mount holes
Frequency control Transmit frequency Channels LCD Nominal effective range Power requirements
Crystal controlled PLL synthesizer
Baby unit: 2405 – 2475 MHz Parent unit: 2405 – 2475 MHz
32
2.4″ Color LCD (QVGA 320×240 pixel)
Maximum power allowed by FCC and IC. Actual operating range may vary according to environmental conditions at the time of use.
Parent unit: 3.6V Ni-MH battery Baby unit power adapter: Output: 6V DC @ 400mA Parent unit power adapter: Output: 6V DC @ 400mA
Technical specifications
Parent unit overview
- POWER LED light · On in green when the parent unit is powered on and linked to the baby unit. · Flashes when the link to the baby unit being viewed is lost.
- TALK · Press and hold to talk to the selected baby unit.
- Arrow keys and VOL / VOL
VOL / · Press to increase the parent unit
speaker volume. · While in a menu, press to scroll up,
or to enter an item’s sub-menu. · While zooming, press and hold to
move the zoomed image upward.
VOL / · Press to decrease the parent unit
speaker volume. · While in a submenu, press to scroll
down. · While zooming, press and hold to
move the zoomed image downward.
· While in a menu, press to choose the next item on the left.
· While zooming, press and hold to move the zoomed image leftward.
· While in a menu, press to choose the next item on the right.
· While zooming, press and hold to move the zoomed image rightward. - MENU/SELECT · Press to enter or exit the menu. · While in a sub-menu, press to choose an item, or save a setting.
- Microphone
- Battery indicator · On in red when the battery is charging. · Flashes when the battery is low.
- Visual sound indicators
The visual sound indicators can show the sound level detected by the baby unit. Sound level detected by the baby unit
- One to three green lights indicate a moderate sound level detected by the baby unit.
- Additional red lights indicate a higher sound level detected by the baby unit (e.g. baby crying loudly).
LCD off/ back
- Press to turn off LCD and keep the sound broadcast.
- Press to return to the previous screen.
9 LCD display 10 Speaker 11 Stand 12 ON/OFF switch
· Slide to turn on or off the parent unit. 13 Power jack
Parent unit icons
or
Real-time temperature · Displays the real-time
temperature detected by the
baby unit in Fahrenheit (oF) or
Celsius (oC) (e.g. 57 oF or 14 oC).
![]()
·
or displays when strong signal strength is detected between the baby unit and the parent unit.
- or displays when moderate or low signal strength is detected between the baby unit and the parent unit.
- displays when the link between the baby unit and the parent unit is lost.
Patrol mode
- Displays when the parent unit is in PATROL mode.
- For VM320-2 only. or Current view status or
- Displays the number of the or baby unit that is being viewed.
Lullaby · Displays when a lullaby is playing.
Zoom · Displays when the current image on the parent unit has zoomed in.
Night vision · Displays when the baby unit being viewed has activated the night vision feature.
Mute alert · Displays when the parent unit
speaker is turned off. · Displays when the parent unit
is talking to the baby unit.
Battery status
- animates when the battery is charging.
- displays solid when the battery is fully charged.
- displays when the battery is low and needs charging.
Speaker volume
· Displays the parent unit
speaker volume level while adjusting.
Main menu icons
Monitoring mode
- You can enter the monitoring mode to view the video from the baby unit.
- For VM320-2 only.
Zoom
- You can zoom in or out with 1x, 2x options while viewing image. Lullaby
- You can select, play, or stop a lullaby.
Brightness
- You can change the brightness of the parent unit screen. LCD screen off timer
- You can set a specific time to turn the screen off.
VOX sensitivity
- With this feature, you can choose to hear sounds from the baby unit all the time, or to hear sounds that exceed a certain level. You can use the parent unit to adjust the microphone sensitivity of your baby unit. The higher the sensitivity level, the more sensitive the baby unit is in detecting sounds for transmitting to the parent unit.
Sound-activated screen
- When the baby unit detects no sound, the parent unit screen stays off to save power. Once a sound is detected, the parent unit screen turns on automatically. It will then turn off again after 50 seconds of no sound detection. Temperature
- You can turn on the temperature alert tone so that the parent unit beeps whenever the room temperature detected by the baby unit falls outside of the desired temperature range. You can choose in Fahrenheit (oF) or Celsius (oC) as the temperature format displayed, or set the maximum/minimum temperature limit for alerts.
Warning icons and messages
/No Link to Camera The selected baby unit is out of range or is turned off.
/Battery low at The battery is empty and Parent Unit needs to be recharged.
/Temperature too high or
/Temperature too low
The temperature detected by the baby unit is higher/lower than the desired temperature alert range.
The parent unit is searching for baby units. The parent unit is connected to AC power.
Dim mode
The dim mode is to help you save the parent unit power. Your parent unit display will dim automatically after 10 minutes of inactivity, in which there is neither key pressed nor alert received from the baby unit.
Note
· While the screen is dimmed, any keypress or alert message will trigger the screen to return to the preset brightness level. After 10 minutes of inactivity, it will dim again.
Night vision
The baby unit has infrared LEDs that allow you to see your baby clearly at night or in a dark room. When the baby unit being viewed detects low light levels, the infrared LEDs are switched on automatically. The images from the baby unit are in black and white, and appears on the screen.
Notes
· It is normal if you see a short white glare on your parent unit screen as the baby unit is adapting to the dark environment. · When the infrared LEDs are on, the images are in black and white. This is normal.
Tip
· Depending on the surroundings and other interfering factors, like lightings, objects, colors and backgrounds, the display resolution may vary. Adjust the baby unit’s angle or place the baby unit at a higher level to prevent glare and blurry display.
Mount the baby unit (optional)
Your baby monitor comes ready for tabletop use. You can also choose to mount your baby monitor on the wall. See Mount the baby unit (optional) in the Quick Start Guide for the wall mounting instructions.
General product care
To keep this product working well and looking good, follow these guidelines:
- Avoid putting it near heating appliances and devices that generate electrical noise (for example, motors or fluorescent lamps).
- DO NOT expose it to direct sunlight or moisture.
- Avoid dropping the product or treating it roughly.
- Clean with a soft cloth.
- DO NOT immerse the parent unit and the baby unit in water and do not clean them under the tap.
- DO NOT use cleaning spray or liquid cleaners.
- Make sure the baby unit and parent unit are dry before you connect them to the mains again.
Storage
When you are not going to use the baby monitor for some time, store the parent unit, the baby unit and the adapters in a cool and dry place.
Frequently asked questions
Below are the questions most frequently asked about the baby monitor. If you cannot find the answer to your question, visit our website at www.vtechphones.com, or contact 1 (800) 595-9511 for customer service.
Why does the baby monitor not respond normally?
Try the following (in the order listed) for common cure: 1. Disconnect the power to the baby units and the parent unit. 2. Wait a few seconds before connecting power back to the baby units and the parent unit. 3. Turn on the baby units and the parent unit. 4. Wait for the parent unit to synchronize with the baby units. Allow up to one minute for
this to take place.
Why don’t the power-on light of the baby unit and parent unit go on when I switch on the units?
Perhaps the parent unit is not connected to the power. Insert the appliance plug into the parent unit and put the adapter in a wall socket. Then, slide the ON/OFF to switch on the parent unit and to establish connection with the baby unit. Perhaps the baby unit is not connected to the power. Insert the appliance plug into the baby unit and put the adapter in a wall socket. Then, slide the ON/OFF switch to ON to switch on the baby unit and to establish connection with the parent unit.
Why doesn’t my parent Make sure the power is not controlled by a wall switch. unit charge while connected to AC power?
Why is my screen in black The screen is in black and white during night-time or in a dark room when the night
and white?
vision feature is activated. This is normal.
Why do I get glare or blurry display on my screen when viewing my baby at night?
During night-time or in a dark room, the surroundings and other interfering factors, like lightings, objects, colors and backgrounds may affect the image quality on your parent unit screen. Adjust the baby unit’s angle or place the baby unit at a higher level to prevent glare and blurry display.
Why does the baby monitor produce a high-pitched noise?
The parent unit and baby units may be too close to each other. · Move the parent unit away from the baby units until the noise stops; OR · Turn down the volume of your parent unit.
Why does the parent unit The baby units may be out of range. Move the parent unit closer to the baby units (but
beep?
not less than 3 feet).
The parent unit may not have enough charge for the parent unit to perform normally. Charge the battery in the parent unit for up to 11 hours.
The temperature of your baby’s room may be too high or too low.
Why don’t I hear a sound/ The parent unit speaker volume may be too low. Press VOL to increase the volume, or Why can’t I hear my baby use the parent unit menu to change sound sensitivity level to the highest level (level 5). cry?
Why can’t I establish a connection? Why is the connection lost every now and then? Why are there sound interruptions?
The baby units may be out of range. Move the parent unit closer to the baby units (but not less than 3 feet). Other electronic and wireless products may cause interference with your baby monitor. Try installing your baby monitor as far away from these devices as possible. If you power on only one baby unit, your parent unit may display and the POWER LED light flashes. Switch to the baby unit you have powered on via menu.
Important safety instructions
The applied nameplate is located at the bottom of the baby unit’s base.
When using your equipment, basic safety precautions should always be followed to reduce the risk of fire, electric shock and injury, including the following:
- Follow all warnings and instructions marked on the product.
- Adult setup is required.
- CAUTION: Do not install the baby unit at a height above 2 metres.
- This product is not a substitute for adult supervision of the infant. Supervising the infant is the parent’s or caregiver’s responsibility. This product could cease operating, and therefore you should not assume it will continue working properly for any given period of time. Further, this is not a medical device and should not be used as such. This product is intended to assist you in supervising your baby.
- Do not use this product near water. For example, do not use it next to a bath tub, wash bowl, kitchen sink, laundry tub or swimming pool, or in a wet basement or shower.
- CAUTION: Use only the battery provided. There may be a risk of explosion if a wrong type of battery is used for the parent unit. The battery cannot be subjected to high or low extreme temperature and low air pressure at high altitude during use, storage or transportation. Disposal of battery into fire or a hot oven, or mechanically crushing or cutting or the battery can result in an explosion. Leaving the battery in an extremely high temperature surrounding environment can result in an explosion or the leakage of flammable liquid of gas. Battery subjected to extremely low air pressure may result in an explosion or the leakage of flammable liquid or gas. Dispose of used battery according to the information in The RBRC® seal.
- Use only the adapters included with this product. Incorrect adapter polarity or voltage can seriously damage the product. Baby unit power adapter: Output: 6V DC 400mA; Parent unit power adapter: Output: 6V DC 400mA.
- The power adapters are intended to be correctly oriented in a vertical or floor mount position. The prongs are not designed to hold the plug in place if it is plugged into a ceiling, under-the-table or cabinet outlet.
- For pluggable equipment, the socket-outlet shall be installed near the equipment and shall be easily accessible.
- Unplug this product from the wall outlet before cleaning. Do not use liquid or aerosol cleaners. Use a damp cloth for cleaning.
- Do not cut off the power adapters to replace them with other plugs, as this causes a hazardous situation.
- Do not allow anything to rest on the power cords. Do not install this product where the cords may be walked on or crimped.
- This product should be operated only from the type of power source indicated on the marking label. If you are not sure of the type of power supply in your home, consult your dealer or local power company.
- Do not overload wall outlets or use an extension cord.
- Do not place this product on an unstable table, shelf, stand or other unstable surfaces.
- This product should not be placed in any area where proper ventilation is not provided. Slots and openings in the back or bottom of this product are provided for ventilation. To protect them from overheating, these openings must not be blocked by placing the product on a soft surface such as a bed, sofa or rug. This product should never be placed near or over a radiator or heat register.
- Never push objects of any kind into this product through the slots because they may touch dangerous voltage points or create a short circuit. Never spill liquid of any kind on the product.
- To reduce the risk of electric shock, do not disassemble this product, but take it to an authorized service facility. Opening or removing parts of the product other than specified access doors may expose you to dangerous voltages or other risks. Incorrect reassembling can cause electric shock when the product is subsequently used.
- You should test the sound reception every time you turn on the units or move one of the components.
- Periodically examine all components for damage.
- Be aware of possible loss of privacy while using public airwaves. Conversations may be picked up by other nursery monitors, cordless phones, scanners, etc.
- Children should be supervised to ensure that they do not play with the product.
- The product is not intended for use by persons (including children) with reduced physical, sensory or mental capabilities, or lack of experience and knowledge, unless they have been given supervision or instruction concerning use of the appliance by a person responsible for their safety.
SAVE THESE INSTRUCTIONS
Cautions
- Use and store the product at a temperature between 32oF and 104oF.
- Do not expose the product to extreme cold, heat or direct sunlight. Do not put the product close to a heating source.
- Batteries should not be exposed to excessive heat such as bright sunshine or fire.
- Warning–Strangulation Hazard–Children have STRANGLED in cords. Keep this cord out of the reach of children (more than 3 ft (0.9m) away). Do not remove this tag.
- Never place the baby unit(s) inside the baby’s crib or playpen. Never cover the baby unit(s) or parent unit with anything such as a towel or a blanket.
- Other electronic products may cause interference with your baby monitor. Try installing your baby monitor as far away from these electronic devices as possible: wireless routers, radios, cellular telephones, intercoms, room monitors, televisions, personal computers, kitchen appliances and cordless telephones.
Precautions for users of implanted cardiac pacemakers Cardiac pacemakers (applies only to digital cordless devices): Wireless Technology Research, LLC (WTR), an independent research entity, led a multidisciplinary evaluation of the interference between portable wireless devices and implanted cardiac pacemakers. Supported by the U.S. Food and Drug Administration, WTR recommends to physicians that:
The RBRC® seal
The RBRC® seal on the Ni-MH battery indicates that VTech Communications, Inc. is voluntarily participating in an industry program to collect and recycle these batteries at the end of their useful lives, when taken out of service within the United States and Canada. The RBRC® program provides a convenient alternative to placing used Ni-MH batteries into the trash or municipal waste, which may be illegal in your area. VTech’s participation in RBRC® makes it easy for you to drop off the spent battery at local retailers participating in the RBRC® program or at authorized VTech product service centers. Please call 1 (800) 8 BATTERY® for information on Ni-MH battery recycling and disposal bans/restrictions in your area. VTech’s involvement in this program is part of its commitment to protecting our environment and conserving natural resources. RBRC® and 1 (800) 8 BATTERY® are registered trademarks of the Rechargeable Battery Recycling Corporation.
FCC and IC regulations
FCC Part 15 This equipment has been tested and found to comply with the requirements for a Class B digital device under Part 15 of the Federal Communications Commission (FCC) rules. These requirements are intended to provide reasonable protection against harmful interference in a residential installation. This equipment generates, uses and can radiate radio frequency energy and, if not installed and used in accordance with the instructions, may cause harmful interference to radio communications. However, there is no guarantee that interference will not occur in a particular installation. If this equipment does cause harmful interference to radio or television reception, which can be determined by turning the equipment off and on, the user is encouraged to try to correct the interference by one or more of the following measures: · Reorient or relocate the receiving antenna. · Increase the separation between the equipment and receiver. · Connect the equipment into an outlet on a circuit different from that to which the receiver is connected. · Consult the dealer or an experienced radio/TV technician for help. WARNING: Changes or modifications to this equipment not expressly approved by the party responsible for compliance could void the user’s authority to operate the equipment. This device complies with Part 15 of the FCC rules. Operation is subject to the following two conditions: (1) this device may not cause harmful interference, and (2) this device must accept any interference received, including interference that may cause undesired operation. To ensure safety of users, the FCC has established criteria for the amount of radio frequency energy that can be safely absorbed by a user or bystander according to the intended usage of the product. This product has been tested and found to comply with the FCC criteria. Caution: This Transmitter must be installed to provide a separation distance of at least 20cm from all persons. The transmitter and antenna of the parent unit shall be held at least 1 in (2.5 cm) from your face. This Class B digital apparatus complies with Canadian requirement: CAN ICES-3 (B)/NMB-3(B)
Industry Canada This device contains licence-exempt transmitter(s)/receiver(s) that comply with Innovation, Science and Economic Development Canada’s licence-exempt RSS(s). Operation is subject to the following two conditions: (1) This device may not cause interference. (2) This device must accept any interference, including interference that may cause undesired operation of the device. The term `’IC:`’ before the certification/registration number only signifies that the Industry Canada technical specifications were met. This product meets the applicable Innovation, Science and Economic Development Canada technical specifications.
FCC RF radiation exposure statement Caution: This Transmitter must be installed to provide a separation distance of at least 20cm from all persons. Use of other accessories may not ensure compliance with FCC RF exposure guidelines. This transmitter must not be co-located or operating in conjunction with any other antenna or transmitter. This equipment complies also with Industry Canada RSS-102 with respect to Canada’s Health Code 6 for Exposure of Humans to RF Fields.
California Energy Commission battery charging testing mode
This baby monitor meets the California Energy Commission (CEC) regulations for energy consumption. Your baby monitor is set up to comply with the energy-conserving standards right out of the box. Follow the instructions to install and charge the battery. The CEC battery charging testing mode is activated while charging. Even if the parent unit is paired to baby units, the CEC battery charging testing mode is activated while it is powered off and charging.
For C-UL compliance only
Limited warranty
What does this limited warranty cover? The manufacturer of this VTech Product warrants to the holder of a valid proof of purchase (“Consumer” or “you”) that the Product and all accessories provided in the sales package (“Product”) are free from defects in material and workmanship, pursuant to the following terms and conditions, when installed and used normally and in accordance with the Product operating instructions. This limited warranty extends only to the Consumer for Products purchased and used in the United States of America and Canada.
What will VTech do if the Product is not free from defects in materials and workmanship during the limited warranty period (“Materially Defective Product”)? During the limited warranty period, VTech’s authorized service representative will repair or replace at VTech’s option, without charge, a Materially Defective Product. If we repair the Product, we may use new or refurbished replacement parts. If we choose to replace the Product, we may replace it with a new or refurbished Product of the same or similar design. We will retain defective parts, modules, or equipment. Repair or replacement of the Product, at VTech’s option, is your exclusive remedy. VTech will return the repaired or replacement Products to you in working condition. You should expect the repair or replacement to take approximately 30 days.
How long is the limited warranty period? The limited warranty period for the Product extends for ONE (1) YEAR from the date of purchase. If VTech repairs or replaces a Materially Defective Product under the terms of this limited warranty, this limited warranty also applies to the repaired or replacement Product for a period of either (a) 90 days from the date the repaired or replacement Product is shipped to you or (b) the time remaining on the original one-year warranty; whichever is longer.
What is not covered by this limited warranty? This limited warranty does not cover: 1. Product that has been subjected to misuse, accident, shipping or other physical damage, improper installation, abnormal
operation or handling, neglect, inundation, fire, water or other liquid intrusion; or 2. Product that has been damaged due to repair, alteration or modification by anyone other than an authorized service
representative of VTech; or 3. Product to the extent that the problem experienced is caused by signal conditions, network reliability, or cable or antenna
systems; or 4. Product to the extent that the problem is caused by use with non-VTech accessories; or 5. Product whose warranty/quality stickers, product serial number plates or electronic serial numbers have been removed,
altered or rendered illegible; or 6. Product purchased, used, serviced, or shipped for repair from outside the United States of America or Canada, or used for
commercial or institutional purposes (including but not limited to Products used for rental purposes); or 7. Product returned without a valid proof of purchase (see item 2 on the following part); or 8. Charges for installation or set up, adjustment of customer controls, and installation or repair of systems outside the unit.
How do you get warranty service? To obtain warranty service in the USA, please visit our website at www.vtechphones.com or call 1 (800) 595-9511. In Canada, go to www.vtechcanada.com or call 1 (800) 267-7377. NOTE: Before calling for service, please review the user’s manual – a check of the Product’s controls and features may save you a service call. Except as provided by applicable law, you assume the risk of loss or damage during transit and transportation and are responsible for delivery or handling charges incurred in the transport of the Product(s) to the service location. VTech will return repaired or replaced Product under this limited warranty. Transportation, delivery or handling charges are prepaid. VTech assumes no risk for damage or loss of the Product in transit. If the Product failure is not covered by this limited warranty, or proof of purchase does not meet the terms of this limited warranty, VTech will notify you and will request that you authorize the cost of repair prior to any further repair activity. You must pay for the cost of repair and return shipping costs for the repair of Products that are not covered by this limited warranty.
What must you return with the Product to get warranty service? 1. Return the entire original package and contents including the Product to the VTech service location along with a
description of the malfunction or difficulty; and 2. Include a “valid proof of purchase” (sales receipt) identifying the Product purchased (Product model) and the date of
purchase or receipt; and 3. Provide your name, complete and correct mailing address, and telephone number.
Other limitations This warranty is the complete and exclusive agreement between you and VTech. It supersedes all other written or oral communications related to this Product. VTech provides no other warranties for this Product. The warranty exclusively describes all of VTech’s responsibilities regarding the Product. There are no other express warranties. No one is authorized to make modifications to this limited warranty and you should not rely on any such modification. State/Provincial Law Rights: This warranty gives you specific legal rights, and you may also have other rights, which vary from state to state or province to province. Limitations: Implied warranties, including those of fitness for a particular purpose and merchantability (an unwritten warranty that the Product is fit for ordinary use) are limited to one year from the date of purchase. Some states/provinces do not allow limitations on how long an implied warranty lasts, so the above limitation may not apply to you. In no event shall VTech be liable for any indirect, special, incidental, consequential, or similar damages (including, but not limited to lost profits or revenue, inability to use the Product or other associated equipment, the cost of substitute equipment, and claims by third parties) resulting from the use of this Product. Some states/provinces do not allow the exclusion or limitation of incidental or consequential damages, so the above limitation or exclusion may not apply to you.
Please retain your original sales receipt as proof of purchase.

WHAT’S IN THE BOX

CONNECT THE BABY MONITOR
NOTE
- Use only the power adapters supplied with this product.
- Make sure the baby monitor is not connected to the switch controlled electric outlet.
- Connect the power adapters in a vertical or floor mount position only. The adapters’ prongs are not designed to hold the weight of baby monitor, so do not connect them to any ceiling, under-the-table, or cabinet outlets. Otherwise, the adapters may not properly connect to the outlets.
- Make sure the parent unit, the baby units and the power adapter cords are out of reach of children.
POWER ON OR OFF THE BABY MONITOR
- Slide the ON/OFF switch to power on or off your baby unit.
- POWER to power on or off your parent unit.
POSITIONING THE BABY MONITOR
Caution
- The default volume of your parent unit is level 4, and the maximum volume is level 7. If you experience high-pitched screeching noise from your baby monitor while positioning:
– Make sure your baby unit and parent unit are more than 3 feet (1 meter) apart, OR
– Lower the volume of your parent unit.
3.
NOTE
- To avoid interference from other electronic devices, place your baby monitor at least 3 feet (1 meter) away from devices such as wireless routers, microwaves, cell phones and computers.
STATUS CHECK
Once you power on both your baby unit and parent unit, your parent unit displays image from the baby unit, and the LINK LED light turns on.
The ON/OFF LED light of baby unit turns on.
BASIC OPERATION – PARENT UNIT
Press VOL / VOL to adjust your parent unit speaker volume.
The sound sensitivity setting also affects the speaker volume. For details, refer to Sound sensitivity and sound activation.
TALK and speak to your parent unit. Your voice is transmitted to the baby unit.
LCD ON/OFF to switch off the screen.
You can still hear sound from the baby unit.
TIP
- Press any keys on the parent unit to turn on the screen again.
Press and hold to pan or tilt the camera upward, downward, leftward or rightward.
Press to zoom in or out.
Press to enter the menu, choose a menu item, or save a setting. You can use the parent unit for advanced settings or operations, such as to play or stop the baby unit lullaby, or to adjust the baby unit sound sensitivity.
While in the menu:
- Press or
 to scroll among the menu options.
 - Press or
 to select an item.
 - Press
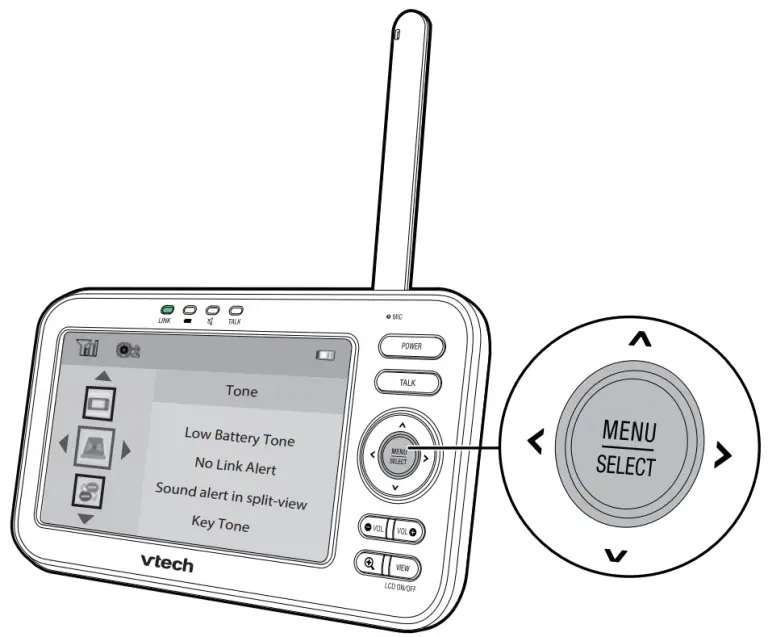 to return to the main menu or idle screen.
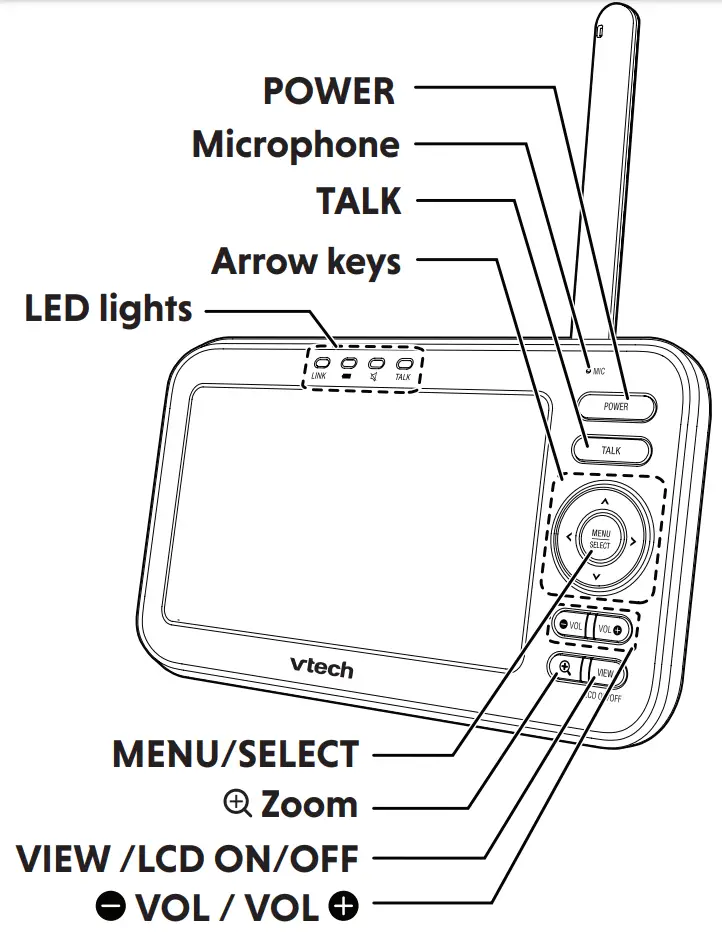
OVERVIEW – PARENT UNIT
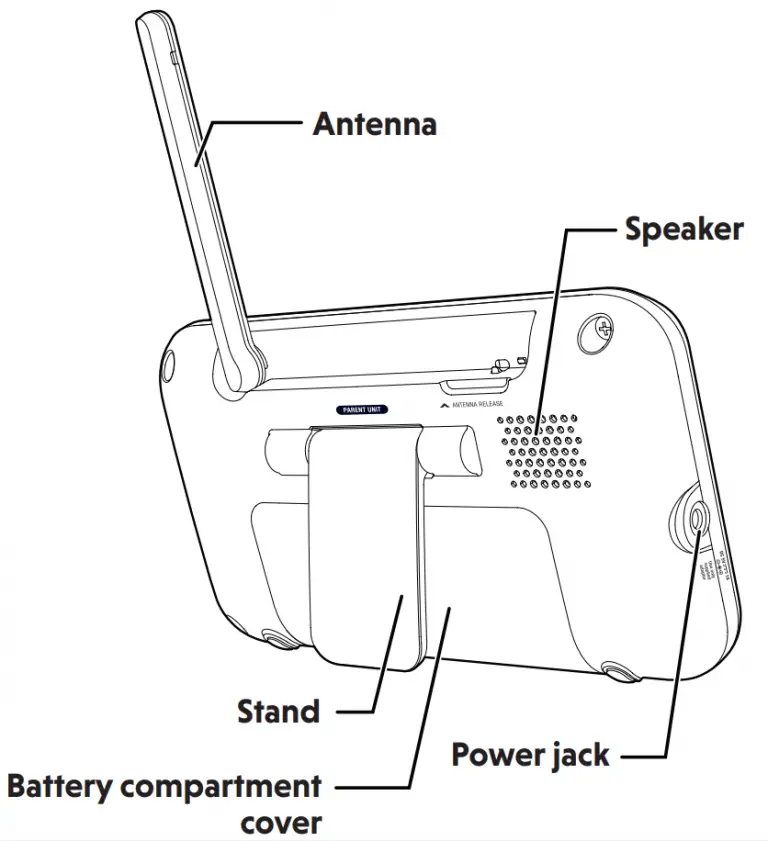
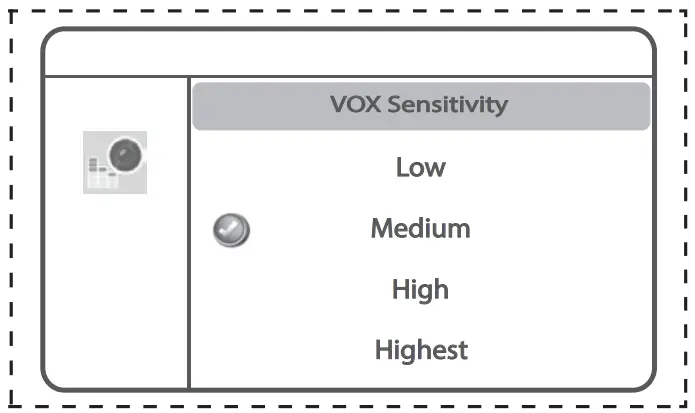
SOUND SENSITIVITY AND SOUND ACTIVATION
Adjust sound detection sensitivity
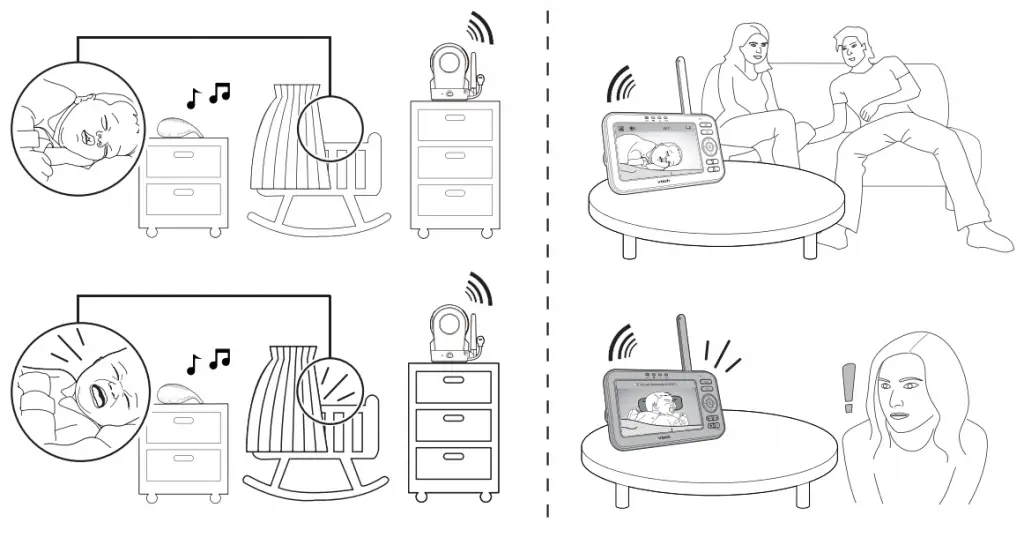
With sound sensitivity setting, you can choose to hear sounds from the baby unit all the time, or to hear sounds that exceed a certain level.

| Parent unit setting | happens… | You may experience… | What you could do… |
| Speaker volume: LOW Sensitivity: Highest [Default] |
Hear all sounds all the time, including background sounds. | Difficulty in hearing your baby’s soft sounds if the background sounds are louder. |
|
Speaker volume: MAX 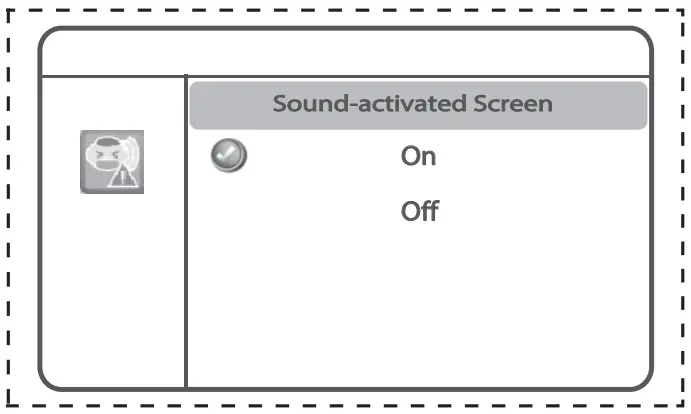
Sensitivity: Low / Medium |
Only hear sounds that exceed the selected sound sensitivity level. | No sound; or sounds that cut in and out at times as the baby unit may not detect extra soft sounds. | Increase the sound sensitivity, and adjust the volume level if necessary. |
Sound activated screen
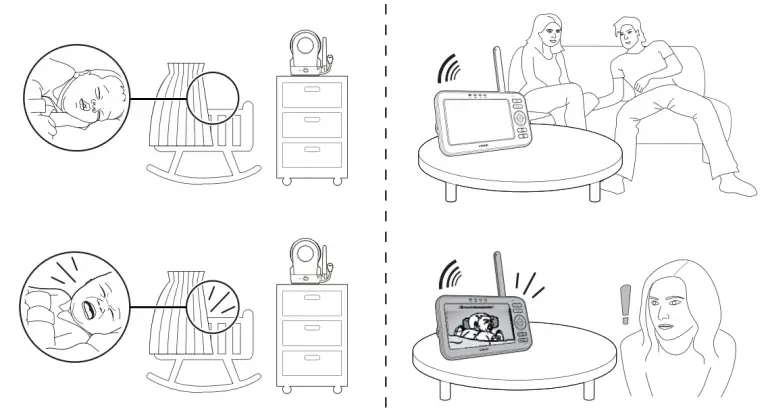
When sound activation is on, the parent unit screen stays off to save power when the baby unit detects no sound.
Once the baby unit detects sounds that are louder than the chosen sound sensitivity level, the parent unit screen turns on automatically. It will then turn off again after 50 seconds of no sound detection.
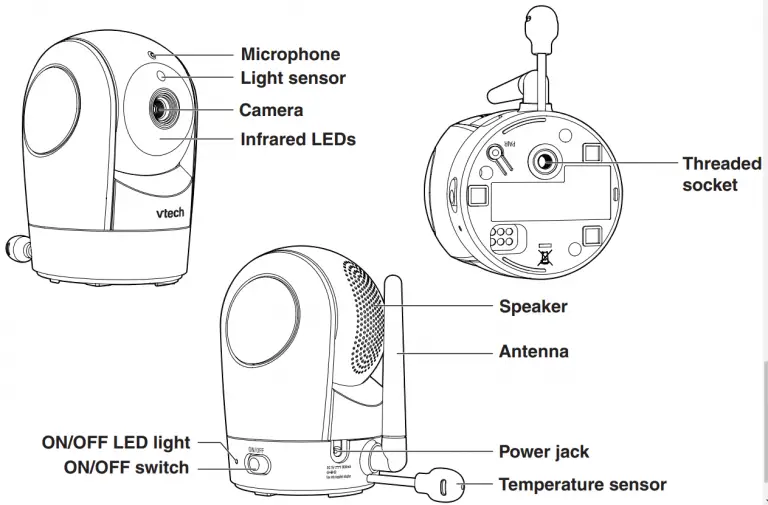
OVERVIEW – BABY UNIT

Dim mode
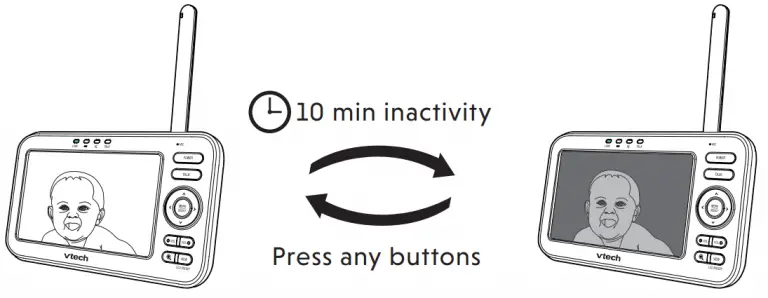
With dim mode preset to on, your parent unit display will dim to conserve energy after 10 minutes of inactivity, in which there is neither key pressed nor alert received from the baby unit.
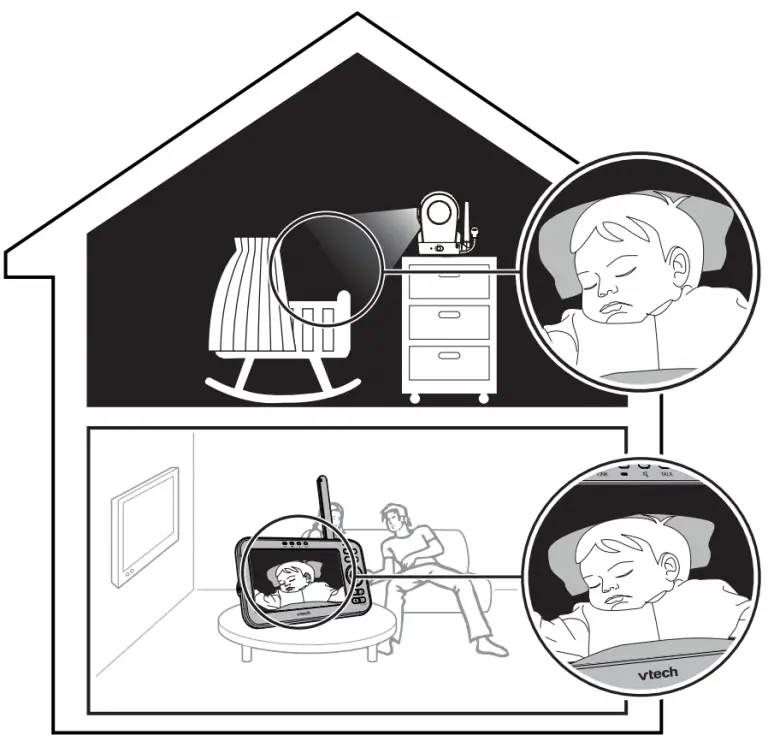
NOTE
- If you do not want LCD to dim automatically, turn off the Dim Mode.
Night vision
The baby unit has infrared LEDs that allow you to see your baby clearly at night or in a dark room. When the baby unit being viewed detects low light levels, the infrared LEDs are switched on automatically. The images from the baby unit are in black and white, and appears on the screen.
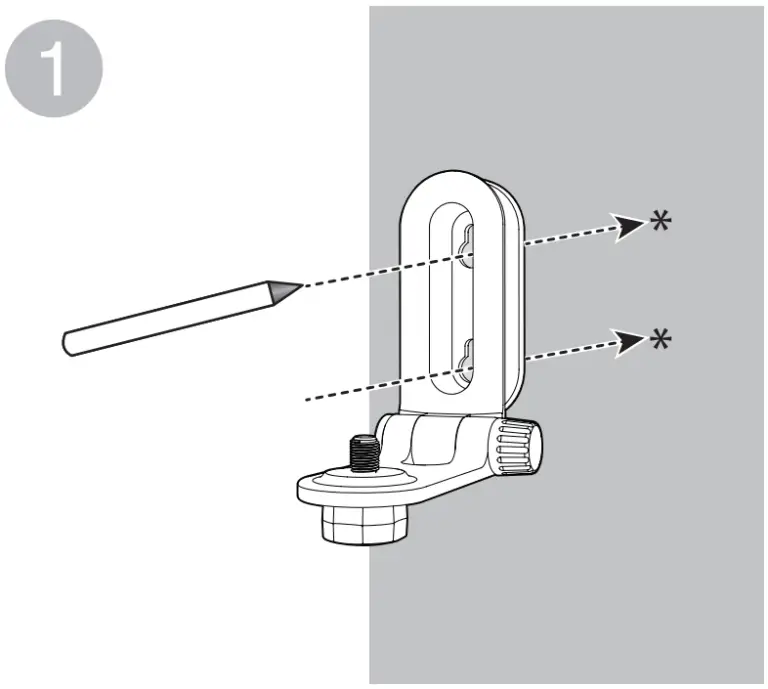
NOTE
- It is normal if you see a short white glare on your parent unit screen as the baby unit is adapting to the dark environment.
- When the infrared LEDs are on, the images are in black and white. This is normal.
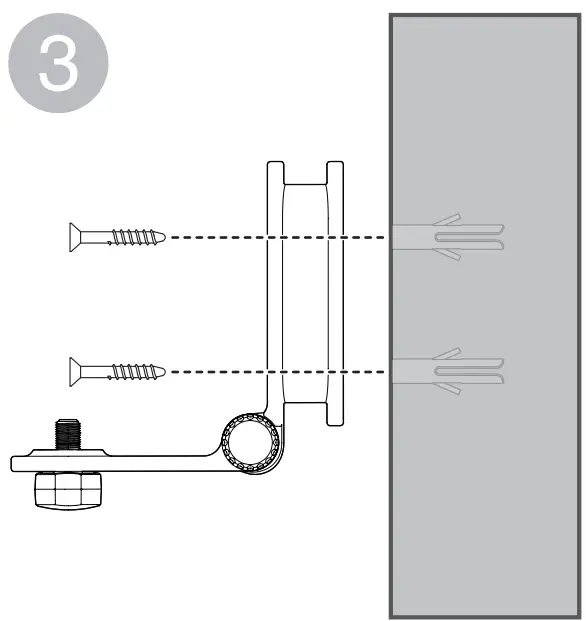 Tip
Tip
- Depending on the surroundings and other interfering factors, like lightings, objects, colors and backgrounds, the video quality may vary. Adjust the baby unit’s angle or place the baby unit at a higher level to prevent glare and blurry display.
Mount the baby unit (optional)
NOTE
- The types of screws and anchors you need depend on the composition of the wall
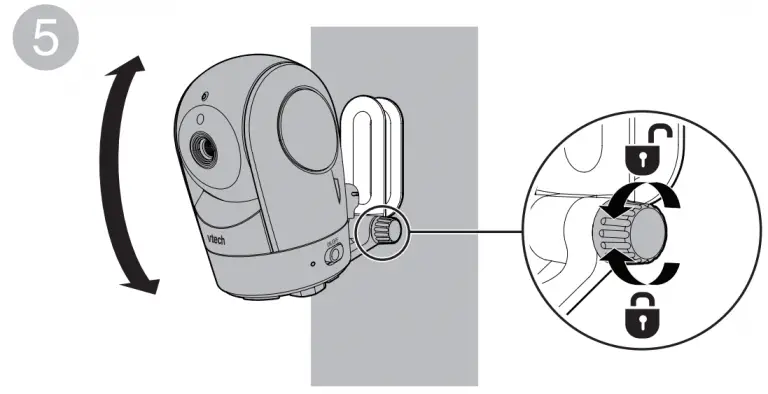
NOTE
- Check for reception strength and camera angle before drilling the holes.
Place the wall mount bracket on a wall and then use a pencil to mark the top and the bottom holes as shown. Remove the wall mount bracket and drill two holes in the wall (7/32 inch drill bit).
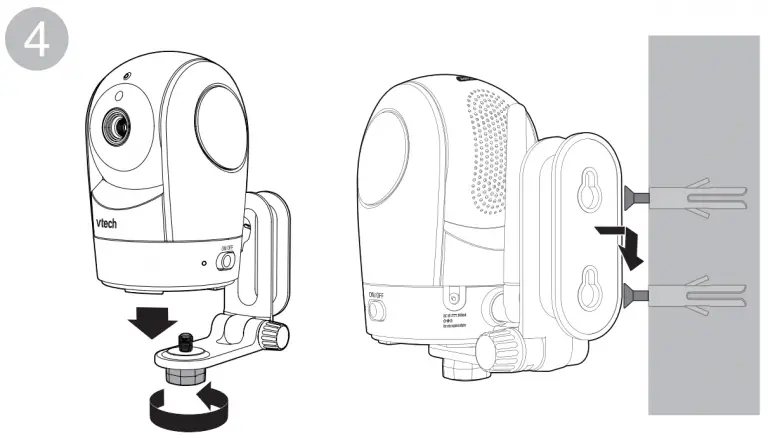
If you drill the holes into a stud, go to step 3.
-OR-
If you drill the holes into an object other than a stud, insert the wall anchors into the holes. Tap gently on the ends with a hammer until the wall anchors are flush with the wall.

Align the wall mount bracket and screws with the holes in the wall as shown. Tighten the screw in the middle hole first, so that the wall mount bracket position is fixed. You can tighten the other screw in the top hole.
Place the baby unit on the wall mount bracket. Tighten the screw into the threaded socket at the bottom to secure the baby unit.
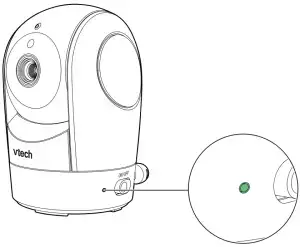
You can maximize your baby unit’s viewing angles by tilting the wall mount bracket.
Hold the baby unit, and then rotate the knob in anticlockwise direction. This will loosen the joint of the wall mount bracket. Tilt your baby unit up or down to adjust to your preferred angle. Then, rotate the knob in clockwise direction to tighten the joint and secure the angle.
OR
Insert the screws into the holes and tighten the screws until only 1/4 inch of the screws are exposed.
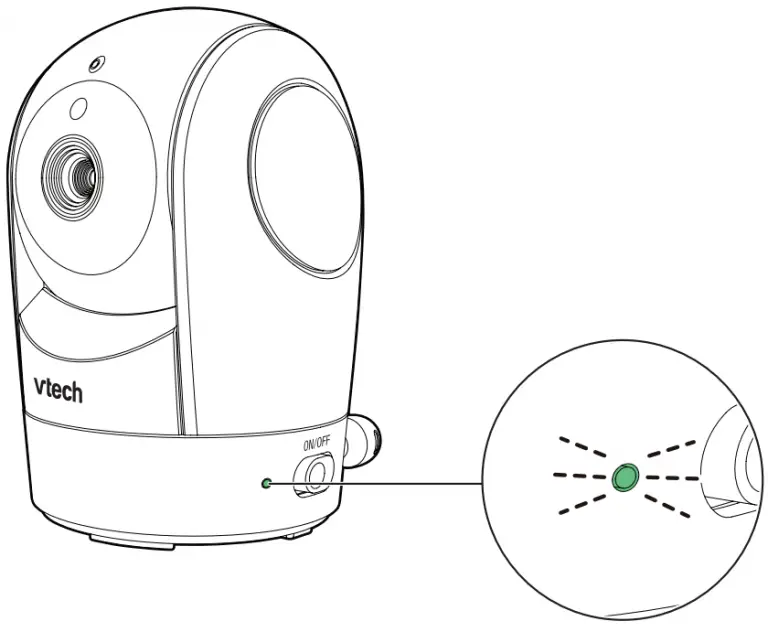
Place the baby unit on the wall mount bracket. Tighten the screw into the threaded socket at the bottom to secure the baby unit.
Align the holes on the wall mount bracket with the screws on the wall, and slide the wall mount bracket down until it locks into place.

FOR VM5262-2 ONLYFOR VM5262-2 ONLY
If you are viewing baby unit![]() , the ON/OFF LED light of baby unit
, the ON/OFF LED light of baby unit![]() turns on. As baby unit
turns on. As baby unit![]() is not being viewed, its ON/OFF LED light flashes.
is not being viewed, its ON/OFF LED light flashes.
![]()
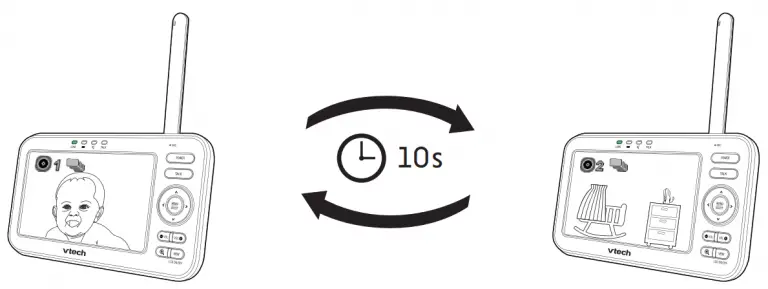
![]()
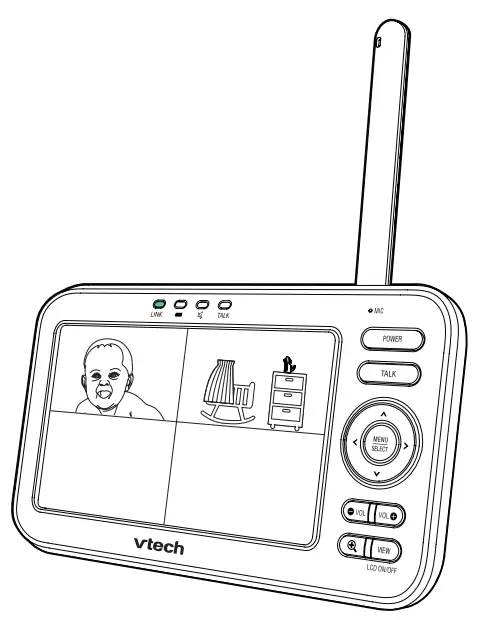
NOTE
• If you power on only one baby unit, you may see the parent unit displaying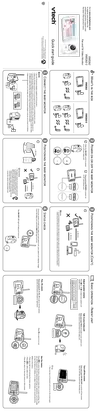 and then
  No link to CAM # (# represents the baby unit number), and the LINK LED light flashing. Press VIEW in Single CAM or Patrol mode to switch to the baby unit you have powered on.
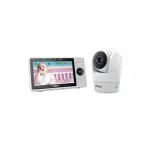
In Single CAM or Patrol mode, press VIEW to switch between the image of baby units ![]() and
and![]() .
.
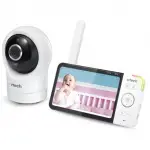

Select Patrol as your monitoring mode to alternately view the image from baby units ![]() and
and ![]() every 10 seconds.
every 10 seconds.


Select Split as your monitoring mode to view the images from both baby units at once.


Specifications are subject to change without notice.
© 2018 VTech Communications, Inc. All rights reserved.
11/18. VM5262-2_QSG_V2.
Document order number: 96-012346-020-100
INSTALLATION INSTRUCTION
SURFACE SPOTLIGHT FITTING
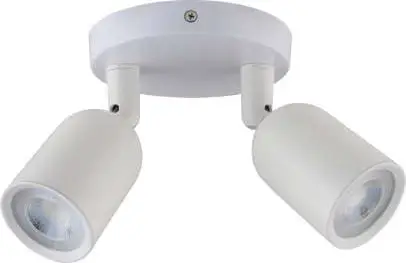

TECHNICAL DATA
| MODEL | VT-897 |
| MAX RATED WATTS | 2x35W |
| BASE | GU10 (Bulb not included) |
| BODY TYPE | PC |
| IP RATING | IP20 |
| DIMENSION | 0120 x 144.8mm |
| INPUT VOLTAGE | AC: 220-240V, 50Hz |
INSTALLATION INSTRUCTION
- Switch off the power before starting the installation.
- Remove the front ring
- Install the lamp on the front ring.
- Install the lamp into the holder and close the ring.
- Using the bracket drill appropriate holes on the ceiling then install the plastic wall plug into the hole and fix the bracket with screws.
- Wire and connect the power cable to the fitting.
- Install the fixture onto the ceiling and adjust the lighting angle.
- Switch on the power if the above steps are done properly without any mistakes

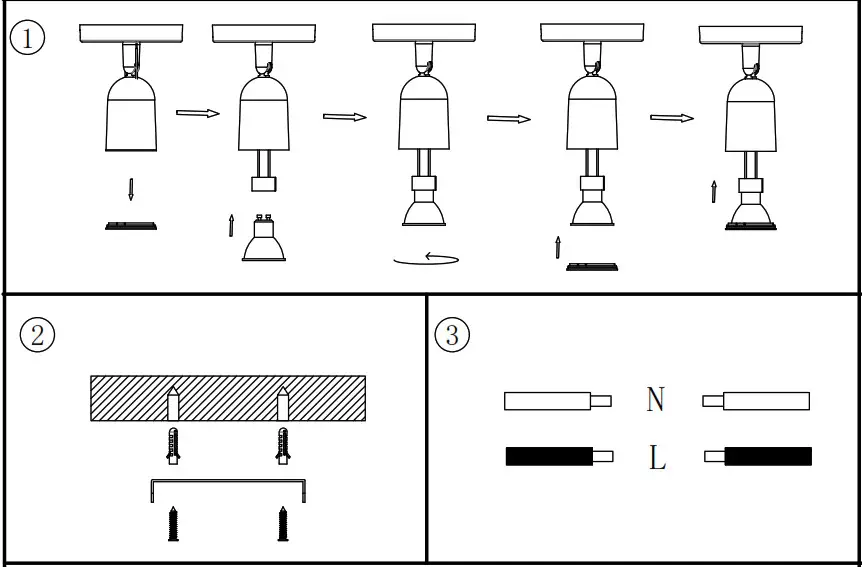
INTRODUCTION & WARRANTY
Thank you for selecting and buying the V-TAC product. V-TAC will serve you the best. Please read these instructions carefully before starting the installation and keep this manual handy for future reference. If you have any other queries, please contact our dealer or local vendor from whom you have purchased the product. They are trained and ready to serve you at your best. The warranty is valid for 3 years from the date of purchase. The warranty does not apply to damage caused by incorrect installation or abnormal wear and tear. The company gives no warranty against damage to any surface due to incorrect removal and installation of the product. The products are suitable for 10-12 Hours of Daily operation. Usage of product for 24 hours a day would void the warranty. This product is warranted for manufacturing defects only.
WARNING!
- Please make sure to turn off the power before starting the installation.
- Installation must be performed by a qualified electrician.
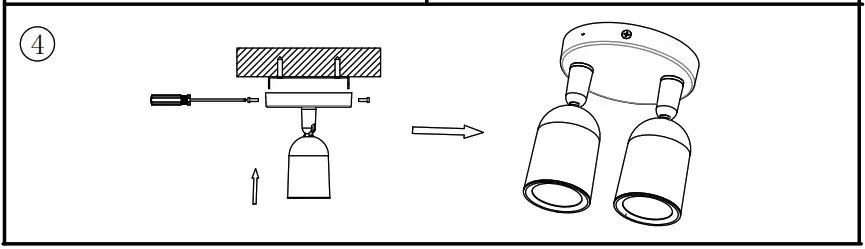 This marking indicates that this product should not be disposed of with other household wastes.
 Caution, risk of electric shock.
In case of any query/issue with the product, please reach out to us at: [email protected] For More products range, inquiry please contact our distributor or nearest dealers. V-TAC EUROPE LTD. Bulgaria, Plovdiv 4000, bul.L.Karavelow 9B
]]>RM5752
Wi-Fi 1080p Video Monitor
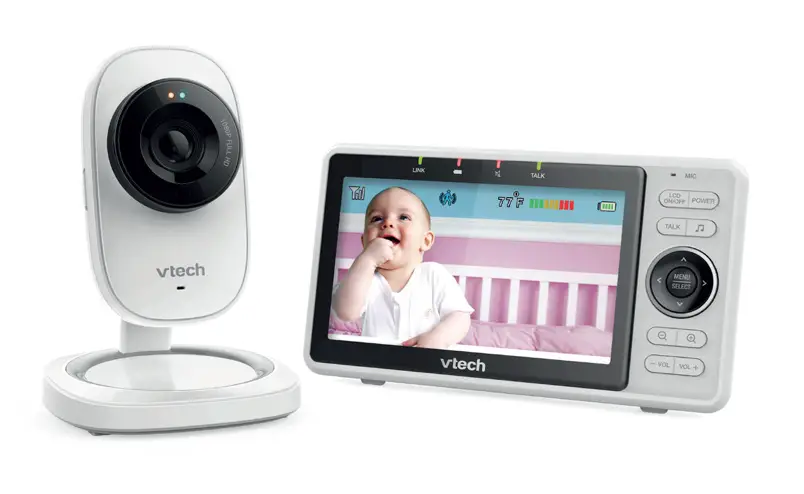
Go to www.vtechphones.com to register your product for enhanced warranty support and latest VTech product news.
VTech Wi-Fi HD Video Monitor allows you to stay close to your baby when you are on the move or away. This monitor is Wi-Fi enabled, which uses your home wireless network to stream live video and audio through the HD camera unit and 5-inch color screen parent unit. It allows you to maintain a constant connection to your baby.
You can also monitor from your smartphone and mobile tablet.
VTech Wi-Fi HD Video Monitor uses MyVTech Baby 1080p app to let you instantly see and hear what’s happening with your baby from anywhere in the world. The app can be downloaded from the App Store or the Google Play TM Store, directly from your smartphone or mobile tablet.
Quick start guide
Set up Wi-Fi connection
- After the parent unit is fully charged, press and hold POWER until the VTech logo appears on screen to power on.
- Press
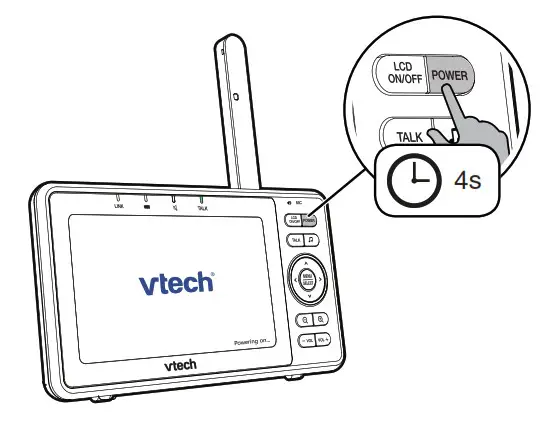 or
or  to highlight your preferred and secured 2.4GHz Wi-Fi network with good signal strength, then press SELECT.
– You must select a password-protected network.

- Enter the password of the Wi-Fi network. Press ,
 ,
,  or
or  to highlight the character, then press SELECT. When done, press , , or to highlight Next, then press SELECT.


• After you have set up the Wi-Fi connection, the parent unit may auto-prompt you for update. For details, please see Auto-prompt for software and firmware updates on the back.
Add camera
- After connecting the parent unit to your Wi-Fi network, the system will help you add your camera. Follow the instructions shown on screen,
then press or to highlight Next, then press SELECT.

- Once your camera is located, the system will connect the camera via the same Wi-Fi network that your parent unit has connected to. When the camera is successfully added to your parent unit, the parent unit displays the camera image.

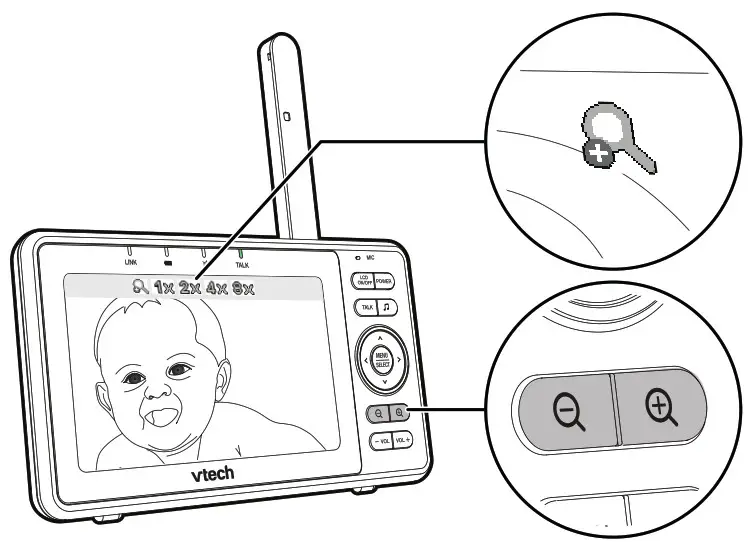
Use the menu
Press MENU/SELECT to enter the menu, choose a menu item, or save a setting. You can use the parent unit menu for advanced setting or operations, such as to play or stop the camera unit lullaby, or adjust the sound detection setting.
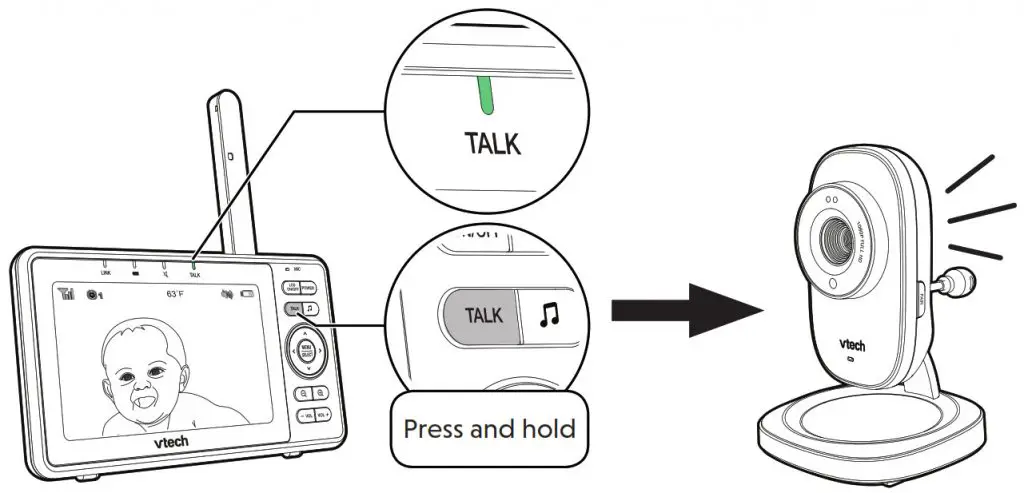 While in the menu:
• Press ![]() , , or to scroll among the menu options.
, , or to scroll among the menu options.
• Press MENU/SELECT to select an item.
• Press -VOL to return to the idle screen.
While in the submenu, press to return to the previous menu.
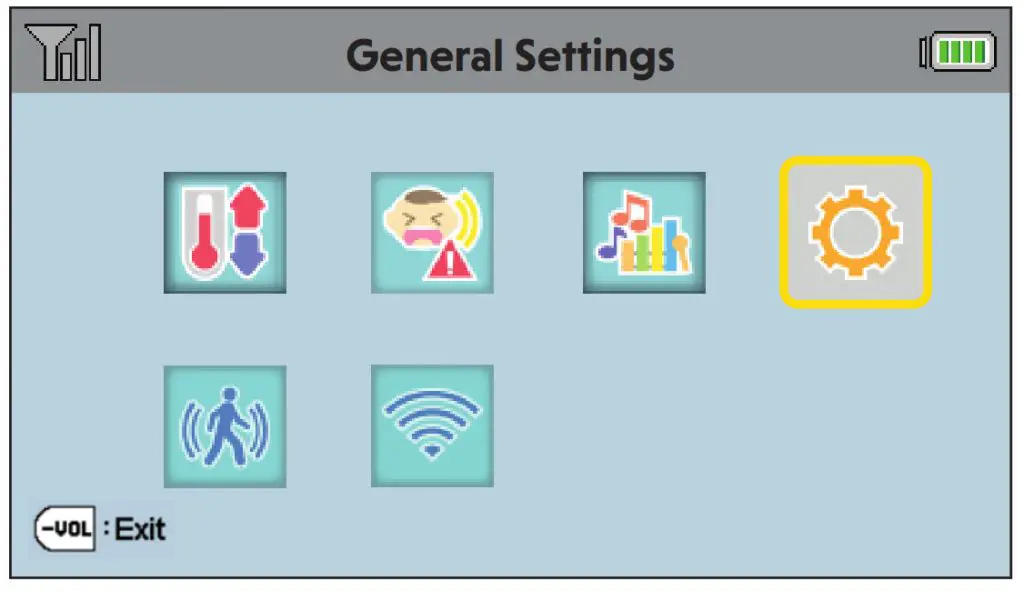
Adjust speaker volume
Press –VOL / VOL+ to adjust your parent unit speaker volume. It determines the volume of sound transmitted from your camera unit.

Zoom
Press 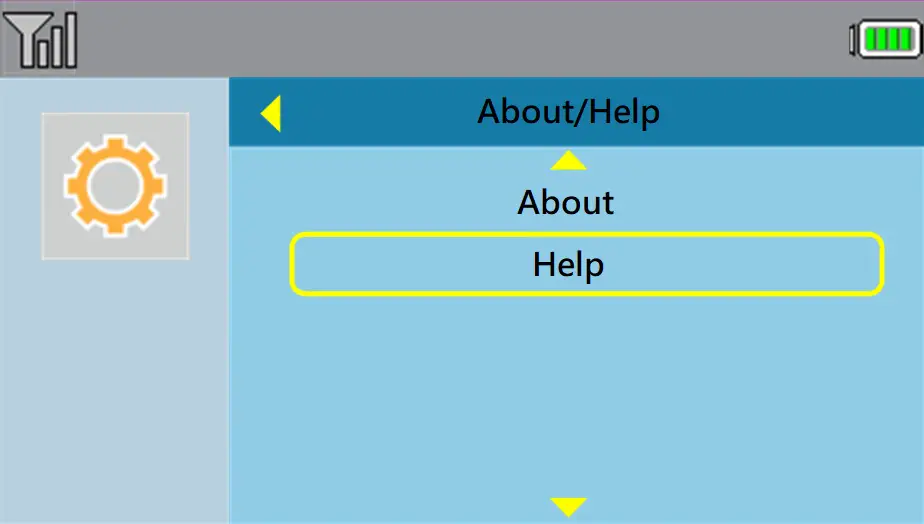 or
or 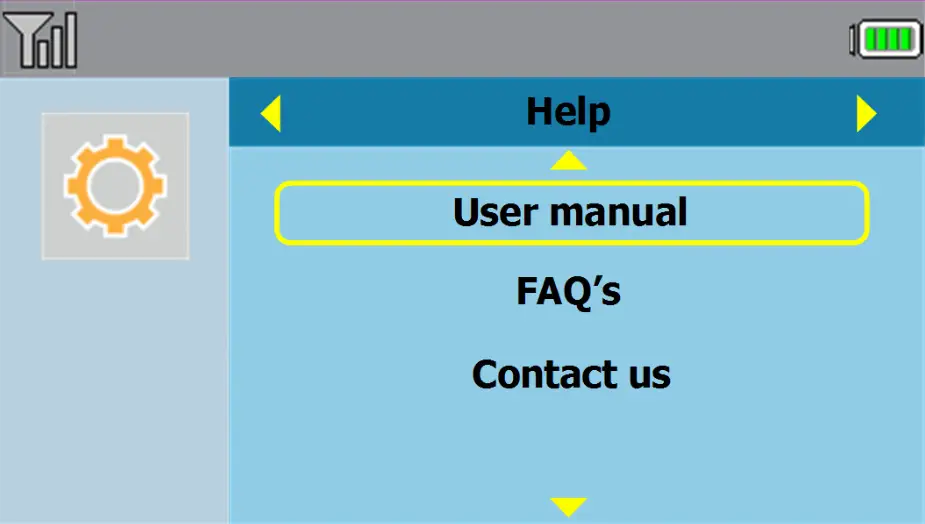 to zoom in or out.
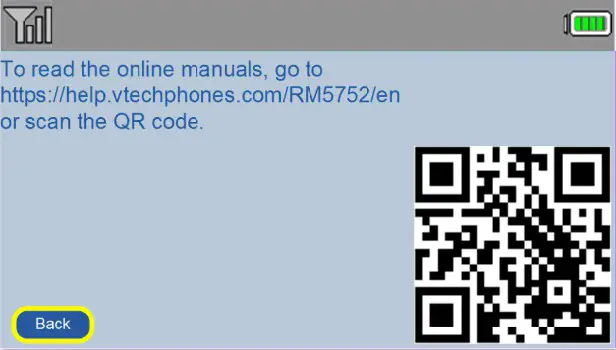
Talk to your baby unit
Press and hold TALK to speak to your parent unit. Your voice is transmitted to the baby unit.

Turn off the screen
Press LCD ON/OFF to switch off the screen. You can still hear sound from the camera unit.

Parent unit settings
1. Press MENU when the parent unit is idle.
2. Press ![]() , , or to choose General Settings, then press SELECT.
, , or to choose General Settings, then press SELECT.
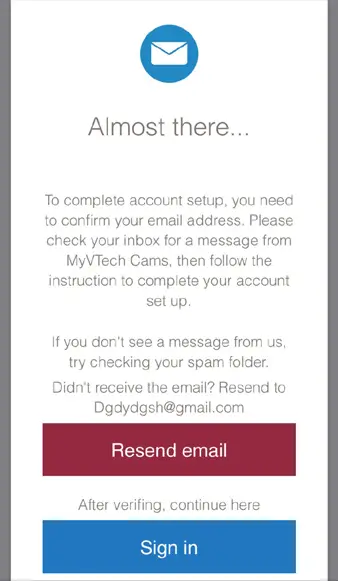
To ensure that your HD video monitor is always at its best performance, the parent unit will prompt you to update its software and the camera unit’s firmware
when there are new versions available.
• Press MENU. The new software will then be installed automatically. When the software update is complete, the parent unit will restart.
![]()
• Updates are available onlywhen the parent unit is connected to AC power.
- Driven by system updates, the software, app manual, and online FAQs will be updated periodically.
For latest information and supports, go and check the app manual and online FAQs.
1. Press MENU when the parent unit is idle.
2. Press or to choose General Settings, then press SELECT.

- Press or to choose About/Help, then press SELECT.

- Press or to choose Help, then press SELECT.
- Press or to choose User manual, then press SELECT.

- Use your smartphone or mobile device to read the online parent unit manual on our product support web page.
• To read the online manuals, go to help.vtechphones.com/RM5752 or scan the QR code.

- Download the free MyVTech Baby 1080p mobile app from the App Store or Google Play store and install it to a mobile device, then you can use your mobile device and the mobile app to monitor your areas remotely.
• Make sure your mobile device meets the minimum requirement for the mobile app.
 https://vttqr.tv/?q=1VP18

https://vttqr.tv/?q=1VP19
Minimum requirement
The mobile app is compatible with:
• Android™ 4.4 or later; and
• iOS 8.0 or later.
Install MyVTech Baby 1080p mobile app
1. Browse the App Store or the Google Play store
2. Search for the mobile app with the keyword “myvtech baby 1080p“.
3. Download and install the MyVTech Baby 1080p mobile app to your mobile device.
Driven by Android and iOS updates, MyVTech Baby 1080p mobile app, app manual, and online FAQs will be updated periodically.
Download and install the latest mobile app. For the latest information and supports, go and check the app manual and online FAQs. - Tap to run the mobile app on your mobile device, and then create a camera account.
• We recommend that you use common webmail services, such as Google Gmail for registration of your camera account.

- Check your email (and Spam folder), and activate your new camera account via the email link, then sign in to your account.
- Follow the instructions on the screen to add the camera to your camera account.
• Make sure your mobile device is connected to the 2.4GHz Wi-Fi network that your parent unit has connected to when adding the camera.

- Type in the security key for the camera. You can check it in your parent unit’s General Settings > About/Help > About.

- Start using your monitoring system remotely.


![]()
• You must complete the camera setup in the above
1. Set up Wi-Fi connection and
2 Add camera sections before you can access your camera remotely.
•. You can add more camera units to your HD video monitor system using the MyVTech Baby 1080p mobile app. Download the mobile app and create a camera account. Then, you can use the mobile app to pair your existing camera units in your parent unit to your camera account, and also pair additional camera units to your account. The mobile app can pair and access up to 10 camera units. The additional camera units can only be paired and accessed via the mobile app.
• The MyVTech Baby 1080p mobile app allows you to view the camera in 1080p full HD. While concurrent viewing with the parent unit, the maximum video resolution becomes 720p.
• Tap on the camera list to display the side menu, and then tap Help to refer to the online mobile app manual for the complete operating instructions. You can also scan the QR code on the left, or go to www.vtechphones.com/manual/RM5752/mobile, to open the manual in a web browser.
Specifications are subject to change without notice.
© 2019 VTech Communications, Inc.
All rights reserved. 06/19. RM5752_QSG_V4.0
Document order number: 96-012616-040-100
Android™ and Google Play™ are trademarks of the Google Inc. App Store is a trademark of Apple Inc., registered in the U.S. and other countries. IOS is a trademark or registered trademark of Cisco in the U.S. and other countries and is used under license.
]]>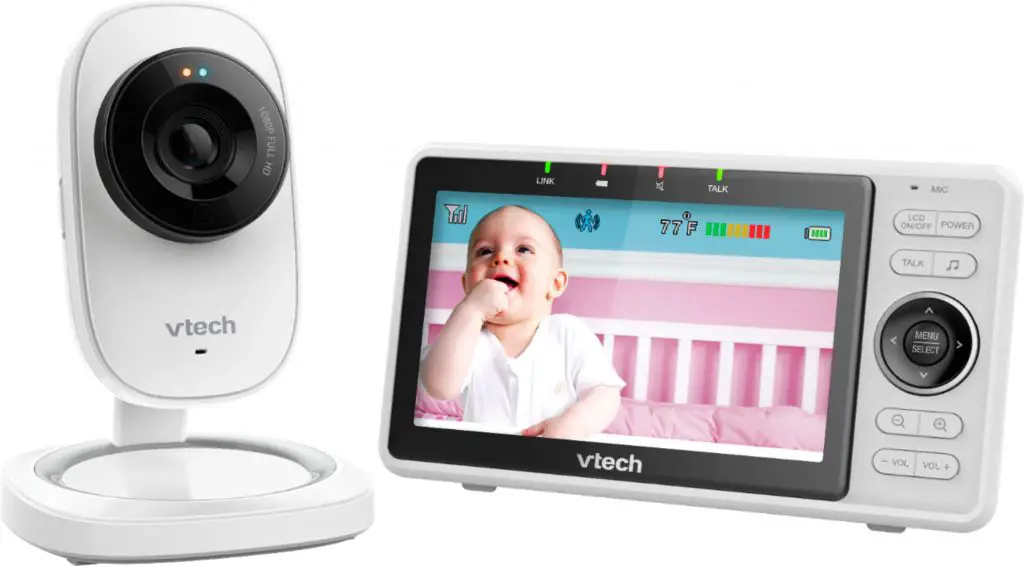
What’s in the box
Your HD video monitor package contains the following items. Save your sales receipt and Camera unit overview original packaging in the event warranty service is necessary.
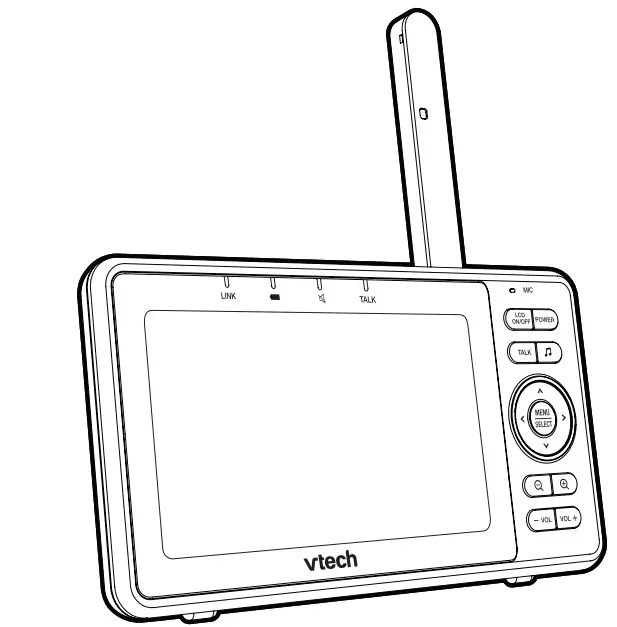
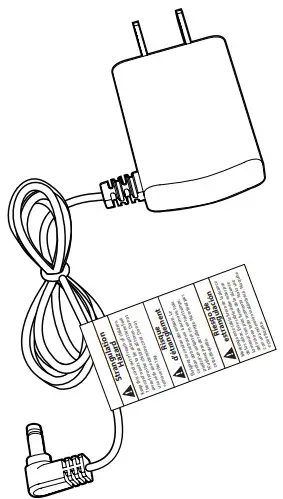
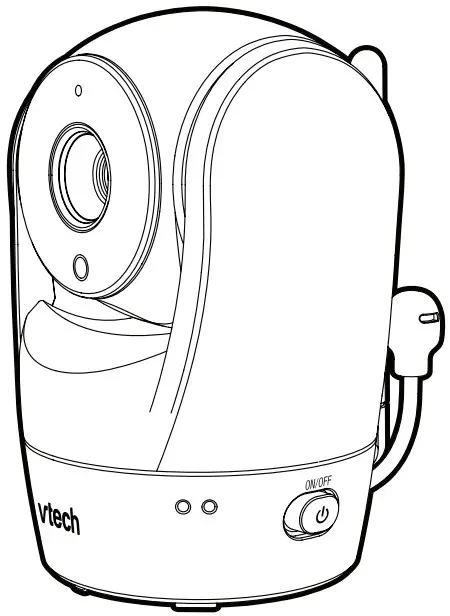
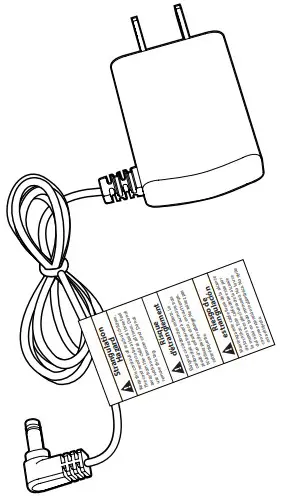
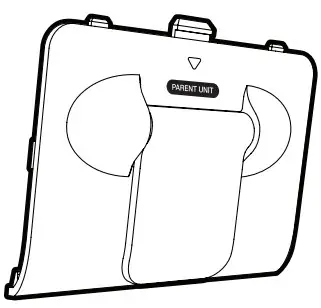
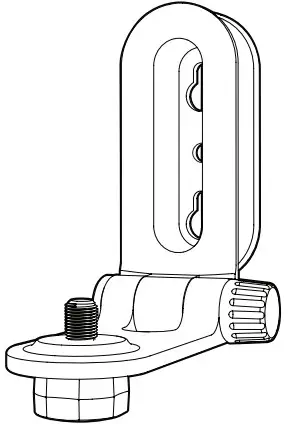

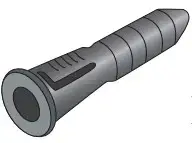
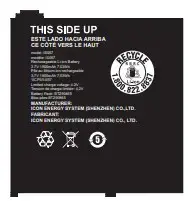
Overview
Camera unit overview
- Microphone
- Camera lens
- Light sensor
- LED indicators
- Flash yellow and blue alternately when the camera unit is in pairing mode.
- Yellow is steady on when the camera unit is connecting to the Internet.
- Yellow and blue are steady on when the camera unit is idle.
- Flash yellow and blue slowly during video streaming.
- Flash yellow and blue quickly and alternately when the camera unit is updating its firmware.
- Infrared LEDs Allow you to see clearly in a dark surrounding.
- ON/OFF switch
- Antenna Connect to router with Wi-Fi.
- Speaker
Caution : For hearing protection, do not stand close to the HD camera when the camera’s alarm goes off. The loud alarm may damage your hearing. - Temperature sensor
- Power jack
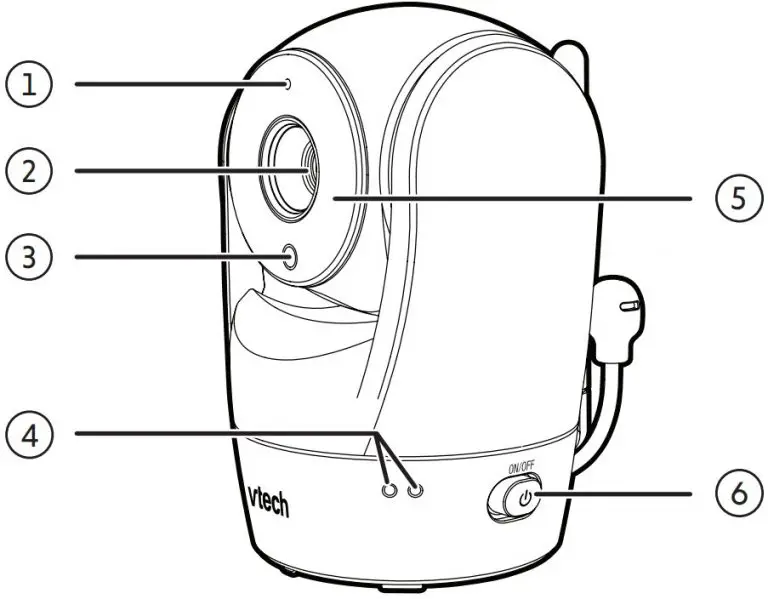
- Threaded socket
- Pair/reset button
- Press and hold for three seconds to enter pairing mode.
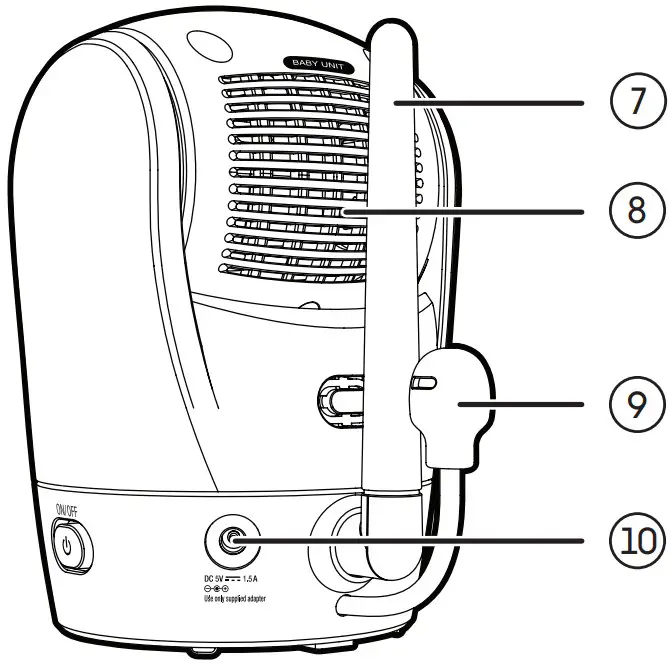
- Press and hold for three seconds to enter pairing mode.
Parent unit overview
- LED Light
- On when the parent unit is connected to AC power, or the battery is charging.
- Flashes when the parent unit battery is low and needs charging.
- Off when the parent unit is disconnected from AC power.
- LINK LED light
- On when the parent unit is linked to the camera unit.
- Flashes when the link to the camera unit is lost.
- LED light
- On when the parent unit speaker volume is set to off.On when the
- parent unit is talking to the camera unit.
- TALK LED light
- On when the parent unit is talking to the camera unit.
- LCD display
- Microphone
- LCD ON/OFF
- POWER
- Lullaby
- Press to enter the lullaby menu.
- TALK
- Press and hold to talk to the camera unit.
- Arrow keys
- While in the submenu, press to exit. , , or
- Press to move the selection box leftward, upward, rightward or downward.
- While viewing image from the camera unit, press and hold to pan the camera unit camera leftward, upward, rightward or downward.
- While viewing zoomed image, press and hold to move the zoomed image leftward, upward, rightward or downward.
- MENU/SELECT
- Press to enter the menu.
- While in a menu, press to choose an item, or save a setting.
- Zoom in
- Zoom out
- – VOL/ VOL +

- Power jack
- Antenna
- Speaker
- Battery compartment cover
- Stand
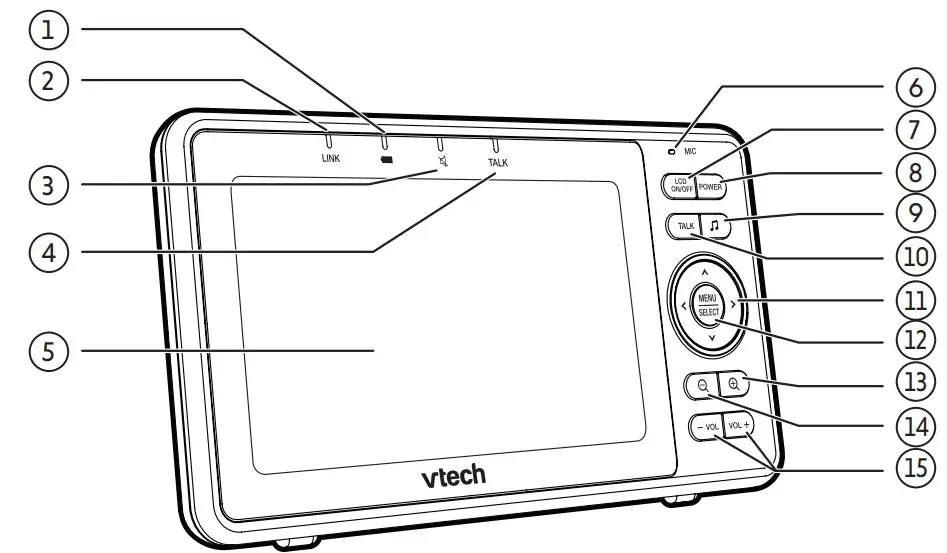
How the system works
The Wi-Fi router (not included) provides Internet connectivity to your HD video monitor system. It serves as a communicating channel between your camera unit and parent unit, allowing you to monitor and/or control your camera unit wherever you are.
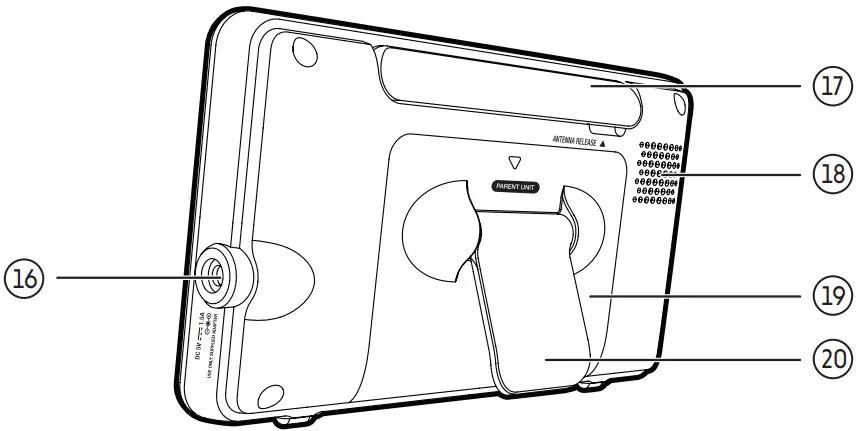
Protect your privacy and online security
VTech cares about your privacy and peace of mind. That’s why we’ve put together a list of industry-recommended best practices to help keep your wireless connection private and your devices protected when online. We recommend you carefully review and consider complying with the following tips.
Ensure your wireless connection is secure :
- Before installing a device, ensure your router’s wireless signal is encrypted by selecting the “WPA2-PSK with AES” setting in your router’s wireless security menu. Change default settings.
- Change your wireless router’s default wireless network name (SSID) to something unique.
- Change default passwords to unique, strong passwords. A strong password:
- Is at least 10 characters long.
- Is complex.
- Does not contain dictionary words or personal information.
- Contains a mix of uppercase letters, lowercase letters, special characters and numbers.
Keep your devices up to date
- Download security patches from manufacturers as soon as they become available. This will ensure you always have the latest security updates.
- If the feature is available, enable automatic updates for future releases.
Disable Universal Plug and Play (UPnP) on your router :
- UPnP enabled on a router can limit the effectiveness of your firewall by allowing other network devices to open inbound ports without any intervention or approval from you. A virus or other malware program could use this function to compromise security for the entire network.
For more information on wireless connections and protecting your data, please review the following resources from industry experts:
- Federal Communications Commission: Wireless Connections and Bluetooth Security Tips – www.fcc.gov/consumers/guides/how-protect-yourself-online.
- U.S. Department of Homeland Security: Before You Connect a New Computer to the Internet – www.us-cert.gov/ncas/tips/ST15-003.
- Federal Trade Commission: Using IP Cameras Safely https://www.consumer.ftc.gov/articles/0382-using-ip-camerassafely.
- Wi-Fi Alliance: Discover Wi-Fi Security – http://www.wi-fi.org/discover-wi-fi/security
Connect, charge and power on the baby monitor
Connect the baby monitor :
Notes :
- Use only the power adapters supplied with this product.
- Make sure the parent unit and the camera unit are not connected to the switch controlled electrical outlets.
- Connect the power adapters in a vertical or floor mount position only. The adapters’ prongs are not designed to hold the weight of the parent unit and the camera unit, so do not connect them to any ceiling, under-the- table, or cabinet outlets. Otherwise, the adapters may not properly connect to the outlets.
- Make sure the parent unit, the camera unit and the power adapter cords are out of reach of children.
Connect and power on the camera unit :
Notes : To maintain compliance with the FCC’s RF exposure guidelines, place the camera unit at least 20cm from nearby persons.
- Connect the power adapter to the camera unit and a power supply
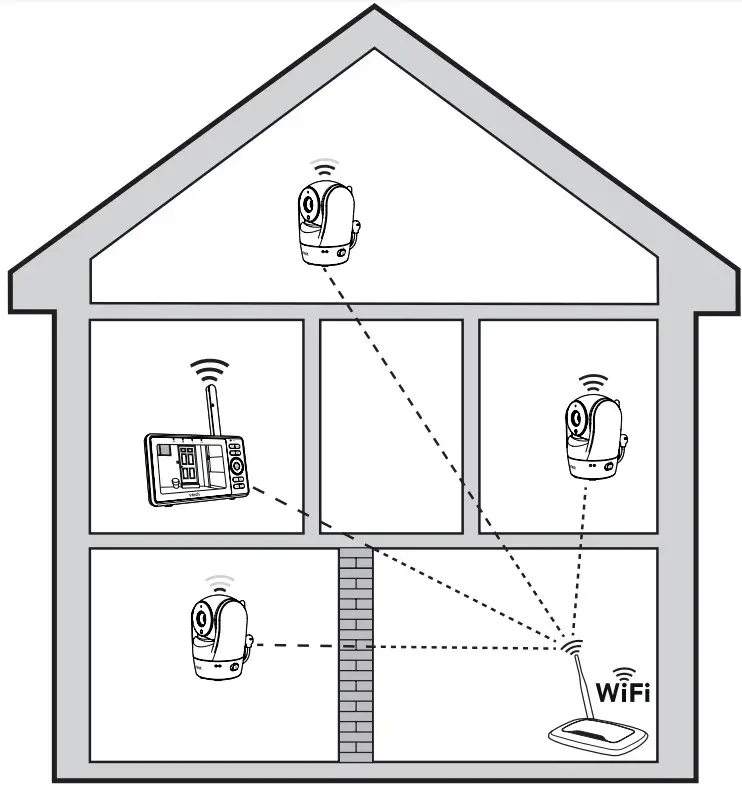
- Slide the ON/OFF switch leftward to power on your camera.
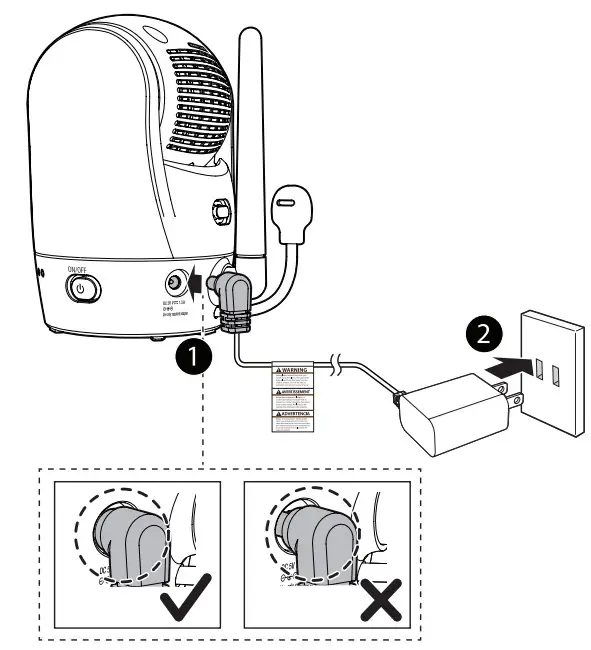
Notes : Slide the ON/OFF switch rightward to power off your camera.
Connect and charge the parent unit
Install the parent unit battery : The parent unit runs on rechargeable battery or AC power. To continuously monitor your baby, keep the parent unit connected to AC power. With the battery alone, the parent unit can cordlessly run for a short time only.
Notes :
- Use only the battery supplied with this product.
- If the parent unit will not be used for a long time, disconnect and remove the battery to prevent possible leakage.
- Press down on the battery compartment cover to pull it out.
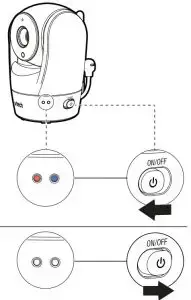
- Make sure the label THIS SIDE UP is facing up while inserting the battery
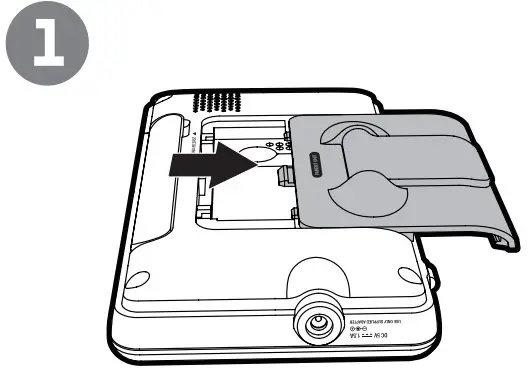
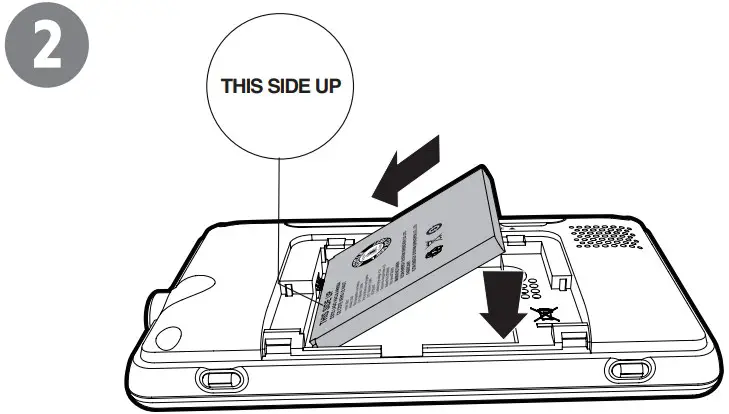
Replace the battery
To replace the battery, press down on the battery compartment cover and pull it out, then follow the steps above to install the battery.
Raise the parent unit antenna
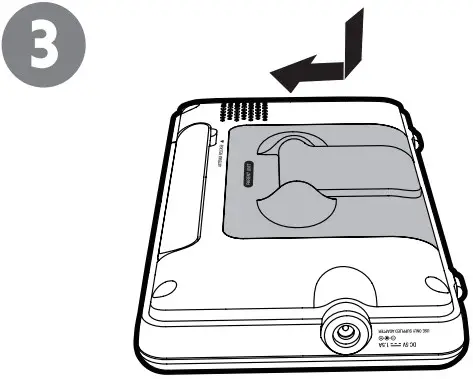
Charge the battery before use :
Notes :
- The parent unit is fully charged after 4 hours of continuous charging.
- It takes longer to charge when the parent unit is turned on. To shorten the charging time, turn the parent unit off while charging.
- The standby time varies depending on your actual use.
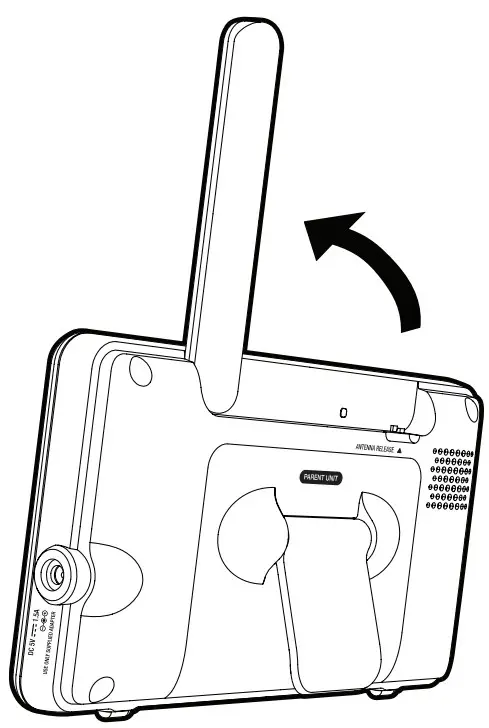
After the parent unit is fully charged, press and hold POWER until the VTech logo appears on screen to power on.
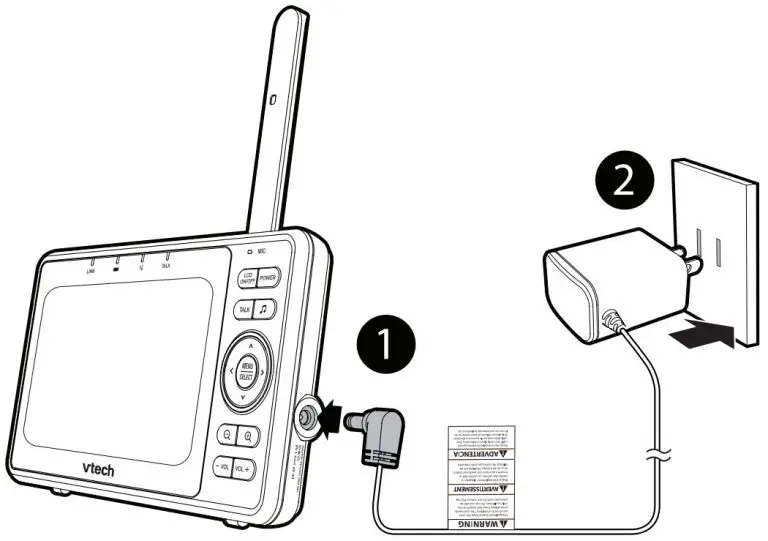
The battery icon indicates the battery status (see the following table) :
| Battery indicators | Battery status | Action |
The battery icon is off and displays 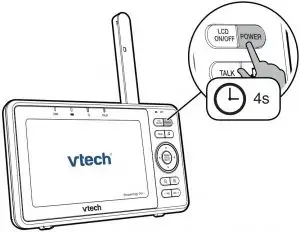 . . |
No battery is installed but operates using AC power, or the battery has been installed incorrectly | Install the parent unit battery. Charge without interruption (at least 30 minutes) |
The screen displays  Battery low at Parent Unit and Battery low at Parent Unit and  . The . The  light flashes. light flashes. |
The battery has very little charge and may be used for only a short time. | Charge without interruption (about 30 minutes). |
The battery icon becomes solid  |
The battery is fully charged. | To keep the battery charged, connect it to AC power when not in use. |
set up the hd video monitor
After you have connected the parent unit and the camera unit, refer to the Quick start guide included in your package to set up your HD video monitor system.
HD video monitor setup:
- Set up Wi-Fi connection
- Add camera
Test the location for the camera unit
Before you install your camera unit, you need to test which of your selected monitoring areas within the house have good Wi-Fi signal strength. After you have powered on your parent unit, you can use your parent unit’s Wi-Fi signal strength indicator to assist in checking. Once you have identified the suitable location, you can install your camera unit. Adjust the distance between your camera unit and the Wi-Fi router if needed.

Tip :
- Depending on surroundings and obstructing factors, such as the effect distance and internal walls have on signal strength, you may experience reduced Wi-Fi signal. To improve the Wi-Fi signal strength, adjust the distance or direction of your parent unit. Check with your parent unit again.
Test the sound level and position the HD video monitor
Notes :
- This HD video monitor is intended as an aid. It is not a substitute for proper adult supervision, and should not be used as such.
Testing the sound level of the HD video monitor
CAUTION :
- For hearing protection, make sure the parent unit is more than 10 feet (3 meters) away from the camera unit. If you hear any high-pitched noise from the parent unit, move the parent unit further until the noise stops. You can also press – VOL on the parent unit to lower or mute the noise.
Tip :
- Increase the parent unit speaker volume if you cannot hear the sounds transmitted from the camera unit.
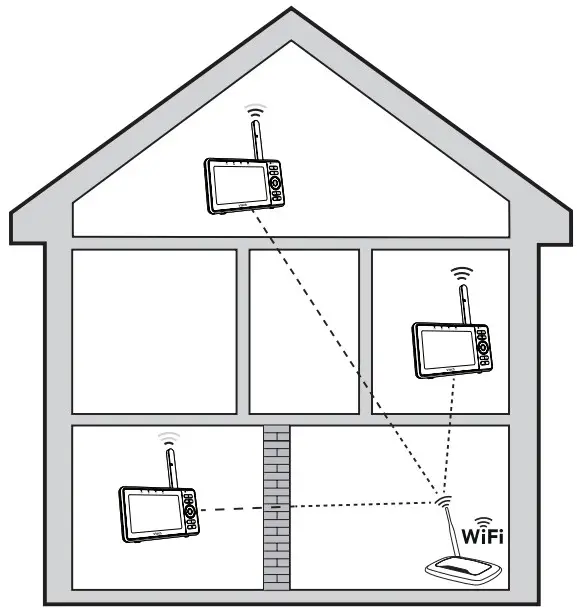
Positioning the HD video monitor
CAUTION :
- Keep the camera unit out of the reach of your baby. Never place or mount the camera unit inside the baby’s crib or playpen.
- Place the camera unit more than 3 feet (1 meter) away from your baby
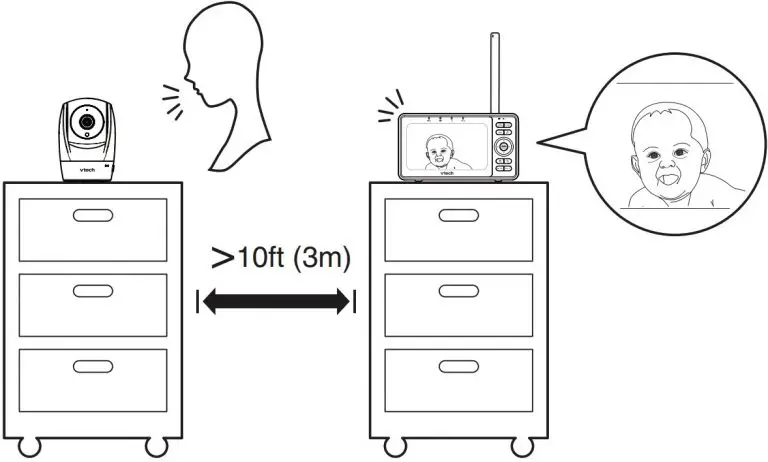
- Adjust the angle of the camera to aim at your baby. Refer to the online manual on how to use the Pan/tilt and Zoom functions of the camera
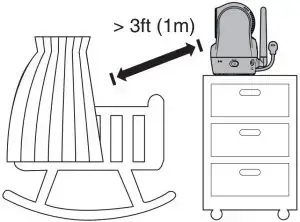
- To avoid causing high-pitched screeching noise from your HD video monitor:
- Make sure your camera unit and parent unit are more than 10 feet (3 meters) apart; OR
- Turn down the volume of your parent unit.

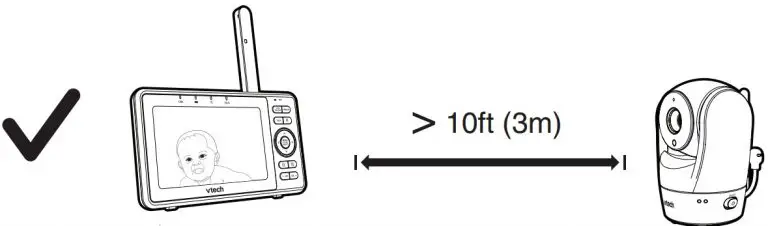
mount the camera unit (optional)
Notes :
- Check for reception strength and camera angle before drilling the holes.
- The types of screws and anchors you need depend on the composition of the wall. You may need to purchase the screws and anchors separately to mount your camera units.
- Place the wall mount bracket on a wall and then use a pencil to mark the top and the bottom holes as shown. Remove the wall mount bracket and drill two holes in the wall (7/32 inch drill bit).
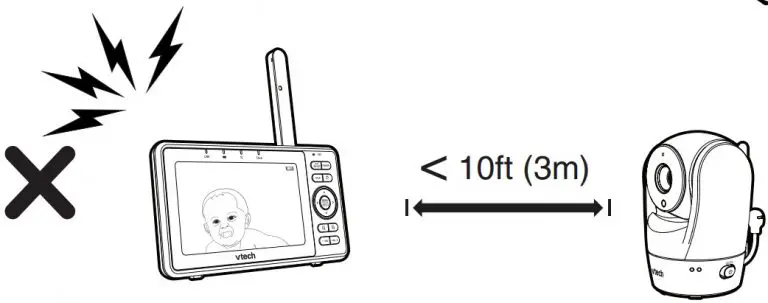
- If you drill the holes into a stud, go to step 3.
- If you drill the holes into an object other than a stud, insert the wall anchors into the holes. Tap gently on the ends with a hammer until the wall anchors are flush with the wall.
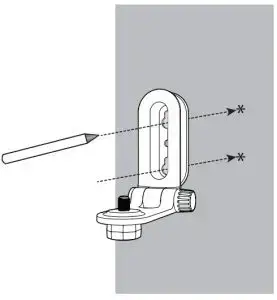
- If you drill the holes into an object other than a stud, insert the wall anchors into the holes. Tap gently on the ends with a hammer until the wall anchors are flush with the wall.
- Align the wall mount bracket and screws with the holes in the wall as shown. Tighten the screw in the middle hole first, so that the wall mount bracket position is fixed. You can tighten the other screw in the top hole.

- Place the camera unit on the wall mount bracket. Tighten the screw into the threaded socket at the bottom to secure the camera unit.

- You can maximize your camera unit’s viewing angles by tilting the wall mount bracket. Hold the camera unit, and then rotate the knob in anticlockwise direction. This will loosen the joint of the wall mount bracket. Tilt your camera unit up or down to adjust to your preferred angle. Then, rotate the knob in clockwise direction to tighten the joint and secure the angle.
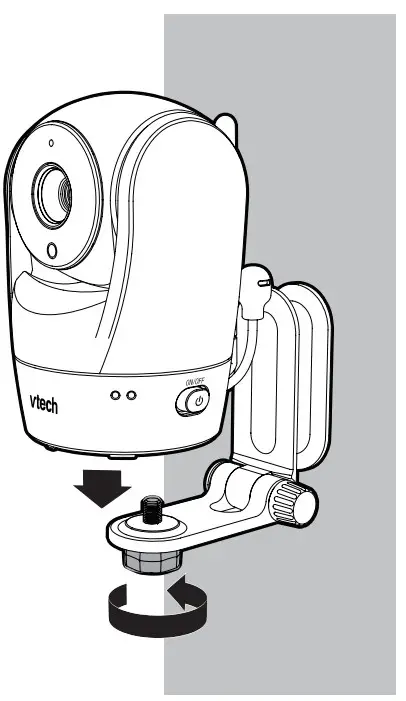
General product care
To keep this product working well and looking good, follow these guidelines:
- Avoid putting it near heating appliances and devices that generate electrical noise (for example, motors or fluorescent lamps).
- DO NOT expose it to direct sunlight or moisture.
- Avoid dropping the product or treating it roughly.
- Clean with a soft cloth.
- DO NOT immerse the parent unit and the camera unit in water and do not clean them under the tap.
- DO NOT use cleaning spray or liquid cleaners.
- Make sure the parent unit and the camera unit are dry before you connect them to the mains again.
Storage
When you are not going to use the HD video monitor for some time, store the parent unit, the camera unit and the adapters in a cool and dry place.
Frequently asked questions
Below are the questions most frequently asked about the HD video monitor. If you cannot find the answer to your question in the below table, visit our website at www.vtechphones.com, or call 1-844-848-8324 (1-844-84-VTECH) for customer service. In Canada, go to www.vtechcanada.com or call 1-888-211-2005.
| Can I turn off the parent unit screen but keep hearing sound from the camera unit? | Press LCD ON/OFF to turn off the screen display without powering off the parent unit. You can still hear sound from the camera unit if the camera is streaming and the speaker volume of the parent unit is turned on. |
| Why does the camera unit not respond normally? | Try the following (in the order listed) for common cure:
|
| Why is my screen in black and white? | The camera unit has a light sensor that measures the ambient light. When the ambient light is dim, such as during nighttime or in a dark room, the camera activates its infrared LEDs, and displays the camera view in black and white. |
| Why does my camera show offline? Why is the connection lost every now and then? | The camera unit may lose the Internet connection. Check your network and the router setting. |
| Other electronic products may cause interference with your camera. Try installing your camera as far away from these electronic devices as possible. | |
| Why don’t I hear a sound/Why can’t I hear my baby cry? | The parent unit speaker volume may be too low. Press VOL + to increase the volume |
| You may have set a low VOX sensitivity level. Set the VOX sensitivity to a higher level. For details, refer to the online manual. |
Limited warranty
What does this limited warranty cover?
The manufacturer of this VTech Product warrants to the holder of a valid proof of purchase (“Consumer” or “you”) that the Product and all accessories provided in the sales package (“Product”) are free from defects in material and workmanship, pursuant to the following terms and conditions, when installed and used normally and in accordance with the Product operating instructions. This limited warranty extends only to the Consumer for Products purchased and used in the United States of America and Canada.
What will VTech do if the Product is not free from defects in materials and workmanship during the limited warranty period (“Materially Defective Product”)?
During the limited warranty period, VTech’s authorized service representative will repair or replace at VTech’s option, without charge, a Materially Defective Product. If we repair the Product, we may use new or refurbished replacement parts. If we choose to replace the Product, we may replace it with a new or refurbished Product of the same or similar design. We will retain defective parts, modules, or equipment. Repair or replacement of the Product, at VTech’s option, is your exclusive remedy. VTech will return the repaired or replacement Products to you in working condition. You should expect the repair or replacement to take approximately 30 days.
How long is the limited warranty period?
The limited warranty period for the Product extends for ONE (1) YEAR from the date of purchase. If VTech repairs or replaces a Materially Defective Product under the terms of this limited warranty, this limited warranty also applies to the repaired or replacement Product for a period of either
- 90 days from the date the repaired or replacement Product is shipped to you or
- the time remaining on the original one-year warranty; whichever is longer.
What is not covered by this limited warranty?
This limited warranty does not cover:
- Product that has been subjected to misuse, accident, shipping or other physical damage, improper installation, abnormal operation or handling, neglect, inundation, fire, water or other liquid intrusion; or
- Product that has been damaged due to repair, alteration or modification by anyone other than an authorized service representative of VTech; or
- Product to the extent that the problem experienced is caused by signal conditions, network reliability, or cable or antenna systems; or
- Product to the extent that the problem is caused by use with non-VTech accessories; or
- Product whose warranty/quality stickers, product serial number plates or electronic serial numbers have been removed, altered or rendered illegible; or
- Product purchased, used, serviced, or shipped for repair from outside the United States of America or Canada, or used for commercial or institutional purposes (including but not limited to Products used for rental purposes); or
- Product returned without a valid proof of purchase (see item 2 on the following part); or
- Charges for installation or set up, adjustment of customer controls, and installation or repair of systems outside the unit.
How do you get warranty service?
To obtain warranty service in the USA, please visit our website at www.vtechphones.com or call 1-844-848-8324 (1-844-84-VTECH). In Canada, go to www.vtechcanada.com or call 1-888-211-2005.NOTE: Before calling for service, please review the user’s manual – a check of the Product’s controls and features may save you a service call. Except as provided by applicable law, you assume the risk of loss or damage during transit and transportation and are responsible for delivery or handling charges incurred in the transport of the Product(s) to the service location. VTech will return repaired or replaced Product under this limited warranty. Transportation, delivery or handling charges are prepaid. VTech assumes no risk for damage or loss of the Product in transit. If the Product failure is not covered by this limited warranty, or proof of purchase does not meet the terms of this limited warranty, VTech will notify you and will request that you authorize the cost of repair prior to any further repair activity. You must pay for the cost of repair and return shipping costs for
the repair of Products that are not covered by this limited warranty.
What must you return with the Product to get warranty service?
- Return the entire original package and contents including the Product to the VTech service location along with a description of the malfunction or difficulty; and
- Include a “valid proof of purchase” (sales receipt) identifying the Product purchased (Product model) and the date of purchase or receipt; and
- Provide your name, complete and correct mailing address, and telephone number.
Other limitations
This warranty is the complete and exclusive agreement between you and VTech. It supersedes all other written or oral communications related to this Product. VTech provides no other warranties for this Product. The warranty exclusively describes all of VTech’s responsibilities regarding the Product. There are no other express warranties. No one is authorized to make modifications to this limited warranty and you should not rely on any such modification State/Provincial Law Rights: This warranty gives you specific legal rights, and you may also have other rights, which vary from state to state or province to province.
Limitations: Implied warranties, including those of fitness for a particular purpose and merchantability (an unwritten warranty that the Product is fit for ordinary use) are limited to one year from the date of purchase. Some states/provinces do not allow limitations on how long an implied warranty lasts, so the above limitation may not apply to you. In no event shall VTech be liable for any indirect, special, incidental, consequential, or similar damages (including, but not limited to lost profits or revenue, inability to use the Product or other associated equipment, the cost of substitute equipment, and claims by third parties) resulting from the use of this Product. Some states/provinces do not allow the exclusion or limitation of incidental or consequential damages, so the above limitation or exclusion may not apply to you.
Please retain your original sales receipt as proof of purchase.
]]>
Getting Started
Register your KidiBuzz™ to get:
- The full collection of educational games that come with this device
- Two FREE apps from Learning Lodge®, VTech’s online store1
- Kid-friendly chatting with KidiConnect™
- Access to Parent Settings where you can manage your child’s apps, set time limits, and more
- CHARGE your KidiBuzz™ using the included USB cable and adapter. A flashing green light indicates charging is in progress. The light will stop flashing when the device is fully charged. A full charge takes about 3.5 hours. The battery should be fully charged before the first use or before attempting a system update.
- SET UP the device by following the on-screen prompts to connect to Wi-Fi2 and select a time zone.
- DOWNLOAD and install an important update to your KidiBuzz™.
- REGISTER your KidiBuzz™ by creating a Learning Lodge® account.
UNLOCK KidiConnect™ at the end of registration and install the app on your mobile device. - ENJOY fun learning games, silly photos, kid-friendly chatting and more!
- For first-time registration and designated content only.
- Supports Wi-Fi 802.11 b/g/n only
Key Features

Shortcut Buttons
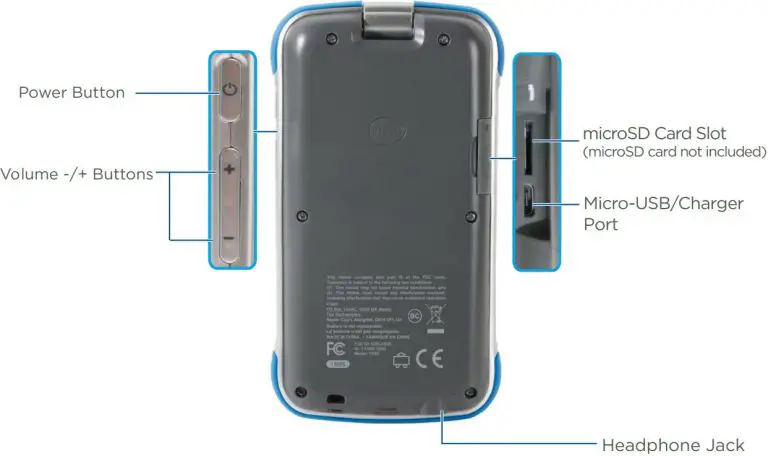 Camera Button – Press this for instant access to the camera.
 Talk Button – Press this to send a quick voice message. If you want to choose a contact first, press the button once then touch the Change Friend icon. If you want to keep sending messages to the same person without choosing a contact, you can hold down the button while you talk, and it will record your voice. Let the button go to send the message.
Parent Settings
To enter Parent Settings, touch the profile icon in the corner of your child’s Home screen. A Parents icon will appear. Touch that icon, then input your passcode on the pop-up screen.

With Parent Settings, you can control the way your child plays by adding or removing content, setting time limits, managing access to the Web, and adjusting device settings.
Adding or Removing Content
Browse Learning Lodge® for a selection of age appropriate educational apps that have been approved by VTech® learning experts. If you’re looking for common Android apps outside of the VTech® ecosystem, go to Device Settings and select Get More Apps to find instructions on how to install a third-party app store.
You can manage any new content you add through the following menu options:
- Storage Manager—Select this option to manage your device’s memory storage.
- VTech® App Manager—Come here to download or uninstall any content you’ve purchased from Learning Lodge®. You can also uninstall some of the content that was included with the system.
- App Settings—If you download content from a third-party app store, it will not appear in your child’s profile until you come here and give them permission to use the app.
Setting Time Limits
Select Time Controls from the Parent Settings menu to limit the amount of time your child is allowed to play per day or to mark certain hours of the day as off limits.
Managing Web Access
The Web Browser creates a kid-friendly environment by only allowing your child to visit sites that have been pre-screened by VTech® for their age-appropriate content. You can add additional sites to your child’s Browser (or remove sites) by selecting Approved Sites from the Parent Settings menu.
Note: Although VTech® makes every effort to ensure a kid-friendly browsing environment, the content of individual websites may change without VTech’s knowledge. Please be sure to monitor your child’s online experience.
Adjusting Device Settings
There are several other options in Parent Settings that will allow you to control your device’s Wi-Fi connection, edit your child’s profile information or your Learning Lodge® account information, and manage detailed device settings.
Other Information
If You Forget Your Parent Settings Passcode
If you forget your Parent Settings passcode, go to the passcode screen and enter the number 9876543210. We’ll send you an email to tell you your passcode.
Charging the Device
To charge the device, first connect the included USB cable to the KidiBuzz™ by inserting the small end of the cable into the micro-USB port on your device. Insert the larger end of the USB cable into the USB socket of the Power Adapter and plug the Adapter into a wall socket.
You can also charge the device by plugging the larger end of the USB cable into a computer’s USB port.
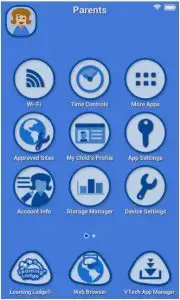
Guidelines for charging
Only charge this device using the included micro USB cable connected to a computer or the included power adapter. Do not charge using a third party adapter. Before use, inspect the cord to confirm that it is in good condition and that there are no breaks or exposed wires. Ensure there are no particles or liquid (water, juice, etc.) in either of the connectors before plugging in either end of the cable. The device should be completely dry with no debris in the cable connectors when charging. Plug in the cable securely, in the correct orientation. If the device is on when plugged in, a dialog box may open on your computer to allow you to access the device’s drive. Never leave the device unattended while charging. Do not charge your device on soft surfaces, as they can trap heat around the device. Typical charging time is between 2-3 hours if the battery is fully depleted. Disconnect the device when it is fully charged. Do not leave the device charging for more than 4 hours.
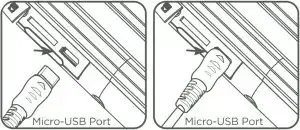
Specification of Power Adapter:
Output: 5V DC
WARNING: All packing materials, such as tape, plastic sheets, packaging locks, removable tags, cable ties and packaging screws are not part of this toy, and should be discarded for your child’s safety.
Note: Please keep this Quick Start Guide as it contains important information.
WARNING
A very small percentage of the public, due to an existing condition, may experience epileptic seizures or momentary loss of consciousness when viewing certain types of flashing colors or patterns, especially on television. While the KidiBuzz™ does not contribute to any additional risks, we do recommend that parents supervise their children while they play video games. If your child experiences dizziness, altered vision, disorientation, or convulsions, discontinue use immediately and consult your physician. Please note that focusing on an LCD screen at close range for a prolonged period of time may cause fatigue or discomfort. We recommend that children take a 15-minute break for every hour of play.
Caution
- When you are not charging the battery or connected to a computer, close the USB port cover on the KidiBuzz™ for safety.
- Use the power adapter and micro-USB cable that came with this device to charge it. Using a different charger may damage your KidiBuzz™.
- Please note: VTech® is the only service provider that is authorized to replace the battery on your KidiBuzz™. Any attempt to remove or replace the battery by a third party or by yourself may damage your KidiBuzz™ and will void your warranty. If you feel your battery needs service, please contact VTech’s Consumer Services Department.
OTHER NOTES:
Static electricity may cause the KidiBuzz™ to malfunction. In some cases, the game play score stored in the device’s memory may be lost. In cases where the KidiBuzz™ is malfunctioning due to static electricity, reset the device by pressing and holding the Power Button for 10 seconds until the unit turns off. Then press and hold the Power Button for 3 seconds to turn on the unit again.
This product is licensed under the AVC patent portfolio license for the personal use of a consumer or other uses in which it does not receive remuneration to
- encode video in compliance with the AVC standard (“AVC video”) and/or
- decode AVC video that was encoded by a consumer engaged in a personal activity and/or was obtained from a video provider licensed to provide AVC video.
No license is granted or shall be implied for any other use. Additional information may be obtained from MPEG LA, L.L.C. See http://www.mpegla.com
Disclaimer and Limitation of Liability
VTech® Electronics North America, L.L.C. and its suppliers assume no responsibility for any damage or loss resulting from the use of this handbook. VTech® Electronics North America, L.L.C. and its suppliers assume no responsibility for any loss or claims by third parties that may arise through the use of this software. VTech® Electronics North America, L.L.C. and its suppliers assume no responsibility for any damage or loss caused by deletion of data as a result of malfunction, dead battery, or repairs. Be sure to make backup copies of important data on other media to protect against data loss.
THIS DEVICE COMPLIES WITH PART 15 OF THE FCC RULES AND INDUSTRY CANADA LICENCE-EXEMPT RSS STANDARD(S). OPERATION IS SUBJECT TO THE FOLLOWING TWO CONDITIONS: (1) THIS DEVICE MAY NOT CAUSE INTERFERENCE, AND (2) THIS DEVICE MUST ACCEPT ANY INTERFERENCE, INCLUDING INTERFERENCE THAT MAY CAUSE UNDESIRED OPERATION OF THE DEVICE. LE PRÉSENT APPAREIL EST CONFORME AUX CNR D’INDUSTRIE CANADA APPLICABLES AUX APPAREILS RADIO EXEMPTS DE LICENCE. L’EXPLOITATION EST AUTORISÉE AUX DEUX CONDITIONS SUIVANTES:
(1) L’APPAREIL NE DOIT PAS PRODUIRE DE BROUILLAGE, ET (2) L’UTILISATEUR DE L’APPAREIL DOIT ACCEPTER TOUT BROUILLAGE RADIOÉLECTRIQUE SUBI, MÊME SI LE BROUILLAGE EST SUSCEPTIBLE D’EN COMPROMETTRE LE FONCTIONNEMENT.
Supplier’s Declaration of Conformity
Trade Name: VTECH®
Model: 1695
Product name: KidiBuzz™
Responsible Party: VTech Electronics North America, LLC
Address: 1156 W. Shure Drive, Suite 200, Arlington Heights, IL 60004
Website: vtechkids.com
Caution : Changes or modifications not expressly approved by the party responsible for compliance could void the user’s authority to operate the equipment.
A USB cable with a ferrite core must be used with this equipment to ensure compliance with the Class B FCC limits.
Note: This equipment has been tested and found to comply with the limits for a Class B digital device, pursuant to Part 15 of the FCC Rules. These limits are designed to provide reasonable protection against harmful interference in a residential installation. This equipment generates, uses and can radiate radio frequency energy and, if not installed and used in accordance with the instructions, may cause harmful interference to radio communications. However, there is no guarantee that interference will not occur in a particular installation. If this equipment does cause harmful interference to radio or television reception, which can be determined by turning the equipment off and on, the user is encouraged to try to correct the interference by one or more of the following measures:
- Reorient or relocate the receiving antenna.
- Increase the separation between the equipment and receiver.
- Connect the equipment into an outlet on a circuit different from that to which the receiver is connected.
- Consult the dealer or an experienced radio/TV technician for help.
END USER LICENSE AGREEMENT
STATING THE TERMS THAT GOVERN YOUR USE OF SOFTWARE FOR KIDIBUZZ OR IN CONNECTION WITH THE APPLICATION OF SOFTWARE (“SOFTWARE”). “SOFTWARE” INCLUDES AUDIO FILES FOR THE KIDIBUZZ SYSTEM.
BY ACTIVATING, USING, DOWNLOADING OR INSTALLING THIS SOFTWARE , YOU ARE AGREEING TO BE BOUND BY THE TERMS OF THIS AGREEMENT. YOUR RIGHT TO USE THE SOFTWARE IS CONDITIONAL UPON YOUR AGREEMENT TO THESE TERMS. IF YOU DETERMINE THAT YOU ARE UNWILLING TO AGREE TO THE TERMS OF THIS LICENSE AGREEMENT, YOU HAVE NO RIGHT TO USE THE SOFTWARE AND YOU SHOULD PROMPTLY RETURN THE SOFTWARE TO VTECH OR DELETE IT.
IF YOU ARE UNDER THE AGE OF 18 OR ARE OTHERWISE CONSIDERED A MINOR IN YOUR JURISDICTION, YOU SHOULD REVIEW THESE TERMS AND CONDITIONS WITH YOUR PARENT OR GUARDIAN (COLLECTIVELY, “PARENT”) AND MAKE SURE THAT YOUR PARENT UNDERSTANDS AND AGREES ON YOUR BEHALF TO THESE TERMS AND CONDITIONS. WHEREVER THIS AGREEMENT REFERS TO “YOU” OR “YOUR,” IT IS MEANT TO INCLUDE BOTH PARENT AND CHILDREN USERS, EXCEPT
WHERE A CHILD IS NOT OF SUFFICIENT LEGAL AGE TO ENTER INTO A BINDING CONTRACT (SUCH AS AN E-COMMERCE TRANSACTION) OR PROVIDE ANY REQUIRED CONSENTS (SUCH AS CONSENT TO DATA COLLECTION, PROCESSING, OR TRANSFERS), IN WHICH CASE THE PARENT OF SUCH CHILD HEREBY ACKNOWLEDGES AND AGREES HE/SHE IS ACTING ON THE CHILD’S BEHALF TO EFFECTUATE SUCH CONTRACTS OR CONSENTS AND IS FULLY LIABLE FOR THE ACTIONS OR INACTIONS OF SUCH CHILD WITH RESPECT TO THE USE OF THE SOFTWARE AND RELATED SERVICES.
- OWNERSHIP. The Software and Documentation (including all content contained within the Product) are owned by VTECH, or its licensors, and are protected by international copyright and other intellectual property laws. The Software and Documentation shall only be used by you in accordance with this Agreement. The Software and Documentation are licensed, not sold. Except as specifically set forth herein, VTECH and its licensors retain all right, title and interest, including all intellectual property rights, in and to the Software and Documentation.
- LICENSE TERMS. VTECH grants to you, subject to the terms, conditions and limitations further defined in this Agreement, a non-exclusive, nonsublicenseable, non-transferable license for non-commercial use, and to use the Documentation in connection with such use of the Software. Any modifications, upgrades, error corrections, or other updates to the Software provided by VTECH to you shall be deemed part of the Software and use thereof shall be governed by the terms and conditions of this Agreement, unless the parties have entered into a separate, written agreement governing such modifications, upgrades, error corrections, or other updates.
- RESTRICTIONS ON REVERSE ENGINEERING AND SECURITY. Except to the extent otherwise expressly and unambiguously authorized by VTECH or to the extent such restrictions are explicitly prohibited by applicable law, you shall NOT reverse engineer, decompile, disassemble, translate or attempt to learn the source code of the Software (ii) copy, modify, create derivative works of
distribute, sell, assign, pledge, sublicense, lease, loan, rent, timeshare, deliver or otherwise transfer the Software (iii) remove from the Software, or alter or add, any copyright, trademarks, trade names, logos, notices or markings (iv) violate, tamper with or circumvent any security system or measures implemented by VTECH which are designed to prevent unauthorized copying of the Software. Any such forbidden use shall immediately terminate your license to the Software without any prior notice. - LIMITED WARRANTY. VTECH warrants to you – subject to your compliance with the terms herein – that for a period of ninety (90) days from the date you purchase the Product, the Software will substantially conform to VTECH’s published specifications for the Software. Your sole and exclusive remedy under the foregoing warranty shall be for VTECH, at its choice, to use commercially reasonable efforts to correct any substantial non-conformity of the Software reported to VTECH in writing within the warranty period and/or provide a replacement copy of the Software. The foregoing warranty shall not apply to any non-conformity that is caused by (i) the use or operation of the Software with an application or in an environment other than that intended or recommended by VTECH, (ii) modifications to the Software not made by VTECH or (iii) third party hardware or software provided by any third party.
VTECH MAKES NO WARRANTIES THAT THE SOFTWARE IS ERROR FREE OR IS SUITABLE FOR YOUR PURPOSES. VTECH MAKES NO WARRANTIES OTHER THAN THOSE SET FORTH ABOVE, AND HEREBY DISCLAIMS ALL OTHER WARRANTIES, WHETHER EXPRESS, IMPLIED OR STATUTORY, WITH RESPECT TO THE SOFTWARE OR DOCUMENTATION, INCLUDING, WITHOUT LIMITATION, ANY IMPLIED WARRANTIES OF MERCHANTABILITY, FITNESS FOR A PARTICULAR PURPOSE, OR NONINFRINGEMENT. NO ORAL OR WRITTEN INFORMATION OR ADVICE GIVEN BY VTECH, ITS RESELLERS, AGENTS OR EMPLOYEES SHALL CREATE A WARRANTY. - LIMITATION OF LIABILITY. IN NO EVENT SHALL VTECH BE LIABLE FOR ANY LOSS OF PROFITS, USE OF DATA, COST OF REPLACEMENT GOODS OR HARDWARE, OR OTHER INDIRECT, INCIDENTAL, SPECIAL, OR CONSEQUENTIAL DAMAGES ARISING OUT OF YOUR USE OR INABILITY TO USE THE SOFTWARE DOWNLOAD OR DOCUMENTATION, EVEN IF VTECH HAS BEEN ADVISED OF THE POSSIBILITY OF SUCH DAMAGES, AND NOTWITHSTANDING THE FAILURE OF ESSENTIAL PURPOSE OF ANY REMEDY. YOU AGREE THAT IN NO EVENT WILL VTECH’S AGGREGATE LIABILITY HEREUNDER OR RELATED TO YOUR USE OF THE SOFTWARE OR DOCUMENTATION EXCEED THE AMOUNT PAID FOR THE PRODUCT AND/OR SOFTWARE.
- TERMINATION. This License Agreement will automatically terminate if you fail to comply with any term thereof. No notice shall be required from VTECH to effect such termination.
Visit our website for more information about our products, downloads, resources and more. vtechkids.com
Read our complete warranty policy online at vtechkids.com/warranty
]]>
![]() ErisStation™
ErisStation™
Wireless Conference System
DECT USB Expansion Speakerphone
Wireless Speaker and DECT Dongle bundle
VCS855
Quick Start Guide


Important safety instructions
When using your telephone equipment, basic safety precautions should always be followed to reduce the risk of fire, electric shock, and injury to persons, including the following:
Safety Information
- Read and understand all instructions.
- Follow all warnings and instructions marked on the product.
- Unplug this product from the wall outlet before cleaning. Do not use liquid or aerosol cleaners. Use a damp cloth for cleaning.
- Do not use this product near water such as near a bathtub, washbowl, kitchen sink, laundry tub, or swimming pool, or in a wet basement or shower.
- Do not place this product on an unstable table, shelf, stand, or other unstable surfaces.
- Slots and openings in the wireless speaker are provided for ventilation. To protect them from overheating, these openings must not be blocked by placing the product on a soft surface such as a bed, sofa, or rug. This product should never be placed near or over a radiator or heat register. This product should not be placed in any area where proper ventilation is not provided.
- This product should be operated only from the type of power source indicated on the marking label. If you are not sure of the type of power supply in your office, consult your dealer or local power company.
- Do not allow anything to rest on the power cord. Do not install this product where the cord may be walked on.
- Never push objects of any kind into this product through the slots in the product because they may touch dangerous voltage points or create a short circuit. Never spill liquid of any kind on the product.
- To reduce the risk of electric shock, do not disassemble this product, but take it to an authorized service facility. Opening or removing parts of the wireless speakerphone other than specified access doors may expose you to dangerous voltages or other risks. Incorrect reassembling can cause electric shock when the product is subsequently used.
- Do not overload wall outlets and extension cords.
- Unplug this product from the wall outlet and refer servicing to an authorized service facility under the following conditions:
• When the power supply cord or plug is damaged or frayed.
• If liquid has been spilled onto the product.
• If the product has been exposed to rain or water.
• If the product does not operate normally by following the operating instructions. Adjust only those controls that are covered by the operation instructions. Improper adjustment of other controls may result in damage and often requires extensive work by an authorized technician to restore the product to normal operation.
If the product has been dropped and the wireless speaker has been damaged. If the product exhibits a distinct change in performance. - Avoid using the ErisStation wireless speaker during an electrical storm. There is a remote risk of electric shock from lightning.
- Do not use the ErisStation Wireless Speaker to report a gas leak in the vicinity of the leak. Under certain circumstances, a spark may be created when the adapter is plugged into the power outlet. This is a common event associated with the closing of any electrical circuit. The user should not plug the product into a power outlet if the product is located in an environment containing concentrations of flammable or flame-supporting gases unless there is adequate ventilation. A spark in such an environment could create a fire or explosion. Such environments might include medical use of oxygen without adequate ventilation; industrial gases (cleaning solvents; gasoline vapors; etc.); a leak of natural gas; etc.
- The power cables are intended to be correctly oriented in a vertical or floor mount position. The prongs are not designed to hold the plug in place if it is plugged into a ceiling or cabinet outlet.
- For pluggable equipment, the socket-outlet shall be installed near the equipment and shall be easily accessible.
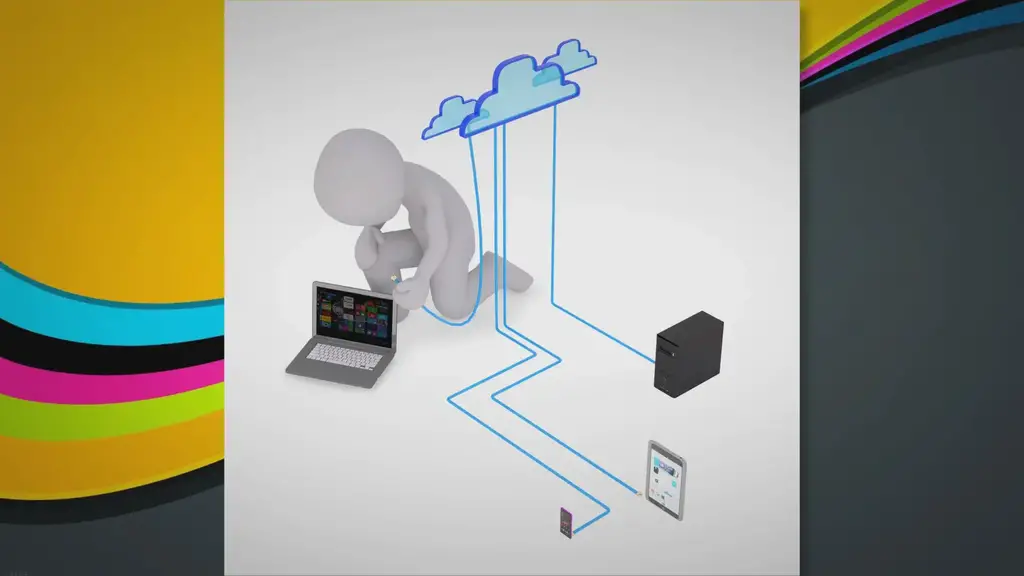 CAUTION: Use only the batteries indicated in this manual. There may be a risk of explosion if the wrong type of battery is used. Use only the supplied rechargeable battery or replacement battery pack (BT260280). Do not dispose of batteries in a fire. They may explode. Dispose of used battery according to the information in The RBRC ® seal.
- Use only the adapter included with this product. Incorrect adapter polarity or voltage can seriously damage the product. Base unit power adapter: Input 100–240V AC 50/60Hz; Output: 12V DC @ 1.0A. 19. Use only with UL-listed phones.
Precautions for users of implanted cardiac pacemakers
Cardiac pacemakers (applies only to digital cordless devices):
Wireless Technology Research, LLC (WTR), an independent research entity, led a multidisciplinary evaluation of the interference between portable digital cordless devices and implanted cardiac pacemakers. Supported by the U.S. Food and Drug Administration, WTR recommends to physicians that:
Pacemaker patients
• Should keep digital cordless devices at least six inches from the pacemaker.
• Should NOT place digital cordless devices directly over the pacemaker, such as in a breast pocket, when it is turned ON.
• Should use the digital cordless device at the ear opposite the pacemaker.
WTR’s evaluation did not identify any risk to bystanders with pacemakers from other persons using wireless telephones.
WTR’s evaluation did not identify any risk to bystanders with pacemakers from other persons using digital cordless devices.
SAVE THESE INSTRUCTIONS
Congratulations
on purchasing your new VTech product. Before using this product, please read the “Important safety instructions” on page 2-4 of this manual.
This quick start guide provides you with the basic installation, setup, and operation instructions for your VTech product.
For customer service or product information, visit our website at vtechphones.com or call 1 (800) 595-9511.
 Telephones identified with this logo have reduced noise and interference when used with most T-coil-equipped hearing aids and cochlear implants. The TIA-1083 Compliant
The logo is a trademark of the Telecommunications Industry Association. Used under license.
For Dongle VU-060: For
FCC ID: EW780-1391-00
IC: 1135B-80139100
HVIN: VU-060
PMN: DECT Dongle
ErisStation ® is a registered trademark of VTech Communications, Inc.
Orbitlink Wireless Technology™ is a trademark of VTech Communications, Inc.
Introduction
The VU-060 DECT Dongle is preregistered to the VCS855 Wireless speaker.
The dongle enables you to connect the wireless speaker to your computer for playing music or audio from soft phone calls.
What’s in the box
Your product package contains the following items. Save your sales receipt and original packaging in the event warranty service is necessary.

NOTE: The wireless speaker battery (BT260280) is not included, and must be purchased separately.
To purchase the battery, or any accessories or replacements, visit our website at www.vtechphones.com/store/products/accessories.
Wireless Speaker Overview

1. Microphone
2. Speaker
3. MUTE ALL
During a call, press to mute or end mute all microphones in the system.
4.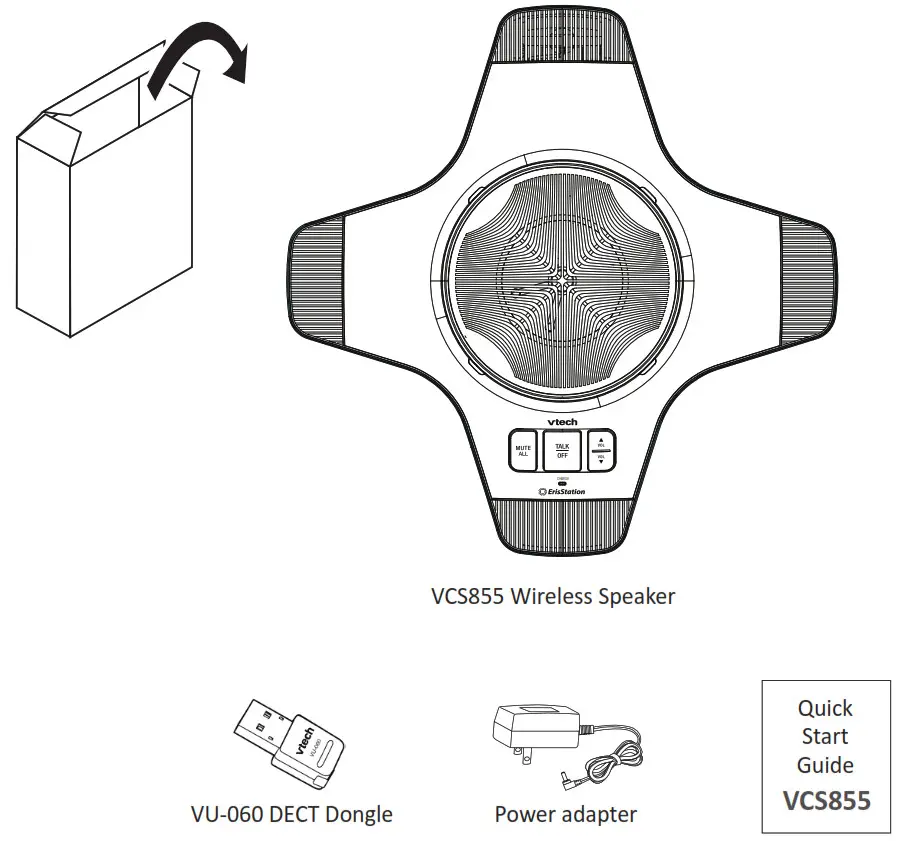
• Press to enable the speaker.
• Press to answer or end a call.
5. Multipurpose LEDs (four)
6. 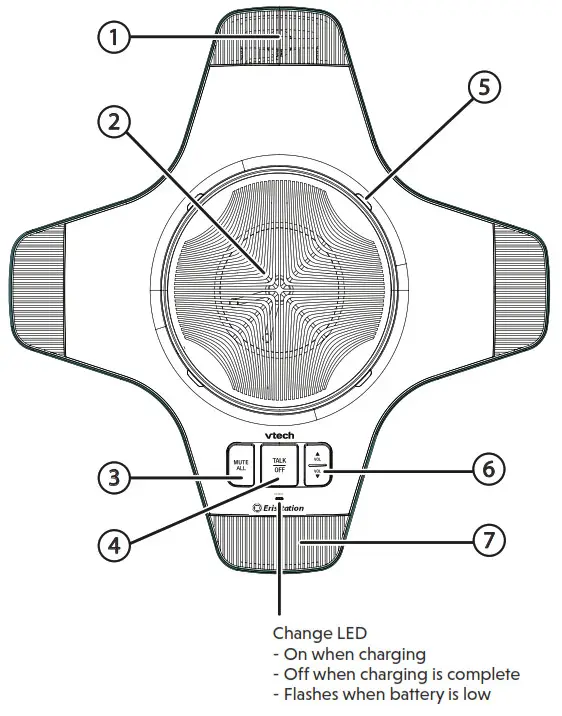
♦ • Press to adjust the speaker volume.
• Press to adjust the ringer volume.
• During a call, press to adjust the speaker volume.
7. Microphone
Wireless Speaker LEDs
| LED color and behavior | Wireless speaker status |
| Steady Green | • Call active, speaker on |
| Flashes Green | • Incoming call |
| Flashes Green slowly | • Paged by base |
| Steady Green for five seconds | • Successfully registered |
| Flashes Red and Green alternately | • Ready for registration |
| Steady Red for five seconds | • Registration failed |
| Steady Red | • Microphone muted |
| Flashes Red slowly | • Out of range, deregistered |
| Steady Orange | • Reset mode |
| Steady Orange for five seconds | • Power on |
Install the wireless speaker battery
• CAUTION: Risk of explosion! Batteries should not be exposed to excessive heat such as bright sunlight or fire.
• CAUTION: Risk of explosion if the battery is replaced by an incorrect type. Dispose of used batteries according to the instructions.
• Use only battery model BT260280.
1. After removing the battery door, plug the battery connector securely into the socket inside the battery compartment.
2. Place the battery into the battery compartment.
3. Attach the battery door until it clicks into place.
Connect power to the wireless speaker
1. Plug one end of the AC adapter into the power jack on the bottom of the unit.
2. Route the cord through the slots.
3. Plug the large end of the AC adapter into a wall outlet not controlled by a switch.
• The supplied power adapter is designed for use only with the VCS855 wireless speaker. It is not designed to power other devices. Do not connect the supplied power adapter to any other devices.
• The AC power cord is intended for a vertical or floor mount position.
The prongs are not designed to hold the plug in place if it is plugged into a ceiling, under-the-table, or cabinet outlet.
Wireless speaker specifications
| Frequency control | Crystal controlled PLL synthesizer |
| Transmit frequency | 1921.536–1928.448 MHz |
| Channels | 5 |
| Nominal effective range | Maximum power allowed by FCC and IC. Actual operating range may vary according to environmental conditions at the time of use. |
| Power requirements | Ni-MH Battery Pack (BT260280); 7.2V; 2100mAH rechargeable battery Power adapter: Input: 100–240V AC 50/60Hz Output: 12V DC @ 1.0A |
DECT Dongle Overview
 For manually registering the dongle to a speaker.
NOTE: Your dongle is preregistered to the wireless speaker.
DECT Dongle LEDs
| LED color and behavior | DECT dongle status |
| Steady Green | • Dongle is not in use |
| Steady Green for three seconds | • Dongle is deregistered from the wireless speaker |
| Flashes Green quickly | • Incoming call |
| Flashes Green quickly every three seconds |
• Wireless speaker is in use |
| Steady Red | • Dongle is not registered |
| Flashes Red very quickly | • Dongle is registering to a wireless speaker |
| Flashes Red quickly | • Dongle is entering registration mode |
| Flashes Red slowly | • Wireless speaker is muted |
Connecting the wireless speaker to a computer
Your DECT dongle is preregistered to the wireless speaker. To connect the wireless speaker to your computer:
1. Plug the dongle in the USB port on your computer. The dongle LED light will turn steady green.
2. Press the  key on the wireless speaker. This enables the speaker to play audio.
Registering the dongle
Your DECT Dongle is preregistered to the wireless speaker. You do not need to register your dongle. However, the steps below are provided in the event you need to manually deregister and re-register your dongle.
To register the dongle to the wireless speaker:
1. Make sure the wireless speakerphone is properly installed. Flashing red and green LEDs indicate the wireless speaker is ready for registration.
2. Press and hold the REGISTRATION button on the bottom of the wireless speaker for five seconds, and then release the button.
3. Plug the dongle to the computer.
4. Press and hold the LED status button on the dongle for about four seconds until the Dongle LED light flashes red very quickly, and then release the button.
It takes about 60 seconds to complete the registration process.
Once the wireless speaker is registered, the wireless speaker LEDs stop flashing. The LEDs turn green briefly and then turn off.
Deregistering the dongle
1. Press the key on the dongle for 10 seconds to enter deregistration mode.
After 4 seconds the red LED starts to double-flash; after 10 seconds the LED starts to flash red rapidly, indicating that the dongle has entered deregistration mode.
2. Release the key and press it again for 1 second to confirm deregistration.
The LED turns green for three seconds, turns off for one second, and then shows steady red light.
Maintenance
Taking care of your wireless speakerphone and DECT dongle
• Your wireless speakerphone / DECT dongle contains sophisticated electronic parts, so it must be treated with care.
Avoid rough treatment
• Place the DECT dongle down gently.
• Save the original packing materials to protect your wireless speakerphone /DECT dongle if you ever need to ship it.
Avoid water and heat
• Your wireless speakerphone / DECT dongle can be damaged if it gets wet.
• Do not use the wireless speakerphone / DECT dongle outdoors in the rain, or handle it with wet hands.
• Do not install the speakerphone charger near a sink, bathtub or shower.
• Do not expose the product to extreme heat.
Electrical storms
• Electrical storms can sometimes cause power surges harmful to electronic equipment.
• For your own safety, take caution when using electrical appliances during storms.
Cleaning your wireless speakerphone / DECT dongle
• Your wireless speakerphone / DECT dongle has a durable plastic casing that should retain its luster for many years.
• Clean it only with a soft cloth slightly dampened with water or mild soap.
• Do not use excess water or cleaning solvents of any kind.
Compliance
FCC part 15
This equipment has been tested and found to comply with the requirements for a Class B digital device under Part 15 of the Federal Communications Commission (FCC) rules. These requirements are intended to provide reasonable protection against harmful interference in a residential installation. This equipment generates, uses and can radiate radio frequency energy and, if not installed and used in accordance with the instructions, may cause harmful interference to radio communications. However, there is no guarantee that interference will not occur in a particular installation. If this equipment does cause harmful interference to radio or television reception, which can be determined by turning the equipment off and on, the user is encouraged to try to correct the interference by one or more of the following measures:
• Reorient or relocate the receiving antenna.
• Increase the separation between the equipment and receiver.
• Connect the equipment into an outlet on a circuit different from that to which the receiver is connected.
• Consult the dealer or an experienced radio/TV technician for help. Changes or modifications to this equipment not expressly approved by the party responsible for compliance could void the user’s authority to operate the equipment. This device complies with Part 15 of the FCC Rules. Operation is subject to the following two conditions: (1) this device may not cause interference, and (2) this device must accept any interference, including interference that may cause undesired operation. Privacy of communications may not be ensured when using this equipment.
To ensure the safety of users, the FCC has established criteria for the amount of radiofrequency energy that can be safely absorbed by a user or bystander according to the intended usage of the product. This product has been tested and found to comply with the FCC criteria. The wireless speaker shall be installed and used such that parts of the user’s body other than the hands are maintained at a distance of approximately 20 cm (8 inches) or more.
Limited warranty
- What does this limited warranty cover? VTech of this VTech product warrants to the holder of a valid proof of purchase (“CONSUMER” or “you”) that the product and all accessories provided in the sales package (“PRODUCT”) are free from defects in material and workmanship, pursuant to the following terms and conditions, when installed and used normally and in accordance with the PRODUCT operating instructions. This limited warranty extends only to the CONSUMER for products purchased and used in the United States of America.
- What will be done if the PRODUCT is not free from defects in materials and workmanship during the limited warranty period (“materially defective PRODUCT”)? During the limited warranty period, VTech’s authorized service representative will repair or replace at VTech’s option, without charge, a materially defective PRODUCT. If VTech repairs the PRODUCT, they may use new or refurbished replacement parts. If VTech chooses to replace the PRODUCT, they may replace it with a new or refurbished PRODUCT of the same or similar design. VTech will retain defective parts, modules, or equipment. Repair or replacement of the PRODUCT, at VTech’s option, is your exclusive remedy. VTech will return repaired or replacement products to you in working condition. You should expect the repair or replacement to take approximately 30 days.
- How long is the limited warranty period? The limited warranty period for the PRODUCT extends for TWO (2) YEARS from the date of purchase. If VTech repairs or replaces a materially defective PRODUCT under the terms of this limited warranty, this limited warranty also applies to repaired or replacement PRODUCT for a period of either (a) 90 days from the date the repaired or replacement PRODUCT is shipped to you or, (b) the time remaining on the original two-year limited warranty; whichever is longer.
- What is not covered by this limited warranty?
This limited warranty does not cover:
• PRODUCT that has been subjected to misuse, accident, shipping or other physical damage, improper installation, abnormal operation or handling, neglect, inundation, fire, water, or another liquid intrusion; or
• PRODUCT that has been damaged due to repair, alteration, or modification by anyone other than an authorized service representative of VTech; or
• PRODUCT to the extent that the problem experienced is caused by signal conditions, network reliability or cable or antenna systems; or
• PRODUCT to the extent that the problem is caused by use with nonVTech accessories; or
• PRODUCT whose warranty/quality stickers, PRODUCT serial number plates or electronic serial numbers have been removed, altered or rendered illegible; or
• PRODUCT purchased, used, serviced, or shipped for repair from outside the United States of America, or used for commercial or institutional purposes (including but not limited to products used for rental purposes); or
• PRODUCT returned without valid proof of purchase (see item 6 below); -or-
• Charges for installation or setup, adjustment of customer controls, and installation or repair of systems outside the unit. - How do you get warranty service?
To obtain warranty service in the United States of America,
visit vtechphones.com or call 1 (800) 595-9511.
NOTE: Before calling for service, please review the user’s manual; a check of the PRODUCT’s controls and features may save you a service call.
Except as provided by applicable law, you assume the risk of loss or damage during transit and transportation and are responsible for delivery or handling charges incurred in the transport of the PRODUCT(s) to the service location. VTech will return repaired or replaced PRODUCT under this limited warranty to you. Transportation, delivery or handling charges are prepaid. VTech assumes no risk for damage or loss of the PRODUCT in transit. If the PRODUCT failure is not covered by this limited warranty, or proof of purchase does not meet the terms of this limited warranty, VTech will notify you and will request that you authorize the cost of repair prior to any further repair activity. You must pay for the cost of repair and return shipping costs for the repair of products that are not covered by this limited warranty. - What must you return with the PRODUCT to get warranty service?
You must:
a. Return the entire original package and contents including the PRODUCT to the VTech service location along with a description of the malfunction or difficulty; and
b. Include a “valid proof of purchase” (sales receipt) identifying the PRODUCT purchased (PRODUCT model) and the date of purchase or receipt; and
c. Provide your name, complete and correct mailing address, and telephone number. - Other limitations This warranty is the complete and exclusive agreement between you and VTech of this PRODUCT. It supersedes all other written or oral communications related to this PRODUCT.
VTech provides no other warranties for this PRODUCT. The warranty exclusively describes all of VTech’s responsibilities regarding the PRODUCT. There are no other express warranties. No one is authorized to make modifications to this limited warranty and you should not rely on any such modification. State/Provincial Law Rights: This warranty gives you specific legal rights, and you may also have other rights which vary from state to state or province to province.
Limitations: Implied warranties, including those of fitness for a particular purpose and merchantability (an unwritten warranty that the PRODUCT is fit for ordinary use), are limited to two years from date of purchase. Some states/provinces do not allow limitations on how long an implied warranty lasts, so the above limitation may not apply to you. In no event shall VTech be liable for any indirect, special, incidental, consequential, or similar damages (including, but not limited to lost profits or revenue, inability to use the PRODUCT or other associated equipment, the cost of substitute equipment, and claims by third parties) resulting from the use of this PRODUCT. Some states/provinces do not allow the exclusion or limitation of incidental or consequential damages, so the above limitation or exclusion may not apply to you.
Please retain your original sales receipt as proof of purchase.
Disclaimer and Limitation of Liability
VTech Communications, Inc. and its suppliers assume no responsibility for any damage or loss resulting from the use of this user’s manual. VTech Communications, Inc. and its suppliers assume no responsibility for any loss or claims by third parties that may arise through the use of this product. VTech Communications, Inc. and its suppliers assume no responsibility for any damage or loss caused by the deletion of data as a result of malfunction, dead battery, or repairs. Be sure to make backup copies of important data on other media to protect against data loss.
Company: VTech Communications, Inc.
Address: 9020 SW Washington Square Road – Ste 555 Tigard, OR 97223, United States
Phone: 1 (800) 595-9511 in the U.S.
Appendix
Troubleshooting
If you have dificulty with your product please try the suggestions below.
For customer service, visit our website at vtechphones.com, or call 1 (800) 595-9511.
My speakerphone does not work at all.
• Make sure the speakerphone charger power adapter is securely plugged into an electrical outlet (see “Connect power to the wireless speaker” on page 8).
The POWER light should be on.
• Make sure the speakerphone is registered to the dongle (see “Registering the dongle” on page 10).
• Other electronic products such as HAM radios and other DECT phones can cause interference with your wireless speakerphone. Try installing your speakerphone as far away as possible from these types of electronic devices.
• If the speakerphone battery is completely depleted, it may take up to 15 minutes to charge the speakerphone before the speakerphone has enough charge to use for a short time.
The other party cannot hear my voice during a call.
• Make sure the mute feature is not turned on during a call. I cannot hear any audio from the wireless speakerphone.
• Make sure the wireless speakerphone is enabled (see “Connecting the wireless speaker to a computer” on page 10) and the speaker volume is not set to the lowest level.
• On your computer, click the speaker icon (located at the bottom right-hand corner in Microsoft Windows). Make sure “VTech Headset” is selected as a current audio device.
• The speakerphone may be too far from the dongle. Move it closer to the dongle.
My computer does not connect to the wireless speakerphone.
• Your DECT dongle is preregistered to the wireless speaker. If the dongle does not connect to the speaker, follow the deregistration and registration instructions. See “Deregistering the dongle” and “Registering the dongle” on page 10.
• Follow the steps below for the common cure for electronic equipment, then try again to register a speakerphone.
Common cure for electronic equipment.
• If the unit is not responding normally, try the following :
– Unplug and then plug the dongle into the computer.
– Wait for the wireless speakerphone to synchronize with the DECT dongle.
Allow up to one minute for this to take place.
VTECH COMMUNICATIONS LTD.
A member of THE VTECH GROUP OF COMPANIES.
Distributed in the U.S.A. by VTech Communications Inc., Tigard, Oregon 97223, USA.
VTech is a registered trademark of VTech Holdings Limited.
ErisTerminal ® is a registered trademark of VTech Communications Inc.
Copyright © 2020 for VTECH COMMUNICATIONS LTD. All rights reserved.
Printed in China. Version 1, 07/20
VTech understands that a child’s needs and abilities change as they grow and with that in mind we develop our toys to teach and entertain at just the right level .
vtech Baby
Toys that will stimulate their interest in different textures, sounds and colours
Pre School
Interactive toys to develop their imagination and encourage language development
Electronic learning computers
Cool, aspirational and inspiring computers for curriculum related learning
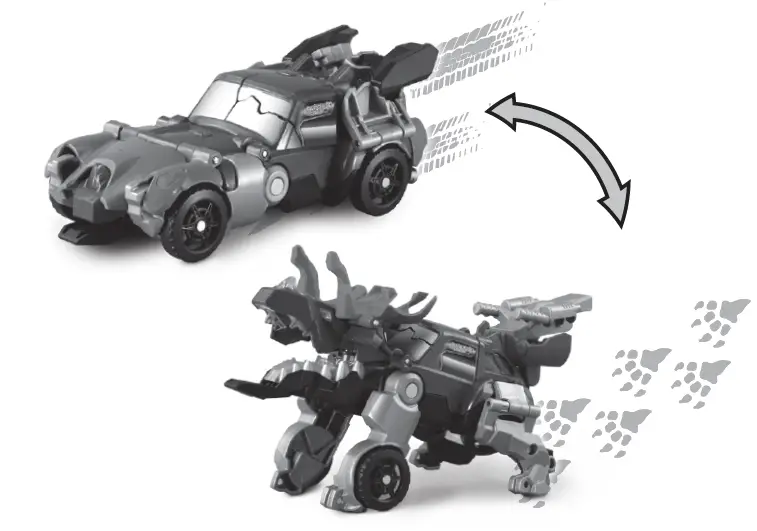

INTRODUCTION
Switch into fun with the Switch & Go Dinos® Bash the Triceratops. In a few simple steps you can switch this powerful Triceratops into a speedy
roadster and back again! Ready to smash and crash? Here we go!

INCLUDED IN THE PACKAGE
- Switch & Go Dinos® Bash the Triceratops
- Parent’s Guide
WARNING:
All packing materials such as tape, plastic sheets, packaging locks, removable tags, cable ties, cords and packaging screws are not part of this toy and should be discarded for your child’s safety.
NOTE: Please keep this parent’s guide as it contains important information.
GETTING STARTED
- Make sure the unit is turned OFF.
- Locate the battery cover on the bottom of the unit. Use a coin or a screwdriver to loosen the screw. Then, remove the cover.
- If used or spent batteries are present, remove these batteries from the unit by pulling up on one end of each battery.
- Install 2 new AA (LR6/AM-3) batteries following the diagram inside the battery box. (For best performance, alkaline batteries or fully charged Ni-MH rechargeable batteries are recommended).
- Replace the battery cover and tighten the screw to secure.
WARNING:
Adult assembly required for battery installation. Keep batteries out of reach of children.
IMPORTANT: BATTERY INFORMATION
- Insert batteries with the correct polarity (+ and -).
- Do not mix old and new batteries.
- Do not mix alkaline, standard (carbon-zinc) or rechargeable batteries.
- Only batteries of the same or equivalent type as recommended are to be used.
- Do not short-circuit the supply terminals.
- Remove batteries during long periods of non-use.
- Remove exhausted batteries from the toy.
- Dispose of batteries safely. Do not dispose of batteries in fire.
RECHARGEABLE BATTERIES:
- Remove rechargeable batteries from the toy before charging.
- Rechargeable batteries are only to be charged under adult supervision.
- Do not charge non-rechargeable batteries.
Disposal of batteries and product
 The crossed-out wheelie bin symbols on products and batteries, or on their respective packaging, indicates they must not be disposed of in domestic waste as they contain substances that can be damaging to the environment and human health. The chemical symbols Hg, Cd or Pb, where marked, indicate that the battery contains more than the specified value of mercury (Hg), cadmium (Cd) or lead (Pb) set out in the Batteries and Accumulators Regulation.
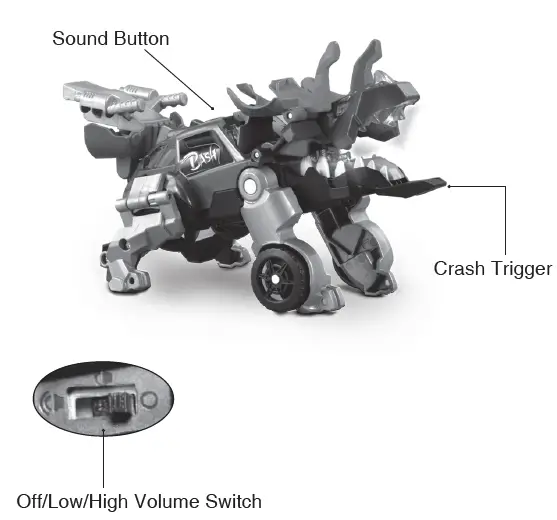 The solid bar indicates that the product was placed on the market after 13th August, 2005. Help protect the environment by disposing of your product or batteries responsibly. VTech® cares for the planet.
Care for the environment and give your toy a second life by disposing of it at a small electricals collection point so all its materials can be recycled. In the UK: Visit www.recyclenow.com to see a list of collection points near you. In Australia & New Zealand: Check with you local council for kerbside collections.
PRODUCT FEATURES
- Off/Low/High
Volume Switch To turn the unit On or to adjust the volume, slide the switch to Low or High . To turn the unit Off, slide the switch to Off .
- Sound Button
Press the Sound Button to hear fun phrases and cool dinosaur sounds in Dino mode, or to hear fun phrases and exciting car sounds in Vehicle mode.
- Crash Trigger
Hit the Crash Trigger to hear dino sounds and to see the top half of the head, neck and dino body pop up in Dino mode with the fire light effect. In Vehicle mode, hit the Crash Trigger to hear vehicle sounds and to see the bonnet, half of the windscreen and one side of the door flash with a light effect.
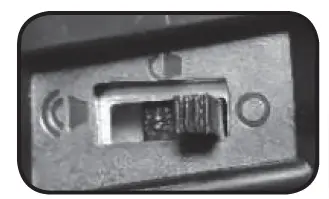
- Automatic Shut-Off
To preserve battery life, the unit will automatically turn off after approximately 40 seconds without input. The unit can be turned on again by pressing the Sound Button, hitting the Crash Trigger, or
by switching between Dino mode and Vehicle mode. The unit will also automatically turn off when battery power is very low.
HOW TO SWITCH
- Dino mode.
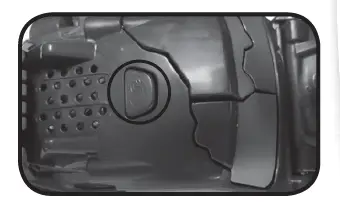
- Flip the crest down and toward the dino’s head.
- Pull the front legs up and toward the dino’s head.
- Swing the legs out.
- Flip the tail down.
- Snap the legs up and toward the dino’s body. The unit is now in Vehicle mode.
NOTE
To switch the vehicle back into a dinosaur, follow the above steps in reverse order.
CARE & MAINTENANCE
- Keep the unit clean by wiping it with a slightly damp cloth.
- Keep the unit out of direct sunlight and away from any direct heat sources.
- Remove the batteries if the unit will not be in use for an extended period of time.
- Do not drop the unit on hard surfaces and do not expose the unit to moisture or water.
TROUBLESHOOTING
If for some reason the unit stops working or malfunctions, please follow these steps:
- Turn the unit Off.
- Interrupt the power supply by removing the batteries.
- Let the unit stand for a few minutes, then replace the batteries.
- Turn the unit back On. The unit should now be ready to use again.
- If the unit still does not work, insert a new set of batteries. If the problem persists, please contact our Consumer Services Department and a service representative will be happy to help you.
CONSUMER SERVICES
Creating and developing VTech® products is accompanied by a responsibility that we at VTech® take very seriously. We make every effort to ensure the accuracy of the information, which forms the value of our products. However, errors sometimes can occur. It is important for you to know that we stand behind our products and encourage you to call our Consumer Services Department with any problems and/or suggestions that you might have. A service representative will be happy to help you.
UK Customers:
Phone: 0330 678 0149 (from UK) or +44 330 678 0149 (outside UK)
Website: www.vtech.co.uk/support
Australian Customers:
Phone: 1800 862 155
Website: support.vtech.com.au
NZ Customers:
Phone: 0800 400 785
Website: support.vtech.com.au
PRODUCT WARRANTY/ CONSUMER GUARANTEES
UK Customers: Read our complete warranty policy online at vtech.co.uk/warranty. Australian Customers:
VTECH ELECTRONICS (AUSTRALIA) PTY LIMITED –
CONSUMER GUARANTEES
Under the Australian Consumer Law, a number of consumer guarantees apply to goods and services supplied by VTech
Electronics (Australia) Pty Limited. Please refer to vtech.com.au/ consumerguarantees for further information.