Victure PC540 Wireless Security Camera
Product Guide
- Photoresistor
- Lens
- Microphone
- Infrared lamp
- Power indicator
- Reset button
- SD card slot
Product Specification
| Model | PC540 |
| Resolution | 1920*1080 @25 FPS |
| Pixel | 2 Mp |
| Storage | Micro SD Card (16G-64G), Cloud Sto r age |
| Power | 5V/1A |
| Wi-Fi | 2.4G |
| APP | Victure Home |
| Infrared LED | 850 nm |
| Lens | Focal length: 3.6mm |
| Sensor: F23 | |
| Wi-Fi | Protoco l: 802.11 b/g/n |
| Frequency band: 2.4G | |
| Channel: 1TX/1RX | |
| Video | Format: H.264 |
| Resolution: 1920X1080 | |
| Max.frame rate: 25FPS 1080P |
Customer service
Need more function of app
- Scan the OR code below or search “Victure IPC” on YouTube to view more functions of app.

- Timely customer service via ipc..
Warranty
- 30-day return policy & 1 years limited warranty.
- Lifetime professional tech support was provided by Victor.
How to Set Up
- Download the Victure home app and create an account
- Connect the camera to a power outlet and wait for 15 seconds until red status light flashes
- Connect your phone to 2.4G wifi and login in Victure home app and click”+” on the front page
- Follow the instruction on the app to finish the steps of connection
LED Indicator
| Indic ator light | St atus |
| Solid red light | The device is powered on and initializing |
| Flashing red light | The device is ready to connect |
| Solid green light | The device is working properly |
| Flashing green light | Connection is in progress |
| Flashing between green and red | Wi-Fi account or password is wrong, please reconnect |
QA
Q: I can’t get the camera connected?
A: Here are some tips about connection below.
- Make sure the wifi is 2.4G, please
- Make sure the location service on your phone be turned on
- Make the camera 1-3m to the router
- Make sure the protective film of the lens is removed
Try to use another phone to connect with it please It will be much appreciated if you can contact us via ipc. if still no good, we will try our best to resolve it.
Q: What if the camera can’t record video to micro SD card inserted?
A: Please format the SD card first, you can try to format it to FAT32 on a computer or format it directly on the app. And make sure the time zone setting on the app is right Please. Make sure the recording time be set to a whole day. If still no good, try deleting the app, reinstall the app then do another camera install and allow the various permissions requested and set the region again, please. It will be much appreciated if you can contact us via if still no good, we will try our best to resolve it.
FCC Certification Info
- Caution: The user is cautioned that changes or modifications not expressly approved by the party responsible for compliance could void the user’s authority to operate the equipment.
- This device complies with Part 15 of the FCC Rules. Operation is subject to the following two conditions:
- This device may not cause harmful interference.
- This device must accept any interference received, including interference that may cause undesired operation.
- NOTE: This equipment has been tested and found to comply with the limits for a Class B digital device, pursuant to Part 15 of the FCC Rules. These limits are designed to provide reasonable protection against harmful interference in a residential installation. This equipment generates, uses and can radiate radio frequency energy and, if not installed and used in accordance with the instructions, may cause harmful interference to radio communications. However, there is no guarantee that interference will not occur in a particular installation.
- If this equipment does cause harmful interference to radio or television reception, which can be determined by turning the equipment off and on, the user is encouraged to try to correct the interference by one or more of the following measures:
- Reorient or relocate the receiving antenna.
- Increase the separation between the equipment and receiver.
- Connect the equipment into an outlet on a circuit different from that to which the receiver is connected.
- Consult the dealer or an experienced radio/TV technician for help.
- FCC Radiation Exposure Statement
This equipment complies with FCC radiation exposure limits set forth for an uncontrolled environment. This equipment should be installed and operated with a minimum distance of 20cm between the radiator and your body.
This transmitter must not be co-located or operating in conjunction with any other antenna or transmitter.
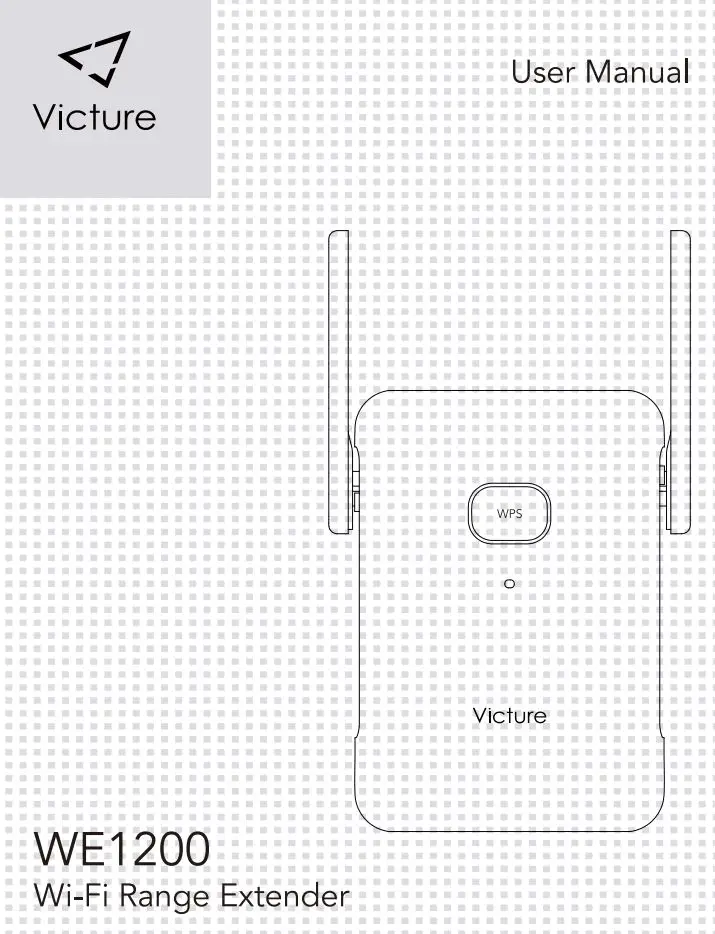
Victure WE1200 Wi-Fi Range Extender
User Manual
Product Diagram
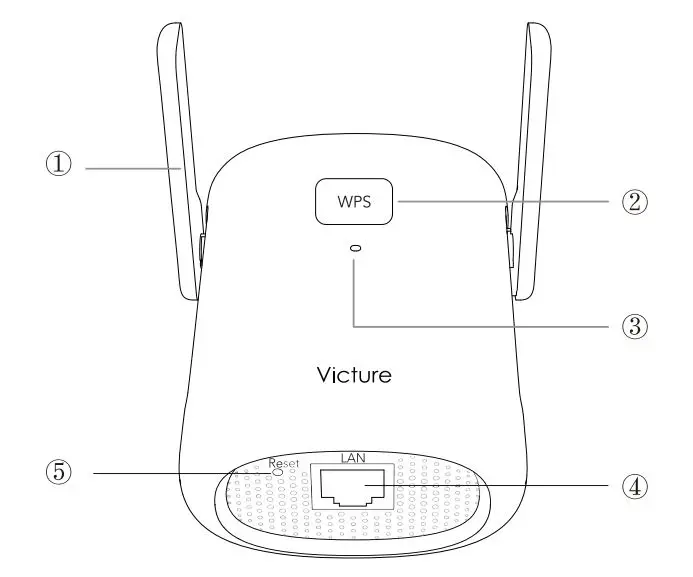
- Antenna
- WPS Button
- Indicator Light
- Ethernet Port
- Reset Button
Customer Service
Need more function
- Scan the OR code below or search “Victure IPC” on You Tube to view more function.

https://www.youtube.com/channel/UCe6_pkm-RbICKSI4WcYt8Qw?view_as=subscriber
- Timely customer service via [email protected]
![]()
![]()
![]()
Warranty
Send us your Order Screenshot via email
[email protected] to extend the warranty to 12 months!
Lifetime professional tech support is provided by Victure.
Steps to install the Wi-Fi extender
- Plug the Wi-Fi extender into the outlet and wait for around one minute until the red light is blinking slowly.
- Join the WIRELESS-2.4G-XXXX or the WIRELESS-5G-XXXX, the password is null. ( “null” means “no need to enter password”)
Tips:
1) When the Wi-Fi logo appears in mobile phone, then start the setup. Don’t worry about the “! “beside the Wi-Fi logo.
2) There must no space between” . “and “net”
3) If you could not find the SSID, then rest the Wi-Fi extender.
4) You could use PC or mobile phone to join the extended wifi and then start setup on PC or mobile phone.
– If you use the computer to set up, please unplug the ethernet cable from PC when you start setup.
5) If primary router is dual band, you could choose 2.4Ghz or 5Ghz Wi-Fi .
– It is better to extend 5Ghz Wi-Fi if there is one wall or only one thin wall between primary router and Wi-Fi extender. But if two walls between them, it is better to choose to extend 2.4Ghz Wi-Fi. - Next, setup page will appear automatically.
(If not, go to the Browser via your mobile phone/computer and enter wireless.net or 192.168.10.1 at address bar.)
Tips:
1) If the set up page could not be entered by the wireless.net, then use the ip address to have a try.
2) Once the status of Wi-Fi extender is been set up , enter the set up page only by the wireless.net
4. Choose the language at the upper right corner.
5. Set new users (6-12 bit) and its password(6-12 bit)
Tips:
This User Account is for login the set up page again and change the setting of Wi-Fi extender.
6.Choose Extender Mode or AP Mode, then choose 2.4GWi-Fi or 5G Wi-Fi
The difference of Extender Mode and AP Mode
Extender Mode (Wireless Connection): Choose Use mobile phone or PC to set up via the set up page.
AP Mode (Wired Connection): Use mobile phone or PC to set up via the set up page. (need a ethernet cable)
Extender Mode
- A. Click the “Wireless Scanner” at the upper right corner.
- B. Select a primary network and then enter the password of your primary network password.
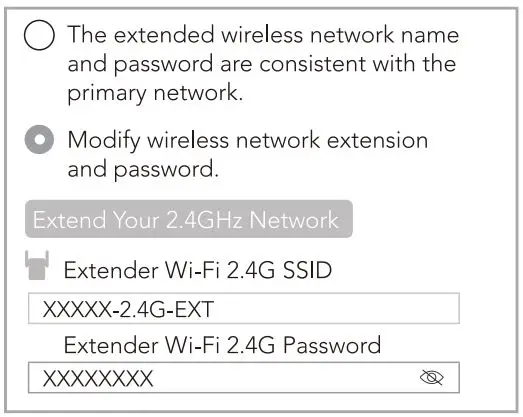
- C. Set the SSID and Password for the extended wireless network.
( SSID is the name of Wi-Fi. It must within 23 words.)
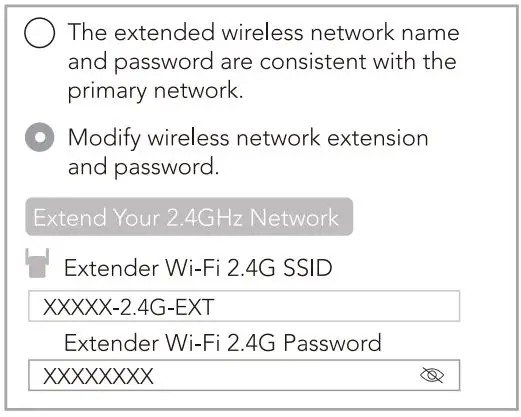
You could choose ” The extended wireless network name and password are consistent with the primary network. ”
– If you choose this, then the extended wireless network SSID is
XXXX-2.4G-EXT or XXXX-SG-EXT and the password is the password of primary router one.(XXXX is the name of primary router) Or choose to “Modify wireless network extension and password.”, then set the new the extended wireless network SSID and password below in this set up page. Next, click “save”
- D. Wait patiently until the indicator light turns green or orange.
(If green, is great. If orange, please place the Wi-Fi extender and router closer.) - E. Join the extended Wi-Fi XXXXXX-2.4G-EXT or XXXXXX-SG-EXT.
AP Mode(lf you choose the AP Mode, then set up as follow)
- A. Click the “AP mode switch” and then click “Next”.
- B. Set the extended wireless network name and password
 Attention: the network name must within 23 bits
- C. Use an ethernet cable to connect the Wi-Fi extender
- D. Wait patiently until the indicator light turns green or orange.
(If green, is great. If orange, please place the Wi-Fi extender and router closer.) - E. Join the extended Wi-Fi with new password.
WPS button to connect
- Firstly, press the WPS button of router
Attention: Please learn about how to let the router into the WPS mode - Press the WPS button of the Wi-Fi extender, then the red light of the Wi-Fi extender will blink fast.
- Wait for the router matches with the Wi-Fi extender. The indicator light turns green or orange means the setup success.
- When the setup is successful, the extended wireless network XXXX-ext is generated.(XXXX is the SSID of your primary router) and the password is the password of primary router.
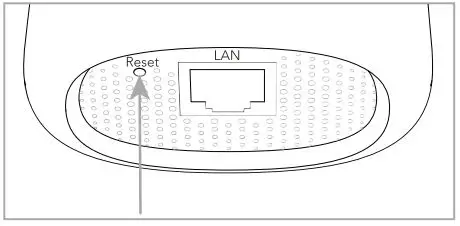
How to reset
Use a pin to poke the reset button until the indicator light is blinking fast.
How to change the password of the extended Wi-Fi in Extender Mode
- Go to the Browser via your mobile phone and enter wireless.net at address bar.
- Use the users name and its password to log in.
- Click “Modify wireless network extension and password”
- Change the Extender Wi-Fi SSID and Extender Wi-Fi password.
Attention: The Extender Wi-Fi SSID must within 23 bits. - Click “Save”.
![]() FCC Statement Note:
FCC Statement Note:
This equipment has been tested and found to comply with the limits for a Class B digital device, pursuant to part 15 of the FCC Rules. These limits are designed to provide reasonable protection against harmful interference in a residential installation. This equipment generates uses and can radiate radio frequency energy and, if not installed and used in accordance with the instructions, may cause harmful interference to radio communications. However, there is no guarantee that interference will not occur in a particular installation. If this equipment does cause harmful interference to radio or television reception, which can be determined by turning the equipment off and on, the user is encouraged to try to correct the interference by one or more of the following measures:
-Reorient or relocate the receiving antenna.
-Increase the separation between the equipment and receiver.
-Connect the equipment into an outlet on a circuit different from that to which the receiver is connected.
-Consult the dealer or an experienced radio/TV technician for help.
This device complies with part 15 of the FCC Rules. Operation is subject to the following two conditions: (1) This device may not cause harmful interference, and (2) this device must accept any interference received, including interference that may cause undesired operation.
Caution!
Any Changes or modifications not expressly approved by the party responsible for compliance could void the user’s authority to operate the equipment. This transmitter must not be co-located or operating in conjunction with any other antenna or transmitter.
Radiation Exposure Statement
- This transmitter must not be co-located or operating in conjunction with any other antenna or transmitter.
- This equipment complies with FCC radiation exposure limits set forth for an uncontrolled environment. This equipment should be installed and operated with minimum distance 20cm between the radiator & your body.
![]()
Victure HC500 Trail Camera User Manual

Warranty
Dear customer,
Thanks for your great support of Victure camera. This product has a 12-MONTH warranty from the date of the purchase.
★ As our valued customer, you could now send us your Order Screenshot via the following email: [email protected] to extend the warranty to 36 MONTHS for free!
If there is any Question or Suggestion about this product, please feel free to contact us via the above email or WhatsApp: +86 13827808023. Our friendly customer service professionals are always standing by to help and we would make every effort to offer you a satisfying answer!
Best Regards,
Victure Trail Camera Team
STEP ONE: WHAT SHOULD I PREPARE BEFORE USING?
> Preparation before Using
- The SD card, the batteries and the external power supply are not included in the package, you need to prepare these things beforehand.
- Tips and Recommendation:
(1) For optimal performance, we recommend using a full set of eight rechargeable batteries of high-quality to maintain maximum battery life. The recommended brands of batteries are Energizer® or Duracell® branded batteries.
(2) External power supply output: 6V/2A; DC-IN plug size: 3.5 mm*1.35 mm/1.3 mm.
(3) Our cameras can support class 6 or faster SD card ranging from 4GB to 128GB. The recommended brands of SD cards are SanDisk® or Kingston® branded card. Please do not use the SD card which is adopted by the TF(micro SD) card. This might cause the file lost issue.
> Install the Batteries
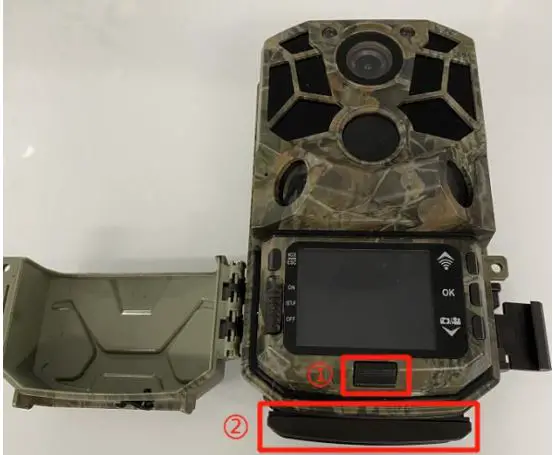
- Press the button at the bottom of the display screen, the battery compartment will pop out, and then pull it out firmly.
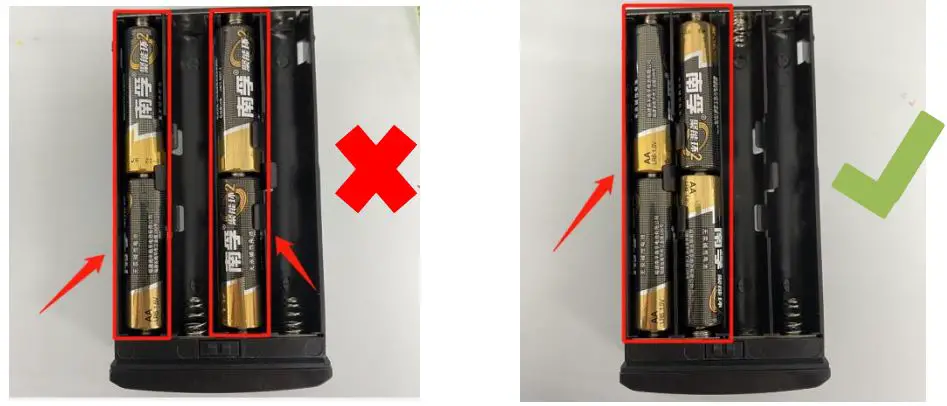
- When the camera uses only four batteries, please install the batteries in the correct position. As shown below.
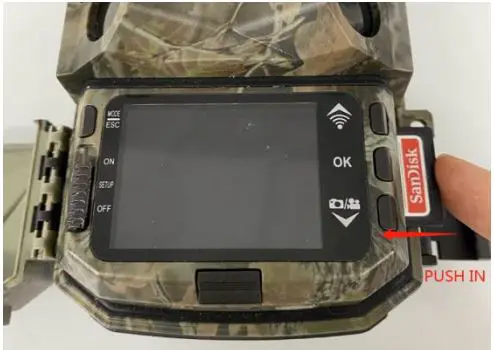
> Insert the SD Card
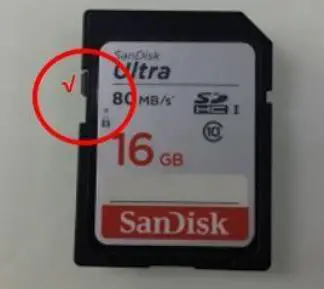
- Turning off the read-write protection of the SD card, which located in the left of the card, so that the camera can recognize the card.
- Please format the memory card as `FAT32′ on the computer and format it again on the camera before use.
- Insert a high-quality SD card when the camera is OFF.
> Tear off the Protective Films
Before you start using the product, please tear off the protective films at the position of the camera’s lens and sensor.
STEP TWO: HOW DO I SET IT?
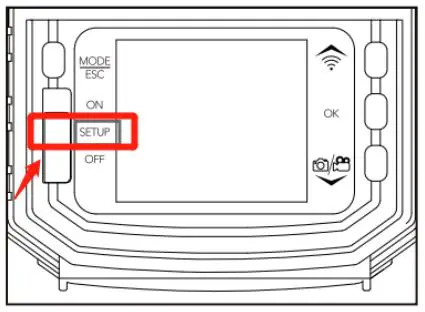
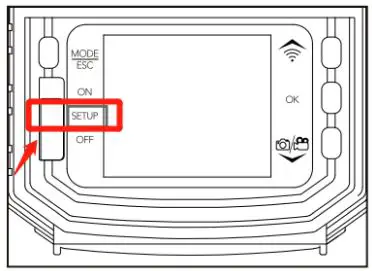
- Slide the Switch Button to the SETUP position. The camera enters test mode. The screen will light up.
- Short press
 Button once You can view the pictures and videos taken by the camera.
 - Short press Button twice and enter the setting interface. Here, you could press the UP and DOWN arrow to change the option, then press the OK button to confirm selection or press the button to return to the last interface. (Under the TEST mode, you could also press the OK button to take photos or videos manually.)
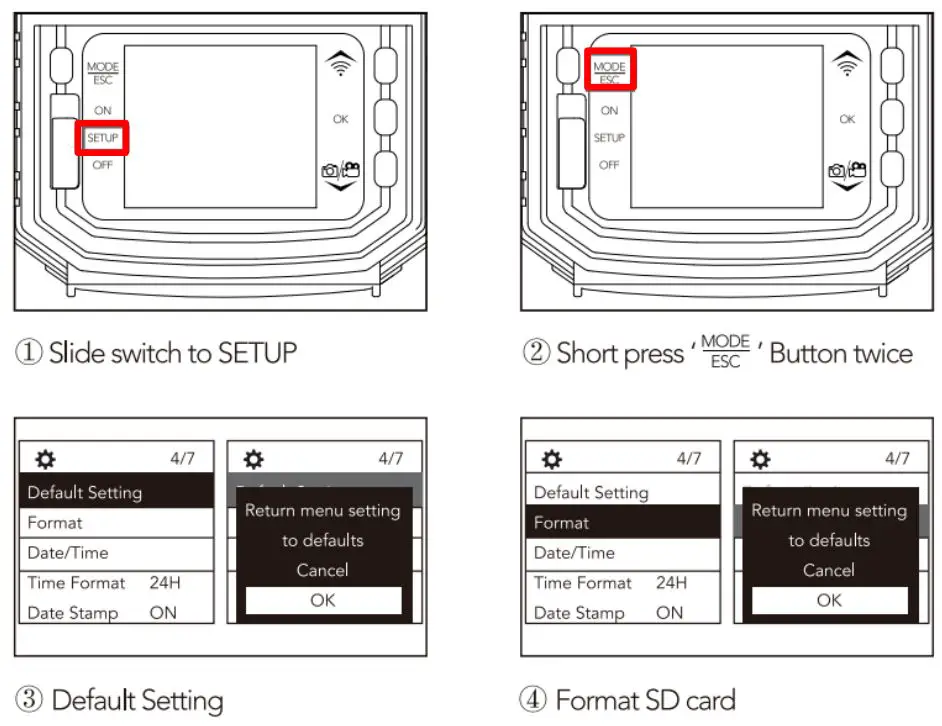
>How To Reset the Camera and Format the SD Card?
> Menu Setting List:
Mode: The camera will only take photos under Photo mode, only take videos under Video mode, and the photo first and then the video under the Photo + Video mode. Please set the function by you need. The camera default setting is Photo.
Image Size: The maximum value is 30MP and the default value is 5MP. Higher resolution provides clearer images, but creates larger files that takes up more of the SD card capacity.
Picture No: The maximum value is 10 Photos and the default value is 1 Photo. Choose 1 photo, and the camera will take one photo once; Choose 2 photos in series will get two photos once, choose 3 photos in series will get 3 photos once. Please set the function by you need.
Caution:
Due to the limitation of the camera’s read and write functions, if you need to make continuous shooting, you could try to reduce the resolution of the photo before setting it.
Resolution: The maximum value is 1296P and default value is 1080P. Higher resolutions produces better quality videos, but creates larger files that takes up more of the SD card capacity.
Video Length: The maximum value is 3 Min and the default value is 10 Sec. You can choose according to your own purpose. To conserve battery power, the video length should no longer than 10s at night.
Caution:
- In the night automatic (ON) mode, the system will automatically record according to the set recording length. When the battery is low, the recording will be stopped early.
- In order to prolong the battery life, please set a shorter recording time.
- When the battery power is low, the camera recording time may be lower than the set value. Please be in time Replacement battery.
Record Audio: The default setting is `on’. Please choose whether to enable this function according to your needs.
PIR Interval: The default choice of the interval is 30 Sec. If choose the 30s interval, the PIR sensor will detect the motion twice in one minute. If you want the PIR sensor to detect motion more frequently, you can choose the shorter interval.
Caution:
This function has a great influence on the batteries’ life. The shorter the interval, the high frequency to capture target, but more power consumption; The longer the interval, the lower frequency to capture the target and less power consumption.
PIR Sensitivity:
The default setting is Medium. Please modify this as needed. E.g. increase sensitivity to capture very small movements or lower the sensitivity if you are just looking for bigger animal movements.
Time Lapse:
Our trail camera has the ability to function as a time lapse camera. This is useful if you want to view the entire activity in a given area such as a large field or you want to observe cold blooded animals(e.g. snakes) or outdoor plants etc. The default setting is OFF, please set the function by you need.
Q: What’s the difference between the Interval and the Time Lapse?
A: Interval – In this mode, the PIR sensor still works. For example, if you choose the 30s interval, the PIR sensor will detect the motion twice in one minute. If the PIR sensor detects an object at this time, the camera will record, but if the PIR sensor doesn’t detect, the camera will not record.
Time Lapse – In this mode, the PIR sensor will no longer working because it will be triggered by the built-in timer, and the camera would take photos in the setting interval time. For example, if you set the time lapse to 30s, the camera will record twice in one minute whether or not there is an object passing by.
IR LED: Used to set the brightness of the IR LED light, which can be switched between auto, economy and off mode. The default setting is Auto. Please modify this as needed.
Low Bat Night Shot: When the battery is low, you can choose not to turn on the infrared light to continue taking pictures or stop night shooting. The default setting is No IR Led. (When the battery power is lower than 30%, it will stop or reduce the night shooting, please update the battery in time)
Monitoring Period: The default option is OFF. Select ON and set the timer, the camera can work for a predetermined period of time and standby for other periods of time.
For example,
I would like to record the activity of my birds at daylight (from 6:00am to 6:00pm), then I can set the timer from 6:00 to 18:00. Do not forget to press the OK button to save your settings.
Language: The default setting is English. You can choose the language by you need.
Default Setting: This selection returns your camera back to the factory default selections for each setting. If you are new to trail camera, you can choose yes when you do not know how to operate the camera or when the camera do not work well for you.
Format: This function can help you format your SD card. Select YES, the SD card will be formatted, the files in the card will be deleted.
Date Stamp: You can choose to turn on or off the date tag in this setting. If you choose the off, the photos or videos of will not have a date stamp.
Beep Sound: When this is on, You can hear the click of the camera button and the on/off prompt.
Camera Name: You can modify the camera name you want in this setting, and the camera name will be printed on the photo. It is convenient for users to identify different cameras by the camera name when multiple cameras are used at the same time.
Password Setting: You can set the camera power-on password through this function; if you forget the password, you can use this password to unlock: OPEN.
Bluetooth: When you need to turn on the camera Wifi via Bluetooth, please turn on this first. The default option is ON.
WIFI SSID: Through this setting to modify the camera’s WiFi hotspot name.
WIFI Password: The WiFi connection password of the camera can be set in this item, the initial password is “12345678” by default.
Auto WIFI Off: You can modify the time of WiFi automatic shutdown in this setting. When you successfully connect the camera wifi and do not operate for a period of time, the camera will automatically disconnect the wifi to save power. The default option is 1 Minute.
Auto Power Off: The default value is 3 Min. Under the TEST mode, when you do not operate the camera for a certain period of time, the camera will automatically shut down to save power. When you want to start the camera again, you need to switch the camera to OFF and then to SETUP.
Backlight: The default value is 1 Min. Under the TEST mode, If you don’t do anything for 1, 2 or 5 minutes the camera will turn off the light on that screen to save power. But the camera can be switched on again by pressing any button.
Version: You can check the camera’s software version information in this setting.
Mcu FW Update: Developers use, users can ignore it.
> The following parameter settings allow you to take more pictures and videos (for reference only)
- Mode: Photo + Video
- Photo NO: 1 photo
- Resolution: 1296P
- Record Audio: on
- PIR Sensitivity: High
- IR LED: Auto
- Side PIR Setup: ON
- Image size: 20MP
- Shutter speed: 1/30
- Video length: 10sec
- PIR Interval: 5sec
- Time lapse: off
- Monitoring Period: off
STEP THREEE: HOW SHOULD I MOUNT IT?
> Mounting the Camera
There are two ways to mount the Victure trail camera: using the provided adjustable web belt, or the tripod socket.
- Using the Adjustable Web Belt
Push one end of the belt through the brackets on the back of the camera. Thread the end of the strap through the buckle. Fasten on the belt securely around the tree trunk by pulling the end of the strap firmly so there is no slack left.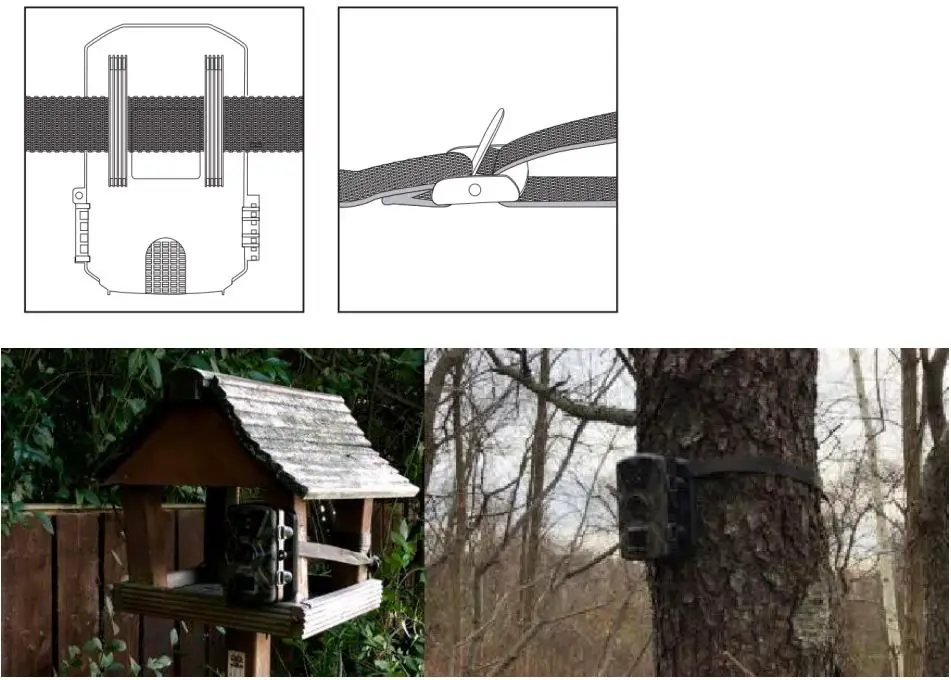
- Using the Tripod Socket
The camera is equipped with a socket at the bottom and to enable mounting on a tripod we provided.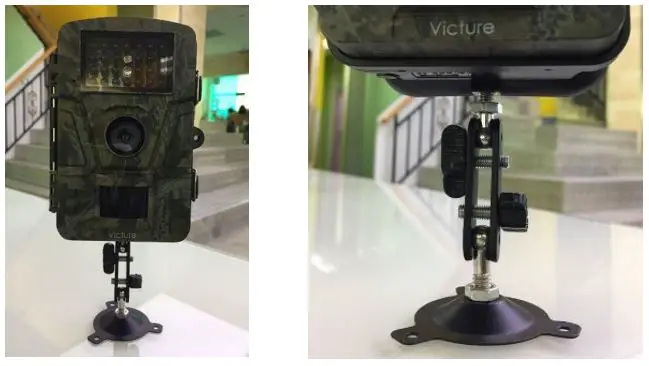
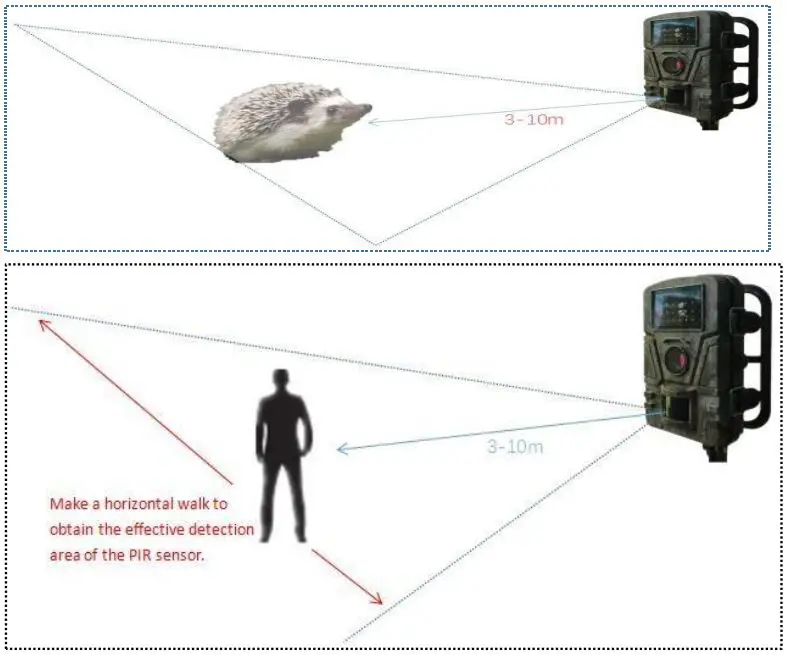
> How to make the camera more accurately capture animals?
The shooting range of this product is 120° fan-shaped area right in front of the camera. The best imaging distance is 3-10 meters in front of the camera. In order to achieve the desired detection of shooting, please place the camera following below instructions:
- Please attach the product to a suitable place, the installation height should be higher to the height of the detected animal. Please make sure that the lens is level or slightly tilted downward angle and make sure that there are no reflective objects within the shooting range, such as smooth rocks.
- Slide the switch button to SETUP position.
- Determine the shooting range (please off the `Auto Power Off’) Make a horizontal walk (not a vertical walk) in front of the PIR sensor window of the product. When the indicator light flashes once, it indicates that the PIR has sensed successfully. At this moment, the area you are in is the valid detection area. Keep doing this test repeatedly, you can obtain the effective detection area of the PIR sensor. When you doing walking test far away from the PIR sensor window, please speed up the pace.
STEP FOUR: SWITCHING ON THE CAMERA
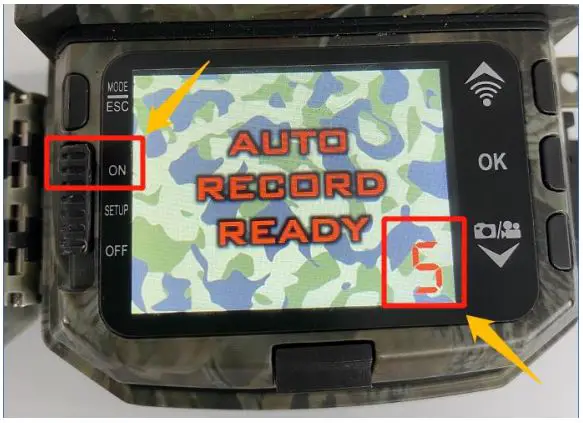
After placing the camera properly, please make sure that the power switch is in the ON position (Do not leave it in the SETUP position).
Once you switch the power switch to the ON position, the motion indicator light will blink for 5 seconds. This means the camera will enter the working state after 5 seconds, please close and lock the front cover of the camera and then walk away.
After it stops blinking, the PIR sensor is active, and the camera will be in working condition. Please note, the PIR sensor is strongly sensitive to ambient temperature. The greater the temperature difference between the environment and your subject, the farther the possible sensing distance.
STEP FIVE: HOW CAN I REVIEW THE PHOTOS AND VIDEOS?
> Review the Files Directly on the Camera
Slide the switch button to SETUP position, press Button to enter the Replay interface. You can view the pictures and videos taken by the camera. In Replay mode, you could:
- Press the
 button: page forward;
 - Press the
 button: page backward;
 - Long press the
 button: delete the current file.
If you are reviewing the videos, you could also:
- Press button: play/pause the video;
- Press button: stop playing the video.
> Review the Files on the Computer
- The way to review the images on your SD card is to review the images on your computer with card reader. The pictures can be viewed on both PC and the Mac computers. Here are the steps:
(1) Insert the SD card into your computer via a card reader..
(2) After the SD card is inserted into your computer, navigate to START/COMPUTER.
(3) Look for the SD card icon. Double click on the SD card icon. A folder named DCIM will appear.
(4) Double click the DCIM folder. A new folder will appear. Your images are in this folder. - You can also connect the camera to your computer via the USB cable included. In this case, please turn off your camera and take out all of the batteries. The screen will display `MSDC’ promptly which means the computer has been connected successfully. Then you could follow the instruction above to locate your picture files.
> Review the Files on you phone or iPad via connect camera’s Wifi
When it’s inconvenient for you to take off the camera, you can use the phone to connect to the WIFI signal sent by the trail camera(with ‘Hunting Camera Pro’ APP). It can help you use your phone to view the photos/videos in the camera directly on your phone(support downloading), also can adjust the settings of the camera. Here’s operational video for your reference: https://www.youtube.com/watch?v=O_u3Liuf8TA
ATTACHMENT: OUR SOCIAL CHANNELS
> YouTube
- Search `Victure TC’ on YouTube, enter into the brand page and then click the `PLAYLISTS’.
- Go through the link on the browser: http://rrd.me/ejNYF
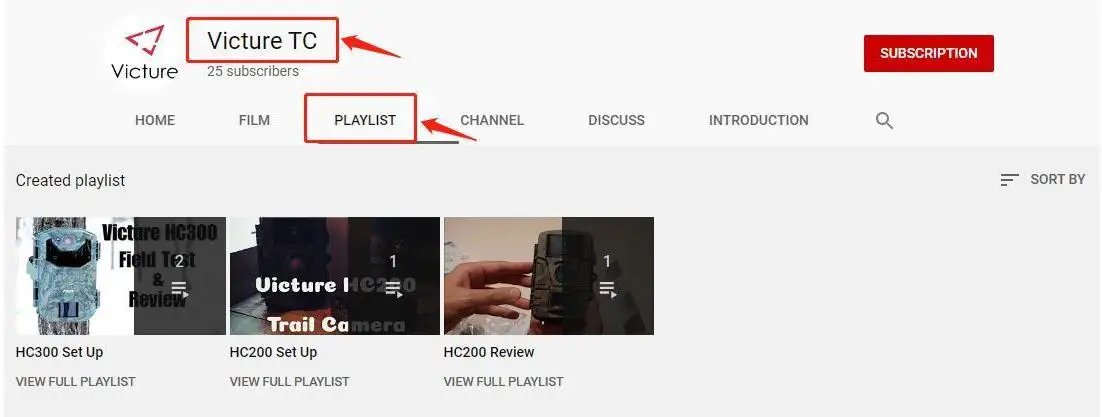
Search: @enjoywildlifecamera

User Manual

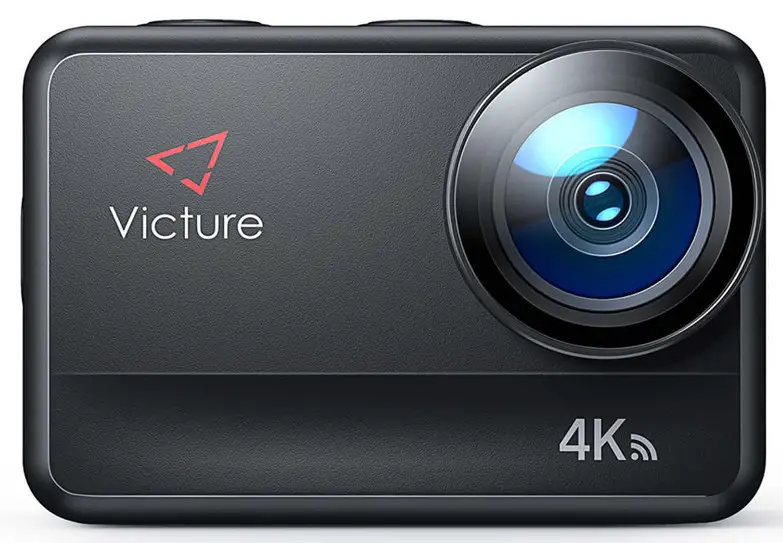
AC 940
Action Camera
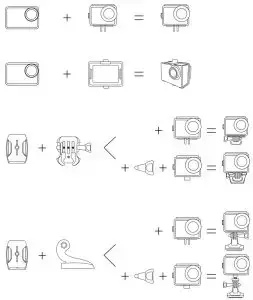
Mounting your camera
Attach your camera to helmets and equipment.
Dear Customer, Thank you for purchasing a product from Victure. Please read and follow this user manual carefully and keep it in a safe place for future reference.
Victure consistently attaches great importance to product quality and high customer satisfaction. We sincerely hope you can make a few suggestions during your use to help us improve our products. Your precious suggestions will help us shape our business to perfectly fit your standards. We’ll soon introduce a series of new products for our valued customers, please share this with your friends.
Just Let us know if you encounter any problems during your use. Our support team will provide you with our best solution without any delay. And all items purchased from Victure are covered by a 1-year warranty.
You can find our contact information below: Victure Action Camera Service E-mail: [email protected] Facebook: Victure Action Camera Club Youtube: Victure Action Camera
Look forward to bringing you more great products in the future. Hope everything goes well in your life.
Kind regards, Victure Support Team
Attention
- Avoid crushing and dropping.
- Keep the camera away from any strong magnetic interference objects like an electrical machine to avoid strong radio waves that might damage the product and affect the sound or image quality.
- Keep the camera away from water and liquids (unless equipped with a waterproof case). This may cause the camera to malfunction.
- Keep it away from children while on charging. It takes 3 hours to fully charge the battery. You are advised to remove the battery after you finish using the camera to extend battery life.
- We recommend you use a high-quality U3 TF Card (32-128 GB) for the best results. Please format the TF card on the camera before using it and restart the camera after formatting.
- Do not expose the camera directly to high temperatures over 55°C.
- Do not place heavy objects on the camera.
- Do not place your TF card near strong magnetic objects to avoid data error or loss.
- Do not use the camera when the battery is low.
- Do not use the camera while charging.
- Do not attempt to open the case of the camera or disassemble it in any way.
- Please remove the battery if you intend to use the camera as a dash camera.
- When you find the camera overheats, unwanted smoke, or unpleasant smell, unplug it immediately from the power outlet to prevent hazardous fire.
- Please store the device in a cool, dry, and dust-free location.
Installation Guide
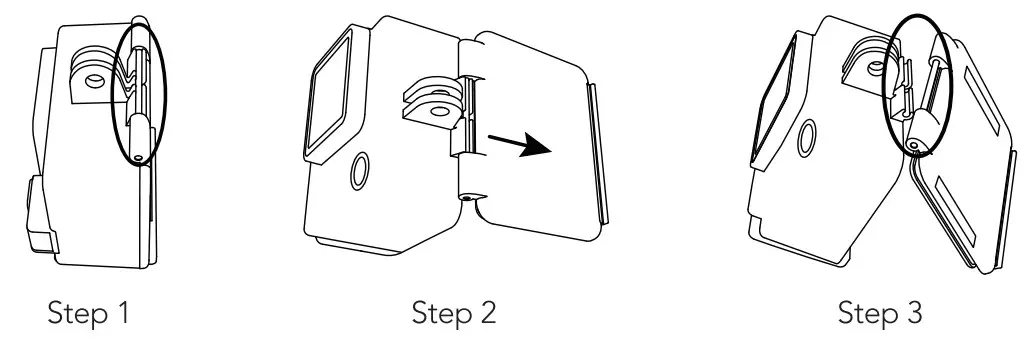
Dust-proof Cover Replacement
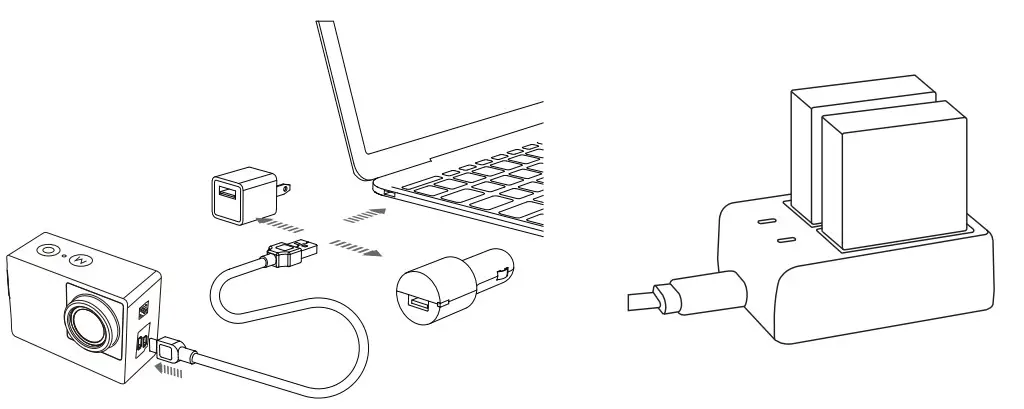
Battery Charging
The Battery charging steps are as below:
Note: The outlet battery charger is not included in this camera package.
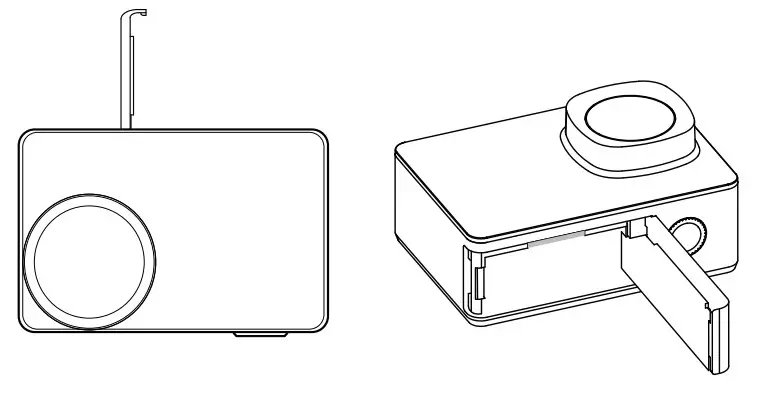
TF Card Installlation & Format
TF Card Installation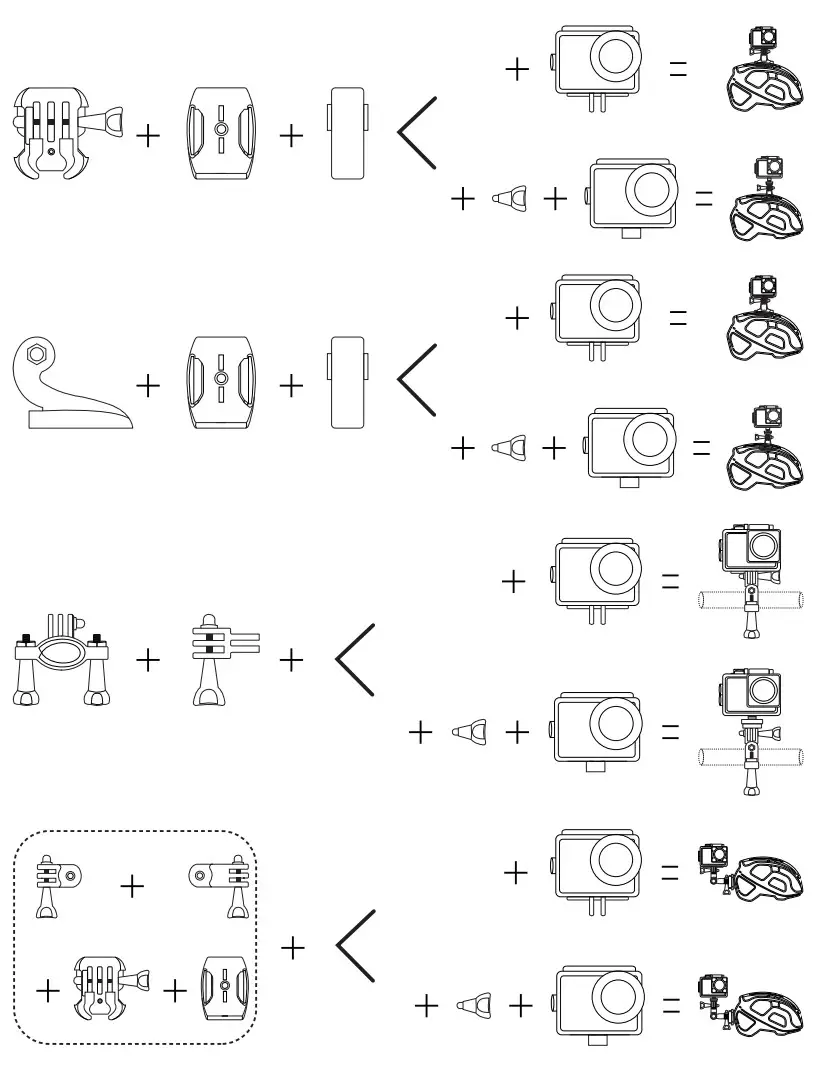
- The camera ONLY supports U3 TF Card with a capacity of 32-128G, otherwise, it may cause the camera unusable.
- After installing the TF card correctly, format it from the setting menu before the first use.
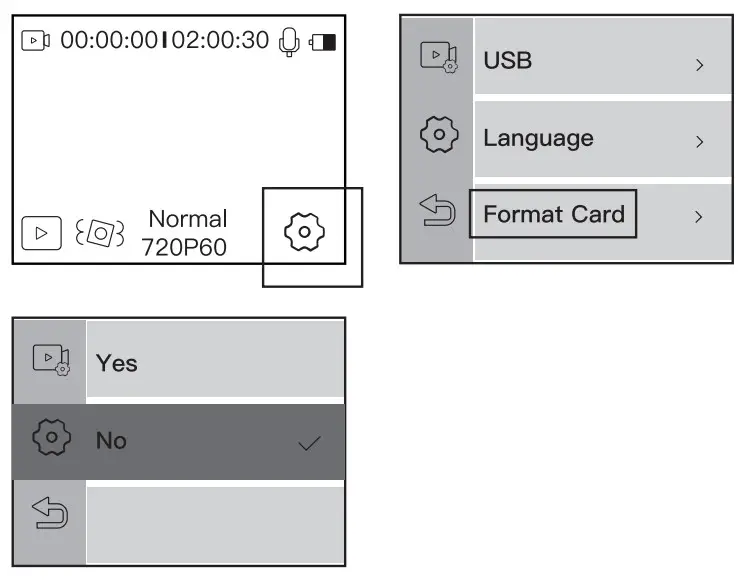
TF Card Formatting
Introduction of host
Product Diagrams
| 1. Lens 2. Mode Button 3. OK / Shoot Button 4. WiFi / Power Button 5. Touch Screen 6. Charging Indicator (Red) |
7. WIFI Indicator (Blue) 8. USB / HDMI Port 9. Speaker 10. Tripod Mount 11. Battery Cover |
Indicator Light
| Working Indicator | 1. While recording a video, the LED continuously flashes. 2. When taking a photo, LED quickly flashes 3 times. 3. Power off, LED is off. |
| Charging Indicator | 1. While charging, LED is bright(Red). 2. Charge fully, LED is off. |
| Wi-Fi Indicator | 1. When the Wi-Fi opens, LED continuously flashes. 2. When WiFi is connected, the LED is bright(Blue). |
Button Instruction
| Power/WiFi Button | 1. Long press the Power key to open the camera. 2. short press to open/off the WIFI. 3. While in boot state, long press power key to shut down. |
| OK Button | 1. Shutter function while Video/Photo mode. 2. Long press into menu setting while video/photo interface, touch screen to select, or short press to confirm for the current option. 3. Video playback status, press to Pause/Play. |
| Mode Button | 1. Short press to switch setting option when in setting interface. 2. Short press to change mode from photo or video. |
Mode Operation Instructions
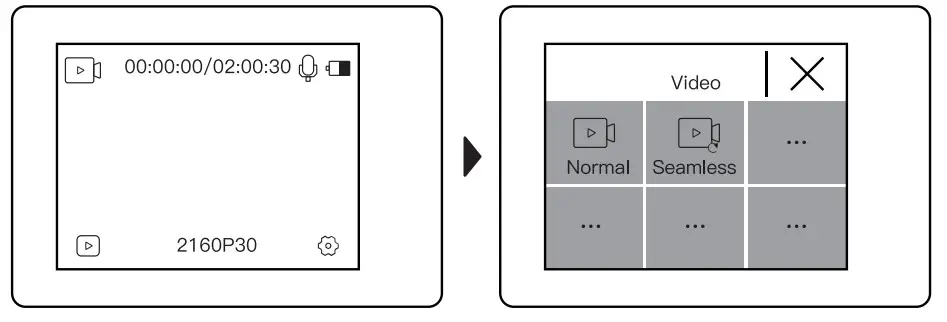
Video Mode
The camera will automatically display video mode when power on.
- Video Mode
- Recorded Video Time
- Available Record Time
- Microphone
- Battery Life
- Video Playback
- Resolution/fps
- Menu Setting
Press for video. 2160P30 or long-press OK button to choose different modes for video.
Press  to enter video setting mode

Video Setting
- Video Resolution: 4K/60FPS, 4K/30FPS, 2.7K/30FPS, 1080P/120FPS, 1080P/60FPS, 1080P/30FPS, 720P/240FPS,720P/120FPS, 720P/60FPS
- Video Quality: High/Middle/Low
- EV: -2.0, -1.0, 0.0, +1.0, +2.0
- EIS: On/Off
- Loop Record: off, 1Min, 3Min, 5Min
- Time-lapse Interval: Off, 1 Sec, 3 Sec, 5 Sec, 10Sec, 30 Sec, 1 Min (The video recorded will be compressed to the time length you set, the result is an apparent time speed increase.)
- Time-lapse Duration: Unlimited, 5 Min, 10 Min, 15 Min, 20 Min, 30 Min, 60 Min (Used when the Time-Lapse is on)
- Slow Motion Movie: Off, On
- Fast Motion Movie: Off, 2X, 4X, 6X, 10X, 15X
- Wind Noise Reduction: Off,On
- Metering: Center/Multi/Spot
- Date Stamp: Off, Date, Date&Time
Photo Mode
Open the camera and it will automatically display video mode. Then right slide or left slide to change it to photo mode.
- Photo Mode
- Photo quantity/Available Photo Shoot Quantity
- Battery Life
- Photo Playback/Photo Files
- Photo Resolution
- Photo Setting
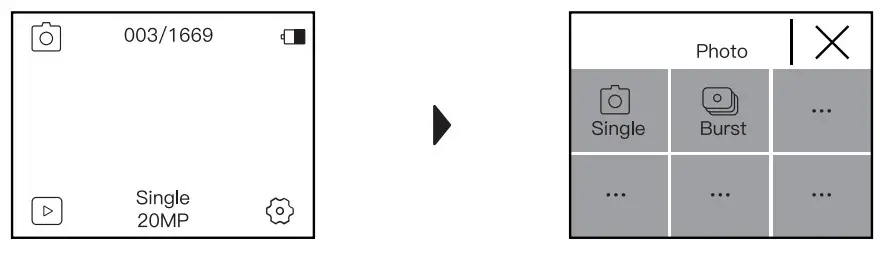
Press 20MP single or long-press OK button to choose different modes for a photo.

Press 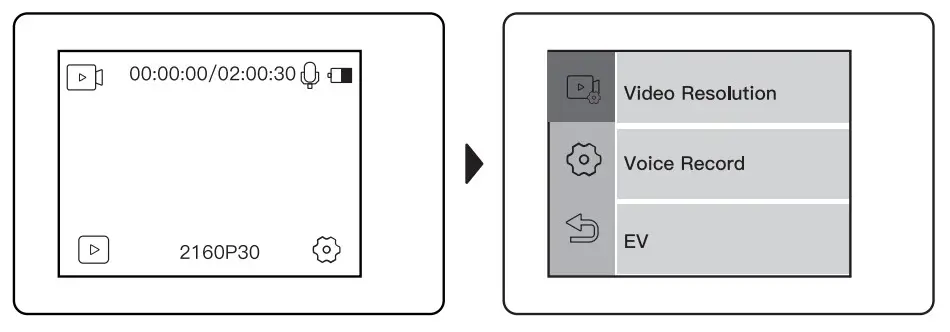 to enter photo setting mode
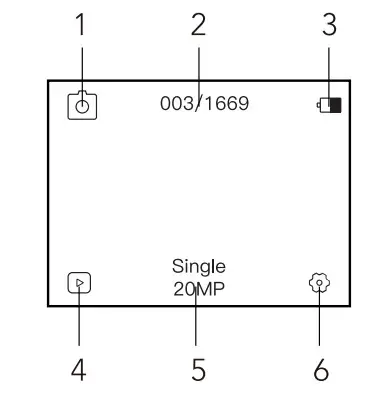
Photo Setting
- Photo Resolution: 20MP, 16MP, 14MP, 10MP, 8MP, 5MP
- ISO: Auto, 100, 200, 400, 800, 1600, 3200
- EV: -2.0, -1.0, 0.0, +1.0, +2.0
- Time-Lapse Interval: Off, 1 Sec, 3 Sec, 5 Sec, 10Sec, 30 Sec, 1 Min
- Time-Lapse Duration: Unlimited, 5 Min, 10 Min, 15 Min, 20 Min, 30 Min, 60 Min
- Photo Burst: Off, 3 shots, 7 shots, 15 shots, 30 shots
- Delay Timer: Off, Delay 2s, Delay 10s,
- Long Exposure: Off, 1 Second, 2 Second, 5 Second, 8 Second, 30 Second, 60 Second
- Metering: Centre, Multi, Spot
- Date Stamp: Off, Date, Date&Time
System Setting
- Power Frequency: 50Hz/60Hz
- Sounds: Shutter, Boot-up, Beep, Volume
- White Balance: Auto, Daylight, Shade, Tungsten Light, White Fluorescent, Underwater. (By adjusting this setting, the camera can correct the color of photos taken under different lighting conditions.)
- Effect: Normal, BW, Natural, Negative, Warm, Brightness Contrast
- Distortion Calibration: On/Off. (To adjust for the fisheye effect)
- Date & Time: Set Date and Time for the camera
- Screen Saver: Off, 1min, 3min, 5min. (After a set period of time, if there is no operation on the camera, the screen will automatically go black. At this point the camera does not turn off, you can press any button to light up the screen.)
- Auto Power Off: Off, 1Min, 3Min, 5Min.( After a set period of time, If there is no operation on the camera, the camera will automatically shut down.)
- Power On Auto Record: On/Off. (When you open the camera it will automatically start to record video.)
- USB: MSDC/PCCAM(UVCMJPG)
- Language: English
- Format Card: Format the memory card in the camera. Once this operation is implemented, all data will be deleted.
- Factory Reset: Reset all camera settings to default settings
- System Info: Firmware version
- Card Info: Card capacity and remaining memory.
WI F I/PC/TV Connection
Wi-Fi Connection
The Wi-Fi application allows you to control your camera remotely on a smart phone or a tablet. You can view the videos and pictures shot on your phone, as well as download them to your phone.
The connecting steps are as follows:
A: Download the iSmtar DV app on your smartphone or tablet in Google Play or Apple App Store.
B: Short press the “Power Button” on the front to turn on WIFI, short press again to Exit. The status light (RED)on the top of the camera remains flashing while the camera is waiting for a Wi-Fi connection and the light stays on when the Wi-Fi is connected
C: Find and connect the Wi-Fi in the Wi-Fi list on your phone with the Wi-Fi name and password displayed on the camera.

D. Open the iSmtar DV APP on your smartphone or tablet after the Wi-Fi is connected, you’ll find the camera is controlled by your phone.
Computer Connection
When you use the included micro-USB cable to connect to a computer, you can access the files stored in the camera’s micro SD card to copy or view them on a computer. This function can also achieve by a micro SD card reader.
TV Connection
With HDMI output, you can display the movies and images recorded by this camera on large screens of TV, projector, etc.
- Turn off the camera.
- Connect the camera and TV with a commercially available Micro HDMI cable (Not Included).
- Turn on the camera and turn on the HDMI setting on the device which you intended to input.
Tips:
- The HDMI input device should support 1080P.
- When outputting HDMI, the display of the camera turns back. The screen is displayed on the HDMI input device, but the operation is operated with the camera.
Specifications
| Model | AC940 |
| Lens | 170 HD wide-angle lens |
| LCD | 2.0″ LCD |
| APP | iSmart DV |
| Picture Format | JPEG |
| Video Format | MOV |
| Video Compression format | H.264 |
| Date Connection | Micro USB2.0, HDMI |
| Extended Memory | MAX to 128G, Micro SDHC |
| Power | 5V/1A |
| Micro speaker | Support |
| Speaker | built-in |
| Battery | 1350mAH |
| Charge Time | About 3-4hours |
| Operating System | Windows XP/7/8 SP3Nista and Mac 10.5 or above |
| Working Temperature | -10C —+55 C |
| Storage Temperature | -20 C — +70 C |
Note: The product specifications are formulated in accordance with the latest information at the time of writing this specification. If any changes are subject to prior notice, please follow the actual camera.
Warranty & Customer Support
All Victure products come with 12 months limited warranty from the date of purchase. Also, we are dedicated to providing the best possible customer service.
If you have any questions about our product or the warranty, please feel free to contact us and we will try our best to reply within 24 hours and solve your problem.
Customer Service E-mail: [email protected]
Youtube account: Victure Action Camera
Facebook: Victure Action Camera Club