READ AND KEEP THESE INSTRUCTIONS FOR FUTURE REFERENCE
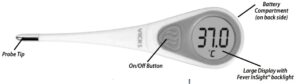
Thank you for purchasing the Vicks® Fever InSight® Thermometer with a large screen display and Fever InSight® feature, a professional accurate instrument for faster and easier temperature taking.
Please read these instructions carefully to ensure accurate temperature measurements and safe operation. When used properly, this high-quality product will give you years of accurate, dependable service.
IMPORTANT SAFETY INFORMATION
- High, prolonged fever requires medical attention, especially for young children. Please contact your physician.
- Do not allow children to take their temperatures unattended.
- Do not allow children to walk or run during temperature taking.
- The thermometer is only suitable for the measurement of body temperature. The use of this thermometer is not intended as a substitute for consultation with your doctor.
- The thermometer is initially calibrated at the time of manufacture. If this thermometer is used according to the use instructions, the accuracy of measurements will not be affected.
TEMPERATURE READINGS
Temperature readings vary from person to person.
Although there is no one “normal” temperature reading, a temperature, taken orally, ranging between 36.1°C / 97°F and 37.7°C / 100°F is considered normal.
A rectal temperature is generally 0.5°C / 1°F higher and an underarm (axillary) temperature will be 0.5°C / 1°F lower.
The best method to determine your own normal temperature is to use the thermometer when you are feeling well.
Record your reading twice a day (early morning and late afternoon).
Take the average of the two temperatures.
This is considered your normal body temperature.
Any variation from it may indicate some sort of illness and you should consult your physician.
BEFORE USE
Your Vicks® Fever InSight® Thermometer is a 3-in-1 thermometer for oral, rectal, or underarm use. Whichever method is used, it is recommended that for 15 minutes prior to use, you avoid eating or drinking, exercising, taking showers or baths or smoking.
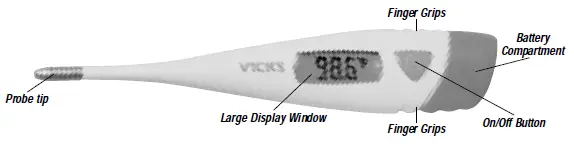
OPERATING YOUR THERMOMETER
TURNING THE THERMOMETER ON
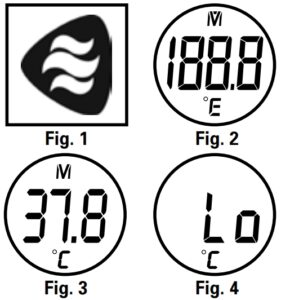
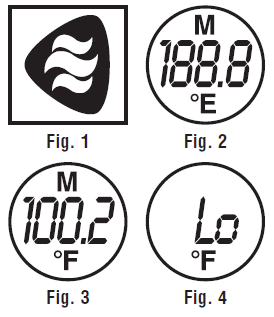
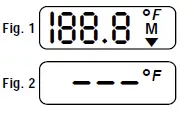
- Turn the thermometer on by pressing the On/Off button (Fig. 1).
- A beep signal will sound and the display will flash Red/Yellow/Green for 1 second.
- Wait for the thermometer to get ready
– The display will show a test value (Fig. 2).
– The display will show last measurement for 2 seconds (Fig. 3).
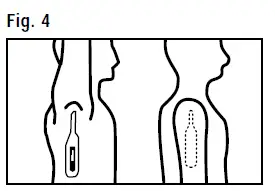
– After about 5 seconds, the display will show it’s ready (Fig. 4).
SELECTING WHERE TO TAKE THE TEMPERATURE
Oral Use
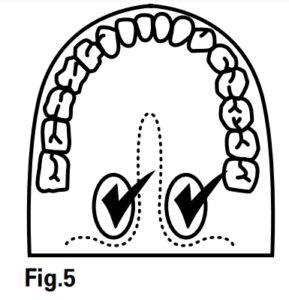
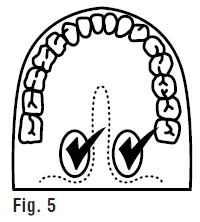
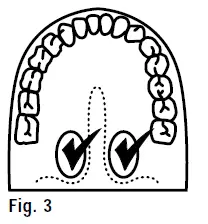
- It is important to place the tip of the thermometer well under the tongue to get a good, accurate reading. (Fig. 5) Place sensor tip in areas marked with “4”. Keep mouth closed and sit still to help ensure an accurate measurement.
- When the peak temperature is reached (usually within 12 seconds), 5 beep signals will sound and the “°C/°F” sign will stop flashing. The temperature measurement is now ready to read and will not change when the thermometer is removed.
- Wash the thermometer as recommended.
Under-the-arm (Axillary) Use
This method can be used for babies and young children.
- Wipe the underarm with a towel.
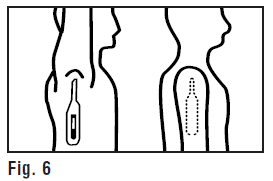
- Place the probe tip under the arm so the tip is touching the skin and position the arm next to the body (Fig. 6). With a young child, it is sometimes helpful to hug the child to keep their arm next to their body. This ensures that the room air does not affect the reading.
- When the peak temperature is reached (usually within 11 seconds but sometimes longer for this method), 5 beep signals will sound and the “°C/°F” sign will stop flashing. The temperature measurement is now ready to read and will not change when the thermometer is removed.
Note: This method produces a temperature reading 0.5°C / 1°F lower than if the temperature were taken orally. - Wash the thermometer as recommended.
Rectal Use
Commonly used for babies, young children, or when it is difficult to take an oral or underarm temperature.
- Lay the patient on his/her side. For a baby, the proper position is to lay on its stomach with legs hanging down, either across your knees or at the edge of a bed or changing table. This positions the infant’s rectum for safe and easy insertion of the thermometer.
- Gently insert the tip of the thermometer NO MORE THAN 1cm into the rectum. If you detect resistance, stop. Hold the thermometer in place during measurement.
- When the peak temperature is reached (usually within 10 seconds) 5 beep signals will sound and the “°C/°F” sign will stop flashing. The temperature measurement is now ready to read and will not change when the thermometer is removed.
NOTE: This method produces a temperature reading 0.5°C / 1°F higher than if the temperature were taken orally. - Wash the thermometer as recommended.
READING THE MEASUREMENT: FEVER INSIGHT® FEATURE
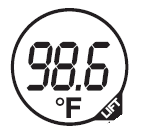
The Vicks® Fever InSight® Thermometer comes with the patented “Fever InSight®” feature which offers a color indicator with the temperature reading. This feature will help you explain to your child the meaning of temperature. It also helps by distracting your child from possible fear associated with temperature taking, especially with young children.
- For readings between 36.1-37.1°C / 97-98.8°F, the screen will display green as the backlight color indicating the temperature is within the “normal” range.
- For readings between 37.2-38.2°C / 99-100.7°F, the screen will display yellow as the backlight color indicating a slight elevation in temperature.
- For readings 38.3°C / 101°F and above, the screen will display red as the backlight color indicating possible fever. The Fever InSight® feature continues for about 5 seconds.
TURNING THE THERMOMETER OFF
Turn the thermometer off by pressing the On/Off button. If you forget to turn it off, the thermometer will automatically turn off after approximately 1 1/2 minutes.
CHANGING TEMPERATURE SCALE FROM °C TO °F OR °F TO °C
When the power is off, press and hold the On/Off button for 4 seconds, when the “M” symbol disappears, release the button and press the button to switch from °C to °F or °F to °C . After 3 seconds idle, the thermometer enters into the ready-for-measurement mode.
CLEANING INSTRUCTIONS
- Clean the thermometer by washing it with soap and warm water or rubbing alcohol (70% isopropyl alcohol).
- Wipe dry with soft cloth.
- DO NOT BOIL OR WASH IN THE DISHWASHER. This will cause the thermometer to no longer function and will void the warranty.
- Do not wash with any thinner or chemical solvent.
SPECIFICATION
- Type: Digital Thermometer (Predictive)
- Battery Life: more than 300 measurements or approximately 2 years if used every other day.
- Accuracy in water bath: +/-0.1°C between 35.5-41.6°C at room temperature of 21.6°C. +/-0.2 °F between 96.0-107°F at room temperature of 71°F
- Temperature Range: 32.0-42.9°C. If less than 32.0°C “Lo” is displayed. If more than 42.9°C “Hi” is displayed. 89.6-109.9°F. If less than 89.6°F “Lo” is displayed. If more than 109.9°F “Hi” is displayed.
- Operating Temperature: +10°C to +40°C (50°F-104°F), 15% to 95% RH
- Storage Temperature: –25°C to +60°C (-13°F-140°F), 15% to 95% RH If the device is not used within specified temperature and humidity ranges the technical accuracy of the measurement cannot be guaranteed.
- Beeper: The thermometer will beep for approximately 8 seconds when peak temperature is reached. For temperatures over 38.3°C/101°F, the audible Fever Alert will sound 5 times.
- Error Messages: The display will read “Err” when a malfunction occurs and the thermometer will power off.
TEST PROTOCOL (Laboratory use only)
- Place the thermometer into a stable liquid bath with the temperature set above 35°C (95°F). The tip of the thermometer should be approximately 0.8 inches (2cm) below the surface.
- Wait for 10 seconds, then turn thermometer on by pressing the blue “On/Off” button.
- When the measurement is completed (approximately 8 seconds), record the temperature reading.
CHANGING THE BATTERIES
The Vicks® Fever InSight® Thermometer features a long-life battery. When the “ ” appears and flashes in the center top of the display, the battery is exhausted and needs replacing.
- Using a coin, unlock the battery cover and carefully remove the battery with a non-metallic instrument.
- Replace the battery with a 3V, CR1225 lithium type or equivalent. Insert the new battery with the positive (+) side facing the battery cover.
- Carefully put the battery cover back in place and, using a coin, tighten the cover.
- Properly dispose of the old battery. Keep out of reach of young children, elderly and pets.
LIFETIME WARRANTY
This product has been produced with the greatest care for normal, household use. Following directions carefully will ensure dependable operation. If for any reason (other than misuse or normal battery operation) you are dissatisfied with your Vicks® Fever InSight® Thermometer, we will repair or replace it, at our option, at no charge during the lifetime warranty period. Modification to the product by the consumer is not authorized and voids the warranty. If the thermometer does not function properly, first check the battery. Replace if necessary. Batteries and packaging are excluded from the warranty.
If you experience unsatisfactory operation, please contact Felton Grimwade & Bosisto’s. If repair is required under the warranty period, the product should be returned with proof of purchase to Felton Grimwade & Bosisto’s service center.
The purchaser assumes responsibility for the proper care and use of the product in accordance with the printed operating manual. The purchaser or user must make his or her judgment as to when to use the product and the length of use. Keep the operation manual available as it is your guide to safe, efficient operation. Our goods come with guarantees that cannot be excluded under the Australian Consumer Law. You are entitled to a replacement or refund for a major failure and for compensation for any other reasonably foreseeable loss or damage. You are also entitled to have the goods repaired or replaced if the goods fail to be of acceptable quality and the failure does not amount to a major failure.
]]>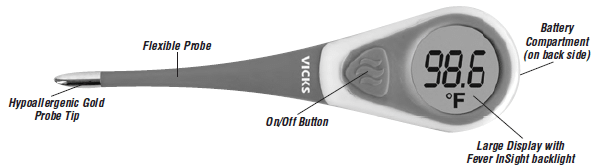
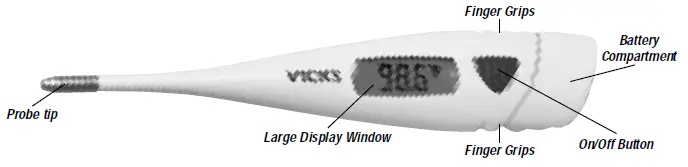
VICKS ComfortFlex
Digital Thermometer
Model : V965F/V966F
READ AND SAVE THESE INSTRUCTIONS
Thank you for purchasing the VICKS® ComfortFlex™ Digital Thermometer with SpeedRead technology, large screen display, and Fever InSight™ feature, a professionally accurate instrument for comfortably measuring body temperature. Please read these instructions carefully to ensure accurate temperatures and safe operation. When used properly, this high quality product will give you years of accurate, dependable service.
IMPORTANT SAFETY INFORMATION
- High, prolonged fever requires medical attention especially for young children. Please contact your physician.
- Do not allow children to take their temperatures unattended.
- Do not allow children to walk or run during temperature taking.
If you have any questions or comments about the VICKS® ComfortFlex™ Digital Thermometer, call our toll-free Consumer
Service Line: 1-800-477-0457.
TEMPERATURE READINGS
Temperature readings vary from person to person. Although there is no one “normal” temperature reading, a temperature, taken orally, ranging between 97°F and 100°F is considered normal. A rectal temperature is generally 1° higher and an underarm (axillary) temperature will be 1° lower.
The best method to determine your own normal temperature is to use the thermometer when you are feeling well. Record your reading twice a day (early morning and late afternoon). Take the average of the two temperatures. This is considered your normal body temperature. Any variation from it may indicate some sort of illness and you should consult your physician.
BEFORE USE
Your VICKS® ComfortFlex™ Digital Thermometer is a 3-in-1 thermometer for oral, rectal, or underarm use. Whichever method is used, it is recommended that for 15 minutes prior to use, avoid eating or drinking any liquids, exercising, taking showers or baths, or smoking.
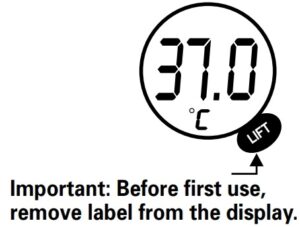
IMPORTANT: Before first use, remove label from the display
PROBE COVERS
Disposable probe covers are provided with your VICKS® ComfortFlex™ Digital Thermometer. Place a cover on the probe tip each time the thermometer is used to help prevent spread of germs. Additional probe covers can be purchased at most drug stores or pharmacy departments.
OPERATING YOUR VICKS® ComfortFlex™ DIGITAL THERMOMETER
- TURNING THE UNIT ON
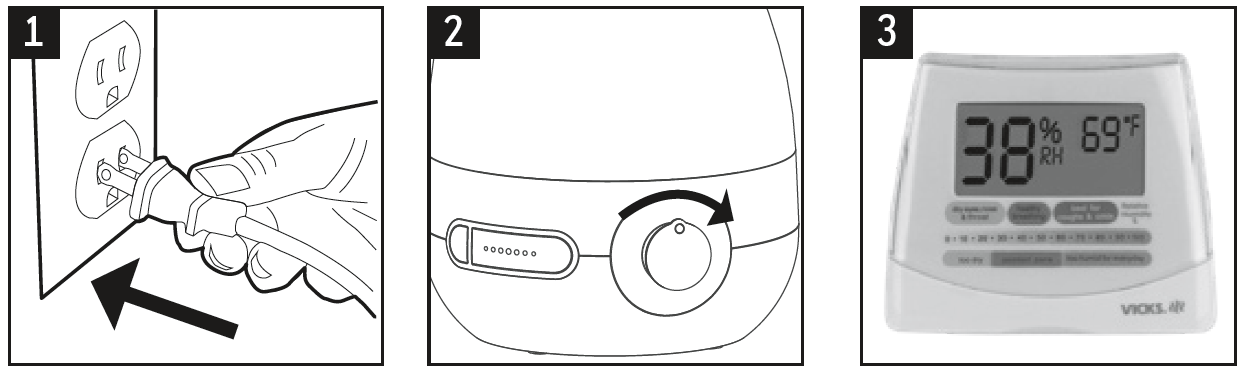
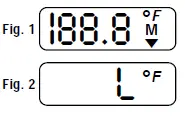
- Turn unit on by pressing the On/Off button (Fig. 1).
- Wait for unit to get ready
– A beep will sound and the display will show a test (Fig. 2).
– The display will show last measurement for 2 seconds (Fig. 3).
– After about 5 seconds, the display will show it’s ready (Fig. 4).
- SELECTING A TEMPERATURE LOCATION
Oral Use
- It is suggested to use a probe cover for Oral Use. Discard the probe cover after taking a temperature.
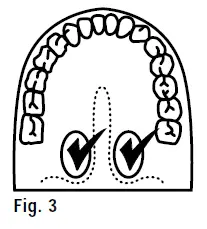
- It is important to place the tip of the thermometer well under the tongue to get a good, accurate reading. (Fig. 5) Place sensor tip in areas marked with “3”. Keep mouth closed and sit still to help ensure an accurate measurement.
- When the peak temperature is reached (usually 12 seconds), 2 beep signals will sound and the “°F” sign will stop flashing. The temperature is now ready to read and will not change when the thermometer is removed.
- Dispose of used probe cover and wash the thermometer as recommended
Under-the-arm (Axillary) Use
This method is used for babies and young children.
- Wipe the underarm with a towel.
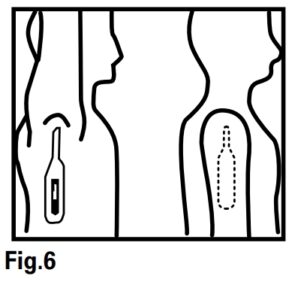
- Place the probe tip under the arm so the tip is touching the skin and position your arm next to your body (Fig. 6). With a young child, it is sometimes helpful to hug the child to keep their arm next to their body. This ensures that the room air does not affect the reading.
- When the peak temperature is reached (usually 11 seconds but sometimes longer for this method), 2 beep signals will sound and the “°F” sign will stop flashing. The temperature is now ready to read and will not change when the thermometer is removed. Note: This method produces a temperature 1° lower than a temperature taken orally.
- Wash the thermometer as recommended.
Rectal Use
Commonly used for babies, young children, or when it is difficult to take an oral or underarm temperature.
- Cover the thermometer’s tip with a probe cover and lubricate with a water-soluble jelly for easier insertion. Do not use petroleum jelly. Read the label of the lubricant to be sure you are using the right kind.
- Lay the patient on his/her side. If the patient is an infant, the proper position for a baby is to lay on its stomach with legs hanging down, either across your knees or at the edge of a bed or changing table. This positions the infant’s rectum for safe and easy insertion of the thermometer.
- Gently insert the tip of the thermometer NO MORE THAN 1/2 inch into the rectum. If you detect resistance, stop. Hold the thermometer in place
during measurement. - When the peak temperature is reached (usually 10 seconds) 2 beep signals will sound and the “°F” sign will stop flashing. The temperature is now ready to read and will not change when the thermometer is removed.
NOTE: This method produces a temperature 1° higher than a temperature taken orally. - Dispose of used probe cover and wash the thermometer as recommended.
3. READING THE MEASUREMENT
The Vicks® ComfortFlex™ Digital Thermometer comes with the patented “Fever InSight” feature offers a color indicator with the temperature readout to better understand the temperature measurement.
- For readings between 97.0-98.9°F, the LCD will display green as the backlight color indicating the measurement is within an acceptable range.
- For readings between 99.0-100.9°F, the LCD will display yellow as the backlight color indicating a slight elevation in temperature measurement.
- For readings 101.0°F and above, the LCD will display red as the backlight color indicating possible fever.
The Fever InSight feature continues for about 7 seconds.
TURNING THE UNIT OFF
Turn the thermometer off by pressing the On/Off button. If you forget to turn it off, the thermometer will automatically turn off after approximately 3.5 minutes.
CLEANING INSTRUCTIONS
- Clean the thermometer by washing with soap and warm water or rubbing alcohol (70% isopropyl alcohol).
- Wipe dry with soft cloth.
- DO NOT BOIL OR CLEAN IN DISHWASHER. This will cause the thermometer to no longer function and will void the warranty.
- Do not wash the unit with any thinner or chemical solvent.
SPECIFICATIONS:
Battery Life: more than 200 hours of continuous operation. (approx. 2 years if used 10 minutes per day, every day).
Accuracy in waterbath: +/-0.2°F between 96.0-107.0°F at room temperature of 71°F.
Temperature Range: 89.6-109.2°F. If less than 89.6°F an “Lo” is displayed. If more than 109.2°F and “Hi” is displayed.
Beeper: Unit will beep for approximately 8 seconds when peak temperature is reached.
Fever alert: A series of 5 short beeps indicate temperatures +101.0°F.
Error messages: The display will read “Err” when a malfunction occurs and the unit will power off after 1 minute.
CHANGING THE BATTERIES
The VICKS® ComfortFlex™ Digital Thermometer features a long life, mercury free battery. When the “/” appears and flashes in the center top of the display, the battery is exhausted and needs replacing.
- Using a coin, unlock the battery cover and carefully remove the battery with a non-metallic instrument.
- Replace the battery with a 1.55V, L41 alkaline or CR1225 silver oxide type or equivalent. Insert the new battery with the positive (+) side facing the battery cover.
- Carefully replace the battery cover and, using a coin, tighten the cover.
- Properly discard the old battery. Keep out of reach of young children, elderly and pets.
LIFETIME WARRANTY
Your VICKS® ComfortFlex™ Digital Thermometer is durable and manufactured for a lifetime of normal, household use. Following directions carefully will ensure years of dependable operation. If for any reason (other than misuse or normal battery replacement) you are dissatisfied with your VICKS® ComfortFlex™ Digital Thermometer, we will repair or replace it, at our option, free during your lifetime.
If the thermometer does not function properly, first check the battery. Replace if necessary. If repair is necessary call our Consumer Relations Department
at 1-800-477-0457 or write to Kaz, Inc., Consumer Relations Department, 250 Turnpike Rd., Southborough, MA 01772, explaining just how the thermometer is improperly working. Our consumer service representative will provide further instruction on how to correct the trouble yourself or will ask you to return the thermometer for repair or replacement.
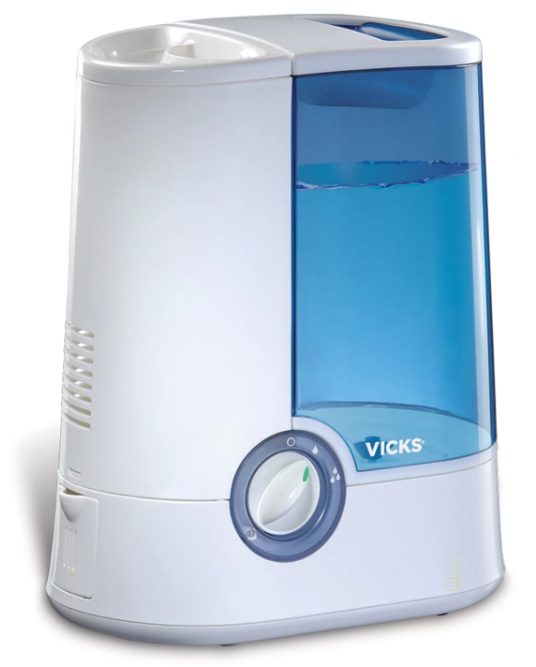
Vicks Warm Mist Humidifier
Important Safety Instructions
READ AND SAVE THESE IMPORTANT SAFETY INSTRUCTIONS BEFORE USING THIS APPLIANCE
WHEN USING ELECTRICAL APPLIANCES, BASIC PRECAUTIONS SHOULD ALWAYS BE FOLLOWED TO REDUCE THE RISK OF FIRE, ELECTRICAL SHOCK AND INJURY TO PERSONS, INCLUDING THE FOLLOWING:
- The appliance should always be placed on a firm, flat, waterproof surface at least four feet (1.22m) away from bedside, twelve inches (30cm) from the wall and out of reach of patient, children and pets. Be sure the appliance is in a stable position and the power cord is away from heated surfaces and out of the way to prevent the humidifier from being tipped over.
- The appliance should not be left unattended in a closed room since air could become saturated and leave condensation on walls and furniture. Leave room door partly open.
- Before using the appliance, extend the cord and inspect for any signs of damage. Do not use the unit if the cord has been damaged.
- The appliance has a polarized plug (one blade is wider than the other) as a safety feature. This plug will fit into a polarized outlet only one way. If the plug does not fit fully into the outlet, reverse the plug. If it still does not fit, contact a qualified electrician. Do not attempt to defeat this safety feature.
- To avoid fire or shock hazard, plug the appliance directly into a 120V AC electrical outlet.
- The appliance should always be unplugged and emptied when not in operation or while being cleaned. Shut off and unplug humidifier before moving. Do not move or tilt humidifier while it is in operation. Plug and unplug unit with dry hands. Never pull by cord.
- Do not operate the appliance without water. Turn off and unplug unit when tank is empty and the reset light is on.
- Caution: To avoid the risk of fire, shock or personal injury, do not use an extension cord.
- Appliance requires regular cleaning. Refer to and follow cleaning instructions.
- Do not operate outdoors; this appliance is intended for indoor use.
- Do not cover or insert objects into any openings on the unit.
- Do not attempt to repair or adjust any electrical or mechanical functions on this appliance. Doing so will void your warranty.
- Do not add any medications (e.g. Kaz Inhalant or Vicks VapoSteam®) into Chimney, Base, Reservoir or Water Tank.
- Do not touch the steam vapor. Steam can cause burns. Do not operate without the Medicine Cup in place on top of the Mist Chimney.
- When moving or lifting the Tank, use one hand on the Tank Handle and the other on the bottom of the tank.
- Do not touch skin with exposed VapoPad or place on furniture, fabric, bedding or plastic.
- For Residential Use Only
How it Works
The Vicks Warm Mist Humidifier is designed to quietly provide visible warm moisture. The tank feeds water into the boiling chamber where it is heated to a steam vapor. The steam vapor mixes with dry air in the mist chimney. The warm moist air is released in the room.
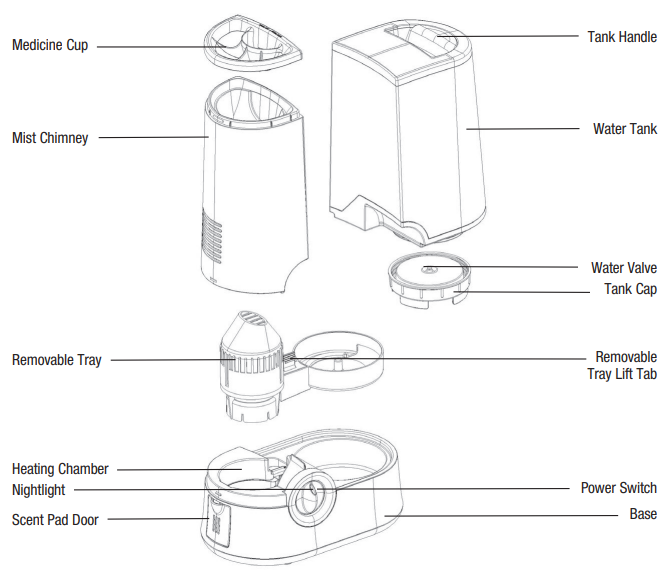
V750 Accessories
The following accessories work great with your humidifier. These accessories can be purchased at most major retailers or through Kaz.com.
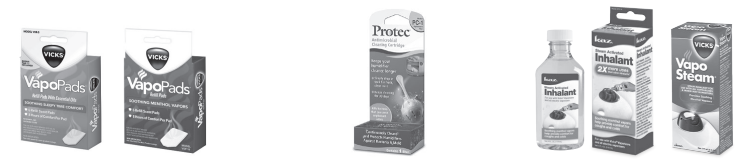
- Vicks VapoPads®
Scent pads provide soothing menthol (VSP-19, VSP-19FP or VSP-19-CAN) or lavender/rosemary (VBR-5, in U.S. only) vapors. (One complimentary menthol scent pad included with product.) - Protec Cleaning Cartridge, PC-1BXN or PC-1C
Keeps your humidifier cleaner, longer. Continuously cleans and protects humidifiers against bacteria and mold for 30 days. - Kaz Inhalant, KFC-4 in U.S, or Vicks VapoSteam, VS177CANEA in Canada Can be added to medicine cup area to provide soothing menthol vapors to help provide comfort.
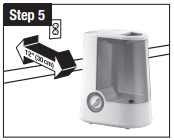
Setting Up Your Vicks Warm Mist Humidifier

- 1. Remove From Box. Remove packaging material. Set aside instruction manual. Recycle packaging materials or save for storage.
- 2. Remove twist tie from power cord and extend power cord full length. DO NOT OPERATE WITH POWER CORD COILED OR TWIST TIE IN PLACE.
- 3-4. Ensure Proper Assembly. Make sure Mist Chimney and Water Tray are securely in place and the blue latch is engaged.
- 5. Select a firm, level location at least 12″ (30cm) from any walls. Place the humidifier on a water-resistant surface. Steam should be directed away from any walls, bedding or furniture. Kaz will not accept responsibility for property damage caused by water spillage.
WARNING!: KEEP OUT OF REACH OF CHILDREN.
This product produces HOT STEAM and should be placed in an area not accessible to children or pets with the power cord also securely out of reach.
Filling / Refilling
NOTE: TANK SHOULD BE CARRIED USING TWO HANDS. ONE HAND USING CARRYING HANDLE LOCATED ON TANK’S TOP AND OTHER HAND SHOULD SUPPORT THE BOTTOM OF THE TANK.
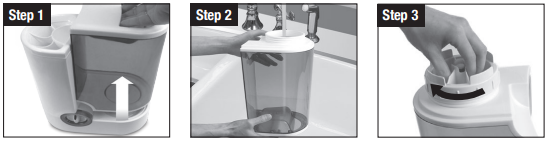
- Remove Tank by grasping handle and pulling up. Remove Tank Cap located on bottom of Tank by turning counterclockwise
- .
- Fill Tank with cool water. Do not fill with warm or hot water.
- Replace Tank Cap by turning clockwise to screw back in place. DO NOT OVER-TIGHTEN. Place Tank back on humidifier base.
RESET:
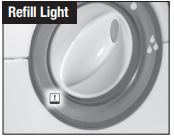
- When your humidifier is out of water the refill light will illuminate
- Turn the humidifier off, wait 15 minutes, refill Tank, and turn humidifier back on.
Operating Instructions V750 Series

- Power: With the power switch in the OFF position, plug the filled humidifier into a polarized 120V outlet. DO NOT FORCE THE POLARIZED PLUG INTO THE OUTLET; It will only fit one way. DO NOT plug in humidifier with wet hands to avoid electric shock.
- Output: Set output control to high or low. Indications your humidifier is operating are that the green nightlight on the control knob will illuminate and after 1-2 minutes your humidifier will produce a visible steam.
- Humidity Level: Once you have reached a comfortable humidity level your humidifier should be turned to the low setting. A comfortable humidity level is between 40-60%. To monitor your humidity level it is recommended you use a hygrometer such as the Vicks V70 or V70-CAN model. If you notice condensation on the walls or windows you should turn your humidifier off as your humidity level is too high.
- CAUTION: DO NOT remove the Mist Chimney, Removable Tray, Water Tank or Medicine Cup when humidifier is in use or for at least 20-30 minutes after unit has been turned off and unplugged.
CAUTION: WHEN MOVING HUMIDIFIER. TURN HUMIDIFIER OFF, UNPLUG and WAIT 20-30 minutes. DO NOT OPERATE YOUR HUMIDIFIER WITHOUT THE TANK IN PLACE OR IF THE UNIT IS EMPTY. DO NOT OPERATE YOUR HUMIDIFIER WITHOUT THE MIST CHIMNEY, REMOVABLE TRAY, OR MEDICINE CUP PROPERLY ASSEMBLED.
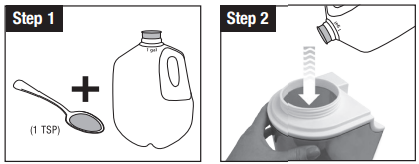
Using Liquid Inhalant

Liquid Inhalants such as Vicks VapoSteam® or Kaz Inhalant can be used in the medicine cup. ONLY USE LIQUIDS THAT ARE RECOMMENDED FOR THIS TYPE OF HUMIDIFIER.
- Add 1 TB (Table Spoon) inhalant to the medicine cup.
- Note: Some residue from inhalant may be left in medicine cup after use. With the humidifier turned off, unplugged and cooled for at least 20 minutes, gently wipe residue from medicine cup.
- DO NOT ADD LIQUID INHALANTS OR ANY ADDITIVES OTHER THAN THOSE RECOMMENDED BY THE HUMIDIFIER MANUFACTURER TO THE WATER. DOING SO CAN HAVE ADVERSE EFFECTS ON THE HUMIDIFIER.
Using Scent Pads

- You can use Vicks Scent Pads, VSP-19 series, VBR-5 series, VVP-6 series with your humidifier to provide up to 8 hrs of soothing vapors.
- Open scent pad by tearing notch on top of pad bag. Do not touch pad with hands. If pad is touched, do not rub face as it may cause eye irritation.
- Open Scent Pad Door located on rear of unit. Insert scent pad with angled end facing towards the product. Close door.
- Your scent pad will last 8 hrs. After 8 hrs., open door, remove old scent pad and discard. If you choose to continue using scent pads, follow steps 2 and 3.
Scent Pad Recommended Usage:
- Not recommended for infants under 10 lbs (4.5kg).
- For children between 10-22 (4.5kg-10kg) lbs do not use more than 2 pads in a 24 hr period.
Scent Pad Ingredients
VSP-19, VSP-19FP, VSP-19-CAN & VVP-6: Eucalyptus Oil, Menthol, Glycol, Cedar Leaf Oil & Others.
Weekly Care And Cleaning
NOTE: All maintenance should be done in the kitchen or bathroom on a water resistant surface.
To properly clean your humidifier we recommend the process of scale removal and disinfecting shown on pages 6 and 7 of this manual.
DISHWASHER SAFE: The following parts are TOP RACK dishwasher safe for residential dishwashers operating at temperatures below 70°C/158°F.

Run the dishwasher on the light duty or normal cycle.
Do not wash with soiled articles/dishes. DO NOT USE DETERGENTS. If you use your dishwasher you will not need to follow the disinfecting and scaling procedure
Please Note: Do not place parts on lower rack of dishwasher. Doing so could cause damage to the humidifier parts and dishwasher.
THE MAIN HOUSING AND WATER TANK ARE NOT DISHWASHER SAFE.
Placing these parts in the dishwasher will damage your humidifier and render it unable to operate properly.
Scale Removal Directions:

- CAUTION: ALWAYS TURN OFF THE POWER SWITCH AND DISCONNECT THE POWER CORD FROM THE ELECTRICAL OUTLET BEFORE CLEANING.
If the humidifier has recently been in use, wait 20-30 minutes for unit to cool before beginning cleaning process. - Remove Water Tank and empty.
- Disassemble the Mist Chimney by gently pushing on the blue release latch and pulling upwards.
- Remove Removable Tray by pushing on blue Removable Tray Lift Tab and gently pulling tab upwards.

- Fill Water Tank and Base with 1 cup of vinegar.
- Wipe Mist Chimney, Medicine Cup and Removable Tray with solution.
- Soak Heating Element for 15-20 minutes then gently scrub with a soft brush to remove
mineral deposits. DO NOT USE HARD BRUSHES, STEEL WOOL OR OTHER HARD ABRASIVES ON THE HEATING ELEMENT. DOING SO WILL DAMAGE THE HEATING ELEMENT.
Rinse Tank, Base, Mist Chimney, Removable Tray and Medicine Cup until smell of the solution is gone.
CAUTION: DO NOT IMMERSE BASE IN WATER - To clean the scent pad area, gently wipe out scent pad heater area with a soft damp cloth. DO NOT USE VINEGAR OR BLEACH SOLUTION TO CLEAN THIS AREA.
Disinfecting Directions – Disinfect Following Scale Removal
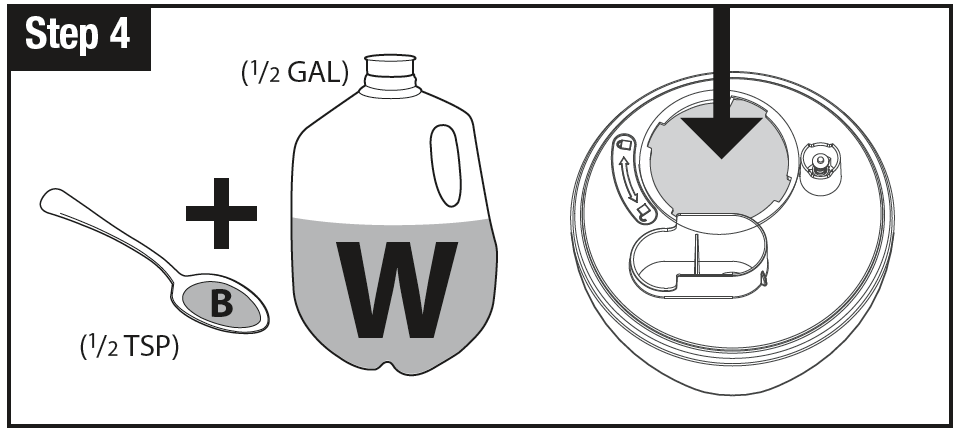
- Add 1 Teaspoon of bleach to 1 gallon (3.8L) water.
- Add ½ to ¾ gallon (1.9L-2.8L)of water/bleach solution to heating element area of the Main Housing and Water Tank.
- Follow steps 6 and 7 from the scaling section (page 7).
Note: Please be careful of clothing, rugs and other non bleach resistant materials when disinfecting. Spilling bleach on clothing, rugs and certain surfaces may cause damage.
NOTE: USING MORE THAN 1 TEASPOON OF BLEACH PER GALLON (3.8L) OF WATER WILL RESULT IN DAMAGE TO YOUR HUMIDIFIER.
Re-Assembling
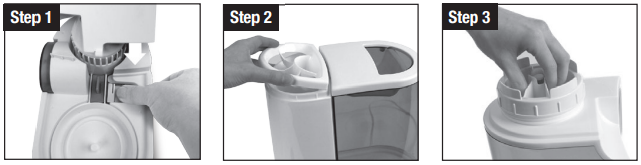
- Push blue Tab to the open position. Place Water Tray and then Mist Chimney back on the humidifier. Make sure they are sitting securely and blue latch is in the closed position.
- Snap Medicine Cup back in place if removed.
- Put Tank Cap back on Water Tank and place Water Tank back on unit.
End-Of-Season Care And Storage
When the humidifier will not be used for at least one week or more, or at the end of the season, follow the CLEANING instructions, starting on page 6. At the end of the season, remove any accessories from the humidifier. Dry the humidifier completely before storing. DO NOT store with water inside the Main Housing Water Reservoir or Water Tank. Pack unit in original carton and store in a cool, dry location.
Consumer Relations
Mail questions or comments to:
Kaz USA, Inc.
Consumer Relations Dept.
250 Turnpike Road, Southborough, MA 01772
TO ORDER REPLACEMENT PARTS CONTACT CONSUMER RELATIONS
Please be sure to specify model number.
Call us toll-free at: 1-800-477-0457
E-mail:
Or visit our website at: www.kaz.com
Electrical Ratings
The Vicks V750 Series model is rated at 120V, 60 Hz.
NOTE: IF YOU EXPERIENCE A PROBLEM, PLEASE CONTACT CONSUMER RELATIONS FIRST OR SEE YOUR WARRANTY. DO NOT RETURN THE HUMIDIFIER TO THE ORIGINAL PLACE OF PURCHASE. DO NOT ATTEMPT TO OPEN THE MOTOR HOUSING OR TAMPER WITH INTERLOCK SWITCH YOURSELF. DOING SO MAY VOID YOUR WARRANTY AND CAUSE PERSONAL INJURY OR DAMAGE TO PROPERTY.
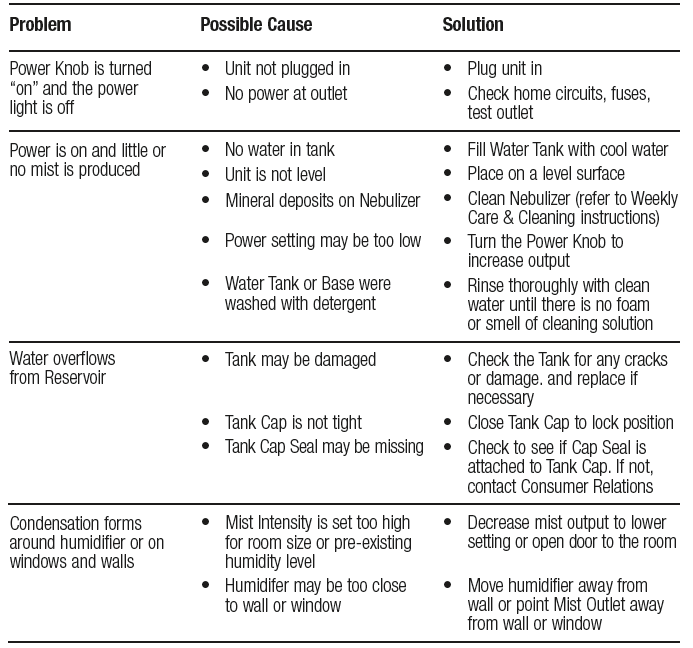
Troubleshooting
NOTE: Failure to keep this unit clean from mineral deposits normally contained in any water supply will affect the efficiency of operation of this unit. Customer failure to follow these instructions may void the warranty.
Limited Warranty
This Vicks Warm Mist Humidifier (Model V750 Series) is warranted against defective material or workmanship for a period of three years from the date of purchase. Any defective part will be, at the discretion of Kaz USA, Inc., repaired or replaced at no charge if the appliance has not been tampered with and has been used according to these printed directions. Retain receipt to prove warranty. This Warranty gives you specific legal rights as well as other rights that vary from state to state. If you experience unsatisfactory operation, first refer to the Trouble-Shooting section herein to determine if the problem is due to care or cleaning. Follow Care and Cleaning instructions. If you have any questions or comments, call the Kaz Consumer Relations Department at 1-800-VAPOR-1-2, e-mail or, write to Kaz, Consumer Relations Department, 250 Turnpike Rd., Southborough, MA 01772 USA or Kaz Canada, Inc., 510 Bronte Street South, Milton, ON L9T 2X6, Canada explaining just how the product is operating. Specify model number. Our Consumer Service Representative will advise you how to correct the problem yourself, or will ask you to return the product for repair or replacement.
Manufacturing Quality Healthcare Products for Over 75 Years
Kaz USA, Inc.
250 Turnpike Road
Southborough, MA 01772
www.kaz.com/vicks •
© 2013 All Rights Reserved. • Made and printed in China.
This product is manufactured by Kaz USA, Inc. under license from The Procter & Gamble Company. Vicks and other associated trademarks are owned by The Procter & Gamble Company. Distributed by Kaz Canada Inc., 510 Bronte St S, Milton, ON L9T 2X6
VICKS Filter Free Ultrasonic Cool Mist Humidifier
This humidifier adds water vapor to the surrounding air which may help the user breathe better.
If you have any questions about the operation of your Vicks Filter Free Ultrasonic Cool Mist Humidifier, call our toll-free Consumer Relations line at 1-800-VAPOR-1-2 or e-mail us at
IMPORTANT! READ AND SAVE THESE INSTRUCTIONS
Important Safety Instructions
READ AND SAVE THESE IMPORTANT SAFETY INSTRUCTIONS BEFORE USING THIS APPLIANCE
WHEN USING ELECTRICAL APPLIANCES, BASIC PRECAUTIONS SHOULD ALWAYS BE FOLLOWED TO REDUCE THE RISK OF FIRE, ELECTRICAL SHOCK AND INJURY TO PERSONS, INCLUDING THE FOLLOWING:
- The appliance should ALWAYS be placed on a firm, flat, waterproof surface at least four feet (1.2 m) away from bedside, 12 inches (30 cm) from the wall and out of reach of patients, children and pets. Be sure the appliance is in a stable position and the power cord is away from heated surfaces and out of the way to prevent the humidifier from being a tripping hazard.
- The appliance should not be left unattended in a closed room. Leave room door partly open. DO NOT aim Mist Outlet directly at walls, furniture and bedding.
- Before using the appliance, extend the cord and inspect for any signs of damage. DO NOT use the unit if the cord has been damaged. DO NOT operate with power cord coiled or twist tie in place.
- The appliance has a polarized plug (one blade is wider than the other) as a safety feature. This plug will fit into a polarized outlet only one way. If the plug does not fit fully into the outlet, reverse the plug.
If it still does not fit, contact a qualified electrician. DO NOT attempt to defeat this safety feature. - To avoid fire or electric shock hazard, plug the appliance directly into a 120V AC electrical outlet. To avoid risk of fire, electric shock or personal injury, DO NOT use an extension cord or power strip.
- The appliance should ALWAYS be unplugged and emptied when not in operation or while being cleaned. Shut off and unplug humidifier before moving. DO NOT move or tilt humidifier while it is in operation. Plug and unplug unit with dry hands. NEVER pull by cord.
- Appliance requires regular cleaning. Refer to and follow cleaning instructions.
- DO NOT operate outdoors; this appliance is intended for indoor residential use only.
- DO NOT cover or insert objects into any openings on the unit.
- DO NOT attempt to repair or adjust any electrical or mechanical functions on this appliance. Doing so will void your warranty.
- DO NOT place in direct sunlight, high temperature areas or near computers or sensitive electronic equipment.
- DO NOT touch the nebulizer while the unit is plugged in as burns could result.
- DO NOT touch skin with exposed VapoPad or place VapoPad on furniture, fabric, bedding or plastic.
- DO NOT add any medications or essential oils (e.g. Kaz Inhalant or Vicks VapoSteam) into Mist Outlet, Base, Water Reservoir or Water Tank.
Getting to Know Your Vicks VUL525/545 Series Humidifiers
How it Works
Water is released from the Water Tank into the Reservoir. A Nebulizer vibrates at ultrasonic frequency, breaking the water into a fine mist. The mist is quietly propelled by a fan up a vertical Mist Chamber to the Mist Outlet where the cool, visible mist enters the room. This humidifier will shut off when the water level is low or when the Tank is removed from the Base.
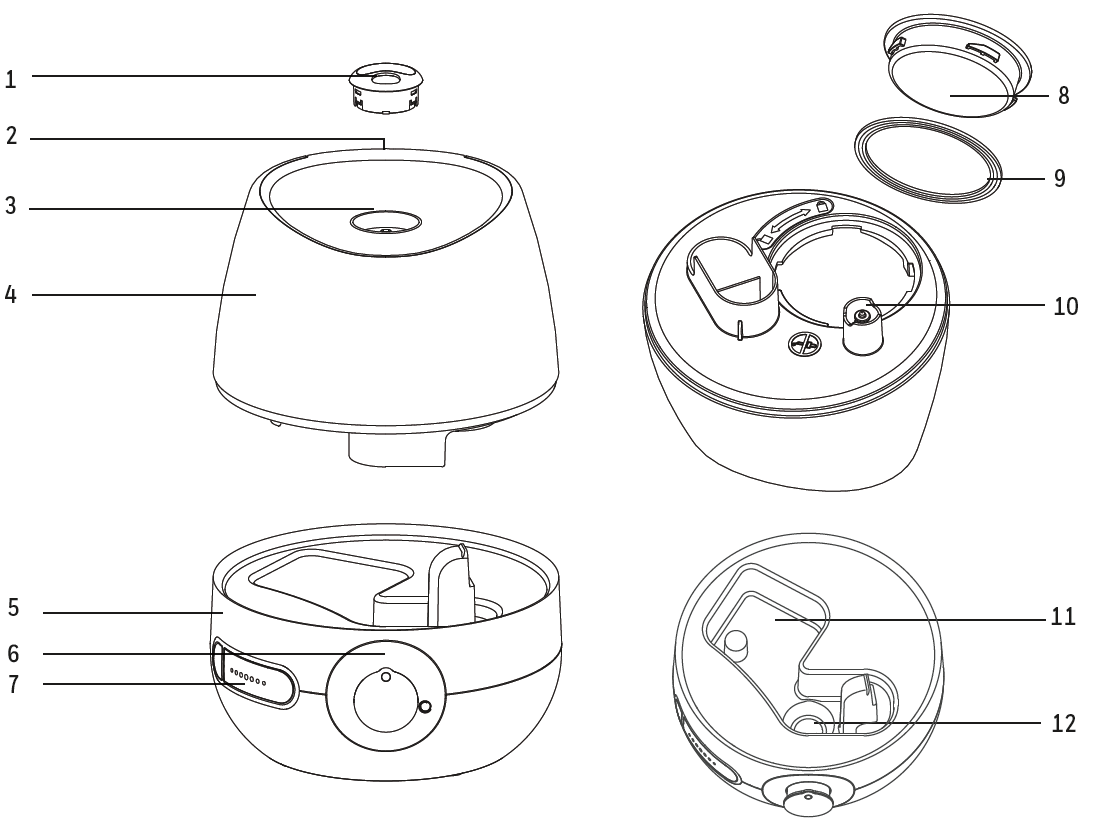
Components
- Mist Nozzle
- Tank Handle (Back of Unit)
- Mist Outlet
- Water Tank
- Base
- Power Knob
- VapoPad Door
- Tank Cap
- Gasket
- Plunger
- Reservoir
- Nebulizer
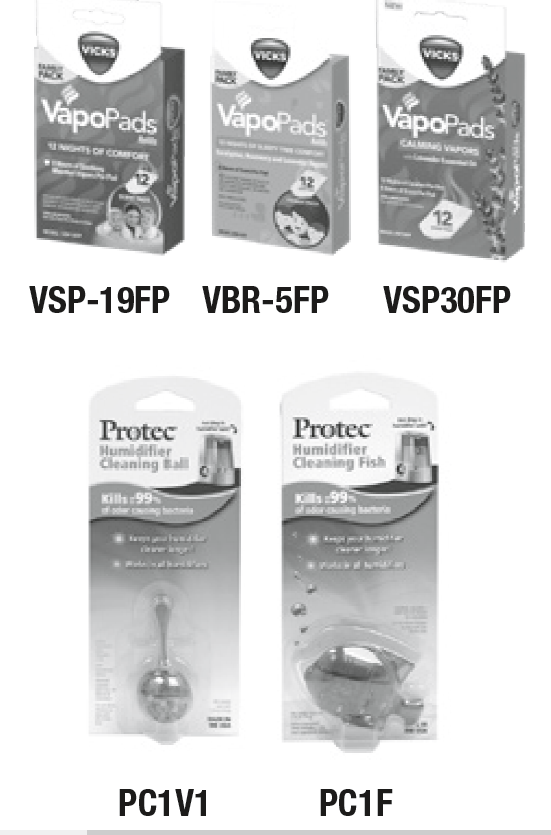
VUL525/VUL545 Series Accessories (Not Included)
The following optional accessories work great with your humidifier.
Vicks VapoPads (One menthol VapoPad sample included)
Use Vicks VapoPads with your humidifier for soothing vapors. Enjoy up to 8 hours of soothing comfort per pad. Choose from three scents: Soothing Menthol Vapors, Comforting Sleepy Time Comfort (eucalyptus, rosemary and lavender) and Calming Vapors (menthol and lavender).
Protec® Antimicrobial Cleaning Products (Not Included)
These products feature an antimicrobial, Aquastat®, that helps keep your humidifier cleaner, longer. Simply drop in the tank for fresh, cleaner mist! Benefits of using these products include:
- Kills up to 99% of odor causing bacteria
- Keeps cleaning for up to 30 days
- Contains no harmful chemicals
Setting Up Your Humidifier
Unpack the Humidifier
Keep this Owner’s Manual for reference
- Remove packaging materials. Remove twist tie from power cord and extend power cord to full length.
- Place on a firm, level, water resistant surface a minimum of 12” (30cm) from any walls. Mist should be directed away from any walls, bedding and furniture.
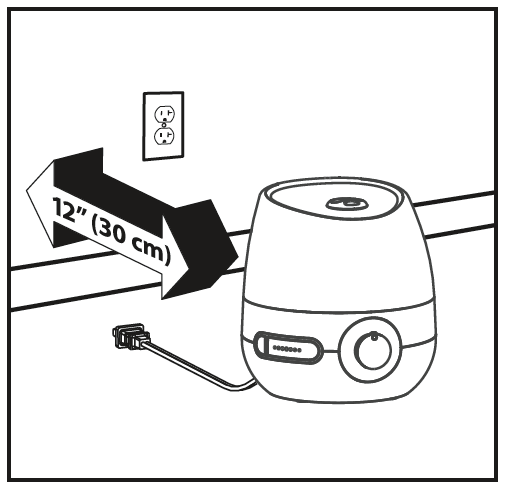
Hard Water and White Dust
- High mineral content in your water, also known as hard water, may cause a white mineral residue to accumulate on surfaces in the room near the humidifier. This mineral residue is commonly referred to as white dust. The higher the mineral content (hardness) of your water, the greater the potential that an ultrasonic humidifier may produce white dust.
- White dust is not a result of a defect or flaw in the humidifier. It is a result of the amount of minerals suspended in the water you are using.
- To reduce white dust, use distilled water or a Protec PDC51V2 Demineralization Cartridge available through Consumer Relations; see back of this manual.
Filling/Refilling
NOTE: Tank should be carried using two hands. One hand using the carrying handle located on tank top and the other hand supporting the base of the tank.
Helen of Troy will not accept responsibility for property damage caused by water spillage.
VUL525 holds 1/2 gallon (1.9L) of water and VUL545 holds 1 gallon (3.8L) of water (tank and reservoir combined).
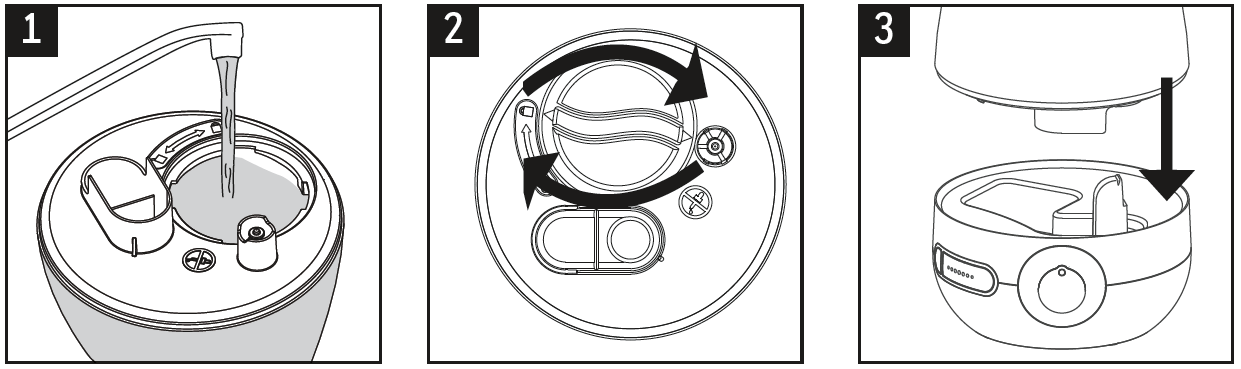
Filling
Always turn the the humidifier off before removing the Water Tank.
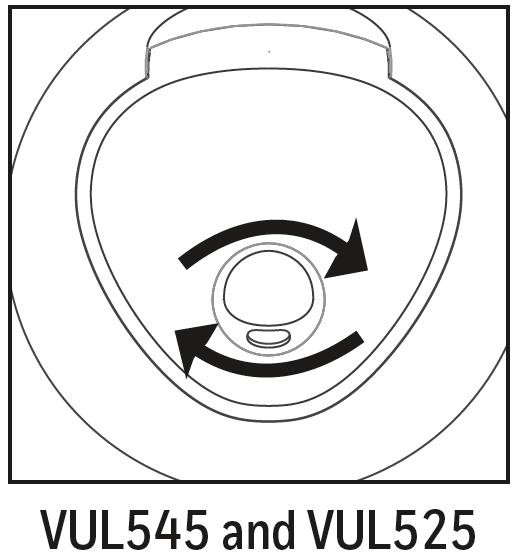
- Remove Water Tank and turn upside down. Remove Tank Cap by turning counterclockwise (left). Fill Tank with cool water. DO NOT fill with warm or hot water.
- Replace Tank Cap by turning clockwise (right), aligning arrow to lock symbol. Be sure Gasket is in place.
- Place Tank on Base. Water will drain from the Tank into the Reservoir when the Plunger is engaged.
Using Your Humidifier
NOTE: Position humidifier to direct mist output away from walls, furniture and bedding.
- With the Power Knob in the OFF position , plug the humidifier into a polarized 120V outlet.
CAUTION: TO AVOID ELECTRIC SHOCK, DO NOT PLUG HUMIDIFIER INTO AN OUTLET WITH WET HANDS. - Turn Power Knob to the right to turn on, then turn to left or right to set desired mist level.
- Humidity Level: When a comfortable humidity level is reached, turn Power Knob to a lower setting.
A comfortable humidity level is between 40-60%. Consider using a humidity monitor to display current room humidity and temperature.
CONDENSATION: If you notice condensation on the walls, windows or around the humidifier, the humidity level is too high. Open doors to the room or turn off humidifier until humidity level drops.
Mist Outlet
This humidifier features a directional Mist Outlet. Use this feature to direct the mist where you want it most.
The Outlet will rotate up to 180º.
Using Vicks VapoPads
Your humidifier can be used with Vicks VapoPads to provide up to 8 hours of soothing vapors.
One free sample of the Vicks Soothing Menthol VapoPad is included with your humidifier. To use your unit with Vicks VapoPads:
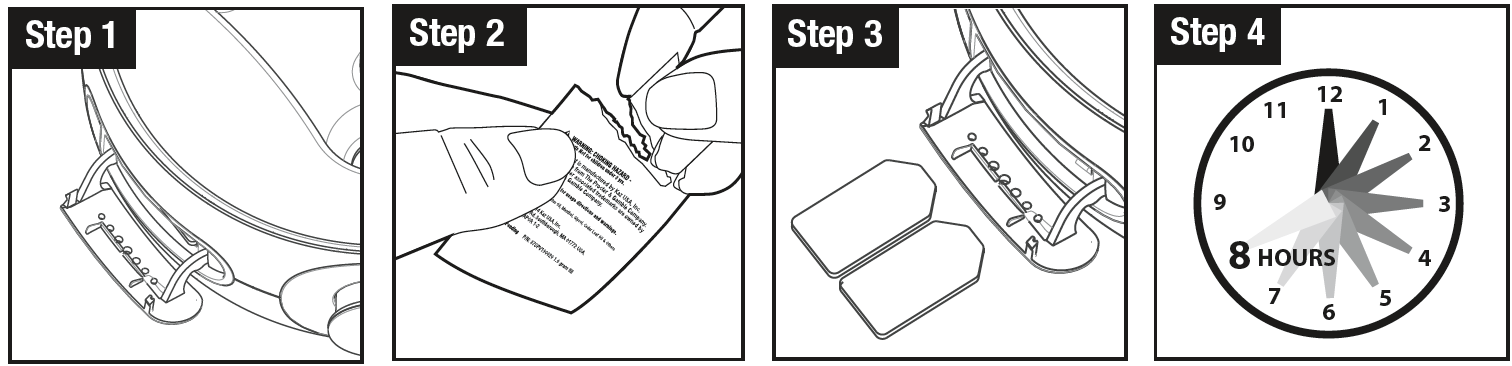
- Open VapoPad Door by pressing the button.
- Open VapoPad by tearing notch on pad bag. DO NOT touch pad with hands. If pad is touched DO NOT rub face or eyes as it may cause irritation.
- Insert Vicks VapoPad with angled end facing towards the product. Push pads into VapoPad Slot. Close door.
- After 8 hours, discard VapoPad. Push button to eject VapoPads.
To continue using VapoPads, repeat steps 1-4.
VapoPad Recommended Usage:
- Not recommended for infants under 10 lbs (4.5 kg).
- For children between 10-22 lbs (4.5-10 kg ) do not use more than 2 pads in a 24 hr period.
Scent Pad Ingredients: VSP-19, VSP-19-CAN: Eucalyptus Oil, Menthol, Glycol, Cedar Leaf Oil & Others
Using The Demineralization Cartridge:
This humidifier has been designed to be used with the Protec PDC51V2 or PDC51CV2 Demineralization Cartridge (not included). In hard water areas, use of distilled water or a demineralization cartridge with tap water will help minimize the production of white dust. Cartridges can be ordered through Consumer Relations; see back of this manual.
Daily Maintenance
For best results, use fresh clean water every day.
Weekly Cleaning
To properly clean your humidifier we recommend the separate processes of Scale Removal and Disinfecting shown below. These two processes must be performed separately.
All maintenance should be done in the kitchen or bathroom on a water resistant surface near a faucet. DO NOT wash any components of this humidifier in the dishwasher.
Instructions for Scale Removal

- Turn off and unplug the humidifier.
- Remove Water Tank from Base. Remove Tank Cap, taking care that the rubber Cap Gasket does not come off. Empty water from Water Tank and Base.
- If Antimicrobial Cleaning Product is installed, remove Antimicrobial Cleaning Product and set aside. DO NOT clean Antimicrobial Cleaning Product. This will damage the Antimicrobial Cleaning Product.
- Add 2 cups of undiluted distilled white vinegar to Water Tank. Replace Tank Cap and swish vinegar solution around in Tank. Place Tank on Base. Vinegar solution will drain into Water Reservoir and loosen mineral buildup (scale) on Nebulizer and Float as they soak in the solution. It will also loosen scale on bottom of Water Tank.
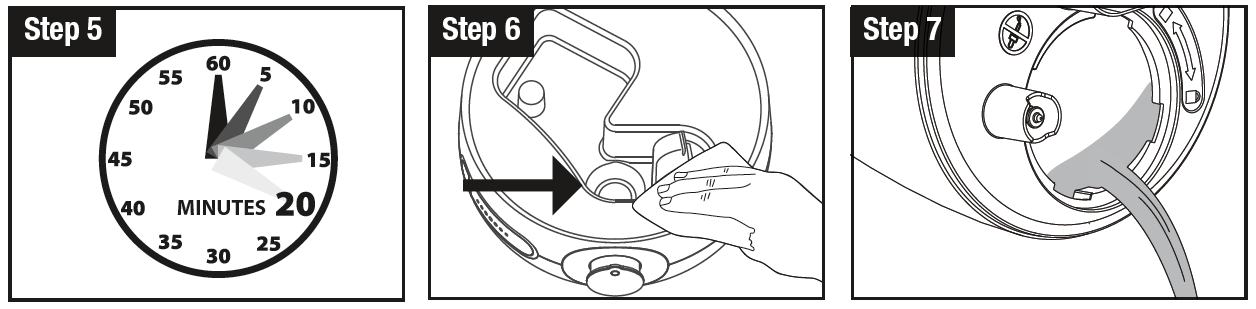
- Soak for 15-20 minutes.
- After soaking, unlock Tank Cap and pour solution out in sink. Pour solution from Water Reservoir out in sink. Wipe Nebulizer and Float with soft cloth to remove loosened mineral deposits.
- Rinse Water Reservoir and Water Tank until smell of vinegar (for Scale Removal process) or bleach solution (for Disinfecting process) is gone. Make sure water does not enter the fan opening (vented opening on right side of Reservoir) or Power Knob.
CAUTION: DO NOT SUBMERGE BASE IN WATER. DOING SO WILL DAMAGE THE HUMIDIFIER AND VOID THE WARRANTY.
Instructions for Disinfecting
Follow Steps 1-3 in Scale Removal Instructions in previous section.
For Step 4: Add ½ tsp of bleach to ½ gallon (1.9L) of water and add to Tank. Replace Tank Cap. Swish solution around in Tank. Place Tank on Base. Bleach solution will drain into Reservoir and will disinfect Reservoir and other components as they soak.
NOTE: Using more than ½ tsp of bleach to ½ gallon of water may result in damage to your humidifier.
See steps 5-7 in Scale Removal Instructions in previous section to complete Disinfecting process.
NOTE: DO NOT mix vinegar and bleach solutions together. Scale Removal and Disinfecting must be done separately.
End-Of-Season Care And Storage
Follow the CLEANING instructions when the humidifier will not be used for at least one week, or at the end of the season.
At the end of the season, remove any accessories used with the humidifier and allow the humidifier and accesories to dry completely before storing.
DO NOT store with water inside the Base, Reservoir or Tank.
Pack unit safely and store in a cool, dry location.
Consumer Relations
TO ORDER REPLACEMENT PARTS CONTACT CONSUMER RELATIONS
Call us toll-free at: 1-800-VAPOR-1-2 (1-800-827-6712)
E-mail:
Or visit our website at: www.VicksHumidifiers.com
Please be sure to specify model number VUL525 or VUL545.
NOTE: Failure to keep this unit clean from mineral deposits normally contained in any water supply will affect the efficiency of operation of this unit. Customer failure to follow these instructions may void the warranty.
Troubleshooting
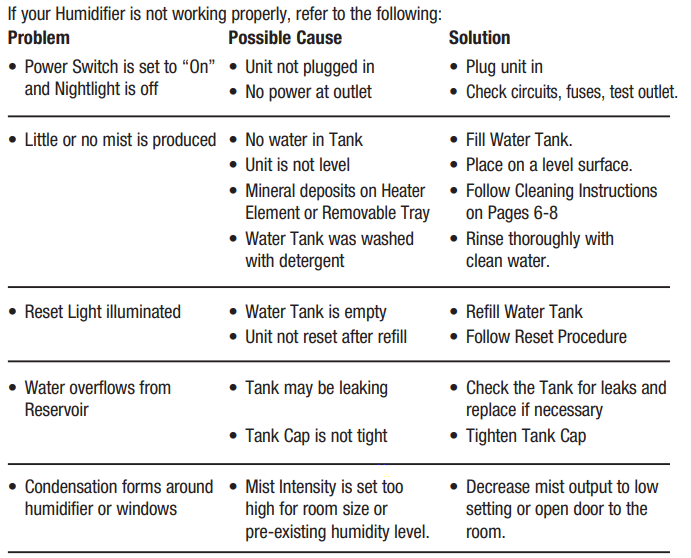
If your humidifier is not working properly, refer to the following:
Specifications
Electrical Ratings
The Vicks VUL525 and VUL545 models are rated at 120V, 60Hz., 25W.
This device complies with Part 18 of the FCC rules.
Warning: Changes or modifications to this unit not expressly approved by the party responsible for compliance could void the user’s authority to operate the equipment. This equipment has been tested and found to comply within the limits for Consumer ISM equipment, pursuant to Part 18 of the FCC rules. These limits are designed to provide reasonable protection against harmful interference in a residential installation. This equipment generates, uses and can radiate radio frequency energy, and if not installed and used in accordance with the instructions, may cause harmful interference with radio communications. However, there is no guarantee that interference will not occur in a particular installation. If this equipment does cause harmful interference to radio or television reception, which can be determined by turning the equipment off and on, the user is encouraged to try to correct the interference by one or more of the following measures:
- Reorient or relocate the receiving antenna.
- Increase the separation between equipment and receiver.
- Connect the equipment into an outlet on a circuit different from that to which the receiver is connected.
- Consult the dealer or an experienced radio TV technician for help.
2 Year Limited Warranty
YOU SHOULD FIRST READ ALL INSTRUCTIONS BEFORE ATTEMPTING TO USE THIS PRODUCT.
A. This 2 year limited warranty applies to repair or replacement of product found to be defective in material or workmanship. This warranty does not apply to damage resulting from commercial, abusive, unreasonable use or supplemental damage. Defects that are the result of normal wear and tear will not be considered manufacturing defects under
this warranty. KAZ IS NOT LIABLE FOR INCIDENTAL OR CONSEQUENTIAL DAMAGES OF ANY NATURE, ANY IMPLIED WARRANTY OF MERCHANTABILITY OR FITNESS FOR A PARTICULAR PURPOSE ON THIS PRODUCT IS LIMITED IN DURATION TO THE DURATION OF THIS WARRANTY. Some jurisdictions do not allow the exclusion or limitation of incidental or consequential damages or limitations on how long an implied warranty lasts, so the above limitations or exclusions may not apply to you. This warranty gives you specific legal rights, and you also may have other rights which vary from jurisdiction to jurisdiction. This warranty applies only to the original purchaser of this product from the original date of purchase.
B. At its option, Kaz will repair or replace this product if it is found to be defective in material or workmanship.
C. This warranty does not cover damage resulting from any unauthorized attempts to repair or from any use not in accordance with the instruction manual.
D. This warranty does not cover the filters, pre-filters, UV bulbs or other accessories (if included) except for material or workmanship defects.
Call us toll-free at 1-800-827-6712 or e-mail:
Please be sure to specify a model number.
NOTE: IF YOU EXPERIENCE A PROBLEM, PLEASE CONTACT CONSUMER RELATIONS FIRST OR SEE YOUR WARRANTY. DO NOT RETURN THE PRODUCT TO THE ORIGINAL PLACE OF PURCHASE. DO NOT ATTEMPT TO OPEN THE MOTOR HOUSING YOURSELF, DOING SO MAY VOID YOUR WARRANTY AND CAUSE DAMAGE TO THE PRODUCT OR PERSONAL INJURY.
© 2021 All rights reserved.
Kaz USA, Inc., a Helen of Troy Company 400 Donald Lynch Blvd., Suite 300, Marlborough, MA 01752
In Canada: Distributed by Kaz Canada, Inc., a Helen of Troy Company 6700 Century Avenue, Suite 210, Mississauga, Ontario L5N 6A4
www.VicksHumidifiers.com
Certain trademarks used under license from The Procter & Gamble Company or its affiliates.
Protec® is a trademark of Helen of Troy Limited.
Aquastat is a registered trademark of K2 Concepts, Inc., Atlanta, GA.
Made and printed in China.
For Responsible recycling, please visit: www.RecycleNation.com
INSTRUCTION MANUAL
VICKS Speed-ReadTM Digital Thermometer
Model V911 & V912
READ AND SAVE THESE INSTRUCTIONS
Thank you for purchasing the VICKS® Speed-ReadTM Digital Thermometer, a professionally accurate instrument for faster and easier temperature taking. Please read these instructions carefully to ensure accurate temperatures and safe operation. When used properly, this high quality product will give you years of accurate, dependable service.
IMPORTANT SAFETY INFORMATION
- High, prolonged fever requires medical attention especially for young children. Please contact your physician.
- Do not allow children to take their temperatures unattended.
- Do not allow children to walk or run during temperature taking.
If you have any questions or comments about the VICKS® Speed-ReadTM Digital Thermometer, call our toll-free Consumer Service Line: 1-800-477-0457.
TEMPERATURE READINGS
Temperature readings vary from person to person. Although there is no one “normal” temperature reading, a temperature, taken orally, ranging between 97°F and 100°F is considered normal. A rectal temperature is generally 1° higher and an underarm (axillary) temperature will be 1° lower.
The best method to determine your own normal temperature is to use the thermometer when you are feeling well. Record your reading twice a day (early morning and late afternoon). Take the average of the two temperatures. This is considered your normal body temperature. Any variation from it may indicate some sort of illness and you should consult your physician.
BEFORE USE
Your VICKS® Speed-ReadTM Digital Thermometer is a 3-in-1 thermometer for oral, rectal, or underarm use. Whichever method is used, it is recommended that for 15 minutes prior to use, avoid eating or drinking any liquids, exercising, taking showers or baths, or smoking.
PROBE COVERS
Disposable probe covers are provided with your VICKS® Speed-ReadTM Digital Thermometer. Place a cover on the probe tip each time the thermometer is used to help prevent contamination. Additional probe covers can be purchased at most drug stores or pharmacy departments.
OPERATING YOUR VICKS® SPEED-READTM DIGITAL THERMOMETER
Press the On/Off button to activate the thermometer. A beep will sound and the display will first show the LCD display test (Fig. 1). After 5 seconds, the display will be in the ready mode (Fig. 2).
ORAL USE
- Cover the thermometer’s tip with a probe cover.
- Place the probe tip well under the tongue. (Fig. 3) Place sensor tip in areas marked with “”. The mouth should remain closed during the measurement to ensure an accurate reading. Be careful not to bite the thermometer.
- When the peak temperature is reached (usually 10-20 seconds), 10 beep signals will sound and the “°F” sign will stop flashing. The temperature is now ready to read and will not change when the thermometer is removed.
- Turn the thermometer off by pressing the On/Off button. If you forget to turn it off, the thermometer will automatically turn off after approximately 10 minutes.
- Dispose of used probe cover and wash the thermometer as recommended.
UNDER-THE-ARM (AXILLARY) USE
This method is used for babies and young children but less accurate and takes longer.
- Wipe the underarm with a towel.
- Cover the thermometer’s tip with a probe cover.
- Place the probe tip under the arm so the tip is touching the skin and position your arm next to your body (Fig. 4). With a young child, it is sometimes helpful to hug the child to keep their arm next to their body. This ensures that the room air does not affect the probe.
- When the peak temperature is reached (usually 20-30 seconds but sometimes longer for this method), 10 beep signals will sound and the “°F” sign will stop flashing. The temperature is now ready to read and will not change when the thermometer is removed. Remember that this method produces a temperature 1° lower than a temperature taken orally.
- Turn the thermometer off by pressing the On/Off button. If you forget to turn it off, the thermometer will automatically turn off after approximately 10 minutes.
- Dispose of used probe cover and wash the thermometer as recommended.
RECTAL USE
Commonly used for babies, young children, or when it is difficult to take an oral or underarm temperature.
- Cover the thermometer’s tip with a probe cover and lubricate with a water-soluble jelly for easier insertion. Do not use a petroleum jelly. Read the label of the lubricant to be sure you are using the right kind.
- Lay the patient on his/her side. If the patient is an infant, the proper position for a baby is to lay on its stomach with legs hanging down, either across your knees or at the edge of a bed or changing table. This positions the infant’s rectum for safe and easy insertion of the thermometer.
- Gently insert the tip of the thermometer NO MORE THAN 1/2 inch into the rectum. If you detect resistance, stop. Hold the thermometer in place during measurement.
- When the peak temperature is reached (usually 10 seconds) 10 beep signals will sound and the “°F” sign will stop flashing. The temperature is now ready to read and will not change when the thermometer is removed.Remember that this method produces a temperature 1° higher than a temperature taken orally.
- Turn the thermometer off by pressing the On/Off button. If you forget to turn it off, the thermometer will automatically turn off after approximately 10 minutes.
- Dispose of used probe cover and wash the thermometer as recommended.
TO RECALL THE LAST TEMPERATURE
When the thermometer is turned on, continue to hold the button down approximately 2 seconds. The last measured temperature will be shown in the LCD display with the letter “M” shown under the degree sign for approximately 3 seconds, then unit will shut off.
CLEANING INSTRUCTIONS
- Clean the thermometer by washing with soap and warm water or rubbing alcohol (70% isopropyl alcohol).
- Wipe dry with soft cloth.
- DO NOT BOIL OR CLEAN IN DISHWASHER. This will cause the thermometer to no longer function and will void the warranty.
- Do not wash the unit with any thinner or chemical solvent.
CHANGING THE BATTERIES
The VICKS® Speed-ReadTM Digital Thermometer features a long life, mercury free battery. When the “” appears in the lower right of the display, the battery is exhausted and needs replacing.
- Slide the battery cap away from the unit and carefully remove the battery with a non-metallic pointed instrument.
- Replace the battery with a 1.55V, L41 alkaline or SR41 silver oxide type or equivalent. Insert the new battery with the positive (+) side facing the display side of the unit.
- Carefully slide the battery cap back into place, making sure that the cap is secure to protect the battery compartment from moisture.
- Properly discard the old battery. Keep out of reach of young children, elderly and pets.
LIFETIME WARRANTY
Your VICKS® Speed-ReadTM Digital Thermometer is durable and manufactured for a lifetime of normal, household use. Following directions carefully will ensure years of dependable operation. If for any reason (other than misuse or normal battery replacement) you are dissatisfied with your VICKS® Speed-ReadTM Digital Thermometer, we will repair or replace it, at our option, free during your lifetime.
If the thermometer does not function properly, first check the battery. Replace if necessary. If repair is necessary call our Consumer Service Department at 1-800-477-0457, email us at [email protected], or write to KAZ Thermometer Service Department, P.O. Box 698, Hudson, NY 12534, explaining just how the thermometer is improperly working. Our consumer service representative will provide further instruction on how to correct the trouble yourself or will ask you to return the thermometer for repair or replacement.
KAZ Manufacturing Quality Healthcare Products for Over 75 Years
Kaz, Incorporated • Thermometer Service Dept. • P.O. Box 698 • Hudson, NY 12534 • www.kaz.com Distributed by Kaz, Inc. under license from The Procter & Gamble Company, Cincinnati, Ohio USA. Vicks is a registered trademark of The Procter & Gamble Company.
©2001 KAZ, Incorporated
Made and printed in China
VICKS V925P-A Digital Pacifier Thermometer User Manual
READ AND SAVE THESE INSTRUCTIONS
Congratulations on your purchase of the Vicks® Digital Pacifier Thermometer. Please read these instructions carefully to ensure accurate temperatures and safe operation. When used properly, this high quality product will give you years of accurate, dependable service.
IMPORTANT SAFETY INSTRUCTIONS
WARNING: The Vicks Pacifier Thermometer is intended for use with children from birth to age 5.
- THIS UNIT IS A MEDICAL DEVICE and is not designed for use as a regular pacifier. Store out of reach of children. Do not let children play with the unit. TEMPERATURE SHOULD BE TAKEN UNDER ADULT SUPERVISION.
- Any pacifier wears out. TO PREVENT POSSIBLE CHOKING HAZARD, test the strength of the nipple by pulling on the bulb portion before each use.
- Examine the pacifier bulb before each use for cracks, tears, tackiness or other signs of wear. Discard a worn unit immediately.
- Components may be harmful if swallowed. Contact your physician immediately should this occur.
- FOR ORAL USE ONLY. Do not measure temperature at any other site.
- The thermometer nipple comes in one size (medium) intended to fit most mouth sizes. Please gauge your child’s mouth size and the nipple size prior to thermometer use. A child using a nipple that is too large has an increased risk of choking.
- Do not attempt to disassemble the unit. There are no user serviceable parts inside. The battery is not replaceable. When the battery is almost exhausted, the following symbol will appear in the display window (
 ) indicating the unit should be discarded. Do not use as a regular pacifier after the battery is discharged. To protect the environment, dispose of the thermometer at appropriate collection sites according to national or local regulations. Keep out of reach of young children, elderly and pets.
 - Do not wash the unit with any thinner or chemical solvent.
- Do not store unit in direct sunlight or at high temperature.
Overview
TEMPERATURE READINGS
This pacifier is for oral use only. Oral temperature readings are often approximately 0.2°F lower than rectal readings and 0.9°F higher than axillary (under the arm) readings.
Temperature readings vary from child to child. Although there is no singular ‘normal’ temperature reading, a temperature taken orally ranging between 97°F and 100°F is considered normal. Your child’s physician should be consulted to determine what temperature range the physician considers to be normal.
The best method to determine your child’s normal temperature is to use the thermometer when the child is feeling well. Record readings twice a day (early morning and late afternoon). Take the average of the two temperatures to calculate a normal body temperature.
OPERATING YOUR VICKS PACIFIER THERMOMETER:
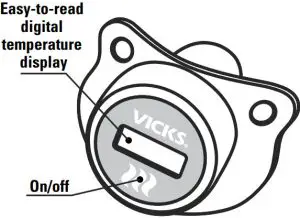
- Press the power button. The display will read (188.8
 ) confirming that the display is working.
 - If you hold the on/off button, the unit will display the last temperature reading.
- Release the power button and the display will show L°F with °F flashing. When the temperature reading reaches 90.0°F or more, the display will show an actual temperature.
- Position the pacifier bulb in child’s mouth. Note: Drinking or eating prior to use may affect reading. Measurement should be taken one half hour after eating or drinking.
- Once the degree sign (°F) on the display has stopped flashing (approx. 2 minutes), the beeper will sound 10 times, indicating that the temperature is ready to read. This reading reflects the oral temperature of the child.
Note It is recommended that the thermometer be left in the child’s mouth for 6-8 minutes to allow the nipple to warm up and to obtain a more accurate reading. This is required if the child does not pacify without interruption. - Press the power button to turn the unit off. In the event that you forget, the thermometer will automatically turn off after 10 minutes.
- Repeat this procedure as necessary if pacifying is interrupted during use.
TO RECALL THE LAST TEMPERATURE:
- Press and hold the power button while turning on the unit. The last measured temperature will be shown in the LCD display with the letter “M” shown under the degree sign in approximately 3 seconds.
- Release the power button. The thermometer will be in “ready-to-measure” mode and the recalled temperature will be erased. Note: If the device is switched off before completion of temperature taking, L°F will appear in memory the next time the unit is used.
CLEANING INSTRUCTIONS:
- Clean the pacifier thermometer by wiping it with soap and warm water or rubbing alcohol (70% isopropyl alcohol).
- Wipe dry with soft cloth. Cover thermometer with the storage case included and store in dry location.
- Store your thermometer in a dry location free from dust and contamination and away from direct sunlight.
Note Do not boil or clean in a dishwasher. This will cause the thermometer to no longer function and will void the warranty. Do not wash the unit with any thinner or chemical solvent.
SPECIFICATIONS:
| Battery Life | More than 200 hours of continuous operation. | Test Protocol (Laboratory use only) |
| Accuracy | +/-0.2°F between 98.0-102.0°F at room temperature of 71°F. | Place thermometer into a stable liquid bath with a temperature set above 95°F. The nipple of the thermometer should be approximately 2cm below the surface. |
| Temperature Range | 90.0° – 109.0°F. If less that 90.0°F an “L” is displayed. If more than 109.0°F an “H” is displayed. | Wait for 90 seconds, then turn thermometer on by pressing the blue On / Off button. The thermometer is now in standard mode. |
| Beeper | Unit will beep for approximately 8 seconds when peak temperature is reached. | When the measurement is completed (approximately 2 minutes), record the temperature reading. |
ONE YEAR LIMITED WARRANTY:
You should first read all Instructions before attempting to use this product.
- This 1 year limited warranty applies to repair or replacement of product found to be defective in material or workmanship. This warranty does not apply to damage resulting from commercial, abusive, unreasonable use or supplemental damage. Defects that are the result of normal wear and tear will not be considered manufacturing defects under this warranty. KAZ IS NOT LIABLE FOR INCIDENTAL OR CONSEQUENTIAL DAMAGES OF ANY NATURE, ANY IMPLIED WARRANTY OF MERCHANTABILITY OR FITNESS FOR A PARTICULAR PURPOSE ON THIS PRODUCT IS LIMITED IN DURATION TO THE DURATION OF THIS WARRANTY. Some jurisdictions do not allow the exclusion or limitation of incidental or consequential damages or limitations on how long an implied warranty lasts, so the above limitations or exclusions may not apply to you. This warranty gives you specific legal rights, and you also may have other rights which vary from jurisdiction to jurisdiction. This warranty applies only to the original purchaser of this product from the original date of purchase.
- At its option, Kaz will repair or replace this product if it is found to be defective in material or workmanship.
- This warranty does not cover damage resulting from any unauthorized attempts to repair or from any use not in accordance with the instruction manual.
Call us toll-free at 1-800-477-0457 or e-mail: [email protected].
Please be sure to specify a model number.
NOTE: IF YOU EXPERIENCE A PROBLEM, PLEASE CONTACT CONSUMER RELATIONS FIRST OR SEE YOUR WARRANTY. DO NOT RETURN THE PRODUCT TO THE ORIGINAL PLACE OF PURCHASE. DO NOT ATTEMPT TO OPEN THE MOTOR HOUSING YOURSELF, DOING SO MAY VOID YOUR WARRANTY AND CAUSE DAMAGE TO THE PRODUCT OR PERSONAL INJURY.
© 2016 All rights reserved.
Kaz USA, Inc., a Helen of Troy Company, Marlborough, MA 01752
This product is distributed under license from The Procter & Gamble Company. VICKS and other associated trademarks are owned by The Procter & Gamble Company
Visit: www.kaz.com
Printed in China
Helen of Troy
CREATIVE DEPARTMENT ARTWORK SPECIFICATIONS
- Brand: Vicks
- Category: Owners Manual
- Models: V925P-A-V
- Die Line Part #: NA
- Oracle Desc. : OWNER’S MANUAL,KAZ Artwork,
V925P-A-V - Subject: owners manual
- Region: US
- Size: IN: W4.75 x H7.375
MM: W120.65 x H187.45 - Scale: 1/1
- Material: 45# Matte Text
- Page count: NA
- Revision: 4
- Date: 24MAR16
- Release Date: 28MAR16
- Rerelease Date:
Colors:
Dielines (Do not print) / Spot Colors

Coating: Overall Gloss

Varnish: Spot UV

Special Instructions:
Quality Requirement of Artwork and Quality Clarification Process of Artwork Printing: Meet Eng-QS-06&02
Kaz USA, Inc., a Helen of Troy Company
Creative Services
Marlborough, MA 01752, USA
+1 508 490 7000
INSTRUCTION MANUAL
VICKS Digital Thermometer
Model: V900 & V901
READ AND SAVE THESE INSTRUCTIONS
Thank you for purchasing the VICKS® Digital Thermometer, a professionally accurate instrument for faster and easier temperature taking. Please read these instructions carefully to ensure accurate temperatures and safe operation. When used properly, this high quality product will give you years of accurate, dependable service.
IMPORTANT SAFETY INFORMATION
- High, prolonged fever requires medical attention especially for young children. Please contact your physician.
- Do not allow children to take their temperatures unattended.
- Do not allow children to walk or run during temperature taking.
If you have any questions or comments about the VICKS® Digital Thermometer, call our toll-free Consumer Service Line: 1-800-477-0457.
TEMPERATURE READINGS
Temperature readings vary from person to person. Although there is no one “normal” temperature reading, a temperature, taken orally, ranging between 97°F and 100°F is considered normal. A rectal temperature is generally 1° higher and an underarm (axillary) temperature will be 1° lower.
The best method to determine your own normal temperature is to use the thermometer when you are feeling well. Record your reading twice a day (early morning and late afternoon). Take the average of the two temperatures. This is considered your normal body temperature. Any variation from it may indicate some sort of illness and you should consult your physician.
BEFORE USE
Your VICKS® Digital Thermometer is a 3-in-1 thermometer for oral, rectal, or underarm use. Whichever method is used, it is recommended that for 15 minutes prior to use, avoid eating or drinking any liquids, exercising, taking showers or baths, or smoking.
PROBE COVERS
Disposable probe covers are provided with your VICKS® Digital Thermometer. Place a cover on the probe tip each time the thermometer is used to help prevent contamination. Additional probe covers can be purchased at most drug stores or pharmacy departments.
OPERATING YOUR VICKS® DIGITAL THERMOMETER
Press the On/Off button to activate the thermometer. A beep will sound and the display will first show the LCD display test (Fig. 1). To show the last recorded temperature, continue to hold the button down approximately 2 seconds. After 5 seconds, the display will be in the ready mode (Fig. 2).
ORAL USE
- Cover the thermometer’s tip with a probe cover.
- Place the probe tip well under the tongue. (Fig. 3) Place sensor tip in areas marked with “TIK MARK”. The mouth should remain closed during the measurement to ensure an accurate reading. Be careful not to bite the thermometer.
- When the peak temperature is reached (usually 60 seconds), a beep signal will sound and the “°F” sign will stop flashing. The temperature is now ready to read and will not change when the thermometer is removed.
- Turn the thermometer off by pressing the On/Off button. If you forget to turn it off, the thermometer will automatically turn off after approximately 10 minutes.
- Dispose of used probe cover and wash the thermometer as recommended.
UNDER-THE-ARM (AXILLARY) USE
This method is used for babies and young children but less accurate and takes longer.

- Wipe the underarm with a towel.
- Cover the thermometer’s tip with a probe cover.
- Place the probe tip under the arm so the tip is touching the skin and position
your arm next to your body (Fig. 4). With a young child, it is sometimes helpful
to hug the child to keep their arm next to their body. This ensures that the room
air does not affect the probe. - When the peak temperature is reached (usually 60 seconds but sometimes
longer for this method), a beep signal will sound and the “°F” sign will stop
flashing. The temperature is now ready to read and will not change when the thermometer is removed. Remember that this method produces a temperature 1° lower than a temperature taken orally. - Turn the thermometer off by pressing the On/Off button. If you forget to turn it off, the thermometer will automatically turn off after approximately 10 minutes.
- Dispose of used probe cover and wash the thermometer as recommended.
RECTAL USE
Commonly used for babies, young children, or when it is difficult to take an oral or underarm temperature.
- Cover the thermometer’s tip with a probe cover and lubricate with a water-soluble jelly for easier insertion. Do not use a petroleum jelly. Read the label of the lubricant to be sure you are using the right kind.
- Lay the patient on his/her side. If the patient is an infant, the proper position for a baby is to lay on its stomach with legs hanging down, either across your knees or at the edge of a bed or changing table. This positions the infant’s rectum for safe and easy insertion of the thermometer.
- Gently insert the tip of the thermometer NO MORE THAN 1/2 inch into the rectum. If you detect resistance, stop. Hold the thermometer in place during measurement.
- When the peak temperature is reached (usually 60 seconds) a beep signal will sound and the “°F” sign will stop flashing. The temperature is now ready to read and will not change when the thermometer is removed. Remember that this method produces a temperature 1° higher than a temperature taken orally.
- Turn the thermometer off by pressing the On/Off button. If you forget to turn it off, the thermometer will automatically turn off after approximately 10 minutes.
- Dispose of used probe cover and wash the thermometer as recommended.
TO RECALL THE LAST TEMPERATURE
When the thermometer is turned on, continue to hold the button down approximately 2 seconds. The last measured temperature will be shown in the LCD display with the letter “M” shown under the degree sign for approximately 3 seconds.
CLEANING INSTRUCTIONS
- Clean the thermometer by washing with soap and warm water or rubbing alcohol (70% isopropyl alcohol).
- Wipe dry with soft cloth.
- DO NOT BOIL OR CLEAN IN DISHWASHER. This will cause the thermometer to no longer function and will void the warranty.
- Do not wash the unit with any thinner or chemical solvent.
CHANGING THE BATTERIES
The VICKS® Digital Thermometer features a long life, mercury free battery. When the “/” appears in the lower right of the display, the battery is exhausted and needs replacing.
- Slide the battery cap away from the unit and carefully remove the battery with a non-metallic pointed instrument.
- Replace the battery with a 1.55V, L41 alkaline or SR41 silver oxide type or equivalent. Insert the new battery with the positive (+) side facing the display side of the unit.
- Carefully slide the battery cap back into place, making sure that the cap is secure to protect the battery compartment from moisture.
- Properly discard the old battery. Keep out of reach of young children, elderly and pets.
LIFETIME WARRANTY
Your VICKS® Digital Thermometer is durable and manufactured for a lifetime of normal, household use. Following directions carefully will ensure years of dependable operation. If for any reason (other than misuse or normal battery replacement) you are dissatisfied with your VICKS® Digital Thermometer, we will repair or replace it, at our option, free during your lifetime.
If the thermometer does not function properly, first check the battery. Replace if necessary. If repair is necessary call our Consumer Service Department at 1-800-477-0457, email us at [email protected], or write to KAZ Thermometer Service Department, P.O. Box 698, Hudson, NY 12534, explaining just how the thermometer is improperly working. Our consumer service representative will provide further instruction on how to correct the trouble yourself or will ask you to return the thermometer for repair or replacement.
]]>