User Manual
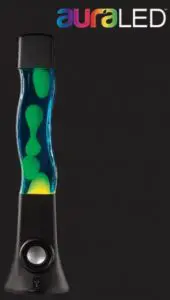
Aura Twisted Lava Lamp
INTRODUCTION & FEATURES
Enjoy a fun and soothing psychedelic glow to the sound of your favorite music with the aura LED Lava Lamp Bluetooth Speaker by Izumi. This 165-inch speaker features a wavy tube shape and AUX or Bluetooth connectivity to accompany your media from any device with a colorful green and blue ambiance
PACKAGE CONTENTS
- 1 x Lava Lamp Bluetooth Speaker
- 1 x Micro-USB Charging Cable
- 1x 35 mm AUX Cable
BLUETOOTH LAVA LAMP
- Colorful & Soothing Liquid Wax Motion Display
- Perfect for Bedrooms, Parties & More
- Bluetooth Connectivity for Smartphones & Smart Devices
- Provides Relaxing Soft Light: Great for Kids & Night Lights
PARTS AND FEATURES
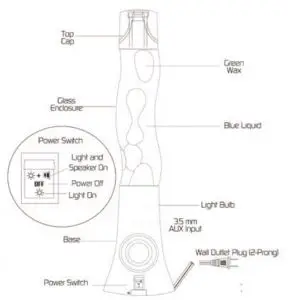
USING YOUR LAVA LAMP
NOTE: This lamp operates at a very warm temperature Never touch the unit once it is plugged in turned on
STEP I: POSITION THE LAMP.
- The lamp and its reflector may become off-center during shipping Check and, if necessary re-center before plugging in the lamp.
- Choose a position away from extreme cold or warm temperatures such as heating or air conditioning vents
- Make sure the lamp is positioned on a solid stationary flat surface and that it is not at risk for falling
STEP 2: CONNECT THE LAMP TO POWER
- Locate an AC wall plug and insert the power plug securely
- Flip the power switch to the ON position (see diagram for reference.
- If necessary, allow the lamp to reach room temperature before turning it on .
- The lamp will take between land 3 hours to warm up to a proper starting temperature
STEP 3: CONNECT TO MEDIA.
- Bluetooth Connection Tum the lamp on and activate Bluetooth pairing from your device’s Settings menu Search for the device name ‘Aura Lava Lamp and select to connect. Youll immediately be able to control media using your device
- AUX Connection Connect the included 35 mm AUX cable to the AUX port on the side of the unit (see diagram for reference Once connected, Insert the other 35 mm head into your device’s audio jack You may now control the media and volume from your device
CLEANING, STORAGE & TIPS FOR USE
- Keep the area around your lava lamp free of clutter that could catch fire, including books, stray papers or posters. .
- Only use fine glass cleaner and a soft cloth to clean your lamp Never use harsh chemical cleaners
- Always unplug your lamp from the power source before cleaning,
- Before carrying/transporting the lamp, check to make sure the wax is completely flat and solidified,
- If you plan to store your lamp for long periods of time, ensure that the unit does not reach temperatures below freezing Store the lamp in its original box. Only store your lava lamp on a cool dry and flat surface Wrap the card around the base of the lamp and keep away from moisture .
- During operation be sure to never move or shake the lamp to avoid permanent damage
- Never heat up or cool down the lamp artificially Doing so could permanently damage the unit,
- The space at the top of the vase is provided for liquid expansion. Do not break the seal of the cap to fill it with liquids or solids
- The color of the wax menu begin to fade slightly after 2-3 uses. If the room temperature is high the wax may overheat resulting in smaller bubbles/formations that float to the top of the vase if the operating temperature is too low, the wax will stay in the bottom of the vase without floating if this happens, wait until the room temperature is back to the designated range before restarting the unit.
PRODUCT SPECIFICATIONS
- Bluetooth Version 42
- Light Bulb: 64/35W
- Speaker Rated Power: 5W
- Impedance: 40
- Sensitivity: s 3%
- Frequency Response: 100Hz – 18,000 Hz
- Working Distance: s 10 m (33 ft)
- Power Consumption: AC 120 V
- Unit Dimensions: 44 x 4 4 x 16 % in
- Colors: Green Wax in Blue Liquid
WARNINGS & SAFETY PRECAUTIONS
- This lamp is not a toy and should be kept out of reach of children and pets.
- Do not attempt to disassemble or modify your unit in any way.
- Keep the unit away from all heal sources, including direct sunlight and heating vents.
- Do not expose the lamp to humidity, water, or any other liquid Do not expose to extremely hot or extremely cold temperatures/conditions.
- Do not ingest the lava lamp’s liquid contents Doing so could cause harm or injury to the user.
- Never touch a lava lamp that is turned on or has been used recently Lamps become hot and can cause severe burns
- Never use your lava lamp if it has a damaged cord or plug if it is not working properly if it has been dropped or damaged, or dropped into water.

tzumi aura LED Twisted Lava Lamp Speaker. Distributed by tzume inc. NY, NY, 10016. Copyright 2019 tzumi. All Rights Reserved. Made in China Samsung and Galaxys are both registered trademarks of Samsung Electronics Co. Ltd. All pictures shown are for illustration purpose only. Actual product may vary due to product enhancement. Other trademarks and trade names on this package are those of their respective owners.
FCC Statement:
This device complies with Part 15 of the FCC rules. Operation is subject to the following two conditions: 1) this device may not cause harmful interference, and 2) this device must accept any interference received, including interference that may cause undesired operation.
Note: This equipment has been tested and found to comply with the limits for a Class B digital device, pursuant to part 15 of the FCC Rules. These limits are designed to provide reasonable protection against harmful interference in a residential installation.
This equipment generates uses and can radiate radio frequency energy and, if not installed and used in accordance with the instructions, may cause harmful interference to radio communications.
However, there is no guarantee that interference will not occur in particular installation. If this equipment does cause harmful interference to radio or television reception, which can be determined by turning the equipment off and on the user is encouraged to try to correct the interference by one or more of the following measures:
- Reorient or relocate the receiving antenna.
- Increase the separation between the equipment and receiver.
- Connect the equipment into an outlet on a circuit different from that to which the receiver is connected.
- Consult the dealer or an experienced radio/TV technician for help.
Changes or modifications not expressly approved by the party responsible for compliance could void the user’s authority to operate the equipment. FCC Radiation Exposure Statement This device complies with FCC RF radiation exposure limits set forth for an uncontrolled environment. This transmitter must not be co-located or operating in conjunction with any other antenna or transmitter.
]]>
Wireless Charging Alarm Clock User Guide
The wireless charging alarm clock can charge your phone and wake you up right on time as well. it features a modernly designed LED along with a wireless charging base that charges and powers your smartphones, Air Pods and other compatible devices through the night. The display brightness can be adjusted tor maximal comfort via the friendly and easy to use buttons.
Package Contents
- Alarm clock
- USB cable
- Manual
Product Overview and Function
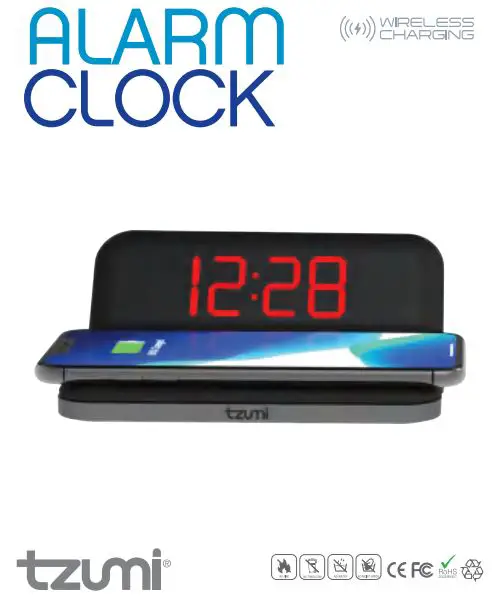
- Easy to use settings
- LED digital display
- Wirelessly charges smartphones and other compatible devices.
Getting Started
1. Powering the Unit
• Plug in the Micro USB cable into the charging port and the other end into a USB power source.
2. Setting the Clock
- Press and hold the time button tor 2 seconds until the time flashes to enter the time setting mode
- Press the time button again then press the button to switch the time from 12-hour mode to the 24-hour mode.
- Press the time button again to enter the hour setting mode
- Press the alarm button again then press the + or – button to adjust the hours.
- Press the time button again to enter the minutes setting mode
- Press the + or – buttons to adjust the minutes
- Press the time button again to confirm the time
3. Adjusting the Display Brightness
• Press and hold the button to cycle thru the 3 display brightness levels
3. Adjusting the Display Brightness
- Press and hold the button to cycle thru the 3 display brightness levels
- Press the alarm button again then press the + or – button to adjust the hours.
- Press the alarm button age in to enter the minutes setting mode
- Press the + or – buttons to adjust the minutes
- Press the alarm button again to confirm the alarm time
- Press the alarm button twice to turn the alarm ON or OFF
Note: When the alarm rings, press the alarm button to turn the alarm OFF or press any other button to snooze the alarm for 5 minutes.
Wireless Charging
- The charging pad supports Qi compatible phones, Air Pods and other devices
- When charging a device, the charging indicator light will light-up.
- if there is a foreign object on the wireless charging pad the status light will blink repeatedly
Specifications
Size: 14.15 x 12.67 x 5.45 cm
Weight: 156g
Voltage: 9V 2A
Max Power: 10W
Wireless Charging: 10W
Materia: ABS + PC
Safeguards
Please note improper use of this unit can result in potential electric shock or fire hazard. Please read and follow the safety instructions carefully before installation and use.
- This unit should not be used near water far example near a bathtub, kitchen sink, laundry tub or wet basement. it poses serious risk of electric shock.
- The unit should be kept away from heat sources such as radiators, heat registers or other appliances that emit heat.
- The unit should only be connected to a power supply described in the operating instructions.
- The unit should be serviced by a qualified service personnel if it is damaged or does not operate normally. Do not attempt to fix it on your own.
- To reduce the risk of electric shock do not expose this product to rain or moisture
tzumi” Distributed by tzumi Inc. NY, NY, 10016. 0 Copyright 2019 tzumi. AII Rights Reserved. Made In China.
AII pictures shown are for illustration purpose only. Actual product may vary due to product enhancement.
Other trademarks and Tracie names on this package are those of their respective owners.
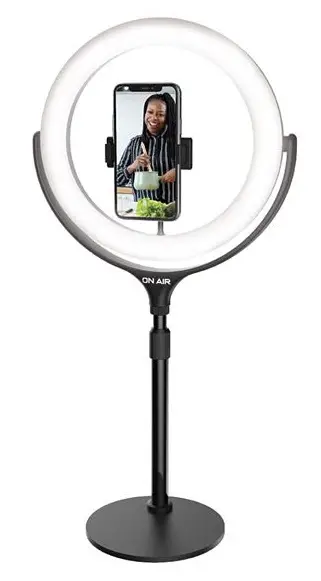
INTRODUCTION & FEATURES
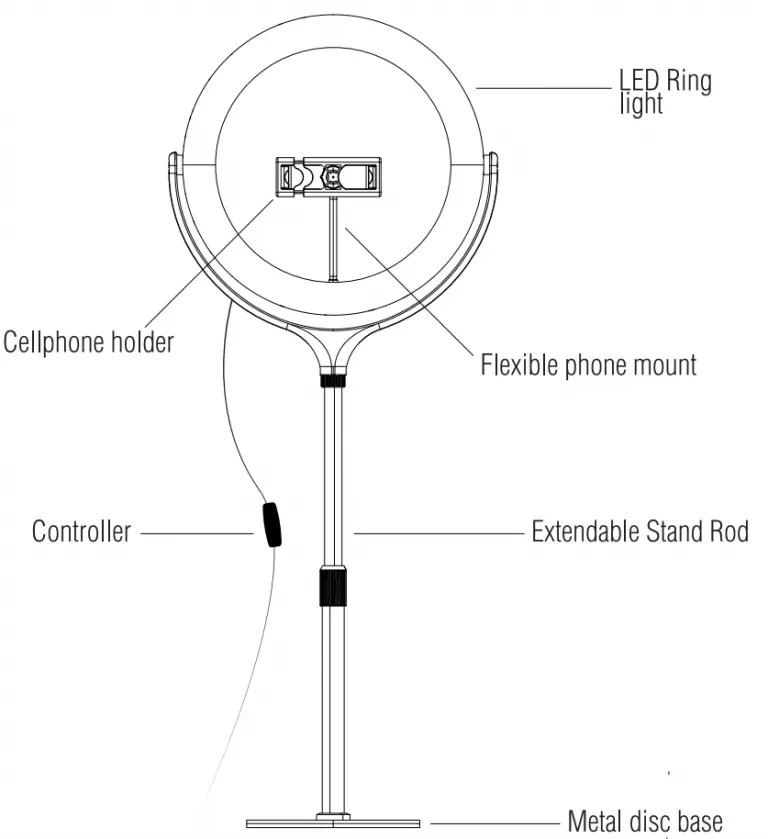
HaloGlowXL is a professional lighting solution for your vlogs, selfies, video calls and more. Its sleek design features a flexible phone mount, an ultra-bright LED ring light and a sturdy 7″ round base. The in-line, USB powered remote features multiple light settings for the perfect glow every time.
USER INSTRUCTIONS
- Place metal disc base on flat surface and screw in stand rod clockwise until it is firmly secured.
- Screw the LED ring light clockwise to the top of the stand rod until firmly secured.
- Place your smartphone into the phone mount and adjust the angle to your liking.
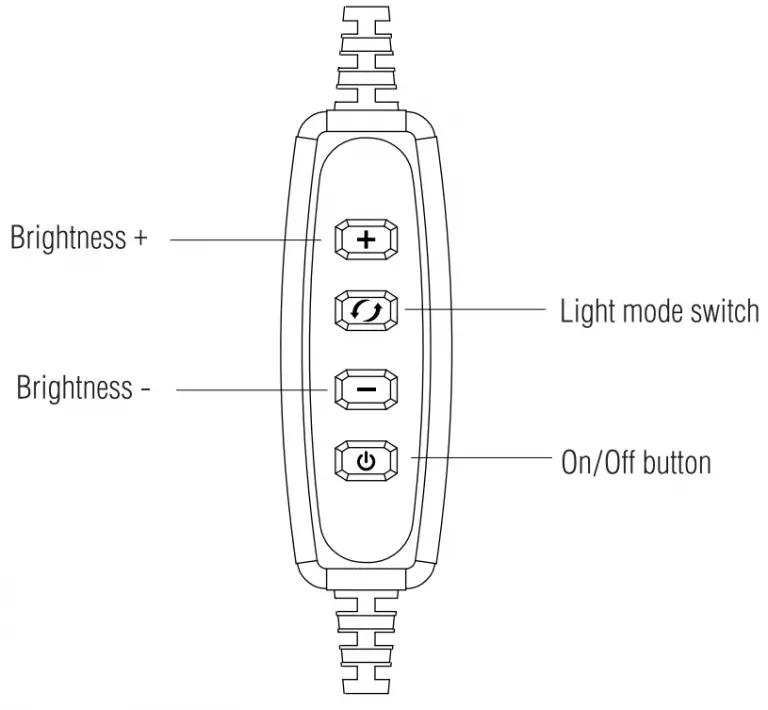
- Plug the remote cord into any USB power source and press 1 the power button “
 “
“ - The LED light will be at the first brightness setting. To increase the Brightness, press”+” up lo 9 more times.
- To decrease brightness, press”-” until the desired setting is reached.
- To rotate between the three light modes white/warm/mixed) press “
 “
“
PRODUCT OVERVIEW & FUNCTIONS

CONTROLLER
PACKAGE CONTENT
- 10″ LED ring light
- User manual.
SPECIFICATIONS
- Power: 25W
- Size: 18x80cm
- Material . ABS/PC/Metal rod
- Charging Port: USB
- LED Lamp Beads: 140pcs
- Power Supply Mode: DC 5V 2A
TROUBLESHOOTING
If the unit malfunctions, do not attempt to repair it yourself.
Doing so will violate the Izumi Warranty and may cause permanent damage. Instead, contact the Customer Support team at tzumi.com/support for assistance.
©Copyright 2019. All Rights Reserved. Made In China

INTRODUCTION & FEATURES
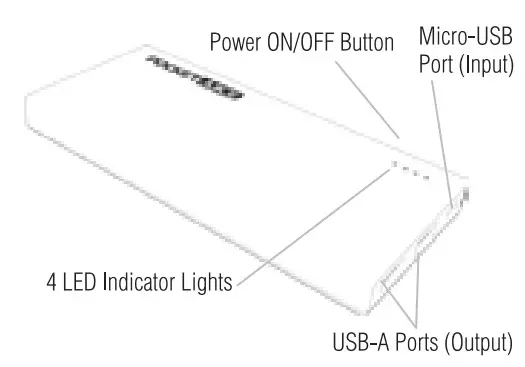
The PockeUuice is the perfect portable charger for powering USB devices on the go, everywhere from vacations and business trips to the daily commute. This slim, lightweight power bank comes pre-charged and is equipped with a scratch-proof rubberized shell for portability and a comfortable grip. Its 8,000 mAh powerful lithium-polymer battery charges devices up to 5 times and features 4 LED battery status indicators for peace of mind. Wherever you go, PocketJuice chargers provide a fast, durable, and streamlined charging experience to rely on.
PACKAGE CONTENTS:
1 x 8,000 mAh Pocket Juice
1x Micro-USB Charging Cable
User Manual
PRODUCT OVERVIEW & FUNCTIONS

- USB Output: DC 5V/ 2.4A; Micro-USB Input: DC 5V/2A
- Rechargeable Lithium-Polymer Battery
- 8,000 mAh Capacity Powers Most Smartphones up to 5x
- 4 LED Battery Status Indicator Lights
CHARGING YOUR POCKETJUICE CHARGER
NOTE: Your PocketJuice charger comes pre-charged. Some [of the battery life may have been reduced during transit, in which case you should fully recharge the unit before j using for the first time.
Quick Power Test: To test your charger’s battery level, press the Power ON/OFF button and refer to the chart on the previous page.
CHARGING VIA AC WALL ADAPTER
Using the provided Micro-USB cable, connect your charger (via Micro-USB port) to an AC Wall adapter (USB port).
CHARGING VIA COMPUTER USB
Using the provided Micro-USB cable, connect your charger (via Micro-USB port) to a computer or laptop (USB port).
It takes approx. 3-5 hours to fully charge a PocketJuice Portable Charger from a depleted battery level. Once the charging process begins, the LED Indicator Lights will illuminate according to the power level (see chart).

During the charging process, the LED Indicator Lights will remain lit until you disconnect your charger unit from the power supply.
NOTE: When fully charged, the PocketJuice 8,000 mAh Portable Charger can power most devices up to 5 times. The number of charge times varies depending on your device’s battery capacity and the age/condition of your PockeUuice.
CHARGING YOUR SMARTPHONE OR OTHER PORTABLE DEVICE
NOTE: For best performance, make sure your PocketJuice power bank is fully charged. Refer to opposite page for charging instructions.
- Connect one end of a USB charging cable (such as the included Micro-USB cable or your device’s original cable) to your phone/device and the USB-A head into your PocketJuice charger.
- Turn your power bank on by pressing the Power ON/OFF button. The charging process will begin immediately. Charge times vary by device (your device should display progress).
- When your device is fully charged, disconnect.
SPECIFICATIONS
Battery Capacity: 8,000 mAh
Battery Type: Rechargeable Lithium-Polymer
Input: DC 5V/2A
Output: DC 5V/2.4A Max
SAFEGUARDS:
- Do not piece, strike, or apply strong pressure with sharp or heavy objects. Strong impact and shocks can cause irreversible damage to the unit.
- Do not operate if the battery has been exposed to any kind of liquid or if it is visibly weVhioist
- The battery should always be charged under adult supervision. Never leave with children unattended. Always remember to shut the unit off when it is not in use.
- Do not expose the unit to extremely high or low temperatures or high pressure. Avoid exposure to direct sunlight, fire, or locations such as the inside of a hot car. Exposure may cause the battery to generate heat, ignite, or explode. Using in this manner may also result in a loss of performance or shortened life expectancy.
- Do not attempt to disassemble or modify the unit in any way. Doing so violates any warranty in place. Immediately discontinue use if, while charging or storing, the battery emits an unusual odor or smoke, feels hot, has a叩eared to change in color or shape, or appears abnormal in any other way.
- If this does occur, contact the tzumi Customer Support Team at tzumi.com/support.
!WARNING! LITHIUM-POLYMER BATTERY
Lithium-polymer cells and battery packs may get hot, ignite or explode if exposed to abuse conditions; this can cause serious injury to the user. Follow all instructions carefully to ensure the safe operation of your PocketJuice Portable Charger.
If you have any questions or concerns about the operation or the precautionary measures listed below, feel free to contact our Customer Support Team at tzumi.com/support.
REMEMBER TO RECYCLE!
Never dispose of batteries in the garbage. Your PocketJuice Is recyclable and should be disposed of at your local battery [recycling center. To learn more information about how teumi recycles and to find the battery recycling centers closest to -you, visit tzumi.com/recycle.
Tzumi Distributed by tzumi inc. NY, NY, 10016.
Copyright 2019 tzumi. All Rights Reserved. Made In China.
All pictures shown are for illustration purposes only. Actual products may vary due to product enhancement. 0iher trademarks and trade names on this package are those 0f their respective owners.
tzumi 8226 Aquaboost Boom Bluetooth Speaker User Guide
FEATURES
Get all the bass you need in this portable, versatile Bluetooth speaker. The AquaBoost Boom Speaker features an easy to control interface, hands-free chatting via your mobile phone, and the ability to play music via MicroSD cards and USB flash drives. Let the music flow!
- Crystal clear audio and rich bass
- Play music via Bluetooth, MicroSD or USB
- Hands-free chatting via Bluetooth
- 3-4 hours of playback time
- Play up to 33ft away
WHAT’S INCLUDED
- Wireless Bluetooth Speaker
- 2-in-l Micro-USB and AUX Cable
- User Guide
PRODUCT OVERVIEW
- Power 5 . MiaoSD/rF card Slot
- Play/Pause(TWS/Hands-Free 6. USS Port
- Volume Down/PreviousTrack 7 . Micro-USS Charging Port
a. Volume Down: Press and hold 8. LED Indicator
b. Previous Track: Press - Volume Up/Next Track
a. Volume Up: Press and hold

PAIRINCi THE SPEAKER TO A BLUETOOTH DEVICE
- Press and hold the power button for 3 seconds to turn the speaker ON. a. The AquaBoost will automatically be in pairing mode when turned ON.
- Open your device Bluetooth menu and select”AquaBoost Boom”.
- You will hear a tone to confirm that your device has successfully paired to the speaker.
- You are now ready to go. Be sure to turn the speaker OFF when you are done to conserve battery life.
CHARGING THE SPEAKER
- Use the included Micro-USB charging cable to connect the speal<er to a USB power source.
• A LED indicator light will turn soild red while charging. - The LED indicator light will turn off once fully charged.
- Be sure to disconnect the cable when charging is finished.
USING THE SPEAKER
- After pairing to a Bluetooth device, inserting a MicroSD card or attaching a USB flash drive, the speaker will automatically detect the music source and will be ready to play.
- f there is more than one music source available. press the Power button to switch between sources.
- Press the Play /Pause button to play /pause the music.
- Press the · +’ button to go to the next song/track or the ‘-‘ button to retract to the previous song/tracl<.
- Press and hold the·+· or·-· buttons to increase or decrease the speaker volume. SPECIFICATIONS
TWSMODE
- This speaker can be linl<ed to a second speaker to create a HD sound system.
- To use this function, you must have a second speaker the same model as this (8226).
- Before pairing the speaker to a device, press and hold the M button on both speal<ers to link them to each other.
- Once linl<ed, proceed with ‘PAIRING THE SPEAKER TO A BLUETOOTH DEVICE’ section.
GENERAL TIPS
- The MicroSD card port reads MicroSD cards to play music.
- The USB Port reads USB flash drives to play music
- The speaker will reconnect automatically once turned on if your device has previously been paired.
- It should take about 3 hours to fully charge the speal<er.
FCC Warning
Any Changes or modifications not expressly approved by the party responsible for compliance could void the user’s authority to operate the equipment.
This device complies with part 15 of the FCC Rules. Operation is subject to the following two conditions: (1)
This device may not cause harmful interference, and (2) this device must accept any interference received, including interference that may cause undesired operation.
This equipment has been tested and found to comply with the limits for a Class B digital device, pursuant to part 15 of the FCC Rules. These limits are designed to provide
reasonable protection against harmful interference in a residential installation. This equipment generates, uses and can radiate radio frequency energy and, if not installed and used in accordance with the instructions,
may cause harmful interference to radio communications.
However, there is no guarantee that interference will not occur in a particular installation. If this equipment does cause harmful interference to radio or television reception, which can be determined by turning the
equipment off and on, the user is encouraged to try to correct the interference by one or more of the following measures:
—Reorient or relocate the receiving antenna.
—Increase the separation between the equipment and receiver.
—Connect the equipment into an outlet on a circuit different from that to which the receiver is connected.
—Consult the dealer or an experienced radio/TV
FCC Radiation Exposure Statement:
This equipment complies with FCC radiation exposure limits set forth for an uncontrolled environment .This equipment should be installed and operated with
minimum distance 20cm between the radiator & your body.
ISEDC warning
This device complies with Innovation, Science, and Economic Development Canad licence-exempt RSS standard(s). Operation is subjectto the following two conditions:
(1) this device may not cause interference, and
(2) this device must accept any interference, including interference that may cause undesired operation of the evice.
SPECIFICATIONS
Playback Time: 3-4 hours
Music Playback: MP3, WMA, WAV
Charge Time: 3 hours
Charging Type: Micro-USB
Output Power: BW
Worldng Distance: 33ft
Battery: 3.7/ /l200mAh (rechargeable)
Weight: 15 ounces
PRECAUTIONS
- Keep away from liquids.
- Do not take apart.
If you have any other questions or issues with product use or care, please contact tzumi Technical Support at: 1-855-GO-TZUMI or [email protected]
Specifications
| Feature | Description |
|---|---|
| Crystal clear audio and rich bass | Provides high-quality sound with rich bass |
| Play music via Bluetooth, MicroSD or USB | Can play music from different sources, including Bluetooth, MicroSD cards, and USB flash drives |
| Hands-free chatting via Bluetooth | Allows for hands-free phone calls via Bluetooth connection |
| 3-4 hours of playback time | Provides 3-4 hours of continuous playback time on a single charge |
| Working distance | Can play music up to 33ft away from the source device |
| Playback Time | 3-4 hours |
| Music Playback | MP3, WMA, WAV |
| Charge Time | 3 hours |
| Charging Type | Micro-USB |
| Output Power | BW |
| Working Distance | 33ft |
| Battery | 3.7/1200mAh (rechargeable) |
| Weight | 15 ounces |
FAQ’s
What music sources can the Aquaboost Boom Bluetooth Speaker play from?
The Aquaboost Boom Bluetooth Speaker can play music via Bluetooth, MicroSD cards, and USB flash drives.
How long is the playback time for the speaker?
The playback time for the speaker is 3-4 hours.
What is the working distance for the speaker?
The working distance for the speaker is up to 33ft.
How do I pair the speaker to a Bluetooth device?
To pair the speaker to a Bluetooth device, press and hold the power button for 3 seconds to turn the speaker ON. The AquaBoost will automatically be in pairing mode when turned ON. Open your device Bluetooth menu and select “AquaBoost Boom”. You will hear a tone to confirm that your device has successfully paired to the speaker.
How do I charge the speaker?
Use the included Micro-USB charging cable to connect the speaker to a USB power source. A LED indicator light will turn solid red while charging. The LED indicator light will turn off once fully charged. Be sure to disconnect the cable when charging is finished.
How do I use the speaker with different music sources?
After pairing to a Bluetooth device, inserting a MicroSD card or attaching a USB flash drive, the speaker will automatically detect the music source and will be ready to play. If there is more than one music source available, press the Power button to switch between sources.
Can I link this speaker to another one to create a HD sound system?
Yes, this speaker can be linked to a second speaker of the same model (8226) to create a HD sound system. Before pairing the speaker to a device, press and hold the M button on both speakers to link them to each other.
What precautions should I take when using the speaker?
Keep the speaker away from liquids and do not take it apart. If you have any other questions or issues with product use or care, please contact tzumi Technical Support at: 1-855-GO-TZUMI or [email protected].
]]>
Ionvac Cordless Vacuum User Manual
INTRODUCTION & FEATURES
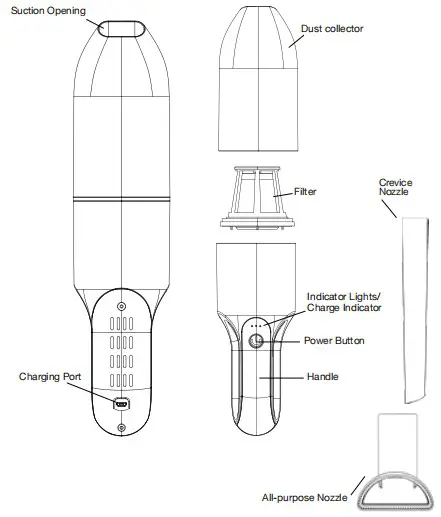
Boasting lightweight design and strong suction the ion vac battery-powered vacuum cleaner picks up dust, debris and dirt from the smallest crevices on any surface. Its incredible powerful suction makes cleaning your home or car a breeze, great for cleaning messes instantaneously. For added convenience you can also use a crevice nozzle or brush attachment for upholstered furniture and sensitive surfaces. USB Type-0 charging allows you to conveniently charge it from any USB power source.
PACKAGE CONTENTS:
- Vacuum cleaner
- Filters
- Dust collector
- Crevice nozzle
- All-purpose nozzle
- USB Type-C Cable
- User manual
PRODUCT OVERVIEW & FUNCTIONS

HOW TO USE THE VACUUM CLEANER
- Remove all packaging contents prior to use.
- Remove the covering cap from the ion vac.
- Make sure the vacuum cleaner is fully charged before use.
- Press the POWER button, the vacuum will turn ON on LOW mode. The indicator lights will illuminate to show battery level.
- Press the POWER button again, the vacuum will switch to HIGH mode.
- Press the POWER button again to turn the vacuum OFF.
HOW TO CHARGE THE BATTERY
- Connect the included USB cable to the charging port and the other end to an AC adapter; plug the adapter into a wall outlet.
- The vacuum can also be charged via any USB port that provides 2A power.
- The indicator lights will flash while the vacuum cleaner is charging.
- Once the battery is fully charged all indicator lights will stay lit.
- Disconnect the plug from the USB port and remove the connection plug.
NOTE: It takes approximately two to three hours to fully charge the ion Vac. When fully charged, the operating time of the vacuum on LOW MODE is approximately 20 minutes; on HIGH MODE it is approximately 10 minutes. It is normal for the ionVac’s battery casing to heat up while charging. To retain the full capacity of the ionVac’s rechargeable battery be sure to fully charge it every two to three months even if it isn’t regularly being used.
ATTACHING AND REMOVING NOZZLES
- To attach a nozzle insert it onto the suction opening
- To remove a nozzle simply pull it out of the suction opening.
- Use the crevice nozzle to reach all corners and angles that cannot be reached with the suction opening.
- The all-purpose nozzle is suitable for use on sensitive surfaces.
CLEANING DIRECTIONS
TO CLEAN THE ALL-PURPOSE NOZZLE
Remove any hairs or threads from the brush
Wipe the all-purpose nozzle with a slightly damp lint-free cloth
TO CLEAN THE DUST COLLECTOR
Empty the dust collector regularly to avoid a decrease in suction, overheating of the vacuum and excessive dirt in the filter.
- Make sure the vacuum cleaner is OFF and disconnected from the power source.
- Hold the vacuum cleaner with the dust collector facing downwards.
- Unscrew the dust collector by turning it.
- Remove the filter out of the dust collector.
- Empty the dust collector and if necessary, wipe it using a damp cloth.
- TO CLEAN THE FILTER
- Turn the filter lid anti-clockwise and remove the filter from the filter holder along with the filter basket.
- Remove the filter basket from the lid of the filter.
- Tap on the filter basket and filter holder over a dust bin
- Alternatively brush out the filter holder basket and lid or wipe them with a damp cloth. Be careful not to damage the gauze while doing so.
TROUBLESHOOTING
- The vacuum cleaner is not working
Make sure that the vacuum cleaner is fully charged prior to use. - The vacuum cleaner has poor suction
Check to see if the dust collector is full, ensure that the filter is clean.
Finally check the status of the battery make sure it is sufficiently charged. - The vacuum cleaner sounds louder than normal
This could be due to several factors:- The dust collector could be full and needs emptying or is inserted incorrectly.
- The filter is dirty or needs to be inserted correctly.
- An object could be stuck in the suction opening.
SPECIFICATIONS
- Battery Type: Lithium ion rechargeable battery
- Voltage/Capacity: 7.2 V/2000mAh
- Vacuum Capacity: Approx. 350ml
- Operating Time: Approx. 10-20 min
- Suction Power: 4-6 kPa
- Sound level: approx. 80dBA
- Charging Time: 2-3 hours
- Charging Port: USB Type-0
- Charging current: 2.2A MAX
- USB Connection: 5V…2A
- Motor Rated voltage: DC 7.2 V
- Low Mode: Operating time is 20 ± 2 minutes when fully charged
- High Mode: Operating times approximately 10 minutes one fully charged
SAFETY INSTRUCTIONS
Please read the safety instructions carefully before using this product.
INTENDED USE
This vacuum cleaner is suitable for picking up dust, dirt and crumbs.
It is not intended for cleaning large areas or for extended use.
The product is intended for domestic use only and not for commercial purposes. This product is not a toy. It is not intended for use by children under 12 years of age.
MISUSE HAZARDS
Never vacuum up the following:
- Glowing ash, cigarette butts, matchsticks etc. Fire hazard!
- Toner or printers. Fire/explosion hazard!
- Toxic substances (e.g. acid, asbestos, asbestos dust etc.).
Danger to health!
- Liquids. Danger of short circuit!
- Pointed hard objects (e.g. Splinters of glass, nails etc.) they can destroy the filter.
- Plaster, cement, dust from drilling, construction waste, makeup etc. These substances may block the filter and damage the vacuum.
ELECTROCUTION DANGER
- Do not immerse the appliance or connection cable in water or other liquids this poses a risk of electric shock.
- Do not touch the appliance, the connection cable or the adapter with wet hands.
- Do not insert objects into the suction opening of the appliance.
RISK OF INJURY
- The vacuum cleaner may only be used when fully assembled and with the filter inserted.
- Never use the vacuum cleaner on humans or pets. Keep hair and items of clothing such as shoelaces and scarves away from the suction opening.
- Make sure that the vacuum is turned off before attaching or removing any nozzles.
- When clearing the dust collector disconnect the connection cable of the appliance from the power supply.
- The appliance comes with a built-in rechargeable battery which cannot be removed or replaced. Do not attempt to remove or replace it on your own, if it is faulty, consult a technician.
DISPOSAL: This product includes a built-in rechargeable battery. You cannot dispose this product along with household waste. It must be disposed of safely at a hazardous waste collection site, recycling facility or an electronic retailer that recycles. Check your local or state laws for disposal procedures.
If you have any questions or for further support, please reach to us at [email protected] we will be glad to help.

tzumi® Distributed by tzumi inc. NY, NY, 10016.
©Copyright 2021 tzumi. All Rights Reserved. Made In China. All pictures shown are for illustration purpose only. Actual product may vary due to product enhancement. Other trademarks and trade names on this package are those of their respective owners.
]]>THE ULTIMATE HOME EXPERIENCE
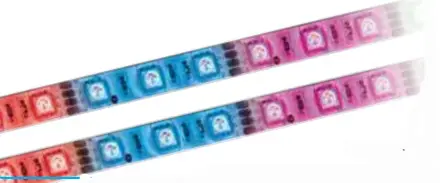
Give your home IMng room a unique atmospheric twist with the USB LEO MOOD LIGHT by Izumi. Designed with a safe adhesive backing this colorful backlight can be fixed directly onto the back of your TV or computer screen enhancing your home theater and easing light-induced Fatigue It fits screens up to 65 and includes a wireless remote controller. which provides you with the freedom to customize your selection of 16 colors and find the perfect brightness. rhythm. and color scheme.
- 16 Color Selection
- Adjustable Color Intensify & Brightness Via Remote Control
- Relieve Eyes From Fatigue
- Create Ambiance & Unique Atmosphere
PRODUCT OVERVIEW
When Remote Control operation becomes slow, it is time to change the battery. Compatible with CR2025 and CR2032 battery types.
INSTALLATION
NOTE Please make sure that the back surface of your Pi is clean from dust oils or fingerprints before attempting to apply your LEO Mood UV Use an alcohol-based cleaning cloth to wipe the back of your TV
 Locate the USB port on the back of your TV. If your TV does not have a U59 port you may use any other USB power source
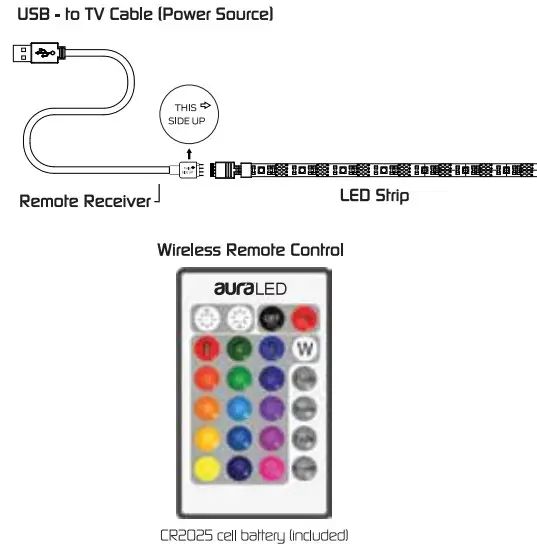
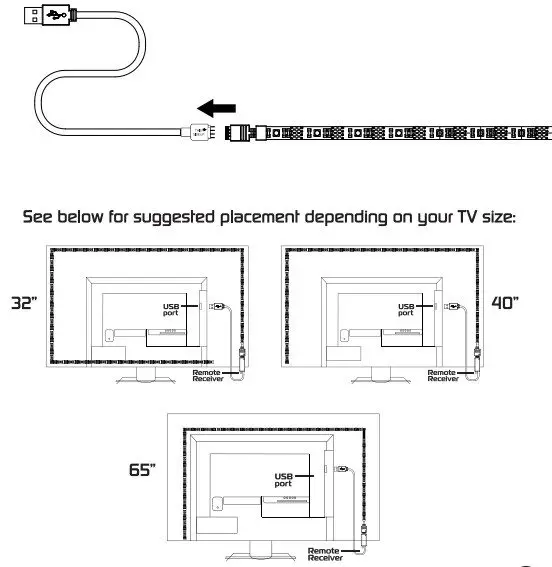
- Make sure that you are satisfied with the coverage area of the LED strip prior to peeling off the adhesive tape Make sure that the US8 cable is placed near the USB port and has enough slack to reach safely. The Remote Receiver must also be visible in order to work properly. See below.
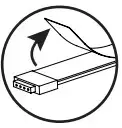
- Peel off the backing of the strip to expose the adhesive.
- Apply to the cleaned surface of the back of W Press down to for a couple of seconds to secure.
- Connect the LEO Strip with the U58 Cable and insert the cable into the USB port.
- Once connected remove the protective plastic strip from the remote control to activate the battery.
- Press the ON button to turn on the LEO strip.
- Refer to the color comprehend settings on the remote to customize your LEO strip.
ASSEMBLY
- Connect the LED Strip with the USB Cable
WIRELESS REMOTE CONTROLS
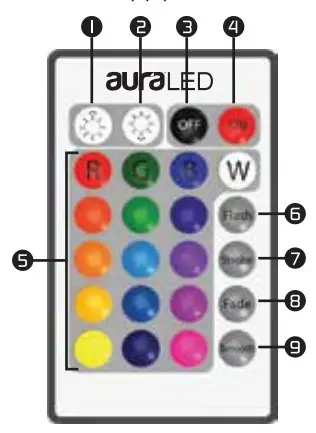
Buttons 1 and 2 can be used to control the effects and speed of Buttons 6, Z 8, 9.
 Brightness (UPI / Flash Control (QUICKI
- Brightness (GOWN) / Flash Control (SLOW)
- Power OFF.
- Power ON
- LEO color buttons 16 colors
- Flash (Changes Instantly) Red > Green > Blue
- Strobe (Changes Gradually) Red > Green > Blue
- Fade (Changes Gradually) Red > Green > Blue > Yellow > Light green > Purple > White
- Smooth (Changes Instantly) Red > Green > Blue > Yellow > Purple > Light Green > White
SPECIFICATIONS
Wireless Remote Control
Coverage area: up to 26 feet (8m) max Battery type: CR2025 cell battery
ABOUT THE AURA LEO APP
Download the AURA LED App From either the Google Play Store or the Apple App Store. From there, you can control your LED strip anywhere directly from your phone or tablet.
- Allows you to choose from a wide range of 16 colors
- Enables you to save default settings such as favorite colors and illumination patterns
- Enables you to match the rhythm of any of your own music or online streaming audio.
- Can also sync LEO illumination with your voice in the app’s microphone voice detection feature
- Lets you to set custom light-activated alarms and sync to your schedule and lifestyle.
USING THE AURA LED APP
- Download the Aura LED App from the App Store or Google Play Store
- Open the app and select an option from the menu in the upper left-hand corner of your screen.
- The LED strip will appear on your screen. You can now control the LED strip.
- Tap on the link icon to connect or disconnect a specific LED strip.
- Use the bottom navigation buttons to manually adjust colors. illumination style/pattern, and control the lights with your music or voice.
SPECIFICATIONS
LED Stria input: DC 5V/0.5A-2A
Power Consumption: 2.5w – IOW
LED chip: 5050. RGB
Color:16 colors with 14 Mood light settings
Beam Angle:120 degrees
LED strip: 30 LED lights / 65 foot (781 Back adhesive 3M self-adhesive
Working temperature: -20°C 11145°C
Working Humidity: 0%11180%
RH Usage: 40.000 hours
IMPORTANT SAFEGUARDS
- Keep LEO strip away from flammable objects
- Always make sure that all parts have been connected properly to avoid short circuits.
- Check to make sure the voltage of the power source IUSEil Is 5V.
- Do not connect the LED strip to the power source until all of the Installation has been completed.
- Do not cut any part of the LED strip or Its connectors.
- Always make sure that the Remote Receiver Is not covered or blocked. This will ensure proper operation using the remote control.
- If this product malfunctions. please do not try to repair It yourself take It to a qualified electrician.
Tzumi ®LED™Mood Light wlApp. Distributed by Immi Inc. NY, NY, 10016. @Copyright 2018 turn. All Rights Reserved. Made In China. Samsung and Galaxy S we both registered trademarks of Samsung Electronics Co.. Ltd. All pictures shown are for illustration purposes only. Actual product may vary due to product enhancement Other trademarks and trade names at this package are those of their respective owners.
]]>Tzumi Ionvac Smartclean RoboVac 2000 User Manual
The Smart Clean Robo Vac 2000 should not be used by children and persons with reduced physical, sensory or mental capabilities. Children should not play with the Smart Clean Robo Vac. Cleaning and user maintenance shall only be done by adults.
The Smart Clean Robo Vac must be used in accordance with the directions in this Instruction Manual. Tzumi Electronics cannot be held liable or responsible for any damages or injuries caused by improper use.
To reduce the risk of injury or damage, keep these safety precautions in mind when setting up, using and maintaining your Smart Clean Robo Vac:
- Read all safety and operating instructions before operating your Smart Clean Robo Vac.
- Retain the safety and operating instructions for future reference.
- Heed all warnings on your Smart Clean Robo Vac, battery, charging Dock and in the owner’s manual.
- Follow all operating and use instructions.

The symbol on the product or its packaging indicates:
Do not dispose of electrical appliances as unsorted municipal waste, use separate collection facilities.
Contact your local authority for information regarding the collection systems available.
User Cautions
- The Smart Clean Robo Vac is for indoor use only. Do not use the Smart Clean Robo Vac outdoor, commercial or industrial environments.
- Before using the Smart Clean Robo Vac, pick up objects like clothing, loose papers, pull cords for blinds or curtains, power cords and any fragile objects.
- The Smart Clean Robo Vac is not a toy. Do not sit or stand on the Smart Clean Robo Vac. Small children and pets should be supervised when the Smart Clean Robo Vac is operating.
- Store and operate the Smart Clean Robo Vac in room temperature environments only.
- Do not use the Smart Clean Robo Vac to pick up anything that is burning or smoking.
- Do not use the Smart Clean Robo Vac to pick up spills, bleach, paint, chemicals or anything wet.
- If the room to be cleaned contains a balcony, a physical barrier should be used to prevent access to the balcony and ensure safe operation.
- Do not place anything on top of the Smart Clean Robo Vac.
- Be aware that the Smart Clean Robo Vac moves on its own. Be careful when walking in the area that the Smart Clean Robo Vac is operating in to avoid stepping on it.
- Do not operate the Smart Clean Robo Vac in areas with exposed electrical outlets in the floor.
Battery Care & Charging
- Charge using a standard outlet only. This product may not be used with any type of power converter. The use of a power converter will immediately void the warranty.
- Do not use a Charging Dock with a damaged cord or plug. If the cord or plug is damaged, it must be serviced by the manufacturer or a qualified service provider.
- Charge indoors only.
- The Charging Dock may be protected with a surge protector in the event of severe electrical storms.
- Never handle or touch the Charging Dock or cables with wet hands.
- Always remove the Smart Clean Robo Vac from the Charging Dock before cleaning or maintaining it.
- The Smart Clean Robo Vac contains Li-on rechargeable batteries, be sure to never open, pierce or damage the batteries.
- Do not wet the battery compartment.
- If the batteries are leaking, stop the Smart Clean Robo Vac use immediately and contact customer service.
This device complies with Part 15 of the FCC rules. Operation is subject to the following two conditions: (1) this device may not cause harmful interference, and (2) this device must accept any inference received, including interference that may cause undesired operation.
Product and Contents
Smart Clean Robo Vac


Accessories

Charging Dock

Remote Control

Operating Instructions
Notes Before Cleaning

Before using the Smart Clean Robo Vac, pick up objects like clothing, loose papers, pull cords for blinds or curtains, power cords and any fragile objects.

If the room to be deaned contains a balcony, a physical barrier should be used to prevent access to the balcony and ensure safe operation.
Using the Smart Clean Robo Vac
- Plug in the Charging Dock and place the remaining wire inside the bottom of the Charging Dock.
Note: Failure to place the remaining wire inside the Charging Dock, may cause the Smart Clean Robo Vac to pull on the wire while charging or cleaning.

- Place the Charging Dock on a hard level surface and against a wall.

- Charging Dock Position
Place the Charging Dock against the wall and make sure it is in an open and uncluttered area leaving at least:- 6 Feet in the front of the Charging Dock.
- 3 Feet on both sides of Charging Dock.

- Install Side Brushes
Attach the Side Brushes to the bottom of the Smart Clean Robo Vac by pressing a brush into each slot until it clicks.

- Turning On the Smart Clean Robo Vac
- Switch the power button at the bottom of the unit to the ON position.
- Place the Smart Clean Robo Vac on the Charging Dock, making sure the metal charging contacts on the Charging Dock match up with those underneath the Smart Clean Robo Vac.
- The Smart Clean Robo Vac will emit a series of tones. Once the power button illuminates the Smart Clean Robo Vac is ready for use.

- Start a Cleaning Cycle
- Press the
 power button once to wake up the Smart Clean RoboVac.
 - Press the power
 button again to start a cleaning cycle (or
  button on Remote Control).
 - If the battery gets low before finishing the cleaning cycle, the Smart Clean Robo Vac will return to the Charging Dock to recharge.
If the Charging Dock is inaccessible, the Smart Clean Robo Vac will not be able to recharge, please place the Smart Clean Robo Vac manually on the Charging Dock to recharge.
Note: Please refer to section 3.3 for more Cleaning Modes.

- Press the
- Pause Cleaning Cycle
- To pause the Smart Clean Robo Vac during a cleaning cycle, press the
 button on Smart Clean Robo Vac or press the
  buttom on the Remote Control.
 - To resume the cleaning cycle, press
 button again.
 - To send Smart Clean Robo Vac back to the Charging Dock, press
 button on the Remote Control.

- To pause the Smart Clean Robo Vac during a cleaning cycle, press the
- Power OFF
To end the cleaning cycle and put Smart Clean Robo Vac in standby mode, press and hold button until the Smart Clean Robo Vac indicators turn off.

Cleaning Modes
The default cleaning suction power is set to 1000 Pa, in case you need more power for a spot, press the Suction Power button on the remote to increase the suction power to 2000 Pa.
- Auto Cleaning
- The Smart Clean Robo Vac will work in a smart zig-zag systematic cleaning path, then will work on a random pattern for seamlessly and thoroughly clean.
- At various times throughout the cleaning cycle, the Smart Clean Robo Vac will touch up around the edges of the room, as well as chair legs and other furniture to help with the navigation.
- The Smart Clean Robo Vac will continue this process until it cleaned the entire area. If the battery gets low before finishing the cleaning cycle, the Smart Clean Robo Vac will return to the Charging Dock to recharge.
- Once the Smart Clean Robo Vac finishes the cleaning cycle, it will go back to the Docking Station to recharge.

- Spot Cleaning
When selecting spot cleaning, the Smart Clean Robo Vac will emphasize on an area of approximately 3 feet for maximum cleaning.- Put the Smart Clean Robo Vac on a localized area that you wish to clean.
- The Smart Clean Robo Vac will work its way in a spiral mode of about 3 feet in diameter and will then spiral back to the original spot.
- The Smart Clean Robo Vac will boost the suction power to the maximum power for this mode.

- Edge Cleaning
After the Smart Cleaning Robo Vac finishes cleaning the open areas, it uses Edge Clean to ensure that it has cleaned along the walls and around furniture legs.- If you prefer a quicker Edge Cleaning, press the
 button on the remote control.

- If you prefer a quicker Edge Cleaning, press the
- Manual Cleaning
You can manually control the Smart Clean Robo Vac to clean a particular area by using the directional buttons on the remote control.

- Controlling the Smart Clean Rob Vac via the Tzumi Smart Home APP

- Use the Tzumi Smart Home app to control the SmartClean RoboVac 2000
To enjoy al the Smart Clean Rob Vac available features, it is recommended to control your RoboVac via the app.
Before you start, make sure that:
- Your smartphone or tablet is connected to a WiFi network.
- Your smartphone or tablet is running IOS 8.0 (or newer) or Android 4.4 (or newer).
- The 2.4 GHz band wireless signal is enabled on your wireless router.
- The WiFi status light is slowly/flashing green.
- Smart Clean Rob Vac is attached to the Charging Base to ensure it has enough power setup.
WiFi Connect Set-Up
- Download the Tzumi Smart Home from the App Store (iOS Devices) or Google Play (Android devices).
- Open the app and create a user account.
- Tap the“+” icon in the top right corner to add the Smart Clean Robo Vac to your account.
How to Connect the RoboVac
- Default Mode Connect: Press the @司button for 5 seconds, you will hear a double tone, RoboVac will reset, wait for the vacuum to finish resetting and Tor the WiFi light to quickly flash blue. Now you can follow the WiFi instructions in the Tzumi Smart Home app to set up the WiFi connection.
- AP Mode Connect: Press the
 button for 5 seconds, you will hear a double tone, Smart Vac will reset, wait for the vacuum to finish resetting and for the WiFi light to quickly flash blue. Within 15 seconds, press the
  button again, the WiFi light will flash slowly, you can now follow the instructions on the Tzumi Smart Home app to finish the connection.
 - Follow the instructions in the app to set up the WiFi connection.
- After connecting successfully, you can control RoboVac via the app.
- In the app, you can select a cleaning mode, set the time, schedule a cleaning, view the system status, receive notifications and access additional features.
Wifi-Status Light
Indicator Lamp Status WiFi Working Status Rapidly flashing ( Interval flashing 250ms) Default configuration state Slowly fashing ( Interval flashing 1500ms) Compatible configuration state Lamp off WiFi configured successfully but not connected to router/ WiFi shut down Lamp on ( Solid green) WiFi configured successfully and have connected to router
- Using the Smart Clean Robo Vac with the Google Assistant or Amazon Alexa
- You can control the Smart Clean Robo Vac with your voice with the Google Assistant or Amazon Alexa smart voice control devices.
Voice control only available in English at the time.
Requirements
- Make sure the Smart Clean Robo Vac its on the Charging Dock to ensure there is enough power.
- The Smart Clean Robo Vac is active in the Tzumi Smart Home APP.
- The Google Home app or Amazon Alexa is installed on your smart device and you have an active account.
- A device with the Google assistant (i.e. Google Home, Google Home Mini) or an Alexa enabled device. (i.e. Amazon Echo, Echo Dot, Echo Show).
Control the Smart Clean Robo Vac with the Google Assistant
- Open the Google Home app.
- Say“OK Google, talk to Smart Vac” the Google Assistant will initiate the Google Action for the Smart Clean Robo Vac.
- Follow the instructions on the Google Home app to link the Tzumi Smart Action.
- You are now ready to control the Smart Clean Robo Vac with simple voice commands.
Try these:
- “OK Google, turn on the Smart Vac” – the Smart Clean Robo Vac will start an automatic cleaning cycle.
- “OK Google, turn off the Smart Vac” – the Smart Clean Robo Vac will go back to the Docking Station.
- “OK Google, where is the Smart Vac” – the Smart Clean Robo Vac will beep.
Control the Smart Clean Robo Vac with Amazon Alexa
- Open the Amazon Alexa app on your smart device and select‘’Skills’ from the options menu.
- Once you are on the ‘Skills’ page, search for ‘Tzumi Smart’ and tap ‘Enable’.
- Use your Tzumi Smart Home APP credentials to log in to give Alexa access to control the Smart Clean Robo Vac.
- You are now ready to control the Smart Clean Robo Vac with simple voice commands.
Try these:
- “Alexa, turn on the Smart Vac” – the Smart Clean Robo Vac will start an automatic cleaning cycle.
- “Alexa, turn off the Smart Vac”- the Smart Clean Robo Vac will go back to the Docking Station.
Please Note: Due to software changes, some of the instructions or commands may change and no longer work.
To see an up-to-date list, go to the Tzumi Smart APP, tap on ‘Me’ and tap on ‘More Services’. You can check instructions and a full list of available commands.
Smart Clean Robo Vac Care
To keep the Smart Clean Robo Vac running at peak performance, perform the following care procedures. If you notice the Smart Clean Robo Vac picks up less debris from the floor, then empty the dust bin, clean the filter and the Main Brush.
| Robot Part | Care Frequency | Replacement Frequency |
| Sponge Filter and High-Efficiency Filter | Once a week (twice a week in homes with pets) | Every 2 months |
| Main Brush | Once every 4 months (once every 3 months in homes with pets) | Every 6- 12 months |
| Dust Bin | After each use | |
| Driving Wheels Side Brush Anti-Drop Sensors Charging Contacts Anti-Collision Sensors |
Once a month |
Emptying Smart Clean Robo Vac’s Dust Bin
- Press the dust bin release button to remove it.

- Open the dust bin door to empty it.

Cleaning the Smart Clean Robo Vac Filter
- Remove the filter by grasping the white tab.

- Shake off debris by tapping the filter against your trash container.

- Rinse filters with water.

- Air-dry the filters completely before use.

Cleaning Smart Clean Robo Vac’s Side Brush
- Remove the Brush.
- Clean the Brush and the Brush stand, and reinstall the Brush.


Cleaning the Smart Clean Robo Vac Anti-Drop Sensors and Charging Contacts
Wipe the Smart Clean Robo Vac’s Anti-Drop sensors with a clean, dry cloth.

 Do not spray cleaning solution directly into the sensor opening.

Cleaning the Smart Clean Robo Vac Main Brush
- Pul on the release tabs to unlock the Brush guard as shown.

- Lift the Main Brush to remove.

- Clean the Main Brush with the provided cleaning tool or a vacuum cleaner.

- Reinstall the Main Brush by inserting the fixed protruding end first and then clicking into place.

- Press down to snap the Main Brush cover into place.

Troubleshooting
The Smart Clean Robo Vac will tell you if something is wrong with a two-tone distress sound followed by a message. The indicator  will also blink or be sold red.
Please refer to the chart below to troubleshoot and resolve the Smart Clean Robo Vac problem. If the problem is not resolved, please contact our customer service department for further assistance.
Rebooting Instructions
For some errors, rebooting the Smart Clean Robo Vac may resolve the problem. To reboot the Smart Clean Robo Vac, switch the power button at the bottom of the unit OFF wait 10 seconds and switch it back ON.
Indicator Solid Red

Indicator Flashing Red

Frequently asked questions


Specifications
- Product Model: 7687
- Input: 19V 0.6A
- Battery Voltage: DC 14.4 V
- Power Consumption: 28W
- Battery Type: Li-ion 2600 ml/DC 14.4 V
- Dust Collector Capacity: 600 ml
- Cleaning Time: Max.100 min
- Charging Time: 300 – 360 min
- Input: 19V
 0.6A
0.6A - Output: 19V
 0.6A
0.6A
| Product Specifications | |
|---|---|
| Product Name | Smart Clean RoboVac 2000 |
| Manufacturer | Tzumi Electronics |
| Usage | Indoor use only |
| Cleaning Modes | Auto cleaning, spot cleaning, edge cleaning, manual cleaning |
| Battery Type | Li-on rechargeable batteries |
| Charging | Charge using a standard outlet only. Do not use a power converter. Charge indoors only. |
| Accessories | Charging Dock, Remote Control |
| Dimensions | Not specified |
| Weight | Not specified |
FAQS
Can it clean tile floors?
Yes the Robovac can vacuum tile floors and hardwood. It can move easily from carpeted areas to hardwood or tile. However, it is not compatible for mopping tile floors or any wet areas.
Will this damage luxury vinyl plank ?
No it works great
Can it vacuum a thick rug on a tile floor? Can it cross a transition between surfaces where one side is slightly higher?
Yes all above
What type of filter does it use?
The filter is proprietary and specific to the model you have, order maintenance kit on Amazon and get everything you will need, filters, brushes, cleaning tool all in one small cardboard box.
How long does it take to fully charge and then how long will it operate until it needs to be recharged?
Knows when to energize, consequently docks and re-energizes its Li-particle battery for as long as 100 minutes between charges
How long does it take to fully charge and then how long will it operate until it needs to be recharged?
Knows when to energize, consequently docks and re-energizes its Li-particle battery for as long as 100 minutes between charges
What type of filter does it use?
The filter is proprietary and specific to the model you have, order maintenance kit on Amazon and get everything you will need, filters, brushes, cleaning tool all in one small cardboard box.
Do robot vacuums damage furniture?
A robot vacuum can damage furniture by bumping into furniture repeatedly and causing dents or scratches, rubbing away paint or varnish with the brush, getting stuck underneath furniture, or spraying furniture with soapy or dirty water.
Can robot vacuum clean under bed?
Removing the mattress or sofa is a good choice for a better cleaning. But that isn’t always possible. A vacuum robot can easily clean under a bed and other tough-to-reach spots.
Is robot vacuum worth it?
Robot vacuums are tops when it comes to keeping your floors clean, but they need more help than you might think. It’s been a couple of years since our family (finally) coughed up the cash for our very first robot vacuum, and I can honestly say it was worth every penny.
Can you use a robot vacuum in a small room?
They need sufficient space to manoeuvre around and find their way back to their charging stations. But if you have some floor space to work with, a robot vacuum can actually do a good job cleaning. The nice thing about cleaning a smaller space is you don’t have to worry about the vacuum’s run time or battery life.
Who uses robot vacuums?
This coincides with a younger demographic that tends to align with new technology, as 46% of robot vacuum owners are in the 18-34 age bracket. As cleaning performance improves and more tech features are added, Interpret expects the robot vacuum sector to continue to grow at a moderate pace.
Can robot vacuum clean sofa?
A suite of intelligent sensors guides the Roomba® robot vacuum throughout your home, along walls, around furniture, and under sofas and beds to help thoroughly clean your floors
Do robot vacuums clean corners?
A smart robot vacuum can be used to spot and clean specific areas of your home, like entrances, dead corners underneath the sofa and bed, or even dining tables.
Can children use the Smart Clean RoboVac 2000?
No, the Smart Clean RoboVac 2000 should not be used by children or persons with reduced physical, sensory, or mental capabilities. Children should not play with the Smart Clean RoboVac.
Can the Smart Clean RoboVac 2000 be used outdoors?
No, the Smart Clean RoboVac 2000 is for indoor use only. It should not be used outdoor, commercial or industrial environments.
Can the Smart Clean RoboVac 2000 pick up wet spills?
No, the Smart Clean RoboVac 2000 should not be used to pick up spills, bleach, paint, chemicals or anything wet.
How do I charge the Smart Clean RoboVac 2000?
Charge the Smart Clean RoboVac 2000 using a standard outlet only. Do not use a Charging Dock with a damaged cord or plug. Charge indoors only.
Can I use a power converter with the Smart Clean RoboVac 2000?
No, the Smart Clean RoboVac 2000 may not be used with any type of power converter. The use of a power converter will immediately void the warranty.
How do I start a cleaning cycle with the Smart Clean RoboVac 2000?
Press the power button once to wake up the Smart Clean RoboVac. Press the power button again to start a cleaning cycle (or button on Remote Control).
Can I pause a cleaning cycle with the Smart Clean RoboVac 2000?
Yes, to pause the Smart Clean RoboVac during a cleaning cycle, press the button on Smart Clean RoboVac or press the button on the Remote Control. To resume the cleaning cycle, press button again.
Can I control the Smart Clean RoboVac 2000 using an app?
A: Yes, you can control the Smart Clean RoboVac 2000 via the Tzumi Smart Home app. Before you start, make sure that your smartphone or tablet is connected to a WiFi network and running IOS 8.0 (or newer) or Android 4.4 (or newer). The 2.4 GHz band wireless signal should be enabled on your wireless router.
]]>User Manual
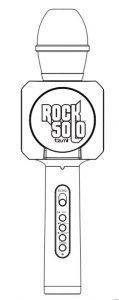
Rock Solo Karaoke Microphone with Built-in Retractable Smartphone Holder
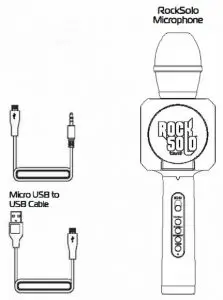
Includes:
- Rode-solo Microphone
- With built-in smart-phone holder
- Micro USB to USB Cable
- Micro USB to 35mm Audio Cable
- User Manual
PAIRING TO BLUETOOTH DEVICE
Make sure the Bluetooth function is available on your electronic device. Specific pairing procedures may vary slightly depending on the device. For detailed information, please refer to your device’s User Guide.
- After successful pairing, devices will remember each other. Therefore, no pairing will be needed next time.
- Keep the distance between the device and the microphone Within 3 feet (for pairing only).
- Turn microphone on using power button.
- Activate the Bluetooth function on your device to search for Bluetooth devices. Look for “Rock Solo” in device list displayed and select.
- Only for some electronic devices: Enter password, 0000. 5. Microphone is now ready for use.
BUILT-IN SMART PHONE HOLDER
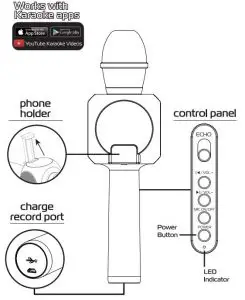
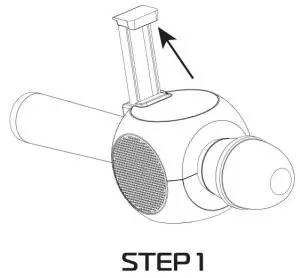
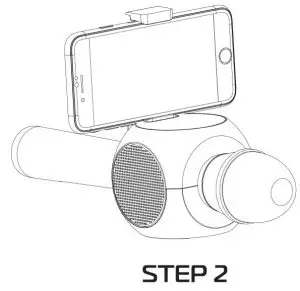
Built-in retractable phone holder is perfect for when you want to sing along while looking at the phone screen.
- STEP 1: Access the phone holder by pulling it UP.
- STEP 2: Place the phone into the bracket. Fits smartphone up to 6 inches.
ROCK SOLO CONTROLS
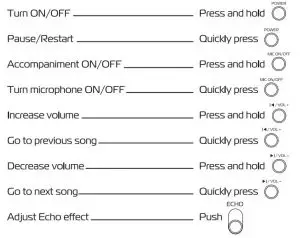
RECORDING WITH MICROPHONE
*Note: Only records via audio cable. Bluetooth must be turned off.
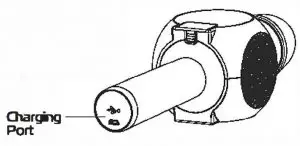
- Insert the audio cable to your phone, plug the micro USB port into the bottom of the microphone base.
- Open your favorite karaoke app. Follow the instructions in the app and start recording.
- When you are done recording, there are 2 ways to listen to your video:
LISTEN THROUGH THE MICROPHONE SPEAKERS: Keep your phone plugged into the microphone and replay your video.
LISTEN THROUGH YOUR PHONE: Unplug your phone from the microphone, turn the microphone off and replay your video.
Please note – iPhone 7 & 7Plus does not have auxiliary jack. You will need your Apple supplied adapter to use this feature.
CHARGING THE MICROPHONE
- When battery is low, the unit will automatically shut off.
- Connect the Micro to USB cable from the microphone to a power source. The LED Indicator will light up red.
- Charging will take about 2 hours. When the unit is done charging, the red light wil shut off.
Note: You may use your microphone while it’s charging.
FAQ / TROUBLESHOOTING
Q: Why is Bluetooth not pairing? A: The distance between your phone and the device may be too far. Bring the devices close together. Or the unit may already be paired with another device in range. Unpair the unit from the other device,
Q: Why does the microphone not turn on? A: Make sure the unit is fully charged before use. The microphone will not turn on if battery level is very low. Blue light indicates a substantial charge.
Q: Why is there sound distortion or static when playing music? A: Your phone signal may be weak, the volume may be too high or the battery power of the unit may be too low. Check the volume on both the device and your phone and make sure the microphone is fully charged.
Q: Why is there loud feedback when I start to record via microphone? A: Some apps are incompatible with external audio input and operate best with headphones, thus making loud noise when recording via microphone. Try another app that is compatible with external audio input.
Q: Why won’t my recording play back though I heard it clearly while recording? A: RockSolo is most compatible with karaoke apps that don’t require headphones. RockSolo should be connected to your phone via 3.5 mm headphone jack to be recognized and work best. If your vocals are not recorded, the app most likely does not support your device. Try using a different app or a device with a different operating system.
IMPORTANT SAFEGUARDS
- Do not use this unit for anything other than its intended use.
- Keep the unit away from heat source, direct sunlight, humidity, water or any other liquid. .
- Do not expose the device to extremely high or low temperatures, as it may damage the battery.
- Do not operate the unit if it has been wet or moist to prevent against electric shock and/or injury to yourself and damage to the unit.
- Do not use the unit if it has been dropped or damaged in any way.
- Repairs to electrical equipment should only be performed by a qualified electrician. Improper repairs may place the user at serious risk.
- Keep the unit out of reach of infants.
SPECIFICATION

 RockSolo Karaoke Microphone Distributed by tzumi Inc. NY, NY, 10016.
Copyright 2017 tzumi Inc. All Rights Reserved. Made in China. Rock Solo is a registered trademark of tzumi Inc. iPhone is a trademark of Apple Inc., registered in the U.S. and other countries, Samsung and Galaxy S are both registered trademarks of Samsung Electronics Co., Ltd, Google, the Google Logo, Android, Google Play, Google Play logo, Google Cardboard and YouTube are registered trademarks of Google Inc. Al other trademarks or service marks are property of their respective owners. Subject to change without prior notice.
]]>User Manual

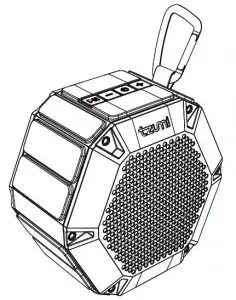
Tzumi AquaBoost Floatingproof Speaker
PRODUCT OVERVIEW
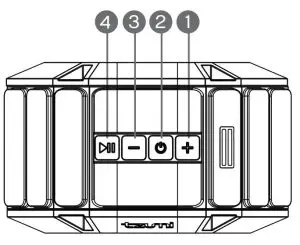
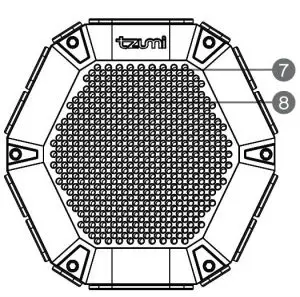
- Volume +/Next Song
- Power
- Volume -/Previous Song
- Play/Pause/ Answer/Refuse Call
- Micro USB port
- Aux
- LED Indicator
- Microphone
CHARGING YOUR SPEAKER
The battery must be fully charged prior to use. It takes approximately 3 hours to fully charge your speaker (from depleted unit).
Red light ON – unit charging
LED OFF – unit fully charged
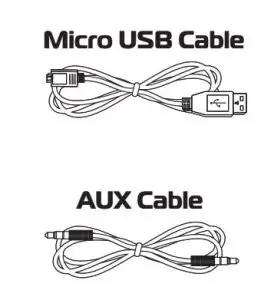
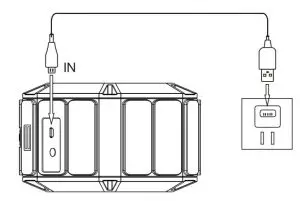
- Via AC Adapter/Wall Charger: Using the provided Micro USB cable, connect your speaker to (Micro USB port) a power source such as an AC USB adapter
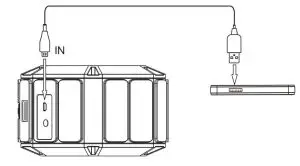
- Via Computer: Using the provided Micro USB cable, connect your speaker (Micro USB port) to the computer/laptop (USB port).
PAIRING THE SPEAKER TO BLUETOOTH DEVICE
Make sure the Bluetooth function is available and enabled on your smartphone. Specific pairing procedures will be different depending on different device models. For detailed information, please refer to your smartphone’s User Guide.
- If no device connection is made within 10 minutes of the speaker being switched on, the speaker will automatically be switched off to save power.
- After a successful pairing, devices will memorize each other. Therefore, no pairing will be needed next time.
- Keep the distance between your device and the speaker within 3 feet (for pairing only).
- Turn on the speaker by pressing and holding the Power Button
 for 3 seconds.
 - The tone prompt will sound and the LED light will flash blue. The unit will automatically enter into pairing mode.
- Activate the Bluetooth function of the device to search for all nearby available Bluetooth devices. After finishing the search, select “Tzumi-AquaBoost” in the device list displayed.
- Your AquaBoost Speaker is ready for use.
SPEAKER CONTROLS
ON/OFF
Press and hold  button for 3 seconds to turn the unit ON. Press and hold the button again to turn it OFF. The unit will turn itself off if inactive for 10 minutes.
VOLUME
- Volume +
Press and hold + Button. - Volume –
Press and hold – Button.
MUSIC
NOTE: The Music Function Control only works with Bluetooth devices that support the A2DP profile.
Go to next song
Press + Button
Go to previous song
Press – Button.
PLAY/PAUSE/ANSWER/REFUSE THE CALL
- Press
 button to answer the call, press it again to hang up.
 - Press and hold
 button for 2 seconds to refuse the call.
 - Double press
 button to call back the last number.
 - To hang up the call press it again.
TO RESET UNIT
Press and hold the  and
and ![]() at the same time around 6 seconds to reset the speaker to its original setting.
at the same time around 6 seconds to reset the speaker to its original setting.
AUX MODE
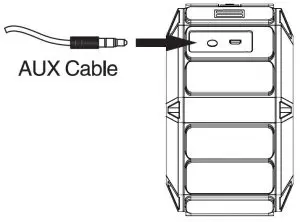
Use the 3.5mm audio cable (included) to connect the speaker to an audio source (MP3/MP4, mobile phone, computer). A tone will sound. The speaker will play the music from the audio source.
IMPORTANT SAFEGUARDS
- Keep speaker away from any source of heat.
- Always adjust the speaker volume to a suitable level to avoid hearing damage or the damage to the unit.
- If not using the speaker for a long period of time, keep the internal battery charged (charge once every 3 months). This will extend the life of your lithium battery.
SPECIFICATIONS
- Frequency: 120 ~ 20KHz
- Battery: 2000mAh/3.7V
- Bluetooth version: V4.2
- Distance: 33 ft (10m)
- Charging time: up to 3 hours
- Playing time: up to 8 hours
- Speaker unit Diameter: D45mm

tzumi® AquaBoost Waterproof Outdoor Speaker Distributed by tzumi® Inc. NY, NY 10016
©Copyright 2017 tzumi All Rights Reserved. Made In China.
©Copyright 2017 iPhone is a trademark of Apple Inc. Registered in the US and other countries. Bluetooth SIG, Inc. The Bluetooth® word mark and logos are registered trademarks owned by Bluetooth SIG, Inc. and any use of such marks by tzumi® is under license. Other trademarks and trade names are thoseof their respective owners. Subject to change without prior notice.
]]>