SVBONY SV305 UserManual
The copyright and modification rights of SV305 manual and other related materials belong to SVBONY. If there is any modification, please forgive us do not notify. Please download the latest version from our official website.
Thanks for purchasing your new 1.25” 2MP SVBONY SV305 astronomy camera! This manual will give you a brief introduction to the SV305 camera. Please read this manual completely before using it. If you have any questions, please feel free to contact us:
Facebook:www.facebook.com/svbony
For software installation instructions and other technical support, please contact us: [email protected]
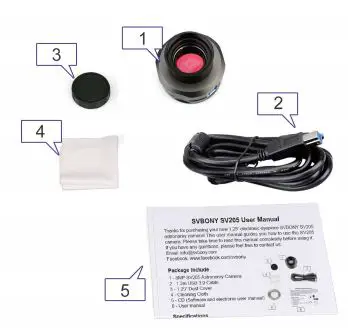
Package Include
1 – 2MP SV305 Astronomy Camera
2 – 2m USB 2.0 Cable
3 – 1.25” Dust Cover
4 – C-lens Adapter
5 – 1.25” Extension Tube
6 – Cleaning Cloth
7 – User Manual
8 – CD
Specifications
| Image Sensor | 1/2.8” COMS Sensor |
| Sensor Model | SONY IMX290 |
| Image Resolution | 2M Pixels (1920*1080) |
| USB Type | USB 2.0 |
| Diagonal Line | 6.5mm |
| Pixel Size | 2.9μm X 2.9μm |
| Shutter | Electronic Rolling Shutter |
| Exposure Mode | Auto/Manual |
| Exposure Time | 1ms-1800s |
| Gain | 10-320 |
| White Balance | R 1-255 / G 1-255 / B 1-255 |
| Maximum Frame Rate | 130FPS |
| ADC | 12bit |
| Built-in buffer | 128M |
| ROI | Any resolution |
| Cable Length | 2m |
| Adapter 1 | 1.25”/M28.5*0.6 |
| Adapter 2 | C-lens adapter |
| Weight | 125g |
| Support System | Windows7,8,8.1,10 |
| Support Telescope | Telescope with 1.25” diagonal |
| Product Size | Ø50X44mm |
| Working Humidity | 30%-80% |
| Storage Humidity | 20%-90% |
| Operating Temperature | -10℃ to +50℃ |
| Storage Temperature | -20℃ to +60℃ |
How to Use SV305 Camera
1. Download the astronomy software and driver from our site: https://www.svbony.com/Product/UserManual
2. Install the astronomy software and driver on your computer.
3. Connect your SV305 camera to the computer, run the astronomy 【sharpcarp】capture software as administrator. enter sharpcap software and single click the【camera】 button, you will see【SVBONY SV305 Camera】. Double click it, then you will see the image or some light on the screen, so the SV305 works.
4. Connect the SV305 camera to your telescope, and you will see what the telescope seeing on your computer screen. Adjust the telescope focus wheel to get a most clear image.
General Clean
Svbony SV305 camera comes with an optical protection window, which could protect the sensor from dust and humidity. And the inside of the image sensor is dry and sealed. We don’t recommend customers disassemble the camera and clear it yourself. Because disassemble the camera may lead the sensor to get wet, or it may cause more dust to enter. If you need to clean the protection window, it is best to do it during the daytime. To see the dust clearly, please connect the SV305 camera to your telescope. Point the telescope to a bright place, a Barlow is required to see the dust clear. Then adjust the exposure time in the software, make sure, not over-exposed. You will see the dust showing as the following image.
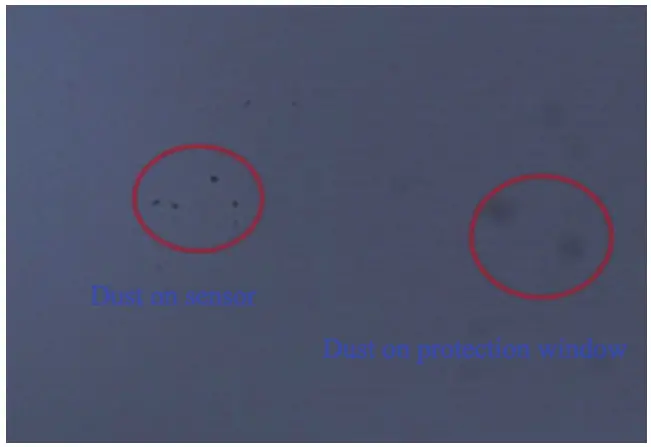 1) The small but dark spots on the image (left) are the shadows of dust on the sensor. The suggested way to clean it is by editing the image by photography software.
2) The big spot on the image (right) are the shadows of dust on the protection window. The Suggested way to clean them is try to blow them away with a manual air pump.
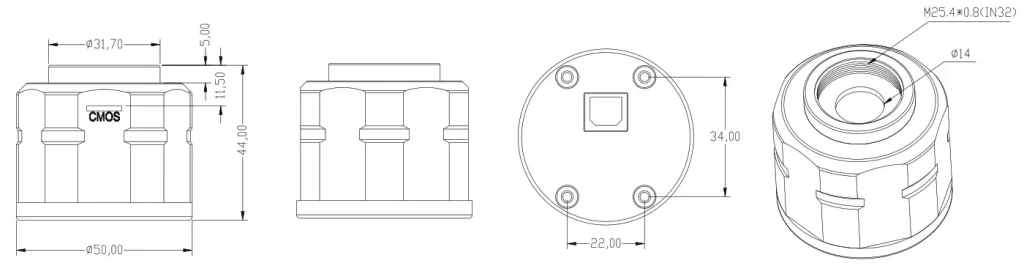
Structure
Quality Assurance & Warranty
The SV305 camera warranty time is one year. Within the warranty period, if the camera fails to function, we will provide you with free after-sales maintenance service. Besides the warranty days, we provide life-long maintenance services and charge only the parts that need repair or replacement. The buyer will pay for the postage of returning the camera to the factory to be repaired. Within the warranty period, if the following occurs, certain maintenance costs will be charged.
- The malfunction and damage caused by incorrect use, unauthorized repairs, and alteration.
- The damage is caused by fire, flood, earthquake, other natural disasters, and secondary product damage.
- The product malfunction was caused by the fall and transportation failures after purchase.
- The malfunction and damage are caused by the other barriers (man-made factors or external devices). 5. Purchase without the warranty card and purchase invoices.
| Warranty Card | |
| Product Model | |
| Defect Reason | Purchasing Date |
| Dealer Name | Telephone |
| User’s Name | Telephone |
| User’s Address | |
| User’s Email | |
| Guarantee Clause: 1. Our product has one year guarantee and free after-sale service. (Out of these 5 conditions ) 2. Please fill in the form with the correct and true information in case we can resend the item to you. |
|

Thanks for purchasing your new 1.25″ electronic eyepiece SVBONY SV205 astronomy camera! This user manual guides you how to use the SV205 camera. Please take time to read this manual completely before using it. If you have any questions, please feel free to contact us:
Web: www.svbony.com
Email: [email protected]
Facebook: www.facebook.com/svbony
Package Include

- 8MP SV205 Astronomy Camera
- 1.2m USB 3.0 Cable
- 1.25″ Dust Cover
- Cleaning Cloth
- User manual
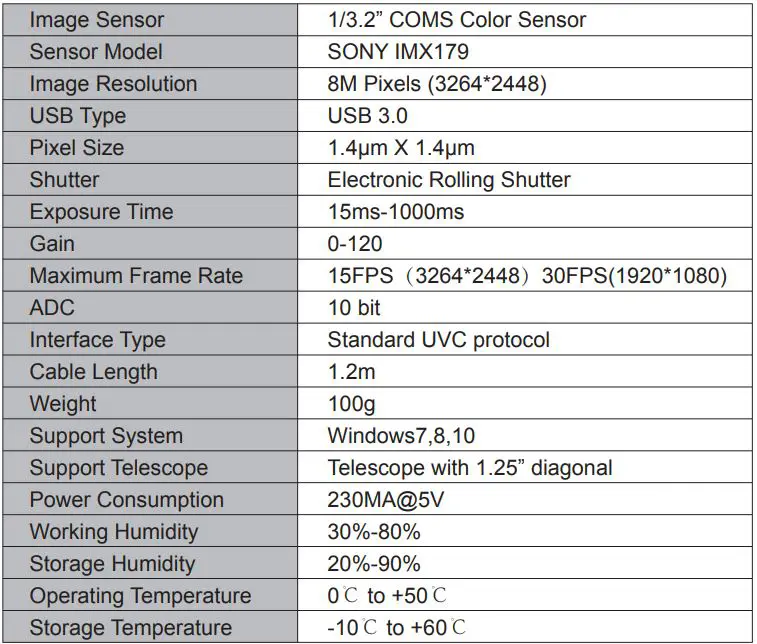
Specifications
How to Use Astronomy Camera
- Download the astronomy software from sharp cap site: https://www.sharpcap.co.uk/sharpcap/downloads
- Install the astronomy software to your computer.
- Connect your SV205 camera to the computer, Windows system will remind the discovery of a new hardware. (Note: Do not use an extension cord or USB HUB that may affect the speed and stability of the image transmission. The USB3.0 SV205 camera could work with USB2.0 port. but the transport speed will be as slow as USB2.0)
- SV205 is standard UVC device, it works with Windows 7, 8, 8.1, 10. Windows system will automatically install the driver.
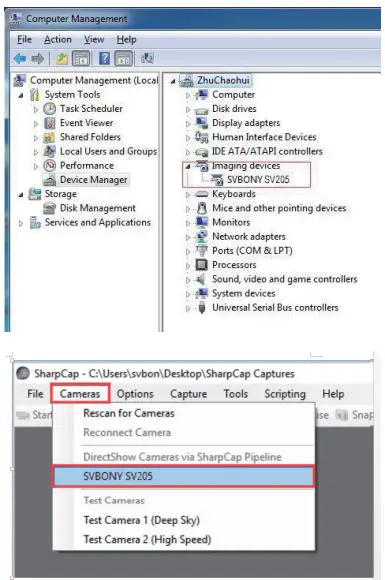
- Check the SV205 in the computer device manager. Make sure everything connecting well.
- Run the astronomy (sharpcarp) capture software as administrator. enter sharpcarp software and single click the(camera) button, you will see (SVBONY SV205 Camera). Double click it, then you will see the image or some light on the screen, so the SV205 works.
- Connect the SV205 camera to your telescope, and you will see what the telescope seeing on your computer screen. Adjust the telescope focus wheel to get a most clear image.
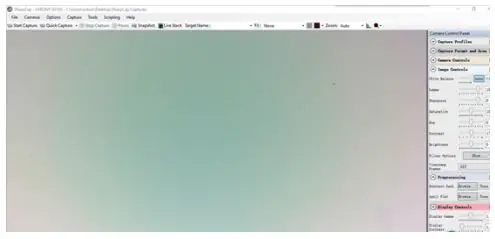
Not connect the telescope
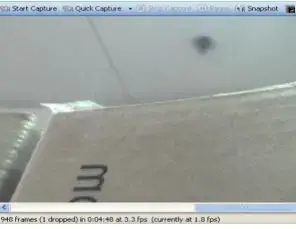
Connect the telescope
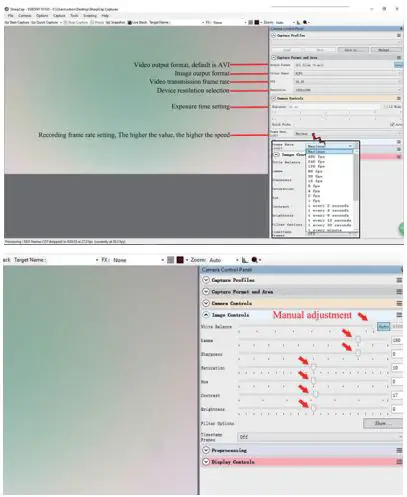
Manually adjust Gain, Contrast, Exposure Time, Frame Rate and Color Saturation on the right side table. To get the ideal image you want.
– Cameras Controls
Manually adjust the parameters to satisfy your need. It’s better to use the automatic default mode.
– Image Controls
Manually adjust the parameters to satisfy your need. It’s better to use the automatic default mode.
The Sharpcarp software will continue to update, please pay attention to download the latest version https://www.sharpcap.co.uk/sharpcap/downloads
General Clean
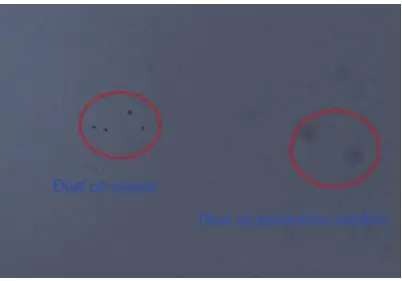
SBNY SV205 camera comes with an IR-Cut protection window, which could protect the sensor from dust and humidity. And the inside of the image sensor is dry and sealed. If you should clean the sensor, it is best to do it during the daytime. To see the dust, please connect the camera to your telescope. Point the telescope to a bright place, a Barlow lens is required to see the dusts clear. Then attach the camera and adjust the exposure to make sure not over exposed. You will see an image like below if it is dirty.
1) The small but dark black spot on the image (left) are the shadows of dust on the sensor.
2) The big spot on the image (right) are the shadows of dust on the protection window. The Suggested way to clean them is try to blow them away with a manual air pump. To clean the dust on the sensor you will need to open the camera chamber.
Structure
Quality Assurance & Warranty
The warranty time is one year. Within warranty period, if the camera fails to function, we will provide you with free after-sales maintenance service. Besides the warranty days, We provide life-long maintenance services and charge only the parts that need repair or replacement. The buyer will pay for the postage of returning camera to factory to be repaired. Within the warranty period, if the following occurs, certain maintenance costs will be charged.
- The malfunction and damaged caused by incorrect use, the unauthorized repairs and alteration.
- The damage caused by fire, flood, earthquake, other natural disasters and secondary product damage.
- The product malfunction caused by the fall and transportation failures after purchase.
- The malfunction and damaged caused by the other barriers (man-made factors or external device).
- Purchase without the warranty card and purchase invoices.