This quick start guide contains basic instructions to get you started. For the full picture, please refer to the supplied manuals which have comprehensive installation and usage instructions and important safety advice.
Setting up the portable air conditioner
For best performance, your new Wi-Fi portable air conditioner must be properly installed with the supplied window kit so you can vent the warm exhaust air to the outside.
Please consult the instruction manual for comprehensive installation instructions.
1. Fit the flexible air exhaust hose and housing connectors to the ends of the flexible air exhaust hose, twisting them into place.
2. Insert the fixing clip of the housing connector into the openings at the back of the air conditioner.
3. Adjust the window slider to the length of a horizontally (or height of a vertically) opening window and fix it with a dowel.
Fit the slider to the bottom of the window sill (or to the side of the window, if it opens vertically), then close the window.
4. Fit the exhaust hose connector (window end) through the opening to the outside.
NOTE: For certain types of windows it may be necessary for you to improvise/modify some aspects of the installation procedure.
Controlling the portable air conditioner
You have three options how to operate the portable air conditioner.
5. When you are at home, you can use the buttons on the control panel to switch the portable air conditioner on or off, select an operation mode, or set the desired room temperature and fan speed.
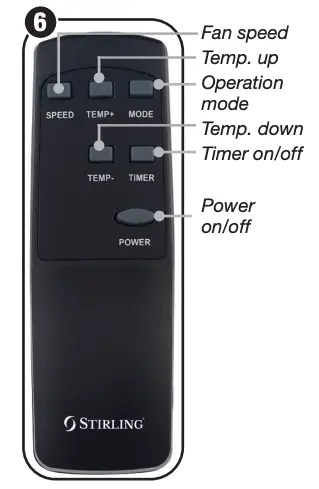
6. Alternatively, use the remote control. The buttons control the same functions as the control panel.
7. Because of its in-built Wi-Fi technology, you can also control this portable air conditioner remotely so that on your arrival your home is comfortably cool.
All you need is an Android smartphone or tablet (or an Apple iPhone or iPad), and an internet connection and Wi-Fi network router set up at your home.
You must also have our STIRLING App installed or updated on your smartphone or mobile device. This app is available from Google Play Store or Apple App Store.
Give us a call
What? You mean this Quick Start Guide didn’t have ALL the answers? The manual has more comprehensive instructions, or speak to us. Call our After Sales Support on 1300 886 649.
Well done, you made it! Now sit back and relax … your new 2.7kW Wi-Fi portable air conditioner is automatically covered by a 3 year warranty.
V1.0
]]>STIRLING STR-DWSS12 Stainless Steel Dishwasher
Installing the dishwasher
CAUTION! This dishwasher is heavy – ensure you have a helper to move it.
This dishwasher must be professionally installed by a licensed plumber or dishwasher installer. Do not install it yourself.
WHERE TO INSTALL? This dishwasher is designed for freestanding use, but it can also be recessed under a single benchtop. The back should rest against the wall behind it and the sides along any adjacent cabinets or walls. Position the dishwasher on a level and sturdy floor. If the floor is uneven, adjust the feet until it reaches a horizontal position.
WATER AND POWER CONNECTIONS Have the appliance installed close to an existing water inlet and drain connection and make sure there is PowerPoint nearby, or in an adjoining cabinet. The dishwasher’s water supply and drain hoses can be positioned either to the right or left sides to facilitate proper installation. Only use the supplied new hoses when connecting this dishwasher to the water supply. Please refer to pages 12–15 in the manual for comprehensive installation instructions.
Customizing your dishwasher
Using your dishwasher
- The height of the upper basket can easily be adjusted in the upper or lower position in order to accommodate taller dishes.
- If you need more space for pots and pans in the lower basket, you can fold down the spike rows at the back so that larger or more pots and pans can be loaded
- The cup rack is designed to hold smaller cups or similar lightweight items. To make room for taller items in the upper basket, you can raise it upwards, or remove it when it is not required for use. Cutlery should be washed in the cutlery basket (in the lower basket).
- Open the door and draw out the lower basket. Load your dishes and push the basket back into place.
- Load the upper basket the same way.
- Add dishwasher detergent and rinse aid (if applicable) according to the instructions. Close the dishwasher door properly.
- Press the POWER button on the control panel. Select the desired wash program using the PROGRAM button, then press START/PAUSE. At the end of the program, the machine will enter a standby state and switch off automatically after 30 minutes if there is no other operation.
Control panel
Please refer to the instruction manual, pages 10–11, for comprehensive descriptions of all buttons and indicators.
Give us a call
What? Do you mean this Quick Start Guide didn’t have ALL the answers? The manual has more comprehensive instructions, or speak to us. Call ours After Sales Support on 1300 112 534. Well done, you made it! Now sit back and relax … your new stainless steel dishwasher is automatically covered by a 3-year warranty.
]]>![]()
Air Purifier
Model Number AP230
INSTRUCTION MANUAL
Welcome
Congratulations on choosing to buy a STIRLING® product. All products brought to you by STIRLING®” are manufactured to the highest standards of performance and safety and, as part of our philosophy of customer service and satisfaction, are backed by our comprehensive 3 Year Warranty. We hope you will enjoy using your purchase for many years to come.
Warranty Details
REGISTER YOUR PURCHASE AT www.aldi.com.au/en/about-aldi/product-registration/ TO KEEP UP-TO-DATE WITH IMPORTANT PRODUCT INFORMATION
The product is guaranteed to be free from defects in workmanship and parts for a period of 36 months from the date of purchase. Defects that occur within this warranty period, under normal use and care, will be repaired, replaced, or refunded at our discretion. The benefits conferred by this warranty are in addition to all rights and remedies in respect of the product that the consumer has under the Competition and Consumer Act 2010 and similar state and territory laws.
Our goods come with guarantees that cannot be excluded under the Australian Consumer Law. You are entitled to a replacement or refund for a major failure and to compensation for any other reasonably foreseeable loss or damage. You are also entitled to have the goods repaired or replaced if the goods fail to be of acceptable quality and the failure does not amount to a major failure.
READ CAREFULLY AND KEEP FOR FUTURE REFERENCE
Read this manual thoroughly before first use, even if you are familiar with this type of product. The safety precautions enclosed herein reduce the risk of fire, electric shock, and injury when correctly adhered to. Make sure you understand all instructions and warnings. Keep the manual in a safe place for future reference, along with the completed warranty certificate, your purchase receipt, and the original packaging. If you sell or transfer ownership of this product, pass on these instructions to the new owner. Always follow basic safety precautions and accident prevention measures when using an electrical appliance, including the following:
Electrical safety and cord handling
- Electrical connection: The unit comes with a plug ready for connection to your mains power outlet. Ensure your electrical outlet is properly installed and earthed and complies with your local electrical safety requirements.
- Voltage: Before turning on the air purifier, ensure the electrical voltage and circuit frequency correspond to those indicated on the appliance.
- WARNING! To reduce the risk of electrocution, never immerse the appliance in water or other liquid; never spill liquids into it. Do not place or store it where it can fall or be pulled into a tub or basin. If it accidentally has fallen into the water, do not reach into the water. Immediately unplug it, let it dry, and have it checked by an authorized service technician.
- Moisture: Do not use the appliance in a bathroom or laundry, or where it can be splashed with water. Do not use it outdoors or operate it with wet hands.
- Power supply cord: Do not kink or damage the cord. Do not pull the cord or place it near a heat source; keep it away from heated surfaces. Always unwind the cord completely to avoid overheating. Run the cord in such a way so that no one will trip over it. Do not cover the cord or run it under carpeting.
- Extension cord/adaptor: Do not modify the length of the power cord or use an extension cord or power adaptor. Do not share a single outlet with other appliances. An improper power supply can cause fire or electric shock.
- WARNING! To reduce the risk of fire or electric shock, do not use this appliance with any solid-state speed control device.
- WARNING! Turn off the unit and unplug it when it is not in use, before servicing, moving, or cleaning it, before removing a filter, and during a thunderstorm. When disconnecting, grip by the plug, do not pull by the cord.
- Switching on/off: Do not use the mains plug to start and stop the unit; always use the POWER button to start and stop the unit.
- WARNING: If the unit is knocked over during use, turn it off and unplug it from the mains power supply immediately. Visually inspect the unit to ensure there is no damage. If you suspect the unit has been damaged, do not use it. Switch it off, unplug it and contact a technician or our after-sales support center for assistance. Do not pick up or operate a damaged appliance, or after it malfunctions or has been dropped or damaged in any manner.
- Damaged cord: If the supply cord is damaged, do not use the appliance. A damaged power supply cord must be replaced by the manufacturer or its service agent or a similarly qualified person in order to avoid a hazard.
- RCD: The installation of a residual current device (safety switch) is recommended to provide additional safety protection when using electrical appliances. It is advisable that a safety switch with a rated residual operating current not exceeding 30mA be installed in the electrical circuit supplying the appliance. See your electrician for professional advice.
Usage conditions and restrictions
- Intended use: This appliance is intended for purifying indoor air in domestic environments. It is not suitable for commercial, industrial or trade use. Do not use it for any other purpose, and only use it as described in this manual.
- Common sense: These instructions are not intended to cover every possible condition and situation. As with any electrical appliance, common sense and caution are therefore always recommended when installing, operating, and maintaining the unit.
- No outdoor use: Do not use the unit outdoors. It is for indoor use only.
- Usage restriction: This appliance is not intended for use by persons (including children) with reduced physical, sensory or mental capabilities, or lack of experience and knowledge unless they have been given supervision or instruction concerning the use of the appliance in a safe way and understand the hazards involved.
- Children: Supervise children to ensure they do not play with the appliance. Close supervision is necessary when any appliance is used by or near children. Cleaning and user maintenance shall not be made by children without supervision.
- Unattended: Do not leave the appliance unattended when in use.
- Openings: Do not obstruct the air intake or outlet openings. Do not insert any objects, or your fingers into the air inlet or air outlet openings.
- Attachments: The use of attachments not recommended or sold by the manufacturer may cause fire, electric shock, or injury.
- Handle with care: Do not shake the appliance vigorously or drop it from an elevation. Doing so will damage the product or shorten its lifespan. Do not sit or stand on the appliance, which may lead to potential injury. Do not press hard on top of the unit or place heavy things on top of it.
- Location: Always place the appliance on a dry, stable, level, and horizontal surface. Never place it on an inclined or uneven surface. Do not use the appliance in an environment where oil is used or smoke is generated, such as in a kitchen.
- Clearances: Ensure there is a clearance of at least 30cm from walls and furniture and at least 50cm from electrical appliances.
- Protect from heat: Do not use the appliance near appliances that get hot during use, such as heaters, ovens or fireplaces. Avoid long-term exposure to direct sunshine.
- No flammable gases: Never locate the air purifier in an area where flammable and combustible gases are present. If combustible gas accumulates around the unit, it may cause a fire.
• Moving the appliance: When moving the air purifier, always turn it off first and disconnect the power supply, and then move it slowly. Keep the unit upward during transport and storage.
• Misuse: We accept no responsibility for any eventual injury or damage caused by improper installation, misuse or noncompliance with the instructions.
Cleaning and maintenance
- Disconnect: Make sure the appliance is disconnected from the power supply when it will not be used for a long time and before cleaning or maintenance.
- Service: Except for the filter, the air purifier has no user-serviceable parts contained inside. Do not attempt to disassemble, modify or conduct repairs on this unit. It has been built in accordance with relevant safety and performance standards. An electrical specialist must carry out all repairs. If the appliance requires service, please contact our after-sales support center.
- Cleaning: Clean the outside of the unit once a month using a dry or slightly damp cloth (not wet!), or use a soft brush attachment of a vacuum cleaner. Never use water, wax, polish, or any other chemical solution to clean the outside of the unit. Never use water or any household cleaners or detergents to clean the 3-in-1 filtration system; use a dry, soft brush to clean the filters and replace
them when necessary.
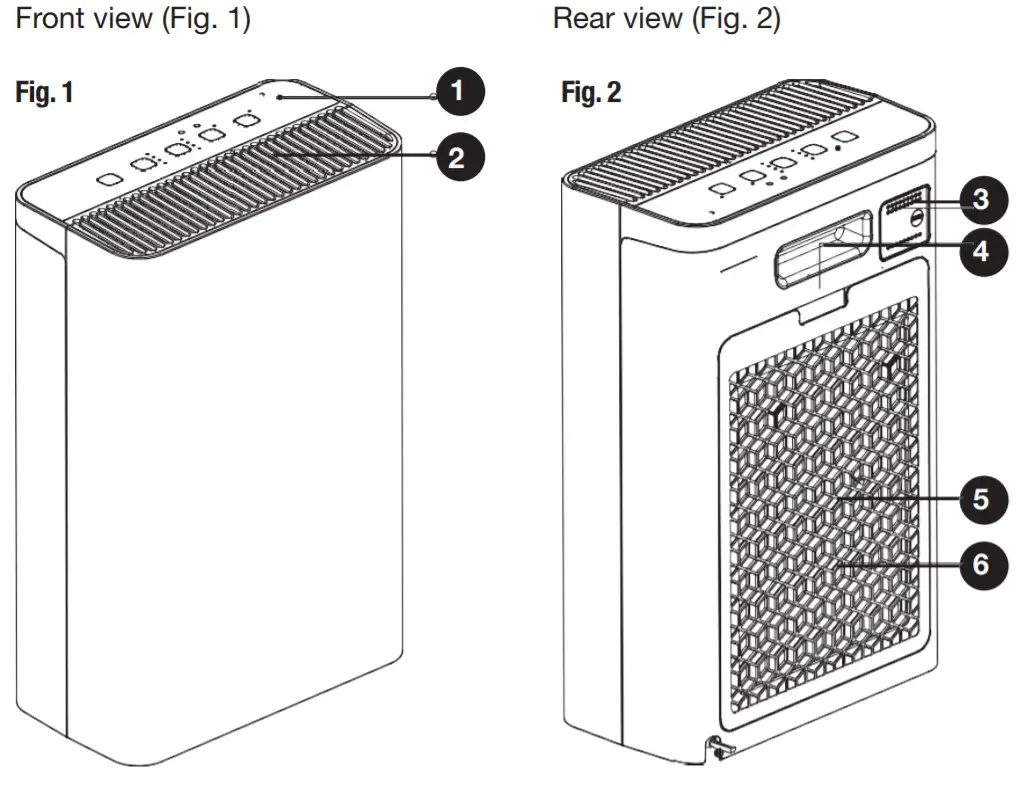
Product Overview
Scope of delivery Air purifier

- Control panel
- Air outlet
- Dust sensor
- Handle
- Air inlet
- Back cover
Documentation (not shown)
Instruction manual
Quick start guide
Warranty certificate
NOTE: Due to continued product improvement, images and illustrations in this manual may vary slightly from the product purchased. All images in this manual are for reference purposes only. Parts are not necessarily pictured to scale.
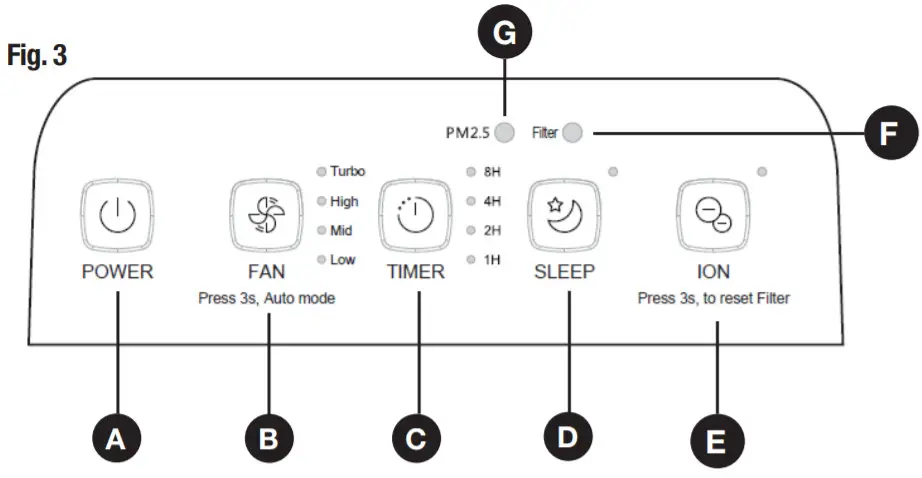
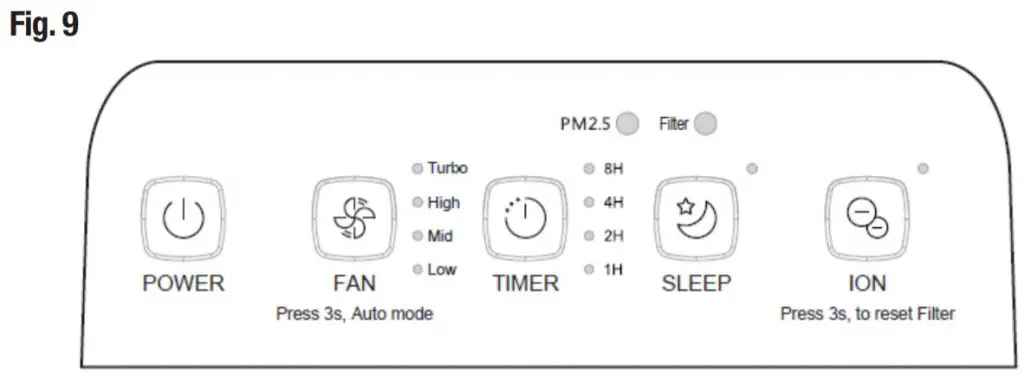
Control panel

A POWER button (and indicator): press to turn the unit on/off.
B FAN button
* Press to choose the fan speed options: turbo, high, mid, low — the respective indicator light will illuminate.
* Press and hold for 3 seconds to enter automatic (Auto) mode, and then press the button again to exit automatic mode.
NOTE: In Auto mode, the purifier automatically adjusts the purification level based on the sensor’s detection data (dust concentration).
C TIMER button: press to select the off-timer period: 1 hour, 2 hours, 4 hours or 8 hours — the respective indicator light will illuminate.
D SLEEP button (and separate indicator): press to turn the sleep mode on/ off — the respective indicator light will illuminate.
E ION button (and separate indicator): press to turn the anion function on/ off — the respective indicator light will illuminate.
F Filter indicator: the filter indicator will flash when it is time for you to clean or replace the filters. After you have replaced the filters, press and hold the ION button for 3 seconds and the counter will reset from the beginning.
G PM2.5 indicator: the air quality indicator illuminates green when the air quality is good, orange when it is average, and red when it is poor. indicator: the air quality indicator illuminates green when the air quality is good, orange when it is average, and red when it is poor.
Getting Started
Before first use
•Unpacking: This product has been packaged to protect it against transportation damage. Unpack the appliance and keep the original packaging materials in a safe place. It will help prevent any damage if the product needs to be transported in the future, and you can use it to store the appliance when it is not in use. In the event that the packaging is to be disposed of, please recycle it where possible.
• Safe packaging disposal: Plastic wrapping can be a suffocation hazard for babies and young children, so ensure all packaging materials are kept out of their reach and disposed of safely.
•Inspection: Unwind the cord fully and inspect it for damage. Do not use the appliance if any part is damaged. In case of damage, contact our after-sales support center for advice.
•Documentation: Make sure you have read and understood all instructions and warnings in this manual. Refer the Product overview to identify all parts of the appliance and familiarise yourself with its operating principles. Pay particular attention to the safety instructions on the previous pages.
• IMPORTANT! Before first use, you will have to unpack the filtration system and install it into the appliance following the instructions on the next page.
Features
- Control panel with touch controls for easy operation
- Air quality indicator (green = good, orange = average, red = poor)
- 8-hour timer
- Sleep mode
- Filter replacement reminder
- Anion generator
The filtration system
To help you keep your home clean and free of indoor air pollutants and allergens, the STIRLING ® Air Purifier is equipped with an effective 3-in-1 filtration system, which consists of a HEPA filter, a carbon filter, and a prefilter.
- The H13 HEPA filter removes 99.7–99.98% of microfine airborne particles such as dust, pollen, and smoke.
- An activated carbon filter is located behind the HEPA filter. It attracts and neutralizes harmful or undesirable fumes and odors from cleaning, cooking or new furniture.
- The prefilter, located behind the carbon filter, traps bigger breathable particles, such as pet hair and dander.
Filter installation
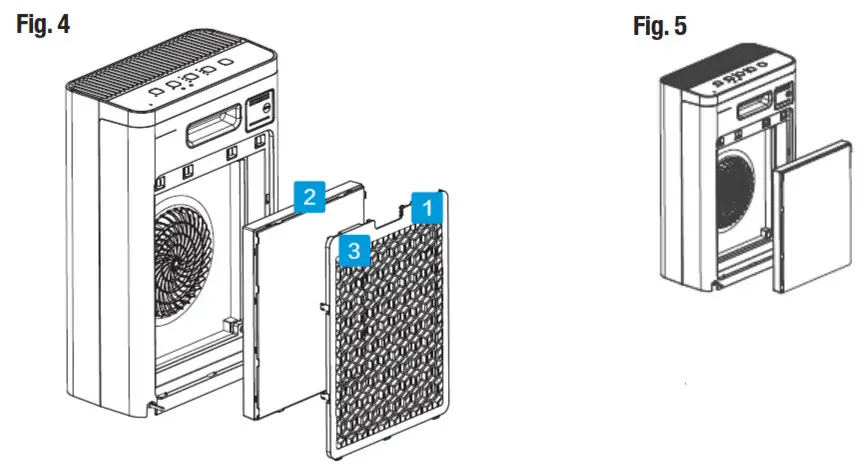
Before using the appliance, you will have to remove all packaging materials from the 3-in1 filter set, which is fitted inside the appliance in its original wrapping. The filters fit into the appliance as shown in Fig. 4.
- Remove the rear cover of the appliance (Fig. 4).
- Take the packaged filtration system out of the appliance (Fig. 5).
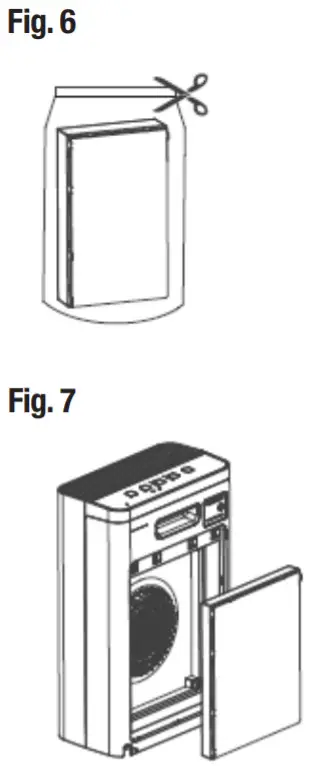
- Remove all packaging materials from the filters (Fig. 6).
- Reinstall the unpacked filtration system into the appliance (Fig. 7).
- Reinstall the rear cover as shown (Fig. 4).
Instructions
Location
- Place the appliance on a dry, stable, level, and horizontal surface. Never place it on an inclined or uneven surface.
- For a better air purification effect, make sure to maintain a clearance of at least 30cm from walls or furniture (Fig. 8) and at least 50cm from electrical appliances.
• Do not use the appliance in the following environments:
* where oil is used or smoke is generated, such as in a kitchen
* near appliances that get hot during use, such as heaters, ovens or fireplaces
* where it would be exposed to direct sunshine for long periods of time
* where flammable and combustible gases are present.
Connecting the air purifier and switching on/off
• Plug the appliance into a properly earthed 220–240V~ 50Hz mains socket and switch on power to the outlet.
• Press the POWER button to turn on the unit.
• When the unit is running, press the POWER button to switch the machine to standby mode.
Using the air purifier
Fan speed
Press the FAN button to choose the fan speed options: turbo, high, mid, low — the respective indicator light will illuminate.
Auto mode
Press the FAN button and hold it for 3 seconds to enter Auto mode. In Auto mode, the purifier automatically adjusts the purification level based on the sensor’s detection data (dust concentration). Press the FAN button again to exit Auto mode.
Off-timer
Make sure the appliance is switched on before setting the timer. Press the TIMER button to select the off-timer period: 1 hour, 2 hours, 4 hours, 8 hours — the respective indicator light will illuminate. The appliance will start timing and shut down automatically after the set period.
Sleep mode
Press the SLEEP button to turn the Sleep mode on or off — the indicator light will illuminate and the fan speed will change to low; other indicator lights will turn off. To exit Sleep mode, press any button; the unit will keep running at low speed but
if there is no further operation within three seconds, it will return to Sleep mode.
Ionizer function
Press the ION button to turn the ionizer function on/off — the respective indicator light will illuminate. This function creates negative ions and discharges them into the air to help remove dust and other positively charged air pollutants by electrostatic attraction.
Air quality status
When the appliance is switched on, the air quality sensors inside the appliance assess the air quality and, after a short while, display the color that corresponds to the current ambient air quality.
The PM2.5 indicator illuminates:
• green when the air quality is good
• orange when the air quality is average
• red when the air quality is poor.
NOTE: PM2.5 refers to inhalable particles: particulate matter with a diameter of less than 2.5 micrometers, which can only be detected with an electron microscope. (For reference, the average human hair is about 70 micrometers in diameter.)
Filter indicator
The air purifier has a filter indicator built-in that automatically counts the usage time and reminds you when the filters need to be cleaned or replaced. When you start the machine, the filter indicator begins counting the hours of usage. It will stop counting when the appliance is shut down or is in standby mode and resume counting when you switch it on again.
When the filter indicator has counted a total of 3000 hours, the Filter indicator
will start flashing to alert you to clean or replace the filters.
- Please refer to page 16 for instructions on how to clean the filters, or to page 17 for how to purchase replacement filters.
- To clear the accumulated time after you have cleaned or replaced the filters, press and hold the ION button for three seconds and the timer will reset from the beginning.
FAQs & Troubleshooting Guide
If you experience problems with your air purifier, or it appears not to be operating correctly, check the information below for solutions to common problems. If you still cannot solve your problem, please contact our after-sales support center for advice. Do not attempt to repair the appliance yourself.
| Problem | Possible cause and solution |
| The appliance does not switch on. | Power is not properly supplied — make sure the appliance is properly connected to your power supply and your electrical outlet is working. |
| The electrical outlet is faulty — check whether the unit is working if connected to a different power outlet. | |
| The appliance is not switched on — ensure you have pressed the POWER button to switch on the appliance. | |
| The appliance makes a loud noise. | The air purifier is located on an inclined surface — place the unit on a level surface. |
| The filter is clogged — check all filters and clean or replace them as necessary. | |
| The air inlet is blocked — check and ensure that the air inlet and outlets are free of obstructions. | |
| Poor air-purifying effect, especially
with regard to odors. |
The filters are installed incorrectly — refer to page 11 for correct filter installation instructions. |
| The filters may have reached the end of their lifespan — replace the filters. | |
| An unpleasant odor is coming from the machine | The filters need to be changed — replace the filters according to the instructions. |
| There is a burnt smell and/or smoke coming from the unit. | The unit is faulty — switch off and unplug the unit, then contact our after-sales support center. |
| The filter parts are still in the original packaging — refer to page 11 for correct filter installation instructions. | |
| The filter indicator does not turn off. | You may not have reset the counter-press and hold the ION button for three seconds to reset the counter. |
| The unit got wet and now works abnormally. | The unit is damaged — switch off and unplug the unit, then contact our after-sales support center. |
Other Useful Information
Electric shock hazard!
Before cleaning and servicing, ensure the unit is switched off and disconnected from the power outlet to prevent possible injury.
Cleaning the exterior parts of the appliance
When required, clean the outside of the unit using a clean and soft, dry or slightly damp cloth (not wet!). Use a dry cloth or a vacuum cleaner soft brush attachment for cleaning the air outlet and intake.
CAUTION! Never use water, wax, polish, or any other chemical cleaning agent to clean the outside of the unit.
Filter maintenance
The 3-in-1 filtration system must be cleaned and/or replaced regularly, as appropriate, in order to ensure efficient operation and maintain the unit in good working order. When the filter indicator flashes, it is time to clean or replace the filters.
- Remove the back cover.
- Take the 3-in-1 filtration system out of the appliance and clean/replace it as appropriate.
- Use a soft, dry brush to remove dust and debris from the filters.
IMPORTANT! Never use water or any household cleaners to clean the HEPA and carbon filters. - When the filters are worn or damaged, or when the air purification effect remains poor, it is time to replace the filters. Spare filter sets are available for purchase from our after-sales support center.
- After you have replaced the filters into the appliance, reattach the back cover and reset the counter.
IMPORTANT!
After cleaning or replacing the filters, remember to press and hold the ION button for three seconds to reset the counter.
Other Useful Information (Cont.)
Storage
If the appliance is not going to be used for an extended period of time, please store the unplugged appliance safely in the original packaging in a dry location, out of reach of children. Do not place any heavy items on top of the appliance during storage as this may result in damage of the appliance.
Service, repair, and spare parts
If you look after your air purifier it should give you years of good service. Should you experience problems with the appliance that you cannot solve yourself using the advice given in this manual, please contact our after-sales support center for advice. Do not attempt to open the appliance.
Our after-sales support center stocks spare filter sets for the air purifier. To purchase a filter set, call the center on 1300 886 649 or email us at [email protected].
Technical specifications
| Power input | 220–240V~ 50Hz |
| Rated power | 50W |
| CADR | 220m |
| Room size suitability | 3 |
| Dimensions (approx.) | /h ±5 |
| Weight (approx.) | 25m |
 CLASS II – DOUBLE INSULATED APPLIANCE
This symbol indicates that the appliance has been designed in such a way
that it does not require a safety connection to electrical earth (ground).
 The RCM Mark (Regulatory Compliance Mark) indicates that the product
complies with the relevant guidelines of the ACMA as well as corresponding
government requirements for the safety of electrical devices.
Compliance
- This appliance has been fully tested and meets all requirements as set out by standards AS/NZS 60335.1 and AS/NZS 60335.2.65.
- This product complies with the maximum allowable concentration of ozone of 0.050 parts per million by volume (ppmv) in a 24-hour period. The Health Canada Guideline 2010 recommends that the maximum exposure limit, based on an average time of 8 hours, is 0.020 ppmv or less when tested in a sealed, controlled room (approximately 30 m³).
Responsible disposal
At the end of its working life, do not throw this appliance out with your household rubbish. Electrical and electronic products contain substances that can have a detrimental effect on the environment and human health if disposed of inappropriately. Observe any local regulations regarding the disposal of electrical consumer goods and dispose of it appropriately for recycling. Contact your local authorities for advice on recycling facilities in your area.
Repair and Refurbished Goods or Parts Notice
Unfortunately, from time to time, faulty products are manufactured which need to be returned to the supplier for repair.
Please be aware that if your product is capable of retaining user-generated data (such as files stored on a computer hard drive, telephone numbers stored on a mobile telephone, songs stored on a portable media player, games saved on a games console, or files stored on a USB memory stick) during the process of repair, some or all of your stored data may be lost. We recommend you save this data elsewhere prior to sending the product for repair.
You should also be aware that rather than repairing goods, we may replace them with refurbished goods of the same type or use refurbished parts in the repair process.
Please be assured though, refurbished parts or replacements are only used where they meet ALDI’s stringent quality specifications.
If at any time you feel your repair is being handled unsatisfactorily, you may escalate your complaint. Please telephone us on 1300 886 649 or write to us at Tempo (Aust) Pty Ltd ABN 70 106 100 252 PO BOX 6056 Frenchs Forest, Sydney, Australia NSW 2086
Telephone: 1300 886 649 (Aust) – Fax: (02) 9975 2688 Tempo Help Desk: 1300 886 649 (Aust)
(Operating Hours: Mon-Sat 09:00am to 06:00pm AEST)
Email: [email protected]

Warranty returns
Should you for any reason need to return this product for a warranty claim, make sure to include all accessories with the product.
The product does not work?
If you encounter problems with this product, or if it fails to perform to your expectations, make sure to contact ours After Sales Support Centre on 1300 886 649.
For an electronic copy of this manual, go to www.stirlingappliances.com.au and download a copy, or contact our after-sales support center.
AFTER-SALES SUPPORT
 1300 886 649
 [email protected]
MODEL: AP230 PRODUCT CODE: 702580 09/2020