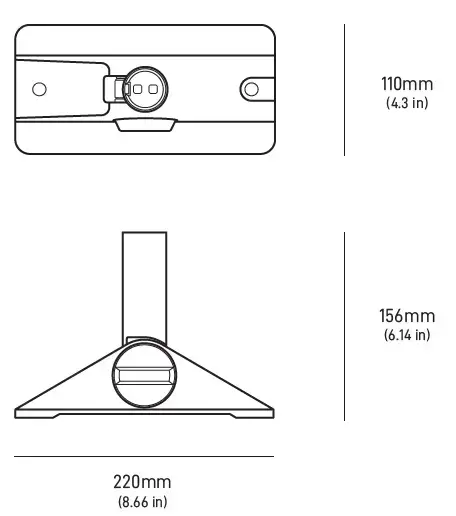
STARLINK Rectangular Satellite-Internet Dish

Find A Clear View of the Sky
Your Starlink needs a clear view of the sky so it can stay connected with satellites as they move overhead. Objects that obstruct the connection between your Starlink and the satellite, such as a tree branch, pole, or roof, will cause service interruptions.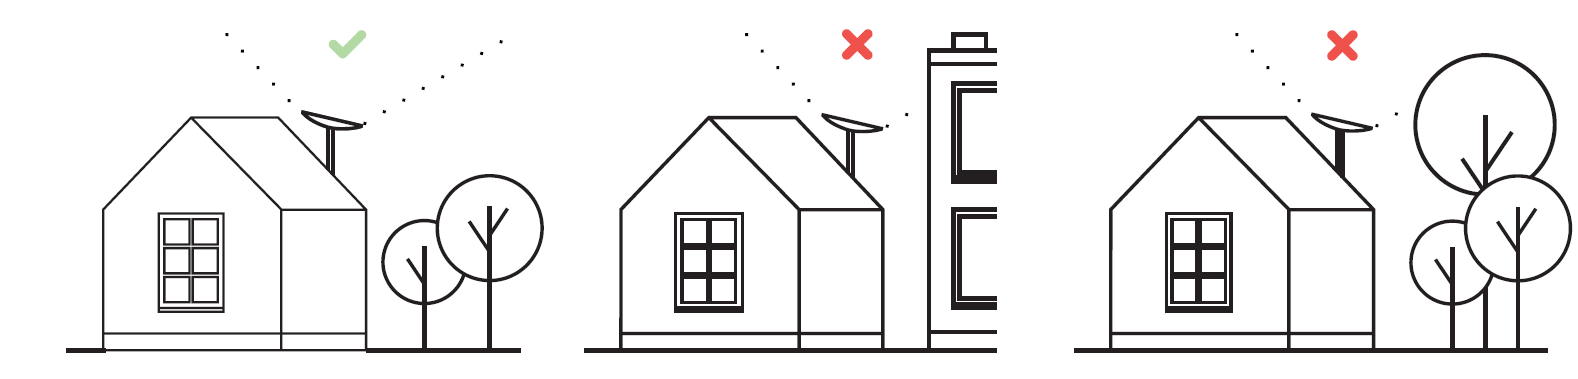
To find a location with a clear view of the sky:
- Download the Starlink App.
- Use the “Check for Obstructions” tool to find an install location that will deliver the best service.
- For best results, Starlink should be installed as close to vertical as possible.
If you could not find a clear field of view from the ground level, consider installing in an elevated location, like a roof, pole, or wall. Additional mounts and accessories are available for purchase on the Starlink Shop.
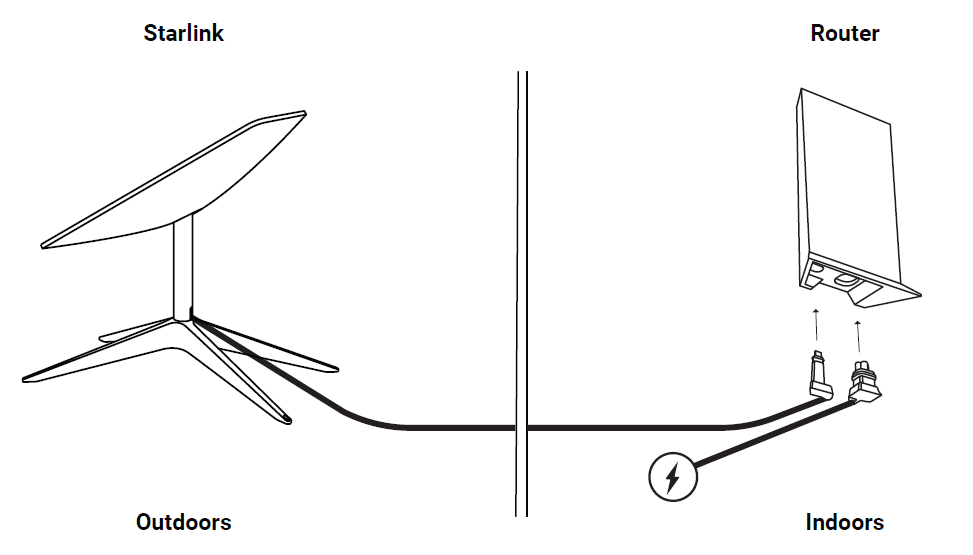
Plug Starlink In
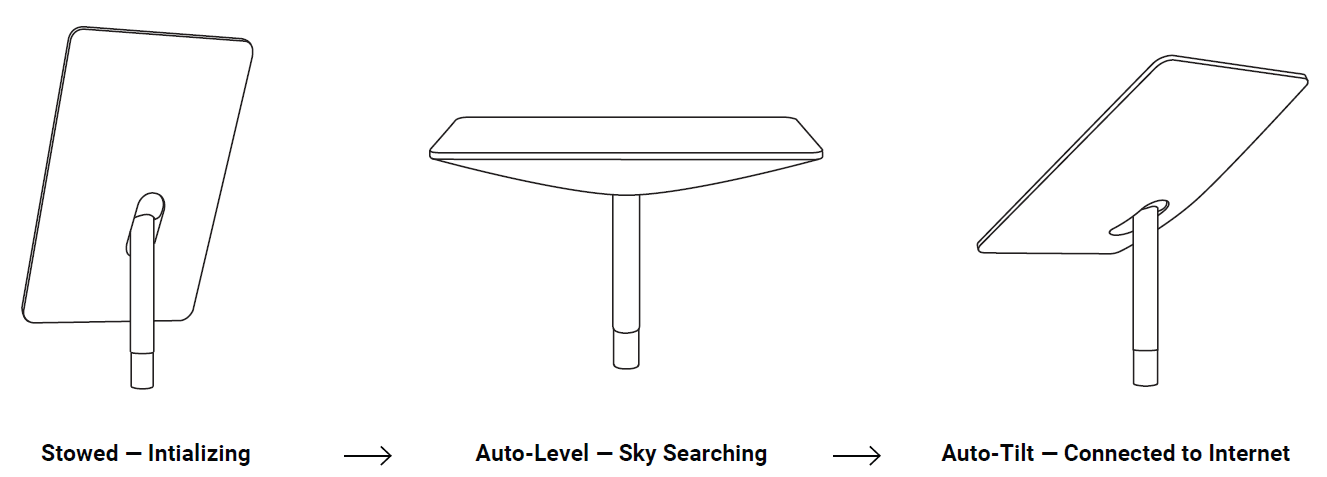
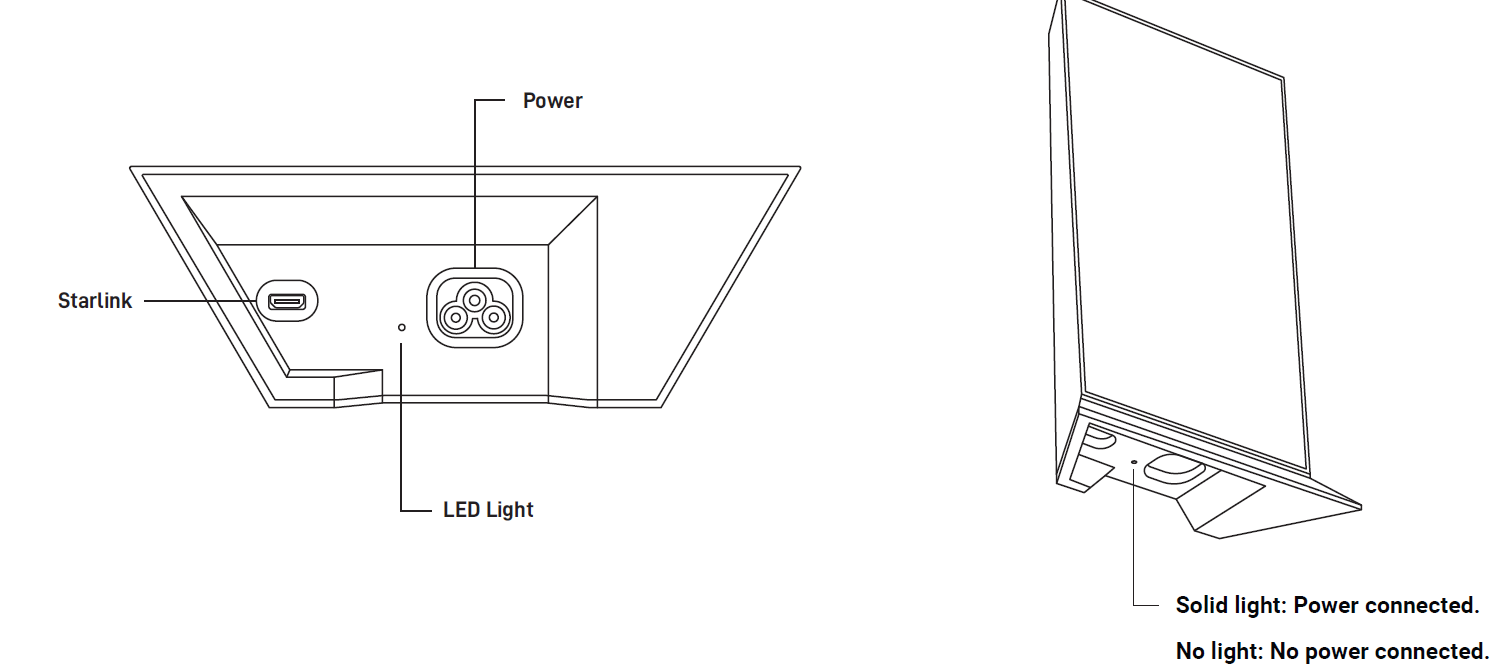
- Put Starlink into base and plug into power.
- Starlink will automatically level itself to search for satellites overhead. Do NOT attempt to manually adjust your Starlink.
- After a few minutes, Starlink will make an initial connection to the Starlink constellation and tilt to the optimum angle for satellite coverage (slightly north or south based on your location in the northern or southern hemisphere).
Connect to WiFi
- On your device, find and connect to the STARLINK network in your WiFi settings.
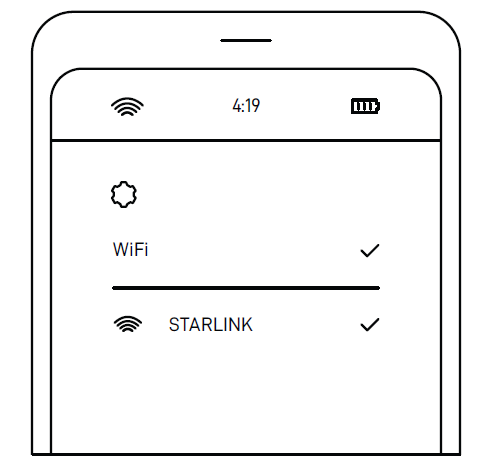
- Once connected, a browser window will open prompting you to enter a new SSID (Network name) and password. This step is optional but recommended.
- You are now connected! Open the Starlink App to customize additional settings, check your connection, and more.
Can’t Get Online?
- Open the Starlink App to check for any alerts, outages, or obstructions.
- Check the WiFi router light.
- Make sure everything is securely plugged in and there is no damage to hardware or cables.
- Confirm you are at the correct service address listed on your account.
- Power cycle Starlink by unplugging from power and then plugging back in.
- If none of these works, contact Starlink Customer Support by logging into your account on starlink.com.
For Further Assistance
Find answers to frequently asked questions, installation education, and additional troubleshooting in the Starlink App and the Support section of starlink.com.
FAQ’S
How do I set up Starlink satellite dish?
Assemble the Dish, Stand, and Cable
Once you unpack your Starlink kit, you need to assemble the dish and mounting base. Start by unplugging the connection cable from the dish: It arrives plugged-in and you need to unplug it to seat the dish mast into the mounting base. Then, insert the dish mast into the mounting base.
My WiFi connection is slow or drops out. How can I improve my WiFi connection?
If you are using a 2.4GHz WiFi router, consider upgrading to a 5GHz WiFi router. 5GHz WiFi has less interference from other devices and will provide better performance.
My WiFi network name is not visible on my Starlink App. How can I fix this?
Make sure that your WiFi network name is the same as it is on your computer or mobile device.
I am having trouble connecting to the Internet with my Starlink. What should I do?
Make sure that your Starlink is connected to power and that the power cord is securely plugged in to both the wall and the back of the Starlink.
My Internet connection keeps disconnecting and reconnecting. What should I do?
If you are using a 2.4GHz WiFi router, consider upgrading to a 5GHz WiFi router. 5GHz WiFi has less interference from other devices and will provide better performance.
The Internet connection on my computer or mobile device keeps disconnecting and reconnecting. What should I do?
Make sure that your computer or mobile device is connected to the same network as your Starlink (i.e., same SSID, password, etc.).
Why does my Internet connection drop when I am watching videos?
Your Internet connection may be too slow for streaming video content, especially if you are using a wireless connection. Please refer to your ISP for more information about your Internet speed requirements for streaming video content.
Why does my Internet connection drop when I am gaming online?
Your Internet connection may be too slow for online gaming, especially if you are using a wireless connection. Please refer to your ISP for more information about your Internet speed requirements for online gaming.
Why does my Internet connection drop when I am downloading files?
Your Internet connection may be too slow for large file downloads, especially if you are using a wireless connection. Please refer to your ISP for more information about your Internet speed requirements for large file downloads.
Why does my Internet connection drop when there are multiple devices connected at once?
If you have multiple devices connected to one modem/router, such as laptops, desktops, tablets, smartphones, etc., then consider upgrading to a modem/router with higher bandwidth capabilities (i.e., faster speeds). This will allow all of the devices connected to it (including Starlink) to share the available bandwidth without slowing down each other’s connections or causing any service interruptions due to over-usage of available bandwidth by any one device on
Where should I put my Starlink router in my house?
Instead, place it in a closer location (about halfway) to the primary router. The bigger your house, the more mesh nodes you will need to cover the whole area. Place your router upright and in an open area and avoid placing it near other objects that will physically block your signal.
What are the disadvantages of Starlink?
The 5 Biggest Disadvantages Of Starlink Internet
Coverage is still lacking. Thomas Dutour/Shutterstock.
Self-installation is needed. JL IMAGES/Shutterstock.
Slower and less reliable than cable. Rido/Shutterstock.
Obstructions can cause connectivity issues. Thomas Dutour/Shutterstock.
Won’t work as well in cities.
STARLINK Rectangular Satellite-Internet Dish
www://theverge.com/
STARLINK Router
STARLINK Router
SETUP
Plug everything in
Power up the router by connecting the power cord and dish cable through the bottom ports of the Router. When everything is connected correctly, the Router LED will glow a pulsing white.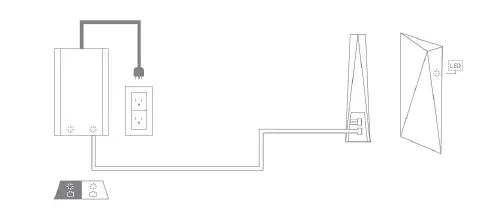
Power Supply LED:
When the Router is powered, the LED glows solid white
Router LED:
- Pulsing White: Initializing
- Solid White: Waiting for the Internet
- Solid Blue: Connected to the Internet
CONNECT
Once the Router LED is solid white and no longer pulsing, the software is initialized and the Router is ready for login. This takes approximately 2 minutes. Connect using the Network ID and password. Once the system has successfully established an internet connection, the Router LED will glow blue, and you will be able to browse the web.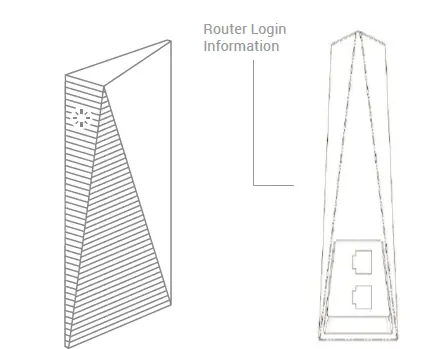
Changing Your Network ID Or Password
To access the Router Admin Portal on a connected device (e.g., phone, tablet, PC) via the Starlink GUI, open the Starlink App, or enter http://192.168.100.1/ in your Internet Browser. STARLINK GUI => SETTINGS Once in SETTINGS, change the IWFI CONFIGURATION.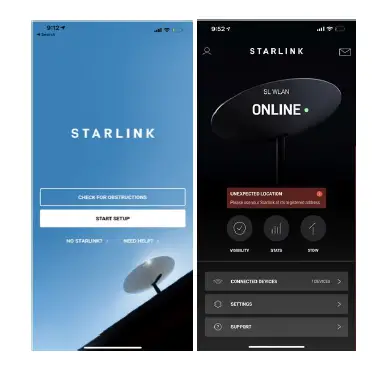
Regulatory information
For regulatory identification purposes, your product is assigned Model No.: UTR-201,
FCC ID: 2AWHPR201, IC: 26207-UTR201
E-Label Access
To view the electronic regulatory labels on the connected device (e.g., phone, tablet, PC) via Starlink GUI Open Starlink App, or http://192.168.100.1/ in Web Browser. Starting from main page of STARLINK GUI
- Step 1 – Access the submenu “Support”
- Step 2 – Access the submenu “Legal”
- Step 3 – Access the submenu “Regulatory Label” Alternatively, the regulatory markings might be located on the bottom of the unit, on the packaging, or elsewhere in this document.
Federal Communications Commission Notice
This device complies with Part 15 of the FCC Rules. Operation is subject to the following two conditions:
- This device may not cause harmful interference.
- this device must accept any interference received, including interference that may cause undesired operation.
FCC Statement
This equipment has been tested and found to comply with the limits for a Class B digital device, pursuant to Part 15 of the FCC Rules. These limits are designed to provide reasonable protection against harmful interference in a residential installation. This equipment generates, uses and can radiate radio frequency energy and, if not installed and used in accordance with the instructions, may cause harmful interference to radio communications. However, there is no guarantee that interference will not occur in a particular installation. If this equipment does cause harmful interference to radio or television reception, which can be determined by turning the equipment off and on, the user is encouraged to try to correct the interference by one of the following measures:
- Reorient or relocate the receiving antenna.
- Increase the separation between the equipment and receiver.
- Connect the equipment into an outlet on a circuit different from that to which the receiver is connected.
- Consult the dealer or an experienced radio/TV technician for help.
FCC Caution: Any changes or modifications not expressly approved by the party responsible for compliance could void the user’s authority to operate this equipment. This transmitter must not be co-located or operating in conjunction with any other antenna or transmitter.
Radiation Exposure Statement:
This equipment complies with FCC radiation exposure limits set forth for an uncontrolled environment. This equipment should be installed and operated with a minimum distance 23 cm between the radiator & your body.
industry Canada statement:
This device complies with ISED’s license-exempt RSS. Operation is subject to the following two conditions: This device may not cause harmful interference, and this device must accept any interference received, including interference that may cause undesired operation.
Caution
the device for operation in the band 5150-5250 MHz is only for indoor use to reduce the potential for harmful interference to cochannel mobile satellite systems;
Radiation Exposure Statement:
This equipment complies with ISED radiation exposure limits set forth for an uncontrolled environment. This equipment should be installed and operated with greater than 28cm between the radiator & your body.
FAQ’S
Does the Router have a warranty?
Yes, the Router has a 1-year limited warranty. See the Warranty section for more details.
What is the difference between the UTR-200 and UTR-201?
The UTR-200 is an older version of the UTR-201. The UTR-200 does not have an Ethernet port on the back, which is why it is cheaper. However, you can still connect to your modem using an Ethernet cable and plug it into the WAN port on the back of the Router.
How do I connect to my Internet Service Provider (ISP) using my Starlink Router?
First, plug in your modem and power up your computer or other device that you want to use with your Starlink Router. Then, connect your computer or other device to one of the four LAN ports on the back of your Starlink Router using an Ethernet cable. Next, connect your modem to one of the four LAN ports on the back of your Starlink Router using another Ethernet cable. Finally, power up your Starlink Router by connecting the power cord and dish cable through the bottom ports of the router. When everything is connected correctly, you will see a pulsing white light on your Starlink Router LED. This indicates that it is initializing and ready for login. This takes approximately 2 minutes. Once this is complete, you will be able to access Internet Service Provider (ISP) by connecting to 192.168.100.1 in any web browser (e.g., Chrome). If you are having trouble connecting to ISP, please contact customer service at 1-800-921-8101 or email us at [email protected] for further assistance with this matter.
How do I change my network ID or password?
To access the router admin portal on a connected device (e.g., phone, tablet, PC) via Starlink GUI, open Starlink App or enter http://192.168.100.1/ in your Internet Browser . STARLINK GUI => SETTINGS Once in SETTINGS , change IWFI CONFIGURATION .
Does Starlink have a router?
The Starlink Wi-Fi router is the key to your new speedy internet connection and serves as the base unit for filling your home with Starlink internet.
How many devices can Starlink router handle?
128 devices
Starlink has no limit on the number of devices you use, so the only limit is what your hardware can support. The Starlink app says that the Starlink router can support up to 128 devices.
Is Starlink router waterproof?
In contrast, the modem on the first-gen Starlink dish is designed to function indoors between 32°F to +86°F. (Both the first-and second-gen Starlink dishes are waterproof and can withstand outdoor conditions between -22°F to +122°F.)
Does the Starlink router have lights?
Power up the Router by connecting the white Ethernet cable between the white Power Supply port and the bottom port of the Router. When everything is connected correctly, the Router LED will glow a pulsing white.
Does Starlink router get hot?
A Reddit user group has been documenting the problem, with several commenters sharing screenshots of alerts regarding overheating of Starlink equipment. SpaceX is telling Starlink users that the equipment might experience overheating when the temperature reaches 122 degrees Fahrenheit.
What are the disadvantages of Starlink?
The 5 Biggest Disadvantages Of Starlink Internet
Coverage is still lacking. Thomas Dutour/Shutterstock. .
Self-installation is needed. JL IMAGES/Shutterstock. .
Slower and less reliable than cable. Rido/Shutterstock. .
Obstructions can cause connectivity issues. Thomas Dutour/Shutterstock. .
Won’t work as well in cities.
What speed is Starlink router?
Starlink Download Speed Varies Between 300 Mbps & Below 50 Mbps In U.S. and U.K. Show Tests. The issue of widely varying download speeds for Starlink is not a new one, and it is likely occurring due to the constellation being in the early stages of its development.
What is included in Starlink kit?
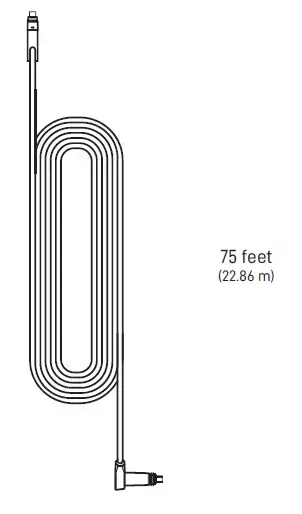
The Starlink kit(Opens in a new window) comes with everything you need to get going: one Starlink dish, a dish mount, and a Wi-Fi router base unit. It also includes a power cable for the base unit and a 75-foot cable for connecting the router to the dish.
STARLINK Router
www://starlink.com/rv
STARLINK Rectangular Internet Dish Accessories Installation Guide

PIPE ADAPTER MOUNT
Designed to attach to any pole with a max diameter of 2.5” (64 mm). Slide adapter over the top of the existing pole, fasten provided screws, and drop Starlink in.
- Tools Needed:
- 7/16” (11.1 mm) Socket Wrench
- Package Dimensions:
- 8.3” x 5.5” x 3.4” / 21 x 14 x 8.7 cm
- Package Weight: 1.35 lbs / 0.6 kg
- Compatibility: Rectangular Starlink
SHORT WALL MOUNT
Designed for installation on an exterior wall, near the top of the gable. Drilling required.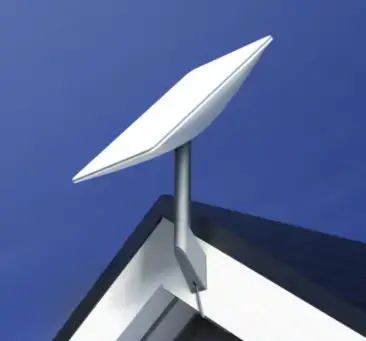
- Tools Needed:
- Drill, Stud / Electrical Finder, Socket Wrench, Level, 5/32” (4 mm) Drill Bit, 0.5” x 2.5” (12.5 mm x 63.5 mm) Socket, Pencil
- Package Dimensions:
- 8.3” x 5.5” x 3.4” / 21 x 14 x 8.7 cm
- Package Weight: 1.4 lbs / 0.6 kg
- Compatibility: Rectangular Starlink
LONG WALL MOUNT
Designed for installation on an exterior wall near the top of the gable; extra length provides clearance of overhang when needed. Drilling required.
- Tools Needed:
- Drill, Stud / Electrical Finder, Socket Wrench, Level, 5/32” (4 mm) Drill Bit, 0.5” x 2.5” (12.5 mm x 63.5 mm) Socket, Pencil
- Package Dimensions:
- 19.1” x 5.5” x 4.7” / 48.5 x 14 x 11.9 cm
- Package Weight: 1.4 lbs / 0.6 kg
- Compatibility: Rectangular Starlink
GROUND POLE MOUNT
Designed for in-ground installation when roof or wall mounting is not possible; requires digging.
- Tools Needed:
- Shovel, Mortar Hoe, Mixing Trough / Bucket, Gloves, Concrete Mix, and Water
- Package Dimensions:
- 45.7” x 4.5” x 2.4” / 116 x 11.5 x 6.1 cm
- Package Weight: 9.43 lbs / 4.27 kg
- Compatibility: Rectangular Starlink
PIVOT MOUNT
Designed for installation on shingled roofs, recommend installing closer to edge for cable routing. Not recommended for tile, slate, and clay roofing. For best results, Starlink should be installed as close to vertical as possible.
- Tools Needed:
- Drill, 5/32” (4 mm) Drill Bit, 1/2” (12.7 mm) Socket Wrench
- Package Dimensions:
- 9.7” x 5.5” x 3.1” / 24.7 x 14 x 7.9 cm
- Package Weight: 2.21 lbs / 1.0 kg
- Compatibility: Rectangular Starlink
STARLINK CABLE
- 75’ Starlink Cable is designed to replace the standard cable from the Starlink Kit in case of damage.
- Package Dimensions:
- 5.87” x 2.0” x 17.17” / 14.9 x 5.1 x 43.6 cm
- Package Weight: 3.09 lbs / 1.4 kg
- Compatibility: Rectangular Starlink
- 150’ Starlink Cable is designed to replace the standard cable from the Starlink Kit when additional length is needed between your install location and the router.
- Package Dimensions:
- 12.25” x 3.5” x 12.75” / 31.1 x 8.9 x 32.4 cm
- Package Weight: 6.06 lbs / 2.75 kg
- Compatibility: Rectangular Starlink
ETHERNET ADAPTER
Designed to connect a device directly to the Starlink Router for a wired connection. Supports up to 1 Gbps speeds.
- Package Dimensions:
- 6.5” x 4.5” x 1.5” / 16.5 x 11.4 x 3.6 cm
- Package Weight: 0.33 lbs / 0.15 kg
- Compatibility: Rectangular Starlink
CABLE ROUTING KIT
Designed for drilling through most walls. Not recommended for masonry, concrete, or hard coat stucco. Best for customers with prior internet cable routing experience and installation; must be comfortable drilling through walls. Kit includes a spade bit, drill bit, cable routing tool, silicone sealant, grommets, and wall clips.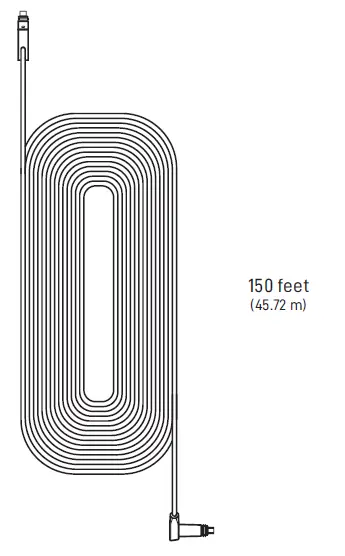
- Tools Needed:
- Drill, Stud / Electrical Finder
- Package Dimensions:
- 3.75” x 5.25” x 1.75” / 34.9 x 13.3 x 4.4 cm
- Package Weight: 0.83 lbs / 0.38 kg
- Compatibility: Rectangular Starlink
MASONRY ROUTING KIT
Designed for drilling through masonry, concrete or hard coat stucco (excluding EIFS) walls. Best for customers with prior internet cable routing experience and installation; must be comfortable drilling through walls. Kit includes a spade bit, drill bit, cable routing tool, silicone sealant, grommets, and wall clips.
- Tools Needed:
- Hammer, Hammer Drill, Phillips Head Drill Bit,
- Stud / Electrical Finder, Goggles, Gloves, and Mask
- Package Dimensions:
- 13.875” x 6.5” x 1.75” / 35.2 x 16.5 x 4.4 cm
- Package Weight: 2.1 lbs / 1 kg
- Compatibility: Rectangular Starlink