SONY Home Theatre System Instruction Manual
Operating Instructions
About These Operating Instructions
- The instructions in these Operating Instructions describe the controls on the remote control.
- Some illustrations are presented as conceptual drawings, and may be different from the actual products.
- The default settings are underlined on each feature description.
- Characters in brackets [ ] appear in the front panel display or on the TV screen.
Installation and Connection
Connecting a TV with an HDMI Cable and/or Optical Cable
Refer to Startup Guide (separate document).
Mounting the Bar Speaker and Surround Speakers on a Wall
You can mount the bar speaker and surround speakers on a wall.

Notes
- Prepare screws (not supplied) that are suitable for the wall material and As a plasterboard wall is especially fragile, attach the screws securely in the wall beam. Install the speakers horizontally, hung by screws in studs in a continuous flat section of the wall.
- Have the installation done by a Sony dealer or licensed contractor and pay special attention to safety during the installation.
- Sony shall not be held responsible for accidents or damage caused by improper installation, insufficient wall strength, improper screw installation or natural disaster, etc.
Mounting the Bar Speaker on a Wall
- Prepare two screws (not supplied) that are suitable for the wall mount holes on the rear of the bar speaker.

- Stick WALL MOUNT TEMPLATE (supplied) on a wall.

1 Align TV CENTER LINE (1) of WALL MOUNT TEMPLATE with the center line of your TV.
2 Align TV BOTTOM LINE (2) of WALL MOUNT TEMPLATE with the bottom of your TV, then stick WALL MOUNT TEMPLATE on a wall by using a commercially available adhesive tape, etc. - Fasten the screws into the marks (A) on SCREW LINE (3) of WALL MOUNT TEMPLATE as in the illustration below.

The screw should protrude as in the illustration. - Remove WALL MOUNT TEMPLATE.
- Hang the bar speaker on the screws. Align the holes on the rear of the bar speaker with the screws, then hang the bar speaker on the two screws.

Note When sticking WALL MOUNT TEMPLATE, smooth it out fully.
Mounting the Surround Speakers on a Wall
- Prepare a screw (not supplied) for each speaker that is suitable for the wall mount hole on the rear of the surround speaker.

- Fasten the screw into the wall. The screw should protrude as in the illustration.

- Hang the surround speaker on the screw. Align the hole on the rear of the surround speaker with the screw, then hang the surround speaker on the screw.

Parts and Controls
What’s in the Box


Guide to Parts and Controls
Details are omitted from the illustrations.
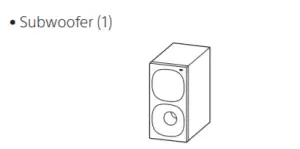
Subwoofer
 (power) button
Turns on the system or sets it to standby mode.- (input select) button
- BLUETOOTH button
- +/– (volume) buttons
- BLUETOOTH indicator
— Lights in blue: BLUETOOTH connection has been established.
— Flashes slowly in blue repeatedly: BLUETOOTH connection is being attempted.
— Flashes twice in blue repeatedly: During pairing standby status. - Front panel display
- (USB) port
- Remote control sensor Point the remote control at the remote control sensor to operate the system.

Rear

- ANALOG IN jack
- HDMI OUT (TV (ARC)) jack Connect a TV that has an HDMI input jack with an HDMI cable. The system is compatible with Audio Return Channel (ARC). ARC is the function that sends TV sound to an AV device such as the system from the TV’s HDMI jack.
- TV IN (OPTICAL) jack
- SPEAKERS jacks
- AC inlet
Remote Control

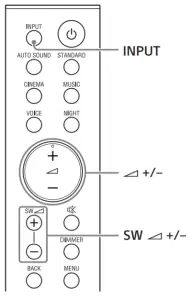
- INPUT
Selects the input source.
Each time you press INPUT, the input source
changes cyclically as follows.
[TV]  [ANALOG] [BT] [USB]
 - AUTO SOUND
Selects AUTO SOUND for the sound mode. - CINEMA
Selects CINEMA for the sound mode. - VOICE
Turns on/off the voice mode.  (volume) +*/–
Adjusts the volume.- SW (subwoofer volume) +/–
Adjusts the subwoofer volume. - MENU
Turns on/off the menu in the front panel
display.
Selects the menu items.
Selects the content on the TV screen for USB
playback.
ENTER
Enters the selection.
Plays the content that is selected by for USB playback.
BACK
Returns to the previous display.
Stops USB playback.  (previous/next)
Selects the previous/next track or file.
Hold down to search backward or forward for
USB playback.- (power)
Turns on the system or sets it to standby
mode. - STANDARD
Selects STANDARD for the sound mode. - MUSIC
Selects MUSIC for the sound mode. - NIGHT
Turns on/off the night mode.  (muting)
Mutes the sound temporarily.
Pressing the button while muting cancels
muting.- DIMMER
Adjusts the brightness of the front panel
display and BLUETOOTH indicator.
Each time you press DIMMER, the brightness setting changes cyclically as follows.
[BRIGHT][DARK] [OFF]
The front panel display and BLUETOOTH indicator light up in the following statuses even if you set the brightness setting to [OFF].
— When operating the system
— For 10 seconds after you stop operating the system
— When displaying the system status, such as
mute, Auto Standby, etc.  (play/pause)*
Plays, pauses, or resumes playback.
* The+ and buttons have a tactile dot. Use it as a guide during operation.
About the replacement of batteries for the remote control
When the system does not respond by operating with the remote control, replace two batteries with new batteries. Use R03 (size AAA) manganese batteries for replacement.
Listening to Music/Sound
Listening to a TV
You can listen to TV sound on the system.

When Connecting to a TV with an HDMI Cable (ARC) or Optical Digital Cable

- Press INPUT repeatedly to select [TV] in the front panel display.
- Adjust the volume.
• Adjust the volume by pressing+/– on the remote control.
• Adjust the subwoofer volume by pressing SW +/– on the remote control.
Notes
- When you connect the TV to both the HDMI OUT (TV (ARC)) and TV IN (OPTICAL) jacks, the jack for audio input is selected depending on which audio signal is input first.
- When the input source does not contain much bass sound, such as in TV programs, the bass sound from the subwoofer may be difficult to hear.
Tip
You can also select the input by pressing on the subwoofer.
When Connecting to a TV with a Stereo Mini Cable
- Press INPUT repeatedly to select [ANALOG] in the front panel display.
- Adjust the volume.
• Adjust the volume by pressing+/– on the remote control.
• Adjust the subwoofer volume by pressing SW+/– on the remote control.
Note
When the input source does not contain much bass sound, such as in TV programs, the bass sound from the subwoofer may be difficult to hear.
Tip
You can also select the input by pressing on the subwoofer
Listening to Music on a USB Device
You can play music files stored on a connected USB device.
Notes
- To view the USB content list on the TV screen, make sure you connect the system to the TV using an HDMI cable.
- Change the input of the TV to the input to which the system is connected.

Listening to Music on a Connected USB Device

- Connect the USB device to the (USB) port.

- Press INPUT repeatedly to select [USB] in the front panel display.
[READ] appears in the front panel display and the system starts reading data of the USB device. When the reading of data is completed, the USB content list appears on the TV screen. - Press to select the content you want, then press ENTER.
The selected content starts playing. - Adjust the volume.
• Adjust the volume by pressing+/– on the remote control.
• Adjust the subwoofer volume by pressing SW+/– on the remote control.
Note
When the input source does not contain much bass sound, such as in TV programs, the bass sound from the subwoofer may be difficult to hear.
To select the play mode
You can select the play mode for USB playback, such as repeat play or random play, from the menu.
- Press MENU.
The menu item appears in the front panel display. - Select [USB] – [REPEAT] by using /ENTER.
- Select the play mode by using /ENTER.
• [OFF]: Repeats off. Plays back all tracks.
• [ONE]: Repeats one track.
• [FOLDER]: Repeats all tracks in a current folder.
• [RANDOM]: Repeats all tracks in a current folder in random order.
• [ALL]: Repeats all tracks. - Press MENU to turn off the menu.
Other operations

Notes
- Do not remove the USB device during operation. To avoid data corruption or damage to the USB device, turn the system off before connecting or removing the USB device.
- [INVALID USB] appears in the front panel display if you connect an unsupported or broken USB device.
- Depending on the file format, rewind and fast forward may not work.
Information of USB Device on the TV Screen

- Playing time
- Total playing time
- Bit rate
- Playback status
- Rewind/fast forward speed
- Play mode
- Selected file index/Total files in the folder
The following messages appear on the TV screen depending on the status of the USB device.
- [File Unsupported] Appears for 2 seconds at the bottom left side when an unsupported file is skipped.
- [Device Not Support]
— A USB device is not supported.
— Device inserted is a non-USB device, a bad
USB device, or a USB device that has no files on it. - [No USB]
No USB device is inserted. - [Waiting]
The system is searching the USB device. - [This device is empty]
There are no playable files in the USB device.
Notes
- Depending on the playback source, some information may not be displayed.
- Depending on the play mode, the information displayed may differ.
Listening to Music from a Mobile Device with the BLUETOOTH Function
You can listen to music stored on a mobile device such as a smartphone or tablet via a wireless connection by connecting the system and the mobile device with the BLUETOOTH function. When connecting to the mobile device with the BLUETOOTH function, you can operate by simply using the supplied remote control without turning the TV on.

Pairing with a Mobile Device

- Press and hold the BLUETOOTH button on the subwoofer for 2 seconds. The system enters the pairing mode and the BLUETOOTH indicator flashes twice repeatedly.

- On the mobile device, search for the system by performing the pairing operation. The list of the BLUETOOTH devices that are searched appears on the screen of the mobile device. For the operation method to pair the BLUETOOTH device to the mobile device, refer to the operating instructions of the mobile device.
- Pair the system and mobile device by selecting “HT-S20R” from the list on the screen of the mobile device. If a passkey is requested, enter “0000.”
- Make sure that the BLUETOOTH indicator on the subwoofer lights in blue. A connection between the system and mobile device has been established.
- Start audio playback with the music app on the connected mobile device. Sound is output from the system.
- Adjust the volume.
• Adjust the volume by pressing +/– on the remote control.
• Adjust the subwoofer volume by pressing SW
+/– on the remote control.
• and on the remote control can be used for the BLUETOOTH function. (Searching backward or forward by holding down does not work.)
Notes
- You can pair up to 10 BLUETOOTH devices. If an 11th BLUETOOTH device is paired, the oldest connected device will be replaced by the new one.
- Perform pairing for the second and subsequent mobile devices.
- When the input source does not contain much bass sound, such as in TV programs, the bass sound from the subwoofer may be difficult to hear.
Tips
- You can check the connection status of the BLUETOOTH function by checking the BLUETOOTH indicator status.
- While the BLUETOOTH input is being selected, the system enters the pairing mode by pressing the BLUETOOTH button on the subwoofer shortly.
Listening to Music of the Paired Mobile Device
- Turn the BLUETOOTH function of the mobile device to on.
- Press INPUT repeatedly to select [BT] or press the BLUETOOTH button on the subwoofer shortly. The BLUETOOTH indicator flashes and the system automatically reconnects to the BLUETOOTH device it was most recently connected to.
- Make sure that the BLUETOOTH indicator lights in blue. A connection between the system and mobile device has been established.
- Start audio playback with the music app on the connected mobile device. Sound is output from the system.
- Adjust the volume.
• Adjust the volume by pressing+/– on the remote control.
• Adjust the subwoofer volume by pressing SW+/– on the remote control.
• and on the remote control can be used for the BLUETOOTH function. (Searching backward or forward by holding down / does not work.)
Note
When the input source does not contain much bass sound, such as in TV programs, the bass sound from the subwoofer may be difficult to hear.
Adjusting the Sound
Enjoying the Sound Effect that is Tailored to Sound Sources (Sound Mode)
You can easily enjoy pre-programmed sound effects that are tailored to different kinds of sound sources.

Press AUTO SOUND, CINEMA, MUSIC, or STANDARD to select the sound mode. The selected sound mode appears in the front panel display.

Making Dialogs Clearer (VOICE)
You can make dialogs clearer by setting the voice mode.

Press VOICE to set the function to on or off.

Enjoying Clear Sound with Low Volume at Midnight (NIGHT)
You can compress sound in accordance with the information contained in the content by setting the night mode to on. Sound is output at low volume with minimum loss of fidelity and clarity of dialog.

Press NIGHT to set the function to on or off.

Note When you turn the system off, the night mode is set to off automatically.
Checking the Current Sound Settings
You can check the settings of the sound, night, and voice modes and current stream information.
- Press MENU to turn on the menu in the front panel display.
- Press to select [CURRENT STATUS], then press ENTER.
- Press
 repeatedly to select the item you want. The current setting appears in the following order. Sound mode Voice mode Night mode Stream Information The current setting appears in the reverse order by pressing
  .
. - Press MENU to turn off the menu.
Changing the Settings
You can set the following items on the menu. Your settings are retained even if you disconnect the AC power cord (mains lead).
- Press MENU to turn on the menu in the front panel display.
- Press /ENTER repeatedly to select the item and setting you want. To return to the upper layer, press BACK.
- Press MENU to turn off the menu.
Note
You can also turn off the menu by performing an operation other than a menu operation such as pressing +/–, SW +/–, , etc.
Menu List
The default settings are underlined. They may differ depending on the area.


Using the Control for HDMI Function
Connecting a device such as a TV or Blu-ray Disc player compatible with the Control for HDMI function* using an HDMI cable enables you to easily operate the device by using a TV or Blu-ray Disc player remote control.
Note
These functions may work with devices other than those manufactured by Sony, but operation is not guaranteed.
* Control for HDMI is a standard used by CEC (Consumer Electronics Control) for allowing HDMI (High-Definition Multimedia Interface) devices to control each other.
Preparing to Use the Control for HDMI Function
Set [HDMI] – [CONTROL FOR HDMI] to [ON]. The default setting is [ON]. Enable the Control for HDMI function settings of the TV and other device connected to the TV.
Tip
If you enable the Control for HDMI function when using a TV manufactured by Sony, the Control for HDMI function of the system is also enabled automatically.
System Power Off Function
When you turn off the TV, the system will turn off automatically.
System Audio Control Function
If you turn on the system while you are watching the TV, the TV sound will be output from the speakers of the system. The volume of the system can be adjusted using the TV remote control. If the TV sound was output from the speakers of the system the previous time you watched the TV, the system will be turned on automatically when you turn on the TV again. Operations can also be made by the TV’s menu. For details, refer to the operating instructions of your TV.
Notes
- Sound is only output from the TV if other than [TV] input is selected when using the Twin Picture function on the TV. When you disable the Twin Picture function, the sound is output from the system.
- The number for the system’s volume level is displayed on the TV screen depending on the TV. The volume number displayed on the TV may differ from the number on the front panel display of the system.
- Depending on the settings of the TV, the System Audio Control function may not be available. For details, refer to the operating instructions of your TV.
- Depending on the TV, if the TV sound was output from the speakers of the TV the previous time you watched the TV, the system may not turn on by interlocking with the TV power even if the TV is turned on.
Audio Return Channel (ARC)
If the system is connected to a TV’s HDMI IN jack compatible with Audio Return Channel, you can listen to TV sound from the speakers of the system without connecting an optical digital cable.
Note
If the TV is not compatible with Audio Return Channel, an optical digital cable needs to be connected (refer to the supplied Startup Guide).
One-Touch Play Function
When you play content on a device (Blu-ray Disc player, “PlayStation®4”, etc.) connected to the TV, the system and TV are turned on automatically, the input of the system is switched to the TV input, and sound is output from the speakers of the system.
Notes
- If the TV sound was output from the speakers of the TV the previous time you watched the TV, the system may not turn on and the sound and picture may be output from the TV even if device content is played.
- Depending on the TV, the beginning part of content being played may not play correctly.
Notes on HDMI Connections
- Use an HDMI-authorized cable.
- Use a Sony High Speed HDMI cable with the Cable Type Logo.
- We do not recommend using an HDMI-DVI conversion cable.
- Check the setup of the connected device if an image is poor or the sound does not come out of the device connected via the HDMI cable.
- Audio signals (sampling frequency, bit length, etc.) transmitted from an HDMI jack may be suppressed by the connected device.
Saving Power Consumption
To use the system with saving power consumption, change the following settings. Turning the System Off by Detecting the Using State
When you set the auto standby function to on, the system enters standby mode automatically when you do not operate the system for about 20 minutes and the system is not receiving an input signal.
Set [SYSTEM] – [AUTO STANDBY] to [ON]. The default setting for models of the Europe countries is [ON]. The default setting for Australia/New Zealand models is [OFF].
Saving Power in Standby Mode
To save power consumption during the standby mode, set [BT] – [STANDBY] and [HDMI] – [CONTROL FOR HDMI] to [OFF]. The default settings for them are [ON].
Resetting the System
If the system does not operate properly, reset the system as follows.
1 Press MENU to turn on the menu in the front panel display.
2 Press to select [RESET], then press ENTER.
3 Press to select [ALL RESET], then press ENTER.
4 Press to select [START], then press ENTER.
All the settings return to their initial status.
To cancel resetting
Select [CANCEL] in step 4.
If You Cannot Perform Resetting Using the Menu
Press and hold and – (volume) on the subwoofer for more than 5 seconds. All the settings return to their initial status.
Tip
The default settings are underlined on each feature description.
Troubleshooting
If the system does not work properly, handle it in the following order.
- Search for the cause and solution of the issue using this troubleshooting.
- Reset the system. All the settings of the system return to their initial status. For details, see “Resetting the System.”
Should any problems persist, consult your nearest Sony dealer.
Power
The system does not power up.
- Check that the AC power cord (mains lead) is connected securely.
- Disconnect the AC power cord (mains lead) from the wall outlet (mains), and then reconnect after several minutes. The system is turned off automatically.
- The auto standby function is working. Set [SYSTEM] – [AUTO STANDBY] to [OFF]. The system does not turn on even when the TV is turned on.
- Set [HDMI] – [CONTROL FOR HDMI] to [ON]. The TV must support the Control for HDMI function. For details, refer to the operating instructions of your TV.
- Check the speaker settings of the TV. The system power syncs with the speaker settings of the TV. For details, refer to the operating instructions of your TV.
- Depending on the TV, if the sound was output from the speakers of the TV the previous time, the system may not turn on by interlocking with the TV even when the TV is turned on.
- The system turns off when the TV is turned off.
- Check the setting of the Control for HDMI function. When the Control for HDMI function is set to on and the input of the system is the TV input, the system turns off automatically when you turn off the TV. The system does not turn off even when the TV is turned off.
- Check the setting of the Control for HDMI function. When you turn off the TV, the system turns off automatically only if the input of the system is TV input. The TV must support the Control for HDMI function. For details, refer to the operating instructions of your TV.
Picture
There is no picture or the picture is not output correctly.
- Select the appropriate input.
- When there is no picture while TV input is selected, select the TV channel that you want using the TV remote control.
- Disconnect an HDMI cable, then connect it again. Make sure that the cable is firmly inserted.
Sound
No TV sound is output from the system.
- Check the type and connection of an HDMI cable or optical digital cable that is connected to the system and the TV (refer to the supplied Startup Guide).
- Disconnect the cables that are connected between the TV and the system, then connect them firmly again. Disconnect the AC power cords (mains leads) of the TV and the system from the AC outlets (mains), then connect them again.
- When the system and TV are connected with an HDMI cable, check the following.
— The HDMI jack of the connected TV is labeled with “ARC.”
— The Control for HDMI function of the TV is set to on.
— On the system, the Control for HDMI function is set to on. - If your TV is not compatible with Audio Return Channel, connect the optical digital cable (refer to the supplied Startup Guide). If the TV is not compatible with Audio Return Channel, TV sound will not be output from the system even if the system is connected to the TV’s HDMI IN jack.
- If the sound of the device that is connected to the optical input jack of the TV is not output, try the following.
— Connect the cable box or satellite box directly to the TV IN (OPTICAL) jack of the system. - Press INPUT repeatedly to select the TV input.
- Increase the volume on the TV or cancel muting.
- Depending on the order in which you turn on the TV and the system, the system may be muted. If this happens, turn on the TV first, then the system.
- Set the speakers setting of the TV (BRAVIA) to Audio System. Refer to the operating instructions of your TV regarding how to set the TV.
- Check the sound output of the TV. Refer to the operating instructions of the TV for the TV settings.
- The system supports the Dolby Digital and PCM audio formats. When you play back an unsupported format, set the digital audio out setting of the TV (BRAVIA) to “PCM.” For details, refer to the operating instructions of your TV.
The sound is output from both the system and the TV.
• Change the audio output setting of the TV so
that the TV sound is output from the external
speaker.
• Set the TV volume to minimum.
No sound or only a very low-level sound is heard from the subwoofer.
- Make sure the AC power cord (mains lead) of the subwoofer is connected properly (refer to the supplied Startup Guide).
- Press SW + to increase the subwoofer volume.
- A subwoofer is for reproducing bass sound. If the input sources contain very little bass sound components (i.e., a TV broadcast), the sound from the subwoofer may be difficult to hear.
- When you play content compatible with copyright protection technology (HDCP), it is not output from the subwoofer.
No sound or only a very low-level sound of the device connected to the system is heard from the system.
- Press + and check the volume level.
- Press or + to cancel the muting function.
- Make sure the input source is selected correctly. You should try other input sources by pressing INPUT repeatedly.
- Check that all the cables and cords of the system and the connected device are firmly inserted.
- If the connected device supports the up sampling feature, you need to turn it off.
No sound or only very low-level sound is heard from the surround speakers.
- Make sure that the cables of the surround speakers are connected properly to the subwoofer (refer to the supplied Startup Guide).
- Check that [SPEAKER] – [MULTI SPEAKER] is set to [ON]. If [SPEAKER] – [MULTI SPEAKER] is set to [OFF], the sound is not output from the surround speakers when playing the sound of 2-channel source.
- Multi-channel sound which has not been recorded as surround sound is not output from the surround speakers.
The surround effect cannot be obtained.
• Depending on the input signal and the sound mode setting, surround sound processing may not work effectively. The surround effect may be subtle, depending on the program or disc.
• To play multi channel audio, check the digital audio output setting on the device connected to the system. For details, refer to the operating instructions supplied with the connected device.
USB Device Connection
The USB device is not recognized.
- Try the following:
1 Turn the system off.
2 Remove and reconnect the USB device.
3 Turn the system on. - Make sure that the USB device is securely connected to the (USB) port.
- Check to see if the USB device or a cable is damaged.
- Make sure that the USB device is on.
- If the USB device is connected via a USB hub, disconnect it and connect the USB device directly to the subwoofer.
Mobile Device Connection
BLUETOOTH connection cannot be completed.
- Make sure that the BLUETOOTH indicator on the subwoofer is lit.
- Make sure the BLUETOOTH device to be connected is turned on and the BLUETOOTH function is enabled.
- Bring the BLUETOOTH device close to the subwoofer.
- Pair this system and the BLUETOOTH device again. You may need to cancel the pairing with this system using your BLUETOOTH device first.
- If [BT] – [POWER] is set to [OFF], set to [ON]. Pairing cannot be achieved.
- Bring the BLUETOOTH device close to the subwoofer.
- Make sure this system is not receiving interference from a wireless LAN device, other 2.4 GHz wireless devices, or a microwave oven. If a device that generates electromagnetic radiation is nearby, move the device away from this system.
- Pairing may not be possible if other BLUETOOTH devices are present around the system. In this case, turn off the other BLUETOOTH devices.
Sound of the connected BLUETOOTH mobile device is not output from the system.
- Make sure that the BLUETOOTH indicator on the subwoofer is lit.
- Bring the BLUETOOTH device close to the subwoofer.
- If a device that generates electromagnetic radiation, such as a wireless LAN device, other BLUETOOTH devices, or a microwave oven is nearby, move the device away from this system.
- Move the USB 3.0 device and its cable away from this system.
- Remove any obstacle between this system and the BLUETOOTH device or move this system away from the obstacle.
- Reposition the connected BLUETOOTH device.
- Switch the wireless LAN frequency of any nearby wireless LAN router or PC to 5 GHz range.
- Increase the volume on the connected BLUETOOTH device.
The sound is not in sync with the image.
- When you are watching movies, you may hear the sound with a slight delay from the image. Remote Control The remote control of this system does not function.
- Point the remote control at the remote control sensor on the subwoofer.
- Remove any obstacles in the path between the remote control and the subwoofer.
- Replace both batteries in the remote control with new ones, if they are weak.
- Make sure you are pressing the correct button on the remote control. The TV remote control does not work.
- Install the bar speaker so that it does not obstruct the remote control sensor of the TV.
Others
The Control for HDMI function does not work properly.
- Check the connection with the system (refer to the supplied Startup Guide).
- Enable the Control for HDMI function on the TV. For details, refer to the operating instructions of your TV.
- Wait a while, and then try again. If you unplug the system, it will take a while before operations can be made. Wait for 15 seconds or longer, and then try again.
- Make sure the devices connected to the system support the Control for HDMI function.
- Enable the Control for HDMI function of the devices connected to the system. For details, refer to the operating instructions of your device.
- The type and number of devices that can be controlled by the Control for HDMI function is restricted by the HDMI CEC standard as follows:
— Recording devices (Blu-ray Disc recorder, DVD recorder, etc.): up to 3 devices
— Playback devices (Blu-ray Disc player, DVD player, etc.): up to 3 devices
— Tuner-related devices: up to 4 devices
— Audio system (receiver/ headphone): up to 1 device (used by this system)
[PROTECT] appears in the front panel display of the subwoofer, the sound is muted, and buttons on the remote control or subwoofer other than (power) do not work.
- The protection feature is activated. Press (power) to turn the system off and disconnect the AC power cord (mains lead) and check the items below.
— Make sure that the ventilations of the subwoofer are not covered and turn on the system after a while.
— When the system is using the USB connection, remove the USB device and turn on the system. If the system operates properly, the current of the connected USB device is over the maximum output current of the system 500 mA, or the USB device may have an abnormality.
The front panel display of the subwoofer is not lit.
- Press DIMMER to set the brightness to [BRIGHT] or [DARK] if set to [OFF].
Sensors of the TV do not work properly.
- The bar speaker may block some sensors (such as the brightness sensor), the remote control receiver of your TV or the emitter for 3D glasses (infrared transmission) of a 3D TV that supports the infrared 3D glass system, or wireless communication. Move the bar speaker away from the TV within a range that allows those parts to operate properly. For the locations of the sensors and remote control receiver, refer to the operating instructions supplied with the TV.
The system does not work properly ([.DEMO] appears in the front panel display).
- The system is in demo mode. To cancel demo mode, reset the system. Press and hold (power) and – (volume) on the subwoofer for more than 5 seconds. When you change to the TV input from the USB input by pressing INPUT, the message appears.
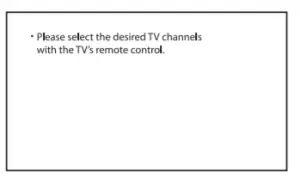
* This screen is an example for English. - Select the TV program by using the TV remote control.
Specifications
Subwoofer (SA-WS20R)
Amplifier section
POWER OUTPUT (rated)
Front L + Front R: 45 W + 45 W (at 4 ohms, 1 kHz, 1% THD)
POWER OUTPUT (reference)
Front L/Front R/Surround L/Surround R/Center: 67 W (per channel
at 4 ohms, 1 kHz)
Subwoofer: 65 W (at 4 ohms, 100 Hz)
Inputs
TV IN (OPTICAL)
USB
ANALOG IN
Output
HDMI OUT (TV (ARC))
HDMI section
Connector
Type A (19pin)
USB section
(USB) port:
Type A
BLUETOOTH section
Communication system
BLUETOOTH Specification version 5.0
Output
BLUETOOTH Specification Power Class 1
Maximum communication range
Line of sight approx. 10 m1)
Frequency band
2.4 GHz band (2.4000 GHz – 2.4835 GHz)
Maximum output power
< 6 dBm
Modulation method
FHSS (Freq Hopping Spread Spectrum)
Compatible BLUETOOTH profiles2)
A2DP (Advanced Audio Distribution Profile)
AVRCP (Audio Video Remote Control Profile)
Supported Codec3)
SBC4)
Transmission range (A2DP)
20 Hz – 20,000 Hz (Sampling frequency 32 kHz, 44.1 kHz, 48 kHz)
- The actual range will vary depending on factors such as obstacles between devices, magnetic fields around a microwave oven, static electricity, cordless phone use, reception sensitivity, the operating system, software applications, etc.
- BLUETOOTH standard profiles indicate the purpose of BLUETOOTH communication between devices.
- Codec: Audio signal compression and conversion format
- Abbreviation for Subband Codec
Speaker section
Speaker system
Subwoofer system, Bass reflex
Speaker
160 mm cone type
General
Power requirements
220 V – 240 V AC, 50 Hz/60 Hz
Power consumption
On: 40 W
Standby mode: 0.5 W or less (Power Saving mode)
(When [CONTROL FOR HDMI] in [HDMI] and [STANDBY] in [BT] are
set to [OFF])
Standby mode: 2 W or less*
(When [CONTROL FOR HDMI] in [HDMI] and [STANDBY] in [BT] are set to [ON])
* The system will automatically enter Power saving mode when there is no HDMI connection and no BLUETOOTH pairing
history.
Dimensions* (approx.) (w/h/d) 192 mm × 387 mm × 342 mm
* Not Including projection portion
Mass (approx.)
7.0 kg
Bar Speaker (SS-S20R)
Speaker system
Full range speaker system, Bass reflex
Speaker
42 mm × 100 mm cone type
Dimensions* (approx.) (w/h/d)
760 mm × 52 mm × 86 mm
* Not Including projection portion
Mass (approx.)
2.0 kg
Surround Speakers (SS-SS20R)
Speaker system
Full range speaker system, Bass reflex
Speaker
65 mm cone type
Dimensions* (approx.) (w/h/d)
86 mm × 171 mm × 86 mm
* Not Including projection portion
Mass (approx.)
0.6 kg
Design and specifications are subject to change without notice.
Playable Types of Files (USB Input)

Notes
- Some files may not play or may play with no sound depending on the file format, the file encoding, or the recording condition.
- Some files edited on a PC may not play.
- The system does not play coded files such as DRM and Lossless.
- The system can recognize the following files or folders in
USB devices:
— up to 200 folders (including empty folders and root folders)
— up to 200 tracks in one folder
— up to folders in the 8th layer (including the root folder) - Some USB devices may not work with this system.
- The system can recognize Mass Storage Class (MSC) devices.
- The sampling frequency is up to 48kHz.
Supported Input Audio Formats (HDMI OUT (TV (ARC)) or TV IN (OPTICAL))
Audio formats supported by this system are as follows.
- Dolby Digital
- Linear PCM 2ch (up to 48kHz)
On BLUETOOTH Communication
- BLUETOOTH devices should be used within approximately 10 meters (33 feet) (unobstructed distance) of each other. The effective communication range may become shorter under the following conditions.
— When a person, metal object, wall or other obstruction is between the devices with a BLUETOOTH connection
— Locations where a wireless LAN is installed
— Around microwave ovens that are in use
— Locations where other electromagnetic waves occur - BLUETOOTH devices and wireless LAN (IEEE 802.11b/g/n) use the same frequency band (2.4 GHz). When using your BLUETOOTH device near a device with wireless LAN capability, electromagnetic interference may occur. This could result in lower data transfer rates, noise, or inability to connect. If this happens, try the following remedies:
— Use this system at least 10 meters (33 feet) away from the wireless LAN device.
— Turn off the power to the wireless LAN device when using your BLUETOOTH device within 10 meters (33 feet).
— Install this system and BLUETOOTH device as closer to each other as possible. - The radio waves broadcast by this system may interfere with the operation of some medical devices. Since this interference may result in malfunction, always turn off the power on this system and BLUETOOTH device in the following locations:
— In hospitals, on trains, in airplanes, at gas stations, and any place where flammable gasses may be present
— Near automatic doors or fire alarms - This system supports security functions that comply with the BLUETOOTH specification to ensure secure connection during communication using BLUETOOTH technology. However, this security may be insufficient depending on the setting contents and other factors, so always be careful when performing communication using BLUETOOTH technology.
- Sony cannot be held liable in any way for damages or other loss resulting from information leaks during communication using BLUETOOTH technology.
- BLUETOOTH communication is not necessarily guaranteed with all BLUETOOTH devices that have the same profile as this system.
- BLUETOOTH devices connected with this system must comply with the BLUETOOTH specification prescribed by the Bluetooth SIG, Inc., and must be certified to comply. However, even when a device complies with the BLUETOOTH specification, there may be cases where the characteristics or specifications of the BLUETOOTH device make it impossible to connect, or may result in different control methods, display or operation.
- Noise may occur or the audio may cut off depending on the BLUETOOTH device connected with this system, the communications environment, or surrounding conditions. If you have any questions or problems concerning your system, please consult your nearest Sony dealer.
Copyrights and Trademarks
This system incorporates Dolby* Digital.
- Manufactured under license from Dolby Laboratories. Dolby, Dolby Audio and the double-D symbol are trademarks of Dolby Laboratories.
The terms HDMI, HDMI High-Definition Multimedia Interface, and the HDMI Logo are trademarks or registered trademarks of HDMI Licensing Administrator, Inc. The BLUETOOTH® word mark and logos are registered trademarks owned by Bluetooth SIG, Inc. and any use of such marks by Sony Corporation is under license. Other trademarks and trade names are those of their respective owners. “BRAVIA” logo is a trademark of Sony Corporation. “PlayStation” is a registered trademark or trademark of Sony Interactive Entertainment Inc. MPEG Layer-3 audio coding technology and patents licensed from Fraunhofer IIS and Thomson. Windows Media is either a registered trademark or trademark of Microsoft Corporation in the
United States and/or other countries. This product is protected by certain intellectual property rights of Microsoft Corporation. Use or distribution of such technology outside of this product is prohibited without a license from Microsoft or an authorized Microsoft subsidiary. All other trademarks are trademarks of their respective owners.
WARNING
Do not install the system in a confined space, such as a bookcase or built-in cabinet. To reduce the risk of fire, do not cover the ventilation opening of the system with newspapers, tablecloths, curtains, etc.
Do not expose the system to naked flame sources (for example, lighted candles). To reduce the risk of fire or electric shock, do not expose this system to dripping or splashing, and
do not place objects filled with liquids, such as vases, on the system. The system is not disconnected from the mains as long as it is connected to the AC outlet, even if the system itself has been turned off. As the main plug is used to disconnect the system from the mains, connect the system to an easily accessible AC outlet. Should you notice an abnormality in the system, disconnect the main plug from the AC outlet immediately.
CAUTION
Risk of explosion if the battery is replaced by an incorrect type. Do not expose batteries or appliances with battery-installed to excessive heat, such as sunshine and fire. Indoor use only.
Do not place this product close to medical devices
This product (including accessories) has magnet(s) which may interfere with pacemakers, programmable shunt valves for hydrocephalus treatment, or other medical devices. Do not place this product close to persons who use such medical devices. Consult your doctor before using this product if you use any such medical device.
Recommended cables Properly shielded and grounded cables and connectors must be used for connection to host computers and/or peripherals.
For the bar speaker and surround speakers The nameplates are located on the bottom of the bar speaker and surround speakers. This equipment has been tested and found to comply with the limits set out in the EMC regulation using a connection cable shorter than 3 meters.
For the customers in Europe
Notice for customers: the following information is only applicable to equipment sold in countries applying EU directives.
This product has been manufactured by or on behalf of Sony Corporation. EU Importer: Sony Europe B.V. Inquiries to the EU Importer or related to product compliance in Europe should be sent to the manufacturer’s authorized representative, Sony Belgium, bijkantoor van Sony Europe B.V., Da Vincilaan 7-D1, 1930 Zaventem, Belgium.
 Hereby, Sony Corporation declares that this equipment is in compliance with Directive 2014/53/EU.
The full text of the EU declaration of conformity is available at the following internet address: http://www.compliance.sony.de/
This radio equipment is intended to be used with the approved version(s) of software that are indicated in the EU Declaration of Conformity. The software loaded on this radio equipment is verified to comply with the essential requirements of the Directive 2014/53/EU.
The software version can be found in [SYSTEM] – [VERSION].
 Disposal of waste batteries and electrical and electronic equipment (applicable in the European Union and other countries with separate collection systems)
This symbol on the product, the battery or on the packaging indicates that the product and the battery shall not be treated as household waste. On certain batteries this symbol might be used in combination with a chemical symbol. The chemical symbol for lead (Pb) is added if the battery contains more than 0.004% lead. By ensuring that these products and batteries are disposed of correctly, you will help to prevent potentially negative consequences for the environment and human health which could be caused by inappropriate waste handling. The recycling of the materials will help to conserve natural resources. In case of products that for safety, performance or data integrity reasons require a permanent connection with an incorporated battery, this battery should be replaced by qualified service staff only. To ensure that the battery and the electrical and electronic
Wireless Noise Canceling Stereo Headset
Do not install the appliance in a confined space, such as a bookcase or built-in cabinet.
Do not expose the batteries (battery pack or batteries installed) to excessive heat such as sunshine, fire or the like for a long time. Do not dismantle, open or shred secondary cells or batteries. Do not expose cells or batteries to heat or fire. Avoid storage in direct sunlight. In the event of a cell leaking, do not allow the liquid to come in contact with the skin or eyes. If contact has been made, wash the affected area with copious amounts of water and seek medical
advice.
Secondary cells and batteries need to be charged before use. Always refer to the manufacturer’s instructions or equipment manual for proper charging instructions. After extended periods of storage, it may be necessary to charge and discharge the cells or batteries several times to obtain
maximum performance. Dispose of properly.
RECYCLING RECHARGEABLE BATTERIES
Rechargeable batteries are recyclable. You can help preserve our environment by returning your used rechargeable batteries to the collection and recycling location nearest you. For more information regarding recycling of rechargeable batteries, visit http://www.sony.com/electronics/eco/environmental-management Caution: Do not handle damaged or leaking rechargeable
batteries. This equipment complies with FCC/IC radiation exposure limits set forth for an uncontrolled environment and meets the FCC radio frequency (RF) Exposure Guidelines and RSS-102 of the IC radio frequency (RF) Exposure rules. This equipment has very low levels
of RF energy that is deemed to comply without testing of specific absorption rate (SAR).
FOR UNITED STATES CUSTOMERS. NOT APPLICABLE IN CANADA, INCLUDING IN THE PROVINCE OF QUEBEC. POUR LES CONSOMMATEURS AUX ÉTATS-UNIS. NON
APPLICABLE AU CANADA, Y COMPRIS LA PROVINCE DE QUÉBEC.
You are cautioned that any changes or modifications not expressly approved in this manual could void your authority to operate this equipment. This device complies with Part 15 of the FCC Rules. Operation is subject to the following two conditions:
(1) this device may not cause harmful interference, and
(2) this device must accept any interference received, including interference that may cause undesired operation.
Note
This equipment has been tested and found to comply with the limits for a Class B digital device, pursuant to Part 15 of the FCC Rules. These limits are designed to provide reasonable protection against harmful interference in a residential installation. This equipment generates, uses, and can radiate radio frequency energy and, if not installed and used in accordance with the instructions, may cause harmful interference to radio communications. However, there is no guarantee that interference will not occur in a particular installation. If this equipment does cause harmful
interference to radio or television reception, which can be determined by turning the equipment off and on, the user is encouraged to try to correct the interference by one or more of the following measures:
– Reorient or relocate the receiving antenna.
– Increase the separation between the equipment and receiver.
– Connect the equipment into an outlet on a circuit different from that to which the receiver is connected.
– Consult the dealer or an experienced radio/TV technician for help.
This equipment must not be co-located or operated in conjunction with any other antenna or transmitter. For the customer in Canada This device complies with Industry Canada’s licence-exempt RSSs. Operation is subject to the following two conditions:
(1) This device may not cause interference; and
(2) This device must accept any interference, including interference that may cause undesired operation of the device.
High volume may affect your hearing.
Do not use the unit while walking, driving or cycling. Doing so may cause traffic accidents.
Do not use at a dangerous place unless the surrounding sound can be heard.
The unit is not waterproof. If water or foreign objects enter the unit, it may result in fire or electric shock. If water or a foreign object enters the unit, stop use immediately and consult your nearest
Sony dealer. In particular, remember to follow the precautions below.
– Use around a sink, etc. Be careful that the unit does not fall into a sink or container filled with water.
– Use in the rain or snow, or in humid locations
– Use while you are sweaty
If you touch the unit with wet hands, or put the unit in the pocket of a damp article of clothing, the unit may get wet. For details on the effect of contact to the human body from the mobile phone or other wireless devices connected to the unit, refer to the instruction manual of the wireless device.
This product has magnets which may interfere with pacemakers, defibrillators and programmable shunt valves or other medical devices. Do not put this product close to these medical devices and
the person who use any of these medical devices. Consult your doctor before using this product, if you have any concerns. This product has magnets. Placing cards with magnets in the vicinity of the product may affect the magnetism of the card and render it unusable.
Note on static electricity Static electricity accumulated in the body may cause mild tingling in your ears. To reduce the effect, wear clothes made from natural materials, which suppress the generation of static electricity.
IMPORTANT: THE VOICE GUIDANCE FOR THIS UNIT IS ONLY AVAILABLE IN ENGLISH.
The voice guidance can be heard from the unit when:
• When powering on: “Power on”
• When powering off: “Power off”
• When the remaining battery level is low and recharge is recommended: “Low battery, please recharge headset”
• When automatically turning off due to low battery: “Please recharge headset. Power off”
• When checking the remaining battery level by pressing the POWER button while the unit turns on: “Battery fully charged” / “Battery about 90%” / “Battery about 80%” / “Battery about 70%” / “Battery about 60%” / “Battery about 50%” / “Battery about 40%” / “Battery about 30%” / “Battery about 20%” / “Battery about 10%”
• When entering pairing mode: “Bluetooth pairing”
• When establishing a Bluetooth connection: “Bluetooth connected”
• When disconnecting a Bluetooth connection: “Bluetooth disconnected”
• When turning on the noise canceling function: “Noise canceling”
• When turning on the Ambient Sound Mode: “Ambient sound”
• When turning off the noise canceling function and the Ambient Sound Mode : “Ambient sound control off”
• When starting the NC Optimizer: “Optimizer start”
• When the NC Optimizer is finished: “Optimizer finished”
• When the automatic switching setting of Speak-to-chat is on: “Speak-to-chat activated”
• When the automatic switching setting of Speak-to-chat is off: “Speak-to-chat deactivated”
Precautions
On BLUETOOTH® communications
• Bluetooth wireless technology operates within a range of about 10 m (30 feet). The maximum communication distance may vary depending on the presence of obstacles (people, metal objects,
walls, etc.) or the electromagnetic environment.
• Bluetooth communications may not be possible, or noise or audio dropout may occur under the following conditions:
– When there is a person between the unit and the Bluetooth device. This situation may be improved by positioning the Bluetooth device so that it faces the antenna of the unit.
– When there is an obstacle, such as a metal object or a wall, between the unit and the Bluetooth device.
– When a Wi-Fi device or microwave oven is in use, or microwaves are emitted near the unit.
– Compared to use indoors, use outdoors is subjected little to signal reflection from walls, floors, and ceilings, which results in audio dropout occurring more frequently than use indoors.
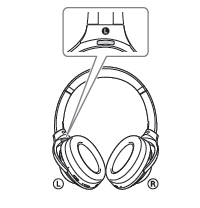
– The antenna is built into the unit as indicated by the dotted line in the illustration below. The sensitivity of the Bluetooth communications can be improved by removing any obstacles between the connected Bluetooth device and the antenna of this unit.

• Bluetooth and Wi-Fi (IEEE802.11b/g/n) devices use the same frequency (2.4 GHz). When using the unit near a Wi-Fi device,electromagnetic interference may occur, resulting in noise, audio dropout, or the inability to connect. If this happens, try performing the following remedies:
– Establish a connection between the unit and the Bluetooth device when they are at least 10 m (30 feet) away from he Wi-Fi device.
– Turn off the Wi-Fi device when using the unit within 10 m (30 feet) of the Wi-Fi device.
– Position the unit and the Bluetooth device as near as possible to each other.
• Microwaves emitting from a Bluetooth device may affect the operation of electronic medical devices. Turn off this unit and other Bluetooth devices in the following locations, as it may cause an accident:
– in hospitals, near priority seating in trains, locations where inflammable gas is present, near automatic doors, or near fire alarms.
• The audio playback on this unit may be delayed from that on the transmitting device, due to the characteristics of Bluetooth wireless technology. As a result, the sound may not be in sync with the image when viewing movies or Playing games.
• This product emits radio waves when used in wireless mode.When used in wireless mode on an airplane, follow flight crew directions regarding permissible use of products in wireless mode.
• The unit supports security functions that comply with the Bluetooth standard as a means of ensuring security during
communication using Bluetooth wireless technology. However, depending on the configured settings and other factors, this security may not be sufficient. Be careful when communicating using Bluetooth wireless technology.
• Sony shall assume no responsibility for any damages or loss resulting from information leaks that occur when using Bluetooth communications.
• Connection with all Bluetooth devices cannot be guaranteed.
– Bluetooth devices connected with the unit must comply with the Bluetooth standard prescribed by Bluetooth SIG, Inc., and must be certified as compliant.
– Even when a connected device complies with the Bluetooth standard, there may be cases where the characteristics or
specifications of the Bluetooth device make it unable to connect, or result in different control methods, display, or
operation.
– When using the unit to perform hands-free talking on the phone, noise may occur depending on the connected device or the communication environment.
• Depending on the device to be connected, it may require some time to start communications. If sound skips frequently during playback
• The situation may be improved by setting the sound quality mode to “priority on stable connection.” For details, refer to the Help Guide.
• The situation may be improved by changing the wireless playback quality settings or fixing the wireless playback mode to SBC on the transmitting device. For details, refer to the operating instructions supplied with the transmitting device.
• When listening to music from a smartphone, the situation may be improved by closing unnecessary apps or restarting the smartphone. On the use of calling apps for smartphones and computers
• This unit supports normal incoming calls only. Calling apps for smartphones and computers are not supported.
On charging the unit
• This unit can be charged using USB only. A computer with a USB port or a USB AC adaptor is required for charging.
• Be sure to use the supplied USB Type-C cable.
• When charging, the unit cannot be turned on and the Bluetooth and noise canceling functions cannot be used.
• If the unit is not used for a long time, the rechargeable battery may become depleted quickly. The battery will be able to hold a proper charge after it is discharged and recharged several times. When storing the unit for a long time, charge the battery once every six months to prevent over-discharge.
• If the rechargeable battery becomes depleted extremely quickly,it should be replaced with a new one. Please contact your nearest Sony dealer for a battery replacement. If the unit does not operate properly
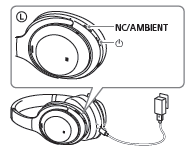
• Follow the procedure below to reset the unit. Press the ? and NC/AMBIENT buttons simultaneously while the unit is charging. The unit is reset. When the unit is reset, the pairing information in the unit is not deleted.
• If the problem persists even after the unit is reset, perform the procedure below to initialize the unit.
Disconnect the USB Type-C cable and turn off the unit. Press and hold the ? and NC/AMBIENT buttons simultaneously for at least 7 seconds. The indicator (blue) flashes 4 times, the unit is initialized, and the unit is reset to the factory settings. When the unit is initialized, all pairing information is deleted.
• After the unit is initialized, it may not connect to your iPhone or computer. If this happens, delete the pairing information of the unit from the iPhone or computer, and then pair them again. On the noise canceling function
• The noise canceling function senses external ambient noise (such as the noise inside a vehicle or the sound of air conditioning inside a room) with built-in microphones, and produces an equal-but-opposite sound that cancels out the ambient noise.
– The noise canceling effect may not be pronounced in a very quiet environment, or some noise may be heard.
– The noise canceling function works for noise in the low frequency band primarily. Although noise is reduced, it is not canceled completely.
– When you use the unit in a train or a car, noise may occur depending on street conditions.
– Mobile phones may cause interference and noise. Should this occur, locate the unit further away from the mobile phone.
– Depending on how you wear the unit, the noise canceling effect may vary or a beeping sound (howling) may occur. If this happens, take off the unit and put it back on again.
Do not cover the microphones of the unit with your hands or other objects. Doing so may prevent the noise canceling
function or the Ambient Sound Mode from working properly, or may cause a beeping sound (howling) to occur. If this happens, take your hands or other object off of the microphones of the unit.
Notes on wearing the unit
• Because the headphones achieve a tight seal over the ears, forcibly pressing them against your ears or quickly pulling them off can result in eardrum damage. Pressing the headphones against your ears may cause the speaker diaphragm to produce a click sound. This is not a malfunction. Other notes
• Do not subject the unit to excessive shock.
• The touch sensor may not operate properly if you apply stickers or other adhesive items to the touch sensor control panel.
• Be careful not to catch your finger in the unit when folding.
• When you use the unit as wired headphones, use the supplied headphone cable only. Make sure that the headphone cable is firmly inserted.
• The Bluetooth function may not work with a mobile phone, depending on the signal conditions and the surrounding
environment.
• Do not apply weight or pressure to the unit for long periods, including when it is stored, as it may cause deformation.
• If you experience discomfort while using the unit, stop using it immediately.
• The earpads may be damaged or deteriorate with long-term use and storage. Cleaning the unit
• When the outside of the unit is dirty, clean it by wiping with a soft dry cloth. If the unit is particularly dirty, soak a cloth in a dilute solution of neutral detergent, and wring it well before wiping. Do not use solvents such as thinner, benzene, or alcohol, as they may damage the surface.
• If you have any questions or problems concerning this unit that are not covered in this manual, please consult your nearest Sony dealer. Replacement parts: earpads Please consult your nearest authorized Sony retailer or www.sony.com for information about replacement parts.
Specifications
Wireless Noise Canceling Stereo Headset
Power source:
DC 3.7 V: Built-in lithium-ion rechargeable battery
DC 5 V: When charged using USB
Operating temperature:
0 °C to 40 °C (32 °F to 104 °F)
Rated power consumption:
8 W
Usage hours:
When connecting via the Bluetooth device Music playback time: Max. 30 hours (NC ON), Max. 22 hours
(Ambient Sound Mode), Max. 38 hours (NC OFF) Communication time: Max. 24 hours (NC ON), Max. 18 hours (Ambient Sound Mode), Max. 30 hours (NC OFF) Standby time: Max. 30 hours (NC ON), Max. 22 hours (Ambient Sound Mode), Max. 200 hours (NC OFF) When connecting via the headphone cable with NC ON: Max. 36 hours
Note: Usage hours may be shorter depending on the Codec Charging time: Approx. 3 hours (About 5 hours of music playback is possible after 10 minutes charging.)
Note: Charging and usage hours may be different depending on the conditions of use. Charging temperature: 5 °C to 35 °C (41 °F ~ 95 °F) Mass: Approx. 255 g (8.99 oz) Receiver Type: Closed, dynamic Driver unit:
40 mm (1 5/8 in.) Impedance: 47 Ω (1 kHz) (when connecting via the headphone cable with the unit turned on)
16 Ω (1 kHz) (when connecting via the headphone cable with the unit turned off) Sensitivity: 104 dB/mW (when connecting via the headphone cable with the unit turned on) 101 dB/mW (when connecting via the headphone cable with
the unit turned off) Frequency response: 4 Hz – 40 Hz (JEITA) Microphone Type: MEMS Directivity: Omni directional
Effective frequency range:
50 Hz – 8,000 Hz
Included items:
Wireless Noise Canceling Stereo Headset (1)
USB Type-C™ cable (USB-A to USB-C™) (approx. 20 cm
(7 7/8 in.)) (1)
Headphone cable (approx. 1.2 m (47 1/4 in.)) (1)
Carrying case (1)
Plug adaptor for airplane (1)1)
1) Depending on the in-flight entertainment services, it may not be
supported.
Communication specification
Communication system:
Bluetooth Specification version 4.2
Output:
Bluetooth Specification Power Class 2
Maximum communication range:
Line of sight approx. 10 m (30 ft)1)
Frequency band:
2.4 GHz band (2.4000 GHz – 2.4835 GHz)
Compatible Bluetooth profiles2):
A2DP (Advanced Audio Distribution Profile)
AVRCP (Audio Video Remote Control Profile)
HFP (Hands-free Profile)
HSP (Headset Profile)
Supported Codec3):
SBC4)
AAC5)
LDAC™
Qualcomm® aptX™ audio
aptX HD
Supported content protection method:
SCMS-T
Transmission range (A2DP):
20 Hz – 40,000 Hz (Sampling frequency LDAC 96 kHz, 990
kbps)
1) The actual range will vary depending on factors such as
obstacles between devices, magnetic fields around a microwave
oven, static electricity, reception sensitivity, antenna’s
performance, operating system, software application, etc.
2) Bluetooth standard profiles indicate the purpose of Bluetooth
communications between devices.
3) Codec: Audio signal compression and conversion format
4) Subband Codec
5) Advanced Audio Coding
Design and specifications are subject to change without notice.
System requirements for battery
charge using USB
USB AC adaptor
A commercially available USB AC adaptor capable of supplying an
output current of 1.5 A or more
Personal Computer
(As of August 2018)
Personal computer with pre-installed with any of the following
operating systems and USB port:
Operating Systems:
When using Windows
Windows® 10 Home / Windows® 10 Pro
Windows® 8.1 / Windows® 8.1 Pro
Windows® 8 / Windows® 8 Pro
Windows® 7
Home Basic / Home Premium / Professional / Ultimate
When using Mac
macOS (version 10.10 or later)
Compatible iPhone/iPod models
iPhone X
iPhone 8
iPhone 8 Plus
iPhone 7
iPhone 7 Plus
iPhone SE
iPhone 6s
iPhone 6s Plus
iPhone 6
iPhone 6 Plus
iPhone 5s
iPod touch (6th generation)
(As of August 2018)
Trademarks
• Windows is a registered trademark or trademark of Microsoft
Corporation in the United States and/or other countries.
• Apple, iPhone, iPod, iPod touch, macOS and Mac are trademarks
of Apple Inc., registered in the U.S. and other countries.
• Use of the Made for Apple badge means that an accessory has
been designed to connect specifically to the Apple product(s)
identified in the badge, and has been certified by the developer
to meet Apple performance standards. Apple is not responsible
for the operation of this device or its compliance with safety and
regulatory standards.
• Android is a trademark of Google LLC.
• The Bluetooth® word mark and logos are registered trademarks
owned by the Bluetooth SIG, Inc. and any use of such marks by
Sony Corporation is under license.
• The N-Mark is a trademark or registered trademark of NFC Forum,
Inc. in the United States and in other countries.
• Qualcomm aptX is a product of Qualcomm Technologies
International, Ltd.
Qualcomm is a trademark of Qualcomm Incorporated, registered
in the United States and other countries, used with permission.
aptX is a trademark of Qualcomm Technologies International,
Ltd., registered in the United States and other countries, used
with permission.
• The LDAC name and logo are trademarks of Sony Corporation.
• USB Type-C™ and USB-C™ are trademarks of USB Implementers
Forum.
• Other trademarks and trade names are those of their respective
owners.
Questions about your Sony WH1000XM3 Noise Cancelling Headphones? Post in the comments!
Download Sony WH1000XM3 Noise Cancelling Headphones Manual [PDF]
References
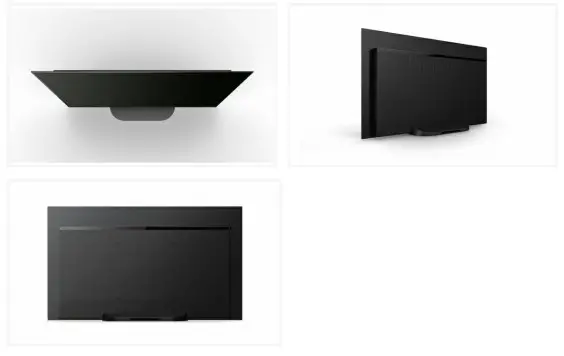
]]>48” BRAVIA 4K Ultra HD HDR
Professional Display

Overview
Make an impressive statement with exquisite 4K HDR images, effortless style, and sound to match.
Make an impressive statement with exquisite 4K HDR images, effortless style, and sound to match Add unprecedented impact to your visual communications with the stunningly styled, fully-featured FWD-48A9/T 48” BRAVIA OLED Professional Display. Combining bright, beautiful 4K HDR image quality with easy operation, flexible networking/control, and extensive integration options, it’s an imposing addition to corporate boardrooms, lobbies, and reception areas.
Optimized for professional display applications, the FWD48A9/T BRAVIA takes full advantage of cutting-edge OLED display technologies, harnessing our X1™ Ultimate picture processor to ensure vibrant high- contrast 4K HDR images.
The sleek, minimalist design of the FWD-48A9/T is sure to impress in any setting. And with Acoustic Surface Audio, powerful cinematic sound comes directly from the 48″ screen without the need for surround speakers.
With advanced control, Pro Mode, optional interactive compatibility, and an embedded HTML5 platform, it makes it easy to create attractive digital signage so you always present a clear image.
Enrich your audience’s display experience with seamless TEOS integration and a choice of built-in solutions to add extra functionality, from meeting room support to automation, with no need for any external devices or
players.
For even greater peace of mind, there’s the added reassurance of our 3 Year Advanced Exchange PrimeSupport service. If there’s a problem with your display, we’ll offer a free, brand new replacement product rather than repair included as standard. You can also choose to extend your service by 2 additional years.
Features
4K image resolution (3840 x 2160 pixels)
4K offers four times the detail of Full HD, with a resolution of over 8 million pixels bringing extra clarity to corporate display, education, and digital signage applications.
More contrast, color, and clarity
Our 4K HDR Processor X1™ Ultimate cleans and refines picture signals, using advanced algorithms to cut noise and boost detail. Even lower-resolution images are upscaled closer to 4K with lifelike color and textures, for more impactful signage.
See finer detail
4K X-Reality PRO upscales pictures closer to true 4K quality. Images are sharpened and refined in real-time, revealing extra detail from lower-resolution picture sources.
Wider colour with TRILUMINOS Display
Powered by our X1™ Ultimate processor, TRILUMINOS Display maps colors from a wider palette, faithfully reproducing a world of more vivid, lifelike hues and tones.
Smoother movement
Our X-Motion Clarity™ technology controls moving images to minimize blur, ensuring smoother, sharper and
brighter detail in fast-moving sequences.
High-quality sound that flows around you
Dolby Atmos creates an immersive soundstage that comes from above as well as from the sides, letting you
hear objects moving overhead with even more realism.
Refined style to match your space
BRAVIA features a slim, contemporary blade design, with a narrow screen bezel that adds an extra touch of
refinement to any interior.
Google Chromecast built-in and Apple Airplay
With Google Chromecast built-in, and Apple Airplay, easily mirror your content and enjoy it on your BRAVIA.
Do more with Android TV
Discover a world of apps and online content powered by Android. Use Voice Search to find content easily without typing.
Quick set-up with Pro Mode
Customize and store display settings and features, then copy easily to multiple displays via USB flash memory.
Easily create digital signage
Integrated support for HTML5 makes it easy to produce compelling digital signage. Combine graphics, text, video, and live web content to create attractive signage in minutes with no extra hardware or special training.
Versatile remote control
Control BRAVIA remotely – including on/off, input signal select and adjust volume – over IP via RJ45 by web API.
TEOS integration
BRAVIA integrates seamlessly with TEOS, Sony’s suite of workspace management applications that orchestrate control of devices and content in boardrooms, meeting areas and public spaces.
Greater peace of mind
There’s extra reassurance with our 3 Year Advanced Exchange PrimeSupport service that’s included as standard. If there’s a fault with your BRAVIA Professional Display, we’ll provide a replacement unit at no extra
charge to keep you up and running.
High contrast OLED screen technology
Each self-illuminating pixel is precisely and individually controlled, with Pixel Contrast Booster technology maximizing dynamic range for exquisite images with unprecedented color contrast. You’ll see unprecedented detail, texture and realism in every scene.
Specifications
| Display Features | |
| Screen Size(inch, measured diagonally) |
48″(47.5″) |
| Display resolution (HxV,pixels) | 3840×2160 |
| Display device | OLED |
| Operation time | 18/7 |
| Aspect Ratio | 16:09 |
| Professional Features | |
| Professional Hidden Mode | yes |
| HDMI auto wake-up | yes |
| Multicast/ IPTV | yes |
| Compatible with TDM Digital Signage/TEOS Solutions | yes |
| Operating System | Android 9.0Pie |
| On-board Storage (GB) | 16 GB |
| Display System | |
| TV System (Digital Terrestrial) | DVB-T/T2 |
| TV System (Digital Cable) | DVB-C |
| TV System (Digital Sat) | DVB-S/S2 |
| Number of Tuners (Terrestrial /Cable) | 2(Digital)/1(Analog) |
| Number of Tuners (Sat) | 2 |
| Network Features | |
| Wi-Fi Direct | Yes |
| Wi-Fi Certified | Yes |
| Apple AirPlay | Yes |
| Chromecast built-in | Yes |
| Internet Browser | Vewd |
| Codec for Home
Network |
MPEG1:MPEG1 / MPEG2PS:MPEG2/ MPEG2TS (HDV,AVCHD):MPEG2,AVC/MP4 (XAVC S): AAC, MPEG4, HELP/ AVI: Xvid,MotionJpeg/ASF (WMV): VC1/ MOV:AVC,MPEG4,MotionJpeg /MKV:Xvid,AVC,MPEG4,VP8.HEVC /WEB: VP8/3GPP: MPEG4, AVC /MP3/ASF(WMA)/LPCM /WAV /MP4AAC/FLAC /JPEG |
| Firmware update | Yes |
| Wireless LAN | Integrated |
| Convenience Features | |
| USB playback codecs | MPEG1:MPEG1 / MPEG2PS:MPEG2/ MPEG2TS(H MOV:AVC,MPEG4,MotionJpeg/ MKV:Xvid,AVC,MP JPEG |
| HDMI-CEC | Yes |
| i-Manual | Yes |
| On-Screen Clock | Yes |
| Sleep Timer | Yes |
| On/Off Timer | Yes |
| Display Language | BUL/CAT/CZE/DAN/GER/GRE/ENG/SPA/EST/FIN/FR |
| Control Specs | |
| IP Control | Yes |
| Pro mode | Yes |
| Inputs & Outputs | |
| HDMI Signal | 4096x2160p(24,50,60Hz), 3840x2160p (24,25,30,50,60Hz),1080p (30,50,60,100,120Hz), 1080/24p,1080i (50,60Hz), 20p(30,50,60Hz),720/24p, 576p,480p |
| HDCP | HDCP2.3(forHDMI1/2/3 / 4) |
| AC Power Input | Pigtail (REAR) |
| RF (Terrestrial/Cable) Connection Input(s) |
1(Bottom) |
| IF (Satellite) Input(s) |
2 (Bottom) |
| Composite Video Input(s) | 1 (Side) |
| HDMI inputs total | 4(1Side,3Bottom) |
| Audio Output(s) | 1 (Bottom) |
| USB ports | 2(Side) /1(Bottom) |
| Ethernet inputs | 1 (Bottom) |
| HDMI PC Input Format | 640×480(31.5kHz,60Hz), 800×600(37.9kHz,60Hz), 1024×768(48.4kHz,60Hz), 1280×1024(64.0kHz,60Hz), 1152×864(67.5kHz,75Hz), 1600×900(55.9kHz,60Hz), 1680×1050(65.3kHz,60Hz), 1920×1080(67.5kHz,60Hz), 3840x2160p(30Hz),3840x 2160p(60Hz,8bits) |
| PCMCIA Slot(s) | 1(Side) |
| Audio Specifications | |
| Speaker Position | Front |
| Audio Power Output | 10W+10W+5W |
| Video Specifications | |
| Wide Mode | Auto/Wide zoom/Normal/ Full/Zoom/14:9 |
| 4:3 Default | Yes |
| Video Processing | 4KX-Reality PRO |
| 4K Processor | Icture Processor X1Ultimate |
| HDR(High Dynamic Range) Compatibility | Yes(HDR10,HLG,Dolby Vision) |
| Frame color | Black |
| Stand Design | Aluminum Central Stand |
| ESA® Hole Spacing Compatible | Yes |
| VESA® Hole Pitch (WxH) | 30.0×30.0cm |
| Eco and Energy Saving | |
| Energy Level Rating | B |
| Power Consumption | 14W |
| Power Consumption (in Standby) | 0.50W |
| Peak luminance ratio for EU | 179% |
| Mercury content (mg) | 0.0 |
| Power Saving Mod/ Back Light Off Mode | Yes |
| Power Requirements (voltage) | AC 220-240V |
| Dimensions | |
| Display Only(W x Hx D) (Approx.) | 106.9×62.4×5.8 (0.42) cm |
| Display with Stand (W x Hx D) (Approx.) | 106.9×62.9×25.5cm |
| Weights ppro | |
| Display Only (Approx.) | 13.9 kg |
| Display with Stand (Approx.) | 17.6 kg |
| Optional Accessories | |
| Wall-mount Bracket | SU-WL450 (Terminal access limitation,refertoSU-WL450 product page), SU-WL850 (Refer to Country/Area Handling Chart) |
| Service and Warranty | |
| Included Prime Support | 3Years with Advanced Exchange |
| Optional Prime Support Extension | PSP.FDWA948.2X |

© 2004 – 2021 Sony Corporation. All rights reserved. Reproduction in whole or in part without written permission is prohibited. Features and specifications are subject to change without notice. The values for mass and dimension are approximate. All trademarks are the property of their respective owners.
]]>
AV RECEIVER
Operating Instructions
5-006-475-12(1)
Owner’s Record
The model and serial numbers are located on the bottom of the unit. Record the serial number in the space provided below. Refer to these numbers whenever you call upon your Sony dealer regarding this product.
Model No. XAV-AX7000
Serial No. ________________
To cancel the demonstration (Demo) display, see page 7.
For the connection/installation, see page 11.
Warning
For safety, be sure to install this unit in the dashboard of the car as the left side of the unit becomes hot during use.
For details, see “Connection/Installation” (page 11).
The nameplate indicating operating voltage, etc., is located on the bottom of the chassis.
The validity of the CE marking is restricted to only those countries where it is legally enforced, mainly in the countries EEA (European Economic Area) and Switzerland.
WARNING
To prevent fire or shock hazard, do not expose the unit to rain or moisture.
To avoid electrical shock, do not open the cabinet. Refer servicing to qualified personnel only.
FOR THE CUSTOMERS IN THE USA. NOT APPLICABLE IN CANADA, INCLUDING IN THE PROVINCE OF QUEBEC.
POUR LES CLIENTS AUX ÉTATS-UNIS. NON APPLICABLE AU CANADA, Y COMPRIS LA PROVINCE DE QUÉBEC.
This equipment has been tested and found to comply with the limits for a Class B digital device, pursuant to Part 15 of the FCC Rules. These limits are designed to provide reasonable protection against harmful interference in a residential installation. This equipment generates, uses, and can radiate radio frequency energy and, if not installed and used in accordance with the instructions, may cause harmful interference to radio communications. However, there is no guarantee that interference will not occur in a particular installation. If this equipment does cause harmful interference to radio or television reception, which can be determined by turning the equipment off and on, the user is encouraged to try to correct the interference by one or more of the following measures:
– Reorient or relocate the receiving antenna.
– Increase the separation between the equipment and receiver.
- Connect the equipment into an outlet on a circuit different from that to which the receiver is connected.
– Consult the dealer or an experienced radio/TV technician for help.
You are cautioned that any changes or modifications not expressly approved in this manual could void your authority to operate this equipment.
This device complies with part 15 of FCC Rules and Innovation, Science and Economic Development Canada’s licence-exempt RSS(s). Operation is subject to the following two conditions:
(1) this device may not cause harmful interference, and
(2) this device must accept any interference received, including interference that may cause undesired operation.
This transmitter must not be co-located or operated in conjunction with any other antenna or transmitter.
This equipment complies with FCC/ISED radiation exposure limits set forth for an uncontrolled environment and meets the FCC radio frequency (RF) Exposure Guidelines and RSS-102 of the ISED radio frequency (RF) Exposure rules as this equipment has very low levels of RF energy.
If you have any questions about this product: Visit: https://www.sony.com/electronics/support
Contact: Sony Customer Information Service Center at 1-800-222-7669
Write: Sony Customer Information Service Center 12451 Gateway Blvd., Fort Myers, FL 33913 Supplier’s Declaration of Conformity Trade Name: SONY Model: XAV-AX7000 Responsible Party: Sony Electronics Inc. Address: 16535 Via Esprillo, San Diego, CA 92127 U.S.A. Telephone Number: 858-942-2230 This device complies with part 15 of the FCC rules. Operation is subject to the following two conditions:
(1) This device may not cause harmful interference, and
(2) this device must accept any interference received, including interference that may cause undesired operation.
For the State of California, USA only Perchlorate Material special handling may apply, See www.dtsc.ca.gov/hazardouswaste/perchlorate
![]() WARNING: Do not ingest battery, Chemical Burn Hazard. The remote commander contains a coin/ button cell battery. If the coin/button cell battery is swallowed, it can cause severe internal burns in just 2 hours and can lead to death. Keep new and used batteries away from children. If the battery compartment does not close securely, stop using the product and keep it away from children. If you think batteries might have been swallowed or placed inside any part of the body, seek immediate medical attention.
WARNING: Do not ingest battery, Chemical Burn Hazard. The remote commander contains a coin/ button cell battery. If the coin/button cell battery is swallowed, it can cause severe internal burns in just 2 hours and can lead to death. Keep new and used batteries away from children. If the battery compartment does not close securely, stop using the product and keep it away from children. If you think batteries might have been swallowed or placed inside any part of the body, seek immediate medical attention.
Note on the lithium battery
Do not expose the battery to excessive heat such as direct sunlight, fire or the like.
Warning if your car’s ignition has no ACC position
Do not install this unit in a car that has no ACC position. The display of the unit does not turn off even after turning the ignition off, and this causes battery drain.
Disclaimer regarding services offered by third parties
Services offered by third parties may be changed, suspended, or terminated without prior notice. Sony does not bear any responsibility in these sorts of situations.
Important notice
Caution
IN NO EVENT SHALL SONY BE LIABLE FOR ANY INCIDENTAL, INDIRECT OR CONSEQUENTIAL DAMAGES OR OTHER DAMAGES INCLUDING, WITHOUT LIMITATION, LOSS OF PROFITS, LOSS OF REVENUE, LOSS OF DATA, LOSS OF USE OF THE PRODUCT OR ANY ASSOCIATED EQUIPMENT, DOWNTIME, AND PURCHASER’S TIME RELATED TO OR ARISING OUT OF THE USE OF THIS PRODUCT, ITS HARDWARE AND/OR ITS SOFTWARE.
Dear customer, this product includes a radio transmitter. Please check your vehicle operation manual or contact the manufacturer of your vehicle or your vehicle dealer, before you install this product into your vehicle.
Emergency calls
This BLUETOOTH car handsfree and the electronic device connected to the handsfree operate using radio signals, cellular, and landline networks as well as user-programmed function, which cannot guarantee connection under all conditions. Therefore do not rely solely upon any electronic device for essential communications (such as medical emergencies).
On BLUETOOTH communication
- Microwaves emitting from a BLUETOOTH device may affect the operation of electronic medical devices. Turn off this unit and other BLUETOOTH devices in the following locations, as it may cause an accident.
- where inflammable gas is present, in a hospital, train, airplane, or petrol station
-near automatic doors or a fire alarm - This unit supports security capabilities that comply with the BLUETOOTH standard to provide a secure connection when the BLUETOOTH wireless technology is used, but security may not be enough depending on the setting. Be careful when communicating using BLUETOOTH wireless technology.
- We do not take any responsibility for the leakage of information during BLUETOOTH communication.
If you have any questions or problems concerning your unit that are not covered in this manual, consult your nearest Sony dealer.
Guide to Parts and Controls
Main Unit and Remote Commander
Main unit
 The VOL (volume) + button has a tactile dot.
RM-X170 remote commander
The remote commander can be used to operate the audio controls. For menu operations, use the touch panel.
 Note
Note
The white buttons in the illustration are not supported.
- Display/touch panel
- HOME
Displays the HOME screen.
 STANDBY
Press and hold to turn the unit to standby mode (USB charging is still available). To resume, press any button. - VOL (volume) +/-
- Receptor for the remote commander
- OPTION
Displays the OPTION screen (page 5).
ATT (attenuate)
Press and hold for 1 second to attenuate the sound.
To cancel, press and hold again, or press VOL +.  (previous/next)
Functions differently depending on the selected source:
– Tuner/SiriusXM: select a preset station.
- USB/BT Audio: fast-reverse/fast-forward.- VOICE
Activates the voice command function for Apple CarPlay and Android AutoTM. - OFF
Turns the source off. - MONITOR OFF
Turns off the monitor. To turn back on, press again. - EQ (equalizer)
Selects an equalizer curve. - Number buttons (0 to 9)
- CLEAR
- ATT (attenuate)
Attenuates the sound. Press again to cancel the attenuation.  (play/pause)
 (previous/next)
 (fast-reverse/fast-forward)
Functions differently depending on the selected source:
– Tuner/SiriusXM: select a preset station.
– USB/BT Audio: move to the previous/next file. Press and hold to: Tuner: tune into a station automatically (SEEK+/SEEK). USB/BT Audio: fast-reverse/fast-forward. Functions differently depending on the selected source.
– Tuner: select a preset station or tune into a station automatically.
– SiriusXM: select a preset channel or move to the previous/next channel.
- USB: select a folder or move to the previous/ next file.
ENTER Enters the selected item.- SRC (source) Changes the source. Each time you press this button, a selectable source is displayed in a popup on the current display.
- MODE
Selects the radio band.
Remove the insulation film before use
Screen displays
Playback screen:
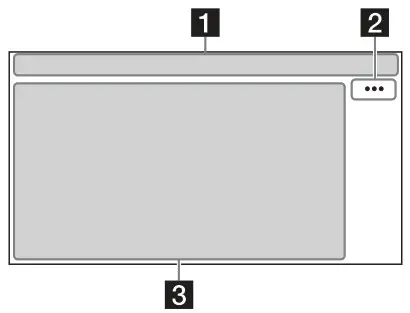 HOME screen:
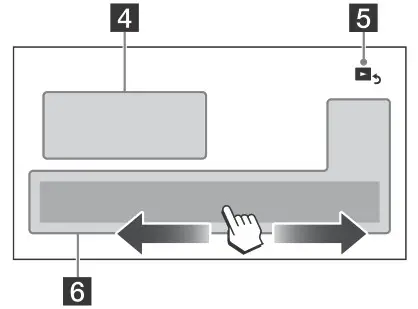 OPTION screen:
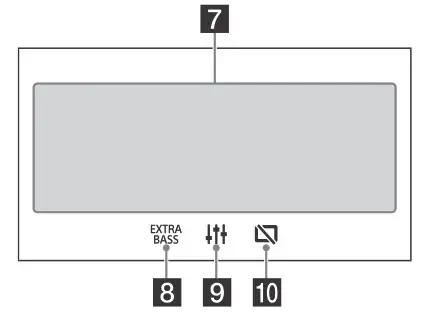
- Status indication

Lights up when the sound is attenuated. 
Indicates the signal strength status of the connected SiriusXM Connect Vehicle Tuner. 
Lights up when the audio device is playable by enabling the A2DP (Advanced Audio Distribution Profile). 
Lights up when handsfree calling is available by enabling the HFP (Handsfree Profile). 
Indicates the signal strength status of the connected mobile phone. 
Indicates the remaining battery status of the connected mobile phone. 
Lights up when the Bluetooth® signal is on. Flashes when the connection is in progress. - ••• (source option)
Opens the source option menu. The available items differ depending on the source. - Application specific area
Displays playback controls/indications or show the unit’s status. Displayed items differ depending on the source. - Clock
Displays the time which are set on the Date/Time setting.  (return to the playback screen) Switches from the HOME screen to the playback screen.
- Sources and Settings select keys
Changes the source or make various settings. Flick to select the setting icon and other icons. Touch the source icon you want to select.
Android Auto 
Apple CarPlay 
Tuner 
SXM 
BT Audio 
Phone 
USB port 1 
WebLink 
USB port 2 
Rear Camera 
Settings - Sound select keys
Changes the sound.  (EXTRA BASS)
Changes the EXTRA BASS setting. (EQ10/Subwoofer)
Changes the EQ10/Subwoofer setting. (monitor off)
Turns off the monitor. When the monitor is turned off, touch any part of the display to turn it back on.
Basic Operations
Pairing with a BLUETOOTH Device
When connecting a BLUETOOTH device for the first time, mutual registration (called “pairing”) is required. Pairing enables this unit and other devices to recognize each other.
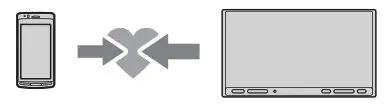
- Press HOME, then touch [Settings] → [Bluetooth] → [Bluetooth Connection] → [ON] [Pairing].
 flashes while the unit is in pairing standby mode.
 - Perform pairing on the BLUETOOTH device so it detects this unit.
- Select your model name shown on the display of the BLUETOOTH device*.
When pairing is made, stays lit.
* If passkey input is required on the BLUETOOTH device, input [0000].
Connecting Rear View Camera
By connecting the optional rear view camera to the CAMERA IN terminal, you can display the picture from the rear view camera. For details, see “Connection/Installation” (page 11).
To display the picture from the rear view camera
Press HOME, then touch [Rear Camera].
Canceling the Demonstration Mode
- Press HOME, then touch [Settings].
- Touch [General], then touch [Demo] to set to [OFF].
- To exit the setup menu, touch
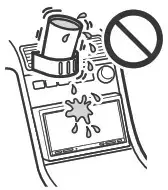 (back) twice.
Updating the Firmware
To update the firmware, visit the support site on the back cover, then follow the online instructions.
Note
During the update, do not remove the USB device.
Additional Information
Precautions
- Power antenna (aerial) extends automatically.
- When you transfer ownership or dispose of your car with the unit installed, initialize all the settings to the factory settings by performing the factory reset.
- Do not splash liquid onto the unit.
Notes on safety
- Comply with your local traffic rules, laws, and regulations.
- While driving
- Do not watch or operate the unit, as it may lead to distraction and cause an accident. Park your car in a safe place to watch or operate the unit.
- Do not use the setup feature or any other function which could divert your attention from the road.
- When backing up your car, be sure to look back and watch the surroundings carefully for your safety even if the rear view camera is connected.
Do not depend on the rear view camera exclusively. - While operating
– Do not insert your hands, fingers, or foreign objects into the unit as it may cause injury or damage to the unit.
– Keep small articles out of the reach of children.
– Be sure to fasten seatbelts to avoid injury in the event of sudden movement of the car.
Preventing an accident
Pictures appear only after you park the car and set the parking brake. If the car starts moving during video playback, the following caution is displayed and you cannot watch the video.
[Video blocked for your safety.]
Do not operate the unit or watch the monitor while driving.
Notes on LCD panel
- Do not get the LCD panel wet or expose it to liquids. This may cause a malfunction.
- Do not press down hard on the LCD panel as doing so can distort the picture or cause a malfunction (i.e., the picture may become unclear or the LCD panel may be damaged).
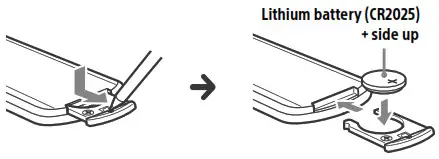
- Do not touch the panel with objects other than with your finger as it may damage or break the LCD panel.
- Clean the LCD panel with a dry soft cloth. Do not use solvents such as benzine, thinner, commercially available cleaners, or antistatic spray.
- Do not use the unit outside the temperature range 0 ºC to 40 ºC (32 ºF to 104 ºF).
- If your car was parked in a cold or hot place, the picture may not be clear. However, the monitor is not damaged and the picture will become clear after the temperature in your car becomes normal.
- Some stationary blue, red, or green dots may appear on the monitor. These are called “bright spots” and can happen with any LCD. The LCD panel is precision-manufactured with more than 99.99% of its segments functional. However, it is possible that a small percentage (typically 0.01%) of the segments may not light up properly. This will not, however, interfere with your viewing.
Notes on the touch panel
- This unit uses a capacitive touch panel. Touch the panel directly with your fingertip.
- Multi-touch operation is not supported on this unit.
- Do not touch the panel with sharp objects such as a needle, pen, or fingernail. Operation with a stylus is not supported on this unit.
- Touching the panel with a gloved finger may cause the unit to operate incorrectly or not respond.
- Do not let any objects contact the touch panel. If the panel is touched by an object other than your fingertip, the unit may not respond correctly.
- Since glass material is used for the panel, do not subject the unit to strong shock. If cracking or chipping occurs on the panel, do not touch the damaged part as it may cause injury.
- Keep other electrical devices away from the touch panel. They may cause the touch panel to malfunction.
- If there are water droplets on the touch panel, or if you touch the panel with wet fingertips, the touch panel may not react correctly.
About iPhone
- Compatible iPhone models: iPhone X, iPhone 8 Plus, iPhone 8, iPhone 7 Plus, iPhone 7, iPhone SE, iPhone 6s Plus, iPhone 6s, iPhone 6 Plus, iPhone 6, iPhone 5s
- Use of the Made for Apple badge means that an accessory has been designed to connect specifically to the Apple product(s) identified in the badge, and has been certified by the developer to meet Apple performance standards. Apple is not responsible for the operation of this device or its compliance with safety and regulatory standards. Please note that the use of this accessory with an Apple product may affect wireless performance.
Notice on license
This product contains software that Sony uses under a licensing agreement with the owner of its copyright. We are obligated to announce the contents of the agreement to customers under requirement by the owner of copyright for the software. For details on software licenses, check [Open Source Licenses] in [General].
Notice on GNU GPL/LGPL applied software
This product contains software that is subject to the following GNU General Public License (hereinafter referred to as “GPL”) or GNU Lesser General Public License (hereinafter referred to as “LGPL”). These establish that customers have the right to acquire, modify, and redistribute the source code of said software in accordance with the terms of the GPL or LGPL displayed on this unit. The source code for the above-listed software is available on the Web. To download, please access the following URL then select the model name “XAV-AX7000.” URL: http://www.sony.net/Products/Linux/ Please note that Sony cannot answer or respond to any inquiries regarding the content of the source code.
If you have any questions or problems concerning your unit that are not covered in this Operating Instructions, consult your nearest Sony dealer.
Maintenance
Replacing the lithium battery (CR2025) of the remote commander
When the battery becomes weak, the range of the remote commander becomes shorter.
CAUTION
Danger of explosion if battery is incorrectly replaced. Replace only with the same or equivalent type.
 Note on the lithium battery
Keep the lithium battery out of the reach of children. Should the battery be swallowed, immediately consult a doctor.
Specifications
FOR THE CUSTOMERS IN THE USA. NOT APPLICABLE IN CANADA, INCLUDING IN THE PROVINCE OF QUEBEC. POUR LES CLIENTS AUX ÉTATS-UNIS. NON APPLICABLE AU CANADA, Y COMPRIS LA PROVINCE DE QUÉBEC.
AUDIO POWER SPECIFICATIONS
![]() CTA2006 Standard
CTA2006 Standard
Power Output: 45 Watts RMS × 4 at
4 Ohms < 1% THD+N SN
Ratio: 80 dBA (reference: 1 Watt into 4 Ohms)
Monitor section
Display type: Wide LCD color monitor
Dimensions: 6.95 in/176 mm
System: TFT active matrix
Number of pixels: 1,152,000 pixels (800 × 3 (RGB) × 480)
Color system: PAL/NTSC automatic select for CAMERA IN terminal
Tuner section
FM
Tuning range: 87.5 MHz 107.9 MHz
Usable sensitivity: 7 dBf
Signal-to-noise ratio: 70 dB (mono)
Separation at 1 kHz: 45 dB
AM
Tuning range: 530 kHz 1,710 kHz
Sensitivity: 32 V
USB player section
Interface:
USB port 1: USB (Hi-speed)
USB port 2: USB (Full-speed)
Maximum current: USB port 1: 1.5 A USB port 2: 500 mA
Wireless communication
Communication System: BLUETOOTH Standard version 3.0
Output: BLUETOOTH Standard Power Class 2 (Max. Conducted +1 dBm)
Maximum communication range*1: Line of sight approx. 10 m (33 ft)
Frequency band: 2.4 GHz band (2.4000 GHz 2.4835 GHz)
Modulation method: FHSS Compatible BLUETOOTH Profiles*2:
A2DP (Advanced Audio Distribution Profile) 1.3 AVRCP (Audio Video Remote Control Profile) 1.3 HFP (Handsfree Profile) 1.6 PBAP (Phone Book Access Profile) 1.1 Corresponding codec: SBC, AAC
*1 The actual range will vary depending on factors such as obstacles between devices, magnetic fields around a microwave oven, static electricity, reception sensitivity, antenna (aerial)’s performance, operating system, software application, etc.
*2 BLUETOOTH standard profiles indicate the purpose of BLUETOOTH communication between devices.
Power amplifier section
Outputs: Speaker outputs
Speaker impedance: 2Ω /4Ω 8Ω
Maximum power output: 100 W × 4 (at 2Ω /4Ω )
General
Power requirements: 12 V DC car battery (negative ground (earth))
Rated current consumption: 10 A Dimensions:
Approx. 178 mm × 100 mm × 179 mm (7 1/8 in × 4 in × 7 1/8 in) (w/h/d)
Mounting dimensions: Approx. 182 mm × 111 mm × 160 mm (7 1/4 in × 4 3/8 in × 6 3/8 in) (w/h/d)
Mass: Approx. 1.2 kg (2 lb 11 oz)
Package contents:
Main unit (1)
Parts for installation and connections (1 set)
Remote commander (1): RM-X170
Optional accessories/equipment:
SiriusXM Connect Vehicle Tuner: SXV100, SXV200, SXV300
Ask the dealer for detailed information.
Design and specifications are subject to change without notice.
Copyrights
![]()
SiriusXM Connect Vehicle Tuner and Subscription sold separately. www.siriusxm.com
Sirius, XM and all related marks and logos are trademarks of
Sirius XM Radio Inc. All rights reserved.
The Bluetooth® word mark and logos are registered trademarks owned by the Bluetooth SIG, Inc. and any use of such marks by Sony Corporation is under license. Other trademarks and trade names are those of their respective owners.
Windows Media is either a registered trademark or trademark of Microsoft Corporation in the United States and/or other countries.
This product is protected by certain intellectual property rights of Microsoft Corporation. Use or distribution of such technology outside of this product is prohibited without a license from Microsoft or an authorized Microsoft subsidiary.
Apple and iPhone are trademarks of Apple Inc., registered in the U.S. and other countries. Apple CarPlay is a trademark of Apple Inc.
Android Auto is a trademark of Google LLC.
WebLink is a registered trademark of Abalta Technologies, Inc. in the U.S. and a trademark in the other countries.
All other trademarks are trademarks of their respective owners.
Connection/Installation
Cautions
- Do not install this unit in a car that has no ACC position. The display of the unit does not turn off even after turning the ignition off, and this causes battery drain.
- Run all ground (earth) leads to a common ground (earth) point.
- Do not get the leads trapped under a screw or caught in moving parts (e.g., seat railing).
- Before making connections, turn the car ignition off to avoid short circuits.
- Connect the yellow and red power supply leads only after all other leads have been connected.
- Be sure to insulate any loose unconnected leads with electrical tape for safety.
- Choose the installation location carefully so that the unit will not interfere with normal driving operations.
- Avoid installing the unit in areas subject to dust, dirt, excessive vibration, or high temperature, such as in direct sunlight or near heater ducts.
- Use only the supplied mounting hardware for a safe and secure installation.
Note on the power supply lead (yellow)
When connecting this unit in combination with other stereo components, the amperage rating of the car circuit to which the unit is connected must be higher than the sum of each component’s fuse amperage rating.
Note on installing in cars with a start-stop system
The unit may restart when starting the engine from startstop. In this case, turn off the start-stop system of your car.
Note on installing in cars with electric parking brake system
For cars with electric parking brakes, some related functions (such as video blocking function) may not work properly.
Mounting angle adjustment
Adjust the mounting angle to less than 30°.
Parts List for Installation
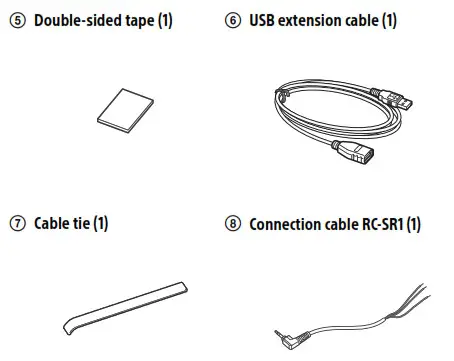
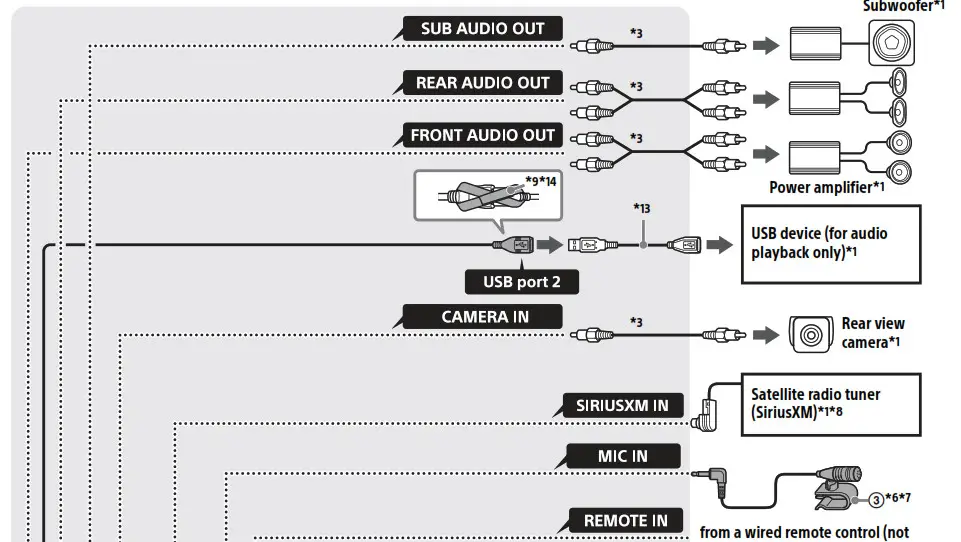
This parts list does not include all the package contents.
Connection
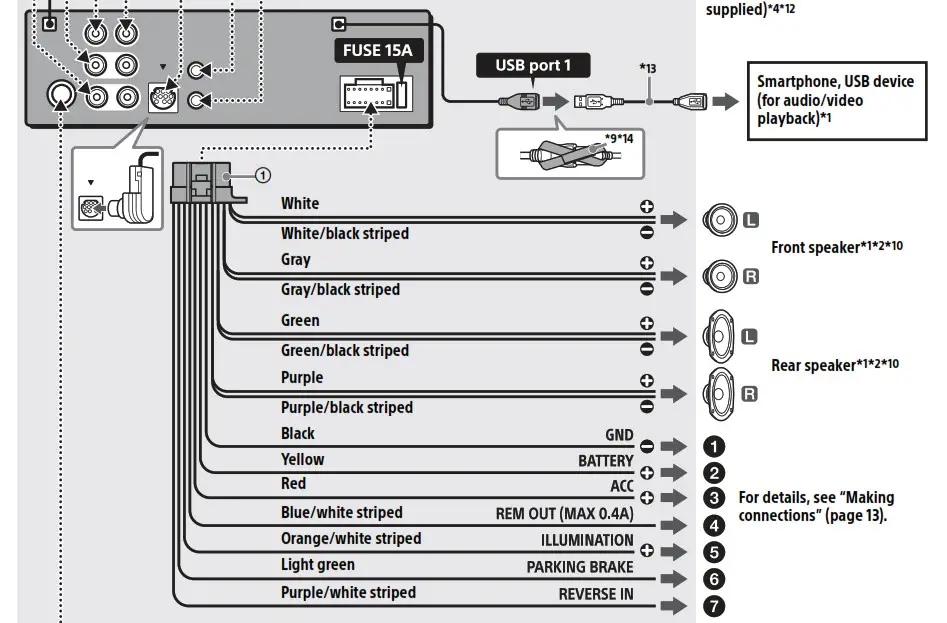

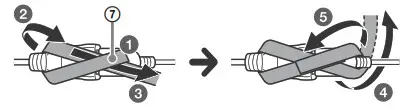
*1 Not supplied
*2 Speaker impedance: 4 to 8 × 4
*3 RCA pin cord (not supplied)
*4 Depending on the type of car, use an adaptor for a wired remote control (not supplied). For details on using the wired remote control, see “Using the wired remote control” (page 14).
*5 Depending on the type of car, use an adaptor (not supplied) if the antenna (aerial) connector does not fit.
*6 Whether in use or not, route the microphone input cord so it does not interfere with driving operations. Secure the cord with a clamp, etc., if it is installed around your feet.
*7 For details on installing the microphone, see “Installing the microphone” (page 14).
*8 For more information on how to install the SiriusXM Connect Vehicle Tuner, consult the installation guide included with the tuner.
*9
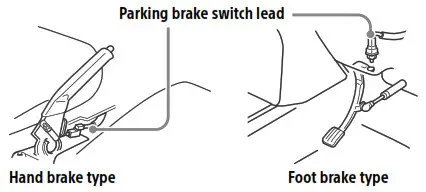 *10 Use speakers with 50W RMS or higher power input capacity. Using Sony XB series full range speakers is recommended.
*11 When the amperage rating of the fuse used on your car is 10 A, make the power connection to the battery directly to avoid short circuits.
*12 When using the steering wheel remote control, use the connection cable RC-SR1 as necessary.
*13 Use the USB extension cable or a commercially available one.
*14 Use the cable tie or a commercially available one.
Making connections
- To a common ground (earth) point
First connect the black ground (earth) lead then connect the yellow and red power supply leads. - To the +12 V power terminal which is energized at all times
Be sure to first connect the black ground (earth) lead to a common ground (earth) point. - To the +12 V power terminal which is energized when the ignition switch is set to the accessory position
Be sure to first connect the black ground (earth) lead to a common ground (earth) point. - To the power antenna (aerial) control lead or the power supply lead of the antenna (aerial) booster
It is not necessary to connect this lead if there is no power antenna (aerial) or antenna (aerial) booster, or with a manually-operated telescopic antenna (aerial).
To AMP REMOTE IN of an optional power amplifier This connection is only for amplifiers and a power antenna (aerial). Connecting any other system may damage the unit.
Note
It will take about 10 seconds to shut down the output of REM OUT after the unit is turned off. - To a car’s illumination signal
Be sure to first connect the black ground (earth) lead to a common ground (earth) point. - To the parking brake switch lead
The mounting position of the parking brake switch lead depends on your car. Be sure to connect the parking brake lead (light green) of the power supply leads to the parking brake switch lead.
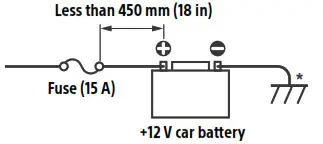
- To the +12 V power terminal of the car’s rear lamp lead (only when connecting the rear view camera)
When connecting to the battery directly
When the amperage rating of the fuse used on your car is 10 A, make the power connection to the battery directly to avoid short circuits. - to a metal point of car
- to the positive battery terminal
Notes
- Despite connecting to the power supply lead of the car, the unit may not fully provide its performance due to insufficient power. In this case, make the power connection to the battery directly.
- All power wires connected to the positive battery post should be fused within 450 mm (18 in) of the battery post, and before they pass through any metal.
- Make sure that the car’s battery wires connected to the car (ground (earth) to chassis)* are of a wire gauge at least equal to that of the main power wire connected from the battery to the head unit.
- During full-power operation, a current of more than 15 A will run through the system. Therefore, make sure that the wires to be connected to the +12 V and GND terminals of this unit are at least 14-Gauge (AWG14) or have a sectional area of more than 2 mm² (3/32 in). When making the speaker parallel connection, use wires with more than 12-Gauge (AWG12) or wire that have a sectional area of more than 3.5 mm² (5/32 in).
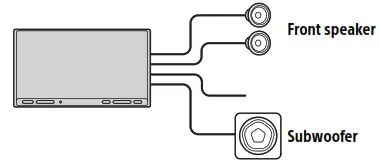
If you have any questions or problems concerning the connection, consult the dealer for details.
Memory hold connection
When the yellow power supply lead is connected, power will always be supplied to the memory circuit even when the ignition switch is turned off.
Connecting the speakers
- Before connecting the speakers, turn the unit off.
- Use speakers with a 2Ω impedance or 4Ω to 8Ω impedance, and with adequate power handling capacities to avoid damage.
Subwoofer direct connection
You can use a subwoofer without a power amplifier when it is connected to a rear speaker lead. To enable the connection, set [Subwoofer Direct] in [Advanced] to [1] to [3].
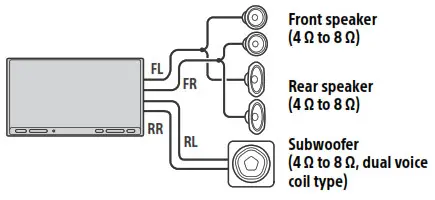
Note
Use a subwoofer with a 2 impedance or 4 to 8 impedance, and with adequate power handling capacities to avoid damage.
Speaker connection for high volume playback
For high volume playback, you can connect front speaker in parallel. For this connection:
– Set [Speaker Impedance Load] in [Advanced] to [2 Ohm].
– Connect the subwoofers to right and left rear speaker leads or use a dual voice coil subwoofer with 4Ω to 8Ω impedance.
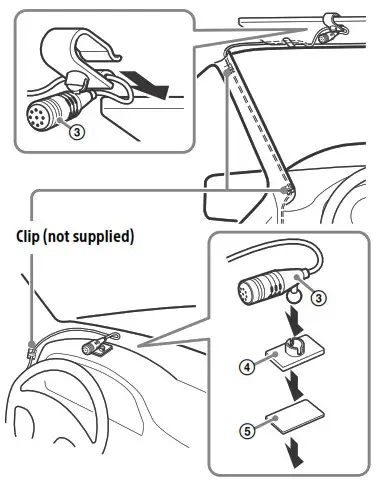
Notes
- When using a subwoofer with dual voice coil, or using subwoofer(s) by connecting to the right and left rear speaker leads, be sure to set [Speaker Impedance Load] in [Advanced] to [2 Ohm].
- To exert the speaker’s potential, make the power connection to the battery directly (page 13).
Installing the microphone
To capture your voice during handsfree calling, you need to install the microphone 3.

Cautions
- It is extremely dangerous if the cord becomes wound around the steering column or gearstick. Be sure to keep it and other parts from interfering with your driving operations.
- If airbags or any other shock-absorbing equipment are in your car, contact the store where you purchased this unit or the car dealer before installation.
Notes
- When mounting on the dashboard, remove the visor clip carefully from the microphone
3, then attach the flatmount base4to the microphone3. - Before attaching the double-sided tape
5, clean the surface of the dashboard with a dry cloth.
Using the wired remote control
When using the steering wheel remote control
Installation of the connection cable RC-SR1 8 is required before use.
- To enable the steering wheel remote control, select [General] → [Steering Control] → [Custom] →
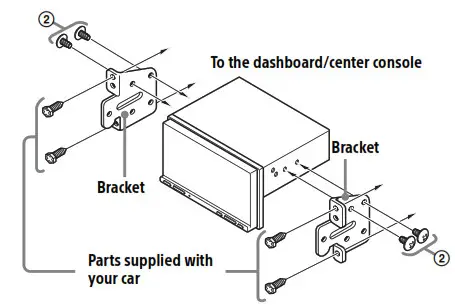 to make the registration.
When the registration is complete, the steering wheel remote control becomes available.
Notes on installing the connection cable RC-SR1 8
- Refer to the support site on the back cover for details then connect each lead properly to the appropriate leads. Making an improper connection may damage the unit.
- Consulting the dealer or an experienced technician for help is recommended.
When using the wired remote control
- To enable the wired remote control, set [Steering Control] in [General] to [Preset].
Using the rear view camera
Installation of the rear view camera (not supplied) is required before use.
The picture from a rear view camera connected to the CAMERA IN terminal is displayed when:
– the back lamp of your car lights up (or the shift lever is set to the R (reverse) position).
– you press HOME, then touch [Rear Camera].
Installation
Mounting the unit in a Japanese car
You may not be able to install this unit in some Japanese cars. In such a case, consult your Sony dealer.
CAUTION
Do not touch the left side of the unit when removing from the dashboard. The heatsink on the left side of the unit remains hot right after use.
When mounting this unit to the preinstalled brackets of your car, use the mounting screws 2 in the appropriate screw holes based on your car: T for TOYOTA and N for NISSAN.
 Note
Note
To prevent a malfunction, install only with the mounting screws 2.
Support site
If you have any questions or for the latest support information on this product, please visit the web site below:
https://www.sony.com/am/support
If you have any questions/problems regarding this product, try the following:
- Read Troubleshooting in Help Guide (online manual).
- Please contact (U.S.A. only); Call 1-800-222-7669 URL https://www.SONY.com
Help Guide (online manual)
For more details, please visit the following web site and refer to your unit name as shown below.

XAV-AX7000
https://rd1.sony.net/help/ev/xav-ax7000/h_zz/
©2019 Sony Corporation Printed in Thailand
https://www.sony.net/
Before operating the system, please read this guide thoroughly and retain it for future reference.
WARNING
To reduce the risk of fire, do not cover the ventilation opening of the appliance with newspapers, tablecloths, curtains, etc. Do not expose the appliance to naked flame sources (for example, lighted candles). Do not install the appliance in a confined space, such as a bookcase or built-in cabinet. Do not expose the batteries (battery pack or batteries installed) to excessive heat such as sunshine, fire or the like for a long time. If your skin touches this product for a long time when the power is on, it may cause a low temperature injury.
CAUTION You are cautioned that any changes or modifications not expressly approved in this manual could void your authority to operate this equipment.
 Disposal of waste batteries (applicable in the European Union and other European countries with separate collection systems)
Do not dismantle, open or shred secondary cells or batteries. In the event of a cell leaking, do not allow the liquid to come in contact with the skin or eyes. If contact has been made, wash the affected area with copious amounts of water and seek medical advice. Do not use any cell or battery which is not designed for use with the equipment. Secondary cells and batteries need to be charged before use. After extended periods of storage, it may be necessary to charge and discharge the cells or batteries several times to obtain maximum performance. Dispose of properly.
Transportation should be performed in the original packaging of the manufacturer. During transport do not drop, do not throw, not to excessive vibration. In case of malfunction couldn’t be fixed by this document please contact your nearest SONY service center.
Precautions
On safety
• The nameplate and important information concerning safety are located inside of the cap on the rear side of the system.
• About micro-USB cables
To charge, use a micro-USB cable and connect the system to:
– an AC outlet by using a commercially-available USB AC adaptor (5 V, at least 0.5 A).
– a USB port of a computer. Make sure to use the following supplied micro-USB cable.

On placement
- Do not set the system in an inclined position.
- Do not leave the system in a location near heat sources, or in a place subject to direct sunlight, excessive dust, or mechanical shock.
- Do not use or leave the system in a car.
- Do not use the system in a sauna.
About the Party Booster function
If the system hits a person or thing, it may cause an accident, injury or malfunction. When using the Party Booster function, notice the following.
- Be sure to disconnect the micro-USB cable, etc. from the system.
- Be sure to close the cap when using the system.
- When using the function, hold firmly and do not shake the system violently so that you do not throw or drop the system from your hand.
- Before using the function, make sure that you have secured sufficient space around the system.
- Do not hit the system with a tool.
- Do not use the function while you are driving or walking.
- Keep 20 cm or more away from the face and eyes while in use.
- Avoid using the function for a long time. Take breaks regularly.
- When using the function, if you get tired, feel uncomfortable or experience pain somewhere in your body, stop using the function immediately.

Others
- Do not use or leave the system in an extremely cold or hot environment (temperature outside the range of 5 °C 35 °C). If the system is used or left in outside the above range, the system may automatically stop to protect internal circuitry.
- At high temperature, the charging may stop or the volume may reduce to protect the battery.
- Even if you do not intend to use the system for a long time, charge the battery to its full capacity once every 6 months to maintain its performance.
About the Voice Guidance IMPORTANT: THE SOUND GUIDANCE IS AVAILABLE IN THIS PRODUCT ONLY IN ENGLISH
Depending on the status of the system, the voice guidance outputs from the speaker as followings.
- When setting the system to the pairing mode; “Bluetooth pairing”
- When pressing the BATT (battery) button to check the battery power during the system is turned on; “Battery fully charged/Battery about 70%/Battery about 50%/ Battery about 20%/Please charge”
- When the battery power is low; “Please charge”
- When the settings are completed for the Speaker Add function; “Double mode”
- When pressing and holding the ADD (Speaker Add) button during the Speaker Add function; “Left/Right/Double mode”
On Copyrights
- Android, Google Play and other related marks and logos are trademarks of Google LLC.
- LDAC™ and LDAC logo are trademarks of Sony Corporation.
- The BLUETOOTH® word mark and logos are registered trademarks owned by the Bluetooth SIG, Inc. and any use of such marks by Sony Corporation is under license.
- The N Mark is a trademark or registered trademark of NFC Forum, Inc. in the United States and in other countries.
- Apple, the Apple logo, iPhone and iPod are trademarks of Apple Inc., registered in the U.S. and other countries. App Store is a service mark of Apple Inc., registered in the U.S. and other countries.
- Use of the Made for Apple badge means that an accessory has been designed to connect specifically to the Apple product(s) identified in the badge, and has been certified by the developer to meet Apple performance standards. Apple is not responsible for the operation of this device or its compliance with safety and regulatory standards.
- WALKMAN and WALKMAN logo are registered trademarks of Sony Corporation.
- Other trademarks and trade names are those of their respective owners.
- ™and ® marks are omitted in the documents.
Notes on waterproof and dust proof features (Read before using the system)
Waterproof and dust proof performance of the system
The system, with the cap fastened securely, has a waterproof specification of IPX7*1 as specified in “Degree of protection against water immersion” of the IEC60529 “Ingress Protection Rating (IP Code)”*3, and a dust proof specification of IP6X*2 as specified in “Degrees of protection against solid foreign objects”*3.
Liquids that the waterproof performance specifications apply to
Applicable: fresh water, tap water, pool water, sea water
Not applicable: liquids other than the above (soapy water, water with detergent or bath agents, shampoo, hot spring water, etc.)
*1 IPX7 (Degree of protection against water immersion): For details, refer to the Help Guide.
*2 IP6X (Degrees of protection against dust): For details, refer to the Help Guide.
*3 The supplied accessory is not waterproof or dust proof.
The waterproof and dust proof performance of the system is based on our measurements under the conditions herein described. Note that malfunctions as a result of water immersion or dust intrusion caused by misuse by the customer are not covered by the warranty.
To avoid deterioration of waterproof and dust proof performance
Check the following and use the system correctly.
- The system passes the drop test from 1.22 m on plywood of 5 cm thickness conforming to MIL-STD 810 F Method 516.5-Shock. However, this does not guarantee no damage, no breakdown, or waterproof and dust proof performance in all conditions. Deformation or damage from dropping the system or subjecting it to mechanical shock may cause deterioration of the waterproof and dust proof performance.
- This unit does not have a design that is resistant to water pressure. Use of the unit in a location where high water pressure is applied, such as in the shower, may cause a malfunction.
- Do not pour high-temperature water or blow hot air from a hair dryer or any other appliance on the system directly. Also, never use the system in high temperature locations such as in saunas or near a stove.
- Handle the cap with care. The cap plays a very important role in maintenance of the waterproof and dust proof performance. When using the system, make sure that the cap is closed completely. When closing the cap, be careful not to allow foreign objects inside. If the cap is not closed completely the waterproof and dust proof performance may deteriorate and may cause a malfunction of the system as a result of water or dust particles entering the system.

How to care for the system
Although the fabric part of the system has water repellent treatment applied, you can use the system more comfortably and for a longer period of time by following the maintenance procedure below.
- If the surface of the system gets dirty in the following cases, wash the system with fresh water (tap water, etc.) promptly to remove the dirt. Leaving dirt on its surface may cause the fabric part to discolor or deteriorate, or the system to malfunction. Ex.
– When salt, sand, etc. is stuck on the system after using it on a beach, pool side, etc.
– When the system is stained with foreign substances (sunscreen, suntan oil, etc.) - If the system gets wet, wipe off the moisture using a dry soft cloth immediately. In addition, dry the system in an airy place until no moisture remains.
- The sound quality may change when water enters the speaker section of the system. It is not malfunction. Wipe off the moisture on its surface, and put the system on a dry soft cloth with the SONY logo facing down to drain the collected water inside the system. Then, dry the system in an airy place until no moisture remains.
Note
- If the surface of the system gets dirty, do not use detergent, thinner, benzine, alcohol, etc. to clean the system because it will affect the water repellent function of the fabric part of the system.
- Especially in cold regions, be sure to wipe off the moisture after using the system. Leaving moisture on its surface may cause the system to freeze and malfunction.
- If sand grains, etc. enter the fabric part of the system, remove them carefully. Never use a vacuum cleaner, etc. on the system. It may cause damage of the speaker unit.
Specifications
Speaker section
Speaker system Approx. 42 mm dia. × 2
Enclosure type Passive radiator model
BLUETOOTH
Communication System
BLUETOOTH Specification version 4.2
BLUETOOTH Specification Power Class 2
Output
Maximum communication range
Line of sight approx. 10 m*1
Frequency band 2.4 GHz band (2.4000 GHz – 2.4835 GHz)
Modulation method FHSS
Compatible BLUETOOTH Profiles*2
A2DP (Advanced Audio Distribution Profile)
AVRCP (Audio Video Remote Control Profile)
HSP (Headset Profile)
HFP (Hands-free Profile)
Supported Codec*3 SBC*4, AAC*5, LDAC*6
Transmission range (A2DP) 20 Hz – 20,000 Hz (Sampling frequency 44.1 kHz)
*1 The actual range will vary depending on factors such as obstacles between devices, magnetic fields around a microwave oven, static electricity, reception sensitivity, aerial’s performance, operating system, software application, etc.
*2 BLUETOOTH standard profiles indicate the purpose of BLUETOOTH communications between devices.
*3 Codec: Audio signal compression and conversion format
*4 Sub band Codec
*5 Advanced Audio Coding
*6 LDAC is an audio coding technology developed by Sony that enables the transmission of High-Resolution (Hi-Res) Audio content, even over a BLUETOOTH connection. Unlike other BLUETOOTH compatible coding technologies such as SBC, it operates without any down conversion of the Hi-Res Audio content
*7, and allows approximately three times more data
*8 than those other technologies to be transmitted over a BLUETOOTH wireless network with unprecedented sound quality, by means of efficient coding and optimized packetization. *7 Excluding DSD format contents. *8 In comparison with SBC (Sub band Coding) when the bitrate of 990 kbps (96/48 kHz) or 909 kbps
(88.2/44.1 kHz) is selected.
Microphone
Type Electret condenser
Directional characteristic Omni directional
Effective frequency range 100 Hz – 7,000 Hz
General
Input
AUDIO IN jack (stereo mini jack)
Power
DC 5 V (Using a commercially-available USB AC adaptor capable of feeding in 1.5 A or 500 mA) or, using built-in lithium-ion battery
Usage life of lithium-ion battery (using the BLUETOOTH connection)
Approx. 12 hours*9 *10 If the volume level of the system is set to maximum, the usage life will be approx. 3 hours.*10
Dimensions (including projecting parts and controls) Approx. 193 mm × 72 mm × 65 mm (w/h/d)
Mass Approx. 530 g including battery
Package Contents Main unit (1) Micro-USB cable (1)
*9 When a specified music source is used, the volume level of the system is set to 25, the sound mode is set to STANDARD, and the illumination is turned off.
*10 Time may vary, depending on the temperature or conditions of use.
System requirements for charging battery using USB
Using a commercially-available USB AC adaptor capable of feeding in 1.5 A or 500 mA (the charging time will be shorter with a USB AC adaptor capable of feeding in 1.5 A)
Compatible iPhone/iPod models
iPhone 8, iPhone 8 Plus, iPhone 7, iPhone 7 Plus, iPhone SE, iPhone 6s, iPhone 6s Plus, iPhone 6, iPhone 6 Plus, iPhone 5s, iPhone 5c, iPhone 5, iPhone 4s, iPod touch (6th generation), iPod touch (5th generation)
Note
Sony cannot accept responsibility in the event that data recorded to iPhone/iPod is lost or damaged when using your iPhone/iPod connected to this system.
![]()
![]()

©2018 Sony Corporation Printed in China
http://www.sony.net/


SRS-XB41
Before operating the system, please read this guide thoroughly and retain it for future reference.
To reduce the risk of fire or electric shock, do not expose the AC adaptor to rain or moisture.
- To reduce the risk of fire, do not cover the ventilation opening of the appliance with newspapers, tablecloths, curtains, etc.
- Do not expose the appliance to naked flame sources (for example, lighted candles).
- To reduce the risk of fire or electric shock, do not expose the AC adaptor to dripping or splashing, and do not place objects filled with liquids, such as vases, on the AC adaptor.
- Do not install the appliance in a confined space, such as a bookcase or built-in cabinet.
- Do not the batteries (battery pack or batteries installed) to excessive heat such as sunshine, fire or the like for a long time.
- As the main plug of the AC adaptor is used to disconnect the AC adaptor from the mains, connect it to an easily accessible AC outlet. Should you notice an abnormality in it, disconnect it from AC outlet immediately.
- The unit is not disconnected from the AC power source (mains) as long as it is connected to the wall outlet, even if the unit itself has been turned off.
- If your skin touches the AC adaptor or this product for a long time when the power is on, it may cause a low temperature injury.
Do not dismantle, open or shred secondary cells or batteries. In the event of a cell leaking, do not allow the liquid to come in contact with the skin or eyes. If contact has been made, wash the affected area with copious amounts of water and seek medical advice. Do not use any charger other than that specifically provided for use with the equipment. Do not use any cell or battery which is not designed for use with the equipment. Secondary cells and batteries need to be charged before use. Always use the correct charger and refer to the manufacturer’s instructions or equipment manual for proper charging instructions. After extended periods of storage, it may be necessary to charge and discharge the cells or batteries several times to obtain maximum performance. Dispose of properly
Disposal of waste batteries (applicable in the European Union and other European countries with separate collection systems).
Transportation should be performed in the original packaging of the manufacturer. During transport do not drop, do not throw, not to excessive vibration.
In case of malfunction couldn’t be fixed by this document – please contact your nearest SONY service center
Precautions
On safety
- The nameplate and important information concerning safety are located as follows:
- Inside of the cap on the rear side of the system
- On the surface of the AC adaptor
| Where purchased | Operating voltage |
| All countries/regions | 100 V – 240 V AC, 50 Hz/60 Hz |
Notes on the AC adaptor
- Use only the supplied AC adaptor. To avoid damaging the system, do not use any other AC adaptor.
On placement
- Do not set the system in an inclined position.
- Do not leave the system in a location near heat sources, or in a place subject to direct sunlight, excessive dust, or mechanical shock.
- Do not use or leave the system in a car.
- Do not use the system in a sauna.
About the Party Booster function
If the system hits a person or thing, it may cause an accident, injury or malfunction. When using the Party Booster function, notice the following.
- Be sure to disconnect the micro-USB cable, AC adaptor, etc. from the system.
- Be sure to close the cap when using the system.
- When using the function, hold firmly and do not shake the system violently so that you do not throw or drop the system from your hand.
- Before using the function, make sure that you have secured sufficient space around the system.
- Do not hit the system with a tool.
- Do not use the function while you are driving or walking.
- Keep 20 cm or more away from the face and eyes while in use.
- Avoid using the function for a long time. Take breaks regularly.
- When using the function, if you get tired, feel uncomfortable or experience pain somewhere in your body, stop using the function immediately.
Others
- Do not use or leave the system in an extremely cold or hot environment (temperature outside the range of 5 °C – 35 °C). If the system is used or left in outside the above range, the system may automatically stop to protect internal circuitry.
- At high temperature, the charging may stop or the volume may reduce to protect the battery.
- Even if you do not intend to use the system for a long time, charge the battery to its full capacity once every 6 months to maintain its performance.
About the Voice Guidance
IMPORTANT: THE SOUND GUIDANCE IS AVAILABLE IN THIS PRODUCT ONLY IN ENGLISH
Depending on the status of the system, the voice guidance outputs from the speaker as followings.
- When setting the system to the pairing mode; “Bluetooth pairing”
- When pressing the BATT (battery) button to check the battery power during the system is turned on; “Battery fully charged/Battery about 70%/Battery about 50%/Battery about 20%/Please charge”
- When the battery power is low; “Please charge”
- When the settings are completed for the Speaker Add function; “Double mode”
- When pressing and holding the ADD (Speaker Add) button during the Speaker Add function; “Left/Right/Double mode”
On Copyrights
- Android, Google Play and other related marks and logos are trademarks of Google LLC.
- LDAC™ and LDAC logo are trademarks of Sony Corporation.
- The BLUETOOTH® word mark and logos are registered trademarks owned by the Bluetooth SIG, Inc. and any use of such marks by Sony Corporation is under license.
- The N Mark is a trademark or registered trademark of NFC Forum, Inc. in the United States and in other countries.
- Apple, the Apple logo, iPhone and iPod are trademarks of Apple Inc., registered in the U.S. and other countries.
App Store is a service mark of Apple Inc., registered in the U.S. and other countries. - Use of the Made for Apple badge means that an accessory has been designed to connect specifically to the Apple product(s) identified in the badge, and has been certified by the developer to meet Apple performance standards. Apple is not responsible for the operation of this device or its compliance with safety and regulatory standards.
Please note that the use of this accessory with an Apple product may affect wireless performance. - WALKMAN and WALKMAN logo are registered trademarks of Sony Corporation.
- Other trademarks and trade names are those of their respective owners.
- ™ and ® marks are omitted in the documents.
Notes on waterproof and dust proof features (Read before using the system)
Waterproof and dust proof performance of the system
The system, with the cap fastened securely, has a waterproof specification of IPX7*¹ as specified in “Degree of protection against water immersion” of the IEC60529 “Ingress Protection Rating (IP Code)”*³, and a dust proof specification of IP6X*² as specified in “Degrees of protection against solid foreign objects”*³.
Liquids that the waterproof performance specifications apply to
| Applicable | fresh water, tap water, pool water, sea water |
| Not applicable | liquids other than the above (soapy water, water with detergent or bath agents, shampoo, hot spring water, etc.) |
- *¹ IPX7 (Degree of protection against water immersion): For details, refer to the Help Guide.
- *² IP6X (Degrees of protection against dust): For details, refer to the Help Guide.
- *³ The supplied accessories are not waterproof or dust proof.
The waterproof and dust proof performance of the system is based on our measurements under the conditions herein described. Note that malfunctions as a result of water immersion or dust intrusion caused by misuse by the customer are not covered by the warranty
To avoid deterioration of waterproof and dust proof performance
Check the following and use the system correctly.
- The system passes the drop test from 1.22 m on plywood of 5 cm thickness conforming to MIL-STD 810 F Method 516.5-Shock. However, this does not guarantee no damage, no breakdown, or waterproof and dust proof performance in all conditions. Deformation or damage from dropping the system or subjecting it to mechanical shock may cause deterioration of the waterproof and dust proof performance.
- This unit does not have a design that is resistant to water pressure. Use of the unit in a location where high water pressure is applied, such as in the shower, may cause a malfunction.
- Do not pour high-temperature water or blow hot air from a hair dryer or any other appliance on the system directly. Also, never use the system in high temperature locations such as in saunas or near a stove.
- Handle the cap with care. The cap plays a very important role in maintenance of the waterproof and dust proof performance. When using the system, make sure that the cap is closed completely. When closing the cap, be careful not to allow foreign objects inside. If the cap is not closed completely the waterproof and dust proof performance may deteriorate and may cause a malfunction of the system as a result of water or dust particles entering the system.
How to care for the system
Although the fabric part of the system has water repellent treatment applied, you can use the system more comfortably and for a longer period of time by following the maintenance procedure below.
- If the surface of the system gets dirty in the following cases, wash the system with fresh water (tap water, etc.) promptly to remove the dirt. Leaving dirt on its surface may cause the fabric part to discolor or deteriorate, or the system to malfunction. Ex.
- When salt, sand, etc. is stuck on the system after using it on a beach, pool side, etc.
- When the system is stained with foreign substances (sunscreen, suntan oil, etc.)
- If the system gets wet, wipe off the moisture using a dry soft cloth immediately. In addition, dry the system in an airy place until no moisture remains.
- The sound quality may change when water enters the speaker section of the system. It is not malfunction. Wipe off the moisture on its surface, and put the system on a dry soft cloth with the SONY logo facing down to drain the collected water inside the system. Then, dry the system in an airy place until no moisture remains.
Note
- If the surface of the system gets dirty, do not use detergent, thinner, benzine, alcohol, etc. to clean the system because it will affect the water repellent function of the fabric part of the system.
- Especially in cold regions, be sure to wipe off the moisture after using the system. Leaving moisture on its surface may cause the system to freeze and malfunction.
- If sand grains, etc. enter the fabric part of the system, remove them carefully. Never use a vacuum cleaner, etc. on the system. It may cause damage of the speaker unit.
Specifications
Speaker section
Speaker system: Approx. 58 mm dia. × 2
Enclosure type: Passive radiator model
BLUETOOTH
| Communication System | |
| Output |
|
| Maximum communication range | |
| Frequency band |
|
| Modulation method | FHSS |
| Compatible BLUETOOTH Profiles*2 | |
| Supported Codec*3 |
|
| Supported Codec*4 | SBC*4, AAC*5, LDAC*6 |
| Transmission range (A2DP) | 20 Hz – 20,000 Hz (Sampling frequency 44.1 kHz) |
- *1 The actual range will vary depending on factors such as obstacles between devices, magnetic fields around a microwave oven, static electricity, reception sensitivity, aerial’s performance, operating system, software application, etc.
- *2 Bluetooth standard profiles indicate the purpose of Bluetooth communications between devices.
- *3 Codec: Audio signal compression and conversion format
- *4 Subband Codec
- *5 Advanced Audio Coding
- *6 LDAC is an audio coding technology developed by Sony that enables the transmission of High-Resolution (Hi-Res) Audio content, even over a BLUETOOTH connection. Unlike other BLUETOOTH compatible coding technologies such as SBC, it operates without any downconversion of the Hi-Res Audio content*7, and allows approximately three times more data*8 than those other technologies to be transmitted over a BLUETOOTH wireless network with unprecedented sound quality, by means of efficient coding and optimized packetization.
- *7 Excluding DSD format contents.
- *8 In comparison with SBC (Subband Coding) when the bitrate of 990 kbps (96/48 kHz) or 909 kbps (88.2/44.1 kHz) is selected.
Microphone
| Type | Electret condenser |
| Directional characteristic | Omni directional |
| Effective frequency range | 100 Hz – 7,000 Hz |
General
| Input | AUDIO IN jack (stereo mini jack) |
| DC OUT | USB jack Type A (for charging the battery of a connected device) (5 V, Max. 1 A) |
| Power | DC 5 V (using the supplied AC adaptor connected to AC 100 V – 240 V, 50 Hz/60 Hz power supply) or, DC 5 V (using a commercially-available USB AC adaptor capable of feeding in 1.5 A) or, using built-in lithium-ion battery |
| Usage life of lithium-ion battery (using the BLUETOOTH connection) | |
| Approx. 24 hours*9 *10 If the volume level of the system is set to maximum, the usage life will be approx. 4 hours.*10 |
|
| Dimensions (including projecting parts and controls) | |
| Mass |
|
| Package Contents |
|
- *9 When a specified music source is used, the volume level of the system is set to 26, the sound mode is set to STANDARD, and the illumination is turned off.
- *10 Time may vary, depending on the temperature or conditions of use.
System requirements for charging battery using USB
Using a commercially-available USB AC adaptor capable of feeding in 1.5 A
Compatible iPhone/iPod models
iPhone 8, iPhone 8 Plus, iPhone 7, iPhone 7 Plus, iPhone SE, iPhone 6s, iPhone 6s Plus, iPhone 6, iPhone 6 Plus, iPhone 5s, iPhone 5c, iPhone 5, iPhone 4s, iPod touch (6th generation), iPod touch (5th generation)
Note
- Sony cannot accept responsibility in the event that data recorded to iPhone/iPod is lost or damaged when using your iPhone/iPod connected to this system.
- Design and specifications are subject to change without notice.
©2018 Sony Corporation
Printed in China
http://www.sony.net/
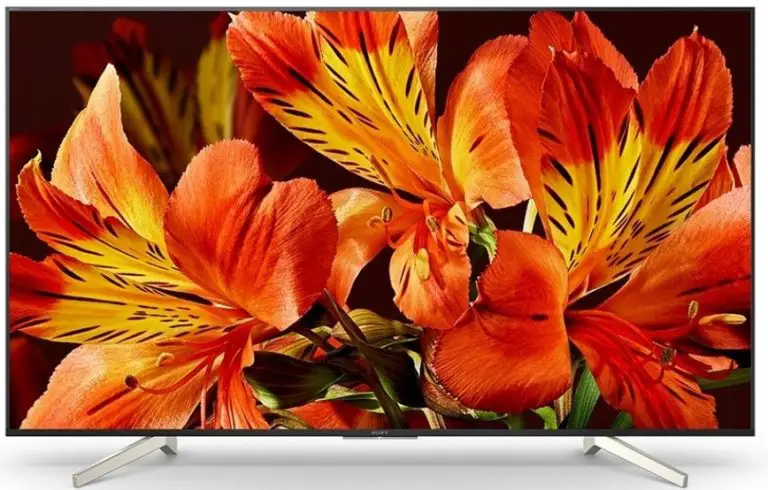
Overview
Optimised display for professional use – display a better, brighter image for your business
This slim, energy-efficient FW-75BZ35F BRAVIA professional display combines bright, beautiful 4K HDR image quality with easy operation, flexible networking/control and extensive integration options.
Ideally suited to professional use, the display takes full advantage of latest consumer television technologies to ensure vibrant, high-brightness 4K images that stand out from the crowd. It’s ideal for integration in corporate environments, with Pro mode to simplify installation and allow easy customisation of display settings to suit different applications and environments.
The display’s intuitive built-in software platform broadens control and customisation options even further. It’s easy to create attractive digital signage, mixing media files and online content with no need for additional player hardware. There’s also a wide range of APIs (Application Programming Interface) options to enable remote control/monitoring and integration with external systems. And for even greater peace of mind there’s the added reassurance of our 3 Year Advanced Exchange warranty.
If there’s a problem with your display, we’ll offer a free, brand new replacement product rather than repair included as standard.
The FW-75BZ35F is ideal for a wide range of business and educational environments.
Applications include meeting room displays, information displays for lobbies and waiting rooms, digital signage, classroom displays, hotel guest room TV, security camera monitoring, guide displays for showrooms and museums, and information displays for sports stadiums, arenas and live venues.
Features
Optimised for professional use
The display meets the needs of a wide range of business applications, with flexible installation options plus wired and wireless network connection and serial communication control.
Versatile remote control
Control BRAVIA remotely – including on/off, input signal select and adjust volume – over IP via RJ45 by web API or via RS-232C.
Flexible mounting and installation
The display offers flexible mounting options (table-top), with VESA standard mounting for easy integration into a wide range of environments.
Quick set-up with Pro Mode
Customise and store display settings and features, then copy them easily to multiple displays via USB flash memory.
Pro mode enables a detailed customisation for a variety of setting menus, which are available to meet your specific usage requirements.
One-step setting optimised for signage and meeting rooms
This tool instantly completes the necessary settings to optimise the signage or meeting room used.
In-built software platform
Powerful processing capabilities broaden control/customisation options and reduces total ownership costs.
Easily create digital signage
Integrated support for HTML5 makes it easy to produce compelling digital signage, with no extra hardware or prior training needed. Combine graphics, text, 4K video and live web content to create attractive signage in minutes.
Open API support
Compatibility with a wide range of web APIs broadens options for remote control/monitoring and integration with external systems.
4K image resolution (3840 x 2160 pixels)
4K offers four times the detail of Full HD, with a resolution of over 8 million pixels bringing extra clarity to corporate display, education and digital signage applications.
Clearer, more natural 4K images
Images are clearer, smoother and more natural with Sony’s 4K X-Reality™ PRO picture processing technology. Advanced noise reduction techniques and a special pattern database ensure that every scene is packed with lifelike detail.
Very high brightness and contrast, ideal for HDR
The high brightness, high contrast panel outshines other displays. It’s ideal for presenting 4K HDR (High Dynamic Range) content, revealing subtle detail in the
brightest highlights and areas of dark shadow.
Smooth, fluid on-screen action
Motionflow XR 960 ensures smoother, more natural reproduction of rapidly moving images on screen.
3 Year Advanced Exchange warranty
Stay up and running with our enhanced warranty. If there’s a problem with your
professional display, we’ll offer a free replacement rather than repairing your existing unit.
Greater colours with TRILUMINOS Display
Our unique TRILUMINOS Display technology enhances your audience’s viewing with a wider palette of rich, natural-looking colours.
Specifications
| General features | |
| Screen size (diagonal) | 75” |
| Brightness (cd/m²) (*1) | 620 cd/m2 |
| Native cont rast ratio | 1,400:1 |
| Dynamic cont rast rati | Over 1 million |
| Response time (ms) | 5 |
| Display resolution | 4K (3840 x 2160) |
| Compatible with HDR | Yes (HDR10, HLG) |
| Aspect ratio | 16:9 |
| Port rait compatibility | Yes |
| Display features | |
| Dimming type | Frame Dimmin |
| Display device | LCD |
| Backlight type | Edge LED |
| Operating system | Android 7.0 |
| Processor | X1 |
| Operation time (*2) | 24/7 |
| Video specs | |
| Wide Mode | Wide zoom / Normal / Full / Zoom / 14:9 |
| 4:3 Default | Yes |
| Video Proces | 4K X-Reality PRO |
| Motionflow | Motionflow XR 800Hz (Native 100Hz) |
| Triluminos | Yes |
| Viewing angle (Right / Left / Up / Down) | 178 (89 / 89 / 89 / 89) |
| Video Signal (HDMI) | 4096 x 2160p (24, 60Hz), 3840 x 2160p (24, 30,60Hz), 1080p (30, 60Hz), 1080/24p, 1080i (60Hz), 720p (30, 60Hz), 720/24p, 480p, 480i |
| 4K 60P quality format | Up to 18Gbps:4K 60p 4:4:4 (8bit), 4:2:2 (8, 10, 12bit), 4:2:0 (8, 10bit) HDR included for HDMI 1 / 2 / 3 / 4 |
| Audio specs | |
| Speaker position | Down Firing |
| Audio Power Output | 10W + 10W |
| Invisible speaker | Yes |
| Professional features | |
| Professional Hidden Mode | Yes |
| HDMI auto wake-up | Yes |
| HTML5 platform | Yes |
| Multicast / IPTV | Yes (UDP / RTP) |
| Compatible with TDM Digital Signage | Yes |
| Available storage | 16 GB |
| Compatible TDM content | Customised design, text, pictures, videos, YouTube, t raffic, weather, public information, Facebook, Twitter, poweroint and more. |
| Network specs | |
| Wi-Fi Direct | Yes |
| Wi-Fi Certified | Yes |
| DLNA | Network Client / Network Renderer |
| Firmware update | Yes (network or USB) |
| Internet Browser | Yes (Opera) |
| Wireless LAN | Integrated |
| Convenience features | |
| USB HDD REC | Yes |
| USB Play (contents) | MPEG1:MPEG1 / MPEG2PS:MPEG2 / MPEG2TS (HDV,AVCHD):MPEG2, AVC / MP4 (XAVC EG4, HEVC / AVI:Xvid, MotionJpeg / ASF (WMV):VC1 / MOV:AVC, MPEG4, MotionJpeg / MKV:Xvid, AVC, MPEG4, VP8.HEVC / WEBM:VP8 / 3GPP:MPEG4, AVC / MP3 / ASF (WMA) / WAV / MP4AAC / FLAC / JPEG |
| On screen clock | Yes |
| Sleep timer | Yes |
| On/Off timer | Yes |
| Google Cast | Yes |
| Control specs | |
| IP Cont rol | Yes |
| RS-232C Cont rol | Yes (jack 3.5) |
| HDMI CEC | Yes |
| Inputs and outputs | |
| HDCP | 2.2 (for HDMI 1 / 2 / 3 / 4) |
| Composite Video Input(s) | 1 (Rear Hybrid w/Component) |
| Component Video (Y/Pb/Pr) Input(s) | 1 (Rear Hybrid w/Composite) |
| HDMI™ Connection(s) (Total) | 4 (3 Side / 1 Rear) |
| Analog Audio Input(s) for HDMI (Total) | 1 (Rear) |
| Digital Audio Output(s) | 1 (Rear) |
| Audio Out | 1 (Side/Hybrid w/HP and Subwoofer Out) |
| USB | 3 (side) |
| Ethernet Connection(s) | 1 (side) |
| Design features | |
| Finish (Surface Color) | Black |
| Table Top Stand | Separate (assembly required) |
| VESA® Hole Spacing Compatible | Yes (40.0 x 30.0 cm) |
| Environment specs | |
| Light Sensor | Yes |
| Energy Label | A+ |
| Screen size (measured diagonally) | 75″ |
| Power Consumption (in Standby) | 0.50W |
| Power Consumption (in Operation) | 149W |
| Lead content | Yes |
| Mercury content (mg) | 0.0 |
| Dynamic Backlight Cont rol | Yes |
| Power Saving Mode / Back Light Off Mode | Yes |
| AC Power Input | 1 (Rear) |
| Measurement | |
| Display Only (W x H x D) | 167.3 x 96.3 x 5.4 (1.68) cm |
| Display with Stand (W x H x D) | 167.3 x 103.1 x 37.1 cm |
| Package Carton (W x H x D) | 188.4 x 108.3 x 18.8 cm |
| Weight | |
| Display Only | 38.9 Kg |
| Display with Stand | 40.1 Kg |
| Package Carton | 53 Kg |
| Optional accessories | |
| TDM Digital Signage 1-year license | TDM-DS1Y |
| TDM Digital Signage 3-years license | TDM-DS3Y |
| TEOS Manage Control license | TEM-CO10 |
| TEOS Manage Meeting Room license | TEM-MR10 |
| EOS Manage Signage license | TEM-DS10 |
| TEOS Connect Mirroring license | TEC-SC100 |
| 10 point IR touch overlay | TO-1375-IR10 |
| 10 point Capacitive touch overlay | TO-1375-CA10 |
| White cover | FC-1375/WO |
| Wood cover | FC-1375/WO |
| Wallmount bracket | SU-WL450/PSE (optional) |
| VGA to HDMI cable | CAB-VGAHDMI1 |
| RS232 jack cable | CAB-RSJA1 |
| Service and Warranty | |
| Standard Warranty | 3 Years with Advanced Exchange |
| Notes | |
| (*1) | Typical value of the panel spec. |
| (*2) | Guaranteed operating temperature range 0°C~35°C
Please set the picture mode to “Standard” Image retention will occur if still picture is left displaying Decreasing brightness associated with the use time is typical |
Gallery
DAB/DAB+/
FM/AM/LW
Bluetooth® Car Audio
Instruction Manual

Warning
For safety, be sure to install this unit on the dashboard of the car as the rear side of the unit becomes hot during use. For details, see “Connection/Installation” (page 10).
Made in Thailand
The nameplate indicating operating voltage, etc., is located on the bottom of the chassis.
The validity of the CE marking is restricted to only those countries where it is legally enforced, mainly in the countries EEA (European Economic Area) and Switzerland. The validity of the UKCA marking is restricted to only those countries where it is legally enforced, mainly in the UK.
Notice for customers: the following information is only applicable to equipment sold in countries applying EU directives and/or the UK applying relevant statutory requirements
This product has been manufactured by or on behalf of Sony Corporation. EU Importer: Sony Europe B.V.
Inquiries to the EU Importer or related to product compliance in Europe should be sent to the manufacturer’s authorized representative, Sony Belgium, bijkantoor
van Sony Europe B.V., Da Vincilaan 7-D1, 1930 Zaventem, Belgium.

Hereby, Sony Corporation declares that this equipment is in compliance with Directive 2014/53/EU.
The full text of the EU declaration of conformity is available at the following internet address:
https://compliance.sony.eu
Hereby, Sony Corporation declares that this equipment is in compliance with the UK’s relevant statutory requirements.
The full text of the declaration of conformity is available at the following internet address:
https://compliance.sony.co.uk
![]() Disposal of waste batteries and electrical and electronic equipment (applicable in the European Union and other countries with separate collection systems)
Disposal of waste batteries and electrical and electronic equipment (applicable in the European Union and other countries with separate collection systems)
This symbol on the product, the battery, or on the packaging indicates that the product and the battery shall not be treated as household waste.
On certain batteries, this symbol might be used in combination with a chemical symbol. The chemical symbol for lead (Pb) is added if the battery contains more than 0.004% lead.
By ensuring that these products and batteries are disposed of correctly, you will help to prevent potential negative consequences for the environment and human health which could be caused by inappropriate waste handling. The recycling of the materials will help to conserve natural resources.
In case of products that for safety, performance, or data integrity reasons require a permanent connection with an incorporated battery, this battery should be replaced by qualified service staff only. To ensure that the battery and the electrical and electronic equipment will be treated properly, hand over these products at end-of-life to the appropriate collection point for the recycling of electrical and electronic equipment.
For all other batteries, please view the section on how to remove the battery from the product safely. Hand the battery over to the appropriate collection point for the recycling of waste batteries.
For more detailed information about recycling this product or battery, please contact your local Civic Office, your household waste disposal service or the shop where you purchased the product or battery.
Warning if your car’s ignition has no ACC position
Be sure to set the AUTO OFF function. The unit will shut off completely and automatically at the set time after the unit is turned off and the clock is displayed (i.e. press and hold OFF for 1 second), which prevents battery drain. If you do not set the AUTO OFF function, press and hold OFF until the display disappears each time you turn the ignition off.
Disclaimer regarding services offered by third parties
Services offered by third parties may be changed, suspended, or terminated without prior notice. Sony does not bear any responsibility in these sorts of situations.
Important notice
Caution
IN NO EVENT SHALL SONY BE LIABLE FOR ANY INCIDENTAL, INDIRECT, OR CONSEQUENTIAL DAMAGES OR OTHER DAMAGES INCLUDING, WITHOUT LIMITATION, LOSS OF PROFITS, LOSS OF REVENUE, LOSS OF DATA, LOSS OF USE OF THE PRODUCT OR ANY ASSOCIATED EQUIPMENT, DOWNTIME, AND PURCHASER’S TIME RELATED TO OR ARISING OUT OF THE USE OF THIS PRODUCT, ITS HARDWARE AND/OR ITS SOFTWARE.
Dear customer, this product includes a radio transmitter.
According to UNECE Regulation no. 10, vehicle manufacturers may impose specific conditions for the installation of radio transmitters into vehicles.
Please check your vehicle operation manual or contact the manufacturer of your vehicle or your vehicle dealer, before you install this product into your vehicle.
Emergency calls
This BLUETOOTH car is handsfree and the electronic device connected to the handsfree operates using radio signals, cellular, and landline networks as well as user-programmed function, which cannot guarantee connection under all conditions. Therefore do not rely solely upon any electronic device for essential communications (such as medical emergencies).
On BLUETOOTH communication
- Microwaves emitting from a BLUETOOTH device may affect the operation of electronic medical devices. Turn off this unit and other BLUETOOTH devices in the following locations, as it may cause an accident.
– where inflammable gas is present, in a hospital, train, airplane, or petrol station
– near automatic doors or a fire alarm - This unit supports security capabilities that comply with the BLUETOOTH standard to provide a secure connection when the BLUETOOTH wireless technology is used,
but security may not be enough depending on the setting. Be careful when communicating using BLUETOOTH wireless technology. - We do not take any responsibility for the leakage of information during BLUETOOTH communication.
If you have any questions or problems concerning your unit that are not covered in this manual, consult your nearest Sony dealer.
Guide to Parts and Controls
Main Unit

- PTY (program type)
During FM reception:
Selects PTY in RDS.
During DAB reception:
Press twice within 2 seconds to select PTY.
Press and hold for more than 2 seconds to perform an autotune to update the station list.
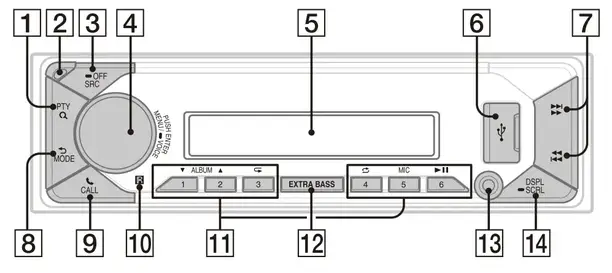 (browse)
During playback:
Enters the browse mode.
(Not available when a USB device in Android™ mode or iPod is connected.)
During DAB reception:
Enters the browse mode. - Front panel release button
- SRC (source)
Turns on the power.
Changes the source.
 OFF
OFF
Press and hold for 1 second to turn the source off and display the clock.
Press and hold for more than 2 seconds to turn off the power and the display. - Control dial
Adjusts the volume.
PUSH ENTER
Enters the selected item.
Press SRC, rotate then press to change the source (timeout in 2 seconds).
MENU
Opens the setup menu.
 VOICE
VOICE
Press and hold for more than 2 seconds to activate voice dial, voice recognition (Android smartphone only), or the Siri function (iPhone only). - Display window
- USB port
 (SEEK –/+)
During radio reception:
Tunes in radio stations automatically.
Press and hold to tune manually.
During DAB reception:
Selects a station.
Press and hold to search for a station group. (Available only when [SEEK BY] is set to [STATION GP].)
 (prev/next) (fast-reverse/fast-forward)
 (back)
Returns to the previous display.
MODE
Selects the radio bands or function modes. CALL
CALL
Enters the call menu.
Receives/ends a call.
Press and hold for more than 2 seconds to switch the BLUETOOTH signal.- Receptor for the remote command
- Number buttons (1 to 6)
Receives preset radio stations.
Press and hold to preset stations.
During DAB reception:
Receives preset DAB stations or radio stations.
Press and hold to preset DAB stations radio stations.
ALBUM
Skips an album for an audio device.
Press and hold to skip albums continuously.
(Not available when a USB device in Android mode or iPod is connected.)
 (repeat)
(Not available when a USB device in Android mode is connected.)
 (shuffle)
(Not available when a USB device in Android mode is connected.)
MIC
 (play/pause)
 - EXTRA BASS
Reinforces bass sound in synchronization with the volume level. Press to change the EXTRA BASS setting: [1], [2], [OFF]. - AUX input jack
- DSPL (display)
Changes display items.
 SCRL (scroll)
Press and hold to scroll a display item.
Basic Operations
Detaching the Front Panel
You can detach the front panel of this unit to prevent theft.
1 Press and hold OFF 1 until the unit turns off, press the front panel release button 2, then pull the panel towards you to remove.

Caution alarm
If you turn the ignition switch to the OFF position without detaching the front panel, the caution alarm will sound for a few seconds. The alarm will only sound if the built-in amplifier is used.
To deactivate the caution alarm
Press MENU, then rotate and press the control dial to select [GENERAL]  [SET CAUTALM] [SET C.ALM-OFF].
Attaching the front panel
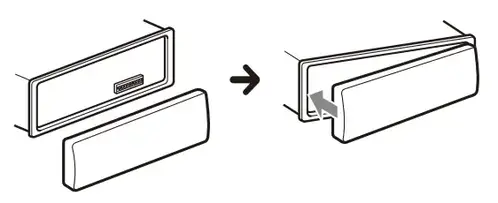
Pairing with a BLUETOOTH Device
When connecting a BLUETOOTH device for the first time, mutual registration (called “pairing”) is required. Pairing enables this unit and other devices to recognize each other. This unit can connect two BLUETOOTH devices (two mobile phones, or a mobile phone and an audio device).
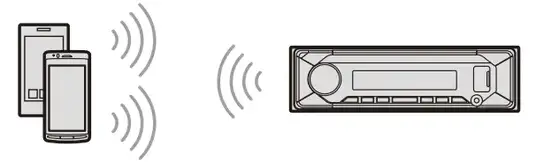
- Press MENU, then rotate and press the control dial to select [BLUETOOTH] [SET PAIRING] [SET DEVICE 1]/[SET DEVICE 2]*.
 flashes while the unit is in pairing standby mode.
* [SET DEVICE 1] or [SET DEVICE 2] will be changed to the paired device name after pairing is complete. - Perform pairing on the BLUETOOTH device so it detects this unit.
- Select your model name shown in the display of the BLUETOOTH device*.
When pairing is made, stays lit.
* If passkey input is required on the BLUETOOTH device, input [0000].
Canceling the Demonstration Mode
You can cancel the demonstration display which appears when the source is off and the clock is displayed.
- Press MENU, rotate the control dial to select [GENERAL], then press it.
- Rotate the control dial to select [SET DEMO], then press it.
- Rotate the control dial to select [SET DEMO-OFF], then press it. The setting is complete.
- Press
 (back) twice.
The display returns to normal reception/ play mode.
Updating the Firmware
To update the firmware, visit the support site on the back cover, then follow the online instructions.
Notes
- Using a USB device (not supplied) is required for updating the firmware. Store the updater in the USB device, and connect the device to the USB port, then perform the update operation.
- Updating the firmware takes a few minutes to complete. During the update, do not turn the ignition to the OFF position, nor remove the USB device.
Resetting the Unit
1 Press and hold DSPL and![]() CALL for more than 2 seconds.
CALL for more than 2 seconds.
Additional Information
Precautions
- Cool off the unit beforehand if your car has been parked in direct sunlight.
- Do not leave audio devices brought inside the car, or it may cause malfunction due to high temperature in direct sunlight.
- Power antenna (aerial) extends automatically.
- Do not splash liquid onto the unit.
Playback order of audio files
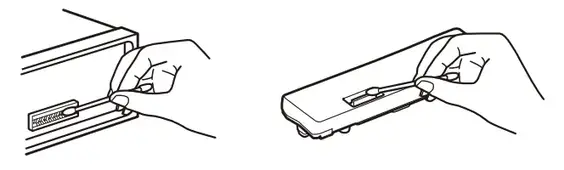
About iPod
- You can connect to the following iPod models. Update your iPod devices to the latest software before use.
Compatible iPhone/iPod models
| Compatible Model | Bluetooth® | USB |
| iPhone XR | ||
| iPhone Xs Max | ||
| iPhone Xs | ||
| iPhone X | ||
| iPhone 8 | ||
| iPhone 8 Plus | ||
| iPhone 7 | ||
| iPhone 7 Plus | ||
| iPhone SE |
| iPhone 6s | ||
| iPhone 6s Plus | ||
| iPhone 6 | ||
| iPhone 6 Plus | ||
| iPhone 5s | ||
| iPhone 5c | ||
| iPhone 5 | ||
| iPhone 4s | ||
| iPod touch (6th generation) |
||
| iPod touch (5th generation) |
||
| iPod nano (7th generation) |
- Use of the Made for Apple badge means that an accessory has been designed to connect specifically to the Apple product(s) identified in the badge, and has been certified by the developer to meet Apple performance standards. Apple is not responsible for the operation of this device or its compliance with safety and regulatory standards. Please note that the use of this accessory with an Apple product may affect wireless performance.
If you have any questions or problems concerning your unit that are not covered in this manual, consult your nearest Sony dealer.
Maintenance
Cleaning the connectors
Avoid touching the connectors directly. The unit may not function properly if the connectors between the unit and the front panel are not clean. In order to prevent this, detach the front panel (page 5) and clean the connectors with a cotton swab. Do not apply too much force. Otherwise, the connectors may be damaged.

Note
For safety, do not remove the front panel while driving.
Specifications
Tuner section
DAB/DAB+
Tuning range:
174.928 MHz – 239.200 MHz
Antenna (aerial) terminal:
External antenna (aerial) connector
FM
Tuning range:
87.5 MHz – 108.0 MHz
Usable sensitivity: 7 dBf
Signal-to-noise ratio: 73 dB
Separation: 50 dB at 1 kHz
AM/LW
Tuning range:
531 kHz – 1,602 kHz (AM),
153 kHz – 279 kHz (LW)
Sensitivity:
AM: 26 μV,
LW: 50 μV
USB Player section
Interface: USB (Full speed)
Maximum current: 1 A
Maximum number of recognizable folders
and files:
Folders (albums): 256
Files (tracks) per folder: 256
Compatible Android Open Accessory
protocol (AOA): 2.0
Corresponding codec:
MP3 (.mp3)
Bit rate: 8 kbps – 320 kbps (Supports VBR
(Variable Bit Rate))
Sampling rate: 16 kHz – 48 kHz
WMA (.wma)
Bit rate: 32 kbps – 192 kbps (Supports VBR
(Variable Bit Rate))
Sampling rate: 32 kHz, 44.1 kHz, 48 kHz
AAC (.m4a, .mp4)
Bit rate: 16 kbps – 320 kbps (stereo)
Sampling rate: 8 kHz – 48 kHz
FLAC (.flac)
Bit depth: 16 bit, 24 bit
Sampling rate: 44.1 kHz, 48 kHz
Supported file system: FAT16, FAT32
Wireless Communication
Communication System:
BLUETOOTH Standard version 3.0
Output:
BLUETOOTH Standard Power Class 2
(Max. Conducted +1 dBm)
Maximum communication range*1:
Line of sight approx. 10 m (33 ft)
Frequency band:
2.4 GHz band (2.4000 GHz – 2.4835 GHz)
Modulation method: FHSS
Compatible BLUETOOTH Profiles*2:
A2DP (Advanced Audio Distribution Profile) 1.3
AVRCP (Audio Video Remote Control Profile) 1.3
HFP (Handsfree Profile) 1.6
PBAP (Phone Book Access Profile)
SPP (Serial Port Profile)
Corresponding codec:
SBC (.sbc), AAC (.m4a)
- The actual range will vary depending on factors such as obstacles between devices, magnetic fields around a microwave oven, static electricity, reception sensitivity, antenna aerial)’s performance, operating system, software application, etc.
- BLUETOOTH standard profiles indicate the purpose of BLUETOOTH communication between devices.
Power amplifier section
Output: Speaker outputs
Speaker impedance: 4 Ω – 8 Ω
Maximum power output: 55 W × 4 (at 4 Ω)
General
Power requirements: 12 V DC car battery
(negative ground (earth))
Rated current consumption: 10 A
Dimensions: Approx. 178 mm × 50 mm × 176 mm (7 1/8 in × 2 in × 7 in) (w/h/d)
Mounting dimensions: Approx. 182 mm × 53 mm × 159 mm (7 1/4 in × 2 1/8 in × 6 3/8 in) (w/h/d)
Mass: Approx. 0.8 kg (1 lb 13 oz)
Package contents: Main unit (1)
Parts for installation and connections (1 set)
Optional accessories/equipment:
Cable for steering wheel remote input: RC-SR1
Ask the dealer for detailed information.
Design and specifications are subject to change without notice.
Copyrights
The Bluetooth® word mark and logos are registered trademarks owned by the Bluetooth SIG, Inc. and any use of such marks by Sony Corporation is under license. Other trademarks and trade names are those of their respective owners.
Windows Media is either a registered trademark or trademark of Microsoft Corporation in the United States and/or other countries.
This product is protected by certain intellectual property rights of Microsoft Corporation. Use or distribution of such technology outside of this product is prohibited without a license from Microsoft or an authorized Microsoft subsidiary.
Apple, iPhone, iPod, iPod nano, iPod touch, and Siri are trademarks of Apple Inc., registered in the U.S. and other countries.
Android is a trademark of Google LLC.
Connection/Installation
Cautions
- Run all ground (earth) leads to a common ground (earth) point.
- Do not get the leads trapped under a screw, or caught in moving parts (e.g., seat railing).
- Before making connections, turn the car ignition off to avoid short circuits.
- Connect the power supply leads 6 to the unit and speakers before connecting it to the auxiliary power connector.
- Be sure to insulate any loose unconnected leads with electrical tape for safety.
- Choose the installation location carefully so that the unit will not interfere with normal driving operations.
- Avoid installing the unit in areas subject to dust, dirt, excessive vibration, or high temperature, such as in direct sunlight or near heater ducts.
- Use only the supplied mounting hardware for a safe and secure installation.
Note on the power supply lead (yellow)
When connecting this unit in combination with other stereo components, the amperage rating of the car circuit to which the unit is connected must be higher than the sum of each component’s fuse amperage rating.
Note on installing in cars with a start-stop system
The unit may restart when starting the engine from start-stop. In this case, turn off the start-stop system of your car.
Mounting angle adjustment
Adjust the mounting angle to less than 30°.
Parts List for Installation

- This parts list does not include all the package contents.
- The mounting sleeve 1 and the trim ring 3 are attached to the unit before shipping before mounting the unit, use the release key 2 to remove the mounting sleeve 1 from the unit. For details, see “Removing the trims ring and the mounting sleeve” (page 14).
- Keep the release keys 2 for future use ashey are also necessary if you remove the unit from your car.
Connection

- Not supplied
- Speaker impedance: 4 Ω to 8 Ω × 4
- RCA pin cord (not supplied)
- Depending on the type of car, use an adaptor for wired remote control (not supplied). For details on using the wired remote control, see “Using the wired remote control” (page 13).
- Whether in use or not, route the microphone input cord such that it does not interfere with driving operations. Secure the cord with a clamp, etc., if it is installed around your feet For details on installing the microphone, see “Installing the microphone” (page 13).
- Depending on the type of car, use an adaptor (not supplied) if the antenna (aerial) connector does not fit.
- Set [SET ANT-PWR] to [ON] (default) or [OFF] depending on the type of DAB antenna (aerial). Max. supply current 0.1 A
Making connections
If you have a power antenna (aerial) without a relay box, connecting this unit with the supplied power supply leads 6 may damage the antenna (aerial).
- To the car’s speaker connector

1 Rear speaker (right) + Purple 2 – Purple/black striped 3 Front speaker (right) + Gray 4 – Gray/black striped 5 Front speaker (left) + White 6 – White/black striped 7 Rear speaker (left) + Green 8 – Green/black striped - To the car’s power connector

| 12 | continuous power supply | Yellow |
| 13 | power antenna (aerial) /power amplifier control (REM OUT) | Blue/white striped |
| 14 | switched illumination power supply | Orange/white striped |
| 15 | switched power supply | Red |
| 16 | ground (earth) | Black |
Subwoofer Easy Connection
You can use a subwoofer without a power amplifier when it is connected to a rear speaker lead.

Notes
- Preparation of the rear speaker leads is required.
- Use a subwoofer with an impedance of 4 Ω to 8 Ω, and with adequate power handling capacities to avoid damage.
Memory hold connection
When the yellow power supply lead is connected, power will always be supplied to the memory circuit even when the ignition switch is turned off.
Speaker connection
- Before connecting the speakers, turn the unit off.
- Use speakers with an impedance of 4 Ω to 8 Ω, and with adequate power handling capacities to avoid damage.
Power connection diagram
Check your car’s auxiliary power connector, and match the connections of leads correctly depending on the car.
Auxiliary power connector
 Common connection

| 12 | continuous power supply | Yellow |
| 15 | switched power supply | Red |
When the positions of the red and yellow leads are inverted

| 12 | switched power supply | Yellow |
| 15 | continuous power supply | Red |
When the car without ACC position

After matching the connections and switching power supply leads correctly, connect the unit to the car’s power supply. If you have any questions and problems connecting your unit that are not covered in this manual, consult the car dealer.
Installing the microphone
To capture your voice during handsfree calling, you need to install the microphone 7

Cautions
- It is extremely dangerous if the cord becomes wound around the steering column or gearstick. Be sure to keep it and other parts from interfering with your driving
operations. - If airbags or any other shock-absorbing equipment is in your car, contact the store where you purchased this unit, or the car dealer, before installation.
Notes
- When mounting on the dashboard, remove the visor clip carefully from the microphone 7, then attach the flat-mount base 8 to the microphone 7.
- Before attaching the double-sided tape 9 clean the surface of the dashboard with a dry cloth.
Using the wired remote control
- To enable the wired remote control, set [STR CONTROL] in [S ET STEERING] to [PRESET].
Installation
Removing the trim ring and the mounting sleeve
Before installing the unit, remove the trim ring 3 and the mounting sleeve 1 from the unit.
- Pinch both edges of the trim ring 3, then pull it out.
 Insert both release keys 2 until they click, and pull down the mounting sleeve 1, then pull up the unit to separate.

Mounting the unit to the dashboard
Before installing, make sure the catches on both sides of the mounting sleeve 1 are bent inwards 2 mm (3/32 in).
- Position the mounting sleeve 1 inside the dashboard, then bend the claws outward for a tight fit.
 Mount the unit onto the mounting sleeve 1, then attach the trim ring 3.

Notes
- If the catches are straight or bent outwards, the unit will not be installed securely and may spring out.
- Make sure the 4 catches on the trim ring 3 are properly engaged in the slots of the unit.
Detaching and attaching the front panel
For details, see “Detaching the Front Panel” (page 5).
Resetting the unit
For details, see “Resetting the Unit” (page 6).
Fuse replacement
When replacing the fuse, be sure to use one matching the amperage rating stated on the original fuse. If the fuse blows, check the power connection and replace the fuse. If the fuse blows again after replacement, there may be an internal malfunction. In such a case, consult your nearest Sony dealer. Hereby, Sony Corporation declares that this equipment is in compliance with Directive 2014/ 53/EU. The full text of the EU declaration of conformity is available at the following internet address:
https://compliance.sony.eu
Support site
If you have any questions or for the latest support information on this product, please visit the website below:
https://www.sony.eu/support
Register your product online now at:
https://www.sony.eu/mysony
Help Guide (online manual)
For more details, please visit the following website and refer to your unit name as shown below.

DSX-B41D
https://rd1.sony.net/help/ev/dsx-b41d/h_zz/


 ©2019 Sony Corporation
Printed in Thailand
https://www.sony.net/
5-013-892-41(1)
Wireless Noise Cancelling Stereo Headset
Reference Guide

https://rd1.sony.net/help/mdr/whch710n/h_zz/

©2020 Sony Corporation
Printed in Vietnam
https://www.sony.net/
WH-CH710N
![]()
![]()
![]()
[A]

[B]
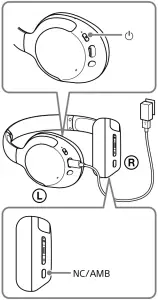
[C]
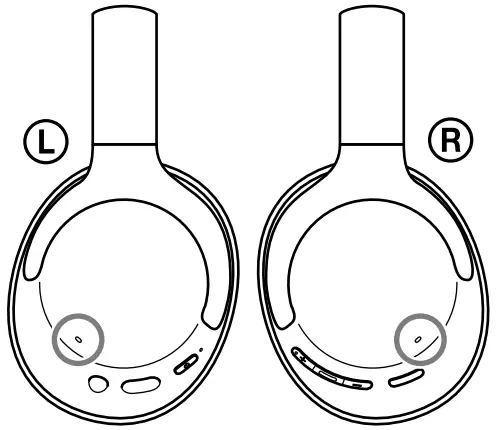
[D]
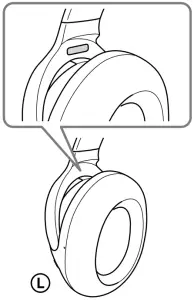
________________________________
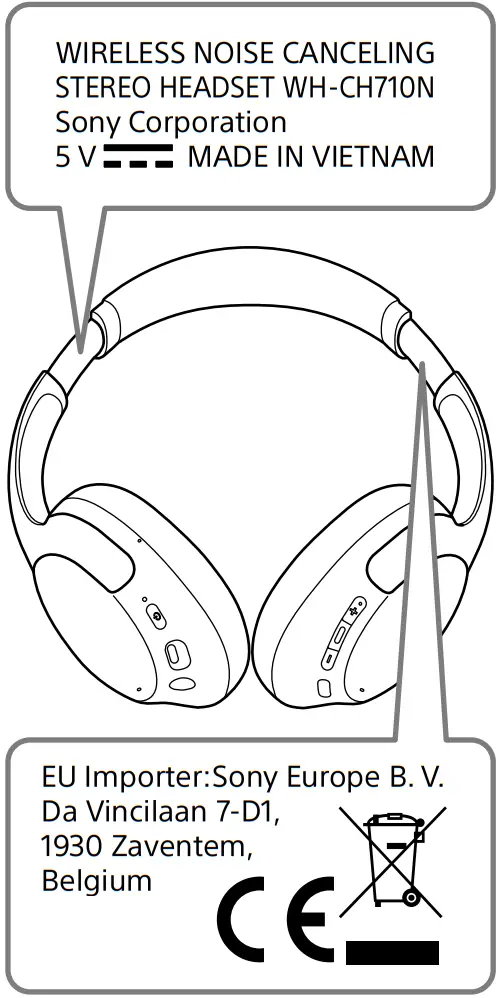
Wireless Noise Cancelling Stereo Headset
Do not install the appliance in a confined space, such as a bookcase or built-in cabinet.
Do not expose the batteries (battery pack or batteries installed) to excessive heat such as sunshine, fire or the like for a long time.
Do not subject the batteries to extreme low temperature conditions that may result in overheating and thermal runaway.
Do not dismantle, open or shred secondary cells or batteries.
Do not expose cells or batteries to heat or fire. Avoid storage in direct sunlight. In the event of a cell leaking, do not allow the liquid to come in contact with the skin or eyes. If contact has been made, wash the affected area with copious amounts of water and seek medical advice.
Secondary cells and batteries need to be charged before use. Always refer to the manufacturer’s instructions or equipment manual for proper charging instructions.
After extended periods of storage, it may be necessary to charge and discharge the cells or batteries several times to obtain maximum performance. Dispose of properly.
This equipment has been tested and found to comply with the limits set out in the EMC regulation using a connection cable shorter than 3 meters.
Only the supplied headphone cables can be used with these headphones.
Notice for customers: the following information is only applicable to equipment sold in countries applying EU directives
This product has been manufactured by or on behalf of Sony Corporation. EU Importer: Sony Europe B.V. Inquiries to the EU Importer or related to product compliance in Europe should be sent to the manufacturer’s authorized representative, Sony Belgium, bijkantoor van Sony Europe B.V., Da Vincilaan 7-D1, 1930 Zaventem, Belgium.
Hereby, Sony Corporation declares that this equipment is in compliance with Directive 2014/53/EU.
The full text of the EU declaration of conformity is available at the following internet address: http://www.compliance.sony.de/


Disposal of waste batteries and electrical and electronic equipment (applicable in the European Union and other countries with separate collection systems)
This symbol on the product, the battery or on the packaging indicates that the product and the battery shall not be treated as household waste. On certain batteries this symbol might be used in combination with a chemical symbol. The chemical symbol for lead (Pb) is added if the battery contains more than 0.004% lead. By ensuring that these products and batteries are disposed of correctly, you will help to prevent potentially negative consequences for the environment and human health which could be caused by inappropriate waste handling. The recycling of the materials will help to conserve natural resources. In case of products that for safety, performance or data integrity reasons require a permanent connection with an incorporated battery, this battery should be replaced by qualified service staff only. To ensure that the battery and the electrical and electronic equipment will be treated properly, hand over these products at end-of-life to the appropriate collection point for the recycling of electrical and electronic equipment. For all other batteries, please view the section on how to remove the battery from the product safely. Hand the battery over to the appropriate collection point for the recycling of waste batteries. For more detailed information about recycling of this product or battery, please contact your local Civic Office, your household waste disposal service or the shop where you purchased the product or battery.
The validity of the CE marking is restricted to only those countries where it is legally enforced, mainly in the countries EEA (European Economic Area) and Switzerland.
High volume may affect your hearing.
Do not use the unit while walking, driving or cycling. Doing so may cause traffic accidents.
Do not use at a dangerous place unless the surrounding sound can be heard.
The unit is not waterproof. If water or foreign objects enter the unit, it may result in fire or electric shock. If water or a foreign object enters the unit, stop use immediately and consult your nearest Sony dealer. In particular, be careful in the following cases.
– When using the unit around a sink, etc. Be careful that the unit does not fall into a sink or container filled with water.
– When using the unit in the rain or snow, or in humid locations
– When using the unit while you are sweaty
If you touch the unit with wet hands, or put the unit in the pocket of a damp article of clothing, the unit may get wet.
For details on the effect of contact to the human body from the mobile phone or other wireless devices connected to the unit, refer to the instruction manual of the wireless device.
Never insert the USB plug when the main unit or charging cable is wet. If the USB plug is inserted while the main unit or charging cable is wet, a short circuit may occur due to the liquid (tap water, seawater, soft drink, etc.) attached to the main unit or charging cable or due to foreign matter, and cause abnormal heat generation or malfunction.
This product (including accessories) has magnet(s) which may interfere with pacemakers, programmable shunt valves for hydrocephalus treatment, or other medical devices. Do not place this product close to persons who use such medical devices. Consult your doctor before using this product if you use any such medical device.
Note on static electricity
Static electricity accumulated in the body may cause mild tingling in your ears. To reduce the effect, wear clothes made from natural materials, which suppress the generation of static electricity.
Precautions
On BLUETOOTH® communications
- Bluetooth wireless technology operates within a range of about 10 m. The maximum communication distance may vary depending on the presence of obstacles (people, metal objects, walls, etc.) or the electromagnetic environment.
- Bluetooth communications may not be possible, or noise or audio dropout may occur under the following conditions:
– When there is a person between the unit and the Bluetooth device. This situation may be improved by positioning the Bluetooth device so that it faces the aerial of the unit.
– When there is an obstacle, such as a metal object or a wall, between the unit and the Bluetooth device.
– When a Wi-Fi device or microwave oven is in use, or microwaves are emitted near the unit.
– Compared to use indoors, use outdoors is subjected little to signal reflection from walls, floors, and ceilings, which results in audio dropout occurring more frequently than use indoors.
– The aerial is built into the unit as indicated by the dotted line in the illustration (Fig. [A]). The sensitivity of the Bluetooth communications can be improved by removing any obstacles between the connected Bluetooth device and the aerial of this unit. - Bluetooth and Wi-Fi (IEEE802.11b/g/n) devices use the same frequency (2.4 GHz). When using the unit near a Wi-Fi device, electromagnetic interference may occur, resulting in noise, audio dropout, or the inability to connect. If this happens, try performing the following remedies:
– Establish a connection between the unit and the Bluetooth device when they are at least 10 m away from the Wi-Fi device.
– Turn off the Wi-Fi device when using the unit within 10 m of the Wi-Fi device.
– Position the unit and the Bluetooth device as near as possible to each other. - Microwaves emitting from a Bluetooth device may affect the operation of electronic medical devices. Turn off this unit and other Bluetooth devices in the following locations, as it may cause an accident:
– in hospitals, near priority seating in trains, locations where inflammable gas is present, near automatic doors, or near fire alarms. - The audio playback on this unit may be delayed from that on the transmitting device, due to the characteristics of Bluetooth wireless technology. As a result, the sound may not be in sync with the image when viewing movies or playing games.
- This product emits radio waves when used in wireless mode. When used in wireless mode on an airplane, follow flight crew directions regarding permissible use of products in wireless mode.
- The unit supports security functions that comply with the Bluetooth standard as a means of ensuring security during communication using Bluetooth wireless technology.
However, depending on the configured settings and other factors, this security may not be sufficient. Be careful when communicating using Bluetooth wireless technology. - Sony shall assume no responsibility for any damages or loss resulting from information leaks that occur when using Bluetooth communications.
- Connection with all Bluetooth devices cannot be guaranteed.
– Bluetooth devices connected with the unit must comply with the Bluetooth standard prescribed by Bluetooth SIG, Inc., and must be certified as compliant.
– Even when a connected device complies with the Bluetooth standard, there may be cases where the characteristics or specifications of the Bluetooth device make it unable to connect, or result in different control methods, display, or operation.
– When using the unit to perform hands-free talking on the phone, noise may occur depending on the connected device or the communication environment. - Depending on the device to be connected, it may require some time to start communications.
If sound skips frequently during playback
- The situation may be improved by changing the wireless playback quality settings or fixing the wireless playback mode to SBC on the transmitting device. For details, refer to the operating instructions supplied with the transmitting device.
- When listening to music from a smartphone, the situation may be improved by closing unnecessary apps or restarting the smartphone.
On the use of calling apps for smartphones and computers
- This unit supports normal incoming calls only. Calling apps for smartphones and computers are not supported.
On charging the unit
- This unit can be charged using USB only. A computer with a USB port or a USB AC adaptor is required for charging.
- Be sure to use the supplied USB Type-C cable.
- When charging, the unit cannot be turned on and the Bluetooth and noise cancelling functions cannot be used.
- If the unit is not used for a long time, the rechargeable battery may become depleted quickly. The battery will be able to hold a proper charge after it is discharged and recharged several times. When storing the unit for a long time, charge the battery once every six months to prevent over-discharge.
- If the rechargeable battery becomes depleted extremely quickly, it should be replaced with a new one. Please contact your nearest Sony dealer for a battery replacement.
If the unit does not operate properly
- Follow the procedure below to reset the unit (Fig. [B]).
Press the and NC/AMB buttons simultaneously while the unit is charging. The unit is reset. When the unit is reset, the pairing information in the unit is not deleted.
 - If the problem persists even after the unit is reset, perform the procedure below to initialize the unit.
Disconnect the USB Type-C cable and turn off the unit. Press and hold the and
and  buttons simultaneously for at least 7 seconds. The indicator (blue) flashes 4 times, the unit is initialized, and the unit is reset to the factory settings. When the unit is initialized, all pairing information is deleted.
 - After the unit is initialized, it may not connect to your iPhone or computer. If this happens, delete the pairing information of the unit from the iPhone or computer, and then pair them again.
On the noise cancelling function
- The noise cancelling function senses external ambient noise (such as the noise inside a vehicle or the sound of air conditioning inside a room) with built-in microphones, and produces an equal-but-opposite sound that cancels out the ambient noise.
– The noise cancelling effect may not be pronounced in a very quiet environment, or some noise may be heard.
– The noise cancelling function works for noise in the low frequency band primarily. Although noise is reduced, it is not cancelled completely.
– When you use the unit in a train or a car, noise may occur depending on street conditions.
– Mobile phones may cause interference and noise. Should this occur, locate the unit further away from the mobile phone.
– Depending on how you wear the unit, the noise cancelling effect may vary or a beeping sound (howling) may occur. If this happens, take off the unit and put it back on again.
– Do not cover the microphones of the unit with your hands or other objects. Doing so may prevent the noise cancelling function or the Ambient Sound Mode from working properly, or may cause a beeping sound (howling) to occur. If this happens, take your hands or other object off of the microphones of the unit (Fig. [C]).
Notes on wearing the unit
- Because the headphones achieve a tight seal over the ears, forcibly pressing them against your ears or quickly pulling them off can result in eardrum damage. When wearing the headphones, the speaker diaphragm may produce a click sound. This is not a malfunction.
Other notes
- Do not subject the unit to excessive shock.
- When you use the unit as wired headphones, use the supplied headphone cable only. Make sure that the headphone cable is firmly inserted.
- The Bluetooth function may not work with a mobile phone, depending on the signal conditions and the surrounding environment.
- Do not apply weight or pressure to the unit for long periods, including when it is stored, as it may cause deformation.
- If you experience discomfort while using the unit, stop using it immediately.
- The earpads may be damaged or deteriorate with long-term use and storage.
Cleaning the unit
- When the outside of the unit is dirty, clean it by wiping with a soft dry cloth. If the unit is particularly dirty, soak a cloth in a dilute solution of neutral detergent, and wring it well before wiping. Do not use solvents such as thinner, benzene, or alcohol, as they may damage the surface.
- If you have any questions or problems concerning this unit that are not covered in this manual, please consult your nearest Sony dealer.
Replacement parts: earpads Please consult your nearest Sony dealer for information about replacement parts.
Location of the serial number label
See Fig. [D]
Specifications
Headset
Power source:
DC 3.7 V: Built-in lithium-ion rechargeable battery
DC 5 V: When charged using USB
Operating temperature:
0 °C to 40 °C
Rated power consumption:
2.0 W
Usage hours:
When connecting via the Bluetooth device
Music playback time:
Max. 35 hours (NC ON),
Max. 40 hours (Ambient Sound Mode), Max. 45 hours (NC OFF)
Communication time:
Max. 35 hours (NC ON),
Max. 35 hours (Ambient Sound Mode), Max. 40 hours (NC OFF)
Standby time: Max. 35 hours
(NC ON), Max. 40 hours
(Ambient Sound Mode),
Max. 200 hours (NC OFF)
When connecting via the headphone cable with NC ON:
Max. 50 hours
Note: Usage hours may be shorter depending on the Codec and the conditions of use.
Charging time:
Approx. 7 hours
(About 60 minutes of music playback is possible after 10 minutes charging.)
Note: Charging and usage hours may be different depending on the conditions of use.
Charging temperature:
5 °C to 35 °C
Mass:
Approx. 223 g
Impedance:
72 Ω (1 kHz) (when connecting via the headphone cable with the unit turned on)
33 Ω (1 kHz) (when connecting via the headphone cable with the unit turned off)
Sensitivity:
94 dB/mW (when connecting via the headphone cable with the unit turned on)
100 dB/mW (when connecting via the headphone cable with the unit turned off)
Frequency response:
7 Hz – 20,000 Hz (JEITA) (when connecting via the headphone cable with the unit turned on)
Included items:
Wireless Noise Cancelling Stereo Headset (1)
USB Type-C® cable (USB-A to USB-C®) (approx. 20 cm) (1)
Headphone cable (approx. 1.2 m) (1)
Communication specification
Communication system:
Bluetooth Specification version 5.0
Output:
Bluetooth Specification Power Class 2
Maximum communication range:
Line of sight approx. 10 m¹)
Frequency band:
2.4 GHz band (2.4000 GHz – 2.4835 GHz)
Operating frequency:
Bluetooth: 2,400 MHz – 2,483.5 MHz
NFC: 13.56 MHz
Maximum output power:
Bluetooth: < 4 dBm
Compatible Bluetooth profiles²):
A2DP / AVRCP / HFP / HSP
Supported Codec³):
SBC / AAC
Transmission range (A2DP):
20 Hz – 20,000 Hz (Sampling frequency 44.1 kHz)
1) The actual range will vary depending on factors such as obstacles between devices, magnetic fields around a microwave oven, static electricity, reception sensitivity, aerial’s performance, operating system, software application, etc.
2) Bluetooth standard profiles indicate the purpose of Bluetooth communications between devices.
3) Codec: Audio signal compression and conversion format
Design and specifications are subject to change without notice.
System requirements for battery charge using USB
USB AC adaptor
A commercially available USB AC adaptor capable of supplying an output current of 0.5 A (500 mA) or more
Trademarks
- iPhone and iPod touch are trademarks of Apple Inc., registered in the U.S. and other countries.
- Android is a trademark of Google LLC.
- The Bluetooth® word mark and logos are registered trademarks owned by the Bluetooth SIG, Inc. and any use of such marks by Sony Corporation is under license.
- The N-Mark is a trademark or registered trademark of NFC Forum, Inc. in the United States and in other countries.
- USB Type-C® and USB-C® are registered trademarks of USB Implementers Forum.
- Other trademarks and trade names are those of their respective owners.
Notes on the License
This product contains software that Sony uses under a licensing agreement with the owner of its copyright. We are obligated to announce the contents of the agreement to customers under requirement by the owner of copyright for the software.
Please access the following URL and read the contents of the license. https://rd1.sony.net/help/mdr/sl/20/
Disclaimer regarding services offered by third parties
Services offered by third parties may be changed, suspended, or terminated without prior notice. Sony does not bear any responsibility in these sorts of situations.
]]>SONY HT-A9-SA-RS5 Wireless Rear Speakers

MOUNTING INSTRUCTIONS
WARNING
- Do not begin to install your Vebos product until you have sread and understood the instructions and warnings contained in this installation manual. If you have any questions regarding any of the instructions or warnings, please contact Vebos.
- This product should only be installed if you have good mechanical understanding and experience with basic building construction. Make sure you fully understand these instructions.
- Make sure that the supporting surface is in good condition and will safely support the combined load of the equipment and all attached hardware and components.
- This support is specially designed for Sony HT-A9 – SA-RS5. Do not use it for any other application.
- Always use an assistant or mechanical lifting equipment to safely lift and position equipment. • Tighten screws firmly, but do not overtighten. Over-tightening can damage the screws, greatly reducing their holding power.
- This product is intended for indoor use only. Use of this product outdoors could lead to product failure and personal injury.
Address: Vebos Hoofdstraat 61 7921AC Zuidwolde the Netherlands
[email protected]