SMARTER SC91 Time and Temperature Projection Alarm Clock
Preface
Thanks for choosing this device from SMARTER.
Before You Start Using It
- Make sure to read the instruction manual carefully. This information will help you to familiarize yourself with your new device, to learn all of its functions, and to get advice in the event of problems.
- Following the instructions will prevent damage to your device.
- We shall not be liable for any damage occurring as a result of not following these instructions.
- Please keep this instruction manual for future reference.
Attention
- Please follow the instructions for operation.
- Please use the original or manufacturer-specified attachments or accessories.
- Do not disassemble the product, so as not to cause trouble or safety hazards.
- Do not place any items on top of the product or damage the product.
- Do not place the product near a water source or in a damp place.
- Please terminate use immediately upon the damage that is caused as a result of improper use or repair by a non-factory approved technician.
- Do not place the product in direct sunlight and high-temperature places (radiator, electric heater, stove, etc.).
- Keep the product away from strong electromagnetic waves, strong static electricity, or moisture and condensation.
- Use by children below 10 years old should be supervised by an adult.
- Clean your device with a soft damp cloth. Do not use solvents or scouring agents.
Package Content
- Alarm clock (with battery)*1
- Instruction manual*1
- DC power adapter*1
- Wireless remote sensor *1
Product Specification
- Projection time and temperature onto a wall or ceiling (digital)
- Two alarms with Snooze function
- Calendar (up to the year of 2099)
- 12/24 hour format is alternative
- 7 Languages of Weekday selectable: English, German, Italian,
Function Introduction
Part A-Positive LCD
- A1: Time
- A2: Calendar
- A3: Week
- A4: Weather Forecasting
- A5: Outdoor Temperature
- A6: Outdoor Humidity
- A7: Indoor Humidity
- A8: Indoor Temperature
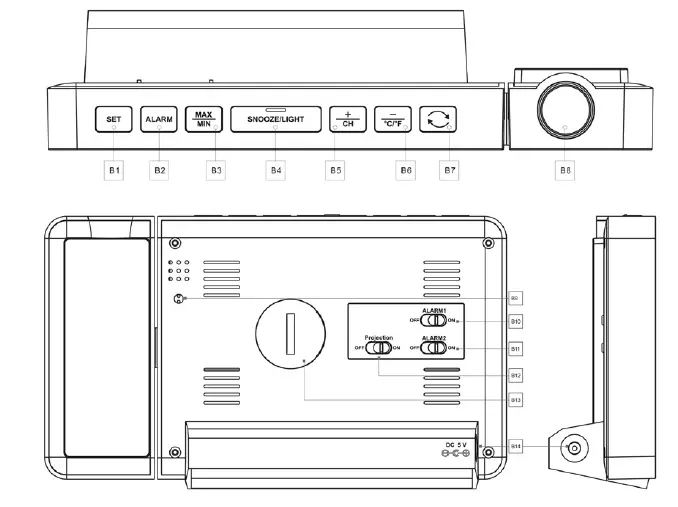
Part B – Back Button and Power
- B1: “SET” button
- B2: “ALARM” button
- B3: ” ” button
- B4: “SNOOZE/LIGHT” button
- ” button
- ” button
- ” button
- B8: Projector
- B9: Temperature sensor
- B10: Alarm1 on/off switch
- B11: Alarm2 on/off switch
- B12: Projection on/off switch
- B13: The battery compartment
- B14: Power supply socket
Part C –Wireless Remote Sensor
- C1: LCD display – Temperature C2: LCD display – Humidity
- C3: Transmit signal LED
- C4: “°C/°F” button
- C5: “TX” button
- C6: “CHANNEL 1 or 2 or 3” switch
- C7: Battery compartment
Getting Start
- Plugin the power adapter to the clock.
- When the clock is successfully connected to the power supply, all the symbols on the LCD display will light up. You will hear a “di di di” sound. The projection clock starts to detect indoor temperature and humidity.
- At the same time, unscrew the battery cover according to the OPEN direction note, take out the battery insulation sheet. Screw the battery cover back.This battery is used for keeping manual settings only, it can’t be used as a normal working power supply.
- Open the wireless remote sensor battery compartment cover, set the channel for the wireless remote sensor through the C7 position and Insert 2 x AA batteries to each wireless remote sensor. Ensure that the battery polarities [ “+” and “–”] are correct. Close the battery compartment.
- The projection clock starts to make a connection with the wireless remote, displayed by a flashing reception RF antenna symbol in the channel display area on the LCD screen. This procedure will take about 3 minutes maximum.
- After the clock receiver made a connection to the outdoor wireless remote sensor, it will enter the normal mode.
Manual Setting
- Press and hold the ” SET ” button for more than 3 seconds, 12Hr/24Hr display starts to flash. Use the ” ” and ” to set the time format to 24Hr mode or 12Hr mode.
- Press ” SET ” to confirm your setting, and the Hour display starts to flash. Use the” ” and ” ” buttons to set the correct hour.
- Press ” SET ” to confirm your setting, and the Minute displays start to flash. Use the” ” and ” ” buttons to set the correct minute.
- Press the ” SET ” button to confirm your setting, the Year display 2018 starts to flash, Use the” ” and ” ” buttons to set the correct year.
- Press the ” SET ” button to confirm your setting, the Month display starts to flash. Use the” ” and ” ” buttons to set the correct month.
- Press the ” SET ” button to confirm your setting, the Date display starts to flash. Use the” ” and ” ” buttons to set the correct date.
- Press the ” SET ” button to confirm your setting, and the Month and Date icon display starts to flash. Use ” ” and ” ” buttons to set the date display on Month/Date or Date/Month.
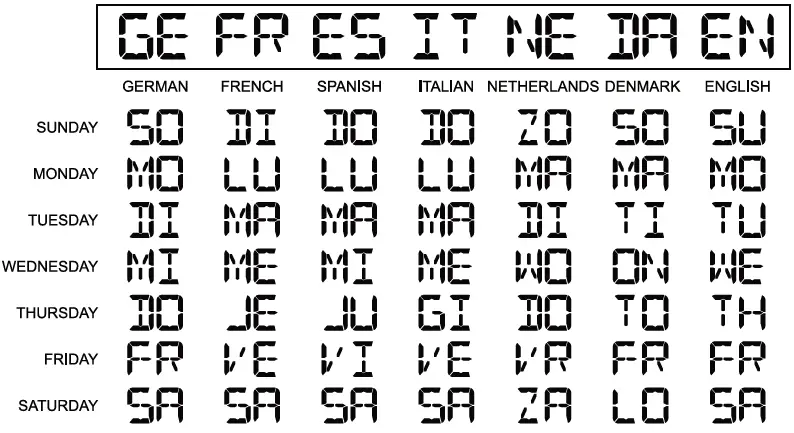
- Press the ” SET ” button to confirm your setting, the language selection for the Weekday displays starts to flash. Use ” + ” and ” ” buttons to select a language.
| Language | Sunday | Monday | Tuesday | Wednesday | Thursday | Friday | Saturday |
| German, GER | SON | MON | DIE | MIT | DON | FRE | SAM |
| English, ENG | SUN | MON | TUE | WED | THU | FRI | SAT |
| French, FRE | DIM | LUN | MAR | MER | JEU | VEN | SAM |
| Italian, ITA | DOM | LUN | MAR | MER | GIO | VEN | SAB |
| Spanish, SPA | DOM | LUN | MAR | MIE | JUE | VIE | SAB |
| Dutch, DUT | ZON | MAA | DIN | WOE | DON | VRI | ZAT |
| Danish, DAN | SON | MAN | TIR | ONS | TOR | FRE | LOR |
- Press the ” SET ” button to confirm your setting, the weather forecast pattern display starts to flash. Use the” ” and ” ” buttons to select the current weather pattern.
- Press ” SET ” to confirm your setting and to end the setting procedures, enter the clock mode.
Please take note of the following:
- The clock will automatically quit the manual setting mode to clock mode if no button is pressed within 30 seconds.
- There are 7 languages of Weekday: English, German, Italian, French, Spanish, Dutch and Danish.
Alarm Function Setting
Activate/Deactivate the Alarm Function
- When the switch of alarm 1 or alarm 2 is moved to the ” ON ” position, the symbol of ” ” or ” ” appears on the LCD display. The alarm function will be activated.
- When the switch of alarm 1 or alarm 2 is moved to the ” OFF ” position, the symbol of ” ” or ” ” disappears. The alarm function will be deactivated.
Manual Setting of the Alarm
- Press the ” ALARM ” button can switch the display ALARM1 time or ALARM2 time.
- Press and hold the ” ALARM ” button for more than 3 seconds the hour display of the Alarm 1 starts to flash. Use the ” ” and “
” buttons to set the required hour. - Press the ” ALARM ” button to confirm your setting, the Minute display of the Alarm 1 starts to flash. Use the ” ” and ” ” buttons to set the required minute.
- Press the ” ALARM ” button to confirm your setting, the Repeat icon “M-F” of the Alarm 1 starts to flash. Use the ” buttons to set the alarm repeat in ” M-F ” , ” S-S ” or ” M-F ” and ” S-S “.
- Press the ” ALARM ” button to confirm your setting, the snooze time of the Alarm 1 starts to flash. Use the ” ” and ” ” buttons to set the snooze time you need or turn off the Snooze function.
- Press the ” ALARM ” button to confirm your setting, the Hour display of the Alarm 2 starts to flash. Use the ” ” and ” ” buttons to set the required hour.
- Press the ” ALARM ” button to confirm your setting, the Minute display of the Alarm 2 starts to flash. Use the ” buttons to set the required minute.
- Press ” ALARM ” button to confirm your setting, the repeat icon ” M-F ” of the Alarm 2 starts to flash. Use the ” ” and ” ” buttons to set the alarm repeat in ” M-F ” , ” S-S ” or ” M-F ” and ” S-S “.
- Press ” ALARM ” button to confirm your setting, the snooze time of the Alarm 2 starts to flash. Use the ” ” and ” ” buttons to set the snooze time you need or turn off the Snooze function.
- Press the ” ALARM ” button to confirm your setting and to end the setting procedure.
- Alarm repeat setting.
M-F: The alarm function will be activated from Monday to Friday.- S-S: The alarm function will be activated on Saturday and Sunday.
- M-F and S-S: The alarm function will be activated throughout the week.
Please take note of the following:
- The clock will automatically switch from setting mode to normal mode if no button is pressed within 30 seconds.
- The alarm will sound for 2 minutes if you do not deactivate it by pressing any button. In this case the alarm will be repeated automatically after 24 hours.
Turn off the Alarm Tone
- The alarm tone will automatically turn off after 2 minutes or you can press any button except ” SNOOZE/LIGHT ” to turn off the alarm tone. The alarm will repeat automatically at the same time of the next day.
Snooze Function
- Under the Snooze function activated status. You can activate the Snooze function by pressing ” SNOOZE/LIGHT ” when the alarm is ringing. The symbol of ” ” or ” ” starts to flash, then the alarm will ring again after the Snooze time.
- Under the Snooze function activated status. Press any button except the ” SNOOZE/LIGHT ” button or press and hold the ” SNOOZE/LIGHT ” button for 2 seconds to exit the snooze mode.
- If one alarm is in Snooze function, the other alarm rings, it will automatically stops the Snooze function of the first alarm.
Please take note of the following:
- The alarm will keep ringing for 2 minutes if you do not deactivate it by pressing any button. In this case the alarm will automatically repeat the next day.
- The ring of the alarm changes 4 times in total during the past 2 minutes.
- The Snooze time setting range: 5 ~ 60MIN, OFF, when set to OFF, means no Snooze function.
Projection Setting
- When the projection shift switch is pushed in the ” ON ” position, the projection display will light up.
- When the projection shift switch is pushed in the ” OFF ” position, the projection display will be closed. Under this state, press the ” SNOOZE/LIGHT ” button to light up the projection for 15 seconds.
- Shot press the” ” button to adjust the projection angle by 180°.
- The suggested distance of projection is 3.3 ~ 9.8 ft (1 ~ 3 m). When there is no light at night, the clock can clearly display the time and temp on the wall or ceiling.
- The contents of the projection display are time and indoor or outdoor temperature composition. The projection will circularly display every 5 seconds for indoor/outdoor temperature.
Backlit Adjustment
- When the clock is powered by DC power adapter, the battery will automatically disconnect with the power supply, the backlit will be bright all the time.
- Press the ” SET ” button to adjust 4 backlit brightness, light-medium – low – out.
- Press ” SNOOZE/LIGHT ” button to light up backlit for 15 seconds when the backlit in out status.
Wireless Remote Sensor Pairing & Manual Setting
Wireless Remote Sensor Pairing
- Step 1:
- Connect the weather station with power supply.
- Insert 2 x AA batteries to each wireless remote sensor.
- Step 2:
- The select channel through the “1 2 3″ knobs for the wireless remote sensor. The indicator light up once to indicate the detected temperature and humidity were sent out by the wireless remote sensor.— Select a channel for the weather station that corresponds to the wireless remote sensor. Press the” ” button to select CH1, CH2, CH3 or CH1 to CH3 (every 5 seconds automatically switch a channel).
- The weather station can connect up to 3 wireless remote sensors at the same time. If multiple wireless remote sensors were used simultaneously, they can not be set as the same channel (a total of 1, 2, 3 channels can be set).
- When the weather station successfully receives signals from the wireless remote sensor, the temperature and humidity detected by the wireless remote sensor are displayed on the ” OUTDOOR REMOTE ” column of the weather station.
Manually Start the Wireless Remote Sensor Signal Reception
If “–” is displayed on the weather station, it indicates the weather station failed to receive signals from the wireless remote sensor, please take the following operations.
— Press and hold the” ” button for 3 seconds to receive signals manually. The outdoor temperature will show an animation of the RF antenna symbol, the weather station will try to receive signals from the wireless remote sensor again.
— Press the ” TX ” button on the wireless remote sensor to send out signals manually.
°C/°F Temperature Display
The temperature displayed on the wireless remote sensor is either in °C or °F. Briefly pressing the ” °C/°F ” button allows you to switch between the individual modes.
Placement of wireless sensors
- The wireless remote sensor is not waterproof.
- The sensor can be placed anywhere (indoor or outdoor) you want to measure the temperature remotely.
- If you want to measure the outdoor temperature, please place the sensor outside away from direct sunlight and rain such as under eaves or on a porch.
Please take note of the following:
- When the outdoor temperature is between –1°C ~ 2.9°C (30.2°F ~ 37.3°F), the frost alarm function will be activated and a flashing “
- ” symbol will be displayed on the weather station.
Temperature
Display and Trend of Temperature/Humidity
- The current indoor temperature/humidity and the temperature/humidity trend (indoor) are shown on the LCD display.
- After connecting with the outdoor sensor successfully, the outdoor temperature/humidity and the temperature/humidity trend (outdoor) can be shown on the LCD display.
You may see the following displays:- : The temperature/humidity is rising.
- : The temperature/humidity is falling.
- No display: The temperature/humidity is remaining constant.
°C or °F Temperature Display
The temperature displayed on the weather station is either in °C or°F. Briefly pressing the ” ” button allows you to switch between the individual modes.
Max/Min Temperature & Humidity, Dew Point Temperature and Heat Index
- To toggle indoor/outdoor sensor maximum, minimum temperature data, outdoor sensor dew point temperature date, heat index, press the ” ” button:
- Once to display the maximum temperature values of the indoor and outdoor sensors.
- Twice to display the minimum temperature values of the indoor and outdoor sensors.
- Three times to display the dew point temperature values of the outdoor sensor.
- Four times to display the heat index values of the outdoor sensor.
- Five times to return to the current temperature levels.
- To reset the maximum and minimum temperature, press and hold down the ” ” button for more than 2 seconds. This will reset all minimum and maximum data recorded to the currently displayed values.
Please take note of the following:
- If the temperature reading is below the measurement range, LL.L will be displayed.
- If the temperature reading is above the measurement range, HH.H will be displayed.
Outdoor Temperature Frost Alarm
- When the outdoor temperature is between –1°C ~ 2.9°C (30.2°F ~ 37.3°F), the frost alarm function will be activated and a flashing “
Outdoor Sensor Mold Risk
- Moldy risk total 3 levels: LO ME and HI, when the risk level is HI, please check the room or outdoor sensor and pay attention to dehumidification.
Weather Forecast
Weather Forecast Statement
- The weather station calculates weather forecast for the next 12 hours based on the barometric pressure trend.
- The weather forecast can’t be compared with the professional weather services supported by satellites and high-performance computers. It provides an approximate indication of current developments.
- Please take the weather forecast from the local weather station as authoritative.
The Symbols of Weather Forecast
- The weather station calculates the weather forecast for the next 12 hours based on the barometric pressure trend.
- The weather forecast can’t be compared with the professional weather services supported by satellites and high-performance computers. It provides an approximate indication of current developments.
- Please take the weather forecast from the local weather station as authoritative.
The Symbols of Weather Forecast
Please take note of the following:
- When the wireless sensor detects that the outdoor temperature falls below -4°C (24.8°F) in a rainy day. The weather forecast will display snowy (The default detection temperature is from CH1 to CH2, CH3).
Barometric Pressure Trend
You may see the following symbols:
- The barometric pressure will rise.
- The barometric pressure will remain constant.
- The barometric pressure will fall.
Low Battery
- If the ” INDOOR ” column displays the battery icon ” “, you need to replace the weather station’s battery as soon as possible.
- If the ” OUTDOOR REMOTE ” column displays the battery icon ” “, you need to replace the outdoor sensor battery corresponding to the currently displayed channel.
Troubleshooting
| PROBLEM | CAUSE | COUNTERMEASURE |
| No projection or backlit. | Clock did not connect with DC power adapter. | Connect the clock with DC power adapter. |
| Backlit or projection was turned off. | Press ” SET ” button to adjust the backlit brightness. | |
| Switch on the projection. | ||
| Projection not clear. | Projection distance is too close or too far. | Keep the projection distance to 3.3 ~ 9.8 ft (1 ~
3 m). |
| Press and hold ” ” button for 3 seconds to adjust the brightness of projection from low to high. |
| Projection image upside down. | Short press ” ” button to adjust the angle by 180°. | |
| Backlit is too bright or too dark. | Press ” SET ” button to adjust 4 backlit brightness, light – medium – low – out. | |
| The batteries are depleted. | Replace new batteries for outdoor sensor. | |
| Press and hold ” ” button | ||
| Can’t display the outdoor temperature. | The weather station can’t receive outdoor sensor’s signals. | for 3 seconds to receive signal manually.
Press ” TX ” button on the outdoor sensor to send out signals manually. |
| The displayed channel of the weather station | Select corresponding channel through the “1 2 3” knobs for the outdoor | |
| sensor or press ” “ | ||
| the channel of the outdoor sensor. | button to switch the weather station displayed channel. | |
| Display an | The outdoor | |
| inaccurate | sensor is exposed | Avoid the outdoor sensor |
| outdoor | to direct sunlight | with direct sunlight and rain. |
| temperature. | or rain. | |
| Fuzzy projection/ Missing pixels projection image/ Have trouble with manual setting. | Contact after-sales service. |
After-sales Support
Please contact us if your device fails to work despite these measures or if your experience with us is less than perfect in any way. Or Join our Instagram or Facebook group for more support and discount information.
Waste Disposal
- This product has been manufactured using high-grade materials and components which can be recycled and reused.
- As a consumer, you are legally required to take them to your retail store or to an appropriate collection site depending on national or local regulations in order to protect the environment.
- The symbols for the heavy metals contained are Cd=cadmium, Hg=mercury, and Pb=lead.
- Please do not dispose of this instrument in household waste. The user is obligated to take end-of-life devices to a designated collection point for the disposal of electrical and electronic equipment, in order to ensure environmentally-compatible disposal.
DOWNLOAD RESOURCES
- SMARTRO SC91 Time and Temperature Projection Alarm Clock [pdf] Instruction Manual SC91, 2AY3B-SC91, 2AY3BSC91, SC91 Time and Temperature Projection Alarm Clock, SC91, Time and Temperature Projection Alarm Clock
- Read more: https://manuals.plus/smartro/sc91-time-and-temperature-projection-alarm-clock-manual#ixzz7kdIBPxDQ
FAQ’S
Can I use the device to replace a traditional alarm clock?
Yes, you can.
What is the difference between this product and a traditional alarm clock?
This product is not only a timepiece, but also a temperature display device. It has many functions, such as alarm clock, time projection, temperature display, etc.
Can I use it as a thermometer?
Yes, you can.
Can I use it to measure the temperature of my baby’s room?
Yes, you can.
How do I change the time on my Smartro?
Button that will dim the backlight. And that’s actually no backlight but it is still readable. And now i’m going to hold the set. Button. And you can select 12 and 24 hour mode i want 24.
How do I reset my projection alarm clock?
Batteries only: Press the SNOOZE/LIGHT button for a 3 second backlight and projection. If the clock display appears distorted or is not responding to buttons, use a pen or paper clip to press and release the RESET button one time. This will reset the clock to default settings. Do not mix old and new batteries.
How do you turn off the alarm on a projection clock?
ACTIVATE/DEACTIVATE TIME ALARM
Press the ALARM button once to view alarm time. Press the ALARM button again to activate the alarm. Bell icon appears. Press the ALARM button again to deactivate the alarm.
What is the point of a projection alarm clock?
The genius behind the projection alarm clock is that you can read the time on the clock face, or you can simply look up at your wall or ceiling to see the time projected in a clearly visible image.
How long does the backup battery last?
The backup battery lasts for about 10 days.
Is there a way to check the backup battery’s charge level?
Yes, there is a way to check it. Press and hold the “Mode” button for about 3 seconds until “BATT” appears on the screen. The display will show you how much charge is left in the backup battery.
How do I change my settings?
You can change your settings by pressing and holding the “Mode” button for about 3 seconds until “SETUP” appears on the screen. The display will show you how much charge is left in the backup battery. Then press any button except for the “Mode” button so that other settings appear on the screen (e.g., Time/Date). You can then change your settings by pressing any button except for the “Mode” button again so that other settings appear on the screen (e.g., Alarm Volume). Finally, press and hold the “Mode” button for about 3 seconds until “SETUP” disappears from the screen so that your changes are saved and exit from Setup Mode.
How do I turn on a projector without a remote?
Open the projector’s lens cover. Connect the power cord to the projector’s power inlet. Plug the power cord into an electrical outlet. Note: With Direct Power On turned on, the projector turns on as soon as you plug it in.
VIDEO
SMARTER SC91 Time and Temperature Projection Alarm Clock
www://smartro.co/
SMARTRO W207006 Smart Color Weather Station
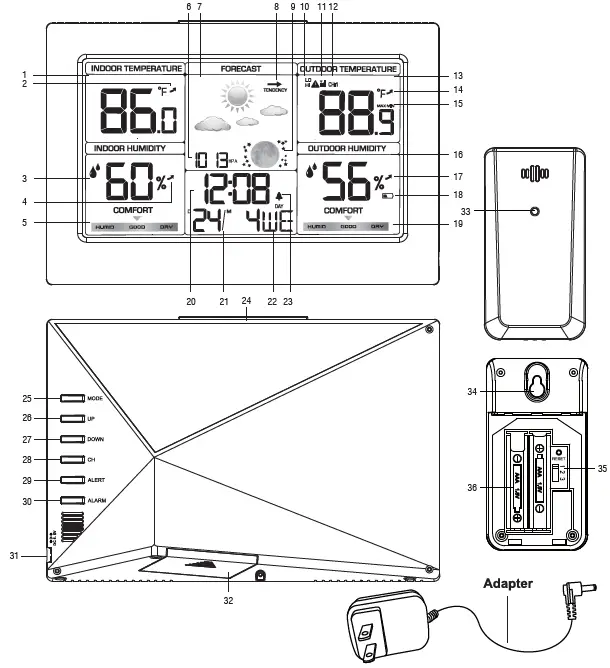
Controls and Displays

- Indoor temperature
- Tendency of indoor temperature
- Indoor humidity
- Tendency of indoor humidity
- Indoor comfortable index
- Barometer display
- Icons of weather forecast
- Trend of barometric
- Moon phase
- Outdoor temperature alert
- Outdoor sensor signal strength
- Channel external sensor
- Outdoor temperature
- Tendency of outdoor temperature
- Outdoor temperature max/min record
- Outdoor humidity
- Tendency of indoor humidity
- Sensor low battery indicator
- Outdoor comfortable index
- Time display
- Calendar
- Weekday
- Alarm and snooze icons
- SNZ/LIGHT button
- Turn on/off the backlight
- Stop the alarm for 5 minutes
- MODE button
- Hold for 3 seconds during the normal mode to enter setting mode.
- Press button during the normal mode to check year.
- UP button
- Increase the current setting value.
- In normal display mode, press this button to switch between Celsius and Fahrenheit at any time
- DOWN button
- Decrease the current setting value.
- Press this button to display max/min temperature/humidity.
- Press and hold the button for 2 seconds to clear the record of MAX/MIN temperature/humidity.
- CH button
- Press this button to select the channel.
- In normal display mode, press and hold to search RF.
- ALERT button
- Enter the alert mode, use UP or DOWN to open or close alert function.
- ALARM button
- Check the alarm time.
- Set the alarm
- External power supply socket
- Battery Compartment 3xAAA
(batteries not included) - Wireless signal indicator
(Flashes when data is being sent to the display unit) - Integrated hang hole
- TX channel selector, select external sensor channel (Maximum 3 channels available)
- Compartment 2xAAA batteries
(batteries not included)
Package Contents
- Color weather station display unit
- Outdoor remote sensor
- Power supply unit
- Instructions Manual
Getting Started
Inserting the batteries/connecting the power supply
- Connect the power supply unit to the power supply unit socket(31) on the back of the color weather station.
- Place 3xAAA batteries into the color weather station.
- Place 2xAAA batteries into the wireless weather sensor.
- Place or hang the sensor outdoors.
Replacing Batteries:
- We recommend using high quality batteries for the best product performance.
- Heavy duty or rechargeable batteries are not recommended.
- The outdoor sensor requires lithium batteries in low temperature conditions. Cold temperatures would cause alkaline batteries work improperly.
- Do not mix old and new batteries. Do not mix alkaline, standard, and rechargeable batteries.
Low Battery Indicator:
If the low battery indicator is displayed on the LCD for either the outdoor sensor or the display unit, immediately change the batteries to prevent disruptions in communications of the devices.
Default Settings
- Default time: 12:00 (Time form: 12H)
- Default date: 01/01 (Year: 2019, date form: M/D)
- Default week: TU (Language: GE, 7 languages can be selected)
- Weather forecast: Partly Sunny
- Default temperature: °F
- Barometer unit: hpa
- Default alarm: AM 7:00, default snooze time: 5min.
The LCD display fully for 3 seconds when changing new battery or resetting, then with a sound BI into the normal state, after testing temperature and barometer, then receiving RF for 3 minutes.
Operation
Manually Setting the Time, Date & Units:
- Press and hold down the “MODE” button for 2 seconds until the display begins to flash.
- Set the following information in the order listed:
- 12/24 hour format.
- Hours
- Minutes
- Date
- Year
- Month/Day or Day/Month format
- Month
- Day
- Day of the week language
- Air pressure unit
- To select individual values, press UP button or the DOWN button and confirm each selection by pressing the MODE button.
Alarm Clock
Setting the Alarm
- Hold the ALARM button for about 3 seconds to set the alarm time. The display begins to flash. Set the following information in the order listed:
- hours
- Minutes
- To select individual values, press UP button or the DOWN button and confirm each selection by pressing the ALARM button.
- If you do not make an entry for 20 seconds, setting mode is exited automatically.
Activating/deactivating the alarm
To turn the alarm ON or OFF, press the ALARM button to enter alarm mode, press the ALARM button again to ON or OFF the alarm. The “ ” symbol should show next to the clock display when alarm is set to ON. Press the ALARM button again to turn off the alarm, when the alarm is set to OFF, the “ ” symbol should not display.
Stopping the alarm/snooze function
- When the alarm is triggered, the alarm symbol begins to flash and an alarm sounds.
- By pressing any button(except the SNOOZE/LIGHT button to stop the alarm. Otherwise, it will stop automatically after 2 minutes.
Note: While the alarm signal is sounding, press the SNOOZE/LIGHT button to activate the snooze function. The alarm will sound after 5 minutes.
Temperature and Humidity
Temperature
- Indoor temperature 0°C ~ 50°C (32°F ~ 122°F), display LL.L when below 0°C and display HH.H when higher than 50°C.
- Outdoor temperature -40°C ~ 60°C (-40°F ~ 140°F), display LL.L when below -40°C and display HH.H when higher than 60°C.
- Temperature resolution: 0.1°C
Humidity
- Indoor humidity range: 20%-95%, display 20% when below 20% and display 95% when higher than 95%.
- Outdoor humidity range: 20%-99%, display 20% when below 20% and display 99% when higher than 99%.
- Humidity resolution: 1 %RH
- When alarm ringing, temperature and humidity test will be stopped.
Setting the Temperature Units:
To switch the temperature measurement between Celsius and Fahrenheit, press the “UP” button which is also the C/F option button. You can switch between Celsius and Fahrenheit at any time (except when setting other setting options.)
Checking the MAX/MIN temperature and humidity
- Press the “DOWN” button to check MAX/MIN temperature and humidity.
- Hold the “DOWN” button to clear the record of MAX/MIN temperature and humidity.
Temperature Alert
- In standard mode, press “ALERT” to enter alert mode, use “UP” or “DOWN” to turn on or off temperature alert function.
- In standard mode, hold “ALERT” to set temperature alert function.
- Setting order:
- outdoor temperature upper limit
- outdoor temperature lower limit
- indoor temperature upper limit
- indoor temperature lower limit
- To select individual values, press UP button or the DOWN button and confirm each selection by pressing the ALERT button.
- If you do not make an entry for 10 seconds, setting mode is exited automatically.
Ice Alert
When the outdoor temperature in the range of -1°C ~ +2.9°C (+30.2°F ~ +37.3°F), the ice icon will flash, when the temperature out of the range, the icon will disappear.
Temperature and humidity trend
- The device checks the temperature for trends every 30 minutes, comparing the current temperature with the temperature from 3 hours ago.
- If the temperature rises 1 °C / 2 °F, the device will display an upward arrow.
- If the temperature drops 1 °C / 2 °F, the device will display a downward arrow.
- If the temperature stays within 1 °C / 2 °F, the device will display a horizontal arrow
BackLight
- Sustained backlight is only possible by power supply unit.
- Press the SNZ/LIGHT button to switch the brightness from ON >> OFF.
- When powered by battery only, the backlight will be off (to conserve power). Press the SNZ/LIGHT button to active the backlight for 10 seconds.
Weather forecast
The unit predicts weather condition of the next 12-24 hours based on the change of atmospheric pressure. The weather forecast is based on atmospheric pressure change and is about 70-75% correct.
Trend of barometric
The trend of barometric: Barometer rise or down at 1 HPA within 1 hours, the arrow will rise or down, if barometer rise or down less than 1 HPA, the arrow displays horizontal.
Remote sensor transmission:
This weather station is arranged to communicate with three external sensors. One of these comes with the unit, the remaining two are optional.
- Power the weather station as described in Getting started.
- Insert the batteries in the external sensor, set the selector to the desired transmission channel (1, 2 or 3). Automatic weather station data will be transmitted.
- Press the CH button more times to select the channel set on the external sensor. Sequentially selects the channel 1, channel 2, channel 3 or sequential display of 3 channels (icon flashing channel).
Week display
Care and Maintenance
Placement of the Device:
Proper placement of both the display unit and the outdoor sensor are critical to the accuracy and performance of this product.
Display unit placement
Place the display unitin a dry area free of dirt and dust. Display unitrightfor tabletop/countertop use.
Important Placement Guidelines
- To ensure accurate temperature measurement, place units out of direct sunlight and away from any heat sources orients.
- Display unit and outdoor sensor must be within 150 ft. (50m) of each other.
- To maximize wireless range, place units away from large metallic items, thick walls, metal surfaces, or other objects that may limit wireless communication.
- To prevent wireless interference, place both units at least 3ft(1 m) away from electronic devices (TV, computer, microwave,radio, etc.
![]()

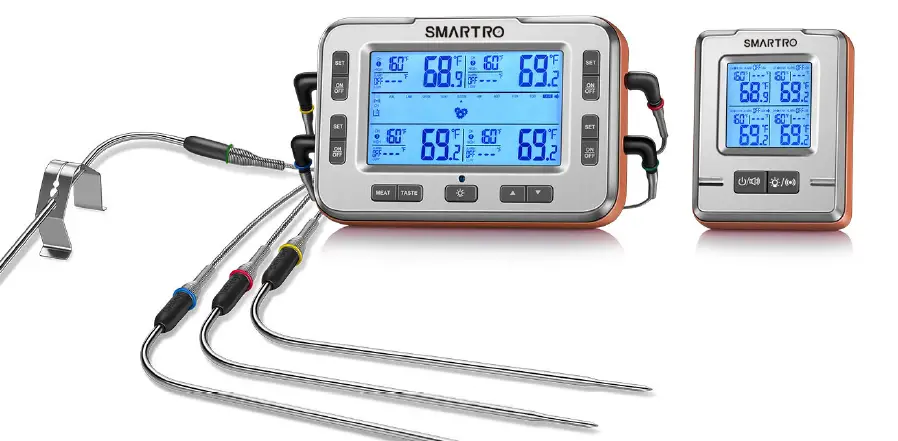
SMARTRO X50 Remote BBQ Alarm Thermometer

SMARTRO X50 Info Sheet
Overview
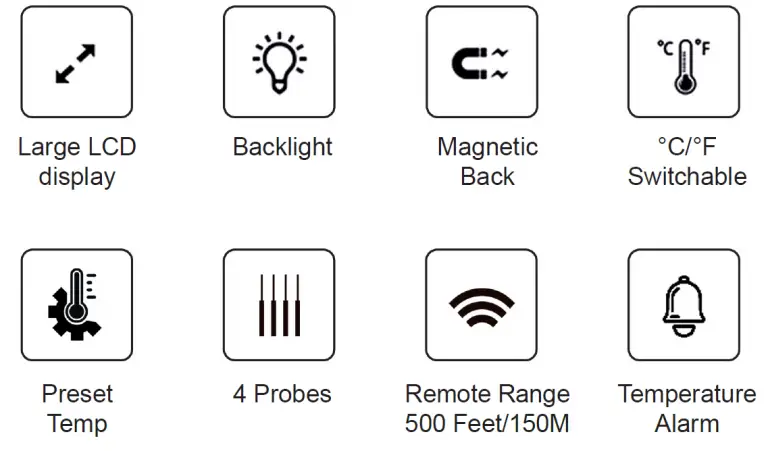
SMARTRO X50 is a four-channel BBQ alarm thermometer for inexperienced or experienced cooks to measure the internal temperature of their meat. Adopting all-new RF wireless technology, SMARTRO X50 allows you to keep track of your cooking from a greater distance with up to 500 feet (152 meters) in rural area with no physical barriers (1 meter above the ground). SMARTRO X50 incorporates the latest technology to provide simple and intuitive use for pros and amateurs alike. Choose various pre-programmed preset temperatures or their associated doneness levels. Alternatively, set the temperature manually. The rugged housing comes with splash-proof protection for use in harsh environments.
Package Contents
- SMARTRO X50 Main Unit x1
- SMARTRO X50 Receiver x1
- Stainless Steel Probe x4
- AA Battery x4
- Probe Ring x8
- Probe Clip x2
- Instruction Manual x1
Product Specifications
Display Size:
X50 Main Unit: 3.66Hx2.12W inches (93Hx53.8W mm)
X50 Receiver: 1.56Hx1.56W inches (39.6Hx39.6W mm)
Product Size:
X50 Main Unit: 5.9Hx3.86Wx1.34D inches (150Hx98Wx34D mm)
X50 Receiver: 3.6Hx2.9Wx1.28D inches (91.5Hx73.7Wx32.5D mm)
Probe Range: -4 to 572°F (-20 to 300°C)
Probe Cable Withstand Temperature: Max 700°F (370°C)
Accuracy:
±1.8°F (±1.0°C) from -4 to 248°F (-20 to 120°C)
±3.6°F (±2.0°C) from 248 to 392°F (120 to 200°C)
±5.4°F (±3.0°C) from 392 to 572°F (200 to 300°C)
Resolution: 0.1°F (°C)
Units: °C/°F Switchable
Water Resistance: IP66 Splash-Proof
Operating Range: 14 to 122°F (-10 to 50°C)
Backlight: 20 seconds
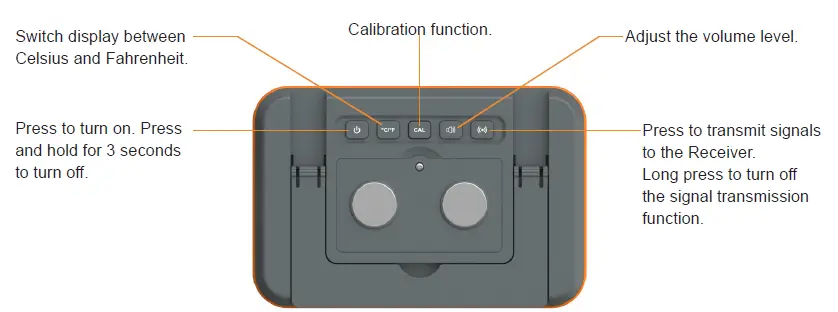
X50 Main Unit (Front)
X50 Main Unit Screen
X50 Main Unit (Back)
X50 Receiver
X50 Receiver Screen
Operating Instructions
Getting Started
Step 1: Open the back cover of the Receiver with a screwdriver and insert 2 AA batteries. It will automatically turn on and can be used after it displays a red backlight and rings 3 times. The “CON” icon will be displayed on the screen of the Receiver.
Step 2: Open the back cover of Main Unit with a screwdriver and insert 2 AA batteries. It will automatically turn on and can be used after it displays a red backlight and rings 3 times.
Get Synced: Turn the Main Unit and the Receiver on and within 10 seconds they will be connected (“CON” icon will be displayed on the Receiver until it connects). If the connection is not successful, please refer to 3. How to Sync Main Unit and Receiver Manually in the manual.
- Press to turn the alarm function on or off of a channel (The default is ON).
- Press to adjust volume level, there are 3 volume levels available.
- Press to switch between Celsius and Fahrenheit display.
- Press to turn on the backlight for 20 seconds.
- Wireless signals can be received within 500ft/152m between the devices in rural area with no barriers (1m above the ground), less if transmitting between walls or barriers.
Main Unit Operating Instructions (Quick Temp Setting)
Step 1: Press of the channel you want to set, and press of the channel to turn the alarm function on or off (The default is ON).
Step 2: Press twice within 3 seconds and the high temperature setting will begin flashing.
Step 3: Press to select the meat type (The default is CUSTOM).
Step 4: Press to set the doneness level. The corresponding preset temperature will be displayed on the screen.
Step 5: Press again (or no operation for 10 seconds) to confirm the setting result and exit the setting mode.
Note:
- When setting, if there is no operation for 10 seconds, the current setting will be automatically saved and setting mode will be exited.
- Settings will be saved on the device unless the batteries are removed or exhausted.
- The preset temperature table is as follows:
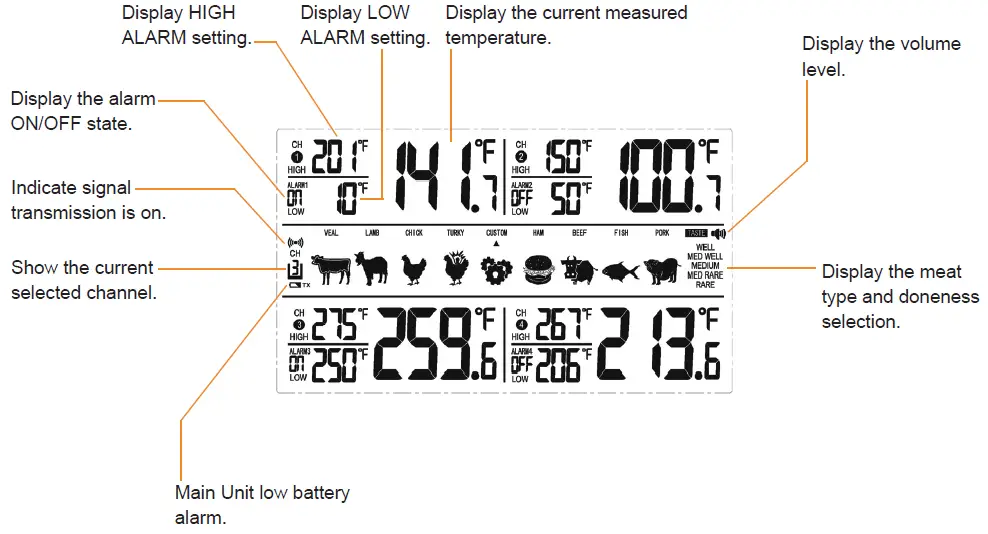
Main Unit Operating Instructions (Manual Setting)
Step 1: Press of the channel you want to set, and press of the channel to turn the alarm function on or off (The default is ON).
Step 2: Press twice within 3 seconds to enter the setting mode.
Step 3: Press to select the meat type to CUSTOM, and the HIGH ALARM digits will begin flashing.
Step 4: Use to adjust the desired HIGH ALARM temperature. Press again to accept the HIGH ALARM setting, and the LOW ALARM digits will begin flashing.
Step 5: Use to adjust the desired LOW ALARM temperature. Press again (or no operation for 10 seconds) to accept LOW ALARM setting and exit the setting mode.
Note:
- Long press to quickly set the temperature.
- When setting, if there is no operation for 10 seconds, the current setting will be automatically saved and setting mode will be exited.
- Settings will be saved on the device unless the batteries are removed or exhausted.
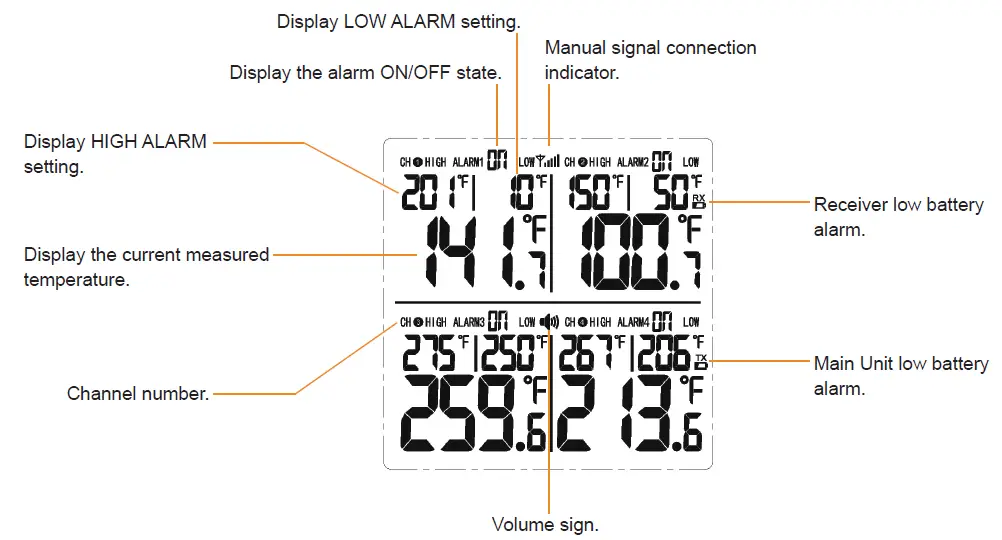
Temperature Alarm Function
Press to turn on or turn off the temperature alarm (The default is ON).
When the alarm function is turned on, and the measured temperature is higher than HIGH ALARM temperature, or lower than LOW ALARM temperature, the alarm will sound, the red backlight will be flashing, and the measured temperature digits will flash.
When the alarm function is turned off, and the measured temperature is higher than HIGH ALARM temperature, or lower than LOW ALARM temperature, only the measured temperature digits will flash.
There are 4 kinds of temperature alarm sounds, each channel has different alarm frequency:
CH 1: bi sound once per second
CH 2: bi sound twice per second
CH 3: bi sound 3 times per second
CH 4: bi sound 4 times per second
Pressing any button on the device will stop the alarm sound and flashing red light.
If multiple channels alarm at the same time, only the last alarm will sound.
How to Sync Main Unit and Receiver Manually
When the Receiver loses signals for 30 seconds, the alarm will automatically ring, the red backlight will be flashing, the screen will display “CON” and enter the state of receiving signals. Press any button on the Receiver to stop the alarm and flashing red light.
If the Receiver fails to receive the signals for 10 minutes, it will automatically shut down.
If you need sync manually, please follow the steps below:
Step 1: Hold button on the Receiver, until “CON” appears on the screen and icon is flashing on the Receiver.
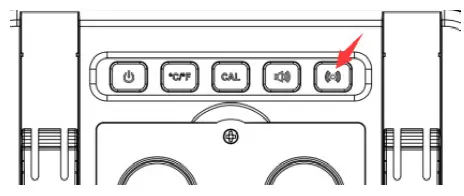
Step 2: Press the Sync button on the back of Main Unit to send signals manually.

The signal transmission indicator of the Main Unit will light up once, icon will be flashing on the Main Unit, and the Receiver will connect with Main Unit and receive the data of Main Unit.
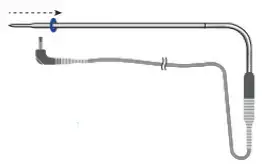
Probe Ring Installation Instructions
SMARTRO X50 has 8 probe rings (including red, yellow, green, blue, 2 rings for each color).
Always attach probe rings by sliding them over the probe tip. Attempting to attach probe rings by sliding them over the probe jack will cause them to stretch and loosen.
First Probe Ring:
Step 1: Slide the first of the two matching probe rings over the probe tip.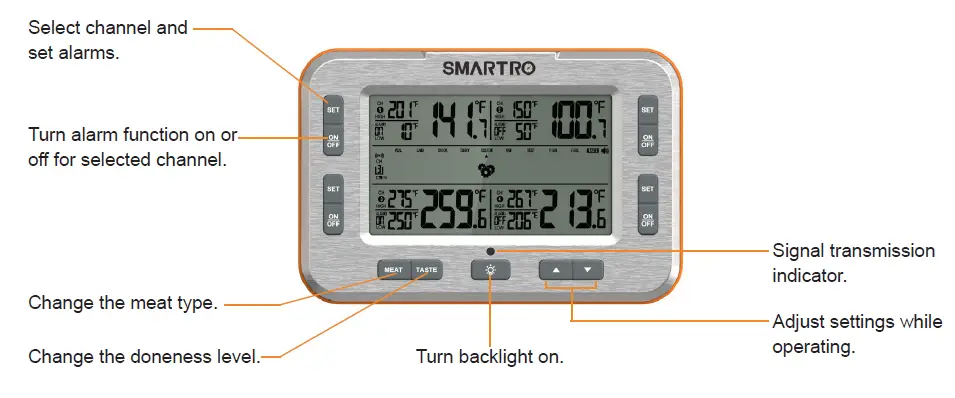
Step 2: Roll the probe ring over the metal springs of the probe.
Step 3: Slide the probe ring down the cable until it is over the metal springs of the probe jack. There will be a slight groove to hold the probe ring in place.
Second Probe Ring:
Step 1: Holding the second probe ring, slide probe ring over the probe.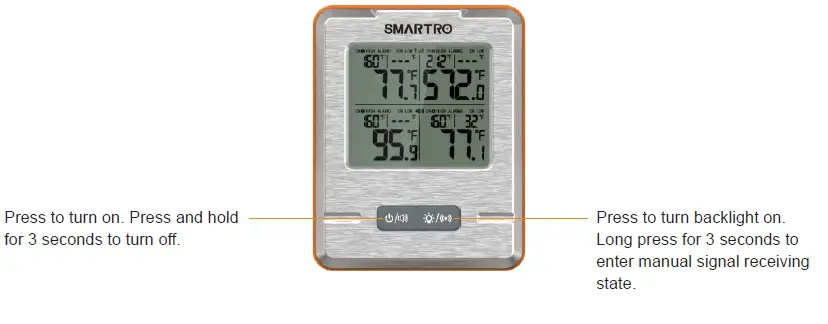
Step 2: Roll the probe ring over the PEEK of the probe.
Step 3: Place the probe ring at the point where the metal spring and the PEEK meet.

Calibration Guide
SMARTRO X50 is ready-to-use. No extra testing or calibration is required before using it. The operations below are for reference only.
Step 1:
Fill a large cup with crushed ice and fill up to 3/4 with purified water. Water that is not purified, such as tap water, still works but may slightly decrease the accuracy. Let the mixture sit for one minute, then stir to allow the temperature to be even throughout. Insert the probe so that the tip is at the centre of the cup and stir gently for 3-4 seconds.
Step 2:
When the measured temperature displays 32°F (0°C), stop stirring the probe, and hold it still in the centre of the cup. The temperature display should read between 28.4-35.6°F (-2 to 2°C).
Step 3:
Press of the channel corresponding to the probe, then long press or 5 seconds. The HIGH ALARM temperature will display “CAL” and measured temperature will display 0.0°F.
Step 4:
Press to increase or decrease the temperature. For example, if you want to add 0.6°F, you can press until the reading displays 0.6°F.
Step 5:
Press again (or no operation for 10 seconds) to save the setting.
Note:
- The available calibration range is ±4°F(±2.2°C).
- Long press to quickly set the temperature.
- When calibrating, if there is no operation for 10 seconds, the current setting will be automatically saved and calibration mode will be exited.
- Settings will be saved on the device unless the batteries are removed or exhausted.
Use & Maintenance
Tips for Use:
- Your SMARTRO X50’s body should not be affixed directly to a smoker or grill’s lid or left in the smoker or oven. The high heat will severely damage the plastic housing.
- Insert the cooking probe so that the tip rests at the thickest part of the meat or food. Avoid gristle or bone.
- You can choose one of the four probes as the air probe. Pinch grate clip, insert probe, and attach the clip to the grate. Place the air probe 1-2 inches away from the food, avoiding the sides of the cooker. The grate clip can be adjusted for different-sized grates by gently bending. We recommend leaving the air probe in the clip while adjusting.
- Set your desired alarm temperatures. Chef-recommended doneness temperatures are listed at the end of the manual. If cooking meat, set the alarm somewhat lower to allow for carryover heat during resting.
Cautions for Probes and Cables:
- Use hot pads or gloves when removing the probe from meat. It will be hot. Do not pull on the cable. Use the molded mini-handle.
- The cables can withstand 700°F (370°C) and the transition/handle 644°F (340°C) for short periods. Probe tip itself is rated to 572°F (300°C). Do NOT expose probe tip to flames or coals.
- The probe is moisture-resistant but we do not recommend full immersion of the cable. Clean probe by wiping with damp cloth and kitchen cleaner.
- Keep the probe cable away from oven elements, flames, coals, grill or oven racks, all of which can reach temperatures far higher than 700°F (even if an oven is set lower).
- When using ovens or smokers, avoid pinching the cable between hot surfaces such as a cast iron grill hood without some insulating protection. Avoid repeated twisting of the probe cable which can break wires.
Troubleshooting
| Issue | Reason | Solution |
| The measuring result is too low or too high. | The measuring temperature exceeds 572°F (300°C) multiple times which results in the main unit being damaged. | Please contact us for support or buy a new one.
Please use the main unit within normal work-temp range -4°F to 572°F (-20°C to 300°C). |
| The probe is exposed to open fire (flame) or probe temperature is higher than 572°F (300°C) which results in the probe being damaged. | Please contact us for support or buy a new probe.
DO NOT expose the probe to open fire (flame) or other objects with temperatures over 572°F (300°C). |
|
| The temp displays “HHH”. | The measuring temperature exceeds 572°F (300°C). | Take out the probe from the high temperature place at once and allow it to cool down, only use this thermometer within normal work- temp range -4°F to 572°F ( -20°C to
300°C). |
| The probe is not plugged in completely or the probe socket is damaged. | Unplug the probe and fully re-insert it into the thermometer. If it still has problem, please contact us for support. |
| The temp displays “LLL”. | The measuring temperature is below -4°F (-20°C). | Take out the probe from the low temperature place at once. Only use this thermometer within normal work-temp range -4°F to 572°F (
-20°C to 300°C). |
| The probe is not plugged in completely or the probe socket is damaged. | Unplug the probe and fully re-insert it into the thermometer. If it still has problem, please contact us for support. | |
| No alarm sound after the temperature reaches
the alarm temperature. |
The alarm switch of the channel you are measuring is off. | Press the ON/OFF button corresponding to the channel you want to measure to turn on the alarm. |
| Cannot set the alarm temperature manually. | The meat type of the channel you selected is not CUSTOM. | Press SET button twice within 3 seconds to enter the setting mode, then press MEAT button to adjust the meat type to CUSTOM. |
| Receiver cannot receive the signal of Main Unit. | Receiver and Main Unit are too far away or there are obstacles between them. | Put Receiver and Main Unit in a position where the signal can be received. |
| The signal transmission function of Main Unit is turned off. | Press the signal button on Main Unit to turn on the signal transmission. |
Contact Us
If your device fails to work or you are less than completely satisfied with this product in any way, please don’t hesitate to contact us. Tel: +1(323)287-5798
E-mail: [email protected]
Facebook: http://bit.ly/smartro_01
Website: https://www.smartro.co/
About our common-interest group:
Passionate about cooking? Come join our community of cooks that share ideas and suggestions on cooking, smoking, BBQ, and more! Gather with passionate cooks just like you who are obsessed with cooking and BBQ. We love trying different ways of cooking and hearing the amazing recipes our customers use. Feel free to share your favorite, original and unique recipes or simply learn for other cooks for around the world. We can’t wait to see you! Take a few seconds to scan this code and join us! You will get several free E-cookbooks as a gift. Don’t miss out!
Chef-Recommended Meat Temperatures
![]()