USER MANUAL
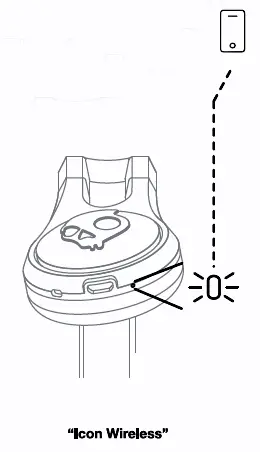
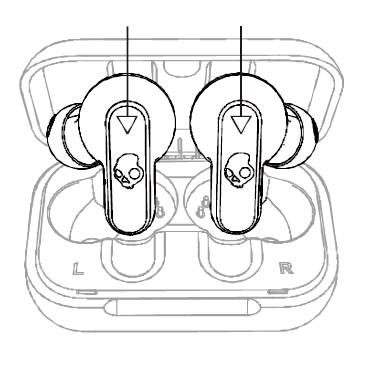
Skullcandy Icon
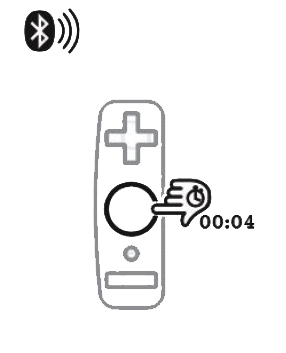
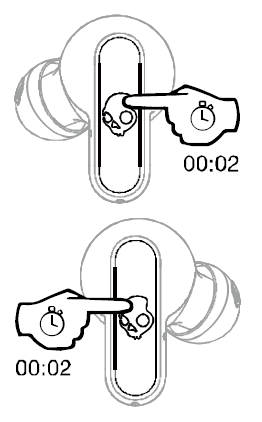
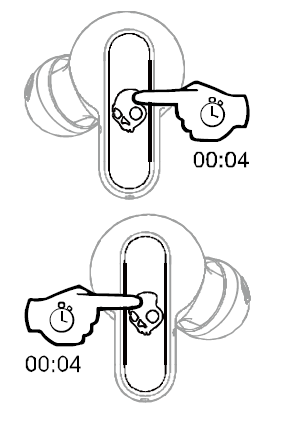
Pairing Mode
Pair New Device *off Mode
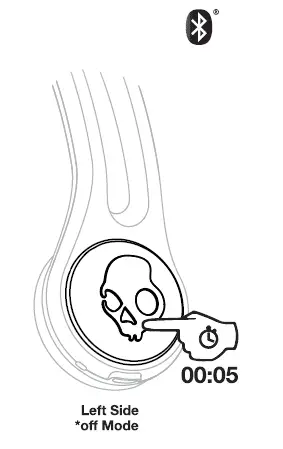
Pair New Device
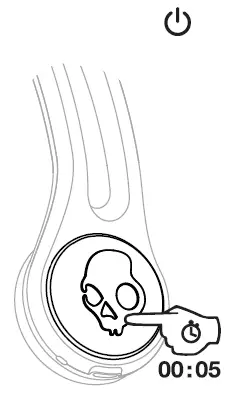
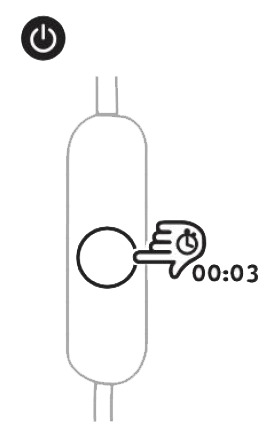
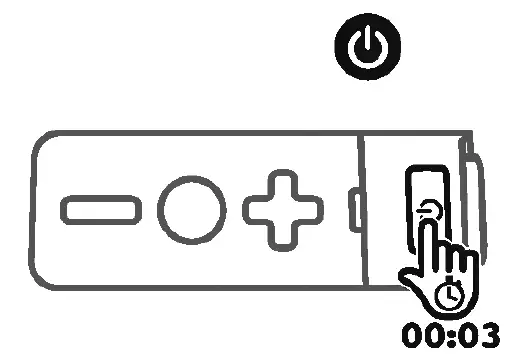
Power-On
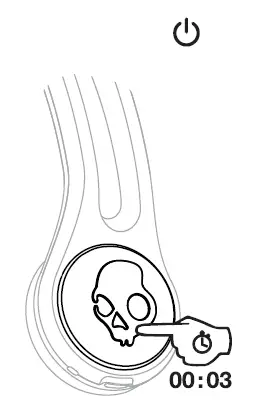
Power- Off
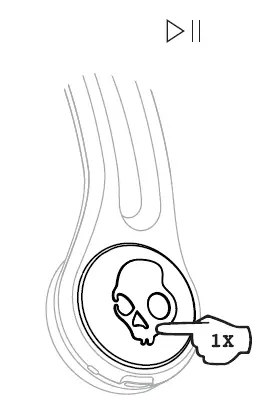
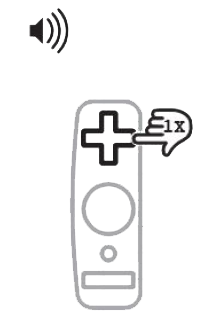
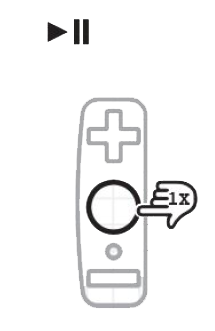
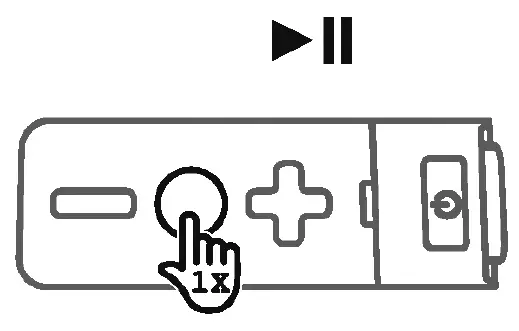
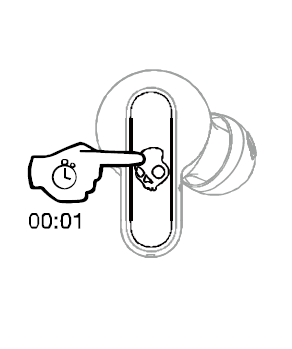
Play/Pause
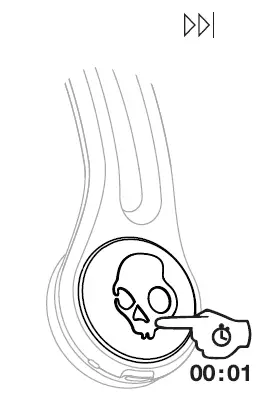
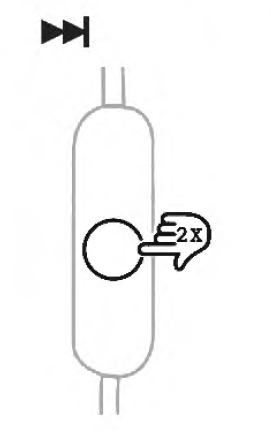
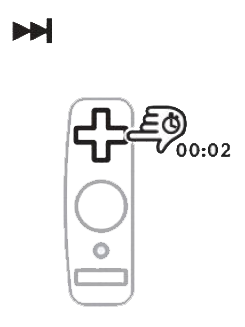
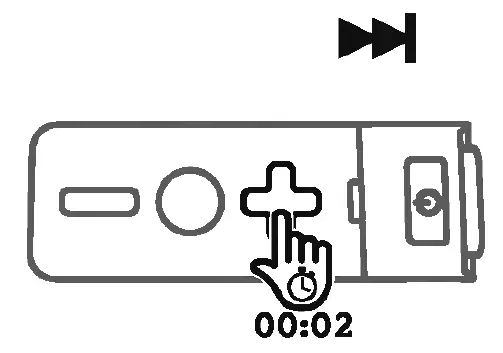
Track Forward
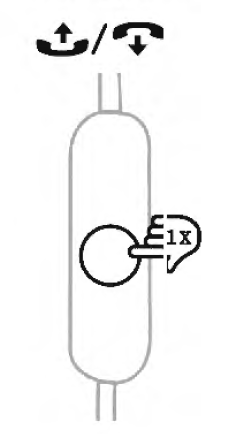
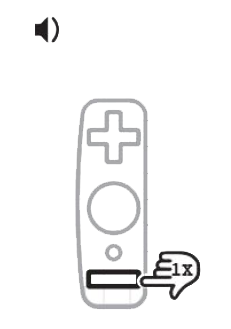
Answer/End
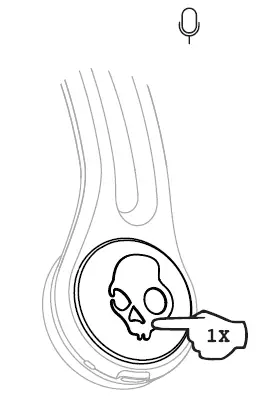
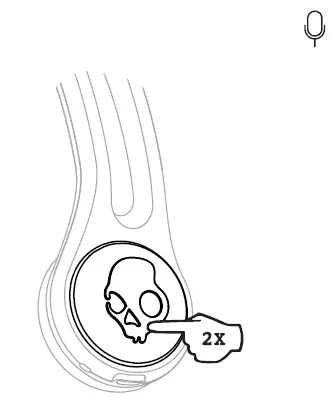
Activate Voice Assistant
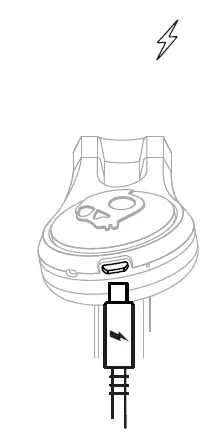
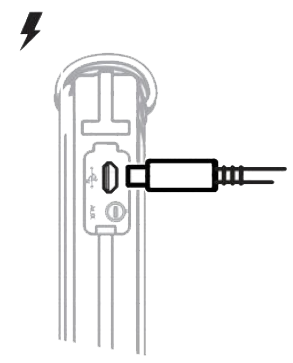
Charge
Questions Visit: www.skullcandy.com
The FCC Compliance Statement
This device complies with part 15 of the FCC Rules. Operation is subject to the following two conditions: (1) This device may not cause harmful interference, and (2) this device must accept any interference received, including interference that may cause undesired operation. This equipment has been tested and found to comply with the limits for a Class B digital device, pursuant to part 15 of the FCC Rules. These limits are designed to provide reasonable protection against harmful interference in a residential installation. This equipment generates, uses and can radiate radio frequency energy and, if not installed and used in accordance with the instructions, may cause harmful interference to radio communications. However, there is no guarantee that interference will not occur in a particular installation. If this equipment does cause harmful interference to radio or television reception, which can be determined by turning the equipment off and on, the user is encouraged to try to correct the interference by one or more of the following measures:
- Reorient or relocate the receiving antenna.
- Increase the separation between the equipment and receiver.
- Connect the equipment into an outlet on a circuit different from that to which the receiver is connected.
- Consult the dealer or an experienced radio/TV technician for help.
The user is cautioned that any changes or modifications not expressly approved by the party responsible for compliance could void the user’s authority to operate the equipment.
IC Compliance Statement
This device contains license-exempt transmitter(receiver'(s) that comply with Innovation, Science and Economic Development Canada’s licensee-exempt RSS(s). Operation is subject to the following two conditions: (1)This device may not cause interference.(2)This device must accept any interference, including interference that may cause undesired operation of the device.
This equipment complies with IC RSS-102 radiation exposure limits set forth for an uncontrolled environment. This transmitter must not be co-located or operating in conjunction with any other antenna or transmitter.
Wireless Earphone MODEL: S51BW
Skullcandy,f>,and other marks are registered trademarks of Skullcandy, Inc. All rights reserved.
Skullcandy,f>,and other marks are registered trademarks of Skullcandy, Inc. All rights reserved.
Hardware Version: 20180509 V2.1
Software Version: lcon_Wireless_8635_ 180608v29
Bluetooth function: 2402MHz – 2480MHz@ 4dBm
CONTAINS Li-ion BATTERY.
BATTERY MUST BE RECYCLED
OR DISPOSED OF PROPERLY.
Americas
Skullcandy, Inc.
6301 N Landmark Dr.
Park City, UT 84098, LI.SA
Skullcandy.corn
User Manual
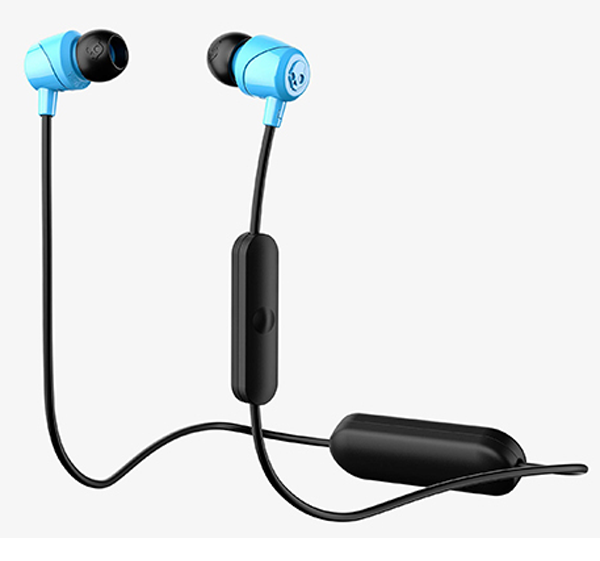
Skullcandy Jib True
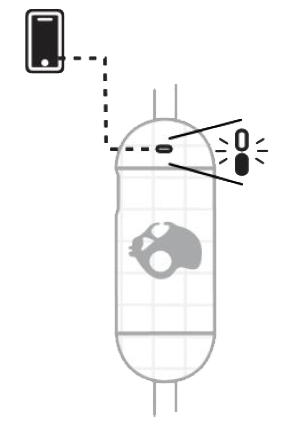
PAIR NEW DEVICE:
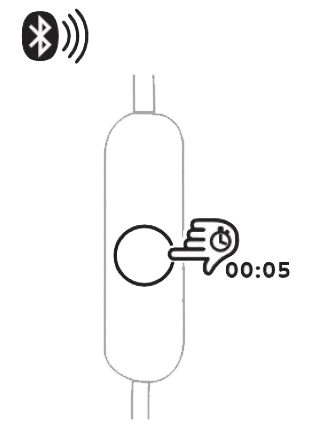
PAIRING MODE:
POWER-ON/OFF:
PLAY/PAUSE

TRACK FORWARD:
TRACK BACK:
ANSWER/EIID :
CHARGE
Wireless Earphone
MODEL: S2JPW
Skullcandy and other marks are registered trademarks of Skullcandy, Inc. All rights reserved.
- Speaker Driver. 9mm
- Impedance: 16 Ohms
- THD <3%@1 khz
- Voltage Regulation: 3.7v
- Bluetooth 5.0
- Weight 17g.
- Hardware: V3.0
- Software: V2.0
- Bluetooth function: 2402MHz-2480MHz54dBm
FCC Compliance Statement
This device complies with Part 15 of the FCC Rules. Operation is subject to the following two conditions: (1) this device may not cause harmful interference, and (2) this device must accept any interference received, including interference that may cause undesired operation. Changes or modifications not expressly approved by the party responsible for compliance could void the user’s authority to operate the equipment.
This equipment has been tested and found to comply with the limits for a Class B digital device, pursuant to Part 15 of the FCC Rules. These limits are designed to provide reasonable protection against harmful interference in a residential installation. This equipment generates, uses and can radiate radio frequency energy and, if not installed and used in accordance with the instructions, may cause harmful interference to radio communications. However, them is no guarantee that interference will not occur in a particular installation. If this equipment does cause harmful interference to radio or television reception, which can be determined by turning the equipment off and on, the user is encouraged to try to correct the interference by one or mom of the following measures:
— Reorient or relocate the receiving antenna. — Increase the separation between the equipment and receiver.
— Connect the equipment into an outlet on a circuit different from that to which the receiver is connected.
— Consult the dealer or an experienced radio/TV technician for help.
ISED Compliance Statement
This device contains licence-exempt transmitters)/receiver(s) that comply with Innovation, Science and Economic Development Canada’s licence-exempt RSS(s). Operation is subject to the following two conditions:
(1 ) This device may not cause interference.
(2) This device must accept any interference, including interference that may cause undesired operation of the device.
2 Year Global Warranty
United States of America and Canada Product Purchases Only Skullcandy products are backed by a warranty. If It doesn’t work the way we promised, we’ll make it right. For Guarantee Claims, Questions and Terms & Conditions call 1-888-MYSKULL.
Skullcandy products are backed by a 2-year warranty. If it doesn’t work the way we promised, we’ll make it right.
Warning: To avoid hearing damage, do not listen at high volume levels.
Disposal: ‘ Many electrical items can be repaired or recycled, saving natural resources and the environment. If you do not recycle, electrical equipment will and up in landfill where hazardous substances will leak out and cause soil and water contamination — harming wildlife and also human health. To remind you that old electrical equipment can be recycled, it is now marked with a crossed out wheeled bin symbol. Please do not throw any electrical equipment (including those marked with the crossed out wheeled bin symbol) in your bin.
FOR WIRELESS PRODUCT
EU/EC DECLARATION OF CONFORMITY
This equipment complies with the European Radio Equipment Directive. A copy of the EU/EC Declaration of Conformity can be found at skullcandy.eu/product-documents
Many Local Authorities will have containers that collect batteries for recycling. Public buildings and your workplace may also have containers. If you do not recycle, batteries will end up in landfill where hazardous substances will leak out and cause soil and water contamination — harming wildlife and also human health. Batteries containing hazardous materials such as mercury (Hg), cadmium (Cd) or lead (Pb) are marked with their chemical symbols as well. This symbol means that according to local laws and regulations the battery shall be disposed of separately from household waste. When this product reaches its end of life, take it to a collection point designated by local authorities or return to purchase location for recycling or disposal.
LIMITED WARRANTY- FOR SALES IN AUSTRALIA:
Against defects for 2 year from the date of purchase. Product will be replaced or refunded at our option. At your cost, deliver product and Proof of Purchase to Skullcandy at 63 Centennial Circuit Byron Bay, 2481 NSW, Australia. Ph 02 6639 5555. Further details at www.skullcandy.com.au or contact [email protected]. Your benefits under this Skullcandy warranty are in addition to your other tights and remedies under a law in relation to this product. Our goods come with guarantees that cannot be excluded under the Australian Consumer Law. You are entitled to a replacement or refund for a major failure and for compensation for any other reasonably foreseeable loss or damage. You are also entitled to have the goods repaired or replaced if the goods fail to be of acceptable quality and the failure does not amount to a major failure.
]]>USER MANUAL
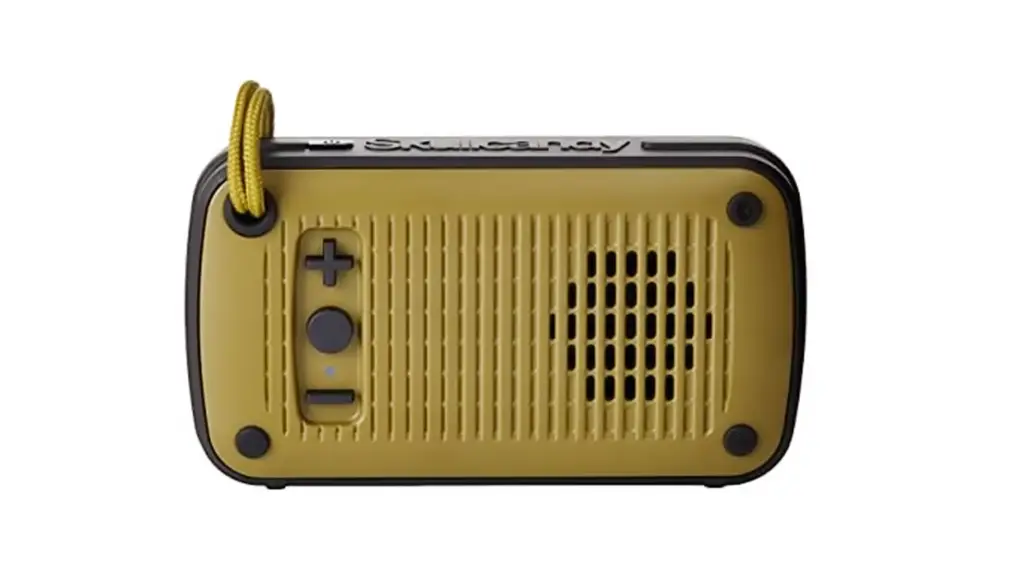
Skullcandy Ambush Wireless Speaker
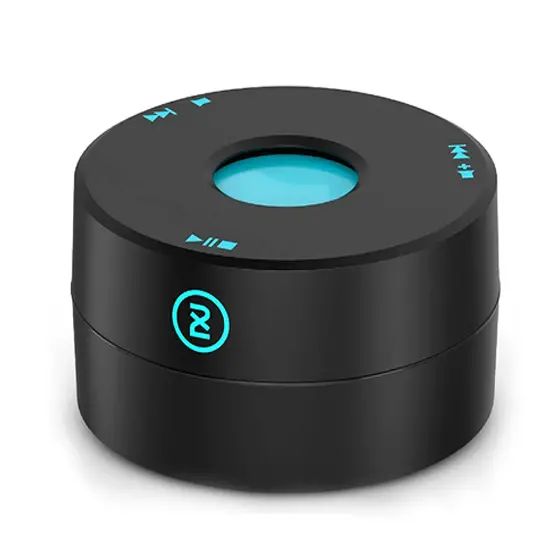
Diagram
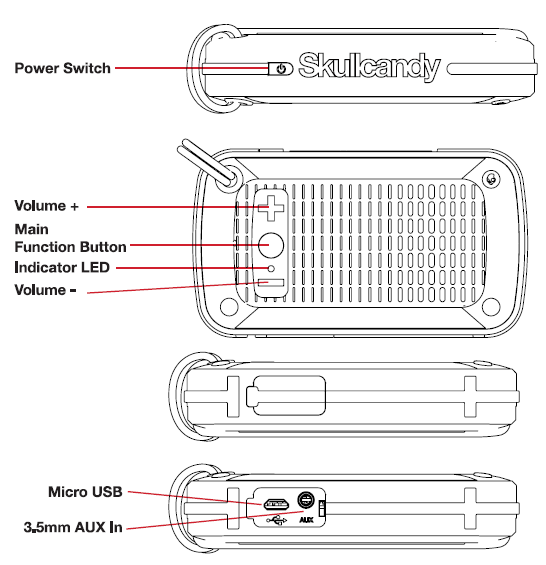
Main Speaker Controls
Power On/Off

Power On
Long press and hold the Power Button. Wait (for up to 3 seconds) for the LED light to flash magenta and the power ON tone to be played. Do not press any other buttons during this time. When Ambush is on, the speaker will look to connect to up to 2 devices in the paired device list. If no paired devices are available for connection, the speaker will enter a NOT connected state and the LED will flash red 2x every 3 seconds.
Power Off
Long press and hold the power button er any time while the Ambush is ON. As the speaker powers OFF, It will play the power down tone and the LED will turn magenta. It is recommended to disconnect all Bluetooth streaming devices before powering OFF.
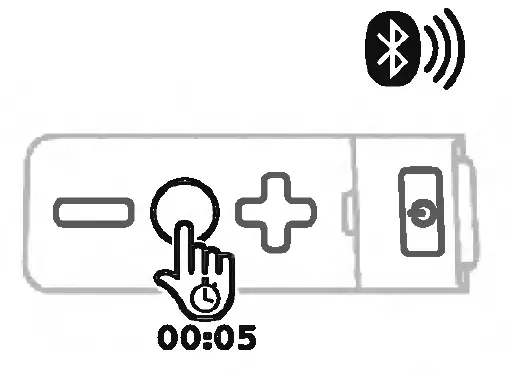
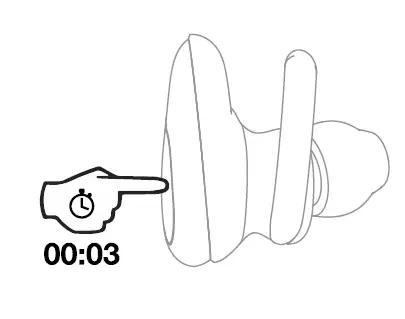
Enter Pairing Mode
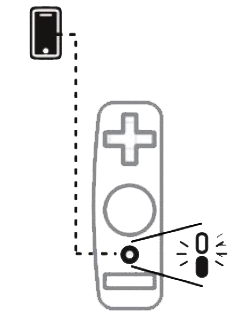
When the speaker is ON, press and hold the round MFB (main function button) for 5 seconds. You will hear the voice notification, “pairing,” and the LED will alternate red and blue when pairing mode is entered. When a device is successfully paired, the LED will flash red 3 times.
Pair New Device
Connect to Device
When the speaker is not connected to a device and not in pairing mode, short press the round MFB button to attempt to connect to a device from the list of paired devices. Ensure the device Bluetooth is ON. When the device is connected, you will hear the voice notification “connected,” and the indicator LED will flash blue once every 3 seconds.
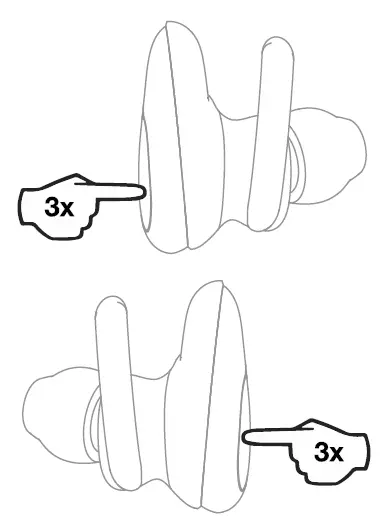
Clearing the Pairing List
To clear the list of paired devices from the speaker, push and hold the + and round MFB simultaneously for 3 seconds while the power is ON. This will reset the speaker to default pairing mode the next time it is powered on. Devices will need to be paired again once this has been done even if previously paired.
Battery Status Check
When the battery is low it will play the voice notification, “please charge device.”
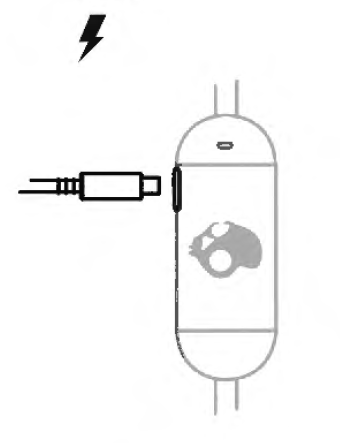
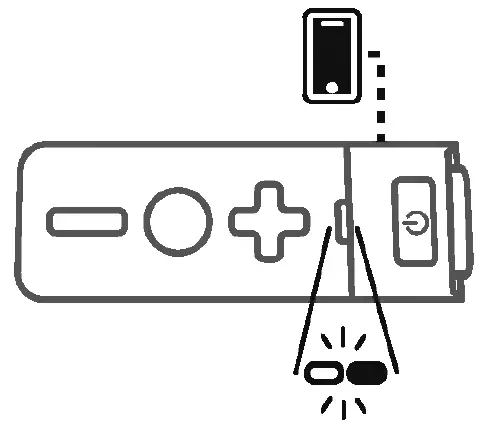
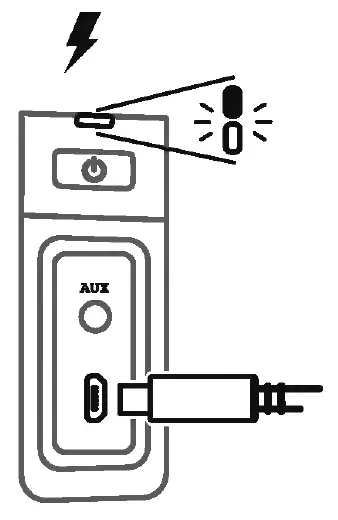
Charging
In any state, you may plug in the included micro USB to USB power cable to begin charging the Ambush. The LED will flash magenta 2x every 3 seconds to confirm that it is charging.
Music Controls
Start Music Playback
When the speaker is connected to the device but not streaming music, short press the round MFB to start streaming. When the device is streaming, the front LED will be off.
Pause Music Playback
When the speaker is streaming music, short press the center button to pause the playback.
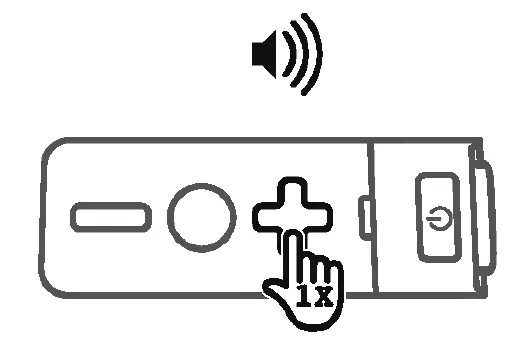
Volume Up
When the speaker is ON and not in pairing mode, press the + button to increase the volume level.
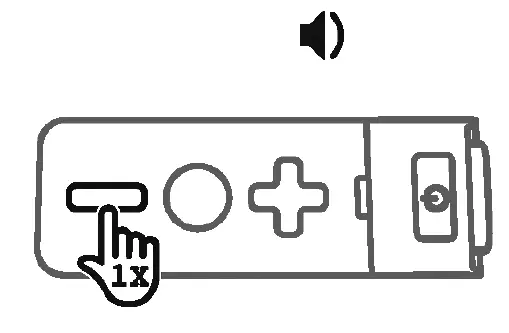
Volume Down
When the speaker is ON and not in pairing mode, press the – button to decrease the volume level.
Music Play/Pause
Track Forward
When the speaker is connected to a device, long press the -f button to track forward.
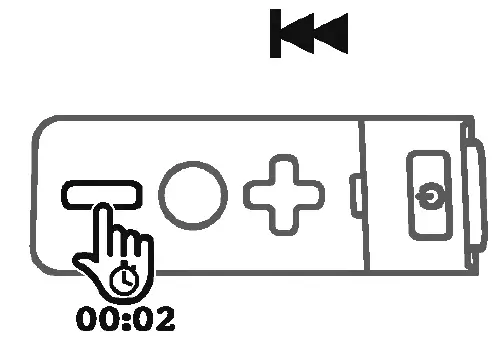
Track Backward
When the speaker is connected to a device, long press the – button to track backward.
3.5 mm Wired Audio Playback
When the device is not streaming via Bluetooth, plug in the included 3.5mm cable into the bottom AUX jack. To play music through the wired connection the source device must be used to control playback. Track controls on the speaker will be disabled. Volume controls will function normally. Note that Bluetooth streaming takes priority over wired audio playback.
Phone Call/Receive Controls
On-Board Mic and Volume function
When the Bluetooth is enabled, the on-board Mic and the volume* – buttons will be activated for full call functionality.
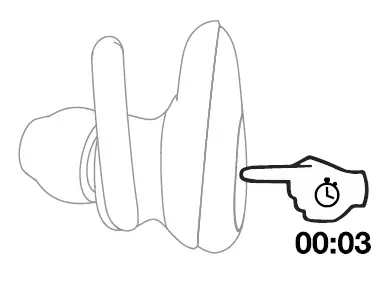
Answer and Hang Up Call
When streaming BT, an incoming call can be answered with a short press of the round MFB. Once connected, the call can be hung up with another single button press of the round MFB.
Reject incoming call
Long press (for up to 3 seconds) the round center button and the call will be rejected.
While call is active:
Put on hold
When the call is active, long press (for up to 3 seconds) the round MFB. Once on hold, another long press of the round MFB will release the call on hold. You are also able to toggle between two calls with the same long press of the round center button, if you have one on hold. If you would like to end the call on hold or end the active call and return to the call on hold, you must short press the round MFB.
Mute Mic function
When the call is active, short press the power button to mute the microphone, and again short press the power button to unmute.
Volume function
Short press the volume + to increase call volume, and short press the volume — to decrease the call volume.
2nd Incoming call
While the active call is connected, short press the round MFB to end the current call and answer the 2nd incoming call. If you would like to put the active call on hold and answer the 2nd incoming call, long press (up to 3 seconds) the round MFB. To then return to the call on hold, long press the round MFB.
Other Device Features
Auto Power Off
If the device is idle for 5 minutes, it will turn itself OFF while the switch is in the ON state. To turn the speaker back ON, press and hold the power button.
Auto LED off
The LED will be powered off after 4.5 minutes for every state. This feature is to conserve battery life. For example, if the BT speaker is at no streaming state for 4.5 minutes, the LED will auto OFF. The timer will reset whenever there is a change in state. One exception is that the LED indication for pa nng mode will remain active during pairing mode as pairing mode itself has a timeout.
Multipoint Support
The speaker supports connecting to up to TWO audio source devices at the same time. At any one time, only one device’s audio will be heard through the speaker. When using the play/pause button on the speaker, the play/pause command will always go to the last streaming device. To switch the playback device, the user has to pause/stop the playback on the currently streaming device and must start the playback from the other device directly. Once the playback is established with the new device the use of play/pause command will function for that device.
Expected Charging Time
When using the provided charger, a fully drained Ambush battery will take approximately 2 hours to fully re-charge to 100% battery life.
Trouble Shooting
There is choppy audio after connecting to the speaker, or will not connect…
When multipoint is enabled, the Bluetooth chip will be searching for a 2nd paired device while still streaming music from the connected device. This causes a short section of choppy audio immediately after connection. It should resolve and play normally after approximately 30 seconds. Also, the following will resolve the issue immediately:
- Restore defaults: Hold Volume + and the round MFB for 5 seconds to reset the paired device list and then pair again.
- If restoring defaults does not solve the problem, remove Ambush from Device: Go in to pairing settings on the device and remove or ‘forget’ Ambush and than pair again.
Wired audio will not play…
When Ambush is on the edge of a room or facing an entire group of people, set it on its bottom surface, so that the speakers are facing the entire group.
Sound Set-Up
Ambush on bottom “feet”
When Ambush is on the edge of a room or facing an entire group of people, set it on its bottom surface, so that the speakers are facing the entire group.
Ambush on back
When Ambush will be playing in the middle of a group (i.e. on a table, by a campfire, etc.), place Ambush on its back face so that the speakers are pointing upward. This creates a uniform 360 degree sound field.
FCC Notice to Users
The following statement applies to all products that have received FCC approval.
This device complies with part 15 of the FCC Rules. Operation is subject to the following two conditions:
(1) This device may not cause harmful interference, and
(2) this device must accept any interference received, including interference that may cause undesired operation. See 47 CFR Sec. 15.19(3).
This equipment has been tested and found to comply with the limits for a Class El digital device, pursuant to part 15 of the FCC Rules. These limits are designed to provide reasonable protection against harmful interference in a residential installation. This equipment generates, uses and can radiate redo frequency energy and, if not installed and used in accordance with the instructions, may cause harmful interference to radio communications. However, there is no guarantee that interference will not occur in a particular installation. If this equipment does cause harmful interference to radio or television reception, which can be determined by turning the equipment off and on, the user is encouraged to try to correct the interference by one or more of the following measures:
- Reorient or relocate the receiving antenna.
- Increase the separation between the equipment and the receiver
- Connect the equipment to an outlet on a circuit different from that to which the receiver is connected.
- Consult the dealer or an experienced radio/TV technician for help.
Changes or modifications not expressly, approved by the party responsible for compliance could void your authority to operate the equipment.
]]>User Manual

Skullcandy Barricade Mini Wireless
POWER-ON/OFF:
PAIRING MODE:
“BARRACADE MINI”
PAIR HEW DEVICE:
VOLUME DOWN:
VOLUME UP:
PLAY/PAUSE:
TRACK FORWARD:
TRACK BACK:
CHARG:
Questions Visit: www.skullcandy.com
The user is cautioned that any changes or modifications not expressly approved by the party responsible for compliance could void the user’s authority to operate the equipment.
The IC Compliance Statement This device complies with Industry Canada’s licence-exempt RSSs. Operation is subject to the following two conditions:
(1) This device may not cause interference; and
(2) This device must accept any interference, including interference that may cause undesired operation of the
device.
The FCC Compliance Statement
This device complies with part 15 of the FCC Rules. Operation is subject to the following two conditions:
(1) This device may not cause harmful interference, and
(2) this device must accept any interference received, including interference that may cause undesired operation.
This equipment has been tested and found to comply with the limits for a Class B digital device, pursuant to part 15 of the FCC Rules. These limits are designed to provide reasonable protection against harmful interference in a residential installation. This equipment generates, uses and can radiate radio frequency energy and, if not installed and used in accordance with the instructions, may cause harmful interference to radio communications. However, there is no guarantee that interference will not occur in a particular installation. If this equipment does cause harmful interference to radio or television reception, which can be determined by turning the equipment off and on, the user is encouraged to try to correct the interference by one or more of the following measures:
- Reorient or relocate the receiving antenna.
- Increase the separation between the equipment and receiver.
- Connect the equipment an outlet on a circuit different from that to with the receiver is connected.
- Consult the dealer or an experienced Radio/TV technician for help.
CONTAINS Li-ion BATTERY. BATTERY MUST BE RECYCLED OR DISPOSED OF PROPERLY.
MODEL: S7PBW
Skullcandy and other marks are registered trademarks of Skullcandy, Inc. All rights reserved.
Speaker Driver: 1 x 5 watt
Weight: 272g.
Input Voltage: DC 5V/0.5A
USER MANUAL
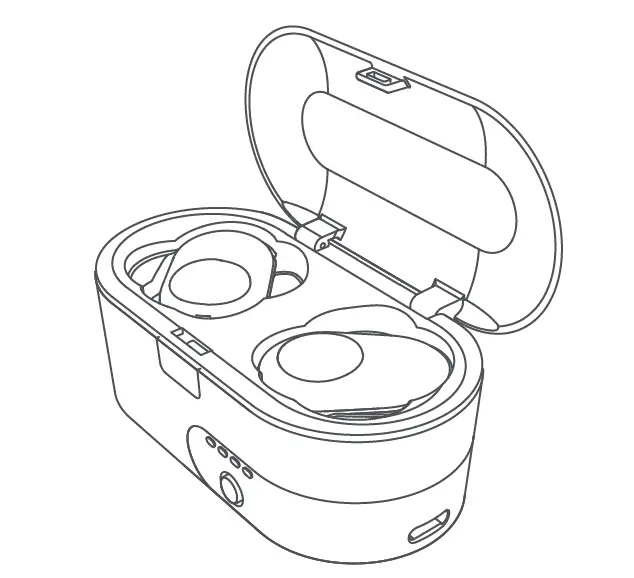
Skullcandy Push
Register Your Product
Skullcandy.com/product-registration/push
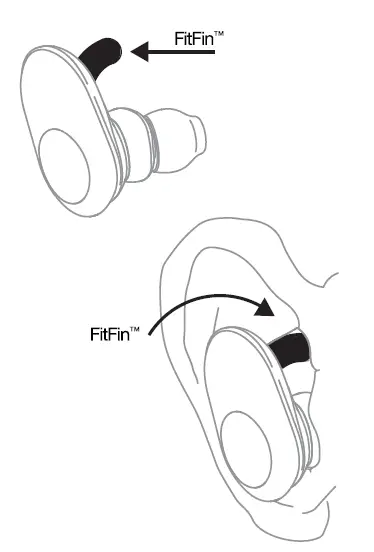
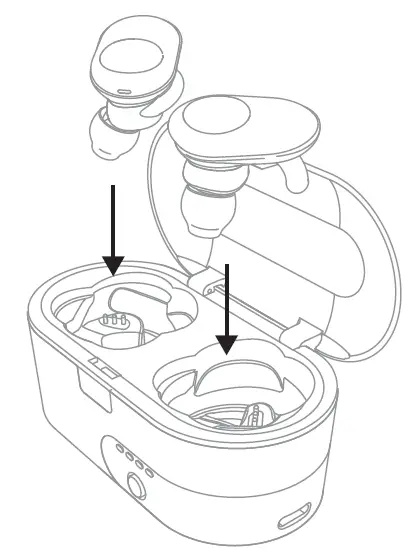
Secure in Ear with FIIFin™
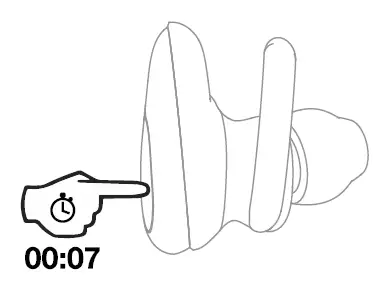
Auto Power- On
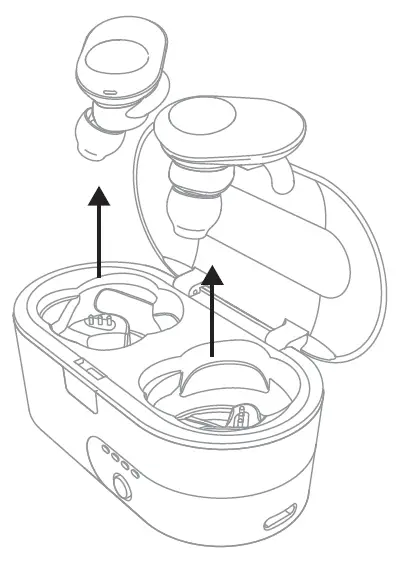
Auto Power- Off
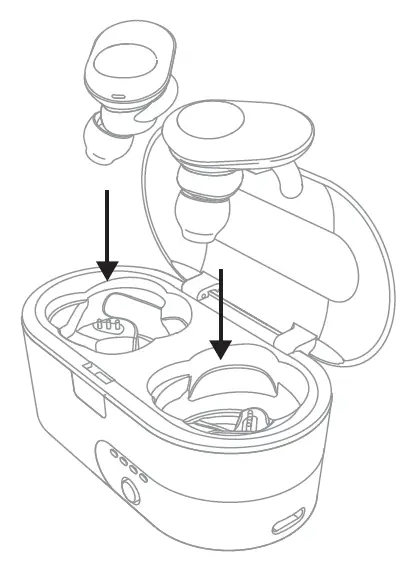
Power-Of!
Charge Case
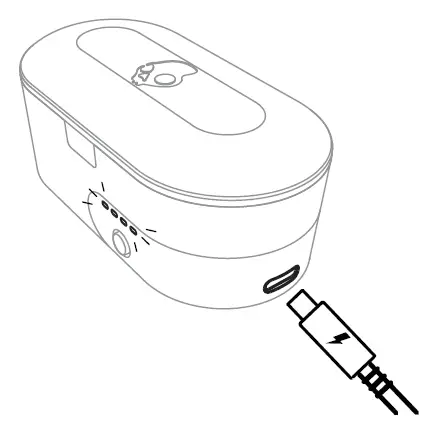
Charge Case
Charge Earbuds
Charge Earbuds
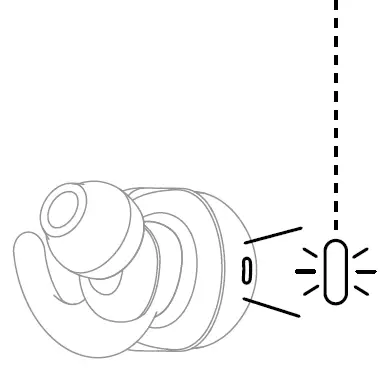
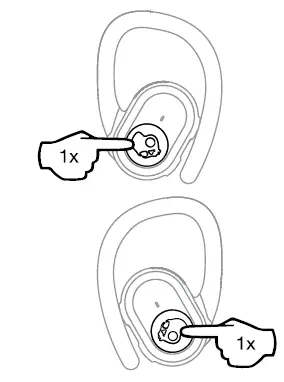
Pairing Mode
Left Side 01 •Off Mode
Pair New Device
“Push”
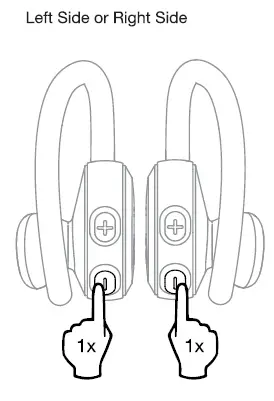
Power – On/Off
Left Side 01
Volume Up
Right Side 02
Volume Down
Left Side 01
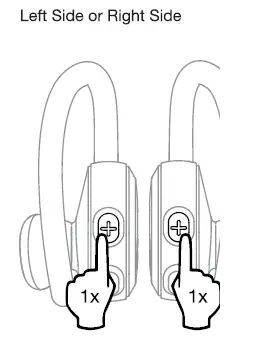
Play/Pause
Left 01 or Right 02 Side
Track Forward
Right Side 02
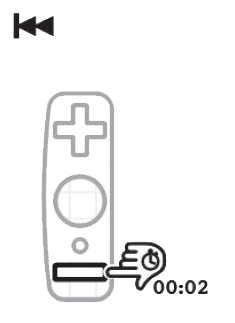
Track Back
Left Side 01
Answer/End
Left 01 or Right 02 Side

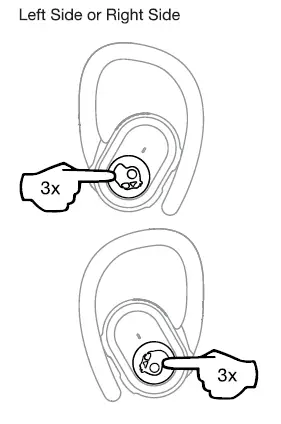
Activate Voice Assistant
Left 0 1 or Right 02 Side
Questions Visit: www.skullcandy.com
ISED Statement
This device contains license expert transmitter / receiver(s) that comply with innovation, Science and Economic Deployment Canada’s license-exempt RSS(s). Operation Is subject to the follo”1ng two conditions:
(1)This device may not cause interference.
(2)Thia device must accept any interference, including Interference that may cause undesired operation of the device.
ISEC RF Exposure statement
This equipment complies with IC RSS-102 radiation exposure limits set forth for an uncontrol environment. This transmitter must not be co-located or operating in conjunction with any other antenna or transmitter.
The FCC Compliance Statement
This device complies with part 15 of the FCC Rules.
Operation Is subject to 1he following two conditions:
(1) This device may not C8.U88 harmful interference, and
(2) this device must accept any interference received, including interference that may ca&.1se und•ir.:I operation. Changes or modifications not expressly approved by the party responsible for compliance could void the user’s authority to operate the equipment This equipment has been tested and found to comply with the limits for a Class B digital device, pursuant to part 15 of the FCC Rules. These limits ate designed to provide responsible protection against harmful Interference In a residential Installation. This equipment generates, uses and can radiate radio frequency energy and, if not installed and used in accordance with the instructions, may cause harmful Interference to radio communication. However. there, is no guarantee that interference will not occur in a particular installation. If this equipment does cause harmful interference to radio or television reception, which can be determinate by turning the equipment off and on, the user Is encouraged to try lo correct the Interference by one or more of the following measures:
- Reorient or relocate the receiving antenna.
- Increase the separation between the equipment and receiver
- Connect the equipment into an outlet on a circuited al to which the receiver ls connected.
- Consult the dealer an experienced radio /TV technician for help.
USER MANUAL
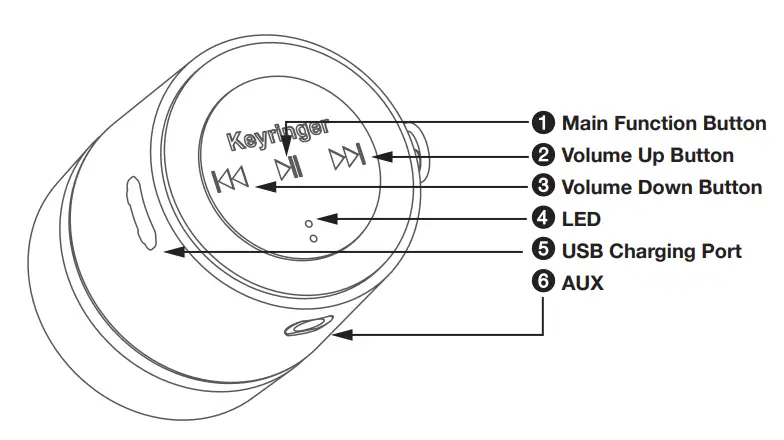
Ringer / KeyRinger
Skullcandy 2XL
Diagram
Power On – 1
Press and hold the MFB until the LED flashes blue and the ascending tone plays.
Power Off – 1
Press and hold the MFB until the descending tone plays and the blue light turns off.
Pairing – 1
Powered off, hold the MFB until the LED alternates flashing Blue and Red. KeyRinger will automatically pair to the last paired device when powered on.
Un-pairing – 1 – 2
Press and hold the MFB and the volume up button until the device powers off. The paired list will now be cleared.
Pause – 1
Press the MFB once to pause and once again to play.
Volume Up – 2
Press volume up button once. A tone will sound at max volume.
Volume Down – 3
Press volume down button once. A tone will sound at minimum volume.
Next Track – 2
Hold down the volume up button.
Previous Track – 3
Hold down the volume down button.
Charging : When connected to the USB cable and power source, the LED will be Red while charging and turn off once fully charged.
Low Battery : There will be a tone warning every 30 seconds.
- Main Function Button
- Volume Up Button
- Volume Down Button
- LED
- USB Charging Port
- AUX
Power On – Press and hold the MFB until the LED flashes blue and the ascending tone plays.
Power Off – Press and hold the MFB until the descending tone plays and the blue light turns off.
Pairing –Powered off, hold the MFB until the LED alternates flashing Blue and Red. KeyRinger will automatically pair to the last paired device when powered on.
Un-pairing – Press and hold the MFB and the volume up button until the device powers off. The paired list will now be cleared.
Pause – Press the MFB once to pause and once again to play.
Volume Up – Press volume up button once. A tone will sound at max volume.
Volume Down – Press volume down button once. A tone will sound at minimum volume.
Next Track – Hold down the volume up button.
Previous Track – Hold down the volume down button.
Charging – When connected to the USB cable and power source, the LED will be Red while charging and turn off once fully charged.
Low Battery – There will be a tone warning every 30 seconds.
FCC COMPLIANCE STATEMENT
This device complies with Part 15 of the FCC Rules. Operation is subject to the following two
conditions:
1) This device may not cause harmful interference.
2) This device must accept interference, including interference that may cause undesired operation
MODIFICATIONS NOT EXPRESSLY APPROVED BY THE MANUFACTURER COULD VOID THE
USER’S AUTHORITY TO OPERATE THE EQUIPMENT UNDER FCC RULES.
This equipment complies with the limits for a Class B digital device as specified in Part 15 of FCC Rules. These limits provide reasonable protection against radio and TV interference in a residential area. However, your equipment might cause TV or radio interference even when it is operating properly. To eliminate interference you can try one or more of the following corrective measures:
- Reorient or relocate the receiving antenna.
- Increase the distance between the equipment and the radio or TV.
- Use outlets on different electrical circuits for the equipment and the radio or TV.
- Consult your dealer or an experienced radio /television technician if the problem still exists.
Modifying or tampering with your system’s internal components can cause a malfunction and might invalidate the system’s warranty and void your FCC authorization to operate it.
IC Statement
This device complies with Industry Canada license-exempt RSS standard(s). Operation is subject to the following two conditions: (1) this device may not cause interference, and (2) this device must accept any interference, including interference that may cause undesired operation of the device.
CONTAINS Li-ion BATTERY.BATTERY MUST BE RECYCLED OR DISPOSED OF PROPERLY.
North America
Skullcandy, Inc., 1441 W.
Ute Blvd. Ste. 250
Park City, UT 84098, U.S.A.
www.skullcandy.com
Canada
Suite 2300 Bentall 5
550 Burrard St.
Vancouver
BC V6c 2B5, Canada
Skullcandy Europe BV
Zentrale Kontakstelle:
Luna ArenA
Herikerbergweg 238
1101 CM Amsterdam
Niederlande
eu.skullcandy.com
USER MANUAL
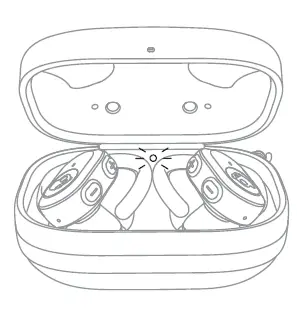
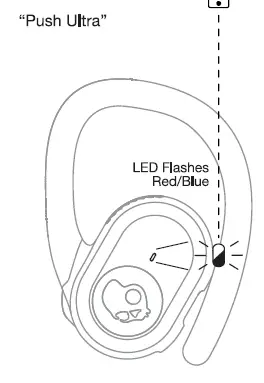
Skullcandy Push Ultra
Auto Pair Mode
Auto Power- On
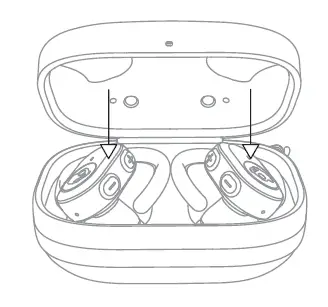
Charge Earbuds
Charge Case

Pairing Mode

Pair New Device
Power-On
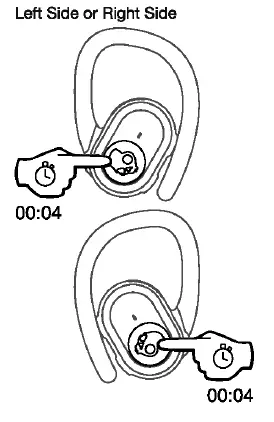
Power – Off
Play/Pause
Track Forward
Track Back
VolumeUp
Volume Down
Answer/End

Activate Voice Assistant
Clear Paired Device
Tile Enabled: Download the App

Pair Tile
3EQ Modes

Questions Visit: www.skullcandy.com
Speaker Dnver: 12mm, Impedance: 320hms, 1HD <3%@1 KHz. Voltage Regulation:
Skulcandye,anc1 other Mari<s are registered trademark<s of Skullcandy, Inc. All rights
Maximum operating temperature 4S’C.
FCC Compliance Statement
This device complies with Part 15 of the FCC Rules. Operation is subject to the following two conditions: (1) this device may not cause harmful interference, and (2) this device must accept any interference received, including interference that may cause undesired operation. Changes or modifications not expressly approved by the party responsible for compliance could void the user’s authority to operate the equipment.
This equipment has been tested and found to comply with the limits for a Class B digital device, pursuant to Part 15 of the FCC Rules. These limits are designed to provide reasonable protection against harmful interference in a residential installation. This equipment generates, uses and can radiate radio frequency energy and, if not installed and used in accordance with the instructions, may cause harmful interference to radio communications. However, there is no guarantee that interference will not occur in a particular installation.
If this equipment does cause harmful interference to radio or television reception, which can be determined by turning the equipment off and on, the user is encouraged to try to correct the interference by one or more of the following measures:
- Reorient or relocate the receiving antenna.
- Increase the separation between the equipment and receiver.
- Connect the equipment into an outlet on a circuit different from
- that to which the receiver is connected.
- — Consult the dealer or an experienced radio/TV technician for help.
ISED SAR Compliance Statement
This equipment complies with ISED radiation exposure limits set forth for an uncontrolled environment. End user must follow the specific operating instructions for satisfying RF exposure compliance. This transmitter must not be co-located or operating in conjunction with any other antenna or transmitter. The portable device is designed to meet the requirements for exposure to radio waves established by the ISED. These requirements set a SAR limit of 1.6 W/kg averaged over one gram of tissue. The highest SAR value reported under this standard during product certification for use when properly worn on the body.
]]>USER MANUAL

METHOD

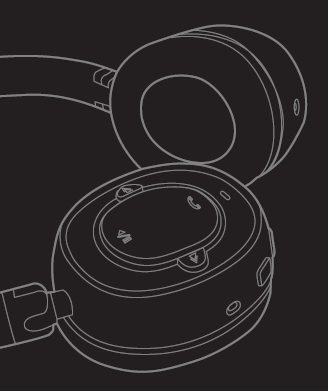
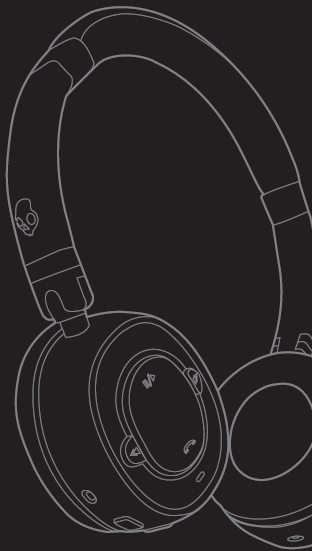
Heads up, smart-guy. In case you haven’t heard, the future is here now. Skullcandy is launching a full on audio assault with Method, a headset calibrated for unlimited hands-free function and wireless compatibility. Whether catching calls mobbing around town or dropping tunes while chilling at home, the Method’s custom sound quality and design will keep you three steps ahead of what’s going down.
FIRST TIME USE
Congrats on making the wise choice of picking up the ultra-stylish Skullcandy Method headset. No doubt you will be the envy of friends and foes alike, so take a minute and give yourself props for your remarkably good taste. First things first, you are going to want to charge the thing. The headset is pre-charged before leaving the factory, but enough time will have likely passed since then, so a re-juice is highly recommended.
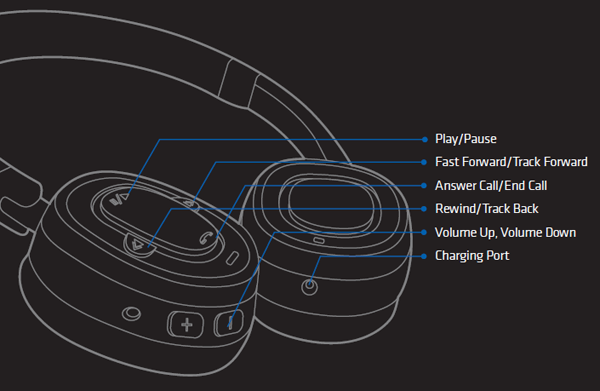
CHARGING WITH USB CABLE
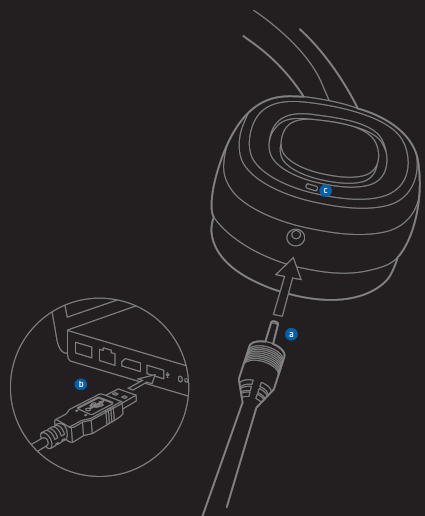
- To connect cable, -a- use the port below the control panel of the left earpiece. You can connect the cable -b- to the USB slot of any
PC or Mac.*
2. While firing up, the light indicator will be RED. To let you know when the process is finished, light -c- will turn GREEN.
3. Low Battery function will be indicated with a blinking RED light -c- and an audible tone going off once a minute to let you know when its time to re-fuel the device.
* It is recommended to charge your Method in an environment between 41-104F. Only use included charging cable. Using an unauthorized charger may cause damage.
PAIRING WITH A BLUETOOTH DEVICE
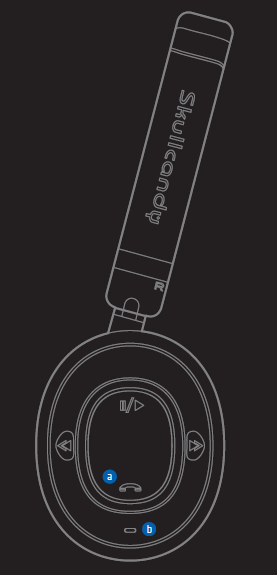
In order to get your Method linked up with Bluetooth capabilities, there’s going to be some small steps you’ll need to take (nothing too complicated, so don’t sweat it.)
- To pair Skullcandy Method, begin with headphones in off mode. Keep phone in the range of three feet when pairing.
- Push in and hold the multi-function button -a- for 6 seconds until the status light -b- flashes BLUE cop lights.
- Turn on Bluetooth on mobile and find the Bluetooth device list. Once there, choose Skullcandy Method from the list.
- Once selected, plug in the password PIN: 0000 on your phone if prompted.
- If required after successful pairing, select the Skullcandy Method from the device list and press connect.
- If all has gone well, the BLUE light -b- blinks once every 5 seconds.
- If for some reason this process has failed, switch off headphones and start the process over. Once you do this once successfully, the paired devices will recognize each other. Unless pairing info is deleted, you shouldn’t need to pair ever again.

PLAYING MUSIC
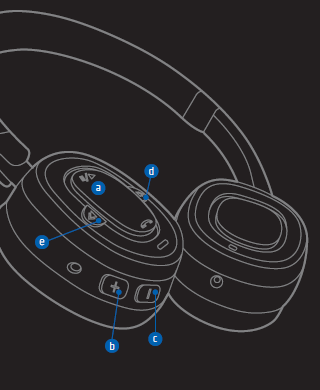
- Lets crank up some state-of-the-art sounds by pressing the play button. -a- You can control the volume by tapping or holding down the volume up button. -b- To decrease volume, do the same thing to the volume down button -c-.
- Hit the pause button -a- to stop tunes dead in their tracks. To bring them back to life, simply hit play. -a-
- * To jump to next track tap forward button, -b- once quickly. Want to hear that last track again, just hit track back button -e- once quickly.
*Compatible with devices that support AVRCP. Apple iPhone, iPod, iPad devices must be running on iOS 4.2.1 or higher.
TAKING CALLS
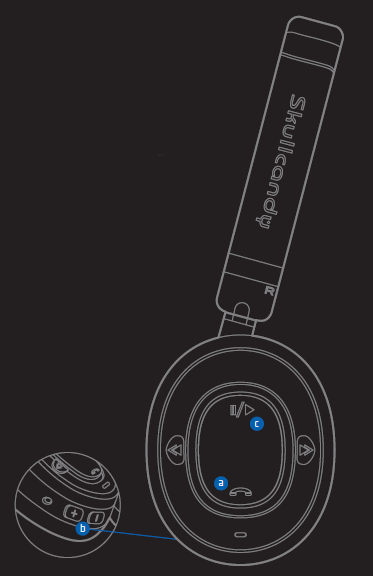
- To answer an incoming call, press the call button -a- once.
- To end call, simply press the call button.-a-
- Press volume up or volume down -b- to adjust the volume.
- Press the play button -c- to mute.
CARE AND MAINTENANCE
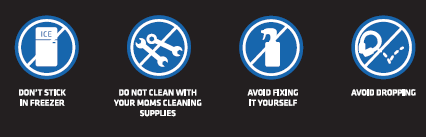
Although it is true that your Method contains multiple super-powers, indestructibility is not one of them. Be sure to keep your Method dry, and do not expose it to direct sunlight or hot areas for extended periods of time. High temperatures will shorten the Method’s life-span, destroy the battery, and distort crucial plastic components. Just the same, the Method will not respond well to extreme cold. So, keep it out of the freezer at all costs. The suitable temperature for Method is 32-104F. If you feel the need to take the product apart, just remember MacGyver will not be around to help you piece it back together. Do not test out any fancy b-ball moves with headphones, because studies have shown they were remarkably better having not been dropped on the floor. Do not use any cleaning products from the bathroom, kitchen or laundry room on the Method. The results will not be pretty and Skullcandy will not be legally responsible for your lack of common sense. If product fails to work, please contact us and we will be happy to provide our sincere support.
FEDERAL COMMUNICATION COMMISSION INTERFERENCE STATEMENT
This equipment has been tested and found to comply with the limits for a Class B digital device, pursuant to Part 15 of the FCC Rules. These limits are designed to provide reasonable protection against harmful interference in a residential installation. This equipment generates, uses and can radiate radio frequency energy and, if not installed and used in accordance with the instructions, may cause harmful interference to radio communications. However, there is no guarantee that interference will not occur in a particular installation. If this equipment does cause harmful interference to radio or television reception, which can be determined by turning the equipment off and on, the user is encouraged to try to correct the interference by one of the following measures:
- Reorient or relocate the receiving antenna.
- Increase the separation between the equipment and receiver.
- Connect the equipment into an outlet on a circuit different from that to which the receiver is connected.
- Consult the dealer or an experienced radio/TV technician for help.
FCC Caution: Any changes or modifications not expressly approved by the party responsible for compliance could void the user’s authority to operate this equipment.
This device complies with Part 15 of the FCC Rules. Operation is subject to the following two conditions:
(1) This device may not cause harmful interference, and
(2) this device must accept any interference received, including interference that may cause undesired operation.
]]>
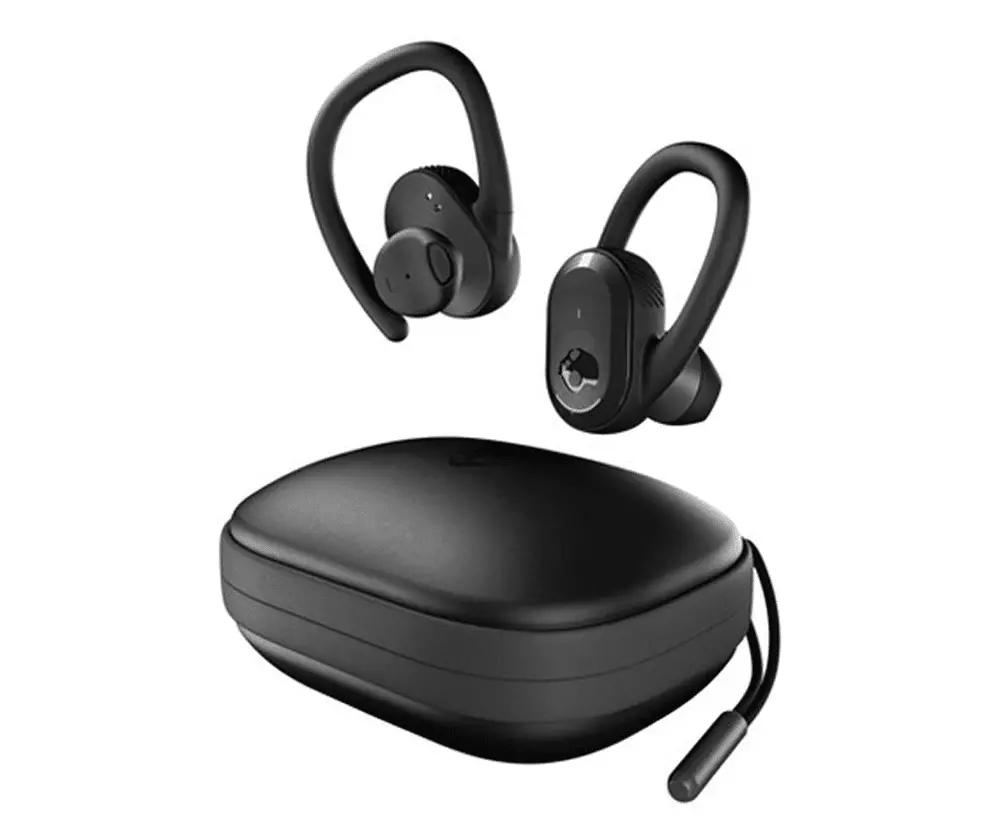
Skullcandy Dime True Wireless in-Ear Earbuds
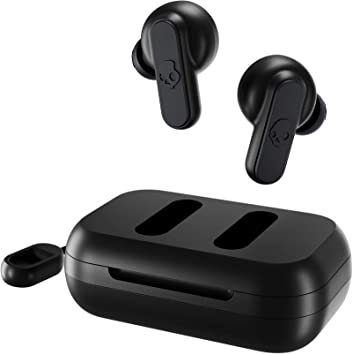
The smallest, lightest earbud we’ve ever made packs a powerful punch. Skullcandy® ultimate sound gives you the kind of full, rich sound you’d expect from far more costly earphones. Even when you’re on the phone, you can use either earbud alone thanks to the dual microphones. Dime is sweat- and water-resistant, so it can withstand workouts and outdoor excursions, and it’s covered by our Fearless Use Promise, so you can listen without stress.
What’s in the box
Specifications
| Driver Diameter |
6 mm |
| Impedance |
16 Ohm±15 |
| Sensitivity |
NA |
| Frequency Response | 20 Hz – 20000 Hz |
| Maximum Power Input | NA |
| Noise Cancelling | NA |
| Wearing Style | In Ear |
| Magnet Type | Dynamic |
| Bluetooth Version | 5.0 |
| Compatible Profiles | All Bluetooth Devices |
| Supported Codecs | HSP, HFP, AVRCP, A2DP |
| Bluetooth Range | 10 Meters |
| Battery Type | Lithium Polymer Batteries |
| Battery Life | 12 Hours |
| Charging Time | 2 Hours |
Setup Dime Earbuds
3 minutes.
Setup you new Skullcandy Dime Earbuds
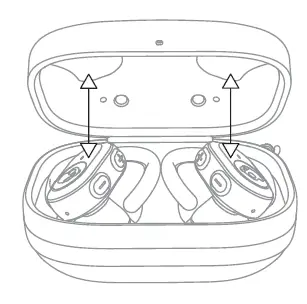
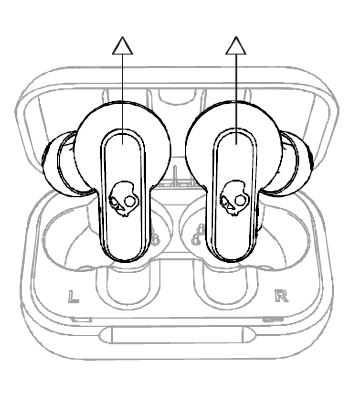
- Remove the Earphones and Stickers to start charging
Remove the earphones from the case and clean the charging contact points of stickers. Before using the earphones for the first time, we recommend charging them for about 30 minutes in the case. Make sure the earphones’ LEDs glow red to signal that they are charging.
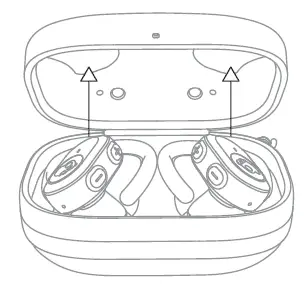
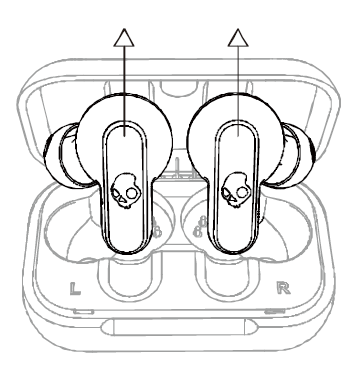
- Once charged, remove from the case
Remove the earbuds from the case once they’ve been charged to begin pairing. Both earbuds will turn on automatically, and the LEDs will glow blue at the same time as they sync.
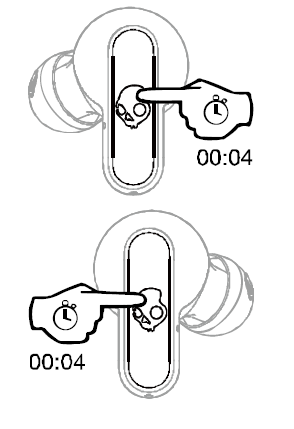
- Enter pairing mode
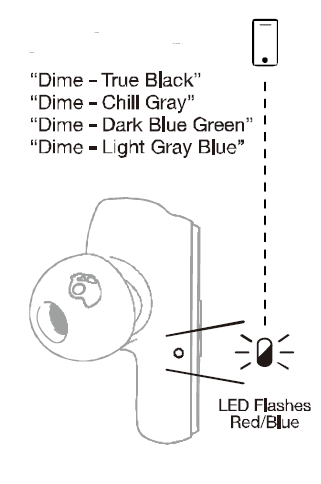
You’ll hear a voice prompt that reads ‘Pairing’ once the earbuds have synchronized up. The left earbud will be the only one to begin flashing red/blue. Turn on Bluetooth on your device and seek for ‘Dime®’ in the list of accessible Bluetooth Devices. If your buds don’t automatically enter pairing mode, hold the button for 4 seconds.
- Pair with your phone
You’ll hear a voice prompt that reads ‘Pairing’ once the earbuds have synchronized up. The left earbud will be the only one to begin flashing red/blue. Turn on Bluetooth on your device and seek for ‘Dime®’ in the list of accessible Bluetooth Devices.
Pairing the New Device
Following these simple steps, you may quickly link to another device if you have already set up and paired to one.
- With a 4-second button hold, turn off your headphones manually.
- Press and hold both earbuds for 4 seconds while they are turned off. This will turn your earphones on, sync them, and then put them into “Pairing” mode. Your LEFT earbud will begin to flash red/blue at this point.
- To pair your new gadget, simply search for and choose Dime® from your available Bluetooth Device list.
PAIRING ISSUES?
ISSUE:The biggest challenge with true wireless earbuds is ensuring your buds are properly connected to each other and your device. There are times when you may unintentionally disconnect your buds and change their paired state; this can create pairing challenges and impact your ability to hear audio in both earbuds or use either bud in Solo Mode. Do not worry, we have a few easy ways to get this fixed!
FIRST COMPLETE A POWER CYCLE by simply placing your buds into the charging case until the LED on both earbuds turns RED. Then remove your buds from the case and evaluate, sometimes this is all you need, but if you’re still having trouble we’ve got you covered.
SOLUTION 1: RE-SYNC YOUR EARBUDS – “AUDIO ISN’T PLAYING FROM BOTH OF MY EARBUDS”
- Power ON your earbuds by removing them from the charging case, or manually press and hold the button on each bud for 2 seconds.
- Once powered ON (you can be in a connected or non-connected state) press the button on BOTH buds 4x to start the earbuds re-sync pairing mode (earbuds connecting to each other).
- Your earbuds will flash Red/Blue momentarily as they re-sync, once successful they will flash Blue together and you will hear a “connected” voice prompt.
- If you were connected to your device, your earbuds will automatically reconnect to your device and you’re ready to stream in stereo audio (sound will play from both earbuds).
SOLUTION 2: RESET YOUR PAIRED DEVICE LIST – “I CAN’T GET MY EARBUDS TO PAIR TO MY DEVICE CORRECTLY, OR SOLUTION 1 ISN’T FIXING MY AUDIO PLAYBACK”
- To ensure ease of re-pairing, please un-pair or forget your Dime® in your paired Bluetooth device list
- Remove your Dime® earbuds from the charging case and allow them to automatically power ON.
- Ensure your earbuds are in a non-connected state, then on either earbud, press the button 2x and then hold for 2 seconds.
- This will automatically reset your paired device list and enter you directly back into Pairing Mode. You will hear the voice prompt “Pairing” and only the LEFT bud will begin to flash RED/BLUE.
- At this time, turn ON your device’s Bluetooth and look for “Dime” in your list of Available Bluetooth devices, and select it.
- IMPORTANT – Select the “Pair” and “Ok” prompts that will pop up on your screen.
- Once successfully paired, a voice prompt will notify you are now “Connected”
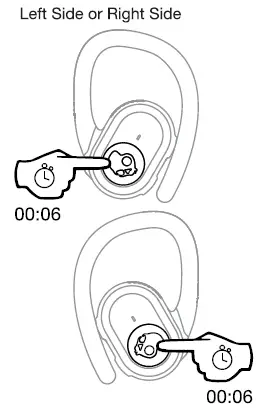
User Controls
- Auto Power On & Power Off:
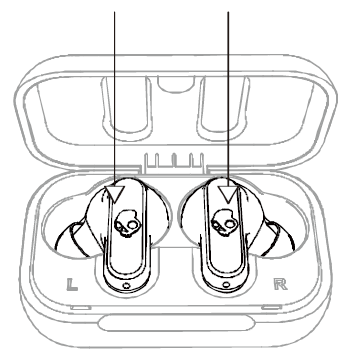
- Remove earbuds from Case, and Place them back into the case (charging will begin).
- Remove earbuds from Case, and Place them back into the case (charging will begin).
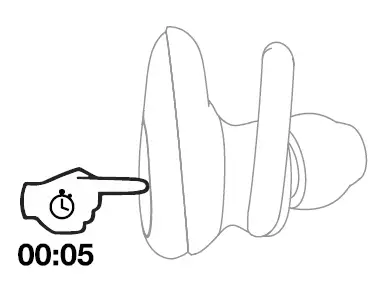
- Manually Power On:
- 2-second hold
- Manually Power Off:
- 4 Second hold
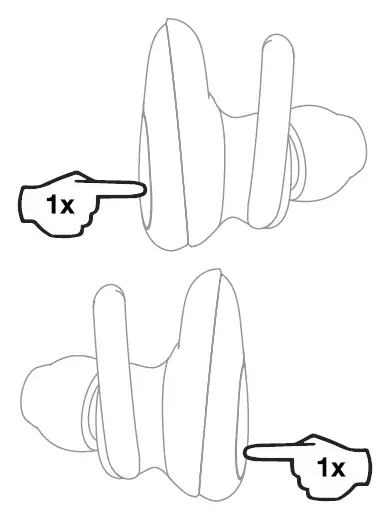
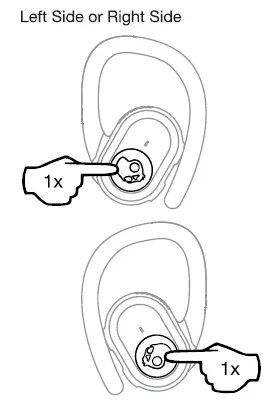
- Play/Pause & Answer/End Calls:
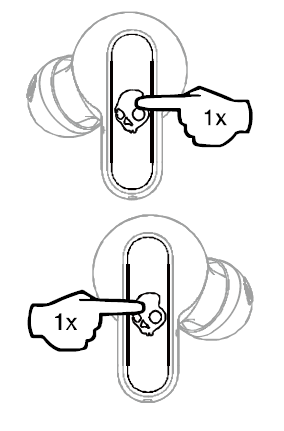
- 1x press on EITHER earbud
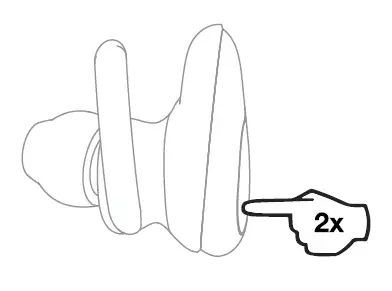
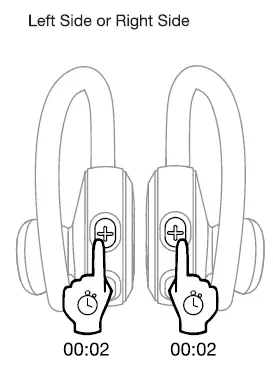
- Volume Up:
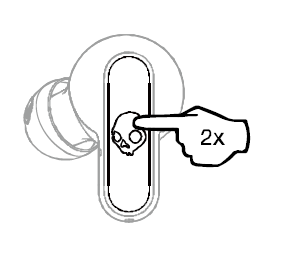
- 2x press on your RIGHT earbud
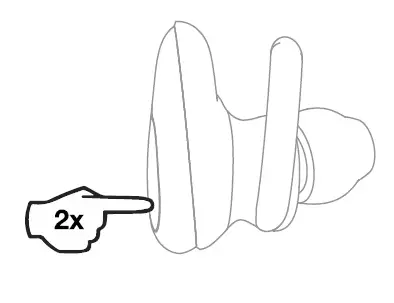
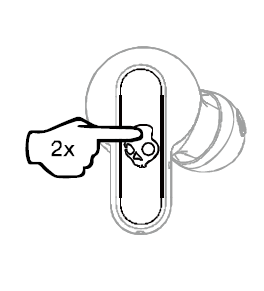
- Volume Down:
- 2x press on your LEFT earbud
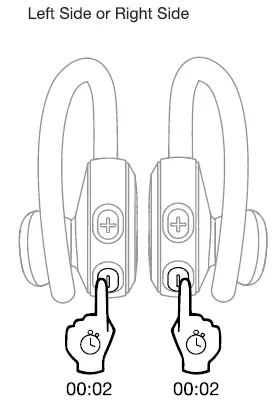
- Track Forward:

- 1 second hold on your RIGHT earbud
- Track restart/ track back:
- 1 second hold on your LEFT earbud
- Activate Assistant:
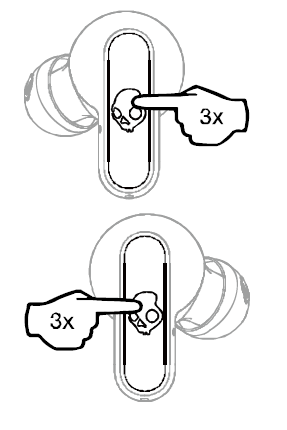
- 3x press on EITHER bud
Auto Pair Mode
Charging
Earbuds
Case
Frequently Asked Questions
What is the total charging time?
EARBUDS:
- It takes an hour for the earbuds to charge to 100% within the case.
- Place your earbuds in the charging case to charge them. While charging, the earbud LEDs will be solid red.
- When the LEDs are fully charged, they will turn off.
- A voice prompt will tell you that your battery has less than 30 minutes of play time left, and the LEDs will blink red every 5 seconds.
CASE:
- It takes 5 hours for the case to charge to 100%.
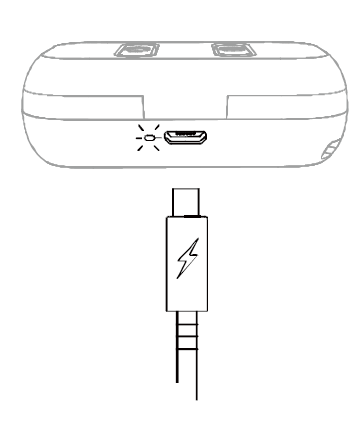
- Connect the Micro-USB charging cable to a computer, wall charger, power bank, or 12-volt adaptor in a car to charge your case.
- When the case is charging, the LED to the left of the micro-usb connector will glow RED, and when the case is fully charged, the LED will turn Green.
FAQ
What is the procedure for connecting my Skullcandy wireless earbuds to my phone?
To pair your Skullcandy headphones with your Android device, go to settings, turn on Bluetooth, pick “Pair New Device,” and then select your Skullcandy device. The pairing procedure has finished.
Is it okay for me to wear Skullcandy dime in the shower?
The Jib True Wireless earbuds are sweat and water resistant to IPX4 standards. That is to say, they are not waterproof.
Is it possible to connect Skullcandy dime to several devices?
Multipoint allows you to connect to and switch between multiple Bluetooth devices. You can effortlessly switch calls from one device to another without having to disconnect and reconnect manually, for example.
Is the Skullcandy dime noise-canceling?
There are no sophisticated capabilities, like as active noise cancellation, and no app support is available. You may, however, use either earpiece separately, and the earpieces are water resistant to IPX4. Even considering the size of the box, the Skullcandy Dime’s battery life is disappointing.
CAN I USE MY SKULLCANDY POWER ACCESSORIES/PC/LAPTOP TO CHARGE DIME®?
To charge your Dime®, you may use almost any USB-A to Micro-USB charging cord.
How nicely do these fit into tiny ears? Also, do they hurt in the same way as the bands on the gel bits do?
These have to be worn with the tiniest rubber fittings. In order for them to stay in my ears, I have to wear them backwards. Because the sesh is also too huge, I must either have tiny ears or have troubles with skullcandy ear buds.
CAN I USE SIRI/GOOGLE ASSISTANT/ALEXA WITH MY DIME®?
When paired to your device, you can press the button on either the LEFT or RIGHT bud 3x to activate your voice assistant feature at any time.
CAN I USE DURING MOST ACTIVITIES?
Dime® has a water resistant rating of (IPX4). This will allow them to hold up to some rain and moisture with no problems at all.
Please note that ONLY the buds have the IPX4 rating. The charging case does NOT have an IPX4 rating so you want to be a bit more careful with that.
WHEN ON A CALL OR LISTENING TO MY CONTENT, WILL I HEAR AUDIO IN ONE OR BOTH EARBUDS?
Dime® has stereo calling and streaming so you’ll always hear the caller or your media content in both ears.
Although, you do have the option to use only one earbud (left or right side) if you prefer Solo Mode in some situations.
WHICH SIDE OF DIME® IS CONSIDERED THE “PRIMARY” BUD?
The LEFT and RIGHT side earbud can be your Primary earbud, so either bud can be used in Solo Mode (one earbud listening).
WHICH VERSION OF BLUETOOTH DOES DIME® USE?
Bluetooth® version 5.0
CAN I USE DIME® WITH A PS4/XBOX ONE/SWITCH?
Xbox One: No
Switch: Yes
PS4: No
CAN I CONNECT DIME® TO A COMPUTER?
Yes, as well as to a phone, tablet, MP3 player, laptop, or anything else with a Bluetooth connection.
WHAT IS THE BLUETOOTH RANGE OF THE DIME®?
You will be able to listen up to 30+ feet (10+ meters) away from your paired device, though your connection experience may vary based on your environment.
DOES THE DIME® PAIR WITH THE SKULLCANDY APP?
Sorry, but the Dime® will not pair with the Skullcandy APP.
WHAT IS THE BENEFIT OF THE ROLE SWITCHING FEATURE AND FUNCTIONALITY?
This allows both the LEFT and RIGHT bud to act as the Primary bud, which allows more media controls and features to be activated from either side. Functions such as, play/pause, answer call/hang up call, Activate Assistant can be controlled on both the LEFT and RIGHT bud, simplifying the user experience.
This feature also allows you to utilize either the LEFT or RIGHT bud in Solo Mode, rather than being limited to just one specific side.
TELL ME ABOUT THE IMPROVED TRUE WIRELESS RE-SYNC OF YOUR EARBUDS?
This improved earbud to earbud pairing solution will not require the end user to Clear/Reset their device every time they have issues with the buds pairing together. Simply re-sync your earbuds following solution 1 above and quickly get audio streaming from both buds in no time.
WHAT IS THIS NEW LANYARD FEATURE USED FOR?
Since the charge case is so insanely small, the provided lanyard accessory is used to connect/clip your case and earbuds to your key chain, backpack, really anything you want. You’ll have no problem carrying your earbuds with you wherever you go!
DOES DIME® HAVE SOME SORT OF FAST CHARGE?
Dime® has a Micro-USB charging port and cable.
WHY DOES THE MICRO USB CHARGING CABLE LOOK DIFFERENT?
With this new design, there is no wrong way to plug the USB-A side of your cable into your power source. The non-directional plug just makes it quicker and easier to plug in since you don’t need to figure out if it’s upside down or not.
CAN I CHARGE DIME® WITH MY SKULLCANDY POWER ACCESSORIES/PC/LAPTOP?
Pretty much all USB-A to Micro-USB charging cables will work to charge your Dime®.
BATTERY LIFE AND PLAY TIME IS VERY IMPORTANT TO ME, HOW LONG DOES THE DIME®LAST?
There is 3.5 hours of play time in the ear buds, and 8.5 hours in the case, allowing up to 12 Hours of total play time.
WHAT IS THE TOTAL CHARGING TIME FOR DIME®?
EARBUDS:
1 hour for the earbuds to charge to 100% inside the caseTo charge your earbuds, place them in the charging case. The earbud LEDs will be solid red while charging.
The LEDs will turn off when fully charged.
When your battery has less than 30 minutes of play time left, a voice prompt will notify you “battery low” and the LEDs will flash red every 5 seconds.
CASE:
5 hours for the case to charge to 100%To charge your case, plug in the Micro-USB charging cable and connect to a computer, wall charger, power bank or 12-volt adapter in a car.
The LED to the left of the mirco-usb port will turn RED to indicate the case is charging, and once the case has fully charged, the LED will turn Green.
BUDS NOT CHARGING IN CASE/CASE LID NOT CLOSING PROPERLY?
ISSUE: Not seeing the RED LED indicator on the buds when you’ve placed your DIME back in the case? This would let you know your earbuds are powered off and charging, so if you’re experiencing this issue here are a few helpful tips.
SOLUTION:
First ensure your case is charged up. If your charge case battery is dead your earbuds will not automatically power off and begin to charge when placed into the case.
Check to see if any debris is blocking the charging pins in the case, or on the bud
Check to see if the removable in-ear gels are placed correctly on the acoustic port, this could be keeping the buds from sitting correctly in the case
This same issue could also be interfering with your case lid when closing, if you’re having a hard time closing the lid correctly, this is an indicator that buds are not set correctly or the gels are interfering.
SOLO MODE
ISSUE: If you would like to use Dime® with only one ear bud (Solo Mode), you’re in luck! The updated technology in Dime® allows you to use either the left OR the right bud in Solo Mode. Once paired correctly, you will be able to switch seamlessly between your right and left earbud. Although, if you’re having any challenges utilizing the Role Switching capabilities, you may follow these simple steps to ensure ease of use when pairing and switching between Solo and Stereo Modes.
SOLUTION:
Please note – BOTH the LEFT and RIGHT bud for Dime® can be used in Solo Mode.
For the optimal Solo Mode functionality, first Power ON and pair your buds to your device normally or as described in our troubleshooting section. This will ensure the seamless transition between Stereo and Solo modes.
Once you’ve paired your earbuds you can simply remove either your left or right earbud from the case and it will connect to your device in Solo Mode. At any time, you can remove the other bud from the case, it will automatically sync and begin streaming audio in Stereo Mode.
Additionally, if you’re already streaming in Stereo Mode, simply place the RIGHT or LEFT bud back into the case; whichever you prefer! The remaining bud will stay paired and function with both phone calls and music.
In Solo Mode you will maintain your Play/Pause, Answer/Hang up Call and Activate Assistant functionality, but please note you will lose some of the media control functionality such as “Volume +/- “, and “Track <</>>”.
Again, if you would like to change back to Stereo Mode while in Solo Mode, simply pull the other bud from the case at any time and you will hear a tone, or the music will seamlessly begin to stream to indicate that you have automatically entered back into Stereo Mode.
PLEASE NOTE – If you’re having any trouble switching between the LEFT and RIGHT buds in Solo Mode, you may need to follow the reset solutions above to regain proper functionality.
USER MANUAL
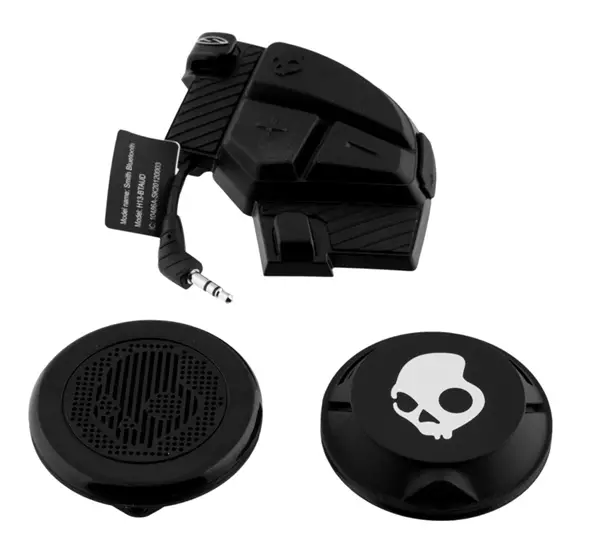
Skullcandy Smith Bluetooth
Model no:H13-BTAUD Rating: 5V 200MA
Main Unite:
This section include the photo of the product and the overview of the main unit
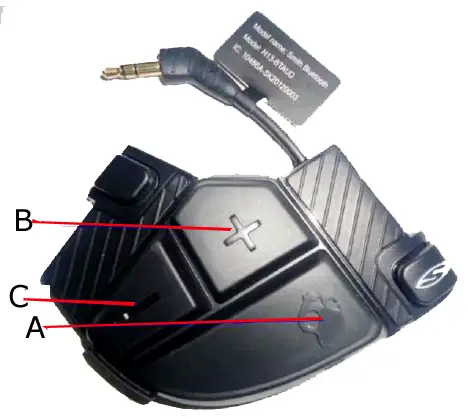
- A: Power on/Power off
Also refer to MFB (Skull Button) below mentioned - B: Volume+
Increase volume and track forward - C: Volume-
Decrease volume and track backward
To Enter Pairing Mode:
- Make sure the Smith Device is in OFF mode
- Long Press MFB (Skull Button) (refer to A point) for 5 seconds
- While in pairing mode, the LED will alternate flashing Blue/Red
In STANDBY mode Blue LED will fast flash two times every 3 secs.
To Power On:
- Make sure Smith is in OFF mode
- Long Press MFB (Skull Button) (refer to A point) for 3 seconds
- While Power On, the LED will flash Blue
- Smith will search and AUTO connect with previous paired phone for 3 seconds
- If previous phone is not available, it will enter STANDBY mode
- Can MANUALLY connect previous phone in STANDBY mode by phone operation
- Please note cannot pair a NEW phone in STANDBY mode
- To pair a NEW phone that has never been paired before, need to start Pairing Mode process.
To Power Off:
- While Smith is in “Power ON” or “STANDBY” mode
- Long Press MFB (Skull Button) (refer to A point) for 3 seconds
- If in STANDBY mode for 30 mins, Smith will automatically Power off
To Answer Phone Call, Play/Pause Music:
- Short Press MFB (Skull Button) (refer to A point)
- Music will resume after hanging up call
Volume Up:
- Short Press Volume Up Button (+)
- Will have audible tone sound when Max volume is reached
- 15 steps of volume control up
Volume Down:
- Short Press Volume Down Button (-)
- Will have audible tone sound (mute) when Min volume is reached
- 15 steps of volume control down
Track Forward:
- Long Press Volume Up Button (+)
Track Backward:
- Long Press Volume Down Button (-)
Tested Line of Sight Range of BT Connection:
- 12 meters
Battery Playback Time:
- 7 to 7.5 hours
Charging:
- Approximately 1.5 Hours
- LED will display solid Red when charging
- When Charge Full, LED will turn off
Low Battery Status Indicator:
- LED will display flashing Red
- Will have audible beeping indication every 30 seconds when battery is low
Your product contains batteries covered by the European Directive 2006/66/EC, which cannot be disposed with normal household waste.
Please inform yourself about the local rules on separate collection of batteries because correct disposal helps to prevent negative consequences for the environmental and human health.
Caution:
Risk of explosion battery is replaced by an incorrect type.
Dispose of used batteries according to the instructions
Warning: Changes or modifications to this unit not expressly approved by the party responsible for compliance could void the user’s authority to operate the equipment.
NOTE: This equipment has been tested and found to comply with the limits for a Class B digital device, pursuant to Part 15 of the FCC Rules. These limits are designed to provide reasonable protection against harmful interference in a residential installation. This equipment generates, uses and can radiate radio frequency energy and, if not installed and used in accordance with the instructions, may cause harmful interference to radio communications.
However, there is no guarantee that interference will not occur in a particular installation. If this equipment does cause harmful interference to radio or television reception, which can be determined by turning the equipment off and on, the user is encouraged to try to correct the interference by one or more of the following measures:
- Reorient or relocate the receiving antenna.
- Increase the separation between the equipment and receiver.
- Connect the equipment into an outlet on a circuit different from that to which the receiver is connected.
- Consult the dealer or an experienced radio/TV technician for help.
This device complies with Part 15 of the FCC Rules. Operation is subject to the following two
conditions :
1) this device may not cause harmful interference, and
(2) this device must accept any interference received, including interference that may cause undesired operation.
This device complies with Industry Canada licence-exempt RSS standard(s). Operation is subject to the following two conditions:
(1) this device may not causeinterference, and
(2) this device must accept any interference, including interference that may cause undesired
operation of the device.
Under Industry Canada regulations, this radio transmitter may only operate using an antenna of a type and maximum (or lesser) gain approved for the transmitter by Industry Canada. To reduce potential radio interference to other users, the antenna type and its gain should be so chosen that the equivalent is tropically radiated power (e.i.r.p.) is not more than that necessary for successful communication.
]]>