SILVERCREST SVEB 160 B2 Vacuum Sealer

Before reading, unfold the page containing the illustrations and familiarise yourself with all functions of the device.
Information about this short manual
This document is a shortened print version of the complete operating instructions.
Scanning the QR code will take you directly to the Lidl Service page (www.lidl-service.com), where you can view and download the full version of the operating instructions by entering the article number (IAN) 367892_2101.
WARNING!
Observe the information in the complete operating instructions and the safety instructions to avoid personal injury and damage to property.
The short manual is an integral part of this product. Before using the product, please familiarise yourself with all operating and safety instructions. Keep the short manual in a safe place and hand over all documents when passing the product on to any future owner/user.
Proper use
This appliance is intended exclusively for the sealing and vacuum-packing of foodstuffs in household quantities and only in private households. This appliance is not intended for commercial or industrial applications or for continuous use. It is not intended for any other purpose nor for use beyond the scope described. No claims of any kind will be accepted for damage arising as a result of incorrect use. The risk shall be borne solely by the user.
Package contents and transport inspection
The appliance is supplied with the following components as standard:
- Vacuum sealer
- 1 x film roll
- 2 x tubes
- 3 x adapters
- 1 x replacement sealing ring
- This short manual
NOTE
- Check the package for completeness and signs of visible damage. If the delivery is incomplete or damage has occurred as a result of defective packaging or during transport, contact the Service hotline (see section Service).
- Remove all parts of the appliance, the tube film, and the operating instructions from the carton.
- Remove all packaging materials and any protective film from the appliance.
DANGER
- Do not allow children to play with packaging materials. There is a risk of suffocation.
Appliance description
Figure A: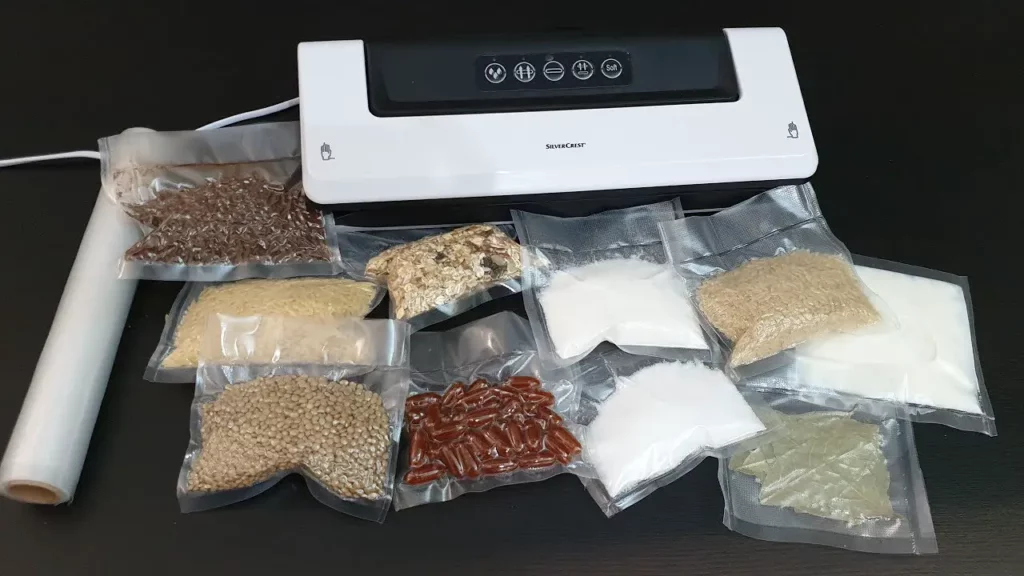
- Appliance lid
- Suction fitting
- Lower sealing ring
- Sealing wires
- Cable storage compartment
- Rear limiters
- Front limiters
- Lid release
- Drip tray
- Suction tube
- Storage compartment lid
- Upper sealing ring
- Press seal
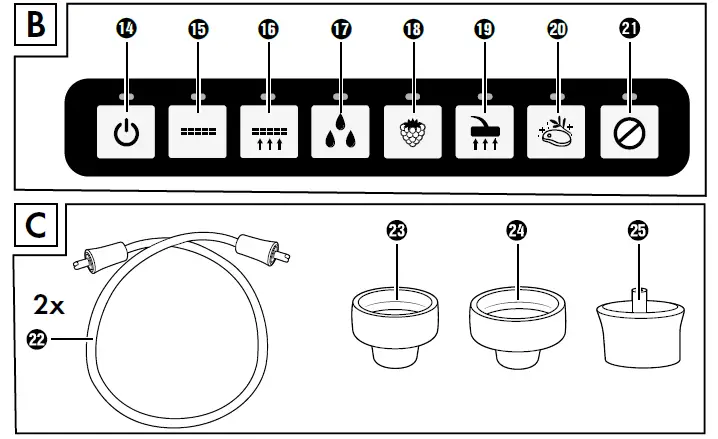
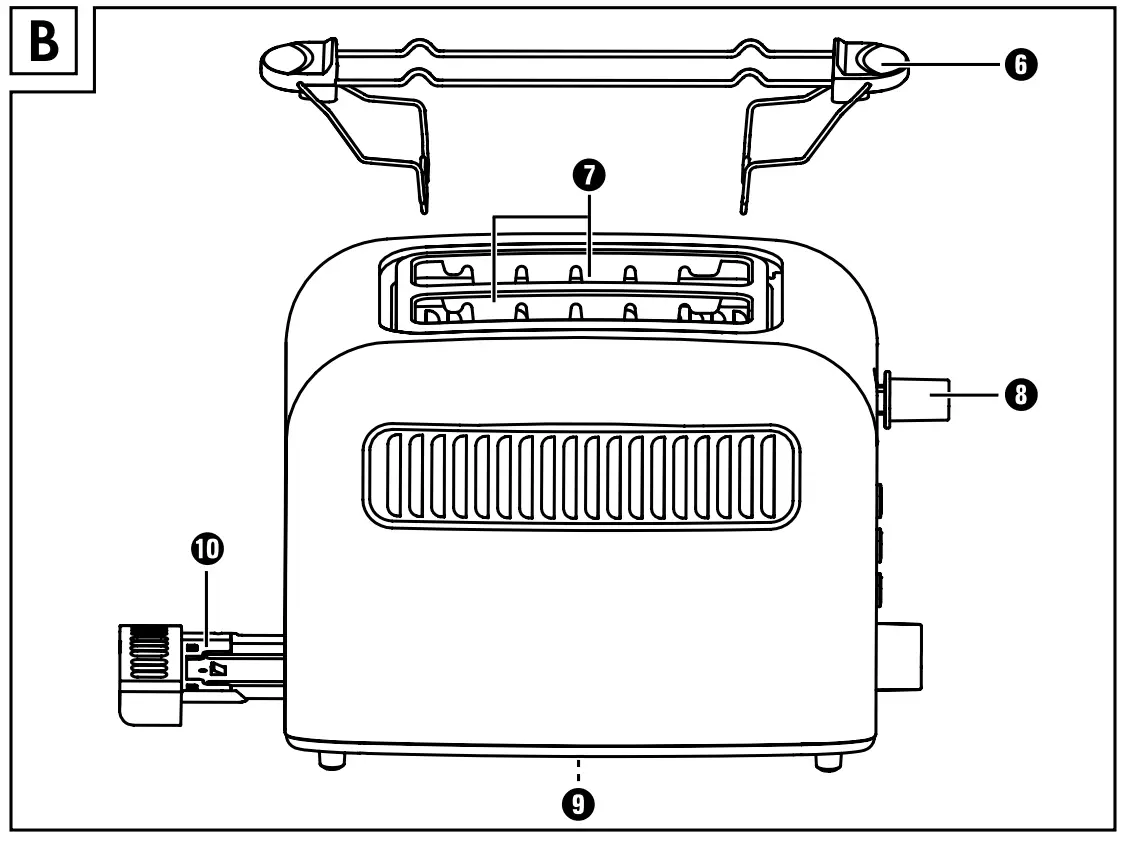
Figure B: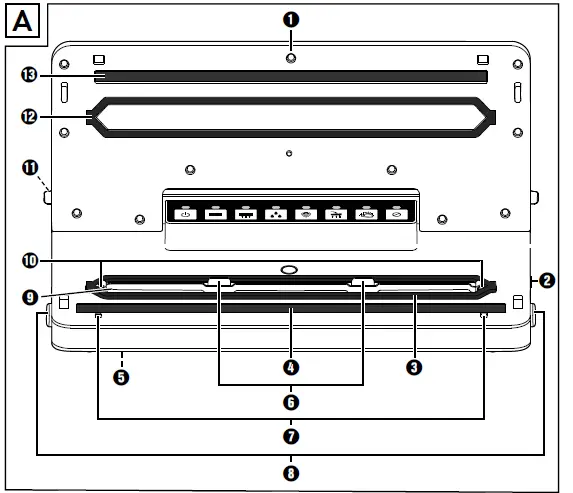
- button (switch appliance on/off) with control lamp (green)
- button (start “Sealing” function) with control lamp (red)
- button (start “Vacuum sealing” function) with control lamp (red)
- button (activate/deactivate additional function “Wet”) with control lamp (green)
- button (activate/deactivate additional function “Soft”) with control lamp (green)
- button (start/cancel “External vacuuming” function) with control lamp (green)
- button (start “Marinate” function) with control lamp (green)
- button (cancel function/process) with control lamp (green)
Figure C: - Vacuum hose
- Adapter A
- Adapter B
- Adapter C
Technical specifications
- Operating voltage 220–240 V ∼ (AC), 50/60 Hz
- Power consumption 160 W
- Protection class II / (double insulation)
- All parts of this appliance that come into contact with food are food-safe.
Safety information
RISK OF ELECTRIC SHOCK!
- Before use, check the appliance for visible external damage. Never operate an appliance that is damaged.
- To avoid potential risks, damaged mains cables should be replaced by the manufacturer, their customer service department or a similarly qualified person.
- Never use an appliance with a faulty power cable.
- Do not use extension cables or power socket strips that do not meet the required safety standards.
- Never open the appliance housing!
- Pull the plug from the socket before starting to clean the appliance.
- Ensure that no moisture can penetrate the appliance during cleaning.
RISK OF INJURY!
- All repairs must be carried out by authorized specialist companies or by the Customer Service department. Improper repairs may result in a risk of injury to the user or damage to the appliance. It will also invalidate any warranty claims.
- The mains power socket must be easily accessible so that the power cable can be easily disconnected in the event of an emergency.
- Cleaning and user maintenance tasks may not be carried out by children unless they are supervised.
- This appliance may be used by children aged 8 years and above and by persons with limited physical, sensory or mental capabilities or lack of experience and knowledge, provided that they are under supervision or have been told how to use the appliance safely and are aware of the potential risks.
- Do not allow children to play with the appliance!
- Children must be supervised to make sure that they do not play with the appliance.
- Do not leave the appliance unsupervised when it is ready for use. To prevent it from being switched on accidentally, always unplug the appliance after use or during breaks.
CAUTION – PROPERTY DAMAGE!
- Do not use an external timer switch or a separate remote control system to operate the appliance.
NOTE
- No user action is required to switch the product between 50 and 60 Hz. The product switches automatically to either 50 or 60 Hz.
Setting up and connecting
Requirements for the set-up location
For safe and trouble-free operation of the appliance, the set-up location must fulfil the following requirements:
- When setting up the appliance, place it on a firm, flat and horizontal surface.
- Do not operate the appliance in a hot, wet or extremely damp environment or in the vicinity of flammable materials.
- The mains power socket must be easily accessible so that the power cable can be easily disconnected in the event of an emergency.
Switching the appliance on/off
CAUTION – PROPERTY DAMAGE
- Before you plug in the appliance, compare the connection data (voltage and frequency) on the rating plate with that of your main power network. This data must match to prevent damage to the appliance.
- Ensure that the power cable is undamaged and is not routed over hot surfaces and/or sharp edges.
- Do not leave the mains cable hanging over any edges (tripping hazard).
- Insert the plug into the mains power socket.
- Press the button r to switch on the appliance. The control lamp r lights up.
- Press the button r again to switch off the appliance. The control lamp r switches off.
- Pull the plug from the socket if you do not plan to use the appliance for an extended period and before cleaning it.
Functions
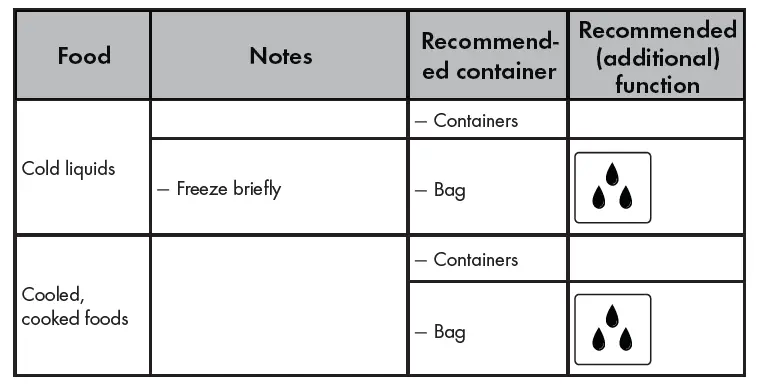
Tips
The following table offers some useful information on the optimal preparation and processing of various foods.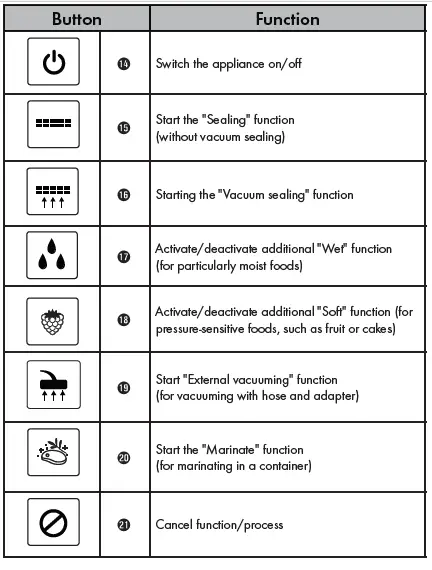
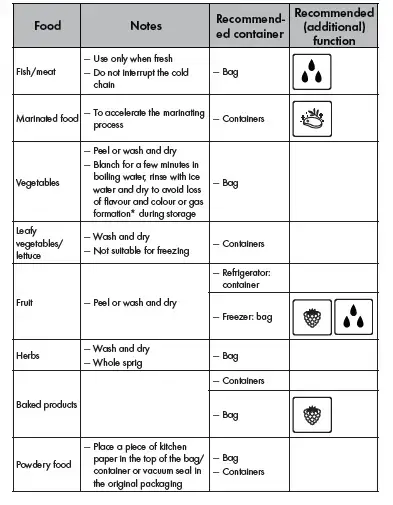
* For example, this applies to all types of cabbage (broccoli, Brussels sprouts, kale, etc.), asparagus, sugar snap peas, beans, romanesco, and Pak Choy.
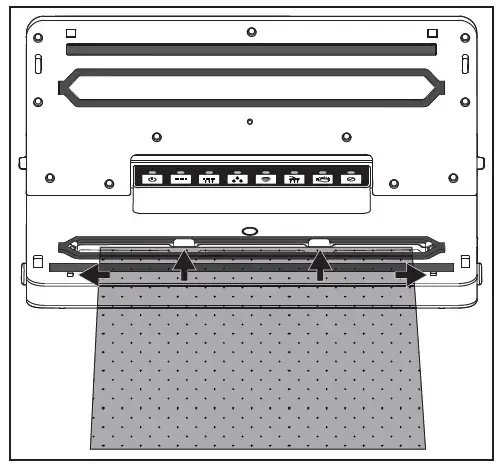
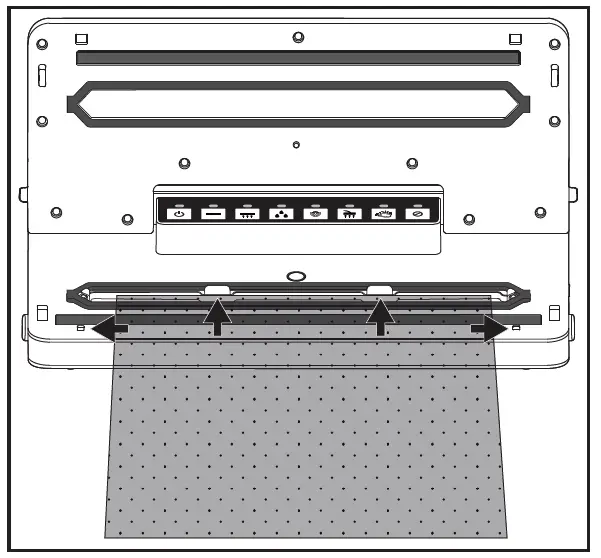
Sealing a tubular film
NOTES ON THE FILM
- The film width may not exceed 30 cm. Otherwise it cannot be sealed correctly.
- Use only nylon PA/PE films with a structure (dots or grooves) on one side and a thickness of approx. 0.17–0.29 mm (170–290 μ) in this appliance. Otherwise, the seal will not be tight and the appliance may be damaged. You can recognize films of this type from the information on the packaging. The quality of the seal will vary depending on the type and thickness of the film.
- The supplied film is suitable for temperatures between -20°C and 110°C.
- The supplied foil is BPA-free and microwaveable. However, never heat completely sealed bags in the microwave. The bag could burst! One side of the bag must be open. Heat the bags for no more than 3 minutes at a maximum temperature of 70°C.
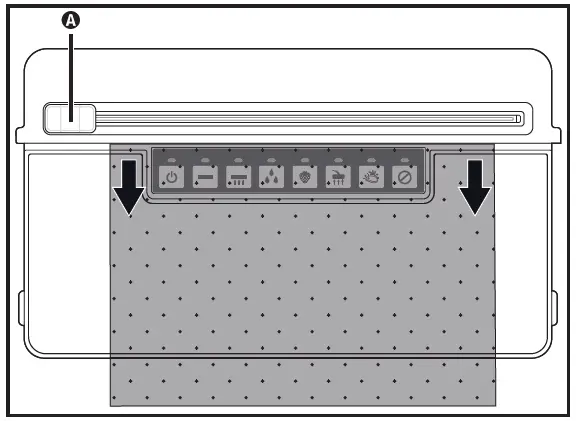
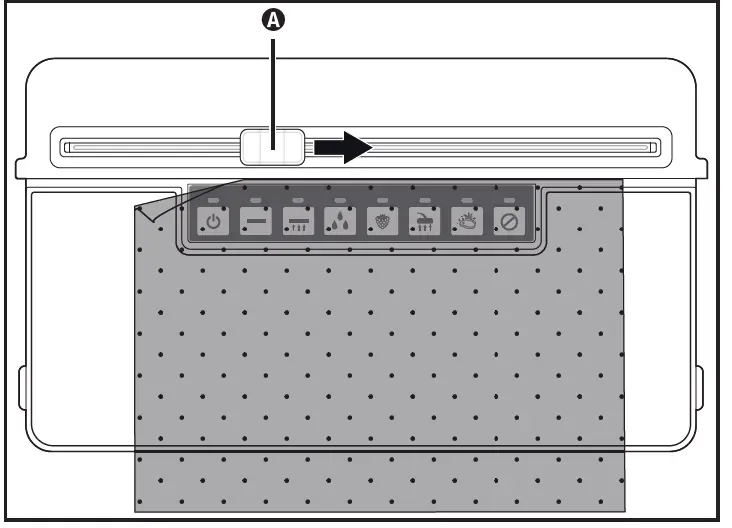
- Using scissors, cut the required length for your bag from the tubular film. Cut as straight as possible or proceed as follows to use the film cutter integrated in the lid of the storage compartment q:
- Push the film A to the right or left of the edge.
- Open the lid of the storage compartment q and pull out as much tubular film as you need. Please note that when the bag is filled, at least 6 cm must remain free from the sealing edge.
- Close the lid q again so that the tubular fi lm is clamped in place.
- Press the fi lm cutter A down lightly and pull it from one side to the other over the tubular fi lm to cut it off.
- Open appliance lid 1 by pressing the lid release 8 and flipping the lid 1 upwards.
- Lay the open end of the bag as far into the appliance so that the opening of the bag is located centrally under the lower seal ring 3. The bag should be inserted no further than the rear limiters 6 and must lie between the front limiters 7. If the bag is lying over one or both limits 6/7, it cannot be sealed correctly:
- Close the appliance lid 1. The press seal e presses the bag onto the sealing wires 4, to create a smooth seam. Ensure that both corners of the appliance lid 1 click into place. If necessary, press them down once again on the markings so that the appliance lid 1 click into place and locks shut.
- Press the button t. The control lamps t/a light up. As soon as the sealing process is completed, the control lamps t/a switch off.
NOTE- You can stop the vacuum sealing process at any time by pressing the button a. The control lamps t/a will then switch off . Press the t again to resume the sealing process.
- Remove the plug from the mains power socket immediately. Do not attempt to repair the appliance yourself. Contact the Customer Service department.
- Open appliance lid 1 by pressing the lid release 8 and flipping lid 1 upwards. Remove the bag. It is now sealed at one end.
- Fill the bag. You must leave at least 6 cm of the bag free up to the edge to be sealed.
CAUTION – PROPERTY DAMAGE
Fill the bag so that no food scraps or liquids can leak out during sealing and get into the appliance. - If you do not want to vacuum the air out of the bag, seal the other, open side now.
NOTE
Wait a few seconds to allow the appliance to cool down before sealing the next bag.
During this cool-down phase, you cannot start the “Sealing” function.
Vacuum sealing
Vacuuming the tube film
You can also suck the air out of the bag (vacuuming) during sealing:
NOTE
If you want to vacuum seal bags with liquid contents only, freeze the liquid briefly so that it does not get sucked into the appliance during vacuuming. If small quantities of liquid or food nonetheless get sucked up, they will be deposited in the drip tray 9 which is located within the lower sealing ring 3.
- Lay the open end of the bag as far into the appliance so that the opening of the bag is located centrally under the lower seal ring 3. The bag should be inserted no further than the rear limiters 6 and must lie between the front limiters 7. Otherwise, the vacuuming and sealing will not function correctly:
- Close the appliance lid 1. Ensure that both corners of the appliance lid 1 click into place. If necessary, press them down once again on the markings so that the appliance lid 1 clicks into place and locks shut.
NOTE- Make sure that neither the upper w nor the lower sealing ring 3 is damaged. Otherwise, the appliance cannot suck the air out of the bag.
- If either one of the sealing rings 3/w is damaged, then simply pull it out of the groove and press the replacement sealing ring into the groove.
- If necessary, select the appropriate additional function for your food. Otherwise, you can skip this step and move on to point 4):
- Press the button u if you want to vacuum particularly moist or juicy food, such as freshly marinated meat or cut fruit.
Moisture between the film and the seam can lead to defective seals. When this function is activated, the sealing time is increased so that the
seal is more stable. If the additional function “Wet” is activated, the corresponding control lamp u lights up. - Press the button i if you want to vacuum seal pressure-sensitive foods such as cakes or berries. When the additional function “Soft” is
activated, the suction pressure is slightly reduced and the food is not squeezed as much. If the additional function “Soft” is activated, the corresponding control lamp i lights up.
NOTE
If you want to vacuum seal moist and pressure-sensitive food, you can also activate both additional functions simultaneously.
- Press the button u if you want to vacuum particularly moist or juicy food, such as freshly marinated meat or cut fruit.
- Press the button z. The control lamps z/a light up and the appliance sucks the air out of the bag. As soon as all the air is sucked out, the control
lamp t also lights up. The appliance now seals the bag. As soon as theM sealing process is completed, the control lamps t/z/a switch off.
NOTE
You can stop the vacuuming process at any time by pressing the button a. The control lamps z/a will then switch off. Press the button z again to resume vacuuming. If the appliance has already switched to the sealing process and the control lamp t is lit, the process can also be stopped with the button a. The control lamps t/z/a will then switch off. Press the button t again to resume the sealing process. - Open appliance lid 1 by pressing the lid release 8 and flipping lid 1 upwards.Remove the vacuum-sealed bag.
NOTE
Once you have sealed 5 bags in a row, allow the appliance to cool down for about 1 minute. During this cool-down phase, it is possible that the
appliance cannot be started. After the cool-down phase, you can use the appliance as normal (even if a whole minute has not yet elapsed).
This does not apply, if the additional function “Wet” is activated. Due to the longer sealing process, a cooling phase of approx. 45 seconds ecessary after each pass.
TIP – “SOUS-VIDE COOKING”
As the supplied film is suitable for temperatures between -20°C and 110°C, it can be used for sous-vide cooking (vacuum cooking).
“Sous-vide” is French and means “under vacuum”. In vacuum cooking, the food (usually fish or meat, but vegetables can also be used) is vacuum-sealed in a bag and then cooked in water or steam cooked at a relatively low temperature (50°C to 90°C). The advantage of this is that volatile flavors and aromas are not lost during cooking. The food does not dry out and the vitamins and flavors are preserved. Herbs or spices that are vacuum-sealed in the bag with the food give off a more intense flavor.
Vacuuming containers and resealable bags
NOTE
- If you want to vacuum seal containers or bags with liquid contents only, freeze the liquid briefly so that it does not get sucked into the appliance
during vacuuming. If small quantities of liquid or food nonetheless get sucked up, they will be deposited in the small drip tray 9 that is located within the lower sealing ring 3. - You can stop the vacuuming process at any time by pressing the button a. The control lamp o/a will switch off. Press the button o again to resume vacuuming.
You can vacuum seal containers and resealable bags using the vacuum hoses s and appropriate adapters d/f/g supplied with the appliance. With some bags or containers by various manufacturers, it is possible that no adapter d/f/g is required and you can push the black coupling piece on the vacuum hose s directly into the bag/container. Experiment to find out which adapter d/f/g creates the best seal or whether you even need an adapter d/f/g at all.
NOTE
- You can order suitable bags and containers separately. Please refer to section “Ordering spare parts and accessories”.
- The vacuum hoses s and adapters d/f/g are also compatible with bags and containers made by other manufacturers.
Adapters e.g. suitable for
- Adapter A d: FoodSaver* lunch boxes, Ernesto, various bags with a valve
- Adapter B f: FoodSaver food storage boxes, Ernesto, various bags with a valve
- Adapter C g CASO**, FoodSaver storage containers
FoodSaver is a registered trademark of Sunbeam Products, Inc.
CASO is a registered trademark of Caso Holding GmbH.
Vacuuming sealing bags
- Connect the vacuum hoses onto the suction fitting 2 of the appliance.
- Select the appropriate adapter A/B d/f for the bag you want to vacuum seal and attach it to the vacuum hose s.
- Close the appliance lid 1. Ensure that both corners of the appliance lid 1 click into place. If necessary, press them down once again on the markings so that the appliance lid 1 click into place and locks shut.
- Close the bag you want to vacuum seal carefully. Vacuum sealing only works properly if the bag is completely closed off. Position the bag so that
the extraction opening of the bag is lying on a smooth surface. - Press the adapters A/B d/f firmly onto the extraction opening on the bag.
- Press the button o. The control lamps o/a light up and the appliance sucks the air out of the bag. As soon as all the air is sucked out, the control lamps o/a switch off.
- You can now remove the adapter A/B d/f from the bag.
Vacuum sealing containers
- Connect the vacuum hoses onto the suction fitting 2 of the appliance.
- Select the appropriate adapter d/f/g for the container you want to vacuum seal and attach it to the vacuum hose s.
- Close the appliance lid 1. Ensure that both corners of the appliance lid 1 click into place. If necessary, press them down once again on the markings so that the appliance lid 1 clicks into place and locks shut.
- Connect the adapter d/f/g to the appropriate fitting on the container. Please refer to the instruction manual of the container for further information.
- Press the button o. The control lamps o/a light up and the appliance sucks the air out of the container. As soon as all the air is sucked out, the control lamps o/a switch off.
- You can now remove the adapter d/f/g from the container and the appliance.
Marinate function
You can use the marinate function if you want to marinate food such as meat. The alternating vacuuming and pausing/aerating allows the marinade to penetrate the pores much more quickly and the marinating process is accelerated.
The process takes around 15 minutes. You will need a suitable vacuum container (e.g. from FoodSaver*) specially designed for marinating. They are characterized by a special valve that makes ventilation possible between the vacuuming phases.
- Connect the vacuum hoses onto the suction fitting 2 of the appliance.
- If necessary for the container being used, connect the adapter g to the vacuum hose s.
- Close the appliance lid 1. Ensure that both corners of the appliance lid 1 click into place. If necessary, press them down once again on the markings and so that the appliance lid 1 click into place and locks shut.
- Connect the adapter g or, if no adapter is required, the black coupling piece on the vacuum hose s to the appropriate fitting on the container. Please refer to the instruction manual of the container for further information.
- Press the button p. The control lamps o/a light up and the appliance starts the marinating program with vacuuming. The appliance now alternates between vacuuming (control lamp plights up) and ventilating (control lamp flashes) for approx. 15 minutes. Once the program is finished, the control lamps p/a switch off.
- You can now remove the adapter g/the vacuum hose s from the container and the appliance.
Cleaning
DANGER
Risk of fatal injury from electrocution!
- Pull the plug from the socket before starting to clean the appliance.
- Ensure that no moisture can penetrate the appliance during cleaning.
CAUTION – PROPERTY DAMAGE
Possible damage to the appliance
- Do not use aggressive or abrasive cleaning agents, as they may corrode the surface of the housing.
- Do not use any hard or sharp objects to remove any adhesive from the sealing wires 4. Otherwise, the sealing wires 4 or the insulation could
be damaged. - Wipe down the outer surfaces with a damp cloth. If necessary, apply a mild detergent to the cloth. Afterwards, wipe the appliance with a cloth moistened only with water to remove any detergent residues.
- Wipe off the upper w and the lower sealing rings 3 as well as the press seal e with a damp cloth.
- Wipe the vacuum hoses s as well as the adapter d/f/g with a damp cloth. If there is heavy soiling, you can also clean these parts in hot water
with a little detergent. - Rinse and clean the drip tray 9 in warm water with a little detergent.
NOTE
- You can clean the drip tray 9 in the dishwasher, if necessary.
Make sure that the part does not get jammed in the dishwasher.
Use the upper basket of the dishwasher if possible. - Ensure that the appliance and all parts are completely dry before reusing or storing them.
Storage
CAUTION
Possible damage to the appliance
Do not click lid 1 into place when you are storing the appliance! When the appliance lid 1 is clicked into place, it exerts continuous pressure
on the upper w and lower sealing rings 3 as well as the press seale. This can negatively affect their function.
- You can store the accessories in the storage compartment directly on the appliance. To do this, open the lid of the storage compartment q:
- Clamp the two vacuum hoses s into the clamps in the lid of the storage compartment q.
- Put the adapters A d, Bf and C g into the slots.
- You can slide the replacement seal into the fi lm roll. This way it is also ready at hand.
- Push the mains cable into the cable storage compartment 5 on the underside of the appliance.
- Store the appliance in a clean, dry place away from direct sunlight.
Disposal
- Never dispose of the appliance in your normal domestic waste.
This product is subject to the provisions of the European Directive 2012/19/EU (Waste Electrical and Electronic Equipment). - Dispose of the appliance via an approved disposal company or your municipal waste facility. Please comply with all applicable regulations. In case of doubt, please contact your waste disposal center.
- Your local community or municipal authorities can provide information on how to dispose of the worn-out product.
- The product is recyclable, subject to extended producer responsibility and is collected separately.
- Returning the packaging to the material cycle conserves raw materials and reduces the amount of waste that is generated. Dispose of packaging materials that are no longer needed in accordance with applicable local regulations.
- Dispose of the packaging in an environmentally friendly manner.
- Note the labelling on the packaging and separate the packaging material components for disposal if necessary. The packaging material is labelled with abbreviations (a) and numbers (b) with the following meanings: 1–7: plastics, 20–22: paper and cardboard, 80–98: composites.
Service
Service Great Britain
Tel.: 0800 404 7657
E-Mail: [email protected]
Importer
Please note that the following address is not the service address. Please use the
service address provided in the operating instructions.
KOMPERNASS HANDELS GMBH
BURGSTRASSE 21
44867 BOCHUM
GERMANY
www.kompernass.com
Ordering replacement parts
You can order replacement parts for this product on the Internet at www.kompernass.com.
NOTE
- If you have problems with your online order, contact our service center by phone or e-mail.
- Please always quote the article number (e.g. IAN 123456_7890) when ordering. You can find it on the title page of these operating instructions.
- Please note that online ordering of replacement parts is not possible for all countries.
SILVERCREST SHMS 300 C2 Hand Mixer Set
OVERVIEW
Introduction
Congratulations on the purchase of your new appliance. You have selected a high-quality product. These operating instructions are a part of this product. They contain important information on safety, usage and disposal. Before using the product, familiarise yourself with all operating and safety instructions. Use the product only as described and only for the specified areas of application. In addition, pass these documents on, together with the product, to any future owner.
Intended use
This appliance is intended exclusively for …
- mixing, puréeing and stirring foods as well as crushing ice cubes,
- use exclusively in normal domestic amounts and only for private use in a domestic environment in dry rooms.
This appliance is not intended for …
- chopping herbs, onions, meat and hard food components such as nuts, pits, large seeds or stalks,
- making nut puree,
- the processing of materials that are not foodstuffs,
- commercial or industrial use,
- for use in damp environments or outdoors,
- processing hot/boiling liquids.
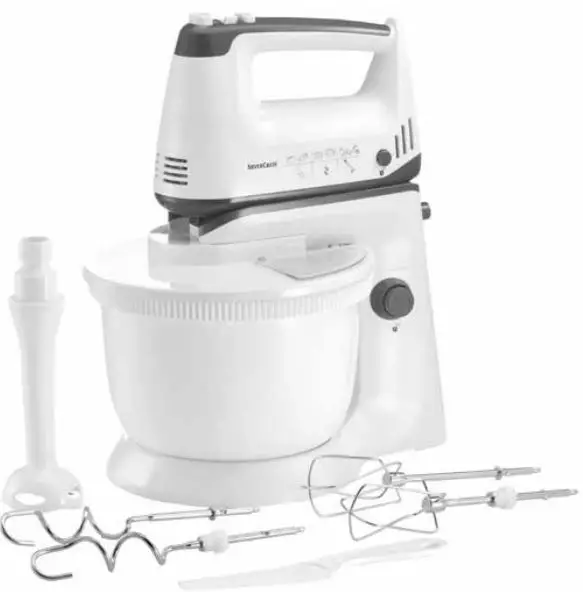
Package contents
After unpacking, check to ensure all items are available. The package contains:
- Motor block, with power cable and plug
- Blender
- Lid
- Measuring cap
- Operating instructions
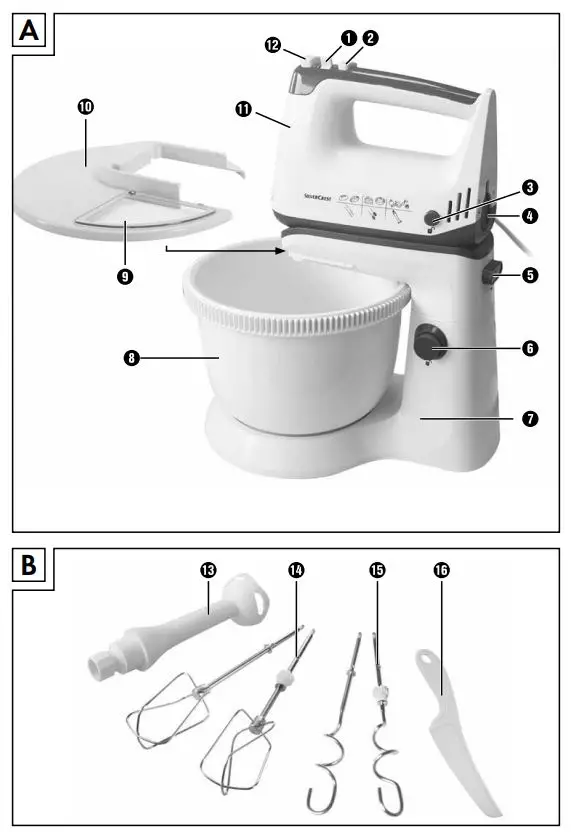
Appliance description
Figure A:
- Speed switch
- Turbo button /
- Blender release button
- Blender socket (with safety catch)
- Hand mixer release button
- Mixer holder release
- Mixer stand (with mixer holder)
- Mixing bowl
- Filling opening
- Lid
- Hand element
- Tool-release button
Figure B: - Blender
- Whisk
- Kneading hook
- Dough scraper
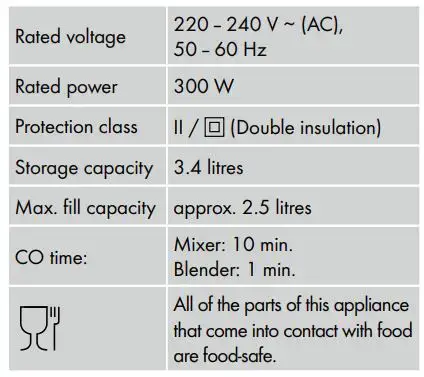
Technical data
The CO time (continuous operation time) is the amount of time an appliance can be operated without the motor overheating and becoming damaged. When the specified CO time has been reached, the appliance must be switched off until the motor has cooled down to room temperature.
Safety instructions
DANGER! ELECTRIC SHOCK!
- Ensure that the appliance, the power cable, and the power plug are never immersed in water or other liquids.
- Use the appliance only in dry rooms; never use it outdoors or in damp environments.
- Ensure that the power cable never becomes wet or damp during operation. Route the power cable in such a way that it cannot become trapped or damaged in any way.
- Arrange for defective power plugs and/or cables to be replaced as soon as possible by a qualified technician or by our Customer Service Department to avoid the risk of injury.
- Always remove the plug from the power socket after use. Switching off the appliance is not sufficient because the appliance receives power as long as the power plug is connected to the socket.
- Check to ensure that the appliance is in a serviceable condition before use. The appliance may not be used if it shows signs of damage, especially to the motor block or the blender attachment.
- Remove the plug from the socket immediately if you notice unexpected smells or noises coming from the appliance while it is in use or if there is an evident malfunction.
WARNING! RISK OF INJURY!
- NEVER insert your hand or fingers into the blender, especially when it is in use. The cutting blades are extremely sharp!
- DO NOT remove the lid when the appliance is in operation.
- To ensure you can react immediately in the event of danger, never leave the appliance running unattended.
- Do not insert cutlery items or mixing tools into the blender while the appliance is in use. There is a considerable risk of injury if these come into contact with the swiftly rotating cutting blades!
- Children should be supervised to ensure that they do not play with the appliance.
- Never use the appliance for purposes other than those described in these instructions.
- Risk of injury if appliance is misused.
- The appliance should always be disconnected from the mains when not supervised and before assembly, disassembly or cleaning.
- This appliance is not to be used by children.
- The appliance and its mains cable must be kept away from children.
- This appliance can be used by persons with reduced physical, sensory or mental capabilities or lack of experience and knowledge if they have been given supervision or instruction concerning safe use of the appliance, and if they are aware of the potential risks.
- Do not allow children to play with the appliance.
- Be careful when handling the appliance. The cutting blades are extremely sharp!
- Take care when emptying the blender! The cutting blades are extremely sharp!
- Take care when cleaning the appliance! The cutting blades are extremely sharp!
- Switch the appliance off and disconnect the plug from the power supply before changing accessories or getting hold of parts that move during operation.
- Always make sure that the blender is switched off before removing the jug from the motor block!
- Use the blender only with the supplied motor block!
CAUTION! MATERIAL DAMAGE!
- Do not use the appliance in direct sunlight or near any heatgenerating appliances.
- NEVER fill the blender with boiling liquids or other foods!Allow these to cool to a lukewarm temperature.
- NEVER operate the appliance when it is empty, i.e. without ingredients in the blender attachment.
Unpacking
- Remove all packaging materials or protective films from the appliance. Retain the packaging, so that you can store the appliance safely or send it by post,
e. g. if it needs to be repaired. - Before using the appliance, check that it is free of damage; check also that the power cable and plug as well as all accessories and appliance parts are undamaged.
- Clean all components carefully before using the appliance for the first time (see “Cleaning”).
Setting up
Once all components have been cleaned as described in the section “Cleaning”:
- Position the appliance so that, …
- that the mains cable passes through the recess at the rear of the appliance,
- the power plug is immediately accessible, so that it can be quickly withdrawn in the event of danger,
- that it is stable and not liable to slip, and so that the sucker feet can attach firmly and the appliance cannot tip over due to vibration,
- that the mains cable is not in the working area and thus does not present a risk of being inadvertently snagged and tipping the appliance over.
Speed levels
Operation
Kneading and whisking
- The motor switches off automatically as soon as the blender 3 is removed from the motor block 6 or the lid 2 is opened. In such cases it may be easy to forget that the machine is still switched on. The motor will then start unexpectedly as soon as the blender attachment 3 is fitted or the lid 2 is closed again:
Therefore:- Do not insert the power plug into the wall socket until the blender 3 is filled and mounted with its lid fitted and closed.
- Before fitting the blender, always check to see that the appliance is switched off or that the power plug has been removed.
- Switch the appliance off first, pull the plug out and wait until the motor has come to a standstill before removing the blender 3 or opening the lid 2.
NOTE
- These recipes are provided subject to change. All ingredients and preparation information are guiding values. Adapt these recipe suggestions based on your personal experience.
- In cases of lactose intolerance, we recommend you use lactose-free milk. Keep in mind, however, that lactose-free milk is a little sweeter.
- Clean the attachments (e, r, t) before first use.
- Push the whisks r or the kneading hooks t into the slots on the hand element q until they click audibly and firmly into place.
- Release the mixer holder on the mixer stand 7 by pressing the mixer holder release 6 and fold the mixer holder 7 upwards.
- Remove the mixing bowl 8 and fill it with the ingredients. Quantities depend on the amount to be prepared.
Puréeing
- Use the blender e to purée foods.
- Open the safety catch of the blender socket 4 by pushing it to the side and holding it firmly
- Push the blender e into the blender socket 4 and push it down firmly. The blender e must audibly click into place.
- To avoid overflowing, the container used for blending should only be filled to about 2/3 of its capacity. Select a suitably large container.
- Press the Turbo button / 2. Keep the Turbo button / 2 pressed down during the whole procedure. The appliance stops as soon as it is released.
- When you have finished working with the blender e, release the Turbo button/ 2 and remove the mains plug from the power socket.
- To remove the blender e from the blender socket 4 , press the blender release button 3 on both sides of the hand element q at the same time. The blender e is now released
from the blender socket 4 . - Remove the blender e with a snapping motion from the blender socket 4
Cleaning
DANGER! ELECTRIC SHOCK!
Before starting to clean the blender and its components:
- Ensure that the motor is switched off and the power plug removed from the socket.
Do not immerse the motor block 6 in water or other liquids. This could result in you receiving a fatal electric shock and cause damage to the appliance. - Never open the housing of the appliance. Otherwise, there is a risk of a fatal electric shock.
WARNING! RISK OF INJURY!
- Never insert your hand or fingers into the blender 3, especially while it is in use. The cutting blades 4 are extremely sharp!
CAUTION! PROPERTY DAMAGE!
- Do not use solvents or abrasive cleaners on the plastic surfaces, they could be damaged by them.
Cleaning the blender
- To prevent injuring yourself on the cutting blades 4, clean the blender 3 only with a long-handled washing-up brush.
- Clean the measuring cap 1 and the lid 2 in mild soap solution. Ensure that the rubber seal 9 is correctly fitted before using lid 2 again.
NOTE
You can also clean lid 2, measuring cap 1 and blender 3 with the cutting blade 4 in your dishwasher. If possible, place all the parts in the upper basket of the dishwasher and make sure that they are not jammed in place.
.
Storage
- If you do not intend to use the blender for an extended period, clean it thoroughly (see chapter “Cleaning”).
- Wrap the mains cable around the cable retainer 7 on the base of the motor block 6 in the direction of the arrow.
- Store the blender in a cool and dry location.
Disposal
- Do not dispose of the appliance in your normal domestic waste. This product is subject to the provisions of European Directive 2012/19/EU. Dispose of the appliance via an approved waste disposal company or your municipal waste disposal facility. Please comply with all applicable regulations. Please contact your waste disposal facility if you are in any doubt.
- Your local community or municipal authorities can provide information on how to dispose of the worn-out product.
- Note the labeling on the packaging and separate the packaging material components for disposal if necessary. The packaging material is labeled with abbreviations (a) and numbers (b) with the following meanings:
- 1–7: Plastics,
- 20–22: Paper and cardboard,
- 80–98: Composites.
- The packaging is made from environmentally friendly material and can be disposed of at your local recycling plant.
Kompernass Handels GmbH warranty
Dear Customer, This appliance has a 3-year warranty valid from the date of purchase. If this product has any faults, you, the buyer, have certain statutory rights. Your statutory rights are not restricted in any way by the warranty described below.
Warranty conditions
The warranty period starts on the date of purchase. Please keep your receipt in a safe place. This will be required as proof of purchase. If any material or manufacturing fault occurs within three years of the date of purchase of the product, we will either repair or replace the product for you or refund the purchase price (at our discretion). This warranty service requires that you present the defective appliance and the proof of purchase (receipt) within the three-year warranty period, along with a brief written description of the fault and of when it occurred. If the defect is covered by the warranty, your product will either be repaired or replaced by us. The repair or replacement of a product does not signify the beginning of a new warranty period.
The warranty period and statutory claims for defects
The warranty period is not prolonged by repairs effected under the warranty. This also applies to replaced and repaired components. Any damage and defects present at the time of purchase must be reported immediately after unpacking. Repairs carried out after expiry of the warranty period shall be subject to a fee.
Scope of the warranty
This appliance has been manufactured in accordance with strict quality guidelines and inspected meticulously prior to delivery. The warranty covers material faults or production faults. The warranty does not extend to product parts subject to normal wear and tear or to fragile parts which could be considered as consumable parts such as switches, batteries or parts made of glass. The warranty does not apply if the product has been damaged, improperly used or improperly maintained. The directions in the operating instructions for the product regarding proper use of the product are to be strictly followed. Uses and actions that are discouraged in the operating instructions or which are warned against must be avoided. This product is intended solely for private use and not for commercial purposes. The warranty shall be deemed void in cases of misuse or improper handling, use of force and modifications / repairs which have not been carried out by one of our authorized service centers.
Warranty claim procedure
- Please have the till receipt and the item number (e.g. IAN 123456_7890) available as proof of purchase.
- You will find the item number on the type plate on the product, an engraving on the product, on the front page of the operating instructions (below left) or on the sticker on the rear or bottom of the product.
- If functional or other defects occur, please contact the service department listed either by telephone or by e-mail.
- You can return a defective product to us free of charge to the service address that will be provided to you. Ensure that you enclose the proof of purchase (till receipt) and information about what the defect is and when it occurred. You can download these instructions along with many other manuals, product videos, and installation software at www.lidl-service.com. This QR code will take you directly to the Lidl service page (www.lidl-service.com) where you can open your operating instructions by entering the item number (IAN) 360749_2007.
Service
Service Great Britain
Tel.: 0800 404 7657
E-Mail: [email protected]
Service Malta
Tel.: 80062230
E-Mail: [email protected]
Importer
Please note that the following address is not the service address. Please use the service address provided in the operating instructions. KOMPERNASS HANDELS GMBH BURGSTRASSE 21 44867 BOCHUM GERMANY www.kompernass.com
]]>
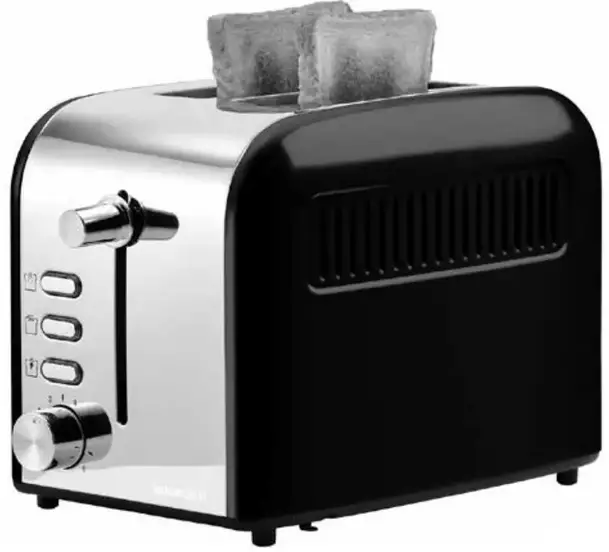
TOASTER / GRILLE-PAIN STC 920 D2
IAN 360747_2007

Before reading, unfold the page containing the illustrations and familiarise yourself with all functions of the device.

Introduction
Congratulations on the purchase of your new appliance!
You have clearly decided in favor of a modern, high-quality product. These operating instructions are a component of this product. They contain important information in regard to safety, use, and disposal. Before using the product, familiarise yourself with all of these operating and safety instructions. Use this appliance only as described and only for the purposes indicated. In addition, pass these documents on, together with the product, to any future owner.
Copyright
This documentation is copyright protected.
Any copying or reproduction of it, including as extracts, as well as the reproduction of images, also in an altered state, is only permitted with the written authorization of the manufacturer.
Limited liability
All technical information, data, and instructions for the installation, connection, and operation contained in these operating instructions correspond to the latest available at the time of printing and, to the best of our knowledge, take into account our previous experience and know-how.
No claims can be derived from the details, illustrations, and descriptions in these instructions.
The manufacturer assumes no responsibility for damage caused by failure to observe these instructions, improper use, incompetent repairs, making unauthorized modifications, or using unapproved replacement parts.
Intended use
This appliance is intended exclusively for toasting slices of bread and bread rolls in private households. It is not intended for use with other foods or other materials.
This appliance is intended exclusively for use in domestic households. Do not use the appliance for commercial applications!
Items supplied
The appliance is delivered with the following components as standard:
- Toaster
- Bread roll rack
- Operating instructions
1) Remove the appliance and the operating instructions from the carton.
2) Remove all packing material.
NOTICE
► Check the contents to ensure everything is present and for visible damage.
► If the delivery is not complete or has been damaged due to defective packaging or transportation, contact the Service Hotline (see section Service).
Disposal of the packaging
The packaging protects the appliance from transport damage. The packaging materials are selected from the point of view of their environmental friendliness and disposal technology and are therefore recyclable.
 The recirculation of packaging into the material circuit saves on raw material and reduces the amount of waste generated. Dispose of packaging material that is no longer needed as per the regionally established regulations.
NOTICE
► If possible preserve the appliance’s original packaging during the warranty period so that, in the event of a warranty claim, you can pack the appliance ideally for its return.
 Note the labeling on the packaging and separate the packaging material components for disposal if necessary. The packaging material is labeled with abbreviations (a) and numbers (b) with the following meanings:
1–7: Plastics,
20–22: Paper and cardboard,
80–98: Composites.
Appliance description
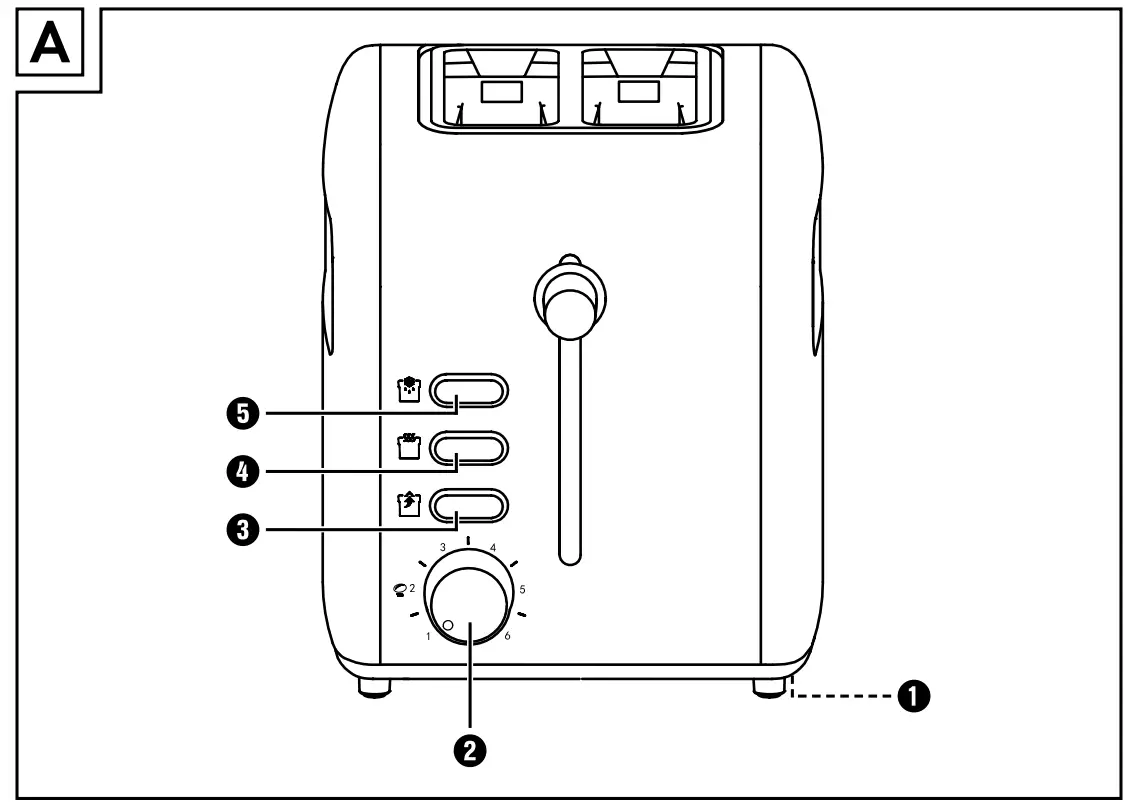
Illustration A:
1 Cable clamp
2 Toasting dial
3 “Stop” button
4 “Warm-up” button
5 “Defrost” button
Illustration B:
6 Bread roll rack
7 Toasting slots
8 Operating button
9 Cable winder
10 Crumb tray
Technical data
| Voltage | 220 – 240 V ∼ (AC), 50 – 60 Hz |
| Power consumption | 740 – 920 W |
 |
All of the parts of this appliance that come into contact with food are food-safe. |
Safety instructions
RISK OF ELECTRIC SHOCK
► If the main cable of this appliance is damaged, it must be replaced by the manufacturer, their customer service department, or a similarly qualified person in order to avoid potential risks.
► Use the appliance only in dry indoor areas, not outdoors.
 NEVER submerge the appliance in water or other liquids! If you do, then you could receive a potentially fatal electric shock.
► NEVER insert cutlery items or other metallic objects into the toaster slots.
► Ensure that the appliance can never come into contact with water. NEVER use the appliance adjacent to water or close to vessels containing liquids.
► Ensure that the power cable never gets wet or moist when the appliance is in use. Lay the cable such that it cannot be clamped or otherwise damaged.
► After use, always remove the plug from the mains power socket, this prevents the unintentional switching on of the appliance.
WARNING! RISK OF INJURY!
► The appliance can be used by children aged 8 years and above and persons with reduced physical, sensory or mental capabilities or lack of experience and knowledge if they have been given supervision or instruction concerning the use of the appliance in a safe way and understand the hazards involved.
► Children should not play with the appliance.
► Cleaning and user maintenance should not be performed by children unless they are older than 8 years of age and are supervised. Children younger than 8 years of age are to be kept away from the appliance and the power cable.
► The appliance can become hot when it is in use. Therefore, only touch the operating elements.
► Use the appliance only on a stable, non-slippery, and level surface.
► Do not use an external timing switch or a separate remote control system to operate the appliance.
► Unwind the power cable completely from the cable winder before using the appliance.
► Risk of burning if you do not use standard toast bread! Because of the smaller size or shape, there is a risk of touching hot parts when removing the toasted bread.
CAUTION! RISK OF FIRE!
► Bakery products can burn! You should therefore NEVER locate the appliance close to or underneath inflammable objects, especially not under curtains or suspended cupboards.
► This appliance may not be used in close vicinity to flammable material.
► NEVER cover the toaster when it is in use.
Tips for use
- Avoid using slices that are too big or too thick, as these can easily become jammed in the appliance. Should slices of bread become jammed, first disconnect the plug from the mains power socket? Release jammed slices of bread with a blunt wooden object (e.g. a wooden spatula or spoon). Thereby, do NOT touch the heater elements.
- Differences in bread sorts, moisture content, and the thickness of individual slices influence the browning of the toast. Therefore the bread for toasting should be kept in sealed packaging until required. Always initially try out a lower level of browning.
- Use a lower level of browning if you are toasting dry bread, as dry bread browns faster than fresh bread.
- Select a higher level of browning for dark bread than for light bread, for example, wheat bread.
- The numbers on the toasting dial 2 are not time indications. They serve only as a guide for the browning.
- To avoid an overheating of the toaster and to obtain an even browning of bread, wait for about 15 seconds between two toasting processes.
- You should only use the highest level on the toasting dial 2 for large slices of dark bread. With this browning level, light bread will scorch and become inedible. In addition, it may cause the generation of smoke. If this occurs, press the button “Stop”3 immediately and disconnect the power cable from the mains power socket.
Setting up
CAUTION! RISK OF FIRE
► You should therefore NEVER locate the appliance close to or underneath inflammable objects, especially not under curtains or suspended cupboards.
- Unwind the cable completely from around the cable winder 9 and lead it through the cable clamp 1.
- Place the appliance on a level and heat-resistant surface.
- Insert the plug into a mains power socket.
NOTICE
► When the toaster is not in use, always remove the plug from the mains power socket. This is the only way to ensure that the appliance is current-free.
Before taking into use
- Operate the toaster without bread 3 times at the maximum browning level “6“.
- Afterward, clean the toaster as described in the chapter “Cleaning”.
NOTICE
► The operating button 8 only engages when the cable is connected to a mains power socket.
► With the first usage, a slight smell can arise (minimal smoke development is also possible). This is normal and dissipates after a short time. Provide for sufficient ventilation. For example, open a window.
Operation
Adjusting the browning level
The desired level of browning, from “light” (1) to “dark” (6), can be adjusted infinitely with the toasting dial 2.
Toasting
CAUTION! RISK OF FIRE!
► Do not cover the toasting slot 7 when the appliance is in operation.
There will be a risk of fire! The appliance could be irreparably damaged!
NOTICE
► If you only want to put one piece of toast into the toaster, turn the toasting dial 2 down by approx. 1 level to achieve the same level of browning as with two pieces of toast.
1) After setting the desired browning level, insert the bread into the toaster slots 7.
2) Press the operating button 8 downwards. The automatic bread centering device centers the inserted bread in the toaster slots 7. During the toasting process the control lamp integrated into the “Stop” button3 glows.
3) When the desired level of browning has been reached the toaster switches itself off automatically, the slices are ejected to the top and the control lamp goes out.
Interrupting the toasting process
If you wish to interrupt the toasting procedure, press the button “Stop” 3.
The toaster switches itself off and the bread slices are ejected upwards.
Warming function
The warming function enables you to warm bread without browning it. As an example, for toast that has gone cold. The bread is only briefly warmed.
1) Insert the bread and press the operating button 8 downwards.
2) Press the “Warm-up” button . The integrated control lamp lights up.
3) When the bread has been reheated, the appliance switches itself off automatically and the slices are ejected upwards.
NOTE
► Press the button “Warm-up” button again to switch off the warming function. The integrated control lamp goes out and the warming process switches to a normal toasting process.
Defrost function
By pressing the button “Defrosting”  , also frozen bread can be thawed and toasted. With this, the toaster slowly warms the bread. Activating the defrost function will allow the frozen bread to achieve the same browning level as when you toast fresh bread.
1) After setting the desired browning level, insert the bread into the toaster slots 7.
2) Press the operating button 8 downwards.
3) Press the button “Defrosting” The integrated control lamp glows.
4) When the defrosting and toasting process is finished, the toaster switches itself off automatically, the control lamp integrated into the button “Defrosting” goes out and the bread slices are ejected to the top.
NOTE
► Press the “Defrost” button again to switch off the defrost function.
The integrated control lamp goes out and the defrost process switches to a normal toasting process.
Crisping bread rolls
Never lay bread rolls directly onto the toaster, always use the bread roll rack 6.
1) Fold out the two feet of the bread roll rack 6.
2) Place the bread roll rack 6 onto the appliance so that the feet protrude into the toasting slots 7 and the bar between the toasting slots 7 fits into the arched sections on the feet. In this position, the bread roll rack 6 sits on the appliance stably.
3) Place the bread rolls onto the rack and start the toasting procedure. Turn the toasting dial 2 up to level  , at most. The actual level of browning can vary depending on the composition and type of bread roll.
NOTE
► After toasting, the rolls will be very hot.
4) As soon as the toaster switches itself off, turn the rolls over to crisp the other side and then switch the toaster back on.
5) When you are finished with the bread roll rack 6, you can fold it for space-saving storage:
– Wait until the bread roll rack 6 has cooled down.
– Remove it from the appliance.
– Fold the feet of the bread roll rack 6 back in.
Crumb tray
When toasting, crumbs that fall from the bread are collected in the crumb tray10.
1) To empty crumbs from the crumb tray 10, simply pull it out.
2) Tip out the crumbs.
3) Slide the crumb tray 10 back into the toaster so that it palpably engages.
Cleaning
RISK OF ELECTRIC SHOCK
► Disconnect the plug from the mains power socket before cleaning the appliance.
NEVER submerge the appliance in water or other liquids! If you do, then you could receive a potentially fatal electric shock.
WARNING! RISK OF INJURY!
► Allow the toaster to cool before cleaning it. Risk of Burns!
CAUTION! PROPERTY DAMAGE!
► Do not use aggressive or abrasive cleaning agents. These can damage the upper surfaces of the appliance.
- Clean the appliance housing only with a dry or lightly moistened cloth.
- Wipe the bread roll rack 6 off with a damp cloth.
- To avoid the risk of fire, empty the crumb tray 10 at regular intervals.
Storage
- Clean the toaster as described in the chapter “Cleaning”.
- Wrap the power cable around the cable winder 9 on the underside of the toaster:
- Store the toaster in a dry location.
Troubleshooting
| Problem | Cause | Remedy |
| The appliance does not function. | The plug is not inserted into a mains power socket. | Connect the power cable to a mains power socket. |
| The appliance is defective. | In this case, contact Customer Services. | |
| The slices of toast are too dark. | The level of browning is set too high. | Set the toasting dial 2 somewhat lower. |
| The slices of bread are not toasted. | The level of browning is set too low. | Set the toasting dial 2 somewhat higher. |
| The operating button 8 does not engage when it is pressed down. | The plug is not inserted into a mains power socket. | Insert the plug into a mains power socket. |
| The appliance is defective. | In this case, contact Customer Services. |
Disposal
 Do not dispose of the appliance in your normal domestic waste.
This product is subject to the provisions of the European Directive 2012/19/EU (Waste Electrical and Electronic Equipment).
Dispose of the appliance through an approved disposal center or at your community waste facility. Observe the currently applicable regulations. In case of doubt, please contact your waste disposal center.
 Your local community or municipal authorities can provide information on how to dispose of the worn-out appliance.
 The product is recyclable, subject to extended producer responsibility, and is collected separately.
Kompernass Handels GmbH warranty
Dear Customer,
This appliance has a 3-year warranty valid from the date of purchase. If this product has any faults, you, the buyer, have certain statutory rights. Your statutory rights are not restricted in any way by the warranty described below.
Warranty conditions
The warranty period starts on the date of purchase. Please keep your receipt in a safe place. This will be required as proof of purchase.
If any material or manufacturing fault occurs within three years of the date of purchase of the product, we will either repair or replace the product for you or refund the purchase price (at our discretion). This warranty service requires that you present the defective appliance and the proof of purchase (receipt) within the three-year warranty period, along with a brief written description of the fault and when it occurred.
If the defect is covered by the warranty, your product will either be repaired or replaced by us. The repair or replacement of a product does not signify the beginning of a new warranty period.
The warranty period and statutory claims for defects
The warranty period is not prolonged by repairs effected under the warranty.
This also applies to replaced and repaired components. Any damage and defects present at the time of purchase must be reported immediately after unpacking. Repairs carried out after the expiry of the warranty period shall be subject to a fee.
Scope of the warranty
This appliance has been manufactured in accordance with strict quality guidelines and inspected meticulously prior to delivery.
The warranty covers material faults or production faults. The warranty does not extend to product parts subject to normal wear and tear or to fragile parts which could be considered consumable parts such as switches, batteries, or parts made of glass.
The warranty does not apply if the product has been damaged, improperly used, or improperly maintained. The directions in the operating instructions for the product regarding the proper use of the product are to be strictly followed. Uses and actions that are discouraged in the operating instructions or which are warned against must be avoided.
This product is intended solely for private use and not for commercial purposes.
The warranty shall be deemed void in cases of misuse or improper handling, use of force, and modifications / repairs which have not been carried out by one of our authorized service centers.
Warranty claim procedure
To ensure quick processing of your case, please observe the following instructions:
- Please have the till receipt and the item number (e.g. IAN 123456_7890) available as proof of purchase.
- You will find the item number on the type plate on the product, an engraving on the product, on the front page of the operating instructions (below left), or on the sticker on the rear or bottom of the product.
- If functional or other defects occur, please contact the service department listed either by telephone or by e-mail.
- You can return a defective product to us free of charge to the service address that will be provided to you. Ensure that you enclose the proof of purchase (till receipt) and information about what the defect is and when it occurred.
You can download these instructions along with many other manuals, product videos, and installation software at www.lidl-service.com.
This QR code will take you directly to the Lidl service page (www.lidl-service.com) where you can open your operating instructions by entering the item number (IAN) 360747_2007.
Service
Service Great Britain
Tel.: 0800 404 7657
E-Mail: [email protected]
Importer
Please note that the following address is not the service address. Please use the
service address provided in the operating instructions.
KOMPERNASS HANDELS GMBH
BURGSTRASSE 21
44867 BOCHUM
GERMANY
www.kompernass.com
OIL-FILLED RADIATOR

OIL-FILLED RADIATOR
Operation and safety notes
This product is only suitable for well-insulated spaces or occasional use
IAN 365189_2101
![]()

| Warnings and symbols used The following warnings are used in this user manual and on the packaging: |
|||
| DANGER! This symbol in combination with the signal word “Danger” marks a high-risk hazard that if not prevented could result in death or serious injury. | Do not touch. | ||
 |
Risk of fire! | ||
| WARNING! This symbol in combination with the signal word “Warning” marks a medium-risk hazard that if not prevented could result in death or serious injury. | WARNING! Do not cover the product to prevent it from overheating | ||
 |
Use the product in dry indoor spaces only | ||
| CAUTION! This symbol in combination with the signal word “Caution” marks a low-risk hazard that if not prevented could result in minor or moderate injury. |  |
Danger – Risk of electric shock! | |
| Alternating current/voltage | |||
| ATTENTION! This symbol with the signal word “Attention” indicates possible property damage. | Direct current/voltage | ||
W |
Watt | ||
| NOTE: This symbol in combination with “Note” provides additional useful information. | Hz |
]Hertz (supply frequency) | |
 |
Minimum position of the temperature control | Maximum position of the temperature control | |
 |
CE mark indicates conformity with relevant EU directives applicable for this product. | ||
OIL-FILLED RADIATOR
Introduction
We congratulate you on the purchase of your new product. You have chosen a high-quality product. The instructions for use are part of the product . They contain important information concerning safety, use, and disposal. Before using the product, please familiarise yourself with all of the safety information and instructions for use. Only use the product as described and for the specified applications. If you pass the product on to anyone else, please ensure that you also pass on all the documentation with it.
Intended use
The product is only designed for heating rooms in private households. It is only intended for indoor use in dry locations. The manufacturer is not liable for damage caused by improper use. This product is only suitable for well insulated spaces or occasional use.
Part description
- Power indicator
- Heat level switch
- Temperature control
- Heating fan switch (with light indicator)
- Heating fan
- Ventilation slots
- Power cord retainer
- Wingnut
- I shape castor assembly
- U shape bolt
- U shape castor assembly
Technical data
| Operating voltage: | 220–240 V∼, 50 Hz |
| Nominal power: | 2400 W |
| Heat level: | “1” – 800 W “2” – 1200 W “3” – 2000 W |
| Temperature control: | Continuously variable |
| A number of heating fins: | 9 |
| Suitable for rooms: | Up to approx. 50–60 m 3 |
| Certification: | GS (TÜV SÜD) |
Scope of delivery
Immediately after unpacking, please check the package contents for completeness and if the product and all parts are in good condition.
Remove all packaging materials from the product.
1 Oil-filled radiator
2 Castor assemblies
2 U shape bolts
4 Wingnuts
1 Instruction manual
![]() Safety notices
Safety notices
READ ALL SAFETY ADVICE AND INSTRUCTIONS. NONOBSERVANCE OF THE SAFETY ADVICE AND INSTRUCTIONS MAY CAUSE ELECTRIC SHOCK, FIRE, AND /OR BAD INJURIES. KEEP ALL SAFETY NOTICES AND INSTRUCTIONS FOR FUTURE REFERENCE!
 WARNING!
DANGER TO LIFE AND RISK OF ACCIDENTS FOR INFANTS AND CHILDREN! Never leave children unsupervised with the packaging materials. The packaging material poses a suffocation hazard. Children frequently underestimate the dangers. Always keep children away from the packaging material.
![]() CAUTION! This product is not a toy for children! Children are not aware of the dangers associated with handling electrical products.
CAUTION! This product is not a toy for children! Children are not aware of the dangers associated with handling electrical products.
This product can be used by children aged 8 years and above and persons with reduced physical, sensory or mental capabilities or lack of experience and knowledge if they have been given supervision or instruction concerning the use of the product in a safe way and understand the hazards involved.
- Children shall not play with the product.
- Cleaning and user maintenance shall not be made by children without supervision.
- Children of less than 3 years should be kept away unless continuously supervised.
- Children aged from 3 years and less than 8 years shall only switch on/off the product provided that it has been placed or installed in its intended normal operating position and they have been given supervision or instruction concerning the use of the product in a safe way and understanding the hazards involved.
- Children aged from 3 years and less than 8 years shall not plug in, regulate and clean the product or perform user maintenance.
![]() CAUTION! Some parts of this product can become very hot and cause burns. Particular attention has to be given where children and vulnerable people are present.
CAUTION! Some parts of this product can become very hot and cause burns. Particular attention has to be given where children and vulnerable people are present.
 WARNING! In order to avoid overheating, do not cover the product.
- The product must not be located immediately below a socket outlet.
- Do not use the product without feet properly installed; follow the assembly instructions within this instruction manual.
- If the supply cord is damaged, it must be replaced by the manufacturer, its service agent, or similarly qualified persons in order to avoid a hazard.
- This product is filled with a precise quantity of special oil . Repairs requiring the opening of the oil container are only to be made by the manufacturer or his service agent. Contact them, if there is an oil leak.
- When scrapping the product, follow the regulations concerning the disposal of oil.
WARNING! Avoid the hazard of life by electric shock:
- Never use a damaged or oil leaking product.
- Never immerse the product into water or any liquid .
- Never touch the product, the power cord, or the mains plug with a wet hand or use it in very humid environments.
- Never place containers filled with liquid, such as drinking glasses, vases etc . on the product. If liquid should enter the product, unplug the mains plug immediately and have the product repaired by a qualified technician.
- Make sure that the details on the rating label are in conformity with your mains voltage. Only connect the product to alternating current with an earthing contact as
otherwise, protection against electric shock is not provided. - In the event of malfunctions, remove the mains plug from the mains socket.
- Do not open the product or attempt to repair it yourself. Defective products should only be repaired by qualified personnel.
- Check the power cord regularly for damage or deterioration.
- Always remove the mains plug from the mains socket after each use and before cleaning the product.
- Do not pull the power cord to unplug the product. Unplug the product by pulling out the mains plug.
- Keep the power cord away from hot surfaces, sharp edges, and mechanical forces.
- Never let the power cord becomes a trip hazard, that no one can get tangled in it or tread on it.
- Allow the product to cool down before moving it to a different location.
 WARNING! HAZARD OF FIRE!
- Do not operate the product close to or below curtains, wall cupboards or other inflammable materials.
- Always operate the product in an upright position (controls on top, both castor assemblies 9]and 11] on the bottom) . Any other position could cause a hazardous situation.
- Place the product on a level, stable and heat-resistant floor.
- Do not place any open fire sources, such as candles, on the product.
- Never block the heating fan 5] or the ventilation slots 6] .
- Do not use this product with a programmer, timer, separate remote-control system or any other device that switches the product on automatically, since a fire risk exists if the product is covered or positioned incorrectly.
- Do not use an extension cord.
- Do not use this product in rooms with a room volume of less than 4 m 3 .
- Only use accessories and additional equipment stated in the instruction manual. The use of other products or accessories than recommended in the instruction manual may present a risk of injuries for you.
- Do not use this product near a bathtub, shower or swimming pool.
Installation (see fig. A–C)
- Place the product upside down on a soft underlay to avoid scratch on the surface, power cord retainer 7] upper than temperature control 3] (see fig . A) .
- Attach the U shape bolt 10] to the product between the first two fins with the threaded ends pointing upward (see fig . A) .
- Place the U shape castor assembly 11] over the U shape bolt 10] with both wheels pointing upward (see fig . B) . Ensure both threaded ends of U shape bolt 10] passing
through both holes on the U shape castor assembly 11] . - Fasten wing nut 8] securely onto each threaded end of U shape bolt 10] .
- Repeat the above steps on the rear side of the product with the I shape castor assembly 9] and the U shape bolt 10] attached between the last two fins (see fig . C) .
- Set the product back to the upright position, wheels on the floor. It is now ready to use .
NOTE: The product is equipped with a tilt protection switch. It will shut down the product automatically if it falls over or is lying on its side.
Operation
- Unwind the power cord completely from the power cord retainer 7] .
- Make sure that both, temperature control 3]and heat level switch 2] are set to “0” respectively.
- Connect the product to a grounded mains socket protected by a residual current circuit breaker. Ensure that the mains voltage of the electrical outlet meets the requirements described in the “Technical data” chapter.
 NOTE: Ensure the mains plug is fully inserted into the mains socket.
Reaching the decided room temperature
- Set the temperature control 3] to and the heat level switch 2] to “3”.
- When the desired room temperature is reached, turn the temperature control 3] gently counter-clockwise until the product shuts off. A “click” sound is emitted. Leave the temperature control 3] at the position and the room temperature is now retained. The product automatically cycles on and off to keep the desired room temperature.
- Use the heat level switch 2] to select how quickly the product shall warm-up. To warm up quickly, set the heat level switch 2] to “3”.
NOTES:
- The power indicator 1] lights up when the heat level switch 2] is turned to “1”, “2” or “3”.
- The power indicator 1] goes off when the heat level switch 2] is turned to “0”.
Turbo heating
- To heat the room more quickly, set the temperature control 3] to. and the heat level switch 2] to “3”.
- Press the heating fan switch 4] to position “I” to switch on the heating fan. An indicator in the heating fan switch 4] will light up . Hot air will be blown through the heating
fan 5] . - To switch off the heating fan 5], press the heating fan switch 4] to the “0” position.
- Using the temperature control 3] to set the product to the desired temperature.
Switch off the product
- Press the heating fan switch 4] to position “0” to switch off the heating fan 5] .
- Turn the temperature control 3] to and
 the heat level switch 2] to “0” .
 - Remove the mains plug from the mains socket.
Frost protection function
The frost protection function automatically controls the product to keep the room temperature above 7 °C, steps are as follows:
- Connect the product to an earthed mains socket protected by a residual current circuit breaker.
- Switch on the product by setting the heat level switch 2] to either “1”, “2” or “3” and by setting the temperature control 3] to . The product switches on when the room temperature is approx. 7 °C . As soon as the room temperature is above 7 °C, the product automatically switches off again .
NOTE: The product will switch itself on and off automatically to maintain a temperature higher than 7 °C .
Use the heating fan only
- To use the heating fan 5] only on the product, the steps are as follows.
- Connect the product to an earthed mains socket protected by a residual current circuit breaker.
- Press the heating fan switch 4] to position “I” to switch on the heating fan 5] . An indicator in the heating fan switch 4] will light up . Hot air will be blown through the heating fan 5] .
- To switch off the heating fan 5], press the heating fan switch 4] to “0” position.
NOTE: The heating fan works independently from the power indicator 1], heat level switch 2] and temperature control 3] .
Care and cleaning
![]() WARNING! Let the product cool down before cleaning.
WARNING! Let the product cool down before cleaning.
![]() WARNING! Never immerse the product, power cord or mains plug into water .
WARNING! Never immerse the product, power cord or mains plug into water .
- Remove the mains plug from the mains socket and leave the product to cool completely before cleaning.
- Use a damp lint-free cloth to clean the product. Use a mild detergent on the cloth for stubborn dirt.
- Do not use abrasive, aggressive, or chemical cleaning agents. It could damage the surfaces of the product.
Storage
- If the product is not to be used for a long period of time, clean it as described in the section “Care and cleaning”.
- Wind the power cord around the power cord retainer 7] clockwise tightly and let the mains plug being held at the upper part of the power cord retainer 7] (fig . D) .
- Store the product at a clean and dry location.
Disposal
The packaging is made entirely of recyclable materials, which you may dispose of at local recycling facilities.
 Observe the marking of the packaging materials for waste separation, which are marked with abbreviations (a) and numbers (b) with the following meaning: 1–7: plastics / 20–22: paper and fibreboard / 80–98: composite materials.
 The product and packaging materials are recyclable, dispose of it separately for better waste treatment. The Triman logo is valid in France only .
 Contact your local refuse disposal authority for more details of how to dispose of your worn-out product.
![]() To help protect the environment, please dispose of the product properly when it has reached the end of its useful life and not in the household waste.
To help protect the environment, please dispose of the product properly when it has reached the end of its useful life and not in the household waste.
Information on collection points and their opening hours can be obtained from your local authority.
Observe the current regulations for waste oil disposal.
Warranty
The product has been manufactured to strict quality guidelines and meticulously examined before delivery. In the event of product defects, you have legal rights against the retailer of this product. Your legal rights are not limited in any way by our warranty detailed below. The warranty for this product is 3 years from the date of purchase. The warranty period begins on the date of purchase. Please keep the original sales receipt in a safe location. This document is required as your proof of purchase. Should this product show any fault in materials or manufacture within 3 years from the date of purchase, we will repair or replace it – at our choice – free of charge to you. This warranty
becomes void if the product has been damaged, or used or maintained improperly. The warranty applies to defects in material or manufacture. This warranty does not cover
product parts subject to normal wear, thus possibly considered consumables (e .g . batteries) or for damage to fragile parts, e .g . switches, rechargeable batteries or glass parts.
Warranty claim procedure
To ensure quick processing of your case, please observe the following instructions:
Please have the till receipt and the item number (e .g . IAN 123456_7890) available as proof of purchase.
You will find the item number on the rating plate, an engraving, on the front page of the instructions for use (bottom left), or as a sticker on the rear or bottom of the product.
If functional or other defects occur, please contact the service department listed either by telephone or by e-mail.
You can return a defective product to us free of charge to the service address that will be provided to you. Ensure that you enclose the proof of purchase (till receipt) and information about what the defect is and when it occurred.
Service
Service Great Britain
Tel .:08000569216
E-Mail:[email protected]
Information requirements for electric local space heaters
Model identifier(s): HG02913 365189_2101
| Item | Symbol | Value | Unit | Item | Unit | |
| Heat output | Type of heat input, for electric storage local space heaters only (select one) | |||||
| Nominal heat output | Pnom | 2.4 | kW | manual heat charge control, with integrated thermostat | [s/no] | |
| Minimum heat output (indicative) | Pin | 0.4 | kW | manual heat charge control with room and/or outdoor temperature feedback | [s/no] | |
| Maximum continuous heat output | Pmax,c | 2.4 | kW | electronic heat charge control with room and/or outdoor temperature feedback | [s/no] | |
| Auxiliary electricity consumption | fan assisted heat output | [s/no] | ||||
| At nominal heat output | elmax | 2.4 | kW | Type of heat output /room temperature control (select one) | ||
| At minimum heat output | elmin | 0.4 | kW | single-stage heat output and no room temperature control | [s/no] | |
| In standby mode | elSB | N/A | kW | Two or more manual stages, no room temperature control | [s/no] | |
| with mechanic thermostat room temperature control | [yes/] | |||||
| with electronic room temperature control | [s/no] | |||||
| electronic room temperature control plus day timer | [s/no] | |||||
| electronic room temperature control plus week timer | [s/no] | |||||
| Other control options (multiple selections possible) | ||||||
| room temperature control, with presence detection | [s/no] | |||||
| room temperature control, with open window detection | [s/no] | |||||
| with distance control option | [s/no] | |||||
| with adaptive start control | [s/no] | |||||
| with working time limitation | [s/no] | |||||
| with black bulb sensor | [s/no] | |||||
Contact details
see the backside of the instruction manual
OEM GmbH & Co. KG
Stiftsbergstraße 1
74167 Neckarsulm
GERMANY
Model No.: HG02913
Version: 07/2021
IAN 365189_2101
SILVERCREST SFW 350 D4 Electric Mincer
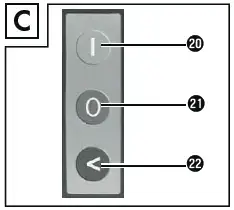
Introduction
Congratulations on the purchase of your new appliance. You have clearly decided in favour of a quality product. These operating instructions are a part of this product. They contain important information in regard to safety, use and disposal. Before using the product, familiarise yourself with all of these operating and safety instructions. Use the product only as described and only for the specified areas of application. Retain these instructions for future reference. In addition, pass these documents on, together with the product, to any future owner.
Copyright
This documentation is copyright protected. Any copying or reproduction of it, including as extracts, as well as the reproduction of images, also in an altered state, is only permitted with the written authorisation of the manufacturer.
Limited liability
All technical information, data and instructions for the installation, connection and operation contained in these operating instructions correspond to the latest available at the time of printing and, to the best of our knowledge, take into account our previous experience and know-how. No claims can be derived from the details, illustrations and descriptions in these instructions. The manufacturer assumes no responsibility for damage caused by failure to ob-serve these instructions, improper use, incompetent repairs, making unauthorised modifications or for using unapproved replacement parts.
Intended use
This appliance is intended only for the preparation of food in quantities expected in domestic households:
- Mincing fresh meat,
- Making sausages with natural or artificial sausage skin,
- Making biscuits,
- Straining tomatoes.
This appliance is not intended for the processing of frozen foods or other hard foodstuffs, e.g. bones or nuts, or for use in commercial or industrial environments.
Items supplied / Component description
Biscuit attachment with pattern strips
- Stodger
- Feeding tray
- Cable retainer
- Motor unit
- Meat grinder casing made of metal
- Locking clamp
- Tomato outlet
- Plastic screw
- Strainer sieve
- Transport screw
- Spring
- Cross blade
- Cutting discs for coarse and fine mincing
- Ring clamp
- Sausage stuffer attachment
- Locking button
- “I” button (On)
- “0” button (Off)
- “<” button (Reverse)
Technical data
| Voltage | 220 – 240 V ∼ (AC), 50 Hz |
| Power consumption | 250 – 350 W |
| Protection class | II / (Double insulation) |
| All of the parts of this appliance that come into contact with food are food-safe. | |
| C.O. Time | 15 minutes |
C.O. Time
The C.O. Time (Continuous Operation) details how long an appliance may be used without the motor overheating and being damaged. After the appliance has run for this period it must be switched off until the motor has cooled itself down.
Safety instructions
RISK OF ELECTRIC SHOCK
- Ensure that the power cable does not become damaged. Pro-tect the cable from heat and ensure that it cannot be trapped or clamped.
- Arrange for defective power plugs and/or cables to be replaced as soon as possible by a qualified technician or by our Customer Service Department to avoid the risk of injury.
- Use the appliance only in dry indoor areas, not outdoors.
Never immerse the motor block in water or any other liquid! If you do, then you could receive a potentially fatal electric shock.
WARNING!
- Never use the appliance for purposes other than those listed here. There will be a major risk of serious accidents should you try to neutralise the safety fitments on the appliance!
- Never put your hand into the openings of the appliance. Do not insert any objects of any kind into the openings – except for the appropriate stodger and the foodstuff to be processed. If you do, there will be a serious risk of accidents!
- Unplug the appliance from the power source before attaching or removing accessories.
- Do not leave the appliance unsupervised when it is ready for use. To avoid it being switched on accidentally, always unplug the appliance after use or during breaks.
- Only use the original accessory parts for this appliance. Other accessories may not meet the safety requirements.
- Never operate the appliance in a no-load condition. This could irreparably damage the appliance.
- Before changing accessories or additional parts that are in motion during operation, the appliance must be switched off and disconnected from mains power.
- Never use the appliance for purposes other than those described in these instructions.
- Warning – the cross blade is very sharp! Always take care when handling and cleaning the appliance.
- The appliance should always be disconnected from the mains when unattended and before assembly, disassembly or cleaning.
- This appliance may not be used by children.
- The appliance and its connecting cable must be kept away from children.
- This appliance may be used by persons with limited physical, sensory or mental capabilities or lack of experience and knowledge, provided that they are under supervision or have been told how to use the appliance safely and are aware of the potential risks.
- The appliance must not be used as a plaything by children.
Assembly / Disassembly
CAUTION – PROPERTY DAMAGE!
All accessories are coated with a thin film of oil to protect them from corrosion. Therefore, carefully clean all of the parts before using the appliance for the first time, as described in detail in the chapter “Cleaning”. After subsequent usage, always apply a light coating of cooking oil to the metallic components.
NOTICE
Before using for the first time, remove the protective foil from the control panel.
Assembling the meat grinder
Unfold the fold-out side. There you will find the step-by-step illustrations for as-sembling the appliance.
- Place the transport screw in the meat grinder casing .
- Place the spring w onto the transport screw .
- Then fit the cross blade on so that the sharp side points away from the spring . Ensure that the square opening in the cross blade is placed correctly on the square axle.
WARNING! RISK OF INJURY!
The cross blade e is very sharp! Risk of injury!
CAUTION – PROPERTY DAMAGE!|
The appliance will be damaged if the cross blade e is inserted the other way around! - Select the appropriate cutting disc
- Place your selected cutting disc into the meat grinder casing 6 so that the fixings on the cutting disc are located in the openings in the meat grinder casing 6.
- After everything has been correctly assembled, screw the ring clamp back on hand-tight.
- The ready-assembled meat grinder casing is connected by a bayonet connector to the motor unit
- Insert the meat grinder casing 6 into the motor unit 5 such that the arrow on the meat grinder casing 6 lies against the symbol motor unit 5. The locking button o presses itself in
- Lightly press the meat grinder casing 6 in and at the same time turn the feeding shaft on the meat grinder casing 6 into the middle position (Fig. B) so that the arrow on the feeding shaft points to the symbol . When the meat grinder casing 6 engages, the locking button o springs out.
- Finally, place the feeding tray 3 on top of the feeding funnel.
- To dismantle it, press the locking button o and turn the feeding funnel to the right (Fig. B) . You can now pull the meat grinder casing 6 out.
Assembling the sausage stuffer attachment
Unfold the fold-out side – there you will find the step-by-step illustrations for as-sembling the appliance.
- Remove the meat grinder casing 6 as described under “Assembling the meat grinder”.
- Dismantle all parts which are fitted to/in the meat grinder casing 6 and clean them.
- Coat all metal parts with cooking oil.
- Put the transport screw q, the spring w and the cross blade e back into the meat grinder casing 6.
- Insert the sausage disc u so that the fixings on the sausage disc u are located in the openings in the meat grinder casing 6.
- Then place the sausage stuffer attachment z before the sausage disc
- Screw the ring clamp t on hand-tight.
- Assemble the meat grinder casing 6 as described under “Assembling the meat grinder”.
Assembling the kubbe attachment
Unfold the fold-out side. There you will find the step-by-step illustrations for as-sembling the appliance.
- Remove the meat grinder casing 6 as described under “Assembling the meat grinder”.
- Disassemble any attachments that might be fitted and clean the meat grinder casing 6.
NOTICE
To use the kubbe attachment i, neither the cross blade e with the spring w, nor a cutting or sausage disc r/u are required! Remove these from the meat grinder casing 6 if necessary. - Coat all metal parts with cooking oil.
- Insert the two plastic parts of the kubbe attachment i so that the fixings on the bottom kubbe attachment ring are located in the openings in the meat grinder casing
- When everything has been attached correctly, screw the ring clamp t back on hand-tight.
- Assemble the meat grinder casing as described under “Assembling the meat grinder”.3
Assembling the biscuit attachments
Unfold the fold-out side. There you will find the step-by-step illustrations for as-sembling the appliance.
- Remove the meat grinder casing as described under “Assembling the meat grinder”.
- Disassemble any attachments that might be fitted and clean the meat grinder casing
NOTICE
To use the biscuit attachment 1, neither the cross blade e with the spring w, nor a cutting or sausage disc r/u are required! Remove these from the meat grinder casing 6 if necessary. - Coat all metal parts with cooking oil.
- Pull the pattern strips 1 away from the front of the biscuit attachment
- First place the plastic disc and then the metal disc of the biscuit attachment 1 into the meat grinder casing (see fold-out side). Insert the biscuit attachment so that the fixings on the biscuit attachment are located in the openings in the meat grinder casing
- After everything has been correctly assembled, screw the ring clamp t back on hand-tight.
- Replace the pattern strips 1 back in to the front of the biscuit attachment 1. Ensure that the grip on the pattern strips 1 points away from the appliance. If it does not, you will not be able to adjust the pattern, which is located directly on the grip.
- Assemble the meat grinder casing 6 as described under “Assembling the meat grinder”.
- To dismantle it, you must first remove the pattern strips 1 before you can screw the ring clamp t open and take the biscuit attachment 1 back out.
Fitting the strainer attachment
Unfold the fold-out page – it contains the step-by-step illustrations for assembling the appliance.
- Remove the meat grinder casing 6 as described in “Assembling the meat grinder”.
- Remove any attachments that might be fitted and clean the meat grinder casing 6.
NOTE
The transport screw q and the cross blade e with the spring w are not required for the strainer attachment! Remove these from the meat grinder casing if necessary. - Push the plastic screw 9 into the meat grinder casing 6.
- Push the strainer sieve 0 over the plastic screw 9 so that the tabs on the strainer sieve 0 fit into the recesses in the meat grinder casing The holes of the strainer sieve should be facing downwards.
- Once everything has been correctly attached, roll the ring clamp t over the strainer sieve 0 and screw it on hand-tight.
- Fit the meat grinder casing 6 as described in “Assembling the meat grinder”.
- Undo the locking clamp 7 on the tomato outlet 8.
- Place the tomato outlet 8 under the strainer sieve by pushing the tip of the strainer sieve 0 through the small hole in the tomato outlet 8:

- Fasten the locking clamp 7 so that it grips the meat grinder casing 6.
- Close the locking clamp 7 by flipping the small closure over the locking clamp 7.
Operation
RISK OF ELECTRIC SHOCK
NEVER open the housing of the motor unit 5 – it does not contain any user-serviceable elements. If the housing is opened, the warranty becomes void. If the housing is opened, there is a risk of receiving a potentially fatal electric shock.
CAUTION – PROPERTY DAMAGE!
- Do not use the appliance for longer than 15 minutes continuously. To avoid an overheating of the appliance, after such a period switch it off and allow it to cool down for ca. 30 minutes.
- NEVER activate the buttons “I” p or “<” s, during a change of rotation direction, if the appliance motor has not come to a complete stop. This could damage the motor.
Operating the appliance
Once the appropriate attachments have been fixed:
- Place the appliance where it will at all times be absolutely stable and under no circumstances could it fall off of the work surface or in any way come into contact with water (due to vibrations or becoming snagged in the power cable). Vibration is unavoidable when it is working.
RISK OF ELECTRIC SHOCK
Never touch an appliance, which is plugged in or is operational when it happens, that falls or lands in water – or in the case of other emergencies!First disconnect the appliance from the mains power source in all emergency situations! Otherwise you run the risk of serious injury or loss of life! - Put the food which is to be processed in the feeding tray 3 and place a catchment container at the front under the exit opening.
- First press the button “0” a to check that the appliance is still switched off. Otherwise there is a risk that the appliance could unintentionally start when the plug is inserted into the power socket.
- Then insert the plug into a mains power socket.
- Press the button “I” p to start the appliance.
WARNING! RISK OF INJURY!
Push the foodstuff into the feeding shaft ONLY with the round stodger 2 –NEVER with one’s fingers, forks, spoons or similar objects. That could lead to physical injury and also damage the appliance.
CAUTION – PROPERTY DAMAGE!
Do not ever press so hard that the motor gets audibly slower. This could overburden the machine and damage it.
Processing meat
- Use pieces of meat that fit easily into the feeding funnel. If necessary, cut the meat to size beforehand. Check that the meat does not have any bones and or tendons.
WARNING!
Minced meat is very prone to bacterial contamination. Therefore take care to maintain good hygiene when processing meat. If you do not, it may cause serious health problems. - When you have read and understood all of the instructions on the topic ”Meat“, you can now use the appliance as described in the chapter “Operating the appliance”.
Processing sausage meat
- Pass meat through the meat grinder twice before using it as sausage stuffing.
- To make sausage stuffing, add some chopped onions, spices and other ingredients to the minced meat, as per your recipe, and knead the mixture well. Refrigerate this for 30 minutes before processing it further.
- Pull one end of the sausage skin (natural or artificial sausage skin) onto the sausage stuffer attachment z and tie a knot in the other end. For 1 kg of the filling, you will need approximately 1.60 m of sausage skin.
TIP!
Soak the natural sausage skin in lukewarm water for about 3 hours before using it and wring it out before attaching it. This will make the natural sau-sage skin more elastic. Natural sausage skins are available from butcher suppliers close to slaughter houses or from your family butcher. - The sausage mixture will be pressed into the sausage skin by the sausage stuffer attachment z. When it is long enough switch the appliance off, press the sausage together at the ends and rotate it a couple of times along its longitudinal axis.
TIP!
Sausage meat tends to expand when cooked or frozen. Therefore, to prevent it from bursting it is best not to overstuff the sausage. - When you have read and understood all of the instructions on the topic ”Sausage”, you can now use the appliance as described in the chapter “Operating the appliance”.
Using the kubbe attachment
With the kubbe attachment i foodstuffs can be processed to form hollow rolls of meat or vegetables, which can then be stuffed as desired.
- First put the meat through the meat grinder twice before pressing it through the kubbe attachment i.
- When you have read and understood all of the instructions on the topic “Kubbe-Attachment”, you can now use the appliance as described in the chapter “Operating the appliance”.
Making biscuits
After you have made the biscuit pastry according to your recipe, and after having fixed the biscuit attachment 1:
- Line a small baking tray with greaseproof paper and place or hold it directly under the exit opening at the front of the appliance.
- Press pastry evenly into the meat grinder casing 6 – the transport screw q then pushes it through the selected design on the design motif strip of the biscuit attachment 1.
- When the biscuit is the required length, stop the appliance and break the pastry off at the exit opening. Lay the biscuits on the baking tray.
- When you have read and understood all of the instructions on the topic “Biscuits”, you can now use the appliance as described in the chapter “Operating the appliance”
Straining tomatoes
- Place a container under the tomato outlet 8.
- Place a container at the front under the strainer sieve 0.
- Quarter the tomatoes and push them into the meat grinder casing 6 slowly and evenly. The plastic screw 9 pushes the tomatoes through the strainer attachment. The strained tomatoes fall into the tomato outlet 8. The tomato skin is ejected from the strainer sieve 0 at the front of the appli-ance.
- Once you have read and understood all of the instructions in the section “Straining tomatoes”, you can use the appliance as described in the section “Operating the appliance”.
Non-functionality
If the drive is blocked by accumulated food:
- Press the button “0” a to stop the meat grinder.
- Press and hold the button “<” s. The appliance will now run in the reverse direction. This enables you to transport the food which has become stuck a short way backwards, and the motor to run freely again.
- When the drive runs smoothly again, release the “<” s button.
- Press the button “I” p to re-start the meat grinder.
- If you do not succeed in getting the drive free with this, clean the appliance as described in the chapter “Cleaning”.
Should the motor suddenly stop, it could be due to automatic activation of the internal overload fuse. This is intended to protect the motor.
- Switch the appliance off and allow it cool down for approximately 30 minutes before continuing to use it.
- Should this not work, wait for a further 15 minutes.
- If it still does not function at the end of this period, this indicates a technical problem. In this case, contact the Customer Service Centre.
If the power cable is damaged or the accessories are visibly damaged:
- Immediately switch the appliance off by pressing the “0” a button!
- If this is not possible without risk to personal safety, disconnect the plug from the mains power socket.
- Arrange for the defective parts to be repaired by Customer Services before re-using the appliance.
Cleaning
Cleaning the motor block
Clean the exterior surfaces and the power cable with a slightly damp cloth. For stubborn dirt, add mild detergent to the cloth. Afterwards, wipe with a cloth moistened only with fresh water to ensure that all detergent is removed. Dry the appliance well before re-using it.
RISK OF ELECTRIC SHOCK|
Never immerse the motor block 5 in water or any other liquid! Should this occur, you are at risk of a potentially fatal electric shock if permeating moisture makes contact with the electrical wiring.
CAUTION – PROPERTY DAMAGE!|
Never use detergents, abrasive cleaners or solvents. These could damage the appliance and leave residues on the foodstuffs.
Cleaning the accessories
Clean the accessories that could come in contact with foodstuffs, … With hot water and a household detergent suitable for use with foods.
NOTICE
- The plastic part of the biscuit attachment 1, the stodger 2, the sausage stuffer attachment z and the kubbe attachment i are dishwasher safe.
- Place the plastic parts in the upper basket of the dishwasher if possible and make sure that none of the parts can get stuck. Otherwise, the plastic parts could become deformed!
WARNING! RISK OF INJURY!|
The cross blade e is very sharp! Risk of injury!
Storage
- Wind the mains cable clockwise around the cable retainer 4 on the underside of the appliance and fasten it in place as shown below. This keeps it safe from damage:
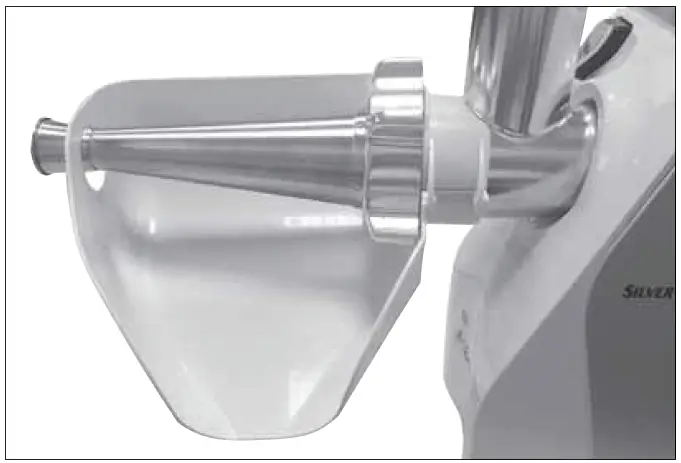
- Store the appliance at a dry location.
- After drying the metal attachments coat them lightly with a little cooking oil –if you are not going to use the appliance immediately. This will protect them from corrosion.
- Store the appliance where it will be out of reach of children and people requiring supervision. They are not always able to correctly assess the potential risks involved with using electrical appliances.
Disposal
Do not dispose of the appliance in your normal domestic waste. This product is subject to the provisions of European Directive 2012/19/EU (Waste Electrical and Electronic Equipment). Dispose of the appliance through an approved disposal centre or at your com-munity waste facility. Observe the currently applicable regulations. In case of doubt, please contact your waste disposal centre. Your local community or municipal authorities can provide information on how to dispose of the worn-out product. The packaging protects the appliance from damage during carriage. The packaging materials have been selected for their environmental friendliness and ease of disposal, and are therefore recyclable. Returning the packaging to the materials cycle conserves raw materials and reduces the amount of waste that is generated. Dispose of packaging materials that are no longer needed in accordance with applicable local regulations.
NOTICE
If possible, keep the original packaging of the appliance during the warranty period so that the device can be packed properly for returning in the event of a warranty claim.
Dispose of the packaging in an environmentally friendly manner.
Note the labelling on the packaging and separate the packaging material components for disposal if necessary. The packaging material is labelled with abbreviations (a) and numbers (b) with the following meanings: 1–7: Plastics 20–22: Paper and cardboard 80–98: Composites
Kompernass Handels GmbH warranty
Dear Customer, This appliance has a 3-year warranty valid from the date of purchase. If this product has any faults, you, the buyer, have certain statutory rights. Your statutory rights are not restricted in any way by the warranty described below.
Warranty conditions
The warranty period starts on the date of purchase. Please keep your receipt in a safe place. This will be required as proof of purchase. If any material or manufacturing fault occurs within three years of the date of purchase of the product, we will either repair or replace the product for you or refund the purchase price (at our discretion). This warranty service requires that you present the defective appliance and the proof of purchase (receipt) within the three-year warranty period, along with a brief written description of the fault and of when it occurred. If the defect is covered by the warranty, your product will either be repaired or replaced by us. The repair or replacement of a product does not signify the beginning of a new warranty period.
Warranty period and statutory claims for defects
The warranty period is not prolonged by repairs effected under the warranty. This also applies to replaced and repaired components. Any damage and defects present at the time of purchase must be reported immediately after un-packing. Repairs carried out after expiry of the warranty period shall be subject to a fee.
Scope of the warranty
This appliance has been manufactured in accordance with strict quality guide-lines and inspected meticulously prior to delivery. The warranty covers material faults or production faults. The warranty does not extend to product parts subject to normal wear and tear or to fragile parts which could be considered as consumable parts such as switches, batteries or parts made of glass. The warranty does not apply if the product has been damaged, improperly used or improperly maintained. The directions in the operating instructions for the product regarding proper use of the product are to be strictly followed. Uses and actions that are discouraged in the operating instructions or which are warned against must be avoided. This product is intended solely for private use and not for commercial purposes. The warranty shall be deemed void in cases of misuse or improper handling, use of force and modifications / repairs which have not been carried out by one of our authorised Service centres.
Warranty claim procedure
To ensure quick processing of your case, please observe the following instructions:
- Please have the till receipt and the item number (e.g. IAN 123456_7890) available as proof of purchase.
- You will find the item number on the type plate on the product, an engraving on the product, on the front page of the operating instructions (below left) or on the sticker on the rear or bottom of the product.
- If functional or other defects occur, please contact the service department listed either by telephone or by e-mail.
- You can return a defective product to us free of charge to the service address that will be provided to you. Ensure that you enclose the proof of purchase (till receipt) and information about what the defect is and when it occurred. You can download these instructions along with many other manuals, product videos and installation software at www.lidl-service.com.
- This QR code will take you directly to the Lidl service page (www.lidl-service.com) where you can open your operating instructions by entering the item number (IAN) 352828_2010.
Service
Service Great Britain
Tel.: 0800 404 7657
E-Mail: [email protected]
Service Malta
Tel.: 80062230
E-Mail: [email protected]
Importer
Please note that the following address is not the service address. Please use the service address provided in the operating instructions. KOMPERNASS HANDELS GMBH
BURGSTRASSE 21 44867 BOCHUM GERMANY www.kompernass.com
Recipes
Kibbeh
Ingredients for the mince filling 400 g lean beef or lamb 2 onions 10 g flour 25 g coarsely chopped pine nuts 1/2 tsp. each of ground allspice, cinnamon, cumin, caraway, cloves, nutmeg Salt and pepper Ingredients for the shell 500 g bulgur wheat (soaked) 500 g lean beef or lamb 1 onion 1 pinch of black pepper, 1 pinch of chilli Mince filling Prepare the mince filling first and leave it to cool while you prepare the shell. Chop the meat twice with the mincer (using first the coarse, then the fine perforated disc r). Mix the meat, flour, pine nuts and spices well. Chop and sear the onions. Add the mince and mix it with the onions. Thoroughly fry the mixture, then let it cool. Shell Chop the meat for the shell twice with the mincer (using first the coarse, then the fine perforated disc r) and mix it with the bulgur wheat, chopped onion and spices. Process the mass twice more using the mincer. Replace the perforated disc r with the kibbeh attachment i (see chapter “Installing the kibbeh attach-ment”) and make kibbeh shells of approx. 7 cm length.
Preparation Fill each kibbeh shell with the mince as soon as it is made, pinching the ends together to create small pouches. Deep-fry the finished kibbeh in hot oil (190 °C) for approximately 3 minutes. They should have a golden brown colour.
Meat rolls
Ingredients for the mince shell 450 g of lean Lamb, Veal or Beef 150 g Flour 1 Tsp Pimento (type of pepper) 1 Tsp Nutmeg 1 Pinch Chili powder 1 Pinch Pepper Ingredients for the meat filling 700 g Mutton 1 1/2 Tbsp Olive oil 1 1/2 Tbsp Onions, finely chopped 1/2 Tsp Pimento (type of pepper) 1/2 Tsp Salt 1 1/2 Tbsp Flour Pass the meat for the wrapping through the meat grinder twice (using first the medium-sized, then the fine perforated disc r) and then combine it with the ingredients. Then pass this mixture through the meat grinder twice. Exchange the cutting disc r for the kibbeh attachment i (see chapter “Using the kibbeh attachment”). Shape the kibbeh wrappers with the kibbeh attachment i and then freeze them.
Filling:
Pass the meat through the meat grinder twice (using first the medium-sized, then the fine perforated disc r). Saute the onions and then mix them well with the meat and other ingredients. Fill the kibbeh wrappers and fry until done. Alternative Fillings: 250 g steamed Broccoli or 250 g steamed Zucchini=or 250 g cooked Rice
Fresh Grill Sausages
Ingredients: 300 g lean Beef 500 g lean Pork 200 g Shoulder bacon 20 g Salt 1/2 Tsp ground white Pepper 1 Tsp Caraway 1/2 Tsp Nutmeg Pass the beef, pork and bacon through the meat grinder twice. Add the mixed spices and salt and thoroughly knead for 5 minutes. Place the sausage filling in the refrigerator for ca. 30 minutes. Fill the skins with sausage meat as detailed (see chapter “Processing sausage meat”) and make sausages of ca. 25 cm in length. Grill the sausages well and eat them on the same day.
Biscuits
Ingredients: 500 g butter 500 g sugar 2 – 3 packets of vanilla sugar 1 packet of vanilla custard 1/4 tsp salt 1 egg 4 egg yolks 800 g plain flour 2 tbsp baking powder 200 g ground (blanched) almonds Zest of a lemon Beat the butter until fluffy. Add the remaining ingredients one after another and knead well into the dough. Cover the finished dough and allow to stand for around 12 hours in the fridge (e.g. overnight). Then pass it through the meat grinder with the biscuit attachment 1. Place the biscuits on a baking tray lined with baking paper. Bake the biscuits in a pre-heated oven at 180°C for approx. 10 – 15 minutes until golden brown.

List of pictograms used
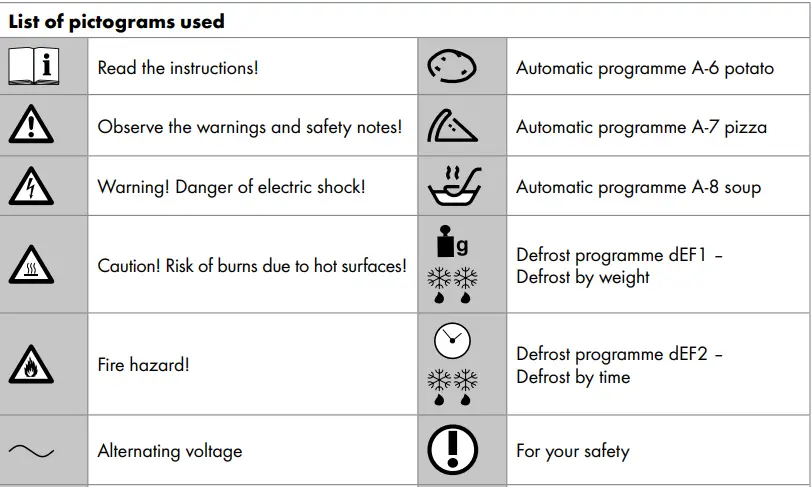
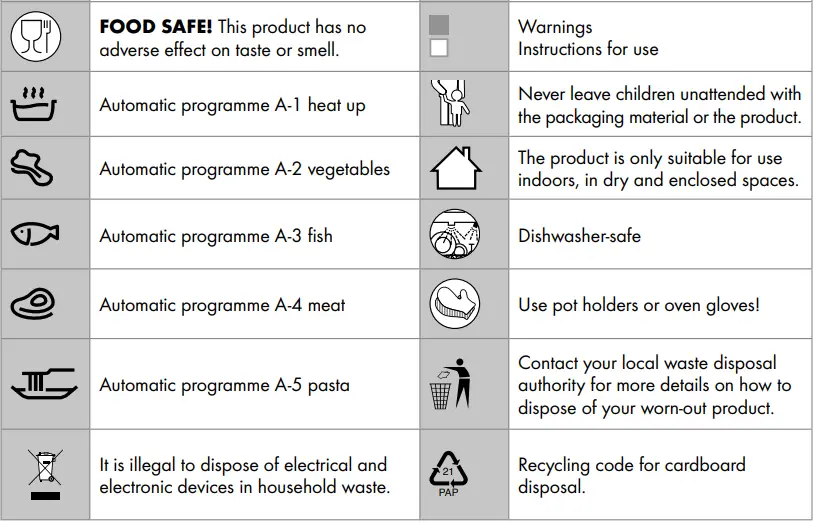
Introduction
 This quick reference guide is a fixed part of the operating instructions. Keep both this and the operating instructions in a safe place. When passing this product on to third parties, please be sure to include all documentation. Read the operating instructions before use, and pay particular attention to the safety instructions included in the operating instructions.
Scan the QR code, or download the complete operating instructions at www.lidl-service.com.

Intended use
This product is suitable for defrosting, heating up and cooking foods and is only intended for use indoors. The product may only be used to heat up suitable foods in suitable containers and dishes. The product is exclusively intended for private, non-commercial use. Only use the product for the intended purpose. Any use other than previously mentioned or product modification is prohibited and can result in injuries and/or product damage. The manufacturer assumes no liability for damage arising from improper use.
 This product is only suitable for use indoors, in dry and enclosed spaces.
Parts description
Microwave
- Mica cover
- Display
- Control panel
- Glass plate
- Turntable ring
- Turntable shaft
- Door locking mechanism
- Door handle
- Door
Control panel - Defrost button

- Timer /Clock button

- Start button

- Rotary control
- Stop button

- Microwave button

Scope of delivery
Verify that the contents are complete and that the product is in perfect condition immediately after unpacking.
- 1 Microwave
- 1 Glass plate
- 1 Turntable ring
- 1 Turntable shaft
- 1 Set of instructions for use
- 1 Quick start guide
Technical data
- Model no.: SMWC 700 B3
- Rated voltage: 230V∼, 50Hz
- Power input: 1050W
- Power output: 700W
- Capacity: approx.: 17 liters
- Diameter of glass plate: approx. 25.5cm
- Microwave dimensions: approx.: 44 x 25.7 x 6.3cm (W x H x D)
- Microwave weight: approx.: 10kg
Safety notes
PLEASE READ THE OPERATING INSTRUCTIONS PRIOR TO USE!
PLEASE KEEP THE OPERATING INSTRUCTIONS IN A SAFE PLACE! IF PASSING THIS PRODUCT ON TO A THIRD PARTY, INCLUDE ALL DOCUMENTS!
 WARNING:
 DANGER TO LIFE AND RISK OF ACCIDENTS FOR INFANTS AND CHILDREN! Never leave children unsupervised with the packaging material. There is a danger of suffocation.
- This product may be used by children aged 8 years and up, as well as by persons with reduced physical, sensory or mental capacities or lacking experience and knowledge, so long as they are supervised or instructed in the safe use of the product and understand the associated risks. Do not allow children to play with the product. Children should not clean or perform user maintenance unsupervised.
- Check the product for damage before each use. Never use the product if it is damaged in any way.
- Product repairs may only be carried out by the manufacturer or a technician appointed by the manufacturer or a similarly qualified person.
- The product is not intended for operation with an external timer switch or a separate remote control system.
- Never operate the product when empty!
- The product must not be operated when the door 9 is open.
If the door 9 the door seals or the door locking mechanism 7 are damaged, the product may not be used until it has been repaired by a qualified professional. - Never remove the light beige Mica cover 1 which is installed to protect the magnetron in the cooking chamber of the product.
 WARNING! It is dangerous for any persons other than qualified professionals to perform any maintenance or repair works which require the removal of the cover which ensures protection against radiation exposure caused by microwave energy.
 - The light inside the product should only be replaced by a qualified professional.
WARNING! Liquids or other foodstuffs must not be heated up inside sealed containers as they can easily explode. - Heating up liquids in the product can result in a so-called boiling delay, i.e. the liquid has already reached boiling point but the usual steam bubbles do not occur. In the event of vibrations, e.g. such as when it is removed from the microwave, the liquid may then suddenly boil. The liquid may abruptly spurt out.
- The contents of baby bottles and jars containing baby food must always be stirred or shaken. Always check the temperature before consumption in order to avoid burns.
- Eggs with shells or whole, hardboiled eggs must not be heated up in the product as they may explode, even if the heating process is finished off in the microwave.
- Do not stand directly in front of the product when opening the door 9 . Escaping steam can cause burns.
- This product is intended for household use and use in similar application areas, such as for example:
- in staff kitchens in shops, offices and other commercial areas;
- on agricultural estates;
- by customers at hotels, motels and other residential environments;
- in bed and breakfasts.
- The product must be cleaned regularly and food residues must be removed.
- If the product is not kept clean, this can lead to wear and tear which compromises the service life of the product and leads to dangerous situations.
- Clean the door 9 and the door locking mechanism 7 regularly. The product must not be cleaned using a steam cleaner.
- Do not expose the product to extreme conditions. Avoid:
- high humidity levels or wet conditions,
- extremely high or low temperatures,
- direct sunlight,
- open flames.
- Do not store food or other objects in the product
 Caution! Avoid the risk of fatal injury from electric shock!
- Only plug the product into a professionally installed mains socket. Make sure that the mains voltage corresponds to that of the product (see “Technical data“).
- If the mains cable for this product becomes damaged, it must be replaced by the manufacturer, its service agent or a similarly qualified person, in order to avoid hazards.
- Ensure that the mains cable cannot become damaged by sharp edges or hot surfaces.
- The product and the mains cable must never be immersed in water or other liquids.
- Always unplug the mains plug from the mains socket before cleaning or if the product will not be used for extended periods.
- Fully unwind the mains cable. Do not kink or squash the mains cable.
- Protect the product against dripping water and splashing water.
- Avoid contact with water or other liquids. Keep the product, the mains cable and the mains plug away from washing basins, sinks or similar. If any liquid gets inside the product, immediately unplug the mains plug from the earthed plug socket. Have the product checked over by a qualified professional.
- Never touch the product or the mains cable with wet hands.
 PREVENT FIRE HAZARDS!
- Do not operate the product near devices which emit heat themselves, e.g. ovens or stoves.
Only use the product in a freestanding capacity. - Do not install the product inside a cupboard.
- The minimum installation height is 85cm.
- Position the back of the product against a wall.
- Observe the required minimum distance (in cm) between the product and other objects (see Fig. C).
- Never cover up the product‘s ventilation openings.
- As soon as you notice sparks, flashes or even fire, immediately press the stop button 14 and unplug the mains plug.
- Never leave the product unattended. Always supervise the cooking or defrosting process.
- Only use utensils which are suitable for use in microwave devices.
- Remove metallic packaging elements from foods before heating them up.
- Never use metal containers for food or drinks.
- Do not heat up fat or oil.
- The product is intended for heating up foods and drinks. Drying foods or clothing and heating up heating pads, slippers, sponges, damp cleaning cloths or similar can cause injuries, ignition or fire.
- When heating foods in plastic or paper containers, you must frequently check the cooking device due to the possibility of fire.
- If the product smokes, switch it off or pull the plug and hold the door closed to smother any flames.
 CAUTION! RISK OF BURNS DUE TO HOT SURFACES!
 Please note that the door 9 and the outer surfaces can become hot during operation. Allow these to cool down or use pot holders or oven gloves.
- Any utensils used can become very hot when heating up foods. Use pot holders or oven gloves.
 For your safety
- We recommend that you use round/oval dishes rather than square /oblong dishes, as foods in the corner areas can easily overcook.
- Use the following utensils to heat up foods:
- Browning dishes
- Plates and dishes
- Glass containers without lids
- Oven glassware
- Oven cooking bags
- Paper plates and cups (for short warming times only)
- Paper towels (to cover foods and soak up fat only)
- Microwaveable plastic containers
- Microwaveable plastic packaging
- Microwaveable thermometers
- Wax paper (to cover foods only)
Always observe the manufacturer‘s instructions.
- Position the foods carefully before cooking. The thickest sections are close to the edges.
- Use a suitable cover if possible. This prevents splashing and ensures that the foods are cooked evenly.
- Pay attention to the cooking time. Choose the shortest specified cooking time and extend this as required. Foods that have been heated up for too long can catch fire.
 FOOD SAFE! This product has no adverse effect on taste or smell.
Initial use
Remove all packaging materials as well as protective films and check that all parts are complete and undamaged. Never remove the light beige Mica cover 1 in the cooking chamber of the product. This is not a packaging material – its purpose is to protect the magnetron. If the product is incomplete or damaged upon delivery, please contact the manufacturer.
Choosing an installation site
- Choose a level surface which ensures sufficient free space for the aeration and ventilation of the product (see Fig. C).
- Make sure that the mains plug is easily accessible so that it can be easily reached and unplugged in case of danger.
- Install the product as far away from radios and televisions as possible. Operating the product can cause disruptions in radio or television reception.
Preparing the product
- Open the door 9 by pulling on the door handle 8.
- Before first use, clean the product‘s cooking chamber with a cloth and some lukewarm water. Make sure that no residue is left when removing all protective and adhesive films.
- Place the turntable shaft 6 in the hole in the base of the cooking chamber. Make sure to insert the turntable shaft 6 into the hole as far as it will go. Place the turntable ring 5 into the well inside the cooking chamber.
 WARNING! Do not operate the product without a properly inserted glass plate 4.
 - Place the glass plate 4 on the turntable ring 5 and the turntable shaft 6. In doing so, the three glass points on the underside of the glass plate 4 must engage in the grooves on the turntable shaft 6.
- Close the door 9 by pushing it shut. Make sure that the door locking mechanism 7 clicks into place.
- Plug the mains plug into a professionally installed mains socket. Make sure that the mains voltage corresponds to that of the product (see “Technical data“).
Configuring default settings
Setting the time
When the product is operated for the first time or if the electricity supply is interrupted, the display 2 shows “0:00“ and the time (24-hour display) must be set.
- Press the timer/clock button
 11 twice.
 - The hour display will start to flash.
- Turn the rotary control 13 to set the desired hour.
- Then press the timer/clock button11 again.
- Turn the rotary control 13 to set the desired minutes.
- Then press the timer/clock button 11 again. The time is now set.
Setting the child safety lock
- You can activate a child safety lock by pressing and holding the stop button
 14 for approx. 3 seconds. A signal tone sounds and appears in the display 2 . The product‘s buttons now have no function. After approx. 3 seconds, the time is displayed again, provided that it has been set.
 - You can deactivate the child safety lock by pressing and holding the stop button
 14 again for 3 seconds. A signal tone sounds and all functions are available again.
Use
 WARNING! Never operate the product when empty!
- Open the door 9 by pulling on the door handle 8.
- Place the food that you want to heat up in a suitable container in the middle of the glass plate 4 .
- Close the door 9 by pushing it shut. Make sure that the door locking mechanism 7 clicks into place.
Quick start
When you press the start button  12 without first setting a power level, the cooking programmed will start on the highest energy level (700 Watts). This function is not available for automatic programmed or for the defrost programmed by weight.
- When you press the start button 12 without first setting a power level, the cooking programmed will start on the highest energy level (700 Watts). This function is not available for automatic programmed or for the defrost programmed by weight.
- Whilst the cooking process is underway, you can lengthen the cooking time by 30 seconds with each press of the start button
 12 .
12 .
Note: The longest cooking time is 95 minutes.
The quantities can be set according to the following table:
| Programme | Weight | Display | Power |
|
A-1 heat up |
200 g | 200 |
700 W |
| 400 g | 400 | ||
| 600 g | 600 | ||
|
A-2 vegetables |
200 g | 200 |
700 W |
| 300 g | 300 | ||
| 400 g | 400 | ||
|
A-3 fish |
250 g | 250 |
560 W |
| 350 g | 350 | ||
| 450 g | 450 | ||
|
A-4 meat |
250 g | 250 |
700 W |
| 350 g | 350 | ||
| 450 g | 450 |
| A-5 pasta | 50 g
(+ 450 ml water) |
50 | 560 W |
| 100 g
(+ 800 ml water) |
100 | ||
| A-6 potato | 200 g | 200 | 700 W |
| 400 g | 400 | ||
| 600 g | 600 | ||
| A-7 pizza | 200 g | 200 | 700 W |
| 400 g | 400 | ||
| A-8 soup | 200 ml | 200 | 560 W |
| 400 ml | 400 |
- Finally, press the start button
 12 to start the programme.
 - If the chosen food is not properly cooked through, cook it again for a few minutes using the cooking programme.
Stopping the programme
To turn or stir the food after half of the cooking time, for example, it is often necessary to interrupt the current programme.
- Open the door 9 or press the stop button
 14 to interrupt the programme. The remaining time will continue to be shown in the display 2 .
 - After you have closed the door 9 again, press the start button
 12 to continue the selected programme.
 - Press the stop button
 14 twice to completely stop the selected programme early.
End of programme
At the end of every programme, 5 signal tones are emitted to signal that the selected process is complete.
- Open the door 9 by pulling on the door handle 8 .
- Carefully remove the food from the cooking chamber.
Cleaning, maintenance and storage
- If the product is not kept clean, this can lead to wear and tear which compromises the service life of the product and leads to dangerous situations.
- Clean the door 9 and the door locking mechanism 7 regularly.
- The product must not be cleaned using a steam cleaner.
- Remove any food residues regularly.
- Do not use harsh cleaning agents or scouring agents.
- Unplug the mains plug from the mains socket if you are not using the product for a long period of time.
- Make sure that all parts are completely dry before you use the product.
- Clean the product using a soft sponge and some soapy water.
 The glass plate 4 is dishwasher-safe.
Troubleshooting
| Problem | Cause | Solution |
| The product won’t start. | The mains plug is not firmly plugged in. | Unplug the mains plug and plug
it back in after 10 seconds. |
| The fuse has burnt through or the switch- disconnector has triggered. | Contact the service centre. | |
| Problems with the plug socket | Check the socket with other
electrical devices. |
|
| The product will not start the cooking process. | The door 9 is not closed properly. | Close the door 9 . |
| The light in the product’s cooking chamber is not working. | The light bulb may be defective. | Contact the service centre. |
Conformity information
MLAP GmbH hereby declares that the “Microwave SMWC 700 B3” complies with the following European requirements:
EMC Directive 2014/30/EU
Low Voltage Directive 2014/35/EU
Ecodesign Directive 2009/125/EC
RoHS Directive 2011/65/EU
Instruction Manual

PDF ONLINE
 www.lidl-service.com
IAN 360601_2010

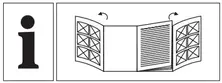 |
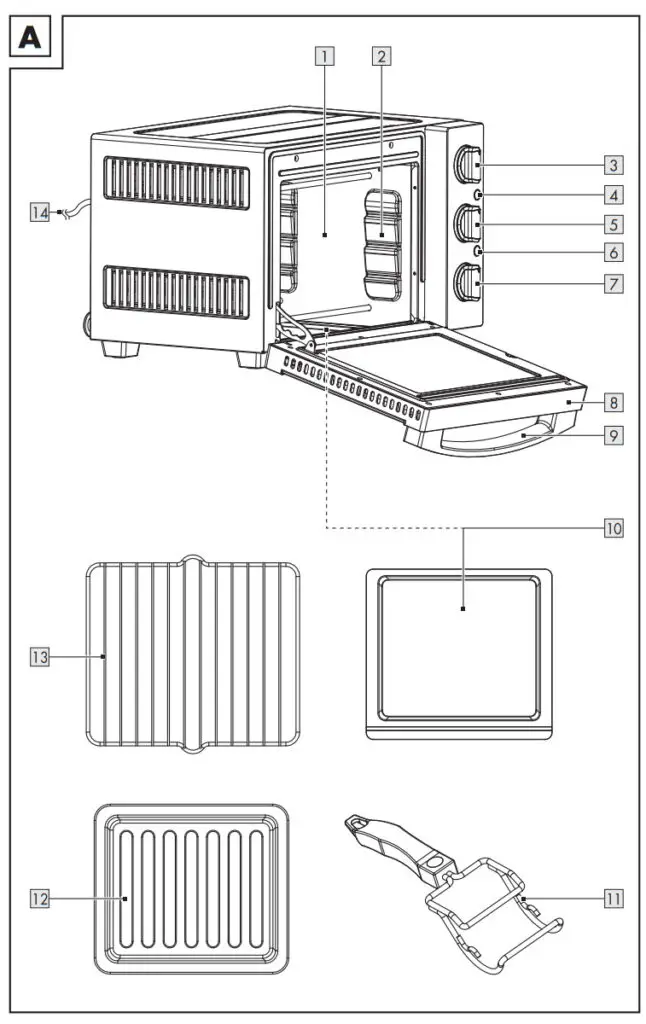 |
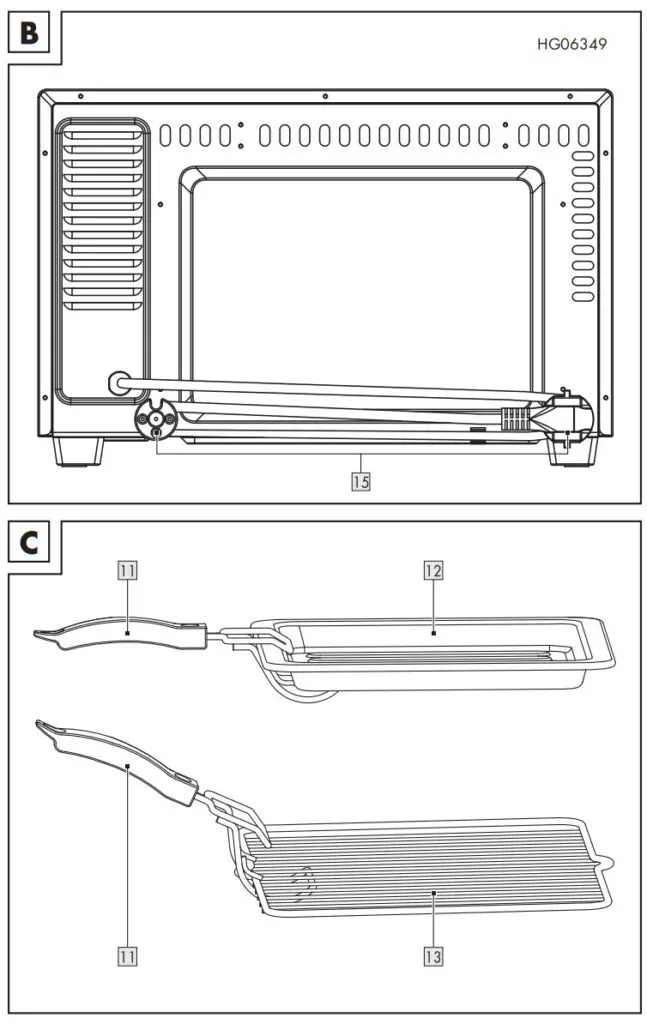 |
|
Warnings and symbols used
The following warnings are used in this user manual and on the packaging:
 |
DANGER! This symbol in combination with the signal word “Danger” marks a high-risk hazard that if not prevented could result in death or serious injury . |
|
WARNING! This symbol in combination with the signal word “Warning” marks a medium-risk hazard that if not prevented could result in death or serious injury. |
|
CAUTION! This symbol in combination with the signal word “Caution” marks a low-risk hazard that if not prevented could result in minor or moderate injury. |
|
ATTENTION! This symbol with the signal word “Attention” indicates possible property damage. |
| NOTE: This symbol in combination with “Note” provides additional useful information. | |
| Alternating current / voltage | |
| Hertz (supply frequency) | |
| Watts | |
| This product is classified as protection class I and must be connected to protective ground. | |
| Use the product in dry indoor spaces only. | |
| Danger – Risk of electric shock! | |
| Warning – The surface is liable to get hot during use! | |
| Food is safe. This product has no adverse effect on taste or smell . | |
| DANGER! Risk of burns! Do not touch the glass door during operation, because it can become very hot. Only touch the glass door after operation once it has completely cooled down . |
MINI OVEN
Introduction
We congratulate you on the purchase of your new product. You have chosen a high-quality product. The instructions for use are part of the product.
They contain important information concerning safety, use, and disposal. Before using the product, please familiarise yourself with all of the safety information and instructions for use. Only use the product as described and for the specified applications. If you pass the product on to anyone else, please ensure that you also pass on all the documentation with it .
Intended use
This product is intended for heating and baking food. Do not use it for any other purpose . The product is designed only for use in private households and must not be used in medicinal or commercial areas .
The manufacturer is not liable for damage caused by improper use.
Scope of delivery
After unpacking the product, check if the delivery is complete and if all parts are in good condition.
Remove all packaging materials before use.
| 1x Mini oven | 1x Baking tray |
| 1x Crumb tray | 1x Grill rack |
| 1x Tongs | 1x Instruction manual |
Description of parts
| 1 Cooking chamber | 9 Handle |
| 2 Rack levels | 10 Crumb tray |
| 3 Thermostat | 11 Tongs |
| 4 Temperature control light | 12 Baking tray |
| 5 Mode selector switch | 13 Grill rack |
| 6 Indicator light | 14 Power cord with power plug |
| 7 Timer | 15 Power cord rewind |
| 8 Door |
Technical data
Nominal voltage: 220–240 V∼, 50 Hz
Power consumption: 1200 W
Protection class: I
Temperature range: 100 to 230 °C
Cooking chamber volume: approx. 15 liters
Certification: GS (TÜV Rheinland)

BEFORE USING THE PRODUCT, PLEASE FAMILIARISE YOURSELF WITH ALL OF THE SAFETY INFORMATION AND INSTRUCTIONS FOR USE! WHEN PASSING THIS PRODUCT ON TO OTHERS, PLEASE ALSO INCLUDE ALL THE DOCUMENTS!
In the case of damage resulting from non-compliance with these operating instructions, the warranty claim becomes invalid! No liability is accepted for consequential damage! In the case of material damage or personal injury caused by incorrect handling or non-compliance with the safety instructions, no liability is accepted!
Children and persons with disabilities
 WARNING! RISK OF LOSS OF LIFE OR ACCIDENT TO INFANTS AND CHILDREN!
Never leave children unsupervised with the packaging material. The packaging material represents the danger of suffocation . Children frequently underestimate the dangers .
Always keep children away from the packaging material.
Packaging material is not a toy.
- This product can be used by children aged 8 years and above and persons with reduced physical, sensory or mental capabilities or lack of experience and knowledge if they have been given supervision or instruction concerning the use of the product in a safe way and understand the hazards involved.
- Children shall not play with the product .
- Cleaning and user maintenance shall not be made by children unless they are older than 8 and supervised.
- Keep the product and its cord out of reach of children less than 8 years.
- The door or the outer surface may become hot when the product is operating.
Intended use
 WARNING! Misuse may lead to injury. Use this product solely in accordance with these instructions. Do not attempt to modify the product in any way.
Electrical safety
![]() DANGER! Risk of electric shock! Never attempt to repair the product yourself .
DANGER! Risk of electric shock! Never attempt to repair the product yourself .
In case of malfunction, repairs are to be conducted by qualified personnel only .
![]() DANGER! Risk of electric shock! Do not immerse the product in water or other liquids. Never hold the product under running water.
DANGER! Risk of electric shock! Do not immerse the product in water or other liquids. Never hold the product under running water.
![]() DANGER! Risk of electric shock! Never use a damaged product. Disconnect the product from the power supply and contact your retailer if it is damaged.
DANGER! Risk of electric shock! Never use a damaged product. Disconnect the product from the power supply and contact your retailer if it is damaged.
- The product is not to be used if it has been dropped or if there are visible signs of damage.
- Before connecting the product to the power supply, check that the voltage and current rating corresponds with the power supply details shown on the product’s rating label.
- Regularly check the power plug and the power cord for damages. If the supply cord is damaged, it must be replaced by the manufacturer, its service agent or similarly qualified persons in order to avoid a hazard.
- Protect the power cord against damages. Do not let it hang over sharp edges, do not squeeze or bend it . Keep the power cord away from hot surfaces and open flames.
Operation
![]() DANGER! Risk of burns!
DANGER! Risk of burns!
During use the product gets hot.
Do not touch the product while in use nor immediately after use.
- Do not place the product on hot plates (gas, electric, coal cooking range, etc .) .
- Operate the product on a level, stable, clean, heat-resistant, and dry surface.
- Do not cover the product while it is in use or shortly after use when it is still warm.
- The use of extension cords is not recommended. If the use of an extension cord is necessary, it must be designed for a current flow of at least 10 A.
- Lay cords and extension cords in such a way that they may not be tripped over or otherwise damaged.
- The product is not intended to be operated by means of an external timer or separate remote control system.
- Always use oven mitts and the included tongs when handling hot accessories.
- Never operate the product without inserted crumb tray. This prevents direct contamination of the cooking chamber and facilitates the care and maintenance of the product.
 DANGER! Risk of burns! Do not touch the glass door during operation, because it can become very hot. Only touch the glass door after operation once it has completely cooled down.
Cleaning and care
![]() WARNING! Risk of injury! Disconnect the product from the power supply before cleaning and when not in use .
WARNING! Risk of injury! Disconnect the product from the power supply before cleaning and when not in use .
- Do not pull the power plug out of the electrical outlet by the power cord.
- Protect the product, its power cord, and power plug against dust, direct sunlight, dripping, and splashing water .
- Protect the product against heat. Do not place the product close to open flames or heat sources such as stoves or heating appliances.
- Do not use abrasive cleaning agents to clean the oven door glass, as they may scratch the surface, which can lead to glass breakage.
- The product shall not be cleaned with a steam cleaner.
Before first use
- Remove the packaging material. Check if all parts are complete.
- Before using the product for the first time:
Operate the product empty in order to let any production residues evaporate .
– Place the product on a flat surface that leaves at least 15 cm distance from the walls to ensure ventilation.
– Remove any accessories from the cooking chamber 1 . Remove the coarse dirt and remaining packaging residue. Wipe the cooking chamber with a clean and dry cloth.
– Close the door 8.
– Connect the power plug 14 with a suitable wall outlet. - For the following steps, refer to the “Operation” chapter.
– Set the mode selector switch 5 to the position (upper and lower heat).
– Set the thermostat to 3 to 230 °C.
– Set the timer for 7 to 20 minutes. The indicator light 6 switches on. Residues, if any, are evaporating. This is normal and harmless.
– The temperature control light 4 lights up as soon as the set temperature is reached .
If the temperature drops again, the temperature control light goes out .
– After the set time has elapsed: Allow the product to cool for 10 minutes. - Disconnect the power plug 14 from the wall outlet.
- Clean the product and its accessories (see “Cleaning and care”).
Operation
Accessories
Crumb tray
![]() ATTENTION! The crumb tray
ATTENTION! The crumb tray 10 protects the bottom of the cooking chamber 1 from coarse dirt and facilitates cleaning.
Use the product only with inserted crumb tray
- Hold the crumb tray
10on the extended grip edge. Fully push in the crumb tray at the product’s bottom (underneath the lower heating elements).
Baking tray
- The baking tray 12 is used for cooking food without a separate container.
- Use aluminum foil and baking paper to prevent food from burning and facilitate cleaning.
Grill rack
- Use the grill rack
13:
– when you want to grill larger meals.
– when you cook the food in a separate container.
NOTE: For very greasy or juicy food: Insert the baking tray 12 underneath the grill rack 13 as a drip tray.
Tongs
The tongs 11 are used for the safe handling of the baking tray 12 and the grill rack 13 when they are still hot (see fig . C).
- Hold the tongs 11 slightly downwards.
- Hook the tongs 11 into the edge of the baking tray 12 or the grill rack 13 .
ATTENTION! When using the grill rack 13, the small hooks of the tongs 11 must also grip from above into the grille. - Tilt the tongs 11 carefully in the direction of the horizontal.
- Check if the tongs 11 have a tight grip. Move the baking tray 12 or the grill rack 13.
Cooking and grilling
(see fig . D)
- Set the desired cooking temperature by rotating the thermostat 3
- Choose the desired cooking mode with the mode selector switch 5 :
| Setting | Mode |
| OFF | Off Heating elements off. |
| Upper heat Only upper heating elements are switched on. |
|
| Lower heat Only lower heating elements are switched on. |
|
| Upper and lower heat Upper and lower heating elements are switched on. |
- Set the timer 7 to the desired cooking time (max . 60 minutes). Starting from the 0 positions, the timer can be turned in both directions.
| Rotation direction | Cooking time |
| Clockwise | Limited cooking time The product switches off when the set time has elapsed. |
| Anti-clockwise to ON position | Unlimited cooking time The product does not switch off automatically. |
- Once timer 7 has been set, the product turns on automatically.
![]() NOTES:
NOTES:
- The indicator light 6 remains lit as long as the product is switched on.
- The temperature control light 4 turns on as soon as the set temperature is reached. If the set temperature drops again, the temperature control light turns off.
- If necessary, preheat the product to the desired temperature for approx. 10 minutes until temperature control light 4 turns on.
- The cooking temperature setting can be changed anytime by rotating the timer 7.
Switching off
- Rotate the timer 7 to the 0 positions.
- When the product is switched off:
– a signal tone sounds.
– the indicator light 6 goes off.
Recipes
![]() NOTE: The amount of ingredients is for reference only. It can be adjusted according to personal preferences.
NOTE: The amount of ingredients is for reference only. It can be adjusted according to personal preferences.
Baked salmon fillet
Ingredients
| 550 g | Salmon fillet |
| 3 tbsp | Vegetable oil |
| 1 tsp | Thyme leaves (chopped) |
| 1 dash | Salt |
| 1 dash | Pepper |
| ½ | Lemon (optional) |
Preparation
- Preheat the product to 200 °C for 10 minutes (upper and lower heat).
- Marinate the salmon in a container with oil, thyme leaves, salt, and pepper.
- Transfer the salmon (with skin on top) to a big sheet of aluminum foil. Wrap the foil around the salmon to cover it.
- Transfer the wrapped salmon with foil onto the baking tray 12. Put the baking tray into cooking chamber 1 at the middle rack level .
Bake for about 30 minutes. - Take out the baking tray 12. Open the foil wrap.
- Return the baking tray 12 with the salmon on the foil into cooking chamber 1 at the middle rack level. Broil for about 15 minutes.
- Optional: Before serving, squeeze the lemon juice on the salmon.
Roast beef
Ingredients
| 1 kg | Sirloin of beef |
| 1 tsp | Salt |
| 1 tsp | Black pepper (freshly ground) |
| 2 tbsp | Vegetable oil |
| 200 g | Baby potatoes (washed and cut into quarters) |
| 2 | Carrots (washed and chopped) |
| 1 | Onion (washed and chopped) |
| 1 bulb | Garlic (peeled) |
| ¼ bunch | Thyme |
| ¼ bunch | Rosemary |
Preparation for the roast beef
- Take the beef out of the fridge. Let the beef rest at room temperature for about 30 minutes. Season with salt and black pepper.
- Preheat the product to 200 °C for 10 minutes (upper and lower heat).
- Cover the baking tray 12 with aluminum foil.
- Heat the vegetable oil in a skillet at medium-high heat. When the oil is about to smoke, add the beef. Cook and flip the beef for 5 to 10 minutes until it turns brown. Transfer the beef from the skillet to a plate. Keep the remaining oil in the skillet .
- Put the baby potatoes, carrots, onions, garlic, thyme, and rosemary in the skillet. Fry for 10 minutes at medium heat. Transfer all these ingredients to the baking tray 12, including the oil .
- Put the beef on top of the vegetables on the baking tray 12 .
- Put the baking tray 12 into the cooking chamber 1 at middle rack level for about 40–100 minutes (Cooking times are depending on the desired degree of doneness. Cooking times may vary, depending on the size and shape of the beef cut).
| Doneness | Cooking time |
| Medium | 40–55 minutes |
| Medium well | 60–80 minutes |
| Well done | 80–100 minutes |
- Transfer the beef and the vegetables to a serving plate.
Optional: Instant gravy mix for beef
- Refer to the cooking instructions on the packaging of your purchase.
Roast chicken breast
Ingredients
| 4 | Chicken breasts (approx. 160 g each) |
| 1 tbsp | Olive oil |
| 1 tsp | Paprika powder |
| ¼ tsp | Garlic powder |
| ¼ tsp | Brown sugar |
| ¼ tsp | Salt |
| ¼ tsp | Black pepper |
Preparation
- Marinate the chicken breasts with all ingredients in a container. Cover the container and keep it in the fridge for at least 1 hour.
- Preheat the product to 200 °C for 10 minutes (upper and lower heat) .
- Cover the baking tray 12 with aluminum foil.
- Put the marinaded chicken breast onto the baking tray 12. Put the baking tray into cooking chamber 1 at the middle rack level . Bake for about 20 minutes.
- Take out the baking tray 12 from the cooking chamber 1.
- Turn the chicken breasts over to the other side.
Return the baking tray 12 into the cooking chamber 1 . Bake for 35–45 minutes until fully cooked.
Roasted chicken wings with black pepper
Ingredients
| 8 | Mid-joint chicken wings |
| 1 tsp | Black pepper |
| 1 tsp | Cumin powder |
| 1 tsp | Salt |
| 1 tbsp | Olive oil |
Preparation
- Marinate the chicken wings with all ingredients in a container. Cover the container and keep it in the fridge for at least 1 hour .
- Cover the baking tray 12 with aluminum foil.
Put the baking tray into cooking chamber 1 at the lower rack level. - Preheat the product to 180 °C for 10 minutes (upper and lower heat) .
- Put the chicken wings onto the grill rack 13.
Put the grill rack into cooking chamber 1 at the middle rack level. Bake for 20 minutes. - Take out the grill rack 13. Turn the chicken wings over to the other side. Bake for another 15–25 minutes until fully cooked.
Baked garlic butter prawns
Ingredients
| 300 g | Big prawns (approx. 6–9 pieces, fresh or unfrozen, whole shell-on raw prawns) |
| 5 tbsp | Butter (melted) |
| ½ bulb | Garlic (peeled and finely chopped) |
| ¼ bunch | Fresh parsley (finely chopped) |
| 1 dash | Black pepper (optional) |
| 1 dash | Salt (optional) |
| ½ | Lemon (optional) |
Preparation
- Put the grill rack 13 into cooking chamber 1 at the middle rack level.
- Preheat the product to 180 °C for 10 minutes (upper and lower heat).
- Fill the melted butter into a baking dish (adjust the amount of butter according to the size of the baking dish and the prawns). Add prawns, fresh parsley, and garlic.
- Transfer the baking dish onto the grill rack 13 in cooking chamber 1.
- Bake for about 20 minutes until well cooked (depending on the size of the prawns).
- Optional: Before serving, season with salt, black pepper, and lemon juice.
Rosemary potatoes
Ingredients
| 450 g | Baby potatoes (washed and cut into halves or quarters) |
| 2–3 tbsp | Olive oil |
| ½ bunch | Rosemary (finely chopped) |
| 1 tsp | Salt |
| 1 tsp | Black pepper |
Preparation
- Preheat the product to 200 °C for 10 minutes (upper and lower heat).
- Put the baby potatoes, olive oil, rosemary, salt, and black pepper into a medium-sized bowl. Mix well to coat the potatoes with all other ingredients.
- Cover the baking tray 12 with aluminum foil.
- Transfer the potatoes to the baking tray 12 .
- Put the baking tray into cooking chamber 1 at the middle rack level.
- Roast the potatoes while flipping them occasionally for 45–60 minutes until crispy golden brown (depending on the size of the potatoes).
Roasted lamb chop
Ingredients
| 4 | Lamb chops |
| 300 g | Baby potatoes (cut into quarters) |
| 150 g | Cherry tomatoes |
| 3 tbsp | Olive oil |
| 1 bunch | Rosemary (cut into 4 pieces) |
| 1 dash | Pepper |
| 1 dash | Salt |
Preparation
- Preheat the product to 200 °C for 10 minutes (upper and lower heat) .
- Cover the baking tray 12 with aluminum foil.
- Transfer the lamb chops and baby potatoes onto the baking tray 12. Season with oil. Add the cherry tomatoes and rosemary.
- Put the baking tray 12 into cooking chamber 1 at the middle rack level. Bake for 20 minutes.
- Take out the baking tray 12 from the cooking chamber 1.
- Turn the lamb chops and potatoes over to the other side. Sprinkle the salt and pepper over the lamb chops and potatoes.
- Put the baking tray 12 into the cooking chamber 1 . Bake for about 20–30 minutes (depending on the size of the lamb chops and potatoes and the desired degree of
doneness).
Baked spaghetti with tomato sauce
Ingredients
| 250 g | Spaghetti |
| 1 dash | Salt |
| 130 g | Minced beef |
| 1 tsp | Vegetable oil |
| 4 cloves | Garlic (peeled and finely chopped) |
| 500 g | Tomato pasta sauce |
| 1 tbsp | Sugar |
| 125 g | Cheddar cheese (shredded) |
| 125 g | Mozzarella cheese (shredded) |
Preparation
- Bring a large pot of water to a boil at medium-high heat. When the water is boiling, add the spaghetti and the salt.
- Let spaghetti cook for about 10 minutes (refer to the cooking time on the packaging of the spaghetti). Drain the spaghetti and set them aside.
- Put the grill rack 13 into cooking chamber 1 at the middle rack level.
- Preheat the product to 200 °C for 10 minutes (upper and lower heat) .
- Heat the vegetable oil in a non-stick saucepan over medium heat. When the oil is just about to smoke, add the garlic and minced beef. Fry for 3 minutes. Transfer the minced beef to a plate and set it aside.
- Put the tomato pasta sauce and sugar into another non-stick saucepan. Cook and stir for 5 minutes. Add the minced beef to the tomato pasta sauce in the saucepan. Cook for 1 minute and mix well .
- Put half of the cooked spaghetti into a baking dish. Top with half a portion of the tomato pasta sauce with minced beef and shredded cheese.
- Put the remaining spaghetti into the baking dish. Top with the remaining tomato pasta sauce with minced beef and shredded cheese.
- Put the baking dish onto the grill rack 13 in the cooking chamber 1 . Bake for 20–30 minutes until the cheese is melted and slightly golden brown.
Roasted asparagus
Ingredients
| 1 bunch | Green asparagus (fresh) |
| 2 tbsp | Olive oil |
| 1 dash | Salt |
| 1 dash | Black pepper (freshly ground) |
Preparation
- Preheat the product to 180 °C for 10 minutes (upper and lower heat) .
- Cover the baking tray 12 with aluminum foil.
- Cut off about 3 cm from the dry bottom part of the asparagus. Peel off the skin from the bottom half of each asparagus spear.
- Wash the asparagus thoroughly and dry it afterward. Put the asparagus onto the baking tray 12. Season with oil, salt, and black pepper.
- Put the baking tray 12 into cooking chamber 1 at middle rack level for 12–15 minutes (depending on the thickness of the asparagus).
Baking frozen pizza
Ingredients
1 Frozen pizza (max . 26 cm diameter)
Preparation
- Put the grill rack 13 into cooking chamber 1 at the middle rack level.
- Preheat the product for 10 minutes (upper and lower heat) . Observe the temperature information on the packaging of the frozen pizza.
- Put the frozen pizza without packaging onto the grill rack 13 in cooking chamber 1 .
- Bake for about 20 minutes. Observe the temperature information on the packaging of the frozen pizza.
Cleaning and care
![]() DANGER! Risk of electric shock! Before cleaning: Always disconnect the product from the wall outlet.
DANGER! Risk of electric shock! Before cleaning: Always disconnect the product from the wall outlet.
![]() DANGER! Risk of burns! Do not clean the product right after operation. Let the product cool first.
DANGER! Risk of burns! Do not clean the product right after operation. Let the product cool first.
![]() WARNING! Do not immerse the product’s electrical components in water or other liquids . Never hold the product under running water.
WARNING! Do not immerse the product’s electrical components in water or other liquids . Never hold the product under running water.
![]() NOTE: Clean the product right after it has cooled. Once the food residues have dried, they are not easy to remove.
NOTE: Clean the product right after it has cooled. Once the food residues have dried, they are not easy to remove.
Cooking chamber and housing
- Remove the accessories from the cooking chamber 1.
- Regularly wipe
– the housing,
– the door 8 (both sides), and
– the viewing window (both sides) with a damp cloth. - If required, use a mild washing-up liquid on the cloth. Afterward, wipe with a cloth moistened only with clear water to remove any detergent residue.
- Do not use cleaning sprays and other aggressive cleaning agents, as they can cause stains, smears, or clouds on the surfaces.
- Do not use abrasive cleaning agents.
Accessories
- Clean the accessories in a kitchen sink.
- Heavily soiled accessories: Before cleaning, soak the accessories in a water bath for a while.
ATTENTION! The accessories are not suitable for cleaning in the dishwasher.
Storage
- Wind the power cord 14 on the power cord rewind 15.
- Store the product at a dry location out of the reach of children.
Disposal
The packaging is made entirely of recyclable materials, which you may dispose of at local recycling facilities.
![]() Observe the marking of the packaging materials for waste separation, which are marked with abbreviations (a) and numbers (b) with the following meaning: 1–7: plastics / 20– 22: paper and fibreboard / 80–98: composite materials.
Observe the marking of the packaging materials for waste separation, which are marked with abbreviations (a) and numbers (b) with the following meaning: 1–7: plastics / 20– 22: paper and fibreboard / 80–98: composite materials.
 The product and packaging materials are recyclable, dispose of them separately for better waste treatment .
The Triman logo is valid in France only.
 Contact your local refuse disposal authority for more details on how to dispose of your worn-out product.
 To help protect the environment, please dispose of the product properly when it has reached the end of its useful life and not as household waste. Information on collection points and their opening hours can be obtained from your local authority.
Warranty
The product has been manufactured to strict quality guidelines and meticulously examined before delivery. In the event of product defects, you have legal rights against the retailer of this product. Your legal rights are not limited in any way by our warranty detailed below.
The warranty for this product is 3 years from the date of purchase. Should this product show any fault in materials or manufacture within 3 years from the date of purchase, we will repair or replace it – at our choice – free of charge to you .
The warranty period begins on the date of purchase. Please keep the original sales receipt in a safe location. This document is required as your proof of purchase. This warranty becomes void if the product has been damaged, used, or maintained improperly.
The warranty applies to defects in material or manufacture. This warranty does not cover product parts subject to normal wear, thus possibly considered consumables (e .g . batteries) or for damage to fragile parts, e .g . switches, rechargeable batteries, or glass parts.
Warranty claim procedure
To ensure quick processing of your case, please observe the following instructions:
Please have the till receipt and the item number (e .g . IAN 123456_7890) available as proof of purchase.
You will find the item number on the rating plate, an engraving, on the front page of the instructions for use (bottom left), or as a sticker on the rear or bottom of the product.
If functional or other defects occur, please contact the service department listed either by telephone or by e-mail.
You can return a defective product to us free of charge to the service address that will be provided to you. Ensure that you enclose the proof of purchase (till receipt) and information about what the defect is and when it occurred.
Service
Service Great Britain
Tel .: 08000569216
E-Mail: [email protected]
Service Ireland
Tel .: 1800 200736
E-Mail: [email protected] OWIM GmbH & Co. KG
Stiftsbergstraße 1
74167 Neckarsulm
GERMANY
Model No.: HG06349
Version: 05/2021
IAN 360601_2010

WET & DRY HANDHELD VACUUM CLEANER
Operating instructions
IAN 364721_2101
Before reading, unfold the page containing the illustrations and familiarise yourself with all functions of the device.
Introduction
Congratulations on the purchase of your new appliance.
You have selected a high-quality product. The operating instructions are part of this product. They contain important information on safety, usage, and disposal. Before using the product, familiarise yourself with all operating and safety instructions. Use the product only as described and for the specified areas of application. Please also pass on these operating instructions to any future owner.
Intended use
This handheld vacuum cleaner may only be used to vacuum dry or wet surfaces, or dry or wet materials and liquids. Do not vacuum people or animals with this appliance. Any other usage of or modification to the appliance is deemed to be improper and carries a significant risk of accidents. The manufacturer accepts no liability for damages that result from improper use of the appliance or are caused by the incorrect operation of it. The appliance is not intended for commercial use.
Package contents
- Hand-Held Wet & Dry Vacuum Cleaner
- Crevice tool
- Wet suction nozzle
- Wall bracket
- Mounting kit (2 screws, 2 wall plugs)
- Mains adapter
- Operating instructions
Check the package contents for completeness directly after unpacking.
Description of the appliance
(For illustrations see the fold-out side)
Figure A:
- Wet suction nozzle
- Crevice nozzle
- Wall bracket
- Mains adapter
- Barrel plug
- On/off switch
- Charge indicator lamp (red/green)
- Release button
- Dust filter bag
- Dust filter
- Dirt container
- Motor unit
Figure B: - Screw
- Wall plug
NOTE
► This appliance is supplied with non-charged batteries. The batteries must be charged before first use.
Technical data
| Appliance | |
| Input voltage | 9 .6 V |
| Input current | (DC) |
| Rechargeable batteries | |
| Capacity | 2200 mAh |
| Rechargeable battery | 7.4 V(2 x 3 .7 V Lithium-ion rechargeable batteries) |
| Mains adapter | |
| Manufacturers | KOMPERNASS HANDELS GMBH, BURGSTRASSE 21, 44867 BOCHUM, GERMANY, Register court: AG Bochum Register number: HRB 4598 |
| Model | SAS 7.4 LI B3-1 |
| Input voltage | 100 ‒ 240 V~ (AC) |
| Input AC frequency | 50/60 Hz |
| Output voltage | 9 .6 V (DC) |
| Output current | 0 .5 A |
| Output power | 9 .6 V |
| Average operating efficiency | 78 .3 % |
| Low load efficiency (10%) | 72 .1 % |
| No-load power consumption | 0 .07 W |
| Input current | 0.3 A |
| Polarity |  (positive inside, negative outside) (positive inside, negative outside) |
| Protection class | II / (double insulation) |
| Efficiency class 6 | VI |
NOTE
► No user action is required to switch the product between 50 and 60 Hz.
The product adapts automatically to either 50 or 60 Hz.
Important safety instructions
DANGER – ELECTRIC SHOCK!
► Never use the handheld vacuum cleaner if the cable, plug, or casing are damaged.
► To prevent accidents, have defective plugs and/or mains cables replaced immediately by an authorized specialist, our customer service or a similarly qualified person.
► Have all repairs carried out by a specialist workshop. Under no circumstances should you open the appliance yourself. Repairs that are not carried out by a specialist workshop could lead to physical injuries.
► Before switching on the appliance, make sure that the mains voltage corresponds to the voltage indicated in the technical data for the appliance.
► Never touch the mains adapter or the appliance with wet or damp hands.
► Do not use the mains adapter with an extension cable; connect the mains adapter directly to a power socket
. Do not charge or use the appliance outdoors.
WARNING! RISK OF INJURY!
► Do not change any accessories while the appliance is switched on.
► Do not use the handheld vacuum cleaner for vacuuming up sharp objects or glass shards.
► Never vacuum up burning matches, glowing ashes, or cigarette butts
.► Do not use the handheld vacuum cleaner for vacuuming up chemical products, stone dust, gypsum, cement, or similar particles.
WARNING! RISK OF INJURY!
► This appliance is not suitable for use with inflammable and explosive substances or chemical and aggressive liquids.
► Always store the appliance indoors. To prevent accidents, keep the appliance in a dry location when not in use .
► Under extreme conditions, leaks in the battery cells may occur. In the event that battery fluid comes into contact with skin or eyes, the affected area must be rinsed off with water immediately. Contact a physician.
► This appliance may be used by children aged 8 years and above and by persons with limited physical, sensory, or mental capabilities or lack of experience and knowledge, provided that they are under supervision or have been told how to use the appliance safely and are aware of the potential risks.
► Children must not use the appliance as a plaything.
► Cleaning and user maintenance tasks may not be carried out by children unless they are supervised.
► Take special care when using the handheld vacuum cleaner on stairs.
CAUTION! PROPERTY DAMAGE!
► Use only accessories recommended by the manufacturer.
► The main adapter may not be used for other purposes.
Never carry the wall bracket or the mains adapter by the cable. Do not pull on the cable when you want to move the appliance.
► Always grip the power plug to disconnect the appliance from the power supply.
► Always be sure to keep the handheld vacuum cleaner away from heating elements, ovens, or other heated appliances and surfaces.
► Make sure that the ventilation slits are never obstructed.
A blocked ventilation circuit can result in overheating and damage to the appliance.
► The appliance is suitable for vacuuming small amounts of water; however, its housing is not splashproof. Therefore, do not immerse the appliance in water and do not expose it to moisture!
► 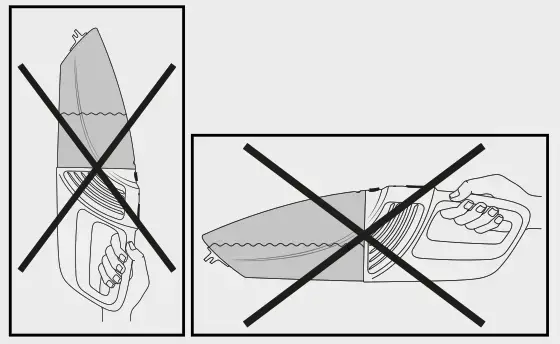 The product is equipped with or supplied with a lithium-ion battery. Do not throw the batteries into a fire and do not subject them to high temperatures. There is a risk of explosion!
► Do not use the handheld vacuum cleaner without the dust filter inserted.
► Do not use the mains adapter for a different product and do not attempt to charge this appliance with a different mains adapter. Use only the mains adapter supplied with this appliance
.► Never attempt to recharge non-rechargeable batteries.
► The batteries in this appliance cannot be replaced.
Prior to first use
■ Remove all packaging materials from the appliance.
■ Press the dust filter bag 9 and the dust filter 10 a little way into the dirt container 11. They might have worked loose during transport and thus not be positioned correctly inside the dirt container 11.
■ Place the dirt container 11 on the motor unit 12:
– Push the plastic tab on the underside of the handheld vacuum cleaner into the recess on the dirt container 11.
– Press the release button 8 and push the dirt container 11 onto the motor unit w at the same time.
– Let go of the release button 8 so that the restraint engages in the recess. The dirt container11 is now firmly seated on motor unit 12.
Information about the batteries
1) This handheld vacuum cleaner is powered by rechargeable lithium-ion batteries.
2) For care of the batteries, we recommend the following: Once the batteries have been charged, disconnect the mains adapter 4 from the mains socket. Do not reconnect the mains adapter 4 with the mains socket until the handheld vacuum cleaner’s suction power has noticeably decreased.
Installation of the wall bracket
DANGER – ELECTRIC SHOCK!
► Ensure that there are no power cables or other conduits or pipes in the wall at the location where you intend to bore the holes for the wall bracket 3 .
Drilling into a current-carrying electric cable can be potentially fatal!
1) Place the barrel plug 5 of the mains adapter 4 into the wall bracket 3 as shown in the diagram. Secure the barrel plug 5 by turning it.
2) Select a suitable installation location for the wall bracket 3:
It must be possible to remove the handheld vacuum cleaner easily and there must be an accessible mains power socket for the mains adapter 4.
3) Drill two holes about 61 mm apart. Use wall bracket 3 to mark the holes, to ensure the correct spacing. The drill holes must be suitable for 5 mm wall plugs.
4) Push the wall plugs 14 into the holes and then screw the wall bracket 3 firmly into place using the screws 13.
5) You can place the nozzles on the accessories holder on the side.
6) Connect the mains adapter 4 to a mains power socket.
Charging
NOTE
► Check to ensure that the on/off switch 6 has been pushed back (to the position “0 ) before starting the charging process.
■ Place the handheld vacuum cleaner from above into wall bracket 3 so that the barrel plug 5 slips into the socket on the handheld vacuum cleaner. The charge indicator lamp 7 flashes red and the charging process begins.
■ Important: The charge indicator lamp 7 lights up green once the handheld vacuum cleaner is charged enough to vacuum again. This does not mean that all the batteries are completely charged. When the charge indicator lamp 7 lights up green, the batteries are charged to around 80%.
■ When charging is complete, which can take around 5 hours with fully discharged batteries, the appliance automatically switches to a trickle charge (maintenance function). Nevertheless, in order to avoid possible damage to the batteries, do not leave the appliance permanently connected to the mains adapter 4.
■ Do not recharge the batteries again until the handheld vacuum cleaner’s suction power becomes appreciably weaker and the charge indicator lamp 7 flashes green.
NOTE
► The handheld vacuum cleaner can also be charged directly via the mains adapter 4 . To do this, remove the barrel plug 5 with a slight twist from the wall bracket 3 and insert it into the socket on the handheld vacuum cleaner.
Operation
CAUTION!
► The suction opening must always be open and may not be blocked. Blockages lead to overheating and damage to the motor
NOTICES
► Make certain that the dust filter 0 is always inserted before using the appliance.
► When vacuuming liquid, do not exceed the MAX marking in dirt container 11.
1) Remove the handheld vacuum cleaner from wall bracket 3 or, if you are not using wall bracket 3 remove the barrel plug 5 from the socket.
2) If required, place the appropriate nozzle in the suction opening:
– the crevice nozzle 2, to clean narrow and difficult to reach locations.
– the wet suction nozzle 1 to vacuum up liquids.
NOTE
► After you have vacuumed up liquids, immediately clean the dirt container 11. Otherwise, bacteria or mold will build up inside! Ensure that the dust filter bag 9 is completely dry before using the appliance again.
NOTE
► If you have vacuumed liquids, always carry the appliance with the wet suction nozzle 1 pointing downwards:

► If you carry the appliance horizontally or with the wet suction nozzle 1 pointing upwards, it is possible that liquid can leak out:

3) To switch the appliance on, slide the on/off switch 6 forwards. The charge indicator lamp 7 lights up green.
4) When you have finished using the appliance, slide the on/off switch 6 to the rear.
NOTE
► Place the handheld vacuum cleaner in the wall bracket 3 and start the charging process once the vacuum power has become noticeably weaker and the charge indicator lamp 7 flashes green.
Cleaning
To achieve the best results, empty the dirt container 11 and clean the dust filter 10 after every use.
CAUTION! MATERIAL DAMAGE!
► Do not use aggressive, chemical, or abrasive cleaning agents. These could damage the outer surfaces of the appliance.
1) To open the dirt container 11, press the release button 8 and remove the dirt container 11.
2) Remove the dust filter 10 from the dirt container 11.
3) Empty the dirt container 11.
4) Pull the dust filter bag 9 with its holder out of the dust filter 10.
5) Rinse the dust filter bag 9 out in cold water and wait until it is completely dry before reinserting it into the dust filter 10. Do not dry it with hot air.
6) Reinsert the dust filter 10 into the dirt container 11. When doing so, ensure that the dust filter 10 is seated squarely and that the rubber lip seals the dirt container 11.
7) Replace the dirt container 11on the motor unit w again:
– Push the plastic tab on the underside of the handheld vacuum cleaner into the recess on the dirt container 11.
– Press the release button 8 and push the dirt container 11 onto the motor unit w at the same time.
– Let go of the release button 8 so that the restraint engages in the recess. The dirt container 11 is now firmly seated on the motor unit 12.
8) Clean the housing and both nozzles with a lightly moistened cloth. For stubborn soiling use a mild detergent on the cloth.
9) Dry all parts thoroughly before using the appliance again or storing it.
Disposal
NOTE
► The appliance contains batteries that cannot be removed by the user. To prevent risks, the removal or replacement of the batteries may only be carried out by the manufacturer, manufacturer‘s customer service department, or a similarly qualified person. When disposing of the appliance, indicate that the appliance contains batteries.
Never dispose of the appliance in your normal domestic waste. This product is subject to the provisions of European Directive 2012/19/EU.
Dispose of the appliance through an approved disposal facility or your municipal waste facility. Please observe the currently applicable regulations. Please contact your waste disposal facility if you are in any doubt.
 Your local community or municipal authorities can provide information on how to dispose of the worn-out product.
 The product is recyclable, subject to extended producer responsibility, and is collected separately.
 The packaging materials have been selected for their environmental friendliness and ease of disposal and are therefore recyclable.
Dispose of packaging materials that are no longer needed in accordance with applicable local regulations.
 Dispose of the packaging in an environmentally friendly manner.
Note the labeling on the packaging and separate the packaging material components for disposal if necessary. The packaging material is labeled with abbreviations (a) and numbers (b) with the following meanings: 1–7: Plastics, 20–22: Paper and cardboard, 80–98: Composites
Kompernass Handels GmbH warranty
Dear Customer,
This appliance has a 3-year warranty valid from the date of purchase. If this product has any faults, you, the buyer, have certain statutory rights. Your statutory rights are not restricted in any way by the warranty described below.
Warranty conditions
The warranty period starts on the date of purchase. Please keep your receipt in a safe place. This will be required as proof of purchase.
If any material or manufacturing fault occurs within three years of the date of purchase of the product, we will either repair or replace the product for you or refund the purchase price (at our discretion). This warranty service requires that you present the defective appliance and the proof of purchase (receipt) within the three-year warranty period, along with a brief written description of the fault and of when it occurred.
If the defect is covered by the warranty, your product will either be repaired or replaced by us. The repair or replacement of a product does not signify the beginning of a new warranty period.
The warranty period and statutory claims for defects
The warranty period is not prolonged by repairs effected under the warranty. This also applies to replaced and repaired components. Any damage and defects present at the time of purchase must be reported immediately after unpacking. Repairs carried out after the expiry of the warranty period shall be subject to a fee.
Scope of the warranty
This appliance has been manufactured in accordance with strict quality guidelines and inspected meticulously prior to delivery
.The warranty covers material faults or production faults. The warranty does not extend to product parts subject to normal wear and tear or too fragile parts which could be considered as consumable parts such as switches, batteries, or parts made of glass.
The warranty does not apply if the product has been damaged, improperly used, or improperly maintained. The directions in the operating instructions for the product regarding the proper use of the product are to be strictly followed. Uses and actions that are discouraged in the operating instructions or which are warned against must be avoided.
This product is intended solely for private use and not for commercial purposes . The warranty shall be deemed void in cases of misuse or improper handling, use of force, and modifications/repairs which have not been carried out by one of our authorized service centers.
Warranty claim procedure
To ensure quick processing of your case, please observe the following instructions:
■ Please have the till receipt and the item number (e .g . IAN 123456_7890) available as proof of purchase.
■ You will find the item number on the type plate on the product, an engraving on the product, on the front page of the operating instructions (below left), or on the sticker on the rear or bottom of the product.
■ If functional or other defects occur, please contact the service department listed either by telephone or by e-mail.
■ You can return a defective product to us free of charge to the service address that will be provided to you . Ensure that you enclose the proof of purchase (till receipt) and information about what the defect is and when it occurred.
You can download these instructions along with many other manuals, product videos, and installation software at www.lidl-service.com.
This QR code will take you directly to the Lidl service page (www.lidl-service.com) where you can open your operating instructions by entering the item number (IAN)364721_2101.

Service
Service Great Britain
Tel .: 0800 404 7657
E-Mail: [email protected]
Importer
Please note that the following address is not the service address. Please use the service address provided in the operating instructions.
KOMPERNASS HANDELS GMBH
BURGSTRASSE 21
44867 BOCHUM
GERMANY
www.kompernass.com
KOMPERNASS HANDELS GMBH
BURGSTRASSE 21
44867 BOCHUM
GERMANY
www.kompernass.com
Last Information Update
IAN 364721_2101

MICROWAVE
Operation and safety notes .
IAN 368548_2010
![]()
Warnings and symbols used
The following warnings are used in this user manual and on the packaging
| DANGER! This symbol in combination with the signal word “Danger” marks a high-risk hazard that if not prevented could result in death or serious injury . | Alternating current / voltage | ||
| Hertz (supply frequency) | |||
| Watts | |||
| WARNING! This symbol in combination with the signal word “Warning” marks a medium-risk hazard that if not prevented could result in death or serious injury. |
This product is classified as protection class I and must be connected to a protective ground. |
||
| Use the product in dry indoor spaces only. |
|||
| CAUTION! This symbol in combination with the signal word “Caution” marks a low-risk hazard that if not prevented could result in minor or moderate injury. | Danger – risk of electric shock! | ||
| Warning – hot surface! | |||
| ATTENTION! This symbol with the signal word “Attention” indicates a possible property damage. | Food safe: This product has no adverse effect on taste or smell. |
||
| NOTE: This symbol in combination with “Note” provides additional useful information . | Suitable for dishwashers (only turntable [2]) |
MICROWAVE
Introduction
We congratulate you on the purchase of your new product. You have chosen a high-quality product. The instructions for use are part of the product. They contain important information concerning safety, use, and disposal. Before using the product, please familiarise yourself with all of the safety information and instructions for use. Only use the product as described and for the specified applications . If you pass the product on to anyone else, please ensure that you also pass on all the documentation with it.
Intended use
This product is intended for heating and preparing food. Do not use it for any other purpose . The product is designed only for use in private household and must not be used in medicinal or commercial areas . The manufacturer is not liable to damage caused by improper use .
Scope of delivery
After unpacking the product, check if the delivery is complete and if all parts are in good condition . Remove all packing materials before use .
1 x Microwave
1 x Turntable
1 x Turntable holder
1 x Rollers
1 x Instruction manual
Description of parts
Before reading, unfold the page containing the illustration and familiarize yourself with all functions of the product . (Fig . A)
- Ventilation openings (rear of product – not illustrated)
- Turntable with rollers and turntable holder
- Power cord with power plug
- POWER knob
- TIMER knob
- Door seal
- Door with door handle and catch
- Cooking chamber
Technical data
Nominal voltage: 220–240 V∼, 50 Hz
Power consumption: 1100 W
Protection class: I
Power output: 700 W
Microwave frequency: 2450 MHz
Cooking chamber
volume: approx. 17 litres
Weight: approx. 9 .9 kg
Measurements: approx. 446 x 241 x 359 mm
GS certified (SGS)
- This product fulfils the requirement of the European standard EN 55011 .
- In conformity with this standard, this product is classified as Group 2 Class B equipment .
- Group 2 = The product intentionally generates radio-frequency energy in the form of electromagnetic radiation for the heat treatment of food .
- Class B equipment = The product is suitable to be used in domestic establishments.
![]() Safety instructions
Safety instructions
BEFORE USING THE PRODUCT, PLEASE FAMILIARIZE YOURSELF WITH ALL OF THE SAFETY INFORMATION AND INSTRUCTIONS FOR USE! WHEN PASSING THIS PRODUCT ON TO OTHERS, PLEASE ALSO INCLUDE ALL THE DOCUMENTS!
In the case of damage resulting from non-compliance with these operating instructions the warranty claim becomes invalid! No liability is accepted for consequential damage! In the case of material damage or personal injury caused by incorrect handling
or non-compliance with the safety instructions, no liability is accepted!
IMPORTANT SAFETY INSTRUCTIONS READ CAREFULLY AND KEEP FOR FUTURE REFERENCE
- This product can be used by children aged from 8 years and above and persons with reduced physical, sensory or mental capabilities or lack of experience and knowledge if they have been given supervision or instruction concerning use of the product in a safe way and understand the hazards involved . Children shall not play with the product . Cleaning and user maintenance shall not be made by children without supervision.
 WARNING! If the door or door seals are damaged, the product must not be operated until it has been repaired by a competent person .
WARNING! It is hazardous for anyone other than a competent person to carry out any service or repair operation that involves the removal of a cover which gives protection against exposure to microwave energy .
WARNING! Liquids and other foods must not be heated in sealed containers since they are liable to explode . - If the supply cord is damaged, it must be replaced by the manufacturer, its service agent, or similarly qualified persons in order to avoid a hazard .
- The product is intended to be used in household and similar applications such as:
- staff kitchen areas in shops, offices, and other working environments;
- farm houses;
- by clients in hotels, motels, and other residential environments;
- bed and breakfast type environments .
- A minimum of 20 cm of free space must remain above the top surface of the product .
- Only use utensils that are suitable for use in microwave ovens.
- Metallic containers for food and beverages are not allowed during cooking with the product .
- When heating food in plastic or paper containers, keep an eye on the product due to the possibility of ignition .
- The product is intended for heating food and beverages . Drying of food or clothing and heating of warming pads, slippers, ponges, damp cloth and similar may lead to risk of injury, ignition, or fire.
- If smoke is emitted, switch off or unplug the product and keep the door closed in order to stifle any flames .
- Microwave heating of beverages can result in delayed eruptive boiling, therefore care must be taken when handling the container. The contents of feeding bottles and baby food jars shall be stirred or shaken and the temperature checked before consumption, in order to avoid burns .
- Eggs in their shell and whole hard-boiled eggs should not be heated in microwave ovens since they may explode, even after microwave heating has ended .
- The product should be cleaned regularly and any food deposits removed .
- Failure to maintain the product in a clean condition could lead to deterioration of the surface that could adversely affect the life of the product and possibly result in a hazardous situation .
- The product shall not be cleaned with a steam cleaner .
- The product is intended to be used freestanding. It must not be placed in a cabinet or in a similar environment.
ADDITIONAL SAFETY ADVICE
- People fitted with a heart pacemaker should consult their doctor about the possible risks of using his product before taking it into use .
DANGER! Risk of burns! During use the product gets hot . Do not touch the product while in use nor immediately after use .
DANGER! Risk of electric shock! Do not immerse the product in water or other liquids. Never hold the product under running water .
DANGER! Risk of electric shock! Never use a damaged product. Disconnect the product from the power supply and contact your retailer if it is damaged. - The product is not to be used if it has been dropped if there are visible signs of damage .
- Before connecting the product to the power supply, check that the voltage and current rating corresponds with the power supply details shown on the product’s rating label .
- Protect the power cord against damages. Do not let it hang over sharp edges, do not squeeze or bend it. Keep the power cord away from hot surfaces and open flames .
Positioning the product
![]() ATTENTION! Do not install the product above a cooker or any other heat-generating device. Installation in such a location could cause damage to the product.
ATTENTION! Do not install the product above a cooker or any other heat-generating device. Installation in such a location could cause damage to the product.
Operation
![]() DANGER! Risk of fire! Remove all metallic closures from the packaging of the food that you intend to heat .
DANGER! Risk of fire! Remove all metallic closures from the packaging of the food that you intend to heat .
- Do not move the product while it is in operation .
- Never operate the product when it is empty .
- Do not place the product on hot plates (gas, electric, coal cooking range, etc .). Operate the product on a level, stable, clean, heat-resistant, and dry surface .
- Do not place flammable materials close to the product .
- The product is not intended to be operated by means of an external timer or separate remote control system.
Cleaning and care
![]() WARNING! Risk of injury! Disconnect the product from the power supply before cleaning work and when not in use .
WARNING! Risk of injury! Disconnect the product from the power supply before cleaning work and when not in use .
- Do not pull the power plug out of the electrical outlet by the power cord .
- Protect the product, its power cord, and power plug against dust, direct sunlight, dripping, and splashing water .
 Do not remove the light grey mica cover plate, which is mounted inside the cooking chamber to protect the magnetron .
- If the luminary inside the product needs replacing, have this done by a qualified specialist .
RADIO INTERFERENCE WITH OTHER DEVICES
The operation of the product may cause interference on your radio, television, or similar devices . If such interference occurs, it can be reduced or corrected by the following remedial measures:
- Clean the door and the door seals of the product .
- Realign the aerial of your radio or television . Keep the product and the receiver spatially separated .
- Move the product away from the receiver .
- Plug the product into another wall socket. The product and the receiver should be connected to different circuits.
SAFETY PRECAUTIONS FOR THE PREVENTION OF EXCESSIVE EXPOSURE TO MICROWAVE ENERGY
- Do not try to operate the product while the door is open .This can lead to you being exposed to a potentially harmful dose of microwave radiation .
- It is also important not to break or manipulate the safety locks .
- Do not jam anything between the door. Make sure that there is no food or cleaning agent residue left on the seals . residue left on the seals.
Basic principles of microwave cookery
- Cooking time: Pay attention to the cooking time. Select the shortest possible stated cooking time and increase as required. Food that is cooked too long can begin to smoke or catch fire .
- Food: Arrange the pieces of food evenly in the product. Cut the food into pieces of approximately the same size. Place the thickest pieces near the edges .
- Covering food: Cover the food during cooking with a lid suitable for microwave cookery. The lid prevents splashing and helps in the even cooking of the food .
- Turning food: While cooking, turn the food in the product once so that items such as chicken or hamburgers are cooked more quickly . Large pieces of food, such as joints of meat, must be turned at least once . Completely rearrange small food items, such as meatballs, after half the cooking time. Turn the meatballs and move them from the middle of the plate to the edge .
- Food with skins: Puncture the skins of potatoes, sausages, and similar food before cooking. Otherwise, they could explode .
- Food with thick skins: Prick whole pumpkins, apples, chestnuts, and similar food before cooking .
- Fat or oil: Do not thaw frozen fat or oil in the product. Do not fry foods in the product . The fat or oil could ignite .
- Beverages: When heating drinks with the product, bubbling may be delayed when the drink boils. Be careful when handling the container. To avoid sudden bubbling up: If possible, place a suitable glass rod in the fluid for as long as it is being heated . To avoid an unexpected bubbling up, leave the liquid to stand in the cooking chamber [8] for about 20 seconds after heating .
- Popcorn: Only microwaveable popcorn shall be used .
Using suitable cookware
- The ideal material for use in a microwave oven is microwave-permeable, allowing the energy to penetrate the container to heat the food. Microwaves cannot penetrate metal . For this reason, metal containers and cookware should not be used .
- When using the product for heating, do not use products made of recycled paper. These can contain minute fragments of metal, which can generate sparks and/or fires .
- We recommend the use of round/oval cookware instead of square or oblong containers, as food in corner areas tends to overcook. The following list provides general hints to assist you in selecting the correct cookware .
| Cookware | Microwave |
| Heatproof glass | Yes |
| Non-heatproof glass | No |
| Heatproof ceramic | Yes |
| Microwave-suitable plastic dishes | Yes |
| Kitchen roll | Yes |
| Metal tray/plate | No |
| Aluminium foil and foil containers | No |
![]() WARNING! Risk of fire! Never use metallic objects when you are using the product. Metals reflect the microwave radiation and this leads to the generation of sparks . This can cause a fire and irreparably damage the product!
WARNING! Risk of fire! Never use metallic objects when you are using the product. Metals reflect the microwave radiation and this leads to the generation of sparks . This can cause a fire and irreparably damage the product!
Before first use
![]() WARNING! Risk of fire! Never operate the product when it is empty .
WARNING! Risk of fire! Never operate the product when it is empty .
- Remove the packaging material (including protection foils and transport protectors inside the cooking chamber [8]). Check if all parts are complete .
- Clean the product and its accessories (see “Cleaning and care”) .
- Clean the surface with a dry cloth to remove water or dust .
Positioning the product
![]() WARNING! Risk of fire! This product is not suitable for installation in a kitchen cabinet. In closed cabinets, the ventilation of
WARNING! Risk of fire! This product is not suitable for installation in a kitchen cabinet. In closed cabinets, the ventilation of
the product is not sufficiently guaranteed. The product could then be damaged and there is a risk of fire!
- Place the product on a flat surface that leaves enough space for ventilation:
- A minimum of 10 cm of free space must remain between the product and the adjacent walls (including side and back wall). It must remain possible to fully open the door [7] .
- A minimum of 20 cm of free space must remain above the top surface of the product .
Assembly
- Insert the turntable holder [2] on the turntable drive (inside the cooking chamber [8]) .
- Place the roller [2] on the roller surface (inside the cooking chamber [8]).
- Place the turntable [2] on the roller and on the turntable holder. The turntable must rest properly on the turntable holder .
- Connect the power plug [3] with a socket-outlet .
Operation
![]() NOTES:
NOTES:
- There may be a faint odour the first time the product is used. Make sure there is sufficient ventilation in the area .
Cooking food
![]() WARNING! Risk of fire! Never use metallic objects when you are using the product. Metals reflect the microwave radiation and this leads to the generation of sparks . This can cause a fire and irreparably damage the product!
WARNING! Risk of fire! Never use metallic objects when you are using the product. Metals reflect the microwave radiation and this leads to the generation of sparks . This can cause a fire and irreparably damage the product!
Selecting the power level

Use the POWER knob [4] to select one of 6 power levels:
| Power level | Power |
| LOW | 150 W |
| DEFROSTING FOOD |
300 W |
| M. LOW | 400 W |
| MED | 500 W |
| M. HIGH | 600 W |
| HIGH | 700 W |
Setting the cooking time
- Turn the TIMER knob [5] to set a cooking time of up to 30 minutes .
![]() NOTE: Selecting a time of less than 2 minutes: Turn the TIMER knob [5] past 2 minutes and then return to the desired time. This action provides more accurate results .
NOTE: Selecting a time of less than 2 minutes: Turn the TIMER knob [5] past 2 minutes and then return to the desired time. This action provides more accurate results .
Starting the cooking process
- Once power level and time are set, the product starts cooking .
- When the set cooking time has expired, the cooking process ends automatically and a ring sounds .
![]() NOTE: Always return the TIMER knob [5] to the 0 position under the following circumstances:
NOTE: Always return the TIMER knob [5] to the 0 position under the following circumstances:
- Food is removed from the product before the set cooking time has expired .
- The product is not used .
- Stopping the cooking process early:
- Turn the TIMER knob [5] back to the O position.
- Open the door [7] by its handle [7].
Defrosting food
Use the ![]() setting on the POWER knob [4] for defrosting food .
setting on the POWER knob [4] for defrosting food .
![]() NOTE: To ensure uniform defrosting, some foods should be mixed or turned after around two thirds of the cooking time.
NOTE: To ensure uniform defrosting, some foods should be mixed or turned after around two thirds of the cooking time.
After the set time has elapsed: A ring sounds.
Cleaning and care
![]() DANGER! Risk of electric shock! Before cleaning: Always disconnect the product from the wall outlet.
DANGER! Risk of electric shock! Before cleaning: Always disconnect the product from the wall outlet.
![]() DANGER! Risk of burns! Do not clean the product right after operation. Let the product cool first.
DANGER! Risk of burns! Do not clean the product right after operation. Let the product cool first.
![]() WARNING! Do not immerse the product’s electrical components in water or other liquids. Never hold the product under running water.
WARNING! Do not immerse the product’s electrical components in water or other liquids. Never hold the product under running water.
![]() NOTES:
NOTES:
- Clean the product right after it has cooled . Once the food residues have dried, they are not easy to remove .
- Do not use cleaning sprays and other aggressive cleaning agents, as they can cause stains, smears, or clouding on the surfaces .
- Do not use abrasive cleaning agents .
- Housing: Clean the product’s housing with a damp cloth .
- Cooking chamber: Always keep the cooking chamber [8] clean. If splashes of food or spilt liquids stick to the walls of the product, wipe them off with a damp cloth . If required, use a mild washing-up liquid on the cloth. Afterward, wipe with a cloth moistened only with clear water to remove any detergent residue.
- Turntable: Clean the turntable [2] regularly with warm, soapy water. The turntable is suitable for dishwashers .
- Splashes and soiling: Use a damp cloth regularly to remove splashes and soiling from the following components:
- Door [7] (both sides)
- Viewing window (both sides)
- Door seal [6] and adjacent components
- Condensation: If condensation accumulates on or around the outside of the door [7], wipe it off with a soft cloth. This can happen if the product is operated in extremely humid conditions .
- Odours: Remove odours regularly. Put a deep microwave bowl – filled with a cup of water, plus the juice and peel of a lemon – into the cooking chamber [8]. Heat the mixture for 5 minutes. Wipe the cooking chamber thoroughly and rub dry with a soft cloth
Troubleshooting
| Problem | Possible cause | Possible solution |
| The product does not start cooking. |
The door [7] is not properly closed . | Close the door [7]. |
| The turntable [2] makes a loud noise when turning. |
The turntable [2] is not correctly positioned on the catch [2]. The rollers [2] and/or the floor of the cooking chamber [8] are unclean . |
Place the turntable [2] correctly in the cooking chamber [8]. Clean the rollers [2] and the floor of the cooking chamber [8] . |
| The light inside the product is not working . | The luminary is defective. | Contact the customer service department . |
Disposal
 The packaging is made entirely of recyclable materials, which you may dispose of at local recycling facilities .
 Observe the marking of the packaging materials for waste separation, which are marked with abbreviations (a) and numbers (b) with following meaning: 1–7: plastics / 20–22: paper and fibreboard / 80–98: composite materials . The product and packaging materials are recyclable, dispose of it separately for better waste treatment . The Triman logo is valid in France only .
 Contact your local refuse disposal authority for more details of how to dispose of your worn-out product .
 To help protect the environment, please dispose of the product properly when it has reached the end of its useful life and not in the household waste . Information on collection points and their opening hours can be obtained from your local authority .
Warranty
The product has been manufactured to strict quality guidelines and meticulously examined before delivery. In the event of product defects, you have legal rights against the retailer of this product. Your legal rights are not limited in any way by our warranty detailed below .
The warranty for this product is 3 years from the date of purchase. Should this product show any fault in materials or manufacture within 3 years from the date of purchase, we will repair or replace it – at our choice – free of charge to you .
The warranty period begins on the date of purchase. Please keep the original sales receipt in a safe location. This document is required as your proof of purchase. This warranty becomes void if the product has been damaged, or used, or maintained improperly .
The warranty applies to defects in material or manufacture. This warranty does not cover product parts subject to normal wear, thus possibly considered consumables (e .g . batteries) or for damage to fragile parts, e .g . switches, rechargeable batteries, or glass parts.
Warranty claim procedure
To ensure quick processing of your case, please observe the following instructions:
Please have the till receipt and the item number (e .g . IAN 123456_7890) available as proof of purchase .
You will find the item number on the rating plate, an engraving, on the front page of the instructions for use (bottom left), or as a ticker on the rear or bottom of the product .
If functional or other defects occur, please contact the service department listed either by telephone or by e-mail .
You can return a defective product to us free of charge to the service address that will be provided to you. Ensure that you enclose the proof of purchase (till receipt) and information about what the defect is and when it occurred.
Service
Service Great Britain
Tel .: 08000569216
E-Mail: [email protected]

OWIM GmbH & Co. KG Stiftsbergstraße 1 74167 Neckarsulm GERMANY
Model No.: HG07733
Version: 04/2021
IAN 368548_2010
]]>![]()
VACUUM SEALER SV 125 C3

VACUUM SEALER
Operating instructions
IAN 367926_2101
![]()
Before reading, unfold the page containing the illustrations and familiarise yourself with all functions of the device.


Introduction
Congratulations on the purchase of your new appliance!
You have decided in favour of a modern, high-quality product. These operating instructions are part of this product. They contain important information on safety, usage and disposal. Before using the product, familiarise yourself with all handling and safety guidelines. This appliance may only be used as described and for the purposes indicated. Please also pass these operating instructions on to any future owner(s).
Copyright
This documentation is protected by copyright.
Any reproduction, or any reprint even in the form of excerpts, as well as the rendition of figures even in modified form, is only permitted with the manufacturer’s written consent.
Limitation of liability
All the technical information, data and instructions regarding installation, connection and operation contained in these operating instructions corresponds to the latest information available to us at the time of printing and takes our previous experience and know-how into account.
No claims can be derived from the details, illustrations and descriptions in these instructions.
The manufacturer assumes no responsibility for damage caused by failure to observe these instructions, improper use, incompetent repairs, unauthorised modifications or for the use of non-approved replacement parts.
Intended use
This appliance is intended exclusively for the sealing and vacuum-packing of foodstuffs in household quantities and only in private households. This device is not intended for commercial or industrial applications or for continuous use.
It is not intended for any other use or use beyond that specified. Claims of any kind for damage arising as a result of incorrect use will not be accepted. The risk shall be borne solely by the user.
Package contents and transport inspection
The appliance is supplied with the following components as standard:
- Vacuum sealer
- 1 x film roll
- 2 x tubes
- 3 x adapters
- 1 x replacement sealing ring
- These operating instructions
NOTE
- Check the package for completeness and for signs of visible damage.
- If the consignment is incomplete or damaged due to defective packaging or carriage, contact the Service hotline (see the chapter Service).
Unpacking
- Remove all parts of the appliance, the tube film and the operating instructions from the carton.
- Remove all packaging material.
- Remove the protective film from the control panel.
 DANGER
 - Packaging materials should not be used as a plaything. Risk of suffocation.
Disposal of packaging materials
The packaging protects the appliance from damage during carriage. The packaging materials have been selected for their environmental friendliness and ease of disposal, and are therefore recyclable.
![]() Returning the packaging to the materials cycle conserves raw materials and reduces the amount of waste that is generated. Dispose of packaging materials that are no longer needed in accordance with applicable local regulations.
Returning the packaging to the materials cycle conserves raw materials and reduces the amount of waste that is generated. Dispose of packaging materials that are no longer needed in accordance with applicable local regulations.
![]() Dispose of the packaging in an environmentally friendly manner. Note the labelling on the packaging and separate the packaging material components for disposal if necessary. The packaging material is labelled with abbreviations (a) and numbers (b) with the following meanings: 17: plastics, 2022: paper and cardboard, 8098: composites
Dispose of the packaging in an environmentally friendly manner. Note the labelling on the packaging and separate the packaging material components for disposal if necessary. The packaging material is labelled with abbreviations (a) and numbers (b) with the following meanings: 17: plastics, 2022: paper and cardboard, 8098: composites
NOTE If possible, keep the original packaging during the warranty period so that the device can be properly packed for returning in the event of a warranty claim.
Description of the appliance
Figure A
| 1. Appliance lid 2. Suction tube 3. Cable retainer 4. Welding wires 5. Lower sealing ring 6. Rear limiters |
7. Front limiters 8. Lid release 9. Suction fitting 10. Upper sealing ring 11. Press seal |
Figure B
12.
button (start/cancel “sealing” function) with control lamp (red)
13.button (start/cancel “vacuuming and sealing” function) with control lamp (red)
14.button (activate/deactivate additional function “wet”) with control lamp (green)
15.button (activate/deactivate additional function “soft”) with control lamp (green)
16.button (start/cancel “external vacuuming” function) with control lamp (red)
Figure C:
| 17. Vacuum hose 18. Adapter A |
19. Adapter B 20. Adapter C |
Technical data
| Operating voltage | 220 – 240 V ∼ (alternating current), 50/60 Hz |
| Power consumption | 125 W |
| Protection class | |
| All of the parts of this appliance that come into contact with food are food-safe. |
Safety guidelines
RISK OF ELECTRIC SHOCK
- Prior to use, check the device for visible external damage.
Never operate an appliance that is damaged. - To avoid potential risks, if the appliance power cable is damaged, it must be replaced by the manufacturer, its customer service or by a qualified technician.
- NEVER use the appliance with a defective power cable.
- Do not use extension cables or power socket strips that do not meet the required safety standards.
- Never open the appliance housing! Remove the plug from the mains power socket before be-ginning to clean the device.
- Ensure that no moisture can penetrate the device during cleaning.
RISK OF INJURY!
- All repairs must be carried out by authorised special-ist companies or by the Customer Service department. Improper repairs may result in a risk of injury to the user or damage to the appliance. They will also invalidate any warranty claim.
- The mains power socket must be easily accessible, so that the power cable can be easily disconnected in the event of an emergency.
RISK OF INJURY!
- Cleaning and user maintenance tasks may not be carried out by children unless they are supervised.
- The appliance and its connecting cable must be kept away from children younger than 8 years old.
- This appliance may be used by children aged 8 years and above and by persons with limited physical, sensory or mental capabilities or lack of experience and knowledge, provided that they are under supervision or have been told how to use the appliance safely and are aware of the potential risks.
- Children must not play with the appliance! Children should be supervised to ensure that they do not play with the appliance.
- Do not leave the appliance unsupervised when it is ready for use. To prevent it being switched on accidentally, always unplug the appliance after use or during breaks.
CAUTION PROPERTY DAMAGE!
- Do not use an external timer switch or a separate remote control system to operate the appliance.
NOTE No user action is required to switch the product between 50 and 60 Hz. The product adapts automatically to either 50 or 60 Hz.
Setting up and connecting
Set-up location requirements
For safe and trouble-free operation of the device , the set-up location must fulfil the following requirements:
- When setting it up, place the appliance on a firm, flat and horizontal surface.
- Do not place the device in a hot, wet or extremely damp environment or in the vicinity of flammable materials.
- The mains power socket must be easily accessible, so that the power cable can be easily disconnected in the event of an emergency.
Electrical connection
CAUTION
- Before you connect the appliance, compare the connection data (voltage and frequency) on the data plate with that of your mains power network. These data must agree so that no damage is sustained by the device.
- Ensure that the power cable is undamaged and is not routed over hot surfaces and/or sharp edges.
- Ensure that the power cable is not taut or kinked.
- Do not let the power cable hang over edges (trip wire effect).
- Insert the plug into the mains mains power socket.
Functions
| Button | Function | |
| 12 | Start/cancel “sealing” function (without vacuuming) | |
| 13 | Start/cancel “vacuuming and sealing” function | |
| 14 | Activate/deactivate additional function “wet” (for particularly moist food products) | |
| 15 | Activate/deactivate additional function “soft” (for pressure-sensitive foods, e.g. fruit or cakes) | |
| 16 | Start/cancel “external vacuuming” function (for vacuuming using the hose and adapter) | |
Tips
The following table offers some useful information on optimal preparation and processing of various food items.
| Food | Notes | Recommended mended container |
Recom mended additional function |
| Fish/meat | – use only when fresh, – do not interrupt the cold chain |
– Bag | |
| Vegetables | – peel or wash and dry – blanch for a few minutes in boiling water, rinse with ice water and dry to avoid loss of flavour and colour or gas formation* during storage |
– Bag | |
| Leafy vegetables/lettuce | – wash and dry – not suitable for freezing |
– Container | |
| Fruit | – peel or wash and dry | – Refrigeratorcontainer | |
| – Freezer: bag | |||
| Herbs | – wash and dry – whole sprig |
– Bag | |
| Baked products | – Container | ||
| – Bag | |||
| Powdery food | – place a piece of kitchen paper in the top of the bag/container or vacuum seal in the original packaging |
– Bag – Container |
|
| Cold liquids | – Container | ||
| – freeze briefly, if necessary | – Bag | ||
| Cooled, cooked foods | – Container | ||
| – Bag | |||
*Applies, for example, to all types of cabbage (broccoli, Brussels sprouts, kale, etc.), asparagus, sugar snap peas, beans, romanesco and pak choy.
Welding a tube film
NOTES ON THE FILM
- The film width may not exceed 30 cm. Otherwise it cannot be welded correctly.
- Use only nylon PA/PE films with a structure (dots or grooves) on one side and a thickness of approx. 0.170.29 mm (170290 ) in this device. Otherwise, the weld seam will not be tight and the appliance may be damaged. You can recognise films of this type from the information on the packaging. The quality of the weld seam will vary depending on the type and thickness of the film.
- The supplied film is suitable for temperatures between -20°C and +110°C.
- The supplied foil is BPA-free and microwaveable. However, never heat completely sealed bags in the microwave. The bag could burst! One side of the bag must be open. Heat the bags for no more than 3 minutes at a maximum temperature of 70°C.
1) Cut the desired length for your bag from the tube film using a pair of scissors. Cut as straight as possible.
2) Open the appliance lid1by pressing the lid release8and opening the lid 1 upwards.
3) Lay the open end of the bag as far into the appliance so that the opening of the bag is located centrally under the lower sealing ring5. The bag should be inserted no further than the rear limiters6and must lie between the front limiters7. If the bag lies over one or both of the two limiters6/7, then the bag cannot be correctly welded.
 NOTE
NOTE
• The bag opening must lie flat on the welding wire4. Otherwise the welding does not work properly.
4) Close the appliance lid1. The press seal11presses the bag onto the welding wire4, to create a smooth seam. Ensure that both corners of the appliance lid1click closed. If necessary, press them down once again on the markings and
and so that the appliance lid
 1clicks into place and locks shut.
5) Press the button 12. The control lamp12lights up. As soon as the sealing process is completed, the control lamp12flashes briefly and then goes out.
NOTE
You can halt the sealing process at any time by pressing the button 12again. The control lamp12flashes and then goes out.
CAUTION PROPERTY DAMAGE!
If the control lamp12does not turn off after a maximum of 10 seconds during the sealing process, the appliance is defective!
• Remove the plug from the mains power socket immediately. Do not attempt to repair the appliance yourself. Contact the Customer Service department.
6) Open the appliance lid1by pressing the lid release8and flipping the lid1upwards. Remove the bag. This is now sealed at one end.
NOTE
Ensure that the weld seam is properly closed. A correct weld seam should be a smooth, straight stripe without any creases.
7) Fill the bag. You must leave at least6cm of the bag free up to the edge to be welded.
CAUTION PROPERTY DAMAGE!
Fill the bag so that no food scraps or liquids can leak out during welding and get into the appliance.
8) If you do not want to vacuum the bag, you can now weld the other, open side.
NOTE
Wait a few seconds to allow the appliance to cool down before sealing the next bag. During this cool-down phase, you cannot start the “seal” function.
Vacuum sealing
Vacuuming the tube film
You can also suck the air out of the bag (vacuum) during welding:
NOTE
- If you want to vacuum seal bags with liquid contents only, it is best to freeze the liquid briefly so that it does not get sucked into the appliance during vacuuming. If small quantities of liquid or food nonetheless get sucked up, they will be deposited in the small drip tray that is located within the lower sealing ring
5.
1) Lay the open end of the bag as far into the appliance so that the opening of the bag is located centrally under the lower sealing ring5. The bag should be inserted no further than the rear limiters6and must lie between the front limiters7. Otherwise the vacuuming and welding will not function correctly:
 2) Close the appliance lid 1. Ensure that both corners of the appliance lid
 1click closed. If necessary, press them down once again on the markingsand so that the appliance lid 1clicks into place and locks shut.
NOTE
• Ensure that the upper10and the lower sealing rings 5 are not damaged! Otherwise the device cannot suck the air out of the bag.
• If either one of the sealing rings 0/5 is damaged, simply pull it out of the groove and press the replacement sealing ring into the groove.
3) If necessary, select the appropriate additional function for your food. Otherwise, you can skip this step and continue with point 4):
Press the button 14if you want to vacuum a particularly moist or juicy food, such as freshly marinated meat or cut fruit. If there is moisture between the film and the seam, this can lead to defective seals. When this function is activated, the sealing time is increased so that the seal is more stable.
If the additional function “wet” is activated, the corresponding control lamp 14lights up.
Press the button 15if you want to vacuum seal pressure-sensitive foods such as cakes or berries. When the additional function “soft” is activated, the suction pressure is slightly reduced and the food is not squeezed as much.
If the additional function “soft” is activated, the corresponding control lamp 15lights up.
NOTE
If you want to vacuum a moist and pressure-sensitive food, you can also activate both additional functions simultaneously.
4) Press the1313125) Once both control lamps1312have gone out, you can open the lid by pressing the lid releases8and flipping the lid1upwards. Remove the vacuum-sealed bag.
NOTE
• You can stop the vacuuming process at any time by pressing the button 13again. The corresponding control lamp13goes out. Press the button e again to resume the vacuuming process. If the appliance has already switched to the sealing process and the control lamp w is also lit, the process can be stopped with the button12. The control lamps13/12flash and then go out. The appliance then stops the sealing process.
• Once you have sealed5bags in a row, allow the appliance to cool down for about1minute. During this cool-down phase, it is possible that you cannot start the appliance. After the cool-down phase, you can use the appliance as normal (even if a whole minute has not yet elapsed). - TIP SOUS-VIDE COOKING
As the supplied film is suitable for temperatures between -20°C and +110°C, it can be used for sous-vide cooking (vacuum cooking). “Sous-vide” is French and means “under vacuum”. In vacuum cooking, the food (usually fish or meat, but vegetables can also be used) is vacuum-sealed in a bag and then cooked in water or steam cooked at a relatively low temperature (50° to 90°C). The advantage of this is that volatile flavours and aromas are not lost during cooking. The food does not dry out and the vitamins and flavours are preserved. Herbs or spices that are vacuum-sealed in the bag with the food give off a more intense flavour.
Vacuuming containers and resealable bags
NOTE
- Do not vacuum bags or containers that contain only liquids. These could be sucked up during the vacuum sealing process. If small quantities of liquid or food do get sucked up, they will be deposited in the small drip tray that is located between the lower sealing ring
5.
You can vacuum seal containers and resealable bags using the vacuum hoses17and appropriate adapters18/19/20supplied with the appliance.
NOTE
- You can order suitable bags and containers separately. Please refer to section “Ordering spare parts and accessories”.
- The vacuum hoses
17and adapters18/19/20are also compatible with bags and containers made by other manufacturers.
| Adapters | e.g. suitable for |
Adapter 18 |
FoodSaver lunch boxes, Ernesto, various bags with a valve |
Adapter 19 |
FoodSaver food storage boxes, Ernesto, various bags with a valve |
Adapter 20 |
CASO, FoodSaver storage boxes |
Vacuuming sealing bags
- Connect the vacuum hose
17onto the suction fitting
9of the appliance. - Select the appropriate adapter A/B
18/19for the bag you want to vacuum and attach it to the vacuum hose17. - Close the appliance lid
1. Ensure that both corners of the appliance lid1click closed. If necessary, press them down once again on the markings and so that the appliance lid 1clicks into place and locks shut. - Close the bag to be vacuum sealed carefully. Vacuum sealing only works properly if the bag is completely closed off. Position the ag so that the extraction opening of the bag is lying on a smooth surface.
- Press the adapters A/B
18/19firmly onto the round extraction opening on the bag. - Press the
 button.
 16The control lamp16lights up and the appliance sucks the air out of the bag. As soon as all the air is sucked out, the control lamp16goes out. - You can now remove the adapter A/B
18/19from the bag.
Vacuum sealing containers
- Connect the vacuum hose
17onto the suction fitting 9of the appliance. - Select the appropriate adapter
18/19/20for the container you want to vacuum and attach it to the vacuum hose17. - Close the appliance lid
1Ensure that both corners of the appliance lid1click closed. If necessary, press them down once again on the markings and so that the appliance lid 1clicks into place and locks shut. - Connect the adapter
18/19/20to the appropriate fitting on the container. Please refer to the instruction manual of the container for further information. - Press the button
16. The control lamp z lights up and the appliance sucks the air out of the container. As soon as all the air is sucked out, the control lamp16goes out. - You can now remove the adapters
18/19/20from the container and the appliance.
Cleaning
DANGER
Risk of fatal injury from electrocution!
- Remove the plug from the mains power socket before beginning to clean the device.
- Ensure that no moisture can penetrate the device during cleaning.
CAUTION
Possible damage to the appliance.
- Do not use aggressive or abrasive cleaning agents, as these may corrode the surface of the casing.
- Do not use any hard or sharp objects to remove any adhesive from the
welding wire4. Otherwise the welding wire4or the insulation could be damaged.
Cleaning the appliance
- Clean the surface of the housing of the appliance with a lightly moistened cloth and a mild detergent.
- Wipe off the upper
10and the lower sealing rings5, as well as the press seal11with a damp cloth. Ensure that the appliance is dry before using it again. - Wipe the vacuum hoses
17,and the adapters18/19/20with a damp cloth. If there is heavy soiling, you can also clean these parts in hot water with a little detergent. Ensure that all components are completely dry before the next use. - Clean the drip tray that is located between the lower sealing ring
5in warm water with a little detergent.
 You can also clean the drip tray in the dishwasher, if required. Make sure that the drip tray does not get jammed in the dishwasher. Use the upper basket in the dishwasher if possible.
Storage
The appliance has a built-in cable retainer 3 on the underside of the housing, on which you can wrap the power cable when it is not in use. Wind the power cable around the cable retainer 3 in the direction indicated by the arrows.

This prevents the power cable from getting caught or soiled, or becoming a source of danger by hanging loosely down.
CAUTION
Possible damage to the appliance.
- Do not click the appliance lid
1closed for storage! When the appliance
lid1is clicked closed it exerts permanent pressure on the upper10and lower sealing rings5, as well as the press seal11. This can negatively affect their function. - Store the appliance in a clean, dry place away from direct sunlight.
Disposal
 Under no circumstances should you dispose of the appliance with the normal household waste. This product is subject to the provisions of European Directive 2012/19/EU (Waste Electrical and Electronic Equipment).
Dispose of the appliance via an approved waste disposal company or your municipal waste disposal facility. Please observe applicable regulations. In case of doubt, please contact your waste disposal centre.
![]() Your local community or municipal authorities can provide information on how to dispose of the worn-out product.
Your local community or municipal authorities can provide information on how to dispose of the worn-out product.
![]() The product is recyclable, subject to extended producer responsibility and is collected separately.
The product is recyclable, subject to extended producer responsibility and is collected separately.
Kompernass Handels GmbH warranty
Dear Customer,
This appliance has a 3-year warranty valid from the date of purchase. If this product has any faults, you, the buyer, have certain statutory rights. Your statutory rights are not restricted in any way by the warranty described below.
Warranty conditions
The warranty period starts on the date of purchase. Please keep your receipt in a safe place. This will be required as proof of purchase.
If any material or manufacturing fault occurs within three years of the date of purchase of the product, we will either repair or replace the product for you or refund the purchase price (at our discretion). This warranty service requires that you present the defective appliance and the proof of purchase (receipt) within the three-year warranty period, along with a brief written description of the fault and of when it occurred.
If the defect is covered by the warranty, your product will either be repaired or replaced by us. The repair or replacement of a product does not signify the beginning of a new warranty period.
Warranty period and statutory claims for defects
The warranty period is not prolonged by repairs effected under the warranty. This also applies to replaced and repaired components. Any damage and defects present at the time of purchase must be reported immediately after unpacking. Repairs carried out after expiry of the warranty period shall be subject to a fee.
Scope of the warranty
This appliance has been manufactured in accordance with strict quality guidelines and inspected meticulously prior to delivery.
The warranty covers material faults or production faults. The warranty does not extend to product parts subject to normal wear and tear or to fragile parts which could be considered as consumable parts such as switches, batteries or parts made of glass.
The warranty does not apply if the product has been damaged, improperly used or improperly maintained. The directions in the operating instructions for the product regarding proper use of the product are to be strictly followed. Uses and actions that are discouraged in the operating instructions or which are warned against must be avoided.
This product is intended solely for private use and not for commercial purposes. The warranty shall be deemed void in cases of misuse or improper handling, use of force and modifications/repairs which have not been carried out by one of our authorised Service centres.
Warranty claim procedure
To ensure quick processing of your case, please observe the following instructions:
- Please have the till receipt and the item number (e.g. IAN 123456_7890) available as proof of purchase.
- You will find the item number on the type plate on the product, an engraving on the product, on the front page of the operating instructions (below left) or on the sticker on the rear or bottom of the product.
- If functional or other defects occur, please contact the service department listed either by telephone or by e-mail.
- You can return a defective product to us free of charge to the service address that will be provided to you. Ensure that you enclose the proof of purchase (till receipt) and information about what the defect is and when it occurred.
![]() You can download these instructions along with many other manuals, product videos and installation software at www.lidl-service.com.
You can download these instructions along with many other manuals, product videos and installation software at www.lidl-service.com.
This QR code will take you directly to the Lidl service page (www.lidl-service.com) where you can open your operating instructions by entering the item number (IAN) 367926_2101.
Service
Service Great Britain
Tel.: 0800 404 7657
E-Mail: [email protected]
Importer
Please note that the following address is not the service address. Please use the service address provided in the operating instructions.
KOMPERNASS HANDELS GMBH BURGSTRASSE 21 44867 BOCHUM GERMANY
www.kompernass.com
Ordering replacement parts
You can order replacement parts for this product on the Internet at
www.kompernass.com.

Scan the QR code with your smartphone/tablet. You can use this QR code to go directly to our website to view and order the available spare parts.
NOTE
- If you have problems with your online order, you can contact our service centre by phone or e-mail.
- Please always quote the article number (e.g. 123456_7890) when ordering. You can find it on the title page of these operating
instructions. - Please note that online ordering of replacement parts is not possible for all countries.
![]()
KOMPERNASS HANDELS GMBH
BURGSTRASSE 21 44867 BOCHUM GERMANY
www.kompernass.com
Last Information Update · Stand der Informationen · Version des informations · Stand van de informatie
Stav informací · Stan informacji · Stav informácií · Estado de las informaciones · Tilstand af information:
02 / 2021 · Ident.-No.: SV125C3-022021-1
IAN 367926_2101
]]>