SHARPER IMAGE®
HEATED INDOOR/OUTDOOR SLIPPERS
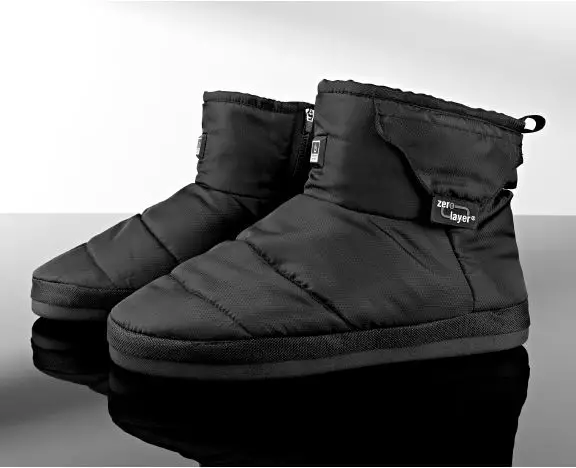
Thank you for purchasing the Sharper Image Heated Indoor/Outdoor Slippers.
Please read this guide and store it for future reference.
FEATURES
• Adjustable temperature control: Pre-Heat, High, Medium
and Low
• Unisex sizing
• Available in Small, Medium, Large, X-Large and XXL
• Includes 5v Power bank and Micro USB cable
IDENTIFICATION OF PARTS
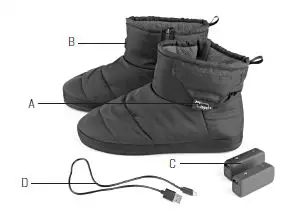
A. Slipper input plugs
B. Control button
C. 5v Power bank
D. Micro USB cable
CHARGING THE 5V POWER BANK
Before using your Heated Indoor/Outdoor Slippers the 5v power bank should be fully charged. Please follow the instructions below on how to charge, use and maintain your power bank.
1. Remove 5v power bank(s) from the packaging.
2. Use the included USB cable and connect to the Micro-USB port on the 5v power bank and the standard USB end of cable to a powered ON computer’s USB port. You can also connect the USB end to an AC adapter and plug directly into the wall.
3. While charging, the 5v power bank’s blue LED’s will illuminate. Once it is fully charged, all 4 blue LED lights will be illuminated. Note: The 5v power bank charging time can vary between 2-4 hours from a wall socket and longer from a computer.
4. Disconnect the 5v power bank from the power source when fully charged.
POWER STATUS
The 5v power bank has 4 blue LED lights to indicate power remaining status. Four blue LED lights indicate that it’s fully charged.
• Three lights indicate 75% power remaining
• Two lights indicate 50% power remaining
• One light indicates the 5v power bank is out of power and needs to be recharged
RECHARGEABLE 5V POWER BANK SYSTEM CARE
• Failure to charge the 5v power bank prior to use can reduce battery life
• Charge between each use and a minimum of once every 3 months. It’s important to maintain between 25% – 75% remaining power when not in use. Failure to do so will result in performance problems and reduced battery life
• The 5v power bank battery life is 300+ cycles before it will diminish in capacity output
• Lithium batteries provide a diminished capacity output in extreme cold temperatures – keep batteries inside the slippers to minimize the impact and improve the performance
HOW TO USE THE HEATED INDOOR/OUTDOOR SLIPPERS
1. Locate the USB plug on Heated Indoor/Outdoor Slippers and connect it to the 5v power bank.
2. Press the power button on the power bank to activate the battery. Then locate the power button on the slippers to activate the heating system.
3. Press and hold down the power button on the slipper for 3 seconds. It will light up and cycle from RED (high), to BLUE (medium/high), to GREEN (low) and then back to RED (high). Note: This is a pre-heat cycle that will take 5 minutes. Once the 5-minute pre-heat cycle is complete the product will automatically turn down to the BLUE (medium/high) setting. You can change the power level setting at any time by pushing the power button.
4. To turn the slippers off, press and hold the power button for 3 seconds or disconnect the USB plug from the 5v power bank. Note: The Heated Indoor/Outdoor Slippers should only be used with the included power bank and USB cable. Never use a power bank or cable with any other device regardless of how similar the plugs may appear to fit or work together.
TEMPERATURE SETTINGS
• Blue: Medium/High heat – 110° F with approximate run time of 4.5 hours
• Green: Low heat – 95° F with approximate run time of 7 hours
• Red: High heat – 130° F with approximate run time of 3 hours
NOTE: We recommend users wear socks while wearing the slippers.
SIZING INFORMATION
Small: Women’s US 5/6
Medium: Men’s US 6 – 7.5 / Women’s US 6.5 – 8
Large: Men’s US 8 – 9.5 / Women’s US 8.5 – 10
X-Large: Men’s US 10 – 11.5 / Women’s US 10.5 – 12
XXL: Men’s US 12-13
CLEANING AND MAINTENANCE
• Remove the battery and USB cable before washing
• It is recommended to place the product in a pillowcase or laundry bag for protection while washing
• Wash in cold water with a mild detergent
• After washing, put in the dryer on tumble dry. Be sure the product and USB plug are completely dry before using again
SAFETY WARNINGS
• Do not use on open wounds, sensitive skin areas, or in the presence of poor circulation
• Check skin frequently during use to ensure rashes or burns are not developing
• The FDA and CPSC recommend the following precautions be taken to avoid hazards associated with the use of heated clothing
ALWAYS
• Inspect the slippers before each use to assure they are in proper working order
• Discard if the product appears worn, cracked or if the electrical cord is frayed
• Read and follow all instructions prior to use
NEVER
• Use on an infant
• Use on a person who is paralyzed or has skin that is not sensitive to temperature changes
• Use on a sleeping or unconscious person
• Use in an oxygen enriched environment or near equipment that stores or emits oxygen
• Sit on this device
• Crush this device
• Unplug this device by pulling its connecting cord
• Use pins or other metallic fasteners to hold this device in place
• Do not submerge product or battery into water while in use
• Do not cut, puncture or tear into the lining of the product
• Do not allow the battery to have contact with water or other liquids. If water or liquids enter the battery interior, immediately disconnect the product from the battery. Allow the battery to dry completely before use
• Do not penetrate, strike, short-circuit or disassemble battery
• Keep all electronic components of your product away from fire and extensive heat
• Do not leave product unattended while connected to the battery
• Only use the charger and batteries included with this product
• If you experience any discomfort while using this product, remove it immediately and consult your physician before resuming use
• Check with your physician if you have heart disease, a pacemaker, diabetes, circulatory problems, sensitivity to heat, or if you are pregnant or under the age of 13
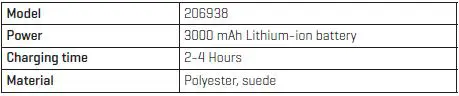
SPECIFICATIONS
WARRANTY / CUSTOMER SERVICE
Sharper Image branded items purchased from SharperImage.com include a 1-year limited replacement warranty. If you have any questions not covered in this guide, please call our Customer Service department at 1 (877) 210-3449. Customer Service agents are available Monday through Friday, 9:00 a.m. to 6:00 p.m. ET.

USER MANUAL
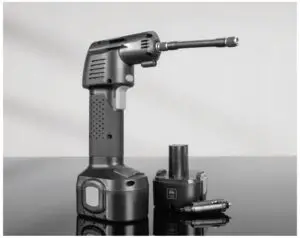
Thank you for purchasing the Sharper Image Cordless Auto Stop Tire Inflator.
Please read this manual thoroughly before operating this device.
FEATURES
- Ideal for inflating car tires, motorcycle tires, sporting equipment, etc.
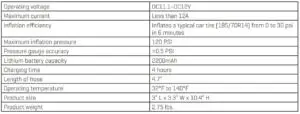
- Inflates a car tire in approximately 6 minutes
- Maximum inflation pressure 120 PSI
- Digital pressure gauge measures in PSI, BAR or kg/cm2
- Accurate to ±0.5 PSI
- Runs on a rechargeable battery or plugs into car cigarette lighter
- LCD display shows the target pressure, pressure units and battery level
IDENTIFICATION OF PARTS
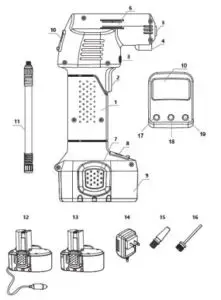 High-pressure air compressor
- Trigger
- Safety switch
- LED light
- Air nozzle
- Pressure hose holder
- Fastener
- Adapter holder
- Battery pack
- LCD display
- Pressure hose with thread connector
- 12V car cigarette lighter adapter
- Battery pack (same as #9)
- AC charger
- Balloon adapter
- Sports ball adapter
- + button (checks pressure setting / increases pressure value)
- Unit button (select pressure format: PSI, BAR or kg/cm2)
- – button (checks pressure setting / decreases pressure value)
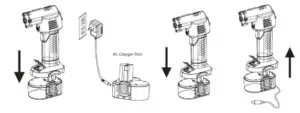
INSTRUCTIONS FOR USE – PLUGGED INTO CAR CIGARETTE LIGHTER
- Plug the 12V power cord into the 12V DC outlet in your car (the car cigarette lighter).
- Insert the pressure hose with thread connector into the air nozzle and tighten.
- Turn on the digital tire gauge by pressing the “UNIT” button. The LCD will light up.
- Press the “UNIT” button to select your desired pressure format (PSI, BAR or kg/cm2).
- Press “+” or “-” to check the pre-set level.
- To increase or decrease the desired pressure, use the “+” or “-” buttons. Press quickly for small adjustments, press and hold for larger adjustments.
- When you have selected the desired air pressure, let go of the button. The LCD will flash for 4 seconds and set itself automatically. Or, you can press the “UNIT” button to set it manually.
- Unlock the safety switch and press the trigger. The compressor will now inflate your tire to your pre-set pressure level. Then, it will shut off automatically.
- Press the trigger of the compressor to stop the compressor if necessary.
- Remove the thread connector from the tire or object after it is fully inflated.
INSTRUCTIONS FOR USE – BATTERY POWER
NOTE: You must charge your air compressor fully before the initial use. A full charge can take up to 4 hours. To check battery level, insert the battery into the air compressor and press the Unit button (center button). Normal charging time: 4 hours.
- Remove the battery from the air compressor by gripping the end of the battery and pulling it out.
- Charge the battery with the included AC charger. Plug the charger into any standard AC outlet. NOTE: Do not use any other charger. Use only the charger that came in this package.
- When the battery is fully charged, you may begin inflation using steps 2-10 above.
SPECIFICATIONS
CAUTION
- Do not allow children to connect/disconnect the air compressor to/from power sources.
- Do not leave children unattended with the air compressor.
- The air compressor is not a toy. Do not allow children to play with the air compressor.
- Do not allow anyone to pump air into the mouth, ears, nose, etc. of people or animals, as this could result in serious injury or death.
- Do not use the air compressor near flammable fluids or gases.
- Always work in a well-lit area.
- Do not run the air compressor continuously for more than 15 minutes. After each 15 minutes,allow it to cool for a minimum of 15 minutes.
- Switch off the compressor if it makes an abnormal noise or overheats. Allow the compressor to cool down for at least 15 minutes.
- Always be careful when removing the air hose.
- Do not expose the air compressor or battery to rain or frost or temperatures above 122°F.
- Do not change the battery in humid or wet conditions.
- Store the air compressor in a secure location.
- If the air compressor is going to be unused for long periods of time, it should be stored in a dry place, inaccessible to children.
- You must charge your air compressor fully before the initial use. A full charge can take up to 4 hours.
WARNING
- For your own safety, use only the parts and accessories included in this package.
- Use of accessories and other parts that are not mentioned in the instructions may increase the risk of user injury.
- Do not use this air compressor for anything other than its intended purpose (inflatingtiresand sporting equipment).
WARRANTY/CUSTOMER SERVICE
Sharper Image branded items purchased from SharperImage.com include a 1-year limited replacement warranty. If you have any questions not covered in this guide, please call our Customer Service department at 1 (877) 210-3449. Customer Service agents are available Monday through Friday, 9:00 a.m. to 6:00 p.m. ET.

User Manual
Sharper Image Night Light Toilet Seat
Sound Activated
NIGHTLIGHT TOILET SEAT
With Slow-Close Hinge
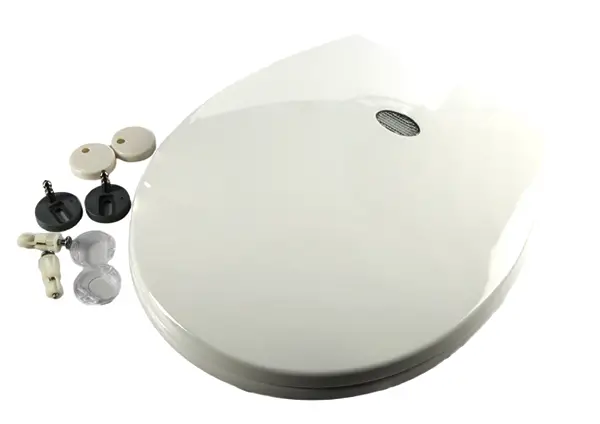
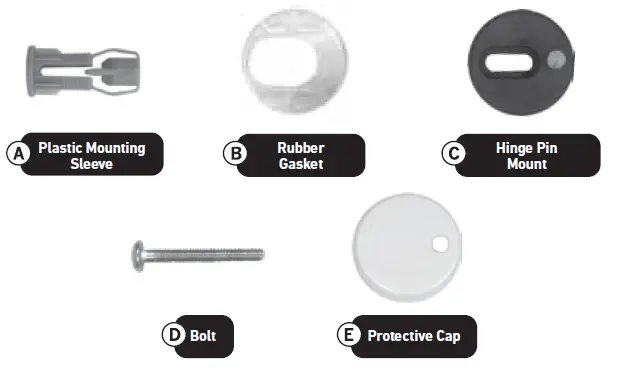
Package List:
Read all instructions very carefully BEFORE installation.
STEP 1.
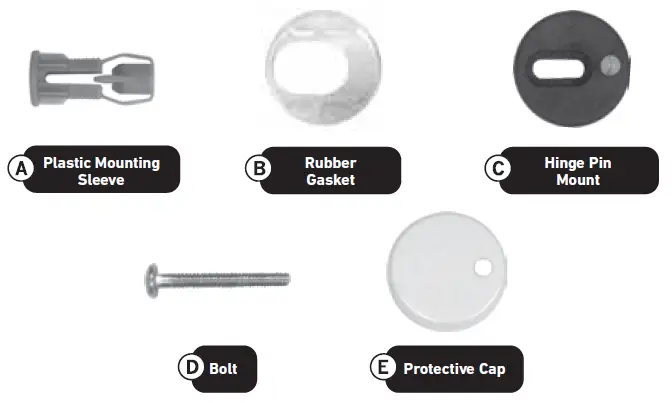
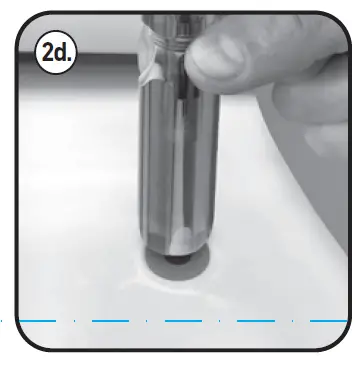
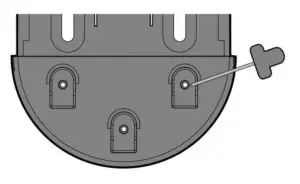
Insert the 2 Plastic Mounting Sleeves (A) into the mounting holes on your toilet bowl by squeezing the 2 plastic arms together with your thumb and forefinger.
Remove the Bolt (D) from the plastic sleeve.
Push the sleeve all the way into the hole until the flange is flush with the top of the bowl.
STEP 2.
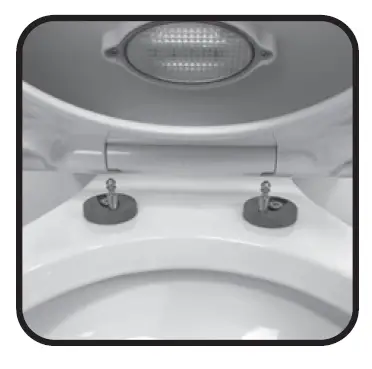
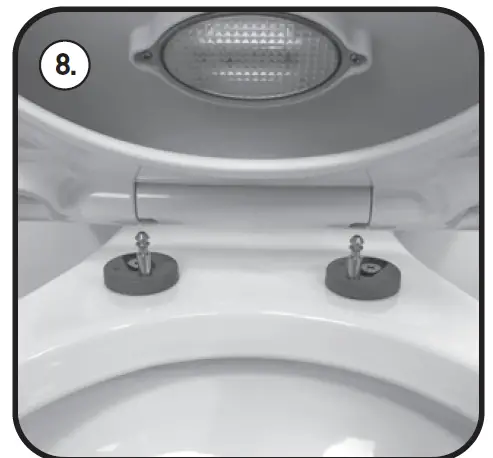
Insert the Rubber Gasket (B) into the plastic bottom of each Hinge Pin Mount (C).

Place the Hinge Pin Mount (C) over the Plastic Mounting Sleeve (A) in the position shown below.
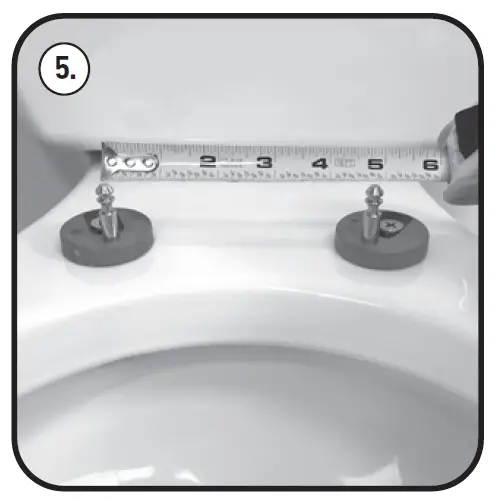
STEP 3.
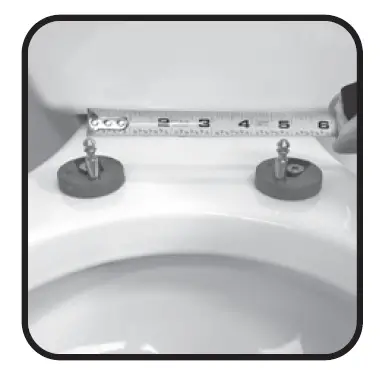
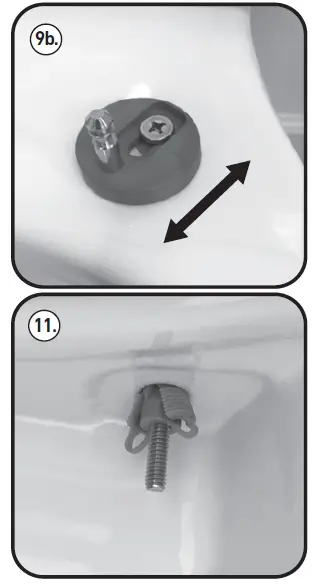
Insert Bolt (D) into Plastic Hinge Mounting Sleeve (A) and tighten to a snug fit only. DO NOT FULLY TIGHTEN THE BOLTS YET. The metal pins need to be equally spaced 6 ¾” apart as shown.
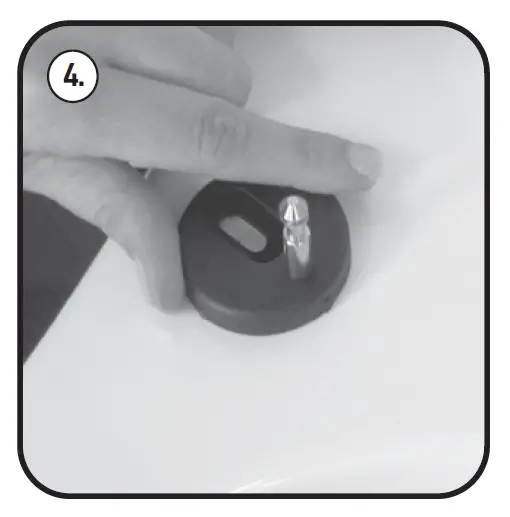
STEP 4.
If the metal pins do not line up with the holes in the toilet seat, loosen Bolt (D) and twist the Hinge Pin Mount (C) until they line up with the holes. Retighten the Bolts (D) until they are snug, but do not fully tightened yet.
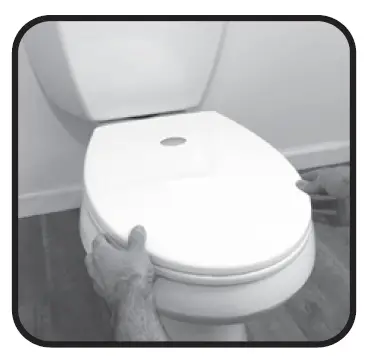
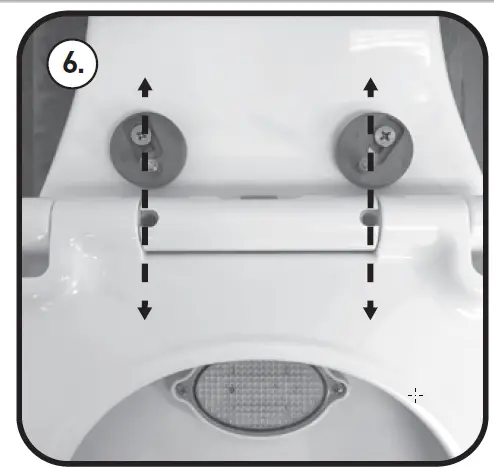
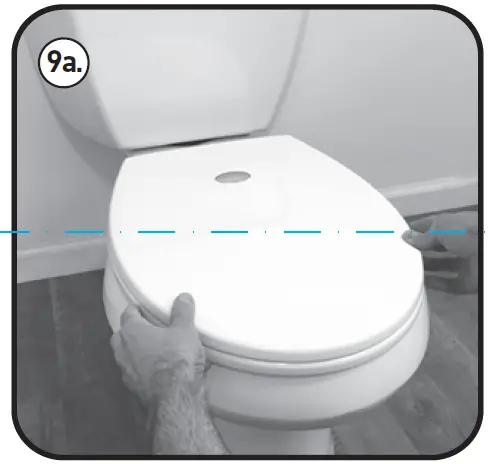
Gently place the toilet seat over the Hinge Pin Mounts (C). Allow the toilet seat to gently close.
STEP 5.
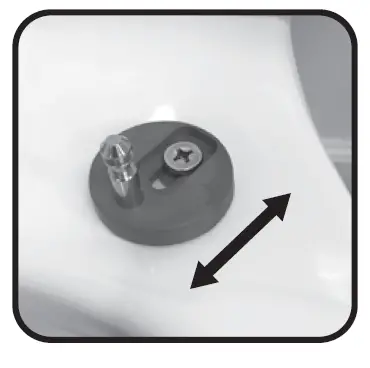
Check the alignment of the toilet seat with the toilet bowl. If the seat is too far forward or too far back or too far left/right, remove the seat and readjust the Hinge Pin Mounts (C). You can adjust the seat forward or back using the slot in the Hinge Pin Mounts (C).
Once the toilet seat is aligned with the bowl, gently remove the seat and fully tighten the bolts securely with a Phillips head screw driver.
STEP 6.
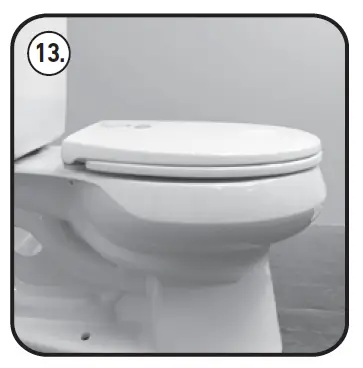
Place the Protective Caps (E) over the Hinge Pin Mounts (C) and push down securely.
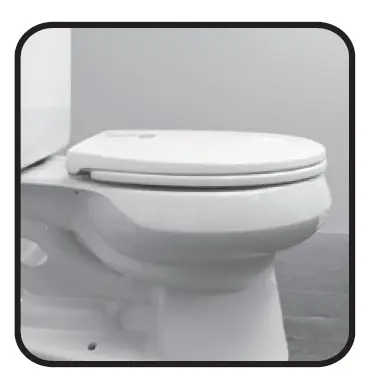
Now click the toilet seat onto the Hinge Pin Mounts (C) and check for proper function and alignment with the toilet bowl.
HAVING TROUBLE INSTALLING YOUR SEAT?
Check out our instructional video for the Sharper Image Sound Activated Nightlight Toilet Seat at https://youtu.be/uP9nEbiFam0

Sharper Image
Made in China
For more information on
Sharpe r Image products,
please visit: ww w.sharperimage.com
©2018 Sharper Image. Sharper Image®
name and logo are registered trademarks.
All rights reserved. Manufactured,
marketed and distributed under license
by Ginsey Home Solutions, Swedesboro, NJ 08085.
1 YEAR LIMITED WARRANTY
Thank you for purchasing the Sharper Image® Nightlight Toilet Seat. LED technology softly lights your way to the bathroom at night. The Sound Activated Auto On and Off features allows the LED to operate only when you need it. The slow-close hinge helps prevent the lid and ring from slamming down and waking the house, and the quick release hinge makes cleaning a breeze.
- Read all instructions carefully before use.
- Carefully remove all contents from the packaging and inspect the product to make sure all components have been received.
- Tools Required: Phillips head screwdriver
Register your product at: www.ginsey.com/registration
Diagram:

GETTING STARTED
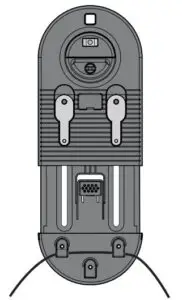
Battery Installation
1) The nightlight operates on 2 x AAA (LR03) batteries (not included).
2) Lay the toilet seat on a flat surface with the lid and ring in the open position as shown.
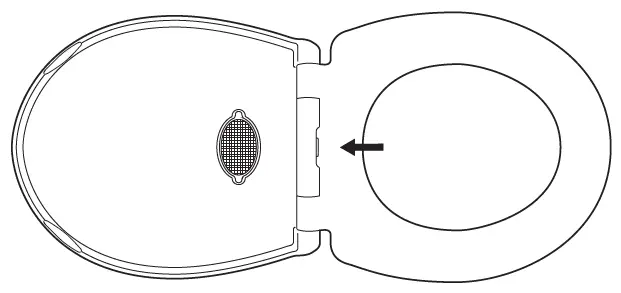
3) Remove the 2 Phillips head screws from the LED housing. Remove and open the LED housing.
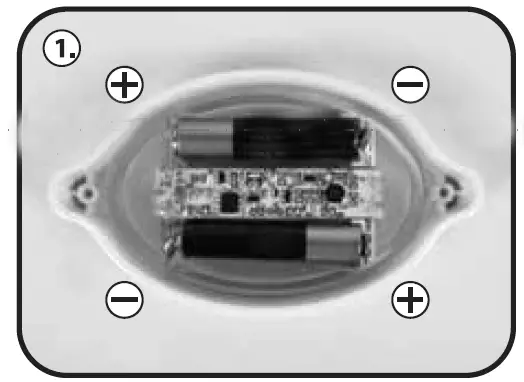
4) Install 2 x AAA batteries with polarity (+/-) as shown in FIGURE 1.
5) Make sure the silicone water seal is seated in place, close the LED housing, place back into the toilet lid and tighten screws. Do not over tighten.
BATTERY INSERTION FIGURE 1.
CAUTION:
- Do not mix old and new batteries or batteries of different types: alkaline, standard (carbon-zinc) or rechargeable (nickel-cadmium).
- Insert batteries with correct polarity as indicated inside the battery compartment.
- Remove batteries during long periods of non-use.
- Always remove exhausted batteries from this product. Dispose of batteries safely.
TOILET SEAT INSTALLATION
Read all instructions very carefully BEFORE installation.
1) Remove old toilet seat and mounting hardware from toilet bowl.

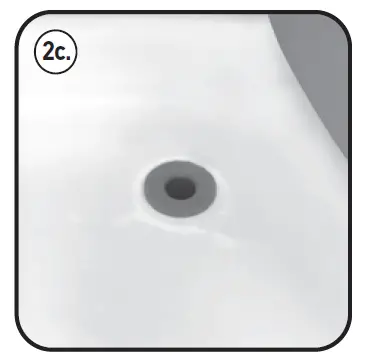
2) Remove new mounting hardware from parts bag. Insert the 2 Plastic Mounting Sleeves (A) into the mounting holes on your toilet bowl by squeezing the 2 plastic arms together with your thumb and forefinger.
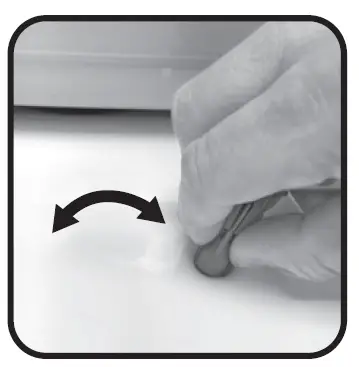
a) If you are having difficulty getting the plastic sleeve into the hole, insert the plastic sleeve into the hole at an angle and rock it back and forth as you push it down
b) Remove the Bolt (D) from the plastic sleeve.
c) Push the sleeve all the way into the hole until the flange is flush with the top of the bowl. d) If the fit is tight, use the handle of the screwdriver to forcibly push the sleeve down until it is completely flush with the bowl.
3) Insert the Rubber Gasket (B) into the plastic bottom of each Hinge Pin Mount (C)
4) Place the Hinge Pin Mount (C) over the Plastic Mounting Sleeve (A) in the position shown below.
 5) Insert Bolt (D) into Plastic Hinge Mounting Sleeve (A) and tighten to a snug fit only. DO NOT FULLY TIGHTEN THE BOLTS YET. The metal pins need to be equally spaced 4 ¾” apart as shown in Figure 5.
6) To check the spacing, place the toilet seat upside down on the bowl so that the mounting holes in the seat line up with the metal pins.
7) If the metal pins do not line up with the holes in the toilet seat, loosen Bolt (D) and twist the Hinge Pin Mount (C) until they line up with the holes. Retighten the Bolts (D) until they are snug, but do not fully tightened yet.
8) Gently place the toilet seat over the Hinge Pin Mounts (C). Allow the toilet seat to gently close.
9) Check the alignment of the toilet seat with the toilet bowl. If the seat is too far forward or too far back or too far left/right, remove the seat and readjust the Hinge Pin Mounts (C). You can adjust the seat forward or back using the slot in the Hinge Pin Mounts (C).
10) Once the toilet seat is aligned with the bowl, gently remove the seat and fully tighten the bolts securely with a Phillips head screw driver.
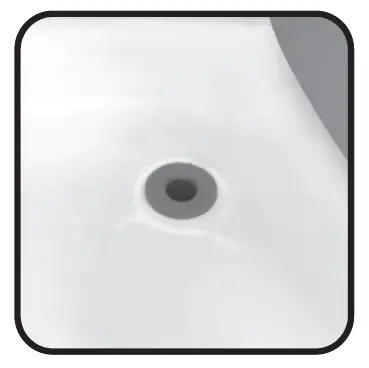
11) The plastic sleeves
should look as shown
in image.
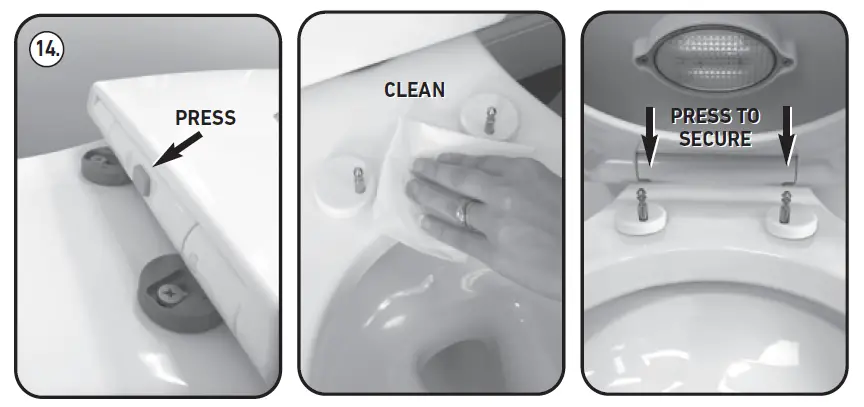
14) To remove the seat for cleaning, simply press the gray button and pull up on the seat. Once cleaning is complete, align the hinge holes to the hinge pins and press down firmly to secure the seat to the toilet bowl.
13) Now click the toilet seat onto the Hinge Pin Mounts (C) and check for proper function and alignment with the toilet bowl.
12) Place the Protective Caps (E) over the Hinge Pin Mounts (C) and push down securely.
13) Now click the toilet seat onto the Hinge Pin Mounts (C) and check for proper function and alignment with the toilet bowl.
14) To remove the seat for cleaning, simply press the gray button and pull up on the seat. Once cleaning is complete, align the hinge holes to the hinge pins and press down firmly to secure the seat to the toilet bowl.
HAVING TROUBLE INSTALLING YOUR SEAT?
Check out our instructional video for the Sharper Image Sound Activated Nightlight Toilet Seat at https://youtu.be/uP9nEbiFam0
NIGHTLIGHT FUNCTION
The LED will only turn ON when it is dark or night time. The LED will turn ON when it detects a sound of someone entering the bathroom (Approximately 65 dB). It provides a soft blue glow that illuminates the toilet lid and ring and is easy on your eyes in the middle of the night. The LED will automatically shut off after 2 minutes. The batteries will last about 6 months.
QUICK RELEASE HINGES
The seat has a quick release feature to help you remove it for easy cleaning. To remove the seat, simply press the gray button on the back of the seat and pull up the seat. To put the seat back on, reverse the steps above. The toilet seat will snap back onto the hinges.
CLEANING AND MAINTENANCE
- Clean the toilet seat as you normally would with bathroom cleaner and water. Dry with soft cloth.
- The LED housing is water resistant. DO NOT SUBMERGE THE LED HOUSING.
Model No: 01271
ONE YEAR LIMITED WARRANTY
Ginsey Home Solutions sells its products with the intent that they are free of defects in manufacture and workmanship for a period of one year from the date of original purchase. Ginsey Home Solutions warrants that its products will be free of defects in material and workmanship under normal use and service.
For warranty service call:
Ginsey Home Solutions
2078 Center Square Road
Swedesboro, NJ 08085
1-800-257-7844
[email protected]
Customer Service is available
8:30am – 5:00pm (EST)
Monday – Friday
Made in China
For more information on
Sharper Image products,
please visit: www.sharperimage.com
©2018 Sharper Image. Sharper Image®
name and logo are registered trademarks.
All rights reserved. Manufactured,
marketed and distributed under license
by Ginsey Home Solutions, Swedesboro, NJ 08085.
USER MANUAL
Go Hang It
GET TO KNOW GO HANG IT! PRO
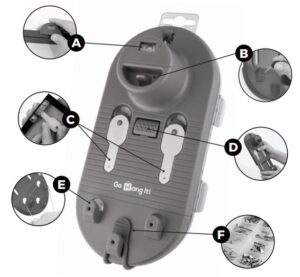
- A. REMOVABLE LEVEL – Snaps o and sets on the edge of your frame to perfectly level your pictures.
- B. REMOVABLE PUSH PIN – Used to mark nail holes through the HOOKS (See E.) when hanging pictures with wire hangers.
- C. MAGNEKEYS – Remove and insert into the notch of our SINGLE-NOTCH PRECISION HANGERS, sawtooth or D-ring hangers to perfectly mark your nail holes.
- D. CENTER BUTTON – Telescopes and extends the base of the unit for wire-hanging pictures. Simply push the button and pull.
- E. BUILT-IN HOOKS – Used to suspend wire hanger pictures on the wall where desired. Insert the PUSH PIN into the guide holes to mark where your nails go.
- F. SILICONE LATCH – Keeps the removable hardware case attached to the unit.
HARDWARE ESSENTIALS INCLUDED

SAWTOOTH PICTURE HANGING
Follow these steps for D-ring hangers too.
INSERT MAGNEKEYS
- Remove the MAGNEKEYS and insert into sawtooth or SINGLE-NOTCH PRECISION HANGERS.
LEVEL & MARK HOLES 2
- Place removable LEVEL on top edge of the frame. Position and level frame on wall then rmly push directly over hangers to mark your nail holes.
INSTALL HARDWARE
- Locate the marks on the wall made by MAGNEKEYS.
Install nails straight into the wall marks.
HANG YOUR PICTURE

WIRE PICTURE HANGING
EXTEND & HOOK
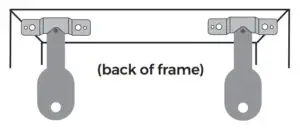
- Press CENTER BUTTON to extend the base. Suspend the frame wire on the
BUILT-IN HOOKS, then position and level picture. Use the two, outer HOOKS for heavier frames and the single HOOK for lighter frames.
MARK HOLES
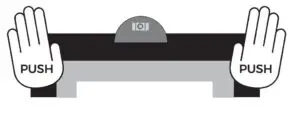
- Pressing rmly against the wall, remove your frame. Locate the removable
PUSH PIN (located beneath the LEVEL) and mark nail holes through the hooks.
INSTALL HARDWARE
- Locate the marks on the wall made by the PUSH PIN. Install picture hook hardware.
HANG YOUR PICTURE
Works with most picture hanging hardware.
- Suggested weight limits:
- Nails in wood studs – 50 lbs
- Nails in drywall – 10 lbs
USER MANUAL
GENERAL OVERVIEW
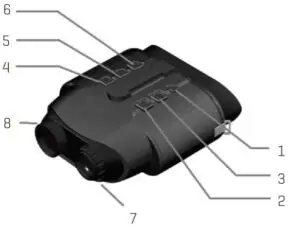
- Power – Short press down to power ON and Long press down to power OFF.
- Zoom – Press to enable 12 level digital Zoom ratio
(1.0->1.07->1.14->1.22->1.30->1.38->1.48->1.58->1.68->1.79->1.92->2.0->1.0) - Mode – Press to flick between 4 modes: Photo, Video, , Gallery, and Setting.
- IR – Press IR for 3 levels of IR brightness (0->IR1- >IR2->IR3->0….) when using the binoculars at night.
- OK
• In Photo mode, press OK to take a photo.
• In Video mode, press OK to start and stop video recording.
• In Gallery/Setting mode, press OK to select options – for example, start playing a recorded video or to select an option from the menu. - Intensity – Pop up TFT backlight adjusting bar for easy adjusting the TFT brightness. Use zoom and IR button to increase/decrease the TFT brightness. Press OK to save.
- Focus Adjustment – Focus the picture by turning the focus wheel clockwise or counter-clockwise.
- IR LED
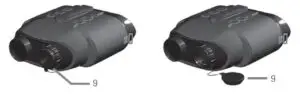
9. Lens cap attachment – Take off for night-time use. Failure to do so will result in severely limited performance.
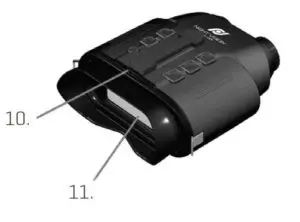
10. Micro SD card and USB slot – These are located just above the eyepiece. Your micro SD card slots in with the card upwards. Push your Micro SD card into the slot until it clicks into place.
11. Eyepiece
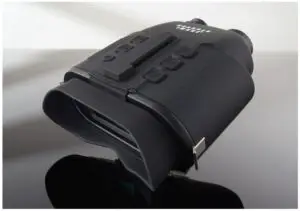
USING THE TRUE NIGHT VISION BINOCULARS
Turn the True Night Vision Binoculars on by pressing down on the ON button for a short period.
Pick an infrared power level by pressing the IR button to illuminate at night. There are 3 brightness settings. A higher setting will provide a brighter picture, but will deplete the batteries quicker.
Focus the picture by turning the focus wheel clockwise or counter-clockwise.
You can use digital zoom to increase the zoom ratio more by pressing the Zoom
button to magnify the picture from 1.0x- >1.07->1.14…to 2.0x then go back to 1x
magnification.
Adjust the LCD brightness level by pressing down on the INTEN button. Operating True Night Vision Binoculars at night may have LCD brightness issues — use the intensity button to adjust LCD brightness accordingly.
Press the Mode button to switch modes — the four modes are: Photo, Video, Gallery and Setting. These are explained in the next sections.
DISPLAY INFORMATION
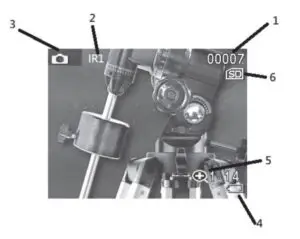
- No. of photos taken
- IR level Indication
- Photo/Video mode icon
- Battery level indicator
- Zoom Ratio indication
- SD card insert indication
TAKING PICTURES AND VIDEOS
To take a picture, go to Photo mode (this is the default mode when the True Night Vision Binoculars are switched on). A camera icon shows at the bottom of the screen. To take a photo, press the OK button.
To record a video, go to Video mode. A small video icon will appear at the bottom of the screen. To start recording, press the OK button. To stop recording, press the OK button again. Video will save automatically onto the Micro SD memory card.
SETTING MENU NAVIGATION
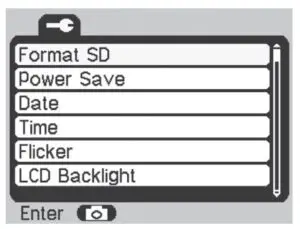
- To get the settings menu, use the MODE button to flick through the photo, video and gallery modes until you reach the setting menu. (pictured).
- Use the Zoom and IR buttons to go up and down, and the OK button to enter/exit menus.
- Pressing the MODE button will go back to Photo mode.
Menu Options:
- Format SD: Erase everything on your installed memory card.
- Power Save: Configure the True Night Vision Binoculars to Turn off after a certain duration of non-use.
- Date: Edit current date for displaying date information on the Photos/Videos.
- Time: Edit current time for showing time information on the Photos/Videos.
- Flicker: Select 50Hz/60Hz according to power system frequency. For example, select 50Hz for 220V/50Hz power system.
- LCD Backlight: Change the brightness of the screen. Use the ZOOM and IR buttons to increase/ decrease the brightness. Press OK to save.
- Date/Time Tag: ON/OFF Date and Time information on the Photos/Videos.
- Version: Display software version installed.
DOWNLOADING FOOTAGE TO YOUR PC
- The True Night Vision Binoculars have a small connection port just above the eyepiece (next to the memory card slot.) Using the supplied USB cable, connect your PC to the True Night Vision Binoculars.
- When the True Night Vision Binoculars are turned off, plug them into your PC. An SDHC & USB icon (pictured) will display on the screen of your True Night Vision Binoculars.
- On Windows, navigate to your File Explorer. The True Night Vision Binoculars may appear as “USB DISK”, “REMOVABLE STORAGE” or something similar, normally processed by a “D or E:”.
- Within this drive, your photos and videos will be in a folder called DCIM100JLCAM.
![]()
VIEWING FOOTAGE ON THE TRUE NIGHT VISION BINOCULARS
You can review your photos and videos directly on the True Night Vision Binoculars. Keep pressing the MODE button until you get to the Gallery mode.
Use the ZOOM and IR buttons to scroll up and down your photos and videos.
You can start playing a video by pressing the OK button on a selected video and selecting “Play” from the sub-menu using the OK button.
To delete a photo or video, press the OK button and select “Delete” from the sub-menu.
TROUBLESHOOTING
Poor image
Check that the True Night Vision Binoculars are focused by adjusting the focus wheel at the front of the device.
Check that the IR illumination level is well adjusted.
Check to make sure lens cap attachment is off when operating in night mode.
No power
If the True Night Vision Binoculars fail to turn on, check for defective, missing, or improperly-installed batteries. Replace or install batteries correctly.
Please make sure to use only alkaline AA batteries.
SPECIFICATIONS
- Optical Zoom 7x
- Objective aperture: 20mm
- Viewing angle: 5.5˚
- Exit pupil distance: 20mm
- Min focus range: 1m
- F# for object lens: Night 1.311/Day 2.8
- Viewing distance at night: 300 feet (100m)
- Sensor: CMOS
- Recording resolution: 640 x 480
- Display resolution: 320 x 240
- IR LED power: 1.5W
- Wavelength: 850nm
- Digital Zoom: 12 levels/Max 2x
- Battery life: Operation Time 8hrs (IR off)/ 2hrs (IR 3)
- Power supply: AA x 4 batteries (included)
- Memory card: Max 32GB Micro SD (not included)
WARRANTY / CUSTOMER SERVICE
Sharper Image branded items purchased from SharperImage.com include a 1-year limited replacement warranty. For Customer Service, please call +1 (877) 210-3449.
SHARPER IMAGE®
POCKET VIDEO DRONE

Thank you for purchasing the Sharper Image Pocket Video Drone. Please read this guide and store it for future reference.
INSTALLATION OF FAN BLADES
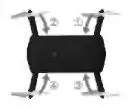
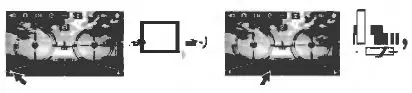
The fan blades should be installed correctly. A corresponds with A, B corresponds with B, etc. Press down the fan blades so that they connect to the motor shaft.
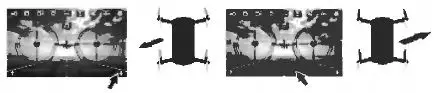
FOLDING/UNFOLDING ARMS
Fold the front arms near the camera first, then fold the back arms. Do the exact opposite when unfolding.
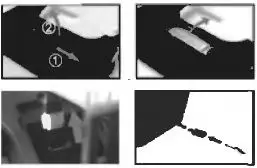
LITHIUM-ION BATTERY
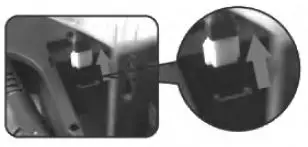
Remove the battery from the battery holder and disconnect it from the power socket. Next, connect the USB-plug charger to your computer’s USB port, then connect it to the charging socket on your drone. When charging, the LED will light up; when fully charged the LED light will be off. Charging time is about 60 minutes.
LITHIUM-ION BATTERY WARNINGS
• There are certain risks involved when using lithium batteries. They may cause fire, bodily injury, and/or property damage. Users must be aware of the risks that come with using this product. Manufacturers, retailers and dealers bear no responsibility in regard to accidents
• If battery leakage occurs, please avoid contact with your eyes and/or skin. If contact occurs, please flush your eyes with clean water and seek medical care immediately
• Please remove the plug immediately if you sense any peculiar smells
BATTERY CHARGING
• Please use only the charger included with this device
• Do not overcharge the battery. Please pull out the charger once the device is fully charged
• Do not charge the battery next to open flames or on the surface of electro-conductive objects. When charging, observe the battery at all times
• Do not charge the battery if it hasn’t cooled down
• Charging temperature should be between 32°F-104°F
RECYCLING
• Do not dispose of this product or its battery with normal household waste
• Please dispose of this product and its battery in accordance with local laws
APP INSTRUCTIONS
WI-FI
1. Use your phone to scan the QR code. Download and install the control software “WiFi UFO”
NOTE: Android, Google Play, and IOS are all supported.

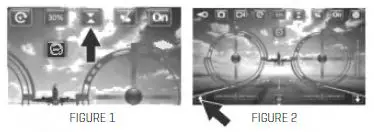
2. Turn on your drone and the lights will flash. Next, turn on your mobile phone and connect to Wi-Fi (WIFI UFO-1111###), as shown in Figure 2.
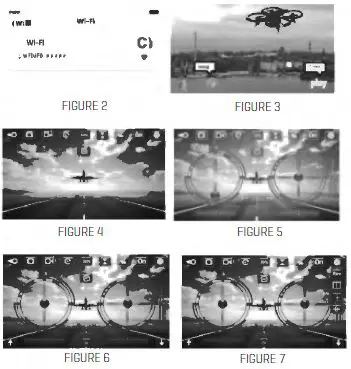
3. Open the App and enter the main interface as shown in Figure 3. Click “Play” in the manipulation interface, as shown in Figure 4. Click to enter the ordinary control interface, as shown in Figure 5. The Altitude Hold Key becomes yellow. Next, enter the Altitude Hold interface as shown in Figure 6. Click for more settings, as shown in Figure 7.
4. When the video links successfully, you can view the images that the Wi-Fi camera transmits through your mobile phone’s screen.
APP INTERFACE DESCRIPTION
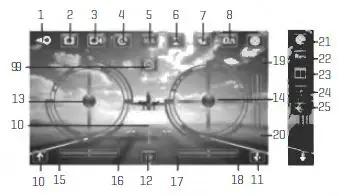
1. Return
2. Photo
3. Video
4. Document (Album/Video)
5. Speed Control: 30%, 60%, 100%
6. Altitude Hold
7. Gravity Induction
8. Show/Hide Steering Wheel
9. 360° Flips/Rolls
10. One-Key Takeoff
11. One-Key Landing
12. Emergency Stop
13. Left Joystick (Throttle)
14. Right Joystick (Rudder)
15. Left Rotation Fine-Tuning
16. Right Rotation Fine-Tuning
17. Left Side Flight Fine-Tuning
18. Right Side Flight Fine-Tuning
19. Forward Fine-Tuning
20. Backward Fine-Tuning
21. More Settings
22. Camera Reverse
23. 3D Display
24. Headless Mode
25. One-Key Calibration
ACCELEROMETER MODE
• Click into Accelerometer Mode, then move the phone in any direction for remote control (Figure 1)
SELFIE MODE
• In Altitude Hold Mode, you can control the drone and make the camera view itself. Click the camera button on the screen to take selfies (Figure 2)

ONE-KEY CALIBRATION
• This function is only allowed when the drone is on the ground
UNLOCKING YOUR DRONE
Unlock the drone prior to flight. Click the Altitude Hold icon shown in Figure 1, then click on the area in Figure 2 to unlock.
OPERATING YOUR DRONE
NOTE: After flight, please disconnect the battery plug from the power connection.
1. Connect the power plug of your drone with the lithium-ion battery socket as shown in the figure above. Place your drone on a level surface (do not move it when the indicator light is flashing).
2. Place the drone in an open space. Before flight, make sure that the rear part of your drone is pointing directly at you.
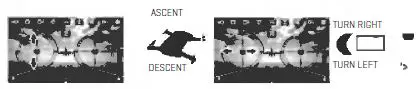
Push up on the Left Joystick (Throttle).
The rotating speed of the blades will increase and the drone will ascend.
Push down on the Left Joystick (Throttle).
The rotating speed of the blades will decrease and the drone will descend.
Push the Left Joystick (Throttle) to the left (the drone will turn left).
Push the Left Joystick (Throttle) to the right (the drone will turn right).
Push up on the Right Joystick (Rudder).
The drone will fly forward.
Push down on the Right Joystick (Rudder).
The drone will fly backward.
Push the Right Joystick (Rudder) to the right (the drone will turn right).
Push the Right Joystick (Rudder) to the left (the drone will turn left).
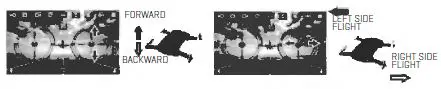
If the drone revolves to the left while hovering, press the Right Rotation Fine-Tuning key continuously until it is back to normal.
If the drone revolves to the right while hovering, press the Left Rotation Fine-Tuning key continuously until it is back to normal.
If the drone flies to the left while hovering, press the Right Side Flight Fine-Tuning key continuously until it is back to normal.
If the drone flies to the right while hovering, press the Left Side Flight Fine-Tuning key continuously until it is back to normal.

If the drone flies backwards while hovering, press the Forward Fine-Tuning key continuously until it is back to normal.
If the drone flies forward while hovering, press the Backward Fine-Tuning key continuously until it is back to normal.
NOTE: When the drone is roughly 11 inches from the ground, it will become unstable due to a blade vortex. This is called the “Ground Effect.” The lighter the drone is, the greater this effect will be.
PRE-FLIGHT ENVIRONMENT
1. When flying indoors, select a wide-open space free of barriers, pets, and people.
2. When flying outdoors, choose a warm, sunny, windless day. DO NOT fly in extreme temperatures. Flying in extreme temperatures may affect the performance of this device. DO NOT fly on windy days as the drone is easily affected by strong winds. Flying in strong wind conditions could result in damage to your drone.
ALTITUDE HOLD
When you release the Left Joystick (Throttle) after ascending/descending, the drone will still hover when the joystick is released.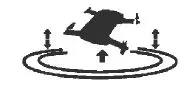
3D FLIPS/ROLLS
Once you’ve mastered basic flight maneuvers, you can try some more adventurous rotations. Fly the drone 9 ft. in the air, then push the rotation button and the Right Joystick (Rutter) to one direction. The drone will rotate in the direction you push the joystick.

WARRANTY / CUSTOMER SERVICE
Sharper Image branded items purchased from SharperImage.com include a 1-year limited replacement warranty. If you have any questions not covered in this guide, please call our Customer Service department at 1 (877) 210-3449. Customer Service agents are available Monday through Friday, 9:00 a.m. to 6:00 p.m. ET.

USER MANUAL

Please read these instructions carefully before using the product
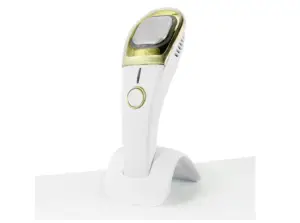
fat Freezer FaceTM, A total new approach to facial sculpting that maintains your natural beauty.
Product Introduction
fatFreezerTM Face uses patented Cryolipolysis Technology to help reduce unwanted fat while shrinking pores, improving skin texture and helping reduce the appearance of fine lines and wrinkles. The fatFreezerTM Face combines 4 cutting edge technologies into one game-changing device: Freeze, Heat, Sonic & Photon Rejuvenation Light. The first at-home device that uses fat freezing cryolipolysis technology to help you:
- Enhance Cheekbones
- Ditch the Double chin
- Contour Jawline
- Tighten the Neck area
The Set Includes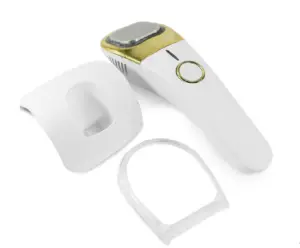
- 1 fatFreezerTM Face Unit
- 1 Pack of Protective Pads
- 1 Charging Station
- 1 USB Charging Cable
- 1 Travel Pouch
- 1 Instruction Manual
- 1 Flexercise Program
Product Features
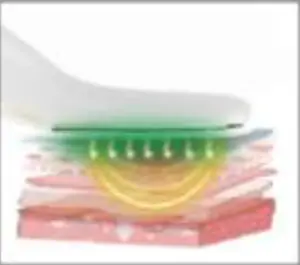
- Rejuvenation- Green Sono Light: With 12,000 high speed, low frequency micro sonic vibrations, combined with Green Sono light therapy, this phase helps to massage, calm, and rejuvenate skin. This sonic vibration also promotes firming effects to improve skin appearance.
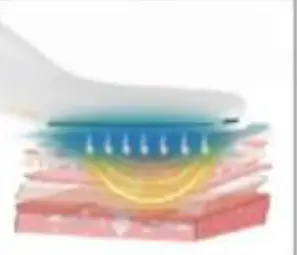
- Sculpting- Blue Cooling Light: Freeze technology is used in conjunction with Blue cooling light which helps optimize the fat reduction process.
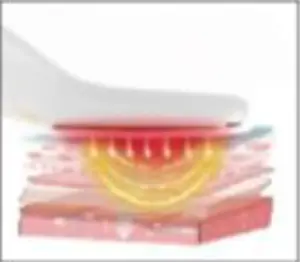
- Circulation- Red Thermo Light: Thermo heat setting promotes circulation and helps to flush the fat out. We combine heat with the red thermo freeze which further promotes circulation and targets wrinkles and fine lines.
Rejuvenation (Green Light) Mode
Vibrating Massage, helps activate the skin, refines pores and helps improve sagginess.
Sculpting (Blue Light) Mode
Cold (~19oC) helps promote micro-circulation on the skin’s surface.
Circulation (Red Light) Mode
Heat (~40oC) can help reduce the appearance of fine lines, wrinkles, loose skin and moisturize the skin.
Product Instructions:
- First start by applying your product of choice. This step only applies to the Circulation & Rejuvenation Modes as with the Sculpting Mode you will have to use your supplied Protective Pad with cold temperatures.
- Begin by sweeping your fatFreezerTM Face down the bridge of the nose, following the shape of your face. Then, in one fluid motion, continue sweeping your fatFreezerTM Face under the eyes and outward. Continue this motion for 2-4 minutes.
- Next, bring your fatFreezerTM Face over the cheekbones, and sweep outward. Repeating the same motion for under the cheekbones. Continue this motion for 2-4 minutes
- Now you’ll move onto the forehead. Use the same sweeping motion, working from the center of the forehead out and using upward motions from the eyebrows to the hairline. You’ll want to continue this motion for a full 4 minutes.
- Next, the chin: Sweep your fatFreezerTM Face from your bottom lip down to the jawline. Move from the center of the chin outward to the ears. After that, sweep your fatFreezerTM Face from the center of chin out and up to the ears. Continue this motion for 4 minutes, alternating sides.
- Don’t forget your neck and décolletage area! For these areas, perform light, quick strokes up the neck to the jawline to help to lift the skin, then use small, circular movements with the fatFreezerTM Face from the center of your décolletage outward. This will help to smooth wrinkles created from sleeping on your side.
Please Note: For the Sculpting Mode, you must hold the fatFreezerTM Face in place for 20 seconds each 2” treatment area. Starting from the bottom and gradually moving upward each 2” section for 4 minutes per section/20 minutes total. This time allows your body to dispose of the unwanted fat while shrinking pores, improving skin texture and helping reduce the appearance of fine lines and wrinkles.
CAUTION: The device will automatically shut off after 15 minutes. This is a built-in safety feature.
Product Specification

Model Number: BK3403
Rated Voltage: 5V
Rated Input Power: 3m
Cleaning and Maintenance
Cleaning
- When not in use, charge device fully then store the device in a dry well-ventilated area. Avoid direct sunlight, and make sure no corrosive chemicals come in contact with it.
- Wipe down the product with a clean cloth. Do not use any soaps or detergents on the device itself.
Maintenance
- Please read the product manual before using, and keep the manual for future reference.
- The product can be charged by USB and Wireless base holder. Charging from low battery to full charge requires 3-4 hours. One charge will allow 2 hours of continuous use depending on the mode.
- Flashing white light rapidly indicates the battery is low. When charging, the white light flashes intermittently. When the battery is saturated, the white light is on.
- Do not use the device while it is charging.
- The product has a heating function, with the approximate temperature being 40℃. People sense temperature differently, and some may feel it is hot instead of warm. After applying essential oils ormassage cream on the skin, the product will automatically adjust the temperature to a more comfortable one.
- Immediately stop using the product if you feel discomfort or experience skin irritation.
- Store the device in a dry well-ventilated place, avoid direct sunlight, and make sure no corrosive chemicals come in contact with it.
- Please use moderate skin care products first, then use this device. *Kind note, excess use of skin care products are hard to absorb. Residual skin care products might infiltrate to this device and damage it. Please clean the device with cleansing cloth after using.
- When not in use, charge device fully then store the device in a dry well-ventilated area.
- The product is portable and can be used anytime, anywhere.
- Do not allow children to come into contact with this product to avoid danger.
Disclaimer and Warranty
Disclaimer
In the process of the preparation of this manual, we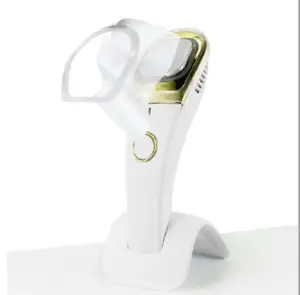
have sought to make the content correct and
complete. However, there is no guarantee that there
are no errors or omissions in the manual. We reserve the right to change specifications of the products mentioned in this manual at any time without prior declaration. No part of this manual shall be reproduced, transmitted, transcribed or stored in a searchable system or translated into any other languages without the written authorization of our company. The company is not responsible for the loss caused by non-standard or wrong operation.
- Warranty
Damage caused by failure to follow the instructions, human factors, force majeure, etc. is not covered by warranty. - Maintenance cost will be charged for product out of warranty.
- You can register for your free warranty on www.IGIA.com.
This is not a weight loss system. fatFreezerTM does not guarantee specific results for individuals who use the fatFreezerTM Face due to many factors that can influence health and weight loss. Individual results may vary.
We make no warranties or guarantees that you will lose any amount of weight for a particular period of time.
No individual result should be considered typical or guaranteed.
This product has not been evaluated by the FDA.
fatFreezerTM Face is not intended to diagnose, treat, cure, or prevent any disease, illness, or medical condition
Warnings
If you are in the care of a physician, consult your physician before using this device.
– Do Not use if you are pregnant
– Do Not use if you have known sensitivity to cold, such as: Cold Urtcaria, Raynaud’s disease, Pernio or Chilblains
– Do Not use if you have known sensitivity or allergy to: isopropyl glycol, fructose and/or glycerin.
– Do Not use if you have impaired peripheral circulation in the face or neck
– Do Not use if you have nerve pain such as post-herpetic neuralgia
– Do Not use if you have impaired skin sensation
– Do Not use if you have open or infected wounds
– Do Not use if you have had recent surgery or scar tissue in the area to be treated
– Do Not use if you have skin conditions such as: Eczema, Dermatitis, or rashes in the area to be treated.
– Do Not use if you have active implanted devices such as pacemakers or defibrillators.
Q & A
The product suddenly stopped vibrating and is not working. What should I do?
- Check to see if the device needs to be charged
- Recheck to see if the device starts correctly.
- Restart the device by turning it off and then on again.
- Please contact the brand distributor.
Cooling mode is not cool or Rejuvenation mode is not heating, what’s the reason?
- Check whether the product electricity is in shortage or not.
- Check if the device starts correctly.
- Restart the product.
Can I use this product every day?
-Yes, the vibration intensity and temperature adjustment of this device are intelligently designed by a professional team, it is suggested to use multi-times a day.
I have skin allergies can I use it?
-This device specially uses the food grade stainless steel, which in line with international standards, and
food-grade silicone with high activity, it is proved to be safe, healthy and no irritation to skin. The
people with allergies feel safe to use it daily.
Why can’t use the product while charging?
-In order to make the product charge quickly to saturation, and it is not convenient to use it in hand
when connected to the USB cable. In order to give you a better product experience, it is
hereby set.
Can I not clean the device after use?
Unclean device can easily breed bacteria and affect re-use, please be sure to clean and store it, also good
usage habits will prolong the service life of the product.

SHARPER IMAGE®
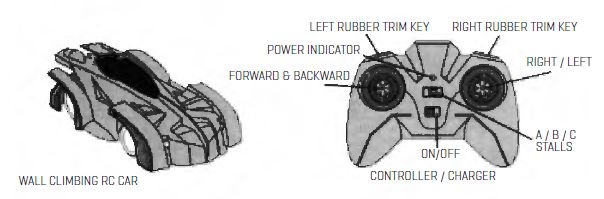
WALL CLIMBING RC CAR

Thank you for purchasing Sharper Image Wall Climbing RC Car. Please read this guide and store it for future reference.
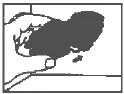
IDENTIFICATION OF PARTS
BATTERY INSTALLATION
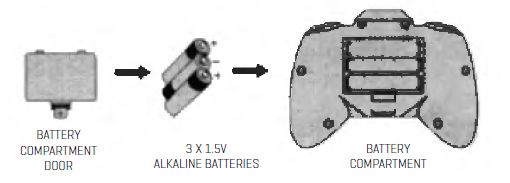
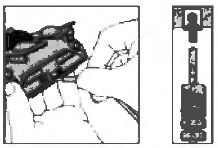
- Loosen screw and remove the battery compartment door.
- Install six 1.5V alkaline batteries (not included) in the battery compartment as shown. Make sure to match batteries to their corresponding polarities (+) & (-).
- Reinstall the battery compartment door and tighten the screw.
CHARGING INSTRUCTIONS
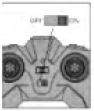
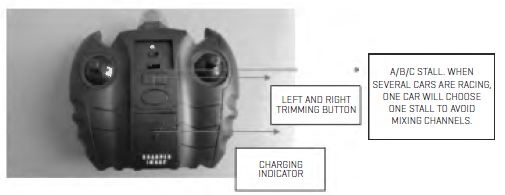
- Make sure the RC car’s WALL/FLOOR/OFF switch is in the OFF position. The car can only be charged when the vehicle is in the OFF position.
2. Make sure the controller switch is in the ON position.
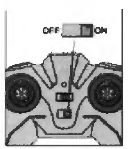
3. Plug the charging cable into the port in the back of the car.
Charging should take an average of 20-40 minutes depending on how much charge resides in the battery.
NOTE: Do not charge the battery immediately after using. Let the battery cool for at least 10 minutes. If charging is not complete after a long period of time, replace the charger batteries. The charging indicator will turn green when charging and will turn off once it’s fully charged.
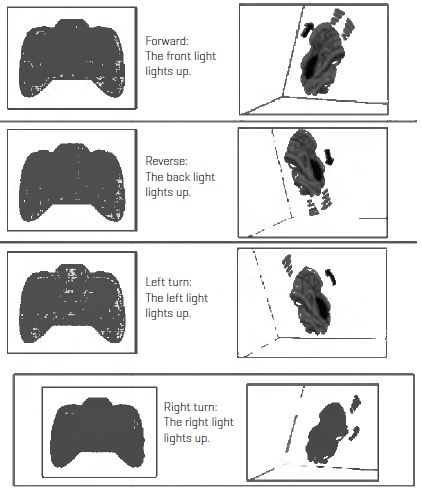
DRIVING ON THE GROUND
Make sure the vehicle’s WALL/FLOOR/OFF switch is in the “FLOOR” position.
The left joystick controls
Forward and Reverse.

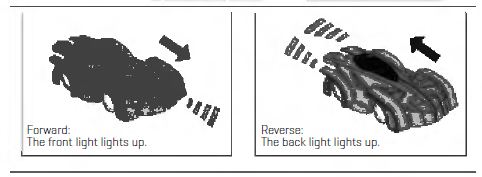
Push the left joystick forward and the right joystick left or right to control the vehicle’s direction.
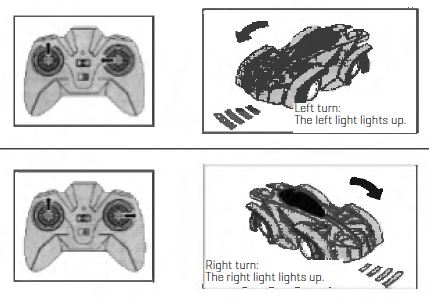
DRIVING ON THE WALLS
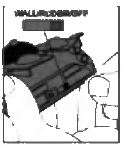
Make sure the vehicle’s WALL/FLOOR/OFF switch is in the “WALL” position.
Turn the controller/charger “ON”
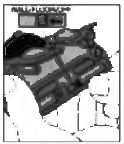
The fabric strips can be adjusted upward at a 45°angle to ensure the car sticks properly to the wall.
Place the vehicle on the wall as shown.
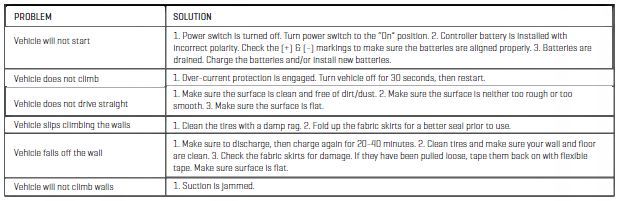
TROUBLESHOOTING
ADULT SUPERVISION RECOMMENDED
NOTE: USE ON SMOOTH, CLEAN SURFACES ONLY!
WARNING
- Adult supervision is required at all times
- Do not stand under the vehicle when it is driving on the ceiling, as it may fall
- Not suitable for young children (choking hazard)
- Remove all batteries if vehicle will not be used for a long period of time
- Do not expose vehicle to water
WARRANTY / CUSTOMER SERVICE
Sharper Image branded items purchased from SharperImage.com include a 1-year limited replacement warranty. If you have any questions not covered in this guide, please call our Customer Service department at 1 (877) 210-3449. Customer Service agents are available Monday through Friday, 9:00 a.m. to 6:00 p.m. ET.
]]>
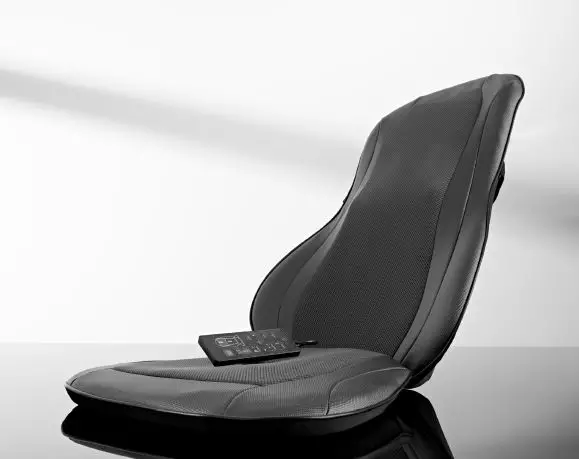
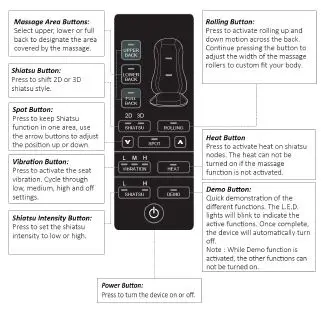
Thank you for purchasing the Sharper Image Shiatsu Massage Seat Cushion. For best results, and for your own safety, please read these instructions prior to using this device for the first time. In addition, please store this guide for future reference.
FEATURES
- Deep-kneading shiatsu and rolling massage
- Back rest massager
- Vibrating seat (High, Medium, Low)
- 2 massage heads
- Spot shiatsu massage
- 2D & 3D Shiatsu massage modes
- Remote control with storage pouch
- Soothing heat therapy
- Back straps
- 15-minute auto timer
- Gel massage nodes provide a softer massage
- Three massage variations (full back, lower back or upper back massage)
- Includes power adapter
SETTING UP YOUR DEVICE
The massage cushion can be used in almost any chair. Slip the straps over the seat or chair and adjust the fastening straps to secure the massager to prevent slippage.
POWERING YOUR DEVICE
- Plug one end of the included power adapter into an AC power source and the other end into the adapter jack attached to the massager
- The wall outlet for the power supply must be close and accessible. NOTE: Only use the power adapter included with this product. Do not use other adapters, as it may damage the device
CLEANING AND MAINTENANCE
- Disconnect the device and allow it to cool down completely. Clean it with a dry, soft cloth or slightly damp sponge. Never allow water or any other liquid to enter the device or its accessories. Never use abrasive cleaners, brushes, etc.
- Do not wrap the power cord around the unit before storing. Store the massage cushion in a safe and dry place and out of children’s reach. Avoid contact with sharp edges or pointed objects, as this might damage the fabric
WARNING
- This product is not a toy! Do not let children play with it
- This product is for personal use only and is not intended for medical or commercial purposes
- The unit is not waterproof; do not expose it to rain or moisture
- Do not leave the unit unattended when plugged in. Unplug it immediately after use
- Make sure that the device is not close to heat sources or left in direct sunlight
- Do not use your massager on areas with swelling, burns, inflammation, open wounds, fresh wounds, hematomas, bleeding or other injuries to the back
- Do not operate if you are pregnant
- Do not use in bed or while sleeping
- Do not use after taking medication or consuming alcohol, or other circumstances which reduces levels of awareness
- Do not operate this product when the cord or plug is damaged
- Do not use the product if it is not working properly, dropped or damaged
- The device is only intended for the purpose described in this user guide
WARRANTY/CUSTOMER SERVICE
Sharper Image branded items purchased from SharperImage.com include a 1-year limited replacement warranty. If you have any questions not covered in this guide, please call our Customer Service department at 1 (877) 210-3449. Customer Service agents are available Monday through Friday, 9:00 a.m. to 6:00 p.m. ET.

USER MANUAL
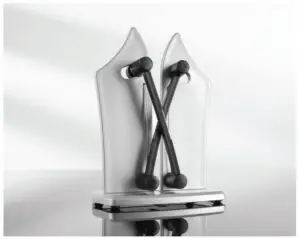
Thank you for choosing the Sharper Image Professional Knife Sharpener. Please take a moment to read this guide and store it for future reference.
FEATURES
- Knife sharpener for smooth and serrated knives
- Sharpen dull and damaged blades in seconds
- Easily sharpen the complete edge of serrated knives
- Hone Japanese (left-hand) single bevel blades
- Made of ultra tough Tungsten Carbide
- Features two independent spring-action arms made of Tungsten Carbide
- Professional and portable
HOW TO USE
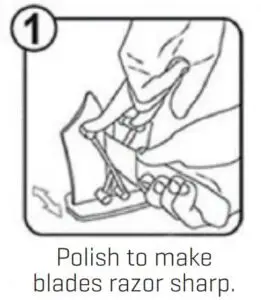

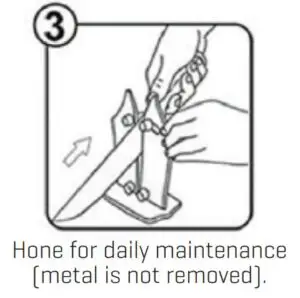
- Pull the knife through the sharpener
- Make sure tip of the knife is facing up to smooth and align the edge without
removing metal - Press lightly when sharpening a fine blade for slicing
- Press harder for a sturdy chopping blade
Professional Knife Sharpener is suitable for the knife type as follows:
- Japanese knives
- Chef knives
- Serrated knives
- Boning knives
- Paring knives
- Cleavers
NOTE: Ceramic blades are not recommended to be used with Professional Knife Sharpener.
SPECIFICATIONS
- Material: Made of Carbon steel and ABS plastic
- Weight: 0.7 LB
- Color: Silver plated
- Package includes: 1 knife sharpener
WARRANTY/CUSTOMER SERVICE
Sharper Image branded items purchased from SharperImage.com include a 1-year
limited replacement warranty. If you have any questions not covered in this guide,
please call our Customer Service department at 1 (877) 210-3449. Customer Service agents are available Monday through Friday, 9:00 a.m. to 6:00 p.m. ET.