Quick Start
- STEP 1: Remove Paper Protector
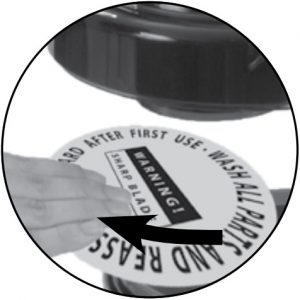
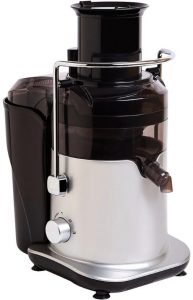
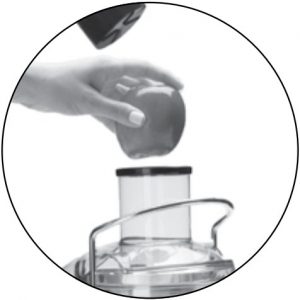
Lower the Locking Bar and remove the Lid and Pulp Guard. Discard the paper protector. Wash all the parts and reassemble the juicer. Secure the Locking Bar. - STEP 2: Align the Juicer’s Spout into a Receptacle
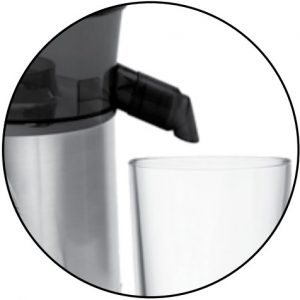
Line up the mouth of the spout with the receptacle into which juice will be deposited. Face the Spout downward to help keep juice from leaking from the sides of the juicer. - STEP 3: Plug In and Power On the Juicer
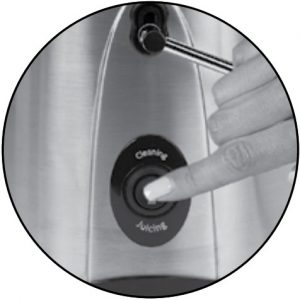
Plug the Power Cord into a 120V power outlet (the plug will fit only one way in a polarized outlet). Press the juicing button to turn on juicer. Wait 5–10 seconds before inserting produce into the Chute. - STEP 4: Add Fresh Fruits and Vegetables
Remove the Pusher and insert fresh fruits and vegetables into the Chute. Use the Pusher to push the produce gently through the Chute (pushing too hard or overloading the Chute may jam the motor). - STEP 5: Self-Cleaning
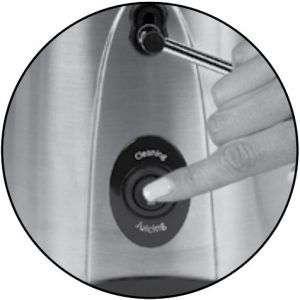
Place an empty cup underneath the spout. Turn the juicer on. Pour water into the juicer while pressing the cleaning button a few times. Remove the cup and you are ready to juice again.
NOTE: Sometimes, you may need to clear away excess produce when making large quantities of juice: Unplug the juicer, remove the Lid and Pulp Guard, and clean the Chute, blade assembly, and pulp collector. The blade is sharp. Be careful when handling. - STEP 6: Cleaning Juicer Parts
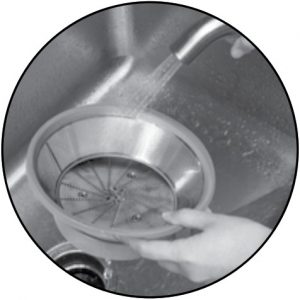
For easiest clean-up, wash juicer parts immediately after juicing. Place the dishwasher-safe parts on the top rack only
Unpack all parts from the box and remove any clear or blue protective film on the components.
Wash with warm, soapy water before first use (only select accessories are dishwasher safe).
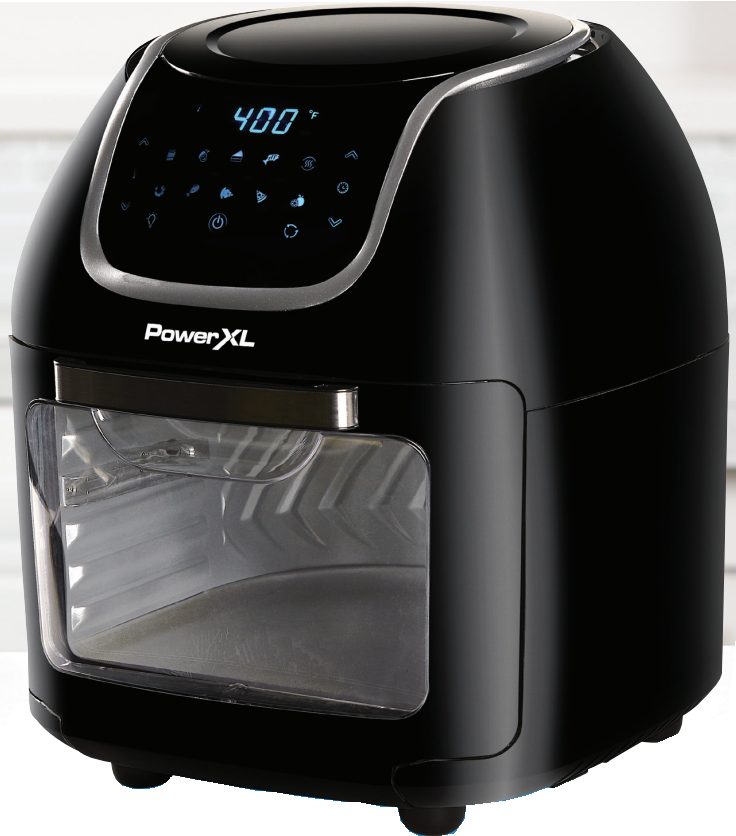
]]>PowerXL Vortex Air Fryer
PowerXL Vortex Air Fryer
See owner’s manual for complete Instructions and important safety information before using this product.
IMPORTANT: Unpack all parts from the box and remove any clear or blue protective film on the components.
Wash with warm, soapy water before first use (only select accessories are dishwasher safe).
Using Instructions
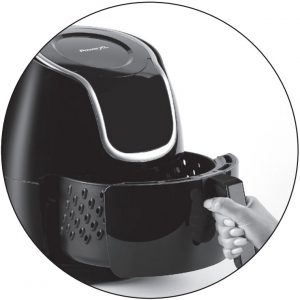
- STEP 1: Remove Basket
Pull the Basket straight out.
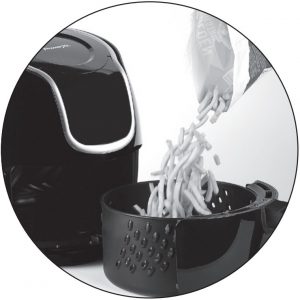
- STEP 2: Load Basket
Place the Fry Tray in the Basket and push down until the Fry Tray clicks into place. Arrange the food you are cooking on top of the Fry Tray.
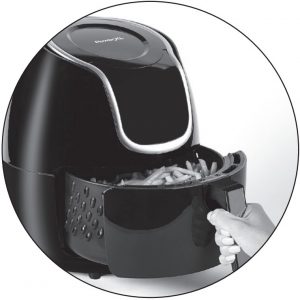
- STEP 3: Return Basket to Unit
Push the Basket straight in until it clicks.
- STEP 4: Power Unit On
Set the time and temperature. Follow instructions specific to your recipe.

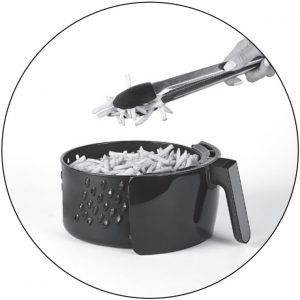
- STEP 5: Remove Basket
Set the Basket on a secure, heat-resistant surface.
Use tongs to remove food.
FAQ’S
How do I clean my PowerXL Air Fryer?
The PowerXL Air Fryer is dishwasher safe. The Basket, Fry Tray, and Lid are also dishwasher safe. The Bowl, Lid Handle, and Power Cord are not dishwasher safe.
What temperature should I set the PowerXL Air Fryer to for cooking?
For best results, set the PowerXL Air Fryer to 350°F.
What temperature should I set the PowerXL Air Fryer to for reheating food?
For best results, set the PowerXL Air Fryer to 400°F.
Can I use metal utensils in my PowerXL Air Fryer?
No. Metal utensils can damage the nonstick coating of your unit. Use plastic or wooden utensils only.
Can I use frozen foods in my PowerXL Air Fryer?
Yes, you can cook frozen foods in your PowerXL Air Fryer as long as they are fully thawed before cooking starts. You may need to adjust cooking times for frozen foods by about 20%.
Can I use marinades or sauces with my PowerXL Air Fryer?
Yes! You can use marinades or sauces with your PowerXL Air Fryer as long as they are oil-free and contain no sugar or salt. Be sure to read the instructions for your recipe carefully before using a marinade or sauce with your unit so that you know how much liquid to add and how long to cook with it on the unit.
How do I know when food is done cooking in my PowerXL Air Fryer?
The timer will alert you when your food is done cooking. If you want to check on your food while it’s cooking, insert a toothpick into the center of the food and if it comes out dry, it’s done! If it comes out wet, continue cooking until it comes out dry.
What is the difference between Power XL and Power XL Vortex air fryer?
The Original Power XL Air Fryer comes with 7 pre-set functions that are – French fries, chicken, steak, roasts, shrimp & baked food. The Original Power XL has a round display and fewer functions compared to the VORTEX family.
Can you grill in the power XL Vortex air fryer?
This air fryer is a modern appliance that lets you fry, grill, bake, or roast all your favorite foods. It can cook anything from French fries and onion rings to steaks, cakes, and vegetables with the touch of a button. Overall Product Weight: 11.9lb.
What are the disadvantages of air fryer?
The downside Air-frying also produces high temperatures at a very rapid rate, thus making it extremely easy to burn food. And charred food may be carcinogenic. In addition, Cucuzza adds, because most devices cook 1 to 3 pounds of food at a time, it can be challenging to air-fry meals for a large family
Can I use coffee filters in my air fryer?
A PSA, I know a lot of you are reading about using coffee filters for your air fryer, please do not use them, these are made just for the air fryer.
Do Air Fryer liners need holes?
Always make sure your parchment paper is perforated to allow airflow during cooking. If there are no holes in your parchment, your food will not warm or cook properly. Airflow is key to using an air fryer.
]]>PowerXL Air Fryer Pro Oven
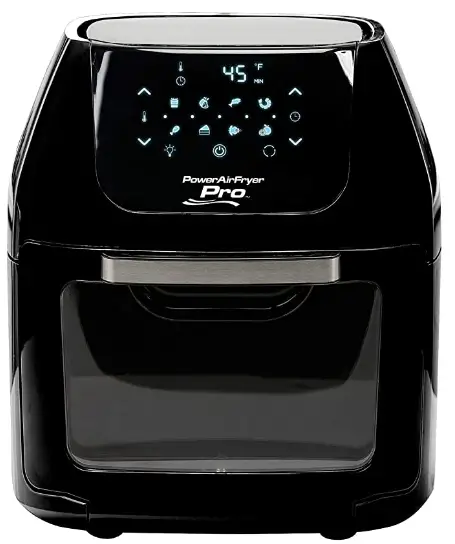
PowerXL Air Fryer Pro Oven
AIR FRYER
See owner’s manual for complete instructions and important safety information before using this product.
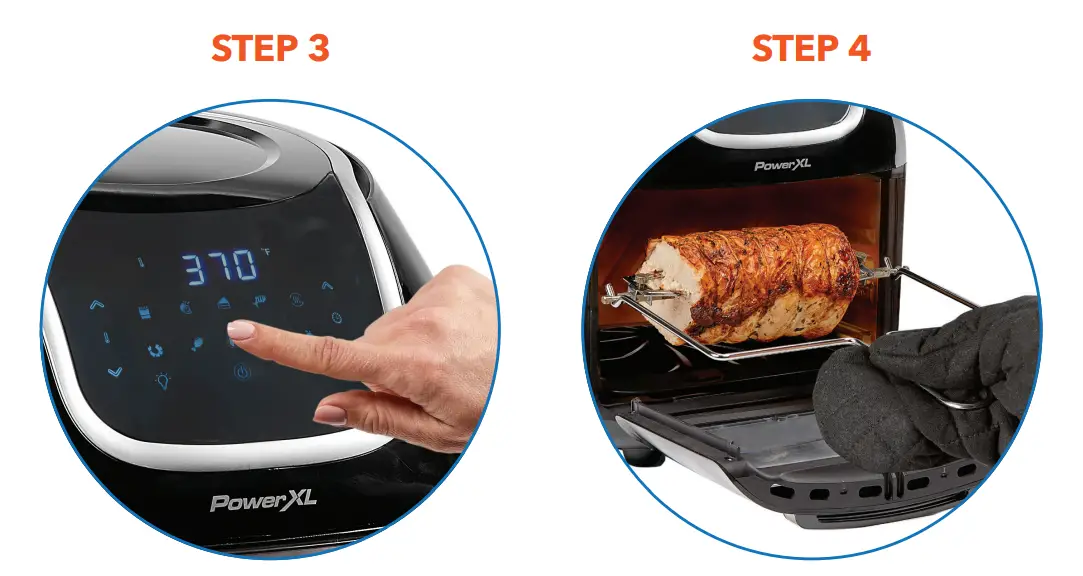
STEP 1

Make sure the Drip Tray is in place. Press the Power/StartStop Button to turn on the appliance.
STEP 2
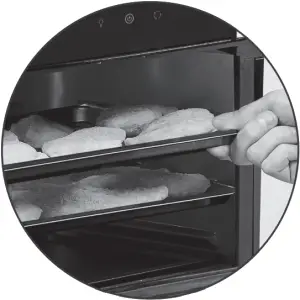
Arrange food on Crisper Trays and place the Crisper Trays inside the appliance.
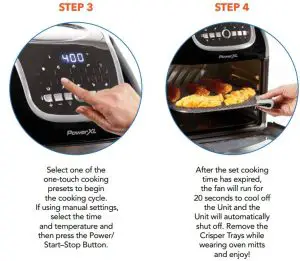
STEP 3
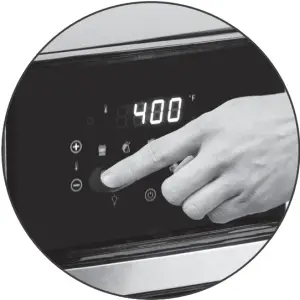
Select one of the one-touch cooking presets to begin the cooking cycle. If using manual settings, select the time and temperature and then press the Power/StartStop Button.
STEP 4
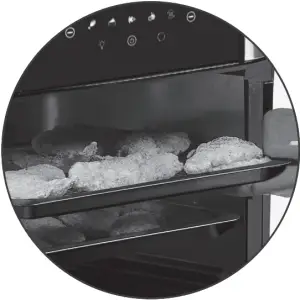
After the set cooking time has expired, check the food and remove the food using oven mitts. The fan will run for 20 seconds to cool down, and the appliance will automatically shut off.
Unpack all parts from the box and wash with warm, soapy water before first use
(only accessories are dishwasher safe).
ROTISSERIE
See owner’s manual for complete instructions and important safety information before using this product.
STEP 1
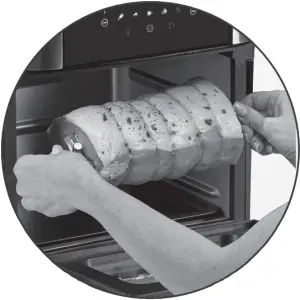
Make sure the Drip Tray is in place. Carefully poke the Rotisserie Shaft through your food. Secure your food with the Rotisserie Forks and place the Rotisserie Shaft inside the appliance. For detailed instructions, please see the owner’s manual.
STEP 2
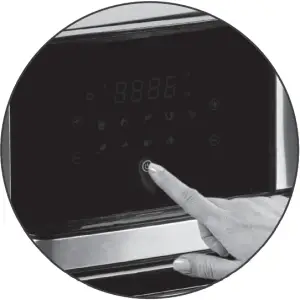
Press the Power/Start-Stop Button to turn on the appliance.
STEP 3
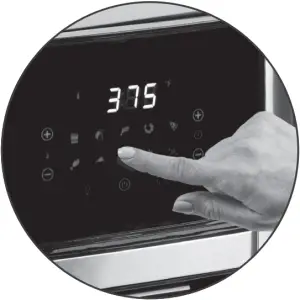
Select the Rotisserie preset to begin the cooking cycle. If using manual settings, select the time and temperature and then press the Power/StartStop Button.
STEP 4
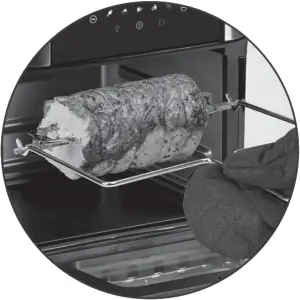
After the set cooking time has expired, check the food and remove the food using oven mitts. The fan will run for 20 seconds to cool down, and the appliance will automatically shut off.
Unpack all parts from the box and wash with warm, soapy water before first use (only accessories are dishwasher safe).
PXL-AFPO-12QT_QSG_TP_ENG_V1_200901
DOWNLOAD RESOURCES
- PowerXL Air Fryer Pro Oven [pdf] User Guide Air Fryer, Pro, Oven, PowerXL
- Read more: https://manuals.plus/powerxl/air-fryer-pro-oven-manual#ixzz7dlqqUBbf
FAQ’S
How do I use my power XL Air Fryer pro?
Press the Power/Start–Stop Button to turn on the appliance. Arrange food on Crisper Trays and place the Crisper Trays inside the appliance. Select one of the one-touch cooking presets to begin the cooking cycle. If using manual settings, select the time and temperature and then press the Power/Start–Stop Button.
How long do you cook chicken wings in a power air fryer pro?
Set the air fryer to 360 degrees F and cook for 12 minutes, then flip the wings with tongs and cook for 12 minutes more. Flip the wings again, increase the heat to 390 degrees F and cook until the outsides are extra-crispy, about 6 minutes more.
Can you put aluminum foil in an air fryer Pro?
Yes, you can put aluminum foil in an air fryer. Tasteofhome.com explains that due to the air fryer’s cooking process consisting of rushing hot air, your aluminum foil and the meal it’s with will not be ruined by the air fryer.
Can you pop popcorn in a power air fryer Pro?
Yes, you can make popcorn in your air fryer and with a little patience, this simple recipe will be your favorite go-to small batch popcorn recipe. Popcorn lovers are going to love popping popcorn in an air fryer! Super easy and a great way to make a flavorful healthy snack any time.
Can eggs be cooked in an air fryer Pro?
Place cold eggs into the air fryer basket. Air fry the fresh eggs at 270 degrees Fahrenheit for 17 minutes of cook time. Carefully remove the cooked eggs from the basket of the air fryer and place them into a bowl of ice water. Remove the eggs from the ice water bath after 10 minutes.
Do you need special pans for air fryer oven?
Yes, anything that is ovenproof, can be used in the air fryer. It can be glass, ceramic, metal or silicone.
How do you use PowerXL Air Fryer racks?
Simply insert them in the preset grooves up and down the sidewalls of your power air fryer oven. They are adjustable.
Why does my power XL Air fryer smell like plastic?
Much like a new car (oh, that new car smell), the smell is basically plastic fumes being released after a couple of weeks, it starts to wear off because the fumes have been released from the plastics, and they are now settled.
What Cannot be cooked in Airfryer?
Any food with a wet batter should not be placed in the air fryer. You also want to avoid putting food that has a wet batter, like corndogs or tempura shrimp, in air fryers.
What is the rack used for in an air fryer?
Some fryers come with a rack that lets you add a second layer of food above the basket. Now you can cook, say, four pieces of salmon instead of just two. (Speaking of which, I made exactly that last night.
Does cooking fish in air fryer smell?
But enter the air fryer: Cook your salmon fillets in the air fryer and not only will they be cooked perfectly, your home will not smell of fish at all.
How do I get the air fryer Pro smell out of my house?
Opening up the back door or a kitchen window and exhaust will take care of the minimal smell released from the vent. To remove any residual food smell from the air fryer chamber, take one part vinegar, one part lemon, and two-part water. Run it for two to three minutes at 400° F.
VIDEO
PowerXL Air Fryer Pro Oven
www://powerxlproducts.com/
![]() VORTEX AIR FRYER PRO
VORTEX AIR FRYER PRO
ROTISSERIE
Recipe Book
 |
 |
Quick Start Guide
Rotisserie Spit
IMPORTANT:
Unpack all parts from the box and remove any clear or blue protective film on the components. Wash with warm, soapy water before first use (only select accessories are dishwasher safe).
 |
|
| Make sure the Drip Tray is in place. Press the Power/ Start–Stop Button to turn on the Air Fryer Pro. |
Carefully poke the Rotisserie Shaft through food, secure the food with the Rotisserie Forks, and place the Rotisserie Shaft inside the Unit. For detailed instructions, please see the owner’s manual. |
 |
|
| Select one of the one-touch cooking presets to begin the cooking cycle. If using manual settings, select the time and temperature and then press the Power/Start–Stop Button. |
After the set cooking time has expired, the fan will run for 20 seconds to cool off the Unit and the Unit will automatically shut off. Remove the Rotisserie Spit using the Fetch Tool and oven mitts and enjoy! |
See the owner’s manual for complete instructions and important safety information before using this product.
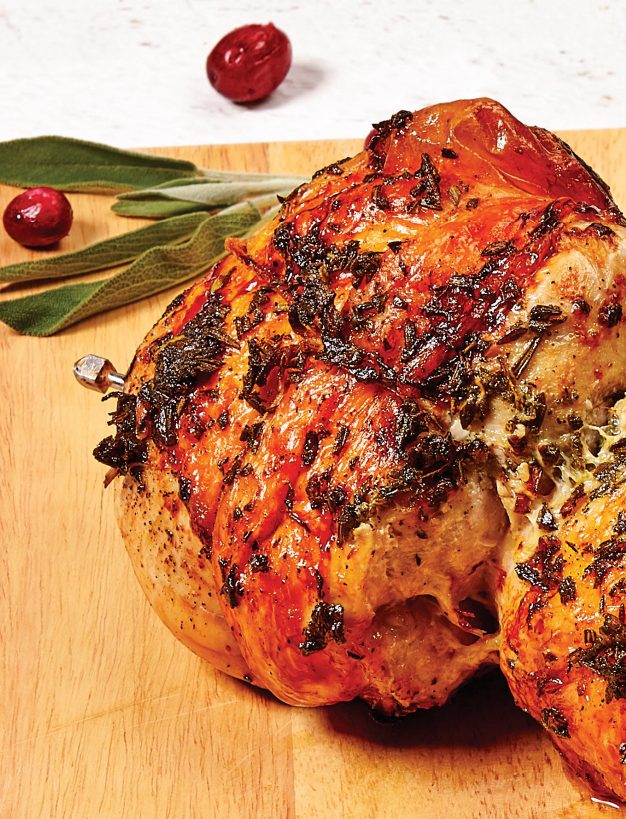
Herb Roasted Turkey
serves 6
Ingredients
|
|
Directions
- Chop the rosemary, thyme, sage, and garlic and mix with the olive oil.
- Rub the turkey breast with the herb mixture and refrigerate for 1 hr.
- Fold the turkey in half and place the Rotisserie Shaft through the turkey. Secure the Shaft with the Forks.
- Place the Shaft into the air fryer. Press the Power Button and then the Rotisserie Button (375° F/191° C) and increase the cooking time to 40 mins. to begin the cooking cycle.
- Use a meat thermometer to measure the internal temperature of the turkey. The turkey is done when the internal temperature reaches 160° F/70° C.
- Let the turkey rest for 10 mins.
before slicing.
BaconWeaved Stuffed Turkey
Serves 6

Ingredients
- 1 turkey breast, boneless
- 1 tsp. salt
- 1 tsp. ground black pepper
- 1 ½ cups cornbread stuffing, cooked
- 10 slices bacon
Directions
- Slice the turkey breast down the middle and open it to butterfly.
- Make a weave with the bacon on wax paper.
- Place the butterflied turkey breast over the bacon weave. Season with salt and ground black pepper.
- Spoon the stuffing into the center of the turkey. Roll the turkey with the bacon.
- Tie the ends and middle of the turkey with string.
- Place the Rotisserie Shaft through the center of the turkey. Secure the Shaft with the Forks.
- Place the Shaft into the air fryer.
Press the Power Button and then the Rotisserie Button (375° F/191° C) and increase the cooking time to 45 mins. to begin the cooking cycle. - Use a meat thermometer to measure the internal temperature of the turkey. The turkey is done when the internal temperature reaches 160° F/70° C.
- Serve with roasted asparagus.
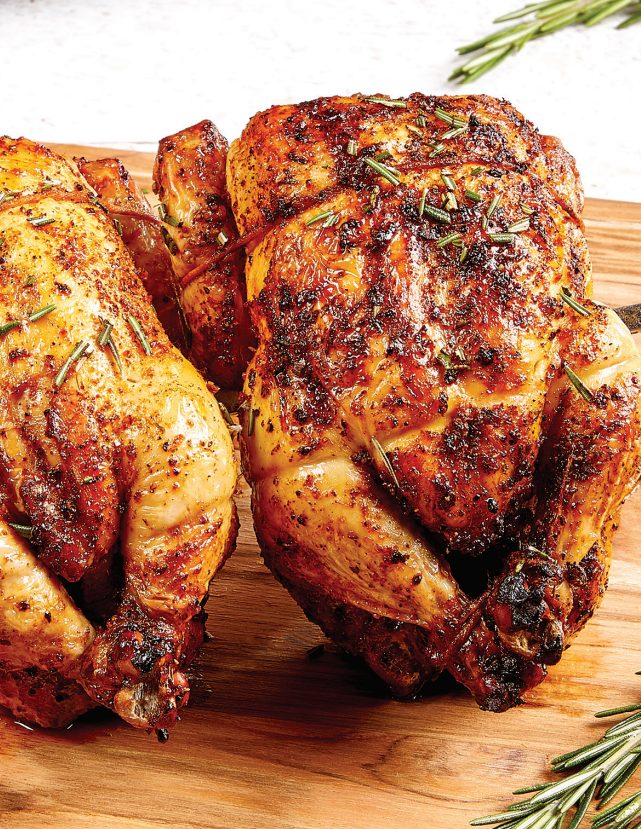
Rotisserie Chicken
serves 4
Ingredients
- 4 lb. whole chicken
- 1 tsp. granulated garlic
- 1 tsp. granulated onion
- 1 tsp. sea salt
- 1 tsp. ground black pepper
- 1 tsp. paprika
Directions
- Tie the chicken legs together, tie the breast area with a second string, and wrap a third-string around the drumsticks.
- Push the Rotisserie Shaft through the opening in the chicken. Secure the Shaft with the Forks.
- Coat the chicken with the seasonings.
- Place the Shaft into the air fryer.
Press the Power Button and then the Rotisserie Button (375° F/191° C) and increase the cooking time to 45 mins. to begin the cooking cycle. - Let the chicken rest for 10–15 mins.
before serving.
Stacked Souvlaki Chicken
serves 8
Ingredients
- ¼ cup olive oil
- 2 tbsp. lemon juice
- 1 tsp. salt
- 1 tsp. ground black pepper
- 1 tsp. oregano
- 8 boneless, skinless chicken breasts
Directions
- Combine all the ingredients in a sealable plastic bag.
- Marinate the ingredients in the bag for 20 mins. in the refrigerator.
- Fold each chicken breast in half.
Place the Rotisserie Shaft through the chicken. Secure the Shaft with the Forks. - Place the Shaft into the air fryer.
Press the Power Button and then the Rotisserie Button (375° F/191° C) and decrease the cooking time to 25 mins. to begin the cooking cycle. - Use a meat thermometer to measure the internal temperature of the chicken. The chicken is done when the internal temperature reaches 165° F/75° C.
Cornish Hens
serves 2
Ingredients
- 1 tsp. salt
- 1 tsp. ground black pepper
- 1 tsp. garlic powder
- 1 sprig rosemary, chopped
- 2 cornish hens
Directions
- Mix the salt, ground black pepper, garlic powder, and rosemary together in a small bowl.
- Rub the spices and herbs generously onto the hens.
- Place the Rotisserie Shaft through the hens. Secure the Shaft with the Forks.
- Tuck the wings and tie the wings and legs with twine to keep the hens in place.
- Place the Shaft in the air fryer. Press the Power Button and then the Rotisserie Button (375° F/191° C) and increase the cooking time to 35 mins. to begin the cooking cycle.
- Use a meat thermometer to measure the internal temperature of the hens. The hens are done when the internal temperature reaches 160° F/70° C.
Southwest Pork Tenderloin
serves 4
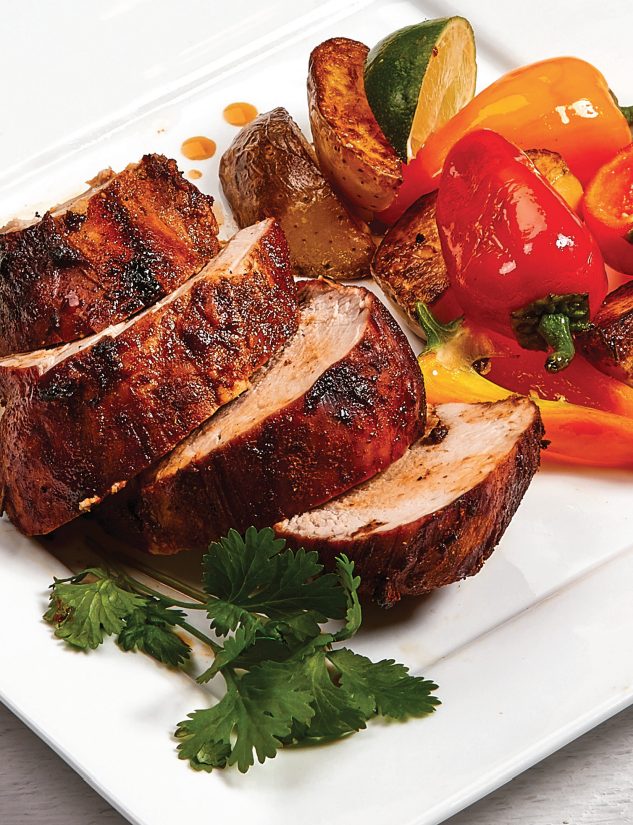 Ingredients
|
|
Directions
- Combine all the ingredients in a bowl.
- Marinate the tenderloins in the refrigerator for 2 hrs.
- Place the Rotisserie Shaft through the tenderloins. Tie the tenderloins with butcher’s twine. Secure the Shaft with the Forks.
- Place the Shaft into the air fryer. Press the Power Button and then the Rotisserie Button (375° F/191° C for 30 mins) to begin the cooking cycle.
- Use a meat thermometer to measure the internal temperature of the tenderloins. The tenderloins are done when the internal temperature reaches 155° F/70° C.
- Let the tenderloins rest before slicing.
Boneless BBQ Ribs
serves 4
Ingredients
|
|
Directions
- Combine the garlic powder, onion powder, sea salt, coriander, cumin, paprika, and ground black pepper in a bowl to make the spice mixture.
- Rub the ribs with the spice mixture.
- Place the Rotisserie Shaft through the ribs. Secure the Shaft with the Forks.
- Place the Shaft into the Power AirFryer Pro. Press the Power Button and then the Rotisserie Button, decrease the cooking temperature to 350° F/177° C and increase the cooking time to 40 mins. to begin the cooking cycle. Halfway through the cooking cycle, brush the ribs with the BBQ sauce.
- Slice and serve.
Rotisserie Sausage
serves 6
Ingredients
- 4 hot Italian sausage links
Directions
- Place the Rotisserie Shaft through the sausage links diagonally. Secure the Shaft with the Forks.
- Place the Shaft into the Power AirFryer Pro. Press the Power Button and then the Rotisserie Button, increase the cooking temperature to 400° F/204° C and decrease the cooking time to 20 mins. to begin the cooking cycle.
- Use a meat thermometer to measure the internal temperature of the sausage. The sausage is done when the internal temperature reaches 165° F/75° C.
- Let the sausage rest before serving.
Bourbon Rotisserie Pork Roast
serves 4
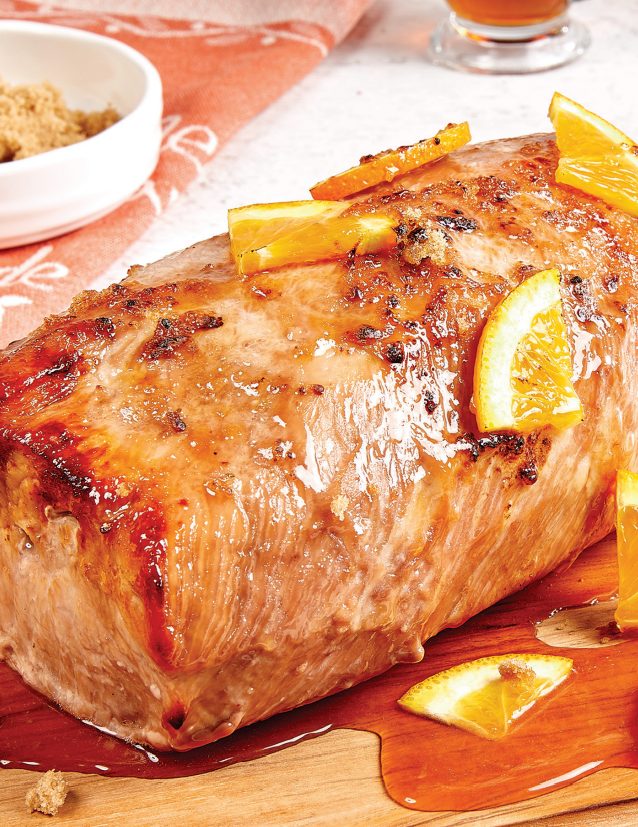
Ingredients
|
|
Directions
- Combine the honey, sugar, orange zest and juice, bourbon, salt, and ground black pepper in a small bowl and mix.
- Place the Rotisserie Shaft through the pork roast. Secure the Shaft with the Forks.
- Generously brush the marinade onto the pork.
- Place the Shaft into the air fryer.
Press the Power Button and then the Rotisserie Button (375° F/191° C) and increase the cooking time to 45 mins. to begin the cooking cycle.
Baste the pork with the marinade every 15 mins. while the pork is cooking. - Use a meat thermometer to measure the internal temperature of the pork. The pork is done when the internal temperature reaches 155° F/70° C.
- Let the pork rest for 15 mins.
before slicing.
Brown SugarGlazed Ham
serves 8
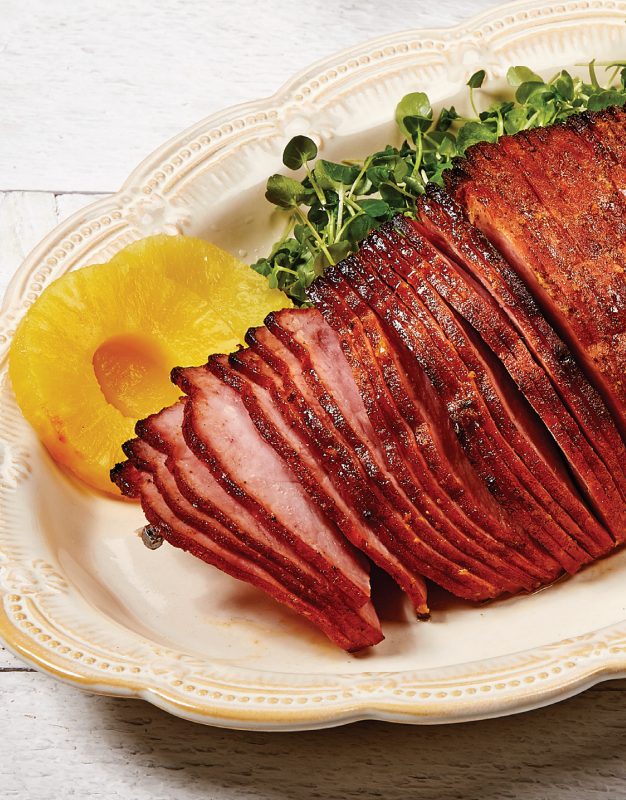 Ingredients
- 1 (3 lb.) ham, cut in half, boneless
- ¼ cup pineapple juice
- ½ cup brown sugar
- ½ cup mustard
- ½ cup ground cloves
Directions
- Combine the honey, sugar, orange zest and juice, bourbon, salt, and ground black pepper in a small bowl and mix.
- Place the Rotisserie Shaft through the pork roast. Secure the Shaft with the Forks.
- Generously brush the marinade onto the pork.
- Place the Shaft into the air fryer.
Press the Power Button and then the Rotisserie Button (375° F/191° C) and increase the cooking time to 45 mins. to begin the cooking cycle.
Baste the pork with the marinade every 15 mins. while the pork is cooking. - Use a meat thermometer to measure the internal temperature of the pork. The pork is done when the internal temperature reaches 155° F/70° C.
- Let the pork rest for 15 mins.
before slicing.
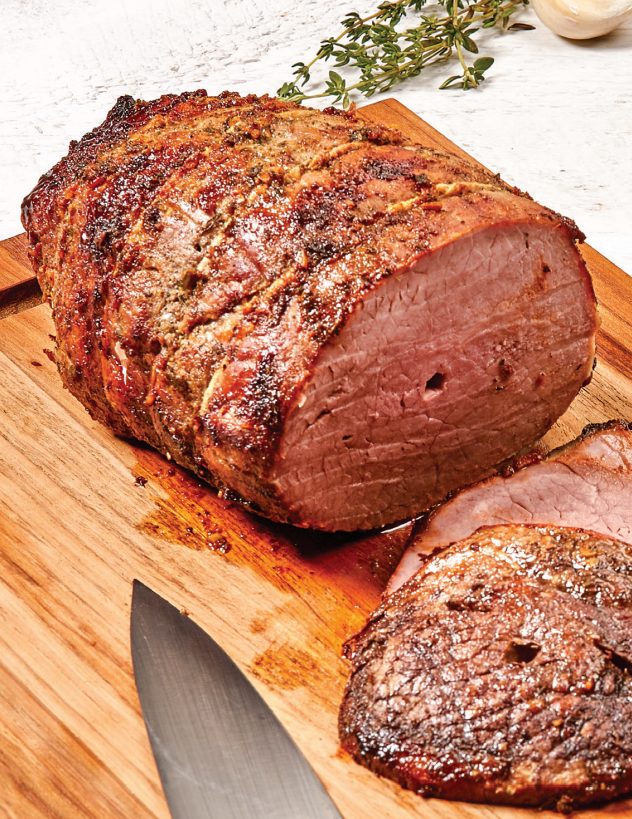
Rotisserie Roast Beef
serves 4
Ingredients
|
|
Directions
- Chop the thyme and garlic. Mix the thyme, garlic, salt, onion powder, ground fennel, ground black pepper, and olive oil together in a bowl to make the herb mixture.
- Rub the roast with the herb mixture and refrigerate for 1 hr.
- Place the Rotisserie Shaft through the center of the roast. Secure the Shaft with the Forks.
- Place the Shaft into the air fryer.
Press the Power Button and then the Rotisserie Button (375° F/191° C) and increase the cooking time to 45 mins.
to begin the cooking cycle. - Cook the roast to the desired doneness (use a meat thermometer to measure the internal temperature):
• Rare: 125° F/50° C
• Medium rare: 135° F/60° C
• Medium: 145° F/65° C
• Well done: 165° F/75° C - Let the roast rest for 10 mins.
before slicing.
Italian Roulade of Beef
serves 8
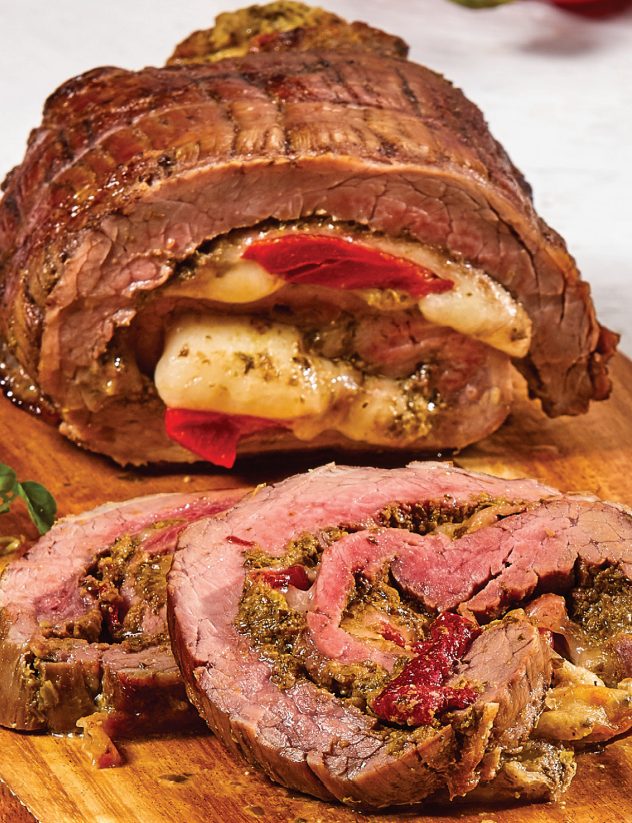 Ingredients
- 1 ½ lb. flank, butterflied
- ¼ cup basil pesto
- ½ lb. provolone, sliced
- 3 roasted red peppers
- 1 tsp. sea salt
- 1 tsp. ground black pepper
Directions
- Place the flank on a cutting board and spread the pesto all over one side of the flank.
- Layer the cheese and roasted peppers on the flank.
- Roll the flank up and tie it with string about five times from one end to the other.
- Season the flank with salt and ground black pepper.
- Place the Rotisserie Shaft through the center of the roast. Secure the shaft with the Forks.
- Place the Shaft into the air fryer.
Press the Power Button and then the Rotisserie Button (375° F/191° C for 30 mins.) to begin the cooking cycle. - Cook the roast to the desired doneness (use a meat thermometer to measure the internal temperature):
• Rare: 125° F/50° C
• Medium rare: 135° F/60° C
• Medium: 145° F/65° C
• Well done: 165° F/75° C - Let the roast rest for 10 mins.
before slicing.
Prime Rib Roast
serves 6
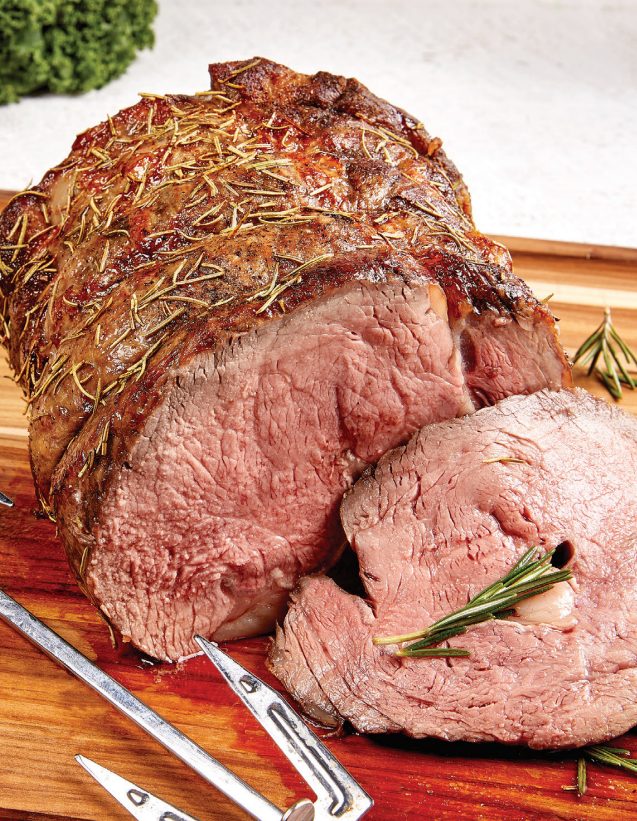 Ingredients
|
|
Directions
- Combine the garlic powder, onion powder, smoked paprika, dried rosemary, salt, and ground black pepper in a small bowl to make the spice and herb mixture.
- Rub the spice and herb mixture onto the roast.
- Place the Rotisserie Shaft through the roast. Secure the Shaft with the Forks.
- Place the Shaft in the Oven. Press the Power Button and then the Rotisserie Button (375° F/191° C) and increase the cooking time to 45 mins. to begin the cooking cycle.
- Use a meat thermometer to measure the internal temperature of the roast. The roast is done when the internal temperature reaches 135° F/60° C.
Rosemary Lemon Leg of Lamb
serves 6
Ingredients
|
|
Directions
- Combine the lemon juice, olive oil, salt, pepper, and rosemary in a small bowl.
- Place the Rotisserie Shaft through the lamb. Use twine to secure the meat. Use the Forks to secure the Shaft.
- Generously brush the lamb with the marinade.
- Place the Shaft in the Power Air Fryer Pro. Press the Power Button and then the Rotisserie Button (30-min. cooking time) and increase the cooking temperature to 400° F/204° C to begin the cooking cycle.
- Use a meat thermometer to measure the internal temperature of the lamb.
- The lamb is done when the internal temperature reaches 145° F/63° C.
![]()
![]() ©2020 Tristar Products, Inc. All rights reserved.
©2020 Tristar Products, Inc. All rights reserved.
Distributed by: Tristar Products, Inc. Fairfield, NJ 07004
Made in China
PXL-VAF_PRO_ROTIS_RB_TP_ENG_V2_200403
PowerXL Grill Air Fryer Combo User Manual MFC-AF-6
When using electrical appliances, basic safety precautions should always be followed. Do not use the PowerXL Grill Air Fryer Combo until you have read this manual thoroughly.
Visit TristarCares.com for tutorial videos, product details, and more. Guarantee Information Inside.
PowerXL Grill Air Fryer Combo
BEFORE YOU BEGIN
The PowerXL Grill Air Fryer Combo will provide you many years of delicious family meals and memories around the dinner table. But before you begin, it’s very important that you read this entire manual, making certain that you are totally familiar with this appliance’s operation and precautions.
Technical Specifications

IMPORTANT SAFEGUARDS
WARNING
When using electrical appliances, always follow these basic safety precautions.
- Read all instructions carefully to prevent injuries.
- This appliance is not intended for use by persons with reduced physical, sensory, or mental capabilities or a lack of experience and knowledge unless they are under the supervision of a responsible person or have been given proper instruction in using the appliance. Do not leave unattended with children or pets. Keep the appliance and cord away from children. Anyone who has not fully read and understood all operating and safety instructions contained in this manual is not qualified to operate or clean this appliance.
- ALWAYS PLACE UNIT ON A FLAT, HEAT-RESISTANT SURFACE. Intended for counter top use only. DO NOT operate on unstable surface. DO NOT place appliance Base on or near a hot gas or electric burner or in a heated oven. DO NOT operate the appliance in an enclosed space or under low-hanging cabinets. Proper space and ventilation is needed to prevent property damage that may be caused by steam released during operation. NEVER operate the appliance near any flammable materials, such as dish towels, paper towels, curtains, or paper plates.
DO NOT let the cord hang over the edge of the table or counter or touch hot surfaces. - USE CAUTION when moving the Inner Pot during or after a cooking cycle.
- Always handle hot Inner Pots with oven mitts while cooking. Place hot cookware on heat-resistant surfaces when not seated in the appliance Base.
- CAUTION HOT SURFACES: This appliance generates heat and steam during use. To avoid injury, do not touch the hot surfaces during operation. Proper precautions must be taken to prevent the risk of personal injury, fires, and damage to property.
- DO NOT USE this appliance for anything other than its intended use.
- NEVER FILL THE INNER POT to more than two thirds capacity. Many foods increase in volume or bubble vigorously while cooking and might boil over the top. Cooking with the lid will prevent splatter and possible injury if bubbles burst and touch exposed skin.
- The use of accessory attachments not recommended by Tristar may cause injuries.
- A short power-supply cord is provided to reduce the
risk resulting from becoming entangled in or tripping over a longer cord. - NEVER plug into an outlet located below the counter. The hanging cord may present a hazard.
- NEVER cover the steam release port on the Lid or the air vents on the back of the base of the appliance.
- DO NOT use this appliance outdoors.
- DO NOT OPERATE if the cord or plug are damaged. If the appliance begins to malfunction during use, immediately unplug the cord from the power.
- DO NOT USE OR ATTEMPT TO REPAIR A MALFUNCTIONING APPLIANCE. Contact Customer Service for assistance (see the back of the manual for contact information).
- UNPLUG THE UNIT from the outlet when not in use and before cleaning. Allow the appliance to cool before attaching or removing parts.
- NEVER immerse the appliance Base and Air Fryer Lid in water. If the appliance falls or accidentally becomes immersed in water, unplug it from the wall outlet immediately. Do not reach into liquid if the appliance is plugged in and immersed. Do not immerse or rinse cords or plugs in water or other liquids.
- To prevent risk of injury, replace only with authorized parts as recommended by Tristar.
- NEVER leave cookware or Inner Pot empty over a hot burner. This could ruin the Inner Pot.
- NEVER put your cookware in the microwave or toaster oven. This is a hazard that can cause electric sparks or fire and could possibly damage the appliances and your cookware.
- NEVER leave your cookware unattended. This helps to avoid potential injury to children or the risk of fire.
- ALWAYS supervise children who are near cookware when in use, or injury may result.
- DO NOT handle hot cookware without hand protection, especially when using the Inner Pot inside the oven. Use oven mitts because the Inner Pot and handles will be very hot.
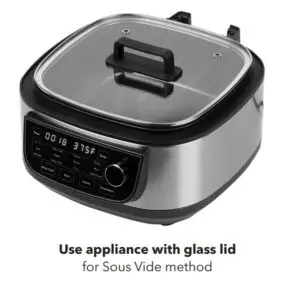
- Exercise caution when using the Glass Lid. As with any glassware used for cooking, the Lid could shatter due to sudden temperature changes or due to impact if it is dropped or knocked against a hard object.
- If the Glass Lid should crack, chip, or become damaged, STOP USING it immediately.
- DO NOT attempt to repair cookware if it is damaged.
- This product is for home use only. It is NOT INTENDED for camping or commercial use.
- DO NOT use aerosol cooking sprays. These sprays will build up on cookware and become difficult to remove while reducing the non-stick coating performance.
- This appliance is not intended for deep frying foods. Extreme caution must be used when moving the appliance when it contains hot liquids or hot oil.
- Only use the provided vessel and approved parts to avoid damage to the appliance.
- Do not put any food or liquid in the base of the appliance.
- Do not place any metal objects inside (or on) the base of the appliance. Metal will activate the induction pads. Do not place your hands on the induction heating element when hot. It will retain heat and burn you.
- Do not touch hot surfaces. Use the handles or knobs.
- Risk of electrical shock. Cook only in removable container. Only use the Base with the Inner Pot.
- Before using your new appliance on any countertop surface, check with your countertop manufacturer or installer for recommendations about using appliances on your surfaces. Some manufacturers and installers may recommend protecting your surface by placing a hot pad or trivet under the appliance for heat protection. Your manufacturer or installer may recommend that hot pans, pots, or electrical appliances should not be used directly on top of the countertop. If you are unsure, place a trivet or hot pad under the appliance before using it.
- To disconnect, turn any control to “off” and then remove the plug from the wall outlet.
- Oversized foods or metal utensils/containers must not be inserted into the appliance as they may create a fire or risk of electric shock.
- A fire may occur if the appliance is covered or touching flammable material, including curtains, draperies, walls, and the like, when in operation.
Do not store any item on top of the appliance
when in operation. - Do not clean with metal scouring pads. Pieces can break off the pad and touch electrical parts, which involves a risk of electric shock.
- Extreme caution should be exercised when using containers constructed of material other than metal or glass.
- Do not place any of the following materials in the appliance: paper, cardboard, plastic, and the like.
- Do not store any materials, other than accessories included with the appliance, in the appliance when not in use.
- Press the “Cancel” button to turn off the appliance.
WARNING:
- Spilled food can cause serious burns.
- Keep the appliance and its cord away from children.
- Never drape the cord over the edge of a counter.
- Never use an outlet located below the counter.
- Never use an extension cord.
WARNING: For California Residents
This product can expose you to Bisphenol A, which is known to the State of California to cause birth defects or other reproductive harm. For more information, go to www.P65Warnings.ca.gov.
Please note that changes or modifications of this product is not expressly approved by the party responsible for compliance could void the user’s authority to operate the equipment.
FCC:
This equipment has been tested and found to comply with the limits for a Class B digital device, pursuant to Part 15 of the FCC Rules. These limits are designed to provide reasonable protection against harmful interference in a residential installation. This equipment generates, uses and can radiate radio frequency energy and, if not installed and used in accordance with the instructions, may cause harmful interference to radio communications. However, there is no guarantee that interference will not occur in a particular installation.
If this equipment does cause harmful interference to radio or television reception, which can be determined by turning the equipment off and on, the user is encouraged to try to correct the interference by one or more of the following measures:
- Reorient or relocate the receiving antenna.
- Increase the separation between the equipment and receiver.
- Connect the equipment into an outlet on a circuit different from that to which the receiver is connected.
- Consult the dealer or an experienced radio/TV technician for help.
This device complies with Part 15 of the FCC Rules. Operation is subject to the following two conditions:
- This device may not cause harmful interference, and
- This device must accept any interference received, including interference that may cause undesired operation.
Tristar Products, Inc.,
490 Route 46 East, Fairfield, NJ 07004
973-575-5400
IMPORTANT SAFEGUARDS
CAUTION
- Always operate the appliance on a horizontal surface that is level, stable, and noncombustible.
- This appliance is intended for normal household use only. It is not intended for use in commercial or retail environments.
- If the appliance is used improperly or for professional or semi-professional purposes or if it is not used according to the instructions in the user manual, the guarantee becomes invalid and the manufacturer will not be held liable for damages.
- Always unplug the appliance after use.
- When the cooking time has completed, cooking will stop and the fan will continue running for 10 secs. to cool down the appliance.
- Let the appliance cool down for approximately 30 mins. before handling, cleaning, or storing.
Overheating Protection
Should the inner temperature control system fail, the overheating protection system will be activated and the appliance will not function. Should this happen, unplug the appliance. Allow time for the appliance to cool completely before restarting or storing.
Electric Power
The unit should be operated on a dedicated electrical outlet. If the electrical outlet is being used by other appliances, your new appliance may not operate properly.
Electromagnetic Fields
This appliance complies with all standards regarding electromagnetic fields. If handled properly and according to the instructions in this user manual, the appliance is safe to use based on scientific evidence available today.
CAUTION: Using the Power Cord
- Plug the power cord into a 120V grounded outlet with no other appliances on the same outlet. Plugging other appliances into the outlet will cause the circuit to overload.
- Never tug the plug forcefully from the wall outlet.
- NEVER USE WITH AN EXTENSION CORD. A short power-supply cord (or detachable power-supply cord) is provided to reduce the risk from becoming entangled in or tripping over a longer cord.
- DO NOT USE WITH ANY OTHER ELECTRICAL OUTLET or modify the plug.
- A short power supply cord is provided to
reduce risk of becoming entangled or presenting
a tripping hazard. - This appliance has been designed for use with a 3-prong, 120V dedicated electrical outlet only. Always attach the electrical cord to the appliance before plugging the device into an outlet.
- Plug into a 3-prong wall outlet with no other appliances on the same outlet. Plugging other appliances into the outlet may cause the circuit
to overload.
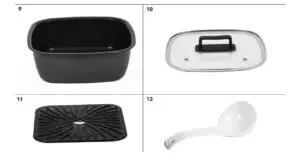
Parts & Accessories
NOTE: Unpack all contents from the packaging. Contents vary by model. Check all packaging material carefully for parts. Please remove any clear or blue protective film on the components.
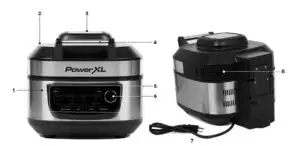
- MAIN UNIT: Features sturdy stainless steel construction throughout. Cleans easily with a damp sponge or cloth and a mild detergent. Avoid harsh, abrasive cleaners. NEVER submerge this appliance
in water or liquids of any kind. - AIR FRYING LID: Attach the Air Frying Lid when using air frying cooking modes (see the “Attaching the Air Frying Lid” section).
- AIR INLET VENT
- LID HANDLE: Always use the handle and avoid touching the lid. The lid may become very hot during the cooking process and can cause injury.
- CONTROL PANEL: Use the Control Panel to use
the cooking presets and set the cooking time
and temperature (see “Using the Digital Control Panel” section). - CONTROL KNOB
- POWER CORD
- AIR OUTLET VENT
- INNER POT
- GLASS LID
- GRILL PLATE Can be used for Air Frying to circulate air under the food. Can be used when steaming to keep food above the liquid. Can be preheated and used as grill plate for grilling meats and vegetables.
- LADLE
Using The Digital Control Panel
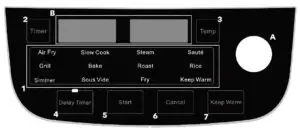
TO START: Plug the Power Cord into the wall outlet. The Digital LED Display will illuminate and a series of dashes will display.
- Selecting a Preset Cooking Mode: 12 preset cooking modes are available: Air Fry, Slow Cook, Steam, Sauté, Grill, Bake, Roast, Rice, Simmer, Sous Vide, Fry, and Keep Warm.
To select a cooking mode, rotate the Control Knob (A) to the right or left. The selected mode will illuminate the Digital LED Display (B). Press the Start Button once and the cooking process will begin and the preset time and temperature will be displayed. - Timer Button: The cooking time may be adjusted for some cooking modes. Press the Timer Button and rotate the Control Knob to the desired setting. The time may be changed at any time during the cooking process.
- Temperature Button: The cooking temperature may be adjusted for some cooking modes. Press the Temp Button and rotate the Control Knob to the desired setting. The temperature may be changed at any time during the cooking process.
- Delay Timer: Many Presets have a Delay Timer feature that will cook your meal at a later time.
- Start Button: Press the Start Button to start.
- Cancel Button will stop any cooking process immediately.
- Keep Warm Function: Most presets will keep your food warm until you are ready to serve it. You may adjust the time for keeping food warm by selecting
the Keep Warm Button and turning the Control Knob to select the desired time.
Cooking Mode Presets Explained
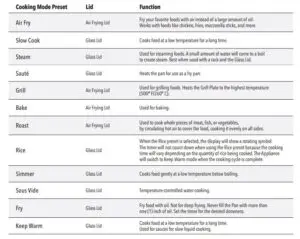
NOTE: See “Cooking Guidelines & Tips” section for more information.
Instructions for Use
Before Using for the First Time
- Read all material, warning stickers, and labels.
- Remove all packing materials, labels, stickers, and clear or blue protective film.
- Wash the Inner Pot and Glass Lid with warm, soapy water.
NOTE: Only the Inner Pot and Lid are dishwasher safe. Never wash or submerge the appliance Base in water or the dishwasher. - Wipe the inside and outside of the appliance Base with a clean, moist cloth.
- Before cooking food, preheat the appliance for a few minutes to allow the appliance to burn off the manufacturer’s protective coating of oil. Wipe the appliance with warm, soapy water and a dishcloth after the burn-in cycle.
Preparing for Use
- Place the appliance on a stable, level, horizontal,
and heat-resistant surface. - Select or set the cooking mode for your recipe.
A Versatile Appliance
The PowerXL Grill Air Fryer Combo is designed to cook a wide variety of your favorite foods. The charts and tables provided within this manual and the Recipe Guide will help you get great results.
Please refer to this information for proper time/temperature settings and proper food quantities.
Recommendations & Tips
Proper Cooking Utensils: To prevent scratching the coating, we recommend using nonmetal utensils with your cookware. Do not cut food on the cookware using sharp utensils, such as forks, knives, mashers, or whisks, that can scratch the cooking surface.
Instructions for Use
Getting Started
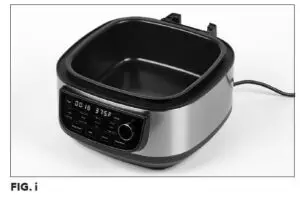
NOTE: The Inner Pot must be inserted into the appliance Base to start a cooking cycle.
- Select and prepare recipe for cooking.
- Place the Inner Pot in the Base as shown (see Fig. i).
- Place all ingredients in the Inner Pot.
- Add Lid if necessary.
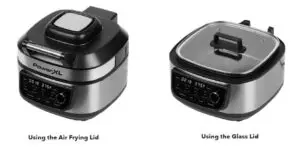
NOTE: The Air Frying Lid is used only for air fry, grill, bake, and roast cooking functions. Keep the air fryer lid in the upward position or remove it and add the Glass Lid when using the other cooking functions. The Air Frying Lid cannot be closed when using non-air fryer cooking functions.
Attaching the Air Frying Lid
Place the Air Frying Lid on top of the Base, aligning the six pins in the Air Frying Lid’s Wire Harness with the six holes in the Base’s Wire Harness. The Air Fry preset will not function unless the Wire Harnesses are aligned properly. Do not twist the Air Frying Lid to close. The Air Frying Lid does not lock.
NOTE: Do not tilt or angle the lid when placing or removing. Lift or lower the lid straight up or down to ensure that the wire harnesses in the lid and base connect properly.
Step By Step
- Once the appliance is plugged in, it will beep once.
The screen will light up. - Rotate the Control Knob left or right and select the desired Preset Mode. The preset Time and Temperature will be displayed. To begin the cooking process, press the Start Button once.
- Depending upon the cooking mode, the time countdown will not begin until predetermined cooking temperature is reached.
- When the cooking time has elapsed, the appliance will switch to Keep Warm for most cooking modes.
Customizing the Cooking Process
As you become more familiar with the appliance, you might want to tweak the settings to suit your individual taste. Adjusting the cooking time and temperature
and setting up the cooker for Time Delay cooking and Manual Presets are all possible with the PowerXL Grill Air Fryer Combo. See the “Cooking Guidelines & Tips” section.
Cooking Guidelines & Tips
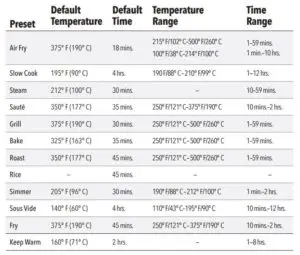
Preset Mode Chart
The times and temperatures on this chart show the basic default settings for the appliance. As you become familiar with the PowerXL Grill Air Fryer Combo, you will be able to make minor adjustments to suit your taste.
NOTE: The Slow Cook, Simmer, and Sous Vide presets often require manual time and temperature settings.
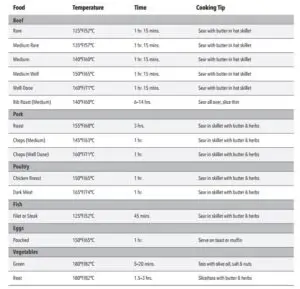
Internal Temperature Meat Chart
Use this chart and a food thermometer to ensure that meat, poultry, seafood, and other cooked foods reach a safe minimum internal temperature.
For maximum food safety, the U.S. Department of Agriculture recommends 165° F for all poultry; 160° F for ground beef, lamb, and pork; and 145° F, with a 3-minute resting period, for all other types of beef, lamb, and pork. Also review the USDA Food Safety Standards.

Cooking Guidelines & Tips
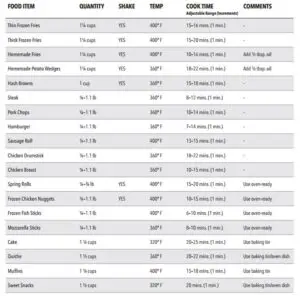
Air Frying Guidelines
NOTE: Keep in mind that these settings are guidelines. Since ingredients differ in origin, size, shape, and brand, we cannot guarantee the best settings for your ingredients.cooking results.
Sous Vide What is Sous Vide?
In the Sous Vide method of cooking, food is sealed inside a plastic bag immersed in water and cooked at a lower temperature. Sous Vide allows for greater control and evenly cooked results. The Sous Vide method holds food at the perfect level of doneness for much longer than regular cooking methods would allow.
The Sous Vide Cooking Cycle
- Fill the Pan with Water. Place the Pan into the appliance. Turn the Control Knob to Sous Vide.
Adjust the cooking time and temperature and then press the Start Button to confirm.
Cover with the Glass Lid.
The appliance will beep once the water reaches the desired temperature. Add the sealed bags to the water. The timer begins once the appliance has reached the desired temperature and will beep again once the timer has expired.
CAUTION: Remove hot cooking bags with plastic tongs to prevent piercing and burns from hot water. Use oven mitts.
Tip
When using the Sous Vide function the timer will not begin counting down until the desired temperature is reached. Reaching the desired temperature may take 30 minutes or more.
What are the Basic Steps?
- The food must be in a sealed plastic bag or vacuum-sealed bag.
- Submerge pouches into the water bath after the liquid has reached your desired temperature.
- Cook for at least the minimum amount of time called for in your recipe.
- Remove each pouch carefully from the water bath. NOTE: Meat, poultry, or fish can be seared in a hot pan to create a crisp surface immediately before serving.
Sous Vide Guidelines
Rice
- Place the Pan into the appliance.
- Add the water, rice, salt, and oil.
- Turn Control Knob to Rice.
- Push the Start Button to confirm. Cover with the Glass Lid.
- The display will state “rice” and the rotating circle will spin during the cooking cycle.
Ratio for Long-Grain White Rice
Combine 1 ½ cups of liquid with 1 cup of rice; this will yield about 2 cups rice or enough for 4 (½-cup) servings.
Ratio for Brown Rice
Combine 2 cups of liquid with 1 cup of brown rice; this will yield about 2 cups rice or enough for 4 (½-cup) servings.
Tips
- Foods that are smaller in size usually require a slightly shorter cooking time than larger foods.
- Large quantities of food only require a longer cooking time than smaller quantities.
- Shaking smaller-sized foods halfway through the cooking process ensures that all the pieces are fried evenly.
- Adding a bit of vegetable oil to fresh potatoes is suggested for a crispier result. When adding oil, do so just before cooking and add only a small amount onto the potato.
- Use premade dough to prepare filled snacks quickly and easily. Premade dough also requires a shorter cooking time than homemade dough.
- You can use the appliance to reheat foods. Simply set the temperature and time to however warm you want your food.
Shaking/Flipping (for Air Frying)
To ensure even cooking, some foods require shaking/flipping during the cooking process. Remove the Inner Pot from the appliance. Gently shake/flip the contents as needed and place them back in the appliance to continue cooking.
CAUTION: The Inner Pot will be hot. Wear an oven mitt during this procedure.
- Place the Inner Pot on a heat-resistant surface.
- Shake the ingredients in the Inner Pot.
- Return the Inner Pot to the appliance to finish cooking.
Slow Cooking Tip
When slow cooking, the timer will not begin counting down until the desired temperature is reached. Reaching the desired temperature may take 30 minutes or more.
Troubleshooting
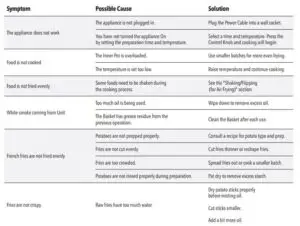

Frequently Asked Questions
Can I use any type of pan to cook in my PowerXL Grill Air Fryer Combo? No, only use the Inner Pot that comes with the appliance.
Does the appliance get hot?
The appliance gets hot during use and stays hot for a while after use. Avoid touching the appliance with your bare hands during and after use. Use oven mitts or potholders when handling food or parts of the appliance when hot.
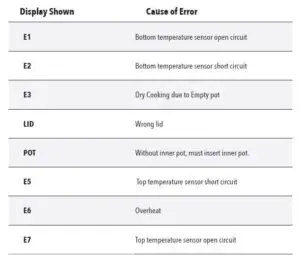
Display Error Indicator
DO NOT USE OR ATTEMPT TO REPAIR A MALFUNCTIONING UNIT.
Contact customer service for further information.
NOTE: E6 error may be caused by too little liquid in hot pan.
The appliance will display E6. Shut off appliance, turn on appliance, add more liquid or turn down heat setting.
Cleaning & Storage
Easy Maintenance
- When cleaning the Inner Pot, allow the Inner Pot to cool completely before washing. Never immerse hot cookware in water as this will cause irreparable warping.
- Cleaning your Inner Pot is quick and easy. After each use, wash it in hot water with mild soap or dish detergent. Rinse thoroughly and wipe dry immediately with a soft dish towel. If any food particles remain, fill the cookware with hot water and liquid dish detergent, soak until the water becomes lukewarm, and use a sponge or soft cloth to remove any remaining food particles.
- Do not use steel wool or metal pads. They could leave coarse scratches.
- Hand wash the appliance Base. DO NOT submerge the base in water. To hand wash, wipe the inside and outside of the appliance Base with a clean, moist cloth.
- Make sure that the device is properly cleaned before storing it in a dry place.
Removing Stubborn Residue
When food is burned on the cookware, a stubborn black residue may remain. If regular cleaning does not loosen it, soak in hot water and 1 tbsp. of non-lemon detergent for 15 mins. Allow the water to become lukewarm before you drain and rinse. Wipe with a plastic spatula or nonabrasive sponge to loosen residue.
Repeat if necessary.
Dishwasher Safe
Only the Inner Pot and Glass Lid are dishwasher safe. Although these components are dishwasher safe, we recommend cleaning by hand. Hand-washing preserves the life of the cookware and helps to maintain its appearance. If cleaning in the dishwasher, follow the suggested guidelines:
- Load the dishwasher carefully. Other dishes and flatware may mark the surface of your cookware.
- Be sure to remove soil from other dishes and flatware. It can be abrasive to nonstick coating.
- We recommend using a non-lemon detergent.
- Regular dishwasher cleaning will eventually scratch any surface.
- To protect yourself from electric shock, NEVER immerse the device, or the Power Cord in water or other liquids.
- DO NOT use any petroleum products, which will damage the outer appliance housing and the Control Panel.
- DO NOT use/store any flammable, acid, or alkaline materials or substances near the device, as this may reduce the service life of the device and lead to deflagration (fire) when the device is turned on.
- DO NOT stack heavy objects on top of the appliance. Excessive weight could possibly damage the appliance.
60-Day Money-Back Guarantee
The PowerXL Grill Air Fryer Combo is covered by a 60-day money-back guarantee. If you are not 100% satisfied with your product, return the product and request a replacement product or refund. Proof of purchase is required. Refunds will include the purchase price, less processing and handling. Follow the instructions in the Return Policy below to request a replacement or refund.
Replacement Guarantee Policy
Our products, when purchased from an authorized retailer, include a 1-year replacement guarantee if your product or component part does not perform as expected, the guarantee extends only to the original purchaser and is not transferable. If you experience an issue with one of our products within 1 year of purchase, return the product or the component part for replacement with a functionally equivalent new product or part. The original proof of purchase is required, and you are responsible to pay to return the unit to us. In the event a replacement unit is issued, the guarantee coverage ends six (6) months following the receipt date of the replacement unit or the remainder of the existing guarantee, whichever is later. Tristar reserves the right to replace the unit with one of equal or greater value.
Return Policy
To receive a refund or replacement under the money-back guarantee, you must return the product to us at your expense. To return the product, call customer service at 1-973-287-5129 or email [email protected] and request a return merchandise authorization number.
Pack the product carefully and include in the package a note with (1) your name, (2) mailing address, (3) phone number, (4) email address, (5) reason for return, and (6) proof of purchase or order number, and (7) specify on the note whether you are requesting a refund or replacement.
Write the return merchandise authorization number on the outside of the package.
Send the product to the following return address:
PowerXL Grill Air Fryer Combo
Tristar Products
500 Returns Road
Wallingford, CT 06495
If the replacement or refund request has not been acknowledged after two weeks,
please contact Customer Service at 973-287-5129.
Refund
Refunds requested within the money-back guarantee timeframe will be issued to the payment method used at purchase if the item was purchased directly from Tristar. If the item was purchased from an authorized retailer, proof of purchase is required, and a check will be issued for the item and sales tax amount. Processing and handling fees are non-refundable.
We are very proud of the design and quality of our PowerXL Grill Air Fryer Combo.
This product has been manufactured to the highest standards. Should you have any questions, our friendly customer service staff is here to help you.
Visit us at www.TristarCares.com, email us at [email protected], or call us at 973-287-5129
Distributed by:
Tristar Products, Inc.
Fairfield, NJ 07004
© 2020 Tristar Products, Inc.
Made in China
PXL-GAFC_IB_TP_ENG_V4_200724
![]()
PowerXL VORTEX Air Fryer Pro Plus User Guide
NOTE: Dehydration times may vary depending on specific food type; for example, the fruit size and degree of ripeness will affect the amount of time required for dehydration to occur. For all recipes, more time may be needed to complete the dehydration process or you may want to add additional time for a crunchier result.
TIP: Rotate the Air Flow Racks mid-cycle for even cooking.
IMPORTANT: Unpack all parts from the box and remove any clear or blue protective film on the components. Wash with warm, soapy water before first use (only select accessories are dishwasher safe).

CANDIED BACON
serves 4

Ingredients
- 1 lb. thick bacon
- ¼ cup dark brown sugar
- ¼ tsp. cayenne pepper
- 2 tbsp. maple syrup
Directions
- Lay the bacon strips onto the Air Flow Racks and trim as needed.
- Sprinkle the brown sugar and cayenne pepper over the bacon and rub into the meat.
- Brush the bacon with the maple syrup. Place the Racks in the Unit. Press the Power Button and then the Shrimp Button (320° F/160° C for 12 mins.) to begin the cooking cycle.
- When the cooking cycle is complete, flip the bacon.
- Press the Power Button and then the Shrimp Button (320° F/160° C for 12 mins.) to begin the cooking cycle again.
- Serve on a Charcuturie board.
KALE CHIPS
serves 4
Ingredients
- 2 bunches kale
- 2 tbsp. olive oil
- 1 tsp. salt
- ½ tsp. ground black pepper
- ½ tsp. granulated garlic
Directions
- Remove the stems from the kale and break the kale into pieces.
- Toss the kale with the olive oil, salt, ground black pepper, and garlic in a bowl.
- Lay the kale onto the Air Flow Racks.
- Place the Racks in the Unit. Press the Power Button and then the Dehydrator Button (2-hr. cooking time) and increase the cooking temperature to 130° F/55° C. Remove the kale when it becomes crispy (about 15–20 mins.).
VEGGIE CHIPS
serves 2

Ingredients
- 3 large parsnips, peeled & sliced very thin
- 3 medium-sized beets, peeled & sliced very thin
- 2 medium-sized sweet potatoes, peeled & sliced very thin
Directions
- Layer the sliced parsnips, beets, and sweet potatoes onto the Air Flow Racks. Do not overlap the vegetables.
- Place the Racks in the Unit. Press the Power Button and then the Dehydrator Button and increase the cooking temperature to 115° F/45° C and the cooking time to 10 hrs. to begin the cooking cycle. Additional time may be added for crispier chips.
DRIED HERBS
makes about ¹/³ cup
Ingredients
2 (0.75 oz.) packages fresh herbs
(parsley, rosemary, thyme, tarragon,
oregano, and sage work well)
Directions
- Spread the fresh herbs onto the Air Flow Racks.
- Place the Racks in the Unit. Press the Power Button and then the Dehydrator Button and increase the cooking temperature to 125° F/50° C to begin the cooking cycle. Depending on the herbs being cooked, adjust the cooking time:
- Parsley: Decrease the cooking time to 1 hr. 30 mins.
- Rosemary: Decrease the cooking time to 2 hrs.
- Thyme: Decrease the cooking time to 3 hrs.
- Tarragon: Decrease the cooking time to 3 hrs.
- Oregano: Decrease the cooking time to 2 hrs.
- Sage: Decrease the cooking time to 3 hrs.
BEEF JERKY
serves 8
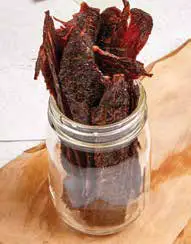
Ingredients
Marinade:
- 4 tbsp. sweet soy sauce
- 5 tbsp. ketchup
- ½ tsp. ground black pepper
- ½ tsp. salt
- ½ tsp. garlic powder dash of sriracha
_______
2 lb. top round, sliced thinly
Directions
- Combine the marinade ingredients in a bowl. Add the top round to the bowl.
- Marinate the top round in the refrigerator for at least 1 hr. (preferably overnight).
- Remove the meat from the marinade and pat it dry. Lay the meat onto the Air Flow Racks.
- Place the Racks in the Unit. Press the Power Button and then the Dehydrator Button and increase the cooking temperature to 160° F/70° C and the cooking time to 6 hrs. to begin the cooking cycle.
ITALIAN CROUTONS
serves 10

Ingredients
- 1 loaf crusty Italian bread, cut into ½ inch cubes
- ¹/³ cup extra virgin olive oil
- 1 tsp. salt
- ½ tsp. ground black pepper
- 1 tbsp. dried oregano
Directions
- 1. Toss all the ingredients together in a bowl.
- 2. Spread the bread cubes onto the Air Flow Racks.
- 3. Place the Racks in the Unit.
- Press the Power Button and decrease the cooking temperature to 350° F/175° C and the cooking time to 8 mins. to begin the cooking cycle.
SUN-DRIED TOMATOES
serves 6

Ingredients
3 lb. plum tomatoes, halved
Directions
- Place the tomato halves, skin side down, onto the Air Flow Racks.
- Place the Racks in the Unit. Press the Power Button and then the Dehydrator Button and increase the cooking temperature to 145°F/63° C and the cooking time to 10 hrs. to begin the cooking cycle.
CRISPY GREEN BEANS
serves 4
Ingredients
- 1 lb. green beans, trimmed and halved
- ¼ cup olive oil
- 1 tsp. salt
- 1 tsp. ground black pepper
Directions
- Toss all the ingredients together in a large bowl.
- Lay the green beans in a single layer onto the Air Flow Racks.
- Place the Racks in the Unit. Press the Power Button and then the Dehydrator Button and increase the cooking temperature to 125° F/50° C and the cooking time to 6 hrs. to begin the cooking cycle.
ALMOND GRANOLA

Ingredients
- 1 2/3 cups sliced almonds
- 1 cup rolled oats
- ¾ cup flaked coconut
- ¼ cup sunflower seeds,
- shells removed
- 1 tsp. kosher salt
- 1 tsp. grape seed oil
- ¹/³ cup honey
- 1 cup dried cherries, chopped
Directions
- Combine the almonds, oats, coconut, sunflower seeds, and salt in a bowl and mix them together.
- Add the grape seed oil and honey to the bowl. Toss to combine.
- Line the Air Flow Racks with parchment paper and spread the granola evenly over the parchment.
- Place the Racks in the Unit. Press the Power Button, decrease the cooking temperature to 220° F/105° C, and increase the cooking time to 40 mins. to begin the cooking cycle.
- After the cooking cycle is complete, add the cherries to the granola and toss to combine.
- Let the granola cool before serving.
DRIED MANGO SLICES
serves 4
Ingredients
3 fresh mangos, peeled and sliced
Directions
- Layer the mango slices in a single layer onto the Air Flow Racks.
- Place the Racks in the Unit. Press the Power Button and then the Dehydrator Button and increase the cooking temperature to 125° F/50° C and the cooking time to 10 hrs. to begin the cooking cycle.
CHEWY KIWI SLICES
makes about ¹/³ cup
Ingredients
6 kiwis, peeled and sliced into ¼ inch rounds
Directions
- Lay the kiwi rounds in a single
layer onto the Air Flow Racks. - Place the Racks in the Unit. Press the Power Button and then the Dehydrator Button and increase the cooking temperature to 125° F/50° C and the cooking time to 6 hrs. to begin the cooking cycle
DRIED ORANGE SLICES
serves 10

Ingredients
4 medium oranges, sliced
Directions
- Lay the orange slices in a single layer onto the Air Flow Racks.
- Place the Racks in the Unit. Press the Power Button and then the Dehydrator Button and increase the cooking temperature to 125° F/50° C and the cooking time to 10 hrs. to begin the cooking cycle
STRAWBERRY ROLL-UPS
serves 20

Ingredients
- vegetable oil, for spraying
- 2 lb. strawberries,
- cored & chopped
- 4 tbsp. sugar
- juice of 1 lemon
Directions
- Line the Air Flow Racks with parchment paper and spray the Racks with vegetable oil.
- Combine the strawberries, sugar, and lemon juice in a blender and blend until a smooth purée forms.
- Divide the purée evenly between the Racks, spreading the purée into a thin layer over the parchment paper.
- Place the Racks in the Unit. Press the Power Button and then the Dehydrator Button and increase the cooking temperature to 170° F/75° C and the cooking time to 10 hrs. to begin the cooking cycle.
- Once the cooking cycle has finished, remove the Racks.
- Cut the parchment paper into 2 in.-thick strips using scissors, roll up the strips, and tie them with twine.
STRAWBERRY SLICES
serves 4
Ingredients
- 1 lb. strawberries,
- sliced thin, stems removed
Directions
- Lay the strawberries onto the
Air Flow Racks in a single layer. - Place the Racks in the Unit. Press the Power Button and then the Dehydrator Button and increase the cooking temperature to 125° F/50° C and the cooking time to 8 hrs. to begin the cooking cycle. The strawberries may be cooked for up to 12 hrs. to increase crispiness.
![]()
©2020 Tristar Products, Inc. All rights reserved.
Distributed by: Tristar Products, Inc. Fairfield, NJ 07004
Made in China
PXL_VAF_PRO_RB_ROTISSERIE_TP_ENG_V1_200

IMPORTANT: Unpack all parts from the box and remove any clear or blue protective film on the components. Wash with warm, soapy water before first use (only select accessories are dishwasher safe).
STEP 1
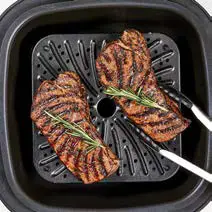
Open the lid. Ensure that the Inner Pot is in place in the Base. If your recipe uses the Grill Plate, place the Grill Plate in the Inner Pot. Ensure that the Grill Plate sits evenly.
STEP 2
Close the lid, turn the Control Knob to select the Grill preset, and press the Start Button to preheat the appliance.

STEP 3
Once the appliance has preheated, “Add Food” will display on the Control Panel. Then, arrange your food on the Grill Plate in the Inner Pot. Close the lid and press the Start Button to continue the cooking process.
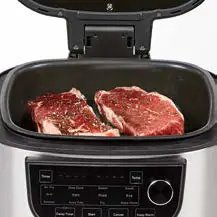
STEP 4
Once the cooking timer has run out, open the lid and carefully remove food with tongs or oven mitts.
Frittata
Ingredients
24 eggs, beaten
1 ¾ cups heavy cream
2 tbsp. olive oil
1 cup diced onion
6 oz red bell pepper, sliced thinly (about 1 medium-size pepper)
6 oz yellow bell pepper, sliced thinly (about 1 medium-size pepper)
2 cups diced ham
16 oz potato tots, fried according to the instructions on the packaging & cooled
3 oz fresh spinach leaves
2 cups shredded cheddar cheese
1 tbsp. salt
1 tsp. ground black pepper
Directions
- In a bowl, whisk together the eggs and cream. Reserve the mixture.
- Place the Inner Pot in the appliance. Place 2 tbsp. olive oil in the Inner Pot.
- Select the Sauté setting. Set the cooking temperature to 350° F/177° C and the cooking time to 10 minutes. Let the oil heat up.
- When the oil is hot, add the onion, peppers, and ham. Sauté until golden.
- Add the potato tots, spinach, egg mixture, and cheese. Stir to combine and sauté for 5 minutes while stirring occasionally.
- Attach the Air Frying Lid to the appliance.
- Select the Air Fry setting. Set the cooking temperature to 315° F/157° C and the cooking time to 20 minutes. If the frittata is not done after 20 minutes, add more cooking time.

Eric’s Egg Muffin
Ingredients
6 oz Canadian bacon, cut into four quarters
12 eggs, beaten
1 ½ cups shredded cheddar cheese
9 English muffins, split & toasted
Directions
- Place the Inner Pot in the appliance. Attach the Air Frying Lid to the appliance.
- In a bowl, combine the Canadian bacon, eggs, and cheese. Pour the mixture evenly into the Inner Pot. Place the top of each English muffin over the mixture. Reserve the bottoms of each Engilsh muffin.
- Select the Air Fry setting. Set the cooking temperature to 375° F/190° C and the cooking time to 15 minutes.
- When the cooking time is complete, use a spatula to cut the bacon, egg, and cheese mixture into nine portions. Remove and complete the sandwiches with the reserved English muffin bottoms.

Cinnamon Bun French Toast
Ingredients
6 eggs
¾ cup half and half
1 tsp. vanilla extract
1 tsp. cinnamon
3 tbsp. maple syrup, plus more for serving
2 12.4-oz cinnamon bun containers
strawberries, for serving
Directions
- In a bowl, mix together the eggs, half and half, vanilla extract, cinnamon, and 3 tbsp. maple syrup.
- Cut each piece of cinnamon bun dough into four equal pieces. Coat the cinnamon bun dough in the batter.
- Place the Inner Pot in the appliance. Place the coated dough in the Inner Pot. Place the Glass Lid on the appliance.
- Select the Slow Cook setting. Set the cooking temperature to 195° F/90° C and the cooking time to 1 hour.

Mac & Cheese
Ingredients
2 lb elbow macaroni
1 quart heavy cream
4 cups chicken stock
4 cups shredded cheddar cheese
Directions
- Place the Inner Pot in the appliance. Add all the ingredients to the Inner Pot and stir.
- Place the Glass Lid on the appliance. Select the Simmersetting. Set the cooking temperature to 205° F/96° C and the cooking time to 30 minutes.

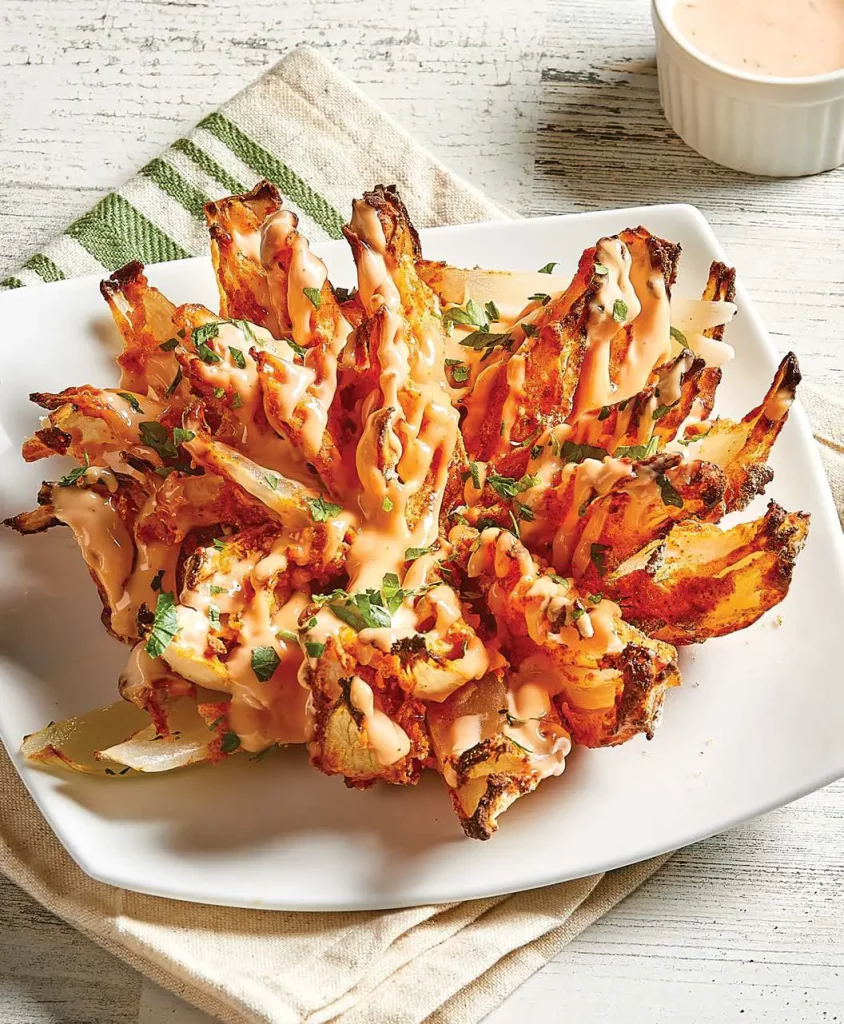
Air-Fried Onion Blossom
Ingredients
1 large onion
2 cups flour
3 tbsp. Cajun seasoning
2 tbsp. paprika
1 tsp. salt
2 eggs
1 cup buttermilk
Directions
- Cut a small flat spot on the non-root end of the onion Peel the onion. Remove any dried or damaged peels. Place the onion, flat side down, on a cutting board (root side up). tarting about ½ inch from the root, use a sharp knife to make a clean slice downward. Next, turn the onion one quarter turn and make another clean slice downward. Follow that with two more quarter turns and two more clean slices downward.
- Now, you should have four clean slices in the onion equally spaced apart. Cut three to four equally spaced cuts downward in each of those four sections. Then,turn the onion root side down and gently fan out those sections.
- In a bowl, combine the flour, Cajun seasoning, paprika, and salt.
- In a separate bowl, whisk together the eggs and buttermilk.
- Dip the onion into the egg mixture and then the flour mixture.
- Place the Inner Pot in the appliance. Attach the Air Frying Lid to the appliance.
- Spray the onion with cooking spray and place the onion in the Inner Pot.
- Select the Air Fry setting. Set the cooking temperature to 375° F/190° C and the cooking time to 15 minutes. Spray the onion with cooking spray occasionally while it cooks.
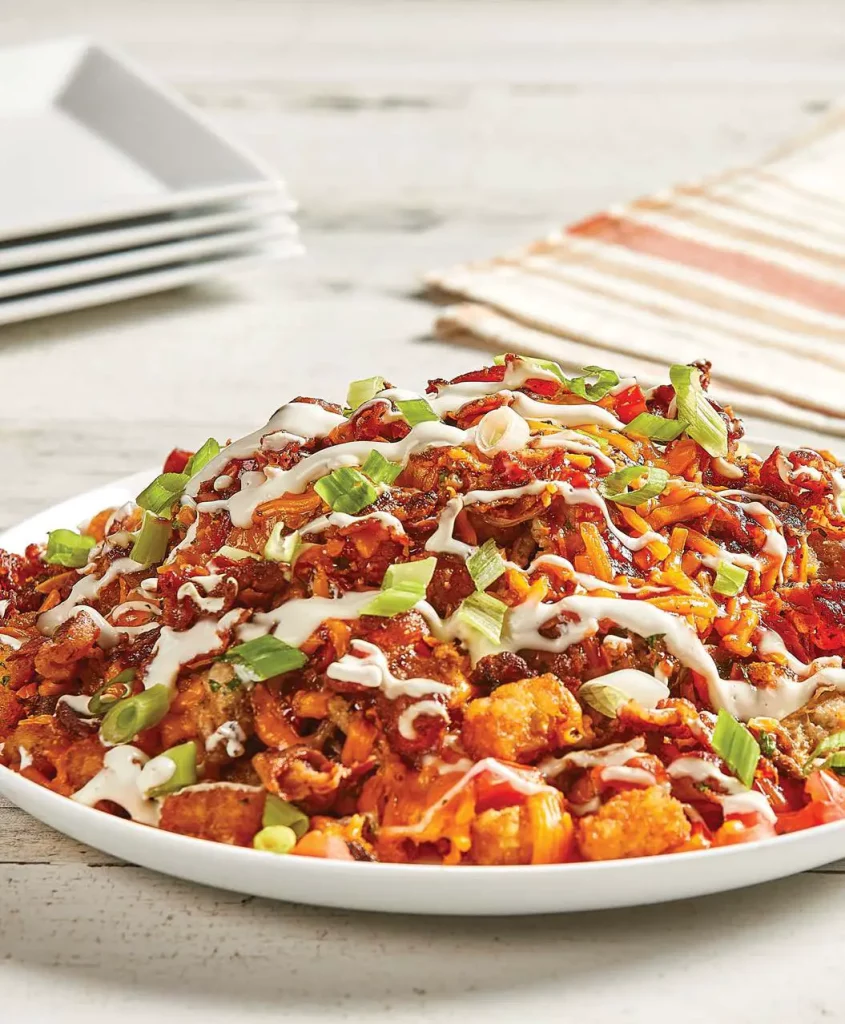
Totchos
Ingredients
1 bag potato tots
1 ½ cups shredded cheddar
½ lb bacon, cooked & diced
1 cup pulled pork
3 scallions, chopped
2 plum tomatoes
¼ cup sour cream
Directions
- Place the Inner Pot in the appliance. Attach the Air Frying Lid to the appliance.
- Select the Air Fry setting. Set the cooking temperature to 400° F/204° C and the cooking time to 18 minutes. Let the appliance preheat.
- When the appliance has preheated, place the potato tots in the Inner Pot. Flip the potato tots halfway through the cooking time.
- When the cooking time is complete, top the potato tots evenly with the rest of the ingredients except the sour cream.
- Select the Air Fry setting. Set the cooking temperature to 400° F/204° C and the cooking time to 8 minutes. Cook until the cheese is melted.
- Serve with the sour cream drizzled over the totchos.
Rice Pilaf
Ingredients
2 cups long-grain rice
2 tbsp. butter
½ small onion, diced small
4 cups chicken broth
1 bay leaf
1 sprig thyme
Directions
1. Place the Inner Pot in the appliance.
2. Select the Rice setting.
3. Rinse the rice.
4. Add the butter and onion and sauté for 1 minute.
5. Add the rice and coat with the butter and onion.
6. Add the broth, thyme, and bay leaf.
7. Cover with the Glass Lid.
8. The rice can be served immediately when the cooking process is complete or the rice can be kept warm in the appliance. Remove the bay leaf and thyme before serving.
Brown Rice
Ingredients
2 cups brown rice
5 cups vegetable stock
1 bay leaf
1 sprig rosemary
Directions
- Place the Inner Pot in the appliance.
- Select the Rice setting.
- Rinse the rice.
- Add the rice, stock, bay leaf, and rosemary.
- Cover with the Glass Lid.
- The rice can be served immediately when the cooking process is complete or the rice can be kept warm in the appliance. Remove the bay leaf and rosemary sprig before serving.
Wild Rice
Ingredients
1 ½ cups wild rice
2 tbsp. butter
1 shallot, minced
1 clove garlic, minced
1 carrot, diced small
4 cups vegetable or chicken stock
1 sprig thyme
1 bay leaf
Directions
- Place the Inner Pot in the appliance.
- Select the Rice setting.
- Rinse the rice.
- Add the butter, shallot, garlic, and carrot and sauté for 3 minutes.
- Add the rice and coat with butter, shallot, garlic, and carrot.
- Add the stock, thyme, and bay leaf.
- Cover with the Glass Lid.
- The rice can be served immediately when the cooking process is complete or the rice can be kept warm in the appliance. Remove the bay leaf and thyme before serving.
Quinoa Pilaf
Ingredients
2 cups quinoa
2 tbsp. olive oil
1 shallot, minced
4 cups chicken or vegetable broth
1 sprig thyme
1 bay leaf
Directions
- Place the Inner Pot in the appliance.
- Select the Rice setting.
- Rinse the quinoa.
- Add the olive oil and shallot and sauté for 1 minute.
- Add the quinoa and coat with the butter and onion.
- Add the broth, thyme, and bay leaf.
- Cover with the Glass Lid.
- The rice can be served immediately when the cooking process is complete or the rice can be kept warm in the appliance. Remove the bay leaf and thyme before serving.
Chicken Pot Pie
Ingredients
3 cups cooked chicken
2 22.6-oz cans cream of chicken soup
10 oz frozen peas & carrots
2 cups diced potato
Pie Crust
1 16.3-oz package biscuits
3 tbsp. butter, melted
Directions
- Place the Inner Pot in the appliance. Mix together all the ingredients except the biscuits and butter in the Inner Pot. Place the Glass Lid on the appliance.
- Select the Simmer setting. Set the cooking temperature to 350° F/177° C and the cooking time to 30 minutes.
- When the cooking time is complete, add the biscuits over the ingredients in the Inner Pot. Attach the Air Frying Lidto the appliance.
- Select the Air Fry setting. Set the cooking temperature to 325° F/163° C and the cooking time to 10 minutes. Cook until the biscuits are golden brown.
- Brush the biscuits with the melted butter before serving.

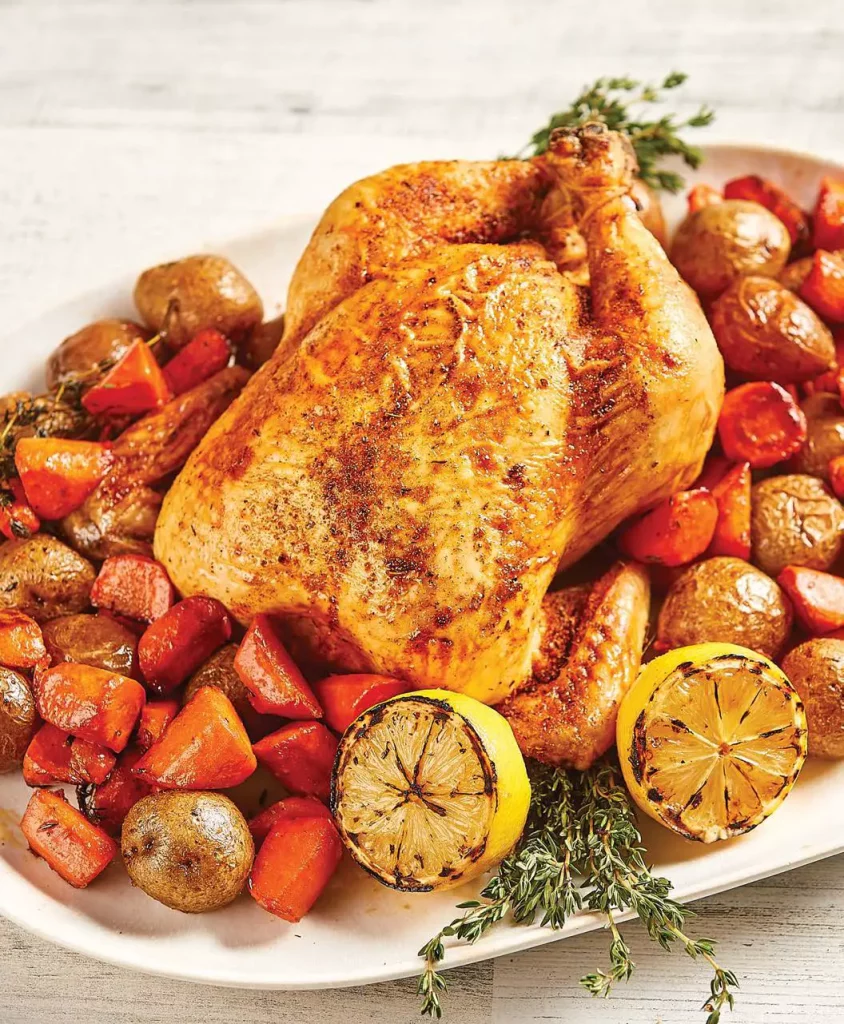
Roast Chicken
Ingredients
1 4-lb chicken
1 tsp. granulated garlic
1 tsp. paprika
1 tsp. salt
1 tsp. ground black pepper
1 onion, quartered
6 sage leaves
3 sprigs thyme, divided
3 sprig rosemary
3 large carrots, sliced
1 lb baby potatoes
Directions
- In a bowl, combine the garlic, paprika, salt, and black pepper. Rub the seasoning mixture all over the chicken.
- Insert the onion, sage, and half of the thyme into the chicken’s cavity.
- Place the Inner Pot in the appliance. Attach the Air F rying L d to the appliance. 4. Select the Roast setting. Set the cooking temperature to 325° F/163° C and the cooking time to 40 minutes. Let the appliance preheat.
- When the appliance has preheated, place the chicken, breast side down, in the Inner Pot and surround the chicken with the rosemary, carrots, potatoes, and the rest of the home. Halfway through the cooking time, flip the chicken. Ensure that the internal temperature of the chicken reaches 165° F/74° C.
- Let the chicken rest for 15 minutes before serving.
Air-Fried Chicken
Ingredients
2 eggs
2 cups buttermilk
2 cups flour
1 tbsp. salt
1 tsp. ground black pepper
1 tsp. dry mustard
1 tsp. celery salt
1 tsp. garlic powder
1 tbsp. paprika
1 4-lb chicken,
cut into 8 pieces*
Directions
- In a bowl, mix the eggs and buttermilk.
- In a separate bowl, mix the flour, salt, black pepper, mustard, celery salt, garlic powder, and paprika.
- Coat each chicken piece in the egg mixture and then the flour mixture.
- Place the Inner Pot in the appliance. Attach the Air Fryin g Lid to the appliance.
- Select the Air Fry setting. Set the cooking temperature to 400° F/204° C and the cooking time to 30 minutes. Let the appliance preheat.
- When the appliance has preheated, place the chicken in the Inner Pot. Halfway through the cooking time, flip the chicken. Ensure that the internal temperature of the chicken reaches 165° F/74° C.
ERIC’S TIP: For extra-crispy chicken, dip the chicken into the flour mixture twice.
* Instead of cutting up a whole chicken, you can use:
• 2 chicken thighs
• 2 chicken legs
• 2 chicken breasts, bone cut in half
• 2 chicken wings
Chili
Ingredients
2 lb ground beef
1 onion, diced small
3 tbsp. chili powder
1 tsp. ground cumin
1 tsp. ground coriander
1 tbsp. salt
1 tsp. ground black pepper
1 tbsp. paprika
2 tbsp. sugar
15 oz black beans, drained
15 oz kidney beans, drained
28 oz crushed tomatoes
½ cup water
1 cup corn kernels
Directions
- Place the Inner Pot in the appliance.
- Select the Sauté setting. Set the cooking temperature to 350° F/177° C and the cooking time to 15 minutes.
- Add the ground beef and sauté for 6 minutes.
- Add the onion and sauté for 3 minutes.
- Add the chili powder, cumin, coriander, salt, black pepper, paprika, and sugar and sauté for 2 minutes.
- Add the beans, tomatoes, water, and corn. Place the Glass Lid on the appliance.
- Select the Simmer setting. Set the cooking temperature to 205° F/96° C and the cooking time to 1 hour.
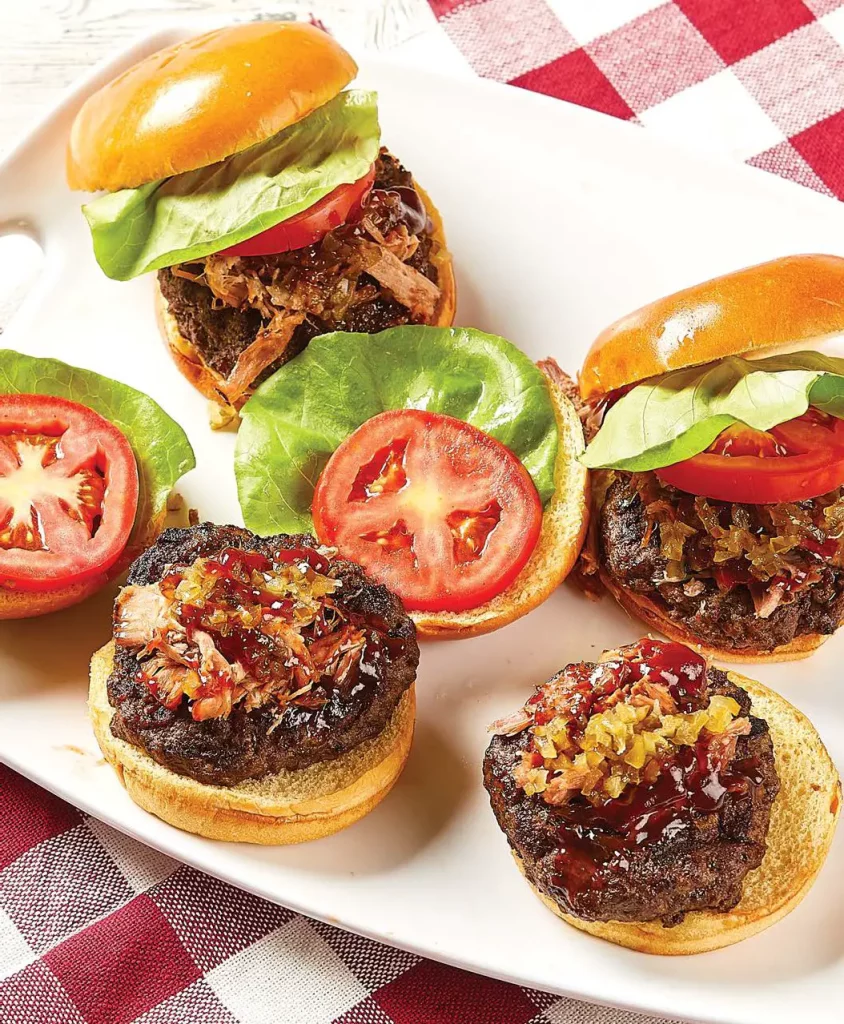
Eric’s Grilled Burgers
Ingredients
4 8-oz hamburgers
¼ cup margarine
1 tsp. salt
1 tsp. ground black pepper
4 brioche rolls, cut in half
1 cup shredded iceberg lettuce
4 slices tomato
4 slices red onion
¼ cup mayonnaise
2 tbsp. relish
2 tbsp. ketchup
1 tsp. yellow mustard
Directions
- Place the Inner Pot in the appliance. Place the Grill Plate in the Inner Pot. Attach the Air Frying Lid to the appliance.
- Select the Grill setting. Set the cooking temperature to 425° F/218° C and the cooking time to 8 minutes. Let the appliance preheat.
- Season the hamburgers with salt and black pepper. When the appliance has preheated, place the hamburgers on the Grill Plate. Close the lid and grill the burgers until the desired doneness is reached (about 4 minutes per side). Remove and reserve the burgers. Butter the inside of the rolls with the margarine and place them, buttered sides down, on the Grill Plate.
- elect the Air ry set. Set the cooking temperature to 400° F/204° C and the cooking time to 4 minutes.
- Assemble the burgers: Place the lettuce, tomato, and nion on a bottom roll half and top with a burger, mayonnaise, relish, ketchup, mustard, and the top roll half.
New York Strip Steaks
Ingredients
8 cloves garlic
8 baby sweet peppers
2 tbsp. olive oil
4 12-oz New York strip steak1 tbsp. salt
1 tsp. coarse ground black pepper
2 sprigs rosemary
Directions
- In a bowl, toss the garlic and peppers with the olive oil.
- Season the steaks with the salt and black pepper.
- Place the Inner Pot in the appliance. Place the Grill Plate in the Inner Pot. Attach the Air Frying Lid to the appliance.
- Select the Grill setting. Set the cooking temperature to 450° F/232° C and the cooking time to 10 minutes. Let the appliance preheat.
- When the appliance has preheated, place the steaks on the Grill Plate and surround them with the peppers, garlic, and rosemary. Grill the steaks for 5 minutes, flip the steaks, nd continue cooking until the desired doneness is reached.
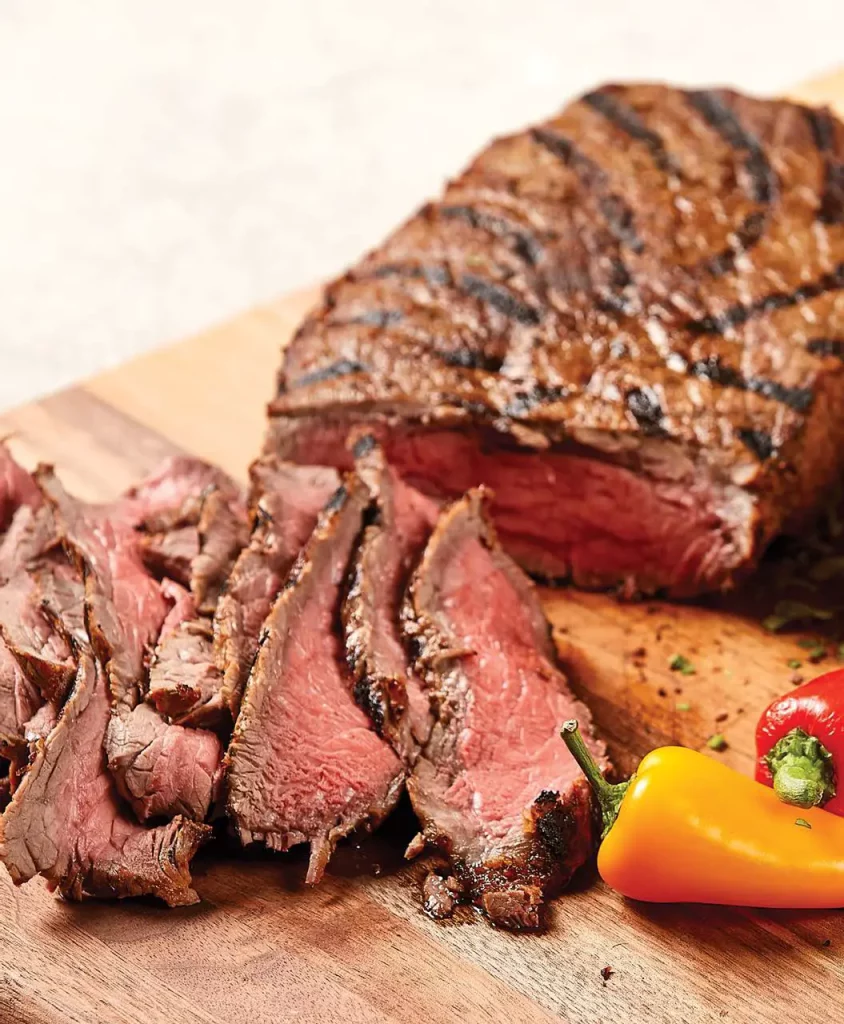
Pork Chops
Ingredients
4 thick-cut pork chops
2 tbsp. olive oil
1 tbsp. salt
1 tsp. ground black pepper
2 sprigs rosemary, chopped
½ tsp. granulated garlic
½ tsp. granulation onion
Tomato Salad
1 pint tri-color cherry tomatoes
2 tbsp. extra virgin olive oil
1 tsp. red wine vinegar
1 small clove garlic, minced
¼ red onion, diced small
4 basil leaves, chopped salt, to taste
ground black pepper, to taste
Directions
- Rub the pork chops with the olive oil, salt, black pepper, rosemary, garlic, and onion.
- Place the Inner Pot in the appliance. Place the Grill Plate inthe Inner Pot. Attach the Air Frying Lid to the appliance.
- Select the Grill setting. Set the cooking temperature to 450° F/232° C and the cooking time to 10 minutes. Let the appliance preheat.
- When the appliance has preheated, place the pork chops on the Grill Plate. Ensure the internal temperature of the pork chops reaches 150° F/61° C. 5. In a bowl, toss the tomato Salad ingredients and season with salt and black pepper.
- Serve the pork chops with the Tomato Salad.
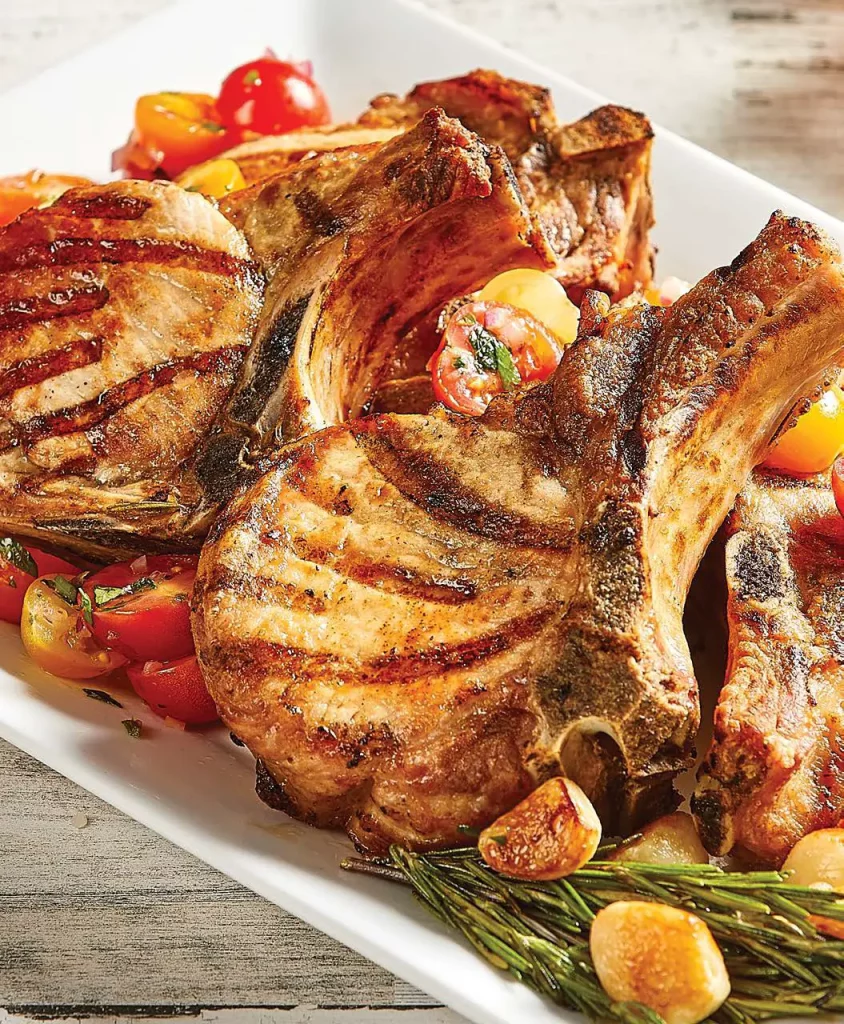
Slow-Cooked Barbecue Ribs
Ingredients
2 racks baby back ribs, cut in half
1 tsp. ground coriander
1 tbsp. paprika
1 tsp. granulated garlic
1 tsp. granulated onion
1 tsp. ground cumin
1 tsp. salt
1 tsp. ground black pepper
4 cups water
1 cup barbeque sauce
Directions
- Rub the ribs with the coriander, paprika, garlic, onion, cumin, salt, and black pepper.
- Place the Inner Pot in the appliance. Add the ribs and water to the Inner Pot. Place the Glass Lid on the appliance.
- Select the Slow Cook setting. Set the cooking temperature to 195° F/90° C and the cooking time to 6 hours. Additional cooking time might be needed if the ribs are not falling apart.
- Remove the ribs and brush them with the barbeque sauce. Place the Grill Plate in the Inner Pot. Place the ribs on the Grill Plate.
- Select the Air Fry setting. Set the cooking temperature to 400° F/204° C and the cooking time to 5 minutes.
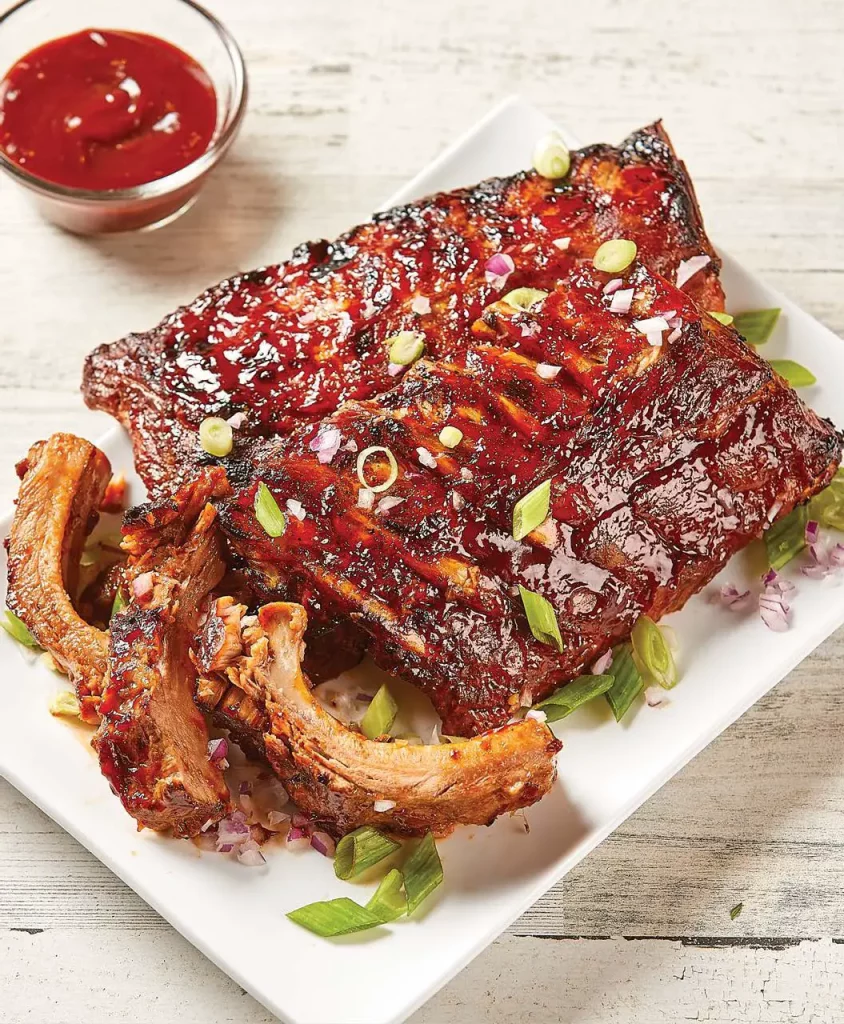
Pulled Pork
Ingredients
1 4-lb pork boneless pork shoulder
1 tbsp. salt
1 tsp. ground black pepper
1 tsp. granulated garlic
1 tsp. granulated onion
1 tsp. cumin
4 cups water
2 cup barbeque sauce
Directions
- Rub the pork with the salt, black pepper, garlic, onion, and cumin.
- Place the Inner Pot in the appliance. Add the pork and water to the Inner Pot. Place the Glass Lid on the appliance.
- Select the Slow Cook setting. Set the cooking temperature to 195° F/90° C and the cooking time to 10 hours. Halfway through the cooking time, flip the pork.
- When the cooking time is complete, remove most of the juice from the Inner Pot and pull the pork apart until it shreds. Add the barbeque sauce and serve.
ERIC’S TIP: Pulled pork is great to serve over totchos and in pulled pork sandwiches!

Waterman’s Feast
Ingredients
12 clams
1 ½ lb mussels
2 ear corn, cut into thirds
1 lb 16–20-size shrimp, peeled & deveined
½ lb Andouille sausage, sliced
1 stick butter, melted
3 tbsp. chopped parsley
1 lemon, sliced
Directions
1. Place the Inner Pot in the appliance. Place the clams, mussels, corn, shrimp, and sausage in the Inner Pot. Place the Glass Lid on the appliance.
2. Select the Steam setting. Set the cooking temperature to 212° F/100° C and the cooking time to 15 minutes. Stir
occasionally while cooking. Discard any clams or mussels that do not open.
3. Drizzle the melted butter over the Waterman’s Feast and sprinkle with the parsley before serving. Garnish with the
lemon slices.
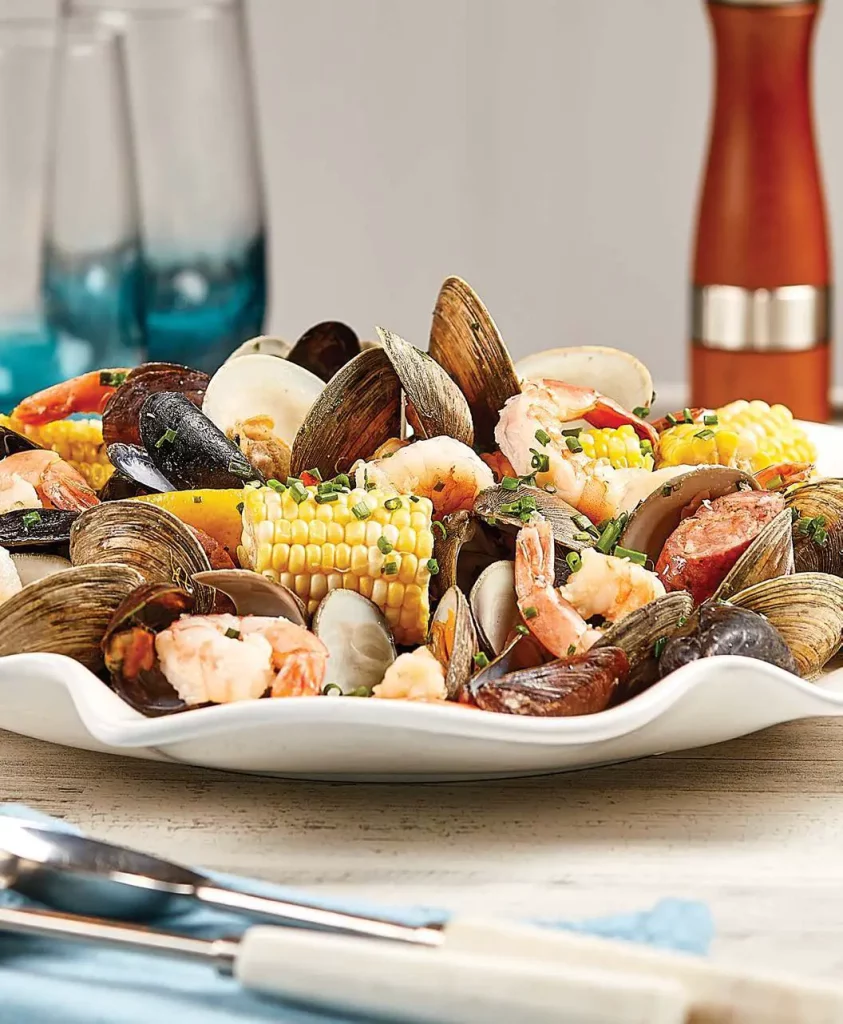
Shrimp Fried Rice
Ingredients
3 tbsp. grapeseed oil
1 small red bell pepper, cutinto thin strips (about 5 oz)
1 lb raw medium-size shrimppeeled & deveined
2 cups cooked rice
3 eggs, beaten
½ cup frozen peas, defrosted
½ cup chopped scallions
3 tbsp. soy sauce
1 tbsp. oyster sauce
Directions
- Place the Inner Pot in the appliance. Place the grapeseed oil in the Inner Pot.
- Select the Sauté setting. Set the cooking temperature to 375° F/190° C and the cooking time to 15 minutes. Let the oil heat up.
- When the oil is hot, add the pepper and cook until just softened.
- Add the shrimp and stir fry for 2 minutes.
- Add the rice and stir until heated through.
- Make a well in the center of the rice and place the eggs in the center of the well. Cook the eggs for 3–4 minutes and then stir them into rice.
- Add the peas, scallions, soy sauce, and oyster sauce. Toss and serve.
Bananas Foster
Ingredients
1 stick butter
¹⁄³ cup light brown sugar
4 bananas, sliced
½ tsp. cinnamon
¼ cup rum
4 large scoops vanilla ice cream
whipped cream, for serving
raspberries, for serving
Directions
- Place the Inner Pot in the appliance. Place the butter and sugar in the Inner Pot.
- Select the Sauté setting. Set the cooking temperature to 350° F/177° C and the cooking time to 10 minutes.
- When the butter and sugar have melted, add the bananas, cinnamon, and rum. Cook for 4 minutes.
- Carefully spoon the Bananas Foster over the ice cream, top with the whipped cream, and garnish with raspberries.
Glazed Doughnuts
Ingredients
8 flaky buttermilk biscuits
vegetable or canola oil
16 oz vanilla frosting
½ cup colorful sprinkles
Directions
- Cut a small round hole in the center of each biscuit.
- Place the Inner Pot in the appliance. Place 2–3 inches of oil in the Inner Pot.
- Select the Fry setting. Set the cooking temperature to 375° F/190° C.
- When the oil reaches 375° F/190° C, fry the biscuits I n the oil. Then, use tongs to carefully remove the doughnuts
and let cool. - Microwave the frosting until melted (15–20 seconds).
- Dip the doughnuts in the frosting and decorate with the sprinkles. Let the glaze dry before serving.
NOTE: Do not use the Air Frying Lid with this recipe.

Blondie Ice Cream Sandwich
Ingredients
½ gallon vanilla ice cream
16 ½ oz store-bought
chocolate chip cookie dough,
cut into 24 slices
¼ cup chocolate syrup
1 cup chocolate cookie crumbs
Directions
- To make the ice cream disc: Wrap a baking pan that fits in the Inner Pot with enough plastic wrap to cover the pan twice. Place the ice cream in the pan over the first layer of plastic wrap and spread until the ice cream forms into a disc. over the ice cream with the remaining plastic wrap and freeze for 1 hour.
- Spray two baking pans that fit in the Inner Pot with nonstick cooking spray and line the pans with parchment paper. Evenly divide the cookie dough between the two pans.
- Place the Inner Pot in the appliance. Place one batch of the cookie dough in the Inner Pot. Refrigerate the other batch of cookie dough while the first batch cooks. Attach the Air Frying Lid to the appliance.
- Select the Bake setting. Set the cooking temperature to 325° F/163° C and the cooking time to 15 minutes. Cook until done.
- When the first batch of cookie dough is cooked, repeat the cooking process with the second batch. Let both batches of cookies cool.
- Place one of the cookie discs on a board and top with the ice cream disc. Drizzle with the chocolate syrup. Top with he second cookie disc and then roll the sides of the ice cream sandwich in the chocolate cookie crumbs. Freeze for 1 hour before serving.

![]()
For parts, recipes, accessories, and everything PowerXL go to tristarcares.com or scan this QR code with your smartphone or tablet:
https://www.tristarcares.com/products/powerxl-brand/
To contact us,
email us at [email protected]
or call us at 973-287-5177.
![]()
©2021 Tristar Products, Inc. All rights reserved.
Distributed by: Tristar Products, Inc. Fairfield, NJ 07004
Made in China
Models: MFC-AF-6 (6QT), MFC-AF-6C (6QT), MFC-AF-8 (8QT)
PXL-GAFC-12IN1_RB_RTL_ENG_V2_210716
![]() GRILLAIR FRYER COMBO 12-IN-1
GRILLAIR FRYER COMBO 12-IN-1
Quick Start Guide
See owner’s manual for complete instructions and important safety information before using this product.
FOR AIR FRYING
IMPORTANT: Unpack all parts from the box and remove any clear or blue protective film on the components.
Wash with warm, soapy water before first use (only select accessories are dishwasher safe).
STEP 1
Attach the Air Frying Lid to the appliance. Open the lid. Ensure that the Inner Pot is in place in the Base. If your recipe uses the Grill Plate, place the Grill Plate in the Inner Pot. Ensure that the Grill Plate sits evenly.
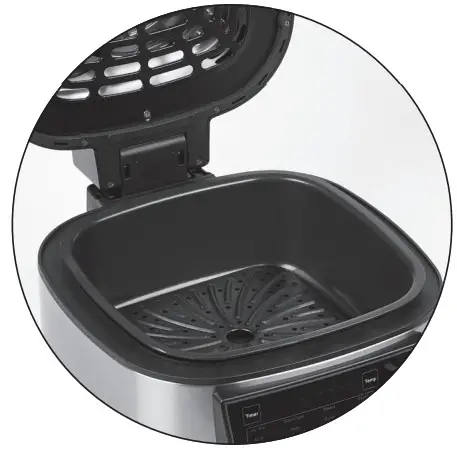
STEP 2
Arrange your food in the Inner Pot.
Close the lid.
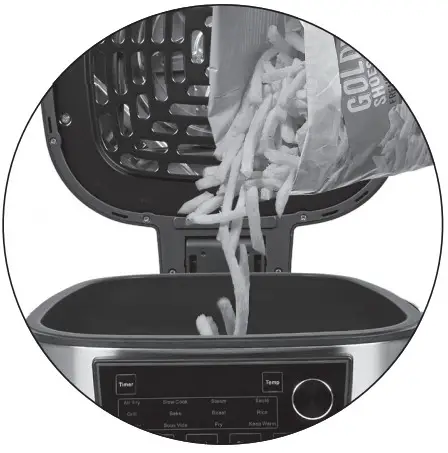
STEP 3
Turn the Control Knob to illuminate the presets on the Control Panel. Select one of the one-touch presets to set a cooking time and temperature or set the time
and temperature manually.
Press the Start Button to begin the cooking process.
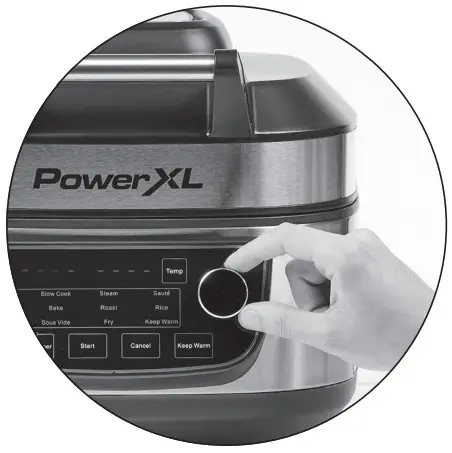
STEP 4
Once the cooking timer has elapsed, open the lid and carefully remove food with tongs or oven mitts.
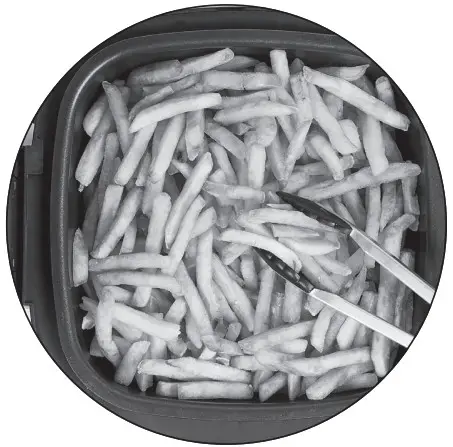
FOR GRILLING
STEP 1
Attach the Air Frying Lid to the appliance. Open the lid. Ensure that the Inner Pot is in place in the Base. Place the Grill Plate in the Inner Pot. Ensure that the Grill Plate sits evenly.
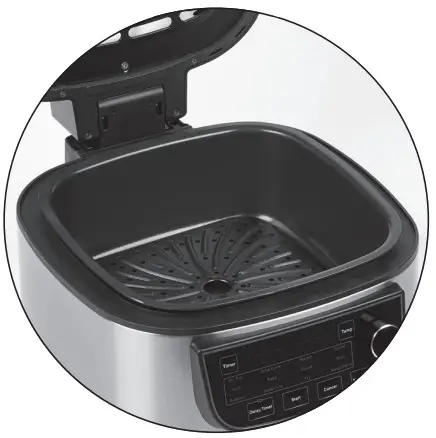
STEP 2
Close the lid, turn the Control Knob to select the Grill preset, and press the Start Button to preheat the appliance.
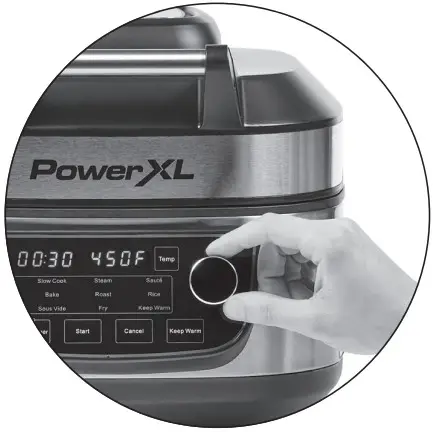
STEP 3
Once the appliance has preheated, “Add Food” will display on the Control Panel. Then, arrange your food on the Grill Plate in the Inner Pot. Close the lid and press the Start Button to continue the cooking process.
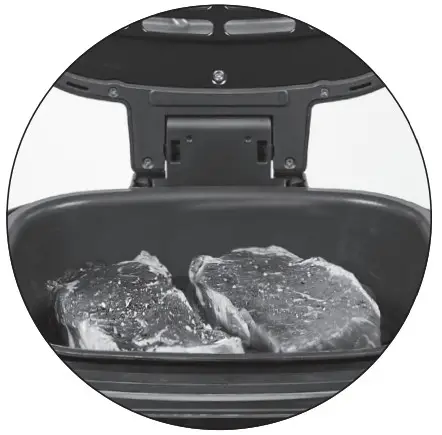
STEP 4
Once the cooking timer has elapsed, open the lid and carefully remove food with tongs or oven mitts.

PXL-GAFC-12IN1_QSG_RTL_ENG_V2_210716
]]>PowerXL Air Fryer Oven
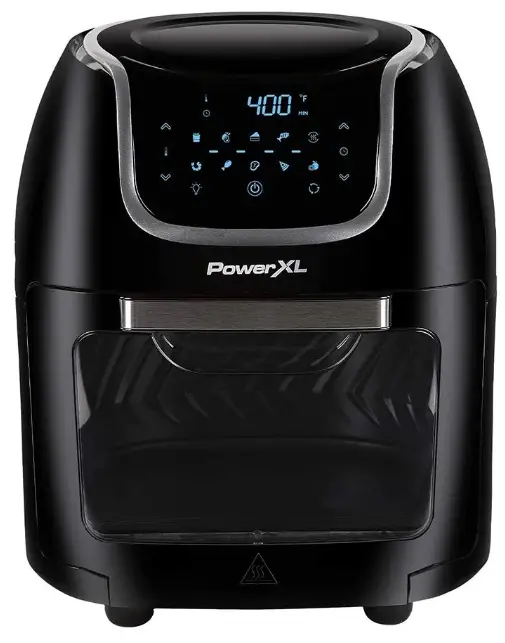
PowerXL Air Fryer Oven
See owner’s manual for complete assembly, instructions and important safety information before using this product.
Quick Start Guide
Air Flying
STEP 1
Make sure the Drip Tray is in place. Press the Power/Start–Stop Button to turn on the appliance.

STEP 2
Arrange food on Crisper Trays and place the Crisper Trays inside the appliance.
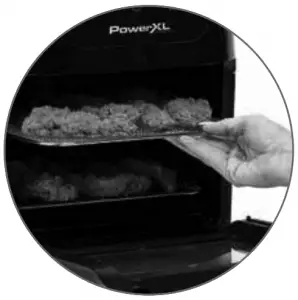
STEP 3
Select one of the one-touch cooking presets to begin the cooking cycle.
If using manual settings, select the time and temperature and then press the Power/Start–Stop Button.
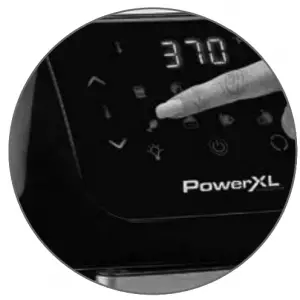
STEP 4
After the set cooking time has expired, the fan will run for 20 seconds to cool off the appliance and the appliance will automatically shut off.
Remove the Crisper Trays while wearing oven mitts and enjoy!
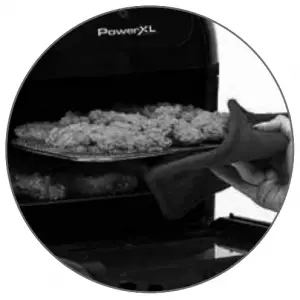
Rotisserie
STEP 1
Make sure the Drip Tray is in place. Press the Power/Start– Stop Button to turn on the appliance.
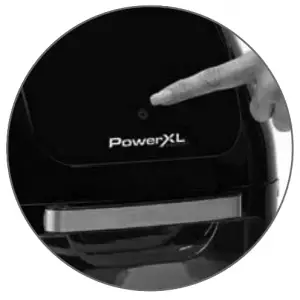
STEP 2
Carefully poke the Rotisserie Shaft through food, secure the food with the Rotisserie Forks, and place the Rotisserie Shaft inside the appliance. For detailed instructions, please see the owner’s manual.
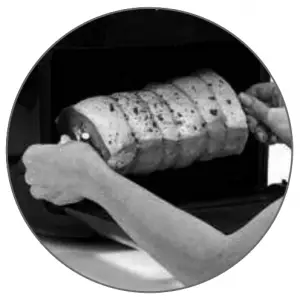
STEP 3
Select the Rotisserie preset to begin the cooking cycle. If using manual settings, select the time and temperature and then press the Power/Start– Stop Button.

STEP 4
After the set cooking time has expired, the fan will run for 20 seconds to cool off the appliance and the appliance will automatically shut off. Remove the Rotisserie Spit using the Fetch Tool or oven mitts and enjoy!
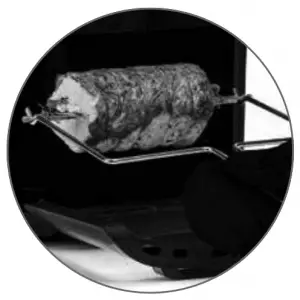
Unpack all parts from the box and wash with warm, soapy water before first use (only accessories are dishwasher safe).
DOWNLOAD RESOURCES
- PowerXL PowerXL Air Fryer Oven [pdf] User Guide PowerXL Air Fryer Oven, Air Frying
- Read more: https://manuals.plus/powerxl/powerxl-air-fryer-oven-manual#ixzz7i01dHsGL
FAQ’S
What should I cook first?
We recommend cooking frozen foods first to become familiar with the appliance. The PowerXL Air Fryer Oven cooks frozen foods quickly and evenly. Please note that food will cook faster than in a conventional oven. Frozen foods can be cooked in as little as 12 minutes.
How do I use my PowerXL air fryer oven?
Press the Power/Start–Stop Button to turn on the appliance. Arrange food on Crisper Trays and place the Crisper Trays inside the appliance. Select one of the one-touch cooking presets to begin the cooking cycle. If using manual settings, select the time and temperature and then press the Power/Start–Stop Button.
How long does it take to cook food in the PowerXL Air Fryer Oven?
The PowerXL Air Fryer Oven uses convection technology to circulate hot air around food, which means that food cooks faster than in a conventional oven. The PowerXL Air Fryer Oven cooks frozen foods in as little as 12 minutes and fresh foods in 20 minutes.
How do you cook frozen French fries in a power XL Air fryer?
Preheat Air Fryer to 400 degrees F. Place the frozen fries in the Air Fryer basket and give them a shake so they are distributed evenly. Cook fries for 10-15 minutes, shaking the basket or tossing the fries every 5 minutes. Add more time depending on your desired crispiness.
Can you put aluminum foil in an air fryer Power XL?
The short answer is yes. While we all know that putting foil in a microwave is a no-no (and if you don’t know, the flying sparks will remind you), air fryers don’t work the same way. They use hot air instead of actual microwaves to create heat, so putting foil in an air fryer doesn’t cause the same alarming spark show.
How do I clean the PowerXL Air Fryer Oven?
The appliance is easy to clean. Simply wipe the outside of the appliance with a damp cloth, and wipe the inside of the appliance with a damp cloth and mild detergent. To remove stubborn stains, use a non-abrasive cleaner such as Bar Keepers Friend or Bon Ami. Do not use abrasive cleaners or scouring pads on any part of the appliance. Do not immerse any part of the appliance in water or other liquid.
How do I clean the Crisper Trays?
The Crisper Trays are dishwasher safe (top rack only). To remove stubborn stains, use a non-abrasive cleaner such as Bar Keepers Friend or Bon Ami . Do not use abrasive cleaners or scouring pads on any part of the appliance. Do not immerse any part of the appliance in water or other liquid .
Do you need the grill plate for air fryer?
If you want to grill, sear, roast or fry in a larger air fryer, you’ll want to add this grill pan to your accessories list. Make sure you pick one that fits your model!
Can I use Pyrex in Airfryer?
Pyrex glassware is capable of withstanding high temperatures up to 425 degrees Fahrenheit so a pyrex dish will be safe in air fryers since most top out at 400 degrees.
Can I wrap chicken in foil in air fryer?
Yes you can wrap chicken in foil in an air fryer if it is ok to use foil in your air fryer model (check your manual if you are unsure). However, don’t wrap chicken in foil to cook if you are using any acidic ingredients in the marinade or seasoning (e.g. tomatoes, chili, citrus).
What are the disadvantages of air fryer?
10 Downsides of Air Fryers
Limited Capacity.
Easy to Burn Food.
Food Dries Out.
Some Foods Don’t Work.
Difficult to Clean.
Less Affordable.
Requires Learning.
Noisy.
Can you reheat food in an air fryer?
The general tip for reheating leftovers in the air fryer is: Preheat the air fryer for 5 minutes at 400°F/204°C. Place the food in the air fryer basket. Cook at 350°F/175°C for 3 to 5 minutes, or until the food is crispy to your liking and comes to temperature.
PowerXL Air Fryer Oven
www://powerxlproducts.com/
![]()
AIR FRYER GRILL
Owner’s Manual
Save These Instructions – For Household Use Only
MODEL: B-AFO-002G
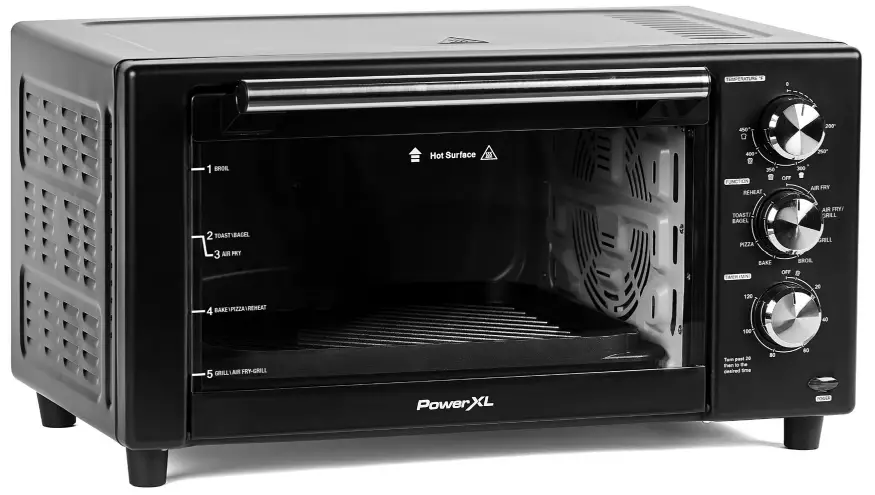
When using electrical appliances, basic safety precautions should always be followed. Do not use the PowerXL Air Fryer Grill™ until you have read this manual thoroughly.
![]() Visit TristarCares.com for tutorial videos, product details, and more.
Visit TristarCares.com for tutorial videos, product details, and more.
Guarantee Information Inside
PowerXL Air Fryer Grill
BEFORE YOU BEGIN
The PowerXL Air Fryer Grill™ will provide you many years of delicious family meals and memories around the dinner table. But before you begin, it’s very important that you read this entire manual, making certain that you are totally familiar with this appliance’s operation and precautions.
Unit Specifications
| Model Number |
Supply Power |
Rated Power |
Capacity | Temperature |
| B-AFO-002G | 120V ~60Hz | 1500W | Up to 930 Internal Cubic Inches | 200° F– 450° F |
IMPORTANT SAFEGUARDS
 WARNING
PREVENT INJURIES! CAREFULLY READ ALL INSTRUCTIONS BEFORE USE!
When using electrical appliances, always follow these basic safety precautions.
- Read all instructions carefully & to prevent injuries.
- This appliance is NOT INTENDED for use by persons with reduced physical, sensory, or mental capabilities or a lack of experience and knowledge unless they are under the supervision of a responsible person or have been given proper instruction in using the appliance. DO NOT leave unattended with children or pets. KEEP this appliance and cord away from children. Aryo one who has not fully read and understood all operating and safety instructions contained in this manual is not qualified to operate or clean this appliance.
- ALWAYS place the Unit on a flat, heat-resistant surface. Intended for countertop use only. DO NOT operate on an unstable surface. DO NOT place on or near a hot gas or electric burner or in a heated oven. DO NOT operate the unit in an enclosed space or under hanging cabinets. Proper space and ventilation are needed to prevent property damage that may be caused by steam released during operation. Never operate the unit near any flammable materials, such as dish towels, paper towels, curtains, or paper plates. 00 NOT let the cord hang over the edge of the table or counter or touch hot surfaces.
- CAUTION HOT SURFACES: This appliance generates extreme heat and steam during use. Proper precautions must be taken to prevent the risk of personal injury, fires, and damage to property.
- DO NOT use this appliance for anything other than its intended use.
- WARNING: To reduce the risk of electric shock, cook only using the removable containers trays, racks, etc. provided. a) Do not touch hot surfaces. Use handles or knobs. b)To disconnect, turn the timer to of( then remove the plug from the wall outlet.
- c) A fire may occur if the Unit’s covered or touching flammable material, including curtains, draperies, walls, and the when in operation. Do not store any item on top of the appliance when in
- The use of accessory attachments NOT RKOMM ENDED by the appliance manufacturer may cause injuries.
- NEVER use the outlet below the counter.
- NEVER use with an extension cord. A short power-supply cord (or detachable power-supply cord) is provided to reduce the risk of becoming entangled in or tripping over a longer cord.
DO NOT use the Unit outdoors.
- DO not operate if the cord or plug is damaged. If the appliance begins to malfunction during use, immediate& unplug the cord from the power source. DO NOT USE OR ATTEMPT TO REPAIR A MALFUNCTIONINGAPPUANCE. Contact customer service for assistance(see the back of the manual for contact information).
- UNPLUG the Unit from the outlet when not in use and before cleaning. Allow the unit to cool before attaching or removing
- NEVER immerse housing in water. If the Unit falls or accidentally becomes immersed in water, unplug it from the wall outlet immediately. Do not reach into liquid if the Unit is plugged in and immersed. Do not immerse or rinse cords or plugs in water or other liquids
- The Unit’s outer surfaces may become hot during use. Wear oven mitts when handling hot surfaces and components.
- When cooking, DO NOT place the app fiance against a wall or against other appliances. Leave at least 5 in. free space on the top, basic, and sides and above the appliance. DO NOT place anything on top of the appliance.
- DO NOT place t the Unit on stovetop surfaces.
- This appliance is intended for normal household use only. It is NOT INTENDED for use in commercial or retail If the PoweaL AirFryer Gilt is used improperly or for professional or semi-professional purposes or if it is not used according to the instructions in the user manual the guarantee becomes invalid and Tristar will not be held liable for damages.
- ALWAYS unplug the appliance after use.
- EXTREME CAUTION must be used when moving an appliance containing hot oil or other hot liquids.
- USE EXTREME CAUTION when removing trays or disposing of hot grease.
- DO NOT c lean with metal scouring pads. Pieces can break off the pad and touch electrical parts, creating a risk of electric shock. Use non-metallic scrub pads.
- Oversize foods or metal utensils MUST NOT be inserted in the Unit as they may create a fire or risk of electric shock.
- EXTREME CAUTION should be exercised when using containers constructed of material other than metal or glass.
- DO not store any materials, other than manufacturer-recommended accessories, in this Unit when not in use.
- DO NOT place any of the following materials in the Unit: paper, cardboard, plastic.
- DO NOT cover the Drip Trayor any part of the Unit with metal foil (except when our recipe instructs to wrap the Crisper Tray/Pisa Rack with fill this will cause overheating of the Unit.
- . Before using your new PowerXL Air Fryer Grill on any countertop surface, check with your countertop manufacturer or installer for recommendations about using appliances on our surfaces. Some manufacturers and installers may recommend protecting your surface by placing a hot pad or trivet under the PowerXL Air Fryer Grill for heat protection.
Your manufacturer or installer may recommend that hot pans, pots, or electrical appliances should not be used directly on top of the countertop. “If you are unsure, place a wood, silicone, or other heat-resistant cutting board under the PowerXL Air Fryer Grill before using it. - Please do not place your PowerXL Air Fryer Grill on a hot cooktop because it could cause a fire, damaging the PowerXL Air Fryer Grill, your cooktop, or your home.
WARNING:
For California Residents
This product can expose you to Bisphenol A, which is known to the State of California to cause birth defects or other reproductive harm. For more information, go to www.P65Warnings.ca.gov.
WARNING
- NEVER put anything on top of the appliance.
- NEVER cover the air vents on the top, back, and side of the cooking Unit.
- ALWAYS use oven mitts when removing anything hot from the Unit.
- NEVER rest anything on the door while it is open.
- DO NOT leave the door open for an extended period.
- ALWAYS ensure that nothing is protruding from the Unit before closing the door.
- ALWAYS close the door gently; NEVER slam the door closed. ALWAYS hold the handle of the door when opening and closing the door.
- A short power supply cord is provided to reduce the risk of becoming entangled or tripping over a longer cord.
- Do not use an extension on the cord with this product.
- Plug the power cord into a 2-prong wall outlet with no other appliances on the same outlet. Plugging other appliances into the outlet will cause the circuit to overload.
- This model is designed for use with a 2-prong grounded 120V dedicated electrical outlet only. Do not use any other electrical outlet a modify the plug.
- This appliance has a polarized plug (one blade is wider than the other). To reduce the risk of electric shock, this
plug is intended to fit into a polarized outlet only one way. If the plug does not fit fully into the outlet, reverse the plug. If it still does not fit, contact a qualified electrician. Do not attempt to modify the plugin anyway. To disconnect, turn any control off, and then remove the plug from war II.
Electric Power
If the electrical circuit is overloaded with other appliances, your new Unit may not operate properly. It should be operated on a dedicated electrical circuit.
IMPORTANT
- Before initial use, hand washes the cooking accessories. Then, wipe the outside and inside of the Unit with a warm, moist cloth and mild detergent. Next, preheat the FbwerXL Air Ayer Ga for a few minutes to burn off any residue. Finally, wipe the Unit ou t with a wet cloth.
CAUTION: Upon first use, the Unit may smoke or emit a burning odor due to oils used to coat and preserve the heating elements.
- The FbwerXLAk Fryer Gal must be operated with the Drip Tray in place, and any food or grease must be removed from the Drip Tray if the Drip Tray becomes more than half full..
- Never operate wurPowerXLAir Fryer Grilwiththedcor open.
- Never put the Baking Pan (or any other accessory) directly on the top of the lower heating elements.
SAVE THESE INSTRUCTIONS – FOR HOUSEHOLD USE ONLY
Parts & Accessories
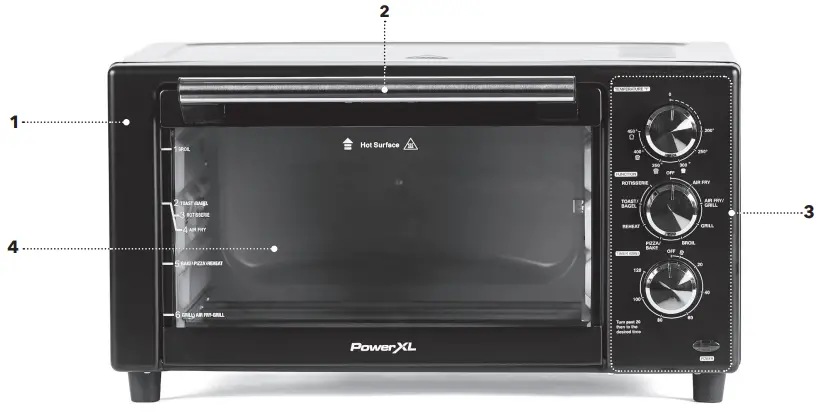
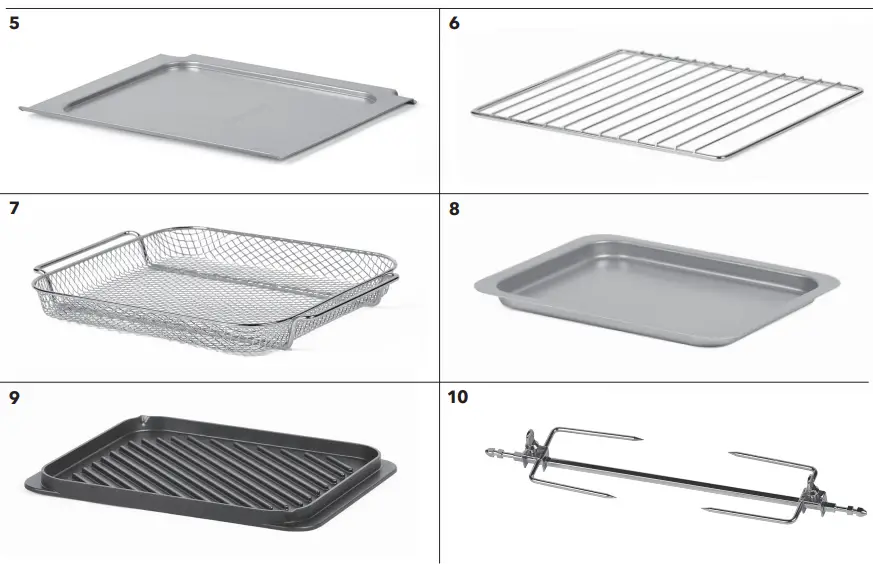
Parts & Accessories
- MAIN UNIT: Features sturdy stainless steel construction throughout. Cleans easily with a damp sponge or cloth and a mild detergent Avoid harsh, abrasive cleaners. NEVER submerge this Unit in water or liquids of any kind.
- DOOR HANDLE: Always use the handle and avoid touching the Glass Door. The Door may become very hot during the cooking process and can cause injury.
- CONTROL PANEL: Contains the Control Buttons and Knobs (see The Control Panel, p.8).
- GLASS DOOM Sturdy, durable tempered glass keeps heat in and helps ensure even heat distribution to NEVER cook with this door in the open position.
- DRIP TRAY: Place in the bottom of the unit just below the heating elements. Never use this Unit without the Drip Tray. The Drip Tray may become full when cooking juicy foods. When the Drip Tray becomes more than half full, empty it. To empty the DrIpTray while: cooking: While wearing oven mitts, open the door and slowly slide the Drip Tray out of the Unit. Empty the Drip Tray and return it to the Unit Close the door to finish the cooking cycle.
- PIZZA RACK: Use for toasting bread, bagels, and pizzas; baking; grilling; and roasting. Quantity
- CRISPER TRAY: Use for cooking oil•free fried foods and broiling. Quantity may vary.
- BAKING PAN: Use for baking and reheating various foods. Deeper oven•safe pans and dishes may be used in the PowerXL Air Myer Gilt CAUTION: When ba<ing or cooking with baking pans and dishes, always place them on a rack. Never cook anything directly on the heating elements.
- GRILL PLATE: Use for grilling steaks, burgers, veggies, and more.
- ROTISSERIE FORK: Used for cooking whole chickens and roasts of all types
Adjustable Tray Positions
The Crisper Tray, Pizza Rack, and Grill Plate can be inserted into any of the three positions between the heating elements in the Unit.
IMPORTANT: The Drip Tray must be kept below the heating elements in the Unit at all times when cooking food.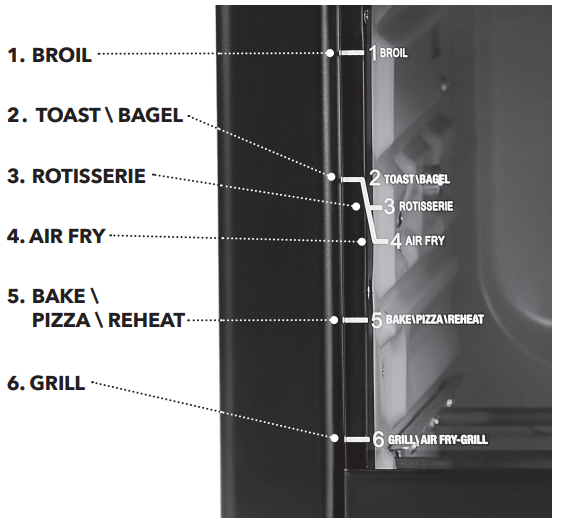
WARNING
The metal components of this Unit will get extremely hot during use. Great care should be taken to avoid personal injury. Wear protective oven mitts or gloves.
The Control Panel
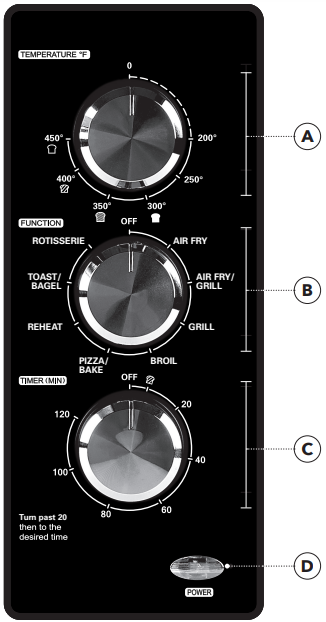
- TEMPERATURE/DARKNESS CONTROL KNOB: Use to set the desired cooking temperature. Temperature control range: 200° F-450° F.
- FUNCTION KNOB: Use to set a cooking function. Different cooking functions activate the air frying fan and different heating elements (see Cooking Function Information, p. 12). A cooking function must be set in order for the cooking process to begin.
- TIME CONTROL KNOB: Use to set the desired cooking time. Time control range: 1-120 minutes.
Turn past 20
then to the
desired time
The above marking appears near the Time Control Knob on the Control Panel. The marking indicates that when setting a cooking time less than 20 minutes, first set the cooking time to 20 minutes. Then, turn the Time Control Knob to the desired cooking time.
TO TOAST:
- Use the Temperature/Darkness Control Knob to select your desired darkness.
 – Light
 – Medium
 -Medium-Dark
 -Dark
-Dark
- Select Toast/Bagel on the Function Knob.
- Turn the Time Control Knob past the 20-minute mark and then back to the toast icon. functions.
The timer will sound when the cooking process is complete.
POWER LIGHT: When a cooking mode and the timer have been set, the light will turn on. Once the timer has expired, the light will turn off.
Using the Accessories
Using the Pizza Rack
- Insert the Drip Tray below the bottom heating elements (at the very bottom of the Unit [see Fig. i]).
- Use the markings on the door to choose the shelf position recommended for your recipe. Insert the Pizza Rack into the desired slot (see Fig. ii) and then place your food on the Pizza Rack.
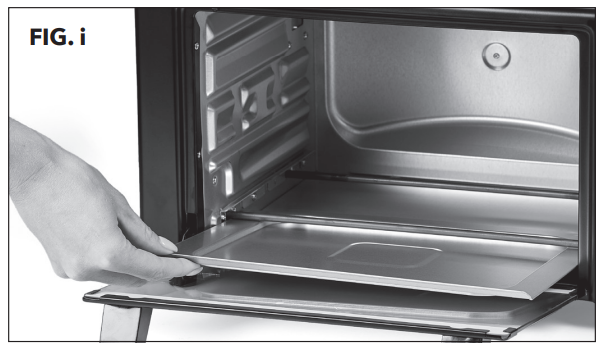
Using the Baking Pan
- Insert the Drip Tray below the bottom heating elements (at the very bottom of the Unit [see Fig. i]).
- Use the markings on the door to choose the shelf position recommended for your recipe. Insert the Pizza Rack into the desired slot (see Fig. ii).
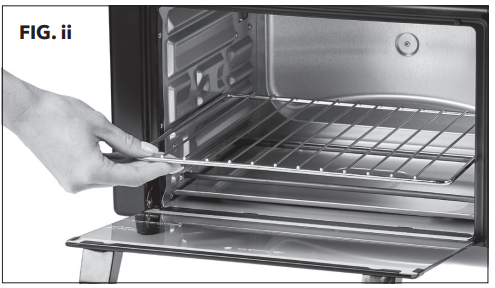
- Place your food on the Baking Pan. Then, place the Baking Pan on the Pizza Rack (see Fig. iii).

Using the Crisper Tray
- Insert the Drip Tray below the bottom heating elements (at the very bottom of the Unit [see Fig. i]).
- Use the markings on the door to choose the shelf position to recommend for your recipe. Place food on the Crisper Tray and insert the Tray into the desired slot (see Fig. iv).
NOTE: When using the Crisper Tray or Pizza Rack to cook food with higher moisture content, use the Baking Pan below the Tray or Rack to catch any dripping juices.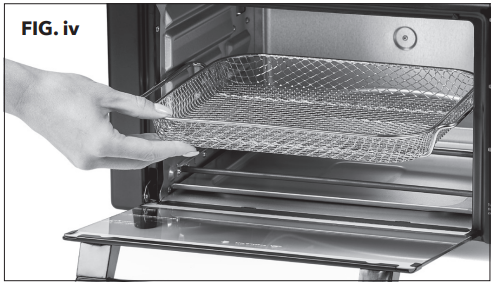
Using the Grill Plate
- Insert the Drip Tray below the bottom heating elements (at the very bottom of the Unit [see Fig. i]).
- Place food on the Grill Plate and insert the Plate into Shelf Position 5 (see Fig. v).
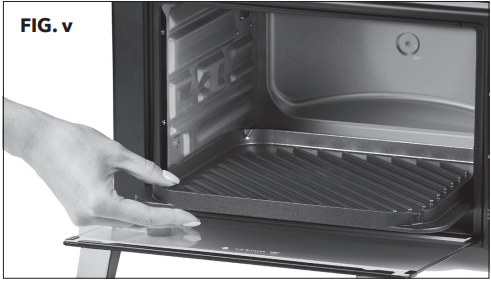
NOTE: To Prevent spillage, never let grease or oil build-up while cooking. It is recommended to drain the grease or oil in a container so the Grill Plate does not overfill.
Accessory Capacities
| Accessory | Function | Capacity |
| Pizza Rack | Varies | 12 lb. (5443 g) |
| Crisper Tray | Air Fry | 10 lb. (4536 g) |
| Grill Plate | Grill | 6 4-oz. burgers |
| Rotisserie Spit | Rotisserie | 4 lb. (1814 g) |
Using the Rotisserie Spit
- Insert the Drip Tray below the bottom heating elements (at the very bottom of the Unit [see Fig. i, p. 9]).
- With the Forks removed, force the Rotisserie Spit through the center of the food lengthwise.
- Slide the Forks (A) onto each side of the Spit and secure them in place by tightening the two Set Screws (B). NOTE: To support the food on the Rotisserie Spit better, insert the Rotisserie Forks into the food at different angles (see Fig. vi).
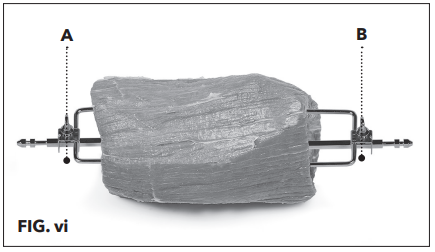
- Hold the assembled Rotisserie Spit at a slight angle with the right side higher than the left side and insert the left side of the Spit into the Rotisserie connection inside the Unit (see Fig. vii).
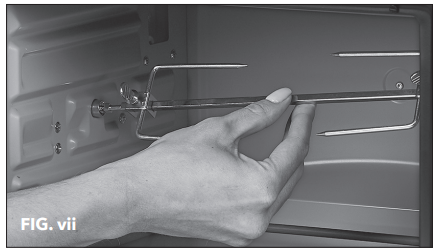
- With the left side securely in place, lower the right side of the Spit into the Rotisserie connection on the right side of the Unit (see Fig. viii).
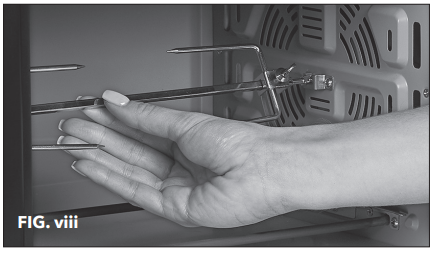
- To remove cooked food, insert a large fork into the food, twist left, and raise to remove the Spit from the left slot, and then remove the food from the Unit with a slight lifting motion. Transfer the food to a carving board or serving plate.
Cooking Function Information
| Mode | Description | Info | Heating Element Used |
| Air Fry | High-speed convection cooking is used to replace deep frying. Great for cooking breaded items using super-heated air with little to no oil. | •Uses the Crisper Tray in Position 4. •Heats from the side and bottom heating elements. •The Air Frying Fan is on. |
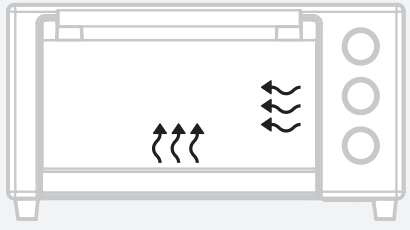 |
| Air Fry/Grill | Get outdoor grilling results using the Grill Plate with the added benefit of superheated air cooking your food quickly and evenly. | •Uses the Grill Plate in Position 6. •Heats from the side and bottom heating elements. •The Air Frying Fan is on. |
|
| Grill | Char-grill food on the non-stick Grill Plate. Get even cooking with the top and bottom heating elements. | •Uses the Grill Plate in Position 6. •Heats from the top and bottom heating elements. •The Air Frying Fan is on. |
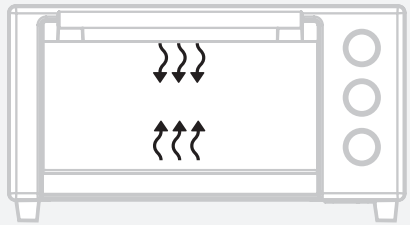 |
| Broil | Melts cheese on burgers or cooked items sears small cuts of meat and cooks open-faced sandwiches. | •Uses the Pizza Rack anchor the Baking Pan in Positions 1 and 2 (the RacklPan should be close to the top heating element for best results). •Heats from the top heating element •The Air Frying Fan is not used. |
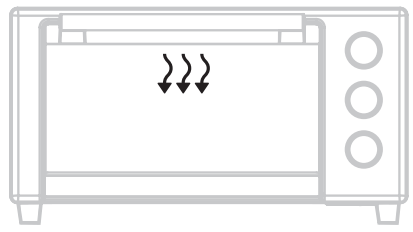 |
| Bake/Pizza | Cook perfect pastries with conveclion cooking. Cook cakes, pies, cookies, or any other baked goods. Perfect for cooking homemade or frozen pizza. Crisps the dough while melting the cheese from the top. |
•Uses the Pizza Rack in Position 5. You can also add a baking tray (muffin tray, loaf pan) if desired. •Heats from the top and bottom heating elements. •The Air Frying Fan is on. •Uses the Pizza Rack in Position 5. •Heats from the top and bottom heating elements. •The Air Frying Fan is on. |
|
| Toast/Bagel | Used to brown and crispbread on both sides. Great for sliced loaves, English muffins.bagels, rolls, and frozen waffles. |
•Uses the Pizza Rack in Position 2. •Use the Time Control Knob to select the desired darkness (light Medium, Medium-Dark, or Dark). Toasts up to 6 slices of loaf bread at once. •Heats from the top and bottom heating elements. •The Air Frying Fan is not used. |
|
| Reheat | Used to heat prepared meals without searing. | •Uses the Pizza Rack in Position 5. •Heats from the top and bottom heating elements. •The Air Frying Fan is on. |
|
| Rotisserie | Heats food with convection-style cooking while the RotisseneSpit rotates your chicken or roast Keeps your food crispy on the outside, juicy on the inside, and evenly cooked. | •Uses the Rotisserie Spit accessory in the Rotisserie slot in Position 3. •Heats from the top and bottom heating elements •The Ai drying fan is used. |
|
Cooking Function Information
Internal Temperature Meat Chart
Use this chart and a food thermometer to ensure that meat, poultry, seafood, and other cooked foods reach a safe minimum internal temperature.
*For maximum food safety, the U.S. Department of Agriculture recommends 165° F for all poultry; 160° F for ground beef, lamb, and
pork; and 145° F, with a 3-minute resting period, for all other types of beef, lamb, and pork. Also, review the USDA Food Safety Standards.
| Food | Type | Internal Tempt |
| Beef &Veal | Ground | 140° F (70° C) |
| Steaks roasts: medium | 145° F (70° C) | |
| Steaks roasts: rare | 125° F (52° C) | |
| Chicken &Turkey | Breasts | 165° F (75° C) |
| Ground, stuffed | 165° F (75° C) | |
| Whole bird, legs, thighs, wings | 165° F (75° C) | |
| Ash & Shellfish | Any type | 145° F (63° C) |
| Lamb | Ground | 160° F (70° C) |
| Steaks roasts: medium | 140° F (70° C) | |
| Steaks roasts: rare | 130° F (55° C) | |
| Pork | Chops, ground, ribs, roasts | 160° F (70° C) |
| Fully cooked ham | 140° F (60° C) |
Tips
- Foods that are smaller in size usually require a slightly shorter cooking time than larger ones.
- Large sizes or quantities of food may require a longer cooking time than smaller sizes or quantities.
- Flipping or turning food halfway through the cooking process ensures that the food is evenly cooked.
- Adding a bit of vegetable oil to fresh potatoes is suggested for a crispier result. When adding oil, do so just before cooking and add only a small amount onto the potato.
- Snacks normally cooked in an oven can also be cooked in the PowerXL Air Fryer Grill.
- Use premade dough to prepare filled snacks quickly and easily. Premade dough also requires a shorter cooking time than homemade dough.
- A baking tin or oven dish can be placed on the rack inside the PowerXL AirFryer Grill when cooking foods such as cakes or quiches. Using a tin or dish is also recommended when cooking fragile or filled foods.
Instructions for Use
Before First Use
- Read all material, warning stickers, and labels.
- Remove all packing materials, labels, and stickers.
- Hand-washing is recommended. Wash all parts and accessories used in the cooking process with warm, soapy water.
- Never wash or submerge the cooking Unit in water.
Wipe the inside and outside of the cooking Unit with a clean, moist cloth. Rinse with a warm, moist cloth. - Before cooking food, preheat the Unit for a few minutes to allow the manufacturer’s protective coating of oil to burn off. Wipe the Unit with warm, soapy water and a dishcloth after this burn-in cycle.
Instructions
- Place the appliance on a stable, level, horizontal, and heat-resistant surface. Ensure that the Unit is usedin an area with good air circulation and away from hot surfaces, other objects or appliances and any combustible materials.
- Ensure that the unit is plugged into a dedicated power outlet.
- Insert the Drip Tray below the bottom heating elements (at the very bottom of the Unit).
- Select the cooking accessory for your recipe.
- Place food to be cooked in the Unit and close the door.
- Use the Function Knob to select a cooking function.
- Use the Temperature/Darkness Control Knob to set the cooking temperature.
- Use the Time Control Knob to set the cooking time.
When setting a cooking time of fewer than 20 minutes, first set the cooking time to 20 minutes. Then, turn the Time/Darkness Control Knob to the desiredcooking time.* The cooking cycle will begin and the Power Light will illuminate when all three settings(temperature, cooking function, and time) are set.
NOTE: When using the Toast function, use the Temperature/Darkness Control Knob to select your desired darkness. Then, select Toast/Bagel on the Function Knob. Finally, turn the Time Control Knob past the 20-minute mark and then back to the toast icon. - When the cooking process is complete and the cooking time has elapsed, the timer will sound and the power Light will darken. When you are done cooking, ensure that the Temperature/Darkness Control KnobFunction Knob, and Time Control Knob are turned to the “OFF” position.
CAUTION: All surfaces inside and outside of the Unit will be extremely hot. To avoid injury, wear oven mitts. Allow at least 30 minutes for the Unit to cool before attempting to clean or store the Unit.
*The timer will not activate unless the Time/Darkness Control Knob is turned past the 20-minute mark. When setting a cooking time of fewer than 20 minutes, be sure to set the correct time once the timer is activated to avoid overcooking food.
Cleaning & Storage
Cleaning
Clean the PowerXL Air Fryer Grill after each use. Remove the power cord from the wall socket and be certain the appliance is thoroughly cooled before cleaning.
- Wipe the outside of the appliance with a warm, moist cloth and mild detergent.
- To clean the door, gently scrub both sides with warm, soapy water and a damp cloth. DO NOT soak or submerge the Unit in water or wash in the dishwasher.
- Clean the inside of the Unit with hot water, a mild detergent, and a non-abrasive sponge. Do not scrub the heating coils because they are fragile and may break. Then, rinse the Unit thoroughly with a clean, damp cloth. Do not leave standing water inside the Unit.
- If necessary, remove unwanted food residue with a nonabrasive cleaning brush.
- Caked-on food on accessories should be soaked in warm, soapy water to remove the food easily.
Hand-washing is recommended. - The Grill Plate may be difficult to remove from the PowerXL Air Fryer Grill once the Grill Plate becomes hot due to heat expansion. To remove the Grill Plate, use an oven mitt to hold the appliance’s base and another oven mitt to hold the Grill Plate while carefully removing the Grill Plate from the appliance. Removing the Grill Plate from the appliance is easier once the appliance cools down.
- Any other service should be performed by an authorized service representative.
Storage
- Unplug the appliance and let it cool thoroughly.
- Make sure all components are clean and dry.
- Place the appliance in a clean, dry place.
Troubleshooting
| Problem | Possible Cause | – Solution |
| The Unit does not work | The Unit is not plugged in. | Plug the power cord into a wall socket. |
| The unit has not been turned on by setting the preparation time and temperature. | Set the temperature and time. | |
| The Unit is plugged into an outlet that is shared with other devices. | Plug the Unit into a dedicated power outlet | |
| Food not cooked | The Unit is overloaded. | Use smaller batches for more even cooking. |
| The temperature is set too low. | Raise the temperature and continue cooking. | |
| Food is not fried evenly | Some foods need to be turned in during the cooking process. | Check halfway through the process and tum food if needed. |
| Foods of different sizes are being cooked together. | Cook similar-sized foods together. | |
| If using multiple racks, trays need to be rotated. | Rotate trays from top to bottom and vice versa. | |
| White smoke coming from Unit | Oil is being used. | Wipe down to remove excess oil |
| Accessories have excess grease residue from previous cooking. | Clean the components and Unit interior after each use. | |
| French fries are not fried evenly | The wrong type of potato is being used.. | Use fresh, firm potatoes. |
| Potatoes were not blanched properly during preparation. | Use cut sticks and pat dry to remove excess starch. | |
| Too many fries are being cooked at once. | Cook less than 2 1/2 cups of fries at a time. |
|
| Fries are not crispy | Raw fries have too much water. | Dry potato sticks properly before misting oil. Cut sticks smaller. Add a bit more oil. |
Frequently Asked Questions
- Does the Unit need time to heat up?
Preheating is needed when you are cooking from a cold start. Add 3 minutes to the cooking time to compensate when preheating is necessary. - Is it possible to shut off the unit at any time?
To turn off the unit, turn the Temperature/Darkness Control Knob, Function Knob, and Time Control Knob to “OFF” to stop the cooking cycle. When the Power Light has darkened, unplug the Unit. - Can I check the food during the cooking process?
You can check the cooking process at any time by looking through the glass door. - What happens if the Unit still does not work after I have tried all the troubleshooting suggestions?
Never attempt home repair. Contact the marketer and follow the procedures set forth by the manual. Failure to do so could render your guarantee null and void. - Why is the grill not working?
Set the cooking temperature to 450° F. Set the Function Knob to Air Fry/Grill or Grill. Set the cooking time by turning the Timer Dial past the 20-minute mark and then to the desired cooking time.
90-Day Money-Back Guarantee
The PowerXL Air Fryer Grill is covered by a 90-day money-back guarantee. If you are not 100% satisfied with your product, return the product and request a replacement product or refund. Proof of purchase is required. Refunds will include the purchase price, less processing, and handling. Follow the instructions in the Return Policy below to request a replacement or refund.
Replacement Guarantee Policy
Our products, when purchased from an authorized retailer, include a 1-year replacement guarantee if your product or component part does not perform as expected, the guarantee extends only to the original purchaser and is not transferable. If you experience an issue with one of our products within 1 year of purchase, return the product or the component part for replacement with a functionally equivalent new product or part. The original proof of purchase is required, and you are responsible to pay to return the unit to us. In the event a replacement unit is issued, the guarantee coverage ends six (6) months following the receipt date of the replacement unit or the remainder of the existing guarantee, whichever is later. Tristar reserves the right to replace the unit with one of equal or greater value.
Return Policy
If, for any reason, you would like to replace or return the product under the money-back guarantee, your order number can be used as the return merchandise authorization number (RMA). If the product was purchased in a retail store, return the product to the store or use “RETAIL” as the RMA. Return your product to the address provided below for a replacement, which will incur no additional processing and handling fees, or for the refund of your purchase price, less processing, and handling. You are responsible for the cost of returning the product. You can locate your order number at www.customerstatus.com. You can call customer service at 973-287-5126 or email [email protected] for any additional questions. Pack the product carefully and include in the package a note with (1) your name, (2) mailing address, (3) phone number, (4) email address, (5) reason for return, and (6) proof of purchase or order number, and (7) specify
on the note whether you are requesting a refund or replacement. Write the RMA on the outside of the package. Send the product to the following return address:
PowerXL Air Fryer Grill
Tristar Products
500 Returns Road
Wallingford, CT 06495
If the replacement or refund request has not been acknowledged after two weeks,
please contact Customer Service at 973-287-5126.
Refund
Refunds requested within the money-back guarantee timeframe will be issued to the payment method used at purchase if the item was purchased directly from Tristar. If the item was purchased from an authorized retailer, proof of purchase is required, and a check will be issued for the item and sales tax amount. Processing and handling fees are non-refundable.
![]()
Air Fryer Grill
We are very proud of the design and quality of our
PowerXL Air Fryer GrillTM
This product has been manufactured to the highest standards.
Should you have any questions, our friendly customer service staff is here to help you.
Visit us at www.TristarCares.com, email us at
[email protected],
or call us at 973-287-5126
 Distributed by:
Tristar Products, Inc.
Fairfield, NJ 07004
© 2020 Tristar Products, Inc.
Made in China
PXL_AFG_IB_TP_ENG_V6_200820
![]()