Polaroid Now User Guide
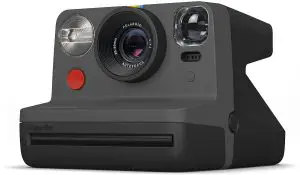
The Polaroid Now catches life as you live it. Our autofocus camera gives you great quality photos wherever the moment takes you. In this manual we will take you through everything you need to know; from how to take your first Polaroid photograph to support if you ever need it, so can get the most out of your new Polaroid camera.
Product Overview

- A. Shutter Button
- B. Lens
- C. Flash
- D. Viewfinder
- E. Self-timer & Double Exposure
- F. Film Door Button
- G. Flash ON | OFF Button
- H. ON | OFF Button
- I. Film Counter LED
- J. Neck Strap Loop
- K. Battery Level Indicator
Film Counter Display
| Display | This means: |
| Unlit | → Camera is off |
| 0 | → No film |
| 1 | → One photo remaining |
| 2 | → Two photos remaining |
| 3 | → Three photos remaining |
| 4 | → Four photos remaining |
| 5 | → Five photos remaining |
| 6 | → Six photos remaining |
| 7 | → Seven photos remaining |
| 8 | → Eight photos remaining |
| – | → Darkslide is inside |
| 1 (flashing) | → Exposure 1 of Double Exposure |
| 2 (flashing) | → Exposure 2 of Double Exposure |
| d o o r | → Film Processing Unit door is open |
| L | → Lens select failure |
| C | → Object too close |
| b (flashing 5x) | → Battery Low |
| → Eject film animation | |
| → EV Trim +½ EV | |
| → EV Trim Normal | |
| → EV Trim -½ EV |
Getting Started
Open the Polaroid Now box and check that you have everything you need:
- Polaroid Now Camera
- Micro USB Charging Cable
- Quick Start Guide
- Camera Neck Strap
Charge your camera
The Polaroid Now won’t be fully charged straight out of the box, so you will need to charge it to get started. Plug the Micro USB side of the cable into the side of the camera and the USB side into your USB charging adapter. The battery level indicator LED next to the Micro USB slot will flash green while the camera is plugged in and charging. It will turn off once the camera is fully charged.
A full charge usually takes about 2 hours through a wall socket with a USB power adapter. A fully-charged Polaroid Now will have enough power to shoot 15 packs of film, depending on usage. Remember to turn off the Polaroid Now after use to save battery life.
Attach your neck strap


Find your instant film
The Polaroid Now uses i-Type and 600 instant film. Get that iconic Polaroid frame in color, black and white, or with our special edition frames. Find your next film here, then you’re ready to take your first Polaroid photograph.
How To Take Your First Photo
- Turn on the Polaroid Now camera
Press the ON | OFF button for ½ a second. The film counter display will show the number ‘0’ because there is currently no film in the camera. - Insert your film pack
Push the film door button to open the film door, then insert the film pack into film chamber of your camera. Push the film pack all the way in with the darkslide facing up and the tab facing toward you. Close the film door. The darkslide will eject. Remove the darkslide and allow the film shield to roll back in. This shield is designed to protect images from light as they develop, so don’t remove it. If the darkslide has not ejected, remove the film pack and re-insert it to make sure it is pushed all the way into the back of the camera.
We recommend using i-Type film as the camera is optimized for use with this particular film.
To make sure the camera always displays the right film count, always finish the film pack before inserting a new one. If you decide to switch packs anyway, be aware that one photo will be wasted as it will be exposed to light. That’s why every pack has a darkslide. - Set the flash mode
In any situation where you are not shooting in bright, direct sunlight, we recommend using the flash to achieve the best shots. That’s why the flash will trigger by default every time you use the Polaroid Now. Shooting without the flash can give you some beautiful results as well, but remember you need another source of light to make sure your photo will turn out. To shoot without the flash, press the flash button on the back panel once.
After taking the photo the flash will be reenabled. To disable the flash until you power off the camera, double press the flash button. - Position yourself
Make sure you are at least 55cm (1.8ft) away from your subject. - Aim at your subject
The Polaroid Now uses a viewfinder located on the left side of the lens barrel. To aim at your subject, simply align your eye with the viewfinder barrel and use the image you see to compose your shot. - Press the shutter button
Press the shutter button to take your photo. The photo will be ejected from the slot at the front of the camera as soon as you let go of the shutter button. You will see that the photo will be covered with a film shield to protect it from light. - Remove the photo
Gently lift the film shield so it rolls back into the camera. Remove the photo and place it face down to continue shielding it from light as it develops. Don’t shake it! Check the back of your film packet for the correct developing times. - Turn the camera off
Press the ON | OFF button for ½ a second to turn off the Polaroid Now.
Tips For Making Great Photos
Natural light
Light is your best friend when it comes to instant photograph, so we recommend to always use the flash. However, on a sunny day outdoors, you don’t need to use your flash at all. Make sure not to shoot towards the sun, shoot with the sun behind you instead, facing your subject directly or side-on, to give you a bright and clear picture without shadow on your subject. For the best results without the flash, the most important thing to remember is to keep your camera as steady as possible. For example, by holding your camera with both hands and putting your elbows on a table.
Framing
Be aware that your photo will not exactly reflect what you see through the viewfinder. For subjects closer than 1.2m (3.93ft) you should adjust your aim slightly up and to the left.
Composition
It’s possible to change the photo composition after focusing on your subject. The shutter button has two positions. First half-press the shutter button, then change the composition and fully press to take the photo.
Special Features
Self-Timer
Get yourself in the photograph with the selftimer. Tap the self-timer button once. The LED will light up orange, indicating that the self-timer is activated. Once you have framed your photo, press the shutter button. The orange LED will blink to indicate the self-timer countdown. You have 9 seconds before the photo is taken.
To make self-timer photos without flash, first activate the self-timer, then press the flash button.
If you change your mind, you can cancel the self-timer by pressing the self-timer button again.
Double Exposure
Express yourself in more ways than one with the Double Exposure feature, which allows you to combine two images in one photo. Press the self-timer button twice to enable double exposure mode. The display will flash ‘1’ until the first shot is taken, then flash ‘2’ until the second shot is taken.
Flash
Double tap to disable flash until the camera is powered off.
Exposure compensation (Trim EV)
For the more experienced photographers, the camera has an exposure compensation mode. This mode allows you to make your photo brighter or darker. This might be to intentionally under- or over-expose, or could be to compensate for scenes with atypical distribution of light and dark elements, such as a landscape with a bright sky or subject with a contrasting background.
+½ EV and -½ EV settings are available which make your photos slightly brighter or darker respectively. To access the Trim EV mode, hold the flash button down for one second. A small line will appear in the display. Tapping the flash button cycles through +½ EV → Normal EV → -½ EV. When you have chosen your EV setting, press the shutter button as you normally would. Remember: the flash is on during this time unless you turned it off previously. After two seconds, the screen will alternate displaying the film count and EV setting.
Charging
Above the Micro USB slot sits the battery level indicator LED to let you know what your battery level is. To check the camera’s battery level, turn the camera on and look at the battery level indicator LED in relation to this table.
Battery Level
| Indicator LED | This means: |
| No Light | → Camera is off |
| Green | → Charged (Enough for 15 packs of film) |
| Orange | → Medium battery (Enough for 1 pack of film) |
| Red | → Low battery |
To charge the camera, insert the charging cable into the Micro USB slot. Once you do that, the LED light will let you know how much charge you have remaining.
Battery Level
| Indicator LED | This means: |
| No Light | → Camera is fully charged |
| Green | → Charging, battery almost full |
| Orange | → Charging, battery is half full |
| Red | → Charging, battery is low |
Cleaning
To clean the lens, use a microfiber cloth designed for that purpose. This will ensure that you do not scratch the lens or leave behind any strands that may impact the quality of your photos.
Spotted marks on your photographs? Dirty rollers could be one of the reasons. When you take a Polaroid photograph, the film goes through two metal rollers. This is where the developer paste is spread between the negative and positive components of the photo before it exits through the film door. If these rollers are dirty or just a little uneven, the chemistry will not spread evenly across the photograph and you get small marks.
To clean the rollers, open the film door compartment of the camera (the film can remain in the camera while cleaning) and grab a soft, damp cloth. Rotate the rollers by turning the black plastic gear on the bottom left and wipe the cloth across the rollers as they move. Make sure the rollers are dry before you use your camera again. We recommend that you check the rollers between every pack of film, and clean them every 2-3 packs even if they look perfectly clean.
Troubleshooting
- My Polaroid Now won’t eject my photo or darkslide.
Make sure your Polaroid Now camera is charged. The camera’s battery level indicator LED will blink red if it doesn’t have enough charge to operate. If this is the case, you should recharge your camera then try again. Still having trouble? Check how many photos you have left. Hold down the power button for two seconds and the film counter display will indicate how many shots you have left in the film pack. If the LED shows ‘0’ this means that there are no shots left in the film pack. - The flash doesn’t fire when I take a photo. The Polaroid Now automatically turns the flash on when you power on the camera. If it’s not firing, press the flash button once until you see the lightning bolt illuminate. When taking photos make sure you don’t accidentally press the flash button.
- My photo turned out too dark. Polaroid cameras love light, so the more light you have the better. Make sure you are not shooting towards the sun. When shooting towards sunlight, the excessive light may cause the camera to overcompensate when exposing the image, creating an image that is too dark to expose your subject properly. If you’re taking photos inside and you don’t want to use the flash, make sure you find another light source – or use the flash. The flash is also useful at night-time, dusk, and cloudy days.
- My photo turned out blurry or fuzzy. Make sure you are at least 55cm (1.8ft) away from your subject. When shooting, make sure you hold the camera steady, especially in low light conditions, and have a strong light source to illuminate your subject.
- The film counter display shows the wrong number. The display resets to ‘8’ every time a cassette is inserted. If a part-used cassette is inserted, the camera will display ‘8’ and countdown as each photo is taken. When you next insert a full film pack, the counter will correctly show 8 remaining photos.
- I took the first shot of a double exposure photo, but I changed my mind. Switch off your camera, press and hold down the shutter button. Switch on the camera again and the film count will display “-”. Continue to hold the shutter button for over 10 seconds until the film is ejected.
Can’t find what you’re looking for?
Browse our frequently asked questions.
Customer Support
We’re here to help.
Get in touch using the details below.
USA/Canada
[email protected]
+1 212 219 3254
Europe/Rest of World
[email protected]
00 800 577 01500
Impossible B.V.
P.O. Box 242 7500 AE Enschede The Netherlands
For more detailed and up-to-date information, visit polaroid.com/help.
Warranty
You can find the warranty for the Polaroid
Now here: polaroid.com/warranty
Technical Specifications
General
Dimensions
- 150mm (L)
- ×111.2mm (W)
- ×94mm (H)
Weight
445 grams (without film pack)
Operating Temperature
40–108°F / 4–42°C, 5–90% relative humidity
Compatible Film
Polaroid i-Type and 600 film in both color and black & white, including special editions.
Battery
High performance lithium-ion battery, 750mAh, 3.7V nominal voltage, 2.775Wh
Materials
Outer shells
Polycarbonate + ABS plastics
Lens
Optical grade polycarbonate lens, coated
Shutter system
Custom design using precision step motor
Optical System
Lens
Fixed focus lens
Focal length
Standard lens: 103 mm
Portrait lens: 95 mm
Field of view
41° vertical, 40° horizontal
Flash System
Vacuum discharge tube strobe
Safety Information
Camera
- Caution: risk of electric shock.
- Do not open or disassemble the motorized roller system.
- Do not disassemble the device. Incorrect reassembly can cause electrical shock if the device is used again.
- Do not immerse the device in water or other fluids.
- Do not operate the device in a high humidity environment or very dusty environments.
- Do not attempt to tamper with, adjust or remove the battery and/or the electronics located inside the camera.
- Do not attempt to remove the door itself, as it is connected to the body of the device. Doing so is unsafe, will likely damage your device, and will void your warranty.
- Do not insert metal objects into the device.
- Do not insert any objects into the rollers or gears.
- Keep small children and infants away from the device to avoid them being injured by the device’s moving parts.
- Do not use or store the device near any heat source or any type of equipment that generates heat, including stereo amplifiers.
- Do not use the device near flammable or explosive gases.
- Do not charge the device if you notice any unusual odors, noise or smoke.
- Do not attempt to disassemble the film’s battery or modify it in any way (if using 600 type film). If battery fluid gets in your eyes, immediately rinse your eyes with fresh, cold running water, and seek medical attention immediately.
- Do not cover the flash.
Battery & Charger
- This device uses a custom lithium-ion battery that is non-removable and mounted inside the camera body.
- No other type of battery can be used. Battery replacement can only be done by authorized service centers. The battery will provide many years of service if properly used.
- Power consumption varies depending on the environment the device is used in and how the device has been stored. Used immediately after full charge, the battery will power the processing of up to 15 film packs with flash exposures. Due to the high energy requirements of the flash, we recommend charging the camera fully before every session for best results.
- Once the battery energy level falls below a certain level, the device will no longer process film. The battery LED will blink and signal when it needs to be recharged. This is to avoid a photo getting stuck as it is being processed through the roller system.
- The rechargeable battery is not fully charged at the time of purchase. Charge the battery fully with the USB charging cable provided. This usually takes 1-2 hours (can vary depending on usage).
- The supplied battery charging cable has been tested to work with the Apple iPhone power adaptors. While it can be used in other USB ports e.g. computer, USB power adaptors, TVs, cars etc., correct operation cannot be guaranteed.
- When the device is no longer in use, please recycle it properly.
Usage Environment
- To protect the high-precision technology contained in this device, never leave the camera in the following environments for extended periods of time: high temperature (+42°C/108°F), high humidity, places with extreme changes in temperature (hot and cold), direct sunlight, sandy or dusty environments such as beaches, damp places, or places with strong vibrations.
- Do not drop the device or subject it to severe shocks or vibrations.
- Do not push, pull or press on the lens.
Compliance
Important directions for using Lithium– Ion Batteries:
- Do not throw into fire.
- Do not short circuit.
- Do not disassemble.
- Do not continue to use when damaged.
- Dispose correctly after use.
- Keep away from water.
EU Declaration of Conformity
Hereby, Impossible B.V. declares that the Polaroid Now analog instant camera is in compliance with the essential requirements of the Electromagnetic Compatibility Directive (2014/30/EU), Low Voltage Directive (2014/35/EU) and RoHs Directive (2011/65/ EU) and other relevant provisions, when used for its intended purpose.
FCC Compliance Statement
This device complies with Part 15 of the FCC Rules. Operation is subject to the following two conditions:
(1) this device may not cause harmful interference, and
(2) this device must accept any interference received, including interference that may cause undesired operation
Caution the user is cautioned that changes or modifications not expressly approved by the party responsible for compliance could void the user’s authority to operate the equipment. This equipment must not be co-located or operated in conjunction with any other antenna or transmitter.
Note This equipment has been tested and found to comply with the limits for a Class B digital device, pursuant to part 15 of the FCC rules. These limits are designed to provide reasonable protection against harmful interference in a residential installation. This equipment generates, uses and can radiate radio frequency energy and, if not installed and used in accordance with the instructions, may cause harmful interference to radio communications. However, there is no guarantee that interference will not occur in a particular installation. If this equipment does cause harmful interference to radio or television reception, which can be determined by turning the equipment off and on, the user is encouraged to try to correct the interference by one or more of the following measures:
- Reorient or relocate the receiving antenna.
- Increase the separation between the equipment and receiver.
- Connect the equipment into an outlet on a circuit different from that to which the receiver is connected.
- Consult the dealer or an experienced radio/ TV technician for help.
This equipment complies with FCC radiation exposure limits set forth for an uncontrolled environment. End user must follow the specific operating instructions for satisfying RF exposure compliance.
Industry Canada (IC)
This device complies with part 15 of the FCC Rule and Industry Canada license– exempt RSS standard(s). Operation is subject to the following two conditions:
- This device may not cause harmful
interference, and - this device must accept any interference received, including interference that may cause undesired operation.
The symbol means that according to local laws and regulations your product should be disposed of separately from household waste. When this product reaches its end of life, take it to a collection point designated by local authorities. Some collection points accept products for free. The separate collection and recycling of your product at the time of disposal will help conserve natural resources and ensure that it is recycled in a manner that protects human health and the environment.
End of life disposal warning: When the product has come to the end of life, dispose of it in accordance with local regulations. This product is subject to the EU directive 202/96/EC on Waste Electrical and Electronic Equipment (WEEE) and should not be disposed as unsorted municipal waste.
Made in China for and distributed by Polaroid Film B.V. (P.O. Box 242, 7500 AE), Enschede, The Netherlands. The POLAROID word and logos (including the Polaroid Classic Border Logo) and Polaroid Now are protected trademarks of Polaroid.

Polaroid 815221021600 At-Home Instant Photo Booth User Manual

 WARNING
This product can expose you to chemicals including Styrene and Benzene, which are known to the State of California to cause birth defects or other reproductive harm.
For more information go to www.P65Warnings.ca.gov
WARNING
To ensure safe operation of the product, be sure to read this User Manual before use. Keep this User Manual in a safe place for easy reference when needed.
WARNING
READ BEFORE USING THE PHOTO BOOTH
SAFETY PRECAUTIONS
The following symbols are used in labels on the Photo Booth to draw attention to potentially hazardous situations:
WARNING : Failure to avoid the risk may result in death or serious injury.
 Electrical Shock Hazard. Disconnect power before removing cover.
Should only be done by a qualified technician.
WARNING : To reduce the risk of fire or electric shock, do not expose this apparatus to rain or moisture.
- Please read and comprehend all warnings stated in this manual.
- Do not get product wet when cleaning.
- The AC/DC adapter and apparatus shall not be exposed to dripping or splashing and that no object filled with liquids, such as vases, shall be placed on apparatus. The AC/DC adapter is used as disconnect device.The AC/DC adapter of apparatus should not be obstructed OR should be easily accessed during intended used. To completely disconnect the power input, the AC/DC adapter of the apparatus shall be disconnected from the main power outlet.
- If appliance is provided with protective earth terminal, it should be connected to main outlet with a protective earth connection.
- Minimum distances 10 cm / 3.94 inches around the apparatus for sufficient ventilation.
- The ventilation should not be impeded by covering the ventilation openings with items such as newspaper, table-cloths, curtains etc.
- No naked flame sources such as lighted candles should be placed on the apparatus.
- The apparatus should only be used in moderate climates.
FCC STATEMENT
This device complies with Part 15 of the FCC rules. Operation is subject to the following two conditions:
(1) This device may not cause harmful interference, and
(2) this device must accept any interference received, including interference that may cause undesired operation.
Warning: Changes or modifications to this unit not expressly approved by the party responsible for compliance could void the user’s authority to operate the equipment.
This equipment has been tested and found to comply with the limits for a Class B digital device, pursuant to Part 15 of the FCC rules. These limits are designed to provide reasonable protection against harmful interference in a residential installation. This equipment generates, uses, and can radiate radio frequency energy and, if not installed and used in accordance with the instructions, may cause harmful interference to radio communications. However, there is no guarantee that interference will not occur in a particular installation. If this equipment does cause harmful interference to radio or television reception, which can be determined by turning the equipment off and on, the user is encouraged to try to correct the interference by one or more of the following measures:
- Reorient or relocate the receiving antenna.
- Increase the separation between the equipment and the receiver.
- Connect the equipment into an outlet on a circuit different from that to which the receiver is connected.
- Consult the dealer or an experienced radio / TV technician for help.
This device contains licence-exempt transmitter(s)/receiver(s) that comply with Innovation, Science and Economic Development Canada’s licence-exempt RSS(s).
Operation is subject to the following two conditions:
- This device may not cause interference.
- This device must accept any interference, including interference that may cause undesired operation of the device.
WARNING: Tastemakers Asia Limited assumes no liability for improper installation or excessive loads placed on screws or bracket. This wall anchor is not a substitute for proper adult supervision.
IMPORTANT SAFETY INSTRUCTIONS
- Read these Instructions.
- Keep these Instructions.
- Heed all Warnings.
- Follow all Instructions.
- Do not use this apparatus near water.
- Clean only with a dry cloth.
- Do not block any ventilation openings. Install in accordance with the manufacturer’s instructions.
- Do not install near any heat sources such as radiators, heat registers, stoves, or other apparatus (including amplifiers) that produce heat.
- Do not defeat the safety purpose of the polarized or grounding – type plug. A polarized plug has two blades with one wider than the other. A grounding type plug has two blades and a third grounding prong. The wide blade or the third prong are provided for your safety. When the provided plug does not fit into your outlet, consult an electrician for replacement of the obsolete outlet.
- Protect the power cord from being walked on or pinched particularly at plugs, convenience receptacles, and the point where they exit from the apparatus.
- Only use attachments/accessories specified by the manufacturer.
- Unplug this apparatus during lightning storms or when unused for long periods of time.
- Refer all servicing to qualified service personnel. Servicing is required when the apparatus has been damaged in any way, such as power-supply cord or plug is damaged, liquid has been spilled or objects have fallen into the apparatus, the apparatus has been exposed to rain or moisture, does not operate normally, or has been dropped.
- The equipment shall be used at working ambient temperature 32° – 95°F (0° – 35°C).
INSTALLATION
Photo Booth is designed for indoor and personal use only. It must not be installed permanently outdoors. The following conditions must be avoided.
- Direct exposure to sunlight, high humidity, direct water contact, dust, high heat, or extreme cold.
- Vibration. Photo Booth must be installed on a level surface. Do not install in an area such that the Photo Booth would present an obstacle in case of an emergency (i.e., near fire equipment or emergency exits).
Contents Included
- User Manual

- Quick Start Guide

- Mounting Hardware

- At-Home Instant Photo Booth

- Wall Bracket

- ZINK® Paper

- Door Mount Set

- Power Cord

Product Features
Front View

Back View

Mounting Options
Table Top
WARNING
Always place Photo Booth on level surface to avoid tipping and serious injury or damage

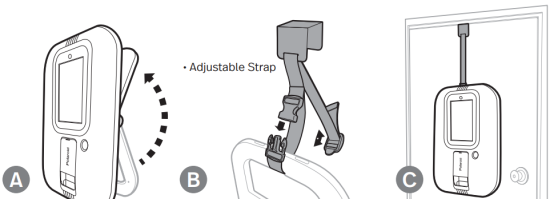
Door Mount
A. Fold Adjustable Stand to the UP position until you hear it lock in place.
B. Attach Adjustable Strap to top of Adjustable Stand and click the buckle closed.
C. Place Door Hook Set over the top of door.
WARNING
- FAILURE TO FOLLOW THESE INSTRUCTIONS CAN RESULT IN DEATH OR INJURY TO CHILDREN AND ADULTS
- MAKE SURE THE INSERTED BUCKLE CLOSES WITH A “CLICK” SOUND AND THE PRODUCT HANGS FIRMLY ON THE DOOR
- NEVER ALLOW CHILDREN TO CLIMB OR HANG ON PHOTO BOOTH
- NEVER PLACE HEAVY ITEMS ON PHOTO BOOTH
- ADULT ASSEMBLY REQUIRED
Wall Mount
WARNING
Serious injury can occur if improperly installed

A. Mount Wall Bracket to the wall with included hardware.
B. Fold Adjustable Stand to the UP position until you hear it lock in place.
C. Place Photo Booth on Wall Bracket and secure with the Safety Strap.
ADULT ASSEMBLY REQUIRED
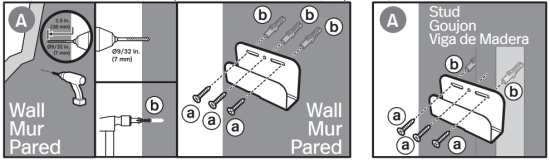
HELPFUL HINT
Use a stud finder to locate stud within the desired area. If stud cannot be found please install other mounting or have installed by a professional.

WARNING
- READ AND FOLLOW ALL INSTRUCTIONS BEFORE USE SERIOUS INJURY CAN OCCUR IF IMPROPERLY INSTALLED
- INSTALL ONLY IN WOODEN STUD WALLS
- NEVER ALLOW CHILDREN TO HANG OR CLIMB ON PHOTO BOOTH
- ALWAYS INSTALL LOCKING LEVER
WALL MOUNT MUST BE INSTALLED IN A WOODEN STUD; FAILURE TO FOLLOW INSTRUCTIONS COULD RESULT IN SERIOUS INJURY OR DAMAGE TO WALL AND PHOTO BOOTH
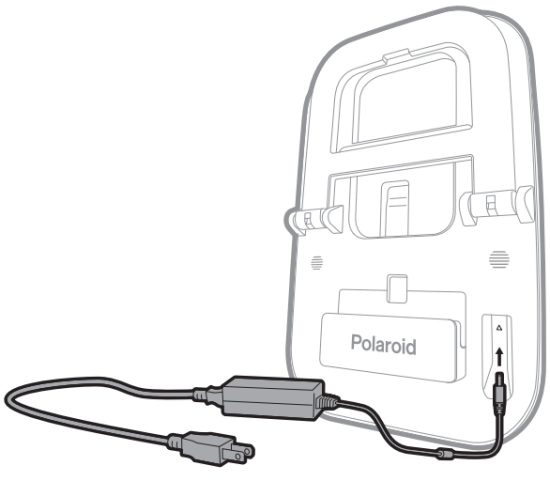
Getting Started
Plug in the power supply on the back of Photo Booth.
This product is intended for use only with the adapter provided
Manufacturer: Blue Iron Holdings Ltd.
Model: BI65-120400-E2
POWER SUPPLY: AC/DC Adapter
INPUT POWER: AC100-240V, 50/60Hz 2A Max
OUTPUT POWER: DC12.0V — 4.0A
MONITOR: 10” Capacitive Touch Screen
ASSEMBLED DIMENSIONS: 23.75” x 15.75” x 7.5” (60.3 x 40 x 19 cm)
- The AC/DC adapter is used as disconnect device
- The AC/DC adapter of apparatus should not be obstructed OR should be easily accessed during intended used
- To be completely disconnect the power input, the AC/DC adapter of apparatus shall be disconnected from the mains
- For PLUGGABLE EQUIPMENT, the socket-outlet shall be installed near the equipment and shall be easily accessible
- The applied nameplate is located at the back of the product
- Equipment is only suitable for mounting at height ≤ 2 meter
External Battery Pack Holder – Used to hold open market battery packs (sold separately) that support 12 Volt 4.0A.

NOTE: External battery pack minimum requirement is 12 Volt 4.0A
Loading Photo Paper
Load your Polaroid At-Home Photo Booth with 2”x 3” (50 x 76mm) ZINK® Photo paper (included)

NOTE: Polaroid At-Home Instant Photo Booth only holds maximum 10 sheets (one pack) of photo paper at a time.
Excess photo paper could cause your Photo Booth to jam and/or not function properly.
- Lift up on printer door.

- Pull forward to open.

- Place the photo paper in the printer with the “Blue” barcode calibration paper facing inward.

- Hold the photo paper in place and close the printer door

- Slightly lift up on the printer door while pressing inward until the printer door lays flush with the Photo Booth housing.
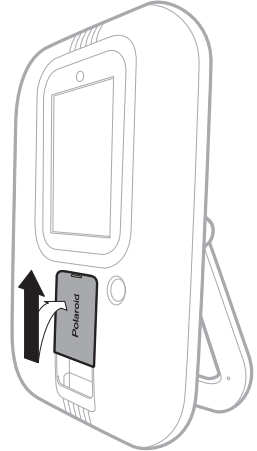
- When printer door is laying flush with the Photo Booth housing, slide downward to lock the door shut.

- After the paper is loaded and the door is closed and locked correctly, the “Blue” calibration

NOTE: Failure to lock the door correctly in place will prevent the photos from printing.
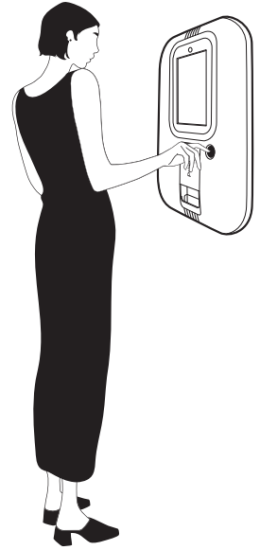
Powering on your Photo Booth
- Press the button on the top of your Polaroid At-Home Instant Photo Booth to power it on.

- Press the shutter button to take a photo.
Advanced Setting
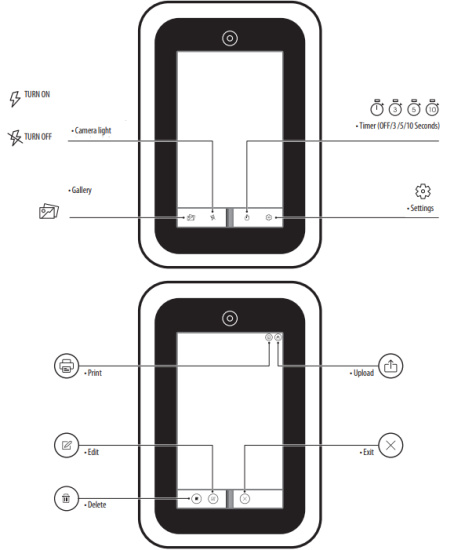


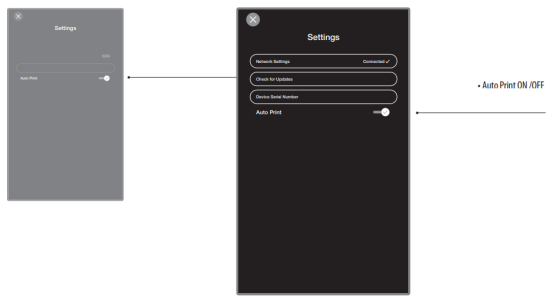
When Auto Print is turned ON, Photo Booth will automatically print after several seconds upon taking a picture.
Editing
Quick Share

Share your photo online!

Scan QR code with your smart phone camera to download the photo to your smart phone and share it via your favorite App.
(Older phones may require a QR code reader App.)
Assistance or Service
Before contacting us for assistance or service, please check the “Troubleshooting” section in the User Manual.
If you still have questions regarding your Photo Booth product or require technical support, contact Polaroid At-Home Instant Photo
Booth Customer Service at www.tastemakersllc.com/polaroidsupport
Troubleshooting
| Problem | Possible cause | Solution |
| -Photo Booth will not turn on. | -Power cord is not plugged into wall outlet. -Wires/ Plugs are hooked up incorrectly. -ON/Off button wasn’t pressed on top of unit. |
-Make sure power cord is plugged into the wall outlet and there is power to that outlet. (Plug other electrical equipment into the power outlet to make sure the outlet normally works.) -Make sure all wires/ plugs are properly connected and all the way set in as directed in assembly instructions. -Push ON/OFF button on top of unit to power on. |
| -The Photo Booth screen is frozen. -The screen looks pixelated or there are lines running through the image. |
-The Photo Booth encountered a problem when processing the data. |
-You may need to RESET the Photo Booth. |
| -The printer is not printing. | -The printer may be out of paper. -The printer door may not be closed properly. -The paper was inserted backwards. |
-Check to make sure you have paper in the printer. -Make sure the printer door is closed properly and locked in place by sliding the door downward until you hear a click sound. (Refer to User Manual) |
| -The printer is printing paper, but there is no image on the paper after it has printed. | -The paper may have been placed in backwards. | -Make sure the printing surface is facing forward. The text side of paper should be facing inward. (Refer to User Manual) |
| -The Photo Booth will not connect to the internet. | -The Photo Booth may be located too far away from your wireless router. -Your WIFI on the Photo Booth may be turned off. -You may need to reestablish a new connection to your WIFI router. -You may be entering the wrong password to your WIFI network. |
-Try moving your Photo Booth closer to your WIFI internet router. -Make sure the Photo Booth WIFI is turned on under Network Settings. -Under the Network Settings choose your network name and click “Forget Network” then reestablish a new connection by selecting your network name and entering in your WIFI password again. -Make sure you are using the correct password to your WIFI network. (Always check to make sure your WIFI password works on your other devices.) |
| -The photos that print look too dark. | -You may not have adequate lighting in the environment that you have your Photo Booth set up. -Your photo paper wasn’t calibrated when you loaded the new paper. |
-Try moving the Photo Booth to a well lit room. -Make sure to use the blue calibration paper when loading new paper in your Photo Booth. (See User Manual) |
| -After each photo my Photo Booth automatically prints. | -This is a feature to the Photo Booth that is found under the Settings Menu. | -If you would like to turn this feature OFF, click on the Settings Menu and unselect the Auto Print feature. |
| -The on screen User Interface does not match the instructions in my user manual. | -After a software update some of the icons and features may have changed to enrich the user experience. | -Visit www.tastemakersllc.com/polaroidusermanual for a list of the most recent features and user interface. |
| -My Photo Booth is not functioning correctly. | -Vous devrez peut-être mettre à jour votre logiciel. | -Click on the Settings tab on your Photo Booth to check for software updates. |
| -My photos appear out of focus. | -Your Photo Booth has an auto focus feature and it is picking up surrounding objects. | -Try centering yourself in the middle of the screen to maintain a strong focus on your face/ faces. |
Stay Up To Date
Important note to user:
We are constantly updating our product functionality and features to increase performance for the best possible user experience. Always check for software updates under the Settings tab to download the latest software to get the most from your Polaroid At-Home Instant Photo Booth.
NOTE: Software updates may add, rearrange or update different features and icons to the user interface that you will not find in this printed User Manual. To stay up to date on the most recent features and user interface always view the latest USER MANUAL by visiting our website at www.tastemakersllc.com/polaroidusermanual.
User Manual Quick Link
Scan QR code below with your smart phone camera and follow on screen prompts to view the latest Photo Booth User Manual for a full list of the
most recent features or visit www.tastemakersllc.com/polaroidusermanual

Have questions? We’ve got answers.
Visit us at
tastemakersllc.com/polaroid
If you have questions regarding your product or require technical support, contact Polaroid At-Home Instant Photo Booth Customer Service at www.tastemakersllc.com/polaroidsupport
]]>![]()
Polaroid PBT9550 Bluetooth Speaker User Manual

PBT9550
Instantly recognizable. Instantly reassuring. The Polaroid Classic Border and Polaroid Color Spectrum logos let you know you’ve purchased a product that exemplifies the best qualities of our brand and that contribute to our rich heritage of quality and innovation.
©2021. All rights reserved.
Polaroid, Polaroid Color Spectrum and Polaroid Classic Border Logo are trademarks of PLR IP Holdings, LLC, used under license. PLR IP Holdings LLC, does not manufacture this product or provide any manufacturer’s warranty or support.
Have questions? We’ve got answers.
Visit us at customersupport123.com

Designed in US
Printed in China
V2. 05-2021
Warranty Information
90-day Limited Warranty
Territory: United States/Canada
LIMITED WARRANTY TO ORIGINAL CONSUMER
This product (including any accessories included in the original packaging) as supplied and distributed new by an authorized retailer is warranted by Southern Telecom, Inc. to the original consumer purchaser against defects in materials and workmanship (“Warranty”) as follows:
To obtain warranty service:
- Visit our customer support portal: www.customersupport123.com
- Select the brand and model of your device
- Select “Service Request” and fill out the form to begin your inquiry
- Exchanges require dated proof of purchase from an authorized retailer
Your product will be repaired or replaced, at our option, for the same or similar model of equal value if examination by the service center determines this product is defective. Products received damaged as a result of shipping will require you to file a claim with the carrier.
Warranty service not provided
This warranty does not cover damage resulting from accident, misuse, abuse, improper installation or operation, lack of reasonable care, unauthorized modification including software modifications such as the installation of custom firmware. This warranty is voided in the event any unauthorized person opens, alters or repairs this product. All products being returned to the authorized service center for repair must be suitably packaged.
NO WARRANTIES, WHETHER EXPRESS OR IMPLIED, INCLUDING, BUT NOT LIMITED TO, ANY IMPLIED WARRANTIES OF MERCHANTABILITY OR FITNESS FOR A PARTICULAR PURPOSE, OTHER THAN THOSE EXPRESSLY DESCRIBED ABOVE SHALL APPLY. DISTRIBUTOR FURTHER DISCLAIMS ALL WARRANTIES AFTER THE EXPRESS WARRANTY PERIOD STATED ABOVE. NO OTHER EXPRESS WARRANTY OR GUARANTY GIVEN BY ANY PERSON, FIRM OR ENTITY WITH RESPECT TO THE PRODUCT SHALL BE BINDING ON DISTRIBUTOR. REPAIR, REPLACEMENT, OR REFUND OF THE ORIGINAL PURCHASE PRICE – AT DISTRIBUTOR’S SOLE DISCRETION – ARE THE EXCLUSIVE REMEDIES OF THE CONSUMER. IN NO EVENT WILL DISTRIBUTOR OR ITS MANUFACTURERS BE LIABLE FOR ANY INCIDENTAL, DIRECT, INDIRECT, SPECIAL, PUNITIVE OR CONSEQUENTIAL DAMAGES (SUCH AS, BUT NOT LIMITED TO, DAMAGES FOR LOSS OF PROFITS, BUSINESS, SAVINGS, DATA OR RECORDS) CAUSED BY THE USE, MISUSE OR INABILITY TO USE THE PRODUCT. EXCEPT AS STATED HEREIN, NO OTHER WARRANTIES SHALL APPLY. NOTWITHSTANDING THE FOREGOING, CONSUMER’S RECOVERY AGAINST DISTRIBUTOR SHALL NOT EXCEED THE PURCHASE PRICE OF THE PRODUCT SOLD BY DISTRIBUTOR. THIS WARRANTY SHALL NOT EXTEND TO ANYONE OTHER THAN THE ORIGINAL CONSUMER WHO PURCHASED THE PRODUCT AND IS NOT TRANSFERABLE.
Some countries, states or provinces do not allow the exclusion or limitation of incidental or consequential damages or allow limitations on warranties, so limitation or exclusions may not apply to you. This warranty gives you specific legal rights, and you may have other rights that vary from state to state or province to province. Contact your authorized retailer to determine if another warranty applies.
Compliance Information
FCC Information
This device complies with Part 15 of the FCC Rules.
Caution: Any changes or modifications not expressly approved could void the user’s authority to operate the equipment.
Note: This equipment has been tested and found to comply with the limits for a Class B digital device, pursuant to part 15 of the FCC Rules. These limits are designed to provide reasonable protection against harmful interference in a residential installation. This equipment generates, uses and can radiate radio frequency energy and, if not installed and used in accordance with the instructions, may cause harmful interference to radio communications. However, there is no guarantee that interference will not occur in a particular installation. If this equipment does cause harmful interference to radio or television reception, which can be determined by turning the equipment off and on, the user is encouraged to try to correct the interference by one or more of the following measures:
- Reorient or relocate the receiving antenna.
- Increase the separation between the equipment and receiver.
- Connect the equipment into an outlet on a circuit different from that to which the receiver is connected.
- Consult the dealer or an experienced radio/TV technician for help.
This device complies with Part 15 of the FCC Rules. Operation is subject to the following two conditions: (1) This device may not cause harmful interference, and (2) this device must accept any interference received, including interference that may cause undesired operation.
Radiation Exposure Information
The device has been evaluated to meet general RF exposure requirement. The device can be used in portable exposure condition without restriction.
WARNING Li-ion Battery Inside
This product is fitted with a Li-ion battery. Do not damage, open, or dismantle the battery and do not use it in damp and/or corrosive conditions. Use only with compatible chargers. Never dispose of batteries in a fire, and never expose them to high temperatures. Do not expose the product to temperatures exceeding 60°C (140°F).
Rating Label Definitions
Before You Begin…
READ CAREFULLY AND KEEP THIS MANUAL
Customer Support
For any questions or problems with your product, please visit our website at customersupport123.com
 Caution: To ensure safe and proper use, read all safety information before using the device. Only use with manufacturer-approved batteries, chargers, accessories, and supplies.
- THIS DEVICE IS NOT A TOY, keep away from children and pets.
- Do not disassemble, modify, or repair the device.
- Do not expose to extreme temperatures (heat or cold), open flames, humid, or wet conditions.
- Do not submerge in water.
- Low power may cause poor Bluetooth connection or sound distortion.
- Do not overcharge battery.
- If using with a USB adapter, make sure the adapter is not damaged.
- Do not allow the USB port or the connectors of the supplied USB cable to be exposed to dust or water, or to come into contact with any conductive materials such as liquids, metallic powders, etc.
- The speaker contains a built-in battery and should not be disposed of with regular household waste. Please consult the local authorities on the correct way to dispose of this device.
In the Box
- PBT9550 – Wireless Speaker (1)
- Micro-USB Charging Cable (x1)
- User Manual (x1)
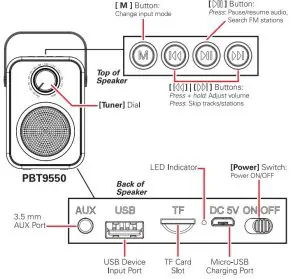
Location of controls
Getting Started
Charging the Speaker
Plug the small connector of the included charging cable into the charging port on the back of the speaker. Plug the large connector into the USB port on a computer, or into a 5V USB adapter (not included) and plug into a wall outlet.
The charging LED indicator will turn RED while charging and turn OFF when fully charged. When the speaker is low on power, a tone will be heard indicating that it needs to be recharged.
Powering ON/OFF
- Move the [Power] switch on the back of the speaker to power ON and OFF.
- When powered ON, the speaker will enter FM radio mode.
Adjusting Volume
In all modes, overall volume can be adjusted with the buttons on the top of the speaker. In AUX and Bluetooth modes, volume can also be controlled by your connected device.
- Press + hold the [
 ] button to increase volume.
 - Press + hold the [
 ] button to decrease volume.
Adjusting Playback
In Bluetooth, FM Radio, TF and USB modes, playback can be controlled by the buttons on the top of the speaker.
- Press the [
 ] to pause playback. Press again to resume.
 - Press the [] button to skip to the next track/station.
- Press the [] button to skip to the previous track/station.
Changing Input Modes
Press the [M] button on the top of the speaker to switch input modes.
ATF card or USB device must be inserted or connected to switch to these modes.
Bluetooth Pairing
- Power the speaker ON, and switch to Bluetooth input mode. The LED indicator will quickly flash BLUE.
- Set your mobile device to search for Bluetooth devices. When the list appears, select PBT9550 from the found devices.
- After a successful pairing, a tone will be heard and the LED indicator will slowly flash BLUE.
In Bluetooth mode, playback and volume can be adjusted with your paired device or the controls on the speaker listed below.
- Press the [] to pause playback. Press again to resume.
- Press the [] button to skip to the next track.
- Press the [] button to skip to the previous track.
Using the AUX Input
Insert one end of a 3.5 mm AUX cable (not included) into the AUX port on the back of the speaker. Insert the other end into the headphone jack or 3.5 mm aux output port on your media-playing device.
Switch input modes until you reach AUX mode.
In AUX mode, all playback will be controlled by your connected device.
Using a TF Card or USB Device
To insert a TF card, insert a TF card into the TF card input port on the speaker with the metal contacts facing down, and push in until it clicks.
To insert a USB device, such as a USB flash drive containing audio files, insert the USB device into the USB device port on the back of the speaker.
Change input modes until you enter TF or USB mode. The speaker will automatically begin playing music off the device. Note: You must have a TF card or USB device inserted to switch to TF or USB input mode.
In TF card and USB mode, all playback is controlled by the buttons on the speaker.
- Press the [] button to pause and resume playback.
- Press the [] and [ ] buttons to skip tracks.
Using the FM Radio
Extend the speaker’s attached antenna toward the sky. Change input modes until you enter FM radio mode.
In FM radio mode, all playback will be controlled by the buttons on the speaker.
- Use the [Tuner) dial to adjust the FM station manually.
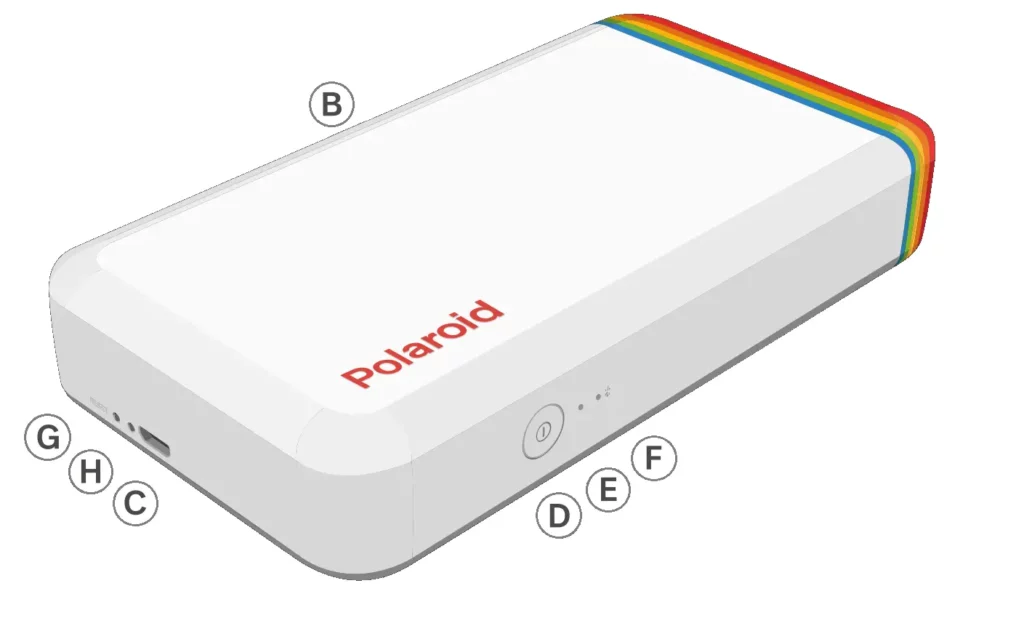
Overview
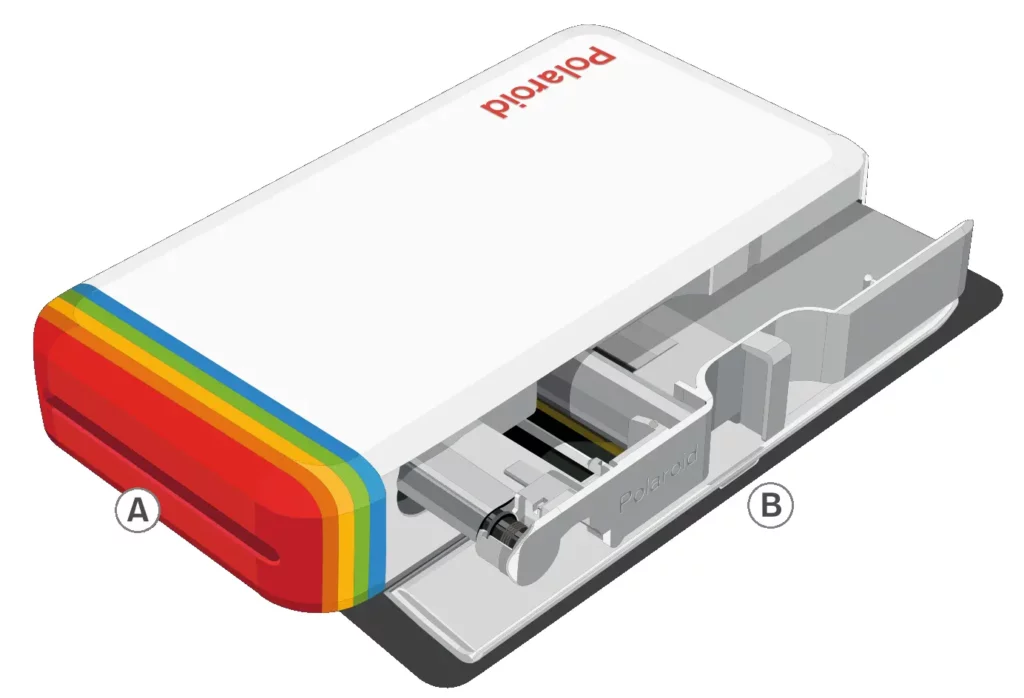
A Photo Eject Slot
B Cartridge Door
C USB Charging Slot
D ON|OFF Button
E Power LED
F Bluetooth® LED
G Reser Button
H Charging LED
Hi, let’s get you started
How to print your first photo
- Charge the Polaroid Hi.Print pocket photo printer using the micro USB cable.
- Download the free Polaroid Hi.Print mobile app from the Apple App Store or Google Play Store. This device only works with the mobile app.
- Open the catridge. door on the side of printer.
- Insert the catridge, It only uses Polaroid Hi.Print 2×3 Paper Catridges. Close the catridge door,
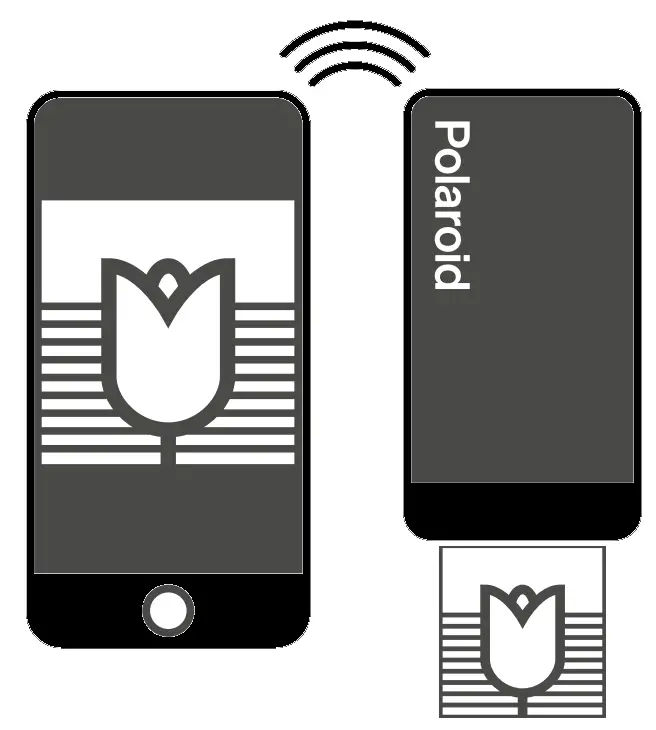
- Turn on the printer by pressing down the ON|OFF button fort 1 second. The Bluetooth LED will blink blue. It’s now ready to be paired with your phone.
- Go the Bluetooth settings on your phone. Turn Bluetooth on and select the Polaroid Hi.Print pocket photo printer with your unique device ID. You will find that ID on the inside of the catridge door .Once it’s paired with your phone, the Bluetooth LED will stop Blinking.
- One the Polaroid Hi.Print app on your phone, Follow thr instructions to print your first photo.
- When your photo prints, the paper will move in and out 4 times tol print each color separately, along with an overcoat.
This protects it from fingerprints, fading, and water splashes. Do not touch the in k foil or pull on the paper while it’s printing.
Need some help?
The power LED blinks red.
The means no cartridge has been inserted.
Insert a Polaroid Hi.Print 2×3 Paper Cartridge and try again.
There’s a paper jam.
Turn the printer off then on again. The paper should eject automatically. If not, please contact our customer service team.
The printer isn’t responding.
Make sure the printer is fully charged. Otherwise, press the reset button. You wil find this small hole nexr to the charging port. You will need something fine and sharp, like a safety pin, to depress and reset the device.
This printer only works with
Have a problem, or a question you need answered?
USA/Canada
[email protected]
+ 1-212-219-3254
Contact our Customer Support Team
EU/Rest of World
[email protected]
00800 5770 1500
or visit polaroid.com/help

Turn your moments into fade-proof photographs with the free Polaroid Hi.Print mobile app.
Download to your phone and follow the simple steps to print your life highlights in high quality.
Available from the Apple App Store or Google Play Store.
 |
 |
 |
Apple and the Apple logo are treadmarks of Apple Inc., registered in the U.S. and other coutries.
Google Play and the Google Play logo are treadmarks of Google LLC. The Bluetooth® word mark and logos are registered treademarks owned by Bluetooth SIG. Inc. and any use of such marks by Polaroid Film B.V. is under license
Warranty
You can find the warranty for Polaroid Hi.Print photo printer here: polaroid.com/warranty
Polaroid, Polaroid Color Spectrum and Polaroid Hi.Print are trademarks of PLR IP Holdings LLC, which is part of the Polaroid group of companies. PLR IP holdings, LLC does n ot manufacture this product or provide any Manufacturer’s Warranty or support.
]]>Polaroid XS100 HD Professional Action Camera

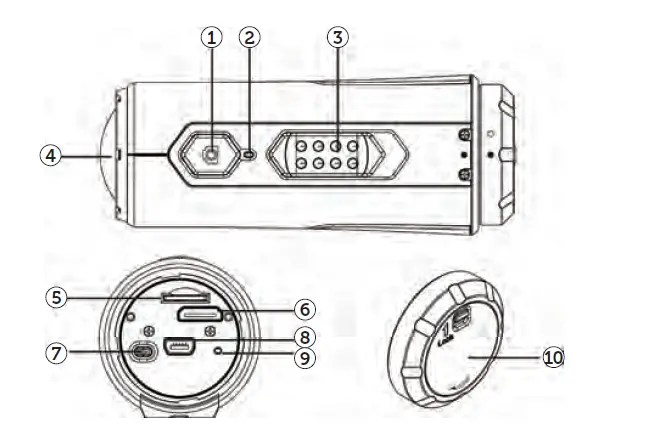
PARTS FAMILIARIZATION
- Power/Shutter Release
- Lens
- LED Indicator
- Recording Slide Switch
- MicroSD Card Slot
- HDMI Port
- Reset Button
- USB Port
- Video Resolution Switch
- Camera Panel Cover
Welcome
Thank you for your purchase of the Polaroid XS100 camera. As supplied herein, the XS100 can be mounted on all kinds of helmets and any type of handlebar or pipe between .75 and 1.4 inches in diameter. All the necessary straps, interlocking mounting parts, USB cable, software and, of course, the camera are included. Additional exciting mounts like suction cups and board mounts will soon be available at polaroidaction.com. Check the site frequently for new accessories.
What’s Included in the Box?
- Camer
- Mini USB to USB cable
- HDMI Cable
- Secure String with quick disconnect
- Mount-Lock
- Mount-Lock Key
- Manual
- Carrying pouch with belt hook
- Helmet mounts (all helmet types)
- Handlebar mounts (all bars measuring .75-in to 1.4-in)
- Assorted mounting hardware
PRECAUTIONS:
- Make sure the XS100’s back cover is twisted on and completely sealed before use. If foreign objects or water enter the camera, turn the power off. Continued use may cause an injury.
- If the camera has been dropped or its case has been damaged, turn the power off. Continued use may cause permanent damage and/or personal injury.
- There are no user-serviceable parts in the camera: DO NOT DISASSEMBLE! Do not place the camera on unstable surfaces. This may cause the camera to fall or tilt over, causing damage. For repair, visit polaroidaction.com for customer service information.
- A camera is a precision instrument. Do not drop, strike, or use excessive force when handling the camera. Doing so may render the camera inoperative.
- Do not leave the camera in places where the temperature may rise significantly such as inside a car. High temperatures may adversely affect the case or internal parts of the camera.
- Before you move the camera, disconnect cords and cables. Failure to do so may damage the cords and cables.
- This is an extreme sports video product. Please be careful that you don’t mount the camera in a fixed position where, in the event of an accident, you subject yourself to bodily contact with the camera.
CHARGING THE BATTERY:
- Connect the USB cable’s mini USB plug into the camera’s mini USB port.
- Connect the cable’s USB plug into a USB port of any computer. Verify that the computer is on.
- The Red LED remains on while the battery is charging.
- The Red LED will turn off when the battery is fully charged.
- Charge the battery before using the camera for the very first time.
- It takes about 3 hours to initially charge the camera. Subsequent charges will take 3 hours or less.
Additional Information
When the battery power is low, the camera will vibrate three times to indicate a low battery. The camera will vibrate two seconds to indicate it’s out of power. If the camera is recording, it will automatically save the file and then shut down.
DO NOT attempt to remove the internal battery. Doing so will void the warranty coverage and can possibly damage the camera.
Insert Micro SD Card
The XS100 supports MicroSD cards up to 32GB (Class 6 or greater cards are recommended). At the rate of 4GB per half-hour, a 32GB card will record full high definition (FHD) video for approximately 4-hours (1080p@30 fps or 720p@60 fps). If there is no MicroSD card in the camera, the Red and Green LED @will flash alternately and continuously.
Check that the camera power is turned OFF. Insert a MicroSD card (with the printed side up) into the MicroSD Card Slot with enough finger pressure to keep the edge of the card flush with the card slot opening.A
To remove the Micro-SD card, press the card inward and release. Grasp the card with two fingers and pull it out.
Never insert a MicroSD card with the printed side down. Forcing the card inward in that position will likely damage the card and/or camera.
A new MicroSD card should be formatted before using. For instructions on how to format the card, refer to the Section “Connecting the Camera to a Computer/TV/HDTV.”
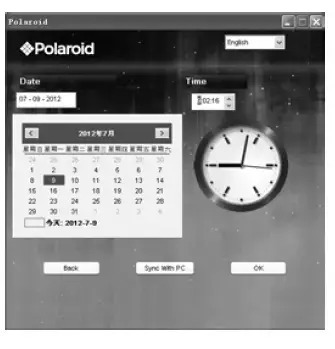
Setting Date Time
You can set the camera’s clock activating the XS100’s software which resides in the camera’s internal memory.
To set up the camera clock:
- Insert a MicroSD card with at least 2MB free space into the camera.
- Connect the camera to a PC via the USB to mini USB cable.
- Press the Power Button 0 to turn the camera ON.
- Using the computer’s file manager, open the MicroSD card folder and find the file “Polaroid.exe.” Double click the file to open it. Mac users note: Visit polaroidaction.com to download the Mac version of the XS100 software.
- Find the “Date and Time” and click “SET.”
- Enter the date and time manually or click “Sync with PC” to set with your PC clock
(Check that your PC time and date are accurate.). - Click “Ok” to save the settings.

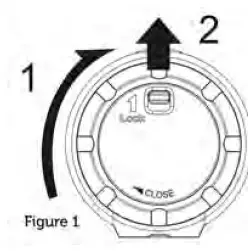
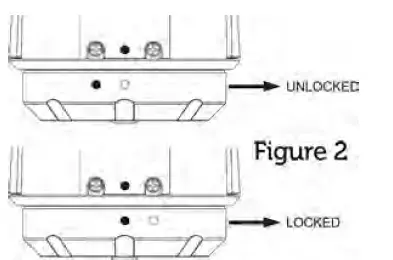
Attaching The Camera Panel Cover
The waterproof housing allows the camera to operate as deep as 30 feet under water. In order to protect the camera when using it in wet conditions, you must seal the camera’s operation panel with the Panel Cover.
- Attach the Panel Cover (Figure 1) to the back of the camera by positioning the Panel Cover Lock in the 12 o’clock position and rotate the outer ring of the Panel Cover clockwise (in the direction of arrow No.1) until the two black circles are lined up (Figure 2).
- Using a fingernail, slide the Panel Cover Lock upward in the direction of the arrow No. 2.
- To remove the Panel Cover, simply reverse the procedure in steps 1 and 2.
Failure to properly seal your camera can result in leaks that may damage or destroy your camera. Your warranty does not cover water damage resulting from user neglect.
The rubber seal on the Panel Cover forms the waterproof barrier to protect the camera in wet and underwater conditions. You must keep this seal clean; a single strand of hair or single grain of sand can cause water to leak into the camera.
After every use in saltwater, you will need to rinse the outside of the product and the seal with non-salt water, then dry. Failure to rinse off saltwater can cause corrosion within the camera and, in turn, the damage will result.
Powering On/Off
To turn the camera ON:
- Press and hold the Power Button
- The camera will vibrate, and the Green LED will turn on.
To turn the camera OFF:
- Press and hold the Power Button.
- The camera will vibrate for two seconds, and the Green LED will turn off.
Recording Videos
Before you start recording, select the video resolution by switching to the Video Resolution Switch There are two HD options to select from: HD (720p 60fps or 720p 30fps) and FHD (Full HD 1080p 30fps or 960p 30fps). You can change the resolution by changing the settings with the XS100 software.
There are two methods available for starting the video record function. The recording is delayed 1-2 seconds as a short vibration indicates recording has started. The LED indicator illuminates RED throughout the recording.
Method 1: Whether the camera power is ON or OFF, simply slide the Recording Slide Switch from STOP to REC to start recording.
Method 2: When your camera is OFF and the Recording Slide Switch is at the REC location, press and hold the Power Button to turn the camera ON, and it will start recording.
To stop recording, move the Recording Slide Switch from REC to STOP. The camera will vibrate and the LED Indicator will illuminate GREEN to indicate the recording has stopped. The camera will then enter the Standby mode. An additional option is to hold the Power Button to stop the recording and turn the camera off. The camera will vibrate for two seconds, and the Red LED light will turn off.
A smaller video file of 432×240 (w/1080p/720p) or 320×240 (w/960p) will be created simultaneously when recording an HD/FHD video file. The smaller video file size allows for more efficient uploading of content to social media sites and email.
- Changing video resolution is disabled during video recording.
- Check that the MicroSD card has sufficient space to capture your video. The card is full when the camera vibrates for 5-seconds, and the Green LED flashes continuously.
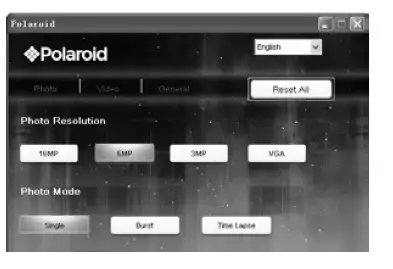
Taking Photos
The XS100 camera allows you to take 16MP, 5MP, 3MP, VGA high-quality still images.
To capture a still image
- Turn on the camera by pressing the Power Button.
- If the camera is in the video recording mode, move the Recording Slide Switch to STOP.
- After the camera power has been turned on, press the Power Button to take a photo. A short vibration and a flash of the Green LED indicate a still photo has been recorded.
The still photo function is disabled during video recording.
The default photo mode is “single photo.” Burst mode gives you a series of 10 photo shots per second to capture that “can’t miss” moment. Time Lapse mode can be utilized to take a series of photos at 5, 10, 30 or 60-second intervals. To change the mode, please refer to the section “Changing the camera settings”
When the memory card becomes full, the camera will vibrate for five seconds and the Green LED will flash continuously.
Reset
Resetting the Camera
Press the Reset Button with a thin and blunt object to reset the camera to the factory default settings.
Auto Rotation
The XS100 has a built-in G-sensor which is able to detect camera orientation. By mounting your camera 90°, 180° or 270° from the default position (refer to picture at right), the recorded view will be rotated to the same angle. This allows the user to mount the camera in different angular positions without recording a rotated or inverted view. The video resolution will be adjusted for 90° and270°. Review the table below.
| Video Resolution | 0° or 180° | 90° or 270° |
| 1080p | 1920×1080 | 608×1088 |
| 960p | 1280×960 | 720×960 |
| 720p | 1280×720 | 416×720 |
- The auto-rotate feature is available only for video capturing, not still photos.
- Adjust your camera orientation before you start recording. The rotation feature will not be activated throughout the recording process.
- You can disable the auto-rotation function in the “General Settings” with the XS100 software.
Connecting To A Computer/Using Software
Using the XS100 Software
- Insert a MicroSD card with at least 2MB free space into the camera.
- Connect the camera to a PC via the USB to mini USB cable.
- Press the Power Button to turn the camera ON.
- Using the computer’s file manager, open the MicroSD card folder and find the file “Polaroid.exe.” Double click the file to open it.
- If you cannot find Polaroid.exe in the MicroSD folder, unplug the cable from PC and turn the camera off and on again, and reconnect the USB cable to the PC.
Mac users note: Visit polaroidaction.com to download the Mac version of the XS100 software.
Browsing files and Transferring Them to a PC
- Click the “Browse Files” icon, and the file folder will pop up; the saved photo and video files will be displayed on the browser.
- Double click a photo or video file to preview the content.
- Copy or Move the files to your PC hard drive to store them in your computer or share them on social media websites or in email.
The FHD/HD video files will be saved as ACTP0001.mp4. The 432×240 or 320×240 video recorded at the same time will be saved as ACTP0001_thm.mp4.
Link to Polaroid Websites:
You can access more Polaroid Action information by clicking the icons at the top of the software. Links will take you to our website, FACEBOOK, and TWITTER pages.
Chaging Camera Settings
The XS100 camera settings can be changed by utilizing the video camera’s software. Simply click on the options in the Photo, Video or General menus.
Set up on Photo Menu:
Click “Photo” to select the desired photo resolution and mode. The active mode will become highlighted.
Video Resolution Values;
Mode
FHD Resolution
Options
1080p: 1920×1080 pixels (16:9),
30 fps (default) 960p: 1280×960 pixels (4:3), 30 fps
HD Resolution:
720p: 1280×720 pixels (16:9),
60 fps (default) 720p: 1280×720 pixels (16.9), 30 fps
Setting The General Menu
Click the “General” menu to select various operational settings for the camera. The active mode will be highlighted.
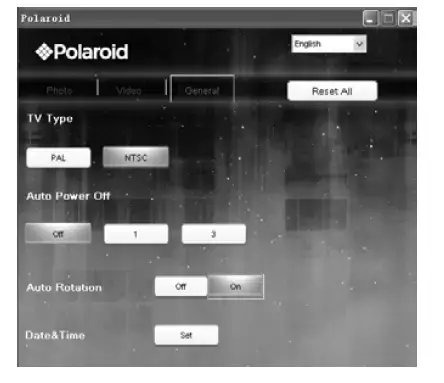
To reset the camera to the default settings, click “Reset All.”
Firmware Update and Installation
In order to keep your camera performing at its best, check regularly for new firmware updates and install them into your camera. Before you update the firmware, make sure you connect your camera to an Internet-accessible computer.
To perform a firmware check and update
- Insert a MicroSD card which has at least 15MB of free space in the camera.
- Run the XS100 software program.
- Click the “Firmware Check” button.
- Click the “Check” button.
- The XS100 software will automatically determine if there is a new firmware version available. A notification will be given if a new firmware version has been detected, display the new version number, and indicate the new version numbers and enhancements for the new version.
- Click the “Download” button, and the new firmware version will be downloaded to the MicroSD card. A notification will be given indicating that the download has successfully transferred to the card.
- Click the “Install” button to confirm that you want to install the newer firmware version.
- Unplug the USB cable from the PC and the camera will automatically install the latest firmware version. The Green LED illuminates to show that the firmware is installed. The process will take approximately 20 seconds.
- The Green LED will turn off once the firmware installation is complete.
- The camera will turn off when the upgrade is done. You can power on the camera and the new firmware will be effective.
- Place your camera in a stable position during the full firmware update process.
- Do not reset or remove the MicroSD card before the full update process has completed. The interruption will lead to potential damage to the camera.
- Any abnormal conditions such as the sudden interruption of the power supply will cause the camera to potentially be damaged due to the firmware update interruption.
Connecting To A HDTV
Connect your XS100 camera to an HDTV with the HDMI to mini HDMI cable. When you are successfully connected, the TV menu will pop up. You can preview, playback, and delete files or format the MicroSD card through your TV screen
- In order to turn off the camera, you will first need to disconnect the camera from the HDTV.
- Be sure there is a MicroSD card in the camera or no card will be displayed on the TV screen.
- No files will be displayed on the TV screen if you don’t have any files in the MicroSD card
Taking Photos with TV:
- Press and hold the Power Button until the TV menu appears.
- Press the Power Button briefly to select the Preview mode.
- Slide the Recording Slide Switch to STOP.
- Press the Power Button twice to enter Photo Preview mode.
- Press the Power Button to take photos.
Recording Video with TV:
- Press and hold the Power Button until the TV menu appears.
- Press the Power Button briefly to select the Preview mode.
- Slide the Recording Slide Switch to REC.
- Press the Power Button twice to enter Video Preview mode.
- Press the Power Button to start recording; press it again to stop recording videos, or slide the Recording Slide Switch to STOP. The camera will then enter the Photo mode.
Hint: You can use the Recording Slide Switch to change between Video and Photo Preview mode.
Playing Back Photo Files w/TV:
- Press and hold the Power Button until the TV menu appears.
- Press the Power Button briefly to select the Play Photo mode.
- Press the Power Button twice to enter the Play Photo mode.
- Select the desired photo file you want to view:
Move the Recording Slide Switch to REC and press the Power Button briefly to view the previous file.
Move the Recording Slide Switch to STOP and press the Power Button briefly to view the next file. - Press the Power Button twice to start the slide show and press it again to stop.
- Press and hold the Power Button to enter to Edit menu.
Playing Back Video Files w/TV:
- Press and hold the Power Button until the TV menu appears.
- Press the Power Button briefly to select the Play Video mode.
- Press the Power Button twice to enter the Play Video mode.
- Select the desired video file you want to view:
Slide the Recording Slide Switch to REC and press the Power Button briefly to view the previous file.
Slide the Recording Slide Switch to STOP and press the Power Button briefly to view the next file. - Press the Power Button twice to start playing the video.
- When the video is playing, press the Power Button briefly one time to pause and press the Power Button twice to continue.
- Press and hold the Power Button to enter the Edit menu
Deleting Photo and/or Video Files w/TV
You can delete a single file or all photo and video files on the MicroSD card.
To delete the files:
- Press and hold the Power Button until the TV menu appears.
- Press the Power Button briefly to select Play Photo or Video mode.
- Press the Power Button twice to enter the Photo or Video Playback mode.
- Select the desired photo or video file to be deleted.
- Press and hold the Power Button to enter to the Edit menu.
- Press the Power Button briefly to select “Delete This Image/Video” or “All.”
- Press the Power Button twice to select “Delete This Image/Video” or All”.
- Press the Power Button briefly to select, “Yes.”
- Press the Power Button twice to confirm.
Formatting a MicroSD Card w/TV:
- Press and hold the Power Button 0 until the TV menu appears.
- Press the Power Button briefly to select Play Photo or Video mode
- Press the Power Button twice to enter either the Photo or Video Playback mode.
- Press and hold the Power Button to enter tthe Edit menu.
- Press the Power Button briefly to select “Format”
- Press the Power Button twice to enter the “Format” interface.
- Press the Power Button briefly to select “YES” and press the Power Button twice to confirm formatting. The MicroSD will be formatted.
Mounting Accessories

- Long Mount Strap
- Helmet Mount
- Short Mount Strap
- Ball Joint
- Ball Joint (L)
- Adhesive Mount (for Helmet)
- Adhesive Mount (for Fitting Piece)
- Secure String
- Fitting Piece
- Mount-Lock Key
- Ball Joint Nut
- Mount-Lock
- Bike Mount
Camera Mounting Methods
The XS100 versatile Mount-Lock Mounting System allows you to use your XS100 in all types of scenarios. With the included helmet and handlebar mounting systems it allows you to attach to all types of helmets like bike (vented), motorcycle, ski, skydive, white water rafting etc. or mount on to a handlebar of a bike, jet ski, 4×4 ATV, Motorcycles as well as Ski poles. The Mount-Lock system allows you to easily remove and remount the camera. Visit Polaroidaction.com for additional exciting mounting systems.
Secure string with quick disconnect:
to feel more secure, a Secure String is included.
- Loop one end of the secure strap through the strap hole of the camera. You may use a pin to help thread it through the hole.
- Attach the other half to the mount you are using in the strap hole or to any other secure place.
- Clip both ends when the camera is mounted.
Attaching Mount-Lock to the XS100:
- Fit the screw of the Mount-Lock in to the tripod socket of the camera.
- Turn the Mount-Lock screw until it is tightened. You can do it by hand using the built-in triangular wire wrench or with the Mount-Lock key; the Mount-Lock Release Arms should now be facing the front of the camera.
Installing the Helmet Straps into the Helmet Mount:
- Choose the suitable strap to mount on different types of helmets. For example, use the short mount strap for bike helmets and the medium mount strap for motorcycle helmets.
- Remove the two strap clips from the strap.
- There are three vents at each side of the Helmet Mount. Loop the strap through the inner vent (closest to the center) from the bottom. (Step 1)
- Loop the strap through the strap clip from the top. (Step 2)
- Loop the strap through the middle vent from the top. (Step 3)
- Loop the strap through the outer vent from the bottom (Step 4)
- Tighten the strap and repeat Steps 1-4 on the other side.
Mounting Helmet Mount on a Vented Helmet:
- Choose the Helmet Mount with a suitable length of the strap.
- Adhere the single-sided adhesive mount to the base of the helmet mount. Use the double-sided adhesive mount to permanently secure the mount to the helmet.
- Loosen and detach the ball joint nut from the helmet mount.
- Insert the Ball Joint through the Ball Joint Nut and then into the Mount Socket, and you should hear a loud click, then tighten the Ball Joint Nut.
- Loop the strap of the helmet mount through the vents of the bike helmet and back through the strap clip.
- Fasten the strap.
- Repeat on the opposite end of the strap until the Helmet Mount is firmly attached to the helmet.
- Attach the Mount-Lock and camera into the Ball Joint Socket. Assure that the Mount- Lock Ball Joint Nut is tightened securely.
- The ball joint system allows you to change the angle of the camera. Simply loosen the nut, adjust the camera angle and re-tighten the nut.
Mounting Helmet Mount on a Non-Vented Helmet (motorcycle):
- Adhere the Helmet Mount to the helmet by applying a double-sided 3M® adhesive mount. By utilizing a combination of the Helmet Mount and fitting piece with straps; it will provide additional security to the mounting system.
- Select the Helmet Mount with a suitable length of strap.
- Loosen and detach the ball joint nut from the Helmet Mount.
- Insert the Ball Joint through the Ball Joint Nut and then into the Helmet Mount Socket, and you should hear a loud click, then tighten the Ball Joint Nut.
- Adhere the double-sided adhesive mount to the base of the Helmet Mount and fitting piece.
- Attach the Helmet Mount at one side of the helmet.
- Loop the strap to the other side of the helmet, through the vent of fitting piece, and back to the original side of the helmet.
- Fasten the strap with a Strap Clip.
- Repeat on the opposite end of the strap until the Helmet Mount is firmly attached to the helmet.
- Attach the Mount-Lock and camera into the Ball Joint Socket. Assure that the Mount-Lock Ball Joint Nut is tightened securely.
- The ball joint system allows you to change the angle of the camera. Simply loosen the nut, adjust the camera angle and re-tighten the nut.
Tips for Achieving a Secure Mounting:
- When straps are not practical, the 3M® adhesive pads can be used to attach the mount to smooth surfaces like a motorcycle helmet. And don’t worry about the adhesive ruining the helmet; they’re removed quite easily when heat is applied (eg. a hairdryer).
- For best results, maximum adhesion of the adhesive pad is achieved by first cleaning the helmet surface thoroughly where the pad will be attached. Apply the pad firmly and allow it to remain unused overnight. The dry time allows the adhesive to create a stronger bond.
- For ultimate camera support, use the straps and the 3M® adhesive pads.
Mounting on a Handlebar or Pole (.75 to 1.4-inch diameter):
- Loosen both bike mount screws.
- Attach the bike mount to the handlebar or pole and tighten the screws until the mount is firmly secured.
- Loosen and detach the ball joint nut from the bike mount.
- Insert the Ball Joint through the Ball Joint Nut and then into the Bike Mount Socket, and you should hear a loud click, then tighten the Ball Joint Nut.
- Attach the Mount-Lock and camera into the Ball Joint Socket. Assure that the Mount-Lock Ball Joint Nut is tightened securely.
- The ball joint system allows you to change the angle of the camera. Simply loosen the nut, adjust the camera angle and re-tighten the nut.
Troubleshooting
| PROBLEMS
1 LED flashes and camera turns off 2 Cannot turn on the camera |
CAUSES
Battery is exhausted |
SOLUTIONS
Recharge the battery |
| Red LED flashes during recording | Low battery | Recharge the battery |
| Cannot take photos or video (Green LED flashes | Memory is full | Replace the memory card with a new one |
| Cannot take photos or video Green and Red LED flashes | 1 MicroSD card is not inserted
2 Card is not formatted |
1 Insert the MicroSD card
2 Format the card |
| Cannot find removable disk after connecting the camera to the computer | Connection Failure | 1 Make sure cable connections are secure and restart the computer if necessary.
2 Try a different USB port on the computer |
Specifications
Optics
- 1 /2.5” 5MP CMOS Image Sensor
- F2.8 Fixed Focus Ultra Sharp Glass Lens
- Light Sensitivity: >1.4 V/lux-sec
- Dynamic Range: >65db
- White Balance, ISO, Scene: Auto
- Exposure Auto Control: Auto
- 170 Degree Ultra Wide Angle Lens
- File Format: Video- H2.64 MPEG4, PHOTO- JPEG Video (NTSC/PAL)
HD Resolutions:
- 1080p: 1920x1080p / 30FPS / 16:9
- 960p: 1280X960P / 30FPS / 4:3
- 720p:1280×720 / 60FPS (Slow Motion) / 16:9
- 720p: 1280×720 / 30FPS/ 16:9
Photo:
- Resolutions 16MP, 5MP, 3MP, VGA
- Photo Mode: Single / Burst (x10) / Time Lapse (5,10,30,60)
Microphone /Audio
- Mono, 48 KHZ, AAC Compression, auto gain control
- Audio Format: AAC+ MP4
Storage/Recording Time
- 32MB internal Memory
- Micro SD – Up To 32GB
Battery/Charging
- 1200MAH Built In Battery (Approx. 2.5 hrs of Use)
Other:
- G-Sensor (Auto Rotation): Yes
- Auto Power Off: off/1min / 3min Dual File Recording: Yes
- Vibrates: Yes”
- Anti-Shake: Yes
- Inputs/Outputs
- USB 2.0, HDMI
Housing
- IPX8: Waterproof Up To 10Meter
- Metallic & Crystal Clear Finishing
- High Impact & Shock Proof
Operating System
- Windows 7/XP SP3 /Vista and later, Mac 10.4 or above Size: 108*42*42.4mm
- Weight: 4.8oz
FCC Statement
This device complies with Part 15 of the FCC Rules. Operation is subject to the following two conditions:
- This device may not cause harmful interference.
- This device must accept any interference received, including interference that may cause undesired operation.
This equipment has been tested and found to comply with the limits for Class B digital devices, pursuant to Part 15 of the FCC rules. These limits are designed to provide reasonable protection against harmful interference in a residential installation. This equipment generates uses and can radiate radio frequency energy and, if not installed and used in accordance with the instructions, may cause harmful interference to radio communications. However, there is no guarantee that interference will not occur in a particular installation. If this equipment does cause harmful interference to radio or television reception, which can be determined by turning the equipment off and on, the user is encouraged to try to correct the interference by one or more of the following measures:
Re-orient or relocate the receiving antenna. Increase the separation between the equipment and receiver.
Connect the equipment into an outlet on a circuit different from that to which the receiver is connected. Consult the dealer or an experienced radio/TV technician for help.
Use of shielded cable is required to comply with Class B limits in Subpart B of Part 15 of the FCC rules.
Do not make any changes or modifications to the equipment unless otherwise specified in the manual. If such changes or modifications should be made, you could be required to stop operation of the equipment. Notice If static electricity or electromagnetism causes data transfer to discontinue midway (fail), restart the application or disconnect and connect the communication cable (USB, etc.) again.
Legal Notice
Trademark Information
Microsoft® and Windows® are U.S. registered trademarks of Microsoft
Corporation.
Pentium® is a registered trademark of Intel Corporation.
iPhone®, iPad®, and Macintosh® are trademarks of Apple Inc.
MicroSD™ is a trademark maintained by SD Card Association.
Other names and products may be trademarks or registered trademarks of their respective owners.
Product Information
Product design and specifications are subject to change without notice. This includes primary product specifications, software, and a instruction manual. This manual is a general reference guide for the product.
The product and accessories that come with your XS100 camera may be different from those described in this manual. This is due to the fact that different retailers often specify slightly different product inclusions and accessories to suit their market requirements, customer demographics, and geographical preferences. Products very often vary between retailers, especially with accessories such as chargers, memory cards, cables, pouches, mounting accessories and language support. Occasionally, a retailer will specify a unique product color and appearance. Contact your dealer for precise product definition and included accessories.
The illustrations in this manual are for the purpose of explanation and may differ from the actual design of your camera.
The manufacturer assumes no liability for any errors or discrepancies in this manual.
PLR IP Holdings, LLC, its licensees, and affiliates, fully support all electronic waste initiatives. As responsible stewards of the environment, and to avoid violating established laws, you should properly dispose of this product in compliance with all applicable regulations, directives or other governances in the area where you reside. Please check with local authorities or the retailer where you purchased this product to determine a location where you can appropriately dispose of the product.
You may also go to www.polaroid.com and reference Social Responsibility http://www.polaroid.com/social-responsibility to learn more about the specific laws in your area and to locate a collection facility near your home.
If your electronic device has internal memory on which personal or other confidential data may be stored, you may want to perform a data sanitization process before you dispose of your device to assure another party cannot access your personal data. Data sanitization varies by the type of product and its software, and you may want to research the best sanitization process for your device before disposal. You may also check with your local recycling facility to determine their data sanitization procedures during the recycling process.
Polaroid, Polaroid & Pixel, Polaroid Classic Border Logo, and Polaroid Color Spectrum are trademarks of PLR IP Holdings, LLC, used under license. All other trademarks are the property of the respective owner, who has not sponsored, endorsed or approved this product. PLR IP Holdings, LLC does not manufacture this product or provide any Manufacturer’s Warranty or support.
Distributed by:
C&A Licensing LLC
2 Bergen Turnpike
Ridgefield Park, NJ 07660
© 2012 All Rights Reserved
MADE IN CHINA
Product features, specifications and appearances are subject to change without notice.
www.polaroidaction.com
Instantly recognizable. instantly reassuring. The Polaroid Classic Border lets you know you’ve purchased a product that the best qualities of our brand and that contribute to our rich
heritage of qua/Hy and innovation.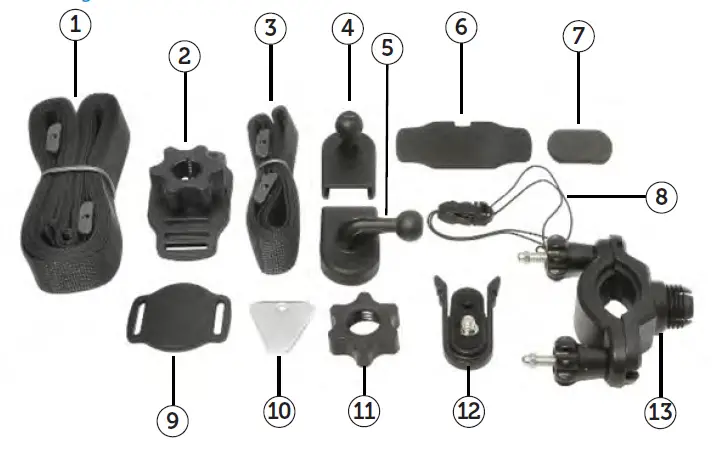
Polaroid PLA21SB001A Dolby Atmos Soundbar

Your Sound Bar

- Remote control sensor
- Display: Shows the current status of the sound bar.
- Wall bracket screws.
- button: Use to switch between ON or STANDBY.
- button: Use to select the input source for the Sound Bar.
- Use to decrease the volume. + Use to increase the volume.
- AC~ socket.
- COAXIAL: Use to connect the sound bar to a COAXIAL OUT socket on an external device.
- OPTICAL socket: Use to connect the sound bar to a OPTICAL OUT socket on an external device.
- USB socket: Insert a USB device to play music. It can also be used to update the sound bar’s software functions.
- AUX socket: Use to connect to the AUX OUT/Headphone sockets on an external device.
- HDMI OUT (TV eARC/ARC) socket: The port supports the eARC/ARC HDMI feature, which allows the sound bar to play audio that originates on the connected TV.
- HDMI IN 1 / 2 sockets: Two HDMI IN ports for connecting HDMI source devices, such as a DVD player, Blu-ray Disc player, or gaming console. Note that only one HDMI input is usable at a time.
Preparing the remote control
IMPORTANT: The remote control will work within a 6m range, however this may be impossible if there are obstacles between the unit and the control. If the remote control is used near other devices which generate infrared rays then it may not operate properly and may interfere with other devices. Fitting/replacing the batteries:Push down gently on the top of the battery cover and slide down off the bottom of the remote control. Insert the two AAA batteries into the battery compartment.Ensure the + & – on the batteries are correctly aligned with the marks in the battery compartment. Slide the battery compartment cover back onto the bottom of the remote control as shown in the diagram and push upwards until it locks in place.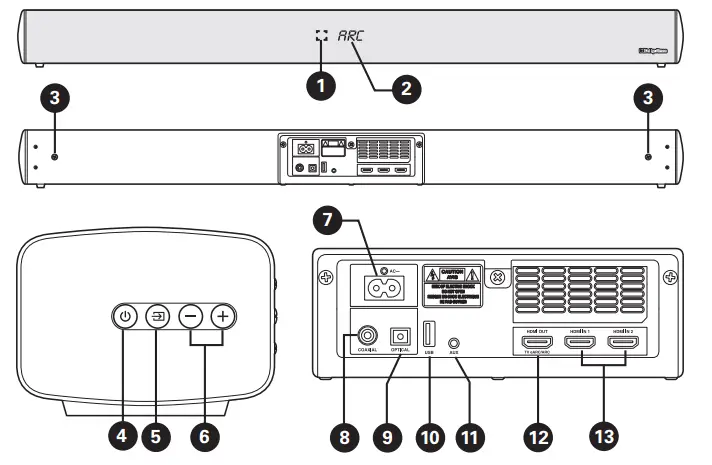
Important battery information
- When the remote control is not used for a long time (more than a month), remove the battery to prevent it from leaking.
- If the batteries do leak, wipe away the leakage inside the battery compartment and replace the batteries with new ones.
- Do not use any batteries other than those specified.
- Do not heat or disassemble batteries. Never throw them in fire or water.
- Do not carry or store batteries with other metallic objects. Doing so could cause batteries to short circuit, leak or explode.
- Never recharge a battery unless it is a rechargeable type.
Recognising the remote control buttons
- : Switches the Sound Bar ON or into the STANDBY mode.
- SOURCE buttons: Use to select the input source for the sound bar.
- : Skip to previous track. uul : Skip to next track. ull : Play / pause / resume playback in Bluetooth mode. Press and hold to activate Bluetooth pairing function or to disconnect form a paired device.
- BASS +/–: Use to adjust the level of the bass.
- : Press to mute the sound bar. + / –: Press + to increase the volume. Press – to reduce the volume.
- TREBLE +/–: Use to adjust the level of the treble.
- VERTICAL/SURROUND: Press to turn the surround sound on or off.
- Equalizer setting buttons: Press to select the equaliser setting best suited to the material you are listening to.
- DIMMER: Used to adjust the brightness of the display.
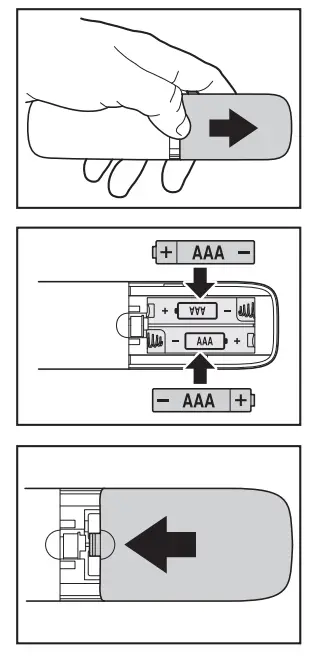
Positioning your Sound Bar
The correct position of the Sound Bar Placed on a stand: If your TV is placed on a stand, place the Sound Bar directly in front of the TV centred on the middle of the screen. Wall mounted: If your TV is fitted to the wall, Mount the Sound Bar directly below the TV centred on the middle of the screen. How to mount your Sound Bar on a wall IMPORTANT: Before installing your Sound Bar please read the information below.
- All installation must be carried out by a qualified person only. Incorrect assembly can result in severe personal injury and property damage (if you intend to install this product yourself, you must check for installations such as electrical wiring and plumbing that may be buried inside the wall). It is the responsibility of the installer to verify that the wall will safely support the total load of the Sound Bar and the wall brackets.
- Additional tools (not included) are required for the installation.
- Do not overtighten screws.
- Keep this instruction manual for future reference.
- Use an electronic stud finder to check the wall type before drilling and mounting.
- Suggested wall mounting height ≤1.5 meters.
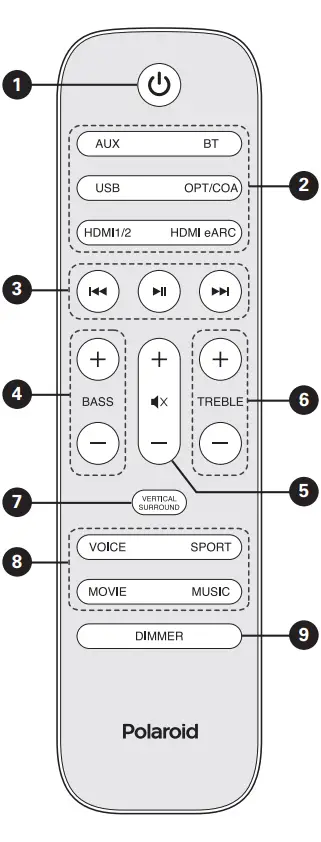
Fitting the wall brackets
WARNING: Before attempting to fit the Sound Bar to the wall, if you are in any way unsure about how or where to fit the Sound Bar you should employ a qualified person to install your Sound Bar. IMPORTANT: The fittings supplied with your Sound Bar may not be suitable for all types of walls. Please consult a professional for advice before drilling any holes if you are in any doubt. IMPORTANT: Mark the position on the wall that you want the sound Bar to be fitted to and check that they align with the holes in the brackets before drilling any holes.
- The distance between the outer holes must be 810 mm with two more holes 30 mm in from them. Ensure the four points are level using a spirit level (A).
- Drill 4 parallel holes (Ø 3-8 mm each according to wall type) in the wall. The distance between the outer holes must be 810 mm With two more holes 30mm in from the outer holes. Firmly insert a dowel into each hole (B).
- Slot the screws into the holes in the brackets. Slot a crosshead screwdriver through the holes in the front of the bracket and tighten the screws into the wall (C).
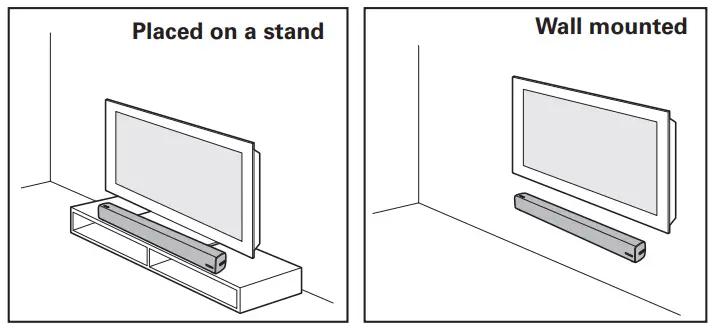
Mounting the Sound Bar
- Remove the two wall bracket screws on the back of the Sound Bar using a cross-head screwdriver (not supplied) (A).
- Screw the two wall mounting screws into the two screw holes left by removing the two wall bracket screws (B).
- Align the heads of the wall mounting screws on the back of the Sound Bar with the slots in the tops of the wall brackets (C).
- Gently push the Sound Bar down until it locks in place (D).
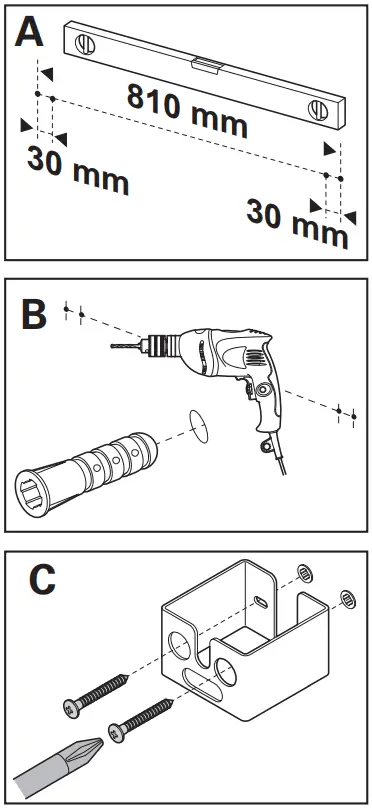
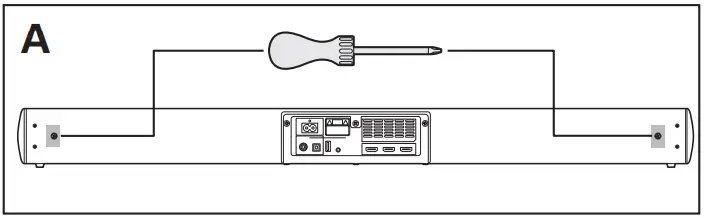
Connecting your Sound Bar
- Dolby Atmos®
Dolby Atmos gives you an immersive listening experience by developing sound in 3-dimensional space, and the richness, clarity, and power of Dolby sound. For more information, please visit: dolby.com/technologies/dolby-atmos - To use Dolby Atmos®
Dolby Atmos® is only available when your sound bar is connected using the HDMI ARC or HDMI sockets and a HDMI 2.0 cable. Please see below for more information on how to connect your soundbar to an external device.Your soundbar will still function when it is connected using other methods (such as a Digital Optical cable) but these are unable to support all of the Dolby Atmos® features. Given this, our recommendation is to connect via a HDMI 2.0 cable into the HDMI ARC or HDMI ports to ensure you can enjoy the full effect of your sound bar.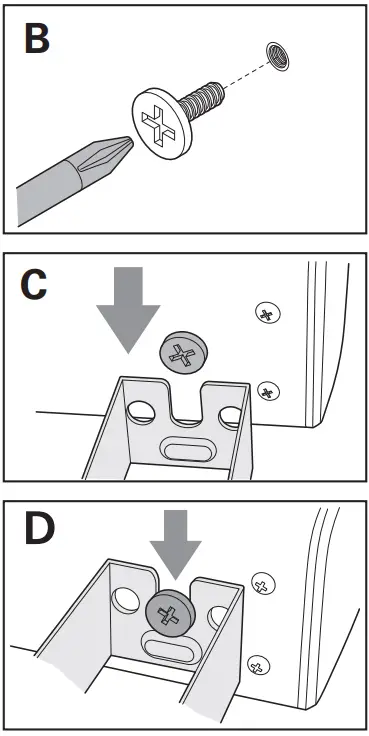
Connecting to the HDMI OUT ARC socket using an HDMI cable
IMPORTANT: The ARC (Audio Return Channel) function allows you to send audio from your ARC compliant TV to your Sound Bar through a single HDMI connection. To enjoy the ARC function, please ensure your TV is both HDMI-CEC and ARC compliant and set up accordingly. When correctly set up, you can use your TV remote control to adjust the volume or mute the Sound Bar.
- Slot one end of the HDMI cable (not supplied) into the HDMI OUT ARC socket on the back of the Sound Bar.
- Slot the other end of the HDMI cable into an HDMI OUT ARC socket on the TV or other device you want to connect to the Sound Bar. TIPS: Your TV must support the HDMI-CEC and ARC function. HDMI-CEC and ARC must be set to ON. The setting method of the HDMI-CEC and ARC may differ depending on the TV or device connected. Please refer to the user manual supplied with the device. Only HDMI 2.0 or higher versions cables are recommended for this soundbar.
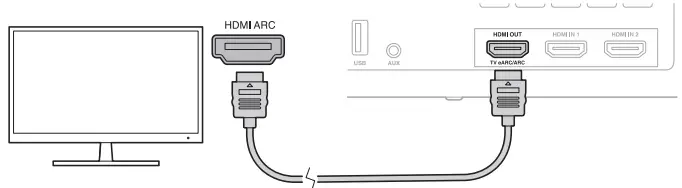
Connecting to the HDMI IN sockets using an HDMI cable
If the device you want to connect to is not HDMI ARC compatible, you can connect to the device using the standard HDIM IN ports on the Sound Bar and a HDMI cable. Note: The package does not include a HDMI cable.
- Use an HDMI cable to connect the soundbar’s HDMI OUT (eARC/ARC) socket to the TV’s HDMI IN socket.
- Use an HDMI cable to connect the soundbar’s HDMI IN (1 or 2) socket to your external devices (e.g. games consoles, DVD players and blu ray). TIPS: Only HDMI 2.0 or higher versions cables are recommended for this sound bar.
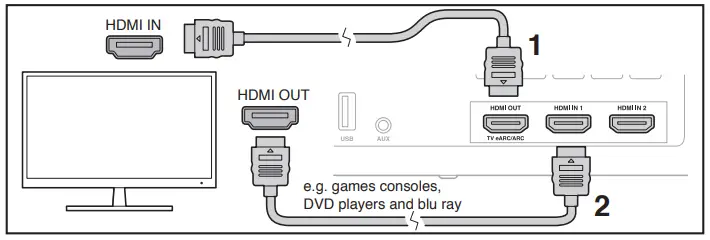
Connecting to the Optical socket using an OPTICAL cable
- Pull the protective cap out of the optical socket on the back of the Sound Bar.
- Slot one end of the OPTICAL cable (not supplied) into the socket on the Sound Bar.
- Slot the other end of the OPTICAL cable into the OPTICAL socket on your TV or other device you want to connect to.IMPORTANT: If there is no sound output and the OPTICAL Indicator flashes, ensure the audio setting of the input source (e.g. TV, game console, DVD player, etc.) is set to PCM mode with optical input.
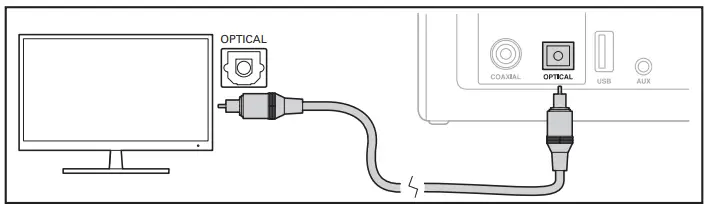
Connecting to the COAXIAL socket using an audio coaxial cable
- Slot one of the plugs on the audio coaxial cable (not supplied) into the COAXIAL socket on the back of the Sound Bar.
- Slot the other end of the audio coaxial cable into the COAXIAL OUT socket on your TV or other device you want to connect to. IMPORTANT: The Sound Bar may not be able to decode all digital audio formatsfrom the input source. If this happens, the Sound Bar will automatically go into mute, this is NOT a fault. Check that the input source (TV, games console, DVD player e.t.c) is set to PCM or Dolby Digital (refer to the user manual for the input device for its audio setting details) with HDMI / OPTICAL / COAXIAL input.
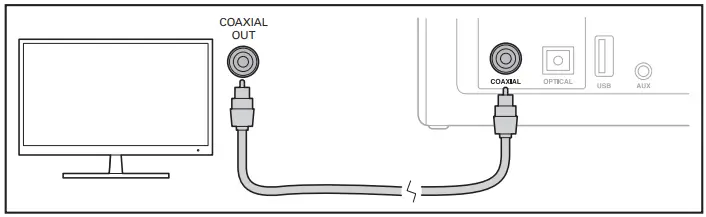
Connecting to the AUX socket using an RCA to 3.5mm audio cable
- Slot the 3.5mm plug on the RCA to 3.5mm cable (not supplied) into the AUX socket on the Sound Bar.
- Slot the other end of the AUX to 3.5mm cable into the red and white AUX sockets on your TV or other device you want to connect to. IMPORTANT: You may need to change the audio settings on your TV or device you have connected to, please consult the instructions supplied with the product for more information.
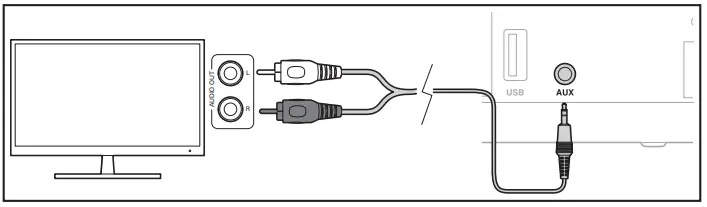
Connecting to the AUX socket using an 3.5mm to 3.5mm audio cable
- Slot one of the plugs on the 3.5mm to 3.5mm audio cable (supplied) into the AUX socket on the back of the Sound Bar.
- Slot the other end of the 3.5mm to 3.5mm audio cable into the headphone socket on your TV or another device you want to connect to.
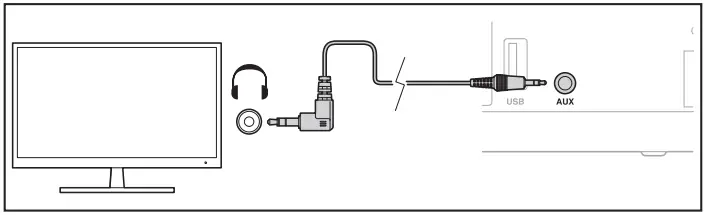
- Fitting a USB drive using the USB socket
Slot the USB device into the USB slot in the back of the Sound Bar. - Attaching the power cable
Slot the end of the power cable into the power socket on the back of the Sound Bar. - Plugging the Sound Bar in
Slot the plug on the end of the power cable into a wall socket and turn the power on if required. Note: Ensure the power supply voltage corresponds to the voltage stated on the back or underside of the Sound Bar. Before plugging the Sound Bar in, ensure that all other connections have been completed. - Turning the Sound Bar on & off
You can turn the Sound Bar on by pressing either the button on the Sound Bar or by pressing the on the remote control. Test mode: Press and hold the buttonthen power up the sound bar to select the test mode, this mode is without DRC and the sound setting is FLAT. It is not a mode that consumers use.
Using your Sound Bar
When you first connect your Sound Bar to the mains it will automatically go into standby mode.Turning on & off Press either the button on the Sound Bar or press the button on the remote control to turn your SoundBar on or off. To turn the Sound Bar off completely you will have to remove the plug from the mains socket. Note: If your TV or other externaldevice is connected, the Sound Bar will automatically switch on when the TV or other external device is switched on. If the Sound Bar is idle, it will automatically switch into standby mode after approximately 15 minutes. Mode selection
Press the button on the end of the Sound Bar repeatedly or press the AUX, BT, OPT/COA, HDMI 1/2, HDMI eARC and USB on the remote control to select the connection mode you have used on the external device.
The selected mode will be shown on the display on the front of the Sound Bar.
Adjusting the Bass/Treble level Press the BASS or TREBLE + / – buttons on the remote control to adjust the amount of bass or treble. Adjusting the volumePress the + / – buttons on the end of the Sound Bar or the volume + / – buttons on the remote control to increase or decrease the volume.
If you want to turn the sound off completely press the button on the remote control. To turn the sound onagain, press the button again or the + / – buttons on the end of the Sound Bar or the volume + / – buttons on the remote control.
Turning the Surround Sound
ON or OFF
Press the VERTICAL/SURROUND button on the remote control to turn on the surround sound. Press the button again to turn the surround sound off.
Setting the Audio Delay (AV SYNC)
Video image processing is sometimes longer than the time required to process the audio signal. This is called “delayed”. The Audio Delay feature is designed to remedy this delay.
IMPORTANT: You must be connected to the device you are listening to with a HDMI 2.0 cable using the HDMI eARC socket.
Press and hold the VERTICAL/ SURROUND button on the remote control to enter the audio delay setting. The Sound Bar display will scroll ‘LATENCY SET’ when activated. Press the volume + / – buttons to adjust the delay in 10 millisecond intervals to adjust the delay time.
Adjusting the brightness
Repeatedly press the DIMMER button on the remote control to select your preferred brightness level.
Using the equalizer (EQ)
effect
Press the VOICE / SPORT / MOVIE / MUSIC buttons on the remote control to select the desired preset equaliser effect.
AUX, OPTICAL, COAXIAL or HDMI operation
Ensure your Sound Bar is connect to the TV, DVD player or audio device as described on pages 10 to 13. When your Sound Bar is turned on, press the button on the end of the Sound Bar or the AUX, OPT/COA, HDMI 1/2 or HDMI eARC buttons on the remote control, the selected mode will be shown on the Sound Bars display. Use the connected device remote control or controls to operate the playback features. Tips The Sound Bar may not be able to decode all digital audio formats from the input source. If this happens, the Sound Bar will automatically go into mute, this is NOT a fault. Check that the input source (TV, games
Using the Bluetooth function
IMPORTANT: The operational range between the Sound Bar and a bluetooth enabled device is approximately 8 meters. The device you wish to connect to the Sound Bar must support Advanced.
- Turn the bluetooth function on the device you wish to pair.
- Press the button on the
end of the Sound Bar until BT is shown on the Sound Bar display or press the BT button on the remote control. “NO BT” will be shown on the display if the Sound Bar is not paired with a devise. - Check the found list on your devise for ‘PLA21SB001A’ and connect to it.
- If the bluetooth connection is successful the Sound Bar will give you an audio prompt ‘Paired’ and the display on the Sound Bar will show “BT”.
- To disconnect the device, switch to another function on the Sound Bar or Press and hold the ulI or BT button on the remote control. The Bluetooth disconnected will be disconnected when you hear a audible prompt.
- The device will also be disconnected if you move out of the range of the Sound Bar.
- If you want to reconnect, move closer to the Sound Bar. Note: Check the bluetooth list on the device to ensure the Sound Bar is still connected.
- If the connection is lost, reconnect following the instructions for pairing the Sound Bar.
Listening to music
If the connected Bluetooth device supports Advanced Audio Distribution Profile (A2DP), you can listen to the music stored on the device through the player.
If the device also supports Audio Video Remote Control Profile (AVRCP), you can use the players remote control to play music stored on the device. - Pair the device with the Sound Bar.
- Play music via your device (if it supports A2DP).
- Use the supplied remote control to control playback from the device (if it supports A2DP).
To pause / resume play, press the ull button on the remote control. To skip to a track, press the ltt / uuI buttons on the remote control.
Troubleshooting
| Problems | What to do |
| No power | • Ensure that the power cable of the apparatus is properly connected.
• Ensure that there is power at the power outlet. • Press button on the remote control or Sound Bar to turn the unit on. |
| Remote control does not work | • Before you press any playback control button, first select the correct source.
• Reduce the distance between the remote control and the unit. • Insert the battery with its polarities (+/-) aligned as indicated. • Replace the batteries. • Aim the remote control directly at the sensor on the front of the Sound Bar. |
| No sound | • Press or the + / – volume buttons on the remote control to ensure the Sound Bar is not muted.
• Increase the volume. Press Volume + button on the remote control or on the Sound Bar. • Press the button on the Sound Bar or one of the source buttons on the remote control to select a different input source. When using either of the Digital input, if there is no audio: • Try setting the TV output to PCM or • Connect directly to your Blu-ray/other source, some TVs do not pass through digital audio. • Your TV may be set to variable audio output. Confirm that the audio output setting is set to FIXED or STANDARD, not VARIABLE. Consult your TV’s user manual for more detailed information. • If using Bluetooth, ensure that the volume on your source device is turned up and that the device is not muted. |
| I can’t find the Bluetooth name of this unit on my Bluetooth device | • Ensure the Bluetooth function is activated on your Bluetooth device.
• Re-pair the unit with your Bluetooth device. |
| The Sound Bar turns off | • When the unit’s external input signal level is too low, the unit will be automatically turn off after 15 minutes. Please increase the volume level of your external device. |
Warnings
This product was designed and manufactured to meet strict quality and safety standards. There are, however, some operation precautions that you should be aware of:
- Read these instructions – All the safety and operating instructions should be read before this product is operated.
- Keep these instructions – The safety and operating instructions should be retained for future reference.
- Heed all warning – All warnings on the appliance and in the operating instructions should be adhered to.
- Follow all instructions – All operating and use instructions should be followed.
- Do not use this appliance near water – The appliance should not be used near water or moisture
- for example, in wet basements or near a swimming pool or similar environments.
- Clean only with a dry cloth.
- Do not block any ventilation
- Do not install near any heat source such as radiators, heaters, stoves or other apparatus (including amplifiers) that produce heat.
- Protect the power cord from being walked on or pinched, particularly at plugs, power boards and at the where it exits from the Sound Bar.
- Only use attachments/accessories specified by the manufacturer.
- Unplug the appliance during thunderstorms or when unused for long periods of time.
- Refer all servicing to qualified personnel. Servicing is required when the appliance has been damaged in any way, such as a damaged power cord or plug, liquid has been spilled or objects have fallen into the unit, the unit has been exposed to rain or moisture, does not operate normally, or has been dropped.
- To reduce the risk of fire or electric shock, do not expose this appliance to rain or moisture. The apparatus must not be exposed to dripping or splashing. Objects filled with liquids, such as vases, must not be placed on the apparatus.
- The mains plug/appliance coupler is used as the disconnect device, the disconnect device must remain readily operable.
- Danger of explosion if battery is incorrectly replaced. Replace only with the same or equivalent type.
- The ventilation should not be impeded by covering the ventilation openings with items such as newspapers, table-cloths, curtains, etc.
- Do not place this unit close to strong magnetic fields.
- Should any solid object or liquid fall into the system, unplug the system and have it checked by qualified personnel before operating it any further.
- Do not attempt to clean the unit with chemical solvents as this might damage the finish. Use a clean, dry or slightly damp cloth.
- When removing the power plug from the wall outlet, always pull directly on the plug, never yank on the cord.
- No naked flame sources, such as lighted candles, should be placed on the apparatus.
- Changes or modifications to this unit not expressly approved by the party responsible for compliance will void the user’s authority to operate the equipment.
- The marking label is pasted on the bottom or back of the equipment.
DO NOT INGEST BATTERY, CHEMICAL BURN HAZARD.
The remote control supplied with this product contains a coin/button battery. If the coin/button cell battery is swallowed, it can cause sever internal burns in just 2 hours and lead to death. Keep new and used batteries away from children. If the battery compartment does not close securely, stop using the product and keep it away from children. If you think batteries might have been swallowed or placed inside any part of the body, seek medical attention.
This appliance is not intended for use by young children
or infirm persons without supervision.
IMPORTANT INFORMATION
- Not placing the TV on tall furniture (for example, cupboards or bookcases) without anchoring both the furniture and TV to a suitable support.
- Not standing the TV on cloth or other materials placed between the TV and the supporting furniture.
- Educating children about the danger of climbing on furniture to reach the TV or its controls
- We hereby declares that this product is in compliance with the essential requirements and other relevant provisions of Directive 2014/53/EU.
Battery disposal information
The batteries used with this product contain chemicals that are harmful to the environment. To preserve our environment, dispose of used batteries according to your local laws and regulations. Do not dispose of batteries with normal household waste. For more information, please contact the local authority or the retailer where you purchased the product.
Technical specification
| Sound Bar | |||
| Bar power supply | AC | 100-240V ~ 50/60Hz | |
| Power consumption | 30 | W | / < 0.5 W (Standby) |
| Speaker impedance | 4Ω | x | 2 |
| USB | 5V | 500mA | |
| Hi-Speed USB (2.0) | |||
| 32GB (max), MP3 | |||
| Audio input sensitivity | 500mV | ||
| Dimensions (W x H x D) | 865 x 71 x 93 mm | ||
| Net weight | 2.5 kg | ||
| Bluetooth | |||
| Bluetooth version (Profiles) | V 4.2 (A2DP, AVRCP) | ||
| Bluetooth maximum power transmitted | 5 dBm | ||
| Bluetooth frequency bands | 2400 MHz~2483.5 MHz | ||
| Amplifier | |||
| Total | 100 W | ||
| Main Unit | 50W x 2 | ||
| Remote control | |||
| Distance/Angle | 6m / 30º | ||
| Battery type | AAA (1.5V x 2) | ||
Specs for products:
- Bluetooth version + SPECS:Bluetooth V5.0+EDR Support: A2DP, AVRCP, HSP, HFP, GAVDP
- SNR: 96dB SNR stereo ADC and stereo DAC Sensitivity: -80dBm﹤0.1% BER
- Frequency: 2402MHz ~ 2480MHz
- Transmission Distance: 10m
- Transmission power: CLASS2, 4dbm
- Audio SNR: ≥75dB
- Audio performance: SBC decoding
- Battery Capacity: 3.7V/200mAH
- Charging Time: about 1.5-2 hour
- Charging Voltage: DC 5V
- Working currency: ≤40mA
- Working temprature: -40℃ to +85℃
- Playtime(50% volume ): 5 hours
- Playtime(100%volume ):4 hours
- Standby time: about 300 hours Speaker Section
- Speaker Dimension: Ф40mm Impedance: 32Ω
- Rated Power: 15 mW
- Power capacity: 150mW
- Sensitivity: 103dB S.P.L/1KHz
- Frequency Response: 20~20KHz
Function description:
- Turning On of device:Long press ON”.
- Turning off of device:Long press
- 2 second on, prompt“Power
- 2 second on,prompt“Power Off”.
Pairing status:
- First time pairing:Boot into pairing mode automatically,Voice prompt“the bluetooth device is ready to pair”. Equipment open bluetooth connection interface option“PBT669”clik connect,no password . After the success of the matching Prompt“The bluetooth device is connected successfully”.
- Re-pairing:Under off status long press about 2 second,red and blue LED flash alternately.
- For already connected device ,bluetooth headphone will automatically back to connect. Headphones into the matching status again .

- Vol + /Next Track
- Power – Play/Pause – Answer/End call/SIRI assist
- Vol – /Previous Track
- LED light indicator
- Micro USB charging port
- Microphone
Operation Guide:
- Get through -Short press
- Hang up –In a call short press
- Replay the last phone number –Double-click Play/Pause
- Music—Short press
- Going to SIRI assist –Long press
- Volume control to up and down —-Long press
LED Light status:
- Charging status —–Long bright red light,full charged red light was off. 2:Device on prompt—–Blue light on
- Pairing status—–Red and blue LED flash alternately
- Standby status—–Blue light flash
- Already connected status—Long bright blue light
- Play status—–Blue light bright 1 second and flash 1 time.
Matters attention:
Low battery prompt: prompt: “Battery low”.
FCC Warning:
This equipment has been tested and found to comply with the limits for a Class B digital device, pursuant to part 15 of the FCC Rules. These limits are designed to provide reasonable protection against harmful interference in a residential installation. This equipment generates, uses and can radiate radio frequency energy and, if not installed and used in accordance with the instructions, may cause harmful interference to radio communications.
However, there is no guarantee that interference will not occur in a particular installation. If this equipment does cause harmful interference to radio or television reception, which can be determined by turning the equipment off and on, the user is encouraged to try to correct the interference by one or more of the following measures:
- Reorient or relocate the receiving antenna.
- Increase the separation between the equipment and receiver.
- Connect the equipment into an outlet on a circuit different from that to which the receiver is connected.
- Consult the dealer or an experienced radio/TV technician for help.
Caution: Any changes or modifications to this device not explicitly approved by the manufacturer could void your authority to operate this equipment.
This device complies with part 15 of the FCC Rules.
Operation is subject to the following two conditions:
- This device may not cause harmful interference, and
- this device must accept any interference received, including interference that may cause undesired operation.
- The device has been evaluated to meet general RF exposure requirements. The device can be used in portable exposure conditions without restriction.
User Manual
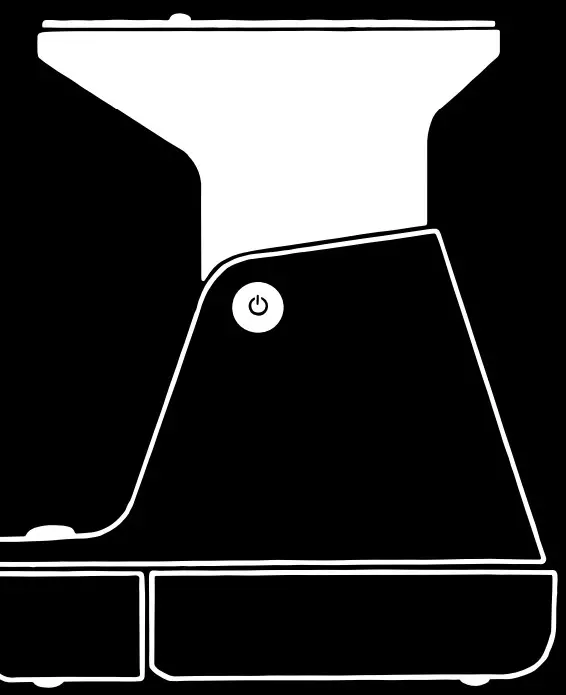
The Polaroid Lab helps you transform your digital photos from your phone into tangible, beautiful Polaroid photographs.
Please be sure to read through this manual before using the Polaroid Lab. Keep for future reference.
To download the companion app, for updated information, video tutorials and more, please visit: polaroid.com/polaroidlab
A. Platform cover
B. Phone platform
C. Touchpoints (2)
D. Light sensor
E. On/Platform release button
Bouton Marche
F. Rainbow logo LED
G. Shutter button
H. Film counter LEDs
I. Film door
J. Battery level rear LEDs
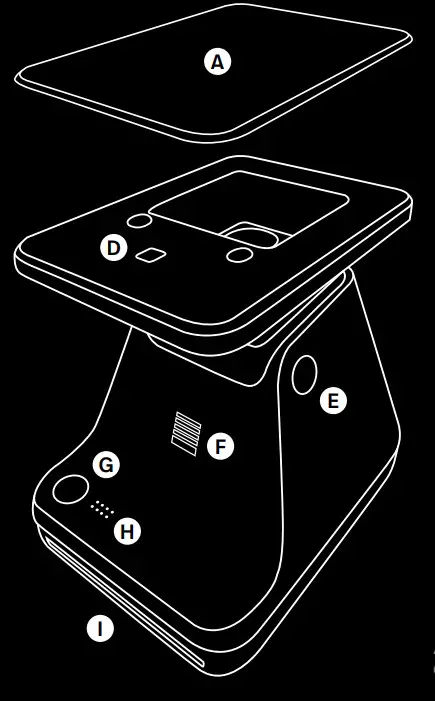
K. Micro-USB charging port
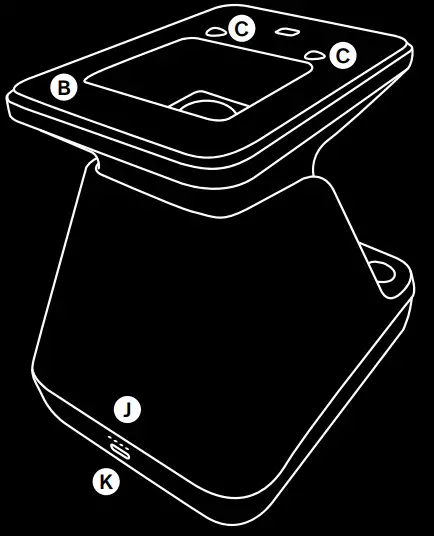
How to use the
- Download the Polaroid App on your phone
You will need the Polaroid Origilals App to use the Polaroid Lab. The App also contains
Tips, Tricks & Tutorials, and Inspiration for more ways to create.
→ polaroid.com/polaroidlab

- Charge the Polaroid Lab
Important The Polaroid Lab will not be fully charged upon purchase. Make sure that it is fully charged before first use. To charge the Polaroid Lab, plug the USB charging cable into the Micro-USB slot on the Polaroid Lab’s back panel and the other end of the cable into a charger, such as a phone adapter or your computer’s USB slot. The LEDs next to the slot light up to show the current battery level, four lit LEDs mean fully charged. If the Polaroid Lab is connected to a charger and is fully charged then all charging LEDs will be off. A full charge usually takes about 2 hours through a wall socket with a phone adapter or up to 4 hours through a computer’s USB slot.
A fully-charged Polaroid Lab will have enough power to shoot 100 packs of film, depending on usage. Remember to turn off the Polaroid Lab after use to conserve battery life.

- Load the film
Pick up the Polaroid Lab and gently pull down the front of the Film door. Take the film cassette out of the packaging and push the
film cassette all the way in, with the film’s darkslide facing up. When you close the film door, the darkslide will eject from the Polaroid
Lab automatically. If the darkslide has not ejected, remove the film pack and re-insert it, making sure it is pushed all the way to the back of the Polaroid Lab.
Note Please check the individual film packaging for development time, handling and storage details.
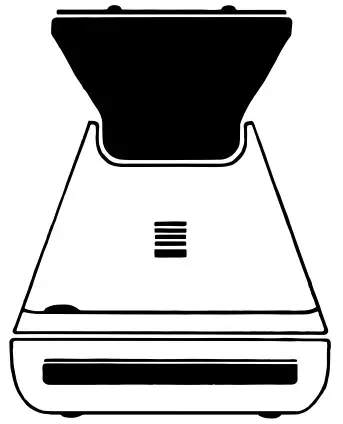
- Turn the Polaroid Lab on
Push the black button on the right side of the Polaroid Lab to raise the phone platform to the photo-taking position and power on.
The Rainbow logo LED will light up and the film counter LED will light up to show how many shots are remaining in the Polaroid
Original App. When you’re done, turn off the Polaroid Lab by pushing down the platform.
Alternatively, it will turn itself off automatically after several minutes of inactivity. - Open the app and select your photo
Open the Polaroid App and select the Polaroid Lab section. Tap the image selection button to choose the image you want to expose and tap proceed. The app will guide you through your first exposure. - Place your phone on the phone platform
Place your phone on the phone platform with the screen facing toward the lens of the Polaroid Lab. Ensure that it is correctly aligned:
the top of your phone must be facing the rear of the camera. Remove any phone covers or screen protectors to ensure the best performance.
The app will detect the Polaroid Lab and orientate the image to be perfectly aligned with the film. It will also display a calibration image above the light sensor to correctly expose your image without having to adjust your phone’s backlight. Make sure that you
turn off all settings or apps which influence the color of the display, such as night shift or true tone, as these can severely impinge the final photograph. - Push the red Shutter button
The Polaroid Lab will detect your phone on the platform and will measure the brightness of the display to ensure the perfect exposure.
Wait until the Rainbow logo LED flashes then press the red shutter button. The photo will be ejected from the slot at the front of the camera as soon as you let go of the shutter button.
Remove the photo from beneath the film shield and let the shield roll back into the Polaroid Lab. Place the photo face down to continue shielding it from light as it develops.
If you want to take another photo of the same image then press the shutter button again.
Further Guidance
- How much film is left in the pack?
There are 8 orange LED lights on the front of the Polaroid Lab. When the Lab is switched on and not in sleep mode, the LEDs will constantly display the film count. The number of LEDs which light up corresponds to the number of shots left in the film pack. For example: If 6 LEDs light up, that means there are 6 shots left in the film pack. If you have used up all 8 shots in the film pack, or if there is no film pack inserted in the camera, then the LEDs will blink rapidly when you turn the Polaroid Lab on or press the shutter button. - How much battery is left?
The Polaroid Lab displays the remaining battery level on four LEDs above the USB slot. When the Polaroid Lab is charging the LED will flash, and when fully charged with a USB cable inserted the LEDs will all be unlit as it will be running on power directly from the charger.
Battery level:
1. Between 1 to 4 LEDs light up One LED indicates enough charge for at least 2 packs of film.
2. Battery charged and USB cable Battery charged and USB cable connected: No LEDs light up. connected: No LEDs light up.
The film counter LED will show the remaining number of photos.
3. Battery empty
Battery empty
No charge remaining. No LEDs light No charge remaining. No LEDs light up, and the Polaroid Lab will cease to up, and the Polaroid Lab will cease to operate until it is recharged. operate until it is recharged. - Compatible film
The Polaroid Lab works with all Polaroid i-Type and 600 type film packs.
We recommend using i-Type film as it is optimized for use with the Polaroid Lab.
The Polaroid Lab is not intended to be used with SX-70 film, Spectra film or any other type of film. - Power supply
Charge the Polaroid Lab before use to ensure it has enough (see →Charge the Polaroid LabThe battery level rear LEDs will flash whilst the Polaroid Lab is plugged in and charging, and will turn off once the Polaroid Lab is fully charged. - Cleaning the rollers
Sometimes excess developer paste from photos may build up on the Polaroid Lab’s rollers, affecting the Polaroid Lab’s performance and causing photos to show unwanted imperfections. The Polaroid Lab has a built-in roller cleaning mode to help with this issue. Just follow these steps:
1. Close the phone platform to turn off the Polaroid Lab
2. Open film door
3. Hold down the right touchpoint and press and hold the shutter button for >2 seconds
4. Rollers will move to the starting position for cleaning
5. Release both buttons, the Polaroid Lab is now in roller cleaning mode
6. Using a damp cloth or cotton swab, gently clean the rollers
7. Press the shutter button to incrementally advance the roller positions
8. Once both rollers are clean on all sides, close the film door
Troubleshooting & FAQ
- My Polaroid Lab won’t eject my photo/darkslide
Make sure that your Polaroid Lab is charged:
The Rainbow logo LED and rear LEDs won’t light up unless there is enough charge to operate.
If this is the case, you should connect the Polaroid Lab to a charger before using it again.
Make sure you still have a film in your Polaroid Lab: to check, lower and then raise the phone
platform. The remaining film counter LEDs will indicate how many shots you have left in the film pack. If the LEDs flash rapidly when the Polaroid Lab turns on again, this means that there are no shots left in the film pack, or that no film pack is inserted.
1. All unlit
Polaroid Lab off, or no pack inserted
2. Shutter button depressed, all flashing Pack inserted, no film
3. All lit
Pack inserted, 8 photographs available
4. Alternate LED-lit
Pack insertion error - The app made an error noise at me
The app will detect if your phone has been placed on the Polaroid Lab correctly. The touchpoints on the phone platform allow the
app to rotate and place the image directly above the lens of the Polaroid Lab. If the app can’t do this then it will let you know so you
can place your phone in a better position.
When you pick up your phone the app will guide you through the correct positioning with a short video. - The shutter button won’t work
If the Rainbow logo LED is lit up then the Polaroid Lab is powered on, and if there is a film in the Polaroid Lab then the appropriate number of film count LEDs will be lit. If you press the shutter button and nothing comes out, look at the film count LED. If your phone isn’t oriented correctly then the Polaroid Lab won’t be able to read the brightness of the image. The Rainbow logo LED will blink 3 times if the phone is recognized. If it keeps rapidly blinking, the Polaroid Lab can’t recognize the sensor area/brightness correctly. If it doesn’t blink at all, it means that it doesn’t recognize the phone on top. This can be because of a phone case or screen protector, which can impair the recognition of the phone. To rectify this, remove any phone case or screen protector. Gently push
the phone on the Lab. - My photo turned out slightly too dark
We didn’t take the original photo on your phone camera, but our regular photo-taking the advice still applies. We’d recommend that you disable True Tone, Night Shift, or Night Mode.
The app will automatically adjust your phone brightness. You can also adjust exposure under the “More” menu in the app. EV can be adjusted from -3 to +3 f-stops.
Tips for Making Great Photos
- Make sure your phone screen is clean.
If you have a phone screen protector make sure that the screen doesn’t have scratches, stains or fingerprints. Ideally, remove any phone screen protector or phone covers to ensure optimum results. - Make sure that your phone is completely flat on the Polaroid Lab phone platform.
- Make sure that your film is fresh!
Stock up on new film at polaroid.com and follow the tip sheet that comes with the film packaging to ensure that your film is as good as it can be. - Make sure all settings and apps which influence colors are turned off (eg. night shift, true tone).
Customer Support
The Polaroid Customer Support Team is always more than happy to hear from you. Get in touch using the contact details provided.
For more detailed and up-to-date information, visit polaroid.com/help
USA/Canada
[email protected]
+1 212 219 3254
Europe/Rest of World
[email protected]
00 800 577 01500
Impossible B.V.
P.O. Box 242 — 7500 AE Enschede
The Netherlands

Technical Specifications
General
Dimensions
150mm (L) ×115.6mm (W) ×149.7mm
(H closed) ×177.16mm (H open)
WeightWeight
600 grams (without film pack)
Operating Temperature
40–108°F / 4–42°C, 5–90% relative humidity
Compatible Film
Polaroid i-Type and 600 type film in both Color
and Black & White, including Special Editions.
Battery
High-performance lithium-ion battery,
1100mAh, 3.7V nominal voltage, 4.07Wh
Materials
Outer shells
Polycarbonate, TPU, EPDM (Ethylene
Propylene Diene Monomer)
LensLens
Optical grade polycarbonate lens, AR coated
Shutter system
Fixed aperture, variable speed shutter
Optical System
LensLens
Fixed focus lens
Focal length
150mm
Lens type
1:2.35 3 element lens system
App System Requirements
Supported phones
- iPhone 6 and newer (except iPhone SE)
- Most current Android devices
Supported phones and operating systems are subject to change. For a full list please visit polaroid.com/labworkswith
Safety Information
Caution
Risk of electric shock — Do not open/ Disassemble the motorized roller system
- Do not disassemble the device. Incorrect reassembly can cause electrical shock if the device is used again.
- Do not immerse the device in water or other fluids.
- Do not operate the device in a high humidity environment or very dusty environments. r
- Do not attempt to tamper with, adjust or remove the battery and/or the electron- located below the rollers behind the
ics located below the rollers behind the device’s film door. - Do not attempt to remove the door itself as it is connected electronically to the body of the device. Doing so is unsafe, will likely damage your device, and will void your warranty.
- Do not insert metal objects into the device.
- Do not insert any objects into the rollers or gears.
- Keep small children and infants away from the device to avoid them being injured by the device’s moving parts.
- Do not use or store the device near any heat source or any type of equipment that generates heat, including stereo amplifiers.
- Do not use the device near flammable or explosive gases.
- Do not charge the device if you notice any unusual odors, noise, or smoke.
- Do not attempt to disassemble the film’s battery or modify it in any way (if using 600-type film). If battery fluid gets in your eyes, immediately rinse your eyes with fresh, cold running water and seek medical attention immediately.
Battery and Charger - This device uses a custom lithium-ion battery that is non-removable and mounted inside the Lab body. No other type of battery can be used. Battery replacement can only be done by authorized service centers. The battery will rized service centers. The battery will
provide many years of service if properly used. Power consumption varies depending on the environment the device is used ing on the environment the device is used in and how the device has been stored.
Used immediately after full charge, the battery will power the processing of up to 100 film packs. - Once the battery energy level falls below a certain level, the device will no longer process film. The LED will blink and signal when it needs to be recharged. This is to avoid a photo getting stuck as it is being processed through the roller system.
- The rechargeable battery is not fully charged at the time of purchase. Charge the battery fully with the USB charging cable (provided). This usually takes 1-2 hours (can vary depending on usage).
- The supplied battery charging cable has been tested to work with the Apple iPhone power adaptors. While it can be used in other USB ports e.g. computers, USB power adaptors, TVs, cars, etc., correct operation cannot be guaranteed.
- When the device is no longer in use, please recycle it properly.
Usage Environment - To protect the high-precision technology contained in this device, never leave the Lab in the following environments for ex-
Lab in the following environments for extended periods of time: high temperature
(+42°C/108°F), high humidity places with extreme changes in temperature (hot and cold), direct sunlight, sandy or dusty environments such as beaches, damp places, or places with strong vibrations. - Do not drop the device or subject it to severe shocks or vibrations.
- Do not push, pull or press on the lens surface
Compliance
Important directions for using
Lithium-Ion Batteries
- Do not throw into fire.
- Do not short circuit.
- Do not disassemble.
- Do not continue to use when damaged.
- Dispose correctly after use.
- Keep away from water.
EU Declaration of Conformity
Hereby, Impossible B.V. declares that the
Polaroid Lab is in compliance with the essential requirements of the Electromagnetic
Compatibility Directive (2014/30/EU), Low
Voltage Directive (2014/35/EU) and RoHs
Directive (2011/65/EU) and other relevant
provisions, when used for its intended
purpose.
FCC Compliance Statement
This device complies with Part 15 of the FCC Rules. Operation is subject to the following two conditions: (1) this device may not cause
harmful interference, and (2) this device must accept any interference received, including interference that may cause undesired operation.
Caution The user is cautioned that changes or modifications not expressly approved by the party responsible for compliance could void the user’s authority to operate the equipment. This equipment must not be co-located or operated in conjunction with any other antenna or transmitter.
Note This equipment has been tested and found to comply with the limits for a Class B digital device, pursuant to part 15 of the FCC rules. These limits are designed to provide reasonable protection against harmful interference in a residential installation.
This equipment generates, uses and can radiate radio frequency energy and, if not installed and used in accordance with the instructions, may cause harmful interference to radio communications. However, there is no guarantee that interference will not occur in a particular installation. If this equipment does cause harmful interference to radio or television reception, which can be determined by turning the equipment off and on, the user is encouraged to try to correct the interference by one or more of the following measures:
- Reorient or relocate the receiving antenna.
- Increase the separation between the
equipment and receiver. - Connect the equipment into an outlet on a circuit different from that to which the receiver is connected.
- Consult the dealer or an experienced radio/TV technician for help.
This equipment complies with FCC FCC radiation exposure limits set forth for an uncontrolled environment. End-user must follow the environment. End-user must follow the specific operating instructions for satisfying RFRF exposure compliance.
exposure compliance.
Industry Canada (IC)
This device complies with part 15 of the FCC Rule and Industry Canada license-exempt RSS standard(s). Operation is subject to the
following two conditions: (1) This device may not cause harmful interference, and (2) this device must accept any interference
received, including interference that may cause undesired operation. The symbol means that according to
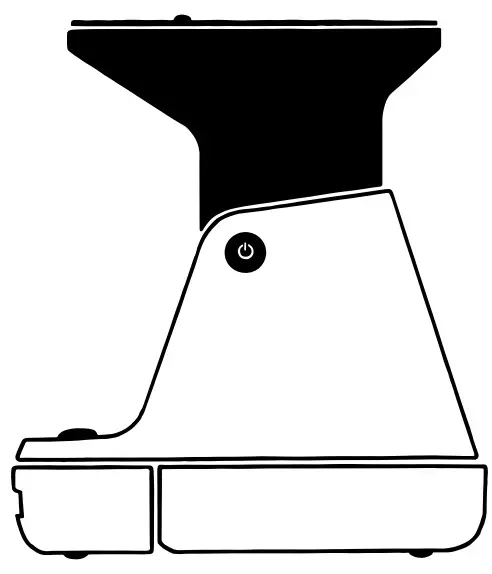 The symbol means that according to local laws and regulations your product should be disposed of separately cut should be disposed of separately from household waste. When this product reaches its end of life, take it to a collection point designated by local authorities. Some. collection points accept products for free.
The separate collection and recycling of your product at the time of disposal will help conserve natural resources and ensure that it is recycled in a manner that protects human health and the environment.