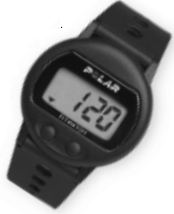
Polar T31 Fitwatch Heart Rate Monitor
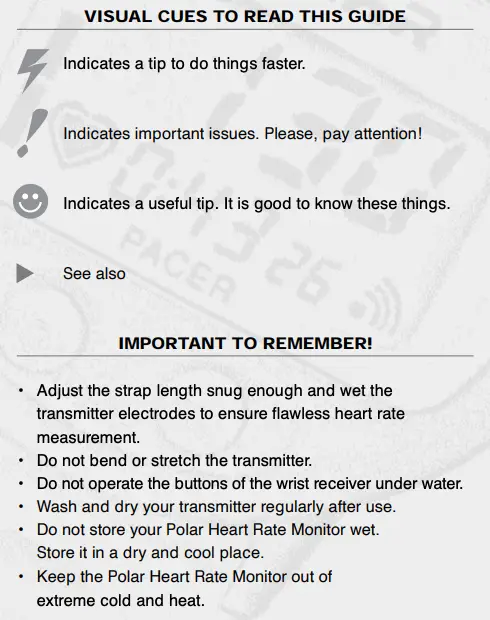
IMPORTANT TO REMEMBER!
- Adjust the strap length snug enough and wet the transmitter electrodes to ensure flawless heart rate measurement.
- Do not bend or stretch the transmitter.
- Do not operate the buttons of the wrist receiver under water.
- Wash and dry your transmitter regularly after use.
- Do not store your Polar Heart Rate Monitor wet. Store it in a dry and cool place.
- Keep the Polar Heart Rate Monitor out of extreme cold and heat.
How does Polar Fitwatch Work
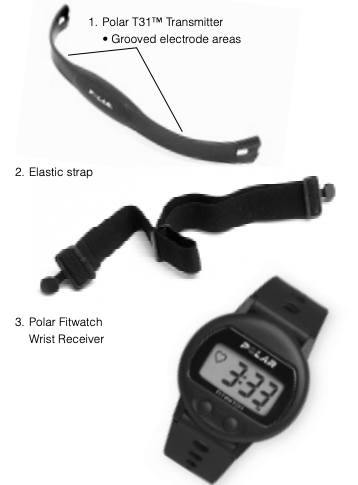
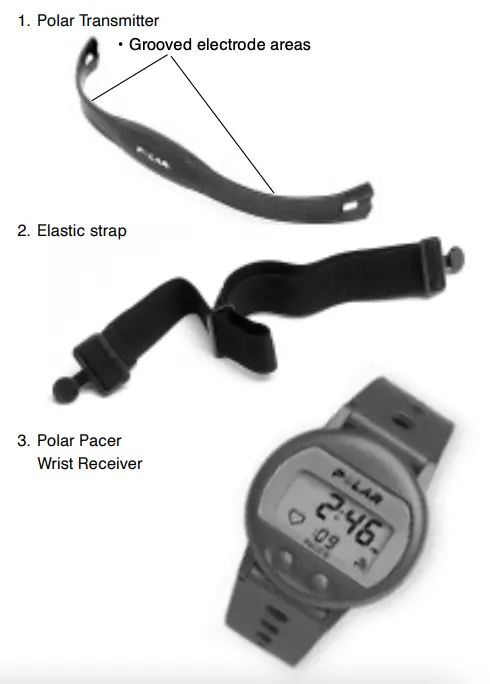
POLAR FITWATCH PARTS
Your Polar Fitwatch consists of three parts:
GETTING GOING
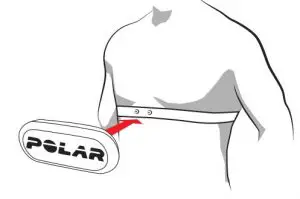
- Attach the Transmitter to the elastic strap.
- Adjust the strap length to fit snugly and comfortably.
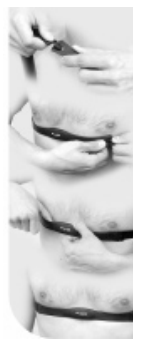
- Secure the strap around your chest, below the chest muscles. Lock the buckle. Check that the Polar logo is in a central upright position.
- Pull the Transmitter off your chest and wet the grooved electrode areas on the back of it.
- Check that the wet electrode areas are firmly against your skin.
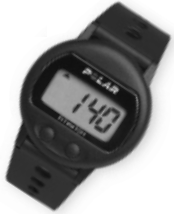
- Wear the Wrist Receiver as you would wear an ordinary watch.
Alternatively, if you go biking, you may attach the Wrist Receiver to a Polar Bike Mount. 
Polar Products. Keep the Wrist Receiver within the transmission range (1 metre / 3 feet ).
 It is recommended that you wear the Transmitter against your bare skin to ensure flawless operation. However, if you wish to wear the Transmitter over a shirt, moisten the shirt well under the electrodes.
It is important that the electrodes are wet during exercise. After exercising to preserve the electrodes and battery life:
- Wash the Transmitter carefully with a mild soap water solution.
- Rinse it with pure water
- . Dry the Transmitter carefully.
How to Start Heart Rate Measurement

1. Wear the Transmitter and the Wrist Receiver as described previously.
2. Begin with the display showing time of day.
3. To start, choose from the following alternatives:
One touch start: In the Time mode press and hold the right button of the Receiver for a few second.
Quick start: In the Time mode, bring the Polar logo of the Receiver to the Transmitter’s Polar logo and wait for a beep signal.
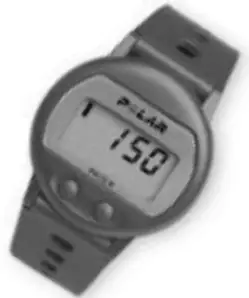
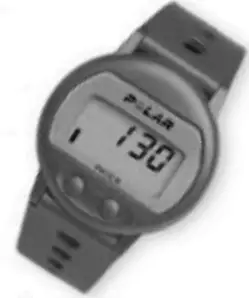
Heart rate measurement commences and heart symbol starts flashing. Your heart rate (in beats per minute) appears in the display in approximately 5 seconds.
4. You can now start exercising with your Polar Fitwatch.
Functions During Heart Rate Measurement
SEE YOUR HEART RATE
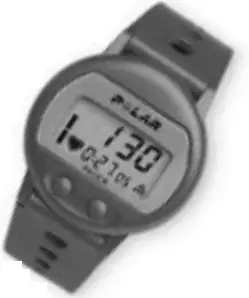
You can see your heart rate in beats per minute. A flashing heart symbol indicates an ongoing heart rate measurement and it flashes at the pace of your heart.

ILLUMINATE THE DISPLAY
Press the right button briefly.
Backlight is activated for a few seconds.
TURN THE TARGET ZONE SOUND SIGNAL ON/OFF
When the Target Zone sound symbol appears in the display, you will hear an alarm sound with each heart beat if you go above the Upper Limit or below the Lower Limit of your Target Zone.
Press and hold the right button to turn the Target Zone sound signal on or off.
 sound signal is on
Also a flashing heart rate reading informs you of being outside your Target Zone.
CHECK THE TIME OF DAY
Whilst exercising you can check the time of day momentarily by bringing the Wrist Receiver near the Transmitter’s Polar logo.
The time of day and backlight will be on for a few seconds.
STOP HEART RATE MEASUREMENT
- Press and hold the left button to stop heart rate measurement.
Heart rate measurement stops.
Time of day appears in the display
In case you forget to stop the heart rate measurement when ending your exercise session and taking off the Transmitter, the Wrist Receiver turns itself into Time mode if no heart rate signal is received for 5 minutes.
How to Set Your Target Zone
1. Begin with the display showing time of day.
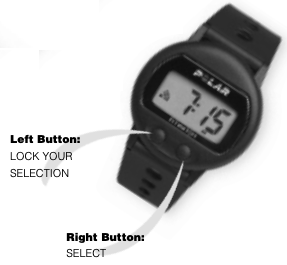
2. Press the left button to enter the Target Zone setting mode.
The Upper Limit reading appears flashing in the display. An arrow ( ![]() ), indicating the Upper Limit, appears in the upper left corner of the display
), indicating the Upper Limit, appears in the upper left corner of the display
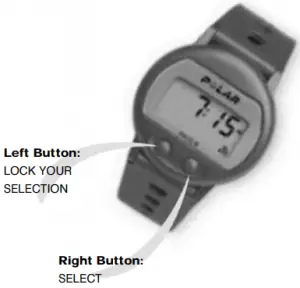
3. Press the right button to set the Upper Limit value of your personal Target Zone.
The value for the Upper Limit starts to increase in 5 beat increments.
 The digits run faster if you press and hold the right button. Release the button at the desired value.
4. Press the left button to lock your selection.
The Lower Limit reading appears flashing in the display. An arrow ( ![]() ), indicating the Lower Limit, appears in the lower left corner of the display
), indicating the Lower Limit, appears in the lower left corner of the display
5. Press the right button to select the correct value for the Lower Limit.
The value for the Lower Limit starts to increase in 5 beats increments.
6. Press the left button to lock your selection.
Polar Fitwatch enters the Time mode
The Upper Limit cannot be set below the Lower Limit. When the Lower Limit value reaches the Upper Limit value, the Lower Limit will be reset to 15, the lowest possible setting.
It may be necessary to reduce the Lower Limit value first and then return to set the Upper Limit.
 To return to the Time mode at any point in the setting procedure, press both buttons simultaneously
How to Set the Watch
Polar Fitwatch has two watch functions: alarm clock and time of day. In the setting mode you can first set the alarm clock function and thereafter the time of day function.
Start the watch settings by pressing both buttons simultaneously in the Time mode. In case you do not want to set the alarm clock, you can skip to the time of day settings by pressing the left button five times.
To return to the Time mode at any point in the watch setting procedure, and to interrupt the watch settings, press both buttons simultaneously.
You can distinguish the mode you are in from the display:
- The heart symbol will be displayed in the time of day mode but not in the setting modes.
SETTING THE ALARM CLOCK
1. With display showing time of day, press both buttons simultaneously
Alarm signal symbol starts flashing.
2. Press the right button to set the alarm clock on/off.
3. Press the left button to lock your selection.
AM/PM starts flashing.
4. Press the right button to select AM or PM for the alarm clock time. AM – before 12 o’clock, PM – after 12 o’clock.
5. Press the left button to lock your selection.
The first digits representing the hours start flashing.
6. Press the right button to select the desired hour.
The digits run faster if you press and hold the right button. Release the button at the desired value.
7. Press the left button to lock your selection.
The digit representing the tens of minutes starts flashing.
8. Press the right button to select the desired tens of minutes.
9. Press the left button to lock your selection.
The digit representing the minutes starts flashing.
10. Press the right button to select the desired minutes.
11. Press the left button to lock your selection.
You enter the time of day setting mode.
AM/PM starts flashing.
12. To set the time of day continue with Setting time of day, step 3. To return to the Time mode, press both buttons simultaneously.
You can turn the alarm off by pressing any of the two buttons. When the alarm comes on it will sound for one minute unless you turn it off before that.
SETTING THE TIME OF DAY
1. In the Time mode, press both buttons simultaneously.
You enter the alarm clock setting mode.
Alarm symbol starts flashing.
2. Press the left button five times to skip the alarm clock setting.
AM/PM for time of day is flashing.
3. Press the right button to select AM or PM for the time of day.
4. Press the left button to lock your selection.
The first digits representing the hours start flashing.
5. Press the right button to select the desired hour.
The digits run faster if you press and hold the right button. Release the button at the desired value.
6. Press the left button to lock your selection.
The digit representing the tens of minutes starts flashing.
7. Press the right button to select the desired tens of minutes.
8. Press the left button to lock your selection.
The digit representing the minutes starts flashing.
9. Press the right button to select the desired minutes.
10. To lock your selection and to restart the seconds press the left button. You will then return to the Time mode. Alternatively, to return to the Time mode without restarting the seconds press both buttons simultaneously.
You may also use Polar Fitwatch as an ordinary watch without a Transmitter.
Exercising with Your Polar Heart Rate Monitor
Regular exercise helps you to sustain and improve your health and fitness, as well as feel better. Exercising has also other great benefits, you can reduce stress, learn to know your body’s reactions and optimise your training time. Whether you are about to start a regular exercise program or you already do sports training, a Polar Heart Rate Monitor will help you to achieve your personal fitness goals in less time, with greater safety.
The effect of your exercise program depends on four factors:
- Intensity of exercise
- Duration of exercise
- Frequency of exercise
- Mode of activity
Exercise may include some risk, especially for those who have been sedentary. To minimise possible risks consider the following advice.
Before beginning a regular exercise program consult your doctor
- if you are over 35 years of age
- if you have not been following a regular exercise program during the past 5 years
- if you smoke
- if you have high blood pressure
- if you have high blood cholesterol
- if you have any signs or symptoms of any disease
- if you are recovering from a serious illness or a medical treatment e.g. surgery
- if you use a pacemaker or another implanted electronic device.
GENERAL EXERCISE RECOMMENDATION
American College of Sports Medicine (ACSM 1990,1995) defines a recommended exercise dose for developing and maintaining cardiovascular fitness in healthy adults as follows:
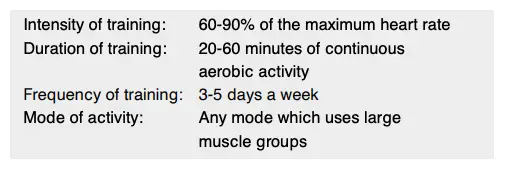
Intensity of training: 60-90% of the maximum heart rate
Duration of training: 20-60 minutes of continuous aerobic activity
Frequency of training: 3-5 days a week
Mode of activity: Any mode which uses large muscle groups
INTENSITY OF EXERCISE
Heart rate is proved to be an excellent indicator of exercise intensity. Heart rate tells you the exertion level of your body during physical or mental loading. With the Polar Heart Rate Monitor you are able to follow the intensity of your exercise easily, keep yourself in the right heart rate Target Zone and stay motivated as you see the improvement. Changes in the heart’s beating rate can be followed with a Polar Heart Rate Monitor wirelessly, continuously and ECG accurately.
Define your exercise intensity according to your target. When you exercise within the defined Target Zone, you ensure the right intensity of your workout. Any physical activity that increases heart rate above the resting heart rate may provide health benefits, but only greater increments above resting heart rate are associated with both health and fitness benefits. This is why you should define your personal Target Zone.
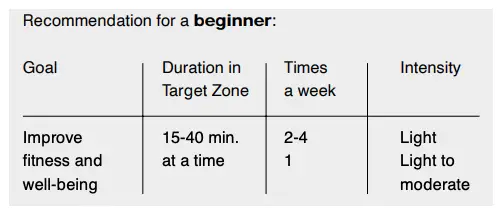
If you are a beginner, sedentary or overweight, a recommended target is to exercise at light or light to moderate intensity. At this target, the exercise is easy-paced and causes only slight breathlessness and sweating.
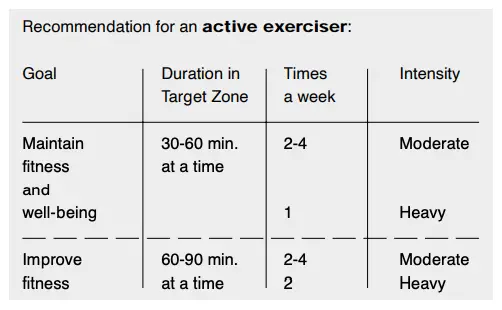
If you aim for improved fitness or exercise for competitive reasons your exercise intensity is moderate or heavy paced, and it causes clear breathlessness and sweating.
However, when planning your personal exercise dose, you can vary the workout intensity e.g. if there is a change in your physical condition or feelings.
Target zones are calculated using the person’s maximum heart rate as a reference. The most reliable way to determine your individual Target Zone is to have your maximum heart rate measured at an exercise stress test. For more information on an exercise stress test, consult your physiologist or doctor.
However, according to ACSM most people can estimate their maximum heart rate by the formula:
220 – Age = Maximum Heart Rate
For example a 35-year old person’s Maximum Heart Rate would be: 220 – 35 = 185 beats per minute
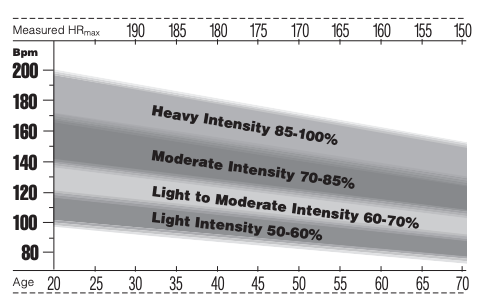
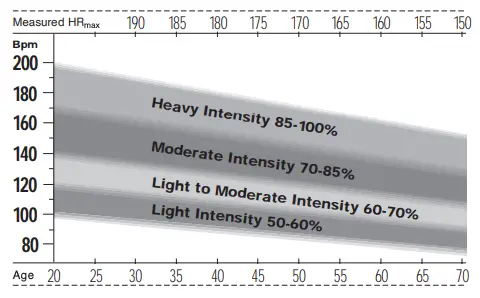
The following Target Range Chart helps you find the right Target Zone for your needs. The percentages for the Target Zones are counted from the maximum heart rate (measured or predicted).
How to find your personal Target Zone ?
If you have had your maximum heart rate measured at an exercise stress test, use the upper axis for measured HRmax. This gives you the precise values for your Target Zone. In case you do not know your exact maximum heart rate, use the lower axis for age.
- Locate one of the four intensity targets, which would be most suitable for you. Each target is shaded differently.
- Locate your age on the down axis or your measured maximum heart rate on the upper axis.
- Read up from your age / read down from your measured maximum heart rate to the target you chose.
- Draw a straight line from the upper edge of the target to the left and you will find the Upper Limit of your Target Zone.
- Then draw another straight line from the lower edge of the target to the left and you will find the Lower Limit for your Target Zone.
- You have now found your Target Zone. As you exercise, make sure that your heart rate stays within your personal Target Zone (between the Lower and the Upper Limit) to get the maximum benefit from your workout.
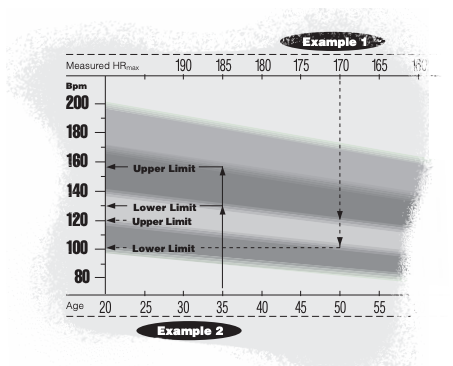
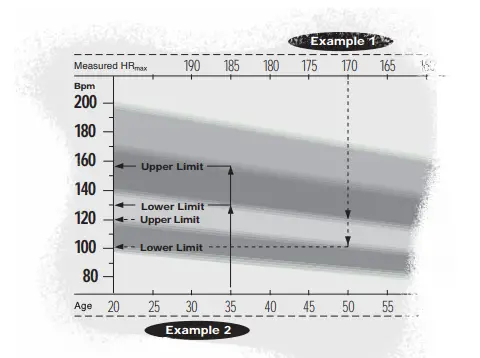
See the examples above:
- A person, whose maximum heart rate has been measured at an exercise stress test. His HRmax is 170 bpm and his goal is to exercise for health at Light to Moderate Intensity. The Target Zone limits are 102-119 bpm.
- A person, who does not know his HRmax. He is 35 years old and his goal is to improve fitness at Moderate Intensity. The Target Zone limits are 130 – 157 bpm.
FREQUENCY OF TRAINING
It is recommended that you exercise 3-5 times a week. You can improve your performance by increasing the frequency of training. Remember to let your body recover properly between the training sessions.
MODE OF ACTIVITY
Select activities that you enjoy and vary your exercise modes. To build a solid base for your aerobic conditioning, choose continuous activities such as jogging, running, walking, swimming, bicycling, rowing and cross-country skiing.
To improve your muscular endurance and strength as well as flexibility choose intermittent activities such as tennis, badminton, football, ice hockey, resistance training and gymnastics.
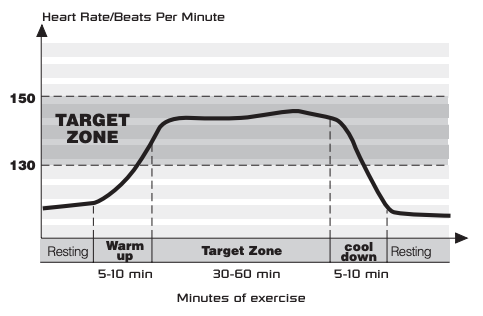
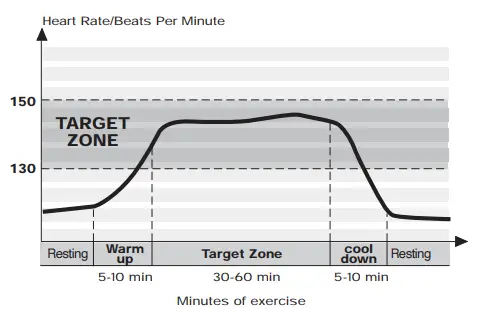
STRUCTURE OF AN EXERCISE SESSION
Begin each workout slowly and give your body a chance to warm up for at least for 5 minutes so that your heart rate is below the selected Target Zone. Gradually increase the intensity of your exercise until you are in your Target Zone.
Remain in your Target Zone for the desired time. After that, gradually reduce the intensity of your exercise and let your heart rate fall below the Target Zone with a 5 minute cooldown period.
For an example of an exercise session for a 35-year-old person with ‘Improved Fitness’ as a target, please see the following chart.
REFERENCES
American College of Sports Medicine. Position Stand. The Recommended Quantity and Quality of Exercise for Developing and Maintaining Cardiorespiratory and Muscular Fitness in Healthy Adults. Med Sci Sports Exerc 22: 265-274, 1990.
American College of Sports Medicine. ACSM’s Guidelines for Exercise Testing and Prescription. Williams & Wilkins, 1995.
Jackson, A.S., Blair, S.N., Mahar, M.T., Wier, L.T., Ross, R.M. and Stuteville, J.E. Prediction of functional aerobic capacity without exercise testing. Med Sci Sports Exerc 22: 863-870, 1990.
Quick guide for exercising
Before beginning, you should ask yourself two key questions:
- What is the amount of my physical activity at the moment?
- What are my goals?
The following steps help you answer the two questions, get the most out of your Polar Heart Rate Monitor, and achieve your personal exercise goals.
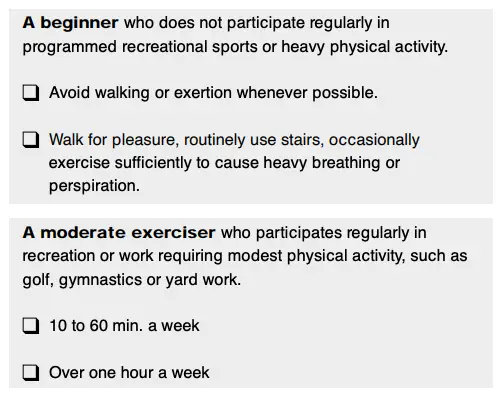
1. DEFINE THE AMOUNT OF YOUR PHYSICAL ACTIVITY
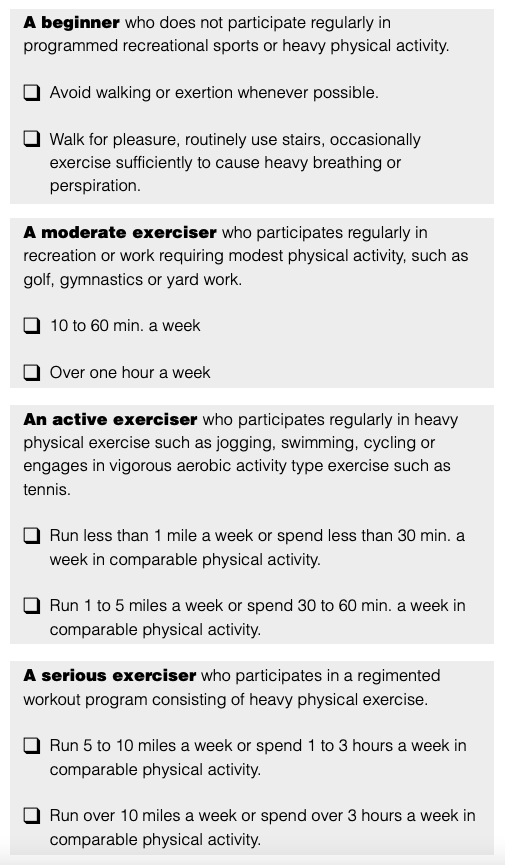
You may have a clear understanding of your present physical condition. In this case you can move to the next step to specify your goals. You can also define the amount of your physical activity by answering the questionnaire which is modified from the “Code for Physical Activity” developed by NASA/Johnson Space Center (Jackson et al. 1990).
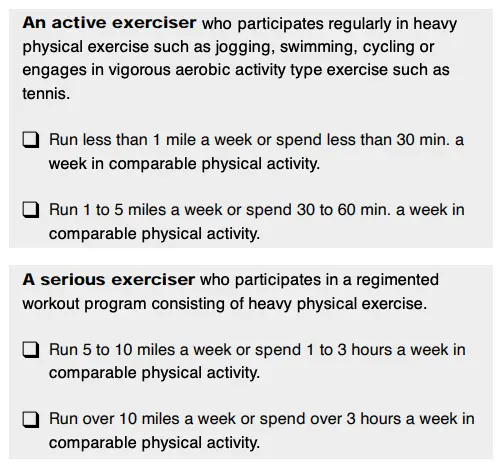
The questionnaire is an easy and quick way to define whether you are a beginner, a moderate exerciser, an active exerciser or a serious exerciser. It is recommended to review the questionnaire every 1-2 months and revise if the amount of your physical activity has changed.
Which alternative best describes your general activity level for the previous month?
2. DETERMINE YOUR EXERCISE GOALS
It is easier to stay motivated when you determine your reason for exercising and establish a goal. That is why you should determine your personal goal very clearly. Your exercise goal may be one of these:
- Get used to regular physical exercise
- Lose weight
- Maintain or improve health
- Maintain or improve fitness
- Compete with yourself
- Achieve competitive results
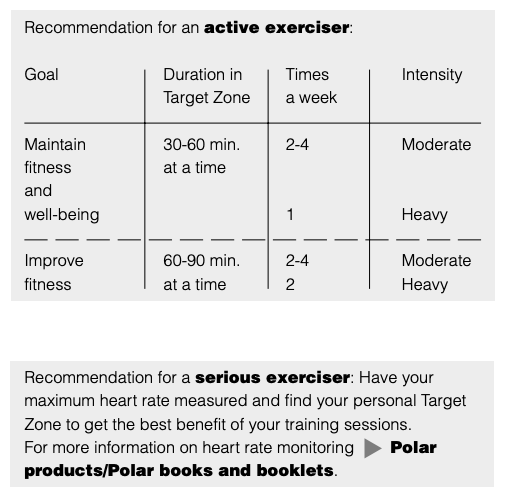
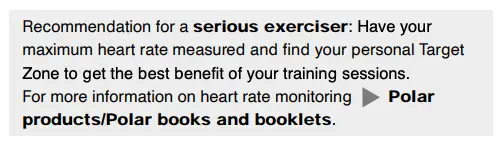
3. EXAMPLES OF EXERCISE RECOMMENDATIONS

Care and Maintenance
Your Polar Heart Rate Monitor is a high-tech instrument of superior design and workmanship and should be treated with care. The suggestions below will help you fulfill the warranty obligations and enjoy this product for many years to come.
TAKING CARE OF YOUR POLAR HEART RATE MONITOR
- Wash the Polar Transmitter regularly after use with a mild soap and water solution. Rinse with pure water. Dry carefully after washing.
- Never store the Polar Transmitter wet. Sweat and moisture can keep its electrodes wet and the Polar Transmitter activated, which shortens the battery life.
- Store your Polar Heart Rate Monitor in a cool and dry place.
- Do not bend or stretch the Polar Transmitter. This may damage the electrodes.
- Keep your Polar Heart Rate Monitor out of extreme cold (below -10 °C / 14 °F) and heat (above 50 °C / 122 °F).
- Do not expose the Polar Heart Rate Monitor to direct sunlight for extended periods, such as by leaving it in a car.
BATTERIES
POLAR TRANSMITTER
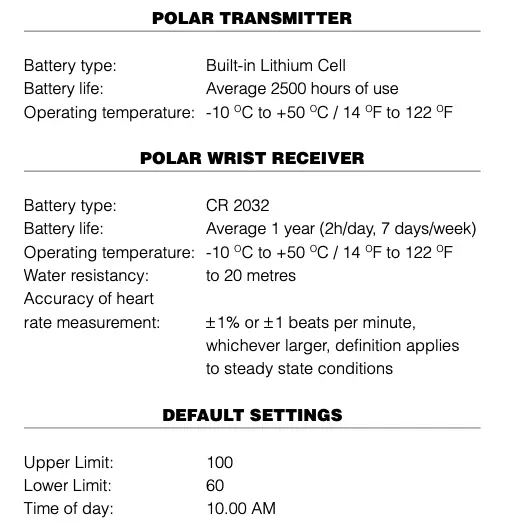
The estimated average battery life of the Polar Transmitter is 2500 hours of use. Contact your distributor/dealer for a Transmitter replacement.
See Service for detailed instructions.
Polar recycles used Transmitters.
POLAR WRIST RECEIVER
The estimated average battery life of the Polar Wrist Receiver is 1 year in normal use (2h/day, 7 days a week). However, because the battery is inserted at the factory, the actual life of your first battery once in your possession may be less than the estimated battery life. Note also that an excessive use of the backlight and the beep signal will shorten the battery life more rapidly.
Do not open the Polar Wrist Receiver yourself. To ensure the water resistance properties and the use of qualified components, the Wrist Receiver battery should be replaced only by a person authorised by Polar Electro Oy. At the same time a full periodic check of the Polar Heart Rate Monitor will be done. Service for detailed instructions.
Precautions
USING A POLAR HEART RATE MONITOR IN A WATER ENVIRONMENT
Polar Fitwatch receiver is water resistant to 20 meters. To maintain the water resistance, do not operate the buttons of the Polar Wrist Receiver under water. The pressure may cause the Receiver to leak.
Heart rate measurement in a water environment is technically demanding for the following reasons:
- Pool water with a high chlorine content and seawater may be very conductive and therefore short circuit the ECG signal so that it cannot be detected by the Transmitter unit.
- Jumping into the water or strenuous muscle movement during competitive swimming may cause water resistance that shifts the Transmitter on the body to a location where it is not possible to pick up ECG signal.
- The ECG signal strength varies depending on the individual’s tissue composition and the percentage of people who have problems in heart rate measuring is considerably higher in a water environment than in other use.
POLAR HEART RATE MONITOR AND INTERFERENCE
ELECTROMAGNETIC INTERFERENCE
Disturbances may occur near high voltage power lines, televisions, cars, bike computers, some exercise equipment or cellular phones.
CROSSTALK
The non-coded Polar Wrist Receiver picks up transmitter signals within 1 metre/ 3 feet. Therefore, when you are using your Polar Heart Rate Monitor make sure no other transmitter is within that range. Signals from more than one transmitter picked up simultaneously can cause an incorrect readout.
EXERCISE EQUIPMENT
Several pieces of exercise equipment with electronic or electrical components such as LED displays, motors and electrical brakes may cause interfering stray signals. To try to tackle these problems, relocate the Polar Wrist Receiver as follows:
- Remove the Polar Transmitter from your chest and use the exercise equipment as you would normally.
- Move the Receiver around until you find an area in which it displays no stray reading or flashing of the heart symbol. Interference is often worst right in front of the display panel of the equipment, while the left or right side of the display is relatively free of disturbance.
- Put the Transmitter back on the chest and keep the Receiver in this interference free area.
- If the Polar Heart Rate Monitor still does not work with the exercise equipment, this piece of equipment may be too noisy electrically for wireless heart rate measurement.
Notice for persons with pacemakers
Persons who have a pacemaker use the Polar Heart Rate Monitor at their own risk. Before starting use, we always recommend an exercise test under doctor’s supervision. The test is to ensure the safety and reliability of the simultaneous use of the pacemaker and the heart rate monitor.
Frequently Asked Questions
WHAT SHOULD I DO IF…
…THERE IS NO HEART RATE READING?
1. Check that the elastic strap is snug enough.
2. Check that the electrodes of the Polar Transmitter are moistened and that you are wearing it as instructed.
3. Check that you have kept the Polar Transmitter clean.
Care and maintenance.
4. Check that there are no sources of electromagnetic radiation in the close vicinity of the Polar Wrist Receiver, such as TV sets, cellular phones, CRT monitors etc.
Precautions.
5. Have you had a cardiac event which may have altered your ECG waveform? In this case consult your physician.
…HEART SYMBOL FLASHES IRREGULARLY?
1. Check that your Polar Wrist Receiver is inside the transmission range and not further that 1 metre/ 3 feet from the Polar Transmitter you are wearing.
2. Check that the elastic strap has not become loose during exercise.
3. Make sure that the electrodes of the Transmitter are moistened.
4. Make sure that there is no other heart rate transmitter within the reception range (1 metre/ 3 feet). Precautions/ Crosstalk.
5. Cardiac arrythmia may cause irregular readings. In this case consult your physician.
…HEART RATE READING BECOMES ERRATIC OR EXTREMELY HIGH (OVER 200 BPM)?
You may have come within range of strong electromagnetic signals which cause erratic readings on the Receiver display. Check your surroundings and move further away from the source of disturbance. Precautions.
…THERE ARE NO REACTIONS TO ANY BUTTONS?
Reset the Polar Heart Rate Monitor. Resetting clears all memory values and settings will return to the default settings.
1. Wear the Polar Transmitter as described earlier in this manual.
2. Simultaneously press both buttons and hold the Polar logo of the Wrist Receiver to the Polar logo of the Polar Transmitter.
Display becomes full of digits.
3. Press either the right or the left button once.
You hear a long beep.
Polar Fitwatch enters the Time mode.
…THE DISPLAY IS BLANK OR FADING?
Usually the first sign of a discharged battery is disappearing of the digits when using the backlight. Have the batteries checked. Service.
…THE BATTERY OF THE WRIST RECEIVER MUST BE REPLACED?
We recommend having all service done by authorised Polar Service. Especially during the warranty period this is necessary to keep the warranty of the whole Polar Heart Rate Monitor valid. Polar Service will test your Wrist Receiver for water resistance after battery replacement and make a full periodic check of the complete Polar Heart Rate Monitor. Care and Maintenance/Batteries and Service.
Technical Specifications
Polar Heart Rate Monitor is designed to indicate the level of physiological strain and intensity in sports and exercise. No other use is intended or implied. Heart rate is displayed as number of heart beats per minute (bpm).
Polar Books and Accessories
POLAR ACCESSORIES
- Polar Bike Mount for all bikes and Polar Heart Rate Monitors
- Elastic straps of different lengths
- Extra Transmitter for other family members
- Polar Heart Bra for women
- Test handle for groups and trainers
Ask your local dealer or distributor for more details.
Service
Polar Service will help you get the most out of your Polar Heart Rate Monitor. Should your Polar Heart Rate Monitor need service, please follow the instructions:
CHECK LIST
Before you return your Polar Heart Rate Monitor for service, please check the following:
1. IS THE TRANSMITTER BEING WORN CORRECTLY?
The Polar logo should be right side up and the Transmitter flat against the skin. The elastic strap should be adjusted for a snug and comfortable fit.
2. ARE THE ELECTRODES MOIST ON THE TRANSMITTER?
It is important that the electrodes are wet during the heart rate measurement.
3. IS THE TRANSMITTER CLEAN?
Regular washing with mild soap and water solution and thorough dry afterwards will ensure that good conductivity remains.
4. ARE YOU HAVING DISTURBANCES CAUSED BY OTHER PEOPLE WITH HEART RATE MONITORS OR EXERCISE EQUIPMENT?
Precautions/Polar Heart Rate Monitor and interference for more details.
SENDING INSTRUCTIONS
- Pack the product carefully to avoid further damage.
- Include all the parts of the Polar Heart Rate Monitor. A full periodic check will be done on the whole product.
- Include proof of purchase (a receipt or its photocopy) if the product is under warranty.
- Include a detailed description of the problem. Use the return sheet of the Customer Care Charter.
- Include your name, return address and daytime telephone number.
- Ship postage prepaid to your dealer or distributor. For contact details see the Customer Care Charter.
POLAR’S SERVICE PROCEDURE
Any service is recommended to be done by authorised Polar service personnel. Our standard test and check procedure will be performed to all Polar Heart Rate Monitors. The test includes following elements:
POLAR TRANSMITTER
- Visual inspection
- Check of the transmission range
- Check of electrode conductivity
- Wash and clean if necessary
POLAR WRIST RECEIVER
- Visual inspection
- Check of battery voltage
- Check and cleaning of case contacts
- Re-assembly, including seal renewal if necessary
- Water resistance test
- Operational test
Water resistance cannot be guaranteed after unauthorised service.
![]()
POLAR M430
Getting Started Guide
Learn more at support.polar.com/en/M430
How to get started
You can choose to set up your new Polar M430 either with (A) a mobile device or with (B) a computer, whichever is the most convenient for you. The M430 is in storage mode, and it wakes up in the setup. To get the most accurate and personal training and activity data, it’s important that you’re precise with the settings in the setup.
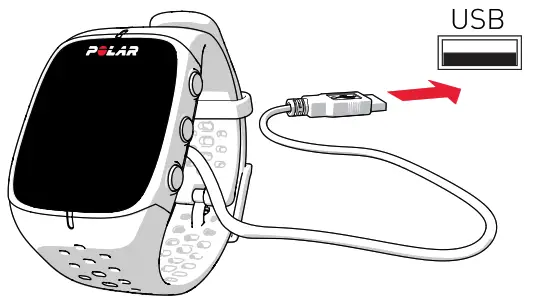
Plug your M430 into a powered USB port or a USB charger with the custom USB cable that came in the box. It may take a few minutes for your M430 to wake up. Let your M430 charge during the setup.
 If there is a firmware update available for your M430, we recommend you install it during the setup. It may take up to 10 minutes to complete.
SET UP WITH A MOBILE DEVICE AND POLAR FLOW APP
Please note that you have to do the pairing in the Flow app and NOT in your mobile device’s Bluetooth settings.
- Make sure your mobile device is connected to the Internet and turn on Bluetooth®.
- Download the Polar Flow app from the App Store or Google Play on your mobile device.
- Open the Flow app on your mobile device.
- Flow app recognizes your M430 nearby and prompts you to start pairing it. Accept the pairing request and enter the Bluetooth pairing code shown on the M430 display to the Flow app.
- Sign in with your Polar account or create a new one. We’ll walk you through the sign-up and setup within the app.
- When you’re done with the settings tap Save and sync and your settings are synced to your M430.
SET UP WITH A COMPUTER
- Go to flow.polar.com/start and install Polar FlowSync data transfer software to your computer.
- Sign in with your Polar account or create a new one. We’ll walk you through the sign-up and set up within the web service.
Get to know your Polar M430
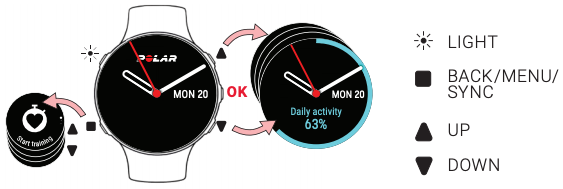
 LIGHT
LIGHT
Illuminate the display by pressing LIGHT.
Lock buttons in time view by pressing and holding LIGHT.
Enter Quick menu in training view by pressing and holding LIGHT.
 BACK
BACK
Return, pause, and stop with the BACK button.
In time view, start pairing and syncing your M430 with your mobile device by pressing and holding BACK.
 UP
UP
Browse the menu, selections, and training views by pressing UP.
Change the watch face by pressing and holding UP.
 DOWN
DOWN
Browse the menu, selections, and training views by pressing DOWN.
Enter the menu, confirm selections and start training by pressing START. During training, press START to mark a lap, press and hold to lock or unlock the heart rate zone you are currently in.
Key features
INTEGRATED GPS
Built-in GPS keeps track of your pace, distance and altitude during training. You can view your route on a map in the Polar Flow app or Flow web service after your session.
WRIST BASED HEART RATE TRAINING
Your M430 has a built-in heart rate sensor that measures your heart rate from the wrist. This makes heart-rate-based training more convenient than ever.
24/7 ACTIVITY TRACKING AND CONTINUOUS HEART RATE
Your M430 tracks your steps, activity, sleep, and calories 24/7, and supports you in achieving your individual daily activity goal. The Continuous Heart Rate feature enables more accurate measurement of daily calorie consumption and your overall activity because physical activities with very little wrist movement can also be tracked.
RUNNING PROGRAM
Train for a running event with a personal and adaptive training plan in Polar Flow. Choose from four different targets: 5K, 10K, half marathon, or marathon, and get a training plan that fits you and your goals.
Heart rate training with Polar M430
By measuring your heart rate when training you make sure you train at the right intensity level for your goal. And you get just the benefits you want to achieve.
Wrist-based heart rate measurement is convenient and easy. Tighten the wrist band for training, start a training session on your M430, and you’re ready to go.
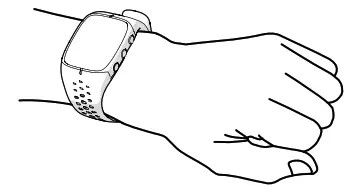
To get accurate heart rate readings during training, secure the wrist band firmly on top of your wrist, just behind the wrist bone. Do NOT place the running watch on top of the wrist bone. The sensor on the back must be touching your skin, but the wrist band should not be too tight.
When not measuring heart rate, loosen the wristband a bit for a more comfortable fit and to let your skin breathe.
Your M430 is also compatible with Polar Bluetooth® Smart heart rate sensor with chest strap. You can buy a heart rate sensor as an accessory.
Start training
- Wear your M430 and tighten the wrist band.
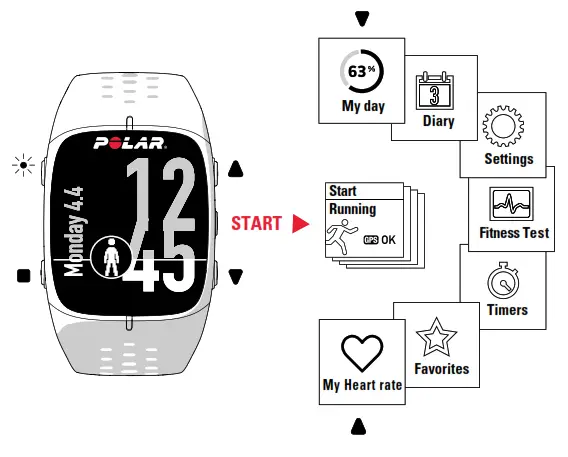
- In time view, press START to enter the list of sport profiles.
- Browse to a sports profile by pressing UP or DOWN.
- Go outdoors and away from tall buildings and trees. Keep your M430 still with the display upwards to catch GPS satellite signals. When the signal is found, M430 vibrates and OK is displayed.
- M430 has found your heart rate when your heart rate is shown.
- Press START to start training recording.
Choose your favorite sports and the information you want to follow during your sessions in the Polar Flow app or web service.
PAUSE AND STOP TRAINING
Press BACK to pause your training session. To continue training, press START. To stop the session, press and hold BACK when paused until Recording ended is displayed.
You’ll get a summary of your training session on your M430 right after you’ve stopped training. Get a more detailed analysis in the Flow app or in the Flow web service.
After training
VIEW YOUR TRAINING DATA AT A GLANCE ON THE MOBILE APP
Get the Polar Flow app on the App Store or Google Play. Sync your M430 with the Flow app after training and get an instant overview and feedback on your training result and performance. In the Flow app, you can also check how you’ve slept and how active you’ve been during the day.
POLAR FLOW WEB SERVICE FOR MORE DETAILED ANALYSIS
Sync your training data to the Flow web service with your computer or via the Flow app. In the web service, you can track your achievements, get guidance and see a detailed analysis of your training results, activity, and sleep.
TAKE CARE OF YOUR M430
Keep your M430 clean by rinsing it under running water after each training session. Before charging, please make sure there’s no moisture, hair, dust or dirt on the M430’s USB connector. Gently wipe off any dirt or moisture. Do not charge the M430 when its USB connector is wet.
Technical specification
BATTERY TYPE – 240 MAH LI-POL BATTERY
HEART RATE SENSOR – INTERNAL OPTICAL
OPERATING TIME – UP TO 8 HOURS TRAINING WITH GPS AND OPTICAL HEART RATE MEASUREMENT
WATER RESISTANCE – SUITABLE FOR SWIMMING
MATERIALS – SILICON, THERMOPLASTIC POLYURETHANE, STAINLESS STEEL, ACRYLONITRILE BUTADIENE STYRENE, GLASS FIBER, POLYCARBONATE, POLYMETHYL METHACRYLATE, LIQUID CRYSTAL POLYMER
The radio equipment operates 2.402 – 2.480 GHz ISM frequency band(s) and 3.0 mW maximum power.
APP STORE IS A SERVICE MARK OF APPLE INC.
ANDROID AND GOOGLE PLAY ARE TRADEMARKS OF GOOGLE INC.
IOS IS A TRADEMARK OR REGISTERED TRADEMARK OF CISCO IN THE U.S. AND OTHER COUNTRIES AND IS USED UNDER LICENSE.
MANUFACTURED BY
POLAR ELECTRO OY
PROFESSORINTIE 5
90440 KEMPELE
FINLAND
[email protected]
WWW.POLAR.COM
COMPATIBLE WITH
![]()
![]()
![]()
![]() /polarglobal
/polarglobal
Polar Pacer Heart Rate Monitor
How does Polar Pacer Work
POLAR PACER PARTS
Your Polar Pacer consists of three parts:
GETTING GOING

- Attach the Polar Transmitter to the elastic strap.
- Adjust the strap length to fit snugly and comfortably.
- Secure the strap around your chest, below the chest muscles. Lock the buckle. Check that the Polar logo is in a central upright position.
- Pull the Transmitter off your chest and wet the grooved electrode areas on the back of it.
- Check that the wet electrode areas are firmly against your skin.
- Wear the Wrist Receiver as you would wear an ordinary watch.
Alternatively, if you go biking, you may attach the Wrist Receiver to a Polar Bike Mount.  Polar Products. Keep the Wrist Receiver within the transmission range (1 metre / 3 feet).
 It is recommended that you wear the Transmitter against your bare skin to ensure flawless operation. However, if you wish to wear the Transmitter over a shirt, moisten the shirt well under the electrodes.
It is important that the electrodes are wet during exercise.
After exercising to preserve the electrodes and battery life:
- Wash the Transmitter carefully with a mild soap water solution.
- Rinse it with pure water.
- Dry the Transmitter carefully
How to Start Heart Rate Measurement

1. Wear the Transmitter and the Wrist Receiver as described previously.
2. Begin with the display showing time of day.
3. To start, choose from the following alternatives:
One touch start: In the Time mode press and hold the right button of the Receiver for 1 second.
 Quick start: In the Time mode, bring the Polar logo of the Receiver to the Transmitter’s Polar logo and wait for a beep signal.
Heart rate measurement commences and heart symbol starts flashing. Stopwatch starts running in the lower line of the display. Your heart rate (in beats per minute) appears in the display in approximately 5 seconds.
4. You can now start exercising with your Polar Pacer.
Functions During Heart Rate Measurement
SEE YOUR HEART RATE AND ELAPSED TIME
- You can see your heart rate in beats per minute. A flashing heart symbol indicates an ongoing heart rate measurement. The inner heart symbol flashes at the pace of your heart.
- The total exercising time runs in the lower line of the display.
- Bars will appear in the left side of the display, one bar after every ten minutes spent in the Target Zone.
- You can hear a beep after every 30 minutes of exercise in the Target Zone.
ILLUMINATE THE DISPLAY
Press the right button briefly.
Backlight is activated for a few seconds.
TURN THE TARGET ZONE SOUND SIGNAL ON/OFF
When the Target Zone sound symbol appears in the display, you will hear an alarm sound with each heart beat if you go above the Upper Limit or below the Lower Limit of your Target Zone. Press and hold the right button to turn the Target Zone sound signal on or off.
 sound signal is on
Also a flashing heart rate reading informs you of being outside your Target Zone.
CHECK THE TIME OF DAY
Whilst exercising you don’t have to press any button to check the time of day momentarily. Just bring the Wrist Receiver near the Transmitter’s Polar logo.
The time of day and backlight will be on for a few seconds.
STOP THE STOPWATCH
The total elapsed time is running in the lower line of the display.
1. Press the left button shortly.
The stopwatch stops.
2. Press the left button shortly again.
The stopwatch continues running.
 You may need this function if you have to stop your exercise momentarily e.g. in traffic lights.
STOP HEART RATE MEASUREMENT
1. Press and hold the left button to stop heart rate measurement.
Heart rate measurement stops.
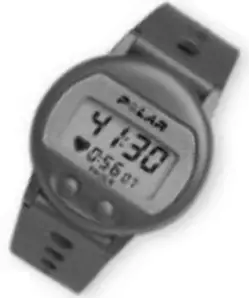
Time spent in the Target Zone appears in the upper line of the display.
Total exercising time appears in the lower line of the display.
2. Press the left button briefly.
Time of day appears in the display.
In case you forget to stop the heart rate measurement when ending your exercise session and taking off the Transmitter, the Wrist Receiver turns itself into Time mode if no heart rate signal is received for 5 minutes.
How to Recall Training Information
Polar Pacer provides you the following information of your last training session:
- Time spent in the Target Zone
- Total exercising time
1. When you stop heart rate measurement you will have the training information displayed.
2. To review the last training information start in the Time mode. Press the left button three times.
Time spent in the Target Zone appears in the upper line of the display.
Total exercising time appears in the lower line of the display.
3. To return to the Time mode, press the left button once.
Your last training information is in the memory of Polar Pacer until the next time you measure heart rate. When you start heart rate measurement again, your previous training information will be replaced by the new one. Polar Pacer saves only one training file at a time.
How to Set Your Target Zone
1. Begin with the display showing time of day.
2. Press the left button to enter the Target Zone setting mode.
The Upper Limit reading appears flashing in the display. The upper bar, indicating the Upper Limit, appears in the upper left corner of the display.
3. Press the right button to set the Upper Limit value of your personal Target Zone.
The numbers will increase in 5 beat increments.
The digits run faster if you press and hold the right button. Release the button at the desired value.
4. Press the left button to lock your selection.
The Lower Limit reading appears flashing in the display. The lower bar, indicating the Lower Limit, appears in the lower left corner of the display.
5. Press the right button to select the correct value for the Lower Limit.
The value for the Lower Limit starts to increase in 5 beats increments.
6. Press the left button to lock your selection. Your last training information appears in the display.
7. Press the left button to return to the Time mode.
The Upper Limit cannot be set below the Lower Limit. When the Lower Limit value reaches the Upper Limit value, the Lower Limit will be reset to 15, the lowest possible setting.
It may be necessary to reduce the Lower Limit value first and then return to set the Upper Limit.
To return to the Time mode at any point in the setting procedure, press both buttons simultaneously.
How to Set the Watch
Polar Pacer has two watch functions: alarm clock and time of day. In the setting functions you have first the alarm clock function and thereafter the time of day function.
Start the watch settings by pressing both buttons simultaneously in the Time mode. In case you do not want to set the alarm clock, you can skip to the time of day settings by pressing the left button five times.
To return to the Time mode at any point in the watch setting procedure, and to interrupt the watch settings, press both buttons simultaneously.
You can distinguish the mode you are in from the display:
- The heart symbol will be displayed in the Time mode but not in the setting modes.
- The alarm clock function displays no seconds whereas the time of day function includes the seconds.
SETTING THE ALARM CLOCK
1. With display showing time of day, press both buttons simultaneously.
Alarm signal symbol starts flashing.
2. Press the right button to set the alarm clock on/off.
3. Press the left button to lock your selection.
AM/PM starts flashing.
4. Press the right button to select AM or PM for the alarm clock time. AM = before 12 o’clock, PM = after 12 o’clock.
5. Press the left button to lock your selection.
The first digits representing the hours start flashing.
6. Press the right button to select the desired hour.
The digits run faster if you press and hold the right button. Release the button at the desired value.
7. Press the left button to lock your selection.
The digit representing the tens of minutes starts flashing.
8. Press the right button to select the desired tens of minutes.
9. Press the left button to lock your selection.
The digit representing the minutes starts flashing.
10. Press the right button to select the desired minutes.
11. Press the left button to lock your selection.
You enter the time of day setting mode. AM/PM starts flashing.
12. To return to the Time mode, press both buttons simultaneously. To set the time of day continue from Setting time of day, step 3.
When the alarm comes on it will sound for one minute. You can turn the alarm off by pressing any of the two buttons.
SETTING THE TIME OF DAY
1. In the Time mode, press both buttons simultaneously.
You enter the alarm clock setting mode.
Alarm symbol starts flashing.
2. Press the left button five times to skip the alarm clock setting. AM/PM for time of day is flashing.
3. Press the right button to select AM or PM for the time of day.
4. Press the left button to lock your selection. The first digits representing the hours start flashing.
5. Press the right button to select the desired hour.
The digits run faster if you press and hold the right button. Release the button at the desired value.
6. Press the left button to lock your selection.
The digit representing the tens of minutes starts flashing.
7. Press the right button to select the desired tens of minutes.
8. Press the left button to lock your selection.
The digit representing the minutes starts flashing.
9. Press the right button to select the desired minutes.
10. To lock your selection and to restart the seconds press the left button. You will then return to the Time mode. Alternatively, to return to the Time mode without restarting the seconds press both buttons simultaneously.
You may also use Polar Pacer as an ordinary watch without a Transmitter.
Exercising with Your Polar Heart Rate Monitor
Regular exercise helps you to sustain and improve your health and fitness, as well as feel better. Exercising has also other great benefits, you can reduce stress, learn to know your body’s reactions and optimise your training time. Whether you are about to start a regular exercise program or you already do sports training, a Polar Heart Rate Monitor will help you to achieve your personal fitness goals in less time, with greater safety.
The effect of your exercise program depends on four factors:
- Intensity of exercise
- Duration of exercise
- Frequency of exercise
- Mode of activity
Exercise may include some risk, especially for those who have been sedentary. To minimise possible risks consider the following advice.
Before beginning a regular exercise program consult your doctor
- if you are over 35 years of age
- if you have not been following a regular exercise program during the past 5 years
- if you smoke
- if you have high blood pressure
- if you have high blood cholesterol
- if you have any signs or symptoms of any disease
- if you are recovering from a serious illness or a medical treatment e.g. surgery
- if you use a pacemaker or another implanted electronic device.
GENERAL EXERCISE RECOMMENDATION
American College of Sports Medicine (ACSM 1990,1995) defines a recommended exercise dose for developing and maintaining cardiovascular fitness in healthy adults as follows:
INTENSITY OF EXERCISE
Heart rate is proved to be an excellent indicator of exercise intensity. Heart rate tells you the exertion level of your body during physical or mental loading. With the Polar Heart Rate Monitor you are able to follow the intensity of your exercise easily, keep yourself in the right heart rate Target Zone and stay motivated as you see the improvement. Changes in the heart’s beating rate can be followed with a Polar Heart Rate Monitor wirelessly, continuously and ECG accurately.
Define your exercise intensity according to your target. When you exercise within the defined Target Zone, you ensure the right intensity of your workout. Any physical activity that increases heart rate above the resting heart rate may provide health benefits, but only greater increments above resting heart rate are associated with both health and fitness benefits. This is why you should define your personal Target Zone.
If you are a beginner, sedentary or overweight, a recommended target is to exercise at light or light to moderate intensity. At this target, the exercise is easy-paced and causes only slight breathlessness and sweating.
If you aim for improved fitness or exercise for competitive reasons your exercise intensity is moderate or heavy paced, and it causes clear breathlessness and sweating.
However, when planning your personal exercise dose, you can vary the workout intensity e.g. if there is a change in your physical condition or feelings.
Target zones are calculated using the person’s maximum heart rate as a reference. The most reliable way to determine your individual Target Zone is to have your maximum heart rate measured at an exercise stress test. For more information on an exercise stress test, consult your physiologist or doctor.
However, according to ACSM most people can estimate their maximum heart rate by the formula:
220 – Age = Maximum Heart Rate
For example a 35-year old person’s Maximum Heart Rate would be: 220 – 35 = 185 beats per minute
The following Target Range Chart helps you find the right Target Zone for your needs. The percentages for the Target Zones are counted from the maximum heart rate (measured or predicted).
How to find your personal Target Zone ?
If you have had your maximum heart rate measured at an exercise stress test, use the upper axis for measured HRmax. This gives you the precise values for your Target Zone. In case you do not know your exact maximum heart rate, use the lower axis for age.
- Locate one of the four intensity targets, which would be most suitable for you. Each target is shaded differently.
- Locate your age on the down axis or your measured maximum heart rate on the upper axis.
- Read up from your age / read down from your measured maximum heart rate to the target you chose.
- Draw a straight line from the upper edge of the target to the left and you will find the Upper Limit of your Target Zone.
- Then draw another straight line from the lower edge of the target to the left and you will find the Lower Limit for your Target Zone.
- You have now found your Target Zone. As you exercise, make sure that your heart rate stays within your personal Target Zone (between the Lower and the Upper Limit) to get the maximum benefit from your workout.
See the examples above:
- A person, whose maximum heart rate has been measured at an exercise stress test. His HRmax is 170 bpm and his goal is to exercise for health at Light to Moderate Intensity. The Target Zone limits are 102-119 bpm.
- A person, who does not know his HRmax. He is 35 years old and his goal is to improve fitness at Moderate Intensity. The Target Zone limits are 130 – 157 bpm.
FREQUENCY OF TRAINING
It is recommended that you exercise 3-5 times a week. You can improve your performance by increasing the frequency of training. Remember to let your body recover properly between the training sessions.
MODE OF ACTIVITY
Select activities that you enjoy and vary your exercise modes. To build a solid base for your aerobic conditioning, choose continuous activities such as jogging, running, walking, swimming, bicycling, rowing and cross-country skiing.
To improve your muscular endurance and strength as well as flexibility choose intermittent activities such as tennis, badminton, football, ice hockey, resistance training and gymnastics.
STRUCTURE OF AN EXERCISE SESSION
Begin each workout slowly and give your body a chance to warm up for at least for 5 minutes so that your heart rate is below the selected Target Zone. Gradually increase the intensity of your exercise until you are in your Target Zone.
Remain in your Target Zone for the desired time. After that, gradually reduce the intensity of your exercise and let your heart rate fall below the Target Zone with a 5 minute cooldown period.
For an example of an exercise session for a 35-year-old person with ‘Improved Fitness’ as a target, please see the following chart.
REFERENCES
American College of Sports Medicine. Position Stand. The Recommended Quantity and Quality of Exercise for Developing and Maintaining Cardiorespiratory and Muscular Fitness in Healthy Adults. Med Sci Sports Exerc 22: 265-274, 1990.
American College of Sports Medicine. ACSM’s Guidelines for Exercise Testing and Prescription. Williams & Wilkins, 1995.
Jackson, A.S., Blair, S.N., Mahar, M.T., Wier, L.T., Ross, R.M. and Stuteville, J.E. Prediction of functional aerobic capacity without exercise testing. Med Sci Sports Exerc 22: 863-870, 1990.
Quick guide for exercising
Before beginning, you should ask yourself two key questions:
- What is the amount of my physical activity at the moment?
- What are my goals?
The following steps help you answer the two questions, get the most out of your Polar Heart Rate Monitor, and achieve your personal exercise goals.
1. DEFINE THE AMOUNT OF YOUR PHYSICAL ACTIVITY
You may have a clear understanding of your present physical condition. In this case you can move to the next step to specify your goals. You can also define the amount of your physical activity by answering the questionnaire which is modified from the “Code for Physical Activity” developed by NASA/Johnson Space Center (Jackson et al. 1990).
The questionnaire is an easy and quick way to define whether you are a beginner, a moderate exerciser, an active exerciser or a serious exerciser. It is recommended to review the questionnaire every 1-2 months and revise if the amount of your physical activity has changed.
Which alternative best describes your general activity level for the previous month?
2. DETERMINE YOUR EXERCISE GOALS
It is easier to stay motivated when you determine your reason for exercising and establish a goal. That is why you should determine your personal goal very clearly. Your exercise goal may be one of these:
- Get used to regular physical exercise
- Lose weight
- Maintain or improve health
- Maintain or improve fitness
- Compete with yourself
- Achieve competitive results
3. EXAMPLES OF EXERCISE RECOMMENDATIONS

Care and Maintenance
Your Polar Heart Rate Monitor is a high-tech instrument of superior design and workmanship and should be treated with care. The suggestions below will help you fulfill the warranty obligations and enjoy this product for many years to come.
TAKING CARE OF YOUR POLAR HEART RATE MONITOR
- Wash the Polar Transmitter regularly after use with a mild soap and water solution. Rinse with pure water. Dry carefully after washing.
- Never store the Polar Transmitter wet. Sweat and moisture can keep its electrodes wet and the Polar Transmitter activated, which shortens the battery life.
- Store your Polar Heart Rate Monitor in a cool and dry place.
- Do not bend or stretch the Polar Transmitter. This may damage the electrodes.
- Keep your Polar Heart Rate Monitor out of extreme cold (below -10 °C / 14 °F) and heat (above 50 °C / 122 °F).
- Do not expose the Polar Heart Rate Monitor to direct sunlight for extended periods, such as by leaving it in a car.
BATTERIES
POLAR TRANSMITTER
The estimated average battery life of the Polar Transmitter is 2500 hours of use. Contact your distributor/dealer for a Transmitter replacement.
See Service for detailed instructions.
Polar recycles used Transmitters.
POLAR WRIST RECEIVER
The estimated average battery life of the Polar Wrist Receiver is 1 year in normal use (2h/day, 7 days a week). However, because the battery is inserted at the factory, the actual life of your first battery once in your possession may be less than the estimated battery life. Note also that an excessive use of the backlight and the beep signal will shorten the battery life more rapidly.
Do not open the Polar Wrist Receiver yourself. To ensure the water resistance properties and the use of qualified components, the Wrist Receiver battery should be replaced only by a person authorised by Polar Electro Oy. At the same time a full periodic check of the Polar Heart Rate Monitor will be done. Service for detailed instructions.
Precautions
USING A POLAR HEART RATE MONITOR IN A WATER ENVIRONMENT
Polar Heart Rate Monitors are water resistant to 20 meters. To maintain the water resistance, do not operate the buttons of the Polar Wrist Receiver under water. The pressure may cause the Receiver to leak.
Heart rate measurement in a water environment is technically demanding for the following reasons:
- Pool water with a high chlorine content and seawater may be very conductive and therefore short circuit the ECG signal so that it cannot be detected by the Transmitter unit.
- Jumping into the water or strenuous muscle movement during competitive swimming may cause water resistance that shifts the Transmitter on the body to a location where it is not possible to pick up ECG signal.
- The ECG signal strength varies depending on the individual’s tissue composition and the percentage of people who have problems in heart rate measuring is considerably higher in a water environment than in other use.
POLAR HEART RATE MONITOR AND INTERFERENCE
ELECTROMAGNETIC INTERFERENCE
Disturbances may occur near high voltage power lines, televisions, cars, bike computers, some exercise equipment or cellular phones.
CROSSTALK
The non-coded Polar Wrist Receiver picks up transmitter signals within 1 metre/ 3 feet. Therefore, when you are using your Polar Heart Rate Monitor make sure no other transmitter is within that range. Signals from more than one transmitter picked up simultaneously can cause an incorrect readout.
EXERCISE EQUIPMENT
Several pieces of exercise equipment with electronic or electrical components such as LED displays, motors and electrical brakes may cause interfering stray signals. To try to tackle these problems, relocate the Polar Wrist Receiver as follows:
- Remove the Polar Transmitter from your chest and use the exercise equipment as you would normally.
- Move the Receiver around until you find an area in which it displays no stray reading or flashing of the heart symbol. Interference is often worst right in front of the display panel of the equipment, while the left or right side of the display is relatively free of disturbance.
- Put the Transmitter back on the chest and keep the Receiver in this interference free area.
- If the Polar Heart Rate Monitor still does not work with the exercise equipment, this piece of equipment may be too noisy electrically for wireless heart rate measurement.
Frequently Asked Questions
WHAT SHOULD I DO IF…
…THERE IS NO HEART RATE READING?
1. Check that the elastic strap is snug enough.
2. Check that the electrodes of the Polar Transmitter are moistened and that you are wearing it as instructed.
3. Check that you have kept the Polar Transmitter clean.
Care and maintenance.
4. Check that there are no sources of electromagnetic radiation in the close vicinity of the Polar Wrist Receiver, such as TV sets, cellular phones, CRT monitors etc.
Precautions.
5. Have you had a cardiac event which may have altered your ECG waveform? In this case consult your physician.
…HEART SYMBOL FLASHES IRREGULARLY?
1. Check that your Polar Wrist Receiver is inside the transmission range and not further that 1 metre/ 3 feet from the Polar Transmitter you are wearing.
2. Check that the elastic strap has not become loose during exercise.
3. Make sure that the electrodes of the Transmitter are moistened.
4. Make sure that there is no other heart rate transmitter within the reception range (1 metre/ 3 feet). Precautions/ Crosstalk.
5. Cardiac arrythmia may cause irregular readings. In this case consult your physician.
…HEART RATE READING BECOMES ERRATIC OR EXTREMELY HIGH (OVER 200 BPM)?
You may have come within range of strong electromagnetic signals which cause erratic readings on the Receiver display. Check your surroundings and move further away from the source of disturbance. Precautions.
…THERE ARE NO REACTIONS TO ANY BUTTONS?
Reset the Polar Heart Rate Monitor. Resetting clears all memory values and settings will return to the default settings.
1. Wear the Polar Transmitter as described earlier in this manual.
2. Simultaneously press both buttons and hold the Polar logo of the Wrist Receiver to the Polar logo of the Polar Transmitter.
Display becomes full of digits.
3. Press either the right or the left button once.
You hear a long beep.
Polar Pacer enters the Time mode.
…THE DISPLAY IS BLANK OR FADING?
Usually the first sign of a discharged battery is disappearing of the digits when using the backlight. Have the batteries checked. Service.
…THE BATTERY OF THE WRIST RECEIVER MUST BE REPLACED?
We recommend having all service done by authorised Polar Service. Especially during the warranty period this is necessary to keep the warranty of the whole Polar Heart Rate Monitor valid. Polar Service will test your Wrist Receiver for water resistance after battery replacement and make a full periodic check of the complete Polar Heart Rate Monitor. Care and Maintenance/Batteries and Service.
Technical Specifications
Polar Heart Rate Monitor is designed to indicate the level of physiological strain and intensity in sports and exercise. No other use is intended or implied. Heart rate is displayed as number of heart beats per minute (bpm).

Polar books and accessories

Ask your local dealer or distributor for more details.
Service
Polar Service will help you get the most out of your Polar Heart Rate Monitor. Should your Polar Heart Rate Monitor need service, please follow the instructions:
CHECK LIST
Before you return your Polar Heart Rate Monitor for service, please check the following:
1. IS THE TRANSMITTER BEING WORN CORRECTLY?
The Polar logo should be right side up and the Transmitter flat against the skin. The elastic strap should be adjusted for a snug and comfortable fit.
2. ARE THE ELECTRODES MOIST ON THE TRANSMITTER?
It is important that the electrodes are wet during the heart rate measurement.
3. IS THE TRANSMITTER CLEAN?
Regular washing with mild soap and water solution and thorough dry afterwards will ensure that good conductivity remains.
4. ARE YOU HAVING DISTURBANCES CAUSED BY OTHER PEOPLE WITH HEART RATE MONITORS OR EXERCISE EQUIPMENT?
Precautions/Polar Heart Rate Monitor and interference for more details.
SENDING INSTRUCTIONS
- Pack the product carefully to avoid further damage.
- Include all the parts of the Polar Heart Rate Monitor. A full periodic check will be done on the whole product.
- Include proof of purchase (a receipt or its photocopy) if the product is under warranty.
- Include a detailed description of the problem. Use the return sheet of the Customer Care Charter.
- Include your name, return address and daytime telephone number.
- Ship postage prepaid to your dealer or distributor. For contact details see the Customer Care Charter.
POLAR’S SERVICE PROCEDURE
Any service is recommended to be done by authorised Polar service personnel. Our standard test and check procedure will be performed to all Polar Heart Rate Monitors. The test includes following elements:
POLAR TRANSMITTER
- Visual inspection
- Check of the transmission range
- Check of electrode conductivity
- Wash and clean if necessary
POLAR WRIST RECEIVER
- Visual inspection
- Check of battery voltage
- Check and cleaning of case contacts
- Re-assembly, including seal renewal if necessary
- Water resistance test
- Operational test
Water resistance cannot be guaranteed after unauthorised service.
Instruction Manual
Polar H9/H10 Heart Rate Monitor Chest Strap
Getting Started Guide
Find product support http://support.polar.com/en/H9 http://support.polar.com/en/H10
MANUFACTURED BY
POLAR ELECTRO OY
PROFESSORINTIE 5
90440 KEMPELE
FINLAND
[email protected]
WWW.POLAR.COM
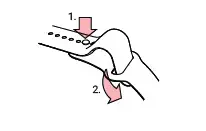
Step 1:
Step 2:
Step 3:
Step 4:
Thanks for choosing Polar! In this guide we’ll walk you through the basics of using H9/H10 heart rate sensor.
You can download the full-length user manual and the latest version of this guide at support.polar.com. For more help, there are some great video tutorials you may want to check out.
Wearing the heart rate sensor
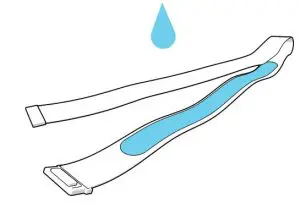
- Moisten the electrode area of the strap (picture 1).
- Fasten the strap around your chest and adjust the strap to fit snugly.
- Attach the connector (picture 2).
 After training, detach the connector and rinse the strap under running water to keep it clean.
Getting started
You can use your Polar H9/H10 with dozens of leading fitness apps including Polar Beat, as well as with many Polar products and ANT+ devices. Check all the compatible products and devices at support.polar.com.
To get started with your H9/H10, please pair it with the app or the Polar product first. For more detailed instructions, see the the app manufacturer’s manual or the user guide of your Polar product.
With H10 you can record a training session also with the sensor alone. The recording can be started from the Polar Beat app.
Please note that the heart rate signal your H9/H10 sends doesn’t pass through the human body. Therefore you shouldn’t keep the receiving device in a backpack, for example, but somewhere in front of you.
By default, H9/H10 sends your HR signal also via ANT+. You can turn it off from the Polar Beat settings, if you want.
Caring for your heart rate sensor
Connector: To preserve battery life and prevent snap oxidation, detach the connector from the strap after every use and wipe it dry with a soft towel.
Strap: Rinse under running water after every use. Wash regularly. Check the label on your strap for detailed washing instructions. Remember, the strap doesn’t last forever; it wears out like any other garment you wear and wash regularly.
Changing the battery is easy
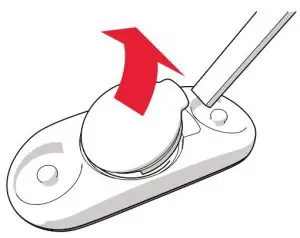
- Lever the battery cover open by using a small flat-headed tool. (picture 3).
- Remove the old battery from the battery cover.
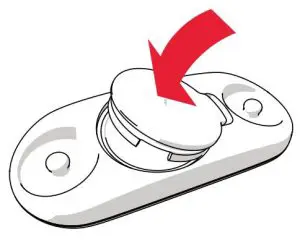
- Insert the new battery (CR2025) inside the cover with the negative (-) side outwards.
- Align the ledge on the battery cover with the slot on the connector and press the battery cover back into place (picture 4). You should hear a snap.
![]() For safety reasons, please make sure you use the correct battery (CR2025).
For safety reasons, please make sure you use the correct battery (CR2025).
Information about materials is available in the user manuals at
support.polar.com/en/H9 and support.polar.com/en/H10.
The radio equipment operates 2.402 – 2.480 GHz ISM frequency band(s) and 6.9 mW maximum power.
]]>Polar GPS Multisport Watch
Getting Started Guide
Get to know your watch
KEY BUTTON FUNCTIONS
- Press OK to confirm selections.
- Browse the watch faces, training views and menu with UP/DOWN, move through selection lists, and adjust a chosen value.
- Return, pause and stop with BACK. In time view press BACK to enter the menu, press and hold to start pairing and syncing.
- Press and hold LIGHT to lock buttons.
TOUCH DISPLAY* (NOT AVAILABLE IN ALL MODELS)
- Tap the display to choose items
- Swipe up or down to scroll
- Swipe left or right in time view to view different watch faces
*Disabled during training sessions
How to get started
- To wake up and charge your watch, plug it into a powered USB port or a USB charger with the custom cable that came in the box.
- To set up your watch, choose your language and setup method. The watch gives you three options for setup: set up (A) on your phone, (B) on your computer or (C) on your watch. Browse to the option most convenient for you with UP/DOWN and confirm your selection with OK. We recommend option A or B.
To get the most accurate and personal training and activity data, it’s important that you’re precise with the settings in the setup.
A. SET UP ON YOUR PHONE
You have to do the pairing in the Polar Flow app and NOT in your phone’s Bluetooth settings.
- Make sure your phone is connected to the internet and turn on Bluetooth®.
- Download the Polar Flow app from the App Store or Google Play.
- Open the Flow app on your phone. The Flow app recognizes your watch and prompts you to start pairing it. Tap the Start Button.
- Accept the Bluetooth pairing request on your phone. Confirm the pin code on your watch and the pairing is done.
- Sign in with your Polar account or create a new one. We’ll walk you through the sign-up and setup within the app.
When you’re done with the settings, tap Save and sync and your settings are synced to your watch.
B. SET UP ON YOUR COMPUTER
- Go to flow.polar.com/start and download and then install the Polar FlowSync data transfer software to your computer.
- Sign in with your Polar account or create a new one. We’ll walk you through the sign-up and setup within the Polar Flow web service.
 If there is a firmware update available for your watch, we recommend you install it during the setup. It may take up to 10 minutes to complete.
Your watch syncs your training data with the Flow mobile app automatically if your phone is within the Bluetooth range and the Flow app is running. You can also sync your training data manually with the Flow app by pressing and holding the BACK button of your watch.
Wrist-based heart rate
To get accurate heart rate readings during training, make sure that you wear the watch correctly:
- Wear the watch on top of your wrist, at least a finger’s width up from the wrist bone.
- Tighten the wristband firmly around your wrist. The sensor on the back must be in constant touch with your skin and the watch should not be able to move on your arm.
When not measuring heart rate, loosen the wristband a bit for a more comfortable fit and to let your skin breathe.
Your watch is also compatible with Polar heart rate sensors with chest straps. You can buy a heart rate sensor as an accessory. Find a full list of sensors and accessories your watch is compatible with at support.polar.com/en/compatibility
Start training
- Wear your watch and tighten the wristband.
- Press BACK to enter the main menu, choose Start training, and then browse to a sport profile.
- Go outdoors and away from tall buildings and trees. Keep your watch still with the display upwards to catch GPS satellite signals. The circle around the GPS icon will turn green when the GPS is ready.
- The watch has found your heart rate when your heart rate is shown.
- When all signals are found, press OK to start training recording.
PAUSE AND STOP TRAINING
Press BACK to pause your training session. To continue training, press OK. To stop the session, press and hold BACK when paused until Recording ended is displayed. You’ll get a summary of your training session on your watch right after you’ve stopped training.
TAKE CARE OF YOUR WATCH
Keep your watch clean by rinsing it under running water after each training session. Before charging, please make sure there’s no moisture, dust or dirt on the charging contacts of your watch and cable. Gently wipe off any dirt or moisture. Do not charge the watch when it’s wet.
Polar Flow app and web service
Sync your watch with the Flow app after training and get an instant overview of and feedback on your training, activity and sleep.
Sync your training data to the Flow web service with your computer or via Flow app to track your achievements, get guidance and see a detailed analysis of your training results, activity and sleep.
Information about materials and technical specifications are available in the user manual at support.polar.com/en
]]>POLAR IGNITE 2 GPS Fitness Watch

How to get started
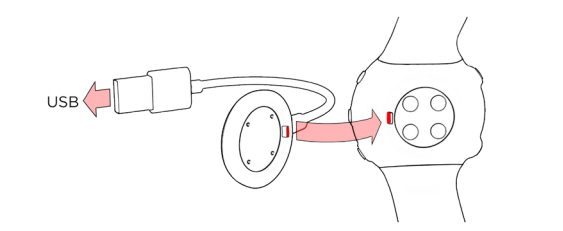
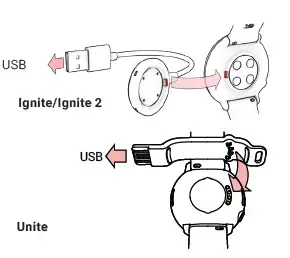
- To wake up and charge your watch, plug it into a powered USB port or a USB charger with the custom cable (Ignite/Ignite 2) or the USB charging adapter (Unite) that came in the box.

- To set up your watch, choose your language and setup method. The watch gives you three options for setup: set up (A) on your phone, (B) on your computer or (C) on your watch. Browse to the options by swiping the display up or down. Tap the display to confirm your selection. We recommend option A or B.
Option A: SET UP ON YOUR PHONE
You have to do the pairing in the Polar Flow app and NOT in your phone’s Bluetooth settings.
- Make sure your phone is connected to the internet and turn on Bluetooth®.
- Download the Polar Flow app from the App Store or Google Play.
- Open the Flow app on your phone. The Flow app recognizes your watch and prompts you to start pairing it. Tap the Start button.
- Accept the Bluetooth pairing request on your phone. Confirm the pin code on your watch and the pairing is done.
- Sign in with your Polar account or create a new one. We’ll walk you through the sign-up and setup within the app. When you’re done with the settings, tap Save and sync and your settings are synced to your watch.
Caution: Your watch syncs your training data with the Flow mobile app automatically if your phone is within the Bluetooth range and the Flow app is running. You can also sync your training data manually with the Flow app by pressing and holding the button of your watch.
Option B: SET UP ON YOUR COMPUTER
- Go to flow.polar.com/start and download and then install the Polar FlowSync data transfer software to your computer.
- Sign in with your Polar account or create a new one. We’ll walk you through the sign-up and set up within the Polar Flow web service
Caution: To get the most accurate and personal training and activity data, it’s important that you’re precise with the settings in the setup.
Caution: If there is a firmware update available for your watch, we recommend you install it during the setup. It may take up to 10 minutes to complete.
WEARING THE UNITE WRISTBAND
- Push the pin into the hole.
- Slide the excess strap underneath.
Get to know your watch
Swipe:
- up or down to scroll
- left or right in time view to view different watch face or during training to see different training views
Tap the display:
- to confirm selections and choose items
- to see more detailed information behind the watch faces
Press the button:
- to return, pause and stop
- in time view to entering the menu
- press and hold to start pairing and syncing
The backlight is automatically switched on when you turn your wrist to look at the watch.
Wearing your watch
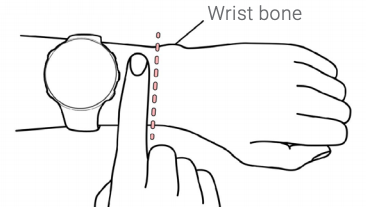
Wear your watch firmly behind the wrist bone. To get accurate heart rate readings during training:
- Wear the watch on top of your wrist, at least a finger’s width up from the wrist bone.
- Tighten the wristband a bit more tightly around your wrist. The sensor on the back must be in constant touch with your skin and the watch should not be able to move on your arm.
When not measuring heart rate or tracking sleep, loosen the wristband to let your skin breathe.
TAKE CARE OF YOUR WATCH
Keep your watch clean by rinsing it under running water after each training session. Before charging, please make sure there’s no moisture, dust or dirt on the charging contacts of your watch and cable. Gently wipe off any dirt or moisture. Do not charge the watch when it’s wet.
Start training
- Wear your watch and tighten the wristband.
- Press the button to enter the main menu, tap Start training, and then swipe left or right to select a sport profile.
- Wait until your heart rate is shown inside the green circle.
- Tap the display to start training recording
PAUSE AND STOP TRAINING
Press the button to pause your training session. Tap the display to continue training. To stop the session, press and hold the button when paused until Recording ended is displayed.
TRAINING WITH GPS
Ignite/Ignite 2: Go outdoors and away from tall buildings and trees. Keep your watch still with the display upwards to catch GPS satellite signals. The circle around the GPS icon will turn green and the watch vibrates when the GPS is ready.
Unite: To get GPS data, connect your watch to your mobile phone. Install the Polar Flow app on your mobile phone, pair it with your Unite and give it permission to always use your phone’s location. You need to keep your mobile phone with you during the training session.
Polar Flow app and web service
Sync your watch with the Flow app after training and get an instant overview of and feedback on your training, activity and sleep.
Sync your training data to the Flow web service with your computer or via the Flow app to track your achievements, get guidance and see a detailed analysis of your training results, activity and sleep.
Information about materials and technical specifications are available in the user manual at support.polar.com/en. For instructions on changing the wristband see this video: bit.ly/polar-wristband.
The radio equipment operates 2.402 – 2.480 GHz ISM frequency band(s) and 5 mW maximum power.
In Polar Ignite/Ignite 2 the Polar Precision Prime optical heart rate sensor fusion technology uses a very small, safe amount of electric current on the skin to measure the contact of the device to your wrist to enhance accuracy.
APP STORE IS A SERVICE MARK OF APPLE INC.
ANDROID AND GOOGLE PLAY ARE TRADEMARKS OF GOOGLE INC.
MANUFACTURED BY POLAR ELECTRO OY PROFESSORINTIE 5 90440 KEMPELE, FINLAND
[email protected]
WWW.POLAR.COM
This user manual contains instructions to the Polar H10 heart rate sensor. The latest version of this user manual and video tutorials can be found at support.polar.com/en/H10_heart_rate_sensor.
HEART RATE SENSOR PARTS
- The plastic electrode areas on the reverse side of the strap detect heart rate

- The connector sends the heart rate signal to the receiving device.

The polar H10 heart rate sensor enables training in a group without interference from other heart rate sensors.
WEARING THE HEART RATE SENSOR
- Moisten the electrode area of the strap.
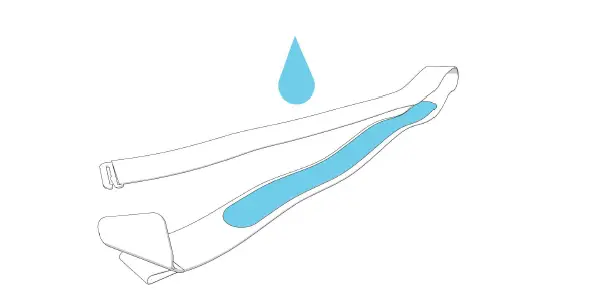
- Fasten the strap around your chest and adjust the strap to fit snugly.
- Attach the connector.
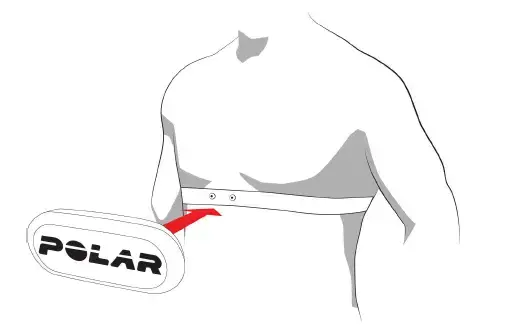
Detach the connector from the strap and rinse the strap under running water after every use. Sweat and moisture may keep the electrodes wet and the heart rate sensor activated. This will reduce the transmitter’s battery life. See detailed washing instructions in the Caring for Your Heart Rate Sensor section or at support.polar.com.
GETTING STARTED
The polar H10 heart rate sensor is compatible with Bluetooth® smart-ready devices that support heart rate service. A separate application is required to view heart rate data on the receiving device (for example, a smartphone). It is recommended to use the Polar Beat application but it is also possible to use other applications. If you have a Polar Flow account Polar Beat automatically synchronizes your training files to it. Please note that you must sign in to your Polar Flow account when starting Polar Beat for the synchronization to work. When using the Polar H10 for the first time, you need to pair the heart rate sensor with your receiving device. For more information on pairing, see the mobile application manufacturer’s instructions. The polar H10 heart rate sensor is also compatible with Polar training computers using GymLink technology. For more information, go to support.polar.com.To ensure sufficient transmission range from your Polar H10 heart rate sensor to the receiving device, keep the device in front of you. A good place is in a front pocket or fixed on a belt. Do not wear the receiving device on your back (for example, in a back pocket or backpack).
PAIRING WITH POLAR BEAT
The heart rate sensor needs to be paired directly in the Polar Beat app. To pair a heart rate sensor with Polar Beat:
- Wear the sensor.
- Open the Polar Beat app on your Android or iOS device.
- Go to the settings section of the app and find the HR sensor. When your sensor is found, tap PAIR.
SENSOR MEMORY
H10 has an internal memory that can store the heart rate data of one training session. You start the session in the Polar Beat mobile app and it also transfers the data from the sensor after the training. It’s especially handy in sports where you can’t have your mobile or wrist unit with you.
To use it:
- Wear your sensor.
- Open Polar Beat app on the mobile you have paired your sensor with.
- Select your sport profile, tap three dots on the top right corner, Save HR with the sensor, and Start
- After your training session, you can stop the recording either by tapping the stop button on the display or removing the connector from its strap.
When you come back into the Bluetooth range of your mobile, Beat will automatically offer to download your finished training session from the sensor memory and sync your Flow diary. If you have removed the connector from the strap. attach it back to its strap and wear the sensor around your chest to ensure a successful connection to the Beat and smooth data transfer.
USING YOUR HEART RATE SENSOR IN WATER
Polar H10 heart rate sensor is water resistant. The GymLink technology can be used in water activities, but Bluetooth® wireless technology will not work in water. You can still record your heart rate from your swim and transfer the data afterward to Polar Beat, the mobile app. Please notice that sea and pool water are very conductive, and electrodes may short-circuit, preventing ECG signals from being detected by the heart rate sensor. When using a bathing suit, the best performance is achieved by wearing the heart rate sensor underneath it.
FIRMWARE UPDATE
With the Polar H10 heart rate sensor, we’ll be able to bring updates to your sensor to improve it or even bring new functionalities to it. You’ll be able to update the firmware via the Polar Beat or Polar Flow mobile app. To receive the firmware updates, your H10 heart rate sensor needs to be paired with the Polar Beat or Polar Flow app, Android or iOS. The app will let you know if there’s an update available and will guide you through it. Sensor pairing is needed after update/battery replacement, if you use H10 with Polar A360, M400, A300, M450, V650, M200, M600 or 3rd party app/device. See instructions.
CARING FOR YOUR HEART RATE SENSOR
The heart rate sensor is a high-tech instrument that should be handled with care. Follow the caring instructions to ensure reliable measurement and to maximize the life span of the heart rate sensor. The following instructions will help you fulfill guarantee obligations. Connector: Detach the connector from the strap after every use and dry the connector with a soft towel. Clean the connection with a mild soap and water solution when needed. Never use alcohol or any abrasive material (e.g. steel wool or cleaning chemicals).
Strap: Rinse the strap under running water after every use and hang to dry. Clean the strap gently with a mild soap and water solution when needed. Do not use moisturizing soaps, because they can leave residue on the strap. Do not soak, iron, dry clean or bleach the strap. Do not stretch the strap or bend the electrode areas sharply. Dry and store the strap and the connector separately to maximize the heart rate sensor battery lifetime. Keep the heart rate sensor in a cool and dry place. Do not store the heart rate sensor wet in non-breathing material, such as a sports bag, to prevent snap oxidation. Do not expose the heart rate sensor to direct sunlight for extended periods. Check the label on your strap to see if it is machine washable. Never put the strap or the connector in a dryer!
BATTERIES
The battery level of your heart rate sensor is displayed on the receiving device. All connectors have user-changeable batteries. To change the battery yourself, follow the instructions below.
- Lever the battery cover open by using a small flat-headed tool.

- Remove the old battery from the battery cover.
- Insert the new battery (CR2025) inside the cover with the negative (-) side outwards.
- Align the ledge on the battery cover with the slot on the connector and press the battery cover back into place. You should hear a snap.
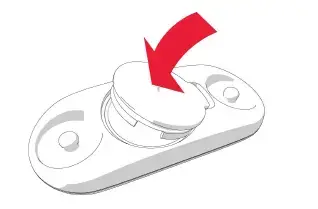
Sensor pairing is needed after update/battery replacement, if you use H10 with Polar A360, M400, A300, M450, V650, M200, M600 or 3rd party app/device. See instructions.
When changing the battery, make sure the sealing ring is not damaged, in which case you should replace it with a new one. You can purchase the sealing ring/battery kits at well-equipped Polar retailers and authorized Polar Services. In the USA and Canada, additional sealing rings are available at authorized Polar Service Centers. In the USA the sealing ring/battery kits are also available at www.shoppolar.com. Keep batteries away from children. If swallowed, contact a doctor immediately. Batteries should be disposed of in compliance with local regulations.
TECHNICAL SPECIFICATIONS
- Battery type: CR 2025
- Battery sealing ring O-ring 20.0 x 0.90 Material Silicone
- Battery lifetime: 400 h
- Operating temperature: -10 °C to +50 °C / 14 °F to 122 °F
- Connector material: ABS, ABS + GF, PC, Stainless steel
- Strap material: 38% Polyamide, 29% Polyurethane, 20%
- Elastane, 13% Polyester, Silicone prints
The Polar H10 heart rate sensor applies the following patented technologies, among others:
- OwnCode® coded transmission
Model UA001/UA002/UA003/UA004
Safety Tips
- Position on a flat, stable surface.
- A service agent/qualified technician should carry out installation and any repairs if required.
- Consult Local and National Standards to comply with the following:
- Health and Safety at Work Legislation
- BS EN Codes of Practice
- Fire Precautions
- IEE Wiring Regulations
- Building Regulations
- DO NOT use jet/pressure washers to clean the appliance.
- DO NOT use the appliance outside.
- DO NOT use this appliance to store medical supplies.
- DO NOT use electrical appliances inside the appliance (e.g. heaters, ice cream makers etc.).
- DO NOT allow oil or fat to come into contact with the plastic components or door seal. Clean immediately if contact occurs.
- DO NOT store products on top of the appliance.
- Bottles that contain a high percentage of alcohol must be sealed and placed vertically in the refrigerator.
- Always carry, store and handle the appliance in a vertical position and move by holding the base of the appliance.
- Always switch off and disconnect the power supply to the appliance when not in use.
- Keep all packaging away from children. Dispose of the packaging in accordance to the regulations of local authorities.
- If the power cord is damaged, it must be replaced by a POLAR agent or a recommended qualified technician in order to avoid a hazard.
- This appliance is not intended for use by persons (includingchildren) with reduced physical, sensory or mental capabilities, or lack of experience and knowledge, unless they have been given supervision or instruction concerning the use of the appliance by a person responsible for their safety.
- Children should be supervised to ensure that they do not play with the appliance.
- Polar recommends that this appliance should be periodically tested (at least annually) by a Competent Person. Testing should include, but not be limited to: Visual Inspection,Polarity Test, Earth Continuity, Insulation Continuity and Functional Testing.
 Warning: Risk of Fire / flammable materials
Do not store explosive substances such as aerosol cans with a flammable propellant in this appliance.
Keep all ventilation openings clear of obstruction. Unit should not be boxed in without adequate ventilation.
- Warning: Do not use mechanical devices or other means to accelerate the defrosting process, other than those recommended by the manufacturer
- • Warning: Do not damage the refrigerant circuit.
- Warning: Do not use electrical appliances inside the food storage compartments of the appliance, unless they are the type recommended by the manufacturer.
Product Description
- UA001 – Polar single door Refrigerator
- UA002 – Polar single door Freezer
- UA003 – Polar double door Refrigerator
- UA004 – Polar double door Freezer
Introduction
Please take a few moments to carefully read through this manual. Correct maintenance and operation of this machine will provide the best possible performance from your POLAR product.
Pack Contents
The following is included:
- POLAR Refrigerator / Freezer
- Keys
- Shelves
- Shelf support bars
- Top hinge and Bottom hinge (for UA001/UA002only)
- Instruction Manual
POLAR prides itself on quality and service, ensuring that at the time of packaging the contents are supplied fully functional and free of damage.
Should you find any damage as a result of transit, please contact your POLAR dealer immediately.
Installation
Note: If the appliance has been stored or moved in a non-vertical position, stand it in an upright position for approximately 12 hours before operation. If in doubt allow to stand.
- Remove the appliance from the packaging and remove the protective film from all surfaces.
- When positioning, maintain a distance of 20cm (7 inches) between the appliance and walls or other objects for ventilation. NEVER LOCATE NEXT TO OR NEAR A HEAT SOURCE.
Note: Before using the appliance for the first time, clean the shelves and interior with soapy water. - Set the brakes on the castors to keep the appliance in position.
Fitting the shelf support bars
- Place the support bar on the ladder at the desired height. For installation, the closed end shall be located at rear and open end at front.
- Push the support bar backwards to let its rear end hang on the rear ladder (Step 1).
- Lift the front end slightly then buckle it onto the front ladder (Step 2)

- Repeat for the remaining support bars.
- Slide the GN pans/shelves into place.
Reversing the door (for UA001/ UA002 only)
The door handle is on the left side by default. If necessary to reverse the door, follow below operations:
All the operations under this section should be carried out only by trained personnel or professional technicians.
- Turn the fixing locks as arrowed to release the control panel.
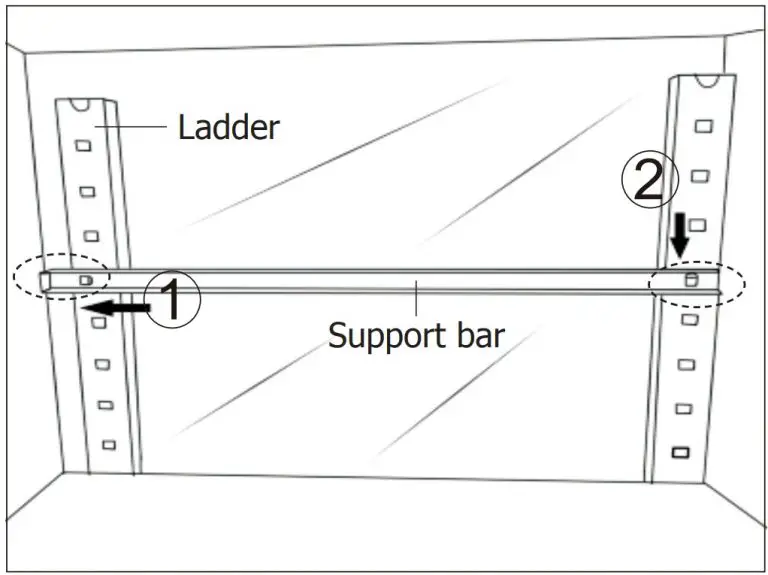
- Lift the controller panel upward for about 15mm, then take it out.
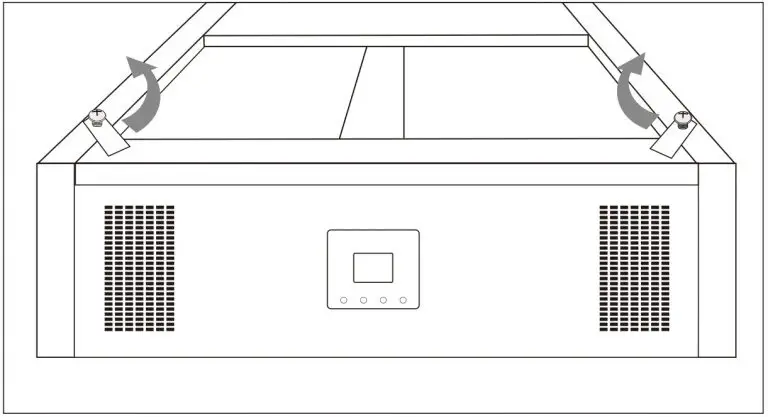
- Remove all inner and exterior screws to release the top decoration plate.

- Remove the bottom decoration plate.
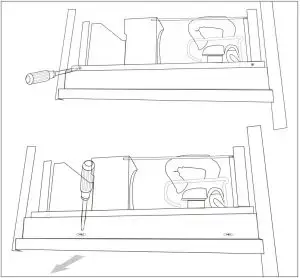
- Remove the right top hinge and bottom hinge to release the door. Then remove the door carefully.
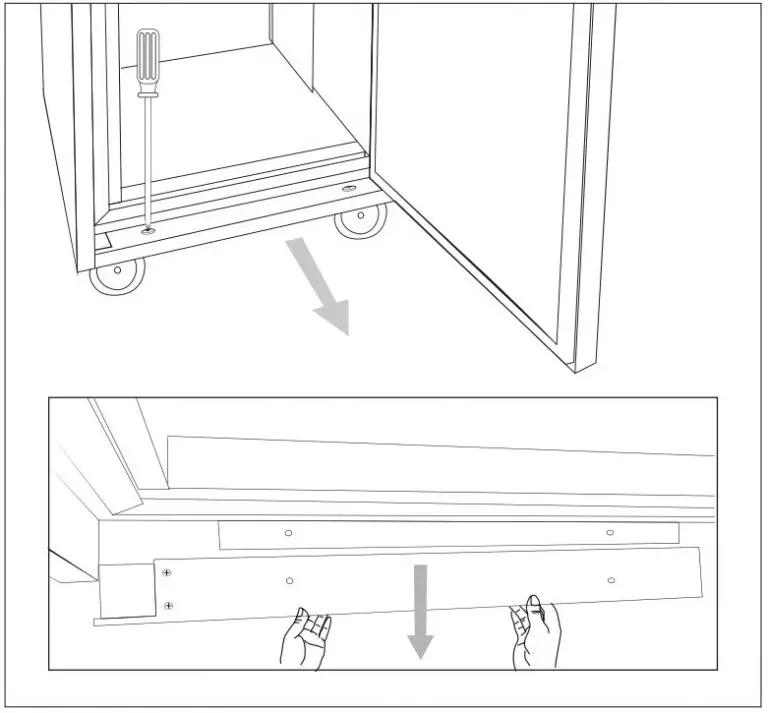
- Mount the left top hinge and bottom hinge with screws. Keep the top hinge a little loose so that the door can be inserted later easily.
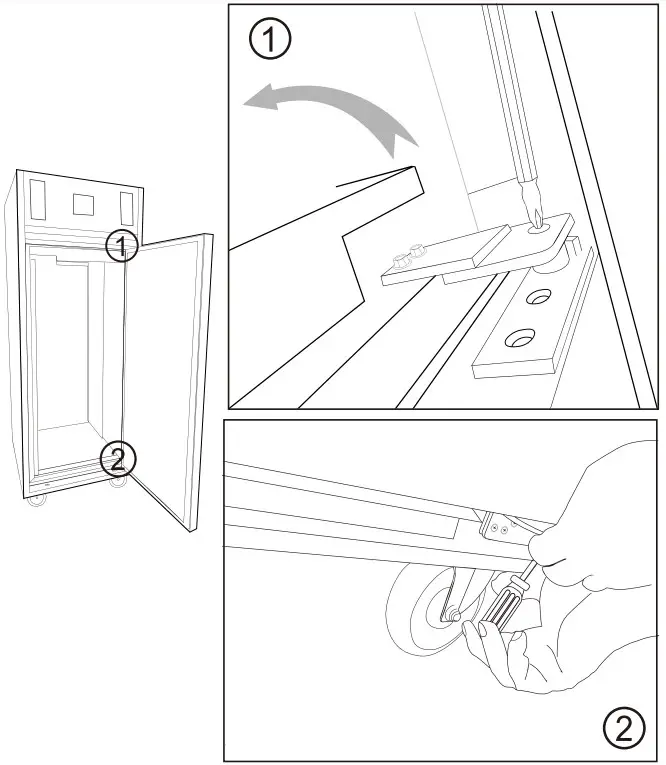
- Reverse the door and insert it into the holes of both hinges. Then fix the door in place with screws.
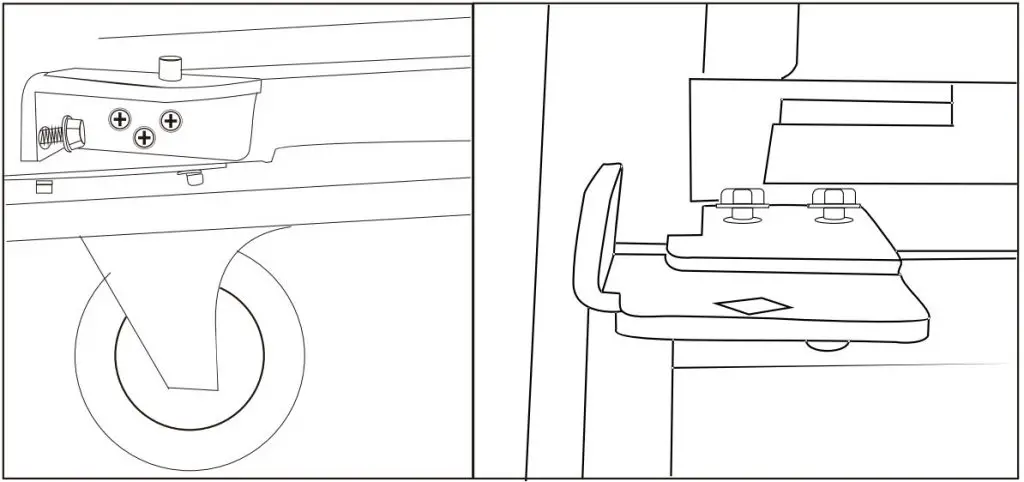
- There are covers on the top and bottom decoration plates, remove the left cover and install on the right side.
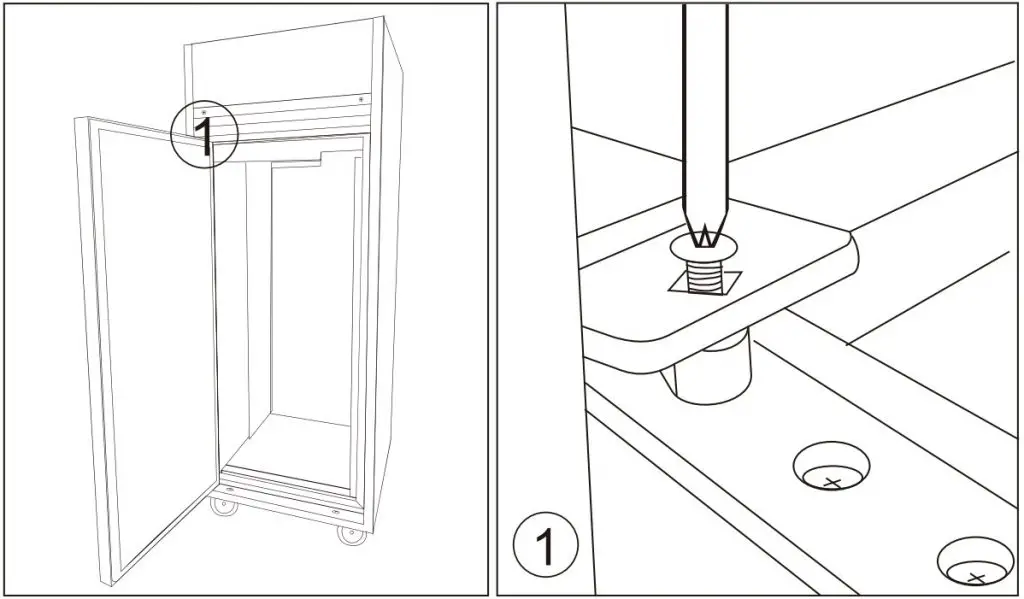
- Install back the top decoration plate, bottom decoration plate, and controller panel with screws. Then turn the fixing locks ahead to fix the control panel in place.
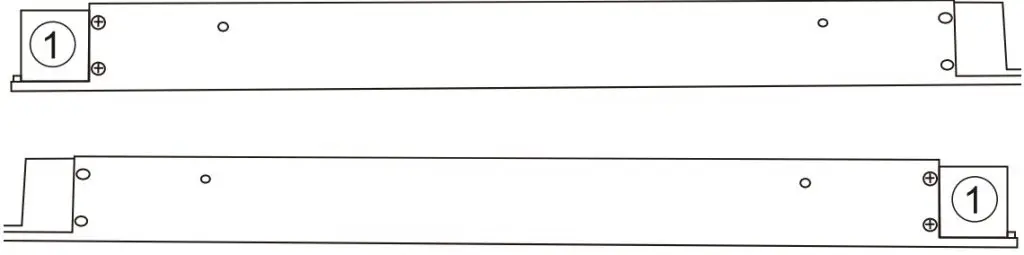
Operation
- Control Panel for refrigerators (UA001/UA003)
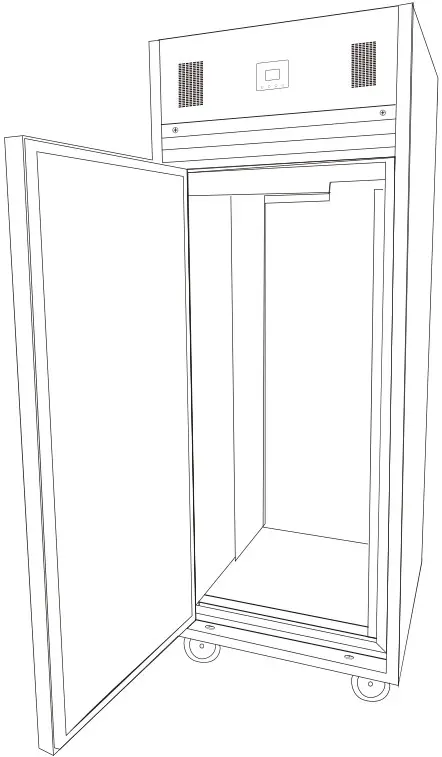
- Control Panel for Freezers (UA002/UA004)

Turn On
- Close the door/doors of the appliance.
- Connect the appliance to the mains power supply.
- To switch system on or off, press and hold
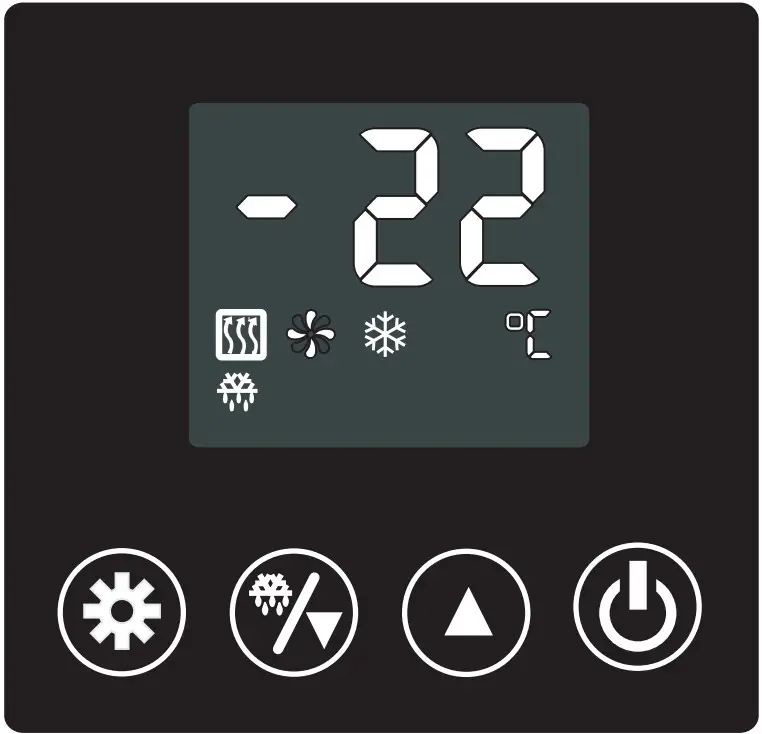 for 3 seconds.
Adjusting the Temperature
- Press
 for 3 seconds. The set temperature on the display will flash.
 - Press
 or
or  to change the set temperature.
 - Wait 6 seconds for the set temperature to be stored.
Manual Defrost
Automatic defrost:
The appliance features an automatic defrost. However, should the appliance require an additional defrost period, carry out below operations:
- Press for 3 seconds to enter defrosting mode. The symbol
 will appear on the display.
 - Press for 3 seconds again to exit.
Short cut operations for refrigerators only
- Press
 once to enter fish mode and display the set temperature (Range: -1°C ~ 1°C).
 - Press
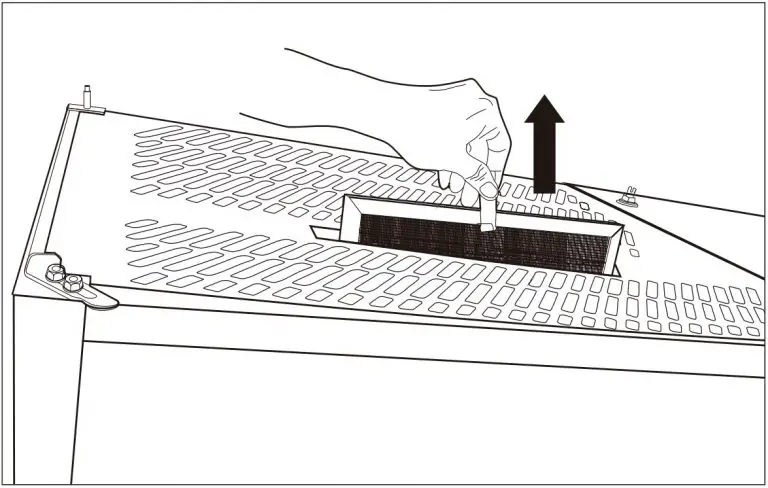 once to enter meat mode and display the set temperature (Range: -2°C ~ 2°C).
 - Press once to return to general mode and display the set temperature (Range: 1°C ~ 4°C).
Cleaning, Care & Maintenance
Switch off and disconnect from the power supply before cleaning.
- Clean the interior of the appliance as often as possible.
- Do not use abrasive cleaning agents. These can leave harmful residues.
- Clean the door seals with warm soapy water.
- Always wipe dry after cleaning.
Cleaning the condenser
- The condenser is part of the refrigeration system. The condenser requires monthly cleaning.
- Always disconnect power supply before carrying out routine maintenance.
- Failure to clean the condenser will reduce the performance and life of your unit and may invalidate your warranty.
- The condenser is located above the refrigerator cabinet at the top.
- These models have a removable filter which can be taken out directly. Clean with a vacuum cleaner.

Troubleshooting
If the machine malfunctions due to causes other than those listed or the proposed corrective actions do not solve the problem please call a Polar agent or qualified technician.
| Fault | Probable Cause | Solution |
| The unit is not working | The unit is not switched on | Check the unit is plugged in correctly and switched on |
| Plug and lead are damaged | Call POLAR agent or qualified Technician | |
| Fuse in the plug has blown | Replace the fuse | |
| Power supply | Check power supply | |
| Internal wiring fault | Call POLAR agent or qualified Technician | |
| The appliance is not cooling | Coolant Leak | Call POLAR agent or qualified technician |
| Fan Motor Failed | Call POLAR agent or qualified technician | |
| Airflow to the condenser obstructed | Increase the gap between appliance and obstacles/heat source | |
| Condenser is clogged | à Cleaning the condenser | |
| Loud noises | Appliance is not level | Adjust position to make it level |
| Appliance is too close to a wall or other object | Move to a more suitable location | |
| Odour from the unit | Unit is not cleaned for long time | Clean the unit thoroughly |
| Odour food not properly packed | Seal and pack odour food properly |
| Error code/ indication | Probable Cause | Solution |
| “ER1” and alarm | The evaporator inlet probe is faulty | Press any button to cease alarm. Call POLAR agent or qualified Technician to replace the faulty probe |
| “ER2” and alarm | The evaporator return gas probe is faulty | Press any button to cease alarm. Call POLAR agent or qualified Technician to replace the faulty probe |
| “ER3” and alarm | The defrost probe (evaporator temperature probe) is faulty. | Press any button to cease alarm. Call POLAR agent or qualified Technician to replace the faulty probe |
| “ER4” and alarm | Door not closed properly or door switch is faulty | Press any button to cease alarm. Close the door/doors properly or check the door switch |
| “ER5” and alarm | Condenser probe is faulty | Press any button to cease alarm. Call POLAR agent or qualified Technician to replace the faulty probe |
| “SO” and alarm | Cabinet temperature probe is open-circuited | Press any button to cease alarm. Call POLAR agent or qualified Technician to replace the faulty probe |
| “SC” and alarm | Cabinet temperature probe is short-circuited | Press any button to cease alarm. Call POLAR agent or qualified Technician to replace the faulty probe |
| “HI” and alarm | Condenser temperature exceeding 60°C | Power off and re-start machine to cease alarm. Press power button for 1 second to check the condenser temperature on the screen. Clean the condenser filter immediately, or Call POLAR agent or qualified technician |
Technical Specifications
| Model | Voltage | Power (W) | Temp. Range | Refrigerant | Dimensions H x W x D mm | Weight (kg) |
| UA001 | 220-240V~ 50Hz | 430 | -2°C ~ +4°C | R290 | 1980 x 737 x 815 | 122.10 |
| UA002 | 220-240V~ 50Hz | 650 | -18°C ~ -22°C | R290 | 1980 x 737 x 815 | 127.90 |
| UA003 | 220-240V~ 50Hz | 460 | -2°C ~ +4°C | R290 | 1980 x 1400 x 815 | 187.60 |
| UA004 | 220-240V~ 50Hz | 800 | -18°C ~ -22°C | R290 | 1980 x 1400 x 815 | 194.00 |
Electrical Wiring
POLAR appliances are supplied with a 3 pin BS1363 plug and lead.
The plug is to be connected to a suitable mains socket.
POLAR appliances are wired as follows:
- Live wire (coloured brown) to terminal marked L
- Neutral wire (coloured blue) to terminal marked N
- Earth wire (coloured green/yellow) to terminal marked E
 This appliance must be earthed.
- If in doubt consult a qualified electrician.
- Electrical isolation points must be kept clear of any obstructions. In the event of any emergency disconnection being required they must be readily accessible.
Disposal
EU regulations require refrigeration product to be disposed of by specialist companies who remove or recycle all gasses, metal and plastic components.
Consult your local waste collection authority regarding disposal of your appliance. Local authorities are not obliged to dispose of commercial refrigeration equipment but may be able to offer advice on how to dispose of the equipment locally.
Alternatively call the POLAR helpline for details of national disposal companies within the EU.
Compliance
The WEEE logo on this product or its documentation indicates that the product must not be disposed of as household waste. To help prevent possible harm to human health and/or the environment, the product must be disposed of in an approved and environmentally safe recycling process. For further information on how to dispose of this product correctly, contact the product supplier, or the local authority responsible for waste disposal in your area.
POLAR parts have undergone strict product testing in order to comply with regulatory standards and specifications set by international, independent, and federal authorities.
POLAR products have been approved to carry the following symbol:


All rights reserved. No part of these instructions may be produced or transmitted in any form or by any means, electronic, mechanical, photocopying, recording or otherwise, without the prior written permission of POLAR.
Every effort is made to ensure all details are correct at the time of going to press, however, POLAR reserve the right to change specifications without notice.

| UK | 0845 146 2887 |
| NL | 0800 – 29 1 29 |
| 040 – 2628080 | |
| FR | 0800 – 29 2 29 |
| 01 60 34 28 80 | |
| DE | 0800 – 1860806 |
| IT | N/A |
| ES | 901-100 133 |
| PT | [email protected] |
DECLARATION OF CONFORMITY
- Equipment Type:
- U-series Premium Single Door Refrigerator
- U series Premium Single Door Freezer
- U-series Premium Double Door Refrigerator
- U series Premium Double Door Freezer
- Model
- UA001
- UA002
- UA003
- UA004
- Application of Council Directives(s)
Machinery Directive 2006/42/EC
EN 60335-1:2012 +A11:2014 +A13:2017
EN 60335-2-89:2010 +A1:2016
EN 62233:2008
Electro-Magnetic Compatibility (EMC) Directive 2014/30/EU
EN 55014-1:2017
EN 55014-2:2015
EN 61000-3-3:2013
EN 61000-3-2:2014
Restriction of Hazardous Substances Directive (RoHS) 2015/863 amending Annex II to Directive 2011/65/EU - Producer Name: Polar
- Producer Address ourth Way, Avonmouth, Bristol, BS11 8TB United Kingdom
- 42 North Point Business Park New Mallow Road Cork Ireland
- the undersigned, hereby declare that the equipment specified above conforms to the above Directive(s) and Standard(s).
- Date: 6th December 2019
- Signature:

- Full Name: Ashley Hooper
- Position : Technical & Quality Manager

17kg Ice Maker
Instruction manual
Model: G620
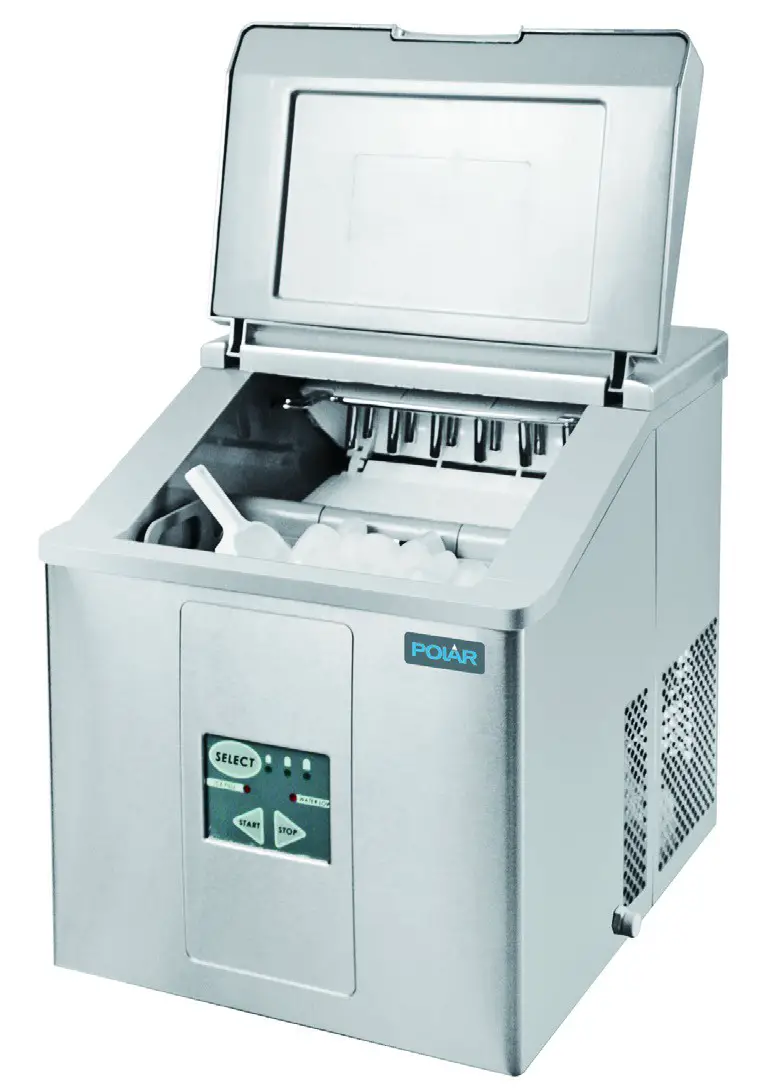
Safety Tips
- Position on a flat, stable surface.
- A service agent/qualified technician should carry out installation and any repairs if required. Do not remove any components or service panels on this product.
- Consult Local and National Standards to comply with the following:
– Health and Safety at Work Legislation
– BS EN Codes of Practice
– Fire Precautions
– IEE Wiring Regulations
– Building Regulations - DO NOT immerse in water or use steam/jet washers to clean the unit.
- DO NOT cover the appliance when it is operating.
- Always carry, store and handle the appliance in a vertical position.
- ONLY use drinking or potable water when making ice cubes.
- For indoor use only.
- Replace any unused water in the tank at least once every 24 hours.
- Keep all packaging away from children. Dispose of the packaging in accordance with the regulations of local authorities.
- This appliance is not intended for use by persons (including children) with reduced physical, sensory or mental capabilities, or lack of experience or knowledge unless they have been given supervision or instruction concerning the use of the appliance by a person responsible for their safety.
- Polar recommends that this appliance should be periodically tested (at least annually) by a Competent Person. Testing should include, but not be limited to: Visual Inspection, Polarity Test, Earth Continuity (Class I equipment), Insulation Continuity and Functional Test.
- If the power cord is damaged, it must be replaced by a POLAR agent or a recommended qualified technician in order to avoid a hazard.
![]() Warning: Risk of Fire flammable materials
Warning: Risk of Fire flammable materials
- Do not store explosive substances such as aerosol cans with a flammable propellant in this appliance.
 Warning: Keep all ventilation openings clear of obstruction. The unit should not be boxing without adequate ventilation.
• Warning: Do not use mechanical devices or other means to accelerate the defrosting process, other than those recommended by the manufacturer.
• Warning: Do not damage the refrigerant circuit.
• Warning: Do not use electrical appliances inside the food storage compartments of the appliance, unless they are the type recommended by the manufacturer.
Introduction
Please take a few moments to carefully read through this manual. Correct maintenance and operation of this machine will provide the best possible performance from your POLAR product. The ice maker is designed to make ice and should not be used as storage to preserve foods, drinks, etc.
The ice maker is designed to make ice and should not be used as storage to preserve foods, drinks, etc.
Pack Contents
The following is included:
- Ice Maker
- Removable ice basket
- Ice scoop
- Instruction manual
POLAR prides itself on quality and service, ensuring that at the time of packaging the contents are supplied fully functional and free of damage.
Should you find any damage as a result of transit, please contact your POLAR dealer immediately.
Installation
Note: If the unit has not been stored or moved in an upright position, let it stand upright for approximately 12 hours before the operation. If in doubt allow standing.
- Remove the appliance from the packaging and remove the protective film from all surfaces.
- When positioning the ice maker, maintain a distance of 10cm between the appliance and walls or other objects for ventilation. NEVER LOCATE NEXT TO OR NEAR A HEAT SOURCE.
- If necessary, adjust the screw legs of the ice maker to make it level. The efficiency of the ice maker can be reduced if the appliance is unevenly located.
Operation
Control Panel
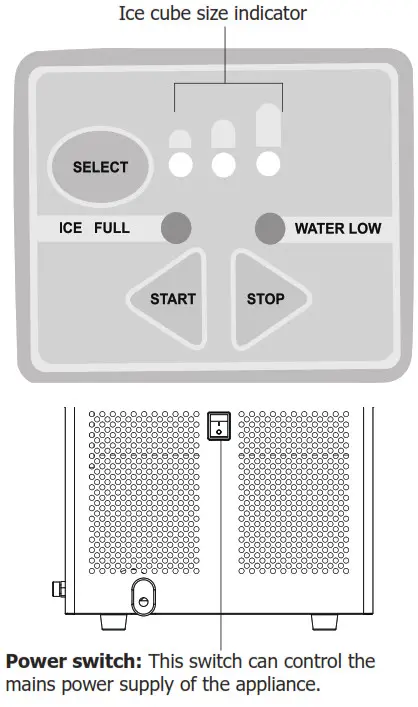
Making Ice
Note: Before using it for the first time, clean the water tank, ice basket, and ice basket shelf. Use the first 3 ice-making cycles to flush out the system. Discard the water and ice created from the first 3 cycles.
Each time the appliance is refilled, the first ice-making cycle is used to reduce the water temperature. This results in uneven ice cube production which is perfectly normal. You may wish to discard ice created in the first production cycle.
- Lift the access lid and fill the water tank up the level of the ice basket shelf.
- Connect the appliance to the power and press the START button.
- Press the SELECT button repeatedly to scroll through the ice cube sizes. Stop when the required size is illuminated.
Note: Each ice-making cycle takes between 6-12 minutes, depending on the size of the cube selected. - The appliance will run a start-up routine and then begin ice production.
Note: If the water level is too low, the Water Low indicator lights up and the appliance stops working. Fill the water tank and the appliance will restart automatically. - When the cubes reach the ice sensor the appliance will stop production. Production resumes once ice has been removed.
- Press the STOP button at any time to halt the ice-making process.
Cleaning, Care & Maintenance
- Always switch off and disconnect the power supply before cleaning.
- Warm, soapy water is recommended for cleaning. Cleaning agents may leave harmful residues. DO NOT wash the base unit, instead, wipe the exterior with a damp cloth.
- A POLAR agent or qualified technician should carry out repairs if required.
- Clean the water filter regularly with a small brush, particularly in hard water areas. The water filter is located in the pump inlet at the bottom of the water tank, remove by pulling out with fingers.

- If the appliance is to be left unused for longer than 24 hours, loosen the drain screw and drain the water from the tank.
- The inner removable parts and water tank should be cleaned regularly.
Descaling
In hard water areas, limescale can build up within the appliance after prolonged use.
To de-scale the appliance:
- Switch off and disconnect the power supply.
- Remove the ice basket and water filter for cleaning.
- Add dilute cleaner into the water tank. (Note: Choose ice maker-specific cleaner and follow the manufacturer’s instructions.)
- Clean the water box, evaporator (metal), and water tank with a soft brush.

- Loosen the drain screw to drain the solution.
- Flush out the system thoroughly with clean water to remove any cleaner residue.
- Re-locate all removable parts.
Note: After descaling, use the first 3 ice-making cycles to flush out the system. Discard the water and ice created from these initial cycles. POLAR recommend this appliance is
descaled monthly or more frequently in hard water area.
Troubleshooting
| Fault | Probable Cause | Solution | |
| The appliance is not working | The unit is not switched on | Check the unit is plugged in correctly and switched on | |
| Plug and lead are damaged | Call POLAR agent or qualified Technician | ||
| Fuse in the plug has blown | Replace the plug fuse | ||
| Power supply | Check power supply | ||
| Internal wiring fault | Call POLAR agent or qualified Technician | ||
| Appliance is noisy or works intermittently | Power fluctuations | Turn off the ice maker and restart after 3 minutes | |
 |
Water indicator is lit | Water level is low or tank is empty | Refill water tank and restart |
| Water filter is blocked | Clean water filter and restart appliance | ||
 |
Ice Full indicator is lit | Ice basket full | Empty the ice basket |
| Room temperature is too low | Move the appliance to a warmer position | ||
 |
Water and Ice Full indicators flash together |
Water box is blocked and cannot tilt | Disconnect from the power supply. Remove some of the ice cubes and gently tilt the water box by hand. Restart the appliance after 3 minutes |
| Ice cubes are sticking together | Ice making cycle is too long | Reset the ice cube size and restart the appliance | |
| Water tank temperature is too low | Empty water tank and refill | ||
| Compressor runs but no ice is made | Refrigerant leak or block in the refrigerant system | Call POLAR agent or qualified technician | |
Technical Specifications
| Model | Voltage | Power | Current | Water Tank Volume |
Bin Storage |
Ice Making Capacity |
Refrigerant | Dimensions H x W x D mm |
Weight |
| G620 | 220-240V 50Hz |
120W | 1.0A | 3.9 liters | 2 kg | 17kg/24 hours | R600a 28g | 415×365×420 | 17.2kg |
Electrical Wiring
POLAR appliances are supplied with a 3 pin BS1363 plug and lead.
The plug is to be connected to a suitable mains socket.
POLAR appliances are wired as follows:
- Live wire (colored brown) to the terminal marked L
- Neutral wire (colored blue) to the terminal marked N
- Earth wire (colored green/yellow) to terminal marked E
This appliance must be earthed.
If in doubt consult a qualified electrician.
Electrical isolation points must be kept clear of any obstructions. In the event of any emergency disconnection being required they must be readily accessible.
Disposal
EU regulations require refrigeration products to be disposed of by specialist companies who remove or recycle all gasses, metal and plastic components.
Consult your local waste collection authority regarding the disposal of your appliance. Local authorities are not obliged to dispose of commercial refrigeration equipment but may be able to offer advice on how to dispose of the equipment locally.
Alternatively, call the POLAR helpline for details of national disposal companies within the EU.
Compliance
 The WEEE logo on this product or its documentation indicates that the product must not be disposed of as household waste. To help prevent possible harm to human health and/or the environment, the product must be disposed of in an approved and environmentally safe recycling process. For further information on how to dispose of this product correctly, contact the product supplier, or the local authority responsible for waste disposal in your area.
 POLAR parts have undergone strict product testing in order to comply with regulatory standards and specifications set by international, independent, and federal authorities.
POLAR products have been approved to carry the following symbol:
All rights reserved. No part of these instructions may be produced or transmitted in any form or by any means, electronic, mechanical, photocopying, recording or otherwise, without the prior written permission of POLAR.
Every effort is made to ensure all details are correct at the time of going to press, however, POLAR reserves the right to change specifications without notice.
 +44 (0)845 146 2887
| Equipment Type | Manual Fill Ice Cube Maker | |
| Model | G620 | |
| Application of Council Directives(s) | Low Voltage Directive (LVD) 2014/35/EU EN 60335-1: 2012 +A11:2014 EN 60335-2-24:2010 EN 62233: 2008 Electro-Magnetic Compatibility (EMC) Directive 2014/30/EU EN 55014:2006 +A1:2009 + A2:2011 EN 55014-2:2015 EN 61000-3-2:2014 EN 61000-3-3:2013 Restriction of Hazardous Substances Directive (RoHS) 2015/863 amending Annex II to Directive 2011/65/EU |
|
| Producer Name | Polar | |
| Producer Address | Fourth Way, Avonmouth, Bristol, BS11 8TB United Kingdom |
42 North Point Business Park New Mallow Road Cork Ireland |
I, the undersigned, hereby declare that the equipment specified above conforms to the above Directive(s) and Standard(s).
| Date | 11th June 2019 |
| Signature |  |
| Full Name | Ashley Hooper |
| Position | Technical & Quality Manager |
![]()

11kg Ice Maker
Instruction manual
Model: T315
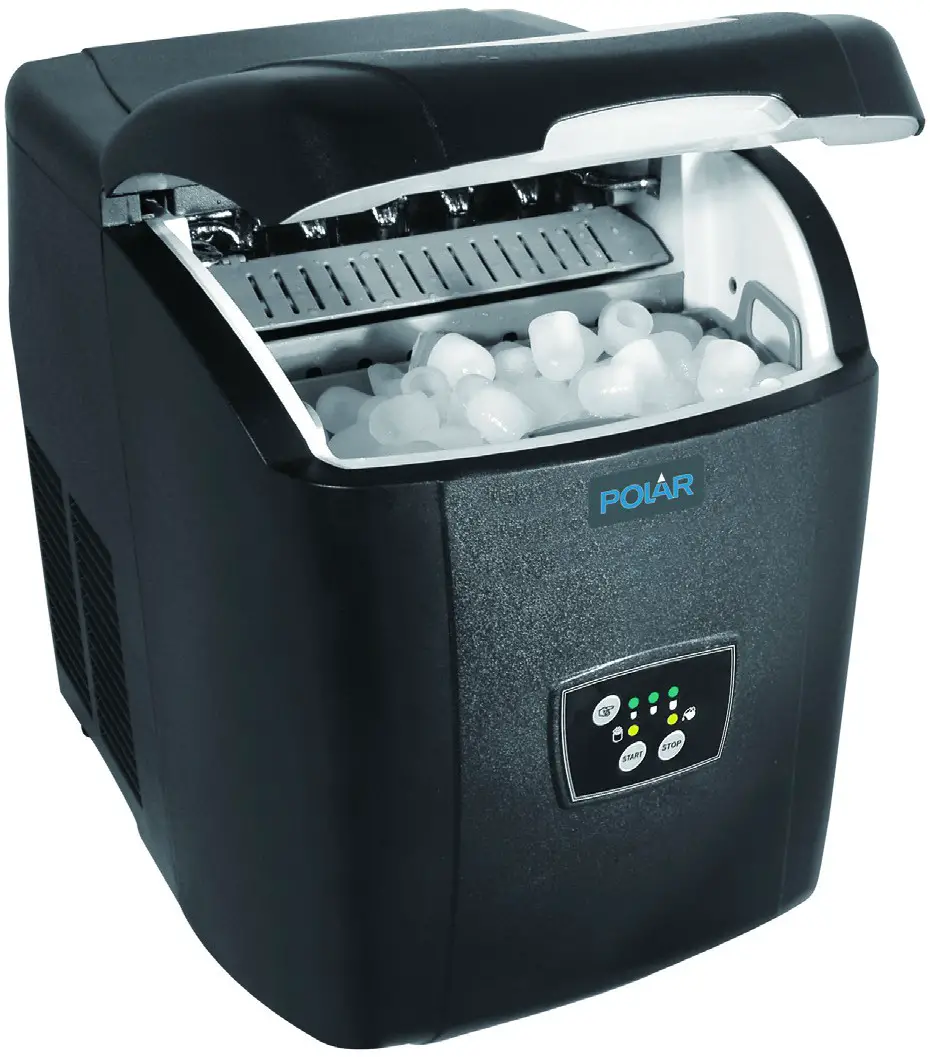
- Position on a flat, stable surface.
- A service agent/qualified technician should carry out installation and any repairs if required. Do not remove any components or service panels on this product.
- Consult Local and National Standards to comply with the following:
– Health and Safety at Work Legislation
– BS EN Codes of Practice
– Fire Precautions
– IEE Wiring Regulations
– Building Regulations - DO NOT immerse in water, or use steam/jet washers to clean the unit.
- DO NOT cover the appliance when it is operating.
- Always carry, store and handle the appliance in a vertical position.
- ONLY use drinking or potable water when making ice cubes.
- For indoor use only.
- Replace any unused water in the tank at least once every 24 hours.
- Keep all packaging away from children. Dispose of the packaging in accordance with the regulations of local authorities.
- This appliance is not intended for use by persons (including children) with reduced physical, sensory or mental capabilities, or lack of experience or knowledge unless they have been given supervision or instruction concerning the use of the appliance by a person responsible for their safety.
- Polar recommends that this appliance should be periodically tested (at least annually) by a Competent Person. Testing should include, but not be limited to: Visual Inspection, Polarity Test, Earth Continuity (Class I equipment), Insulation Continuity and Functional Test.
- If the power cord is damaged, it must be replaced by a POLAR agent or a recommended qualified technician in order to avoid a hazard.
 Warning: Risk of Fire flammable materials
- Do not store explosive substances such as aerosol cans with a flammable propellant in this appliance.
Warning: Keep all ventilation openings clear of obstruction. The unit should not be boxed in without adequate ventilation. - Warning: Do not use mechanical devices or other means to accelerate the defrosting process, other than those recommended by the manufacturer.
- Warning: Do not damage the refrigerant circuit.
- Warning: Do not use electrical appliances inside the food storage compartments of the appliance, unless they are the type recommended by the manufacturer.
Introduction
Please take a few moments to carefully read through this manual. Correct maintenance and operation of this machine will provide the best possible performance from your POLAR product.
The ice maker is designed to make ice and should not be used as storage to preserve foods, drinks, etc.
Pack Contents
The following is included:
- Ice Maker
- Removable ice basket
- Ice scoop
- Instruction manual
POLAR prides itself on quality and service, ensuring that at the time of packaging the contents are supplied fully functional and free of damage.
Should you find any damage as a result of transit, please contact your POLAR dealer immediately.
Installation
 Note: If the unit has not been stored or moved in an upright position, let it stand upright for approximately 12 hours before the operation. If in doubt allow standing.
- Remove the appliance from the packaging and remove the protective film from all surfaces.
- When positioning the ice maker, maintain a distance of 10cm between the appliance and walls or other objects for ventilation. NEVER LOCATE NEXT TO OR NEAR A HEAT SOURCE.
- If necessary, adjust the screw legs of the ice maker to make it level. The efficiency of the ice maker can be reduced if the appliance is unevenly located.
Operation
Control Panel

Making Ice
Note: Before using it for the first time, clean the water tank, ice basket, and ice basket shelf. Use the first 3 ice-making cycles to flush out the system. Discard the water and ice created from the first 3 cycles.
Each time the appliance is refilled, the first ice-making cycle is used to reduce the water temperature. This results in uneven ice cube production which is perfectly normal. You may wish to discard ice created in the first two production cycles.
- Lift the access lid and fill the water tank up the level of the ice basket shelf.
- Connect the appliance to the power and press the START button.
- Press the HAND button repeatedly to scroll through the ice cube sizes. Stop when the required size is illuminated.
Note: The ice-making cycle takes between 6-12 minutes, depending on the size of the cube selected. Larger cubes will take longer to produce. - The appliance will run a startup routine and then begin ice production.
Note: If the water level is too low, the Water Low indicator lights up and the appliance stops working. Fill the water tank and the appliance will restart automatically. - When the cubes reach the ice sensor the appliance will stop production. Production resumes once ice has been removed.
- Press the STOP button at any time to halt the ice-making process.
Cleaning, Care & Maintenance
- Always switch off and disconnect the power supply before cleaning.
- Warm, soapy water is recommended for cleaning. Cleaning agents may leave harmful residues. DO NOT wash the base unit, instead, wipe the exterior with a damp cloth.
- A POLAR agent or qualified technician should carry out repairs if required.
- Clean the water filter regularly with a small brush, particularly in hard water areas. The water filter is located in the pump inlet at the bottom of the water tank, remove by pulling out with fingers.

- If the appliance is to be left unused for longer than 24 hours, loosen the drain screw and drain the water from the tank.
- The inner removable parts and water tank should be cleaned regularly.
Descaling
In hard water areas, limescale can build up within the appliance after prolonged use. To de-scale the appliance:
- Switch off and disconnect the power supply.
- Remove the ice basket and water filter for cleaning.
- Add dilute cleaner into the water tank. (Note: Choose ice maker-specific cleaner and follow the manufacturer’s instructions.)
- Clean the water box, evaporator (metal), and water tank with a soft brush.
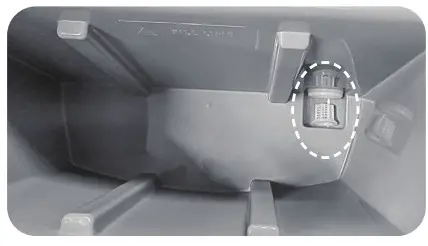
- Loosen the drain screw to drain the solution.
- Flush out the system thoroughly with clean water to remove any cleaner residue.
- Re-locate all removable parts.
Note: After descaling, use the first 3 ice-making cycles to flush out the system. Discard the water and ice created from these initial cycles. POLAR recommend this appliance is descaled monthly or more frequently in hard water area.
Troubleshooting
| Fault | Probable Cause | Solution | |
| The appliance is not working | The unit is not switched on | Check the unit is plugged in correctly and switched on | |
| Plug and lead are damaged | Call POLAR agent or qualified Technician | ||
| Fuse in the plug has blown | Replace the plug fuse | ||
| Power supply | Check power supply | ||
| Internal wiring fault | Call POLAR agent or qualified Technician | ||
| Appliance is noisy or works intermittently | Power fluctuations | Turn off the ice maker and restart after 3 minutes | |
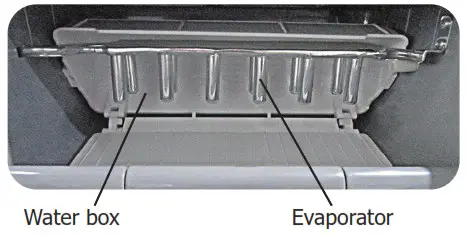 |
Water indicator is lit | Water level is low or tank is empty | Refill water tank and restart |
| Water filter is blocked | Clean water filter and restart appliance | ||
 |
Ice Full indicator is lit | Ice basket full | Empty the ice basket |
| Room temperature is too low | Move the appliance to a warmer position | ||
 |
Water and Ice Full indicators flash together |
Water box is blocked and cannot tilt | Disconnect from the power supply. Remove some of the ice cubes and gently tilt the water box by hand. Restart the appliance after 3 minutes |
| Ice cubes are sticking together | Ice making cycle is too long | Reset the ice cube size and restart the appliance | |
| Water tank temperature is too low | Empty water tank and refill | ||
| Compressor runs but no ice is made | Refrigerant leak or block in the refrigerant system | Call POLAR agent or qualified technician | |
Technical Specifications
| Model | Voltage | Power | Current | Water Tank Volume |
Bin Storage |
Ice Making Capacity |
Refrigerant | Dimensions H x W x D mm |
Weight |
| T315 | 220-240V 50Hz |
100W | 0.8A | 2 litres | 1 kg | 11kg/24 hours | R600a 31g | 380 x 305 x 380 | 12.2 kg |
Electrical Wiring
POLAR appliances are supplied with a 3 pin, BS1363 plug and lead.
The plug is to be connected to a suitable mains socket.
POLAR appliances are wired as follows:
- Live wire (colored brown) to the terminal marked L
- Neutral wire (colored blue) to terminal marked N
- Earth wire (colored green/yellow) to terminal marked E
This appliance must be earthed.
If in doubt consult a qualified electrician.
Electrical isolation points must be kept clear of any obstructions. In the event of any emergency disconnection being required they must be readily accessible.
Disposal
EU regulations require refrigeration products to be disposed of by specialist companies who remove or recycle all gasses, metal and plastic components.
Consult your local waste collection authority regarding the disposal of your appliance. Local authorities are not obliged to dispose of commercial refrigeration equipment but may be able to offer advice on how to dispose of the equipment locally.
Alternatively, call the POLAR helpline for details of national disposal companies within the EU.
Compliance
 The WEEE logo on this product or its documentation indicates that the product must not be disposed of as household waste. To help prevent possible harm to human health and/or the environment, the product must be disposed of in an approved and environmentally safe recycling process. For further information on how to dispose of this product correctly, contact the product supplier, or the local authority responsible for waste disposal in your area.
 POLAR parts have undergone strict product testing in order to comply with regulatory standards and specifications set by international, independent, and federal authorities.
POLAR products have been approved to carry the following symbol: All rights reserved. No part of these instructions may be produced or transmitted in any form or by any means, electronic, mechanical, photocopying, recording or otherwise, without the prior written permission of POLAR. Every effort is made to ensure all details are correct at the time of going to press, however, POLAR reserves the right to change specifications without notice.
 +44 (0)845 146 2887 UK
DECLARATION OF CONFORMITY
| Equipment Type | Manual Fill Ice Cube Maker | |
| Model | T315 | |
| Application of Council Directives(s) | Low Voltage Directive (LVD) 2014/35/EU EN 60335-1: 2012 +A11:2014 EN 60335-2-24:2010 EN 62233: 2008 Electro-Magnetic Compatibility (EMC) Directive 2014/30/EU EN 55014:2006 +A1:2009 + A2:2011 EN 55014-2:2015 EN 61000-3-2:2014 EN 61000-3-3:2013 Restriction of Hazardous Substances Directive| (RoHS) 2015/863 amending Annex II to Directive 2011/65/EU |
|
| Producer Name | Polar | |
| Producer Address | Fourth Way, Avonmouth, Bristol, BS11 8TB United Kingdom |
42 North Point Business Park New Mallow Road Cork Ireland |
I, the undersigned, hereby declare that the equipment specified above conforms to the above Directive(s) and Standard(s).
| Date | 11th June 2019 |
| Signature |  |
| Full Name | Ashley Hooper |
| Position | Technical & Quality Manager |

http://www.polar-refrigerator.com/
T315_ML_A5_v9_20200716
]]>