View Fullscreen
Operating Instructions LED TV
Model No.
TH-49HX900Z
English
For more detailed instructions, please refer to [eHELP] (Built-in Operating Instructions). How to use [eHELP] (p. 19)
Thank you for purchasing this Panasonic product. Please read these instructions carefully before operating this product and retain them for future reference. Please carefully read the “Safety Precautions” of this manual before use. The images shown in this manual are for illustrative purposes only.
F0420-0
FAS
TQB4GD0352
English
Contents
Be Sure to Read
Important Notice··················································· 3 Safety Precautions ··············································· 4 Accessories ························································ 7 Installing the TV ··················································· 7 Installing the wall-hanging bracket ··························10 Connections ·······················································10 Identifying Controls ··············································16 First time Auto Tuning···········································18 How to Use eHELP··············································19 FAQs ································································20 Maintenance ······················································21 Specifications ·····················································22
2 English
The terms HDMI and HDMI High-Definition Multimedia Interface, and the HDMI Logo are trademarks or registered trademarks of HDMI Licensing Administrator, Inc. in the United States and other countries.
Dolby, Dolby Vision, Dolby Atmos, Dolby Audio, and the double-D symbol are trademarks of Dolby Laboratories. Manufactured under license from Dolby Laboratories. Confidential unpublished works. Copyright © 2012-2019 Dolby Laboratories. All rights reserved.
The Bluetooth® word mark and logos are registered trademarks owned by Bluetooth SIG, Inc. and any use of such marks by Panasonic Corporation is under license.
x.v.ColourTM is a trademark.
DiSEqCTM is a trademark of EUTELSAT.
For information about the trademarks, refer to [eHELP] (Search by Purpose > Read first > Before use > Licence).
Important Notice
Internet apps are provided by their respective service providers, and may be changed, interrupted, or discontinued at any time.
Panasonic assumes no responsibility and makes no warranty for the availability or the continuity of the services.
Panasonic does not guarantee operation and performance of peripheral devices made by other manufacturers; and we disclaim any liability or damage arising from operation and/or performance from usage of such other maker’s peripheral devices.
Handling of customer information
Certain customer information such as IP address of your device (this TV)’s network interface will be collected as soon as you connect your Panasonic-branded smart television (this TV) or other devices to the internet (excerpted from our privacy policy). We do this to protect our customers and the integrity of our Service as well as to protect the rights or property of Panasonic. If you wish to know more about the processing of your information in this context, please refer to the full text of our privacy policy displayed at [eHELP] (Search by Purpose > Network > Network settings > Terms of Service and Settings).
When using Internet connecting function of this TV, after agreeing (in the jurisdictions where customer’s consent is required to collect personal information under applicable privacy laws) to or reviewing Panasonic’s terms of service / privacy policy (hereinafter referred to as terms and conditions etc.), customer information on the use of this unit may be collected and used according to terms and conditions etc.
For details of terms of service / privacy policy, refer to [eHELP] (Search by Purpose > Network > Network settings > Terms of Service and Settings).
Customer’s personal information may be recorded on this TV by broadcasting organization or application provider. Before repairing, transferring or discarding this TV, erase all the information recorded on this TV according to the following procedure.
[eHELP] (Search by Purpose > Functions > Shipping Condition)
Customer Information may be collected by provider via application provided by third parties on this TV or website. Please confirm the terms and conditions etc. of provider in advance.
· Panasonic will not be held responsible for collecting or using customer information via application provided by third party on this TV or website.
· When entering your credit card number, name, etc., pay special attention to the trustworthiness of the provider.
English 3
· Registered information may be registered in the server etc. of provider. Before repairing, transferring or discarding this TV, be sure to erase the information according to the terms and conditions etc. of provider.
The recording and playback of content on this or any other device may require permission from the owner of the copyright or other such rights in that content. Panasonic has no authority to and does not grant you that permission and explicitly disclaims any right, ability or intention to obtain such permission on your behalf. It is your responsibility to ensure that your use of this or any other device complies with applicable copyright legislation in your country. Please refer to that legislation for more information on the relevant laws and regulations involved or contact the owner of the rights in the content you wish to record or playback.
This product is licensed under the AVC patent portfolio license for the personal use of a consumer or other uses in which it does not receive remuneration to (i) encode video in compliance with the AVC Standard (“AVC Video”) and/or (ii) decode AVC Video that was encoded by a consumer engaged in a personal activity and/or was obtained from a video provider licensed to provide AVC Video. No license is granted or shall be implied for any other use. Additional information may be obtained from MPEG LA, L.L.C. See http://www.mpegla.com
Panasonic and its affiliates make no representations or warranties of any kind with respect to the USB devices and the performance of communication between the USB devices and the USB port of Panasonic products, and expressly disclaims any and all warranties, whether express or implied or otherwise, including without limitation any implied warranty of fitness for a particular purpose, any loss of data, and any implied warranties arising from course of dealing or course of performance of data communication between the USB devices and the USB port of Panasonic products.
Transport only in upright position.
This mark indicates the product operates on AC voltage.
This mark indicates a Class II or double insulated electrical appliance wherein the product does not require a safety connection to electrical earth (ground).
Safety Precautions
To help avoid risk of electrical shock, fire, damage or injury, please follow the warnings and cautions below:
Mains plug and lead
Warning
If you detect anything unusual, immediately remove the mains plug.
This TV is designed to operate on AC 220-240 V, 50 / 60 Hz.
Insert the mains plug fully into the mains socket. To turn Off the apparatus completely, you must pull
the mains plug out of the mains socket. Consequently, the mains plug should be easily accessible at all times. Disconnect the mains plug when cleaning the TV. Do not touch the mains plug with wet hands.
Do not damage the mains lead. · Do not place a heavy object on the lead.
· Do not place the lead near a high temperature object.
· Do not pull on the lead. Hold onto the mains plug body when disconnecting the plug.
· Do not move the TV with the lead plugged into a mains socket.
· Do not twist the lead, bend it excessively or stretch it.
· Do not use a damaged mains plug or mains socket.
· Ensure the TV does not crush the mains lead. Do not use any mains lead other than that provided
with this TV.
Take care
Warning Do not remove covers and never
modify the TV yourself as live parts are accessible and risk of electric shock when they are removed. There are no user serviceable parts inside.
4 English
Do not expose the TV to rain or excessive moisture. This TV must not be exposed to dripping or splashing water and objects filled with liquid, such as vases, must not be placed on top of or above the TV.
Do not insert foreign objects into the TV through the air vents.
If the TV is used in an area where insects may easily enter the TV.
It is possible for insects to enter the TV, such as small flies, spiders, ants, etc. which may cause damage to the TV or become trapped in an area visible on the TV, e.g. within the screen.
Do not use an unapproved pedestal / mounting equipment. Be sure to ask your local Panasonic dealer to perform the setup or installation of approved wall-hanging brackets.
Do not apply any strong force or impact to the display panel.
Ensure that children do not climb on the TV.
Do not place the TV on sloping or unstable surfaces, and ensure that the TV does not hang over the edge of the base.
Warning Never place a TV in an unstable location. A TV may fall, causing serious personal injury or death. Many injuries, particularly to children, can be avoided by taking simple precautions such as:
· Using cabinets or stands recommended by the manufacturer of the TV.
· Only using furniture that can safely support the TV.
· Ensuring the TV is not overhanging the edge of the supporting furniture.
· Not placing the TV on tall furniture (for example, cupboards or bookcases) without anchoring both the furniture and the TV to a suitable support.
· Not placing the TV on cloth or other materials that may be located between the TV and supporting furniture.
· Educating children about the dangers of climbing on furniture to reach the TV or its controls.
If your existing TV is being retained and relocated, the same considerations as above should be applied.
This TV is designed for indoor use.
This TV is designed for table-top use.
Do not expose the TV to direct sunlight and other sources of heat.
To prevent the spread of fire, keep candles or other open flames away from this product at all times
Suffocation / Choking Hazard
Warning
The packaging of this product may cause suffocation, and some of the parts are small and may present a choking hazard to young children. Keep these parts out of reach of young children.
Pedestal
Warning
Do not disassemble or modify the pedestal.
Caution
Do not use any pedestal other than the one provided with this TV.
Do not use the pedestal if it becomes warped or physically damaged. If this occurs, contact your nearest Panasonic dealer immediately.
During setup, make sure that all screws are securely tightened.
Ensure that the TV does not suffer any impact during installation of the pedestal.
Ensure that children do not climb onto the pedestal.
Install or remove the TV from the pedestal with at least two people.
Install or remove the TV according to the specified procedure.
Radio waves
Warning
Do not use the TV in any medical institutions or locations with medical equipment. Radio waves may interfere with the medical equipment and may cause accidents due to malfunction.
Do not use the TV near any automatic control equipment such as automatic doors or fire alarms. Radio waves may interfere with the automatic control equipment and may cause accidents due to malfunction.
Keep at least 15 cm away from the TV if you have a cardiac pacemaker. Radio waves may interfere with the operation of the pacemaker.
Do not disassemble or alter the TV in any way.
English 5
Built-in wireless LAN
Caution
Do not use the built-in wireless LAN to connect to any wireless network (SSID*) for which you do not have usage rights. Such networks may be listed as a result of searches. However, using them may be regarded as illegal access.
*SSID is a name for identifying a particular wireless network for transmission.
Do not subject the built-in wireless LAN to high temperatures, direct sunlight or moisture.
Data transmitted and received over radio waves may be intercepted and monitored.
The built-in wireless LAN uses 2.4 GHz and 5 GHz frequency bands. To avoid malfunctions or slow response caused by radio wave interference when using the built-in wireless LAN, keep the TV away from other devices that use 2.4 GHz and 5 GHz signals such as other wireless LAN devices, microwave ovens, and mobile phones.
When problems occur due to static electricity, etc., the TV might stop operating to protect itself. In this case, turn the TV off at the Mains power On/Off switch, then turn it back on.
Bluetooth® wireless technology
Caution
The TV uses the 2.4 GHz radio frequency ISM band (Bluetooth®). To avoid malfunctions or slow response caused by radio wave interference, keep the TV away from the devices such as other wireless LAN devices, other Bluetooth devices, microwaves, mobile phones and the devices that use 2.4 GHz signal.
Ventilation
Caution
Allow sufficient space (at least 10 cm) around the TV in order to help prevent excessive heat, which could lead to early failure of some electronic components.
10
10
10
10
(cm)
Ventilation should not be impeded by covering the ventilation openings with items such as newspapers, tablecloths and curtains.
Whether you are using a pedestal or not, always ensure the vents at the bottom of the TV are not blocked and there is sufficient space to enable adequate ventilation.
Moving the TV
Caution Before moving the TV, disconnect all cables. At least two people are required to move the TV to
prevent injury that may be caused by the tipping or falling of TV.
When not in use for a long time
Caution This TV will still consume some power even in the Off mode, as long as the mains plug is still connected to a live mains socket. Remove the mains plug from the wall socket when
the TV is not in use for a prolonged period of time.
Excessive volume
Caution Do not expose your ears to
excessive volume from the headphones. Irreversible damage can be caused. If you hear a drumming noise in your ears, turn down the volume or temporarily stop using the headphones.
Battery for the Remote Control
Caution Incorrect installation may cause battery leakage,
corrosion and explosion. Replace only with the same or equivalent type. Do not mix old and new batteries. Do not mix different battery types (such as alkaline
and manganese batteries). Do not use rechargeable batteries (Ni-Cd, etc.). Do not burn or break up batteries. Do not expose batteries to excessive heat such as
sunshine, fire or the like. Make sure you dispose of batteries correctly. Remove the battery from the unit when not using for
a prolonged period of time to prevent battery leakage, corrosion and explosion.
6 English
Accessories
Installing the TV
Standard accessories
Make sure the following accessories are included with your TV. If any items are missing, contact your dealer.
1. Mains lead (p. 11)
2. Remote Control (p. 16)
N2QAYB001252
3. Pedestal (p. 7)
4. Batteries (2) R6
(p. 16)
5. Cable band (2) (p. 14)
Assembly screw (2) M4 x 5.5 (mm)
6. Fall prevention parts
(p. 9)
The fall-prevention band is fixed to the pedestal with tapes.
Assembling / Removing the pedestal
Preparations
Take out the pedestal and the TV from the packing case and put the TV onto a work table with the screen panel down on the clean and soft cloth (blanket, etc.) Use a flat and firm table bigger than the TV. Do not hold the screen panel part. Make sure not to scratch or break the TV.
Assembling the pedestal
Select a method to assemble the pedestal from the following 2 styles.
Insert the pedestal firmly, otherwise it may come off when setting up the TV.
Do not assemble the pedestal by any method other than those specified below.
Style1
Check for any accessories hidden behind or in the
packing material when opening the box.
1
A
Operating Instructions with Warranty statement
Accessories may not be placed all together. Take care not to throw them away unintentionally.
Illustrations shown above may be different between model and countries.
English 7
2
A
Style2
1
A
3
8 English
Removing the pedestal from the TV
2
A Be sure to remove the pedestal in the following
procedures when you use the wall-hanging bracket or
repack the TV.
1 Put the TV onto a work table with the screen panel down on the clean and soft cloth.
2 Pull out the pedestal from the TV.
Preventing the TV from falling over
Be sure to secure the pedestal to a furniture as shown to prevent the TV from falling over. This information is designed to reduce the risk of
injuries caused by the TV falling over. However, no measure can guarantee prevention from falling over in all cases including the disasters. Attaching the fall-prevention parts Band (1)
Wood screw (1) 1 Remove the screw.
3
2 Attach the fall-prevention parts.
B A
English 9
Installing the wallhanging bracket
Choosing to wall mount the TV shall be done at the owner’s risk. Always use a qualified installer to perform a TV wall bracket installation. Incorrect fitting may cause equipment to fall, resulting in injury and product damage. Any such damage will void your warranty.
Holes for wall-hanging bracket installation
Rear of the TV
a: 200 mm b: 200 mm
a b
(View from the side) Depth of screw minimum: 9 mm maximum: 21 mm Type of screw: M6
Connections
External equipment and cables shown are not supplied with this TV.
Please ensure that the unit is disconnected from the mains socket before attaching or disconnecting any cables.
Check the terminal type and cable plugs are correct for connection.
Use a fully wired HDMI compliant cable. Keep the TV away from electronic equipment (video
equipment, etc.) or equipment with an infrared sensor, otherwise distortion of image / sound may occur or operation of other equipment may be affected. Please also read the manual of the equipment being connected.
Removing the terminal cover / rear cover from the TV
Be sure to remove the terminal cover / rear cover before connecting or disconnecting cables.
When the connections are completed, attach the terminal cover / rear cover. (p. 15)
Screw for fixing the TV onto the wall-hanging bracket (not supplied with the TV)
Warning
When optional accessories such as wall brackets, etc. are used, always read and follow the manufactures installation and usage instructions.
Do not mount the unit directly below ceiling lights (such as spotlights or halogen lights) which typically give off high heat. Doing so may warp or damage plastic cabinet parts.
When installing wall brackets you must ensure the wall bracket is not electrically grounded to metal wall studs. Always ensure that there are no electrical cables, pipes, etc. in the wall before you begin the wall bracket installation.
Terminal cover
Rear cover
10 English
Terminals
1 2 3 4 5
6
Basic connections
Mains lead
AC 220-240 V 50 / 60 Hz
Mains lead (supplied)
Insert the mains plug firmly into place. When disconnecting the mains lead, be absolutely sure to disconnect the mains plug from the mains socket first.
7
8
9
1 Model name plate 2 Headphone / Subwoofer jack (p. 14) 3 HDMI1 – 2 (p. 11, 12, 13) 4 USB 1 – 3 port
This symbol indicates DC operation 5 ETHERNET terminal (p. 12) 6 Aerial terminal (p. 11)
Satellite terminal (p. 12) 7 DIGITAL AUDIO OUT (p. 13) 8 AV IN (COMPONENT / VIDEO) (p. 12) 9 HDMI3 – 4 To watch content in 4K format, use HDMI terminal.
(p. 12)
Aerial
TV
RF cable Aerial For Digital TV, Analogue TV Keep RF (aerial) cable away from the mains lead to avoid and minimise mains interference pickup. Do not place the RF cable under the TV. An aerial, correct cable (75 coaxial) and correct terminating plug are required to obtain optimum quality picture and sound. If a communal aerial system is used, you may require the correct connection cable and plug between the wall aerial socket and the TV. Your local Television Service Centre or dealer may be able to assist you in obtaining the correct aerial system for your particular area and the accessories required. Any matters regarding aerial installation, upgrading of existing systems or accessories required, and the costs incurred, are the responsibility of you, the customer.
English 11
Satellite dish
TV
Satellite cable Satellite dish For Satellite TV To ensure your satellite dish is correctly installed, please consult your local dealer. Also consult the received satellite broadcasting companies for details.
AV devices
DVD Recorder / Blu-ray Recorder, etc.
TV
Network
A broadband network environment is required to be able to use internet services. If you do not have any broadband network services,
please consult your retailer for assistance. Prepare the internet environment for wired connection
or wireless connection. Setup of the network connection will start when first
using the TV. (p. 16)
Wired connection
TV
Internet environment
LAN cable (Shielded) Use Shielded Twist Pair (STP) LAN cable.
Wireless connection
RF cable HDMI cable DVD Recorder / Blu-ray Recorder, etc. Aerial
Set top box
TV
HDMI cable Set top box Satellite dish
Internet environment
Built-in wireless LAN (Rear of the TV) Access point
Connections for 4K / HDR compatible equipment
TV
HDMI cable 4K / HDR compatible equipment Connect the 4K compatible equipment to HDMI terminal using a 4K compatible cable and you can watch content in 4K format. Supporting HDR does not increase the peak brightness capabilities of the TV panel.
12 English
[HDMI Auto Setting] (Setup Menu)
Reproduces the image more precisely with the expanded colour gamut when connecting the 4K compatible equipment. Select the mode depending on the equipment.
[Mode1]: For better compatibility. Set to [Mode1] when the image or sound in HDMI input is not played properly. [Mode2]: For the 4K compatible equipment that has the function to output the image precisely with the expanded colour gamut To change the mode
1. Select the HDMI input mode connected to the equipment.
2. Display the menu and select [HDMI Auto Setting] (Setup Menu).
For information about the valid format, refer to [eHELP] (Search by Purpose > Watching > 4K resolution > HDMI Auto Setting).
Other connections**
DVD Player
TV
Camcorder / Game equipment
TV (Viewing)
(Listening)
Composite video cable (Shielded) Audio cable (Shielded) Camcorder / Game equipment
Amplifier (external speakers)
TV
(Viewing) (Listening)
Component video cable (Shielded) Audio cable (Shielded) DVD Player
HDMI cable Amplifier with speaker system External equipment (DVD Player, etc.) Use HDMI2 to connect the TV to an amplifier which has ARC (Audio Return Channel) function. If connecting to an amplifier without ARC function, use DIGITAL AUDIO OUT.
TV
Optical cable DIGITAL AUDIO IN e.g. Amplifier with speaker system
English 13
Headphones
To use the headphones, set [Headphone Terminal Output] to [Headphone].
TV
Cable arrangement
Fix the cables using the cable clamp, cable tie, etc. and then attach the terminal cover / rear cover to the TV.
Fixing the cables using the cable band
(3.5 mm stereo mini plug)
Subwoofer
To use the subwoofer, set [Headphone Terminal Output] to [Sub Woofer]. (The subwoofer output from the TV is the same for both L and R).
TV
Audio cable (3.5 mm stereo mini plug – audio pin plug)
USB HDD (for recording)
Use USB 1 port for connecting the USB HDD.
For details, refer to [eHELP] (Search by Purpose > Recording).
VIERA Link
Use HDMI1 – 4 for VIERA Link connection.
For details, refer to [eHELP] (Search by Purpose > Functions > VIERA Link “HDAVI ControlTM”).
** For more details on Other Connection, refer to [eHELP] (Search by Purpose > Watching > External Connection)
14 English
Note
Fix cables as necessary.
When using the optional accessory, follow the option’s assembly manual to fix cables.
Attaching the terminal cover / rear cover
Be careful not to nip the cables between the TV and the terminal cover / rear cover.
When using USB 2 port, USB 3 port, HDMI3 terminal or HDMI4 terminal, you cannot attach the terminal cover. Keep the removed terminal cover for future use.
When using AV IN terminal or DIGITAL AUDIO, you cannot attach the rear cover. Keep the removed rear cover for future use.
Do not apply load to the terminal cover / rear cover.
English 15
Identifying Controls
Remote Control
1[ ] Switches TV On or Off (Standby)
2 PICTURE Changes viewing mode.
3 [Main Menu] Access Picture, Sound, Network, Timer, Setup and Help Menus, etc.
4 Teletext button Switches to teletext mode.
5 Information Display channel and programme information.
6 NETFLIX Accesses NETFLIX service directly. A broadband network environment is required in order to fully use this function. This service may be stopped or changed without notice.
7 OK Confirms selections and choices.
8 [Option Menu]: Easy optional setting for viewing, sound, etc.
9 Coloured buttons (red-green-yellow-blue) 10 Volume Up / Down 11 Numeric buttons 12 [eHELP]
Built-in Operating Instructions 13 [MY APP]** 14 Input mode selection
TV – switches to Satellite TV / Digital TV / Analogue TV.
AV – switches to AV input mode from Input Selection list.
15 Audio Description 16 Subtitles 17 EXIT
Returns to the normal viewing screen. 18 HOME** 19 APPS** 20 Cursor buttons 21 RETURN
Returns to the previous menu / page. 22 Channel Up / Down 23 Sound Mute On / Off 24 Last view
Switches to previously viewed channel or input mode.
25 Operations for contents, connected equipment, etc.
26 TV Guide Displays Electronic Programme guide.
**For more details on Remote Control, refer to [eHELP] (Search by Purpose > Home)
Installing / Removing batteries
Hook
Pull open
Note the correct polarity (+ or -)
Close
16 English
Indicator / Control panel
When pressing 4, 5, 6 buttons, the control panel guide appears on the right side of the screen for 3 seconds to highlight which button has been pressed.
4
5
6
1 2, 3
7 Rear side of the TV
1 Power LED Red: Standby
Green: On Orange: Standby with some functions (recording,
etc.) active The LED blinks when the TV receives a command
from the remote control.
2 Ambient sensor Senses brightness to adjust picture quality when [Ambient Sensor] in the Picture Menu is set to [On].
3 Remote control signal receiver Do not place any objects between the TV remote control signal receiver and remote control.
4 Input mode selection Press repeatedly until you reach the desired mode.
[Main Menu] Press and hold for about 3 seconds to display main
menu.
OK (when in the menu system) 5 Channel Up / Down 6 Volume Up / Down 7 Mains power On / Off switch
Use to switch the mains power. To turn Off the apparatus completely, you must pull
the mains plug out of the mains socket. [ ]: Standby / On
English 17
First time Auto Tuning
When the TV is turned on for the first time, it will automatically search for available TV channels and give options to set up the TV. These steps are not necessary if the setup has been
completed by your local dealer. Please complete connections (p. 10 – 14) and
settings (if necessary) of the connected equipment before starting Auto Tuning. For information about the settings for the connected equipment, read the manual of the equipment.
1 Plug the TV into a live mains socket
and turn the power on
Takes a few seconds to be displayed.
2 Select the following items
Set up each item by following the on-screen instructions.
Example:
Please select your viewing environment.
Home
Shop
How to use the remote control
Set up the network connection
Tick the TV signal mode to tune, and then select [Start Auto Tuning]
If satellite TV is selected, select your preferred Satellite TV search mode
Select your region (Satellite)
Auto Tuning is now complete and the TV is ready for viewing.
If tuning has failed check the Satellite cable, RF cable, and the network connection, and then follow the onscreen instructions.
Note
The TV goes into Standby mode when no operation is performed for 4 hours if [Auto Standby] in the Timer Menu is set to [On].
The TV goes into Standby mode when no signal is received and no operation is performed for 10 minutes if [No signal Power off] in the Timer Menu is set to [On].
To retune all channels [Auto Tuning] in [Tuning Menu] (Setup Menu)
If no satellite channel is found, set [LNB Band Frequency] to suit your environment. [LNB Configuration] in [Satellite TV Tuning Menu] (Setup Menu)
To add the available TV signal mode later [Add TV Signal] in [Tuning Menu] (Setup Menu)
To initialise all settings [Shipping Condition] in [System Menu] (Setup Menu)
Move the cursor
Access the item / store the setting Return to the previous item (if available)
Select the language Select [Home] Select [Home] for use in a home viewing environment. [Shop] is for shop display. To change the viewing environment later on, the set
will need to have all settings initialised by accessing Shipping Condition.
OTT service advertisement screen
18 English
How to Use eHELP
[eHELP] is the detailed operating instructions built into the TV, and gives a more detailed explanation for a better understanding of the operation of each feature.
1 Display [eHELP]
or
[Help]
[eHELP]
If the [eHELP] has been accessed previously since the TV was turned on, the confirmation screen is displayed to select whether to go to the [First page] or to the [Last viewed page].
2 Select the menu
To scroll the description (if more than 1 page) While the description is highlighted
To open the reference screen (
)
To display the menu related to the description (only for some descriptions)
(red) To check the features of this TV
Search by Purpose > Read first > Features
select access To access [How to use] (green) [Keyword Search]: Search the content of eHELP in the keyword. [Search by Purpose]: Search the content of eHELP for each item. [Support]: Access the support information (FAQs, etc.).
3 Select the item
Example:
select access To return to the previous screen / field
English 19
FAQs
Before requesting service or assistance, please follow these simple guides to solve the problem. For details, refer to [eHELP] (Support > FAQs).
The TV does not switch on Check the mains lead is plugged into the TV and the
mains socket.
The TV goes into Standby mode Auto power standby function is activated.
The remote control does not work or is intermittent Are the batteries installed correctly? (p. 16) Has the TV been switched on? The batteries may be running low. Replace them with
new ones. Point the remote control directly at the TV’s remote
control signal receiver (within about 7 m and a 30 degree angle of the signal receiver). Situate the TV away from sunshine or other sources of bright light so they do not shine on the TV’s remote control signal receiver.
No image is displayed Check the TV is turned on. Check the mains lead is plugged into the TV and the
power socket. Check the correct input mode is selected. Check the setting of [AV] ([COMPONENT] / [VIDEO])
in [Input Selection] to match the signal being output by the external equipment. Is [Backlight], [Contrast], [Brightness] or [Colour] in the Picture Menu set to the minimum? Check all required cables and connections are firmly in place.
An unusual image is displayed This TV has a built-in Self Test. Makes a diagnosis of
picture or sound problems. [TV Self Test] (Help Menu)
Turn the TV off with Mains power On / Off switch, then turn it on again.
If the problem persists, initialise all settings. [Shipping Condition] in [System Menu] (Setup Menu)
The image or sound from external equipment are unusual when the equipment is connected via HDMI Set [HDMI Auto Setting] (Setup Menu) to [Mode1]
(p. 13)
No sound is produced from the connected HDMI equipment Set the audio output format of the connected HDMI
equipment to PCM.
Intermittent Wi-Fi Make sure the TV has a network connection with
stable Wi-Fi signal from the router and make sure the Wi-Fi password is entered correctly. For details, refer [eHELP] (Search by Purpose > Network > Network Connection > Network Menu)
When pushed with a finger, the display panel moves slightly and makes a noise There is a little gap around the panel to prevent
damage to the panel. This is not a malfunction.
Parts of the TV become hot Parts of the TV may become hot. These temperature
rises do not pose any problems in terms of performance or quality.
The child lock for broadcast. The child lock for broadcast password has been forgotten Enter new 4 digit PIN code and select [Change PIN
code] For details, refer [eHELP] (Search by Purpose >
Function > Child Lock)
Some programmes cannot be tuned Check the antenna (aerial) / cable connection
Control TV with equipment (Smartphone, etc.) For details, refer [eHELP] (Search by Purpose >
Network > Internet content > Information > Network Setting).
About the inquiry Please contact your local Panasonic dealer for
assistance. If you make an inquiry from a place where this TV is not present, we cannot answer about contents that require visual confirmation for connection, phenomenon, etc. of this TV itself.
20 English
Maintenance
First, remove the mains plug from the mains socket. Display panel, Cabinet, Pedestal
Regular care: Gently wipe the surface of the display panel, cabinet, or pedestal by using a soft cloth to remove dirt or fingerprints. For stubborn dirt: (1) First clean the dust from the surface. (2) Dampen a soft cloth with clean water or diluted neutral detergent (1 part detergent to 100 parts water). (3) Wring out the cloth firmly. (Please note, do not let liquid enter the TV inside as it may lead to product failure.) (4) Carefully wipe moisten and wipe away the stubborn dirt. (5) Finally, wipe away all the moisture.
Caution Do not use a hard cloth or rub the surface too hard, otherwise this may cause scratches on the surface. Take care not to subject the surfaces to insect repellent, solvent, thinner or other volatile substances. This may
degrade surface quality or cause peeling of the paint. The surface of the display panel is specially treated and may be easily damaged. Take care not to tap or scratch the
surface with your fingernail or other hard objects. Do not allow the cabinet and pedestal to make contact with a rubber or PVC substance for a long time. This may
degrade surface quality.
Mains plug
Wipe the mains plug with a dry cloth at regular intervals. Moisture and dust may cause fire or electrical shock.
English 21
Specifications
Specification
TH-49HX900Z
Dimensions (W x H x D)
1 095 mm × 690 mm × 197 mm (With Pedestal) 1 095 mm × 638 mm × 44 mm (TV only)
Mass
16.0 Net (With Pedestal) 15.5 Net (TV only)
Power Rating AC 220-240 V, 50 / 60 Hz 0.85 A
Normal (Home) mode
77 W
Standby power consumption
0.50 W
Visible screen size (diagonal)
123 cm
Display resolution 3 840 (W) × 2 160 (H)
Panel
LED backlight Liquid Crystal Display
Sound
Speaker output 20 W (10 W + 10 W)
Headphones / Subwoofer 3.5 mm stereo mini jack × 1
AV IN (COMPONENT / VIDEO)
VIDEO Pin jack × 1 1.0 V[p-p] (75 )
AUDIO L – R Pin jack × 2
0.5 V[rms]
Y 1.0 V[p-p]
(including synchronisation)
PB/CB, PR/CR ±0.35 V[p-p]
Connection terminals
HDMI1 / 2 / 3 / 4 input
TYPE A Connectors
HDMI1 / 3 / 4:
HDMI2:
4K, Content Type, Deep Colour, x.v.ColourTM 4K, Content Type, Audio Return Channel, Deep Colour, x.v.ColourTM
This TV supports “HDAVI Control 5” function.
ETHERNET 10BASE-T / 100BASE-TX
USB 1 / 2 / 3
USB 1: DC 5 V, Max. 900 mA [SuperSpeed USB (USB 3.0)]
USB 2 / 3: DC 5 V, Max. 500 mA [Hi-Speed USB (USB 2.0)]
DIGITAL AUDIO OUT PCM / Dolby Digital, Fibre optic
Receiving systems / Band name
Satellite TV Digital satellite services Receiver frequency range – 950 MHz to 2150 MHz DiSEqC – Version 1.0
PAL B / G Reception of Off air broadcast
Digital TV 8 MHz VHF / UHF (New Zealand) free-to-air TV broadcast reception
PAL 60 Hz Playback of NTSC tape from some PAL Video recorders (VCR)
M.NTSC Playback from M.NTSC Video recorders (VCR)
NTSC Playback from NTSC Video recorders (VCR)
Satellite dish input Female F-type 75 × 1
Aerial input
Standard Belling & Lee connector
VHF / UHF
Operating conditions
Temperature 0 °C – 35 °C
Humidity 20 % – 80 % RH (non-condensing)
Built-in wireless LAN
Standard compliance and Frequency range*1 IEEE802.11a/n/ac 5.15 GHz – 5.35 GHz, 5.47 GHz – 5.85 GHz
IEEE802.11b/g/n 2.400 GHz – 2.4835 GHz
Security WPA2-PSK (TKIP/AES) WPA-PSK (TKIP/AES) WEP (64 bit/128 bit)
Bluetooth wireless Standard Compliance technology*2 Bluetooth 4.2
Frequency Range 2.402 GHz – 2.480 GHz
*1: The frequency and channel differ depending on the country. *2: Not all the Bluetooth compatible devices are available with this TV. Up to 5 devices can be used simultaneously
(except bundled remote control).
Note Design and Specifications are subject to change without notice. Mass and Dimensions shown are approximate.
For information about the open source software, refer to [eHELP] (Search by Purpose > Read first > Before use > Licence).
22 English
WARRANTY – New Zealand only
NEW ZEALAND
Distributed in New Zealand by Panasonic New Zealand Limited 18 Sir Woolf Fisher Drive, Highbrook, East Tamaki, Private Bag 14911, Panmure, Auckland
Tel. 09 272 0100
Customer Care Center Email: [email protected]
www.panasonic.co.nz
Customer’s Record
The model number of this product may be found on the model name plate on the rear panel (when the terminal cover is removed.). The serial number may be found on the model name plate or the serial number label located on side or bottom of the rear panel. You should note this serial number in the space provided below and retain this book, plus your purchase receipt, as a permanent record of your purchase to aid in identification in the event of theft or loss, and for Warranty Service purposes.
Model Number
Serial Number
Web Site: http://www.panasonic.com
© Panasonic Corporation 2020
English
Printed in Malaysia 04-2020

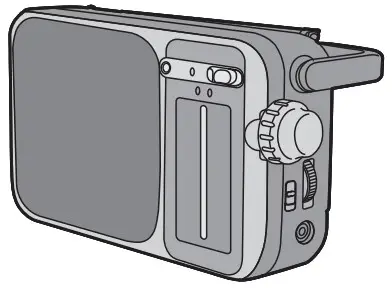
FM-AM 2-BAND RECEIVER
RF-2400D
Owner’s Manual
Thank you for purchasing this product.
For optimum performance and safety, please read these instructions carefully.
Please keep this manual for future reference.
If you have any questions, visit
http://shop.panasonic.com/support
Register online at http://shop.panasonic.com/support
Panasonic Corporation of North America Two Riverfront Plaza, Newark, NJ 07102-5490
http://shop.panasonic.com/
© Panasonic Corporation 2017 Printed in Indonesia
TQBM0271-1
L1217CH1028
| The model number and a serial number of this product can be found on either the back or the bottom of the unit. Please note them in the space provided below and keep them for future reference.
MODEL NUMBER______________ RF-2400D __________ SERIAL NUMBER________________________ |
User memo:
| DATE OF PURCHASE_______________ DEALER NAME___________________ DEALER ADDRESS_________________ TELEPHONE NUMBER______________ |
CAUTION: TO REDUCE THE RISK OF ELECTRIC SHOCK, DO NOT REMOVE SCREWS.
NO USER-SERVICEABLE PARTS INSIDE.
REFER SERVICING TO QUALIFIED SERVICE PERSONNEL.
 The lightning flash with the arrowhead symbol, within an equilateral triangle, is intended to alert the user to the presence of uninsulated “dangerous voltage” within the product’s enclosure that may be of sufficient magnitude to constitute a risk of electric shock to persons.
 The exclamation point within an equilateral triangle is intended to alert the user to the presence of important operating and maintenance (servicing) instructions in the literature accompanying the appliance.
Conforms to UL STD 60065.
IMPORTANT SAFETY INSTRUCTIONS
Read these operating instructions carefully before using the unit. Follow the safety instructions on the unit and the applicable safety instructions listed below. Keep these operating instructions handy for future reference.
- Read these instructions.
- Keep these instructions.
- Heed all warnings.
- Follow all instructions.
- Do not use this apparatus near water.
- Clean only with a dry cloth.
- Do not block any ventilation openings. Install in accordance with the manufacturer’s instructions.
- Do not install near any heat sources such as radiators, heat registers, stoves, or other apparatus (including amplifiers) that produce heat.
- Do not defeat the safety purpose of the polarized or grounding-type plug. A polarized plug has two blades with one wider than the other. A grounding-type plug has two blades and a third grounding prong. The wide blade or the third prong are provided for your safety. If the provided plug does not fit into your outlet, consult an electrician for the replacement of the obsolete outlet.
- Protect the power cord from being walked on or pinched particularly at plugs, convenience receptacles, and the point where they exit from the apparatus.
- Only use attachments/accessories specified by the manufacturer.
- Use only with the cart, stand, tripod, bracket, or table specified by the manufacturer, or sold with the apparatus. When a cart is used, use caution when moving the cart/apparatus combination to avoid injury from tip-over.
- Unplug this apparatus during lightning storms or when unused for long periods of time.

- Refer all servicing to qualified service personnel. Servicing is required when the apparatus has been damaged in any way, such as power-supply cord or plug is damaged, liquid has been spilled or objects have fallen into the apparatus, the apparatus has been exposed to rain or moisture, does not operate normally, or has been dropped.
Safety precautions
 WARNING!
- To reduce the risk of fire, electric shock, or product damage,
– Do not expose this unit to rain, moisture, dripping, or splashing.
– Do not place objects filled with liquids, such as vases, on this unit.
– Use the recommended accessories.
– Do not remove covers.
– Do not repair this unit by yourself. Refer servicing to qualified service personnel. - The power plug is the disconnecting device. Install this unit so that the power plug
can be unplugged from the socket-outlet immediately.
CAUTION!
- Remove the batteries if the unit is not to be used for a long time.
- Insert so the poles (+ and –) match those in the unit.
- Do not mix old and new batteries.
- Do not use different types of batteries at the same time.
- Do not break open or short-circuit the battery.
- Do not charge the alkaline or manganese battery.
- Do not use the battery if the cover has peeled off.
- Do not heat or expose to flame.
- Do not leave the battery(ies) in a car exposed to direct sunlight for a long period of time with doors and windows closed.
- The danger of explosion if the battery is incorrectly replaced. Replace only with the type recommended by the manufacturer.
- When disposing of the batteries, please contact your local authorities or dealer and ask for the correct method of disposal.
Small objects
- The knobs (e.g., [TUNING] knob) can come off when pulled hard. To prevent children from swallowing the knob, do not pull it off.
| FCC Note: This device complies with Part 15 of the FCC Rules. Operation is subject to the following two conditions: (1) This device may not cause harmful interference, and (2) This device must accept any interference received, including interference that may cause undesired operation. |
Supplied accessories
Check and identify the supplied accessories.
Use numbers indicated in parentheses when asking for replacement parts. (Product numbers correct as of Dec 2017. This may be subject to change.)
To order accessories, call the dealer from whom you have made your purchase.
1 AC power supply cord
(K2CB2CB00021)
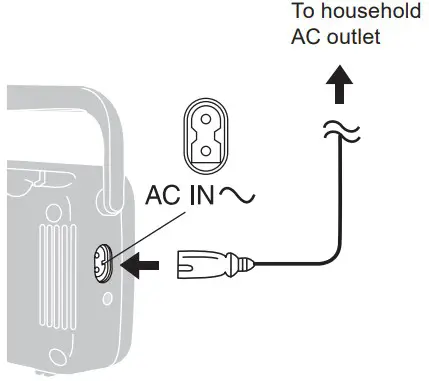
Power Supply
- Connecting AC power supply cord
The included AC power supply cord is for use with this unit only. Do not use it with other equipment.
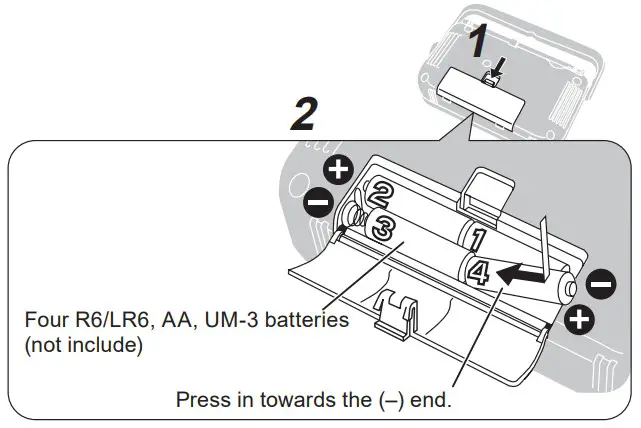
- Using dry cell batteries (not included)
Unplug the AC power supply cord from the household AC outlet and the AC IN socket on the unit.
- Open the battery lid.
- Insert batteries in the designated order.
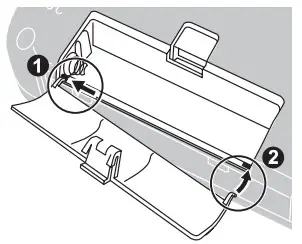
- If the battery lid comes loose
Insert the protrusions on the lid into the cutouts on both sides of the compartment.
Listening to the Radio

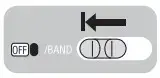
- To turn the radio off
Set [OFF/BAND] to OFF.
The OFF indicator turns orange.
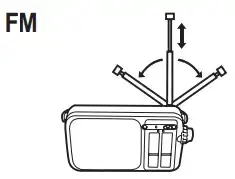
- To adjust the antennas
Pull out the telescopic antenna and adjust its length and angle for optimum reception.
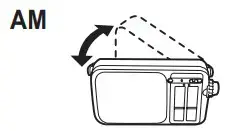
The unit has a built-in ferrite antenna, so try various directions for optimum reception.
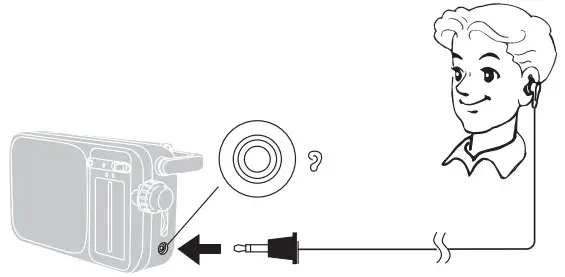
- Using an earphone (not included) Sound is not heard from the speaker.
Plug type: 3.5 mm (⅛″), monaural
Specifications
Frequency range
FM 87 – 108 MHz
AM 520 – 1710 kHz
Output jack Earphone, Ø 3.5 mm (⅛”), 8 Ω
Speaker 10 cm (4″), 4 Ω (Full range)
Power requirement
AC 120 V, 60 Hz
Battery 6 V (Four R6/LR6, AA, UM-3 batteries)
Power consumption 3 W
Dimension (WxHxD) 234 x 122 x 82 mm
(9¼″ x 4¾″ x 3¼″)
Mass 690 g (1 lb. 8.3 oz.) (without batteries)
Battery life:
| Alkaline (LR6) | Manganese (R6) | |
| FM | Approx. 52 H | Approx. 21 H |
| AM | Approx. 55 H | Approx. 20 H |
Power consumption in standby mode: 0.4 W
Note:
Specifications are subject to change without notice. Mass and dimensions are approximate.
Maintenance
To clean this unit, use a soft, dry cloth.
If the surfaces are extremely dirty, use a soft cloth dipped in a soap-andwater solution or a weak detergent solution.
- Never use alcohol, paint thinner or benzine to clean this unit.
- Before using chemically treated cloth, read the instructions that came with the cloth carefully.
Limited Warranty (ONLY FOR U.S.A.)
Panasonic Products Limited Warranty
Limited Warranty Coverage (For USA Only)
If your product does not work properly because of a defect in materials or workmanship, Panasonic Corporation of North America (referred to as “the warrantor”) will, for the length of the period indicated on the chart below, which starts with the date of original purchase (“warranty period”), at its option either (a) repair your product with new or refurbished parts, (b) replace it with a new or a refurbished equivalent value product, or (c) refund your purchase price. The decision to repair, replace or refund will be made by the warrantor.
| Product or Part Name | Parts | Labor |
| Audio Products (except items listed below) | One (1) year | One (1) year |
| All included Accessories (Except Non-Rechargeable
Batteries) |
90 Days | Not Applicable |
| Only Non-Rechargeable Batteries | 10 Days | Not Applicable |
During the “Labor” warranty period there will be no charge for labor. During the “Parts” warranty period, there will be no charge for parts. This Limited Warranty excludes both parts and labor for non-rechargeable batteries, antennas, and cosmetic parts (cabinet). This warranty only applies to products purchased and serviced in the United States. This warranty is extended only to the original purchaser of a new product that was not sold “as is”.
Mail-In Service — Online Repair Request
Online Repair Request
To submit a new repair request and for a quick repair, status visit our Web Site at http://shop.panasonic.com/support
When shipping the unit, carefully pack, include all supplied accessories listed in the Owner’s Manual, and send it prepaid, adequately insured, and packed well in a carton box. When shipping Lithium Ion batteries please visit our Web Site at http://shop.panasonic.com/support as Panasonic is committed to providing the most up-to-date information. Include a letter detailing the complaint, a return address, and provide a daytime phone number where you can be reached. A valid registered receipt is required under the Limited Warranty.
IF REPAIR IS NEEDED DURING THE WARRANTY PERIOD, THE PURCHASER WILL BE REQUIRED TO FURNISH A SALES RECEIPT/PROOF OF PURCHASE INDICATING DATE OF PURCHASE, AMOUNT PAID, AND PLACE OF PURCHASE. THE CUSTOMER WILL BE CHARGED FOR THE REPAIR OF ANY UNIT RECEIVED WITHOUT SUCH PROOF OF PURCHASE.
Limited Warranty Limits and Exclusions
This warranty ONLY COVERS failures due to defects in materials or workmanship and DOES NOT COVER normal wear and tear or cosmetic damage. The warranty ALSO DOES NOT COVER damages that occurred in shipment or failures which are caused by products not supplied by the warrantor, or failures which result from accidents, misuse, abuse, neglect, mishandling, misapplication, alteration, faulty installation, setup
adjustments, misadjustment of consumer controls, improper maintenance, power line surge, lightning damage, modification, the introduction of sand, humidity or liquids, commercial use such as hotel, office, restaurant, or other business or rental use of the product, or service by anyone other than a Factory Service Center or other Authorized Servicer, or damage that is attributable tracts of God.
THERE ARE NO EXPRESS WARRANTIES EXCEPT AS LISTED UNDER “LIMITED WARRANTY COVERAGE”.THE WARRANTOR IS NOT LIABLE FOR INCIDENTAL OR CONSEQUENTIAL DAMAGES RESULTING FROM THE USE F THIS PRODUCT, OR ARISING OUT OF ANY BREACH OF THIS WARRANTY.
(As examples, this excludes damages for lost time, travel to and from the servicer, loss of or damage to media or images, data, or other memory or recorded content. The items listed are not exclusive, but for illustration only.)
ALL EXPRESS AND IMPLIED WARRANTIES, INCLUDING THE WARRANTY OF MERCHANTABILITY, ARE LIMITED TO THE PERIOD OF THE LIMITED WARRANTY.
Some states do not allow the exclusion or limitation of incidental or consequential damages, or limitations on how long an implied warranty lasts, so the exclusions may not apply to you.
This warranty gives you specific legal rights and you may also have other rights which vary from state to state. If a problem with this product develops during or after the warranty period, you may contact your dealer or Service Center. If the problem is not handled to your satisfaction, then write to
Consumer Affairs Department
Panasonic Corporation of North America
661 Independence Pkwy
Chesapeake, VA 23320
PARTS AND SERVICES, WHICH ARE NOT COVERED BY THIS LIMITED WARRANTY, ARE YOUR RESPONSIBILITY.
| Shop Accessories! for all your Panasonic gear Go to http://shop.panasonic.com/support Get everything you need to get the most out of your Panasonic products Accessories & Parts for your Camera, Phone, A/V products, TV, Computers & Networking, Personal Care, Home Appliances, Headphones, Batteries, Backup Chargers & more… Customer Services Directory For Product Information, Operating Assistance, Parts, Owner’s Manuals, Dealer and Service info go to http://shop.panasonic.com/support For the hearing or speech impaired TTY: 1-877-833-8855 |
As of December 2017
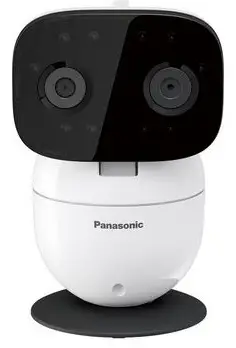
]]>Panasonic Baby Monitor Additional camera
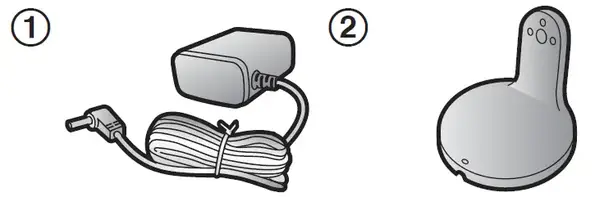
Accessory information
Supplied accessories
| No. | Accessory item/Part number | Qty. |
| A | AC adaptor*1 | 1 |
| B | Wall mounting adaptor*2 | 1 |
For U.S.A. users:
- PNWYAC300W00 (for U.S.A. users only)
- PNWYAC300W01 (for U.S.A. users only)
Other information
- Design and specifications are subject to change without notice.
- The illustrations in these instructions may vary slightly from the actual product.
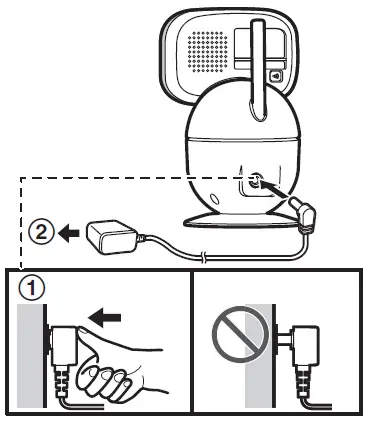
Installation
Connections
- Insert the AC adaptor plug firmly into the DC jack.
- Connect the AC adaptor to the power outlet.
Note:
- Use only the supplied AC adaptor S006AKU0500100.
- The camera unit can be placed on a flat surface. Make sure to choose a stable location.
- The camera can also be mounted on the wall (page 10).
Note about power connections
AC adaptor connection
- The AC adaptor must remain connected at all times. (It is normal for the adaptor to feel warm during use.)
- The AC adaptor should be connected to a vertically oriented or floor-mounted AC outlet. Do not connect the AC adaptor to a ceiling-mounted AC outlet, as the weight of the adaptor may cause it to become disconnected.
Registering a camera unit
You must register the camera unit to your monitor unit before it can be used.
- Monitor unit:
MMENUN a MbN: “Camera Management” a MOKN a MbN: “Add Camera” a MOKN- An operation guide is displayed. Press MOKN to continue.
- Complete the following step within 90 seconds.
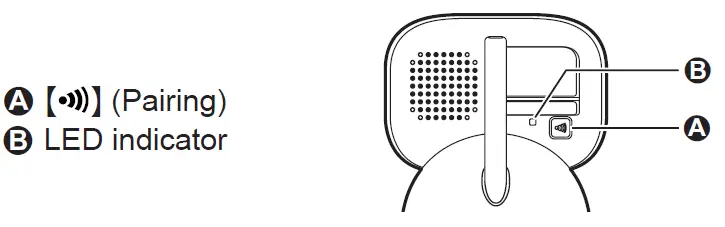
- Camera unit:
Press and hold M N for 3 seconds until the LED indicator starts blinking.
Note:
A message is displayed on the monitor unit to show if the registration was successful or not, and a beep sounds.
LED indicator
You can use the LED indicator to confirm the camera unit’s status.
| LED indicator | Status |
| Off | No power |
| Green, lit | Normal operation |
| Green, blinking slowly | Registration mode |
| Green, blinking quickly | Device malfunction |
Graphical symbols for use on equipment and their descriptions
About this system
- This system is not designed to provide complete protection from property loss.
To the maximum extent permitted by applicable law, Panasonic will not be held responsible for any damage incurred as a result of property loss. - This product should not be used as substitute for a medical or caregiver’s supervision. It is the caregiver’s responsibility to stay close enough to handle any eventuality.
- The system’s wireless features are subject to interference, therefore functionality in all situations cannot be guaranteed.
Panasonic will not be held responsible for injury or damage to property that occurs in the event of wireless communication error or failure. - If a power failure occurs or the power is disconnected, the temperature will not be accurate for up to an hour.
For your safety
To prevent severe injury and loss of life/property, read this section carefully before using the product to ensure proper and safe operation of your product.
Power connection
WARNING
- Completely insert the AC adaptor/power plug into the power outlet.
Failure to do so may cause electric shock and/or excessive heat resulting in a fire. - Regularly remove any dust, etc. from the AC adaptor/power plug by pulling it from the power outlet, then wiping with a dry cloth. Accumulated dust may cause an insulation defect from moisture, etc. resulting in a fire.
- Unplug the product from power outlets if it emits smoke, an abnormal smell, or makes an unusual noise. These conditions can cause fire or electric shock. Confirm that smoke has stopped emitting and contact us.
For U.S.A. users
http://shop.panasonic.com/support
For Canada users
www.panasonic.ca/english/support
www.panasonic.ca/french/support - Unplug from power outlets and never touch the inside of the product if its casing has been broken open. Danger of electric shock exists.
- Never touch the plug with wet hands. Danger of electric shock exists.
Installation
- To prevent the risk of fire or electrical shock, do not expose the product to rain or any type of moisture.
- Do not place or use this product near automatically controlled devices such as automatic doors and fire alarms. Radio waves emitted from this product may cause such devices to malfunction resulting in an accident.
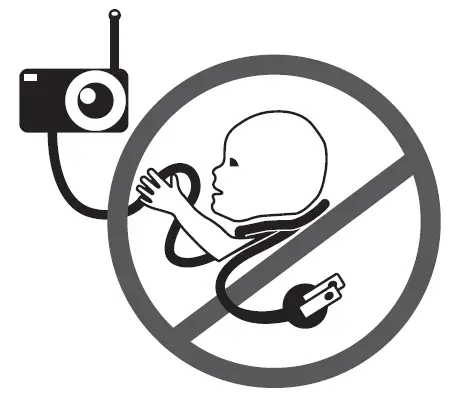
- WARNING:
Strangulation Hazard: Children have STRANGLED in cords.
Keep this cord out of the reach of children (more than 1 m (3 feet) away).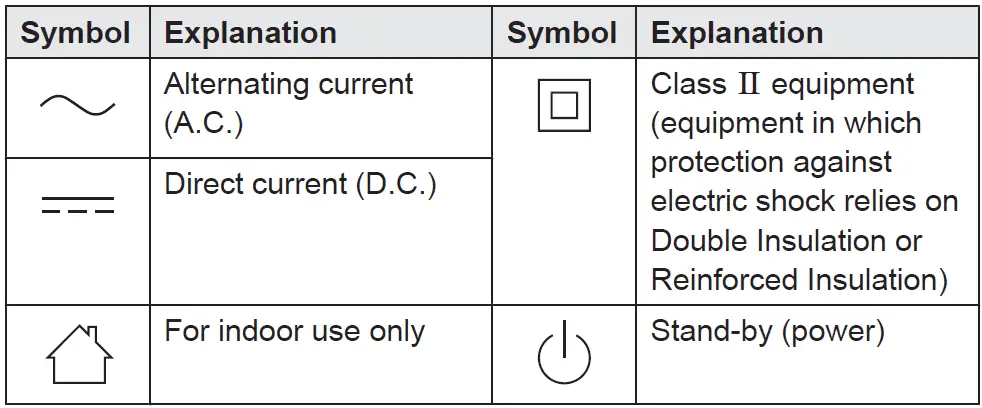
- Do not allow the AC adaptor to be excessively pulled, bent or placed under heavy objects.
- Keep small parts, such as screws, out of the reach of children. There is a risk of swallowing. In the event they are swallowed, seek medical advice immediately.
Operating safeguards
- Unplug the product from power outlets before cleaning. Do not use liquid or aerosol cleaners.
- Do not disassemble the product.
- Never put metal objects inside the product. If metal objects enter the product, turn off the circuit breaker and contact an authorized service center.
Medical
- Consult the manufacturer of any personal medical devices, such as pacemakers or hearing aids, to determine if they are adequately shielded from external RF (radio frequency) energy. DECT features operate between 1.92 GHz and 1.93 GHz with a peak transmission power of 115 mW (max.).
- Do not use the product in health care facilities if any regulations posted in the area instruct you not to do so. Hospitals or health care facilities may be using equipment that could be sensitive to external RF energy.
Installation and location
- Never install wiring during a lightning storm.
- The AC adaptor is used as the main disconnect device. Ensure that the AC outlet is installed near the product and is easily accessible.
- Mount the product on the stable location where the camera unit can be adequately supported when installing.
- Do not mount the product on soft material. It may fall down, break or cause injury.
- Do not mount the product on the following materials: gypsum board, ALC (autoclaved lightweight cellular concrete), concrete block, plywood less than 25 mm (1 inch) thick, etc.
Preventing accidents and injuries
Do not put your ear(s) near the speaker, as loud sounds emitted from the speaker may cause hearing impairment.
Important safety instructions
When using your product, basic safety precautions should always be followed to reduce the risk of fire, electric shock, and injury to persons, including the following:
- Do not use this product near water for example, near a bathtub, washbowl, kitchen sink, or laundry tub, in a wet basement or near a swimming pool.
- Use only the power cord indicated in this manual.
Other information
Routine care
- Wipe the outer surface of the product with a soft moist cloth.
- Do not use benzine, thinner, or any abrasive powder.
Camera image quality
- Camera images may have the following characteristics.
- Colors in images may differ from the actual colors.
- Faces or objects may appear dark when there is light behind the subject (i.e., backlighting).
- Image quality may be reduced in dark locations.
When the subject is lit by sunlight or halogen lights, black areas of the image may appear purplish. This is not a malfunction.
Wall mounting
- Attach the wall mounting adaptor to the camera unit after making the connections (page 3).
- Only use the supplied screw that is attached to the camera base when attaching the wall mounting adaptor to the camera unit. Do not use user supplied screws. This may cause the camera unit to become loose from the wall mounting adaptor.
- Mount the camera unit on the stable location where the unit can be adequately supported when installing.
- Use a string or wire to prevent the camera unit from falling and causing injury if the camera unit comes off from the wall.
- Do not mount the wall mounting adaptor to a ceiling.
- Do not mount the camera unit on a soft material. It may fall down, break or cause injury.
- Do not mount the camera unit on the following places: plaster board, ALC (autoclaved lightweight cellular concrete), concrete block, plywood less than 25 mm (1 inch) thick, etc.
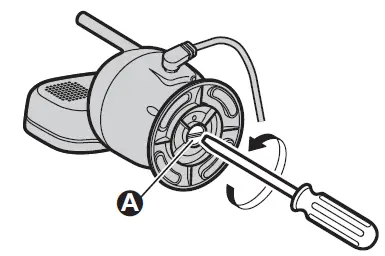
- Remove the screw and then remove the camera base from the camera unit.
 A. Supplied screw
 - Attach the wall mounting adaptor to the camera unit.
- Drive the supplied screw into the camera unit.
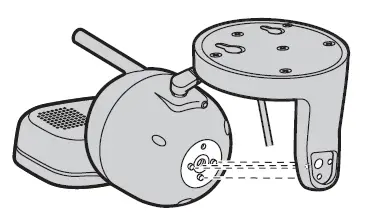 A. Supplied screw
 - Drive the screws (not supplied) into the wall.
B. Longer than 20 mm (25/32 inches)
C. Space 1.3 mm (1/32 inches)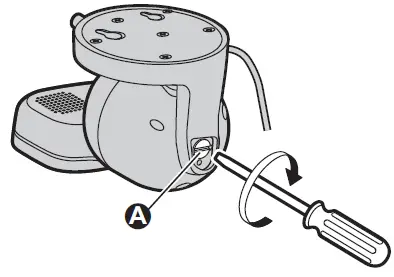 Note: Use the following template when determining the location of the screw holes.
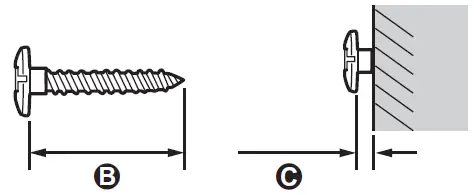
- Mount the camera unit to the wall.
D. Screws
E. 31 mm (1 7/32 inches)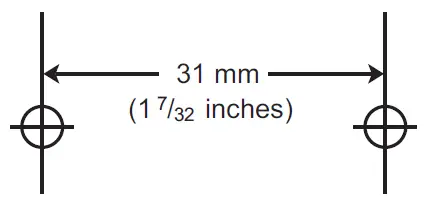
- Adjust the angle of the camera unit by using MFN, MEN, MDN, or MCN on the monitor unit.
Specifications
- Standards
DECT (Digital Enhanced
Cordless Telecommunications) - Frequency range
DECT: 1.92 GHz – 1.93 GHz - RF transmission power
DECT: 115 mW (max.) - Power source
Input: 100 – 240 V AC,
50/60 Hz
Output: 5.0 V DC, 1,000 mA - Power consumption
Normal operation: 2.8 W
Night vision mode: 4.2 W
Sleep mode: 2.1 W - Operating conditions
0 °C – 40 °C (32 °F – 104 °F) up to 90 % relative humidity (non-condensing) - Transmitting range
Up to 457.5 m (1,500 feet)*1 - Image sensor
0.3 megapixel CMOS - Minimum illuminance required
0 lx*2 - Focal length
Fixed (0.4 m (1.3 feet) – infinity) - Angular field of view (camera angle)
Horizontal: approx. 37°
Vertical: approx. 28° - Motion detection method
Visual sensor - Detection range
Motion sensor:
Horizontal: approx. 37°
Vertical: approx. 28° - Adjustable mounting angles
Horizontal: ±136°
Vertical: facing forward – facing
down approx. +0° to -44°
(movable range with the pan/tilt) - Dimensions (height ´ width ´ depth)
Approx. 123 mm ´ 77 mm ´
69 mm (4 13/16 inches ´
3 1/16 inches ´ 2 11/16 inches) - Mass (weight)
Approx. 224 g (0.49 lb)
1. When used in the direction of maximum radiation, in the line of sight, and with no interference.
2. The infrared LEDs that surround the camera lens will illuminate in low-light conditions.
FCC and other information (for U.S.A. users)
This device complies with Part 15 of the FCC Rules. Operation is subject to the following two conditions:
(1) This device may not cause harmful interference, and (2) this device must accept any interference received, including interference that may cause undesired operation.
Privacy of communications may not be ensured when using this device.
CAUTION:
Any changes or modifications not expressly approved by the party responsible for compliance could void the user’s authority to operate this device.
NOTE:
This equipment has been tested and found to comply with the limits for a Class B digital device, pursuant to Part 15 of the FCC Rules. These limits are designed to provide reasonable protection against harmful interference in a residential installation. This equipment generates, uses, and can radiate radio frequency energy and, if not installed and used in accordance with the instructions, may cause harmful interference to radio communications. However, there is no guarantee that interference will not occur in a particular installation. If this equipment does cause harmful interference to radio or television reception, which can be determined by turning the equipment off and on, the user is encouraged to try to correct the interference by one or more of the following measures:
- Reorient or relocate the receiving antenna.
- Increase the separation between the equipment and receiver.
- Connect the equipment into an outlet on a circuit different from that to which the receiver is connected.
- Consult the dealer or an experienced radio/TV technician for help.
Some devices operate at frequencies that may cause interference to nearby TVs and VCRs. To minimize or prevent such interference, this device should not be placed near or on top of a TV or VCR. If interference is experienced, move this device further away from the TV or VCR. This will often reduce or eliminate interference.
FCC RF Exposure Warning:
- This product complies with FCC radiation exposure limits set forth for an uncontrolled environment.
- To comply with FCC RF exposure requirements, the device must be installed and operated 20 cm (8 inches) or more between the product and all person’s body.
- This product may not be collocated or operated in conjunction with any other antenna or transmitter.
Notice:
FCC ID can be found on the rear of the unit.
Limited Warranty (ONLY FOR U.S.A.)
Limited Warranty Coverage (For USA Only)
If your product does not work properly because of a defect in materials or workmanship, Panasonic Corporation of North America (referred to as “the warrantor”) will, for the length of the period indicated on the chart below, which starts with the date of original purchase (“warranty period”), at its option either (a) repair your product with new or refurbished parts, (b) replace it with a new or a refurbished equivalent value product, or (c) refund your purchase price. The decision to repair, replace or refund will be made by the warrantor.
| Product or Part Name | Parts | Labor |
| Home Network System Products | One (1) Year | One (1) Year |
| microSD card (Included model only) | 90 days | N/A |
During the “Labor” warranty period there will be no charge for labor. During the “Parts” warranty period, there will be no charge for parts. This Limited Warranty excludes both parts and labor for non-rechargeable batteries, antennas, and cosmetic parts (cabinet).
This warranty only applies to products purchased and serviced in the United States.
This warranty is extended only to the original purchaser of a new product which was not sold “as is”.
![]()
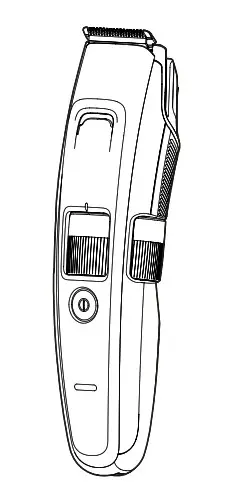
Operating Instructions
(Household) AC/Rechargeable Beard Trimmer
Model No. ER-GB96
 Thank you for purchasing this Panasonic product.
Before operating this unit, please read these instructions completely and save them for future use.
Safety precautions
To reduce the risk of injury, loss of life, electric shock, fire, and damage to property, always observe the following safety precautions.
Explanation of symbols
The following symbols are used to classify and describe the level of hazard, injury, and property damage caused when the denotation is disregarded and improper use is performed.
 DANGER DANGER |
Denotes a potential hazard that will result in serious injury or death. |
| WARNING |
Denotes a potential hazard that could result in serious injury or death. |
| CAUTION |
Denotes a hazard that could result in minor injury or property damage. |
| The following symbols are used to classify and describe the types of instructions to be observed. | |
| This symbol is used to alert users to a specific operating procedure that must not be performed. | |
 This symbol is used to alert users to a specific operating procedure that must be followed in order to operate the unit safely. This symbol is used to alert users to a specific operating procedure that must be followed in order to operate the unit safely. |
This symbol is used to alert users to a specific operating procedure that must be followed in order to operate the unit safely. |
WARNING
This product
![]() This product has a built-in rechargeable battery.
This product has a built-in rechargeable battery.
Do not throw into flame or heat.
– Doing so may cause fluid leak, overheating, or explosion.
![]() Do not modify or repair.
Do not modify or repair.
– Doing so may cause fire, electric shock, or injury.
Contact an authorized service centre for repair (battery change, etc.).
![]() Never disassemble except when disposing of the product.
Never disassemble except when disposing of the product.
– Doing so may cause fire, electric shock, or injury.
In case of an abnormality or malfunction
Immediately stop using and remove the adaptor if there is an abnormality or malfunction.
– Failure to do so may cause fire, electric shock, or injury.
<Abnormality or malfunction cases>
The main unit or AC adaptor is deformed or abnormally hot.
The main unit or AC adaptor smells of burning.
There is an abnormal sound during the use or charging of the main unit or AC adaptor.
Immediately request inspection or repair at an authorized service center.
Power supply
![]() Do not connect or disconnect the adaptor to a household outlet with a wet hand.
Do not connect or disconnect the adaptor to a household outlet with a wet hand.
– Doing so may cause electric shock or injury.
 WARNING
Do not immerse the AC adaptor in water or wash it with water.
Do not clean with water when the AC adaptor is attached.
Do not place the AC adaptor over or near a water-filled sink or bathtub.
![]() Never use the appliance if the AC adaptor is damaged or if the power plug fits loosely in a household outlet.
Never use the appliance if the AC adaptor is damaged or if the power plug fits loosely in a household outlet.
Do not damage or modify, or forcefully bend, pull, or twist the cord.
Also, do not place anything heavy on or pinch the cord.
– Doing so may cause electric shock or fire due to a short circuit.
![]() Do not use in a way exceeding the rating of the household outlet or the wiring.
Do not use in a way exceeding the rating of the household outlet or the wiring.
– Exceeding the rating by connecting too many plugs to one household outlet may cause fire due to overheating.
Do not use anything other than the supplied AC adaptor for this product.
Also, do not use any other product with the supplied AC adaptor. (See page 8.)
– Doing so may cause burns or fire due to a short circuit.
Always ensure the appliance is operated on an electric power source matched to the rated voltage indicated on the AC adaptor.
Fully insert the adaptor.
– Failure to do so may cause fire or electric shock.
Always unplug the adaptor from the household outlet when cleaning.
– Failure to do so may cause electric shock or injury.
Regularly clean the power plug and the appliance plug to prevent dust from accumulating.
– Failure to do so may cause fire due to insulation failure caused by humidity.
Disconnect the adaptor and wipe with a dry cloth.
Preventing accidents
![]() Do not store within the reach of children or infants.
Do not store within the reach of children or infants.
Do not let them use it.
– Putting the blade, the cleaning brush, and/or oil container in the mouth may cause accidents or injury.
If the oil is consumed accidentally, do not induce vomiting. Please drink a large amount of water, and contact a physician.
If the oil comes into contact with eyes, immediately wash thoroughly with running water, and contact a physician.
– Failure to do so may result in physical problems.
This appliance is not intended for use by persons (including children) with reduced physical, sensory or mental capabilities, or lack of experience and knowledge unless they have been given supervision or instruction concerning use of the appliance by a person responsible for their safety.
Children should be supervised to ensure that they do not play with the appliance.
– Failure to do so may cause an accident or injury.
WARNING
The supply cord cannot be replaced. If the cord is damaged, the AC adaptor should be scrapped.
– Failure to do so may cause an accident or injury.
CAUTION
♦Protecting the skin
![]() Do not press the blade strongly against your skin or lips.
Do not press the blade strongly against your skin or lips.
Do not use this product for any purpose other than trimming your beard.
Do not directly apply the blades on ears or rough skin (such as swellings, injuries, and blemishes).
– Doing so may cause injury to ears or uneven skin.
Check that the blades are not damaged or deformed before use.
– Failure to do so may cause skin injury.
♦Note the following precautions
![]() Do not allow metal objects or trash to adhere to the power plug or the appliance plug.
Do not allow metal objects or trash to adhere to the power plug or the appliance plug.
– Doing so may cause electric shock or fire due to a short circuit.
![]() Do not drop it or expose it to shock.
Do not drop it or expose it to shock.
– Doing so may cause injury.
![]() Do not wrap the cord around the adaptor when storing.
Do not wrap the cord around the adaptor when storing.
– Doing so may cause the wire in the cord to break with the load, and may cause fire due to a short circuit.
Disconnect the adaptor from the household outlet when not using it.
– Failure to do so may cause electric shock or fire due to electrical leakage resulting from insulation deterioration.
Disconnect the adaptor or the appliance plug by holding onto the adaptor or the appliance plug instead of the cord.
– Failure to do so may cause electric shock or injury.
► Handling of the removed battery when disposing
DANGER
- The rechargeable battery is exclusively for use with this appliance. Do not use the battery with other products.
- Do not charge the battery after it has been removed from the product.
- Do not throw into fire or apply heat.
- Do not solder, disassemble, or modify the battery.
- Do not let the positive and negative terminals of the battery get in contact with each other through metallic objects.
- Do not carry or store the battery together with metallic jewelry such as necklaces and hairpins.
- Never peel off the tube.
– Doing so may cause a fluid leak, overheating, or explosion.
DANGER
The battery contains alkaline fluid. If it comes in contact with the eyes, do not rub the eyes, and thoroughly rinse with clean water, such as tap water.
– Failure to do so may cause loss of vision. Consult a physician immediately.
WARNING
![]() After removing the rechargeable battery, do not keep it within reach of children and infants.
After removing the rechargeable battery, do not keep it within reach of children and infants.
– The battery will harm the body if accidentally swallowed.
If this happens, consult a physician immediately.
The battery contains alkaline fluid. If it comes in contact with the skin or clothes, rinse off with clean water, such as tap water.
– Failure to do so may cause skin injury.
Intended use
Be sure to mount the attachment after each use. Otherwise, infants may remove the blade and accidentally swallow it, or the blade may be deformed.
Apply the oil to the blade before and after each use. (See page 13.)
Failure to apply the oil may cause the following problems.
– The appliance has become blunt.
– Shorter operating time.
– Louder sound.
The appliance may become warm during operation and/or charging. This is normal.
Clean the housing only with a soft cloth slightly dampened with tap water or soapy tap water. Do not use thinner, benzene, alcohol or other chemicals.
Before using an attachment, check that it has been installed correctly. Failure to do so may cause hair to be cut too short.
Store the appliance in a place with low humidity after use.
The appliance should not be used on animals.
The following symbol indicates that a specific detachable power supply unit is required for connecting the electrical appliance to the supply mains. The type reference of power supply unit is marked near the symbol.

Parts identification

A. Main body
- Water inlet
- Trimming height indication mark
- Dial (Height adjustment control)
- Power switch
- Charge status lamp
- Appliance socket
B Blade
- Cleaning lever
- Moving blade
- Stationary blade
- Mounting hook
C. Comb attachment A (1 mm to 10 mm)
D. Comb attachment B(11 mm to 20 mm)
E. Comb attachment C (21 mm to 30 mm)
F. Detail trimming attachment
G. AC adaptor (RE9-86)
- Adaptor
- Power plug
- Cord
- Appliance plug
Accessories
H. Cleaning brush
I. Oil
J. Travel pouch
Charging
- Turn the appliance off.
1.Connect the appliance plug to the appliance socket.
2.Plug in the adaptor into a household outlet. - Check that the charge status lamp glows.
- Charging is completed after approx. 1 hour.
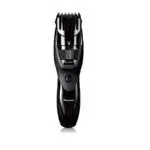
3.Disconnect the adaptor when the charge status lamp stops glowing.
(for safety and to reduce energy usage) <To check if charging is completed> - If you remove and reinsert the appliance plug while charging, the charge status lamp glows and turns off after approximately 5 seconds.
Notes - To keep charging the battery will not affect battery performance.
- If there is noise from the radio or other sources while using or charging the product, move to a different location to use the product.
- When the appliance is not used for 6 months or more, the battery will weaken (leak battery fluid, etc.). Fully charge the battery once every 6 months.
- You can charge the battery before it is completely discharged. However, it is recommended to charge when the battery is completely discharged. The battery life depends strongly on factors such as how it is used and stored.
- Recommended ambient temperature for charging is 0 – 35 °C. Battery performance may decrease or charging time changes under extremely low or high temperatures.
- A full charge supplies enough power for approximately 50 minutes of use. (Based on dry use at 20 – 30 °C.)
The operating time may differ depending on the frequency of use. - When charging the appliance for the first time or when it has not been in use for more than 6 months, the charging time may change or the charge status lamp may not glow for a few minutes or the operating time may shorten. Please charge it for more than 8 hours in such cases.
AC operation
If you connect the AC adaptor to the appliance in the same way as for charging and turn on the power, you can use it.
- If the remaining battery is too low, the blades may move slowly or stop, even with the AC operation. In this case, charge the battery for 1 minute or more.
- The battery will be discharged, even with the AC operation.
How to use
- Turn the appliance off.
- Apply the oil to the blade before and after each use.
(See page 13.) - Do not use with shaving foam applied or when the beard is wet.
A wet beard may stick to the skin or bunch up, making it difficult to trim. - Before trimming, comb your mustache with a comb.
- The appliance may not operate in an ambient temperature lower than approximately 0 °C.
- Mount the desired attachment and adjust the trimming height as needed. (See page 10.)
• It can also be used without the attachment. (Trimming height: approx. 0.5 mm) - Press the power switch to turn on the power.
Removing and mounting the attachments
Take care not to injure hands, etc., with the blade when removing or mounting the attachment.
Mounting the attachment
Mount the attachment to the main body until it clicks. If the attachment is not attached correctly, it may shift and end up cutting too much during use.
Removing the attachment
Hold the main body securely and remove the attachment from the main body.
Comb attachment
- The actual hair length will be a little longer than the height you set.
- A setting of 10.5 mm or 20.5 mm is unavailable.
- Hair trimmings may collect inside the attachment when a large volume of beard is cut, so discard hair trimmings after each use.
How to use the comb attachment
Mount the desired attachment and turn the dial and adjust the trimming height indication mark to the desired height.

Comb attachment A
| Indicator | 1 | • | 2 | • | 3 | • | 4 | • | 5 | • |
| Trimming height (mm) (estimate) | 1 | 1.5 | 2 | 2.5 | 3 | 3.5 | 4 | 4.5 | 5 | 5.5 |
| Indicator | 6 | • | 7 | • | 8 | • | 9 | • | 10 |
| Trimming height (mm) (estimate) | 6 | 6.5 | 7 | 7.5 | 8 | 8.5 | 9 | 9.5 | 10 |

Comb attachment B
| Indicator | 11 | • | 12 | • | 13 | • | 14 | • | 15 | • |
| Trimming height (mm) (estimate) | 11 | 11.5 | 12 | 12.5 | 13 | 13.5 | 14 | 14.5 | 15 | 15.5 |

| Indicator | 16 | • | 17 | • | 18 | • | 19 | • | 20 |
| Trimming height (mm) (estimate) | 16 | 16.5 | 17 | 17.5 | 18 | 18.5 | 19 | 19.5 | 20 |
Comb attachment C
| Indicator | 21 | • | 22 | • | 23 | • | 24 | • | 25 | • |
| Trimming height (mm) (estimate) |
21 | 21.5 | 22 | 22.5 | 23 | 23.5 | 24 | 24.5 | 25 | 25.5 |
| Indicator | 26 | • | 27 | • | 28 | • | 29 | • | 30 |
| Trimming height (mm) (estimate) |
26 | 26.5 | 27 | 27.5 | 28 | 28.5 | 29 | 29.5 | 30 |
![Panasonic ER-GB96 Beard Trimmer - Comb attachment ]C](images/19.webp)
Trimming to an even length
Holding the appliance with the power switch facing outwards, trim by bringing the blade in contact with the skin and moving the appliance against the flow of the beard.
Detail trimming attachment
- The trimming height cannot be adjusted.
How to use the detail trimming attachment
Slide the detail trimming attachment to switch the position of the blade to be exposed depending on the location to cut.

Trim the beard in tight sections or to detailed form
Move the blade along the skin to trim.

Without the attachment
(Trimming height: approx. 0.5 mm)
- The appliance cannot trim hair to lengths less than 0.5 mm.
Trimming the downy hair
Holding the appliance with the power switch facing outwards, trim by bringing the blade in contact with the skin. Design precise lines
- Place the blade at a right angle on the edge of where you want to make a precise line.
- Move the blade away and down from the area you want to leave, and cut the remaining beard.

Above and below lips
Holding the appliance with the power switch at the bottom, cut across a line with the blade at a 90° angle to the skin.
 Full beard
Holding the appliance with the power switch at the bottom, and keeping the blade at a 90° angle to the direction of the hairs, trim and shape your beard as desired.
Ends of mustache
Holding the appliance with the power switch facing outside, trim gradually from the ends by bringing the blade in contact with the skin.
Cleaning
- Clean the main body, blade and attachment after each use.
(If not cleaned, the motion will become poor and the sharpness will worsen.) - Turn the appliance off.
- Remove the main body from the AC adaptor.
With water
To remove light dirt
- Remove the attachment and turn the appliance on.
- Run water down the water inlet at the front of the main body, rinse thoroughly for approximately 20 seconds, and then turn the appliance off.

To remove heavy dirt
- Remove the attachment and blade.
- Clean the appliance, the blade and the attachments with running water.

•Be careful not to hit the main body on the sink or any other object while draining the water. Failure to do so may cause malfunction.
•Rinse with water and shake up and down several times to remove the water. - Wipe off the water with a towel and let it dry naturally.
It will dry faster with the blade removed. - Apply the oil to the blade after drying. (See this page.)
- Attach the attachment and blade to the appliance.

 The mark on the left means suitable for cleaning under an open water tap.
With the brush
- Remove the attachment and blade.
- Brush off any hair trimmings from the main body and from around the blade.

- Brush any hair trimmings out from between the stationary blade and the moving blade while pressing down the cleaning lever to raise the moving blade.
- Apply the oil to the blade. (See this page.)
- Attach the attachment and blade to the appliance.

Lubrication
• Apply the oil to the blade before and after each use.
- Remove the blade. (See this page.)
- Apply a drop of the oil to each indicated point.
- Attach the blade to the main body, turn on the power and allow to run for approximately 5 seconds.
 Removing the blade
Hold the main body with the switch facing upward and push the blade with your thumb while catching the blade in your other hand.
Remounting the blade
Fit the mounting hook (B) into the blade mounting (A) on the appliance and then push in until you hear a click. 
Troubleshooting
| Problem | Action |
| The appliance has become blunt. | Until problems are solved, please follow each procedure as follows:
|
| The operating time is short. | Charge the battery for approximately 8 hours continuously to rejuvenate it. |
| The appliance stopped working. | If few uses remain even after charging, the battery has reached the end of its life. (Fluid may be leaking due to degradation at the end of battery life.) Contact an authorized service center for repair.Insert the appliance plug into the main body firmly and make sure the charge status lamp glows. |
| The appliance cannot be charged. | Charge within the recommended charging temperature of 0 °C to 35 °C. |
| Makes a loud sound. |
|
If the problems still cannot be solved, contact the store where you purchased the unit or a service center authorized by Panasonic for repair.
Blade life
Blade life varies according to the frequency and period of use of the appliance.
For example, the blade life is approximately 3 years when using the appliance for 5 minutes 10 times a month. Replace the blades if cutting efficiency reduces substantially despite proper maintenance.
Battery life
Battery life will vary according to the frequency and length of use. If the battery is charged once a month, the service life will be approximately 3 years.
If the operating time is significantly shorter even after a full charge, the battery has reached the end of its life.
Removing the built-in rechargeable battery
Remove the built-in rechargeable battery before disposing of the appliance.
The battery must be disposed of safely.
Please make sure that the battery is disposed of at an officially designated location if there is one.
This figure must only be used when disposing of the appliance, and must not be used to repair it. If you dismantle the appliance yourself, it will no longer be waterproof, which may cause it to malfunction.
- Remove the appliance from the AC adaptor.
- Press the power switch to turn on the power and then keep the power on until the battery is completely discharged.
- Perform Steps a to k , and then lift the battery to remove it.
- Take care not to short-circuit the positive and negative terminals of the removed battery, and insulate the terminals by applying tape to them.
For environmental protection and recycling of materials, This appliance contains a Nickel-Metal Hydride battery. Please make sure that the battery is disposed of at an officially designated location if there is one.
Specifications
| Power source | See the nameplate on the AC adaptor(Automatic voltage conversion) |
| Motor voltage | 1.2 V |
| Charging time | Approx. 1 hour |
MEMO….
Panasonic Corporation
http://www.panasonic.com
© Panasonic Corporation 2018
Printed in China
ER9700GB961421 Y0118-0
View Fullscreen
Model No. KX-TGF975 KX-TG994SK
Quick Guide
Connections
Base unit 1 Connect the AC adaptor to the unit by pressing the plug firmly. 2 Fasten the cord by hooking it. 3 Connect the AC adaptor to the power outlet. 4 Connect the telephone line cord to the unit, then to the single-line telephone jack (RJ11C) until you hear a click. 5 A DSL/ADSL filter (not supplied) is required if you have a DSL/ADSL service. Note: L Use only the supplied Panasonic AC adaptor PNLV226.
1
3
2
5
4
4
Charger 1 Connect the AC adaptor to the power outlet.
1
Printed in Malaysia
PNQW6002ZA PP0121KR0
Battery installation/Battery charging/Removing the battery
Charge for about 7 hours.
4
2
2
3
1
1
Note: L USE ONLY rechargeable Ni-MH batteries AAA (R03) size (1 ). L Do NOT use alkaline/manganese/Ni-Cd batteries. L Confirm correct polarities (S, T). L Follow the directions on the display to set up the unit. L Confirm “Charging” is displayed (2 ).
Removing the battery
1 2
2
Operating tips
Soft keys By pressing a soft key, you can select the feature shown directly above it on the display. Pay
attention to the display to see what functions the soft keys are assigned during operation. Navigator key Handset: – {^}, {V}, {<}, or {>}: Scroll through various lists and items. – VOL. (Volume: {^} or {V}): Adjust the receiver or speaker volume while talking. – {<} k: View the phonebook entry.
– {>} REDIAL: View the redial list. – {V} CID (Caller ID): View the caller list. Base unit: – {^}, {V}, {7}, or {8}: Scroll through various lists and items. – VOL. (Volume: {^} or {V}): Adjust the speaker volume while talking. – {7}/{8}: Repeat/skip messages during playback.
Handset
Base unit
{^}
{^}
{7}
{8}
{<}
{>}
{V}
{V}
Date and time (Handset) 1 {MENU}(1)1 2 Enter the current month, date, and year. s {OK} 3 Enter the current hour and minute (12-hour clock format). 4 *: Select “AM” or “PM”. s {SAVE} s {OFF} Recording your greeting message of the answering system for the landline (Handset)
You can record your own greeting message instead of using a pre-recorded greeting message.
1 {MENU}(3)2 s {r}: “Yes” s {SELECT} 2 After a beep sounds, speak clearly about 20 cm (8 inches) away from the microphone
(2 minutes max.).
3 Press {STOP} to stop recording. s {OFF}
3
Link to cell
You can connect your base unit and cellular phone using Bluetooth® wireless technology, so that you can make or answer cellular calls using your phone system. For more details, please visit our Web site: http://shop.panasonic.com/bluetooth-phone L Locate your cellular phone near the base unit. If the cellular phone is too close to the base unit
during a cellular call, you may hear noise. For best performance, we recommend placing the cellular phone between 0.6 m to 3 m (2 feet to 10 feet) away from the base unit.
1
2
1 Cellular line 2 Cellular phone service providers
Pairing a Bluetooth cellular phone
1 Base unit:
Press and hold {CELL 1} or {CELL 2} for about 5 seconds. L After the corresponding CELL indicator on the base unit starts flashing, the rest of the
procedure must be completed within 5 minutes.
2 Your cellular phone:
While the corresponding CELL indicator is flashing, follow the instructions of your cellular phone to enter the pairing mode. L Depending on your cellular phone, it may ask you to enter the Bluetooth PIN (default:
“0000”). If your cellular phone shows PassKey confirmation on its display, follow the directions to proceed.
3 Base unit:
Wait until a long beep sounds. L It may take more than 10 seconds to complete pairing. L When the corresponding CELL indicator lights up, the cellular phone is connected to the
base unit. You are ready to make cellular calls. Note: L Make sure that your cellular phone is set to connect to this product automatically. Refer to your
cellular phone’s operating instructions.
Trademarks L The Bluetooth® word mark and logos are registered trademarks owned by Bluetooth SIG, Inc.,
and any use of such marks by Panasonic Corporation is under license. L All other trademarks identified herein are the property of their respective owners.
4
Link to cell
Base unit: CELL indicators
Status
Meaning
On
A cellular phone is connected. Ready to make/receive cellular
calls.
Flashing slowly Flashing rapidly
– The cellular line is in use. – Phonebook entries are being copied from a cellular phone. – The base unit is searching for the paired cellular phone. – The base unit is pairing a cellular phone. – A cellular call is on hold. – The remote voice assist feature is in use.
A cellular call or text message is being received.
Light off
– A cellular phone is not paired to the base unit. – A cellular phone is not connected to the base unit.
Handset: Link to cell display items
td
– A cellular line is in use.*1
L When flashing slowly: The cellular call is on hold.
L When flashing rapidly: A cellular call or text message is being received. – The remote voice assist feature is in use.*1
*1 Corresponding lines (1, 2: cellular line) are indicated next to the item.
xd
A cellular phone is connected.*1 Ready to make/receive cellular calls.
L When turned off: A cellular phone is not connected to the base unit.
*1 Corresponding lines (1, 2: cellular line) are indicated next to the item.
uv
– A cellular call is in progress on that line. – The cellular line is selected for the setting.
Base unit: Link to cell display items
uv
– A cellular call is in progress on that line. – The cellular line is selected for the setting.
A Bluetooth headset is connected to the base unit. It is ready for use.
A Bluetooth headset is in use.
5
Link to cell
Connecting/disconnecting the cellular phone (Handset) Auto connection to the Bluetooth devices (cellular phones) The unit connects to the Bluetooth devices at regular intervals if the connection is lost. To change the interval (default: “1 min”), see the operating instructions. L Only 1 Bluetooth device can be used with the unit at a time, and the base unit loses its
connection from other Bluetooth devices. To automatically resume the connection to Bluetooth devices, leave the auto connection on. Connecting/disconnecting the cellular phone manually If you will not be using the paired cellular phone’s link to cell feature temporarily (for example, you do not want the unit to ring when your cellular line receives a call), you can disconnect your cellular phone from the base unit. If you want to use it again, reconnect the cellular phone to the base unit. L After you disconnect a paired cellular phone from the base unit manually, it will automatically be connected to the base unit in 30 minutes. If you do not use the link to cell feature anymore, unpair the cellular phone. L A disconnected cellular phone is not unpaired from the base unit, so pairing it to the base unit again is unnecessary.
1 To connect/disconnect:
For CELL 1: {MENU}(6251 For CELL 2: {MENU}(6252 L A long beep sounds.
2 {OFF}
Cellular line only mode (If you do not use the landline) (Handset) If you do not use the landline, we recommend setting the unit to the cellular line only mode. The default setting is “Off”. L If you turn on the “Cell line only mode”, disconnect the telephone line cord from the base
unit. Otherwise the “Cell line only mode” cannot be activated.
1 {MENU}(157 2 To turn on:
{r}: “On” s {SELECT} s {r}: “Yes” s {SELECT} To turn off: {r}: “Off” s {SELECT}
6
Basic operations
Making/Answering calls (Handset)
Making cellular calls
1 Dial the phone number. s {CELL}
L When the cellular line only mode is set, you can also press
{C}/{s} instead of {CELL}.
2 When only 1 cellular phone is paired, the unit starts dialing.
When 2 cellular phones are paired: {r}: Select the desired cellular phone. s {SELECT}
Making landline calls
Dial the phone number. s {C}/{s}
Answering calls
{C}/{s}
To hang up
{OFF}
To adjust the receiver/ speaker volume
Making a call using the redial list
Press {^} or {V} repeatedly while talking.
1 {>} REDIAL s {r}: Select the desired entry. 2 To make a cellular call:
When only 1 cellular phone is paired: {CELL} or When 2 cellular phones are paired: {CELL} s {r}: Select the desired cellular phone. s {SELECT} To make a landline call: {C}/{s}
Making/Answering calls (Base unit)
Making cellular calls
Dial the phone number. s {CELL 1}/{CELL 2} L When the cellular line only mode is set, you can also press
{SP-PHONE} without pressing {CELL 1}/{CELL 2}.
Making landline calls
Dial the phone number. s {SP-PHONE}
Answering calls
{SP-PHONE}
To hang up
{SP-PHONE}
To adjust the speaker volume
Making a call using the redial list
Press {^} or {V} repeatedly while talking.
1 {REDIAL} s {r}: Select the desired entry. 2 To make a cellular call: {CELL 1}/{CELL 2}
To make a landline call: {SP-PHONE}
Adjusting the ringer volume (Handset/Base unit)
To adjust the ringer volume (cellular line/landline)
Press {^} or {V} repeatedly to select the desired volume while ringing.
7
Basic operations
Phonebook (Handset) Adding entries
Making calls
1 {<} k s {MENU} 2 {r}: “Add new entry” s {SELECT} 3 Enter the party’s name (16 characters max.). s {OK} 4 Enter the party’s phone number (24 digits max.). s {OK} 5 {r}: Select the desired group. s {SELECT} 2 times s
{OFF} L In step 3, you can switch the language for entering characters.
( s {r}: Select the desired language. s {OK}
1 {<} k s {r}: Select the desired entry. 2 To make a cellular call:
When only 1 cellular phone is paired: {CELL} or When 2 cellular phones are paired: {CELL} s {r}: Select the desired cellular phone. s {SELECT} To make a landline call: {C}
Phonebook (Base unit) Making calls
1 {k} s {r}: Select the desired entry. 2 To make a cellular call: {CELL 1}/{CELL 2}
To make a landline call: {SP-PHONE}
Answering system for the landline (Base unit)
Answering on/off
Press {ANSWER ON/OFF} to turn on/off the answering system.
Listening to messages
{P} (PLAY)
Answering system for the landline (Handset)
Listening to messages
To listen to new messages: {PLAY} or {MENU}(323 To listen to all messages: {MENU}(324
8
Using Bluetooth devices
Copying phonebook entries from a Bluetooth cellular phone (phonebook transfer) You can copy phonebook entries from the paired cellular phones or other cellular phones (not paired) to the unit’s phonebook.
1 Handset: {MENU}(618 2 Handset:
To copy from paired cellular phones: {r}: Select the desired cellular phone. s {SELECT} L Copied items are stored to the group (“Cell 1” or “Cell 2”) which the cellular phone is
paired to. To copy from other cellular phones (not paired): {r}: “Other cell” s {SELECT} s {r}: Select the group you want to copy to. s {SELECT}
3 Handset:
When “Use the cell to transfer phone book” is displayed: Go to step 4. When “Select mode” menu is displayed: {r}: Select “Auto” or “Manual”. s {SELECT} “Auto”: Download all entries from the cellular phone automatically. Go to step 5. “Manual”: Copy entries you selected. L “Select mode” menu is displayed only when the cellular phone supports Phone Book
Access Profile (PBAP) for Bluetooth connection. L Some cellular phones may require you to perform an operation on the cellular phone even if
you select “Auto”.
4 Cellular phone:
Follow the instructions of your cellular phone to copy phonebook entries. L For other cellular phones (not paired), you need to search for and select the base unit. The
Bluetooth PIN (default: “0000”) may be required. If your cellular phone shows PassKey confirmation on its display, follow the directions to proceed. L The entries being copied are displayed on the handset.
5 Handset:
Wait until “Completed” is displayed. s {OFF}
9
Using Bluetooth devices
Using a Bluetooth headset (optional)
By pairing a Bluetooth headset to the base unit, you can enjoy hands-free conversations when talking on landline calls. L Only 1 Bluetooth device can be used with the unit at a time.*1 *1 You cannot use a Bluetooth headset to talk on a cellular line.
Pairing a Bluetooth headset to the base unit
1 Bluetooth headset:
Set your headset to pairing mode. L Refer to your headset’s operating instructions.
2 Handset:
{MENU}(621
1 2
1 Pair using the handset. 2 Pairing
3 If your headset PIN is “0000”, go to step 4.
If your headset PIN is not “0000”, press {CLEAR}, then enter your headset’s PIN.
L Typically, default PIN is “0000”. Refer to the headset’s operating instructions.
4 Press {OK}, then wait until a long beep sounds. s {OFF}
L When
is displayed on the base unit, the headset is available for use.
Operating a Bluetooth headset using a landline L Refer to your headset’s operating instructions for details.
L Some features described here may not be available depending on Bluetooth headset.
N Making landline calls with your headset (Base unit)
1 Press your headset’s button. 2 Dial the phone number using the base unit after hearing the dial tone on your headset. 3 When you finish talking, press your headset’s button.
N Answering landline calls with your headset To answer a landline call, press your headset’s button.
When you finish talking, press your headset’s button.
L If you cannot hang up the call using your headset, press {SP-PHONE} on the base unit 2 times.
N Switching between the base unit and your headset You can switch between the base unit and your headset:
– during a landline call with the base unit speakerphone.
– during an intercom call between the base unit and handset.
– while listening to messages recorded on the base unit answering system.
To switch to your headset: Press { } on the base unit.
To switch to the base unit: Press {SP-PHONE} on the base unit.
10
Frequently asked questions
Question
Cause/solution
Why is _ displayed?
L The handset is too far from the base unit. Move closer. L The base unit’s AC adaptor is not properly connected. Reconnect
AC adaptor to the base unit. L The handset is not registered to the base unit. Register it.
1 Handset: {MENU}(13) 2 Base unit: Press and hold {LOCATOR} for about 5 seconds. 3 Handset: Press {OK}, then wait until a long beep sounds.
Why am I unable to pair a cellular phone to the base unit?
L Depending on the compatibility of the cellular phone, you may not be able to pair it to the base unit. For more information, please visit http://shop.panasonic.com/bluetooth-phone
L Confirm that the Bluetooth feature of your cellular phone is turned on. You may need to turn this feature on depending on your cellular phone.
Why is there no dial tone? L The cellular phone has not been paired to the base unit. Pair the
(cellular line)
cellular phone.
How can I increase the handset volume level?
L Press the volume key {^} repeatedly while talking.
Why is the conversation noisy or cutting off?
L Try to relocate the base unit so that distance to the handset is minimized.
L If the same problem occurs even if the handset is next to the base unit, please visit: http://shop.panasonic.com/support
Can I add another accessory handset to my base unit?
L Yes, you can add up to 6 handsets (including the handset(s) sold with your base unit) to a single base unit.
L To purchase additional accessory handset(s) (KX-TGFA97), please visit: http://shop.panasonic.com/support TTY users (hearing or speech impaired users) can call 1-877-8338855.
Can I keep the batteries charging all the time?
L You can leave the handset on the base unit or charger anytime. This will not harm the batteries.
How can I answer a call waiting call (2nd call)?
L Press {FLASH} on the handset or {CALL WAIT} on the base unit when you hear the call waiting tone.
]]>Panasonic Rechargeable Body Hair Trimmer

Safety precautions
To reduce the risk of injury, loss of life, electric shock, fire, and damage to property, always observe the following safety precautions.
Explanation of symbols
The following symbols are used to classify and describe the level of hazard, injury, and property damage caused when the denotation is disregarded and improper use is performed.
DANGER: Denotes a potential hazard that will result in serious injury or death.
WARNING: Denotes a potential hazard that could result in serious injury or death.
CAUTION: Denotes a hazard that could result in minor injury or property damage.
The following symbols are used to classify and describe the type of instructions to be observed.
This symbol is used to alert users to a specific operating procedure that must not be performed.
This symbol is used to alert users to a specific operating procedure that must be followed in order to operate the unit safely.
IMPORTANT SAFETY INSTRUCTIONS
When using an electrical appliance, basic precautions are required to always be followed, including the following.
Read all instructions before using this appliance.
This product
This product has a built-in rechargeable battery. Do not throw into flame or heat.
Doing so may cause fluid leak, overheating, or explosion.
Do not modify or repair.
Doing so may cause fire, electric shock, or injury.
Contact an authorized service center for repair (battery change, etc.).
Never disassemble except when disposing of the product.
Doing so may cause fire, electric shock, or injury.
In case of an abnormality or malfunction Immediately stop using and remove the adaptor if there is an abnormality or malfunction.
Failure to do so may cause fire, electric shock, or injury.
<Abnormality or malfunction cases>
- The main body or AC adaptor is deformed or abnormally hot.
- The main body or AC adaptor smells of burning.
- There is an abnormal sound during use or charging of the main body or AC adaptor.
- Immediately request inspection or repair at an authorized service center.
Do not connect or disconnect the adaptor to a household outlet with a wet hand. - Doing so may cause electric shock or injury.
- Do not immerse the AC adaptor in water or wash with water.
- Do not place the AC adaptor over or near water filled sink or bathtub.
- Never use the appliance if the AC adaptor is damaged or if the power plug fits loosely in a household outlet.
- Do not damage or modify, or forcefully bend, pull, or twist the cord.
- Also, do not place anything heavy on or pinch the cord.
- Doing so may cause electric shock or fire due to a short circuit.
Do not use in a way exceeding the rating of the household outlet or the wiring. - Exceeding the rating by connecting too many plugs to one household outlet may cause fire due to overheating.
- Do not use anything other than the supplied AC adaptor for any purpose.
- Also, do not use any other product with the supplied AC adaptor.
- Doing so may cause burns or fire due to a short circuit.
- Always ensure the appliance is operated on an electric power source matched to the rated voltage indicated on the AC adaptor.
- Fully insert the adaptor.
- Failure to do so may cause fire or electric shock.
Always unplug the adaptor from a household outlet when cleaning. - Failure to do so may cause electric shock or injury.
Regularly clean the power plug and the appliance plug to prevent dust from accumulating. - Failure to do so may cause fire due to insulation failure caused by humidity.
- Disconnect the adaptor and wipe with a dry cloth.
Do not place within reach of children or infants. Do not let them use it.
- Doing so may cause injury or accidental ingestion of the accessories or removable small parts.
- If the oil is consumed accidentally, do not induce vomiting, drink a large amount of water, and contact a physician.
- If the oil comes into contact with eyes, immediately wash thoroughly with running water, and contact a physician.
- Failure to do so may result in physical problems.
The supply cord cannot be replaced. If the cord is damaged, the AC adaptor should be scrapped. - Failure to do so may cause an accident or injury.
CAUTION:
Protecting the skin
- Do not press the blade forcibly against the skin.
- Do not use this product for any purpose other than trimming body hair.
- Do not use this product without an attachment to trim hair in the following areas: sensitive zones, buttocks, anus, and surrounding areas.
- Do not use this product to trim hair in the following areas.
- Face or head (hair, beard, etc.)
- Areas with rough or bumpy skin (swollen areas, cuts, hemorrhoids, and other sensitive areas; nipples and surrounding areas)
- Moles, bruises, etc.
- Doing so may cause skin injury.
- Do not forcefully press the blade. Also, do not touch blade with nails.
- Do not bring the blade into contact with hard objects.
- Doing so may cause the blade to become damaged and injure the skin as the blade is very thin. Be careful when using it.
- Check that the blades are not damaged or deformed before use.
- Failure to do so may cause skin injury.
Note the following precautions
- Do not allow metallic objects to touch or short the power plug or the appliance plug.
- Doing so may cause electric shock or fire due to a short circuit.
- Do not share your appliance with your family or other people.
- Doing so may result in infection or inflammation.
- Do not drop or hit against other objects. – Doing so may cause injury.
- Do not wrap the cord around the adaptor and main body when storing.
- Doing so may cause the wire in the cord to break with the load, and may cause fire due to short circuit.
- Disconnect the adaptor from the household outlet when not charging.
- Failure to do so may cause electric shock or fire due to electrical leakage resulting from insulation deterioration.
- Disconnect the adaptor or the appliance plug by holding onto the adaptor or the appliance plug instead of the cord.
- Failure to do so may cause electric shock or injury.
DANGER:
- The rechargeable battery is exclusively for use with this appliance. Do not use the battery with other products.
- Do not charge the battery after it has been removed from the product.
- Do not throw into fire or apply heat.
- Do not solder, disassemble, or modify the battery.
- Do not let the positive and negative terminals of the battery get in contact with each other through metallic objects.
- Do not carry or store the battery together with metallic jewelry such as necklaces and hairpins.
- Never peel off the tube.
- Doing so may cause fluid leak, overheating, or explosion.
- The battery contains alkaline fluid. If it comes in contact with the eyes, do not rub the eyes. Thoroughly rinse with clean water, such as tap water.
- Failure to do so may cause loss of vision.
- Consult a physician immediately.
WARNING:
- After removing the rechargeable battery, do not keep it within reach of children and infants.
- The battery will harm the body if accidentally swallowed.
- If this happens, consult a physician immediately.
- The battery contains alkaline fluid. If it comes in contact with the skin or clothes, rinse off with clean water, such as tap water.
- Failure to do so may cause skin injury.
Important information
- This WET/DRY appliance can be used for wet trimming or for dry trimming. You can use this watertight appliance in a shower and clean it in water.
- The following symbol means that it is suitable for use in a bath or shower.
- Before using an attachment, check that it has been installed correctly. Failure to do so may cause hair to be cut too short.
- The appliance should not be used on animals.
- Apply the oil to the blade before and after each use.(See page 17.)
- Failure to apply the oil may cause the following problems.
- The blade has become blunt.
- Shorter operating time.
- Louder sound.
- Store the main body in a place with low humidity after use. Failure to do so may cause malfunction due to condensation or rust.
- Charge the appliance correctly according to these Operating Instructions. (See page 10 “Charging”.)
- This appliance contains a battery that is only replaceable by skilled persons. Please contact an authorized service center for the details of repair.
- The following symbol indicates that a specific detachable power supply unit is required for connecting the electrical appliance to the supply mains. The type reference of power supply unit is marked near the symbol.
- Be sure to place the skinguard attachment on the main body to protect the blade when carrying around or storing.
Parts identification
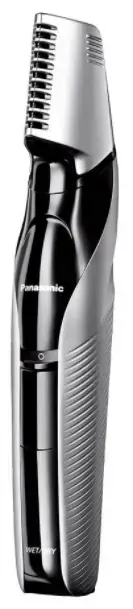 Main body
- Power switch
- Charge status lamp
- Appliance socket
- Blade
Trimming height comb attachment - Dial
- Trimming height indication mark
Skinguard attachment
AC adaptor (RE9-86)
- Adaptor
- Power plug
- Cord
- Appliance plug
Accessories
Cleaning brush
Oil
Travel case
Preparation
Charging
Make sure that the main body is turned off.
- Connect the appliance plug to the appliance socket.
- Plug the adaptor into a household outlet.
- Check that the charge status lamp ( ) glows.
- Charging is completed after approx. 1 hour.
- If the shape of the plug does not fit the power outlet, use an attachment plug adaptor of the proper configuration.
- Disconnect the adaptor when the charge status lamp stops glowing.
(for safety and to reduce energy usage)
<How to check if the charging is completed> Remove and reinsert the appliance plug. If the charge status lamp glows and turns off after approximately 5 seconds, it is completed.
You cannot operate the main body while charging.
Notes:
- If there is noise from the radio or other sources while using or charging the appliance, move to a different location to use the appliance.
- When the appliance has not been used for 6 months or more, the battery will weaken (leak battery fluid, etc.). Fully charge the battery once every 6 months.
- When the appliance is charged for the first time or it has not been in use for more than 6 months, the charging time may change or the charge status lamp ( ) may not glow in the first few minutes. In addition, the operating time may become shorter. Please charge it for more than 8 hours in such cases.
- Recommended ambient temperature for charging is 0 °C – 35 °C (32 °F – 95 °F). The charging time may change or battery performance may decrease outside of the recommended temperature.
- A full charge supplies enough power for approximately 50 minutes of use. (Based on using at 20 °C – 30 °C (68 °F – 86 °F).) The operating time may differ depending on the frequency of use and the operating method.
- You can charge the battery before it is completely discharged. However, it is recommended to charge when the battery is completely discharged. The battery life depends strongly on factors such as how it is used and stored.
Read before use
Using this appliance to trim hair in areas that are not visually accessible may result in cuts or injury. Please use with care.
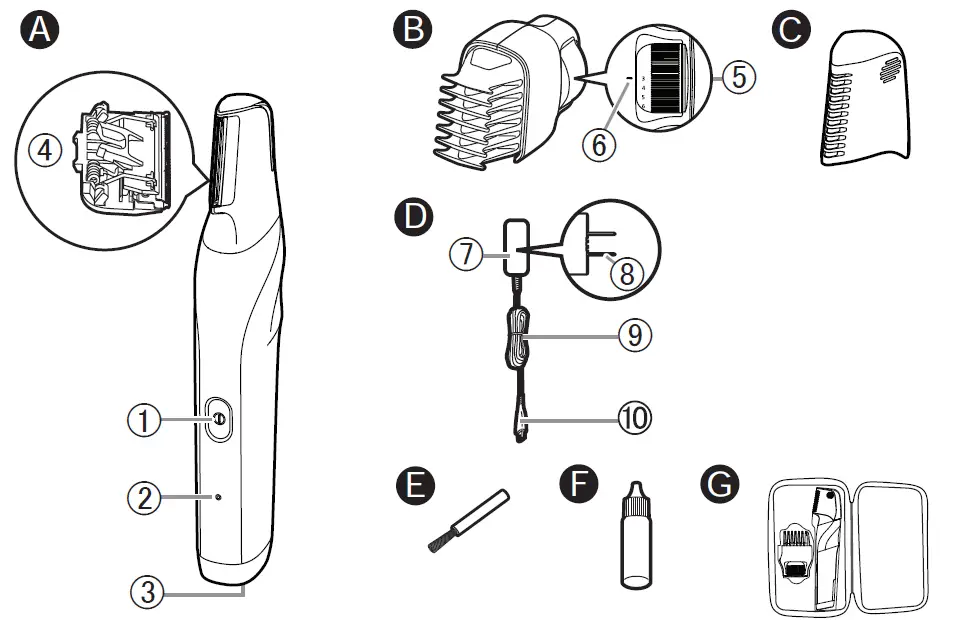
Notes:
- Stretch the skin on the areas with loose or flabby skin, or with wrinkles, and lightly apply the edge of the blade or attachment.
- Do not use the attachment on wet hair. Wet hair might clump or stick to the skin, becoming hard to trim. If you use the attachment to trim wet hair, you may not be able to achieve a uniform trim.
- For areas with thick or dense hair growth, trim a bit at a time. Hair sometimes gets caught or builds up in the attachment. When this happens, clean the attachment.
How to use
Apply the oil to the blade before and after each use.
The appliance may not operate in an ambient temperature lower than approximately 0 °C (32 °F).
• Please clean the appliance after each use.
Note before trimming
• Make sure that the main body is turned off.
• Check that the blades are not damaged or deformed before use.
Trimming dry hair
- Select the desired attachments, then press the power switch to turn on the power and trim.
- Use the appropriate attachment as needed. It can also be used without the attachment.
- Without the attachment (See page 14.)
- Skinguard attachment (See page 14.)
- Trimming height comb attachment
- Turn off the switch after use.
Trimming wet hair
- Do not use the attachment when trimming wet hair. 1 Wet and apply soap to your body.
- Press the power switch to turn on the power and trim.
Without the attachment. - Apply less pressure than you would when trimming dry hair, and move the main body in a gliding motion.
- Turn off the switch after use.
Removing and mounting the attachments
Take care not to injure hands, etc., with the blade when removing or mounting the attachment.
Removing the attachment
Hold the main body securely and pull the attachment out upward and remove it from the main body.
Hold the rib ( a ) part securely and remove the skinguard attachment.
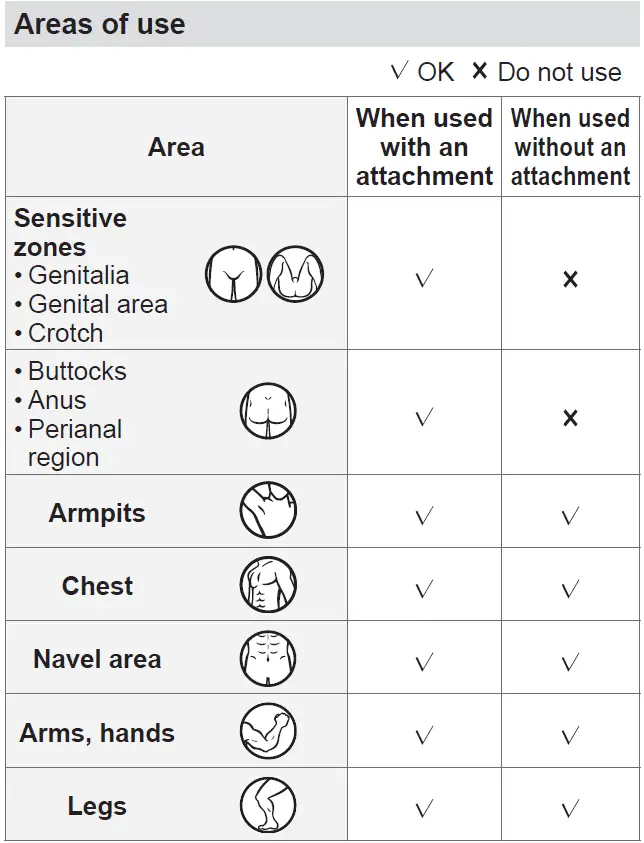
Mounting the attachment
Mount the attachment to the main body until it clicks.
If the attachment is not attached correctly, it may shift and end up cutting too much during use.
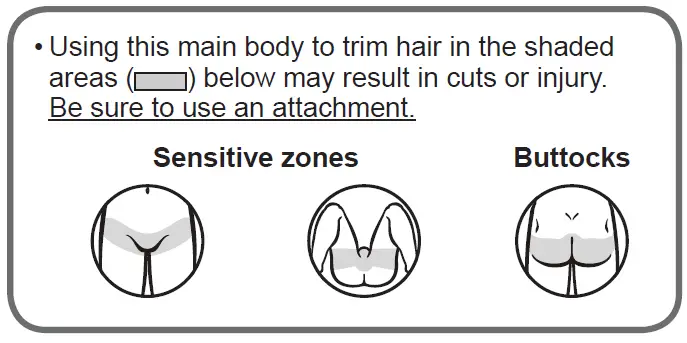
Without attachment
Apply light pressure and slowly move the main body against the direction of hair growth.
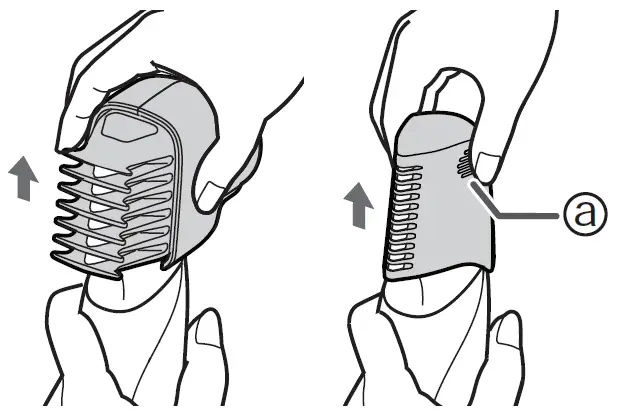
- To trim navel hair, lay the blade flat against your skin and then move the main body in a gliding motion. This allows you to trim hair down to a length of approximately 0.1 mm (1/254˝).
- It does not matter which side of the blade you lay against your skin.
Skinguard attachment
Lightly apply the edge of the skinguard attachment against your skin and then slowly move the main body.

This allows you to safely trim hair down to a length of approximately 2 mm (5/64˝).
Trimming height comb attachment
- The digit on the attachment indicates the target trimming length.
- Actual hair length will be a little longer than the height you set.
- The desired results may not be achieved if hair is too long.
In this case, trim the hair to a length of about 20 mm (25/32˝) before using the appliance. - Hair will be easy to accumulate in the attachment when a lot of hair is cut. When this happens, clean the attachment. (See pages 15 and 16.)
- Turn the dial and adjust the trimming height indication mark ( b ) to the desired height.
Trimming height: approx. 3 mm (1/8˝) to 12 mm (15/32˝)
- Apply the flat part of the comb against your skin and cut your hair by combing it left and right.
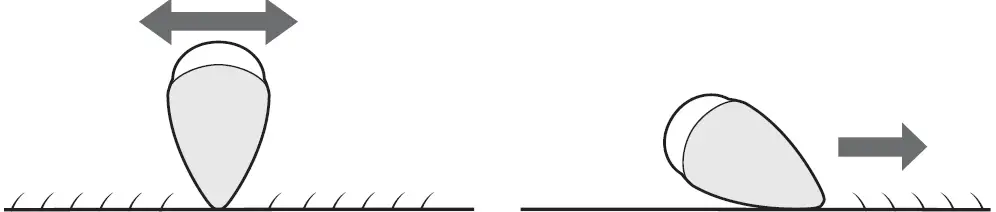
Maintenance
Cleaning
- Clean the main body and the blade after each use.(If not cleaned, the motion will become poor and the sharpness will worsen.)
- Do not use thinner, benzine, alcohol, or other chemicals. Doing so may cause failure, cracking, or discoloration of the main body. Wipe the main body only with a soft cloth slightly dampened with tap water or soapy tap water.
- Make sure that the main body is turned off.
- Remove the main body from the AC adaptor.
With water
To remove light dirt
- Remove the attachment and turn the main body on.
- Run water down the water inlet at the back of the main body, rinse thoroughly for approximately 20 seconds, and then turn the main body off.
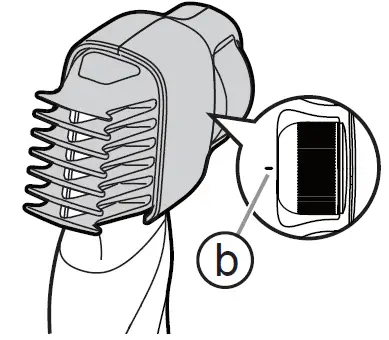
To remove heavy dirt
- Remove the attachment and blade.(See pages 13 and 16.)
- Clean the main body, the blade, and the attachments with running water.
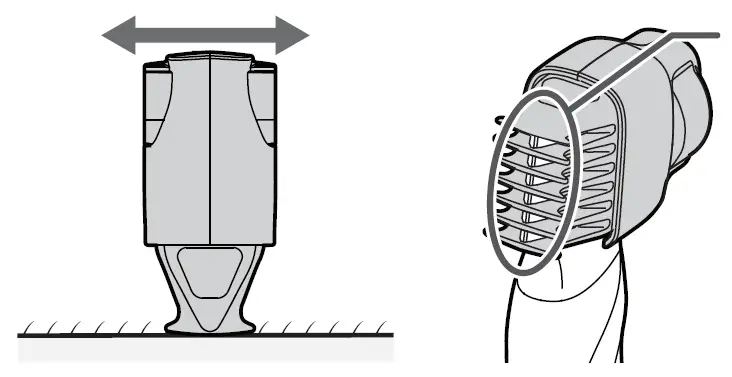
- Wipe off the water with a towel and let it dry naturally.
• It will dry faster with the blade removed. - Apply the oil to the blade after drying.
- Attach the blade and the skinguard attachment to the main body.
• Be sure to place the skinguard attachment on the main body to protect the blade when storing.
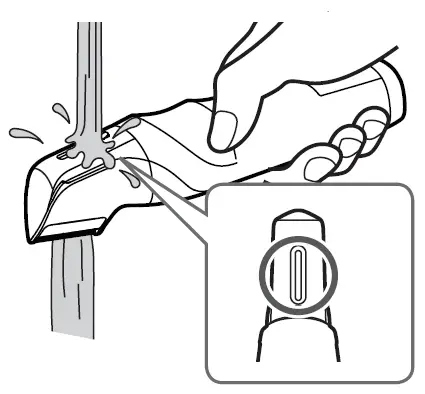
Troubleshooting
Perform the following actions.
If the problems still cannot be solved, contact the store where you purchased the unit or a service center authorized by Panasonic for repair.
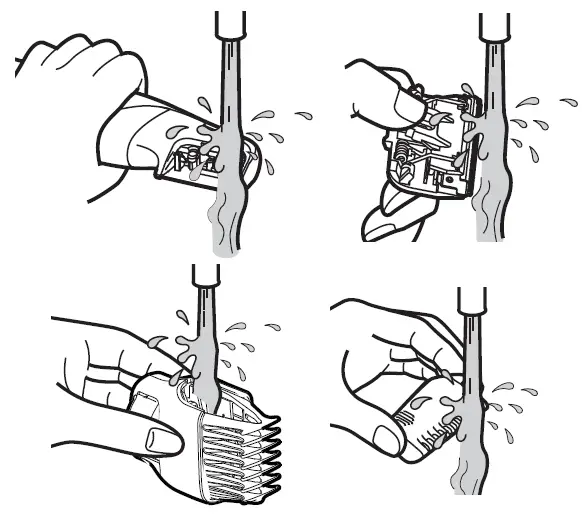
Blade life
Blade life varies according to the frequency and period of use of the main body.
For example, the blade life is approximately 3 years when using the main body for 10 minutes four times a month. Replace the blades if cutting efficiency reduces substantially despite proper maintenance.
Battery life
Battery life will vary according to the frequency and length of use. If the battery is charged once a month, the service life will be approximately 3 years.
If the operating time is significantly shorter even after a full charge, the battery has reached the end of its life.
Removing the built-in rechargeable battery
ATTENTION:
A nickel metal hydride battery that is recyclable powers the product you have purchased.
Please call 1-800-8-BATTERY for information on how to recycle this battery.
Remove the built-in rechargeable battery before disposing of the main body.
The battery is to be disposed of safely.
Please make sure that the battery is disposed of at an officially designated location if there is one.
This figure must only be used when disposing of the main body, and must not be used to repair it. If you dismantle the main body yourself, it will no longer be waterproof, which may cause it to malfunction.
- Remove the main body from the AC adaptor.
- Press the power switch to turn on the power and then keep the power on until the battery is completely discharged.
- Perform steps 1 to 8 and lift the battery, and then remove it.
- Take care not to short circuit the positive and negative terminals of the removed battery, and insulate the terminals by applying tape to them.
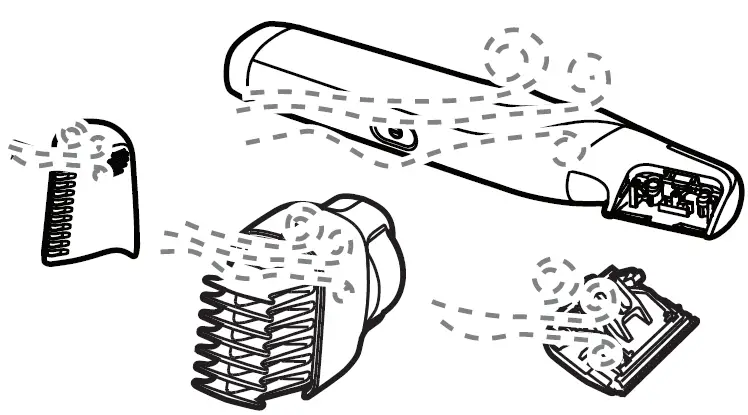
Specifications
| Power source | See the name plate on the AC adaptor.
(Automatic voltage conversion) |
| Motor voltage | 1.2 V |
| Charging time | Approx. 1 hour |
This product is intended for household use only.
Federal Communication Commission Interference
Statement
This equipment has been tested and found to comply with the limits for a Class B digital device, pursuant to Part 15 of the FCC Rules. These limits are designed to provide reasonable protection against harmful interference in a residential installation. This equipment generates, uses and can radiate radio frequency energy and, if not installed and used in accordance with the instructions, may cause harmful interference to radio communications. However, there is no guarantee that interference will not occur in a particular installation. If this equipment does cause harmful interference to radio or television reception, which can be determined by turning the equipment off and on, the user is encouraged to try to correct the interference by one of the following measures:
- Reorient or relocate the receiving antenna.
- Increase the separation between the equipment and receiver.
- Connect the equipment into an outlet on a circuit different from that to which the receiver is connected.
- Consult the dealer or an experienced radio/TV technician for help.
FCC Caution: To assure continued compliance, install and use in accordance with provided instructions. Any changes or modifications not expressly approved by the party responsible for compliance could void the user’s authority to operate this equipment.
![]()
View Fullscreen
Operating Instructions OLED TV
Model No.
TX-55FZ802B TX-65FZ802B
English
(image: TX-65FZ802B)
For more detailed instructions, please refer to [eHELP] (Built-in Operating Instructions). How to use [eHELP] (p. 21)
Thank you for purchasing this Panasonic product. Please read these instructions carefully before operating this product and retain them for future reference. Please carefully read the “Safety Precautions” of this manual before use. The images shown in this manual are for illustrative purposes only.
M0418-0
TQB0E2808U
English
Contents
Be Sure to Read
Important Notice··················································· 4 Safety Precautions ··············································· 5
Accessories ························································ 9 Installing the TV ··················································· 9 Installing the wall-hanging bracket ··························11 Connections ·······················································11 Identifying Controls ··············································18 First time Auto Setup············································20 Watching TV·······················································21 How to Use eHELP··············································21 FAQs ································································23 Maintenance ······················································24 Specifications ·····················································25
2 English
“PlayReady” is a trademark registered by Microsoft. Please be aware of the following. (a) This product contains technology subject to certain intellectual property rights of Microsoft. Use or distribution of this technology outside of this product is prohibited without the appropriate license(s) from Microsoft. (b) Content owners use Microsoft PlayReadyTM content access technology to protect their intellectual property, including copyrighted content. This device uses PlayReady technology to access PlayReady-protected content and/or WMDRM-protected content. If the device fails to properly enforce restrictions on content usage, content owners may require Microsoft to revoke the device’s ability to consume PlayReady-protected content. Revocation should not affect unprotected content or content protected by other content access technologies. Content owners may require you to upgrade PlayReady to access their content. If you decline an upgrade, you will not be able to access content that requires the upgrade.
DLNA®, the DLNA Logo and DLNA CERTIFIEDTM are trademarks, service marks, or certification marks of the Digital Living Network Alliance.
The terms HDMI and HDMI High-Definition Multimedia Interface, and the HDMI Logo are trademarks or registered trademarks of HDMI Licensing Administrator, Inc. in the United States and other countries.
HDAVI ControlTM is a trademark of Panasonic Corporation.
Manufactured under license from Dolby Laboratories. Dolby, Dolby Audio, and the double-D symbol are trademarks of Dolby Laboratories.
Speech Powered by Dragon 2002-2018 Nuance Communications, Inc. All rights reserved.
SDXC Logo is a trademark of SD-3C, LLC.
The Bluetooth® word mark and logos are registered trademarks owned by Bluetooth SIG, Inc. and any use of such marks by Panasonic Corporation is under license. Other trademarks and trade names are those of their respective owners.
“AVCHD” and “AVCHD Progressive” are trademarks of Panasonic Corporation and Sony Corporation.
DVB and the DVB logos are trademarks of the DVB Project.
x.v.ColourTM is a trademark.
“freesat” is a registered trademark and the “freesat” logo is a trademark of Freesat (UK) Ltd.
For information about the trademarks, refer to [eHELP] (Search by Purpose > Read first > Before use > Licence).
The illustration for TX-65FZ802B is used in this manual unless otherwise mentioned. Illustrations shown may be different depending on the model.
English 3
Important Notice
Do not display any still part of the image for a long period
In such cases the still part of the image remains dimly on the screen (“image retention”). This is not considered a malfunction and is not covered by the warranty. Typical still image parts:
· Still images shown continuously on the same area (ex. channel number, channel logo, other logos or title image, etc.)
· Still or moving pictures viewed in 4:3 or 14:9 aspect ratio, etc.
· Video games
To avoid image retention, the screen saver may be activated (OLED logo moves) or the on-screen message may move after a few minutes if no signals are sent or no operations are performed.
To avoid image retention, the screen may become dim when the motionless image is displayed. This is not a malfunction. The brightness of the screen returns to the previous level when the active image is displayed.
Be sure to turn the TV off with the remote control to perform the panel maintenance. During the panel maintenance, LED turns to orange. (p. 19) The maintenance works as necessary.
Set aspect ratio to [4:3 full] for 4:3 image. For details, refer to [eHELP] (Search by Purpose > Watching > For best picture).
For more information “Panel maintenance” (p. 19)
Notice for DVB / Data broadcasting / IPTV functions
This TV is designed to meet the standards (as of August, 2017) of digital services. Not all the features are available depending on the
country, area, broadcaster, service provider and network environment. Compatibility with future services is not guaranteed.
Internet apps are provided by their respective service providers, and may be changed, interrupted, or discontinued at any time. Panasonic assumes no responsibility and makes no warranty for the availability or the continuity of the services.
Panasonic does not guarantee operation and performance of peripheral devices made by other manufacturers; and we disclaim any liability or damage arising from operation and/or performance from usage of such other maker’s peripheral devices.
Handling of customer information
When using Internet connecting function of this TV, after agreeing to Panasonic`s terms of service / privacy policy (hereinafter referred to as terms and conditions etc.), Customer Information on the use of this unit may be collected and used according to terms and conditions etc.
For details of terms of service / privacy policy, refer to [eHELP] (Search by Purpose > Network > Network settings > Terms of Service and Settings)
Customer’s personal information may be recorded on this TV by broadcasting organization or application provider. Before repairing, transferring or discarding this TV, erase all the information recorded on this TV according to the following procedure.
[eHELP] (Search by Purpose > Functions > Shipping Condition)
Customer Information may be collected by provider via application provided by third parties on this TV or website. Please confirm the terms and conditions etc. of provider in advance.
· Panasonic will not be held responsible for collecting or using customer Information via application provided by third party on this TV or website.
· When entering your credit card number, name, etc., pay special attention to the trustworthiness of the provider.
· Registered information may be registered in the server etc. of provider. Before repairing, transferring or discarding this TV, be sure to erase the information according to the terms and conditions etc. of provider.
The recording and playback of content on this or any other device may require permission from the owner of the copyright or other such rights in that content. Panasonic has no authority to and does not grant you that permission and explicitly disclaims any right, ability or intention to obtain such permission on your behalf. It is your responsibility to ensure that your use of this or any other device complies with applicable copyright legislation in your country. Please refer to that legislation for more information on the relevant laws and regulations involved or contact the owner of the rights in the content you wish to record or playback.
This product is licensed under the AVC patent portfolio license for the personal and non-commercial use of a consumer to (i) encode video in compliance with the AVC Standard (“AVC Video”) and/or (ii) decode AVC Video that was encoded by a consumer engaged in a personal and non-commercial activity and/or was obtained from a video provider licensed to provide AVC Video. No license is granted or shall be implied for any other use.
Additional information may be obtained from MPEG LA, LLC.
See http://www.mpegla.com.
4 English
This mark indicates the product operates on AC voltage.
This mark indicates a Class II or double insulated electrical appliance wherein the product does not require a safety connection to electrical earth (ground). Transport only in upright position.
Safety Precautions
To help avoid risk of electrical shock, fire, damage or injury, please follow the warnings and cautions below:
Mains plug and lead
Warning
If you detect anything unusual, immediately switch off the mains supply switch and remove the mains plug.
IMPORTANT: THE MOULDED MAINS PLUG
FOR YOUR SAFETY, PLEASE READ THE FOLLOWING TEXT CAREFULLY.
This TV is supplied with a moulded 3-pin mains plug for your safety and convenience.
A 10 amp fuse is fitted in this mains plug. Shall the fuse need to be replaced, please ensure that the replacement fuse has a 10 amp rating and that it is approved by ASTA or BSI to BS1362.
Check for the ASTA mark the fuse body.
or the BSI mark on
If the mains plug contains a removable fuse cover, you must ensure that it is refitted when the fuse is replaced.
If you lose the fuse cover, the mains plug must not be used until a replacement cover is obtained.
A replacement fuse cover may be purchased from your local dealer. Do not cut off the mains plug.
Do not use any other type of mains lead except the one supplied with this TV.
The supplied mains lead and moulded plug are designed to be used with this TV to avoid interference and for your safety.
If the mains socket in your home is not suitable, get it changed by a qualified electrician.
If the plug or mains lead becomes damaged, purchase a replacement from an authorised dealer.
How to replace the fuse:
Example 1
For plug type shown in example 1
Lift out the removable fuse cover with a screwdriver and replace the fuse, then refit it securely into the mains plug. For plug type shown in example 2
Lift open the fuse cover in the mains plug with a screwdriver and replace the fuse, then press the fuse cover down securely.
Example 2
English 5
This TV is designed to operate on AC 220-240 V, 50 / 60 Hz.
Insert the mains plug fully into the mains socket. To turn Off the apparatus completely, you must pull
the mains plug out of the mains socket.
Consequently, the mains plug should be easily accessible at all times. Disconnect the mains plug when cleaning the TV. Do not touch the mains plug with wet hands.
Do not damage the mains lead. · Do not place a heavy object on the lead.
· Do not place the lead near a high temperature object.
· Do not pull on the lead. Hold onto the mains plug body when disconnecting the plug.
· Do not move the TV with the lead plugged into a mains socket.
· Do not twist the lead, bend it excessively or stretch it.
· Do not use a damaged mains plug or mains socket.
· Ensure the TV does not crush the mains lead.
Take care
Warning Do not remove covers and never
modify the TV yourself as live parts are accessible and risk of electric shock when they are removed. There are no user serviceable parts inside. Do not expose the TV to rain or excessive moisture. This TV must not be exposed to dripping or splashing water and objects filled with liquid, such as vases, must not be placed on top of or above the TV. Do not insert foreign objects into the TV through the air vents. If the TV is used in an area where insects may easily enter the TV.
It is possible for insects to enter the TV, such as small flies, spiders, ants, etc. which may cause damage to the TV or become trapped in an area visible on the TV, e.g. within the screen.
If the TV is used in an environment where there is dust or smoke.
It is possible for dust/smoke particles to enter the TV through the air vents during normal operation which can become trapped inside the unit. This may cause overheating, malfunction, deterioration in picture quality, etc.
Do not use an unapproved pedestal / mounting equipment. Be sure to ask your local Panasonic dealer to perform the setup or installation of approved wall-hanging brackets.
Do not apply any strong force or impact to the display panel.
Ensure that children do not climb on the TV.
Do not place the TV on sloping or unstable surfaces, and ensure that the TV does not hang over the edge of the base.
Warning Never place a TV in an unstable location. A TV may fall, causing serious personal injury or death. Many injuries, particularly to children, can be avoided by taking simple precautions such as:
· Using cabinets or stands recommended by the manufacturer of the TV.
· Only using furniture that can safely support the TV.
· Ensuring the TV is not overhanging the edge of the supporting furniture.
· Not placing the TV on tall furniture (for example, cupboards or bookcases) without anchoring both the furniture and the TV to a suitable support.
· Not placing the TV on cloth or other materials that may be located between the TV and supporting furniture.
· Educating children about the dangers of climbing on furniture to reach the TV or its controls.
If your existing TV is being retained and relocated, the same considerations as above should be applied.
This TV is designed for table-top use.
Do not expose the TV to direct sunlight and other sources of heat.
To prevent the spread of fire, keep candles or other open flames away from this product at all times
6 English
Suffocation / Choking Hazard
Warning
The packaging of this product may cause suffocation, and some of the parts are small and may present a choking hazard to young children. Keep these parts out of reach of young children.
Do not allow children to handle any small objects such as SD Card. The small object could be swallowed by young children. Remove SD Card immediately after use and store out of reach of young children.
Pedestal
Warning
Do not disassemble or modify the pedestal.
Caution
Do not use any pedestal other than the one provided with this TV.
Do not use the pedestal if it becomes warped or physically damaged. If this occurs, contact your nearest Panasonic dealer immediately.
During setup, make sure that all screws are securely tightened.
Ensure that the TV does not suffer any impact during installation of the pedestal.
Ensure that children do not climb onto the pedestal.
Install or remove the TV from the pedestal with at least two people.
Install or remove the TV according to the specified procedure.
Radio waves
Warning
Do not use the TV in any medical institutions or locations with medical equipment. Radio waves may interfere with the medical equipment and may cause accidents due to malfunction.
Do not use the TV near any automatic control equipment such as automatic doors or fire alarms. Radio waves may interfere with the automatic control equipment and may cause accidents due to malfunction.
Keep at least 15 cm away from the TV if you have a cardiac pacemaker. Radio waves may interfere with the operation of the pacemaker.
Do not disassemble or alter the TV in any way.
Built-in wireless LAN
Caution
Do not use the built-in wireless LAN to connect to any wireless network (SSID*) for which you do not have usage rights. Such networks may be listed as a result of searches. However, using them may be regarded as illegal access.
*SSID is a name for identifying a particular wireless network for transmission.
Do not subject the built-in wireless LAN to high temperatures, direct sunlight or moisture.
Data transmitted and received over radio waves may be intercepted and monitored.
The built-in wireless LAN uses 2.4 GHz and 5 GHz frequency bands. To avoid malfunctions or slow response caused by radio wave interference when using the built-in wireless LAN, keep the TV away from other devices that use 2.4 GHz and 5 GHz signals such as other wireless LAN devices, microwave ovens, and mobile phones.
When problems occur due to static electricity, etc., the TV might stop operating to protect itself. In this case, turn the TV off at the Mains power On / Off switch, then turn it back on.
Bluetooth® wireless technology
Caution
The TV uses the 2.4 GHz radio frequency ISM band (Bluetooth®). To avoid malfunctions or slow response caused by radio wave interference, keep the TV away from the devices such as other wireless LAN devices, other Bluetooth devices, microwaves, mobile phones and the devices that use 2.4 GHz signal.
Ventilation
Caution
Allow sufficient space (at least 10 cm) around the TV in order to help prevent excessive heat, which could lead to early failure of some electronic components.
10
10
10
10
(cm)
Ventilation should not be impeded by covering the ventilation openings with items such as newspapers, tablecloths and curtains.
Whether you are using a pedestal or not, always ensure the vents at the bottom of the TV are not blocked and there is sufficient space to enable adequate ventilation.
English 7
Moving the TV
Caution
Before moving the TV, disconnect all cables.
At least two people are required to move the TV to prevent injury that may be caused by the tipping or falling of TV.
Do not hold the screen part as shown below when moving the TV. This may cause malfunction or damage.
How to carry the TV. (p. 10)
Remove the battery from the unit when not using for a prolonged period of time to prevent battery leakage, corrosion and explosion.
OLED TV Declaration of Conformity (DoC) “Hereby, Panasonic Corporation declares that this TV is in compliance with the essential requirements and other relevant provisions of the Directive 2014/53/EU.” If you want to get a copy of the original DoC of this TV, please visit the following website: http://www.ptc.panasonic.eu/doc
Authorized Representative: Panasonic Testing Centre Panasonic Marketing Europe GmbH Winsbergring 15, D-22525 Hamburg, Germany
Transport only in upright position. Transporting the TV with its display panel facing upwards or downwards may cause damage to the internal circuitry.
When not in use for a long time
Caution
This TV will still consume some power even in the Off mode, as long as the mains plug is still connected to a live mains socket. Remove the mains plug from the wall socket when
the TV is not in use for a prolonged period of time.
Excessive volume
Caution Do not expose your ears to
excessive volume from the headphones. Irreversible damage can be caused. If you hear a drumming noise in your ears, turn down the volume or temporarily stop using the headphones.
Battery for the Remote Control
Caution Incorrect installation may cause battery leakage,
corrosion and explosion. Replace only with the same or equivalent type. Do not mix old and new batteries. Do not mix different battery types (such as alkaline
and manganese batteries). Do not use rechargeable batteries (Ni-Cd, etc.). Do not burn or break up batteries. Do not expose batteries to excessive heat such as
sunshine, fire or the like. Make sure you dispose of batteries correctly.
5.15 5.35 GHz band of wireless LAN is restricted to indoor operation only in the following countries.
Ireland, United Kingdom
Maximum radio-frequency power transmitted in the frequency bands
Type of wireless Frequency band Maximum EIRP
2 412-2 472 MHz 20 dBm
Wireless LAN
5 150-5 250 MHz 23 dBm 5 250-5 350 MHz 23 dBm
5 470-5 725 MHz 23 dBm
Bluetooth
2 402-2 480 MHz 9 dBm
8 English
Accessories
Standard accessories
Remote Control (p. 18)
N2QAYB001179
Installing the TV
Assembling / Removing the pedestal
Assembly screw (4) M4 × 15
Base
Pedestal (p. 9)
Cable clamp (2) (p. 16)
Cable tie (3) (p. 16)
Pedestal cover
Batteries (2) R6
(p. 19)
Operating Instructions Production Registration Leaflet
Accessories may not be placed all together. Take care not to throw them away unintentionally.
English 9
Assembling the pedestal
2
1
C
Removing the pedestal
Be sure to remove the pedestal in the following procedures when you use the wall-hanging bracket or repack the TV. 1 Remove the pedestal cover . 2 Remove the assembly screws from the pedestal. 3 Pull out the pedestal from the TV.
B
A
10 English
Installing the wallhanging bracket
Please contact your local Panasonic dealer to purchase the recommended wall-hanging bracket.
Holes for wall-hanging bracket installation
Rear of the TV
55-inch model
a: 400 mm
a
b: 300 mm
b
65-inch model
a: 400 mm
b: 400 mm
(View from the side) Depth of screw minimum: 23 mm maximum: 28 mm Diameter: M6
Screw for fixing the TV onto the wall-hanging bracket (not supplied with the TV)
Warning
Using other wall-hanging brackets, or installing a wallhanging bracket by yourself have the risk of personal injury and product damage. In order to maintain the unit’s performance and safety, be absolutely sure to ask your dealer or a licensed contractor to secure the wall-hanging brackets. Any damage caused by installing without a qualified installer will void your warranty.
Carefully read the instructions accompanying optional accessories, and be absolutely sure to take steps to prevent the TV from falling off.
Handle the TV carefully during installation since subjecting it to impact or other forces may cause product damage.
Take care when fixing wall brackets to the wall. Always ensure that there are no electrical cables or pipes in the wall before hanging bracket.
To prevent fall and injury, remove the TV from its fixed wall position when it is no longer in use.
Connections
External equipment and cables shown are not supplied with this TV.
Please ensure that the unit is disconnected from the mains socket before attaching or disconnecting any cables.
Check the terminal type and cable plugs are correct for connection.
Use a fully wired HDMI compliant cable. Keep the TV away from electronic equipment (video
equipment, etc.) or equipment with an infrared sensor, otherwise distortion of image / sound may occur or operation of other equipment may be affected. Please also read the manual of the equipment being connected.
English 11
Removing the pedestal cover / terminal cover from the TV
Be sure to remove the pedestal cover / terminal cover before connecting or disconnecting cables.
When the connections are completed, attach the pedestal cover / terminal cover. (p. 17)
Terminal cover
12 English
C
Terminals 1
2
10 11
3
4 5
6 7
8 9
12
13
1 Model name plate 2 CI slot (p. 15) 3 SD card slot 4 HDMI1 – 2 (p. 13, 14, 15) 5 USB 1 port
This symbol indicates DC operation 6 Terrestrial terminal (p. 13) 7 Satellite terminal (p. 13) 8 ETHERNET terminal (p. 14) 9 Headphone jack (p. 15) 10 USB 2 – 3 port 11 HDMI3 – 4
12 AV (COMPONENT / VIDEO) (p. 15)
13 DIGITAL AUDIO To watch content in 4K format, use HDMI terminal.
(p. 14)
Basic connections
Mains lead
AC 220-240 V 50 / 60 Hz
Satellite connection
For Freesat, Other Sat., Satellite
Dual Tuner
TV
Mains lead
Cable tie (Bundled the mains lead) To loosen:
Satellite cables Satellite dish
Single Tuner
TV
Knob
Keep pushing the knob
To remove from the TV:
Snaps Keep pushing both side snaps
Aerial
TV
Satellite cable Satellite dish To ensure your satellite dish is correctly installed, please consult your local dealer. Also consult the received satellite broadcasting companies for details.
AV devices
DVD Recorder / Blu-ray Recorder, etc.
TV
RF cable Terrestrial aerial For DVB, Analogue
RF cable HDMI cable DVD Recorder / Blu-ray Recorder, etc. Terrestrial aerial
English 13
Cable TV box
TV
Connections for 4K / HDR compatible equipment
TV
Cable
HDMI cable RF cable Cable TV box Terrestrial aerial
Network
A broadband network environment is required to be able to use internet services. If you do not have any broadband network services,
please consult your retailer for assistance. Prepare the internet environment for wired connection
or wireless connection. Setup of the network connection will start when first
using the TV. (p. 20)
Wired connection
TV
Internet environment
LAN cable (Shielded) Use Shielded Twist Pair (STP) LAN cable.
Wireless connection
Internet environment
Built-in wireless LAN (Rear of the TV) Access point
HDMI cable
4K / HDR compatible equipment
To watch high-definition 4K more accurately or HDR content, connect the 4K compatible equipment to HDMI1 or 2 terminal.
Connect the 4K compatible equipment to HDMI terminal using a 4K compatible cable and you can watch content in 4K format.
Supporting HDR does not increase the peak brightness capabilities of the TV panel.
[HDMI Auto Setting] (Setup Menu)
Reproduces the image more precisely with the expanded colour gamut when connecting the 4K compatible equipment. Select the mode depending on the equipment.
[Mode1]: For better compatibility. Set to [Mode1] when the image or sound in HDMI input is not played properly. [Mode2]: For the 4K compatible equipment that has the function to output the image precisely with the expanded colour gamut
To change the mode
1. Select the HDMI input mode connected to the equipment.
2. Display the menu and select [HDMI Auto Setting] (Setup Menu).
For information about the valid format, refer to [eHELP] (Search by Purpose > Watching > 4K resolution > HDMI Auto Setting).
14 English
Other connections
TV
DVD Player
(COMPONENT equipment)
TV
(Viewing)
(Listening)
DVD Player
Camcorder / Game equipment
(VIDEO equipment) TV
(Viewing)
(Listening)
Camcorder / Game equipment
Amplifier (listening with external speakers)
Use HDMI2 to connect the TV to an amplifier which has ARC (Audio Return Channel) function. If connecting to an amplifier without ARC function, use DIGITAL AUDIO.
To enjoy multi-channel sound from external equipment (e.g. Dolby Digital 5.1ch), connect the equipment to the amplifier. For information about the connections, read the manuals of the equipment and amplifier.
HDMI cable Amplifier with speaker system External equipment (DVD Player, etc.)
Headphones
For information about the volume settings, refer to [eHELP] (Search by Purpose > Settings > Sound).
TV
(3.5 mm stereo mini plug)
Common Interface
Turn the TV off with Mains Power On / Off switch whenever inserting or removing the CI module.
If a smart card and a CI module come as a set, first insert the CI module, then insert the smart card into the CI module.
Insert or remove the CI module completely in the correct direction as shown.
Normally encrypted channels will appear. (Viewable channels and their features depend on the CI module.) If encrypted channels do not appear [Common Interface] in the Setup Menu
There might be some CI modules in the market with older firmware versions that do not work fully interoperable with this new CI+ v1.4 TV. In this case, please contact your content provider.
For details, refer to [eHELP] (Search by Purpose > Functions > Common Interface), read the manual of the CI module, or check with the content provider.
Be sure to remove the CI module card, etc. before repairing, transferring or discarding.
TV
CI module
English 15
USB HDD (for recording)
Use USB 1 port for connecting the USB HDD.
For details, refer to [eHELP] (Search by Purpose > Recording).
VIERA Link
Use HDMI1 – 4 for VIERA Link connection.
For details, refer to [eHELP] (Search by Purpose > Functions > VIERA Link “HDAVI ControlTM”).
Cable arrangement
Fix the cables using the cable clamp, cable tie, etc. and then attach the terminal cover to the TV.
Fixing the Mains lead using the cable clamp
Attach the cable clamp Insert the cable clamp in a hole
Hole
Bundle the cable Set
To release: Keep pushing the tab Tab
Tab To remove from the TV:
Keep pushing both side snaps
Snaps
16 English
Fixing the cables using the cable tie
Attaching the terminal cover / pedestal
cover
Do not apply load to the terminal cover / pedestal cover.
Be careful not to nip the cables between the TV and the terminal cover / pedestal cover.
When using USB 2 port, USB 3 port, AV terminal, DIGITAL AUDIO, HDMI3 terminal or HDMI4 terminal, you cannot attach the terminal cover. Keep the removed terminal cover for future use.
Attach the cable tie Insert the cable tie in a hole
Hole Bundle the cables
Set the tip in the hooks Hooks
To loosen: Keep pushing the knob
Knob C
To remove from the TV:
Snaps
Keep pushing both side snaps
<Example>
Fix cables as necessary.
When using the optional accessory, follow the option’s assembly manual to fix cables.
English 17
Identifying Controls
Remote Control
1 [ ]: Switches TV On or Off (Standby) 2 PICTURE
Changes Viewing Mode. 3 [Main Menu]
Press to access Picture, Sound, Network, Timer, Setup and Help Menus, etc.
4 Text service button 5 Information
Displays channel and programme information. 6 Netflix
Accesses NETFLIX service directly. A broadband network environment is required in
order to fully use this function. This service may be stopped or changed without
notice.
18 English
7 OK Confirms selections and choices. Press after selecting channel positions to quickly change channel.
8 [Option Menu] Easy optional setting for viewing, sound, etc.
9 Coloured buttons (red-green-yellow-blue) Used for the selection, navigation and operation of various functions.
10 Volume Up / Down 11 Numeric buttons
Changes channel and teletext pages. Sets characters. When in Standby mode, switches TV on.
12 [eHELP] Displays [eHELP] (Built-in Operating Instructions).
13 [My App] Assigns a favourite application. After setting, starts the application easily by pressing this button. For details, refer to [eHELP] (Search by Purpose > Home > Apps)
14 Input mode selection TV – switches to Freesat / DVB / Analogue / Other Sat. / Satellite. AV – switches to AV input mode from Input Selection list.
15 APPS Displays [Apps] (applications list).
16 Subtitles Displays subtitles.
17 Exit Returns to the normal viewing screen.
18 HOME Displays [Home]. For details, refer to [eHELP] (Search by Purpose > Read first > Features).
19 TV Guide Displays Electronic Programme Guide.
20 Cursor buttons Makes selections and adjustments.
21 Return Returns to the previous menu / page.
22 Channel Up / Down 23 Sound Mute On / Off 24 Freeview Play
Accesses Freeview Play service directly. A broadband network environment is required in
order to fully use this function. This service may be stopped or changed without
notice.
25 Operations for contents, connected equipment, etc.
Installing / Removing batteries
Hook
Pull open
Note the correct polarity (+ or -)
Close
Indicator / Control panel
When pressing 4, 5, 6 buttons, the control panel guide appears on the right side of the screen for 3 seconds to highlight which button has been pressed.
4
5
6
1 23
7 Rear side of the TV
1 Remote control signal receiver
Do not place any objects between the TV remote control signal receiver and remote control.
2 Ambient sensor
Senses brightness to adjust picture quality when [Ambient Sensor] in the Picture Menu is set to [On].
3 Power LED
Red: Standby
Green: On · Depending on the ambient brightness, adjusts the brightness of LED to easy-to-view levels automatically.
Orange: Standby with some functions (recording, etc.) active or panel maintenance in progress
The LED blinks when the TV receives a command from the remote control.
4 Input mode selection Press repeatedly until you reach the desired mode.
[Main Menu] Press and hold for about 3 seconds to display main
menu.
OK (when in the menu system) 5 Channel Up / Down
Cursor Up / Down (when in the menu system)
6 Volume Up / Down Cursor Left / Right (when in the menu system)
7 Mains power On / Off switch Use to switch the mains power. To turn Off the apparatus completely, you must pull the mains plug out of the mains socket. [ ]: Standby / On
Panel maintenance
Be sure to turn the TV off with the remote control to perform the panel maintenance. During the panel maintenance, LED turns to orange.
During panel maintenance, avoid touching and exerting any pressure on the screen. (e.g. wiping the screen, etc.)
There are two types of the maintenance as following.
Normal maintenance automatically starts, and it takes approx. 10 minutes.
Regular maintenance takes approx. 80 minutes.
· When regular maintenance is necessary, the message appears on the screen after turning the TV off with the remote control. Follow the onscreen instructions.
· During the panel maintenance, a white horizontal line appears on the screen for a while. This is not a malfunction.
For information about panel maintenance, refer to [eHELP] (Search by Purpose > Watching > For best picture > Screen Settings)
English 19
First time Auto Setup
When the TV is turned on for the first time, it will automatically search for available TV channels and give options to set up the TV. These steps are not necessary if the setup has been
completed by your local dealer. Please complete connections (p. 11 – 17) and settings
(if necessary) of the connected equipment before starting Auto Setup. For information about the settings for the connected equipment, read the manual of the equipment.
1 Plug the TV into a live mains socket
and turn the power on
Takes a few seconds to be displayed.
Select your region
Auto Setup is now complete and the TV is ready for viewing.
If tuning has failed check the Satellite cable, RF cable, and the network connection, and then follow the onscreen instructions.
Note
The TV goes into Standby mode when no operation is performed for 4 hours if [Auto Standby] in the Timer Menu is set to [On].
The TV goes into Standby mode when no signal is received and no operation is performed for 10 minutes if [No signal Power off] in the Timer Menu is set to [On].
To retune all channels [Auto Setup] in [Tuning Menu] (Setup Menu)
To add the available TV signal mode later [Add TV Signal] in [Tuning Menu] (Setup Menu)
To initialise all settings [Shipping Condition] in [System Menu] (Setup Menu)
2 Select the following items
Set up each item by following the on-screen instructions.
Example:
Please select your viewing environment.
Home
Shop
How to use the remote control
Move the cursor
Access the item / store the setting
Return to the previous item (if available)
Select [Home] Select [Home] for use in a home viewing environment. [Shop] is for shop display. To change the viewing environment later on, the set
will need to have all settings initialised by accessing Shipping Condition.
Set up the network connection Select your country Auto Setup screen varies depending on the country
and the signal mode. [Satellite Antenna Setup]
Ensure the satellite connections are completed (p. 13) and select the tuner mode ([Dual Tuner] / [Single Tuner]).
20 English
Watching TV
1 Turn power on
(TV) or
(Remote Control) Mains power On / Off switch should be on.
(p. 19) Displays the information bar at the bottom of the screen for several seconds. For information about the operation and settings,
refer to [eHELP]. (Search by Purpose > Read first > Features)
2 Select the mode
TV Selection Freesat DVB Analogue Other Sat. Satellite Selectable modes vary depending on the stored channels and selected country.
3 Select a channel
up down or
Freesat channel position numbers are in the 101 999 and 0101 – 0999 ranges. DVB and Other Sat. / Satellite channel position begin from number 1 upward. Analogue channel position numbers are in the 0 – 99 range.
How to Use eHELP
[eHELP] is the detailed operating instructions built into the TV, and gives a more detailed explanation for a better understanding of the operation of each feature.
1 Display [eHELP]
or
[Help]
[eHELP]
If the [eHELP] has been accessed previously since the TV was turned on, the confirmation screen is displayed to select whether to go to the [First page] or to the [Last viewed page].
2 Select the menu
select
access
To access [How to use] (green)
[Keyword Search]: Search the content of eHELP in the keyword.
[Search by Purpose]: Search the content of eHELP for each item.
[Support]: Access the support information (FAQs, etc.).
3 Select the item
Example:
select access To return to the previous screen / field
English 21
To scroll the description (if more than 1 page) While the description is highlighted
To open the reference screen (
)
To display the menu related to the description (only for some descriptions)
(red) To check the features of this TV
Search by Purpose > Read first > Features
22 English
FAQs
Before requesting service or assistance, please follow these simple guides to solve the problem. For details, refer to [eHELP] (Support > FAQs).
It takes several seconds to display the image after turning the TV on When turning the TV on, the panel adjustment is
performed. It is not a malfunction.
The TV does not switch on Check the mains lead is plugged into the TV and the
mains socket. The fuse in the mains plug may have blown. Replace
it with one of an identical rating. (p. 5)
The TV goes into Standby mode Auto power standby function is activated.
The remote control does not work or is intermittent Are the batteries installed correctly? (p. 19) Has the TV been switched on? The batteries may be running low. Replace them with
new ones. Point the remote control directly at the TV’s remote
control signal receiver (within about 7 m and a 30 degree angle of the signal receiver). Situate the TV away from sunshine or other sources of bright light so they do not shine on the TV’s remote control signal receiver.
No image is displayed Check the TV is turned on. Check the mains lead is plugged into the TV and the
mains socket. Check the correct input mode is selected. Check the setting of [AV] ([COMPONENT] / [VIDEO])
in [Input Selection] to match the signal being output by the external equipment. Is [Luminance Level], [Contrast], [Brightness] or [Colour] in the Picture Menu set to the minimum? Check all required cables and connections are firmly in place.
An unusual image is displayed This TV has a built-in Self Test. Makes a diagnosis of
picture or sound problems. [TV Self Test] (Help Menu)
Turn the TV off with Mains power On / Off switch, then turn it on again.
If the problem persists, initialise all settings. [Shipping Condition] in [System Menu] (Setup Menu)
The image or sound from external equipment are unusual when the equipment is connected via HDMI Set [HDMI Auto Setting] (Setup Menu) to [Mode1]
(p. 14)
Parts of the TV become hot Parts of the TV may become hot. These temperature
rises do not pose any problems in terms of performance or quality.
When pushed with a finger, the display panel moves slightly and makes a noise There is a little gap around the panel to prevent
damage to the panel. This is not a malfunction.
About the inquiry Please contact your local Panasonic dealer for
assistance. If you make an inquiry from a place where this TV is not present, we cannot answer about contents that require visual confirmation for connection, phenomenon, etc. of this TV itself.
LED turns to orange Panel maintenance may be in progress.
LED turns to orange again in standby mode when the TV is turned on / off before the panel maintenance is completed. (Be sure to turn the TV off with the remote control to perform the panel maintenance.) During panel maintenance, avoid touching and exerting any pressure on the screen. (e.g. wiping the screen, etc.) For more information
“Panel maintenance” (p. 19)
The panel maintenance notification is displayed when turning the TV off with Standby On / Off switch of the TV’s remote control. Perform the panel maintenance. Select [Turn the
TV off now] and press OK button to start the panel maintenance. The panel maintenance is interrupted when selecting [Don’t start panel maintenance this time] or turning the TV off while the notification is displayed. The notification is displayed again when turning the TV off with Standby On / Off switch of the TV’s remote control next time. For more information
“Panel maintenance” (p. 19)
A white horizontal line appears in Standby mode. A white horizontal line may appear on the screen for a
while to adjust the panel. This is not a malfunction.
English 23
Check you can get Freeview HD in your area by visiting www.freeview.co.uk
To get the most up to date service from Freeview it is important for Freeview customers to retune from time to time. How do I re-tune my Freeview TV ?
This is a quick reference. If you have any problems, check the Operating Instructions or ask a friend or family member to show you how. Alternatively, go to your local electrical retailer, contact your local Panasonic dealer or visit freeview.co.uk/retune
Re-tuning only takes a few minutes, just follow the steps below:
1. Press the TV button to select DVB mode.
2. Press the MENU button to open the main menu.
3. [Setup] [DVB Tuning Menu] [Auto Setup] Please note: most digital TV recorders will keep your original recordings after running a re-tune but you will need to reset any future recordings.
Maintenance
First, remove the mains plug from the mains socket.
Display panel, Cabinet, Pedestal
Regular care: Gently wipe the surface of the display panel, cabinet, or pedestal by using a soft cloth to remove dirt or fingerprints. For stubborn dirt: (1) First clean the dust from the surface. (2) Dampen a soft cloth with clean water or diluted
neutral detergent (1 part detergent to 100 parts water). (3) Wring out the cloth firmly. (Please note, do not let liquid enter the TV inside as it may lead to product failure.) (4) Carefully wipe moisten and wipe away the stubborn dirt. (5) Finally, wipe away all the moisture.
Caution Do not use a hard cloth or rub the surface too hard,
otherwise this may cause scratches on the surface. Take care not to subject the surfaces to insect
repellent, solvent, thinner or other volatile substances. This may degrade surface quality or cause peeling of the paint. The surface of the display panel is specially treated and may be easily damaged. Take care not to tap or scratch the surface with your fingernail or other hard objects. Do not allow the cabinet and pedestal to make contact with a rubber or PVC substance for a long time. This may degrade surface quality.
Mains plug
Wipe the mains plug with a dry cloth at regular intervals. Moisture and dust may cause fire or electrical shock.
24 English
Specifications
TV
Model No. 55-inch model : TX-55FZ802B 65-inch model : TX-65FZ802B
Dimensions (W × H × D)
55-inch model 1 228 mm × 774 mm × 300 mm (With Pedestal) 1 228 mm × 713 mm × 62 mm (TV only)
65-inch model 1 449 mm × 898 mm × 300 mm (With Pedestal) 1 449 mm × 837 mm × 62 mm (TV only)
Mass
55-inch model 27.5 kg Net (With Pedestal) 22.0 kg Net (TV only)
65-inch model 33.5 kg Net (With Pedestal) 28.0 kg Net (TV only)
Power source AC 220-240 V, 50 / 60 Hz
Panel OLED panel
Sound Speaker output 40 W (10 W × 2 + 10 W × 2) Headphones 3.5 mm stereo mini jack × 1
Connection terminals AV input (COMPONENT / VIDEO) VIDEO Pin jack × 1 1.0 V[p-p] (75 ) AUDIO L – R Pin jack × 2 0.5 V[rms] Y 1.0 V[p-p] (including synchronisation) PB/CB, PR/CR ±0.35 V[p-p]
HDMI 1 / 2 / 3 / 4 input TYPE A Connectors HDMI1 / 3 / 4: 4K, Content Type, Deep Colour, x.v.ColourTM HDMI2: 4K, Content Type, Audio Return Channel, Deep Colour, x.v.ColourTM
This TV supports “HDAVI Control 5” function.
Card slot SD Card slot × 1 Common Interface slot (complies with CI Plus) × 1
ETHERNET RJ45, IEEE802.3 10BASE-T / 100BASE-TX
USB 1 / 2 / 3 USB1: DC 5 V, Max. 900 mA [SuperSpeed USB (USB 3.0)] USB2 / 3: DC 5 V, Max. 500 mA [Hi-Speed USB (USB 2.0)]
DIGITAL AUDIO output PCM / Dolby Digital, Fibre optic
Receiving systems / Band name
DVB-S / S2 (Freesat / Other Sat.)
Freesat services via Satellite dish input Receiver frequency range – 950 MHz to 2 150 MHz Not available for DiSEqC control
DVB-S / S2 Receiver frequency range – 950 MHz to 2 150 MHz Not available for DiSEqC control
DVB-T / T2 Digital terrestrial services
PAL I UHF E21 – 68
PAL I VHF A – J CATV S1 – S20 UHF E21 – E69 CATV S21 – S41 (Hyperband)
English 25
PAL 525/60 Playback of NTSC tape from some PAL Video recorders (VCR) or NTSC disc playback from DVD player and recorder
M.NTSC Playback from M.NTSC Video recorders (VCR)
NTSC (AV input only) Playback from NTSC Video recorders (VCR)
Satellite dish input Female F-type 75 × 2
Aerial input
UHF
VHF / UHF
Operating conditions Temperature 0 °C – 35 °C Humidity 20 % – 80 % RH (non-condensing)
Built-in wireless LAN Standard compliance and Frequency range*1 IEEE802.11a/n 5.180 GHz – 5.320 GHz, 5.500 GHz – 5.580 GHz, 5.660 GHz – 5.700 GHz IEEE802.11b/g/n 2.412 GHz – 2.472 GHz Security WPA2-PSK (TKIP/AES) WPA-PSK (TKIP/AES) WEP (64 bit/128 bit)
Bluetooth wireless technology*2 Standard Compliance Bluetooth 3.0 Frequency Range 2.402 GHz – 2.480 GHz
*1: The frequency and channel differ depending on the country.
*2: Not all the Bluetooth compatible devices are available with this TV. Up to 5 devices can be used simultaneously.
Note
Design and Specifications are subject to change without notice. Mass and Dimensions shown are approximate.
For information about the power consumption, display resolution, etc., refer to Product fiche.
For information about the open source software, refer to [eHELP] (Search by Purpose > Read first > Before use > Licence).
26 English
Disposal of Old Equipment and Batteries Only for European Union and countries with recycling systems
These symbols on the products, packaging, and/or accompanying documents mean that used electrical and electronic products and batteries must not be mixed with general household waste. For proper treatment, recovery and recycling of old products and used batteries, please take them to applicable collection points in accordance with your national legislation. By disposing of them correctly, you will help to save valuable resources and prevent any potential negative effects on human health and the environment. For more information about collection and recycling, please contact your local municipality. Penalties may be applicable for incorrect disposal of this waste, in accordance with national legislation.
Note for the battery symbol (bottom symbol): This symbol might be used in combination with a chemical symbol. In this case it complies with the requirement set by the Directive for the chemical involved.
Sales and Support Information
Customer Communications Centre · For customers within the UK: 0344 844 3899 · For customers within Ireland: 01289 8333 · Monday – Friday 9:00am – 5:00pm, (Excluding public holidays). · For further support on your product, please visit our website: www.panasonic.co.uk
Direct Sales at Panasonic UK · Order accessory and consumable items for your product with ease and confidence by phoning our Customer Communications Centre Monday – Friday 9:00am – 5:00pm, (Excluding public holidays). · Or go on line through our Internet Accessory ordering application at www.pas-europe.com. · Most major credit and debit cards accepted. · All enquiries transactions and distribution facilities are provided directly by Panasonic UK. · It couldn’t be simpler! · Also available through our Internet is direct shopping for a wide range of finished products. Take a browse on our website for further details.
Customer’s Record
The model number and serial number of this product may be found on the model name plate and serial number label located on the rear panel (when the terminal cover is removed.). You should note this serial number in the space provided below and retain this book, plus your purchase receipt, as a permanent record of your purchase to aid in identification in the event of theft or loss, and for Warranty Service purposes.
Model Number
Serial Number
Willoughby Road, Bracknell, Berkshire, RG12 8FP Web Site: http://www.panasonic.com
© Panasonic Corporation 2018
English
Printed in the Czech Republic 04-2018
Documents / Resources
 |
Panasonic OLED TV [pdf] Instruction Manual OLED TV, TX-55FZ802B, TX-65FZ802B |
References

Retune videos | Freeview
Freeview | All your favourite TV shows, all in one place and all for free
Electronics, Beauty & Appliances | Panasonic UK & Ireland
Panasonic North America | Technologies that Move Us
Panasonic UK/Eire Spare Part Sales
Panasonic Testing Centre
Leave a comment
Cancel reply
]]>Safety precautions
Unit
WARNING:
- To reduce the risk of fire, electric shock or product damage,
- Do not expose this unit to rain, moisture, dripping or splashing.
- Do not place objects filled with liquids, such as vases, on this unit.
- Use the recommended accessories.
- Do not remove covers.
- Do not repair this unit by yourself. Refer servicing to qualified service personnel.
Avoid the use in the following conditions
- High or low extreme temperatures during use, storage or transportation
- Disposal of a battery into fire or a hot oven, or mechanically crushing or cutting of a battery, that can result in an explosion.
- Extremely high temperature and/or extremely low air pressure that can result in an explosion or the leakage of flammable liquid or gas.
- Avoid using or placing this unit near sources of heat.
- Do not listen with this unit at high volume in places where you need to hear sounds from the surrounding environment for safety, such as at railroad crossings, and construction sites.
Earpieces
- Keep the earpieces out of reach of children to prevent swallowing.
- Securely attach the earpieces. If they are left in the ears after coming off, injury or sickness may be caused.
Allergies
- Discontinue use if you experience discomfort with the earphones or any other parts that directly contact your skin.
- Continued use may cause rashes or other allergic reactions.
Precautions for listening with the Earphones
- Excessive sound pressure from earphones and headphones can cause hearing loss.
- Do not use your earphones at a high volume. Hearing experts advise against continuous extended play.
- If you experience a ringing in your ears, reduce volume or discontinue use
- Do not use while operating a motorised vehicle. It may create a traffic hazard and is illegal in many areas.
- You should use extreme caution or temporarily discontinue use in potentially hazardous situations.
This unit may receive radio interference caused by mobile telephones during use. If such interference occurs,
please increase separation between this unit and the mobile telephone.
Use only the supplied USB charging cord when connecting to a computer.
This unit is intended for use in moderate and tropical climates.
About Bluetooth®
Panasonic bears no responsibility for data and/or information that is compromised during a wireless transmission.
Frequency band used
This unit uses the 2.4 GHz frequency band.
Certification of this unit
- This unit conforms to frequency restrictions and has received certification based on frequency laws. Thus, a wireless permit is not necessary.
- The actions below are punishable by law in some countries:
- Taking apart/modifying this unit.
- Removing specification indications.
Restrictions of us
- Wireless transmission and/or usage with all Bluetooth® equipped devices is not guaranteed
- All devices must conform to standards set by Bluetooth SIG, Inc.
- Depending on the specifications and settings of a device, it can fail to connect or some operations can be different.
- This unit supports Bluetooth® security features. But depending on the operating environment and/or settings, this security may not be sufficient. Transmit data wirelessly to this unit with caution
- This unit cannot transmit data to a Bluetooth® device.
Range of use
Use this unit at a maximum range of 10 m.
The range can decrease depending on the environment, obstacles or interference.
Interference from other devices
- This unit may not function properly and troubles such as noise and sound jumps may arise due to radio wave interference if this unit is located too to other Bluetooth® devices or the devices that use the 2.4 GHz band.
- This unit may not function properly if radio waves from a nearby broadcasting station, etc. is too strong.
Intended usage
- This unit is for normal, general use only.
- Do not use this system near an equipment or in an environment that is sensitive to radio frequency interference (example: airports, hospitals, laboratories, etc.).
Expressions used in this document
- Pages to be referred to are indicated as
 .
. - The product illustrations may differ from the actual product
Accessories
Please check and identify the supplied accessories
- 1 x USB charging cord
- 1 x Earpieces set (L, S)
- M-size earpieces are attached at the time of purchase.
Maintenance
Clean this unit with a dry and soft cloth.
- Do not use solvents including benzine, thinner, alcohol, kitchen detergent, a chemical wiper, etc. This might cause the exterior case and the cord to be deformed or the coating to come off.
Keeping the battery performance
- During the long period of disuse, full charge this unit once every 6 months to keep the battery performance.
Part names

- (A) Left earphone
- (B) Right earphone
- (C) Remote controller
- Earpiece
- Battery case
- Raised dot indicating the left side
- LED indicator light*1*2
- Microphone
- USB lid
- Charging terminal (DC IN)
• Open the USB lid and connect the USB charging cord (supplied) to this terminal when charging. ( 7)
7) - [+] button
- [
 ] button
 - [–] button
- Hereafter referred to as “LED”
- Examples of lighting/blinking patterns
- The battery is low when it is blinking in red. ( 13, “Battery level notification”)
Lighting (red): Charging is in progress Blinking alternately in blue and red: Bluetoothe pairing (registration) standby Blinking slowly (blue): Bluetoothe connection standby Blinking twice about every 2 seconds (blue)3: A Bluetoote pairing (registration) has been established or a call is in progress Blinking (blue).3: A call is being received
Charging
The rechargeable battery (installed in the unit) is not charged initially. Charge the battery before using the unit.
- Open the USB lid.
- If there is moisture in the USB lid area, wipe it off before opening the lid.
- Connect this unit to a computer using the USB charging cord.
(A): LED
(B): USB charging cord (supplied)
- Check the direction of the terminals and plug in/out straight holding onto the plug. (It may result in malfunction by the deforming of the terminal if it is plugged in obliquely or in wrong direction.)
(C): Computer

- Turn on the computer in advance
- The LED lights in red when charging is in progress. When charging is completed, the LED will go out.
- It takes approx. 2 hours to charge the battery from empty to full.
- Check the direction of the terminals and plug in/out straight holding onto the plug. (It may result in malfunction by the deforming of the terminal if it is plugged in obliquely or in wrong direction.)
- Close the USB lid securely.
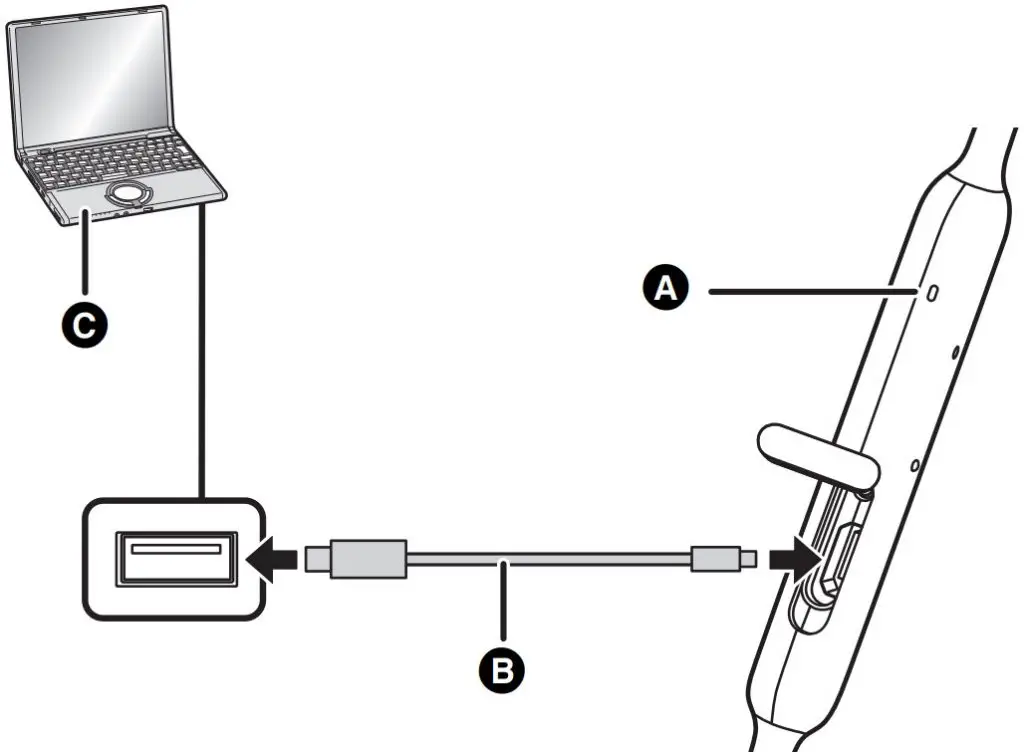
Attention
Do not touch the charging terminal with wet hand.
- If sweat or liquid is attached to the charging terminal, malfunction may occur.
Note
- Charge in a room temperature between 10 oC and 35 oC. Outside of this temperature range, charging may stop and the LED may go out.
- It is not possible to turn the power on or connect to Bluetooth® devices during charging.
- Do not use any other USB charging cords except the supplied one. Doing so may cause malfunction.
- Charging may not be performed or may stop if the computer is in or switched to standby or sleep mode.
Turning the power on/off
In the power-off state, press and hold [![]() ] of this unit for approx. 3 seconds until the LED (blue) blinks.
] of this unit for approx. 3 seconds until the LED (blue) blinks.
- A beep will sound, and the LED (blue) will blink slowly.
To turn the power off
Press and hold [![]() ] for approximately 3 seconds. An English
] for approximately 3 seconds. An English
guidance message will be heard, and the power will be turned off.

- It is possible to switch the audio guidance between English and French. ( 13)
Note
- If the unit is not connected to a Bluetooth® device, an English guidance message will be heard and turn off the unit automatically approximately 5 minutes after you have stopped using it. 13, “Auto power off”)
- It is possible to switch the audio guidance between English and French. ( 13)
How to wear the earphones
The left earphone has the raised dot as shown in the illustration.
- M-size earpieces are attached at the time of purchase. If they are not the right size, replace them with S or L-size earpieces (supplied)

Connecting a Bluetooth® device
Preparation
- Place the Bluetooth® device within approx. 1 m from the unit.
- Check the device operation using its operation instructions as required.
Pairing (Registration) this unit with the Bluetooth® device for connection
- In the power-off state, press and hold [] of this unit until the LED blinks.
When pairing a device for the first time:approx. 3 seconds
When pairing a second or subsequent devices: approx. 5 seconds- The unit starts to search for the Bluetooth® device for connection, and the LED will blink in blue and red alternately
- Turn on the power of the Bluetooth® device, and enable the Bluetooth® function
- Select “RP-HTX20B” from the Bluetooth® device’s menu.
- `A MAC address (an alphanumeric character string that is displayed by and unique to the device) may be displayed before “RP-HTX20B” is displayed.
- If prompted for a passkey, input the passkey “0000 (four zeros)” of this
unit.

- Check the connection with the Bluetooth® device on the unit.
- The LED will blink in blue and red alternately until the connection with the device is completed. When the LED (blue) blinks twice every approx. 2 seconds, pairing (registration) is completed. (Connection established)
- The LED will blink in blue and red alternately until the connection with the device is completed. When the LED (blue) blinks twice every approx. 2 seconds, pairing (registration) is completed. (Connection established)
Note
- If connection to a device is not established within approximately 5 minutes, the unit will be turned off. Perform pairing again.
- You can pair up to 8 Bluetooth® devices with this unit. If a 9th device is paired, the device with the oldest connection will be replaced. To use it, perform pairing again.
Connecting a paired Bluetooth® device
- Turn on this unit.
- Press and hold [] of this unit for approx. 3 seconds until the LED (blue) blinks.
- A beep will sound, and the LED (blue) will blink slowly.
- Press and hold [
- Perform steps 2 and 3 of “Pairing (Registration) this unit with the Bluetooth® device for connection”. ( 9)
- When the LED (blue) blinks twice every approx. 2 seconds, pairing (registration) is completed. (Connection established)
Note
- This unit remembers the device lastly connected. Connection may be automatically established after step 1 (see above).
- If connection to a device is not established within approximately 5 minutes, the unit will be turned off. Turn on the unit again.
Listening to music
If the Bluetooth® compatible device supports the “A2DP” and “AVRCP” Bluetooth® profiles, music can be played back with remote control operations on the unit.
- A2DP (Advanced Audio Distribution Profile): Transmits audio to the unit.
- AVRCP (Audio/Video Remote Control Profile): Allows remote control of the device using the unit
- Connect the Bluetooth® device and the unit. (l 9, “Connecting a Bluetooth® device”)
- Select and play the music on the Bluetooth® device.
- The unit’s earphones will output the music or the audio of the video being played back.
- Operating time:
The maximum playback time is approximately 8 hours and 30 minutes. (It may become shorter depending on the usage conditions.)
Attention
- The unit might leak sound depending on the volume level.
- When the volume is increased to near maximum level, music may sound distorted. Decrease the volume until the distortion is cleared.
Remote controlling
You can control the Bluetooth® device using the unit.
- Depending on the Bluetooth® device or the app, even if you press buttons on the unit, some functions may not respond or may operate differently from the descriptions below.
(Operation example)

| Function | Operation |
| Play/Pause | Press [0]. |
| Increase the volume | Press [+]. |
| Decrease the volume | Press I- I. |
| Forward to the start of next track |
Press and hold (+I for approximately 2 seconds. |
| Return to the start of current track |
Press and hold (–] for approximately 2 seconds. |
Note
- The volume can be adjusted in 16 levels. When the maximum or minimum volume is reached, a beep will sound.
Making a phone call
With Bluetooth® enabled phones (cell phones or smartphones) that support the “HSP” or “HFP” Bluetooth® profile, you can use the unit for phone calls.
- HSP (Headset Profile):
This profile can be used to receive monaural sounds and establish two-way communication using the microphone on the unit. - HFP (Hands-Free Profile):
In addition to the HSP functions, this profile has the incoming and outgoing calls function. (This unit does not have a function that allows you to make phone calls independently of a Bluetooth® enabled phone.)
- Connect the Bluetooth® device and the unit. ( 9, “Connecting a Bluetooth® device”)
- Press [ ] on the unit and answer the incoming call.
- During an incoming call, ringtone will sound from the earphones and the
LED will blink. - (HFP only) To reject the incoming call, press [ ] twice quickly..
- During an incoming call, ringtone will sound from the earphones and the
- Start talking.
- The LED will repeatedly blink 2 times during a call.
- The volume can be adjusted during a phone call. For setting instructions, see page 11.
- Press [ ] to end the phone call.
- A beep will sound.
Note
- There may be instances when hands free setting needs to be done on the Bluetooth® enabled phone.
- Depending on the Bluetooth® enabled phone, you may hear incoming and outgoing call ringtones of the phone from the unit.
- (HFP only) It may be difficult to hear phone conversations when the unit is used in locations with loud ambient noise or in outdoor or other locations exposed to powerful winds. In that case, change the calling location or switch the calling device to the Bluetooth® enabled phone to continue the call. (Press [ ] on the unit twice quickly to switch.)
- You can have the Bluetooth® enabled phone make phone calls by using the microphone of the unit and an app of the Bluetooth® enabled phone. (13, “Activating voice functions”)
Useful functions
Activating voice functions
You can activate Siri or other voice functions with a button on the unit.
- Connect the Bluetooth® device and the unit. ( 9, “Connecting a Bluetooth® device”)
- Press [ ] of this unit twice quickly.
- The voice function on the Bluetooth® device will be activated.
Note
- For details about voice function commands, refer to the operating instructions for the Bluetooth® device.
- The voice function may not work depending on the smartphone specifications and the app version.
Guidance messages
The unit is equipped with an a function that provides an audio notification when you turn off the unit, connect a Bluetooth® device or change a setting, for example.
- This unit has English and French messages for the audio guidance.
- The audio guidance function cannot be disabled.
- The audio guidance volume cannot be adjusted.
Switching the audio guidance language
Press and hold [![]() ] and [–] for at least 5 seconds.
] and [–] for at least 5 seconds.
Battery level notification
- When the unit is turned off, an English guidance message will be heard indicating the battery level.
- When the battery starts running low during use of the unit, the blinking LED will turn from blue to red. A beep will sound every 1 minute. When the battery runs out, an English guidance message will be heard and the power will turn off.
- It is possible to switch the audio guidance between English and French. (above)
Auto power off
If the unit is not connected to a Bluetooth® device, an English guidance message will be heard and turn off the unit automatically approximately 5 minutes after you have stopped using it.
- It is possible to switch the audio guidance between English and French. ( above)
Resetting the unit
This unit can be reset when all operations are rejected. To reset the unit, press and hold [![]() ] for 10 seconds or more. All the previous operations will be cancelled. (The pairing device information will not be deleted.)
] for 10 seconds or more. All the previous operations will be cancelled. (The pairing device information will not be deleted.)
Restoring to the factory settings
When you want to delete all pairing device information, etc., you can restore the unit to the factory settings (original settings upon purchase). Charge the battery before restoring the unit.
- While the unit is turned off, press and hold [ ] for at least 5 seconds until the LED starts blinking alternately in blue and red.
- While the LED is blinking alternately in blue and red, press and hold [+] and [–] at the same time for at least 5 seconds.
- The default settings will be restored after the LED (blue) blinks fast and the unit turns off.
Attention
- When pairing a device again, delete the registering information (Device: “RP-HTX20B”) from the Bluetooth® device’s menu, and register this unit with the Bluetooth® device again. ( 9)
Copyright, etc
The Bluetooth® word mark and logos are registered trademarks owned by Bluetooth SIG, Inc. and any use of such marks by Panasonic Corporation is under license.
Other trademarks and trade names are those of their respective owners. Siri is a trademark of Apple Inc., registered in the U.S. and other countries.
Other system names and product names appearing in this document are in general the registered trademarks or trademarks of the respective developer companies.
Note that the TM mark and ® mark do not appear in this document.
Troubleshooting
Before requesting service, make the following checks. If you are in doubt about some of the check points, or if the remedies indicated do not solve the problem, consult your dealer for instructions.
Sound and audio volume
No sound.
- Make sure that the unit and the Bluetooth® device are connected correctly. ( 9)
- Check if music is playing on the Bluetooth® device.
- Make sure that the unit is turned on and the volume is not set too low.
- Pair and connect the Bluetooth® device and the unit again. ( 9)
- Check if the Bluetooth® compatible device supports “A2DP” profile. For details on profiles, see “Listening to music” ( 11). Also refer to the operating manual for the Bluetooth® compatible device.
Low volume.
- Increase the volume of the unit. ( 11)
- Increase the volume on the Bluetooth® device.
Sound from the device is cut off. / Too much noise. / Sound quality is bad.
- Sound may be disrupted if signals are blocked. Do not fully cover this unit with the palm of your hand, etc.
- The device may be out of the 10 m communication range. Move the device closer to this unit.
- Remove any obstacle between this unit and the device.
- Switch off any wireless LAN device when not in use.
Bluetooth® device connection
The device cannot be connected.
- You can pair up to 8 Bluetooth® devices with this unit. If a 9th device is paired, the device with the oldest connection will be replaced.
- Delete the pairing information for this unit from the Bluetooth® device, then pair them again. ( 9)
Phone Calls
You cannot hear the other person.
- Make sure that the unit and the Bluetooth® enabled phone are turned on.
- Check if the unit and the Bluetooth® enabled phone are connected. ( 9)
- Check the audio settings of the Bluetooth® enabled phone. Switch the calling device to the unit if it is set to the Bluetooth® enabled phone. ( 9)
- If the volume of the other person’s voice is too low, increase the volume of both the unit and the Bluetooth® enabled phone.
Cannot make a phone call.
- Check if the Bluetooth® compatible device supports “HSP” or “HFP” profile. For details on profiles, see “Listening to music” ( 11) and “Making a phone call” (12). Also refer to the operating manual for the Bluetooth® enabled phone.
General
The unit does not respond.
- This unit can be reset when all operations are rejected. To reset the unit, press and hold [ ] for 10 seconds or more. ( 13)
Power supply and charging
- Cannot charge the unit. / LED does not light or flashes during charging. / Charging takes longer.
- Is the USB charging cord connected firmly to the USB terminal of the computer? ( 7)
- Make sure to charge in a room temperature between 10 oC and 35 oC.
- Make sure the computer is turned on and is not on standby or sleep mode.
- Is the USB port you are currently using working properly? If your computer has other USB ports, unplug the connector from its current port and plug it into one of the other ports.
- If the measures mentioned above are not applicable, unplug the USB charging cord and plug it in again.
- It takes approx. 2 hours to charge the battery from empty to full.
- If the charge time and operating time become shortened, the battery may have run down. (Number of charging times of the installed battery: Approximately 300)
- The LED lights in red when charging is in progress. When charging is completed, the LED will go out.
The power does not turn on. / The power turns off.
- Is the unit being charged? The power cannot be turned ON during charging. ( 7)
- The battery is low when the LED is blinking in red. Charge the unit.
- Is auto power off active? (13)
Guidance messages
The audio guidance language has changed.
- The audio guidance language can be switched. ( 13)
Specifications
| General | |
| Power supply | DC 5 V. 150 rnA (Internal battery: 3.7 V (Li-polymer 155 mA11)) |
| Operating time” | Approx. 8 hours 30 min |
| Charging time.2 (25 “C) | Approx. 2 hours |
| Charging temperature range | 10 “C to 35 eC |
| Operating temperature range | O’C to 40 “C |
| Operating humidity range | 35 %RH to 80 %RH (no condensation) |
| Driver units | 9 mm |
| Mass | Approx. 18 g |
| Bluetooth® section | |
| BluetoothS system specification | Ver. 4.2 |
| Wireless equipment classification | Cass 2 (2.5 mW) |
| Frequency band | 2402 MHz to 2480 MHz |
| Max RF power | 4 dBm |
| Supported profiles | A2DP. AVRCP. HSP. HFP |
| Supported codes | SBC |
| Operating distance | Up to 10 m |
| Terminal section | |
| DC IN | DC 5 V, 150 mA |
| Microphone section | |
| Type | Mono |
| Accessory | |
| USB charging cord | Approx. 0.1 m |
- It may be shorter depending on the operating conditions.
- The time required to charge the battery from empty to full.
- Specifications are subject to change without notice.
To remove the battery when disposing of this unit
The following instructions are not intended for repairing purposes but for the disposal of this unit.
This unit is not restorable once disassembled.
- When disposing of this unit, take out the battery installed in this unit and recycle it.
Danger
As the rechargeable battery is specifically for this product, do not use it for any other device.
- Do not charge the removed battery.
- Do not heat or expose to flame.
- Do not leave the battery(ies) in a car exposed to direct sunlight for a long period of time with doors and windows closed.
- Do not pierce the battery with a nail, subject it to an impact, or dismantle or modify it.
- Do not let the wires touch any other metal or each other.
- Do not carry or store the battery with a necklace, hair pin, or the like.
- Doing so may cause the battery to generate heat, ignite, or rupture.
Warning
Do not place the removed battery, and other items within reach of infants.
Accidental swallowing of such an item may have an adverse effect on the body.
- In the event that you think such an item has been swallowed, consult a doctor immediately.
In the event of fluid leaking from the battery, take the following measure, and do not touch the fluid with bare hands.
Fluid entering into an eye may cause loss of eyesight
- Wash the eye with water immediately without rubbing it, and then consult a doctor. Fluid getting on your body or clothes may cause inflammation of the skin or injury.
- Sufficiently rinse with clean water, and then consult a doctor.
A lithium-ion polymer rechargeable battery is built in to the battery case. Please discard according to local regulations. When disposing this product, disassemble properly by following the procedure, and remove the internal rechargeable battery.
- Disassemble after the battery runs out.
- When disposing of the battery, please contact your local authorities or dealer and ask for the correct method of disposal.
- Put a straight-slot screwdriver (commercially available) into the battery case.
- Make sure to keep fingers away from the tip of the screwdriver.
- Use a screwdriver that fits into the slit on the battery case. If it is too small, the battery case will not open properly.
- Use the screwdriver for leverage, and push the upper cover A upward.
- Be careful not to touch the battery with the screwdriver.
- Be careful not to touch the battery with the screwdriver.
- Hold the battery B, and remove it.
- Pull off the battery B and separate it from the battery case by cutting off the wires, one by one, with scissors.
- Insulate the wire parts of the removed battery with cellophane tape.
- Do not damage or dismantle the battery.
Panasonic Corporation
http://www.panasonic.com
Headphones Owner's Manual

http://shop.panasonic.com/support
http://shop.panasonic.com/support
www.panasonic.ca/english/support
IMPORTANT SAFETY INSTRUCTIONS
Read these operating instructions carefully before using the unit. Follow the safety instructions on the unit and the applicable safety instructions listed below. Keep these operating instructions handy for future reference.
- Read these instructions.
- Keep these instructions.
- Heed all warnings.
- Follow all instructions.
- Do not use this apparatus near water.
- Clean only with dry cloth.
- Do not block any ventilation openings. Install in accordance with the manufacturer’s instructions.
- Do not install near any heat sources such as radiators, heat registers, stoves, or other apparatus (including amplifiers) that produce heat.
- Do not defeat the safety purpose of the polarized or grounding-type plug. A polarized plug has two blades with one wider than the other. A grounding-type plug has two blades and a third grounding prong. The wide blade or the third prong are provided for your safety. If the provided plug does not fit into your outlet, consult an electrician for replacement of the obsolete outlet.
- Protect the power cord from being walked on or pinched particularly at plugs, convenience receptacles, and the point where they exit from the apparatus.
- Only use attachments/accessories specified by the manufacturer.

- Use only with the cart, stand, tripod, bracket, or table specified by the manufacturer, or sold with the apparatus. When a cart is used, use caution when moving the cart/ apparatus combination to avoid injury from tip-over.
- Unplug this apparatus during lightning storms or when unused for long periods of time.
- Refer all servicing to qualified service personnel. Servicing is required when the apparatus has been damaged in any way, such as power-supply cord or plug is damaged, liquid has been spilled or objects have fallen into the apparatus, the apparatus has been exposed to rain or moisture, does not operate normally, or has been dropped.
Safety precautions
![]() For US and Canada only Pour les É.-U. et le Canada securement
For US and Canada only Pour les É.-U. et le Canada securement
A lithium ion battery that is recyclable powers the product you have purchased. Please call 1-800-8-BATTERY for information on how to recycle this battery.
THE FOLLOWING APPLIES ONLY IN THE U.S.A. AND CANADA.
This device complies with Part 15 of FCC Rules and Innovation, Science and Economic Development Canada’s license-exempt RSS(s). Operation is subject to the following two conditions:
(1) this device may not cause harmful interference, and
(2) this device must accept any interference received, including interference that may cause undesired operation.
[RB-M500B]
FCC ID: ACJ-RB-M500B
Model: RB-M500B
IC: 216A-RBM500B
[RB-M300B]
FCC ID: ACJ-RB-M500B
Model: RB-M300B
IC: 216A-RBM500B
This transmitter must not be co-located or operated in conjunction with any other antenna or transmitter.
This equipment complies with FCC/ISED radiation exposure limits set forth for an uncontrolled environment and meets the FCC radio frequency (RF) Exposure Guidelines and RSS-102 of the ISED radio frequency (RF) Exposure rules as this equipment has very low levels of RF energy.
THE FOLLOWING APPLIES ONLY IN THE U.S.A.
FCC Note:
This equipment has been tested and found to comply with the limits for a Class B digital device, pursuant to Part 15 of the FCC Rules. These limits are designed to provide reasonable protection against harmful interference in a residential installation. This equipment generates, uses, and can radiate radio frequency energy and, if not installed and used in accordance with the instructions, may cause harmful interference to radio communications. However, there is no guarantee that interference will not occur in a particular installation. If this equipment does cause harmful interference to radio or television reception, which can be determined by turning the equipment off and on, the user is encouraged to try to correct the interference by one or more of the following measures:
- Reorient or relocate the receiving antenna.
- Increase the separation between the equipment and receiver.
- Connect the equipment into an outlet on a circuit different from that to which the receiver is connected.
- Consult the dealer or an experienced radio/TV technician for help.
FCC Caution:
Any unauthorized changes or modifications to this equipment would void the user’s authority to operate this device.
This device complies with Part 15 of the FCC Rules. Operation is subject to the following two conditions: (1) This device may not cause harmful interference, and (2) this device must accept any interference received, including interference that may cause undesired operation.
Supplier’s Declaration of Conformity
[RB-M500B]
Trade Name: Panasonic
Model No.: RB-M500B
[RB-M300B]
Trade Name: Panasonic
Model No.: RB-M300B
Responsible Party: Panasonic Corporation of North America Two Riverfront Plaza, Newark, NJ 07102-5490
Support Contact: http://shop.panasonic.com/support
THE FOLLOWING APPLIES ONLY IN CANADA.
CAN ICES-3(B)/NMB-3(B)
◼◾ Unit
WARNING:
To reduce the risk of fire, electric shock or product damage,
- Do not expose this unit to rain, moisture, dripping or splashing.
- Do not place objects filled with liquids, such as vases, on this unit.
- Use the recommended accessories.
- Do not remove covers.
- Do not repair this unit by yourself. Refer servicing to qualified service personnel. Avoid the use in the following conditions
- High or low extreme temperatures during use, storage or transportation.
- Disposal of a battery into fire or a hot oven, or mechanically crushing or cutting of a battery, that can result in an explosion.
- Extremely high temperature and/or extremely low air pressure that can result in an explosion or the leakage of flammable liquid or gas.
- Avoid using or placing this unit near sources of heat.
- Do not listen with this unit at high volume in places where you need to hear sounds from the surrounding environment for safety, such as at railroad crossings, and construction sites.
- Wide band characteristic voltage equal or larger than 75 mV.
- Keep this unit away from something susceptible to the magnetism. Such devices as a clock may not operate correctly.
- When using this unit in an airplane, heed the instructions given by the airline company. Some airlines may forbid your using the unit. For further details, contact the airline you will be flying with.
◾ Allergies
- Discontinue use if you experience discomfort with the ear pads or any other parts that directly contact your skin.
- Continued use may cause rashes or other allergic reactions.
◾ Precautions for listening with the Headphones
- Excessive sound pressure from earphones and headphones can cause hearing loss.
- Do not use your headphones at a high volume. Hearing experts advise against continuous extended play.
- If you experience a ringing in your ears, reduce volume or discontinue use.
- Do not use while operating a motorized vehicle. It may create a traffic hazard and is illegal in many areas.
- You should use extreme caution or temporarily discontinue use in potentially hazardous situations.
This unit may receive radio interference caused by mobile telephones during use. If such interference occurs, please increase separation between this unit and the mobile telephone.
Use only the supplied USB charging cord when connecting to a computer.
This unit is intended for use in moderate and tropical climates.
![]()
About Bluetooth®
Panasonic bears no responsibility for data and/or information that is compromised during a wireless transmission.
◾ Frequency band used
This unit uses the 2.4 GHz frequency band.
◾ Certification of this unit
- This unit conforms to frequency restrictions and has received certification based on frequency laws. Thus, a wireless permit is not necessary.
- The actions below are punishable by law in some countries:
– Taking apart/modifying this unit.
– Removing specification indications.
◾ Restrictions of use
- Wireless transmission and/or usage with all Bluetooth® equipped devices is not guaranteed.
- All devices must conform to standards set by Bluetooth SIG, Inc.
- Depending on the specifications and settings of a device, it can fail to connect or some operations can be different.
- This unit supports Bluetooth® security features. But depending on the operating environment and/or settings, this security may not be sufficient. Transmit data wirelessly to this unit with caution.
- This unit cannot transmit data to a Bluetooth® device.
◾ Range of use
Use this unit at a maximum range of 10 m (33 ft). The range can decrease depending on the environment, obstacles or interference.
◾ Interference from other devices
- This unit may not function properly and troubles such as noise and sound jumps may arise due to radio wave interference if this unit is located too close to other Bluetooth® devices or the devices that use the 2.4 GHz band.
- This unit may not function properly if radio waves from a nearby broadcasting station, etc. is too strong.
◾ Intended usage
- This unit is for normal, general use only.
- Do not use this system near an equipment or in an environment that is sensitive to radio frequency interference (example: airports, hospitals, laboratories, etc.).
Before use
Expressions used in this document
- Pages to be referred to are indicated as “→ ΟΟ”.
- The product illustrations may differ from the actual product.
- Unless otherwise indicated, illustrations in these operating instructions are of RB-M500B.
Marks denoting model names
Functionality differences between models are indicated with the model marks below.
- RB-M500B: [RB-M500B]
- RB-M300B: [RB-M300B]
Accessories
Please check and identify the supplied accessories.
To order accessories, contact the dealer from whom you have made your purchase.
1 x USB charging cord
1 x Detachable cord
Only for U.S.A.: To order accessories, refer to “Limited Warranty (ONLY FOR U.S.A.)” on “Basic Owner’s Manual”.
Maintenance
Clean this unit with a dry and soft cloth.
- Do not use solvents including benzine, thinner, alcohol, kitchen detergent, a chemical wiper, etc. This might cause the exterior case to be deformed or the coating to come off. Keeping the battery performance.
- During the long period of disuse, full charge this unit once every 6 months to keep the battery performance.
Part names

- Audio input terminal
- [+] button
- [⊙] button
- [-] button
- Power/pairing LED*1
- Microphone
- Charging terminal (DC IN)
• Connect the USB charging cord (supplied) to this terminal when charging. (→ 9, “Charging”) - [RB-M500B] [BASS +]/[BASS -] button
- [RB-M300B] [BASS] switch
- Ear pads
- Raised dot indicating the left side
*1 Examples of lighting/blinking patterns
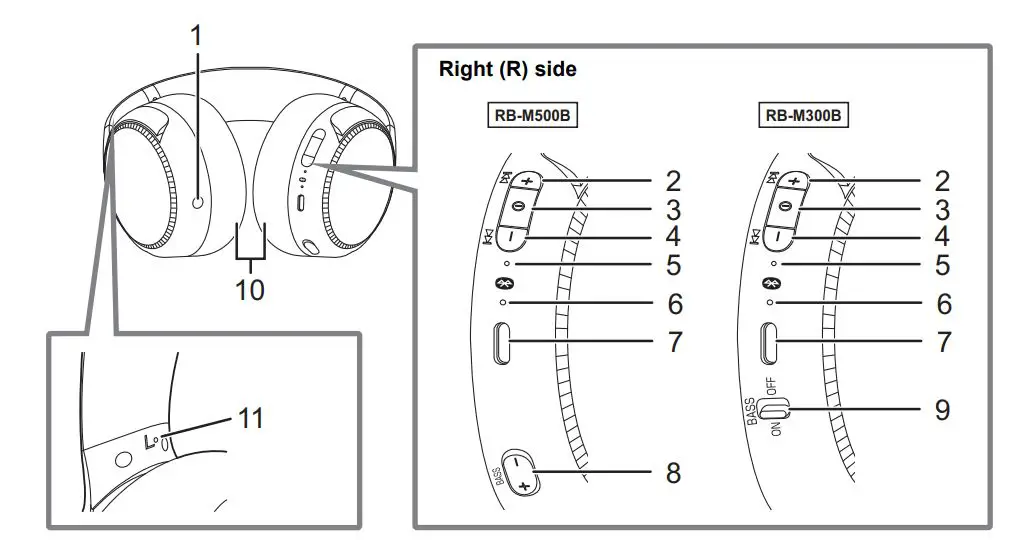
*2 The battery is low when it is blinking in red. (→ 16, “Battery level notification”)
Preparation
Charging
The rechargeable battery (installed in the unit) is not charged initially. Charge the battery before using the unit.
Connect this unit to a computer using the USB charging cord.
(A:) Power/pairing LED
(B:) USB charging cord (supplied)
• Check the direction of the terminals and plug in/out straight holding onto the plug. (It may result in malfunction by the deforming of the terminal if it is plugged in obliquely or in wrong direction.)
(C:) Computer · Turn on the computer in advance.
- The power/pairing LED lights in red when charging is in progress. When charging is completed, the power/pairing LED will go out.
- It takes approx. 4 hours to charge the battery from empty to full.
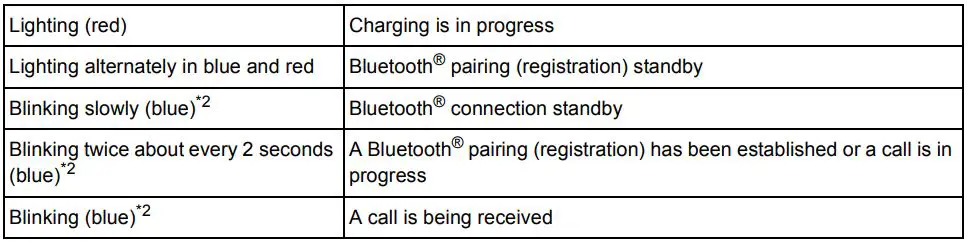
Note
- Charge in a room temperature between 10ºC and 35ºC (50ºF and 95ºF). Outside of this temperature range, charging may stop and the power/pairing LED may go out.
- It is not possible to turn the power on or connect to Bluetooth® devices during charging.
- Do not use any other USB charging cords except the supplied one. Doing so may cause malfunction.
- Charging may not be performed or may stop if the computer is in or switched to standby or sleep mode.
Turning the power on/off
In the power-off state, press and hold [⊙] of this unit for approx. 3 seconds until the power/pairing LED (blue) blinks.
• A beep will sound, and the power/pairing LED (blue) will blink slowly.
◾ To turn the power off Press and hold [ ] for approximately 3 seconds. An English guidance message will be heard, and the power will be turned off. · It is possible to switch the language of the audio guidance. (l 15, “Guidance messages”)
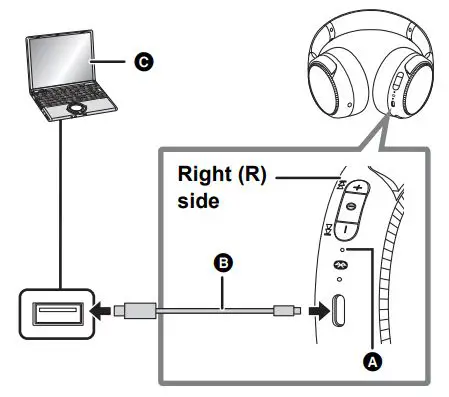
Note
- If the unit is not connected to a Bluetooth® device, an English guidance message will be heard and turn off the unit automatically approximately 5 minutes after you have stopped using it. (l 16, “Auto power off”)
- It is possible to switch the language of the audio guidance. (l 15, “Guidance messages”)
Connecting a Bluetooth® device
Preparation
- Place the Bluetooth® device within approx. 1 m (3.3 ft) from the unit.
- Check the device operation using its operation instructions as required.
Pairing (Registration) this unit with the Bluetooth® device for connection
1 In the power-off state, press and hold [ ] of this unit until the power/pairing LED blinks.
When pairing a device for the first time: approx. 3 seconds
When pairing a second or subsequent devices: approx. 5 seconds
• This unit will start to search for a Bluetooth® device to connect to, and the power/pairing LED will light alternately in blue and red.
2 Turn on the power of the Bluetooth® device, and enable the Bluetooth® function.
3 Select “RB-M500B” or “RB-M300B” from the Bluetooth® device’s menu.
- A MAC address (an alphanumeric character string that is displayed by and unique to the device) may be displayed before “RB-M500B” or “RB-M300B” is displayed.
- If prompted for a passkey, input the passkey “0000 (four zeros)” of this
unit.
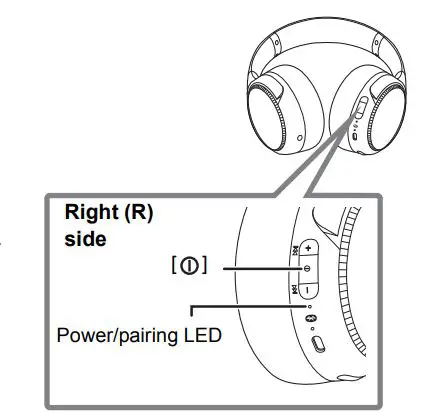
4 Check the connection with the Bluetooth® device on the unit.
- The power/pairing LED will light alternately in blue and red until the connection with the device is completed. When the power/pairing LED (blue) blinks twice every approx. 2 seconds, pairing (registration) is completed. (Connection established)
Note
- If connection to a device is not established within approximately 5 minutes, the unit will be turned off. Perform pairing again.
- You can pair up to 9 Bluetooth® devices with this unit. If a 10th device is paired, the device with the oldest connection will be replaced. To use it, perform pairing again.
Connecting a paired Bluetooth® device
1 Turn on this unit.
• Press and hold [⊙] of this unit for approx. 3 seconds until the power/pairing LED (blue) blinks. · A beep will sound, and the power/pairing LED (blue) will blink slowly.
2 Perform steps 2 and 3 of “Pairing (Registration) this unit with the Bluetooth® device for connection”. (→ 10)
- When the power/pairing LED (blue) blinks twice every approx. 2 seconds, pairing (registration) is completed. (Connection established)
Note
- This unit remembers the device lastly connected. Connection may be automatically established after step 1 (see above).
- If connection to a device is not established within approximately 5 minutes, the unit will be turned off. Turn on the unit again.
Operation
Listening to music
If the Bluetooth® compatible device supports the “A2DP” and “AVRCP” Bluetooth® profiles, music can be played back with remote control operations on the unit.
- A2DP (Advanced Audio Distribution Profile): Transmits audio to the unit.
- AVRCP (Audio/Video Remote Control Profile): Allows remote control of the device using the unit.
1 Connect the Bluetooth® device and the unit. (l 10, “Connecting a Bluetooth® device”)
2 Select and play the music on the Bluetooth® device.
- The unit’s headphones will output the music or the audio of the video being played back.
- Operating time (It may become shorter depending on the usage conditions.):
[RB-M500B] The maximum playback time is approximately 30 hours.
[RB-M300B] The maximum playback time is approximately 50 hours.
◾ Attention
- The unit might leak sound depending on the volume level.
- When the volume is increased to near maximum level, music may sound distorted. Decrease the volume until the distortion is cleared.
Remote controlling
You can control the Bluetooth® device using the unit.
- Depending on the Bluetooth® device or the app, even if you press buttons on the unit, some functions may not respond or may operate differently from the descriptions below.
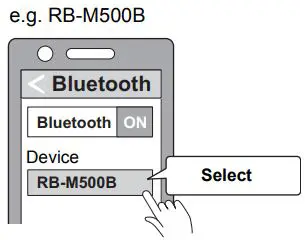
Note
- The volume can be adjusted in 31 levels (16 levels during calls). When the maximum or minimum volume is reached, a beep will sound.
[RB-M500B]
You can amplify the bass in the music or videos you are playing back and enjoy a powerful experience by directly transferring the vibrations to the headphones themselves. While playing back music or videos on a device connected via Bluetooth®
Press [BASS i] or [BASS j] to adjust the Bass reactor strength level.
- This unit vibrates along with the bass of the music or video being played back.
- Bass reactor strength level: Off ,-. Low ,-. Middle ,-. High (The default value is Low.)
- Even when the power is turned off, the setting before turning it off will be stored to memory.
- The playback time depends on the music source and the Bass reactor strength level.
Note
- This may not be effective depending on the music or video being played back.
- If you feel ill while using the Bass reactor, set the Bass reactor to Off.
- Turn on this unit to use the Bass reactor when using this unit with the detachable cord (supplied) connected.
[RB-M300B] Enhancing the bass (Bass enhancer)
You can enjoy music with enhanced bass.
Slide [BASS] switch to ON.
◾ To turn off the bass enhancer function
When [BASS] switch is sided to OFF, the bass enhancer function will turn off.
Note
- This may not be effective depending on the music or video being played back.
Making a phone call
With Bluetooth® enabled phones (cell phones or smartphones) that support the “HSP” or “HFP” Bluetooth® profile, you can use the unit for phone calls.
- HSP (Headset Profile): This profile can be used to receive monaural sounds and establish two-way communication using the microphone on the unit.
- HFP (Hands-Free Profile): In addition to the HSP functions, this profile has the incoming and outgoing calls function. (This unit does not have a function that allows you to make phone calls independently of a Bluetooth® enabled phone.)
1 Connect the Bluetooth® device and the unit. (l 10, “Connecting a Bluetooth® device”)
2 Press [⊙] on the unit and answer the incoming call.
- During an incoming call, ringtone will sound from the unit and the power/pairing LED will blink.
- (HFP only) To reject the incoming call, press [⊙] twice quickly.
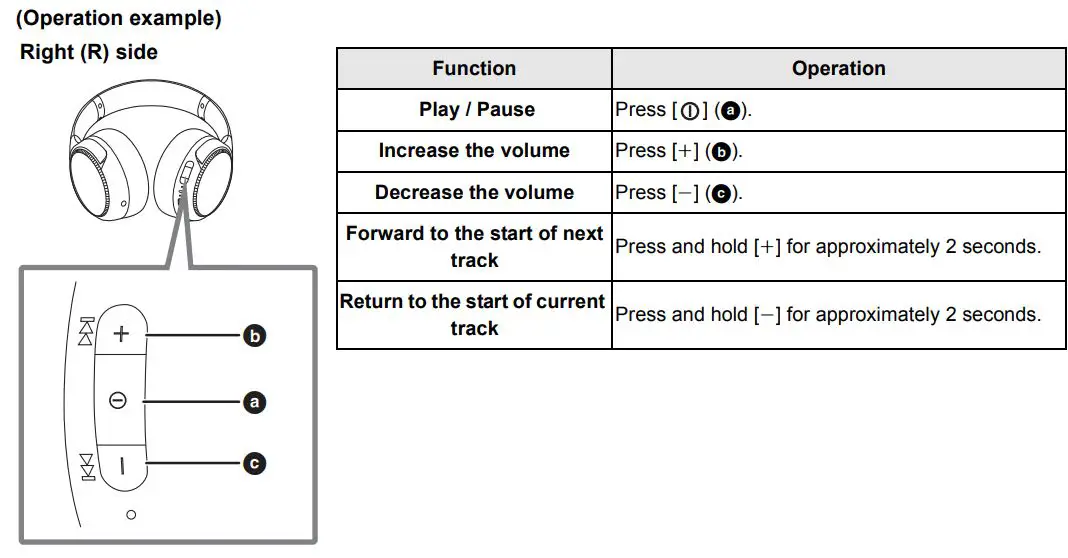
3 Start talking.
- The power/pairing LED will repeatedly blink 2 times during a call.
- The volume can be adjusted during a phone call. For setting instructions, see page 12.
4 Press [⊙] to end the phone call.
- A beep will sound.
Note
- There may be instances when hands free setting needs to be done on the Bluetooth® enabled phone.
- Depending on the Bluetooth® enabled phone, you may hear incoming and outgoing call ringtones of the phone from the unit.
- (HFP only) It may be difficult to hear phone conversations when the unit is used in locations with loud ambient noise or in outdoor or other locations exposed to powerful winds. In that case, change the calling location or switch the calling device to the Bluetooth® enabled phone to continue the call.(Press [⊙] on the unit twice quickly to switch.)
- You can have the Bluetooth® enabled phone make phone calls by using the microphone of the unit and an app of the Bluetooth® enabled phone. (→ 15, “Activating voice functions”)
Useful functions
Activating voice functions
You can use a button on this unit to activate Siri or other voice functions on your smartphone or similar device.
1 Connect the Bluetooth® device and the unit. (l 10, “Connecting a Bluetooth® device”)
2 Press [⊙] of this unit twice quickly.
Note
- For details about voice function commands, refer to the operating instructions for the Bluetooth® device.
- The voice function may not work depending on the smartphone, etc., specifications and the app version.
Guidance messages
The unit is equipped with an a function that provides an audio notification when you turn on/off the unit, connect a Bluetooth® device or change a setting, for example.
- This unit has messages for the following languages for the audio guidance. English/French
- The audio guidance function cannot be disabled.
- The audio guidance volume cannot be adjusted.
◾ Switching the audio guidance language
Press and hold [-] and [⊙] for at least 5 seconds.
- The language is switched one at a time each time this operation is performed.
Battery level notification
- When the unit is turned off, an English guidance message will be heard indicating the battery level.
- When the battery level starts to run low, the blinking power/pairing LED will turn from blue to red, and as it drops further, you will be notified by one beep every 1 minute. When the battery runs out, an English guidance message will be heard and the power will turn off.
- It is possible to switch the language of the audio guidance. (l 15, “Guidance messages”)
Auto power off
If the unit is not connected to a Bluetooth® device, an English guidance message will be heard and turn off the unit automatically approximately 5 minutes after you have stopped using it.
- It is possible to switch the language of the audio guidance. (→ 15, “Guidance messages”) Auto power off does not work when the detachable cord (supplied) is connected.
Using the detachable cord (supplied)
While the power is turned off or the battery has no remaining charge, this unit can be used as normal headphones by connecting the detachable cord (supplied).
- Before connecting the detachable cord (supplied), lower the volume on the connected device.
- If you connect the detachable cord (supplied) during Bluetooth® connection, the Bluetooth® connection will be lost. ([RB-M300B] The unit turns off.)
- Noise may occur due to dirt on the plug. Clean the plug with a soft dry cloth if this occurs.
- Do not use any other detachable cords except the supplied one.
- [RB-M500B] When the detachable cord (supplied) is connected and the power is turned on, you can use the Bass reactor. However, the volume cannot be adjusted in this case.
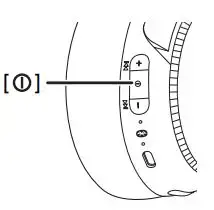
Resetting the unit
This unit can be reset when all operations are rejected. To reset the unit, connect the unit to a computer using the USB charging cord. All the previous operations will be canceled. (The pairing device information will not be deleted.)
Other
Restoring to the factory settings
You can restore the unit to the factory settings (original settings upon purchase). Performing the following procedure returns the volume level, etc., to the factory settings and deletes the information for all registered devices. Charge the battery before restoring the unit.
1 While the power is turned off, press and hold [⊙] for at least 5 seconds until the power/ pairing LED lights alternately in blue and red.
2 While the power/pairing LED is lighting alternately in blue and red, press and hold [+] and [-] at the same time for at least 5 seconds.
- The default settings will be restored after the power/pairing LED (blue) blinks fast and the unit turns off.
◾ Attention
- When pairing a device again, delete the registering information (Device: “RB-M500B” or “RB-M300B”) from the Bluetooth® device’s menu, and register this unit with the Bluetooth® device again. (→ 10)
Copyright, etc.
The Bluetooth® word mark and logos are registered trademarks owned by Bluetooth SIG, Inc. and any use of such marks by Panasonic Corporation is under license. Other trademarks and trade names are those of their respective owners.
Siri is a trademarks of Apple Inc., registered in the U.S. and other countries.
Other system names and product names appearing in this document are in general the registered trademarks or trademarks of the respective developer companies. Note that the TM mark and ® mark do not appear in this document.
Copyright notice
This product uses open source software based on the Free Software Foundation’s GPL and other conditions. The relevant conditions apply to the software. The license information for the GPL shown on this product and information about open source software are published on our website. The source code licensed under the conditions of the GPL is available publicly. Please note that these types of software are not covered by warranty. At least 3 years from sale of this product, Panasonic Corporation will give to any individual or group who contacts us, for a charge of no more than the cost of physically distributing source code, a complete machine-readable copy of the source code and the list of copyright notices corresponding to the GPL software covered under the conditions of the GPL usage agreement. Refer to the following URL to make enquiries regarding the above mentioned content and for information on how to obtain the relevant source code: https://panasonic.jp/support/global/cs/audio/download/index.html
1 Remove the right ear pad to view certification information.
2 Certification information (a) is indicated on the speaker plate portion (b), which becomes visible when the right ear pad (R side) is removed.
3 To attach the ear pad, fit the part (d) of the ear pad into the part (c).
If you pull the ear pad too much, the ear pad can tear.
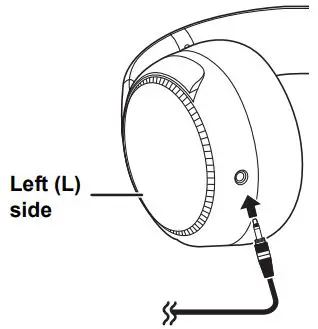
Troubleshooting
Before requesting service, make the following checks. If you are in doubt about some of the check points, or if the remedies indicated in the chart do not solve the problem, refer to “Customer Services Directory” on “Basic Owner’s Manual” if you reside in the U.S.A., or refer to “CONTACT INFORMATION” on “Basic Owner’s Manual” if you reside in Canada, or consult your dealer for instructions.
Sound and audio volume
No sound.
- Make sure that the unit and the Bluetooth® device are connected correctly. (→ 10)
- Check if music is playing on the Bluetooth® device.
- Make sure that the unit is turned on and the volume is not set too low.
- Pair and connect the Bluetooth® device and the unit again. (→ 10)
- Check if the Bluetooth® compatible device supports “A2DP” profile. For details on profiles, see “Listening to music” (→ 12). Also refer to the operating manual for the Bluetooth® compatible device.
Cannot adjust the volume. - The control button does not work when the detachable cord (supplied) is used.
Low volume. - Increase the volume of the unit. (→ 12)
- Increase the volume on the Bluetooth® device.
Sound from the device is cut off. / Too much noise. / Sound quality is bad. - Sound may be disrupted if signals are blocked. Do not fully cover this unit with the palm of your hand, etc.
- The device may be out of the 10 m (33 ft.) communication range. Move the device closer to this unit.
- Remove any obstacle between this unit and the device.
- Switch off any wireless LAN device when not in use.
Bluetooth® device connection
The device cannot be connected.
- You can pair up to 9 Bluetooth® devices with this unit. If a 10th device is paired, the device with the oldest connection will be replaced.
- Delete the pairing information for this unit from the Bluetooth® device, then pair them again. (→ 10)
Phone Calls
You cannot hear the person on the other end of the call.
- Make sure that the unit and the Bluetooth® enabled phone are turned on.
- Check if the unit and the Bluetooth® enabled phone are connected. (→ 10)
- Check the audio settings of the Bluetooth® enabled phone. Switch the calling device to the unit if it is set to the Bluetooth® enabled phone. (→ 10)
- If the volume of the other person’s voice is too low, increase the volume of both the unit and the Bluetooth® enabled phone.
Cannot make a phone call. - Check if the Bluetooth® compatible device supports “HSP” or “HFP” profile. For details on profiles, see “Listening to music” (→ 12) and “Making a phone call” (→14). Also refer to the operating manual for the Bluetooth® enabled phone.
General
The unit does not respond.
- This unit can be reset when all operations are rejected. To reset the unit, connect the unit to a computer using the USB charging cord. (→16)
Power supply and charging
Cannot charge the unit. / The power/pairing LED does not light during charging. / Charging takes longer.
- Is the USB charging cord connected firmly to the USB terminal of the computer? (l 9)
- Make sure to charge in a room temperature between 10ºC and 35ºC (50ºF to 95ºF).
- Make sure the computer is turned on and is not on standby or sleep mode.
- Is the USB port you are currently using working properly? If your computer has other USB ports, unplug the connector from its current port and plug it into one of the other ports.
- If the measures mentioned above are not applicable, unplug the USB charging cord and plug it in again.
- It takes approx. 4 hours to charge the battery from empty to full.
- If the charge time and operating time become shortened, the battery may have run down. (Number of charging times of the installed battery: Approximately 300)
- The power/pairing LED lights in red when charging is in progress. When charging is completed, the power/pairing LED will go out.
The power does not turn on. / The power turns off. - Is the unit being charged? The power cannot be turned ON during charging. (l 9)
- The battery is low when the power/pairing LED is blinking in red. Charge the unit.
- Is auto power off active? (l 16)
Guidance messages
The audio guidance language has changed.
- The audio guidance language can be switched. (l 15)
Specifications
◾ General
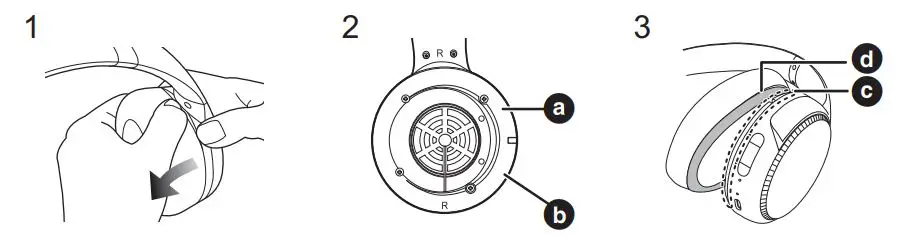
*1 It may be shorter depending on the operating conditions.
*2 The time required to charge the battery from empty to full.
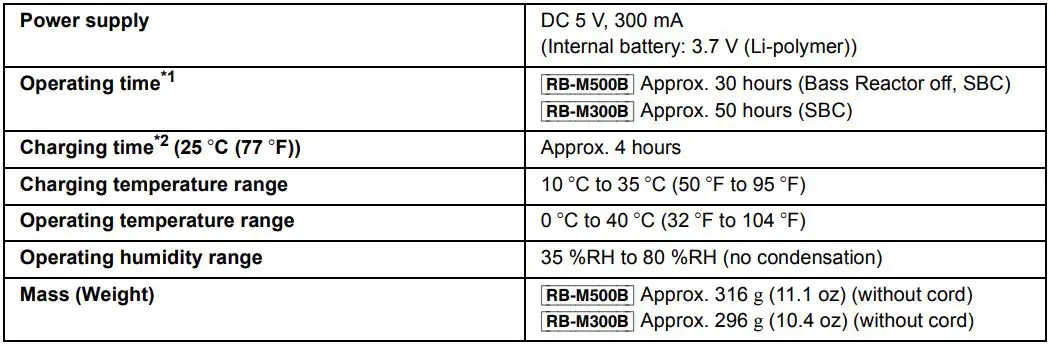
To remove the battery when disposing of this unit
The following instructions are not intended for repairing purposes but for the disposal of this unit. This unit is not restorable once disassembled.
- When disposing of this unit, take out the battery installed in this unit and recycle it.
- Disassemble after the battery runs out.
- Keep disassembled parts out of reach of children.
Regarding the handling of used battery
- Insulate the terminals with adhesive tape or similar material.
- Do not disassemble.
◾ Battery
- Do not heat or expose to flame.
- Do not leave the battery in a car exposed to direct sunlight for a long period of time with doors and windows closed.
- Battery mishandling can cause electrolyte leakage which can damage items the leaked fluid comes into contact with. If electrolyte leaks from the battery, consult your dealer. Wash thoroughly with water if electrolyte comes in contact with any part of your body.
- When disposing of the battery, please contact your local authorities or dealer and ask for the correct method of disposal.
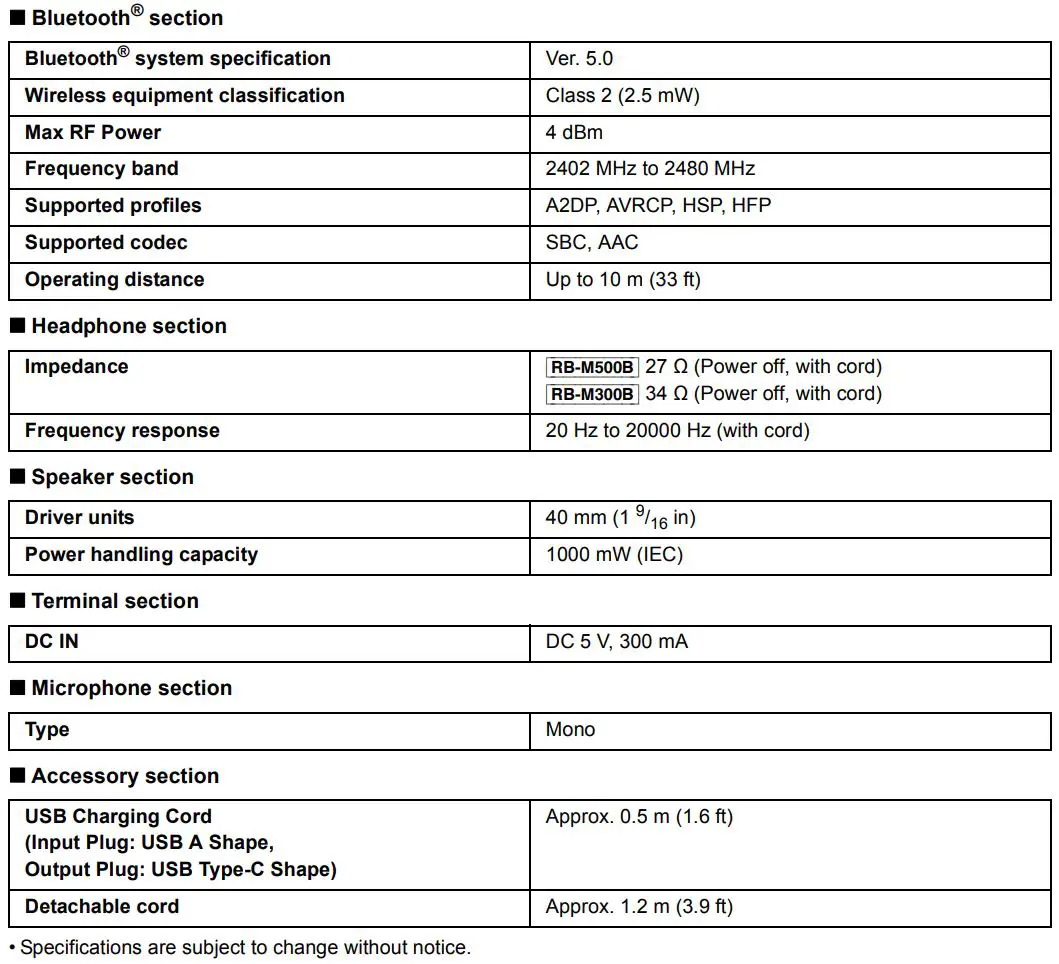
- Remove the left ear pad.
- Remove the 4 screws.
- Remove the part A in step 2.
- Remove the battery, and cut off the wires one by one with scissors.
Declaration of Conformity (DoC) Hereby, “Panasonic Corporation” declares that this product is in compliance with the essential requirements and other relevant provisions of Directive 2014/53/EU. Customers can download a copy of the original DoC to our RE products from our DoC server: http://www.ptc.panasonic.eu
Contact to Authorized Representative: Panasonic Marketing Europe GmbH, Panasonic Testing Centre, Winsbergring 15, 22525 Hamburg, Germany
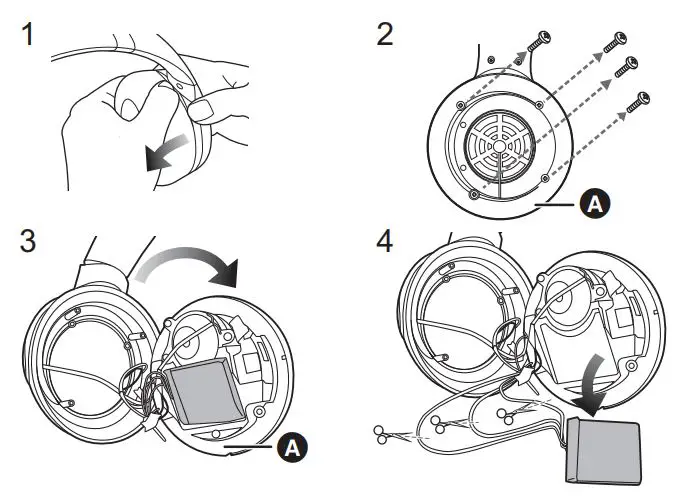
Disposal of Old Equipment and Batteries Only for European Union and countries with recycling systems
![]() These symbols on the products, packaging, and/or accompanying documents mean that used electrical and electronic products and batteries must not be mixed with general household waste. For proper treatment, recovery and recycling of old products and used batteries, please take them to applicable collection points in accordance with your national legislation. By disposing of them correctly, you will help to save valuable resources and prevent any potential negative effects on human health and the environment. For more information about collection and recycling, please contact your local municipality. Penalties may be applicable for incorrect disposal of this waste, in accordance with national legislation.
These symbols on the products, packaging, and/or accompanying documents mean that used electrical and electronic products and batteries must not be mixed with general household waste. For proper treatment, recovery and recycling of old products and used batteries, please take them to applicable collection points in accordance with your national legislation. By disposing of them correctly, you will help to save valuable resources and prevent any potential negative effects on human health and the environment. For more information about collection and recycling, please contact your local municipality. Penalties may be applicable for incorrect disposal of this waste, in accordance with national legislation.
![]() (Note for the battery symbol (bottom symbol):
(Note for the battery symbol (bottom symbol):
This symbol might be used in combination with a chemical symbol. In this case it complies with the requirement set by the Directive for the chemical involved.
For Thailand only
This telecommunication equipment conforms to NTC/NBTC technical requirement.
For Singapore only
Complies with
IMDA Standards
DB01017
For the United Kingdom and Ireland customers
Sales and Support Information
Customer Communications Centre
- For customers within the UK: 0344 844 3899
- For customers within Ireland: 01 289 8333
- Monday Friday 9:00 am5:00 pm (Excluding public holidays).
- For further support on your product, please visit our website:
www.panasonic.co.uk
Direct Sales at Panasonic UK
- Order accessory and consumable items for your product with ease and confidence by phoning our Customer Communications Centre Monday Friday 9:00 am5:00 pm (Excluding public holidays).
- Or go on line through our Internet Accessory ordering application at www.pas-europe.com.
- Most major credit and debit cards accepted.
- All enquiries transactions and distribution facilities are provided directly by Panasonic UK.
- It couldn’t be simpler!
- Also available through our Internet is direct shopping for a wide range of finished products. Take a browse on our website for further details.
EU
![]()
Manufactured by: Panasonic Corporation
Kadoma, Osaka, Japan
Authorized Representative in Europe: Panasonic Marketing Europe GmbH
Panasonic Testing Centre
Winsbergring 15, 22525 Hamburg, Germany
Panasonic Corporation of North America Two Riverfront Plaza, Newark, NJ 07102-5490 http://shop.panasonic.com
© Panasonic Corporation 2020
Panasonic Canada Inc.
5770 Ambler Drive, Mississauga, Ontario L4W 2T3
www.panasonic.com
Panasonic Corporation
http://www.panasonic.com
TQBM0679-1
F0120MH2020
Basic Owner’s Manual
Manuel d’utilisation Fonctions de base
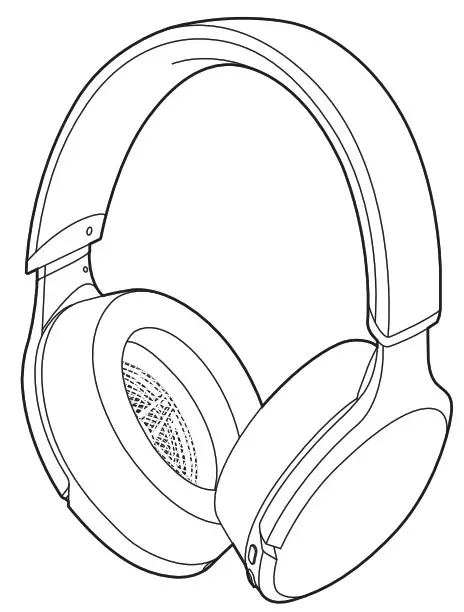
Model No. RP-HD305B
Thank you for purchasing this product.
Please read these instructions carefully before using this product, and save this manual for future use.
Register online athttp://shop.panasonic.com/support (U.S. customers only)
If you have any questions, visit:
In the U.S.A.: http://shop.panasonic.com/support
In Canada: www.panasonic.ca/english/support

IMPORTANT SAFETY INSTRUCTIONS
Read these operating instructions carefully before using the unit.
Follow the safety instructions on the unit and the applicable safety instructions listed below. Keep these operating instructions handy for future reference.
- Read these instructions.
- Keep these instructions.
- Heed all warnings.
- Follow all instructions.
- Do does not use this apparatus near water.
- Clean only with a dry cloth.
- Do does not block any ventilation openings. Install in accordance with the manufacturer’s instructions.
- Do does not install near any heat sources such as radiators, heat registers, stoves, or other apparatus (including amplifiers) that produce heat.
- Do does not defeat the safety purpose of the polarized or grounding-type plug. A polarized plug has two blades with one wider than the other. A grounding-type plug has two blades and a third grounding prong. The wide blade or the third prong are provided for your safety. If the provided plug does not fit into your outlet, consult an electrician for the replacement of the obsolete outlet.
- Protect the power cord from being walked on or pinched particularly at plugs, convenience receptacles, and the point where they exit from the apparatus.
- Only use attachments/accessories specified by the manufacturer.
- Use only with the cart, stand, tripod, bracket, or table specified by the manufacturer, or sold with the apparatus. When a cart is used, use caution when moving the cart/apparatus combination to avoid injury from tip-over.

- Unplug this apparatus during lightning storms or when unused for long periods of time.
- Refer all servicing to qualified service personnel. Servicing is required when the apparatus has been damaged in any way, such as power-supply cord or plug is damaged, liquid has been spilled or objects have fallen into the apparatus, the apparatus has been exposed to rain or moisture, does not operate normally, or has been dropped.
Safety precautions
 A lithium-ion battery that is recyclable powers the product you have purchased.
Please call 1-800-8-BATTERY for information on how to recycle this battery.
This device complies with part 15 of FCC Rules and Innovation, Science and Economic Development Canada’s license-exempt RSS(s). Operation is subject to the following two conditions:
- this device may not cause harmful interference, and
- this device must accept any interference received, including interference that may cause undesired operation.
FCC ID: ACJ-RP-HD305B
Model: RP-HD305B
IC: 216A-RPHD305B
This transmitter must not be co-located or operated in conjunction with any other antenna or transmitter.
This equipment complies with FCC/ISED radiation exposure limitsset forth for an uncontrolled environment and meets the FCC radio frequency (RF) Exposure Guidelines and RSS-102 of the ISED radio frequency (RF) Exposure rules as this equipment has very low levels of RF energy.
THE FOLLOWING APPLIES ONLY IN THE U.S.A.
FCC Note:
This equipment has been tested and found to comply with the limits for a Class B digital device, pursuant to Part 15 of the FCC Rules.
These limits are designed to provide reasonable protection against harmful interference in a residential installation. This equipment generates, uses, and can radiate radio frequency energy and, if not installed and used in accordance with the instructions, may cause harmful interference to radio communications.
However, there is no guarantee that interference will not occur in a particular installation. If this equipment does cause harmful interference to radio or television reception, which can be determined by turning the equipment off and on, the user is encouraged to try to correct the interference by one or more of the following measures:
- Reorient or relocate the receiving antenna.
- Increase the separation between the equipment and receiver.
- Connect the equipment into an outlet on a circuit different from that to which the receiver is connected.
- Consult the dealer or an experienced radio/TV technician for help.
Any unauthorized changes or modifications to this equipment would void the user’s authority to operate this device.
This device complies with Part 15 of the FCC Rules. Operation is subject to the following two conditions: (1) This device may not cause harmful interference, and (2) this device must accept any interference received, including interference that may cause undesired operation.
Suppliers Declaration of Conformity
Trade Name: Panasonic
Model No.: RP-HD305B
Responsible Party: Panasonic Corporation of North America
Two Riverfront Plaza, Newark,
NJ 07102-5490
Support Contact: http://shop.panasonic.com/support
THE FOLLOWING APPLIES ONLY IN CANADA.
CAN ICES-3(B)/NMB-3(B)
 CONFORMS TO
UL STD. 60065
CERTIFIED TO CSA STD.
C22.2 NO. 60065
CONFORME À LA NORME CAN/CSA
C22.2 NO. 60065
 Emergy Verified
Unit
WARNING:
To reduce the risk of fire, electric shock or product damage,
- Do not expose this unit to rain, moisture, dripping or splashing.
- Do not place objects filled with liquids, such as vases, on this unit.
- Use the recommended accessories.
- Do not remove covers.
- Do not repair this unit by yourself. Refer servicing to qualified service personnel.
- Avoid using or placing this unit near sources of heat.
- Do not use while operating a motorized vehicle. It may create a traffic hazard and is illegal in many areas.
- Do not listen with this unit at high volume in places where you need to hear sounds from the surrounding environment for safety, such as at railroad crossings, and construction sites.
- Keep this unit away from something susceptible to magnetism. Such devices as a clock may not operate correctly.
Allergies
- Discontinue use if you experience discomfort with the ear pads or any other parts that directly contact your skin.
- Continued use may cause rashes or other allergic reactions.
Use only the supplied USB charging cord when connecting to a computer.
Remove the right ear pad to view authentication information. (1)
Authentication information ( a) is indicated on the speaker plate portion (b), which becomes visible when the right ear pad (R side) is removed.
(2) To attach the ear pad, fit part d of the earpad into part c. (3) Do not pull the ear pad with force when attaching or removing.

The Bluetooth ® word mark and logos are registered trademarks owned by Bluetooth SIG, Inc. and any use of such marks by Panasonic Corporation is under license. Other trademarks and trade names are those of their respective owners.
Siri is a trademark of Apple Inc.
QR Code is a registered trademark of DENSO WAVE INCORPORATED.
Qualcomm aptX is a product of Qualcomm Technologies, Inc. and/or its subsidiaries.
Qualcomm is a trademark of Qualcomm Incorporated, registered in the United States and other countries. aptX is a trademark of Qualcomm Technologies International, Ltd., registered in the United States and other countries.
Other system names and product names appearing in this document are in general the registered trademarks or trademarks of the respective developer companies.
Note that the TM mark and® mark do not appear in this document.
Limited Warranty
Panasonic Products Limited Warranty
Limited Warranty Coverage
If your product does not work properly because of a defect in materials or workmanship, Panasonic Corporation of North America (referred to as “the warrantor”) will, for the length of the period indicated on the chart below, which starts with the date of original purchase (“warranty period”), at its option either (a) repair your product with new or refurbished parts, (b) replace with a new or a refurbished equivalent value product, or (c) refund your purchase price. The decision to repair, replace or refund will be made by the warrantor.
| Product or Part Name | Parts | Labor |
| Headphones/ Earphones/Headset | 1 year | Not Applicable |
| All included Accessories | 90 days | Not Applicable |
During the “Labor” warranty period there will be no charge for labor. During the “Parts” warranty period, there will be no charge for parts. This Limited Warranty excludes both parts and labor for non-rechargeable batteries, antennas, and cosmetic parts (cabinet). This warranty only applies to products purchased and serviced in the United States. This warranty is extended only to the original purchaser of a new product that was not sold “as is”.
Mail-In Service--Online Repair Request
Online Repair Request
T o submit a new repair request and for quick repair status visit our Web Site at http://shop.panasonic.com/support
When shipping the unit, carefully pack, include all supplied accessories listed in the Owner’s Manual, and send it prepaid, adequately insured and packed well in a carton box. When shipping Lithium Ion batteries please visit our Web Site at http://shop.panasonic.com/support as Panasonic is committed to providing the most up-to-date information. Include a letter detailing the complaint, a return address and provide a daytime phone number where you can be reached. A valid registered receipt is required under the Limited Warranty.
IF REPAIR IS NEEDED DURING THE WARRANTY PERIOD, THE PURCHASER WILL BE REQUIRED TO FURNISH A SALES RECEIPT/PROOF OF PURCHASE INDICATING DATE OF PURCHASE, AMOUNT PAID AND PLACE OF PURCHASE. CUSTOMERS WILL BE CHARGED FOR THE REPAIR OF ANY UNIT RECEIVED WITHOUT SUCH PROOF OF PURCHASE.
Limited Warranty Limits and Exclusions
This warranty ONLY COVERS failures due to defects in materials or workmanship and DOES NOT COVER normal wear and tear or cosmetic damage. The warranty ALSO DOES NOT COVER damages that occurred in shipment, or failures which are caused by products not supplied by the warrantor, or failures that result from accidents, misuse, abuse, neglect, mishandling, misapplication, alteration, faulty installation, set-up adjustments, misadjustment of consumer controls, improper maintenance, power line surge, lightning damage, modification, the introduction of sand, humidity or liquids, commercial use such as hotel, office, restaurant, or other business or rental use of the product, or service by anyone other than a Factory Service Center or other Authorized Servicer, or damage that is attributable to acts of God.
THERE ARE NO EXPRESS WARRANTIES EXCEPT AS LISTED UNDER “LIMITED WARRANTY COVERAGE”.
THE WARRANTOR IS NOT LIABLE FOR INCIDENTAL OR CONSEQUENTIAL DAMAGES RESULTING FROM THE USE OF THIS PRODUCT OR ARISING OUT OF ANY BREACH OF THIS WARRANTY.
(As examples, this excludes damages for lost time, travel to and from the servicer, loss of or damage to media or images, data or other memory or recorded content. The items listed are not exclusive, but for illustration only.)
ALL EXPRESS AND IMPLIED WARRANTIES, INCLUDING THE WARRANTY OF MERCHANTABILITY, ARE LIMITED TO THE PERIOD OF THE LIMITED WARRANTY.
Some states do not allow the exclusion or limitation of incidental or consequential damages, or limitations on how long an implied warranty lasts, so the exclusions may not apply to you. This warranty gives you specific legal rights and you may also have other rights which vary from state to state. If a problem with this product develops during or after the warranty period, you may contact your dealer or Service Center. If the problem is not handled to your satisfaction, then write to:
Consumer Affairs Department
Panasonic Corporation of North America
661 Independence Pkwy
Chesapeake, VA 23320
PARTS AND SERVICES, WHICH ARE NOT COVERED BY THIS LIMITED WARRANTY, ARE YOUR RESPONSIBILITY.
| Shop Accessories!
for all your Panasonic gear Customer Services Directory For Product Information, Operating Assistance, Parts, Owner’s Manuals, Dealer and Service info go to http://shop.panasonic.com/support |
Limited Warranty
Panasonic Canada Inc.
5770 Ambler Drive, Mississauga, Ontario L4W 2T3
PANASONIC PRODUCT – LIMITED WARRANTY EXCHANGE PROGRAM
Panasonic Canada Inc. warrants this product to be free from defects in material and workmanship under normal use and for a period as stated below from the date of original purchase agrees to, at its option either (a) repair your product with new or refurbished parts, (b) replace it with a new or a refurbished equivalent value product, or (c) refund your purchase price. The decision to repair, replace or refund will be made by Panasonic Canada Inc.
| Accessories | One (1) year |
This warranty is given only to the original purchaser, or the person for whom it was purchased as a gift, of a Panasonic brand product mentioned above sold by an authorized Panasonic dealer in Canada and purchased and used in Canada, which product was not sold “as is”, and which product was delivered to you in new condition in the original packaging.
IN ORDER TO BE ELIGIBLE TO RECEIVE A WARRANTY SERVICE HEREUNDER, A PURCHASE RECEIPT OR OTHER PROOF OF DATE OF ORIGINAL PURCHASE, SHOWING AMOUNT PAID AND PLACE OF PURCHASE IS REQUIRED
LIMITATIONS AND EXCLUSIONS
This warranty ONLY COVERS failures due to defects in materials or workmanship and DOES NOT COVER normal wear and tear or cosmetic damage. The warranty ALSO DOES NOT COVER damages that occurred in shipment, or failures which are caused by products not supplied by Panasonic Canada Inc., or failures that result from accidents, misuse, abuse, neglect, mishandling, misapplication, alteration, faulty installation, set-up adjustments, misadjustment of consumer controls, improper maintenance, power line surge, lightning damage, modification, the introduction of sand, humidity or liquids, commercial use such as hotel, office, restaurant, or other business or rental use of the product, or service by anyone other than an Authorized Servicer, or damage that is attributable to acts of God. Dry cell batteries are also excluded from coverage under this warranty.
THIS EXPRESS, LIMITED WARRANTY IS IN LIEU OF ALL OTHER WARRANTIES, EXPRESS OR IMPLIED, INCLUDING
ANY IMPLIED WARRANTIES OF MERCHANTABILITY AND FITNESS FOR A PARTICULAR PURPOSE. IN NO EVENT
WILL PANASONIC CANADA INC. BE LIABLE FOR ANY SPECIAL, INDIRECT, OR CONSEQUENTIAL DAMAGES RESULTING FROM THE USE OF THIS PRODUCT OR ARISING OUT OF ANY BREACH OF ANY EXPRESS OR IMPLIED WARRANTY. (As examples, this warranty excludes damages for lost time, travel to and from the Authorized Servicer, loss of or damage to media or images, data or other memory or recorded content. This list of items is not exhaustive, but for illustration only.)
In certain instances, some jurisdictions do not allow the exclusion or limitation of incidental or consequential damages, or the exclusion of implied warranties, so the above limitations and exclusions may not be applicable. This warranty gives you specific legal rights and you may have other rights which vary depending on your province or territory.
CONTACT INFORMATION
For product operation and information assistance, please visit our the Support page:
www.panasonic.ca/english/support
For defective product exchange within the warranty period, please contact the original dealer.
| The serial number of this product can be found on the left side of the headphones. Remove the left ear pad to see it. Please note them in the space provided below and keep for future reference. MODEL NUMBER RP-__________HD305B___________ SERIAL NUMBER_______________________________ |
User memo:
| DATE OF PURCHASE___________ DEALER NAME________________ DEALER ADDRESS___________ TELEPHONE NUMBER_________ |
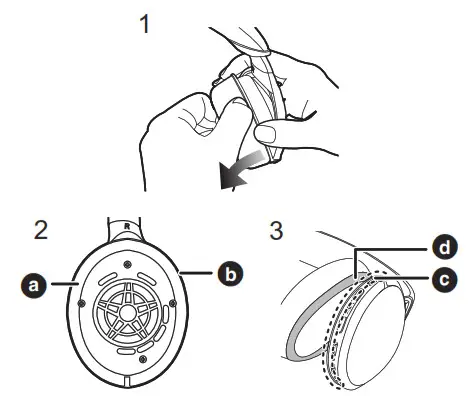
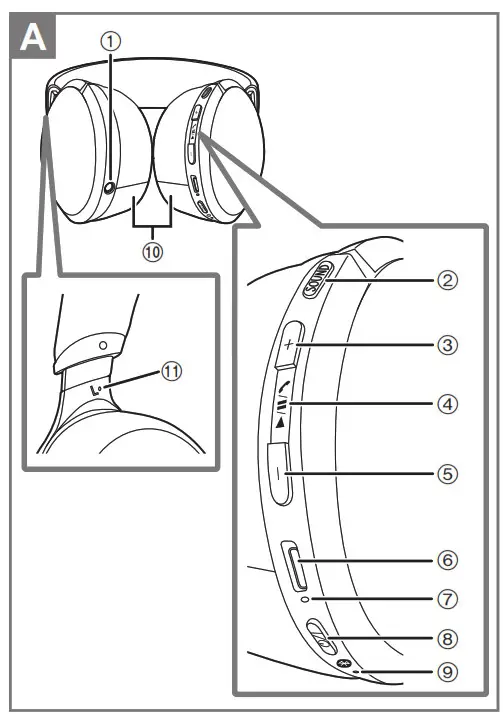
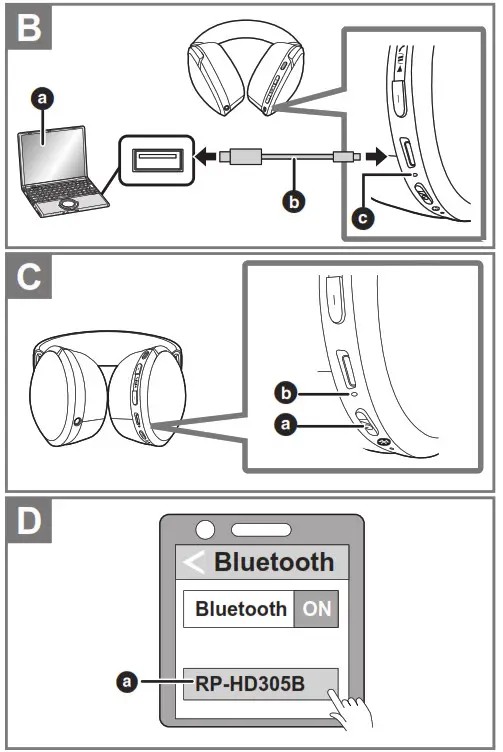
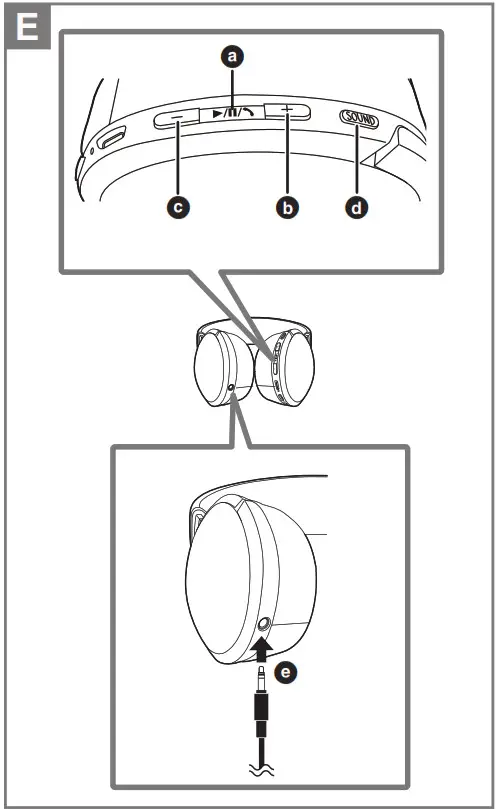
Part names
- Audio input terminal
- [SOUND] button
- [i] button
- button
- [j] button
- Charging terminal (DC IN)
- Power/pairing LED
- [()] button*
- Microphone
- Ear pads
- Raised dot indicating the left side
*: Standby/ON
Charging
The rechargeable battery (installed in the unit) is not charged initially. Charge the battery before using the unit.
Connect this unit to a computer ( a) using the USB charging cord (supplied) (b).
- The power/pairing LED (c) lights in red when charging is in progress. When charging is completed, the power/pairing LED will
go out. - It takes approx. 5hours to charge the battery from empty to full.
- Check the direction of the terminals and plugin/out straight holding onto the plug. (It may result in malfunction by the deforming of the terminal if it is plugged in obliquely or in the wrong direction.)
- It is not possible to turn the power on or connect to Bluetooth® devices during charging.
- Make sure the computer is turned on and is not on standby or sleep mode.
- Do not use any other USB charging cords except the supplied one.
- When the battery level starts to run low, the blinking power/pairing LED will turn from blue to red, and as it drops further, you will be notified by one beep every 1minute.
* When the battery runs out, an English guidance message will be heard and the power will turn off.
*If you press [()] twice quickly, an English guidance message will be heard and you can check the battery level.
Turning the power on/off
Press and hold [![]() (
(![]() )] (a) of this unit for approx.
)] (a) of this unit for approx.
3seconds until the power/pairing LED (blue) (b) blinks.
- A beep will sound, and the power/pairing LED (blue) will blink slowly.
To turn the power off
Press and hold [I()] for approximately 3seconds. An English guidance message will be heard, and the power will be turned off. - If the unit is not connected to a Bluetooth® device, an English guidance message will be heard and turn off the unit automatically approximately 5minutes after you have stopped using it. (Auto power off)
Connecting a Bluetooth® device
Bluetooth ® pairing
- In the power-off state, press and hold [()] of this unit until the power/pairing LED blinks.
–When pairing a device for the first time: approx. 3seconds
–When pairing a second or subsequent devices: approx. 5seconds
• This unit will start to search for a Bluetooth® device to connect to, and the power/pairing LED will light alternately in blue and red. - Turn on the power of the Bluetooth® device, and enable the Bluetooth® function.
- Select “RP-HD305B” (a) from the Bluetooth® device’s menu.
• If prompted for a passkey, input the passkey “0000 (four zeros)” of this unit.
• When the power/pairing LED (blue) blinks twice every approx. 2seconds, pairing (registration) is completed. (Connection established)
• If the connection to a device is not established within approximately 5minutes, the unit will be turned off. Perform pairing again.
Connecting a paired Bluetooth® device
- Turn on this unit.
- Perform steps 2 and 3 of “Bluetooth ® pairing”. (→above)
• When the power/pairing LED (blue) blinks twice every approx. 2seconds, pairing (registration) is completed. (Connection established)
Using the headphones
When using the functions below that are indicated with the [![]() ] mark, connect the Bluetooth® device and the unit.
] mark, connect the Bluetooth® device and the unit.
Listening to music [![]() ] Select and play the music on the Bluetooth® device.
] Select and play the music on the Bluetooth® device.
•The unit’s headphones will output the music or the audio of the video being played back.
Remote controlling (Available only if your Bluetooth® device supports “AVRCP” Bluetooth® profiles) [![]() ] (Operation example)
] (Operation example)
Play / Pause: Press [![]() ] ( a).
] ( a).
Increase the volume: Press [+] ( b).
Decrease the volume: Press [-] ( c).
Forward to the start of next track: Press [![]() ] twice quickly.
] twice quickly.
Return to the start of current track: Press [![]() ] three times quickly.
] three times quickly.
Fast forward: Press [![]() ] twice quickly; hold the second press.
] twice quickly; hold the second press.
Fast rewind: Press [![]() ] three times quickly; hold the third press.
] three times quickly; hold the third press.
- The volume can be adjusted in 31levels (16 levels during calls).
When the maximum or minimum volume is reached, a beep will sound.
Selecting the sound mode []
This changes the sound quality of the music or video being played back.
Press the [SOUND] ( d) button on this unit. - Each press of this button changes the sound quality.
–Bass Enhancer: Produces a more dynamic sound effect with enhanced bass.
–Clear Voice: Produces a sound effect that makes human voices, such as vocals and dialogues, clear to listen to.
–OFF: Turns off sound effects. - The setting immediately before the power is turned off is stored.
- You will be notified by audio guidance when the mode is switched.
- This may not be effective depending on the music or video being played back.
Troubleshooting
Before requesting service, make the following checks. If you are in doubt about some of the checkpoints, or if the remedies indicated in the chart do not solve the problem, refer to “Customer Services Directory” on the front page if you reside in the U.S.A., or refer to “CONTACT INFORMATION” on the front page if you reside in Canada.
No sound.
- Make sure that the unit and the Bluetooth ® device are connected correctly.(→ D )
- Check if music is playing on the Bluetooth® device.
- Make sure that the unit is turned on and the volume is not set too low.
- Pair and connect the Bluetooth® device and the unit again. (→ D )
- Check if the Bluetooth® compatible device supports the “A2DP” profile. For details on profiles, see “Listening to music” in “Owner’s Manual (PDF format)”. Also, refer to the operating manual for the Bluetooth® compatible device.
- If there is more than one active Bluetooth® device around this unit, it may be connected to the wrong one, so check that it is connected to the correct one.
Low volume. - Increase the volume of the unit. (→ E )
- Increase the volume on the Bluetooth® device.
The sound from the device is cut off. / Too much noise. / Sound quality is bad. - The sound may be disrupted if signals are blocked. Do not fully cover this unit with the palm of your hand, etc.
- The device may be out of the 10 m (33ft.) communication range. Move the device closer to this unit.
- Remove any obstacle between this unit and the device.
- Switch off any wireless LAN device when not in use.
The device cannot be connected.
- Delete the pairing information for this unit from the Bluetooth® device, then pair them again. (→ D )
You cannot hear the other person.
- Make sure that the unit and the Bluetooth ® enabled phone are turned on.
- Check if the unit and the Bluetooth® enabled phone are connected.(→ D )
- Check the audio settings of the Bluetooth® enabled phone. Switch the calling device to the unit if it is set to the Bluetooth® enabled phone. (→ D )
- If the volume of the other person’s voice is too low, increase the volume of both the unit and the Bluetooth ® enabled phone.
Cannot make a phone call. - Check if the Bluetooth® compatible device supports the “HSP” or “HFP” profile. For details on profiles, see “Listening to music” and “Making a phone call” in “Owner’s Manual (PDF format)”. Also, refer to the operating manual for the Bluetooth® enabled phone.
The unit does not respond. - This unit can be reset when all operations are rejected. To reset the unit, connect the unit to a computer using the USB charging cord. (The pairing device information will not be deleted.)
- The power cannot be turned on when the detachable cord (supplied) is connected.(→ E )
Cannot charge the unit.
- Is the USB port you are currently using working properly? If your the computer has other USB ports, unplug the connector from its current port and plug it into one of the other ports.
- If the measures mentioned above are not applicable, unplug the USB charging cord and plug it in again.
- If the charge time and operating time become shortened, the battery may have run down. (Number of charging times of the installed battery: Approximately 300)
The power/pairing LED does not light during charging. / Charging takes longer. - Is the USB charging cord connected firmly to the USB terminal of the computer? (→ B )
- Make sure to charge at a room temperature between 10oC and 35oC (50oF and 95oF).
The power does not turn on. - Is the unit being charged? The power cannot be turned ON during charging. (→ B )
- The power cannot be turned on when the detachable cord (supplied) is connected. (→ E )
The audio guidance language has changed. - The audio guidance language can be switched. (Press and hold [j] and
[()] for at least 5seconds.) It is possible to switch the audio guidance between English and French.
Specifications
General
| Power supply | DC 5 V, 300 mA
(Internal battery: 3.7 V (Li-polymer)) |
| Operating time | Approx. 24 hours (SBC) |
| Charging time*2 (25 °C (77 °F)) | Approx. 5 hours |
| Charging temperature range | 10 °C to 35 °C (50 °F to 95 °F) |
| Operating temperature range | 0 °C to 40 °C (32 °F to 104 °F) |
| Operating humidity range | 35 %RH to 80 %RH (no condensation) |
| Mass (Weight) | Approx. 218 g (7.7 oz) (without cord) |
Bluetooth® sectio
| Frequency band | 2402MHz to 2480MHz |
| Supported profiles | A2DP, AVRCP, HSP, HFP |
| Supported codec | SBC, AAC, Qualcomm® aptX™, Qualcomm® aptX ™ Low Latency |
Headphone section
| Impedance | 38Ω (Power off, with cord) |
Speaker section
| Max input | 1000mW (IEC) |
- It may be shorter depending on the operating conditions.
- The time required to charge the battery from empty to full.
• Specifications are subject to change without notice.
Panasonic Corporation of North America
Two Riverfront Plaza, Newark, NJ 07102-5490
http://shop.panasonic.com
TQBM0496
F0319SK1039
More detailed operating instructions are available in “Owner’s Manual (PDF format)”.
To read it, download it from the website.
https://panasonic.jp/support/global/cs/accessories/oi/rp_hd300b/
•Click the desired language.
https://panasonic.jp/support/global/cs/accessories/oi/rp_hd300b/
Accessories
Please check and identify the supplied accessories.
Only for the U.S.A.:
To order accessories, refer to “Limited Warranty” on the rear page.
Only for Canada:
To order accessories, contact the dealer from whom you
have made your purchase.
1xUSB charging cord
1xDetachable cord
Expressions used in this document
- The product illustrations may differ from the actual product.