nedis Hot air fryer
Intended use
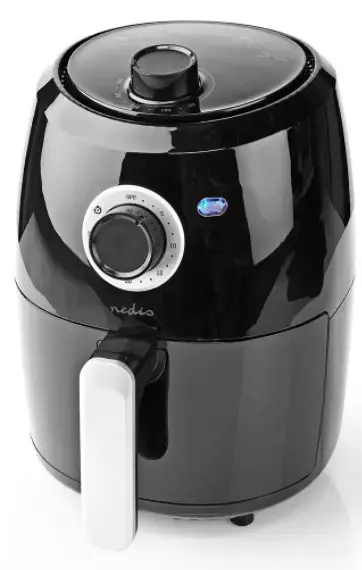
The Nedis KAAF120FBK is a hot air fryer with a 2.4 L capacity.
This product is intended to be used in household and similar applications such as kitchen areas.
This product can be used by children aged from 8 years and above and persons with reduced physical, sensory or mental capabilities or lack of experience and knowledge if they have been given supervision or instruction concerning use of the product in a safe way and understand the hazards involved. Children shall not play with the product. Cleaning and user maintenance shall not be done by children without supervision.
The product is intended for indoor use only.
The product is not intended for professional use. Any modification of the product may have consequences for safety, warranty and proper functioning.
Specifications
| Product | Hot air fryer |
| Article number | KAAF120FBK |
| Dimensions (l x w x h) | 269 x 215 x 305 mm |
| Weight | 2590 g |
| Power input | 220 – 240 VAC ; 50 /
60 Hz |
| Heating power | 1000 W |
| Motor power | 20 W |
| Rated operating time | 60 min |
| Timer | 30 min |
| Temperature range | 80 °C – 200 °C |
| Capacity | 2.4 L |
| Cable length | 800 mm |
Main parts
- Temperature dial
- Power indicator LED
- Timer dial
- Tray
- Pan
- Handle
- Air outlet
- Power cable
Safety instructions
- Only use the product as described in this manual.
- Read the manual carefully before use. Keep the manual for future reference.
- Do not use the product if a part is damaged or defective. Replace a damaged or defective product immediately.
- Do not drop the product and avoid bumping.
- This product may only be serviced by a qualified technician for maintenance to reduce the risk of electric shock.
- Children should be supervised to ensure that they do not play with the product.
- Disconnect the product from the electrical outlet and other equipment if problems occur.
- The product must only be powered with the voltage corresponding to the marking on the product.
- Do not use external timers or remote control systems to switch the product on or off.
- Do not immerse the product, the power cable or plug in water or other liquids.
- The use of accessories not recommended by the product manufacturer may result in fire, electric shock or injury to persons.
- Unplug the product and set dials to zero when not in use and before cleaning.
- Allow the product to cool before moving, cleaning, putting on- or taking off parts.
- Do not let the power cable hang over the edge of a table or counter, or touch hot surfaces.
- Do not use the product for outdoor uses, the product is designed for indoor use.
- Do not use any accessories that are not included.
- Place the product on a stable, flat and heat resistant surface.
- Keep the product at a distance from flammable objects such as furniture, curtains and similar.
- Do not touch any hot surfaces.
- Do not touch any hot parts of the pan and tray. Use the handle to move the pan.
- Only plug the cable into a wall outlet. Do not use extension cords.
- Do not cover the product.
- Keep distance from the air outlet while using the product.
- Be careful when sliding out the pan, hot steam may escape.
- Do not fill the pan with oil or other liquids.
- Make sure the pan and tray are dry before use.
- Make sure the pan is completely inserted when the product is operational.
- Any modification of the product may have consequences for safety, warranty and proper functioning.
Before first use
- Clean the tray A4 and the pan A5 with water and soap.
- Prevent water going into the handle A6 and the front panel of A5.
Using the product
Place the product on a stable, flat and heat resistant surface.
- Plug the power cable A8 into the power outlet. Keep the air outlet A7 at least 15 cm away from the wall.
- Place A4 into A5.
- Place food into A5.
– Do not fill the pan above the ‘MAX’ indicator. - Slide A5 back into the product by A6.
- Rotate the timer dial A3 to the required time according to the food packaging.
Preheat the product for 3 minutes if the product is cold. - Rotate the temperature dial A1 to the required temperature according to the food packaging.
- When you hear the timer bell, slide out A5 by pulling A6.
Be careful when sliding out the pan, hot steam may escape. - Slide A5 back into the product by A6 and adjust the timer if the food is not ready yet.
- Remove the food with a food tong or by lifting A5 out of the product and emptying it into a bowl or onto a plate.
Nedis BV
De Tweeling 28, 5215 MC ’s-Hertogenbosch The Netherlands
nedis Wireless Bluetooth sports earphones

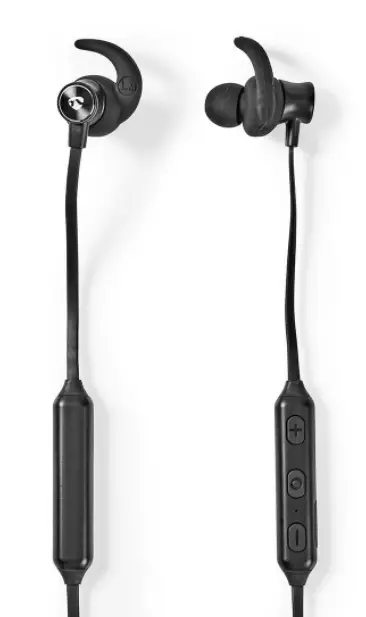
Parts list
- Fin eartips
- Earphones
- Volume+ button
- Multifunction button
- Status indicator LED
- Micro USB port with protective cap
- Volume- button
Switching on the earphones
• Press and hold 4 for 4 seconds to switch on the earphones. The status indicator LED 5 on the earphones blinks blue three times
Charging the earphones
• Plug the micro USB cable into the micro USB slot of the earphones 6.
The status indicator LED 5 on the earphones burns red to indicate the earphones are charging.
The status indicator LED 5 on the earphones turns blue when the earphones are fully charged.
Pairing the earphones to a Bluetooth audio source
- While the earphones are switched off, press and hold 4 to enter pairing mode.
The status indicator LED 5 on the earphones start to blink blue/red to indicate the earphones are pairing. - Enable Bluetooth on the device you want to pair the earphones with.
- Select “HPBT8000” from the list of available Bluetooth devices on your device.
- If asked, enter the pairing code ‘0000’.
When pairing is complete, the status indicator LED 5 will light up blue.
The earphones will automatically reconnect with the last paired device when switched on.
Controlling the volume
- Raise the volume on the earphones with the Volume+
- Lower the volume on the earphones with the Volume button
Controlling the music
- Press 4 to play or pause the music
- Press and hold 3 to skip to the next song.
- Press and hold 7 to go back to the start of the song. Press and hold again within 2 seconds to go to the previous song.
Making phone calls
With the earphones connected to a mobile phone via Bluetooth, phone calls will automatically be redirected to the earphones.
When you receive an incoming phone call, the status indicator LED 5 will flash blue and the phone will ring through the speakers of the earphones.
- To answer an incoming call, press 4.
- To reject an incoming call, press and hold 4 for 2 seconds.
- To end a call, press 4.
- To cancel an outgoing phone call, press 4.
- To quickly redial the last called number, double press 4.
Low battery alarm
When the battery is low, the status indicator LED 5 will flash red 3 times every 20 seconds
Switching off the earphones
Press and hold 4 for 4 seconds to switch off the earphones. The status indicator LED 5 on the earphones blinks red twice.
The earphones will automatically switch off when there is no Bluetooth connection for more than 6 minutes.
Specifications
| Product | In-ear sport earphones |
| Article number | HPBT8000BK |
| Bluetooth® version | 5.0 |
| Battery Capacity | 80 mAh |
| Charging time | ±2 hours |
| Playback time | Up to 5 hours |
| Talk time | Up to 5 hours |
| Charging current | 5 V/DC – 500 mA |
| Bluetooth frequency range | 2.402 – 2.480 GHz |
| Wireless Transmission effective distance | Up to 10 meters |
| Maximum Transmission power | 4 dBm |
| Maximum Antenna gain | 1.7 dBi |
| Speaker driver size | 12 mm dynamic |
| Microphone | Built-in |
| Cable length | 60 cm |
Declaration of Conformity
We, Nedis B.V. declare as manufacturer that the product HPBT8000BK from our brand Nedis®, produced in China, has been tested according to all relevant CE standards and regulations and that all tests have been passed successfully. This includes, but is not limited to the RED 2014/53/EU regulation.
The complete Declaration of Conformity (and the safety datasheet if applicable) can be found and downloaded via webshop.nedis.com/HPBT8000BK#support
For additional information regarding the compliance, contact the customer service:
Web: www.nedis.com
E-mail: [email protected]
Phone: +31 (0)73-5991055 (during office hours)
Nedis B.V., de Tweeling 28
5215 MC ’s-Hertogenbosch, the Netherlands
Deep Fryer
![]() For more information see the extended manual online: ned.is/kadf600fsr
For more information see the extended manual online: ned.is/kadf600fsr
Intended use
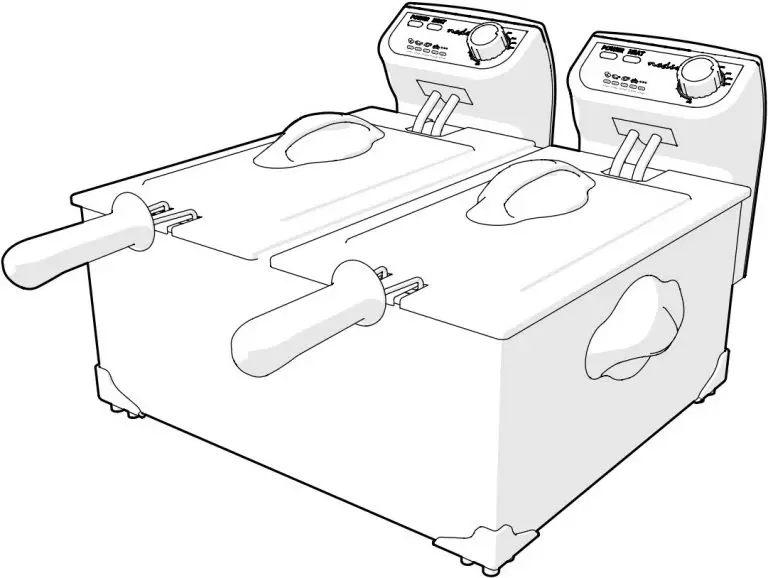
- The Nedis KADF600FSR is a double deep fryer with a 6.0 l capacity.
- The product is equipped with an overheating safeguard.
- This product is only intended for frying food.
- This product is not intended to be operated by means of an external timer or a separate remote control system.
- This product is intended for use in household environments for typical housekeeping functions that may also be used by non-expert users for typical housekeeping functions, such as: shops, offices other similar working environments, farm houses, by clients in hotels, motels and other residential type environments and/or in bed and breakfast type environments.
- The product is intended for indoor use only.
- The product is not intended for professional use.
- This product is not intended for use by persons (including children) with reduced physical, sensory or mental capabilities or lack of experience and knowledge, unless they have been given supervision or instruction concerning the use of the product by a person responsible for their safety.
- Any modification of the product may have consequences for safety, warranty and proper functioning.
Specifications
| Product | Deep Fryer |
| Article number | KADF600FSR |
| Dimensions | (l x w x h) 52 x 41 x 24 cm |
| Weight | 1500 g |
| Power supply | 220 – 240 VAC / 50 Hz |
| Power consumption | 2 x 1800 W |
| Temperature range | 130 – 190 °C |
| Capacity | 6.0 L |
Main parts

- Power indicator LED
- Heat indicator LED
- Advised frying temperatures
- Control dial
- Handles
- Lid
- Frying basket
- Basket handle
- Basket hook
- Inner pan
- Min – Max indicators
- Housing
- Power input
- Reset button
- Heating element
- Power cable
- Power connector
Safety instructions
![]() WARNING
WARNING
- Ensure you have fully read and understood the instructions in this document before you install or use the product. Keep this document for future reference.
- Only use the product as described in this document.
- Do not use the product if a part is damaged or defective. Replace a damaged or defective product immediately.
- Do not drop the product and avoid bumping.
- Unplug the product from the power source and other equipment if problems occur.
- Make sure that the power cable cannot become entangled and does not hang over the edge of a worktop.
- Avoid spillage on the power connector.
- Do not use an extension cable.
- Do not use a timer or a separate remote-control system that switches on the product automatically.
- Do not let the power cable touch hot surfaces.
- Plug into a grounded outlet only.
- Unplug the product when not in use and before cleaning.
- Do not unplug the product by pulling on the cable. Always grasp the plug and pull.
- Keep the product out of reach from children.
- Children should be supervised to ensure that they do not play with the
product. - Place the product on a stable and flat surface.
- Do not install the product in a cabinet.
- Ensure a minimum of 10 cm free space around the product to provide enough ventilation during frying.
- Do not leave the product unattended when switched on.
- Do not expose the product to water, rain, moisture or high humidity.
- Never immerse the product in water or place it in a dishwasher.
- Prevent water and/or ice from mixing with oil or fat, as this causes heavy spattering or violent bubbling of the oil or fat. To minimize spattering, remove all excess ice from frozen ingredients before you fry them and dry ingredients thoroughly before you fry them. Do not overfill the pan. After cleaning, dry all parts thoroughly before you put oil or fat in the fryer.
- Make sure the fryer is always filled with oil or fat to a level between the Min – Max indicators on the inside of the inner pan to prevent either overflowing or overheating.
- Never use the product without oil or fat, this will damage the product.
- Fry food golden-yellow instead of dark or brown and remove burnt remnants.
Do not fry starchy foods, especially potato and cereal products, at a temperature above 175 °C (to minimize the production of acrylamide). - Do not fry Asian rice cakes (or similar types of food) in this appliance. This might cause heavy spattering or violent bubbling of the oil or fat.
- Do not switch on the product before you have filled it with oil or fat, as this can damage the product.
- During frying hot steam may escape through the openings. Keep your hands and face at a safe distance. Also be careful of hot steam when you remove the lid.
- Make sure the product is switched off and the oil is cooled down, before moving the product.
- Only move the product in an upright position.
- Do not expose the product to direct sunlight, naked flames or heat.
- Keep distance from flammable objects.
- Do not touch the hot parts of the product directly.
- Do not use the product if the surface is cracked.
- This product may only be serviced by a qualified technician for maintenance to reduce the risk of electric shock.
Before first use
- Remove all packaging material, protective stickers and covers from the product.
- Clean the frying basket A7 and the inner pan A10 in warm soapy water, rinse it with warm water and wipe it dry.
Placing the handle

Image B
![]() Make sure that the basket handle A8 is placed correctly.
Make sure that the basket handle A8 is placed correctly.
- Fit the ends of A8 into the eyes of the frying basket A7.
- Move A8 downwards and press it until it locks into A7.
Installing the product
Follow the instructions.
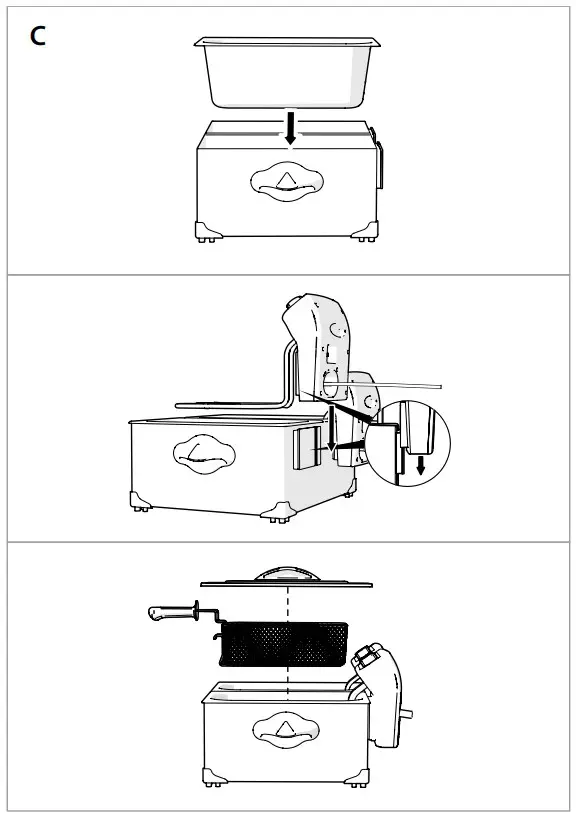
Image C
Using the product
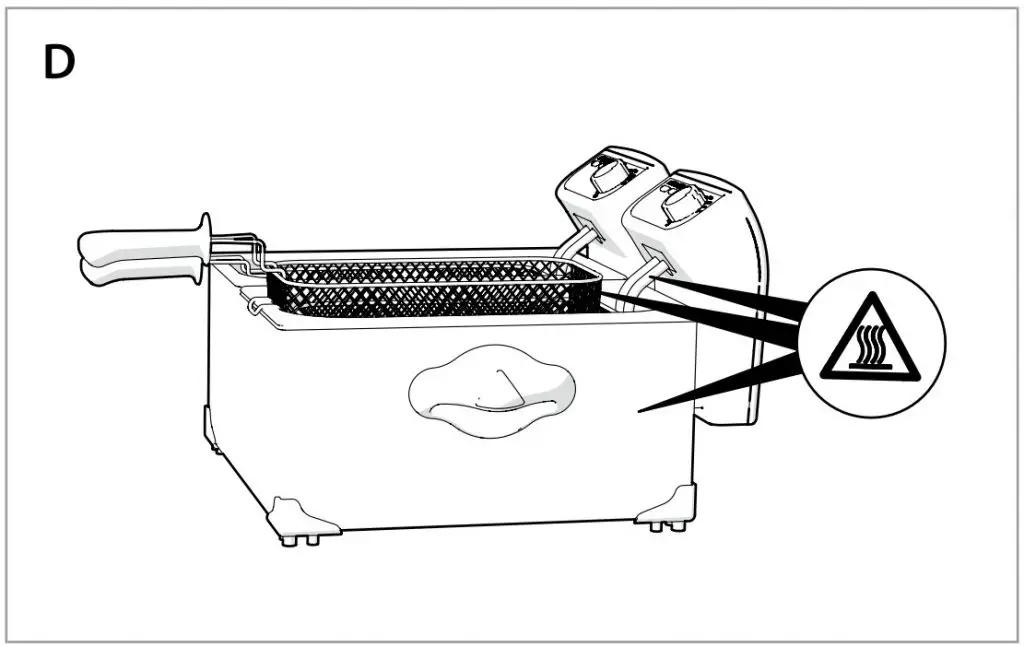
Image D
![]() Do not touch any hot surfaces.
Do not touch any hot surfaces.
![]() Make sure that all parts are dry before you fill the fryer with oil or fat.
Make sure that all parts are dry before you fill the fryer with oil or fat.
![]() This product is only suitable for use with oil or liquid fat, not for solid fat.
This product is only suitable for use with oil or liquid fat, not for solid fat.
- Fill A10 with oil between the Min – Max indicators A11.
 Only use oil that is suitable for frying.
Never use the product without oil or fat, this will damage the product.
Only use the product for frying food.
Place the product on a stable, flat and heat resistant surface.
Ensure a minimum of 10 cm free space around the product to provide enough ventilation during frying. - Place the lid A6 on A10.
- Plug the power connector A17 into the power input A13 (image E).
- Plug the power cable A16 into the power outlet.
The power indicator LED A1 lights up. - Check the food packaging for the required frying temperature and duration to get the best results.
- Set the control dial A4 to the correct temperature.
The heat indicator LED A2 lights up.
Do not place food in the product before it has reached the set temperature. A2 switches off when the oil has reached the set temperature. - Remove A6 from A10.
- Lift A7 and hang it on the edge of A10.
Use a maximum of 600 grams of chips for each pan, to prevent overflowing the pan.
 Use a maximum of 100 grams of frozen food (other than chips) for each pan, because the oil cools off rapidly.
Remove all excess ice from frozen food and dry the food thoroughly before you place them in the product. - Fill A7 with food.
- Slowly lower A7 into the oil to prevent the oil from heavy spattering.
- Place A6 on A10.
A15 automatically switches on and off to maintain the set oil temperature during frying.
Be careful when opening the lid, hot steam may escape. - Regularly check if the food has not been fried too deep.
- When the food is ready, turn A4 to MIN.
- Remove A6 from A10.
- Lift A7 and hang it on the edge of A10 to let the oil drip off into A10.
Be careful, the basket and food are hot. - Remove the food with a food tong or by lifting A7 out of the product and emptying it into a bowl or onto a plate.
- Unplug A16 from the power outlet after use.
- Let the product cool down without A6 to prevent condensation.
- Remove any food residue from the oil with a skimmer to maintain the best quality of the oil.
Changing the oil

Image E
- Unplug A15 from the power outlet.
Make sure oil or fat has cooled down, before removing the oil. - Pour the oil in an empty oil container.
Used oil is harmful to the environment. Follow the guidelines issued by the local authorities for disposing the oil. - Clean the product after removing the oil. Follow the instructions in the next paragraph.
- Dry all parts thoroughly before you put oil or fat in the fryer.
Always replace all oil, do not mix new and old oil.
- Change the oil after every 8 – 10 frying sessions or as soon as it becomes dark, or if the smell of the oil has changed.
- Change the oil if you recognize high concentration of water in the oil. You can recognize this by large bubbles, water droplets or water vapor.
If you switch on the product with water mixed in the oil, it can spatter out with an explosion during frying.
Cleaning
![]() Avoid abrasives that can damage the surface.
Avoid abrasives that can damage the surface.
![]() Only A7 A10 can be cleaned in water or dishwasher when removed from the product.
Only A7 A10 can be cleaned in water or dishwasher when removed from the product.
- Remove any food residue from the inside of A10 With a paper tissue.
- Clean A6 A7 A10 thoroughly in warm soapy water by using a brush.
- Rinse A6 A7 A10 in warm clean water and wipe it dry.
- Clean the outside of the product with a soft clean, damp cloth.


Rechargeable Video Doorbell
100% wireless solution
WIFICDP20WT / WIFICDP20GY


http://ned.is/WIFICDP20WT http://ned.is/WIFICDP20GY

Quick start guide
Rechargeable Video Doorbell
WIFICDP20WT
WIFICDP20GY
 For more information see the extended manual online: ned.is/wificdp20wtned.is/wificdp20gy
Intended use
The Nedis WIFICDP20XX is a Wi-Fi based Video Doorbell that streams recorded video and audio directly to your smartphone or tablet.
This product is intended for indoor and outdoor use.
Consult the local laws and regulations for security cameras before using and installing.
The product is not intended for professional use.
Any modification of the product may have consequences for safety, warranty, and proper functioning.
Specifications
| Product | Rechargeable Video Doorbell | |
| Article number | WIFICDP2OWT | WIFICDP2OGY |
| Dimensions (I x w x h) | 141 x 50 x 32 mm | |
| Video resolution | 1280 px – 720 px | 1920 px – 1080 px |
| Video Compression | H.264 | |
| Viewing angle | 100 ° | 180 ° |
| Image sensor | 1/4’CMOS sensor | 1/2.9″CMOS sensor |
| Night vision range | 5.0 m | |
| Memory | MicroSD card: Up to 128 GB (not included) | |
| IP rating | 1P54 (splash proof) | |
| Working temperature | -20 – 50 °C | |
| Battery type | 1 x 18650 (Li-ion) | 2 x 18650 (Li-ion) |
| Battery capacity | 2600 mAh | 5200 mAh |
| Battery lifetime | Up to 2 months in standby or 200 recordings | Up to 4 months in standby or 400 recordings |
| Power input | 5 VDC ; 2 A (Micro USB) | |
| Standby power | 2 mA | |
| Wi-Fi frequency range | 2412 – 2472 MHz | |
| Wireless connections | Wi-Fi & 433 MHz | |
| Max. radio transmit power | 18 dBm | |
| Compatible indoor chime | WIFICDPC10)c( | |
| Max. distance between doorbell and indoor chime | 20 – 30 m | |
| Infrared LEDs | 6pcs Infrared LEDs with 5 meters visibility | |
| PIR sensor | 3 m | |
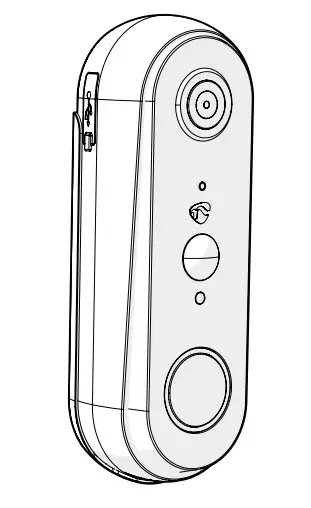
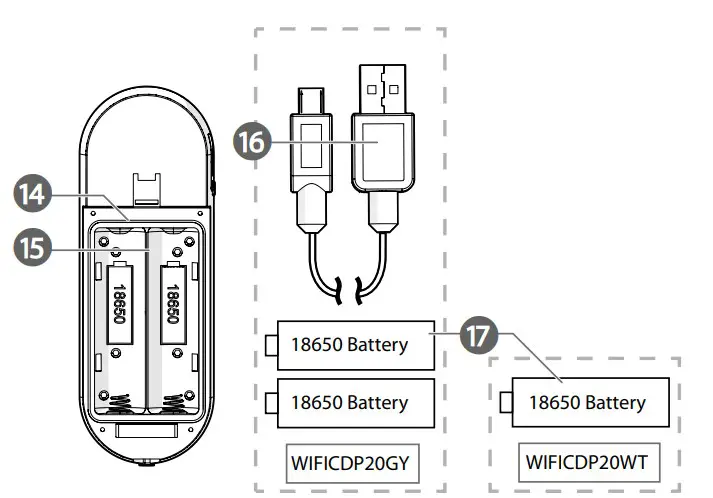
Main parts (image A)
| 1. Battery cover 2. Mounting holes 3.Mounting bracket 4.Hexagonal bolt 5. Micro USB port 6. Reset button |
7.Charging indicator LED 8. Camera lens 9.Microphone 10. PIR sensor 11.Call button 12.Status indicator LED |
13. Speaker 14.MicroSD card slot 15.Battery compartment 16.Micro USB cable 17.Batteries |
Safety instructions
 WARNING
- Ensure you have fully read and understood the instructions in this document before you install or use the product. Keep the packaging and this document for future reference.
- Only use the product as described in this document.
- Disconnect the product from the power source and other equipment if problems occur.
- Do not use the product if a part is damaged or defective. Replace a damaged or defective product immediately.
- Do not drop the product and avoid bumping.
- In the event of a cell leaking, do not allow the liquid to come in contact with the skin or eyes. If contact has been made, wash the affected area with copious amounts of water and seek medical advice.
- Do not use any cell or battery that is not designed for use with the product.
- Do not dismantle, open or shred secondary cells or batteries.
- Do not expose cells or batteries to heat or fire. Avoid storage in direct sunlight.
- Seek medical advice immediately if a cell or a battery has been swallowed.
- Do not short-circuit a cell or a battery.
- Do not store cells or batteries haphazardly in a box or drawer where they may short-circuit each other or be short-circuited by other metal objects.
- Do not subject cells or batteries to mechanical shock.
- Use only the cell or battery in the application for which it was intended.
- Do not mix cells of different manufacture, capacity, size or type within a product.
- Wipe the cell or battery terminals with a clean dry cloth if they become dirty.
- Battery usage by children should be supervised.
- Observe the plus (+) and minus (–) marks on the cell, battery and equipment and ensure correct use.
- Do not use any charger other than that specifically provided for use with the equipment.
- Do not leave a battery on prolonged charge when not in use.
- After extended periods of storage, it may be necessary to charge and discharge the cells or batteries several times to obtain maximum performance.
- Disconnect the power supply before making or breaking the connections to the battery.
- During charging, the battery must be placed in a well-ventilated area.
- Dispose of the cell or battery properly.
- When possible, remove the battery from the product when not in use.
- Clean the product regularly with a soft, clean, dry cloth. Avoid abrasives that can damage the surface.
- Do not use aggressive chemical cleaning agents such as ammonia, acid or acetone when cleaning the product.
- Consult the local laws and regulations for this product before installing and using.
Preparing the product
- Unscrew the hexagonal bolt A4 from the bottom of the bracket
- Unscrew the battery cover A1 to open the product.
- Optional: insert a microSD card (not included) into the microSD card slot A14, to locally store recordings.
- Insert the required batteries into the battery compartment A15.
 – Observe the plus (+) and minus (–) marks on the cell, battery and equipment and ensure correct use.
The status indicator LED Ae blinks red to indicate the product is ready for installation.
If Ae doesn’t blink blue, reset the product by holding the reset button A6 with a pin for 5 seconds.
Installing the Nedis SmartLife app
- Download the Nedis Smartlife app for Android or iOS on your phone via Google Play or the Apple App Store.
- Open the Nedis Smartlife app on your phone.
- Create an account with your e-mail address and tap Continue. You will receive a verification code on your e-mail address.
- Enter the received verification code.
- Create a password and tap Done.
- Tap Add Home to create a SmartLife Home.
- Set your location, choose the rooms you want to connect with and tap Done.
Connecting the app
- Tap + in the top right corner in the Nedis SmartLife app.
- Select the product type you want to add from the list.
- Confirm the status indicator LED A12 is blinking.
- Enter the Wi-Fi network data and tap Confirm.
- Tap Continue and a QR-code will appear.
- Hold your phone with a 15 – 20 cm distance in front of the camera. If the camera has detected the QR- code, you will hear a sound.
- Tap to confirm you heard the sound.
- Give the product a name and tap Done. A12 turns blue. The product is now ready for use.
If A12 doesn’t blink blue, reset the product by holding the reset button A6 with a pin for 5 seconds.
Making video recordings and screenshots
- You can make video recordings and screenshots on your phone, by tapping Record and Screenshot .
Playing back motion detected videos
Motion detected videos are automatically saved on the microSD card, if inserted.
- Tap Playback to open the stored videos.
- Select the day of the recording.
- Zoom and drag the timeline to select the recording.
Declaration of Conformity
We, Nedis B.V. declare as manufacturer that the product WIFICDP20WT WIFICDP20GY from our brand Nedis®, produced in China, has been tested according to all relevant CE standards and regulations and that all tests have been passed successfully. This includes, but is not limited to the RED 2014/53/ EU regulation.
The complete Declaration of Conformity (and the safety datasheet if applicable)
can be found and downloaded via:
nedis.com/WIFICDP20WT#support
nedis.com/WIFICDP20GY#support
For additional information regarding the compliance, contact the customer service:
Web: www.nedis.com
E-mail: [email protected]
Nedis B.V., de Tweeling 28
5215 MC ’s-Hertogenbosch, the Netherlands
USB wall charger
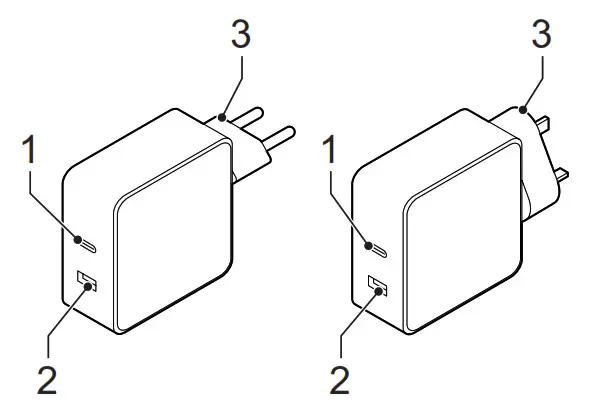
Description
| 1. USB port (USB-C) | • Check the input voltage of your USB device and the output voltage of the USB charger to make sure that the voltages match. Make sure that the total current does not exceed the rated output current of the USB charger. • Connect a suitable charging cable to your USB device and the USB port. Note: To ensure safety and best performance, use the original charging cable of yourUSB device. • Insert the mains plug into the wall socket. The USB charger will detect the best charging mode and start charging your USB device automatically. Note: Your USB device should indicate that it is in charging mode. • Disconnect the USB charger from the wall socket when not in use. |
| 2. USB port (USB-A) | |
| 3. Mains plug |
Technical data
| 1. USB port (USB-C) | 45W / 5VDC-3A, 9VDC-3A, 12VDC-3A, 15VDC-3A, 20VDC-2.25A |
| 2. USB port (USB-A) | 12W / 5VDC-2.4A |
Safety
General safety
- Read the manual carefully before use. Keep the manual for future reference.
- The manufacturer is not liable for consequential damages or for damages to property or persons caused by non-observance of the safety instructions and improper use of the device.
- Only use the device for its intended purposes. Do not use the device for other purposes than described in the manual.
- Do not use the device if any part is damaged or defective. If the device is damaged or defective, replace the device immediately.
- The device is suitable for indoor use only. Do not use the device outdoors.
- The device is suitable for domestic use only. Do not use the device for commercial purposes.
- Do not use the device in locations with high humidity, such as bathrooms and swimming pools.
- Do not use the device near bathtubs, showers, basins or other vessels containing water.
- Do not use a timer or a separate remote-control system that switches on the device automatically.
Electrical safety
- To reduce risk of electric shock, this product should only be opened by an authorized technician when service is required.
- Disconnect the product from the mains and other equipment if a problem should occur.
- Do not use the device if the mains cable or mains plug is damaged or defective. If the mains cable or mains plug is damaged or defective, it must be replaced by the manufacturer or an authorized repair agent.
- Before use, always check that the mains voltage is the same as the voltage on the rating plate of the device.
- Do not move the device by pulling the mains cable. Make sure that the mains cable cannot become entangled.
- Do not immerse the device, the mains cable or the mains plug in water or other liquids.
- Do not leave the device unattended while the mains plug is connected to the mains supply.
- Do not use an extension cable.
Cleaning and maintenance
Warning!
- Before cleaning or maintenance, always switch off the device, remove the mains plug from the wall socket and wait until the device has cooled down.
- Do not use cleaning solvents or abrasives.
- Do not clean the inside of the device.
- Do not attempt to repair the device. If the device does not operate correctly, replace it with a new device.
- Do not immerse the device in water or other liquids.
- Clean the outside of the device using a soft, damp cloth. Thoroughly dry the device with a clean, dry cloth.
Support
If you need further help or have comments or suggestions, please visit www.nedis.com/support
]]>
Description
- Status indicator
- Speaker
- Reset button
- Memory card slot (microSD)
- Power input (Micro USB)
- Climate sensor
Use
- Download and install the app “Nedis SmartLife“ from Apple App Store or Google Play Store on your mobile device.
- Launch the app “Nedis SmartLife“.
- Create a new account or log in to your existing account.
- Tap “+” to add the device.
- Select “Security Camera” from the list of products.
- Insert the memory card into the memory card slot.
- Plug in the climate sensor.
- Use the USB cable to connect the power adapter to the device. Insert the mains plug of the power adapter into the wall socket.
- If the status indicator does not flash: Press and hold the reset button for 6 seconds.
If the status indicator flashes: Confirm in the app. - Confrm the Wi-Fi network and password.
- Enter the device name.
Note: The device name will also be used for push notifications. - Take one of these actions:
- Bend the camera to make sure it remains in standing position.
- Mount the mounting bracket to the required location using the screws or the double-sided adhesive tape. Clamp the camera into the mounting bracket.
- If necessary, adjust the camera angle.
Safety
![]() Caution: Risk of Electric Shock Dot Not Open
Caution: Risk of Electric Shock Dot Not Open ![]()
- To reduce risk of electric shock, this product should only be opened by an authorized technician when service is required.
- Disconnect the product from the mains and other equipment if a problem should occur.
- Read the manual carefully before use. Keep the manual for future reference.
- Only use the device for its intended purposes. Do not use the device for other purposes than described in the manual.
- Do not use the device if any part is damaged or defective. If the device is damaged or defective, replace the device immediately.
- The device is suitable for indoor use only. Do not use the device outdoors.
- Do not expose the product to water or moisture.
Cleaning and maintenance
Warning!
- Do not use cleaning solvents or abrasives.
- Do not clean the inside of the device.
- Do not attempt to repair the device. If the device does not operate correctly, replace it with a new device.
- Clean the outside of the device using a soft, damp cloth.
Support
If you need further help or have comments or suggestions please visit www.nedis.com/support
Costumer Service
Tel: +31 (0)73-5993965
Email: [email protected]
Website: www.nedis.com/contact
NEDIS B.V.
De Tweeling 28
5215 MC ’s-Hertogenbosch
THE NETHERLANDS
Single Electric Blanket
150 x 80 cm
PEBL130CWT1
![]()
Quick start guide
A
![]() B
B
![]() C
C
![]()
![]()
For more information see the extended manual online: ned.is/pebl130cwt1
Intended use
The product is exclusively intended as electric under blanket for indoor use. Any modification of the product may have consequences for safety, warranty and proper functioning.
Parts list [Image A]
- Plug
- Locking tab
- Power socket
- Temperature button
- Time button
- High button
- Blanket
- Temperature icon
- Time icon
- Time indicator
- Temperature indicator
- Power switch
- Controller PS7G-H/L
Safety instructions
![]() WARNING
WARNING
- Only use the product as described in this manual.
- Ensure before use you know how the product works and how to operate it.
- Do not use the product if a part is damaged or defective. Replace a damaged or defective device immediately.
- This product may only be serviced by a qualified technician for maintenance to reduce the risk of electric shock.
- Disconnect the product from the electrical outlet and other equipment if problems occur.
- Do not drop the product and avoid bumping.
- Used only as underblanket.
- Always use the voltage (A.C. Only) marked on the rating label.
- Use only the type of controller marked on rating label.
- Always switch off the controller before you insert or remove a plug.
- Do not expose the product to water or moisture.
- The product is not intended for medical use in hospitals.
- Do not use together with another heating appliance.
- When in use ensure the blanket and mains cord do not get trapped.
- Children should be supervised to ensure that they do not play with the product.
- Cleaning and user maintenance shall not be done by children without supervision.
- The product must not be used by persons insensitive to heat and other very vulnerable persons who are unable to react to overheating.
- Children under the age of 3 are not to use the product due to their inability to react to overheating.
- The product is not to be used by young children over 3 years of age, unless the controls have been pre-set by a parent or guardian, or unless the child has been adequately instructed on how to operate the controls safely.
- The product can be used by children aged from 8 years and above and persons with reduced physical, sensory or mental capabilities or lack of experience and knowledge if they have been given supervision or instruction concerning use of the product in a safe way and understand the hazards involved.
Connecting and removing the controller [Image B and C]
Connect the controller [Image B]
- Lift the locking tab
 .
. - Push the plug
 into the power socket
  .
.
Remove the controller [Image C]
![]() Make sure the power switch
Make sure the power switch ![]() of the controller
of the controller ![]() is switched to Off.
is switched to Off.
- Lift the locking tab .
- Pull the plug out of the power socket .
 Do not pull the cord of the controller
  . And do not try to pull the plug out without lifting the locking tab .
Preheat and use
![]() Do not use if it is damp or wet.
Do not use if it is damp or wet.
i) Preheat 30-60 minutes before using.
- Connect the controller.
- Connect the power cord to the mains.
Ensure people do not trip over the cord. - Switch the power switch
 to On.
 - Press the High button
 to set at `H’.
i) After one hour the high temperature automatically will change to `L’ (Low temperature). - Press the Temperature button
 to set the temperature. Select L,1-7,H.
 - Press the Time button
 to select the total operating time. Select 1-9 hour.
![]() If you go to sleep or use it for a long time, set at ‘L’ or 1, to avoid overheating.
If you go to sleep or use it for a long time, set at ‘L’ or 1, to avoid overheating.
After use
- When the blanket is not in use, switch the power switch to Off.
- Remove the plug from the power socket .
- Disconnect the power cord from the mains.
If you want to store the blanket for a longer period. Repeat step 1 – 3. - Let it cool down. Make sure the blanket is dry.
Let it dry naturally. Do not iron or dry in the sun. - Gently fold the blanket and place back into the packing bag.
- Store in a cool dry place.
Do not place items on top of it.
Cleaning & Maintenance
Cleaning
- Disconnect the controller from the blanket and from the mains, before cleaning and when not in use.
- Do not use aggressive chemical cleaning agents such as ammonia, acid or acetone when cleaning the product.
- Do not immerse the controller in water or get it wet.
- Do not wring out the blanket.
- Allow the blanket to dry naturally. Do not dry the blanket in the sun, do not use a product such as a hair dryer to dry it, and do not connect it to the mains supply to dry it.
- Do not use mothproofing agents.
![]() Read the instructions before use.
Read the instructions before use.
![]() Do not insert pins.
Do not insert pins.
 Do not use folded or rucked.
 Not to be used by very young children (0-3 years).
![]() Do not bleach.
Do not bleach.
![]() Do not tumble dry.
Do not tumble dry.
![]() Do not iron.
Do not iron.
![]() Do not dry clean.
Do not dry clean.
![]() Maximum washing temperature 40 °C.
Maximum washing temperature 40 °C.
Clean the product regularly with a soft, clean, dry cloth. Avoid abrasives that can damage the surface.
To clean the blanket, hand wiping it down with a soft damp cloth with very mild detergent, mildly process at a maximum washing temperature of 40°C. Allow it to dry thoroughly before using or storing it. When washed, drape it over a clothesline to dry.
- Do not use clothes pegs to secure it.
Machine washing of the blanket is possible; however, hand wiping it down will prolong the life of the blanket. To machine wash, remove the controller and place the blanket in a net bag and seal it. Use a small amount of detergent and set the washing machine to a “Delicate Wash” with a maximum temperature of 40°C. When washed, remove the blanket from the net bag and drape it over a clothes line to dry.
- Do not use clothes pegs to secure it.
Maintenance
Do not try to open or repair the controller, cord or the blanket. It must be serviced by a qualified person.
Examine the blanket frequently to check that there are no signs of wear or damage. If any damage/wear is spotted, do not use the blanket and search for specialist advice.
Specifications
| Product | Single Electric Blanket |
| Article number | PEBL130CWT1 |
| Dimensions (l x w) | 150 x 80 cm |
| Input voltage | AC 220 – 240 V ~ 50 Hz |
| Wattage | 60 Watt |
| Temperature settings range | 25 °C – 50 °C ± 5 °C |
| Material | Flannel fleece & polyester |
Quick start guide
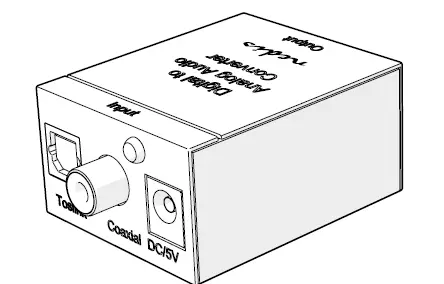
Digital to Analogue Audio Converter
 For more information see the extended manual online: ned.is/acon2510bk
Intended use
This product is a converter for coaxial or toslink digital audio to analog L/R audio. The product is intended for indoor use only. Any modification of the product may have consequences for safety, warranty and proper functioning.
Specifications
| Product | Digital to Analogue Audio Converter |
| Article number | ACON2510BK |
| Dimensions (l x w x h) | 51 x 41 x 26 mm |
| Weight | 78g |
| Power input | 5.0 VDC ; 2.0 A |
| Operating temperature | 0 °C – 70 °C |
| Operating humidity | 10 % – 85 % (RH) |
| Storage humidity | -10 % – 85 % (RH) |
| Power consumption | 0.5 W |
| Supported bitrates | 32 kHz 24-bit
44.1 kHz 24-bit 48 kHz 24-bit 96 kHz 24-bit |
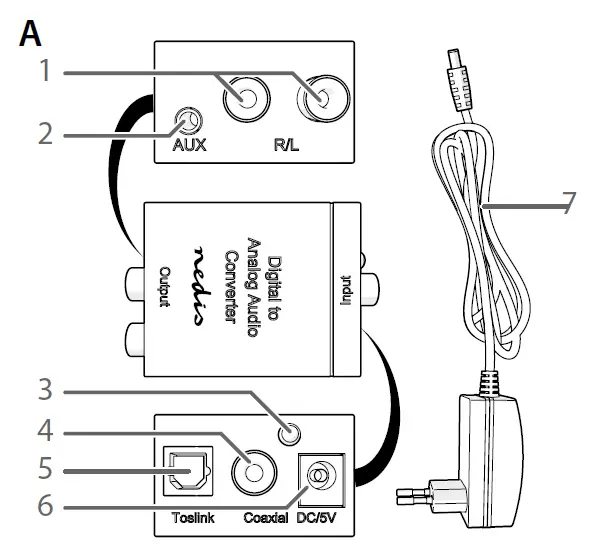
Main parts (image A)
- R/L output
- AUX output
- Power indicator LED
- Coaxial input
- Toslink female input
- DC power port
- Power cable
Safety instructions
- Ensure you have fully read and understood the instructions in this document before you install or use the product. Keep the packaging and this document for future reference.
- Only use the product as described in this document.
- Do not use the product if a part is damaged or defective. Replace a damaged or defective product immediately.
- Do not drop the product and avoid bumping.
- Do not expose the product to water or moisture.
- Only use the provided power cable.
- Disconnect the product from the power source and other equipment if problems occur.
- Do not unplug the product by pulling on the cable. Always grasp the plug and pull.
- This product may only be serviced by a qualified technician for maintenance to reduce the risk of electric shock.
Installing the product
 Make sure all the devices you want to connect have been switched off.
- Plug a twin R/L cable (not included) into the R/L output A1 or plug an AUX cable or headphone (not included) into the AUX output A2.
- Plug the other end of the cable into your audio output device.
- Plug a coaxial cable (not included) into the coaxial input A4 or plug a Toslink cable (not included) into the Toslink female input A5.
- Plug the other end of the cable into your audio output device.
Using the product
- Plug the power cable A7 into the power port A6.
- Plug the other end of A7 into a power outlet. The product switches on. The power indicator LED A3 lights up.
- Switch on the connected audio devices.
Quick start guide
Party Cooler
 For more information see the extended manual online: ned.is/kapc100ss
Intended use
The product is not intended for professional use. Any modification of the product may have consequences for safety,
warranty and proper functioning. The product is intended for indoor use only.
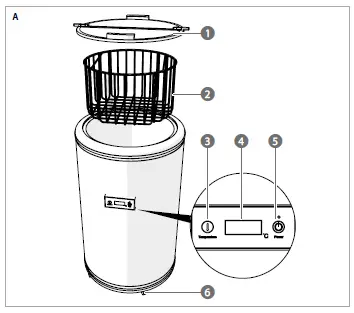
Main parts (image A)
- Lid
- Basket
- Thermostat button
- Display
- Power button
- Wheels
Safety instructions
 WARNING
- Read the instructions before use.
- Only use the product as described in this manual.
- Close supervision is necessary when the product is used by or near children, animals or infirm persons. Do not allow children to play with it or touch it.
- Do not unplug the power supply by pulling on the cable. Always grasp the plug and pull.
- Do not use the product if a part is damaged or defective. Replace a damaged or defective device immediately.
- Do not block ventilation openings and make sure that there is enough space around the product.
- Do not use mechanical products or other means to accelerate the defrosting process, other than those recommended by the manufacturer.
- Do not puncture or heat any part of the refrigerant circuit.
- Do not use electrical products inside the food storage compartment, unless recommended by the manufacturer.
- Do not store explosive substances, such as aerosol cans, with a flammable propellant in this product.
- This product is intended to be used in household and similar applications such as kitchen areas.
- Make sure the power cable is not trapped or damaged.
- Do not place multiple portable power outlets behind the product.
- Before cleaning or moving, switch off the product and disconnect the power.
- Do not operate the product in the presence of explosive fumes.
- Connect to a grounded outlet only.
- When using an extension cord, use one that is as short as possible, fully extended, 1.5 mm2 size, approved.
- Do not use the product where splashing of water might occur, e.g. bathroom, swimming pool or close to a washbowl.
- Do not expose the product to direct sunlight, naked flames or heat.
- Do not expose the product to water or moisture.
- The product is intended for indoor use only.
- Store the unit indoors.
Installing the product
 Place the product on a stable and flat surface.
- Clean the product with a damp cloth.
 Dry thoroughly before use.
If the product has been tilted, allow it to stand upright for 20 to 30 minutes before plugging it in. - Plug the power plug in a working power outlet.
- Press A5 to turn on the product.
- Press A3 to adjust the cooling temperature.
4 A4 flashes during the adjustment.
4 The temperature in the product depends on the temperature in the surrounding area, the contents of the product and how often and how long the lid is opened.
4 For better cooling, keep the lid closed.
Specifications
| Product | Party Cooler |
| Article number | KAPC100SS |
| Dimensions (l x w x h) | 46 x 46 x 83 cm |
| Power supply | 220-240V~50Hz/ 0.40 A |
| Cooling temperature | 0 °C – 16 °C |
| Weight | 22.5 kg |
| Operating temperature | ~43 °C |
| Climatic class | SN / N / ST |
| Refrigerant | R600a / 31g |
| Insulating gas | Cyclopentane (C5H10) |
Requires gateway WIFIZBxxx
Nedis BV
De Tweeling 28, 5215 MC ’s-Hertogenbosch
The Netherlands
06/20

For more information see the extended manual online: ned.is/zbsd10wt
Intended use
The Nedis ZBSD10WT is a wireless, battery powered door sensor.
You can connect the product wirelessly to the Nedis SmartLife app via the Zigbee gateway.
When connected, the app displays if the door is open or closed.
The product is intended for indoor use only.
The product is not intended for professional use.
Any modification of the product may have consequences for safety, warranty and proper functioning.
Specifications
| Product | Zigbee door sensor |
| Article number | ZBSD10WT |
| Dimensions (l x w x h) | 60 x 26 x 11 mm 35 x 9 x 10 mm |
| Battery lifetime | 1 year |
| Zigbee frequency range | 2400 – 2483 GHz |
| Maximum transmit power | 10 dB |
| Antenna gain | 2.5 dB |
| Temperature range | 0 °C – 40 °C |
| Operating humidity | < 100 % RH |
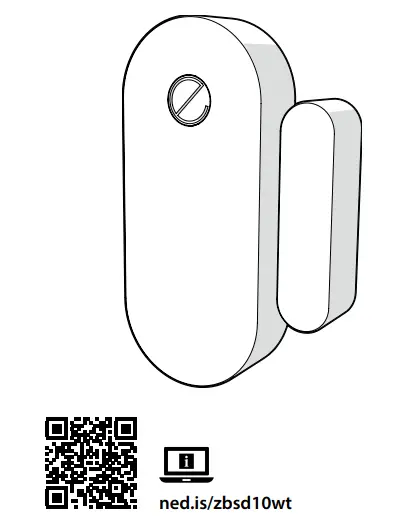
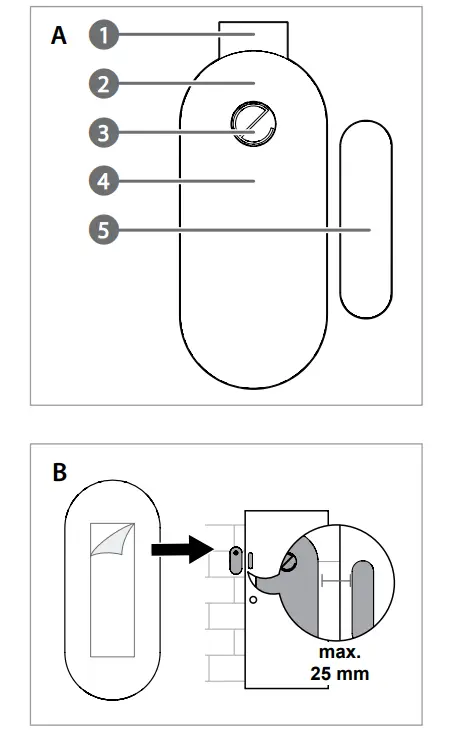
Main parts
(image A)
- Battery insulation tab
- Status indicator LED
- Function button
- Main sensor unit
- Magnetic contact
Safety instructions
![]() WARNING
WARNING
- Ensure you have fully read and understood the instructions in this document before you install or use the product. Keep this document for future reference.
- Only use the product as described in this document.
- Do not use the product if a part is damaged or defective. Replace a damaged or defective product immediately.
- Do not drop the product and avoid bumping.
- This product may only be serviced by a qualified technician for maintenance to reduce the risk of electric shock.
- Do not expose the product to water or moisture.
- Children should be supervised to ensure that they do not play with the product.
- Only power the product with the voltage corresponding to the markings on the product.
- Always keep button cell batteries, both full and empty, out of reach of children to avoid the chance of swallowing. Dispose of used batteries immediately and safely. Button cell batteries can cause serious internal chemical burns in as little as two hours when swallowed. Keep in mind that the first symptoms may look like child diseases like coughing or drooling. Seek immediate medical attention when you suspect that batteries have been swallowed.
- Do not recharge non-rechargeable batteries.
- Do not dismantle, open or shred secondary cells or batteries.
- Do not expose cells or batteries to heat or fire. Avoid storage in direct sunlight.
- Do not short-circuit a cell or a battery.
- Do not store cells or batteries haphazardly in a box or drawer where they may short-circuit each other or be short-circuited by other metal objects.
- Do not subject cells or batteries to mechanical shock.
- In the event of a cell leaking, do not allow the liquid to come in contact with the skin or eyes. If contact has been made, wash the affected area with copious amounts of water and seek medical advice.
- Observe the plus (+) and minus (–) marks on the cell, battery and equipment and ensure correct use.
- Do not use any cell or battery which is not designed for use with the equipment.
- Seek medical advice immediately if a cell or a battery has been swallowed.
- Always purchase the battery recommended by the product manufacturer for the product.
- Keep cells and batteries clean and dry.
- Wipe the cell or battery terminals with a clean dry cloth if they become dirty.
- Use only the cell or battery in the application for which it was intended.
- When possible, remove the battery from the product when not in use.
- Properly dispose of the empty battery.
- Some wireless products may interfere with implantable medical devices and other medical equipment, such as pacemakers, cochlear implants and hearing aids. Consult the manufacturer of your medical equipment for more information.
- Do not use the product at locations where the use of wireless devices is prohibited due to potential interference with other electronic devices, which may cause safety hazards.
Connecting to the Zigbee gateway
![]() Make sure the Zigbee gateway is connected to the Nedis SmartLife app.
Make sure the Zigbee gateway is connected to the Nedis SmartLife app.
![]() For information on how to connect the gateway to the app, consult the manual of the gateway.
For information on how to connect the gateway to the app, consult the manual of the gateway.
- Open the Nedis SmartLife app on your phone.
- Select the Zigbee gateway to enter the gateway interface.
- Tap Add subdevice.
- Remove the battery insulation tab A1. The status indicator LED A2 starts blinking to indicate pairing mode is active.
 If not, press and hold the function button A3 for 5 seconds to manually enter the pairing mode.
 - Tap to confirm A2 is blinking.
The sensor appears in the app when the product is successfully connected to the gateway.
Installing the sensor
The product is now ready for use.
Install the product onto a door as shown in image B.
The overview screen of the sensor
- Open the Nedis SmartLife app on your phone.
- Select the Zigbee gateway to enter the gateway interface.
- Select the sensor you want to view.
The app shows the measured values of the sensor.
• Tap Set alarm to switch the low battery alarm on or off for the selected sensor.
Creating an automated action
The sensor can control other devices with an automated action.
- Open the Nedis SmartLife app on your phone.
- Tap Smart scenes at the bottom of the home screen.
- Tap Automation to open the automation interface.
- Tap + in the top right corner.
Here you can fill in different options to create an automation. - Tap Save.
The new automation appears in the automation interface.
Removing the product from the app
- Open the sensor interface.
- Tap the pencil icon in the top right corner.
- Tap Remove Device.
Declaration of Conformity
We, Nedis B.V. declare as manufacturer that the product ZBSD10WT from our brand Nedis®, produced in China, has been tested according to all relevant CE standards and regulations and that all tests have been passed successfully. This includes, but is not limited to the RED 2014/53/EU regulation.
The complete Declaration of Conformity (and the safety datasheet if applicable) can be found and downloaded via: nedis.com/zbsd10wt#support
For additional information regarding the compliance, contact the customer service:
Web: www.nedis.com
E-mail: [email protected]
Nedis B.V., de Tweeling 28
5215 MC ’s-Hertogenbosch, the Netherlands