milwaukee HEATED JACKET User Manual

To reduce the risk of injury, user must read and understand operator’s manual.
GENERAL PRODUCT SAFETY WARNINGS
Read all safety warnings and instructions. Failure to follow the warnings and instructions may result in electric shock, fire and or serious injury.
ELECTRICAL SAFETY
- Do not expose heated jacket to rain or wet conditions. Water will increase the risk of electric shock.
- Do not abuse the power cable. Never use the cord for carrying, pulling or unplugging the heated jacket. Keep cord away from heat, oil, sharp edges or moving parts.
PERSONAL SAFETY
• Stay alert, watch what you are doing and use common sense when using the heated jacket.
Do not use while you are tired or under the influence of drugs, alcohol or medication. A moment of inattention may result in serious personal injury.
PRODUCT USE AND CARE
- Do not use the heated jacket if the power button does not turn it on and off. Any heated jacket that cannot be controlled with the power button is dangerous and must be repaired.
- Disconnect the battery pack from the heated jacket before storing. Such preventive safety measures reduce the risk of starting the heated jacket accidentally.
- Store out of the reach of children and do not allow persons unfamiliar with these instructions to operate the heated jacket. Heated jacket can be dangerous in the hands of untrained users.
- Maintain heated jacket. Check for breakage of parts and any other condition the may affect the heated jacket’s operation. If damaged, have the heated jacket repaired before use.
- Use the heated jacket in accordance with these instructions, taking into account the working conditions and the work to be performed. Use of the heated jacket for operation different from those intended could result in a hazardous situation.
BATTERY TOOL USE AND CARE
- Recharge only with the charger specified by the manufacturer. A charger that is suitable for one type of battery pack may create a risk of fire when used with another battery pack.
- Use heated jacket only with specifically designated battery packs. Use of any other battery packs may create a risk of injury and fire.
- When battery pack is not in use, keep it away from other metal objects like paper clips, coins, keys, nails, screws, or other small metal objects that can make a connection from one terminal to another. Shorting the battery terminals together may cause burns or a fire.
- Under abusive conditions, liquid may be ejected from the battery; avoid contact. If contact accidentally occurs, flush with water. If liquid contacts eyes, additionally seek medical help. Liquid ejected from the battery may cause irritation or burns.
SERVICE
- Have your heated jacket serviced by a qualified repair person using only identical replacement parts. This will ensure that the safety of the heated jacket is maintained.
SPECIFIC SAFETY RULES FOR HEATED JACKET
Read instructions carefully.
Use:
- Do not use this heated jacket with an infant, child, a helpless person, or anyone insensitive to heat, such as a person with poor blood circulation.
- If you have a medical condition making sensitive to overheating, or you use any personal medical devices, consult the device manufacturer and/or your physician to determine if use of this product is appropriate.
- Never use if inner liner is wet.
- Heating elements are not recommended to touch bare skin.
- Shut off power immediately if discomfort occurs
- Do not allow the cords to be pinched.
- If improper operation of this heated jacket is observed, discontinue its use immediately and contact a MILWAUKEE service facility for repair.
- Do not use pins. They may damage the electric wiring.
Care :
- Before washing, disconnect and remove battery
- Before washing, disconnect and remove battery pack and battery controller from battery controller pocket. Push the power cord completely into the battery controller pocket and fasten closed.
- Follow Care Instructions on jacket tags. Machine wash, Gentle Cycle in warm water. Tumble Dry Low Heat.
- Do not bleach.
- Do not iron.
- Do not wring or twist.
- Do not dry clean. Do not use dry-cleaning fluid or this heated jacket.
- Do not bleach. Cleaning solvents may have a deteriorating effect on the insulation of the heating element.
- Maintain labels and nameplates. These carry important information. If unreadable or missing, contact a MILWAUKEE service facility for a replacement.
SYMBOLOGY
 Volts
Volts Direct Current
 Machine wash, gentle cycle in warm water
 Do not bleach
 Do not wring or twist
 Tumble dry, low heat
 Do not iron
 Do not dry-clean
 Regulatory Compliance Mark (RCM).
This product meets applicable regulatory requirements. Read Operator’s Manual
 This charger was only suitable for indoor use. Never expose the charger to rain.
 Class III appliance
 Time-lag fuse 3.0A
ADDITIONAL BATTERY SAFETY RULES
To reduce the risk of fire, personal injury, and product damage due to a short circuit, never immerse your tool, battery pack or charger in fluid or allow a fluid to flow inside them. Corrosive or conductive fluids, such as seawater, certain industrial chemicals, and bleach or bleach-containing products, etc., can cause a short circuit.
SPECIFICATIONS
- Cat. No : M12 HJM BLACK9, M12 HJM OGX, M12 HJM BLACK9W, M12 TC
- Volts : 12V DC
- Battery Type : M12™
- Charger Type : M12™
FUNCTIONAL DESCRIPTIONS
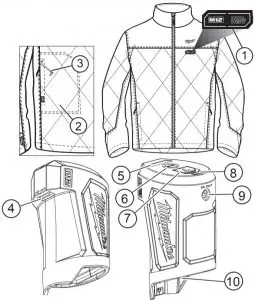
- Jacket
 Power Buttons and Shoulder
- High: Red LED
- Medium: White LED
- Low: Blue LED
- Battery contoller pocket
- Power cable
- USB out
- Fuel Gauge LEDs
- USB power button
- Micro USB in
- Charging LEDs
- RED: Charging
- Green: Charging complete
- DC out
- Battery bay
ASSEMBLY
Recharge only with the charger specified for the battery. For specific charging instructions, read the operator’s manual supplied with your charger and battery.
Inserting/Removing the Battery
To insert the battery, slide the pack into the body of the battery controller. Make sure it latches securely into place. Insert the power cable (from inside the battery controller pocket) into the power cable port on the battery controller.
Using the USB Out Port
The USB Out port can be used to charge a cell phone, MP3 player, or other personal device that uses less than 5V, 2.1A of DC electrical current.
To turn on the USB Out port, press the USB power button on the controller. The USB port will remain on for two hours before turning off automatically. It is recommended that the battery controller USB port not be used while in the jacket.
Fuel Gauge
Press the USB power button to display the battery pack’s remaining power on the fuel gauge LEDs.
OPERATION
The zone power buttons are located on the up-per left side of the jacket. Use the jacket and shoulder power buttons to control the two zones. To turn on. press and hold (1 to 2 seconds) the zone’s power button. The zone will be turned to High and the red LED will light. Temperature setting can be adjusted at any time by pressing the zones power button. Each press will cycle through the zone’s temperature settings. To turn off the heated jacket. press and hold (1 to 2 seconds) the zone’s power button. The LED will turn off. If the heated jacket turns off unexpectedly. check connections and charge the battery pack.
CARE
To reduce the risk of injury, always unplug the charger and remove the battery pack and battery controller from the heated jacket before performing any maintenance. Never disassemble the heated jacket, battery pack or charger. Contact a MILWAUKEE’ service facility for ALL repairs. If the heated jacket does not start or operate properly with a fully charged battery pack. clean the contacts on the battery pack. If the heated jacket still does not work properly. return the heated jacket, charger and battery pack. to a MILWAUKEE service facility for repairs.
To reduce the risk of personal in-jury and damage, disconnect and remove battery pack and battery controller from battery controller pocket before washing. Never immerse your battery controller, battery pack, or charger in liquid or allow a liquid to flow inside them.
To clean the heated jacket:
- Remove battery pack and battery controller.
- Push the power cord completely into the battery controller pocket and zip closed.
- Machine wash, Gentle Cycle in warm water. Do not use bleach. Do not dry clean. Do not wring or twist.
- Tumble Dry on Low Heat. Do not iron.
CHARGING THE BATTERY
Charge only MILWAUKEE 12V Li-on batteries in MILWAUKEE® 12V Li-Ion Chargers. Other types of batteries may cause personal injury and damage.
When to Charge the Battery Pack with this MILWAUKEE° Charger
Remove the battery pack from the tool for charging when convenient for you and your job. MILWAUKEE batteries do not develop a “memory” when charged after only a partial discharge. It is not necessary to run down the battery pack before placing it on the charger.
- Use the Fuel Gauge to determine when to charge your MILWAUKEE Li-Ion battery pack.
- You can “Top-Off’ your battery pack’s charge before starting a big job or long day of use.
- The only time it is necessary to charge the MILWAUKEE® Li-Ion battery pack is when the battery pack has reached the end of its charge. To signal the end of charge, power to the tool will drop quickly, allowing you just enough power to finish making a cut, drilling a hole, or driving a fastener. Charge the battery pack as needed.
Charging the Battery Pack
- Plug your USB A end of the cable into a power source such as an AC wall adaptor, computer or car port.
- Insert the Micro-USB end of the cable into the Micro-USB port in the charger.
- Insert the battery pack into charger. The indicator light will display the charging status:
- Red: Charging
- Green: Charged
- Red Flashing: Battery is too hot or too cold Red/
- Green Flashing: Damaged or Faulty Battery
- During charging, press the power button to display the current charge on the fuel gauge.
- USB A Port (for device charging) and DC out port (for powering heated gear) is shut down when the Micro-USB port is being used.
- A fully discharged battery pack with an internal temperature in the normal range will charge in about 130 to 525 minutes, depending on the battery pack.
- Heavily cycled batteries may take longer to charge completely.
- After charging is complete, the continuous green light will come on.
- The charger will keep the battery pack fully charged if it is left on the charger.
- The Red Flashing Indicator light on the charger indicates that the battery pack temperature is out-side the charging range. Once the battery pack is within the acceptable range, normal charging will take place and the red light will be continuous. Hot or cold batteries may take longer to charge.
- If the light indicator flashes red and green, check that the battery pack is fully seated into the bay. Remove the battery pack and reinsert. If the light continues to flash red and green, the battery pack may be extremely hot or cold, or wet. Allow the battery pack to cool down, warm up, or dry out and then reinse it. If the problem persists, contact a MILWAUKEE service facility.
- If the light indicator does not come on, check that the battery pack is fully seated into the bay. Remove the battery pack and reinsert. If the light indicator still does not come on, remove pack and unplug charger for at least 2 minutes. After 2 minutes, plug charger back in and insert pack. If after these attempts the light indicator still does not come on, contact a MILWAUKEE® service facility.
Maintenance and Storage
Store your charger in a cool, dry place. Unplug battery chargers and remove batteries when not in use. Do not store battery packs in the M12Tu Compact Charger and Power Source.
ACCESSORIES
Use only recommended accessories. Others may be hazardous. For a complete listing of accessories, go online to milwaukeetools.com.au/
milwaukeetools.co.nz
or contact a distributor.
WARRANTY – AUSTRALIA and NEW ZEALAND
Please refer to Australian and New Zealand warranty supplied with tool. This warranty applies only to product sold in Australia and New Zealand.
SERVICE – AUSTRALIA and NEW ZEALAND
MILWAUKEE®prides itself in producing a premium quality product that is Nothing But Heavy DutyTM.
Your satisfaction with our products is very important to us! If you encounter any problems with the operation of this tool, please contact your authorised MILWAUKEE® dealer.
For a list of MILWAUKEE® dealers, guarantee or service agents please contact MILWAUKEE®
Customer Service or visit our website.
(Australia Toll Free Telephone Number 1300 645 928)
(New Zealand Toll Free Telephone Number 0800 645 928)
or visit milwaukeetool.com.au/milwaukeetool.co.nz
FAQs
How to turn on the heated jacket?
The power button is located on the left side of the battery pack. Press the power button to turn on. Press again to turn off.
How long does it take to charge?
It takes 3-4 hours to fully charge a dead battery pack.
How long does it last?
The heated jacket can run for up to 6 hours on a full charge.
How do I know when the battery is low?
When the battery is low, the power button will flash red and you will hear a beeping sound.
How do I know when the heated jacket is fully charged?
When you plug in your heated jacket, the red light will come on and stay on until your heated jacket is fully charged.
What are some of the safety features?
The heated jacket has an automatic shut off after 8 hours of continuous use. It also has an automatic low voltage shutoff which turns off your heated jacket if your voltage drops below 10 volts. If you are using a generator, please make sure that it produces at least 10 volts before using your heated jacket.
What are some of the heating elements in the heated jacket?
Heated jackets have 2 heating elements in the chest area, 2 heating elements in each arm and 1 heating element in each leg area.
Does it come with a warranty?
Yes, all Milwaukee heated jackets come with a one year warranty from date of purchase against manufacturer defects. Warranty does not cover damage caused by misuse or abuse of product or if product is repaired or altered by anyone other than Milwaukee Tool Corporation.
Can I use a 12v battery instead of the 7.4 volt that this jacket comes with without causing damage to the jacket?
No, that does not work which is crazy to me but I have multiple 12v jackets that plug into my bike including this Milwaukee one and the 12v battery pack will not work or stay powered up. It puts the battery into a fault/error status and you have to plug it in to reset it. The battery pack that comes with this jacket is 7.4v. I purchased Milwaukee and other top brand batteries that were 12v to have extras and none of them work with the jackets. Only the 7.4v batteries work with all my 12 volt jackets. Milwaukee, Hotwired and Venture jackets all use 7.4v batteries and work great.
Will this work with the Milwaukee heated chaps?
the chaps do not work with a battery pack, they are motorcycle battery or leather jacket hook up only..
Will this battery system work with the Milwaukee Heated Socks?
This did not work for my hooded. Very disappointing
Does this battery work for the Milwaukee tool heated jacket?
The Milwaukee tool heated jacket has a different battery pack than this battery pack.
Can i use this on the Milwaukee m12 heated axis jacket?
This is a different battery pack and will not work for that jacket.
Video
Milwaukee Electric Tool Corporation
13135 West Lisbon Road, Brookfield, Wisconsin U.S.A. 53005
Milwaukee Tool (Australia)
21 Kelletts Road, Rowville, VIC 3178
Melbourne, Australia
Milwaukee Tool (New Zealand)
274 Church Street, Penrose, Auckland, 1061, New Zealand
Designed by Milwaukee Electric Tool Corp.
Professionally Made in China for Milwaukee Tool (Australia) / Milwaukee Tool (New Zealand)
Printed in China

OPERATOR’S MANUAL
Cat. No. / No de cat.
MXF002
MX FUEL™ CARRY-ON ™ 3600W/1800W POWER SUPPLY
WARNING To reduce the risk of injury, the user must read and understand the operator’s manual.
IMPORTANT SAFETY INSTRUCTIONS
WARNING Read all safety warnings and all instructions. Failure to follow the warnings and instructions may result in electric shock, fire, and/or serious injury. Save all warnings and instructions for future reference.
WORK AREA SAFETY
- To reduce the risk of injury, close supervision is necessary when an appliance is used near children.
ELECTRICAL SAFETY
- Power cord plugs must match the outlet. Never modify the plug in any way. Do not use any adapter plugs with earthed (grounded) power tools. Unmodified plugs and matching outlets will reduce the risk of electric shock.
- Avoid body contact with earthed or grounded surfaces, such as pipes, radiators, ranges, and refrigerators. There is an increased risk of electric shock if your body is earthed or grounded.
- To reduce the risk of electric shock, do not put equipment in water or other liquid. Do not place or store appliances where they can fall or be pulled into a tub or sink.
- Do not abuse the cord. Never use the cord for carrying, pulling, or unplugging the power tool. Keep cord away from heat, oil, sharp edges, or moving parts.
- Arrange cords carefully to avoid hazardous environments. Tripping or snagging on cords can cause injury and product damage. Do not allow cords to run through puddles or across wet ground.
- Do not unplug by pulling on the cord. To unplug, grasp the plug, not the cord.
- Unplug the cord from the outlet when not in use and before servicing or cleaning.
- Always use a suitable extension cord to reduce the risk of electric shock.
- If operating equipment in a damp location is unavoidable, use a ground fault circuit interrupter (GFCI) protected supply.
The use of a GFCI reduces the risk of electric shock.
PERSONAL SAFETY
- Do not overreach. Keep proper footing and balance at all times. This enables better control of the power supply in unexpected situations.
- Do not use a ladder or unstable support. Stable footing on a solid surface enables better control of the power supply in unexpected situations.
BATTERY TOOL USE AND CARE
- Recharge only with the charger specified by the manufacturer. A charger suitable for one type of battery pack may create a risk of fire when used with another battery pack.
- Use power supply only with specifically designated battery packs. Use of any other battery packs may create a risk of injury and fire.
- Do not short circuit. A short-circuited battery pack may cause fire, personal injury, and product damage. A battery pack will short circuit if a metal object makes a connection between the positive and negative contacts on the battery pack. Do not place a battery pack near anything that may cause a short circuit, such as coins, keys, or nails in your pocket.
- Do not allow fluids to flow into the battery pack. Corrosive or conductive fluids, such as seawater, certain industrial chemicals, bleach or bleach-containing products, etc., can cause a short circuit.
- Under abusive conditions, liquid may be ejected from the battery; avoid contact. If contact accidentally occurs, flush with water. If liquid contacts eyes, additionally seek medical help. Liquid ejected from the battery may cause irritation or burns.
- Do not use a battery pack or equipment that is damaged or modified. Damaged or modified batteries may exhibit unpredictable behavior resulting in fire, explosion, or risk of injury.
- Do not expose a battery pack or equipment to fire or excessive temperature. Exposure to fire or temperature above 265°F (130°C) may cause an explosion.
- Follow all charging instructions and do not charge the battery pack or equipment outside the temperature range specified in the instructions. Charging improperly or at temperatures outside the specified range may damage the battery and increase the risk of fire.
CHARGER USE AND CARE
- Caution – To reduce the risk of injury, charge MILWAUKEE Lithium-Ion packs only in their MILWAUKEE Lithium-Ion charger. Other types of batteries may burst to cause personal injury and damage. Do not wire a battery pack to a power supply plug or car cigarette lighter. Batteries will be permanently disabled or damaged.
- Charge only MILWAUKEE MX™ Lithium-Ion packs. Other types of batteries may burst to cause personal injury or damage.
- Avoid dangerous environments. Do not charge the battery pack in the rain, snow, damp or wet locations. Do not use a battery pack or charger in the presence of explosive atmospheres (gaseous fumes, dust, or flammable materials) because sparks may be generated when inserting or removing the battery pack, possibly causing a fire.
- Charge in a well-ventilated area. Do not block charger vents. Keep them clear to allow proper ventilation. Do not allow smoking or open flames near a charging battery pack. Vented gases may explode.
- Maintain charger cord. When unplugging the charger, pull the plug rather than the cord to reduce the risk of damage to the electrical plug and cord. Never carry a charger by its cord. Keep cord from heat, oil, and sharp edges. Make sure the cord will not be stepped on, tripped over, or subjected to damage or stress. Do not use the charger with a damaged cord or plug. Have a damaged charger replaced immediately.
- Use only recommended attachments. Use of an attachment not recommended or sold by the battery charger or battery pack manufacturer may result in a risk of fire, electric shock, or personal injury.
- Unplug the charger when not in use. Remove battery packs from unplugged chargers.
- To reduce the risk of electric shock, always unplug the charger before cleaning or maintenance. Do not allow water to flow into the plug. Use a Ground Fault Circuit Interrupter (GFCI) to reduce shock hazards.
- Store your battery and charger in a cool, dry place. Do not store battery packs where temperatures may exceed 120°F (50°C) such as in direct sunlight, a vehicle, or a metal building during the summer.
SERVICE
- Has your power supply been serviced by a qualified repair person using only identical replacement parts? This will ensure that the safety of the power supply is maintained.
- Never service damaged battery packs. Service of battery packs should only be performed by the manufacturer or authorized service providers.
SPECIFIC SAFETY RULES
- This equipment has arcing or sparking parts which should not be exposed to flammable vapors. Locate equipment at least 18″ (457 mm) above the floor when used in a repair facility.
- Do not expose to rain.
- For indoor use or temporary outdoor use. Exercise reasonable care when using in wet conditions.
- Connect only to properly grounded outlets.
- Do not use if the cord or batteries are damaged in any way.
- Use proper extension cord. Keep cords dry and off the ground; use a GFCI protected circuit while charging.
- Chemical Burn Hazard. Keep coin cell batteries away from children.
- Store indoors.
- Do not operate multiple power supplies in parallel.
- Operating this power supply less than 3′ (1 m) from building or other obstruction can cause overheating and damage to the power supply. For proper cooling, allow at least 3′ (1 m) of empty space above and around the power supply.
- Do not connect power supply output to a building’s electrical system.
- The power supply ground terminal is connected to the ground terminals of each receptacle. Before using the ground terminal, consult a qualified electrician, electrical inspector, or local agency having jurisdiction for local codes or ordinances that apply to the intended use of the generator.
- The power supply is isolated from the frame and from the AC receptacle ground pin.
- Electrical devices that require a grounded receptacle pin connection will not function if the receptacle ground pin is not functional.
- Do not exceed the load rating of the power supply. Be mindful of the individual and accumulative electrical load for all attachments. Exceeding the load capacity of the power supply could result in overheating, fire, electrical shock, or injury.
- Do not overload the power supply’s capacity. Exceeding the power supply’s wattage/amperage capacity may damage the power supply and/or electrical devices connected to it.
- Attachments may require more power consumption than this power supply is capable of providing. Check the attachment’s manual to avoid damage to the attachment or risk of personal injury.
- Always follow all safety rules recommended by the manufacturer of attachments.
- Do not use this power supply to provide power for emergency medical equipment or life support devices.
- Never leave the power supply unattended while in use.
- Know your power supply. Read the operator’s manual carefully. Learn its applications and limitations, as well as the specific potential hazards related to this product. Do not alter or modify the power supply from the original design or function. Misuse and improper handling can cause injury.
- Always use common sense and be cautious when using tools. It is not possible to anticipate every situation that could result in a dangerous outcome. Do not use this tool if you do not understand these operating instructions or you feel the work is beyond your capability; contact Milwaukee Tool or a trained professional for additional information or training.
- Maintain labels and nameplates. These carry important information. If unreadable or missing, contact a MILWAUKEE service facility for a free replacement.
INSTALLATION GROUNDING
DANGER
Improperly connecting the grounding wire can result in the risk of electric shock. Check with a qualified electrician if you are in doubt as to whether the outlet is properly grounded. Do not modify the plug provided with the equipment. Never remove the grounding prong from the plug. Do not use the equipment if the cord or plug is damaged. If damaged, have it repaired by a MILWAUKEE service facility before use. If the plug will not fit the outlet, have a proper outlet installed by a qualified electrician.
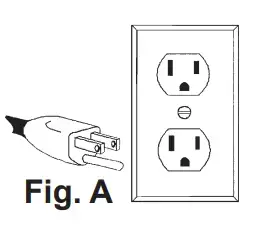
Grounded Tools (Three-Prong Plugs)
Tools marked “Grounding Required” have a three-wire cord and three-prong grounding plug. The plug must be connected to a properly grounded outlet(See Figure A). If the tool should electrically malfunction or break down, grounding provides a low resistance path to carry electricity away from the user, reducing the risk of electric shock. The grounding prong in the plug is connected through the green wire inside the cord to the grounding system in the tool. The green wire in the cord must be the only wire connected to the tool’s grounding system and must never be attached to an electrically”live” terminal. Your tool must be plugged into an appropriate outlet, properly installed, and grounded in accordance with all codes and ordinances. The plug and outlet should look like those in Figure A.
EXTENSION CORDS
Grounded tools require a three-wire extension cord. Double insulated tools can use either a two or three-wire extension cord. As the distance from the supply outlet increases, you must use a heavier gauge extension cord. Using extension cords with inadequately sized wire causes a serious drop in voltage, resulting in loss of power and possible tool damage. Refer to the table shown to determine the required minimum wire size. The smaller the gauge number of the wire, the greater the capacity of the cord. For example, a 14 gauge cord can carry a higher current than a 16 gauge cord. When using more than one extension cord to make up the total length, be sure each cord contains at least the minimum wire size required. If you are using one extension cord for more than one tool, add the nameplate amperes and use the sum to determine the required minimum wire size.
Guidelines for Using Extension Cords
- If you are using an extension cord outdoors, be sure it is marked with the suffix “W-A” (“W” in Canada) to indicate that it is acceptable for outdoor use.
- Be sure your extension cord is properly wired and in good electrical condition. Always replace a damaged extension cord or have it repaired by a qualified person before using it.
- Protect your extension cords from sharp objects, excessive heat, and damp or wet areas.
| Recommended Minimum Wire Gauge For Extension Cords* | |||||
| Nameplate Amps | Extension Cord Length | ||||
| 25′ | 50’ | 75’ | 100’ | 150’ | |
| 0 – 2.0 2.1 – 3.4 3.5 – 5.0 5.1 – 7.0 7.1 – 12.0 12.1 – 16.0 16.1 – 20.0 |
18 18 18 18 16 14 12 |
18 18 18 16 14 12 10 |
18 18 16 14 12 10 — |
18 16 14 12 10 — — |
16 14 12 12 — — — |
* Based on limiting the line voltage drop to five volts at 150% of the rated amperes.
READ AND SAVE ALL INSTRUCTIONS FOR FUTURE USE.
SPECIFICATIONS
Cat. No. ……………………………………………..MXF002
Battery Type …………………………………. MX FUEL™
Charger Type………………………………… MX FUEL™
Rated Input Voltage …………………………… 120 V AC
Rated Input Amps ……………………………………..3.9 A
Rated Output Voltage (Charger) …………….72 V DC
Rated Output Amps (Charger) ……………… 4.5 A DC
Rated Output (Receptacle)
Peak Watts ………………………………………. 3600 W
Continuous Watts ……………………………… 1800 W
Voltage……………………………………………….. 120 V
Rated Frequency …………………………………… 60 Hz
Recommended Ambient
Charging Temperature ………………..40°F to 105°F (5°C to 40°C)
FUNCTIONAL DESCRIPTION
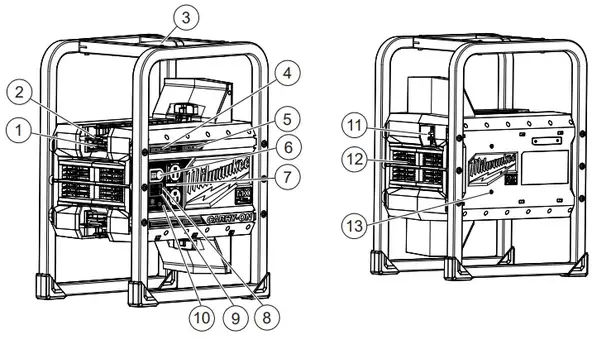
- Battery latch lever
- Battery lock ring
- Carry handle
- Fuel gauge
- Battery charging status/charger indicator
- Arm button
- AC outlets
- Overload indicator
- Overheat indicator
- Grounding terminal
- AC input
- Fan
- M12™/M18™charger screw mounts
SYMBOLOGY
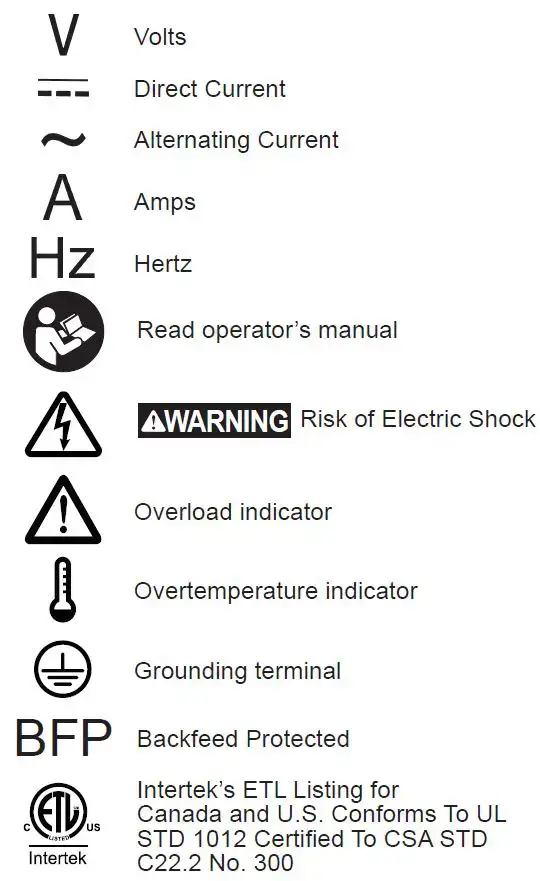
ASSEMBLY
WARNING
Recharge only with the charger specified for the battery. For specific charging instructions, read the operator’s manual supplied with your charger and battery.
Removing/Inserting the Battery
To remove the battery, push the battery latch lock to the side and squeeze the battery latch lever. Pull the battery pack away from the machine. To insert the battery, slide the pack into the body of the machine. Make sure it latches securely into place
GENERAL OPERATION
Power Supply Capacity
Make sure the power supply can supply enough continuous (running) and surge (starting) watts for the items being powered at the same time.
- Select the items to be powered at the same time.
- Total the continuous (running) watts of these items.
This is the amount of power the power supply must produce to keep the items running. See wattage reference chart. - Estimate how many surge (starting) watts will be needed. Surge wattage is the short burst of power needed to start electric motor-driven tools or appliances such as a circular saw. Because not all motors start at the same time, total surge watts can be estimated by adding only the item(s) with the highest additional surge watts to the total rated watts from step 2.
Power Management
To prolong the life of the power supply and attached devices, it is important to take care when adding electrical loads to the power supply. There should be nothing connected to the power supply outlets before starting the machine. The correct and safe way to manage power supply power is to sequentially add loads, as follows:
- With nothing connected to the power supply, start the machine (see “Arming the Machine”).
- Plugin and turn on the first load, preferably the largest load.
- Permit the power supply output to stabilize (power supply runs smoothly and the attached device operates properly).
- Plugin and turn on the next load.
- Again, permit the power supply to stabilize.
- Never add more loads than the power supply capacity. Take special care to consider surge loads in power supply capacity as previously described.
| Application/ Equipment | Estimated Watts* | Estimated Starting Watts* |
| Job Site | ||
| Electric Drill – 3/8″ | 600 | 1000 |
| Work Light | 1000 | 1000 |
| Reciprocating Saw | 960 | 1920 |
| Circular Saw – 7-1/4″ | 1400 | 2300 |
| Miter Saw – 10″ | 1900 | 3379 |
| Air Compressor – 1/4 HP | 970 | 1600 |
| Airless Sprayer – 1/3 HP | 600 | 1200 |
| Radio | 50 | 50 |
| M18TM Rapid Charger | 330 | 330 |
| Emergency/Home Standby | ||
| Lights (qty. 4 x 75 W) | 300 | 300 |
| Microwave | 1000 | 1000 |
| 46″ Flat Panel Television | 190 | 190 |
| Satellite Receiver | 250 | 250 |
| Portable Fan | 40 | 120 |
| Heater | 1300 | 1300 |
| Laptop | 250 | 250 |
| *Wattages listed are approximate. Check tool or appliance for actual wattage. |
||
Arming the Machine
MX FUEL™ machines must be armed prior to use.
Even with the battery pack inserted, functions will not operate until the machine is armed.
To arm the machine:
- Insert the battery pack.
- Press the Arm button. The MX FUEL™ icon will light and the LEDs are now operational.
NOTE: The internal fan will operate whenever the machine is in use. - After 60 minutes of inactivity (no current being drawn), the machine will enter sleep mode. The MX FUEL™ icon will go off and the LEDs are nonoperational.
- Press the Arm button to reactivate the machine.
- Press and hold the ARM button for 2 seconds to unarm (turn off) the machine. The MX FUEL™ icon will go off.
NOTE: The internal fan will continue to operate for a short time after the machine has been turned off.
Onboard Fuel Gauge LEDs and Alert Tones
Onboard Fuel Gauge LEDs display real-time battery levels for their respective MX battery. When the machine detects a low battery condition, a dead battery, an overload, or overtemp condition, the user will be alerted with an audible tone(s). Investigate the root cause of the tone(s) to continue use.
Overload and Overtemperature Conditions
When an overload or temperature condition occurs, the machine will produce a unique tone and the respective icon will light. Take the appropriate action, such as turning off or reducing the load on the machine, or allowing the machine to rest (cool down) before continuing use.
ONE-KEY™
To learn more about the ONE-KEY™ functionality for this tool, please refer to the quick reference included with this product or go to milwaukeetool.com/One-Key. To download the ONE-KEY™ app, visit the App Store or Google Play from your smart device.
| ONE-KEY™ Indicator | |
| Solid Blue | Wireless mode is active and ready to be configured via the ONE-KEY™ app. |
| Blinking Blue | The tool is actively communicating with the ONE-KEYTM app. |
| Blinking Red | The tool is in security lockout and can be unlocked by the owner via the ONE-KEYTM app. |
CHARGER OPERATION
WARNING Charge only MILWAUKEE MX™ Lithium-Ion batteries in this MILWAUKEE Lithium-Ion charger. Other types of batteries may cause personal injury and damage.
When to Charge the Battery Pack
Remove the battery pack from the tool for charging when convenient for you and your job. MILWAUKEE batteries do not develop a “memory” when charged after only a partial discharge. It is not necessary to run down the battery pack before placing it on the charger.
- Use the Fuel Gauge to determine when to charge your MILWAUKEE Lithium-Ion battery pack.
- You can “Top-Off” your battery pack’s charge before starting a big job or a long day of use.
- The only time it is necessary to charge the MILWAUKEE Lithium-Ion battery pack is when the battery pack has reached the end of its charge. To signal the end of charge, power to the tool will drop quickly, allowing you just enough power to finish making a cut, drilling a hole, or driving a fastener. Charge the battery pack as needed.
How to Charge the Battery Pack
Align the battery pack with the bay and slide the battery pack into the charger as far as possible. The red light will come on, either flashing quickly (battery pack or charger is too hot or cold), flashing slowly (communication between pack and charger), or continuously (the pack is charging).
- When a battery pack is inserted into the charger, the LEDs will indicate the following:
 Continuous red: Charging
 Continuous green light: Charging is complete
 Flashing red: Battery is too hot/cold Charging will begin when the battery reaches the correct charging temperature
 Flashing red/green: Damaged or faulty battery pack
- The next battery pack inserted in the charger will begin charging when the previous pack is fully charged.
- A fully discharged battery pack with an internal temperature in the normal range will charge in about 45 to 90 minutes, depending on the battery pack and internal temperature of the charger.
- Heavily cycled batteries may take longer to charge completely.
- The fuel gauge lights are displayed as the pack is being charged, indicating how fully charged the pack is. The fuel gauge will turn off when charging is complete.
- After charging is complete, the continuous green light will come on.
- The charger will keep the battery pack fully charged if it is left on the charger. The light indicator will be the same as normal charging.
- If the light indicator flashes red and green, check that the battery pack is fully seated in the bay. Remove the battery pack and reinsert. If the light continues to flash red and green, remove pack(s) and unplug the charger for at least 2 minutes. After 2 minutes, plug the charger back in and insert the pack. If the problem persists, contact a MILWAUKEE service facility.
- If the light indicator does not come on, check that the battery pack is fully seated in the bay. Remove the battery pack and reinsert. If the light indicator still does not come on, remove pack(s) and unplug the charger for at least 2 minutes. After 2 minutes, plug the charger back in and insert the pack. If after these attempts the light indicator still does not come on, contact a MILWAUKEE service facility.
Charging a Hot or Cold Battery Pack
The Red Flashing Indicator light on the charger indicates that the battery pack temperature is outside the charging range. Once the battery pack is within the acceptable range, normal charging will take place and the red light will be continuous. Hot or cold batteries may take longer to charge.
| Lithium-Ion Charging Status | ||
| Battery Pack Temperature |
Red Charger Indicator Light |
Charging Status |
| Too Hot Normal Range Too Cold |
Fast Flashing Continuous Fast Flashing |
Not charging Normal charging Not charging |
MAINTENANCE
WARNING To reduce the risk of injury, always unplug the tool and charger and remove the battery pack from the charger or tool before performing any maintenance. Never disassemble the tool, battery pack, or charger. Contact a MILWAUKEE service facility for ALL repairs. To reduce the risk of fire, personal injury, and product damage due to a short circuit, never immerse your tool, battery pack, or charger in fluid or allow fluid to flow inside them. Corrosive or conductive fluids, such as seawater, certain industrial chemicals, bleach or bleach-containing products, etc., can cause a short circuit.
Maintain Power Supply
Keep your power supply in good repair by adopting a regular maintenance program. If the power supply does not work properly, return the power supply to a MILWAUKEE service facility for repairs.
ONE-KEY™

WARNING Chemical Burn Hazard. This device contains a lithium button/coin cell battery. A new or used battery can cause severe internal burns and lead to death in as little as 2 hours if swallowed or enters the body. Always secure the battery cover. If it does not close securely, stop using the device, remove the batteries, and keep it away from children. If you think batteries may have been swallowed or entered the body, seek immediate medical attention.
Internal Battery
An internal battery is used to facilitate full ONE-KEY™ functionality.
To replace the battery:
1. Remove the battery pack(s) and all extension cord connections.
2. Open the battery door. Remove the cap screw inside and twist the cap a quarter turn.
3. Remove the old battery. WARNING! Always keep batteries away from children and dispose of them properly; new and used batteries can cause injury.
4. Insert the new battery (Cat. No. 50-11-0025).
Always use MILWAUKEE replacement batteries; others may not be rated for high temperatures.
5. Replace the cap and screw. Close the battery door.
WARNING
To reduce the risk of personal injury and damage, never immerse your tool, battery pack, or charger in liquid or allow a liquid to flow inside them.
Cleaning
Clean dust and debris from vents. Keep handles clean, dry, and free of oil or grease. Use only mild soap and a damp cloth to clean, since certain cleaning agents and solvents are harmful to plastics and other insulated parts. Do not use sprays or solvents. Some of these include gasoline, turpentine, lacquer thinner, paint thinner, chlorinated cleaning solvents, ammonia, and household detergents containing ammonia. Never use flammable or combustible solvents around tools.
Repairs
For repairs, return the tool, battery pack, and charger to the nearest authorized service center.
ACCESSORIES
WARNING
Use only recommended accessories. Others may be hazardous.
For a complete listing of accessories, go online to www.milwaukeetool.com or contact a distributor.
SERVICE – UNITED STATES
1-800-SAWDUST (1.800.729.3878)
Monday-Friday, 7:00 AM – 6:30 PM CST or visit www.milwaukeetool.com
Contact Corporate After Sales Service Technical Support with technical, service/repair, or warranty questions.
Email: [email protected]
Become a Heavy Duty Club Member at www.milwaukeetool.com to receive important notifications regarding your tool purchases.
SERVICE – CANADA
Milwaukee Tool (Canada) Ltd
1.800.268.4015
Monday-Friday, 7:00 AM – 4:30 PM CST
or visit www.milwaukeetool.ca
LIMITED WARRANTY USA & CANADA
Every MILWAUKEE MX FUEL™ Product, battery pack, and charger are warranted to the original purchaser only to be free from defects in material and workmanship. Subject to certain exceptions, MILWAUKEE will repair or replace an MX FUEL™ product, battery pack, or charger which, after examination, is determined by MILWAUKEE to be defective in material or workmanship for a period of two (2) years after the date of purchase. Return of the MX FUEL™ product, battery pack, or charger to a MILWAUKEE factory Service Center location or MILWAUKEE Authorized Service Station, freight prepaid and insured, is required. For the proper shipping procedure of battery packs, contact 1.800.SAWDUST (1.800.729.3878), or go to www.milwaukeetool.com. A copy of the proof of purchase should be included with the returned product. This warranty does not apply to damage that MILWAUKEE determines to be from repairs made or attempted by anyone other than MILWAUKEE authorized personnel, misuse, alterations, abuse, normal wear and tear, lack of maintenance, or accidents.
Normal Wear: Many MX FUEL™ products need periodic parts replacement and service to achieve the best performance. This warranty does not cover repair when normal use has exhausted the life of a part including, but not limited to, assist & drive belts, pulleys, blade flanges, vacuum gaskets, tool-free handles, set pins, skis, drive couplers, rubber boots, auto-feed, stabilize blocks, wheels, carrier wheels, cords, o-rings, seals, bumpers, driver blades, pistons, strikers, lifters, tool holder, and bumper cover washers. Warranty Registration is not necessary to obtain the applicable warranty on a MX FUEL™ product, battery pack, or charger.
ACCEPTANCE OF THE EXCLUSIVE REPAIR AND REPLACEMENT REMEDIES DESCRIBED HEREIN IS A CONDITION OF THE CONTRACT FOR THE PURCHASE OF EVERY MILWAUKEE PRODUCT. IF YOU DO NOT AGREE TO THIS CONDITION, YOU SHOULD NOT PURCHASE THE PRODUCT. IN NO EVENT SHALL MILWAUKEE BE LIABLE FOR ANY INCIDENTAL, SPECIAL, CONSEQUENTIAL, OR PUNITIVE DAMAGES, OR FOR ANY COSTS, ATTORNEY FEES, EXPENSES, LOSSES, OR DELAYS ALLEGED TO BE AS A CONSEQUENCE OF ANY DAMAGE TO, FAILURE OF, OR DEFECT IN ANY PRODUCT INCLUDING, BUT NOT LIMITED TO, ANY CLAIMS FOR LOSS OF PROFITS. SOME STATES DO NOT ALLOW THE EXCLUSION OR LIMITATION OF INCIDENTAL OR CONSEQUENTIAL DAMAGES, SO THE ABOVE LIMITATION OR EXCLUSION MAY NOT APPLY TO YOU. THIS WARRANTY IS EXCLUSIVE AND IN LIEU OF ALL OTHER EXPRESS WARRANTIES, WRITTEN OR ORAL. TO THE EXTENT PERMITTED BY LAW, MILWAUKEE DISCLAIMS ANY IMPLIED WARRANTIES, INCLUDING WITHOUT LIMITATION ANY IMPLIED WARRANTY OF MERCHANTABILITY OR FITNESS FOR A PARTICULAR USE OR PURPOSE; TO THE EXTENT SUCH DISCLAIMER IS NOT PERMITTED BY LAW, SUCH IMPLIED WARRANTIES ARE LIMITED TO THE DURATION OF THE APPLICABLE EXPRESS WARRANTY AS DESCRIBED ABOVE. SOME STATES DO NOT ALLOW LIMITATIONS ON HOW LONG AN IMPLIED WARRANTY LASTS, SO THE ABOVE LIMITATION MAY NOT APPLY TO YOU, THIS WARRANTY GIVES YOU SPECIFIC LEGAL RIGHTS, AND YOU MAY ALSO HAVE OTHER RIGHTS WHICH VARY FROM STATE TO STATE.
This warranty applies to products sold in the U.S.A. and Canada only. Please consult the ‘Service Center Search’ in the Parts & Service section of MILWAUKEE’s website www.milwaukeetool.com or call 1.800. SAWDUST (1.800.729.3878) to locate your nearest service facility for warranty and non-warranty service on an MX FUEL™ product, battery pack, or charger.
LIMITED WARRANTY – MEXICO, CENTRAL AMERICA & CARIBEAN
ELECTRONIC INDUSTRIES’ warranty is for 2 years since the original purchase date.
This warranty card covers any defect in material and workmanship on this Product.
To make this warranty valid, present this warranty card, sealed/ stamped by the distributor or store where you purchased the product, to the Authorized Service Center (ASC). Or, if this card has not been sealed/stamped, present the original proof of purchase to the ASC. Call 55 4160-3547 to find the nearest ASC, for service, parts, accessories, or components.
Procedure to make this warranty valid
Take the product to the ASC, along with the warranty card sealed/ stamped by the distributor or store where you purchased the product, and any faulty piece or component will be replaced without cost for you. We will cover all freight costs relative to this warranty process.
Exceptions
This warranty is not valid in the following situations
a) When the product is used in a different manner from the end-user guide or instruction manual.
b) When the conditions of use are not normal.
c) When the product was modified or repaired by people not authorized by TECHTRONIC INDUSTRIES.
Note: If the cord set is damaged, it should be replaced by an Authorized Service Center to avoid electric risks. SERVICE AND ATTENTION CENTER Call to 55 4160-3547 IMPORTED AND COMMERCIALIZED BY TECHTRONIC INDUSTRIES MEXICO, S.A. DE C.V. Miguel de Cervantes Saavedra No.301 Piso 5, Torre Norte 11520 Colonia Ampliación Granada Miguel Hidalgo, Ciudad de Mexico, Mexico
Model: —————————————————————–
Date of Purchase: —————————————————
Distributor or Store Stamp:—————————————-
MILWAUKEE TOOL
13135 West Lisbon Road
Brookfield, WI 53005 USA
58140207d1
01609000101Q-01(A)
05/20
Printed in China

IMPORTANT SAFETY INSTRUCTIONS
![]() READ AND UNDERSTAND ALL INSTRUCTIONS.
READ AND UNDERSTAND ALL INSTRUCTIONS.
Failure to follow all instructions listed below, may result in electric shock, fire and/or serious personal injury.
SAVE THESE INSTRUCTIONS
- SAVE THESE INSTRUCTIONS – THIS MANUAL CONTAINS IMPORTANT SAFETY AND OPERATING INSTRUCTIONS FOR THE REDLITHIUM® USB BATTERY CAT. NO. L4 B2 AND USB RECHARGEABLE LIGHT.
- USE AND CHARGE ONLY REDLITHIUM® USB BATTERIES IN THIS USB RECHARGEABLE LIGHT. OTHER TYPES OF BATTERIES MAY CAUSE PERSONAL INJURY AND DAMAGE.
- BEFORE USING THE BATTERY AND LIGHT, READ THIS OPERATOR’S MANUAL AND ALL LABELS ON THE BATTERY AND LIGHT.
- USE ONLY WITH LISTED/CERTIFIED ITE POWER SUPPLY. Others may result in a risk of fire, electric shock or personal injury.
- AVOID DANGEROUS ENVIRONMENTS. Do not charge battery in rain, snow, damp or wet locations.
Do not use battery or charger in the presence of explosive atmospheres (gaseous fumes, dust or flammable materials) because sparks may be generated when inserting or removing battery, possibly causing fire. - CHARGE IN A WELL VENTILATED AREA. Do not block charger vents. Keep them clear to allow proper ventilation. Do not allow smoking or open flames near a charging battery. Vented gases may explode.
- MAINTAIN CORD. When unplugging charger, pull plug rather than cord to reduce the risk of damage to the electrical plug and cord. Never carry charger by its cord. Keep cord from heat, oil and sharp edges.
Make sure cord will not be stepped on, tripped over or subjected to damage or stress. Do not use charger with damaged cord or plug. Have a damaged charger replaced immediately. - USE ONLY RECOMMENDED ATTACHMENTS. Use of an attachment not recommended or sold by the battery charger or battery manufacturer may result in a risk of fire, electric shock or personal injury.
- TO REDUCE THE RISK OF ELECTRIC SHOCK, always unplug charger before cleaning or maintenance.
- DO NOT BURN OR INCINERATE BATTERY PACKS. Battery may explode, causing personal injury or damage. Toxic fumes and materials are created when battery are burned.
- DO NOT CRUSH, DROP, OR DAMAGE BATTERY. Do not use a battery or charger that has received a sharp blow, been dropped, run over, or damaged in any way (e.g., pierced with a nail, hit with a hammer, stepped on).
- DO NOT DISASSEMBLE. Incorrect reassembly may result in the risk of electric shock, fire or exposure to battery chemicals. If it is damaged, take it to a MILWAUKEE® service facility.
- BATTERY CHEMICALS CAUSE SERIOUS BURNS. Never allow contact with skin, eyes, or mouth. If a damaged battery leaks battery chemicals, use rubber or neoprene gloves to dispose of it. If skin is exposed to battery fluids, wash with soap and water and rinse with vinegar. If eyes are exposed to battery chemicals, immediately flush with water for 20 minutes and seek medical attention. Remove and dispose of contaminated clothing.
- DO NOT SHORT CIRCUIT. A short-circuited battery pack may cause fire, personal injury, and product damage. A battery pack will short circuit if a metal object makes a connection between the positive and negative contacts on the battery pack.
Do not place a battery pack near anything that may cause a short circuit, such as coins, keys or nails in your pocket. - DO NOT ALLOW FLUIDS TO FLOW INTO BATTERY PACK. Corrosive or conductive fluids, such as seawater, certain industrial chemicals, and bleach or bleach containing products, etc., can cause a short circuit.
- STORE IN A COOL, DRY PLACE. Do not store battery where temperatures may exceed 50OC (120OF) such as in direct sunlight, a vehicle or metal building during the summer.
- TO REDUCE THE RISK OF INJURY, CLOSE SUPERVISION IS NECESSARY when an appliance is used near children.
- STORE IDLE LIGHT OUT OF REACH OF CHILDREN. Warm lights can become hazardous in the hands of children.
- KNOW YOUR LIGHT. Read this manual carefully to learn your light’s applications and limitations as well as potential hazards associated with this type of light.
- MAINTAIN LABELS AND NAMEPLATES.
These carry important information. If unreadable or missing, contact a MILWAUKEE® service facility for a replacement.
SAVE INSTRUCTIONS FOR FUTURE REFERENCE.
SPECIFICATIONS
| Cat. No | L4 HLVIS |
| Rated Power Input | 8W |
| USB Input Volts | 5V DC |
| USB Input Amps | 0.1 – 2.1 A |
| Output Volts | 4V DC |
| Output Amps | 2.1A |
| Battery Cat. No | L4 B2 |
| Volts | 4V DC |
| Operating Temperature | 4V DC |
| Battery and Charger | 4o C to 40o C (40o F to 104o F) |
| Battery and Tool | -20o C to 60o C (-4o F to 140o F) |
| Power Supply Cat. No | 4931 4605 95 |
SYMBOLOGY
 |
Volts |
 |
Amps |
 |
Direct Current |
 |
Properly Recycle Batteries |
 |
Class III protection |
 |
This charger is only suitable for indoor use. Never expose the charger to rain. |
 |
Do not stare at the operating light source |
 |
Read Operator’s Manual |
 |
Regulatory Compliance Mark (RCM). This product meets applicable regulatory requirements. |
BATTERY
![]() To reduce the risk of fire, personal injury, and product damage due to a short circuit, never immerse your tool, battery pack or charger in fluid or allow a fluid to flow inside them. Corrosive or conductive fluids, such as seawater, certain industrial chemicals, and bleach or bleach containing products, etc., can cause a short circuit.
To reduce the risk of fire, personal injury, and product damage due to a short circuit, never immerse your tool, battery pack or charger in fluid or allow a fluid to flow inside them. Corrosive or conductive fluids, such as seawater, certain industrial chemicals, and bleach or bleach containing products, etc., can cause a short circuit.
Maintenance and Storage
Do not expose your battery to water or rain, or allow it to get wet. This could damage battery. Do not use oil or solvents to clean or lubricate your battery. The plastic casing will become brittle and crack, causing a risk of injury. Store batteries at room temperature away from moisture. Do not store in damp locations where corrosion of terminals may occur. As with other battery types, permanent capacity loss can result if the pack is stored for long periods of time at high temperatures (over 50° C). MILWAUKEE® Li-Ion batteries maintain their charge during storage longer than other battery types. After about a year of storage, charge the battery as normal.
![]() To reduce the risk of injury or explosion, never burn or incinerate a battery pack even if it is damaged, dead or completely discharged. When burned, toxic fumes and materials are created.
To reduce the risk of injury or explosion, never burn or incinerate a battery pack even if it is damaged, dead or completely discharged. When burned, toxic fumes and materials are created.
Disposing of MILWAUKEE® Li-Ion Battery
MILWAUKEE® Li-Ion batteries are more environmentally friendly than some other types of power tool batteries. Always dispose of your battery according to federal, state and local regulations.
Contact a recycling agency in your area for recycling locations.
Even discharged batteries contain some energy.
Before disposing, use electrical tape to cover the terminals to prevent the battery from shorting, which could cause a fire or explosion
RBRC Battery Recycling Seals
The RBRC™ Battery Recycling Seals (see “Symbology”) on your batteries indicate that MILWAUKEE® has arranged for the recycling of that battery with the Rechargeable Battery Recycling Corporation (RBRC). At the end of your battery’s useful life, return the battery to a MILWAUKEE®
Branch Office/Service Centre or the participating retailer nearest you.
USB RECHARGEABLE LIGHT
![]() Use and charge only REDLITHIUMTM USB batteries in this USB rechargeable light. Other types of batteries may cause personal injury and damage.
Use and charge only REDLITHIUMTM USB batteries in this USB rechargeable light. Other types of batteries may cause personal injury and damage.
Inserting the Battery
- Open the battery door.
- Line up the battery with the compartment and fully insert the battery.
- Close the battery door.
Charging the Battery
- Plug your USB cable into a power source such as an AC wall adaptor, computer or car port.
- Lift the rubber cover to expose the micro USB port.
Insert the micro USB plug into the micro USB port.
Users may experience longer charge times from laptops and other power sources. - The indicator light will display the charging status: Red Solid: Charging, 0 79% charged Green Flashing: Charging, 80-99% charged Green Solid: 100% Charged Red/Green Flashing: Damaged or Faulty Battery If the light indicator flashes red and green, check that the battery is fully seated into the bay. Remove the battery and reinsert. If the light continues to flash red and green, the battery may be extremely hot or cold, or wet. Allow the battery to cool down, warm up, or dry out and then reinsert. If the problem persists, contact a MILWAUKEE® service facility.
Operation
![]() To reduce the risk of injury, do not look directly into the light when the light is on.
To reduce the risk of injury, do not look directly into the light when the light is on.
Headlamp
Clip the light onto the strap and use the buckle to adjust the strap to the required size. Use the included clips to attach to a hard hat. Rotate the light up or down as needed.
Press the power button  to turn the light on and off. Press the mode button to cycle through Spot/Flood, Flood High, Flood Medium, Flood Low, and Spot.
The fuel gauge will display the battery life:
Green Solid: 50-100% remaining
Yellow Solid: 11-49% remaining
Red Solid: 3-10% remaining
Red Flashing: 0-3% remaining
During use, when the battery charge reaches 3%, the main LED and charge indicator will flash, indicating up to 5 minutes of runtime remains. Prior to immediate shutdown, the main LED will flash 3 times, then the tool will shutdown. Remaining runtime may be less than 5 minutes if the light is turned on when battery capacity is already 0-3%.
Press the power button to cycle through on, strobe and off. Press and hold the power button to turn off without cycling.
![]() To reduce the risk of injury, always unplug the charger and remove the battery from the charger before performing any maintenance. The charger and battery have no internal serviceable parts. Never disassemble the battery or charger.
To reduce the risk of injury, always unplug the charger and remove the battery from the charger before performing any maintenance. The charger and battery have no internal serviceable parts. Never disassemble the battery or charger.
Maintenance and Storage
Store your charger in a cool, dry place.
As a general practice, it is best to unplug battery chargers and remove batteries when not in use. No battery damage will occur, however, if the charger and battery are left plugged in.
![]() To reduce the risk of injury and damage, never immerse your battery or charger in liquid or allow a liquid to flow inside them.
To reduce the risk of injury and damage, never immerse your battery or charger in liquid or allow a liquid to flow inside them.
WARRANTY – AUSTRALIA and NEW ZEALAND
Please refer to Australian and New Zealand warranty supplied with tool. This warranty applies only to product sold in Australia and New Zealand.
SERVICE – AUSTRALIA and NEW ZEALAND
MILWAUKEE® prides itself in producing a premium quality product that is Nothing But Heavy DutyTM. Your satisfaction with our products is very important to us! If you encounter any problems with the operation of this tool, please contact your authorised MILWAUKEE® dealer.
For a list of MILWAUKEE® dealers, guarantee or service agents please contact MILWAUKEE® Customer Service or visit our website.
(Australia Toll Free Telephone Number 1300 645 928)
(New Zealand Toll Free Telephone Number 0800 645 928) or visit milwaukeetool.com.au / milwaukeetool.co.nz.
Milwaukee Electric Tool Corporation
13135 West Lisbon Road, Brookfield, Wisconsin U.S.A. 53005
Milwaukee Tool (Australia)
21 Kelletts Road, Rowville, VIC 3178
Melbourne, Australia
Milwaukee Tool (New Zealand)
21 Kelletts Road, Rowville, VIC 3178
Melbourne, Australia
Milwaukee Tool (New Zealand)
274 Church Street, Penrose,
Auckland, 1061, New Zealand
Designed by Milwaukee Electric Tool Corp.
Professionally Made in China for Milwaukee Tool (Australia) / Milwaukee Tool (New Zealand)

 WARNING
 To reduce the risk of injury, user must read and understand operator’s manual.
SAFTEY INSTUCTIONS
GENERAL POWER TOOL SAFETY WARNINGS
![]() Read all safety warnings, instructions, illustrations and specifications provided with this power tool.
Read all safety warnings, instructions, illustrations and specifications provided with this power tool.
Failure to follow all instructions listed below may result in electric shock, fire and/or serious injury.
Save all warnings and instructions for future reference.
The term “power tool” in the warnings refers to your mains-operated (corded) power tool or battery-operated (cordless) power tool.
WORK AREA SAFETY
- Keep work area clean and well lit. Cluttered or dark areas invite accidents.
- Do not operate power tools in explosive atmospheres, such as in the presence of flammable liquids, gases or dust. Power tools create sparks which may ignite the dust or fumes.
- Keep children and bystanders away while operating a power tool. Distractions can cause you to lose control.
ELECTRICAL SAFETY
- Power tool plugs must match the outlet. Never modify the plug in any way. Do not use any adapter plugs with earthed (grounded) power Unmodified plugs and matching outlets will reduce risk of electric shock.
- Avoid body contact with earthed or grounded surfaces, such as pipes, radiators, ranges and There is an increased risk of electric shock if your body is earthed or grounded.
- Do not expose power tools to rain or wet conditions Water entering a power tool will increase the risk of electric shock.
- Do not abuse the cord. Never use the cord for carrying, pulling or unplugging the power tool. Keep cord away from heat, oil, sharp edges or moving Damaged or entangled cords increase the risk of electric shock.
- When operating a power tool outdoors, use an ex- tension cord suitable for outdoor Use of a cord suitable for outdoor use reduces the risk of electric shock.
- If operating a power tool in a damp location is unavoidable, use a residual current device (RCD) protected supply. Use of a RCD reduces the risk of electric the risk of electric shock.
PERSONAL SAFETY
- Stay alert, watch what you are doing and use common sense when operating a power Do not use a power tool while you are tired or under the influence of drugs, alcohol or medication. A moment of inattention while operating power tools may result in serious personal injury.
- Use personal protective Always wear eye protection. Protective equipment such as a dust mask, non-skid safety shoes, hard hat or hearing protection used for appropriate conditions will reduce personal injuries.
- Prevent unintentional Ensure the switch is in the off-position before connecting to power source and/or battery pack, picking up or carrying the tool. Carrying power tools with your finger on the switch or energising power tools that have the switch on invites accidents.
- Remove any adjusting key or wrench before turning the power tool on. A wrench or a key left attached to a rotating part of the power tool may result in personal injury.
- Do not Keep proper footing and balance at all times. This enables better control of the power tool in unexpected situations.
- Dress properly. Do not wear loose clothing or Keep your hair and clothing away from moving parts. Loose clothes, jewellery or long hair can be caught in moving parts.
- If devices are provided for the connection of dust extraction and collection facilities, ensure these are connected and properly used. Use of dust collection can reduce dust-related hazards.
- Do not let familiarity gained from frequent use of tools allow you to become complacent and ignore tool safety principles. A careless action can cause severe injury within a fraction of a second.
POWER TOOL USE AND CARE
- Do not force the power Use the correct power tool for your application. The correct power tool will do the job better and safer at the rate for which it was designed.
- Do not use the power tool if the switch does not turn it on and Any power tool that cannot be controlled with the switch is dangerous and must be repaired.
- Disconnect the plug from the power source and/ or remove the battery pack, if detachable, from the power tool before making any adjustments, changing accessories, or storing power tools. Such preventive safety measures reduce the risk of starting the power tool
- Store idle power tools out of the reach of children and do not allow persons unfamiliar with the power tool or these instructions to operate the power Power tools are dangerous in the hands of untrained users.
- Maintain power tools and accessories. Check for misalignment or binding of moving parts, breakage of parts and any other condition that may affect the power tool’s If damaged, have the power tool repaired before use. Many accidents are caused by poorly maintained power tools.
- Keep cutting tools sharp and clean. Properly maintained cutting tools with sharp cutting edges are less likely to bind and are easier to control.
- Use the power tool, accessories and tool bits in accordance with these instructions, taking into account the working conditions and the work to be performed. Use of the power tool for operations different from those intended could result in a hazardous situation.
- Keep handles and grasping surfaces dry, clean and free from oil and grease. Slippery handles and grasping surfaces do not allow for safe handling and control of the tool in unexpected situations.
BATTERY TOOL USE AND CARE
- Recharge only with the charger specified by the A charger that is suitable for one type of battery pack may create a risk of fire when used with another battery pack.
- Use power tools only with specifically designated battery Use of any other battery packs may create a risk of injury and fire.
- When battery pack is not in use, keep it away from other metal objects, like paper clips, coins, keys, nails, screws or other small metal objects, that can make a connection from one terminal to Shorting the battery terminals together may cause burns or a fire.
- Under abusive conditions, liquid may be ejected from the battery; avoid If contact accidentally occurs, flush with water. If liquid contacts eyes, additionally seek medical help. Liquid ejected from the battery may cause irritation or burns.
- Do not use a battery pack or tool that is dam- aged or Damaged or modified batteries may exhibit unpredictable behavior resulting in fire explosion or risk of injury.
- Do not expose a battery pack or tool to fire or excessive temperature. Exposure to fire or temperature above 130°C (265°F) may cause explosion.
- Follow all charging instructions and do not charge the battery pack or tool outside the temperature range specified in the instructions. Charging improperly or at temperatures outside the specified range may damage the battery and increase the risk of fire.
SERVICE
- Have your power tool serviced by a qualified repair person using only identical replacement This will ensure that the safety of the power tool is maintained.
- Never service damaged battery packs. Service of battery packs should only be performed by the manufacturer or authorised service providers.
SPECIFIC SAFETY RULES FOR RIVET TOOL
- Hold the power tool by insulated gripping surfaces when performing an operation where the fastener may contact hidden Fasteners contacting “live” wire may make exposed metal parts of the power tool “live” and could dive the operator an electric shock.
- Always use mandrel Spent mandrels can be ejected from the tool, causing injury.
- Chemical Burn Hazard. Keep coin cell battery away from
- Always use common sense and be cautious when using tools. It is not possible to anticipate every situation that could result in a dangerous Do not use this tool if you do not understand these operating instructions or you feel the work is beyond your capability; contact MILWAUKEE® Tool or a trained professional for additional information or training.
- Maintain labels and nameplates. These carry important information. If unreadable or missing, contact a MILWAUKEE® service facility for a replacement.
 Some dust created by power sanding, sawing, grinding, drilling, and other construction activities contains chemicals known to cause cancer, birth defects or other reproductive harm. Some examples of these chemicals are:
 - lead from lead-based paint
- crystalline silica from bricks and cement and other masonry products, and
- arsenic and chromium from chemically-treated lumber.
Your risk from these exposures varies, depending on how often you do this type of work. To reduce your exposure to these chemicals: work in a well ventilated area, and work with approved safety equipment, such as those dust masks that are specially designed to filter out microscopic particles.
ADDITIONAL BATTERY SAFETY RULES
![]() To reduce the risk of fire, personal injury, and product damage due to a short circuit, never immerse your tool, battery pack or charger in fluid or allow a fluid to flow inside them. Corrosive or conductive fluids, such as seawater , certain industrial chemicals, and bleach or bleach-containing products, etc., can cause a short circuit.
To reduce the risk of fire, personal injury, and product damage due to a short circuit, never immerse your tool, battery pack or charger in fluid or allow a fluid to flow inside them. Corrosive or conductive fluids, such as seawater , certain industrial chemicals, and bleach or bleach-containing products, etc., can cause a short circuit.
![]() Do not charge non-rechargeable batteries.
Do not charge non-rechargeable batteries.
SYMBOLOGY
 |
Volts |
 |
Direct Current |
 |
Read Operator’s Manual |
 |
Always wear eye protection |
 |
Wear gloves. |
 |
Regulatory Compliance Mark (RCM). This product meets applicable regulatory requirements. |
 |
Do not dispose of electric tools together with household waste material. Electric tools and electronic equipment that have reached the end of their life must be collected separately and returned to an environmentally compatible recycling facility. |
SPECIFICATIONS
| Cat. No. | M18 FPRT |
| Volts | 18V DC |
| Battery Type | M18™ |
| Charger Type | M18™ |
| Blind Rivet Sizes | 3/16″ (4.76mm), 7/32″ (5.56mm), 1/4″ (6.35mm), 9/32″ (7.14mm) |
| Recommended Ambient | |
| Operating Temperature | 0°C to 51°C |
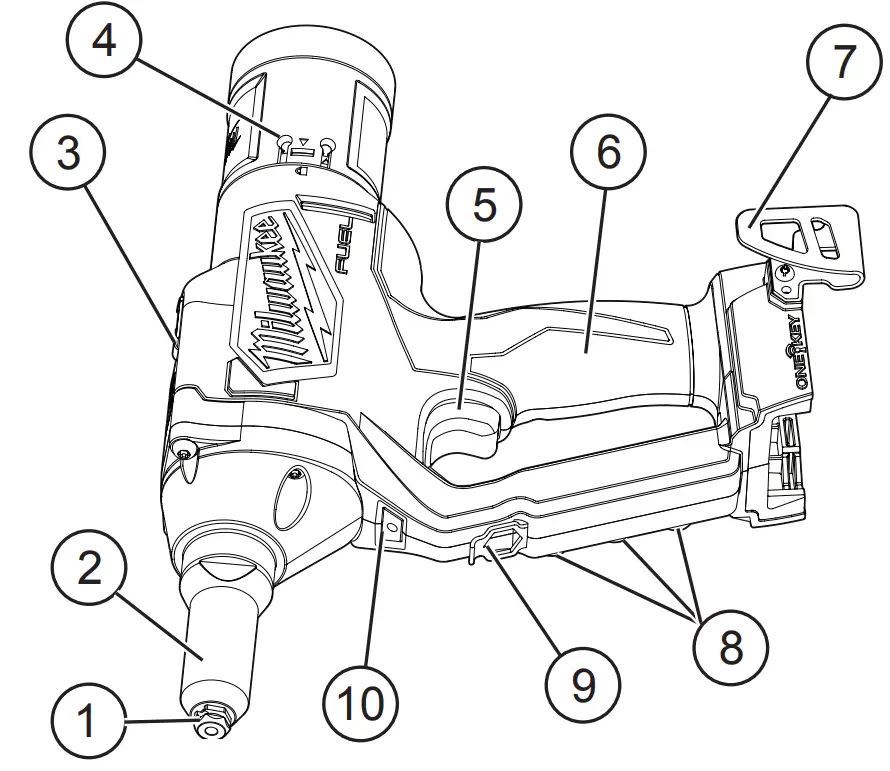
FUNCTIONAL DESCRIPTION

- Nose piece
- Nose housing
- Tool hanger
- Mandrel collector
- Trigger
- Handle
- Belt hook
- Nose piece storage
- Wrench
- LED
ASSEMBLY
Recharge only with the charger specified for the battery. For specific charging instructions, read the operator’s manual supplied with your charger and battery.
Removing/Inserting the Battery
![]() To remove the battery, push in the release buttons and pull the battery pack away from the tool.
To remove the battery, push in the release buttons and pull the battery pack away from the tool.
![]() Always lock the trigger or remove the battery pack any time the tool is not in use.
Always lock the trigger or remove the battery pack any time the tool is not in use.
To insert the battery, slide the pack into the body of the tool. Make sure it latches securely into place.
![]() Only use accessories specifically recommended for this tool. Others may be hazardous.
Only use accessories specifically recommended for this tool. Others may be hazardous.
Always use mandrel box. Spent mandrels can be ejected from the tool, causing injury.
Once the rivet is set, the mandrel collects in the box. Empty the mandrel box often to avoid jamming the tool.
![]() Never use the tool without the mandrel box installed. Loose mandrels could cause a hazard.
Never use the tool without the mandrel box installed. Loose mandrels could cause a hazard.
- To install the mandrel box, line up the box with the detents in the tool. Slide the box onto the tool, and rotate to lock
 in place.
 - To empty the mandrel box, rotate the box and pull away from the tool. Empty the box and reinstall before use.
Installing the Nose Piece
The rivet tool comes with 4 nose pieces for 3/16″ (4.76mm), 7/32 (5.56mm), 1/4″ (6.35mm), and 9/32″ (7.14mm) blind rivet sizes.
- Remove battery pack.
- Remove the nose housing from the tool (recommended). NOTE: Due to the spring, it can be difficult to install the nose piece into the nose housing without first removing the nose housing.
- Remove the nose piece from the nose housing. For ease of use, the wrench does not need to be removed from the tool for use. Insert the nose housing into the onboard wrench storage and turn counterclockwise.

- Select the correct nose piece
for the rivet to be installed. To remove the nose piece from the on-tool storage, use your thumb to pull down on needed nose piece. - Insert the new nose piece into the nose housing.
Use the onboard wrench to hand-tighten securely. 6. Screw the nose housing onto the tool and hand tighten securely.Nose Piece Ring Color 3/16″ (4.76mm) Black 1/4″ (6.35mm) Green 7/32″ (5.56mm) Red 9/32″ (7.14mm) Brown
ONE-KEY™
To learn more about the ONE-KEY™ functionality for this tool, go to milwaukeetool.com/One-Key. To download the ONE-KEY™ app, visit the App Store or Google Play from your smart device.
| ONE-KEY™ Indicator | |
| Solid Blue | Wireless mode is active and ready to be configured via the ONE-KEY™ app. |
| Blinking Blue | Tool is actively communicating with the ONE-KEY™ app. |
| Blinking Red | Tool is in security lockout and can be unlocked by the owner via the ONE-KEY™ app. |
OPERATION
![]() To reduce the risk of injury wear proper eye protection marked , always to comply with AS/NZS 1337.1.
To reduce the risk of injury wear proper eye protection marked , always to comply with AS/NZS 1337.1.
Always remove battery pack before changing or removing accessories. Only use accessories specifically recommended for this tool. Others may be hazardous.
Always hold tool securely and anticipate a sudden reaction.
Using the Rivet Tool
- Prepare the workpiece. If necessary, drill a pilot hole.
- Place the blind rivet mandrel into the nose piece.

- Insert the rivet end into the workpiece. Hold the tool securely and pull and hold the trigger until the rivet is fully set and the motor stops.
Release the trigger. The tool will reset.

NOTE: Releasing the trigger before the rivet is fully set will cause the tool to return to its starting position. - Tip the tool back to clear the mandrel. It will slide into the mandrel box.
- Empty the mandrel box after setting 100-150 rivets, depending on size.

MAINTENANCE
![]() To reduce the risk of injury, always unplug the charger and remove the battery pack from the charger or tool before performing any maintenance. Never disassemble the tool, battery pack or charger. Contact a MILWAUKEE® service facility for ALL repairs.
To reduce the risk of injury, always unplug the charger and remove the battery pack from the charger or tool before performing any maintenance. Never disassemble the tool, battery pack or charger. Contact a MILWAUKEE® service facility for ALL repairs.
Maintaining Tool
Keep your tool, battery pack and charger in good repair by adopting a regular maintenance program.
Inspect your tool for issues such as undue noise, misalignment or binding of moving parts, breakage of parts, or any other condition that may affect the tool operation. Return the tool, battery pack, and charger to a MILWAUKEE® service facility for repair.
After six months to one year, depending on use, return the tool, battery pack and charger to a MILWAUKEE® service facility for inspection. If the tool does not start or operate at full power with a fully charged battery pack, clean the contacts on the battery pack. If the tool still does not work properly, return the tool, charger and battery pack, to a MILWAUKEE® service facility for repairs.
Cleaning/Lubricating
Clean and lubricate the nose of the tool after heavy use (5000 rivets) or if tool becomes contaminated with dust and debris.
- Remove battery pack.

- Remove the nose housing from the tool and the nose piece from the housing.
- Remove the guide (with jaws), pusher tube, and spring from the tool.
- Clean all pieces with a dry cloth and inspect for damage. If damaged, return to a MILWAUKEE® service facility for repairs.
- Apply a small amount of oil to the pieces and reassemble, as shown. Ensure the jaws are properly seated in the guide.
ONE-KEY™
![]() Chemical Burn Hazard.
Chemical Burn Hazard.
This device contains a lithium button/coin cell battery. A new or used battery can cause severe internal burns and lead to death in as little as 2 hours if swallowed or enters the body. 
Always secure the battery cover. If it does not close securely, stop using the device, remove the batteries, and keep it away from children. If you think batteries may have been swallowed or entered the body, seek immediate medical attention.
Internal Battery
An internal battery is used to facilitate full ONE-KEY™ functionality.
To replace the battery:
- Remove the battery pack.
- Remove the screw(s) and open the battery door.
- Remove the old battery, keep it away from children, and dispose of it properly.
- Insert the new battery (3V CR2032), with the positive side facing up.
- Close the battery door and tighten the screw(s) securely.
![]() To reduce the risk of personal injury and damage, never immerse your tool, battery pack or charger in liquid or allow a liquid to flow inside them.
To reduce the risk of personal injury and damage, never immerse your tool, battery pack or charger in liquid or allow a liquid to flow inside them.
Cleaning
Clean dust and debris from any vents. Keep tool clean, dry and free of oil or grease. Use only mild soap and a damp cloth to clean, since certain cleaning agents and solvents are harmful to plastics and other insulated parts. Some of these include gasoline, turpentine, lacquer thinner, paint thinner, chlorinated cleaning solvents, ammonia and household detergents containing ammonia. Never use flammable or combustible solvents around tools.
Repairs
For repairs, return the tool, battery pack and charger to the nearest authorised service centre.
ACCESSORIES
![]() Use only recommended accessories. Others may be hazardous.
Use only recommended accessories. Others may be hazardous.
For a complete listing of accessories, go online to milwaukeetool.com.au/ milwaukeetool.co.nz or contact a distributor
WARRANTY
WARRANTY – AUSTRALIA and NEW ZEALAND
Please refer to Australian and New Zealand warranty supplied with tool. This warranty applies only to product sold by authorised dealers in Australia and New Zealand.
SERVICE – AUSTRALIA and NEW ZEALAND
MILWAUKEE® prides itself in producing a premium quality product that is Nothing But Heavy DutyTM.
Your satisfaction with our products is very important to us! If you encounter any problems with the operation of this tool, please contact your authorised MILWAUKEE® dealer.
For a list of MILWAUKEE® dealers, guarantee or service agents please contact MILWAUKEE®
Customer Service or visit our website.
(Australia Toll Free Telephone Number 1300 645 928) (New Zealand Toll Free Telephone Number 0800 645 928) or visit milwaukeetool.com.au/milwaukeetool.co.nz
Milwaukee Electric Tool Corporation
13135 West Lisbon Road, Brookfield, Wisconsin U.S.A. 53005
Milwaukee Tool (Australia)
21 Kelletts Road, Rowville, VIC 3178
Melbourne, Australia
Milwaukee Tool (New Zealand)
274 Church Street, Penrose,
Auckland, 1061, New Zealand
DESIGNED BY MILWAUKEE ELECTRIC TOOL CORP.
PROFESSIONALLY MADE IN CHINA
PRINTED IN CHINA
]]>
GENERAL POWER TOOL SAFETY WARNINGS
Read all safety warnings, instructions, illustrations and specifications provided with this power tool. Failure to follow all instructions listed below may result in electric shock, fire and/or serious injury. Save all
warnings and instructions for future reference. The term “power tool” in the warnings refers to your mains-operated (corded) power tool or battery-operated (cordless) power tool.
WORK AREA SAFETY
- Keep work area clean and well lit. Cluttered or dark areas invite accidents.
- Do not operate power tools in explosive atmospheres, such as in the presence of flammable liquids, gases or dust. Power tools create sparks which may ignite the dust or fumes.
- Keep children and bystanders away while operating
- power tool. Distractions can cause you to lose control.
ELECTRICAL SAFETY
- Power tool plugs must match the outlet. Never modify the plug in any way. Do not use any adapter plugs with earthed (grounded) power tools. Unmodified plugs and matching outlets will reduce risk of electric shock.
- Avoid body contact with earthed or grounded surfaces, such as pipes, radiators, ranges and refrigerators. There is an increased risk of electric shock if your body is earthed or grounded.
- Do not expose power tools to rain or wet conditions. Water entering a power tool will increase the risk of electric shock.
- Do not abuse the cord. Never use the cord for carrying, pulling or unplugging the power tool. Keep cord away from heat, oil, sharp edges or moving parts. Damaged or entangled cords increase the risk of electric shock.
- When operating a power tool outdoors, use an extension cord suitable for outdoor use. Use of a cord suitable for outdoor use reduces the risk of electric shock.
- If operating a power tool in a damp location is unavoidable, use a residual current device (RCD) protected supply. Use of a RCD reduces the risk of electric shock.
PERSONAL SAFETY
- Stay alert, watch what you are doing and use common sense when operating a power tool. Do not use a power tool while you are tired or under the influence of drugs, alcohol or medication. A moment of inattention while operating power tools may result in serious personal injury.
- Use personal protective equipment. Always wear eye protection. Protective equipment such as a dust mask, non-skid safety shoes, hard hat or hearing protection used for appropriate conditions will reduce personal injuries.
- Prevent unintentional starting. Ensure the switch is in the off-position before connecting to power source and/or battery pack, picking up or carrying the tool. Carrying power tools with your finger on
the switch or energising power tools that have the switch on invites accidents. - Remove any adjusting key or wrench before turning the power tool on. A wrench or a key left attached to a rotating part of the power tool may result in personal injury.
- Do not overreach. Keep proper footing and balance at all times. This enables better control of the power tool in unexpected situations.
- Dress properly. Do not wear loose clothing or jewellery. Keep your hair and clothing away from moving parts. Loose clothes, jewellery or long hair can be caught in moving parts.
- If devices are provided for the connection of dust extraction and collection facilities, ensure these are connected and properly used. Use of dust collection can reduce dust-related hazards.
- Do not let familiarity gained from frequent use of tools allow you to become complacent and ignore tool safety principles. A careless action can cause severe injury within a fraction of a second.
POWER TOOL USE AND CARE
- Do not force the power tool. Use the correct power tool for your application. The correct power tool will do the job better and safer at the rate for which it was designed.
- Do not use the power tool if the switch does not turn it on and off. Any power tool that cannot be controlled with the switch is dangerous and must be repaired.
- Disconnect the plug from the power source and/ or remove the battery pack, if detachable, from the power tool before making any adjustments, changing accessories, or storing power tools. Such preventive safety measures reduce the risk of starting the power tool accidentally.
- Store idle power tools out of the reach of children and do not allow persons unfamiliar with the power tool or these instructions to operate the power tool. Power tools are dangerous in the hands of untrained users.
- Maintain power tools and accessories. Check for misalignment or binding of moving parts, breakage of parts and any other condition that may affect the power tool’s operation. If damaged, have the power tool repaired before use. Many accidents are caused by poorly maintained power tools.
- Keep cutting tools sharp and clean. Properly maintained cutting tools with sharp cutting edges are less likely to bind and are easier to control.
- Use the power tool, accessories and tool bits etc. in accordance with these instructions, taking into account the working conditions and the work to be performed. Use of the power tool for operations different from those intended could result in a hazardous situation.
- Keep handles and grasping surfaces dry, clean and free from oil and grease. Slippery handles and grasping surfaces do not allow for safe handling and control of the tool in unexpected situations
BATTERY TOOL USE AND CARE
- Recharge only with the charger specified by the manufacturer. A charger that is suitable for one type of battery pack may create a risk of fire when used with another battery pack.
- Use power tools only with specifically designated battery packs. Use of any other battery packs may create a risk of injury and fire.
- When battery pack is not in use, keep it away from other metal objects, like paper clips, coins, keys, nails, screws or other small metal objects, that can make a connection from one terminal to another. Shorting the battery terminals together may cause burns or a fire.
- Under abusive conditions, liquid may be ejected from the battery; avoid contact. If contact accidentally occurs, flush with water. If liquid contacts eyes, additionally seek medical help. Liquid ejected from the battery may cause irritation or burns.
- Do not use a battery pack or tool that is damaged or modified. Damaged or modified batteries may exhibit unpredictable behaviour resulting in fire, explosion or risk of injury.
- Do not expose a battery pack or tool to fire or excessive temperature. Exposure to fire or temperature above 130°C (265°F) may cause explosion.
- Follow all charging instructions and do not charge the battery pack or tool outside the temperature range specified in the instructions. Charging improperly or at temperatures outside the specified range may damage the battery and increase the risk of fire
SERVICE
- Have your power tool serviced by a qualified repair person using only identical replacement parts. This will ensure that the safety of the power tool is maintained.
- Never service damaged battery packs. Service of battery packs should only be performed by the manufacturer or authorised service providers.
SPECIFIC SAFETY RULES FOR IMPACT WRENCH
- Hold power tool by insulated gripping surfaces, when performing an operation where the fastener may contact hidden wiring. Fasteners contacting a “live” wire may make exposed metal parts of the power tool “live” and could give the operator an electric shock.
- Wear ear protectors when impact drilling. Exposure to noise can cause hearing loss.
- Use only sockets and other accessories specifically designed for use on impact wrenches and drivers. Other sockets and accessories might shatter or break causing injury.
To reduce the risk of injury, when working in dusty situations, wear appropriate respiratory protection or use an appropriate dust extraction solution.
- Always use common sense and be cautious when using tools. It is not possible to anticipate every situation that could result in a dangerous outcome.
Do not use this tool if you do not understand these operating instructions or you feel the work is beyond your capability; contact MILWAUKEE® Tool or a training. trained professional for additional information or - Maintain labels and nameplates. These carry important information. If unreadable or missing, contact a MILWAUKEE® service facility for a replacement.
- Some dust created by power sanding, sawing, grinding, drilling, and other construction activities contains chemicals known to cause cancer, birth defects or other reproductive harm. Some examples of these chemicals are:
- lead from lead-based paint
- crystalline silica from bricks and cement and other masonry products, and
- arsenic and chromium from chemically-treated lumber. Your risk from these exposures varies, depending on how often you do this type of work. To reduce your exposure to these chemicals: work in a well ventilated
area, and work with approved safety equipment, such as those dust masks that are specially designed to filter out microscopic particles.
SYMBOLOGY
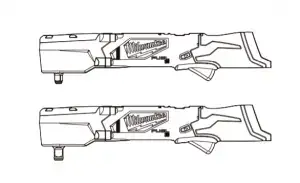
FUNCTIONAL DESCRIPTION

- 3/8″ Friction ring anvil (Cat. No. M12FRAIWF38)

- Drive head
- Speed control
- LED
- Control switch
- Trigger
- Handle
- 1/2″ Friction ring anvil (Cat. No. M12FRAIWF12)
ADDITIONAL BATTERY SAFETY RULES
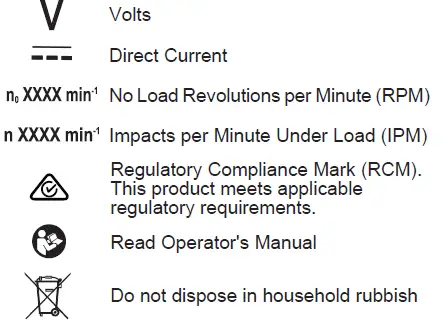 WARNING
To reduce the risk of fire, personal injury, and product damage due to a short circuit, never immerse your tool, battery pack or charger in fluid or allow a fluid to flow inside them. Corrosive or conductive fluids,
such as seawater, certain industrial chemicals, and bleach or bleach-containing products, etc., can cause a short circuit.
Do not charge non-rechargeable batteries.
SPECIFICATIONS
Cat. No. M12FRAIWF38, M12FRAIWF12
RPM 0-3000
IPM . 0-3600
Volts.. 12V DC
Battery Type M12™
Charger Type. M12™
Recommended Ambient
Operating Temperatur -17°C to 51°C
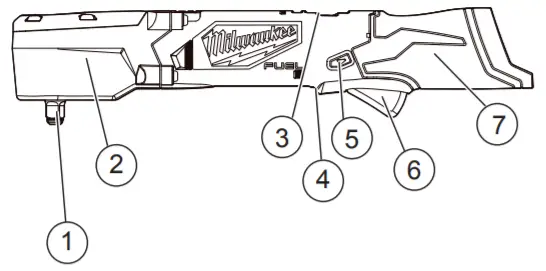
Recharge only with the charger specified for the battery. For specific charging instructions, read the operator’s manual supplied with your charger and battery. Removing/Inserting the Battery
To remove the battery, push in the release buttons and pull the battery pack away from the tool.
WARNING Always remove battery pack before changing or removing accessories.
To insert the battery, slide the pack into the body of the tool. Make sure it latches securely into place.
WARNING Only use accessories specifically recommended for this tool. Others may be hazardous.Attaching and Removing Accessories 3/8″ and 1/2″ Friction Ring (Cat. No. M12FRAIWF38 and M12FRAIWF12)
- Use only the appropriate size Square Drive Sockets.
- To attach a socket, align the accessory with the anvil and push it firmly over the retaining ring.
- To remove the accessory, pull the accessory o the anvil.
OPERATION
WARNING To reduce the risk of injury, always wear proper eye protection marked
to comply with ANSI Z87.1. When working in dusty situations, wear appropriate respiratory protection or use an appropriate dust extraction solution. Fuel Gauge
To determine the amount of charge left in the battery, turn the tool ON. The Fuel Gauge will light up for 2-3 seconds. When less than 10% of charge is left, 1 light on the fuel gauge will flash 4 times.
To signal the end of charge, 1 light on the fuel gauge will flash 8 times and the tool will not run. Charge the battery pack. If the battery becomes too hot, the fuel gauge lights will flash in an alternating pattern and the tool will not run. Allow the battery to cool down.
Using the Control Switch
The control switch may be set to three positions: forward, reverse and lock. Due to a lockout mechanism, the control switch can only be adjusted when the ON/OFF switch is not pressed. Always allow the
motor to come to a complete stop before using the control switch.
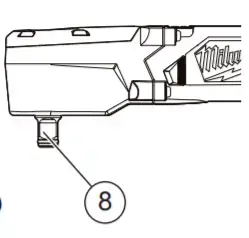
- For forward (clockwise) rotation, push the control switch in the direction shown. Check the direction of rotation before use.
- For reverse (counterclockwise) rotation, push the control switch in the direction shown. Check the direction of rotation before use.
- To lock the trigger, push the control switch to the centre position. The trigger will not work when the control switch is in the locked position. Always remove the battery pack before performing
maintenance, changing accessories, storing the tool and any time the tool is not in use.
Using the Drive Control
The drive control button is used Drive Control to adjust the rotation speed (RPM) for the application.
To select the drive control mode:

- Unlock, then pull and release the trigger to turn on the tool. The current indicator is lit. NOTE: The trigger will not work when the control switch is in the locked position.
- Press the drive control button to cycle through the 4 modes. When the desired mode indicator is lit, begin work.
- In mode:
- Auto Shut O – In forward, the tool runs at a reduced RPM and then shuts o once the torque i s achieved.
- Bolt Removal – In reverse, the tool runs at full RPM and IPM until the nut breaks free from the joint.
Then, the tool slows to a reduced RPM for better control in removing the nut.
Starting, Stopping and Controlling Speed
- These tools may be operated at any speed from 0 to full speed.
To start the tool, pull the trigger.
NOTE: An LED is turned on when the trigger is pulled. - To vary the driving speed, simply increase or decrease pressure on the trigger. The further the trigger is pulled, the greater the speed.
- To stop the tool, release the trigger and the electric brake stops the tool instantly.
Impacting Techniques
The longer a bolt, screw, or nut is impacted, the tighter it will become. To help prevent damaging the fasteners or workpieces, avoid excessive impacting. Be particularly careful when impacting smaller
fasteners because they require less impacting to reach optimum torque. Practice with various fasteners, noting the length of
time required to reach the desired torque. Check the tightness with a hand-torque wrench. If the fasteners are too tight, reduce the impacting time. If they are
not tight enough, increase the impacting time. Oil, dirt, rust or other matter on the threads or under
the head of the fastener a ects the degree of tightness.
The torque required to loosen a fastener averages 75% to 80% of the tightening torque, depending on the condition of the contacting surfaces.
On light gasket jobs, run each fastener down to a relatively light torque and use a hand torque wrench for final tightening.
MAINTENANCE
WARNING To reduce the risk of injury, always unplug the charger and remove the battery pack from the charger or tool before performing any maintenance. Never disassemble the tool, battery pack or charger. Contact a
MILWAUKEE® service facility for ALL repairs. Maintaining Tool Keep your tool, battery pack and charger in good repair by adopting a regular maintenance program. Inspect your tool for issues such as undue noise,
misalignment or binding of moving parts, breakage of parts, or any other condition that may a ect the tool operation. Return the tool, battery pack, and charger to a MILWAUKEE® service facility for repair. After six
months to one year, depending on use, return the tool, battery pack and charger to a MILWAUKEE® service facility for inspection. If the tool does not start or operate at full power with a fully charged battery pack, clean the contacts on the battery pack. If the tool still does not work properly, return the tool, charger and battery pack, to a MILWAUKEE® service facility for repairs.
 WARNING To reduce the risk of personal injury and damage, never immerse your tool, battery pack or charger in liquid or allow a liquid to flow inside them. Cleaning
Clean dust and debris from vents. Keep handles clean, dry and free of oil or grease. Use only mild soap and a damp cloth to clean, since certain cleaning agents and solvents are harmful to plastics and other insulated parts. Some of these include gasoline, turpentine, lacquer thinner, paint thinner, chlorinated cleaning solvents, ammonia and household detergents containing ammonia. Never use flammable or combustible solvents around tools.
Repairs
For repairs, return the tool, battery pack and charger to the nearest authorised service center.
WARRANTY – AUSTRALIA and NEW ZEALAND
Please refer to Australian and New Zealand warranty supplied with tool. This warranty applies only to product sold in Australia and New Zealand.
SERVICE – AUSTRALIA and NEW ZEALAND
MILWAUKEE® prides itself in producing a premium quality product that is Nothing But Heavy DutyTM. Your satisfaction with our products is very important to us! If you encounter any problems with the operation of this tool, please contact your authorised MILWAUKEE® dealer. For a list of MILWAUKEE® dealers, guarantee or service agents please contact MILWAUKEE® Customer Service or visit our website. (Australia Toll Free Telephone Number 1300 645 928) (New Zealand Toll Free Telephone Number 0800 645 928) or visit milwaukeetool.com.au/milwaukeetool.co.nz.
]]> Cat. No.
M18 FFN
M18 FUEL™ 30° FRAMING NAILER
![]() WARNING
WARNING
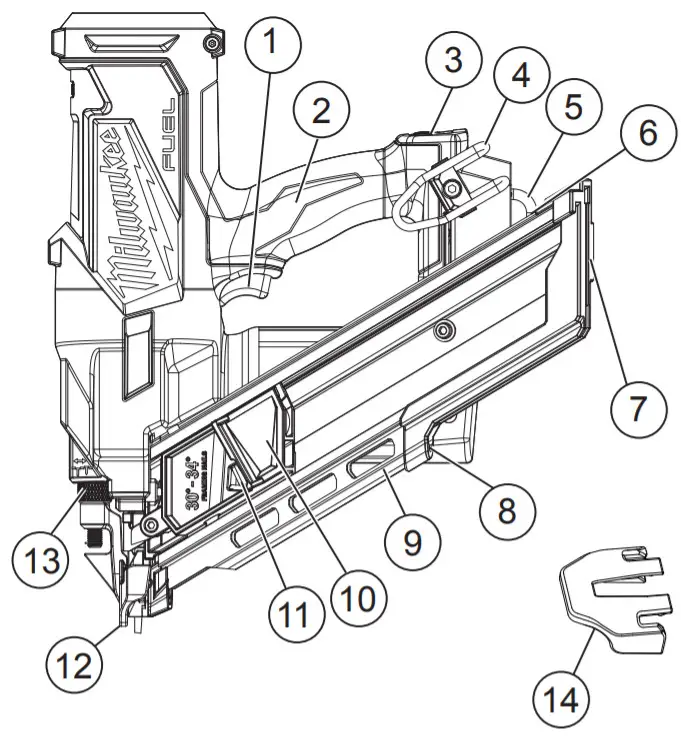 To reduce the risk of injury, the user must read and understand the operator’s manual.
GENERAL POWER TOOL SAFETY WARNINGS
![]() WARNING
WARNING
Read all safety warnings, instructions, illustrations, and specifications provided with this power tool.
Failure to follow all instructions listed below may result in electric shock, Save all warnings and in- instructions for future reference. The term “power tool” in the warnings refers to your mains-operated (corded) power tool or battery-operated (cordless) power tool.
WORK AREA SAFETY
- Keep work area clean and well-lit. Cluttered or dark areas invite accidents.
- Do not operate power tools in explosive atmoliquids, gases, or dust. Power tools create sparks that may ignite dust or fumes.
- Keep children and bystanders away while operating a power tool. Distractions can cause you to lose control.
ELECTRICAL SAFETY
- Power tool plugs must match the outlet. Never modify the plug in any way. Do not use any adapter plugs with earthed (grounded) power tools.
and matching outlets will reduce the risk of electric shock. - Avoid body contact with earthed or grounded surfaces, such as pipes, radiators, ranges, and refrigerators. There is an increased risk of electric shock if your body is earthed or grounded.
- Do not expose power tools to rain or wet conditions.
Water entering a power tool will increase the risk of electric shock. - Do not abuse the cord. Never use the cord for carrying, pulling, or unplugging the power tool. Keep cord away from heat, oil, sharp edges, or moving parts. Damaged or entangled cords increase the risk of electric shock.
- When operating a power tool outdoors, use an extension cord suitable for outdoor use. The use of a cord suitable for outdoor use reduces the risk of electric shock.
- If operating a power tool in a damp location is unavoidable, use a residual current device (RCD) protected supply. The use of an RCD reduces the risk of electric shock.
PERSONAL SAFETY
- Stay alert, watch what you are doing, and use common sense when operating a power tool. Do not use a power tool while you are tired or under
A moment of inattention while operating power tools may result in serious personal injury. - Use personal protective equipment. Always wear eye protection. Protective equipment such as a dust mask, non-skid safety shoes, hard hat, or hearing protection used for appropriate conditions will reduce personal injuries.
- Prevent unintentional starting. Ensure the switch source and/or battery pack, picking up or carrying the tool.
switch or energizing power tools that have the switch on invites accidents. - Remove any adjusting key or wrench before turning the power tool on. A wrench or a key left attached to a rotating part of the power tool may result in personal injury.
- Do not overreach. Keep proper footing and balance at all times. This enables better control of the power tool in unexpected situations.
- Dress properly. Do not wear loose clothing or jewelry. Keep your hair and clothing away from moving parts. Loose clothes, jewelry, or long hair can
be caught in moving parts. - If devices are provided for the connection of dust extraction and collection facilities, ensure these are connected and properly used. The use of dust collection can reduce dust-related hazards.
- Do not let familiarity gained from frequent use of tools allow you to become complacent and ignore tool safety principles. A careless action can cause severe injury within a fraction of a second.
POWER TOOL USE AND CARE
- Do not force the power tool. Use the correct power tool for your application. The correct power tool will do the
job better and safer at the rate for which it was designed. - Do not use the power tool if the switch does not turn any power tool that cannot be controlled with the switch is dangerous and must be repaired.
- Disconnect the plug from the power source and/ or remove the battery pack, if detachable, from the power tool before making any adjustments, changing accessories, or storing power tools. Such preventive safety measures reduce the risk of starting the power tool accidentally.
- Store idle power tools out of the reach of children and do not allow persons unfamiliar with the power tool or these instructions to operate the power tool. Power tools are dangerous in the hands of untrained users.
- Maintain power tools and accessories. Check for misalignment or binding of moving parts, breakage the power tool’s operation. If damaged, have the power tool repaired before use. Many accidents are caused by poorly maintained power tools.
- Keep cutting tools sharp and clean. Properly maintained cutting tools with sharp cutting edges are less likely to bind and are easier to control.
- Use the power tool, accessories and tool bits, etc. in accordance with these instructions, taking into account the working conditions and the work to be performed. from those intended could result in a hazardous situation.
- Keep handles and grasping surfaces dry, clean, and free from oil and grease. Slippery handles and grasping surfaces do not allow for safe handling and control of the tool in unexpected situations.
BATTERY TOOL USE AND CARE
- Recharge only with the charger specified by the manufacturer. A charger that is suitable for one type of battery pack may create a risk of fire when used with another battery pack.
- Use power tools only with specifically designated battery packs. Use of any other battery packs may create a risk of injury and fire.
- When the battery pack is not in use, keep it away from other metal objects, like paper clips, coins, keys, nails, screws, or other small metal objects, that can make a connection from one terminal to another. Shorting the battery terminals together may cause burns or a fire.
- Under abusive conditions, liquid may be ejected from the battery; avoid contact. If contact accidentally occurs, flush with water. If liquid contacts eyes, additionally seek medical help. Liquid ejected from the battery may cause irritation or burns.
- Do not use a battery pack or tool that is damaged or modified. Damaged or modified batteries may exhibit unpredictable behavior resulting in fire, explosion, or risk of injury
- Do not expose a battery pack or tool to fire or excessive temperature. Ex sure to fire or temperature above 130°C (265°F) may cause an explosion.
- Follow all charging instructions and do not charge the battery pack or tool outside the temperature range specified in the instructions. Charging improperly or at temperatures outside the specified range may damage the battery and increase the risk of fire.
SERVICE
- Have yours. power tool serviced by a qualified repair person using only identical replacement parts. This will ensure that the safety of the power tool is maintained.
- Never service damaged battery packs. Service of battery packs should only be performed by the manufacturer or authorized service providers.
NAILER SAFETY WARNINGS
- Always assume that the tool contains fasteners. Careless handling of the nailer can result in the unexpected firing of fasteners and personal injury.
- Do not point the tool towards yourself or anyone Unexpected triggering will discharge the fastener causing an injury.
- Do not actuate the tool unless the tool is placed firmly against the workpiece. If the tool is not in contact with the workpiece, the fastener may be deflected away from your target.
- Disconnect the tool from the power source when the fastener jams in the tool. While removing a jammed fastener, the nailer may be accidentally activated if it is plugged in.
- Use caution while removing a jammed fastener. The mechanism may be under compression and the fastener may be forcefully discharged while attempting to free a jammed condition.
- Do not use this nailer for fastening electrical It is not designed for electric cable installation and may damage the insulation of electric cables time and may damage the insulation of electric cables thereby causing electric shock or fire hazards.
- Prior to each use, check workplace contact and trigger for correct operation. Do not disassemble or clamp parts of the workpiece contact, trigger, or driving This will cause unexpected actuation, resulting in serious injury.
- Do not engage In horseplay. The discharged fasteners are projectiles capable of causing serious
- Do not remove, tamper with, or otherwise cause the tool operating controls to become Inoperable. This will cause unexpected resulting in serious injury.
- Do not operate a tool If any portion of the tool operating controls Is Inoperable, disconnected, altered, or not working properly. This will cause unexpected actuation, resulting in serious
- Always keep hands and body away from the discharge area of the tool. Never attempt to clear a jammed workpiece contact by grasping the discharge area of the Fasteners discharged from the tool can cause serious injury if they contact hands or body.
- Do not drive fasteners close to the edge of the workpiece. Fasteners can slip off corners and edges or penetrate through thin material, making them projectiles capable of causing serious
- Use the tool only for the Intended Purpose. Do not abuse the tool. Do not use as a hammer, stamp or engrave information onto parts, drop or impact the tool or otherwise apply excess force to the tool in use Do not mount the tool to stands or modify it for stationary
- Always use common sense and be cautious when using tools. It is not possible to anticipate every situation that could result in a dangerous Do not use this tool if you do not understand these operating instructions or you feel the work is beyond your capability; contact MILWAUKEE Tool or a trained professional for additional information or training.
- Maintain labels and nameplates. These carry important information. If unreadable or missing, contact a MILWAUKEE service facility for a replacement.
![]() WARNING Some dust created by power sanding, sawing, grinding, drilling, and other construction activities contains chemicals known to cause cancer, birth defects, or other reproductive harm. Some examples of these chemicals are:
WARNING Some dust created by power sanding, sawing, grinding, drilling, and other construction activities contains chemicals known to cause cancer, birth defects, or other reproductive harm. Some examples of these chemicals are:
- lead from lead-based paint
- crystalline silica from bricks and cement and other masonry products, and arsenic and chromium from chemically treated lumber. Your risk from these exposures varies, depending on how often you do this type of work. To reduce your exposure to these chemicals: work in a well-ventilated area, and work with approved safety equipment, such as those dust masks that are specially designed to filter out microscopic particles.
ADDITIONAL BATTERY SAFETY RULES
![]() warning reduces the risk of fire, personal injury, and product damage due to a short circuit, never immerse your tool, battery pack, or charger in fluid or allow fluid to flow inside them. Corrosive or conductive fluids, such as seawater, certain industrial chemicals, and bleach or bleach-containing products, etc., can cause a short circuit.
warning reduces the risk of fire, personal injury, and product damage due to a short circuit, never immerse your tool, battery pack, or charger in fluid or allow fluid to flow inside them. Corrosive or conductive fluids, such as seawater, certain industrial chemicals, and bleach or bleach-containing products, etc., can cause a short circuit.
SYMBOLOGY
 |
Volts |
 |
Direct Current |
 |
Single Sequential Actuation |
| Contact (Bump) Actuation | |
|
Read Operator’s Manual |
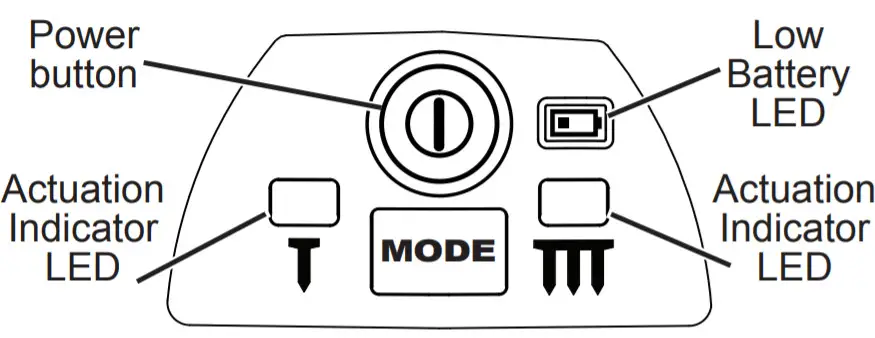 |
Wear Eye Protection |
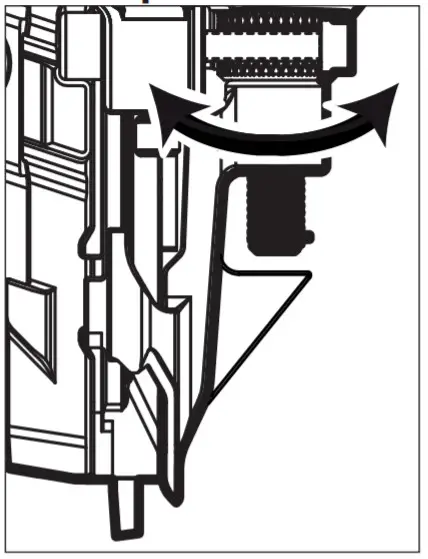 |
Keep Hands Away |
|
Regulatory Compliance Mark (RCM). This product meets applicable regulatory requirements. |
SPECIFICATIONS
| Volts | 18V DC |
| Battery Type | M18™ |
| Recommended Ambient Charger Type |
M18™ |
| Operating Temperature | -17°C to 51°C |
| Cat. No. | M18 FFN |
| Collation Angle | 30-34° |
| Fastener Length | 50-90mm (2″- 3-1/2″) |
| Fastener Size (Diameter) | 2.8-3.3mm(0.131″-0.131″) |
| Magazine Capacity | 51 nails |
FUNCTIONAL DESCRIPTION

| 1. Trigger 2. Handle 3. Power/Actuation selection 4. Belt hook 5. Rafter hook 6. Hex wrench 7. Nail slot 8. LED |
9. Magazine 10. Pusher 11. Pusher release button 12. Workpiece contact bracket 13. Depth adjustment 14. No-Mar Pad |
ASSEMBLY
![]() WARNING Recharge only with the charger – manual supplied with your charger and battery.
WARNING Recharge only with the charger – manual supplied with your charger and battery.
Removing/Inserting the Battery
To remove the battery, push the release buttons and pull the battery pack away from the tool.
![]() WARNING Always remove the battery pack before changing or removing accessories.
WARNING Always remove the battery pack before changing or removing accessories.
To insert the battery, slide the pack into the body of the tool. Make sure it latches securely into place.
Attaching No-Mar Pad
The No-Mar Pad on the nose of the tool protects the workpiece when the workpiece contact is compressed during actuation.
- Remove the battery pack.
- Snap the No-Mar Pad into place over the points of the workpiece contact bracket.
- Pull on the No-Mar Pad to be certain it is properly secured.
- To remove the pad, pull the pad away from the workpiece contact bracket.
Installing/Removing Fastener Strips
![]() WARNING Always remove the battery pack before changing or removing fasteners.
WARNING Always remove the battery pack before changing or removing fasteners.
Always wear safety goggles or glasses with side shields.
Keep fingers clear of fastener track of magazine. pusher could pinch finger, causing injury
To install fastener strips:
- Remove the battery pack.
- WARNING! Always point the tool away from yourself and others when installing fasteners. Failure to do so could result in injury.
- Slide the fastener strip into the nail slot and down toward the front of the tool. Be sure the point of the fasteners is pointed downward.
WARNING! Use only recommended fasteners of the correct size, length, collation angle, and head type as indicated on the tool’s nameplate. Other fasteners could result in tool malfunction, leading to injury. - Press and hold the pusher release button and slide the pusher back past the end of the fastener strips.
- Continue to hold the pusher, but release the button Slowly slide the pusher forward until it rests against the fastener strip.
To remove fastener strips:
- Remove the battery pack.
- WARNING! Always point the tool away from yourself and others when installing fasteners. Failure to do so could result in injury.
- Press and hold the pusher release button and slide the pusher towards the front of the tool. Release the pusher.
- Slide the nails back and out of the nail slot.
OPERATION
![]() WARNING
WARNING
To reduce the risk of injury, always wear safety goggles or glasses with side shields. The operator and other people in the work area must wear eye protection in accordance with ANSI Z87.1. Eye protection does not protection chosen has side shields or provides
and sides. The employer is responsible for enforcing the use of eye protection by the operator and other people in the work area. When required, wear head protection in accordance with ANSI Z89.1. To reduce the risk of injury to yourself and others, test the tool before beginning work each day according to the “Required Daily Testing” section. Do not use the tool unless you thoroughly
understand the actuation mode selected. Remove battery pack and fasteners before leaving the work area, moving the tool to another location, or handing the tool to another person. Failure to do so could result in serious injury. Do not use this tool for fastening electrical cables. It is not designed for electric cable installation and may damage the insulation of electric cables thereby causing electric shock
NEVER wedge or hold back the workpiece contact mechanism during the operation of the tool. Never attempt to clear a jammed workpiece contact by grasping the discharge area of the tool. Doing so could result in serious injury. To avoid serious injury, do not attempt to prevent the recoil by holding the tool firmly against it.
the work. Keep face and body away from the tool. During normal use, the tool will recoil immediately after driving a fastener. This is a normal function of the tool. Restriction to the recoil can result in a second fastener being driven when the tool is in contract actuation mode. Grip the Handel firmly let the tool do the work and do not place a second hand on top of the tool. Power/Actuation Selection
- Install the battery pack.
- Press and hold the Power button to turn on the tool (the Power button’s green LED ring will light).
- The Low Battery LED indicates when the battery

- Press and hold the MODE button to toggle between single sequential actuation mode and contact (bump) actuation mode. WARNING! Understand the actuation process before use.
Single Sequential Actuation –
The workpiece contact and then the trigger must be activated in a specific sequence to drive a fastener.
 Contact (Bump) Actuation –
The workpiece contact and the trigger can be activated in any sequence to drive a fastener. - Press and hold the Power button.to turn off the tool
Single Sequential Actuation Operation
- Grip the handle firmly.
- Push the tool against the work surface, compressing the workpiece contact.
- Pull the trigger to drive the fastener.
WARNING! To avoid serious injury, do not attempt to prevent the recoil by holding the tool too firmly against the work. - Remove your finger from the trigger and remove the tool from the workpiece.
Contact (Bump) Actuation Operation
Contact Actuation can follow two different sequences, depending on your use.
Multiple actuations:
- Grip the handle firmly.
- Pull and hold the trigger.
- Push the tool against the work surface, compressing the workpiece contact to drive the fastener.
WARNING! To avoid serious injury, do not attempt to prevent the recoil by holding the tool too firmly against the work. - Continue to hold the trigger and repeat the workpiece
Single actuation:
- Grip the handle firmly.
- Push the tool against the work surface, compressing the workpiece contact.
- Pull the trigger to drive the fastener.
WARNING! To avoid serious injury, do not attempt to prevent the recoil by holding the tool too firmly against the work.
- Remove your finger from the trigger and remove the tool from the workpiece.
Reload Indicator
To indicate that the magazine is almost empty of fasteners (about 4-5 left), the workpiece contact will not compress, preventing operation under usual pressure. Install more fasteners to continue working.
![]() WARNING
WARNING
NEVER wedge or hold back the workpiece contact mechanism during the operation of the tool. Never attempt to clear a jammed workpiece contact by grasping the discharge area of the tool. Doing so could result in serious injury.
To avoid serious injury, do not attempt to prevent the recoil by holding the tool too firmly against the work. Keep face and body away from the tool. During normal use, the tool will recoil immediately after driving a fastener. This is a normal function of the tool. Restriction to the recoil can result in a second fastener being driven when the tool is in Contact Actuation mode. Grip the handle firmly, let the tool do the work, and do not place a second hand on top of the tool.
Setting the Depth of Drive
The depth of drive can be adjusted to account for the size of the fastener and the workpiece material.
![]() WARNING
WARNING
Know what is behind your workpiece. A fastener could travel through the workpiece and out the other side, striking a bystander and causing serious injury. Lower the depth of drive to prevent the fastener from being pushed all the way through the workpiece.

- Drive a test fastener.
- Remove the battery pack.
- WARNING! Always point the tool away from yourself and others when making adjustments. Failure to do so could result in injury.
- Turn the depth selector left or right to increase or decrease the driving depth.
- Repeat until the desired depth is reached.
Clearing a Jammed Fastener
Most jams are caused by a fastener or part of a fastener wedging between the driver blade and the nail guide. Fastener strips with an incorrect collation angle or the wrong fastener gauge may cause continuous jamming. To clear the jam:
- Remove the battery pack.
- WARNING! Always point the tool away from yourself and others when installing or removing fasteners. Failure to do so could result in injury.
- Remove fastener strip from the magazine.
- Remove the fastener using needle-nose pliers. If necessary, remove the magazine from the tool.
- Follow the steps under “Required Daily Testing” before restarting the work.
REQUIRED DAILY TESTING
![]() WARNING To reduce the risk of injury to yourself and others, test the tool before beginning work each day or if the tool is
WARNING To reduce the risk of injury to yourself and others, test the tool before beginning work each day or if the tool is
dropped, received a sharp blow, been run over, etc. Complete the following ORDER. If the tool does not work as it should contact a MILWAUKEE®checklist IN facility service immediately.
Always point tools away from yourself and others.
- Remove the battery pack.
- WARNING! Always point the tool away from yourself and others when installing fasteners. Failure to do so could result in injury.
- Check all screws, bolts, nuts, and pins on the tool. Any loose fasteners must be tightened.
- Open the magazine (to override the Reload Indicator) and press the workpiece contact against a workpiece. It must move
smoothly. - With the workpiece contact pressed against the workpiece, pull the trigger. It must move smoothly.
- Insert the battery pack.
- Select the Single Sequential Actuation Operation. Without pulling the trigger, open the magazine (to override the Reload Indicator) and press the workpiece contact against a workpiece. The tool must not operate. Holding the workpiece contact away from the workpiece, open the magazine (to override the Reload Indicator). Pull and hold the trigger for 5 seconds.
The tool must not operate. Continue to pull and hold the trigger and push the workpiece contact against a workpiece.
The tool must not operate. Without pulling the trigger, open the magazine (to override the Reload Indicator) and press the workpiece contact against a workpiece. Pull the trigger. The tool must operate. Release the trigger. The driver must move up. - Select the Contact Actuation Operation. Holding the workpiece contact away from the workpiece, open the magazine (to override the Reload Indicator) and pull the trigger. The tool must not operate.
Continue to pull and hold the trigger and push the workpiece contact against a workpiece. The tool must operate. - If all previous tests work properly, set the tool for your work. Select the operation and load fastener strips.
- Set the depth of drive according to the “Setting the Depth of Drive” section.
- If all tests operate properly, the tool is ready for use.
Repeat these tests before use each day or if the tool is dropped, received a sharp blow, been run over, jammed, etc.
Resetting Striker
After a nail jam or low battery condition, the striker may not reset.
To reset the striker,
- Remove the battery pack.
- WARNING! Always point the tool away from yourself and others when installing or removing fasteners. Failure to do so could result in injury.
- Remove fastener strip from the magazine.
- Check for incorrect striker position. If the striker does not require a reset, see the steps for clearing a jammed nail.
- To reset the striker, install a battery pack.
- Hold open the nail pusher (to override the Reload Indicator) and press the workpiece contact against a workpiece.
- Pull the trigger.
- The striker will retract.
- Follow the steps under “Required Daily Testing” before restarting the work.
MAINTENANCE
![]() WARNING
WARNING
To reduce the risk of injury, always unplug the charger and remove the battery pack from the charger or tool before performing any maintenance. Never disassemble the tool, battery pack, or charger. Contact a MILWAUKEE® service facility for ALL repairs.
Maintaining Tool
Keep your tool, battery pack, and charger in good repair by adopting a regular maintenance program. Inspect your tool for issues such as undue noise, misalignment or binding of moving parts, breakage of parts, or any other condition that may affect the tool operation. Return the tool, battery pack, and charger to a MILWAUKEE® service facility for repair. After six months to one year, depending on use, return the tool, battery pack, and charger to a MILWAUKEE® service facility for inspection. If the tool does not start or operate at full power with a fully charged battery pack, clean the contacts on the battery pack. If the tool still does not work properly, return the tool, charger, and battery pack, to a MILWAUKEE® service facility for repairs.
![]() WARNING
WARNING
To jury and reduce the damage, risk of never personal immerse in- your tool, battery pack or charger in liquid or
Cleaning
Clean dust and debris from vents. Keep handles clean, dry, and free of oil or grease. Use only mild soap and a damp cloth to clean, since certain cleaning agents and solvents are harmful to plastics and other insulated parts. Some of these include gasoline, turpentine, lacquer thinner, paint thinner, chlorinated cleaning solvents, ammonia, and household detergents containing ammonia. Never use or combustible solvents around tools.
Repairs
For repairs, return the tool, battery pack, and charger to the nearest service center.
ACCESSORIES
![]() WARNING
WARNING
Use only recommended accessories. Others may be hazardous.
For a complete listing of accessories, go online to milwaukeetool.com.au / milwaukeetool.co.nz or contact a distributor.
WARRANTY – AUSTRALIA and NEW ZEALAND
Please refer to Australian and New Zealand warranty supplied with the tool. This warranty applies only to products sold in Australia and New Zealand.
SERVICE – AUSTRALIA and NEW ZEALAND
MILWAUKEE® prides itself in producing a premium quality product that is Nothing But Heavy duty™. Your satisfaction with our products is very important to us! If you encounter any problems with the operation of this tool, please contact your authorized MILWAUKEE® dealer.
For a list of MILWAUKEE® dealers, guarantee, or service agents please contact MILWAUKEE® Customer Service or visit our website.
(Australia Toll-Free Telephone Number 1300 645 928)
(New Zealand Toll-Free Telephone Number 0800 645 928)
or visit milwaukeetool.com.au/milwaukeetool.co.nz.
Milwaukee Electric Tool Corporation
13135 West Lisbon Road, Brookfield, Wisconsin U.S.A. 53005
Milwaukee Tool (Australia)
21 Kellett’s Road, Rowville, VIC 3178
Melbourne, Australia
Milwaukee Tool (New Zealand)
274 Church Street, Penrose,
Auckland, 1061, New Zealand
DESIGNED BY MILWAUKEE ELECTRIC TOOL CORP.
PROFESSIONALLY MADE IN CHINA
PRINTED IN CHINA
All rade arks are owned by Techtronic Cordless GP unless otherwise stated.
© 20 Milwaukee Electric Tool Corporation.

![]() WARNING
WARNING
 To reduce the risk of injury, user must read and understand operator’s manual.
GENERAL POWER TOOL SAFETY WARNINGS
![]() WARNING Read all safety warnings, instructions, illustrations and specifications provided with this power tool. Failure to follow all instructions listed below may result in electric shock, fire and/or serious injury. Save all warnings and instructions for future reference. The term “power tool” in the warnings refers to your mains-operated (corded) power tool or battery-operated (cordless) power tool.
WARNING Read all safety warnings, instructions, illustrations and specifications provided with this power tool. Failure to follow all instructions listed below may result in electric shock, fire and/or serious injury. Save all warnings and instructions for future reference. The term “power tool” in the warnings refers to your mains-operated (corded) power tool or battery-operated (cordless) power tool.
WORK AREA SAFETY
- Keep work area clean and well lit. Cluttered or dark areas invite accidents.
- Do not operate power tools in explosive atmo-spheres, such as in the presence of flammable liquids, gases or dust. Power tools create sparks w which may ignite the dust or fumes.
- Keep children and bystanders away while operating a power tool. Distractions can cause you to lose control.
ELECTRICAL SAFETY
- Power tool plugs must match the outlet. Never modify the plug in any way. Do not use any adapter plugs with earthed (grounded) power tools. Unmodified plugs and matching outlets will reduce risk of electric shock.
- Avoid body contact with earthed or grounded surfaces, such as pipes, radiators, ranges and refrigerators. There is an increased risk of electric shock if your body is earthed or grounded.
- Do not expose power tools to rain or wet conditions. Water entering a power tool will increase the risk of electric shock.
- Do not abuse the cord. Never use the cord for carrying, pulling or unplugging the power tool. Keep cord away from heat, oil, sharp edges or moving parts. Damaged or entangled cords increase the risk of electric shock.
- When operating a power tool outdoors, use an extension cord suitable for outdoor use. Use of a cord suitable for outdoor use reduces the risk of electric shock.
- If operating a power tool in a damp location is unavoidable, use a residual current device (RCD) protected supply. Use of a RCD reduces the risk of electric shock.
PERSONAL SAFETY
- Stay alert, watch what you are doing and use common sense when operating a power tool. Do not use a power tool while you are tired or under the influence of drugs, alcohol or medication. A moment of inattention while operating power tools may result in serious personal injury.
- Use personal protective equipment. Always wear eye protection. Protective equipment such as a dust mask, non-skid safety shoes, hard hat or hearing protection used for appropriate conditions will reduce personal injuries.
- Prevent unintentional starting. Ensure the switch is in the off-position before connecting to power source and/or battery pack, picking up or carrying the tool. Carrying power tools with your finger on the switch or energising power tools that have the switch on invites accidents.
- Remove any adjusting key or wrench before turning the power tool on. A wrench or a key left attached to a rotating part of the power tool may result in personal injury.
- Do not overreach. Keep proper footing and balance at all times. This enables better control of the power tool in unexpected situations.
- Dress properly. Do not wear loose clothing or jewellery. Keep your hair and clothing away from moving parts. Loose clothes, jewellery or long hair can be caught in moving parts.
- If devices are provided for the connection of dust extraction and collection facilities, ensure these are connected and properly used. Use of dust collection can reduce dust-related hazards.
- Do not let familiarity gained from frequent use of tools allow you to become complacent and ignore tool safety principles. A careless action can cause severe injury within a fraction of a second.
POWER TOOL USE AND CARE
- Do not force the power tool. Use the correct power tool for your application. The correct power tool will do the job better and safer at the rate for which it was designed.
- Do not use the power tool if the switch does not turn it on and off. Any power tool that cannot be controlled with the switch is dangerous and must be repaired.
- Disconnect the plug form the power source and/or remove the battery pack, if detachable, from the power tool before making any adjustments, changing accessories, or storing power tools. Such preventive safety measures reduce the risk of starting the power tool accidentally.
- Store idle power tools out of the reach of children and do not allow persons unfamiliar with the power tool or these instructions to operate the power tool. Power tools are dangerous in the hands of untrained users.
- Maintain power tools and accessories. Check for misalignment or binding of moving parts, breakage of parts and any other condition that have the power tool repaired before use. Many accidents are caused by poorly maintained power tools.
- Keep cutting tools sharp and clean. Properly maintained cutting tools with sharp cutting edges are less likely to bind and are easier to control.
- Use the power tool, accessories and tool bits etc. in accordance with these instructions, taking into account the working conditions and the work to be performed. Use of the power tool for operations different form those intended could result in a hazardous situation.
- Keep handles and grasping surfaces dry, clean and free from oil and grease.Slippery handles and grasping surfaces do not allow for safe handling and control of the tool in unexpected situations.
BATTERY TOOL USE AND CARE
- Recharge only wit the charger specified by the manufacturer. A charger that is suitable for one type of battery pack may create a risk of fire when used with another battery pack.
- Use power tools only with specifically designated battery packs. Use of any other battery packs may create a risk of injury and fire.
- When battery pack is not in use, keep it away from other metal objects, like paper clips, coins, keys, nails, screws or other small metal objects, that can make a connection from one terminal to another. Shorting the battery terminals together may cause burns or a fire.
- Under abusive conditions, liquid may be ejected from the battery; avoid contact. If contact accidentally occurs, flush with water. If liquid contacts eyes, additionally seek medical help. Liquid ejected from the battery may cause irritation or burns.
- Do not use a battery pack or tool that is dam-aged or modified. Damaged or modified batteries may exhibit unpredictable behavior resulting in fire, explosion or risk of injury.
- Do not expose a battery pack or tool to fire or excessive temperature. Exposure to fire or temperature above 130°C (265°F) may cause explosion.
- Follow all charging instructions and do not charge the battery pack or tool outside the temperature range specified in the instructions. Charging improperly or at temperatures outside the specified range may damage the battery and increase the risk of fire.
SERVICE
- lave your power tool serviced by a qualified repair person using only identical replacement parts. This will ensure that the safety of the power tool is maintained.
- Never service damaged battery packs. Service of battery packs should only be performed by the manufacturer or authorised service providers.
SPECIFIC SAFETY RULES FOR MULTI-TOOL
- Hold power tool by insulated gripping surfaces, when performing an operation where the cutting accessory may contact hidden wiring. Cutting accessory contacting a “live” wire may make exposed metal parts of the power tool “live” and could give the operator an electric shock.
- Use clamps or another practical way to secure and support the workpiece to a stable platform. Holding the work by hand or against your body leaves it unstable and may lead to loss of control.
- To reduce the risk of explosion, electric shock and property damage, always check the work area for hidden gas pipes, electrical wires or water pipes when making blind or plunge cuts.
- Keep hands away from all cutting edges and moving parts. Do not reach underneath the workpiece.
- Do not use dull or damaged blade, which can cause excessive friction, blade binding and kick-back.
- Know your workpiece. Remove nail and screw heads before scraping. Hitting hard objects with blade may cause the tool to kick back.
 Warning To reduce the risk of injury, when working in dusty wear appropriate respiratory situations, protection.
 - Always use common sense and be cautious when using tools. It is not possible to anticipate every situation that could result in a dangerous outcome.
Do not use this tool if you do not understand these operating instructions or you feel the work is beyond your capability; contact Milwaukee Tool or a trained professional for additional information or training. - Maintain labels and nameplates. These carry important information. If unreadable or missing, contact a MILWAUKEE® service facility for a replacement.
WARNING Some dust created by power sanding, sawing, grinding, drilling, and other construction activities contains chemicals known to cause cancer, birth defects or other reproductive harm. Some examples of these chemicals are: - lead from lead-based paint
- crystalline silica from bricks and cement and other masonry products, and
- arsenic and chromium from chemically-treated lumber.
Your risk from these exposures varies, depending on how often you do this type of work. To reduce your exposure to these chemicals: work in a well ventilated area, and work with approved safety equipment, such as those dust masks that are specially designed to filter out microscopic particles.
ADDITIONAL BATTERY SAFETY RULES
![]() WARNING: To reduce the risk of fire, personal injury , and product damage due to a short circuit, never immerse your tool, battery pack or charger in fluid or allow a fluid to flow inside them. Corrosive or conductive fluids, such as seawater , certain industrial chemicals, and bleach or bleach-containing products, etc., can cause a short circuit.
WARNING: To reduce the risk of fire, personal injury , and product damage due to a short circuit, never immerse your tool, battery pack or charger in fluid or allow a fluid to flow inside them. Corrosive or conductive fluids, such as seawater , certain industrial chemicals, and bleach or bleach-containing products, etc., can cause a short circuit.
![]() WARNING: Do not charge non-rechargeable batteries.
WARNING: Do not charge non-rechargeable batteries.
SYMBOLOGY
- V Volts
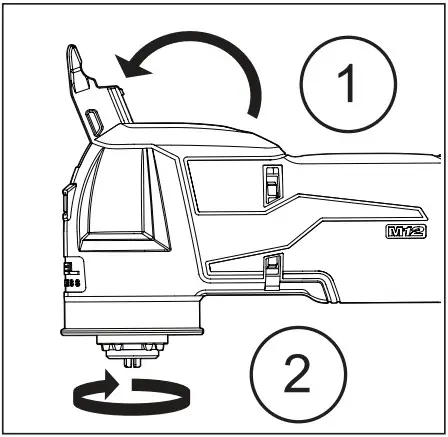 Direct Current
- no No load Revolutions per Minute (RPM)
- Read Operator’s Manual
-
 Do not dispose of electric tools together with household waste material. Electric tools and electronic equipment that have reached the end of their life must be collected separately and returned to an environmentally compatible recycling facility.
  Regulatory Compliance Mark (RCM). This product meets applicable regulatory requirements.
SPECIFICATIONS
- Cat. No. ………………………………………….. M12 FMT
- Volts………………………………………………….. 12V DC
- Battery Type ………………………………………….M12™
- Charger Type…………………………………………M12™
- No Load OPM ………………….. 10,000 – 20,000 min-1
- Recommended Ambient
- Operating Temperature ………………. -17°C to 51°C
FUNCTIONAL DESCRIPTION

- Accessory bolt
- Adapter
- Inner Flange
- LED
- Quick release lever
- Fuel gauge
- On/Off switch
- Speed dial
ASSEMBLY
![]() Warning: Recharge only with the charger specified for the battery. For specific charging instructions, read the operator’s manual supplied with your charger and battery.
Warning: Recharge only with the charger specified for the battery. For specific charging instructions, read the operator’s manual supplied with your charger and battery.
Removing/Inserting the Battery
To remove the battery, push in the release buttons and pull the battery pack away from the tool.
![]() Warning: Always remove battery pack before changing or removing accessories. To insert the battery, slide the pack into the body of the tool.
Warning: Always remove battery pack before changing or removing accessories. To insert the battery, slide the pack into the body of the tool.
![]() Warning: Make sure it latches securely into place. Only use accessories specifically recommended for this tool. Others may be hazardous.
Warning: Make sure it latches securely into place. Only use accessories specifically recommended for this tool. Others may be hazardous.
Changing Accessories

- Remove the battery pack.
- Lift the quick release lever and push it firmly forward over the detent.(1)
- Turn tool over.
- Unscrew the accessory bolt.
- Remove any accessories. (2)
- Clean bolt, flange,and acces-sories of all dirt and debris.
- Place the accessory and bolt onto the tool.Hand tighten securely. NOTE: If the accessory does not fit snuggly on the flange, an adapter may be necessary.
- Press the quick release lever back into place.

Blade adapter (available as a spare part) required for these arbour types.
OPERATION
![]() Warning: To reduce the risk wear proper eye protection marked of injury, always to comply with AS/NZS 1337.1.
Warning: To reduce the risk wear proper eye protection marked of injury, always to comply with AS/NZS 1337.1.
To reduce the risk wear proper eye protection marked of injury, always to comply with AS/NZS 1337.1.
Fuel Gauge
To determine the amount of charge left in the battery, turn the tool ON. The Fuel Gauge will light up for 2-3 seconds. When less than 10% of charge is left, 1 light on the fuel gauge will flash 4 times.
To signal the end of charge, 1 light on the fuel gauge will flash 8 times and the tool will not run. Charge the battery pack.
If the battery becomes too hot, the fuel gauge lights will flash in an alternating pattern and the tool will not run. Allow the battery to cool down
Selecting Speed
To set the maximum speed, rotate the speed dial. Set the speed dial to “1” for the lowest speed (10,000 OPM). Set the speed dial to “12” for the highest speed (20,000 OPM).
Starting/Stopping
- To start the tool, grasp the handle and slide the switch forward to the ON (I) position.
- Allow the tool to come to full speed before beginning work.
- Control pressure and surface contact between accessory and workpiece.
- To stop the tool, slide the switch back to the OFF (0) position. Make sure the tool comes to a complete stop before laying the tool down.
APPLICATIONS
![]() Warning: To reduce the risk of electric shock, check work area for hidden pipes and wires before drilling or driving screws.
Warning: To reduce the risk of electric shock, check work area for hidden pipes and wires before drilling or driving screws.
Typical Applications
A large variety of accessories are available for applications such as sawing/cutting, scraping, and sanding.
Sawing/Cutting
Install a sawing/cutting blade at an angle easy to use. Properly clamp the workpiece. Set the speed dial to a high speed. Start the tool and allow it to reach full speed. Use moderate pressure to avoid burning or scorching the workpiece.
Scraping
Install a scraping blade at an angle easy to use. Start the tool and allow it to reach full speed. Use light pressure and a low angle to avoid gouging and damaging the workpiece.
Sanding
Install a sanding backing pad at an angle easy to backing pad. Generally, use 24 or 36 grit for heavy stock removal; 50, 60, or 80 grit for medium stock removal and 120 or 240 girth for finishing. Always begin with a coarse grit, using successively finer grits to obtin the desired finish.
Properly clamp the workpiece. Start the tool and allow it to reach full speed. Use light pressure and long, sweeping, side to side strokes, advancing forward to produce the desired finish.
MAINTENANCE
![]() Warning: To reduce the risk of injury, always unplug the charger and remove the battery pack from the charger or tool before performing any maintenance. Never disassem- ble the tool, battery pack or charger. Contact a MILWAUKEE® service facility for ALL repairs.
Warning: To reduce the risk of injury, always unplug the charger and remove the battery pack from the charger or tool before performing any maintenance. Never disassem- ble the tool, battery pack or charger. Contact a MILWAUKEE® service facility for ALL repairs.
Maintaining Tool
Keep your tool, battery pack and charger in good repair by adopting a regular maintenance program. Inspect your tool for issues such as undue noise, misalignment or binding of moving parts, breakage of parts, or any other condition that may affect the tool operation. Return the tool, battery pack, and charger to a MILWAUKEE® service facility for repair. After six months to one year, depending on use, return the tool, battery pack and charger to a MILWAUKEE® service facility for inspection.
If the tool does not start or operate at full power with a fully charged battery pack, clean the contacts on the battery pack. If the tool still does not work properly, return the tool, charger and battery pack, to a MILWAUKEE® service facility for repairs.
![]() Warning: To reduce the risk of personal injury and damage, never immerse your tool, battery pack or charger in liquid or allow a liquid to flow inside them.
Warning: To reduce the risk of personal injury and damage, never immerse your tool, battery pack or charger in liquid or allow a liquid to flow inside them.
Cleaning
Clean dust and debris from vents. Keep handles clean, dry and free of oil or grease. Use only mild soap and a damp cloth to clean, since certain cleaning agents and solvents are harmful to plastics and other insulated parts. Some of these include gasoline, turpentine, lacquer thinner, paint thinner, chlorinated cleaning solvents, ammonia and household detergents containing ammonia. Never use flammable or combustible solvents around tools.
Repairs
For repairs, return the tool, battery pack and charger to the nearest authorised service centre.
ACCESSORIES
![]() WARNING: Use only recommended accessories. Others may be hazardous.
WARNING: Use only recommended accessories. Others may be hazardous.
For a complete listing of accessories, go online to www.milwaukeetool.com.au or www.milwaukeetool.co.nz or contact a distributor.
WARRANTY – AUSTRALIA and NEW ZEALAND
Please refer to Australian and New Zealand warranty supplied with tool. This warranty applies only to product sold in Australia and New Zealand.
SERVICE – AUSTRALIA and NEW ZEALAND
MILWAUKEE® prides itself in producing a premium quality product that is Nothing But Heavy DutyTM. Your satisfaction with our products is very important to us! If you encounter any problems with the operation of this tool, please contact your authorised MILWAUKEE® dealer.
For a list of MILWAUKEE® dealers, guarantee or service agents please contact MILWAUKEE®
Customer Service or visit our website.
(Australia Toll Free Telephone Number 1300 645 928)
(New Zealand Toll Free Telephone Number 0800 645 928)
or visit milwaukeetool.com.au/milwaukeetool.co.nz.
Milwaukee Electric Tool Corporation
13135 West Lisbon Road, Brookfield, Wisconsin U.S.A. 53005
Milwaukee Tool (Australia)
21 Kelletts Road, Rowville, VIC 3178
Melbourne, Australia
Milwaukee Tool (New Zealand)
274 Church Street, Penrose,
Auckland, 1061, New Zealand
DESIGNED BY MILWAUKEE ELECTRIC TOOL CORP.
PROFESSIONALLY MADE IN CHINA
PRINTED IN CHINA
All trade marks are owned by Techtronic Cordless GP unless otherwise stated.
© 2020 Milwaukee Electric Tool Corporation.
]]>
milwaukee REDLITHIUM USB Beacon Hard Hat Light
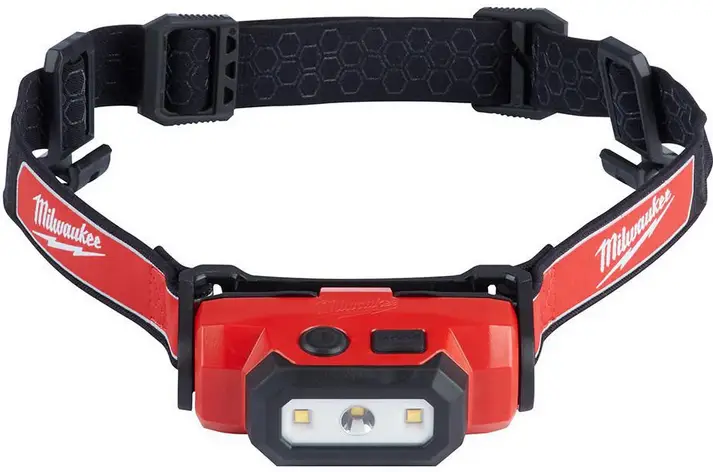
IMPORTANT SAFETY INSTRUCTIONS
- SAVE THESE INSTRUCTIONS – THIS MANUAL CONTAINS IMPORTANT SAFETY AND OPERATING INSTRUCTIONS FOR REDLITHIUMTM USB BATTERIES AND THE REDLITHIUMTM USB BEACON HARD HAT LIGHT.
- USE AND CHARGE ONLY REDLITHIUMTM USB BATTERIES IN THIS USB RECHARGEABLE LIGHT. OTHER TYPES OF BATTERIES MAY CAUSE PERSONAL INJURY AND DAMAGE.
- BEFORE USING THE BATTERY AND LIGHT, READ THIS OPERATOR’S MANUAL AND ALL LABELS ON THE BATTERY AND LIGHT.
- USE ONLY WITH LISTED/CERTIFIED ITE POWER SUPPLY. Others may result in a risk of fire, electric shock or personal injury.
- AVOID DANGEROUS ENVIRONMENTS. Do not charge battery in rain, snow, damp or wet locations. Do not use battery or charger in the presence of explosive atmospheres (gaseous fumes, dust or flammable materials) because sparks may be generated when inserting or removing battery, possibly causing fire.
- CHARGE IN A WELL VENTILATED AREA. Do not block charger vents. Keep them clear to allow proper ventilation. Do not allow smoking or open flames near a charging battery. Vented gases may explode.
- MAINTAIN CORD. When unplugging charger, pull plug rather than cord to reduce the risk of damage to the electrical plug and cord. Never carry charger by its cord. Keep cord from heat, oil and sharp edges. Make sure cord will not be stepped on, tripped over or subjected to damage or stress. Do not use charger with damaged cord or plug. Have a damaged charger replaced immediately.
- USE ONLY RECOMMENDED ATTACHMENTS. Use of an attachment not recommended or sold by the battery charger or battery manufacturer may result in a risk of fire, electric shock or personal injury.
- TO REDUCE THE RISK OF ELECTRIC SHOCK, always unplug charger before cleaning or maintenance.
- DO NOT BURN OR INCINERATE BATTERY PACKS. Battery may explode, causing personal injury or damage. Toxic fumes and materials are created when battery are burned.
- DO NOT CRUSH, DROP, OR DAMAGE BATTERY. Do not use a battery or charger that has received a sharp blow, been dropped, run over, or damaged in any way (e.g., pierced with a nail, hit with a hammer, stepped on).
- DO NOT DISASSEMBLE. Incorrect reassembly may result in the risk of electric shock, fire or exposure to battery chemicals. If it is damaged, take it to a MILWAUKEE® service facility.
- BATTERY CHEMICALS CAUSE SERIOUS BURNS. Never allow contact with skin, eyes, or mouth. If a damaged battery leaks battery chemicals, use rubber or neoprene gloves to dispose of it. If skin is exposed to battery fluids, wash with soap and water and rinse with vinegar. If eyes are exposed to battery chemicals, immediately flush with water for 20 minutes and seek medical attention. Remove and dispose of contaminated clothing.
- DO NOT SHORT CIRCUIT. A short-circuited battery pack may cause fire, personal injury, and product damage. A battery pack will short circuit if a metal object makes a connection between the positive and negative contacts on the battery pack. Do not place a battery pack near anything that may cause a short circuit, such as coins, keys or nails in your pocket.
- STORE IN A COOL, DRY PLACE. Do not store battery where temperatures may exceed 50°C (120°F) such as in direct sunlight, a vehicle or metal building during the summer.
- TO REDUCE THE RISK OF INJURY, CLOSE SUPERVISION IS NECESSARY when an appliance is used near children.
- STORE IDLE LIGHT OUT OF REACH OF CHILDREN. Warm lights can become hazardous in the hands of children.
- KNOW YOUR LIGHT. Read this manual carefully to learn your light’s applications and limitations as well as potential hazards associated with this type of light.
- MAINTAIN LABELS AND NAMEPLATES. These carry important information. If unreadable or missing, contact a MILWAUKEE® service facility for a replacement.
ADDITIONAL BATTERY SAFETY RULES
To reduce the risk of fire, personal injury, and product damage due to a short circuit, never immerse your tool, battery pack or charger in fluid or allow a fluid to flow inside them. Corrosive or conductive fluids, such as seawater, certain industrial chemicals, and bleach or bleach-containing products, etc., can cause a short circuit.
SPECIFICATIONS
- Cat. No. ……………………………………………. L4 HLVIS
- Rated Power Input ………………………………………. 8W
- USB Input Volts ………………………………………. 5V DC
- USB Input Amps ………………………………….0.1 – 2.1 A
- Output Volts ……………………………………………. 4V DC
- Output Amps ………………………………………………2.1A
REDLITHIUM™ USB Batteries
- Volts ………………………………………………………. 4V DC
Operating Temperature- Battery and Charger .. 4°C to 40°C (40°F to 104°F)
- Battery and Tool …….. -20°C to 60°C (-4°F to 140°F)
- Power Supply Cat. No. ………………….. 4931 4605 95
SYMBOLOGY
- VOLTS

- AMPS

- Direct Current

- Do not share at the operating light source
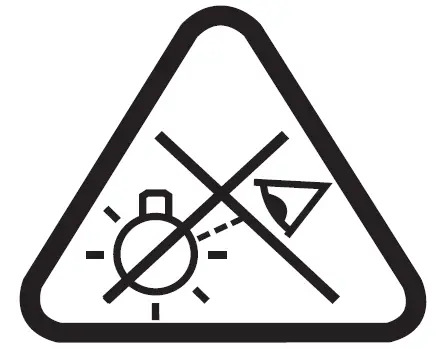
- Universal Series Bus

- Class III protection

- This charger is only suitable for indoor use. Never expose the charger to rain.

- Read Operator’s Manual

- Regulatory Compliance Mark (RCM). This product meets applicable regulatory requirements

BATTERY
Maintenance and Storage
Do not expose your battery to water or rain, or allow it to get wet. This could damage battery. Do not use oil or solvents to clean or lubricate your battery. The plastic casing will become brittle and crack, causing a risk of injury. Store batteries at room temperature away from moisture. Do not store in damp locations where corrosion of terminals may occur. As with other battery types, permanent capacity loss can result if the pack is stored for long periods of time at high temperatures (over 50°C (120°F). MILWAUKEE® Li-Ion batteries maintain their charge during storage longer than other battery types. After about a year of storage, charge the battery as normal.
MILWAUKEE® Li-Ion batteries are more environmentally friendly than some other types of power tool batteries. Always dispose of your battery according to federal, state and local regulations. Contact a recycling agency in your area for recycling locations.
Even discharged batteries contain some energy. Before disposing, use electrical tape to cover the terminals to prevent the battery from shorting, which could cause a fire or explosion.
LIGHT
Use and TM charge only REDLITHIUM USB batteries in this USB rechargeable light. Other types of batteries may cause personal injury and damage. The light source of this illuminaires not replaceable; when the light source reaches its end of life the whole luminaire should be replaced.
Inserting the Battery
- Open the battery door.
- Line up the battery with the compartment and fully insert the battery.
- Close the battery door.
Charging the Battery
- Plug your USB cable into a power source such as an AC wall adapter, computer or car port.
- Lift the rubber cover to expose the micro USB port. Insert the micro USB plug into the micro USB port. Users may experience longer charge times from laptops and other power sources.
- The indicator light will display the charging status:
- Red Solid: Charging, 0-79% charged
- Green Flashing: Charging, 80-99% charged
- Green Solid: 100% Charged
- Red/Green Flashing: Damaged or Faulty Battery
If the light indicator flashes red and green, check that the battery is fully seated into the bay. Remove the battery and reinsert. If the light continues to flash red and green, the battery may be extremely hot or cold, or wet. Allow the battery to cool down, warm up, or dry out and then reinsert. If the problem persists, contact a MILWAUKEE® service facility.
Operation
WARNING: To reduce the risk of injury, do not look directly into the light when the light is on.
Headlamp
Clip the light onto the strap and use the buckle to adjust the strap to the required size. Use the included clips to attach to a hard hat. Rotate the light up or down as needed.
Press the power button to turn the light on and off. Press the mode button to cycle through Spot/Flood, Flood High, Flood Medium, Flood Low, and Spot. The fuel gauge will display the battery life:
- Green Solid: 50-100% remaining
- Yellow Solid: 11-49% remaining
- Red Solid: 3-10% remaining
- Red Flashing: 0-3% remaining
During use, when the battery charge reaches 3%, the main LED and charge indicator will flash, indicating up to 5 minutes of runtime remains. Prior to immediate shutdown, the main LED will flash 3 times, then the tool will shutdown. Remaining runtime may be less than 5 minutes if the light is turned on when battery capacity is already 0-3%.
Press the power button to cycle through on, strobe and off. Press and hold the power button to turn off without cycling.
WARNING: To reduce the risk of injury, always unplug the charger and remove the battery from the charger before performing any maintenance. The charger and battery have no internal serviceable parts. Never disassemble the battery or charger.
Maintenance and Storage
Store your charger in a cool, dry place. As a general practice, it is best to unplug battery chargers and remove batteries when not in use. No battery damage will occur, however, if the charger and battery are left plugged in.
Cleaning
Clean out dust and debris from charger vents and electrical contacts by blowing with compressed air. Use only mild soap and a damp cloth to clean the battery and charger, keeping away from all electrical contacts. Certain cleaning agents and solvents are harmful to plastics and other insulated parts. Some of these include gasoline, turpentine, lacquer thinner, paint thinner, chlorinated cleaning solvents, ammonia and household detergents containing ammonia. Never use flammable or combustible solvents around batteries, charger, or tools.
WARRANTY – AUSTRALIA and NEW ZEALAND
Please refer to Australian and New Zealand warranty supplied with tool. This warranty applies only to product sold by authorized dealers in Australia and New Zealand.
SERVICE – AUSTRALIA and NEW ZEALAND
MILWAUKEE® prides itself in producing a premium quality product that is Nothing But Heavy DutyTM. Your satisfaction with our products is very important to us! If you encounter any problems with the operation of this tool, please contact your authorised MILWAUKEE® dealer.
For a list of MILWAUKEE® dealers, guarantee or service agents please contact MILWAUKEE® Customer Service or visit our website.
(Australia Toll Free Telephone Number 1300 645 928)
(New Zealand Toll Free Telephone Number 0800 645 928)
or visit milwaukeetool.com.au / milwaukeetool.co.nz.
Milwaukee Electric Tool Corporation
13135 West Lisbon Road, Brookfield, Wisconsin U.S.A. 53005
Milwaukee Tool (Australia)
21 Kelletts Road, Rowville, VIC 3178, Melbourne, Australia
Milwaukee Tool (New Zealand)
274 Church Street, Penrose, Auckland, 1061, New Zealand
]]>
milwaukee Fuel Straight Die Grinder

GENERAL POWER TOOL SAFETY WARNINGS
WARNING:
Read all safety warnings, instructions provided with this power tool. Failure to follow all instructions listed below may result in Save all warnings and instructions for future reference. The term “power tool” in the warnings refers to your mains-operated (corded) power tool or battery-operated (cordless) power tool.
WORK AREA SAFETY
- Keep work area clean and well lit. Cluttered or dark areas invite accidents,
- Do not operate power tools in explosive atom liquids, gases or dust. Power tools create sparks which may ignite the dust or fumes.
- Keep children and bystanders away while operating a power tool. Distractions can cause you to lose control.
ELECTRICAL SAFETY
- Power tool plugs must match the outlet. Never modify the plug in any way. Do not use any adapter plugs with earthed (grounded) power tools. reduce risk of electric shock.
- Avoid body contact with earthed or grounded surfaces, such as pipes, radiators, ranges and refrigerators. There is an increased risk of electric shock if your body is earthed or grounded.
- Do not expose power tools to rain or wet conditions. Water entering a power tool will increase the risk of electric shock.
- Do not abuse the cord. Never use the cord for carrying, pulling or unplugging the power tool. Keep cord away from heat, oil, sharp edges or moving parts. Damaged or entangled cords increase the risk of electric shock.
- When operating a power tool outdoors, use an extension cord suitable for outdoor use. Use of a cord suitable for outdoor use reduces the risk of electric shock.
- If operating a power tool in a damp location is unavoidable, use a residual current device (RCD) protected supply. Use of an RCD reduces the risk of electric shock.
PERSONAL SAFETY
- Stay alert, watch what you are doing and use common sense when operating a power tool. Do not use a power tool while you are tired or under A moment of inattention while operating power tools may result in serious personal injury.
- Use personal protective equipment. Always wear eye protection. Protective equipment such as a dust mask, non-skid safety shoes, hard hat or hearing protection used for appropriate conditions will reduce personal injuries.
- Prevent unintentional starting. Ensure the switch source and/or battery pack, picking up or carrying the tool. switch or energising power tools that have the switch on invites accidents.
- Remove any adjusting key or wrench before turning the power tool on. A wrench or a key left attached to a rotating part of the power tool may result in personal injury.
- Do not overreach. Keep proper footing and balance at all times. This enables better control of the power tool in unexpected situations.
- Dress properly. Do not wear loose clothing or jewelry. Keep your hair and clothing away from moving parts. Loose clothes, jewelry or long hair can be caught in moving parts.
- If devices are provided for the connection of dust extraction and collection facilities, ensure these bare connected and properly used. Use of dust collection can reduce dust-related hazards.
- Do not let familiarity gained from frequent use of tools allow you to become complacent and ignore tool safety principles. A careless action can cause severe injury within a fraction of a second.
POWER TOOL USE AND CARE
- Do not force the power tool. Use the correct power tool for your application. The correct power tool will do the job better and safer at the rate for which it was designed.
- Do not use the power tool if the switch does not turn Any power tool that cannot be controlled with the switch is dangerous and must be repaired.
- Disconnect the plug from the power source and/ or remove the battery pack, if detachable, from the power tool before making any adjustments, changing accessories, or storing power tools. Such preventive safety measures reduce the risk of starting the power tool accidentally.
- Store idle power tools out of the reach of children and do not allow persons unfamiliar with the power tool or these instructions to operate the power tool. Power tools are dangerous in the hands of untrained users.
- Maintain power tools and accessories. Check for misalignment or binding of moving parts, breakage the power tool’s operation. If damaged, have the power tool repaired before use. Many accidents are caused by poorly maintained power tools.
- Keep cutting tools sharp and clean. Properly maintained cutting tools with sharp cutting edges are less likely to bind and are easier to control.
- Use the power tool, accessories and tool bits etc. in accordance with these instructions, taking into account the working conditions and the work to be performed. Use of the power tool for operations hazardous situation.
- Keep handles and grasping surfaces dry, clean and free from oil and grease. Slippery handles and grasping surfaces do not allow for safe handling and control of the tool in unexpected situations.
BATTERY TOOL USE AND CARE
- Recharge only with the charger specified with the manufacturer. A charger that is suitable for one type with another battery pack. battery packs. Use of any other battery packs may create a risk of injury and fire.
- When battery pack is not in use, keep it away from other metal objects, like paper clips, coins, keys, nails, screws or other small metal objects, that can make a connection from one terminal to another. Shorting the battery terminals together may
- Under abusive conditions, liquid may be ejected from the battery; avoid contact. If contact accidently occurs, flush with water. If liquid contacts eyes, additonally seek medical help. Liquid ejected from the battery may cause itching or burn.
- Do not use a battery pack or tool that is damaged or modified. Damaged or modified batteries may exhibit unpredictable behavior resulting in fire, explosion, or risk of injury.
- Do not expose a battery pack or tool to fire or excessive temperature. above 130 C (265 F) may cause explosion.
- Follow all charging instructions and do not charge the battery pack or tool outside the temperature range specified in the instructions. Charging improperly or at temperatures outside the specified range may damage the battery and increase the risk of fire.
Service
- Have you power tool serviced by a qualified repair person using only identical replacement parts. This will ensure that the safety of power tool is maintained
- Never service damaged battery packs. Service of the battery packs should only be performed by the manufacturer or authorised service provider.
GENERAL POWER TOOL SAFETY WARNINGS
WARNING
Read all safety warnings, instruc-tions, illustrations and specifica-tions provided with this power tool. Failure to follow all instructions listed below may result in electric shock, fire and/or serious injury. Save all warnings and instiructions for future reference. The term “power tool” in the warnings refers to your mains-operated (corded) power tool or battery-oper-ated (cordless) power tool. WORK AREA SAFETY •Keep work area clean and well lit. Cluttered or dark areas invite accidents. •Do not operate power tools in explosive atmo-spheres, such as in the presence of flammable liquids, gases or dust. Power tools create sparks which may ignite the dust or fumes. •Keep children and bystanders away while operat-ing a power tool. Distractions can cause you to lose control.
ELECTRICAL SAFETY
Power tool plugs must match the outlet. Never modify the plug in any way. Do not use any adapter plugs with earthed (grounded) power tools. Unmodified plugs and matching outlets will reduce risk of electric shock.
- Avoid body contact with earthed or grounded surfaces, such as pipes, radiators, ranges and refrigerators. There is an increased risk of electric shock if your body is earthed or grounded.
- Do not expose power tools to rain or wet condi-tions. Water entering a power tool will increase the risk of electric shock.
- Do not abuse the cord. Never use the cord for carrying, pulling or unplugging the power tool. Keep cord away from heat, oil, sharp edges or moving parts. Damaged or entangled cords increase the risk of electric shock.
- When operating a power tool outdoors, use an extension cord suitable for outdoor use. Use of a cord suitable for outdoor use reduces the risk of electric shock.
- If operating a power tool in a damp location is unavoidable, use a residual current device (RCD) protected supply. Use of a RCD reduces the risk of electric shock.
PERSONAL SAFETY
- Stay alert, watch what you are doing and use common sense when operating a power tool. Do not use a power tool while you are tired or under the influence of drugs, alcohol or medication. A moment of inattention while operating power tools may result in serious personal injury.
- Use personal protective equipment. Always wear eye protection. Protective equipment such as a dust mask, non-skid safety shoes, hard hat or hearing protection used for appropriate conditions will reduce personal injuries.
- Prevent unintentional starting. Ensure the switch is in the off-position before connecting to power source and/or battery pack, picking up or carrying the tool. Carrying power tools with your finger on the switch or energising power tools that have the switch on invites accidents.
- Remove any adjusting key or wrench before turning the power tool on. A wrench or a key left attached to a rotating part of the power tool may result in personal injury.
- Do not overreach. Keep proper footing and balance at all times. This enables better control of the power tool in unexpected situations.
- Dress properly. Do not wear loose clothing or jewelry. Keep your hair and clothing away from moving parts. Loose clothes, jewelry or long hair can be caught in moving parts.
- If devices are provided for the connection of dust extraction and collection facilities, ensure these are connected and properly used. Use of dust collection can reduce dust-related hazards.
- Do not let familiarity gained from frequent use of tools allow you to become complacent and ignore tool safety principles. A careless action can cause severe injury within a fraction of a second.
POWER TOOL USE AND CARE
- Do not force the power tool. Use the correct power tool for your application. The correct power tool will do the job better and safer at the rate for which it was designed.
- Do not use the power tool if the switch does not Any power tool that cannot be controlled with the switch is dangerous and must be repaired.
- Disconnect the plug from the power source and/ or remove the battery pack, if detachable, from the power tool before making any adjustments, changing accessories, or storing power tools. Such preventive safety measures reduce the risk of starting the power tool accidentally.
- Store idle power tools out of the reach of children and do not allow persons unfamiliar with the power tool or these instructions to operate the power tool. Power tools are dangerous in the hands of untrained users.
- Maintain power tools and accessories. Check for misalignment or binding of moving parts, breakage of parts and any other condition that may tools effect operation . If damaged have the power tool repaired before use. Many accidents are caused by poorly maintained power tools.
- Keep cutting tools sharp and clean. Properly maintained cutting tools with sharp cutting edges are less likely to bind and are easier to control.
- Use the power tool, accessories and tool bits etc. in accordance with these instructions, taking into account the working conditions and the work to be performed. Use of the power tool result in a hazardous situation.
- Keep handles and grasping surfaces dry, clean and free from oil and grease. Slippery handles and rasping surfaces do not allow for safe handling and control of the tool in unexpected situations.
BATTERY TOOL USE AND CARE
- Recharge only with the charger specified by the manufacturer. A charger that is suitable for one type of battercake may create a risk of fire when used with another battery pack.
- Use power tools only with specifically designated battery packs. Use of any other battery packs may create a risk of injury and fire.
- When battery pack is not in use, keep it away from other metal objects, like paper clips, coins, keys, nails, screws or other small metal objects, that can make a connection from one terminal to another. Shorting the battery terminals together may cause burns or a fire.
- Under abusive conditions, liquid may be ejected from the battery; avoid contact. If contact accident-tally occurs, flush with water. If liquid contacts eyes, additionally seek medical help. Liquid ejected from the battery may cause irritation or burns.
- Do not use a battery pack or tool that is dam-aged or mode r led. Damaged or modified batteries may exhibit unpredictable behavior resulting in fire, explosion or risk of injury.
- Do not expose a battery pack or tool to fire or excessive temperature. Exposure to fire or temperature above 130°C (265°F) may muse explosion.
- Follow all charging instructions and do not charge the battery pack or tool outside the temperature range specified in the instructions. Charging im-properly or at temperatures outside the specified range may damage the battery and increase the risk of fire.
SERVICE
- Have your power tool serviced by a qualified repair person using only identical replacement parts. This will ensure that the safety of the power tool is maintained.
- Never service damaged battery packs. Service of battery packs should only be performed by the manufacturer or authorised service providers.
SPECIFIC SAFETY RULES FOR LAMINATE TRIMMER
- Use clamps or another practical way to secure and support the workpiece to a stable platform. Holding the work by your hand or against the body leaves it unstable and may lead to loss of control.
- Always hold the tool firmly in your hand(s) dur-ing the start-up. The reaction torque of the motor, as it accelerates to full speed, can cause the tool to twist.
- Maintain a firm grip on the power tool and po-sition your body and arm to allow you to resist kickback forces. The operator can control kick-back forces, if proper precautions are taken.
- Some woods contain preservatives that can be toxic. Take extra care to prevent inhalation and skin contact when working with these materials. Request, and follow, any safety information avail-able from your material supplier.
- Never hold the workpiece in one hand and the tool in the other hand when using the tool. Never place hands near or below cutting surface. Clamping the material and guiding the tool with both hands is safer.
- Never use dull or damaged bits. Sharp bits must be handled with care. Damaged bits can break during use. Dull bits require more force to push the tool, which could cause the bit to break. Damaged bits can throw carbide pieces and bum the workpiece.
- After changing the bit or making any adjust-ments, make sure the collet nut and any other adjustment devices are securely tightened. Loose adjustment devices can unexpectedly shift, causing loss of control. Loose rotating components will be violently thrown. Watch for vibration or wob-bling that could indicate an improperly installed bit.
- Never start the tool when the bit is in contact with the material. The bit cutting edge may grab the material causing loss of control of the tool.
- Never lay the tool down until the bit has come to a complete stop. The spinning bit can grab the surface and pull the tool out of your control.
- Never touch the bit during or immediately after use. After use the bit, collet, and collet nut may be hot enough to bum bare skin.
- Never clamp the workpiece to a hard surface, such as concrete or stone. Contact with the bit could cause the tool to jump and loss of control.
- Only operate the trimmer when held. Do not clamp or secure the trimmer to a surface and hold the workpiece by hand.
- Never use bits larger than the smallest of the openings in the base, sub-base, or dust collection port.
- Do not loosen or remove the plunge base caps. Internal springs are under pressure. If loosened or removed, the plunge base caps and internal springs will become projectiles, which could cause injury.
 Warning
To reduce the risk of injury, when working in dusty situations, wear appropriate respiratory protection or use an OSHA compliant dust extraction solution. - Always use common sense and be cautious when using tools. It is not possible to anticipate every situation that could result in a dangerous outcome. Do not use this tool if you do not understand these operating instructions or you feel the work is beyond your capability; contact MILWAUKEE® Tool or a trained professional for additional information or training.
- Maintain labels and nameplates. These carry important information. If unreadable or missing, contact a MILWAUKEE® service facility for a replacement.
Warning
Some dust created by power sanding, sawing, grinding, drilling, and other construction activities contains chemicals known to cause cancer, birth defects or other reproductive harm. Some examples of these chemicals are: - Lead from lead-based paint
- crystalline silica from bricks and cement and other masonry products, and arsenic and chromium from chemically-treated lumber. Your risk from these exposures varies, depending on how often you do this type of work. To reduce your exposure to these chemicals: work in a well ventilated area, and work with approved safety equipment, such as those dust masks that are specially designed to filter out microscope is particles.
ADDITIONAL BATTERY SAFETY RULES
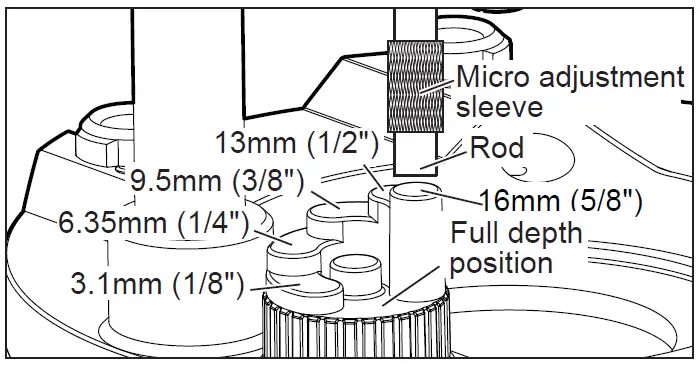 WARNING
To reduce the risk of fire, personal injury , and product damage due to a short circuit, never immerse your tool, battery pack or charger in fluid or allow a fluid to flow inside them. Corrosive or conductive fluids, such as seawater, certain industrial chemicals, and bleach or bleach-containing products, etc., can cause a short circuit.
SPECIFICATIONS
Cat. No. M18 FTR
Volts 18V DC
Battery Type M18™
Charger Type M18™
No Load RPM 10,000 – 31,000
Maximum Bit Size 38mm (1-1/2″)
Collet Size 6.35mm (1/4″) & 6
mm Recommended Ambient
Operating Temperature -17°C to 51°C
Plunge Base Cat. No. 48105601
Offset Base Cat. No. 48105602
FUNCTIONAL DESCRIPTION


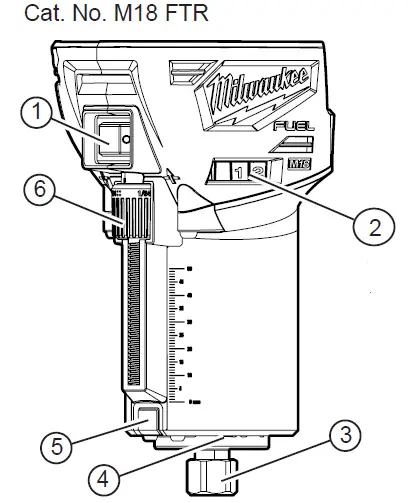
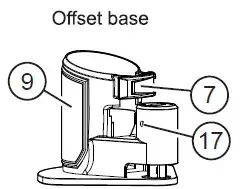
1. ON/OFF switch
2. Speed control dial
3. Collet / collet nut
4. LED (not shown)
5. Spindle lock
6. Micro adjustment dial
7. Quick release lever
8. Macro adjustment button
9. Gripping surface
10. Depth turret
11. Micro adjustment sleeve
12. Handles
13. Depth gauge knob
14. Plunge release lever
15. Depth gauge indicator
16. Depth gauge
17. Shaft / housing hole
SYMBOLOGY
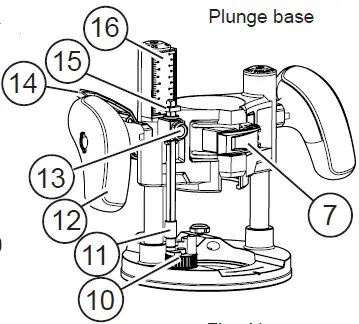 Volts
Volts
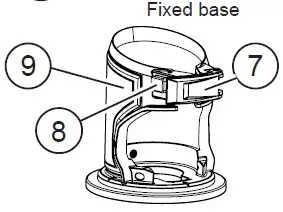 Direct Current
 No Load Revolutions per Minute (RPM)
 Read Operator’s Manual
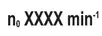 Wear eye protection.
 Wear hearing protection.
 Wear dust mask.
 Do not dispose of electric tools together with household waste material. Electric tools and electronic equipment that have reached the end of their life must be collected separately and returned to an environmentally compatible recycling facility.
 Regulatory Compliance Mark (RCM). This product meets applicable regulatory requirements
ASSEMBLY
WARNING
Recharge only with the charger specified for the battery. For spe-cific charging instructions, read the operator’s manual supplied with your charger and battery. Removing/Inserting the Battery To remove the battery, push in the release buttons and pull the battery pack away from the tool.
WARNING
Always remove battery pack before changing or removing accessories. To insert the battery, slide the pack into the body of the tool. Make sure it latches securely into place.
WARNING
Only use accessories specifically recommended for this tool. Others may be hazardous. Always remove battery from tool before changing or removing accessories. Only use accessories specifically recommended for this tool. Others may be hazardous. Installing Collets The collet must be attached to the collet nut before installing the collet assembly to the tool. Be sure that the collet size matches the size of the bit shank, otherwise the collet may break. 1. To assemble, place collet on an even surface, and place the nut over the collet. 2. Press down on the nut to snap the nut and collet together. 3. To disassemble, use a rod to push the collet out of the nut.
Installing/Removing Bits
WARNING
Always remove battery from the tool before attaching or removing accessories or making adjustments. Use only specifically recommended accessories. Others may be hazardous. Never use bits larger than the smallest of the openings in the base, sub-base, or dust shroud. The use of larger bits can result in loss of control and possible serious personal injury. Do not tighten the collet nut without inserting the bit. The collet may break. Never touch the bit during or immediately after use. After use the bit, collet, and collet nut may be hot enough to burn bare skin.
- Turn the On/Off switch to OFF (O) and remove the battery pack.
- Place the trimmer upside down on a workbench.
- Press and hold the spindle lock and use the 17 mm (11/16″) wrench to loosen the collet nut counterclockwise (or use the 11mm (7/16″) spindle lock wrench to hold the spindle securely).
- Insert the bit shank into the collet as far as it will go.
- Back the bit shank out slightly to avoid bottoming out.
- Be sure there is a minimum of 1.6 mm (1/16″) between the bottom of the collet assembly and the radius to the cutting portion of the bit.
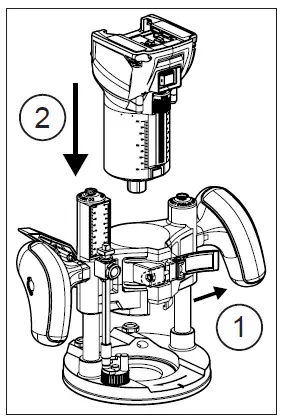
- Be sure that the collet is not clamped to a fluted section on the bit shank. The collet should be clamped to a solid part on the bit shank to ensure a tight grip.
- Hand-tighten the collet nut.
- Press and hold the spindle lock and use the 17 mm (11/16″) wrench to securely tighten the collet nut clockwise (or use the 11 mm (7/16″) spindle lock wrench to hold the spindle securely).
WARNING
If the collet nut is not tightened securely, the bit may come out during use, causing serious persohal injury. Installing/Removing Bases
WARNING
To reduce the risk of injury, DO NOT use the trimmer if the quick release lever does not hold the motor securely in the base. If the quick release lever becomes loose, secure the screw with a 3 mm hex wrench to make a snug fit. Pressing the macro adjustment button will cause the motor housing to drop down, which may cause personal injury or damage to the tool or workpiece. Make sure your hand is firmly on the motor when pressing the button.
Fixed Base
- Open the quick release lever. (1)
- Press the macro adjustment button on the fixed base. (2)
- Insert the tool into the base. (3)
- Release the button.
- Close the quick release lever.
- To remove the base, reverse the procedure.
Accessory Plunge Base
- Open the quick release lever. (1)
- Insert the tool into the base. (2)
- Close the quick release lever.
- To remove the base, reverse the procedure.
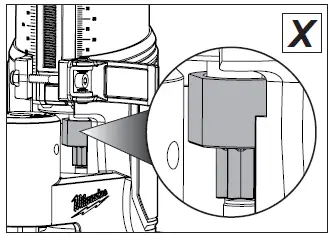
Accessory Offset Base
To install the offset base, the collet assembly must be removed from the trimmer motor and installed onto the offset base. The transfer bit must be installed onto the trimmer motor.
- Press and hold the Transfer spindle lock and use the bit 17 mm (11/16″) wrench to loosen the collet nut counterclockwise (or use the 11 mm (7/16″) spindle lock wrench to hold the spindle securely).
- Remove the collet nut and install the transfer bit. ■17 – n’ spindle lock and use rt’
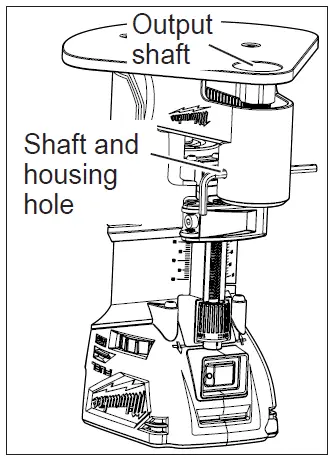
- Press and hold the the 17mm (11/16″) wrench to securely tighten the collet nut clockwise (or use the 17mm (11/16″) spindle lock wrench to hold the spindle securely
- Open the quick release lever. (1)
- Insert the tool into the (2)
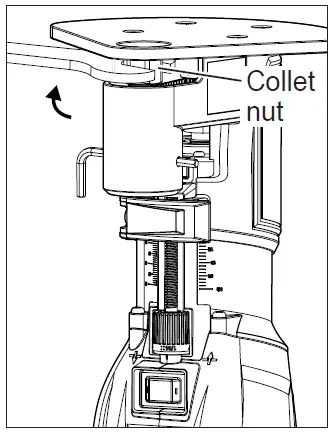
- Visually confirm that the transfer bit is seated inside the pulley connection in the offset
- If the transfer bit does not align, remove the motor from the offset base, rotate the transfer bit slightly, and reinstall the
- Close the quick release
- Thread the collet nut assembly into the offset
- Insert the trimmer bit into the collet until it bottoms out.
- To set the depth of cut, insert the 3 mm hex wrench into the micro adjustment set Rotate clockwise (-) or counterclockwise (+) to reach the desired depth of cut.
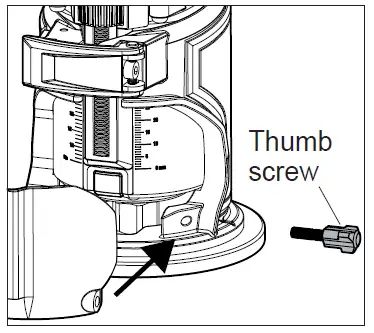
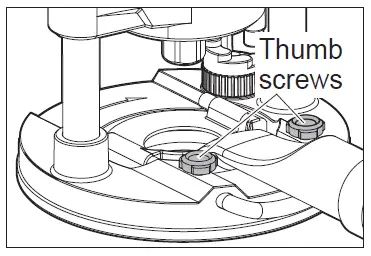
- Rotate the collet nut to align the output shaft hole with the housing hole. Insert the 3 mm hex wrench through both the output shaft and housing
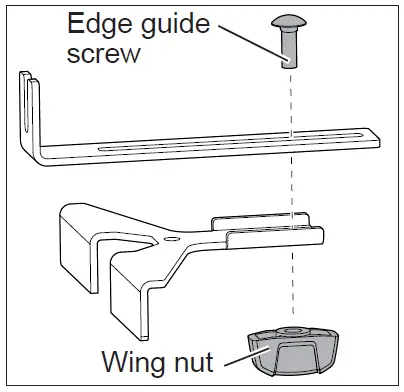
- Use the 17mm (11/16″) wrench to securely tighten the collet nut clockwise.
- To remove the base, reverse the procedure.
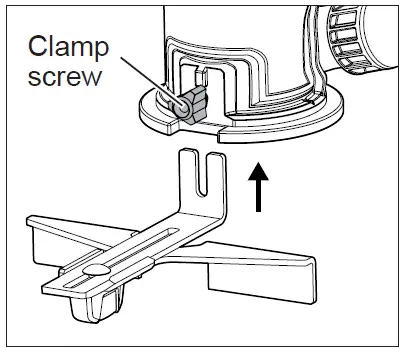
WARNING During use, always keep vacuum hose clear of the path of the bit.
Fixed Base
- Attach the dust shroud to the fixed base. and tighten thumb screw.
- Connect a vacuum hose to the port.

WARNING
To reduce the risk of injury, do not use the dust shroud when plunge cutting if the bit is larger than the port opening 35 mm (1-3/8″). If a rotating trimmer bit contacts the dust shroud, the adapter will break and flying debris may cause injury.
Accessory Plunge Base
Installing a Straight Edge Guide
- Attach the dust shroud to the plunge base, and slide the U-rod into the base holes.
- Tighten the thumb screws.
- Connect a vacuum hose to the port.
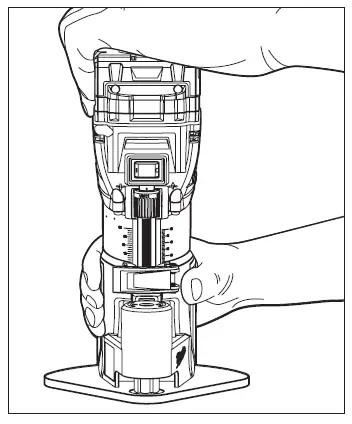
Installing a Straight Edge Guide
The straight edge guide is for use with the fixed base.
1.Assemble the Edge guide . straight edge guide, screw as shown.
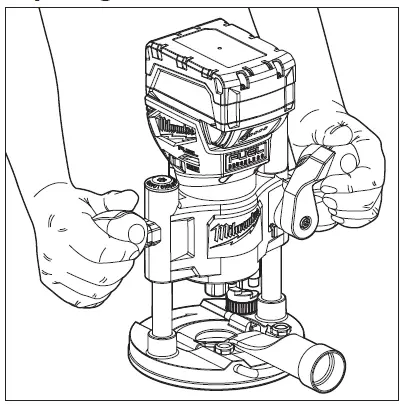
2. Attach the straight edge guide to the Clamp fixed base and tighten the clamp screw securely
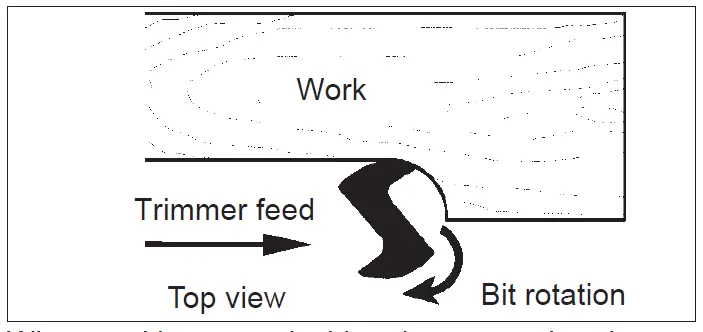
Template Guides
Use only a maximum 30 mm (1-3/16″) template guide with this tool. A 146 mm (5-3/4″) template sub-base plate is needed to install a template guide. Always use a centering cone for best results with a 30mm (1-3/16″) center hole. To install a template guide, insert the guide into the center hole of the subbase and secure according to the template guide instructions.
OPERATION
WARNING To reduce the risk wear proper eye protection marked of injury, always to comply with ANSI Z87.1. When working in dusty situations, wear appropriate respiratory protection or use an OSHA compliant dust extraction solution. Remove the battery before changing accessories or making adjustments.
Never make adjustments while the trimmer is running.
DO NOT use the trimmer if the quick release lever does not hold the motor securely in the base. NEVER use the plunge base in a trimmer table.
Selecting the Speed
The (RPM) of tool can be changed by turning the speed control dial. Variable speed dial settings range from numbers six (6) through one (1). Higher numbers correspond to higher speeds and lower number correspond to lower speeds. Use higher speeds for smaller bits and cutters, softwoods, plastics and laminates. Use lower speeds for larger diameter bits and cutters.
Feedback Control
The electronic speed control system allows the tool to maintain constant speed between no-load and load conditions.
Electronic Overload Protection
These tools are equipped with an electronic overload remove the bit from the workpiece and push the OFF (O) position to reset the tool. Allow the tool to cool before restarting your work.
WARNING Pressing the macro adjustment button will cause the motor housing to drop down, which may cause personal injury or damage to the tool or workpiece. Makeing the button.
Adjusting the Cutting Depth
Fixed Base
Changes to cutter depth can be read on the depth scale on the motor housing. Each mark on the scale indicates a 1.6mm (1/16″) change in depth setting. Use the bottom edge of the removable base as reference when setting depth of cut. To make deeper cuts, make successive passes as required, lowering the bit 3.1 mm (1/8″) for each pass. OFF (O) and remove the battery pack.
- Turn the On/Off switch to OFF (0) and remove the battery pack.
- Open the quick release lever. .
- Press the macro adjustment button and slide the motor close to the desired depth.
- Use the micro adjustment dial to fine-adjust to the desired depth of cut.
- Close the quick release lever. Accessory Plunge Base The plunge base depth of cut can be set two ways; for single pass cuts (shallow cuts less than 3.1mm (1/8″)), or for multiple pass cuts.
The plunge base depth of cut can be set two ways; for single pass cuts (shallow cuts less than 3.1mm (1/8″)), or for multiple pass cuts.
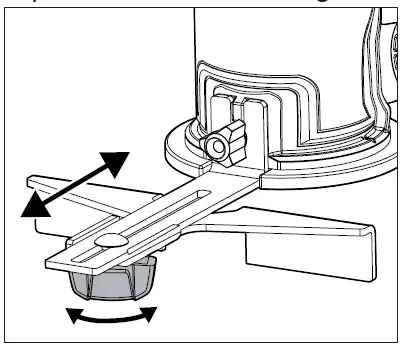
Single Pass Cuts
A shallow cut, such as a mortis cut, can be cut in a single pass.
- Turn the On/Off switch to OFF (0) and remove the battery pack.
- Install the bit and insert the tool into the base.
- Rotate the depth turret until the highest setting 16mm (5/8″) is directly below the depth gauge rod.
- Loosen the depth gauge knob.
- Press the plunge release lever and lower the trimmer motor until the bit touches the workpiece.
- Release the plunge release lever. 7. Set the depth of cut: a. Raise the depth gauge rod and slide the piece to be inlaid (such as a hinge) between the top turret and the depth gauge rod. lighten the depth gauge knob. Remove the reference piece from the turret.
- Set the depth of cut:
(a) Raise the depth gauge rod and slide the piece to be inlaid (such as a hinge) between the top turret and the depth gauge rod. Tighten the depth gauge knob. Remove the reference piece from the turret.
(b) Slide the depth gauge indicator to zero (0) and then raise the depth gauge rod to the desired depth of cut. Tighten the depth gauge knob.
NOTE: do not exceed 3.1mm (1/8″) cut in a single pass. - Make the cut as described in Making the Cut
Multiple Pass Cuts
For cuts more than 3.1mm (1/8″) deep, multiple passes are necessary.
- Turn the On/Off switch to OFF (0) and remove t battery pack.
- Install the bit and insert the tool into the base.
- Rotate the depth turret until the lowest setting (full depth position) is directly below the depth gauge rod.
- Loosen the depth gauge knob.
- Press the plunge release lever and lower the trimmer motor until the bit touches the swisplagg.
- Slide the depth gauge indicator to zero (0).
- Raise the depth gauge rod to the desired depth of cut.
- Tighten the depth gauge knob.
- Use the micro adjustment sleeve for fine adjustments (loosen for a shallower cut, tighten for a deeper cut).
- Press the plunge release lever and raise the trimmer motor.
- Rotate the turret to the highest possible step to prepare for the first cut.
- Make the cut as described in Makixua the Cut -Accessory Plunge Base. Accessory Offset Base The depth of cut of the offset bit is set when the bit s installed.
Accessory Plunge Base.
Accessory Offset Base
warning The depth of cut of the offset bit is set when the bit is installed.
Holding the Tool Keep hands and body away from the bit and all moving parts. Always hold the tool firmly in your hand(s) during the start-up. The reaction torque of the motor, as it accelerates to full speed, can cause the tool to twist. Maintain a firm grip on the power tool and posi-tion your body and arm to allow you to resist kick-back forces. The operator can control kickback forces, if proper precautions are taken. Fixed Base and Accessory Offset Base For best results, hold tool with one hand on the base and a second hand on the top of the battery pack.
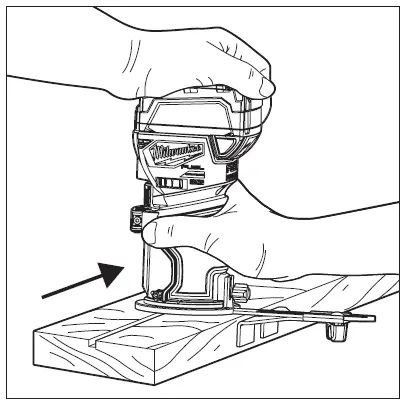

Accessory Plunge Base
To reduce the risk of injury, NEVER use the plunge base in a trimmer table.
Hold tool with both hands on the handles at all times for maximum control.

WARNING
To reduce the risk of injury, always wear eye protection. To reduce the risk of explosion, electric shock and property damage, always check the work area for hidden pipes and wires before trimming. Avoid open area of trimmer base. Serious personal injury will result from contact with a rotating bit. Starting and Stopping the Trimmer Motor
- To start the motor, hold the trimmer so the bit is away from you and not in contact with the workpiece.
- Hold the tool firmly and turn the On/Off switch to ON (I).
- To stop the motor, hold the trimmer so the bit is away from you and turn the On/Off switch to OFF (0). Hold the tool until the bit stops turning.
Making the Cut
Before cutting, check that the collet nut and all adjustments are tight. Verify that the quick release lever is fully closed and secure. Set the speed and depth of cut for material being worked. Keep the cutting pressure constant but do not use excessive force on the trimmer so the motor speed slows excessively. It may be necessary on exceptionally hard woods, problem materials, or
extreme cuts to make more than one pass to get the desired depth of cut. When using the dust collection hose, place the hose
out of the path of the trimmer. Before beginning the cut on the workpiece, make a sample cut on a scrap piece of lumber to check the settings and dimensions. Always be sure the
workpiece is secure before routing. When routing edges, the trimmer should be held firmly down and against the work. Since the cutter rotates clockwise, more efficient cutting will be obtained if the trimmer is moved from left to right as you stand facing the work. The arrows on the base of the tool indicate the direction of bit rotation. When working on the outside of an edge, move trimmer in a counterclockwise direction.

When working on an inside edge, move the trimmer in a clockwise direction. Moving the trimmer in the opposite direction is known as “climb cutting.”
WARNING
To reduce the risk of injury, avoid “climb cutting.” Climb cutting increases the potential for loss of control of the tool and damage to the workpiece. If climb cutting can not be avoided, use extreme caution. Fixed Base with a Straight Edge To obtain a straight cut, use the straight edge guide, or clamp a piece of scrap lumber to use as a guide.
1. To adjust the straight edge guide, loosen the wing nut and ad-just the distance between the bit and the straight edge guide. Tighten the wing nut securely.

2. To use the straight edge glide, move the too with the straight edge guide flush with the side of the workpiece.

3. To use a piece of scrap lumber as a guide, when the distance between the side of the workpiece and the cutting position is too wide for the straight edge guide, or if the side of the workpiece is not straight. Securely clamp a straight board to the work-piece and use it as a guide against the trimmer base.

Accessory Plunge Base
WARNING Always hold the handles firmly with both hands during operation. Do not use a plunge base trimmer if the motor does not rise automatically when the plunge release lever is pressed.
NEVER use the plunge bake in a trimmer table.
1. Securely clamp the work iece.
2. Set the depth of cut as described in Adjusting the Cutting Depth – Accessory Plunge Base.
3. Press the plunge release lever and raise the bit above the workpiece.
4. Hold the trimmer so the bit is away from you and not in contact with the workpiece. Turn on the tool.
5. Press the plunge release lever and slowly lower the bit into the workpiece until the depth stop rod contacts the turret. Release the plunge release lever.
6. Begin moving the trimmer, keeping the sub base flat on the workpiece.
7. When finished, press the plunge release lever and raise the bit out of the workpiece.
8. To stop the motor, hold the trimmer so the bit is away from you and turn the On/Off switch to OFF (0).
9. For multiple pass cuts, rotate the turret to the next step and repeat. Make multiple passes, rotat-ing the turret to a lower step each time.
MAINTENANCE
WARNING To reduce the risk of injury, always unplug the charger and remove the battery pack from the charger or tool before performing any maintenance. Never disassemble the tool, battery pack or charger. Contact a MILWAUKEE’ service facility for ALL repairs. Maintaining Tool Keep your tool, battery pack and charger in good repair by adopting a regular maintenance program. Inspect your tool for issues such as undue noise, misalignment or binding of moving parts, breakage of parts, or any other condition that may affect the tool operation. Return the tool, battery pack, and charger to a MILWAUKEE° service facility for repair. After six months to one year, depending on use, return the tool, battery pack and charger to a MILWAUKEE° service facility for inspection. If the tool does not start or operate at full power with a fully charged battery pack, clean the contacts on the battery pack. If the tool still does not work properly, return the tool, charger and battery pack, to a MILWAUKEE° service facility for repairs.
WARNING
To reduce the risk of personal in-jury and damage, never immerse your tool, battery pack or charger in liquid or allow a liquid to flow inside them. Cleaning Clean dust and debris from vents. Keep handles clean, dry and free of oil or grease. Use only mild soap and a damp cloth to clean, since certain clean-ing agents and solvents are harmful to plastics and other insulated parts. Some of these include gasoline, turpentine, lacquer thinner, paint thinner, chlorinated cleaning solvents, ammonia and household deter-gents containing ammonia. Never use flammable or combustible solvents around tools.
Repairs
For repairs, return the tool, battery pack and charger to the nearest service centre.
ACCESSORIES
WARNING Use only recommended accesso-ries. Others may be hazardous. For a complete listing of accessories, go online to milwaukeetool.com.aulmilwaukeetool.co.nz or contact a distributor.
WARRANTY – AUSTRALIA and NEW ZEALAND
Please refer to Australian and New Zealand warranty supplied with tool. This warranty applies only to product sold in Australia and New Zealand.
SERVICE – AUSTRALIA and NEW ZEALAND
MILWAUKEE®prides itself in producing a premium quality product that is Nothing But Heavy Duty®. Your satisfaction with our products is very important to us! If you encounter any problems with the operation of this tool, please contact your authorised MILWAUKEE® dealer. For a list of MILWAUKEE® dealers, guarantee or service agents please contact MILWAUKEE® Customer Service or visit our website. (Australia Toll Free Telephone Number 1300 645 928)
(New Zealand Toll Free Telephone Number 0800 645 928) or visit milwaukeetool.com.au/milwaukeetool.co.nz.
Milwaukee Electric Tool Corporation
13135 West Lisbon Road, Brookfield, Wisconsin U.S.A. 53005
Milwaukee Tool (Australia)
21 Kelletts Road, Rowville, VIC 3178 Melbourne, Australia
Milwaukee Tool (New Zealand) 274 Church Street, Penrose, Auckland, 1061, New Zealand
Designed by Milwaukee Electric Tool Corp.
Professionally Made in China for Milwaukee Tool (Australia) / Milwaukee Tool (New Zealand) Printed in China