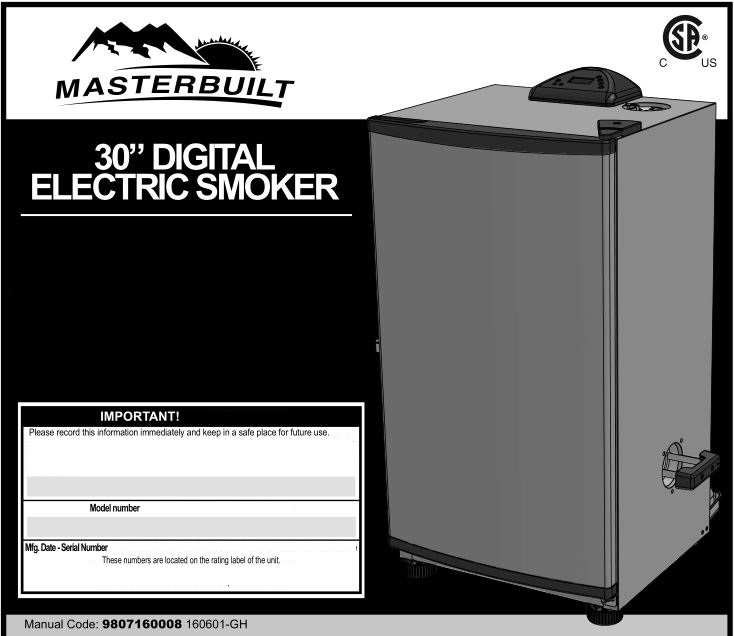
THIS PRODUCT IS FOR OUTDOOR USE ONLY.
ASSEMBLY, CARE & USE MANUAL WARNING & SAFETY INFORMATION
Tools needed for assembly: Adjustable Wrench and Phillips Head Screwdriver
Approximate assembly time: 25 minutes *Actual product may differ from picture shown
WARNING
This manual contains important information necessary for the proper assembly and safe use of the appliance.
Read and follow all warnings and instructions before assembling and using the appliance.
Follow all warnings and instructions when using the appliance.
Keep this manual for future reference.
CARBON MONOXIDE HAZARD
Burning wood chips gives off carbon monoxide, which has no odor and can cause death.
DO NOT burn wood chips inside homes, vehicles, tents, garages or any enclosed areas. Use only outdoors where it is well ventilated.
Failure to follow these instructions could result in fi re, explosion or burn hazard, which could cause property damage, personal injury or death.
WARNING
CALIFORNIA PROPOSITION 65
- Combustion by-products produced when using this product contain chemicals known to the State of California to cause cancer, birth defects, and other reproductive harm.
- This product contains chemicals known to the State of California to cause cancer, birth defects or other reproductive harm.
GENERAL WARNINGS AND SAFETY INFO
READ ALL INSTRUCTIONS
- Unit is for OUTDOOR USE ONLY.
- Never use inside enclosed areas such as patios, garages, buildings or tents.
- Never use inside recreational vehicles or on boats.
- Never operate the unit under overhead construction such as roof coverings, carports, awnings, or overhangs.
- Never use unit as a heater (READ CARBON MONOXIDE HAZARD).
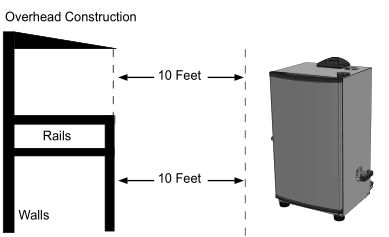
- Maintain a minimum distance of 10ft (3m) from overhead construction, walls, rails or other structures.
- Keep a minimum 10ft (3m) clearance of all combustible materials such as wood, dry plants, grass, brush, paper, or canvas.
- Keep this appliance clear and free from combustible materials such as gasoline and other flammable vapors and liquids.
- Use the unit on a level, non-combustible, stable surface such as dirt, concrete, brick or rock.
- Unit MUST be on the ground. Do not place unit on tables or counters. Do NOT move unit across uneven surfaces.
- Do not use unit on wooden or flammable surfaces.
- Do not leave unit unattended.
- Never use unit for anything other than its intended use. This unit is NOT for commercial use.
- Keep a fire extinguisher accessible at all times while operating unit.
- Before each use check all nuts, screws and bolts to make sure they are tight and secure.
- Use of alcohol, prescription or non-prescription drugs may impair user’s ability to properly assemble or safely operate unit.
- Keep children and pets away from unit at all times. Do NOT allow children to use unit. Close supervision is necessary should children or pets be in area where unit is being used.
- Do NOT allow anyone to conduct activities around unit during or following its use until it has cooled.
- Avoid bumping or impacting unit.
- Never move unit when in use. Allow unit to cool completely (below 115°F (45°C)) before moving or storing.
- The unit is HOT while in use and will remain HOT for a period of time afterward and during the cooling process. Use CAUTION. Wear protective gloves/mitts.
- Do not touch HOT surfaces.
- Do not use wood pellets.
- Never use glass, plastic or ceramic cookware in unit. Never place empty cookware in unit while in use.
- Accessory attachments not supplied by Masterbuilt Manufacturing, Inc. are NOT recommended and may cause injury.
- Wood tray is HOT when unit is in use. Use caution when adding wood.
- Be careful when removing food from unit. All surfaces are HOT and may cause burns. Use protective gloves or long, sturdy cooking tools.
- Always use unit in accordance with all applicable local, state and federal fi re codes.
- Dispose of cold ashes by placing them in aluminum foil, soaking with water and discarding in a non-combustible container.
- Do not store unit with HOT ashes inside unit. Store only when all surfaces are cold.
- When using electrical appliances, basic safety precautions should always be followed including the following:
- Do not plug in the electric smoker until fully assembled and ready for use.
- Use only approved grounded electrical outlet.
- Do not use during an electrical storm.
- Do not expose the electric smoker to rain or water at any time.
- To protect against electrical shock do not immerse cord, plug or control panel in water or other liquid.
- Do not operate any appliance with a damaged cord or plug, or after appliance malfunctions or has been damaged in any manner. Contact Masterbuilt Customer Service for assistance at 1-800-489-1581.
- Longer detachable power-supply cords or extension cords are available and may be used if care is exercised in their use.
- If a longer detachable power-supply cord or extension cord is used: 1. The marked electrical rating of the cord set or extension cord should be at least as great as the electrical rating of the appliance; and 2. The cord should be arranged so that it will not drape over the countertop or tabletop where it can be pulled by children or tripped over unintentionally.
- The extension cord must be a grounding-type 3-wire cord.
- Outdoor extension cords must be used with outdoor use products and are marked with suffix “W” and with the statement “Suitable for Use with Outdoor Appliances.”
- CAUTION – To reduce the risk of electric shock, keep the extension cord connection dry and off the ground.
- Do not let cord hang on or touch hot surfaces.
- Do not place on or near a hot gas or electric burner, or in a heated oven.
- Fuel, such as charcoal briquettes or heat pellets, are not to be used in electric smoker.
- To disconnect, turn control panel “OFF” then remove plug from outlet.
- Unplug from outlet when not in use and before cleaning. Allow unit to cool completely before adding/removing racks, drip tray or water bowl.
- Drip tray is only for the bottom of electric smoker. Do not put drip tray on rack. This may damage electric smoker.
- Do not cover racks with metal foil. This will trap heat and cause severe damage to electric smoker.
- Do not clean this product with a water sprayer or the like.
SAVE THESE INSTRUCTIONS
STRUCTURAL PROXIMITY AND SAFETY USAGE
REMINDER: NEVER OPERATE THIS SMOKER UNDER ANY OVERHEAD CONSTRUCTION. MAINTAIN A MINIMUM DISTANCE OF 10 FEET FROM OVERHEAD CONSTRUCTION, WALLS OR RAILS.
WARNING: ELECTRIC POWER CORD IS A TRIP HAZARD
USER MANUAL
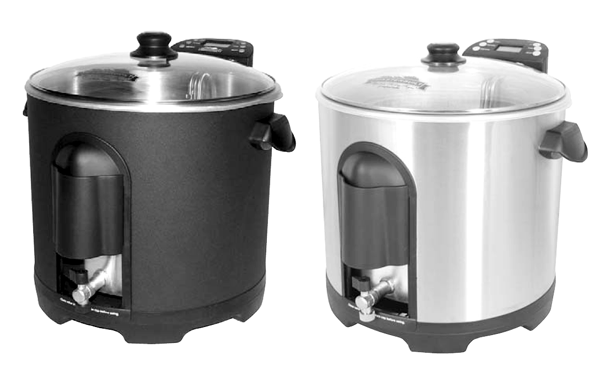
Electric Fryer, Boiler, & Steamer
Masterbuilt : [20010306, 20010406]
Masterbuilt Manufacturing, Inc.
450 Brown Avenue, Columbus,GA 31906
1-800-489-1581
www.masterbuilt.com
WARNINGS
MPORTANT SAFEGUARDS
When using electrical appliances, basic safety precautions should always be followed, including but not limited to the following:
- Read all instructions.
- A short cord is provided to prevent possibility of entanglement or tripping that may occur with use of a longer cord.
- Never move appliance when oil or water is above 100°F(37°C).
- Do NOT touch hot surfaces. Use handles and knobs.
- To protect against electric shock, do NOT immerse cord, plugs, or any part of control panel in water or other liquids.
- Do NOT move appliance while in use or HOT.
- This is an ATTENDED appliance. Do NOT leave this appliance unattended during use. Even after use, never allow children or pets near appliance. Heated liquid inside cooking pot remains dangerously HOT for a period of time after use.
- Close supervision is necessary when appliance is used near children. Do NOT let children handle or put cord in mouth.
- ALWAYS keep children and pets away from appliance.
- Unplug from outlet when not in use and before cleaning. Allow to cool before removing parts for cleaning and storing.
- Do NOT operate appliance with a damaged cord, plug, or after appliance mal functions, or has been damaged in any manner. Contact Master built Customer Service for assistance 1-800-489-1581.
- Accessory attachments not supplied by Master built Manufacturing, Inc. are not recommended and may cause injury.
- Do NOT use outdoors, appliance is for indoor use only.
- Do NOT let cord hang over edge of table or counter, or touch hot surfaces.
- Do NOT place on or near a HOT gas or electric burner, or in a heated oven.
- ALWAYS attach breakaway cord w/plug to appliance first, then plug cord in outlet.
- To disconnect, turn thermostat control knob to “OFF”, then remove plug from outlet.
- Do NOT use appliance for other than intended use.
- If oil begins to smoke, IMMEDIATELY turn appliance off.
- NEVER overfill cooking pot. Do NOT exceed max fill line.
- Do NOT immerse electric cord or control panel in water.
- Open lid with caution to prevent being burned by escaping steam.
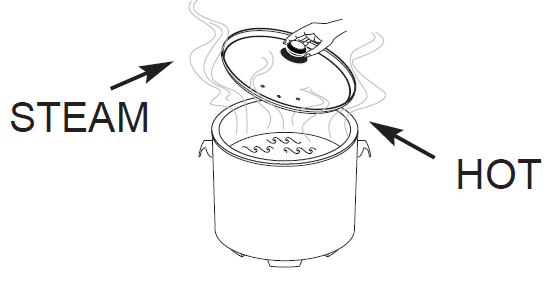
SAVE THESE INSTRUCTIONS
IMPORTANT INFORMATION: DO NOT USE AN EXTENSION CORD.
Use of extension cord increases risk of entanglement or tripping.
Use of extension cord causes loss of energy and appliance may not heat properly.
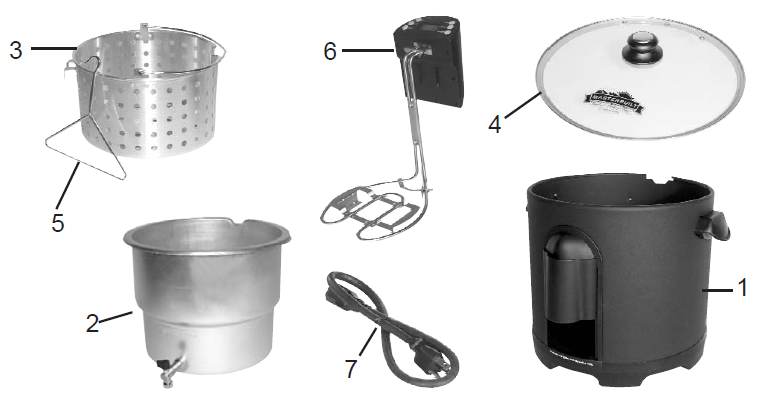
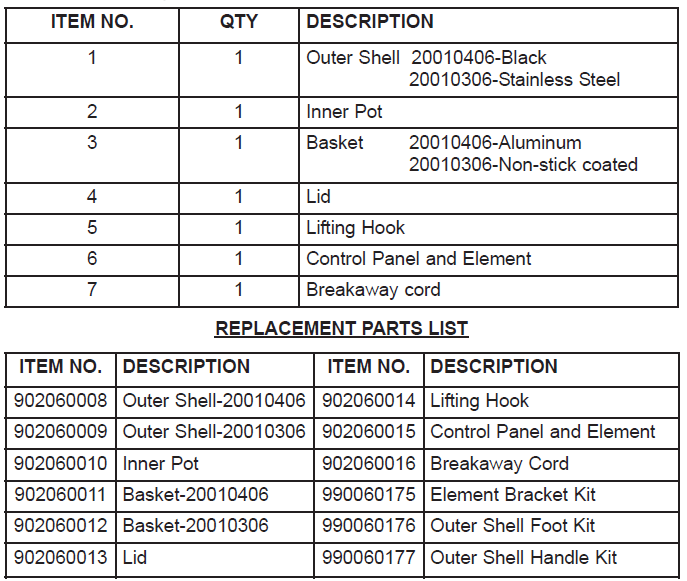
PARTS LIST
STOP!
DO NOT RETURN TO RETAILER
For Assembly Assistance, Missing or Damaged Parts
Call: MASTERBUILT Customer Service at 1-800-489-1581 or
EMAIL us at [email protected]
ASSEMBLY INSTRUCTIONS
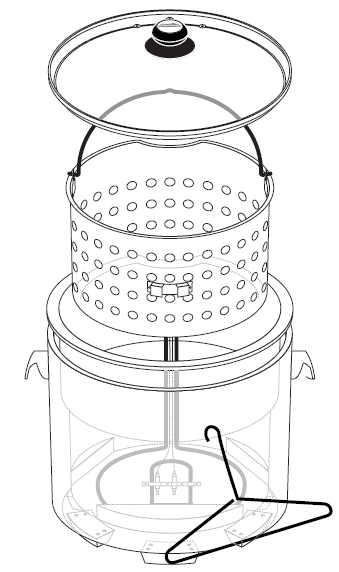
Step 1
Align notch of inner pot (2) with notch on outer shell (1). Insert inner pot into outer shell.
Step 2
Attach control panel and element (6) to outer shell mounting bracket as shown. Control must be correctly attached for appliance to operate. A built in safety switch on control panel will prevent unit from heating if not mounted properly.
Step 3
Place basket (3) inside inner pot.
Step 4
Place glass lid (4) on last.
Glass lid will not fit tightly when basket’s in use during cooking process.
STARTER TIPS
FOR BEST RESULTS, READ following start up tips before using this product. Remember this is an ELECTRIC unit and has different characteristics than a gas unit.
FOR SAFETY, heating element only heats up when properly attached to mounting bracket (see assembly instructions). This is a powerful heating element and may cause circuit breaker to trip. Minimize occurrences by operating any additional appliances on separate circuit. Tripping circuit breaker will NOT damage unit or household electrical system.
PRE-HEATING oil or water may take up to 55 minutes. Take advantage of this time to prepare foods for cooking. For optimum performance, completely pre-heat unit to cooking temperature before frying or boiling foods. Keeping lid ON during pre-heating and cooking cycles will reduce heating time and keep temperature more consistent.
INDICATOR LIGHT will turn ON when heating liquid in unit. It will turn OFF when liquid has been heated to designated temperature. Indicator light may turn on and off during cooking as heating element works to maintain a constant temperature.
POWER LIGHT will illuminate indicating power cord is plugged into outlet. Unit will not start heating until START button is pushed.
TIMER is NOT connected to heating element. Element WILL NOT TURN OFF when timer beeps.
OPERATING INSTRUCTIONS
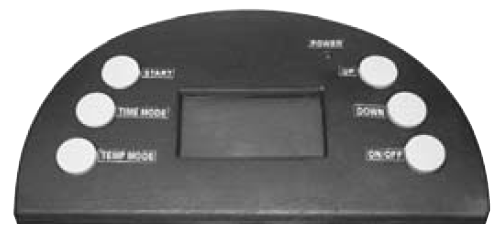
Step 1
Mount control panel & element onto bracket on outer shell.
Step 2
Plug power cord into an outlet (refer to “Warnings & Important Safeguards” section of
manual). Power light will illuminate indicating the unit is plugged in, element is mounted
correctly and unit is on.
Step 3
Note: Temperature MUST be set before timer will function.
To set temperature:
- Press ON button.
- Press TEMP MODE button once-LED display will blink.
- Use UP and DOWN buttons to set temperature.
- Press TEMP MODE button again to lock in temperature.
To set timer:
- Press TIME MODE button once-LED display for hours will blink.
- Use UP and DOWN buttons to set minutes.
- Press TIME MODE button again to lock in time
Step 4
When cooking time has elapsed and food is done, press ON/OFF button to turn off heating element and unplug power cord.
Allow excess oil to drain by hooking basket on side of pot with drain clip.
CAUTION: When using drain hook on basket, make sure that basket is firmly in place on rim of pot before releasing handle so basket will not fall back into hot oil or water causing personal injury.
WARNING: Do not use appliance without water or oil in pot. It can be severely damaged if heated while empty.
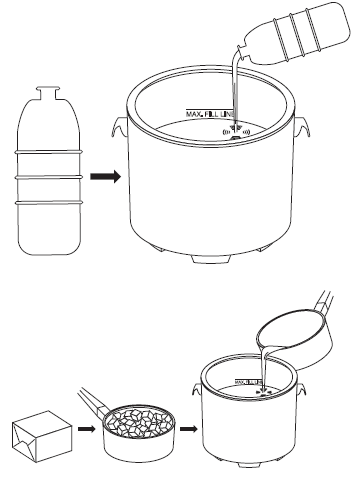
WARNING: Place unit on level and stable surface to prevent tipping.
CAUTION: Hot when in use.
CAUTION: Do not overfill pot past fill line.
CAUTION: Do not mix different types of oil at the same time.
CAUTION: Never melt fat or lard on the heating element or in basket
RESET FUNCTION
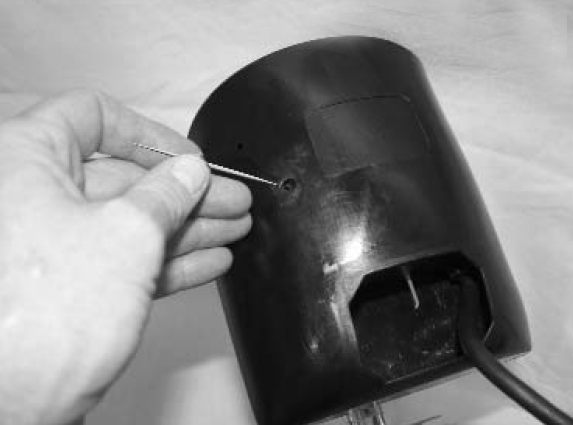
- Your appliance is equipped with an overheat safety feature.
- If appliance overheats it will shut off automatically.
- To reset appliance, unplug from outlet, then insert a toothpick into small hole found on back of control panel.
HOW TO CLEAN UNIT
Masterbuilt recommends cleaning unit prior to use.
Clean lid, inner pot, and basket with a damp cloth or sponge using a mild detergent. Rinse and dry thoroughly. These parts may also be cleaned in a dishwasher. Clean outer shell, cord, control panel and element with a damp cloth or sponge using a mild detergent. Dry thoroughly.
NEVER put these parts in a dishwasher.
WARNING: Do not place control panel under running water. Immersing control panel and cord can cause electrocution.
STORAGE & MAINTENANCE
DANGER: Disconnect electric cord from outlet, before cleaning, servicing and/or removing heating element. Electrical shock can result in personal injury or death.
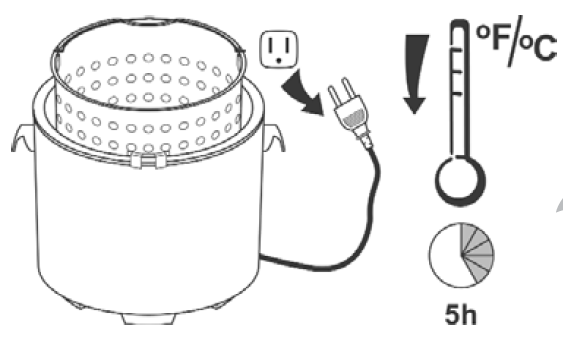
Turn appliance off, unplug and let cool for 2 hours if using water, 5 hours if using oil before cleaning or storing.
CAUTION: Do not pour used oil in sink. Drain it back into oil containers.
DRAIN VALVE
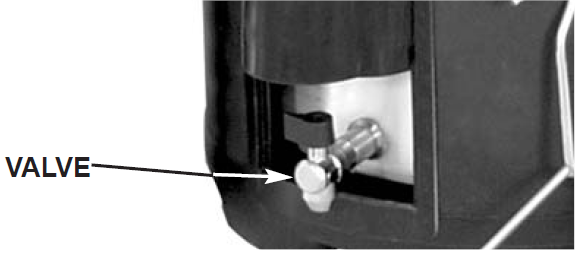
CAUTION: Do not pour used oil in sink. Drain it back into oil containers.
DANGER: Disconnect electric cord from outlet, before cleaning, servicing and/or removing heating element. Electrical shock can result in personal injury or death.
ATTENTION: Not all models are equipped with drain valve. (See packaging for details) Align drain valve spout over container and drain. Close valve when complete. Unused oil may be stored in appliance. Do NOT store water in appliance.
FREQUENTLY ASKED QUESTIONS
Why won’t my turkey fryer turn on?
The Control Panel features a “Safety Switch” that must be aligned properly for unit to power on. Green light will illuminate when control panel is mounted correctly.
How much oil do I need to use?
Fryer will require approximately 1.5 gallons (5.7L) of oil. The fill line is the maximum amount of liquid that can safely be used in this unit. Filling to the line provides more than enough water or oil to prepare any dish in this unit.
What type of oil should I use?
Peanut oil is recommended because of the great taste and higher smoke point but any common cooking oil may be used.
How hot will the oil become?
Oil will reach 400°F (204°C) in approximately 55 minutes. Oil temperature will decrease to 275°- 280°F (135-138°C) when turkey is placed in fryer, which is an appropriate turkey frying temperature.
Should I keep the lid on during use?
Yes, the lid helps retain heat, and keeps splatter inside unit
What size turkey can I deep fry in this unit?
You can deep fry up to a 14 lb (6.35kgs) turkey in this unit.
Can an extension cord be used with this unit?
No, extension cords will lose electric current resulting in increased cooking time and decreased performance. Extension cords can also pose a trip hazard.
Does the turkey go in the basket breast side up or down?
Turkey and turkey breasts should be placed horizontal in basket, breast side up.
I followed the formula and the turkey did not fully cook. What went wrong?
Cooking conditions may vary. Turkey could have been cold. Bring turkey to room temperature before frying. Sometimes a cold or frozen spot in a joint or deep in the turkey breast does not allow that section to cook properly.
Can the Electric Turkey Fryer be used outdoors?
Outdoor use is not recommended for Masterbuilt’s Electric Turkey Fryer.
If you do not want to use the unit in your house please use in a garage or covered patio to prevent Electric Turkey Fryer from being exposed to rain showers.
VISIT OUR WEBSITE FOR MORE INFORMATION AND GREAT TASTING RECIPES.
www.masterbuilt.com
RECIPES
DEEP FRIED WHOLE TURKEY
MAXIMUM RECOMMENDED
TURKEY SIZE IS 14 POUNDS (6.35kgs)!
Allow turkey to reach room temperature or set out 1 hour before frying.
THAWING TURKEY
The National Wild Turkey Federation recommends refrigerator thawing and to allow approximately 24 hours for every five pounds (2.3kgs) of bird thawed in the refrigerator.
COOKING INSTRUCTIONS
- Insure turkey is completely thawed, free of ice and water. Remove neck, giblet bag, plastic pop-up cooking indicator and leg ties. Pay special attention to inner cavity area when checking for ice or water.
- Fill pot with oil to the fill line.
- Set control dial to 400°F (204°C) (pre-heating time may take up to 55 minutes), and place lid on unit.
- While oil is pre-heating, prepare turkey. Inject with marinade of your choice and season outside of turkey with a Cajun rub.
- CALCULATE COOKING TIME
The formula for calculating turkey cooking time is 3 minutes per pound (0.45kg), then add 5 minutes to total cooking time, rounding to nearest minute:
13.86 lbs X 3 mins 41.58 mins
Plus 5 minutes + 5.00 mins
__________________
= 46.58 mins
Total Cooking Time 47.00 mins
NOTE: Cooking conditions vary. Insert a food thermometer 2 inches (5.08cm) into the deepest part of turkey and make sure an internal temperature of 180°F (82°C) is reached.
6. Heating indicator light will go OFF when temperature is reached.
7. Place turkey horizontally in basket, breast side up.
8. Wearing protective gloves or mitts, hook basket handle with lifting hook and very slowly lower basket into hot oil.
9. With basket in place, cover with lid. Set timer or mark time.
10. Heating light will come on, indicating the element is heating. Be certain to cook for complete calculated time .
11. When cooking time is complete, turn turkey fryer OFF and lift basket from hot oil slowly. Hook basket to side of pot with drain clip to drain excess oil.
12. Carefully tilt the turkey up on one end to allow oil to drain out of the center cavity.
The turkey can remain in the basket to cool until ready to serve.
DEEP FRIED TURKEY BREAST
Follow the above directions and safety precautions and adjust formula to 7 minutes per pound (0.45kg), then add 5 minutes to total cooking time.
LOW COUNTRY BOIL (BOILING)
- 1 lb (0.45kg) shrimp
- 1 lb (0.45kg) crawfish
- 1 lb (0.45kg) smoked sausage
- 8 pieces of short ear corn
- 2 bags of crab boil mix
- 2 lbs (0.91kg) of whole new potatoes
Fill inner pot with water to fill line, add 2 bags of crab boil mix and bring water to a boil. Allow water to boil for 15 minutes then add sausage (cut sausage in 1/4 inch (0.64cm) thick slices). Three minutes later, add potatoes; 3 minutes later, add corn; 3 minutes later, add shrimp and crawfish together; 3 minutes later, remove and serve.
COOKING CHART
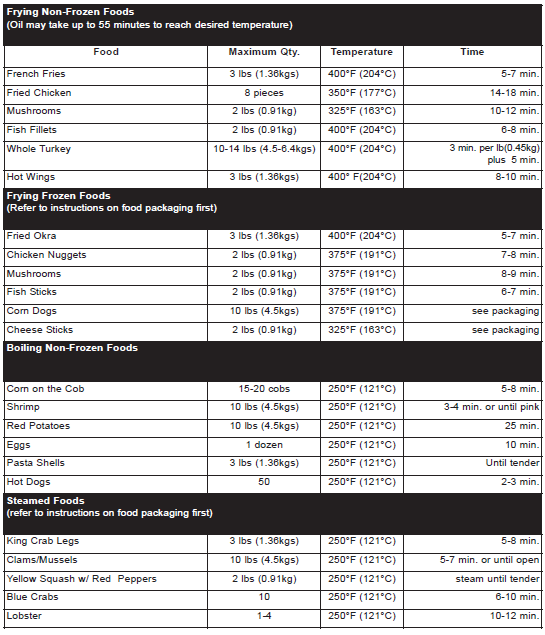
WARNING: NEVER place frozen poultry in oil. Use extreme caution when cooking frozen foods. Never fill oil past fill line or exceed maximum amount of food in basket. Spill over can cause serious injury. Slowly lower basket into hot oil and cover with lid. Always wear protective gloves or mitts.
CAUTION: When using drain hook on basket, make sure that basket is firmly in place on rim of pot before releasing handle so basket will not fall back into hot oil or water causing personal injury.
HOW TO STEAM USING APPLIANCE
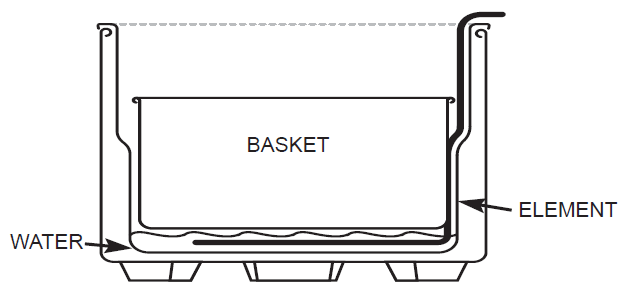
Add water until it reaches bottom of the basket. Do not allow water to evaporate. This will cause the element to overheat and can damage the unit.
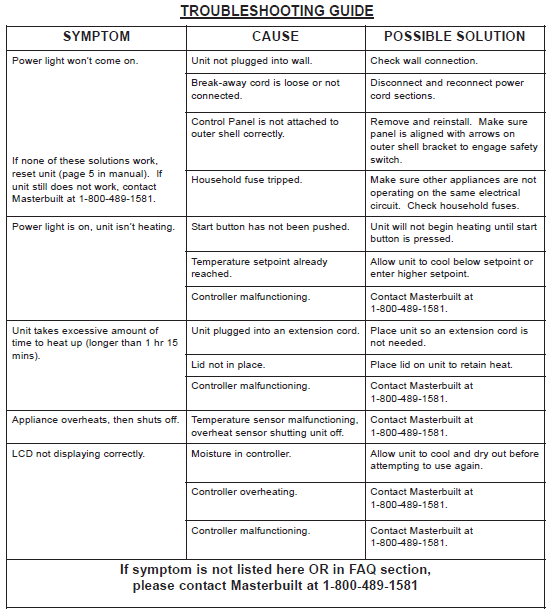
TROUBLESHOOTING GUIDE
WARRANTY INFORMATION
Masterbuilt warrants its products to be free from defects in material and workmanship under proper assembly, normal use and recommended care for 90 days from the date of original retail purchase.
Masterbuilt warranty does not cover paint finish as it may burn off during normal use.
Masterbuilt warranty does not cover rust of the unit.Masterbuilt requires reasonable proof of purchase for warranty claims and suggests that you keep your receipt. Upon the expiration of such warranty, all such liability shall terminate.
Within the stated warranty period, Masterbuilt, at its discretion, shall repair or replace defective components free of charge with owner being responsible for shipping.Should Masterbuilt require return of component(s) in question for inspection Masterbuilt will be responsible for shipping charges to return requested item.This warranty excludes property damage sustained due to misuse, abuse, accident, damage arising out of transportation, or damage incurred by commercial use of this product.
This expressed warranty is the sole warranty given by Masterbuilt and is in lieu of all other warranties, expressed or implied including implied warranty, merchantability, or fitness for a particular purpose.
Neither Masterbuilt nor the retail establishment selling this product, has authority to make any warranties or to promise remedies in addition to or inconsistent with those stated above.
Masterbuilt’s maximum liability, in any event, shall not exceed the purchase price of the product paid by the original consumer/purchaser. Some states do not allow the exclusion or limitation of incidental or consequential damages. In such a case, the above limitations or exclusions may not be applicable.
California residents only: Not withstanding this limitation of warranty, the following specific restrictions apply; if service, repair, or replacement of the product is not commercially practical, the retailer selling the product or Masterbuilt will refund the purchase price paid for the product, less the amount directly attributable to use by the original buyer prior to the discovery of the nonconformity. Owner may take the product to the retail establishment selling this product in order to obtain performance under warranty.
This expressed warranty gives you specific legal rights, and you may also have other rights which vary from state to state.

Welcome to the family. Let’s get started.
MES 130P, MES 140P
BLUETOOTH DIGITAL ELECTRIC SMOKER
Manual applies to the following model number(s)
MB26073519 with 10” legs
Mfg. Date – Serial Number
These numbers are located on the rating label of the smoker.
IMPORTANT
Please record this information immediately and keep it in a safe place for future use. 
 WARNING
- This manual contains important information necessary for the proper assembly and safe use of the appliance.
- Read and follow all warnings and instructions before assembling and using the appliance.
- Keep this manual for future reference.
 Failure to follow these instructions could result in fire, explosion, or burn the hazard which could cause property damage, personal injury, or death.
 CARBON MONOXIDE HAZARD
- Burning wood chips give off carbon monoxide which has no odor and can cause death.
- DO NOT burn wood chips inside homes, vehicles, tents, garages, or any enclosed areas.
- Use only outdoors where it is well ventilated.
 WARNINGS AND IMPORTANT SAFEGUARDS
READ ALL INSTRUCTIONS
- The smoker is for OUTDOOR HOUSEHOLD USE ONLY.
- Never use inside enclosed areas such as patios, garages, buildings, or tents.
- Never use inside recreational vehicles or on boats.
- Never operate smoker under overhead construction such as roof coverings, carports, awnings, or overhangs.
- Never use a smoker as a heater (READ CARBON MONOXIDE HAZARD).
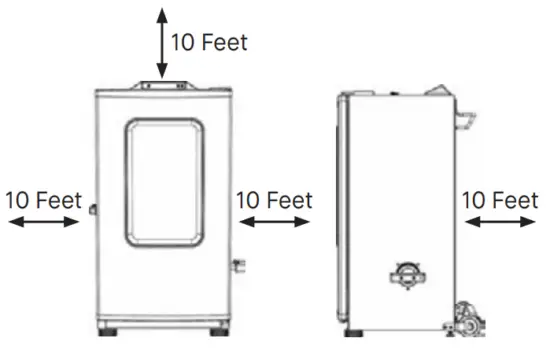
- Maintain a minimum distance of 10ft (3m) from overhead construction, walls, rails, or other structures.
- Keep a minimum 10ft (3m) clearance of all combustible materials such as wood, dry plants, grass, brush, paper, or canvas.
- Keep appliances clear and free from combustible materials such as gasoline and other flammable vapors and liquids.
- Use smoker on a level, non-combustible, stable surface such as dirt, concrete, brick, or rock.
- Smoker MUST be on the ground. Do not place smokers on tables or counters. Do NOT move smokers across uneven surfaces.
- Do not use smokers on wooden or flammable surfaces.
- Do not leave the smoker unattended.
- Never use a smoker for anything other than its intended use. This smoker is NOT for commercial use.
- Keep a fire extinguisher accessible at all times while operating a smoker.
- Before each use check all nuts, screws, and bolts to make sure they are tight and secure.
- The use of alcohol, prescription, or non-prescription drugs may impair the user’s ability to properly assemble or safely operate a smoker.
- Keep children and pets away from smokers at all times. Do NOT allow children to use smokers. Close supervision is necessary when children or pets are in the area where the smoker is being used.
- Do NOT allow anyone to conduct activities around smoker during or following its use until it has cooled.
- Avoid bumping or impacting smokers.
- Never move smoker when in use. Allow smoker to cool completely (below 115°F (45°C)) before moving or storing.
 WARNINGS AND IMPORTANT SAFEGUARDS
- The smoker is HOT while in use and will remain HOT for a period of time afterward and during the cooling process. Use CAUTION. Wear protective gloves/mitts.
- Do not touch HOT surfaces. Use handles or knobs.
- Do not use wood pellets or wood chunks.
- Never use glass, plastic, or ceramic cookware in smokers. Never place empty cookware in the smoker while in use.
- Accessory attachments not supplied by Masterbuilt Manufacturing, LLC are NOT recommended and may cause injury.
- The wood chip tray is HOT when the smoker is in use. Use caution when adding wood chips.
- Be careful when removing food from smokers. All surfaces are HOT and may cause burns. Use protective gloves or long, sturdy cooking tools.
- Always use smoke in accordance with all applicable local, state, and federal fire codes.
- Dispose of cold ashes by placing them in aluminum foil, soaking with water, and discarding them in a noncombustible container.
- Do not store smoker with HOT ashes inside smoker. Store only when all surfaces are cold.
- When using electrical appliances, basic safety precautions should always be followed including the following: 1) Do not plug-in electric smoker until fully assembled and ready for use. 2) Use only approved grounded electrical outlets. 3) Do not use it during an electrical storm. 4) Do not expose the electric smokers to rain or water at any time.
- To protect against electrical shock do not immerse the cord, plug, or control panel in water or other liquid.
- Do not operate any appliance with a damaged cord or plug, or after the appliance malfunctions or has been damaged in any manner. Contact Masterbuilt Customer Service for assistance at 1-800-489-1581.
- Longer detachable power supply cords or extension cords may be used if care is exercised in their use.
- If a longer detachable power-supply cord or extension cord is used: 1) The marked electrical rating of the cord set or extension cord should be at least as great as the electrical rating of the appliance, and 2) The cord should be arranged so that it will not drape over the counter top or tabletop where it can be pulled by children or tripped over unintentionally.
- The extension cord must be a grounding-type 3-wire cord.
- Outdoor extension cords must be used with outdoor use products and are marked with the suffix “W” and with the statement “Suitable for Use with Outdoor Appliances.”
- CAUTION – To reduce the risk of electric shock, keep the extension cord connection dry and off the ground.
- Do not let the cord hang on or touch hot surfaces.
- Do not place on or near a hot gas or electric burner, or in a heated oven.
- Fuel, such as charcoal briquettes or heat pellets, are not to be used in an electric smoker.
- To disconnect, turn the control panel OFF then remove the plug from the outlet.
- Unplug from outlet when not in use and before cleaning. Allow smoker to cool completely before adding/removing racks, drip pan, or water bowl.
- Drip pan is only for the bottom of the electric smoker. Do not put the drip pan on the rack. This may damage electric smokers.
- Do not clean this product with a water sprayer or the like.
- Store smoker indoors when not in use, out of reach of children.
SAVE THESE INSTRUCTIONS
Structural Proximity and Safe Usage Recommendations
REMINDER: Maintain a minimum distance of 10 feet from rear, sides, and top of smoker to overhead construction, walls, rails, or other combustible construction. This clearance provides adequate space for proper combustion, air circulation and venting.
 WARNING
An electric power cord is a trip hazard.
 WARNING
- Smoker should only be rolled on a smooth surface. The smoker should never be rolled up or downstairs or on uneven surfaces. Potential damage to the smoker or harm to the user may result from failure to follow warnings.

 DO NOT RETURN TO RETAILER for assembly assistance, missing or damaged parts. Please contact MASTERBUILT customer service at 1-800-489- 1581 or support.masterbuilt.com. Please have the model number and serial number available. These numbers are located on the silver rating label on the smoker.
- Parts that are preassembled at the time of purchase should be ordered separately if replacement is needed.
Parts List
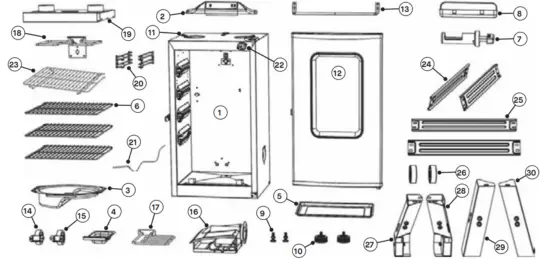
| NO | QTY | DESCRIPTION |
| 1 | 1 | Smoker Body |
| 2 | 1 | Digital Control Panel |
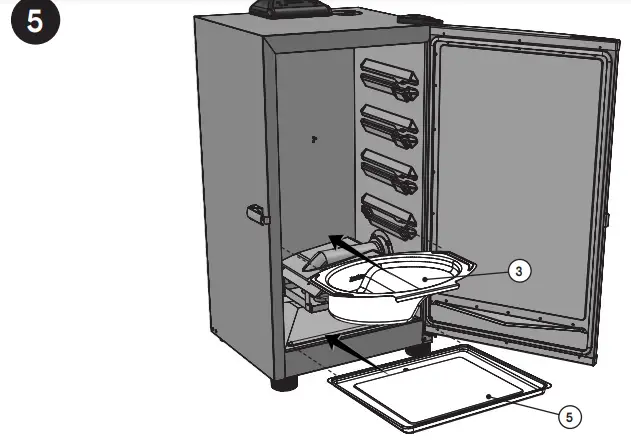
| 3 | 1 | Water Bowl |
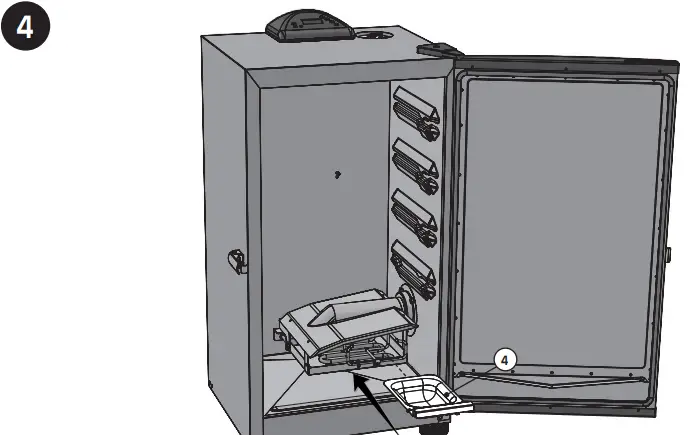
| 4 | 1 | Wood Chip Tray |
| 5 | 1 | Drip Pan |
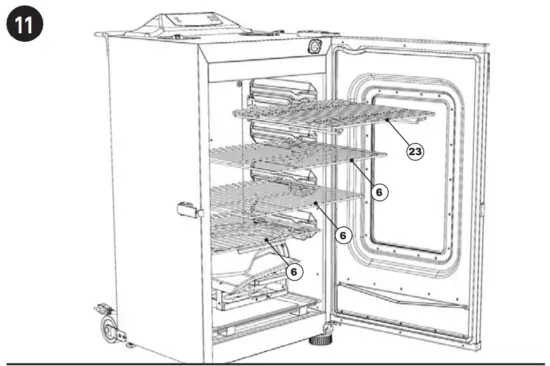
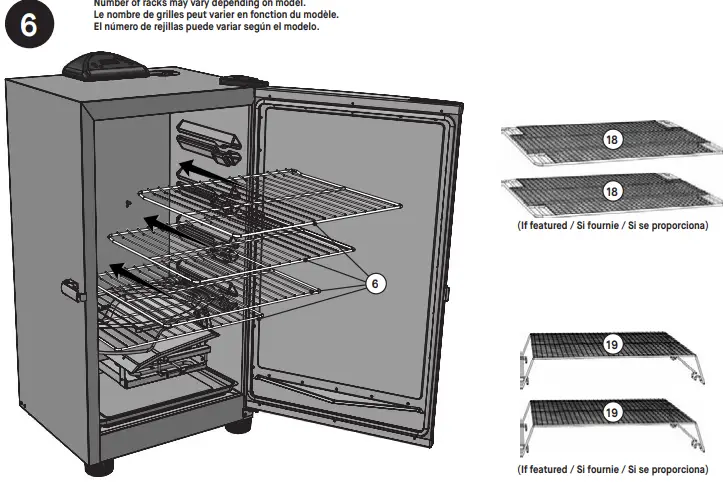
| 6 | 3 | Rack |
| 7 | 1 | Wood Chip Loader |
| 8 | 1 | Grease Tray |
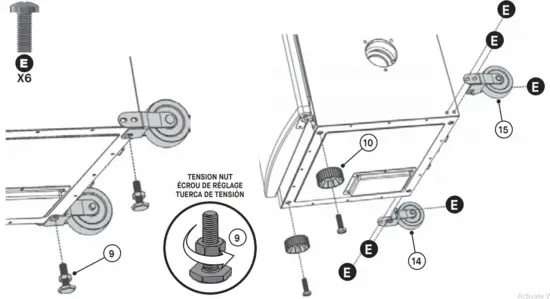
| 9 | 2 | Adjustable Screw Leg |
| 10 | 2 | Leg Boot |
| 11 | 2 | Air Damper (preassembled) |
| 12 | 1 | Door (preassembled) |
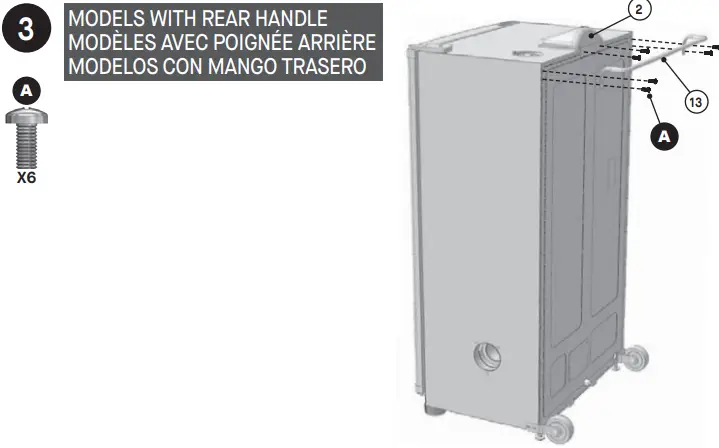
| 13 | 1 | Rear Handle |
| 14 | 1 | Left Rear Wheel |
| 15 | 1 | Right Rear Wheel |
| 16 | 1 | Wood Chip Housing (preassembled) |
| 17 | 1 | Main Element (preassembled) |
| 18 | 1 | Broiler Element (preassembled) |
| 19 | 1 | Broiler Heat Shield (preassembled) |
| 20 | 2 | Rack Support (preassembled) |
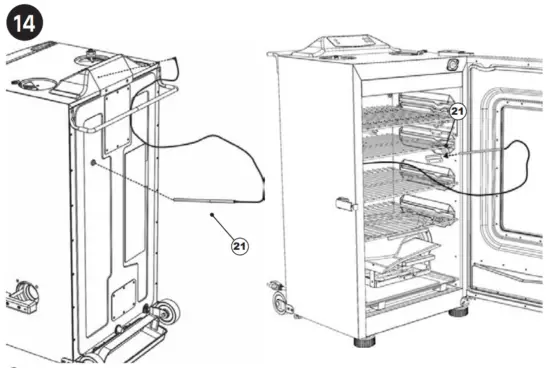
| 21 | 1 | Meat Probe |
| 22 | 1 | Door Switch (preassembled) |
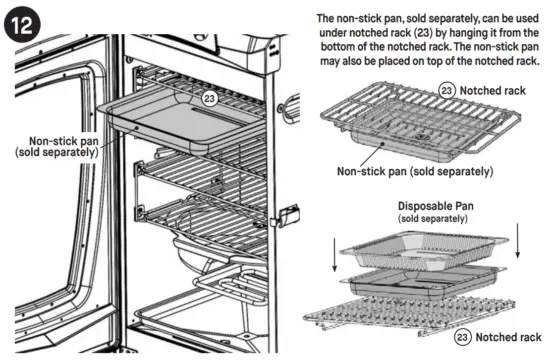
| 23 | 1 | Notched Rack |
| – | – | Non-stick Pan (sold separately) |
| – | – | Disposable Pan (sold separately) |
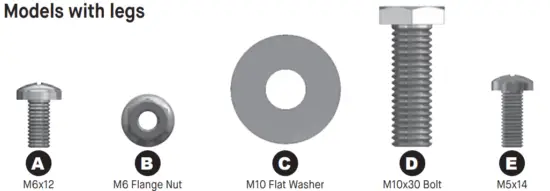
Models with legs
| 24 | 2 | Side Brace |
| 25 | 2 | Cross Brace |
| 26 | 2 | Wheel |
| 27 | 1 | Left Rear Leg |
| 28 | 1 | Right Rear Leg |
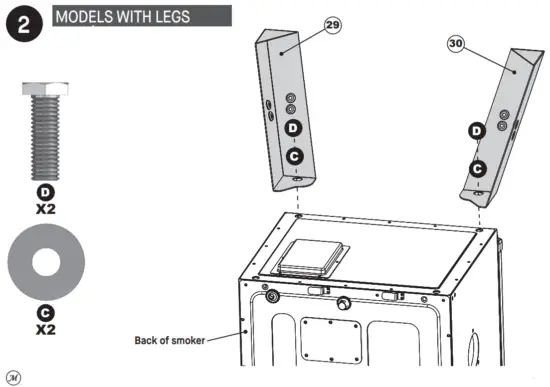
| 29 | 1 | Left Front Leg |
| 30 | 1 | Right Front Leg |
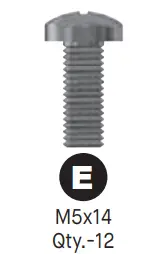
Hardware List
Models without legs
- BEFORE ASSEMBLY READ ALL INSTRUCTIONS CAREFULLY.
- Assemble on a clean flat surface.
- Tools needed: Adjustable wrench, Phillips head screwdriver
- Approximate assembly time: 25 minutes
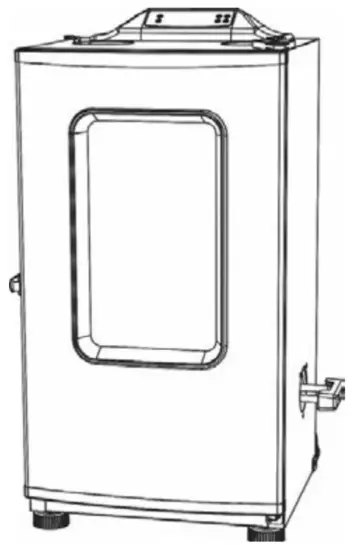
- The actual product may differ from the picture shown.
- It is possible that some assembly steps have been completed in the factory.
Assembly
MODELS WITHOUT LEGS
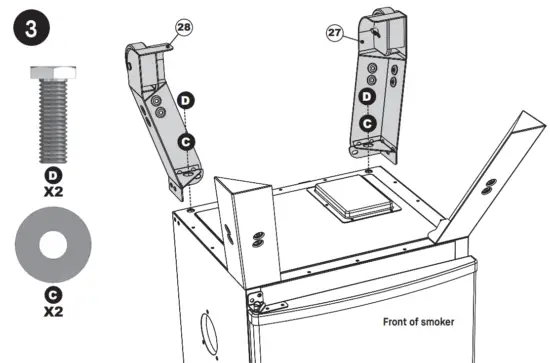
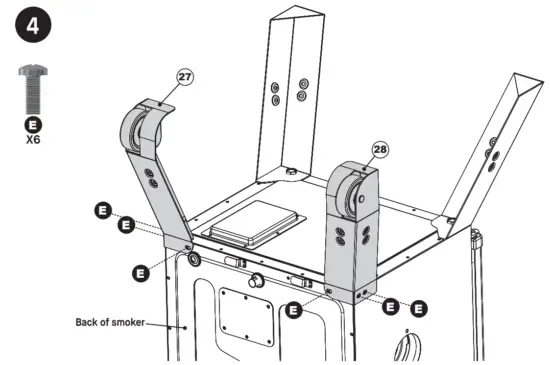
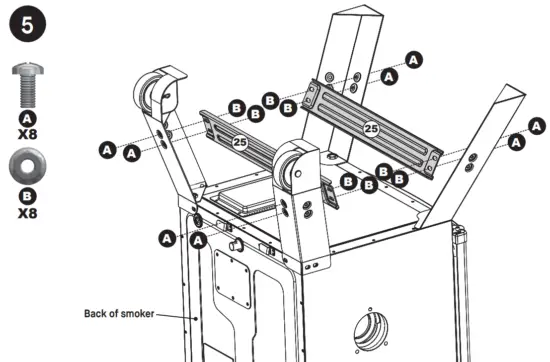
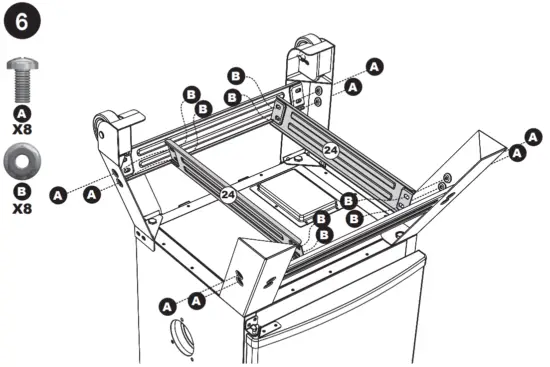
Items sold separately are available at: masterbuilt.com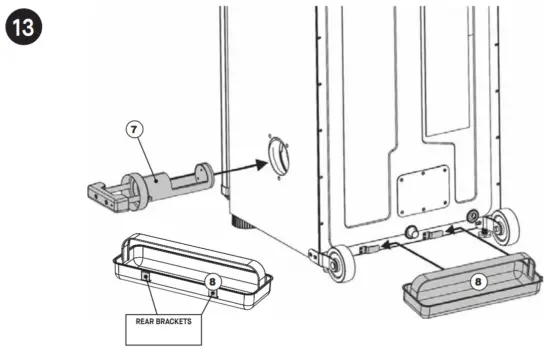
Operating Instructions
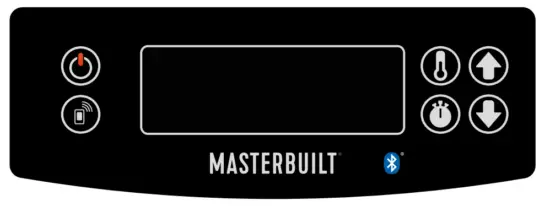
CONTROL PANEL
To set the temperature for smoking:
- Press the ON/OFF button
 . LED will display temperature/meat probe/time in sequence.
 - Press the SET TEMP button
 once. LED will display both (bottom element).
 - Press the SET TEMP button
 again to select the bottom element.
 - Press the UP or DOWN arrows
 to select temperature. The maximum temperature setting is 275°F (135°C).
 - Press the SET TEMP button
 again to lock in the temperature.
 - The bottom element icon
 will illuminate to indicate temperature has been set.
To set the timer:
- Countdown Timer:
- Press the SET TIME button
 once-LED display for hours will blink.
 - Use the UP or DOWN arrows
 to set hours.
 - Press the SET TIME button
 again to lock in hours. The minutes LED will start blinking.
 - Use the UP or DOWN arrows
 to set minutes.
 - Press the SET TIME button
 to lock in minutes and start the timer.
 - Duration (Count-up) Timer:
- This timer will start counting from 00:00.
- Press and hold the SET TIME button
 once – the LED display will start counting from 00:00.
NOTE: When the outside temperature is cooler than 65°F (18°C) and/or altitude is above 3,500 feet (1067m), additional cooking time may be required. To ensure that meat is completely cooked use a meat thermometer to test internal temperature or use a meat probe if featured.
Top broiler element:
- The top broiler element provides two unique benefits:
1. Food can be slow-smoked and then positioned under the top broiler element to crisp or caramelize a sauce.
2. Food can be cooked under the top broiler element quicker than traditional smoking, similar to a broiler in an oven.
Setting the top broiler element:
- Press the SET TEMP button
 once. LED will display both (bottom element).
 - Press the UP or DOWN arrows
 to select ToP (top broiler element) and press SET TEMP again.
 - Press the UP or DOWN arrows
 to select High/Medium/Low.
 - Press the SET TEMP button
 again to lock in the setting.
 - The top broiler element icon
 will illuminate to indicate temperature has been set.
NOTE: A time does not have to be set. The element will begin heating once the temperature is set.
Operating Instructions
To use meat probe:
- Insert a meat probe into the center of the meat to get the most accurate reading.
- Press the UP or DOWN arrows
 to stop the LED flashing sequence at MP 1. LED will display the internal temperature at the meat probe.
 - Press the UP or DOWN arrows
 again to return the display to the temperature/meat probe/time remaining sequence.
Door switch :
- Your smoker is equipped with a door switch that works in correspondence with Bluetooth.
- If the door is opened during the cook cycle the Bluetooth app will switch to “monitor only” and will not allow you to operate the smoker with your smart device. To enable Bluetooth functionality again, press the Bluetooth button
 on the control panel.
To RESET control panel:
If the control panel displays an error message, turn the smoker off and unplug the smoker from the outlet. Wait ten seconds, plug the smoker back into the outlet, then turn the electric smoker on. This will reset the control panel.
BLUETOOTH
- Download the Masterbuilt app from the Apple App Store or Google Play Store onto your smart device(s).
For more information go to masterbuilt.com/support/app-requirements. - Once the download is complete, open the Masterbuilt app and follow the instructions for pairing your Bluetooth smoker and smart device(s).
This device complies with Part 15 of the FCC Rules. Operation is subject to the following two conditions:
- This device may not cause harmful interference, and
- This device must accept any interference received, including interference that may cause undesired operation.
FCC Warning
Warning: Changes or modifications to this smoker that are not expressly approved by the party responsible for compliance and could void the user’s authority to operate the equipment.
FCC Statement
This equipment has been tested and found to comply with the limits for a Class B digital device, pursuant to Part 15 of the FCC Rules. These limits are designed to provide reasonable protection against harmful interference in a residential installation. This equipment generates, uses, and can radiate radio frequency energy, and if not installed and used in accordance with the instructions, may cause harmful interference to radio communications.
However, there is no guarantee that interference will not occur in a particular installation. If this equipment does cause harmful interference to radio or television reception, which can be determined by turning the equipment off and on, the user is encouraged to try to correct the interference by one or more of the following measures:
- Reorient or relocate the receiving antenna.
- Increase the separation between the equipment and receiver.
- Connect the equipment into an outlet on a circuit different from that to which the receiver is connected.
- Consult the dealer or an experienced radio/TV technician for help.
PRE-SEASONING
PRE-SEASON SMOKER PRIOR TO FIRST USE. Some smoke may appear during this time, this is normal.
- Make sure the water pan is in place WITHOUT WATER.
- Set temperature to 275°F (135°C) and run smoker for 3 hours.
- During the last 45 minutes, add ½ cup of wood chips in the wood chip loader and unload wood chips into the wood chip tray to complete pre-seasoning. This amount is equal to the contents of a filled wood chip loader.
- Shut down and allow it to cool.
LOADING FOOD INTO SMOKER
- Pre-heat smoker for 30 to 45 minutes at desired cooking temperature before loading food.
- DO NOT cover racks with aluminum foil as this will not allow heat to circulate properly.
- Do not overload smokers with food. Extra-large amounts of food may trap heat, extend cooking time and cause uneven cooking. Leave space between food on racks and smoker sides to ensure proper heat circulation. If utilizing cooking pans, place pans on the center of the rack to ensure even cooking.
- Do not open the smoker door unless necessary. Opening the smoker door causes heat to escape, may extend cooking time, and may cause wood chips to flare up. Closing the door will re-stabilize the temperature and stop flare-ups.
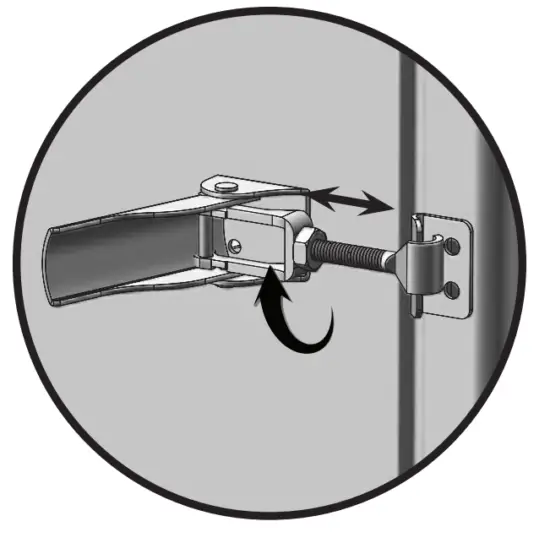
- There will be a lot of smoke produced when using wood chips. Smoke will escape through seams and turn the inside of smoker black. This is normal. To minimize smoke loss around the door, the door latch can be adjusted to further tighten the door seal against the body.
- To adjust the door latch, loosen the hex nut on the door latch. Turn hook clockwise to tighten as shown. Secure hex nut firmly against the door latch (see diagram).
- Check grease tray often during cooking. Empty the grease tray before it gets full. The grease tray may need to be emptied periodically during cooking.
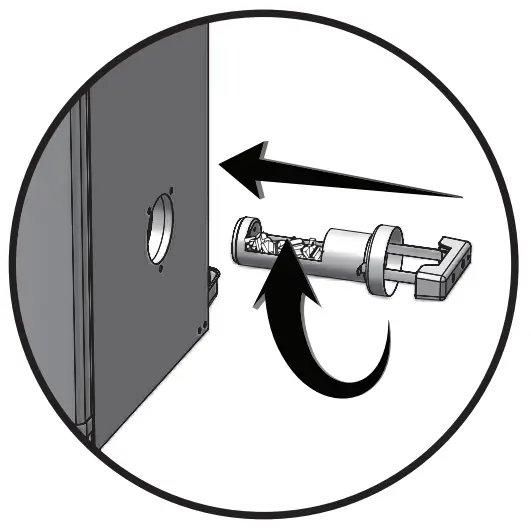
WOOD CHIP LOADER
- Wood chip loader and wood chip tray MUST be in place when using a smoker. This minimizes the chance of wood flare-ups.
- Wood chips must be used in order to produce smoke and create the smoke flavor.
- Before starting the smoker, place ½ cup of wood chips in the chip loader. Never use more than ½ cup of wood chips at a time. Never use wood chunks or wood pellets.
- Insert wood chip loader into a smoker. Wood chips should be level with the top rim of the wood chip loader.
- Turn the handle clockwise in direction of the arrow mark on the smoker to unload wood chips. Wood chips will drop into the wood chip tray. Turn the handle counterclockwise to an upright position and leave the wood chip loader in place.
- If wood chips do not smoke on a low setting, increase the temperature to 275°. After 8 to 10 minutes, or when wood chips begin to smolder, reduce temperature to desired low setting.
- You may use dry or pre-soaked wood chips in your smoker. Dry chips will burn faster and produce more intense smoke. Chips pre-soaked in water (for approximately 30 minutes) will burn slower and produce less intense smoke.
- Check the wood chip tray periodically to see if the wood has burned down. Add more chips as needed.
- Do not leave old ashes in the wood chip tray. Once ashes are cold, empty tray. The tray should be cleaned out prior to, and after each use to prevent ash buildup.
ADDING MORE WOOD DURING THE SMOKING PROCESS:
NOTE: Never add more than ½ cup (1 filled chip loader) at a time. Additional chips should not be added until any previously added chips have ceased generating smoke.
- Pull wood chip loader from the smoker.
- Place wood chips in a wood chip loader and insert them into a smoker.
- Turn the handle clockwise in direction of the arrow mark on the smoker to unload wood chips. Wood chips will drop into the wood chip tray.
- The temperature may spike briefly after wood chips are added. It will stabilize after a short time. Do not adjust the temperature settings.
 CAUTION
- Keep smoker door closed when adding wood chips. A flare-up may occur when the door is opened. If wood chips flare up, immediately close the door and vent, wait for wood chips to burn down, then the open door again. Do not spray with water.
- Wood chip loader will be HOT even if a handle is not.
- Never use wood chunks or wood pellets
WATER BOWL
- Wait until the smoker reaches the desired temperature.
- Fill the water bowl to fill the line with water or liquids like an apple or pineapple juice.
- You may also add slices of fruit, onions, or fresh dried herbs into the water to blend different subtle flavors into your smoked food.
Tip: For chicken or other foods high in moisture, little or no liquid is needed.
CLEANING AND STORAGE
ALWAYS MAKE SURE THE SMOKER IS COOL TO THE TOUCH BEFORE CLEANING AND STORING.
- Be sure to clean the smoker after each use. This will extend the life of your smoker and prevent mold and mildew.
- For rack supports, racks, water bowl, and drip pan use a mild dish detergent. Rinse and dry thoroughly.
- For wood chip tray and wood chip loader, clean frequently to remove ash build-up, residue, and dust.
- Dispose of cold ashes by placing them in aluminum foil, soaking with water, and discarding them in a noncombustible container.
- For the interior, glass indoor (if featured), and exterior of the smoker, simply wipe down with a damp cloth. Do not use a cleaning agent. Make sure to dry thoroughly.
- After cleaning, store the smoker in a covered and dry area.
- Check your smoker periodically to avoid possible rust and corrosion due to moisture buildup.
Troubleshooting
| SYMPTOM | CAUSE | POSSIBLE SOLUTION |
| No power to controller (Does not beep when plugged into an outlet). | Not plugged into an outlet. | Plug into a power source. |
| The House breaker tripped. | Reset breaker. | |
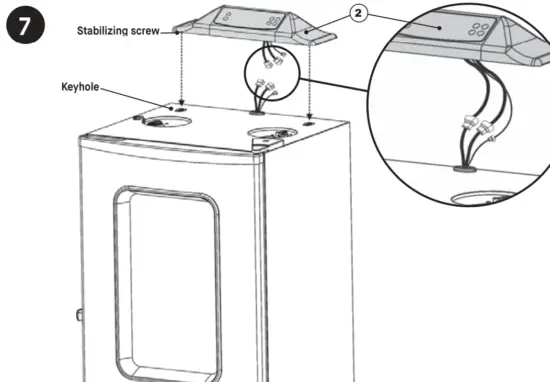
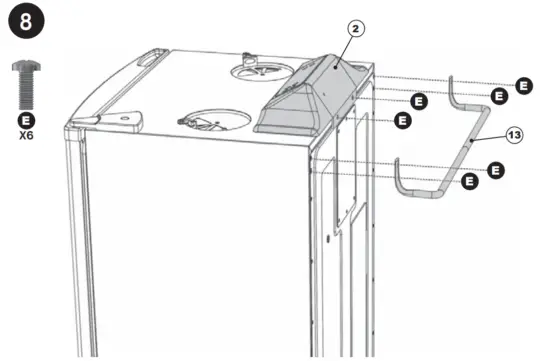
| Bad connection at controller. | Unplug the connection and reconnect. Reference assembly steps 7 and 8. | |
| Bad connection at PCB (Power Circuit Board). | Unplug the connection and reconnect. Reference PCB access instructions. | |
| Faulty PCB (Power Circuit Board). | Call Masterbuilt for replacement at 1-800-489-1581. | |
| Faulty controller. | Call Masterbuilt for replacement at 1-800-489-1581. | |
| Faulty body wiring. | Call Masterbuilt for replacement at 1-800-489-1581. | |
| The power indicator is not on (the controller beeps when plugged in). | The smoker is not powered on. | Press the on/off button. |
| Faulty controller. | Call Masterbuilt for replacement at 1-800-489-1581. | |
| No display on the controller (power light is on). | The controller temperature is below -10°F (-23°C). | Remove the controller from the smoker and bring it to a temperature above 0°F (-18°C). Reference controller access instructions. |
| Faulty controller. | Call Masterbuilt for replacement at 1-800-489-1581. | |
| The heating indicator is not on. | Temperature and time are not set. | Set temperature and time and wait 60 seconds for the heating light to turn on. |
| Faulty controller. | Call Masterbuilt for replacement at 1-800-489-1581. | |
| Faulty body wiring. | Call Masterbuilt for replacement at 1-800-489-1581. | |
| The element is not on. | Bad connection at element. | Check element connection. Reference element access instructions. |
| Faulty HTL (High Temp Limit Safety Shut-Off). | Call Masterbuilt at 1-800-489-1581. | |
| Faulty element. | Call Masterbuilt for replacement at 1-800-489-1581. | |
| The meat probe does not display on the controller. | Meat Probe not connected before smoker was plugged into an outlet. | Plug the meat probe into the meat probe jack and unplug a smoker from the outlet. Wait 10 seconds and plug the smoker back into the outlet. The smoker performs a self-check when plugged into the outlet to determine the proper information to display. |
| Bad connection at meat probe. | Unplug the connection and reconnect. | |
| Faulty meat probe. | Call Masterbuilt for replacement at 1-800-489-1581. | |
| Faulty controller. | Call Masterbuilt for replacement at 1-800-489-1581. | |
| Meat probe temperature is not accurate. | Perform meat probe temperature verification. | Reference meat probe verification instructions. The meat probe has a +/-5°F (2.78°C) tolerance. |
| Faulty meat probe. | Call Masterbuilt for replacement at 1-800-489-1581. | |
| Faulty controller. | Call Masterbuilt for replacement at 1-800-489-1581. | |
| The cabinet temperature is not accurate. | Perform meat probe temperature verification. | Reference meat probe verification instructions. The meat probe has a +/-5°F (2.78°C) tolerance. |
| Perform cabinet temperature verification. | Reference cabinet temperature verification instructions. Cabinet temperature has a +/-15°F (8.33°C) tolerance of average cabinet temperature. | |
| Faulty controller. | Call Masterbuilt for replacement at 1-800-489-1581. |
| SYMPTOM | CAUSE | POSSIBLE SOLUTION |
| The smoker takes an excessive amount of time to heat. | Climate. | Temperatures below 65°F (18°C) may extend heating time. |
| Smoker plugged into an extension cord. | Plug smoker directly into a power source. The maximum length of an extension cord is 25ft (8m). The minimum gauge is 12/3. | |
| The door is not closed properly. | Close the door and adjust the latch so that door seals completely around the smoker. | |
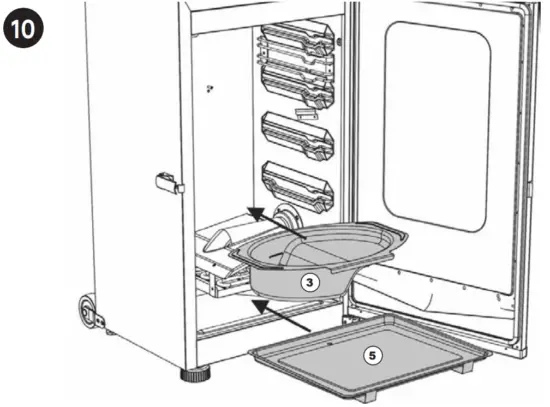
| The water bowl is not properly located. | Locate the water bowl properly on supports. See assembly steps for proper installation. | |
| Faulty controller. | Call Masterbuilt for replacement at 1-800-489-1581. | |
| Gap between the door and the smoker. | Improper door alignment. | Adjust door hinges. |
| Damaged door seal. | Call Masterbuilt for replacement at 1-800-489-1581 for the replacement door kit. | |
| The grease is leaking from the smoker. | The door is not closed properly. | Close door and adjust latch so door seals completely around the smoker. |
| The smoker is not level. | Move smoker to a level surface. | |
| The drip pan is not in the proper location. | Align drip pan so that drain hole in pan and smoker bottom align. | |
| The grease tray is full. | Empty grease tray and reinstall under the smoker. | |
| The drain tube is clogged. | Clean drain tube. | |
| No smoke. | No wood chips. | Add wood chips (See adding wood chips guide). |
| Element not staying on long enough to heat chips due to climate. | 1. Open vent fully. 2. Open the door briefly to allow the smoker’s temperature to drop approximately 5°F (2.78°C) below the set temperature then close the door. | |
| The controller will not adjust the temperature. | Faulty controller. | Call Masterbuilt for replacement at 1-800-489-1581. |
| The controller will not adjust the time. | Faulty controller. | Call Masterbuilt for replacement at 1-800-489-1581. |
| Error code. | The thermostat probe is damaged/short-circuited. | Call Masterbuilt for replacement at 1-800-489-1581. |
| The meat probe is damaged/short-circuited. | ||
| Faulty controller. |
Power Circuit Board (PCB) Access
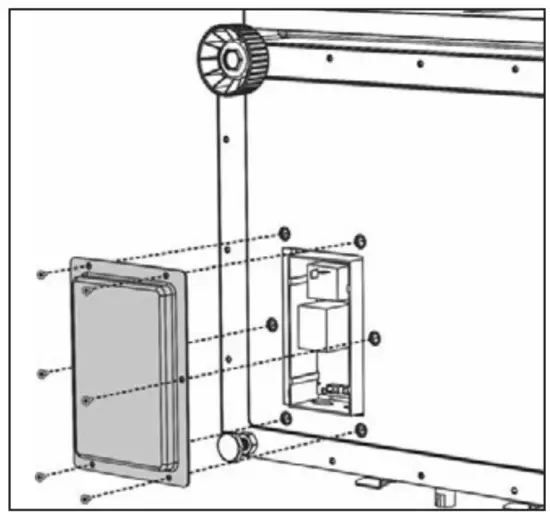
Tool needed for access: Phillips head screwdriver, pliers
DIRECTIONS:
- Turn the smoker off.
- Unplug the smoker from the power source and allow it to fully cool.
- Locate the access panel for the power circuit board on the bottom of the smoker.
- Remove the six (6) screws and remove the access panel cover.
- Carefully remove and reconnect each wire one at a time to ensure that each wire is reconnected to its proper location. Removal may be easier with the use of pliers.
- Replace the access panel cover and secure it with the six (6) screws.
Element Access
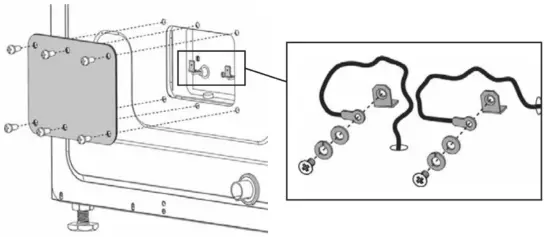
Tool needed for access: Phillips head screwdriver
DIRECTIONS:
- Turn the smoker off.
- Unplug the smoker from the power source and allow it to fully cool.
- Remove six (6) screws and access panel cover from the back of the smoker.
- Carefully pull back the protective covering from the two-element terminals and ensure that the screw connections are tight and secure.
- Replace the access panel cover and secure it with six (6) screws.
Meat Probe Temperature Verification
Low-Temperature Test
- Place the meat probe in ice water (temperature of ice water = 32°F = 0°C) for 5 minutes.
- Turn on the smoker.
- LED will show the temperature at the probe.
- The meat probe temperature reading should be 32°F, ±5°F. The acceptable range is within 27°F to 37°F.
High-Temperature Test
- Place the meat probe in boiling water (temperature of boiling water = 212°F = 100°C) for 5 minutes.
- Turn on the smoker.
- LED will show the temperature at the probe.
- The meat probe temperature reading should be 212°F, ±5°F. The acceptable range is within 207°F to 217°F.
Cabinet Temperature Verification
- Place meat probe in the center of middle rack.
- Turn on the smoker.
- Set controller to 275°F.
- Allow smoker to reach and stabilize at 275°F.
- Read the actual cabinet temperature displayed.
- LED will show the temperature at the probe.
- Meat probe temperature reading should be ±15°F of the actual cabinet temperature.
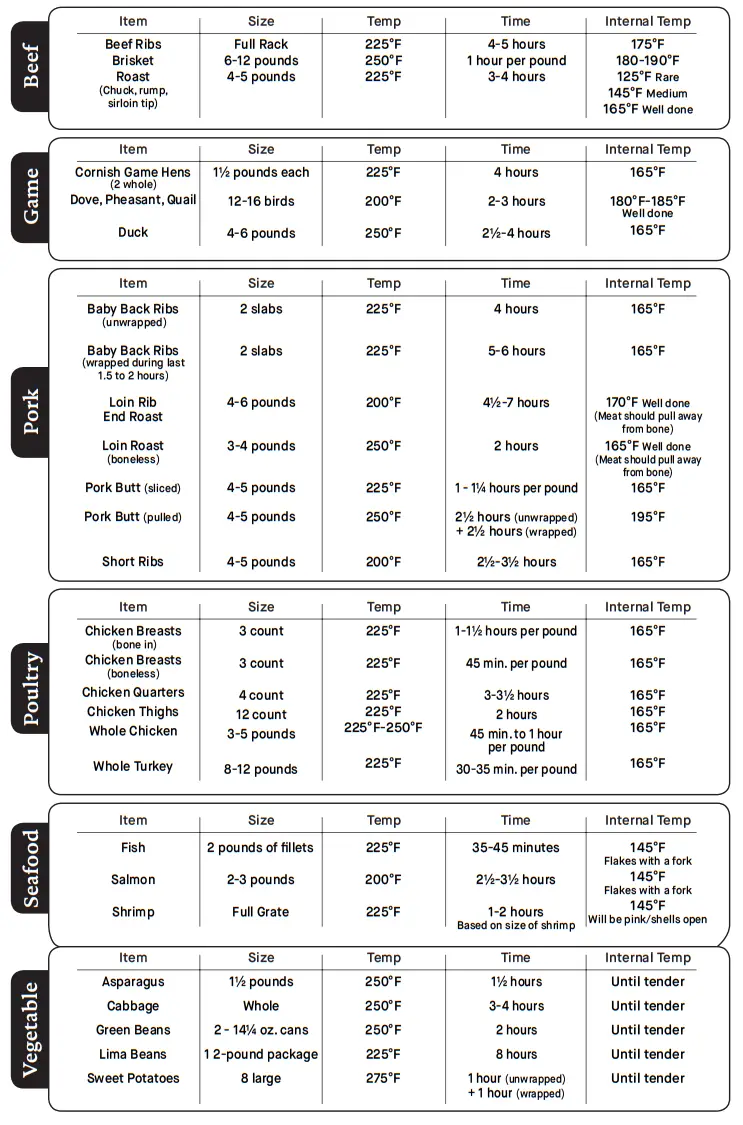
Wood Chips Smoking Guide

Smoking Times and Temperatures
Ready. Set. Craft your Masterpiece.
Pulled Pork Sliders
- 1 pork butt (8 lb)
- 4 tbsp of your favorite dry rub
- 6 to 7 heaping tablespoons of yellow mustard
- 16 slider rolls, split and toasted
- 2 cups ketchup
- ¼ cup apple cider vinegar
- 2 tbsp fresh lemon juice
- 1 tsp garlic powder
- 1 tsp onion powder
- 1 tsp garlic pepper
- In a heavy saucepan over low heat, combine ketchup, apple cider vinegar, lemon juice, garlic powder, onion powder, and garlic pepper then stir well. Simmer, stirring occasionally for 10 to 15 minutes.
- Season pork butt generously with dry rub seasoning. Place pork in a resealable plastic bag.
- Spread mustard evenly over the butt while inside the bag to avoid mess. Seal bag and refrigerate overnight.
- Preheat smoker to 225°F.
- Place the button on the middle rack of the smoker and smoke for 7 to 8 hours or until the internal temperature reaches 185°F.
- Remove from smoker. Cover with heavy-duty aluminum foil and return to smoker.
- Increase smoker temperature to 275°F. Smoke for an additional 2 hours or until internal temperature reaches 200°F
- Let meat rest inside foil for 30 minutes. Then pull pork, add to slider buns, top with BBQ sauce, serve and enjoy!
Smoked Mac ‘N’ Cheese
- 1 (16 oz) package elbow macaroni
- ¼ cup butter
- ¼ cup all-purpose flour
- 3 cups milk
- 1 (8 oz) package cream cheese, cut into large chunks
- 1 tsp salt
- ½ tsp black pepper
- 2 cups (8 oz) extra-sharp Cheddar cheese, shredded
- 2 cups (8 oz) Gouda cheese, shredded
- 1 cup (4 oz) Parmesan cheese, shredded
- Load the wood chip tray with one small handful of wood chips and preheat the smoker to 225°F.
- Cook pasta according to package directions. In a medium saucepan melt butter then whisk flour into the butter. Cook over medium heat for 2 minutes until sauce is bubbly and thick. Whisk in milk and bring to a boil. Cook 5 minutes until thickened. Stir in cream cheese until the mixture is smooth. Add salt and pepper.
- In a large bowl combine 1 cup Cheddar cheese, 1 cup Gouda cheese, Parmesan cheese, pasta, and cream sauce. Spoon mixture into a 9.5” x 11” aluminum roasting pan coated with non-stick cooking spray. Sprinkle top with remaining Cheddar cheese and Gouda cheese.
- Place in smoker and cook for 1 hour at 225°F or until brown, bubbly and delicious.
See more recipes at masterbuilt.com/recipes
Masterbuilt 1-Year Limited Warranty
Masterbuilt warrants its products to be free from defects in material and workmanship under proper assembly, normal use, and recommended care for 1 year from the date of original retail purchase. The Masterbuilt warranty does not cover paint finish as it may burn off during normal use. The Masterbuilt warranty does not cover rust. Masterbuilt requires proof of purchase for a warranty claim, such as a receipt. Upon the expiration of such warranty, all such liability shall terminate.
Within the stated warranty period, Masterbuilt, at its discretion, shall replace defective components free of charge, with the owner being responsible for shipping. Should Masterbuilt require the return of component(s) in question for inspection, Masterbuilt will be responsible for shipping charges to return the requested item. This warranty excludes property damage sustained due to misuse, abuse, accident, or damage arising out of transportation.
This express warranty is the sole warranty given by Masterbuilt and is in lieu of all other warranties, expressed or implied including implied warranty, merchantability, or fitness for a particular purpose. Neither Masterbuilt nor the retail establishment selling this product has the authority to make any warranties or to promise any remedies in addition to or inconsistent with those stated above. Masterbuilt’s maximum liability, in any event, shall not exceed the purchase price of the product paid by the original consumer/ purchaser. Some states do not allow the exclusion or limitation of incidental or consequential damages. In such a case, the above limitations or exclusions may not be applicable.
California residents only: Notwithstanding this limitation of warranty, the following specific restrictions apply; if service, repair, or replacement of the product is not commercially practical, the retailer selling the product or Masterbuilt will refund the purchase price paid for the product, less the amount directly attributable to use by the original buyer prior to the discovery of the nonconformity. The owner may take the product to the retail establishment selling this product in order to obtain performance under warranty. This express warranty gives you specific legal rights, and you may also have other rights which vary from state to state.
Visit masterbuilt.com or complete the form below and return to:
Attn: Warranty Registration
Masterbuilt Manufacturing, LLC
1 Masterbuilt Court | Columbus, GA 31907
Name: _________________ Address: ____________________
City: ______________
State/Province: ________ Postal Code: ________________ Phone Number: _____________
E-mail Address: ___________________________
*Model Number: ___________________ *Serial Number: ___________________________
Purchase Date: ___________ Place of Purchase: __________
*Model Number and Serial Number are located on silver label on back of smoker.

Rest assured, we’re here to help.
Customer Service masterbuilt.com/contact
Masterbuilt Manufacturing, LLC
1 Masterbuilt Court | Columbus, GA | 31907
@masterbuilt 1.800.489.1581
Operation Manual and Safety Instructions
AIR FRYER
EF13G1D

MB20013020
Your model number
Mfg. Date – Serial Number
These numbers are located on the back of the appliance.
FOR OUTDOOR HOUSEHOLD USE ONLY
Manual Code: 9801200005 201013-GH
 WARNING
- This manual contains important information necessary for the proper assembly and safe use of the appliance.
- Read and follow all warnings and instructions before assembling and using the appliance.
- Keep this manual for future reference.
 Failure to follow these instructions could result in fire, explosion or burn hazards which could cause property damage, personal injury, or death.
CARBON MONOXIDE HAZARD
- Burning wood chips give off carbon monoxide, which has no odor and can cause death.
- DO NOT burn wood chips inside homes, vehicles, tents, garages or any enclosed areas.
- Use only outdoors where it is well ventilated.
WOOD CHIPS DO NOT COME WITH THIS PRODUCT.
READ ALL INSTRUCTIONS
- For outdoor household use only. Do not operate in an enclosed area.
- Unit MUST be on the ground. Do not place units on tables or counters.
- Do not plug in the air fryer until fully assembled and ready for use.
- Use only approved grounded electrical outlets.
- Do not use during an electrical storm.
- Do not expose the air fryer to rain or water at any time.
- To protect against electrical shock do not immerse the cord, plug, or control panel in water or other liquid.
- Do not operate any appliance with a damaged cord or plug, or after appliance malfunctions or is dropped or damaged in any manner.
- Keep a fire extinguisher accessible at all times while operating air fryer.
- Do not let the cord touch hot surfaces.
- Do not place on or near a hot gas or electric burner, or in a heated oven.
- Keep children and pets away from the air fryer at all times. Do not allow children to use air fryers. Close supervision is necessary when children or pets are in the area where an air fryer is being used. · Fuel, such as charcoal briquettes or heat pellets, are not to be used in the air fryers.
- Never use an air fryer as a heater (READ CARBON MONOXIDE HAZARD).
- Use air fryer only on a level, stable surface to prevent tipping.
- Do not allow anyone to conduct activities around the air fryer during or following its use until it has cooled.
- An air fryer is HOT while in use and will remain HOT for a period of time afterward. Use caution.
- Do not touch HOT surfaces. Use handles or knobs.
- The use of alcohol, prescription, or non-prescription drugs may impair the user’s ability to properly assemble or safely operate an air fryer.
- Avoid bumping or impacting the air fryer.
- Never move air fryer when in use. Allow the air fryer to cool completely before moving or storing.
- Be careful when removing food from the air fryer. All surfaces are HOT and may cause burns. Use protective gloves or long, sturdy cooking tools.
- The grease tray is only for the bottom of the air fryer. Do not put grease trays on cooking baskets as this may damage air fryer.
- The smokebox is HOT when the air fryer is in use. Use caution when adding wood.
- Remove plug from the outlet when the air fryer is not in use, before putting on or taking off parts, and before cleaning. Allow cooling before handling.
- Accessory attachments not supplied by Masterbuilt Manufacturing, LLC are not recommended and may cause injury.
- Never use the air fryer for anything other than its intended purpose. The air fryer is not for commercial use.
- Always use air fryer in accordance with all applicable local, state, and federal fire codes.
- Longer extension cords are available and may be used if care is exercised in their use.
- If a longer extension cord is used, the marked rating should be at least as great as the electrical rating of the appliance.
- The extension cord must be a grounding-type 3-wire cord.
- Outdoor extension cords must be used with outdoor use products and are marked with suffix “W” and with the statement “Suitable for Use with Outdoor Appliances.”
- CAUTION – To reduce the risk of electric shock, keep the extension cord connection dry and off the ground.
- Extreme caution must be used when moving an appliance containing hot liquids.
- Do not clean this product with a water sprayer or the like.
- Store air fryer indoors when not in use – out of the reach of children.
- Use extreme caution when removing the tray or disposing of hot grease.
- Do not clean with metal scouring pads. Pieces can break off the pad and touch electrical parts, creating a risk of electric shock.
SAVE THESE INSTRUCTIONS
Structural Proximity and Safe Usage Recommendations
REMINDER: Maintain a minimum distance of 10 feet from rear, sides and top of air fryer to overhead construction, walls, rails or other combustible construction. This clearance provides adequate space for proper combustion, air circulation and venting.
 WARNING
The electric power cord is a trip hazard.
DO NOT OPERATE ON COMBUSTIBLE SURFACES
Parts List
| NO. | QTY/CANT. | DESCRIPCIÓN |
| 1 | 1 | Rear Brace |
| 2 | 1 | Front Brace |
| 3 | 1 | Front Right Leg |
| 4 | 1 | Front Left Leg |
| 5 | 2 | Side Brace |
| 6 | 2 | Rear Leg |
| 7 | 1 | Fryer Body |
| 8 | 1 | Lifting Hook |
| 9 | 2 | Lift Handle |
| 10 | 1 | Smoke Box |
| 11 | 1 | Grease Tray |
| 12 | 2 | Grease Tray Bracket |
| 13 | 1 | Poultry Basket w/Stand |
| 14 | 1 | Heat Deflector |
| 15 | 3 | Stacking Baskets |
| 16 | 1 | Bottom Stacking Basket |
Hardware List
 DO NOT RETURN TO RETAILER for assembly assistance, missing or damaged parts. Please contact MASTERBUILT customer service at www.masterbuilt.com/pages/support. Please have the model number and serial number available. These numbers are located on the silver rating label on the appliance.
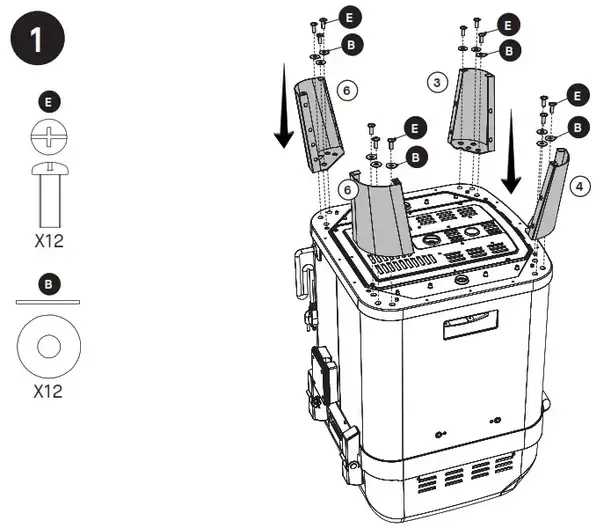
- BEFORE ASSEMBLY READ ALL INSTRUCTIONS CAREFULLY.
- Assemble on a clean flat surface.
- Tools needed: Phillips head screwdriver
- Approximate assembly time: 20 minutes
- The actual product may differ from the picture shown.
- It is possible that some assembly steps have been completed in the factory.
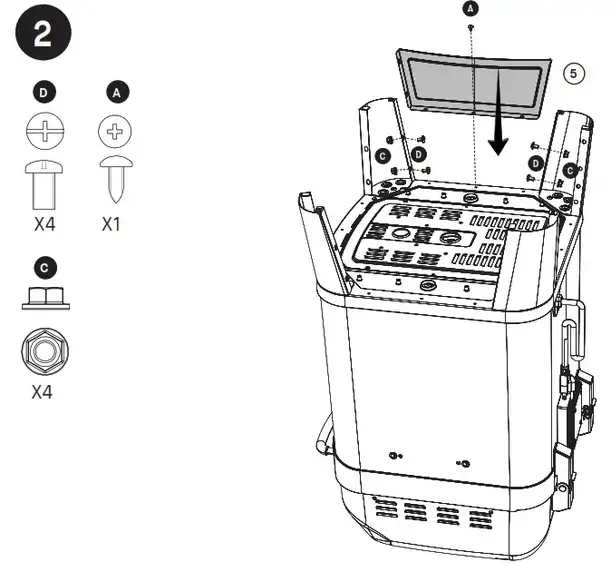
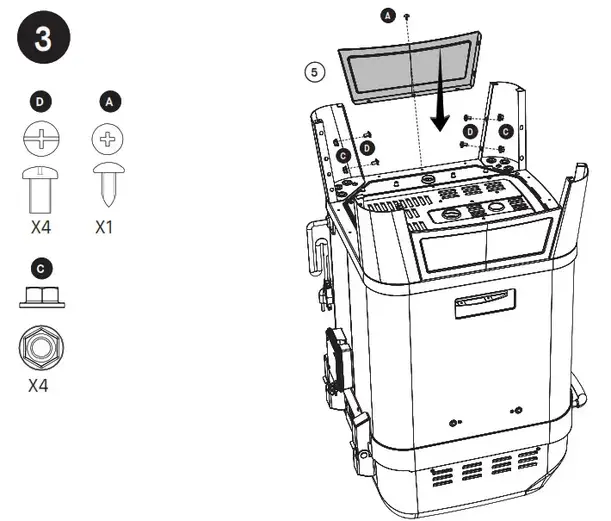
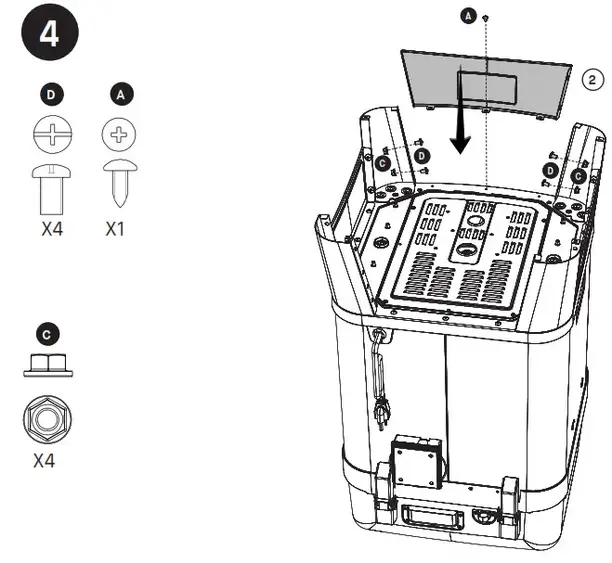
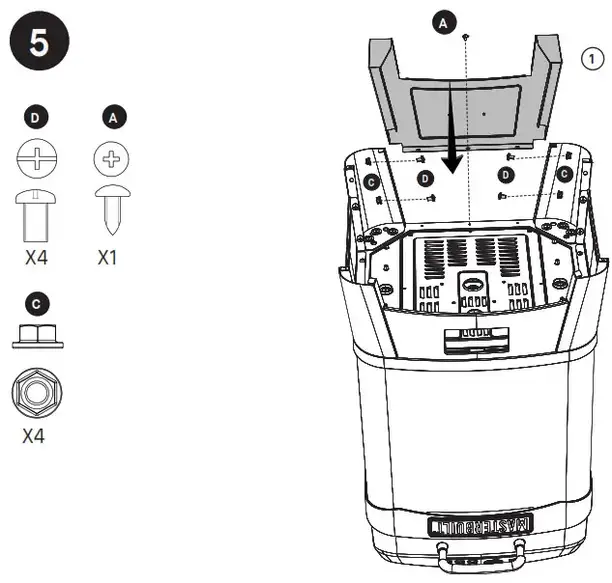
Assembly
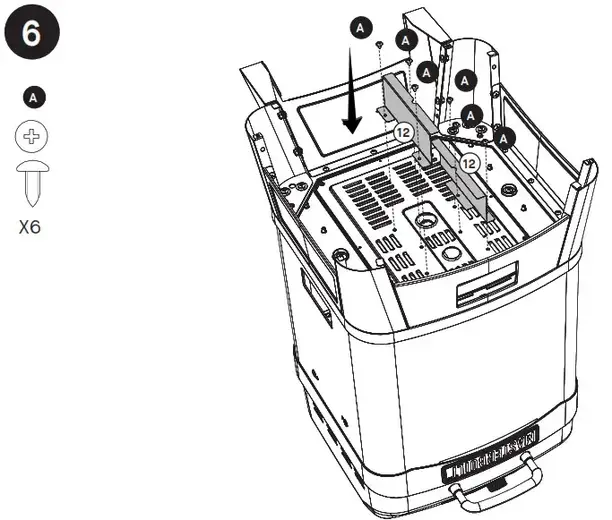
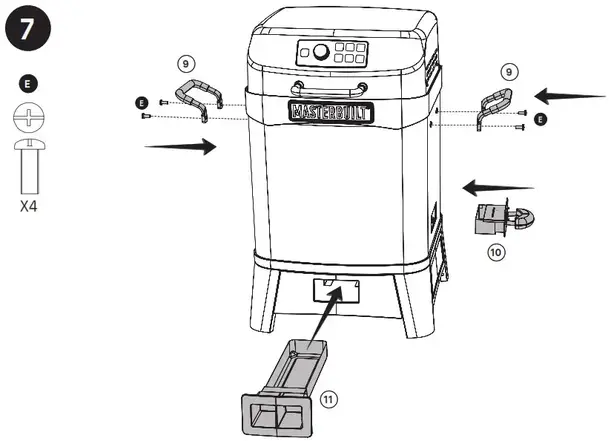
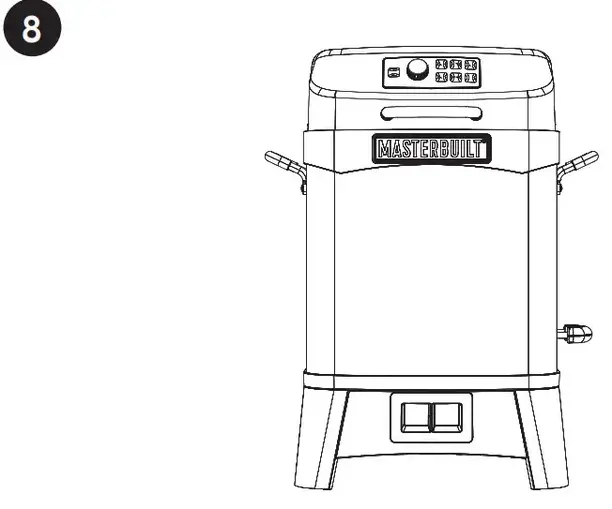
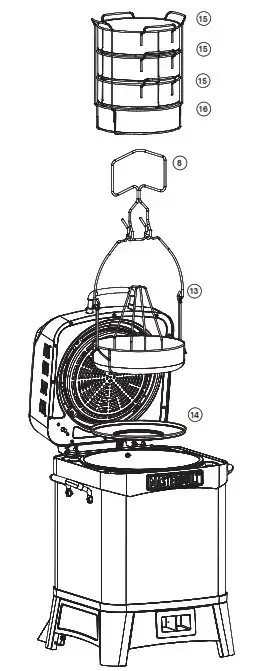
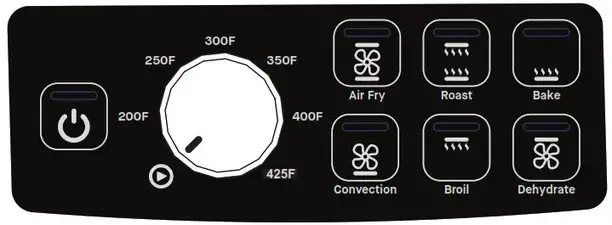


CONTROL PANEL

QUICK START GUIDE
Step 1 – Plug it in
Step 2 – Press the power button (turn it on)
Step 3 – Press the cook function you wish to use
Step 4 – Select your temperature with the control knob
Step 5 – Wait 10 minutes to allow the unit to preheat
COOKING OVERVIEW
- Air Fry:
A. Preset 400F
B. Function does smoke at a preset temperature - Roast:
A. Preset 400F
B. Function does smoke at a preset temperature - Bake:
A. Preset 400F
B. Function does smoke at a preset temperature - Convection:
A. Preset 400F
B. Function does smoke at a preset temperature - Broil
A. Preset 425F
B. Function does not smoke at a preset temperature - Dehydrate
A. Preset 140F
B. Function does not smoke at a preset temperature
WOOD CHIP TRAY
- Before starting the unit, place wood chips in a wood chip tray.
- Wood chips should stay well below the top rim of the wood chip tray. DO NOT use wood chunks.
- Check the wood chip tray periodically to see if the wood has burned down. Add more chips as needed.
Note: Wood chip tray is hot during use. - Wood chip tray MUST be in place when using an outdoor air fryer.
- Do not leave old wood ashes in the wood chip tray. Once ashes are cold, empty tray. The tray should be cleaned out prior to and after each use to prevent ash buildup.
- Should wood chips flare up, immediately close lid, wait for wood chips to burn down? Do not spray with water.
CLEANING AND STORAGE
- Clean unit prior to use.
- After use, turn the appliance off, unplug and let it cool before cleaning or storing.
- Remove the grease tray and wipe thoroughly using mild detergent.
- Clean lid, cooking rack, turkey stand, and basket with a damp cloth or sponge using a mild detergent.
- The clean outer shell, inner lining, cord, and control panel with a damp cloth or sponge using a mild detergent.
Dry thoroughly. - Baskets, stands, heat deflector, grease tray, smokebox, and lifting hook may be cleaned in the dishwasher.
ALWAYS MAKE SURE THE UNIT IS UNPLUGGED AND COOL TO THE TOUCH BEFORE CLEANING AND STORING.
Shutdown Instructions
Step 1:
Remove food from the air fryer.
Step 2:
Close the lid and press the power button to power the unit down.
Step 3:
Leave the lid closed and the unit plugged in for 5 minutes.
Step 4:
Once the unit has cooled completely, unplug, clean, and store.
Troubleshooting
| SYMPTOM | CAUSE | POSSIBLE SOLUTION |
| The power light won’t come on | Not plugged into an outlet | Check outlet connection |
| House breaker tripped | Make sure other appliances are not operating on the same electrical circuit. Check household breakers. | |
| Controller malfunctioning | Contact Masterbuilt at www.masterbuilt.com/pages/support | |
| Fryer takes an excessive amount of time to heat up or does not heat at all | Fryer plugged into the wrong type of extension cord | Use the properly rated extension cord or set fryer so the extension cord does not have to be used. |
| Lid must be closed for operation | Close lid to retain heat in the fryer | |
| Controller malfunctioning | Contact Masterbuilt at www.masterbuilt.com/pages/support | |
| The controller does not adjust the temperature | Not plugged into an outlet | Check outlet connection |
| Controller malfunctioning | Contact Masterbuilt at www.masterbuilt.com/pages/support | |
| Fryer reaches extremely high temperatures | Temperature setting too high | Adjust controller to lower setting |
| Controller/element malfunctioning | Contact Masterbuilt at www.masterbuilt.com/pages/support | |
| The power light is on, the fryer isn’t heating | Faulty element | Contact Masterbuilt at www.masterbuilt.com/pages/support |
| Controller malfunctioning | Contact Masterbuilt at www.masterbuilt.com/pages/support | |
| Fryer is beeping continuously, power button and cook function button flashing. | Fryer is in the cool down mode he |
Press any button to cancel the alarm. Inspect the fryer and eliminate the cause for overheating. Check for grease fires by slowly opening the lid. If there is no fire, close the lid and press any button to cancel the alarm. The fryer will resume the normal cooking cycle when it reaches the set temperature. If a fire occurs, close the lid and, press any button to cancel the alarm. Unplug the fryer. |
If your air fryer is beeping (10 beeps per minute), and the lights are flashing, you have a TC error.
Contact Masterbuilt at www.masterbuilt.com/pages/support.
If the symptom is not listed here, please contact Masterbuilt at www.masterbuilt.com/pages/support.
Wood Chips Smoking Guide
 |
POULTRY Hickory, Mesquite, Alder, Pecan, Maple, Apple, Cherry |
 |
BEEF Hickory, Mesquite |
 |
FISH Hickory, Alder, Pecan, Apple |
 |
PORK Hickory, Alder, Pecan, Maple, Apple, Cherry |
 |
HAM Hickory |
 |
LAMB Mesquite |
To ensure that it is safe to eat, food must be cooked to the minimum internal temperatures listed in the table below.
| USDA* Safe Minimum Internal Temperatures | |
| Fish | 145°F (63°C) |
| Pork | 160°F (71°C) |
| Egg Dishes | 160°F (71°C) |
| Steaks and Roasts of Beef, Veal or Lamb | 145°F (63°C) |
| Ground Beef, Veal or Lamb | 160°F (71°C) |
| Whole Poultry (Turkey, Chicken, Duck, etc.) | 165°F (74°C) |
| Ground or Pieces of Poultry (Chicken Breast, etc.) | 165°F (74°C) |
* United States Department of Agriculture

Rest assured, we’re here to help.
Customer Service
masterbuilt.com/contact-us
masterbuilt.com/warranty
masterbuilt.com/collections/parts
@masterbuilt
masterbuilt.com

MASTERBUILT EF13G1D Air Fryer

WARNING
- This manual contains important information necessary for the proper assembly and safe use of the appliance.
- Read and follow all warnings and instructions before assembling and using the appliance.
- Keep this manual for future reference.
CARBON MONOXIDE HAZARD
- Burning wood chips gives off carbon monoxide, which has no odor and can cause death.
- DO NOT burn wood chips inside homes, vehicles, tents, garages or any enclosed areas.
- Use only outdoors where it is well ventilated.
WARNINGS AND IMPORTANT SAFEGUARDS
- For outdoor household use only. Do not operate in an enclosed area.
- Unit MUST be on the ground. Do not place unit on tables or counters.
- Do not plug in air fryer until fully assembled and ready for use.
- Use only approved grounded electrical outlet.
- Do not use during an electrical storm.
- Do not expose air fryer to rain or water at anytime.
- To protect against electrical shock do not immerse cord, plug or control panel in water or other liquid.
- Do not operate any appliance with a damaged cord or plug, or after appliance malfunctions or is dropped or damaged in any manner.
- Keep a fire extinguisher accessible at all times while operating air fryer.
- Do not let cord touch hot surfaces.
- Do not place on or near a hot gas or electric burner, or in a heated oven.
- Keep children and pets away from air fryer at all times. Do not allow children to use air fryer. Close supervision is necessary when children or pets are in the area where air fryer is being used.
- Fuel, such as charcoal briquettes or heat pellets, are not to be used in air fryer.
- Never use air fryer as a heater (READ CARBON MONOXIDE HAZARD).
- Use air fryer only on a level, stable surface to prevent tipping.
- Do not allow anyone to conduct activities around air fryer during or following its use until it has cooled.
- Air fryer is HOT while in use and will remain HOT for a period of time afterwards. Use caution.
- Do not touch HOT surfaces. Use handles or knobs.
- The use of alcohol, prescription or non-prescription drugs may impair the user’s ability to properly assemble or safely operate air fryer.
- Avoid bumping or impacting air fryer.
- Never move air fryer when in use. Allow air fryer to cool completely before moving or storing.
- Be careful when removing food from air fryer. All surfaces are HOT and may cause burns. Use protective gloves or long, sturdy cooking tools.
- Grease tray is only for the bottom of air fryer. Do not put grease tray on cooking baskets as this may damage air fryer.
- Smoke box is HOT when air fryer is in use. Use caution when adding wood.
- Remove plug from outlet when the air fryer is not in use, before putting on or taking off parts, and before cleaning. Allow to cool before handling.
- Accessory attachments not supplied by Masterbuilt Manufacturing, LLC are not recommended and may cause injury.
- Never use air fryer for anything other than its intended purpose. The air fryer is not for commercial use.
- Always use air fryer in accordance with all applicable local, state and federal fire codes.
- Longer extension cords are available and may be used if care is exercised in their use.
- If a longer extension cord is used, the marked rating should be at least as great as the electrical rating of the appliance.
- The extension cord must be a grounding-type 3-wire cord.
- Outdoor extension cords must be used with outdoor use products and are marked with suffix “W” and with the statement “Suitable for Use with Outdoor Appliances.”
- CAUTION – To reduce the risk of electric shock, keep extension cord connection dry and off the ground.
- Extreme caution must be used when moving an appliance containing hot liquids.
- Do not clean this product with a water sprayer or the like.
- Store air fryer indoors when not in use – out of the reach of children.
- Use extreme caution when removing tray or disposing of hot grease.
- Do not clean with metal scouring pads. Pieces can break off the pad and touch electrical parts, creating a risk of electric shock.
Structural Proximity and Safe Usage Recommendations
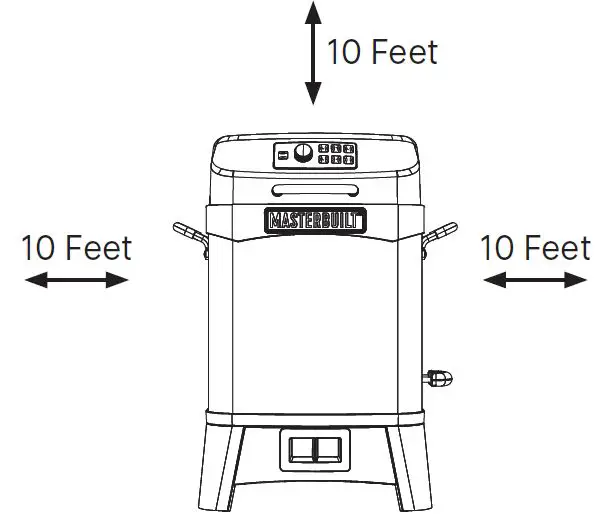
REMINDER: Maintain a minimum distance of 10 feet from rear, sides and top of air fryer to overhead construction, walls, rails or other combustible construction. This clearance provides adequate space for proper combustion, air circulation and venting.
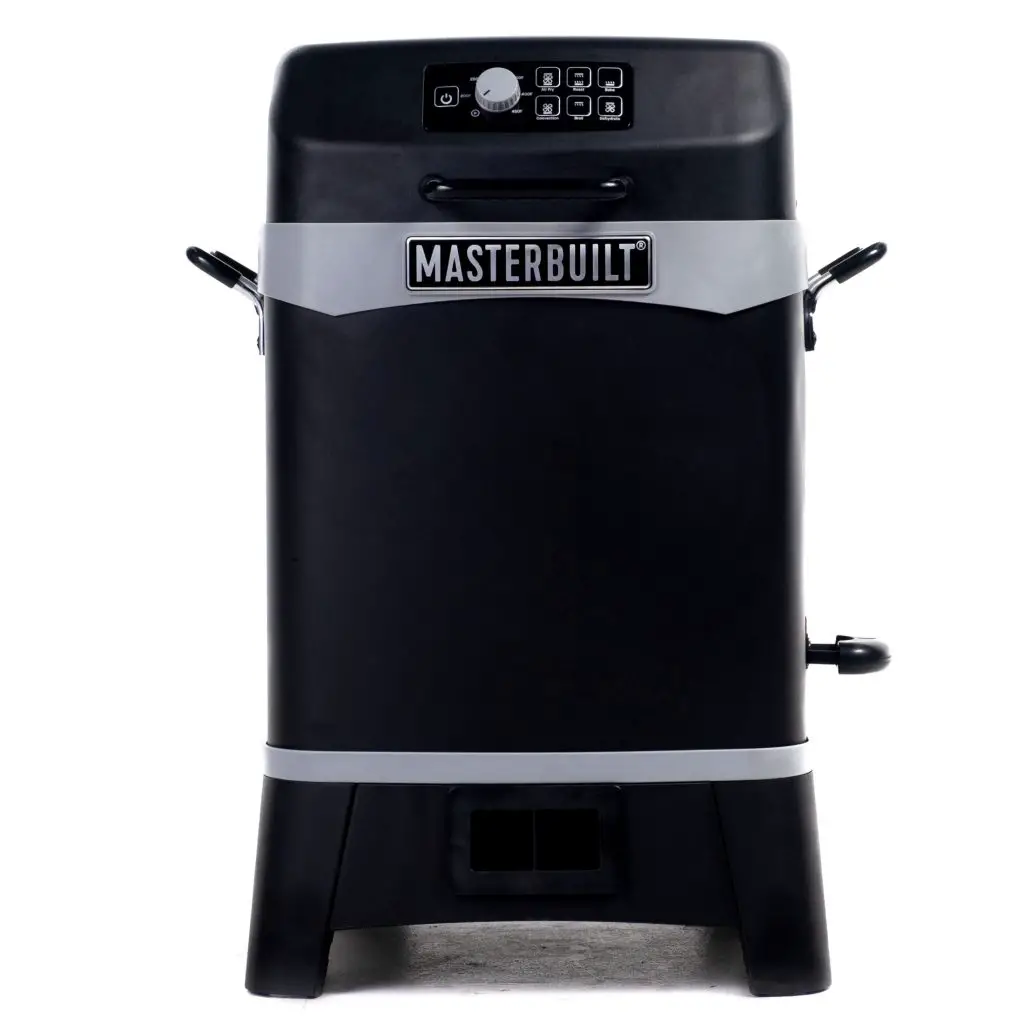
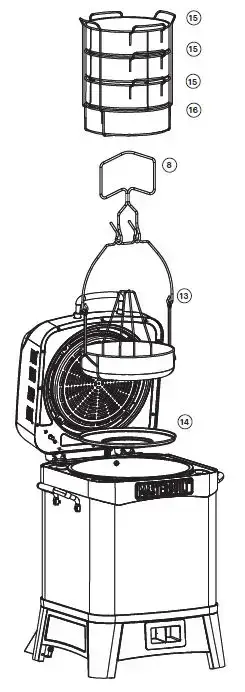
Parts List
NO. QTY/CANT. DESCRIPCIÓN
1 1 Rear Brace
2 1 Front Brace
3 1 Front Right Leg
4 1 Front Left Leg
5 2 Side Brace
6 2 Rear Leg
7 1 Fryer Body
8 1 Lifting Hook
9 2 Lift Handle
10 1 Smoke Box
11 1 Grease Tray
12 2 Grease Tray Bracket
13 1 Poultry Basket w/Stand
14 1 Heat Deflector
15 3 Stacking Baskets
16 1 Bottom Stacking Basket
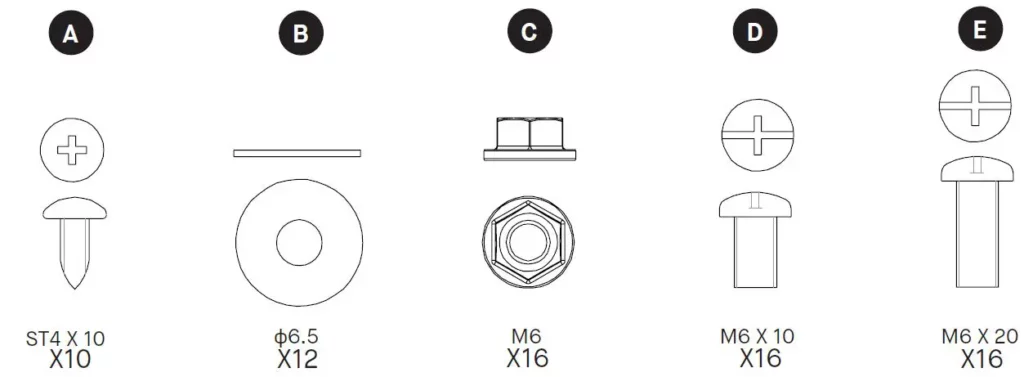
Hardware List

DO NOT RETURN TO RETAILER for assembly assistance, missing or damaged parts. Please contact MASTERBUILT customer service at www.masterbuilt.com/pages/support. Please have the model number and serial number available. These numbers are located on the silver rating label on the appliance.
BEFORE ASSEMBLY READ ALL INSTRUCTIONS CAREFULLY.
- Assemble on a clean flat surface.
- Tools needed: Phillips head screwdriver
- Approximate assembly time: 20 minutes
- Actual product may differ from picture shown.
- It is possible that some assembly steps have been completed in the factory.
Assembly
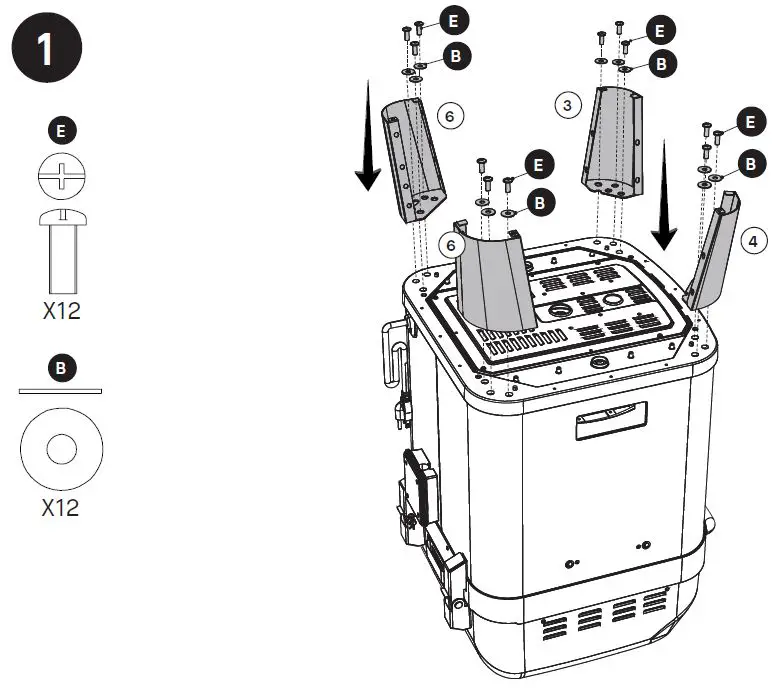
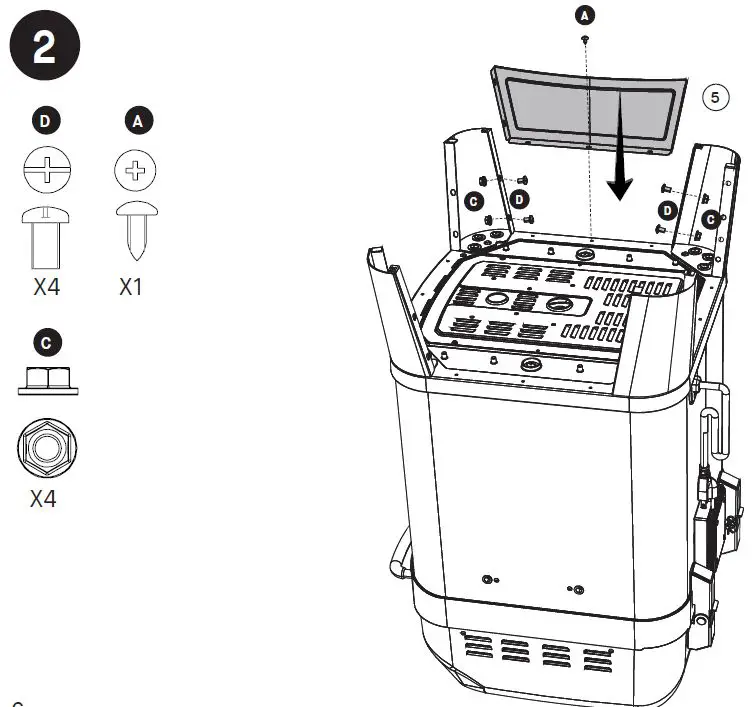
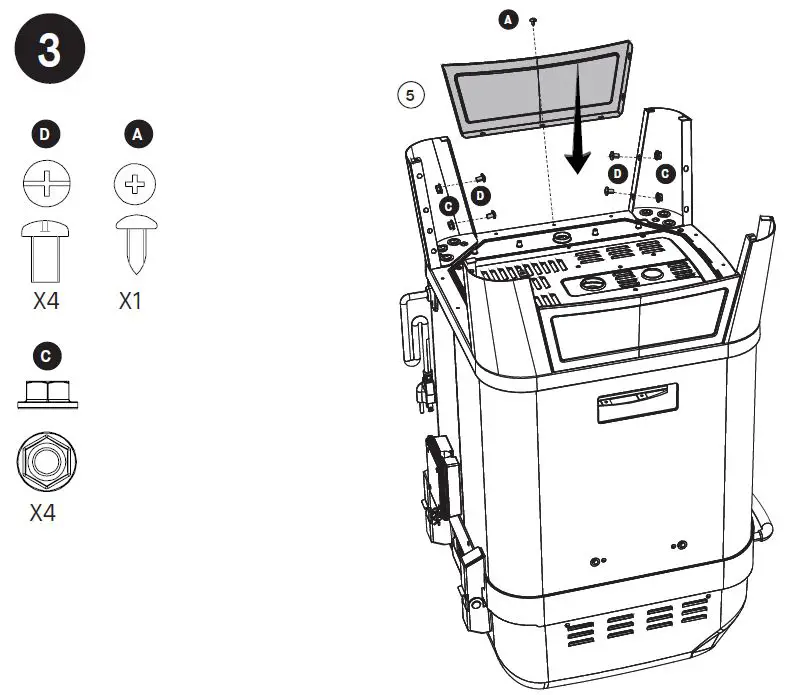
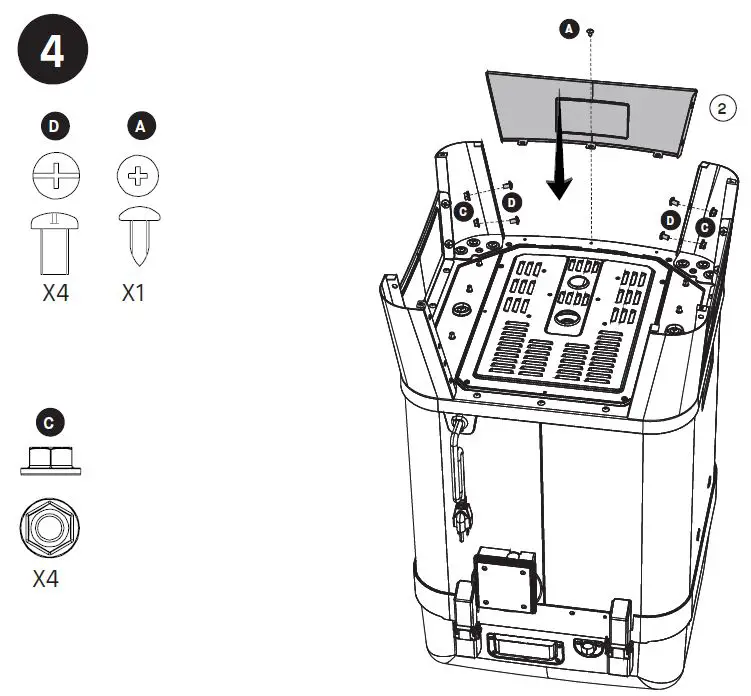
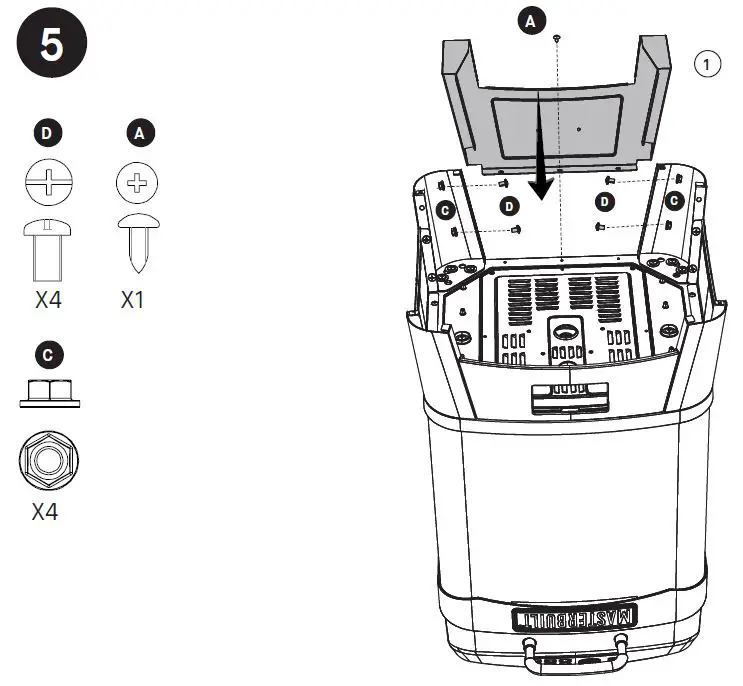
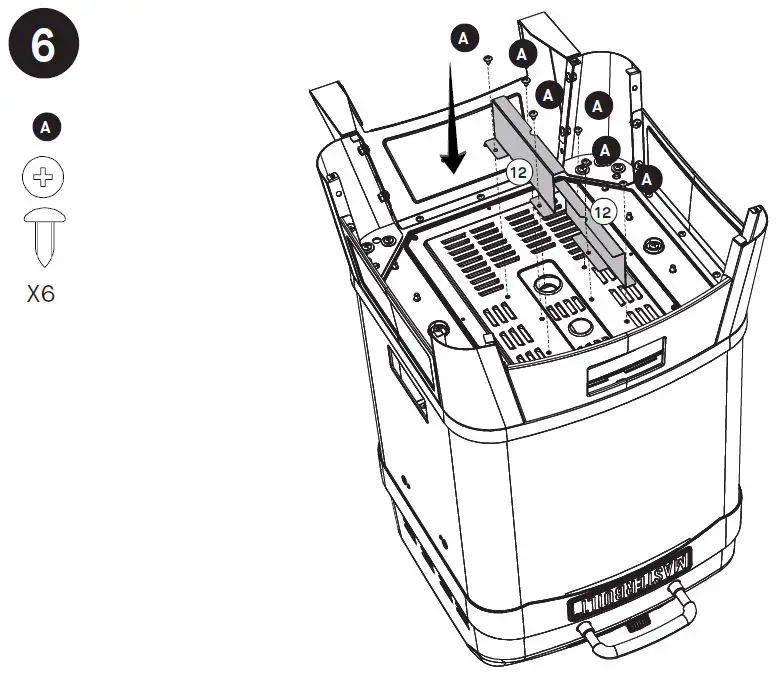
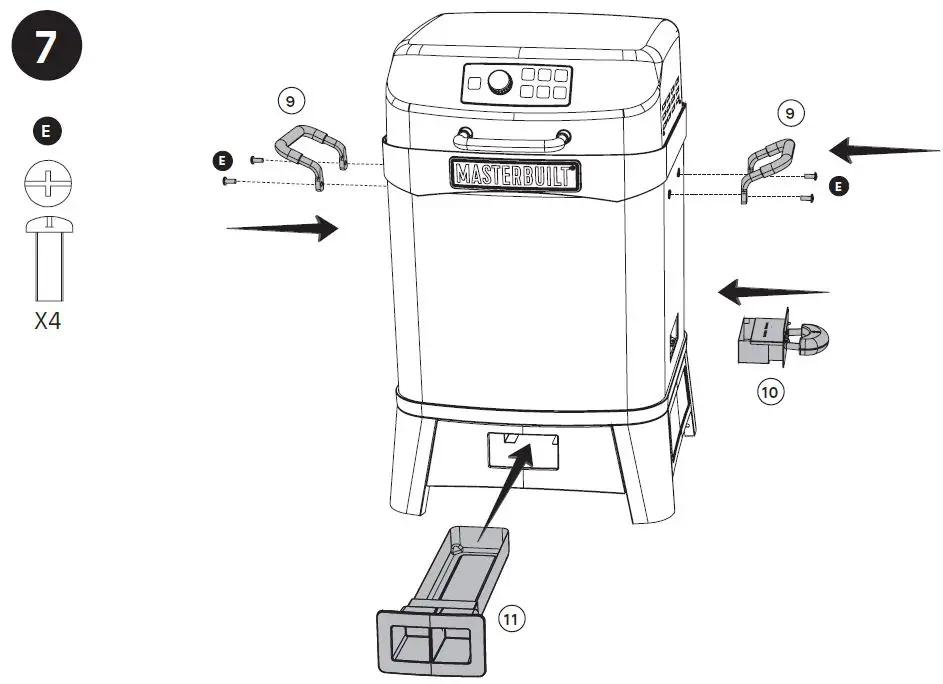
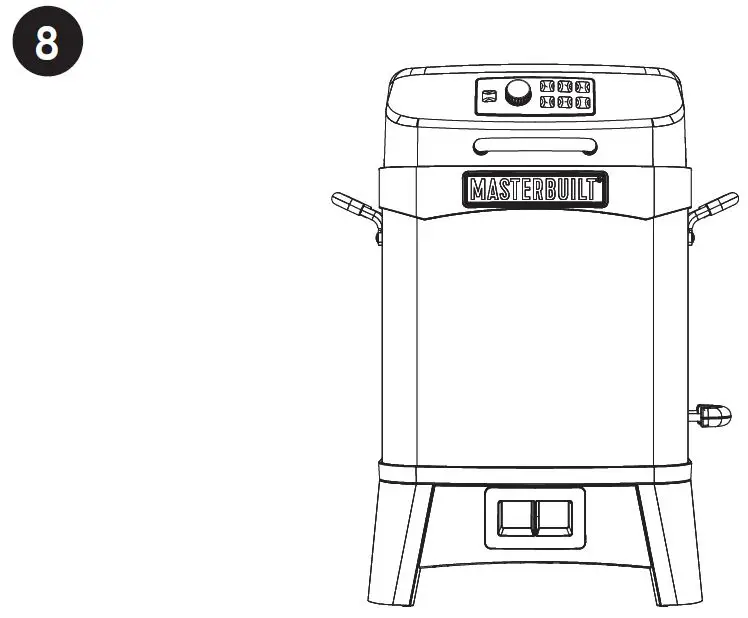
Operating Instructions
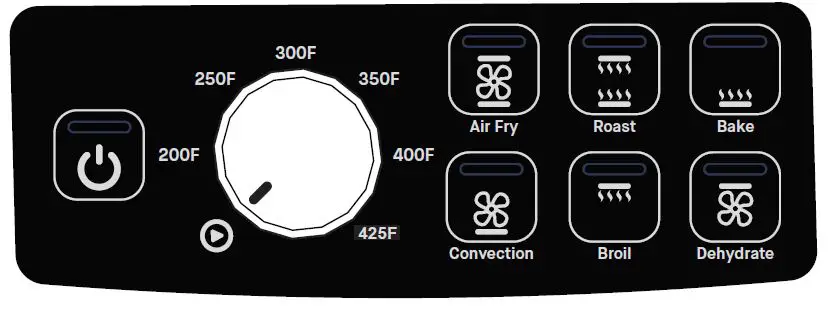
CONTROL PANEL
QUICK START GUIDE
Step 1 – Plug it in
Step 2 – Press the power button (turn it on)
Step 3 – Press the cook function you wish to use
Step 4 – Select your temperature with the control knob
Step 5 – Wait 10 minutes to allow the unit to preheat
COOKING OVERVIEW
- Air Fry:
A. Preset 400F
B. Function does smoke at preset temperature - Roast:
A. Preset 400F
B. Function does smoke at preset temperature - Bake:
A. Preset 400F
B. Function does smoke at preset temperature - Convection:
A. Preset 400F
B. Function does smoke at preset temperature - Broil
A. Preset 425F
B. Function does not smoke at preset temperature - Dehydrate
A. Preset 140F
B. Function does not smoke at preset temperature
WOOD CHIP TRAY
- Before starting unit, place wood chips in wood chip tray.
- Wood chips should stay well below the top rim of wood chip tray. DO NOT use wood chunks.
- Check wood chip tray periodically to see if wood has burned down. Add more chips as needed.
Note: Wood chip tray is hot during use. - Wood chip tray MUST be in place when using outdoor air fryer.
- Do not leave old wood ashes in the wood chip tray. Once ashes are cold, empty tray. Tray should be cleaned out prior to and after each use to prevent ash buildup.
- Should wood chips flare up, immediately close lid, wait for wood chips to burn down. Do not spray with water.
CLEANING AND STORAGE
- Clean unit prior to use.
- After use, turn appliance off, unplug and let cool before cleaning or storing.
- Remove grease tray and wipe thoroughly using mild detergent.
- Clean lid, cooking rack, turkey stand, and basket with a damp cloth or sponge using a mild detergent.
- Clean outer shell, inner lining, cord, and control panel with a damp cloth or sponge using a mild detergent. Dry thoroughly.
- Baskets, stands, heat deflector, grease tray, smoke box, and lifting hook may be cleaned in the dishwasher.
ALWAYS MAKE SURE UNIT IS UNPLUGGED AND COOL TO THE TOUCH BEFORE CLEANING AND STORING.
Shutdown Instructions
Step 1:
Remove food from the air fryer.
Step 2:
Close the lid and press the power button to power the unit down.
Step 3:
Leave the lid closed and the unit plugged in for 5 minutes.
Step 4:
Once the unit has cooled completely, unplug, clean, and store.
Troubleshooting
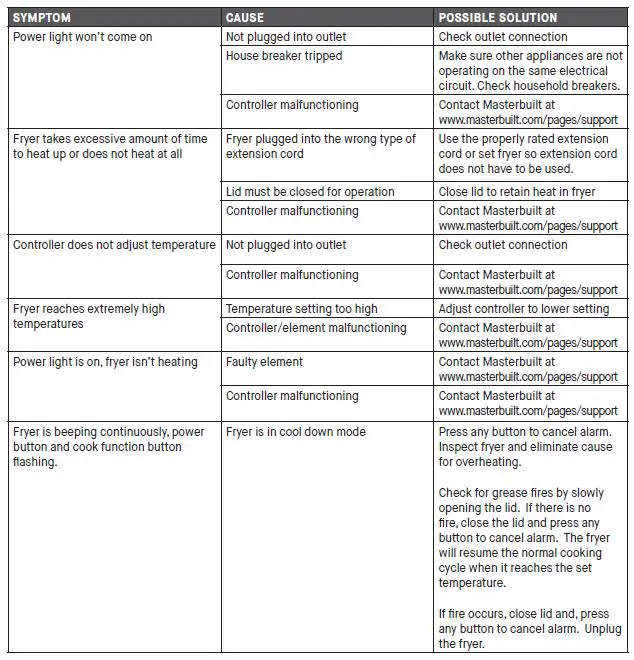
If your air fryer is beeping (10 beeps per minute), and the lights are flashing, you have a TC error. Contact Masterbuilt at www.masterbuilt.com/pages/support
If symptom is not listed here, please contact Masterbuilt at www.masterbuilt.com/pages/support
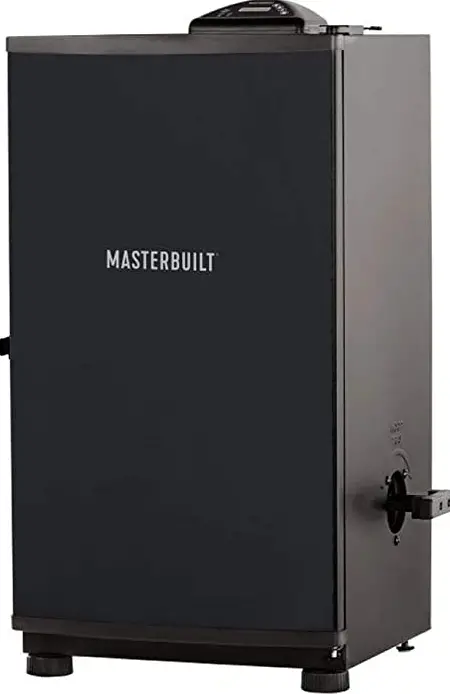
MASTERBUILT MES 130B Digital Electric Smoker

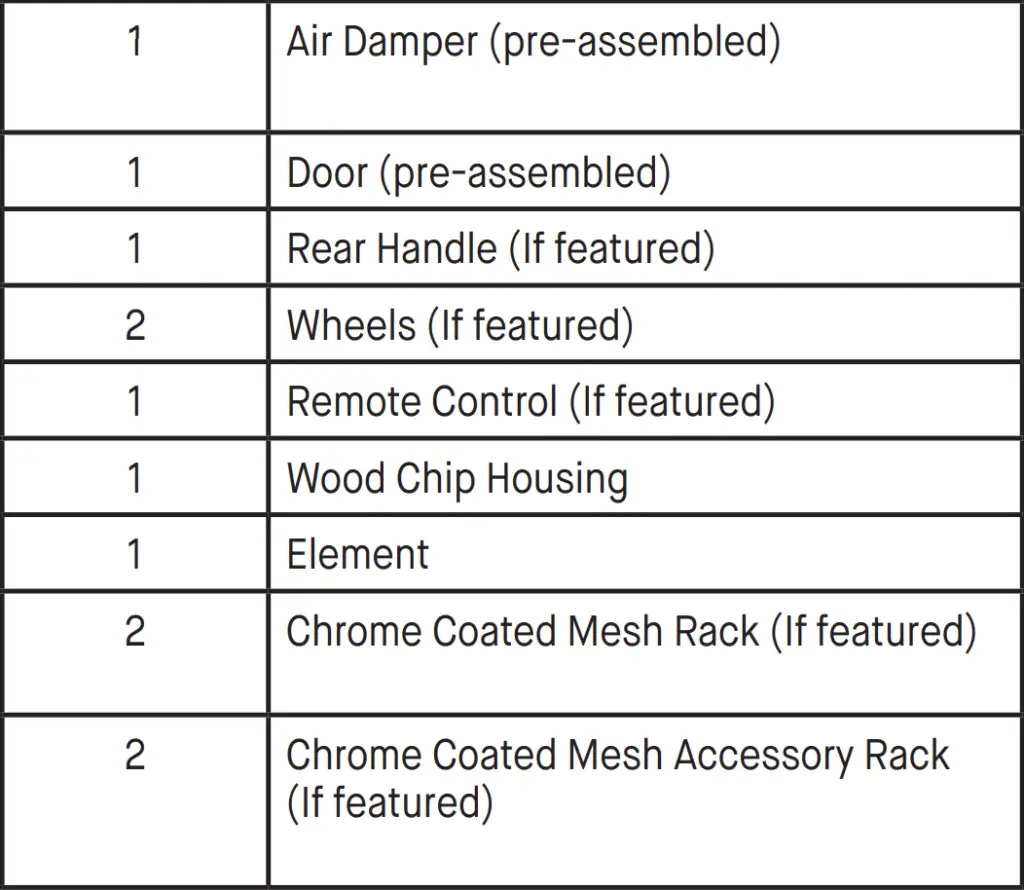
Parts List
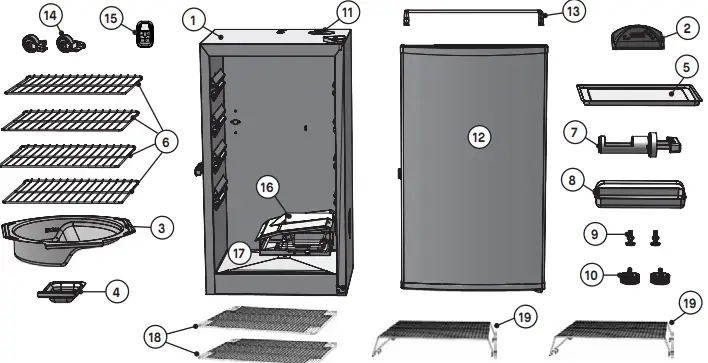
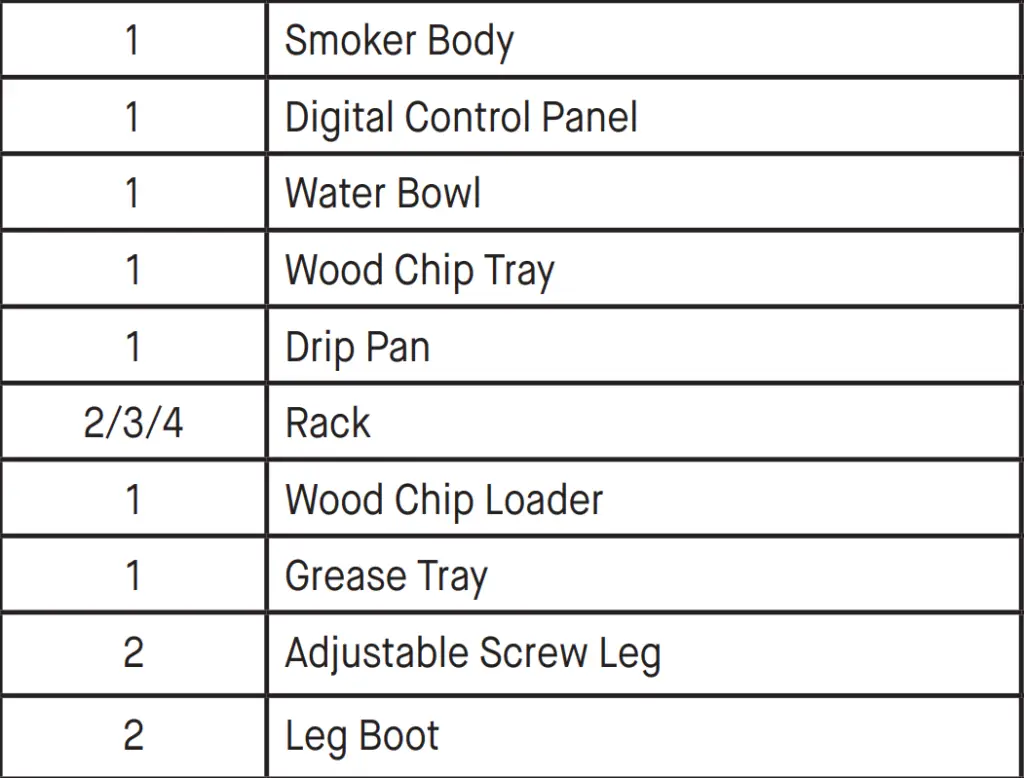
Hardware List
BEFORE ASSEMBLY READ ALL INSTRUCTIONS CAREFULLY.
- Assemble on a clean flat surface.
- Tools needed: Adjustable wrench, Phillips head screwdriver
- Approximate assembly time: 25 minutes
- The actual product may differ from the picture shown.
- It is possible that some assembly steps have been completed in the factory
Assembly
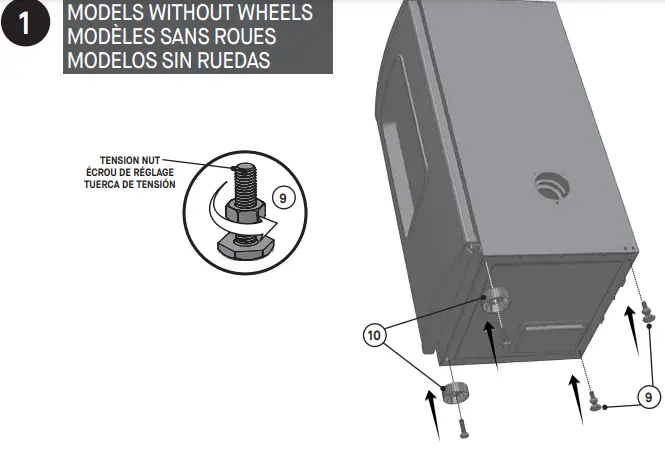
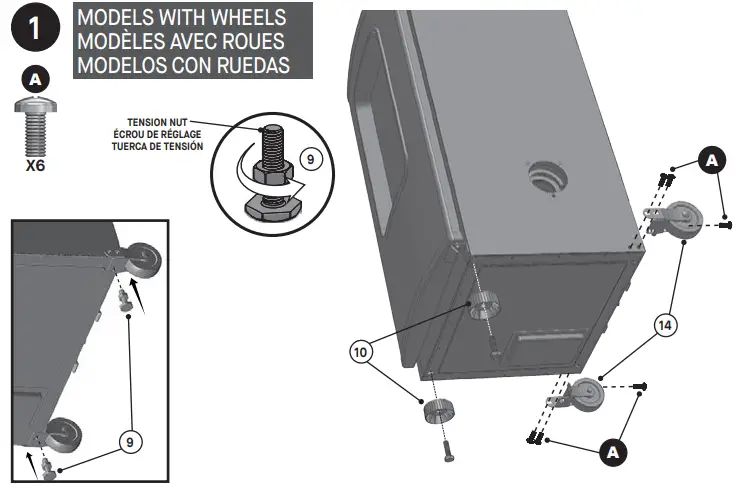
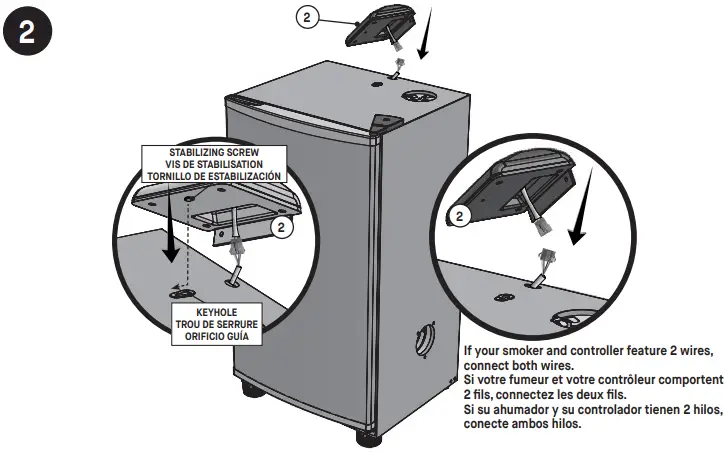
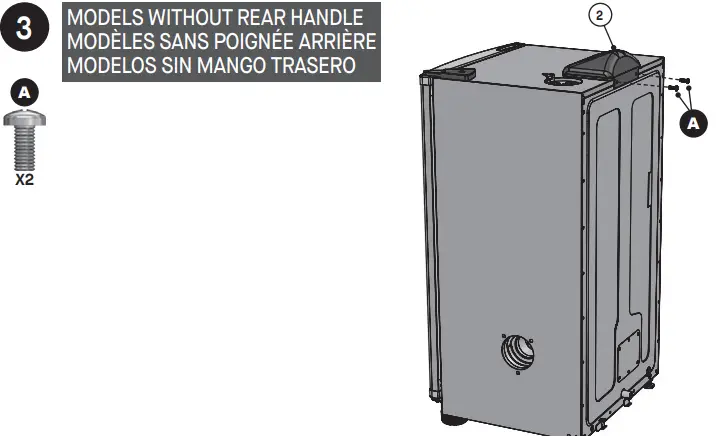
Operating Instructions
CONTROL PANEL
To set temperature:
- Press ON/OFF button.
- Press SET TEMP button once-LED display will blink.
- Use up or down arrows to set temperature. Maximum temperature setting is 275°F (135°C).
- Press SET TEMP button again to lock in temperature.
Note: Heating will not begin until timer is set.
To set timer: - Press SET TIME button once-LED display for hours will blink.
- Use up or down arrows to set hours.
- Press SET TIME button again to lock in hours. The minutes LED will start blinking.
- Use up or down arrows to set minutes.
- Press SET TIME to lock in minutes and start cook cycle. Heat will turn off when time has expired. NOTE: When outside temperature is cooler than 65°F (18°C) and/or altitude is above 3,500 feet (1067m), additional cooking time may be required. To ensure that meat is completely cooked use a meat thermometer to test internal temperature or use meat probe, if featured.
To use meat probe (If featured): - Insert meat probe into center of meat to get most accurate reading.
- Press and hold MEAT PROBE button-LED display will show internal temperature of meat.
- Once MEAT PROBE button is released-LED display will return to set temperature or set time. To use light (If featured):
- Press LIGHT button to turn light on.
- Press LIGHT button to turn light off. To RESET control panel: If control panel displays an error message, turn smoker off and unplug smoker from outlet. Wait ten seconds, plug smoker back into outlet then turn smoker on.
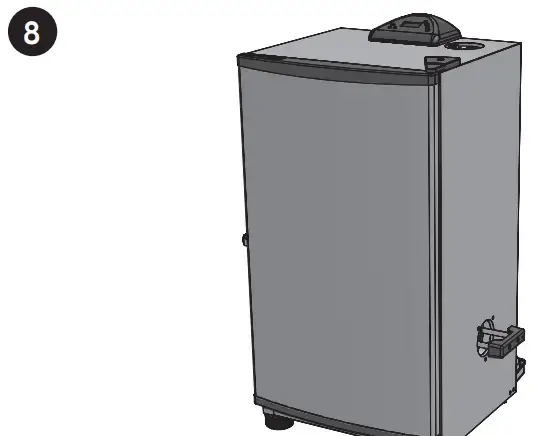
To replace batteries:
- Slide belt clip to the left to remove. Press tab down on battery cover and pull out.
- Install 2 AAA alkaline batteries. Check positive (+) and negative (-) symbols on the case and battery to ensure proper installation. Replace the battery cover.
- Remove batteries before storing remote control.
To test frequency range: - Turn smoker on. Use remote to turn light on and off as you move away from smoker.
- Remote control is out of frequency range when light will no longer turn on and off. Remote control has frequency range of up to 100ft (30m). Test frequency range before and during use. IMPORTANT:
- Do not leave remote control exposed to sunlight for prolonged periods of time.
Troubleshooting
- If the remote is not working properly or not interfacing correctly with the controller, it may be due to weak batteries, incorrect battery installation or the remote is not correctly linked to controller. Possible solutions:
- Replace batteries and install them according to the image in the battery housing.
- Link controller and remote:
- Turn controller and remote ON.
- Press and hold SET TEMP on the controller for 3 seconds.
- On the remote, press MEAT PROBE, LIGHT, MEAT PROBE, LIGHT (all buttons must be pressed within 5 seconds of each other). A short beep will occur after each button is pressed.
REMOTE CONTROL
This device complies with Part 15 of the FCC Rules. Operation is subject to the following two conditions:
- This device may not cause harmful interference, and
- This device must accept any interference received, including interference that may cause undesired operation.
FCC Statment
Warning: Changes or modifications to this smoker not expressly approved by the party responsible for compliance could void the user’s authority to operate the equipment.
FCC Statement
This equipment has been tested and found to comply with the limits for a Class B digital device, pursuant to Part 15 of the FCC Rules. These limits are designed to provide reasonable protection against harmful interference in a residential installation. This equipment generates uses and can radiate radio frequency energy and, if not installed and used in accordance with the instructions, may cause harmful interference to radio communications. However, there is no guarantee that interference will not occur in a particular installation. If this equipment does cause harmful interference to radio or television reception, which can be determined by turning the equipment off and on, the user is encouraged to try to correct the interference by one or more of the following measures:
- Reorient or relocate the receiving antenna.
- Increase the separation between the equipment and receiver.
- Connect the equipment into an outlet on a circuit different from that to which the receiver is connected.
- Consult the dealer or an experienced radio/TV technician for help
PRE-SEASONING
PRE-SEASON SMOKER PRIOR TO FIRST USE. Some smoke may appear during this time, this is normal.
- Make sure water bowl is in place WITHOUT WATER.
- Set temperature to 275°F (135°C) and run smoker for 3 hours.
- . Add 1/2 cup of wood chips to the wood chip loader during the last 45 minutes to complete pre-seasoning.
- Shut down and allow to cool.
LOADING FOOD INTO SMOKER
- Pre-heat smoker for 30 to 45 minutes at desired cooking temperature before loading food.
- DO NOT cover racks with aluminum foil as this will not allow heat to circulate properly.
- Do not overload smoker with food. Extra large amounts of food may trap heat, extend cooking time and cause uneven cooking. Leave space between food on racks and smoker sides to ensure proper heat circulation. If utilizing cooking pans, place pans on center of rack to ensure even cooking.
- Do not open smoker door unless necessary. Opening smoker door causes heat to escape, may extend cooking time, and may cause wood chips to flare up. Closing the door will re-stabilize the temperature and stop flare up.
- There will be a lot of smoke produced when using wood chips. Smoke will escape through seams and turn the inside of smoker black. This is normal. To minimize smoke loss around door, the door latch can be adjusted to further tighten the door seal against the body.
- To adjust door latch, loosen hex nut on door latch. Turn hook clockwise to tighten as shown. Secure hex nut firmly against door latch (see diagram).
- Check grease tray often during cooking. Empty grease tray before it gets full. Grease tray may need to be emptied periodically during cooking.
WOOD CHIP LOADER
- Wood chip loader and wood chip tray MUST be in place when using smoker. This minimizes the chance of wood flare ups.
- Wood chips must be used in order to produce smoke and create the smoke flavor.
- Before starting the smoker, place ½ cup of wood chips in chip loader. Never use more than ½ cup of wood chips at a time. Never use wood chunks or wood pellets.
- Insert wood chip loader into a smoker. Wood chips should be level with top rim of wood chip loader.
- Turn handle clockwise in direction of arrow mark on smoker to unload wood chips. Wood chips will drop into wood chip tray. Turn handle counterclockwise to upright position and leave wood chip loader in place.
- If wood chips do not smoke on low setting, increase the temperature to 275°. After 8 to 10 minutes, or when wood chips begin to smolder, reduce temperature to desired low setting.
- You may use dry or pre-soaked wood chips in your smoker. Dry chips will burn faster and produce more intense smoke. Chips pre-soaked in water (for approximately 30 minutes) will burn slower and produce a less intense smoke.
- Check wood chip tray periodically to see if wood has burned down. Add more chips as needed.
- Do not leave old ashes in the wood chip tray. Once ashes are cold, empty tray. Tray should be cleaned out prior to, and after each use to prevent ash buildup.
WATER BOWL
- Wait until the smoker reaches the desired temperature.
- Fill water bowl to fill line with water or liquids like apple or pineapple juice.
- You may also add slices of fruit, onions or fresh dried herbs into the water to blend different subtle flavors into your smoked food. Tip: For chicken or other foods high in moisture, little or no liquid is needed.
CLEANING AND STORAGE
ALWAYS MAKE SURE THE SMOKER IS COOL TO THE TOUCH BEFORE CLEANING AND STORING.
- Be sure to clean the smoker after each use. This will extend the life of your smoker and prevent mold and mildew.
- For rack supports, racks, water bowl and drip pan use a mild dish detergent. Rinse and dry thoroughly.
- For wood chip tray and wood chip loader, clean frequently to remove ash build up, residue and dust.
- Dispose of cold ashes by placing them in aluminum foil, soaking with water and discarding in a noncombustible container.
- For the interior, glass indoor (if featured), and exterior of smoker, simply wipe down with a damp cloth. Do not use a cleaning agent. Make sure to dry thoroughly.
- After cleaning, store smoker in a covered and dry area.
- Check your smoker periodically to avoid possible rust and corrosion due to moisture buildup.
- Watch a video with step-by-step instructions on how to clean your smoker at www.youtube.com/ Masterbuilt Electric Smokehouse: Cleaning and Storage.
MASTERBUILT MB20100112 Slow Smoker

READ ALL INSTRUCTIONS
- Unit is for OUTDOOR HOUSEHOLD USE ONLY.
- Never use inside enclosed areas such as patios, garages, buildings or tents.
- Never use inside recreational vehicles or on boats.
- ever operate unit under overhead construction such as roof coverings, carports, awnings, or overhangs.
- Never use unit as a heater (READ CARBON MONOXIDE HAZARD).
- Maintain a minimum distance of 10ft (3m) from overhead construction, walls, rails or other structures.
- Keep a minimum 10ft (3m) clearance of all combustible materials such as wood, dry plants, grass, brush, paper, or canvas.
- Keep appliance clear and free from combustible materials such as gasoline and other flammable vapors and liquids.
- Use unit on a level, non-combustible, stable surface such as dirt, concrete, brick or rock.
- Unit MUST be on the ground, or securely attached to smoker with optional bracket. Do not place unit on tables or counters. Do NOT move unit across uneven surfaces.
GENERAL WARNINGS AND SAFETY INFORMATION
- Do not lift unit by lid handle.
- Do not use unit on wooden or flammable surfaces.
- Do not leave unit unattended.
- Keep a fire extinguisher accessible at all times while operating the unit.
- Before each use check all nuts, screws and bolts to make sure they are tight and secure.
- Use of alcohol, prescription or non-prescription drugs may impair user’s ability to properly assemble or safely operate unit.
- eep children and pets away from unit at all times. Do NOT allow children to use unit. Close supervision is necessary when children or pets are in area where unit is being used.
- Do NOT allow anyone to conduct activities around unit during or following use until it has cooled.
- Avoid bumping or impacting unit when in use.
- Never move when attached to the smoker or when the smoker is in use. Allow slow smoker to cool completely (below 115°F (45°C)) before moving or storing.
- The unit is HOT while in use and will remain HOT for a period of time afterward and during the cooling process. Use CAUTION. Wear protective gloves/mitts.
- Do not touch HOT surfaces. Use handles or knobs.
- Accessory attachments not supplied by Masterbuilt Manufacturing, LLC are NOT recommended and may cause injury.
- Chip tube is HOT when unit is in use. Use caution when adding wood.
- Always use unit in accordance with all applicable local, state and federal fire codes.
- Dispose of cold ashes by placing them in aluminum foil, soaking with water and discarding in a non-combustible container.
- Do not store unit with HOT ashes inside unit. Store only when all surfaces are cold.
- Store unit indoors when not in use, out of reach of children.
- Never use slow smokers for anything other than its intended purpose. This unit is not for commercial use.
- Fuel, such as charcoal briquettes, heat pellets, or wood cooking pellets are not to be used in slow smokers.
- When using electrical appliances, basic safety precautions should always be followed including the following:
- Do not plug in slow smoker until fully assembled and ready for use.
- use only approved grounded electrical outlet.
- Do not use during an electrical storm.
- Do not expose slow smokers to rain or water at any time.
- To protect against electrical shock do not immerse the cord, plug or control panel in water or other liquid.
- Do not operate any appliance with a damaged cord or plug, or after the appliance malfunctions or has been damaged in any manner. Contact Masterbuilt Customer Service for assistance at 1-800-489-1581.
- Longer detachable power-supply cords or extension cords are available and may be used if care is exercised in their use.
- f a longer detachable power-supply cord or extension cord is used: 1. The marked electrical rating of the cord set or extension cord should be at least as great as the electrical rating of the appliance;
- nd 2. The cord should be arranged so that it will not drape over the countertop or tabletop where it can be pulled by children or tripped over unintentionally.
- The extension cord must be a grounding-type 3-wire cord.
- Outdoor extension cords must be used with outdoor use products and are marked with suffix “W” and with the statement “Suitable for Use with Outdoor Appliances”.
- CAUTION – To reduce the risk of electric shock, keep the extension cord connection dry and off the ground.
- Do not let cord hang on or touch hot surfaces.
- Do not place on or near a hot gas or electric burner, or in a heated oven.
- To disconnect, turn the switch “OFF” then remove plug from outlet.
- Unplug from outlet when not in use and before cleaning. Allow unit to cool completely before adding/removing wood chip tube.
- Do not clean this product with a water sprayer or the like.
SAVE THESE INSTRUCTIONS
WARNING
SLOW SMOKER DOES NOT COOK FOOD. A SECONDARY PROCESS IS NEEDED TO COOK FOOD BEFORE CONSUMING NOT RECOMMENDED FOR USE DURING EXTREMELY HOT WEATHER CONDITIONS AS A SLOW SMOKER. UNCOOKED FOOD MAY SPOIL IF LEFT OUT IN INCLEMENTLY HOT WEATHER.
CAUTION
When lid is open and chip tube cap is removed a flare-up may occur. Never remove chip cap during use. Wait for wood chips to burn down before adding more chips. Do not spray with water.
MASTERBUILT TIPS FOR SUCCESSFUL SMOKING
- This is a slow smoker… allows sufficient time for cooking.
- The slow smoker is a smoke generating accessory and is intended for use with Masterbuilt® smokers.
- Pre-season the smoker that the slow smoker is attached to prior to first use. See PRE-SEASON INSTRUCTIONS.
- Extreme cold temperatures may extend cooking times.
- CLEAN AFTER EVERY USE. This will extend the life of the unit and prevent mold and mildew.
PRE-SEASON INSTRUCTIONS
- Make sure water pan is in place with NO WATER.
- Set temperature to 275°F (135°C) and run unit for 3 hours.
- To complete pre-seasoning, during last 45 minutes, add ½ cup of wood chips in the wood chip loader and unload wood chips into the wood chip tray. This amount is equal to the contents of a filled wood chip loader.
- Shut down and allow to cool.
NOTE: Never add more than ½ cup (1 filled chip loader) at a time. Additional chips should not be added until any previously added chips have ceased generating smoke.
To the pre-season slow smoker, run unit for 1 hour without wood chips to burn off factory oil.
HOW TO USE CHIP TUBE
- Never use wood chunks.
- Use dry, un-soaked wood chips.
- Before starting unit, place wood chips in a chip tube.
- Wood chips should be below or level with top rim of chip tube.
- Always place chip tube cap on chip tube before smoking.
HOW TO CLEAN AND STORE SMOKER
- Be sure to clean the smoker after each use. Make sure your smoker is unplugged and completely cool.
- Clean wood chip tube and cap frequently to remove ash build-up, residue and dust.
- Dispose of cold ashes by placing them in aluminum foil, soaking with water and discarding in a non-combustible container.
- After cleaning, store the smoker in a covered and dry area.
- When not infrequent use and using a cover, remember to check your smoker periodically to avoid possible rust and corrosion due to moisture buildup.
