 USER MANUAL
KingSlim D2 Dash Cam
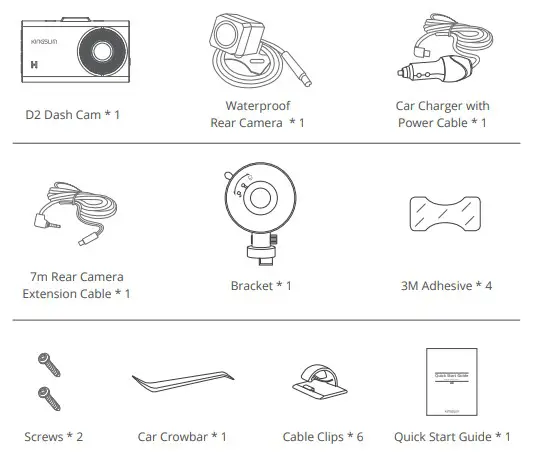
WHAT’S IN THE BOX
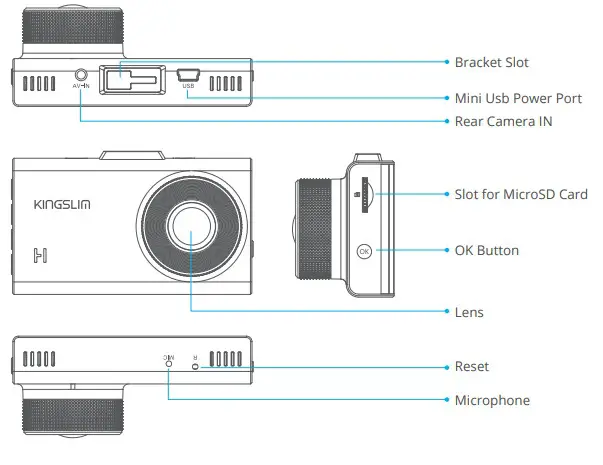
CAMERA OVERVIEW
 Note:
Note:
- Power Button:
Function 1: Press to wake up/turn off the screen.
Function 2: Long press to turn on/off camera. - Down Button: Press to turn on/off audio recording.
- Up Button:
Function 1: Press to take screenshots when it is recording.
Function 2: Long press to switch display modes.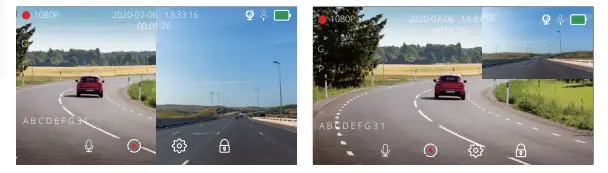
- Menu Button:
Function 1: Press to enter the setup menu mode.
Function 2: Long press to enter the playback menu mode. - OK Button: Press to start or stop recording, long press to start emergency recording.
- Reset: Restore factory settings.
- Mini USB Power Port: Supply power for the machine and charge the internal battery.
INSTALLATION
- Insert the microSD card.
Warm Tips: A Class 10 or above microSD card is highly recommended for a D2 dashcam (microSD card is not included). Please format your card in the camera before using this dashcam.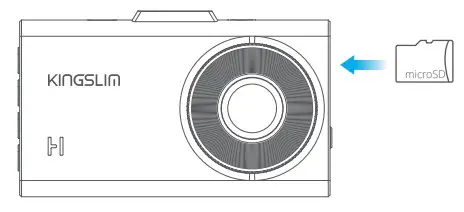
- Insert the bracket into the bracket slot.
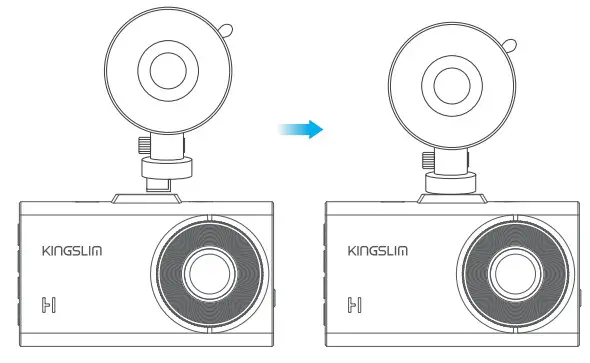
- Install the D2 dash cam on the windshield.
Firstly, clean the windshield with a dry cloth. Secondly, take off the film of the suction cup and press the suction cup onto the windshield to make sure there is no air inside the suction cup, and then rotate to secure the bracket.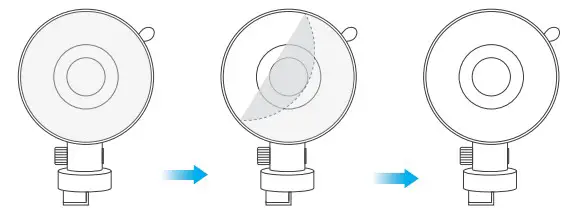
- Adjust the view angle of the dashcam to ensure a good view.
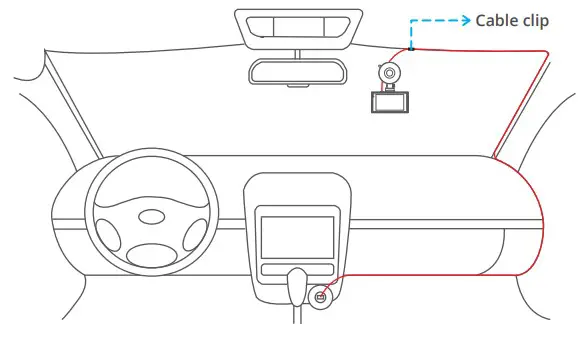
- Connect the USB Power Cable into the USB power port of D2 Dash Cam, then plug the Car Charger in the cigarette lighter in your car.
- Connect the Rear Camera with the Extension Cable into D2 Dash Cam to check whether the Rear Camera works well.
- Install the Rear Camera.
Position 1: Install the Rear Camera on the rear windshield. The installation is easier.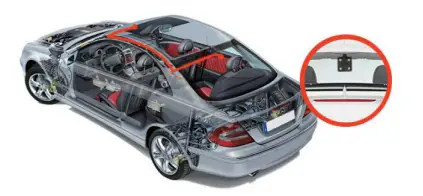 Position 2: Install the Rear Camera near the license plate. Position 2 is highly recommended. The rear image is crisp and clear for both the rear viewing and reversing guide.
 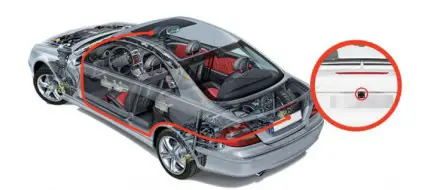 To use the reversing guide function, please install the rear camera in position 2, then connect the red trigger wire of the Rear Camera Extension Cable to the positive lead of the vehicle reversing lamp.
 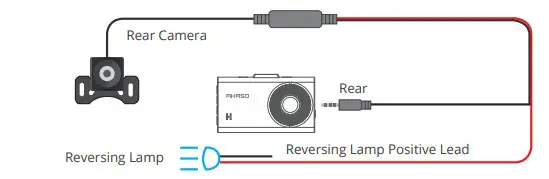 Note:
Note:
① Pay attention to the connector position when connecting the Rear Camera with the Extension Cable, please refer to the below details. ② Please clean the position to ensure the adhesive quality before installing the Rear Camera.
③ Please clean the rear windshield regularly to ensure the image quality if you choose position 1.
④ If you choose position 2, you can install the rear camera with the included adhesive stickers or screws. - Use the crowbar to hide the cables.
FORMATTING THE MICRO SD CARD
FORMATTING THE MICROSD CARD
Please format your microSD card in the camera before using this dashcam.
- Press “
 (menu button)” to enter the Settings page;
 - Press “
 (down button)” to select “Format”, then press the “
  ” button;
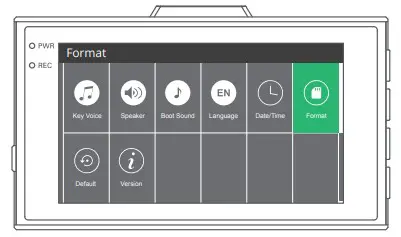
- Select “Confirm” then press the “ ” button

RECORDING
- Press “
 (Power button) to turn on the device, or connect a car charger and start the car engine, the device will start automatically.
 - Every time you exit from the setting menu or playback menu, the device will be in the automatic recording mode. If you want to stop it, please press “ ”.
ICON INTRODUCTION
The main interface![]()
| 1.Recording indicator 2.Video resolution 3.Date/Time 4.Video time 5.Rear cam status 6.Microphone indicator 7.Power status 8.Video lock 9.Settings |
10.Video recording 11.Audio recording 12.Emergency recording 13.License Plate 14.Parking guard 15.G-Sensor 16.Front cam recording interface 17.Rear cam recording interface |
Note:
The emergency recording status bar appears on the screen only when it is in the emergency recording mode.
SETUP MENU
Press “ ![]() (menu button)” to enter the dash camera setting menu.
(menu button)” to enter the dash camera setting menu.
Press “![]() ” or “ ” to select functions. Press “
” or “ ” to select functions. Press “![]() ” to confirm your selection.
” to confirm your selection.
The device stops recording when setting up the dashcam.
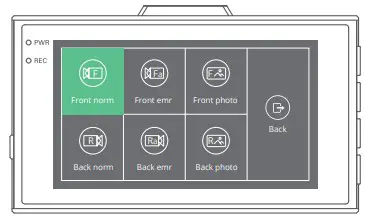
 Back
Back
Select “Back” and press “![]() ” to return to the main interface.
” to return to the main interface.
Resolution
Select “Resolution” and press “![]() ” to select the recording resolution of
” to select the recording resolution of
“2K+1080P” or “1080P+1080P”.
Loop Record
Select “Loop Record” and press “ ![]() ”. Press “
”. Press “ ![]() ” or “
” or “ ![]() ” to select the duration of the individually recorded video files, and press “
” to select the duration of the individually recorded video files, and press “ ![]() ” to save and exit. The oldest file will be automatically overwritten when the microSD card is full. Options: 1Min, 3Mins and 5Mins Default Setting: 3Mins
” to save and exit. The oldest file will be automatically overwritten when the microSD card is full. Options: 1Min, 3Mins and 5Mins Default Setting: 3Mins
Record Audio
Select “Record Audio” and press “ ![]() ”. Press “
”. Press “ ![]() ” to turn on or off the microphone,
” to turn on or off the microphone,
and press “![]() ” to exit.
” to exit.
Options: ON and OFF
Default Setting: ON
G-Sensor
Select “G-Sensor” and press “![]() ”. Press “
”. Press “ ![]() ” or “
” or “![]() ” to turn off or adjust the sensitivity of the built-in G- sensor, and press “ ” to save and exit. When the G-Sensor is turned on, if an impact or sudden braking is detected, it will automatically start recording and save footage to either the “front emr” folder or “back emr” folder. The higher the G-sensor’s sensitivity level, the easier to trigger the emergency recording.
” to turn off or adjust the sensitivity of the built-in G- sensor, and press “ ” to save and exit. When the G-Sensor is turned on, if an impact or sudden braking is detected, it will automatically start recording and save footage to either the “front emr” folder or “back emr” folder. The higher the G-sensor’s sensitivity level, the easier to trigger the emergency recording.
Options: OFF, Low, Middle, and High
Default Setting: LOW
Parking Guard
Select “Parking Guard” and press “ ![]() ”. Press “
”. Press “![]() ” or “
” or “![]() ” to turn off or adjust the sensitivity of the parking mode, and press “
” to turn off or adjust the sensitivity of the parking mode, and press “![]() ” to save and exit. The higher level you select, the more likely the dashcam will activate the 20s video recording. If the parking mode is turned off, the device will not be turned on.
” to save and exit. The higher level you select, the more likely the dashcam will activate the 20s video recording. If the parking mode is turned off, the device will not be turned on.
Options: OFF, Low, Middle, and High
Default Setting: OFF
License
Select “License” and press “ ![]() ”. Press “
”. Press “ ![]() ” or “
” or “![]() ” to choose your license plate number, and press “
” to choose your license plate number, and press “ ![]() ” to confirm. After finishing, choose Confirm and press “
” to confirm. After finishing, choose Confirm and press “ ![]() ”.
”.
Screen Saver
Select “Screen Saver” and press “ ![]() ”. Press “
”. Press “![]() ” or “
” or “ ![]() ” to change the screen saver time, press “ ” to save and exit.
” to change the screen saver time, press “ ” to save and exit.
Options: OFF, 1Min, and 3Mins
Default Setting: 1Min
Video Encode
Select “Video Encode” and press “![]() ”. Press “
”. Press “![]() ” to switch video encode modes. Note: H.265 can minimize the footage size, you can store more video files in the memory card. H.264 has better compatibility.
” to switch video encode modes. Note: H.265 can minimize the footage size, you can store more video files in the memory card. H.264 has better compatibility.
Options: H.264 and H.265
Default Setting: H.265
Frequency
Select “Frequency” and press “![]() ”. Press “
”. Press “ ![]() ” to switch frequency, “60Hz” or “50Hz”. The default setting is “60Hz”. To avoid interference, please choose the right frequency based on your local AC parameters.
” to switch frequency, “60Hz” or “50Hz”. The default setting is “60Hz”. To avoid interference, please choose the right frequency based on your local AC parameters.
USB Mode
Select “USB Mode” and press “ ![]() ”. Press “
”. Press “![]() ” or “
” or “![]() ” to choose “STORAGE/UVC /CHARGE”, and press “
” to choose “STORAGE/UVC /CHARGE”, and press “![]() ” to save and exit.
” to save and exit.
Storage: The device could be connected to a computer via a USB cable to copy and transfer files to/from a computer.
UVC: USB video class. The device could be connected to a computer via a USB cable as a computer camera.
CHARGE: Charging the dashcam.
Mirror Image
Select “Mirror Image” and press “![]() ”. Press “
”. Press “ ![]() ” to turn on or off mirror image. This function is for the rear camera. The rear camera video is flipped horizontally in the main recording interface, like looking in the mirror.
” to turn on or off mirror image. This function is for the rear camera. The rear camera video is flipped horizontally in the main recording interface, like looking in the mirror.
Options: ON and OFF
Default Setting: ON
Key Voice
Select “Key Voice” and press “ ![]() ”. Press “
”. Press “ ![]() ” to turn on or off the key sound.
” to turn on or off the key sound.
Options: ON and OFF
Default Setting: ON
Speaker
Select “Speaker” and press “![]() ”. Press “
”. Press “ ![]() ” or “
” or “![]() ” to adjust speaker volume.
” to adjust speaker volume.
Options: Mute, Low, Middle, and High
Default Setting: High
Boot Sound
Select “Boot Sound” and press “![]() ”. Press “
”. Press “ ![]() ” to turn on or off boot sound.
” to turn on or off boot sound.
Options: ON and OFF
Default Setting: ON
Language
Select “Language” and press “ ![]() ”. Press “
”. Press “![]() ” or “
” or “ ![]() ” to change a language, and press “
” to change a language, and press “![]() ” to save and exit.
” to save and exit.
Options: English, French, German, Italian, Japanese, Spanish, etc.
Default Setting: English
Date/Time
Select “Date/Time” and press “![]() ”. Press “
”. Press “![]() ” or “
” or “ ![]() ” to adjust the date and time, press “
” to adjust the date and time, press “ ![]() ” to confirm, after finishing, choose Confirm and press “
” to confirm, after finishing, choose Confirm and press “ ![]() ”.
”.
Format
Every time you insert a new microSD card, please format the card in the dashcam to ensure better compatibility with the camera. Select “Format” and press “ ![]() ”, choose “Confirm” and press “
”, choose “Confirm” and press “![]() ”.
”.
Default
Select “Default” and press “ ![]() ”, choose “Confirm” and press “
”, choose “Confirm” and press “ ![]() ”, and then dash cam will be restored to factory settings.
”, and then dash cam will be restored to factory settings.
Version
Select “Default” and press “ ![]() ” to check the camera’s version. Press “
” to check the camera’s version. Press “ ![]() ” to exit.
” to exit.
PLAYBACK MENU
Use this mode to view and manage photos and videos. Long press “![]() ” to enter the playback menu. Use the Up and Down buttons to scroll through the recorded video/photo files. The device is not recording when it is in the Playback menu.
” to enter the playback menu. Use the Up and Down buttons to scroll through the recorded video/photo files. The device is not recording when it is in the Playback menu.  View the videos/photos
- Press “ ” to enter the files.
- Use the Up and Down buttons to choose which video/photo you want to view.
- Press “ ” to play the video/photo.
- Long press “ ” to exit
Delete the videos/photos
Press “ ![]() ” to switch from “Folder Name”, “Select All”, “Delete”, and “Return”.
” to switch from “Folder Name”, “Select All”, “Delete”, and “Return”.
- Select All: Press “ ” to select all videos/photos. If you want to choose a few videos/ photos, press “
 ” and use the Up and Down buttons to scroll through the recorded video/photo, press “” to deselect.
 - Press “ ” and press “
 ” to choose “
 ”.
”. - Press “ ” and press “ ” to choose “Confirm”.
Return to the playback menu
Press “ ![]() ” and press “
” and press “![]() ”. Or press “
”. Or press “![]() ”, use “
”, use “![]() ” to choose “
” to choose “ ![]() “ and press “
“ and press “ ![]() ”.
”.
Return to the recording menu
Press “ ![]() ” to choose “Back” and press “
” to choose “Back” and press “ ![]() ” to exit.
” to exit.
SPECIFICATIONS
- Front Camera: 5MP, f/1.6, 170° FOV
- Rear Camera: 2MP, f/2.0, 170° FOV
- Video: 2.5K@25fps + 1080P@30fps
- Screen: 3-inch IPS Display
- Video Coding: H.264/H.265
- Input: 5V DC
- Size: 85mm*48mm*17mm
- Weight: 104.9g
- Working Temperature: -20°C~60°C
TROUBLESHOOTING
If your dashcam does not appear to be operating properly, please follow these troubleshooting steps:
- Cannot record
① Check whether your microSD card has enough space. Please format the microSD card after use.
② Check if the loop recording in the setting menu is set to OFF.
Set “Loop Record” to 3 MINS. - When it is recording, it will stop automatically
At the time of recording, a large amount of high-definition video data are processed. Please use a high-speed MicroSD card of Class 10 or higher. - A “File Error” prompt appears when you playback your pictures and videos Please use a genuine MicroSD card. Please format the microSD card.
- The image is misty
Ensure there is no fingerprints or dirty on the camera lens, and use a soft and dry cloth to clean the lens. Clean the front windshield. - Crash
After the crash, use a sharp object to press the reset button to restart the device.
PRECAUTIONS
- Please place it in a secure place and prevent the lens from scratches and dirt.
- Do not expose the device to rain, moisture, or water under any circumstance.
- Avoid leaving the device in direct sunlight for extended periods of time.
- Do not dismantle or expose the internal battery.
CONTACT US
For any inquiries with KingSlim products, please feel free to contact us, we will
respond within 24 hours.
E-mail: [email protected]
Tel: 888-811-1140 (US) Mon-Fri (except holiday) 9am-5pm (EST)
Official website: www.kingslim.net
microSD and the microSD logo are trademarks of SD-3C, LLC.