CD Receiver
KDC-X303 KDC-BT375U KDC-BT350U
KDC-BT33 KDC-BT275U KDC-BT23
CD-RECEIVER
Quick Start Guide
AMPLI-TUNER LECTEUR DE CD
ENGLISH
KDC-MP375BT KMR-D375BT
For detailed operations and information, refer to the INSTRUCTION MANUAL on the following website:
For your records Record the serial number, found on the back of the unit, in the spaces designated on the warranty card, and in the space provided below. Refer to the model and serial numbers whenever you call upon your Kenwood dealer for information or service on the product. Model KDC-X303/KDC-BT375U/KDC-BT350U/KDC-BT33/KDC-BT275U/KDC-BT23/KDC-MP375BT/KMR-D375BT Serial number
US Residents Only
Register Online Register your Kenwood product at http://www.kenwood.com/usa/
© 2018 JVC KENWOOD Corporation
<www.kenwood.com/cs/ce/>
B5K-0553-10 [KN]
CAUTION Use of controls or adjustments or performance of procedures other than those specified herein may result in hazardous radiation exposure. In compliance with Federal Regulations, following are reproductions of labels on, or inside the product relating to laser product safety.
JVC KENWOOD Corporation 2967-3, ISHIKAWA-MACHI, HACHIOJI-SHI, TOKYO, JAPAN
THIS PRODUCT COMPLIES WITH DHHS RULES 21CFR SUBCHAPTER J IN EFFECT AT DATE OF MANUFACTURE.
Location : Top Plate
FCC WARNING
This equipment may generate or use radio frequency energy. Changes or modifications to this equipment may cause harmful interference unless the modifications are expressly approved in the instruction manual. The user could lose the authority to operate this equipment if an unauthorized change or modification is made.
FCC NOTE
This equipment has been tested and found to comply with the limits for a Class B digital device, pursuant to Part 15 of the FCC Rules. These limits are designed to provide reasonable protection against harmful interference in a residential installation. This equipment may cause harmful interference to radio communications, if it is not installed and used in accordance with the instructions. However, there is no guarantee that interference will not occur in a particular installation. If this equipment does cause harmful interference to radio or television reception, which can be determined by turning the equipment off and on, the user is encouraged to try to correct the interference by one or more of the following measures:
- Reorient or relocate the receiving antenna.
- Increase the separation between the equipment and receiver.
- Connect the equipment into an outlet on a circuit different from that to which the receiver is connected.
- Consult the dealer or an experienced radio/TV technician for help.
Supplier’s Declaration of Conformity Trade Name: KENWOOD Products: CD RECEIVER Model Name: KDC-X303/KDC-BT375U/KDC-BT350U/KDC-BT33/KDC-BT275U/ KDC-BT23/KDC-MP375BT/KMR-D375BT
Responsible Party: JVCKENWOOD USA CORPORATION 2201 East Dominguez Street, Long Beach, CA 90810, U.S.A. PHONE: 310 639-9000
THIS DEVICE COMPLIES WITH PART 15 OF THE FCC RULES. OPERATION IS SUBJECT TO THE FOLLOWING TWO CONDITIONS: (1) THIS DEVICE MAY NOT CAUSE HARMFUL INTERFERENCE, AND (2) THIS DEVICE MUST ACCEPT ANY INTERFERENCE RECEIVED, INCLUDING INTERFERENCE THAT MAY
CAUSE UNDESIRED OPERATION.
IC (Industry Canada) Notice This device complies with Industry Canada’s licence-exempt RSSs. Operation is subject to the following two conditions: (1) This device may not cause interference; and (2) This device must accept any interference, including interference that may cause undesired
operation of the device.
Contains Bluetooth Module FCC ID: IC ID:
ZWY8811X 12033A-8811X
This transmitter must not be co-located or operated in conjunction with any other antenna or transmitter.
CAUTION This equipment complies with FCC/IC radiation exposure limits set forth for an uncontrolled environment and meets the FCC radio frequency (RF) Exposure Guidelines and RSS-102 of the IC radio frequency (RF) Exposure rules. This equipment has very low levels of RF energy that it deemed to comply without maximum permissive exposure evaluation (MPE). But it is desirable that it should be installed and operated keeping the radiator at least 20cm or more away from person’s body.
ATTENTION
SOFTWARE LICENSE AGREEMENT
The software embedded in the Product (hereinafter the “Licensed Software”) provided by Licensor is copyrighted to or sublicensable by the Licensor, and this Agreement provides for the terms and conditions which Users shall follow in order to use the Licensed Software.
The User shall use the Licensed Software by agreeing with the terms of this Software License Agreement. This Agreement shall be deemed completed at the time the User (hereinafter the “User”) initially used the Product in which the “Licensed Software” is embedded.
The Licensed Software may include the software which has been licensed to the Licensor directly or indirectly from any third party. In such case, some third parties require the Users to follow their conditions for use separately from this Software License Agreement. Such software shall not be subject to this Agreement, and the Users are urged to read the “Important Notice concerning the Software” to be provided separately below.
Article 1 General Provision
The Licensor shall grant to the User a non-exclusive and non-transferable (other than the exceptional case referred to in Article 3, Paragraph 1) licensed to use the Licensed Software within the country of the User. (the country where the User bought the Product (hereinafter the “Country”)
Article 2 License
- The license granted under this Agreement shall be the right to use the Licensed Software in the Product.
- The User shall not duplicate, copy, modify, add, translate or otherwise alter, or lease the Licensed Software and any related documents, whether in whole or in part.
- The use of the Licensed Software shall be limited to personal purpose, and the Licensed Software shall not be distributed, licensed or sub-licensed whether it is for commercial purpose or not.
- The User shall use the Licensed Software according to the directions described in the operation manual or help file, and is prohibited to use or duplicate any data in a manner violating the Copyright Law or any other laws and regulations by applying whole or a part of the Licensed Software.
Article 3 Conditions for Grant of License
- When the User transfers the Product, it may also transfer the license to use the Licensed Software embedded in the Product (including any related materials, updates and upgrades) on condition that no original, copies or related materials continue in the possession of the User, and that the User shall cause the transferee to comply with this Software License Agreement.
- The User shall not carry out reverse engineering, disassembling, decompiling or any other code analysis works in connection with the Licensed Software.
Article 4 Right pertaining to the Licensed Software
Any and all copyrights and other rights pertaining to the Licensed Software and related documents shall belong to the Licensor or the original holder of the right who granted to the Licensor the license or sublicense for the Licensed Software (hereinafter the “Original Rightholder”), and the User shall not be entitled to any right other than the license granted hereunder, in respect of the Licensed Software and any related documents.
Article 5 Indemnification of Licensor
- Neither the Licensor nor the Original Rightholder shall be liable for any damage incurred by the User or any third party due to the exercise of the license granted to the User under this Agreement, unless otherwise restricted by law.
- The Licensor will offer no guarantee for the merchantability, convertibility and consistency with certain objective of the Licensed Software.
Article 6 Liability to Third Party
If any dispute has arisen with any third party due to an infringement upon a copyright, patent or any other intellectual property right that was caused by the User’s use of the Licensed Software, the User shall settle such dispute at its own cost and hold the Licensor and the Original Rightholder harmless from any inconvenience it may cause.
Article 7 Confidentiality
The User shall keep the confidentiality of such portion of the Licensed Software, related documents thereof or any other information to be granted under this Agreement, as well as the conditions of this Agreement as has not yet entered the public domain, and shall not disclose or divulge the same to any third party without approval of the Licensor.
Article 8 Termination
In case the User falls under any of the events described in the following items, the Licensor may immediately terminate this Agreement or claim that the User compensates for the damage incurred by the Licensor due to such event: (1) when the User violated any provision of this Agreement; or (2) when a petition has been filed against the User for an attachment, provisional attachment, provisional disposition or any other compulsory execution.
Article 9 Destruction of the Licensed Software
If this Agreement is terminated pursuant to the provision of Article 8, the User shall destroy the Licensed Software, any related documents and copies thereof within two (2) weeks from such date of termination.
Article 10 Protection of Copyright
1. The copyright and all the other intellectual property rights relating to the Licensed Software shall belong to the Licensor and the Original Rightholder, and in no event shall they be under the ownership of the User.
2. The User shall, whenever it uses the Licensed Software, comply with any laws relating to the copyright and other intellectual property rights.
Article 11 Export Restriction
1. It is prohibited to export the Licensed Software and any related documents outside the country of the User (including transmission thereof outside the country of the User via Internet of other communication tools).
2. The User shall understand that the Licensed Software shall be subject to the export restrictions adopted by the country of User and any other countries.
3. The User shall agree that the software will be subject to any and all applicable international and domestic laws (including the export control regulation of the country of User and any other countries, and any restrictions concerning the end-users, the use by end-users and importing countries to be provided by the country of User and any other countries, and any other governmental authorities).
Article 12 Miscellaneous
1. In the event any part of this Agreement is invalidated by operation of law, the residual provisions shall continue in force.
2. Matters not stipulated in this Agreement or any ambiguity or question raised in the construction of this Agreement shall be provided or settled upon good-faith consultation between the Licensor and the User.
3. The Licensor and the User hereby agree that this Agreement is governed by the laws of Japan, and any dispute arising from, and relating to the rights and obligations under, this Agreement shall be submitted to the exclusive jurisdiction of the Tokyo District Court for its first instance.
Important Notice concerning the Software
-jansson
Copyright (c) 2009-2012 Petri Lehtinen <[email protected]>
Permission is hereby granted, free of charge, to any person obtaining a copy of this software and associated documentation files (the “Software”), to deal in the Software without restriction, including without limitation the rights to use, copy, modify, merge, publish, distribute, sublicense, and/ or sell copies of the Software, and to permit persons to whom the Software is furnished to do so, subject to the following conditions:
The above copyright notice and this permission notice shall be included in all copies or substantial portions of the Software.
THE SOFTWARE IS PROVIDED “AS IS”, WITHOUT WARRANTY OF ANY KIND, EXPRESS OR IMPLIED, INCLUDING BUT NOT LIMITED TO THE WARRANTIES OF MERCHANTABILITY, FITNESS FOR A PARTICULAR PURPOSE AND NONINFRINGEMENT. IN NO EVENT SHALL THE AUTHORS OR COPYRIGHT HOLDERS BE LIABLE FOR ANY CLAIM, DAMAGES OR OTHER LIABILITY, WHETHER IN AN ACTION OF CONTRACT, TORT OR OTHERWISE, ARISING FROM, OUT OF OR IN CONNECTION WITH THE SOFTWARE OR THE USE OR OTHER DEALINGS IN THE SOFTWARE.
-cJSON
Copyright (c) 2009 Dave Gamble
Permission is hereby granted, free of charge, to any person obtaining a copy of this software and associated documentation files (the “Software”), to deal in the Software without restriction, including without limitation the rights to use, copy, modify, merge, publish, distribute, sublicense, and/ or sell copies of the Software, and to permit persons to whom the Software is furnished to do so, subject to the following conditions:
The above copyright notice and this permission notice shall be included in all copies or substantial portions of the Software.
THE SOFTWARE IS PROVIDED “AS IS”, WITHOUT WARRANTY OF ANY KIND, EXPRESS OR IMPLIED, INCLUDING BUT NOT LIMITED TO THE WARRANTIES OF MERCHANTABILITY, FITNESS FOR A PARTICULAR PURPOSE AND NONINFRINGEMENT. IN NO EVENT SHALL THE AUTHORS OR COPYRIGHT HOLDERS BE LIABLE FOR ANY CLAIM, DAMAGES OR OTHER LIABILITY, WHETHER IN AN ACTION OF CONTRACT, TORT OR OTHERWISE, ARISING FROM, OUT OF OR IN CONNECTION WITH THE SOFTWARE OR THE USE OR OTHER DEALINGS IN THE SOFTWARE.
-CMP
The MIT License (MIT) Copyright (c) 2014 Charles Gunyon
Permission is hereby granted, free of charge, to any person obtaining a copy of this software and associated documentation files (the “Software”), to deal in the Software without restriction, including without limitation the rights to use, copy, modify, merge, publish, distribute, sublicense, and/ or sell copies of the Software, and to permit persons to whom the Software is furnished to do so, subject to the following conditions:
The above copyright notice and this permission notice shall be included in all copies or substantial portions of the Software.
THE SOFTWARE IS PROVIDED “AS IS”, WITHOUT WARRANTY OF ANY KIND, EXPRESS OR IMPLIED, INCLUDING BUT NOT LIMITED TO THE WARRANTIES OF MERCHANTABILITY, FITNESS FOR A PARTICULAR PURPOSE AND NONINFRINGEMENT. IN NO EVENT SHALL THE AUTHORS OR COPYRIGHT HOLDERS BE LIABLE FOR ANY CLAIM, DAMAGES OR OTHER LIABILITY, WHETHER IN AN ACTION OF CONTRACT, TORT OR OTHERWISE, ARISING FROM, OUT OF OR IN CONNECTION WITH THE SOFTWARE OR THE USE OR OTHER DEALINGS IN THE SOFTWARE.
INSTALLATION/CONNECTION
Warning
- The unit can only be used with a 12 V DC power supply, negative ground.
- Disconnect the battery’s negative terminal before wiring and mounting.
- Do not connect Battery wire (yellow) and Ignition wire (red) to the car
chassis or Ground wire (black) to prevent a short circuit. - To prevent short circuit:
Insulate unconnected wires with vinyl tape. Be sure to ground this unit to the car’s chassis again after installation. Secure the wires with cable clamps and wrap vinyl tape around the
wires that comes into contact with metal parts to protect the wires.
Basic procedure
- Remove the key from the ignition switch, then disconnect the terminal of the car battery.
- Connect the wires properly. See “Wiring connection” on page
- Install the unit to your car. See “Installing the unit (in-dash mounting)”.
- Connect the terminal of the car battery.
- Press BSRC to turn on the power.
- Detach the face plate and reset the unit within 5 seconds. See “How to reset” on page 4.
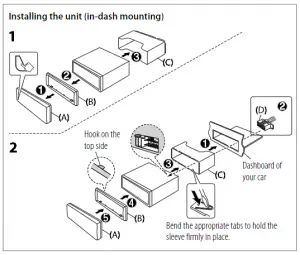
Installing the unit (in-dash mounting)
Caution
- For safety’s sake, leave wiring and mounting to professionals. Consult the car audio dealer.
- Install this unit in the console of your vehicle. Do not touch the metal parts of this unit during and shortly after use of the unit. Metal parts such as the heat sink and enclosure become hot.
- Do not connect the wires of speakers to the car chassis or Ground wire (black), or connect them in parallel.
- Mount the unit at an angle of less than 30º.
- If your vehicle wiring harness does not have the ignition terminal, connect Ignition wire (red) to the terminal on the vehicle’s fuse box which provides 12 V DC power supply and is turned on and off by the ignition key.
- Keep all cables away from heat dissipate metal parts.
- After the unit is installed, check whether the brake lamps, blinkers, wipers, etc. on the car are working properly.
- If the fuse blows, first make sure the wires are not touching car’s chassis, then replace the old fuse with one that has the same rating.
Installing the unit (without mounting sleeve)
- Remove the mounting sleeve and trim plate from the unit.
- Align the holes in the unit (on both sides) with the vehicle mounting bracket and secure the unit with screws (supplied/ commercially available).
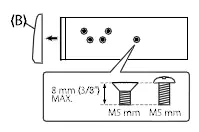
Use only the specified screws. Using wrong screws might damage the unit.
Wiring connection Fuse (10 A)

Antenna terminal
If no connections are made, do not let the wire come out from the tab.
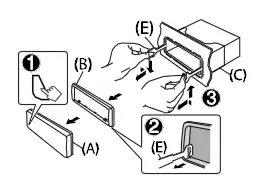
Removing the unit
Part list (supplied)
(A) Faceplate (×1)
(B) Trimplate (×1)
(C) Mounting sleeve (×1)
(D) Wiring harness (×1)
(E) Extraction key (×2)
(F) Screw (supplied for / M5 × 7 mm (×4) M5 × 6 mm (×4) M4 × 8 mm (×1)
Car fuse box
Ignition switch
Car fuse box Battery
a Brown: To connect the
d Red: Ignition 12 V
KENWOOD navigation system, e Yellow: Battery 12 V
refer your navigation manual f Black: Ground
b Blue/white: To the power
g White ª, White/black ·: control terminal when using Front speaker (left) the optional power amplifier h Gray ª, Gray/black ·: or to the antenna control Front speaker (right)
/
terminal in the vehicle
i Green ª, Green/black ·:
c Light blue/yellow: To the Rear speaker (left) steering wheel remote control j Purple ª, Purple/black ·: adapter or to KENWOOD Rear speaker (right) Marine Remote Control unit (optional accessory) for
BEFORE USE
BASICS
IMPORTANT
· To ensure proper use, please read through this Guide before using this product. It is especially important that you read and observe Warnings and Cautions in this Guide.
· Please keep the Guide in a safe and accessible place for future reference.
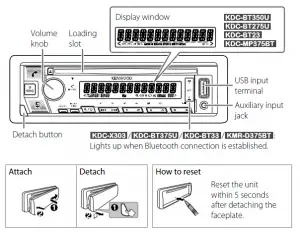
Faceplate
Warning
Do not operate any function that takes your attention away from safe driving.
Caution
Volume setting:
- Adjust the volume so that you can hear sounds outside the car to prevent accidents.
- Lower the volume before playing digital sources to avoid damaging the speakers by the sudden increase of the output level.
General:
- Avoid using the external device if it might hinder safe driving.
- Make sure all important data has been backed up. We shall bear no responsibility for any loss of recorded data.
- Never put or leave any metallic objects (such as coins or metal tools) inside the unit to prevent a short circuit.
- If a disc error occurs due to condensation on the laser lens, eject the disc and wait for the moisture to evaporate.
- USB rating is indicated on the main unit. To view, detach the faceplate.
- Depending on the types of cars, the antenna will automatically
extend when you turn on the unit with the antenna control wire connected. Turn off the unit or change the source to STANDBY when parking at a low ceiling area.
Detach button
USB input terminal
Auxiliary input jack
Lights up when Bluetooth connection is established.
Attach
Detach
How to reset
Reset the unit within 5 seconds after detaching the faceplate.
To Turn on the power
Adjust the volume Select a source Change the display information
On the faceplate Press BSRC. · Press and hold to turn off the power. Turn the volume knob. Press BSRC repeatedly. Press DISP repeatedly.
GETTING STARTED
1 Select the display language and cancel the demonstration
When you turn on the power for the first time (or [FACTORY RESET] is set to [YES]), the display shows: “SEL LANGUAGE” “PRESS” “VOLUME KNOB”
1 Turn the volume knob to select [ENG] (English) or [SPA] (Spanish), then
press the knob.
[ENG] is selected for the initial setup.
Then, (except for
) the display shows: “CANCEL DEMO”
“PRESS” “VOLUME KNOB”.
2 Press the volume knob again.
[YES] is selected for the initial setup.
3 Press the volume knob again.
“DEMO OFF” appears.
2 Set the clock and date
1 Press the volume knob to enter [FUNCTION]. 2 Turn the volume knob to select [CLOCK], then press the knob.
To adjust the clock 3 Turn the volume knob to select [CLOCK ADJUST], then press the knob. 4 Turn the volume knob to make the settings, then press the knob.
Hour Minute 5 Turn the volume knob to select [CLOCK FORMAT], then press the knob. 6 Turn the volume knob to select [12H] or [24H], then press the knob.
To set the date 7 Turn the volume knob to select [DATE FORMAT], then press the knob. 8 Turn the volume knob to select [DD/MM/YY] or [MM/DD/YY], then press
the knob. 9 Turn the volume knob to select [DATE SET], then press the knob.
10 Turn the volume knob to make the settings, then press the knob.
Day Month Year or Month Day Year
11 Press and hold
to exit.
To return to the previous setting item, press
.
3 Set the initial settings
1 Press BSRC repeatedly to enter STANDBY.
2 Press the volume knob to enter [FUNCTION].
3 Turn the volume knob to select an item (see the following table), then
press the knob.
4 Repeat step 3 until the desired item is selected or activated.
5 Press and hold
to exit.
To return to the previous setting item, press
.
[SYSTEM] [KEY BEEP] [FACTORY RESET]
[CLOCK] [CLOCK DISPLAY]
[ENGLISH] [ESPANOL]
Default: [XX]
[ON]: Activates the keypress tone. ; [OFF]: Deactivates.
[YES]: Resets the settings to default (except the stored station). ; [NO]: Cancels.
(Except for
)
[ON]: The clock time is shown on the display even when the unit is
turned off. ; [OFF]: Cancels.
Select the display language for [FUNCTION] menu and music information if applicable. By default, [ENGLISH] is selected.
5
RADIO
Search for a station 1 Press BSRC repeatedly to select RADIO. 2 Press BAND repeatedly to select FM1/FM2/FM3/AM. 3 Press S / T to search for a station.
Settings in memory
You can store up to 18 stations for FM and 6 stations for AM.
Store a station While listening to a station…. Press and hold one of the number buttons (1 to 6).
Select a stored station Press one of the number buttons (1 to 6).
CD/USB/iPod/ANDROID
Start playback
The source changes automatically and playback starts when you load a disc or attach a device (USB device/ iPod/iPhone/ Android device) to the USB input terminal.
To Play back/pause Reverse/Fast-forward Select a track/file Select a folder Repeat play Random play
On the faceplate
Press 6 IW.
Press and hold
.
Press
.
Press 2 / 1 .
Press 4 repeatedly.
Press 3 repeatedly.
6
FUNCTIONS SETTINGS
1 Press the volume knob to enter [FUNCTION].
2 Turn the volume knob to select an item, then press the knob.
3 Repeat step 2 until the desired item is selected or activated.
4 Press and hold
to exit.
To return to the previous setting item, press
.
· Refer to the INSTRUCTION MANUAL on the following website for the detailed explanation of each item: <www.kenwood.com/cs/ce/>
· The availability of each item vary depending on the model.
[FUNCTION] menu items
[AUDIO CONTROL] :
[DISPLAY]
:
[TUNER SETTING] :
[SIRIUS XM] :
[USB]
:
[BT MODE]
:
[REMOTE APP] :
[MIC GAIN]* :
[NR LEVEL]* :
[ECHO CANCEL]* :
[SYSTEM]
:
[CLOCK]
:
[ENGLISH]
:
[DEMO MODE] :
Sets your preferred audio settings. Sets your preferred control for the display window. Settings for radio source. Settings for Sirius XM tuner. Settings for using a USB device. Settings for using a Bluetooth device. Settings for using smartphone to control this unit. Sets the sensitivity of the microphone. Adjusts the noise reduction level. Adjusts the echo cancellation delay time. Settings for this unit. Adjusts the clock. Selects language for the menu and music information. Selects language for the menu and music information. Activates or deactivates the display demonstration.
* Applicable only while talking on the phone.
Examples of some well-used settings
Subwoofer Level Setting 1 Press the volume knob to enter [FUNCTION].
2 Turn the volume knob to select [AUDIO CONTROL], then press the knob.
3 Turn the volume knob to select [SUBWOOFER SET], then press the knob.
4 Turn the volume knob to select [SW SET ON], then press the knob.
5 Turn the volume knob to select [SUB-W LEVEL], then press the knob.
6 Turn the volume knob to adjust the subwoofer level, then press the knob.
7 Press and hold to exit.
Note: For you need to set [SWITCH PREOUT] to [SUB-W] in standby mode before you can make the above settings.
Illumination Color Setting For preferred illumination color for each zone.
, you can set your
6 Repeat step 4 and step 5 to set color for other zones.
7 Press and hold
to exit.
1 Press the volume knob to enter [FUNCTION].
2 Turn the volume knob to select [DISPLAY], then press the knob.
3 Turn the volume knob to select [COLOR SELECT], then press the knob.
4 Turn the volume knob to select a zone ([ALL ZONE], [ZONE 1], [ZONE 2]), then press the knob.
5 Turn the volume knob to select a color for the selected zone, then press the knob. [INITIAL COLOR]/[VARIABLE SCAN]/[CUSTOM R/G/B]/ [RED1]/[RED2]/[RED3]/[PURPLE1]/[PURPLE2]/[PURPLE3]/ [PURPLE4]/[BLUE1]/[BLUE2]/[BLUE3]/[SKYBLUE1]/ [SKYBLUE2]/[LIGHTBLUE]/[AQUA1]/[AQUA2]/[GREEN1]/ [GREEN2]/[GREEN3]/[YELLOWGREEN1]/[YELLOWGREEN2]/ [YELLOW]/[ORANGE1]/[ORANGE2]/[ORANGERED]
OTHER INFORMATION
For playback operations of AUX, SPOTIFY, Pandora®, iHeartRadio®, SiriusXM® Radio sources, refer to the INSTRUCTION MANUAL on the following website: <www.kenwood.com/cs/ce/> · The availability of each source vary depending on the model.
Note for specifications Bluetooth Frequency Range:
2.402 GHz — 2.480 GHz Bluetooth RF Output Power (E.I.R.P.):
+4 dBm (MAX), Power Class 2 Speaker Impedance:
4 — 8 Operating Voltage:
12 V DC car battery
BLUETOOTH®
Depending on the operating system and the firmware version of your mobile phone, Bluetooth features may not work with this unit.
Connect the microphone
Connect the supplied microphone to the microphone input jack on the rear panel.
Adjust the microphone angle Secure using cord clamps (not supplied) if necessary.
Pair and connect a Bluetooth device for the first time
1 Press B SRC to turn on the unit. 2 Search and select the name of your receiver (“KDC-X3 “/”KDC-BT3 “/
“KDC-BT3 /BT2 “/”KDC-MP3 “/”KMR-D3 “) on the Bluetooth device. “PAIRING” “PASS XXXXXX” “Device name” “PRESS” “VOLUME KNOB” appears on the display. · For some Bluetooth devices, you may need to enter the Personal
Identification Number (PIN) code immediately after searching. 3 Press the volume knob to start pairing.
“PAIRING OK” appears when pairing is completed.
Once pairing is completed, Bluetooth connection is established
automatically.
: “BT1” and/or “BT2”
indicator on the faceplate lights up.
: “BT1” and/or “BT2” on the display window lights up.
Answer a call
Press or the volume knob or one of the number buttons (1 to 6).
- To adjust the phone volume [00] to [35], turn the volume knob.
- To end a call, press
Audio player via Bluetooth
1 Press B SRC repeatedly to select BT AUDIO. · Pressing enters BT AUDIO directly.
2 Operate the audio player via Bluetooth to start playback.
To Play back/pause Select group or folder Reverse skip/Forward skip Reverse/Fast-forward Repeat play Random play
On the faceplate
Press 6 IW.
Press 2 / 1 .
Press
Press and hold
Press 4 repeatedly.
Press and hold 3 to select [ALL RANDOM].
· Microsoft and Windows Media are either registered trademarks or trademarks of Microsoft Corporation in the United States and/or other countries. · Use of the Made for Apple badge means that an accessory has been designed to connect specifically to the Apple product(s) identified in the badge, and has been certified by the developer to meet Apple
performance standards. Apple is not responsible for the operation of this device or its compliance with safety and regulatory standards. Please note that the use of this accessory with an Apple product may affect wireless performance. · Apple, iPhone, iPod, iPod nano, iPod touch, and Lightning are trademarks of Apple Inc., registered in the U.S. and other countries. · Pandora, the Pandora logo, and the Pandora trade dress are trademarks or registered trademarks of Pandora Media, Inc., used with permission. · iHeartRadio® and iHeartAutoTM are trademarks owned by iHeartMedia, Inc. All uses are authorized under license. · Sirius, XM and all related marks and logos are trademarks of Sirius XM Radio Inc. All rights reserved. · SPOTIFY and the Spotify logo are among the registered trademarks of Spotify AB. · Android is a trademark of Google LLC. · The “AAC” logo is a trademark of Dolby Laboratories. · The Bluetooth® word mark and logos are registered trademarks owned by the Bluetooth SIG, Inc. and any use of such marks by JVC KENWOOD Corporation is under license. Other trademarks and trade names are those of their respective owners.
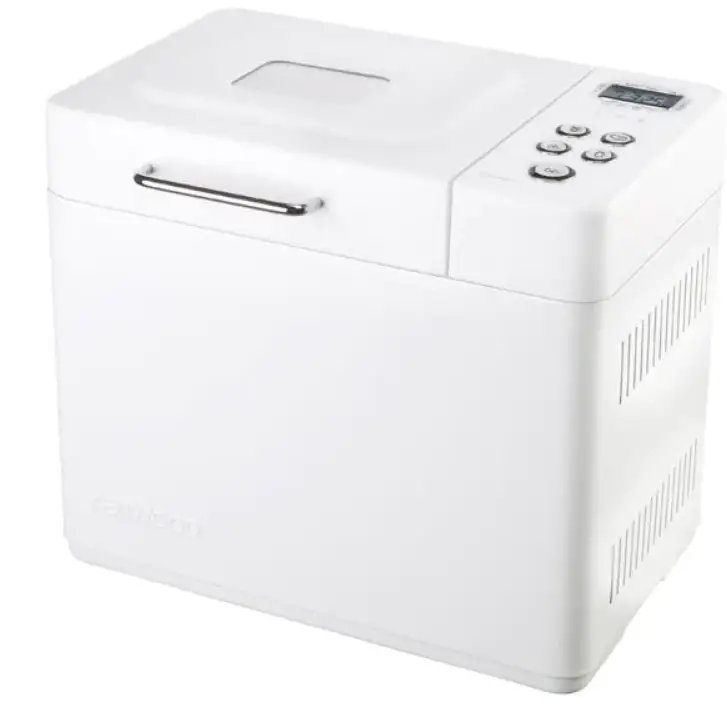
KENWOOD BM250 RAPID BAKE BREAD MAKER
before using your Kenwood appliance
- Read these instructions carefully and retain for future reference.
- Remove all packaging and any labels. safety
- Do not touch hot surfaces. Accessible surfaces are liable to get hot during use. Always use oven gloves to remove the hot bread pan.
- To prevent spillages inside the oven chamber, always remove the bread pan from the machine before adding the ingredients. Ingredients that splash onto the heating element can burn and cause smoke.
- Do not use this appliance if there is any visible sign of damage to the supply cord or if it has been accidentally dropped.
- Do not immerse this appliance, the supply cord or the plug in water or any other liquid.
- Always unplug this appliance after use, before fitting or removing parts or before cleaning.
- Do not let the electrical supply cord hang over the edge of a work surface or allow it to touch hot surfaces such as a gas or electric hob.
- This appliance should only be used on a flat heat resistant surface.
- Do not place your hand inside the oven chamber after the bread pan has been removed as it will be very hot.
- Do not touch moving parts within the Bread Maker.
- Do not exceed the maximum capacity (1Kg) stated as this could result in over-loading the Bread Maker.
- Do not place the Bread Maker in direct sun light, near hot appliances or in a draught. All these things can affect the internal temperature of the oven, which could spoil the results.
- Do not use this appliance outdoors.
- Do not operate the Bread Maker when it is empty as this could cause it serious damage.
- Do not use the oven chamber for any type of storage.
- Do not cover the steam vents in the lid and ensure there is adequate ventilation around the bread maker during operation.
- Do not let infirm people use the appliance without supervision.
- Do not let children use or play with the appliance.
- Only use the appliance for its intended domestic use.
- Kenwood will not accept any liability if the appliance is subject to improper use, or failure to comply with these instructions. before plugging in
- Make sure your electricity supply is the same as the one shown on the underside of your Bread Maker.
- This machine complies with European Economic Community Directive 89/336/EEC before using your bread maker for the first time
- Wash all parts (see care and cleaning).
PRODUCT FEATURES
key
- lid handle
- viewing window
- heating element
- bread pan handle
- kneader
- drive shaft
- drive coupling
- on/off switch
- measuring cup
- dual measuring spoon 1tsp & 1tbsp
- control panel
- display window
- timer indicator
- program status indicator
- crust colour indicators (light, medium, dark, rapid)
- delay timer buttons
- loaf size button
- start/stop button
- rapid bake button
- crust colour button
- menu button
- loaf size indicators
how to measure ingredients
(refer to illustrations 3 to 7)
- It is extremely important to use the exact measure of ingredients for best results.
- Always measure liquid ingredients in the see-through measuring cup with graduated markings provided.
- Liquid should just reach marking on cup at eye level, not above or below (see 3).
- Always use liquids at room temperature, 20ºC/68ºF, unless making bread using the rapid 1 hour cycle. Follow the instructions given in the recipe section.
- Always use the measuring spoon provided to measure smaller quantities of dry and liquid ingredients. Use the slider to select between the following measure – 1⁄2 tsp, 1 tsp, 1⁄2 tbsp or 1 tbsp. Fill to the top and level off the spoon (see 6 & 7). on/off switch
- Your Kenwood breadmaker is fitted with an ON/OFF switch and will not operate until the “on” switch is pressed.
- Plug in and press the ON/OFF switch situated at the back of the breadmaker – the unit will beep and 3:25 will appear in the display window.
- Always switch off and unplug your breadmaker after use.
program status indicator
- The program status indicator is situated in the display window and the indicator arrow will point to the stage of the cycle the breadmaker has reached as follows: –
- Pre-heat – The pre-heat feature only operates at the start of the wholewheat setting (30 minutes wholemeal and 5 minutes wholemeal rapid) to warm the ingredients before the first kneading stage begins.
- There is no kneader action during this period.
- Knead – The dough is either in the first or 2nd kneading stage or being knocked back between the rising cycles. During the last 10minutes of the 2nd
- Kneading cycle on setting (1), (3), (4) an alert will sound to tell you to add any additional ingredients manually.
- Rest – dough is being rested between the kneading cycles.
- Rise – the dough is in either the 1st, 2nd or 3rd rising cycle.
- Bake – The loaf is in the final baking cycle.
- Keep Warm – The bread maker automatically goes into the Keep warm mode at the end of the baking cycle. It will stay on the keep warm mode for up to
- 1hour or until the machine is turned off, which ever is soonest. Please note: the heating element will switch on and off and will glow intermittently during the keep warm cycle.
- End – end of program.
using your Bread Maker (refer to illustration panel)
- Lift out the bread pan by the handle.
- Fit the kneader.
- Pour the water into the bread pan.
- Add the rest of the ingredients to the pan in the order listed in the recipes. Ensure that all the ingredients are weighed accurately
- as incorrect measures will produce poor results.
- Insert the bread pan into the oven chamber and push down to ensure it is locked in position.
- Lower the handle and close the lid.
- Plug in and switch on – the unit will beep and default to setting 1 (3:25).
- Press the MENU button until the required program is selected. The breadmaker will default to 1Kg & medium crust colour. Note: If using the “RAPID BAKE” , just press the button and the program will start automatically.
- Select the loaf size by pressing the LOAF SIZE button
- until the indicator moves to the required loaf size.
- Select the crust colour by pressing the CRUST button
- until the indicator moves to the required crust colour (light, medium or dark).
- Press the START button . To stop or cancel the program press the START/STOP button for 2 – 3 seconds.
- At the end of the baking cycle unplug the breadmaker
- Lift out the bread pan by the handle. Always use oven gloves as the pan handle will be hot.
- Then turn out onto a wire rack to cool.
- Leave the bread to cool for at least 30 minutes before slicing, to allow the steam to escape. The bread will be difficult to slice if hot.
- Clean the bread pan and kneader immediately after use (see care and cleaning).
bread/dough program chart
| bread/dough program chart | ||||||||
| program | Total Program Time | Alert For Adding
Ingredients ✬✬ |
Keep Warm
✬✬✬ |
|||||
| 500g | 750g | 1Kg | 500g | 750g | 1Kg | |||
| 1 basic | White or Brown Bread Flour recipes | 3:13 | 3:18 | 3:25 | 2:51 | 2:56 | 3:03 | 60 |
| 2 french | Produces a crisper crust and suited to loaves low in fat and sugar | 3:30 | 3:32 | 3:35 | – | – | – | 60 |
| Rapid Loaves ✬ | 2:30 | 2:32 | 2:35 | – | – | – | ||
| 3 wholewheat | Wholewheat or wholemeal flour recipes: 30 minute preheat | 3:43 | 3:45 | 3:48 | 2:56 | 2:58 | 3:01 | 60 |
| Rapid Loaves: 5 minute preheat ✬ | 2:28 | 2:30 | 2:33 | – | – | – | ||
| 4 sweet | High sugar bread recipes | 3:17 | 3:22 | 3:27 | 2:55 | 3:00 | 3:05 | 60 |
| 5 gluten free | For use with gluten free flours and gluten free bread mixes. Max 500g flour wt | 2:24 | – | 60 | ||||
| 6 packet mix | For ready prepared bread mixes Max 500g mix | 2:24 | – | 60 | ||||
| 7 cake | Non-yeast batter breads and cakes | 1:43 | – | – | ||||
| 8 dough | Dough for hand shaping and baking in your own oven. | 1:30 | – | – | ||||
| 9 pasta dough | Pasta dough recipes | 0:14 | – | – | ||||
| 10 jam | For making jams | 1:05 | – | – | ||||
| 11 bake | Bake only feature. Can also be used to rewarm or crisp loaves already baked and cooled. | 1:00 | – | 60 | ||||
| rapid bake button | Produces loaves of bread in under 1 hour. Loaves require warm water, extra yeast and less salt. | 0:58 | – | 60 | ||||
delay timer
The Delay timer allows you to delay the bread making process up to 15 hours. The delayed start cannot be used with the “RAPID BAKE” program and is not recommended for use with either the dough, jam or gluten free settings.
IMPORTANT: When using this delayed start function you must not use perishable ingredients – things that ‘go off’ easily at room temperature or above, such as milk, egg, cheese and yoghurt etc. To use the DELAY TIMER simply place the ingredients in the bread pan and lock the pan into the bread maker. Then:
- Press the MENU pad to choose the required program – the program cycle time is displayed.
- Select the crust colour and size required.
- Then set the delay timer.
- Press the (+) TIMER pad and keep pressing until the total time required is displayed. If you go past the required time press the (-) TIMER pad to go back. The timer pad when pressed, moves in 10 minute increments. You do not need to work out the difference between the program time selected and the total hours required as the bread maker will automatically include the setting cycle time.
Example: Finished loaf required at 7am. If the breadmaker is set up with the required recipe ingredients at 10pm the evening before, total time to be set on the delayed timer is 9 hours. - Press the MENU pad to choose your program e.g. 1 and use the (+) timer pad to scroll the time in 10 minute increments to display ‘9:05’.
If you go past ‘9:05’, simply press the (-) timer pad until you return to ‘9:05’. - Press the start pad and the display colon (:) will flash. The timer will start to count down.
- If you make a mistake or wish to change the time set, press the START/STOP pad until it beeps. You can then reset the time.
power interruption protection
- Your Bread Maker has an 8 minute power interruption protection in case the unit is accidentally unplugged during operation. The unit will continue the program if plugged back in straight away. care and cleaning
- IMPORTANT: unplug the Bread Maker and allow to cool before cleaning.
- Do not immerse either the Bread Maker body or the outside base of the bread pan in water.
- Do not use a dishwasher to clean bread pan. Dishwashing can damage the non-stick properties of the bread pan allowing bread to stick during baking.
- Do not use abrasive scouring pads or metal implements.
- Clean the bread pan and the kneader immediately after each use by partially filling the pan with warm soapy water. Leave to soak for 5 to 10 minutes. To remove the kneader, turn clockwise and lift off. Finish cleaning with a soft cloth, rinse and dry.
- If the kneader cannot be removed after 10 minutes, hold the shaft from underneath the pan and twist back and forth until the kneader is released.
- Use a soft damp cloth to clean the outside and inside surfaces of the Bread Maker if necessary.
- The lid can be lifted off for cleaning. service and customer care
- If the cord is damaged it must, for safety reasons, be replaced by KENWOOD or an authorised KENWOOD repairer.
- If you need help with:
- using your machine or
- servicing or repairs
- Contact the shop where you bought your Bread Maker.
Basic White Bread
| Ingredients | 500g | 750g | 1Kg |
| Water | 245ml | 290ml | 380ml |
| Vegetable oil | 1tbsp | 11⁄2tbsp | 11⁄2tbsp |
| Unbleached white bread flour | 350g | 450g | 600g |
| Skimmed milk powder | 1tbsp | 4tsp | 2tbsp |
| Salt | 1tsp | 11⁄2tsp | 11⁄2tsp |
| Sugar | 2tsp | 1tbsp | 4tsp |
| Easy blend dried yeast | 1tsp | 11⁄2tsp | 11⁄2tsp |
Brioche Bread
| Ingredients | 500g | 750g | 1Kg |
| Milk | 130ml | 220ml | 260ml |
| Eggs | 1 | 2 | 2 |
| Butter, melted | 80g | 140g | 180g |
| Unbleached white bread flour | 350g | 500g | 600g |
| Salt | 1tsp | 1tsp | 11⁄2tsp |
| Sugar | 30g | 60g | 80g |
| Easy blend dried yeast | 11⁄2tsp | 2tsp | 21⁄2tsp |
Wholemeal Seeded Bread
| Ingredients | 750g | 1Kg |
| Water | 300mls | 380mls |
| Vegetable Oil | 1tbsp | 11⁄2tbsp |
| Wholemeal bread flour | 400g | 500g |
| Unbleached white bread flour | 50g | 100g |
| Skimmed milk powder | 4tsp | 2tbsp |
| Salt | 1tsp | 11⁄2tsp |
| Sugar | 2tsp | 1tbsp |
| Easy blend dried yeast | 1tsp | 1tsp |
| Pumpkin Seeds | 3tsp | 3tsp |
| Sunflower seeds | 3tsp | 3tsp |
| Poppy seeds | 2tsp | 3tsp |
| Lightly toasted sesame seeds | 2tsp | 3tsp |
Rapid White Bread
| Ingredients | 1Kg |
| Milk, lukewarm (32-35°C) | 420ml |
| Vegetable oil | 11⁄2tbsp |
| Unbleached white bread flour | 600g |
| Skimmed milk powder | 2tbsp |
| Salt | 1tsp |
| Sugar | 5tsp |
| Easy blend dried yeast | 4tsp |
Bread rolls
| Ingredients | 1Kg |
| Water | 240ml |
| Egg | 1 |
| Unbleached white bread flour | 450g |
| Salt | 1tsp |
| Sugar | 2tsp |
| Butter | 25g |
| Easy blend dried yeast | 11⁄2tsp |
| For the topping: | |
| Egg yolk beaten with 15ml (1tbsp) water |
1 |
| Sesame seeds and poppy seeds, for sprinkling, optional |
troubleshooting guide
| PROBLEM | POSSIBLE CAUSE | SOLUTION | |
| LOAF SIZE AND SHAPE | |||
| 1. Bread does not rise enough | • Wholemeal breads will be lower than white breads due to less gluten forming protein in whole wheat flour.
• Not enough liquid. • Sugar omitted or not enough added. • Wrong type of flour used. • Wrong type of yeast used. • Not enough yeast added or too old. • Rapid bread cycle chosen. • Yeast and sugar came into contact with each other before kneading cycle. |
• Normal situation, no solution.
• Increase liquid by 15ml/3tsp. • Assemble ingredients as listed in recipe. • You may have used plain white flour instead of strong bread flour which has a higher gluten content. • Do not use all-purpose flour. • For best results use only fast action “easy blend” yeast. • Measure amount recommended and check expiry date on package. • This cycle produces shorter loaves. This is normal. • Make sure they remain separate when added to the bread pan. |
|
| 2. Flat loaves, no rising. | • Yeast omitted.
• Yeast too old. • Liquid too hot. • Too much salt added. • If using timer, yeast got wet before bread making process started. |
• Assemble ingredients as listed in recipe.
• Check expiry date. • Use liquid at correct temperature for bread setting being used. • Use amount recommended. • Place dry ingredients into corners of pan and make slight well in centre of dry ingredients for yeast to protect it from liquids. |
|
| 3. Top inflated – mushroom-like in appearance. | • Too much yeast.
• Too much sugar. • Too much flour. • Not enough salt. • Warm, humid weather. |
• Reduce yeast by 1/4tsp.
• Reduce sugar by 1tsp. • Reduce flour by 6 to 9tsp. • Use amount of salt recommended in recipe. • Reduce liquid by 15ml/3 tsp and yeast by 1/4 tsp. |
|
| 4. Top and sides cave in. | • Too much liquid.
• Too much yeast. • High humidity and warm weather may have caused the dough to rise too fast. |
• Reduce liquid by 15ml/3tsp next time or add a little extra flour.
• Use amount recommended in recipe or try a quicker cycle next time. • Chill the water or add milk straight from the fridge |
|
| 5. Gnarly, knotted top – not smooth. | • Not enough liquid.
• Too much flour. • Tops of loaves may not all be perfectly shaped, however, this does not affect wonderful flavour of bread. |
• Increase liquid by 15ml/3tsp.
• Measure flour acurately. • Make sure dough is made under the best possible conditions. |
|
| PROBLEM | POSSIBLE CAUSE | SOLUTION | |
| LOAF SIZE AND SHAPE | |||
| 6. Collapsed while baking.
7. Loaves uneven shorter on one end. |
• Machine was placed in a draught or may have been knocked or jolted during rising.
• Exceeding capacity of bread pan.
• Not enough salt used or omitted. (salt helps prevent the dough over proving) • Too much yeast. • Warm, humid weather.
• Dough too dry and not allowed to rise evenly in pan. |
• Reposition bread maker.
• Do not use more ingredients than recommended for large loaf (max. 1Kg). • Use amount of salt recommended in recipe. • Measure yeast acurately. • Reduce liquid by 15ml/3tsp and reduce yeast by 1/4tsp.
• Increase liquid by 15ml/3 tsp. |
|
| BREAD TEXTURE | |||
| 8. Heavy dense texture. | • Too much flour.
• Not enough yeast.
• Not enough sugar. |
• Measure accurately.
• Measure right amount of recommended yeast. • Measure accurately. |
|
| 9. Open, course, holey texture. | • Salt omitted.
• Too much yeast.
• Too much liquid. |
• Assemble ingredients as listed in recipe.
• Measure right amount of recommended yeast. • Reduce liquid by 15ml/3tsp. |
|
| 10. Centre of loaf is raw, not baked enough. | • Too much liquid.
• Power cut during operation.
• Quantities were too large and machine could not cope. |
• Reduce liquid by 15ml/3tsp.
• If power is cut during operation,for more than 8 minutes you will need to remove the unbaked loaf from the pan and start again with fresh ingredients. • Reduce amounts to maximum quantities allowed. |
|
| 11. Bread doesn’t slice well, very sticky. | • Sliced while too hot.
• Not using proper knife. |
• Allow bread to cool on rack at least 30 minutes to release steam, before slicing.
• Use a good bread knife. |
|
| CRUST COLOUR AND THICKNESS | |||
| 12. Dark crust colour/ too thick. | • DARK crust setting used. | • Use medium or light setting the next time. | |
| 13. Loaf of bread is burnt. | • Bread maker malfunctioning. | • Refer to “Service and customer care” section. | |
| 14. Crust too light. | • Bread not baked long enough.
• No milk powder or fresh milk in recipe. |
• Extend baking time.
• Add 15ml/3tsp skimmed milk powder or replace 50% of water with milk to encourage browning. |
|
| PROBLEM | POSSIBLE CAUSE | SOLUTION | |
| PAN PROBLEMS | |||
| 15. Kneader cannot be removed.
16. Bread sticks to pan/ difficult to shake out. |
• You must add water to bread pan and allow kneader to soak before it can be removed.
• Can happen over prolonged use. |
• Follow cleaning instructions after use. You may need to twist kneader slightly after soaking to loosen.
• Lightly wipe the inside of bread pan with vegetable oil. • Refer to “Service and customer care” section. |
|
| MACHINE MECHANICS | |||
| 17. Breadmaker not operating/Kneader not moving. | • Breadmaker not switched on
• Pan not correctly located. • Delay timer selected. |
• Check on/off switch @ is in the ON position.
• Check the pan is locked in place. • Breadmaker will not start until the countdown reaches the program start time. |
|
| 18. Ingredients not mixed. | • Did not start bread maker.
• Forgot to put kneader in pan. |
• After programming control panel, press start button to turn bread maker on.
• Always make sure kneader is on shaft in bottom of pan before adding ingredients. |
|
| 19. Burning odour noted during operation. | • Ingredients spilled inside oven.
• Pan leaks.
• Exceeding capacity of bread pan. |
• Be careful not to spill ingredients when adding to pan. Ingredients can burn on heating unit and cause smoke.
• See “Service and Customer care” section. • Do not use more ingredients than recommended in recipe and always measure ingredients accurately. |
|
| 20. Machine unplugged by mistake or power lost during use.
How can I save the bread?. |
• If machine is in knead cycle, discard ingredients and start again.
• If machine is in rise cycle, remove dough from bread pan, shape and place in greased 23 x 12.5cm/9 x 5 in. loaf tin, cover and allow to rise until doubled in size. Use bake only setting 11 or bake in pre-heated conventional oven at 200ºC/400ºF/Gas mark 6 for 30-35 minutes or until golden brown. • If machine is in bake cycle, use the bake only setting 11 or bake in pre-heated conventional oven at 200ºC/400ºF/Gas mark 6 and remove top rack. Carefully remove pan from machine and place on bottom rack in oven. Bake until golden brown. |
||
| 21. E:01 appears on display and machine cannot be turned on. | • Oven chamber too hot. | • Unplug and allow to cool down for 30 minutes. | |
| 22. H:HH & E:EE appears in display and
machine does not operate. |
• Bread machine is malfunctioning. Temperature sensor error | • See “Service and Customer care” section. | |