JAM Ultra Earbuds Wireless Earphones
CONTENTS BOX
A – 2 Ear buds
B – Portable Charging Case
C – Assorted Ear Tips
D – Micro USB Cord
E – Welcome Card
F – Legal Card
G – Jam Sticker
CONTROLS
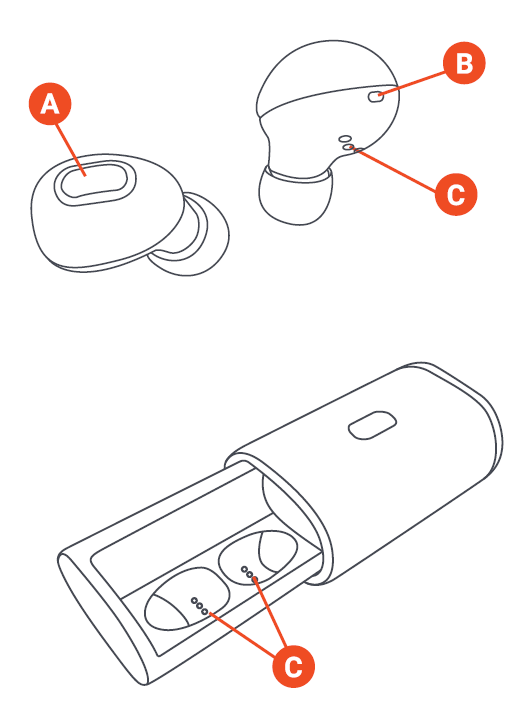
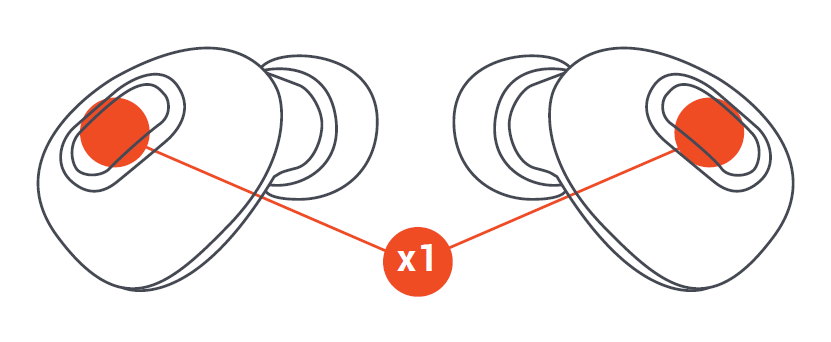
A – Multi-Function Button
B – Earbud Status Light
C – Earbud Charging Contacts
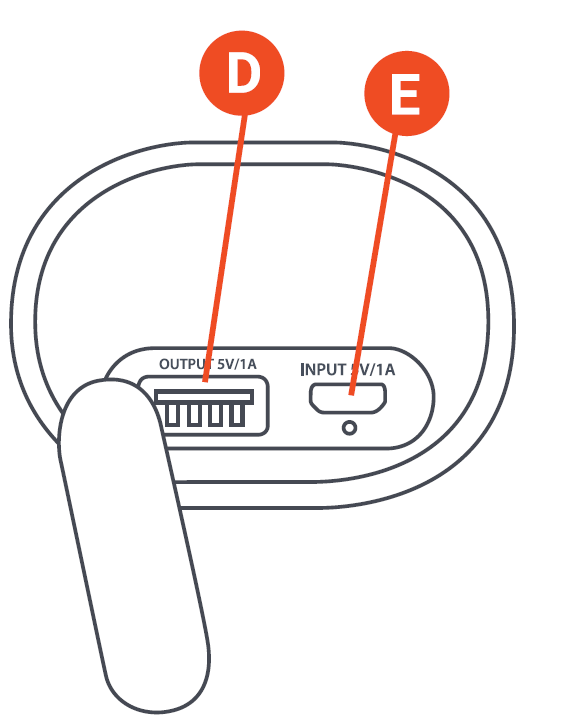
D – USB Charging Port – To Charge Your Smart Device
E – Micro USB Charging Port – To Charge The Portable Case
SET UP
CHARGING YOUR EARBUDS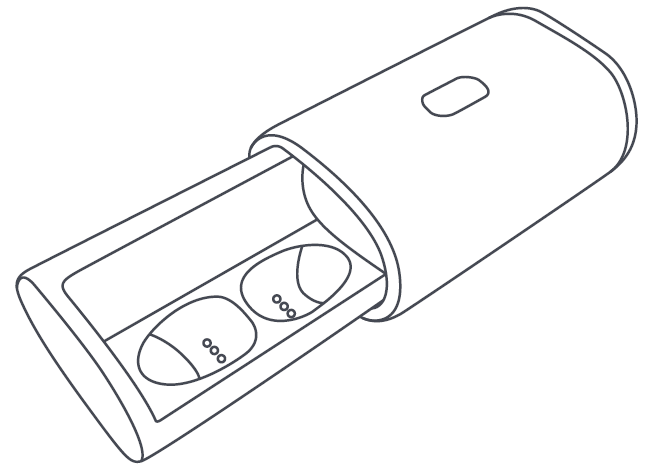 To charge your ear buds, place them into the portable case. The red LEDs show that they are charging. If the red LEDs do not appear when placed in the case, adjust the earbuds to make sure they are in line with the charging contacts. When fully charged, the LEDs will shut off.
CHARGING YOUR PORTABLE CASE
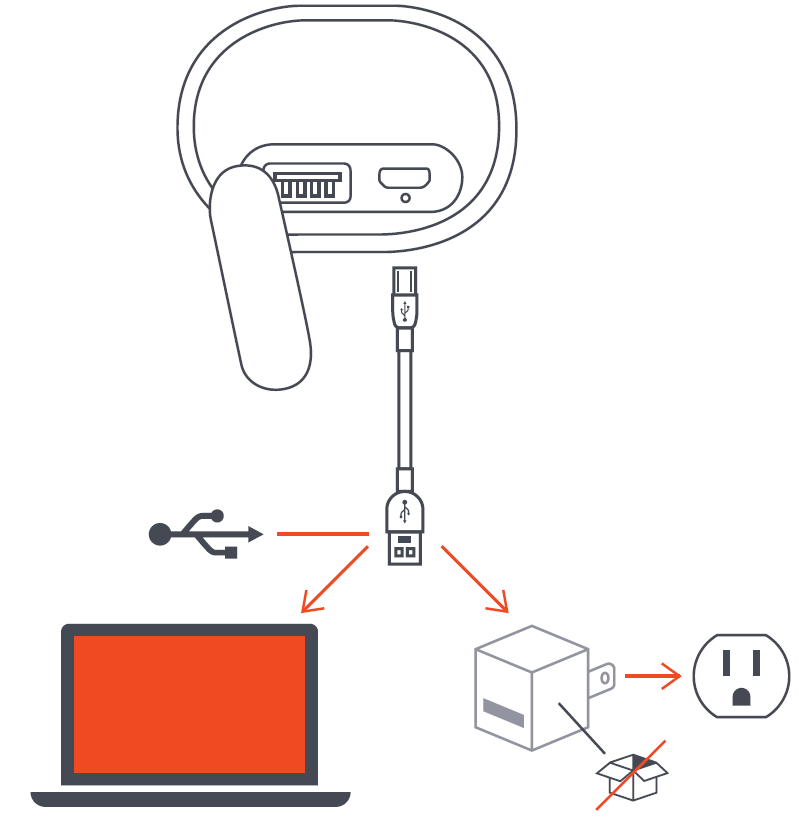 Plug the small end of the micro USB cable into the micro USB port, located on the right side of the case, the LED on the case will show solid red when charging. When the portable case is fully charged, the LED will shut off.
CONNECT BOTH EARBUDS
STEP ONE – TURNING OFF THE EARBUDS
Place earbuds back in case or press and hold multi-function button for 5 seconds to turn off. Your earbuds will automatically turn on when taken out of the portable charging case. If you need to turn them on manually, you can quick press the multi-function button once on both earbuds.
STEP TWO – CONNECTING THE EARBUDS TO EACH OTHER
When you take the earbuds out of their case, they will automatically sync to each other, and the LEDs will turn solid blue for 5 seconds. Your earbuds will then go into pairing mode and begin searching for a Bluetooth device, and the LEDs will quick flash blue.
If your earbuds don’t sync to each other automatically, please check to make sure they are charged and turned on.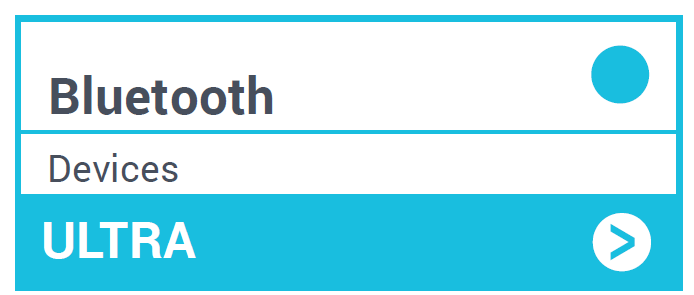
STEP THREE – CONNECTING TO A DEVICE
Enable Bluetooth on your device. From the Bluetooth menu, select “Ultra”. When the device and Ultra are connected, you will hear a tone. This means pairing is complete.
CONNECT ONE EARBUD
Connect only one earbud for mono sound. This is a great option if you want to hear your surroundings as well as your music.
STEP ONE – TURN ON ONE EARBUD
Your earbud will automatically turn on when taken out of the portable charging case. If you need to turn it on manually, you can quick press the multi-function button once on the earbud.
Note: To connect to one earbud only, you must only have one earbud powered on.
STEP TWO – PAIRING MODE
Once the earbud is powered on, wait for 5 seconds, the LED will flash red and blue. This will indicate your earbud is in single pairing mode.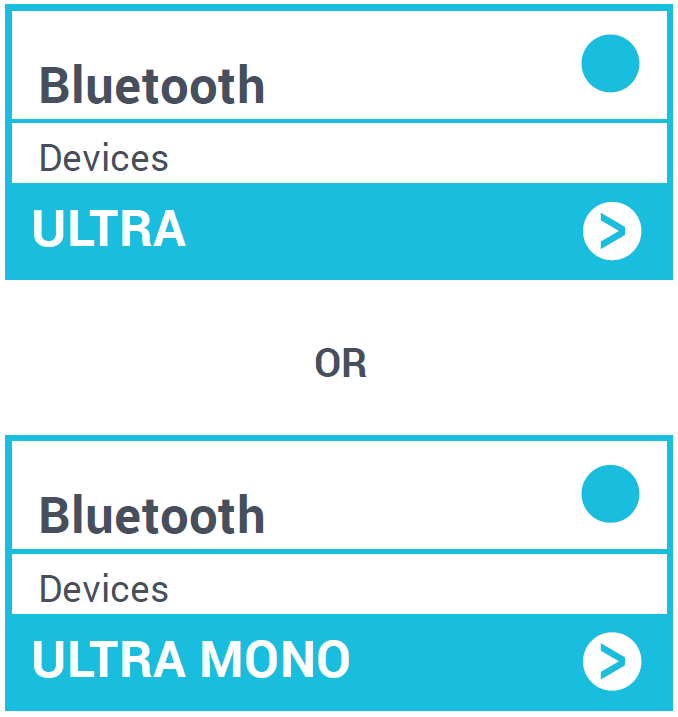
STEP THREE – CONNECTING TO A DEVICE
Enable Bluetooth on your device. From the Bluetooth menu, and depending on which earbud you are connecting to, select “Ultra” for the left earbud, or “Ultra Mono” for the right earbud. When the device and Ultra are connected, you will hear a tone. This means pairing is complete.
Note: When using only one earbud, you can power on the other earbud and go back to stereo sound. You may need to reconnect to your device from the Bluetooth Menu.
TURNING OFF YOUR EARBUDS

To turn off your earbuds, place the earbuds back in your case, or press and hold the multi-function button on the earbuds for 5 seconds.
USING THE BACKUP BATTERY
Plug your device’s USB charging cable into the portable charging case, and then into your smart device.
With a full battery, your travel case can recharge your earbuds up to 15 times, or provide one full charge for a typical smartphone.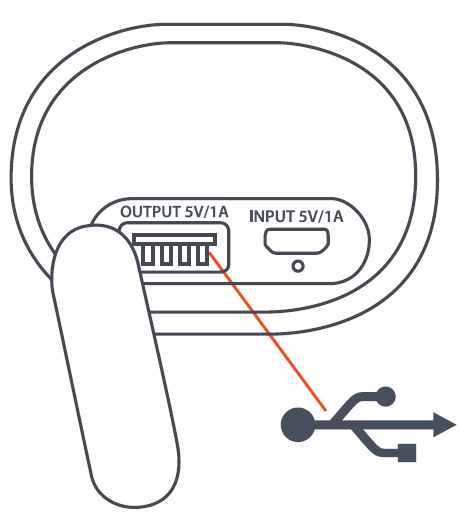
NOTE: The USB charging output rating is 5VDC, 1.0A. Some devices such as tablets may not appear to charge, or may charge slowly. Consult your device manufacturer for its charge requirements.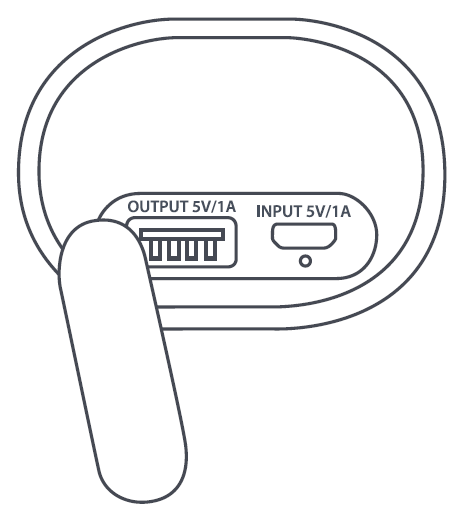
LED INDICATORS
EARBUDS IN CHARGING CASE
| Solid red | Charging |
| LED off | Charging complete |
PORTABLE CHARGING CASE
| Solid blue | Charging earbuds |
| Solid red | Charging |
| LED Off | Charging complete |
EARBUDS IN USE
| Breathe blue | Earbuds in sync mode with each other |
| Quick flash blue | Earbuds in pairing mode with device |
| Blue flash every 5
seconds |
Paired with device |
EARBUDS IN MONO USE
| Flashing red/blue | Earbud in pairing mode with device |
| Blue flash every 5
seconds |
Paired with device |
BASIC FUNCTIONS
MUSIC
| Play/Pause | Press either multi- function button once |
CALLS
|
Pick up a call |
Press either multi- function button once |
|
Decline a call |
Press and hold either multi-function button for 2 seconds |
|
End a call |
Press either multi- function button once |
| Take a second incoming call | Press either multi- function button once |
| Decline a second incoming call | Use the phone keypad |
NOTE: Phone calls, FaceTime, and Siri are heard only through one earbud (mono). If using your earbuds in stereo, they will automatically switch to mono once a call is accepted or Siri is activated.
OTHER
|
Activate Siri/Google Assist |
Quickly double-press either multi-function button |
| Check battery level of earbuds | Look at smartphone |
|
Turn off earbud |
Press and hold multi- function button for 5 seconds |
TROUBLESHOOTING
- Plug your charging case into an USB Adapter and charge the case for 3 hours. Check to see that the red charging light is on. When the light turns off, the case is fully charged.
- Set your ear buds into the charging case. Check the ear buds to confirm the red charging light is on. When the earbuds are fully charged, the red light will turn off.
- Turn off Bluetooth on your device.
- Remove both ear buds from the charging case.
- Ear buds should automatically sync together once powered on. LEDs will breathe blue and turn solid blue for 5 seconds once earbuds are connected to each other.
- Turn on Bluetooth on your device.
- Pair to “Ultra”.
![]()
HX-TT400
Instruction Book
CONTENTS

| A – Turntable B – Power adapter C – USB-PC cable D – RCA-t o-Aux cable |
E – Felt pad F – Quick start guide G – Welcome card H – Legal card |
CONTROLS
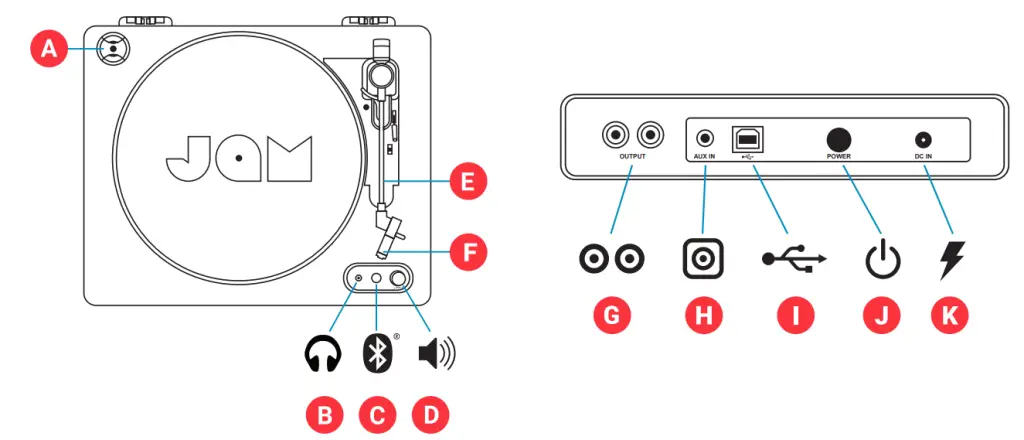
| A – 45 RPM adapter B – Headphone jack C – Bluetooth® pairing button D – Volume control E – Tonearm F – Stylus |
G – RCA connector H – Aux-in port I – USB digitization port J – Power button K – Power input |
SET UP
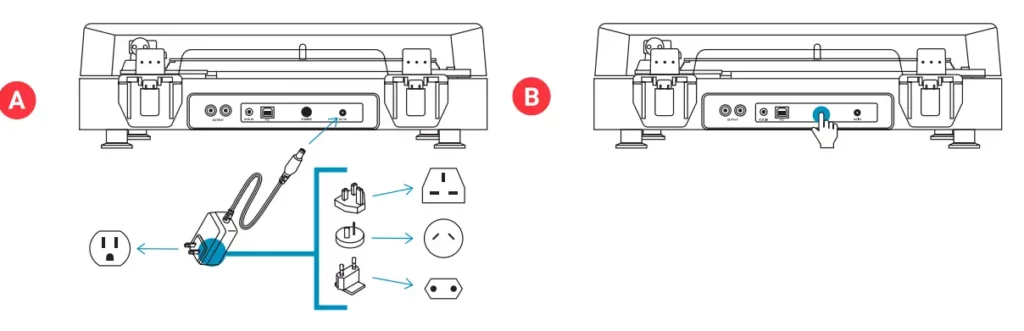
TURNING ON YOUR TURNTABLE
A – Attach the correct adapter plug for your region to the adapter. Plug the supplied power cord into the power input on the back of the turntable, and plug into a wall socket.
B – Press the power button to turn on your turntable to turn it on.

CONNECTING DEVICES
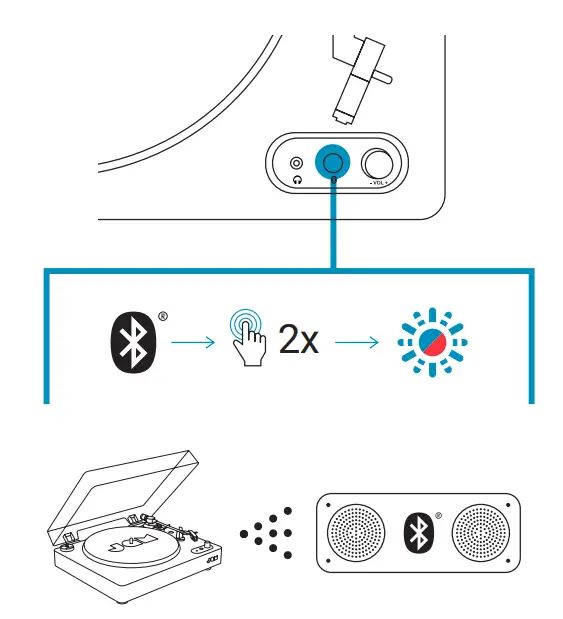
Bluetooth®
A – Make sure the Bluetooth® device you would like to pair to is powered on and in pairing mode.
B – Press the Bluetooth® button on the front of your turntable twice to begin the pairing process.
C – The LED will flash blue when searching for a device, then turn solid blue once paired.
TIP: If taking a while to pair (+30 secs), press the Bluetooth® pair button on the turntable 1 more time to re-initiate the searching feature.
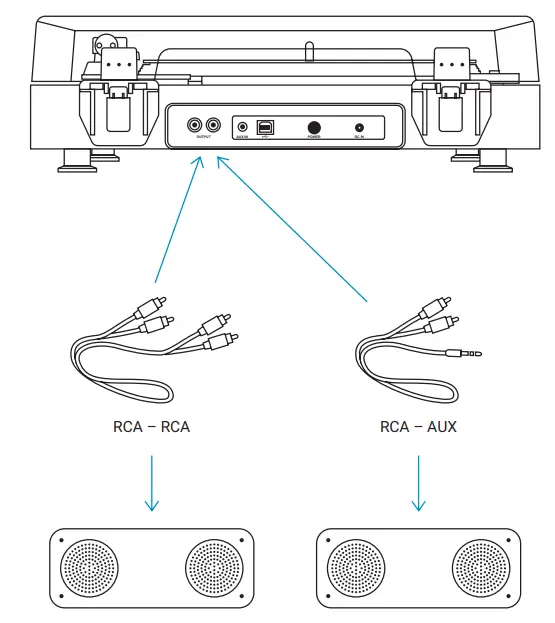
CORDED CONNECTIONS
CAUTION:
Switch off power to all equipment before making connections. Read the instructions of each component you intend to use with this unit before proceeding. Be sure to insert each plug securely. To prevent hum and noise, avoid bundling the signal interconnection cables together with the power cord.
RCA-to-RCA INPUT
To connect the turntable to devices with RCA input, use an RCA to RCA cable (available separately). Connect the RCA plugs on one end of the cable to the L and R sockets on the back of the turntable and the plugs at the other end to the corresponding L and R sockets on the back of the device.
RCA-to-AUX INPUT
To connect the turntable to a device with an AUX input, use a RCA to AUX cable (included). Connect the RCA plugs to the L and R sockets on the back of the turntable and the AUX plug to the AUX socket on the back of the device.
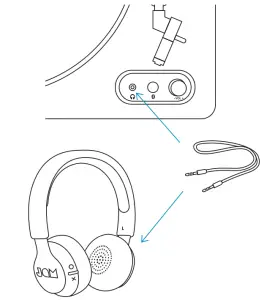
HEADPHONE/AUXILIARY OPERATION
A. Connect a set of headphones or speakers (not included) via an auxiliary cable to the headphone socket on the front panel of the unit.
B. Put on the headphones or turn on the speaker and slowly increase the volume until you can hear it clearly and comfortably, without distortion.
USE
SETTING UP A RECORD
A – Lift the dust cover and place your record on the turntable and, align the hole with the pin.
B – Select the 33 1/3, 45, or 78 RPM as required.
C – Remove white plastic stylus guard and keep for storage later, after use.
D – Next remove the tonearm lock, lift the stylus, and place it on your record.
E – The record will automatically begin turning as the tonearm moves across. To play your music, pull the lift handle forward to lower the tonearm, and place the stylus on your record.
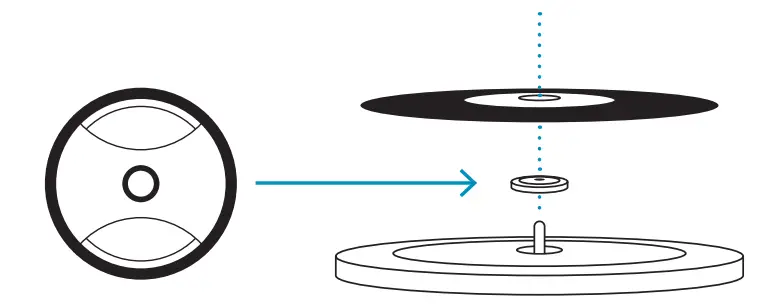
USING THE 45 RPM ADAPTER
Place the 45 RPM adapter over the spindle, gently place your 45 RPM record onto the turntable, then continue following the normal operation instructions.

MAINTENANCE
- DO NOT leave vinyl records on the turntable after use.
- Return the vinyl record to its original packaging and store away until next use.
- After use, return the tonearm to its original place, replace the plastic stylus cover, and secure the tonearm lock.
- Replace the dust cover and close the lid to avoid dust damage.
- Unplug the power and other cables after use.
- Please note, the stylus cartridge can be easily damaged.
- For a replacement stylus, please go to jamaudio.com/parts
LEGAL INFORMATION
READ ALL INSTRUCTIONS BEFORE USE AND SAVE THESE INSTRUCTIONS FOR FUTURE REFERENCE.
FCC Warning:
This equipment has been tested and found to comply with the limits for a Class B digital device, pursuant to Part 15 of the FCC Rules. These limits are designed to provide reasonable protection against harmful interference in a residential installation. This equipment generates, uses, and can radiate radio frequency energy and, if not installed and used in accordance with the instructions, may cause harmful interference to radio communications. However, there is no guarantee that interference will not occur in a particular installation. If this equipment does cause harmful interference to radio or television reception, which can be determined by turning the equipment off and on, the user is encouraged to try to correct the interference by one or more of the following measures:
- Reorient or relocate the receiving antenna.
- Increase the separation between the equipment and receiver.
- Connect the equipment into an outlet on a circuit different from that to which the receiver is connected.
- Consult the dealer or an experienced radio/TV technician for help.
Any changes or modifications not expressly approved by the party responsible for compliance could void the user’s authority to operate the equipment.
This device complies with Part 15 of the FCC Rules. Operation is subject to the following two conditions:
- This device may not cause harmful interference, and
- This device must accept any interference received, including interference that may cause undesired operation.
FCC RF Exposure Statement:
This equipment complies with FCC radiation exposure limits set forth for an uncontrolled environment. This transmitter must not be co-located or operating in conjunction with any other antenna or transmitter.
ISEDC Caution:
This device complies with Innovation, Science, and Economic Development Canada licence-exempt RSS standard(s). Operation is subject to the following two conditions:
- This device may not cause interference, and
- This device must accept any interference, including interference that may cause undesired operation of the device.
ISEDC RF Exposure Statement:
The device is in compliance with RF exposure guidelines; users can obtain Canadian information on RF exposure and compliance.
1-YEAR LIMITED WARRANTY – US & CANADA
WARRANTY – US & CANADA
JAM warrants this product free from defects in material and workmanship for a period of 1 year from the date of purchase. This warranty does not cover damage caused by misuse or abuse, accident, the attachment of any unauthorized accessory, alteration to the product, or any other conditions whatsoever that are beyond the control of JAM.
For detailed Warranty instructions and information, visit www.jamaudio.com/customer-support/warranty-1yr. To obtain warranty service on your JAM product, contact a Consumer Relations representative by the telephone number or email address for your country of residence. Please make sure to have the model number of the product available.
| For service in the USA Email: [email protected] Tel: 1-888-802-0040 8:30am–7:00pm EST M–F |
For service in Canada Email: [email protected] Tel: 1-888-225-7378 8:30am–5:00pm EST M–F |
WARRANTY – UK & EUROPE
JAM warrants this product free from defects in material and workmanship for a period of 2 years from the date of purchase. This warranty does not cover damage caused by misuse or abuse, accident, the attachment of any unauthorized accessory, alteration to the product, or any other conditions whatsoever that are beyond the control of JAM. Distributed in the EU by FKA Brands Ltd, Somerhill Business Park, Tonbridge, TN11 0GP, UK. Tel: 020 3538 0768 Email: [email protected].
WARRANTY – AUSTRALIA
(1-YEAR LIMITED WARRANTY)
We or Us means JAM Australia Pty Ltd ACN 31 103 985 717 and our contact details are set out at the end of this warranty; You mean the purchaser or the original end-user of the Goods. You may be a domestic user or a professional user; Supplier means the authorized distributor or retailer of the Goods that sold you the Goods in Australia and New Zealand, and Goods means the product or equipment which was accompanied by this warranty and purchased in Australia and New Zealand.
For Australia:
Our Goods come with guarantees that cannot be excluded under the Australian Consumer Law. You are entitled, subject to the provisions of the Australian Consumer Law, to a replacement or refund for a major failure and for compensation for any other reasonably foreseeable loss or damage. You are also entitled, subject to the provisions of the Australian Consumer Law, to have the Goods repaired or replaced if the goods fail to be of acceptable quality and the failure does not amount to a major failure. This is not a complete statement of your legal rights as a consumer.
For New Zealand:
Our Goods come with guarantees that cannot be excluded under the Consumer Guarantees Act 1993. This guarantee applies in addition to the conditions and guarantees implied by that legislation.
The Warranty
JAM sells its products with the intent that they are free of defects in manufacture and workmanship under normal use and service. In the unlikely event that your JAM product proves to be faulty within 1 year from the date of purchase due to workmanship or materials only, we will replace it at our own expense, subject to the terms and conditions of this guarantee. The warranty period is limited to 3 months from the date of purchase for products used commercially/professionally.
Terms and Conditions:
In addition to the rights and remedies that you have under the Australian Consumer Law, Consumer Guarantees Act of New Zealand or any other applicable law and without excluding such rights and remedies warranty against defects:
- The Goods are designed to withstand the rigors of normal household use and are manufactured to the highest standards using the highest quality components. Whilst unlikely, if during the first 12 months (3 months commercial use) from their date of purchase from the Supplier (Warranty Period), the Goods prove defective by reason of improper workmanship or materials and none of your statutory rights or remedies apply, we will replace the Goods, subject to the terms and conditions of this warranty.
- We do not have to replace the Goods under this Additional Warranty if the Goods have been damaged due to misuse or abuse, accident, the attachment of any unauthorised accessory, alteration to the product, improper installation, unauthorised repairs or modifications, improper use of electrical/power supply, loss of power, malfunction, or damage of an operating part from a failure to provide manufacturer’s recommended maintenance, transportation damage, theft, neglect, vandalism, environmental conditions, or any other conditions whatsoever that are beyond the control of JAM.
- This Warranty does not extend to the purchase of used, repaired, or secondhand products, or to products not imported or supplied by HoMedics Australia Pty Ltd, including but not limited to those sold on offshore internet auction sites.
- This Warranty extends only to consumers and does not extend to Suppliers.
- Even when we do not have to replace the Goods, we may decide to do so anyway. In some cases, we may decide to substitute the Goods with a similar alternative product of our choosing. All such decisions are at our absolute discretion.
- All such replaced or substituted Goods continue to receive the benefit of this Additional Warranty for the time remaining on the original Warranty Period (or 3 months, whichever is the longest).
- This Additional Warranty does not cover items damaged by normal wear and tear, including but not limited to chips, scratches, abrasions, discoloration, and other minor defects, where the damage has a negligible effect on the operation or performance of the Goods.
- This Additional Warranty is limited to replacement or substitution only. As far as the law permits, we will not be liable for any loss or damage caused to property or persons arising from any cause whatsoever and shall have no liability for any incidental, consequential, or special damages.
- This warranty is only valid and enforceable in Australia and New Zealand.
Making a Claim:
In order to claim under this Warranty, you must return the goods to the Supplier (place of purchase) for replacement. If this is not possible, please contact our Consumer Relations department by email ([email protected]) or at the address below.
- All returned Goods must be accompanied by satisfactory proof of purchase that clearly indicates the name and address of the Supplier, the date and place of purchase, and identifies the product. It is best to provide an original, legible, and unmodified receipt or sales invoice.
- You must bear any expense for return of the Goods or otherwise associated with making your claim under this Additional Warranty.
Distributed in Australia by HOMEDICS AUSTRALIA PTY LTD, 14 Kingsley Close, Rowville, Victoria 3178. Distributed in New Zealand by Phoenix Distribution NZ Ltd, 7B Orbit Drive, Albany / North Shore 0757, Auckland, New Zealand.
For service in Australia
Email: [email protected]
Tel: 03-87566500
8:30am–5:00pm AEST M–F
www.jam-audio.com.au
IMPORTANT SAFETY INSTRUCTIONS
READ ALL INSTRUCTIONS BEFORE USING.
WARNING: Do not place speakers too close to ears. May cause damage to the eardrums, especially in young children.
- Use this product only for its intended purpose as described in this manual. Do not use attachments not recommended by Jam.
- Jam is not liable for any damage caused to smartphones, iPod/MP3 players, or any other devices.
- Do not place or store this product where it can fall or be dropped into a tub or sink without shutting waterproof doors.
- Do not place or drop into water or any other liquid without shutting waterproof doors.
- Not for use by children. THIS IS NOT A TOY.
- Never operate this product if it has a damaged cord, plug, cable, or housing.
- Keep away from heated surfaces.
- Only set on a dry surface. Do not place on a surface wet from water or cleaning solvents if waterproof doors are open.
WARNING:
CAUTION: All servicing of this product must be performed by authorized Jam Audio service personnel only. For a complete user guide and to register your product, visit www.jamaudio.com (USA), canada.jamaudio.com (Canada), or uk.jamaudio.com/instructionbooks (UK).
 To prevent possible hearing damage, do not listen at high volume for long periods.
![]() WEEE EXPLANATION
WEEE EXPLANATION
This marking indicates that this product should not be disposed of with other household wastes throughout the EU. To prevent possible harm to the environment or human health from uncontrolled waste disposal, recycle it responsibly to promote the sustainable reuse of material resources.
Hereby, FKA Brands Ltd, declares that this radio device is in compliance with the essential requirements and other relevant provisions of Directive 2014/53/EU. A copy of the Declaration of Conformity can be obtained from uk.jamaudio.com/DoC.
© 2019 HMDX. All rights reserved. JAM is a registered trademark of HMDX. HMDX is a registered trademark of FKA Distributing Co.
The Bluetooth® word mark and logos are registered trademarks owned by Bluetooth® SIG, Inc. and any use of such marks by HMDX is under license.
![]()

Operating frequency band: 2402 – 2480MHz
HX-TT400: Maximum radio-frequency power transmitted:-4.61dBm
Distributed by HMDX.
3000 N Pontiac Trail
Commerce Township, MI 48390
All rights reserved.
IB-HXTT400