Instant Zest Plus Rice and Grain Cooker
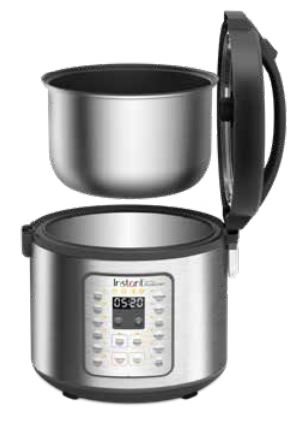
Full manual and instruction videos available at instantappliances.com
Register your product today at instantappliances.com/support/register
Welcome to the world of Instant cooking.
Thank you for welcoming us into your kitchen.
Having families ourselves, we developed the InstantTM ZestTM Plus to allow busy families and professionals alike to cook healthy, delicious meals more easily and in less time.
We have partnered with chefs, authors and bloggers to compile a collection of recipes that we hope you enjoy!
Happy cooking,
Download the Instant Pot App
• Original Recipes
• New User Tips
• Getting Started Videos
Initial Setup
- Remove all packaging material from in and around the cooker, and verify that all parts are accounted for.
- Place the cooker on a stable, level surface, away from external heat sources.
- Read all Important Safeguards in the included Safety, Maintenance & Warranty booklet before use. Failure to do so may result in property damage and/or personal injury.
- Follow Care & Cleaning instructions in the included Safety, Maintenance & Warranty booklet to wash the cooker before first use.
- Do not remove safety warning stickers from lid or rating label from back of cooker base.
CAUTION
Never use the cooker on a stovetop. Do not place the appliance on or in close proximity to a hot gas or electric burner, or a heated oven. Heat from an external source will damage the appliance.
Product Overview
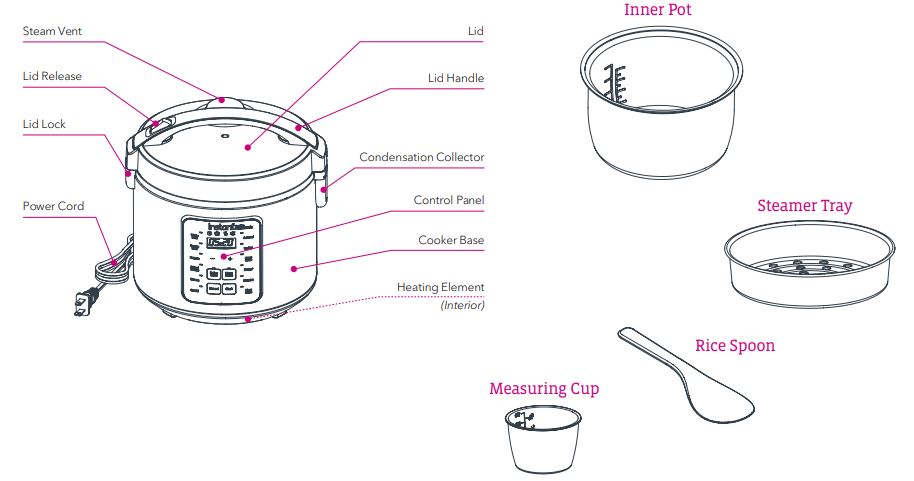
Getting Started
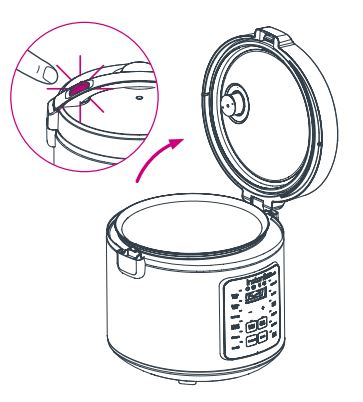
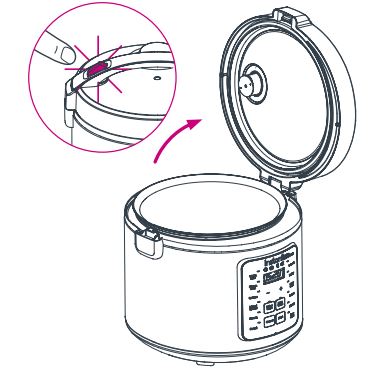
- Press the lid release button on the lid handle down, then open the lid.
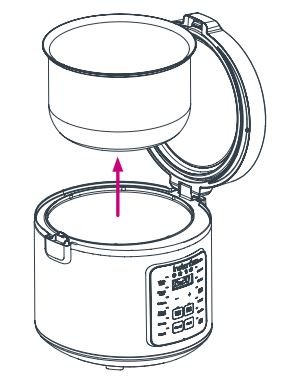
- Remove the inner pot from the cooker base.
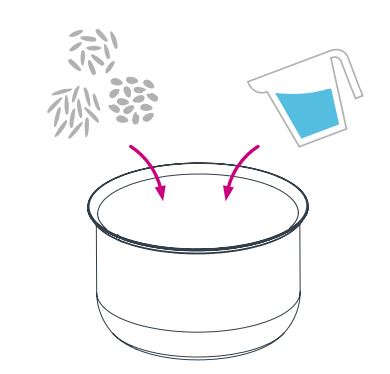
- Add grain and cooking liquid to the inner pot, according to your recipe.
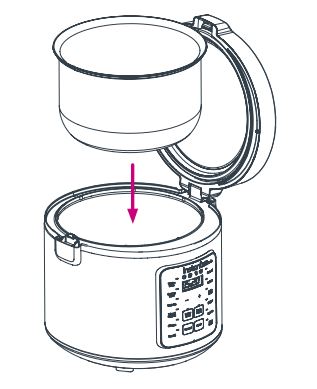
- Insert the inner pot into the cooker base.
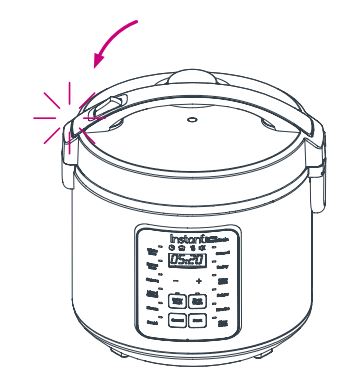
- Close the lid. It clicks to indicate that it is closed correctly.
- Connect the power cord to a 120V power source.
The cooker is in Standby, and the display indicates “OFF”.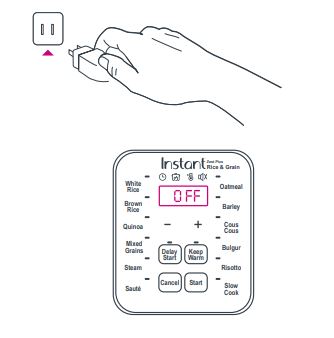
- Select a Smart Program.
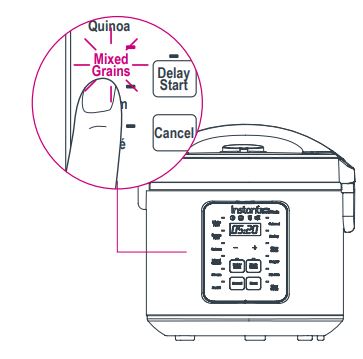
- If applicable, use –/+ to manually adjust the cook time.
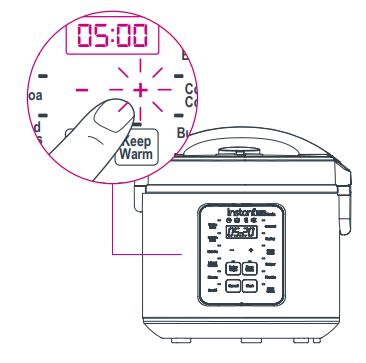 Note: All Smart Programs except Steam, Sauté, Oatmeal and Slow Cook will automatically set the cook time based on the volume of grain in the inner pot.
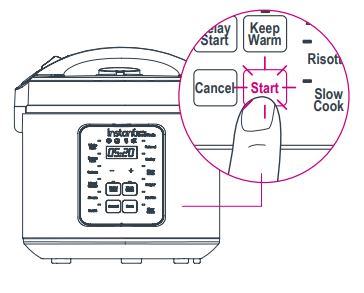
 - Press Start to begin cooking cycle.
Display indicates “On” for automated programs. For manually adjusted programs (Sauté, Steam, Slow Cook, Oatmeal) the countdown time is displayed.
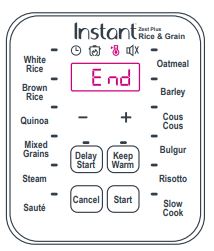
- When the Smart Program completes, the cooker will go to Keep Warm and display “End”. To cancel this function, press Cancel at any time.
- When ready, press the lid release on the lid handle down, then carefully open the lid.
More Controls

- Cancel
Press to stop a Smart Program at any time. Cooker returns to Standby and displays “OFF”. - Delay Start
Postpone cooking up to 24 hours. Select a Smart Program and then press Delay Start to turn the setting On. Use –/+ to set the number of hours and minutes and press Start to begin cooking. There is no Delay Start function on Sauté program. - Keep Warm
Setting is on by default on all Smart Programs. Once Smart Program is selected, press Keep Warm to turn the setting off. - Sound Off
Sound is automatically set to On. To turn sound off, before choosing a smart program, press and hold “–” key until the Sound Off icon lights up.
Note: Error code alerts will be silenced. - Sound On
To turn sound back on, before choosing a smart program, press and hold “+” key until cooker beeps.
Smart Programs
| Smart Program | Grain : Water Ratio | Estimated Cook Time | Notes |
| White Rice | 1 cup : 1 ½ cups | 25 – 60 minutes | The cooker detects the volume of grain and automatically sets the cook time accordingly. |
| Brown Rice | 1 cup : 2 cups | 40 – 90 minutes | |
| Mixed Grains | 1 cup : 2 cups | 40 – 90 minutes | |
| Quinoa | 1 cup : 1 ½ cups | 30 – 60 minutes | |
| Barley | 1 cup : 2 cups | 40 – 90 minutes | |
| Cous Cous | 1 cup : 1 cup | 15 – 40 minutes | |
| Bulgur / Cracked Wheat | 1 cup : 1 ½ cups | 30 – 60 minutes | |
| Oatmeal | 1 cup : 3 cups | 20 – 90 minutes | Manually set cook time. |
Note: Cooking times and ratios are recommendations only. Follow a trusted recipe. For the complete cooking timetable, visit instantappliances.com
| Smart Program | Temperature | Estimated Cook Time | Notes |
| Steam | 100ºC / 212ºF | 5 – 60 minutes | To preserve vitamins and minerals, use a steamer basket and keep your food out of the boiling water. |
| Sauté | Low / High | 1 – 30 minutes | Do not close the lid when using Sauté. To switch between ”Lo“ and ”Hi“ press the Sauté button before pressing Start. |
| Risotto | Auto | 30 – 60 minutes | Sauté dry rice and desired vegetables before adding liquid. |
| Slow Cook | Low / High | 30 minutes –
24 hours |
To switch between ”Lo“ and ”Hi“ press the Slow Cook button before pressing Start. Compatible with all standard slow cooker recipes. |
| Manual Keep Warm | Low / High | up to 12 hours | To switch between ”Lo“ and ”Hi“ press the
Keep Warm button before pressing Start. |
Register your product today at: instantappliances.com/support/register
Instant Brands Inc.
11 – 300 Earl Grey Dr., Suite 383 Ottawa, Ontario
K2T 1C1
Canada
Contact Customer Care:
1-800-828-7280
instantappliances.com/#Chat
instantappliances.com
store.instantappliances.com

Instant VORTEX PLUS 6 Quart Air Fryer User Guide
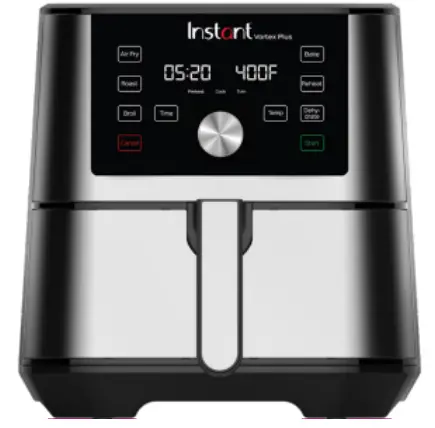 Instant VORTEX PLUS 6 Quart Air Fryer User Guide
Getting Started Guide

Full Manual, How to Videos and Recipes available online at instantappliances.com
Register your product today at instantappliances.com/support/register

Initial Setup
- Remove all packaging material from in and around the Air Fryer, as well as all accessories from inside the cooking chamber.
- Follow Care & Cleaning instructions in the Safety, Maintenance & Warranty booklet to clean the air fryer before first use.
- Place the Air Fryer on a stable, level surface, away from combustible material and external heat sources. Leave at least 5” of space around the air fryer.
- Do not place anything on top of the air fryer and do not block the air vents.
- Never use the Air Fryer on a stovetop.
- Read all Important Safeguards in the Safety, Maintenance & Warranty booklet before use. Failure to do so may result in property damage and/or personal injury.
Product Overview


The models listed here may not be representative of all models in the Vortex, Vortex Plus and Vortex Pro series.
For a complete list of colors and patterns, visit instantappliances.com.
Initial Test Run
(approximate time: 25 minutes)
- Connect the power cord to a 2 120V power source.
Air fryer is in Standby and display indicates “OFF”.

Note: To wake the air fryer, press the dial button or touch the screen. - Remove the air fry basket from the cooking chamber.
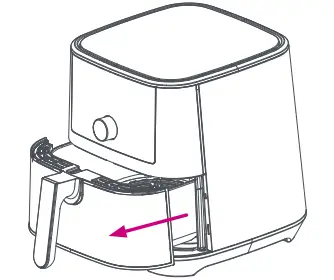
- Place the cooking tray on the bottom 4 of the air fry basket.
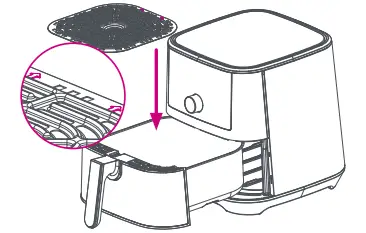
Note: Ensure the indicator arrows point towards the back or the front of the air fryer. - Insert the air fry basket back into the cooking chamber.
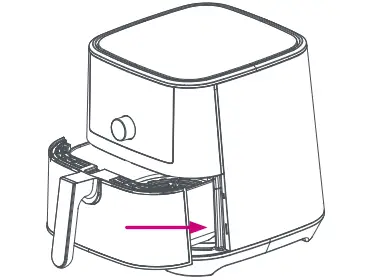
- Select Smart Program: Air Fry.
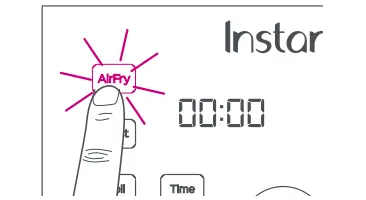
- Touch Temp, then use the dial to adjust the cooking temperature to 205 ºC/400 ºF.
Touch Time, then use the dial to adjust the cook time to 20 minutes.*

*Note: Smart Programs automatically save your last temperature and time settings. - Touch Start to begin cooking.
The display indicates “On” while the air fryer Preheats.

Touch the Time or Temp key to select the desired setting, then use the dial to adjust the cook time and temperature at any time during cooking.

- When the air fryer reaches the target temperature, the display indicates “Add Food”.
For this initial test, do not add food to the air fry basket.*
* Note: Some food items do not require a preheat time. Whether you remove the basket or not, cooking will proceed after 10 seconds.

When cooking, food may be added before or after preheating, as you desire. - Carefully remove and re-insert the 10 air fryer basket.
Display changes from “Add Food” to indicate cook time and temperature.
Display also indicates “Cook”.

- Part way through the Smart Program, the air fryer beeps and displays “turn Food” to remind you to flip or shake your food items.*

Remove the air fry basket to pause the Smart Program and insert it into the cooking chamber to resume.
* Note: Notice only appears on Air Fry and Roast. Some food items do not require attention. Cooking will proceed after 10 seconds whether food has been turned or not. - When 1 minute remains, the cook time counts down in seconds.
When the Smart Program completes, the display indicates “End” and the fan conitnues to blow to cool the air fryer.
Note: If the door is not opened, the Air Fryer will remind you that food is ready after 5, 30, and 60 minutes.

For further operation instructions, refer to the full User Manual online at instantappliances.com.
 The air fryer and air fry basket will be hot during and after cooking. Do not touch hot surfaces. Allow the air fryer to cool to room temperature, then clean the air fry basket according to “Care & Cleaning” instructions in the included Safety, Maintenance & Warranty booklet.
More Controls

Smart Programs

* Broil & Dehydrate Smart Programs are only available on Vortex Plus 6 models.
For further information on controls and Smart Programs, refer to the full User Manual online at instantappliances.com.
Cooking Timetable

*Note: Cook times and temperatures are recommendations only All oven safe cookware is safe to use in the Air Fryer For a complete cooking timetable, visit instantappliances.com
FAQS
What is the difference between the Vortex, Vortex Plus and Vortex Pro?
The Vortex and Vortex Plus have a 3.5-quart capacity, while the Vortex Pro has a 6-quart capacity. The cooking baskets are interchangeable among all three models.
What is the difference between an air fryer and a convection oven?
Air fryers use rapid hot air circulation to cook food. Convection ovens use hot air, but also use convection fans to circulate the hot air around food.
How do I clean my air fryer?
Refer to the Care & Cleaning instructions in the Safety, Maintenance & Warranty booklet for cleaning instructions.
What’s in the box?
Electric Pressure Cooker with Air Fryer Lid
Does it smoke?
Use liquid smoke.
What are the actual dimensions of the 6qt? Looking to find a dust cover to fit it.
It’s 11L”x11″Wx13″H. base is a bit wider so base is probably closer to a 12″x12″, since it’s slightly tapered at the top
Can this appliance be used with a 220V power source?
No.
What are the interior measurements of the Vortex Plus 6 quart basket?
9 1/2 x 9 3/4 x 3 3/4.
Does this tell you when to turn over or shake?
Turn food, but not shake food.
Can you wash the air fryer basket over water?
Yes you can
How much ford it weigh?
The Instant Vortex Plus 6-in-1 4QT unit weighs 9lbs.
What Is the difference between the plus and non-plus models?
The Vortex 6Qt has the following functions: air fry, bake, reheat, roast. The exterior is black plastic. The Instant Vortex Plus 6 Quart Air Fryer has the following functions: air fry, bake, reheat, roast, broil and dehydrate. The exterior is stainless steel. If you have more questions please contact our support team and we can help you further!
How much is the tax?
Tax is applied in accordance with you locale mandates.
does it make crispy?
The Instant Vortex Plus 6 Quart Air Fryer is great for making crispy, tasty food. When making french fries you can toss them in a little oil before cooking for that extra crunch! Enjoy!
Forget the debate of whether the rubber/silcon pieces on the tray should be removed; more importantly, are they necessary?
The Instant Vortex Plus 6 Quart Air Fryer is great for making crispy, tasty food. When making french fries you can toss them in a little oil before cooking for that extra crunch! Enjoy!
Can you use it to make fish & chips?
The Instant Vortex Plus 4 Quart Air Fryer makes tasty, crispy fish and chips! There are recipes on our Instant Home website under the Recipe section. Enjoy!
]]>Instant Vortex Mini 2 Litre Air Fryer
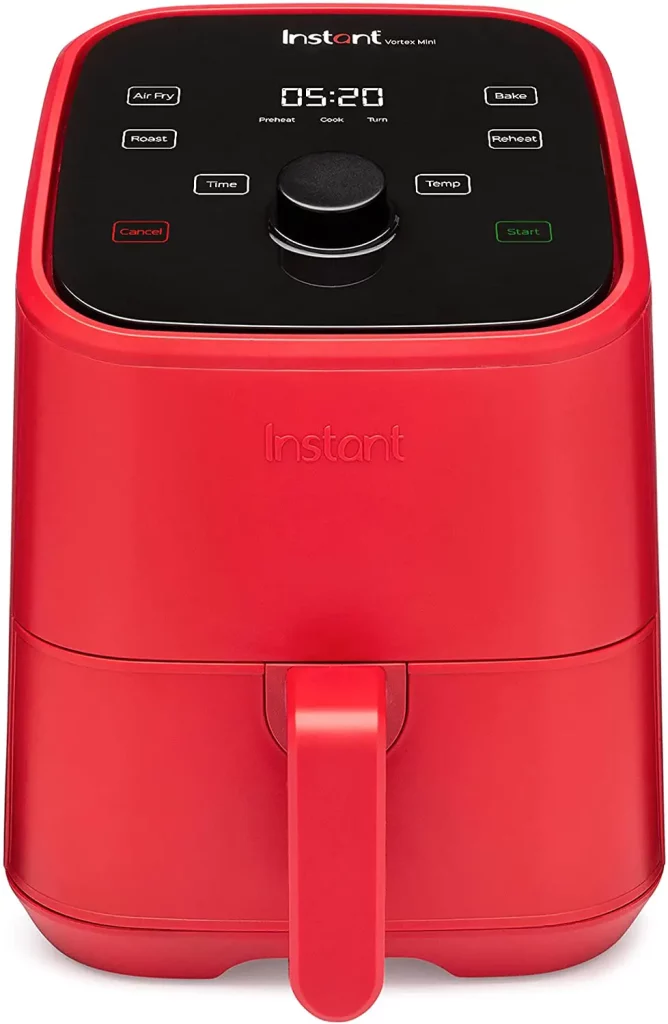
IMPORTANT SAFEGUARDS
At Instant Brands™ your safety always comes first. The Instant™ Vortex™ family was designed with your safety in mind, and we mean business. Visit instantpot.com.au to learn about this appliance’s safety mechanisms. When using electrical appliances, basic safety precautions should always be followed:
- READ ALL INSTRUCTIONS, SAFEGUARDS, AND WAR NINGS BEFORE OPERATING THE APPLIANCE. FAILURE TO FOLLOW THESE SAFEGUARDS AND INSTRUCTIONS MAY RESULT IN INJURY AND/OR PROPERTY DAMAGE.
- The appliance’s outer surfaces may become hot during use. DO NOT touch hot surfaces. Only use the air fryer basket handle to lift and carry the air fryer basket. Wear proper hand protection when handling hot components. Extreme caution must be used when moving the appliance. Let the appliance cool to room temperature before handling or moving.
- CAUTION To protect against the risk of electrical shock, DO NOT immerse power lead, plug, or the appliance in water or other liquid.
- DO NOT rinse the appliance under tap.
- The cooking chamber contains electrical components. To avoid electrical shock, DO NOT put liquid of any kind into the cooking chamber.
- This appliance is NOT to be used by children or by persons with reduced physical, sensory, or mental capabilities. Close supervision is necessary when this appliance is used near children and these individuals. Children should not use or play with this appliance.
- Turn off and unplug when not in use, as well as before adding or removing parts or accessories, and before cleaning. To turn off, press Cancel. To unplug, grasp the plug and pull from the socket. NEVER pull from the power lead.
- Avoid making contact with moving parts.
- Inspect the appliance and power lead regularly. DO NOT operate any appliance with a damaged lead or plug or after the appliance malfunctions, or is dropped or damaged in any manner. For assistance, contact the Customer Care Team at [email protected] or 1800 251 643 or 02 9317 1000.
WARNING: Read this manual carefully and completely, and retain for future reference. Failure to adhere to safety instructions may result in serious injury. - DO NOT use any accessories or attachments not authorised by Instant Brands™ Inc. The use of attachments not recommended by the manufacturer, may cause a risk of injury, fire or electric shock.
- For household countertop use only. Do not use outdoors. Not for commercial use. Not for use in staff kitchen areas in shops, offices and other working environments, farm houses, nor by clients in hotels, motels and other residential type environments such as bed and breakfasts.
- DO NOT place the appliance on any kind of stovetop, or in a heated oven; heat from an external source will damage the appliance.
- DO NOT let power lead contact hot surfaces or open flame, including a stovetop.
- DO NOT use appliance for anything other than intended use.
- Proper maintenance is recommended after each use. Refer to Care, Cleaning & Storage. Let the appliance cool to room temperature before cleaning or storage.
- CAUTION Spilled food can cause serious burns. A short power-supply lead is provided to reduce the hazards resulting from grabbing, entanglement and tripping. Keep appliance and lead away from children. NEVER drape lead over edge of table or counter, NEVER use power socket below counter, and NEVER use with an extension lead.
- DO NOT attempt to repair, replace, alter, or modify components of the appliance. This may cause electric shock, fire and/or injury, and will void the warranty.
- DO NOT tamper with any of the safety mechanisms.
- DO NOT use the appliance in electrical systems other than 220-240V~ 50-60Hz for Australia and New Zealand. DO NOT use with power converters or adapters.
- DO NOT overfill the appliance or accessories. Overfilling may cause food to contact the heating element, which may result in fire and/or personal injury.
- DO NOT cover the cooling vents while the appliance is in operation. Doing so will prevent even cooking and may cause damage to the appliance.
- NEVER pour oil into the cooking chamber. This could result in fire and/or personal injury.
- While cooking, the internal temperature of the appliance reaches several hundred degrees. To avoid personal injury, NEVER place unprotected hands inside the appliance until it has cooled to room temperature.
- When cooking, DO NOT place the appliance against a wall or against other appliances. Leave at least 13 cm of free space on the back, sides, and above the appliance. DO NOT operate the appliance on or near combustible materials such as tablecloths and curtains. DO NOT place anything on top of the appliance.
- When in operation, hot air is released through the cooling vents. Keep your hands and face at a safe distance from the cooling vents and take extreme caution when removing the accessories from the appliance.
- Should the unit emit black smoke, press Cancel and unplug the appliance immediately. Wait for smoking to stop before removing the air fryer basket, then clean the appliance thoroughly.
- DO NOT leave the appliance unattended while in use.
- NEVER connect this appliance to an external timer switch or separate remote-control system.
- Use extreme caution when removing hot accessories from the cooking chamber or disposing of hot grease.
- Oversized foods and/or metal utensils must not be inserted into the cooking chamber as they may cause risk of fire and/or personal injury.
- DO NOT store any materials, other than the included accessories, in the cooking chamber when not in use.
- DO NOT place any combustible materials in the cooking chamber, such as paper, cardboard, plastic, Styrofoam or wood.
- DO NOT use appliance accessories in any other appliance including microwave ovens, toaster ovens, convection or conventional ovens, ceramic, electric, induction or gas hobs, or outdoor grills.
- CAUTION Use extreme caution when moving an appliance containing hot oil or other hot liquids.
SAVE THESE INSTRUCTIONS.
WARNING
To avoid injury, read and understand instruction manual before using this appliance.
Electrical shock hazard. Use grounded socket only.
- DO NOT remove ground.
- DO NOT use an adapter.
- DO NOT use an extension lead.
Failure to follow these instructions may result in electric shock and/or serious injury.
THE FAILURE TO FOLLOW ANY OF THE IMPORTANT SAFEGUARDS AND/OR THE INSTRUCTIONS FOR SAFE USE IS A MISUSE OF YOUR APPLIANCE THAT CAN VOID YOUR WARRANTY AND CREATE THE RISK OF SERIOUS INJURY.
Special Cord Set Instructions
As per CE safety requirements, a short power supply cord is provided to reduce the hazards resulting from grabbing, entanglement and tripping. This appliance has a 3-prong grounding plug. To reduce the risk of electric shock, plug the power cord into a grounded (earthed) electrical outlet that is easily accessible.
Product Specifications
Find Your Model Name and Serial Number
Find both of these on the rating label on the bottom of the airfryer.
Product, Parts & Accessories
Before using your cute new air fryer, make sure that everything is present and accounted for.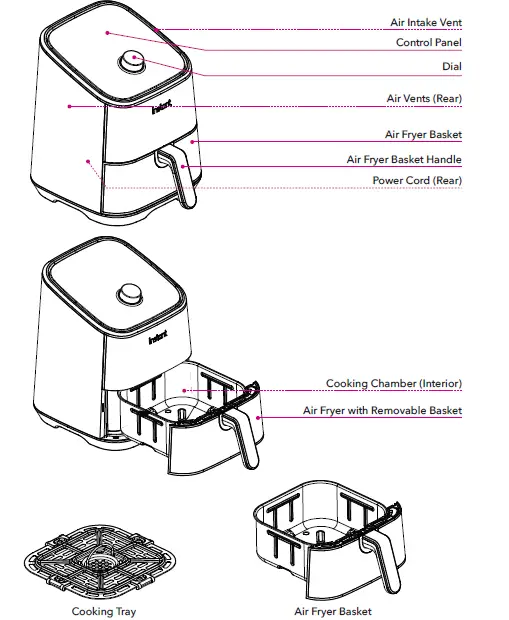
Getting Started
Initial Setup
“Notice the small things. The rewards are inversely proportional.” – Liz Vassey.
- Pull that Instant™ Vortex™ Mini Air Fryer out of the box!
- Remove the air fryer basket and check the cooking chamber for loose packing material before first use. Don’t remove the silicone supports from the removable cooking tray.
- You may be tempted to put the air fryer on your stovetop — but don’t do it! Place it on a stable, level surface, away from combustible material and external heat sources. Do not place your air fryer on top of another appliance. Make sure to leave at least 13 cm of space above and around all sides of the appliance.
- Follow the Care, Cleaning & Storage instructions to wash your new air fryer before using it. Don’t remove the safety warning stickers or the rating label from the air fryer.
WARNING
- Read the Important Safeguards before using the appliance. Failure to read and follow those instructions for safe use may result in damage to the appliance, property damage or personal injury.
- Do not place the appliance on a stovetop, on another appliance, or in a heated oven. Heat from an external source will damage the appliance.
- To avoid the risk of fire, property damage, and/or personal injury, do not place anything on top of the appliance, and do not block the air vents.
Initial Test Run
Do you have to do the test run? No — but getting to know the ins and outs of your Instant™ Vortex™ Mini Air Fryer prepares you for success in the kitchen! Take a few minutes to get to know how this little baby works.
Stage 1: Setting up the air fryer for cooking
- Connect the power cord to a 220-240V power source. The air fryer is in standby mode and the display shows OFF.
- Remove the air fryer basket from the cooking chamber.
- Place the cooking tray on the bottom of the air fryer basket (if it is not already installed).
- Insert the air fryer basket back into the cooking chamber.
- Touch Air Fry.
- Touch Time, then turn the dial to adjust the cook time to 20 minutes (00:20). Each Smart Program automatically saves the adjustments you make to the time and temperature when you touch Start.
- Touch Start to begin!
The display shows On and the cooking status shows Preheat. The first few times you use your air fryer, you may notice a strong plastic smell. This is normal, non-toxic, and goes away quickly.
Stage 2: “Cooking” (…but not really, this is just a test!)
- When the air fryer is hot enough, the display shows Add Food. For this initial test, do not add food to the air fryer basket. Carefully remove and re-insert the air fryer basket. The displayalternates between the cooking time and temperature, and the cooking status shows Cook.
- Part way through cooking, the display shows turn Food. Wait 10 seconds for the program to resume automatically, or, remove and re-insert the air fryer basket to pause and resume the program manually.
- When 1 minute remains, the display counts down the remaining cooking time in seconds. When the Smart Program completes, the display shows End and the fan blows for a little while to help cool the air fryer.
- Press the dial or remove and re-insert the air fryer basket to return to standby mode and start cooking for real! If you forget this last step, the air fryer will beep to remind you about it after 5, 30, and 60 minutes.
CAUTION: The air fryer and air fryer basket will be hot during and after cooking. To avoid the risk of burn injury, DO NOT touch hot surfaces. Allow the air fryer to cool to room temperature, then clean the appliance according to Care, Cleaning & Storage instructions.
Control Panel
| 1 | Time/Temperature Display | Shows the cooking time, the set temperature, reminder messages and error messages. |
| 2 | Time | Touch Time and turn the dial if you want to adjust the cooking time. |
| 3 | Temp | Touch Temp and turn the dial if you want to adjust the cooking temperature. |
| 4 | Cooking Status | Preheat, Cook and Turn. |
| 5 | Smart Programs | • Air Fry
• Roast • Bake • Reheat |
| 6 | Dial | Rotate to adjust cooking times and temperatures. Press to wake the display. |
| 7 | Start | Touch Start to begin a selected smart program. |
| 8 | Cancel | Touch Cancel to stop a smart program at any time and go back to standby. |
Find full instructions for use online at instantpot.com.au
Settings
| To do this… | Do this! |
| Wake the air fryer | Touch the display, press the dial, or remove and re-insert the air fryer basket to wake the air fryer. The display shows OFF to let you know that it’s in standby mode and ready for action. |
| Turn sounds on and off | In standby mode, touch and hold both the Time and Temp for 3 seconds. The display shows S On when the sound is on, and SOFF when the sound is off.
Error alerts cannot be silenced. |
| Change temperature scale (ºC or ºF) | In standby mode, touch and hold the Temp key for 5 seconds to toggle between °C and °F. |
| Save a custom cooking time | Select a smart program, then touch Time and use the dial to adjust the time as you like. Press the dial or touch Start to save the change. |
| Save a custom cooking temperature | Select a smart program, then touch Temp and use the dial to adjust the temperature as you like. Press the dial or touch Start to save the change. |
| Reset an individual smart program | In standby mode, touch and hold the smart program key you want to reset (for example:
Air Fry) for 3 seconds. The cooking time and temperature for that Smart Program are restored to the factory default settings. |
| Reset all smart programs | In standby mode, press and hold the dial for 3 seconds. The cooking times and temperatures for all Smart Programs are restored to the factory default settings. |
Cooking Status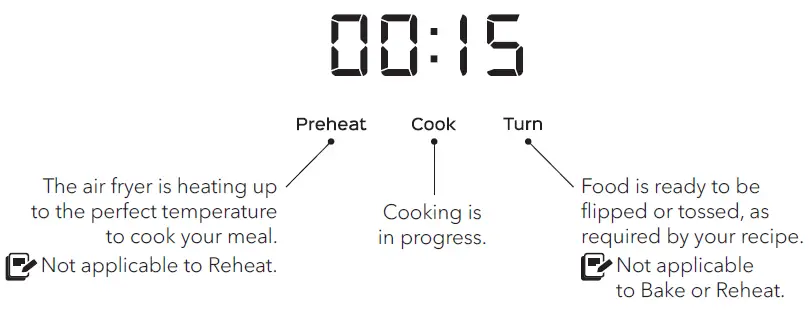
Status Messages
| OFF | The air fryer is in standby mode. |
| ON | A smart program is in the Preheat stage. Not applicable to Reheat. |
| ADD Food | This message appears to let you know that the air fryer
has reached the perfect cooking temperature and food can be added to the air fryer basket (if it hasn’t been already). Not applicable to Reheat. |
| OPEN | May indicate that the air fryer basket has been removed or is not fully inserted. |
| 05:20 | The display alternates between showing the cooking time, the temperature, and on-screen messages. |
| Turn Food | Food is ready to be turned or tossed, as recommended by your recipe. Not applicable to Bake or Reheat. |
| END | The Smart Program has finished. |
Cooking
Cooking in the Instant™ Vortex™ Mini Air Fryer is quick and easy — food goes in, crispy deliciousness comes out! Find full instructions for use and cooking time tables online at instantpot.com.au or download the free Instant Pot app for fun, easy to follow recipes.
Air Fry, Roast, Bake and Reheat
These programs give your meals all the rich, crispy flavor of deep frying with little to no oil, so you can say, “See ya!” to the greasy mess and extra calories! The presets are a starting point that you can experiment with to get the results you like best.
| Smart Program | Default Time | Time Range | Default Temperature | Temperature Range |
| Air Fry | 12 minutes
(00:12) |
1 minute to 1 hour
(00:01 to 01:00) |
205°C | 82 to 205°C |
| Roast | 18 minutes
(00:18) |
1 minute to 1 hour
(00:01 to 01:00) |
193°C | 82 to 205°C |
| Bake | 30 minutes
(00:30) |
1 minute to 1 hour
(00:01 to 01:00) |
166°C | 82 to 205°C |
| Reheat | 10 minutes
(00:10) |
1 minute to 1 hour
(00:01 to 01:00) |
138°C | 49 to 182°C |
CAUTION:
- To avoid the risk of fire, property damage and personal injury, DO NOT spray cooking oil into the cooking chamber.
- The air fryer and air frying accessories will be hot during and after cooking. Do not touch hot surfaces with unprotected hands. Always use proper hand protection and exercise extreme caution when adding or removing food from the hot cooking chamber. Allow all items to cool to room temperature, then clean them according to Care, Cleaning & Storage instructions.
- To avoid a burn injury, always use proper hand protection and exercise extreme caution when adding or removing food from the hot cooking chamber.
Care, Cleaning & Storage
Clean your air fryer and accessories after each use. Always unplug the air fryer and let it cool to room temperature before cleaning. Never use harsh chemical detergents, scouring pads, or powders on any of the parts or components. Let all surfaces dry thoroughly before use, and before storage.
| Part or Accessory | Cleaning Method and Notes |
| Air Fryer Basket | • Clean the air fryer basket with a sponge or cloth and warm water and dish soap, then rinse well. Ensure that all grease and food debris are removed.
• DO NOT immerse the basket in water or any other liquid. • DO NOT machine wash the basket. |
| Cooking Tray | • Clean the cooking tray with a cloth or sponge and warm water and dish soap.
• The cooking tray has non-stick coating. To avoid damage to the non-stick coating, DO NOT use metal cleaning utensils. |
| Cooking Chamber | • Clean the cooking chamber with a sponge or soft cloth and warm water and dish soap.
• To remove baked-on grease and food residue from cooking chamber, spray with a mixture of baking soda and vinegar and wipe clean with damp cloth. • For stubborn stains, allow the mixture to sit on the affected area for several minutes before scrubbing clean. • Check the heating coil for oil spatter and food debris. Clean the heating coil with a damp cloth as needed. Ensure the heating coil is completely dry before next use. |
| Exterior | • Clean with a soft, damp cloth or sponge and wipe dry. |
Any other servicing must be performed by an authorised representative. For Troubleshooting tips, visit instantpot.com.au or contact Customer Support at [email protected].
WARNING:
To avoid risk of electrical shock and personal injury:
- Do not immerse the appliance in water.
- Do not rinse the appliance under a tap.
- Do not wet prongs of the power cord.
Without proper cleaning, food and grease splatter may build up around the heating element, causing the risk of smoke, fire, and personal injury. If you see or smell smoke, touch Cancel, unplug the appliance, and allow it to cool. Remove food splatter or grease with a soft cloth and dish detergent.
Warranty
Limited Warranty
This Limited Warranty is issued by Corelle Brands (Australia) Pty Ltd (Corelle Brands Australia) and is effective for one year from the date of original consumer purchase. Proof of original purchase date and return of your appliance is required to obtain service under this Limited. Return of your appliance to us will be done in accordance with our instructions only. Provided that this appliance is
operated and maintained in accordance with written operating instructions attached to or furnished with the appliance or published operating instructions on www.instantpot.com.au, Corelle Brands Australia will, in its sole and exclusive discretion, either: (i) repair defects in materials or workmanship; or (ii) replace the appliance. In the event that your appliance is replaced, the Limited Warranty
on the replacement appliance will expire 12 months from the date of original consumer purchase. We remind you the appliance you purchased is for personal use only (not commercial use). Any modification/alteration or attempted modification/alteration to your appliance will void this Limited Warranty, unless such modification/alteration or attempted modification/alteration was expressly authorized by a Corelle Brands Australia Representative in writing.
This Limited Warranty only covers Corelle Brands Australia’s appliances/products and is not extended to any other appliances, products, equipment, components, or devices that you use or may use in conjunction with the Corelle Brands Australia’s appliances.
To claim under this Limited Warranty:
- Contact Corelle Brands Australia at: 9C Commercial Road, Kingsgrove, NSW, 2208 Email: [email protected]
- Provide a description of the appliance you believe has malfunctioned due to defective parts or workmanship.
- If it is necessary for the appliance to be sent to Corelle Brands Australia for repair or replacement, Corelle Brands Australia will send you a pre-paid shipping label and you must send the appliance and your dated sales receipt to Corelle Brands Australia along with the appliance. If you do not have your dated sales receipt, please advise Corelle Brands Australia in advance, and Corelle Brands Australia will attempt to verify your purchase.
- If Corelle Brands Australia determines that the appliance has malfunctioned due to defective parts or workmanship, and is covered under this Limited Warranty, Corelle Brands Australia will repair and return the appliance, or send you a replacement appliance, at Corelle Brands Australia’s cost.
- Any repaired or replaced appliance will be covered by this Limited Warranty for the remainder of the original warranty period or ninety (90) days following your receipt of the replacement or repaired appliance, whichever is greater.
- If Corelle Brands Australia confirms the appliance has not malfunctioned due to defective parts or workmanship, and/or is in working order, or if proof of purchase is not verified, Corelle Brands Australia reserves the right to return the appliance to you at your pre-paid cost. If this cost is not met, Corelle Brands Australia reserves the right to dispose of the appliance after 45 days’ notice to you.
Limitation and Exclusions
To the maximum extent permitted by law, the maximum liability of Corelle Brands Australia, if any, for any allegedly defective appliance or part shall in no circumstances exceed the purchase price of a comparable replacement appliance or part of the same age.
This Limited Warranty does not cover:
- Damage resulting from accident, modification/alteration (unless expressly authorized by a Corelle Brands Australia Representative in writing), misuse, abuse, neglect, unreasonable use, use contrary to the written operating instructions attached to or furnished with the appliance or published operating instructions on www.instantpot.com.au, normal wear and tear, commercial use, improper assembly by you or anyone, disassembly by you or anyone, repair by you or anyone, failure to provide reasonable and necessary maintenance, force majeure event including but not limited to fire, flood, acts of God;
- Repairs where your appliance is used for other than normal, personal use or when it is used in a manner that is contrary to the written operating instructions attached to or furnished with the appliance or published operating instructions on www.instantpot.com.au ; or
- Use of unauthorized parts and accessories, or repairs to parts and systems resulting from unauthorized repairs or modifications/alterations made to your appliance. The cost of repair or replacement under these excluded circumstances shall be borne by you. Our goods come with guarantees that cannot be excluded under the Australian Consumer Law. You are entitled to a replacement or refund for a major failure and compensation for any other reasonably foreseeable loss or damage. You are also entitled to have the goods repaired or replaced if the goods fail to be of acceptable quality and the failure does not amount to a major failure.
Distributed by Corelle Brands (Australia) Pty Ltd. 9c Commercial Road, Kingsgrove, NSW, 2208. 1800 251 643 or (02) 9317 1000.
Email: [email protected]
©2021 Corelle Brands (Australia) Pty Ltd. Distributed by Corelle Brands (Australia) Pty Ltd. 9c Commercial Road, Kingsgrove, NSW, 2208, Australia
Register your product today at: instantpot.com.au/support/register
Contact Customer Care: Ph 1800 251 643 or 02 9317 1000
[email protected]
instantpot.com.au

![]()
IP-DUO60 Pot Duo 7-In-1 Electric Pressure Cooker
User Guide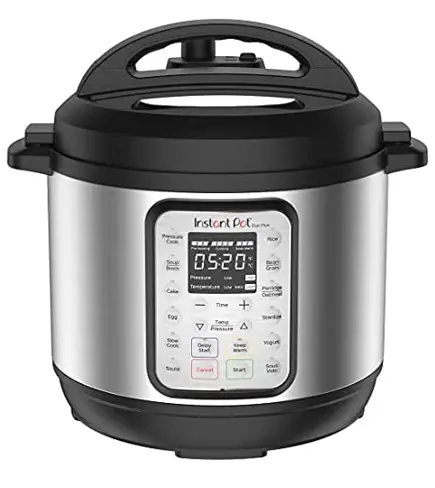
![]()
This Instant Pot®Duo™ multifunction cooker can help you cook healthy delicious meals more easily and in less time. We hope you fall in love with Instant Pot cooking, and enjoy it in your kitchen for years to come! This guide is for the Instant Pot Duo version 5. For other user manuals, visit instanthome.com.
WHAT’S IN THE BOX
Parts + accessories
Sealing Ring (installed in the lid)
Condensation Collector
Steam Rack with Handles (Mini steam rack may not have handles)
Illustrations are for reference only and may differ from the actual product.
Remember to recycle!
We designed this packaging with sustainability in mind. Please recycle everything that can be recycled where you live.
USING YOUR DUO
Control panel
We’ve designed the control panel to be simple to use and easy to read. 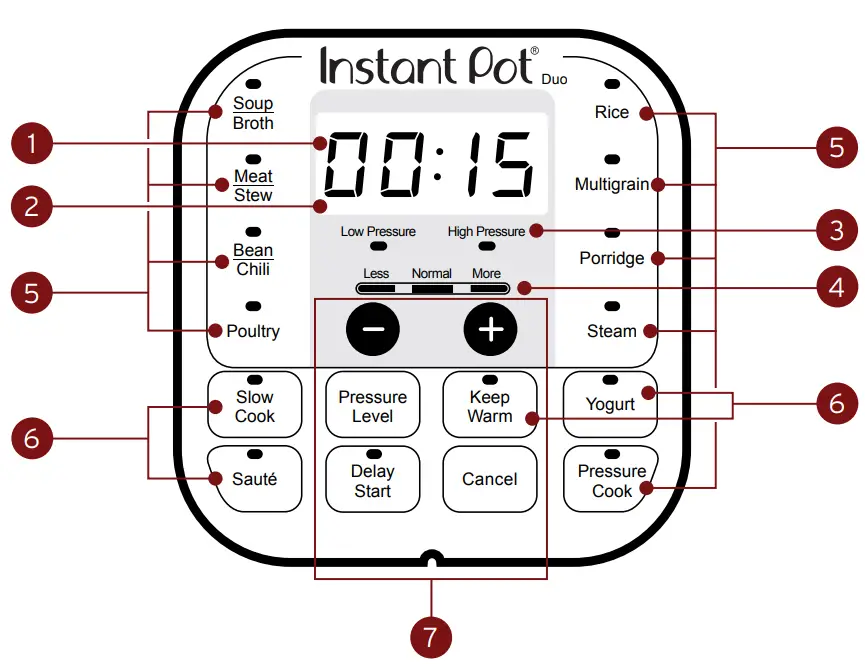
- Time
• Cooking time
• Delay Start time
• Keep Warm time - Status Messages
- Pressure
• Low or High - Time/temperature options
• Pressure cooking: 3 preset time options
• Non-Pressure cooking: 3 temperature levels - Pressure Cooking Smart Programs
• Light shows the active Smart Program - Non-Pressure Cooking Smart Programs
• Light shows the active Smart Program - Smart Program Settings
• Choose Pressure Level
• Keep Warm On/Off
• Delay Start On/Off
• Cancel
Status messages
The control panel shows the information you need to know when using your Instant Pot Duo.
 |
Standby mode |
 |
Preheat mode |
 |
Lid not properly secured or missing |
 |
Time Smart Program: cooking time remaining Delay Start: time until Smart Program starts Keep Warm: time food has been warming |
 |
Rice Smart Program is running |
 |
Yogurt Smart Program is in pasteurizing cycle |
 |
Sauté Smart Program is ready to add food |
 |
Smart Program ended (Keep Warm is off) |
 |
Overheating: see Troubleshooting |
 |
Error: see Troubleshooting |
Using the lid
You’ll use the stainless steel lid for most cooking programs, and especially for pressure cooking. Always use the pressure cooking lid that came with this Instant Pot Duo cooker base.
Open the Lid
- Turn the lid handle to align the arrow symbol on the lid with the unlock symbol on the cooker base.
- Lift the lid up and off the cooker base. You can insert the handle into the cooking base vertically for easy storage.
Close the Lid - Align the arrow symbol on the lid with the unlock symbol on the cooker base and lower the lid onto the track.
- Turn the lid until the arrow symbol on the lid aligns with the lock symbol on the cooker base.
Turning the sound On/Off
Turn sound on
When in Standby mode, press, and hold + button until the display shows S On.
Turn sound off
When in Standby mode, press and hold the – button until the display shows SOFF.
Audible safety alerts (beeps) cannot be turned off.
Delay the start of cooking
You can set a Delay Start timer for a minimum of 10 minutes or a maximum of 24 hours.
- Select a Smart Program, adjust the settings as you want, then press Delay Start.
Once Delay Start has been selected, there is no way to return to the cooking settings.
To adjust Smart Program settings, press Cancel and enter new selections. - When the hours’ field flashes, use the – / + buttons to adjust the delay time hours.
- 3. Press Delay Start again to toggle to the minute’s field and adjust the delay time minutes.
- Delay Start begins automatically and the timer counts down.
- When Delay Start ends, the Smart Program begins, and the display indicates On.
Delay Start is not available with the Sauté or Yogurt Smart Programs.
Reset Smart Programs to original settings
Reset Individual Smart Programs
With the cooker in Standby mode, press and hold one Smart
Program button until the cooker returns to Standby and shows OFF.
The Smart Program’s pressure level, cooking time, and temperature are restored to the factory default setting.
Reset All Smart Programs
With the cooker in Standby mode, press and hold Cancel until the cooker beeps.
All Smart Program pressure levels, cooking times, and temperatures are restored to the factory default setting.
INITIAL SET UP
Clean before use
- Wash the inner cooking pot with hot water and soap. Rinse and use a soft cloth to dry them outside. Or you can wash the inner cooking pot in the dishwasher.
- Wipe the heating element inside the cooker base with a soft cloth to ensure there are no stray packaging particles.
Setting up the condensation collector
The condensation collector sits at the back of the cooker base and accumulates overflow moisture from the condensation rim. It should be installed before cooking, then emptied and rinsed out after each use.
Remove the condensation collector
Pull the condensation collector away from the cooker base; do not pull it down.
Note the tabs on the cooker base and the grooves on the condensation collector.
Install the condensation collector
Align the grooves on the condensation collector with the tabs on the back of the cooker base and slide the condensation collector into place.
Plugin the cord (3QT and 6QT models)
When you’re ready to use your Instant Pot Duo, plug the electrical cord into the power socket on the back of the unit.
Note: the 8QT model has an electrical cord that is always connected to the unit.
Test run
Setting up your new Instant Pot Duo for a test run is a great way to familiarize yourself with how the unit works before you actually cook a meal.
To perform a test run:
- Follow the instructions for pressure cooking on page 9 using the Steam Smart Program.
- Add water (but no food) as shown in ‘Using liquid to create steam’ on page 10.
- Set the cooking time to 5 minutes.
- After the cooking session is done, discard any remaining water.
- Wash and dry the inner cooking pot.
Now you’re ready to cook a meal in your Instant Pot Duo!
PRESSURE COOKING
Pressure cooking uses pressurized steam to quickly and evenly cook foods.
How to pressure cook
Prep
Cut, chop, season or marinate your ingredients according to your recipe.
Preheat
- Place the inner cooking pot into the cooker base.
- Add ingredients to the inner cooking pot.
- Place the lid on top of the cooker base and lock the lid. See ‘How to lock the lid’ below
- Select a smart program for cooking by pressing the button on the control panel. See ‘About pressure cooking programs’ above
- Press the Smart Program again to toggle between time options: Less, Normal, or More.
- If you want to increase or decrease the cooking time exactly, press + or –.
- Press Pressure Level to toggle between pressure options: High or Low.
- Keep Warm setting is ON by default. Press Keep Warm again to turn it off.
- After 10 seconds, the display shows On and the Instant Pot Duo is building pressure.
It can take 10–15 minutes to reach the pressure setting for cooking. Frozen foods increase the preheating time.
The pressure level and time you choose will be the new settings the next time you use that Smart Program
Cook - When the pressure is ready, your Instant Pot Duo will beep once and starts cooking.
- The cooking time starts counting down.
- When the timer reaches 00:00, the cooker will beep 5 times, and the cooking stops.
You can press Cancel to stop a Smart Program at any time.
Release steam
Choose from the steam release method that works for your recipe.
See ‘How to release steam’ below for full details
Using liquid to create steam
Pressure cooking requires liquid in the inner cooking pot to produce the steam needed. Depending on the size of your Instant Pot Duo, here are the minimum amounts you’ll need:
| Instant Pot Size | Minimum Liquid for Pressure Cooking* |
| 3 Quarts / 2.8 Litres | 1 cup (8 oz / 250 mL) |
| 6 Quarts / 5.7 Litres | 1 1⁄2 cups (12 oz / 375 mL) |
| 8 Quarts / 7.6 Litres | 2 cups (16 oz / 500 mL) |
*Unless otherwise specified in the recipe.
Pressure cooking liquids should be water-based, such as broth, stock, soup, or juice. If using canned, condensed, or cream-based soup, add water as directed above.
How to lock the lid
For pressure cooking, the lid must be securely locked into place to prevent steam from escaping. When you place the lid on the cooker base:
- Line up [triangle symbol] on lid with [open padlock symbol] on the cooker base.
- Turn lid clockwise until [triangle symbol] on lid lines up with [triangle symbol] on cooker base.
How to release steam
Instant Pot Duo can release steam in 2 different ways. Use the one that best fits the type of food you’re cooking.
Natural steam release
Releases steam gradually over time (up to 40 minutes or more) after cooking stops.
Use for: Foods that can simmer, like stews, chili, pasta, oatmeal, beans, and grains.
- After cooking, leave the steam release switch in the Sealing position until all pressure is released.
- The float valve drops into the lid when all steam is released.
- After steam release, turn the lid counterclockwise and remove the lid.
Quick steam release
Quickly releases steam after you press the steam release switch.
Use for: Foods that tend to overcook, like vegetables and seafood.
- After cooking, set steam release switch to Venting position and wait for all pressure to release.
- The float valve drops into the lid when all steam is released.
- After steam release, turn the lid counterclockwise and remove the lid.
Pressure Cooking Caution
This appliance uses pressure to cook. Allow the appliance to release all excess pressure and steam before opening the lid. Opening the lid before pressure is released may result in burns, injury, and/ or property damage. Read more in the Safety, Maintenance, and Warranty document.
Pressure Cooking Smart Programs
These Smart Programs are designed to pressure cook specific types of food. You can adjust the settings as your recipe directs.
Soup/Broth
| Pressure | Low / High | ||
| Setting | Less | Normal | More |
| Cooking Time | 20 minutes (00:20) | 35 minutes (00:35) | 4 hours (04:00) |
| Best for | Soup without meat | Soup with meat | Bone broth / High fat content |
Tip
The soup/broth remains clear due to a lack of boiling motion. Use Natural Release for soups with higher starch content.
Meat/Stew
| Pressure | Low / High | ||
| Setting | Less | Normal | More |
| Cooking Time | 20 minutes (00:20) | 35 minutes(00:35) | 45 minutes (00:45) |
| Best for | Softer texture | Very soft texture | Fall-off-the-boat texture |
Tip
Allow meat to rest for 5-30 minutes after cooking to retain juices.
Beans/Chili
| Pressure | Low / High | ||
| Setting | Less | Normal | More |
| Cooking Time | 25 minutes (00:25) | 30 minutes (00:30) | 40 minutes (00:40) |
| Best for | Firmer texture | Soft Texture | Very soft texture |
Tips
Choose to set based on desired bean texture or adjust the cooking time manually. When cooking beans or legumes, always use the Natural Release Method.
Make sure dry beans are completely submerged in water.
Poultry
| Pressure | Low / High | ||
| Setting | Less | Normal | More |
| Cooking Time | 5 minutes (00:05) | 15 minutes(00:15) | 30 minutes (00:30) |
| Best for | Softer texture | Very soft texture | Fall-off-the-boat texture |
Tip
Allow meat to rest for 5-30 minutes depending on size. It will retain cooking juices for tender, succulent meat
Rice
| Pressure | Low / High | ||
| Setting | Less | Normal | More |
| Cooking Time (Auto) | 8 minutes (00:08) | 12 minutes (00:12) | 15 minutes (00:15) |
| Best for | Al-dente / White Rice | Normal texture / White Rice | Softer texture / White Rice |
Tip
The Instant Pot Duo automatically adjusts cooking time depending on the volume of rice; the display will show Auto. You can adjust cooking time and setting to achieve desired texture. Use a 10-minute timed steam release for fluffy rice.
Multigrain
| Pressure | Low / High | ||
| Setting | Less | Normal | More |
| Cooking Time | 20 minutes (00:20) | 40 minutes (00:40) | 1 hour+45 minutes soaking (01:45) |
| Best for | Al dente / Brown rice | Brown or wild rice | Tough grains or a mixture of grains and beans |
Tip
The More setting will add an additional 45 minutes for soaking grains/beans with 60 minutes of pressure cooking
Porridge
| Pressure | Low / High | ||
| Setting | Less | Normal | More |
| Cooking Time | 5 minutes (00:05) | 20 minutes (00:20) | 30 minutes (00:30) |
| Best for | Oatmeal: steel-cut or rolled | Pudding, porridge, or congee | Porridge or congee with a mixture of various grains |
Tips
Adjust cooking time as the recipe directs. Use Natural Steam Release when cooking foods that expand.
Steam
| Pressure | Low / High | ||
| Setting | Less | Normal | More |
| Cooking Time | 3 minutes (00:03) | 10 minutes (00:10) | 15 minutes (00:15) |
| Best for | Vegetables | Fish and seafood | Meat |
Tips
Use the provided steam rack to elevate food above cooking liquid. Use Quick Steam Release to avoid overcooking food.
SAUTÉING
Use Sauté in place of frying or saucepan. Sautéing can deepen the flavors of your food, or can simmer, thicken or reduce sauces.
Choose from these settings in the Sauté Smart Program:
| Setting | Less 170 F / 77 C | Normal 154 F / 68 C | More 143 F / 62 C |
| Cooking time | 30 minutes (00:30) | 30 minutes (00:30) | 30 minutes (00:30) |
| Best for | Simmering, thickening, and reducing liquids | Pan-searing or sautéing | Stir-frying or browning meat |
How to sauté
Prep
Cut, chop, season or marinate your ingredients according to your recipe.
Preheat
- Place the inner cooking pot into the cooker base.
- Press Sauté.
- Cycle through temperature presets to select Less, Normal, or More.
- Press – / + to adjust the cooking time.
- After 10 seconds, the cooker beeps 3 times and the Display shows ON.
Cook
- When the display shows Hot, add ingredients.
- When the timer ends, the cooker beeps 10 times and the display shows End.
- Press Cancel if you want to finish cooking before the timer runs out.
Deglazing
Deglazing is the process of adding a liquid to a hot pan, releasing all of the delicious, caramelized pieces stuck to the bottom.
- Remove food from the inner pot.
- Add water, broth, or wine.
- Use a wooden spoon or silicone spatula to loosen food stuck to the bottom of the inner cooking pot.
Sautéing before Pressure or Slow Cooking
Quite often, you’ll want to sauté foods to brown them before further cooking them.
- Sauté ingredients.
- Press Cancel.
You can deglaze the inner cooking pot now before switching to Pressure Cook or Slow Cook (see Deglazing Inner Pot) - Select from the Smart Program.
SLOW COOKING
Slow Cook lets you make your favorite simmering and stewing recipes just like grandma used to make. This program does not use pressure to cook food. Make sure the steam release is set to Venting or use a glass lid with a venting hole.
Choose from these settings in the Slow Cook Smart Program:
| Setting | Less | Normal | More |
| Best for | ‘Low and Slow’ cooking | The medium setting is equivalent on traditional slow cookers | The high setting equivalent on traditional slow cookers |
| Cooking Time | 8 hours (08:00) | 6 hours (06:00) | 4 hours (04:00) |
How to slow cook
Prep
Cut, chop, season or marinate your ingredients according to your recipe.
Cook
- Place the inner cooking pot into the cooker base.
- Add ingredients to the inner cooking pot.
- Place the lid on top of the cooker base and lock the lid.
- Press Slow Cook.
- Cycle through temperature presets to select Less, Normal, or More.
- Press – / + to adjust the cooking time.
- Keep Warm setting is On by default. Press Keep Warm again to turn it off.
- After 10 seconds, the display shows an On and displays timer.
Keep Warm
When cooking completes, the display shows End if Keep Warm is turned off. If not, the timer begins counting from 00:00 up to 10 hours (10:00).
YOGURT MAKING
You can use your Instant Pot Duo to easily make delicious, fermented dairy and non-dairy yogurt.
Choose from these settings in the Yogurt Smart Program:
| Setting | Less | Normal | More |
| Cooking Time | 24 hours (24:00) | 30 minutes* (00:30) | 3 minutes (00:03) |
| Best for | For lower temperature fermentation or Jiu Niang, a sweet, fermented rice dessert | Fermenting milk after culture has been added | Pasteurizing milk Display shows boiL |
* You can adjust the time from 30 to 99 minutes
How to make yogurt Pasteurizing Milk
- Insert the inner pot into the cooker
- Add unpasteurized milk to the inner
- Place and close
- Press Yogurt.
- Press Yogurt again to cycle through Less, Normal, More.
- After 10 seconds, the display shows boiL.
- When pasteurization finishes, the display shows End.
Note: Milk must reach a minimum of 161°F / 72°C for pasteurization to occur
Adding Culture/Starter
- Allow pasteurized milk to cool to 43°C / 110°F.
- Add a starter culture to the milk according to the package
If using plain yogurt as a starter, ensure that it contains an active culture. Mix in 2 tbsp (30 mL) of yogurt per 1 gallon (3.7 L) of milk or follow a trusted recipe - Place and close
Ferment
- Press Yogurt.
- Cycle to Normal by pressing Yogurt again; display shows 8 hours (08:00).
- Use – / + buttons to adjust the fermentation time if
- After 10 seconds the cooker begins heating; the display shows the timer counting up to the set time from 00:00.
- When fermentation completes, the cooker beeps and the display shows End.A longer fermentation period will produce tangier yogurt
- Allow yogurt
- Place in fridge for 12–24 hours to develop
How much to make?
| Instant Pot Size | Minimum Milk Volume | Maximum Milk Volume |
| 3 Quarts / 2.8 Liters | 2 Cups(16 oz / 500 mL) | 2 Quarts(64 oz / 1.9 L) |
| 6 Quarts / 5.7 Liters | 4 Cups(32 oz / 1000 mL) | 4 Quarts (128 oz / 3.8 L) |
| 8 Quarts / 7.6 Liters | 6 Cups(48 oz / 1500 mL) | 6 Quarts(192 oz / 5.7 L) |
KEEP WARM
The Keep Warm setting turns on automatically after cooking on all Smart Programs except Sauté and Yogurt. You can also use Keep Warm to reheat food.
Keep warm after cooking
- When automatic warming begins, the timer shows the time passed, up to 10
- To turn automatic warming off (either during cooking or during automatic warming), press Keep Warm and the light above the button turns
Reheat and keep warm
- When in Standby mode, press Keep Warm.
- Press again to cycle through Less, Normal and More temperature levels
- Press the – / + buttons to set a timer for up to 10
| Part | Cleaning instructions |
| Accessories • Steam Rack • Condensation Collector |
• Wash after each use • Hand wash with hot water and mild dish soap or wash in the dishwasher, top rack • Never use harsh chemical detergents, powders, or scouring pads on accessories • Empty and rinse condensation collector after each use |
| Lid and Parts • Anti-Block Shield • Sealing Ring • Steam Release Valve • Float Valve • Silicone Cap |
• Hand wash with hot water and mild dish soap or wash in the dishwasher, top rack • Remove all small parts from lid before washing. • With steam release valve and anti-block shield removed, clean interior of steam release pipe to prevent clogging. • To drain water from the lid after dishwashing, grasp the lid handle and hold the lid vertically over a sink, then turn it all the way around • After cleaning, store the lid upside down on the cooker base • Store sealing rings in a well-ventilated area to disperse odor • To eliminate odors from the sealing ring, add 1 cup (8 oz / 250 mL) water and 1 cup (8 oz / 250 mL) white vinegar to the inner cooking pot, and run Pressure Cook for 5–10 minutes, then use Quick Steam Release |
| Inner Cooking Pot | • Wash after each use. • Hand wash with hot water and mild dish soap or wash in dishwasher* • Hard water stains may need a vinegar-dampened sponge and scrubbing to remove • For tough or burned food residue, soak in hot water for a few hours before cleaning • Dry all exterior surfaces before placing in a cooker base |
| Part | Cleaning instructions |
| Power cord | • Use a barely damp cloth to wipe any particles off the cord |
| Cooker base | • Wipe the inside of the cooker base as well as the condensation rim with a barely damp cloth, and allow to air dry • Clean the outside of the cooker base and the control panel with a soft, barely damp cloth or sponge |
*Some discoloration may occur after machine washing, but this will not affect the cooker’s safety or performance.
In the manual
For full details about removing lid parts for cleaning, read the User Manual, available at instanthome.com.
LEARN MORE
There’s a whole world of Instant Air Fryer information and help just waiting for you. Here are some of the most helpful resources.
Get the full User Manual
Instanthome.com
Register your product
Instanthome.com/register
Contact Consumer Care
Instanthome.com
[email protected]
Instant Recipe App with 1000+ recipes
Instanthome.com
iOS and Android app stores
Cooking charts and more recipes
instanthome.com
How-to videos, tips, and more
Instanthome.com
Replacement parts and accessories
Instanthome.com
Join the community![]()
Product specifications
| Model | Volume | Wattage | Power | Weight | Dimensions |
| Duo Mini v5 | 3 Quart2.8 Litres | 700watts | 120V/60Hz | 3.9 kg 8.6 lbs. | in:11.4Lx10Wx11.2H cm:29Lx25.5Wx28.5H |
| Duo 60 v5 | 6 Quart5.7 Litres | 1000watts | 120V/60Hz | 5.35 kg 11.8 lbs. | in:13.4Lx12.2Wx12.5H cm:34Lx31Wx31.7H |
| Duo 80 v5 | 8 Quart7.6 Litres | 1200watts | 120V/60Hz | 7.16 kg 15.79 lbs. | in:14.8Lx13.3Wx14.2H cm:37.6Lx33.8Wx36.1H |
Instant Brands Inc.,
495 March Road, Suite 200
Kanata, Ontario, K2K 3G1 Canada
instanthome.com
© 2021 Instant Brands™
Inc 110-0043-01-0301
Instant VORTEX PLUS 10 Quart Air Fryer User Guide
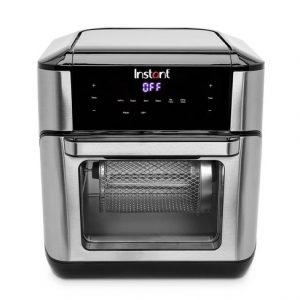
Welcome to the world of Instant cooking.
Hello! Thank you for welcoming us into your kitchen.
Having families ourselves, we developed the InstantTM VortexTM Air Fryer Oven to allow busy families and professionals alike to cook healthy, delicious meals more easily and in less time.
We have partnered with chefs, authors and bloggers to compile a collection of recipes that we hope you enjoy!

Robert J. Wang
Founder & Chief Innovation Officer
Download the FREE Instant Pot App
IMPORTANT SAFEGUARDS
When using, to avoid the risk of serious injury when using your appliance, basic safety precautions should be followed, including the following:
- READ ALL INSTRUCTIONS, SAFEGUARDS, AND WARNINGS BEFORE OPERATING THE APPLIANCE.
- Always operate the appliance on a stable, non-combustible, level surface.
- The appliance’s outer surfaces may become hot during use. Do not touch hot surfaces. Wear Instant Pot® mini mitts or oven mitts when opening the
oven door and handling hot components. Extreme caution must be used when moving the appliance. Let the appliance cool to room temperature before handling or moving.  CAUTION: To protect against the risk of electrical shock, do not immerse power cord, plug, or the appliance in water or other liquid.
- Do not rinse the appliance under tap.
- The cooking chamber contains electrical components. To avoid electrical shock, do not put liquid of any kind into the cooking chamber.
- This appliance is NOT to be used by children or by persons with reduced physical, sensory, or mental capabilities. Close supervision is necessary when this appliance is used near children and these individuals. Children should not use or play with this appliance.
- Unplug from the outlet when not in use, as well as before adding or removing parts or accessories, and before cleaning. To unplug, grasp the plug and pull from the outlet. Never pull from the power cord.
- Avoid contact with moving parts.
- Regularly inspect the appliance and power cord. Do not operate any appliance with a damaged cord or plug or after the appliance malfunctions, or is dropped or damaged in any manner. Contact Customer Care at [email protected] or 1-800-828-7280.
- Do not use any accessories or attachments not authorized by Instant BrandsTM Inc. The use of attachments not recommended by the manufacturer, such as fry baskets, may cause a risk of injury, fire or electric shock.
- For household countertop use only. Do not use outdoors. Not for commercial use.
- Do not place the appliance on any kind of stovetop, or in a heated oven; heat from an external source will damage the appliance.
- Do not let power cord contact hot surfaces or open flame, including a stovetop.
- Do not use appliance for anything other than intended use.
- Proper maintenance is recommended after each use. Refer to “Care & Cleaning”. Let the appliance cool to room temperature before cleaning or storage.
- CAUTION Spilled food can cause serious burns. A short powersupply cord is provided to reduce the hazards resulting from grabbing, entanglement and tripping. Keep appliance and cord away from children. Never drape cord over edge of table or counter, never use power outlet below counter, and never use with an extension cord.
- Do not attempt to repair, replace, alter, or modify components of the appliance. This may cause electric shock, fire and/or injury, and will void the warranty.
- Do not tamper with any of the safety mechanisms.
- Do not use the appliance in electrical systems other than 120V~60Hz for Canada and the USA. Do not use with power converters or adapters.
- Do not overfill the air fryer basket. Overfilling may cause food to contact the heating element, which may result in fire and/or personal injury.
- Do not cover the air vents while the appliance is in operation. Doing so will prevent even cooking and may cause damage to the appliance.
- Never pour oil into the cooking chamber. Fire and personal injury could result.
- While cooking, the internal temperature of the appliance reaches several hundred degrees. To avoid personal injury, never place unprotected hands inside the appliance until it has cooled to room temperature.
- When cooking, do not place the appliance against a wall or against other appliances. Leave at least 5” of free space on the back, sides, and above the appliance. Do not operate the appliance on or near combustible materials such as tablecloths and curtains. Do not place anything on top of the appliance.
- When in operation, hot air is released through the air vents. Keep your hands and face at a safe distance from the air vents and take extreme caution when removing the accessories from the appliance.
- Should the unit emit black smoke, press Cancel and unplug the appliance immediately. Wait for smoking to stop before opening the door, then clean the appliance thoroughly.
- Do not leave the appliance unattended while in use.
- Never connect this appliance to an external timer switch or separate remote-control system.
- Use extreme caution when removing hot accessories from the cooking chamber or disposing of hot grease.
- Oversized foods and/or metal utensils must not be inserted into the cooking chamber as they may cause risk of fire and/or personal injury.
- Do not store any materials, other than the included accessories, in the cooking chamber when not in use.
- Do not place any combustible materials in the cooking chamber, such as paper, cardboard, plastic, Styrofoam or wood.
- The included accessories are not to be used in a microwave, toaster oven, convection or conventional oven, nor on a ceramic, electric, induction or gas cooktop, or an outdoor grill.
SAVE THESE INSTRUCTIONS
 WARNING: Read this manual carefully and completely, and retain for future reference. Failure to adhere to safety instructions may result in serious injury.
 WARNING: To avoid injury, read and understand instruction manual before using this machine
 WARNING: Electrical shock hazard. Use grounded outlet only. DO NOT remove ground. DO NOT use an adapter. DO NOT use an extension cord. Failure to follow instructions can cause electrical shock and/or death
NOTICE: Electrical shock hazard. Use grounded outlet only. DO NOT remove ground. DO NOT use an adapter. DO NOT use an extension cord. Failure to follow instructions can cause electrical shock and/or death
Special Cord Set Instructions
As per UL safety requirements, a short power supply cord (0.6 m to 0.9 m / 24 in – 35 in) is provided to reduce the hazards resulting from grabbing, entanglement and tripping
This appliance has a 3-prong grounding plug. To reduce the risk of electric shock, plug the power cord into a grounded (earthed) electrical outlet that is easily accessible.
Product Specifications

Initial Setup
- Remove all packaging material from, in and around the oven, as well as all accessories from inside the oven chamber.
- Follow Care & Cleaning instructions in this manual to clean the oven before first use.
- Place the oven on a stable, level surface, away from combustible material and external heat sources. Leave at least 5” of space around the oven.
- Do not place the oven on a stovetop.
- Do not place anything on top of the oven.
- Do not block the air vents.
- Read the Important Safeguards in this User Manual before using the oven. Failure to read and follow Important Safeguards may result in damage to the oven, damage to property or personal injury
Product Overview
The Vortex Plus Air Fryer Oven uses rapid air circulation to cook food, giving your meals all the crispy rich flavor of deep frying with little or no oil.
Air Fryer Oven
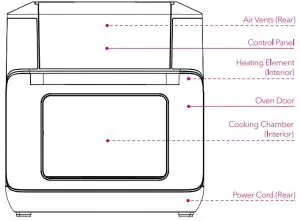
Air Fryer Oven Accessories


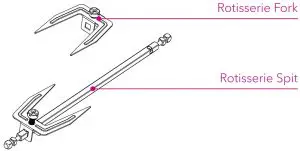

Control Panel
The Vortex Plus Air Fryer Oven Control Panel features intuitive touch screen controls and an LED Display.
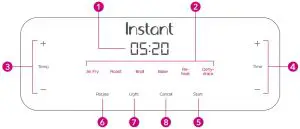
Display
Shows cooking time, cooking temperature, reminders and error messages.
Smart Programs
Smart Programs control cooking times and temperatures automatically. Select a Smart Program by touching the label on the Control Panel. Display reads “Off” to indicate that the Smart Program has been initiated and the oven is in Standby mode.
Vortex Plus 10 Smart Programs:
• Air Fry
• Roast
• Broil
• Bake
• Reheat
• Dehydrate
Note: Each Smart Program includes a default cooking time and temperature.
Adjust Temperature
Touch the Temp [+] or [-] signs to adjust the cooking temperature. Touch and hold to adjust quickly.
Adjust Time
Touch the Time [+] or [-] signs to adjust the cooking time. Touch and hold to adjust quickly.
Note: The Smart Program saves your time and temperature adjustments when you touch Start.
Start
Touch the Start key to begin cooking.
Rotate
Once cooking has begun, touch the Rotate key to turn rotisserie rotation on and off.
Note: Applicable to Air Fry & Roast only. The key turns blue when the Rotate function is available.
Light
Touch the Light key to turn the oven light on or off. The oven light turns off automatically after 5 minutes.
Cancel
Touch the Cancel key to stop cooking. The oven goes into to Standby mode and the Display reads “OFF”.
More Controls
Smart Program Reset
When in Standby, touch and hold the Smart Program you wish to reset for 3 seconds. The Smart Program cooking time and temperature is restored to the default setting.
Full Reset
When in Standby, touch and hold both the Temp and Time plus [+] signs at the same time for 3 seconds. All Smart Programs cooking times and temperatures are restored to the default settings
Sound On/Off
When in Standby (Display reads “Off”), touch and hold both the Temp and Time minus [−] signs for 3 seconds to toggle sound on or off.
Note: Error alerts cannot be silenced.
Display Messages
OFF indicates that the Air Fryer is in Standby mode.
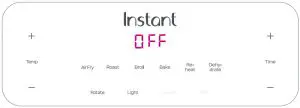
On indicates that the Air Fryer is in Preheating mode.
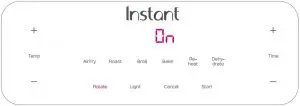
Add food indicates that the oven has reached desired temperature and food can be added


00:00 indicates that the Smart Program is running. The time indicator will count down while your food is cooking.

turn Food is a reminder to turn, flip or shake food items as recommended by your recipe.


End indicates that the Smart Program has ended.

Test Run
Follow these steps to ensure your oven is operating properly.
- Open the oven door.
Place the drip pan on the bottom of the cooking chamber.
Close door. - Plug the power cord into a 120V power source.
Display reads “OFF” indicating that oven is in Standby mode. - Touch the Air Fry Smart Program control on the Control Panel.
vvvThe default Air Fry Smart Program cooking temperature is 400ºF. - Touch the [+] or [−] Time controls to adjust the cooking time to 20 minutes.
Note: Smart Programs automatically save your last temperature and time settings. - Touch Start to begin cooking.
The display reads “On” while the oven is in Preheat mode.
Use the Temp [+] or [−] and Time [+] or [−] controls to adjust the cooking temperature or time. - When the oven reaches the Smart Program cooking temperature, the display reads “Add Food”.
For this test run, do not add food to the cooking chamber. - Open oven door.
Use Instant Pot® mini-mitts or oven mitts and carefully insert both cooking trays into the heated cooking chamber.
Close door.
The cooking time and temperature will be displayed - Part way through the Smart Program cooking time, the oven beeps and displays “turn Food” to remind you to turn your food.
Open the door to automatically pause the Smart Program, then close the door to resume.
Note: The “turn Food” reminder only appears when using Air Fry or Roast Smart Programs and only if Rotate is not turned on.
Note: Cooking will recommence after 10 seconds whether food has been turned or not.
- Display will count down the last minute of cooking time in seconds When the Smart Program is complete, display reads “End” and the fan blows to cool the oven.
Note: The Air Fryer Oven will remind you that food is ready 5, 30 and 60 minutes after the Smart Program ends.
 CAUTION: The oven will be hot during and after cooking. Do not touch hot surfaces. Always use Instant Pot® Mini Mitts or oven mitts to remove cooking trays. Allow the oven to cool to room temperature, then clean the accessories and cooking chamber. Refer to “Care & Cleaning” in the included Safety, Maintenance & Warranty booklet.
Smart Program Settings
Default Vortex Plus 10 Smart Program Time and Temperature settings are as shown in the table below.
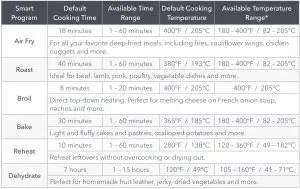
Using the Rotisserie Accessory
Always insert rotisserie accessories and food before preheating the oven.
To use the Rotisserie Basket
Read these instructions and/or watch the video to ensure you are using the rotisserie properly. Failure to follow these steps could result in damage to the rotisserie catch.
- Place food items in the rotisserie basket.
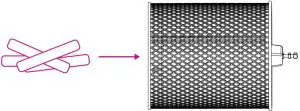
- Align the tab on the rotisserie basket with the notch in the lid then place the lid.
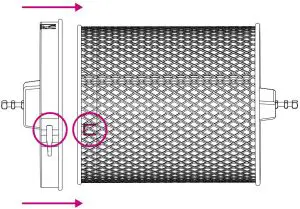
- Turn the lid clockwise to secure it.
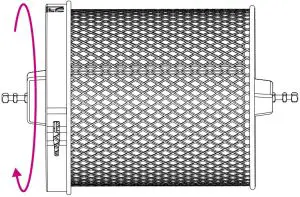
 CAUTION: Do not overfill the rotisserie basket.
Using the Rotisserie Accessory
Always insert rotisserie accessories and food before preheating the oven.
To use the Rotisserie Spit & Forks
- Unscrew the 2 set screws.
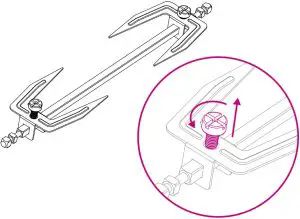
- Remove the forks from the spit.

- Push the food item onto the spit.

- Slide the forks onto both ends of the spit, ensuring the prongs are
inserted into the food item.
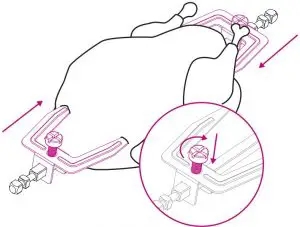
- Tighten the set screw to secure the forks.
Always insert rotisserie accessories and food before preheating the oven.
Rotisserie Cooking
- With the oven door open, slide the basket accessory or rotisserie spit into the guides into the cooking chamber. Both the basket and rotisserie spit install and remove the same way.

- Move the rotisserie 3 catch lever to the right and hold it in position.
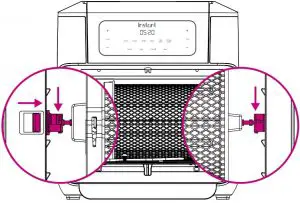
- Align the rotisserie arm with the hole in the center of the rotisserie catch on both sides of the cooking chamber.
- Release the rotisserie catch lever and rotate the rotisserie basket into place to ensure that the arm is held securely in place.
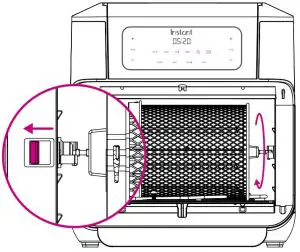
- Close the oven door.

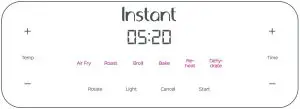
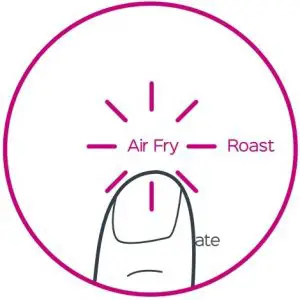
- Select Air Fry or Roast.
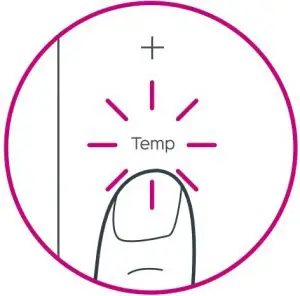
- Use the Temp and Time [+ / −] controls to adjust cooking temperature and time as desired.
- Touch Start.
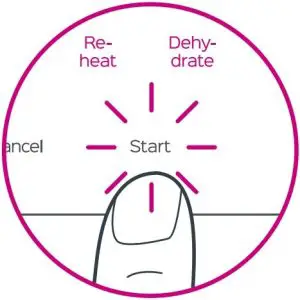
- Touch Rotate.
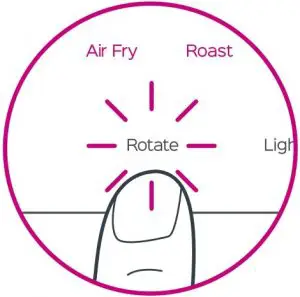
Removing the Accessory
- Use caution when opening oven door. Door and accessories will be hot. Position the rotisserie lift hooks beneath the left and right arms of the accessory
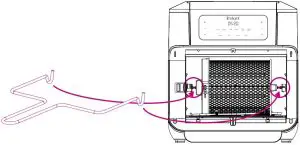
- Move the rotisserie catch lever to the right to release the accessory.
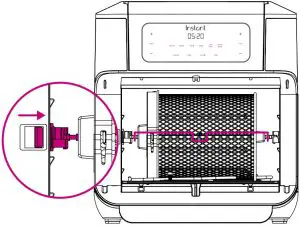
- Pull the accessory towards you, then release the rotisserie catch lever.
- Carefully remove the accessory from the cooking chamber.
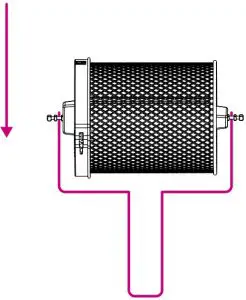
 WARNING: Rotisserie spit, forks, and basket will be hot during and after cooking. Always use the rotisserie lift to remove rotisserie accessories, and exercise extreme caution when removing hot accessories from the cooking chamber. Always use Instant Pot® Mini Mitts or oven mitts when disassembling hot rotisserie accessories.
Cooking Timetable

Note: Cooking times and temperatures are recommendations only. Always follow a trusted recipe.
 CAUTION: Always use a meat thermometer to ensure the internal temperature of poultry reaches at least 165°F / 75°C.
Cooking Tips
Instant Air Fryer Ovens can cook all your favorite fresh and frozen oven-baked, and deep-fried snacks—fast!
- Use the Smart Programs as a starting point and experiment with cooking times, and temperatures to get the results your prefer.
- Rotisserie-cooked foods and rotisserie accessories, and foods must be placed in the oven before touching Start
- With the exception of rotisserie-cooked foods, most foods will benefit greatly from a preheated oven. Wait for the display to read “Add Food” before inserting food into the cooking chamber.
- When cooking coated food items, choose breadcrumb batters over liquid-based batters to ensure that the batter will stick to the food.
- Flip or rotate food items when the display indicates “turn Food” to ensure they are evenly cooked on both sides.
- For crispy, golden fries, soak fresh potato sticks in ice water for 15 minutes, pat dry and spray lightly with cooking oil before inserting them to the oven.
- When baking cake, pie, quiche, or any food with filling or batter, use an oven-safe baking dish and cover food with foil or an oven-safe lid to prevent the top from overcooking.
- The drip pan doubles as a flat cooking tray. Use the drip pan when cooking fragile or filled foods.
- When cooking pizza, insert both cooking trays into the oven and place the pizza on the bottom cooking tray.
- Pat moist food items dry before cooking to prevent steam, splatter and excess steam.
- Air frying can cause oil and fat to drip from foods. To prevent excess smoke, carefully remove and empty the drip pan periodically throughout cooking.
- To ensure seasoning adheres to food items, spray food items with cooking oil before adding seasoning.
- Feel free to use any oven-safe cookware in your Air Fryer Oven.
- Find dozens of easy to follow recipes at:
recipes.instantpot.com
Download the Instant Pot app at:
instantpot.com/instant-pot-recipe-app-free-recipes/
 CAUTION: Do not spray cooking oil into the cooking chamber.
Care & Cleaning
Always unplug your Vortex Plus Air Fryer Oven and let it cool to room temperature before cleaning.
Never use harsh chemical detergents, scouring pads, or powders on any of the parts or components.
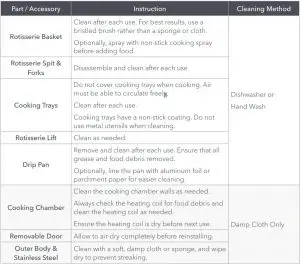
Note: To remove baked-on grease and food residue from accessories, and the cooking chamber, spray with a mixture of baking soda and vinegar and wipe clean with damp cloth. For stubborn stains, allow the mixture to sit on the affected area for several minutes before scrubbing clean.
Remove the Oven Door
- Place one hand on top of the Air Fryer Oven to hold it firmly in place.
- Open the door to a 45º angle from the oven.
- Pull the door up from the right side until it pops out of its track
Reinstall the Oven Door
- Hold the door at a 45º angle from the oven
- Align the teeth at the bottom of the oven door with the grooves in the Air Fryer Oven.
- Press down on the right side of the oven door until it pops into place, then press the left side down.
 WARNING: Do not immerse the appliance in water. Do not rinse the appliance under a tap. Do not wet prongs of power cord.
Without proper cleaning, food and grease splatter may build up around the heating element, causing the risk of smoke, fire, and personal injury.
If you smell smoke, touch Cancel and unplug the appliance. Once cool, remove food splatter or grease with a soft cloth and mild detergent.
Troubleshooting
Register your product today at instantappliances.com/support/register
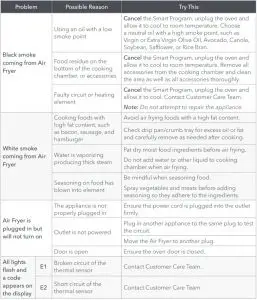
If the problems persist or for any service issue, contact an authorized service representative at [email protected] or by creating a support ticket instantappliances.com/support
Warranty
Limited Warranty
This Limited Warranty is effective for one year from the date of original consumer purchase. Proof of original purchase date and, if requested by an authorised representative of Instant Brands Inc. (“Instant Brands”), return of your appliance, is required to obtain service under this Limited Warranty. Provided that this appliance is operated and maintained in accordance with written instructions attached to or furnished with the appliance, Instant Brands will, in its sole and exclusive discretion, either: (i) repair defects in materials or workmanship; or (ii) replace the appliance. In the event that your appliance is replaced, the Limited Warranty on the replacement appliance will expire 12 months from the date of original consumer purchase.
This Limited Warranty extends only to the original purchaser and use of the appliance in the United States of America and Canada. This warranty does not cover units that are used outside of the United States of America and Canada.
Any modification or attempted modification to your appliance may interfere with the safe operation of the appliance and will void this Limited Warranty. This Limited Warranty does not apply in respect of any appliance or any part thereof that has been altered or modified unless such alterations or modifications were expressly authorised by an Instant Brands representative.
Limitation and Exclusions
The liability of Instant Brands, if any, for any allegedly defective appliance or part shall in no circumstances exceed the purchase price of a comparable replacement appliance.
This Limited Warranty does not cover:
- Damage resulting from accident, alteration, misuse, abuse, neglect, unreasonable use, use contrary to the operating instructions, normal wear and tear, commercial use, improper assembly, disassembly, failure to provide reasonable and necessary maintenance, fire, flood, acts of God or repair by anyone unless directed by an Instant Brands Representative;
- Repairs where your appliance is used for other than normal, personal use or when it is used in a manner that is contrary to published user or operator instructions; or
- Use of unauthorized parts and accessories, or repairs to parts and systems resulting from unauthorized repairs or modifications made to this appliance.
The cost of repair or replacement under these excluded circumstances shall be paid by you.
The cost of repair or replacement under these excluded circumstances shall be paid by you.
Disclaimer of Implied Warranties
EXCEPT AS EXPRESSLY PROVIDED HEREIN AND TO THE EXTENT PERMITTED BY LAW, INSTANT BRANDS MAKES NO WARRANTIES, CONDITIONS OR REPRESENTATIONS, EXPRESS OR IMPLIED, BY STATUTE, USAGE, CUSTOM OF TRADE OR OTHERWISE WITH RESPECT TO THE APPLIANCES OR PARTS COVERED BY THIS WARRANTY, INCLUDING BUT NOT LIMITED TO, WARRANTIES, CONDITIONS, OR REPRESENTATIONS OF WORKMANSHIP, MERCHANTABILITY, MERCHANTABLE QUALITY, FITNESS FOR A PARTICULAR PURPOSE OR DURABILITY
Some states or provinces do not allow for the exclusion of implied warranties of merchantability or fitness, so this limitation may not apply to you. In these states and provinces, you have only the implied warranties that are expressly required to be provided in accordance with applicable law.
Limitation of Remedies; Exclusion of Incidental and Consequential Damage
YOUR SOLE AND EXCLUSIVE REMEDY UNDER THIS LIMITED WARRANTY SHALL BE APPLIANCE REPAIR OR REPLACEMENT AS PROVIDED HEREIN. INSTANT BRANDS SHALL NOT BE LIABLE FOR INDIRECT, INCIDENTAL OR CONSEQUENTIAL DAMAGES ARISING OUT OF OR IN CONNECTION WITH THE USE OR PERFORMANCE OF THE APPLIANCE OR DAMAGES WITH RESPECT TO ANY ECONOMIC LOSS, PERSONAL INJURY, LOSS OF PROPERTY, LOSS OF REVENUES OR PROFITS, LOSS OF ENJOYMENT OR USE, COSTS OF REMOVAL, INSTALLATION OR OTHER INDIRECT, INCIDENTAL OR CONSEQUENTIAL DAMAGES OF ANY NATURE OR KIND.
Warranty Registration
Please visit www.instantappliances.com/support/register to register your new Instant Brands™ appliance and validate your warranty within thirty (30) days of purchase. You will be asked to provide the store name, date of purchase, model number (found on the back of your appliance) and serial number (found on the bottom of your appliance) along with your name and email address. The registration will enable us to keep you up to date with product developments, recipes and contact you in the unlikely event of a product safety notification. By registering, you acknowledge that you have read and understand the instructions for use, and warnings set forth in the accompanying instructions.
Warranty Service
To obtain service under this warranty, please contact our Customer Service Department by phone at 1-800-828-7280 or by email to [email protected]. You can also create a support ticket online at www.instantappliances.com/support. If we are unable to resolve the problem, you may be asked to send your appliance to the Service Department for quality inspection. Instant Brands is not responsible for shipping costs related to warranty service, save and except for shipping costs associated with the return of your appliance from Canada or within the 48 contiguous states and the District of Columbia of the United States of America, as provided herein. When returning your appliance, please include your name, mailing address, email address, phone number, and proof of the original purchase date as well as a description of the problem you are encountering with the appliance.

Instant Brands Inc.
11 – 300 Earl Grey Dr., Suite 383
Ottawa, Ontario
K2T 1C1
Canada
Register your product today at:
instantappliances.com/support/register
Contact Customer Care: 1-800-828-7280
[email protected]
instantappliances.com/#Chat
instantappliances.com
store.instantappliances.com
IMPORTANT SAFEGUARDS
(Yes, we have to)
At Instant Brands, your safety always comes first. Enjoy using your Instant™ Milk Frother, knowing it was designed to be quick, easy, and completely safe to use.
As always, be cautious when using electrical appliances and follow basic safety precautions.
READ ALL INSTRUCTIONS, SAFEGUARDS AND WARNINGS BEFORE USE. FAILURE TO FOLLOW THESE SAFEGUARDS AND INSTRUCTIONS MAY RESULT IN INJURY AND/OR PROPERTY DAMAGE.
- For countertop use only. Always operate the appliance on a stable, non-combustible, level surface.
- For household use only. Not for commercial use. DO NOT use the appliance for anything other than its intended use.
- Make sure that your outlet voltage corresponds to the voltage stated on the rating label, located on the sticker under the base.
- DO NOT operate the appliance while the pitcher is empty.
- Avoid spillage on the connector.
- To protect against fire, electric shock, and injury to persons,
DO NOT immerse the power cord, plug, pitcher, or appliance base in water or other liquid. - Unplug from the outlet when not in use and before cleaning. After using a program that heats, there will be residual heat within the pitcher. Allow the appliance to cool before putting on or taking off parts, and before cleaning.
- Regularly inspect the appliance and power cord.
DO NOT operate the appliance if the power cord or plug is damaged, or after the appliance malfunctions or is dropped or damaged in any manner. For assistance, contact Customer Care at [email protected], instantappliances.com/#chat, or by phone at 1-800-828-7280. - DO NOT let the power cord hang over the edge of tables or
counters, and DO NOT allow it to touch hot surfaces. - DO NOT place the appliance on or near a hot gas or electric burner, or in a heated oven.
- Fill the pitcher with only milk or non-dairy milk alternatives.
Never fill the pitcher with oil or other liquids. DO NOT fill past the appropriate MAX fill lines for your desired setting, as hot liquid may be ejected. - Always operate the appliance with the lid in place. DO NOT remove the lid while frothing to avoid scalding injury.
- Avoid contacting moving parts. Keep hands and utensils out of the pitcher while frothing to reduce the risk of personal injury and/or property damage.
- Some parts of the appliance are hot when the appliance is in operation. Only use the handle to move or carry the pitcher.
- Extreme caution must be used when moving the appliance when it contains hot liquids.
- To disconnect, press the Start/Cancel button and ensure the unit is off, then unplug the base from the power source. To unplug safely, grasp the plug and remove from the outlet. Never pull from the power cord.
- DO NOT use the appliance outdoors. Never leave the appliance exposed to sun, wind, rain and/or snow.
- DO NOT leave the appliance unattended when in use.
- This appliance is NOT to be used by children or by persons with reduced physical, sensory or mental capabilities. Close supervision is necessary when any appliance is used near children and these individuals. Children should not play with this appliance.
- The use of accessories not recommended by the manufacturer may result in fire, electric shock or injury to persons.
- The appliance is only to be used with the base provided.
- Extension cords are available and may be used if care is exercised in their use:
• The marked electrical rating of the extension cord should be at least as great as the electrical rating of the appliance;
• The longer cord should be arranged so that it will not drape over the counter top or table top where it can be pulled on by children or tripped over.
SAVE THESE INSTRUCTIONS.

Read this manual carefully and completely and retain for future reference. Failure to adhere to safety instructions may result in serious injury or damage.

To avoid injury, read and understand the instructions in this user manual before attempting to use this appliance.

Electrical shock hazard.
• DO NOT use an adapter.
• DO NOT remove the bottom cover. No user-serviceable parts inside. Repair should be done by authorized service personnel only.
Failure to follow these instructions may result in electric shock and/or death.

THE FAILURE TO FOLLOW ANY OF THE IMPORTANT SAFEGUARDS AND/OR THE INSTRUCTIONS FOR SAFE USE IS A MISUSE OF YOUR APPLIANCE THAT CAN VOID YOUR WARRANTY AND CREATE THE RISK OF SERIOUS INJURY.
Special cord set instructions
As per safety requirement, a short power supply cord (0.6 m to 0.9 m /24” to 35”) is provided to reduce the hazards resulting from grabbing, entanglement and tripping.
This appliance has a polarized plug and one blade is wider than the other. To reduce the risk of electric shock, the plug is intended to fit into a polarized outlet only one way. If the plug does not fit fully into the outlet, reverse the plug. If it still does not fit, contact a qualified electrician. DO NOT attempt to modify the plugin anyway.

Read this manual carefully and completely and retain it for future reference. Failure to adhere to safety instructions may result in serious injury or damage.
Product specifications
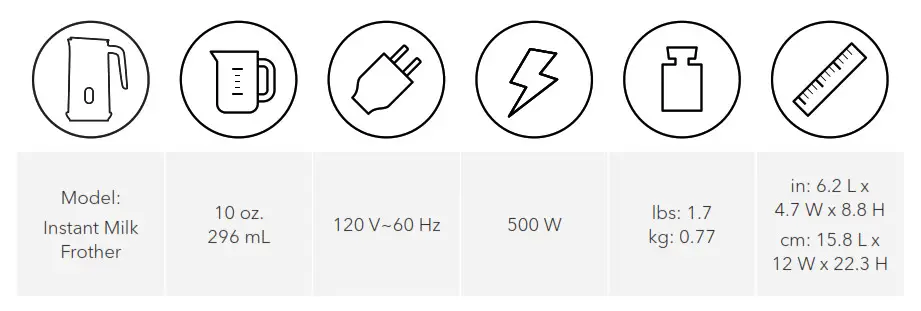
Let’s get started!
So, what’s in the box?
Before using your new milk frother, make sure everything is present and accounted for.
- Instant Milk Frother
- Frothing paddle
- Lid
- Base with cord
- User manual
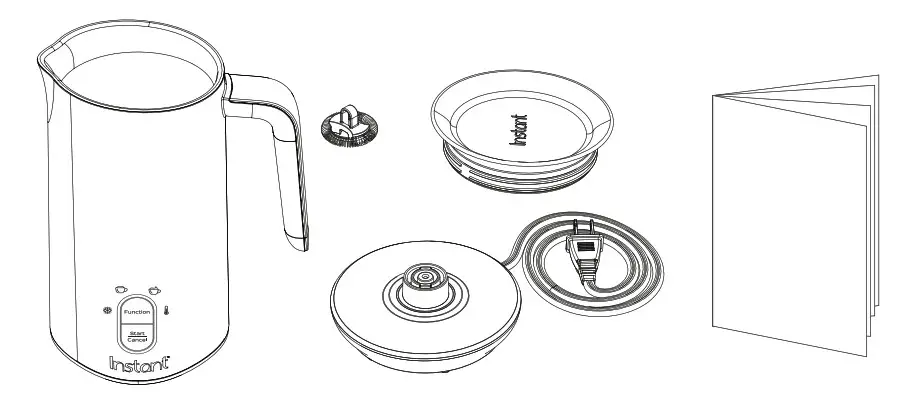
See Product, parts, and accessories for a full parts breakdown.
For more information and how-to videos,
visit instantappliances.com/milkfrother.
Is something missing or damaged?
Contact a Customer Care Advisor by chat at instantappliances.com/#chat, by
e-mail at [email protected], or by phone at 1-800-828-7280.
Product, parts and accessories
Instant Milk Frother
Make sure everything is installed properly before use.
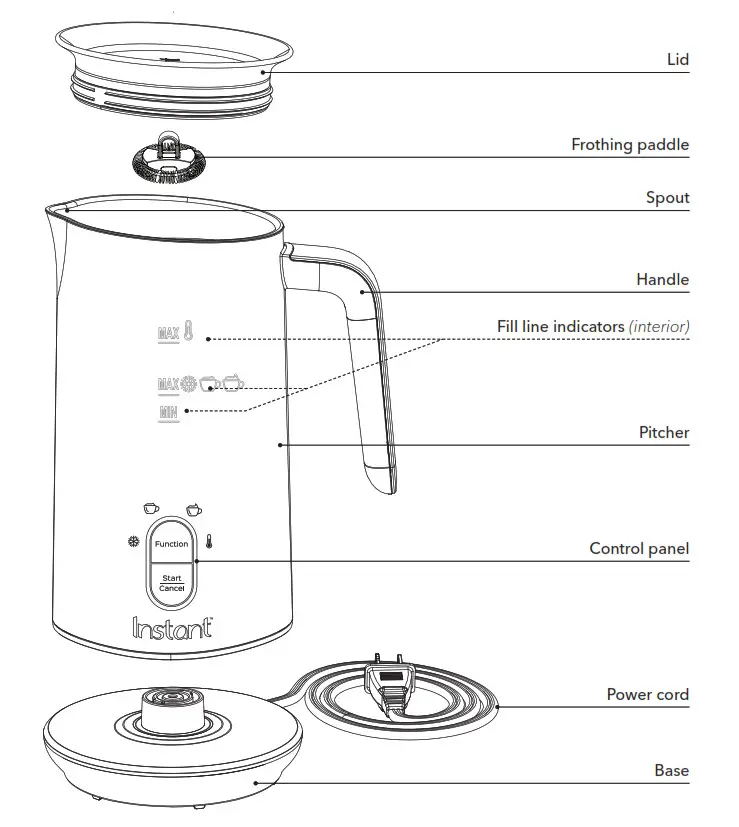
Initial setup
Is your drink missing a little somethin’ somethin’? Get this little guy going and start showing off your foam flair.
- Pull your new milk frother out of the box!
- Remove all the packaging material and accessories from in and around the appliance. Make sure to check inside the pitcher!
- Place the milk frother base on a stable, level surface.
- Follow the instructions in Initial cleaning before frothing for the first time.
Initial cleaning
Before using your milk frother, it’s important to clean the components.
- Disassemble the milk frother into 3 parts:
• The lid
• The frothing paddle (pull up gently to remove)
• The pitcher - Hand wash the lid, the frothing paddle, and the inside of the pitcher with hot water and dish soap. Do not immerse the pitcher in water or other liquid.
- Rinse the lid, the frothing paddle, and the inside of the pitcher with clear, warm water, then dry them thoroughly with a soft cloth.
That’s it! Start whipping up that fresh, fluffy foam.

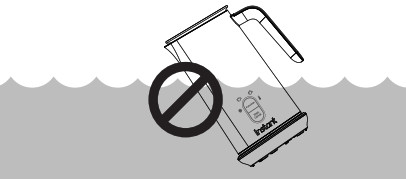
The pitcher and base contain electrical components. To avoid fire, electric shock, or personal injury, DO NOT machine wash, rinse or immerse the milk frother base, pitcher, power cord or plug in water or other liquids.
Making drinks
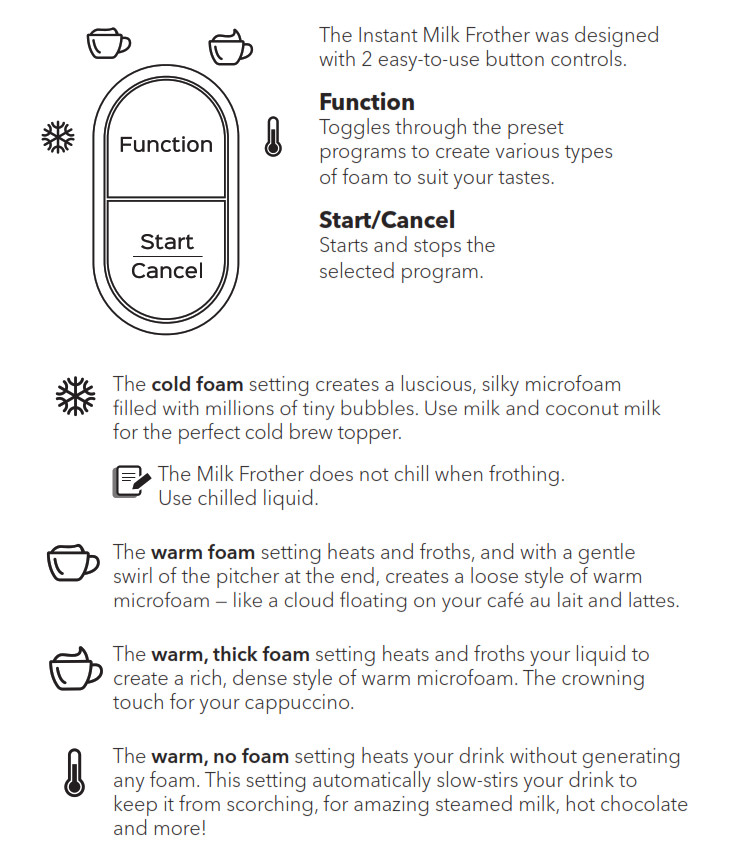
Making drinks
Set up the Milk Frother for use
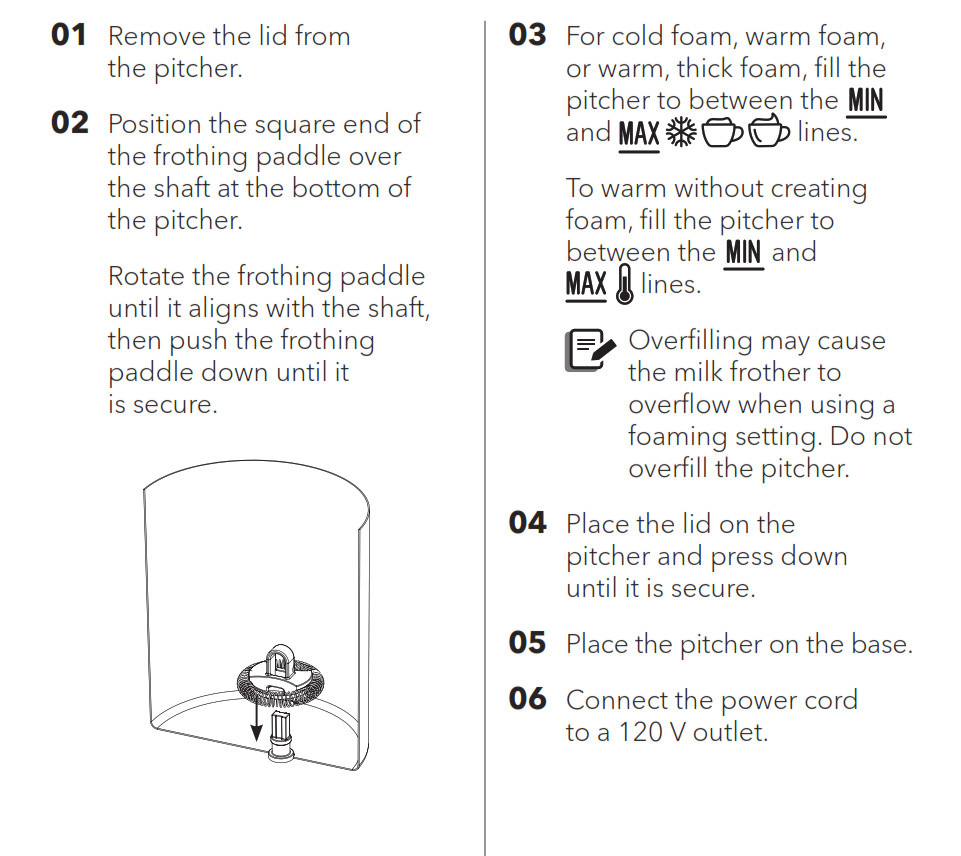

Do not attempt to froth if the liquid level is below the MIN fill line as indicated on the inside of the pitcher.

DO NOT remove the lid while the frothing paddle is in operation to avoid risk of electric shock, personal injury, and/or property damage.
Settings
01 Press Function to toggle between all settings.
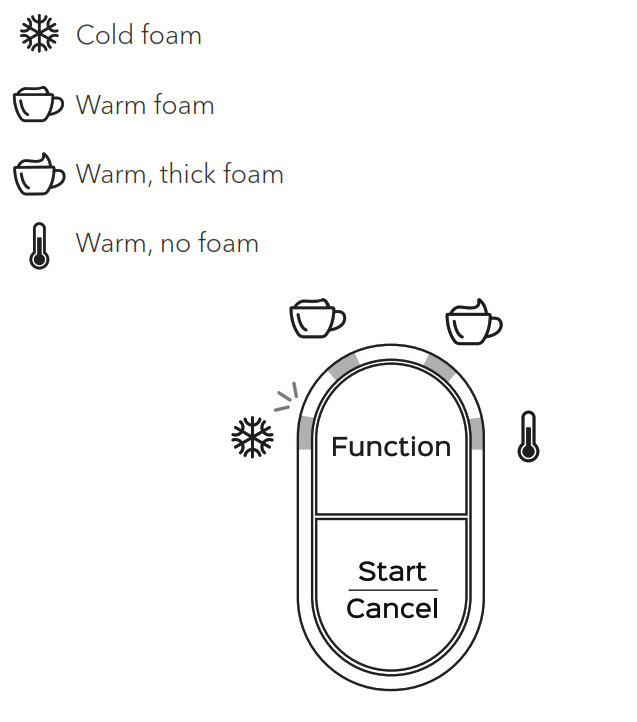
The light that corresponds to the selected program blinks.
02 Press Start/Cancel.
The light stays illuminated and the program starts after a few seconds.
03 To stop the program at any time, press Start/Cancel.
When the program ends, the milk frother stops.
![]() Programs will only run for a maximum of 3 minutes.
Programs will only run for a maximum of 3 minutes.
Frothing tips
Follow these tips and tricks to make sure you’re treating yourself to the best drink possible.
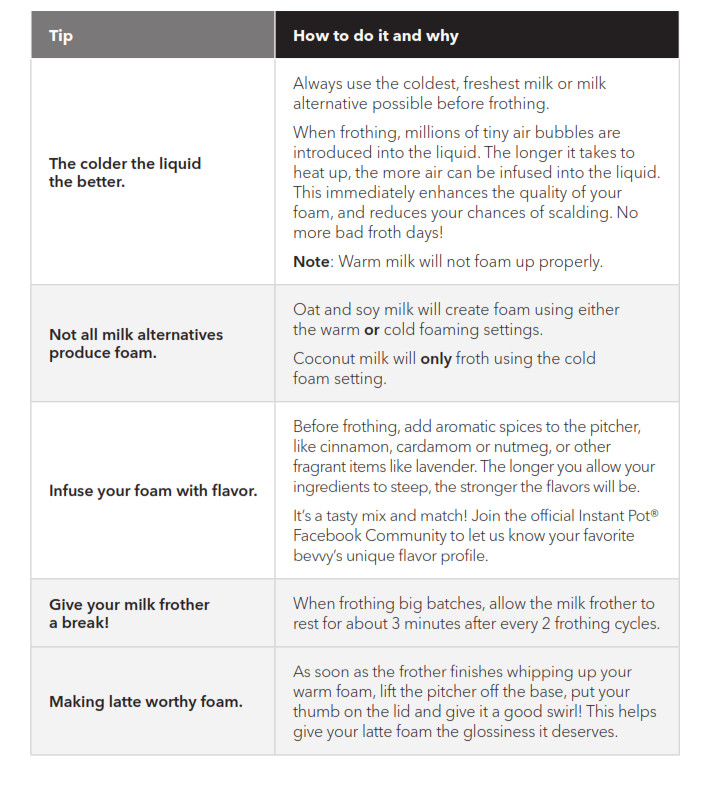
Care, cleaning and storage
Clean your Instant Milk Frother after every use to ensure the best possible flavor and to prevent milk from baking onto the inside of the pitcher.
Always unplug the milk frother and let it cool to room temperature before cleaning. Never use metal scouring pads, abrasive powders or harsh chemical detergents on any of the milk frother’s parts or components.
Let all parts dry thoroughly before use or before storage.
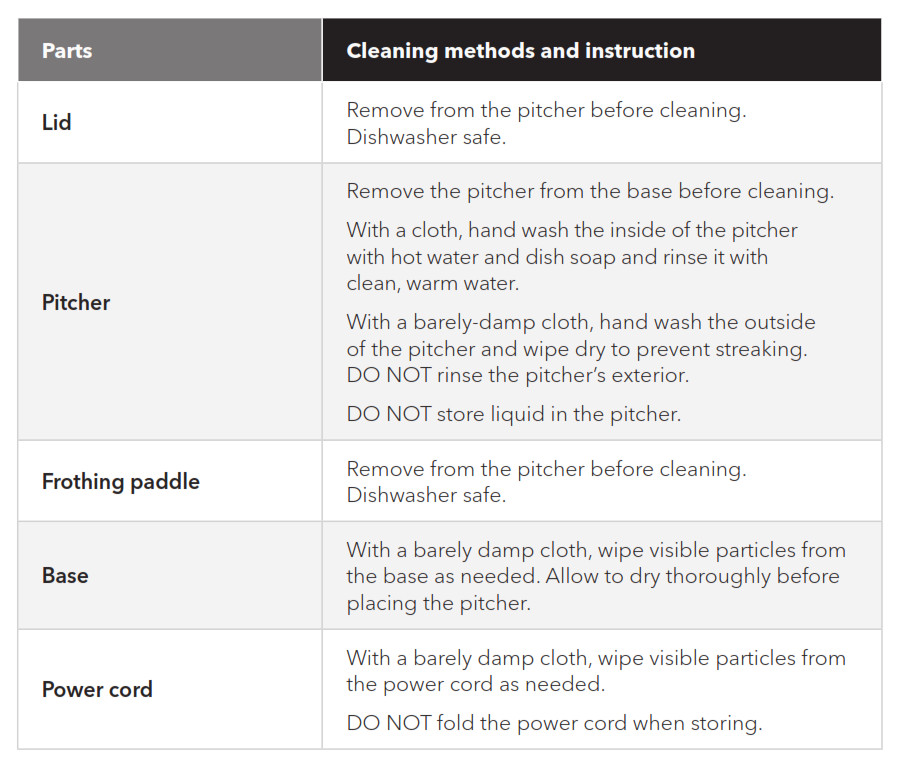


The pitcher and base contain electrical components. To avoid fire, electric shock or personal injury, DO NOT machine wash, rinse, or immerse the milk frother base, pitcher, power cord, or plug in water or other liquids.
Troubleshooting
Register your Instant Milk Frother today at instantappliances.com/support/register.
Contact a Customer Care Advisor by chat at instantappliances.com/#chat, by e-mail at [email protected], or by phone at 1-800-828-7280.
For more troubleshooting tips go to instantappliances.com/milkfrother.
Resolution table
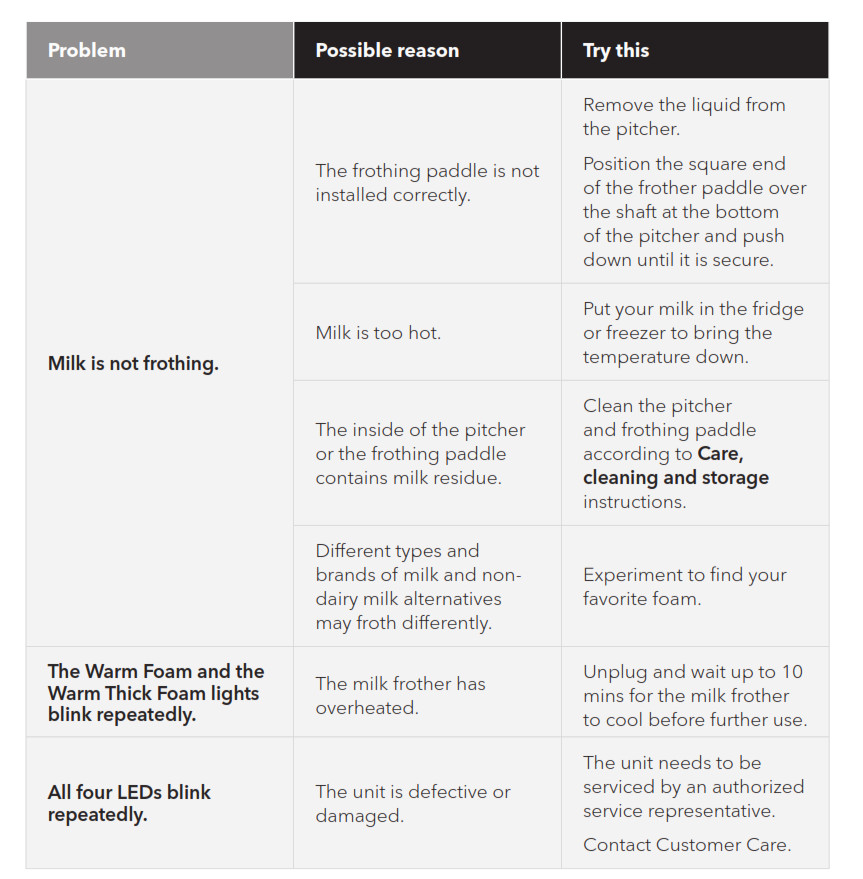
Any other servicing should be performed by an authorized service representative.
Warranty
Limited Warranty
This Limited Warranty is effective for one year from the date of original consumer purchase. Proof of original purchase date and, if requested by an authorized representative of Instant Brands Inc. (“Instant Brands”), return of your appliance, is required to obtain service under this Limited Warranty. Provided that this appliance is operated and maintained in accordance with written instructions attached to or furnished with the appliance, Instant Brands will, in its sole and exclusive discretion, either: (i) repair defects in materials or workmanship; or (ii) replace the appliance. In the event that your appliance is replaced, the Limited Warranty on the replacement appliance will expire 12 months from the date of original consumer purchase.
This Limited Warranty extends only to the original purchaser and use of the appliance in the United States of America and Canada. This warranty does not cover units that are used outside of the United States of America and Canada.
Any modification or attempted modification to your appliance may interfere with the safe operation of the appliance and will void this Limited Warranty. This Limited Warranty does not apply in respect of any appliance or any part thereof that has been altered or modified unless such alterations or modifications were expressly authorized by an Instant Brands representative.
Limitation and Exclusions
The liability of Instant Brands, if any, for any allegedly defective appliance or part shall in no circumstances exceed the purchase price of a comparable replacement appliance.
This Limited Warranty does not cover:
- Damage resulting from accident, alteration, misuse, abuse, neglect, unreasonable use, use contrary to the operating instructions, normal wear and tear, commercial use, improper assembly, disassembly, failure to provide reasonable and necessary maintenance, fire, flood, acts of God or repair by anyone unless directed by an Instant Brands Representative;
- Repairs where your appliance is used for other than normal, personal use or when it is used in a manner that is contrary to published user or operator instructions; or
- Use of unauthorized parts and accessories, or repairs to parts and systems resulting from unauthorized repairs or modifications made to this appliance.
The cost of repair or replacement under these excluded circumstances shall be paid by you.
Disclaimer of Implied Warranties
EXCEPT AS EXPRESSLY PROVIDED HEREIN AND TO THE EXTENT PERMITTED BY LAW, INSTANT BRANDS MAKES NO WARRANTIES, CONDITIONS OR REPRESENTATIONS, EXPRESS OR IMPLIED, BY STATUTE, USAGE, CUSTOM OF TRADE OR OTHERWISE WITH RESPECT TO THE APPLIANCES OR PARTS COVERED BY THIS WARRANTY, INCLUDING BUT NOT LIMITED TO, WARRANTIES, CONDITIONS, OR REPRESENTATIONS OF WORKMANSHIP, MERCHANTABILITY, MERCHANTABLE QUALITY, FITNESS FOR A PARTICULAR PURPOSE OR DURABILITY.
Some states or provinces do not allow for the exclusion of implied warranties of merchantability or fitness, so this limitation may not apply to you. In these states and provinces, you have only the implied warranties that are expressly required to be provided in accordance with applicable law.
Limitation of Remedies; Exclusion of Incidental and Consequential Damage
YOUR SOLE AND EXCLUSIVE REMEDY UNDER THIS LIMITED WARRANTY SHALL BE APPLIANCE REPAIR OR REPLACEMENT AS PROVIDED HEREIN. INSTANT BRANDS SHALL NOT BE LIABLE FOR INDIRECT, INCIDENTAL OR CONSEQUENTIAL DAMAGES ARISING OUT OF OR IN CONNECTION WITH THE USE OR PERFORMANCE OF THE APPLIANCE OR DAMAGES WITH RESPECT TO ANY ECONOMIC LOSS, PERSONAL INJURY, LOSS OF PROPERTY, LOSS OF REVENUES OR PROFITS, LOSS OF ENJOYMENT OR USE, COSTS OF REMOVAL, INSTALLATION OR OTHER INDIRECT, INCIDENTAL OR CONSEQUENTIAL DAMAGES OF ANY NATURE OR KIND.
Warranty Registration
Please visit www.instantappliances.com/support/register to register your new Instant Brands™ appliance and validate your warranty within thirty (30) days of purchase. You will be asked to provide the store name, date of purchase, model number (found on the back of your appliance), and serial number (found on the bottom of your appliance) along with your name and email address. The registration will enable us to keep you up to date with product developments, recipes and contact you in the unlikely event of a product safety notification. By registering, you acknowledge that you have read and understood the instructions for use, and warnings set forth in the accompanying instructions.
Warranty Service
To obtain service under this warranty, please contact our Customer Service Department by phone at 1-800-828-7280 or by email to [email protected]. You can also create a support ticket online at www.instantappliances.com/support. If we are unable to resolve the problem, you may be asked to send your appliance to the Service Department for quality inspection. Instant Brands is not responsible for shipping costs related to warranty service, save and except for shipping costs associated with the return of your appliance from Canada or within the 48 contiguous states and the District of Columbia of the United States of America, as provided herein. When returning your appliance, please include your name, mailing address, email address, phone number, and proof of the original purchase date as well as a description of the problem you are encountering with the appliance.

Instant Brands Inc.
11—300 Earl Grey Dr., Suite 383
Ottawa, Ontario
K2T 1C1
Canada
Register your product today
instantappliances.com/support/register
Contact us
1-800-828-7280
[email protected]
instantappliances.com/#Chat
instantappliances.com
store.instantpot.com
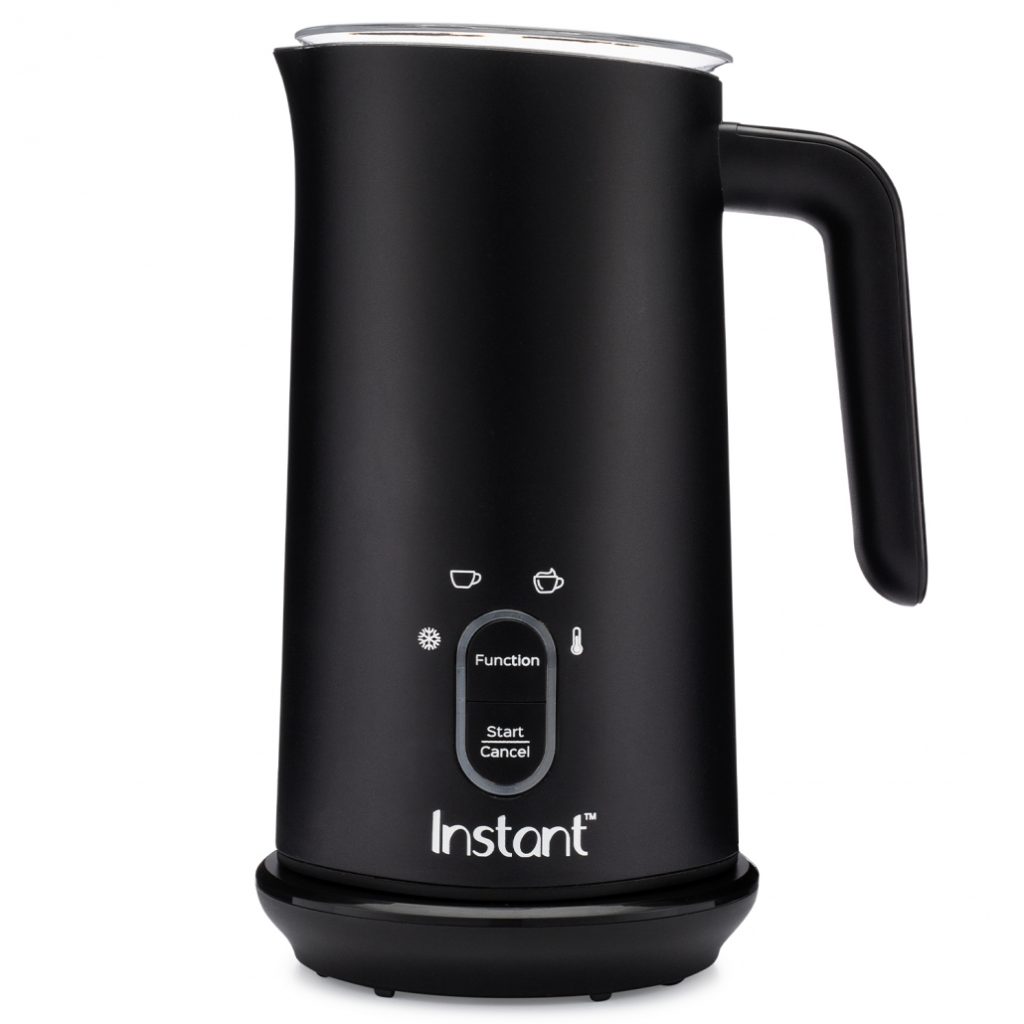
Copyright© 2020 Instant Brands™ Inc
697-0102-01
Instant Pot Duo Crisp Multifunction Cooker

WHAT’S IN THE BOX
Pressure Cooker Lid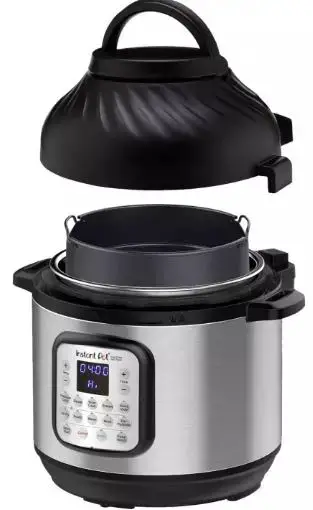
Stainless Steel Inner Cooking Pot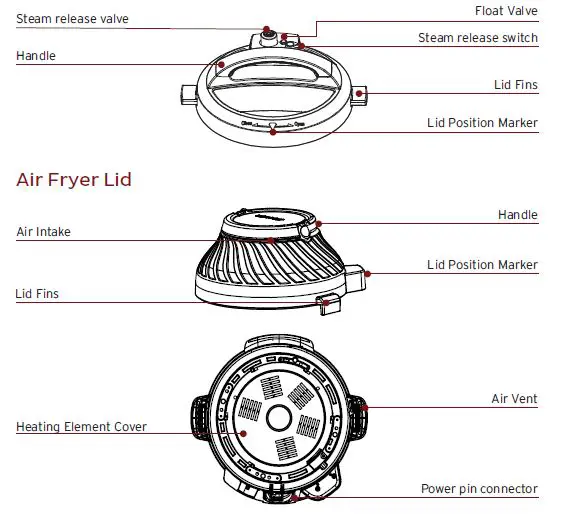
Cooker Base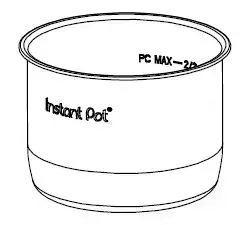
Parts + accessories
- Sealing Ring (installed in pressure cooker lid)
- Condensation Collector
- Cooking Rack with Handles (Mini steam rack may not have handles)
- Air Fryer Basket
- Air Fryer Basket Base
- Protective Pad and Storage Cover
Illustrations are for reference only and may differ from the actual product.
Remember to recycle!
We designed this packaging with sustainability in mind. Please recycle everything that can be recycled where you live.
USING YOUR DUO CRISP
Control panel
We’ve designed the control panel to be simple to use and easy to read.
Need new illustration here?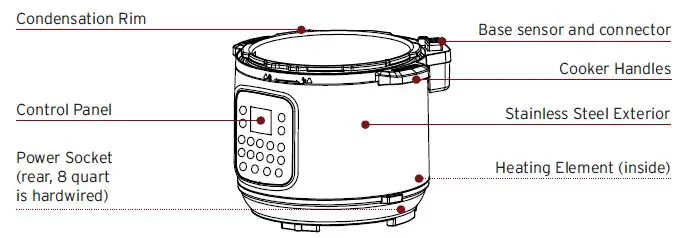
- Time
- Cooking time
- Delay Start time
- Keep Warm time
- Temperature/Pressure
- Cooking temperature
- Low or High pressure
- Temperature Control
- Increase or decrease cooking temperature
- Time Control
- Increase or decrease cooking time
- Smart Program Settings
- Start
- Keep Warm On/Off
- Delay Start On/Off
- Cancel
- Pressure and Slow Cooking Smart Programs
- Light shows the active Smart Program
- Air Frying Smart Programs
- Light shows the active Smart Program
Status messages
The control panel shows the information you need to know when using your Instant Pot Duo Crisp.
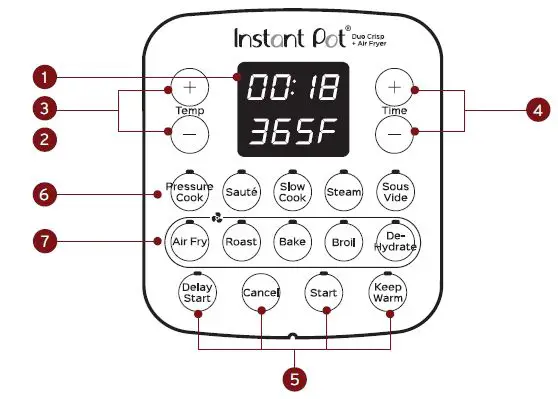
Using the pressure cooker lid
You’ll use the stainless steel lid for most cooking programs, and especially for pressure cooking. Always use the pressure cooking lid that came with this Instant Pot Duo Crisp cooker base.
Open the Lid
- Turn the lid handle to align the arrow symbol on the lid with the unlock symbol on the cooker base.
- Lift the lid up and off the cooker base.
Close the Lid
- Align the arrow symbol on the lid with the unlock symbol on the cooker base and lower the lid onto the track.
- Turn the lid until the arrow symbol on the lid aligns with the lock symbol on the cooker base. Using the air fryer lid You’ll use the air fryer lid for all air frying. Always use the air fryer lid that came with this Instant Pot Duo Crisp cooker base.
Open the Lid
- Turn the lid handle to align the arrow symbol on the lid with the unlock symbol on the cooker base.
- Lift the lid up and off the cooker base.
Close the Lid
Align the arrow symbol on the lid with the unlock symbol on the cooker base and lower the lid onto the track. Press the lid down slightly to ensure that the lid sensor connector contacts the base sensor connector.
Store the Lid
- Place the protective pad on the counter with the grooved side facing up.
- Align the back of the air fryer lid with OPEN on the protective pad, then turn the air fryer lid clockwise to the LOCK position.
Turning the sound On/Off
Turn sound on
When in Standby mode, press and hold + button until the display shows S On.
Turn sound off
When in Standby mode, press and hold – the button until the display shows SOFF. Audible safety alerts (beeps) cannot be turned off.
Choosing the temperature scale
You can choose to show the cooking temperature in either Fahrenheit or Celsius.
- When in Standby mode, press and hold Temp + until the display shows °F or °C.
The cooking temperature will now show in the scale you chose.
Delay the start of cooking
You can set a Delay Start timer for a minimum of 10 minutes or a maximum of 24 hours. Delay Start is available for the Pressure Cook, Sauté, Slow Cook, Steam and Sous Vide Smart Programs, but not for the air fry Smart Programs.
- Select a Smart Program, adjust the settings as you want, then press Delay Start. Once Delay Start has been selected, there is no way to return to the cooking settings. To adjust Smart Program settings, press Cancel and enter new selections.
- When the hours field flashes, use the Time – / + buttons to adjust the delay time hours.
- Press Delay Start again to toggle to the minutes field and adjust the delay time minutes.
- Delay Start begins automatically and the timer counts down.
- When Delay Start ends, the Smart Program begins, and the display indicates On.
Save Custom Temperatures
You can set and save custom temperatures for the Sous Vide, Air Fry, Roast, Bake, Broil and Dehydrate Smart Programs.
- Select the Smart Program you want to set.
- Use the Temp – / + buttons to adjust the temperature in °F or °C.
- Press Start to start the program and save the temperature. The next time you use that Smart Program, the new temperature is used. Adjustments made after cooking begins are not saved.
Reset Smart Programs to original settings
Reset Individual Smart Programs
- With the cooker in Standby mode, press and hold one Smart Program button until the cooker returns to Standby and shows OFF. The Smart Program’s pressure level, cooking time and temperature are restored to the factory default setting.
Reset All Smart Programs - 2. With the cooker in Standby mode, press and hold Cancel until the cooker beeps.
INITIAL SET UP
Clean before use
- Wash the inner cooking pot with hot water and soap. Rinse and use a soft cloth to dry the outside. Or you can wash the inner cooking pot in the dishwasher
- Wipe the heating element inside the cooker base with a soft cloth to ensure there are no stray packaging particles.
- Wash the accessories with hot water and dish soap. Rinse with warm, clear water and use a soft cloth to dry.
Setting up the condensation collector
The condensation collector sits at the back of the cooker base and accumulates overflow moisture from the condensation rim. It should be installed before cooking, then emptied and rinsed out after each use.
Remove the condensation collector
Pull the condensation collector away from the cooker base; do not pull down. Note the tabs on the cooker base and the grooves on the condensation collector.
Install the condensation collector
Align the grooves on the condensation collector with the tabs on the back of the cooker base and slide the condensation collector into place.
Test run
Setting up your new Instant Pot Duo Crisp for a test run is a great way to familiarize yourself with how the unit works before you actually cook a meal.
To perform a test run:
- Follow the instructions for pressure cooking on page 11.
- Use 3 quarts water, but no food.
- Set the cooking time to 5 minutes.
- After the cooking session is done, discard any remaining water.
- Wash and dry the inner cooking pot.
Now you’re ready to cook a meal in your Instant Pot Duo Crisp!
PRESSURE COOKING
Pressure cooking uses pressurized steam to quickly and evenly cook foods.
Pressure cooking programs
Your Instant Pot Duo Crisp includes 4 Smart Programs for pressure cooking: Steam, Rice, Oatmeal and Pressure Cooking.
| Default Pressure | Default Cooking Time | Min Cooking Time | Max Cooking Time | |
| Pressure Cook | High | 35 minutes
(00:35) |
0 minutes
(00:00) |
4 hours
(04:00) |
| Steam | High | 30 minutes
(00:30) |
0 minutes
(00:00) |
4 hours
(04:00) |
| Rice | Low | 12 minutes
(00:12) |
1 minute
(00:30) |
1 hour
(01:00) |
| Oatmeal | High | 5 minutes
(00:05) |
1 minute
(00:30) |
1 hour
(01:00) |
How to pressure cook
Prep
Cut, chop, season or marinate your ingredients according to your recipe.
Preheat
- Place the inner cooking pot into the cooker base.
- Add ingredients to the inner cooking pot.
- Place the pressure cooker lid on top of the cooker base and lock the lid making sure the sealing ring is installed properly. See ‘How to lock the pressure cooker lid’ below
- Choose a Smart Program for cooking and press its button on the Control Panel. See ‘About pressure cooking programs’ above
- Press the Smart Program again to toggle between temperature options: Low or High.
- If you want to increase or decrease the cooking time exactly, press + or –.
- Press Pressure Level to toggle between pressure options: High or Low.
- Keep Warm setting is ON by default. Press Keep Warm again to turn it off.
- After 10 seconds, the display shows On and the Instant Pot Duo Crisp is building pressure.
It can take 10–15 minutes to reach the pressure setting for cooking. Frozen foods increase the preheating time.
The pressure level and time you choose will be the new settings the next time you use that Smart Program
Cook
- When the pressure is ready, your Instant Pot Duo Crisp starts cooking and the steam float valve rises to the up position.
- The cooking timer starts counting down.
- When the timer reaches 00:00, cooking stops. You can press Cancel to stop a Smart Program at any time.
Release steam
Choose from the steam release method that works for your recipe. See ‘How to release steam’ below for full details
Using liquid to create steam
Pressure cooking requires liquid in the inner cooking pot to produce the steam needed. Depending on the size of your Instant Pot Duo Crisp, here are the minimum amounts you’ll need:
| Instant Pot Size | Minimum Liquid for Pressure Cooking* |
| 3 Quarts / 2.8 Litres | 1 cup (8 oz / 250 mL) |
| 6 Quarts / 5.7 Litres | 1 1⁄2 cups (12 oz / 375 mL) |
| 8 Quarts / 7.6 Litres | 2 cups (16 oz / 500 mL) |
*Unless otherwise specified in recipe.
Pressure cooking liquids should be water-based, such as broth, stock, soup or juice. If using canned, condensed, or cream-based soup, add water as directed above.
How to lock the pressure cooker lid
For pressure cooking, the lid must be securely locked into place to prevent steam from escaping. When you place the lid on the cooker base:
- Line up [triangle symbol] on lid with [open padlock symbol] on the cooker base.
- Turn lid clockwise until [triangle symbol] on lid lines up with [triangle symbol] on cooker base.
How to release steam
Instant Pot Duo Crisp can release steam in 3 different ways. Use the one that best fits the type of food you’re cooking.
Natural steam release
Releases steam gradually over time (up to 40 minutes or more) as after cooking stops. Use for: Foods that can simmer, like stews, chili, pasta, oatmeal, beans and grains.
- After cooking, leave the steam release switch in the Sealing position until all pressure is released.
- The float valve drops into lid when all steam is released.
- After steam release, turn lid counterclockwise and remove the lid.
Quick steam release
Quickly releases steam after you press the steam release switch. Use for: Foods that tend to overcook, like vegetables and seafood.
- After cooking, press down on Vent button to release steam and wait for all pressure to release.
- Float valve drops into lid when all steam is released.
- After steam release, turn lid counterclockwise and remove the lid.
Timed steam release
Allows food to continue cooking as steam releases for a specific time that you set.
Use for: xxx
- After cooking, leave the steam release switch in Sealing position for the set time. [how?]
- When timer reaches 00:00, set the steam release switch to the Venting position and wait for all pressure to release.
- Float valve drops into lid when all steam is released.
- After steam release, turn lid counterclockwise and remove the lid. You can insert the handle into the cooking base vertically for easy storage.
Pressure Cooking Caution
This appliance uses pressure to cook. Allow the appliance to release all excess pressure and steam before opening the pressure cooker lid. Opening the lid before pressure is released may result in burns, injury and/or property damage. Read more in the Safety, Maintenance and Warranty document.
SAUTÉING
Use Sauté in place of a frying or saucepan. Sautéing can deepen the flavors of your food, or can simmer, thicken or reduce sauces. Choose from these settings in the Sauté Smart Program:
| Setting | Low | High |
| Cooking time | 15 minutes
(00:15) |
30 minutes
(00:30) |
| Best for | Simmering, thickening, and reducing liquids | Stir-frying or browning meat |
How to sauté
Prep
Cut, chop, season or marinate your ingredients according to your recipe.
Preheat
- Place the inner cooking pot into the cooker base.
- Press Sauté.
- Cycle through temperature presets to select Low or High.
- Press – / + to adjust cooking time.
- Keep Warm setting is on by default. Press Keep Warm again to turn it off.
- After 10 seconds, the display shows On and displays timer.
Cook
- When the display shows Hot, add ingredients.
- When the timer ends, display shows End.
- Press Cancel if you want to finish cooking before timer runs out.
Deglazing
Deglazing is the process of adding a liquid to a hot pan, releasing all of the delicious, caramelized pieces stuck to the bottom.
- Remove food from inner pot
- Add water, broth, or wine
- Use a wooden spoon or silicone spatula to loosen food stuck to the bottom of the inner cooking pot
Deglazing
Deglazing is the process of adding a liquid to a hot pan, releasing all of the delicious, caramelized pieces stuck to the bottom.
Sautéing before Pressure or Slow Cooking
Quite often, you’ll want to sauté foods to brown them before further cooking them.
- Sauté ingredients
- Press Cancel You can deglaze the inner cooking pot now before switching to Pressure Cook or Slow Cook (see Deglazing Inner Pot)
- Select from the Smart Program
SLOW COOKING
Slow Cook lets you make your favorite simmering and stewing recipes – just like grandma used to make. This program does not use pressure to cook food. Make sure steam release is set to Venting or use a glass lid with a venting hole. Choose from these settings in the Slow Cook Smart Program:
| Setting | Low | High |
| Best for | ‘Low and Slow’ cooking | High setting equivalent on traditional slow cookers |
| Cooking Time | 10 hours
(10:00) |
4 hours
(04:00) |
How to slow cook
Prep
Cut, chop, season or marinate your ingredients according to your recipe.
Cook
- Place the inner cooking pot into the cooker base
- Add ingredients to the inner cooking pot
- Place pressure cooker lid on top of the cooker base and lock the lid
- Press Slow Cook
- Cycle through temperature presets to select Low or High
- Press – / + to adjust cooking time
- Keep Warm setting is On by default. Press Keep Warm again to turn it off
- After 10 seconds, the display shows On and displays timer
Keep Warm
When cooking completes, the display shows End if Keep Warm is turned off. If not, the timer begins counting from 00:00 up to 10 hours (10:00).
Keep warm
The Keep Warm setting turns on automatically after cooking on all Smart Programs except Sauté and Yogurt. You can also use Keep Warm to reheat food.
Keep warm after cooking
- When automatic warming begins, the timer shows the time passed, up to 10 hours.
- To turn automatic warming off (either during cooking or during automatic warming), press Keep Warm and the light above the button turns off.
Reheat and keep warm
- When in Standby mode, press Keep Warm.
- Press again to cycle through Less, Normal and More temperature levels.
- Press the – / + buttons to set a timer for up to 99 hours and 50 minutes.
AIR FRYING
The Duo Crisp uses the Air Fry lid to produce rapid air circulation to crisp or cook food, giving your meals all the rich, crispy flavor of deep frying, with little to no oil.
There are two options for air frying:
- Give your food a crisp finish after cooking with the Pressure Cook, Slow Cook, Steam or Sous Vide Smart Programs.
- Cook your dish entirely with the Air Fry, Roast, Bake or Broil Smart Programs.
What to cook in
For best results use the provided air fryer basket or you can also cook directly in the inner cooking pot if your recipe calls for that.
Prep
Cut, chop, season, marinate or batter your ingredients according to your recipe.
Cook
- Place your food into the air fryer basket or directly in the inner pot, according to your recipe.
- Insert the inner pot into the cooker base.
- Place the lid on the cooker base.
- Press Air Fry.
- Use the Temp + / – buttons to adjust the temperature.
- Use the Time + / – buttons to adjust the cooking time.
- Press Start to begin. The display shows On to indicate that pre-heating has started.
Note: Adjustments to the cooking time and temperature are saved when you press Start. - When the cooker reaches the target temperature, the cooking countdown timer starts.
Turn
- Partway through the cooking cycle the display shows Turn Food. Some food does not require turning. If you do not remove the lid after Turn Food displays, cooking will proceed after 10 seconds.
- Lift the air fryer lid off the cooker base and place it on the protective pad.
Lifting the lid automatically pauses cooking for 3 minutes. After 3 minutes the program will stop, and the air fryer lid will go into Standby mode. - Carefully turn, flip, or rotate your food.
- Close the lid again. Cooking continues.
Finish
When the Smart Program completes, the lid beeps, and the display shows End. The air fryer lid beep after 5 minutes, 20 minutes, and 60 minutes to remind you that cooking has completed.
Roast
You can roast foods like beef, lamb, pork, poultry, vegetables and scalloped potatoes, for a deliciously tender inside and browned outside.
| Setting | Default | Minimum | Maximum |
| Temperature | 380°F / 193°C | 180°F / 82°C | 400°F / 204°C |
| Cooking Time | 40 minutes
(00:40) |
1 minutes
(00:01) |
1 hour
(01:00) |
To roast
- Follow the basic instructions for Air drying.
- Select “Roast” as the Smart Program.
Bake
You can bake foods like bread, cakes, pastries and buns, with the Duo Crisp acting like your own “mini oven”.
| Setting | Default | Minimum | Maximum |
| Temperature | 400°F / 204°C | 400°F / 204°C | 400°F / 204°C |
| Cooking Time | 30 minutes
(00:30) |
1 minute
(00:01) |
1 hour
(01:00) |
To bake
- Follow the basic instructions for Air Frying.
- Select “Bake” as the Smart Program.
- There is no need to turn the food partway through cooking.
Leave approximately 1”/ 2.5 cm of space around all sides of the baking dish to allow heat to circulate evenly.
Broil
Broiling cooks using direct top-down heating, and broiled foods are best when placed close to the heating element.
| Setting | Default | Minimum | Maximum |
| Temperature | 400°F / 204°C | Not adjustable | Not adjustable |
| Cooking Time | 30 minutes
(00:30) |
1 minute
(00:01) |
1 hour
(01:00) |
To broil
- Follow the basic instructions for Air Frying.
- Place food in the broil/dehydrating tray in the air fryer basket.
- Select “Broil” as the Smart Program.
- There is no need to turn the food partway through cooking.
CLEANING
Clean your Instant Pot Duo Crisp after each use. Always unplug the unit and let all parts cool to room temperature before cleaning. Before use or storing, make sure all surfaces are dry.
| Part | Cleaning instructions |
| Pressure Cooker Lid and parts
• Anti-Block Shield • Sealing Ring • Steam Release Valve • Float Valve • Silicone Cap |
• Hand wash with hot water and mild dish soap or wash in the dishwasher, top rack
• Remove all small parts from lid before washing. • With steam release valve and anti-block shield removed, clean interior of steam release pipe to prevent clogging. • To drain water from the lid after dishwashing, grasp the lid handle and hold the lid vertically over a sink, then turn it all the way around • After cleaning, store the lid upside down on the cooker base • Store sealing rings in a well-ventilated area to disperse odor • To eliminate odors from sealing ring, add 1 cup (8 oz / 250 mL) water and 1 cup (8 oz / 250 mL) white vinegar to inner cooking pot, and run Pressure Cook for 5–10 minutes, then use Quick Steam Release |
| Air Fryer Lid | • Allow the air fryer lid to cool to room temperature, then clean the heating element and surrounding area with a soft, damp cloth or sponge. Ensure it is free of food debris and/or grease splatter.
• Wipe the exterior clean with a soft damp cloth or sponge. • Do not remove the heating element cover. |
| Part | Cleaning instructions |
| Inner Cooking Pot | • Wash after each use.
• Hand wash with hot water and mild dish soap or wash in dishwasher* • Hard water stains may need a vinegar-dampened sponge and scrubbing to remove • For tough or burned food residue, soak in hot water for a few hours before cleaning • Dry all exterior surfaces before placing in cooker base |
| Accessories
• Steam Rack • Condensation Collector • Protective Pad and Storage Cover • Multi-Level Air Fryer Basket • Air Fryer Basket Base • Broil/ Dehydrating Tray |
• Wash after each use
• Hand wash with hot water and mild dish soap or wash in the dishwasher, top rack • Never use harsh chemical detergents, powders or scouring pads on accessories • Empty and rinse condensation collector after each use |
| Power cord | • Use a barely damp cloth to wipe any particles off cord |
| Cooker base | • Wipe the inside of the cooker base as well as the condensation rim with a barely damp cloth, and allow to air dry
• Clean the outside of the cooker base and the control panel with a soft, barely damp cloth or sponge |
*Some discoloration may occur after machine washing, but this will not affect the cooker’s safety or performance.
In the manual
For full details about removing pressure cooker lid parts for cleaning, read the User Manual, available at instanthome.com
LEARN MORE
There’s a whole world of Instant Air Fryer information and help just waiting for you. Here are some of the most helpful resources.
- Get the full User Manual
Instanthome.com - Register your product
Instanthome.com/register - Contact Consumer Care
Instanthome.com
[email protected] - Instant Recipe App with 1000+ recipes
Instanthome.com
iOS and Android app stores - Cooking charts and more recipes
instanthome.com - How-to videos, tips and more
Instanthome.com - Replacement parts and accessories
kInstanthome.com
Product specifications
| Volume | Wattage | Power | Weight | Dimensions | |
| DUCO6002 | 6 Quart
5.7 Litres |
1500
watts |
120V/
60Hz |
8.9 kg
19.62 lbs. |
Pressure Cooking Lid
in: 13.58Lx13.58Wx12.99H |
| cm: 34.5 L x 34.5 W x 33 H | |||||
| Air Frying Lid | |||||
| in: 13.58 L x 13.58 W x 13.97 H
cm: 34.5 L x 34.5 W x 35.5 H |
|||||
| DUCO8002 | 8 Quart
7.6 Litres |
1500
watts |
120V/
60Hz |
10.06 kg
22.18 lbs. |
Pressure Cooking Lid
in: 14.76 L x 13.58 W x 14.17 H cm: 37.5 L x 34.5 W x 36 H |
| Air Frying Lid | |||||
| in: 14.76 L x 13.58 W x 15.28 H |
Instant Brands Inc.,
495 March Road, Suite 200 Kanata, Ontario, K2K 3G1 Canada
instanthome.com
© 2021 Instant Brands™ Inc
140-0045-01-0301

VORTEX™
6 QUART AIR FRYER
User manual

Download the Instant Pot app with
1000+ recipes at instantappliances.com/app.
IMPORTANT SAFEGUARDS
(Yes, we have to)
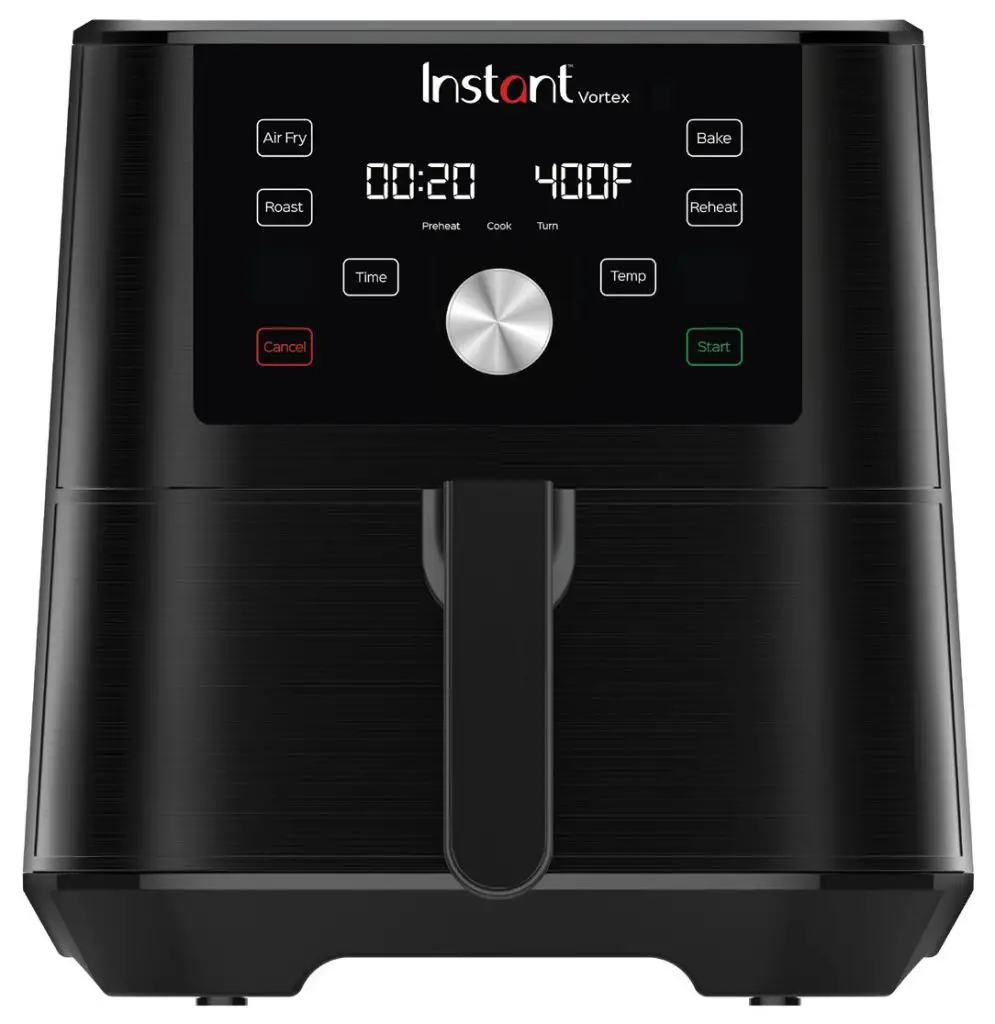 At Instant Brands™ your safety always comes first. The Instant ™ Vortex ™ family was designed with your safety in mind, and we mean business. Visit instantappliances.com to learn about this appliance’s safety mechanisms.
When using electrical appliances, basic safety precautions should always be followed:
- READ ALL INSTRUCTIONS, SAFEGUARDS, AND WARNINGS BEFORE OPERATING THE APPLIANCE. FAILURE TO FOLLOW THESE SAFEGUARDS AND INSTRUCTIONS MAY RESULT IN INJURY AND/OR PROPERTY DAMAGE.
- The appliance’s outer surfaces may become hot during use. DO NOT touch hot surfaces. Only use the air fryer basket handle to lift and carry the air fryer basket. Wear proper hand protection when handling hot components. Extreme caution must be used when moving the appliance. Let the appliance cool to room temperature before handling or moving.
 CAUTION To protect against the risk of electrical shock, DO NOT immerse power cord, plug, or the appliance in water or other liquid.
- DO NOT rinse the appliance under tap.
- The cooking chamber contains electrical components. To avoid electrical shock, DO NOT put liquid of any kind into the cooking chamber.
- This appliance is NOT to be used by children or by persons with reduced physical, sensory, or mental capabilities. Close supervision is necessary when this appliance is used near children and these individuals. Children should not use or play with this appliance.
- Turn off and unplug when not in use, as well as before adding or removing parts or accessories, and before cleaning. To turn off, press Cancel. To unplug, grasp the plug and pull from the outlet. NEVER pull from the power cord.
- Avoid making contact with moving parts.
- Inspect the appliance and power cord regularly. DO NOT operate any appliance with a damaged cord or plug or after the appliance malfunctions, or is dropped or damaged in any manner. For assistance, contact the Customer Care Team at [email protected] or 1-800-828-7280.
- DO NOT use any accessories or attachments not authorized by Instant Brands Inc. The use of attachments not recommended by the manufacturer may cause a risk of injury, fire or electric shock.
- For household countertop use only. DO NOT use outdoors. Not for commercial use.
- DO NOT place the appliance on any kind of stovetop, or in a heated oven; heat from an external source will damage the appliance.
- DO NOT let the power cord contact hot surfaces or open flame, including a stovetop.
- DO NOT use appliances for anything other than intended use.
- Proper maintenance is recommended after each use. Refer to Care, cleaning, and storage. Let the appliance cool to room temperature before cleaning or storage.
 CAUTION Spilled food can cause serious burns. A short power-supply cord is provided to reduce the hazards resulting from grabbing, entanglement and tripping. Keep appliances and cords away from children. NEVER drape the cord over the edge of the table or counter, NEVER use the power outlet below the counter, and NEVER use with an extension cord.
- DO NOT attempt to repair, replace, alter, or modify components of the appliance. This may cause electric shock, fire, and/or injury, and will void the warranty.
- DO NOT tamper with any of the safety mechanisms.
- DO NOT use the appliance in electrical systems other than 120 V ~60 Hz. DO NOT use with power converters or adapters.
- DO NOT overfill the appliance or accessories. Overfilling may cause food to contact the heating element, which may result in fire and/or personal injury.
- DO NOT cover the cooling vents while the appliance is in operation. Doing so will prevent even cooking and may cause damage to the appliance.
- NEVER pour oil into the cooking chamber. This could result in fire and/or personal injury.
- While cooking, the internal temperature of the appliance reaches several hundred degrees. To avoid personal injury, NEVER place unprotected hands inside the appliance until it has cooled to room temperature.
- When cooking, DO NOT place the appliance against a wall or against other appliances. Leave at least 5″ / 13 cm of free space on the back, sides, and above the appliance. DO NOT operate the appliance on or near combustible materials such as tablecloths and curtains. DO NOT place anything on top of the appliance.
- When in operation, hot air is released through the cooling vents. Keep your hands and face at a safe distance from the cooling vents and take extreme caution when removing the accessories from the appliance.
- Should the unit emit black smoke, press Cancel and unplug the appliance immediately. Wait for smoking to stop before opening the door, then clean the appliance thoroughly.
- DO NOT leave the appliance unattended while in use.
- NEVER connect this appliance to an external timer switch or separate remote-control system.
- Use extreme caution when removing hot accessories from the cooking chamber or disposing of hot grease.
- Oversized foods and/or metal utensils must not be inserted into the cooking chamber as they may cause a risk of fire and/or personal injury.
- DO NOT store any materials, other than the included accessories, in the cooking chamber when not in use.
- DO NOT place any combustible materials in the cooking chamber, such as paper, cardboard, plastic, Styrofoam or wood.
- DO NOT use appliance accessories in any other appliance including microwave ovens, toaster ovens, convection or conventional ovens, ceramic, electric, induction or gas cooktops, or outdoor grills.
- Use extreme caution when moving an appliance containing hot oil or other hot liquids.
SAVE THESE INSTRUCTIONS.
WARNING
Read this manual carefully and completely and retain for future reference.
Failure to adhere to safety instructions may result in serious injury or damage.
 WARNING
To avoid injury, read and understand the instructions in this user manual before attempting to use this appliance.
 WARNING
Electrical shock hazard. Use grounded outlet only.
- DO NOT remove ground.
- DO NOT use an adapter.
- DO NOT use an extension cord.
Failure to follow these instructions may result in electric shock and/or serious injury.
 WARNING
THE FAILURE TO FOLLOW ANY OF THE IMPORTANT SAFEGUARDS AND/OR THE INSTRUCTIONS FOR SAFE USE IS A MISUSE OF YOUR APPLIANCE THAT CAN VOID YOUR WARRANTY AND CREATE THE RISK OF SERIOUS INJURY.
Special cord set instructions
As per safety requirements, a short power supply cord (0.6 m to 0.9 m / 24” to 35”) is provided to reduce the hazards resulting from grabbing, entanglement and tripping.
This appliance has a 3-prong grounding plug. To reduce the risk of electric shock, plug the power cord into a grounded (earthed) electrical outlet that is easily accessible.
Product specifications

Find your model name and serial number
Find both of these on the rating label on the back of the air fryer, near the power cord.
 WARNING
Read this manual carefully and completely and retain it for future reference.
Failure to adhere to safety instructions may result in serious injury or damage.
Product, parts, and accessories
Before using your cute new air fryer, make sure that everything is present and accounted for.
Air fryer
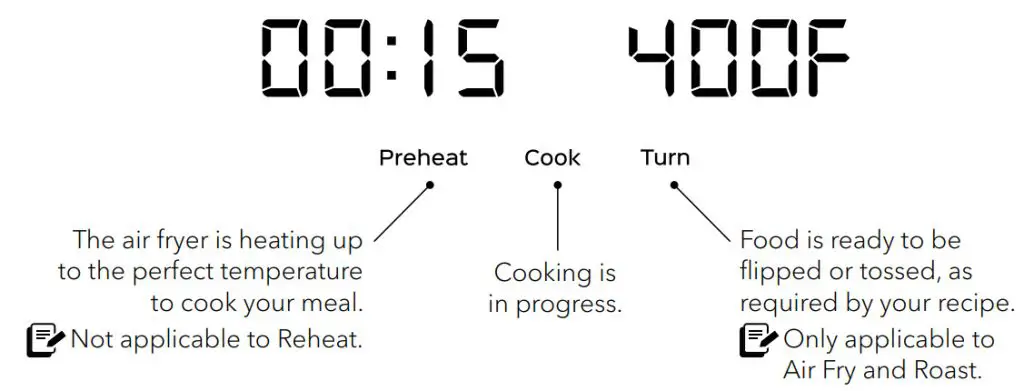
Illustrations in this document are for reference only and may differ from the actual product.
Always refer to the actual product.
Get started
Initial set up
 “Notice the small things. The rewards are inversely proportional.” – Liz Vassey
- Pull that Vortex out of the box!
- Remove the air fryer basket and check the cooking chamber for loose packing material before first use.
- You may be tempted to put the air fryer on your stovetop — but don’t do it! Place it on a stable, level surface, away from combustible material and external heat sources.
Do not place your air fryer on top of another appliance.
 Make sure to leave at least 13 cm / 5″ of space above and around all sides of the appliance.
 - Follow the Care, cleaning, and storage instructions to wash your new air fryer before using it.
 Don’t remove the safety warning stickers or the rating label from the air fryer.
Is something missing or damaged?
Get in touch with a Customer Care Advisor through our chat widget at instantappliances.com/#chat, by email at [email protected] or by phone at 1-800-828-7280 and we’ll happily make some magic happen for you!
 WARNING WARNING |
||
| Read the Important Safeguards before using the appliance. Failure to read and follow those instructions for safe use may result in damage to the appliance, property damage, or personal injury. | Do not place the appliance on a stovetop, on another appliance, or in a heated oven. The heat from an external source will damage the appliance. | To avoid the risk of fire, property damage, and/ or personal injury, do not place anything on top of the appliance and do not block the air vents. |
Initial test run
Do you have to do the test run? No — but getting to know the ins and outs of your Vortex prepares you for success in the kitchen! Take a few minutes to get to know how this little guy works.
Stage 1: Setting up the air fryer for cooking
- Connect the power cord to a 120 V power source.
The air fryer is in standby mode and the display shows OFF. - Remove the air fryer basket from the cooking chamber.
- Place the cooking tray on the bottom of the air fryer basket (if it is not already installed).
 Make sure the little indicator arrows on the cooking tray point towards the back or the front of the air fryer basket.
 - Insert the air fryer basket back into the cooking chamber.
- Touch Air Fry.
- Touch Temp, then turn the dial to adjust the cooking temperature to 205ºC / 400ºF.
 Each Smart Program automatically saves the adjustments you make to the time and temperature when you touch Start.
 - Touch Start to begin!
The display shows On and the cooking status shows Preheat.
 The first few times you use your air fryer, you may notice a strong plastic smell.
This is normal, non-toxic, and goes away quickly.
Stage 2: “Cooking” (…but not really, this is just a test!)
- When the air fryer is hot enough, the display shows Add Food.
 For this initial test, do not add food to the air fryer basket.
Carefully remove and re-insert the air fryer basket. The display shows the cooking time and temperature, and the cooking status shows Cook. - Partway through cooking, the display shows turn Food.
Wait 10 seconds for the program to resume automatically, or, remove and re-insert the air fryer basket to pause and resume the program manually. - When 1 minute remains, the display counts down the remaining cooking time in seconds.
When the Smart Program completes, the display shows End and the fan blows for a little while to help cool the air fryer. - Touch Cancel to return to standby mode and start cooking for real!
 If you forget this last step, the air fryer will beep to remind you about it after 5, 30, and 60 minutes.
 CAUTION
The air fryer and air fryer basket will be hot during and after cooking. To avoid the risk of burn injury, DO NOT touch hot surfaces. Allow the air fryer to cool to room temperature, then clean the appliance according to Care, cleaning, and storage instructions.
Control panel

| 1 | Time/temperature display | Shows the cooking time, the set temperature, reminder messages, and error messages. |
| 2 | Time | Touch Time if you want to adjust the cooking time. |
| 3 | Temp | Touch Temp if you want to adjust the cooking temperature. |
| 4 | Cooking status | Preheat, Cook, and Turn. |
| 5 | Smart programs | •Air Fry •Roast •Bake •Reheat |
| 6 | Dial | Rotate to adjust cooking times and temperatures. Press to wake the display. |
| 7 | Start | Touch Start to begin a selected smart program. |
| 8 | Cancel | Touch Cancel to stop a smart program at any time and go back to standby. |
Settings
| To do this… | Do this! |
| Wake the air fryer. | Touch any button, press the dial, or remove and re-insert the air fryer basket to wake the air fryer. The display shows OFF to let you know that it’s in standby mode and ready for action. |
| Turn sounds on and off. | In standby mode, touch and hold both Time and Temp for 5 seconds. |
| Change temperature scale (°C or °F). | In standby mode, touch and hold the Temp key for 5 seconds to toggle between °C and °F. |
| Save a custom cooking time. | Select a smart program, then touch Time, and use the dial to adjust the time as you like. Touch Start to save the change to memory. |
| Save a custom cooking temperature. | Select a smart program, then touch Temp and turn the dial to adjust the temperature as you like. Touch Start to save the change to memory. |
| Reset an individual smart program. | In standby mode, touch and hold the smart program key you want to reset (for example Air Fry) for 5 seconds. The cooking time and temperature for that Smart Program are restored to the factory default settings. |
| Reset all smart programs. | In standby mode, press and hold the dial for 5 seconds. The cooking times and temperatures for all Smart Programs are restored to the factory default settings. |
Cooking status
Status messages
 |
The air fryer is in standby mode. |
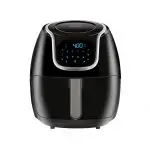 |
A smart program is in the Preheat stage. |
 |
This message appears to let you know that the air fryer has reached the perfect cooking temperature and food can be added to the air fryer basket (if it hasn’t been already). |
 |
The display shows the cooking time and on-screen messages. |
 |
The display also shows the set cooking temperature and on-screen messages. |
 |
Food is ready to be turned or tossed, as recommended by your recipe. |
 |
The Smart Program has finished. |
Cooking
Cooking in the Vortex is quick and easy — food goes in, crispy deliciousness comes out!
Check out the cooking timetables for guidance, or visit our recipe site for fun, easy-to-follow recipes with big crunch. You can also download the free Instant Pot app to search recipes, save favorites, make notes and more!
 CAUTION
When cooking meat, always use a meat thermometer to ensure the internal temperature reaches a safe minimum temperature. Refer to the USDA’s Safe Minimum Internal Temperature Chart or Health Canada’s Cooking Temperatures Chart for more information.
Air Fry, Roast, and Bake
These programs give your meals all the rich, crispy flavor of deep frying with little to no oil, so you can say, “See ya!” to the greasy mess and extra calories! The presets are a starting point that you can experiment with to get the results you like best.
| Smart program | Default time | Time range | Default temperature | Temperature range |
| Air Fry | 15 minutes (00:15) |
1 minute to 1 hour (00:01 to 01:00) |
196°C / 385°F | 82 to 205°C 180 to 400°F |
| Roast | 18 minutes (00:18) |
1 minute to 1 hour (00:01 to 01:00) |
193°C / 380°F | 82 to 205°C 180 to 400°F |
| Bake | 30 minutes (00:30) |
1 minute to 1 hour (00:01 to 01:00) |
185°C / 365°F | 82 to 205°C 180 to 400°F |
Stage 1: Setting up for cooking
- Follow steps 01 to 04 in the Initial test run: Stage 1 to set up the air fryer.
- Touch the smart program you want to use: Air Fry, Roast, or Bake.
- Touch Temp, then turn the dial to adjust the temperature.
- Touch Time, then turn the dial to adjust the time.
 Smart Programs automatically save adjustments to temperature and time settings when you touch Start.
 - Touch Start to begin!
The display shows On and the cooking status shows Preheat.
Stage 2: Cooking
- When the display shows Add Food, remove the air fryer basket and carefully place your food items inside the hot cooking chamber.
You can put food directly on the cooking tray or within any oven-safe baking dish. - Carefully re-insert the air fryer basket. The display shows the cooking time and temperature, and the cooking status shows Cook.
- Partway through cooking, the display shows turn Food.
 Not applicable to Bake.
If you want to toss or turn your food, remove the air fryer basket and take care of business, then re-insert the basket into the air fryer. Cooking pauses and resumes automatically.
 If your food does not need to be flipped, wait 10 seconds for the program to resume automatically.
 - When the display shows End, carefully remove your food from the hot cooking chamber.
 CAUTION CAUTION |
|
| The air fryer oven and air frying accessories will be hot during and after cooking. Do not touch hot surfaces with unprotected hands. Allow all items to cool to room temperature, then clean them according to Care, cleaning, and storage instructions. | Always use proper hand protection and exercise extreme caution when adding or removing food from the hot cooking chamber. |
Cooking tips
Give all your favorite fresh and frozen oven-baked and deep-fried snacks a fighting chance!
- Preheating is an important step! Wait for the Add Food message to appear before adding food to the air fryer basket.
- When baking muffins, buns, quiche, and other treats, cover your oven-safe baking dish to prevent the top from overcooking.
- For coated food, like onion rings or deep-fried pickles, use an egg wash with breadcrumbs rather than liquid-based batters to make sure that batter sticks to the food.
- Spray food items with cooking oil before adding seasoning to get the seasoning to stick well.
- For super-crispy fries, soak your fresh-cut potato sticks in ice water for 15 minutes, then pat them dry and spray them lightly with oil before cooking.
- Patting dry moist food items before cooking to prevents excess steam and splatter and gives you crispier results.
- Air frying can cause oil and fat to drip from foods. To prevent excess smoke, carefully remove and drain the air fryer basket as needed.
Check out the cooking timetables, download the Instant Pot app, or visit our recipe site for fun, easy-to-follow recipes.
 CAUTION
To avoid the risk of fire, property damage and personal injury, DO NOT spray cooking oil into the cooking chamber
 CAUTION
When cooking meat, always use a meat thermometer to ensure the internal temperature reaches a safe minimum temperature. Refer to the USDA’s Safe Minimum Internal Temperature Chart or Health Canada’s Cooking Temperatures Chart for more information.
Reheat
| Smart program | Default time | Time range | Default temperature | Temperature range |
| Reheat | 10 minutes (00:10) | 1 minute to 1 hour (00:01 to 01:00) |
138°C / 280°F | 49 to 182°C120 to 360°F |
- Follow steps 01 to 04 in the Initial test run: Stage 1 to set up the air fryer.
- Remove the air fryer basket and place your food items inside, then carefully re-insert it.
- Touch Reheat.
- Touch Temp, then turn the dial to adjust the temperature.
- Touch Time, then turn the dial to adjust the time.
 Smart Programs automatically save adjustments to temperature and time settings when you touch Start.
 - Touch Start to begin heating. The time begins to count down right away.
- When the display shows End, carefully remove your food from the hot cooking chamber.
 CAUTION CAUTION |
|
| The air fryer oven and air frying accessories will be hot during and after cooking. Do not touch hot surfaces with unprotected hands. Allow all items to cool to room temperature, then clean them according to Care, cleaning, and storage instructions. | To avoid a burn injury, always use proper hand protection and exercise extreme caution when adding or removing food from the hot cooking chamber. |
Care, cleaning, and storage
Clean your air fryer and accessories after each use.
Always unplug the air fryer and let it cool to room temperature before cleaning.
Never use harsh chemical detergents, scouring pads, or powders on any of the parts or components.
Let all surfaces dry thoroughly before use, and before storage.
| Part or accessory | Cleaning method and notes |
| Air fryer basket | • Clean the air fryer basket with a sponge or cloth and warm water and dish soap, then rinse well. Ensure that all grease and food debris are removed. • DO NOT immerse the basket in water or any other liquid. • DO NOT machine wash the basket. |
| Cooking tray | • Clean the cooking tray with a cloth or sponge and warm water and dish soap. • The cooking tray has a non-stick coating. To avoid damage to the non-stick coating, DO NOT use metal cleaning utensils. |
| Cooking chamber | • Clean the cooking chamber with a sponge or soft cloth and warm water and dish soap. • To remove baked-on grease and food residue from the cooking chamber, spray with a mixture of baking soda and vinegar and wipe clean with a damp cloth. • For stubborn stains, allow the mixture to sit on the affected area for several minutes before scrubbing clean. • Check the heating coil for oil spatter and food debris. Clean the heating coil with a damp cloth as needed. Ensure the heating coil is completely dry before next use. |
| Exterior | • Clean with a soft, damp cloth or sponge and wipe dry. |
 WARNING WARNING |
||
| To avoid the risk of electrical shock and personal injury: • Do not immerse the appliance in water. • Do not rinse the appliance under a tap. • Do not wet prongs of the power cord. |
Without proper cleaning, food and grease splatter may build up around the heating element, causing the risk of smoke, fire, and personal injury. |
If you see or smell smoke, touch Cancel, unplug the appliance, and allow it to cool. Remove food splatter or grease with a soft cloth and dish detergent. |
Troubleshooting
Register your air fryer today!
If your problem persists or if you have questions, get in touch with a Customer Care Advisor through our chat widget at instantappliances.com/#chat, by email at [email protected] or by phone at 1-800-828-7280.
| Problem | Possible reason Solution | ||
| Black smoke is coming from the air fryer. |
 CAUTION Stop cooking immediately. Cancel the Smart Program, then unplug CAUTION Stop cooking immediately. Cancel the Smart Program, then unplugthe air fryer and allow it to cool to room temperature. |
||
| Using an oil with a low smoke point. | Touch Cancel, unplug the air fryer and allow it to cool to room temperature. Choose a neutral oil with a high smoke point, such as Avocado, Canola, Soybean, Safflower, or Rice Bran oil. |
||
| Food residue on the heating coil, in the cooking chamber or on accessories. | Touch Cancel, unplug the air fryer and allow it to cool to room temperature. Clean the cooking chamber and accessories thoroughly. |
||
| Faulty circuit or heating element. | Touch Cancel, unplug the air fryer and allow it to cool to room temperature. Contact Customer Care. |
||
| White smoke is coming from the air fryer. | Cooking foods with high-fat content, such as bacon, sausage, and hamburger. | Avoid air frying foods with high-fat content. | |
| Check the air fryer basket for excess oil or fat and carefully remove as needed after cooking. | |||
| Water is vaporizing, producing thick steam. | Pat dry moist food ingredients before air frying and do not add water or other liquid to the cooking chamber when air frying. | ||
| The seasoning on food has blown into the element. | Be mindful when seasoning food. Spray vegetables and meats with oil before seasoning to help the seasoning stick. |
||
| The air fryer is plugged in but will not turn on. | The appliance is not properly plugged in. | Make sure the power cord is in good condition and is plugged into the outlet firmly. | |
| Outlet is not powered. | Plug another appliance into the same outlet to test the circuit. | ||
| Plug the air fryer into another outlet. | |||
| Air fryer basket is not fully inserted into the cooking chamber. | Make sure the air fryer basket is fully inserted into the cooking chamber. | ||
| All lights flash and a code appears on the display. | El | The temperature sensor broke the circuit. | Contact Customer Care. |
| E2 | Temperature sensor short circuit. | Contact Customer Care. | |
Any other servicing must be performed by an authorized representative.
Warranty
Limited Warranty
This Limited Warranty is effective for one year from the date of original consumer purchase. Proof of original purchase date and, if requested by an authorized representative of Instant Brands Inc.
(“Instant Brands”), return of your appliance is required to obtain service under this Limited Warranty. Provided that this appliance is operated and maintained in accordance with written instructions attached to or furnished with the appliance, Instant Brands will, in its sole and exclusive discretion, either: (i) repair defects in materials or workmanship; or (ii) replace the appliance. In the event that your appliance is replaced, the Limited Warranty on the replacement appliance will expire 12 months from the date of original consumer purchase.
This Limited Warranty extends only to the original purchaser and use of the appliance in the United States of America and Canada. This warranty does not cover units that are used outside of the United States of America and Canada.
Any modification or attempted modification to your appliance may interfere with the safe operation of the appliance and will void this Limited Warranty. This Limited Warranty does not apply in respect of any appliance or any part thereof that has been altered or modified unless such alterations or modifications were expressly authorized by an Instant Brands representative.
Limitation and Exclusions
The liability of Instant Brands, if any, for any allegedly defective appliance or part shall in no circumstances exceed the purchase price of a comparable replacement appliance.
This Limited Warranty does not cover:
- Damage resulting from accident, alteration, misuse, abuse, neglect, unreasonable use, use contrary to the operating instructions, normal wear, and tear, commercial use, improper assembly, disassembly, failure to provide reasonable and necessary maintenance, fire, flood, acts of God or repair by anyone unless directed by an Instant Brands Representative;
- Repairs where your appliance is used for other than normal, personal use or when it is used in a manner that is contrary to published user or operator instructions; or Use of unauthorized parts and accessories, or repairs to parts and systems resulting from unauthorized repairs or modifications made to this appliance.
The cost of repair or replacement under these excluded circumstances shall be paid by you.
Disclaimer of Implied Warranties
EXCEPT AS EXPRESSLY PROVIDED HEREIN AND TO THE EXTENT PERMITTED BY LAW, INSTANT BRANDS MAKES NO WARRANTIES, CONDITIONS OR REPRESENTATIONS, EXPRESS OR IMPLIED, BY STATUTE, USAGE, CUSTOM OF TRADE OR OTHERWISE WITH RESPECT TO THE APPLIANCES OR PARTS COVERED BY THIS WARRANTY, INCLUDING BUT NOT LIMITED TO, WARRANTIES, CONDITIONS, OR REPRESENTATIONS OF WORKMANSHIP, MERCHANTABILITY, MERCHANTABLE QUALITY, FITNESS FOR A PARTICULAR PURPOSE OR DURABILITY.
Some states or provinces do not allow for the exclusion of implied warranties of merchantability or fitness, so this limitation may not apply to you. In these states and provinces, you have only the implied warranties that are expressly required to be provided in accordance with applicable law.
Limitation of Remedies; Exclusion of Incidental and Consequential Damage
YOUR SOLE AND EXCLUSIVE REMEDY UNDER THIS LIMITED WARRANTY SHALL BE APPLIANCE REPAIR OR REPLACEMENT AS PROVIDED HEREIN. INSTANT BRANDS SHALL NOT BE LIABLE FOR INDIRECT, INCIDENTAL OR CONSEQUENTIAL DAMAGES ARISING OUT OF OR IN CONNECTION WITH THE USE OR PERFORMANCE OF THE APPLIANCE OR DAMAGES WITH RESPECT TO ANY ECONOMIC LOSS, PERSONAL INJURY, LOSS OF PROPERTY, LOSS OF REVENUES OR PROFITS, LOSS OF ENJOYMENT OR USE, COSTS OF REMOVAL, INSTALLATION OR OTHER INDIRECT, INCIDENTAL OR CONSEQUENTIAL DAMAGES OF ANY NATURE OR KIND.
Warranty Registration
Please visit www.instantappliances.com/support/register to register your new Instant Brands™ appliance and validate your warranty within thirty (30) days of purchase. You will be asked to provide the store name, date of purchase, model number (found on the back of your appliance) and serial number (found on the bottom of your appliance) along with your name and email address. The registration will enable us to keep you up to date with product developments, recipes and contact you in the unlikely event of a product safety notification. By registering, you acknowledge that you have read and understood the instructions for use, and warnings set forth in the accompanying instructions.
Warranty Service
To obtain service under this warranty, please contact our Customer Service Department by phone at 1-800-828-7280 or by email to [email protected]. You can also create a support ticket online at www.instantappliances.com/support. If we are unable to resolve the problem, you may be asked to send your appliance to the Service Department for quality inspection. Instant Brands is not responsible for shipping costs related to warranty service, save and except for shipping costs associated with the return of your appliance from Canada or within the 48 contiguous states and the District of Columbia of the United States of America, as provided herein. When returning your appliance, please include your name, mailing address, email address, phone number, and proof of the original purchase date as well as a description of the problem you are encountering with the appliance.

Instant Brands Inc.
11—300 Earl Grey Dr., Suite 383
Ottawa, Ontario
K2T 1C1
Canada
Register your product today
instantappliances.com/support/register

Contact us
1-800-828-7280
[email protected]
instantappliances.com/#chat
instantappliances.com
store.instantappliances.com
Copyright © 2020 Instant Brands™ Inc
685-0101-32

Instant Vortex Mini 2 Quart Air Fryer
Instant Vortex Mini 2 Quart Air Fryer
IMPORTANT SAFEGUARDS
(Yes, we have to)
At Instant Brands™ your safety always comes first. The Instant™ Vortex™ family was designed with your safety in mind, and we mean business. Visit instantappliances.com to learn about this appliance’s safety mechanisms. When using electrical appliances, basic safety precautions should always be followed:
- READ ALL INSTRUCTIONS, SAFEGUARDS, AND WAR NINGS
BEFORE OPERATING THE APPLIANCE. FAILURE TO FOLLOW THESE SAFEGUARDS AND INSTRUCTIONS MAY RESULT IN INJURY AND/OR PROPERTY DAMAGE. - The appliance’s outer surfaces may become hot during use. DO NOT touch hot surfaces. Only use the air fryer basket handle to lift and carry the air fryer basket. Wear proper hand protection when handling hot components. Extreme caution must be used when moving the appliance. Let the appliance cool to room temperature before handling or moving.
- CAUTION: To protect against the risk of electrical shock, DO NOT immerse power cord, plug, or the appliance in water or other liquid.
- DO NOT rinse the appliance under tap.
- The cooking chamber contains electrical components. To avoid electrical shock, DO NOT put liquid of any kind into the cooking chamber.
- This appliance is NOT to be used by children or by persons with reduced physical, sensory, or mental capabilities. Close supervision is necessary when this appliance is used near children and these individuals. Children should not use or play with this appliance.
- Turn off and unplug when not in use, as well as before adding or removing parts or accessories, and before cleaning. To turn off, press Cancel. To unplug, grasp the plug and pull from the outlet. NEVER pull from the power cord.
- Avoid making contact with moving parts.
- Inspect the appliance and power cord regularly. DO NOT operate any appliance with a damaged cord or plug or after the appliance malfunctions, or is dropped or damaged in any manner. For assistance, contact the Customer Care Team at [email protected] or 1-800-828-7280.
- DO NOT use any accessories or attachments not authorized by Instant Brands Inc. The use of attachments not recommended by the manufacturer, may cause a risk of injury, fire or electric shock.
- For household countertop use only. DO NOT use outdoors. Not for commercial use.
- DO NOT place the appliance on any kind of stovetop, or in a heated oven; heat from an external source will damage the appliance.
- DO NOT let power cord contact hot surfaces or open flame, including a stovetop.
- DO NOT use appliance for anything other than intended use.
- Proper maintenance is recommended after each use. Refer to Care, cleaning and storage. Let the appliance cool to room temperature before cleaning or storage.
- Spilled food can cause serious burns. A short power supply cord is provided to reduce the hazards resulting from grabbing, entanglement and tripping. Keep appliance and cord away from children. NEVER drape cord over edge of table or counter, NEVER use power outlet below counter, and NEVER use with an extension cord.
- Caution: DO NOT attempt to repair, replace, alter, or modify components of the appliance. This may cause electric shock, fire and/or injury, and will void the warranty.
- DO NOT tamper with any of the safety mechanisms.
- DO NOT use the appliance in electrical systems other than 120 V ~
60 Hz. DO NOT use with power converters or adapters. - DO NOT overfill the appliance or accessories. Overfilling may cause food to contact the heating element, which may result in fire and/or personal injury.
- DO NOT cover the cooling vents while the appliance is in operation. Doing so will prevent even cooking and may cause damage to the appliance.
- NEVER pour oil into the cooking chamber. This could result in fire and/or personal injury.
- While cooking, the internal temperature of the appliance reaches several hundred degrees. To avoid personal injury, NEVER place unprotected hands inside the appliance until it has cooled to room temperature.
- When cooking, DO NOT place the appliance against a wall or against other appliances. Leave at least 5″ / 13 cm of free space on the back, sides, and above the appliance. DO NOT operate the appliance on or near combustible materials such as tablecloths and curtains. DO NOT place anything on top of the appliance.
- When in operation, hot air is released through the cooling vents. Keep your hands and face at a safe distance from the cooling vents and take extreme caution when removing the accessories from the appliance.
- Should the unit emit black smoke, press Cancel and unplug the appliance immediately. Wait for smoking to stop before removing the air fryer basket, then clean the appliance thoroughly.
- DO NOT leave the appliance unattended while in use.
- NEVER connect this appliance to an external timer switch or separate remote-control system.
- Use extreme caution when removing hot accessories from the cooking chamber or disposing of hot grease.
- Oversized foods and/or metal utensils must not be inserted into the cooking chamber as they may cause risk of fire and/or personal injury.
- DO NOT store any materials, other than the included accessories, in the cooking chamber when not in use.
- DO NOT place any combustible materials in the cooking chamber, such as paper, cardboard, plastic, Styrofoam or wood.
- DO NOT use appliance accessories in any other appliance including microwave ovens, toaster ovens, convection or conventional ovens, ceramic, electric, induction or gas cooktops, or outdoor grills.
- Use extreme caution when moving an appliance contaning hot oil or other hot liquids.
SAVE THESE INSTRUCTIONS.
WARNING: Read this manual carefully and completely and retain for future reference. Failure to adhere to safety instructions may result in serious injury or damage.
WARNING: To avoid injury, read and understand the instructions in this user manual before attempting to use this appliance.
WARNING: Electrical shock hazard. Use grounded outlet only.
- DO NOT remove ground.
- DO NOT use an adapter.
- DO NOT use an extension cord.
Failure to follow these instructions may result in electric shock and/or serious injury
WARNING: THE FAILURE TO FOLLOW ANY OF THE IMPORTANT SAFEGUARDS AND/OR THE INSTRUCTIONS FOR SAFE USE IS A MISUSE OF YOUR APPLIANCE THAT CAN VOID YOUR WARRANTY AND CREATE THE RISK OF SERIOUS INJURY
Special cord set instructions
As per safety requirements, a short power supply cord (0.6 m to 0.9 m / 24” to 35”) is provided to reduce the hazards resulting from grabbing, entanglement and tripping.
This appliance has a 3-prong grounding plug. To reduce the risk of electric shock, plug the power cord into a grounded (earthed) electrical outlet that is easily accessible.
Product specifications
 |
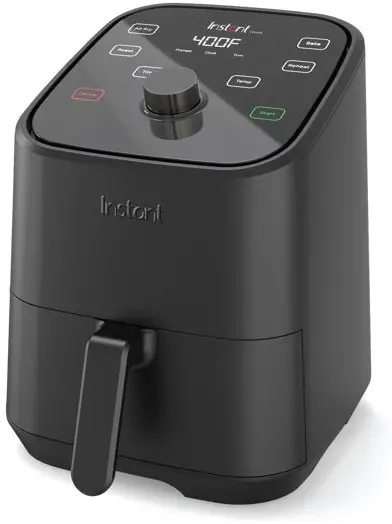 |
 |
 |
 |
 |
| Models: Vortex Mini RE Vortex Mini AQ Vortex Mini BL Vortex Mini WH | 1300 W | 120 V ~ 60 Hz | 2 Quart | 7.28 lb/ 3.3 kg | in: 11.26D x 9.02W x 11.73H cm: 28.6D x 22.9W x 29.8H |
Find your model name and serial number
Find both of these on the rating label on the back of the air fryer, near the power cord.
Product, parts and accessories
Before using your cute new air fryer, make sure that everything is present and accounted for.
Air fryer


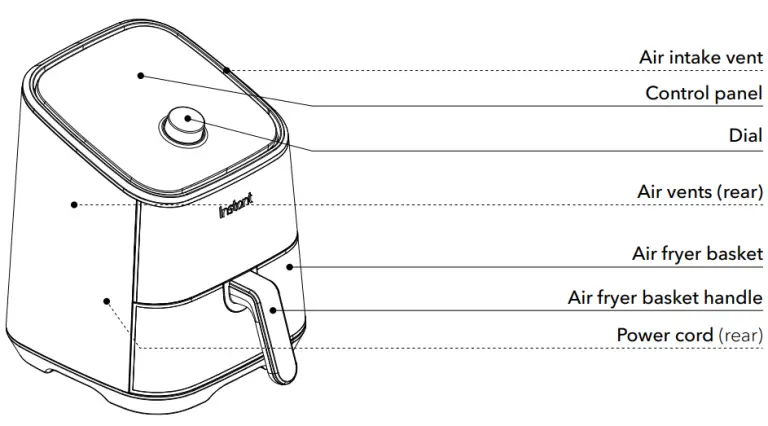
Cooking tray
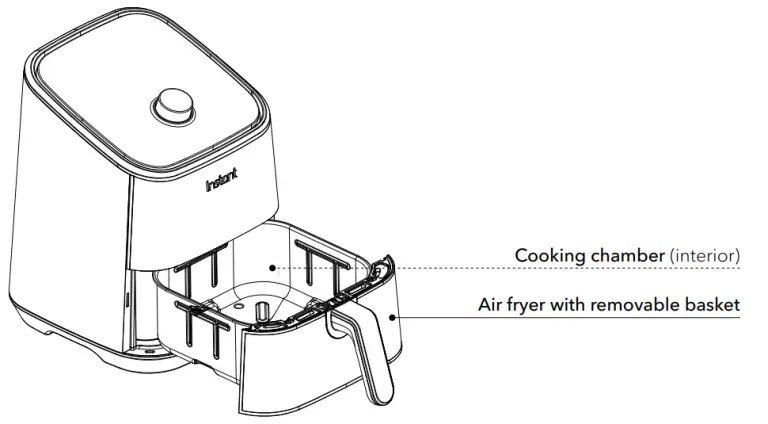
Air fryer basket
Get started
Initial set up
Notice the small things. The rewards are inversely proportional.” – Liz Vassey
- Pull that Vortex Mini out of the box!
- Remove the air fryer basket and check the cooking chamber for loose packing material before first use.
Don’t remove the silicone supports from the removable cooking tray. - You may be tempted to put the air fryer on your stovetop — but don’t do it! Place it on a stable, level surface, away from combustible material and external heat sources. Do not place your air fryer on top of another appliance.
Make sure to leave at least 13 cm / 5″ of space above and around all sides of the appliance. - Follow the Care, cleaning and storage instructions to wash your new air fryer before using it.
Don’t remove the safety warning stickers or the rating label from the air fryer.
Is something missing or damaged?
Get in touch with a Customer Care Advisor through our chat widget at instantappliances.com/#chat, by email at [email protected] or by phone at 1-800-828-7280 and we’ll happily make some magic happen for you!
WARNING
Read the Important Safeguards before using the appliance. Failure to read and follow those instructions for safe use may result in damage to the appliance, property damage or personal injury.
Do not place the appliance on a stovetop, on another appliance, or in a heated oven. Heat from an external source will damage the appliance.
To avoid the risk of fire, property damage, and/ or personal injury, do not place anything on top of the appliance, and do not block the air vents.
Initial test run
Do you have to do the test run? No — but getting to know the ins and outs of your Vortex Mini prepares you for success in the kitchen! Take a few minutes to get to know how this little guy works.
Stage 1: Setting up the air fryer for cooking
- Connect the power cord to a 120 V power source. The air fryer is in standby mode and the display shows OFF.
- Remove the air fryer basket from the cooking chamber.
- Place the cooking tray on the bottom of the air fryer basket (if it is not already installed).
- Insert the air fryer basket back into the cooking chamber.
- Touch Air Fry.
- Touch Time, then turn the dial to adjust the cook time to 20 minutes (00:20). Each Smart Program automatically saves the adjustments you make to the time and temperature when you touch Start.
- Touch Start to begin!
The display shows On and the cooking status shows Preheat. The first few times you use your air fryer, you may notice a strong plastic smell. This is normal, non-toxic, and goes away quickly.
Stage 2: “Cooking” (…but not really, this is just a test!)
- When the air fryer is hot enough, the display shows Add Food. For this initial test, do not add food to the air fryer basket. Carefully remove and re-insert the air fryer basket. The display shows the cooking time and temperature, and the cooking status shows Cook.
- Part way through cooking, the display shows turn Food. Wait 10 seconds for the program to resume automatically, or, remove and re-insert the air fryer basket to pause and resume the program manually.
- When 1 minute remains, the display counts down the remaining cooking time in seconds. When the Smart Program completes, the display shows End and the fan blows for a little while to help cool the air fryer.
- Press the dial or remove and re-insert the air fryer basket to return to standby mode and start cooking for real!
If you forget this last step, the air fryer will beep to remind you about it after 5, 30, and 60 minutes
CAUTION: The air fryer and air fryer basket will be hot during and after cooking. To avoid the risk of burn injury, DO NOT touch hot surfaces. Allow the air fryer to cool to room temperature, then clean the appliance according to Care, cleaning and storage instructions.
Control panel
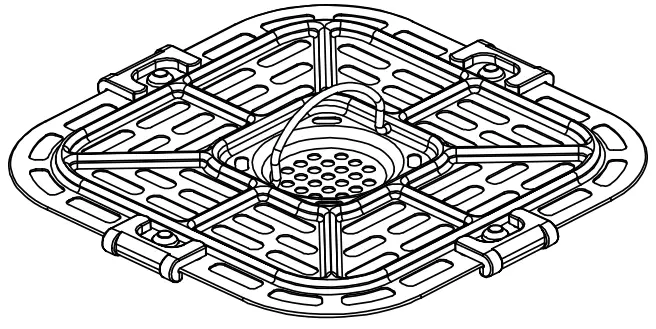
| 1 | Time/temperature display | Shows the cooking time, the set temperature, reminder messages and error messages. |
| 2 | Time | Touch Time if you want to adjust the cooking time. |
| 3 | Temp | Touch Temp if you want to adjust the cooking temperature. |
| 4 | Cooking status | Preheat, Cook and Turn. |
|
5 |
Smart programs | • Air Fry
• Roast • Bake • Reheat |
|
6 |
Dial | Rotate to adjust cooking times and temperatures. Press to wake the display. |
| 7 | Start | Touch Start to begin a selected smart program. |
| 8 | Cancel | Touch Cancel to stop a smart program at any time and go back to standby. |
Settings
| To do this… | Do this! |
| Wake the air fryer. | Touch any button, press the dial, or remove and re-insert the air fryer basket to wake the air fryer. The display shows OFF to let you know that it’s in standby mode and ready for action. |
| Turn sounds on and off. | In standby mode, touch and hold both the Time and Temp) for 3 seconds. The display shows S On when the sound is on, and SOFF when the sound is off. Error alerts cannot be silenced. |
| Change temperature scale (ºC or ºF). | In standby mode, touch and hold the Temp key for 5 seconds to toggle between °C and °F. |
| Save a custom cooking time. | Select a smart program, then touch Time, and use the dial to adjust the time as you like. Touch Start to save the change to memory. |
| Reset an individual smart program. | In standby mode, touch and hold the smart program key you want to reset (for example:
Air Fry) for 3 seconds. The cooking time and temperature for that Smart Program are restored to the factory default settings. |
| Reset all smart programs. | In standby mode, press and hold the dial for 3 seconds. The cooking times and temperatures for all Smart Programs are restored to the factory default settings. |
Cooking status
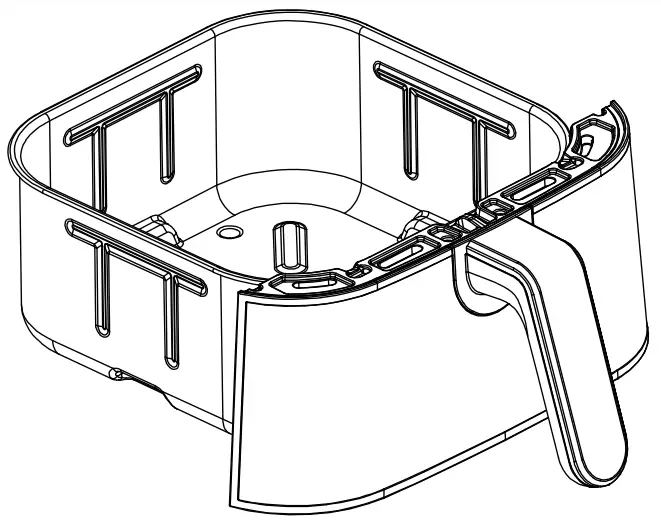
Status messages
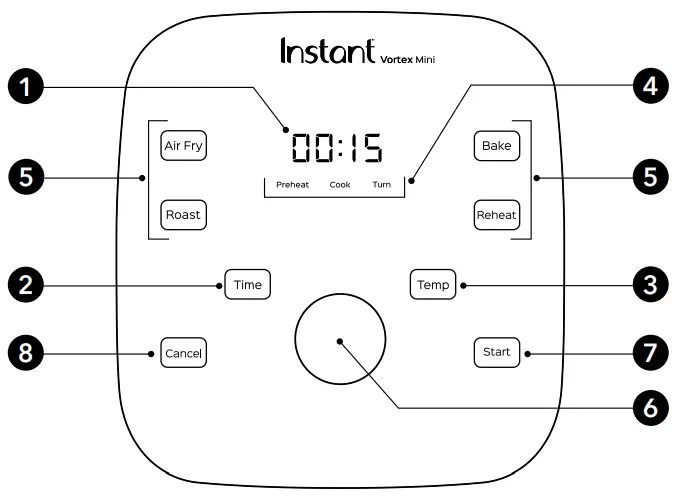 |
The air fryer is in standby mode. |
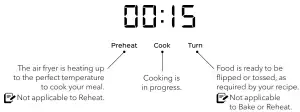 |
A smart program is in the Preheat stage. Not applicable to Reheat. |
 |
This message appears to let you know that the air fryer has reached the perfect cooking temperature and food can be added to the air fryer basket (if it hasn’t been already). Not applicable to Reheat. |
 |
May indicate that the air fryer basket has been removed or is not fully inserted. |
 |
The display shows the cooking time, and on-screen messages. |
 |
Food is ready to be turned or tossed, as recommended by your recipe. Not applicable to Bake or Reheat. |
 |
The Smart Program has finished. |
COOKING
Cooking in the Vortex is quick and easy — food goes in, crispy deliciousness comes out!
Check out the cooking timetables for guidance, or visit our recipe site for fun, easy-to follow recipes with big crunch. You can also download the free Instant Pot app to search recipes, save favorites, make notes and more!
CAUTION: When cooking meat, always use a meat thermometer to ensure the internal temperature reaches a safe minimum temperature. Refer to the USDA’s Safe Minimum Internal Temperature Chart or Health Canada’s Cooking Temperatures Chart for more information.
Air Fry, Roast and Bake
These programs give your meals all the rich, crispy flavor of deep frying with little to no oil, so you can say, “See ya!” to the greasy mess and extra calories! The presets are a starting point that you can experiment with to get the results you like best.
| Smart program | Default time | Time range | Default temperature | Temperature range |
| Air Fry | 12 minutes
(00:12) |
1 minute to 1 hour
(00:01 to 01:00) |
205°C / 400°F | 82 to 205°C
180 to 400°F |
| Roast | 18 minutes
(00:18) |
1 minute to 1 hour
(00:01 to 01:00) |
193°C / 380°F | 82 to 205°C
180 to 400°F |
| Bake | 30 minutes
(00:30) |
1 minute to 1 hour
(00:01 to 01:00) |
166°C / 330°F | 82 to 205°C
180 to 400°F |
Stage 1: Setting up for cooking
- Follow steps 01 to 04 in the Initial test
run: Stage 1 to set up the air fryer. - Touch the smart program you want to
use: Air Fry, Roast or Bake. - Touch Temp, then turn the dial to adjust the temperature.
- Touch Time, then turn the dial to adjust the time.
Smart Programs automatically save adjustments to temperature and time settings when you touch Start. - Touch Start to begin!
The display shows On and the cooking status shows Preheat.
Stage 2: Cooking
- When the display shows Add Food, remove the air fryer basket and carefully place your food items inside the hot cooking chamber. You can put food directly on the cooking tray or within any ovensafe baking dish.
- Carefully re-insert the air fryer basket.
The display shows the cooking time and temperature, and the cooking status shows Cook. - Part way through cooking, the display shows turn Food. Not applicable to Bake.
If you want to toss or turn your food, remove the air fryer basket and take care of business, then re-insert the basket into the air fryer. Cooking pauses and resumes automatically.
If your food does not need to be flipped, wait 10 seconds for the program to resume automatically. - When the display shows End, carefully remove your food from the hot cooking chamber.
CAUTION
The air fryer oven and air frying accessories will be hot during and after cooking. Do not touch hot surfaces with unprotected hands. Allow all items to cool to room temperature, then clean them according to Care, cleaning and storage instructions.
Always use proper hand protection and exercise extreme caution when adding or removing food from the hot cooking chamber.
Cooking tips
Give all your favorite fresh and frozen oven-baked and deep-fried snacks a fighting chance!
- Preheating is an important step! Wait for the Add Food message to appear before adding food to the air fryer basket.
- When baking muffins, buns, quiche, and other treats, use an oven safe baking dish covered with foil (or an oven-safe lid) to prevent the top from overcooking.
- For coated food, like onion rings or deep-fried pickles, use an egg wash with breadcrumbs rather than liquid-based batters to make sure that batter sticks to the food.
- Spray food items with cooking oil before adding seasoning to get the seasoning to stick well.
- For super crispy fries, soak your fresh-cut potato sticks in ice water for 15 minutes, then pat them dry and spray them lightly with oil before cooking.
- Patting dry moist food items before cooking to prevents excess steam and splatter and gives you crispier results.
- Air frying can cause oil and fat to drip from foods. To prevent excess smoke, carefully remove and drain the air fryer basket as needed.
Check out the cooking timetables, download the Instant Pot app, or visit our recipe site for fun, easy-to-follow recipes.
CAUTION
To avoid the risk of fire, property damage and personal injury, DO NOT spray cooking oil into the cooking chamber
CAUTION
When cooking meat, always use a meat thermometer to ensure the internal temperature reaches a safe minimum temperature. Refer to the USDA’s Safe Minimum Internal Temperature Chart or Health Canada’s Cooking Temperatures Chart for more information.
Reheat
| Smart program | Default time | Time range | Default temperature | Temperature range |
| Reheat | 10 minutes (00:10) | 1 minute to 1 hour (00:01 to 01:00) | 138°C / 280°F | 49 to 182°C
120 to 360°F |
- Follow steps 01 to 04 in the Initial test
run: Stage 1 to set up the air fryer. - Remove the air fryer basket and place your food items inside, then carefully re-insert it.
- Touch Reheat.
- Touch Temp, then turn the dial to adjust the temperature.
- Touch Time, then turn the dial to adjust the time.
Smart Programs automatically save adjustments to temperature and time settings when you touch Start. - Touch Start to begin reheating. The time begins to count down right away.
- When the display shows End, carefully remove your food from the air fryer.
CAUTION
The air fryer oven and air frying accessories will be hot during and after cooking. Do not touch hot surfaces with unprotected hands. Allow all items to cool to room temperature, then clean them according to Care, cleaning and storage instructions.
To avoid a burn injury, always use proper hand protection and exercise extreme caution when adding or removing food from the hot cooking chamber.
Care, cleaning and storage
Clean your air fryer and accessories after each use.
Always unplug the air fryer and let it cool to room temperature before cleaning.
Never use harsh chemical detergents, scouring pads, or powders on any of the parts or components.
Let all surfaces dry thoroughly before use, and before storage.
| Part or accessory Cleaning method and notes | |
| Air fryer basket | • Clean the air fryer basket with a sponge or cloth and warm water and dish soap, then rinse well. Ensure that all grease and food debris are removed.
• DO NOT immerse the basket in water or any other liquid. • DO NOT machine wash the basket. |
| Cooking tray | •Clean the cooking tray with a cloth or sponge and warm water and dish soap.
•The cooking tray has non-stick coating. To avoid damage to the non-stick coating, DO NOT use metal cleaning utensils. |
| Cooking chamber | •Clean the cooking chamber with a sponge or soft cloth and warm water and dish soap.
•To remove baked-on grease and food residue from cooking chamber, spray with a mixture of baking soda and vinegar and wipe clean with damp cloth. • For stubborn stains, allow the mixture to sit on the affected area for several minutes before scrubbing clean. • Check the heating coil for oil spatter and food debris. Clean the heating coil with a damp cloth as needed. Ensure the heating coil is completely dry before next use. |
| Exterior | • Clean with a soft, damp cloth or sponge and wipe dry. |
WARNING
To avoid risk of electrical shock and personal injury:
- Do not immerse the appliance in water.
- Do not rinse the appliance under a tap.
- Do not wet prongs of the power cord.
Without proper cleaning, food and grease splatter may build up around the heating element, causing the risk of smoke, fire, and personal injury.
If you see or smell smoke, touch Cancel, unplug the appliance, and allow it to cool. Remove food splatter or grease with a soft cloth and dish detergent.
Troubleshooting
Register your air fryer today!
If your problem persists or if you have questions, get in touch with a Customer Care Advisor through our chat widget at instantappliances.com/#chat, by email at [email protected] or by phone at 1-800-828-7280.
| Problem | Possible reason | Solution | |
| Black smoke is coming from the air fryer. | Stop cooking immediately. Cancel the Smart Program, then unplug the air fryer and allow it to cool to room temperature. | ||
| Using an oil with a low smoke point. | Touch Cancel, unplug the air fryer, and allow it to cool to room temperature.
Choose a neutral oil with a high smoke point, such as Avocado, Canola, Soybean, Safflower, or Rice Bran oil. |
||
| Food residue on the heating coil, in the cooking chamber or on accessories. | Touch Cancel, unplug the air fryer, and allow it to cool to room temperature.
Clean the cooking chamber and accessories thoroughly. |
||
| Faulty circuit or heating element. | Touch Cancel, unplug the air fryer, and allow it to cool to room temperature.
Contact Customer Care. Note: Do not attempt to repair the appliance. |
||
| White smoke is coming from the air fryer. | Cooking foods with a high fat content, such as bacon, sausage, and hamburger. | Avoid air frying foods with a high fat content. | |
| Check the air fryer basket for excess oil or fat and carefully remove as needed after cooking. | |||
| Water is vaporizing, producing thick steam. | Pat dry moist food ingredients before air frying and do not add water or other liquid to the cooking chamber when air frying. | ||
| Seasoning on food has blown into the element. | Be mindful when seasoning food.
Spray vegetables and meats with oil before seasoning to help the seasoning stick. |
||
| The air fryer is plugged in but will not turn on. | The appliance is not properly plugged in. | Make sure the power cord is in good condition, and is plugged into the outlet firmly. | |
| Outlet is not powered. | Plug another appliance into the same outlet to test the circuit. | ||
| Plug the air fryer into another outlet. | |||
| Air fryer basket is not fully inserted into the cooking chamber. | Make sure the air fryer basket is fully inserted into the cooking chamber. | ||
| All lights flash and a code appears on the display. | E1 | Temperature sensor broken circuit. | Contact Customer Care. |
| E2 | Temperature sensor short circuit. | Contact Customer Care. | |
Any other servicing must be performed by an authorized representative.
Warranty
Limited Warranty
This Limited Warranty is effective for one year from the date of original consumer purchase. Proof of original purchase date and, if requested by an authorized representative of Instant Brands Inc. (“Instant Brands”), return of your appliance, is required to obtain service under this Limited Warranty. Provided that this appliance is operated and maintained in accordance with written instructions attached to or furnished with the appliance, Instant Brands will, in its sole and exclusive discretion, either: (i) repair defects in materials or workmanship; or (ii) replace the appliance. In the event that your appliance is replaced, the Limited Warranty on the replacement appliance will expire 12 months from the date of original consumer purchase.
This Limited Warranty extends only to the original purchaser and use of the appliance in the United States of America and Canada. This warranty does not cover units that are used outside of the United States of America and Canada.
Limitation and Exclusions
The liability of Instant Brands, if any, for any allegedly defective appliance or part shall in no circumstances exceed the purchase price of a comparable replacement appliance.
This Limited Warranty does not cover:
- Damage resulting from accident, alteration, misuse, abuse, neglect, unreasonable use, use contrary to the operating instructions, normal wear and tear, commercial use, improper assembly, disassembly, failure to provide reasonable and necessary maintenance, fire, flood, acts of God or repair by anyone unless directed by an Instant Brands Representative;
- Repairs where your appliance is used for other than normal, personal use or when it is used in a manner that is contrary to published user or operator instructions; or
- Use of unauthorized parts and accessories, or repairs to parts and systems resulting from unauthorized repairs or modifications made to this appliance.
The cost of repair or replacement under these excluded circumstances shall be paid by you.
Disclaimer of Implied Warranties
EXCEPT AS EXPRESSLY PROVIDED HEREIN AND TO THE EXTENT PERMITTED BY LAW, INSTANT BRANDS MAKES NO WARRANTIES, CONDITIONS OR REPRESENTATIONS, EXPRESS OR IMPLIED, BY STATUTE, USAGE, CUSTOM OF TRADE OR OTHERWISE WITH RESPECT TO THE APPLIANCES OR PARTS COVERED BY THIS WARRANTY, INCLUDING BUT NOT LIMITED TO, WARRANTIES, CONDITIONS, OR REPRESENTATIONS OF WORKMANSHIP, MERCHANTABILITY, MERCHANTABLE QUALITY, FITNESS FOR A PARTICULAR PURPOSE OR DURABILITY.
Some states or provinces do not allow for the exclusion of implied warranties of merchantability or fitness, so this limitation may not apply to you. In these states and provinces, you have only the implied warranties that are expressly required to be provided in accordance with applicable law.
Limitation of Remedies; Exclusion of Incidental and Consequential Damage
YOUR SOLE AND EXCLUSIVE REMEDY UNDER THIS LIMITED WARRANTY SHALL BE APPLIANCE REPAIR OR REPLACEMENT AS PROVIDED HEREIN. INSTANT BRANDS SHALL NOT BE LIABLE FOR INDIRECT, INCIDENTAL OR CONSEQUENTIAL DAMAGES ARISING OUT OF OR IN CONNECTION WITH THE USE OR PERFORMANCE OF THE APPLIANCE OR DAMAGES WITH RESPECT TO ANY ECONOMIC LOSS, PERSONAL INJURY, LOSS OF PROPERTY, LOSS OF REVENUES OR PROFITS, LOSS OF ENJOYMENT OR USE, COSTS OF REMOVAL, INSTALLATION OR OTHER INDIRECT, INCIDENTAL OR CONSEQUENTIAL DAMAGES OF ANY NATURE OR KIND.
Warranty Registration
Please visit www.instantappliances.com/support/register to register your new Instant Brands™ appliance and validate your warranty within thirty (30) days of purchase. You will be asked to provide the store name, date of purchase, model number (found on the back of your appliance) and serial number (found on the bottom of your appliance) along with your name and email address. The registration will enable us to keep you up to date with product developments, recipes and contact you in the unlikely event of a product safety notification. By registering, you acknowledge that you have read and understand the instructions for use, and warnings set forth in the accompanying instructions.
Warranty Service
To obtain service under this warranty, please contact our Customer Service Department by phone at 1-800-828-7280 or by email to [email protected]. You can also create a support ticket online at www.instantappliances.com/support. If we are unable to resolve the problem, you may be asked to send your appliance to the Service Department for quality inspection. Instant Brands is not responsible for shipping costs related to warranty service, save and except for shipping costs associated with the return of your appliance from Canada or within the 48 contiguous states and the District of Columbia of the United States of America, as provided herein. When returning your appliance, please include your name, mailing address, email address, phone number, and proof of the original purchase date as well as a description of the problem you are encountering with the appliance.
Register your product today
instantappliances.com/support/register
Contact us: 1-800-828-7280
[email protected]
instantappliances.com/#chat
DOWNLOAD RESOURCES
- Instant Vortex Mini 2 Quart Air Fryer [pdf] User Manual Vortex Mini, 2 Quart Air Fryer
- Read more: https://manuals.plus/instant/vortex-mini-2-quart-air-fryer-manual#ixzz7gVdwixbm
- Instant Vortex Mini 2 Quart Air Fryer [pdf] User Manual 140-3011-01, Vortex Mini, 2 Quart Air Fryer, Vortex Mini 2 Quart Air Fryer
- Read more: https://manuals.plus/instant/vortex-mini-2-quart-air-fryer-manual#ixzz7gVe0jDbh
FAQ’S
How do I know if my Instant Vortex™ Mini 2 Quart Air Fryer is working?
The Instant Vortex™ Mini 2 Quart Air Fryer will beep when the timer reaches zero.
How do I know if my Instant Vortex™ Mini 2 Quart Air Fryer is hot?
The Instant Vortex™ Mini 2 Quart Air Fryer will have a warm, red glow when it is heating up and after cooking.
How do I know when the Instant Vortex™ Mini 2 Quart Air Fryer is done cooking?
The Instant Vortex™ Mini 2 Quart Air Fryer will beep when the timer reaches zero.
What temperature should I set the Instant Vortex™ Mini 2 Quart Air Fryer to cook with?
We recommend setting the temperature to 350°F. If you are cooking frozen foods, we recommend setting the temperature to 400°F. If you are cooking fish, we recommend setting the temperature to 395°F. If you are cooking chicken, we recommend setting the temperature to 390°F. If you are cooking vegetables, we recommend setting the temperature to 375°F. If you are cooking pizza, we recommend setting the temperature to 400°F. If you are cooking bacon, we recommend setting the temperature to 350°F. If you are cooking steak, we recommend setting the temperature to 400°F. If you are cooking shrimp, we recommend setting the temperature to 400°F.
How long should I cook food in my Instant Vortex™ Mini 2 Quart Air Fryer?
We recommend that you cook frozen foods for 10 minutes and thawed foods for 15 minutes in your Instant Vortex™ Mini 2 Quart Air Fryer at 350°F or 400°F (depending on what food you are cooking).
Can I use my Instant Vortex™ Mini 2 Quart Air Fryer without oil or butter?
Yes! You can use your Instant Vortex™ Mini 2 Quart Air Fryer without oil or butter and still get a crispy outside and juicy inside! Just make sure that your food is dry before putting it in your Instant Vortex™ Mini 2 Quart Air Fryer!
Can you cook frozen chicken in air fryer?
This post may contain affiliate links. Did you know that you can cook frozen chicken breasts in the air fryer. There’s no need to thaw the chicken, just toss it in your air fryer straight out of the freezer. It’s a quick and easy way to cook juicy chicken breasts
How does an air fryer work?
Air fryers use convection heat to cook foods so that they are browned and crispy on the outside but remain moist and tender on the inside. Cooking with an air fryer takes less time and makes less of a mess than deep frying or traditional oven roasting. Another plus is that air frying also uses minimal oil.
Do air fryers use a lot of electricity?
Air fryers are much more energy-efficient than most convection ovens because they cook food much faster, though they do use electricity which is typically more expensive than gas.
What is the disadvantage of air fryer?
The downside Air-frying also produces high temperatures at a very rapid rate, thus making it extremely easy to burn food. And charred food may be carcinogenic. In addition, Cucuzza adds, because most devices cook 1 to 3 pounds of food at a time, it can be challenging to air-fry meals for a large family.
What does red light mean on air fryer?
Select air frying temperature from 175°F to 400°F. 7. Turn timer dial to the desired air frying time plus 3 minutes for preheat if the Air Fryer is cold. The blue HEAT ON light and the red POWER light will illuminate; the Air Fryer will begin heating.
What do the buttons mean on air fryer?
TIME/TEMP BUTTON: Use this button to toggle between adjusting Cook Time (from 1 minute up to 60 minutes) and Temperature (from 302°F up to 392°F). BUTTON: Use these buttons to increase/decrease the Time and/or Temperature settings. HEATING INDICATOR: This icon will illuminate when the Air Fryer is heating. Menu.
]]>INSTANT DIGITAL THERMOMETER OWNER’S MANUAL
Model:DMT-102
 Warning:
- Read instructions thoroughly before using a digital thermometer.
- Choking Hazard: Thermometer cap and battery may be fatal if swallowed. Do not allow children to use this device without parental supervision.
- Do not use a thermometer in-ear. Designed use is for oral, rectal, and armpit (Wits) readings only.
- Do not place the thermometer battery near extreme heat as it may explode.
- Note: Use of the probe cover may result in a 0.27(0.1r ) discrepancy from actual temperature.
- Remove the battery from the device when not in operation for a long time.
- The use of temperature readings for self-diagnosis is dangerous. Consult your doctor for the interpretation of the results. Self-diagnosis may lead to the worsening of existing disease conditions.
- Do not attempt measurements when the thermometer is wet as inaccurate readings may result.
- Do not bite the thermometer. Doing so may lead to breakage and/or injury.
- Do not attempt to disassemble or repair the thermometer. Doing so may result in inaccurate readings.
- After each use, disinfect the thermometer especially in case the device is used by more than one person.
- Do not force the thermometer into the rectum. Stop insertion and abort the measurement when pain is present. Failure to do so may lead to injury.
- Do not use a thermometer orally after being used rectally.
- For children who are two years old or younger, please do not use the devices orally.
- If the unit has been stored at temperatures over 41°F —1047 or —40t), leave it in 417 —1047 (5410 —40°C) ambient temperature for about 15 minutes before using it.
PLEASE READ CAREFULLY BEFORE USING
This digital thermometer provides a quick and highly accurate reading of an individual’s body temperature. The digital thermometer is intended to measure the human body’s temperature in regular mode orally, rectally, or under the arm, and the device is reusable for clinical or home use on people of all ages. To better understand its functions and to provide years of dependable results, please read all instructions first.
This appliance conforms to the following standards:
ASTM E1112 Standard Specification for Electronic Thermometer for Intermittent Determination of Patient Temperature,
ISO 80601-2.56 Medical electrical equipment —Part 2-56:Particular requirements for basic safety and essential performance of clinical thermometers for body temperature measurement,
IEC 60601-1-11 Medical electrical equipment —Part 1-I I: General requirements for basic safety and essential performance –Collateral Standard: Requirements for medical electrical equipment and medical electrical systems used in the home healthcare environment and complies with the requirements of IEC 60601-1-2(EMC), AAMI/ANSI ES60601-1(Safety) standards. And the manufacturer is ISO 13485 certified.
CONTENTS
I Thermometer, I Owner’s Manual, I Storage Case
PRODUCT ILLUSTRATION
*The performance of the device may be degraded should one or more of the following occur:
– Operation outside the manufacturer’s stated temperature and humidity range.
– Storage outside the manufacturer’s stated temperature and humidity range.
– Mechanical shock (for example, drop test) or degraded sensor.
– The patient temperature is below ambient temperature.
*Portable and mobile RF communications can affect the device. The device needs special precautions regarding EMC according to the EMC information provided in the accompanying documents.
*Do not use the devices in the MR environment.
SYMBOL EXPLANATION
 |
Direct Current |  |
Batch Code |
 |
Type BF Applied Part |  |
Manufacturer |
 |
Consult Accompanying Documents |  |
Storage and Transportation Temperature Limit:-4°F —131°F (-20°C-55°C) |
SPECIFICATIONS
| Type: | Digital Thermometer (Not Predictive) |
| Measure Range: | 90.0°F -109.9°F (32.0°C —42.9°C) (°C /°Fchosen by manufacturer) |
| Accuracy: | ±0.2°F(±0.1°C) during 95.9T-107.67(35.5°C-42.0°C) at 64.4°F-82.47(18°C-28°C ) ambient operating range ±0.47(±0.2t) for other measuring and ambient operating range |
| Operating mode: | Direct Mode |
| Display: | Liquid crystal display, 3 1/2 digits |
| Memory: | For storing the last measured value |
| Battery: | One 1.5 V DC. button battery (size LR41or SR41, UCC 392) |
| Battery life: | Approx. 200hours of continuous operation or 1 year with 3 measurements per day |
| Dimension: | 12.4cm x 1.8cm x 1.1 cm (Lx Wx H) |
| Weight: | Approx. 10 grams including battery |
| Expected service life: | Three years |
| Ambient operating range: | Temperature: 41°F —1047(5°C —40°C) Relative humidity: 15%-95%RH Atmospheric Pressure : 700hPa — 1060hPa |
| Storage and transportation conditions: | Temperature:-4°F ^-1331°F (-20°C-55°C) Relative humidity: 15%-95%Ril Atmospheric Pressure : 700hPa — 1060hPa |
| Ingress Protection Rating: | IP 22 |
| Classification: | Type BF  |
ºF/°C SWITCHABLE
Temperature readings are available in the Fahrenheit or Celsius scale (Tit; located in the upper right corner of LCD.) With the unit off, press and hold the On/Off Button for approximately 2 seconds to change the current setting.
DIRECTIONS
- Press the On/Off Button next to the LCD display. A tone will sound as the screen shows; BRE, followed by the last recorded temperature. After showing the self-test temperature, the thermometer is now in testing mode.
- Position thermometer in the desired location (mouth, rectum, or armpit.)
a) Oral Use: Place thermometer under tongue as indicated by ” d ” position shown in Figure 2. Close your mouth and breathe evenly through the nose to prevent the measurement from being influenced by inhaled/exhaled air. Normal temperature between 96.37 and 99.17 (35.7 °C and 37.3 °C).
b) Rectal Use: Lubricate silver probe tip with petroleum jelly for easy insertion. Gently insert sensor approximately lcm (less than 1/2 “) into the rectum. Normal temperature between 97.2°F and 99.97 (36.2 rands 37.7 °C).

c) Armpit Use: Wipe armpit dry. Place the probe in the armpit and keep arm pressed firmly at the side. From a medical viewpoint, this method will always provide inaccurate readings, and should not be used if precise measurements are required. Normal temperature between 95.4°F and 98.1°F (35.2 °C and 36.7 °C). - The degree sign flashes throughout the testing process. When flashing stops an alarm will beep for approximately 10 seconds. The measured reading will appear on the LCD simultaneously. The minimum measurement time until the signaling tone (beep) must be maintained without exception. The measurement continues even after the buzzer notification. So that in order to achieve better body temperature measurement results, recommend to keep the probe in the mouth and rectum for about 2 minutes, or in the armpit for about 5 minutes regardless of the beep sound and at least 30 seconds measurement interval should be maintained.
*Note: Normally the buzzes are ” Bi-Bi-Bi- Bi-“; Alarm beeps more rapidly when the temperature reaches 100°F (37.8°C) or higher, and the buzzes are “Ri-Ri-Ri Ri-Ri-Ri Bi-Bi-Bi” - To prolong battery life, press the On/Off Button to turn the unit off after testing is complete. If no action is taken, the unit will automatically shut off after around 10 minutes.
TROUBLESHOOTING
| Error message | Problem | Solution |
.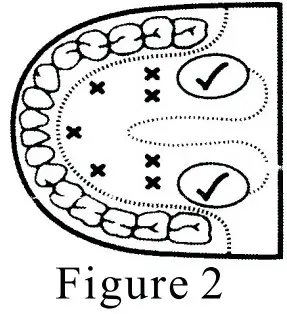 |
I temperature taken is lower than 90.0°F(32.0°C) | Turn off, wait one minute and take a new temperature via close contact and sufficient rest. |
 |
Temperature taken is higher than 109.9°F(42.9°C) | Turn off, wait one minute and take a new temperature via close contact and sufficient rest. |
 |
The system is not functioning properly. | Unload the battery, wait for 1 minute and repower it. If the message reappears, contact the retailer for service. |
 |
Dead battery: Battery icon is flashing, can’t be measurable. | Replace the battery. |
BATTERY REPLACEMENT
- Replace the battery when ”
 ” appears in the lower right corner of the LCD display.
 - Pull battery cover off as shown in Figure 3.

- Gently pull out plastic circuit board with battery chamber approximately 1 cm (slightly less than1/2″.) (See Figure 4)
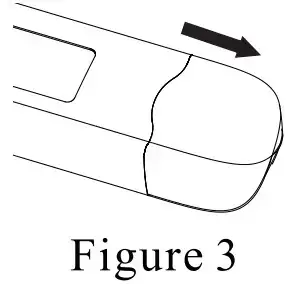
- Use a pointed object such as a pen to remove old batteries. Discard battery lawfully. Replace with new 5V DC button type LR41 or SR41, UCC392, or equivalent. Be sure the battery is installed with “±” polarity facing up. (See Figure 5)
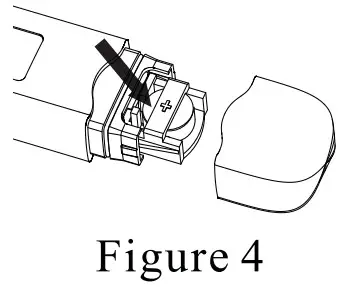
- Slide the battery chamber back into place and attach the cover.
CLEANING AND DISINFECTION
Wipe the thermometer with a soft clean cloth. For stubborn stains, wipe the thermometer with a cloth that has been dampened with water or a neutral detergent solution and then wring thoroughly. Finish by wiping with a soft dry cloth. For disinfection, 75% Ethanol or Isopropyl alcohol can be used. Observe the following to prevent damage to the thermometer. -Do not use benzene, thinner, gasoline, or other strong solvents to clean the thermometer. -Do not attempt to disinfect the sensing section (tip) of the thermometer by immersing in alcohol or in hot water (water over 122°F (50 °C)). -Do not use ultrasonic washing to clean the thermometer.
CALIBRATION
The thermometer is initially calibrated at the time of manufacture. If the thermometer is used according to the user’s instruction, periodic readjustment is not required. However, we recommend checking calibration every two years or whenever the clinical accuracy of the thermometer is in question. Turn on the thermometer and insert it into the water bath and then check the laboratory accuracy. Please send the complete device to the dealers or manufacturer. ASTM laboratory accuracy requirements in the display range of 98.6 to 102.2 °F (37.0 to 39.0 °C) for electronic thermometers is ±0.2°F(±0.1 °C). The above recommendations do not supersede the legal requirements. The user must always comply with legal requirements for the control of the measurement, functionality, and accuracy of the device which are required by the scope of relevant laws, directives, or ordinances where the device is used.
FCC INFORMATION
Caution: Changes or modifications to this unit not expressly approved by the party responsible for compliance could void the user authority to operate the equipment. *Note: This equipment has been tested and found to comply with the limits for a Class B digital device, pursuant to Part 15 of the FCC Rules. These limits are designed to provide reasonable protection against harmful interference in a residential installation. This equipment generates, uses, and can radiate radio frequency energy. If this equipment does cause harmful interference to radio or television reception, which can be determined by turning the equipment off and on, the user is encouraged to try and correct the interference by one or more of the following measures: – Reorient or relocate the receiving antenna. – Increase the distance between the equipment and the receiver. – Connect the equipment to an outlet on a circuit different from that to which the recAiMicereptyczslows – Consult the dealer or an experienced radio/TV technician for help.
LIMITED WARRANTY
The thermometer is guaranteed for one year from the date of purchase. If the thermometer does not function properly due to defective components or poor workmanship, we will repair or replace it free of charge. All components are covered by this warranty excluding the battery. The warranty does not cover damages to your thermometer due to improper handling. To obtain warranty service, an original or copy of the sales receipt from the original retailer is required. E-mail: [email protected]
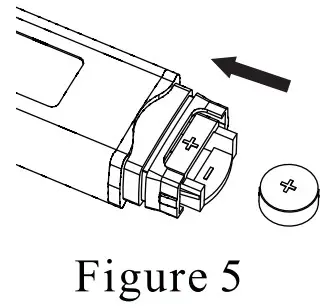 Disposal of this product and used batteries should be carried out in accordance with the national regulations for the disposal of electronic products.
 JOYTECH HEALTHCARE CO.LTD.
No.365, Wuzhou Road, Yuhang Economic Development Zone, Hangzhou city, 311100 Zhej Liang, China Made in China
Document No. : JDMT-0704-002
Article No.: 001
Version: Z
Date of Issue: 2015.12


