hOmeLabs Dehumidifier
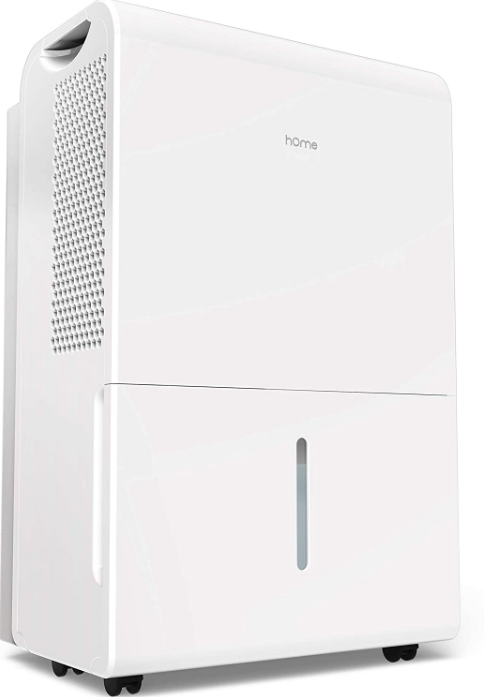
hOmeLabs Dehumidifier
22, 35 and 50 Pint* Capacity Models
HME020030N
HME020006N
HME020031N
HME020391N
Thank you for purchasing our quality appliance. Please be sure to read the entirety of this user manual carefully prior to the use of the product. If you have any questions regarding the use of this product,
please call 1-800-898-3002.
BEFORE FIRST USE:
To prevent any internal damage, it is very important to keep refrigeration units (like this one) upright throughout their journey. Please leave it standing upright and outside the box for 24 HOURS before plugging it in.
In the event this product malfunctions or the customer believes it is defective, the customer should contact Customer Service and retain the defective product pending further instructions. Defective products should be clearly marked or stored where they cannot be used again by mistake. Failure to retain the product may impede hOme™ ’s ability to correct any legitimate problem and may limit the extent to which hOme™ may provide recourse.
Congratulations
on bringing home your new appliance!
Don’t forget to register your product at homelabs.com/reg for updates, coupons, and other relevant information.
Although greatly appreciated, product registration is not required to activate any warranty.
Important Safety Instructions
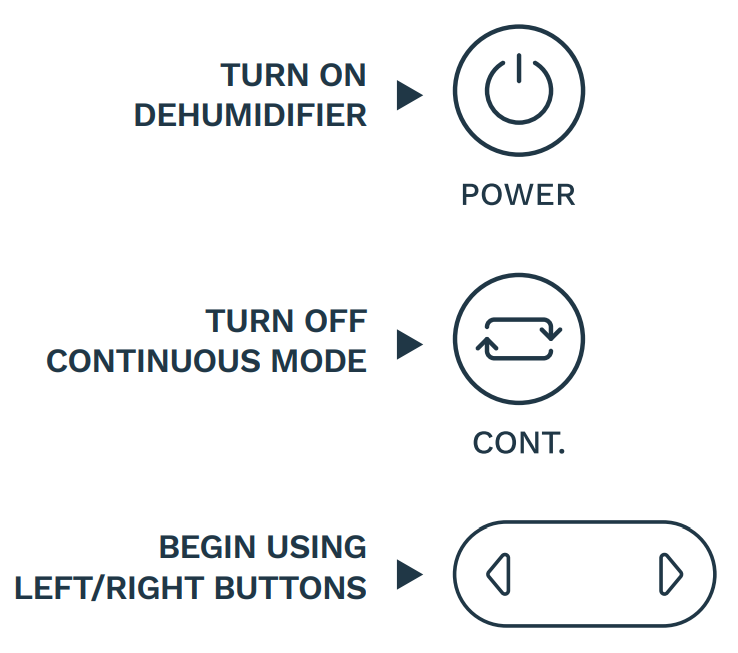
![]() IMPORTANT NOTICE FOR FIRST TIME USE
IMPORTANT NOTICE FOR FIRST TIME USE
PLEASE NOTE:
This dehumidifier defaults to CONTINUOUS MODE, disabling the use of the LEFT/RIGHT buttons. To regain use of the buttons, confirm THE CONTINUOUS MODE is turned off.
SAVE THESE INSTRUCTIONS / FOR HOUSEHOLD USE ONLY
To prevent injury to the user or other people and property damage, the following instructions must be followed when using the dehumidifier. Incorrect operation due to disregard of instructions may cause harm or damage.
- Do not exceed the rating of the power outlet or connected device.
- Do not operate or turn off the dehumidifier by plugging in or unplugging the device. Use the control panel instead.
- Do not use if the power cord is broken or damaged.
- Do not modify the power cord length or share the outlet with other
- Do not touch the plug with wet
- Do not install the dehumidifier in a location that may be exposed to a combustible gas.
- Do not place the dehumidifier near a heat source.
- Disconnect the power if strange sounds, smells, or smoke come from the dehumidifier.
- You should never try to take apart or repair the dehumidifier by
- Make sure to turn off and unplug the dehumidifier before cleaning.
- Do not use the dehumidifier near flammable gas or combustibles, such as gasoline, benzene, thinner, etc.
- Do not drink or use the water drained from the dehumidifier.
- Do not take the water bucket out while the dehumidifier is
- Do not use the dehumidifier in small spaces.
- Do not place the dehumidifier in places where it may be splashed by water.
- Place the dehumidifier on a level, sturdy section of the
- Do not cover the intake or exhaust openings of the dehumidifier with cloths or towels.
- Do not clean the appliance with any chemicals or organic solvent, e.g. Ethyl acetate,
- This appliance is not intended for locations near flammable or combustible
- Care should be taken when using the dehumidifier in a room with the following persons: infants, children, and the elderly.
- For people who are sensitive to humidity, do not set the humidity level too low on the
- Never insert your finger or other foreign objects into grills or openings Take special care to warn children of these
- Do not place a heavy object on the power cord and make sure that the cord is not
- Do not climb on or sit on the
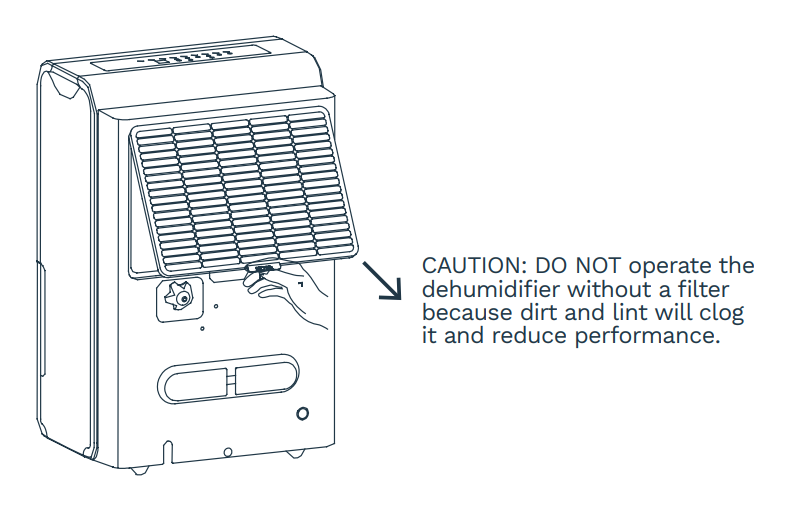
- Always insert the filters securely. Make sure to clean the filter once every
- If water enters the dehumidifier, turn the dehumidifier off and disconnect the power, contact Customer Service in order to avoid a hazard.
- Do not place flower vases or other water containers on top of the
ELECTRICAL INFORMATION
- The hOme™ nameplate is located on the rear panel of the dehumidifier and contains electrical and other technical data specific to this dehumidifier.
- Be sure the dehumidifier is properly grounded. To minimize shock and fire hazards, proper grounding is important. This power cord is equipped with a three-prong grounding plug for protection against shock hazards.
- Your dehumidifier must be used in a properly grounded wall socket. If your wall socket is not adequately grounded or protected by a time-delay fuse or circuit breaker, have a qualified electrician install the proper socket.
- Avoid fire hazards or electric shocks. Do not use an extension cord or an adapter plug. Do not remove any prong from the/power cord.
CAUTION
- This dehumidifier can only be used by children 8 years or older and persons with reduced physical, sensory or mental capabilities or lack of experience and knowledge with supervision or instruction concerning the use of the dehumidifier. Cleaning and user maintenance shall not be done by children without supervision.
- If the supply cord is damaged, it must be replaced by qualified personnel. Please contact Customer Service in order to avoid a hazard.
- Prior to cleaning or other maintenance, the dehumidifier must be disconnected from the supply mains.
- Do not install the dehumidifier in a location that may be exposed to a combustible gas.
- If combustible gas accumulates around the dehumidifier, it may cause a fire.
- If the dehumidifier is knocked over during use, turn off the dehumidifier and unplug it from the main power supply immediately. Visually inspect the dehumidifier to ensure there is no damage. If you suspect the dehumidifier has been damaged, contact Customer Service for repair or replacement.
- During a thunderstorm, the power must be cut off to avoid damage to the dehumidifier due to lightning.
- Do not run the cord under carpeting. Do not cover the cord with throw rugs, runners, or similar coverings. Do not route the cord under furniture or appliances. Arrange the cord away from the traffic area and where it will not be tripped over.
- To reduce the risk of fire or electric shock, do not use this dehumidifier with any solid-state speed control device.
- The dehumidifier shall be installed in accordance with national wiring regulations.
- Contact Customer Service for repair or maintenance of this dehumidifier.
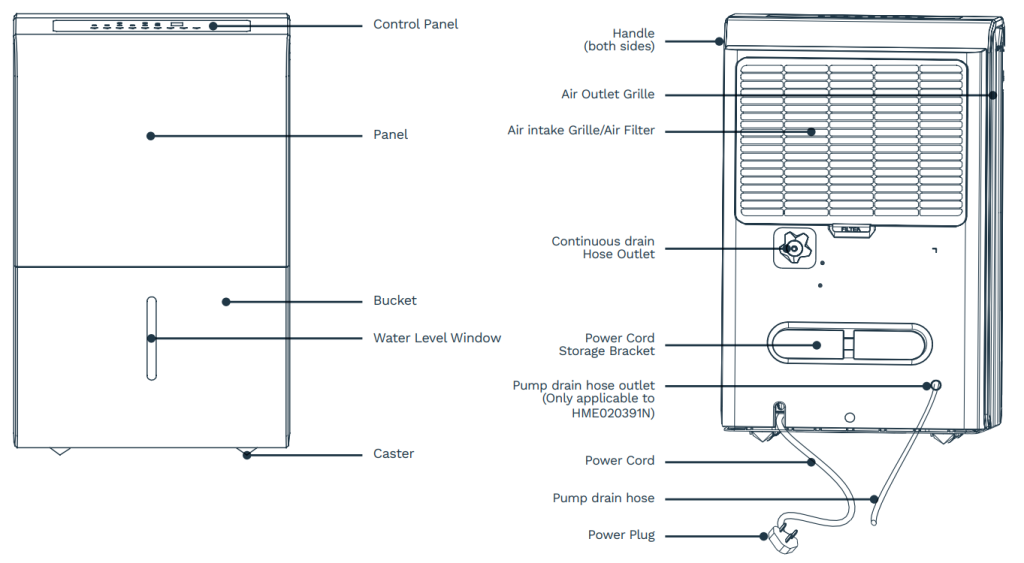
Parts Description
| FRONT | REAR |
 |
|
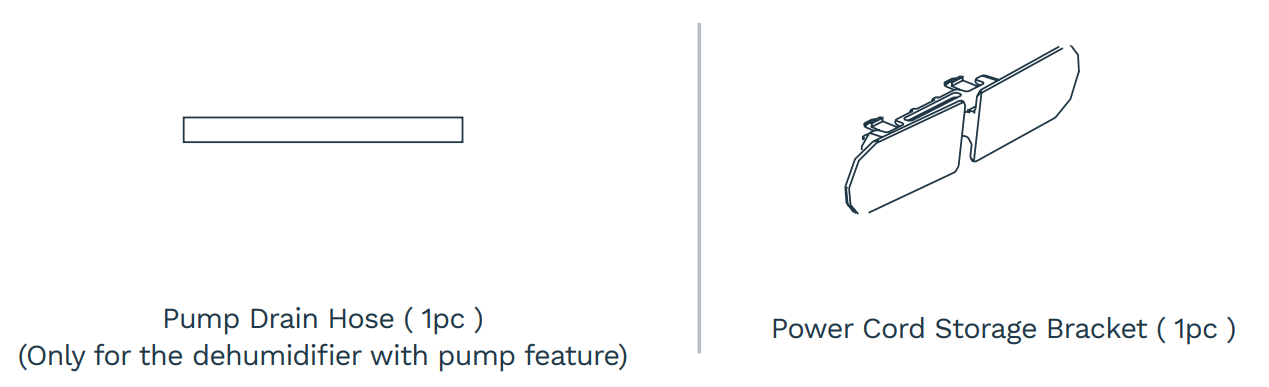
ACCESSORIES
(placed in the bucket of the dehumidifier)
Operation
PLACEMENT
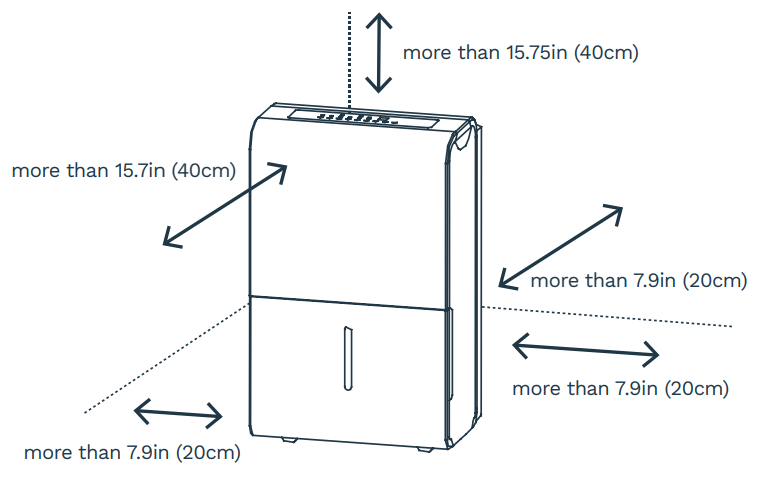
- This unit may have been tilted or placed upside down during shipping. To ensure this device works properly, please ensure this unit is upright for at least 24 hours before initial use.
- This dehumidifier is designed to operate with a working environment between 41°F (5°C) and 90°F (32°C). more Casters (Installed at four points on the bottom of the dehumidifier)
- Do not force casters to move over the carpet, or move the dehumidifier with water in the bucket. (The dehumidifier may tip over and spill water.)
SMART FUNCTIONS
- Auto Shut Off
When the bucket is full and/or the humidity setting is reached, the dehumidifier will automatically shut off. - Power-on Delay
To avoid any damage to the dehumidifier, the dehumidifier will not start operation following a complete cycle until after three (3) minutes. The operation will automatically start after three (3) minutes. - Bucket Full Indicator Light
The Full indicator glows when the bucket is ready to be emptied. - Auto Defrost
When the frost builds up on the evaporator coils, the compressor will cycle off and the fan will continue to run until the frost disappears. - Auto-Restart
If the dehumidifier shuts off unexpectedly due to power being cut, the dehumidifier will restart with the previous function setting automatically when the power resumes.
NOTE:
All the illustrations in the manual are for explanation purposes only. Your dehumidifier may be slightly different. The actual shape shall prevail. The design and specifications are subject to change without prior notice for product improvement. Consult Customer Service for details.
CONTROL PANEL
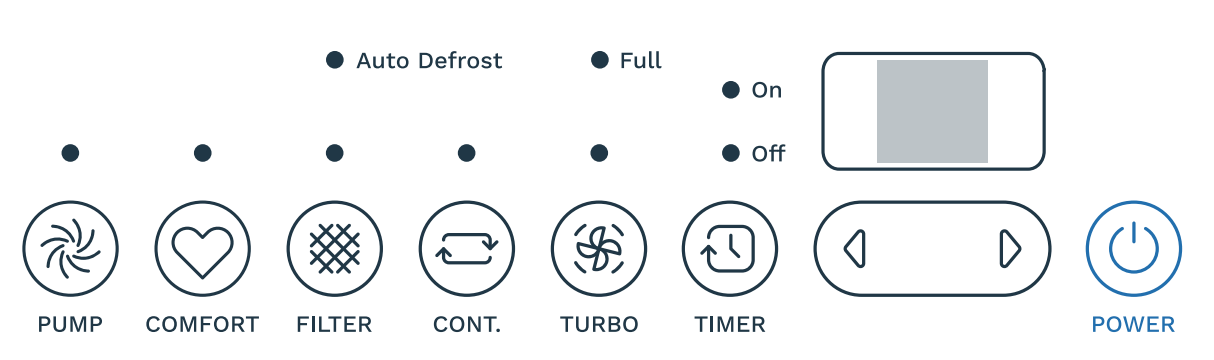
 PUMP button (Only applicable to HME020391N)
Press to activate the pump operation.
Note: Before starting the pump, make sure the pump drain hose is attached, the continuous drain hose is removed and the plastic cover of the continuous drain hose outlet is replaced tightly. When the bucket is full, the pump starts to work. Refer to the next pages for removing the collected water.
Note: It needs time before water was pumped at the beginning.
 COMFORT button
Press this button to turn the comfort function on/off. Under this model, the humidity cannot be adjusted manually but will be preset to a recommended comfortable level based on the ambient temperature. The level will be controlled as per the below table:
| Ambient Temperature | <65 ˚F | 65 -77 ˚F | >77 ˚F |
| Relative Humidity | 55 % | 50 % | 45 % |
Note: Press  or
or  button, the COMFORT mode will be canceled, and the humidity level can be adjusted.
 FILTER button
The check filter feature is a reminder to clean the Air Filter for more efficient operation. The Filter light (clean filter light) will flash after 250 hours of operation. To reset after cleaning the filter, press the filter button and the light will go off.
 CONTINUOUS button
Press to activate the continuous dehumidifying operation. The appliance will work continuously and will not stop except that the bucket is full. In continuous mode, the and or buttons are locked.
 TURBO button
Controls the fan speed. Press to select either High or Normal fan speed. Set the fan control to High for maximum moisture removal. When the humidity has been reduced and quiet operation is preferred, set the fan control to Normal.
 TIMER button
Press to set an Auto on or an Auto-off timer (0 – 24 hours) in conjunction with the and buttons. The timer runs only one cycle, thus remember to set a timer before next time’s use.
- After plugging in the appliance, press the TIMER button, the TIMER OFF indicator will light up, meaning the Auto-off timer setting is activated.
Useand buttons to set the value of the time you want to shut down the appliance. The one-off Auto-off timer setting is finished. - Press the TIMER button again, the TIMER ON indicator will light up, meaning the Auto on timer setting is activated. Use and buttons to set the value of time you want to turn on the appliance next time. The one-off Auto-off timer setting is finished.
- To change the timer settings, repeat the above operations.
- Press or hold and buttons to change the Auto time by 0.5-hour increments, up to 10 hours, then at 1-hour increments up to 24 hours. The control will count down the time remaining until the start.
- The selected time will register in 5 seconds and the system will automatically revert back to display the previous humidity setting.
- To cancel a timer, adjust the timer value to 0.0.
The corresponding timer indicator will light off, meaning the timer is canceled. Another way to cancel a timer is to restart the appliance, the one-off timer will also become
invalid. - When the bucket is full, the screen displays the “P2” error code, the appliance will then shut down automatically. Both the Auto-on/ Auto-off timer will be canceled.
 LED display
Shows the set % humidity level from 35% to 85% or auto start/stop time (0~24) while setting, then shows the actual (±5% accuracy) room % humidity level in a range of 30% RH (Relative Humidity) to 90%RH (Relative Humidity).
Error Codes:
AS – Humidity sensor error
ES – Temperature sensor error
Protection Codes:
P2 – Bucket is full or bucket is not in the right position.
Empty the bucket and replace it in the right position.
Eb – Bucket is removed or not in the right position.
Replace the bucket in the right position. (Only applicable to the unit with pump feature.)
 POWER button
Press to turn the dehumidifier on and off.
 LEFT / RIGHT buttons
NOTE: When the dehumidifier is first turned on, it will go on Continuous mode by default. This will disable the use of the LEFT/RIGHT buttons. Make sure to turn off Continuous mode to regain function in these buttons.
Humidity Set Control buttons
- The humidity level can be set within a range of 35%RH (Relative Humidity) to 85%RH (Relative Humidity) in 5% increments.
- For drier air, press the button and set it to a lower percent value (%).
For damper air, press thebutton and set a higher percent value (%).
Timer Set Control buttons
- Press to initiate the auto start and auto stop feature, in conjunction with the and buttons.
Indicator Lights
- ON ………………… Timer ON light
- OFF ………………. Timer OFF light
- FULL …………….. The water tank is full and should be emptied
- DEFROST ……… The appliance is on Defrost mode
Note: When one of the above malfunctions occurs, turn off the dehumidifier, and check for any obstructions. Restart the dehumidifier, if the malfunction is still present, turn off the dehumidifier and unplug the power cord. Contact Customer Service for repair and/or replacement.
REMOVING THE COLLECTED WATER
- Use the bucket
When the bucket is full, remove the bucket and empty it.
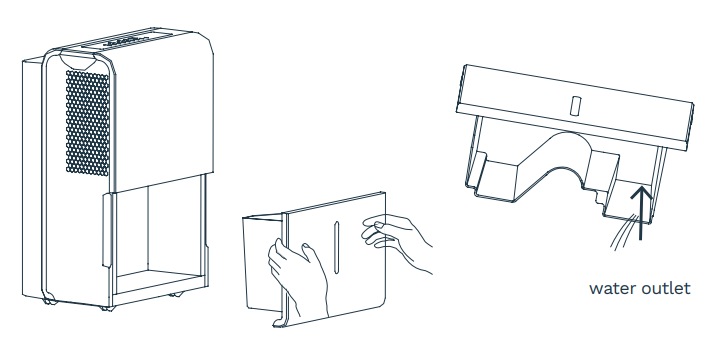
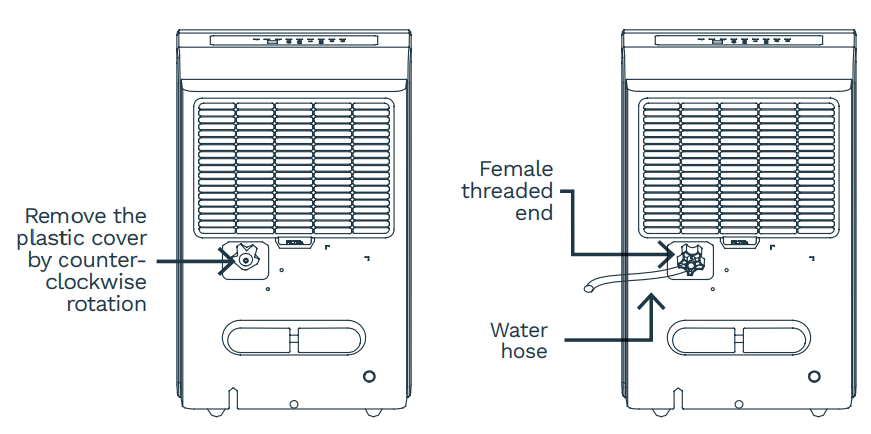
- Continuous draining
Water can be automatically be emptied into a floor drain by attaching the dehumidifier to a water hose with a female threaded end. (NOTE: On some models, the female threaded end is not included)
 Note: Do not use continuous draining when the outdoor temperature is equal to or less than 32°F (0°C), otherwise the water will freeze, causing the water hose to block up and the dehumidifier may be damaged.
 Note:
Note:
• Make sure the connection is tight and there is no leaking.
• Lead the water hose to the floor drain or a suitable drainage facility, the drainage facility should be lower than the drain outlet of the dehumidifier.
• Be sure to run the water hose sloping downward to let the water flow out smoothly.
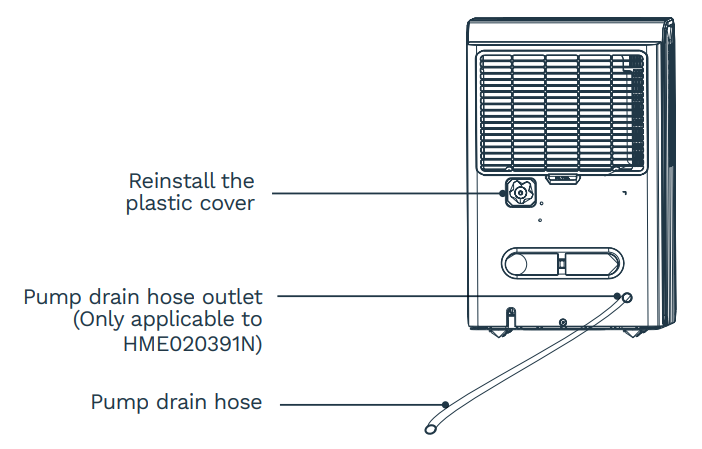
• When the continuous drain feature is not being used, remove the drain hose from the outlet and replace the plastic cover of the continuous drain hose outlet tightly. - Pump draining (Only applicable to HME020391N)
• Remove the continuous drain hose from the unit.
Replace the plastic cover of the continuous drain hose outlet tightly.
• Attach the pump drain hose (Outer diameter: 1/4”; length: 16.4 ft) to the pump drain hose outlet. The insert depth should not be less than 0.59 inches.
Lead the drain hose to the floor drain or a suitable drainage facility.
 Note:• Make sure the connection is tight and there is no leaking.
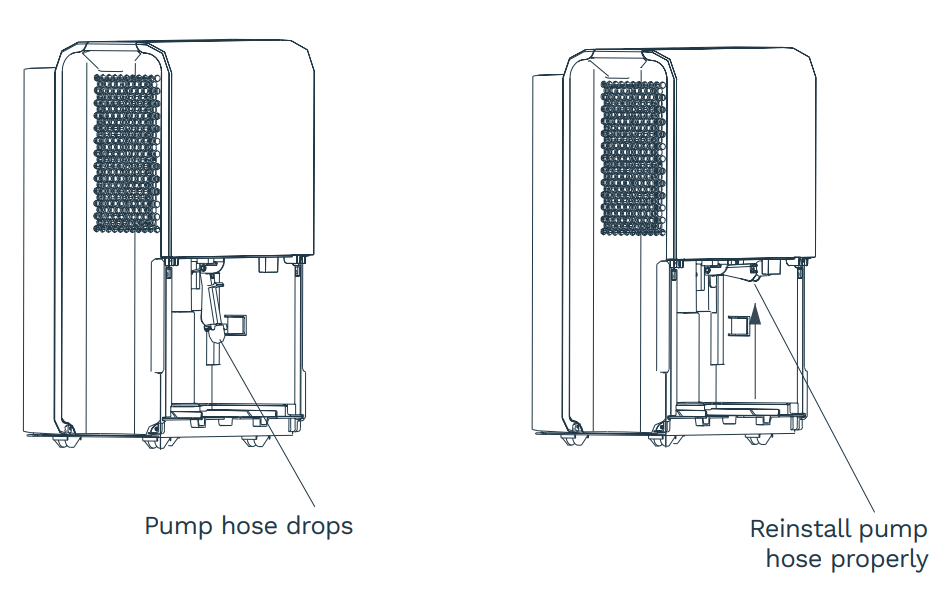
• If the pump hose drops when removing the bucket, you must install the pump house to the unit before replacing the bucket into the unit.
• The maximum pumping elevation is 16.4 ft.
 Note: Do not use the pump when the outdoor temperature is equal to or less than 32°F (0°C), otherwise the water will freeze, causing the water hose to block up and the dehumidifier may be damaged.
Care & Cleaning
CARE AND CLEANING OF THE DEHUMIDIFIER
WARNING: Turn the dehumidifier off and remove the plug from the wall outlet before cleaning.
Clean the dehumidifier with water and mild detergent.
Do not use bleach or abrasives.
- Clean the Grille and Case
• Do not splash water directly onto the main unit. Doing so may cause an electrical shock, cause the insulation to deteriorate, or cause the unit to rust.
• The air intake and outlet grilles get soiled easily. Use a vacuum attachment or brush to clean. - Clean the bucket
Clean the bucket with water and a mild detergent every two weeks. - Clean the air filter
Clean the filter with potable water at least once every 30 days. - Storing the dehumidifier
Store the dehumidifier when it will not be used for a long time.
• After turning off the dehumidifier, wait one day until all water in the internal of the dehumidifier flows into the bucket, and then empty the bucket.
• Clean the main dehumidifier, bucket, and air filter.
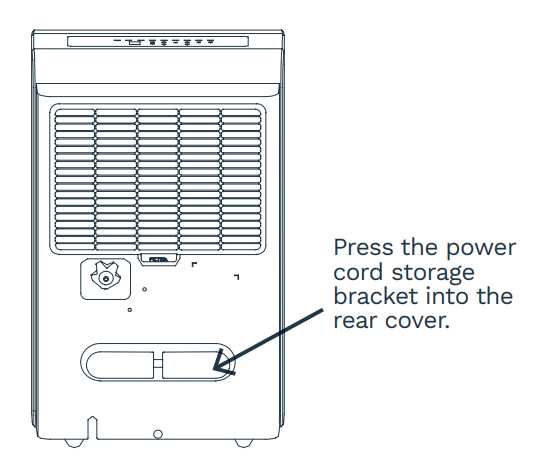
• Wrap the cord and bundle it with the band.
• Cover the dehumidifier with a plastic bag.
• Store the dehumidifier upright in a dry, well-ventilated place.
Troubleshooting
Before contacting customer service, reviewing this list can save time. This list includes the most common occurrences that are not the result of defective workmanship or materials in this dehumidifier.
| PROBLEM | CAUSE/SOLUTION |
| The dehumidifier does not start |
|
| The dehumidifier does not dry the air as it should |
|
| The dehumidifier makes a loud noise when operating |
|
| Frost appears on the coils |
|
| Water on floor |
|
| Water does not drain from the hose |
|
| The pump indicator blinks. (Only applicable to HME020391N) |
|
Contact Customer Service if the dehumidifier operates abnormally or does not operate, and the solutions above are not useful.
Warranty
hOme™ offers a limited one-year warranty (“warranty period”) on all of our products purchased new and unused from hOme Technologies, LLC or an authorized reseller, with original proof of purchase and where a defect has arisen, wholly or substantially, as a result of faulty manufacture, parts or workmanship during the warranty period. The warranty does not apply where damage is caused by other factors, including without limitation: (a) normal wear and tear; (b) abuse, mishandling, accident, or failure to follow operating instructions; (c) exposure to liquid or infiltration of foreign particles; (d) servicing or modifications of the product other than by hOme™ ; (e) commercial or non-household use.
The hOme™ warranty covers all costs related to restoring the proven defective product through repair or replacement of any defective part and necessary labor so that it conforms to its original specifications. A replacement product may be provided instead of repairing a defective product. hOme™ ’s exclusive obligation under this warranty is limited to such repair or replacement.
A receipt indicating the purchase date is required for any claim, so please keep all receipts in a safe place. We recommend that you register your product on our website, homelabs.com/reg. Although greatly appreciated, the product registration is not required to activate any warranty and product registration does not eliminate the need for the original proof of purchase.
The warranty becomes void if attempts at repair are made by non-authorized third parties and/or if spare parts, other than those provided by hOme™, are used.
You may also arrange for service after the warranty expires at an additional cost.
These are our general terms for warranty service, but we always urge our customers to reach out to us with any issue, regardless of warranty terms. If you have an issue with a hOme™ product, please contact us at 1-800-898-3002, and we will do our best to resolve it for you.
This warranty gives you specific legal rights, and you may have other legal rights which vary from state to state, country to country, or province to province. The customer may assert any such rights at their sole discretion.
Warning
This manual is to be used with all items with the model numbers
HME020030N
HME020006N
HME020031N
HME020391N
WARNING: Keep all plastic bags away from children.
Manufacturer, distributor, importer, and seller are not liable for ANY damage caused by improper use, storage, care, or failure to follow warnings associated with this product.
Contact Us
 CHAT WITH US CHAT WITH US |
 CALL US CALL US |
 EMAIL US EMAIL US |
| homelabs.com/help | 1-(800)-898-3002 | [email protected] |
For Household Use Only
1-800-898-3002
homelabs.com/help
© 2020 hOmeLabs, LLC
37 East 18 Street, 7th Floor
New York, NY 10003
All rights reserved, hOme™
Printed in China.
FAQ’S
Do dehumidifiers need to be cleaned?
Dehumidifiers require regular cleaning in order to function properly. We recommend that you clean it once every three weeks if it’s used frequently.
Do dehumidifiers use a lot of electricity?
Do dehumidifiers use a lot of electricity? Yes. Dehumidifiers use a lot of electricity. While the wattage (483.24W is average) and the hourly electricity usage (0.427 kWh is average) are not substantial, the long duration of use results in dehumidifiers consuming a considerable amount of electricity.
What are the disadvantages of a dehumidifier?
Disadvantages of dehumidifiers
they can make quite some noise.
might not work in low temperatures.
needs regular maintenance.
can be quite large and heavy.
uses electricity constantly, therefore;
increases energy bill.
purchase costs are around $200.
windows and doors need to be closed.
Why are my bedroom windows wet in the morning?
The reason it happens is because the external air is warmer than the temperature of the glazed pane’s surface – and the dew point of the air is higher. It is more likely to occur at night or early in the morning when temperatures are low, particularly if there is a clear sky and almost no wind.
How do I know if my dehumidifier is working properly?
One of the first signs to learn that it is time to fix your dehumidifier is when it is not collecting water. If you notice that your device is working but there is no difference in the humidity level, and therefore the room temperature continues to be uncomfortable, you simply have to check on the humidistat.
Why is my dehumidifier running but not collecting water?
If your dehumidifier is not collecting water, the unit is not operating properly: Try resetting the dehumidifier by disconnecting power to the unit for 30 seconds and re-connecting the power. Then, set the control settings and see if the unit operates properly.
What makes a dehumidifier stop working?
Clean the air filter
A clogged dehumidifier air filter will stop it from working. Having a clean air filter sounds pretty simple but a lot of people forget to clean theirs. Fortunately, cleaning the air filter is the simplest maintenance task that you can conduct on your dehumidifier.
What happens if dehumidifier filter is dirty?
Clean the Filter. The air filter plays an important role in protecting the internal parts of the dehumidifier and also cleaning your dry air. If the air filter is filthy and covered in grime, the dehumidifier simply won’t work as the air can’t pass.
Can you reuse water from a dehumidifier?
The water collected in your dehumidifier is deionised water. You can use it in several cases. However, if there is still mold in the place you dehumidify, it would be better to wait till you improve your air quality with the continuous dehumidification and use the water afterwards.
How long should a dehumidifier run per day?
12 hours a day
To achieve the highest energy efficiency, run a dehumidifier for at least 12 hours a day. This will allow you to remove moisture from the air without racking up the energy costs
Do dehumidifiers use a lot of electricity?
Yes. Dehumidifiers use a lot of electricity. While the wattage (483.24W is average) and the hourly electricity usage (0.427 kWh is average) are not substantial, the long duration of use results in dehumidifiers consuming a considerable amount of electricity.
Why does my dehumidifier turn off after a few minutes?
It should always be lower than 60 percent. If you do not have the idea of the relative humidity you want to achieve, it is possible that you have chosen a value close enough to the present humidity conditions, or even above the humidity already present. This causes your dehumidifier to shut down after little operation.
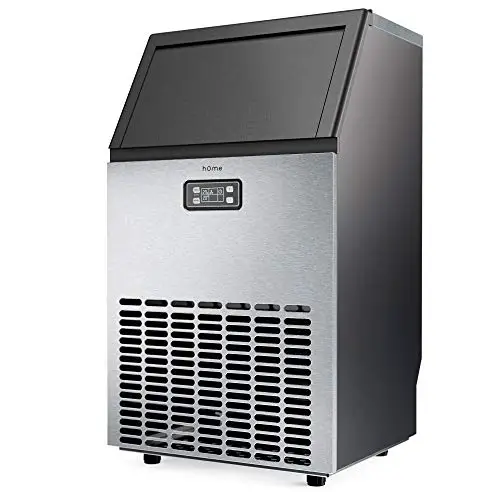
]]>homelabs Commercial Ice Machine
BEFORE FIRST USE:
To prevent any internal damage, it is very important to
keep refrigeration units (like this one) upright throughout their journey. Please leave it standing upright and outside the box for 24 HOURS before plugging it in.
IMPORTANT SAFETY INSTRUCTIONS
When using your home™ Commercial Ice Machine (appliance), basic safety precautions should always be followed to reduce the risk of fire, electrical shock, and/or injury to persons. Incorrect operation due to ignoring instructions may cause harm or damage.
- Use this appliance only for its intended purpose as described in this manual.
- This Ice Machine must be properly installed in accordance with the installation instructions before it is used.
- The appliance must be positioned so that the plug is accessible.
- Connect the plug to properly polarized outlets only. No other appliance should be plugged into the same outlet. Be sure that the plug is fully inserted into the receptacle.
- Do not run the power cord over carpeting or other heat insulators. Do not cover the cord. Keep the cord away from traffic areas, and do not submerge in water or any other liquid.
- We do not recommend the use of an extension cord as it may overheat and cause a risk of fire. If you must use an extension cord, use No.14AWG as a minimum size and rated no less than 1875 watts.
- If the supply cord is damaged, it must be replaced by the manufacturer, its service agent, or a similarly qualified person in order to avoid a hazard.
- Disconnect the main plug from the socket when not in use for a long period of time.
- Unplug the appliance before cleaning or making any repairs or services.
- Never unplug your appliance by pulling the power cord. Always grasp the plug firmly and pull straight out from the outlet.
- Do not use your appliance outdoors. Keep the appliance away from direct sunlight and make sure that there are at least 15cm (6 inches) between the back of your appliance and the wall.
- Do not tip over the appliance. Otherwise, it will generate noises and make the size of each ice cube irregular. It may also cause water leakage from the appliance.
- If the appliance is brought in from the outside during the winter season, give it a few hours to warm up to room temperature before plugging it in.
- Do not use any other liquids to make ice cubes besides water.
- Do not clean your Ice Machine with flammable fluids. The fumes can create a fire hazard or explosion.
- To avoid a hazard due to any instability of the appliance, it must be placed on a flat, sturdy surface.
- This appliance MUST be earthed. Use the proper power source according to the rating label. Use 110-120V/60Hz earthed power supply.
ELECTRICAL SHOCK HAZARD
- Plug into a grounding wall outlet.
- Never remove the ground prong.
- Use a separate power supply or receptacle.
- Never use an adapter.
- Never use an extension cord.
- Failure to follow these instructions can result in death, fire, or electrical shock.
- Failure to follow these instructions can result in death, fire, or electrical shock.
- Keep ventilation openings in the appliance enclosure or in the built-in structure clear of obstruction.
- Do not damage the refrigerant circuit.
- This appliance is not intended for use by persons (including children) with reduced physical, sensory or mental capabilities, or a lack of experience and knowledge. This applies unless they have been given supervision or instruction concerning use of the appliance by a person responsible for their safety.
- Children should be supervised to ensure that they do not play with the appliance.
- Do not store explosive substances, such as aerosol cans with a flammable propellant, in this appliance.
- This appliance is intended to be used in indoor and similar applications, such as staff kitchen areas in shops, offices and other working environments, farmhouses and hotels, motels and other residential type environments, bed and breakfast type environments, or catering and similar non-retail applications.
- IMPORTANT: The wires in the power cord are colored in accordance with the following code:
- Green or Green with a strip Yellow: Grounding
- To avoid the appliance falling or tipping over, always place on a flat, sturdy surface. Damage may occur if the appliance falls.
PARTS DESCRIPTION

ACCESSORIES
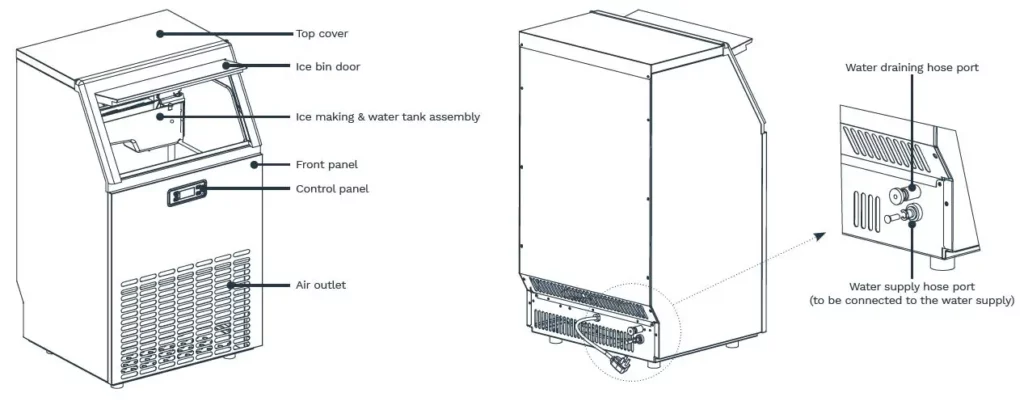
CONTROL PANEL & FUNCTIONS
- A. “TIMER/CLEAN” button
Press this button to enter the TIMER setting program. Press and hold this button for more than 5 seconds to enter the CLEAN program. - B. “ON/OFF” button
Press this button to enter STANDBY mode. During Self-cleaning or Ice making program, press this button to turn
off the appliance. If the appliance is set with Timer, press this button to cancel the Timer setting.
When the appliance is making ice cubes, press and hold this button for more than 5 seconds to switch to the
ice collecting process. - C. LCD display
- Environmental temperature and ice making time countdown. Unit of Ice making time countdown is Minutes (M). Unit of environmental temperature is Fahrenheit (F).
- Ice making and ice-collecting display. The rotation of the symbol indicates the process of ice making, while the flash of the symbol indicates the process of ice-collecting.
- Automatic self-cleaning.
- On/Off status.
- Error code display. E1 means the environmental temperature sensor is damaged. E2 means there is an ice making error or refrigerant leak.
- Water inflow and shortage display. When the symbol flashes, it indicates that there is enough water in the water tank. When the symbol lights on, it indicates that there is not enough water in the water tank.
- Ice full alarm. Take out the ice before the next ice making cycle.
- Setting display. Unit for time switch machine is Hour (H). Unit for the ice making time is Minute (M).
- D&E. “+” “-” button
Adjust the ice making time length with the “+” or “-” button. The default setting is zero. There will be 1 minute added or reduced per each press of the “+” or “-” button.
It is also used to adjust the delay time of the timer. The default setting is zero. There will be 1 hour added or reduced per each press of the “+” or “-” button.
Press and hold the “+” or “-” button for 5 seconds to switch the temperature unit between Fahrenheit (°F) and Celsius (°C).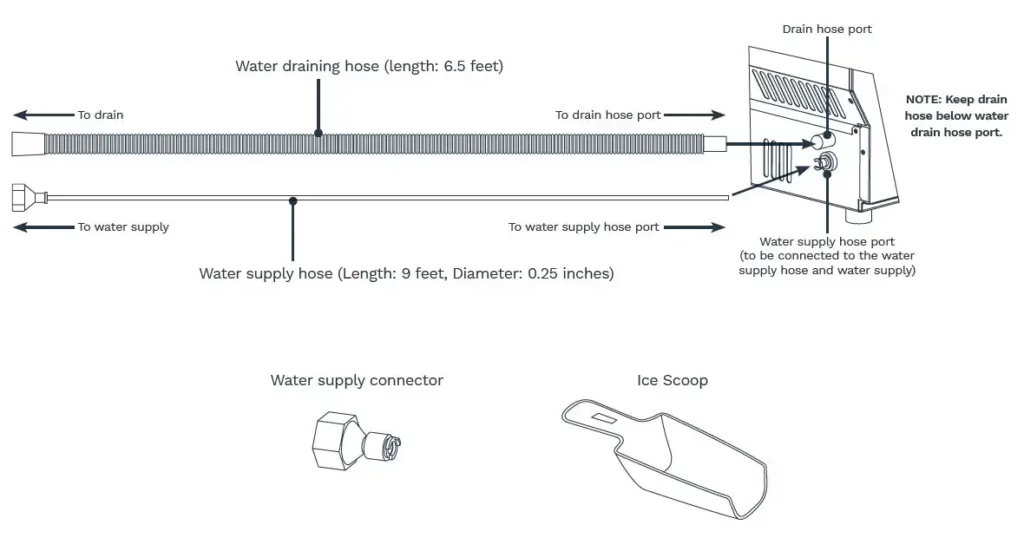
OPERATION
UNPACKING AND INSTALLATION
- Remove the exterior and interior packaging. Check if all the accessories, including the instruction manual, ice scoop, water supply hose, water hose connector, and the water draining hose are inside. If any parts are missing, please contact hOme™ customer service at 1-800-898-3002.
- Remove the tape that is holding the door, inner cabinet, and ice scoop to the appliance. Clean the inside of the Ice Machine and accessories with water. Let the appliance dry completely.
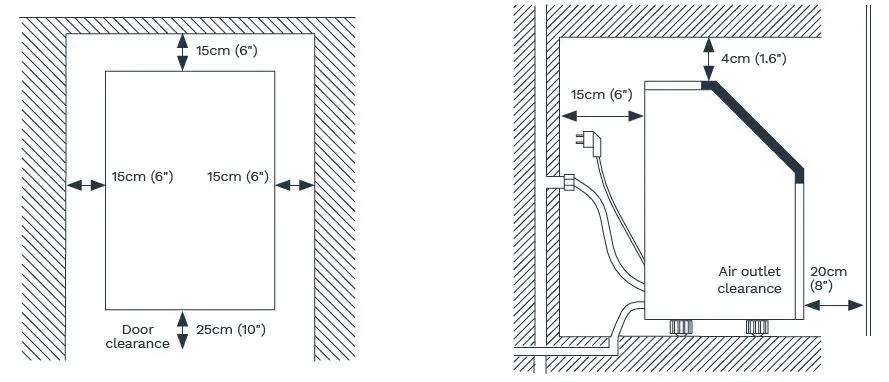
- Put the appliance on a flat surface without direct sunlight and/or other sources of heat (i.e. stove, furnace, radiator).
Make sure there is at least a 20cm (8 inches) gap between the air outlet and any obstacles, 25cm (10 inches) in front
to open the door, and at least 15cm (6 inches) between the back and the wall. - The appliance must be positioned so that the plug is accessible.
- Do not put anything on top of the Ice Machine.
- When installing the Ice Machine under a counter, follow the recommended spacing dimensions. Place electrical supplies, water supplies, and drain fixtures in the recommended locations as shown in the figure below.
- Choose a well-ventilated area with a temperature between 10°C (50°F) and 32°C (90°F). This appliance MUST be installed in an indoor area without wind, rain, water, spray, or drips.
- The Ice Machine requires a continuous water supply with the pressure of 1-8 Bar. The temperature of the water inflow should be between 5°C (41°F) and 25°C (77°F) for proper operation.
- Keep in an upright position for 24 hours before the initial power up.
WARNING: Connect to the potable water supply only. Only use drinking water.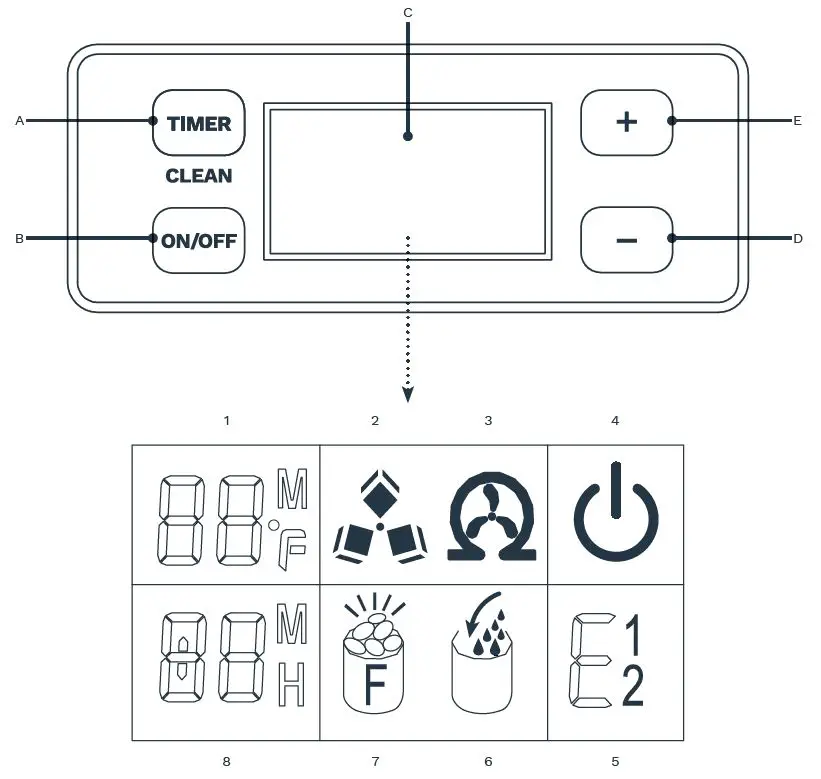
CONNECTING YOUR ICE MACHINE
WARNING: Improper use of the grounded plug can result in the risk of electrical shock. If the power cord is damaged, please contact hOme™ Customer Service at 1-800-898-3002.
- It is recommended that a separate circuit, serving only your Ice Machine, be provided. Use receptacles that cannot be turned off by a switch or pull chain. If the supply cord or plug needs to be replaced, it should be done by a certified electrician.
- Plug your appliance into a secure, properly installed, grounded wall outlet. Under any circumstances, do not cut or remove the third (ground) prong from the power cord. Any questions concerning power and/or grounding should be directed toward a certified electrician.
- This appliance requires a standard 110-120 volt, 60Hz electrical outlet.
CLEANING YOUR ICE MACHINE BEFORE FIRST USE
Before using your appliance, it is strongly recommended to clean it thoroughly.
- Open the Door for ice taking.
- Clean the inside with a special ice maker cleaning fluid (usually based on citric acid), warm water, and a soft cloth.
- Then use potable water to rinse the inside parts. You can pull the water draining hose to drain out the rinsed water in the water tank.
- Clean the ice storage cabinet in the same way. Drain out all rinsed water from the water draining hose, which is located at the back of the Ice Machine.
- You must reinstall the water draining hose of the water tank and the cap of the water draining port. Otherwise, the appliance will not make ice normally. After cleaning, you should discard the ice cubes made from the first ice making cycle.
- The outside of the Ice Machine should be cleaned regularly with a slightly damp cloth.
- Dry the interior and exterior with a clean, soft cloth.
WATER CONNECTION FOR YOUR ICE MACHINE
NOTE:
- Make sure to use the new hose sets supplied with the appliance to connect to the water supply. Old hose sets should not be reused.
- The water pressure of the main water supply system should be 0.04-0.6 MPa (5.8-87 psi).
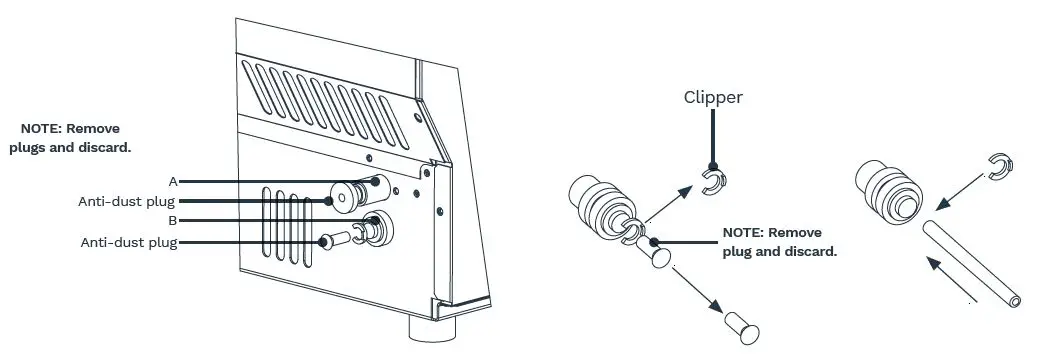
- Connect the water supply hose to the appliance. Remove the clipper on the water supply hose port for the water supply
(indicated “B” in the following illustration), which is located at the back. Then push the anti-dust plug inwards. Use your finger to press the circle to fix the anti-dust plug. Then take down the anti-dust plug. Insert one end of the white water hose into the water inflow port. Push inwards completely and reinstall the clipper. - Connect the water draining hose. Pull out the water drainage cap (indicated “A” in the following illustration), then connect the draining hose. Connect the other end of this draining hose to the main water drainage pipeline. Keep drain hose below water drainage port “A.”
- Connect the water supply hose to the water supply system. Install the connector to the water supply by the screw thread. Remove the clipper from the water supply connector. Insert the other end of the hose into the water supply connector port completely, then reinstall the clipper.
OPERATING YOUR ICE MACHINE
- Plug in the Ice Machine. The ON/OFF symbol (4) will flash in the display window. Press the “ON/OFF” button on the control panel. The Ice Machine will start to make ice cubes when the water reaches the standard level on the water tank through the electromagnetic water valve. The symbol will change to a solid light and the Ice cube symbol (2) will start rotating. The ambient temperature will be displayed in the upper left (1) of the display: “80F” means the ambient temperature is 80°F. A few minutes later, a number flashes in the same area: “10M,” which means the remaining ice making time for the current cycle is 10 minutes.
- When each ice making cycle is completed, it will enter the ice collecting process, and the Ice cube symbol (2) will flash. The hose will add water to the water tank through the electromagnetic valve, and the arrow on the Water inflow symbol (6) will flash until the water reaches the standard level. When the Water inflow symbol (6) light is off, it means the
Ice Machine is ready for the ice making cycle. In the case of a water shortage, the Ice Machine needs to be restarted. Otherwise, it will start up automatically after 15 minutes.
NOTE: Each ice making cycle takes about 11-20 minutes based on the ambient and water temperature. The first ice making cycle will be longer because of the high water temperature in the water tank. However, it will last for less than 30 minutes. - To adjust the ice thickness, press the “+” or “-” button on the control panel. The number at the bottom left of the display shows the time setting of the ice making with the default “0”. Press the “+” button once to add one minute at a time, and the ice cubes will be thicker. Press the “-” button once to reduce one minute at a time, and the ice cubes will be thinner. NOTE: The adjustment only affects the next and subsequent ice making cycles.
- When the Ice full alarm (7) lights up, the appliance stops working. It will work again after you take out the ice.
- To turn off the appliance during the ice making process, press the “ON/OFF” button on the control panel to enter the standby mode. If you press and hold “ON/OFF” for more than 5 seconds during ice making, the appliance enters into the ice collecting process.
- The timer setting range is between 1 to 24 hours. When the appliance is running, you can set up the time to turn it off. When the appliance is on standby, you can set up the time to turn it on. To set up the timing, press the “TIMER” button. The default time displays “1H” (H meaning hour). Press the “+” or “-” buttons to adjust to the time that you desire. During the process of time adjustment, the “H” in the lower corner (8) will flash. After 5 seconds without any movement, the
“H” light will change from flashing to solid, meaning the timer setting has been completed. In standby mode where “5H” is displayed, it means the appliance will start working automatically after 5 hours. During the ice making process where “5H” is displayed, it means the appliance will turn off automatically after 5 hours. The “H” indicates that the appliance currently has a timer setting on. The number before “H” indicates the time countdown. When it reaches zero, the appliance enters into the mode you preset. Press the “TIMER” button to cancel the timer setting during the countdown. - To start the Self-cleaning program, plug in the main power plug after connecting the water hoses, then press and hold the “TIMER/CLEAN” button for more than 5 seconds. The Automatic self-cleaning symbol (3) will rotate on display, and the time countdown area will display 20M. This means the default cleaning time is 20 minutes. The “TIMER/CLEAN” button will light on during this period. The water pump runs for 8 minutes and stops for 3 minutes, then recycles. The total duration time is 20 minutes for one self-cleaning cycle. When the water pump stops working, water will flow to the water tank automatically. When the program is completed, the Ice Machine will turn off automatically.
NOTE: You can press the “ON/OFF” button to cancel the Self-cleaning program immediately.
MAINTENANCE
CLEANING & MAINTENANCE OF YOUR ICE MACHINE
WARNING: Before cleaning or maintenance, unplug the Ice Machine from the main power supply (Exception: Self-cleaning program). Do not use any alcohol or fume for cleaning/sanitization of the Ice Machine. It may cause cracks on the plastic parts. Ask an authorized service engineer to check and clean the condenser at least once a year, in order to keep the appliance working properly.
CAUTION: If the Ice Machine has been left unused for a long period of time, it must be thoroughly cleaned before the next use. Follow the cleaning instructions below. Do not leave any solution inside the Ice Machine after cleaning.
Periodic cleaning and proper maintenance will ensure efficiency, performance, hygiene, and duration of the machine.
Never keep anything in the ice storage bin. Objects, like wine and beer bottles, are unsanitary and may cause obstruction of the drain pipe.
Exterior Cleaning
To clean the outside of the Ice Machine, use a slightly damp cloth and wipe down the exterior. DO NOT use direct water or solvent-based or abrasive cleaners.
NOTE:
Stainless steel products exposed to chlorine gas and moisture, such as in spas or swimming pools, may cause discoloration
of stainless steel. Discoloration from chlorine gas is normal.
Cleaning of Ice Storage
The ice storage cabinet should be sanitized occasionally. Clean the cabinet before the Ice Machine is used for the first time and reused after a long period of time. Follow the steps below:
- Turn off the Ice Machine and unplug the power cord.
- Open the Door for ice taking and wipe down the interior with a special ice maker cleaning fluid (usually based on citric acid) and follow the instructions provided by the manufacturer.
- Rinse thoroughly with potable water. The rinsed water should be drained out via the drain hose.
- Dry with a clean, soft cloth.
The ice scoop should be washed regularly. Wash it in the same fashion as you would any food container.
Cleaning of the Ice Making Parts
- Repeat the above steps to clean the water tank and other inner parts of the Ice Machine.
- When the water flowing from the water dividing pipe on the evaporator is very minor, disassemble the water dividing pipe for cleaning. Clean each small hole on the water dividing pipe, like in the following illustration on Page 14. Make sure all holes are unclogged, then reinstall the water dividing pipe to the original location.
- If the ice cubes on the surface of the evaporator do not fall down easily, do not use mechanical force to remove them. Press and hold the “ON/OFF” button for more than 5 seconds to switch to the ice collecting process. The ice cubes will start to fall down. Turn off the Ice Machine and unplug the power cord to clean the surface of the evaporator.
NOTE: After cleaning the interior parts of your Ice Machine, install the parts to the original position, then plug in and turn on the machine. It is recommended to discard the first batch of ice.
Cleaning Suggestion
- The Ice scoop, door for ice taking, and water outlet pipe should be cleaned after each use. Rinse the ice scoop and wipe the door with a clean cloth.
- The Water tank, Ice full detecting board, and the surface of the Evaporator should be cleaned twice every month.
- All the components and surfaces exposed to water or ice cubes, like the Ice storage bin, water tank, evaporator, water pump, silicone tube, water outlet pipe, etc. should be cleaned by using a nickel safe ice machine cleaner 6 months after the first use. This should be done by a professional service provider.
WARNING: Wear rubber gloves and safety goggles when handling the Ice Machine Cleaner or Sanitizer.
NOTE: Minerals that are removed from water during the ice making cycle will eventually form a hard, scaly deposit in the water system. Clean the system regularly to remove the mineral scale buildup. The frequency of cleaning depends on how hard your water is. With 4 to 5 grains/liter, it is recommended to clean the system every 6 months.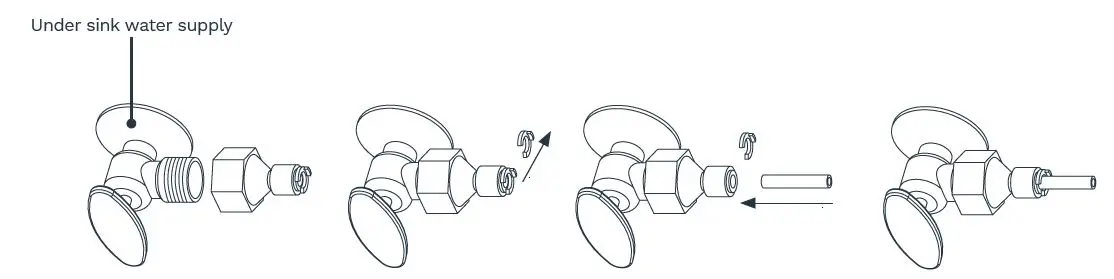
TROUBLESHOOTING
| PROBLEM
The “Water inflow and shortage” (6) indicator is on. The appliance starts to enter the ice making process, but water flows in and the “ADD WATER” indicator flashes. The water pump is working, but there is little water flow out from the water dividing pipe. The transparency of the ice cube is not very good. Ice cube shape is irregular. Ice cubes are too thin. Ice cubes are too thick. There are no ice cubes produced from the normal ice making cycle. |
POSSIBLE CAUSES
There is no water supply. The floating ball of the water level detecting switch is blocked and cannot rise. Water flows out from the water tank. Water flows out from the water draining hose of the water tank. |
SOLUTION
Check the water supply pressure and whether the supply hose is blocked. Add water pressure or clean the hose if needed. Clean the water tank and the water level detecting switch. Place the appliance on a flat surface, not on a slope. Pull out the pipe and install back into the slot of the water tank properly. |
| The water supply hose is blocked or
water is flowing in very slowly. |
Check the water supply pressure and whether the supply hose is blocked. Add water pressure or clean the hose if needed. | |
| The small holes on the water dividing pipe are blocked. | Clean the water dividing pipe. Make sure all nine holes are unclogged. | |
| Water quality is not good or the water tank is dirty. | Change the water supply, or use the water filter to soften or filter the water. | |
| The small holes on the water dividing pipe are blocked. | Clean the water tank and change to clean purified water. Clean the water dividing pipe. Make sure all nine holes are unclogged. | |
| The ambient temperature is too high. Air circulation around the appliance is not good. | Move the appliance to a low-temperature space or increase the time of each ice making cycle. | |
| The ambient temperature is too low. | Make sure that there is at least a 20cm (8 inches) gap between the air outlet and the obstacles, 25cm (10 inches) in front to open the door, and at least 15cm (6 inches) between the back of the appliance and the wall. Reduce the time of each ice making cycle. | |
| The ambient temperature or water temperature in the water tank is too high. There is a refrigerant leak.
The cooling system tube is clogged. |
Move to a place with a temperature lower than 32 Celsius and use low-temperature water.
Call an authorized technical service engineer to maintain the process. |
WARRANTY
hOme™ offers a limited two-year warranty (“warranty period”) on all of our products purchased new and unused from hOme Technologies, LLC or an authorized reseller, with an original proof of purchase and where a defect has arisen, wholly or substantially, as a result of faulty manufacture, parts or workmanship during the warranty period. The warranty does not apply where damage is caused by other factors, including but without limitation: (a) normal wear and tear; (b) abuse, mishandling, accident, or failure to follow operating instructions; (c) exposure to liquid or infiltration of foreign particles; (d) servicing or modifications of the product other than by hOme™; (e) commercial or non-indoor use.
The hOme™ warranty covers all costs related to restoring the proven defective product through repair or replacement of any defective part and necessary labor so that it conforms to its original specifications. A replacement product may be provided instead of repairing a defective product. HOme™’s exclusive obligation under this warranty is limited to such
repair or replacement.
A receipt indicating the purchase date is required for any claim, so please keep all receipts in a safe place. We recommend that you register your product on our website, homelabs.com/reg. Although greatly appreciated, the product registration is not required to activate any warranty and product registration does not eliminate the need for the original proof of purchase.
The warranty becomes void if attempts at repair are made by non-authorized third parties and/or if spare parts, other than those provided by hOme™, are used.
You may also arrange for service after the warranty expires at an additional cost.
These are our general terms for warranty service, but we always urge our customers to reach out to us with any issue, regardless of warranty terms. If you have an issue with a hOme™ product, please contact us at 1-800-898-3002, and we will do our best to resolve it for you.
This warranty gives you specific legal rights and you may have other legal rights, which vary from state to state, country to country, or province to province. The customer may assert any such rights at their sole discretion.
![]()
homelabs.com/chat
1-(800)-898-3002
[email protected]