
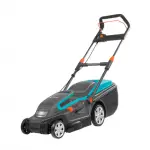
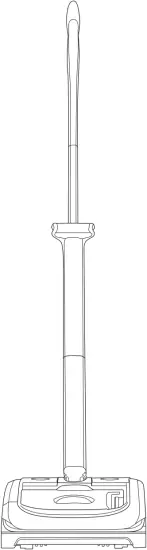
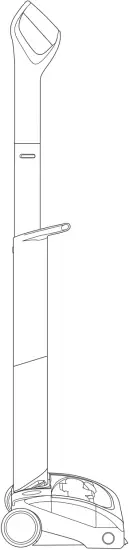
Small Lawnmower
Model number: SLM50
OPERATING MANUAL
Original Instructions
IMPORTANT SAFEGUARDS:
IMPORTANT: READ ALL INSTRUCTIONS BEFORE USE.
RETAIN INSTRUCTIONS FOR FUTURE REFERENCE.
 Do not use in rain or leave outdoors whilst raining.
![]() WARNING: Basic safety precautions should always be observed when using an electrical appliance to reduce the risk of fire, electrical shock, or serious injury.
WARNING: Basic safety precautions should always be observed when using an electrical appliance to reduce the risk of fire, electrical shock, or serious injury.
Personal Safety:
- Only use the mower on grass and lawns, as described in this manual.
- Keep out of reach of children and animals at all times.
- Only use in daylight or good artificial light.
- Do not use while there are other people, especially children, nearby.
- Stay alert, watch what you are doing, and use common sense when operating the mower.
- Do not use the mower while you are tired or under the influence of drugs, alcohol, or medication. This may result in serious personal injury.
- Always be aware of your surroundings and stay alert for possible hazards.
- Use protective personal equipment such as safety glasses, non-skid safety shoes, sturdy gloves to reduce the risk of personal injury.
- Do not operate when barefoot or wearing open-toed shoes.
- Dress appropriately. Do not wear loose clothing or jewelry and keep hair, clothing, and gloves away from moving parts.
- Always be sure of your footing on slopes or in slippery conditions.
- Do not use on excessively steep slopes.
- Take particular care when reversing with the mower or pulling it towards you.
- Never touch the rotating blade.
- Never operate the mower over gravel, as this risks flicking stones.
- Check the area where the mower is to be used and remove any objects that could jam or be thrown by the mower, such as stones and sticks.
- Avoid operating the mower on wet grass.
- Never operate the mower with damaged guards or without the guards in place.
- Visually check the cutting tools and their fasteners for any damage before each use.
- To prevent imbalance, any damaged or worn-out parts should be replaced.
- When operating the mower ensure that your hand is correctly positioned on the handle.
- Only start the mower when your feet are a safe distance from the cutting blade.
- Do not tilt the mower when starting the motor.
- Do not operate the mower if it is incomplete or has unauthorized modifications.
- Keep all body parts, especially hands and feet, away from the blade at all times.
- Warning, the blade will continue to move after the motor is switched off.
- Ensure that the blade has fully stopped and the safety key has been removed before:
– leaving the mower
– clearing a blockage
– adjusting the cutting height
– lifting or carrying the mower
– tilting the mower to move
– checking or cleaning the mower
– carrying out any maintenance - If the mower vibrates intensively, stop the motor fully and identify the cause.
- The operator is responsible for accidents or hazards occurring to other people at their property.
- This appliance is not intended for use by persons (including children) with reduced physical, sensory or mental capabilities or lack of experience or knowledge.
- Never modify the mower in any way.
Electrical safety:
- Do not operate the mower in explosive atmospheres, such as in the presence of flammable liquids, gases, or dust. Mowers create sparks, which may ignite dust and fumes.
- Do not use the mower when a thunderstorm is approaching.
- Avoid body contact with earthed or grounded surfaces, such as pipes. There is an increased risk of electric shock if your body is earthed or grounded.
- Do not expose the mower to rain or wet conditions.
- Do not handle the charger or the mower with wet hands.
- Before charging check the power supply and charger cables for signs of damage or aging.
- Do not expose the mower to temperatures exceeding 80ºC, or leave the mower in direct sunlight or in the hot boot of a car for prolonged periods.
Battery safety:
- Do not attempt to use the charger with any other product or to charge this product with any other charger.
- Do not use the charger in moist or wet conditions or outdoors.
- Disconnect the cable connectors by pulling the plug only, never the charger.
- Do not use a damaged charger.
- Never cover the ventilation slots.
- Never open the charger. In case of a defect, contact Gtech.
- This product contains Li-Ion batteries.
Do not incinerate batteries or expose them to high temperatures, as they may explode. - Do not charge the battery when the surrounding air temperature or the battery pack is below 0°C or above 40°C.
- After heavy use or in high temperatures the battery may become warm. Allow the product to cool for 30 minutes before charging.
- Use only with the battery pack supplied.
- Leaks from battery cells can occur under extreme conditions. If the liquid gets on your skin wash immediately with soap and water. If the liquid gets into your eyes, flush them immediately with cold water for a minimum of 10 minutes and seek urgent medical attention.
- Protect the battery against excessive temperatures and fire.
- Do not store the battery outside for prolonged periods of time over the winter months.
- Do not dispose of the battery pack into household waste, fire, or water. The battery pack should be collected, recycled, or disposed of in an environmentally friendly manner.
Discharge your battery pack by operating your Lawn Mower.
Remove the battery pack from the housing and cover the battery pack connections with heavy-duty ventilation tape to prevent a short circuit and energy discharge. Do not attempt to open or remove any of the components. - Remove the battery and charger from the mains when fully charged.
- Unplug the charger from the mains and battery when fully charged.
Service:
- Do not use the mower if the switch does not turn on or off. Any power tool that cannot be controlled by the switch is dangerous and must be removed or replaced.
- Before any servicing and cleaning take out the safety key and remove the battery.
- Check all visible fixing screws and nuts, especially on the cutter bar, to ensure they are tightened properly.
- Do not keep the mower in a damp room.
- Before using the mower and after any impact, check for signs of wear and damage and repair or replace as necessary.
- Use only genuine replacement parts.
This will ensure that the safety of the mower is maintained. - Do not attempt to repair any damaged parts on the mower unless you are qualified to do so.
- Please contact Gtech on 01905 345891 if you have any queries about your product.
Intended Use:
- This product is intended for DOMESTIC USE ONLY.
Warning Label Descriptions
|
Warning/Caution. |  |
Remove safety key before servicing and cleaning. |
 |
Beware of severing toes or hands. Do not put hands or feet near a rotating blade. |  |
Switch off. Remove the battery before maintenance. |
|
Read the instruction manual. |  |
Keep bystanders at a safe distance (at least 5m). |
 |
Caution: Wait until blades stop rotating when switched off. |  |
Always keep the lawnmower on the ground when mowing. Tilting or lifting the lawnmower may cause stones to be thrown out. |
|
Do not mow in the rain or leave the lawnmower outdoors while raining. |  |
Guaranteed Sound Power Level |
- Please read this manual carefully. Familiarise yourself thoroughly with the controls and proper use of this machine. You should know how the machine works and how to
immediately switch it off. - Never let children use this mower. Never let adults work with this mower if not properly trained.
- Do not let any persons, especially small children, or pets near you while mowing.
- Take care not to slip or fall while mowing.
Thank you for choosing Gtech
“Welcome to the Gtech family. I started Gtech to create sensible, easy-to-use products that do a great job, and hope you get many years of trouble-free performance from your new product.”

 Nick Grey – Inventor, owner of Gtech
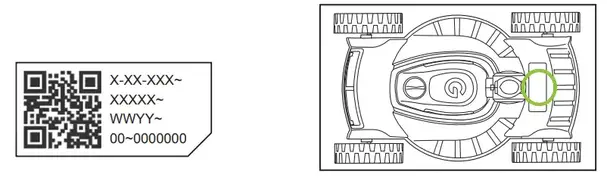
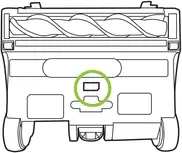
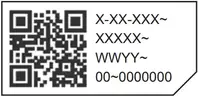
Make a note of your product serial number code for future reference. You can find this behind the handle on the body of the mower.
_ – _ _ – _ _ _ ~
_ _ _ _ _ ~
_ _ _ _ ~
_ _ ~ _ _ _ _ _ _ _
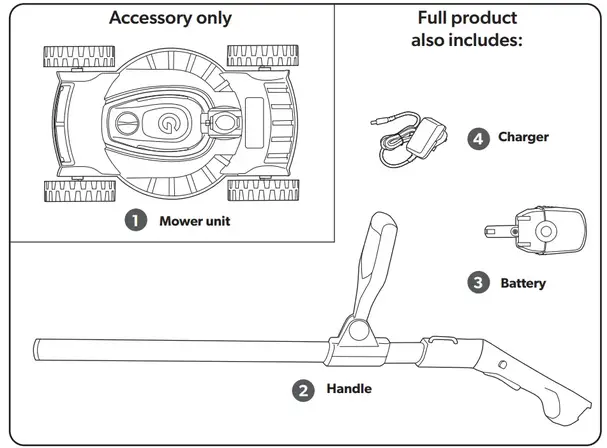
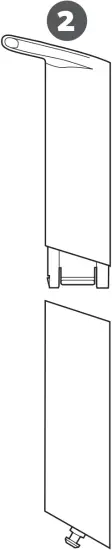
What’s in the box
Assembly
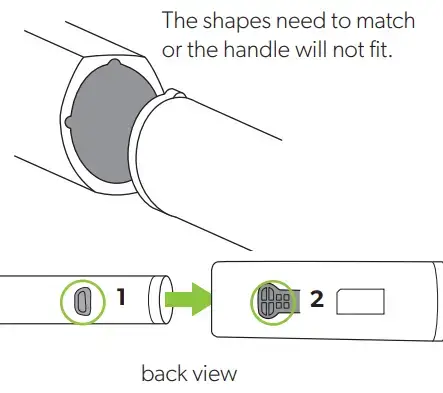
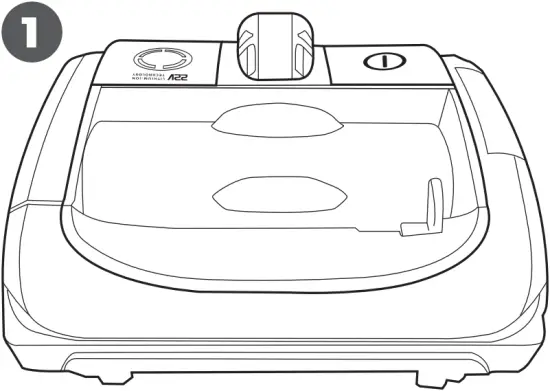
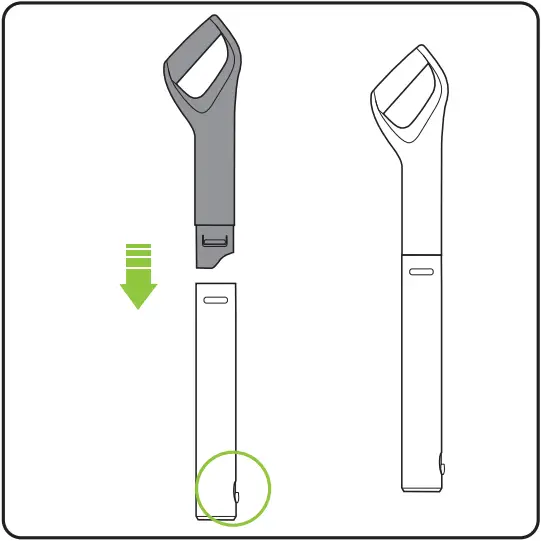
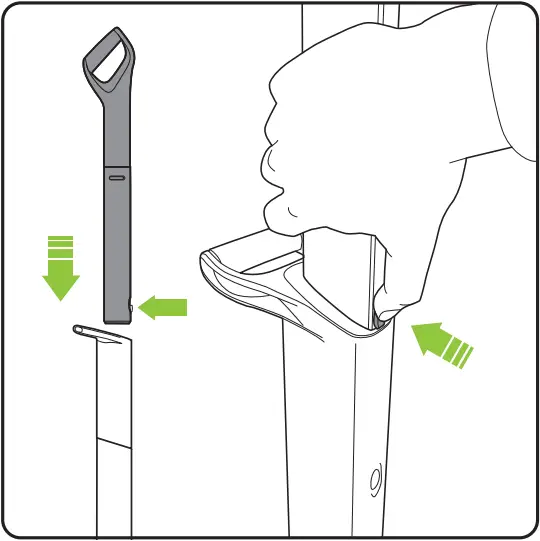
Insert the handle into the mower main unit, ensuring it is the right way up.
When the pole is fully inserted, button (1) will pop up into the aperture (2).
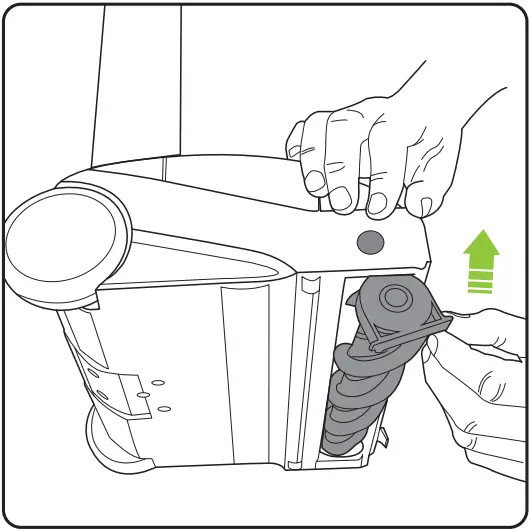
Insert the battery which will click into place.
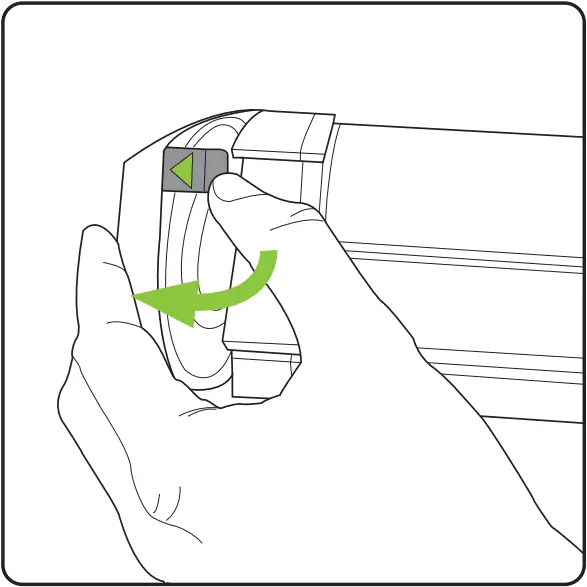
The safety key
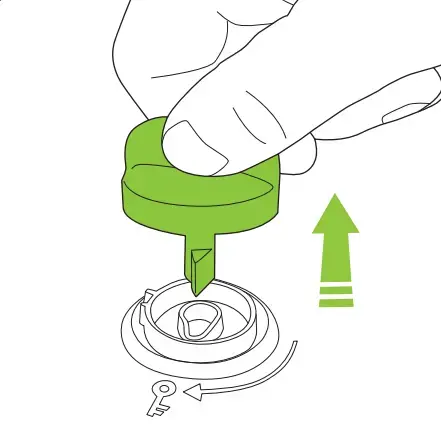
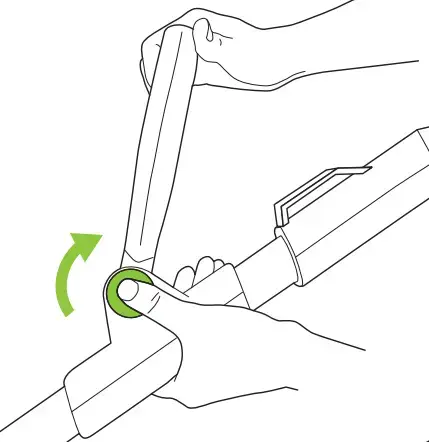
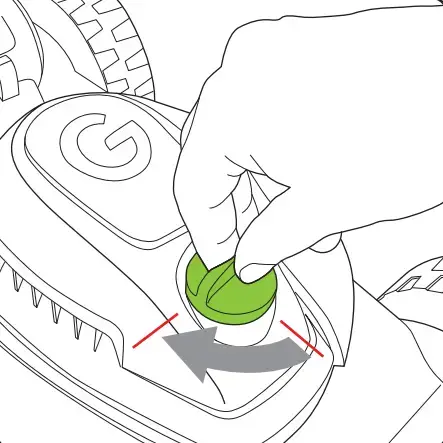
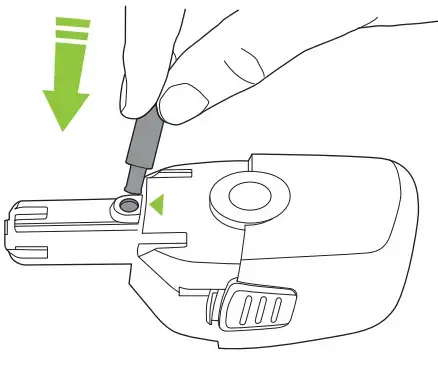
The mower will not work without the safety key. Rotate it 90º clockwise to operate.
The safety key can be removed and stored out of reach of children.
Operation
![]() WARNING: To reduce the risk of injury remove the safety key when the mower is not in use, being transported, handled or stored, or carrying out any maintenance.
WARNING: To reduce the risk of injury remove the safety key when the mower is not in use, being transported, handled or stored, or carrying out any maintenance.
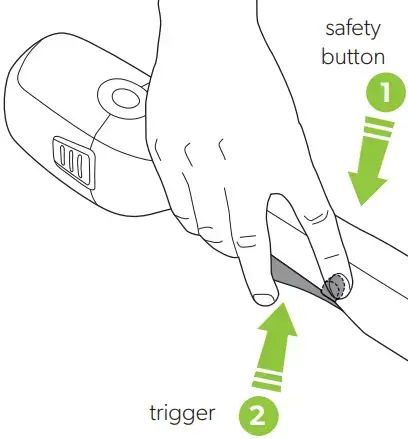
Push and hold the safety button on either side, then press the trigger to operate.
When you release the trigger the mower will stop.
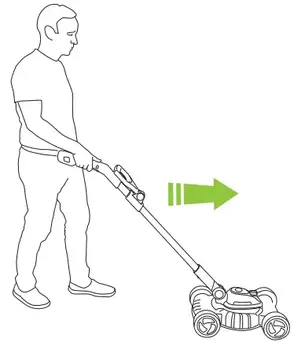
Push the mower along as you walk behind it.
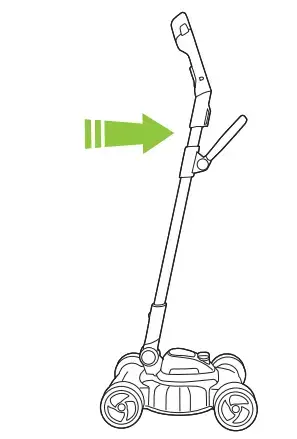
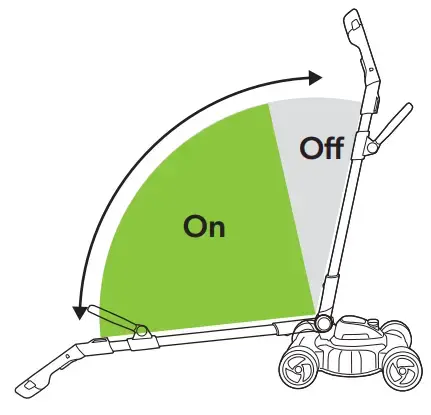
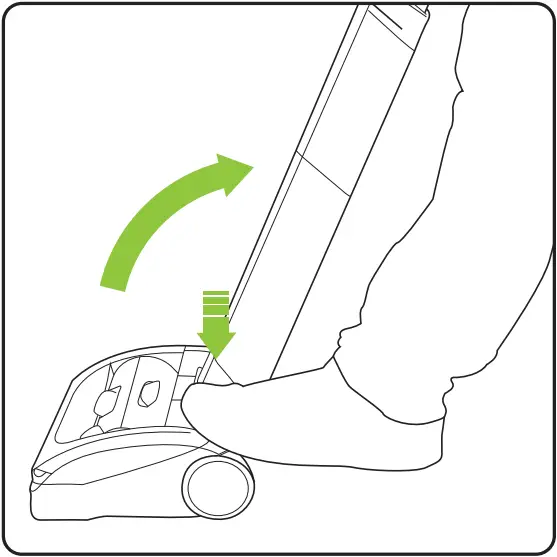
When the handle is pushed forwards the motor will cut out as a safety feature. This is also the “parking” position for the mower.
The mower has a safety cut-out feature when the handle is in parking mode.
Adjusting the cutting height
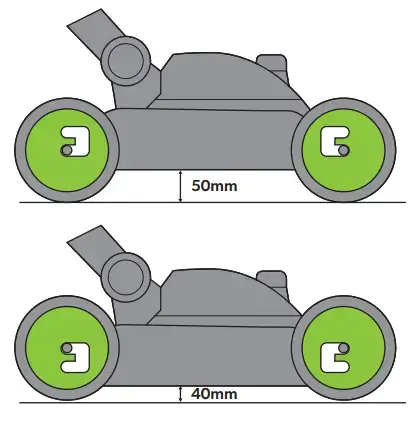
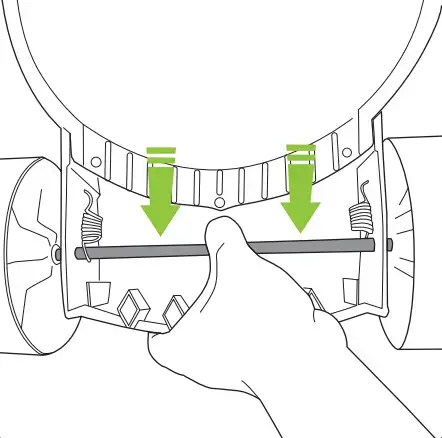
There are two cutting heights. To change from one to the other, engage the safety switch and remove the battery, then turn the mower over. Pull the axle away from the blade and guide it into the other position.
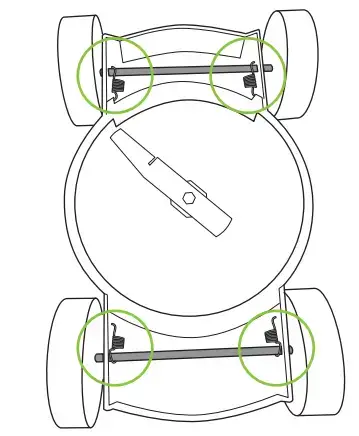
The spring will keep the axle in position.
The cutting heights are 40mm and 50mm.
Ensure both wheels on both axes are in the same setting.
![]() WARNING: To reduce the risk of personal injury, wait for the blade to stop rotating and remove the safety key and battery before adjusting the cutting height.
WARNING: To reduce the risk of personal injury, wait for the blade to stop rotating and remove the safety key and battery before adjusting the cutting height.
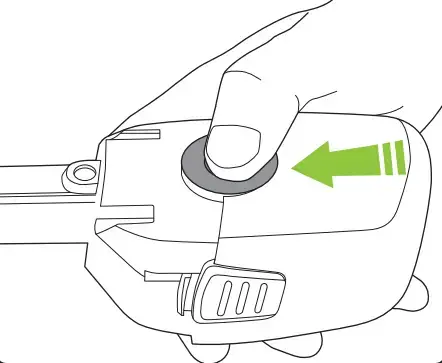
Removing the battery for charging
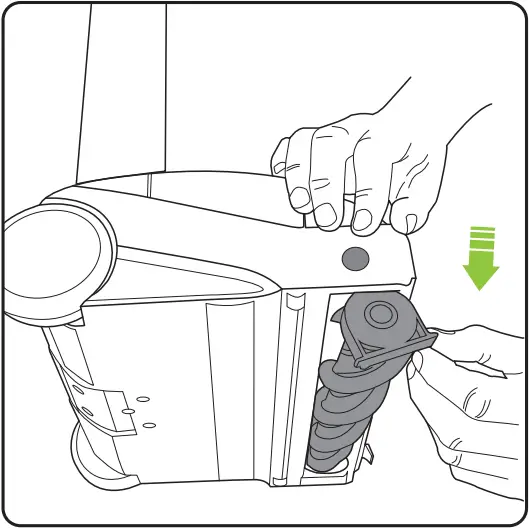
Press both buttons at the same time and pull to remove the battery.
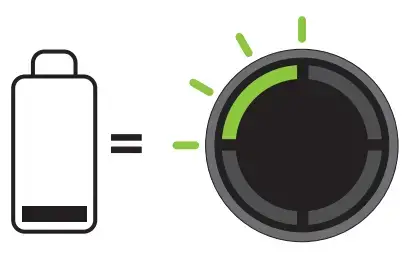
Checking the battery charge status
Press the button to check how much charge there is in the battery.
The number of lit LEDs shows the charge.

When there is no charge left, the final LED will flash for 10 seconds and then go out.
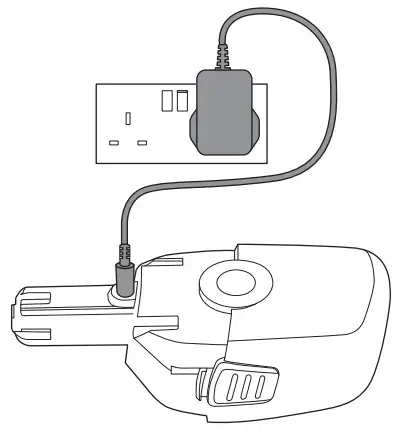
Charging the battery

Connect the charger to the battery where indicated.
Plug the charger into an ordinary plug socket.

While charging the LEDs will progressively pulse until all four are lit.

The battery can be charged from flat in 4 hours. The state of charge indicator will show 4 solid green lights when it is charged.
Disassembly

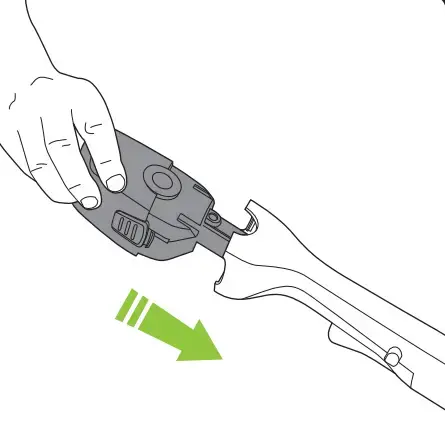
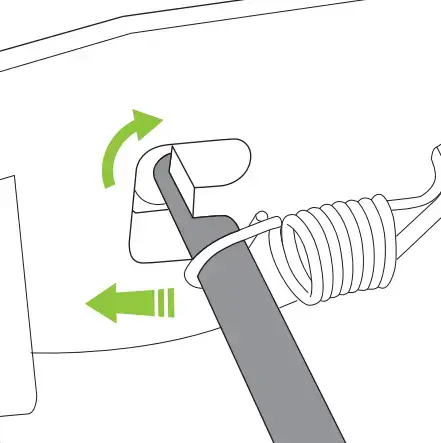
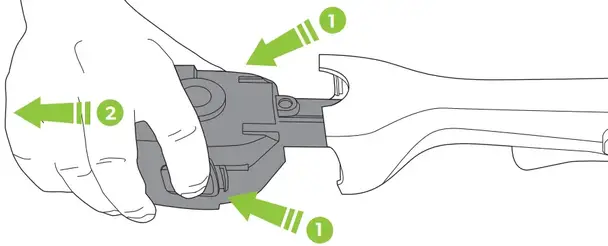
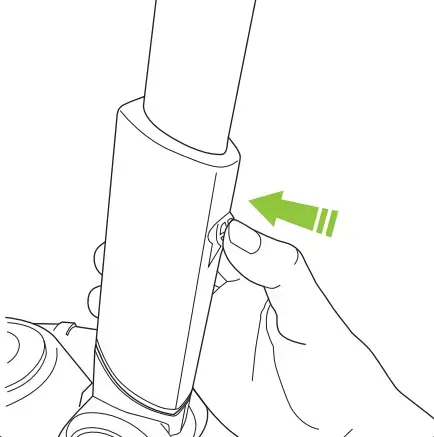
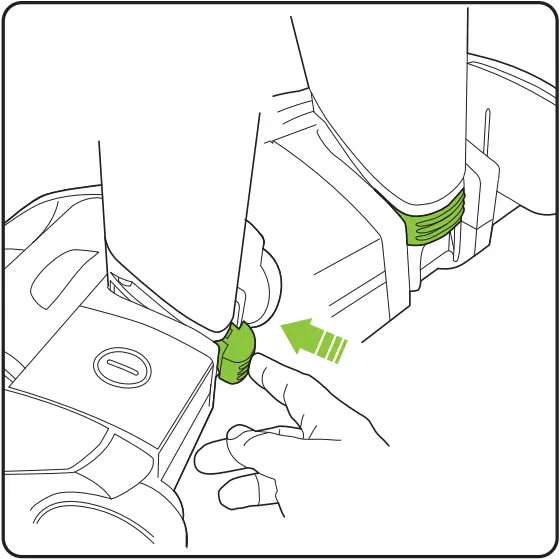
To remove the handle, first, remove the battery then press the button at the back of the lower part of the handle.

Then pull the handle out.
Product Care
![]() Wear protective gloves when handling, cleaning, or replacing the blade.
Wear protective gloves when handling, cleaning, or replacing the blade.
![]() To reduce the risk of injury ensure that the safety key and battery are removed when the mower is not in use, being transported, handled, or stored.
To reduce the risk of injury ensure that the safety key and battery are removed when the mower is not in use, being transported, handled, or stored.
To ensure that your product gives you long and reliable service, carry out the following maintenance regularly:
- Check for obvious defects such as a loose, dislodged, worn, or damaged blade, loose fixings, and worn damaged, or loose parts.
- Check that any covers and guards are correctly fitted and undamaged.
- Always clean the cutting blade after use and apply a lubricating oil or spray before storage.
- Before use, check the condition of the cutting edges of the blade and ensure the blade fixings are secure.
- Do not use water, solvents, or polishes to clean the mower. Wipe clean with a dry cloth.
- Do not use abrasive materials to clean the product, and do not immerse it in water.
- Store it in a secure, dry place, out of reach of children. Do not expose to moisture.
PLEASE NOTE: if the product needs to be repaired or replaced, only use replacement parts supplied by the manufacturer.
Spare parts can be purchased from Grey Technology Ltd.
Tel: 01905 345 891
Web: www.gtech.co.uk/support
Troubleshooting
| Motor not running | 1. Charge battery 2. Check safety key is inserted and switched on 3. Check switch operation It will click if operating correctly. |
| Irregular running/machine vibrating strongly | 1. Blade may be defective 2. Blade may be loose 3. Check the blade is fitted and the nut is tightened. 4. Check if any obstacle is preventing normal rotation of the blade. |
| Struggling to cut/jamming | 1. Push the mower more slowly 2. Raise the cutting height 3. Check for the build-up of grass 4. Blade may be blunt |
| Cutting blade will not cut | 1. Blade is either worn or damaged. 2. Replace blade |
| Cutting time has reduced | 1. Use a lighter cutting action and cut in several stages. 2. Fully discharge and recharge the battery. 3. Replace blade. |
| Mower stops when cutting | 1. Handle may be in “park” position. 2. Charge battery. |
| Trimmer stops when cutting. LEDs show solid red | 1. The mower is overloaded. 2. Check the blade and remove any debris. 3. Grass too thick— use lighter cutting action/ raise height setting. 4. Push the mower more slowly. |
Product support
If these initial tips do not solve your problem we please visit our support area where you can find troubleshooting help including online manuals, FAQs, and how-to-videos, as well as genuine spares and replacement parts compatible with your product. Visit: www.gtech.co.uk/support
| Online | Live chat support | [email protected] | How-to Videos |
TECHNICAL SPECIFICATION
| Voltage | 18V |
| Battery capacity | 2.0 Ah Li-Ion |
| Blade speed | 5200 rpm |
| Charge time | 4 hour |
| Cutting Width | 250mm |
| Protection type | IPX 4 |
| Measured sound power level | 84.5 dB (A); K=1.98 dB (A) |
| Guaranteed sound power level | 96 DB(A) |
| Sound pressure level | 72.8 dB (A); K= 3 dB (A) |
| Vibration | Front handle:1.559 m/s2 Rear handle: 1.049 m/s2 K=1.5 m/s2 |
| Weight | 2.5kg (chassis only) |
| Charger Input | 100-240V—, 50/60Hz, 0.35A |
| Charger Output | 21.6V DC—500mA 10.8W |
Environmental and Product Recycling
The symbol indicates that this product is covered by legislation for waste electrical and electronic products (Directive 2012/19/EU))
When the product has reached the end of its life please do not dispose of it with general household waste. Consider the environment and take it to a recognized recycling facility.
The product contains a Li-Ion battery which should not be disposed of with general household waste. The battery should be disposed of properly with the product at a recycling facility.
Call your local council, civic amenity site, or recycling center for information on the disposal and recycling of electrical products.
Alternatively, visit www.recycle-more.co.uk for advice on recycling and to find your nearest recycling facilities.
FOR DOMESTIC USE ONLY
![]()
WARRANTY – REGISTRATION
Visit www.gtech.co.uk/warrantyregistration to register your product to ensure that we have all the information required to provide you with quick and efficient support.
You will need your product’s serial code.

2-03-091 11712-000001 WWYY 1 |
If you purchased directly from Gtech your details are already registered and your 2-year warranty will start automatically.
If you purchased from an authorized Gtech retailer, please register your warranty within 3 months and you will need to provide proof of purchase to support any claim against your warranty.
WARRANTY – TERMS AND CONDITIONS
If your product is within its warranty and has a fault that cannot be resolved from the troubleshooting section or online support, please do the following:
- Contact our Gtech Customer Care Helpline in the UK: 08000 308 794, who will go through any troubleshooting with you to identify the fault.
- If your fault can be resolved by a replacement part, this will be sent to you free of charge.
- Following troubleshooting, if your product needs to be replaced, we will arrange the collection of your faulty product for inspection and delivery of a replacement product free of charge.
Your product is guaranteed against material or manufacturing faults for 2 years from the date of purchase (or the delivery date if this is later) subject to the following terms and conditions:
SUMMARY
The guarantee becomes effective at the date of purchase (or the date of delivery if this is later). If a product is repaired or replaced during the warranty period, the warranty period is not started again.
- You must provide proof of delivery/ purchase before any work can be carried out on the product. Without this proof, any work carried out will be chargeable. Please keep your receipt or delivery note.
- All work will be carried out by Gtech or its authorized agents.
- Any parts which are replaced will become the property of Gtech.
- The repair or replacement of your product is under guarantee and will not extend the period of guarantee.
- The guarantee provides benefits that are additional to and do not affect your statutory rights as a consumer.
WHAT ISN’T COVERED
Gtech does not guarantee the repair or replacement of a product as a result of:
- Normal wear and tear (e.g. blade, batteries).
- Accidental damage, faults caused by negligent use or lack of care and maintenance, misuse, neglect, careless operation or handling of the product which is not in accordance with operating manual.
- Blockages. Please refer to the operating manual for details of how to unblock your product.
- Use of the product for anything other than normal domestic household purposes.
- Use of parts and accessories which are not Gtech genuine components.
- Faulty installation (except where installed by Gtech)
- If it is modified in any way.
- Repairs or alterations carried out by parties other than Gtech or its authorized agents.
- Purchasing your product from an unofficial third party (i.e not from Gtech or an official Gtech retailer.
- If you are in doubt as to what is covered by your guarantee, please call the Gtech Customer Care Helpline on the UK: 08000 308 794 International orders are subject to a delivery charge for both faulty and non-faulty products.
EC Declaration of Conformity
We, the manufacturer/ importer,
Grey Technology Ltd
Brindley Road
Warndon
Worcester
WR4 9FB, UK
declare that the following machine complies with the appropriate health and safety requirements of the following directors based on its design and type.
In case of alteration of the machine, not agreed upon by us, this declaration will lose its validity
| Product’s name / function: | Cordless Lawnmower / for cutting grass. |
| Machine Type: | SLM50 |
| Rated voltage: | 18VDC |
| Measured sound power level: | 84.5 dB(A) K= 1.98 dB (A) |
| Guaranted sound power level: | 96dB(A) |
| Notified Body: | Conformity assessment method to Directive 2000/14/EC and 2005/88/EC The EC type-examination certificate is issued by SGS Notified body of Noise directive: AV Technology Unit 2 Easter Court Europa Boulevard Warrington, Cheshire, WA5 7ZB, United Kingdom. Notified Body number:1067 |
| Applicable EC Directives: | EMC Directive 2014/30/EU Machinery Directive 2006/42/EC Noise Directive 2000/14/EC and 2005/88/EC RoHS Directive 2011/65/EU |
| Applicable Harmonized Standards: | EN 60335-1 EN 60335-2-77 EN 55014-1 EN 55014-2 EN 62321 |
| Authorized Signature/Date/ Place: |  12/5/2021 12/5/2021 |
| Title of Signatory: | Technical Manager |
Name and address of the person authorized to compile the technical file, who must be established in the community:
Andrew Boddy
Grey Technology Ltd
Brindley Road
Warndon
Worcester
WR4 9FB
Grey Technology Limited
Brindley Road, Warndon, Worcester, WR4 9FB, UK
email: [email protected]
telephone: 01905 345891
www.gtech.co.uk/support
CPN4969
08/07/2021
10:20

Model number:
OPERATING MANUAL
Do not use in rain or leave outdoors whilst raining.
WARNING: Basic safety precautions should always be observed when using an electrical appliance, including the following to reduce the risk of fire, electrical shock, or injury:
Personal Safety:
- Store indoors in a dry place out of the reach of children.
- Always use responsibly. This appliance can be used by children aged from 8 years and above and persons with reduced physical, sensory or mental capabilities or lack of experience and knowledge if they have been given supervision or instruction concerning use of the appliance in a safe way and understand the hazards involved.
- Don’t let children play with the appliance; supervise children using or maintaining the appliance.
- Use only manufacturer’s recommended attachments as described in this manual; misuse or use of any accessory or attachment other than those recommended, may present a risk of personal injury.
- Take extra care when cleaning stairs.
- Keep the appliance and accessories away from hot surfaces.
- Do not block the appliances openings or hinder air flow; keep openings free of any objects including dust, lint, clothing, fingers (and all parts of the body).
- Particularly keep hair away from openings and moving parts.
Electrical safety:
- Only use batteries and chargers supplied by Gtech.
- Never modify the charger in any way.
- The charger has been designed for a specific voltage. Always check that the mains voltage is the same as that stated on the rating plate.
A charger that is suitable for one type of battery pack may create a risk of fire when used with another battery pack; never use the charger with another appliance or attempt to charge this product with another charger. - Before use, check the charger cord for signs of damage or ageing. A damaged or entangled charger cord increases the risk of fire and electric shock.
- Do not abuse the charger cord.
- Never carry the charger by the cord.
- Do not pull the cord to disconnect from a socket; grasp the plug and pull to disconnect.
- Don’t wrap the cord around the charger when storing.
- Keep the charger cord away from hot surfaces and sharp edges.
- The supply cord cannot be replaced. If the cord is damaged the charger should be discarded and replaced.
- Do not handle the charger or the appliance with wet hands.
- Do not store or charge the appliance outdoors.
- The charger must be removed from the socket before removing the battery, cleaning or maintaining the appliance.
Battery safety:
- This appliance includes Li-Ion batteries; do not incinerate batteries or expose to high temperatures, as they may explode.
- Liquid ejected from the battery may cause irritation or burns.
- In an emergency situation contact professional help immediately!
- Leaks from the battery cells can occur under extreme conditions. Do not touch any liquid that leaks from the battery. If the liquid gets on the skin wash immediately with soap and water. If the liquid gets into the eyes, flush them immediately with clean water for a minimum of 10 minutes and seek medical attention. Wear gloves to handle the battery and dispose of immediately in accordance with local regulations.
- Shorting the battery terminals may cause burns or fire.
- When the battery pack is not in use, keep it away from paper clips, coins, keys, nails, screws or other small metal objects that could make a connection from one terminal to another.
- When you dispose of the appliance remove the battery and dispose of the battery safely in accordance with local regulations.
Service:
- Before using the appliance and after any impact, check for signs of wear or damage and repair as necessary.
- Do not use the appliance if any part is damaged or defective.
- Repairs should be carried out by a service agent or a suitably qualified person in accordance with relevant safety regulations. Repairs by unqualified persons could be dangerous.
- Never modify the appliance in any way as this may increase the risk of personal injury.
- Only use replacement parts or accessories provided or recommended by Gtech.
Intended use:
- This appliance has been designed for domestic dry vacuum cleaning only.
- Do not pick up liquids or use on wet surfaces.
- Do not pick up anything that is flammable, burning or smoking.
- Use only as described in this manual.
- Don’t use on concrete, tarmacadam or other rough surfaces.
- The brush bar may damage certain floor surfaces. Before vacuuming flooring, rugs or carpets, check the flooring manufacturer’s recommended cleaning instructions.
- The product may damage delicate fabrics or upholstery. Care should be taken on loose-weave carpets and coverings or where there are loose threads. It is advised to test on an inconspicuous area first before use.
- The product has been designed to clean a wide variety of floor surfaces without the need to change settings. However some surfaces such as delicate loose-pile rugs or carpets, tasselled rug edges or damaged carpets with exposed threads are not suitable for cleaning with a rotary brush.
- The product has a constantly rotating brush bar. Never leave the cleaning head in one spot for an extended period of time as this may damage the floor surface.
- Particularly for hard flooring, before vacuuming check the area being cleaned is free of any hard debris or objects that could damage the flooring if caught underneath the product, and that the underside of the product is free from foreign objects that could mark the surface.
WARNING:
- Do not use water, solvents, or polishes to clean the outside of the appliance; wipe clean with a dry cloth.
- Never immerse the unit in water and do not clean in a dish washer.
- Never use the appliance without the filter fitted.
 Thank you for choosing Gtech
“Welcome to the Gtech family. I started Gtech to create sensible, easy to use products that do a great job, and hope you get many years of trouble-free performance from your new product.”
 Nick Grey - Inventor, owner of Gtech
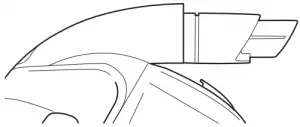
Make a note of your product serial number code for future reference. You can find this on the underside of item (1)


_ – _ _ – _ _ _ ~
_ _ _ _ _ ~
_ _ _ _ ~
_ _ ~ _ _ _ _ _ _ _
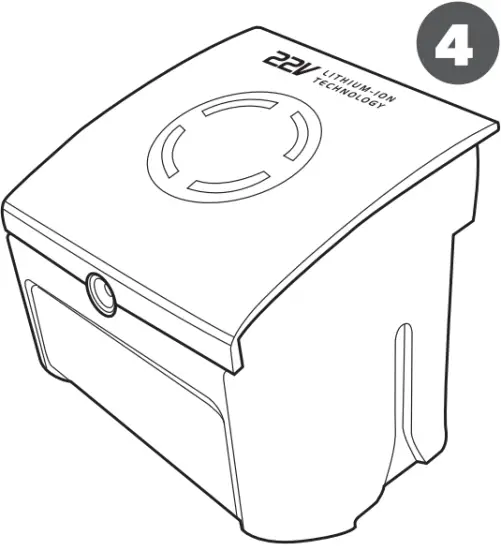
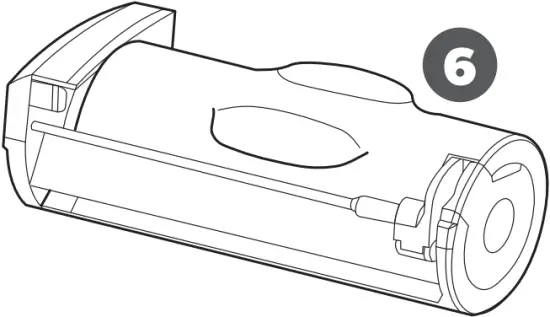
What’s in the box


- Head full assembly
- Lower Handle
X 2 components - Upper Handle
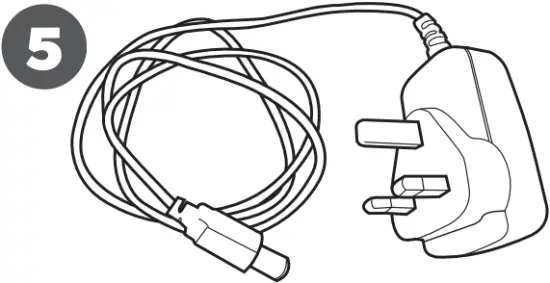
X 2 components - Battery
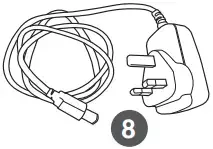
- Charger
- Bin
- Filter
- Hair removal tool
Assembly
Push the two parts of the lower handle together in the orientation shown above. They will only fit one way. They will click into place and remain permanently fixed.
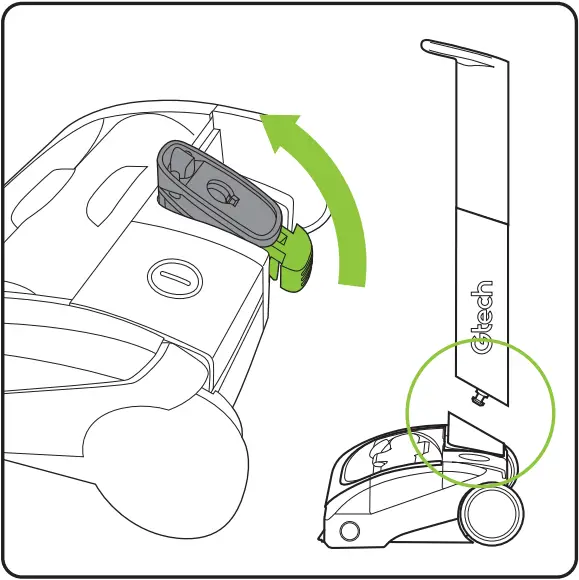
Push the pivot poke to the upright position. This might require some force.
Attach the lower handle to the head assembly (See next step)
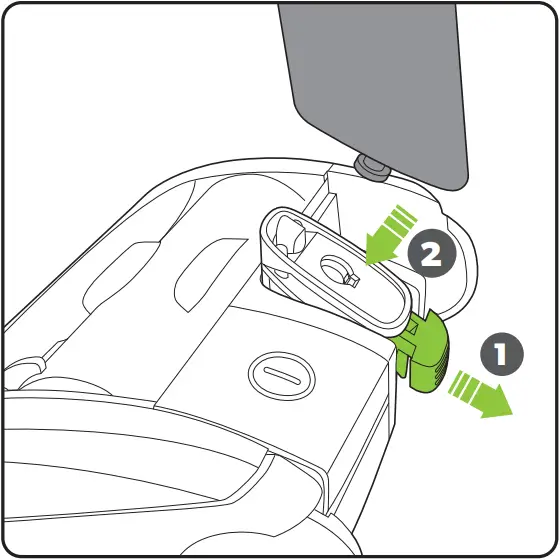
Pull out the green locking clip to allow the lower handle to fit (the clip remains attached to the head) Insert the metal pin on the lower handle into the hole in the pivot yoke.

Ensure the lower handle is sitting completely flush against the pivot yoke. Firmly push the green locking clip until it clicks fully into place. The clip can be pulled out to unlock the lower handle should it need to be removed.
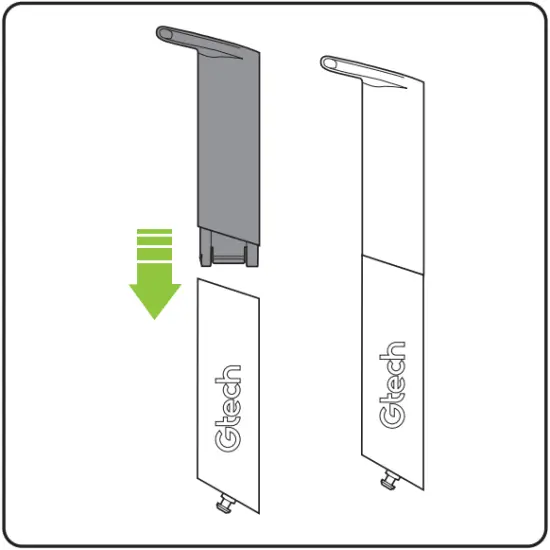
Push the two parts of the upper handle together in the orientation shown above. They will only fit one way. They will click into place and remain permanently fixed.
Insert the upper handle into the lower handle. You will need to press the button on the upper handle to fit it in. Once it slides down you will hear it click into place.
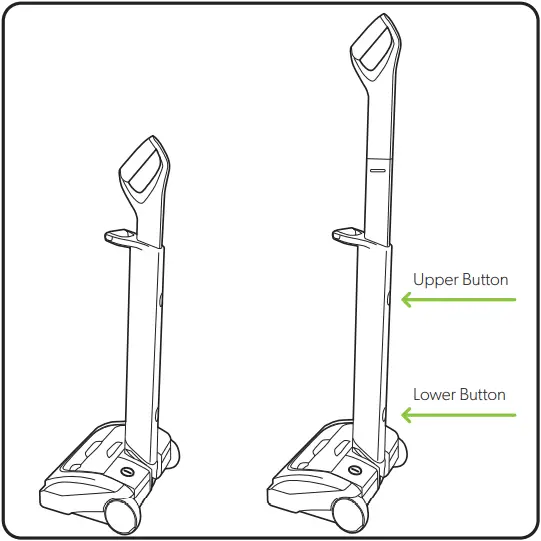
Storage
To stow or extend the upper handle simply press the button on the lower handle to unlock the upper handle.
The upper handle will now slide up or down depending on required position.
The upper handle can be set in two positions: Lowered for storage and raised for use. To lower the handle, release the upper button. To raise the handle from the stored position, release the lower button.
Operation
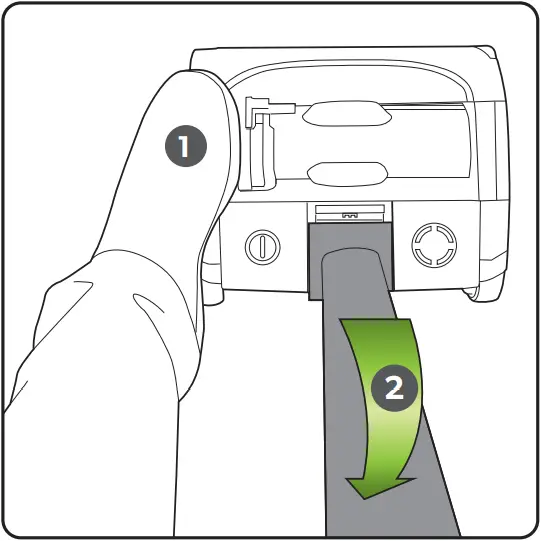
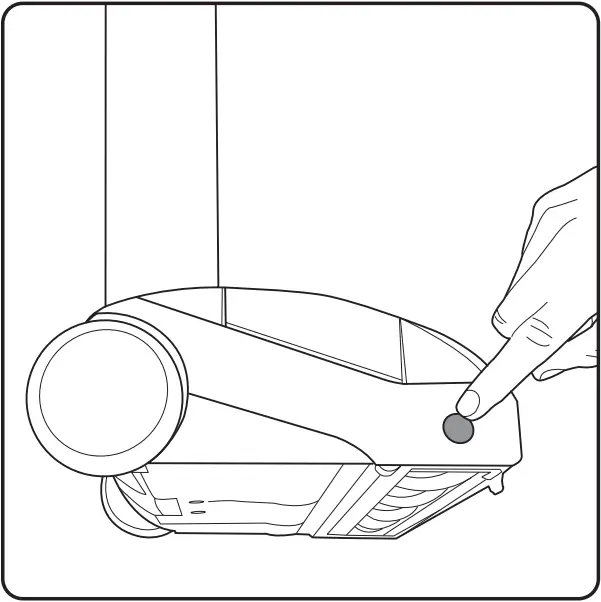
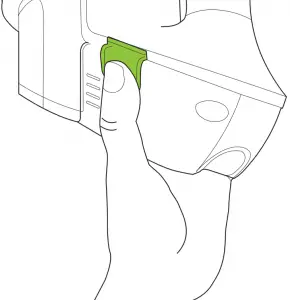
Without pressing the power button, place your foot on the left side of the head (1) and pull the handle back (2).
The power button is located on the left hand side of the head assembly.
Press the power button with your foot to turn the product on.
Battery charging
When the state of charge indicator starts to flash one green LED, recharge the battery.
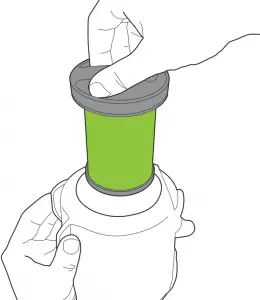
To remove the battery, squeeze the latch underneath and pull upwards.
The battery can be charged whilst it’s in the product, or when it’s off the product. The battery can be charged from flat in 4 hours. The state of charge indicator will show 4 solid green lights when it is charged.
It is OK to charge for 1 hour for a burst of cleaning. Replace the battery by sliding it down into the head assembly. It will click into place.
Emptying the bin
![]()
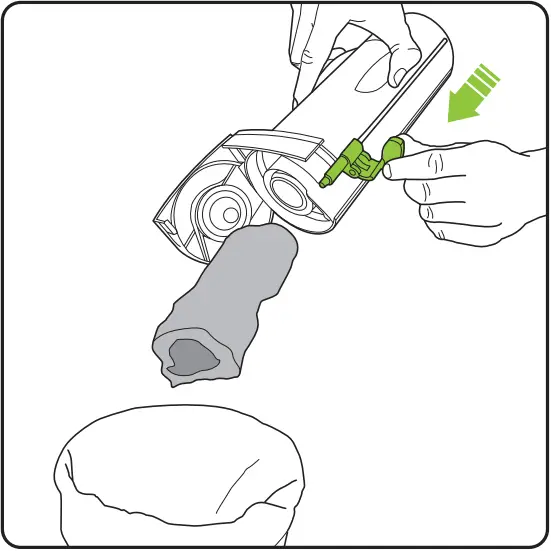
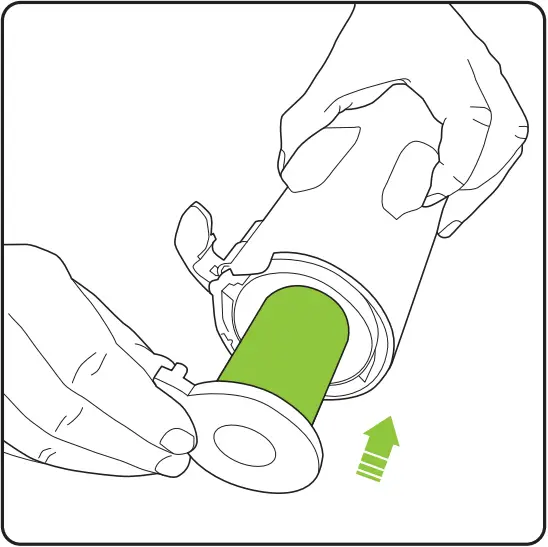
Holding onto the product with one hand, pull the bin handle and lift the bin out of the product.
![]()
Lift and release the latch marked with the green arrow to pull open the lid.
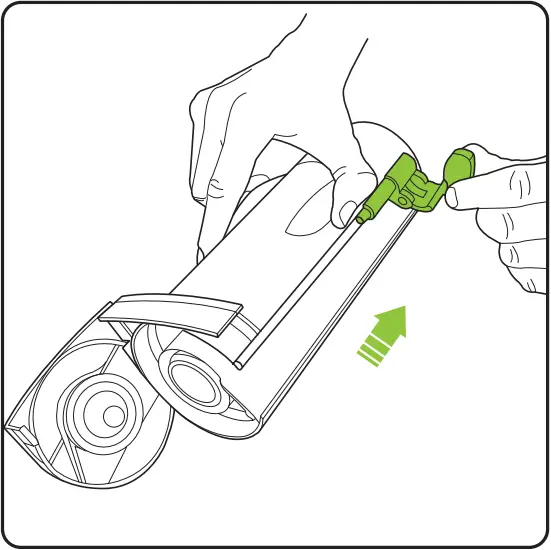
![]()
Hold the product’s bin over a rubbish bin and push the green lever towards the lid to empty the dirt.
![]()
Pull the green lever back towards the bottom of the bin. Close the bin lid and reinsert the bin into the product.
Cleaning the filters – do this once a month or more frequently depending on use.

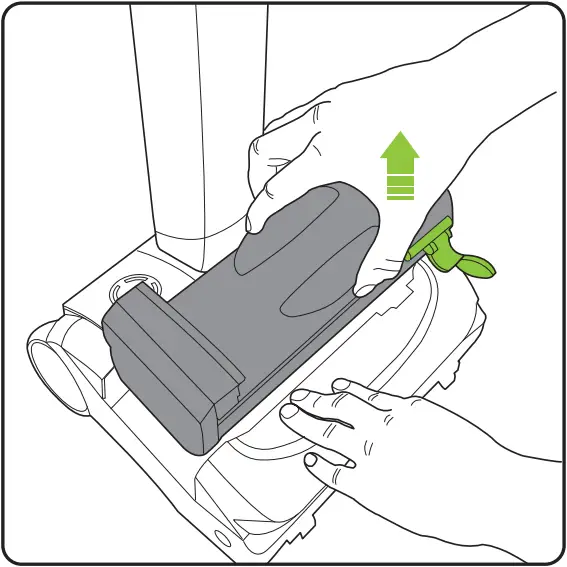
Holding onto the product with one hand, pull the bin handle and lift the bin out of the product.
Pull the filter out of the filter housing. Tap the dirt from the filter and tip any dirt from the filter housing. Wash the filter if necessary.
Remove the filter from the inner shroud, by twisting and pulling.
Tap the inner shroud over a bin to remove any excess dirt.
Wash the filter under a tap. Squeeze out any excess water then let it dry completely before reinserting into the product. Recommended water temperature 40°C. Do not use detergent or soaps. Never put bin back without filter inside. You could damage the motor.
Replacing the filters
Slide the filter onto the inner shroud.
Slide the filter and inner shroud into the filter housing.
Removing and cleaning the brush bar / jam or fault
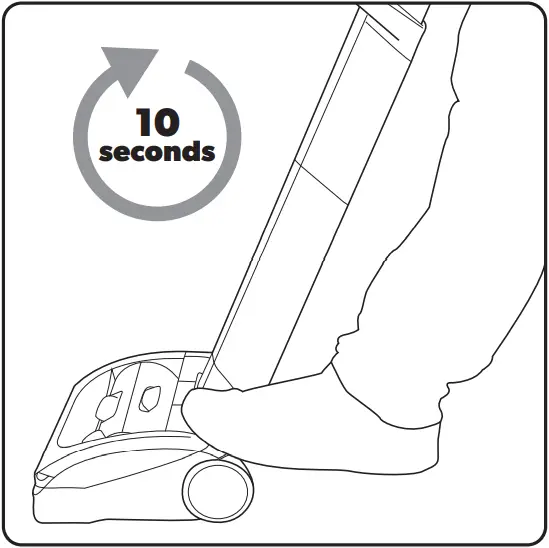
If the brush bar jams during use, the product will stop and the LEDs will appear red. You will need to remove and clean the brush bar.
The product will not re-start until the red lights go out. This will take ten seconds.
If the problem persists, follow the troubleshooting instructions on page 14.
Before checking for a blockage, remove the battery.
Rest the product on its side and locate the brush bar button on the right hand side. Press the button inwards and then pull the brush bar out from the bottom of the product.
The brush bar can now be removed, starting at the button end.

To remove hair from the brush bar, run the hair removal tool down the groove to cut the hair, then use the comb remove it.
Never operate the product without the brush bar in place.
While the brush bar is removed you can take the opportunity to remove any hair from the brush bar housing comb as indicated.
Re-insert the brush bar, starting by the end furthest away from the button. Then line up and push the brush bar into the product until it clicks into place.
Replace the battery.
AIRRAM TECHNICAL SPECIFICATION
| Battery model | 103A022 |
| Battery | 22V Li-Ion |
| Charging period | 4 hours |
| Battery charger output | 27V DC 500mA |
| Weight | 3.2kg |
The ![]() symbol indicates that this product is covered by legislation for waste electrical and electronic products (2012/19/EU)
symbol indicates that this product is covered by legislation for waste electrical and electronic products (2012/19/EU)
When the vacuum has reached the end of its life, it and the Li-Ion battery it contains should not be disposed of with general household waste. The battery should be removed from the vacuum and both should be disposed of properly at a recognised recycling facility.
Call your local council, civic amenity site, or recycling centre for information on the disposal and recycling of electrical products.
Alternatively visit www.recycle-more.co.uk for advice on recycling and to find your nearest recycling facilities.
FOR HOUSEHOLD USE ONLY ![]()
![]()
Product care
Your product doesn’t need much maintenance: keep the filters clean, keep the brush bar tangle-free and charge the battery. Wipe it with a dry cloth if it gets dirty, including under the bin.
Troubleshooting
| Product is not cleaning well |
|
| Product has stopped or won’t work |
|
| Battery will not charge |
|
Product support
If these initial tips do not solve your problem we please visit our support area where you can find troubleshooting help including online manuals, FAQs and how-to-videos, as well as genuine spares and replacement parts compatible with your product.
Visit: www.gtech.co.uk/support


Online Live chat support [email protected] How to Videos
WARRANTY - REGISTRATION
Visit www.gtech.co.uk/warrantyregistration to register your product and ensure that we have all the information required to provide you with quick and efficient support.
You will need your product’s serial number.

 If you purchased directly from Gtech, your details are already registered and your 2-year warranty will start automatically.
If you purchased from an authorised Gtech retailer, please register your warranty within 3 months. You will need to provide proof of purchase to support any claim(s) against your warranty.
WARRANTY - TERMS AND CONDITIONS
If your product is within its warranty and has a fault that cannot be resolved from the troubleshooting section or online support, please do the following:
- Contact our Gtech Customer Care Helpline on UK: 08000 308 794, who will go through any troubleshooting with you to identify the fault.
- If your fault can be resolved by a replacement part, this will be sent to you free of charge.
- Following troubleshooting, if your product needs to be replaced, we will arrange collection of your faulty product for inspection, and delivery of a replacement product free of charge.
Your product is guaranteed against material or manufacturing faults for 2 years from the date of purchase (or the delivery date if this is later) subject to the following terms and conditions:
SUMMARY
The guarantee becomes effective at the date of purchase (or the date of delivery if this is later). If a product is repaired or replaced during the warranty period, the warranty period is not started again.
- You must provide proof of delivery/purchase before any work can be carried out on the product. Without this proof, any work carried out will be chargeable. Please keep your receipt or delivery note.
- All work will be carried out by Gtech or its authorised agents.
- Any parts which are replaced will become the property of Gtech.
- The repair or replacement of your product is under guarantee and will not extend the period of guarantee.
- The guarantee provides benefits which are additional to and do not affect your statutory rights as a consumer.
WHAT ISN’T COVERED
Gtech does not guarantee the repair or replacement of a product as a result of:
- Normal wear and tear (e.g. drive belt, brush bar, batteries).
- Use of consumables (e.g dust bags and cartridges)
- Accidental damage, faults caused by negligent use or lack of care and maintenance, misuse, neglect, careless operation or handling of the product which is not in accordance with operating manual.
- Blockages. Please refer to the operating manual for details of how to unblock your product.
- Use of the product for anything other than the normal domestic household purposes.
- Use of parts and accessories which are not Gtech genuine components.
- Faulty installation (except where installed by Gtech)
- If it is modified in any way.
- Repairs or alterations carried out by parties other than Gtech or its authorised agents.
- Purchasing your product from an unofficial third party (i.e not from Gtech or an official Gtech retailer.
- If you are in doubt as to what is covered by your guarantee, please call the Gtech Customer Care Helpline on UK: 08000 308 794
International orders are subject to a delivery charge for both faulty and non faulty products.
![]()
Grey Technology Limited
Brindley Road, Warndon, Worcester WR4 9FB, UK
email: [email protected]
telephone: 08000 308 794
www.gtech.co.uk
CPN04992
4992_Unite_Fortune_AirRAM_manual_aw.indd 25/05/2021 11:52
]]>![]()

Mk.2
Model number: ATF036
OPERATING MANUAL
Do not use in rain or leave outdoors whilst raining.

WARNING: Basic safety precautions should always be observed when using an electrical appliance, including the following to reduce the risk of fire, electrical shock, or injury:
Personal Safety:
- Store indoors in a dry place out of the reach of children.
- Always use responsibly. This appliance can be used by children aged from 8 years and above and persons with reduced physical, sensory or mental capabilities or lack of experience and knowledge if they have been given supervision or instruction concerning use of the appliance in a safe way and understand the hazards involved.
- Don’t let children play with the appliance; supervise children using or maintaining the appliance.
- Use only manufacturer’s recommended attachments as described in this manual; misuse or use of any accessory or attachment other than those recommended, may present a risk of personal injury.
- Take extra care when cleaning stairs.
- Keep the appliance and accessories away from hot surfaces.
- Do not block the appliances openings or hinder air flow; keep openings free of any objects including dust, lint, clothing, fingers (and all parts of the body).
- Particularly keep hair away from the brush bar and other moving parts.
Electrical safety:
- Only use batteries and chargers supplied by Gtech.
- Never modify the charger in any way.
- The charger has been designed for a specific voltage. Always check that the mains voltage is the same as that stated on the rating plate.
- A charger that is suitable for one type of battery pack may create a risk of fire when used with another battery pack; never use the charger with another appliance or attempt to charge this product with another charger.
- Before use, check the charger cord for signs of damage or ageing. A damaged or entangled charger cord increases the risk of fire and electric shock.
- Do not abuse the charger cord.
- Never carry the charger by the cord.
- Do not pull the cord to disconnect from a socket; grasp the plug and pull to disconnect.
- Don’t wrap the cord around the charger when storing.
- Keep the charger cord away from hot surfaces and sharp edges.
- The supply cord cannot be replaced. If the cord is damaged the charger should be discarded and replaced.
- Do not handle the charger or the appliance with wet hands.
- Do not store or charge the appliance outdoors.
2
- The charger must be removed from the socket before removing the battery, cleaning or maintaining the appliance.
- Ensure the appliance is off before connecting or disconnecting the motorised brush bar.
Battery safety:
- This appliance includes Li-Ion batteries; do not incinerate batteries or expose to high temperatures, as they may explode.
- Liquid ejected from the battery may cause irritation or burns.
- In an emergency situation contact professional help immediately!
- Leaks from the battery cells can occur under extreme conditions. Do not touch any liquid that leaks from the battery. If the liquid gets on the skin wash immediately with soap and water. If the liquid gets into the eyes, flush them immediately with clean water for a minimum of 10 minutes and seek medical attention. Wear gloves to handle the battery and dispose of immediately in accordance with local regulations.
- Shorting the battery terminals may cause burns or fire.
- When the battery pack is not in use, keep it away from paper clips, coins, keys, nails, screws or other small metal objects that could make a connection from one terminal to another.
- When you dispose of the appliance remove the battery and dispose of the battery safely in accordance with local regulations.
Service:
- Before using the appliance and after any impact, check for signs of wear or damage and repair as necessary.
- Do not use the appliance if any part is damaged or defective.
- Repairs should be carried out by a service agent or a suitably qualified person in accordance with relevant safety regulations. Repairs by unqualified persons could be dangerous.
- Never modify the appliance in any way as this may increase the risk of personal injury.
- Only use replacement parts or accessories provided or recommended by Gtech.
Intended use:
- This appliance has been designed for domestic dry vacuum cleaning only.
- Do not pick up liquids or use on wet surfaces.
- Do not pick up anything that is flammable, burning or smoking.
- Use only as described in this manual.
- Don’t use on concrete, tarmacadam or other rough surfaces.
- The brush bar may damage certain surfaces. Before vacuuming flooring, upholstery, rugs, carpets or any other surfaces, check the manufacturer’s recommended cleaning instructions.
- May damage delicate fabrics or upholstery. Care should be taken on loose-weave fabrics or where there are loose threads. If in doubt please test on an inconspicuous area first.
- The Multi has a constantly rotating brush bar. Never leave the Power Brush in one spot for an extended period of time as this may damage the area being cleaned.
WARNING:
- Do not use water, solvents, or polishes to clean the outside of the appliance; wipe clean with a dry cloth.
- Never immerse the unit in water and do not clean in a dish washer.
- Never use the appliance without the filter fitted.
- Ensure the battery is removed before changing tools.
3
Thank you for choosing a Gtech Multi
“I started Gtech to create sensible, easy to use products, which do a great job. Your opinion is important to us. Please take the time to write a review of the Multi either on the website of the store you bought it from or by emailing us at [email protected]. We will use your feedback to improve our products and services and let other people know what it’s like to be part of the Gtech family.” Nick Grey Inventor, Owner of Gtech
What’s in the box


![]()
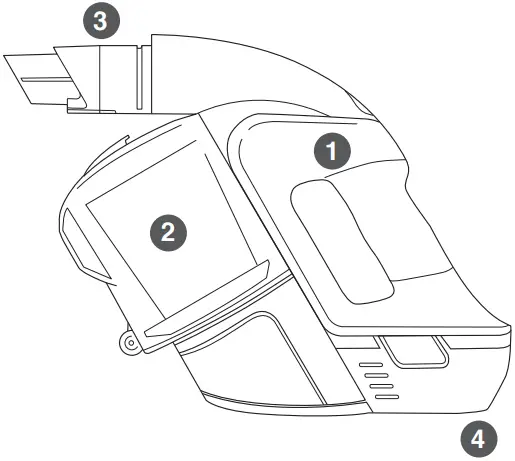
1 Gtech Multi vacuum cleaner 5 Dusting brush
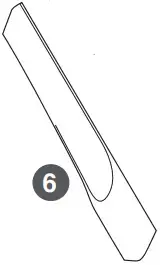
2 Bin (fitted) 6 Crevice tool (stored inside the handle)
3 Active nozzle 7 Power brush
4 Battery (fitted) 8 Charger
PRODUCT SERIAL NUMBER:
You can find this on the underside of your product
4
Operation
The dusting brush can be slotted onto the active nozzle. The crevice tool is stored on board the product for easy access.

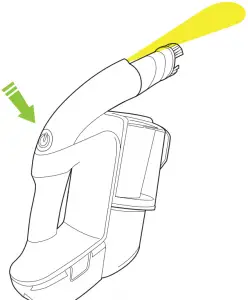
Press the button above the handle to turn the Multi on and off.
![]()
![]()
![]()

An active nozzle is built into your Multi. The dusting brush, crevice tool, and power brush all attach to the active nozzle.
5
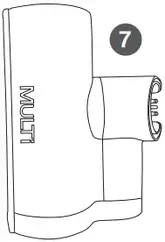
Power brush

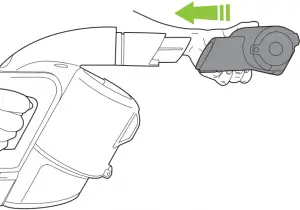
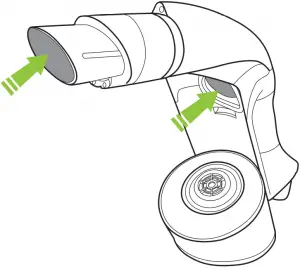
Make sure the terminals on the Power Brush and Active nozzle are correctly lined up and gently push the Power brush onto the Active nozzle. The battery should be removed when changing attachments.
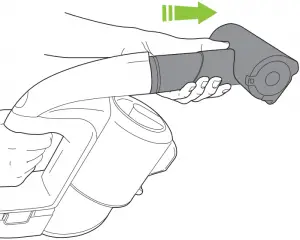
Gently pull the Power Brush from the Multi to remove. The battery should be removed when changing attachments.
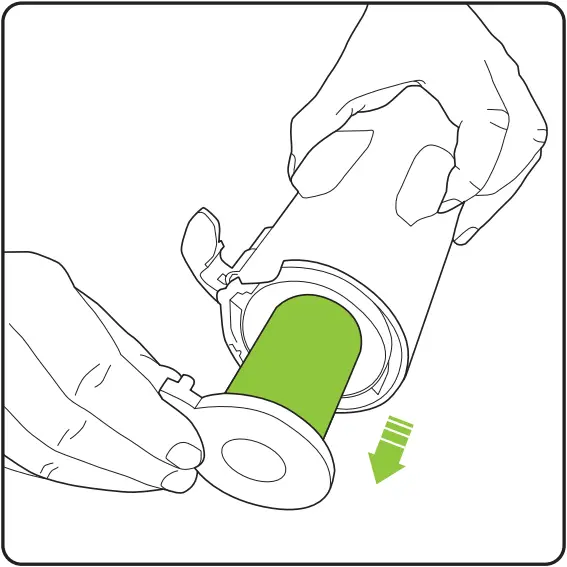
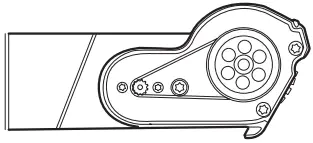
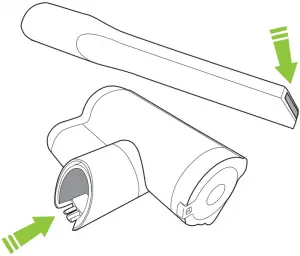
To clean the brush bar, first remove the power brush. Rotate the latch from the lock to the unlock position and pull out the brush bar.
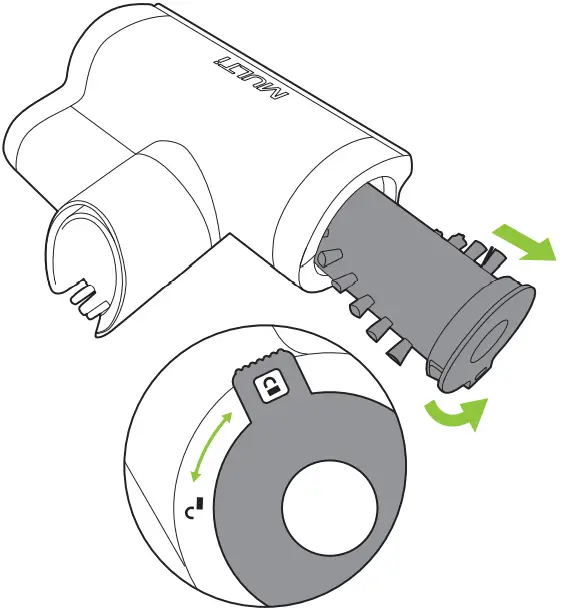
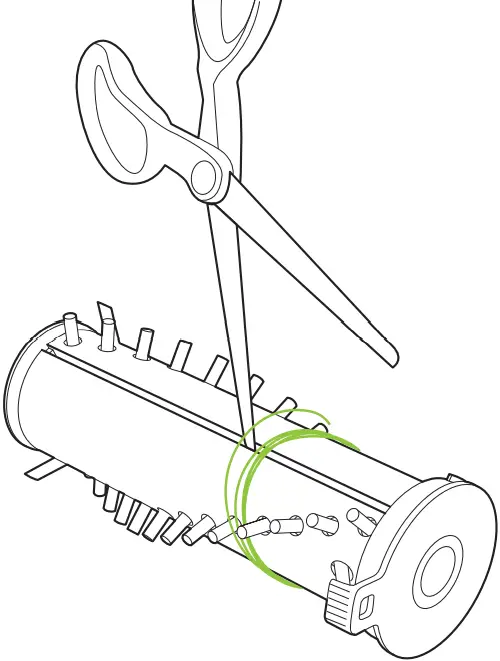
To remove hair from the brush bar, run an open pair of scissors down the groove to cut the hair, then pull it out. Never operate the power brush without the brush bar in.
6
Battery charging
When a single green light flashes, recharge the battery.

The battery can be charged on or off the main unit
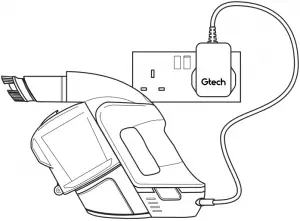

After 4 hours, the LEDs turn solid green and charging is complete.

It is OK to charge for 1 hour for a burst of cleaning.
7
State of Charge


100% – 75% 75% – 50%


50% – 25% 25% – 1%
The battery state of charge indicator shows how much charge the Multi has. As you use the product, the green lights will turn off in a downwards direction.
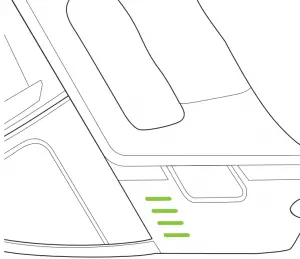
While the battery is on charge, the LEDs will pulsate and in turn illuminate. When the battery is fully charged all of the LEDs will be solid green.
8
Emptying the bin
![]()
There’s no latch, the bin just pulls off. It’s easier if you wiggle it as you pull it.
![]()
Hold the Multi’s bin over a rubbish bin and release the latch to empty the dirt. A gentle tap will help. Remove the filter and tap off the excess debris each time you empty the bin.
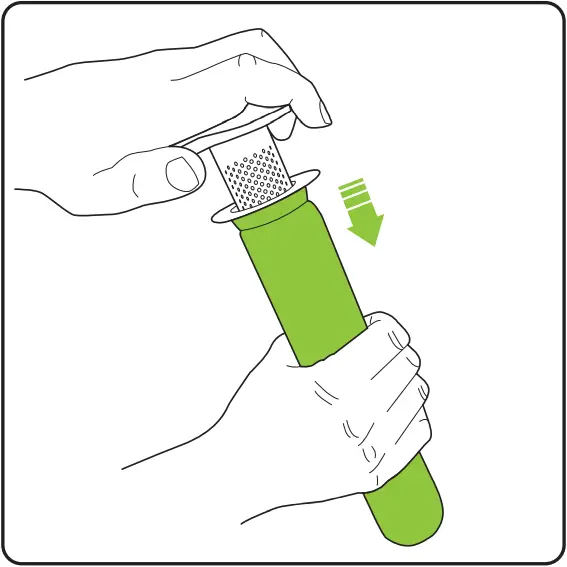
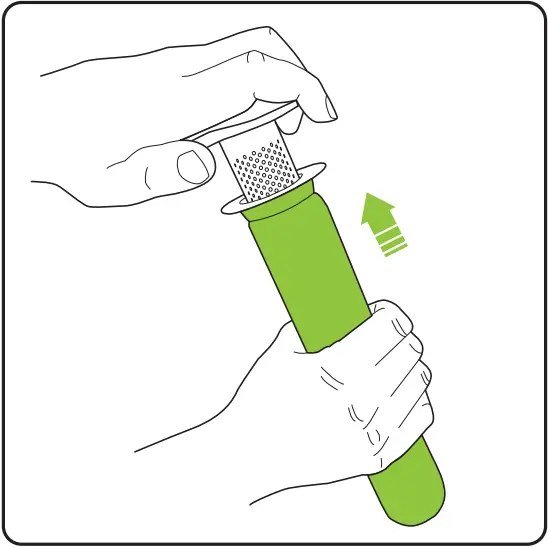
Cleaning the filter
Remove the filter by pulling it from the top of the bin. Tap the dirt from the filter and tip any dirt from the filter housing. Wash the filter if necessary.

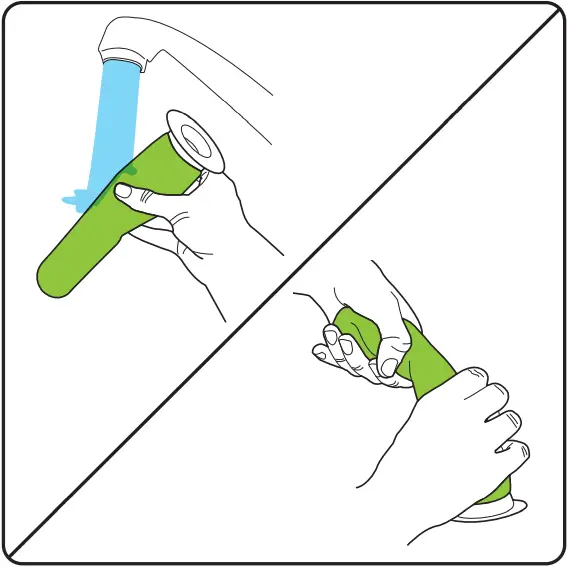
Wash the filter under a tap, squeeze it out then let it dry completely before using it. Recommended water temp 40°C do not use any detergent. (You can buy more at www.gtech.co.uk)
9
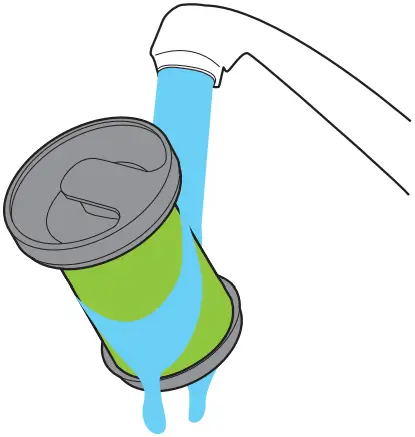
If the suction is low when the bin is empty and filter is clean…
you have a blockage.
Remove the battery & bin and look through both ends of the tube. Remove any blockages.
The tools can block too, sometimes.
Removing the battery
Press the green buttons and pull to remove the battery. The battery can be charged on or off the main unit. If you want to buy a spare battery go to www.gtech.co.uk or call 01905 345891
10
Product Care
Your Gtech Multi doesn’t need much maintenance: keep the filter clean, check for blockages, remove hair from the brushbar and charge the battery. Wipe it with a dry cloth if it gets dirty, including the area under the bin. Never wash it with liquid, run it under a tap or use it without the filter.
Troubleshooting
| Multi is not cleaning well | 1. Empty the bin 2. Clean the holes in the filter housing 3. Wash the filter 4. Check for blockages 5. Remove hair from brushbar |
| Multi has stopped or won’t work | 6. Charge the battery (check the socket works and is turned on) 7. It might be blocked – check items 1 to 4 above |
| 4 Red lights displayed on battery | 8. Brush bar jammed. 9. Turn off Multi, remove the battery and clear the blockage. |
| If this doesn’t solve your problem don’t worry, we will help. Go to www.gtech.co.uk/support or call 01905 345 891 |
|
GTECH MULTI TECHNICAL SPECIFICATION
| Battery model | 113A1003 |
| Battery | 22V 2000mAh Li-Ion |
| Charging period | 4 hours |
| Battery charger output | 27V DC 500mA |
| Weight (with standard nozzle) | 1.5kg |
11
WARRANTY - TERMS AND CONDITIONS
If your Gtech Multi breaks during the first 2 years, don’t worry, we will mend it for you.
Go to www.gtech.co.uk/support or call 01905 345 891 for assistance.
WHAT ISN’T COVERED
Gtech does not guarantee the repair or replacement of a product as a result of:
- Normal wear and tear (e.g. filters & brush bar)
- Accidental damage, faults caused by negligent use or care, misuse, neglect, careless operation or handling of the vacuum cleaner which is not in accordance with Gtech Multi operating manual.
- Blockages – please refer to the Gtech Multi operating manual for details of how to unblock your vacuum cleaner.
- Use of the vacuum cleaner for anything other than the normal domestic household purposes.
- Use of parts and accessories which are not Gtech genuine components.
- Repairs or alterations carried out by parties other than Gtech or its authorised agents.
- If you are in doubt as to what is covered by your guarantee, please call the Gtech Customer Care Helpline on 01905 345 891.
SUMMARY
- The guarantee becomes effective at the date of purchase (or the date of delivery if this is later).
- You must provide proof of delivery/purchase before any work can be carried out on the vacuum cleaner. Without this proof, any work carried out will be chargeable. Please keep your receipt or delivery note.
- All work will be carried out by Gtech or its authorised agents.
- Any parts which are replaced will become the property of Gtech.
- The repair or replacement of your vacuum cleaner is under guarantee and will not extend the period of guarantee.
The  symbol indicates that this product is covered by legislation for waste electrical and electronic products (EN2002/96/EC)
When the vacuum has reached the end of its life, it and the Li-Ion battery it contains should not be disposed of with general household waste. The battery should be removed from the vacuum and both should be disposed of properly at a recognised recycling facility.
Call your local council, via amenity site, or recycling centre for information on the disposal and recycling of electrical products. Alternatively visit www.recycle-more.co.uk for advice on recycling and to find your nearest recycling facilities.
FOR HOUSEHOLD USE ONLY
10
Notes
11
Notes
10
Notes
11
![]()
Grey Technology Limited
Brindley Road, Warndon, Worcester WR4 9FB
email: [email protected]
telephone: 01905 345891
www.gtech.co.uk
CPN01432
]]>