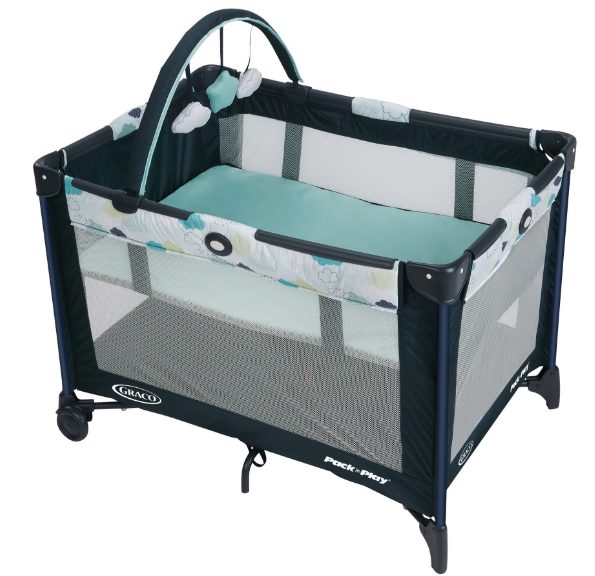
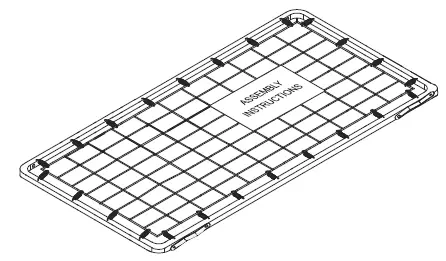
Graco Pack‘n Play
 Dear Customer,
Please fill in the model and serial numbers above from the label on the center of the bottom of your new Pack ’N Play®. Thank you for purchasing this Graco® Pack ’N Play!Graco is the recognized leader in the design and manufacture of quality baby products. We believe your new Graco Pack ’N Play is a wise choice, promising many hours of enjoyment for your baby. Before using your Pack ’N Play, please take a few minutes to read this Owner’s Manual. The short time you spend reading these instructions will help you use your Pack ’N Play properly. Failure to follow these warnings and instructions could result in serious injury or death.
Setting Up the Pack ’N Play
- THIS PRODUCT REQUIRES ADULT ASSEMBLY.
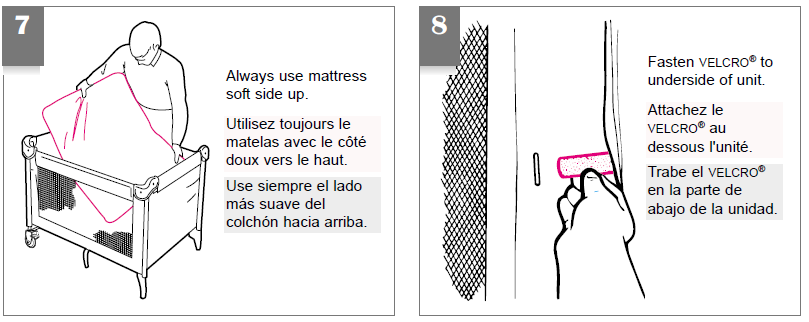
- Keep fingers clear of top corners during setup. Be sure Pack ’N Play is completely set up before use. Check that the four top rails are completely latched, the center of the floor is pushed down, and the mattress is flat and secured by the Velcro® straps. Always follow the instructions in the owner’s manual to set up the Pack ’N Play.
- Before each use, inspect this product for damaged hardware, loose joints, missing parts or sharp edges. Do not use Pack ’N Play if any parts are missing or broken. Call USA 1-800-345-4109 (Canada 1-800-667-8184) for replacement parts or the owner’s manual. Do not substitute parts.
Using the Pack ’N Play
- The Pack ’N Play is for playing or sleeping. When used for playing, never leave the child unattended and always keep the child in view. When used for sleeping, you must still provide the supervision necessary for the continued safety of your child.
- Always keep the Pack ’N Play away from hazards in the area that may injure your child.
- When a child is able to pull to a standing position, remove bumper pads, large toys, and other objects that could serve as steps for climbing out. Stop using this product when your child reaches 35 inches (89 cm) in height, weighs more than 30 pounds (14 kg), or is able to climb out.
- Do not modify Pack ’N Play or add any attachments that are not listed in the owner’s manual, including an add-on bassinet.
- DO NOT leave a child in the product with side lowered. Be sure side is in raised and locked position whenever child is in the product.
- If refinishing, use a non-toxic finish specified for children’s products.
Avoiding Suffocation Hazards
- Unlike cribs that have rigid sides, the Pack ’N Play has flexible sides. As a result, the Pack ’N Play mattress is specially designed to prevent suffocation. The Pack ’N Play mattress has a solid base, a certain length and width, and is less than one inch thick in order to meet safety standards. Using a thicker or a different-sized mattress may allow a child’s head to get between the mattress and the side of the Pack ’N Play causing suffocation.
- Infants can suffocate
- In gaps between an extra mattress and the side of a product
- On soft bedding.
- NEVER add a mattress, pillow, comforter or padding. Use ONLY the mattress pad provided by Graco.
- NEVER LEAVE INFANT IN PRODUCT WITH SIDES DOWN. The infant may roll into space between pad and lose mesh side causing suffocation.
- Never use plastic shipping bags or another plastic film as mattress covers not sold and intended for that purpose. They can cause suffocation.
- Do not use a water mattress with the Pack ’N Play.
Avoiding Strangulation Hazards
- Strings and cords can cause strangulation. Keep strings and cords away from child.
- Do not place the Pack ’N Play near a window where cords from blinds or drapes can strangle a child.
- Do not hang strings on or over the Pack ’N Play.
- Do not place items with a string around a child’s neck, such as hood strings, pacifier cords, etc.
- Do not attach strings to toys.
Questions?
In the U.S.A. or Canada, please contact our Customer Service Department with any questions you may have concerning parts, use, or maintenance. When you contact us, please have your product’s model and serial numbers ready so that we may help you efficiently.
Telephone us at: USA: 1-800-345-4109 Canada: 1-800-667-8184 Montreal: 514-344-3533
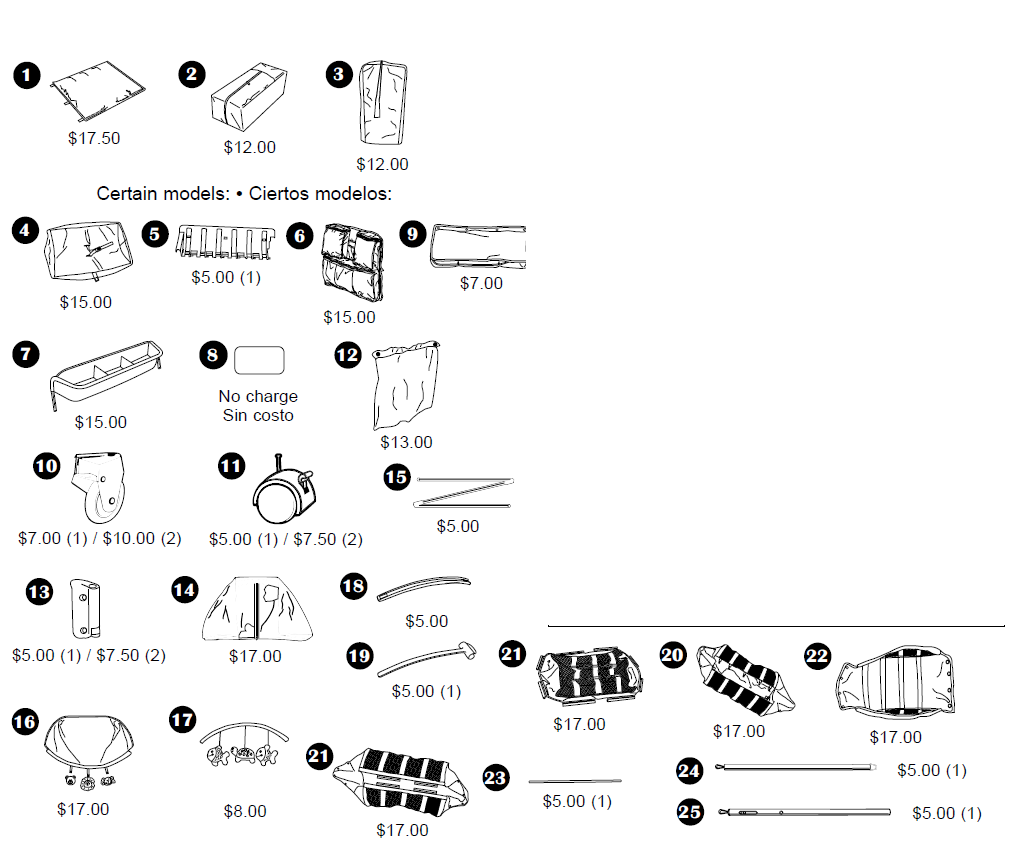
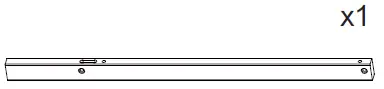
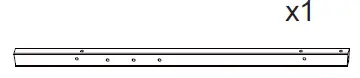
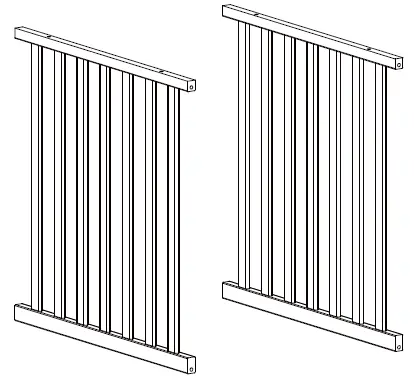
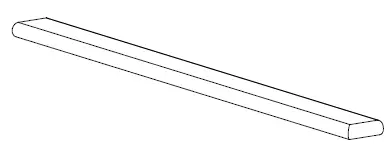
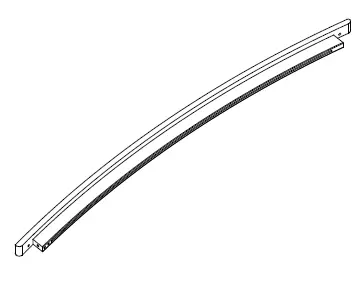
Parts list
This model may not include some features shown below. Check that you have all the parts for this model BEFORE assembling your product. If any parts are missing, call Customer Service. No tools are required.
- ALL MODELS

FEATURES ON CERTAIN MODELS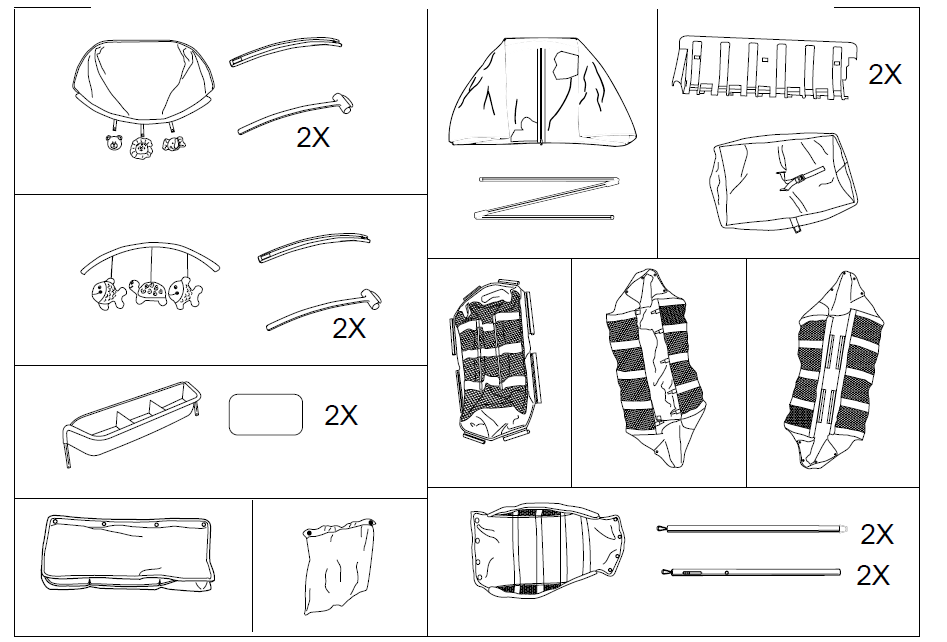
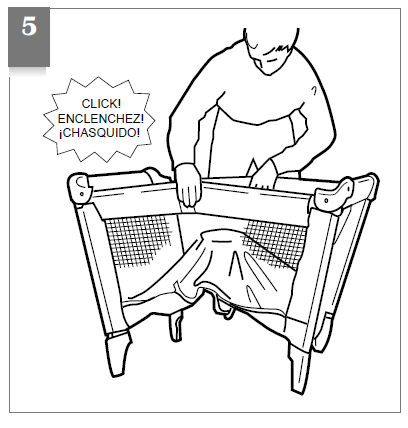
Setup
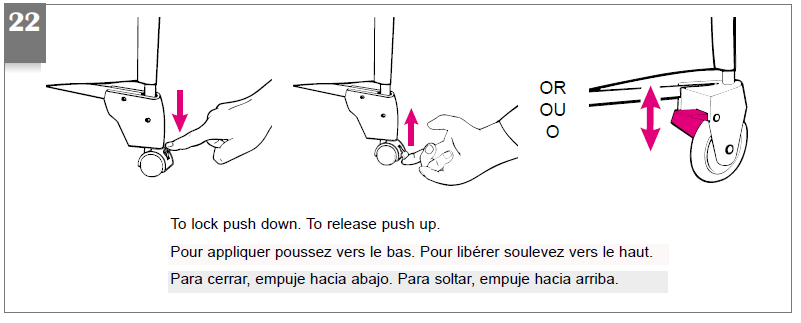
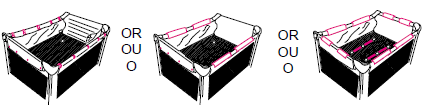
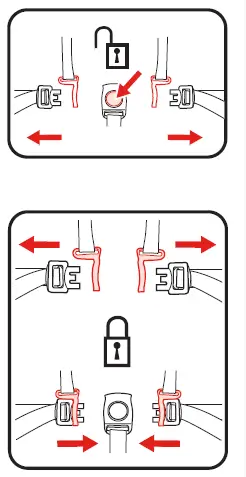
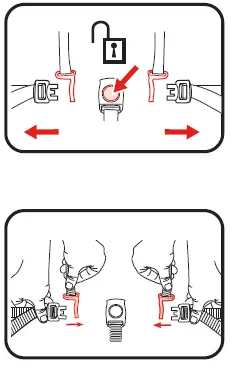
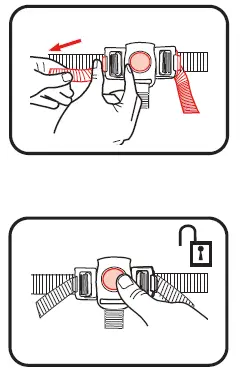
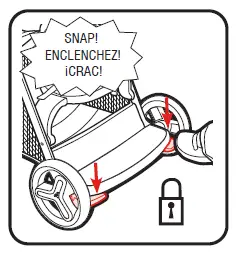
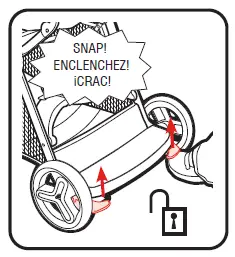
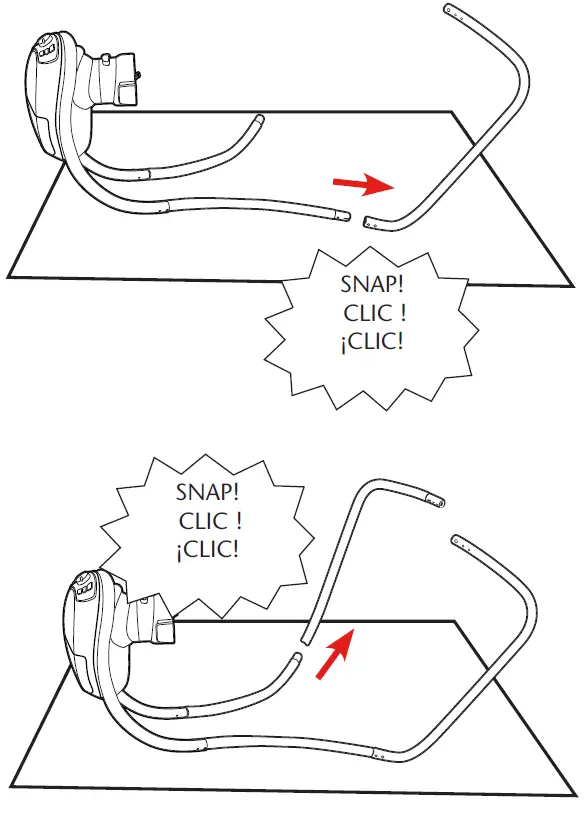
- For smooth setup and takedown, it’s important to remember one thing: the center of the floor must be at least halfway up to the top rails when locking OR unlocking rails (see figures 4 & 5).
Therefore: - When setting up, lock rails BEFORE lowering the center.
- Be sure top rails have become rigid. If not, pull up again until they are rigid. If top rails do not latch, lift the center of the floor higher.
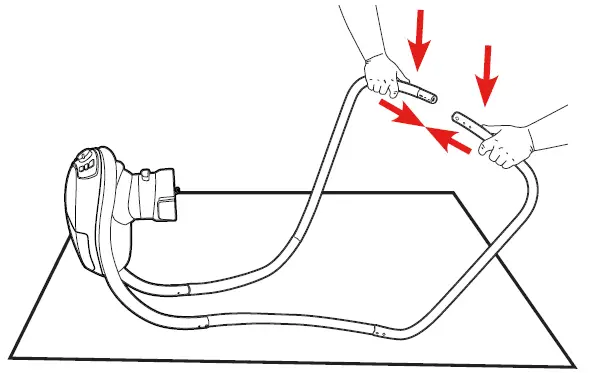
- When taking down, raise center halfway BEFORE unlocking rails.
- Hold one end of the unit up and push the center of the floor down.
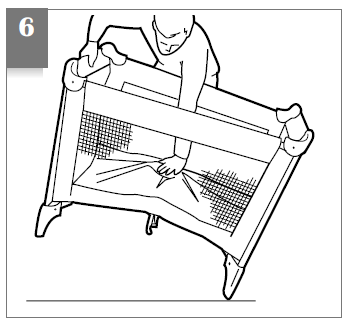
- If the center does not stay down, place some weight (several books) in the center of the unit and let it stand overnight.
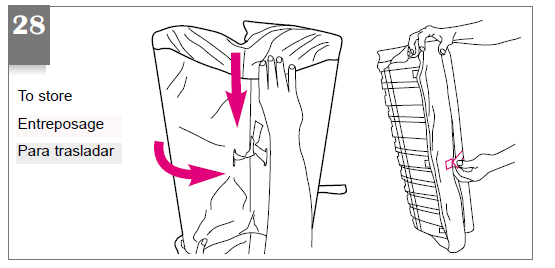
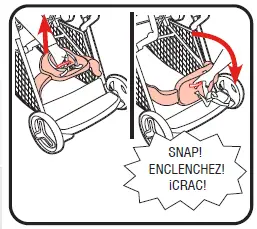
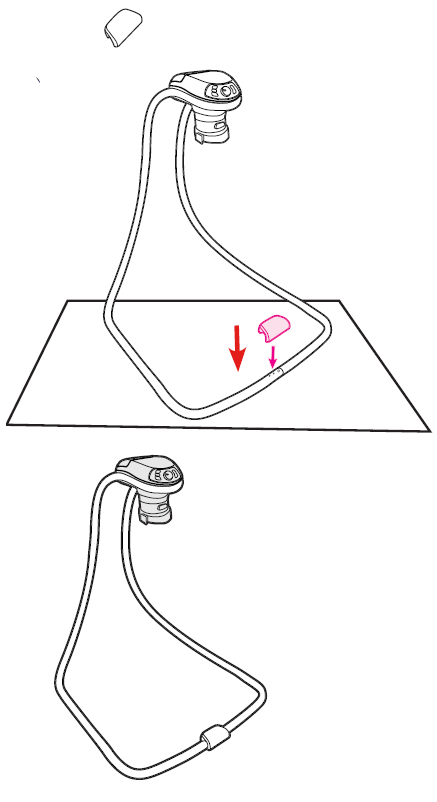
To Fold
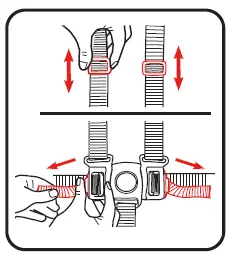
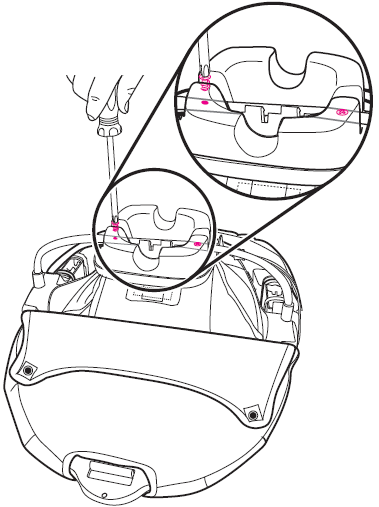
- Lift up slightly on the top rail.
- Push up on the button located under this symbol to release the two tubes.
- Push down.
- If top rails do not unlatch, DO NOT FORCE. Lift the center of the floor higher.
- Both tubes must be released for the top rail to fold.
- Pull center up all the way.
- Do not force. If unit will not fold, look for a partially latched top rail. Squeeze the latch button to release the rail.
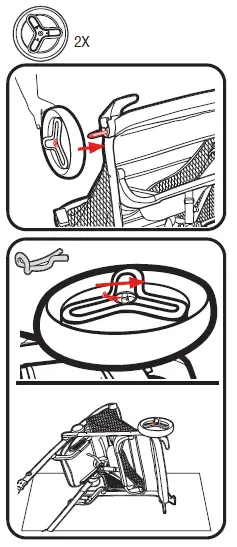
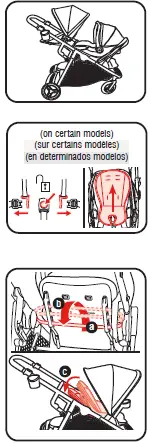
Accessories (On certain models)
If your bassinet is already installed, unsnap the four snaps on the bassinet end flap from either end of Pack ’N Play. Snap accessory bag on. Snap bassinet end flap over the accessory bag.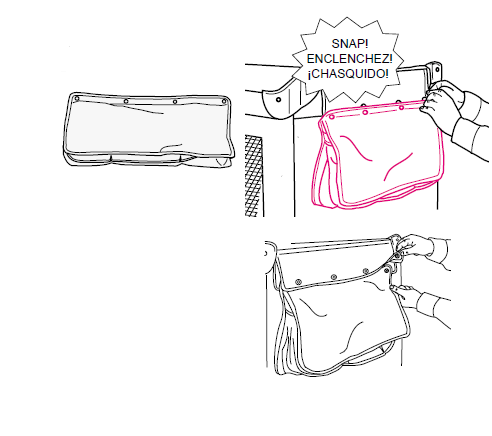
WARNING Always keep objects out of the child’s reach. Remove parent organizer when a child is able to pull himself up in the Pack ’N Play. Slide plastic dividers into pockets. To remove: push button and pull up.
Changing Table
WARNING To protect your child from falls and other injuries:
- Always stay within arm’s reach of your child when using the changing table. Always use waist belt when child is on the changing table. Never leave child unattended.
- The changing table is designed for use only with this Graco Pack ’N Play. Do not use on the floor, bed, counter or other surfaces. Before each use make sure the changing table is properly secured to the Pack ’N Play by pushing down firmly in the middle of the changing table.
- Do not use changing table as a sleeping or play area.
- The weight limit for the changing table is 25 lbs (11 kg). Do not use the changing table as extra storage. Always remove the changing table when your child is in the Pack ’N Play.
- Place on flat surface to help with assembly. Check that two halves are fastened securely by twisting and pulling on them.
WARNING Avoid falls. The waist belt must be secured by placing the plastic retainer through the opening between the two parts of the changing table. Check that retainer lays flat on the back of the changing table.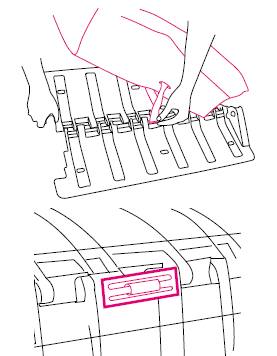
If the changing table rests on any of the hooks for the bassinet, move the changing table until it rests on the top rails of the unit.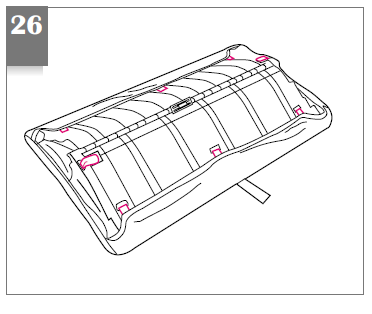
Toy Bar
WARNING
- Possible entanglement or strangulation injury.
- Remove toy bar when baby begins to push up on hands and knees. Recommended use from birth to 5 months.
- Toys are not intended to be mouthed by the baby and should be positioned clearly out of reach of the baby’s face and mouth.
- Always attach all provided fasteners (strings, straps, clamps, etc.) tightly to Pack ’N Play according to these instructions. Check frequently.
- Do not add additional strings or straps to attach to any other crib or playpen.
- Possible entanglement or strangulation injury. Remove toy bar when baby begins to push up on hands and knees. Recommended use from birth to 5 months.
- Toys are not intended to be mouthed by the baby and should be positioned clearly out of reach of the baby’s face and mouth.
- Always attach all provided fasteners (strings, straps, clamps, etc.) tightly to Pack ’N Play according to these instructions. Check frequently.
- Do not add additional strings or straps to attach to any other crib or playpen.
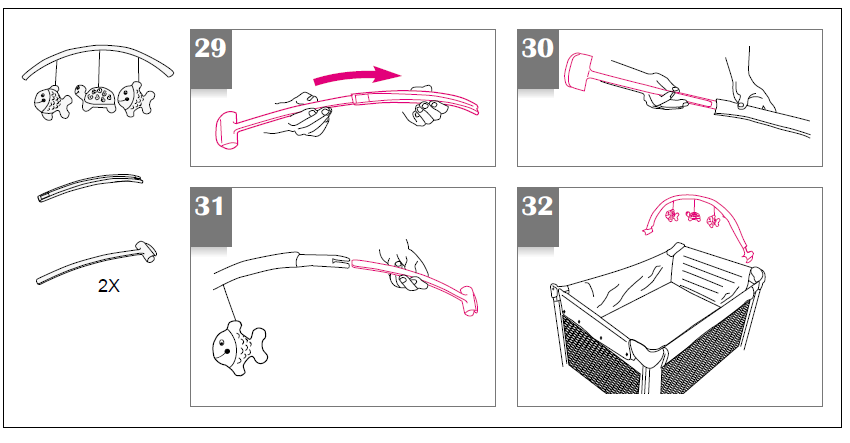
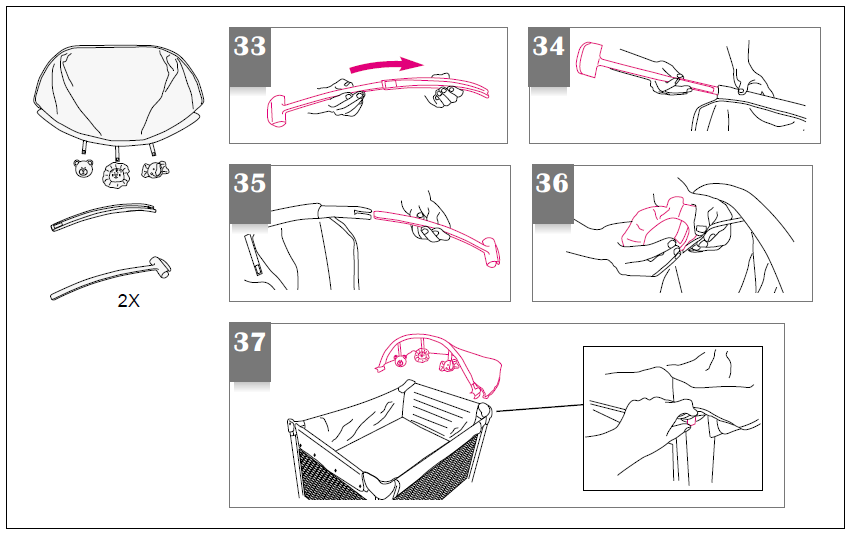
Indoor Canopy
- Possible entanglement or strangulation injury. Remove canopy with toys when baby begins to push up on hands and knees.
- Recommended use from birth to 5 months.
- Toys are not intended to be mouthed by the baby and should be positioned clearly out of reach of the baby’s face and mouth.
- Always attach all provided fasteners (strings, straps, clamps, etc.) tightly to Pack ’N Play according to these instructions. Check frequently.
- Do not add additional strings or straps to attach to any other crib or playpen.
- For indoor use only. This canopy does not provide protection from the harmful sun that can burn your child.
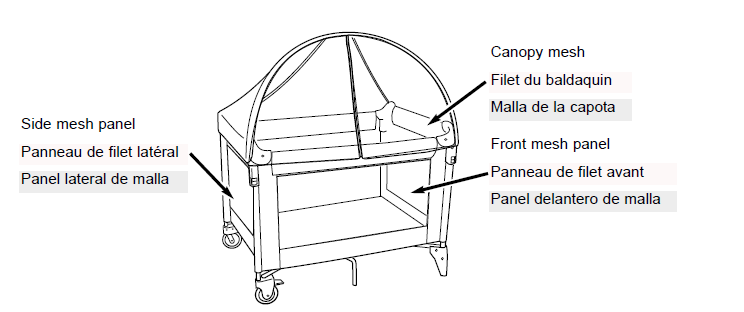
Outdoor Canopy
When properly used, the canopy provides shade for your child. However, your child may be warmer inside the play yard than in a shaded area outside the playard. To help prevent the build-up of heat inside the playard and to avoid over-heating your child:
- Turn canopy mesh away from the sun. Keep entire mattress shaded from sunlight at all times.
- Keep playard well ventilated:
- Always keep the front mesh panel and one side mesh panel of the playard open
- Never cover the canopy mesh. Never use an outdoor canopy with a bassinet.
- As always, use good judgment to protect your child from exposure to heat which can lead to serious injury or death.
- NEVER leave your child unattended. ALWAYS keep your child in view.
Maintenance of Canopy:
DO NOT machine wash or dry in a dryer. DO NOT dry clean. Spot clean with a damp cloth and a mild soap. NO BLEACH.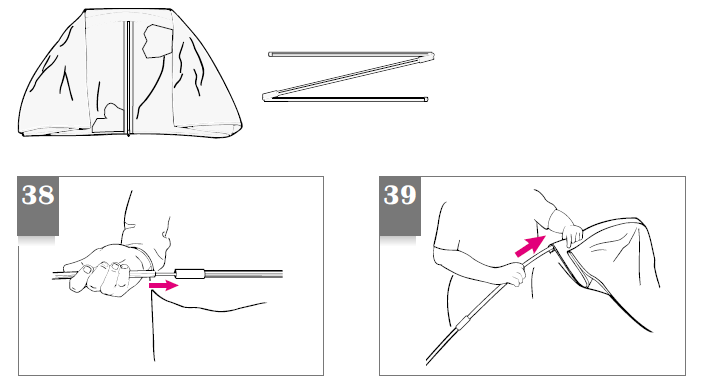
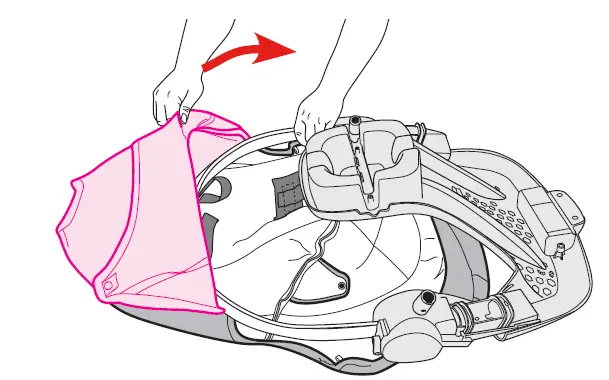
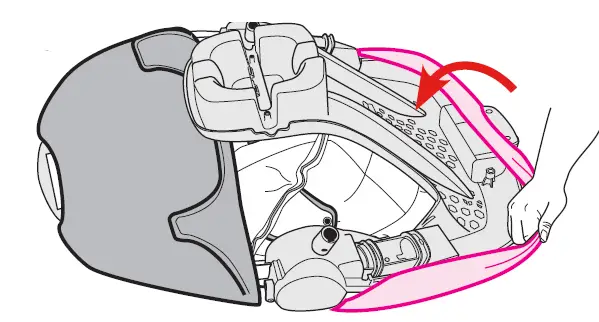
The mesh side of the canopy goes on the same side of the unit as the brackets. The shiny side goes on the inside of the unit.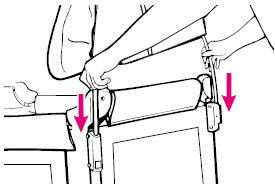
Fasten VELCRO® to back corners of unit.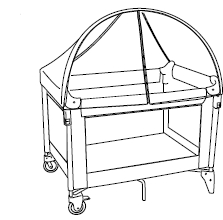
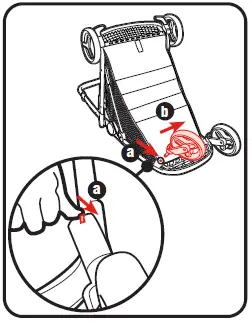
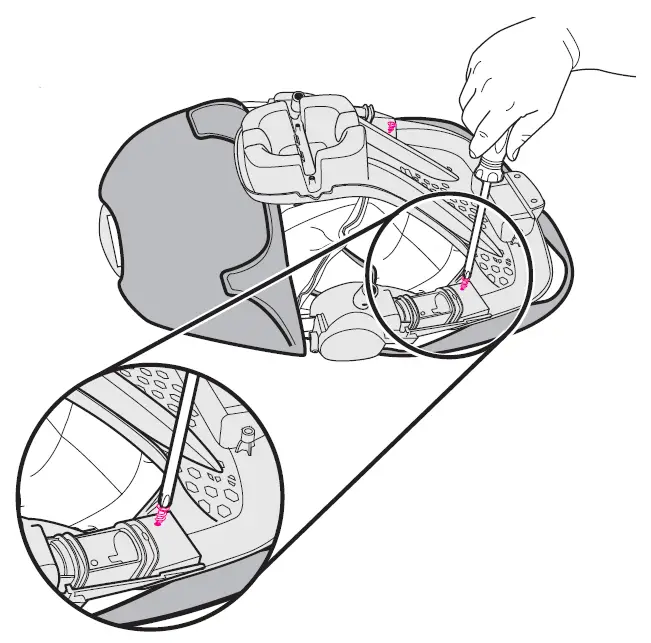
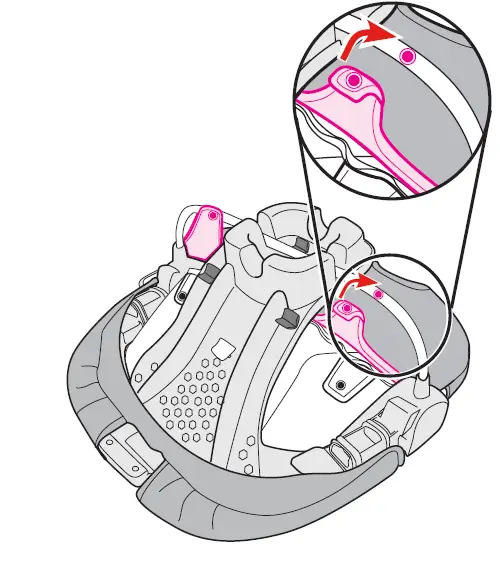
To remove: grasp tube firmly so it will not spring out. Push in, then pull up.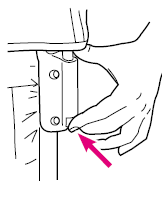
Bassinets
- Use bassinet with only one child at a time.
- Never place a child under the bassinet.
- Discontinue using your bassinet if child weighs over 15 lbs. (6.8 kg), can roll over, or can push up on hands and knees.
- DO NOT store the bassinet in the Pack ’N Play while in use.
- To help prevent heat build-up inside the Pack ’N Play and to avoid overheating your child, when using the bassinet DO NOT use an outdoor canopy.
- To avoid SUFFOCATION, DO NOT use extra paddings such as a water mattress, mattress, or pillows inside the bassinet. Use ONLY mattress provided by Graco. DO NOT use your bassinet without the mattress provided by Graco.
- Snap the flaps to the ends.
- CHECK:
Two tubes MUST be installed before placing the mattress pad in the bassinet.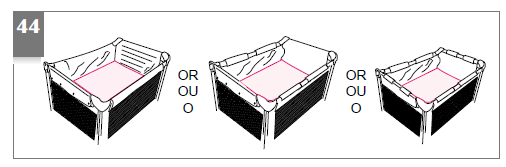
- WARNING The bassinet must be fully assembled and installed before using.
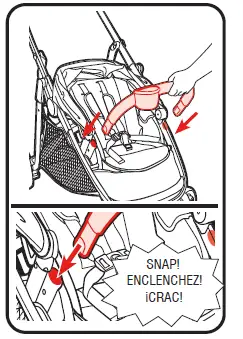
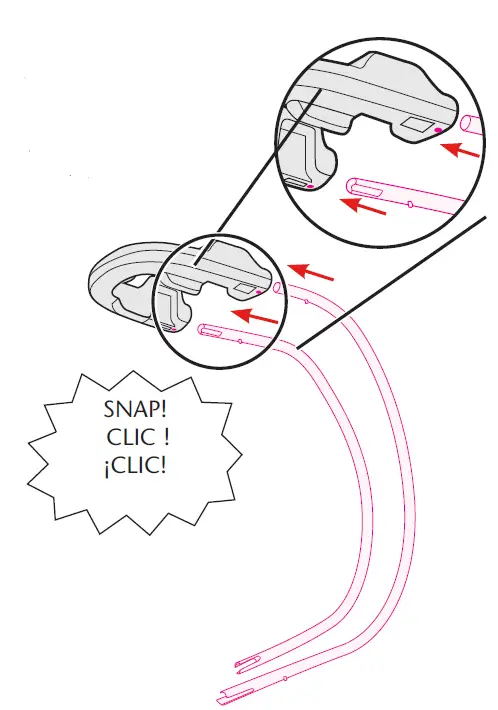
Bassinet with Tubes
WARNING
The loop ends must be in the slots in the corners to secure the bassinet in the Pack ’N Play. Pull up on the tube and bassinet to ensure that the tube is in place. The bassinet must be fully assembled and installed, including top rails, snaps and bottom pad, before using. To remove the bassinet, reverse the steps. Twist the tubes to pull them apart. Use extreme care when pulling the tubes apart.
Care and Maintenance
FROM TIME TO TIME CHECK YOUR PACK ’N PLAY for worn parts, torn material or stitching. Replace or repair the parts as needed. Use only Graco® replacement parts.IF PACK ’N PLAY IS USED AT THE BEACH, you MUST clean sand off your Pack ’N Play, including the feet, before packing it into cover. Sand in top rail lock may damage it.TO CLEAN PACK ’N PLAY, use only household soap and warm water. TO WASH CARRY BAG, machine wash in cold water on a delicate cycle and drip-dry. NO BLEACH OR DETERGENT.
Replacement Parts (USA)
Complete the form below. Your model number MUST be included on the form to ensure proper replacement parts. Your model number can be found on a sticker on the center of the bottom of your Pack ’N Play. Payment in U.S. dollars must accompany your order. Return the form with payment to: GRACO Children’s Products Inc. Customer Service Department 150 Oaklands Blvd. Exton, PA 19341
- Circle the part you need. You may only order parts that come with your original model.
- Marque con un círculo el repuesto que necesita. Sólo puede pedir piezas que están incluidas en su modelo original
- Check or money order enclosed (payable to Graco Children’s Products Inc.)
GRACO READY2GROW Series Stroller

WARNING
Failure to follow these warnings and the assembly instructions could result in serious injury or death. Only use product as instructed.
PLEASE SAVE OWNER’S MANUAL FOR FUTURE USE.
ADULT ASSEMBLY REQUIRED.
NEVER LEAVE child unattended. Always keep child in view while in stroller.
AVOID SERIOUS INJURY from falling or sliding out. Always use seat belt. After fastening buckles, adjust belts to get a snug fit around your child.
AVOID FINGER ENTRAPMENT: Keep your child away and use care when folding and unfolding the stroller. Be certain the stroller is fully erected and latched before allowing your child near the stroller.
AVOID STRANGULATION:
DO NOT place items with a string around your child’s neck, suspend strings from this product, or attach strings to toys.
NEVER USE STROLLER ON STAIRS or escalators. You may suddenly lose control of the stroller or your child may fall out. Also, use extra care when going up or down a step or curb.
STROLLER TO BE USED only
at walking speed. Product not intended for use while jogging, skating, etc.
USE OF THE FRONT SEAT, BENCH SEAT OR STANDING PLATFORM with a child weighing more than 50 lb (22.5 kg) or taller than 45 in. (114 cm) will cause excessive wear and stress on the stroller.
USE OF THE REAR SEAT with a child weighing more than 40 lb (18 kg) or taller than 43 in. (109 cm) will cause excessive wear and stress on the stroller.
TIPPING HAZARD! DO NOT OVERLOAD FRONT SEAT, REAR SEAT, BENCH SEAT OR STANDING PLATFORM PAST THE MANUFACTURERS RECOMMENDED WEIGHT RATING.
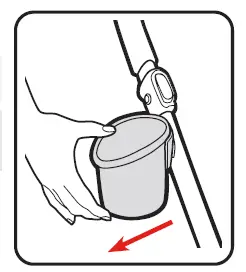
TO PREVENT TIPPING, do not place more than 1 lb (0.5 kg) on the cup holder.
TO AVOID BURNS, never put hot liquids in the cup holder.
TO PREVENT A HAZARDOUS, UNSTABLE CONDITION, never place purses, shopping bags, parcels or accessory items on the handle or canopy.
TO PREVENT A HAZARDOUS, UNSTABLE CONDITION, do not place more than 10 lb (4.5 kg) in the storage basket.
DO NOT use storage basket as a child carrier.
NEVER ALLOW YOUR STROLLER to be used as a toy.
DISCONTINUE USING YOUR STROLLER should it become damaged or broken.
ONLY USE THE TODDLER SEATS PROVIDED WITH THIS STROLLER.
TO AVOID INJURY TO YOUR
CHILD: THIS STROLLER IS ONLY COMPATIBLE WITH GRACO® SNUGRIDE® INFANT CAR SEATS WITH CLICK CONNECT™.
Only use with Graco® infant car seats that have the Click Connect™ logo. Improper use of this stroller with other manufacturers’ car seats may result in serious injury or death.
- READ THE MANUAL provided with your Graco car seat before using it with your stroller.
- ALWAYS SECURE your child with the car seat harness when using the car seat in the stroller. If your child is already in the car seat, check that the child is secured with the harness.
TO PUT CHILDREN IN THE STROLLER:
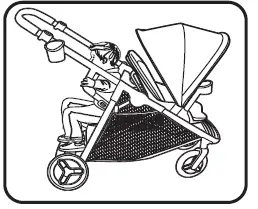
- You may use this stroller with two infant car seats. Refer to the sections “To Attach Graco® Infant Car Seat to Rear Position” and “To Attach Graco Infant Car Seat to Front Position”
pages 37-46. Only use a GRACO® SNUGRIDE® CLICK CONNECT™ CAR SEAT.
READY2GROW™ 2.0 Use Positions
WARNING
This model may not include some features shown below.
CHECK that you have all the parts for this model BEFORE assembling your product. If any parts are missing, call Customer Service.
1-800-345-4109
NO TOOLS REQUIRED
All models
 Red bag contains hardware, do not discard.
WARNING: Remove and IMMEDIATELY discard the zip tie.
On certain models
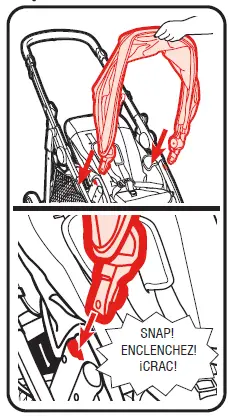
To Open Stroller
Be sure to place stroller on top of a piece of cardboard or some other protective cover to prevent any damage to floor.
- Open stroller lock.
- Lift handle of stroller up.
- CHECK that the stroller is completely latched open every time you open the stroller and before continuing with the rest of the assembly steps.
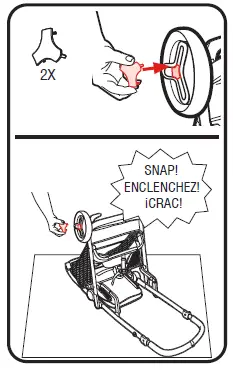
Rear Wheels
- Insert axle rod through axle opening.
- Place wheel on axle.
- Locate the red bag and remove its cotter pins and hardware. Push straight side of pin through axle hole. Pin will separate around the axle. Curved end of pin MUST face up as shown. CHECK that wheel is secure by pulling on it. Repeat steps 2-3 on other side
- Snap hubcap over pin as shown. Repeat with other hubcap.
Front Wheels
- Attach front wheels to front leg tubes as shown.
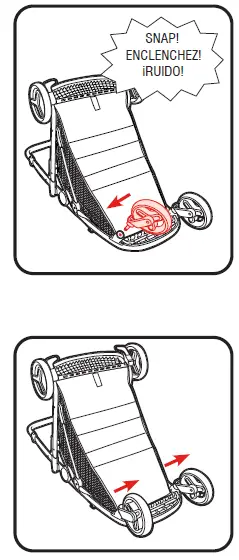
- CHECK that wheels are securely attached by pulling on wheel assembly.
Parent’s Cupholder
- Line up opening in cupholder with mount on stroller and press onto stroller tube.
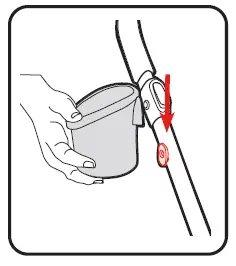
- MAKE SURE cupholder is snapped securely into mount.
Canopy
Front Seat Canopy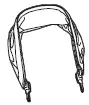
- Insert front canopy into the canopy mounts on each side of the stroller.
- To remove front canopy, press buttons on bottom on both ends and lift off.
 Rear Seat Canopy
- Attach canopy into the canopy mounts on each side of the rear seat as shown. MAKE SURE canopy is behind the rear seat back.
- Wrap canopy around seat back and fasten hook and loop tape on the rear of canopy as shown. MAKE SURE canopy is always fastened with the hook and loop tape when seat is in use.
- Pull forward to open canopy.
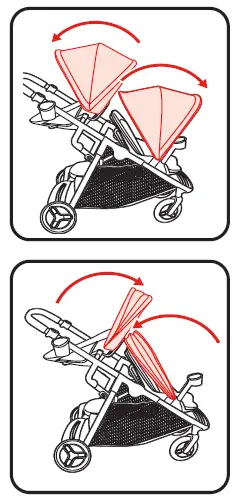
- Push backwards to close canopy.
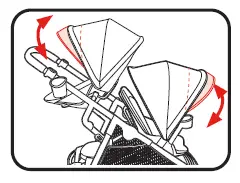
- To open or close canopy visor. (On certain models)
Child’s Arm Bar
WARNING
Always secure your child with the seat belt. The arm bar is not a restraint device. DO NOT lift the stroller by the child’s arm bar. Use care when installing the arm bar on the stroller with a child in the stroller.
- Attach child’s arm bar onto arm bar mounts.
- Pull on child’s arm bar to ensure it is secure.
- To remove child’s arm bar, press buttons on bottom on both ends and lift off.
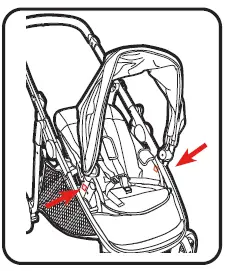
Elevated Rear Seat
WARNING
- Do not allow child to stand on seat.
- ONLY USE rear seat on the stroller and do not remove or carry the rear seat while child is in it.
- Never use seat in vehicle or in any other product.
- Attach seat as shown.
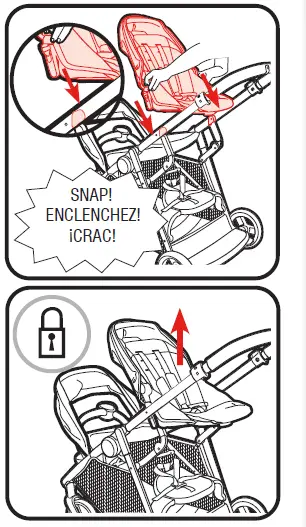
- CHECK that elevated rear seat is securely attached to the stroller by pulling up on seat.
To Remove Elevated Rear Seat
- Push buttons on both sides of the seat and pull up as shown.
To Secure Child
WARNING Falling Hazard: Always use the seat belt.
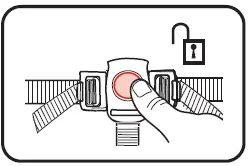
- To open, press button on buckle to release the waist straps.
- To close, slide shoulder strap connectors onto waist straps and insert into buckle.
- Use slide adjuster at shoulder and waist for tighter adjustment. To change shoulder harness slots, see page 29.
3 Point Harness (Front and Elevated Rear Seats Only)
- To open, press button on buckle to release the waist straps.
- Slide shoulder strap connectors off of waist straps.
- Remove shoulder straps from stroller.
- Attach waist straps to harness buckle as shown.
- Use slide adjuster at waist for tighter adjustment.
- To open, press button on buckle to release the waist straps.
Adjusting Shoulder Harness position

- Shoulder harness anchor
- Slide adjuster
- Push harness anchor through the front of the seat then re-insert through desired slots at the same height level. Use either shoulder harness anchor in the slots that are closest to child’s shoulder height. Use slide adjuster for further adjustment.
To Recline
WARNING
When making adjustments to the stroller seat, make sure child’s head, arms, and legs are clear of moving seat parts and stroller frame.
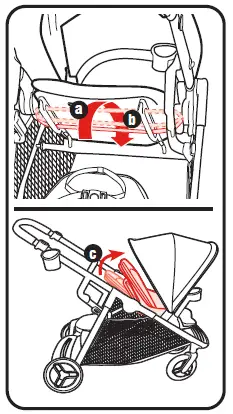
- To recline: (a) Pull up on recline bar, (b) rotate recline bar around, away from seat, and down until seat back is in reclined position (c).
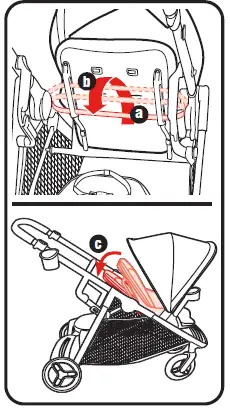
- To raise: (a) Pull up on recline bar, (b) rotate recline bar upward toward the seat and down until seat back is in upright position (c).
Brakes
WARNING
CHECK that brakes are on by trying to push stroller.
-
- Push down on both brake pedals to lock brakes.
- Push up on both brake pedals to unlock brakes.
- Push down on both brake pedals to lock brakes.
Easy Access Storage Basket
Child seat rotates out of way for better access to storage basket.
- For easy access to storage basket: Pull up on strap in center of seat and rotate bench seat down.
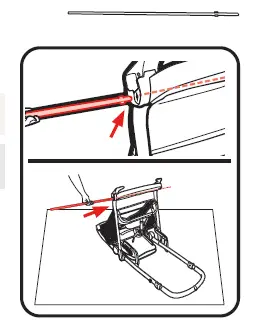
Removing Front Wheels
- To remove front wheels: (a) Push button as shown, (b) pull wheel off.
Bench Seat
WARNING
Do not allow child to stand on seat.
- Remove the elevated rear seat to use the bench seat. Push buttons on both sides of the seat and pull up as shown.
- Raise seat back to highest position.
- To use bench seat: Close easy access basket by lifting up and rotating the bench seat.
- Press button on buckle to release the waist straps.
- Have child sit in seat and hold onto handles.
- Attach waist straps to harness buckle as shown.
- Use slide adjuster at waist for tighter adjustment.
Platform
WARNING
- DO NOT allow child to stand on platform, facing backwards.
- To avoid falling, child must hold onto stroller frame.
- Remove the elevated rear seat to use the platform.
- To use platform: Close easy access basket by lifting up and rotating the bench seat.
- Have child stand on platform and hold onto handles.
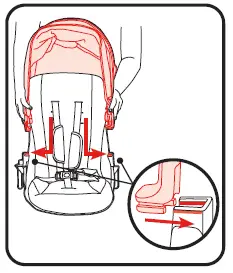
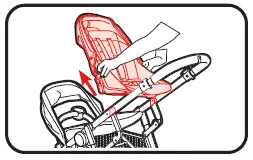
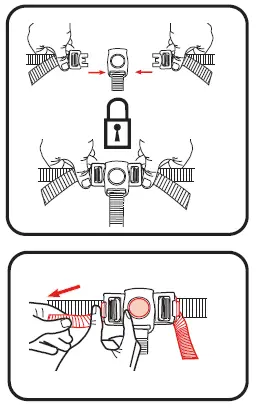
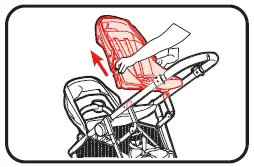
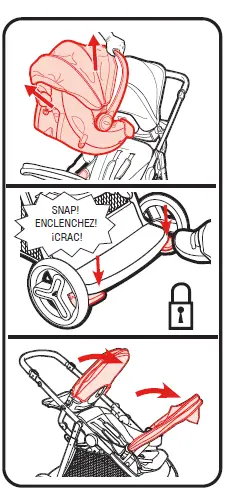
To Attach Graco® Infant Car Seat to Rear Position
For models that do not come with an infant car seat one may be purchased separately
WARNING
Use only a Graco® SnugRide® Click Connect™ car seat with this stroller. This stroller is only compatible with Graco® SnugRide® infant car seats with Click Connect™. Only use with Graco® infant car seats that have the Click Connect™ logo. Improper use of this product with a car seat may result in serious injury or death. Read the manual provided with your Graco car seat before using it with your product.
- Always secure your child with infant car seat harness when using the car seat in the product. If your child is already in the car seat, check that the child is secured with the harness.
Infant car seat can be inserted in stroller frame rear facing.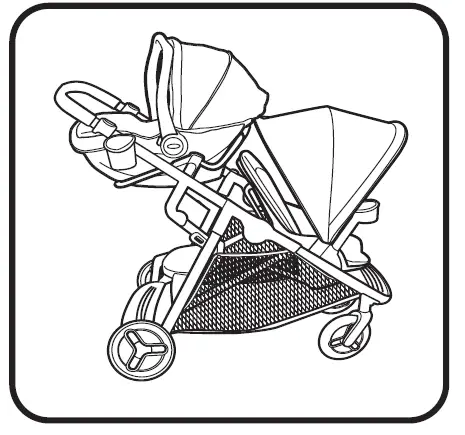
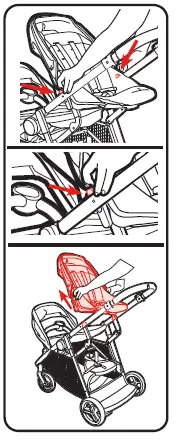
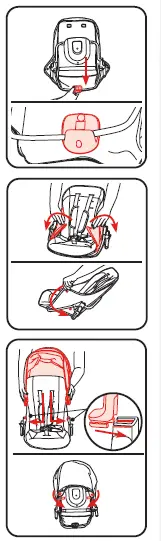
Remove Pad from Elevated Seat Frame to Attach Infant Car Seat
- To remove canopy: Disconnect hook and loop patches from back of canopy. Push in on canopy mounts and lift canopy off elevated rear seat.
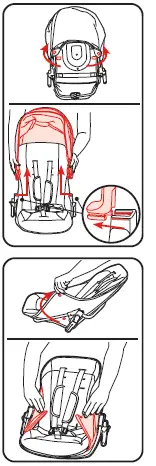
- Disconnect snaps on both sides of seat.
- At the head end, press button on rear of seat in and disconnect from seat tube.
- At the foot end, press the button

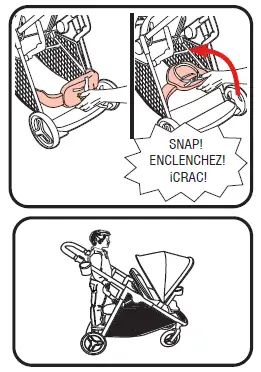
- MAKE SURE front seat canopy is folded forward. Attach rear seat frame to stroller frame as shown.
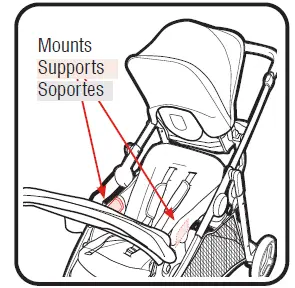
- Insert infant car seat into rear seat frame and push down on car seat until the latches snap into the seat attachment mounts.
- Check that infant car seat is securely attached by pulling up on it.
- To remove car seat: squeeze release handle at back of car seat, and lift car seat out of the stroller.

Attach Pad Onto Elevated Seat Frame
- Place seat pad onto frame aligning button on head end of pad with opening in frame. Press button in opening in frame.
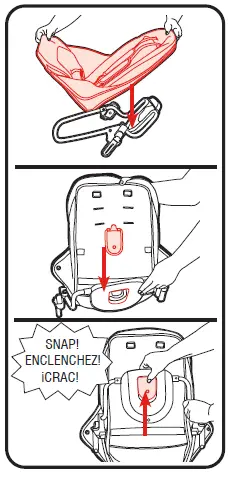
- Attach hook on foot end of seat pad to other end of frame.
- Wrap seat pad around frame and attach snaps on both sides of seat.
- Attach canopy mounts to sides of frame and hook and loop patches to rear of seat.
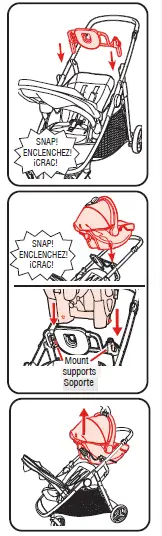
To Attach Graco® Infant Car Seat to Front Position
- Infant car seat can be inserted in seat rear facing.
- Remove body support (on certain models) if installed.
- Recline seat back to lowest position.
- Rotate front canopy forward or backwards, and close front canopy. If moving canopy backward, first remove the rear seat frame, move canopy, there attach rear seat frame if using.
ALWAYS keep front canopy attached when car seat is installed.
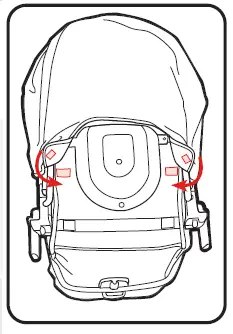
- Locate the 2 Click Connect™ mounts.
- Insert car seat into stroller and push down on car seat until the latches snap into the seat attachment mounts.

- Check that infant car seat is securely attached by pulling up on it.
- To remove car seat: squeeze release handle at back of car seat, and lift car seat out of the stroller.
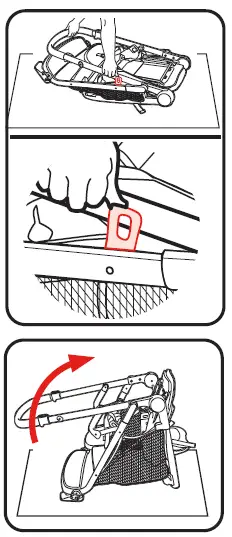
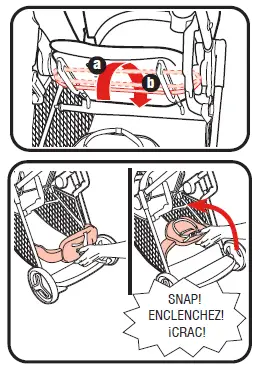
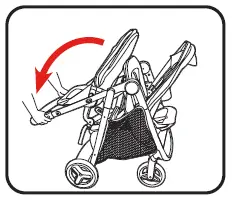
To Fold Stroller Frame
NOTE: Stroller can be folded with or without elevated rear seat installed.
DO NOT fold stroller with a car seat in front or rear position.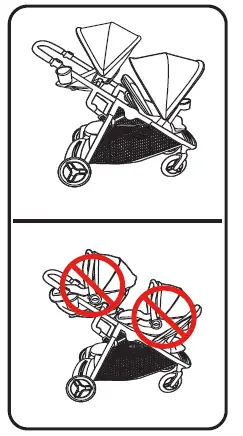
- Before folding stroller:
- Remove infant car seats
- Lock brakes
- Close canopies and rotate front canopy forward.
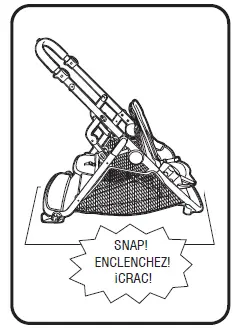
- To fold, press buttons on handle (a) and pull up on the folding latch (b).
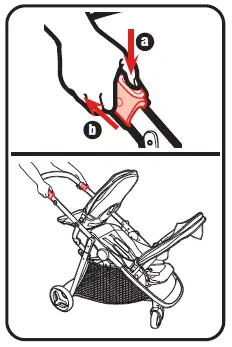
- Push handle down.
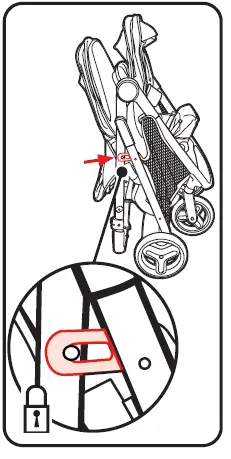
- Storage latch will engage, and stroller will rest on the rear wheels and handle.
Harness Covers
- To attach harness covers, slide onto harness straps.
Body Support (on certain models)
WARNING: ONLY USE body support when harness is in lowest 2 harness positions.
- Insert harness straps through openings in body support corresponding with the slots the stroller harness straps are in.
Care & Maintenance
- TO CLEAN SEAT COVER, refer to your care tag on the seat pad for washing instructions. NO BLEACH.
- TO CLEAN STROLLER FRAME, use only household soap and warm water. NO BLEACH or detergent.
- FROM TIME TO TIME, CHECK YOUR STROLLER for loose screws, worn parts, torn material or stitching. Replace or repair the parts as needed. Use only Graco replacement parts.
- EXCESSIVE EXPOSURE TO SUN OR HEAT could cause fading or warping of parts.
- IF STROLLER BECOMES WET, open canopy and allow to dry thoroughly before storing.
- IF WHEEL SQUEAKS, use a light oil (e.g., WD-40, 3-in-1, or sewing machine oil). It is important to get the oil into the axle and wheel assembly as illustrated.
- WHEN USING YOUR STROLLER AT THE BEACH, completely clean your stroller afterward to remove sand and salt from mechanisms and wheel assemblies.
Replacement Parts
- Warranty Information (USA)
To purchase parts or accessories or for warranty information in the United States, please contact us at the following:
www.gracobaby.com
or/o
1-800-345-4109
To purchase parts or accessories or for warranty information in Canada, please contact us at the following:
www.gracobaby.ca
or/ou
1-800-345-4109
Product Registration (USA)
To register your Graco product from within the U.S.A. visit us online at www.gracobaby.com/productregistration or return registration card provided with your product. We currently do not accept product registrations from those living outside the United States of America.
]]>GRACO 1893776 DuetSoothe Swing and Rocker
Prevent serious injury or death: Failure to follow these warnings and the assembly instructions could result in serious injury or death.
INSTRUCTIONS
- THIS PRODUCT REQUIRES ADULT ASSEMBLY. Follow assembly instructions carefully. If you experience any difficulties, please contact the Customer Service Department. FALL and STRANGULATION HAZARDS: Infants have suffered head injuries falling from swings and have strangled in straps.
- ALWAYS use restraints. Adjust to fit snugly.
- STOP using product when infant attempts to climb out (approximately 9 months) or reaches 30 lb (13.6 kg).
- Stay near and watch infant during use. This product is not safe for unsupervised use or unattended sleep.
- Never carry swing with infant in it.
SUFFOCATION HAZARDS: Young infants have limited head and neck control. If the seat is too upright, infant’s head can drop forward and compress the airway.
- ALWAYS keep swing seat fully reclined until infant is at least 4 months old AND can hold up head without help.
STRANGULATION HAZARD:
- DO NOT suspend strings over the product or attach strings to toys.
- DO NOT place product in any location where there are cords, such as window blind cords, drapes, phone cords, etc.
- Strings can cause strangulation. DO NOT place items with a string around your child’s neck, such as hood strings or pacifier cords.
- DO NOT USE THIS PRODUCT if it is damaged or broken.
- NEVER USE as a car seat.
- DO NOT place product near water and moisture. Do not use the product near possible wet areas, such as a bathtub, shower, wash basin, sink, laundry tub, swimming pool, wet basement, etc.
- DO NOT use the AC adapter if it has been exposed to liquids, has been dropped, or is damaged.
- Protect the power cord. Place it so it is not walked on or pinched by furniture or other items.
- DO NOT use with an extension cord.
- Use only power cord provided.
- ROCKER MODE:
FALL HAZARD: Children have suffered head injuries falling from product. - ALWAYS use restraints. Adjust to fit snugly.
- NEVER use this product to carry or transport a child.
- Child’s movement can slide product. Use only on floor. Never place product near edges of counter tops, tables, or other elevated sur-faces.
- STOP using product when baby starts trying to sit up or has reached 18 lb (8.2kg), whichever comes first.
- NEVER use this product as a means to transport an infant in a motor vehicle.
- Maximum recommended height is 27 in. (68.2 cm) and weight is 18 lb (8.2 kg).
SUFFOCATION HAZARD: Babies have suffocated when seats tipped over on soft surfaces.
- NEVER use on a bed, sofa, cushion, or other soft surface.
- Stay near and watch child during use. This product is not safe for unsupervised use or unattended sleep.
FOR SAFE BATTERY USE
Keep the batteries out of children’s reach. Any battery may leak battery acid if mixed with a different battery type, if inserted incorrectly (put in backwards) or if all batteries are not replaced or recharged at the same time. Do not mix old and new batteries. Do not mix alkaline, standard (carbon-zinc) or rechargeable (nickel-cadmium) batteries. Any battery may leak battery acid or explode if disposed of in fire or an attempt is made to charge a battery not intended to be recharged. Never recharge a cell of one type in a recharger made for a cell of another type. Discard leaky batteries immediately. Leaky batteries can cause skin burns or other personal injury. When discarding batteries, be sure to dispose of them in the proper manner, according to your state and local regulations. To prevent battery leaks, which can burn skin and eyes,
- Remove batteries before putting product into storage for a prolonged period of time.
- Dispose of used batteries immediately.
- Old and new batteries should not be mixed. Always replace the entire set of batteries at one time.
- Never mix old and new batteries, or batteries of different brands or types. Alkaline, standard carbon-zinc, and rechargeable nickel-cadmium batteries should not be mixed.
FCC
Recommended type batteries—alkaline disposables, size D (LR20-1.5V). NEVER mix battery types. Change batteries when product ceases to operate satisfactorily. Changes or modifications to this unit not expressly approved by the party responsible for compliance could void the user authority to operate the equipment.
NOTE: This equipment has been tested and found to comply with the limits for a Class B digital device, pursuant to Part 15 of the FCC Rules. This Class A/B digital apparatus meets all requirements of the Canadian Interference-Causing Equipment Regulations. These limits are designed to provide reasonable protection against harmful interference in a residential installation. This equipment generates, uses and can radiate radio frequency energy and, if not installed and used in accordance with the instructions, may cause harmful interference to radio communications. However, there is no guarantee that interference will not occur in a particular installation. If this equipment does cause harmful interference to radio or television reception, which can be determined by turning the equipment off and on, the user is encouraged to try to correct the interference by one or more of the following measures:
- Reorient or relocate the receiving antenna.
- Increase the separation between the equipment and receiver.
- Connect the equipment into an outlet on a circuit different from that to which the receiver is needed.
- Consult the dealer or an experienced radio/TV technician for help.
This Class B digital apparatus meets all requirements of the Canadian Interference-Causing Equipment Regulations. CAN ICES-3 (B) /NMB-3 (B).
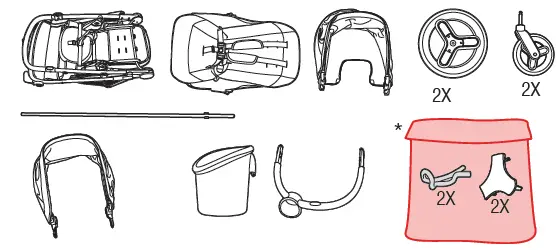
Parts list
This model may not include some features shown below. Check that you have all the parts for this model BEFORE assembling your product. If any parts are missing, call Customer Service.
Tools required: Phillips Screwdriver
ALL MODELS 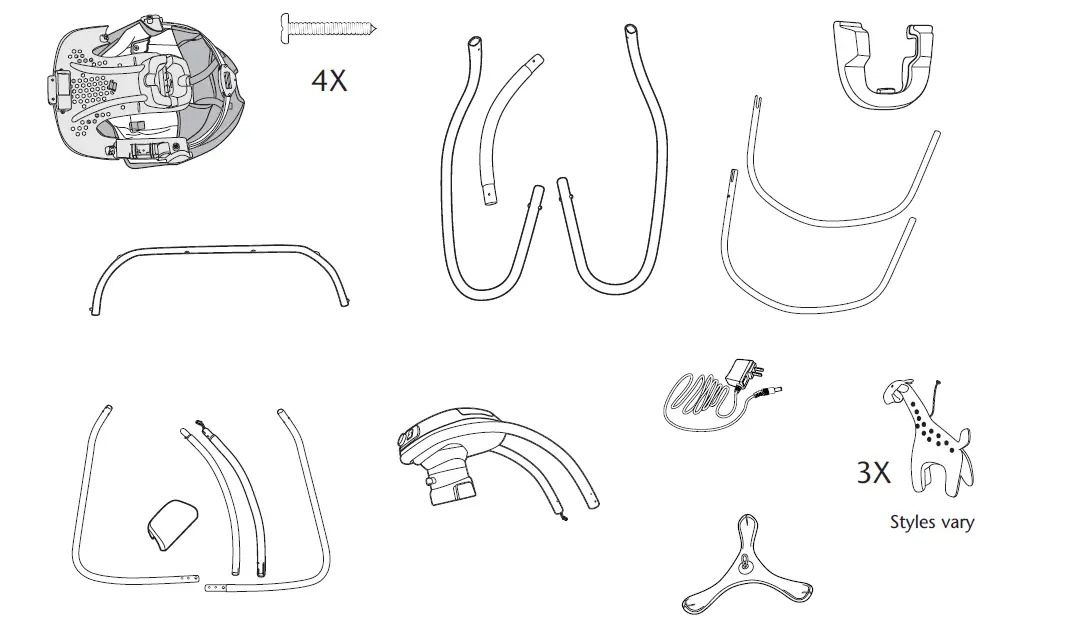
FEATURES ON CERTAIN MODELS
Assembly
- Wrap seat pad over tubes on seat.
- Attach seat pieces together as shown.
- Fasten screw on each side of seat as shown.
- Wrap seat pad around vibration unit and bottom of seat frame.
- Attach elastic straps to hooks on both sides of seat.
- Pull seat pad webbing through bottom of frame as shown.
- Insert seat tube into brackets on rear of seat with snaps facing away from the recline handle as shown.
- Fasten seat tube with two screws. CHECK to make sure seat tube is attached by pulling on it.
Attaching Seat Pad
- Attach flaps on bottom of seat pad to snaps on seat tube as shown.
- Attach seat pad to snaps on tube as shown.
Assembling Legs
- Assemble legs as shown.
- Lay seat face down and insert leg tubes into holes in leg bracket until they snap into place. CHECK to make sure leg tubes are attached by pulling on them.
Assembling Swing Frame
- Place carton on ground. Lay unit down as shown. Plug wires together as shown and insert wires inside tube.
- Insert motor housing tubes to leg tubes as shown.

- Insert vertical tubes into base tubes as shown.
- Grab base tubes and push down while inserting tubes together.
- Place the cover on tubes as shown.
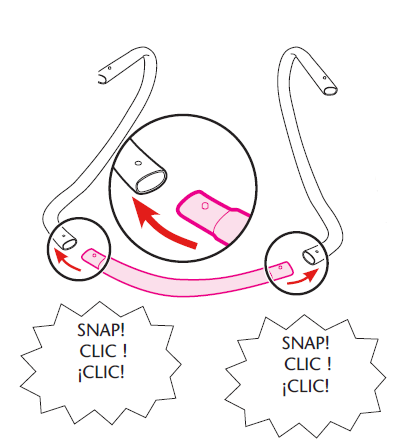
Attaching Rocker Seat
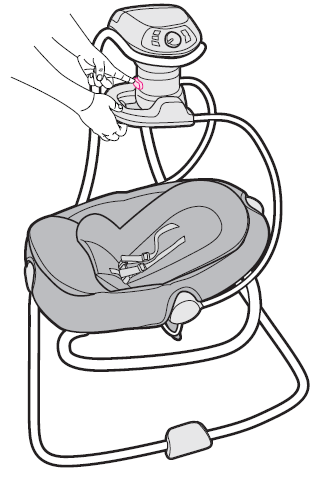
- Insert rocker arm tubes into handle until they snap into place as shown. CHECK to make sure rocker arm tubes are attached by pulling on them.
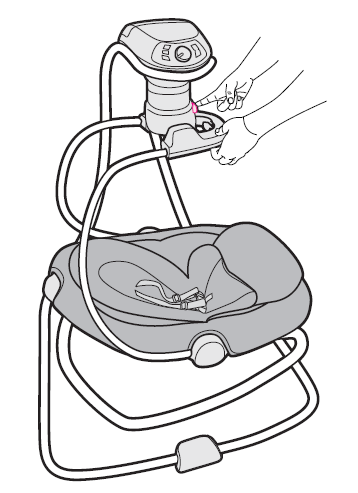
- Insert assembled rocker arms into sides of rocker seat as shown. CHECK to make sure rocker arm tubes are attached by pulling on them.
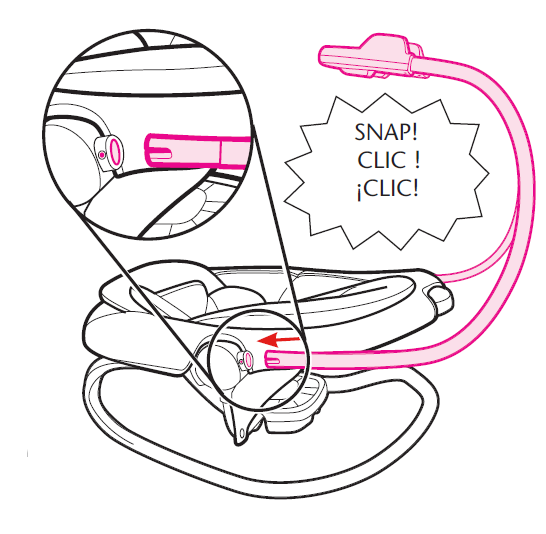
- Place rocker onto swing mounts as shown until it clicks into place. Mounts are on both sides of motor housing.

- CHECK to make sure it is attached by pulling up on it.

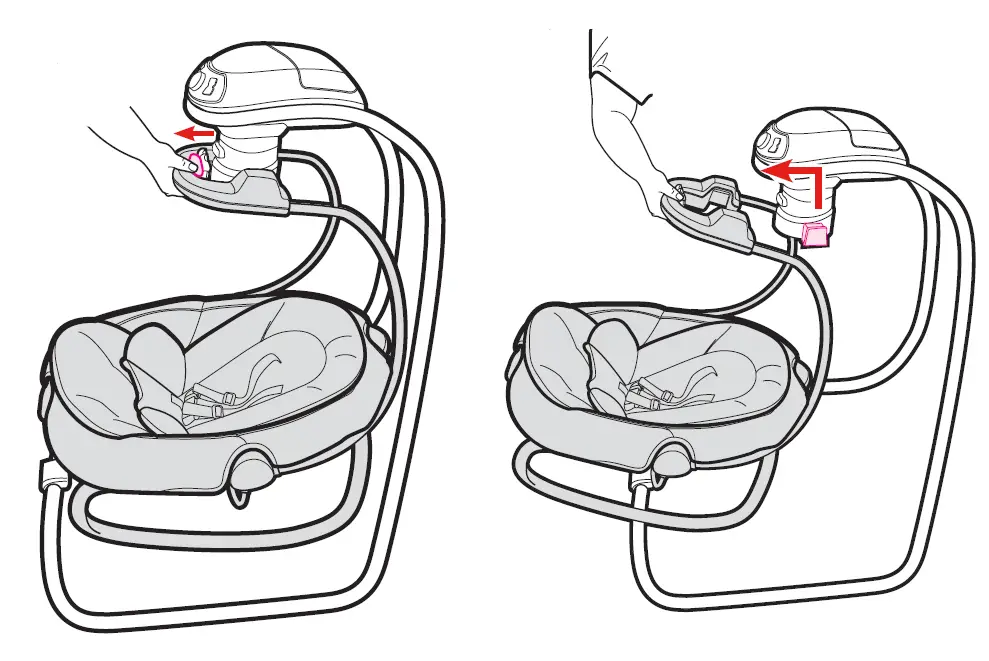
To Adjust Seat Positions
- To adjust seat position, push button in on motor housing and rotate into one of three positions.
To Adjust Recline (2 positions)
Use the most reclined position for newborn and young babies. Use the more upright position for older, more active infants.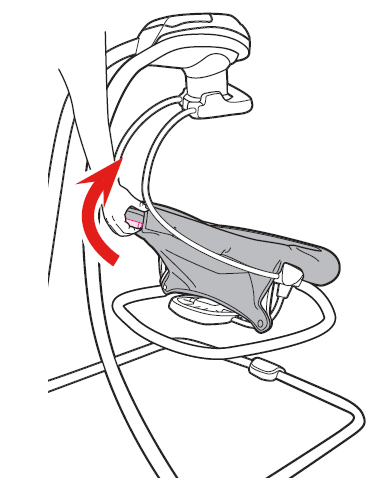
- Squeeze button on handle at top of seat and rotate up or down.
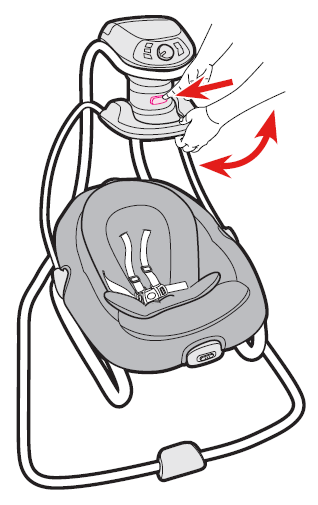
To Remove Rocker Seat
- To use as rocker, squeeze release button on inside of handle. Pull rocker up and off of the mounts.
To Secure Infant
- Use slide adjuster at shoulder and waist for tighter adjustment. To change shoulder harness slots,
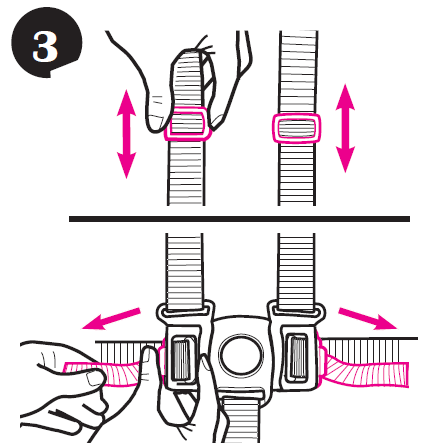
- When changing harness strap slots, MAKE SURE harness straps are going through same slots in seat pad.
- The harness straps must go into the slot that is even with or slightly above the shoulders. Avoid twisting straps.
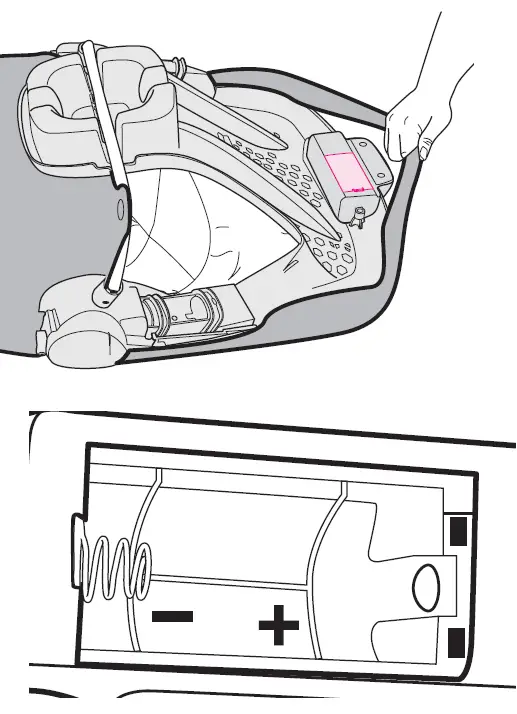
Installing Batteries
WARNING To avoid injury: Remove child from swing before changing batteries.
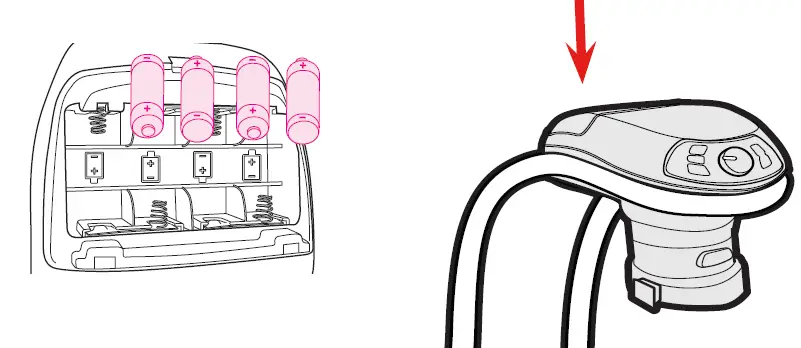 With baby out of swing, open the battery compartment lid by inserting a screwdriver into the coin slot. Insert four D (LR20-1.5V) cell batteries.
CHECK that the batteries are put in correctly. Your swing will not run if the batteries are put in backwards.
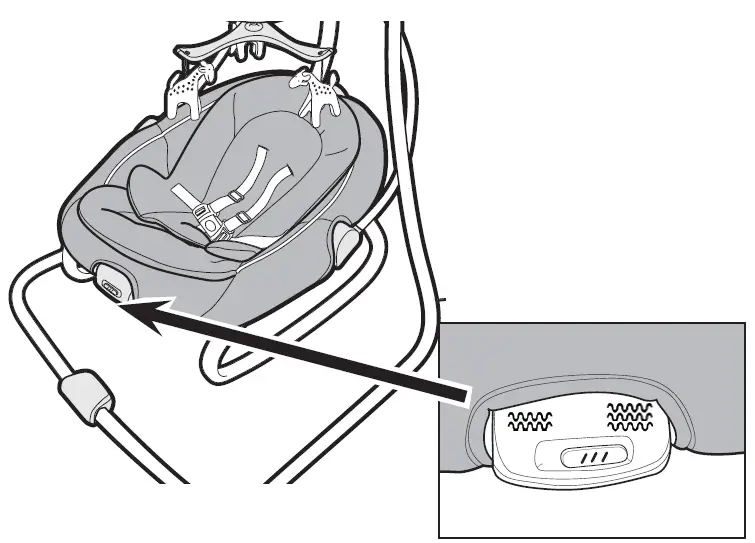
To Use Wall Plug
- WARNING Product does not recharge batteries. When AC adapter is in use, batteries will automatically shut off.
- DO NOT place product near water and moisture. Do not use the product near possible wet areas, such as a bathtub, shower, wash basin, sink, laundry tub, swimming pool, wet basement, etc.
- DO NOT use the AC adaptor if it has been exposed to liquids, has been dropped, or is damaged. Protect the power cord. Place it so it is not walked on or pinched by furniture or other items.
- WARNING Strangulation Hazard: Keep this cord out of the reach of children. DO NOT use with an extension cord. Use only power cord provided.
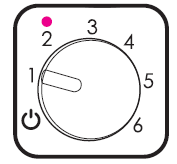
Starting Swing (6 Speed)
WARNING avoid serious injury from falling or sliding out. Always use seat belt. After fastening buckles, adjust belts to get a snug fit around your infant.
TO TURN SWING ON:
Rotate the speed dial clockwise, and lightly push the swing to get it started. Observe the swinging motion for a minute. It takes time for the swing to adjust to a setting. Change setting if needed by moving the dial clockwise for faster speeds or counter-clockwise for slower.
TO TURN SWING OFF:
Turn dial counter-clockwise until it “CLICKS” into the “OFF” position. Your seat may be stopped at any time the motor is running without damaging the motor.
 (Music) Selects music. All ten songs will play in turn and then start again with the first song. Skip a song by pressing the button. Music will automatically shut off 60 minutes after the last button press or speed change.
 (Soothing Sounds)Selects from five soothing sounds from nature: womb sounds, stream, forest, white noise, and distant storm. The selected soothing sound will play continuously until a different sound is selected or the timer turns the product off. Press the button to skip to the next sound.
 (Volume Up) Raises sound/music volume.
 (Volume Down) Lowers sound/music volume.
 (Music off) Turns off all sound/music.
 Low Battery Alert- When you select a swing speed (other than OFF) it will check the battery voltage if they are installed. If the batteries are low, the LED will blink – 1 second on, 1 second off.
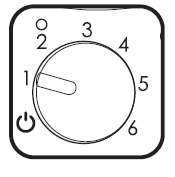 1-6 set the speed of the product. Speed 1 moves the product a little. Speed 6 moves the product through its full range.
Features on Certain Models
This model may not include some features.
Body support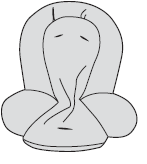
- Styles vary
- Only use this body support on this swing. Never use this body support on any other product.

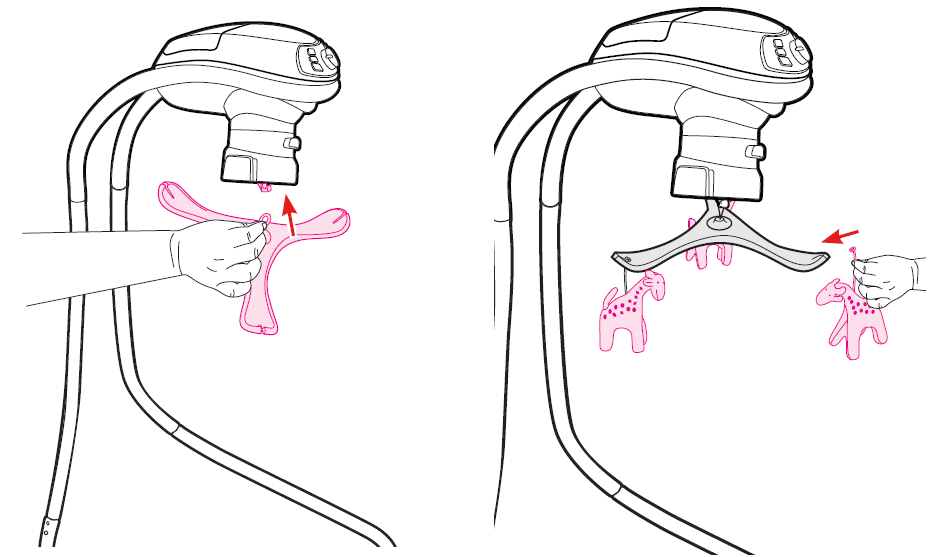
Assembling Mobile
Styles vary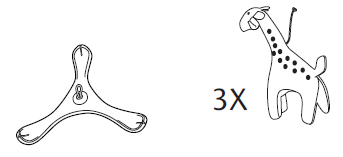
To Use Vibration
- Remove battery lid, found under seat, with a key and insert 1-D (LR20-1.5V) battery in module. Replace lid.
- Vibration: Turn to one of two settings.
Problem Solving
SWING WON’T OPERATE:
- No batteries in swing.
- Batteries dead.
- Speed setting too low.
- Batteries in backwards — check “+” and “-”.
- Corrosion on battery terminals. Rotate batteries in place against terminals, or clean with sandpaper or steel wool if corrosion is severe.
- Baby grabbing swing legs. (Discontinue use.)
- Push swing to start.
SEAT DOESN’T SWING VERY HIGH:
- Control setting too low.
- Blanket hanging down, causing increased wind resistance.
- Batteries too weak.
- Baby too heavy or too active. (Discontinue use.)
- Soft carpet (swings higher on hard floors).
Care and Maintenance
- FROM TIME TO TIME CHECK YOUR SWING for loose screws, worn parts, torn material or stitching. Replace or repair the parts as needed. Use only Graco replacement parts.
- TO CLEAN SEAT COVER, Refer to your care tag on your seat pad for washing instructions. NO BLEACH.
- TO CLEAN FRAME, use only household soap and warm water. NO BLEACH OR DETERGENT.
- EXCESSIVE EXPOSURE TO SUN OR HEAT could cause fading or warping of parts.
Warranty Information (USA)
Replacement Parts
To purchase parts or accessories or for warranty information in the United States, please contact us at the following: www.gracobaby.com
or/o 1-800-345-4109
To purchase parts or accessories or for warranty information in Canada, please contact us at the following : Pour commander des pièces ou pour service sous garantie au Canada, communiquer avec nous : www.gracobaby.ca
or/ou 1-800-345-4109
Product Registration
(USA)
To register your Graco product from within the U.S.A. visit us online at www.gracobaby.com/productregistration or return the registration card provided with your product. We currently do not accept product registrations from those living outside the United States of America.
]]>
CAUTION: Carefully read instructions and procedures for safe operation. DO NOT USE if this product should become damaged and/or components are broken, inspect this product for damaged hardware, loose joints, loose bolts or other fasteners, missing parts or sharp edges before and after assembly. Assembly of this product will require two people.
Please store this manual in the plastic pouch for future reference.
An on Customers living in the United States and Canada
If you are missing parts, or hardware, or if your product has been damaged during shipping,
DO NOT RETURN YOUR PRODUCT
The store does not stock parts and may not be able to help you. Contact Stork Cra directly and we will ship you the parts you need to your shipping address at no cost to you. We have three convenient ways for you to reach us:
- Visit us to order parts online
- Email us at
- Call us toll-free from the USA or from Canada at 1-877-274-0277, Monday to Friday from 7:00 am 3:00 pm.
WARNING
Failure to follow these warnings and the assembly instructions could result in serious injury or death.
- Read all instructions before assembling the crib. KEEP INSTRUCTIONS FOR FUTURE USE.
- Infants can suffocate on soft bedding. Never add a pillow or comforter. Never place additional padding under an infant.
- The mattress used in this crib should not be more than 6 inches (15cm) thick and should be of such length and width that the gap between the mattress and the sides of the crib is not more than 1 3/16 inches (3cm) when the mattress is pushed into the corner of the crib.
- Infants can suffocate in gaps between crib sides and a mattress that is too small.
- Check this product for damaged hardware, loose joints, loose bolts or other fasteners, missing parts or sharp edges before and after assembly and frequently during use. Securely tighten loose bolts and other fasteners. DO NOT use the crib if any parts are missing, damaged or broken. Contact Stork Craft for replacement parts and instructional literature if needed. DO NOT substitute parts.
- To reduce the risk of SIDS, pediatricians recommend healthy infants be placed on their backs to sleep unless otherwise advised by their physician.
- DO NOT use a water mattress with this crib.
- Never use plastic shipping bags or another plastic films as mattress covers because they can cause suffocation.
- If re-finishing, use a non-toxic finish specified for children’s products.
- DO NOT use this crib if the attached or enclosed instructions cannot be strictly adhered to.
- Follow warnings on all products in a crib.
STRANGULATION HAZARD
- Strings can cause strangulation! Do not place items with a string around a child’s neck, such as hood strings or pacifier cords. Do not suspend strings over a crib or toddler bed for any reason or attach strings to toys.
- To help prevent strangulation tighten all fasteners. A child can trap parts of the body or clothing on loose fasteners.
- DO NOT place a crib near a window where cords from blinds or drapes may strangle a child.
FALL HAZARD
- When a child is able to pull up to the standing position, set the mattress to the lowest position and remove bumper pads, large toys, and other objects that could serve as steps for climbing out.
- Stop using the crib when the child begins to climb out or reaches a height of 35 inches (89 cm).
CAUTION: ANY MATTRESS USED IN THIS CRIB SHALL BE AT LEAST 27 1/4 INCHES BY 51 5/8 INCHES (69 CM X 131 CM) WITH A THICKNESS NOT EXCEEDING 6 INCHES (15 CM) AND A MINIMUM MATTRESS THICKNESS OF 4 INCHES (10 CM). THIS PRODUCT CONFORMS TO APPLICABLE REGULATIONS PROMULGATED BY THE CONSUMER PRODUCT SAFETY COMMISSION.
DISTRIBUTED BY
3993 Howard Hughes Parkway, Unit# 250 Las Vegas, NV, USA. 89169 Tel: 1 877 274 0277
e-mail: [email protected]
Identifying the parts
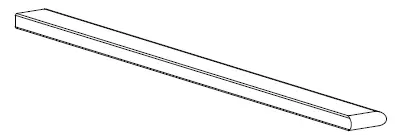
- Left Front Post
- Right Front Post
- Left Back Post

- Right Back Post
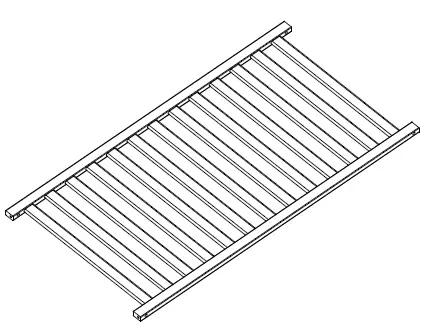
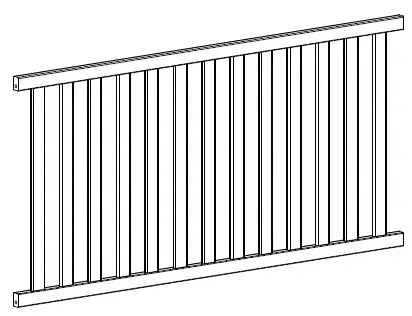
- Crib End
- Crib Left End Top X 1
- Crib Right End Top X 1
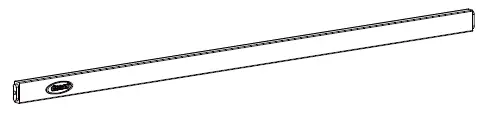
- Back Rail Bottom
- Front Rail
- Stretcher Bar
- Mattress Support
- Back Rail Top
- Back panel
ASSEMBLY INSTRUCTIONS
HARDWARE AND TOOL DIAGRAM
THIS PRODUCT USES IMPERIAL THREADED HARDWARE

- BOLTS
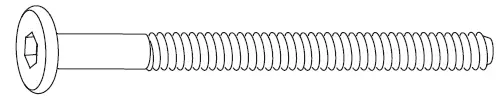
- BOLTS
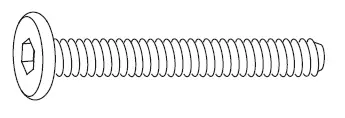
- BOLTS
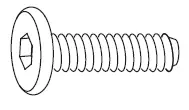
- BOLTS

- Barrel nut
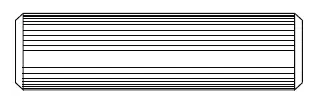
- Wooden dowel
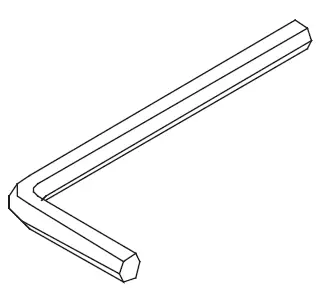
- Allen Key
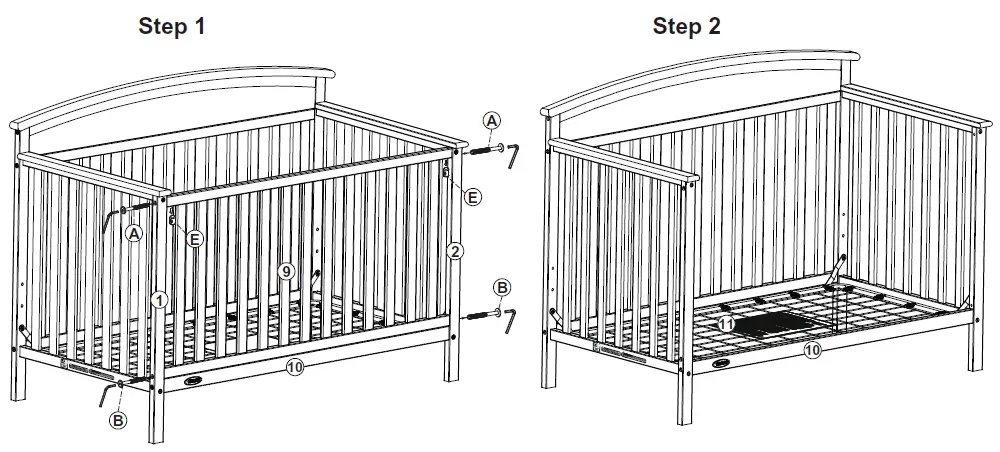
Step 1
Step 2
Step 3
Step 4
Step 5
Step 6
- After assembly Tighten bolts firmly and retighten periodically
Spring shown here in Lowest position.
NOTE: We recommend setting the spring in the highest position for newborn babies. Lower the mattress spring as the child grows and becomes more mobile.
Step 7
TO CONVERT TO A TODDLER/DAY BED
WARNING
Failure to follow these warnings and the assembly instructions could result in serious injury or death from entrapment or strangulation.
- DO NOT place bed near windows where the cord from blinds or drapes may strangle a child.
- The child must be at least 15 months old and not more than 50 lbs. to use this bed.
- Use a full-size crib mattress as specified for this bed.
- The mattress used in this bed must have a minimum dimension of 51 5/8” x 27 1/4” x 4” and a maximum of 6” thick.
- Do not place items with a string, cord, or ribbon around a child’s neck, such as hood strings or pacifier cords.
- Do not suspend strings over a toddler bed for any reason
Step 8
Converting Crib to a Full-Size Bed
You have the option to convert the crib to a full-size bed. Simply disassemble the crib to get the headboard components shown below. Attach it to a full-size metal bed frame (NOT INCLUDED) to convert to a full-size bed.
Headboard
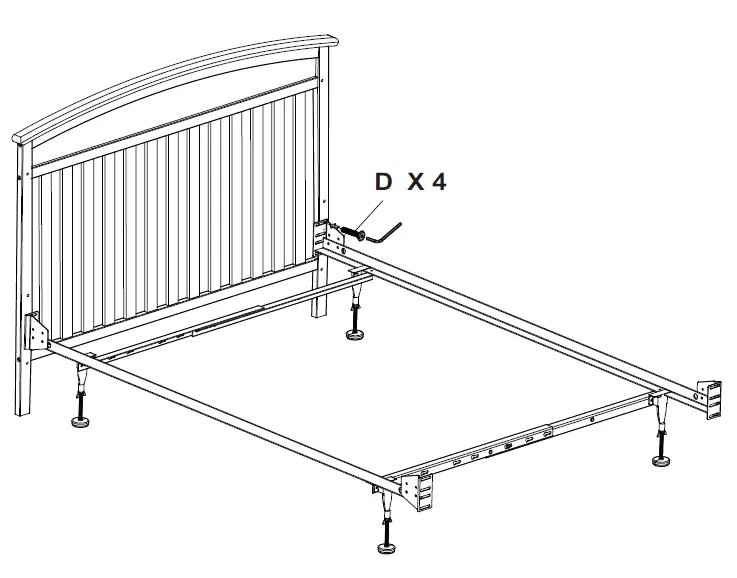
- (Full size Bed Frame Sold Seperately ; Styles may vary)
STORAGE AND CARE
- DO NOT remove any part that is attached with wood screws, The stationary side rail, mattress base can all be disassembled for storage. Simply review the assembly instructions for each and reverse the order to disassemble. Wipe all parts with a dampened clean cloth. DO NOT use abrasives. To convert to a double bed please follow the instructions in the double bed kit. (MUST BE PURCHASED SEPARATELY)
LIMITED ONE-YEAR WARRANTY
Your product is warranted against defects in workmanship or material for ONE YEAR from the date of the original purchase. This warranty shall be limited to, at the discretion of the company, repairing or replacing any part of the product which, in the opinion of the company, shall be proved defective in materials or workmanship under normal use and service during the one year warranty period. Shipping charges may apply for addresses outside of the continental United States and Canada. Date of purchase of the product must be established by production of your sales receipt or other satisfactory evidence.
HOW TO GET PROMPT, EFFICIENT SERVICE
Contact our customer care department. The telephone number and hours of operation are listed below. When calling our customer care department, make sure to mention the model number and date of manufacture. Both can be found on the end panel.
- Model
- Pack Date
- Date of Purchase
- Customer Service Direct Telephone line: 1- 877-274-0277 Fax: (604) 274-9727
- Hours of operation: 7:00 AM to 3:00 PM, Pacific Standard Time e-mail: [email protected]
DISTRIBUTED BY
Stork Craft Mfg. (USA), Inc., 3993 Howard Hughes Parkway, Unit#250 Las Vegas, NV, USA.89169 Tel: 1 877 274 0277 e-mail: [email protected] Twitter @Storkcraft
]]>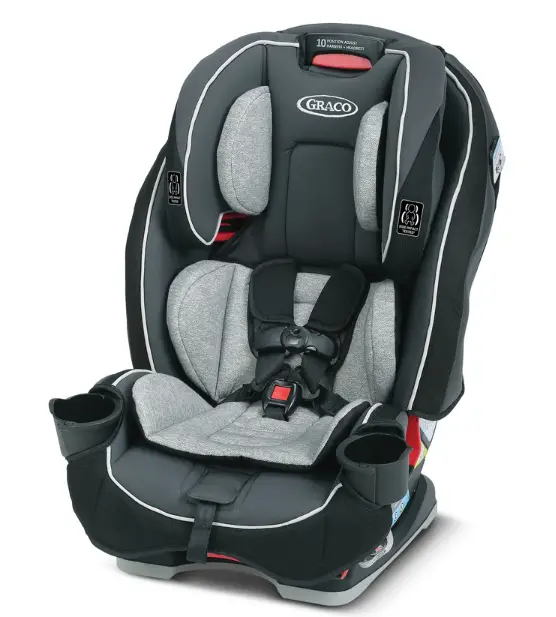
graco SnugEssentials™ INFANT CAR SEAT & BASE

Parts List Fitting Guide
- Carry Handle
- Canopy
- Body Pillow
- Harness Covers
- Buckle
- Buckle Cover
- Harness Straps
- Harness Release Lever
- Harness Adjustment Strap
- Handle Adjustment Buttons
- Rear-Facing Lap Belt Path (when used without the base)
- Instruction Manual Storage
- Base release lever
- Head Support Height Adjustment
- Rear-Facing Lap Belt Path (when used without the base)
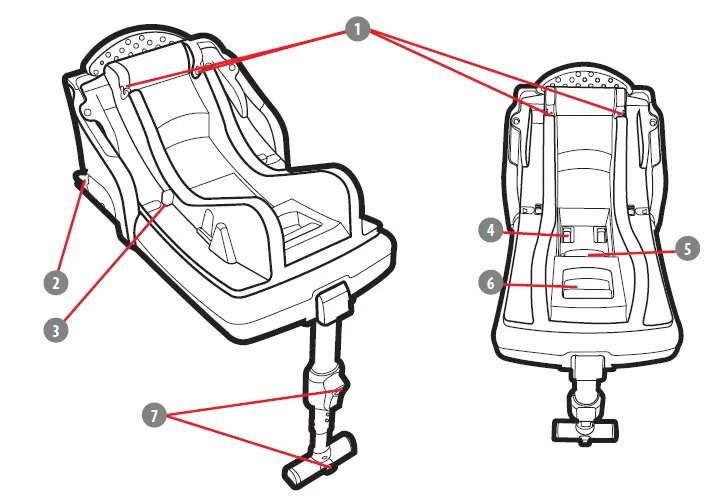
- Car Seat Base Lock
- ISOFIX Attachments
- Car Seat Attachment Indicator ISOFIX Extender Buttons ISOFIX Release Lever
- Recline Handle
- Support Leg Adjustment Buttons
WARNINGS!
- Do not make any alterations or additions to this child restraint without the approval of the Type Approval Authority, it is dangerous to do so.
- It is dangerous not to follow closely the manufacturer installation instructions provided with this child restraint, FAILURE TO USE THIS CHILD RESTRAINT PROPERLY INCREASES THE RISK OF SERIOUS INJURY OR DEATH IN A SHARP TURN, SUDDEN STOP OR CRASH!
- It is dangerous to use the car seat on an elevated surface, e.g. a table.
- Always use the restraint system.
- This car seat is not intended for prolonged periods of sleeping.
- This car seat does not replace a cot or a bed. Should your child need to sleep, then it should be placed in a suitable cot or bed.
- Do not use accessories or replacement parts other than those approved by the manufacturer.
Important safety advice
- When this Infant Carrier is used in recline positions 5, 6, and 7
- This child restraint is suitable for use by children within the following size range 40 cm – 87 cm.
- This child restraint is suitable for use by children with a maximum weight of 13 kg.
- Please also check the “i-Size Child Restraint System” instructions in the vehicle manufacturer’s handbook.
- It is very important to ensure that any lap strap is worn low
- The rigid items and plastic parts of a child restraint shall be so located and installed that they are not liable, during everyday use of the vehicle, to become trapped by a movable seat or in a door of the vehicle.
- Do not use this child restraint in seating positions where there is an active frontal airbag installed.
- Any straps restraining the child should not be twisted.
- Any straps holding the restraint to the vehicle should be tight.
- Any straps restraining the child should be adjusted to the child’s body.
- This Child Restraint should be replaced when it has been subject to violent stresses in an accident.
- Do not leave a child in this child restraint unattended.
- Any luggage or other objects liable to cause injuries in the event of a collision must be properly secured.
- This Child Restraint System must not be used without the cover.
- The Child Restraint System cover must not be replaced with any other than the one recommended by the manufacturer, because the cover constitutes an integral part of the restraint performance.
your own, it is very important to READ, UNDERSTAND AND FOLLOW THE OWNER’S MANUAL. - If you need help, please contact our Customer Service Department with any questions you may have concerning parts, use, or maintenance. When you contact us, please have your product’s model number and manufactured
- numbers can be found on a sticker on the back of your child restraint.
Your child’s safety depends on:- Choose the proper head support position based on your child’s size.
- Properly secure your child in the child restraint.
- Select a suitable location for the child restraint in your vehicle.
- Properly routing and securing the vehicle seat belt.
! THE CHILD RESTRAINT CAN BECOME VERY HOT IF LEFT IN THE SUN. Contact with these parts can burn your child’s skin. Always touch the surface of any metal or plastic parts before putting your child in the child restraint.
! NEVER USE A SECOND-HAND CHILD RESTRAINT or a child restraint whose history you do not know.
INSTRUCTIONS
- Rotate Support Leg Out
- Place base on the vehicle seat. The support leg has two buttons to allow the length to be adjusted. Press the buttons to adjust the leg length. The
oor. Make sure the load leg is secure by pressing down on the base. - Extend the ISOFIX connectors.
Squeeze the ISOFIX extender buttons and pull the ISOFIX connectors out. - Press the ISOFIX connectors onto the vehicle anchors until a click is heard. When the ISOFIX connectors are locked the connection indicators will be green. If the base is not locked in the indicators will be red.
- Squeeze the ISOFIX extender buttons. Push down firmly on the base towards the back of the vehicle seat to ensure a tight fit on the seat.
- To release the base from the vehicle seat pull the ISOFIX release lever and remove base.
- Recline Car Seat
To recline the car seat pull recline handle and slide into correct position for your child.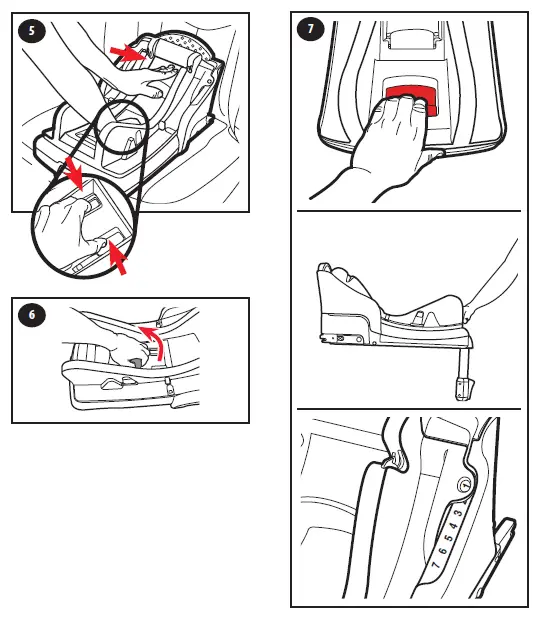
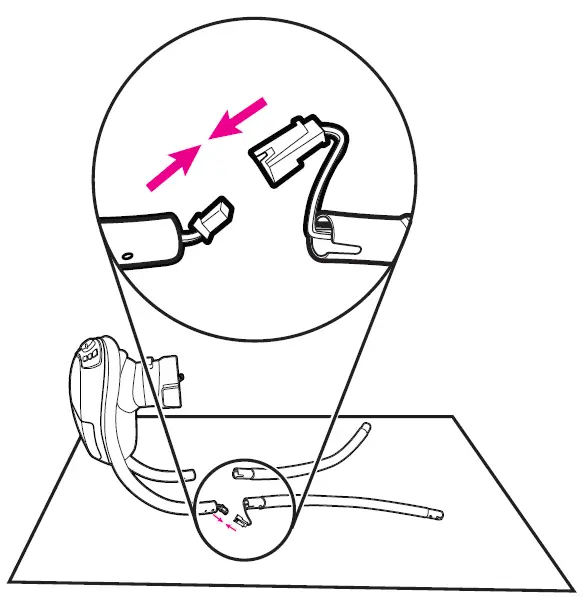
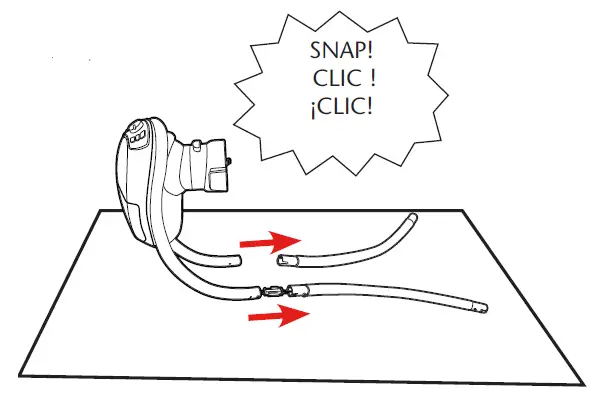
- Attaching the car seat to the base
To attach seat to base, position front of seat in base then push down on the back until it locks into place. (See Illustration).Pull up on car seat to be sure it is securely fixed onto base. - To remove, squeeze the release handle at back of the car seat to release the attachment catch. Lift car seat from base as shown. Always place the handle in the down position when removing your baby from the seat and if you place the car seat onto the seat
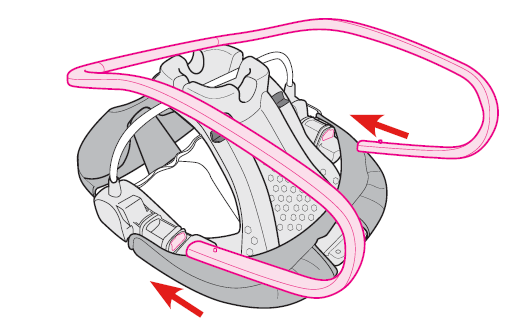
Car Seat Installation Without Base - Place Car Seat Rear-Facing in the Vehicle Place the car seat on the vehicle seat. Push it back until the front of the car seat touches the vehicle seatback.
- Put lap section of the belt over car seat and under the two belt hooks marked with blue labels. Buckle the vehicle belt.
- Place the shoulder belt around the back of the car seat exactly as shown, making sure to run it through the center guides on the back of the seat and below the notch opposite the shoulder belt
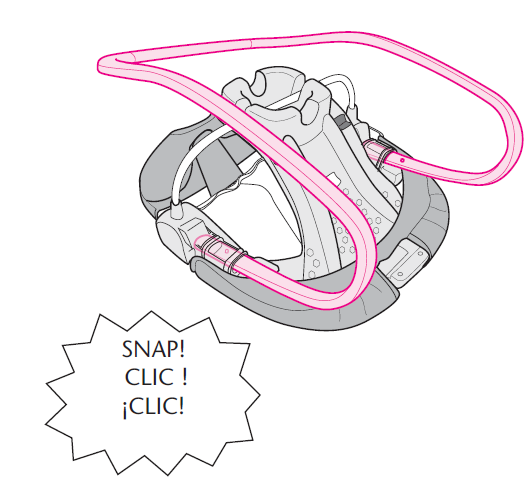
and not be twisted. Make sure the buckle and seat belt are in line with each other. Contact Graco if in doubt about this point.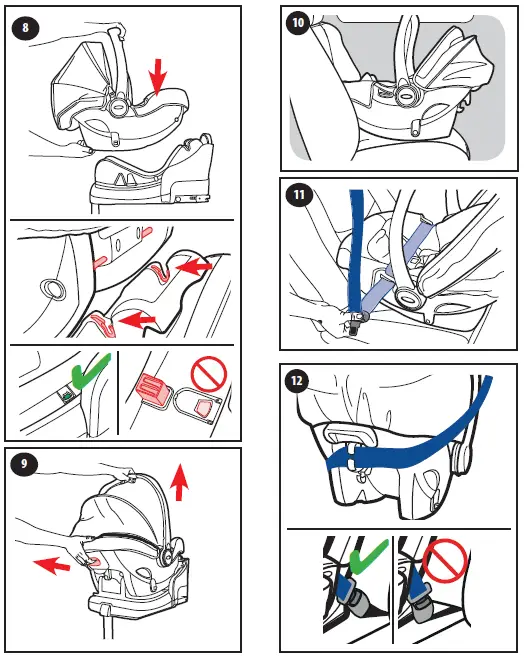
- Tighten Vehicle Seat Belt
Lay your forearm across the car seat at the belt path and push down. Pull-on the shoulder belt to tighten while feeding the slack back into the retractor. - Adjusting the handle
Squeeze latches on both sides at bottom of the handle to release it. Rotate the handle until it clicks into any of the 4 positions:
Position A (up): MUST be used when carrying by a handle,
Position B: Vehicle Travel Position
Position C: Convenience Position
Position D (down): is the sitting position.
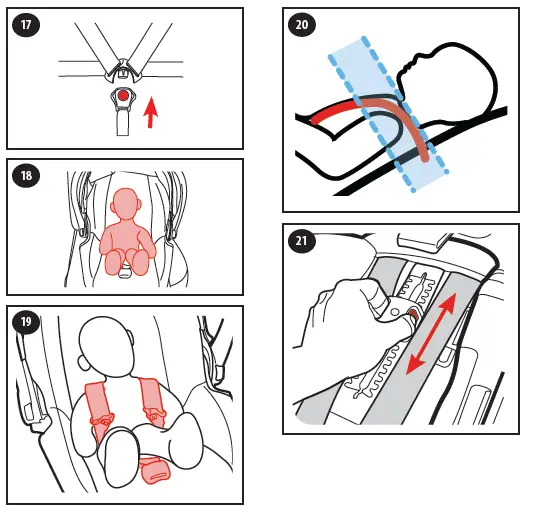
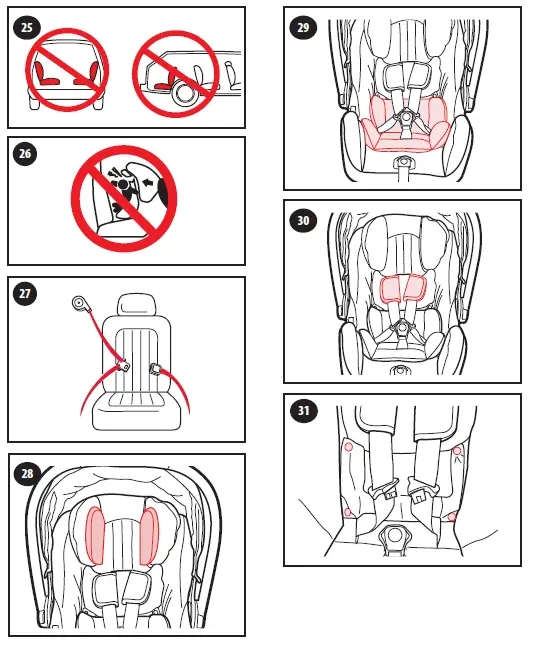
Always place the handle in the B position when using it in a vehicle. - Canopy Mesh Opening To open the mesh canopy opening, unzip as shown. Securing Child Loosen Harness Straps Push down on the harness release lever while pulling out on the harness straps.
- Press the red button on the harness to unfasten
- Place Your Child in the Seat back.
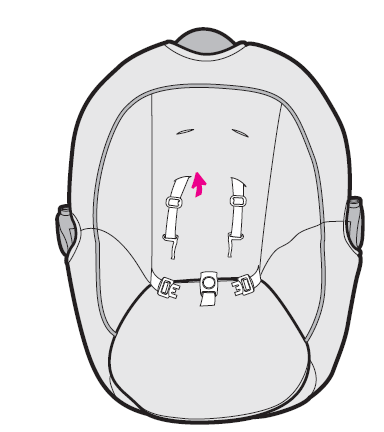
- Place Harness Straps Over Child’s Shoulders
- Be Sure the Harness Straps are at the Proper Height Harness straps must be at or just below the child’s shoulders.
- To change harness location, from the back of the seat, squeeze the headrest adjustment buttons and move it up or down to the correct harness position.
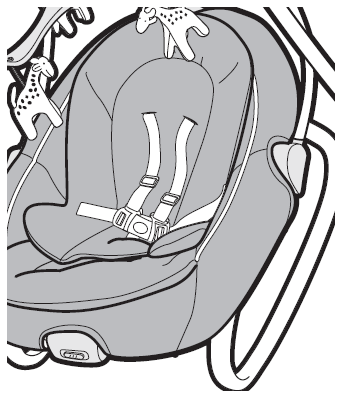
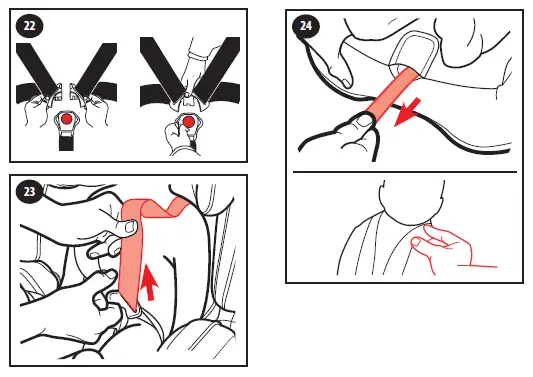
- Buckle Harness Straps Fit the two buckle tongues together and push them into the buckle. You will hear a “click” when buckle tongues are securely attached. Pull up on the buckle tongue to make sure it is securely attached.
- Pull All the Slack Out From around the Waist Pull up on the harness strap while pushing the buckle tongue down. Do this on both sides.
- Tighten the Harness by Pulling the Harness Adjustment Strap
When you are not able to pinch any of the harness webbings at your child’s shoulder, the harness is tight enough.
Unsafe Vehicle Seat Locations
Never install this car seat in any of the following vehicle seating locations: - rear-facing or side-facing vehicle seats
- rear-facing with an active frontal airbag
- Identify Your Seat Belt Type
There is only one type of vehicle seat belts that can be used with this car seat: Combined Lap & Shoulder Seat-belt
3 connections points.ACCESSORIES
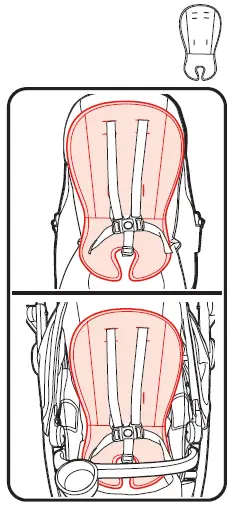
- HEAD PILLOW
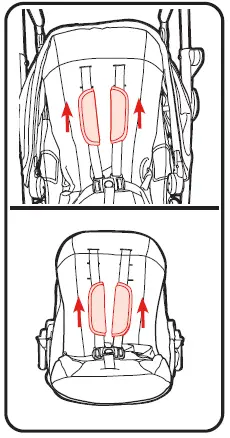
Use only with infants up to 60 cm. To remove, slide out from behind the headrest pad. - BODY PILLOW
Use only with the lowest two sets of harness slots. To remove, unbuckle the buckle and remove the pillow. - Harness Covers
To remove, undo the fastening strips and remove.
Cleaning Seat Cover - Unsnap the four buttons on the seat cover.
- Pull out the plastic flaps from the side of the seat
- Pull out the plastic flaps from the side of the seat
- Pull the cover off the shell.
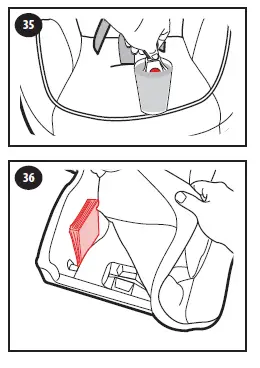
- To remove the canopy from the canopy hoop, first press the release tab and remove it from the mounting remove canopy.
Machine wash cover and canopy in cold water on delicate cycle and drip dry. DO NOT USE BLEACH. Reverse the steps to reattach the cover to the shell. Make sure the harness straps are not twisted.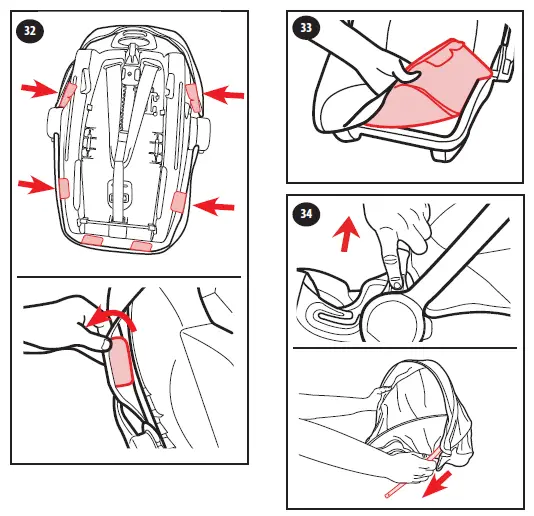
Cleaning Crotch Buckle
WARNING! Inspect and clean the buckle from time to time to remove any objects or debris that could prevent latching. - To clean the buckle, place in a cup of warm water and gently agitate the buckle. Press the red button several times while in the water. DO NOT SUBMERGE THE BUCKLE STRAP. DO NOT USE SOAPS, HOUSEHOLD DETERGENTS or LUBRICANTS. Shake out excess water and allow to air dry. Repeat steps as needed until it fastens with a click.
Cleaning Harness
Surface wash only with mild soap and damp cloth. DO NOT IMMERSE THE HARNESS STRAPS IN WATER Doing so may weaken the straps.
If harness straps are frayed or heavily soiled, contact Customer Service at
www.gracobaby.eu
www.graco.co.uk
www.gracobaby.pl - Store instruction manual in the slot with the instruction book icon as shown.
Replacement Parts
To purchase parts or accessories, please contact us at the following:
www.gracobaby.eu
www.graco.co.uk
www.gracobaby.pl
Product of:
Wonder Brands Limited
FLAT/RM 1501, 15/F, Capital Centre, 151 Gloucester Road,
Wan Chai, Hong Kong
Customer Service
gracobaby.eu
www.gracobaby.pl
For UK and ROI
[email protected]
+44 0800 952 0063