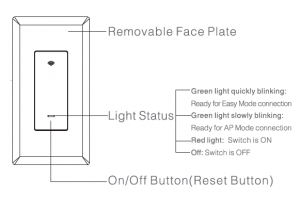
►Product Overview
!►Parameters
Input: 100V-240V~, 50/60Hz Output: 15A(Max) Rated Power: 1800W/120V
WiFi Frequency: 2.4GHz Power Supply Mode: Neutral+Live Wire
IM3EFORE YOU INSTALL
WARNING!
RISK OF ELECTRIC SHOCK. Incorrect installation could be dangerous or illegal, multiple breakers may need to be de-energized for safe installation. Please call a professional electrician if you are unfamiliar or uncomfortable with electrical work.

Make sure your wiring is compatible. The Gosund light switch replaces single pole switches only. If your light can be turned on from two different
wall switches, that’s a 3-way switch and Gosund light switch is not compatible.
► Install the Gosund Light Switch

Step 1
Shut OFF the power at the circuit breaker for the switch you are replacing. You may need to shut OFF more than one circuit breaker/switch to make sure the switch you’re working on is powered OFF.
IMPORTANT: USE A NON-CONTACT VOLTAGE DETECTOR OR FLIP YOUR LIGHT SWITCH A FEW TIMES TO MAKE SURE THAT THE POWER IS OFF.
Step 2:
Unscrew and disconnect the wires from the old switch using a screw driver.
Step 3
Identify the wires on your Gosund Light Switch. Switch(Live/Load) Wires-On this light, the switch wires are the one red wire and one black wire.
Neutral wire -The Gosund Light Switch requires this wire, but isn’t always present in your electrical wiring at home. If present, the neutral wire is
normally found within the wall box with a wire nut on top of it.
Ground wire -It’s normally green or copper in color.
Step 4:
Install the Gosund Light Switch.Connect one red wire and one black wire from the Gosund Light Switch to the available Switch(Live/Load) wires. In case you found more than one wire.just place them into the wire out.
NOTE:The wire nut is the cap-like object connecting the wires.
Step 5:
If you have a Ground wire (optional), disconnect it from the old switch and connect it to the green wire on the Gosund Light Switch.
Step 6:
Unscrew the wire nut that is holding together the existing Neutral wires. Connect the white wire from the Gosund Light Switch to the outlet’s exposed Neutral wires. Securely screw them together inside the wire nut.
!► Install the Gosund Ap
- Search for Gosund App on App store /Google Play Store, or just scan the QR code below to download. (For iPhone, you can use build-in camera to scan the
QR code. For Android, you may need barcode scanner to do that. Please confirm the App icon before downloading.) - Register an account and memories the password, enter your email address or your phone number, then obtain verification code to complete the reg is try.
!►Connect with Your Cellphone
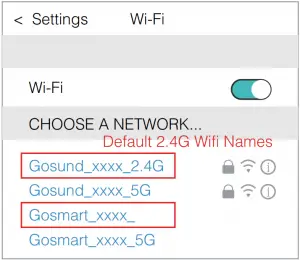
Requirements: 2.4GHz Wi-Fi condition at home
A: For Easy Mode Connection- Green Indicator Light Blinks Quickly
—> Confirm that the smart switch is well installed
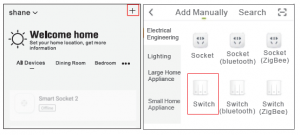
—>Open Gosund App—>Choose the”+ “symbol,
—>” Switch”
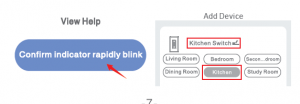
—> Confirm the light status on your switch and follow the App guide. (If you don’t see green light quickly blinking, press On/Off button to reset)
—>Seta unique name for this smart switch, choose the room location
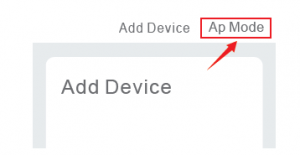
B:APMode
—> Please switch to “AP Mode” if the connection fails in “Easy Mode”;
—> First go back to the Add Device”+”interface, choose the AP Mode on the upper right corner.
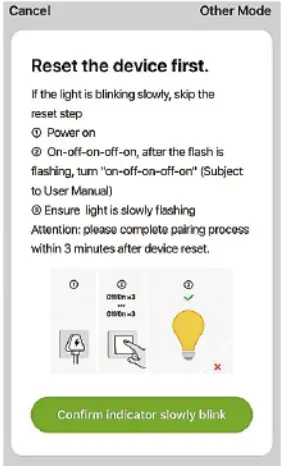
–>Long press on/off button until the indicator light flashes slowly;
–>Make sure the indicator light is flash ing slowly and confirm it in APP;
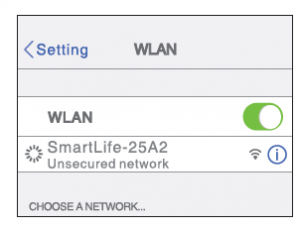
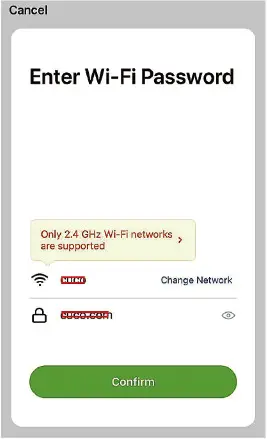
–>Choose your 2.4G Wi-Fi and enter the password and confirm it in APP;
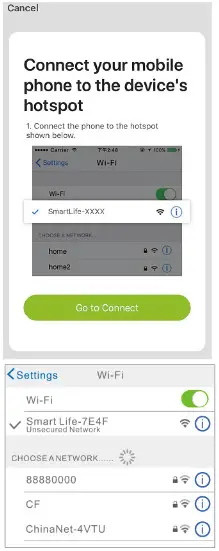
–> Tap “Connect now” and choose Wi-Fi hotspot named “Smartlife-xxx”, then go back to Gosund application;
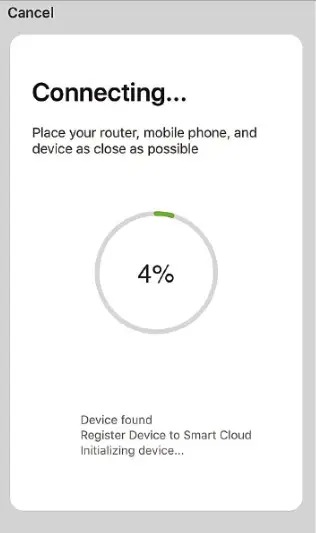
–>Wait till successful configuration and then tap “Completed”.
Note: if the connection fails in “AP Mode”, please check if your router is dual-band Wi-Fi. If it is
dual-band Wi-Fi, please enter the router management interface to split 2.4G and 5G Wi-Fi,and then connect 2.4G Wi-Fi.
!►Getting to Know Gosund App
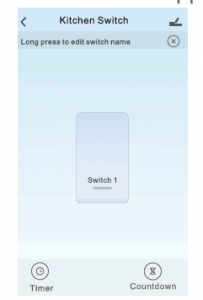
Set timer/schedule
Set device names
Set countdowns
Note: edit the default names in this interface, for better management.
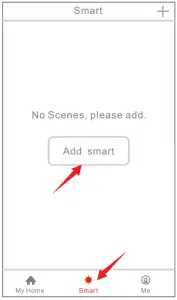
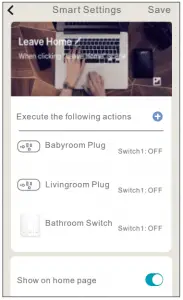
l► Create Scenes/Groups
You can create certain scenes and groups on Gosund App, it allows you to control different smart devices in different rooms at the same time.
If you want to give others the permission to control your Smart Switch, you can authorize that by device sharing function. Go to the Gosund App–> Choose
the device you want to share–>Choose Edit Button
–>Choose shared devices –>Add sharing–>Enter his/her Gosund account–>Search and complete.
►How To Connect with Amazon Alexa Requirements:
- Amazon Alexa Device and Alexa App
- The Smart Switch connected with Gosund App
- Gosund App user ID and password
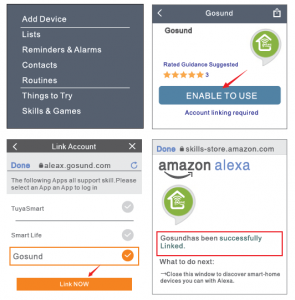
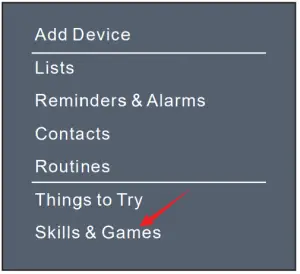
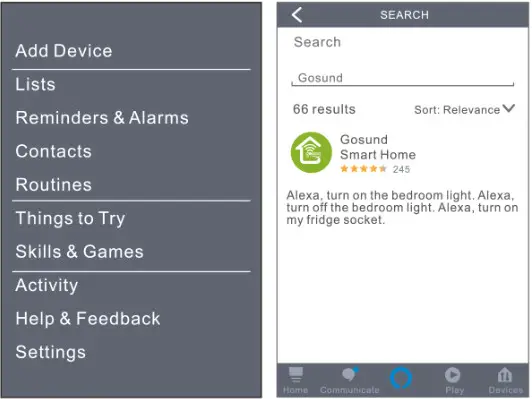
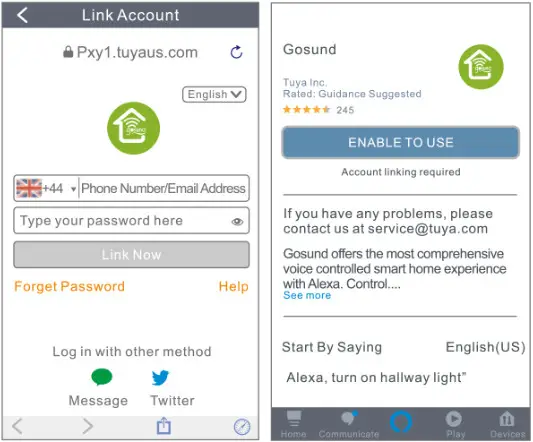
Add Gosund as a “Skill” for Alexa
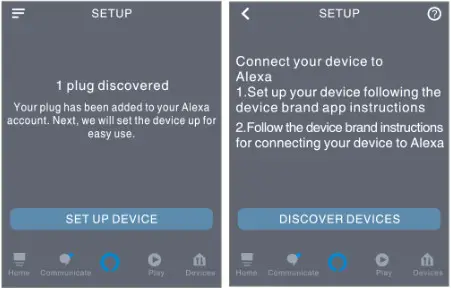
Open Alexa app and choose Skills&Games–> Search for Gosund–>ENABLE TO USE–>Enter the Gosund account –>Authorize to use –>Choose Gosund. And then, the devices you added on will sync to Alexa App. You can also ask Alexa to discover new devices for you at the moment.
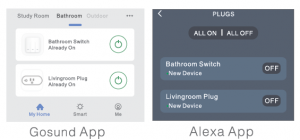
How to ask Alexa to turn on/off Smart Switch First you need to set exact name for the switch on Gosund app. If not, Alexa may tell you “Sorry,
I can’t find the device named xxx .. . ” You can say to Alexa “Alexa, turn on/off bathroom switch”, this command wi ll help you to do the work.
Things you can do with Alexa
- Voice Control the smart switch
- Remote Control the smart switch via Alexa App
- Add the smart switch to certain groups on Alexa App
For other questions about Alexa, please find out with Amazon Alexa support page, or contact us for help directly by email.
Tips for using Alexa Voice Control Please make sure the device name you set for the smart switch is unique and recognizable for Alexa voice assistant.
You should make sure all the smart devices names at your home are non-repetitive and recognizable for Alexa. Vocie assistant system needs the exact command
l►How To Connect with Google Home
You can do that by linking Gosund app with Google Home app, go to Google Home app and find “Works with Google” –>Search Gosund –>Enter your
Gosund account –>Authorize to use. And then the Google Home App will guide you through .
l►How To Connect with Google Home
You can do that by linking Gosund app with Google Home app, go to Google Home app and find “Works with Google” –>Search Gosund –>Enter your
Gosund account –>Authorize to use. And then the Google Home App will guide you through .
!►Trouble Shooting
Q: Why my phone connection failed ?
A:* You should try both Easy Mode and AP Mode, read page 2-page 8, make sure to follow the guide and try again.
- Confirm your home Wi-Fi is 2.4GHz and you entered the correct password during the connection.
- Remove&lnstall the smart switch to start again, see what happens. Contact the after sales service for further help if you still have problems with the connection after following the steps above.
Q:Why can’t I voice control it with my Alexa/Google ?
A:* Make sure you set up smart switch successfully on Gosund app, and they are working fine .
- Make sure you put correct account when you link Gosund as a skill on Alexa/Google App, and you can find it on your skills.
- Make sure your Alexa/Google device is working fine.
- Check the device names that you set for this smart switch, it should be non-repetitive and recognizable for voice assistant, Also, please make sure your native language is available for Al exa.
If you still have trouble to voice control our smart switch after fol lowed all instructions, do not hesitate to contact us for help.
Q: Do I need to set up the device again if I changed my router?
A:Yes! you must set up the smart switch again ii there is any change of the current Wi-Fi status, either you changed your router or your moved the device
to a new house. However, you don’t need to worryif you are just moving it inside your room, with the sameWi-Fi.
Q: Why does it turns on/off or comes offline surprisingly?
A:Check your Wi-Fi status and make sure the electricity is fine. Check ii you’ve set timer for it. If everything looks alright, just reset the smart switch on your app again and see what happens. Email to after-sales services if this problem still exists.
►Safety Information
This device is for I ndoor&Dry condition use only. Make sure the switch electricity is correct for the appliances that you attempt to use with.
Do not try to disassemble this device by yourself, be aware of product damage and safety risks. Keep away from hot, humidity and other extreme environment.
This device meets UL94 V-0 flammability standard
!► Warranty
90 days money-back guarantee: If you’re not satisfied with this purchase, you can choose to refund this order with in 90 days. 24months limited warranty:
- Device was used in proper technical working condition.
- Covers unartificial fai lures and defections on th is device. Risk of Damage:
Not suitable for appliances that exceed 15A Current, be careful.
Do not cover if the device was found artific ial disassembled.
Contact Us
For any inquiries or comments concerning our products. Your advice is very much appreciated. Manufacturer: Shenzhen Gosund Technology Co., Ltd Website: www.gosund.com
]]>![]()

WP6 Smart Plug Instruction
-1-

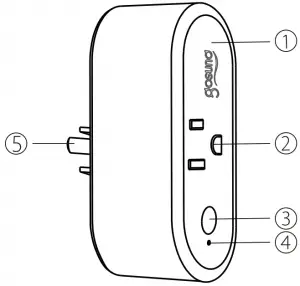
- Flame Resistant Material
- Socket Panel
- On/Off Button
- Indicator Light
- Power Plug
Note: On/Off button can also be used as a factory reset button- simply press and hold the button.
Only do this if you want to erase the socket’s current settings.
Model Number: WP6
Input: 110-240V, 60Hz, 16A Max
-2-
Output: 16A Max
Working Temp: -20~45°C
Wi-Fi Frequency: 2.4GHz
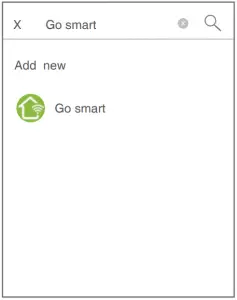
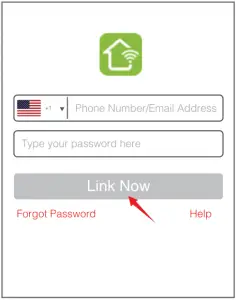
- Search for Go Smart App on App store/Google Play Store, or just scan the QR code below to download. (For iPhone, you can use build-in camera to scan the QR code. For Android, you may need barcode scanner to do that. Please confirm the App icon before downloading.)
PS: You can also add this smart plug to smart life app directly if you already have it on your phone, it is compatible and works the same way. - Register an account and memories the password, enter your email address or your phone number, then obtain verification code to complete the registry.
-3-
Requirements: 2.4GHz Wi-Fi condition at home
For 2.4Ghz Wi-Fi You’ll Need to Know:
1. If you only have 5GHz Wi-Fi router, you will not be able to complete the connection.
2. If you are using a dual Wi-Fi router and it broadcast 2 Wi-Fi signals, make sure that your phone was connected with the 2.4GHz Wi-Fi signal,it should be the Wi-Fi signal that next to “_5G” .
-4-
3. If you are using a dual Wi-Fi router but it broadcast only 1 Wi-Fi signal, you will have to manage your Wi-Fi router and change the settings to have 2.4GHz Wi-Fi.(you may change it back after connection)
-5-
A: For Easy Mode Connection- Blue Indicator Light Blink Quickly (Every 0.5 second)
—> Confirm that the smart plug is well installed
—> Open Go Smart app
—> Choose the “+” symbol
—> “Electrical Outlet”
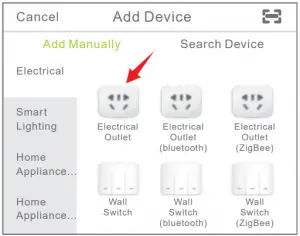
-6-
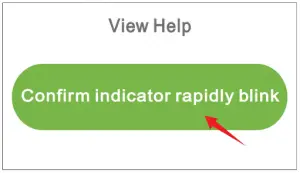
—> Confirm the light status on your plug and follow the App guide. (If you don’t see blue light quickly blinking, press On/Off button to reset)
—> Set a unique name for this smart plug, choose the room location.

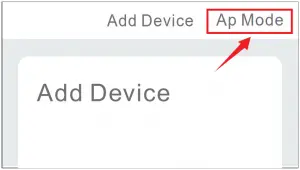
B:AP Mode (Indicator light blinks every 2 seconds )If the Easy mode connection failed, please remove and install the smart plug into your power outlet again. When you make sure the indicator light is quickly blink again for Easy mode, hold the power button for about 7 seconds to plug to AP mode. Once you see the indicator light slowly blink(every 2 seconds), you can start to try the AP mode connection.
-7-
–> First go back to the Add Device “+” interface, choose the AP Mode on the upper right corner.
–>Long press on/off button until the indicator light flashes slowly;
–>Make sure the indicator light is flashing slowly and confirm it in APP;
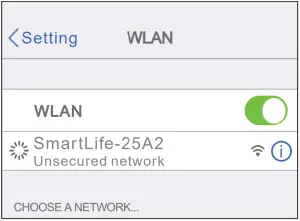
–>Choose your 2.4G Wi-Fi and enter the password and confirm it in APP;
–>Tap “Connect now” and choose Wi-Fi hotspot named “SmartLife-xxx”, then go back to Go Smart App;
–>Wait till successful configuration and then tap “Completed”.
-8-
-9-
 Set timer/schedule
 Set device names
 Set countdowns
Note: edit the default names in this interface, for better management.
You can create certain scenes and groups on Go Smart App, it allows you to control different smart devices in different rooms at the same time.
-10-
If you want to give others the permission to control your smart plug, you can authorize that by devicesharing function. Go to the Go Smart app
–>Choose the device you want to share
–>Choose Edit Button –>Choose shared devices –>Add sharing
–>Enter his/her Go Smart account
–>Search and complete.
Requirements:
1.Amazon Alexa Device and Alexa App
2.The Smart Plug connected with Go Smart App
3. Go Smart App user ID and password
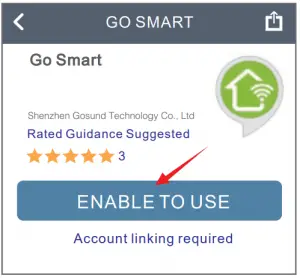
Add Go Smart as a “Skill” for Alexa
Open Alexa app and choose Skills& Games
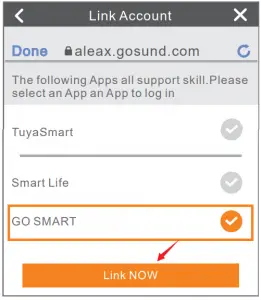
–>Search for Go Smart–>ENABLE TO USE–>Enter the Go Smart account
-11-
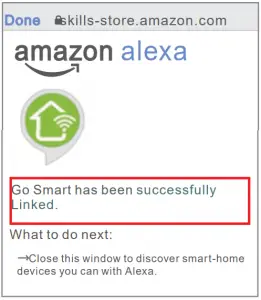
–>Authorize to use –>Choose Go Smart.
And then, the devices you added on will sync to Alexa App. You can also ask Alexa to discover new devices for you in this moment.
-12-
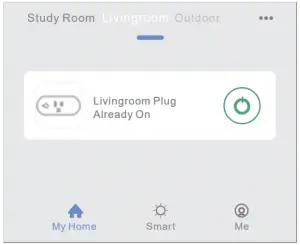
How to ask Alexa to turn on/off Smart Plug
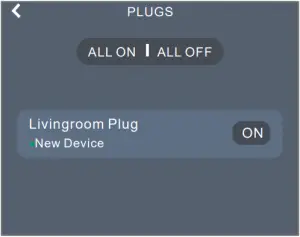
First you need to set exact name for the plug on Go Smart app. If not, Alexa may tells you: “Sorry, I can’t find the device named xxx…” You can say to Alexa “Alexa, turn On/Off Livingroom plug”, this command will help you to do the work.
Go Smart App Alexa App
Things you can do with Alexa
* Voice Control the smart plug
* Remote Control the smart plug via Alexa App.
* Add the smart plug to certain groups on Alexa App. For other questions
-13-
about Alexa, please find out with Amazon Alexa support page, or contact us for help directly by email.
Tips for using Alexa Voice Control
Please make sure the device name you set for the smart plug is unique and recognizable for Alexa voice assistant. You should make sure all the smart devices names at your home are non-repetitive and recognizable for Alexa. Voice assistant system needs the exact command to do the work.
After you connected the smart plugs with go smart app successfully, you can start to link them to
Google Home App:
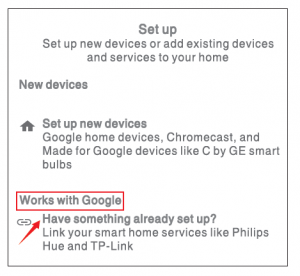
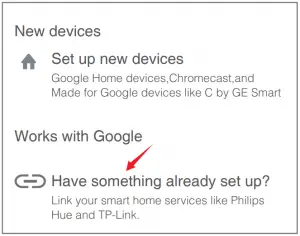
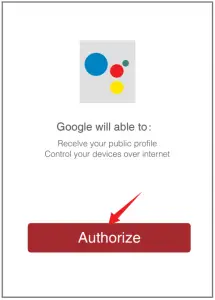
Open Google Home app and find “Set up device”
–>Click “Works with Google”
-14 –
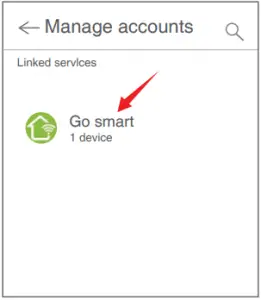
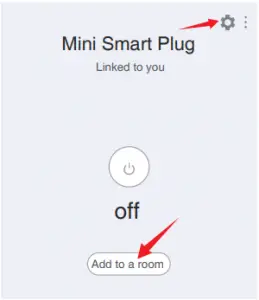
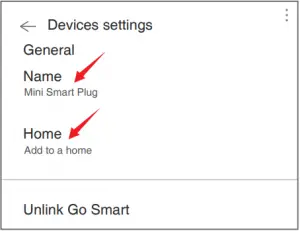
–>Search go smart–>Enter your go smart account –>Authorize to use. After that you will see the smart plug in the home page of Google Home as “Linked to you”, but you still haven’t set the device name and assign a home or a room for it.
-15 –
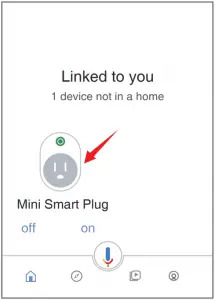
Now click the device that “Linked to you” or open “Works with Google”
-16 –
again to manage your linked devices, follow the steps below and set up the device names, rooms and home for the smart plug, you won’t be able to voice control it before you complete that.
-17-
Q: Why my phone connection failed?
A:* You should try both Easy Mode and AP Mode, read page 5-page 7, make sure to follow the guide and try again.
*Confirm your home Wi-Fi is 2.4GHz and you entered the correct password during the connection.
*Remove&Install the smart plug to start again, see what happens.Contact the after sales service for further help if you still have problems with the connection after following the steps above.
Q: Why can’t I voice control it with my Alexa/Google?
A: * Make sure you set up smart plug successfully on Go Smart app, and they are working fine.
* Make sure you put correct account when you link Go Smart as a skill on Alexa/Google App, and you can find it on your skills.
-18-
* Make sure your Alexa/Google device is working fine.
* Check the device names that you set for this smart plug, it should be nonrepetitive and recognizable for voice assistant, Also, please make sure your native language is available for Alexa.
If you still having trouble to voice control our smart plug after followed all instructions, do not hesitate to contact us for help.
Q: Do I need to set up the device again if I changed my router?
A: Yes! you must set up the smart plug again if there is any change of the current Wi-Fi status, either you changed your router or your moved the device to a new house. However, you don’t need to worry if you are just moving it inside your room, with the same Wi-Fi.
-19-
Q: Why does the schedule function works differently from my settings?
A: * If the smart plug has been temporary lost power or Wi-Fi connection, the previous schedules might be lost too, please set new schedules in this case.
* If the smart plug turns on/off in the wrong time, please contact the aftersales team for help to update the firmware.
This device is for Indoor&Dry condition use only. Make sure the plug electricity is correct for the appliances that you attempt to use with. Do not try to disassemble this device by yourself, be aware of product damage and safety risks. Keep away from hot, humidity and other extreme environment. This device meets UL94 V-0 flammability standard.
-20-
90 days money-back guarantee: If you’re not satisfied with this purchase, you can choose to refund this order within 90 days.
12 months limited warranty:
* Device was used in proper technical working condition.
* Covers unartificial failures and defections on this device.
Risk of Damage: Not suitable for appliances that exceed 16A Current, be careful. Do not cover if the device was found artificial disassembled.
-21-
Friendly reminder: Different App versions may lead to differences in the interfaces, but the description of the function should be the same.
For any inquiries or comments concerning our products, please send email to: [email protected].
Manufacturer:
Shenzhen Gosund Technology Co.,Ltd
Website: www.gosund.com
Email Support: [email protected].


-22-
]]>
gosund SP1-C Smart Socket
Product Package
- Smart Socket
- User Manual
| 1.LED indicator | Wi-Fi/Power status |
| Quick press to switch on/off. | |
| Press & hold for about 5 seconds to | |
| 2.Power / Reset Button | factory reset.
Note: all connection data will be clear- ed. SP1-C must be removed from the |
| Home APP and then added back | |
| again. |
LED Status Indication
| Status | LED Indicator |
| Search Wi-Fi | Blue blinking quickly |
| Adding a device | Blue blinking slowly |
| A device added successfully | Red blinking slowly 5 times |
| Discovering a device | Red blinking slowly 5 times |
| Connected to Wi-Fi (Outlet On) | Blue staying on |
| Connected to Wi-Fi (Outlet Off) | Indication LED stay off |
| Disconnected from Wi-Fi | Red blinking quickly |
| Reset | Press & Hold for 5s, then red blinking once,
Blue blinking quickly |
| OTA in Progress | Red blinking slowly |
| OTA done | Red blinking quickly 4 times |
Parameter
- Input: 230V ~ 50/60Hz 16A Max.
- Output: 3680W Max.
Working temperature: 0°C-35°C - Wi-Fi frequency: 2.4GHz
Reset
Turn on the power, hold the Switch/ Pairing for 5 seconds and let go when the socket starts to flash quickly, the reset is successful. When the socket is in a new network environment, you need to restore the factory settings, and then reconnect to the network.
Warnings and Precautions
Important!
- Keep it out of the reach of children and pets.
- Do not use this product in humid environments or outdoors. It’s for indoor use only.
- Do not place this product near heating devices, such as microwave ovens, stoves, or radiators.
- Protect the product from extreme temperatures, direct sunlight, strong jolts, high humidity, moisture, flammable gases, vapors and solvents.
- Do not disassemble, modify, or repair your device, and ask help from the authorized professionals for device malfunction.
- Do not use the device when it is no longer working properly or visibly damaged.
- Do not store the device for extended periods in poor ambient conditions.
- Do not insert your device to another one.
- Never use aggressive detergents such as rubbing alcohol or other chemical solutions because these could damage the casing or even impair the functioning of the prod-uct.
- Note: The image shown in the manual is indicative only. If there is inconsistency between the image and the actual product, the actual product shall govern.
Add accessories
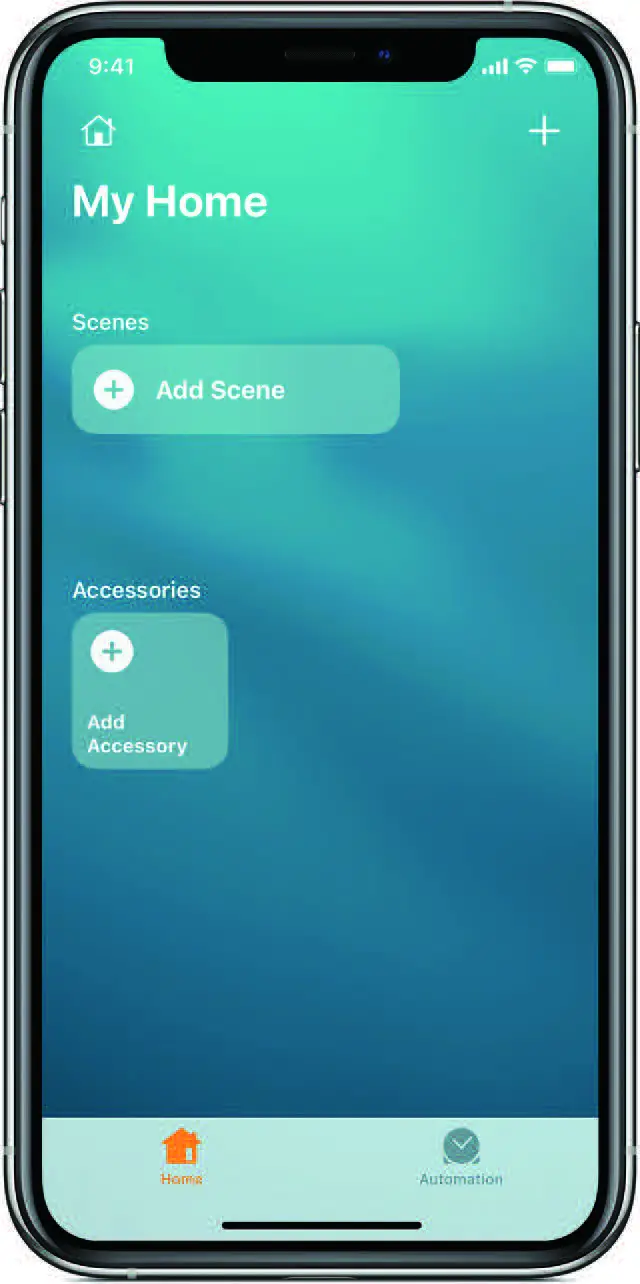
To add an accessory to the Home app, use your iPhone, iPad, or iPod touch. You can’t add accessories to the Home app on Mac. Before you set up your accessory, check these things first:
- Make sure that it’s powered on and nearby.
- Check your accessory’s manual to see if it needs a- dditional hardware to work with HomeKit.
Then follow these steps:
- Open the Home app and tap Add Accessory O or+.
- Use the camera on your iPhone, iPad, or iPod touch to scan the eightdigit HomeKit code, or QR code on the accessory or accessory documentation.
- When your accessory appears, tap it. If asked to Add Accessory to Network, tap Allow.
- Name your accessory and assign it to a room to help you identify it in the Home app and control it withSiri.
- Tap Next, then tap Done. Some accessories, speakers, and smart TVs might require software updates or additional setup with the manufacturer’s app.
If you can’t add an accessory
Update your iPhone, iPad, or iPod touch to the latest version of iOS or iPadOS. To use and manage your home in the Home app on all of your devices, sign in to iCloud with your Apple ID on every device. Then turn on iCloud Keychain and Home in iCloud Settings. Reset Turn on the power,hold the Switch/ Pairing for 5 seconds and let go when the socket starts to flash quickly, the reset is successful. When the socket is in a new network environment, you need to restore the factory settings, and then reconnect to the network.
SP1-C firmware update procedure
- SP1-C updates its firmware automatically.
- 0nce SP1-C connected to the internet, it will check and download the latest firmware.
- The new firmware will take effect after next time bootup. During SP1-C updating firmware, red lights blink slowly.
- When SP1-C updates successfully, red lights blink quickly 4 times.
After-sales
All products come with a limited warranty of 12 months from the date of purchase. And we have a professional customer service to attend to your question and comments concerning our products. Please do not hesitate to contact us.
Contact Us
- Shenzhen Gosund Technology Co., Ltd
- Website: www.gosund.com
- Support: [email protected]
- Address: Gushu Community, Xixiang
- Street, Baoan District, Shenzhen, China

Smart Wi-Fi LED Light Strip
User Manual
Product Package
- Light Strip
- Smart controller
- User manual
- 5 pieces adhesive tape
LED Light Strip
Input: DC 12V,1A
Rated power: 12W
Wi-Fi Frequency:2.4GHz
Light emitting mode:RGB
Install the LED USB Light Strip
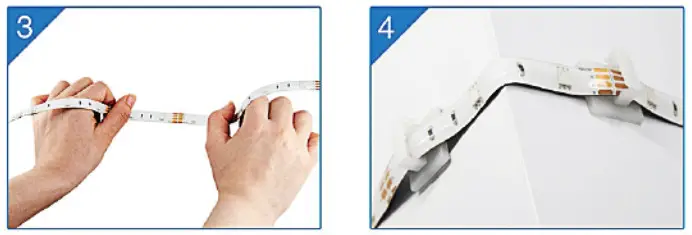
Please note that the front of the light strip is on the same side as the front of the controller.
Note: Here are some tips about install 16.4ft LED strip lights:
- The strip lights should be stick on a clean wall and installation is firm.
- The controller cannot be perched upside down on the wall.
- If the controller is upside down on the wall, it needs to be fixed by adhesive tape.
Upgraded Stronger 3M Adhesive
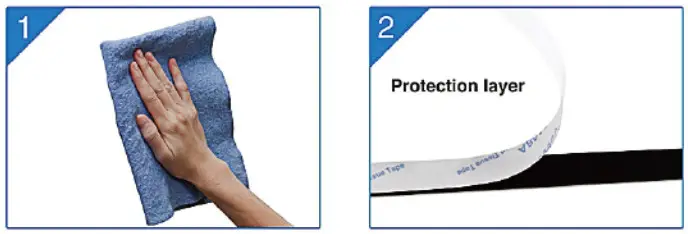
- Surfaces should be clean,dust-free and dry possible before application
- Tear adhesive tape, keep it clean
- Make sure to press the tape firmly into place when applying, and please press at least 10 seconds
- Fix the strip lights stand in the Corner, the strip lights are more stable
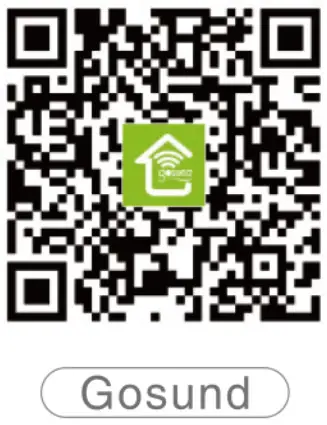
Download “Gosund” APP
- Search “Gosund” App on App Store, Google Play or scan the QR code below and install it.
- Please open the “Gosund” App. Click register and type in your email address to automatically create an account, otherwise type in your phone number to get a verification code to register an account. If you already havea “Gosund” account, simply click login with your account.
- The free APP “Gosund” is compatible with mobile devices that supports IOS 8.0 above and Android 4.4 above.
Connecting the device with Gosund App
A: For Easy Mode Connection- LED Light Strip blue lights blinking quickly .
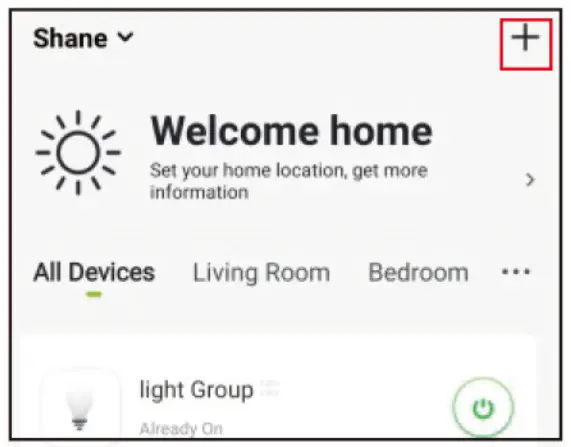
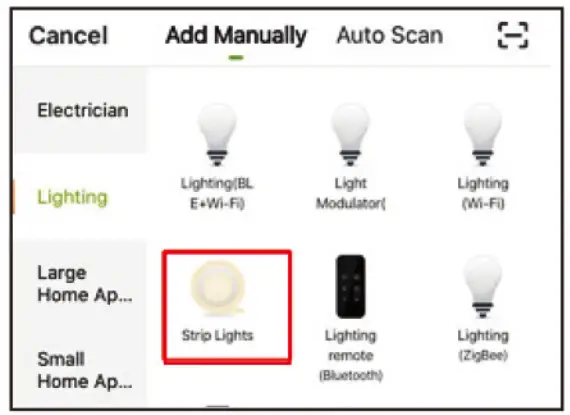
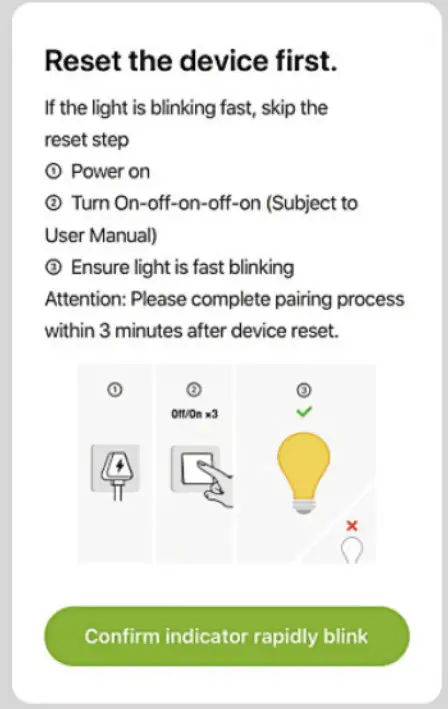
- Long press(more than 6 seconds) on/off button until the light strip falshes quickly –>Open Gosund App–>Choose the “+” symbol–>”Lighting’–>”Strip lights”.
- Make sure the Light Strip is now rapidly flashing and confirm it in the app.
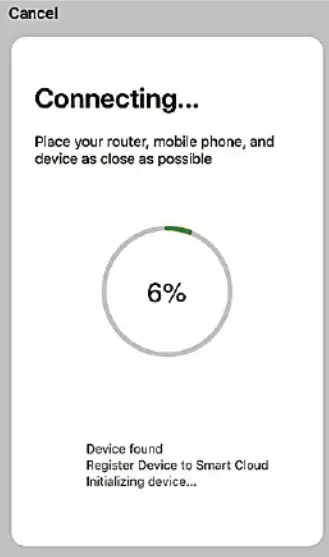
- Choose your home WiFi(make sure the WiFi connection you choose is the same connection/WiFi you used on your phone/device and it should
be 2.4GHz not 5GHz)

- Finally, wait to successfully configure, then tap “Completed”.
B.AP Mode
- Please switch to “Other Mode”, Click “AP Mode”
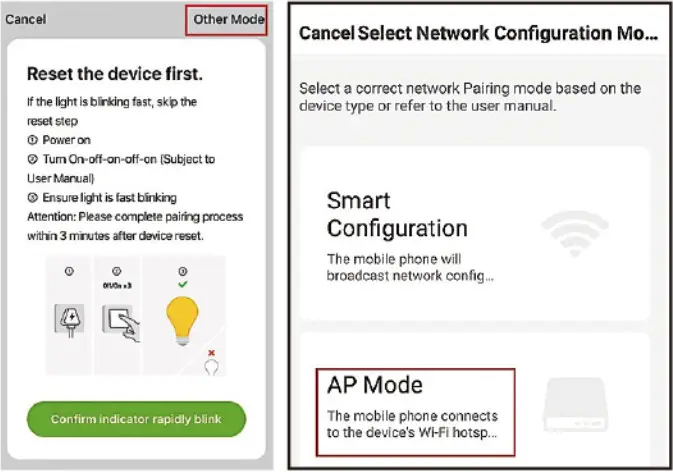
- Long press on/off button until the Light Strip flashes slowly;
- Make sure the Light Strip is flashing slowly and confirm it in APP;
- Choose your 2.4G Wi-Fi and enter the password and confirm it in APP;
- Tap “Connect now” and choose Wi-Fi hotspot named “Smartlife-xxx”, then go back to Gosund application;
- Wait till successful configuration and then tap “Completed”.
 Note: if the connection fails in“AP Mode’, please check if your router is dual-band Wi-Fi. If it is dual-band Wi-Fi, please enter the router management interface to split 2.4G and 5G Wi-Fi, and then connect 2.4G Wi-Fi.
After connecting the network, short press on/off button to switch different color, press on/off button 2-6 seconds to power off, long press on/off button more than 6 seconds to restore factory settings.
Getting to know “Gosund”APP
You can create certain scenes and groups on Gosund App, it allows you to control different smart devices in different rooms at the same time.
Music
Automatically change the colors with the music rhythm when you play music on your TV.
Using Amazon Echo Quick Guide What You’ll Need…
Make sure your Echo dot is connected with your Amazon Alexa and you have “Gosund”APP account.
A.Enable our Skill in Alexa APP
Log inyourAmazon Alexa,choose “Skill” inthe option bar, then search “Gosund” in the search bar; Select “Gosund” in the search result and click “Enable”.
- Input your account and password that you have registered at “Gosund” APP. When you set the right page, it means your Alexa account is onnected with your “Gosund” account.
B.Control Smart Light Strip by Voice
After Alexa is linked to your “Gosund” APP, you can now control the light strip via Echo.
- Discovering device simply say to Echo: “Echo(or Alexa),discover my device.”or choose “add device’’to discover the smart light strip.Echo will start to find the device which is added in “Gosund” APP. It will take about 20 seconds to show the result. Or you may click“Discover device” on the Alexa APP, it will successfully show available devices.
Note:
Echo is one of the wake-up name, the other two names are Alexa and Amazon.
- Support Skill List
You can control devices by instruction like below:
“Alexa, turn on/off(name of the smart light strip)”
“Alexa, turn on the light strip.”
“Alexa, turn off the light strip.”
Note: The name of the device must be consistent with the name of light strip on the “Gosund”APP.The name is recommended to use easy pronunciation of English words.(Amazon Echo just supports English temporarily.)
After-sale & Warranty
All NiteBird products come with a limited warranty of 12 months from the date of purchase. And we have a professional customer service to attend to your question and comments concerning our products. Please do not hesitate to contact us at [email protected]
We will do our best to help you resolve any problems you might have about Our products until you are satisfied. We appreciate your support and cooperation.
