 a
a
Geeni Smart WiFi Camera
Thank you for purchasing your GEENI smart home product. Get started using your new devices by downloading Geeni, one convenient app that manages everything straight from your phone or tablet. Easily connect to your home Wi-Fi and control multiple devices from the touch of your fingertips.
What’s in the Box?
- Smart Wi-Fi Camera
- USB Cable
- Mounting Adhesive
- Power Adapter
- User Manual
Get Ready
- Know your Wi-Fi network and password
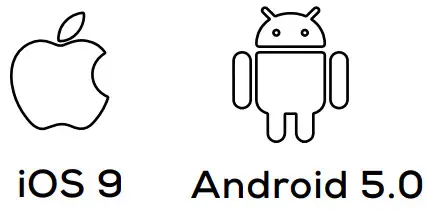
- Make sure your mobile device is running iOS® 9 or higher or Android™ 5.0 × or higher
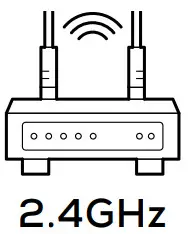
- Make sure you’re connecting to a 2.4GHz Wi-Fi network (Geeni can’t connect to 5GHz networks)
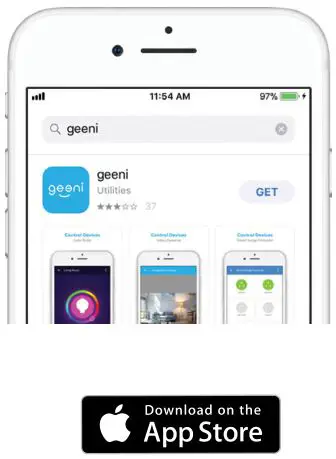
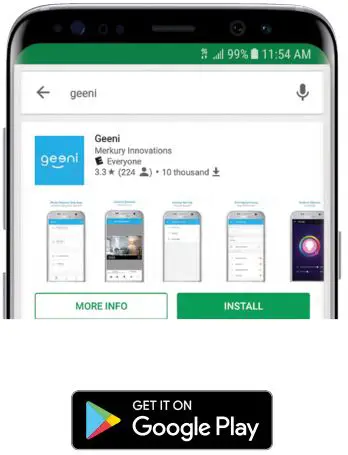
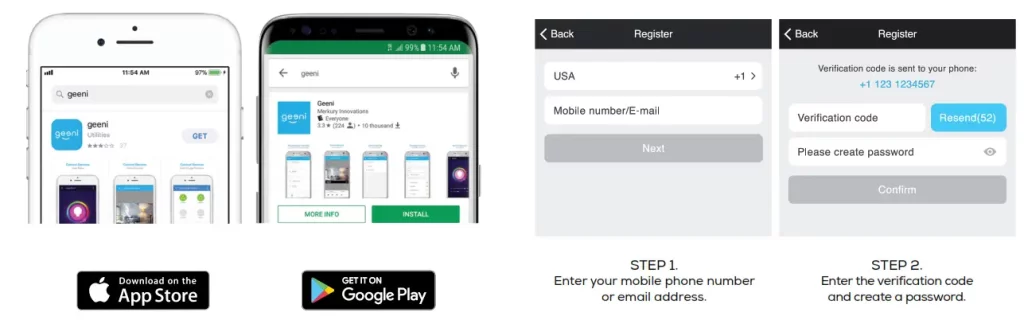
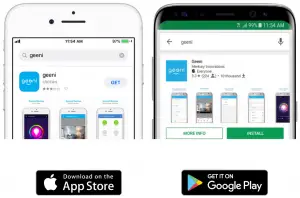
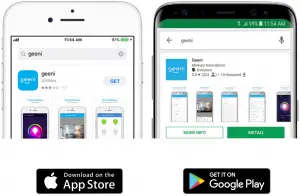
Download the Geeni app from App Store or Google Play
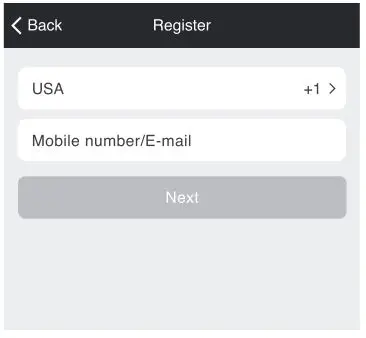
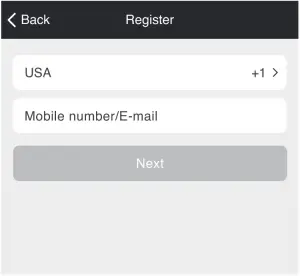
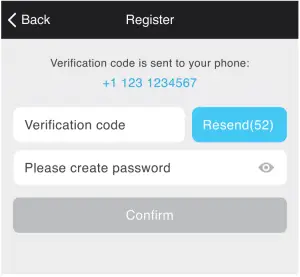
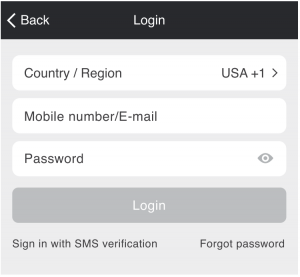
Register an account on your Geeni app
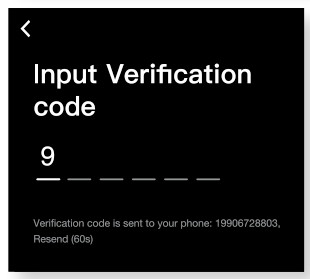
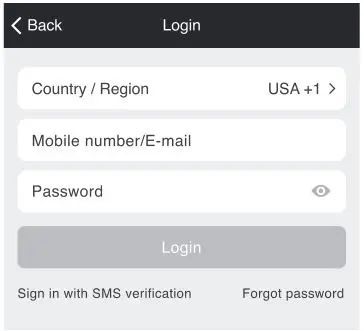
STEP 1:Enter your mobile phone number or email address.
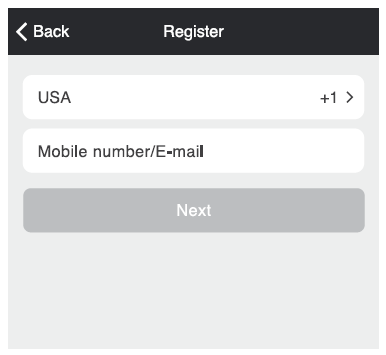
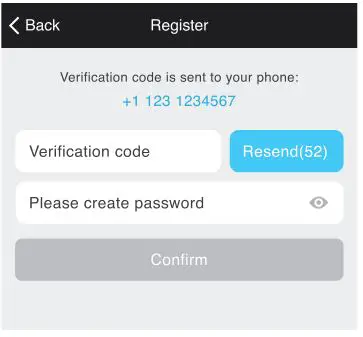
STEP 2:
Enter the verification code and create a password.

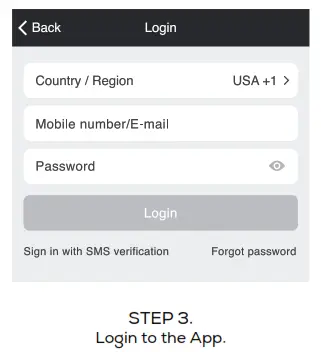
STEP 3:
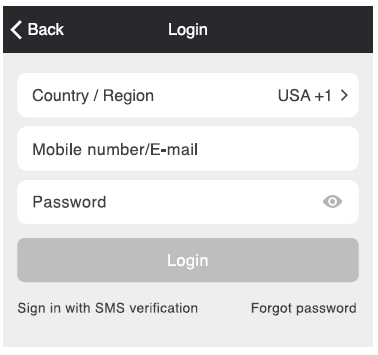
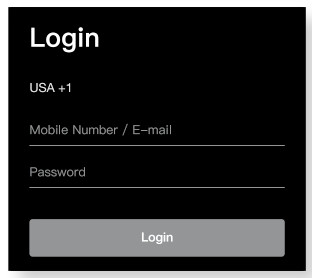
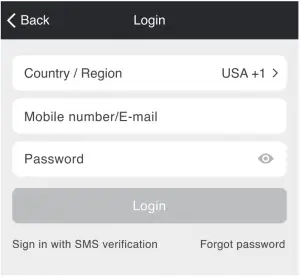
Login to the App.
Plug In
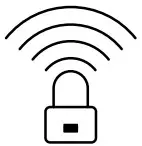
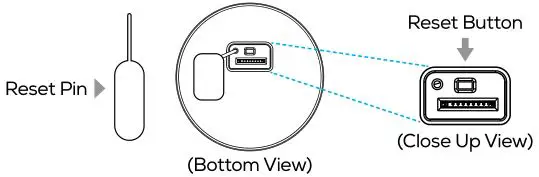
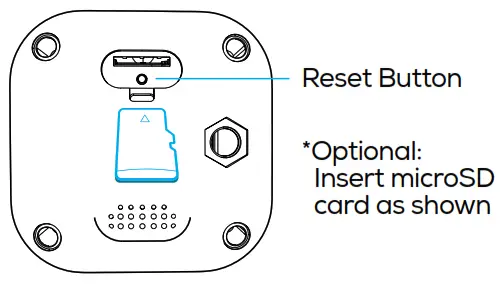
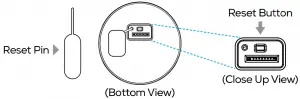
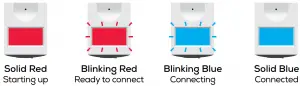
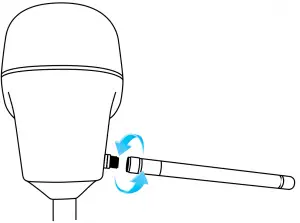
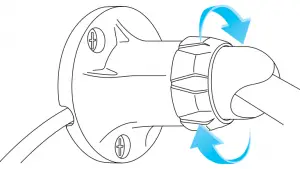
How do I reset my device?
Use the reset pin to press the Reset Button (as pictured) for several seconds until the camera starts to beep.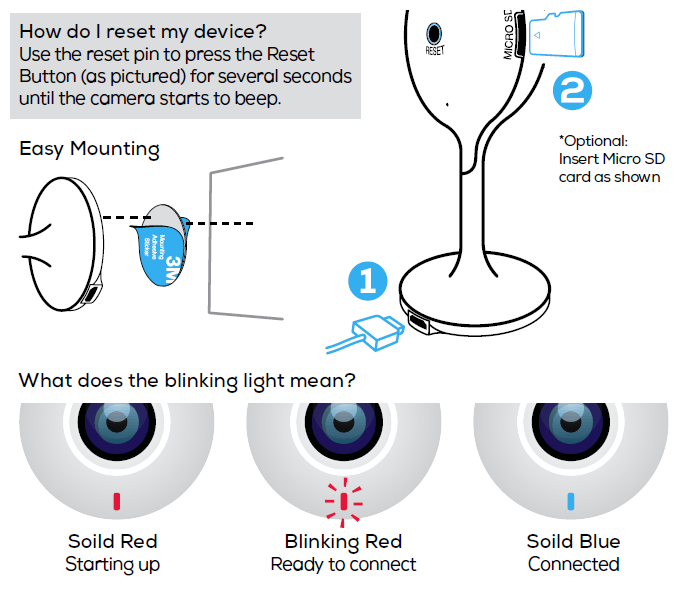
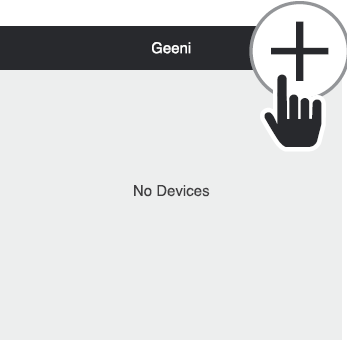
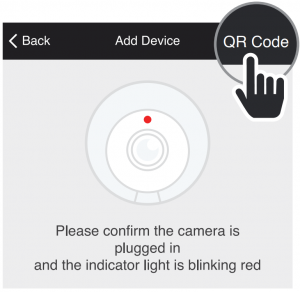
Add device. Method 1: Easy Mode
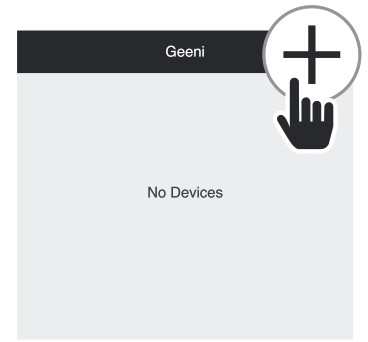
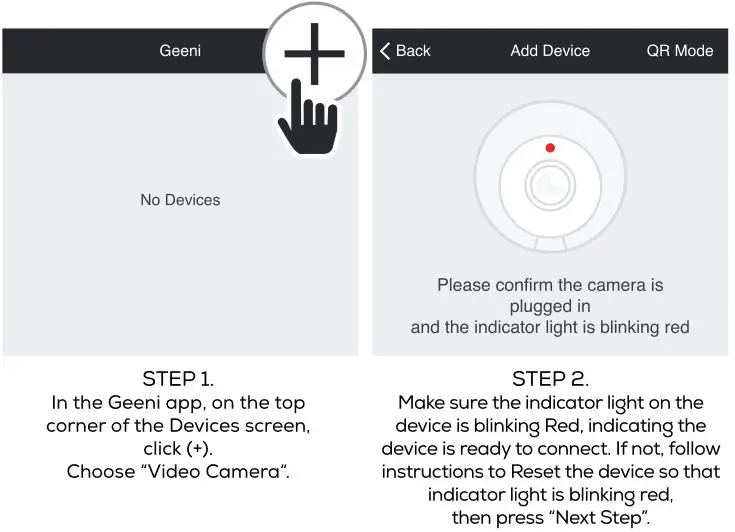
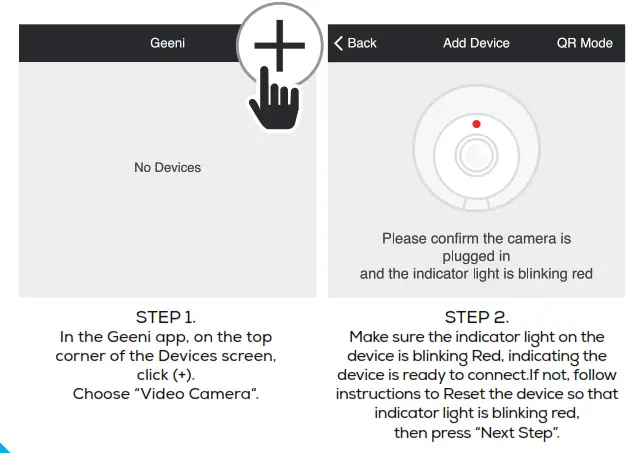
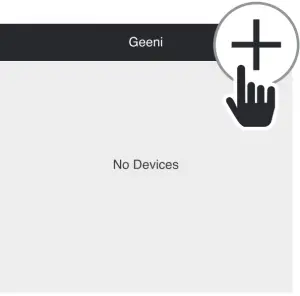
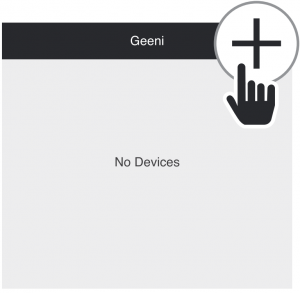
STEP 1:In the Geeni app, on the top corner of the Devices screen, click (+).
Choose “Video Camera“.
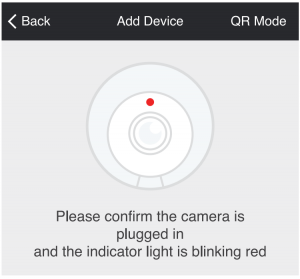
STEP 2:
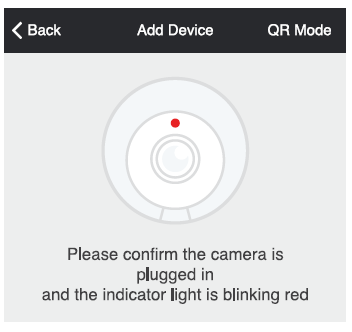
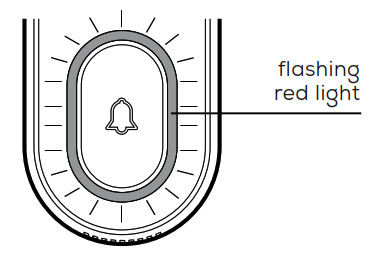
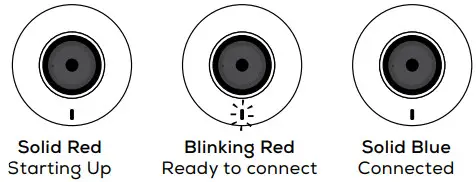
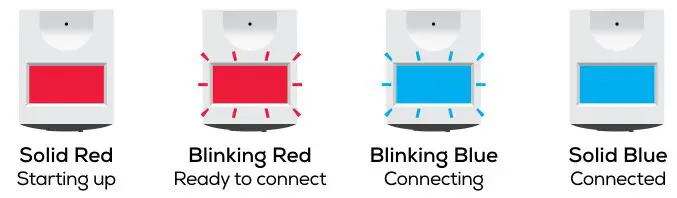
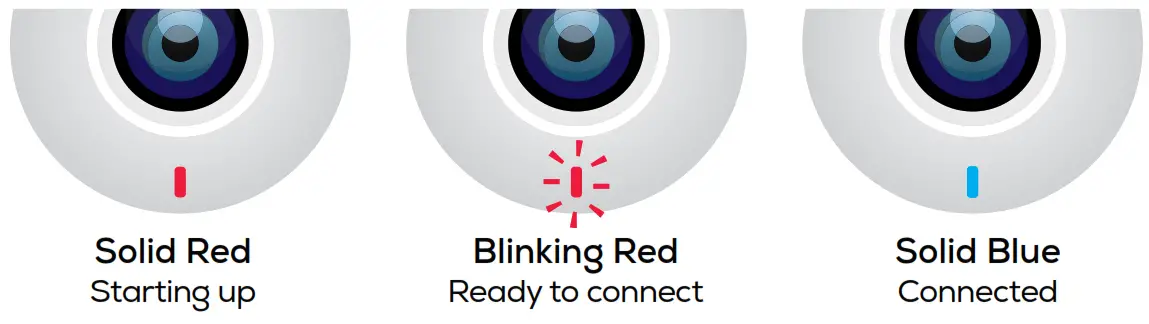
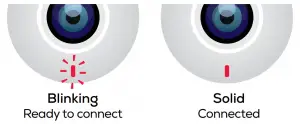
Make sure the indicator light on the device is blinking Red, indicating the device is ready to connect. If not, follow instructions to Reset the device so that indicator light is blinking red,
then press “Next Step”.
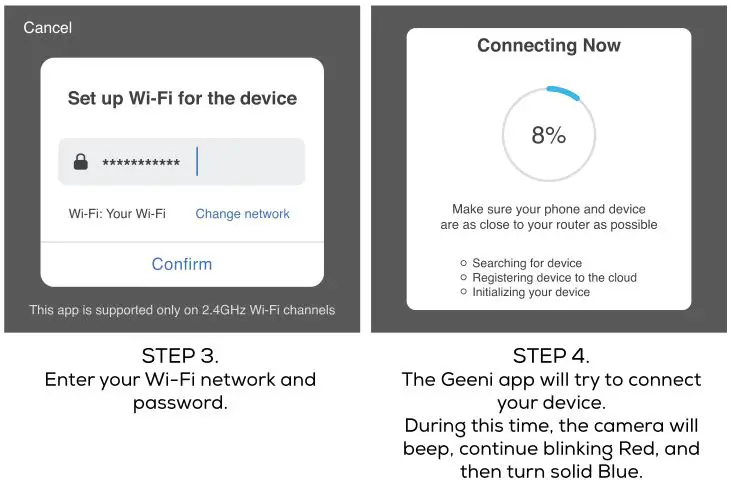
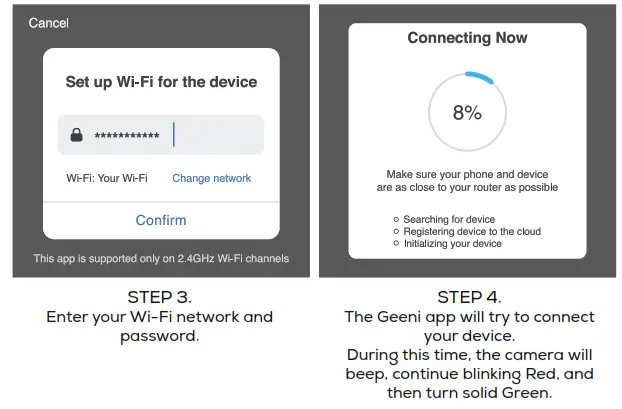
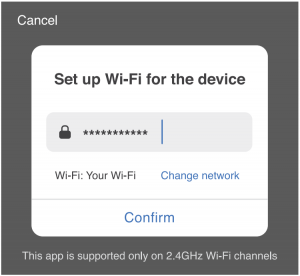
STEP 3:
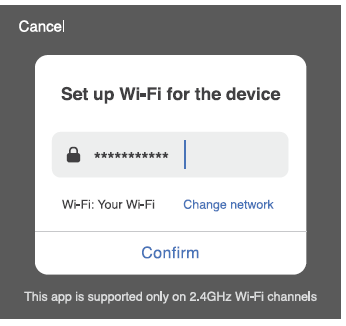
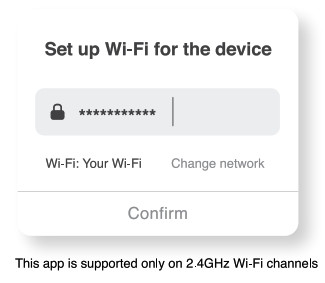
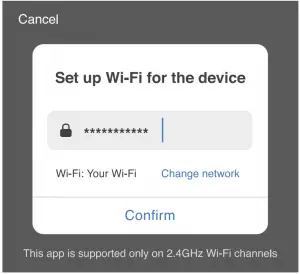
Enter your Wi-Fi network and password.
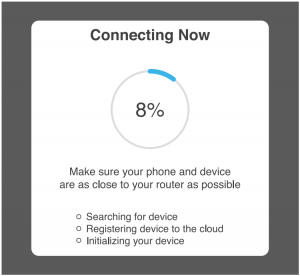
STEP 4:
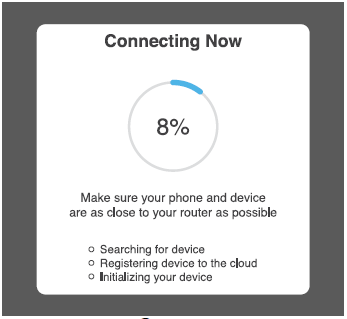
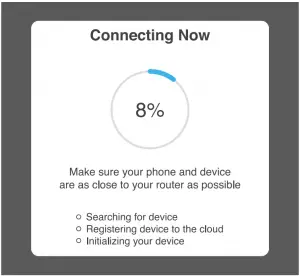
The Geeni app will try to connect your device.
During this time, the camera will beep, continue blinking Red, and then turn solid Blue.
*If the connection fails, try to reset and connect directly using QR Code Mode.
NOTE: Geeni can’t connect to 5GHz networks.
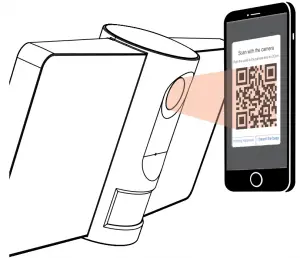
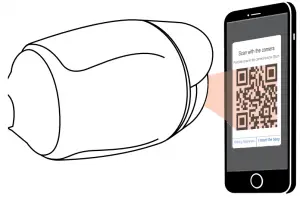
Add device. Method 2: Backup QR Code Mode
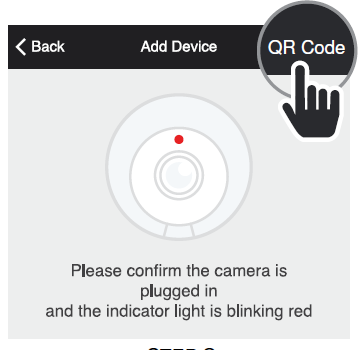
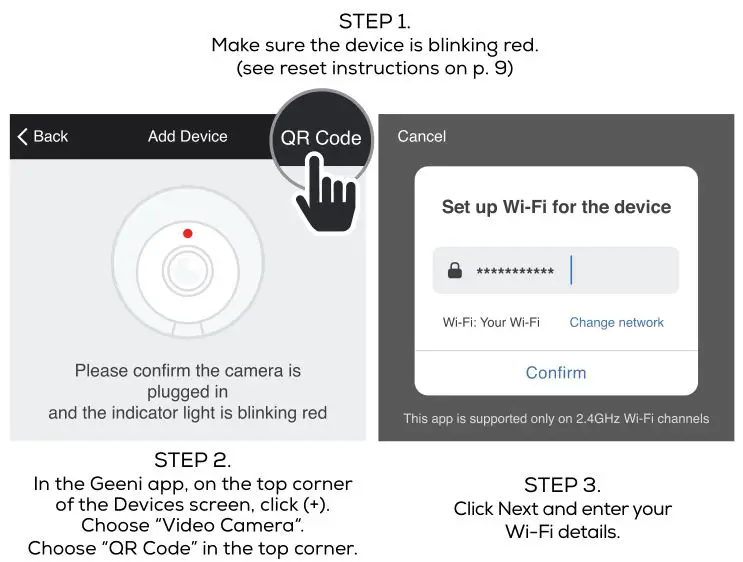
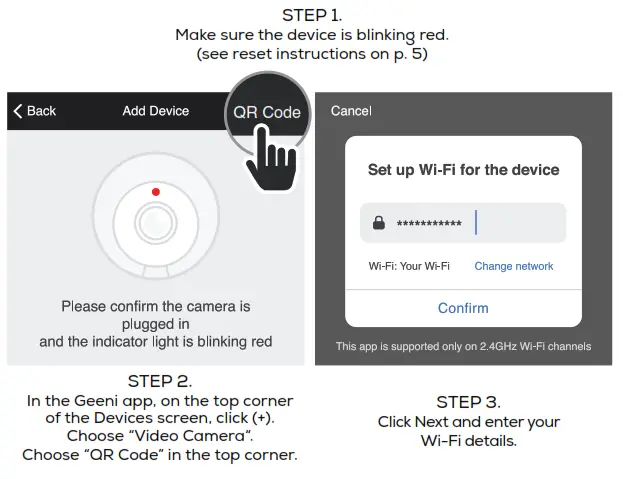
STEP 1:Make sure the device is blinking red.(see reset instructions on p. 5)
STEP 2:
In the Geeni app, on the top corner of the Devices screen, click (+). Choose “Video Camera“.
Choose “QR Code” in the top corner.
STEP 3:
Click Next and enter your Wi-Fi details.
STEP 4:
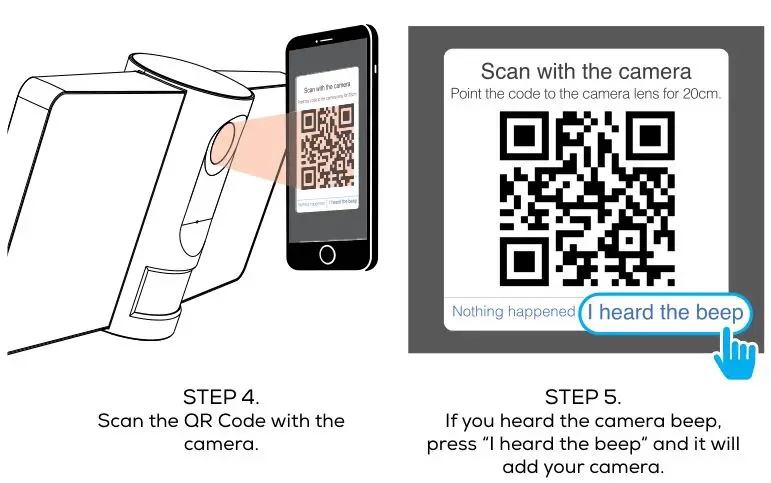
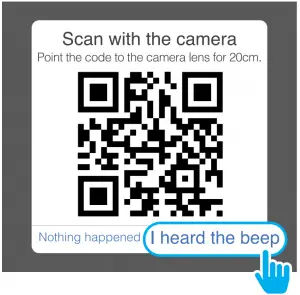
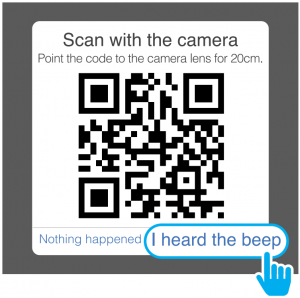
Scan the QR Code with the camera.
STEP 5:
If you heard the camera beep, press “I heard the beep“ and it will add your camera.
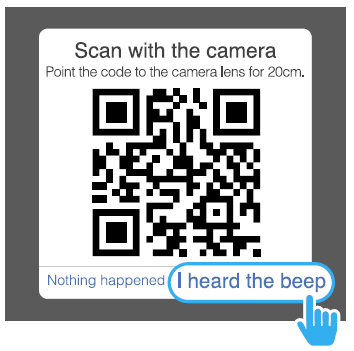
NOTE: Geeni can’t connect to 5GHz networks.
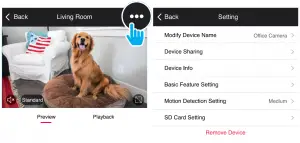
Settings
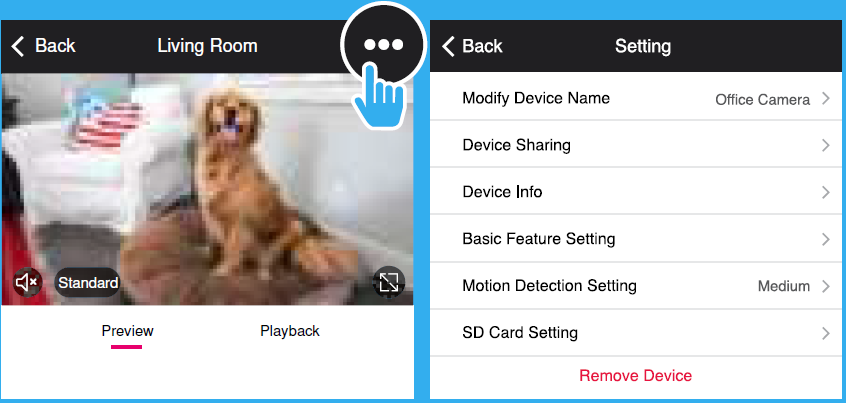
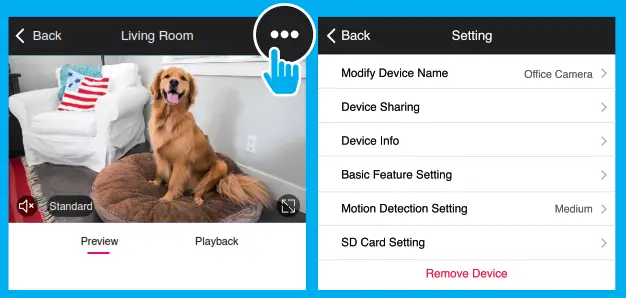
Access Camera Settings: From your main device list, click on the camera you want to edit, then press “ “ button on the top right for advanced settings.
Device Name: Press to rename your device to something like “Bedroom” or “Kids’ Room”.
Device Sharing: let friends, spouse, roommates, or family keep an eye on what your cameras see. Whether it’s a baby’s crib or the family dog, you can decide who gets to check in, access the camera, and set notifications.
Remove Device: Delete the camera from your account. Until it’s deleted, it will always be linked to your account.
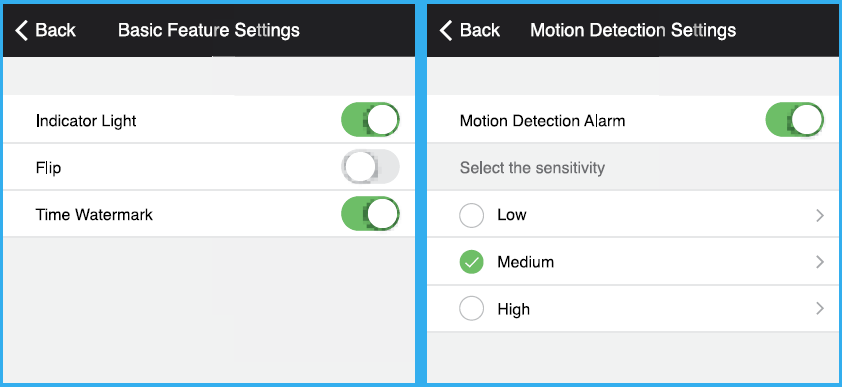
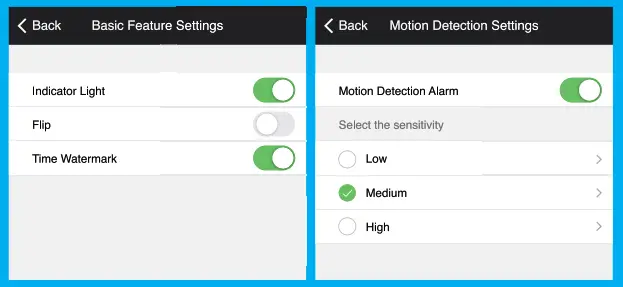
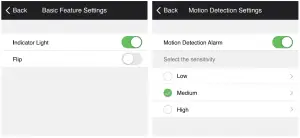
Indicator Light: By default, the camera lights up to show it’s on. Switch “Indicator Light” off to hide the light.
Flip: If you mount your camera upside down, toggling the “Flip” function will rotate the image so that it’s right side up.
Time Watermark: Turn the time watermark on to always see a time stamp of when video is taking place.
Motion Detection: When turned on, you’ll receive notifications to your phone whenever the camera senses motion. Press to turn Motion Detection off or set how sensitive you want it to be.
Format SD Card: Press to erase your Micro SD Card.
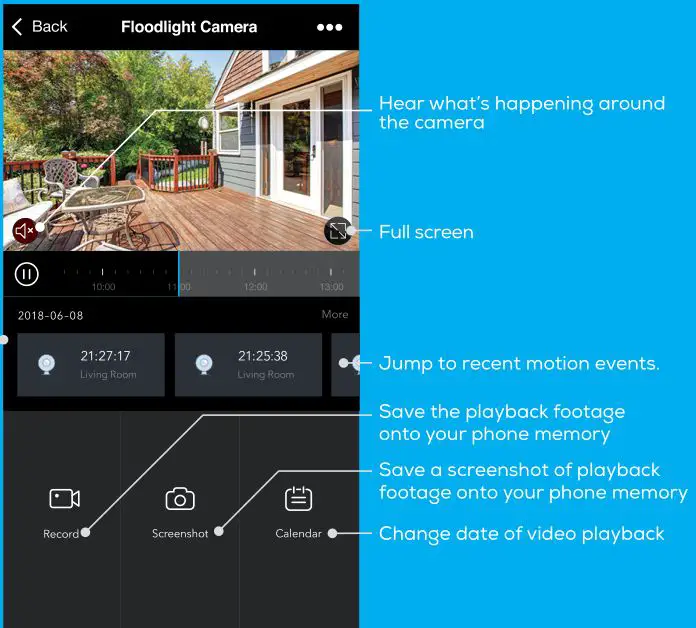
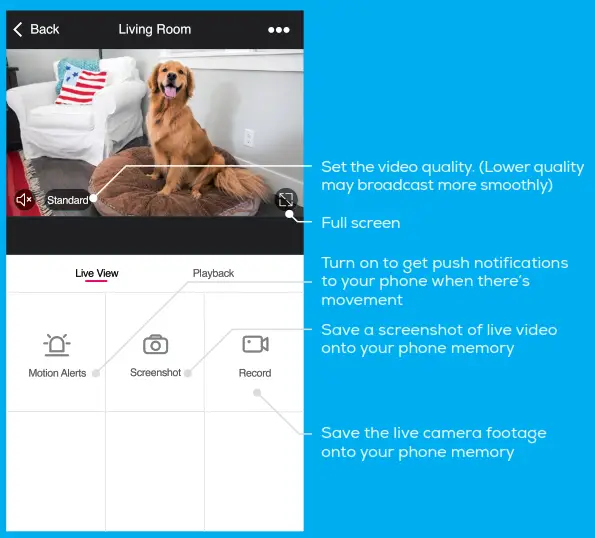
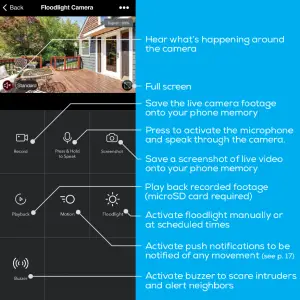
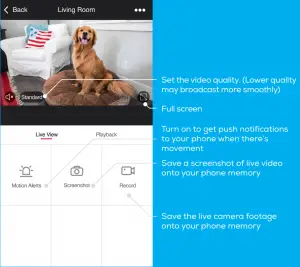
Live View
- Hear what’s happening around the camera
- Set the video quality. (Lower quality may broadcast more smoothly)
- Full screen
- Turn on to get push notifications to your phone when there’s movement
- Press to activate the microphone and speak into the camera
- Save the live camera footage onto your phone memory
- Save a screenshot of live video onto your phone memory
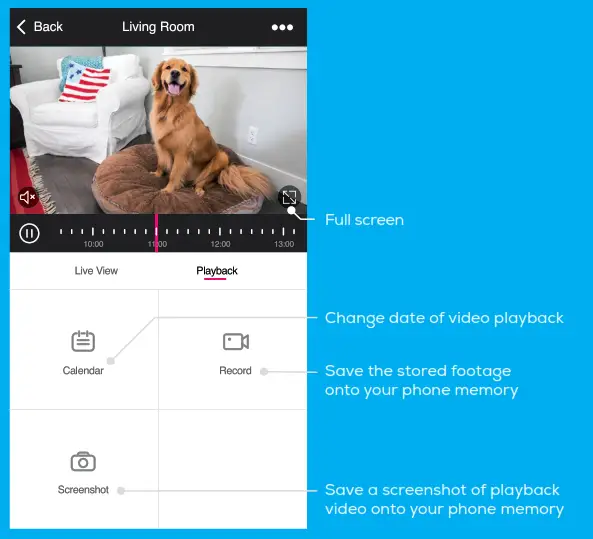
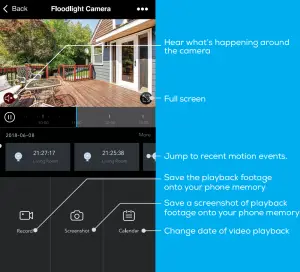
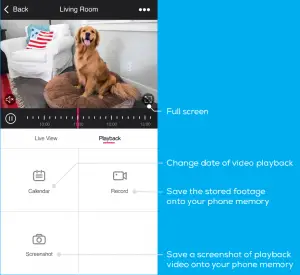
Playback
- Hear sound around the camera
- Full screen
- Change date of video playback
- Save the playback camera footage onto your phone memory
- Save a screenshot of playback video onto your phone memory
Frequently Asked Questions
1. Can I share with family and friends?
Yes, you can share your cameras with family and friends who will have access to view the camera and control your bulbs, plugs, and other Geeni devices. In the Geeni app, press the Profile button and click on the “Device Sharing” button, and you will be able to give or revoke sharing permissions. In order to share, the other user should already have downloaded the Geeni app and registered a new account.
2. Recording and Micro SD Card Usage:
Without a Micro SD card (optional, sold separately), the smart Wi-Fi camera can show live camera video, save screenshots or videos of the camera stream to your phone for later, and record still snapshots of motion alerts when notifications are turned on.
Installing a Micro SD card will further enable video recording and playback from your phone. When the card is installed, the camera will continuously record and play back video to your phone until the card
is full (up to 128GB supported). Video is encrypted and only viewable through the Geeni app on your phone, so do not try removing the Micro SD card to view video.
3. How Much Video Can The Camera Record?
Depending on video quality, the camera will use around 1gb of storage per day, so a 32GB card can provide weeks of continuous video. As the card fills up, the oldest footage will automatically be replaced by new video, so you don’t have to ever worry about running out of storage space.
4. How Many Cameras Can I Control?
Geeni’s app can control an unlimited amount of devices in an unlimited amount of locations. Your router may have a limit of how many devices can be connected to one router.
5. My Geeni device has a funny name. How do I rename it?
From your main device list, click on one of the devices you want to rename, press the “ ” button on the top right for advanced settings, and click Modify Device Name. You’ll then be able to choose a more familiar name.
6. The device appears offline or unreachable, what should I do?
Make sure your Wi-Fi router is online and in range.
Make sure you have the latest Geeni functionality by clicking “Check for firmware update” in your device settings.
7. What’s the Wireless Range?
The range of your home Wi-Fi is heavily dependent on your home router and the conditions of the room. Check with your router specifications for exact range data.
8. If my Wi-Fi/Internet goes down, will Geeni still work?
Geeni products need to be connected to Wi-Fi in order to use them remotely.
Troubleshooting
Cannot connect to your Wi-Fi network.
Make sure you entered the correct Wi-Fi password during the Wi-Fi setup. Check whether there are any Internet connection problems. If the Wi-Fi signal is too weak, reset your Wi-Fi router and try again.
System Requirements
- Mobile device running iOS® 9 or higher or Android™ 5.0x or higher
- Existing Wi-Fi Network
Technical Specifications
- Camera: up to 1080HD (1920x1080P) at 25 frames / sec. H.264 encoding
- Field of View: 115º diagonal
- Audio: Internal Speaker and Microphone
- Storage: supports up to 128gb Micro SD card (not included)
- Wi-Fi: IEEE 802.11N, 2.4GHz
(not compatible with 5GHz Wi-Fi networks)
FCC Notice:
This device complies with Part 15 of the FCC Rules. Operation is subject to the two following conditions:
- This device may not cause harmful interference.
- This device must accept any interference received, including interference that may cause undesired operation.
Note: This equipment has been tested and found to comply with the limits for a Class B digital device, pursuant to Part 15 of the FCC Rules. These limits are designed to provide reasonable protection against harmful interference in a residential installation.
Support:
If you encounter any issues, please contact us at [email protected] for help. To explore our full selection of products, visit us at: www.mygeeni.com
(888) 232-3143 Toll-free (English Only)
© 2019 Merkury Innovations • 45 Broadway 3rd FL, New York NY 10006. The illustrated product and specifi-cations may differ slightly from those supplied. Geeni is a trademark of Merkury Innovations LLC. iPhone, Apple and the Apple logo are trademarks of Apple Inc., registered in the U.S. and other countries. App Store is a service mark of Apple Inc. Android, Google Assistant, Google Play, and the Google Play logo are trademarks of Google Inc. Google is a trademark of Google LLC. iOS is a registered trademark of Cisco in the U.S. and other countries and is used under license. Amazon, Alexa and all related logos are trademarks of Amazon.com, Inc. or its affiliates. Cortana is a registered trademark of Microsoft Corporation. All other trademarks and trade names are those of their respective owners.
Made in China
![]()
START GUIDE
SMART WI-FI DOORBELL
Pour les instructions en français, veuillez consulter la page 19
Thank you for purchasing your GEENI smart home product.
Get started using your new devices by downloading Geeni, one convenient app that manages everything straight from your phone or tablet. Easily connect to your home Wi-Fi, and control multiple devices from the touch of your fingertips.
FCC Notice:
This equipment has been tested and found to comply with the limits for a Class B digital device, pursuant to part 15 of the FCC Rules. These limits are designed to provide reasonable protection against harmful interference in a residential installation. This equipment generates, uses and can radiate radio frequency energy and, if not installed and used in accordance with the instructions, may cause harmful interference to radio communications. However, there is no guarantee that interference will not occur in a particular installation. If this equipment does cause harmful interference to radio or television reception, which can be determined by turning the equipment off and on, the user is encouraged to try to correct the interference by one or more of the following measures:
- Reorient or relocate the receiving antenna.
- Increase the separation between the equipment and receiver.
- Connect the equipment into an outlet on a circuit different from that to which the receiver is connected.
- Consult the dealer or an experienced radio/TV technician for help.
Caution: Any changes or modifications to this device not explicitly approved by manufacturer could void your authority to operate this equipment.
This device complies with part 15 of the FCC Rules. Operation is subject to the following two conditions: (1) This device may not cause harmful interference, and (2) this device must accept any interference received, including interference that may cause undesired operation.
The device has been evaluated to meet general RF exposure requirement. The device can be used in portable exposure condition without restriction.
Support: If you encounter any issues, please contact us at support.mygeeni.com for help.
(888) 232-3143 Toll-free
To explore our full selection of products, visit us at: www.mygeeni.com
© 2020 Merkury Innovations · 45 Broadway 3rd FL, New York NY 10006. The illustrated product and specifications may differ slightly from those supplied. Geeni is a trademark of Merkury Innovations LLC. iPhone, Apple and the Apple logo are trademarks of Apple Inc., registered in the U.S. and other countries. App Store is a service mark of Apple Inc. Google, Google Play, and related marks and logos are trademarks of Google LLC. iOS is a registered trademark of Cisco in the U.S. and other countries and is used under license. Amazon, Alexa and all related logos are trademarks of Amazon.com, Inc. or its affiliates. All other trademarks and trade names are those of their respective owners.
Made in China
START GUIDE
What’s in the Box
 Get Ready
- Make sure you’re connecting toa 2.4GHz Wi-Fi network. A microSD card is required to record footage (Geeni can’t connect to 5GHz networks)
- Requires an existing wired doorbell with chime connected to a 12V or 24V AC and 10VA minimum Transformer.
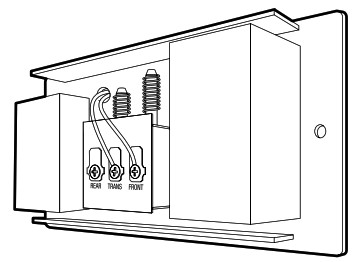
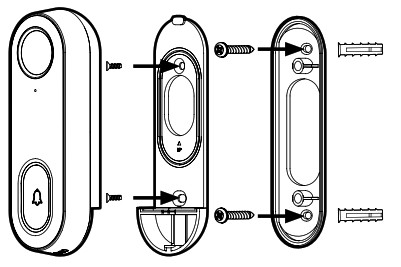
Product Diagram
| Power Port | AC 12V~24V |
| Doorbell Button | Press the button to activate the doorbell |
| Status Light | 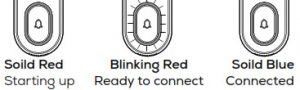 |
| Microphone | Captures sound for your video |
| SD card slot | Supports local SD Card storage (Max.128G) |
| Reset | Press and hold on for 5 seconds with pin to reset the doorbell |
STEP 1 : Register
Download the Geeni App from App Store or Google Play.

https://apps.apple.com/us/app/geeni/id1177386276

https://play.google.com/store/apps/details?id=com.merkuryinnovations.geeni
Register an account on your Geeni App.
01.
Enter your mobile phone number or email address
 02.
02.
Enter the verification code and create a password.
 03.
03.
Log in to the App.
 STEP 2 : Installation
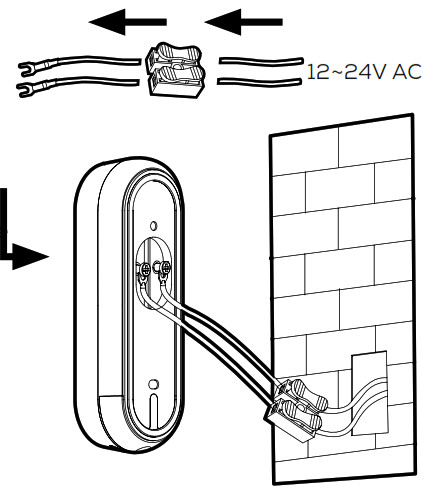
Connecting to existing chime system.
01.
First turn off the power breaker at your fuse box for your existing doorbell and chime. Ring your doorbell to confirm it is now off.
 02.
02.
Find your chime (most likely a rectangular box mounted inside and around your front door) and remove the cover.
 03.
03.
Loosen both screws in the terminal, and hook both connectors from the chime adaptor under each screw (refer to image).
 04.
04.
Using the included double-sided tape, affix the chime adapter to your box wherever there is space and replace the cover. Be sure to not
interfere with any other parts of the chime.
 05.
05.
Connect your existing doorbell wire to the included wire terminals and connect the additional hooks to the screws on the back of the smart doorbell (refer to image). Either wire can be connected to either terminal
 06.
06.
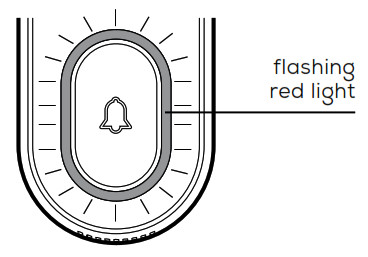
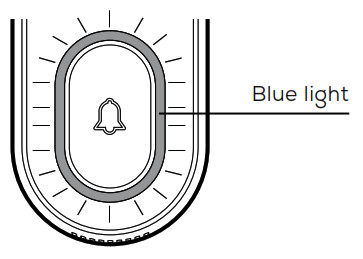
Return to the fuse box and turn the power back on. The ring around the smart doorbell button should turn on and blink red slowly. You are now ready to connect to Wi-Fi.
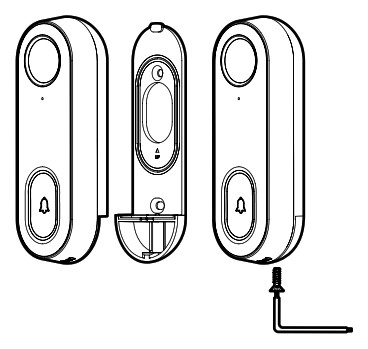
Mode 1 – General Doorbell Installation
01.
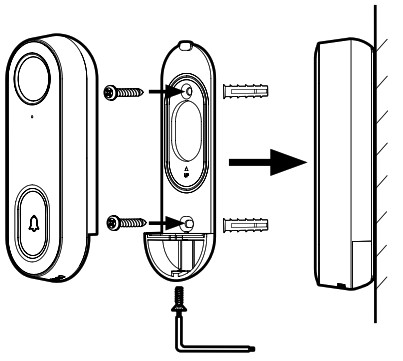
Mount the bracket to the desired wall with the included screws.
 02.
02.
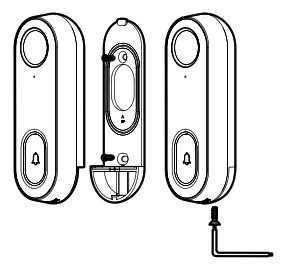
Install the camera in the bracket and lock in with the security screw.
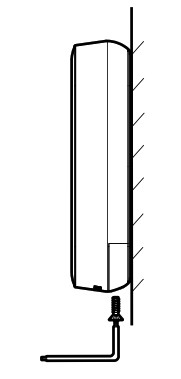
Mode 2 – Installation with Angled Wall Mount
01.
For a desired tilted angle, attach the initial bracket to the angled mount
 02.
02.
Install the angled mount to the wall with the included screws.
03.
Install the camera in the bracket /angled mount and lock in with the security screw.
 STEP 3 : Connect
Add device: Easy Mode
01.
In the Geeni app, on the top corner of the Devices screen, click ![]() Choose “Video Doorbell”.
Choose “Video Doorbell”.
 02.
02.
Be sure the ring around the doorbell button is flashing a red light. If not flashing, insert the reset pin into the reset button and hold for ten seconds.
 03.
03.
Enter your Wi-Fi network and password.
04.
The Geeni app will attempt to connect. When the ring on the doorbell turns blue, connection was successful!
NOTE: Geeni can’t connect to 5GHz networks.
NOTE: If the connection fails, try to connect using QR Code Mode (See next section)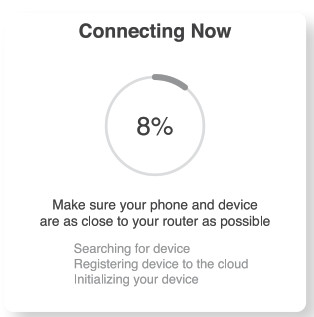 05.
05.
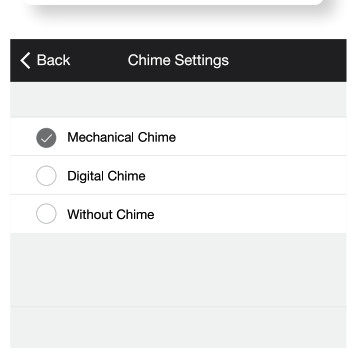
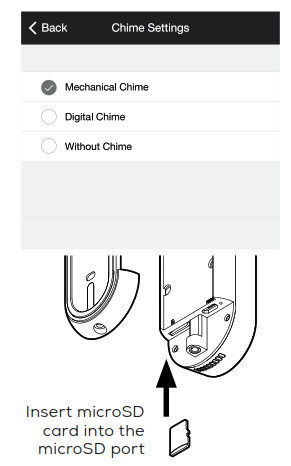
Select which type of chime you have, determined from chime installation steps.
 06.
06.
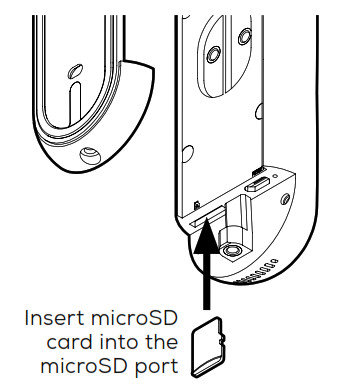
(Optional) Insert your MicroSD card into the port located at the bottom of doorbell. This is not necessary for live view, but is required to record and play back footage.
 07.
07.
Replace camera back into mount and secure with security screw. Your smart doorbell is now ready to use!
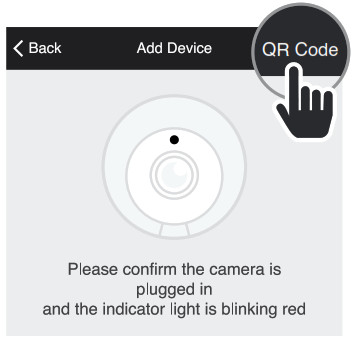
Add device:
01.
Be sure to reset doorbell with the reset pin, ring should be flashing red to indicate it’s ready to connect.
 02.
02.
In the Geeni app, on the top corner of the Devices screen, click ![]() Choose “Video Doorbell”
Choose “Video Doorbell”
03.
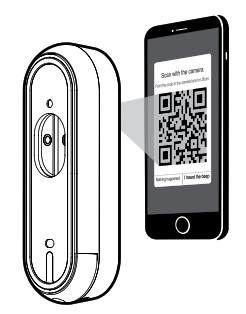
Choose “QR Code” in the top corner. Click Next and enter your Wi-Fi details.
 04.
04.
Use the smart doorbell’s camera to scan the QR code on your smartphone. The ring will turn blue once connected to Geeni successfully.
 NOTE: Geeni can’t connect to 5GHz networks.
 05.
05.
Select which type of chime you have, determined from chime installation steps.
 06.
06.
(Optional) Insert your MicroSD card into the port located at the bottom of doorbell. This is not necessary for live view, but is required to record and playback footage.
07.
Replace camera back into mount and secure with security screw. Your smart doorbell is now ready to use!
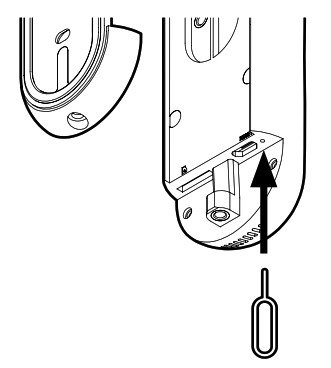
 *How do I reset the device and what does the blinking light mean?
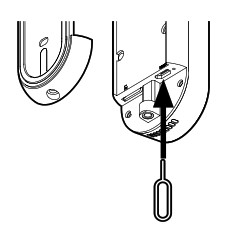 Reset the doorbell by inserting the reset pin into the reset button, located beneath the doorbell button. Press and hold for 5 seconds.
Frequently Asked Questions
- Can I share with family and friends?
Yes! You can share access to all Merkury devices— cameras, plugs, bulbs, doorbells, etc.— with family & friends. In the Geeni app, press the “Profile” button and click on “Device Sharing” to give or revoke sharing permissions. In order to share, the other user should have already downloaded the Geeni app and registered an account. - How much footage can the doorbell camera record?
An optional microSD card is required to record footage. Depending on video quality, your smart doorbell will use around 1GB of storage a day, so a 32GB card can provide weeks of continuous video. As the card fills up, the oldest footage will automatically be replaced by new video, so you don’t have to ever worry about running out of storage space. - My device has a funny name. How do I rename it?
From your main device list, click on one of the devices you want to rename, press the “•••” button on the top right for advanced settings, and click Modify Device Name (or Modify Group Name, if applicable). You’ll then be able to choose a more familiar name. - The bulb appears offline or unreachable, what should I do?
Check the light switch and make sure that it’s switched ON. The light bulb requires an “always-on” power supply to operate properly. Make sure your Wi-Fi router is online and in range. Make sure you have the latest Geeni functionality by clicking “Check for firmware update” in your device settings. - What’s the Wireless Range?
The range of your home Wi-Fi is heavily dependent on your home router and the conditions of the room. Check with your router specifications for exact range data. - If my Wi-Fi/Internet goes down, will Geeni still work?
Merkury products need to be connected to Wi-Fi in order to use them remotely.
Troubleshooting
- Cannot connect to your Wi-Fi network.
Make sure you entered the correct Wi-Fi password during the Wi-Fi setup. Check whether there are any Internet connection problems. If the Wi-Fi signal is too weak, reset your Wi-Fi router and try again.
The smart doorbell does not power on.
- Verify that the wires are securely connected to your smart doorbell camera.
- Double check that the power was turned back on to the doorbell.
- Ensure that the wires on the chime adapter are connected securely to the chime’s terminals (if installed).
- Test the voltage of your doorbell wires. It must be between 12V and 24V AC. If your existing voltage is outside of this range, replace the transformer.
The smart doorbell powers on but the chime does not work when the button is pressed.
- Remove the chime’s cover and make sure that the moving parts of the chime aren’t being touched by any wires or the chime adapter.
- Press the button again while the chime’s cover is removed. If it works, try mounting the chime adapter on the outside of
the chime, and then replace the chime cover.
The chime won’t stop ringing.
The most common reason for this is that the chime adapter is not correctly connected to the chime.
Reset the device
Doorbell can be reset by inserting the reset pin into the reset button for 5 seconds.
System Requirements
- Mobile device running iOS® 9 or higher or Android™ 5.0 or higher
- Existing Wi-Fi Network
- Existing chime with 12V/24V AC and 10VA minimum transformer.
VOICE CONTROL GUIDE
Thank you for purchasing your GEENI smart home product. Make sure your devices are already set up using the Geeni app, then follow these steps.
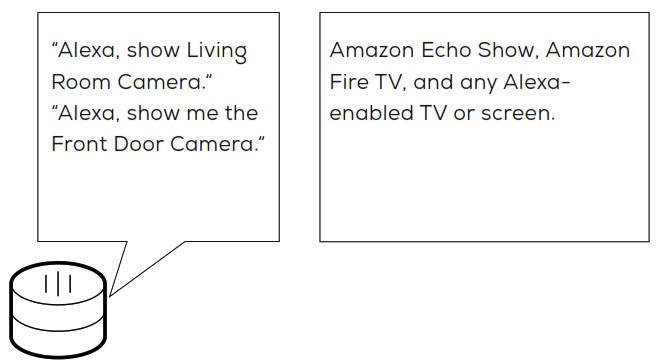
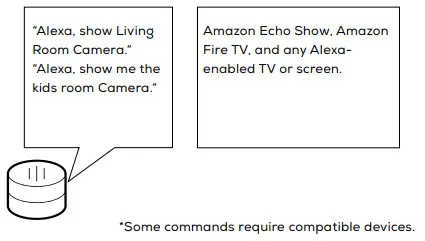
Your video device is able to stream video to these leading smart assistants.
Name and Control Each Device by Voice


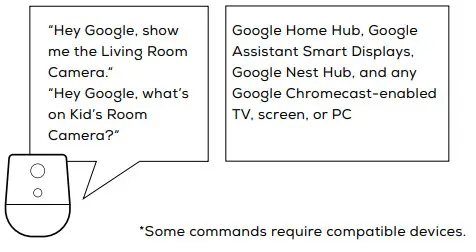
To control your GEENI smart home products just say “OK Google,“ or “Hey Google,“ and ask. Make sure your devices are already set up using the Geeni app.
Things you can say*: Stream to:
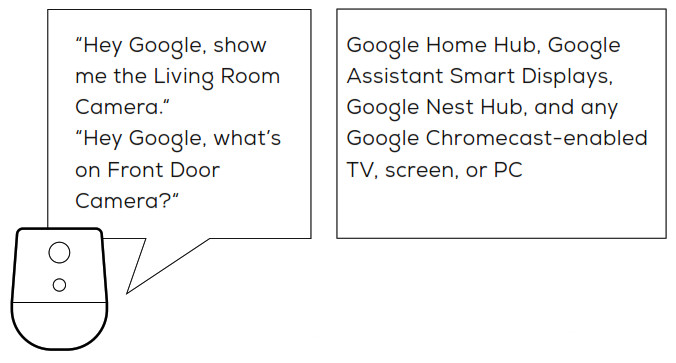
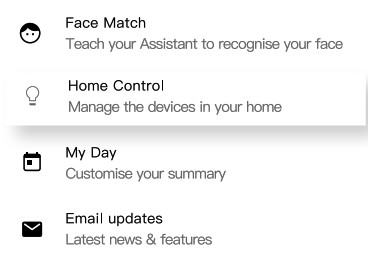
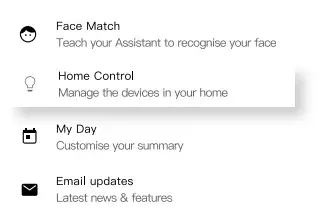
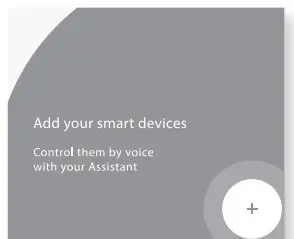
- Open the Google Home app and go to Home Control in the menu.
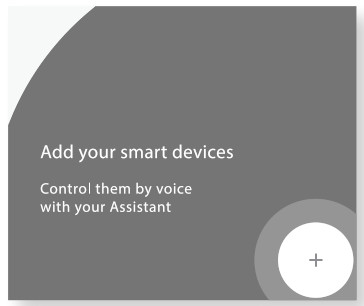
- Tap the “+“ button.
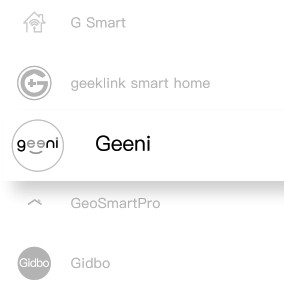
- Choose “Geeni“ from the list of Home Control partners.
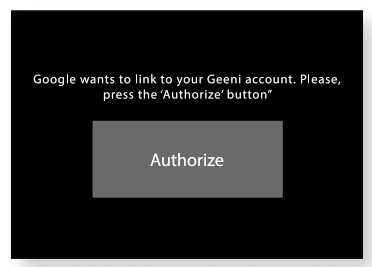
- Authorize your account with Google Assistant using the username and password from your Geeni app.
Now your Google Home app and MERKURY devices are linked! Your’re now able to say “Hey Google“ and control your GEENI devices.
- At any time, go into the “Home Control“ section of the Google Home app to set nicknames and rooms for your devices. You can rename your devices in the Geeni app, and Google Assistant will refer to them by the same name.
So if you rename a doorbell to ‘Front Door’ or ‘Back Porch,’ then Google Assistant will use that same name later on. You can always give it a nickname using the Google Home app as well.
Google Assistant will be able to control devices by room.

To control your GEENI smart home products, just ask Alexa. Make sure your devices are already set up using the Geeni app.
Things you can say*: Stream to:
*Some commands require compatible devices.
01
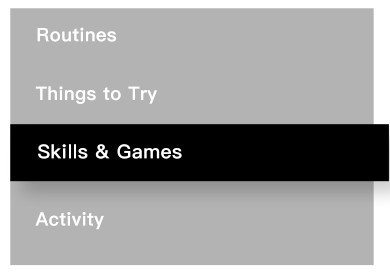
Open the Alexa app and go to Skills in the menu.
 02
02
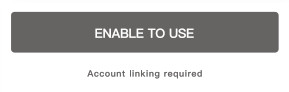
Search for Geeni then tap Enable.
 03
03
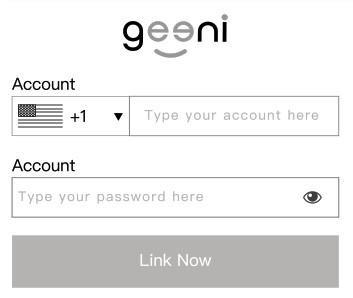
Authorize your account with Smart Home Skills using the username and password from your Geeni app.
 04
04
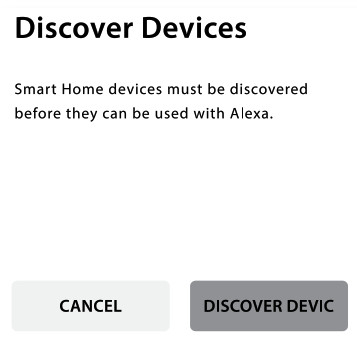
Choose “Discover Devices.“ After a few seconds your GEENI devices will be displayed under Smart Home in the Alexa app.
- You can rename your devices in the Geeni app, and Alexa will refer to them by the same name.
So if you rename a smart doorbell to ‘Front Door’ or ‘Back Porch,’ then Alexa will use that same name later on.
More information is available at: http://tinyurl.com/alexa-smart-home-groups
geeni Smart Wi-Fi Camera User Guide
Thank you for purchasing your GEENI smart home product.
Get started using your new devices by downloading Geeni, one convenient app that manages everything straight from your phone or tablet. Easily connect to your home Wi-Fi, and control multiple devices from the touch of your fingertips.
START GUIDE
What’s in the Box
Get Ready
- Know your Wi-Fi network and password
- Make sure your mobile device is running iOS® 9 or higher or Android™ 5.0 or higher
- Make sure you’re connecting to a 2.4GHz Wi-Fi network. (Geeni can’t connect to 5GHz networks)
- a microSD card can be used to save recorded footage but is not required (not included)
STEP 1
- Download the Geeni app from App Store or Google Play.

- Register an account on your Geeni App.
01. Enter your mobile phone number or email address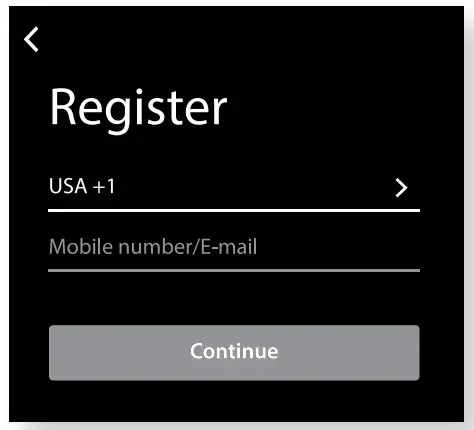
02. Enter the verification code and create a password.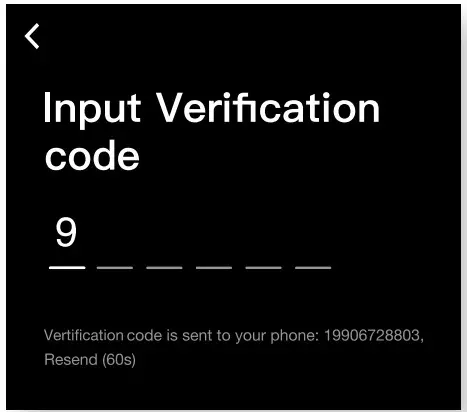
03. Log in to the App.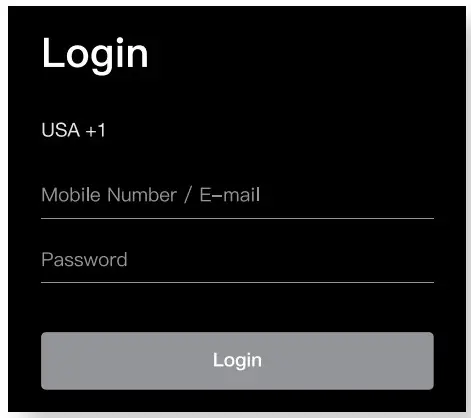
STEP 2
- Plug-In Plug camera into a power source using the included USB cable. The indicator will remain solid red when starting up but will
begin to blink red when connected. If it does not blink, please reset.
*see reset instructions on p. 4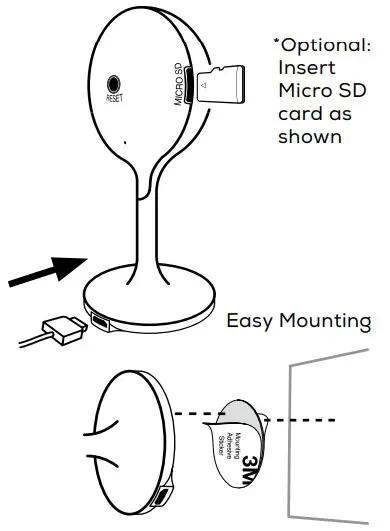
STEP 3
- Add device:
Easy Mode
01. In the Geeni app, on the top corner of the Devices screen, click Choose “Wi-Fi Camera”.
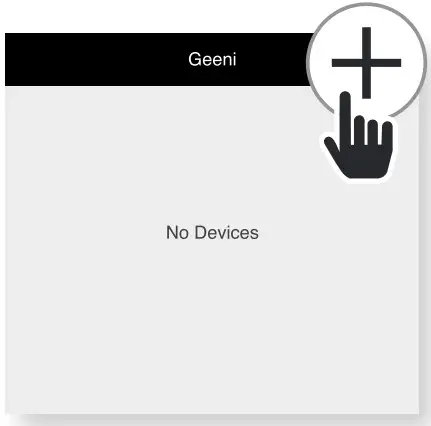 02. Make sure the light on the camera is blinking red, indicating the device is ready to connect, then press Next Step.
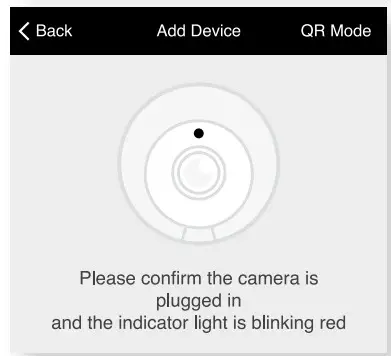 03. Enter your Wi-Fi network and password.
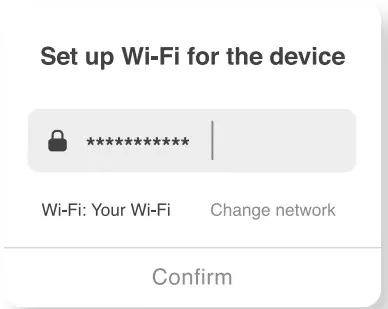 04. The Geeni app will attempt to connect. This may take a few moments. When the blinking light turns solid blue, the connection was
successful!
NOTE: Geeni can’t connect to 5GHz networks.
*If the connection fails, try to connect using QR Mode.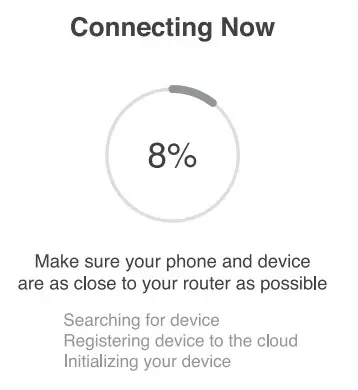
- Add device:
QR Code Mode
01. Be sure to reset the camera by pressing the reset button for 3-4 seconds.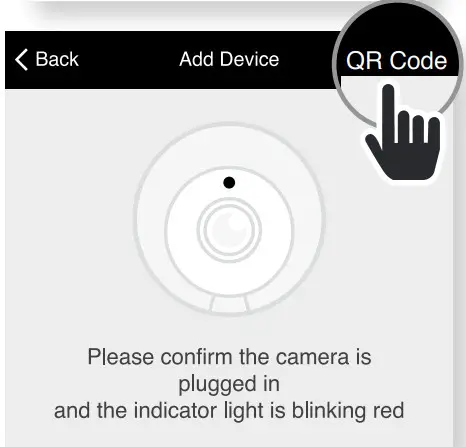 02. In the Geeni app, on the top corner of the Devices screen, click Choose “Wi-Fi Camera” Choose “QR Code” in the top corner.
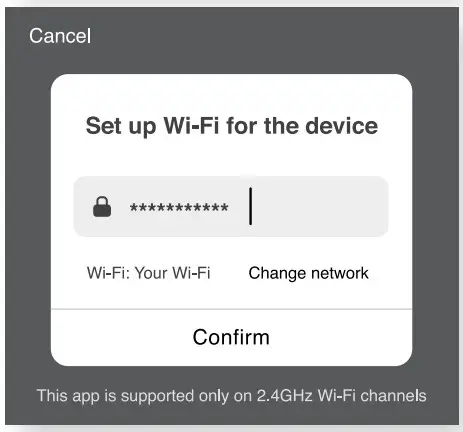 03. Click Next and enter your Wi-Fi details.
04. Scan the QR code with the camera. When you hear the camera beep, select ‘I heard the beep’ and it will add your camera.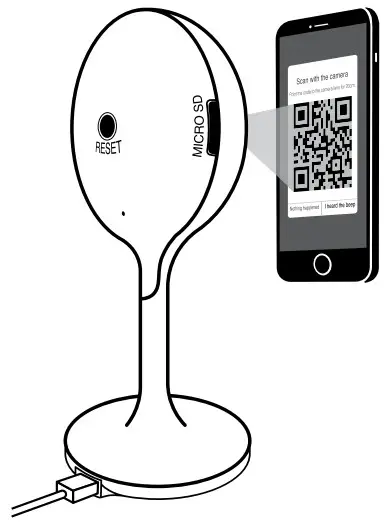 05. The indicator light will turn solid blue when the device was connected successfully!
NOTE: Geeni can’t connect to 5GHz networks.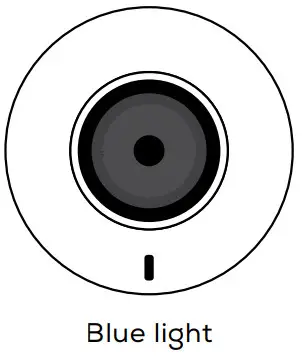
*How do I reset the device and what does the blinking light mean?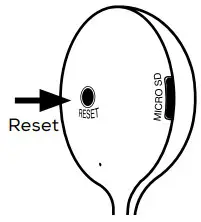
Reset the camera by pressing the reset button for 3-4 seconds.
SETTINGS
- Access Camera Settings:
From your main device list, click on the camera you want to edit, then press the “••• “ button on the top right for advanced settings.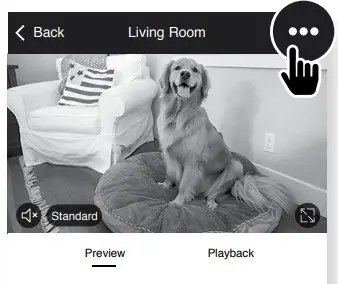
- Device Name:
Press to rename your device to something like “Bedroom” or “Kids’ Room”. - Device Sharing:
let friends, spouses, roommates, or family keep an eye on what your cameras see. Whether it’s a baby’s crib or the family dog, you can decide who gets to check-in, access the camera, and set notifications.
- Remove Device:
Delete the camera from your account. Until it’s deleted, it will always be linked to your account. - Indicator Light:
By default, the camera lights up to show it’s on. Switch “Indicator Light” off to hide the light. - Flip:
If you mount your camera upside down, toggling the “Flip” function will rotate the image so that it’s right side up.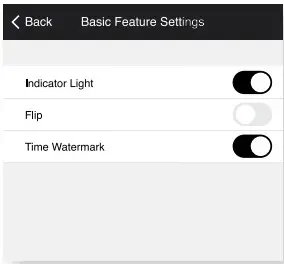
- Time Watermark:
Turn the time watermark on to always see a timestamp of when the video is taking place.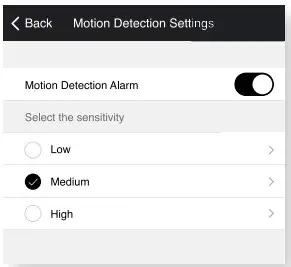
- Motion Detection:
When turned on, you’ll receive notifications to your phone whenever the camera senses motion. Press to turn Motion Detection off or set how sensitive you want it to be. - Format SD Card:
Press to erase your Micro SD Card. (not included)
Frequently Asked Questions
- Can I share with family and friends?
Yes! You can share access to all GEENI devices— cameras, plugs, bulbs, doorbells, etc.— with family & friends. In the Geeni app, press the “Profile” button and click on “Device Sharing” to give or revoke sharing permissions. In order to share, the other user should have already downloaded the Geeni app and registered an account. - Recording and Micro SD Card Usage:
Without a Micro SD card (optional, sold separately), the smart Wi-Fi camera can show live camera video, save screenshots or videos of the camera stream to your phone for later, and record still snapshots of motion alerts when notifications are turned on. Installing a Micro SD card will further enable video recording and playback from your phone. When the card is installed, the camera will continuously record and playback video to your phone until the card is full (up to 128GB supported). Video is encrypted and only viewable through the Geeni app on your phone, so do not try removing the MicroSD card to view the video. - How Much Video Can the Camera Record?
Depending on video quality, the camera will use around 1GB of storage per day, so a 32GB card can provide weeks of continuous video. As the card fills up, the oldest footage will automatically be replaced by a new video, so you don’t have to ever worry about running out of storage space. - How Many Devices Can I Control?
The Geeni app can control an unlimited amount of devices in an unlimited amount of locations. Your router may have a limit of how many devices can be connected to one router. My GEENI device has a funny name. How do I rename it? From your main device list, click on one of the devices you want to rename, press the “•••” button on the top right for advanced settings, and click Modify Device Name (or Modify Group Name, if applicable). You’ll then be able to choose a more familiar name. - What’s the Wireless Range?
The range of your home Wi-Fi is heavily dependent on your home router and the conditions of the room. Check with your router specifications for exact range data. - If my Wi-Fi/Internet goes down, will Geeni still work?
GEENI products need to be connected to Wi-Fi in order to use them remotely.
Troubleshooting
- Cannot connect to your Wi-Fi network.
Make sure you entered the correct Wi-Fi password during the Wi-Fi setup. Check whether there are any Internet connection problems. If the Wi-Fi signal is too weak, reset your Wi-Fi router and try again.
Reset the device
- The camera can be reset by holding down the reset button for 3-4 seconds.
System Requirements
- Mobile device running iOS® 9 or higher or Android™ 5.0 or higher
- Existing Wi-Fi Network
Technical Specifications
- Camera: up to 1080p (1920 x 1080) at 25 frames/sec.
H.264 encoding - Field of View: 115° diagonal
- Audio: Internal Speaker and Microphone
- Storage: supports up to 128gb MicroSD card (not included)
- Wi-Fi: IEEE 802.11n, 2.4GHz
(Wi-Fi not compatible with 5GHz Wi-Fi networks)
VOICE CONTROL GUIDE
Thank you for purchasing your GEENI smart home product. Make sure your devices are already set up using the Geeni app, then follow these steps.
Your video device is able to stream video to these leading smart assistants.
Name and Control Each Device by Voice

 To control your GEENI smart home products, just say “OK Google,“ or “Hey Google,“ and ask. Make sure your devices are already set up using the Geeni app.
Things you can say*: Stream to:
01
- Open the Google Home app and go to Home Control in the menu.
02
- Tap the “+“ button.
03
Choose “Geeni“ from the list of Home Control partners.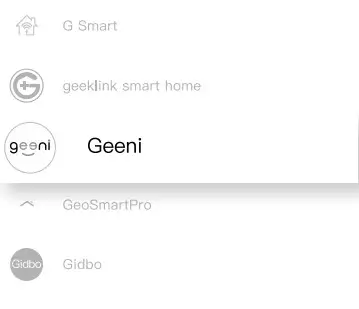 04
04
Authorize your account with Google Assistant using the username and password from your Geeni app.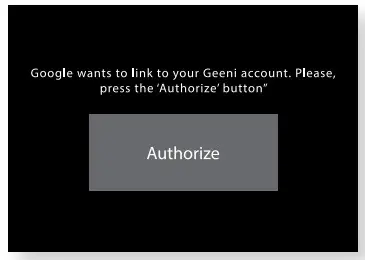
Now your Google Home app and GEENI devices are linked!
You’re now able to say “Hey Google“ and control your GEENI devices.
- At any time, go into the “Home Control“ section of the Google Home app to set nicknames and rooms for your devices. You can rename your devices in the Geeni app, and Google Assistant will refer to them by the same name.
So if you rename a camera to ‘Living Room Camera’ or ‘Baby’s Room,“ then Google Assistant will use that same name later on. You can always give it a nickname using the Google Home app as well.
Google Assistant will be able to control devices by room.

To control your GEENI smart home products, just ask Alexa.
Make sure your devices are already set up using the Geeni app.
Things you can say*: Stream to:
01 Open the Alexa app and go to Skills in the menu.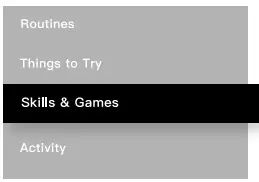 02 Search for Geeni then tap Enable.
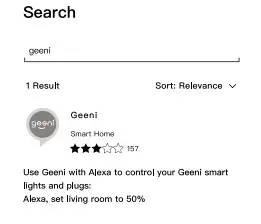
03 Authorize your account with Smart Home Skills using the username and password from your Geeni app. 04 Choose “Discover Devices.“ After a few seconds, your GEENI devices will be displayed under Smart Home in the Alexa app.
You can rename your devices in the Geeni app, and Alexa will refer to them by the same name.
So if you rename a smart bulb to “Living Room“ or a nickname like a smart camera to “Living Room Camera” or “Baby’s Room,”
Alternatively, you can create an Alexa group, like “Bedroom“ or “Downstairs,“ and add the device to the group.
Alexa will recognize the group name in the Alexa app, or the device name in the Geeni app.
More information is available at:
http://tinyurl.com/alexa-smart-home-groups
Can’t connect?
Need help?
WE CAN HELP
DO NOT
RETURN THIS
PRODUCT TO
THE STORE
support.mygeeni.com
(888)232-3143 Toll-free
or tap ‘support‘ for help in the Geeni app.
FCC Notice:
This equipment has been tested and found to comply with the limits for a Class B digital device, pursuant to part 15 of the FCC Rules. These limits are designed to provide reasonable protection against harmful interference in a residential installation. This equipment generates, uses and can radiate radio frequency energy and, if not installed and used in accordance with the instructions, may cause harmful interference to radio communications. However, there is no guarantee that interference will not occur in a particular installation. If this equipment does cause harmful interference to radio or television reception, which can be determined by turning the equipment off
and on, the user is encouraged to try to correct the interference by one or more of the following measures:
- Reorient or relocate the receiving antenna.
- Increase the separation between the equipment and receiver.
- Connect the equipment into an outlet on a circuit different from that to which the receiver is connected.
- Consult the dealer or an experienced radio/TV technician for help. Caution: Any changes or modifications to this device not explicitly approved by manufacturer could void your authority to operate this equipment.
This device complies with part 15 of the FCC Rules. Operation is subject to the following two conditions: (1) This device may not cause harmful interference, and (2) this device must accept any interference received, including interference that may cause undesired operation.
The device has been evaluated to meet general RF exposure requirements.
The device can be used in portable exposure conditions without restriction.
Support:
If you encounter any issues, please contact us at support.mygeeni.com for help. To explore our full selection of products, visit us at: www.mygeeni.com
(888) 232-3143 Toll-free (English Only)
© 2020 Merkury Innovations • 45 Broadway 3rd FL, New York NY 10006.
The illustrated product and specifications may differ slightly from those supplied. Geeni is a trademark of Merkury Innovations LLC. iPhone, Apple, and the Apple logo are trademarks of Apple Inc., registered in the U.S. and other countries. App Store is a service mark of Apple Inc. Google, Google Play, and related marks and logos are trademarks of Google LLC. iOS is a registered trademark of Cisco in the U.S. and other countries and is used under license.
Amazon, Alexa, and all related logos are trademarks of Amazon.com, Inc. or its affiliates. All other trademarks and trade names are those of their respective owners.
Made in China
FAQS
My camera is blinking red but I can’t connect to it. What should I do?
Make sure the camera is connected to a power source. If the light is still blinking red, please reset your camera by pressing the reset button on the back of the camera.
How do I reset my Geeni device?
To reset your Geeni device, press and hold the reset button located on the back of your device for 5 seconds. The LED light will blink red once and then turn solid red. This means that your device has been successfully reset and is ready to connect to your Wi-Fi network again.
How do I change my Wi-Fi password?
You can change your Wi-Fi password in the Geeni app under Settings > Wi-Fi Settings > Change Password > Enter New Password > Confirm New Password > Save Changes. Make sure you enter a new password and confirm it before saving changes. If you have any issues, please contact customer care at 1-855-4GEENI (1-855-443-3654).
Does this detect all movement or just people movement?
From my review of it”,the camera would work only in daylight hours,then other times day and night…then only daylight again,literally as soon as the sun went down nothing was recorded sometimes!!if its for security you need it consistent!then it would catch the end of movement,not the beginning”
How long does the camera work on full charge?
It depends on how active the camera is. It sits in standby mode and only records when motion is detected. I have mine facing the back half of the property and motion detection comes on 5 or 6 times a day. Usually a neighbor’s dog or some sort of wildlife walks past the camera. Mine was at 40% after 4 months I think before I decided to recharge it. The app will let you know when to charge it.
Can you Turn off the sound
Yes there’s an option to turn off the sound
Does this work on 5g wifi?
No. Sorry.
How do these get power when outside? A regular outlet?
Yes, once the battery needs recharge.
Does night vision require a light to be able to see?
No you don’t need a light at all the cameras have night vision which means it’ll be in black and white unless there is a little light then it will be color just dark. I love my Freebird cameras for outdoors and the wired ones are really good.
Is this system expandable? Can more cameras be added later?
Yes
What is the range of the motion detector?
Not exactly sure or catches movement on the street which is probably 20 feet from the camera but then again one of the cameras that placed on the back catches movement from cars passing by on the next block
Do you need to subscribe monthly
No, you can use SD cards instead; however, if you would like cloud services then yes. I personally use SD cards and just erase the clips every few weeks and I can still review the footage from my phone that is within the SD cards. Without SD cards you only get photos. The SD cards give you short video recordings.
Can you keep it plugged in full time?
Yes
Why claim weather proof? the lens fogs up to the point nothing is visible in cold weather and the battery doesn’t last 3 months either
These are suppose to be plugged in. So I have outdoor plugs. I have had mine for few years. Worked great all year round. I put them over front and back doors. But they both have a top covering for weather protection. Such as the one has a in closed porch. So it’s protected from rain snow everything. The other one has a top covering. But you need to plug them in and hook it up to your WI-FI.
Does it rotate
Yes
Will it alert you when there is movement in your house?
If you have it set up that way
Can you set them to be on certain times, so from 10pm-7am, or are they on constantly?
You can’t-its constantly on
Will this camera work with Blue Iris?
Don’t think so. It comes with a app. My brother helped me get this installed.
Battery type?
9000mh lithium
How do you get it to record more than just little clips?
It won’t record continues
VIDEO
![]()
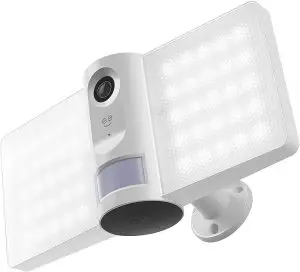
geeni Smart Wi-Fi Floodlight Camera User Guide
![]()
Thank you for purchasing your GEENI smart home product. Get started using your new devices by downloading Geeni, one convenient app that manages everything straight from your phone or tablet. Easily connect to your home Wi-Fi and control multiple devices from the touch of your fingertips.
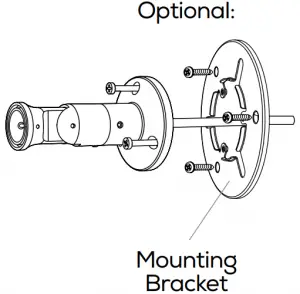
What’s in the Box
- Smart Floodlight + Security Camera
- Bracket + Internal Grip
- Mounting Screws
- Mounting Bracket
- Waterproof Connector
- Allen Wrench
- Wire Nuts
- Reset Pin
- User Manual
Get Ready
- Know your Wi-Fi network and password
- Locate a suitable mounting location
- Make sure your mobile device is running iOS® 9 or higher or Android™ 5.0 or higher
- Make sure you’re connecting to a 2.4GHz Wi-Fi network (Geeni can’t connect to 5GHz networks)
Mount and Wire
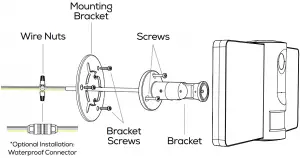
Mounting Breakdown

*If the wires are placed in an outdoor environment, it is suggested to install the included waterproof connector (instead of using the wire nuts).
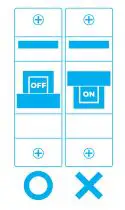
Shut off power at the circuit breaker for the switch that you are replacing. More than one disconnection may be required to turn off power. Use a non-contact voltage tester to ensure that power is off.
 WARNING: Risk of electric shock
- AC 100~240V Power connection. Verify that the supply voltage is correct
- Disconnect Power before operation. Use your home’s circuit breaker to switch off power. This protects you and your camera.
- Properly ground fixture
- Always follow code standards when installing wired connections
- Consult an electrician if necessary
CAUTION: Risk of fire, do not install near combustible surfaces
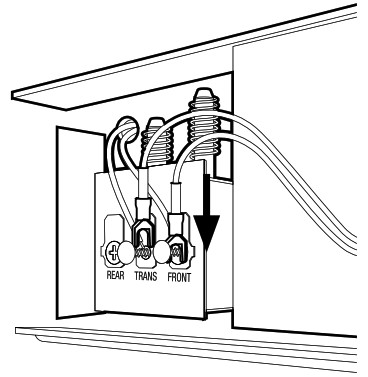
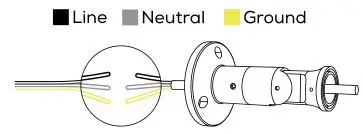
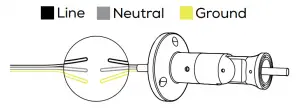
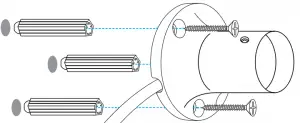
STEP 1. Feed floodlight wires through the bracket and connect Line, Neutral, and Ground (if needed) Wires with provided Wire Nuts.
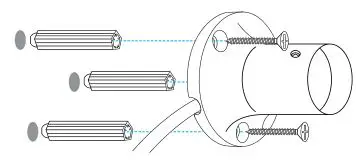
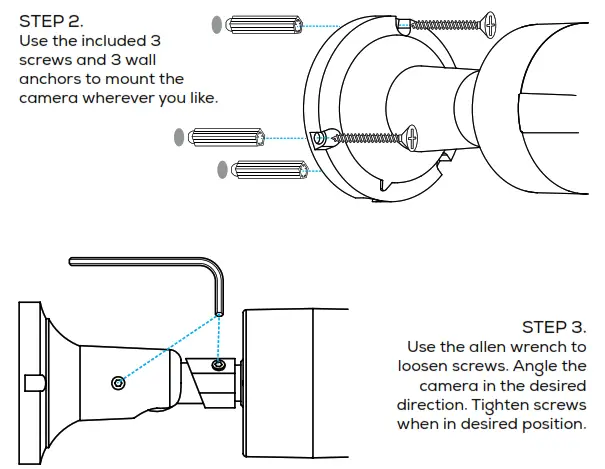
STEP 2. Place adhesive interior grip inside of bracket and use the included 3 screws and 3 wall anchors to mount the camera wherever you like.
STEP 3. Attach the floodlight to the mounted bracket. Camera should be 9 Ft from the ground for optimal sensor detection.
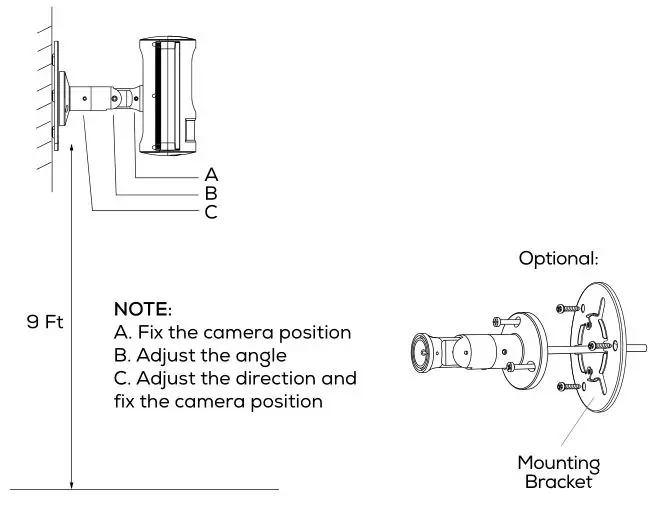
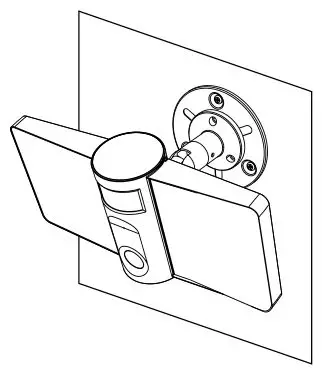
STEP 4. Finally, use included allen wrench and adjust allen screws to ensure the device has the optimal viewing angle.
Now your device should be powered and ready to pair with the Geeni app.
Download the Geeni app from App Store or Google Play.
Register an account on your Geeni app.
STEP 1. Enter your mobile phone number or email address.
STEP 2. Enter the verification code and create a password.
Login to the Geeni App.
STEP 3. Login to the App. 8
Connect to App.
How do I reset my device?
A reset button is located under the cover on the bottom of your floodlight. Reset the camera by removing the cover and holding down the button for several seconds.
Note: The camera will appear inactive while booting up–allow two minutes for the light to activate.
What does the blinking sensor light mean?
Add device. Method 1: Easy Mode
NOTE: Geeni can’t connect to 5GHz networks. *If the connection fails, try to reset and connect directly using QR Code Mode.
Add device. Method 2: Backup QR Code Mode
Live View
Playback
Settings
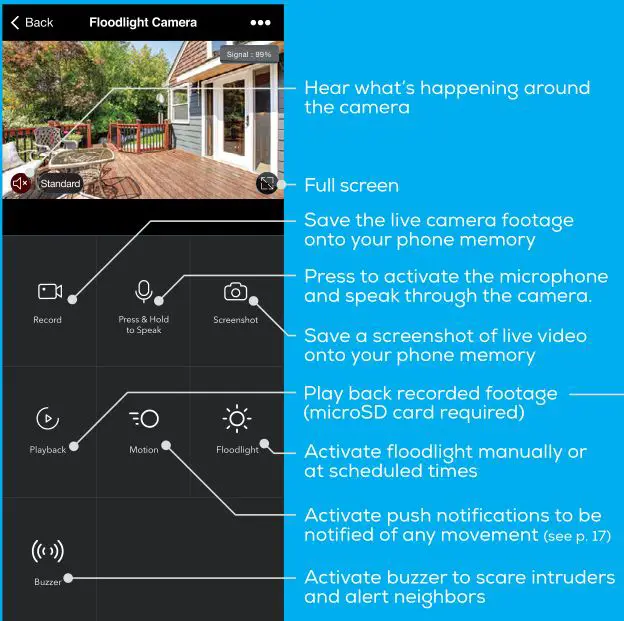
Access Camera Settings: From your main device list, click on the camera you want to edit, then press “•••” button on the top right for advanced settings.
Device Name: Press to rename your device to something like “Backyard” or “Driveway”.
Device Sharing: Let friends, spouse, roommates, or family keep an eye on what your cameras see. Whether it’s the patio or the side entrance, you can decide who gets to check in, access the camera, and set notifications.
Remove Device: Delete the camera from your account. Until it’s deleted, it will always be linked to your account.
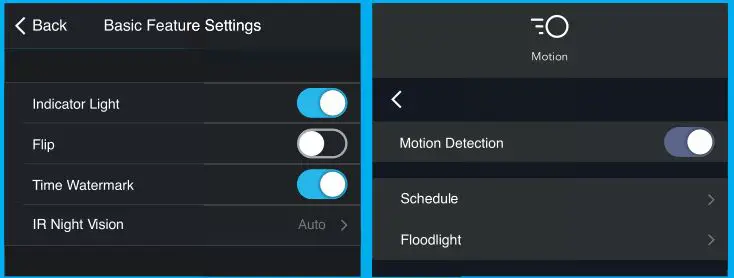
Indicator Light: By default, the camera lights up to show it’s on. Switch “Indicator Light” off to hide the light.
Flip: If you mount your camera upside down, toggling the “Flip” function will rotate the image so that it’s right side up.
Time Watermark: Turn the time watermark on to always see a time stamp of when video is taking place.
Motion Detection: When turned on, you’ll receive notifications to your phone whenever the camera senses motion. Press to turn Motion Detection off, schedule motion alerts and/or control floodlight duration.
Night Vision: The camera is set to automatically activate night vision in the dark. Toggle here to manually turn night vision on or off.
SD Card Settings: SD Card options includes erasing your microSD Card.
Frequently Asked Questions
1. Can I share with family and friends?
Yes, you can share your cameras with family and friends who will have access to view the camera and control your bulbs, plugs, and other Geeni devices. In the Geeni app, press the Profile button and click on the “Device Sharing” button, and you will be able to give or revoke sharing permissions. In order to share, the other user should already have downloaded the Geeni app and registered a new account.
2. Recording and Micro SD Card Usage:
Without a Micro SD card (optional, sold separately), the smart Wi-Fi camera can show live camera video, save screenshots or videos of the camera stream to your phone for later, and record still snapshots of motion alerts when notifications are turned on. Installing a Micro SD card will further enable video recording and playback from your phone. When the card is installed, the camera will continuously record and play back video to your phone until the card is full (up to 128GB supported). Video is encrypted and only viewable through the Geeni app on your phone, so do not try removing the Micro SD card to view video.
3. How Much Video Can The Camera Record?
Depending on video quality, the camera will use around 1gb of storage per day, so a 32GB card can provide weeks of continuous video. As the card fills up, the oldest footage will automatically be replaced by new video, so you don’t have to ever worry about running out of storage space.
4. How Many Cameras Can I Control?
Geeni’s app can control an unlimited amount of devices in an unlimited amount of locations. Your router may have a limit of how many devices can be connected to one router.
5. My Geeni device has a funny name. How do I rename it?
From your main device list, click on one of the devices you want to rename, press the ” ” button on the top right for advanced settings, and click Modify Device Name. You’ll then be able to choose a more familiar name.
6. The device appears offline or unreachable, what should I do?
Make sure your Wi-Fi router is online and in range. Make sure you have the latest Geeni functionality by clicking “Check for firmware update” in your device settings.
7. What’s the Wireless Range?
The range of your home Wi-Fi is heavily dependent on your home router and the conditions of the room. Check with your router specifications for exact range data.
8. If my Wi-Fi/Internet goes down, will Geeni still work?
Geeni products need to be connected to Wi-Fi in order to use them remotely.
Troubleshooting
Cannot connect to your Wi-Fi network:
Make sure you entered the correct Wi-Fi password during the Wi-Fi setup. Check whether there are any Internet connection problems. If the Wi-Fi signal is too weak, reset your Wi-Fi router and try again.
System Requirements
- Mobile device running iOS® 9 or higher or AndroidTM 5.0 or higher
- Existing Wi-Fi Network
Technical Specifications
- Camera: up to 1080p (1920x1080P) at 25 frames / sec. H.264 encoding
- Field of View: 140º
- Weatherproof: IP54
- Storage: supports up to 128gb microSD card (not included)
- Wi-Fi: IEEE 802.11B/G/N, 2.4GHz (not compatible with 5GHz Wi-Fi networks)
FCC Notice:
This device complies with Part 15 of the FCC Rules. Operation is subject to the two following conditions:
- This device may not cause harmful interference.
- This device must accept any interference received, including interference that may cause undesired operation.
Note: This equipment has been tested and found to comply with the limits for a Class B digital device, pursuant to Part 15 of the FCC Rules. These limits are designed to provide reasonable protection against harmful interference in a residential installation.
Support:
If you encounter any issues, please visit us at support.mygeeni.com for help. To explore our full selection of products, visit us at: www.mygeeni.com
(888) 232-3143 Toll-free (English Only)
© 2020 Merkury Innovations · 45 Broadway 3rd FL, New York NY 10006. The illustrated product and specifications may differ slightly from those supplied. Geeni is a trademark of Merkury Innovations LLC. iPhone, Apple and the Apple logo are trademarks of Apple Inc., registered in the U.S. and other countries. App Store is a service mark of Apple Inc. Galaxy S is a registered trademark of Samsung Electronics Co., Ltd. Google, Google Play, and related marks and logos are trademarks of Google LLC. iOS is a registered trademark of Cisco in the U.S. and other countries and is used under license. Amazon, Alexa and all related logos are trademarks of Amazon.com, Inc. or its affiliates. All other trademarks and trade names are those of their respective owners.
Made in China
Can’t connect? Need help?

DO NOT RETURN THIS PRODUCT TO THE STORE
Geeni support:
support.mygeeni.com
(888) 232-3143 Toll-free (English Only) or tap `Support’ for help in the Geeni app.
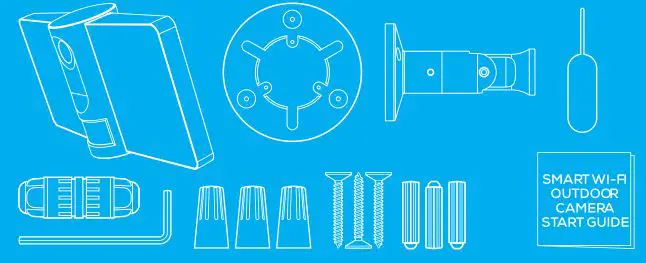
SMART WI-FI OUTDOOR CAMERA
START GUIDE
![]()
Thank you for purchasing your GEENI smart home product. Get started using your new devices by downloading Geeni, one convenient app that manages everything straight from your phone or tablet. Easily connect to your home Wi-Fi and control multiple devices from the touch of your fingertips.
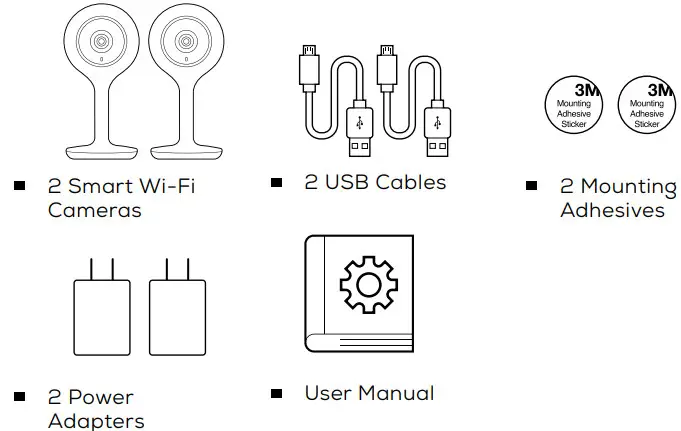
What’s in the Box
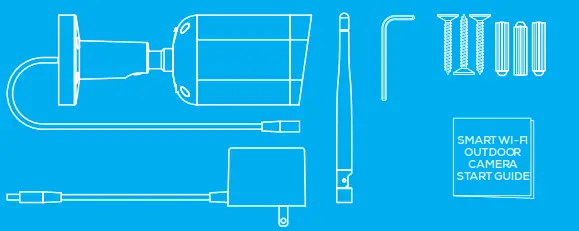
• 2x Smart Outdoor Camera
• 2x Mounting Kit
• 2x Camera Antenna
• 2x Power Adapter
• Allen Wrench
• User Manual
Get Ready
• Know your Wi-Fi network and password
• Locate a suitable mounting location but do NOT mount until setup is complete
• Make sure your mobile device is running iOS® 9 or higher or Android™ 5.0 or higher
• Make sure you’re connecting to a 2.4GHz Wi-Fi network (Geeni can’t connect to 5GHz networks)
1 Download the Geeni app from App Store or Google Play.
2 Register an account on your Geeni app.
2 Login to the Geeni App.
3 Plug-In.
How do I reset my device?
Open the compartment on the back of the camera, and press the reset button for several seconds until the camera starts to beep.
Important: Set up and connect the camera before mounting. Set up works best near your home router. If the camera is disconnected from power after setup, it will automatically reconnect when plugged in again.
Note: The camera will appear inactive while booting up—allow two minutes for the light to activate.
What does the blinking light mean?
4 Add device. Method 1: Easy Mode
NOTE: Geeni can’t connect to 5GHz networks. *If the connection fails, try to reset and connect directly using QR Code Mode.
5 Add device. Method 2: Backup QR Code Mode
6 Mount the Camera

NOTE: If you unplug the camera, you do not need to repeat the setup steps—the camera will automatically reconnect to your Wi-Fi network.
Settings
Access Camera Settings:
From your main device list, click on the camera you want to edit, then press the “•••“ button on the top right for advanced settings. Device Name: Press to rename your camera to something like “Porch” or “Backyard”.
Device Sharing: let friends, spouse, roommates, or family keep an eye on what your cameras see. Whether it’s the backyard or the family dog, you can decide who gets to check-in, access the camera, and set notifications. Remove Device: Delete the camera from your account. Until it’s deleted, it will always be linked to your account. Format SD Card: Press to erase your microSD Card.
Indicator Light: By default, the camera’s light is set to remain lit to indicate power. Switch “Indicator Light” off to hide the light.
Flip: If you mount your camera upside down, toggling the “Flip” function will rotate the image so that it’s right side up.
Time Watermark: Turn the time watermark on to always see a time stamp of when video is taking place.
Motion Detection: When turned on, you’ll receive notifications to your phone whenever the camera senses motion. Press to turn Motion Detection off or adjust the sensitivity.
Night Vision: The camera is set to automatically activate night vision in the dark. Toggle here to manually turn night vision on or off.
Live View
Playback
Frequently Asked Questions
1. Can I share with family and friends?
Yes, you can share your cameras with family and friends who will have access to view the camera and control your bulbs, plugs, and other Geeni devices. In the Geeni app, press the Profile button and click on the “Device Sharing” button, and you will be able to give or revoke sharing permissions. In order to share, the other user should already have downloaded the Geeni app and registered a new account.
2. Recording and microSD card usage:
Without a microSD card (optional, sold separately), the smart Wi-Fi camera can show live camera video, save screenshots or videos of the camera stream to your phone for later, and record still snapshots of motion alerts when notifications are turned on. Installing a microSD card will further enable video recording and playback from your phone. When the card is installed, the camera will continuously record and play back video to your phone until the card is full (up to 128GB supported). Video is encrypted and only viewable through the Geeni app on your phone, so do not try removing the microSD card to view video.
3. How much video can the camera record?
Depending on the video quality, the camera will use around 1GB of storage to record 24 hours of footage. This can mean an entire day of continuous footage, or multiple days of motion-only recording. As the card fills up, the oldest footage will be automatically replaced by new video.
If you would like to increase your internal storage space, contact [email protected] for an instructional video on how to open up the camera and install a larger microSD card.
4. How many cameras can I control?
Geeni’s app can control an unlimited amount of devices in an unlimited amount of locations. Your router may have a limit of how many devices can be connected to one router.
5. My Geeni device has a funny name. How do I rename it?
From your main device list, click on one of the devices you want to rename, press the “•••” button on the top right for advanced settings, and click Modify Device Name. You’ll then be able to choose a more familiar name.
6. The device appears offline or unreachable, what should I do?
Make sure your Wi-Fi router is online and in range and check that you have the latest Geeni functionality by clicking “Check for firmware update” in your device settings.
7. What’s the wireless range?
The range of your home Wi-Fi is heavily dependent on your home router and the conditions of the room. Check with your router specifications for exact range data.
8. If my Wi-Fi/Internet goes down, will Geeni still work?
Geeni products need to be connected to Wi-Fi in order to use them remotely.
Troubleshooting
Cannot connect to your Wi-Fi network: Make sure you entered the correct Wi-Fi password during the Wi-Fi setup. Check whether there are any Internet connection problems. If the Wi-Fi signal is too weak, reset your Wi-Fi router and try again.
System Requirements
• Mobile device running iOS® 9 or higher or Android™ 5.0 or higher
• Existing Wi-Fi Network
Technical Specifications
• Camera: 1080p (1920×1080) up to 25 frames / sec. H.264 encoding
• Field of View: 130º
• Weatherproof: IP65
• Storage: supports up to 128GB microSD card (not included)
• Wi-Fi: IEEE 802.11 B/G/N, 2.4GHz (not compatible with 5GHz Wi-Fi networks)
FCC Notice:
This device complies with Part 15 of the FCC Rules. Operation is subject to the two following conditions:
1. This device may not cause harmful interference.
2. This device must accept any interference received, including interference that may cause undesired operation.
Note: This equipment has been tested and found to comply with the limits for a Class B digital device, pursuant to Part 15 of the FCC Rules. These limits are designed to provide reasonable protection against harmful interference in a residential installation.
Support:
If you encounter any issues, please contact us at [email protected] for help.
To explore our full selection of products, visit us at: www.mygeeni.com
(888) 232-3143 Toll-free (English Only)
© 2020 Merkury Innovations • 45 Broadway 3rd FL, New York NY 10006.
The illustrated product and specifications may differ slightly from those supplied. Geeni is a trademark of Merkury Innovations LLC. iPhone, Apple and the Apple logo are trademarks of Apple Inc., registered in the U.S. and other countries. App Store is a service mark of Apple Inc. Galaxy S is a registered trademark of Samsung Electronics Co., Ltd. Google, Google Play, and related marks and logos are trademarks of Google LLC. iOS is a registered trademark of Cisco in the U.S. and other countries and is used under license. Amazon, Alexa, and all related logos are trademarks of Amazon.com, Inc. or its affiliates. All other trademarks and trade names are those of their respective owners.
Made in China
Can’t connect? Need help?

DO NOT RETURN THIS PRODUCT TO THE STORE
Geeni support: [email protected]
(888) 232-3143 Toll-free (English Only) or tap ‘Support’ for help in the Geeni app.
Geeni Smart WiFi Floodlight Camera
Thank you for purchasing your GEENI smart home product.
Get started using your new devices by downloading Geeni, one convenient app that manages everything straight from your phone or tablet. Easily connect to your home Wi-Fi and control multiple devices from the touch of your fingertips.
What’s in the Box
- Smart Floodlight + Security Camera
- Bracket + Internal Grip
- Mounting Screws
- Mounting Bracket
- Waterproof Connector
- Allen Wrench
- Wire Nuts
- Reset Pin
- User Manual
Get Ready
- Know your Wi-Fi network and password
- Locate a suitable mounting location
- Make sure your mobile device is running iOS® 9 or higher or Android™ 5.0 or higher
- Make sure you’re connecting to a 2.4GHz Wi-Fi network (Geeni can’t connect to 5GHz networks)
Mount and Wire
Mounting Breakdown
*If the wires are placed in an outdoor environment, it is suggested to install the included waterproof connector (instead of using the wire nuts).
Shut off power at the circuit breaker for the switch that you are replacing. More than one disconnection may be required to turn off power. Use a non-contact voltage tester to ensure that power is off.
 WARNING: Risk of electric shock
- AC 100~240V Power connection. Verify that the supply voltage is correct
- Disconnect Power before operation. Use your home’s circuit breaker to switch off power. This protects you and your camera.
- Properly ground fixture
- Always follow code standards when installing wired connections
- Consult an electrician if necessary
CAUTION: Risk of fire, do not install near combustible surfaces
STEP 1.
Feed floodlight wires through the bracket and connect Line, Neutral, and Ground (if needed) Wires with provided Wire Nuts.
STEP 2.
Place adhesive interior grip inside of bracket and use the included 3 screws and 3 wall anchors to mount the camera wherever you like.
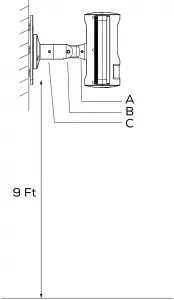
STEP 3. Attach the floodlight to the mounted bracket. Camera should be 9 Ft from the ground for optimal sensor detection.
NOTE:
A. Fix the camera position
B. Adjust the angle
C. Adjust the direction and fix the camera position
STEP 4. Finally, use included allen wrench and adjust allen screws to ensure the device has the optimal viewing angle.
Now your device should be powered and ready to pair with the Geeni app.
Download the Geeni app from App Store or Google Play
Register an account on your Geeni app
STEP 1. Enter your mobile phone number or email address.
STEP 2. Enter the verification code and create a password.

Login to the Geeni App
STEP 3. Login to the App.
Connect to App
How do I reset my device?
A reset button is located under the cover on the bottom of your floodlight. Reset the camera by removing the cover and holding down the button for several seconds.
Note: The camera will appear inactive while booting up–allow two minutes for the light to activate.
What does the blinking sensor light mean?
Add device. Method 1: Easy Mode
STEP 1. In the Geeni app, on the top corner of the Devices screen, click (+). Choose “Video Camera”.
STEP 2. Make sure the indicator light on the device is blinking Red, indicating the device is ready to connect. If not, follow instructions to Reset the device so that indicator light is blinking red, then press “Next Step”.

STEP 3. Enter your Wi-Fi network and password.

STEP 4. The Geeni app will try to connect your device.
During this time, the camera will beep, continue blinking Red, and then turn solid Blue.
NOTE: Geeni can’t connect to 5GHz networks. *If the connection fails, try to reset and connect directly using QR Code Mode.
Add device. Method 2: Backup QR Code Mode
STEP 1. Make sure the device is blinking red. (see reset instructions down below)
STEP 2. In the Geeni app, on the top corner of the Devices screen, click (+). Choose “Video Camera”. Choose “QR Code” in the top corner.
STEP 3. Click Next and enter your Wi-Fi details.
STEP 4. Scan the QR Code with the camera.
STEP 5. If you heard the camera beep, press “I heard the beep” and it will add your camera.
Live View
Playback
Settings
Access Camera Settings:
From your main device list, click on the camera you want to edit, then press ” ” button on the top right for advanced settings.
Device Name:
Press to rename your device to something like “Backyard” or “Driveway”.
Device Sharing:
Let friends, spouse, roommates, or family keep an eye on what your cameras see. Whether it’s the patio or the side entrance, you can decide who gets to check in, access the camera, and set notifications.
Remove Device:
Delete the camera from your account. Until it’s deleted, it will always be linked to your account.
Indicator Light:
By default, the camera lights up to show it’s on. Switch “Indicator Light” off to hide the light.
Flip:
If you mount your camera upside down, toggling the “Flip” function will rotate the image so that it’s right side up.
Time Watermark:
Turn the time watermark on to always see a time stamp of when video is taking place.
Motion Detection:
When turned on, you’ll receive notifications to your phone whenever the camera senses motion. Press to turn Motion Detection off, schedule motion alerts and/or control floodlight duration.
Night Vision:
The camera is set to automatically activate night vision in the dark. Toggle here to manually turn night vision on or off.
SD Card Settings:
SD Card options includes erasing your microSD Card.
Frequently Asked Questions
- Can I share with family and friends?
Yes, you can share your cameras with family and friends who will have access to view the camera and control your bulbs, plugs, and other Geeni devices. In the Geeni app, press the Profile button and click on the “Device Sharing” button, and you will be able to give or revoke sharing permissions. In order to share, the other user should already have downloaded the Geeni app and registered a new account. - Recording and Micro SD Card Usage:
Without a Micro SD card (optional, sold separately), the smart Wi-Fi camera can show live camera video, save screenshots or videos of the camera stream to your phone for later, and record still snapshots of motion alerts when notifications are turned on. Installing a Micro SD card will further enable video recording and playback from your phone. When the card is installed, the camera will continuously record and play back video to your phone until the card is full (up to 128GB supported). Video is encrypted and only viewable through the Geeni app on your phone, so do not try removing the Micro SD card to view video. - How Much Video Can The Camera Record?
Depending on video quality, the camera will use around 1gb of storage per day, so a 32GB card can provide weeks of continuous video. As the card fills up, the oldest footage will automatically be replaced by new video, so you don’t have to ever worry about running out of storage space. - How Many Cameras Can I Control?
Geeni’s app can control an unlimited amount of devices in an unlimited amount of locations. Your router may have a limit of how many devices can be connected to one router. - My Geeni device has a funny name. How do I rename it?
From your main device list, click on one of the devices you want to rename, press the ” ” button on the top right for advanced settings, and click Modify Device Name. You’ll then be able to choose a more familiar name. - The device appears offline or unreachable, what should I do?
Make sure your Wi-Fi router is online and in range. Make sure you have the latest Geeni functionality by clicking “Check for firmware update” in your device settings. - What’s the Wireless Range?
The range of your home Wi-Fi is heavily dependent on your home router and the conditions of the room. Check with your router specifications for exact range data. - If my Wi-Fi/Internet goes down, will Geeni still work?
Geeni products need to be connected to Wi-Fi in order to use them remotely.
Troubleshooting
Cannot connect to your Wi-Fi network:
Make sure you entered the correct Wi-Fi password during the Wi-Fi setup. Check whether there are any Internet connection problems. If the Wi-Fi signal is too weak, reset your Wi-Fi router and try again.
System Requirements
- Mobile device running iOS® 9 or higher or AndroidTM 5.0 or higher
- Existing Wi-Fi Network
Technical Specifications
- Camera: up to 1080p (1920x1080P) at 25 frames / sec. H.264 encoding
- Field of View: 140º · Weatherproof: IP54
- Storage: supports up to 128gb microSD card (not included)
- Wi-Fi: IEEE 802.11B/G/N, 2.4GHz (not compatible with 5GHz Wi-Fi networks)
FCC Notice:
This device complies with Part 15 of the FCC Rules. Operation is subject to the two following conditions: 1. This device may not cause harmful interference. 2. This device must accept any interference received, including interference that may cause undesired operation. Note: This equipment has been tested and found to comply with the limits for a Class B digital device, pursuant to Part 15 of the FCC Rules. These limits are designed to provide reasonable protection against harmful interference in a residential installation.
Support:
If you encounter any issues, please visit us at support.mygeeni.com for help. To explore our full selection of products, visit us at: www.mygeeni.com (888) 232-3143 Toll-free (English Only)
© 2020 Merkury Innovations · 45 Broadway 3rd FL, New York NY 10006. The illustrated product and specifications may differ slightly from those supplied. Geeni is a trademark of Merkury Innovations LLC. iPhone, Apple and the Apple logo are trademarks of Apple Inc., registered in the U.S. and other countries. App Store is a service mark of Apple Inc. Galaxy S is a registered trademark of Samsung Electronics Co., Ltd. Google, Google Play, and related marks and logos are trademarks of Google LLC. iOS is a registered trademark of Cisco in the U.S. and other countries and is used under license. Amazon, Alexa and all related logos are trademarks of Amazon.com, Inc. or its affiliates. All other trademarks and trade names are those of their respective owners.
Made in China
Can’t connect? Need help?

DO NOT RETURN THIS PRODUCT TO THE STORE
support.mygeeni.com
(888) 232-3143 Toll-free (English Only) or tap `Support’ for help in the Geeni app.
Geeni Smart WiFi Outdoor Camera
Thank you for purchasing your GEENI smart home product.
Get started using your new devices by downloading Geeni, one convenient app that manages everything straight from your phone or tablet. Easily connect to your home Wi-Fi and control multiple devices from the touch of your fingertips.
What’s in the Box
- Smart Outdoor Camera
- Mounting Screws
- Camera Antenna
- 16GB MicroSD Card (pre-installed)
- Power Adapter
- User Manual
Get Ready
- Know your Wi-Fi network and password
- Locate a suitable mounting location, but do NOT mount until setup is complete
- Make sure your mobile device is running iOS® 9 or higher or Android™ 5.0 or higher
- Make sure you’re connecting to a 2.4GHz Wi-Fi network (Geeni can’t connect to 5GHz networks)
Download the Geeni app from App Store or Google Play
Register an account on your Geeni app
STEP 1. Enter your mobile phone number or email address.

STEP 2. Enter the verification code and create a password.
Login to the Geeni App
STEP 3. Login to the App.
Plug In
How do I reset my device?
A reset button is located on the cord connected to the camera. Reset the camera by holding down the button for several seconds.

Important: Set up and connect the camera before mounting. Set up works best near your home router. If the camera is disconnected from power after setup, it will automatically reconnect when plugged in again. Note: The camera will appear inactive while booting up–allow two minutes for the light to activate.
What does the blinking light mean?
Add device. Method 1: Easy Mode
STEP 1. In the Geeni app, on the top corner of the Devices screen, click (+). Choose “Wifi Camera”.
STEP 2. Make sure the indicator light on the device is blinking Red, indicating the device is ready to connect. If not, follow instructions to Reset the device so that indicator light is blinking red, then press “Next Step”.
STEP 3. Enter your Wi-Fi network and password.
STEP 4. The Geeni app will try to connect your device. During this time, the camera will beep, continue blinking Red, and then turn solid.
NOTE: Geeni can’t connect to 5GHz networks. *If the connection fails, try to reset and connect directly using QR Code Mode.
Add device. Method 2: Backup QR Code Mode
STEP 1. Make sure the device is blinking red. (see reset instructions)
STEP 2. In the Geeni app, on the top corner of the Devices screen, click (+). Choose “Video Camera”. Choose “QR Code” in the top corner.
STEP 3. Click Next and enter your Wi-Fi details.

STEP 4. Scan the QR Code with the camera.
STEP 5. If you heard the camera beep, press “I heard the beep” and it will add your camera.
Mount the Camera
STEP 1. Screw the included antenna onto the right side of the camera.
NOTE: If you unplug the camera, you do not need to repeat the setup steps- the camera will automatically reconnect to your Wi-Fi network.
STEP 2. Use the included 3 screws and 3 wall anchors to mount the camera wherever you like.

STEP 3. Use the adjustment knob to angle the camera in the desired direction. Make sure the knob is fully secured before letting go of the camera.
Settings
Access Camera Settings:
From your main device list, click on the camera you want to edit, then press the “···” button on the top right for advanced settings.
Device Name:
Press to rename your camera to something like “Porch” or “Backyard”.
Device Sharing:
let friends, spouse, roommates, or family keep an eye on what your cameras see. Whether it’s the backyard or the family dog, you can decide who gets to check in, access the camera, and set notifications.
Remove Device:
Delete the camera from your account. Until it’s deleted, it will always be linked to your account.
Format SD Card:
Press to erase your microSD Card.
Indicator Light:
By default, the camera’s light is set to remain lit to indicate power. Switch “Indicator Light” off to hide the light.
Flip:
If you mount your camera upside down, toggling the “Flip” function will rotate the image so that it’s right side up.
Motion Detection:
When turned on, you’ll receive notifications to your phone whenever the camera senses motion. Press to turn Motion Detection off or adjust sensitivity.
Night Vision:
The camera is set to automatically activate night vision in the dark. Toggle here to manually turn night vision on or off.
Live View
Playback
Frequently Asked Questions
- Can I share with family and friends?
Yes, you can share your cameras with family and friends who will have access to view the camera and control your bulbs, plugs, and other Geeni devices. In the Geeni app, press the Profile button and click on the “Device Sharing” button, and you will be able to give or revoke sharing permissions. In order to share, the other user should already have downloaded the Geeni app and registered a new account. - How does the pre-installed microSD card work:
The camera has a preinstalled 16GB microSD card and will continuously record until the card is full. This video is encrypted and only viewable through the Geeni app on your phone; you can remove the pre-installed microSD card, in order to install a larger capacity card, but you cannot view the footage saved on the microSD card outside of the Geeni app. - How much video can the camera record?
Depending on the video quality, the camera will use around 1GB of storage to record 24 hours of footage. This can mean an entire day of continuous footage, or multiple days of motion-only recording. As the card fills up, the oldest footage will be automatically replaced by new video. If you would like to increase your internal storage space, visit MyGeeni. com for an instructional video on how to open up the camera and install a larger microSD card. - How many cameras can I control?
Geeni’s app can control an unlimited amount of devices in an unlimited amount of locations. Your router may have a limit of how many devices can be connected to one router. - My Geeni device has a funny name. How do I rename it?
From your main device list, click on one of the devices you want to rename, press the ” ” button on the top right for advanced settings, and click Modify Device Name. You’ll then be able to choose a more familiar name. - The device appears offline or unreachable, what should I do?
Make sure your Wi-Fi router is online and in range and check that you have the latest Geeni functionality by clicking “Check for firmware update” in your device settings. - What’s the wireless range?
The range of your home Wi-Fi is heavily dependent on your home router and the conditions of the room. Check with your router specifications for exact range data. - If my Wi-Fi/Internet goes down, will Geeni still work?
Geeni products need to be connected to Wi-Fi in order to use them remotely.
Troubleshooting
Cannot connect to your Wi-Fi network:
Make sure you entered the correct Wi-Fi password during the Wi-Fi setup. Check whether there are any Internet connection problems. If the Wi-Fi signal is too weak, reset your Wi-Fi router and try again.
System Requirements
- Mobile device running iOS® 9 or higher or AndroidTM 5.0 or higher
- Existing Wi-Fi Network
Technical Specifications
- Camera: up to 1080p (1920x1080P) at 10 frames / sec. H.264 encoding
- Field of View: 95° · Weatherproof: IP66
- Storage: supports up to 128gb microSD card (16GB microSD card is included, and is replaceable)
- Wi-Fi: IEEE 802.11 B/G/N, 2.4GHz (not compatible with 5GHz Wi-Fi networks)
FCC Notice:
This equipment has been tested and found to comply with the limits for a Class B digital device, pursuant to part 15 of the FCC Rules. These limits are designed to provide reasonable protection against harmful interference in a residential installation. This equipment generates, uses and can radiate radio frequency energy and, if not installed and used in accordance with the instructions, may cause harmful interference to radio communications. However, there is no guarantee that interference will not occur in a particular installation. If this equipment does cause harmful interference to radio or television reception, which can be determined by turning the equipment off and on, the user is encouraged to try to correct the interference by one or more of the following measures:
- Reorient or relocate the receiving antenna.
- Increase the separation between the equipment and receiver.
- Connect the equipment into an outlet on a circuit different from that to which the receiver is connected.
- Consult the dealer or an experienced radio/TV technician for help.
Caution: Any changes or modifications to this device not explicitly approved by manufacturer could void your authority to operate this equipment.
This device complies with part 15 of the FCC Rules. Operation is subject to the following two conditions: (1) This device may not cause harmful interference, and (2) this device must accept any interference received, including interference that may cause undesired operation.
The device has been evaluated to meet general RF exposure requirement. The device can be used in portable exposure condition without restriction.
Support:
If you encounter any issues, please visit us at support.mygeeni.com for help. To explore our full selection of products, visit us at: www.mygeeni.com (888) 232-3143 Toll-free
© 2019 Merkury Innovations · 45 Broadway 3rd FL, New York NY 10006. The illustrated product and specifications may differ slightly from those supplied. Geeni is a trademark of Merkury Innovations LLC. iPhone, Apple and the Apple logo are trademarks of Apple Inc., registered in the U.S. and other countries. App Store is a service mark of Apple Inc. Google, Google Play, and related marks and logos are trademarks of Google LLC. iOS is a registered trademark of Cisco in the U.S. and other countries and is used under license. Amazon, Alexa and all related logos are trademarks of Amazon.com, Inc. or its affiliates. All other trademarks and trade names are those of their respective owners.
Made in China
Can’t connect? Need help?

DO NOT RETURN THIS PRODUCT TO THE STORE
Geeni support: support.mygeeni.com (888) 232-3143 Toll-free or tap `Support’ for help in the Geeni app.
GEENI™ SMART WI-FI SECURITY CAMERA START GUIDE
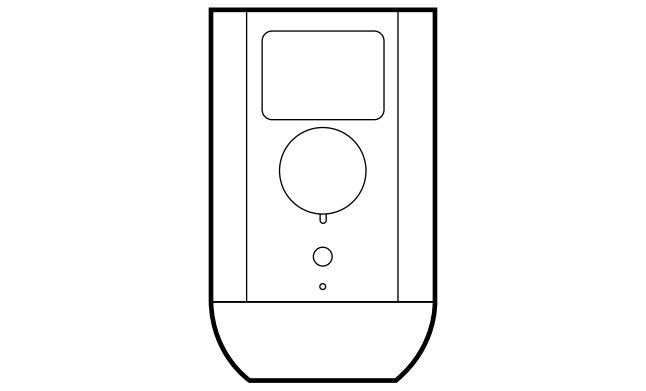
Thank you for purchasing your GEENI smart home product.
Get started using your new devices by downloading Geeni, one convenient app that manages everything straight from your phone or tablet. Easily connect to your home Wi-Fi, and control multiple devices from the touch of your fingertips.
FCC Notice:
This equipment has been tested and found to comply with the limits for a Class B digital device, pursuant to part 15 of the FCC Rules. These limits are designed to provide reasonable protection against harmful interference in a residential installation. This equipment generates, uses and can radiate radio frequency energy and, if not installed and used in accordance with the instructions, may cause harmful interference to radio communications. However, there is no guarantee that interference will not occur in a particular installation. If this equipment does cause harmful interference to radio or television reception, which can be determined by turning the equipment off and on, the user is encouraged to try to correct the interference by one or more of the following measures:
- Reorient or relocate the receiving antenna.
- Increase the separation between the equipment and receiver.
- Connect the equipment into an outlet on a circuit different from that to which the receiver is connected.
- Consult the dealer or an experienced radio/TV technician for help.
Caution: Any changes or modifications to this device not explicitly approved by manufacturer could void your authority to operate this equipment.
This device complies with part 15 of the FCC Rules. Operation is subject to the following two conditions: (1) This device may not cause harmful interference, and (2) this device must accept any interference received, including interference that may cause undesired operation.
The device has been evaluated to meet general RF exposure requirement. The device can be used in portable exposure condition without restriction.
Support:
If you encounter any issues, please contact us at support.mygeeni.com for help.
(888) 232-3143 Toll-free
To explore our full selection of products, visit us at: www.mygeeni.com
© 2020 Merkury Innovations · 45 Broadway 3rd FL, New York NY 10006. The illustrated product and specifications may differ slightly from those supplied. Geeni is a trademark of Merkury Innovations LLC. iPhone, Apple and the Apple logo are trademarks of Apple Inc., registered in the U.S. and other countries. App Store is a service mark of Apple Inc. Google, Google Play, and related marks and logos are trademarks of Google LLC. iOS is a registered trademark of Cisco in the U.S. and other countries and is used under license. Amazon, Alexa and all related logos are trademarks of Amazon.com, Inc. or its affiliates. All other trademarks and trade names are those of their respective owners.
Made in China
What’s in the Box
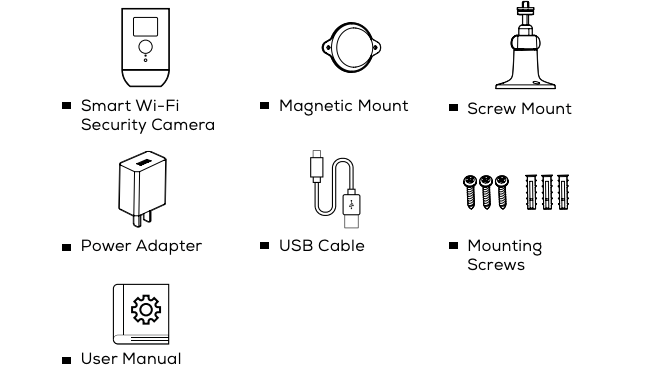
Get Ready

Product Diagram
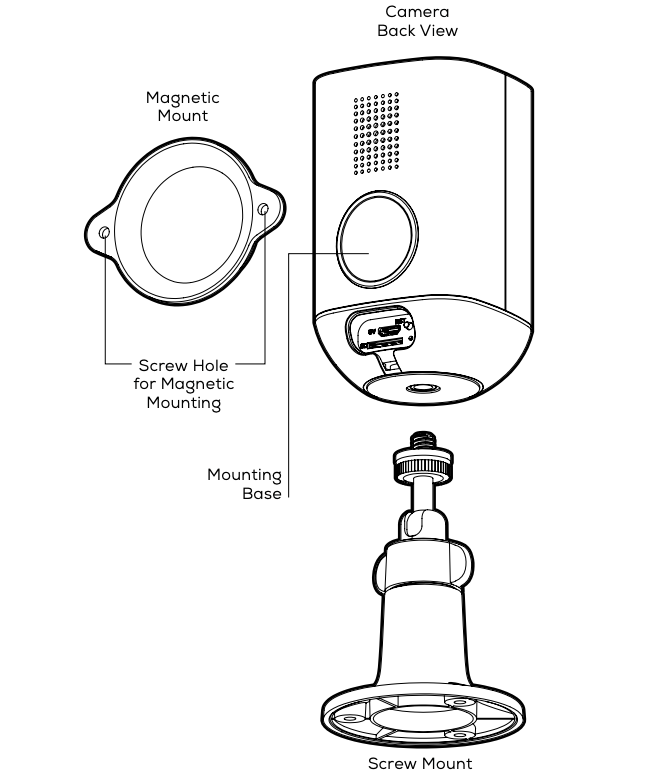
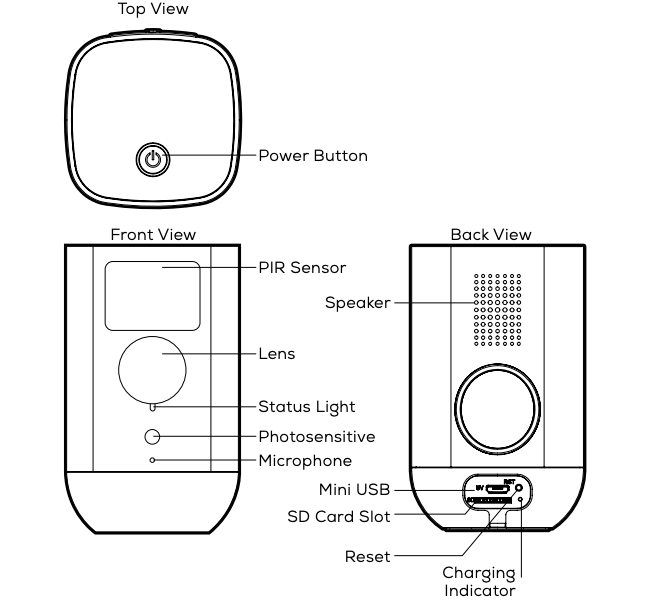
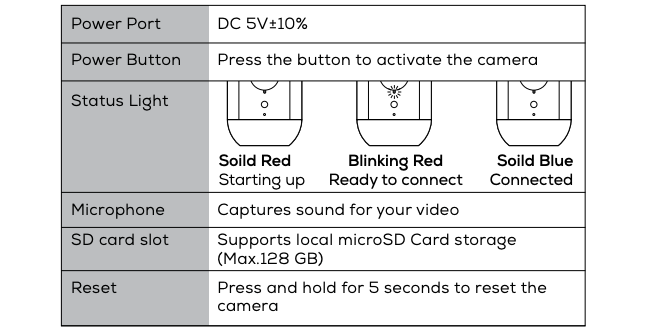
Charging, Register
This Wireless Smart Camera can be charged by connecting to any standard USB power source or outlet. The charging indicator light will blink red when charging and turn blue when charging is complete.
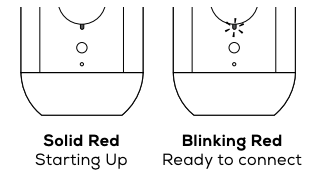
STEP 1: Register
- Download the Geeni App from App Store or Google Play.

- Register an account on your Geeni App.
- Enter your mobile phone number or email address
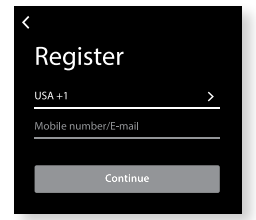
- Enter the verification code and create a password.
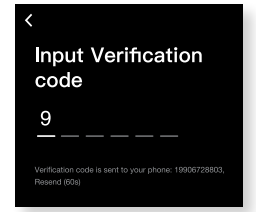
- Log into the App.
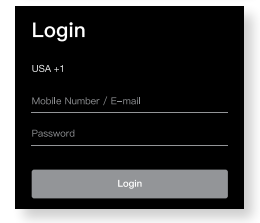
Install
STEP 2 : Installation
- Install:
Method 1 – Magnetic Mount Installation
- Use the included 2 screws and wall anchors to mount the camera to the desired wall
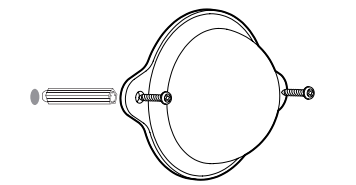
- Camera attaches to mount magnetically.
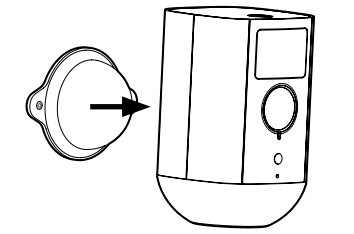
- Install:
Method 2 – Screw Mount Installation
- Use the included 3 screws and wall anchors to mount the stand to the desired wall.
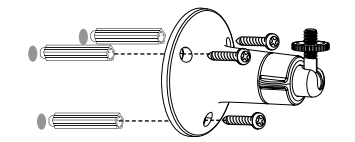
- Install the camera in the screw mount and lock it with the screw
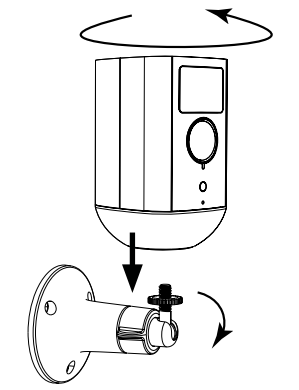
- After adjusting your camera angle, lock the screw
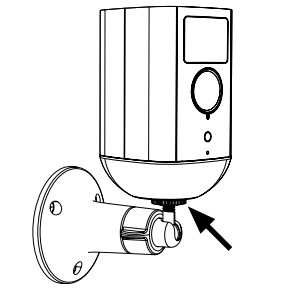
Connect (Easy Mode)
STEP 3
- Add device: Easy Mode
- In the Geeni app, on the top corner of the Devices screen, click + Choose “Wi-Fi Camera”.
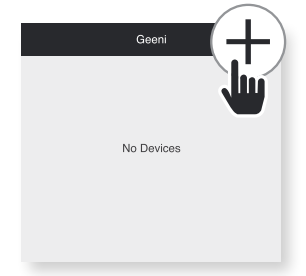
- Make sure the light on the camera is blinking red, indicating the device is ready to connect, then press Next Step.
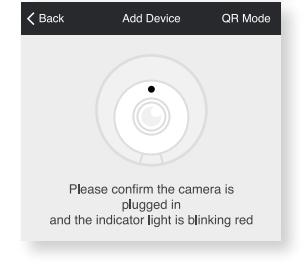
- Enter your Wi-Fi network and password.
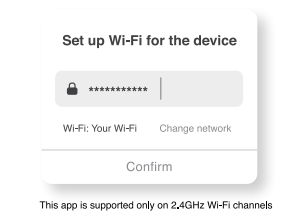
- The Geeni app will attempt to connect. This may take a few moments. When the blinking light turns solid blue, connection was successful!
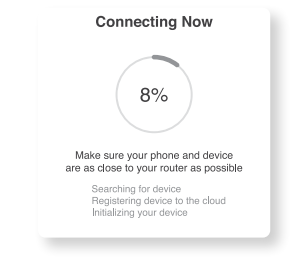
NOTE: Geeni can’t connect to 5GHz networks.
*If the connection fails, try to connect using QR Mode.
Connect (QR Code Mode)
- Add device:
QR Code Mode
- Be sure to reset camera by pressing the reset button for 3-4 seconds.
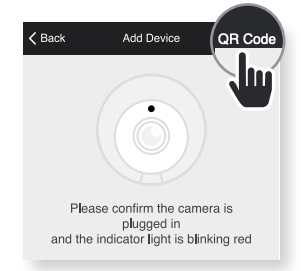
- In the Geeni app, on the top corner of the Devices screen, click + Choose “Wi-Fi Camera” Choose “QR Code” in the top corner.
- Click Next and enter your Wi-Fi details.
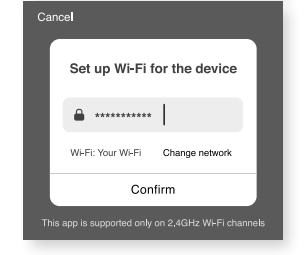
- Scan the QR code with the camera. When you hear the camera beep, select `I heard the beep’ and it will add your camera.
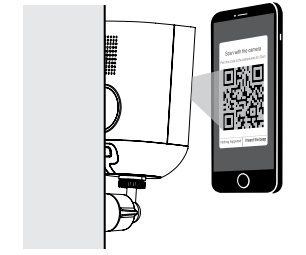
- The indicator light will turn solid blue when device is connected successfully!
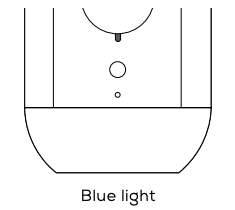
NOTE: Geeni can’t connect to 5GHz networks.
*How do I reset the device and what does the blinking light mean?
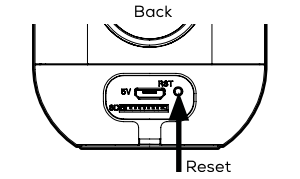
Reset the Camera by pressing the reset button for 3-4 seconds.
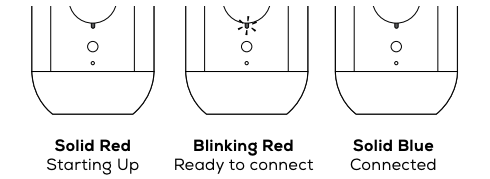
Settings
- Access Camera Settings:
From your main device list, click on the camera you want to edit, then press “···” button on the top right for advanced settings.
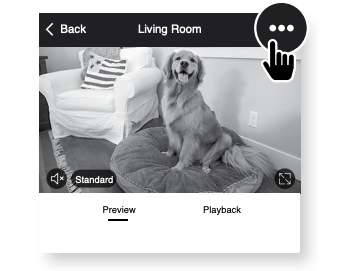
- Device Name:
Press to rename your device to something like “Backyard” or “Front Yard”
- Device Sharing:
Let friends, spouse, roommates, or family keep an eye on what your cameras see. Whether it’s a baby’s crib or the family dog, you can decide who gets to check in, access the camera, and set notifications.
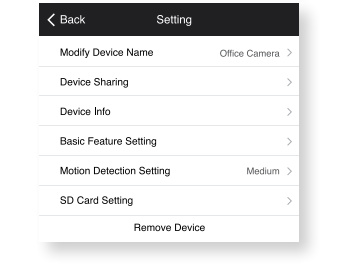
- Remove Device:
Delete the camera from your account. Until it’s deleted, it will always be linked to your account.
- Indicator Light:
By default, the camera lights up to show it’s on. Switch “Indicator Light” off to hide the light.
- Flip:
If you mount your camera upside down, toggling the “Flip” function will rotate the image so that it’s right side up.
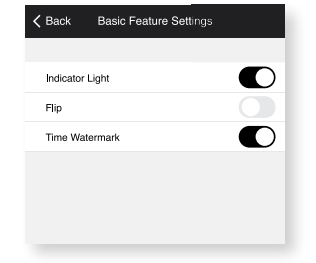
- Time Watermark:
Turn the time watermark on to always see a time stamp of when video is taking place.
- Motion Detection:
When turned on, you’ll receive notifications to your phone whenever the camera senses motion. Press to turn Motion Detection off or set how sensitive you want it to be.

- Format SD Card:
Press to erase your microSD Card.
Questions, Troubleshooting, Notices
Frequently Asked Questions
- Can I share with family and friends?
Yes! You can share access to all Geeni devices– cameras, plugs, bulbs, doorbells, etc.– with family & friends. In the Geeni app, press the “Profile” button and click on “Device Sharing” to give or revoke sharing permissions. In order to share, the other user should have already downloaded the Geeni app and registered an account. - How much footage can the camera record?
An optional microSD card is required to record footage. Depending on video quality, your smart camera will use around 2GB of storage a day, so a 32GB card can provide weeks of continuous video. As the card fills up, the oldest footage will automatically be replaced by new video, so you don’t have to ever worry about running out of storage space. - My Geeni device has a funny name. How do I rename it?
From your main device list, click on one of the devices you want to rename, press the “···” button on the top right for advanced settings, and click Modify Device Name (or Modify Group Name, if applicable). You’ll then be able to choose a more familiar name. - The device appears offline or unreachable, what should I do?
Check the camera button and make sure that it’s switched ON. The camera requires an “always-on” power supply to operate properly. Make sure your Wi-Fi router is online and in range. Make sure you have the latest Geeni functionality by clicking “Check for firmware update” in your device settings. - What’s the Wireless Range? The range of your home Wi-Fi is heavily dependent on your home router and the conditions of the room. Check with your router specifications for exact range data.
- If my Wi-Fi/Internet goes down, will Geeni still work?
Geeni products need to be connected to Wi-Fi in order to use them remotely.
Troubleshooting
- Cannot connect to your Wi-Fi network.
Make sure you entered the correct Wi-Fi password during the Wi-Fi setup. Check whether there are any Internet connection problems. If the Wi-Fi signal is too weak, reset your Wi-Fi router and try again.
Reset the device
- Camera can be reset by holding down the reset button for 3-4 seconds.
System Requirements
- Mobile device running iOS® 9 or higher or AndroidTM 5.0 or higher
- Existing Wi-Fi Network
Technical Specifications
- Camera: up to 1080p (1920 x 1080) at 25 frames/sec. H.264 encoding
- Field of View: 130° diagonal
- Audio: Internal Speaker and Microphone
- Storage: supports up to 128 GB microSD card (not included)
- Wi-Fi not compatible with 5GHz Wi-Fi networks.
Voice Control Guide
Thank you for purchasing your GEENI smart home product. Make sure your devices are already set up using the Geeni app, then follow these steps.
Your video device is able to stream video to these leading smart assistants.
Name and Control Each Device by Voice

Google Assistant
To control your Geeni smart home products just say “OK Google,” or “Hey Google,” and ask. Make sure your devices are already set up using the Geeni app.

- Open the Google Home app and go to Home Control in the menu.

- Tap the “+” button.
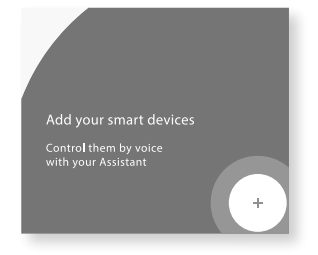
- Choose “Geeni” from the list of Home Control partners.
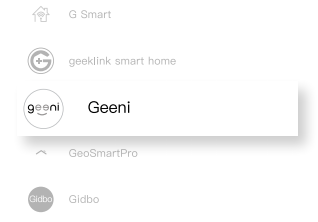
- Authorize your account with Google Assistant using the username and password from your Geeni app.
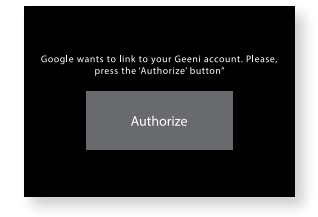
Now your Google Home app and Geeni devices are linked!
Your’re now able to say “Hey Google” and control your Geeni devices.
- At any time, go into the “Home Control” section of the Google Home app to set nicknames and rooms for your devices. You can rename your devices in the Geeni app, and Google Assistant will refer to them by the same name.
So if you rename a camera to `Front Door’ or `Back Porch,’ then Google Assistant will use that same name later on. You can always give it a nickname using the Google Home app as well.
Google Assistant will be able to control devices by room.
Amazon Alexa

To control your Geeni smart home products, just ask Alexa. Make sure your devices are already set up using the Geeni app.
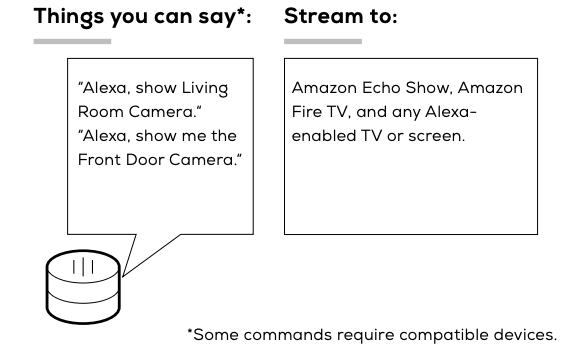
- Open the Alexa app and go to Skills in the menu.
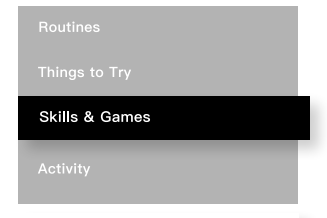
- Search for Geeni then tap Enable.
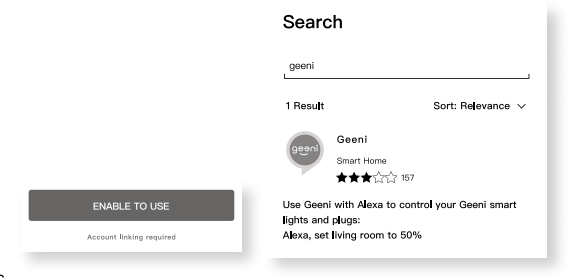
- Authorize your account with Smart Home Skills using the username and password from your Geeni app.
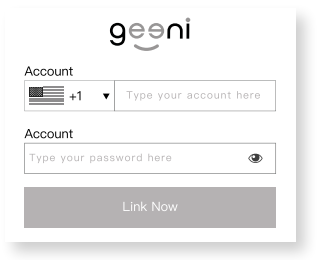
- Choose “Discover Devices.” After a few seconds your Geeni devices will be displayed under Smart Home in the Alexa app.
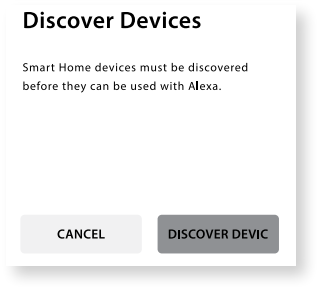
- You can rename your devices in the Geeni app, and Alexa will refer to them by the same name.
So if you rename a smart camera to `Front Door’ or `Back Porch,’ then Alexa will use that same name later on.
More information is available at: http://tinyurl.com/alexa-smart-home-groups
Can’t connect?
Need help?
WE CAN HELP
DO NOT RETURN THIS PRODUCT TO THE STORE
support.mygeeni.com
(888)232-3143 Toll-free
or tap ‘support‘ for help in the Geeni app.