FISHER PAYKEL OB60SC5CEX2 60cm 5 Function Oven User Guide

DIMENSIONS
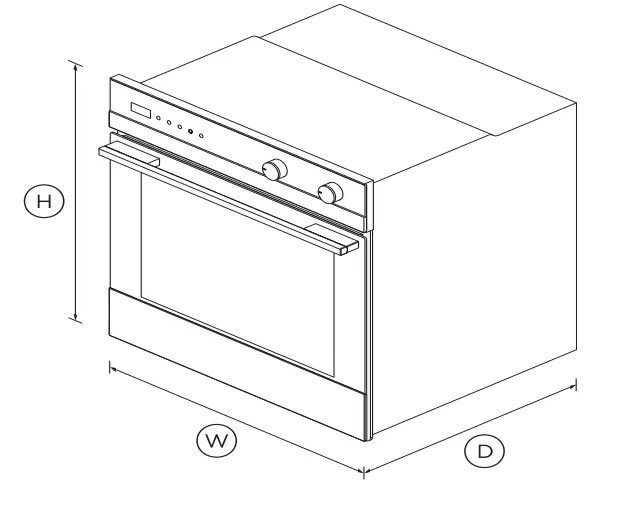
- Height 598mm
- Width 596mm
- Depth 565mm
FEATURES & BENEFITS
Multi-function Flexibility
This built-in oven has five functions including Bake, Fan Bake and Pizza Bake, allowing you to use a variety of cooking styles.
Generous capacity
With a generous sized internal cavity of 85L total capacity, you can create several dishes at once using multiple shelves.
Consistently hot
Ideal for multi-shelf cooking, this built-in oven features
Fast and easy cleaning
Cleaning this built-in oven is quick and easy thanks to the optional catalytic liners which absorb oil and fat splashes during cooking.
Refined styling
With sophisticated handle styling and black glass finish, our builtin ovens are designed to match the rest of Fisher & Paykel’s kitchen appliance family.
Safe and sound
The CoolTouch door of this built-in oven is safe to touch from the outside. Sturdy, fully extendable shelves slide all the way out, reducing the need for you to reach inside.
SPECIFICATIONS
Accessories
- Catalytic panels •
- Chromed shelf runners •
- Full extension sliding shelves Optional (part 565048)
- Full extension telescopic Optional (part 565048)
- Optional Accessory round Part 81645
- Optional catalytic panels Part 562816
- Optional round handle Part 81645
- Roasting dish 1
- Step down wire shelf 1
- Telescopic sliding runners 1 set
- Telescopic sliding shelves 1 set
Capacity
- Shelf positions 6
- Total gross 85L
Cleaning
- Acid resistant graphite enamel •
- Removable oven door •
- Removable oven door inner •
- Removable shelf runners •
Controls
- Automatic cooking/minute •
- Electronic clock •
Functions
- Bake •
- Fan bake •
- Fan grill •
- Grill •
- Number of functions 5
- Pastry Bake with Pizza mode •
- Pizza bake •
Performance
- AeroTech™ technology •
- Grill power 3000W
- Whisper quiet cooking •
Power requirements
- Amperage 12.8 – 13.8A
- Supply frequency 50Hz
- Supply voltage 220 – 240V
Product dimensions
- Depth 565mm
- Height 598mm
- Width 596mm
Safety
- Advanced cooling system •
- Balanced oven door •
- CoolTouch door •
- Non-tip shelves •
- SKU: 81748
The product dimensions and specifications in this page apply to the specific product and model. Under our policy of continuous improvement, these dimensions and specifications may change at any time. You should therefore check with Fisher & Paykel’s Customer Care Centre to ensure this page correctly describes the model currently available. ? Fisher & Paykel Appliances Ltd 2020
With generous capacity and beautiful contemporary styling, this built-in oven will complement your kitchen design perfectly.
- 85L total capacity
- Five oven functions including Pizza Bake
Other product
Other product downloads available at fisherpaykel.com
 User Guide
A PEACE OF MIND SALE
 24 Hours 7 Days a Week Customer Support
T 0800 372 273
W www.fisherpaykel.com
Fisher Paykel Dishdrawer Double Dishdrawer
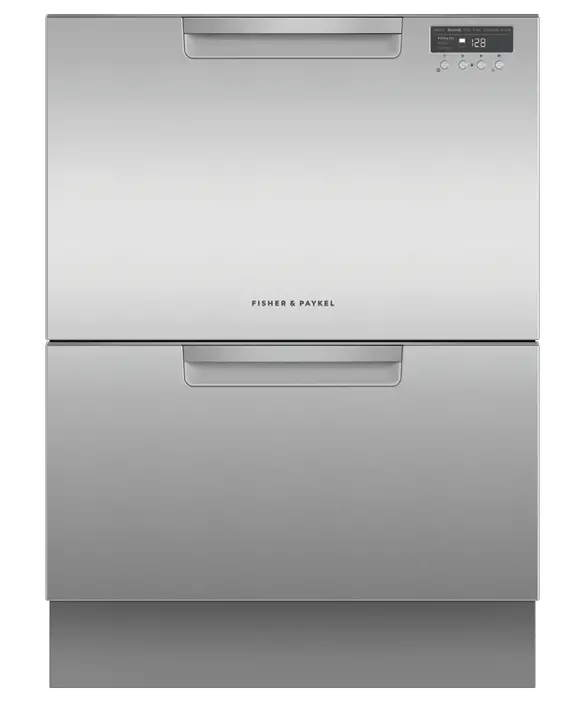
Fisher Paykel Dishdrawer Double Dishdrawer
DISHDRAWER DISHWASHER
Keep this document handy for easy reference.
- For detailed information on the features of your dishwasher, see your ‘User guide’.
- Before using your dishwasher, make sure you read the full ‘User guide’, with special attention to the ‘Safety and warnings’ section.
- For contact information or if you require service, assistance or replacement parts, see the end of this document or your ‘Service & warranty’ booklet.
OPERATING INSTRUCTIONS – STARTING A WASH
Discard scraps
Scrape large food particles off (e.g. bones, fruit stones) and remove any foreign objects (e.g. toothpicks, strings, paper
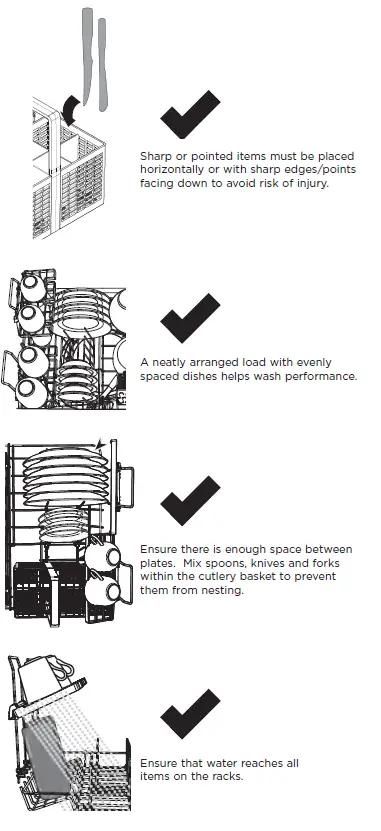
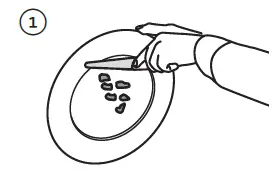 Load dishes carefully
To help with wash performance, arrange dishes so they are evenly spaced and not nesting.
IMPORTANT!
Accommodates plates up to a max height of 280mm (11”) for standard tubs or 310mm (12 1/4”) for tall tubs
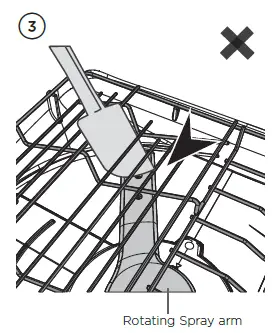
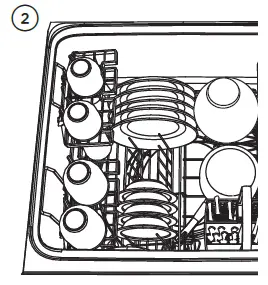 Check spray arm(s) are mounted correctly and can rotate fully around
Check the spray arm is mounted correctly by physically rotating it around with your hand. Before a wash, ensure there are no items blocking the spray arm(s) from rotating
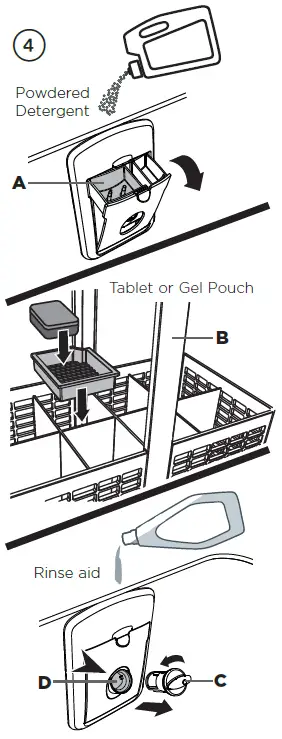
 Add detergent
Fill the detergent dispenser (A) with powdered detergent and close the dispenser door.
IMPORTANT!
Do not place liquid detergent or tablets in the detergent dispenser.
If using a tablet or gel pouch, place it in the cutlery basket (B) or at the edge of the base rack (see user guide for details).
Check rinse aid
If the indicator on its plug (C) glows bright red, refill the rinse aid dispenser (D) with liquid rinse aid. Make sure you then refit the rinse aid plug back into its original position, by rotating the plug back into an upright position
Select wash
Press to select a wash >> program.

Start wash or set Delay start
To start wash: Close the drawer and press OR Press on the control panel before closing the door To set delay start: Press and hold to set the delay start time, then close the drawer. Note: Each tone indicates a 1h delay.

CONTROLS AND INDICATORS
Indicators Description
Off/On
Opening the drawer will automatically turn the dishwasher on. If the dishwasher is in an idle state, touch any button to reactivate it.
- Wash program indicators
If lit: The wash program has been selected. - Lock indicator
If lit: Keylock or child lock is activated. - Wash modifier indicators
If lit: The wash modifier has been selected. The wash program length and temperature will be modified accordingly. - Delay start indicator
If lit: Delay start is set. The wash program will start after the selected time delay (1-12h
Controls Description
WASH PROGRAM SELECTOR
Press >> to scroll through the wash program options. See opposite table for program descriptions.
WASH PROGRAM DESCRIPTION
Heavy Heavily soiled pots, pans and dishes.
Medium Dishes that are quite heavily soiled or food soils that have been left to dry overnight.
Eco (default setting) Normally soiled dishes for optimum water and energy usage. The US/Canada Energy Guide is based on this program.
Fast Lightly soiled dishes.
Delicate Lightly soiled and heat sensitive crockery.
Rinse Prevents odours and soils from drying on dishes.
WASH MODIFIER SELECTOR: Press to scroll through the wash modifier options .Note: Not all modifiers are available for all wash programs.
Keylock
Disables all the buttons (helpful when cleaning the dishwasher).
To activate:
Press and hold until you hear a tone. The lock indicator will light up.
Childlock
Disables all the buttons and locks the drawer closed (preventing unauthorised use by children).
To activate:
Press and hold until you hear two tones. The lock indicator will light up. To cancel keylock/childlock: If the drawer is open Press and hold until you hear a tone. The lock indicator will go out. If the drawer is closed Press and hold until you hear a tone. The lock indicator will go out
START SELECTOR (either on door or inner control panel)
- To start wash: Close the drawer and press>> OR Press on the control panel before closing the door To Pause: Press
- Wait for three short and one long tone before opening the drawer. Forcing it open mid cycle may cause damage or injury.
- If the drawer is not restarted within seven minutes it will sound intermittently until it is restarted.
Delay start
- Press and hold to set the delay start time. Each tone indicates a 1h delay (up to 12h). The delay start indicator will light up.
- If you scroll past 12h the dishwasher will exit delay start. To re-enter delay start follow step 1 above.
- The wash will start when the delay time is over, provided the drawer is closed.
DD24 models only US/CA
If drawer is not closed within 4 seconds of setting delay start, OR If the drawer is opened after delay start has been set (for example, to load more dishes), delay start will be suspended.
To resume:
Press and close the drawer OR close the drawer and press . Cancel wash/delay start Press and hold or .
- If there is any water in the drawer, it will automatically drain before the dishwasher turns off.
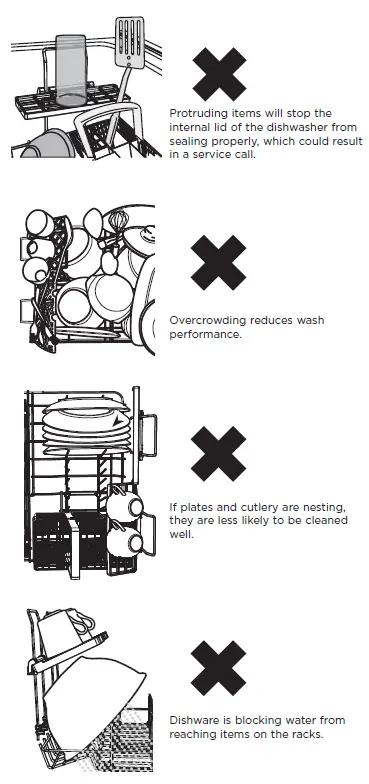
DOS AND DON’TS OF LOADING
How to change the setting of an option
- CHECK
Check that there is no wash underway, then open the drawer. - ENTER MENU
To enter the menu: Press and hold the and together for four seconds.- You are now in the Rinse aid option of the preference options menu.
- To change the Rinse aid setting, go to step 4 now.
- SCROLL TO OPTION
Press to scroll to the next option. The wash modifier indicators will display which option is selected (see table below). When you have scrolled to the end of the sequence, the menu will start again with Rinse aid. - CHANGE SETTING
Press to change the setting within an option. The wash program indicators will display which setting is selected (see table below). - SAVE SETTING & QUIT MENU
Press to save the new setting and quit the preference options menu.
Double models only:
You can use either drawer to change the settings. Changing the settings in one tub will set your preferences for the whole dishwasher
FOR MORE INFORMATION
For detailed information on the features of your dishwasher see your ‘User guide
For warranty information see your ‘Service and warranty’ booklet
IF YOU have any questions or comments
- need a Fisher & Paykel authorized technician to service your product
- need replacement parts or accessories
- want to register your product see your ‘Service and warranty’ booklet or contact us via our website :www.fisherpaykel.com
DOWNLOAD RESOURCES
- Fisher Paykel Dishdrawer Double Dishdrawer [pdf] Instruction Manual Dishdrawer Double Dishdrawer, DD60SDFX9, DD60SDFTX9, DD60SDFHX9, DD24SDFTX9, DD60DDFX9, DD60SDFX9, DD60SDFTX9, DD60DDFHX9, DD60SDFHX9, DD24DDFTX9, DD24SDFTX9
- Read more: https://manuals.plus/fisher-paykel/dishdrawer-double-dishdrawer-manual#ixzz7degJAyIV
FAQ’S
Are double drawer dishwashers worth it?
If you ask us, double dish drawers are the ideal dishwasher together they offer the same capacity as a standard dishwasher, but with more flexibility and opportunities for space and energy savings.
Can you run both drawers of a Fisher Paykel dishwasher at the same time?
Both drawers operate independently so different wash cycles can run simultaneously to accommodate a variety of loads.
How do I reset my Fisher and Paykel double drawer dishwasher?
Reset Procedures for the Fisher & Paykel Dishwasher
Press and hold the button decorated with the key and lock image for five seconds.
Press the power button to turn off power to the Fisher & Paykel dishwasher.
Wait a few minutes and then press the power button to restore power.
How do you secure a Fisher Paykel dishwasher?
Clip all four side mounting brackets into their slots using a flat-bladed screwdriver. Ensure they’re securely fitted before sliding product into cavity. The mounting slots are in pairs, one on each side diagonally across the product. A bracket must match A slot and B bracket must match B slot.
Why does my Fisher and Paykel dishwasher keep beeping?
The drainage hose may be blocked or kinked, or the connection to drainage pipe may be blocked. Ensure the drainage hose and connection to pipes are not blocked. once to stop the beeping, and then again to clear the fault. to resume the wash program.
Why is my dishwasher making a loud noise?
Your dishwasher may be making a loud noise if it has just started a wash cycle and you have opened the door before it has finished filling or if you have opened it during a wash cycle when it is still spinning or draining water. This will cause excess noise as well as vibration from the pump motor until it has stopped completely. To prevent this from happening, wait for your dishwasher to finish filling or stop spinning before opening the door during a wash cycle.
What is the red light on my Fisher and Paykel dishwasher?
The red ECO light will indicate the feature is on. If your dishes are heavily soiled or you require enhanced dry performance, we do not recommend ECO programmes. If the DishDrawer® is operating and a power failure occurs, it will stop. The DishDrawer® may be unable to be opened during this time.
What model dishdrawer do I have?
Located on the left hand side of the appliance, underneath the top drawer and hidden when closed.
What are the advantages of a drawer dishwasher?
In a standard dishwasher the door drops down, blocking walkways, especially in smaller kitchens. Drawer dishwashers pull out like a regular drawer and can be opened only as far as necessary for access. Loading the top drawer eliminates the need for bending, making it more convenient for those with back or knee issues.
What is the purpose of a double dishwasher?
A double dishwasher is a cleaning system for dishes that utilizes two stacked drawers. These models are often identical in size to standard washer units, and can be installed beneath cabinetry near the sink in the same manner. The two roll out drawers are designed to function independently of one another.
How much water do Fisher dish drawers use?
Each DishDrawerTM uses only 7 litres of water per cycle, while sink handwashing uses an average of 15 litres. Above – Tall, single DishDrawerTM integrated.
Does Fisher Paykel dishwasher dry?
Yes, this DishDrawer model dries the dishes at the end of the wash cycle.
VIDEO
Fisher Paykel Dishdrawer Double Dishdrawer
www://fisherpaykel.com/
QUICK REFERENCE GUIDE > RS3084WRUK1
Fisher-Paykel-Integrated Refrigerator Freezer, 30″, Ice & Water

Series 9 | Integrated
Panel Ready | Left hinge
A slim profile, perfect for compact kitchens, or pair it with other Integrated models for generous chilled and frozen storage.
- Keep food fresher for longer by constantly maintaining the ideal temperature with ActiveSmart™ technology
- Create the perfect climate for each type of food with Variable Temperature Zone: choice of four food modes, Pantry, Fridge, Soft Freeze or Freezer
- Convenient access to fresh, chilled water and ice with internal water dispenser and icemaker
- Customize with your own kitchen cabinetry or purchase our stainless steel door panel and handle accessories
DIMENSIONS
Height – 84 “
Width – 29 3/4″
Depth – 24 “
FEATURES & BENEFITS
Variable Temperature Zone
Create the perfect climate and store each type of food at optimal temperature and humidity with Variable Temperature Zone, reducing food waste due to spoiling. You have the choice of four food modes: Pantry, Fridge, Soft Freeze or Freezer. Use the Max cold feature for periods of high refrigerator or freezer use, or full grocery loads.
SPECIFICATIONS
Accessories (sold separately)
Hinge change (from left hinge – 848184P
Hinge change (from right hinge – 848183P
Joiner kit – 24985
Matching Replacement Water – 847200
Professional Round Handle Kit – 25722
Professional Square Handle Kit – 25724
Consumption
Energy star rating – Yes (Most efficient)
Freezer features
Automatic ice maker – •
Door alarm – •
Freezer bins – 2
Ice Boost – •
LED bin lighting – •
LED ceiling lighting – •
LED side lighting – •
Max cold – •
SmartTouch interface at – •
Performance
ActiveSmart™ Foodcare – •
Adaptive defrost – •
Dual evaporator – •
Frost free freezer – •
Humidity control system – •
Inverter controlled compressor – •
Sabbath mode – •
Variable food modes – Pantry; Fridge; Soft freeze;
Power Requirements
Rated current – 10A
Supply frequency – 60Hz
Supply voltage – 115V
Product dimensions
Depth – 24 ”
Height – 84 ”
Width – 29 3/4″
Refrigerator features
Adjustable door shelves – 4
Adjustable glass cantilevered – •
Covered door shelves – 1
Door alarm – •
Gallon door shelves – 1
LED bin lighting – •
LED ceiling lighting – •
LED side lighting – •
SmartTouch interface at – •
Soft-close fruit and vegetable – 2
Stackable bottle holders – 4 x clip-in; 4 x flexible
Ultra slim water dispenser – •
Warranty
Parts and labor – 2 years
Sealed system parts only – 5 years
SKU – 25687
TEST The product dimensions and specifications in this page apply to the specific product and model. Under our policy of continuous improvement, these dimensions and specifications may change at any time. You should therefore check with Fisher & Paykel’s Customer Care Centre to ensure this page correctly describes the model currently available. ? Fisher & Paykel Appliances Ltd 2020
Other product downloads available at fisherpaykel.com
 User Guide
Energy Labels
Service & Warranty Booklet
Installation Guide

A PEACE OF MIND SALE
24 Hours 7 Days a Week Customer Support
T 1.888.936.7872 Wwww.fisherpaykel.com
User Guide
WA7560E1 Top Loader Washing Machine
QUICK REFERENCE GUIDE > WA7560E1
Top Loader Washing Machine, 7.5kg
Series 7 | Top
Load White
Running on SmartDriveTM technology for a quicker, quieter wash, you’ll have plenty of room for a generous wash load.
- Six wash cycles including Quick, Wool, and Delicate
- Energy saving with Eco-ActiveTM
- 4-star energy and 3.5-star water rating
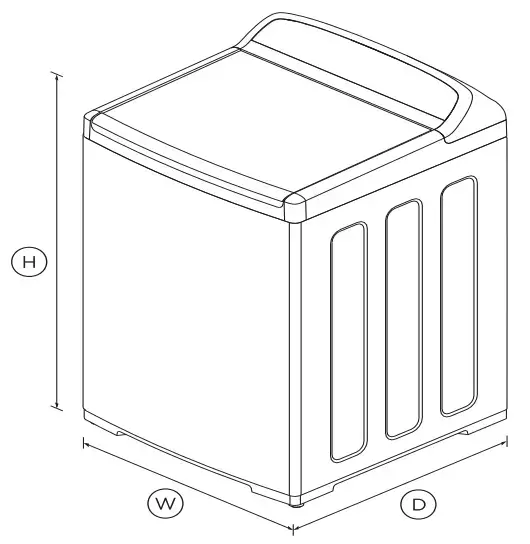
DIMENSIONS
| Height | 1045 mm |
| Width | 600 mm |
| Depth | 600 mm |

FEATURES & BENEFITS
Easy to use
This machine has a cycle to suit every type of load including Delicate, Allergy and Wool. Select a cycle with easy-to-use SmartTouchTM controls.
Easy installation
Self-leveling feet make installation easy and ensure the washer stays level, to reduce vibration and keep noise to a minimum.
Cares for clothes
The flexible finned agitator ensures less tangling for superior clothes care.
Eco-ActiveTM washes
Eco-ActiveTM recirculates water and detergent through clothes so less hot water is used to remove stains, dirt and bacteria.
Quicker drying
Drying times are reduced due to a fast spin speed of 1100RPM, which helps remove more water.
Soft-close lid
The robust plastic lid has a soft close mechanism that makes it family safe, avoids slamming and allows for hands-free operation.
SPECIFICATIONS
Consumption
| Annual energy consumption | 289kWh |
| Annual water consumption | 92L |
| Energy rating | 4 star |
| Water rating | 3.5 star (WELS) |
Features
| Adjustable alert beeps | • |
| Agitator | Flexible finned |
| Auto out of balance correction | • |
| Automatic water level | • |
| Controlled cold | • |
| Delay start | • |
| Detergent dispenser | • |
| Eco rinse | • |
| Fabric softener dispenser | • |
| Keylock | • |
| Lid lock | • |
| Manual water levels | 5 |
| No spin / Spin Hold | • |
| Rinse options | 3 |
| Spin speeds | 3 |
| Stainless steel drum | • |
| Water temperature controls | 5 |
| Auto-Lint disposal | • |
| Detergent | Regular |
| Load sensing | • |
| Maximum spin speed | 1100 rpm |
| Number of spin speeds | 3 |
| SmartDrive™ technology | • |
| Depth | 600mm |
| Height | 1045mm |
| Height (Lid open) | 1350 – 1380mm |
| Width | 600mm |
Warranty
| Parts and labor | 2 years |
| Parts only SmartDrive™ Motor | 10 years |
Wash Cycles
| Allergy | • |
| Delicate | • |
| Eco-Active™ | • |
| Heavy | • |
| Number of wash cycles | 6 |
| Quick | • |
| Regular | • |
| Wool | • |
| SKU | 92262 |
The product dimensions and specifications on this page apply to the specific product and model. Under our policy of continuous improvement, these dimensions and specifications may change at any time. You should therefore check with Fisher & Paykel’s Customer Care Centre to ensure this page correctly describes the model currently available. ? Fisher & Paykel Appliances Ltd 2020
Other product downloads available at fisherpaykel.com
![]() User Guide
User Guide
![]() Service & Warranty
Service & Warranty
![]() Installation Guide
Installation Guide
![]()
![]() A PEACE OF MIND SALE
A PEACE OF MIND SALE
24 Hours 7 Days a Week Customer Support
T 0800 372 273
Wwww.fisherpaykel.com
Date: 14.07.2022 > 2
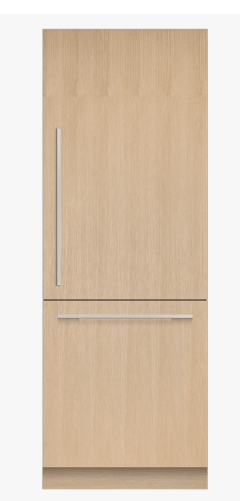
FISHER PAYKEL OB60SDPTB1 60cm Built-In Single Oven

About Product
A highlight of the Fisher & Paykel collection, this Series 9 oven with touchscreen ensures that every dish is cooked to perfection.
- Touchscreen-guided cooking capability offers helpful tips for different food types as well as full recipes
- 85L total capacity with 16 oven functions including Roast and Pastry Bake
- Moisture level control with ActiveVent™ technology
- The pyrolytic self-cleaning function breaks down food residue for an easy clean
DIMENSIONS
- Height: 598mm
- Width: 596mm
- Depth: 565mm
FEATURES & BENEFITS
Cook with confidence
Our touchscreen interface provides an intuitive guided cooking experience that helps deliver perfect results, whether you’ve been cooking all your life or just starting out. Cook with a favourite method, a hero ingredient, or a go-to cooking function or recipe.
Generous capacity
With a generous 85L total capacity, you can create several perfectly cooked dishes at once using multiple shelves.
Exceptional performance
Our unique cooking technologies were developed to deliver perfect results. ActiveVent ensures optimized moisture levels, while AeroTech circulates heat evenly for a consistent temperature.
Multi-function flexibility
The cooking functions have each been tailored, tested, tweaked, and perfected to ensure that no matter what you’re cooking, you’ve got the right heat to match. A food probe precisely monitors cooking in real-time, giving you complete control.
Self-cleaning
Our pyrolytic self-cleaning technology breaks down food residue at a very high temperature, leaving a light ash that’s easily removed with a damp cloth. The enamel-coated side racks don’t need to be removed when using this function.
Design freedom
Available in an elegant black or a stylish black with stainless steel, this oven is designed to fit seamlessly into your kitchen. Premium materials and detailing to support a cohesive, considered kitchen design.
SPECIFICATIONS
Accessories
- Food probe 1
- Full extension sliding shelves 2 sets
- Grill rack 1 set
- Roasting dish 1
- Smokeless grill tray 1
- Step down wire shelf 1
Capacity
- Shelf positions 6
- Total gross 85L
Cleaning
- Acid-resistant graphite enamel •
- Pyrolytic self-clean •
- Removable oven door •
- Removable oven door inner •
- Removable shelf runners •
Controls
- Adjustable audio and display •
- Automatic cooking/minute •
- Automatic pre-set •
- Celsius/Fahrenheit •
- Electronic clock •
- Electronic oven control •
- Food probe •
- Guided cooking by food type •
- Intuitive touchscreen display •
- Multi-language display UK English, US English,
- Precise electronic temperature •
- Soft open and close door •
- Wi-Fi connectivity •
Functions
- Air fry •
- Bake •
- Classic bake •
- Dehydrate •
- Fan bake •
- Fan forced •
- Fan grill •
- Grill •
- Number of functions 16
- Pastry Bake •
- Pizza bake •
- Pyrolytic self-clean •
- Rapid proof •
- Roast •
- Slow cook •
- Vent bake •
- Warm •
Performance
- ActiveVent™ system •
- AeroTech™ technology •
- Automatic rapid pre-heat •
- Grill power 3000W
- Whisper quiet cooking •
- Power requirements
- Amperage 12.8 – 13.8A
- Supply frequency 50Hz
- Supply voltage 220 – 240V
Product dimensions
- Depth: 565mm
- Height: 598mm
- Width: 596mm
Safety
- Advanced cooling system •
- Balanced oven door •
- Catalytic venting system •
- Control panel key lock •
- CoolTouch door •
- Full extension sliding shelves •
- Non-tip shelves •
SKU
- 81912
The product dimensions and specifications in this page apply to the specific product and model. Under our policy of continuous improvement, these dimensions and specifications may change at any time. You should therefore check with Fisher & Paykel’s Customer Care Centre to ensure this page correctly describes the model currently available. ? Fisher & Paykel Appliances Ltd 2020
Other product downloads available at fisherpaykel.com
- Service & Warranty
- User Guide
- Installation Guide
- Specification Guide Oven
- Data Sheet Oven
A PEACE OF MIND SALE
24 Hours 7 Days a Week Customer Support T 0800 372 273 www.fisherpaykel.com
]]>QUICK REFERENCE GUIDE > DD24DCTW9 N
Double DishDrawerTM Dishwasher, Tall, Sanitize
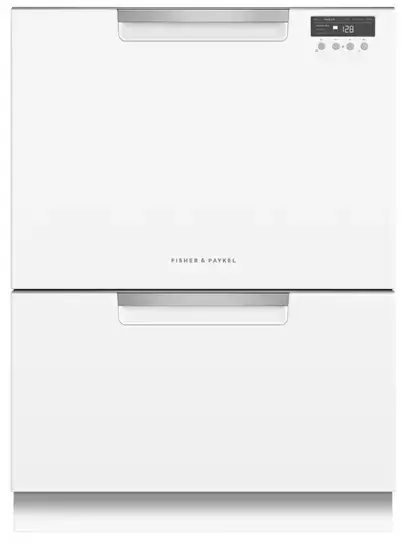
Series 7 | Contemporary White
Doing the dishes got easier. Load one drawer while the other washes – with the top drawer fitting your large dinner plates easily.
- Six wash programs, as well as additional Quick wash, Sanitize, and Extra Dry options
- Flexible racking can be folded down to fit bigger dishes
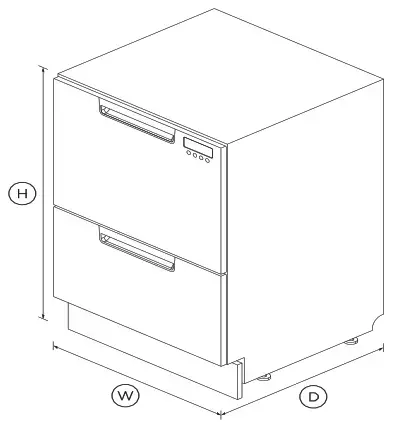
DIMENSIONS
| Height | 34 – 36 3/8″ |
| Width | 23 9/16″ |
| Depth | 22 9/16″ |
FEATURES & BENEFITS
Ease of use
DishDrawer™ Dishwashers are as easy to open and close as kitchen drawers and can be conveniently positioned at bench height for ease of loading and minimal bending. Flexible racking allows you to make adjustments to fit in a variety of dishes.
Independent wash
With the ability to use both drawers independently and select different wash programs the DishDrawer™ Dishwasher can wash everything from fine glass and crystal to heavily soiled pots and pans.
Quick, Sanitize, and Extra Dry options
The Quick wash modifier delivers a faster wash while maintaining performance. The Sanitize option provides extra protection killing 99.9% of bacteria in the final rinse. The Extra Dry setting is perfect for plastic dishes.
Quiet performer
Running at a very low decibel rating, these DishDrawer™ Dishwashers do their job without making a fuss. The combination of intelligent technology and simple mechanics means greater reliability and excellent wash performance.
SPECIFICATIONS
Accessories
| Contemporary round handle | Part number 81674 |
| Cutlery basket | • |
| Knife clip and multipurpose | • |
Capacity and loading
| Accommodates round plates | 12.25″ (top) 11″ (bottom) |
| Adjustable height, foldable | • |
| Fold down tines | • |
| Pitch adjustable tines | • |
| Place settings | 14 |
Consumption
| Energy rating | Energy star |
| Energy usage | 265kWh/year |
Controls
| Child lock | • |
| Electronic fault/Diagnostic | • |
| End of cycle beeps | • |
| Energy saving delays start | • |
| Rinse aid indicator light | • |
Features
| Fan assisted drying | • |
| Flow through detergent | • |
| Quiet operation | • |
| SmartDrive™ technology | • |
Performance
| Noise on gentle cycle top | 44dBA |
Power requirements
| Amperage | 9.6A |
| Electric circuit | 3 wire |
| Rated current | 15A |
| Supply frequency | 60Hz |
| Supply voltage | 120V |
Product dimensions
| Depth | 22 9/16″ |
| Height | 34 – 36 3/8″ |
| Width | 23 9/16″ |
Warranty
| Parts and labor | Limited 2 years |
| Extra Dry | • |
| Quick | • |
| Sanitize | • |
| Wash modifiers | 3 |
Wash Programs
| Delicate | • |
| Fast | • |
| Heavy | • |
| Medium | • |
| Normal eco | • |
| Rinse | • |
| Wash programs | 15 |
| SKU | 81597 |
The product dimensions and specifications on this page apply to the specific product and model. Under our policy of continuous improvement, these dimensions and specifications may change at any time. You should therefore check with Fisher & Paykel’s Customer Care Centre to ensure this page correctly describes the model currently available. ? Fisher & Paykel Appliances Ltd 2020
Other product downloads available at fisherpaykel.com
 Quick Start Guide
User Guide
Installation Guide
Specification GuideDoubleDishDrawer
Data Sheet Double DishDrawer
![]() A PEACE OF MIND SALE
A PEACE OF MIND SALE
24 Hours 7 Days a Week Customer Support
T 1.888.936.7872 W www.fisherpaykel.com![]()
Instruction Manual

INTENDED USE
The MR850 Respiratory Humidifier is used to warm and humidify gases delivered to patients requiring mechanical ventilation, positive-pressure breathing assistance, or other medical gases.
ATTENTION: This product is for use under the supervision of trained medical personnel.
WARNINGS
- The use of breathing circuits, chambers, other accessories or parts that are not approved by Fisher & Paykel Healthcare may impair performance or compromise safety.
- Use of damaged components or accessories may impair the performance of this device or compromise safety.
- When mounting a Humidifier adjacent to a patient ensure that the Humidifier is always securely mounted and positioned lower than the patient.
- Do not use this device without gas flow. If the gas flow is interrupted, turn the Humidifier off.
- Gas mixes, such as helium-oxygen mixtures, that have different physical or thermal properties from air or air-oxygen mixture may impair performance or compromise safety.
- This device is not suitable for the delivery of flammable anesthetic mixes or nitrous oxide.
- Remove any sources of ignition, such as cigarettes, an open flame, or materials that burn or ignite easily at high oxygen concentrations.
- Covering breathing tubes with a blanket or heating them in an incubator or with an overhead heater can affect the quality of the therapy or injure the patient.
- Hot surfaces may exceed 74 °C; avoid touching these.
- Do not fill the chamber with water in excess of 37 °C.
- Do not touch the glass tip of the Chamber Probe during use. It may cause a skin burn.
- To avoid the risk of electric shock, this equipment must only be connected to the main power supply with protective earth.
- Ensure that Invasive Mode is set for patients who have bypassed airways.
- Ensure that both Temperature Probe sensors are correctly and securely fitted. Failure to do so may result in gas temperatures in excess of 41 °C being delivered to the patient.
- Do not use the Humidifier at an altitude above 3000 m (700 hPa) or outside a temperature of 18 – 26 °C. Using the Humidifier above this altitude or outside of this temperature range can affect the quality of the therapy or injure the patient.
- Ensure that appropriate ventilator and/or patient monitor alarms are set, connections are secure and a leak test is completed before use.
- To prevent disconnection of the tubing or tubing system during use, only tubes in compliance with ISO 5367 or ISO 80601-2-74 should be used.
- No modification of equipment or replacement of individual components is allowed.
- Do not position the Humidifier so that it is difficult to disconnect the mains plug.
- This device must not be used in a flammable or explosive environment.
- California residents please be advised of the following, pursuant to Proposition 65: This product contains chemicals known to the State of California to cause cancer, birth defects and other reproductive harm. For more information, please visit: www.fphcare.com/prop65
CAUTIONS
- Use USP sterile water or equivalent for humidification. Adding other substances to the water can have adverse effects.
SPECIFICATIONS
| Dimensions: | 140 mm x 173 mm x 135 mm (without chamber fitted) |
| Weight: | 2.8 kg (without chamber fitted) 3.1 kg (chamber fitted and filled with water) |
| Mains Supply: | 115 V~, 60 Hz |
| Rated Power: | 220 VA |
| Heater-plate Output: | 150 W |
| Heater-wire Output: | 22 V~, 2.73 A, 60 W |
| Essential Performance: | Delivery of specified humidification output or generation of an alarm condition |
| Invasive Mode | Mask Mode | |
| Humidity Performance: | 33 mg/L | 12 mg/L |
| Flow Range:” | 5 60 L/min | 5120 L/min |
| Chamber Outlet Control Temperature Range: | 35.5 – 42 °C | 31 – 36 °C |
| Airway Control Temperature Range: | 35 – 40 °C | 28 – 34 °C |
| Warm-up Time: | < 30 minutes | < 30 minutes |
| Recommended Environmental Conditions:* | Ambient temperature:18 – 26 °C (64.4 – 78.8 °F) Ambient humidity:10 – 95% RH Ambient pressure:700 – 1060 hPa |
| Temperature Display Range: | ± 2 °C |
| Gas Temperature Measurement Accuracy: | (Temperature Probe Accuracy: ± 0.3 °C, in 25 – 45 °C range) |
| Software Version: | Refer to MR850 System Technical Manual (available from your Fisher & Paykel Healthcare representative or your supplier) |
| Alarm Sound Pressure Level: | > 50 dBA at 1 m |
| Audio Information Signal: | Single beep or a double beep |
| Maximum Operating Pressure: | Refer to chamber and breathing circuit specifications |
| Service Life: | 7 years (if used in accordance with this User Instructions booklet) |
CLASSIFICATIONS
| Electrical Classification: | Class I, continuous |
| Humidifier Classification: | Category 1 |
| Type of Protection Against Ingress of Water: | IPX1 |
| Degree of Protection Against Electric Shock: | Type BF applied part |
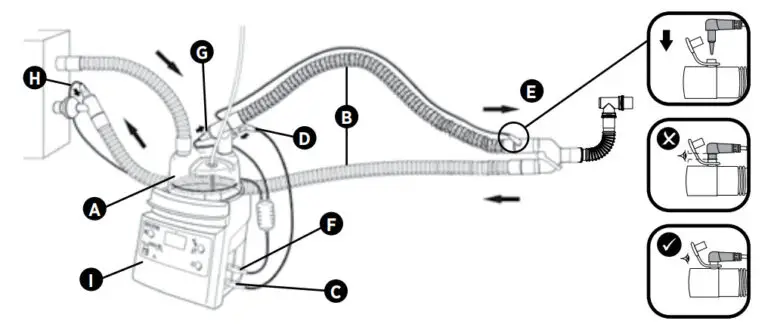
SET-UP
MOUNTING
The Humidifier (I) can either be placed on a flat stable surface or mounted to a ventilator, pole stand or medical equipment rail with an approved mounting bracket. The system shall be installed according to Electromagnetic Compatibility information contained in MR850 System Technical Manual.
ACCESSORIES
- (A) Humidification Chamber (e.g. MR290)
- (B) Breathing Circuit (e.g. RT380)
- (C,D,E) Temperature Probe (e.g. 900MR869)
- (F,G,H) Heater-wire Adapter (e.g. 900MR805)
- Mounting Bracket (e.g. 900MR303)
The accessory choice will depend upon the application.
Please contact your local Fisher & Paykel Healthcare representative for recommendations.
ATTENTION: Refer to the User Instructions which accompany each accessory.
SET-UP INSTRUCTIONS
- Visually inspect the Humidifier (I) and accessories for damage before use and replace if damaged.
- Slide the Humidification Chamber (A) onto the Humidifier (I) and connect Breathing Circuit (B) (refer to the Humidification Chamber and Breathing Circuit User Instructions for further details).
- Insert the Temperature Probe Connector (C) into the blue socket on the Humidifier.
- Push the Chamber Probe (D) and Airway Probe (E) into the Breathing Circuit making sure they are correctly located and pushed into place. The probe lead can be secured using Breathing Circuit Clips.
- Insert the Heater-wire Adapter Connector (F) into the yellow socket on the Humidifier.
- Connect the other end(s) of the Heater-wire Adapter (G), (H) to the Breathing Circuit socket(s).
The humidification system is now set up. - Turn on using the On/Off button. The Humidifier will default to Invasive Mode. After turning on the Humidifier, look at the display and alarm indicators to visually confirm that they turn on then off.
Following this, listen for an audible tone to confirm that the sounder is functioning correctly. If a fault is detected, send for servicing.
The humidification system is now ready for use.
OPERATION
On/Off Button
The Humidifier will turn ON if this button is held down briefly. The Humidifier will always default to Invasive Mode when it is turned on.
The button must be held down for more than 1 second to turn the Humidifier OFF. Remove the mains plug to completely isolate power from this device.
Mute Button
The Mute Button silences the Humidifier’s alarm. The duration of an audio pause is 2 minutes.
Pushing the Mute Button can reactive the audio alarm. Mute status is shown with a green indicator.
Temperature Display
This displays the saturated gas temperature (the lower of the Airway and Chamber Outlet temperatures in °C) delivered to the patient. This display will normally show the Chamber Outlet temperature (around 37 °C for Invasive Mode, and 31 °C for Mask Mode).
By pushing and holding the Mute Button for 1 second, the Chamber Outlet temperature and then the Airway temperature is displayed. The display will then revert to normal operation.
Mode Button
This button switches between Invasive and Mask Mode. Mode selection is shown with a green indicator.
- Invasive Mode for patients with bypassed airways.
The system delivers gas as close to body temperature saturated (37 °C, 44 mg/L) as possible. - Mask Mode for patients receiving face mask or head-box therapy. The system delivers a comfortable level of humidity.
ALARMS
Alarm Priority
| Medium Priority Alarm | Signaled by an audible alarm sound and a flashing visual alarm indicator (yellow). |
| Low Priority Alarm | Signaled by a constantly-lit visual alarm indicator (yellow). |
List Of Alarms
| Airway Probe Indicates if the Airway Probe is not inserted into the Breathing Circuit (may take up to 15 minutes to alarm). |
|
| Chamber Probe Indicates if the Chamber Probe is not inserted into the Breathing Circuit (may take up to 15 minutes to alarm). |
|
| Heater-wire Indicates if the Heater-wire Adapter or Breathing Circuit has not been connected, or is faulty. |
|
| Water Out Indicates when there is insufficient water in the chamber, by measuring gas flow and the amount of power used to maintain the Chamber Outlet temperature (may take up to 20 minutes to alarm) |
|
| Temperature Probe Indicates if the Temperature Probe has not been connected, or is faulty. |
|
| See Manual Indicates a hardware fault. The Humidifier and all accessories shall be replaced immediately and sent for servicing. |
|
| Low Temperature Warns if the displayed temperature falls below a predetermined performance threshold for a predetermined time. This alarm condition can be caused by many factors such as cold and/or drafty ambient conditions or very high or low gas flows. For Invasive Mode, a “Low Priority” alarm is activated 25 seconds after the displayed temperature falls below 35.5 °C. If the temperature remains low, a “Medium Priority” alarm is activated (depending on both the length of time the displayed temperature is below 35.5 °C as well as the level of temperature drop). For Mask Mode, a “Low Priority” alarm is activated 25 seconds after the displayed temperature falls below 26.0 °C. |
|
| High Temperature Warns if the gas temperature exceeds a predetermined performance threshold. A Medium Priority alarm is activated immediately if at any time the displayed temperature reaches 41 °C, or if the Airway Probe temperature reaches 43 °C. The Humidifier will immediately power down the Heater-wire and Heater- plate, followed by a flashing temperature display. |
NOTES:
- Under cold or drafty conditions, the chamber outlet temperature may drop as low as 35.5 °C in order to minimize condensation forming in the Breathing Circuit.
- The Low-Temperature Alarm is a “Low Priority” or “Medium Priority” alarm. All other alarms have been assessed as “Medium Priority” alarms.
- The alarm conditions are specified for an operator’s position of within 1 meter of the device.
TRANSPORTATION AND STORAGE CONDITIONS
| Temperature: | -10 – 50 °C (14 – 122 °F) |
| Humidity: | 10 – 95% Relative Humidity |
| Date of manufacture: | Refer to the product label |
CLEANING
Humidifier: Using a damp cloth, clean the MR850 Humidifier with either isopropyl alcohol or normal dishwashing detergent.
Accessories: Refer to the User Instructions which accompany each accessory for cleaning guidelines.
NOTE: Do not immerse the Humidifier or accessory electrical connectors in any liquid.
DISPOSAL
At the end of service life, discard according to standard hospital procedure for electrical and electronic equipment.
ROUTINE MAINTENANCE AND SERVICING
Refer maintenance and servicing to qualified service personnel. A full technical description, including the maintenance schedule, performance test, and service data, is contained in MR850 System Technical Manual.
ELECTROMAGNETIC COMPATIBILITY
The device complies with the electromagnetic compatibility requirements of IEC60601-1-2. Users shall install and use according to the electromagnetic compatibility information contained in MR850 System Technical Manual.
Essential performance may be lost in the event of power failure or where the intensity of electromagnetic disturbance is high.
WARNINGS
- The device is intended to be used in a professional healthcare facility environment e.g. hospitals, except for areas where the intensity of electromagnetic disturbances is high, e.g. near active high-frequency surgical equipment, rooms used for magnetic resonance imaging, electrophysiology laboratories, or areas where short-wave therapy equipment is used.
- The device or system should not be used adjacent to or stacked with other equipment. If adjacent or stacked use is necessary, the device or system should be observed to verify normal operation in the configuration in which it will be used.
- The use of accessories, transducers, cables, and spare parts other than those specified by Fisher & Paykel Healthcare could cause increased electromagnetic emissions or decreased electromagnetic immunity of the device or system resulting in improper operation.
- Portable radio frequency communications equipment (including peripherals such as antenna cables and external antennas) should be used no closer than 30 cm (12 inches) to any part of the MR850 Humidifier, including cables specified by the manufacturer. Otherwise, degradation of the performance of this equipment could result.
SYMBOL DEFINITIONS

Manufacturer Fisher & Paykel Healthcare Ltd, 15 Maurice Paykel Place, East Tamaki, Auckland 2013, PO Box 14 348 Panmure, Auckland 1741, New Zealand Tel: +64 9 574 0100 Fax: +64 9 574 0158 Email: [email protected] Web: www.fphcare.com Importer/ Distributor Australia (Sponsor) Fisher & Paykel Healthcare Pty Ltd, 19-31 King Street, Nunawading, Melbourne, Victoria 3131. Tel: +61 3 9871 4900 Fax: +61 3 9871 4998 Austria Tel: 0800 29 31 23 Fax: 0800 29 31 22 Benelux Tel: +31 40 216 3555 Fax: +31 40 216 3554 Brazil Fisher & Paykel do Brasil, Rua Sampaio Viana, 277 cj 21, Paraíso, 04004-000, São Paulo – SP, Brazil Tel: +55 11 2548 7002 China
www.fphcare.com
REF 185042343 REV N 2020-04 © 2020 Fisher & Paykel Healthcare Limited