3-Axis Gimbal for Sony Camera
Guilin Feiyu Technology Incorporated Company
User Manual EN V 1.2
Product Overview
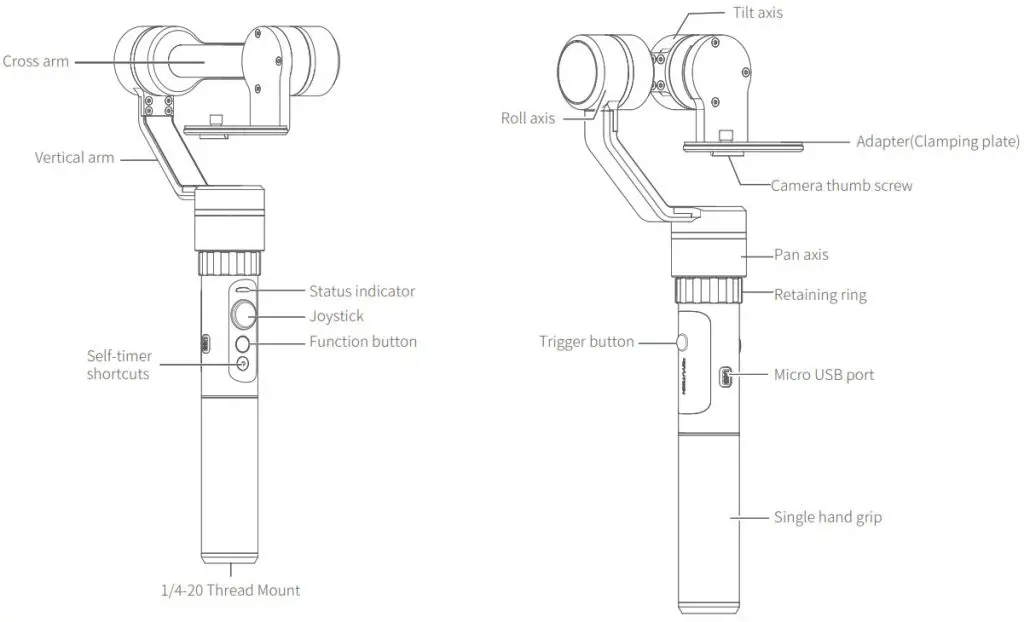
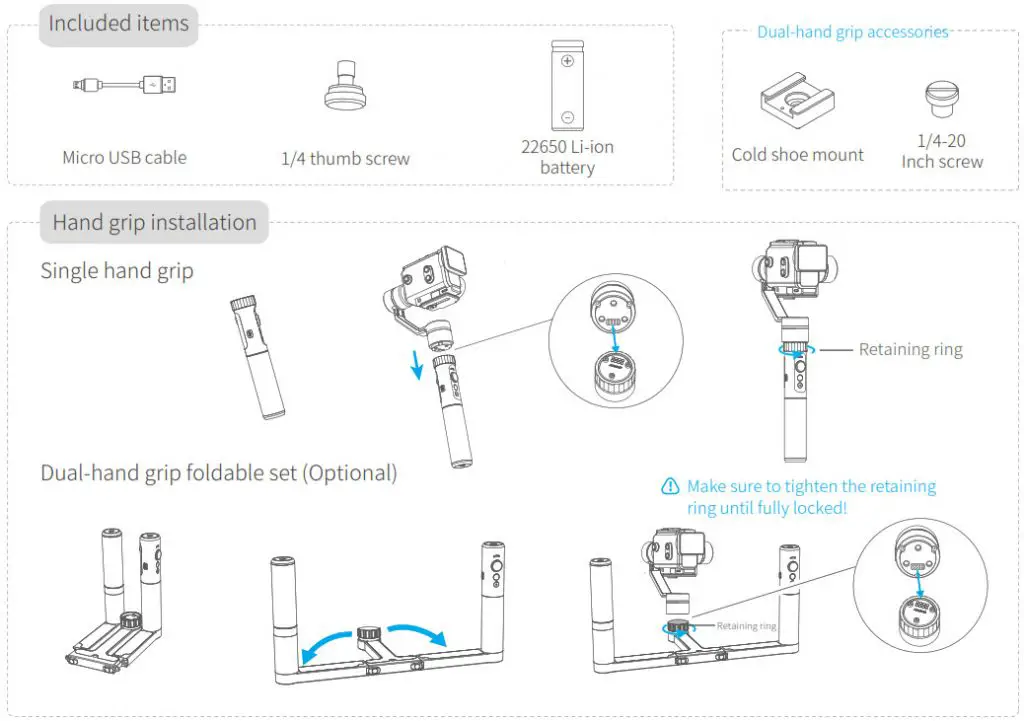
User Guide
- Insert battery
Remove the handgrip and insert the provided 22650 battery.

- Install the Sony camera
Tips: you need to install the waterproof shell before you can perform the following steps
Place the camera correctly on the clamping plate and attach the tilt axis, use the camera thumbscrew to secure the camera through the middle chute at the bottom of the clamping plate.
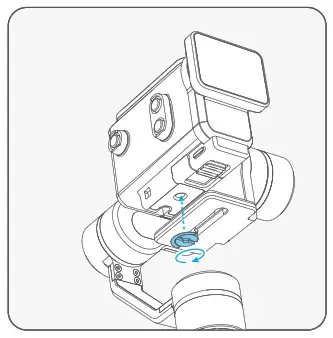
 Attention !
(1) Please install the camera before powering on the gimbal.
(2) When not in use, turn off the gimbal and then remove the camera. - Gimbal charging
* Please fully charge the battery before powering on the gimbal for the first time.
Option 1: charging with micro USB cable.
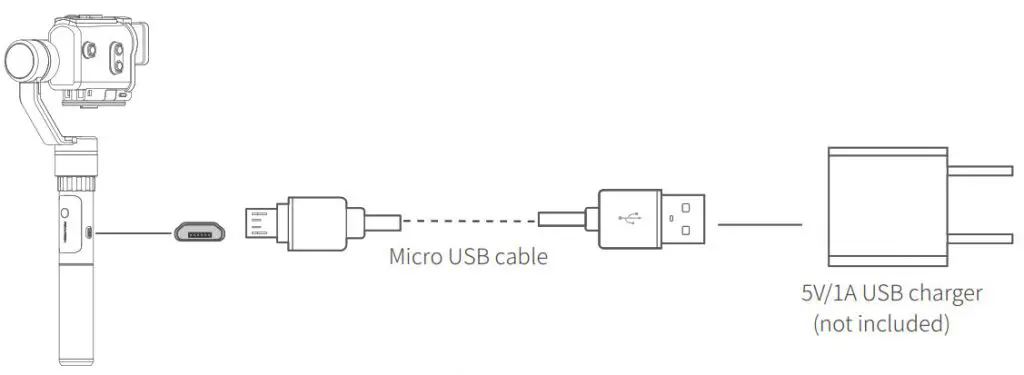 Option 2: remove the battery and charge in external charger (not included).
 - Balance the gimbal
How to balance gimbal
If the camera is tilted to the left, then loose camera thumb screw, move the camera to the right,try to adjust to the best balance,and then tighten the camera thumbscrew.
If the camera is tilted to the right, then loose camera thumb screw, move the camera to the left,try to adjust to the best balance,and then tighten the camera thumbscrew.
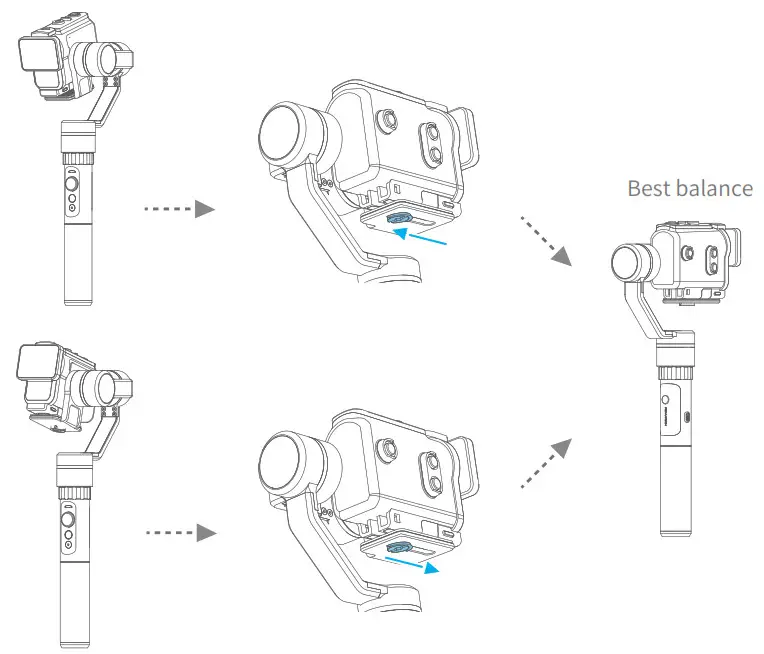
- Power on / off
Power on: press and hold the function button until the status indicator turns green and gimbal beeps.
Power off: press and hold the function button until the status indicator changes from a flashing red to a solid red light and gimbal beeps.
 Attention: make sure the camera is secure before powering on the gimbal.
Functions Modes
Instructions of button
| Function button | Function | Explanation |
| Single click | Pan mode | Default mode |
| Double clicks | Follow mode | In the follow mode, the joystick is pushed to the left / right to push and control the angle is -25 ° ~ + 25 ° |
| Triple clicks | Selfie mode | Camera pans around 180 ° so that its main camera faces ser |
| Four clicks | Motion Control mode | Both the panning and tilting directions can be rotated |
| Five clicks | Initialization | After the initialization succeeds or fails, you can click the function button to wake up the gimbal |
| Trigger button | Function | Explanation |
| Press & Hold | Temporary Lock | In the pan mode or follow mode, holding the trigger button temporarily locks panning and tilting until released |
| Double clicks | Reset to default | Centers the camera away from the user on all 3 axes ( pan, tilt and roll) and switches back to the default pan mode |
Note: The firmware upgrade may occur manual operation function and the actual product features do not match, please get the latest version manual on the official website.
Explanation of indicator status
The current mode of the gimbal can be identified by the indicator status.
| Indicator status | Mode / Status |
| Blue light flashes once | Pan mode |
| Blue light flashes twice | Follow mode |
| Blue light constant on | Lock mode / Gimbal initializing |
| Blue light keeps flashing | Initialization failure / Malfunction |
| Red light flashes three times | Low power |
| Red light keeps flashing | Gimbal powering off |
![]() When battery is low, the status indicator will blink red three times every 5 seconds.
When battery is low, the status indicator will blink red three times every 5 seconds.
Please charge gimbal or replace the battery.
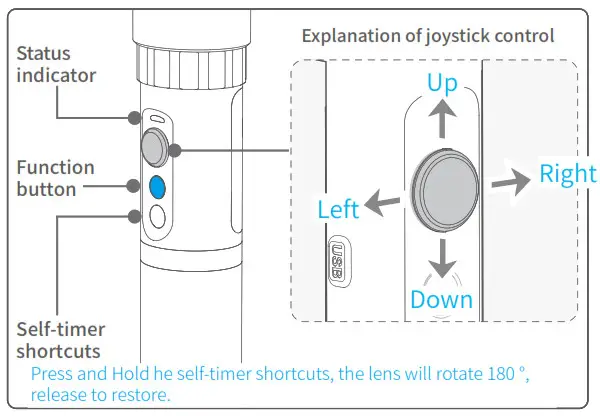
Modes
Pan mode (Default mode )
The rolling and tilting direction are fixed, and the camera moves according to the hand movement direction of the user.
Follow mode
The rolling direction is fixed, and the camera moves according to the hand movement direction of the user.
Lock mode
The orientation of the camera is fixed.
Reset
Return to pan mode, all to return to default.
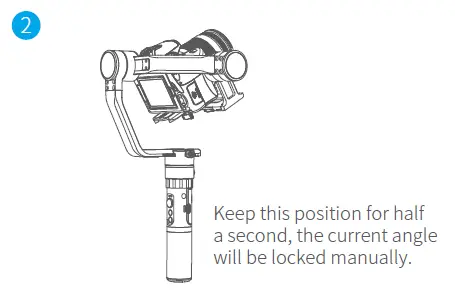
Manual Lock
Camera can be manually positioned while lock mode , follow mode or pan mode. both the pan and tilt can be manually set.
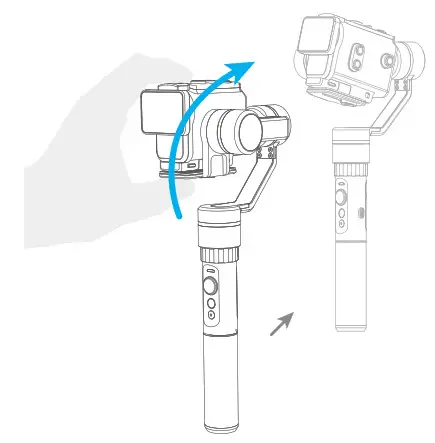 Manually move camera to desired position, and hold for half a second. New tilt and/or pan positions are automatically saved.
Motion Control Mode
The G5 GS gimbal can easily create constant speed moves by using the motion control mode. This mode can be used for recording both regular video and timelapse photography. For best results, attach gimbal to the FeiyuTech tripod, or other tripod, to keep it completely still.
- Set motion speed in Feiyu ON App
To set the motion speed, connect to the Feiyu ON App and select desired speed from the motion control option in the settings menu. Motion Control speed reference table
G5 GS Rotation speed 12 seconds / turn 18 seconds / turn 24 seconds / turn 30 seconds / turn 1 minute / turn 2 minutes / turn 4 minutes / turn 8 minutes / turn 15 minutes / turn 30 minutes / turn 1 hour / turn (default) 4 hours / turn 8 hours / turn - Enter motion control mode by clicking the function button 4 times
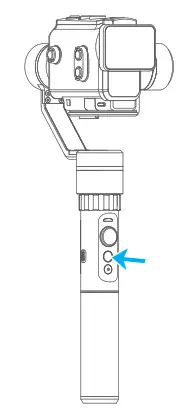
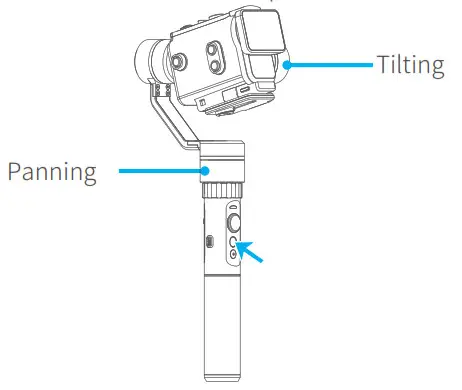
- Set rotation start position
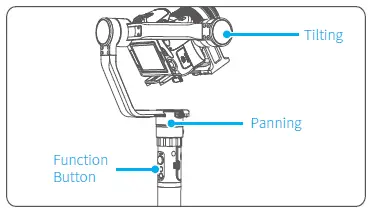
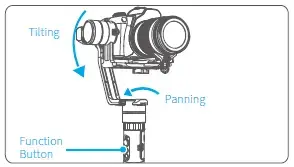
Record the first position (rotation start position) by manually moving camera to desired position. Hold in position for half a second. Click the function button to record rotation start position.
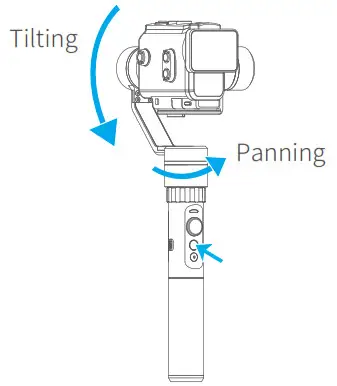
- Set rotation end position
Record the second position (rotation end position) by manually moving camera to desired position. Hold in position for half a second. Click the function button to record rotation end position.
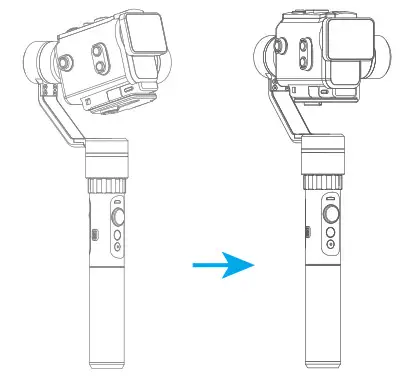
- The gimbal is motion control from rotation start position to rotation end position
Gimbal will automatically move back to rotation start position and start moving to rotation end position at a constant speedas determined by user in the Feiyu ON App.
Exit operations:
- Gimbal automatically exits motion control mode once move completes.
- Click the function button to exit the motion control mode during automatic rotation and reset the gimbal.
- Enter the motion control mode or motion control setting, double click the trigger button to exit the motion control mode and reset the gimbal.
Download and connect App
- Download ” Feiyu ON “ and install it.
Please download Feiyu ON at your smartphone app store or can the QR code below.
* Requires iOS 9.0 or later, Android 6.0 or later.

https://itunes.apple.com/us/app/feiyu-on/id1170606381?mt=8

http://www.feiyu-tech.cn/download/App/Feiyu_On.apk - Connecting App
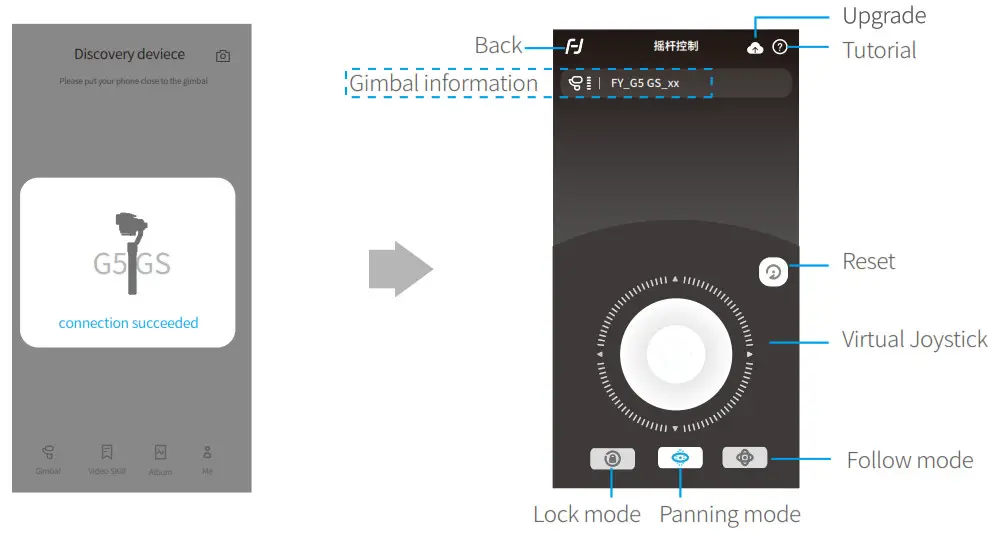
Start the App on your camera,follow the instructions to connect the camera with gimbal via bluetooth.
Firmware Upgrade
Upgrade the firmware through the Feiyu ON App.
(1) Click the icon ![]()
(2) Select upgrade type.
(3) Follow the prompts to upgrade the firmware.
Upgrade type introductions:
Gimbal update: Repair / update or newly add gimbal control / function / parameter and etc.
Keyboard update: Repair / update or newly add button/touch screen/interaction functions, update more compatibility cameras which can be controlled through WIFI, repair few bugs about camera control through WIFI, and etc.
Gimbal Initialization
You can initialize your gimbal when:
- Camera fails to remain level.
- Gimbal has no been used for a long period of time.
- Gimbal is used in extreme temperature variations.
Instructions:
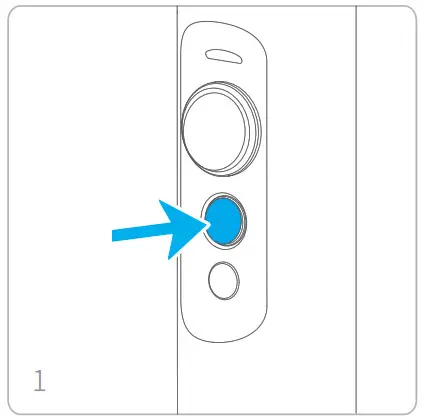 Click the function button five times. The motors will stop working. Status indicator turns solid blue.
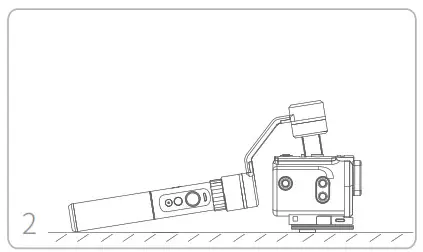 Place the gimbal on a flat, horizontal surface. The gimbal will automatically initialize after a few seconds detecting no movement. The blue light will flash three times to indicate end of initialization.
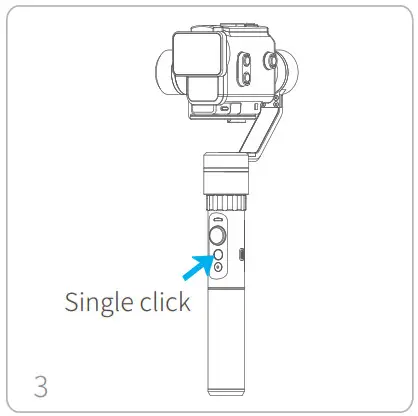 After the initialization is successful, click the function button to wake up.
Note: if the initialization is not successful, click the function button to wake up. restart initialization process.
Technical Specifications
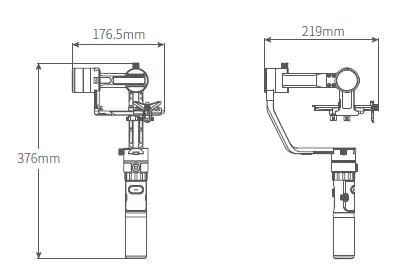
(Unit:mm)
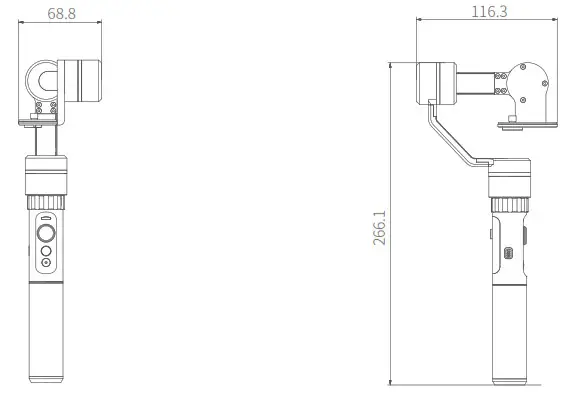
| Max. Tilting Range | No limit |
| Max. Rolling Range | +/- 160° |
| Max. Panning Range | No limit |
| Tilting speed | Min: 2°/s – Max: 75°/s |
| Panning speed | Min: 3°/s – Max: 150°/s |
| Operation time | 7 Hours |
| Adaption camera and mobile camera width range | AS50 sony camera and 130 ~ 200g sony camera |
| Weight | 314g (Not including battery and camera ) |
DISCLAIMER
Any user for illegal purpose prohibited. Users are responsible for use products. The company assumes no liability for any risks related to or resulting from the debug and use of this product (including direct, indirect or third-party losses). For any unknown sources of using, we will not be at any services. Updating and changes of product firmware and program me may cause changes in function descriptions in this user manual, please read the instructions carefully before upgrading the firmware and use the corresponding user manual. You can get the latest user manual from the official website: www.feiyu-tech.com FeiyuTech reserves the right to amend this manual and the terms and conditions of use the gimbal at any time.
Attention
- Please correctly assemble the gimbal in accordance with the diagram.
- Please install the camera before turning on the gimbal.
- When the gimbal is not in use or placed on the table, please ensure it is powered off.
Guilin Feiyu Technology Incorporated Company
Website: www.feiyu-tech.com
E-mail: [email protected]
Tel: +86 (0)773 2320866
Due to software and hardware improvements, your actual product might differ from the descriptions and pictures in this user manual.
You can get the latest user manual from the official website.
For more information, please visit our official website

http://weixin.qq.com/r/rUz741jEWAUnrRyA9xm-

a2000
Guilin Feiyu Technology Incorporated Company User Manual EN V 2.3
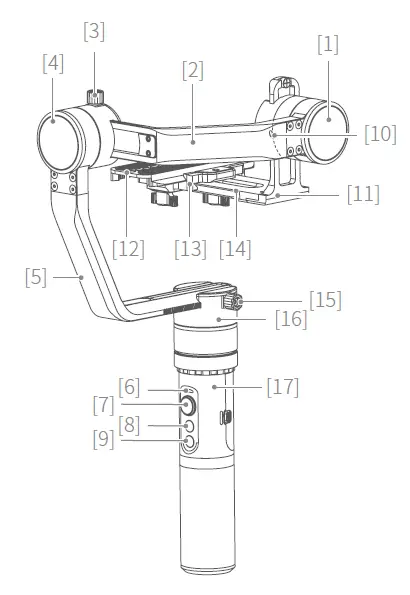
1. Product Overview

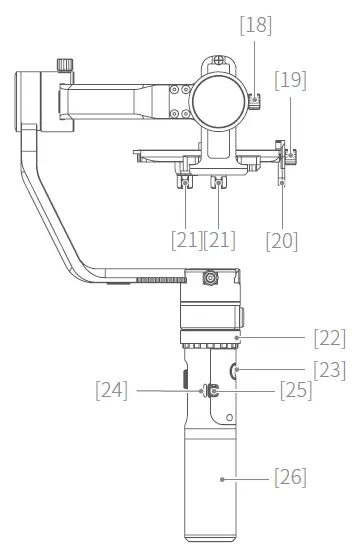
- Tilting axis
- Cross arm
- Rolling lock screw
- Rolling axis
- Vertical arm
- Status indicator
- Joystick
- Function button
- Shutter button
- Shutter cable socket
- Sliding arm
- Quick plate
- Adjustment skateboard
- Adapter(Clamping plate)
- Panning lock screw
- Panning axis
- Socket connector
- Tilting lock screw
- Camera support frame screw
- Camera support frame
- Thumb screw
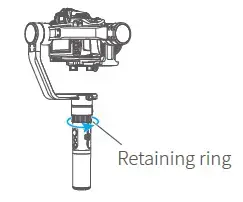
- Retaining ring
- Trigger button
- Charging indicator
- USB interface
- Handle
Included Accessories
USB cable
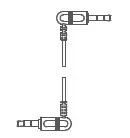
Shutter release cable for Sony cameras (3.5 audio to multi)
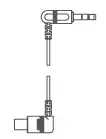
Shutter release cable for Panasonic cameras (3.5 mm to multi port)

Shutter release cable for Canon cameras(RS-80N3)

4 Batteries (type: 18650)
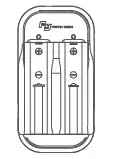
Smart charger

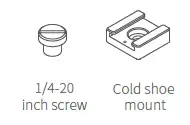
Thumb screw

Camera support frame screw
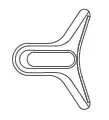
Camera support frame

Quick plate

Tripod
Installation Way
Single Handle


Advanced Accessories
(double-hand fordable set)
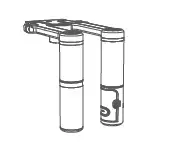
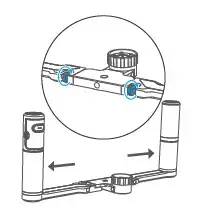
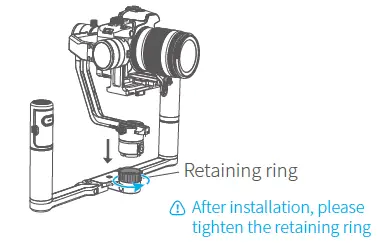
Double-Hand Fordable Set (optional)
2. User Guide
Attention: please read the following instructions before turning on the power on the gimbal
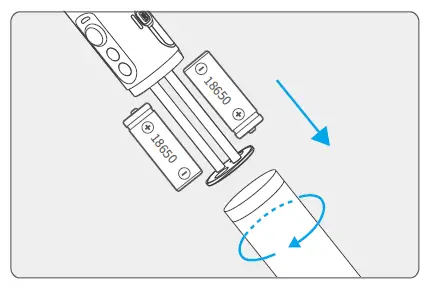
- Insert the Batteries
Prior to use, please be sure to fully charge the batteries.
Remove the handle, insert 2 pcs 18650 batteries and tighten the handle.
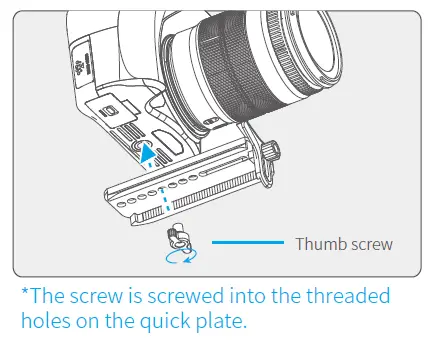
- Attach Camera (1)Remove the quick plate from the gimbal. Insert the provided 1/4-20 screw into a mounting hole on quick plate.For a front-heavy camera(i.e. bigger,heaver lens),select a mounting hole closer to the back end of the quick plate to ensure proper balance.
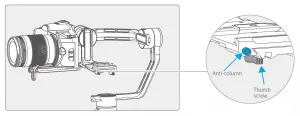
(2)After installing the camera, press and hold the anti-column, place the quick plate with mounted which the camera is mounted on the clamping plate, and tighten the screws.
3 Balance Adjustment
Adjust the center of gravity balance of the three axis (see section 9. Balance Adjustment for details) then turn on the gimbal.
Note: center of gravity imbalance can lead to stable performance degradation, and may not balance the camera.
4 Power On/Power Off4
Power on: press and hold the function button until the green light on and you hear the tone.
Power off: press and hold the function button until the red light changes from quick flashing to constant and you hear the tone.
3. Modes / Functions
Operating Instructions
Function button Function Explanation
One tap Panning Mode Default mode
Two taps Panning and Tilting Mode
Under panning and tilting mode, control the rolling axis by moving the joystick to the left or right, and the control angle is – 30 °~+ 30°
Three taps Rotate horizontal 180°
Make the camera lens rotate 180 °(the current mode of work does not change)
Four taps Autorotation Mode
Both the panning and tilting directions can be rotated
Five taps Initialization
After the initialization succeeds or fails, you can click the function button to wake up the gimbal
Trigger button Function Explanation
Long press Lock
In the panning mode or panning and tilting mode, press and hold lock shortcuts to enter the lock mode, release to return before mode
Two taps Reset
Return to panning mode, tilting and rolling to return to initial level
Explanation of LED Indicator Status
The current mode of the gimbal can be identified by the indicator status.
LED indicator status Mode / status
Blue light flashes once Panning Mode
Blue light flashes twice
Panning and Tilting Mode
Blue light constant on
Lock mode / initialize the gimbal
Blue light keeps flashing
Initialization failure / malfunction
Red light flashes three times Low battery
Red light keeps flashing
Entering power off
In case of low battery the indicator light will flash red three times every 5 seconds. Please charge gimbal or replace batteries.
Working Modes
Panning Mode (default mode)
Tilting and rolling direction are fixed, and the camera lens moves according to the handle movement.
Panning and Tilting Mode
The rolling direction is fixed, and the camera lens moves according to the hand movement.
Lock Mode
The orientation of the camera is fixed.
Reset
Return to panning mode, tilting and rolling to return to initial level.
Manual Lock
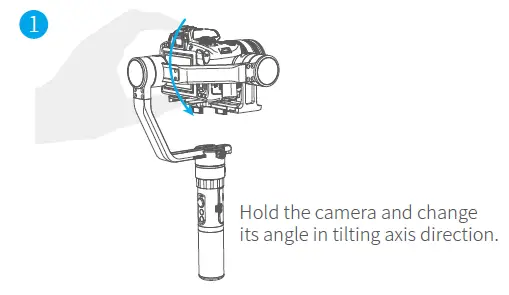
Pull to the required angle and hold for half a second to lock in that position. (The tilting axis and panning axis in lock mode can be manual. The tilting axis can be manually locked in the panning mode.) Take the tilting axis as an example:
Autorotation Mode
With camera, delay photography function can be used to achieve mobile delay photography.
1. The speed setting is made by Feiyu ON App.
a2000 Rotate Speed
12 seconds / turn
18 seconds / turn
24 seconds / turn
30 seconds / turn
1 minute / turn
2 minutes / turn
4 minutes / turn
8 minutes / turn
15 minutes / turn
30 minutes / turn
1 hour / turn (default)
4 hours / turn
8 hours / turn
Note: both the panning and tilting directions can be rotated.
2.Four taps on function button, gimbal will enter the auto rotation mode.
3. Set the gimbal start rotation position: pull the tilting axis or panning axis to the start position by hand,click the function button to record the start position.
4. Pull the gimbal (which can be rotated more than one turn) to the rotation path you want to set, and then click the function button to record the end position.
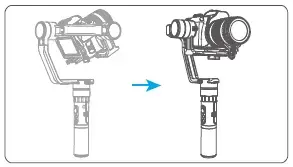
5.The gimbal will go to the start position and start the auto rotation function.
Exit operations:
- Click the function button to exit the auto rotation mode during automatic rotation.
- Two taps the trigger button to exit the auto rotation mode during setting the automatic rotation.
Photograph
The shutter button can take pictures via the shutter release cable.
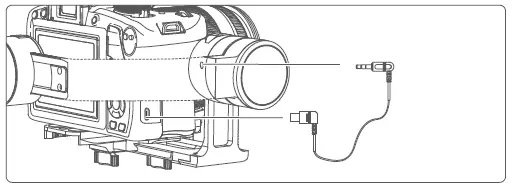
Manual photograph: click the shutter button to focus, click again within 3s to take pictures.If there is no operation within 3 seconds , the focus state is cleared. Automatic continuous shooting: shutter button long press 3s or more, gimbal “drop”
sound and enter the automatic continuous shooting mode, the default 5s shot once. One tap the shutter button to exit the automatic continuous shooting mode.(you can enter the Feiyu On App to setting the photographic interval time.)
4. Charging
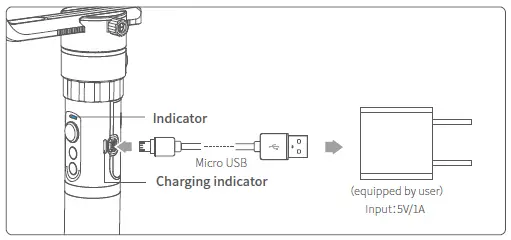
Explanation of Charging Indicator Status
LED status – Mode / status
Blue light on, red light off – Stop charging
Blue light and red light are flashing (If the two batteries voltage difference between the larger, the process takes a long time) – The voltage of two batteries balance adjustment
Blue light and red light – charging
5. Download and Connect App
1 Download “Feiyu ON” and Install It.
Please download Feiyu ON at your smartphone app store or can the QR code below. * Requires iOS 9.0 or later, Android 6.0 or later.
iOS Version Android Version
2 Connecting App
Start the App on your smartphone,follow the instructions to connect the Feiyu On App with gimbal via bluetooth. Upgrade
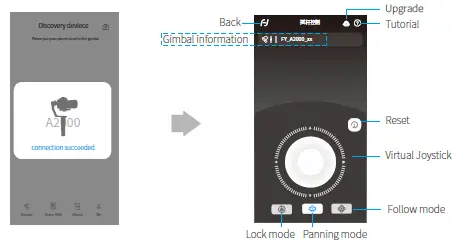
6. Gimbal Initialization
You can initialize your gimbal when:
- Camera is not level
- If not used for a long time
- In case of extreme temperature variations
Adjusting steps:
Five taps on the function button: the motor stops working after the vioce “drop”. The blue light is constant on.
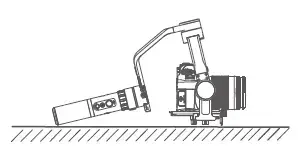
Place the gimbal on a flat surface. The gimbal will automatically initialize when it detects the non movement. The blue light will flash three times and initialization ends,otherwise, the initialization fails.
After the initialization is successful, click the function button to wake up.

Note: if the initialization is not successful for a long time, long press the function button to turn off the gimbal,restar it and then initialize.
7. Firmware Upgrade
Upgrade the firmware through the Feiyu ON App.
- Click the icon
- Select upgrade type.
- Follow the prompts to upgrade the firmware.
Upgrade type introductions:
Gimbal update: Repair / update or newly add gimbal control / function / parameter and etc.
Keyboard update: Repair / update or newly add button/touch screen/interaction functions, update more compatibility cameras which can be controlled through WIFI, repair few bugs about camera control through WIFI, and etc.
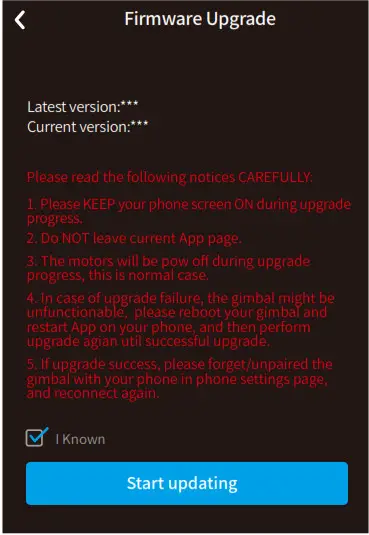
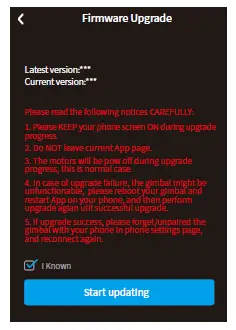
Firmware Upgrade
Latest version:***
Current version:***
Please read the following notices CAREFULLY:
1. Please KEEP your phone screen ON during upgrade progress.
2. Do NOT leave current App page.
3. The motors will be pow off during upgrade progress, this is normal case.
4. In case of upgrade failure, the gimbal might be unfunctionable, please reboot your gimbal and restart App on your phone, and then perform upgrade agian util successful upgrade.
5. If upgrade success, please forget/unpaired the gimbal with your phone in phone settings page, and reconnect again.
I Known
Start updating
8. Parameters
Titling Angle – 360°
Rolling Angle – 360°
Panning Angle – 360°
Tilting Increments – 2°/s ~ 75°/s
Panning Increments – 3°/s ~ 150°/s
Life Time – 12 Hours (center of gravity balance)
Load weight Adaption – 250g~2500g
Weight – 1111.5g(not including the accessories of batteries,camera,camera lens and etc.)
Adaption – Sony NEX-5N/NEX-7 and other N-series, SONY A7RII / ILCE-7R / ILCE-5100, Panasonic LUMIX GH4, Canon 5D Mark III (with standard lens), and other cameras with similar dimensions with weight less 2500g(the camera weight including the accessories of lens and etc.
9. Balance Adjustment
STEP 1 Balance Adjustment of the Tilting Axis
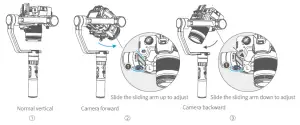
Adjust the center of gravity of the camera in two steps to the axis of rotation of the tilting axis. (1)Adjust the center of gravity position of the tilting axis up and down: point the camera lens down, adjust cross arm to maintain the level, as shown in figure ①, let go and observe the state of rotation. Adjust the balance via adjust the sliding arm up and down(refer to figure ② ③). * After adjustment, be sure to tighten the lock screw.
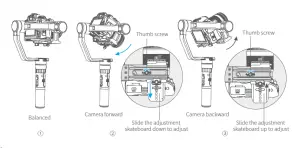
(2)Adjust the center of gravity position of the tilting axis forward and backward: point the camera lens horizontal forward, adjust cross arm to maintain the level as shown in figure ①,let go and observe the state of rotation. Loosen the screw on the bottom of the camera and adjust the balance by sliding the adjustment skateboard up and down at the bottom of the camera(refer to figure ② ③).
* After adjustment, be sure to tighten the lock screw.
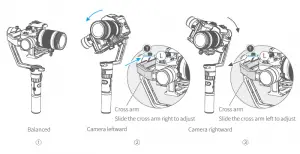
STEP 2 Balance Adjustment of the Rolling Axis
When the balance adjustment of tilting axis completed, the balance of the rolling axis can be adjusted: keep the gimbal socket connector vertical to the ground with the hand-held control handle as shown in figure ①, leave the gimbal powered off and observe the balance. Loosen the lock screw and slide the cross arm left and right to adjust the roll(refer to figure ② ③).
* After adjustment, be sure to tighten the lock screw.
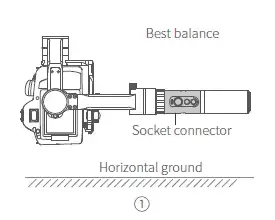
STEP 3 Balance Adjustment of the Panning Axis
When the balance adjustment of tilting axis and rolling axis is completed, the balance of the panning axis can be adjusted. Keep the gimbal socket connector in the horizontal position, adjust hand-held panning axis as shown in figure ①,let go and observe the state of rotation.
Loosen the lock screw on the panning and slide the vertical arm forward and backward to adjust (refer to figure ② ③).
* After adjustment, be sure to tighten the lock screw.
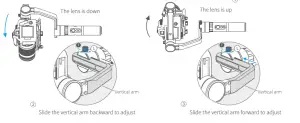

Slide the vertical arm backward to adjust – Slide the vertical arm forward to adjust
D I S C L A I M E R
Any use for illegal purposes prohibited.Users are responsible for use products.
The company assumes no liability for any risks related to or resulting from the debug and use of this product (including the direct, indirect or third-party losses).
For any unknown sources of using, we will not be at any services.
Updating and changes of product firmware and program me may cause changes in function descriptions in this user manual, please read the instructions carefully before upgrading the firmware and use the corresponding user manual.
You can get the latest user manual from the official website: www.feiyu-tech.com FeiyuTech reserves the right to amend this manual and the terms and conditions of use the gimbal at any time. Please correctly assemble the gimbal in accordance with the diagram.
Attention
- Please install the camera before turning on the gimbal.
- When the gimbal is not in use or placed on the table, please ensure it is powered off.
- Remove the battery when not in use for a long time.
Guilin Feiyu Technology Incorporated Company
Due to software and hardware improvements, your actual product might differ from the descriptions and pictures in this user manual. You can get the latest user manual from the official website.
For more information, please visit our official website
]]>
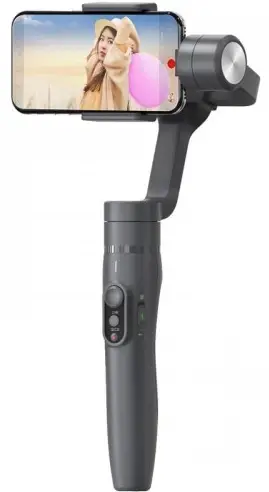
FeiyuTech VIMBLE 3-Axzis Stabilized Handheld Gimbal for Smartphone
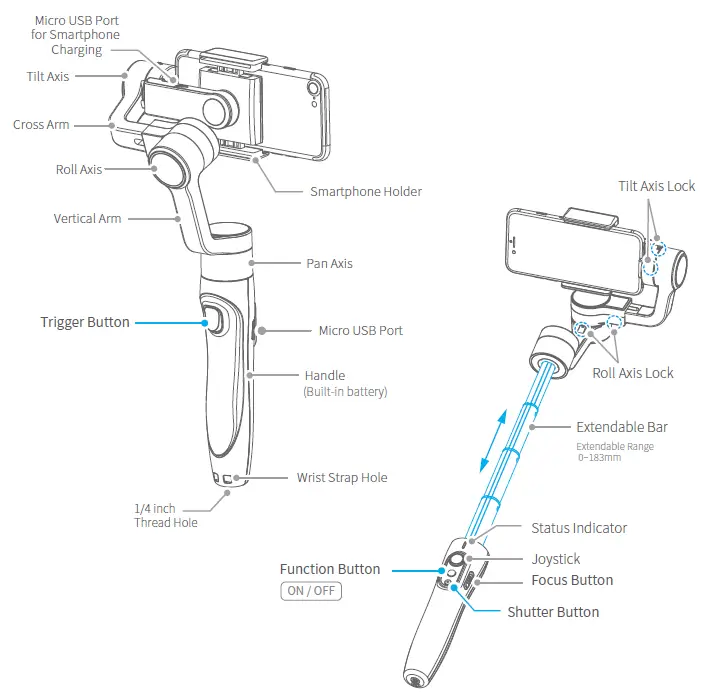
Overview
Accessories
Start to Use
TIPS
- Please fully charge the battery before powering on the gimbal for the first time.
- If the power is too low, the red light will flash three times every five seconds that indicating you should charge it immediately.
- When not in use, power off the gimbal.
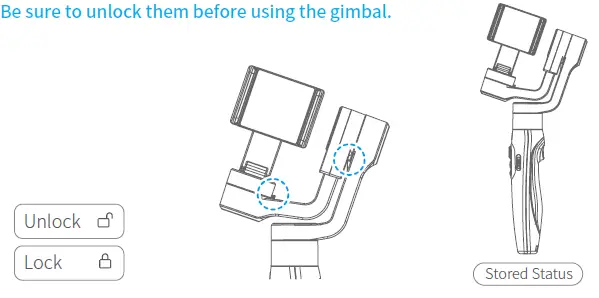
- Unlock the three axis clamp before powering on the gimbal.
Charging
Connect the USB cable to charge. The indicator light is red when charging, and green when fully charged.

Positioning Lock
Each of the tilt axis and roll axis has positioning lock for storage purposes.

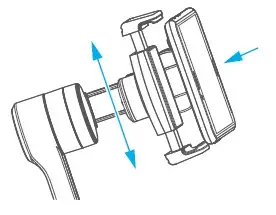
Smartphone Installation
Place smartphone in holder so that the phone is snug against the back of the holder.
It’s recommended to remove your smartphone protective case.
Smartphone holder width range : 57-84mm.
Balancing
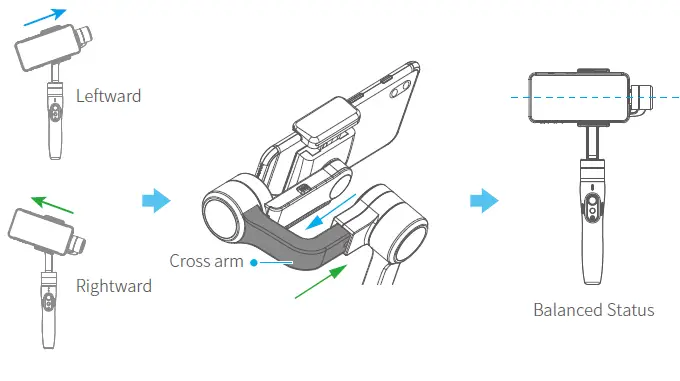
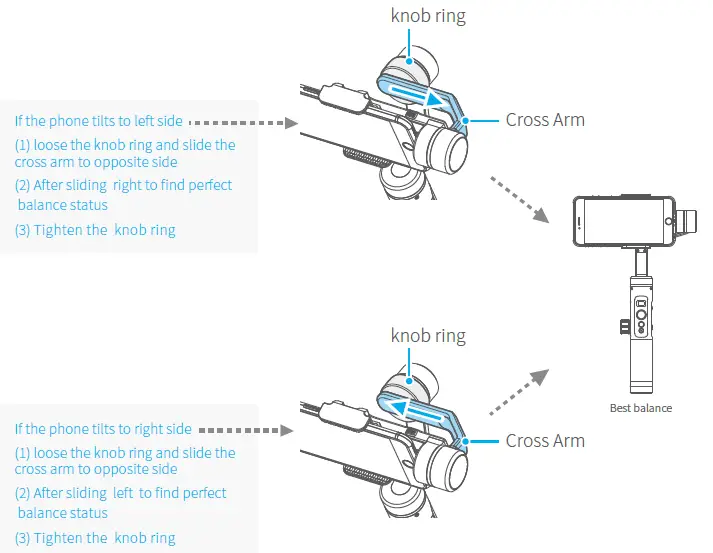
If the smartphone tilts to left or right after installed the smartphone, please slide the cross arm to the opposite direction which the smartphone tilts to to balance.
Power ON / OFF
Make sure unlock the roll and pan lock before powering on the gimbal.
Power ON Long press the function button and release it when you hear the tone. (Green light will change to blue)
Power OFF Long press the function button and release it when you hear the tone. (The red light will turn off)
Function Operation
Function / Modes Introduction
Pan Mode(Default mode)
The roll and tilt direction are fixed, and the smartphone moves according to the left-right movements of the user’s hand.
Lock Mode
The orientation of the smartphone is fixed.
Follow Mode
The roll direction is fixed, and the smartphone moves according to the left-right movements, up-down movements of the user’s hand.
Reset
Return to panning mode, three axises return to default position.
Manual Lock
Slide the tilt axis to one position for shooting.
Landscape and Portrait Shot
Assist landscape or portrait shooting.
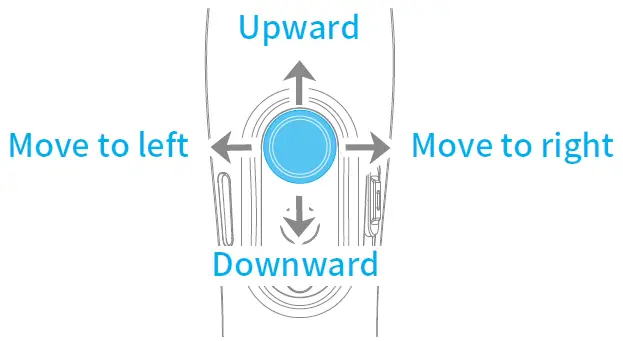
Joystick

Function Button Operation
| Function button | Function |
| Single tap | Pan Mode (Click once) |
| Lock Mode (Click again) | |
| Double tap | Follow Mode* |
| Triple tap | All Follow Mode * |
| Quintuple tap | Gimbal Initialization
( Single click the function button to wake up ) |
| Long press | Power ON / OFF |
The button’s operation function can be modified on App, after connecting Feiyu ON App succeeded.
Shutter Button Operation
The gimbal can control the photography after only Bluetooth is connected with smartphone.
Connect Smartphone
Bluetooth connection
- Power on the gimbal, open smartphone bluetooth.
- Choose below Bluetooth connection way:
- After Bluetooth connecting successful, the shutter button is activated.
The green light flashes once while other indicator status (About every 5 seconds flashes once)
| Shutter Button | Function | Control the App Feiyu ON | Control smartphone camera *
via bluetooth |
| Single click | Photography | ||
| Video
( Click again to end the recording the video ) |
|||
| Double click | Switch to photo / video mode | ||
| Triple click | Switch front and rear camera | ||
| Long time press | Video recording in shooting mode
( Long press the shutter button again to end the recording ) |
Focus Button Operation
| Focus Button | Function |
| Sliding up-down | Adjust focus (Adjust field-of-view) |
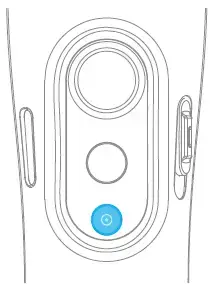
Trigger Button Operation
| Trigger Button | Function |
| Long press | Enter follow mode*( Release trigger button enter into previous mode) |
| Double tap | Reset |
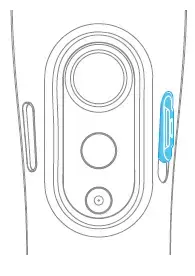
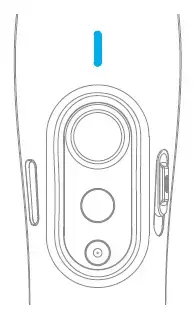
Light Indicator Explanation
The current mode of the stabilizer can be identified by the indicator status.

Trigger Button Operation
Manually move camera to desired position, and hold for half a second, new tilt position is automatically saved.
Landscape and Portrait Shot Switching
Press buttons to switch
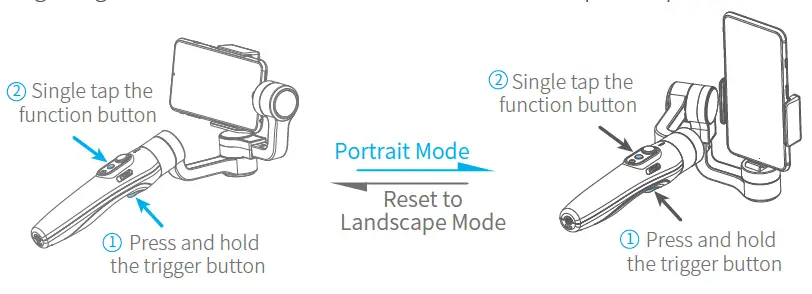
Hold the gimbal horizontally, press and hold the trigger button, and then single tag function button to switch between landscape and portrait mode.
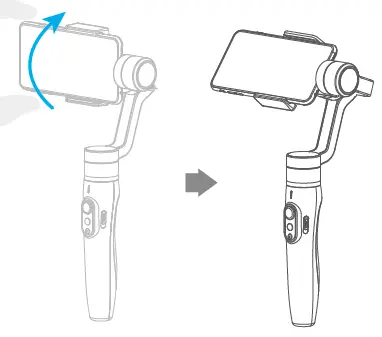
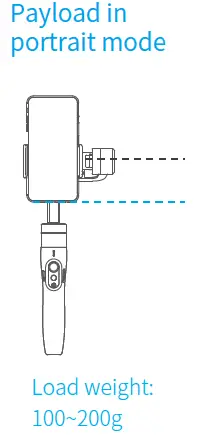
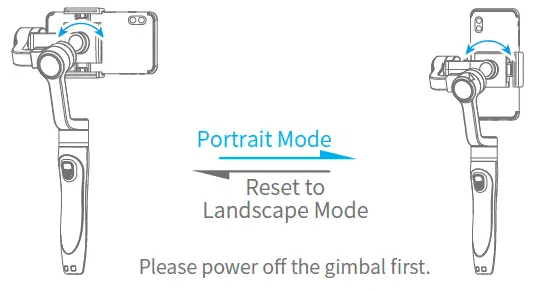
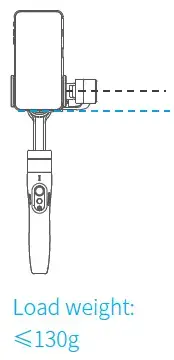
Rotate the Smartphone Holder to switch
Switching portrait /landscape mode by manually rotate the smartphone holder left or right.
Gimbal Initialization
Initialize gimbal when:
- Smartphone fails to remain level.
- Gimbal has no been used for a long period of time.
- Gimbal is used in extreme temperature variations.
STEP
- Click the function button five times. The motors will stop working. Status indicator turns solid blue.
- Place the gimbal on a flat, horizontal surface. The gimbal will automatically initialize after a few seconds detecting no movement. The blue light will flash three times to indicate end of initialization.
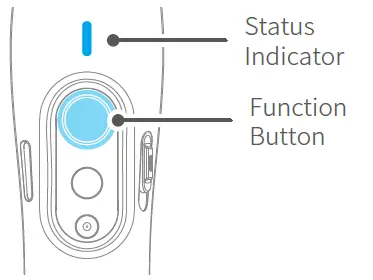
- After the initialization is successful, click the function button to wake up.
Note: if the initialization is not successful, click the function button to wake up. restart initialization process.
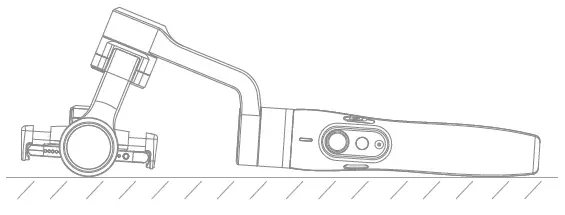
Smartphone Charging
Charge the smartphone via cable and choose the corresponding cable according to charging port.
Connect and Use Feiyu ON App
Download the App
Scan the QR code to download the app, or search for “Feiyu ON” in the App Store or Google Play.
Requires iOS 9.0 or above, Android 6.0 or above.
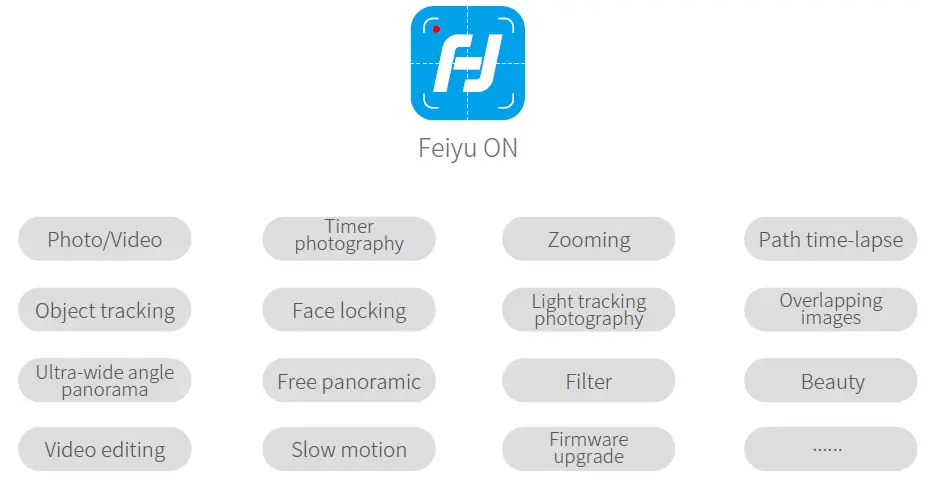
Connect the App
Open Feiyu ON app and connect the gimbal via tips. Format Bluetooth of gimbal: FY_Vimble2S_XX
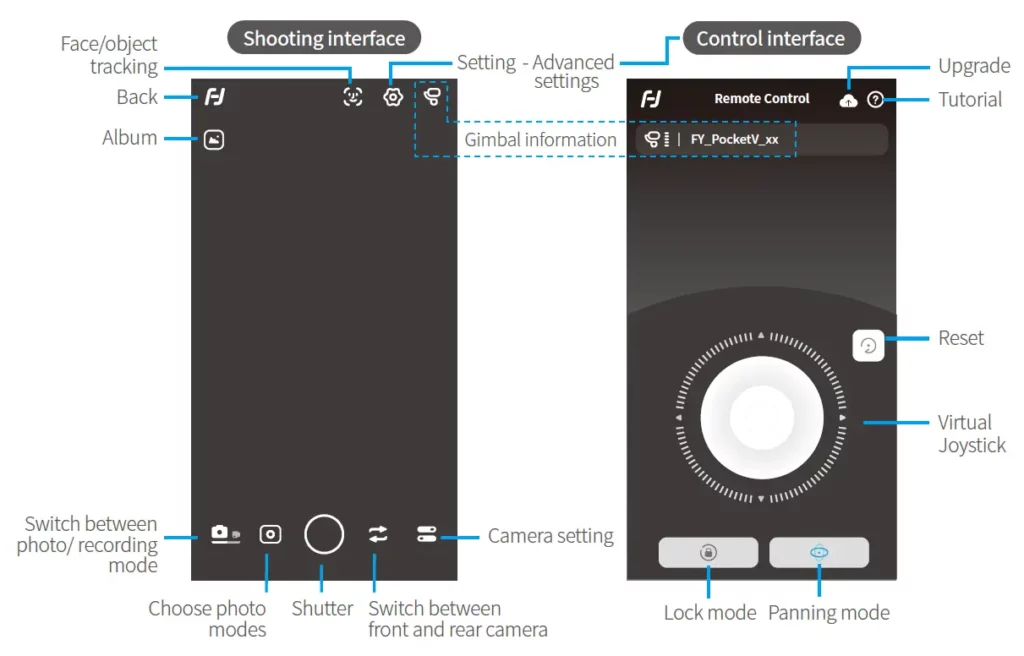
Shooting / control interface

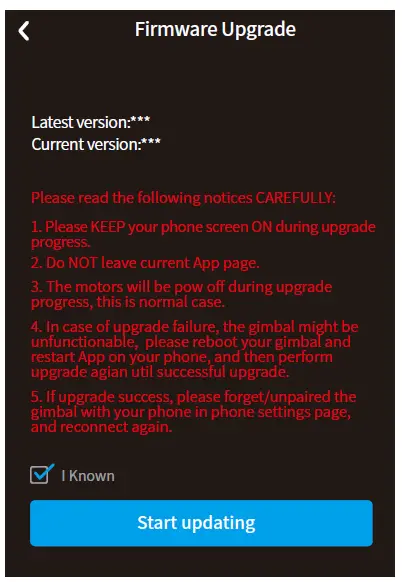
Firmware Upgrade
Upgrade the firmware through the App.
- Click the icon
- Select upgrade type.
- Follow the prompts to upgrade the firmware.
Upgrade type introductions:
Keyboard firmware update: Repair / update or newly add button/touch screen/interaction functions, update more compatibility cameras which can be controlled through WIFI, repair few bugs about camera control through WIFI, and etc.
Bluetooth firmware update: Repair / update or newly add Bluetooth functions, update more compatibility cameras, and etc.
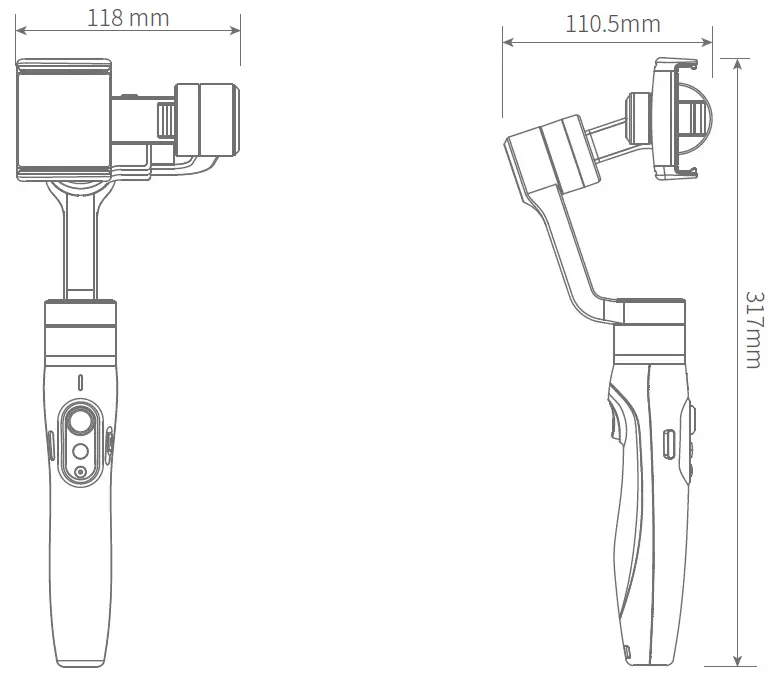
Specifications
Disclaimer
Thanks for using Feiyu Gimbal. The information in this document affects your safety and your legal rights and responsibilities. Read the entire document carefully to ensure proper configuration before use, Failure to read and follow instructions and warnings in this document may result in serious injury to yourself or others, or damage to your products or damage to other objects in the vicinity.
By using this product, you hereby signify that you have read this disclaimer and warning carefully and that you understand and agree to abide by the terms and conditions herein. You agree that you are solely responsible for your own conduct while using this product, and for any consequences thereof. You agree to use this product only for purposes that are proper and in accordance with all applicable laws, rules, and regulations, and all terms, precautions, practices, policies and guideline
FeiyuTech has made and may make available. FeiyuTech accepts no liability for damage, injury or any legal responsibility incurred directly or indirectly from the use of product.
FeiyuTech will not provide any service for any product obtained from abnormal channels.
Notice
- Make sure motor spinning is not blocked by external force when gimbal is power on.
- Gimbal DO NOT contact water or other liquid if the gimbal is not mark waterproof or splash-proof. Waterproof and splash-proof product DO NOT contact sea water or other corrosive liquid.
- DO NOT disassembly the gimbal except marked detachable. It need send to FeiyuTech after-sales or authorized service center to fix it if you accidently disassembly and cause abnormal work. The relevant costs are borne by user.
- Prolonged continuous operation may cause the motor surface temperature to rise, please operate carefully.
- DO NOT drop or strike batteries. If the battery is abnormal, contact Feiyu After-sales support.
Storage and Maintenance
- Keep the gimbal and battery out of the reach of children and pets.
- DO NOT leave the gimbal and battery near heat sources such as a furnace or heater. DO NOT leave the gimbal and battery inside of a vehicle on hot days.
- Please storage the battery in dry environment.
- DO NOT overcharge or overuse the battery, otherwise it will cause damage to the battery core
- Never use the gimbal and battery when the temperature is too high or too low.
Official Social Media
Facebook: www.facebook.com/feiyutech
YouTube Channel: www.youtube.com/c/Feiyu-tech
Twitter: www.twitter.com/feiyutech
Instagram: www.instagram.com/FeiyuTech
YouTube Channel: www.youtube.com/c/Feiyu-tech
Online Store: store.feiyu-tech.com

Model: SPG2
Guilin Feiyu Technology Incorporated Company
Accessories
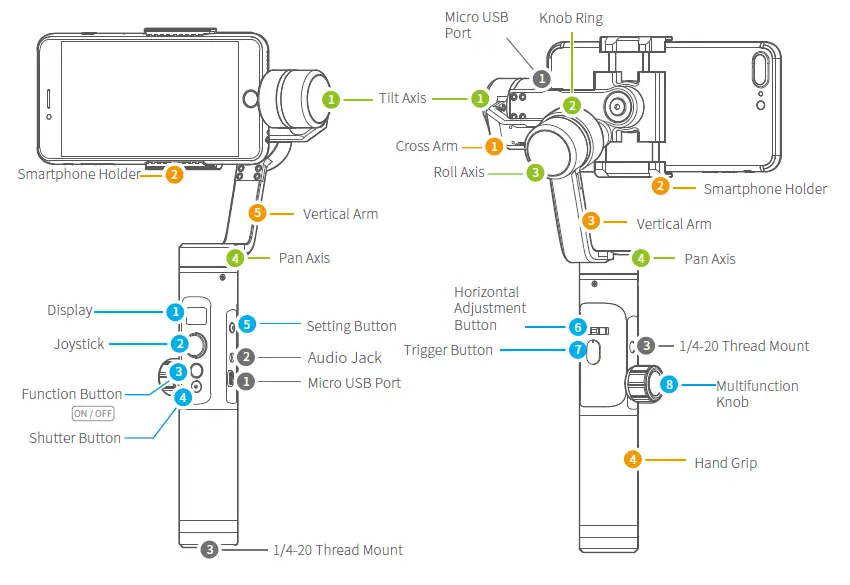
Introduction of Interface and screws
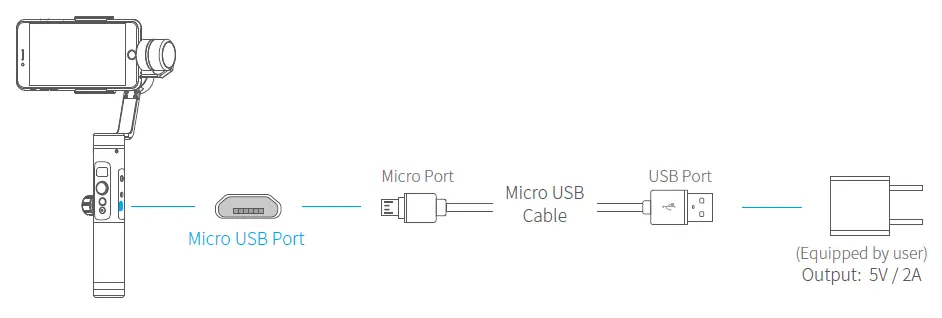
1. Micro USB Port
- Used for charging the gimbal (input 5V / 2A ), the gimbal can be used while being charged, but it is not available for external power supply.
- Used for firmware upgrade (computer), please refer to the firmware upgrade operation steps for details.
Please stuff up this port by the dustproof plug when it is not in use.
2. Audio Jack
Used to connect the phone to the audio input or output of the phone.
3. 1/4-20 Thread Mount
Used for expanding other accessories, such as the tripod which built-in 1/4 inch screw, extension rod and so on.
Introduction of Display and Buttons
1. Display

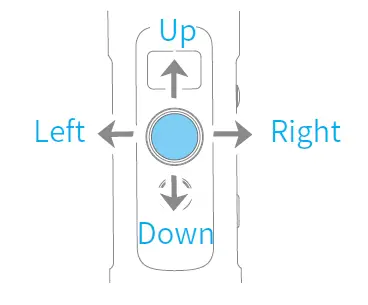
2. Joystick
3. Function Button
- Long press: Power on / Power off
- Single tap: Panning Mode / Lock Mode
- Double tap: Follow Mode
- Triple tap: All Follow Mode
- Quadruple tap: Auto-rotation Mode
- Five tap: Initialization
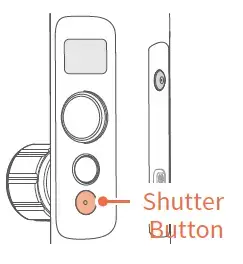
4. Shutter Button
After the gimbal is connected to the mobile phone through Feiyu ON App, single tap the shutter button to control the phone to take photos, and double tap it to switch between the front and the rear lens of the camera, press and hold to control the video recording.
Please refer to the chapter “App – Download and Connecting” in page 10
5. Setting Button
- Long press: Switch the volume interface/Click to exit
- Single tap: Click on the main interface to switch to the phone shooting mode
6. Horizontal Adjustment Button
You can control the horizon angle via the horizontal adjustment button.
7. Trigger Button
- Press and hold: Fast follow mode
- Double tap: Reset
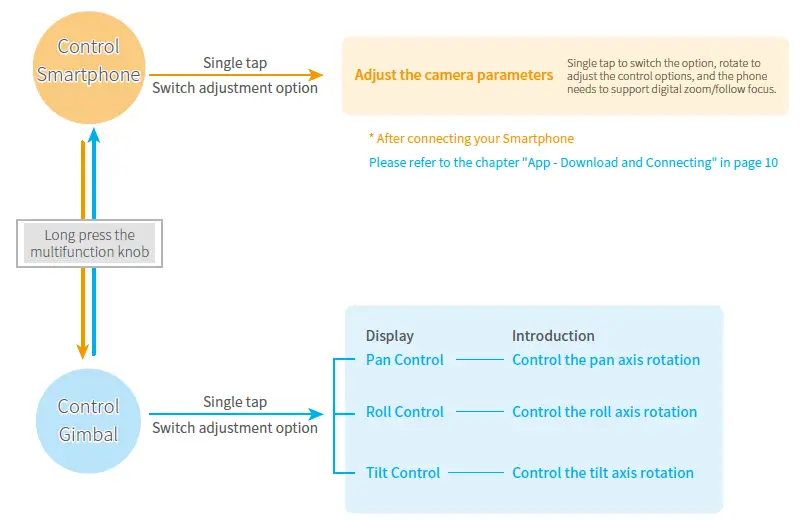
8. Multifunction Knob
- Achieve the control to the focal length of Smartphone, such as follow focus, zoom.
- Control the axial angle of the gimbal
Introduction of Axis and Knob
- Tilt Axis
Take the Smartphone lens as the base point, and control the smartphone lens to move upward or downward by tilt axis. - Knob Ring
Used for fixing the cross arm. - Roll axis
Take the smartphone lens as the base point, and control the smartphone lens to tilt to the left or tilt to the right by roll axis. - Pan Aaxxiiss
Take the smartphone lens as the base point, and control the smartphone lens to turn left or turn right by pan axis.
Introduction of Other Components
- Cross arm
Used for adjusting the up and down centre-of-gravity position of smartphone. - Smartphone holder
Used for fixing the Smartphone. - Vertical arm
Used for connecting the rolling axis and the panning axis. - Hand grip
Used for holding the gimbal by one hand.
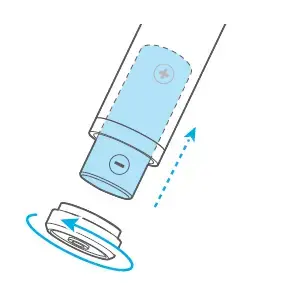
1. Install Battery
Remove the bottom cap, insert a 26650 battery and then tighten the cap.
- Type: 26650
- Battery Capacity: 5000mAh
2. Put the Smartphone on
It’s recommended to remove your smartphone protective case.
Place smartphone in holder so that the phone is snug against the back of the holder.
3. Balance the Gimbal
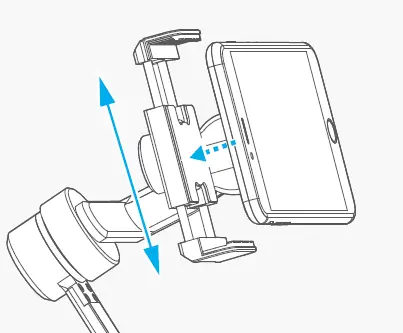
4. Set the horizontal shooting/ vertical shooting of mobile phone
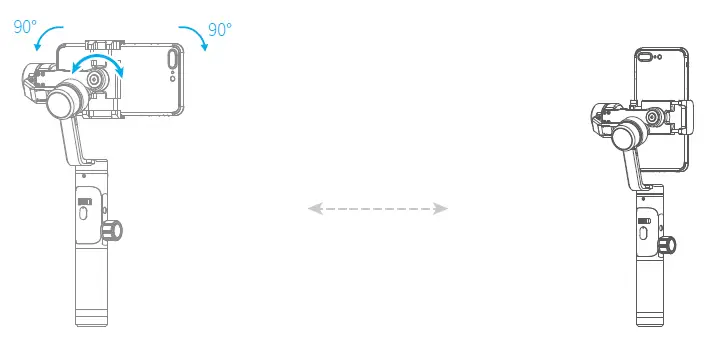
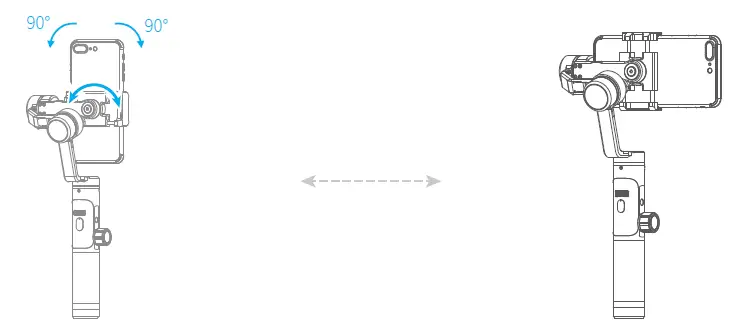
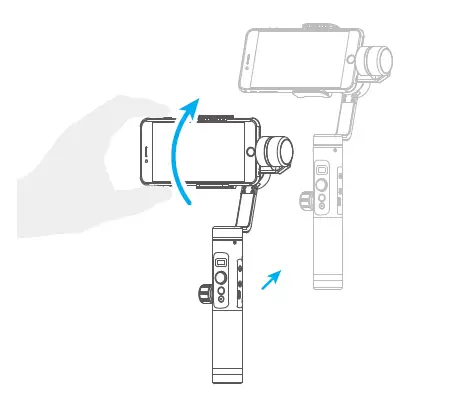
Support clockwise / counterclockwise rotation
Pull the mobile phone fixture to switch between horizontal and vertical shooting, as shown in below picture:
5. Power on / off
NOTE
- Please mount the smartphone before powering on the gimbal.
- When the battery is low, please charge the gimbal.
- When not in use, turn off the gimbal and then remove the battery.
Power on / off: Long press the function button, the display will show and release it when you hear the beep tone.
Charging the Gimbal
Charging with Micro USB cable as shown below.
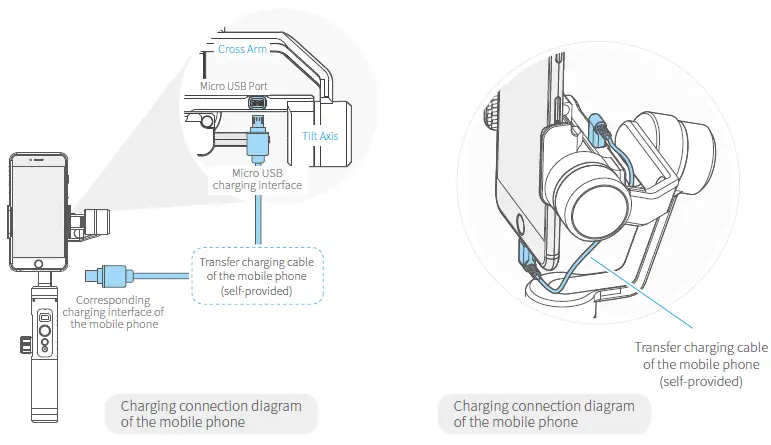
Charging the Smartphone
Use the mobile phone transfer charging cable (self-provided) to charge the mobile phone, and select the corresponding charging adapter cable according to the charging port of the mobile phone.
Modes
Panning Mode (Default mode)
The roll and tilt direction are fixed, and the smartphone moves according to the left-right movements of the user’s hand.
Follow Mode
The roll direction is fixed, and the smartphone moves according to the left-right movements, up-down movements of the user’s hand.
All Follow Mode
The smartphone moves according to the user’s hand.
Reset
Return to panning mode, three axises return to default position.
Lock Mode
The orientation of the camera is fixed.
Introduction of Display

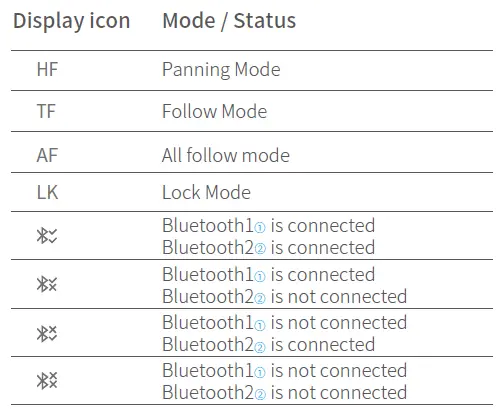
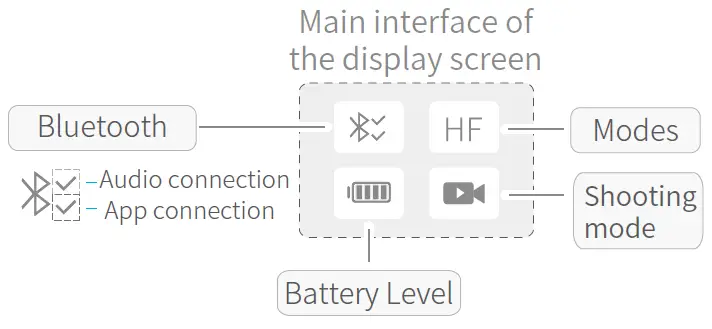
- Bluetooth 1 is used for connecting the mobile phone with the gimbal via audio; please refer to the “Mobile Phone Audio Connection” .
- Bluetooth 2 is used for connecting the mobile phone with the gimbal via APP; please refer to the “App Downloading and Connection”.
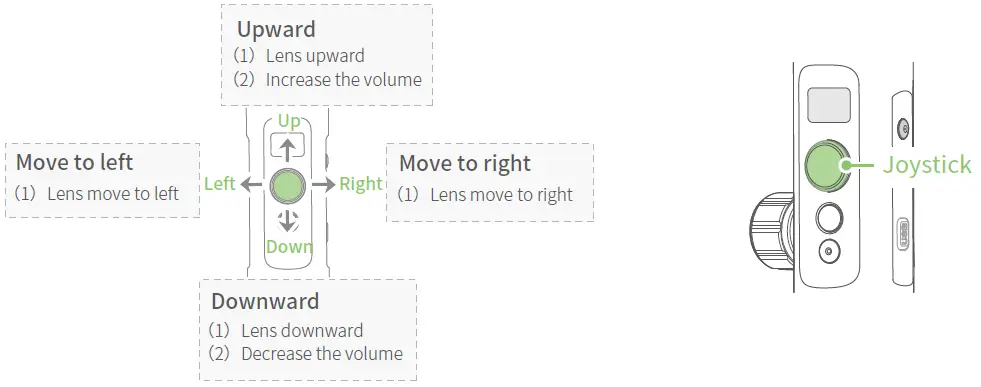
Joystick – operation

Function Button – operation
Note:Functions in practice may differ from what is described in the manual in hand due to firmware upgrade. Please refer to the latest version of manual which could be found on official website.
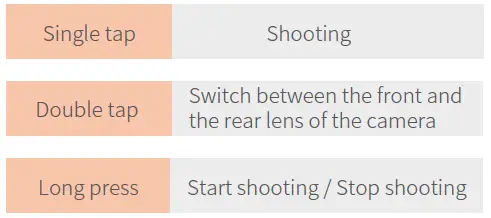
Shutter Button-operation
When SPG 2 is connected to the mobile phone via Feiyu ON App, single tap the shutter button to control the phone to take photos, double tap it to switch between the front and the rear lens of the camera, press and hold it to control the video recording.

Please refer to the chapter “App – Download and Connecting” in page 10
Setting Button – operation
When SPG 2 is connected to the mobile phone via Feiyu ON App, the setting button can switch the phone shooting mode, and the phone volume can be adjusted after connecting to the phone audio Bluetooth.
Please refer to the chapter “App – Download and Connecting” in page 10
Switch Camera Modes
Single tap the setting button to switch the phone shooting mode
Adjust volume
Press and hold the setting button to switch between the main interface and the volume interface.
You can adjust the volume by moving the four-directional joystick up/down (this operation requires connecting to the mobile phone audio Bluetooth)

Horizontal Adjustment Button – operation
You can control the horizon angle via the horizontal adjustment button.

Trigger Button – operation

Multifunction Knob – Zooming control / Follow focus / Control 3 Axis


App – Download and Connecting
- Download and Install Feiyu ON App
Please download Feiyu ON at your smartphone app store or can the QR code below.
* Requires iOS 9.0 or later, Android 6.0 or later.
Or search and download the “Feiyu ON” App on the following application platform:

2. Connecting Feiyu ON App
- Turn on the gimbal.
- On smartphone, enable bluetooth and open Feiyu ON App. Login or register, follow instruction and connect to the Gimbal
Manual Lock
Camera can be manually positioned while in panning mode , follow mode or lock mode. Both the pan axis and tilt axis can be manually set up.
Manually move camera to desired position, and hold for half a second. New tilt and/or pan positions are automatically saved.
Take the tilt axis setting for example:

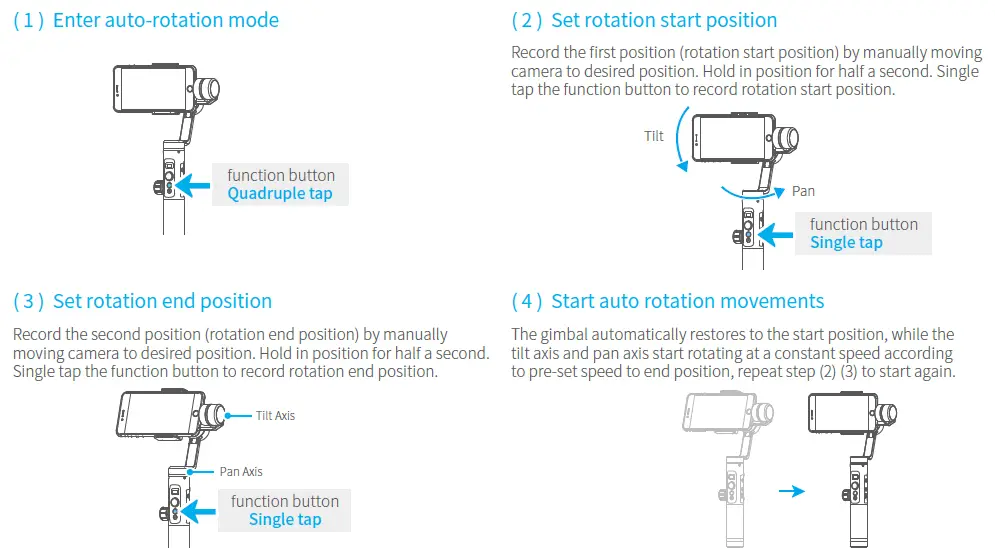
Auto-rotation Mode
The SPG2 gimbal can easily create constant speed movements in the auto-rotation mode.
This mode can be used for recording both regular video and motion timelapse photography.
For better performance, attach gimbal to the FeiyuTech tripod, or other tripod, to keep it completely still.
Set rotation speed in Feiyu ON App
Both the pan and tilt directions can be rotated.
Connect to the Feiyu ON App and select desired speed from the auto-rotation mode rate option in the settings menu.

Exit ⇒ Double tap Trigger button ⇒ Exit the auto-rotation mode and reset
Firmware Upgrade
Mobile phone audio connection
Turn on the phone Bluetooth and connect to FY_SPG2AUDID_XX, after the connection is successful, the phone audio can be input or output through the audio jack of SPG 2.
Gimbal Initialization
You can initialize your gimbal when:
- When smartphone is not level
- If not used for a long period of time
- In case of extreme temperature variations
Adjusting Steps

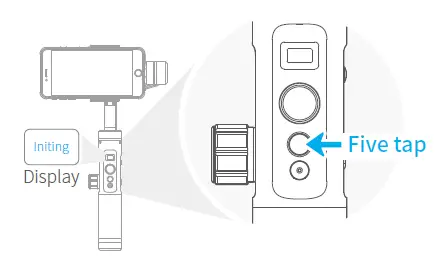
- Tap the function button for 5 consecutive times and hear the “beep” sound, and the motor will stop working and “Initing” shows up.
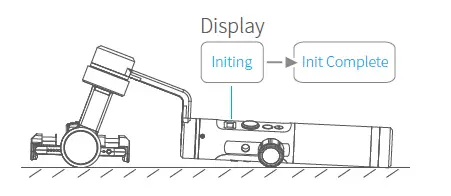
2. Place the gimbal on the table unmoved, and the gimbal automatically detect whether or not it is placed on a static flat surface, and then its initializing will start automatically showing “Initing” on the display, and “Init Complete” will be displayed after the initializing has been successfully completed.
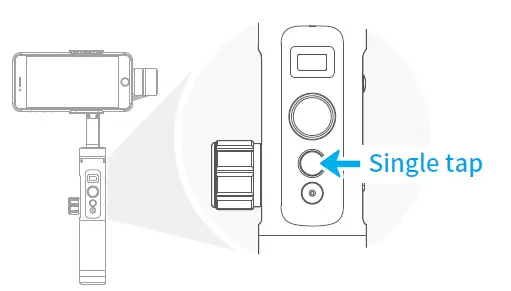
3. After the initialization is done, single tap the function button to wake up and return to the main interface.
NOTE: If the initialization is not successful for a long time, long press the function button to turn off the gimbal, restart it and then initialize.
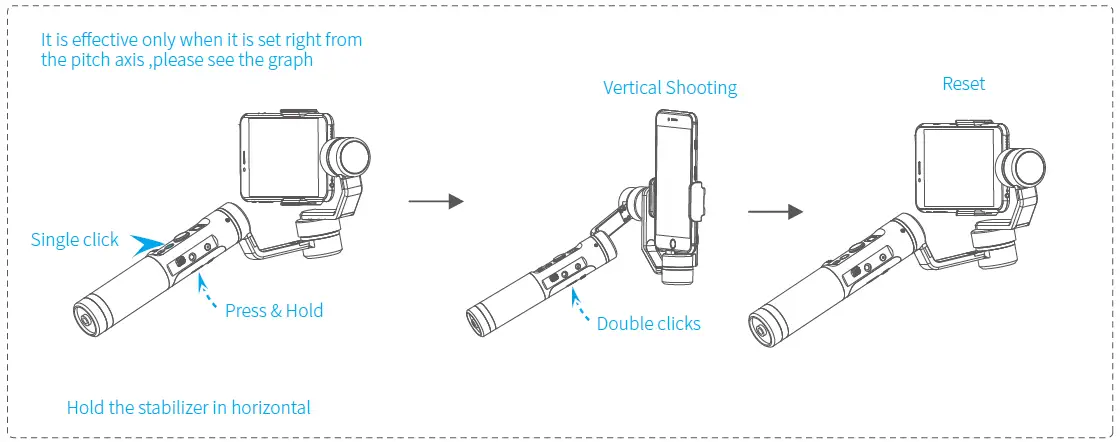
Vertical Shooting
Press and hold the trigger button in the horizontal shooting mode and then single click the function button to switch to the vertical shooting mode.
Double click the trigger button to exit the vertical shooting and restore to the horizontal shooting mode.
Audio recording with Bluetooth connection
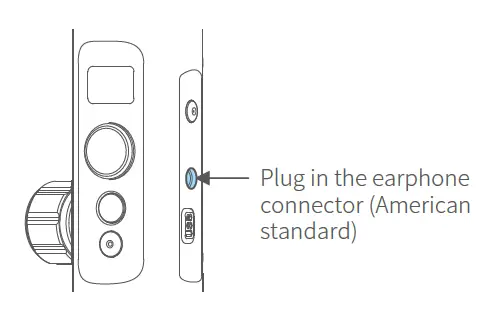
Note: The audio jack at the SPG2 handle is suitable for American standard earphones. To use the Chinese standard earphones, you need to use the conversion cable (self-prepared).
- Turn the gimbal on and plug the earphone connector into the audio jack on the right side of the SPG2 handle.
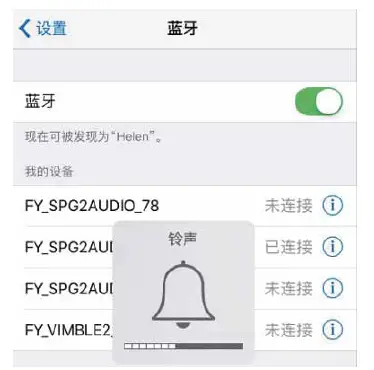
2. Turn on the mobile phone Bluetooth and connect to FY_SPG2AUDID_XX. After the connection is successful, press the shutter button on the handle. If the volume appears on the phone interface (as shown in below picture), the connection is successful.
3. Open the Feiyu ON App, after the connection is successful, click the volume icon at the top right corner of the interface, select “Bluetooth Earphone”, blow or talk to the sound hole 1 of the earphone, and the icon has sound waves, which indicates the reception is OK.
4. Press and hold the shutter button for about 1 second to start video recording. After the video recording is completed, you can play back the video in the album and listen to the audio effects from the earphones. Or disconnect the Bluetooth with the gimbal from the Bluetooth list on your mobile phone to listen to the audio effects from your mobile phone.
Precautions:
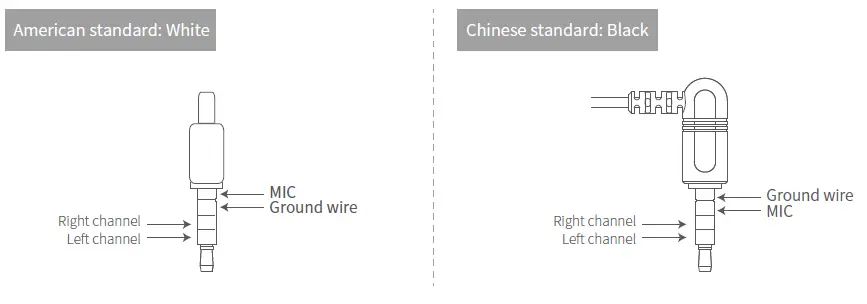
- When using the earphone for recording, please note that the audio jack at the SPG2 handle is suitable for
American standard earphones, to use the Chinese standard earphones, you need to use the conversion cable.
Most of the American standard and Chinese standard earphones can be distinguished by the color of the insulation ring. American standard: White; Chinese standard: Black.
2. When using a microphone equipped with a camera, the corresponding mobile phone patch cable is required,
the interface of the patch cable is suitable for mobile phones and is the American standard.
3. SPG2’s Bluetooth radio is not available for the phone’s camera, it needs to be used with the Feiyu ON APP, or
some live or video app, such as the iOS client end of Tik Tok.
- Product Name: SPG2 3-Axis Stabilized Handheld Gimbal for Smartphone
- Max. Tilting Range: 320°
- Max. Rolling Range: 320°
- Max. Panning Range: 360°
- Tilting Speed: 2°/s ~ 75°/s
- Panning Speed: 3°/s ~ 150°/s
- Operation Time: 14Hours
- Weight: 440g ( exclude the battery and smart phone)
- Adaption smart phone: IPhone series and Android series (width 54mm~95mm)
Guilin Feiyu Technology Incorporated Company
]]>


