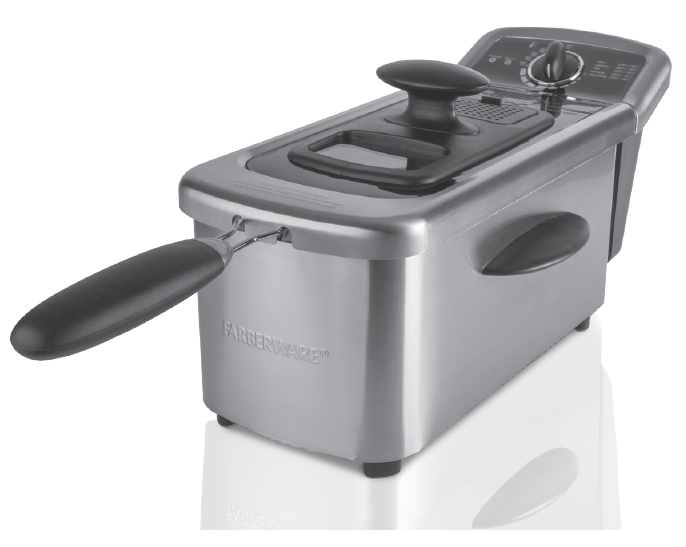
Model Number: 103737
UPC: 681131037372
Customer Assistance
1-855-451-2897 (US)
Please consider the option to recycle the packaging material and donate any appliance you are no longer using.
IMPORTANT SAFEGUARDS
When using electrical appliances, basic safety precautions should always be followed, including the following:
- Read all instructions before use.
- Do not touch hot surfaces. Use handles or knobs.
- To protect against electric shock do not immerse cord, plugs, or control panel assembly in water or other liquid.
- Close supervision is necessary when any appliance is used by or near children.
- Unplug from wall outlet when not in use and before cleaning. Allow to cool before putting on or taking off parts, and before cleaning the appliance.
- Do not operate any appliance with a damaged cord or plug, or after the appliance malfunctions or has been dropped or damaged in any manner. Call our toll-free customer assistance number for information on examination, repair, or adjustment.
- The use of accessory attachments not recommended by the appliance manufacturer may result in fire, electric shock or injuries to persons.
- Do not use outdoors or in a damp area.
- Do not let power cord hang over edge of table or counter, or touch hot surfaces.
- Do not place on or near a hot gas or electric burner, or in a heated oven.
- Extreme caution must be used when moving an appliance containing hot oil or other hot liquids.
- Always attach plug to appliance first, then plug cord in the wall outlet. To disconnect, turn temperature control knob to • OFF position, then remove plug from wall outlet.
- Do not use appliance for other than intended use.
- Extreme caution must be used when moving fryer containing hot oil.
- Be sure handles are properly assembled to basket and locked in place. See detailed assembly instructions, on page 7.
- Dry food to prevent oil splashing.
- Store the appliance indoors to prevent electronic parts failure.
- Use only heat resistant tools. Do not use metal tools as they may become hot.
- Do not let children handle or put the electrical cord into their mouths.
SAVE THESE INSTRUCTIONS
ADDITIONAL SAFEGUARDS
This appliance is for HOUSEHOLD USE ONLY.
- Periodically check for the looseness and retighten screws or nuts in accordance with manufacturer’s instructions.
WARNING
Overtightening can result in stripping of screws or nuts or cracking of handle or feet.
WARNING
SERIOUS HOT-OIL BURNS MAY RESULT FROM A DEEP FRYER BEING PULLED OFF A COUNTERTOP. DO NOT ALLOW THE CORD TO HANG OVER THE EDGE OF THE COUNTER WHERE IT MAY BE GRABBED BY CHILDREN OR BECOME ENTANGLED WITH THE USER. DO NOT USE WITH AN EXTENSION CORD.
DO NOT USE WITH AN EXTENSION CORD.
Polarized plug
- This appliance has a polarized plug (one blade is wider than the other). To reduce the risk of electric shock, this plug is intended to fit into a polarized outlet only one way. If the plug does not fit fully into the outlet, reverse the plug. If it still does not fit, contact a qualified electrician. Do not attempt to modify the plug in any way.
- A short detachable power-supply cord is to be provided to reduce the risk resulting from becoming entangled in or tripping over a longer cord.
- Do not let children handle or put the electrical cord into their mouths.
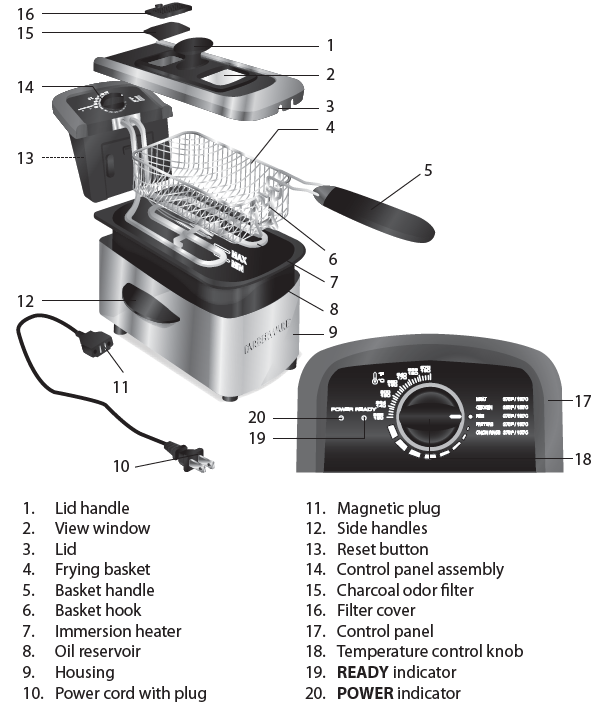
PARTS
ILLUSTRATIONS
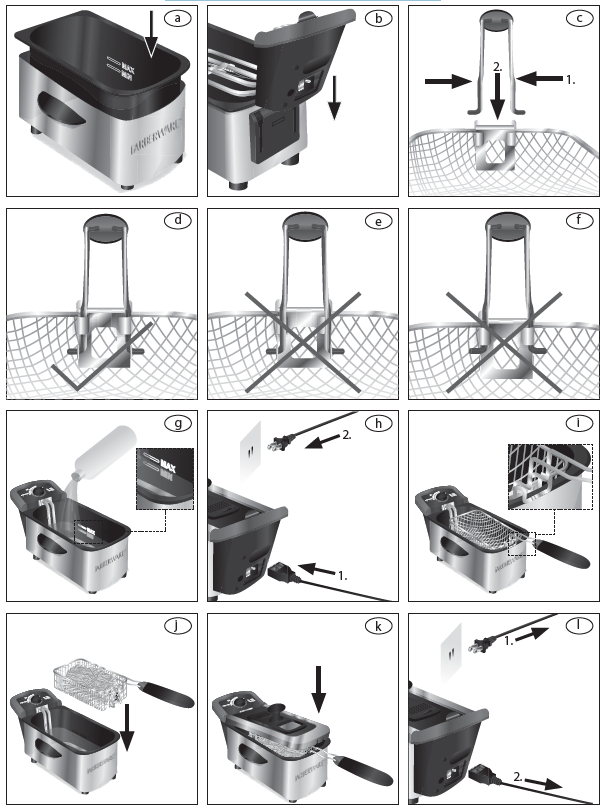
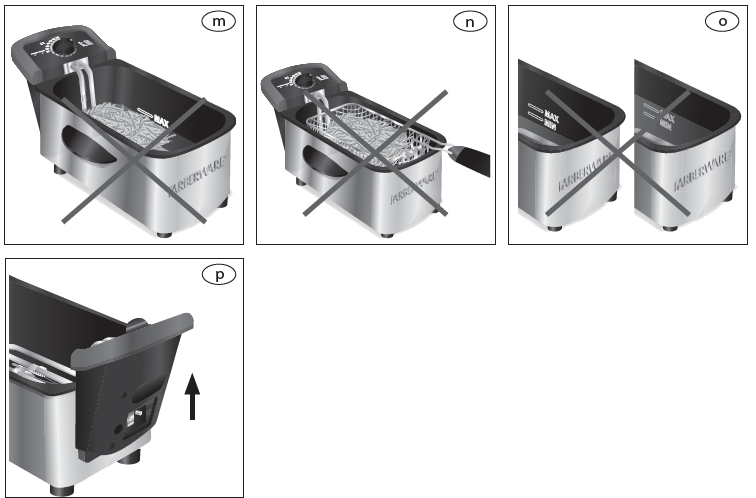
OPERATION
Before first use
- Remove all packaging materials, labels and/or stickers from your appliance.
- Check package contents for completeness and damage. Do not operate the appliance if package content is incomplete or appears damaged. Return it immediately to the dealer.
CAUTION: Danger of suffocation! Packaging materials are not toys. Always keep plastic bags, foils and Styrofoam parts away from babies and children. Packaging material could block nose and mouth and prevent breathing.
- Clean your appliance thoroughly before using for the first time ( Cleaning).
NOTE: The appliance may produce an odor and emit smoke when switched on for the first time, as residues from the production process are eliminated. This is normal and does not indicate a defect or hazard.
CAUTION: Never let the power cord (10) come in contact with the housing (9) or the lid (3) of the appliance during use.
Assembly
CAUTION: Always ensure there is oil in the oil reservoir (8) before you turn on the appliance.
- Place the appliance on a clean, flat and heat resistant surface.
- Before using your appliance make sure:
- the oil reservoir (8) is secured in the correct position (the round edges are opposite to the connecting plate of the housing (9) (ill.
 ).
). - the control panel assembly (14) is inserted into the slots of the connecting plate on the back of the housing (9) (ill.
 ).
). - basket handle (5) is locked in place in the frying basket (4) (ill.
 ).
).
- the oil reservoir (8) is secured in the correct position (the round edges are opposite to the connecting plate of the housing (9) (ill.
NOTE: To lock the basket handle (5) in place, press the bars together (ill.  ). Slide the handle between the slots while inserting the ends of the bar into the bracket on the frying basket (4). Do not assemble any other way (ill.
  +
+  ). Incorrect assembly may lead to an unstable setup and might cause injuries.
CAUTION: Do not fill the frying basket (4) over half way. Too much food can cause excess foaming and could cause the oil to overflow during operation.
NOTE: Your appliance is equipped with a safety switch located on the control panel assembly (14). If the control panel assembly (14) is not placed properly in its position, the appliance will not operate.
Using the appliance
Use the deep fryer for frying food such as French fries, chicken or fish pieces.
NOTE: The appliance has a rated power of 1400W. Before plugging it into the wall outlet, ensure that the electrical circuit is not overloaded with other appliances. This appliance should always be operated on a separate 120V~ 60Hz wall outlet.
- Pour cooking oil into the oil reservoir (8) (ill.
 ).
). - DO NOT OVER OR UNDER FILL (ill.
 ). The minimum oil capacity is 2L, the maximum oil capacity is 2.5L.
 - Spread a little oil on the inside of the view window (2) to prevent condensation.
- Place the lid (3) onto the housing (9).
- Attach the magnetic plug (11) to the socket on the back side of the control assembly (14). The magnetic plug (11) is designed to only fit one way. Be sure the side stating THIS SIDE UP is facing up (ill.
 ).
).
NOTE: Make sure the appliance is switched off before connecting it to the electric circuit.
- Insert the plug (10) into a wall outlet (ill.
 ). The POWER indicator (20) and READY indicator (19) turn on.
CAUTION: Do not fry food without the basket (4) (ill.  ).
).
- Turn the temperature control knob (18) to the required temperature (
 Frying time and temperature). The READY indicator (19) will turn on when the set temperature is reached.
Approximate time durations until set temperature is reached:

- After the oil has been preheated, remove the lid (3).
- Lift out the frying basket (4) and place the basket on a heat resistant surface or trivet.
- Fill the frying basket (4) with food (ill.
 ). Do not place too much food into the frying basket (4) (ill.
  ).
). - Carefully lower the frying basket (4) into the oil reservoir (8).
- Cover the appliance with the lid (3) (ill.
 ).
).
CAUTION: After immersing the frying basket (4) in the oil, immediately place the lid (3) on the appliance. Danger of hot oil splashing out.
CAUTION: Food added to the appliance must be dry. If frying frozen foods such as French fries or chicken wings, remove all ice particles from the frozen foods prior to frying to prevent oil from overflowing.
CAUTION: Always remove excess moisture from food by patting with paper towel before frying. Even a small amount of water can cause severe splattering of hot oil.
NOTE: When frying fresh cut potatoes and high moisture content food, lower the basket slowly into the oil. If the oil boils or foams too rapidly raise the basket for a few seconds and lower again. Do this until the basket can be lowered without excess foaming. Do not use the cover when frying fresh cut potatoes or other high moisture content foods.
NOTE: For frying times, see Frying time and temperature or use the recommended times for your recipe.
- After the frying time has elapsed, remove the lid (3).
- Lift out the frying basket (4) and hang it onto the basket hook (6) on the rim of the oil reservoir (8).
- Let the food drain in the frying basket (4) for a few seconds to remove excess oil and retain crispness.
- Carefully lift the frying basket (4) and pour the food onto a place that has been covered with a paper towel to collect remaining oil.
- After the cooking process is finished, turn the temperature control knob (18) to • OFF position.
- To completely switch off the appliance, always disconnect the plug (10) from the wall outlet before removing the magnetic plug (11) from the socket on the appliance (ill.
 ).
).
CAUTION: The break-away power cord is for accidental disconnection. Do not remove during normal operation. If the cord becomes disconnected, immediately remove the plug (10) from the wall outlet. Turn the temperature control knob (18) to • OFF position and then reconnect the magnetic plug (11) to the appliance. Then reconnect the plug (10) to the wall outlet.
CAUTION: This appliance generates heat and steam during use. Proper precautions must be taken to prevent the risk of burns, fires or other injuries to persons or damage to property. Do not leave the appliance unattended while in use.
CAUTION: The metal surfaces of the appliance become hot. Do not touch while in use. Allow the appliance to cool at least 30 minutes before handling.
Frying time and temperature
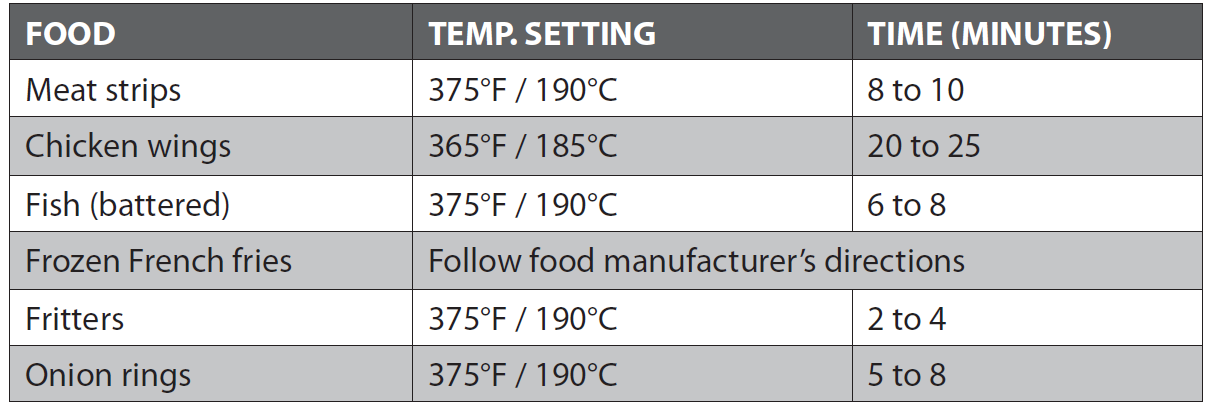
The frying times in the chart below are approximate and should be adjusted to suit your own tastes, different food quantities and food manufacturer instructions.
The reset feature
Your appliance is equipped with a feature that protects it from damage due to overheating. If for some reason the appliance overheats, it will automatically switch off. Once the appliance has been reset, it can be turned on again.
Reset the appliance
- Unplug the appliance from the wall outlet.
- Let the appliance and the oil in the reservoir cool completely.
- After the appliance has cooled completely, use the tip of a ball point pen or pencil, and push the reset button (13), which is located at the back of the control assembly (ill.
 ). Then you may resume frying.
HINTS AND TIPS
Choosing the right cooking oil
As a general rule, choose cooking oils with a high smoke point and avoid flavored oils.
- Suitable: Pure corn oil, blended vegetable oil, soybean oil, sunflower oil, grape seed oil
- Not suitable: Olive oil, peanut oil, walnut oil, lard
Cooking with oil
Cooking oil can enhance the food’s flavor – or spoil its taste. As with any other food component, freshness and correct handling of the oil is the key to successful deep frying results.
The quality of the oil decreases with use at high temperatures. Food particles, water and other liquids will further lower its quality, therefore:
- Do not mix different cooking oils
- Only use fresh and clean cooking oils:
- Regularly remove burnt food particles while frying.
- After use and before storage, filter oil with a fine-mesh filter to remove-smaller particles.
- Do not reuse oil that has been used to fry fish or other strongly flavored food.
- Some meats, such as chicken wings, will release large amounts of liquids –when frying, thus watering down the oil. Do not reuse this oil.
Do not use the cooking oil anymore if you notice the following:
- Before use: oil smells rancid or its color has visibly darkened.
- While frying: oil is foaming strongly or smoke appears on the oil’s surface at normal operating temperature.
Storing oil
- Do not store used cooking oil in the refrigerator. Choose a cool place that is not subject to sunlight. Generally, oil may be stored for a period of 3 month, once the bottle is opened. Please observe the oil manufacturer’s storage directions as well.
Cleaning
Proper maintenance will ensure many years of service from your appliance. Clean the appliance after every use. The appliance contains no user serviceable parts and requires little maintenance. Leave any servicing or repairs to qualified personnel.
CAUTION: Always turn the temperature control knob (18) to • OFF position. Disconnect the plug (10) from the wall outlet before disconnecting the magnetic plug (11) from its socket. Allow all parts of the appliance to cool completely.
NOTE: Do not immerse the power cord with plug (10) or appliance and magnetic plug (11) into water or any other liquid. Do not use abrasive cleaners, steel wool or scouring pads. Dry all parts thoroughly after cleaning, before using or storing the appliance. Ensure that no water enters the appliance housing.
- Do not attempt to attach the magnetic plug (11) permanently to the appliance.
- Clean the surface of the appliance, the lid (3) and the basket handle (5) with a damp cloth.
- The frying basket (4) (remove the basket handle) (5), lid (3) (remove the filter) and the oil reservoir are dishwasher safe.
- Remove the frying basket (4).
- Remove the basket handle (5) from the frying basket (4).
- Wash the frying basket (4) in a dishwasher or with hot soapy water. Rinse and dry in carefully.
CAUTION: Do not clean the basket handle (5) in the dishwasher.
- Remove the control panel assembly (14) from the back of the housing (9).
- Carefully lift the oil reservoir (8) by holding its rim.
CAUTION: The control panel assembly (14) should never be immersed into water or any other liquids.
- Gently clean the surface of the control panel assembly (14) with a damp cloth and a mild soap solution or plain water.
- After cleaning, reassemble appliance by placing the oil reservoir (8) into the housing and placing the control panel assembly (14) in its place (ill
 ). If the control panel assembly (14) is not placed properly in its position, the appliance will not operate.
 - Dry all parts thoroughly after cleaning, before using the appliance.
NOTE: Clean the filter (15) every 3 months or after every 12 uses.
- Open the filter cover (16) and remove the filter (15).
- Clean the filter (15) in hot soapy water. Rinse and dry.
- Clean the inside of the filter cover (16) with damp soapy sponge. Rinse and dry thoroughly.
- Insert the filter (15) and replace the filter cover (16).
CAUTION: Do not clean the filter (15) in a dishwasher.
Storage:
- Before storage, always make sure the appliance is completely cool, clean and dry.
- It is recommended to store the appliance in a dry place.
- Store the appliance on a stable shelf or in a cupboard, preferably in its original packaging. To avoid accidents, ensure that both the appliance and its power cord are beyond reach of children or pets.
Troubleshooting
If additional assistance is needed, please contact our Customer Assistance at 1-855-451-2897 (US).
Technical
Rated voltage: 120V~ 60Hz
Rated current: 11.67A
Rated power input:1400W
Oil capacity: max. 2.5L

FARBERWARE FW-AF-GRY Compact Oil-Less Fryer User Manual
Please consider the option to recycle the packaging material.
IMPORTANT SAFEGUARDS
When using electrical appliances, basic safety precautions should always be followed, including the following:• Read all instructions before use.
- Do not touch hot surfaces. Use handles or knobs.
- WARNING – to protect against electric shock, fire, and personal injury:
– do not immerse cord, plug, or appliance housing in water or other liquids;
– do not immerse the appliance or any electrical components in water or any other liquids;
– always switch off and unplug the appliance before cleaning. - Close supervision is necessary when any appliance is used by or near children.
- Unplug from the wall outlet when not in use and before cleaning. Allow cooling before putting on or taking off parts, and before cleaning the appliance.
- Do not operate any appliance with a damaged cord or plug, or after the appliance malfunctions or has been damaged in any manner. Call our toll-free customer assistance number for information on examination, repair, or adjustment.
- The use of accessory attachments not recommended by the appliance manufacturer may result in fire, electric shock or injuries to persons.
- Do not use outdoors or in a damp area.
- Do not let the power cord hang over the edge of the table or counter, or touch hot surfaces.
- Do not place on or near a hot gas or electric burner or in a heated oven.
- Extreme caution must be used when moving an appliance containing hot oil or other hot liquids.
- To switch off the appliance, turn the Time Control Knob to 0, then remove the plug from the wall outlet.
- Do not use appliances other than intended use.
- Never leave the appliance unattended during operation.
- CAUTION – Risk of electric shock. Cook only in a removable container.
- Oversized foods or metal utensils must not be inserted in the appliance as they may create a fire or risk of electric shock.
- During uses and when removing the Basket, hot steam is released. Keep hands and face clear.
- Ensure a minimum distance around the appliance of at least 6 inches to other objects, cupboards, and walls.
- Use extreme caution when removing the Basket or disposing of hot grease.
- Extreme caution should be exercised when using containers constructed of anything other than metal or glass.
- A fire may occur if the appliance is covered or touches flammable material, including curtains, draperies, walls, and the like, when in operation. Do not store any item on top of the appliance when in operation.
- Never pull on the cord to disconnect the appliance from the wall outlet; instead, grasp the plug and pull on the plug.
- Let the appliance cool completely before putting it away or storing it.
- Do not clean with metal scouring pads. Pieces can break off the pad and touch electrical parts involving a risk of electric shock.
- Do not store any materials, other than manufacturers’ recommended accessories, in this appliance when not in use.
- Do not place any of the following materials in the appliance: paper, cardboard, plastic.
- Do not cover the Basket or any part of the appliance with metal foil. This will cause overheating of the appliance.
- During hot air frying, hot steam is released through the air outlet openings.
- Keep your hands and face at a safe distance from the steam and from the air outlet openings. Also, be careful of hot steam and air when you remove the cooking accessories from the appliance.
- Immediately switch off and unplug the appliance if you see dark smoke coming out of the appliance. Wait for the smoke emission to stop before you remove the Basket from the appliance.
- Always place the appliance on a horizontal, level, heat resistant, and stable surface.
- Let the appliance cool down for approximately 30 minutes before handling or cleaning it.
- The appliance is equipped with a safety micro-switch inside that will pause the cooking process automatically if the Basket is opened during cooking.
ADDITIONAL SAFEGUARDS
This appliance is for HOUSEHOLD USE ONLY.
WARNING:
– DO NOT OPERATE THIS APPLIANCE, IF THE POWER CORD SHOWS DAMAGE OR IF THE APPLIANCE WORKS INTERMITTENTLY OR STOPS WORKING ENTIRELY.
- A short power-supply cord is to be provided to reduce the risk resulting from becoming entangled in or tripping over a longer cord.
- Longer extension cords are available and may be used if care is exercised in their use.
- If a long detachable power-supply cord or extension cord is used:
– The marked electrical rating of the cord or extension cord should be at least as great as the electrical rating of the appliance.
– If the appliance is of the grounded type, the extension cord should be a grounding 3-wire cord; and
– The longer cord should be arranged so that it does not drape over the countertop or tabletop where it can be pulled on by children or tripped over unintentionally.
Polarized plug
This appliance has a polarized plug (one blade is wider than the other). As a safety feature, this plug will fit in a polarized outlet only one way. If the plug does not fit fully in the outlet, reverse the plug. If it still does not fit, contact a qualified electrician. Do not attempt to defeat this safety feature.
Do not let children handle or put the electrical cord into their mouths.
SAVE THESE INSTRUCTIONS!
PARTS
OPERATION
Before first use
- Remove all packaging materials, labels, and/or stickers from your appliance.
- Check the package to verify all contents are included and undamaged. Do not operate the appliance if the contents are incomplete or appear damaged. Return it immediately to Walmart.
The danger of suffocation!
– Packaging materials are not toys. Always keep plastic bags, foils and foam parts away from babies and children. Packaging material could block airways and prevent breathing.
NOTE:
– Always use the appliance with the Trivet placed securely in the Basket.
– The appliance may produce an odor and emit smoke when switched on for the first time, as residues from the production process are eliminated. This is normal and does not indicate a defect or hazard.
- It is recommended to operate it for at least 20 minutes on its highest setting ( Using the appliance), until no odor or smoke is present. During use, ensure ample ventilation
- Let the appliance cool completely.
- Clean the appliance ( Cleaning and Maintenance).
Using the appliance
This appliance can be used to prepare fries and potatoes, meat and poultry, snacks, and for baking ( Recommended cooking times and temperatures). This appliance uses a combination of hot air, high-speed air circulation, and a top Heating Element to cook food from all sides. It is an alternative way to cook food and snacks in a quick, healthy and easy way.
WARNING:
– Do not use the appliance to cook greasy or fatty food, such as sausages, as the grease could catch on fire.
NOTE:
– The appliance has a rated power of 1200W. Before plugging it into the wall outlet, ensure that no other appliances are already connected to the electrical circuit. Unplug them first if necessary. This appliance should always be operated on a separate 120V ~ 60Hz wall outlet.
– Make sure the appliance is switched off before connecting it to a wall outlet.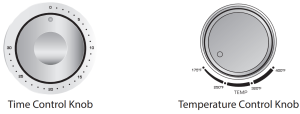
| Control knob | Function | Possible settings |
| Time | Setting the operating time / switching on the appliance Switching off the appliance |
Rotate clockwise to adjust: 0 to 30 minutes (1min intervals) Turn to 0 to switch off the appliance |
| Temperature | Setting the temperature | Rotate counterclockwise to adjust: 175°F (80°C) to 400°F (200°C) |
• Place the appliance on a clean, flat, and heat-resistant surface. Ensure a minimum distance around the appliance of at least 6 inches to other objects, cupboards and walls.
• Hold the Trivet Handle push the Trivet down into the Basket (ill.a
• Always keep the Silicon Pad (x4) on Trivet (ill. a
• Place the Basket in the appliance housing (ill. a
• Insert the plug into a wall outlet (ill. b The POWER indicator will turn on.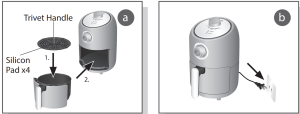
WARNING:
– Only use accessories recommended by the manufacturer. Do not place any other materials in the appliance.
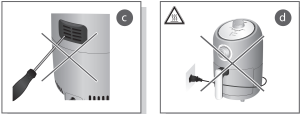
– Do not cover or insert any objects into the Air Vents (ill. c ).
– Never let the power cord come in contact with the housing of the appliance during use (ill. d
 • Preheat the appliance by turning the Time Control Knob to 3 minutes and the Temperature Control Knob to the required temperature. The HEATING Indicator will light up (ill. e ).
NOTE:
– For short cooking times, it is recommended to turn the Time Control Knob 5 minutes past the required time and then turn it back to the required cooking time. This will ensure higher timer accuracy and that the timer will turn off once reaching 0.
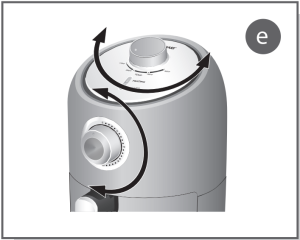
– The appliance is equipped with Safety Switches. If the Basket is not placed correctly in the housing or removed during use, the appliance will not switch on or is switched off automatically. Ensure the Basket is flush with the appliance housing.
The danger of burns!
– Always pay special attention when inserting or removing accessories and food from the appliance. Never place your bare hand inside the appliance (ill. f ), or touch the housing (ill. g ) when the appliance is plugged in and switched on. It is recommended to always use oven mitts.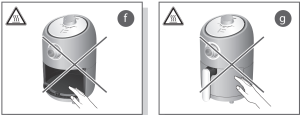
– Escaping steam can burn.
• Once the selected time has elapsed, a bell will ring to indicate the cooking cycle has finished and the appliance will switch off. The HEATING Indicator will turn off.
WARNING:
– Never place the hot Basket directly on a tabletop or countertop to avoid damage to surfaces. It is recommended to use a heat-resistant Trivet or cutting board.
• Remove the Basket by its handle from the appliance (ill. h ) and place it on a clean, flat, and heat resistant surface.
• Place the food to be cooked into the Basket (ill. i ).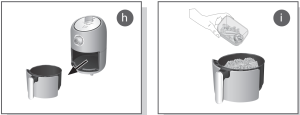
WARNING:
– Do not overfill the Basket.
– Do not use the Basket without the Trivet. Do not place food directly in the Basket.
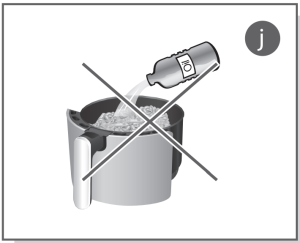
– Do not add oil directly into the Basket (ill. j ).
• Place the Basket back into the appliance housing.
• Turn the Time Control Knob to the required time and the Temperature Control Knob to the required temperature ( Recommended cooking times and temperatures). The HEATING Indicator will light up until the Time Control Knob reaches 0, indicating that the selected time has elapsed..
– Some foods might require the Basket to be shaken after half of the cooking time. Simply use the handle to remove the Basket from the appliance, shake the Basket in a back and forth motion a few times until all ingredients have moved inside the Basket and place it back in the appliance. The appliance will switch off as soon as the Basket is removed and switch back on once placed back inside. The timer will continue to run down.
• Once the selected time has elapsed, a bell will ring to indicate the cooking cycle has finished and the appliance will switch off. The HEATING Indicator will turn off.
WARNING: Basket will be hot. Do not touch with the bare hand;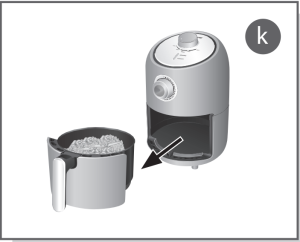
NOTE:
– The appliance can also be switched off manually, by turning the Time Control Knob to 0. A bell will ring to indicate the appliance is switched off. The HEATING Indicator will turn off.
• Remove the Basket by its handle from the appliance and place it on a clean, flat, and heat resistant surface (ill. k ).
WARNING:
– Slowly turn the Basket upside down to empty it and avoid spilling hot oil, liquids, and/or food residues collected at the bottom of the Basket.
– Danger of burns with hot oil and liquids!
• Carefully pour the food onto a suitable dish. Use suitable utensils to remove large or fragile food and avoid spilling.
The danger of burns!
– The metal surfaces of the appliance become hot. Do not touch while in use. Allow the appliance to cool at least 30 minutes before handling and cleaning.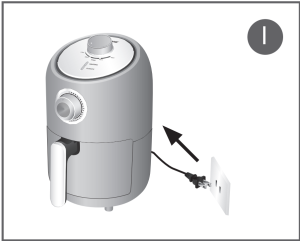 NOTE:
NOTE:
– The appliance is ready for a second batch of food as soon as the first one is done, there is no waiting time required.
• Grasp the plug and pull on the plug to disconnect the plug from the wall outlet (ill. l)
• Allow the appliance to cool down completely before cleaning it ( Cleaning and Maintenance). Clean after every use.
Recommended cooking times and temperatures
NOTE:
– The following temperatures and times are recommendations only. Adjust them to your personal preferences and needs. They are based on food at refrigerator temperatures. Cooking frozen food will take longer. All recommended times include preheating. Additional preheating isn’t necessary.
| Min – Max Amount (lb) | Time (min.) | Temp. (°F) | Shake/Flip | Additional information | |
| Potatoes & fries | |||||
| Thin frozen fries | 0.3-0.8 | 10-18 | 400 | Shake 1-2 times | |
| Thick frozen fries | 0.3-0.8 | 18-23 | 400 | Shake 2-3 times | |
| Home-made fries (0.3 x 0.3 inch) | 0.3-0.8 | 20-25 | 360 | Add 1/2 tbsp. of oil | |
| Home-made potato wedges | 0.3-1 | 20-26 | 400 | Add 1/2 tbsp. of oil | |
| Hashbrown | 0.3-0.8 | 20-30 | 360 | ||
| Min – Max Amount (lb) | Time (min.) | Temp. (°F) | Shake/Flip | Additional information | |
| Meat & Poultry | |||||
| Steak | 0.2-0.8 | 20-30 | 360 | Flip halfway | |
| Pork chops | 0.2-0.6 | 22-30 | 360 | ||
| Hamburger | 0.2-0.8 | 12-18 | 360 | ||
| Chicken breast | 0.2-0.9 | 20-30 | 400 | ||
| Drumsticks | 0.2-0.8 | 20-30 | 360 | Flip every 8 minutes | |
| Snacks | |||||
| Spring rolls | 0.2-0.5 | 8-10 | 400 | Shake halfway | Use oven ready type |
| Frozen chicken nuggets | 0.2-0.8 | 10-15 | 400 | ||
| Frozen fish fingers | 0.2-0.5 | 6-10 | 400 | ||
| Frozen cheese sticks | 0.2-0.5 | 8-10 | 360 | ||
| Frozen vegetables | 0.2-0.5 | 10 | 320 | ||
| Baking | |||||
| Cake | 0.3 | 20-25 | 320 | ||
| Quiche | 0.4 | 20-22 | 360 | ||
| Muffins | 1 to 3 mini muffins | 9-11 | 370 | ||
Making home-made fries
- Peel the potatoes and cut them into sticks.
- For best results, soak the potato sticks in water for 30 minutes.
- Rinse the potato sticks thoroughly and dry them with paper towels.
- Pour 1/2 tablespoon of canola oil in a bowl, put the sticks on top, and mix until they are coated with oil.
- Remove the sticks from the bowl with a kitchen utensil so that excess oil stays behind in the bowl. Put the sticks in the Basket on top of the Trivet.
NOTE:
– Do not tilt the bowl to pour the potato sticks into the Basket. Transfer them with a kitchen utensil in smaller batches to prevent excess oil to be transferred.
– Air-fry the potato sticks according to the instructions above. Cooking time and temperature are required to be adjusted depending on the quantity.
HINTS AND TIPS
- This appliance can be used to prepare many foods that can also be prepared in a traditional oven.
- Smaller food normally requires less cooking time than larger food.
- It is recommended to cook defrosted food and cook from a refrigerated temperature to shorten the cooking time. Note: some foods do not require thawing, please refer to the specific cooking instructions for the food you are preparing.
- It is recommended to use a meat thermometer to check the cooking progress.
- For short cooking times, it is recommended to turn the Time Control Knob TIME 5 minutes past the required time and then turn it back to the required cooking time. This will ensure higher timer accuracy and that the timer will turn off once reaching 0.
- In the event of food flare-ups, do not remove the Basket; turn the Time Control Knob to 0 and unplug the appliance.
- Wait at least 30 minutes before attempting to remove the Trivet from the Basket.
- For evenly crispy food, we recommend shaking the food through the cooking process. Recipes with a shorter cooking time (<10 min) require at least one shake, halfway through the cooking process. Longer recipes (>10 min) require shaking 2-3 times through the cooking process. For best results, shake at least every 8 minutes.
- The optimal amount for cooking crispy fries is up to 0.8lb of sliced potatoes.
- Use the pre-made dough to cook filled snacks quickly and easily. The pre-made dough also requires a shorter cooking time than homemade dough.
- Place a baking tin or oven-compatible dish in the Basket with Trivet if you want to bake a cake, quiche or if you want to fry fragile or filled ingredients.
- You can also use the appliance to reheat food. Place food into the appliance, and then set the Temperature Control Knob around 290°F and the Time Control Knob
to 10 minutes.
CLEANING AND MAINTENANCE
Proper maintenance will ensure many years of service from your appliance. Clean the appliance after every use. The appliance contains no user-serviceable parts and requires little maintenance. Leave any servicing or repairs to qualified personnel.
WARNING:
– Always turn the Time Control Knob to 0 and disconnect the plug from the wall outlet before cleaning. Allow all parts of the appliance to cool down completely.
NOTE:
– Do not immerse the Power Cord with Plug and appliance housing into water or any other liquids. Do not use abrasive cleaners, steel wool, or scouring pads. Dry all parts thoroughly after cleaning, before using or storing the appliance. Ensure that no water enters the appliance housing.
- Remove the Basket from the appliance and then, use the Trivet Handle to remove the Trivet from the Basket.
- Wipe the inside and outside of the appliance with a slightly damp, soft cloth and some mild detergent if needed.
- Take extra care when cleaning near the Heating Element in order not to damage it.
- The Trivet and Basket can be washed in hot soapy water or in a dishwasher.
WARNING:
– Any food residue left on the Trivet and/or Basket could cause odor and/ or smoke emissions.
NOTE:
– Dry all parts and surfaces thoroughly before use. Make sure that all parts and surfaces are completely dry before connecting the appliance to a wall outlet.
Food residue removal
In case food residues cannot be easily removed from the Trivet and/or Basket, follow the below procedure:
- Place the Trivet into the Basket.
- Fill the Basket with hot water. Add some mild detergent if needed.
- Let soak for 10 minutes and then wash the Trivet and Basket in hot soapy water or in a dishwasher.
- Ensure all food residues have been removed.
Storage
- Before storage, always make sure the appliance is completely cool, clean, and dry.
- It is recommended to store the appliance in a dry place.
- Store the appliance on a stable shelf or in a cupboard. To avoid accidents, ensure that both the appliance and its power cord are beyond the reach of children or pets.
TROUBLESHOOTING
| Problem | Cause | Solution |
| The appliance is not working | Appliance not plugged in | Insert the plug into the wall outlet |
| Wall outlet not energized | Check fuses and circuit breaker | |
| Basket not properly engaged with the appliance housing | Fit the Basket properly into the appliance housing | |
| Time Control Knob not set | Rotate the Time Control Knob to set the operating time according to the food to be cooked | |
| The appliance is working but the POWER Indicator does not light up | Damaged POWER
indicator light |
Contact qualified personnel to check and repair the appliance |
| The POWER
Indicator lights up but the appliance does not heat up |
Time Control Knob not set | Rotate the Time Control Knob to set the operation time according to the food to be cooked. The HEATING indicator lights up. |
| The HEATING
Indicator lights up but the appliance does not heat up |
Malfunctioning appliance | Contact qualified personnel to check and repair the appliance |
| The appliance heats up but the Time Control Knob is on the 0 | Malfunctioning Time Control Knob | Unplug the appliance from the wall outlet and contact qualified personnel to check and repair the appliance |
| The Time Control Knob does
not ring upon reaching 0 |
Reduced timer accuracy | Turn the Time Control Knob
5 minutes past the required time and turn it back to the required cooking time |
| Malfunctioning Time Control Knob | Contact qualified personnel to check and repair the appliance | |
| The fan does not operate during the cooking process | Damaged fan | Unplug the appliance from the wall outlet and contact qualified personnel to check and repair the appliance |
| Problem | Cause | Solution |
| The appliance produces an odor and emits smoke | Residues from the production process are eliminated during first use | Operate the appliance for at least 20 minutes on its highest setting, with no food, until no odor or smoke is present |
| Food residues not properly removed following previous use | Unplug the appliance from the wall outlet, let it cool down and clean thoroughly before using it again | |
| Malfunctioning appliance Food too greasy | Unplug the appliance from the wall outlet and contact qualified personnel to check and repair the appliance
Ensure ample ventilation, unplug the appliance from the wall outlet and let it cool down |
If additional assistance is needed, please contact our Customer Assistance at 1-855-451-2897 (US).
TECHNICAL DATA
| Rated voltage: | 120V ~ 60Hz | Rated power input: | 1200W |
| Rated current: | 10A | Capacity: | Max. 1.9QT |
CUSTOMER ASSISTANCE
If you have a claim under this warranty, please call our Customer Assistance Number. For faster service, please have the model number and product name ready
for the operator to assist you. This number can be found on the bottom of your appliance and on the front page of this manual.
Model Number: __________________ Product Name: __________________
Customer Assistance Number 1-855-451-2897.Keep these numbers for future reference!
Two-year limited warranty
© 2019 Farberware Licensing Company,
LLC. All Rights Reserved.
Copyrights and Trademarks of Farberware Licensing Company,
LLC, including FARBERWARE®,
are used under license from Farberware Licensing Company, LLC.
FAQS
What does your warranty cover?
- Any defect in material or workmanship. For how long after the original purchase?
- Two years.
What will we do?
- Provide you with a new one.
- For those items still under warranty but no longer available, WAL-MART reserves the right to replace them with a similar FARBERWARE branded product of equal or greater value.
How do you make a warranty claim?
- Save your receipt.
- Properly pack your unit. We recommend using the original carton and packing materials.
- Return the product to your nearest Walmart store or call Customer Assistance at 1-855-451-2897.
What does your warranty not cover?
- Parts subject to wear, including, without limitation, glass parts, glass containers, cutter/strainer, blades, seals, gaskets, clutches, motor brushes, and/or agitators, etc.
- Commercial use or any other use not found in printed directions.
- Damage from misuse, abuse, or neglect, including failure to clean product regularly in accordance with manufacturer’s instructions.
How does state law relate to this warranty?
- This warranty gives you specific legal rights, and you may also have other rights which vary from state to state or province to province.
- This warranty is in lieu of any other warranty or condition, whether express or implied, written or oral, including, without limitation, any statutory warranty or condition of merchantability or fitness for a particular purpose.
- WAL-MART, FARBERWARE, and the product manufacturer expressly disclaim all responsibility for special, incidental, and consequential damages or losses caused by use of this appliance. Any liability is expressly limited to an amount equal to the purchase price paid whether a claim, however, instituted, is based on contract, indemnity, warranty, tort including negligence), strict liability, or otherwise. Some states or provinces do not allow this exclusion or limitation of incidental or consequential losses, so the foregoing disclaimer may not apply to you.
What if you encounter a problem with this product while using it outside the country of purchase?
• The warranty is valid only in the country of purchase and if you follow the warranty claim procedure as noted.
Make popcorn?
Don’t know, read manual. think probably not, kernels would fall thru holes of inner basket, tho there are parchment paper discs available.
Which Replacement knob?
There are only 2 knobs, they are both the same.
What is the wattage?
It goes up.to 400 degrees. It is 5 stars on the reviews it was rated the best air fryer on consumer reports out of numerous ones.
18 x 16 is pretty big – is it 18″ tall and 16″ wide?
closer to 14 high and 11 or 12 wide
does the manual mention how long to cook various m things?
Yes & gives various recipes as well.
What model number?
mine is 45447 in 2021
Is this a HF-919B?
Yes it is. A great air fryer rated top one on consumer reports.
Are there any accessories for this? Steamer rack, etc. like other manufacturers offer?
No
Which air fryer cookbook do I order for this air fryer?
It comes with a cook book
What are the inner dimensions of the basket?
8″ diameter x 4 ” deep
Which size parchment paper works with this model farberware air fryer?
8”
Plastic part over handle release?
Slides forward, toward the baskets, so the inner basket can be released from the main basket.
Does only the inner basket contain teflon?
The inner basket is non stick, not sure what the material is. It is very easy to clean and does not chip.
Can this be used as a food dehydrater?
A chiefman air fryer is best to use. I’m not sure because it dosent have the function to do that.
How long will it take to cook food?
The time it takes to cook food depends on the quantity and type of food being cooked. For example, if you are cooking 1 cup of frozen French fries, it will take approximately 15 minutes to cook. If you are cooking 2 cups of frozen French fries, it will take approximately 20 minutes to cook. If you are cooking 6 cups of frozen French fries, it will take approximately 40 minutes to cook.
What is the wattage of the appliance?
The wattage is 1000 watts.
What does “Fryer” mean?
Fryer means that this appliance can be used for frying foods such as chicken, fish, and vegetables. It does not mean that this appliance can only be used for frying foods. This appliance can also be used for cooking other foods such as popcorn, french fries, and more.

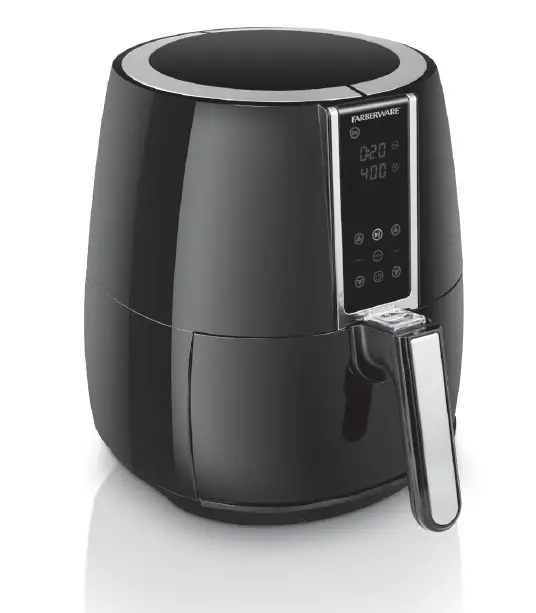
DIGITAL OIL-LESS FRYER
Model Number: FBW FT 43479 BK
UPC: 848052004283
Customer Assistance
1-855-451-2897 (US)
IMPORTANT SAFEGUARDS
When using electrical appliances, basic safety precautions should always be followed, including the following:
- Read all instructions before use.
- Do not touch hot surfaces. Use handles or knobs.
- WARNING – to protect against electric shock, fire and personal injury:
– do not immerse cord or plug in water or other liquids;
– do not immerse the appliance or any electrical components in water or any other liquids;
– always switch off and unplug the appliance before cleaning;
– cook only in the provided basket placed in the basket holder. - Close supervision is necessary when any appliance is used by or near children.
- Unplug from wall outlet when not in use and before cleaning. Allow to cool before putting on or taking off parts, and before cleaning the appliance.
- Do not operate any appliance with a damaged cord or plug, or after the appliance malfunctions or has been damaged in any manner. Call our toll-free customer assistance number for information on examination, repair, or adjustment.
- The use of accessory attachments not recommended by the appliance manufacturer may result in fire, electric shock or injuries to persons.
- Do not use outdoors or in a damp area.
- Do not let power cord hang over edge of table or counter, or touch hot surfaces.
- Do not place on or near a hot gas or electric burner or in a heated oven.
- Extreme caution must be used when moving an appliance containing hot oil or other hot liquids.
- To turn off and disconnect, press the On/off button , then remove plug from wall outlet.
- Never pull on the cord to disconnect the appliance from the wall outlet; instead, grasp the plug and pull on the plug.
- CAUTION – Risk of electric shock. Cook only in removable container.
- Oversized foods or metal utensils must not be inserted in the appliance as they may create a fire or risk of electric shock.
- Do not use appliance for other than intended use.
- Never leave the appliance unattended during operation.
- During use and when removing the basket, hot steam is released. Keep hands and face clear.
- Ensure a minimum distance around the appliance of at least 6 inches to other objects, cupboards and walls.
- A fire may occur if the appliance is covered or touches flammable material, including curtains, draperies, walls, and the like, when in operation. Do not store any item on top of the appliance when in operation.
SAVE THESE INSTRUCTIONS!
IMPORTANT SAFEGUARDS
- Use extreme caution when removing the basket, the basket holder or disposing of hot grease.
- Do not clean with metal scouring pads. Pieces can break off the pad and touch electrical parts involving a risk of electric shock.
- Extreme caution should be exercised when using containers constructed of other than metal or glass.
- Do not store any materials, other than manufacturers recommended accessories, in this appliance when not in use.
- Do not place any of the following materials in the appliance: paper, cardboard, plastic.
- Do not cover the basket or any part of the appliance with metal foil. This will cause overheating of the appliance.
- Let the appliance cool completely before putting away or storing.
ADDITIONAL SAFEGUARDS
This appliance is for HOUSEHOLD USE ONLY.
WARNING:
– DO NOT OPERATE THIS APPLIANCE, IF THE POWER CORD SHOWS DAMAGE OR IF APPLIANCE WORKS INTERMITTENTLY OR STOPS WORKING ENTIRELY.
- A short power-supply cord is to be provided to reduce the risk resulting from becoming entangled in or tripping over a longer cord.
- Longer extension cords are available and may be used if care is exercised in their use.
- If an extension cord is used:
– The marked electrical rating of the cord or extension cord should be at least as great as the electrical rating of the appliance.
– If the appliance is of the grounded type, the extension cord should be a grounding 3 wire cord; and
– The longer cord should be arranged so that it does not drape over the countertop or table top where it can be pulled on by children or tripped over unintentionally.
Polarized plug
- This appliance has a polarized plug (one blade is wider than the other). As a safety feature, this plug will fit in a polarized outlet only one way. If the plug does not fit fully in the outlet, reverse the plug. If it still does not fit, contact a qualified electrician. Do not attempt to defeat this safety feature.
- Do not let children handle or put the electrical cord into their mouths.
SAVE THESE INSTRUCTIONS!
PARTS
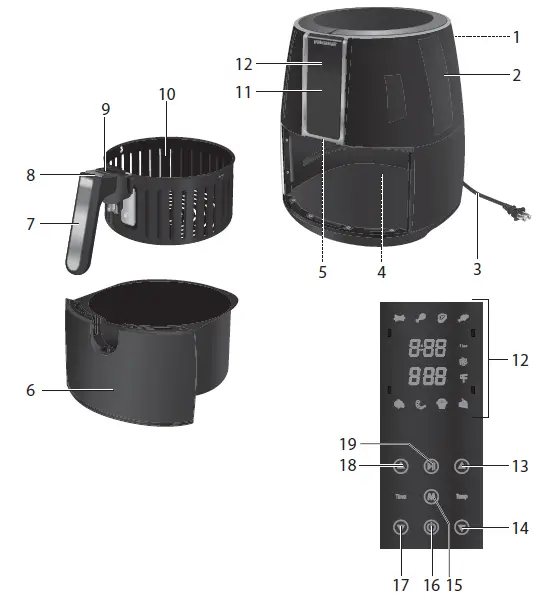
1. Air vents
2. Housing
3. Power cord with plug
4. Heating element
5. Safety switch
6. Basket holder
7. Basket handle
8. Release button
9. Release button cover
10. Basket
11. Control panel
12. Digital LED display
13. Increase temperature button 
14. Decrease temperature button 
15. Select program button 
16. On/off button 
17. Decrease time button 
18. Increase time button 
19. Start/Pause button 
KNOW YOUR DIGITAL OIL-LESS FRYER
Prepare your favorite foods and snacks in a quick, healthy, and easy way with your new Digital Oil-Less Fryer. This Oil-less Fryer combines heat with high-speed air circulation to cook your ingredients from all sides, simultaneously! It also allows you to prepare a variety of tasty dishes without the addition of excess oils or fats to most ingredients. This Oil-less Fryer features:
- Digital control of the cooking time and temperature.
- A digital control panel with 8 preset menu options.
- A temperature control range up to 400°F (200°C)
- A timer range from 1 to 60 minutes, which is equipped with an auto shut-off feature. Once the timer reaches “0”, the unit will turn itself off.
- Capacity of 2 lbs.
Other great advantages provided by your Oil-less Fryer include:
- Fast cooking, with little to no preheating required.
- Quick and easy clean-up: the non-stick coated parts are conveniently sized to fit in the dishwasher.
- Hassle-free frying—no spatters, no mess, and no oil smell!
- Versatility—with its frying, baking, grilling, and roasting capacities, this unit serves as a great cooking tool for a busy kitchen.
- No assembly required—very easy and safe to use!
Important: For golden, crispier results, similar to those obtained in a deep fryer, it is important to remember that leaner foods (fries, vegetables, chicken, fish, etc.) are best coated with just a tablespoon of oil. Simply add the ingredients in a bowl, add a tablespoon of oil, and toss until well coated.
You can also air-fry any food designed for being baked in the oven. The cooking times will likely need to be adjusted, because the Oil-less Fryer will bake food much faster than a traditional oven or toaster oven.
ILLUSTRATIONS
OPERATION
Before first use
- Remove all packaging materials, labels and/or other transportation means.
- Check package content to verify it is complete and undamaged. Do not operate the appliance if the content is incomplete or appears damaged. Return it immediately to Walmart.
Danger of suffocation!
- Packaging materials are not toys. Always keep plastic bags, foils and foam parts away from babies and children. Packaging material could block airways and prevent breathing.
NOTE:
*Always use the appliance with the basket (10) placed securely in the basketholder (6).
*The appliance may produce an odor and emit smoke when switched on for the first time, as residues from the production process are eliminated. This is normal and does not indicate a defect or hazard.
- It is recommended to operate it for at least 20 minutes on its highest setting ( Using the appliance), until no odor or smoke is present. During use, ensure ample ventilation.
- Let the appliance cool completely.
- Clean the appliance ( Cleaning and Maintenance).
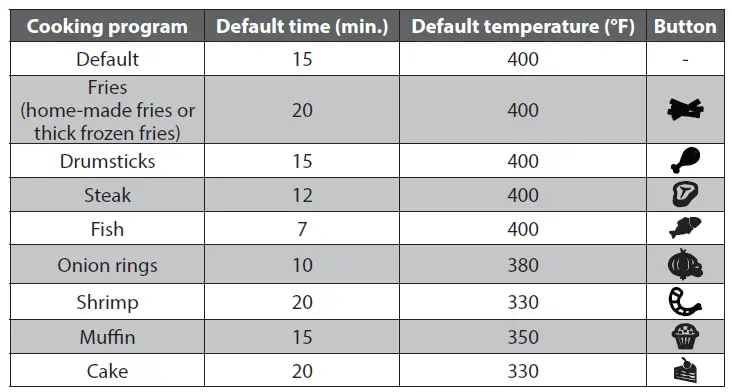
Cooking programs
The appliance is equipped with several pre-set cooking programs. The cooking times and temperatures can be adjusted to suit your own taste, food quantities and food manufacturer’s instructions.
Using the appliance
This appliance can be used to prepare fries and potatoes, meat and poultry, snacks and for baking ( Recommended cooking times and temperatures).
This appliance uses a combination of hot air, high speed air circulation and a top heating element to cook food from all sides. It is an alternative way to cook food and snacks in a quick, healthy and easy way.
WARNING:
Do not use the appliance to cook greasy or fatty food, such as sausages, as the grease could catch on fire.
NOTE:
The appliance has a rated power of 1500W. Before plugging it into the wall outlet, ensure that the electrical circuit is not overloaded with other appliances. This appliance should always be operated on a separate 120V ~ 60Hz wall outlet.
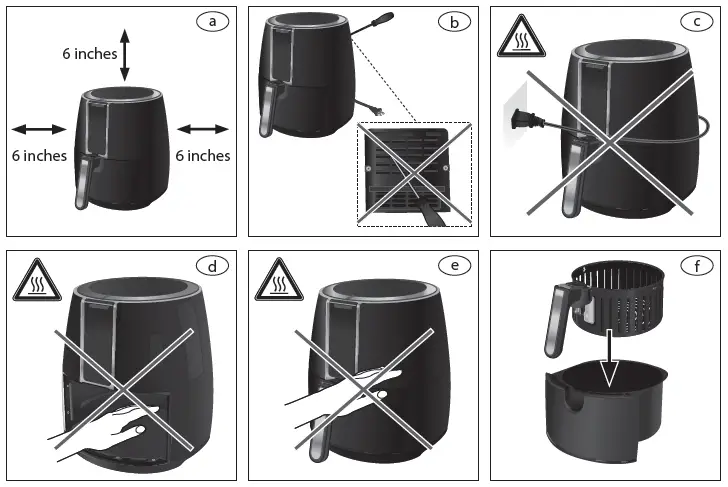
- Place the appliance on a clean, flat and heat-resistant surface. Ensure a minimum distance around the appliance of at least 6 inches to other objects, cupboards and walls (a).
WARNING:
→ Only use accessories recommended by the manufacturer. Do not place any other materials in the appliance.
→ Do not cover or insert any objects into the air vents (1) (b).
→ Never let the power cord (3) come in contact with the housing (2) of the appliance during use (c).
Danger of burns!
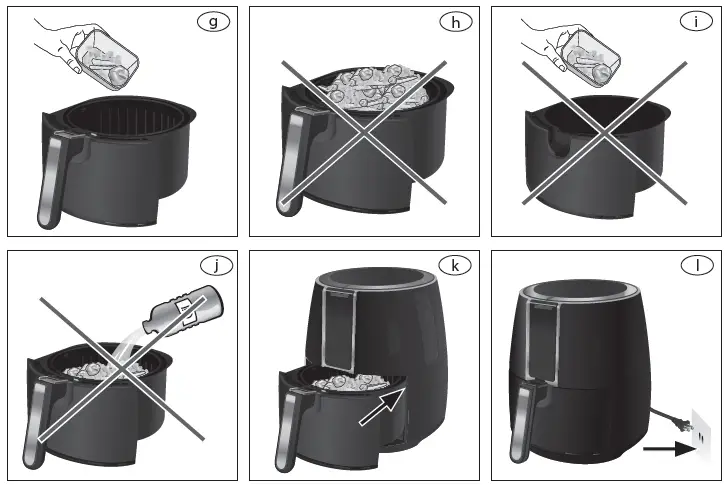
→ Always pay special attention when inserting or removing accessories and food from the appliance. Never place your bare hand inside the appliance (d), or on the housing (2) (e) when the appliance is plugged in and switched on. It is recommended to always use oven mitts.
→ Escaping steam can burn.
- Insert the basket (10) into the basket holder (6) (f).
- Place the food to be cooked in the basket (10) (g).
WARNING:
→ Do not overfill the basket (10) (h). Do not exceed the MAX marking on the basket (10) when placing food inside.
→ Do not use the basket holder (6) without the basket (10). Do not place food directly in the basket holder (6) (i).
→ Do not add oil directly into the basket (10) or basket holder (6) (j).
- Place the basket holder (6) in the appliance housing (k).
NOTE:
→ The appliance is equipped with a safety switch (5). If the basket holder (6) is not placed correctly in the housing (2) or removed during use, the appliance will not switch on or is switched off automatically. Ensure the basket holder (6) is flush with the appliance housing (2).
→ The default settings of the appliance are a temperature of 400°F and default time of 15 minutes.
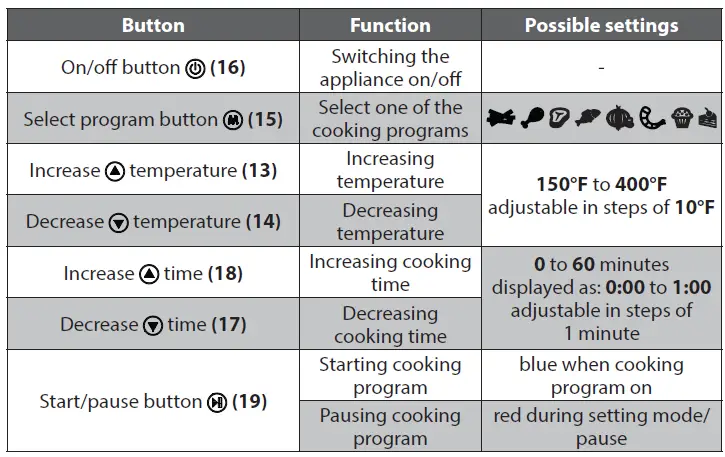
→ Press and hold either of the buttons increase  (13) and decrease
  (14) temperature
  or either of the buttons increase
  (18) or decrease
  (17) time Time to adjust the corresponding setting faster.
- Insert the plug (3) into a wall outlet (i). The on/off button
 (16) lights up blue.
 - Press the on/off button
 (16) to switch the appliance on. The display lights up and shows the default settings.
 - Press the select program button
 (15) until the required cooking program is selected ( → Cooking programs) or use the default settings.
 - Press the increase
 and decrease
  buttons (13, 14) to set the required temperature
  and the increase
 and decrease
  buttons (17, 18) to set the required time TIME. Press the on/off button
  (16) to exit the selected program, if required.
 - Press the start/pause button
 (19) to start the cooking program. The fan
  symbol on the display (12) turns blue and blinks until the set temperature is reached.
NOTE:
→ The fan  symbol on the display (12) remains continuously on when the set temperature is reached. During use, the fan symbol
  will blink from time to time, indicating the appliance is heating, to ensure a consistent cooking temperature.
→ During the cooking process, the cooking programs, temperature and time cannot be adjusted. Press the start/pause button  (19) to pause the cooking program. The fan symbol
  on the display (12) turns off. Time and temperature can be adjusted according to your needs and another program can also be selected, if required. Press the start/pause button
  (19) again to continue the cooking process with updated settings.
→ Some foods might require the basket (10) to be shaken after half of the cooking time. Simply use the handle (7) to remove the basket holder (6) from the appliance, give it a shake and place it back in the appliance. The appliance will switch off as soon as the basket holder (6) is removed and switch back on once placed back inside.
→ The appliance can be switched off manually, by pressing the on/off button  (16).
(16).
- Once the set time has passed, the appliance will beep to indicate the cooking process has finished.
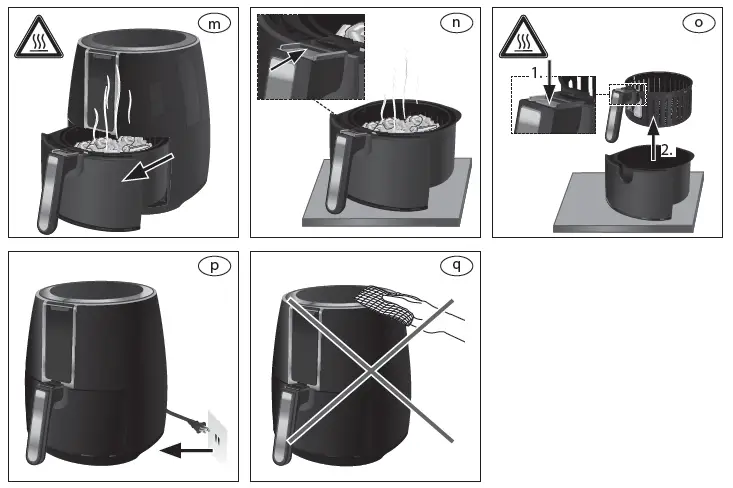
- Use the handle (7) to remove the basket holder (6) from the appliance (m) and place it on a clean, flat and heat resistant surface. Never place the hot basket holder (6) directly on a tabletop or countertop to avoid damage to surfaces.
- To remove the basket (10) from the basket holder (6), first push the release button cover (9) forward to expose the release button (8) (n).
- Then, press the release button (8) and carefully lift the basket (10) upwards, out of the basket holder (6), by the handle (7) (o).
- Turn the basket upside down and carefully pour the food onto a suitable dish. Use suitable utensils to remove food, if required.
- Continue using the appliance straight away to prepare additional food, if required. If you have finished using the appliance, disconnect the plug (3) from the wall outlet (p).
- Allow the appliance to cool down completely before cleaning it ( → Cleaning and Maintenance). Clean after every use.
Danger of burns!
→ Do not press the release button (8) unless the basket holder (6) is placed on a clean, flat and heat resistant surface, it may contain hot liquids generated during the cooking process.
→Always release the basket (10) from the basket holder (6) before emptying it. Hot oil, other liquids or food residues may have collected in the basket holder (6).
→ The metal surfaces of the appliance become hot. Do not touch while in use. Allow the appliance to cool at least 30 minutes before handling and cleaning.
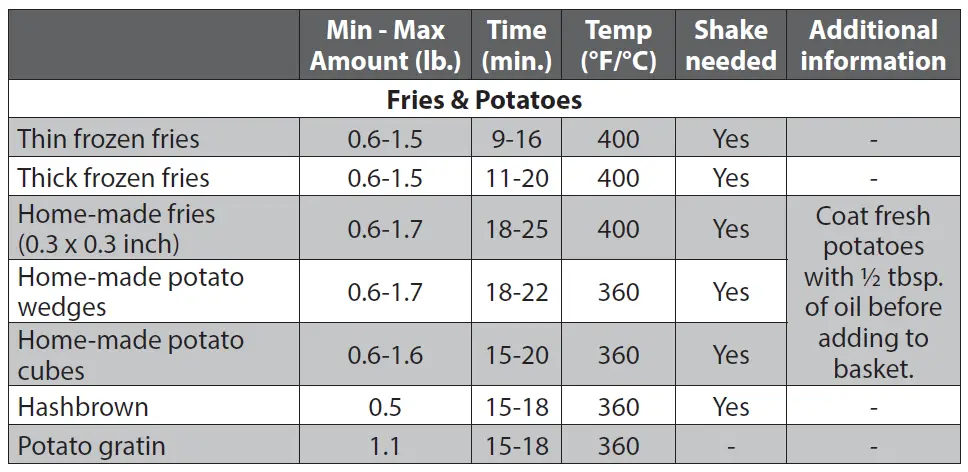
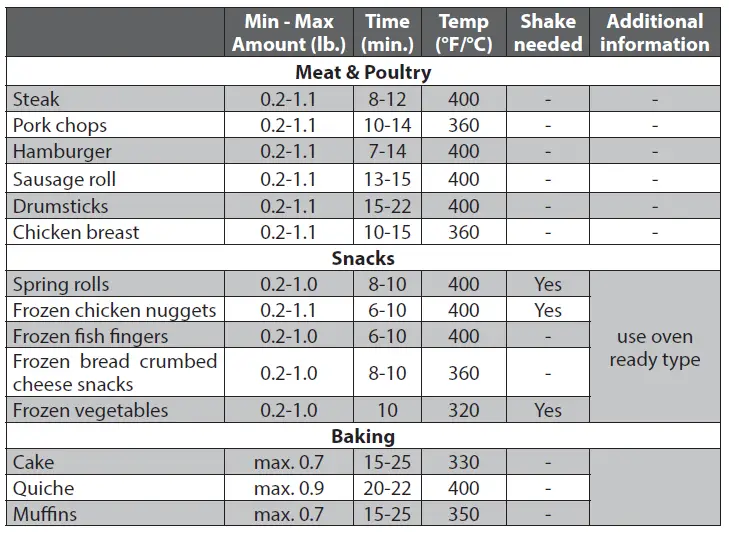
Recommended cooking times and temperatures
NOTE:
→ The following temperatures and times are recommendations only. Adjust them to your personal preferences and needs. They are based on food at refrigerator temperatures. Cooking frozen food will take longer.
HINTS AND TIPS
- This appliance can be used to cook many foods that can also be prepared in a traditional oven.
- Smaller quantities of food normally require a slightly shorter cooking time than larger quantities of food.
- To reduce cooking time, defrost food prior to cooking. It is recommended that some foods should not be thawed/defrosted prior to cooking, such as frozen fish, and frozen french fries.
- It is recommended to use a meat thermometer to check the cooking progress.
- In the event of food flare-ups, do not remove the basket holder (6); press the on/off button
 (16) and unplug the appliance.
 - Do not release the basket (10) from the basket holder (6) unless it is placed on a clean, flat and heat resistant surface.
- When the food you are cooking requires shaking, it is recommended to set the time to half the required time or use a separate timer set for half of the suggested cooking time. This way a bell will ring and remind you to shake the basket (10).
- The optimal amount for cooking crispy fries is up to 1.5lbs of sliced potatoes.
- Use pre-made dough to cook filled snacks quickly and easily. Pre-made dough also requires a shorter cooking time than home-made dough.
- Use the appliance to reheat food. Place food into the appliance, and then set the temperature to 150°F and the time up to 10 minutes.
- It is recommended to only use nylon, heat-proof plastic or wooden cooking utensils. Metal utensils may damage the non-stick surface. Always remove utensils from the appliance. Do not leave them in the appliance during use.
CLEANING AND MAINTENANCE
Proper maintenance will ensure many years of service from your appliance. Clean the appliance after every use. The appliance contains no user serviceable parts and requires little maintenance. Leave any servicing or repairs to qualified personnel.
WARNING:
→ Always turn the appliance off by pressing the on/off button (16). Disconnect the plug (3) from the wall outlet before cleaning. Allow all parts of the appliance to cool down completely.
NOTE:
→ Do not immerse the power cord with plug (3) and appliance housing (2) into water or any other liquids. Do not use abrasive cleaners, steel wool or scouring pads (q). Dry all parts thoroughly after cleaning, before using or storing the appliance. Ensure that no water enters the appliance housing (2).
- Remove the basket holder (6) from the appliance and then, the basket (10) from the basket holder (6).
- Wipe the inside and outside of the appliance with a slightly damp, soft cloth and some mild detergent if needed.
- Take extra care when cleaning near the heating element (4) in order not to damage it.
- The basket holder (6) and basket (10) and can be washed in hot soapy water. The basket holder (6) and basket (10) can also be placed in a dishwasher.
WARNING:
→ Any food residue left on the basket (10) and basket holder (6) could cause odor and/or smoke emissions. Ensure all parts of the appliance are free from residue.
NOTE:
Dry all parts and surfaces thoroughly before use. Make sure that all parts and surfaces are completely dry before connecting the appliance to a wall outlet.
Storage
- Before storage, always make sure the appliance is completely cool, clean and dry.
- It is recommended to store the appliance in a dry place.
- Store the appliance on a stable shelf or in a cupboard. To avoid accidents, ensure that both the appliance and its power cord are beyond reach of children or pets.
TROUBLESHOOTING
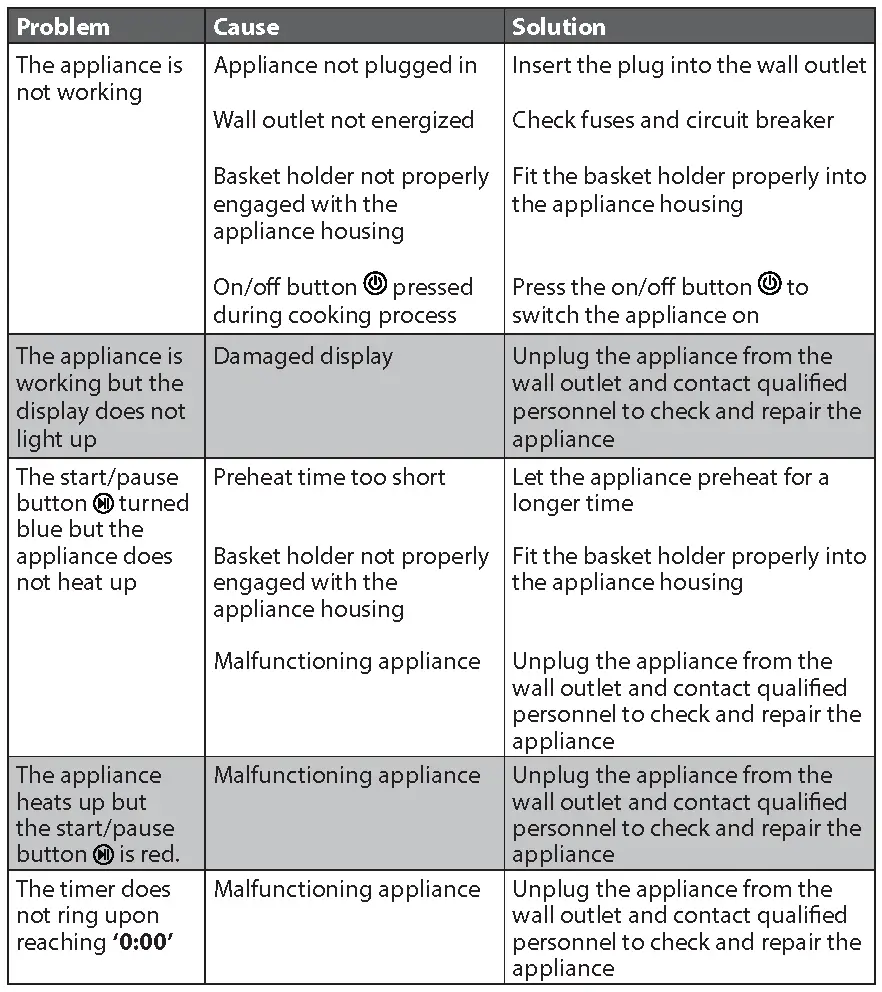
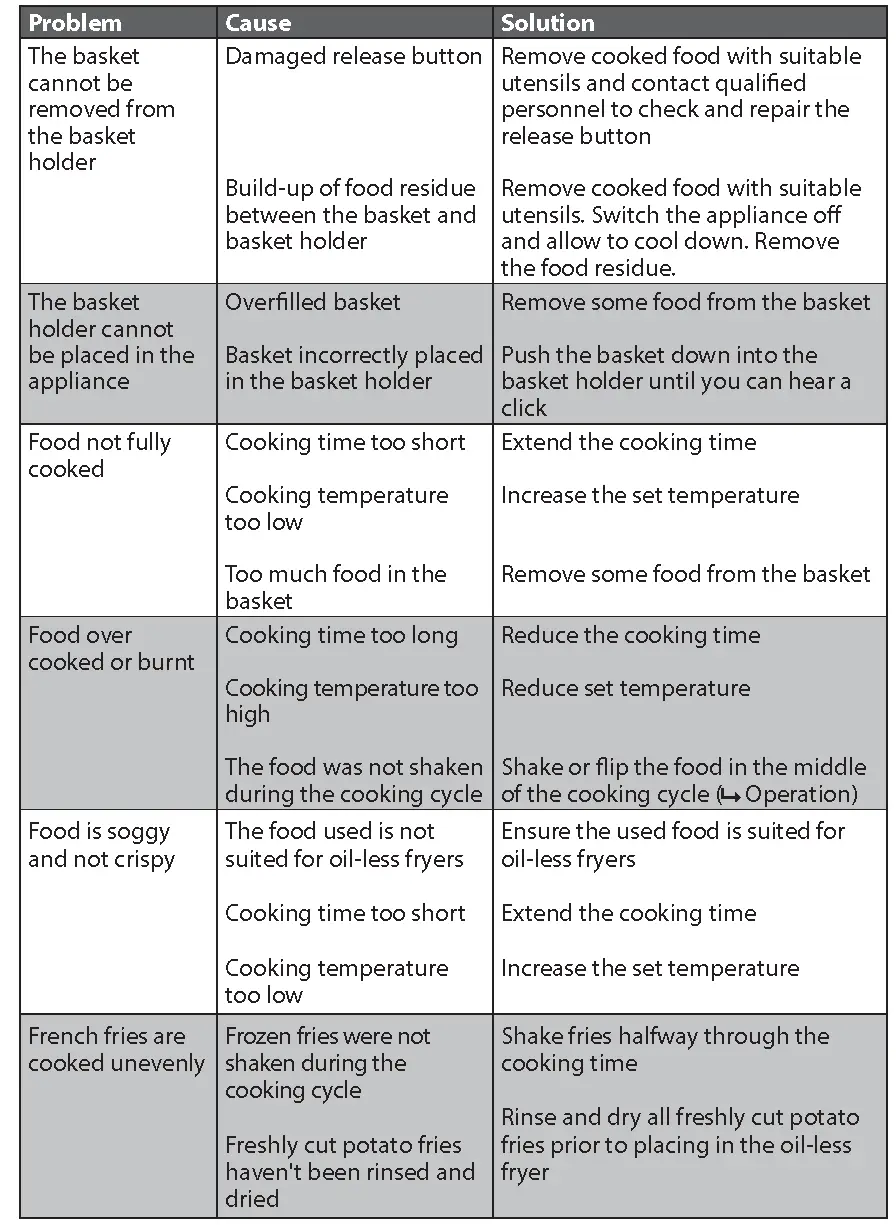
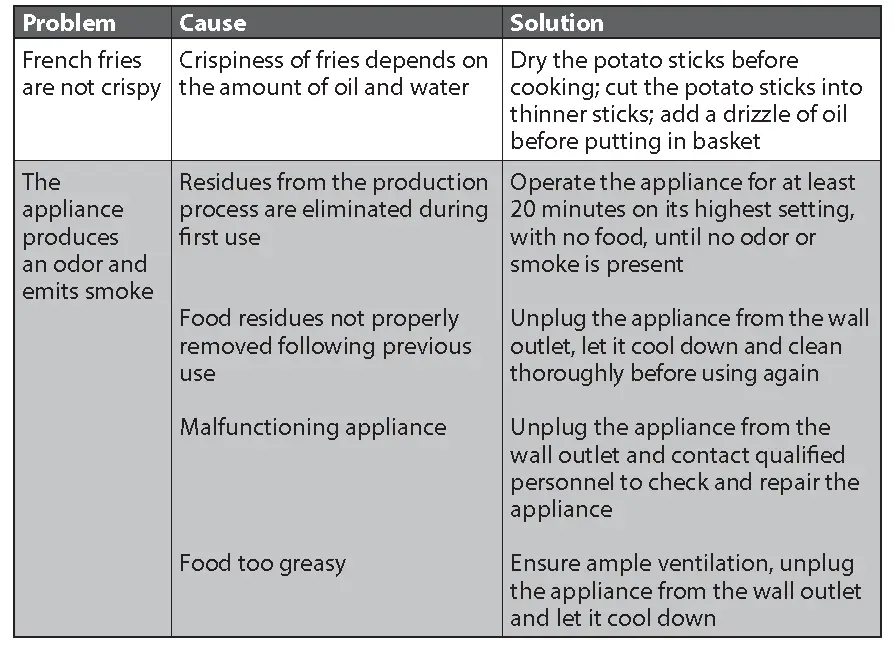
If additional assistance is needed, please contact our Customer Assistance at
1-855-451-2897 (US).
TECHNICAL DATA
- Rated voltage: 120V ~ 60Hz
- Rated power input: 1500W
- Rated current: 12.5A
- Capacity: Max. 3.2Qt (3L)
CUSTOMER ASSISTANCE
If you have a claim under this warranty, please call our Customer Assistance Number. For faster service, please have the model number and product name ready for the operator to assist you. This number can be found on the bottom of your appliance and on the front page of this manual.
Model Number: __________________ Product Name: __________________
Customer Assistance Number 1-855-451-2897
Keep these numbers for future reference!
Two-year limited warranty
What does your warranty cover?
- Any defect in material or workmanship.
For how long after the original purchase?
- Two years.
What will we do?
- Provide you with a new one.
- For those items still under warranty but no longer available, WAL-MART reserves the right to replace with a similar FARBERWARE branded product of equal or greater value.
How do you make a warranty claim?
- Save your receipt.
- Properly pack your unit. We recommend using the original carton and packing materials.
- Return the product to your nearest
Walmart store or call Customer Assistance
at 1-855-451-2897.
What does your warranty not cover?
- Parts subject to wear, including, without limitation, glass parts, glass containers, cutter/strainer, blades, seals, gaskets, clutches, motor brushes, and/or agitators, etc.
- Commercial use or any other use not found in printed directions.
- Damage from misuse, abuse, or neglect, including failure to clean product regularly in accordance with manufacturer’s instructions.
How does state law relate to this warranty?
- This warranty gives you specific legal rights, and you may also have other rights which vary from state to state or province to province.
- This warranty is in lieu of any other warranty or condition, whether express or implied, written or oral, including, without limitation, any statutory warranty or condition of merchantability or fitness for a particular purpose.
- WAL-MART, FARBERWARE and the product manufacturer expressly disclaim all responsibility for special, incidental, and consequential damages or losses caused by use of this appliance. Any liability is expressly limited to an amount equal to the purchase price paid whether a claim, however instituted, is based on contract, indemnity, warranty, tort (including negligence), strict liability, or otherwise.
Some states or provinces do not allow this exclusion or limitation of incidental or consequential losses, so the foregoing disclaimer may not apply to you.
What if you encounter a problem with this product while using it outside the country of purchase?
- The warranty is valid only in the country of purchase and if you follow the warranty claim procedure as noted.
FARBERWARE
© 2017 Farberware Licensing Company, LLC. All Rights Reserved.
Copyrights and Trademarks of Farberware Licensing Company,
LLC, including FARBERWARE®, are used under license from
Farberware Licensing Company, LLC.
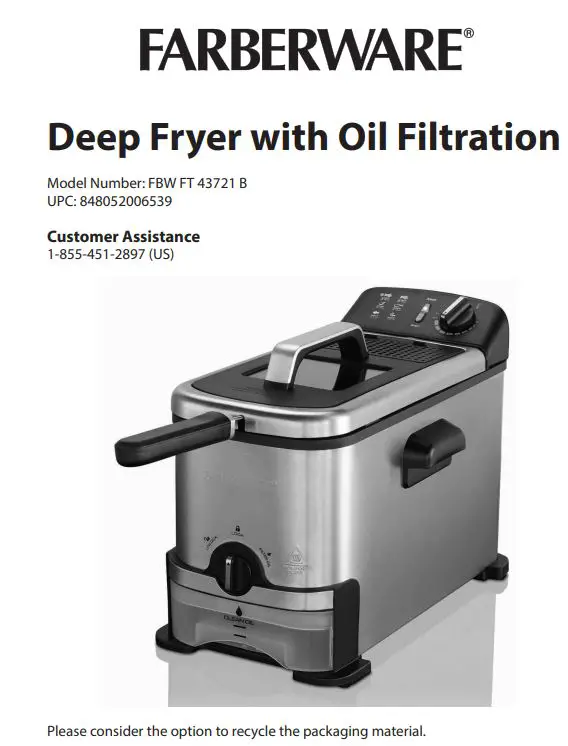
FARBERWARE Deep Fryer with Oil Filtration
IMPORTANT SAFEGUARDS
When using electrical appliances, basic safety precautions should always be followed, including the following:
- Read all instructions before use.
- Do not touch hot surfaces. Use handles or knobs.
- WARNING
– to protect against electric shock, fire, and personal injury:
– do not immerse cord, plug, or motor unit in water or other liquids;
– do not immerse the appliance or any electrical components in water or any other liquids;
– always switch off and unplug the appliance before cleaning. - Close supervision is necessary when any appliance is used by or near children.
- Unplug from the wall outlet when not in use and before cleaning. Allow cooling before handling, putting on, or taking off parts, and before cleaning the appliance.
- Do not operate any appliance with a damaged cord or plug, or after the appliance malfunctions or has been damaged in any manner. Call our toll-free customer assistance number for information on examination, repair, or adjustment.
- The use of accessory attachments not recommended by the appliance manufacturer may result in fire, electric shock, or injuries to persons.
- Do not use outdoors or in a damp area.
- Do not let the power cord hang over the edge of the table or counter, or touch hot surfaces.
- Do not place on or near a hot gas or electric burner or in a heated oven.
- Extreme caution must be used when moving a fryer containing hot oil or other hot liquids.
- Always attach the plug to the appliance first, then plug the cord in the wall outlet. To disconnect, turn the Temperature Control Knob to 0, then remove the plug from the wall outlet.
- Do not use appliances other than intended use.
- Be sure handles are properly assembled to the basket and locked in place.
- Remove excess surface moisture from foods prior to cooking to prevent heated oil from foaming out when food is added.
- Ensure both the lid and Oil Reservoir are completely dry after washing and before use.
- Never leave the appliance unattended during operation.
- A fire may occur if the appliance is covered or touches flammable material, including curtains, draperies, walls, and the like, when in operation. Do not store any item on top of the appliance when in operation.
SAVE THESE INSTRUCTIONS!
IMPORTANT SAFEGUARDS
- In the event of a fire, never try to extinguish the flames with water. Unplug the appliance from the wall outlet. Place the lid on the appliance, if it can be done safely. Smother the flames with a damp cloth, or use a fire extinguisher.
- Use only heat-resistant tools. Do not use metal tools as they may become hot.
- Never pull on the power cord to disconnect the appliance from the wall outlet; instead, grasp the plug and pull on the plug.
- Do not clean with metal scouring pads. Pieces can break off the pad and touch electrical parts involving a risk of electric shock.
- Do not attempt to defeat the Safety Switch or remove the Silicon Rubber Sealing Plate.
- WARNING! Always wait 4 hours until the oil has cooled down completely, before draining or filtering. Failure to do so may damage the deep fryer.
ADDITIONAL SAFEGUARDS
This appliance is for HOUSEHOLD USE ONLY.
WARNING:
– Over tightening can result in stripping of screws or nuts or cracking of handle, lid, or Control Panel Assembly.
Periodically check for looseness and retighten screws or nuts in accordance with the manufacturer’s instructions.
WARNING:
– SERIOUS HOT OIL BURNS MAY RESULT FROM A DEEP FRYER BEING PULLED OFF A COUNTERTOP. DO NOT ALLOW THE CORD TO HANG OVER THE EDGE OF THE COUNTER WHERE IT MAY BE GRABBED BY CHILDREN OR BECOME ENTANGLED WITH THE USER.
– DO NOT USE WITH AN EXTENSION CORD.
– DO NOT OPERATE THIS APPLIANCE, IF THE POWER CORD SHOWS DAMAGE OR IF THE APPLIANCE WORKS INTERMITTENTLY OR STOPS WORKING ENTIRELY.
SAVE THESE INSTRUCTIONS!
• A short detachable power supply cord is provided to reduce the risk resulting from it being grabbed by children, becoming entangled in, or tripping over a longer cord.
Polarized plug
– This appliance has a polarized plug (one blade is wider than the other). To reduce the risk of electric shock, this plug is intended to fit into a polarized outlet only one way. If the plug does not fit fully into the outlet, reverse the plug. If it still does not fit, contact a qualified electrician. Do not attempt to modify the plugin anyway.
– Do not let children handle or put the electrical cord into their mouths.
SAVE THESE INSTRUCTIONS!
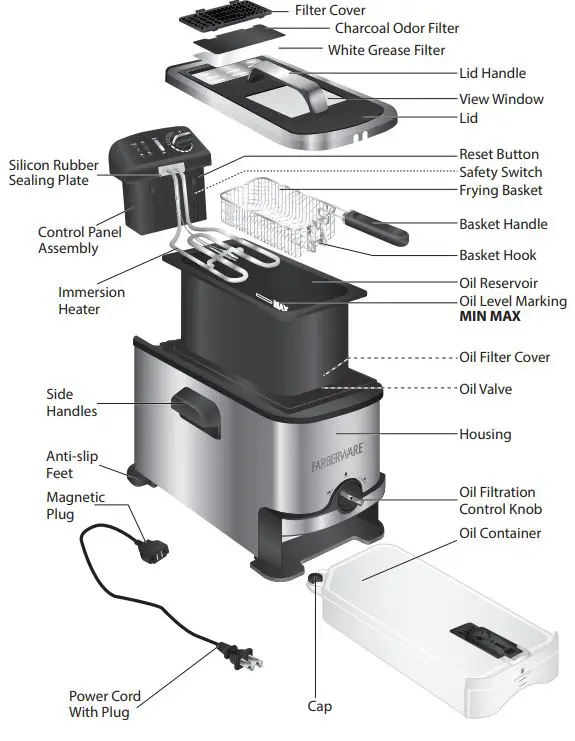
PARTS
BEFORE FIRST USE
- Remove all packaging materials and/or other transportation means.
- Check package content to verify it is complete and undamaged. Do not operate
the appliance if the content is incomplete or appears damaged. Return it immediately to Walmart.
The danger of suffocation!
– Packaging materials are not toys. Always keep plastic bags, foils, and foam parts
away from babies and children. Packaging material could block airways and prevent breathing.
NOTE:
– The appliance may produce an odor and/or emit smoke when switched on for the first time, as residues from the production process are eliminated. This is normal and does not indicate a defect or hazard. Ensure ample ventilation.
• Clean the appliance thoroughly before using it for the first time ( Cleaning and Maintenance).
ASSEMBLY
- Place the appliance on a clean, flat, and heat-resistant surface.
- Before using your appliance make sure:
– the Basket Handle is locked in place in the Frying Basket. To lock the Basket Handle in place, press the bars together and slide them between the slots. Inserting the ends of the bars into the bracket on the Frying Basket and push the Basket Handle backward (ill. (a) and (b) ). Do not assemble any other way (ill. (c) ).
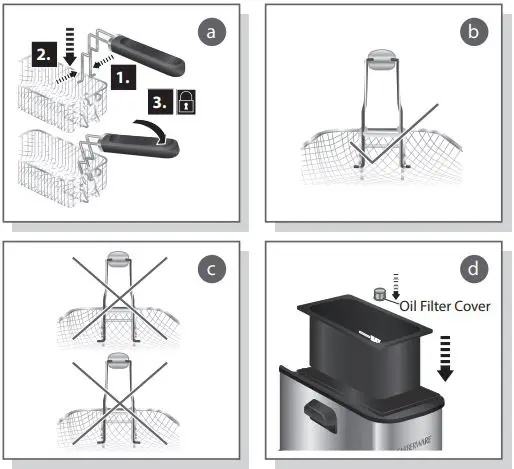
– the Oil Reservoir is secured in the correct position with the Oil Filter Cover and Oil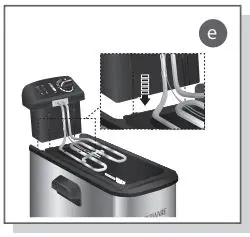 Valve on the same side as the Oil Filtration Control Knob (ill. (d) ). Ensure the oil Filter Cover is in place inside the Oil Reservoir.
– the Control Panel Assembly is placed on the connecting plate on the back of the Housing. Ensure the grooves of the connecting plate are in the guides of the Control Panel Assembly (ill. (e) ).
USING THE APPLIANCE
NOTE:
– YOUR APPLIANCE IS EQUIPPED WITH A SAFETY SWITCH LOCATED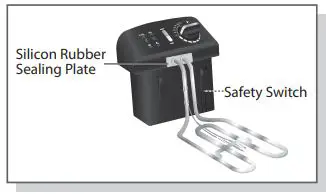 ON THE CONTROL PANEL ASSEMBLY. IF THE CONTROL PANEL ASSEMBLY IS NOT PLACED PROPERLY IN ITS POSITION, THE APPLIANCE WILL NOT
OPERATE.
– Incorrect assembly may lead to an unstable setup and might cause injuries.
– The Silicon Rubber Sealing Plate prevents hot steam from escaping from under the lid. Do not attempt to remove. This appliance can be used for frying food such as French fries, chicken, or fish pieces ( Recommended frying times and temperatures).
NOTE:
– The appliance has a rated power of 1700W. Before plugging it into the wall outlet, ensure that the electrical circuit is not overloaded with other appliances. This appliance should always be operated on a separate 120V ~ 60Hz wall outlet.
– Make sure the appliance is switched off before connecting it to a wall outlet.
- Place the appliance on a clean, flat, and heat-resistant surface. When using the
 appliance on wooden surfaces, use a heat-resistant mat to protect the wood from damages. Ensure a minimum distance around the appliance of at least 4 inches to other objects, cupboards, and walls.
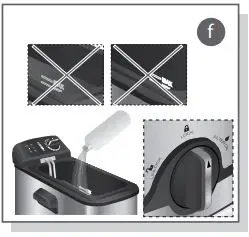
 - Ensure the Oil Container is assembled, empty, and in place inside the appliance, the Oil Filtration Control Knob is in the LOCK ( ) position and the Oil Filter Cover is in place inside the Oil Reservoir. Then, pour suitable cooking oil into the Oil Reservoir (ill. (f) ).
The danger of burns!
– Never refill the Oil Reservoir during use or while hot. Always allow the appliance to cool down completely. Do not mix new oil with old oil.
WARNING:
– DO NOT OVER OR UNDER FILL (ill. (f) ). The minimum oil capacity is 1.9L (MIN), the maximum oil capacity is 3L (MAX). Ensure the oil level always remains between the MIN and MAX marking.
- Spread a little oil on the inside of the View Window to prevent condensation.
- Place the Lid onto the Housing.
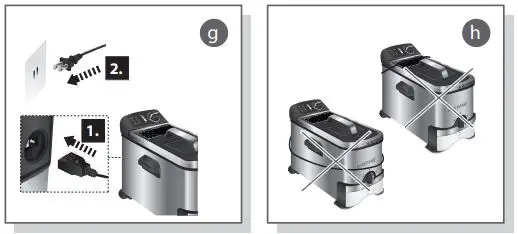
- Ensure the Temperature Control Knob is on the 0 positions before attaching the
Magnetic Plug to the socket on the backside of the Control Panel Assembly (ill. (g) ).
NOTE:
– The Magnetic Plug is designed to only fit one way. Ensure the side stating THIS SIDE UP is facing up and the Magnetic Plug is properly attached.
• Insert the Power Cord With Plug into a wall outlet (ill. (g) ).
WARNING:
– Only use accessories recommended by the manufacturer. Do not place any other materials in the appliance.
– Never let the Power Cord With Plug come in contact with the Lid or appliance Housing during use (ill. h ).
The danger of burns!
– Do not touch the Lid or appliance Housing during or after use (ill. (i) ).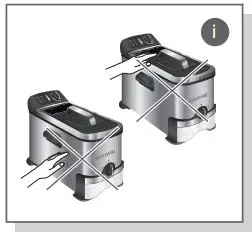
Only use the Handles provided.
– Always pay special attention when adding or removing accessories and food from the appliance. Never touch the Lid or appliance Housing when the appliance is plugged in and switched on or immediately after use. It is recommended to always use oven mitts.
– Escaping steam can burn.
• Turn the Temperature Control Knob to the required temperature ( Recommended frying times and temperatures) (ill. (j) ). POWER Indicator (Blue) will turn on to indicate the appliance is heating. Once the set temperature has been reached, the READY Indicator (Green) will turn on.
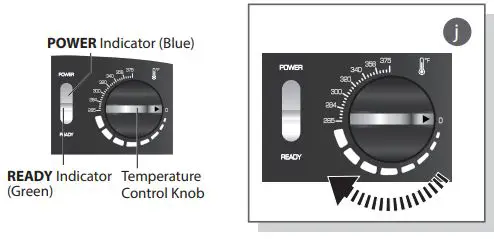
Approximate time durations until the set temperature is reached:

- After the oil has been preheated, remove the Lid.
- Place the Frying Basket on a clean, flat, and heat-resistant surface.
- Fill the Frying Basket with food (ill. k ). Do not overfill the Frying Basket (ill. l ).
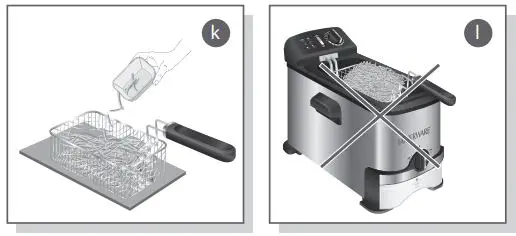
WARNING:
– Do not fry food without the Frying Basket (ill. m ).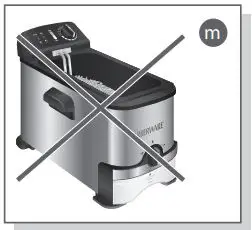
– Do not fill the Frying Basket over halfway. Too much food can cause excess foaming and could cause the oil to overflow during operation.
– Food added to the appliance must be dry. If frying frozen foods such as French fries or chicken wings, remove all ice particles from the frozen foods prior to frying to prevent oil from overflowing.
– Always remove excess moisture from food by patting with a paper towel before frying. Even a small amount of water can cause a severe splattering of hot oil.
– After immersing the Frying Basket in the oil, immediately place the Lid on the appliance. The danger of hot oil splashing out.
• Carefully lower the Frying Basket into the Oil Reservoir (ill. n ).
• Cover the Oil Reservoir with the Lid (ill. o ). Ensure the recessed parts of the Lid fit
properly over the Basket Handle and Silicon Sealing Plate.
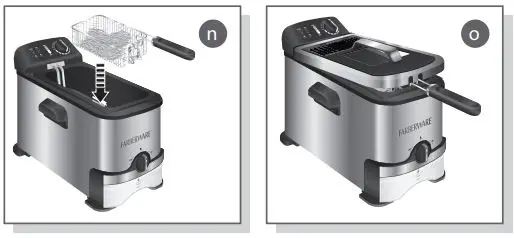
NOTE:
– When frying fresh-cut potatoes and high moisture content food, lower the basket slowly into the oil. If the oil boils or foams too rapidly, raise the basket for a few seconds and lower it again. Do this until the basket can be lowered without excess foaming.
– Do not place the Lid on the appliance when frying fresh-cut potatoes or other high moisture content foods.
– For frying times, see Recommended frying times and temperatures or follow the instructions from the food manufacturer.
- After the frying time has elapsed, remove the Lid.
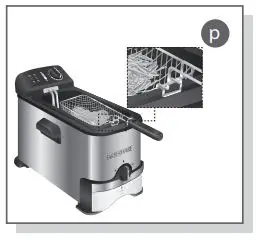
- Use the Basket Handle to lift out the Frying Basket and hang it onto the Basket Hook onto the rim of the Oil Reservoir (ill. (p) ).
- Let the food drain in the Frying Basket for a few seconds to remove excess oil and retain crispness.
- Use the Basket Handle to carefully lift the Frying Basket and pour the food onto a heat-resistant dish that has been covered with a paper towel to collect the remaining oil.
WARNING:
– Never place the hot Frying Basket directly on a tabletop or countertop to avoid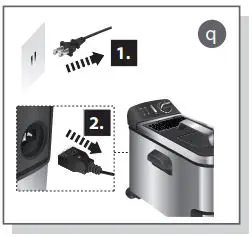 damage to surfaces. It is recommended to use a heat-resistant trivet or cutting board.
• Place the Frying Basket on a clean, flat, and heat-resistant surface.
• After the cooking process is finished, turn the Temperature Control Knob to the 0 positions and remove the Power Cord With Plug from the wall outlet. Then, remove the Magnetic Plug from the socket on the backside of the Control Panel Assembly (ill. (q) ).
WARNING:
– Always disconnect the Power Cord With Plug from the wall outlet before removing the Magnetic Plug from the Control Panel Assembly.
– The break-away power cord is for accidental disconnection. Do not remove during normal operation. If the Magnetic Plug is disconnected, immediately remove the Power Cord With Plug from the wall outlet. Turn the Temperature Control Knob to the 0 positions. Reconnect the Magnetic Plug to the Control Panel Assembly and then reconnect the Power Cord With Plug to the wall outlet.
– This appliance generates heat and steam during use. Proper precautions must be taken to prevent the risk of burns, fires, or other injuries to persons or damage to property. Do not leave the appliance unattended while in use.
– The surfaces of the appliance become hot. Do not touch while in use. Allow the appliance to cool at least 30 minutes before handling.
RECOMMENDED FRYING TIMES AND TEMPERATURES
NOTE:
– The frying times in the chart below are approximate and should be adjusted to suit your own tastes, different food quantities, and food manufacturer’s instructions.

CHOOSING THE RIGHT COOKING OIL
As a general rule, choose cooking oils with a high smoke point and avoid flavored oils.
Suitable: Pure corn oil, blended vegetable oil, soybean oil, sunflower oil, grape seed oil, peanut oil
Not suitable: Olive oil, walnut oil, lard
COOKING WITH OIL
Cooking oil can enhance the food’s flavor or spoil its taste. As with any other food component, freshness and correct handling of the oil is the key to successful deep-frying results. The quality of the oil decreases with use at high temperatures. Food particles, water, and other liquids will further lower its quality, therefore:
• Do not mix different cooking oils.
• Only use fresh and clean cooking oils:
– Regularly remove burnt food particles while frying. Always use utensils that are safe to immerse into hot oils without damaging the utensil or the appliance, and always wear oven mitts when removing any burnt food particles.
– After use and before storage, filter oil with the integrated filtration system ( Oil Filtration)
– Do not reuse oil that has been used to fry fish or other strongly flavored food.
– Some meats, such as chicken wings, will release large amounts of liquids when frying, thus watering down the oil. Do not reuse this oil.
Do not use the cooking oil anymore if you notice the following:
Before use: oil smells rancid or its color has visibly darkened.
While frying: oil is foaming strongly of smoke that appears on the oil’s surface at normal operating temperature.
OIL FILTRATION
NOTE:
– Filter the oil after each use. Store filtered oil properly ( Storing oil).
– Discard oil on a regular basis depending on oil quality ( Cooking with oil).
– After switching off the appliance, wait at least 4 hours for the oil to cool down, depending on the settings selected during use. Hotter oil will take longer to reach a cool temperature.
– Filtering the oil after each use will help prolong the life of the cooking oil, but it should still be discarded if the oil deteriorates after multiple uses. We estimate that oil, in normal use, should be changed at least after every 10 uses.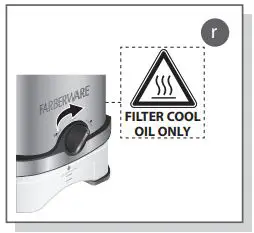
• Ensure the Oil Container is assembled, empty, and in place inside the appliance.
• Once the oil has cooled down to room temperature, turn the Oil Filtration Control Knob to the FILTER OIL ![]() position (ill. (r) ). The oil will start dripping inside the Oil Container. The Oil Filter Cover will keep food residues from being transferred to the Oil Container.
position (ill. (r) ). The oil will start dripping inside the Oil Container. The Oil Filter Cover will keep food residues from being transferred to the Oil Container.
• When all oil has been filtered:
– Turn the Oil Filtration Control Knob to the LOCK ![]() position if the container will remain inside the appliance.
position if the container will remain inside the appliance.
– Turn the Oil Filtration Control Knob to UNLOCK ![]() position if the container is to be removed from the appliance.
position if the container is to be removed from the appliance.
NOTE:
– Always wait 4 hours until the oil has cooled down completely, before draining or filtering.
– Extreme caution must be used when moving the appliance while the Oil Reservoir and Oil Container are not both empty.
– When removing the Oil Container from the appliance, handle with care. Keep the Oil Container flat and hold it with both hands.
Emptying the Oil Container
Filtered oil can be stored in a suitable container ( Storing oil) or re-used for frying a new batch of food ( Cooking with oil).
• Unscrew the Cap on top of the Oil Container (ill. (s) ).
• Slowly pour the Oil Container content into a suitable container or the Oil Reservoir, if required.
NOTE:
– Ensure the Oil Filtration Control Knob is in UNLOCK ![]() position before pouring oil into the Oil Reservoir.
position before pouring oil into the Oil Reservoir.
– Tilt the Oil Container upwards (vertical position) gradually to avoid leaks from the side of the container.
– Oil can be stored in the Oil Reservoir, inside the deep fryer, or in another cool dry place ( Storing oil).
• Screw the Cap back on top of the Oil Container.
• Insert the Oil Container back into the appliance and turn the Oil Filtration Control
Knob to the LOCK ![]() position to secure the Oil Container in place (ill. (t) ).
position to secure the Oil Container in place (ill. (t) ).
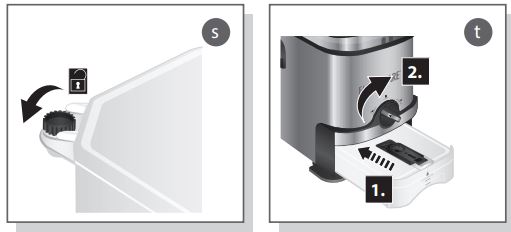
STORING OIL
- Do not store used cooking oil in the refrigerator. Choose a cool place that is not subject to sunlight. Generally, the oil may be stored for a period of 3 months, once the bottle is opened. Please observe the oil manufacturer’s storage directions as well.
HINTS AND TIPS
- Smaller quantities of food normally require a slightly shorter cooking time than larger quantities of food.
- To reduce cooking time, defrost food prior to cooking. It is recommended that some foods should not be thawed/defrosted prior to cooking, such as frozen fish, and frozen French fries.
- It is recommended to use a meat thermometer to check the cooking progress.
- In the event of food flare-ups, do not remove the Lid, do not remove the Frying
Basket; turn the Temperature Control Knob to the 0 positions and unplug the appliance. - When the food you are cooking requires shaking, it is recommended to use a timer set for half of the suggested cooking time. This way a bell will ring and remind you to shake the Frying Basket.
- It is recommended to only use nylon, heat-proof plastic, or wooden cooking utensils. Metal utensils may become hot and damage the non-stick surface. Always remove utensils from the appliance. Do not leave them in the appliance during use.
CLEANING AND MAINTENANCE
Proper maintenance will ensure many years of service from your appliance. Clean the appliance after every use. The appliance contains no user-serviceable parts and requires little maintenance. Leave any servicing or repairs to qualified personnel.
WARNING:
– Always turn the Temperature Control Knob to the 0 positions, disconnect the Power Cord With Plug from the wall outlet, and then the Magnetic Plug from the Control Panel Assembly before cleaning. Allow all parts of the appliance to cool down completely.
NOTE:
– Do not immerse the Power Cord With Plug, Magnetic Plug, or appliance into water or any other liquids. Do not use abrasive cleaners, steel wool, or scouring pads. Dry all parts thoroughly after cleaning, before using or storing the appliance. Ensure that no water enters the appliance Housing.
– Do not attempt to attach the Magnetic Plug permanently to the appliance.
– Do not attempt to remove the Silicon Rubber Sealing Plate.
• Ensure the Oil Container is in place, then turn the Oil Filtration Control Knob to the FILTER OIL ![]() position to empty the Oil Reservoir ( Oil filtration).
position to empty the Oil Reservoir ( Oil filtration).
• Place the Frying Basket on a clean, flat, and heat-resistant surface.
The danger of burns!
– Ensure the Frying Basket cooled down completely before touching its surface and attempting to remove the Basket Handle.
– Ensure the oil-cooled down completely before emptying the Oil Reservoir into the Oil Container.
- Remove the Basket Handle from the Frying Basket.
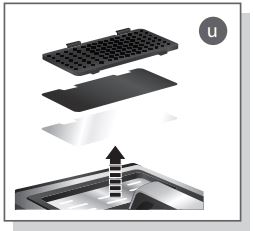
- Remove the Control Panel Assembly from the Oil Reservoir. Carefully clean the
Control Panel Assembly and Immersion Heater with a damp cloth. - Pull the oil Filter Cover from the Oil Reservoir and then remove the Oil Reservoir from the Housing.
- Open the lid Filter Cover and remove both Charcoal Odor Filter and White Grease Filter (ill. (u) ).
- Clean the appliance Housing with a damp cloth.
- Wash the Lid, Frying Basket, Basket Handle, Oil Reservoir, and Oil Filter Cover with hot soapy water or in a dishwasher. Rinse and dry carefully.
- Dry all parts thoroughly after cleaning and before using the appliance again.
NOTE:
– If the Oil Container needs to be cleaned, ensure it is empty before attempting to clean ( Emptying the Oil Container). Wash with hot soapy water or in a dishwasher. Rinse and dry carefully.
– Clean the Charcoal Odor Filter and White Grease Filter every 3 months or after every 12 uses with hot soapy water. Do not clean in a dishwasher. –
Dry all parts and surfaces thoroughly before use. Make sure that all parts and surfaces are completely dry before connecting the appliance to a wall outlet. Even a small amount of water can cause a severe splattering of hot oil.
STORAGE
- Before storage, always make sure the appliance is completely cool, clean, and dry.
- It is recommended to store the appliance in a dry place.
- Store the appliance on a stable shelf or in a cupboard. To avoid accidents, ensure
that both the appliance and its power cord are beyond the reach of children or pets.
TROUBLESHOOTING
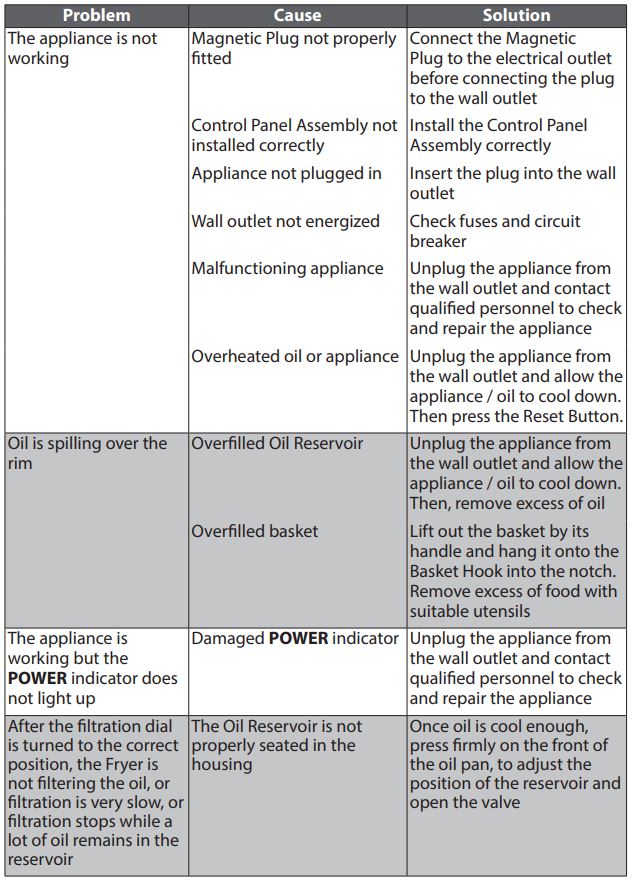
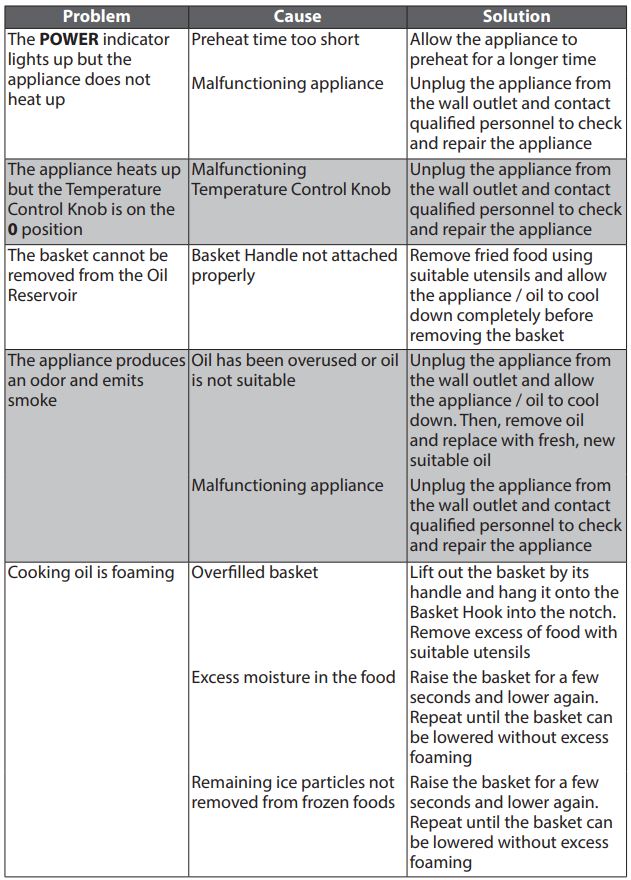
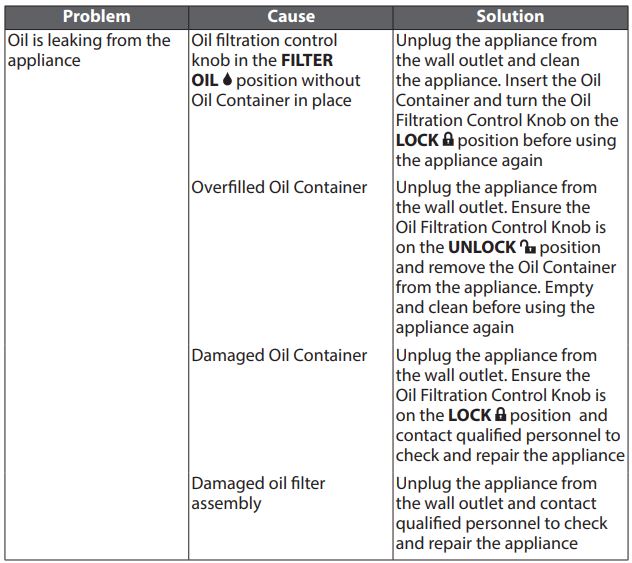
If additional assistance is needed, please contact our Customer Assistance at 1-855451-2897 (US).
TECHNICAL DATA
Rated voltage: 120V ~ 60Hz
Rated current: 14.2A
Rated power input: 1700W
Capacity:
MIN 1.9L (2Qt)
MAX 3L (3.2Qt)
CUSTOMER ASSISTANCE
If you have a claim under this warranty, please call our Customer Assistance Number. For faster service, please have the model number and product name ready for the operator to assist you. This number can be found on the bottom of your appliance and on the front page of this manual. Model Number: __________________ Product Name: __________________ Customer Assistance Number 1-855-451-2897 Keep these numbers for future reference!
Two-year limited warranty
What does your warranty cover?
•Any defect in material or workmanship.
For how long after the original purchase?
•Two years.
What will we do?
•Provide you with a new one.
•For those items still under warranty but no longer available, WAL-MART reserves the right to replace them with a similar FARBERWARE branded product of equal or greater value.
How do you make a warranty claim?
•Save your receipt.
•Properly pack your unit. We recommend using the original carton and packing materials.
•Return the product to your nearest Walmart store or call Customer Assistance at 1-855-451-2897.
What does your warranty not cover?
•Parts subject to wear, including, without limitation, glass parts, glass containers, cutter/strainer, blades, seals, gaskets, clutches, motor brushes, and/or agitators, etc.
•Commercial use or any other use not found in printed directions.
•Damage from misuse, abuse, or neglect, including failure to clean product regularly in accordance with manufacturer’s instructions.
How does state law relate to this warranty?
•This warranty gives you specific legal rights, and you may also have other rights which vary from state to state or province to province.
•This warranty is in lieu of any other warranty or condition, whether express or implied, written or oral, including, without limitation, any statutory warranty or condition of merchantability or fitness for a particular purpose.
•WAL-MART, FARBERWARE, and the product manufacturer expressly disclaim all responsibility for special, incidental, and consequential damages or losses caused by the use of this appliance. Any liability is expressly limited to an amount equal to the purchase price paid whether a claim, however, instituted, is based on contract, indemnity, warranty, tort (including negligence), strict liability, or otherwise. Some states or provinces do not allow this exclusion or limitation of incidental or consequential losses, so the foregoing disclaimer may not apply to you.
What if you encounter a problem with this product while using it outside the country of purchase?
•The warranty is valid only in the country of purchase and if you follow the warranty claim procedure as noted.
 © 2019 Farberware Licensing Company, LLC. All Rights Reserved. Copyrights and Trademarks of Farberware Licensing Company, LLC, including FARBERWARE®, are used under license from Farberware Licensing Company, LLC.

EASY POUR WAFFLE MAKER
Model Number: WM 43981
UPC: 848052005143
Customer Assistance
1-855-451-2897 (US)
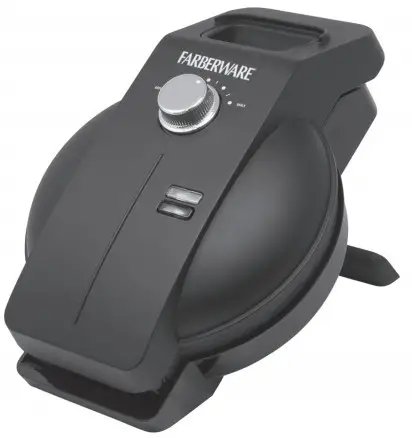
Please consider the option to recycle the packaging material.
IMPORTANT SAFEGUARDS
When using electrical appliances, basic safety precautions should always be followed, including the following:
- Read all instructions before use.
- Do not touch hot surfaces. Use handles or knobs.
- WARNING – to protect against electric shock, fire, and personal injury:
– do not immerse cord, plug, or appliance in water or other liquids;
– do not immerse the appliance or any electrical components in water or any other liquids;
– always switch off and unplug the appliance before cleaning. - Close supervision is necessary when any appliance is used by or near children.
- Unplug from wall outlet when not in use and before cleaning. Allow cooling before putting on or taking off parts, and before cleaning the appliance.
- Do not operate any appliance with a damaged cord or plug, or after the appliance malfunctions or has been damaged in any manner. Call our toll-free customer assistance number for information on examination, repair, or adjustment.
- The use of accessory attachments not recommended by the appliance manufacturer may result in fire, electric shock or injuries to persons.
- Do not use outdoors or in a damp area.
- Do not place the appliance close to the edge of the countertop.
- Do not let the power cord hang over the edge of the table or counter, or touch hot surfaces.
- Do not place on or near a hot gas or electric burner or in a heated oven.
- Extreme caution must be used when moving an appliance containing hot oil or other hot liquids. A fire may occur if the appliance is covered or touches flammable material, including curtains, draperies, walls, and the like, when in operation. Do not store any item on top of the appliance when in operation.
- When using this appliance, provide 6 – 8 inches of air space above, behind and on both sides for air circulation.
- It is recommended that you use a heat-resistant mat underneath the appliance to avoid any heat damage to your counter or furniture.
- Do not use the appliance with open waffle plates.
- To disconnect, turn the control knob (3) to MIN and then remove the plug from the wall outlet.
SAVE THESE INSTRUCTIONS!
IMPORTANT SAFEGUARDS
- Never pull on the power cord to disconnect the appliance from the wall outlet; instead, grasp the plug and pull on the plug.
- Do not use appliances other than intended use.
- Do not clean with metal scouring pads. Pieces can break off the pad and touch electrical parts involving a risk of electric shock.
- Let the appliance cool completely before putting away or storing.
- Never leave the appliance unattended during use.
ADDITIONAL SAFEGUARDS
This appliance is for HOUSEHOLD USE ONLY.
WARNING:
– DO NOT OPERATE THIS APPLIANCE, IF THE POWER CORD SHOWS DAMAGE OR IF THE APPLIANCE WORKS INTERMITTENTLY OR STOPS WORKING ENTIRELY.
- A short power supply cord is provided to reduce the risk resulting from becoming entangled in or tripping over a longer cord.
- Longer extension cords are available and may be used if care is exercised in their use.
- If an extension cord is used:
– The marked electrical rating of the extension cord should be at least as great as the electrical rating of the appliance.
– The longer cord should be arranged so that it does not drape over the countertop or table top where it can be pulled on by children or tripped over unintentionally.
Polarized plug
- This appliance has a polarized plug (one blade is wider than the other). To reduce the risk of electric shock, this plug is intended to fit into a polarized outlet only one way. If the plug does not fit fully in the outlet, reverse the plug. If it still does not fit, contact a qualified electrician. Do not attempt to modify the plugin anyway.
- Do not let children handle or put the electrical cord into their mouths.
SAVE THESE INSTRUCTIONS!
PARTS
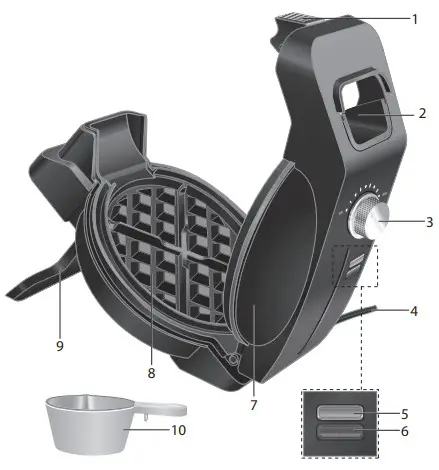
- Locking latch
- Pour spout
- Control knob (browning level:
MIN (light) to MAX (dark)) - Power cord with plug
- Power indicator (blue)
- Ready indicator (green)
- Lid
- Waffle plate
- Stand
- Measuring cup
ILLUSTRATIONS
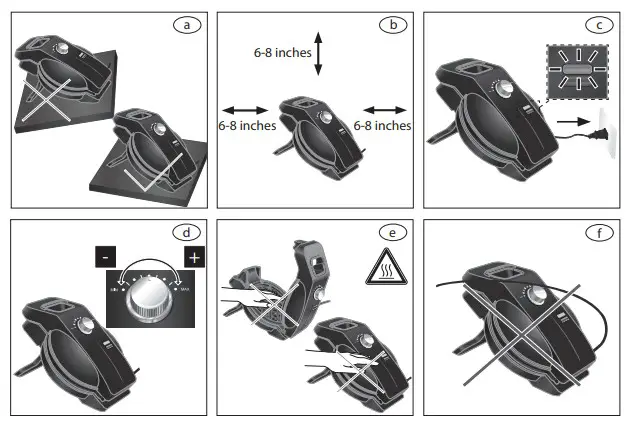
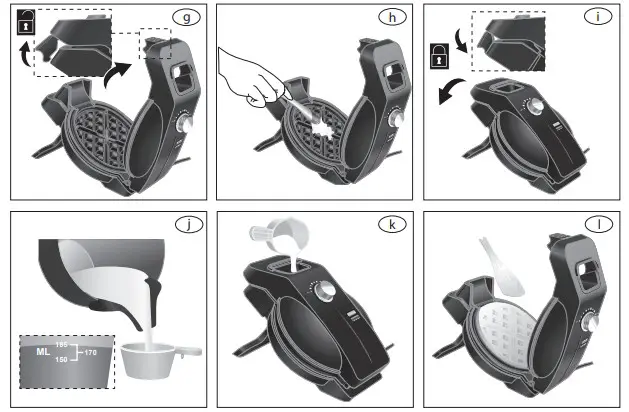
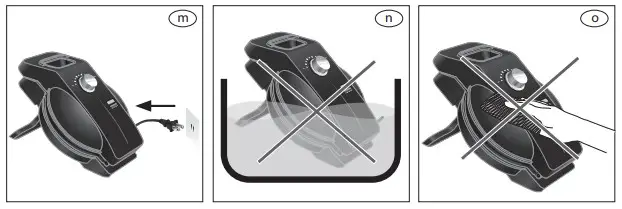
WARNING:
– Always use an oven mitt to protect your hand when handling the appliance. Escaping steam can burn and the appliance housing is hot.
Before first use
- Remove all packaging materials and/or other transportation means.
- Check package content to verify it is complete and undamaged. Do not operate the appliance if the content is incomplete or appears damaged. Return it immediately to Walmart.
The danger of suffocation!
– Packaging materials are not toys. Always keep plastic bags, foils, and foam parts away from babies and children. Packaging material could block airways and Prevent breathing.
NOTE:
– The appliance may produce an odor and/or emit smoke when switched on for the first time, as residues from the production process are eliminated. This is normal and does not indicate a defect or hazard.
- Clean your appliance and all accessories thoroughly before using for the first time ( Cleaning and Maintenance).
- When using the appliance for the first time, it is recommended to operate it for at least 10 minutes without any foodstuff on the waffle plates ( Using the Appliance), until no odor or smoke is present. During use, ensure ample ventilation.
- Let the appliance cool completely.
- Clean the appliance ( Cleaning and Maintenance).
USING THE APPLIANCE
This appliance is designed for making waffles and is not intended for any other use.
NOTE:
– The appliance has a rated power of 800W. Before plugging it into the wall outlet, ensure that the electrical circuit is not overloaded with other appliances. This appliance should always be operated on a separate 120V ~ 60Hz wall outlet.
– Make sure the lid (7) is closed and the locking latch (1) is locked in place before connecting the appliance into the wall outlet.
– Do not operate the appliance in the horizontal position.
- Fully unfold the stand (9) and place the appliance on a clean, flat, and heat-resistant surface (ill. a ).
- Ensure a minimum distance around the appliance of at least 6 – 8 inches to other objects, cupboards, and walls (ill. b ).
- Connect the plug (4) into a wall outlet (ill. c ). The blue power indicator (5) will turn on.
- Turn the control knob (3) to the desired browning level (ill. d), between MIN and MAX. The appliance will heat up to an operating temperature of the set browning level.
- Once the operating temperature has been reached, the green ready indicator (6) will turn on. The heat-up time will take about 3 – 5 minutes.
NOTE:
– Leave the lid (1) closed to reduce heat-up time.
The danger of burns!
– Do not touch the waffle plates (8) and/or the lid surface (ill. e ).
WARNING:
– Never let the power cord (4) come in contact with the lid (7) during use (ill.
BAKING WAFFLES
Danger of burns!
– Always use an oven mitt to protect your hand when handling the appliance. Escaping steam can burn and the appliance housing is hot.
– Do not touch the waffle plates (8) and/or the lid surface.
- Disengage the locking latch (1) and carefully open the lid (7) (ill. ).
- Apply cooking spray or spray butter on the waffle plates (8) (ill. h ).
- Close the lid (7) and engage the locking latch (1) (ill. i ).
- Pour the batter into the measuring cup (10) until 185 ml (ill. j ).
- Hold the measuring cup 3 – 5 inches above the pour spout (2) and pour the batter slowly and steadily into the pour spout (ill. k ).
NOTE:
– Turn the control knob (3) to adjust the browning level if necessary.
– Use a thinner waffle batter rather than a thick one for best results.
– During the cooking process, the green ready indicator (6) will turn on and off several times to ensure a constant temperature.
– Waffles take about 3 – 6 minutes, depending on the recipe, or once no more steam is being emitted.
– Do not open the lid (7) within the first few minutes, as this may cause the waffle to tears.
- Disengage the locking latch (1), open the lid (7), and remove the waffles using a plastic or wooden utensil (ill. l ).
NOTE:
– Never use metal utensils, as these will damage the non-stick coating.
– You may need to adapt the cooking time based on the result of your first batches of waffles.
- After removing the waffles, keep the lid (7) closed.
- Wait for the green ready indicator (6) to light up again, indicating the operating temperature of the set browning level has been reached, before repeating the previous steps to baking more waffles.
- Once you have finished using the appliance, turn the control knob (3) to MIN and disconnect the plug (4) from the wall outlet (ill. m ). Both indicators will switch off.
- Allow the appliance to cool down completely before handling again.
RECIPES
Golden waffles
| 1 ¾ c | all-purpose flour |
| 2 tsp | baking powder |
| 1 tsp | baking soda |
| ½ tsp | salt |
| 1/3 c | bakers sugar |
| 1 c | milk |
| 1 c | water |
| 3 | eggs |
| 1 tbsp | vanilla extract |
| ½ tsp | almond extract |
| ½ c | vegetable oil |
- Start with all ingredients at room temperature.
- Sift together flour, baking powder, baking soda, salt, and sugar.
- In a separate bowl whisk together milk, water, eggs, vanilla extract, almond extract, and oil.
- Add wet ingredients to dry and whisk until the batter is smooth. Allow batter to rest for 5 minutes, stir again. Use the measuring cup to pour batter into the pour spout when green ready light is illuminated.
- Pour batter slowly and steadily holding the measuring cup 3 – 5 inches above the pour spout. This helps to prevent clogging of the pour spout. Cook for 4 minutes with the control knob on MAX level.
- Serves 6. Serve with fresh berries and powdered sugar.
RECIPES
Pumpkin waffle
| 2 c | all-purpose flour |
| 2 tsp | baking powder |
| 1 tsp | baking soda |
| 1 tsp | salt |
| 1 ½ c | milk |
| ½ c | water |
| ½ c | pureed pumpkin |
| ½ c | vegetable oil |
| 3 | eggs |
| 1/3 c | brown sugar |
| 1 tbsp | maple syrup |
| 1 tsp | vanilla extract |
| 1 ½ tsp | cinnamon |
| 1 tsp | ground ginger |
| ½ tsp | nutmeg |
| ¼ tsp | ground clove |
- Sift together flour, baking powder, baking soda, and salt.
- In a separate bowl beat together milk, water, pumpkin, oil, eggs, brown sugar, maple syrup, vanilla extract, cinnamon, ginger, nutmeg, and clove.
- Add wet ingredients to dry ingredients and blend together until the batter is smooth. Allow to rest for 5 minutes, stir again. Use the measuring cup to pour batter into the pour spout when green ready light is illuminated.
- Pour batter slowly and steadily holding the measuring cup 3 – 5 inches above the pour spout. This helps prevent clogging of the pour spout. Cook for 4 minutes with the control knob on MAX level.
- Serves 6. Serve with whipped cream and cinnamon sugar sprinkles.
Cinnamon waffle with mascarpone maple honey icing
| 2 c | all-purpose flour |
| 2 tsp | baking powder |
| 1 tsp | baking soda |
| 1 tsp | salt |
| 1 tsp | cinnamon |
| 2 c | buttermilk |
| ½ c | vegetable oil |
| ½ c | water |
| 2 | eggs |
| 1/3 c | brown sugar packed firm |
| 1 tsp | vanilla extract |
- Start with buttermilk, eggs, and water at room temperature.
- Sift together flour, baking powder, baking soda, salt, and cinnamon.
- In a separate bowl blend together with a hand mixer buttermilk, vegetable oil, water, eggs, brown sugar and vanilla extract.
- Add wet ingredients to dry and blend until the batter is smooth. Allow batter to rest for 5 minutes, blend again. Use the measuring cup to pour batter into the pour spout when green ready light is illuminated.
- Pour batter slowly and steadily holding the measuring cup 3 – 5 inches above the pour spout. This helps prevent clogging of the pour spout. Cook for 3 – 4 minutes with the control knob on MAX level.
- Serves 6. Serve with: 1 cup mascarpone, 1/3 cup maple syrup, and 1 tbsp. honey blended together, drizzle icing.
Peanut butter waffle
| 1 ¾ c | all-purpose flour |
| 2 tsp | baking powder |
| 1 tsp | baking soda |
| 1 tsp | salt |
| 1/3 c | bakers sugar |
| 1 c | milk |
| 1 c | water |
| 3 | eggs |
| 1 tbsp | vanilla extract |
| ½ c | creamy peanut butter |
| ½ c | vegetable oil |
- Sift together flour, baking powder, baking soda, salt, and sugar.
- In a separate bowl whisk together milk, water, eggs, and vanilla extract.
- In separate bowl blend peanut butter and oil, with a hand mixer or blender. Add to milk mixture and blend until smooth.
- Add wet ingredients to dry and blend until the batter is smooth. Allow resting for 5 minutes, stir again. Use the measuring cup to pour batter into the waffle maker when green ready light is illuminated.
- Pour batter slowly and steadily holding the measuring cup 3 – 5 inches above the pour spout. This helps prevent clogging of the pour spout. Cook for 3 – 4 minutes with the control knob on MAX level.
- Serves 6. Serve with jelly or with bacon and banana.
Cheddar jack cheese & chive waffle
| 1 ¾ c | all-purpose flour |
| 2 tsp | baking powder |
| 1 tsp | baking soda |
| 1 tsp | salt |
| ¼ c | bakers sugar |
| 1 tsp | herbs de Provence |
| ½ tsp | granulated garlic |
| ½ tsp | granulated onion |
| 2 c | water |
| 3 | eggs |
| ½ tsp | vanilla extract |
| ½ c | vegetable oil |
| 2 tbsp | finely chopped fresh chive |
| 1/3 c | fancy shredded cheddar & Monterey Jack cheeses |
| ¼ c | fancy shredded Parmesan cheese |
HING AND MAINTAIN
- The appliance is designed to create a delicious Belgium-style waffle without holes, empty spaces or messy overflow. The waffle plates channel the batter down on a 45% angle to produce a complete waffle with a crisp finish and a tender center.
The batter expands during the cooking process and the overflow is contained in the pour spout. - Use the recipes or, if using a boxed waffle mix, follow the instructions and then thin the waffle mix with water (2 tbsp. to 2/3 cup depending on batch size) for a smooth pourable batter. Use the measuring cup (10) to pour batter into the pour
spout when the green ready indicator is illuminated. - Pour batter slowly and steadily holding the measuring cup 3 – 5 inches above the pour spout. This helps to prevent clogging of the pour spout. Cook for 4 minutes with the control knob on MAX level. Disengage the latch, open the lid and remove the waffle to serve. We recommend using tongs or a fork specially designed for Belgian Waffles.
- Most waffle batter can be poured directly onto the non-stick waffle plates (8). Use a cooking spray for dessert waffles or any recipe with a lot of sugar. If your waffles start to stick, the waffle plates (8) may need to be scrubbed with a nylon brush to remove any cooked-on food particles.
- Most waffles can be made ahead of time and kept warm in a 200°F (90°C) oven.
- To store waffles, let them cool, and then pack into an airtight container. Store in a refrigerator or freezer. Waffles can be reheated in a microwave oven or regular oven.
- Most waffles are done in about 3 – 6 minutes. Recipes made from scratch may take longer. Check if waffles are done after 3 – 6 minutes or once no more steam is being emitted. If the appliance does not open easily, allow waffles to cook for another minute before checking again.
- It is recommended to clean all accessories after each use.
CLEANING AND MAINTENANCE
Proper maintenance will ensure many years of service from your appliance. Clean the appliance after every use. The appliance contains no user-serviceable parts and requires little maintenance. Leave any servicing or repairs to qualified personnel.
WARNING:
– Always disconnect the plug (4) from the wall outlet before cleaning. Allow all parts of the appliance to cool down completely.
NOTE:
– Do not immerse the power cord with plug (4) or appliance into water or any other liquids (ill. n ).
– Do not use abrasive cleaners, steel wool, or scouring pads (ill. o ). Dry all parts thoroughly after cleaning, before using or storing the appliance. Ensure that no water enters the appliance housing.
- Wipe the appliance housing, lid (7), and waffle plates (8) with a damp cloth. Rinse the cloth and wipe all parts again.
NOTE:
– Dry all parts and surfaces thoroughly before use. Make sure that all parts and surfaces are completely dry before connecting the appliance to a wall outlet.
Storage
- Before storage, always make sure the appliance is completely cool, clean, and dry.
- It is recommended to store the appliance in a dry place.
- Store the appliance on a stable shelf or in a cupboard. To avoid accidents, ensure that both the appliance and its power cord are beyond the reach of children or pets.
TROUBLESHOOTING
| Problem | Cause | Solution |
| The appliance is not working | Appliance not plugged in Wall outlet not energized Malfunctioning appliance Overheated appliance | Insert the plug into the wall outlet Check fuses and circuit breaker Disconnect the appliance from the wall outlet and contact qualified personnel to check and repair the appliance Disconnect the appliance from the wall outlet and allow to cool down before using it again |
| The blue power indicator is on but the appliance does not heat up | Preheat time too short Malfunctioning appliance | Let the appliance preheat for a longer time Disconnect the appliance from the wall outlet and contact qualified personnel to check and repair the appliance |
| The appliance heats up but the blue power indicator is off | Malfunctioning appliance | Disconnect the appliance from the wall outlet and contact qualified personnel to check and repair the appliance |
| Batter is spilling over | Waffle plates overfilled Waffle batter too liquid | Reduce the amount of batter used per serving Add some flour to the batter |
| Waffle is not fully cooked | Cooking time too short | Allow waffle to cook for longer |
If additional assistance is needed, please contact our Customer Assistance at 1-855-451-2897 (US).
TECHNICAL DATA
| Rated voltage: | 120V ~ 60Hz |
| Rated current: | 6.7A |
| Rated power input: | 800W |
CUSTOMER ASSISTANCE
If you have a claim under this warranty, please call our Customer Assistance Number. For faster service, please have the model number and product name ready for the operator to assist you. This number can be found on the bottom of your appliance and on the front page of this manual.
Model Number: __________________ Product Name: __________________
Customer Assistance Number 1-855-451-2897
Keep these numbers for future reference!
Two-year limited warranty
What does your warranty cover?
- Any defect in material or workmanship.
For how long after the original purchase? - Two years.
What will we do? - Provide you with a new one.
- For those items still under warranty but no longer available, WAL-MART reserves the right to replace with a similar FARBERWARE branded product of equal or greater value.
How do you make a warranty claim? - Save your receipt.
- Properly pack your unit. We recommend using the original carton and packing materials.
- Return the product to your nearest Walmart store or call Customer Assistance at 1-855-451-2897.
What does your warranty not cover? - Parts subject to wear, including, without limitation, glass parts, glass containers, cutter/strainer, blades, seals, gaskets, clutches, motor brushes, and/or agitators, etc.
- Commercial use or any other use, not found in printed directions.
- Damage from misuse, abuse, or neglect, including failure to clean product regularly in accordance with manufacturer’s
instructions.
How does state law relate to this warranty?
- This warranty gives you specific legal rights, and you may also have other rights which vary from state to state or province
to province. - This warranty is in lieu of any other warranty or condition, whether express or implied, written or oral, including, without
limitation, any statutory warranty or condition of merchantability or fitness for a particular purpose. - WAL-MART, FARBERWARE, and the product manufacturer expressly disclaim all responsibility for special, incidental, and consequential damages or losses caused by the use of this appliance. Any liability is expressly limited to an amount equal to the purchase price paid whether a claim, however, instituted, is based on contract, indemnity, warranty, tort (including negligence), strict liability, or otherwise. Some states or provinces do not allow this exclusion or limitation of incidental or consequential losses, so the foregoing disclaimer may not apply to you.
What if you encounter a problem with this product while using it outside the country of purchase? - The warranty is valid only in the country of purchase and if you follow the warranty claim procedure as noted.

© 2018 Farberware Licensing Company, LLC. All Rights Reserved. Copyrights and Trademarks of Farberware Licensing Company, LLC, including FARBERWARE®, are used under license from Farberware Licensing Company, LLC.
]]>
MICROWAVE OVEN
INSTRUCTION MANUAL
Model: FMO16AHTBSD
Read these instructions carefully before using your microwave oven, and to maintain its upkeep. If you follow the instructions, your oven will provide you with many years of good service.
KEEP THESE INSTRUCTIONS IN A SAFE PLACE
(rev. 1 09/ 0/19 MD)
Farberware is a registered trademark of Farberware Licensing Company, LLC Manufactured and sold pursuant to a license from Farberware Licensing Company, LLC © 2019 Farberware Licensing Company, LLC. All rights reserved.
PRECAUTIONS TO AVOID POSSIBLE EXPOSURE TO EXCESSIVE MICROWAVE ENERGY
(a) Do not attempt to operate this oven with the door open since an open-door operation can result in harmful exposure to microwave energy. It is important not to tamper with the safety interlocks.
(b) Do not place any object between the oven front face and the door or allow food or cleaner residue to accumulate on the sealing surfaces.
(c) Do not operate the oven if it is damaged. It is particularly important that the oven door close properly and that there is no damage to the:
(1) DOOR (bent)
(2) HINGES AND LATCHES (broken or loosened)
(3) DOOR SEALS AND SEALING SURFACES (Do not use if the door seal or sealing surfaces are damaged.)
(d) The oven should not be adjusted or repaired by anyone except properly qualified service personnel.
SPECIFICATIONS
| Model: | FMO16AHTBSD |
| Rated Voltage: | 120V~60Hz |
| Rated Input Power (Microwave): Rated Output Power (Microwave): Oven Capacity: | 1550W |
| Turntable Diameter: | 1100W |
| External Dimensions: | 1.6 cubic feet |
| Net Weight: | 13.5 inches |
| Model: | 21.8*19.2*12.9 inches |
| Rated Voltage: | 33.1 lbs |
 WARNING:
This product can expose you to chemicals including Phthalates or other chemicals which are known to the State of California to cause cancer, birth defects, and other reproductive harm. For more information, visit www.P65Warnings.ca.gov
IMPORTANT SAFETY INSTRUCTIONS
When using electrical appliances basic safety precautions should be followed, including the following:
WARNING – To reduce the risk of burns, electric shock, fire, injury to persons, or exposure to excessive microwave energy:
- read all instructions before using the appliance.
- Read and follow the specific: “PRECAUTIONS TO AVOID POSSIBLE EXPOSURE TO EXCESSIVE MICROWAVE ENERGY” found on the page.
- This appliance must be grounded. Connect only to properly grounded outlet. See “GROUNDING INSTRUCTIONS” found on page 6.
- Install or locate this appliance only in accordance with the provided installation instructions.
- Some products such as whole eggs and sealed containers – for example, closed glass jars – are able to explode and should not be heated in this oven.
- Use this appliance only for its intended use as described in the manual. Do not use corrosive chemicals or vapors in this appliance. This type of oven is specifically designed to heat, cook, or dry food. It is not designed for industrial or laboratory use.
- As with any appliance, close supervision is necessary when used by children.
- Do not operate this appliance if it has a damaged cord or plug, if it is not working properly, or if it has been damaged or dropped.
- This appliance should be serviced only by qualified service personnel. Contact the nearest authorized service facility for examination, repair, or adjustment.
- Do not cover or block any openings on the appliance.
- Do not store this appliance outdoors. Do not use this product near water – for example, near a kitchen sink, in a wet basement, near a swimming pool, or a similar location.
- Do not immerse the cord or plug in water.
- Keep the cord away from the heated surface.
- Do not let the cord hang over the edge of the table or counter.
- When cleaning surfaces of door and oven that come together on closing the door, use only mild, nonabrasive soaps, or detergent applied with a sponge or soft cloth.
- To reduce the risk of fire in the oven cavity:
a. Do not overcook food. Carefully attend appliance when paper, plastic, or other combustible materials are placed inside the oven to facilitate cooking.
b. Remove wire twist-ties from paper or plastic bags before placing the bag in the oven.
c. If material inside of the oven ignites, keep the oven door closed, turn the oven off, and disconnect the power cord, or shut off power at the fuse or circuit breaker panel.
d. Do not use the cavity for storage purposes. Do not leave paper products, cooking utensils, or food in the cavity when not in use. - Liquids, such as water, coffee, or tea are able to be overheated beyond the boiling point without appearing to be boiling. Visible bubbling or boiling when the container is removed from the microwave oven is not always present.
THIS COULD RESULT IN VERY HOT LIQUID SUDDENLY BOILING OVER WHEN THE CONTAINER IS DISTURBED OR A UTENSIL IS INSERTED INTO THE LIQUID.
To reduce the risk of injury to persons:
- Do not overheat the liquid.
- Stir the liquid both before and halfway through heating it.
- Do not use straight-sided containers with narrow necks.
- After heating, allow the container to stand in the microwave oven for a short time before removing the container.
- Use extreme care when inserting a spoon or other utensil into the container.
SAVE THESE INSTRUCTIONS
GROUNDING INSTRUCTIONS
This appliance must be grounded. In the event of an electrical short circuit, grounding reduces the risk of electric shock by providing an escape wire for the electric current. This appliance is equipped with a cord having a grounding wire with a grounding plug. The plug must be plugged into an outlet that is properly installed and grounded.
WARNING – Improper use of the grounding can result in a risk of electric shock. Consult a qualified
electrician or serviceman if the grounding instructions are not completely understood, or if doubt exists as
to whether the appliance is properly grounded. If it is necessary to use an extension cord, use only a 3-wire
an extension cord that has a 3-blade grounded plug, and a 3-slot receptacle that will accept the plug on the appliance.
The marked rating of the extension cord shall be equal to or greater than the electrical rating of the appliance.
DANGER – Electric Shock Hazard
Touching some of the internal components can cause serious personal injury or death. Do not disassemble this appliance.
WARNING – Electric Shock Hazard
Improper use of the grounding can result in electric shock. Do not plug into an outlet until the appliance is properly installed and grounded.
- A short power supply cord is provided to reduce the risks resulting from becoming entangled in or tripping over a longer cord.
- Longer cord sets or extension cords are available and may be used if care is exercised in their use.
- If a long cord or extension cord is used:
a.The marked electrical rating of the cord set or extension cord should be at least as great as the electrical rating of the appliance.
b. The extension cord must be a grounding-type 3-wire cord.
c. The longer cord should be arranged so that it will not drape over the countertop or tabletop where it can be pulled on by children or tripped over unintentionally.
RADIO INTERFERENCE
- Operation of the microwave oven may cause interference to your radio, TV or similar equipment.
- When there is interference, it may be reduced or eliminated by taking the following measures:
- Clean the door and sealing the surface of the oven.
a. Reorient the receiving antenna of radio or television.
b. Relocate the microwave oven with respect to the receiver.
c. Move the microwave oven away from the receiver.
d. Plug the microwave oven into a different outlet so that the microwave oven and receiver are on
different branch circuits.
SAFETY
- The oven must be on a leveled surface.
- The turntable and turntable roller rest must be in the oven during cooking. Place the cookware gently on the turntable and handle it carefully to avoid possible breakage.
- Incorrect use of browning dishes may cause the turntable to break.
- Use only the specified bag size when using Direct Access Popcorn.
- The oven has several built-in safety switches to ensure that the power remains off when the door is open. Do not tamper with these switches.
- Do not operate the microwave oven empty. Operating the oven with no food or food that is extremely low in moisture can cause fire, charring, or sparking.
- Do not cook bacon directly on the turntable. Excessive local heating of the turntable may cause the turntable to break.
- Do not heat baby bottles or baby food in the microwave oven. Uneven heating may occur and could cause physical injury.
- Do not heat narrow-necked containers, such as syrup bottles.
- Do not attempt to deep-fry in your microwave oven.
- Do not attempt home canning in this microwave oven, as it is impossible to be sure all contents of the jar have reached boiling temperature.
- Do not use this microwave oven for commercial purposes. This microwave oven is made for household use only.
- To prevent delayed eruptive boiling of hot liquids and beverages or scalding yourself, stir liquid before placing the container in the oven and again halfway through cooking time. Let stand in the oven for a short time and stir again before removing the container.
- Use care when cooking food in the microwave oven to avoid burning due to excessive cooking.
- Failure to maintain the oven in a clean condition could lead to deterioration that could adversely affect the life of the appliance and possibly result in a hazardous situation.
UTENSILS
 CAUTION – Personal Injury Hazard
Tightly closed utensils could explode. Closed containers should be opened and plastic pouches should be pierced before cooking.
See the instructions on “Materials you can use in microwave oven or to be avoided in a microwave oven.”
There may be certain non-metallic utensils that are not safe to use for microwaving. If in doubt, you can test the utensil in question following the procedure below.
Utensil Test:
- Fill a microwave-safe container with 1 cup of cold water (250ml) along with the utensil in question.
- Cook on maximum power for 1 minute.
- Carefully feel the utensil. If the empty utensil is warm, do not use it for microwave cooking.
- Do not exceed 1 minute of cooking time.
MATERIALS TO AVOID IN MICROWAVE OVEN
| Utensils | Remarks |
| Aluminum tray | May cause arcing. Transfer food into microwave-safe dish. |
| Food carton with metal handle | May cause arcing. Transfer food into microwave-safe dish. |
| Metal or metal-trimmed utensils | Metal shields the food from microwave energy. Metal trim may cause arcing. |
| Metal twist ties | May cause arcing and could cause a in the oven. |
| Paper bags | May cause fire in the oven |
| Plastic foam | The plastic foam may melt or contaminate the liquid inside when ex- posed to high temperature. |
| wood | Wood will dry out when used in the microwave oven and may split or crack. |
MATERIALS YOU CAN USE IN MICROWAVE OVEN
| Utensils | |
| Browning dish | Follow manufacturer* instructions. The bottom of the browning dish must be at
least 3/16 inch (5mm) above the turntable. Incorrect usage may cause the turntable to break. |
| Dinnerware | Microwave-safe only. Follow manufacturer’s instructions. Do not use cracked or chipped dishes |
| Glass jars | Always remove lid. Use only to heat food until just warm. Most glass jars are not heat resistant and may break. |
| Glassware | Heat-resistant oven glassware only. Make sure there is no metallic trim. Do not use cracked or chipped dishes. |
| Oven cooking bags | Follow manufacturer* instructions. Do not close with the metal tie. Make slits to allow steam to escape. |
| Paper plates and cups | Use for short-term cooking/warming only. Do not leave the oven unattended while cooking. |
| Paper towels | Use to cover food for reheating and absorbing fat. Use with supervision for a short-term cooking only. |
| Parchment paper | Use as a cover to prevent splattering or a wrap for steaming. |
| Plastic | Microwave-safe only. Follow the manufacturer* instructions. Should be labeled “Microwave Safe”. Some plastic containers soften, as the food inside gets hot. “Boiling bags” and tightly closed plastic bags should be slit, pierced or vented as directed by the package. |
| Plastic wrap | Microwave-safe only. Use to cover food during cooking to retain moisture. Do not allow plastic wrap to touch food. |
| Thermometers | Microwave-safe only (meat and candy thermometers). |
| Wax paper | Use as a cover to prevent splattering and retain moisture. |
SETTING UP OUR OVEN
Names of Oven Parts and Accessories
Remove the oven and all materials from the carton and oven cavity. Your oven comes with the following accessories.
Glass tray (turntable)
Turntable ring assembly
Instruction manual

Turntable Installation
- Never place the glass tray upside down. The glass tray should never be restricted.
- Both glass tray and turntable ring assembly must always be used during cooking.
- All food and containers of food are always placed on the glass tray for cooking.
- If glass tray or turntable ring assembly cracks or breaks, contact your nearest authorized service center.
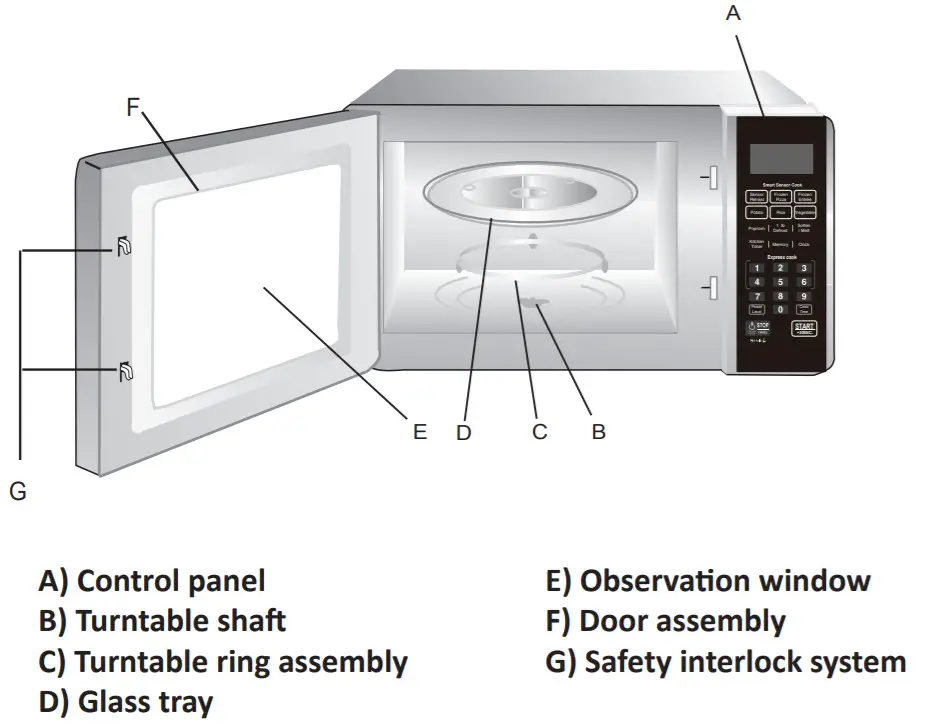
Countertop Installation
Remove all packing material and accessories. Examine the oven for any damage such as dents or broken doors. Do not install if the oven is damaged.
Cabinet: Remove any protective film found on the microwave oven cabinet surface. Do not remove the light brown Mica cover that is attached to the oven cavity to protect the magnetron.

- Select a level surface that provides enough open space for the intake and/or outlet vents. A minimum clearance of 3.0 inches (7.5cm) is required between the oven and any adjacent walls. One side must be open.
a. Leave a minimum clearance of 12 inches (30cm) above the oven.
b. Do not remove the legs from the bottom of the oven.
c. Blocking the intake and/or outlet openings can damage the oven.
d. Place the oven as far away from radios and TV as possible. Operation of microwave oven may cause interference to your radio or TV reception. - Plug your oven into a standard household outlet. Be sure the voltage and the frequency is the same as the voltage and the frequency on the rating label.
WARNING: Do not install an oven over a range cooktop or other heat-producing appliance. If installed near or
over a heat source, the oven could be damaged and the warranty would be void.
CONTROL PANEL
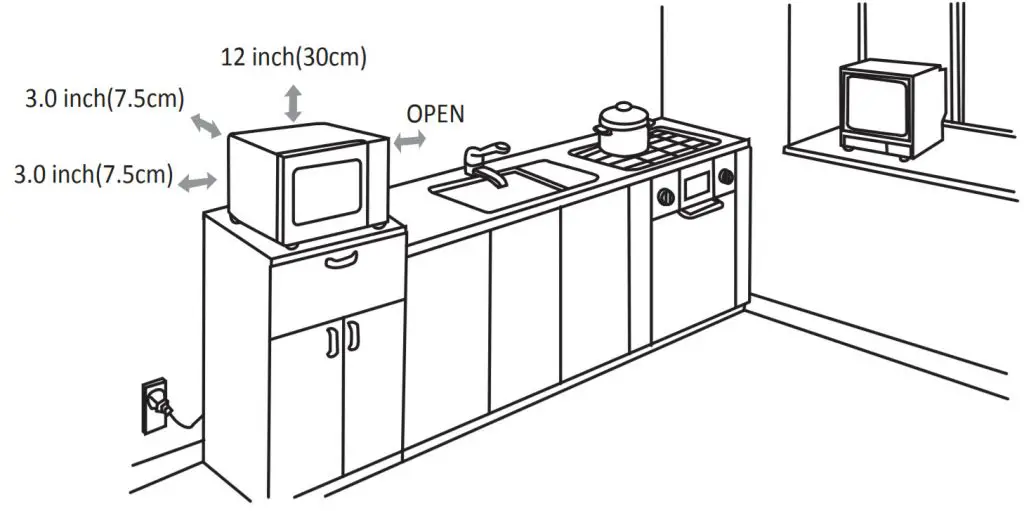
- Frozen Pizza
- Sensor Reheat
- Potato
- Rice
- Popcorn
- Kitchen Timer
- Number Pad (0-9)
- Power Level
- Stop/CANCEL
- Frozen Entree
- Vegetable
- Soften / Melt
- 1 Ib Defrost
- Clock
- Memory
- Cook Time
- START/+30SEC(Begin cooking time or add time to cooking)
OPERATION
1. Power Level
Ten power levels are available.
| Number key | 0 | 9 | 8 | 7 | 6 | 5 | 4 | 3 | 2 | 1 |
| Level | 10 | 9 | 8 | 7 | 6 | 5 | 4 | 3 | 2 | 1 |
| Power | 100% | 90% | 80% | 70% | 60% | 50% | 40% | 30% | 20% | 10% |
| Display | PL10 | PL9 | PL8 | PL7 | PL6 | PL5 | PL4 | PL3 | PL2 | PL1 |
2. Clock Setting
When the microwave oven is plugged into an outlet, the oven will display ” 0:00 ”
1) Press “CLOCK “, the screen will display 00:00 The hour figure will flash; “:” and the other “0” will be lighted.
2) Press the number keys and enter the correct time. For example, time is 10:12 now, please press “1,0,1,2 ” in turn.CLOCK”
3) Press ” to finish clock setting. “:” will flash and the clock will be lighted.
4) If the numbers input is not within the range of 1:00–12:59, the setting will be invalid until valid numbers are input.
Note: In the process of clock setting, if the ” STOP/CANCEL ” button is pressed or if there is no operation within 1 minute, the oven will go back to the former state automatically.
3. Kitchen Timer
1) Press “KITCHEN TIMER “, the screen will display 00:00.
2)Press the number keys and enter the correct timer. (The maximum time is 99 minutes and 99 seconds)
3) Press START/+30SEC. ” to confirm setting.
4) If the numbers input is not within the range of 1:00–12:59, the setting will be invalid until valid numbers are input..
Note: In the process of clock setting, if the ” STOP/CANCEL ” button is pressed or if there is no operation within 1 minute, the oven will go back to the former state automatically.
3. Kitchen Timer
1) Press “KITCHEN TIMER”, the screen will display 00:00.
2) Press the number keys and enter the correct timer. (The maximum time is 99 minutes and 99 seconds)
3) Press “START/+30SEC. ” to confirm setting.
4) When the kitchen time arrives, the buzzer will ring 5 times. If the clock is set (12-hour system), the screen will display the current time.
Note 1)The kitchen time is differ from the 12-hour system, Kitchen Timer is a timer. 2)During the timer process, any program cannot be set. Time cannot be increased by pressing the “START/+30SEC. ” key.
4. Microwave cook
1) Press “COOK TIME” once, the screen will display “00:00″.
2) Press number keys to input the cooking time; the maximum cooking time is 99 minutes and 99 seconds.
3) Press ” POWER LEVEL ” once, the screen will display “PL10”. The default power is 100% power. Now you can press number keys to adjust the power level.
4) Press “START/+30SEC. ” to start cooking.
Example: to cook the food with 50% microwave power for 15 minutes.
a. Press ” COOK TIME ” once.”00:00″ displays.
b.Press “1”,”5″,”0″,”0″ in order.
c.Press ” POWER LEVEL “once, then press “5” to select 50% microwave power.
d.Press ” START/+30SEC. ” to start cooking.
Note: In the process of cooking, if the ” STOP/CANCEL ” button is pressed or if there is no operation within 1 minute, the oven will go back to the former setting automatically.
5. Speedy Cooking
1) In waiting for the state, instant cooking at 100% power level can be started by selecting a cooking time from 1 to 6 minutes by pressing number pads1 to 6. Press ” START/+30SEC.” to increase the cooking time; the maximum cooking time is 99 minutes and 99 seconds.
2) In waiting for the state, instant cooking at 100% power level with 30 seconds’ cooking time can be started by pressing ” START/+30SEC . “. Each press on the same button will increase cooking time by 30 seconds. the maximum cooking time is 99 minutes and 99 seconds.
3) In a cooking state, cooking time can be increased by pressing ” ” . START/+30SEC.’The maximum cooking time is 99 minutes and 99 seconds.
Note:1) Under microwave and auto menu cooking states, press the” START/+30SEC.” button to increase cooking time by 30 seconds.
6. 1lb Defrost Function
1) Press “DEFROST “, the screen will display “1.0”.
2) Press “START/+30SEC. ” to start defrosting and the cooking time remained will be displayed.
7. Sensor Cook
1) In waiting for the state, but the food in the oven press the menu key in the sensor cook
2) Press ” START/+30SEC ” to start the sensor cook function and no need to set a time.
3) When the steaming is emanated, the surplus time will display.
The buzzer will sound 5 beeps when finishing. At last, the oven will turn back to the waiting sta
Note:
1)When cooking or reheating food, you should do these in order to have the best effect.
a.The room temperature cannot be over 35 degrees.
b.The weight of food must be more than 110g (4 Oz).
c.The cavity, glass tray, and utensils must be kept drying before putting the food in.
d.The reheat food can be covered with the lid. But the lid must have a vent hole in order to emanate the steam. A sealed utensil is forbidden.
2) During the cooking process, the following points must be done.
a.Keep the door close when the surplus time not display or the buzzer does not sound tiwice
b.When the buzzer sound twice, the time will count down and display the surplus time, you can open the door to mix the food up, turn it over or replace the food. And then go on the new operation.
3) Please leave the food alone for a while after cooking has been finished.
4) During the sensor cooking process, if the time does not count down, please do not open the oven door or press the ” STOP/CANCEL” key. Otherwise, the sensor will make mistakes.
EXAMPLE: Sensor Reheat Menu,
1) In waiting states, put the food into the microwave oven, press ” SENSOR REHEAT ” “SC-1″ is displayed.
2) Press ” START/+30SEC ” to start the sensor reheat function and no need to set a time.
3) The buzzer will sound 5 beeps when finishing. At last, the oven will turn back to the waiting state.
Note:1) Food to be avoided in sensor reheating.
a.Bread and other dry food, such as biscuits, cakes.
b.For raw or uncooked foods.
c.Beverage and frozen food.
2)The oven cannot cook automatically when the temperature of the oven cavity is high.
3)The reheat food can be covered with the lid. But the lid must have a vent hole in order to emanate the steam. A sealed utensil is forbidden.
4) During the sensor cooking process, please do not open the oven door or press the ” STOP/CANCEL ” key. Otherwise, the sensor will make mistakes.
5) The sensor reheat has different requests for different food. Casseroles – Add to 4 tablespoons of water, cover with a lid or vented plastic wrap.
3 Stir when time appears in the display window. Canned foods -Empty contents into a casserole dish or serving bowl, cover dish with a lid or vented plastic wrap. After reheating, let stand for a few minutes. A plate of food- Arranged food on the plate; top with butter, gravy, etc. Cover with lid or vented
plastic wrap. After reheating, let stand for a few minutes.
| Menu button | Food | Food Code | Weiÿhtf /Portion |
| Sensor Reheat | Sensor Reheat | Sc-z | 8.0~32.0 oz |
| frozen Pizza | Frozen Pizza | SC-2 | 6.0~12.0 oz |
| Frozen Entrée | Frozen Entrée | SC-3 | 8.0~32.0 oz |
| Potato | Potato | SC-4 | 1~4 potatoes 10.0oz each |
| Rice | Rice | SC-5 | 8 .0 oz ~ 1 6.0 0z |
| Vegetable | Fresh/Frozen Vegetable |
SC-6/ SC-7 | 4.0~16.0 oz |
POPCORN
- Press ” POPCORN ” repeatedly until the weight you needed appears in the display, “Oz” light. For example, press ” POPCORN ” once, “1.75” displays.
2Press ” START/+30SEC. ” to cook, “Oz” disappears.
| Times( Press “POPCORN”) | Weight | Display |
| Once | 1.75 0z | 1.75 |
| Twice | 3.oz | 3.0 |
| Thrice | 3.5Oz | 3.5 |
SOFTEN/MELT
- Press ” SOFTEN/MELT ” repeatedly until the menu you needed appears in the display.
- After choosing the menu, press a number pad to select the weight or portion of the food)
- Press ” START/+30SEC. ” to cook.
Auto Menu Chart:
| Food | Display | Weight/ Portion |
| Melt-Butter/ Margarine | S-1 | 1-3 STICKS |
| Melt-Chocolate | S-2 | 4 Oz
8 Oz |
| Melt-Cheese | S-3 | 8 Oz
16 Oz |
| Melt-Marshmallows | S-4 | 5Oz 10 Oz |
| Soften-Butter | 5-5 | 1-3 STICKS |
| Soften-Ice cream/ Frozen juice | S-6 | 6Oz
12 Oz 16 Oz |
| Soften-Cream cheese | S-7 | 3 Oz
8 Oz |
MEMORY FUNCTION
- Press “MEMORY ” to choose the memory 1-3 procedure. 1,2,3 will display. If the procedure has been set, press ” START/+30SEC. ” to use it. If not, continue to set the procedure. Only one or two microwave stages can be set.
- After finishing the setting, press ” MEMORY” to save the procedure and turn back to the waiting states. If press ” START/+30SEC. “, it can save and operate the setting. Example: save one program as memory 2. To cook the food with 80% microwave power for
3 minutes and 20 seconds. Operate the following steps:
a. In waiting states, press ”
b. Press ” COOK TIME “, then input number keys “3”, “2”, “0” to choose the cooking time.
c. Press ” POWER LEVEL ” once, then press the number button “8”, “PL8″ displays.
d. Press ” MEMORY” twice, “2” displays. MEMORY ” to save the current setting. If press ” START/+30SEC.”, the cooking program can be operated and save as memory 2.
e. To run the saved program, in waiting states, press ” press “MEMORY ” twice, “2” displays, and START/+30SEC. ” to run the saved cooking program.
Note: Auto menu cannot be set as memory cooking.
Multi-section cooking
At most 2 sections can be set for cooking. In multi-section cooking, if one section is defrosting, then defrosting shall be placed in the first section. When the first stage finish, the buzzer will sound once and the next stage will begin cooking.
Example: if you want to cook with 80% microwave power for 5 minutes + 60% microwave power for 10 minutes. The cooking steps are as follows.
1) Press “COOK TIME ” once, then press “5”,”0″,”0″ to set 5 minutes.
2) Press “POWER LEVEL ” once.
3) Press the number button “8” to set 80% microwave power.
4) Press “COOK TIME ” once, then press “1”,”0″,”0″,”0″ to set 10 minutes.
5) Press “POWER LEVEL ” once.
6) then press the number button “6” to set 60% microwave power
7) Press ” START/+30SEC.” to start cooking.
Note: auto menu cannot be set as one of the multi-section.
INQUIRING FUNCTION
- If the clock has been set, in n cooking state, press ” CLOCK “, the clock will display for three seconds. After that, the oven will turn back to the clock state.
- In the microwave cooking state, press ” POWER LEVEL ” to inquire about microwave power level After three seconds, the oven will turn back
to the previous state. the current microwave power will be displayed.
LOCK FUNCTION FOR CHILDREN
Lock: In the waiting state, press ” STOP/CANCEL ” for 3 seconds, there will be a long “beep” denoting the entering into the children-lock state; If the clock has been set, the current time will display.
Lock quitting: In locked state, press ” STOP/CANCEL ” for 3 seconds, there will be a long “beep” denoting that lock is released.
COOKING END REMINDING FUNCTION
When the cooking is over, the screen will display “End” and the buzzer sounds 5 “beep” to reminds the user the cooking is finished. In order to make the appliance into the normal operating state, please press ” ” or open the door. STOP/CANCEL
OTHER SPECIFICATIONS
- START/+30SEC. ” must be pressed to continue cooking if the door is opened during cooking;
- The buzzer sounds once by efficient press, inefficient press will be no response.
ENERGY SAVER MODE
- In standby mode, press the “STOP/Cancel” once (less than 3 seconds to avoid starting the child lock function to enter the Energy Saver mode.
- In child-locked mode, press the “STOP/Cancel” once (less than 3 seconds) and release it to enter the Energy Saver Mode.
- The above operation is the only way to start the Energy Saver mode.
- The Energy Saver mode works only if the door is closed.
TURN ON/OFF THE BUER SOUND
It is the default that the buzzer sounds are open. In waiting for the state, long-pressing on number 8 for 3 seconds, it sounds a long beep, turns off the sound.
When the sounds turn off, long-pressing on 8for For 3 seconds, it sounds a long beep and the sound turns off. All the buttons have no beep when they are pressed, including the ending cooking sounds are turn off too.
Note: All models have a mute function and energy-saved function. This function can work under lock function too.
MAINTENANCE
Troubleshooting
Check your problem by using the chart below and try the solutions for each problem. If the microwave oven still does not work properly, contact the nearest authorized service center
| Trouble | Possible Cause | Possible Remedy |
| The oven will not start | a. Electrical cord for the oven is not plugged in.
b. Door is open. c. Wrong operation is set. |
a. Plug into the outlet.
b. Close the door and try again. c. Check instructions. |
| Arcing or sparking | a. Materials to be avoided in microwave
oven were used. b. The oven is operated when empty. c. Spilled food remains in the cavity. |
a. Use microwave-safe cookware only.
b. Do not operate with the oven empty. c. Clean cavity with a wet towel |
| Unevenly cooked
foods |
a. Materials to be avoided in microwave oven were used.
b. Food is not defrosted completely. c. Cooking time, the power level is not suitable. d. Food is not turned or stirred. |
a. Use microwave-safe cookware only.
b. Completely defrost food. c. Use the correct cooking time, power level. d. Turn or stir food. |
| Overcooked foods | Cooking time, the power level is not suitable. | Use the correct cooking time, power level. |
| Undercooked foods | a. Materials to be avoided in microwave
oven were used. b. Food is not defrosted completely. c. Oven ventilation ports are restricted. d. Cooking time, the power level is not suitable. |
a. Use microwave-safe cookware only.
b. Completely defrost food. c. Check to see that oven ventilation ports are not restricted. d. Use the correct cooking time, power level. |
| Improper Defrosting | a. Materials to be avoided in microwave
oven were used. b. Cooking time, the power level is not suitable. c. Food is not turned or stirred. |
a. Use microwave-safe cookware only.
b. Use the correct cooking time, power level. c. Turn or stir food. |
ONE YEAR LIMITED WARRANTY
This warranty applies to products purchased and used in the U.S. and Canada.
This is the only expressed warranty for this product and is in lieu of any other warranty or condition.
This product is warranted to be free from defects in material and workmanship for a period of one (1) year from the date of original purchase. This warranty is valid for the original retail purchaser or gift recipient from the date of initial retail purchase and is not transferable.
Keep your original sales receipt as proof of purchase is required to make a warranty claim.
IMPORTANT: This warranty does not cover damages resulting from use not in conformity with the printed directions, accident, misuse or abuse, alternation, the affixing of any attachments not provided with the product, loss of parts, or subjecting the appliance to any but the specified voltage. (Read directions carefully.) This warranty is void if the product is used for other than single-family household use or subjected to any voltage and waveform other than as specified on the rating label (e.g., 120V ~ 60 Hz).
Englewood Marketing LLC excludes all claims for special, incidental, and consequential damages caused by a breach of express or implied warranty. All liability is limited to the amount of the purchase price. Every implied warranty, including any statutory warranty or condition of merchantability or fitness for a particular purpose, is disclaimed except to the extent prohibited by law, in which case such warranty or condition is limited to the duration of this written warranty. This warranty gives you specific legal rights. You may have other legal rights that vary depending on where you live. Some states or provinces do not allow limitations on implied warranties or special, incidental, or consequential damages, so the foregoing limitations may not
apply to you.
If there are any issues, please send an email to [email protected]. For faster service, please have the model, type, and serial numbers included in the email. Thank you.
To make a warranty claim or if service is required, please call our CUSTOMER SERVICE NUMBER.
For faster service, please have the model, type, and series numbers ready for the operator to assist you.
Customer Service Number
Englewood Marketing LLC
In the US 844-918-0509
Email: [email protected]