DEFY DFD448 375Lt Upright Fridge
Please read this manual before using the product!
Dear Customer,
We’d like you to make the best use of our product, which has been manufactured in modern facilities with care and meticulous quality controls.
Thus, we advice you to read the entire user manual before you use the product. In case the product changes hands, do not forget to hand the guide to its new owner along with the product.
This guide will help you use the product quickly and safely.
- Please read the user guide carefully before installing and operating the product.
- Always observe the applicable safety instructions.
- Keep the user guide within easy reach for future use.
- Please read any other documents provided with the product.
Keep in mind that this user guide may apply to several product models. The guide clearly indicates any variations of different models.
Safety and environment instructions
This section provides the safety instructions necessary to prevent the risk of injury and material damage. Failure to observe these instructions will invalidate all types of product warranty.
Intended use
WARNING:
- Keep ventilation openings, in the ap appliance enclosure or in the built-in structure, clear of obstruction.
- Do not use mechanical devices or other means to accelerate the defrosting process, other than those recommended by the manufacturer.
- Do not damage the refrigerant circuit.
- Do not use electrical appliances inside the food & storage compartments of the appliance, unless they are of the type recommended by the manufacturer.
This appliance is intended to be used in households and similar applications such as
- staff kitchen areas in shops, offices and other working environments;
- farm houses and by clients in hotels, motels and other residential type environments;
- bed and breakfast type environments;
- catering and similar non-retail.
General safety
- This product should not be used by persons with physical, sensory and mental disabilities, without sufficient knowledge and experience or by children. The device can only be used by such persons under supervision and instruction of a person responsible for their safety. Children should not be allowed to play with this device.
- In case of malfunction, unplug the device.
- After unplugging, wait at least 5 minutes before plugging in again.
- Unplug the product when not in use.
- Do not touch the plug with wet hands! Do not pull the cable to plug off, always hold the plug.
- Do not plug in the refrigerator if the socket is loose.
- Unplug the product during installation, maintenance, cleaning and repair.
- If the product will not be used for a while, unplug the product and remove any food inside.
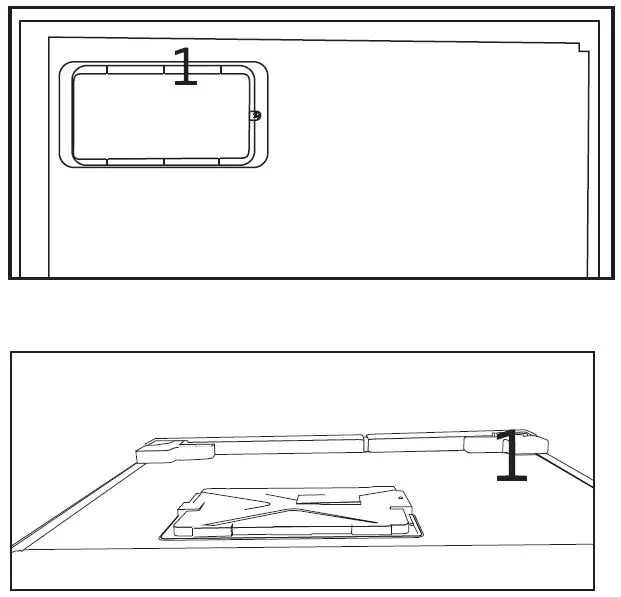
- Do not use the product when the compartment with circuit cards located on the upper back part of the product (electrical card box cover) (1) is open.
Safety and environment instructions
HC warning
If the product comprises a cooling system using R600a gas, take care to avoid damaging the cooling system and its pipe while using and moving the product. This gas is flammable. If the cooling system is damaged, keep the product away from sources of fire and ventilate the room immediately. The label on the inner left side indicates the type O f gas use d · mt h e Product.
For models with water dispenser
- Pressure for cold water inlet shall be maximum 90 psi (6.2 bar). If your water pressure exceeds 80 psi (5.5 bar), use a pressure limiting valve in your mains system. If you do not know how to check your water pressure, ask for the help of a professional plumber.
- If there is risk of water hammer effect in your installation, always use a water hammer prevention equipment in your installation. Consult Professional plumbers if you are not sure that there is no water hammer effect in your installation.
- Do not install on the hot water inlet. Take precautions against of the risk of freezing of the hoses. Water temperature operating interval shall be 33° F (0.6°() minimum and 100° F (38°() maximum.
- Use drinking water only.
Intended use
- This product is designed for home use. It is not intended for commercial use.
- The product should be used to store food and beverages only.
- Do not keep sensitive products requiring controlled temperatures (vaccines, heat medical sensitive supplies, etc.) medication, in the refrigerator.
- The manufacturer assumes no responsibility for any damage due to misuse or mishandling.
Child safety
- Keep packaging materials out of children’s reach.
- Do not allow the children to play with the product.
- If the product’s door comprises a lock, keep the key out of children’s reach.
Safety and environment instructions
Compliance with WEEE
Directive and Disposing of the Waste Product This product complies with EU WEEE Directive (2012/19/EU). This product bears a classification symbol for waste electrical and electronic equipment (WEEE).
This product has been manufactured with high quality parts and materials which can be reused and are suitable for recycling. Do not dispose of the waste product with normal domestic and other wastes at the end of its service life. Take it to the collection center for the recycling of electrical and electronic equipment. Please consult your local authorities to learn about these collection centers.
Compliance with RoHS Directive
- This product complies with EU WEEE Directive (2011/65/EU). It does not contain harmful and prohibited materials specified in the Directive.
Package information
- Packaging materials of the product are manufactured from recyclable materials in accordance with our National Environment Regulations. Do not dispose of the packaging materials together with the domestic or other wastes. Take them to the packaging material collection points designated by the local authorities.
Your refrigerator
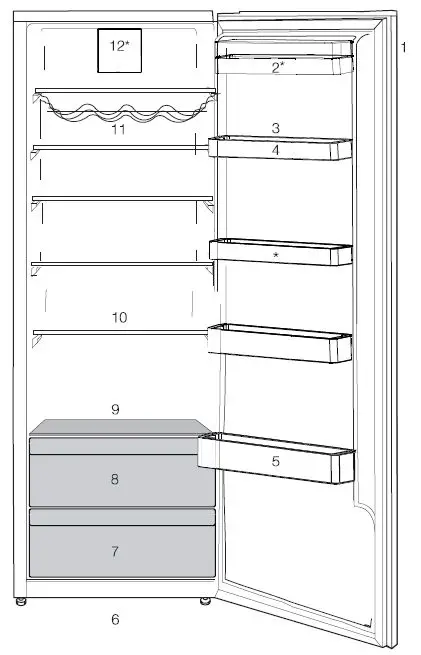
- Indicator panel
- Butter & Cheese sections
- Egg section
- Door shelf
- Bottle shelves
- Adjustable front feet
- Crispers
- Chiller
- Chiller cover and glass
- Movable shelves
- Wine cellar
- Fan
*May not be available in all models. Figures that take place in this instruction manual are schematic and may not correspond exactly with your product. If the subject parts are not included in the product you have purchased, then it is valid for other models.
Installation
Appropriate Installation Location
Contact an Authorized Service for the installation of the product. In order to prepare the product for use, refer the information in the user manual and ensure that electrical installation and water installation are appropriate. If not, call a qualified electrician and technician to have any necessary arrangements carried out.
WARNING:
- The manufacturer shall not be held liable for damages that may arise from procedures carried out by unauthorized persons.
- If the door clearance of the room where the product shall be placed is so tight to prevent passing of the product, remove the door of the room and pass the product through the door by turning it to its side; if this does not work, contact the authorized service.
- The place to product on an even more surface to prevent jolts,
- Install the product at least 30 cm away from heat sources such as hobs, heater cores and stoves and at least 5 cm away from electrical ovens,
- Product must not be subjected to direct sunlight and kept in humid places.
- Appropriate air ventilation must be provided around your product in order to achieve an efficient operation. If the product is to be placed in a recess in the wall, pay attention to leave at least 5 cm distance with the ceiling and side walls.
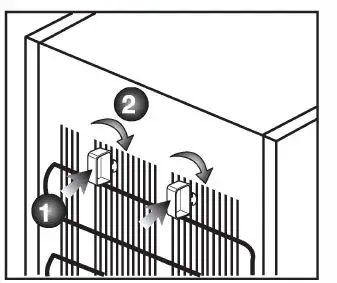
Installing the Plastic Wedges
Plastic wedges supplied with the product are used to create the distance for the air circulation between the product and the rear wall.
- To install the wedges, remove the screws on the product and use the screws supplied together with the wedges.
- Insert the 2 plastic wedges onto the rear ventilation cover as illustrated in the figure.
Adjusting the Feet
If the product stands unbalanced after installation, adjust the feet on the front by rotating them to the right or left.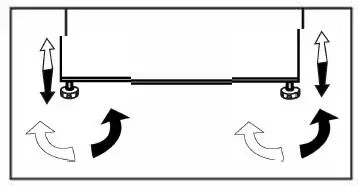
Electrical Connection
WARNING:
- Do not make connections via extension cables or multi-plugs.
- Damaged power cable must be replaced by the Authorized Service Agent
- If two coolers are to be installed side by side, there 1 should be at least 4 cm distance between them.
- Our company is not liable for any damages that will arise when the product is used without grounding and electrical connection in accordance with the national regulations.
- Power cable plug must be within easy reach after installation.
- Do not extension cords or cordless multiple outlets between your product and the wall outlet.
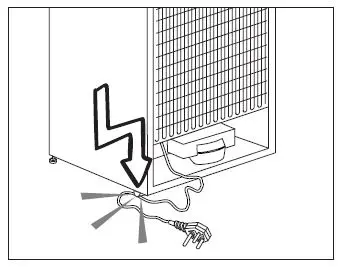
The condenser of your appliance is located on the back as shown below. In order to achieve better energy efficiency with lower energy consumption, please pull the condenser towards yourself as illustrated in the picture below. may not be available in all models.
Preparation
- Your refrigerator should be installed at least 30 cm away from heat sources such as hobs, ovens, central heater and stoves and at least 5 cm away from electrical ovens and should not be located under direct sunlight
- The ambient temperature of the room where you install your refrigerator should at least be 5°C. Operating your refrigerator under cooler conditions is not recommended with regard to its efficiency.
- Please make sure that the interior of your refrigerator is cleaned thoroughly.
- If two refrigerators are to be installed side by side, there should be at least 2 cm distance between them.
- When you operate your refrigerator for the first time, please observe the following instructions during the initial six hours.
- The door should not be opened frequently.
- It must be operated empty without any food in it
- Do not unplug your refrigerator. If a power failure occurs out of your control, please see the warnings in the “Recommended solutions for the problems” section.
- Original packaging and foam materials should be kept for future transportation or moving.
- The baskets/drawers that are provided with the chill compartment must always be in use for low energy consumption and for better storage conditions.
- Food contact with the temperature sensor in the freezer compartment may increase the energy consumption of the appliance. Thus any contact with the sensor(s) must be avoided.
- In some models, the instrument panel automatically turns off 5 minutes after the door has closed. It will be reactivated when the door has opened or pressed on any key.
- Due to temperature change as a result of opening/closing the product door during operation, condensation on the door/body shelves and the glass containers is normal
Operating the product
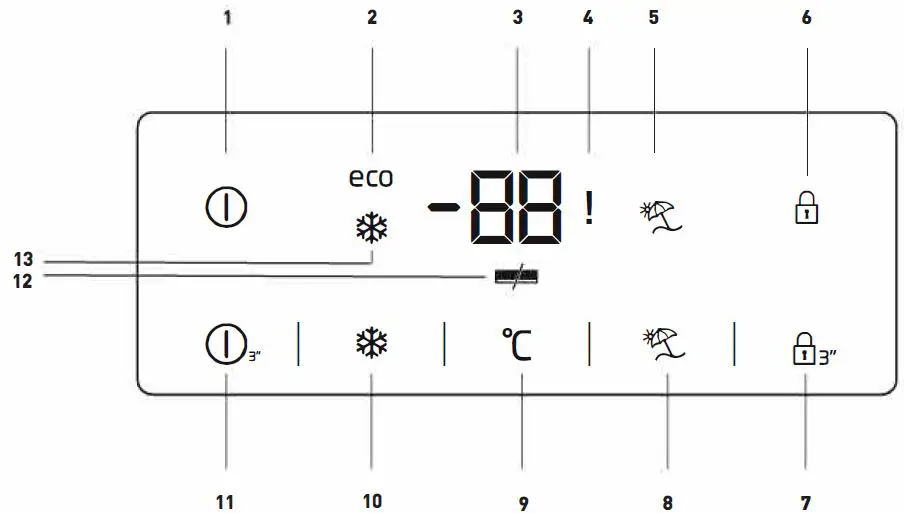
- On/Off Indicator:
This icon (Ci)) come on when the fridge is turned off. All the other icons turn off. - Economic Usage Indicator:
This icon (eco) comes on when the Fridge Compartment is set to 8°C which is the most economical set value. Economic Usage Indicator turns off when the Quick Fridge or Quick Freeze function is selected. - Fridge Compartment Temperature Setting Indicator:
Indicates the temperature set for the Fridge Compartment. - Power failure/High temperature I error warning indicator :
This light (!) illuminates during a power failure, high-temperature failures and error warnings. During sustained power failures, the highest temperature that the fridge compartment reaches will flash on the digital display. - Vacation Indicator:
This icon lights up when the Vacation Function is active. - Key Lock Indicator:
This icon (6]) lights up when the Key Lock mode is activated. - Key Lock Mode:
Press Key Lock (6J3 .. ) button continuously for 3 seconds. Key lock icon will light up and key lock mode will be activated. Buttons will not function if the Key Lock mode is active. Press Key Lock button continuously for 3 seconds again. Key lock icon will turn off and the key lock mode will be exite.
Figures in this user manual are schematic and may not match the product exactly. If the subject parts are not included in the product you have purchased, then those parts are valid for other models. - Vacation Function:
When you press Vacation button, vacation function is activated and vacation indicator lights. You can use this function when you will not use your fridge for a long time. Note that there should be no food inside your fridge, otherwise fridge can not preserve your food at Vacation mode.
If this function is activated, fridge compartment temperature is kept at 15 C0 in order to prevent bad smelling. Press Vacation button again to deactivate vacation function. - Fridge Set Function:
This function allows you to make the Fridge compartment temperature setting. Press this button to set the temperature of the fridge compartment to 8,7,6,5,4,3, and 1 respectively. - Quick Fridge Function:
Quick Fridge indicator($) turns on when the Quick Fridge function is on. Press Quick Fridge button again to cancel this function. Quick Fridge indicator will turn off and normal settings will be resumed. Quick Fridge function will be cancelled automatically 1 hours later if you do not cancel it manually. If you want to cool plenty amount of fresh food, press Quick Fridge button before you place the food into the fridge compartment. - 0n/Off Function:
This function (CD?) allows you to make the Fridge turn off when pressed for 3 seconds.The fridge could be turned on by pressing On/Off button for 3 seconds again. - Energy Saving Indicator :
If the product doors are kept closed for a long time energy saving function is automatically activated and energy saving symbol is illuminated.=
When energy saving function is activated, all symbols on the display other than energy saving symbol will turn off. When the Energy Saving function is activated, if any button is pressed or the door is opened, energy saving function will be canceled and the symbols on display will return to normal.
Energy saving function is activated during delivery from factory and cannot be canceled. - Quick Freeze Indicator :
This icon ($) comes on when the Quick Freeze function is on.
Freezing fresh food
- In order to preserve the quality of the food, it shall be frozen as quickly as possible when it is placed in the freezer compartment, use the fast freezing feature for this purpose.
- You may store the food longer in freezer compartment when you freeze them while they are fresh.
- Pack the food to be frozen and close the packing so that it would not allow entrance of air.
- Ensure that you pack your food before putting them in the freezer. Use freezer containers, foils and moisture-proof papers, plastic bags and other packing materials instead of traditional packing papers.
- Label each pack of food by adding the date before freezing. You may distinguish the freshness of each food pack in this way when you open your freezer each time. Store the food frozen before in the front side of compartment to ensure that they are used first.
- Frozen food must be used immediately after they are thawed and they should not be re-frozen.
- Do not freeze too large quantities of food at one time.
Freezer Compartment Setting Fridge compartment Setting Remarks -180( 4°c This is the normal recommended setting. -20,-22 or-24°( 4°c These settings are recommended when the ambient temperature exceeds 30°C. Quick Freeze 4°c Use when you wish to freeze your food in a short time. Your product will return to its previous mode when the process is over. -18°( or colder 2°( Use these settings if you think that your fridge compartment is not cold enough because of the hot ambient conditions or frequent opening and closing of the door.
Recommendations for preserving the frozen food
The compartment shall be set to -18°( at least
- Put packages in the freezer as quickly as possible after purchase without allowing the to thaw.
- Check whether the “Use By” and “Best Before” dates on the packaging are expired or not before freezing it
- Ensure that the package of the food is not damaged.
Deep-freeze information
According to IEC 62552 standards, the product shall freeze at least 4.5 kg of food at 32°( ambient temperature to -18°( or lower within 24 hours for every 100-litres of freezer volume. It is possible to preserve the food for a long time only at -18°( or lower temperatures. You can keep the freshness of food for many months (at -18°( or lower temperatures in the deep freeze). Foods to be frozen should not be allowed to come in contact with the previously frozen items to prevent them from getting thawed partially. Boil the vegetables and drain their water in order to store vegetables for a longer time as frozen. After draining their water, put them in air-proof packages and place them inside the freezer. Food such as bananas, tomatoes, lettuce, celery, boiled eggs, potatoes are not suitable for freezing. When these foods are frozen, only their nutritional value and taste shall be affected negatively. They shall not be spoiled so that they would create a risk for human health.
Placing the food
| Freezer compartment shelves | Various frozen food such as meat, fish, ice cream, vegetables
and etc. |
| Refrigerator compartment shelves | Food in pans, covered plates and closed containers, eggs (in
closed container) |
| Door shelves of fridge compartment | Small and packaged food or beverage |
| Crisper | Vegetables and fruits |
| Fresh zone compartment | Delicatessen (breakfast food, meat products that shall be consumed in a short time) |
Door open warning
(This feature is optional)
An audio warning signal will be given when the door of your product is left open for at least 1 minute. This warning will be muted when the door is closed or any of the display buttons (if any) are pressed. Door open warning is given to user both visually and acoustically. If the warning continues for 10 minutes, interior lights will be turned off.
Changing the door opening direction
Door opening direction of your refrigerator can be changed according to the place you are using it.If this is necessary, please call your nearest Authorized Service, Above description is a general expression.For information on changing the opening direction of the door, you must refer to the warning label located on the inner side of the door,
Maintenance and cleaning
Cleaning your fridge at regular intervals will extend the service life of the product.
WARNING: Unplug the product before cleaning it.
- Never use gasoline, benzene, or similar substances for cleaning purposes.
- Never use any sharp and abrasive tools, soap, household cleaners, detergent, and wax polish for cleaning.
- For non-No Frost products, water drops and frosting up to a fingerbreadth occur on the rear wall of the Fridge compartment. Do not clean it; never apply oil or similar agents on it.
- Only use slightly damp microfiber cloths to clean the outer surface of the product. Sponges and other types of cleaning cloths may scratch the surface
- Dissolve one teaspoon of bi-carbonate in half a liter of water. Soak a cloth with the solution and wrung it thoroughly. Wipe the interior of the refrigerator with this cloth and the dry thoroughly.
- Make sure that no water enters the lamp housing and other electrical items.
- If you will not use the refrigerator for a long period of time, unplug it, remove all food inside, clean it and leave the door ajar.
- Check regularly that the door gaskets are clean. If not, clean them.
- To remove door and body shelves, remove all of its contents.
- Remove the door shelves by pulling them up. After cleaning, slide them from top to bottom to install.
- Never use cleaning agents or water that contain chlorine to clean the outer surfaces and chromium-coated parts of the product. Chlorine causes corrosion on such metal surfaces.
Avoiding bad odours
- Materials that may cause odor are not used in the production of our refrigerators. However, inappropriate food-preserving conditions and not cleaning the inner surface of the refrigerator as required can bring forth the problem of odor. Pay attention to the following to avoid this problem:
- Keeping the refrigerator clean is important. Food residuals, stains, etc. can cause odor. Therefore, clean the refrigerator with bi-carbonate dissolved in water every few months. Never use detergents or soap.
- Keep the food in closed containers. Microorganisms spreading out from uncovered containers can cause unpleasant odors.
- Never keep the food that have passed best before dates and spoiled in the refrigerator.
Protecting the plastic surfaces
Do not put liquid oils or oil-cooked meals in your refrigerator in unsealed containers as they damage the plastic surfaces of the refrigerator. If oil is spilled or smeared onto the plastic surfaces, clean and rinse the relevant part of the surface at once with warm water.
Troubleshooting
Check this list before contacting the service. Doing so will save you time and money. This list includes frequent complaints that are not related to faulty workmanship or materials. Certain features mentioned herein may not apply to your product. The refrigerator is not working.
- The power plug is not fully settled.
- Plug it in to settle completely into the socket.
- The fuse connected to the socket powering the product or the main fuse is blown. > > > Check the fuses.
Condensation on the side wall of the cooler compartment (MULTI-ZONE, COOL, CONTROL and FLEXI ZONE).
- The door is opened too frequently > > > Take care not to open the product’s door too frequently.
- The environment is too humid. > > > Do not install the product in humid environments.
- Foods containing liquids are kept in unsealed holders. > > > Keep the foods containing liquids in sealed holders.
- The product’s door is left open. > > > Do not keep the product’s door open for long periods.
- The thermostat is set to too low temperature. > > > Set the thermostat to appropriate temperature.
Compressor is not working.
- In case of sudden power failure or pulling the power plug off and putting back on, the gas pressure in the product’s cooling system is not balanced, which triggers the compressor thermic safeguard. The product will restart after approximately 6 minutes. If the product does not restart after this period, contact the service.
- Defrosting is active. > > > This is normal for a fully-automatic defrosting product. The defrosting is carried out periodically.
- The product is not plugged in. > > > Make sure the power cord is plugged in.
- The temperature setting is incorrect. > > > Select the appropriate temperature setting.
- The power is out. > > > The product will continue to operate normally once the power is restored.
The refrigerator’s operating noise is increasing while in use.
The product’s operating performance may vary depending on the ambient temperature variations. This is normal and not a malfunction.
The refrigerator runs too often or for too long.
- The new product may be larger than the previous one. Larger products will run for longer periods.
- The room temperature may be high. > > > The product will normally run for long periods in higher room temperature.
- The product may have been recently plugged in or a new food item is placed inside. > > > The product will take longer to reach the set temperature when recently plugged in or a new food item is placed inside. This is normal.
- Large quantities of hot food may have been recently placed into the product. > > > Do not place hot food into the product.
- The doors were opened frequently or kept open for long periods. > > > The warm air moving inside will cause the product to run longer. Do not open the doors too frequently.
- The freezer or cooler door may be ajar. > > > Check that the doors are fully closed.
- The product may be set to temperature too low. > > > Set the temperature to a higher degree and wait for the product to reach the adjusted temperature.
- The cooler or freezer door washer may be dirty, worn out, broken or not properly settled. > > > Clean or replace the washer. Damaged / torn door washer will cause the product to run for longer periods to preserve the current temperature.
The freezer temperature is very low, but the cooler temperature is adequate.
- The freezer compartment temperature is set to a very low degree. > > > Set the freezer compartment temperature to a higher degree and check again.
The cooler temperature is very low, but the freezer temperature is adequate.
- The cooler compartment temperature is set to a very low degree. > > > Set the freezer compartment temperature to a higher degree and check again.
The food items kept in cooler compartment drawers are frozen.
- The cooler compartment temperature is set to a very low degree. > > > Set the freezer compartment temperature to a higher degree and check again.
The temperature in the cooler or the freezer is too high.
- The cooler compartment temperature is set to a very high degree. > > > Temperature setting of the cooler compartment has an effect on the temperature in the freezer compartment. Wait until the temperature of relevant parts reach the sufficient level by changing the temperature of cooler or freezer compartments.
- The doors were opened frequently or kept open for long periods. > > > Do not open the doors too frequently.
- The door may be ajar. > > > Fully close the door.
- The product may have been recently plugged in or a new food item is placed inside. > > > This is normal. The product will take longer to reach the set temperature when recently plugged in or a new food item is placed inside.
- Large quantities of hot food may have been recently placed into the product. > > > Do not place hot food into the product.
Shaking or noise.
- The ground is not level or durable. > > > If the product is shaking when moved slowly, adjust the stands to balance the product. Also make sure the ground is sufficiently durable to bear the product.
- Any items placed on the product may cause noise. > > > Remove any items placed on the product.
The product is making noise of liquid flowing, spraying etc.
- The product’s operating principles involve liquid and gas flows. > > > This is normal and not a malfunction.
There is sound of wind blowing coming from the product.
- The product uses a fan for the cooling process. This is normal and not a malfunction.
There is condensation on the product’s internal walls.
- Hot or humid weather will increase icing and condensation. This is normal and not a malfunction.
- The doors were opened frequently or kept open for long periods. > > > Do not open the doors too frequently; if open, close the door.
- The door may be ajar. > > > Fully close the door.
There is condensation on the product’s exterior or between the doors.
- The ambient weather may be humid, this is quite normal in humid weather. > > > The condensation will dissipate when the humidity is reduced.
The interior smells bad.
- The product is not cleaned regularly. > > > Clean the interior regularly using a sponge, warm water and carbonated water.
- Certain holders and packaging materials may cause odour. > > > Use holders and packaging materials without free of odour,
- The foods were placed in unsealed holders. > > > Keep the foods in sealed holders. Microorganisms may spread out of unsealed food items and cause malodor. Remove any expired or spoilt foods from the product.
The door is not closing.
- Food packages may be blocking the door. > > > Relocate any items blocking the doors.
- The product is not standing in full upright position on the ground. > > > Adjust the stands to balance the product.
- The ground is not level or durable. > > > Make sure the ground is level and sufficiently durable to bear the product.
The vegetable bin is jammed.
- The food items may be in contact with the upper section of the drawer. > > > Reorganize the food items in the drawer.
If The Surface Of The Product Is Hot.
- High temperatures may be observed between the two doors, on the side panels and at the rear grill while the product is operating. This is normal and does not require service maintenance! Be careful when touching these areas.
WARNING: If the problem persists after following the instructions in this section, contact your vendor or an Authorised Service. Do not try to repair the product.
]]>DEFY DSS506 521 Electric Stove Instruction Manual
Introduction
Congratulations on the purchase of this quality product. We trust that you will enjoy many years of trouble free use.
Please read these instructions carefully before using the stove.
This manual will provide you with information on how to operate and care for your product in order that you gain the maximum benefit from it.
Unpacking
- Please ensure that packaging material is disposed of in a responsible manner.
- Plastic bags should be cut up to prevent children playing with them and accidentally suffocating.
- Remove all packing from the oven cavity and position the accessories.
- If the appliance is damaged in any way, do not use it. Report the damage to your dealer, who will take the necessary corrective action.
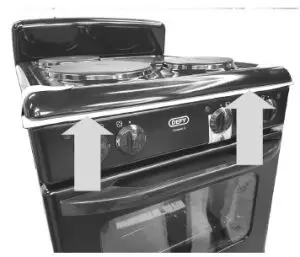
- A polystyrene strip has been placed between the control panel and the hob. (See diagram with arrows below) Please ensure the strip is completely removed prior to use. Failure to do so is a safety hazard. Check that there are no broken pieces of polystyrene left between the control panel and the hob.
Installation
- Surfaces immediately adjacent to the oven should be able to withstand temperatures of up to 100°C without delaminating or discoloring.
Cupboard design
- Your Defy oven is designed to give you years of trouble free service, however it is important that it be correctly installed.
- Cooking appliances generate considerable heat. The layout and materials of the mounting cabinet should take account of the characteristics of the oven.
- Surfaces immediately adjacent to the oven should be able to withstand temperatures of up to 100°C without delaminating or discolouring.
- Overhanging doors above the oven may be subjected to heat as well as condensation if very moist foods are being cooked.

Electrical installation
(Model 521 only)
This appliance must be earthed and the manufacturer and the seller do not accept responsibility for any damage due to incorrect installation or electrical connection.
This appliance should not be connected through an earth leakage system.
Refer to S.A.N.S. 10142
Connection to the power supply
This appliance has a ‘Y’ type supply cord connection and must be installed by a licensed electrician, who will ensure that the stove is correctly connected and safely earthed. The rated current is printed on the serial number label attached to the stove upper back panel. The appliance must be connected to the mains through an All pole isolating switch which has a minimum clearance between the contacts of 3 mm. in All poles. A means for disconnection must be provided in the fixed wiring.
Electrical installation (Model 501 only)
Push the electric plug into a 230V. 15A. Earthed wall socket The stove is a plug in model with a 15A. power supply.
It is therefore not possible to use all the elements at the same time. Set the selector to the required position.
Connecting the sprague to the oven
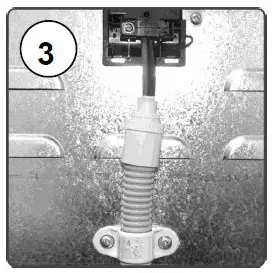
- Purchase a standard plastic/metal saddle type bracket, capable of going around the 20 mm diameter sprague and with a hole pitch of 38 mm (Plastic) 45 mm (Metal), from your local hardware and 2 off 4.2 mm x
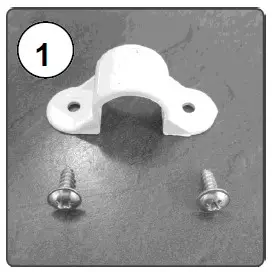
12 mm self tapping screws. 3 Plates
Bake and 2 small plates
Grill and 2 small plates - Feed the cables through the Sprague and connect to the mains terminal block of the appliance.
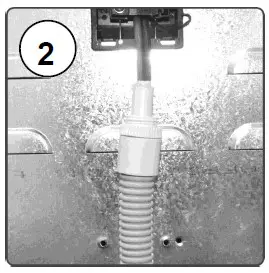
- Place the plastic/metal saddle around the sprague and fasten via the 2 self tapping screws onto the factory pre punched holes adjacent to the mains terminal block of the appliance.
 WARNING! ELECTRICAL CONNECTION MUST ONLY BE DONE BY A QUALIFIED ELECTRICIAN!
 Danger of fire: Do not store items on the cooking surface. CAUTION: The cooking process has to be supervised. A short term cooking process has to be supervised continuously. WARNING: Unattended cooking on a hob with fat or oil can be dangerous and may result in a fire.
Safety advice
This section contains safety instructions that will help you avoid risk of injury and damage. All warranties will become void if you do not follow these instructions.
General safety
- This appliance is not intended for use by persons (including children) with reduced physical, sensory or mental capabilities, or lack of experience and knowledge, unless they have been given supervision or instruction concerning the use of the appliance by a person responsible for their safety.
- Children should be supervised to ensure that they do not play with the appliance.
- Connect the appliance to an earthed outlet/line protected by a fuse of suitable capacity. Have the earth installation made by a qualified electrician. Our company shall not be liable for any problems arising due to the appliance not being earthed in accordance with the local regulations.
- If the supply cord is damaged, it must be replaced by the manufacturer, its service agent or similar qualified persons in order to avoid a hazard.
- Do not operate the appliance if it is defective or has any visible damage.
- Do not carry out any repairs or modifications on the appliance.
- Never wash down the appliance with water! There is the risk of electric shock!
- Never use the appliance when your judgment or coordination is impaired by the use of alcohol and/or drugs.
- The appliance must be disconnected from the mains during installation, maintenance, cleaning and repair procedures.
- Be careful when using alcoholic drinks in your dishes. Alcohol evaporates at high temperatures and may cause a fire since it can ignite when it comes into contact with hot surfaces.
- Do not heat closed tins and glass jars in the oven. The pressure that would build up in the tin/jar may cause it to burst.
- Do not place baking trays, dishes or aluminium foil directly onto the bottom of the oven. The heat accumulation might damage the bottom of the oven.
- Keep all ventilation slots clear of obstructions.
- The appliance may be hot when it is in use. Never touch the hot burners, inner sections of the oven or heaters etc.
- Always use heat resistant oven gloves when putting in or removing dishes from the hot oven.
- Do not use the appliance with the front door glass removed or cracked.
- The rear surface of the oven gets hot when it is in use. Make sure that the electrical connection does not come into contact with the rear surface as connections may get damaged.
- Do not trap the mains cable between the oven door and frame and do not route it over hot surfaces as the cable insulation may melt and cause a fire as a result of a short circuit.
- Make sure that the function knobs are switched off after every use.
- When using gas, ensure that the room is well ventilated.
- Always keep children and infirm persons away from the appliance when it is in use.
- Only use the appliance for preparing food.
- Use a deep pan, large enough to cover the appropriate burner.
- Always dry food thoroughly before placing it in hot oil or fat. Frozen food in particular will spit and splatter if added too quickly.
- Never fill the pan more than one third full of fat or oil.
- Never heat fat or fry with a lid on the pan.
- Do not fry too much food at once. This lowers the temperature of the oil or fat and results in fatty foods.
- Do not leave hot fat or oil unattended. If overheating occurs, these could catch fire.
- Do not store flammable items in the oven.
- Always keep the oven door gasket clean.
- Avoid spilling fruit juice, particularly citrus, on the appliance as it could damage the enamel.
- Do not use the appliance for heating rooms or drying clothes. There is a fire hazard.
- The lamp(s) used in this appliance is not suitable for household room illumination.
 DANGER Risk of scalding by hot steam!
Take care when opening the oven door as steam may escape.
 Danger of fire: Do not store items on the cooking surface.
CAUTION: The cooking process has to be supervised. A short term cooking process has to be supervised continuously.
 WARNING: Unattended cooking on a hob with fat or oil can be dangerous and may result in a fire.
WARNING Hot surfaces may cause burns! Do not touch the hot surfaces of the appliance. Use oven gloves. Keep children away from the appliance.
DANGER Risk of fire by overheated oil! When heating oil, do not leave it unattended. Never try to extinguish a fire with water! When oil has caught fire, immediately cover the pot or pan with a lid. Switch off the hob if safe to do so and phone the fire service.
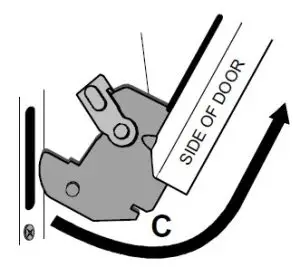
Anti-Tilt mechanism
- “A” 1 x Stability chain
- “B” 1 x Stability hook with anchor sleeve
- “A” is factory fitted at the rear of the stove in the centre. (See overleaf for instructions if the removable splashback is to be fitted)
- Position the stove and move “A” to touch the wall behind the stove.
- Mark the hole where “A” touches the wall behind the stove.
- Move the stove away from the wall to allow for an area to work in.
- Using a 8.0 mm concrete bit, drill a hole at the marked position.
- Using the Stability hook and anchor sleeve “B”, firmly secure “B” to the wall.
- Slide the stove back in position and engage the stability chain “A” onto the Stability hook “B”.
- The stove is then secured and will not accidentally tilt if downward pressure is applied to the open oven door.
 Figures in this manual are schematic and may not match your stove exactly.
Safety regulations stipulate that the ANTI-TILT mechanism supplied with the stove, must be fitted as shown.
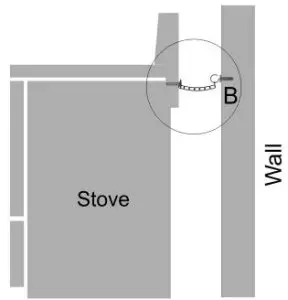
Anti-tilt installation side view
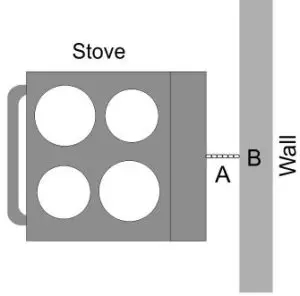
Anti-tilt installation top view

Fitting the removable splashback
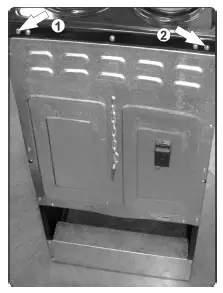
Remove the splashback (recessed in the polystyrene) from the polystyrene packaging. Loosen screws numbered 1 and 2 on the stove.
Align the 2 splashback key slotted holes with the 2 holes on the back of the stove. Slide the key slotted holes of the splash back over the loosened screws and gently push the splash back into position.
Fasten the screws 3 & 4 to secure the splashback in place as indicated in the diagrams above.

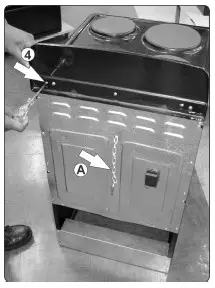
Please see instructions on the previous page regarding correct fitment and of the anti tilt mechanism (A) to the wall.
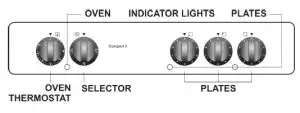
The control panel (Model 501)
The control panel (Model 521)
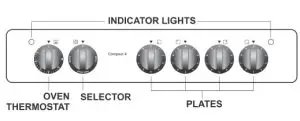
4 Position selector
- The selector is used to select one of four oven operating modes.
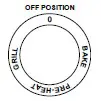
- 0 or OFF,
- Bake
- Pre-Heat
- Grill
- BAKE is used for baking and roasting
- PRE-HEAT utilises all the oven elements to quickly bring the oven up to the selected temperature. The oven indicator light will remain on until the selected
temperature is reached Thereafter the selector must be set to BAKE . You may use the oven without PRE-HEAT, it just takes a little longer to warm up. - GRILL is used for conventional grilling
Grilling
- Keep oven door closed during grilling.
- Set the selector to grill and the oven thermostat to the grill position.
- Place oven shelf on the top shelf position.
- Place the item to be grilled in a roast pan on the shelf under the pre-heated grill element.
- The oven door may be opened to check on the grilling process which should be done every 5 to 10 minutes to avoid burning the food.
- The oven control must be turned to the OFF position when grilling is complete.
Baking (For Model 521 only) For best baking results, use an aluminium bake tray (300 x 230 x 30mm.)
Teflon coated baking trays are not recommended.
- Set the selector to pre-heat and set the oven thermostat to the desired temperature.
- The indicator light will glow and remain on until the oven has reached the selected temperature.
- When the indicator light switches off, the food should be placed in the oven.
- Set the selector to bake
- During baking the indicator light will regularly cycle on and off as the oven thermostat maintains the selected temperature.
- The door may be opened, for inspection purposes, after about half the cooking time has elapsed..
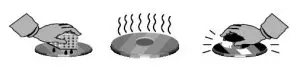
Solid plates
- Before using the plates for the first time, switch them on for four minutes at the highest setting. This allows the factory applied protective coating to burn in.
- The markings around the plate control knobs represent the following heat settings:
- 1 = Warming.
- 2 = Slow simmer.
- 3 = Simmer.
- 4 = Medium heat.
- 5 = High heat
- 6 = Boiling and frying.
Caring for solid plates
- To prevent blotchy discolouration and corrosion, moisture from spatters and spills should be cleaned off immediately.
- To clean the plates, wipe them with a damp cloth or nylon pad. A little liquid detergent may be used. Do not use metal scourers or sharp metal objects to clean the plates.
- After cleaning, dry the plates by switching them on for a short while.
- To prevent rust, periodically apply some, sewing machine oil or electrical hotplate polish – available from Defy Service Centres. Extra attention is required in areas of high humidity or in close proximity to the sea.
Recommendations - Use only pots with a solid level base. An uneven base can prolong cooking times and waste energy.
- Use pots with a base diameter slightly larger than the plate. This will ensure even heat distribution and prevent spillage from dripping onto and staining the hot plate.
- Always cover the pot with a lid. This will conserve energy and minimise spillage.
- Thermal shock could damage the plates. Do not put cold pots on very hot plates.
Note
The warranty does not cover the replacement or repair of rusted or corroded solid plates. It is therefore the owners responsibility to care for them as described above.
Cleaning Do not use a steam cleaner. Cleaning the Exterior
- Switch off the electrical supply to the stove before cleaning any part of it
- Use a damp soapy cloth and avoid the use of abrasive powders and scouring pads.
Switch off the power at the mains in the event of a fault or when cleaning the appliance.
Cleaning the Oven
- Use a hot, soapy damp cloth to clean any part of the oven. Stubborn stains may require the use of a nylon scrubbing brush and a liquid cleaner. Do not use metal scouring pads or abrasive cleaners.
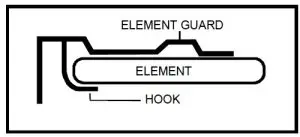
Element and guard
- After cleaning the oven, ensure that the oven element is securely clipped into the hook of the element guard. Failure to observe this precaution will allow the element to rest on and damage the oven enamel.
Oven door
(Only applies to models with removable oven door)
The oven door may be removed to improve access to the oven for cleaning purposes.
- Open the door fully to expose the hinges (A) on either side.
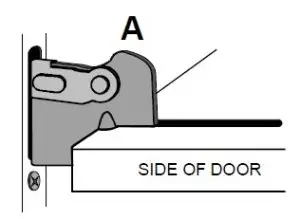
- Flip the hinge locking levers (B) to the upright position.
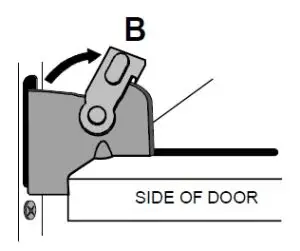
- Partially close the oven door and lift it free of the side panel retaining slots.
- After cleaning, re-fit the oven door in reverse order making sure that the bottom hinge notches © locate properly onto the bottom edges of the side panel retaining slots.
Owner’s responsibility
Since the following are not factory faults, they are the owner’s responsibility.
- Damage to exterior finish.
- Breakage of glass and other components.
- Damage through improper use or installation of the appliance.
- Damage caused by moving the appliance
Branches
If you have followed the instructions and still have a problem, contact the customer care line on 086 100 3339. They will be able to advise you on any aspect of the appliance.
South African Branches:
BLOEMFONTEIN
Unit Number 5
Monument Business Park
50 Monument Road
Oranjesig
Bloemfontein
[email protected]
CAPE TOWN
5A Marconi Rd. Montague Gardens, 7441 [email protected]
GAUTENG, MIDRAND
127 15th Road, Cnr Pharmaceutical &15th Rd,
Midrand, Gauteng
[email protected]
POLOKWANE
87 Nelson Mandela Drive, Superbia 0699
[email protected]
PORT ELIZABETH
112 Patterson Road, North End, Port Elizabeth 6001
[email protected]
Warranty
This certificate is issued by DEFY APPLIANCES (PTY) LIMITED manufacturers of Defy and Ocean products, hereinafter the Company, to the original purchaser only, of the appliance described on the certificate and shall constitute the only warranty given in respect of this appliance.
The Company warrants to the original purchaser that for a period of THREE YEARS from date of purchase the appliance is free from defect under normal domestic use, both in workmanship and
material, subject to the following conditions.
- Repair or replacement of any part of this appliance, found by the Company to be defective, shall be at the election of the Company. The Company reserves the right to effect such service through any of its Service Divisions or Authorised Service Dealers. The cost of such service shall be borne by the Company in full, provided that the appliance is located no further than 50 km from a Company Service Centre or an Authorised Service Dealer. Where the appliance is located beyond the 50 km radius, the purchaser shall be liable for the standard travelling charges, as determined by the Company.
CARRY IN SERVICE Microwave ovens, Compact cookers and small appliances are repaired in our service centres and are not collected from the customers home. Faulty units should be delivered to the purchasing dealer or to the nearest Company Service Centre for warranty repairs. - Rusted or corroded plates, vitreous enamelware, fuses and lamps are specifically excluded from these warranties. It is an express condition of these warranties that the purchaser takes due care and attention in the use and maintenance of the appliance. Abuse, misuse in conflict with operating instructions, connection to incorrect voltages and subjection to commercial use shall release the Company from its obligations.
- This warranty shall become void and cease to operate if the appliance is dismantled by, or any repairs to the appliance are effected by any persons not duly authorised by the Company, or if substitute parts not approved by the Company are used in the appliance, or if the serial number of the appliance is removed.
- The Company shall not be responsible for damages resulting from fire, flood, civil disturbances or any Act of God. The Company shall not, in terms of these warranties be responsible nor held liable for any consequential loss or damage of any kind caused by or due to the failure or malfunction of the appliance. The Company shall not be responsible for damages caused by insect and/or animal infestation.
- The Company shall not be responsible for transportation or other costs other than those incurred within the provisions of Point 1 of this Certificate.
- For warranties in the Republic of South Africa and Sub-Saharan Africa, please contact the customer care line. Please refer to the previous page for respective South African branches and Sub-Saharan Africa branches.
- Where service is requested under warranty and no fault or defect can be found by the Company, all costs incurred will be for the purchaser’s account.This Certificate as well as your invoice will serve as proof of purchase. For the purpose of warranty, it will be essential to produc. this Certificate and invoice. Failure to do so, will render the purchaser liable for service costs.