DBPOWER Mini Lcd Video Projector User Manual

ACTIVATE YOUR 12-MONTH WARRANTY & GET EXCLUSIVE GIFT
Register within 7 days aſter receiving your new product.
PLEASE VISIT US NOW
www.dbpower.co/warranty
CUSTOMER SERVICE
[email protected] www.dbpower.co
NOTE
- Only suitable for home entertainment in a dark environment. NOT for presentation purposes.
- Dolby audio is NOT supported.
- DO NOT obstruct the air vents when using. UNPLUG & PREVENT DUST from entering when not in use.
A Big Thank You
We’re thrilled that you have chosen to purchase the Mini LCD Video
Projector. At DBPOWER, we’re committed to providing you with products
that enhance your daily life. We also aim to give our customers excellent
support. Should you have any questions or feedback about your new
product, simply get in touch with our customer support team at
1-855-666-9888, or by email at [email protected]
Enjoy your new product!
NOTICE
Not recommended for PPTs, Word, Excel, or business presentations.
To connect the DBPOWER mini projector with a tablet or smartphone, it is necessary to use a wireless HDMI adapter. For Android phones which support MHL an MHL to HDMI cable is required and for iPhones & iPads, a Lightning to HDMI cable adapter is required.
To connect the mini video projector to PCs or laptops, please adjust the PC/laptop display resolution to 800*600 or 1024*768 for best clarity.
Please note that it is only suitable for use in dark rooms. Dolby support not supported. Please turn off Dolby digital in your device.
ACCESSORY LIST
1 x AV signal cable
1 x Remote control (battery not included)
1 x HDMI cable
1 x Power Cable
1 x User manual
1 x Warranty card
1 x Operation guide
SAFETY NOTICE
Please read the user manual carefully before using the projector.
Please use a standard power cord with ground wire to ensure stable power supply.
Please use the same power voltage as marked on the projector.
Please do not disassemble the projector by yourself; otherwise the warranty will be void.
Please do not look into the lens when the projector is operating, otherwise it may hurt your eyes.
Please do not cover the projector ventilation holes with any material.
Please keep the projector away from water or any other liquid as it is not waterproof.
Please don’t put the projector in wet or moist conditions to prevent electric shock.
Please turn off and unplug from the power supply if not using the projector for a long time.
Please use the original packing foam or other anti-shock material when relocating the projector.
Please contact our customer support if the projector has any problems.
This mini projector comes with a full 24-month warranty.
Please contact us if you want to know more information about the warranty.
(Warranty service does not include the frame, manual, packing and subjective ideas about the video, sound or image aspects)
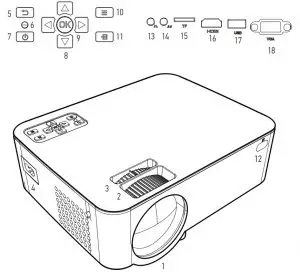
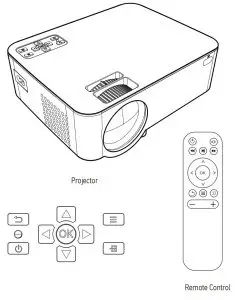
- lens
( Please do not look into the lens when the projector is on.) - .Manual focus
- Keystone
- power input
- ESC
- Light on
- Power button
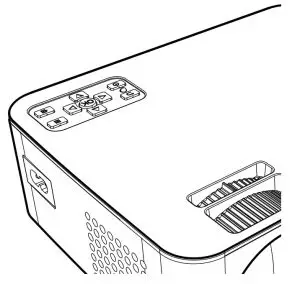
- Direction buttons
- OK
- Menu
- Source
- IR
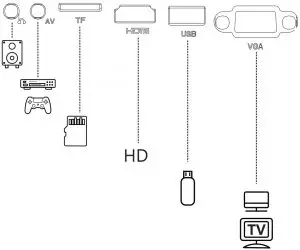
- Earphone slot
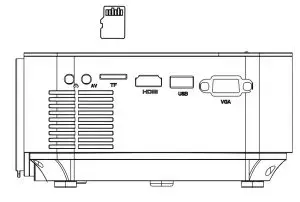
- AV
- TF
- HDMI
- USB
- VGA
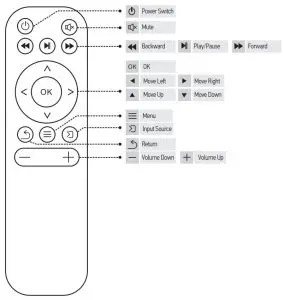
IR TRANSMITTER
Caution
Do not submerge the remote control in water.
Do not put the remote control near fire or in wet/hot places.
Do not use old and new batteries together in the remote control.
Please take the batteries out if not using the remote control for a long time to avoid battery leakage.
Please point the remote control at the IR receiver.
USER MANUAL
4.1 Connecting the projector to power
4.1.1 Connect the power cable to the projector.
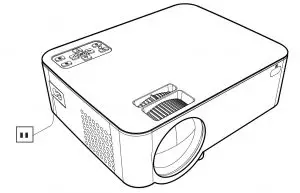
4.1.2 The projector will display an indicator light when connected to power.
4.2 Power ON/OFF
Press the “ ” button on the projector or on the remote control to power on.
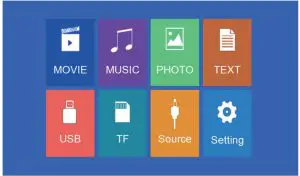
4.3 Multimedia boot screen
Aſter 2-5 seconds, the multimedia screen will be displayed.
4.4 Focus & keystone correction
4.4.1 If the image is displayed as a trapezoid shape, you can adjust it with the keystone correction function by pressing button 3.
This should normalize the display image.
4.4.2 Image focusing
Make sure the projector is horizontal to the projector screen and adjust the focus by pressing button 2.
You can display video or the menu to check adjustment.
SOLUTION
The projector uses an optical keystone correction function, so the image can be adjusted as below:
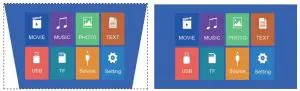
However, this projector does not have a horizontal keystone correction function.
The projector must be placed horizontally to the projection screen. If you encounter this problem, it is probably because the projector has not been placed horizontally to the projection screen, or the projection screen is not vertically positioned.
Solution: Adjust the projector’s position so that it is horizontal to the screen.
5.1 Connections
Connect multiple devices and applications.
5.2 Playing media from a USB/TF card
5.2.1 Insert the USB/TF card into the slot (picture).
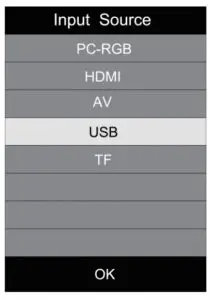
5.2.2 Choose TF or USB as source from the menu.
Supported multimedia formats
| Multimedia | Audio file | MP3/WMA/OGG/AAC/MA4/FLAC/APE/WAV |
| Picture file | JPEG/BMP/PNG | |
| Video file | MPEG1, MPEG2, FLV, MPEG4, RM, AVI /RMVB, MOV, MKV, DIVX, FVOB M-JPEG (only unspported 640*480) | |
| Text file | TXT |
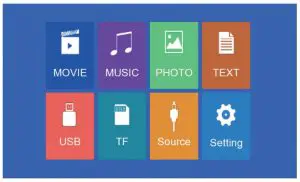
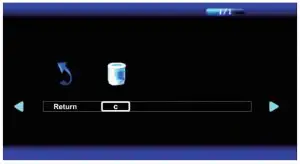
5.2.3 Choose the content which you need to display:
Video/music/photos/text.
5.2.4 Choose the file you want to display. Press “  ” to display or stop.
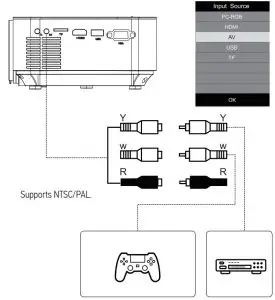
5.3 AV video connection
Use a 3-in-1 AV cable to connect to the projector as shown below. Once connected, select the AV signal source.
5.4 HDMI connection
5.4.1 Use the HDMI slot to connect computers and HDMI compatible devices.
Once connected, select the HDMI signal source.
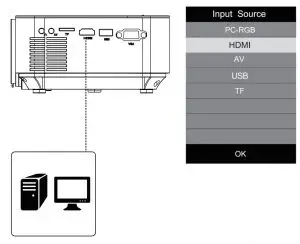
Supported resolutions:
576P, 480P, 720P, 1080P, 640×480, 800×600, 1024×768, 1280×1024, 1280×720, 1440×900, 1366×768, 1920×1080, 1280×800, 1440×960, 680×1050
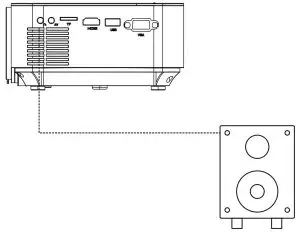
5.5 3.5mm audio connection
5.5.1 Use the 3.5mm audio jack to connect headphones and speaker equipment.
Note: This projector does not support Dolby sound.
MENU SETTINGS
6.1 Remote control user guide
Press the “Menu” key to enter the main menu, then press “  ” to enter each sub-menu.
Press “  ” to select the sub-menu, then adjust the parameters per your needs, and press the “OK” key to confirm.
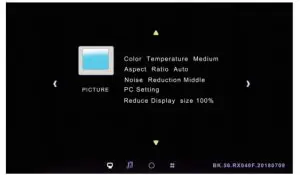
6.2 Function of sub-menus
6.2.1 Image sub-menu:Picture mode/color temperature/aspect ratio/noise reduction.
6.2.2 Time sub-menu
Clock/OFF time/ON time auto shutdown timer/auto sleep.
6.2.3 Setting sub menu
Available adjustment: OSD language, restore factory settings, OSD duration, image flip, zoom.
6.2.4 Audio sub menu
Available adjustment: sound mode, balance, auto volume, surround sound.
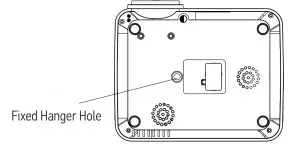
PROJECTOR INSTALLATION
7.1 Please refer to the following diagram for mounting the
projector on a ceiling.
Do not place the projector near heat sources to prevent the projector from overheating.
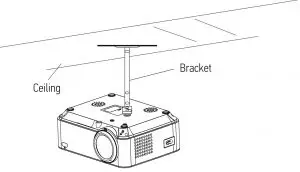
When ceiling mounting the projector, please ensure screws of a suitable quality are used, and that screw depth is deep enough to prevent the projector from falling.
TECHNOLOGY FEATURES
8.1 Basic parameters
| Imaging Technology | TFT LCD | Color Reproduction | 16.7K |
| Resolution | 800*480 RGB | Keystone | Manual Correction ± 15˚ |
| Highest Resolution | 1920*1080 | Power Voltage | 100V-240V 50/60Hz |
| Light | LED | Integrated watt | 51W (Max) |
| Life Span | 50,000 hrs | Input | USB/TF/VGA/HDMI/AV |
| Lens | Multichip Coated | Output | Earphone USB(5V-500MA) |
| Operation Mode | Lens (F=125) Manual Operation | Speaker | 8Ω 2W |
| System support | Support multi-media | ||
| Language support | Support 23 Language | ||
| Throw Distance | 1-5M | Unit size | 202.2*158.5*75.8mm |
| Screen Size | 32-176 Inches | Projector Ratio | 1.4:1 |
| Aspect Ratio | 4:3/16:9 | New Weight | 0.92KG |
8.2 Projection distance and screen size
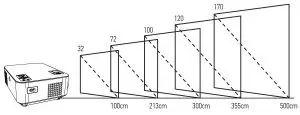
For reference only. The projection distance and screen size differ based on the configuration of the projector.

Learn more about DBPOWER, please visit us at: www.dbpower.co
OR
Scan QR Code & Start Chatting

DBPOWER 11.5″ Portable DVD Player, 5-Hour Built-in Rechargeable Battery

Specifications
- BRAND: DBPOWER
- MEDIA TYPE: SD, VCD
- PACKAGE DIMENSIONS: 13.66 x 8.9 x 3.27 inches
- SCREEN SIZE: 9.5 Inches
- COLOUR: Black
- CONNECTIVITY TECHNOLOGY: USB
- ITEM WEIGHT: 1.94 pounds
- BATTERIES: 1 Lithium Metal battery
Intrduction
While you’re on the road, enjoy all of your favorite TV episodes and movies, or keep your kids entertained by watching their favorite cartoons. 5 hours of movie playback are guaranteed thanks to a built-in 2500 mAh rechargeable lithium battery. A built-in battery, a car charger, and an AC power converter, so it can last a long time before needing to be recharged. Direct playback in the following formats: CD, DVD, CD-R/RW, DVD-R/+R, DVD+RW/-RW, VCD, SVCD (but not Blu-ray DVD); up to 32GB USB and SD Card support; MP3/WMA/WAV, JPEG, MPEG2/AVI/DIVX support; MP3/WMA/WAV, JPEG, MPEG2/AVI/DIVX support; MP3/WMA/WAV There are no restrictions on where it can be used. 9-INCH SWIVELING SCREEN with a one-of-a-kind design. The 800*480 Swivel Screen can rotate 270 degrees and flip 180 degrees. While on family road excursions, the DBPOWER Portable DVD Player may easily be swiveled as a tablet and fastened to the back of your car’s headrest (head restraint).
Design with two speakers. The DBPOWER Portable CD Player has two strong stereo speakers that increase the volume and clarity. A 3.5mm earphone jack is also located on the right side of the DVD player, allowing for a concentrated and clear sound. There’s one more feature you’ll appreciate. DBPOWER is controlled remotely and runs on a universal operating system. Your portable DVD player’s break-point memory function allows you to resume where you left off last time. QIGROP Warranty: We offer 24-hour after-sales support and a 12-month warranty to ensure that you are completely delighted with your purchase.
WHAT’S INCLUDED
- 1 x DVD player;
- 1 x AV cable;
- 1 x Remote controller;
- 1 x 1.8M Power adapter;
- 1 x 1.8M Car Charger;
- 1 x User manual
TROUBLE SHOOTING
“NO DISC” IS DISPLAYED ON A DVD PLAYER
Examine the following disc, USB flash drive, and SD card formats: The DVD player in the Qur can only play certain types of DVDs. BD is not supported by CDVCD/DVD (BIlu-ray Disc). USB flash drives, UHD BD (Ultra HD Blu-ray). SD cards must be formatted in FAT32 and have a maximum capacity of 32GB. Please replace a support disc and try again.
THERE WILL BE NO VISUALS TO PRESENT, SIMPLY AUDIO
Please note that if a client plays a video in P4/AVI format, the video must be under 10 minutes long. It will not play unless the resolution is set to 720″576.
THE DEVICE’S SCREEN SIZE IS INCOMPATIBLE
- The DVD player has two sizes: the body and the screen.
- We normally use the diagonal length to define the screen size of a DVD player, and our DVD player has a diagonal length of 9.5 inches.
THE MAXIMUM VOLUME IS STILL QUITE LOW
- Change a disc, and the volume depends on the video file volume that you are playing. Then try once more.
- The loudness is also affected by the environment; for example, if you use in a noisy setting, the loud sound will be amplified. If you use it in a car while driving on a bumpy road, it may be difficult to hear. Your establishment is quite noisy.
WHEN SPINNING THE DVDD, ALT MAKES A LOT OF NOISE
The laser head will look for the starting point of the disc when reading it for the first time. On the disc, there is a signal pit. As a result, the bald head’s motor will spin at a high rate. When reading the
disc for the first 15 seconds. This will produce noise, but this is to be expected when reading a disc. When the tracking process is over, the motor speed will return to normal, and the noise level will be reduced to zero. It is normal if the sound is a spinning sound.
I SKIPPED AND THEN FROZE
The pickup’s lens has been polluted or damaged. This frequently occurs when we change discs/remove them, or when we accidentally touch the player’s lens. Please don’t touch the lens, and try changing the disc and checking again.
THE REMOTE CONTROL IS BROKEN
It is recommended that the remote control be pointed at the DVD player’s IR receiver.
THE PLAYING TUME OF A BATTERY DOES NOT MATCH:
It, like any other electronic equipment, is affected by the brightness and volume while playing.
THE UNIT HAS NO “PLAY” OR “PAUSE” BUTTONS
Please note that the “OK” button, located in the middle of the circular button, serves as the “Play” button, while the “Stop” button serves as the “Pause” button. For your convenience, I’ve attached a photo:
Frequently Asked Questions
- What is the best way to tell when my portable DVD player is fully charged?
While charging, the power indicator is red, and after it is finished, it is yellow. When completely charged, your player may play for 2.5 hours. Note: If the battery low icon displays on the screen during playback, the built-in battery power is low and your player has to be recharged. - Why isn’t the disc being read by my portable DVD player?
The DVD disc isn’t properly put, which is the most likely and usual problem. The disc is filthy, damaged, or burnt in a format that is incompatible with the player. - What is the best way to tell when my portable DVD player is fully charged?
While charging, the power indicator is red, and after it is finished, it is yellow. When completely charged, your player may play for 2.5 hours. Note: If the battery low icon displays on the screen during playback, the built-in battery power is low and your player has to be recharged. - Is it possible to charge a portable DVD player via USB?
Use the charger that came with the player at all times. The majority of USB chargers are insufficiently powered. If the battery or charger that came with it won’t retain a charge, it’s possible that it’s malfunctioning. - What is the best way to charge my DVD player?
1 Connect one end of the car power adapter (not included) to the player’s DC IN jack on the side. 2 Connect the adapter’s opposite end to a 12V car power outlet or cigarette lighter socket. 3 Turn your player off. The red charging indicator illuminates.