CORSAIR COMPONENTS, INC.
47100 BAYSIDE PARKWAY FREMONT CALIFORNIA 94538 USA
![]()
QUICK START GUIDE
VOID PRO
SURROUND

![]()
ENGLISH ………………….. 2

2 ENGLISH
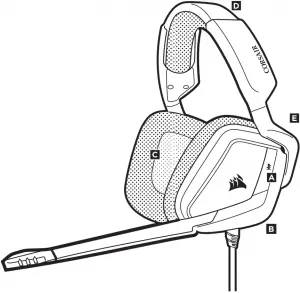
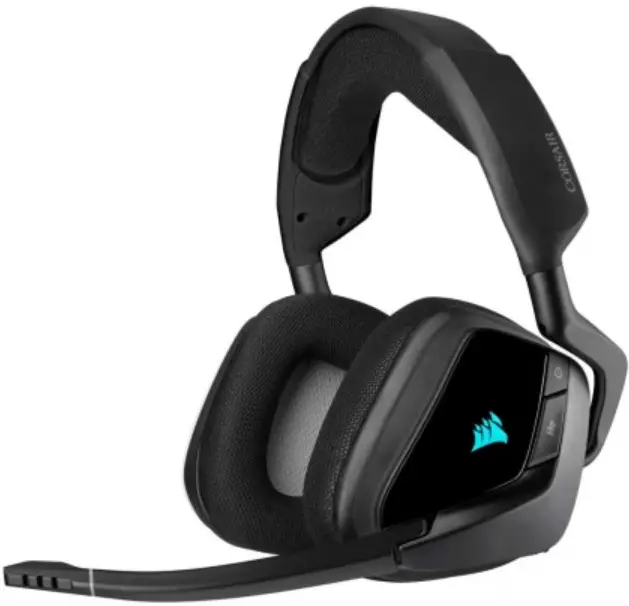
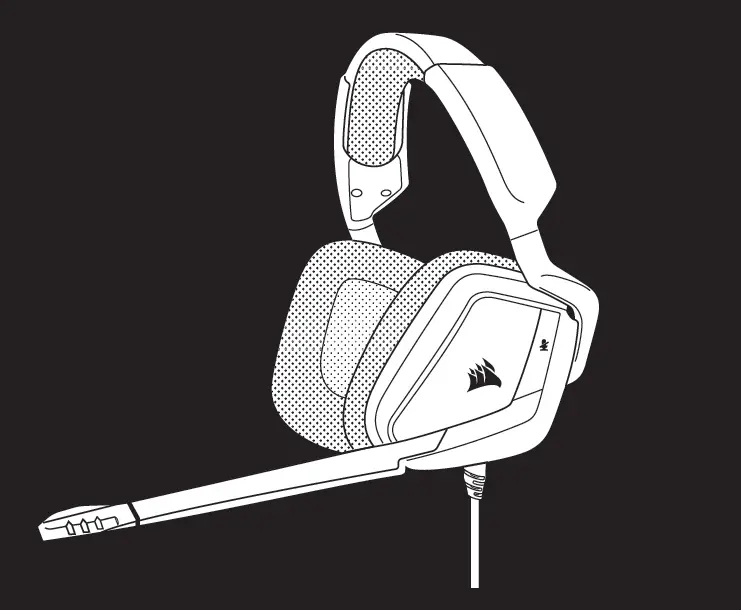
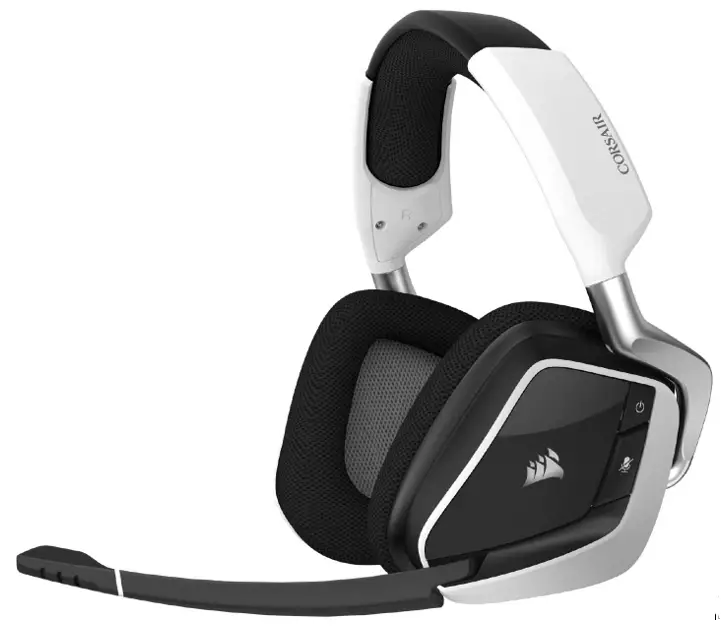
A Corsair VOID PRO SURROUND Headset
B Dolby Headphone 7.1 USB Adapter
C Microphone foam windscreen (removable)
D Quick start guide
A 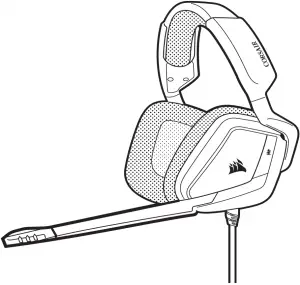
B 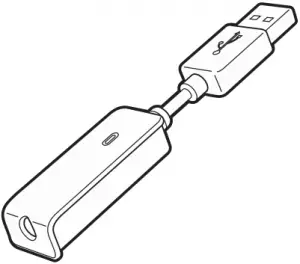 C
C 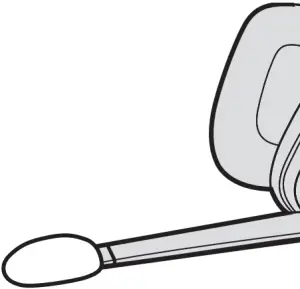 D
D 

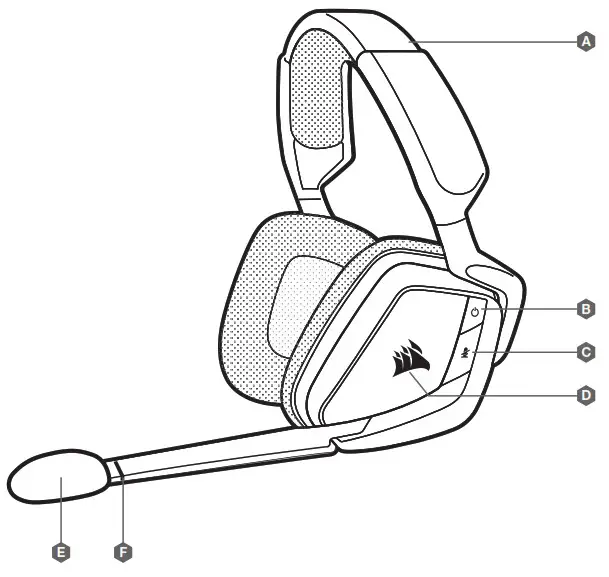
3 ENGLISH
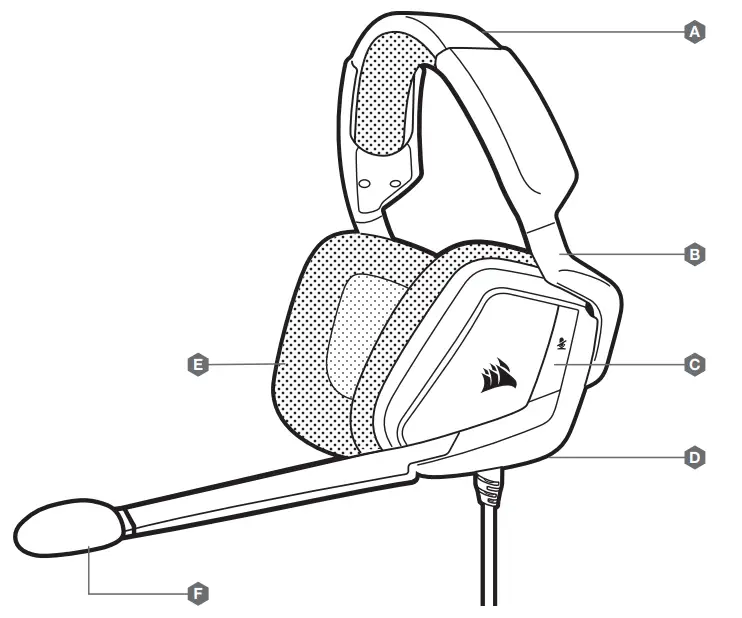
A Mute button
B Volume Control
C Microfiber covered ear pads
D Headband adjustment
E Cantilevered arm + hinge
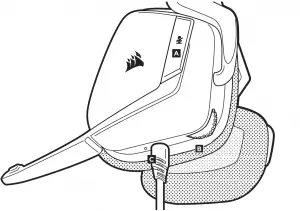
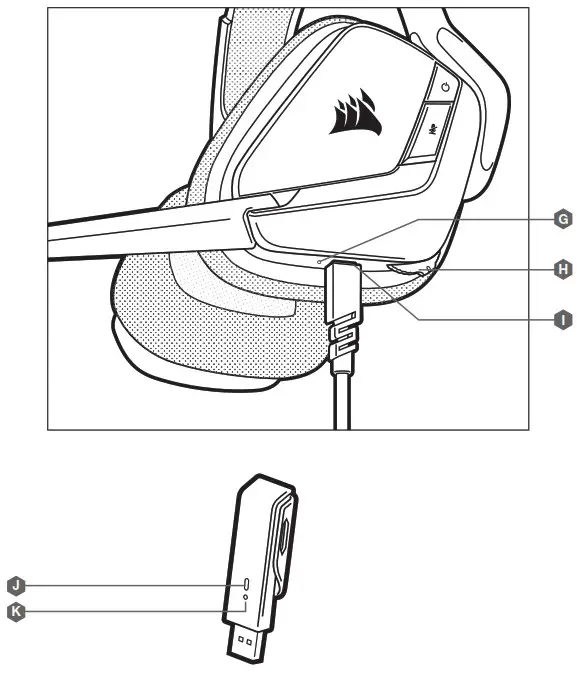
4 ENGLISH
A Mute button
B Volume Control
C USB Cable (Non-Detachable)
5 ENGLISH
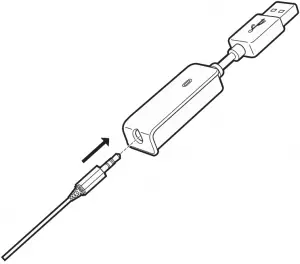
Remember that powering the Dolby Headphone 7.1 USB Adaptor requires a high power (USB 2.0 or better) port. Some USB ports on older keyboards and monitors do not support high-power devices.
Place the headset on your head and adjust the headband for a comfortable fit. The extra-large ear pads and deep earcups enable the Corsair VOID PRO SURROUND Headset to fit comfortably so you can play for hours without fatigue.
6 ENGLISH
- Go to corsair.com/support/downloads to download the Corsair Utility Engine (`CUE’) Software.
Using CUE software will enable the full feature set of the VOID PRO SURROUND Headset.
- Install the software on a PC running Windows 7, 8 or 10.
- After installation is complete, reboot your PC, and launch CUE.
You can use it to:
- Select and customize audio equalizer (EQ) settings.
- Adjust headset volume, microphone input volume, and microphone feedback.
- Set Dolby Headphone 7.1 SURROUND sound on or off
The software’s built-in documentation explains how to use the VOID PRO SURROUND Headset features in greater detail.
7 ENGLISH
For the best audio performance:
- Download the Corsair Utility Engine software from
corsair.com/support/downloads - Don’t be afraid to use the software equalizer to adjust the audio quality to your liking. EQ presets have been provided for popular gaming and media types.
Prolonged listening at high volumes may adversely affect your hearing. Take breaks between sessions and always begin with the volume at the lowest possible level before increasing.
8 ENGLISH
As with any audio product, reduce the volume before trying it with an audio source the first time.
You can adjust the volume with:
- The “CUE Control” is the digital volume controller on the headset at the
bottom corner of your left earcup: hold or repeatedly toggle it downwards to reduce volume, and upwards in short increments to increase volume. - The standard Windows audio controller can also be used to adjust volume.
- Once an audio source is playing, set the volume to a comfortable level.
9 ENGLISH
Your new VOID PRO SURROUND Headset features a high performance “unidirectional” microphone designed to reject noise other than your voice, but it must be pointed directly at your mouth to function correctly.
- Bend the flexible microphone boom to best fit near to the left corner of your mouth.
- For improved voice quality, the included microphone foam windscreen may be applied over the microphone head.
- We’ve found that about a 30 degree bend is a good place to start, but feel free to increase or decrease this if your mic is too loud or too soft.
Enjoy your Corsair VOID PRO SURROUND Headset! If you have any questions or comments, see the back panel of this guide for contact information.
 Note on environmental protection
After the implementation of the European Directive 2002/96/EU in the national legal system, the following applies:
— Electrical and electronic devices may not be disposed of with domestic waste.
— Consumers are obligated by law to return electrical and electronic devices at the end of their service lives to the public collecting points set up for this purpose of point of sale. Details to this are defined by the national law of the respective country. This symbol on the product, the instruction manual or the package indicates that a product is subject to these regulations. By recycling, reusing the materials or other forms of utilizing old devices, you are making an important contribution to protecting our environment.
!
CAUTION!
The manufacturer is not responsible for any radio or TV interference caused by unauthorized modifications to this equipment. Such modifications could void the user authority to operate the equipment.
FCC STATEMENT
This equipment has been tested and found to comply with the limits for a Class B digital device, pursuant to part 15 of the FCC Rules. These limits are designed to provide reasonable protection against harmful interference in a residential installation. This equipment generates, uses and can radiate radio frequency energy and, if not installed and used in accordance with the instructions, may cause harmful interference to radio communications. However, there is no guarantee that interference will not occur in a particular installation. If this equipment does cause harmful interference to radio or television reception, which can be determined by turning the equipment off and on, the user is encouraged to try to correct the interference by one or more of the following measures:
- Reorient or relocate the receiving antenna.
- Increase the separation between the equipment and receiver.
- Connect the equipment into an outlet on a circuit different from that to which the receiver is connected.
- Consult the dealer or an experienced radio/TV technician for help.
This device must not be co-located or operating in conjunction with any other antenna or transmitter.
Operation is subject to the following two conditions:
- this device may not cause harmful interference, and
- this device must accept any interference received, including interference that may cause undesired operation.
53

EMAIL
[email protected]
WEB
corsair.com
BLOG
corsair.com/blog
FORUM
forum.corsair.com
FACEBOOK
facebook.com/Corsair
TWITTER
twitter.com/Corsair
YOUTUBE
youtube.com/Corsair
© 2017 Corsair Components, Inc.
All rights reserved.
Corsair and the sails logo are registered trademarks, and Corsair Gaming and the Corsair Gaming logo are trademarks of Corsair in the United States and/or other countries. All other trademarks are the property of their respective owners.
Product may vary slightly from those pictured.
P/N: 49-001564 Rev AA
]]>

VOID RGB ELITE WIRELESS
VOID RGB ELITE WIRELESS
Premium Wireless Gaming Headset with 7.1 Surround Sound
CONTROLS AND FEATURES
| A | Headband adjustment | G | Status LED (RF, battery) |
| B | Power button | H | Jog dial (volume + EQ) |
| C | Mute button | I | Charging port |
| D | RGB light (user-programmable) | J | Wireless sync LED indicator |
| E | Microphone foam windscreen (removable) | K | Pairing button (transmitter paired by default) |
| F | Mic LED (mute) |
Connect the wireless USB transmitter to any working USB port on your PC. The headset is designed to operate at a range of up to 40 feet (12m) from the wireless transmitter, but other wireless devices, electronics, and obstructions such as walls may reduce wireless range.
IMPORTANT: The first time you use the CORSAIR VOID RGB ELITE WIRELESS Headset on a PC, the operating system will automatically install the device driver. After the device driver loads, we recommend you reboot your PC before use. Prolonged listening at high volumes may adversely affect your hearing. Take breaks between sessions and always begin with the volume at the lowest possible level before increasing.
iCUE
Go to corsair.com/support/downloads to download the iCUE Software. Using the iCUE software will enable the full feature set of your headset.
NOTE: If the headset is used without software, some features will be disabled.
> Install the iCUE software on a PC running Windows 7, Windows 8.1, Windows 10 or later.
> After installation is complete, reboot your PC, and launch iCUE.
iCUE SOFTWARE CAN BE USED TO
> Choose your RGB color preference and light intensity.
> Select and customize audio equalizer (EQ) settings.
> Adjust microphone input volume, and microphone sidetone.
> Set 7.1 surround sound on or off.
The software’s built-in documentation explains how to use the headset’s features in greater detail.
STATUS LED INDICATIONS
Single blink red = connected, battery low
Single blink green = connected, battery normal
Rapid blink red = disconnected, battery low
Rapid blink green = disconnected, battery normal
Solid amber = battery charging
Solid green = battery charged
Rapid blink amber = pairing mode
CHARGING
The CORSAIR VOID RGB ELITE WIRELESS Headset must be fully charged before its first use.
> Connect the USB charging cable to any working USB port on your PC.
> Connect the USB charging cable to the CORSAIR VOID RGB ELITE WIRELESS Headset.
The CORSAIR VOID RGB ELITE WIRELESS Headset battery has no “memory effect”, so there is no need to completely discharge it before recharging.
Remember that the USB charging cable requires a high power (USB 2.0 or better) port. Some USB ports found on older devices do not support USB 2.0.
AUDIO SETTINGS
Short key press (.1-.5 seconds) on JOG DIAL toggles EQ.
Medium keypress (.6-2 seconds) on JOG DIAL toggles 7.1 surround sound.
MIC CONTROL
Short key press (.1-.5 seconds) on mic mute button toggles mute on and off.
Long key press (2-4 seconds) on mic mute button toggles sidetone on and off.
NOTE: iCUE software can also be used to control these features.
FOR OPTIMAL WIRELESS PERFORMANCE
> Place the wireless USB transmitter in an open, unobstructed area.
> Make sure the battery is fully charged before initial use.
> Do not leave the battery fully discharged for long periods. Battery life is maximized by keeping the battery in a partially charged state.
> If RGB lighting effects are unimportant to you, they can be disabled with iCUE to extend battery life.
> Remove the USB charging cable promptly after the headset has been fully charged.
> Keep the headset at room temperature (20-30°C or 68-86°F).
PREVENTION OF HEARING LOSS:
Listening to sound at a high volume may permanently damage your hearing. Background noise, as well as continued exposure to high volume levels, can make sounds seem quieter than they actually are.
For specific product documentation, please visit: corsair.com/documentation. To prevent possible hearing damage, do not listen to high volume levels for long periods.
![]()
CORSAIR MEMORY, Inc. declares that this equipment is in compliance with Directive 2014/30/EU and Directive 2011/65/EU. A copy of the original declaration of conformity can be obtained at “[email protected]”. Operating temperature: 0°C~+40°C.
![]() NOTE ON ENVIRONMENTAL PROTECTION
NOTE ON ENVIRONMENTAL PROTECTION
After the implementation of the European Directive 2012/19/EU in the national legal system, the following applies:
> Electrical and electronic devices may not be disposed of with domestic waste.
> Consumers are obliged by law to return electrical and electronic devices at the end of their service lives to the public collecting points set up for this purpose or point of sale. Details to this are defined by the national law of the respective country. This symbol on the product, the instruction manual, or the package indicates that a product is subject to these regulations. By recycling, reusing the materials, or other forms of utilizing old devices, you are making an important contribution to protecting our environment.
VOID RGB ELITE WIRELESS

| WEB: corsair.com PHONE: (888) 222-4346 SUPPORT: support.corsair.com |
BLOG: corsair.com/blog FORUM: forum.corsair.com YOUTUBE: youtube.com/corsairhowto |
| © 2019 CORSAIR MEMORY, Inc. All rights reserved. CORSAIR and the sails logo are registered trademarks in the United States and/or other countries. All other trademarks are the property of their respective owners. Product may vary lightly from those pictured. 49-001921 AA | |

![]()
VOID ELITE SURROUND
WEB: corsair.com PHONE: (888) 222-4346 SUPPORT: support.corsair.com
BLOG: corsair.com/blog FORUM: forum.corsair.com YOUTUBE: youtube.com/corsairhowto
© 2019 CORSAIR MEMORY, Inc. All rights reserved. CORSAIR and the sails logo are registered trademarks in the United States and/or other countries. All other trademarks are the property of their respective owners. Product may vary slightly from those pictured. 49-001929 AA
VOID ELITE SURROUND
Premium Gaming Headset with 7.1 Surround Sound
CONTROLS AND FEATURES
A – Headband adjustment
B – Cantilevered arm + hinge
C – Mute button
D – Volume control
E – 7.1 surround sound USB adapter
F – Microfiber covered ear pads
G – Microphone foam windscreen (removable)

GETTING STARTED WITH YOUR VOID ELITE SURROUND HEADSET
VOID ELITE SURROUND is a multi-platform headset that operates in two audio modes: stereo and 7.1 surround sound.
> In stereo mode, you can connect the 3.5mm audio jack into any PC, Mac, PlayStation 4, XBOX One*,
Nintendo Switch or mobile device.
> The included 7.1 surround sound USB adapter enables surround sound on PC. * May require Microsoft adapter sold separately.
If using headset on PC, go to corsair.com/support/downloads to download the iCUE Software. Using the iCUE software will enable the full feature set of your headset. NOTE: If the headset is used without software, some features will be disabled.
> Install the iCUE software on a PC running Windows 7, Windows 8.1, Windows 10 or later.
> After installation is complete, reboot your PC, and launch iCUE.
iCUE SOFTWARE CAN BE USED TO
Select and customize audio equalizer (EQ) settings.
> Adjust microphone input volume and microphone side tone.
> Set 7.1 surround sound on or off.
NOTE: Prolonged listening at high volumes may adversely affect your hearing. Take breaks between sessions and always begin with the volume at the lowest possible level before increasing.
PREVENTION OF HEARING LOSS:
Listening to sound at high volume may permanently damage your hearing. Background noise, as well as continued exposure to high volume levels, can make sounds seem quieter than they actually are.
For specific product documentation, please visit: corsair.com/documentation. To prevent possible hearing damage, do not listen at high volume levels for long periods.
CORSAIR MEMORY, Inc. declares that this equipment is in compliance with Directive 2014/30/EU and Directive 2011/65/EU. A copy of the original declaration of conformity can be obtained at “[email protected]”. Operating temperature: 0°C~+40°C
NOTE ON ENVIRONMENTAL PROTECTION
After the implementation of the European Directive 2012/19/EU in the national legal system, the following applies: > Electrical and electronic devices may not be disposed of with domestic waste. > Consumers are obliged by law to return electrical and electronic devices at the end of their service lives to the public collecting points set up for this purpose or point of sale. Details to this are defined by the national law of the respective country. This symbol on the product, the instruction manual or the package indicates that a product is subject to these regulations. By recycling, reusing the materials or other forms of utilizing old devices, you are making an important contribution to protecting our environment.
]]>
QUICK START GUIDE
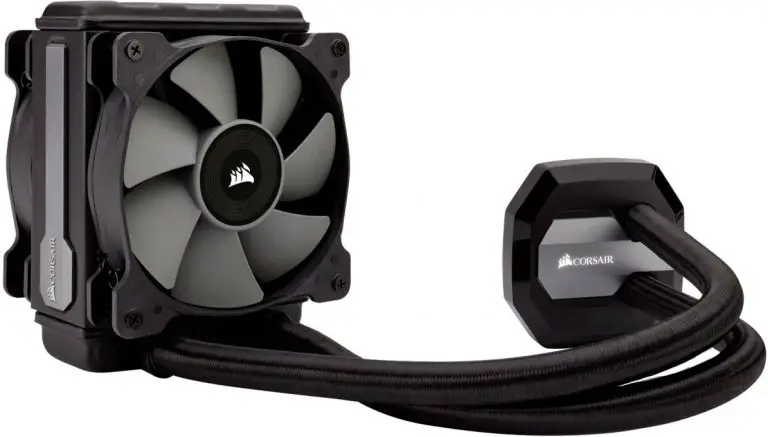
Note : Most newer PC cases include a CPU cutout to allow access to the bottom of the motherboard. If your case does not include a cutout, you will need to remove your motherboard from the case before installation.
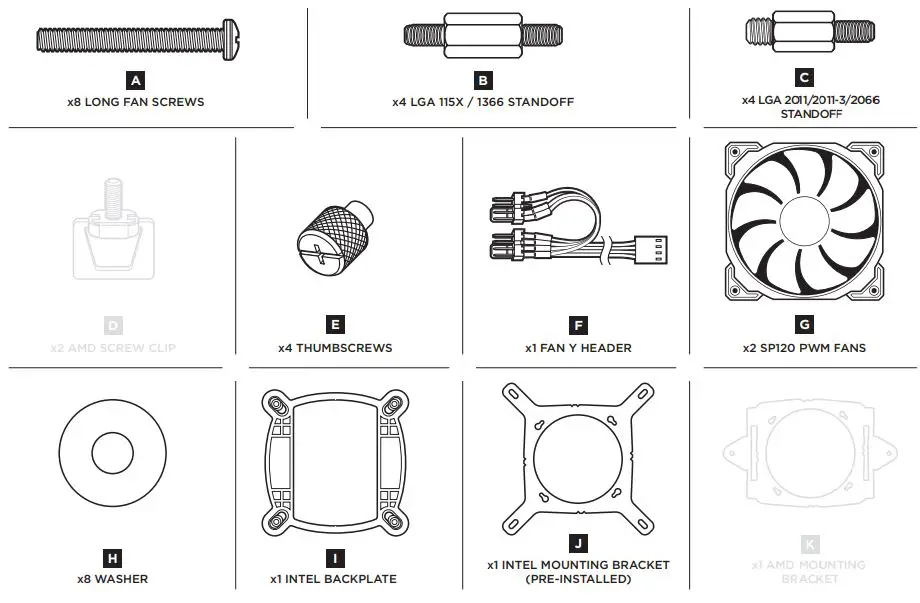
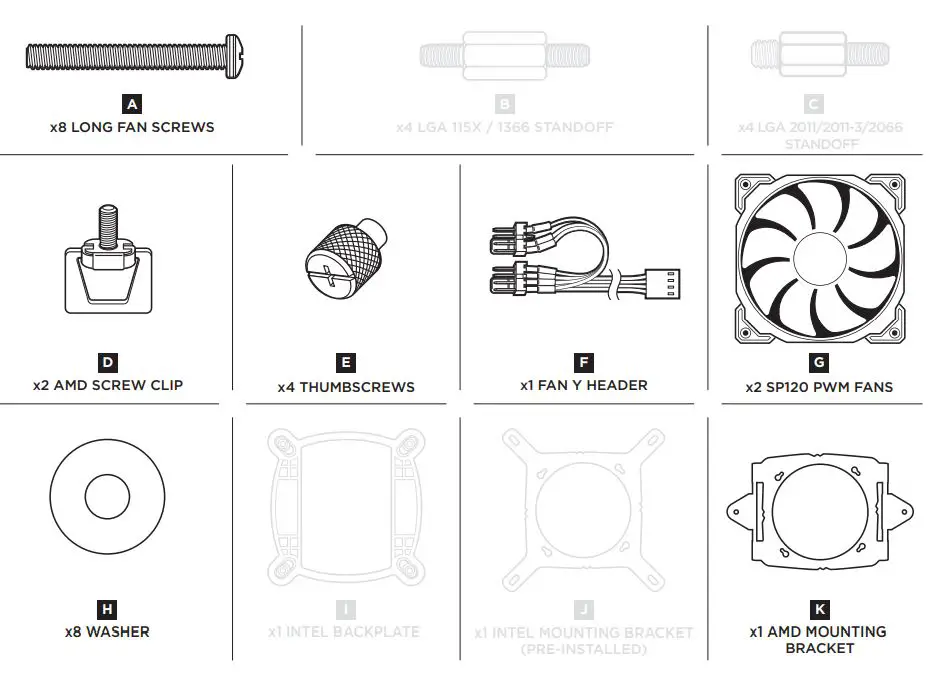
Included Hardware
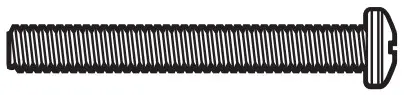
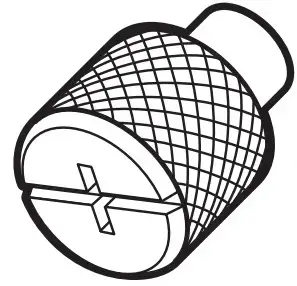
Highlighted parts for Intel installation only :
- x8 LONG FAN SCREWS
- x4 LGA 115X / 1366 STANDOFF

- x4 LGA 2011 STANDOFF
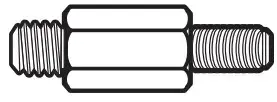
- x4 AMD BLACK STANDOFF

- x4 THUMBSCREWS
- x2 SP120L FANS

- x8 WASHER
- x1 INTEL BACKPLATE

- x1 INTEL MOUNTING BRACKET (PRE-INSTALLED)

- x1 AMD MOUNTING BRACKET
- CORSAIR iCUE USB CABLE (Included)

Note : The H80i v2 comes with Intel mounting bracket pre-installed on the pump for quick installation.
Installing the Intel Backplate
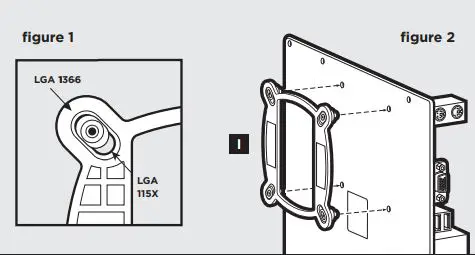
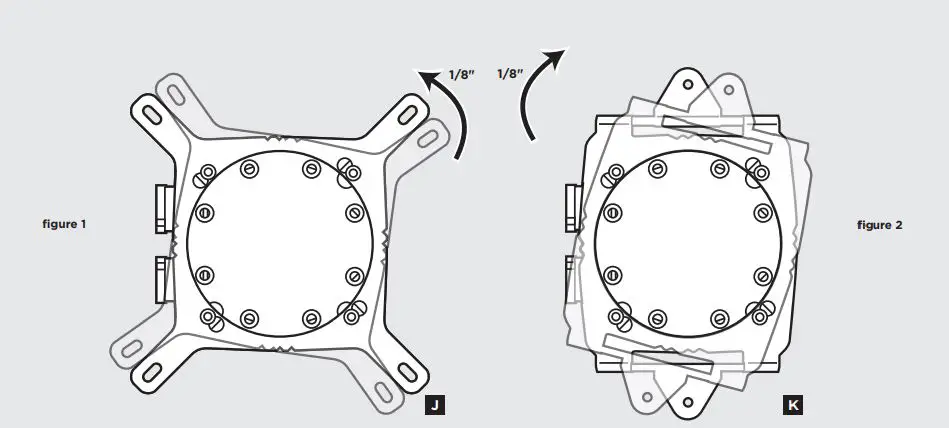
- For LGA 115X installation, slide the backplate pins inside (figure 1).
- For LGA 1366 installation, slide the backplate pins outside (figure 1).
- Install the assembled backplate (figure 2).
Note: Intel LGA 2011 does not require backplate installation.
Proceed to step 2.
Figure 1

Figure 2

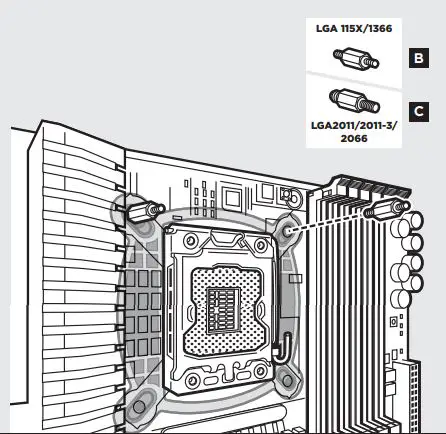
Installing the Intel Standoff Screws
- Attach the provided Intel standoff.
- Use (B) for LGA 115X/1366, or (C) for LGA 2011.
- Tighten all four screws until firmly secure.


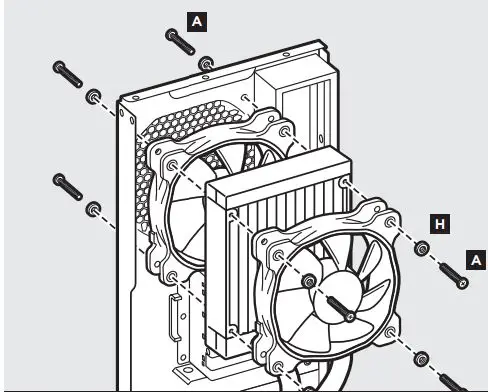
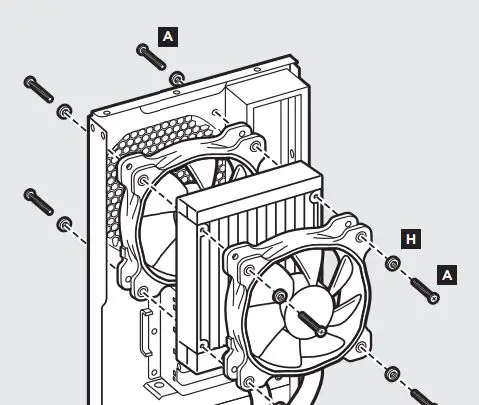
Installing the Fan and Radiator
- Mount the radiator and fan to your case’s rear 120mm fan opening as shown below.
Note: For best cooling performance, we recommend mounting the fan as an air intake to your PC case.

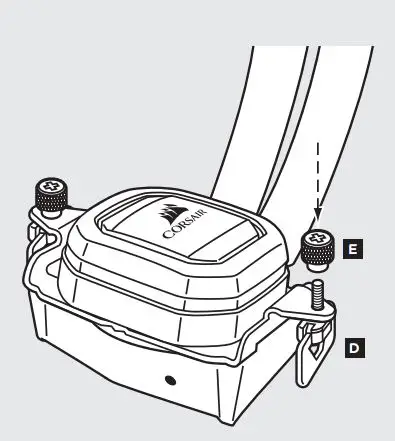
Installing the Pump Unit
- Align the bracket and pump over the standoff screws as shown.
- Tighten the thumbscrews until all four corners are firmly secured.

Connect Power to the Fan and Pump
- Connect the pump power cable to the CPU_FAN header on your motherboard (figure 1).


- Connect the fans to the two connectors coming off the pump (figure 2).
Connect Pump to USB Header
Using the included CORSAIR iCUE USB cable, attach pump unit to a motherboard USB header.

FAQ
- How do I know the direction of the air flow of the fan? An arrow located on the side of the fan indicates the direction of air flow.
- Can I reuse the pre-applied thermal paste on the H80i v2 for a re-installation? Re-installation of the H80i v2 cooler will require you clean off the pre-applied thermal paste and apply an aftermarket paste.
- Do I mount the radiator hose up or down? For optimized cooling, CORSAIR recommends the radiator is mounted hose down.

Note: Most newer PC cases include a CPU cutout to allow access to the bottom of the motherboard. If your case does not include a cutout, you will need to remove your motherboard from the case before installation.
Included Hardware
Highlighted parts for Intel installation only

Note: The H75 comes with Intel mounting bracket pre-installed on the pump for quick installation.
Installing the Intel Backplate
- For LGA 115X installation, slide the backplate pins inside (figure 1).
- For LGA 1366 installation, slide the backplate pins outside (figure 1).
- Install the assembled backplate (figure 2).
Note: Intel LGA 2011 and LGA 2066 does not require backplate installation. Proceed to step 2.
Installing the Intel Standoff Screws
- Attach the provided Intel standoff. ·
- Use (B) for LGA 115X/1366, or (C) for LGA 2011/2011-3/2066.
- Tighten all four screws until firmly secure.
Install the Fans and Radiator
Mount the radiator and fans to your case’s rear 120mm fan opening as shown below. Note: For best cooling performance, we recommend mounting the fan as an air intake to your PC case.
Installing the Pump Unit
- Align the bracket and pump over the standoff screws as shown.
- Tighten the thumbscrews until all four corners are firmly secured.
Connect Power to the Fans and Pump
- Connect pump power cable to an available SATA power plug (figure 1).
- Connect pump tach cable to the CPU_FAN header on your motherboard (figure 1).
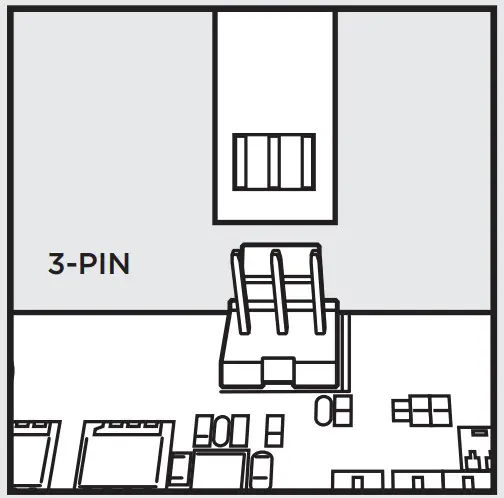
- Connect the included Y-header cable to any available 3-pin or 4-pin fan header (figure 2).
- Connect the fans into the Y-header cables (figure 2).

AMD
Included Hardware
Highlighted parts for AMD installation only

Installing the AMD Mounting Bracket
Installation du support de fixation AMD
Note: It is important that the AMD retention bracket be evenly secured on all sides before installation!
- Remove the integrated Intel mounting bracket by turning the mounting bracket, and pulling away from the copper collate (figure 1).
- Install the AMD bracket by aligning the twist lock, pushing in, turning the opposite direction, and allowing bracket to secure (figure 2).
Install the Fans and Radiator
Mount the radiator and fans to your case’s rear 120mm fan opening as shown below. Note: For best cooling performance, we recommend mounting the fan as an air intake to your PC case.
Prepare the Mounting Bracket
Insert the AMD screw clips and secure with the screws as shown. Do not tighten the thumbscrews all the way.
Install the Pump Unit
Align the bracket with the Stock AMD mounting clips as shown. Tighten the thumbscrews until secure.
Connect Power to the Fans and Pump
- Connect pump power cable to an available SATA power plug (figure 1).
- Connect pump tach cable to the CPU_FAN header on your motherboard (figure 1).
- Connect the included Y-header cable to any available 3-pin or 4-pin fan header (figure 2).
- Connect the fans into the Y-header cables (figure 2).

FAQ
- How do I know the direction of the air flow of the fan?
An arrow located on the side of the fan indicates the direction of air flow. - Can I reuse the pre-applied thermal paste on the H75 for a re-installation?
Re-installation of the H75 cooler will require you clean off the pre-applied thermal paste and apply an aftermarket paste.
Thank you for purchasing the CORSAIR Hydro Series H75 High Performance Liquid CPU Cooler. Please visit: corsair.com to download a detailed user guide or to obtain technical support.
![]()
NOTE ON ENVIRONMENTAL PROTECTION: After the implementation of the European Directive 2012/19/EU in the national legal system, the following applies:
– Electrical and electronic devices may not be disposed of with domestic waste.
– Consumers are obliged by law to return electrical and electronic devices at the end of their service lives to the public collecting points set up for this purpose or point of sale. Details to this are defined by the national law of the respective country. This symbol on the product, the instruction manual or the package indicates that a product is subject to these regulations. By recycling, reusing the materials or other forms of utilizing old devices, you are making an important contribution to protecting our environment.
![]()
CORSAIR MEMORY, Inc. declares that this equipment is in compliance with Directive 2014/30/EU and Directive 2011/65/EU. A copy of the original declaration of conformity can be obtain at [email protected].

EMAIL: [email protected]
FACEBOOK: facebook.com/corsair
BLOG: corsair.com/blog/
FORUM: forum.corsair.com
TWITTER: twitter.com/corsair
USA and CANADA: (510) 657-8747 | INTERNATIONAL: (888) 222-4346 | FAX: (510) 657-8748
47100 Bayside Parkway • Fremont • California • 94538 • USA
© 2017-2019 CORSAIR MEMORY, Inc. All rights reserved. CORSAIR and the sails logo are registered trademarks, and CORSAIR is a trademark in the United
States and/or other countries. All other trademarks are the property of their respective owners. Product may vary slightly from those pictured. 49-001628 AB
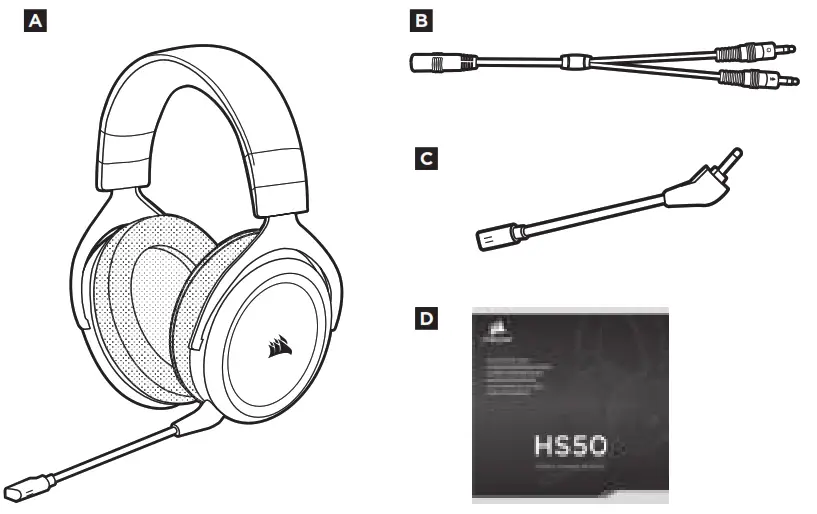
STEREO GAMING HEADSET
QUICKSTART GUIDE

A. CORSAIR HS50 Stereo Gaming Headset
B. Y-adapter cable (female 4-pole 3.5mm to dual male 3-pole for PC)
C. Detachable microphone boom
D. Quick start guide
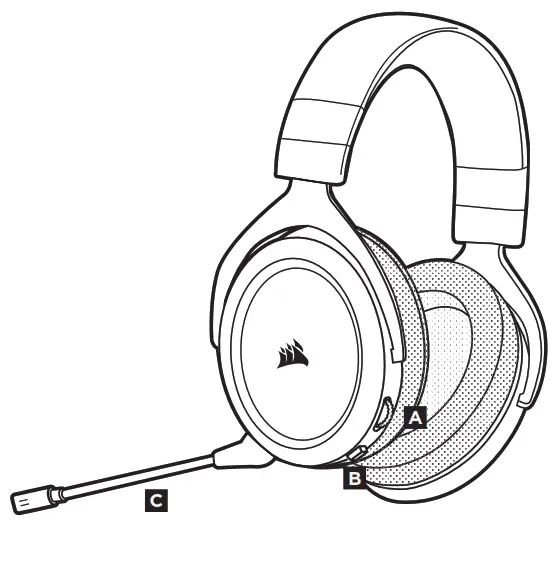
⇒CONTROLS AND FEATURES
A. Volume dial
B. Microphone mute button
C. Detachable microphone boom
⇒HS50 MICROPHONE
Your new HS50 Headset features a detachable high performance “unidirectional” microphone designed to reject noise other than your voice, but it must be pointed directly at your mouth to function correctly.
- Bend the flexible microphone boom to best fit near the left corner of your mouth.
- The microphone should be about 1.5 inches / 4cm away from your mouth for best performance.
- We’ve found that about a 30-degree bend is a good place to start, but feel free to increase or decrease this if your mic is too loud or too soft.
Note on environmental protection
 After the implementation of the European Directive 2012/19/EU in the national legal system, the following applies:
— Electrical and electronic devices may not be disposed of with domestic waste.
— Consumers are obligated by law to return electrical and electronic
devices at the end of their service live to the public collecting points set up for this purpose of point of sale. Details to this are defined by the national law of the respective country. This symbol on the product, the instruction manual or the package indicates that a product is subject to these regulations. By recycling, reusing the materials, or other forms of utilizing old devices, you are making an important contribution to protecting our environment.

| EMAIL [email protected] |
WEB corsair.com |
BLOG corsair.com/blog |
FORUM forum.corsair.com |
| FACEBOOK facebook.com/Corsair |
TWITTER twitter.com/Corsair |
YOUTUBE youtube.com/Corsair |
|
© 2017 CORSAIR Components, Inc.
All rights reserved. CORSAIR and the sails logo are registered trademarks in the United States and/or other countries. Product may vary slightly from those pictured.
49-001618 AB
![]()
CORSAIR COMPONENTS, INC.
7100 BAYSIDE PARKWAY • FREMONT • CALIFORNIA • 94538 • USA
CORSAIR iCUE NEXUS

HARDWARE SETUP
iCUE NEXUS connects to PC USB via the standalone base or when attached to a K70 RGB MK.2 or K95 RGB PLATINUM series keyboard via an included bracket.
STANDALONE BASE
- Connect USB to base
- Insert iCUE NEXUS
- Connect base USB to PC
KEYBOARD BRACKET
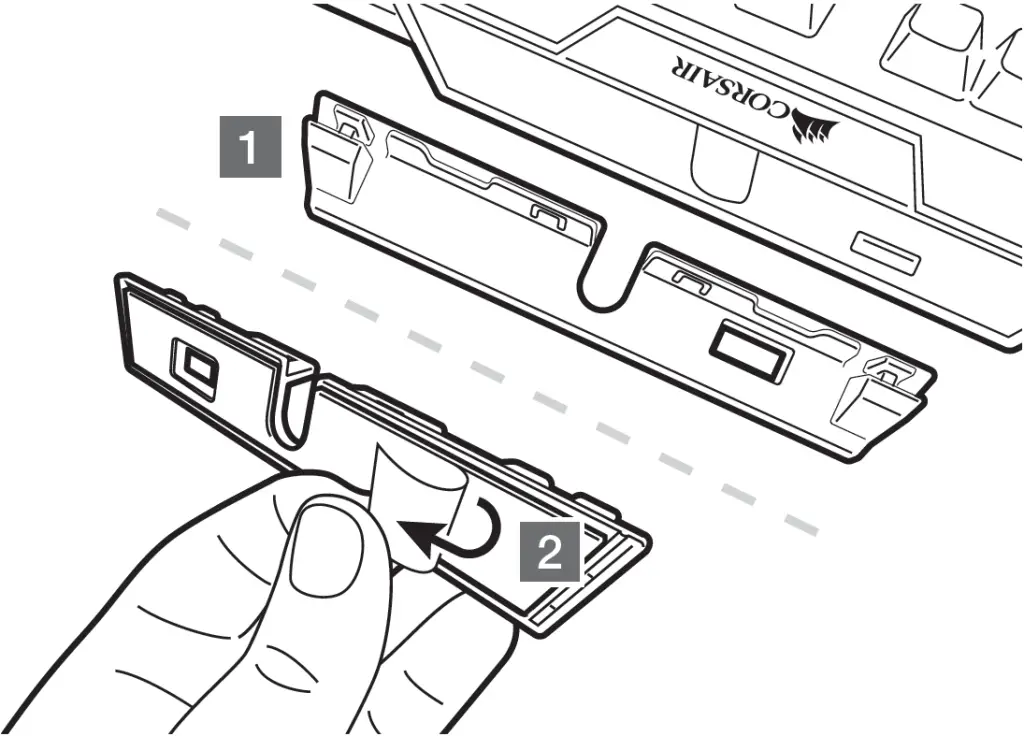
- Locate bracket matching keyboard rear center panel
- Peel off protective film
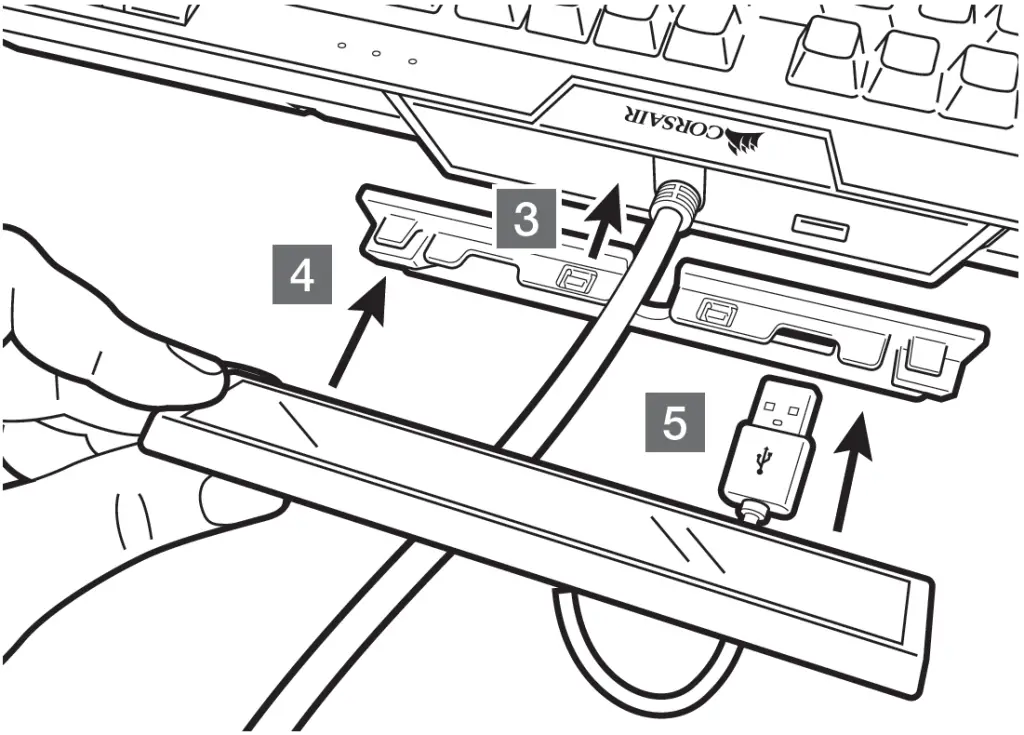
- Attach bracket to keyboard
- Slide iCUE NEXUS onto bracket
- Connect USB to keyboard
IMPORTANT: If attached to a keyboard, allow 24 hours for the adhesive tape on the bracket to set before using the touch screen. To remove the bracket later, turn over the keyboard and insert the included removal tool (H) into the gap between the bracket and the keyboard from the bottom side, and then gently press down to lift the bracket until it begins to detach. Hold the partially detached portion while continuing to lift different areas of the bracket until it is fully released from the keyboard. Additional brackets are available at www.corsair.com.
SOFTWARE SETUP
iCUE NEXUS requires the iCUE software. Download iCUE from www.corsair.com/downloads and install on your Windows® PC.
- Launch iCUE, click the iCUE NEXUS device tile, and then go to the Screens tab to begin designing your own screens with custom graphics and functions.
- Swipe left and right on the touch screen to quickly navigate between screens.
NOTE: For more information on advanced programming and product tutorials, visit www.corsair.com/nexus-faq.
GETTING TO KNOW iCUE NEXUS


- iCUE NEXUS
- TOUCH SCREEN
- USB CONNECTOR
- STANDALONE BASE
- BASE USB PASSTHROUGH
- BASE USB CONNECTOR
- KEYBOARD MOUNTING BRACKETS x 3
- BRACKET REMOVAL TOOL
WEB: corsair.com
PHONE: (888) 222-4346
SUPPORT: support.corsair.com
BLOG: corsair.com/blog
FORUM: forum.corsair.com
YOUTUBE: youtube.com/corsairhowto
© 2020 CORSAIR MEMORY Inc. All rights reserved. CORSAIR and the sails logo are registered trademarks in the United States and/or other countries. All other trademarks are the property of their respective owners. Product may vary slightly from those pictured.
![]()

VOID ELITE STEREO
Premium Gaming Headset
CONTENTS, CONTROLS, AND FEATURES
| A. Headband adjustment | D. Volume control |
| B. Cantilevered arm + hinge | E. Microfiber covered ear pads |
| C. Mute button | F. Microphone foam windscreen (removable) |
GETTING STARTED
You can connect the VOID ELITE STEREO to any PC, Mac, PlayStation 4, Xbox One*, Nintendo Switch
or mobile device.
Place the headset on your head and adjust the headband for a comfortable fit. The plush memory foam earpads enable the VOID ELITE STEREO headset to fit comfortably so you can play for hours without fatigue.
*May require Microsoft adapter sold separately.
ADJUSTMENT
As with any audio product, reduce the volume before trying it with an audio source the first time.
You can adjust the volume with:
- The volume controller on the headset is at the bottom corner of your left earcup.
- The standard Windows audio controller can also be used to adjust the volume.
- Once an audio source is playing, set the volume to a comfortable level.
MICROPHONE ADJUSTMENT
Your new VOID ELITE STEREO headset features a high-performance “omnidirectional” microphone.
Bend the flexible microphone boom to best fit near to the left corner of your mouth.
We’ve found that about a 30-degree bend is a good place to start, but feel free to increase or decrease this if your mic is too loud or too soft.
Enjoy your VOID ELITE STEREO headset! If you have any questions or comments, see the back panel of this guide for contact information.
NOTE ON ENVIRONMENTAL PROTECTION
After the implementation of the European Directive 2012/19/EU in the national legal system, the following applies:
- Electrical and electronic devices may not be disposed of with domestic waste.
- Consumers are obliged by law to return electrical and electronic devices at the end of their service lives to the public collecting points set up for this purpose or point of sale. Details to this are defined by the national law of the respective country. This symbol on the product, the instruction manual, or the package indicates that a product is subject to these regulations. By recycling, reusing the materials, or other forms of utilizing old devices, you are making an important contribution to protecting our environment.

CORSAIR MEMORY, Inc. declares that this equipment is in compliance with Directive 2014/30/EU and Directive 2011/65/EU.
A copy of the original declaration of conformity can be obtained at “corsair.com/documentation”. Operating Temperature: 0°C ~ + 40°C
![]()
![]()
PREVENTION OF HEARING LOSS
To prevent possible hearing damage, do not listen to high volume levels for long periods.
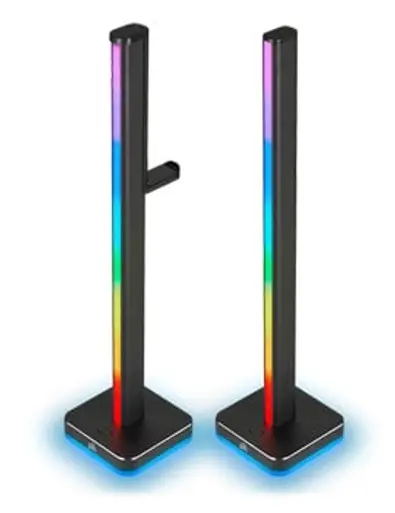
iCUE LT100
Smart Lighting Towers
STARTER KIT

PACKAGE CONTENTS
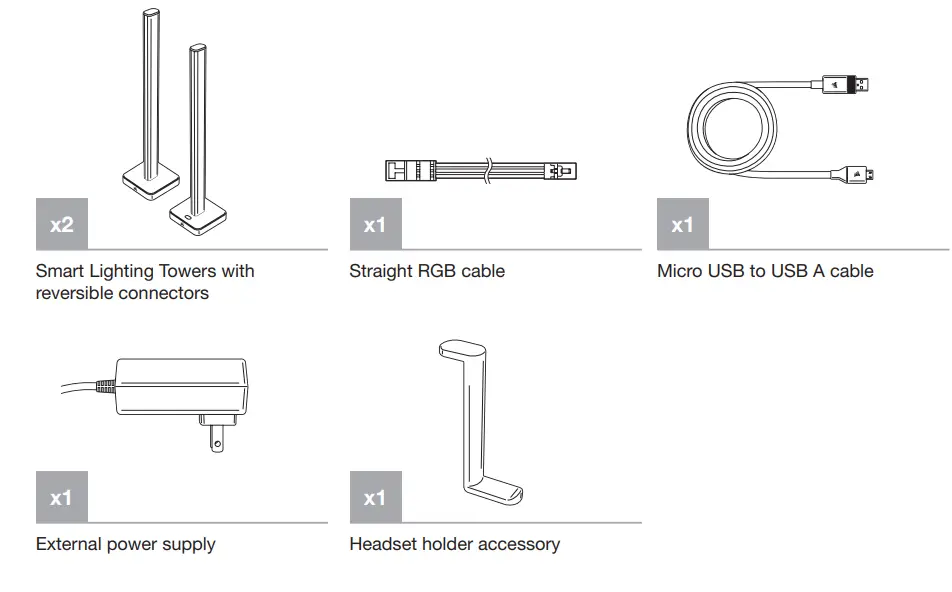
SPECIFICATIONS
| Unit dimensions | 422mm x 95mm x 95mm (without the headset holder), 423mm x 95mm x 106mm (with headset holder) |
| Power input (AC adapter) | 5V 1800mm |
| Tower 1 (with button) | With the controller, white diffuser silicone, aluminum post and base, 46 RGB LEDs |
| Tower 2 (without button) | No controller, white diffuser silicone, aluminum post and base, 46 RGB LEDs |
| USB cable | Micro USB to USB A, 1500mm |
| RGB cable | Straight RGB cable 1500mm |
| Headset holder | Plastic |
SET UP
- Remove Lighting Towers from Starter Kit box.
- Use the straight RGB cable to connect the 2 towers.
- Connect one end of the power cord to the LT100 base and the other end to the electrical outlet.
- Quick press and release on the multi-function button to control the light on and off.
- 11 Preset lighting profiles are included:
• Super X (Combination of predetermined effects)
• Color Pulse
• Static
• Sequential
• Rainbow
• Visor
• Color Shift
• Color Wave
• Temperature
• Marquee
• Strobing
(User can cycle through the lighting effect manually by pressing the multi-function button for 2 seconds. LEDs on the base blink blue/green accordingly. With each press of the button, the effect switches to the next one from the preset list.) - Plug the Micro USB cable into the LT100 base, then plug the USB A into the available USB port in the system.
- Turn on your PC.
- Download CORSAIR iCUE software at www.corsair.com/downloads. Internet connection is required to download the latest. Run the installer program and follow instructions for installation.
- Follow the lighting setup in iCUE.
- When connecting to Expansion Kit (sold separately), the external power and USB cables will need to be removed from the tower for the LED detection procedure to start. Users can also press the “LED detection” button in iCUE software. Or press and hold the multi-function button for 5 seconds to detect LED count. LEDs on the base will blink blue/green accordingly.
- Y RGB cable is included in the Expansion Kit, which is used to connect the main controller tower to the expansion tower. The straight RGB cable from the Starter Kit connects to the last expansion tower.
- The LEDs can support 16.8M colors and update at a rate of 25 times per second with no flickering.
- The maximum number of connected towers is 4. (Expansion is sold separately and requires the Starter Kit.)
- With the reversible connector design, the user can remove the post and rotate the tower to face back to the wall or face front for variable intensity.
- The removable headset holder can be attached conveniently to a Lighting Tower so you can hang your headset within easy reach.
| WEB: corsair.com PHONE: (888) 222-4346 SUPPORT: support.corsair.com |
BLOG: corsair.com/blog FORUM: forum.corsair.com YOUTUBE: youtube.com/corsairhowto |
|
| © 2020 CORSAIR MEMORY Inc. All rights reserved. CORSAIR and the sails logo are registered trademarks in the United States and/or other countries. All other trademarks are the property of their respective owners. Product may vary slightly from those pictured. 49-002039 AA |
 |
|
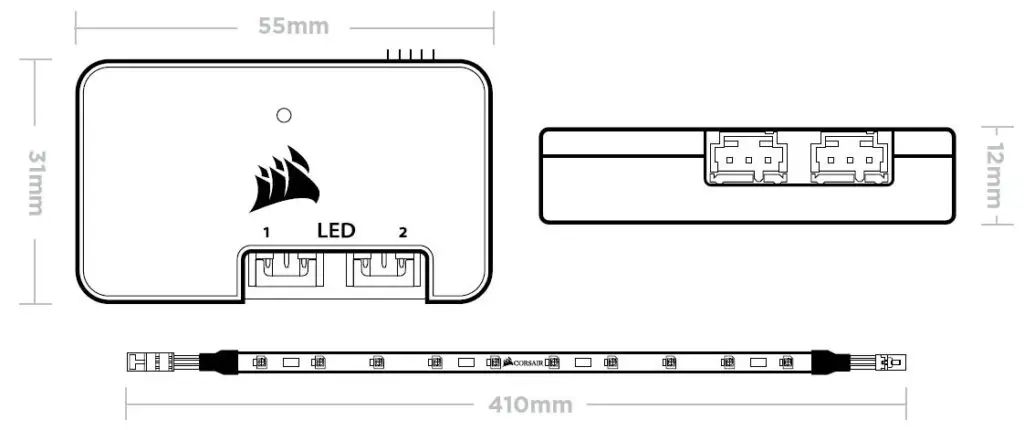
Corsair CL-9011109-WW Lighting Node PRO
Package Contents
- x1 CORSAIR Lighting Node PRO
- x4 Individually addressable RGB LED strips
- x4 RGB extension cables
- x2 HD RGB LED hub cables
- x1 Mini USB to 9-pin internal USB cables
- x2 Mounting tapes
Specifications
| Lighting Node PRO | |
| Power input | 4.5V to 5.5V |
| Unit dimension | 55mm x 31mm x 12mm |
| RGB LED channels | 2 |
| Max. RGB LED strip per channel | 4 |
| Mini USB cable | 375mm |
| SATA power cable | 440mm |
| HD RGB LED hub cable | 485mm |
| Individually Addressable RGB LED strip | |
| Length | 410mm |
| RGB LED chip count | 10 |
| Protective cover | IP65-rated transparent silicone |
| Adhesion type | 4 magnets per strip and full-strip tape |
| RGB extension cable | 345mm |
Installation
- Turn your system off prior to installing your Lighting Node PRO.
- Plug the mini USB cable into the back of the Lighting Node PRO then plug the 9-pin end into an available internal 2.0 header in your system.
- Connect the individually addressable RGB strip into a 3- pin header labeled “LED”. Use the extension cable if installing in a large case.
- OPTIONAL: Plug the HD RGB LED cable into an available LED header to connect an HD RGB LED hub (sold separately).
- Mount the magnetic RGB strips on the desired location inside your case. Alternatively, peel the adhesive tape on the back of the RGB strips to adhere it on your case.
WARNING!- Please refrain from mounting the strips on components that are sensitive to magnets.
- Connect the SATA power connector to any available SATA connector from your system power supply.
- Mount the Lighting Node PRO inside your case with the included double-sided tape.
- For the full Corsair Link experience, please download our latest Corsair Link software at www.corsair.com/downloads.
FAQ’s
The package includes one Corsair Lighting Node PRO, four Individually addressable RGB LED strips, four RGB extension cables, two HD RGB LED hub cables, one Mini USB to 9-pin internal USB cables, and two Mounting tapes.
Corsair CL-9011109-WW Lighting Node PRO has two RGB LED channels.
The maximum number of RGB LED strips per channel that can be connected to Corsair CL-9011109-WW Lighting Node PRO is four.
The length of the Individually Addressable RGB LED strip that comes with Corsair CL-9011109-WW Lighting Node PRO is 410mm.
The protective cover of the Individually Addressable RGB LED strip that comes with Corsair CL-9011109-WW Lighting Node PRO has an IP65 rating.
Turn your system off prior to installing your Lighting Node PRO. Plug the mini USB cable into the back of the Lighting Node PRO then plug the 9-pin end into an available internal 2.0 header in your system. Connect the individually addressable RGB strip into a 3- pin header labeled “LED”. Use the extension cable if installing in a large case. OPTIONAL: Plug the HD RGB LED cable into an available LED header to connect an HD RGB LED hub (sold separately). Mount the magnetic RGB strips on the desired location inside your case. Alternatively, peel the adhesive tape on the back of the RGB strips to adhere it on your case.
Please refrain from mounting the strips on components that are sensitive to magnets.
Connect the SATA power connector to any available SATA connector from your system power supply.
For the full Corsair Link experience, please download our latest Corsair Link software at www.corsair.com/downloads.
The Corsair CL-9011109-WW Lighting Node PRO is a lighting controller and hub designed by Corsair. It is used to control and synchronize RGB lighting in your PC case or other compatible Corsair products.
Yes, the Corsair CL-9011109-WW Lighting Node PRO is compatible with other Corsair products that support RGB lighting. This includes Corsair RGB LED strips, RGB fans, and other compatible peripherals. You can synchronize the lighting effects across multiple devices using the Corsair iCUE software.
While it is recommended to use the Corsair iCUE software to fully control and customize the lighting effects, the Corsair CL-9011109-WW Lighting Node PRO can still function without it. By default, the Lighting Node PRO will cycle through pre-set lighting patterns. However, for more advanced control and customization, the software is highly recommended.
The Corsair CL-9011109-WW Lighting Node PRO supports up to six individually addressable RGB LED strips or fans. Each lighting channel on the Lighting Node PRO can control one RGB device. If you have more than six devices, you would need to use additional Lighting Node PRO units or compatible Corsair RGB hubs to expand the capacity.
The Corsair CL-9011109-WW Lighting Node PRO is primarily designed to work with Corsair RGB products. While it may be possible to connect non-Corsair RGB devices, compatibility and control options may vary. It is recommended to check the product specifications and compatibility before attempting to connect non-Corsair RGB products.
No, the Corsair CL-9011109-WW Lighting Node PRO is specifically designed to work with the Corsair iCUE software. It does not support third-party RGB control software. To fully utilize its features and customization options, it is recommended to use the Corsair iCUE software.