CDA DC741 Built-under & DC941 Built-In
Double Oven Instruction Manual
Important
This appliance must only be used for the purpose for which it is intended, i.e. domestic cooking. Any other use could be dangerous and may lead to premature failure of the appliance.
The CDA Group Ltd cannot be held responsible for injuries or losses caused by incorrect use or installation of this product. Please note that CDA reserve the right to invalidate the guarantee supplied with this product following incorrect installation or misuse of the appliance.
This appliance is not designed to be used by people (including children) with reduced physical, sensorial or mental capacity, or who lack experience or knowledge about it, unless they have had supervision or instructions on how to use the appliance by someone who is responsible for their safety.
Under no circumstances should any external covers be removed for servicing or maintenance except by suitably qualified personnel.
User information:
- Ovens become hot during and immediately after use.
- The oven door can become hot during operation.
- After use, please ensure that the control knobs are in the `Off’ position.
- Keep children away from the appliance when in use, and immediately after use.
- Keep the oven door closed when the appliance is in use.
Appliance information:
Please enter the details on the appliance rating plate below for reference, to assist CDA Customer Care in the event of a fault with your appliance and to register your appliance for guarantee purposes.

EU Declarations of Conformity:
This oven has been designed, constructed and marketed in compliance with safety requirements of EU Directive 2014/35/EU (LVD) and requirements of EU Directive 2014/30/EU (EMC).
This appliance has been manufactured to the strictest standards and complies with all applicable legislation, including Electrical safety (LVD) and Electromagnetic interference compatibility (EMC). Parts intended to come into contact with food conform to 1935/2004/EC.
IMPORTANT INFORMATION FOR CORRECT DISPOSAL OF THE PRODUCT IN ACCORDANCE WITH EC DIRECTIVE 2012/19/EU. At the end of its working life, the product must not be disposed of as urban waste. It must be taken to a special local authority differentiated waste collection centre or to a dealer providing this service.
Disposing of a household appliance separately avoids possible negative consequences for the environment and health deriving from inappropriate disposal and enables the constituent materials to be recovered to obtain significant savings in energy and resources. As a reminder of the need to dispose of household appliances separately, the product is marked with a crossed-out wheeled dustbin.
Important safety notes
- Read the user instructions carefully before using the oven for the first time.
- Follow the instructions for first use of the oven.
- Clean the oven regularly.
- Steam cleaners must not be used when cleaning this appliance.
- Remove spills as soon as they occur.
- Always use oven gloves when removing shelves and trays from the ovens.
- Do not allow children near the oven when in use.
- Do not allow fat or oils to build up on the oven shelves, grill pan or oven base.
- Do not place any cooking utensils or plates directly on the oven base.
- Keep the oven door closed when the oven is in use.
- Do not grill food containing fat without using the grill pan grid.
- Do not cover the grill pan grid or the oven walls with aluminium foil.
- Do not use the oven tray for roasting.
- Do not perform maintenance or cleaning of the oven without first switching off the electricity supply. If the oven has recently been used, allow to cool.
- Do not place hot enamel parts in water. Leave them to cool first.
- Do not allow vinegar, coffee, milk, saltwater, lemon or tomato juice to remain in contact with enamel parts.
- Do not use abrasive cleaners or powders that will scratch the surface of the enamel.
- Do not attempt to repair the internal workings of your oven.
- The oven is equipped with a safety thermostat which will switch off the oven in the event of the oven overheating. If the safety thermostat should switch off the power, you must wait for the oven to cool down before using it again.
- Do not cover the oven floor with aluminium foil.
First use of the oven
The metal casing of this appliance has been coated with a preservative to protect it during transport and storage. This should be removed during installation by using a non-abrasive stainless steel cleaner. Always follow the instructions given with the cleaner being used.
Before using the oven for the first time we recommend that you clean both oven cavities with soapy water, rinse carefully and then heat on each of the below programmes at maximum temperature for the specified time. A slightly unpleasant smell may be produced, caused by grease remaining on the oven elements from the production process.
Top oven
 15 minutes full grill
 60 minutes conventional
Lower oven
 60 minutes fan oven
Please note:
- This oven has been fitted with a cooling fan to achieve maximum efficiency and to maintain low surface temperatures. The cooling fan will switch on automatically when the oven is switched on and runs for a while after the oven has been switched off – the length of time can vary and will be increased by poor ventilation.
- The oven light remains on for every cooking function.
- Do not switch off the oven if you have set a programme for semiautomatic or automatic cooking as this will cancel the programme.
- The current time must be set on the programmer/timer for the cooking functions to work properly (see page 10).
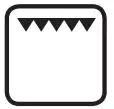
Oven controls and use
Cooking function knobs
To set the function, turn the cooking function knob for the required oven clockwise to the required function. Each of the oven functions uses different elements within the oven to offer you the best choice of cooking every time. These are explained below:
Conventional oven
This function uses the top and bottom heating elements only with a temperature between 50ºC and 250ºC. Natural convection creates a perfect cooking zone in the centre of the oven, ideal for dark fruit cakes and pastries.
 Warming oven
This function uses the bottom heating element only with a temperature set between 50ºC and 250ºC. This natural heat is perfect for dough proving and blind-baking.
Grill
This function radiates the heat from the grill element and the top element. This fully temperature variable grill is ideal for grilling a full family meal. It can be set between 50ºC and 250ºC.
When grilling, please note:
- Always grill with the oven door closed.
- Put the grill pan as close to the grill as possible.
- Do not grill for more than 30 minutes at a time.
- Preheat the grill for a few minutes with the oven door closed.
 Oven Lamp
This function switches on the oven light in the cavity. Please note: the oven light will operate on all cooking functions
 Defrost
Using the fan only this oven function circulates the air around the oven cavity, speeding up the natural defrost process (1kg takes approximately one hour, depending on the type of food).
Fan Oven
Using the circular element and the fan with a temperature between 50ºC and 250ºC, this cooking function blows the air into and around the oven cavity. Both cooking temperatures and cooking times can be reduced for a more energy efficient cooking programme. This function is perfect for cooking various food types simultaneously as foods are sealed quickly to prevent flavour transfer.
Temperature knob
- To set the temperature, turn the temperature knob for the required oven clockwise to the required temperature.
- Once the oven has reached the required temperature, the temperature indicator lamp on the control panel will switch off.
- The temperature indicator lamp will light up when the oven elements are working.
Programming the oven
Please note:
- The semi-automatic and automatic cooking programmes will only work with the main (lower) oven.
- The alert beep will cut off after two minutes if it is not switched off manually.
- The current time must be set in order for the functions to work. If you are unsure whether the current time is mains supply for approximately 10 seconds and then turn it back on. Set the time as per the instructions below.
Setting the clock
The clock is present to 12:00, and will revert to this after a power failure. When the current time indicator is flashing, touch or . When the correct time is shown on the display, the clock will set after approximately five seconds’ delay.
To change the clock once it has been set, touch repeatedly until the current time indicator flashes, then touch or . When the correct time is shown on the display, the clock will set after approximately five seconds’ delay.
The minute minder
It can be set for up to 23 hours and 59 minutes.
To set the minute minder:
- Touch (M) repeatedly until the minute minder indicator flashes.
- Then touch (+) or (-) to select the required duration for the minute minder. When the correct duration shows on the display, either touch (M) or wait for approximately five seconds. The minute minder indicator will remain lit to confirm the minute minder is on.
- When the countdown is complete, there will be an alert beep which will continue for two minutes and the minute minder indicator will
Please note:
At the end of the countdown, the minute madder will not switch off the oven. remember to turn off the oven manually.
Semi-automatic cooking
The main oven can be set to switch off automatically at a present time up to a maximum of 10 hours.
To set a semi-automatic cooking programme:
- Select the oven function and temperature (the oven will switch on).
- Touch (M) until the cooking time indicator flashes.
- Then touch (+) or (-) to select the required duration for the semi-automatic cooking programme. When the correct duration shows on the display, wait for approximately five seconds. The cooking time indicator will remain lit to confirm the semi-automatic programme is on.
- When the cooking time is complete, there will be an alert beep which will continue for two minutes and the cooking time indicator will flash. To switch off the alert beep, touch any key.
- Turn the control knobs to the off position.
Please note:
At the end of the cooking programme, remember to turn off the oven manually.
Automatic cooking
The main oven can be set to switch on and off automatically at present times up to a maximum of 10 hours.
To set an automatic cooking programme, follow the steps for setting a semi-automatic programme above, and then:
- Touch (M) until the end of cooking time indicator flashes.
- Then touch (+) or (-) to select the required end of cooking time.
When the correct time shows on the display, wait for approximately five seconds. The cooking time and end of cooking time indicators will remain lit to confirm the automatic programme is on. · - The oven will switch off until the automatic programme starts. When the programme starts, the cooking time indicator will switch off
- When the cooking time is complete, there will be an alert beep which will continue for two minutes and the end of cooking time
Please note:
At the end of the cooking programme, oven manually (at the control knobs). If you have not switched the oven off at the control knobs, pressing a control panel key will reactivate the previously set function.
Care and maintenance
IMPORTANT
Before any maintenance is started involving electrical parts, the appliance must be disconnected from the power supply. If the oven has been in use, let the oven cavity and the heating elements cool down before attempting any maintenance.
The oven exterior
As the oven has a stainless steel or enamel surface, you should use a nonabrasive cleaner. Any abrasive cleaner (including Cif) will scratch the surface and could erase the control panel markings. Stainless steel can be effectively cleaned by simply using a dilute solution of water and mild detergent and drying to a shine with a clean cloth. Proprietary stainless steel cleaners are available. We recommend the a clean microfibre cloth for cleaning stainless steel surfaces.
Inside of the oven
The oven should always be cleaned after use when it has cooled down.
The cavity should be cleaned using a mild detergent solution and warm water.
Suitable proprietary chemical cleaners may be used after first consulting with the manufacturers’ recommendations and testing a sample on a small area of the oven cavity. Abrasive cleaning agents or scouring pads/cloths should not be used on the cavity surface.
IMPORTANT:
- Steam cleaners must not be used when cleaning this appliance.
- Once care and maintenance is complete, ensure that all parts are correctly replaced before using the oven.
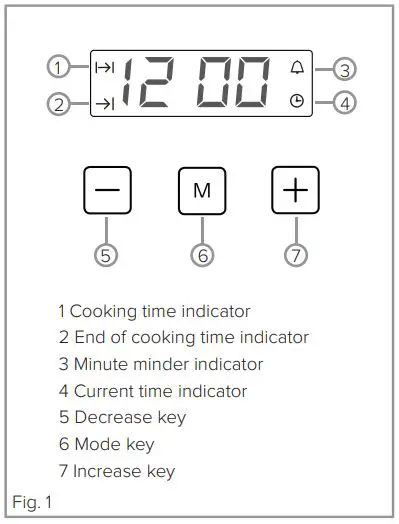
Changing the oven lamp
Before any maintenance is started involving electrical parts, the appliance must be disconnected from the power supply.
If the oven has been in use, let the oven cavity and the heating elements cool down before attempting any maintenance.
Changing the bulb (fig. 2)
Unscrew the protective cover. We recommend that you wash and dry the glass cover at this point. Carefully remove the old bulb and insert the new bulb suitable for high temperatures (300ºC) having the following specifications: 230240V, 50Hz, 25W, G9 fitting.
Refit the protective cover.
IMPORTANT
Never use screwdrivers or other utensils to remove the light cover. This could damage the enamel of the oven or the lamp holder. Remove only by hand. Make sure the power is off and the lamp assembly has cooled.
IMPORTANT
Never replace the bulb with bare hands as contamination from your fingers can cause premature failure. Always use a clean cloth or gloves.
Please note:
The bulb replacement is not covered by your guarantee.
See page 16 for information on removing the appliance doors.
Oven doors
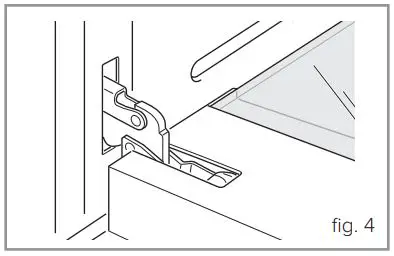
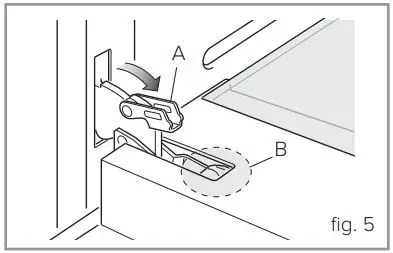
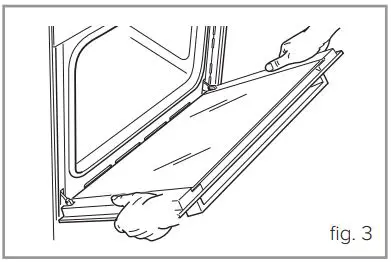
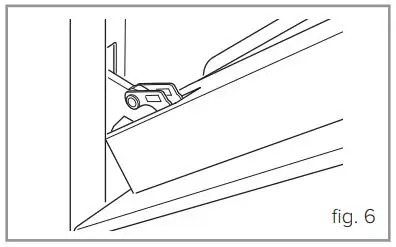
Removing the oven doors
The oven door can easily be removed as follows:
- Open the door to the full extent (fig. 4).
- Open the lever A completely on the left and right hinges (fig. 5).
- Hold the door as shown in (fig. 3).
- Gently close the door (fig. 6) until left and right hinge levers A are hooked to part B of the door (fig. 5).
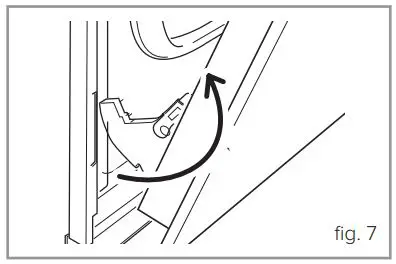
- Withdraw the hinge hooks from their location following arrow C (fig. 7).
- Rest the door on a soft surface.
- To replace the door, repeat the above steps in reverse order.
Troubleshooting
If you have any problems with your appliance, you should check the following troubleshooting steps prior to calling CDA Customer Care to help avoid unnecessary service visits. Contact details for CDA Customer Care are on page 18 and the rear cover of this manual.
- If there is no power to the oven.
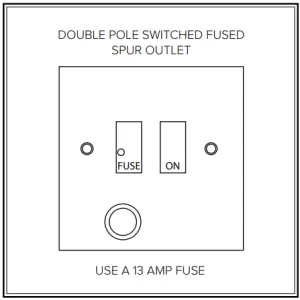
Check that the mains power supply is switched on. If it is and the oven is still not working then switch the mains power supply off and check the fuse at the spur. Replace the fuse and try switching the power back on.
- If there is power to the oven (the programmer is on/lit) but the oven is not heating.
It is possible that the current time/clock has not been set. Switch the The clock should show `12:00′ and a flashing rectangular indicator by the clock symbol on the control panel. Use the or keys to set the current time. After approximately 5 seconds the time should set and the oven should function as normal.
It is also possible that the automatic cooking function and a cooking duration have been engaged. This is signified by the end of cooking time indicator and the cooking time indicator being on. To cancel this function, press ok until the cooking time indicator flashes. Use to return the cooking duration to `0.00′. After approximately 5 seconds you should be able to use your oven as normal.
- If a function is on (and working) but the internal light is not working
It is most likely that the bulb has blown. Switch the appliance off at the mains power supply and fit a replacement bulb as per page 14. Be sure to follow the safety warnings on page 14.
If none of the previous troubleshooting checks resolve your issue, please contact CDA Customer Care using the contact details below:
Contact CDA Customer Care
A : Customer Care Department, The CDA Group Ltd, Harby Road, Langar, Nottinghamshire, NG13 9HY
T : 01949 862 012
F : 01949 862 003
E : [email protected]
W : www.cda.eu
Mains electricity connection
Warning! This appliance must be earthed
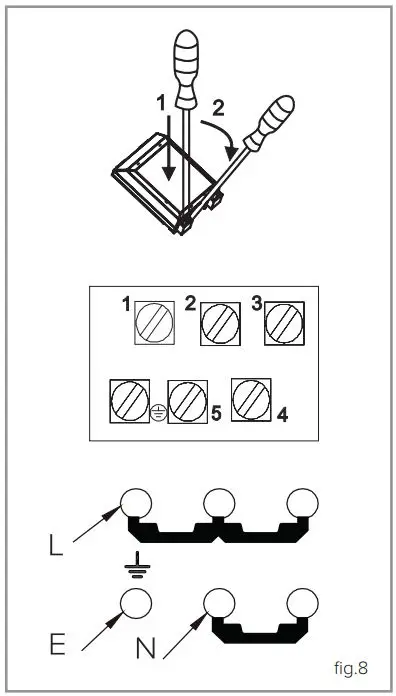
To connect this appliance to a UK standard mains supply, connect the bridging links between 1-2-3 for the live feed and 4-5 for the neutral feed.
This appliance must be connected to the power supply by a qualified electrician or engineer, who is a member of the N.I.C.E.I.C. and who will comply with the I.E.T. and local regulations.
This appliance is intended to be connected to fixed wiring and is not suitable for connection to a 13A plug or 13A supply.
This appliance is intended to be connected to fixed wiring by a double pole switch, having a contact separation of at least 3mm in all poles. The switch must be positioned no further than 2m from the appliance.
Release the two locks located at either side of the connector cover at the rear of the appliance.
Feed the mains lead through the cable clamp to prevent accidental disconnection.
Tighten the cable clamp securely and close the connector cover.
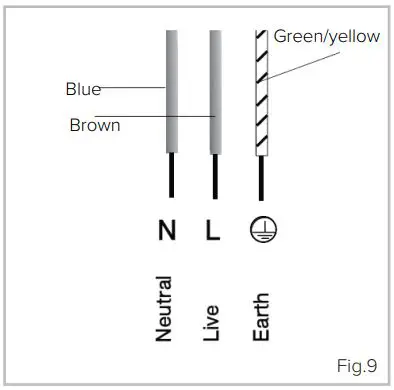
Green and Yellow = Earth (PE)
Blue = Neutral
Brown = Live
Please note:
- The mains cable must only be replaced by a qualified electrician or service engineer and must be of equivalent or better rating (i.e. 2.5mm², HO5RR-F).
- This appliance is intended to be connected to the mains supply with a cable of cross section area 2.5 mm². A larger cable will not fit the terminal connections.
- The marking of the current rating of the fuse or circuit breaker protecting this appliance should be marked on the socket outlet.
- Assembly and electrical connection should be carried out by specialised personnel.
- When installing this product we recommend you seek the help of another individual.
Installation
Important
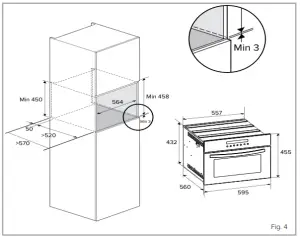
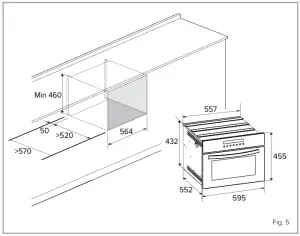
Failure to allow adequate ventilation to the appliance may result in overheating or damage to adjacent units and could invalidate the warranty. The diagram below shows the minimum required.
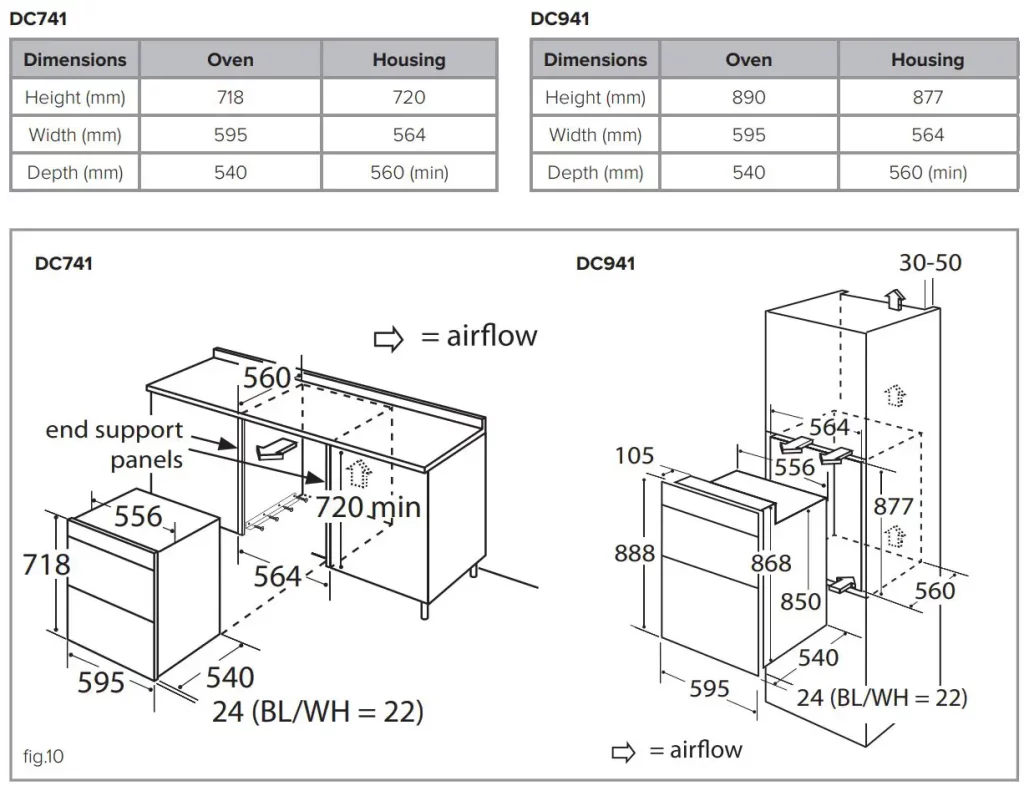
This appliance is type X installation. The walls of the kitchen units must be able to withstand temperatures of 75°C above ambient (typically this is between 90°C and 100°C).
When correctly installed ensure that there is a gap of 4mm minimum between the sides of the oven and adjacent furniture doors.
Lift the oven carefully into position on the shelf, taking care NOT to lift it by the door handles. If you lower the oven door, you will see 4 screw holes, 2 on each side of the oven. The oven should then be secured to the housing by fitting screws into these holes. Remember the housing should not be free standing but be secured to the wall and/or adjacent fittings.
How to install your oven
You will need the following housing area fit your oven correctly.
DC741 only: We recommend that you fit end support panels onto the adjacent units to allow the oven to be secured in place (as shown in fig. 10).
If fitting a hob above your oven, observe the minimum gap required below the hob.
Appliance dimensions
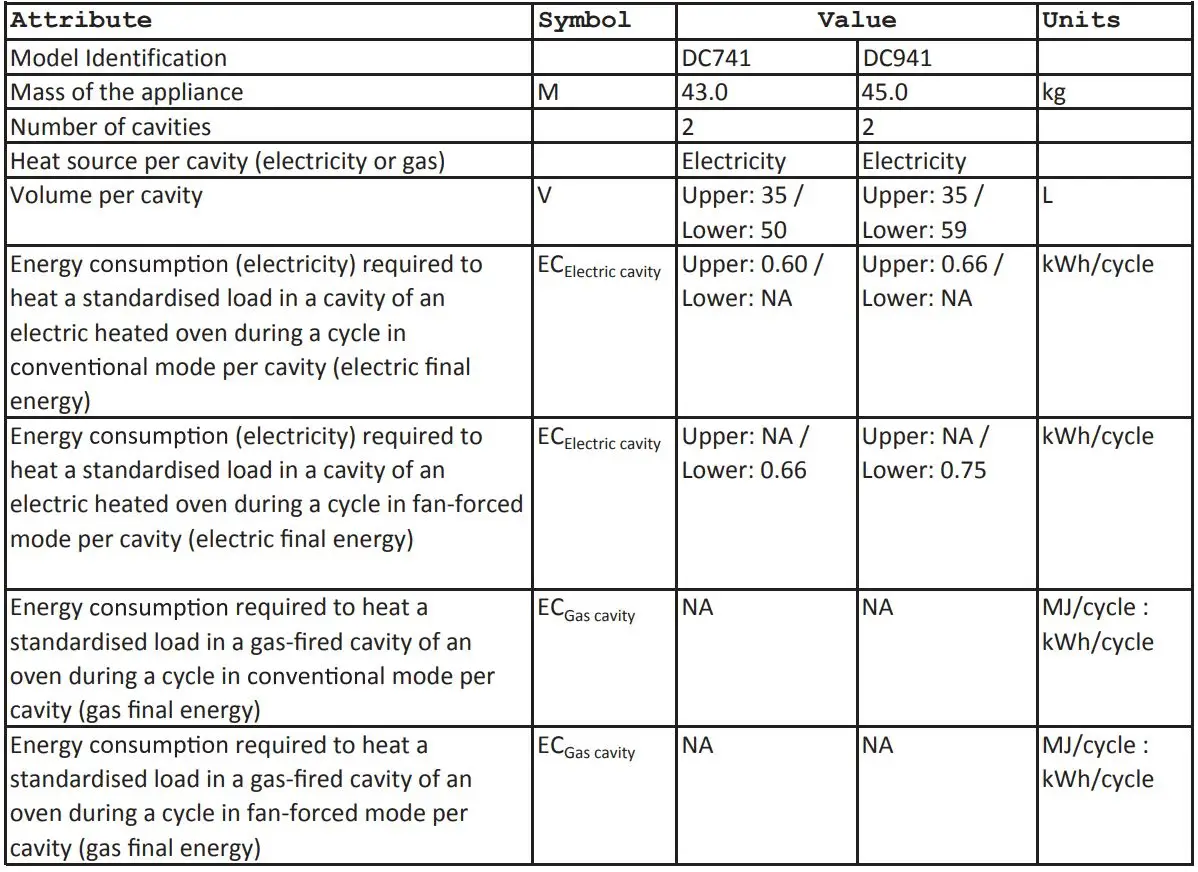
Energy Efficiency Information
E & O E. All instructions, dimensions and illustrations are provided for guidance only. CDA reserve the right to change specifications without prior notice.

![]() For service or queries relating to your product please contact:
For service or queries relating to your product please contact:
The Customer Care Department on 01949 862 012 or email [email protected]
For more information please contact:
The Sales Department on 01949 862 010 or email [email protected]
Customer Care Department. The CDA Group Ltd, Harby Road, Langar, Nottinghamshire, NG13 9HY
T: 01949 862 012 F: 01949 862 003 E: [email protected]
www.cda.eu
![]()
VK903
Compact combination microwave oven
Use and maintenance
Important information
This appliance must only be used for the purpose for which it is intended, i.e. domestic cooking. Any other use could be dangerous and may lead to premature failure of the appliance.
The CDA Group Ltd. cannot be held responsible for injuries or losses caused by incorrect use or installation of this product. Please note that CDA reserve the right to invalidate the guarantee supplied with this product following the incorrect installation or misuse of the appliance.
Under no circumstances should any external covers be removed for servicing or maintenance except by suitably qualified personnel.
User information:
- Ovens become hot during and immediately after use.
- The oven door can become very hot during operation.
- After use, please ensure that the oven is switched ‘Off’.
- Keep children away from the appliance when in use, and immediately after use.
- Keep the oven door closed whilst grilling.
Appliance information:
Please enter the details on the appliance rating plate below for reference, to assist CDA Customer Care in the event of a fault with your appliance and to register your appliance for guarantee purposes.
Appliance Model
Serial Number
Important information
EU Declarations of Conformity:
This oven has been designed, constructed, and marketed in compliance with the safety requirements of EU Directive 2014/35/EU (LVD) and requirements of EU Directive 2014/30/EU (EMC).
Parts intended to come into contact with food conform to 1935/2004/EC.
IMPORTANT INFORMATION FOR CORRECT DISPOSAL OF THE PRODUCT IN ACCORDANCE WITH EU DIRECTIVE 2012/19/EU.
At the end of its working life, the product must not be disposed of as urban waste. It must be taken to a special local authority differentiated waste collection center or to a dealer providing this service.
Disposing of a household appliance separately avoids possible negative consequences for the environment and health deriving from inappropriate disposal and enables the constituent materials to be recovered to obtain significant savings in energy and resources. As a reminder of the need to dispose of household appliances separately, the product is marked with a crossed-out wheeled dustbin.
Important information
- Read the user instructions carefully before using the oven for the first time.
- Follow the instructions for the first use of the oven.
- Clean the oven regularly.
- Remove spills as soon as they occur.
- Always use oven gloves when removing shelves and trays from the oven.
- Do not allow children near the oven when in use.
- Do not allow fat or oils to build upon the oven shelves, grill pan, or oven base.
- Do not place any cooking utensils or plates directly on the oven base.
- Always grill with the oven door closed.
- Do not grill food containing fat without using the grill pan grid.
- Do not cover the pans, grids, or oven walls with aluminum foil.
- Do not use the oven tray for roasting.
- Do not perform maintenance or cleaning of the oven without first switching off the electricity supply. If the oven has recently been used, allow cooling.
- Do not place hot enamel parts in water. Leave them to cool first.
- Do not allow vinegar, coffee, milk, saltwater, lemon, or tomato juice to remain in contact with enamel parts.
- Do not use abrasive cleaners or powders that will scratch the surface of the enamel or stainless steel.
- Do not attempt to repair the internal workings of your oven.
- Do not cover the oven floor with aluminum foil.
Before first use
First use
Before using the oven for the first time we recommend that, with the power supply off, you clean the oven with soapy water. Once done, rinse carefully, remove all accessories from the appliance and then heat on the below program at maximum temperature for the specified time. A slightly unpleasant smell may be produced, caused by grease remaining on the oven element from the production process. 30 minutes full grill with rear element and fan
Please note:
This oven has been fitted with a cooling fan to achieve maximum efficiency and to maintain low surface temperatures. The cooling fan will switch on automatically when the oven switches on. It is normal for the cooling fan to run for an hour or more after use, depending on the duration, temperature, and type of cooking
program used.
- The oven light remains on for every cooking function for 1 minute then will go out. The oven light can be switched on or off at any time.
- Switching the oven off will result in any semi-automatic or automatic cooking being canceled
- We recommend preheating the grill for 5 minutes before each use.
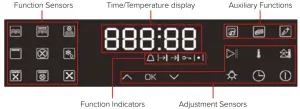
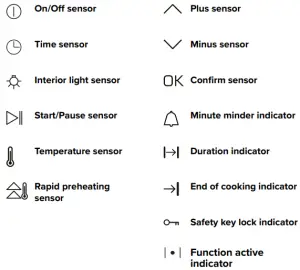
Using the touch controls
The touch controls should be used with the flat of your finger, rather than the fingertip.
Switching the appliance on and off
To switch the appliance on
Touch and hold the ‘On/Off’ sensor  for approximately 3 seconds and until the appliance beeps.
To switch the appliance off
Touch and hold the “On/Off” sensor for approximately 3 seconds and until the oven beeps. All displays except for the time display should extinguish.
Please note: To switch the appliance off completely, i.e. before cleaning it, you will need to switch it off at the main isolation switch.
Setting the clock
- In standby mode, press and hold the timer sensor
 until the minutes of the display flash.
 - Use
 and
and  set the minutes. Touch the sensor to confirm the setting.
 - The hours of the display will now be flashing. Use and set the hours. Touch the sensor to confirm the setting.
Note: The clock can only be set in 24-hour format
Setting the minute minder
Select a function and touch the sensor until the minute minder indicator  flashes. Then, use the and sensors to set the desired time. Touch the sensor to confirm the setting or wait 5 seconds and the setting will save automatically and the indicator will be illuminated on the display.
The minute minder can be set between 1 minute and 24 hours.
Once the duration time has elapsed you will hear beeping and the display will flash 0:00. Touch the sensor to mute the beeping and return to standby mode. If no sensor is pressed, the beeping will stop after 60 seconds but the display will continue to flash.
Please note: The minute minder function is available for cooking and defrosting functions, not microwave functions.
Functions
Below is a table of functions for the appliance including any adjustable settings
| Icon | Function | Power | Preset temperature °C | Microwave power w | Preset Time min | Adjustable temperature range | Adjustable Microwave power range |
Minute minder |
| Microwave | 1740 W | / | 100 – 900W | NO | ||||
| Microwave and grill | 1740 W/ 1900 W | 180 | 400 | – L | 200 – 600W | NO | ||
| Microwave + rear element + fan | 1740 WI 3100 W | 180 | .::,.: | 200 – 600W | NO | |||
| Defrost | 1740 W | / | 400 | / | NO | |||
| Top grill | 1900W | 180 | / | Default | 50 – 230t | / | YES | |
| Rear element+fan | 3100 W | 180 | / | Default | 50 – 230°C | / | YES | |
| Top grill t fan | 1900 W | 180 | / | Default | 50 – 230t | / | ||
| Top grill* rear element +fan | 3100 W | 180 | / | Default | 50-230°C | / | YES | |
| Fan defrost | 20W | / | / | Default | I | / | YES |
Selecting a function and beginning cooking (microwave functions)
- Touch a sensor on the control panel to enter the setting of that function. The display will show the functions default time setting
- Pressing the sensor will allow you to change the operating time for the function. Use the and to adjust the time. Touch the sensor to confirm the setting
- Pressing the
 sensor will allow you to change the power level of the microwave and temperature if applicable. Use the and to adjust the power. Touch to confirm the setting
 - Once you are happy with the settings, press the
 sensor to begin cooking. The display will show the duration left on the cooking function and the Duration indicator
  and the Function active indicator • will both be illuminated
Selecting a function and beginning cooking (oven functions)
- Touch a sensor on the control panel to enter the setting of that function. The display will show the default temperature setting if a cooking function is selected. If a defrost function is selected the display will show the default time.
- Pressing the sensor will allow you to set the minute minder. Use the and to adjust the time and touch the sensor to confirm the setting
- Pressing the sensor will allow you to change the temperature of the setting. Use and and to adjust the temperature and touch the sensor to confirm the setting
- Once you are happy with the settings, press the sensor to begin the function. For a cooking function, the display will show the current temperature and the Function active • indicator will be illuminated. For a defrost function, the display will show the current time or the time left on the function, if applicable.
Pausing and altering functions
Simply press the Start/Pause sensor whilst the appliance is in use. This will allow you to suspend operation temporarily. To resume the function, simply press the sensor once more. Whilst the appliance is paused you can adjust the temperature, where available, without affecting the running time of the function.
Note: Opening the appliance door will also temporarily pause the function. Closing the door will resume the function automatically.
Stopping a function
Simply press and hold the on/off sensor for approximately 1 second.
Auxiliary functions
This appliance features a number of preset functions which create the ideal cooking environment (time, temperature, etc.) for certain dishes. Below is a table of these functions and their adjustable settings.
| Icon | Food type | Function | Power | Preset tempera- ture (°C) |
Microwave power (W) |
Preset time (min) |
Adjustable tempera- ture range (°C) |
Adjustable microwave power range |
Minute minder |
| Meat | Fan, Grill & Microwave |
900W | 200 | 900W | 20 | 180 – 220 | 400W – 900W |
NO | |
| Cake | Fan, Rear Element & Microwave |
900W | 160 | 900W | 25 | 150 – 180 | 600W – 900W |
NO | |
| Vegetables | Microwave | 800W | / | 800W | 3 | / | 800W – 900W |
NO |
Auxiliary function settings
It is possible to alter the settings of the auxiliary functions to suit your preferences. To do this simply select the function you require and press . Press again and the function will pause, whilst paused you can alter any applicable settings such as temperature, duration, or microwave power by pressing the appropriate sensor and using the and sensors. When you are ready to resume the function simply press .
Safety key lock
This appliance is equipped with a safety key lock to prevent accidental use. The safety key lock can be activated when the appliance is in standby mode (i.e. just the clock displayed) or whilst a function is running. To activate the safety key lock, simultaneously press and hold both the and sensors until the  indicator illuminates. To deactivate the safety lock simply press and hold both sensors again and the indicator will go out.
Interior lighting
The interior lighting will come on automatically when the oven is in use and will turn itself off automatically after 1 minute but can be turned on and off as you wish. The light will also turn on after opening the oven door. The light can be turned on when the oven is on standby without a function in operation. Simply press the light sensor to operate the light as necessary. If the bulb in your appliance should fail, please contact CDA
Customer Care to arrange a service visit. The bulb and appliance must not be serviced by anyone except a CDA authorized service agent.
Operating time limiter
Each temperature, when used outside of semi and automatic cooking, has an operating time limiter to help to prevent damage to the internal components of this appliance. After a certain working time at given temperatures the appliance with switches the function off automatically. The temperatures and associated maximum operating times are listed in the table below.
| Temperature | Maximum operating hours |
| 20 – 120°C | 24 |
| 121 – 200°C | 6 |
| 201 – 230°C | 4 |
Please note: The cooking time can be set between 0 and 10 hours. The end of cooking time can be set to 10 hours ahead of the current time. If an end of cooking time is set, then this will take priority, for example over the current time, on the time display.
Semi-automatic cooking
This function allows for a cooking time to be set. When the set time elapses the oven will switch the set function off and an acoustic signal will sound to alert the user. The cooking time available ranges from between 1 minute and 10 hours.
To switch on semi-automatic cooking
- First, select a heating function and the temperature required
- Press the sensor twice and the indicator will flash on the
- Use the and sensors to adjust the duration as needed and touch to confirm the setting or alternatively wait 5 seconds and the duration will automatically set
- To clear the duration setting, either cycle down the minutes using the and sensors until the display shows 0:00 or touch the sensor and you will return to standby mode and you can begin the function again
During the cooking process, the indicator will be illuminated.
Once the duration time has elapsed you will hear beeping and the display will flash 0:00. Touch the sensor to mute the beeping and return to standby mode. If no sensor is pressed, the beeping will stop after 60 seconds but the display will continue to flash.
Automatic cooking
This function allows for a delay to be set for cooking and an automatic end time. For example, if you set the cooking duration to 1 hour, and the end time to 15:00, then the oven will activate the function at 14:00.
Note: Automatic cooking is not available on any functions using the microwave
To switch on automatic cooking
- First, select a heating function and the temperature required
- Press the sensor twice and the indicator will flash on the display
- Use the and sensors to adjust the duration as needed.
- Press the sensor again and the indicator will flash on the display and the end time will also be shown
- Use the and sensors to adjust the end time and touch to confirm the setting
- To clear the duration setting, either cycle down the minutes using the and sensors until the display shows 0:00 or touch the sensor and you will return to standby mode and you can begin the function again.
During the cooking process, the indicator will be illuminated.
Once the duration time has elapsed you will hear beeping and the display will flash 0:00. Touch the sensor to mute the beeping and return to standby mode. If no sensor is pressed, the beeping will stop after 60 seconds but the display will continue to flash.
Care and maintenance
It is important, before carrying out any cleaning or maintenance, that you disconnect or switch off the appliance at the power supply. If the oven has been in use, let the cavity and any elements cool down sufficiently before attempting any cleaning or maintenance.
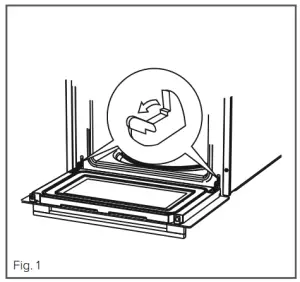
Removing the appliance door
In order to allow for easier access into the oven cavity for cleaning, it is possible to remove the door. Before removing the door, ensure that you have an area prepared in which you can place the removed door. This area should ideally be protected by something like a folded, dirt-free, towel to help prevent damage to surfaces and
the door.
- Open the door fully
- Lift and tilt the safety catch part of the hinge (Fig .1) so that it is fully extended and points towards the door.
- Close the door most of the way, lift it slightly and then pull it, safely but firmly, towards you.
Replacing the appliance door
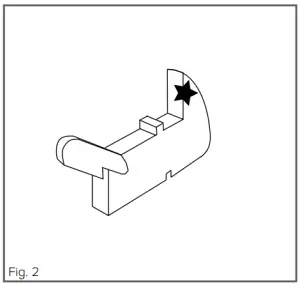
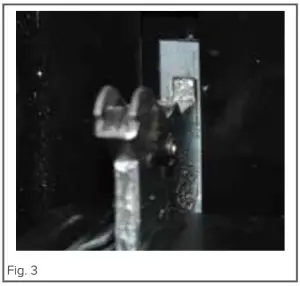
- Hold the door to the appliance in the closed position and maneuver the hinges so that the part of the hinge, highlighted by the star in fig. 2, inserts into the hinge slot in the cavity frame.
- Next, ensure the notch on the underside of the hinge sits on the lip of the hinge slot. Open the door fully. Each hinge should be seated in the same way as the hinge in fig. 3. If it is not, follow the steps for removing the door and try replacing it again.
- Finally, lift the safety catch part of the hinges back into place so that they are lying flat against the hinges.
Please note: If the hinge safety catches are not in the correct place then the door and/or appliance may receive damage when attempting to close the door.
Cleaning
IMPORTANT
- Before any maintenance is started involving electrical parts, the appliance must be disconnected from the power supply.
- If the oven has been in use, let the oven cavity and the heating elements cool down before attempting any
maintenance. - Steam cleaners must not be used when cleaning this appliance.
- Once care and maintenance are complete, ensure that all parts are correctly replaced before using the oven.
- Do not store flammable material in the oven.
- Do not allow grease or food particles to build up around the door.
The oven exterior
As the oven has a stainless steel or enamel surface, you should use a non-abrasive cleaner. Any abrasive cleaner (including Cif) will scratch the surface and could erase the control panel markings.
Inside of oven
It is recommended that the interior of the oven be cleaned after every use using suitable products, especially if any spillage has occurred. The shelves can be removed and washed by hand or in the dishwasher.
Stainless steel
Stainless steel can be effectively cleaned by simply using a dilute solution of water and mild detergent and drying to a shine with a clean cloth. Proprietary stainless steel cleaners are available. We recommend a clean microfibre cloth for cleaning stainless steel surfaces.
Grill
When used regularly, the grill element does not need cleaning as the intense heat will burn off any splashes. The interior ceiling may need regular cleaning, which should be done with warm water, detergent, and a sponge. If the grill is not used regularly, it should be run for 10 minutes every month to burn off any splashes, in order to reduce the risk of fire.
IMPORTANT:
When correctly installed, your product meets all safety requirements laid out for this type of product. However, special care should be taken around the rear or the underneath of the appliance as these areas are not designed or intended to be touched and may contain sharp or rough edges that could cause injury.
Installation
The appliance can be installed under a worktop or in a wall unit (open or closed) with the appropriate dimensions for recessed installation.
Center the oven in the unit, ensuring that there is as much of a gap as possible, for ventilation purposes, between the appliance and the surrounding unit. The material of the unit supporting the appliance must be heat resistant (or covered with a heat resistant material). For greater stability, attach the oven to the unit with four screws through the holes provided on the side panels.
If the appliance is to be installed under a worktop, ensure the top rail has been removed to provide free airflow around the product.
Do not use your appliance immediately after moving it from a cold location, as condensation may cause a malfunction. Wait approximately 1-2 hours before use.
Installation diagrams are on page 21.
Mains electrical connection
Warning! This appliance must be earthed
This appliance is supplied with a 3 core mains cable; the wires are in accordance with the following code:

Green and Yellow = Earth
Blue = Neutral
Brown = Live
Input L •L2 Ul Output L.
Input N• N4 U3 – Output N
We recommend that the appliance be connected by a qualified electrician, who is a member of the N.I.C.E.I.C. and who will comply with the I.E.T. and local regulations.
This appliance is intended to be connected to fixed wiring and is not suitable for connection to a 13A plug.
This appliance is intended to be connected to fixed wiring by a double pole switch, having a contact separation of at least 3mm in all poles. The switch must be positioned no further than 2m from the appliance.
Please note:
• The mains cable must only be replaced by a qualified electrician or service engineer and must be of equivalent or better rating (i.e. 1.5mm
HO5RR-F).
The current rating of the fuse or circuit breaker protecting this appliance should be marked on the outlet (13A).
Assembly and electrical connection should be carried out by specialized personnel.
When installing this product we recommend you seek the help of another individual.
The main isolation switch must be accessible after installation.
Mains electrical voltage: 240Vac, 50Hz
Total rated electrical consumption: 3.1 kW
Microwave output: 900W, 2450MHz