Canon TS3500 Series Color Inkjet All-in-One Printer User Guide
Read Safety and Important Information (addendum) first.


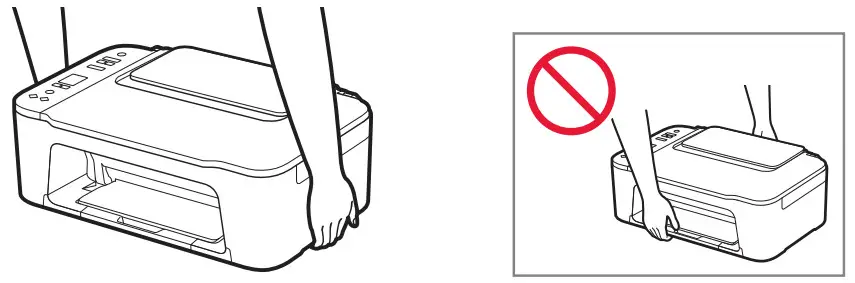
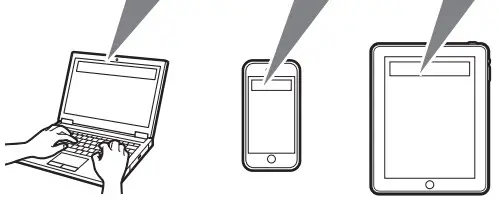
Holding the Printer
Setting Up the Printer
![]() For Setup, visit the URL
For Setup, visit the URL
https://ij.start.canon
or scan the code with your mobile device

Box Contents
- FINE cartridges
- Power Cord
- Safety and Important Information
- Getting Started (this manual)
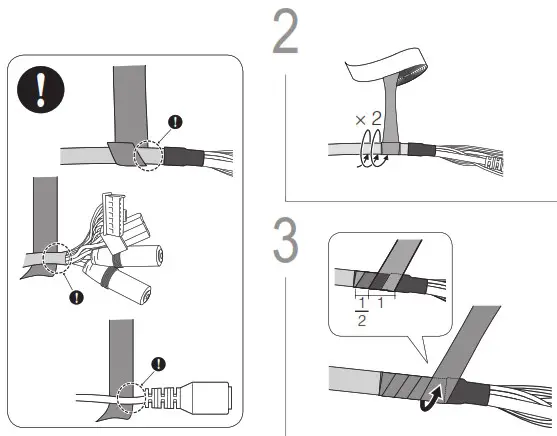
Removing Packing Materials

https://rs.ciggws.net/rd2.cgi?FNC=GSQB_MOV&DEV=TS3500%20series&CTN=MOV%2Fprotective_material.html
- Remove the orange tape on the right and open the cover.

- Remove the orange tape on the left.
- Close the cover.
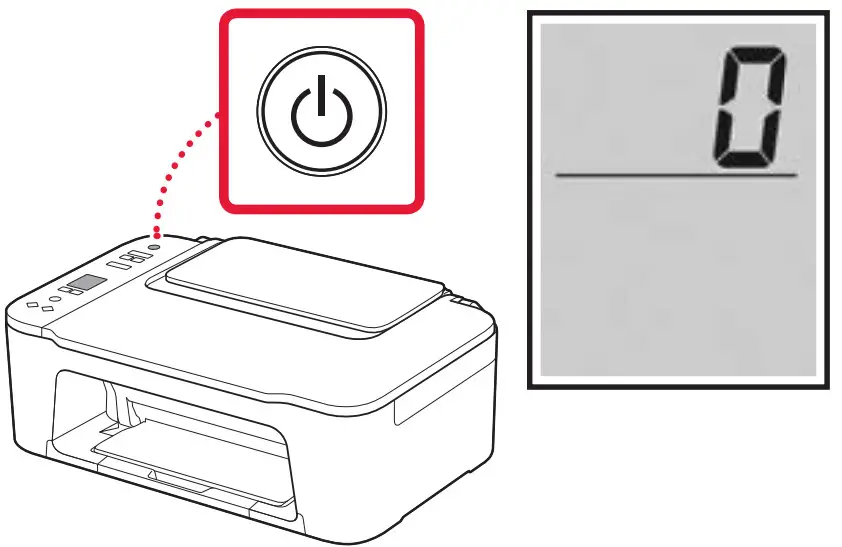
Turning on the Printer
https://rs.ciggws.net/rd2.cgi?FNC=GSQB_MOV&DEV=TS3500%20series&CTN=MOV%2Fpower.html
- Connect the power cord.
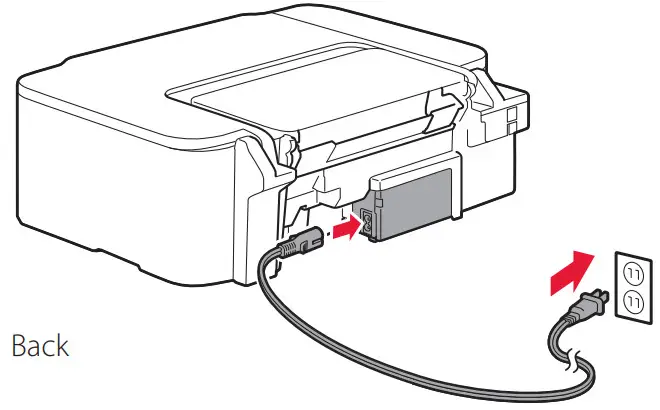
- Press the ON button.
 Important
If another screen appears, see “If any of the following screens appear” on page 3 and follow the instructions.
Setting Up the Printer
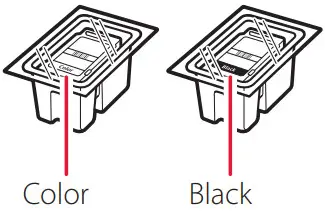
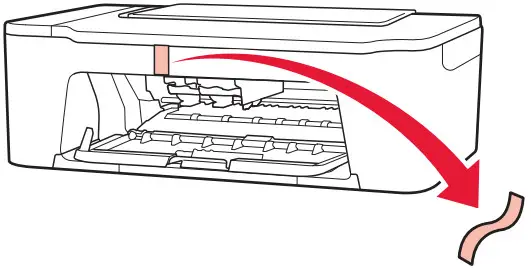
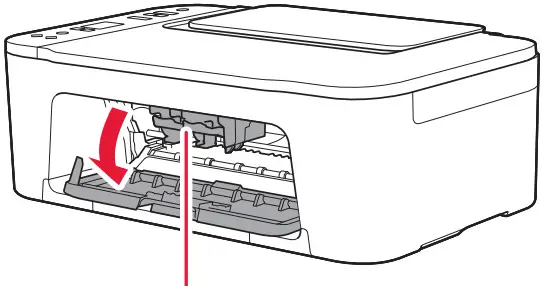
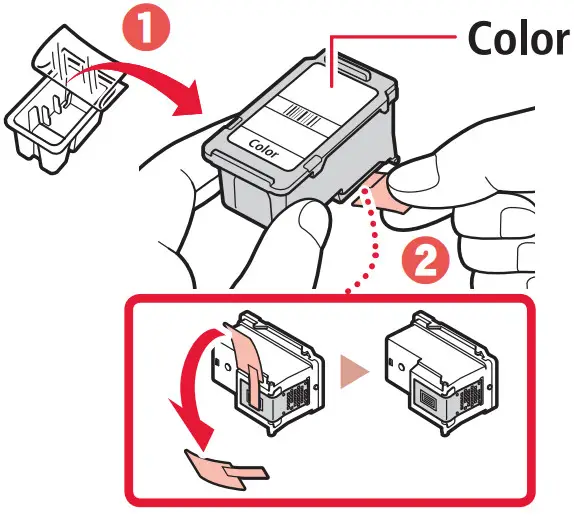
Installing the FINE Cartridges
https://rs.ciggws.net/rd2.cgi?FNC=GSQB_MOV&DEV=TS3500%20series&CTN=MOV%2Ffine_cartridge.html
- Open the cover.
 Caution
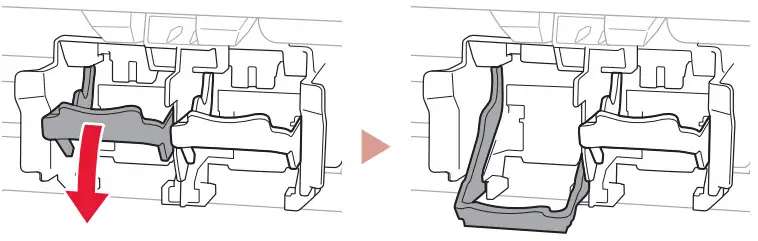
Do not touch the FINE cartridge holder until it stops moving. - Lower the ink cartridge lock lever on the left-hand side.
- Remove the Color FINE cartridge from the package and remove the protective tape.
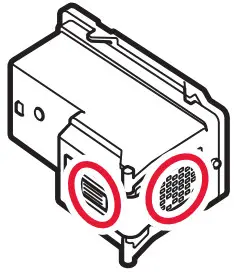
 Important
• Do not touch the ink on the protective tape. It could stain your hands or surrounding objects.
• Do not touch the areas shown in the figure.
Otherwise, the printer may not print correctly.
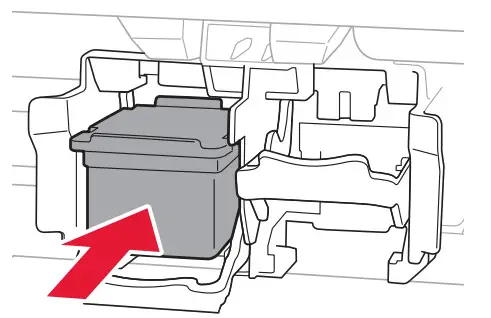
- Insert the Color FINE cartridge in the FINE cartridge holder.
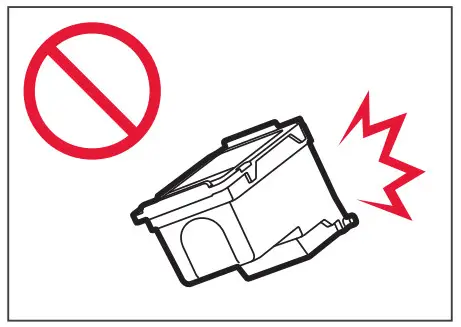
 Important
Do not bump the FINE cartridge. Doing so may cause a malfunction.
- Raise the ink cartridge lock lever.

- Repeat steps 2 to 5 and install the Black FINE cartridge on the right-hand side.
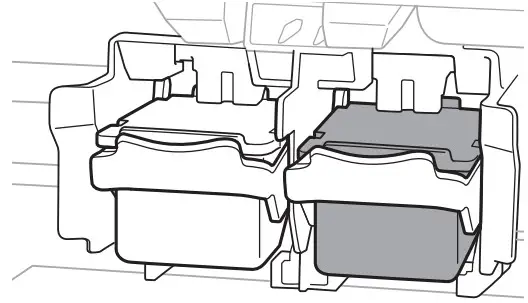
- Close the cover.
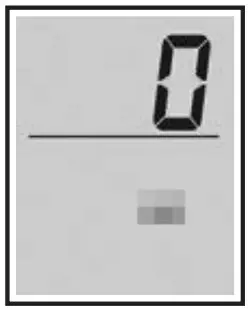
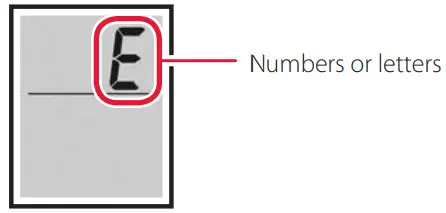
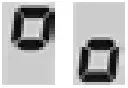
- Check that the following screen appears.
 Important
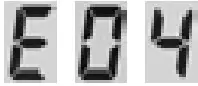
If E > 0 > 4 appears on the screen, see “If any of the following screens appear” on page 3 and follow the instructions.
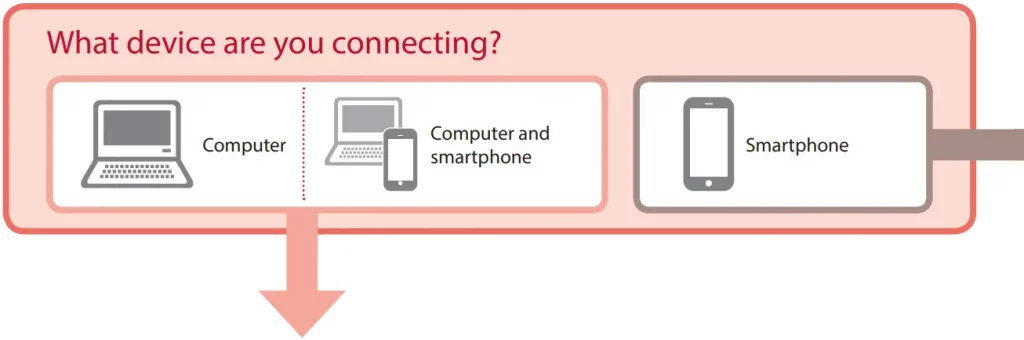
Select the connection method that best matches how you will use the printer.
- To use the printer without connecting to any other devices
→ The setup is now complete. - To use the printer connecting to a computer or smartphone
→ Proceed to the next page.
![]() If any of the following screens appear
If any of the following screens appear
Check the screen, and then follow the corresponding instructions below.
Install the FINE cartridges.
→ “4. Installing the FINE Cartridges” on page 2

Protective material remaining.
→ “2. Removing Packing Materials” on page 1
FINE cartridges are not installed correctly.
→ “4. Installing the FINE Cartridges” on page 2
For all other cases, refer to the Online Manual.
Connecting to a Computer
If you are using multiple computers, perform these steps on each computer.

- Access the Canon website from your computer.
 https://ij.start.canon
 - Select
 Set Up.
 - Enter your printer’s model name and click Go.
- Click Start.
- Click (B) Connecting to a Computer/Smartphone.
• The following steps are for Windows users. - Click Download.
- Run the downloaded file.
• Follow the on-screen instructions.
• These operations may take some time.
• To connect to a smartphone as well, see “5-b. Connecting to a Smartphone” on page 5.
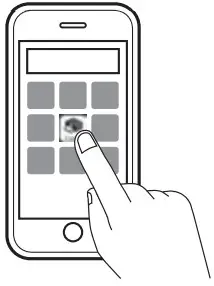
Connecting to a Smartphone
If you are using multiple smartphones, perform these steps on each smartphone.

- Install the “Canon PRINT Inkjet/SELPHY” app on your smartphone.

• Search for “Canon PRINT” in App Store or Google Play.
• Access the Canon website to download the app.

https://rs.ciggws.net/rd2.cgi?FNC=GS2_APP - Open your smartphone’s Wi-Fi settings. Check that the network name (SSID) that starts with “Canon_ij_” appears.
(Example of iOS screen)
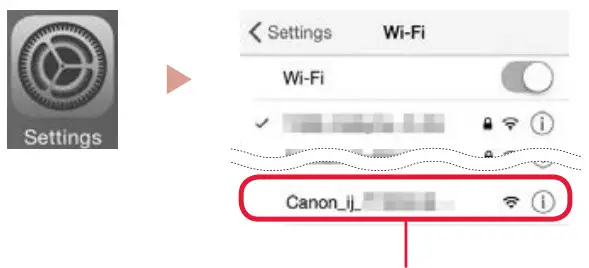
The network name (SSID) that starts with “Canon_ij_”
• If “Canon_ij_” appears→ Proceed to step 3.
• If “Canon_ij_” does not appea→r Proceed to step 4. - Tap the network name (SSID) that starts with “Canon_ij_”.
- Open the installed app, and follow the on-screen instructions in the app to add your printer.
Once you have added your printer, you can print from your smartphone.
To print photos, see “Loading Paper” on page 6.
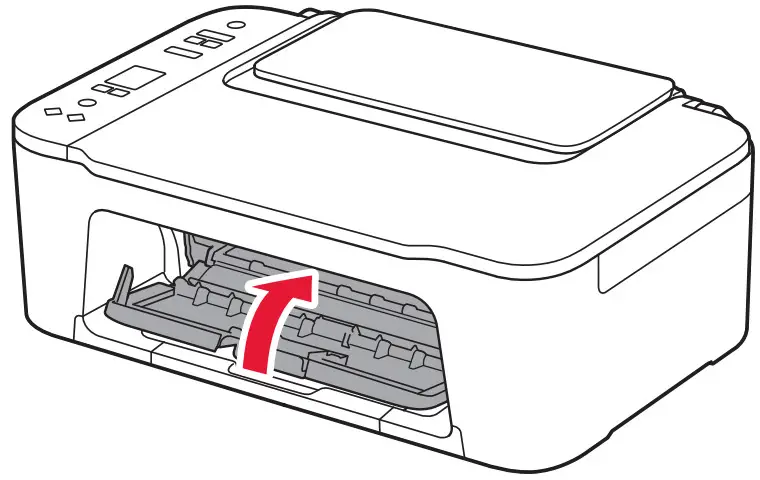
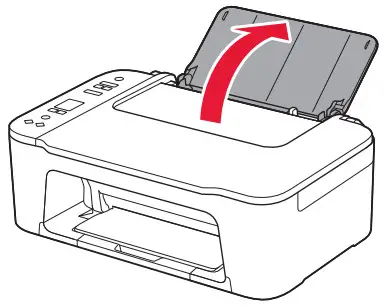
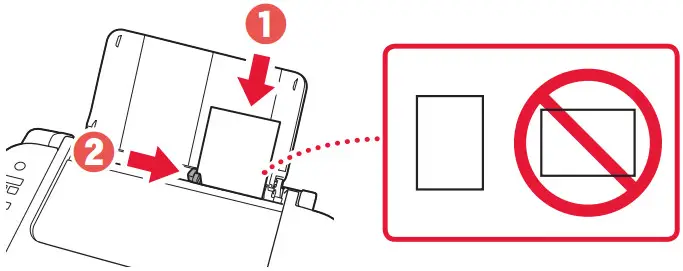
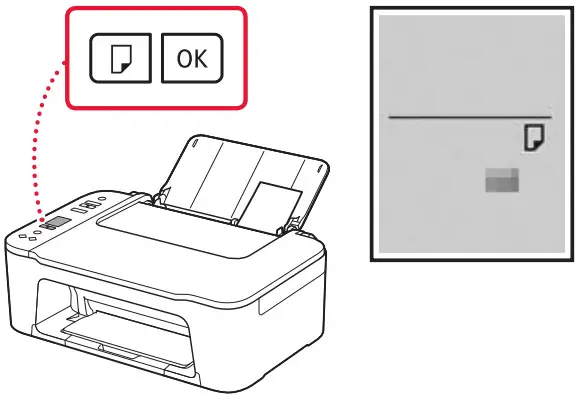
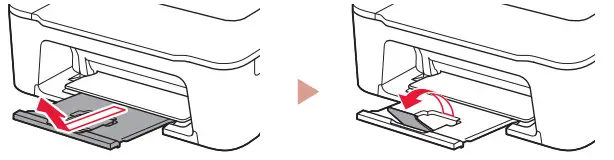
Loading Paper
- Open the paper support.
- Slide the paper guide to the left.

- Load several sheets of paper against the right edge with the print side facing up and align the paper guide to the width of the paper.
- Press the Paper Select button, select a paper size, and then press the OK button.
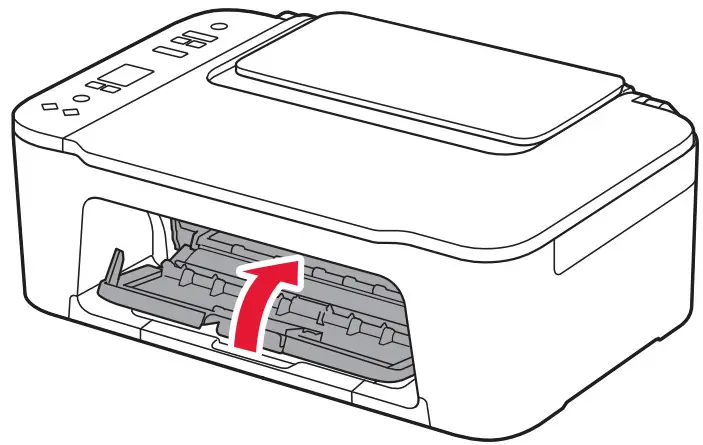
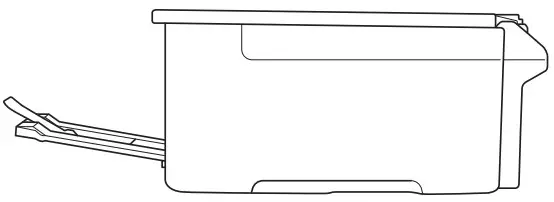
- Extend the paper output tray, and open the output tray extension.
• Look at it from the side to confirm it looks like the diagram.
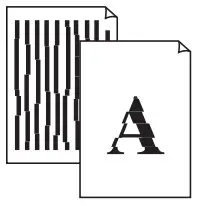
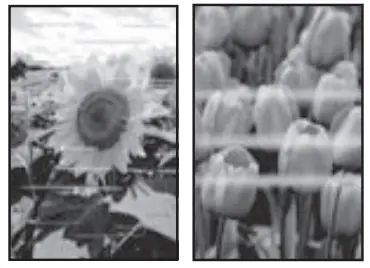
If Print Results Are Unsatisfactory
Perform Print Head Alignment if straight lines are crooked or colors are inconsistent, or print results are otherwise not what you expected.
For details, click Maintenance on the Online Manual and refer to If Printing Is Faint or Uneven > Aligning the Print Head.
Refer to the back cover for how to access the Online Manual.
■ Lines Are Misaligned
■ Uneven or Streaked Colors
How-To Video Library
Videoteca sobre procedimientos
www.usa.canon.com/howto/printer
Trademarks
- Windows is a trademark or registered trademark of Microsoft Corporation in the U.S. and/or other countries.
- App Store is a trademark of Apple Inc., registered in the U.S. and other countries.
- Google Play is a registered trademark of Google LLC.
 Access Online Manual
From your browser


QT6-3631-V01 XXXXXXXX © CANON INC. 2021 PRINTED IN XXXXXXX
FAQS
Does this come with an ink cartridges
Yes it comes with starter cartridges
What ink cartridge works in this printer, does it come with cartridges?
It comes with black 275 and color 276 cartridges. The info is incorrect on Amazon’s page. It will not use 245 and 246 cartridges.
Is it required to have both color cartridge and b/w cartridges installed to work? or can i omit the color cartridge completely?
Yes, both cartridges have to be in the printer to work. It comes with both cartridges.
Does this use 245 ink cartridge?
No. It takes 275 and 276
Does this printer use generic ink? Will it work? Is it easy to get?
You can buy two ink cartridges (Black and color) from Amazon or Canon for about $13 each.
Does it work as stand alone copier?
yes
do i need admin log in code to hookup ?
No administrative log in is required. Your PC or computer (once connected) will accept the Cannon printer and prompt you on how it will work on your device.
How do I remove the FINE cartridge from the printer?
Press the lever on the left-hand side of the cartridge and pull it out.
How do I install the FINE cartridge?
Insert the cartridge into the holder with its label facing up.
What should I do if I spill ink or other foreign material on my printer, FINE cartridges, or other parts?
Turn off your printer and unplug it from its power source. Then, wipe away any ink or foreign material using a soft cloth dampened with water or a mild cleaning solution. Next, wipe away any remaining ink or foreign material using a dry cloth. If you cannot remove all of it, turn your printer off and unplug it from its power source for at least one hour before turning it back on again. Do not touch any electrical parts such as connectors during this time. When you are sure that all of the ink or foreign material has been removed, turn your printer back on and plug it in to an AC outlet again. Then, follow these steps to continue setting up your printer: 1) Connect your printer to an AC outlet; 2) Load paper in your printer; 3) Load your FINE cartridges; 4) Press the ON button; 5) Print a test page to make sure that everything is working correctly; 6) If you are using Windows, install Canon software; 7) If you are using Mac OS X v10.6/10.7/10.8/10.9/10.10/10.11, install Canon software; 8) If you are using Mac OS X v10.5 or earlier, skip this step; 9) If you are using Windows, set up wireless printing; 10) Print a test page to make sure that everything is working correctly; 11) Scan and save setup information (optional); 12) Scan and save setup information (optional); 13) Scan and save setup information (optional).If any problems occur during setup, see “Troubleshooting” on page 4 for help solving them..
Is it compatible with hp laptop ?
If you laptop has wifi it will work with the printer or you can hard wire laptop to printer if you don’t want to use wireless printing
Does it print photos
Yes
Will this printer work with windows 10 or 11?
Yes, it works fine with Windows 10. As for Windows 11, I don’t know.
Will it scan when its out of ink?
Yes
Is this a inkjet printer ?
Yes, this is an inkjet printer. We recently purchased it and are very pleased with how it prints, although it should be emphasized that while the printer sells for a very reasonable price, the replacement inks are particularly expensive.
is there a quiet mode?
It should be on home screen settings. quiet mode.
Will this printer work on Windows 11?
Yes
Is this printer compatible with an apple product?
YES
is there a quiet mode?
It should be on home screen settings. quiet mode.
Is this printer compatible with an apple product
YES.
![]()
Canon Wireless Inkjet All-in-one Printer User Manual
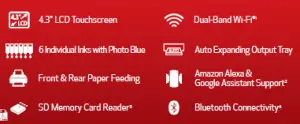
KEY FEATURES:
Pl>(MA TS8320 WIRELESS INKJET ALL-IN-ONE PRINTER
TECHNICAL INFORMATION
Software PIXMA TS8320 Wireless Inkjet All-In-One Printer Driver, Scan Utility (Win/Mac) /
(Windows®23 / Mac®24) Scan Utility Lite (Mac Only), Easy-PhotoPrint Editor Software9
OS Compatibility Windows:23 Windows® 10, Windows 8.1, Windows 7 SP1 Mac:24 Mac OS® X v10.11.6 – macOS v10.14 (Mojave) Mobile Operating Systems:25 iOS,® Android,™ Windows 10 Mobile, and Fire OS (Amazon Fire) devices26.
Mobile Apps Canon PRINT app,7 Easy-PhotoPrint Editor app,9 Message In Print app,11
(iOS®/ Android™) Nail Sticker Creator app12
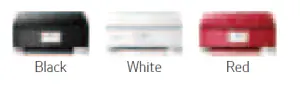
AVAILABLE COLORS
PRODUCT INFORMATION
Model No. PIXMA TS8320 Black Wireless Inkjet All-In-One Printer 3775C002
PIXMA TS8320 White Wireless Inkjet All-In-One Printer 3775C022
PIXMA TS8320 Red Wireless Inkjet All-In-One Printer 3775C042
SPECIFICATIONS ARE SUBJECT TO CHANGE WITHOUT NOTICE. ALL VIEWSCREEN AND PRINTER OUTPUT IMAGES ARE SIMULATED.
- Wireless printing and scanning requires a working network with wireless 802.11b/g/n/ac or ad capability, operating at 2.4GHz or 5Ghz. Wireless performance may vary based on terrain and distance between the printer and wireless network clients.
- Requires an active smart assistant account linked and accompanying app enabled, the smart device and printer to be actively connected with permission to the Canon Inkjet Cloud Printing Center, and the required action(s), skill(s), or applet(s) available/enabled to the compatible printer. Voice commands can not be displayed as text on Amazon smart devices with screens.
- Compatible memory cards include SD Card, SDHC Card. The following can be used with the addition of a special adapter sold separately: miniSD Card, miniSDHC Card, microSD Card, microSDHC Card, microSDXC Card. Supported File Formats include: JPEG and TIFF (Exif-compliant) taken by DCF(Ver.1.0/2.0) compliant digital cameras. (Exif ver2.2/2.21/2.3 compliant).
- Compatible with iPad, iPhone or iPod touch devices running iOS 9.0 or later, or Android mobile devices running Android 5.1 or later, with Bluetooth hardware enabled. For full print functionality Canon PRINT Inkjet/ SELPHY app must be open and paired to use Bluetooth functions, available for free on the App Store and at Google Play. Bluetooth communication and functionality cannot be guaranteed on all Android devices.
- AirPrint functionality requires a compatible iPad, iPhone, or iPod Touch device running iOS 7.0 or later, and an AirPrintenabled printer connected to the same network as your iOS device. A printer connected to the USB port of your Mac, PC, AirPort Base station, or Time Capsule is not supported.
- Requires Android™ mobile device with Android 5.0 operating system or later with the Mopria Print Service pre-loaded with that device and the compatible PIXMA printer on the same wireless network. Printing with Mopria is also available on mobile devices with Android 5.0 operating system or later with a download of the Mopria Print Service from Google Play.
- Requires an Internet connection and the Canon PRINT Inkjet/SELPHY app, available for free on the App Store and at Google Play. Compatible with iPad, iPhone 3GS or later, and iPod touch 3rd generation or later devices running iOS 7.0 or later, and Android mobile devices running Android 2.3.3 or later. Your device must be connected to the same working network with wireless 802.11 b/g/n/ac/ad capability as your printer. Requires a compatible social media account and is subject to that social media account’s Terms of Service. Certain exceptions may apply.
- Paper types NOT supported for borderless printing are as follows: Envelope, High Resolution Paper, T-Shirt Transfer and Photo Stickers. The maximum borderless printing size is 8.5″x11.”
- The Easy-PhotoPrint Editor software requires an Internet connection and is compatible with the following operating systems; Microsoft Windows 10 (64-bit/32-bit), Microsoft Windows 8.1 (64-bit/32-bit), Microsoft Windows 7 SP1 (64-bit/32-bit), macOS High Sierra v10.13, macOS Sierra v10.12, Mac OS X El Capitan v10.11 and Mac OS X El Capitan v10.10.5. Minimum Windows and macOS/Mac OS X requirements are: 2GB of RAM and a monitor with 1024×768 resolution. The Easy-PhotoPrint Editor mobile application requires an Internet connection and the Easy- PhotoPrint Editor app v1.1.0, available for free on the App Store and at Google Play. Compatible with iPad Air2 (2nd Generation), iPad Mini 4 and iPhone 6s or later devices running iOS 10 or later, and Android mobile devices running Android 5.x or later. Certain exceptions may apply. The following file formats are supported: JPEG, PNG, HEIF (devices running iOS 11 and mac OS v10.13 or later), DLP save data, Poster Artist export data, EasyPhoto+ export data, Easy-PhotoPrint Editor export data.
- Requires an Internet connection and the Message In Print app (Version 1.1), available for free on the App Store and at Google Play. Compatible with iPad and iPhone 6 or later devices running iOS 10 or later, and Android mobile devices running Android 5.1 or later. Your device must be connected to the same working network with wireless 802.11 b/g/n/ ac/ad capability as your printer. Requires original content to be created using the Message In Print app/service, then printed on a compatible Canon Printer
- released in August 2009 or later and delivered to recipient, who views image and content through the compatible Message In Print app on their compatible device. Compatible paper sizes include 3.5″x x 3.5,” 4″ x 4″ Square, 4″ x 6″ and 5″ x 5″ Square only, and compatible media types include Genuine Canon Photo Paper Glossy, Photo Paper Semi-Gloss, Photo Paper Luster and Photo Paper Matte only. Certain exceptions may apply.
- Requires an Internet connection and the Canon Nail Sticker Creator app, available for free on the App Store and at Google Play. Compatible with iPad and iPhone devices running iOS 10 or later, and Android mobile devices running Android 5.1 or later. Compatible with the select Canon PIXMA Printers. Requires content to be created using the Canon
Nail Sticker Creator app, printed using Genuine Canon Nail Stickers on compatible Canon PIXMA printer models. Certain exceptions may apply. - This feature requires the printer to be connected with permission to the Canon Inkjet Cloud Printing Center (CICPC), an Internet connection, active 3rd party (social network or Cloud Storage) account, and a compatible Canon inkjet printer. Certain exceptions may apply.
- DPS over IP compatible device required.
- Document print speeds are the averages of ESAT in Office Category Test for the default simplex mode, ISO/IEC 24734. Photo print speed is based on the default setting using ISO/JIS-SCID N2 on Photo Paper Plus Glossy II and does not take into account data processing time on host computer. Print speed may vary depending on system configuration, interface, software, document complexity, print mode, page coverage, type of paper used etc. Copy speeds are the average of
sFCOT and sESAT, ISO/IEC 29183. Copy speed may vary depending on document complexity, copy mode, page coverage, type of paper used etc. and does not take into account warming up time. See www.usa.canon.com/ipm for additional details. - Resolution may vary based on printer driver setting. Color ink droplets can be placed with a horizontal pitch of 1/4800 inch at minimum.
- Auto Scan Mode is only available when scanning using a computer using the “IJ Scan Utility” or “IJ Scan Utility Lite” software.
- Optical resolution is a measure of maximum hardware sampling resolution, based on ISO 14473 standard.
- Canon Print Service is a print plug-in for Android smart devices, which enables printing from Android v4.4 – v5.0 devices to many Canon printers via a Wi-Fi network. The plug-in does not work as a standalone app. Available for free at Google Play.
- Based on accelerated testing by Canon in dark storage under controlled temperature, humidity and gas conditions, simulating storage in an album with plastic sleeves. Canon cannot guarantee the longevity of prints; results may vary depending on printed image, drying time, display/storage conditions, and environmental factors.
See www.usa.canon.com/chromalife100 for additional details. - Requires a smart device with the Canon PRINT Inkjet/SELPHY app installed and connected to the desired active wireless network to complete cableless setup.
- Requires an active IFTTT account, the printer to be actively connected with permission to the Canon Inkjet Cloud Printing Center, and an IFTTT ‘applet’ installed/enabled and required active account/service linked to the printer.
- Operation can only be guaranteed on a PC with pre-installed Windows 10, Windows 8.1, Windows 7 SP1.
- Internet Connection required during software installation. For full compatibility macOS v10.12.1 or later is recommended.
- Some functions may not be available with these Operating Systems. Please refer to the manual or website for details.
- Requires “Canon Print Plug-in” available for free from the Amazon Appstore and an Amazon Fire Phone, Amazon Kindle Fire HD6 or HDX7 device or later running Fire OS 4.0 or later.
- Warranty programs are subject to certain conditions and restrictions. See www.usa.canon.com/support for details.
©2020 Canon U.S.A., Inc. Canon and PIXMA are registered trademarks of Canon Inc. in the U.S. and may be registered trademarks or trademarks in other countries. Microsoft, Windows, the Windows logo and Internet Explorer are trademarks or registered trademarks of the Microsoft group of companies in the U.S. and other countries. Apple, iPad, iPhone, iPod touch and Time Capsule are registered trademarks of Apple Inc. Android, Google Assistant, and Google Play are trademarks of Google Inc. The Mopria logo is a trademark of Mopria Alliance, Inc. Amazon, Alexa,
Fire, and all related logos are trademarks of Amazon.com, Inc. or its affiliates. The USB-IF logo is a trademark of Universal Serial Bus Implementers Forum, Inc. Wi-Fi is a registered trademark of the Wi-Fi Alliance. The ‘Wi-Fi CERTIFIED’ logo is a certification mark of the Wi-Fi Alliance.
The Wi-Fi Protected Setup Mark is a mark of the Wi-Fi Alliance. All other product and brand names are trademarks of their respective owners. As an ENERGY STAR® partner, Canon U.S.A., Inc. has certified this product as meeting the ENERGY STAR® energy efficiency criteria through an EPA-recognized certification body.
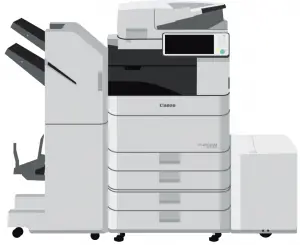
 Canon Image Runner Advance Devices Cleaning Instructions
Use
Lint-free or microfiber cloth
Isopropyl alcohol (at least 70% concentrate)
Glass cleaner on platen
Disposable gloves
Do
 Any cleaning product sprayed directly onto machine.
Commercial wet wipes, as they contain ingredients other than alcohol.
Cleaners that contain volatile solvents, such as paint thinners or benzene.
Other Instruction
Clean all areas of the imageRUNNER ADVANCE device that are touched by users, such as control panels, covers, and jam locations, while using these precautions:
Make sure the device is powered down and unplugged before cleaning
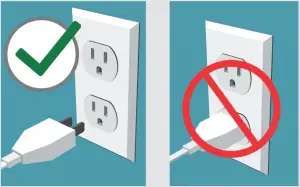
Wait until surfaces are dry before plugging in and powering on the device.
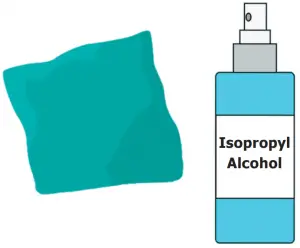
Apply isopropyl alcohol (at least 70% concentrate) onto a lint-free or microfiber cloth, then wipe ALL surfaces of the device that are touched by users. |
Use only glass cleaner on the scan glass of the device and wipe with a lint-free or microfiber cloth.


Properly dispose of cloth/rag and protective gloves after one use. |
- This cleaning method does not guarantee effectiveness against any particular virus.
- Isopropyl alcohol is flammable and should never be used near open fire or flame.
Did you know there are ways to limit the number of touchpoints to operate the imageRUNNER ADVANCE device?
With Remote Operators Kit, the imageRUNNER ADVANCE user interface and hard keys are replicated on a computer screen, so a user can operate all device functions—copy, print, fax, scan, send—from a network connected computer.
 Use a compatible mobile device to connect to the imageRUNNER ADVANCE device through enhanced features of the free Canon PRINT Business app. This allows users to perform many functions of their MFP from the familiar interface of their smartphone or tablet.
This recommended cleaning procedure cannot guarantee the elimination of microbes, including but not limited to the novel coronavirus, from Canon imageRUNNER ADVANCE products. Be cautious in the storage and use of the alcohol, including following all product instructions and warnings. Canon and imageRUNNER are registered trademarks or trademarks of Canon Inc. in the United States and may also be registered trademarks or trademarks in other countries. Specifications and availability subject to change without notice. Not responsible for typographical errors.
©2020 Canon U.S.A., Inc. All rights reserved

Canon MAXIFY Wireless Home Office All-In-One Printer User Guide

FAST
SHARP
COST-EFFECTIVE
FROM ANYWHERE
A home office shouldn’t limit productivity. Engineered for maximum efficiency, the Canon MAXIFY MB2720 Home Office All-In-One boasts a quick first print out time and fast multi-page copying. The MAXIFY MB2720 enhances productivity with dual paper cassettes, so you are ready to take on the big jobs
Every MAXIFY printer is built on the foundation of five core features. These elements are the top desired printing features for business customers.


With Quick First Print, you’re ready to print in as little as 6 seconds from power on.

Count on Canon for the quality your business deserves.

With MAXIFY printers, you can print from your favorite device; whether that is a smartphone, tablet, computer, or even the cloud.

To help serve your business better, all MAXIFY printers feature 100% US based Service & Support with a dedicated MAXIFY email address and phone number.
 Built to handle big jobs, the MAXIFY MB2720 features a 500 Sheet Paper Capacity with two 250 sheet paper trays.
 With MAXIFY Printers, you can print from your favorite device; whether that is a smartphone, tablet, computer, or even the cloud.
 Print laser-sharp text that is highlighter and smudge resistant with Dual Resistant High Density (DRHD) Inks.
 With Quick First Print, you’re ready to print in as little as 6 seconds from power on.

- 3.0” Touch LCD
- Scan to Email
- Sharp Black Text
- Ethernet
- AirPrint™
- Fax
- Legal-Size Scanning
- 20,000 Page Duty Cycle4
- Auto 2-Sided Print
| Print Features | AirPrint (3) Auto 2-Sided Printing, Advanced Auto Sheet Feeder, Canon PRINT app (2) Document Printing, Microsoft Mobile Print, Mopria®6 , Print from USB, Quick Toolbox, Wireless Printing(7) |
| Print Speed | FPOT (Black): 6 Seconds ESAT (Black): 24.0 ipm FPOT (Color): 7 Seconds ESAT (Color): 15.5 ipm |
| Number of Nozzles | Pigment Black: 1,280 / Color: 3,072 / Total: 4,352 |
| Print Resolution | Up to 600 x 1200 dpi |
| Recommended Monthly Print Volume | 250 – 1,250 Pages per Month – Ideal for 1-4 users |
| Paper Sizes | 4” x 6”, 5” x 7”, 8” x 10”, Letter, Legal, U.S. #10 Envelopes |
| Paper Tray Capacity | Upper Cassette: 250 Sheets Plain Paper (Letter or Legal) or 20 Sheets Photo Paper 4”x 6” Lower Cassette: 250 Sheets Plain Paper (Letter or Legal) |
| Copy Features | 2-on-1 Copy, 4-on-1 Copy, ID Card Copy, AE (Auto Exposure / Intensity) Copy, Collated Copy (ADF only), Fit-to-Page, Frame Erase Copy (Flatbed), Preset Copy Ratios, Preview, Standard Copy, Zoom |
| Copy Speed | FCOT (Color): Approx. 12 Seconds |
| Reduction/ Enlargement | 25% – 400% |
| Scan Features | Push Scan, Scan to Memory (USB Flash Memory), Network Scan, Scan Solution, Scan to Cloud, Scan to Concur9 , Scan to Email, Scan to Network Folder |
| Scanning Element | Contact Image Sensor (CIS) |
| Scanning Resolution1 | ADF & Flatbed: 1200 x 1200 dpi (Optical), 19,200 x 19,200 dpi (Interpolated) |
| Maximum Color Depth | h 48-bit Internal/24-bit External |
| Maximum | Flatbed: 8.5” x 11” (Letter) ADF: 8.5” x 14” (Legal) |
| ADF Sheet Capacity | Letter Size: 50 Sheets Legal Size: 10 Sheets |
| FAX Features | Answering Machine Connectivity, Caller Rejection, Check RX Fax Info, Dial Search, Double-Sided printing (Fax Images), FAX to Network Folder, Extra Fine Mode, Fax Reception Reject, Fax Number Re-Entry, Memory Transmission, Redial, Remote Reception |
| Modem Speed (Up to)11 | 33.6 Kbps (Super G3 Color FAX |
| Transmission Speed1 | 2 Black: Approx. 3 sec. per page Color: Approx. 1 min. per page |
| Memory Capacity13 | Approx. 250 Pages |
| Group Dialing | 100 Locations |
| General Features | Custom Profi les, 3.0” Touch LCD, Folder Setting Utility, Access Point Mode, High Page Yield, Job Reservation, Low Cost Per Page Printing, Quick First Print, MAXIFY Cloud Link14, Quiet Mode, Standard MIB Support, SNMP Support, Records of Use, Job Reservation, Remote UI, Setting Restrictions |
| Connectivity | Wireless LAN (IEEE 802.11b/g/n)7 ; Ethernet; USB Flash Memory; Hi-Speed USB |
| Size/Weight15 | Dimensions: 18.3” (L) x 18.1” (W) x 12.6” (H) Weight: 26.5 lbs. |
| Computer Operating Systems | Windows:, 16,17 Windows® 10, Windows 8, Windows 8.1, Windows 7, Windows 7 SP1, Windows Vista® SP1, Vista SP2, Windows Server® 2012, 2012 R217, Windows Server® 2008, 2008 R217 Mac:18 Mac OS® X v10.8.5 – 10.11 |
| Mobile Operating Systems | iOS®, Android, Windows RT20 and Windows 10 Mobile |
| Software (Windows16,17/Mac18) | MAXIFY MB2720 Printer Driver; Master Setup; Poster Artist Lite21 (Windows Only); Scan Utility; My Printer (Windows Only); Network Tool; Speed Dial Utility |
| Warranty22 | 1-Year limited warranty with Instant Exchange program. 1-Year toll-free 100% US-based technical phone support. Dedicated MAXIFY service email: [email protected] Dedicated MAXIFY phone support at 1-844-4-MAXIFY Monday – Friday: 8am – 10pm Saturday: 10am – 7pm |
| Model No. | MAXIFY MB2720 Wireless Home Office All-In-One Printer | 0958C002[AA] |
| Compatible Inks | PGI-1200 XL Pigment Black Ink Tank | 9183B001[AA] |
| PGI-1200 XL Pigment Cyan Ink Tank | 9196B001[AA] | |
| PGI-1200 XL Pigment Magenta Ink Tank | 9197B001[AA] | |
| PGI-1200 XL Pigment Yellow Ink Tank | 9198B001[AA] | |
| PGI-1200 Pigment Black Ink Tank | 9219B001[AA] | |
| PGI-1200 Pigment Cyan Ink Tank | 9232B001[AA] | |
| PGI-1200 Pigment Magenta Ink Tank | 9233B001[AA] | |
| PGI-1200 Pigment Yellow Ink Tank | 9234B001[AA] | |
| Value Ink Pack | PGI-1200 CMY Value Pack | 9232B005[AA] |
For the name of the nearest dealer, call: 1-800-OK-CANON
SPECIFICATIONS ARE SUBJECT TO CHANGE WITHOUT NOTICE.
ALL VIEWSCREEN AND PRINTER OUTPUT IMAGES ARE SIMULATED.
- Document print speeds are the averages of ESAT in Office Category Test for the default simplex mode, ISO/IEC 24734. Document print speeds are the averages of FPOT in Office Category Test for the default simplex mode, ISO/IEC17629:2014. Print speed may vary. During successive printing, the printer may slow down the operation to prevent the internal temperature from rising. depending on system configuration, interface, software, document complexity, print mode, page coverage, type of paper used etc. Copy speeds are the average of sFCOT and sESAT, ISO/IEC 29183.Copy speed may vary depending on document complexity, copy mode, page coverage, type of paper used etc. and does not take into account warming up time. When scanning or copying a certain volume of documents (approx. 150 sheets in default settings) continuously from the ADF, the printer may switch to “waiting mode“ in which paper feeding stops for several tens of seconds after each scan to prohibit overheating the ADF. See www.usa.canon.com/ipm for additional details.
- Requires an Internet connection and the Canon PRINT Inkjet/SELPHY app, available for free on the App Store and at Google Play. Compatible with iPad, iPhone 3GS or later, and iPod touch 3rd generation or later devices running iOS 7.0 or later, and Android mobile devices running Android 2.3.3 or later. Your device must be connected to the same working network with wireless 802.11 b/g/n capability as your printer. For users of compatible Apple mobile devices, document printing requires Apple AirPrint, which requires an AirPrint-enabled printer connected to the same network as your iOS device. A printer connected to the USB port of your Mac, PC, AirPort Base station, or Time Capsule is not supported.
- AirPrint functionality requires an iPad, iPhone 3GS or later, or iPod touch 3rd generation or later device running iOS 4.2 or later, and an AirPrint-enabled printer connected to the same network as your iOS device. A printer connected to the USB port of your Mac, PC, AirPort Base station, or Time Capsule is not supported.
- Duty Cycle is defined as the maximum number of printed pages for a single peak month.
- Requires Android™ mobile device with Android 5.0 operating system or later with the Mopria Print Service pre-loaded with that device and the compatible PIXMA printer on the same wireless network. Printing with Mopria is also available on mobile devices with Android 5.0 operating system or later with a download of the Mopria Print Service from Google Play.
- Wireless printing requires a working network with wireless 802.11b/g or n capability. Wireless performance may vary based on terrain and distance between the printer and wireless network clients.
- Resolution may vary based on printer driver setting. Color ink droplets can be placed with a horizontal pitch of 1/600 inch at minimum.
- Scan to Concur requires a valid Concur account. Scanned fi les have a 10MB volume limit, with a 100 page maximum. Multi scan not available, receipts uploaded to Concur Cloud.
- Optical resolution is a measure of maximum hardware sampling resolution, based on ISO 14473 standard.
- The Public Switched Telephone Network currently supports fax modem speeds of 28.8 Kbps or lower, depending on telephone line conditions. Sending and receiving fax machines need to conform to ITU-T version 3.4 guidelines.
- Black & white document fax transmission speed is based on default setting using ITU-T No.1 chart. Color document fax transmission speed is based on default setting using Canon Color Fax Test Sheet. Actual transmission speed varies depending on document complexity, fax setting at receiving end, and line conditions etc.
- Page count is based on ITU-T No.1 chart or Canon FAX Standard Chart No.1. The number of pages able to be kept in memory will vary based on remaining memory capacity and document complexity.
- Requires an Internet connection.
- Dimensions with letter (A4) paper installed.
- Operation can only be guaranteed on a PC with factory-installed Windows 10, Windows 8.1, Windows 8, Windows 7, Windows Vista or XP.
- Available from printer driver and fax driver only. XPS drive is not supported for Windows Server 2003 and 2003 R2.
- Internet Connection required during software installation.
- Some functions may not be available with these Operating Systems. Please refer to the manual or our website for full details.
- Requires a Windows RT compatible device with Windows 10, Windows 8.1 or Windows 8 and the Canon Easy-Photo Print app for Windows RT available for free in the Windows Store.
- Poster Artist Lite software v2.60.00 is compatible with 64/32 bit versions of Microsoft® Windows®10, Windows 8.1, Windows 8, Windows 7 and Windows Vista®, and only compatible with Canon PIXMA (released after July 2015), MAXIFY, image PROGRAF and Océ printers. Minimum computer system requirements: Pentium4 2.4Ghz CPU or higher with 1GB RAM, 1024×768 pixel display and 5GB of system hard drive space.
- Warranty programs are subject to certain conditions and restrictions. See www.usa.canon.com/support for details.

©2020 Canon U.S.A., Inc. Canon and PIXMA is a registered trademark and MAXIFY is a trademark of Canon Inc. in the U.S. and may be registered trademarks or trademarks in other countries. Microsoft, Windows, the Windows logo and Internet Explorer are trademarks or registered trademarks of the Microsoft group of companies in the U.S. and other countries. AirPort, Apple, iPad, iPhone, iPod touch and Time Capsule are registered trademarks of Apple Inc. AirPrint is a trademark of Apple Inc. App Store is a service mark of Apple Inc. iOS is a trademark or registered trademark of Cisco in the U.S. and other countries and is used under license. Android and Google Play are trademarks of Google Inc. Mopria is a trademark of the Mopria Alliance Inc. The USB-IF logo is a trademark of Universal Serial Bus Implementers Forum, Inc. Wi-Fi is a registered trademark of the Wi-Fi Alliance. The ‘Wi-Fi CERTIFIED’ logo is a certification mark of the Wi-Fi Alliance. The Wi-Fi Protected Setup Mark is a mark of the Wi-Fi Alliance. All other product and brand names are trademarks of their respective owners.
As an ENERGY STAR® partner, Canon U.S.A., Inc. has determined that this product meets the ENERGY STAR® guidelines for energy efficiency.

MF83Cdw
Setup Guide
- After finish reading, this guide, store it in a safe place for future reference.
- The information in this guide is subject to change without notice.
- Important Safety Instructions
Be sure to read these manuals before using the machine. - Setup Guide (this document)
- User’s Guide / FAQ

https://go.oip.manual.canon/?rid=rPzb9qwr
https://oip.manual.canon/
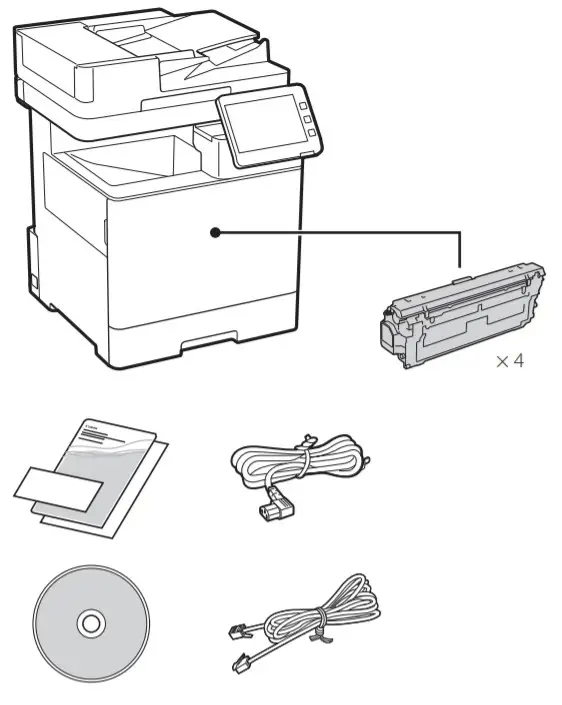
Checking the Items Included

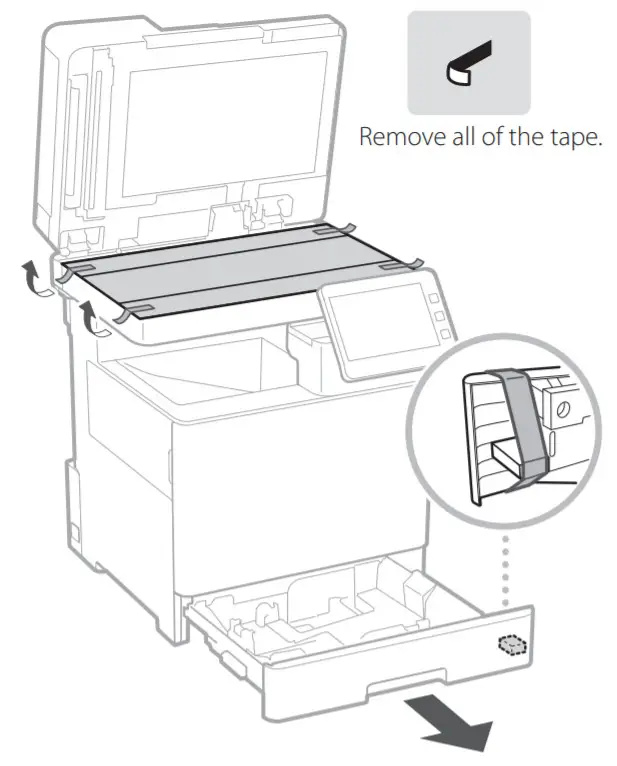
Removing the Packing Material
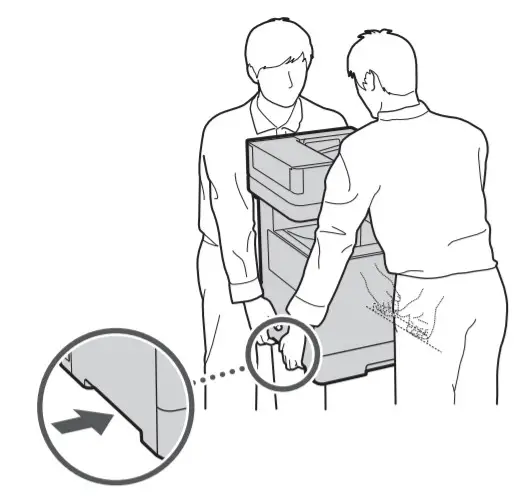
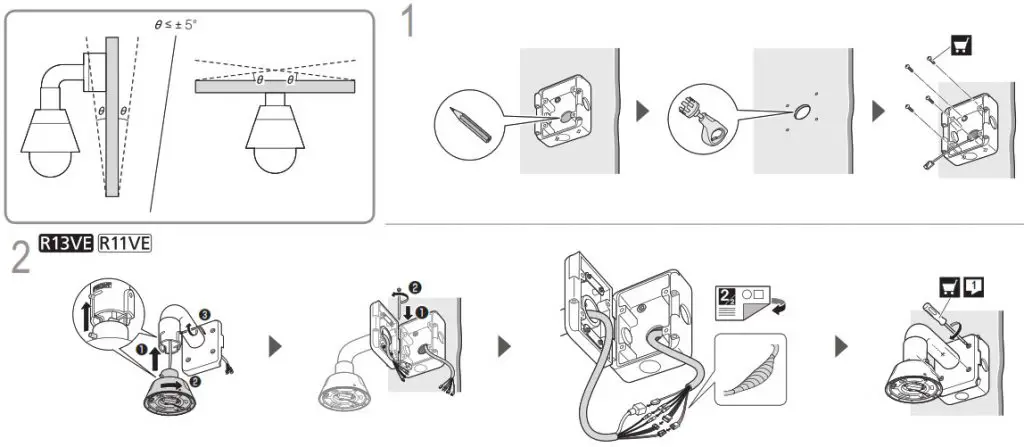
1. Install the machine in the location where it will be used.

2. Remove all the packing material.
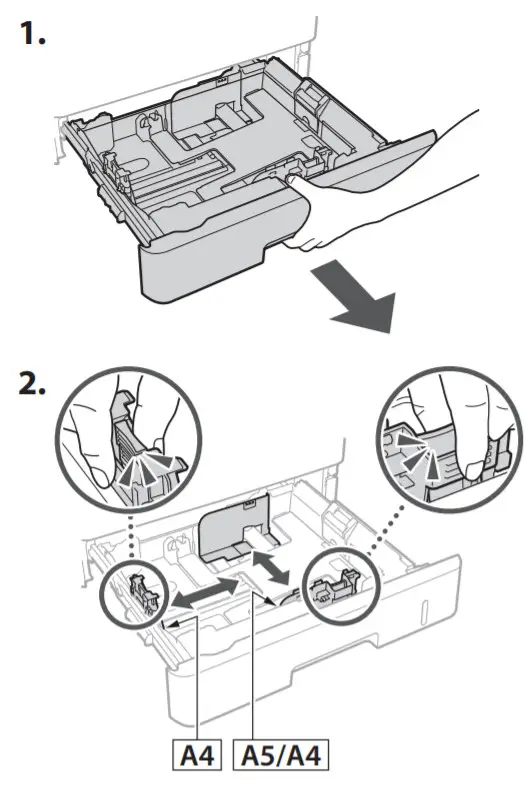
Loading Paper
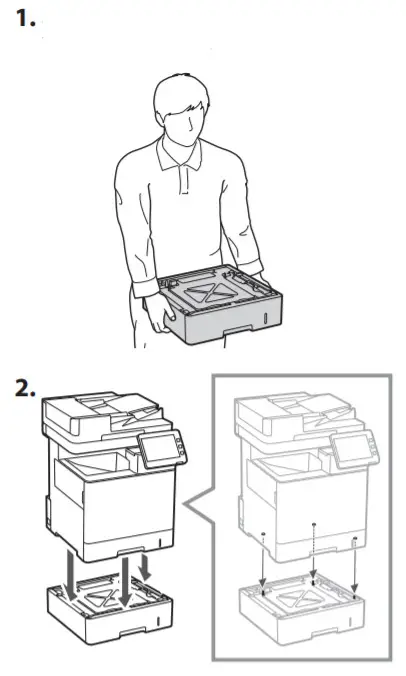
Installing the Optional Product
 if you are not using the optional product, proceed to step(Connecting the Cords and Cables 5
Before Installing the Optional Product
When installing the optional product after the machine has been installed, perform the following before starting work:
- Shut down the machine and your computer.
- Unplug the machine from the mains power outlet.
- Disconnect all cords and cables from the machine.
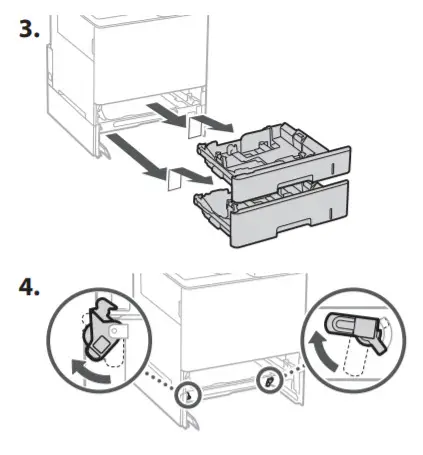
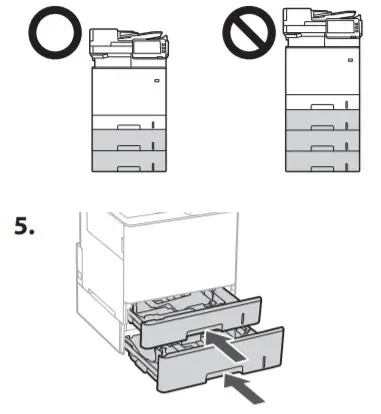
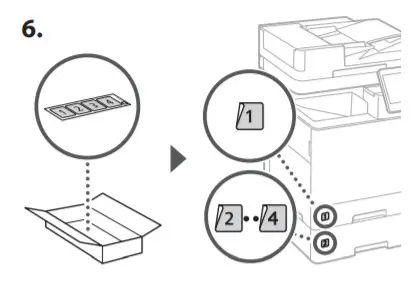
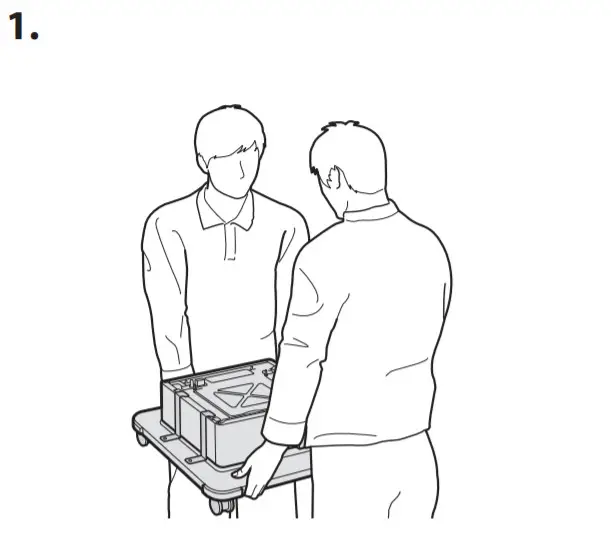
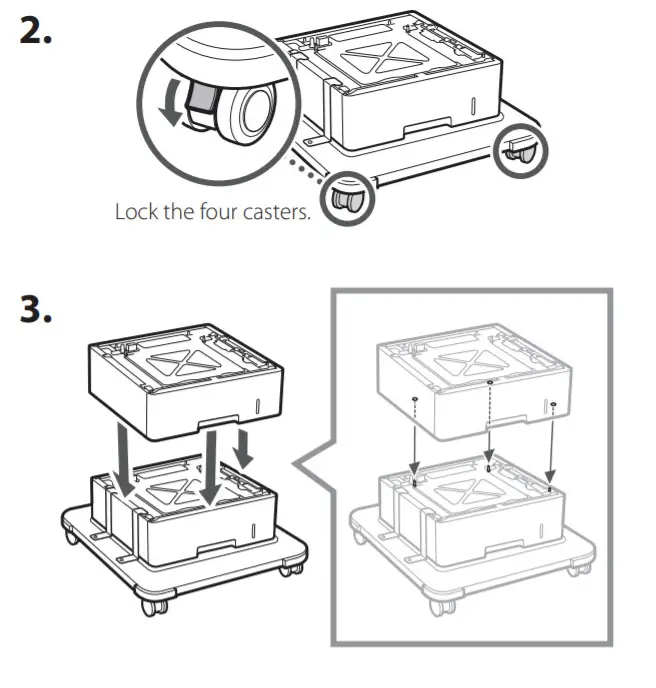
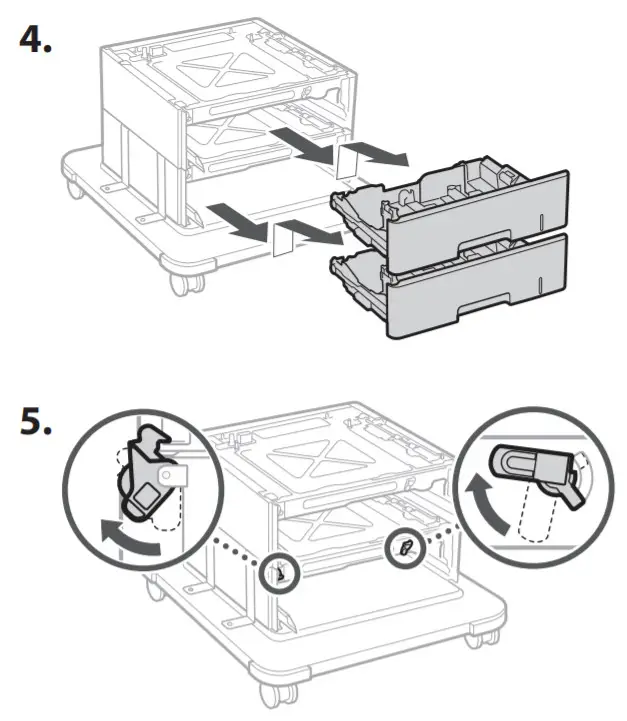
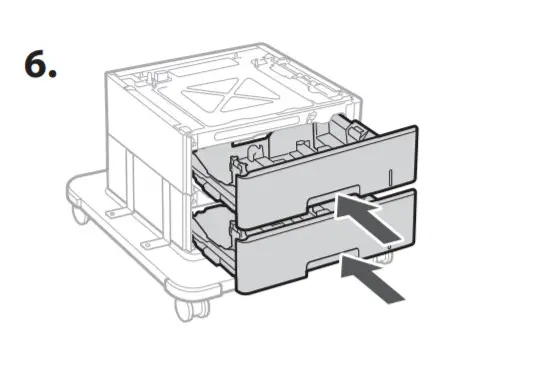
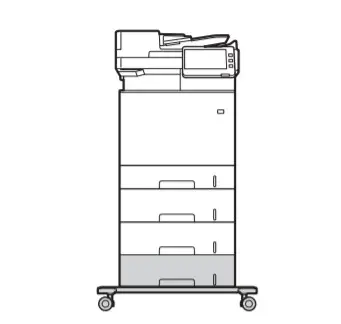
Paper Feeder/Cassette Pedestal
1. Install the paper feeder in the location where it will be used.
 |
 |
- You can stack up to two paper feeders.
 |
 |
When Using the Cassette Pedestal
1. Install the cassette pedestal in the location where it will be used.
 |
 |
 |
 |
 |
|
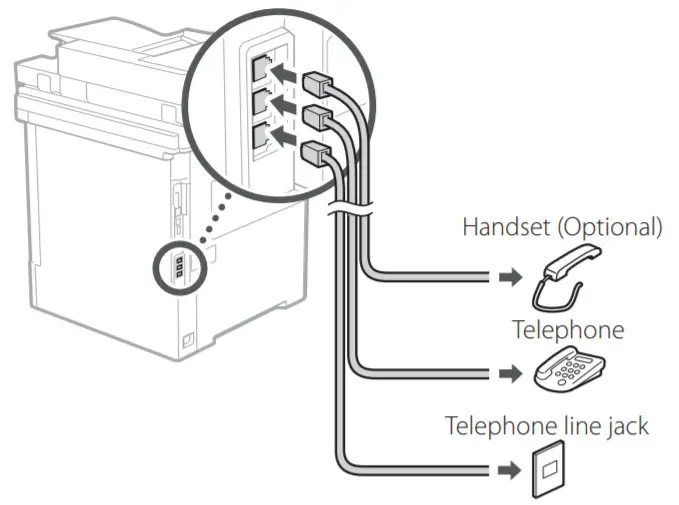
Handset
 |
 |
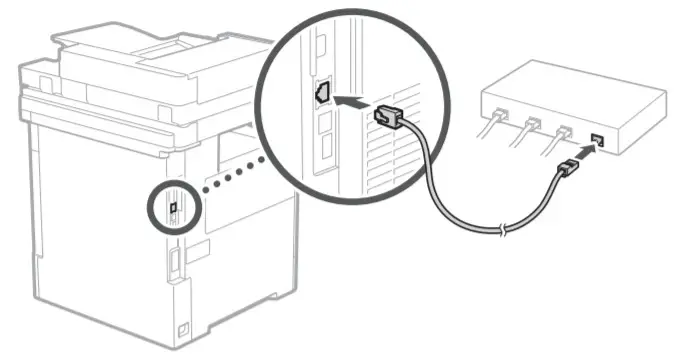
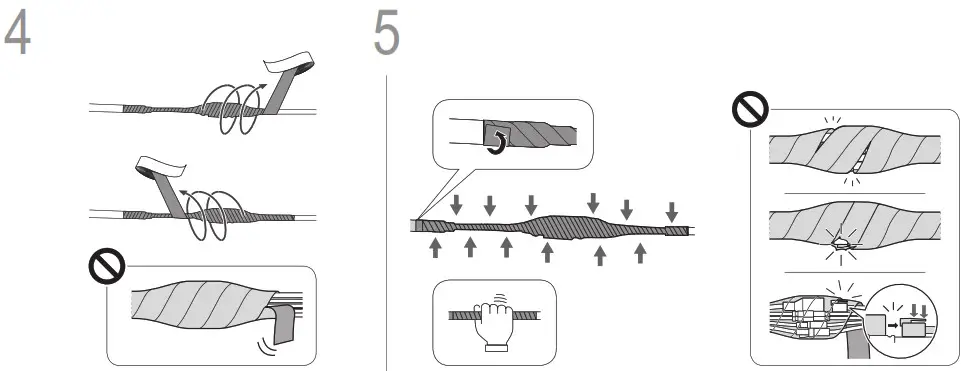
Connecting the Cords and Cables
1. To connect to a wired LAN, connect the machine to the router using a LAN cable.
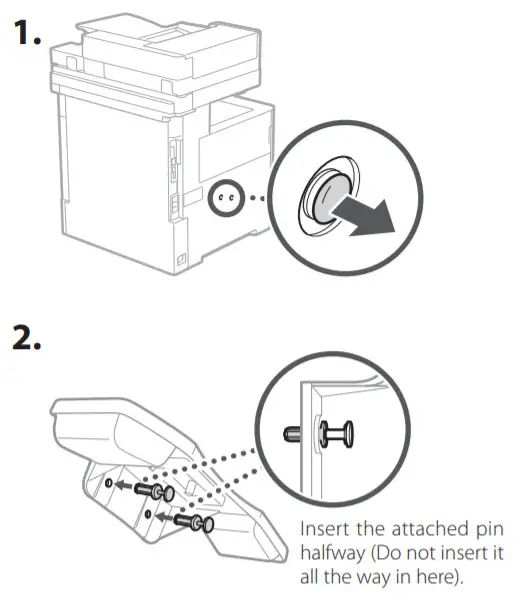
2. To use the machine for faxes, connect it to the phone line using a modular cable.
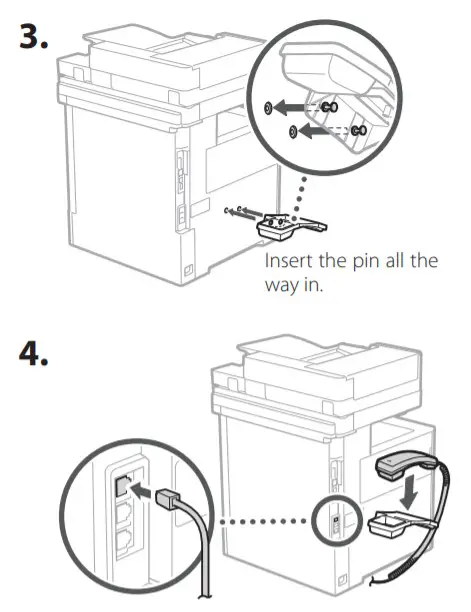
- Always check the line before connecting. Connecting to a dedicated line for business phones, etc. could cause a fault.
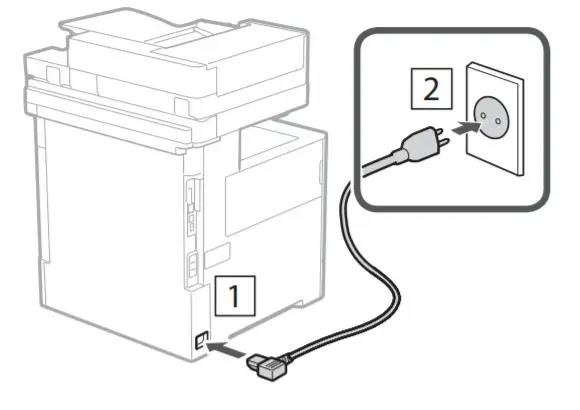
3. Connecting the Power Cord.
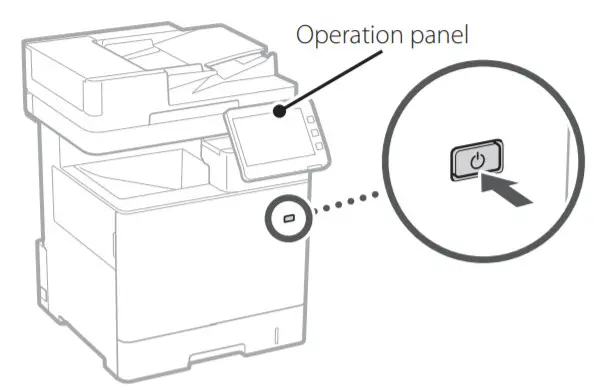
Setting Up Using the Setup Guide
When you turn the machine on for the first time, the setup Guide starts up on the operation panel.
Scan the following QR code for information on using the Setup Guide.
https://go.oip.manual.canon/?rid=Y3UBQVHy
What You Can Use the
1 Specifying the Basic Settings
Specify basic settings such as the screen display language and the type of paper used.
Setup Guide For
2 Specifying the Security Settings

Specify the administrator login and user authentication settings to improve the security of the machine.
The default administrator login is “Administrator” and the default password is “7654321”.
3 Setting the Date and Time
Set the machine’s date and time.
4 Specifying the Network Settings
Specify the settings for connecting the machine to a network.
Select a wired LAN or wireless LAN and specify the IP address. Depending on your network environment, specify the DNS and proxy settings also.
5 Specifying the Fax Settings
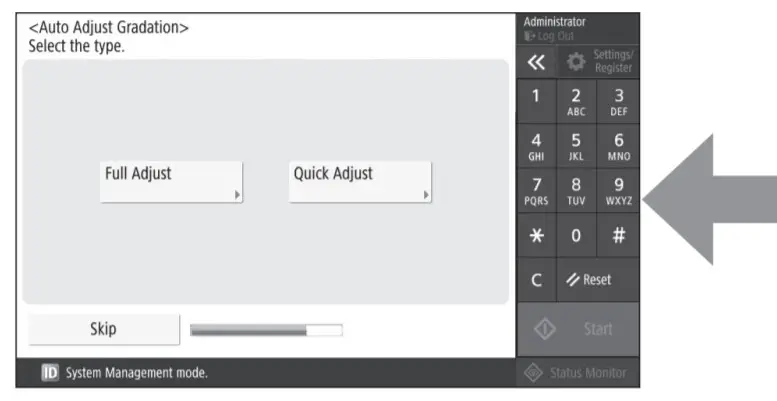
6 Adjusting the Gradation Automatically
You can adjust the color gradations to get a better printing result.
Specify the settings required for using the fax functions.
Installing the Software/ Drivers
Install the software and drivers from the CD/DVD-ROM included, or visit the URL below and download them from the Canon website for your country/region.
https://global.canon/en/support/

Example: MF832Cdw download

Network Camera
BIE-7249-000
Installation Guide

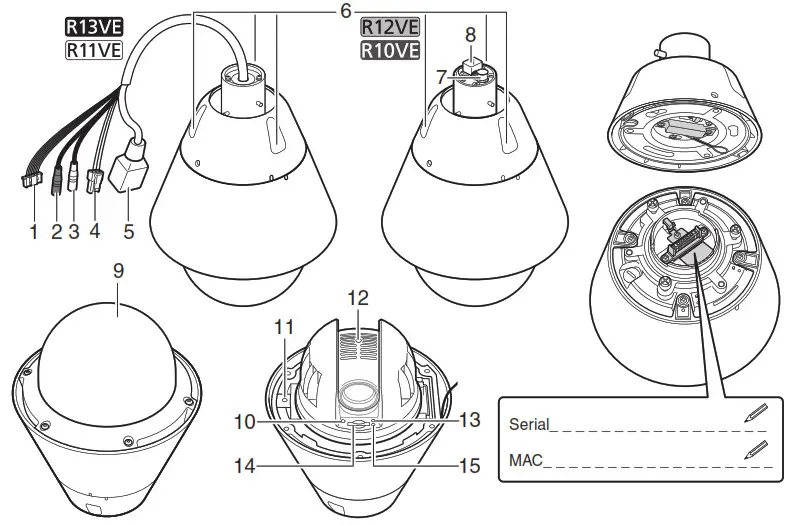
VB-R13VE(H2)/VB-R13VE/VB-R12VE(H2)/VB-R12VE/
VB-R11VE(H2)/VB-R11VE/VB-R10VE(H2)/VB-R10VE/
This Installation Guide is comprised of pages [1/2] and [2/2]. Please be sure to read the included “Safety Precautions” leaflet for correct use. After reading the Installation Guide, keep it in a safe location.
There are two types of cameras: Hydrophilic Coating Model and Non-hydrophilic Coating Model. The hydrophilic coating models have a “hydrophilic coating model label” attached on the product’s exterior cover.
Hydrophilic Coating Models
- VB-R13VE (H2)/VB-R12VE (H2)/VB-R11VE (H2)/VB-R10VE (H2)
Non-hydrophilic Coating Models - VB-R13VE/VB-R12VE/VB-R11VE/VB-R10VE

For handling the hydrophilic coating, be sure to read the included “Safety Precautions”.
Do not remove the protective sheet of the hydrophilic coating model until installation of the camera is completed.
* Some cameras are not available in certain countries or regions.
![]() Caution
Caution
Request a professional installer for all installation work. Never try to install the camera yourself. Doing so may result in unforeseen accidents such as dropping the camera or electric shock.
Symbols used in this Installation Guide
R13VE: VB-R13VE (H2)/VB-R13VE R12VE: VB-R11VE (H2)/VB-R11VE
R11VE: VB-R12VE (H2)/VB-R12VE R10VE: VB-R10VE (H2)/VB-R10VE
![]() Items indicated in the Installation Guide [2/2] with this icon are not included with the camera, and should be provided by the user.
Items indicated in the Installation Guide [2/2] with this icon are not included with the camera, and should be provided by the user.
Check Included Items
| Camera | Before Using This Camera | Safety Precautions | Safety Precautions |
| Installation Guide (This document) | Dedicated Wrench | Waterproofing Tape | |
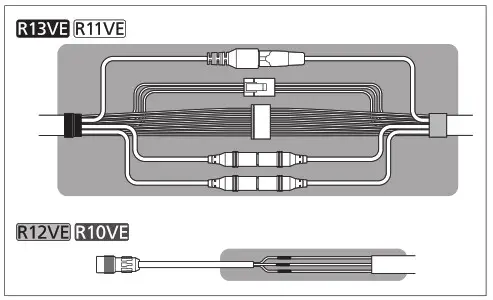
Power Interface Cable (BK2-0036-000) R13VE R13VE
I/O Interface Cable (BK2-0035-000) R12VE R10VE
Power Interface Cable (Waterproof) (BK2-0039-000) R12VE R10VE|
LAN Connector Set (Waterproof) R12VE R10VE
Accessories
The following accessories can be purchased separately as necessary. Some accessories are not available in certain countries or regions.
Ceiling Mounting Kit CM10-VB
Dedicated accessory for attaching the camera to the ceiling.
Wall Mounting kit WM10-VB
Dedicated accessory for attaching the camera to a wall surface.
1.5inch Pipe Adapter PA10-15-VB
Dedicated accessory used to install the camera to the end of pipe that extends from high ceilings, such as in big-box stores.
Dome Unit DU10-S-VB
Smoked dome cover (Hydrophilic coating is not treated).
Canon AC Adapter PA-V18
Dedicated AC adapter for this camera.
Part Names

- External device I/O terminals
R13VER11VE - Audio input terminal (Black) (common LINE IN and MIC IN)
R13VER11VE - Audio output terminal (White) (LINE OUT)
R13VER11VE - Power connection terminal
R13VER11VE - LAN connector (RJ45, 100Base-TX)
R13VER11VE - Attachment lock screws /
- Power connection terminal
R12VER10VE - LAN connector
R12VER10VE - Dome case /
- Reset switch*1 /
- Reboot switch /
- Lens /
- LED (Orange) /
- Memory card slot /
- LED (Blue)*2
*1 Please refer to the “Operation Guide” for the method to reset the camera.
*2 On: when powered on, during reboot / Off: during normal use
Notes for When and After Installing the Camera
When Installing the Camera
Installing the Camera Outdoors
R13VER11VEBe sure to wrap with waterproofing tape. Please refer to the “Wrapping the Waterproofing Tape” cautions below for how to wrap.R12VER10VEPlease be sure to use the included LAN Connector Set (Waterproof).- If connecting the camera to the composite pipe by wiring, bridge the gap using Ceiling Mounting Kit (sold separately) or Wall Mounting kit (sold separately). When connecting the pipe, apply silicon sealant to seal it tightly after attaching the pipe to prevent water getting in as necessary.
Wrapping the Waterproofing Tape
Properly waterproof the connections, as shown in the Installation Guide [2/2], using the waterproofing tape (included). If not properly waterproofed, it may result in water intrusion, thereby causing breakdown.
- To prevent cable connections from shorting out, wrap each individual connection with insulating tape, and then wrap all of the cables with waterproofing tape. Please refer to the Installation Guide [2/2] for details on how to wrap the waterproofing tape.
- The camera conforms to the dust-resistant/waterproof specification (IP66), however the cable ends that connect to external devices are not. Cable connections should be wrapped with waterproofing tape, if there are any chances that it may get wet.
- Accessories for installation are not dust-proof/waterproof. Wrap the cable connections with the included waterproofing tape, even if they can fit within the optional unit, because there could be a chance of the cables getting wet.
After Installing the Camera
When the temperature within the camera is low (heater activation)
When the camera is powered by a 24 V AC/ PoE+ power source, the heater unit can be used. The heater unit will be activated automatically when the temperature within the camera is low. The orange LED will be lit, until the camera has warmed up enough to start transferring video. Once the temperature within the camera has reached the level where it can transfer the video once again, the orange LED will turn off.
Before Installing the Camera
Separating the Camera and Attachment
![]() Note
Note
Please unhook the safety wire connected to the camera.
Removing and Attaching the Dome Case
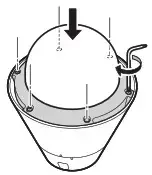
Removing the Dome Case
Loosen the screws holding the dome case in place with the dedicated wrench, and remove it. Loosen the screws on the dome case to detach the safety wire.

CaseThe screws used for the dome case fall prevention safety wire and dome cover holder are as follows.
Attaching the Dome
- Fix the screws in the dome case and attach the safety wire.
- Align the dome case with the camera body.
- Tighten the dome case screws with the dedicated wrench.
![]() Note
Note
When you use a memory card, remove the dome case and place it in the memory card slot (SD memory card, SDHC memory card, and SDXC memory card are available).
| Nominal diameter | Length | Head shape |
| M3 | 6 mm (0.24 in.) | pan head |
Connecting the LAN Connector Set (Waterproof) R12VE R10VE
Connect the LAN cable to the connector.
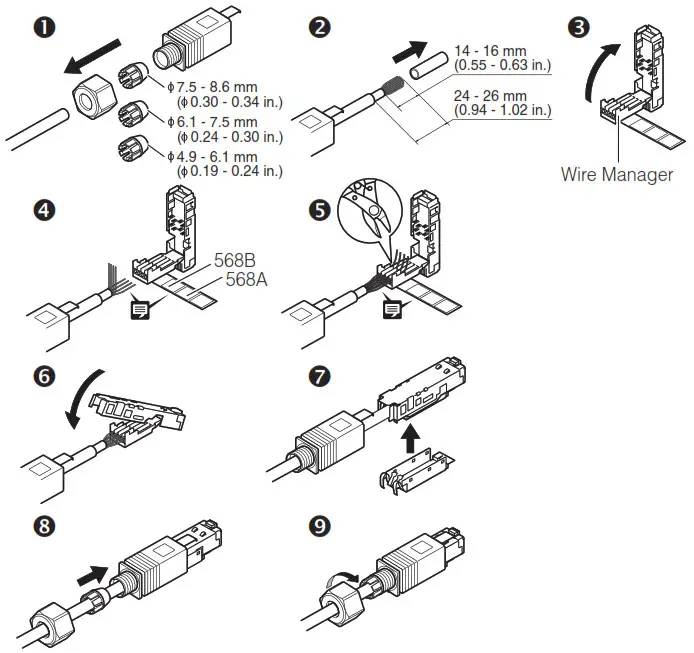
![]() Note
Note
- Align the wires with the terminal settings according to the 568B/568A color coded illustration, and insert them into the wire manager.
- The LAN cable may not be able to be properly inserted or removed from the LAN connector, if the LAN Connector Set (Waterproof) is not used. The cable’s water resistance will not be maintained as well.
Specifications
Please refer to the “Appendix Specifications” for specifications not listed below.
Min. Subject Illumination R13VE R12VE
Day Mode (color):
0.05 lux (F1.4, shutter speed 1/30 sec., when smart shade control is off, 50IRE) Night Mode (monochrome):
0.002 lux (F1.4, shutter speed 1/30 sec., when smart shade control is off, 50IRE)
When using the Dome Unit (Smoked) (sold separately)
Day Mode (color): 0.1 lux (F1.4, shutter speed 1/30 sec., when smart shade control is off, 50IRE)
Night Mode (monochrome):
0.004 lux (F1.4, shutter speed 1/30 sec., when smart shade control is off, 50IRE)
R11VE R10VE
Day Mode (color):
0.03 lux (F1.4, shutter speed 1/30 sec., when smart shade control is off, 50IRE)
Night Mode (monochrome):
0.002 lux (F1.4, shutter speed 1/30 sec., when smart shade control is off, 50IRE)
When using the Dome Unit (Smoked) (sold separately)
Day Mode (color):
0.06 lux (F1.4, shutter speed 1/30 sec., when smart shade control is off, 50IRE)
Night Mode (monochrome):
0.004 lux (F1.4, shutter speed 1/30 sec., when smart shade control is off, 50IRE) 360° continuous panning
Pan Angle Range Tilt Angle Range
180° (ceiling-mounted position: 0° 180°)
– When the horizontal direction of the camera is 0°
– When the tilt angle is between angles below, the dome cover can cause a line to appear in the video, as well as a decline in the video quality
0° 12° (168° 180°) (W)
0° 5° (175° 180°) (T)
Operating Environment (Includes LAN Connector Set (Waterproof))
Temperature
Operating Temperature Range (including direct sun exposure):
AC: -50°C +55°C (-58°F +131°F)
PoE+: -35°C +55°C (-31°F +131°F)
DC, PoE: -10°C +55°C (+14°F +131°F)
Start-up Temperature Range (including direct sun exposure):
AC, PoE+: -30°C +55°C (-22°F +131°F)
DC, PoE: -10°C +55°C (+14°F +131°F)
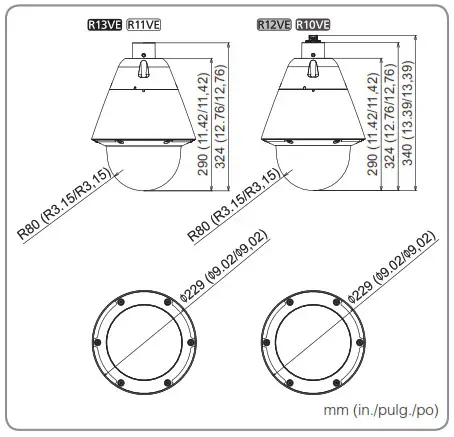
Dimensions
Humidity: 5% 85% (without condensation)
R13VE R11VE (∅ x H) ∅229 x 324 mm ( ∅9.02 x 12.76 in.)
-Camera only
R13VE R11VE ( ∅x H) ∅229 x 324 mm ( ∅9.02 x 12.76 in.)
-Camera only (excluding the connector height) Approx. 3530 g (7.79 lb.)
R13VE R12VE Approx. 3530 g (7.79 lb.)
R13VE R11VE Approx. 3420 g (7.54 lb.)
Connecting the Camera
Power Connection
Please be sure to read the user manual for the dedicated power supply before use.
![]() Note
Note
- Power supply should conform to all local codes.
- The power supply should also comply with IEC/UL60950-1 (SELV/LPS) standards.
PoE+/PoE (Power over Ethernet)
Power can be supplied to the camera by using a LAN cable connected to a PoE+/PoE HUB that conforms to the IEEE802.3at Type 2 (PoE+)/Type 1 (PoE) standard. Use a category 5 or better LAN cable, 100 m (328 ft.) or less in length.
![]() Important
Important
- Check with your dealer for more information about PoE+/PoE HUB and Midspan technology. Midspan (a LAN cable power supply device) is a device that, like a PoE+/PoE HUB, supplies power to the camera via a LAN cable.
- Some PoE+/PoE HUBs allow the limitation of power for each port, but applying limits may interfere with performance. If using this type of PoE+/PoE HUB, do not limit the operating power.
- Some PoE+/PoE HUBs have limits for the total power consumption for the ports, which can interfere with performance when multiple ports are in use. In such a case, check the user manual for your PoE+/PoE HUB.
- When the camera is connected to both a PoE+/PoE HUB and an external power supply (12 V DC or 24 V AC), power will be supplied in the following order of precedence. External power supply (24 V AC) > PoE+/PoE HUB > External power supply (12 V DC) However, when connecting power from both, certain combinations could cause problems such as unstable network connections. If a problem arises, disable one of the power supplies.
External Power Supply
12 V DC or 24 V AC input can be used. Use the included power interface cable to connect to the camera power connection terminal.

12 V DC can be connected in a non-polar configuration.
- BROWN Power 24 V AC/12 V DC non-polar
- BLUE Power 24 V AC/12 V DC non-polar
- GREEN FG (frame ground)
![]() Important
Important
- The power supply should be within the following voltage range: 24 V AC: Voltage fluctuation within ±10% of 24 V AC (50 Hz or 60 Hz ±0.5 Hz or less) Current supply capacity of at least 2.0 A per camera 12 V DC: Voltage fluctuation within ±10% of 12 V DC Current supply capacity of at least 1.5 A per camera
- When using a 12 V DC battery power supply, be sure to connect resistors of at least 0.5 1.0 /20 W in series to the power line.
- For an external power supply, use a double-insulated device.
Recommended Power Cables [Reference]
| Cable (AWG) | 24 | 22 | 20 | 18 | 16 | |||||
| 12 V DC maximum cable length m (ft.) | 4 | (13.) | 6 | (20.) | 10 | (33.) | 17 | (56.) | 26 | (85.) |
| 24 V AC maximum cable length m (ft.) | 6 | (20.) | 10 | (33.) | 15 | (49.) | 24 | (79.) | 39 | (128.) |
Use UL cable (UL-1015 or equivalent) for 12 V DC or 24 V AC wiring.
© CANON INC. 2019
Printed in Japan
AC Adapter
Please use the dedicated AC adapter (sold separately). Remove the power connector attached to the AC adapter, then connect the power interface cable included in the package, as shown in the following diagram.
 External Device I/O Terminals
 R13VE R11VE
External device I/O terminals consist of two input and output systems each. Viewer can be used to check external device input status and control output to an external device (please refer to the “Operation Guide”).
Use the included I/O interface cable to connect to external device input/output terminals.

- BROWN External device input 1 IN1 (+)
- BLACK External device input 1 IN1 (-)
- RED External device input 2 IN2 (+)
- BLACK External device input 2 IN2 (-)
- ORANGE External device output 1 OUT1
- YELLOW External device output 1 OUT1
- GREEN External device output 2 OUT2
- BLUE External device output 2 OUT2
External Device Input Terminals (IN1, IN2)
External device input terminals consist of two sets (IN1, IN2) of two terminals, with the negative terminals connected to the camera interior GND. Connecting 2-wire cable to the positive and negative terminals and opening or closing the circuit notifies the Viewer.
![]() Important
Important
When connecting sensors and switches, connect terminals that are electrically isolated from the respective power and GND.
External Device Output Terminals (OUT1, OUT2)
External device output terminals consist of two sets (OUT1, OUT2) of two terminals. The sets have no polarity. Controls from the Viewer can be used to open and close the circuit between the terminals. Using optical couplers, the output terminals are isolated from the camera’s internal circuit.
The load connected to the output terminals should be within the following rating range. Rating between output terminals:
Maximum voltage 50 V DC Continuous load current at or below 100 mA On resistance: Max. 30Ω
 Audio Input/Output Terminals
 R13VE R11VE
Each audio input/output terminal has one input system and one output system. Connecting the camera to an audio input/output device such as a microphone or a speaker with an amplifier allows you to send/receive audio through the Viewer. Use the ø3.5 mm ( ø0.14 in.) monaural mini-jack connector to connect to an audio input/output device.
Audio Input Terminal Common LINE IN/MIC IN (monaural input)
Although the camera has a single audio input system, it supports two types of microphone input: LINE IN and MIC IN. Before using the audio input, please confirm the [Audio Input] in the Setting Page (please refer to the “Operation Guide”). LINE IN is selected by default. Input terminal: ø3.5 mm ( 0.14 in.) mini jack (monaural)
- Dynamic MIC IN
Input impedance: 1.5 kΩ ±5% * Supported microphones: Output impedance: 400 600Ω - Condenser MIC IN
Input impedance (microphone bias resistance): 2.2 kΩ ±5% Microphone power supply: plug-in power (voltage: 2.3 V) * Supported microphones: Condenser microphones with plug-in power support - LINE IN
Input level: Max. 1 Vp-p * Use a microphone with an amplifier.
Audio Output Terminal LINE OUT (monaural output)
Connect the camera to a speaker with an amplifier. Audio can be sent to the speaker from the Viewer. Output terminal: ø3.5 mm ( ø0.14 in.) mini jack (monaural) Output level: Max. 1 Vp-p
* Use a speaker with an amplifier.
The contents of this guide are subject to change without any prior notice.
![]()
BIM-7156-000
VB-R13VE(H2)/VB-R13VE/
VB-R12VE(H2)/VB-R12VE/
VB-R11VE(H2)/VB-R11VE/
VB-R10VE(H2)/VB-R10VE/
- This document describes the wall installation for the Wall Mounting kit WM10-VB.
- The ceiling installation process is the same as the wall installation. In the case of installation using the 1.5 inch pipe adapter PA10-15VB, be sure to connect the cable to the camera first, before fixing the attachment to the pipe. For details, refer to the Installation Guide included in the option item.
- Do not remove the protective sheet of the hydrophilic coating model until installation of the camera is completed
 .
.

 TORX T30 driver
TORX is the trademark of Acument Intellectual Properties, LLC.
Cut off the cap if the power interface cable (Waterproof) is to be used. Keep the cut-off cap in a safe location. If the cap is not attached when the power interface cable (Waterproof) is not being used, it may result in the accumulation of water, which will damage the camera body.
Wrap the included waterproof tape to the cable connection.

![]() Be careful as to where to start wrapping.
Be careful as to where to start wrapping.

© CANON INC 2019
Printed in Japan
SAFETY INFORMATION
READ BEFORE USE
Please read the following instructions and safety precautions before using the device. For regulatory and additional safety information, refer to the Regulation and Warranty Information sheet included in your package contents.RMN: PP3001 Regulatory Model Identification Number is assigned for regulatory identification purpose.
 Warning

- Keep away from children and Improper use of this product may cause suffocation or accident.
- Stop using the device immediately if it emits smoke or a strange smell, or otherwise behaves
- Do not look at the sun or bright lights through the viewfinder or the Blindness or vision problems could result.
- Do not fire the flash near the It may hurt the eyes.
- A strap wound around a child’s neck may result in If your product uses a power cord, mistakenly winding the cord around a child’s neck may result in asphyxiation.
- Turn the device off in places where camera use is The electromagnetic waves emitted by the camera may interfere with the operation of electronic instruments and other devices. Exercise adequate caution when using the product in places where use of electronic devices is restricted, such as inside airplanes and medical facilities.
CAUTION

- When operating in extreme weather, the device might not Let the printer temperature adjust to the recommended operating temperature of 15º to 32ºC, before attempting to print again.
- When charging, please charge the device at the recommended temperature of 15º to 32ºC.
- Use a soft dry cloth to clean the Do not clean with a damp cloth or volatile liquids such as paint thinner.
- Keep the top cover closed to avoid dust and other particles from entering the inside of the
- If the device is not functioning properly, please contact the dealer you purchased this product from or Canon Service & Support at https://www.canon-europe.com/support
- Never expose the battery to high temperatures, direct heat, or dispose by
- Electromagnetic interference or electrostatic discharge may cause the device to malfunction or the memory to be lost or Should this occur, use a pin, or similar item to press the [RESET] button at the bottom of the device.
OVERVIEW
SUPPLIED ITEMS
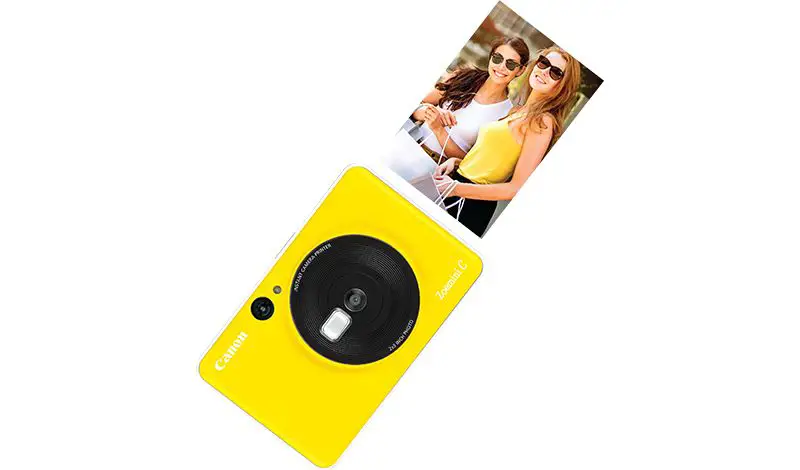
- Instant Camera Printer

- Quick Start Guide

- Regulation and Warranty Information sheet
- USB Cable

- CANON ZINK™ Photo Paper (10 sheets)

- Wrist Strap
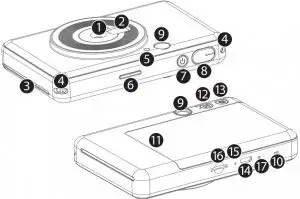
PRODUCT FEATURES

- Camera Lens
- Selfie Mirror
- Print Output Slot
- Strap Hole
- Flash
- Status LED
- Power Button
- Shutter Button
- Viewfinder
- Speaker
- Printer Cover
- Aspect Ratio Button
- Reprint Button
- MicroUSB Port
- Charging Status LED
- MicroSD Card
- Slot (up to 256GB)
- Reset Button * To reset the device, press with a pin
SETUP
CHARGING
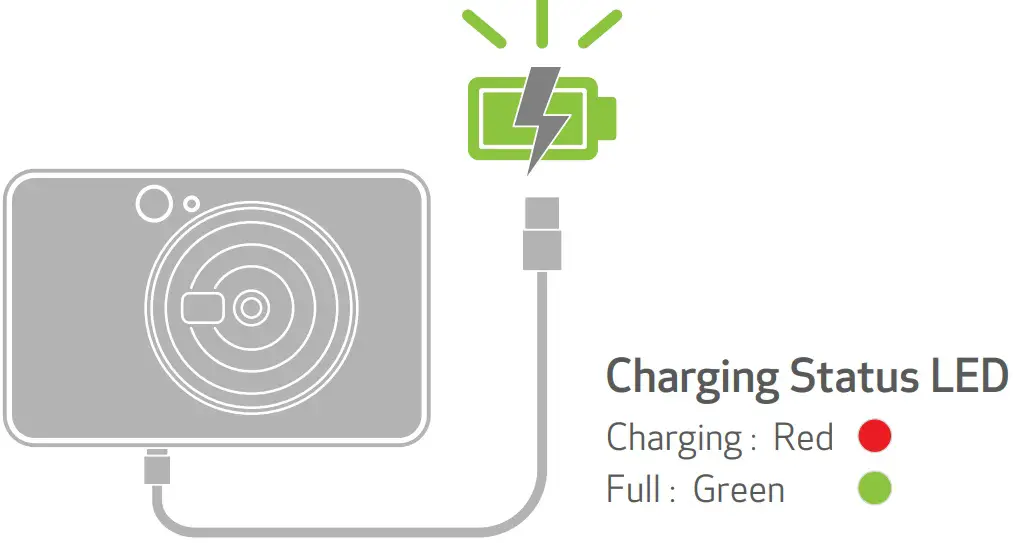
The device has a built-in battery. Please fully charge the device via the USB cable provided before using.
- Insert the smaller end of the supplied USB cable into the device and other end into a chargeable USB adapter.
- The charging LED light will turn red to indicate charging.
- Once fully charged, the charging LED will turn green. Operating time may vary depending on the battery status, operational status and environment conditions.
 NOTE
NOTE
About USB Cable
HANDLE THE USB CABLE WITH CARE WHILE CHARGING
- Do not place any heavy objects on top of the
- Do not place the USB cable near
- Do not scratch damage, twist or pull hard on the
- Do not plug or unplug the cable with wet
- Avoid too high/too low temperature or humid
- Please unplug the USB cable from power source after
- Please use the supplied USB cable for
LOAD PAPER
- Remove the cover by sliding it forward in the direction of the arrow.

- Open a single pouch of photo paper (10 sheets + blue SMART SHEET™).
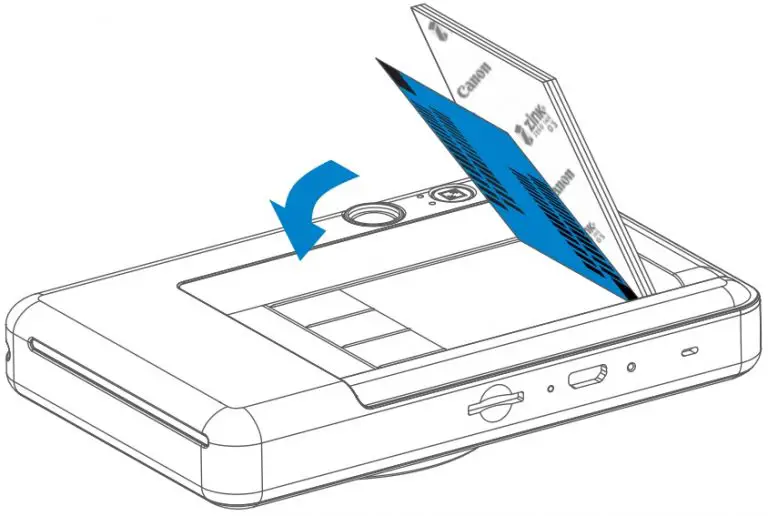
- Place all 10 photo paper sheets and the one SMART SHEET™ into the photo paper compartment Stack the photo paper on top of the blue SMART SHEET™, making sure the blue barcode and the photo paper logos are facing.

- Place the top cover back onto the device. It should click into place when closed properly. The blue SMART SHEET™ will be sent through the device automatically before the first
EXTERNAL MEMORY
 An external MicroSD card (up to 256 GB) is needed for saving captured photos. Only FAT16, FAT32 and exFAT format are supported.
PREPARING A MEMORY CARD
Use the following memory cards (sold separately)
- MicroSD memory cards *1
- MicroSDHC memory cards *1 *2
- MicroSDXC memory cards *1 *2 *1 Cards conforming to SD standards. However, not all memory cards have been verified to work with the camera. *2 UHS-I memory cards are also supported.
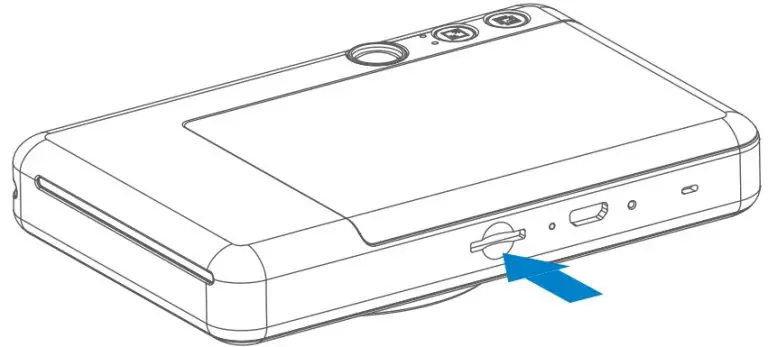
INSTALL AND REMOVE THE MicroSD CARD
- Insert the Micro SD card into the slot at the bottom of the You will feel a slight click when the card is fully inserted .
- Push on the top of the card to release Gently pull to fully remove the card from the device.
- If there is an error on reading /writing to the Micro SD card, remove the Micro SD card and restart the
- Connect the device to a computer by USB Double-click the external drive image when it appears on the computer to view and save the photos.
NOTE
MAINTAINING THE DEVICE
- Use and keep the device in the recommended environment of 15º to 32º C and 40-55% relative
WHEN USING PHOTO PAPER
- Only load 10 ZINK™ photo paper sheets and 1 SMART SHEET™. Do not load more as it can result in paper jams or printing
- If there is a paper jam, simply turn the printer OFF and ON to automatically clear the paper Don’t try to pull the paper out.
- While the device is printing, don’t pull or tug on the photo
- Handle photo paper carefully to avoid damage or
- Keep the photo paper clean when If photo paper is dirty or damaged, it may result in a paper jam or print error.
- Don’t open a new pouch of photo paper until you are ready to load it into your
- Don’t expose photo paper to direct sunlight or
- Don’t leave your photo paper in an area where the temperature or humidity is out of the suggested conditions indicated on the It may reduce the quality of the printed photo.
ABOUT THE SMART SHEET™
- Each pouch of photo paper contains 10 sheets of photo paper and 1 blue SMART SHEET™.
- Load the SMART SHEET™ and photo paper from within the same pouch for optimal print quality. Each SMART SHEET™ is specifically tuned for the pouch of paper it is contained
- The SMART SHEET™ will be sent through the device automatically before the first print to clean the printer and optimize print quality for that specific paper pouch (10 sheets).
- Keep the SMART SHEET™ and only discard after you have printed all 10 sheets of photo paper in the If print quality is not as expected, you can reuse the SMART SHEET™ if the paper is still from the same pouch. Simply slide the SMART SHEET™ with its barcode-side down underneath the remaining photo paper.
- Using a SMART SHEET™ from another pouch may result in reduced print
OPERATION
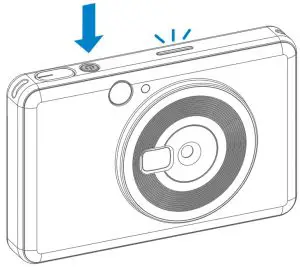
POWER ON/OFF

- Press and hold the Power button
 until the LED indicator light turns on.
 - When the LED indicator turns to a stead y white , the device is ready to use.
- Press and hold the Power button to turn off the device.
AUTO POWER OFF
- When the device is idle for about 5 minutes, it will automatically power The user can resume the device by pressing the Power button again.
TAKING A PHOTO

- Hold the device, confirm the desired composition of the image.
- Press the Shutter button
 to take a photo
The camera will automatically trigger the flash if it is necessary for the lighting conditions
Use the reflective plate besides the lens as a self-portrait mirror for selfie
VIEWFINDER
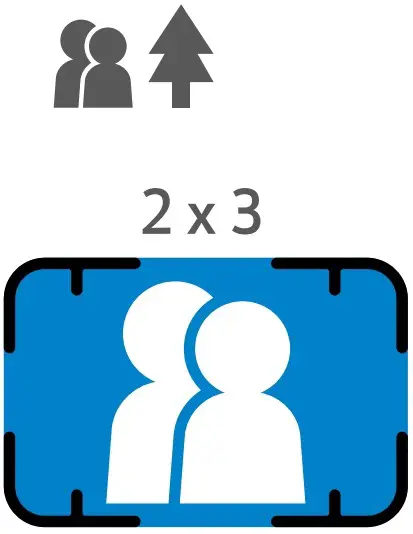
Compose an image with the frame mark in the viewfinder


2 X 3 Frame Mark for normal shooting at 1m – ∞

2 X 2 Frame Mark for normal shooting at 1m – ∞
ASPECT RATIO
The user can choose between two aspect ratios, 2×3 and 2×2 with the Aspect ratio button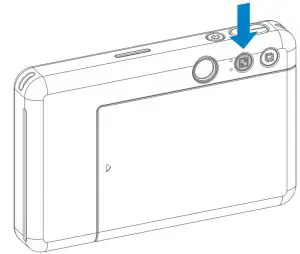 .
.
Aspect ratio can be changed at any time before taking a photo.
When the aspect ratio is 2×2, the blank area of the photo paper is different. It is based on how the device is being held.


PRINTING AND REPRINT
PRINTING A PHOTO
- The photo will be printed out immediately after taking the
- The device can hold up to 3 images at a time to

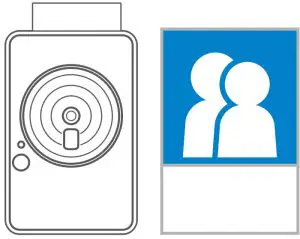
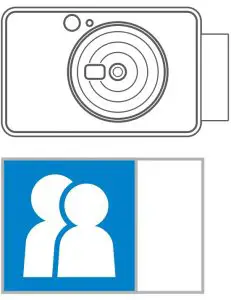
REPRINT A PHOTO
When you have captured a photo and it is printed out, if you want to duplicate the same photo or distribute several pieces of the same photos in a party, you can just simply press the Reprint button to reprint the last printed photo.
LED INDICATOR
| Status | Operation/Situation | LED Indictior |
| Power On | Press and hold the Power Button |  |
| Standby | After the device is powered on |  |
| Power Off | Press and hold the Power Button |  |
| Smart Sheet Error | When the device detects wrong SMART SHEET™ is inserted, or other SMART SHEET™ error |  |
| Processing SHEET SMART | When the device is printing out SMART SHEET™ |  |
| No Paper | When the device has no paper, the device will not allow for taking a photo |  |
| Paper Jam/ Cover Open | When there is a paper jam or the printer cover is opened | |
| Printing | Preparing for printing | |
| Printing Photo | When the device is printing a photo |  |
| MS Mode (Mass Storage Mode) | Device is Connected to a computer |  |
| MicroSD Card Error | Cannot write data into MicroSD Card |  |
| Temperature Too High | When the device temperature is too high |  |
| Temperature Too Low | When the device temperature is too low |  |
| Printer Head Cooling | Checking the printer head temperature and letting it cool down before printing |  |
| Low Battery | When battery level is down to 20% |  |
| Very Low Battery | When battery level is very low |  |
| Status | LED Indictior | Actions |
| MicroSD Card Error |  |
Check if the MicroSD card is inserted properly
Check if the MicroSD card is full Check if the MicroSD card is corrupted Check if the MicroSD card is compatibl |
| Paper Feeding Failed |  |
Open the paper compartment cover to check if Canon ZINK™ photo paper is inserted |
| Paper Jam | |
Power off and on the device, the photo paper will be fed out automatically |
| No Paper | |
Reload Canon ZINK™ photo paper into the device |
| Printer cover is not closed properly | |
Close the printer cover properly |
| Overheat | |
Wait until the device temperature returns to normal, the device will resume working again |
| Device does not Work | N/A | Make sure the battery level is not too low. If it is, recharge the device |
| Take a Photo | N/A | Make sure print queue buffer is available
Make sure device has Canon ZINK™ photo paper |
SPECIFICATIONS
Printing Technology ZINK™
Printing Resolution 314 x 500 dpi (dots per inch)
Printing Speed Approximately 50 seconds – Motor starts and stops, at room temperature 25º C
Photo Aspect Ratio 2″ x 2″ or 2″ x 3″
Compatible Paper Canon ZINK™ Photo Paper : ZP-2030-20 (20 sheets) ZP-2030-50 (50 sheets) 2″ x 3″ /Peel-and-Stick Back
Paper Capacity Up to 10 sheets of ZINK™ photo paper + 1 SMART SHEET™ Photo Resolution 5MP
Focal Length 24 mm
Aperture f / 2.4
Focusing Range 50cm – ∞
Sensitivity Auto (ISO 100 – 1600)
Flash YES (Auto)
Flash Range 0.5m – 1.0m
Memory Card MicroSD Card, up to 256GB
Power Source Built-in Rechargeable Li-Polymer Battery 700mAh, 7.4V Charging Speed Approximately 90 minutes (Full Charge)
Power Adapter Output Current : 1.6A (min) Voltage : 5V
Environmental Parameters – Recommended Printing Operating, Charging, and
Storage Temperature : 15º to 32º C Recommended Printing Operating, Charging, and Storage Humidity : 40-55% RH Operating Temperature : 5º to 40º C Operating Humidity : < 70% RH
Automatic Power-off 5 minutes
Dimension 121mm (W) x 78.3mm (H) x 23.7mm (D)
Weight 170 g
Compatible OS Windows 7 / 8 / 8.1 / 10
(for Computer) Mac OSX 10.10 – 10.14
Connection for Charging USB 2.0 (Micro USB) and Data Transfer
]]>
Thank you for purchasing a Canon product.
Canon RF100mm F2.8 L MACRO IS USM is a macro lens for use with EOS R series cameras.
- “IS” stands for Image Stabilizer.
- “USM” stands for Ultrasonic Motor.
Camera Firmware
Please use the latest version of firmware with the camera in use. For details on whether the firmware is the latest version or not, and for details on updating the firmware, please check the Canon website.
Conventions used in these instructions
![]() Warning to prevent lens or camera malfunction or damage.
Warning to prevent lens or camera malfunction or damage.
![]() Supplementary notes on using the lens and taking pictures.
Supplementary notes on using the lens and taking pictures.
Safety Precautions
Precautions to ensure that the camera is used safely. Read these precautions thoroughly. Make sure all details are observed in order to prevent risks and injury to the user and other people.
![]() Warning Details pertaining to risks that may result in death or serious injury.
Warning Details pertaining to risks that may result in death or serious injury.
- Do not look directly at the sun or other strong light sources through a lens. This may result in loss of sight.
- Do not leave a lens in the sun without the lens cap attached. The lens may concentrate entering sunlight and cause a malfunction or fire.
![]() Caution Details pertaining to risks that may result in injury or damage to other objects.
Caution Details pertaining to risks that may result in injury or damage to other objects.
- Do not leave the product in places exposed to extremely high or low temperatures. The product may cause burns or injury when touched.
General Precautions
Handling Precautions
- Do not leave the product in excessive heat such as in a car in direct sunlight. High temperatures can cause the product to malfunction.
- If the lens is taken from a cold environment into a warm one, condensation may develop on the lens surface and internal parts. To prevent condensation in this case, first put the lens into an airtight plastic bag before taking it from a cold to warm environment. Then take out the lens after it has warmed gradually. Do the same when taking the lens from a warm environment into a cold one.
- The lens interior may appear to waver, but this does not indicate a defect or failure, and will not cause any problems in use.
- In order to optimize aperture control, there are occasions in which the aperture blades will move during focusing, even when the aperture value is set for aperture-priority AE or manual exposure, etc.
- Please also read any lens related handling precautions listed in your camera’s instruction manual.
This device complies with Part 15 of the FCC Rules. Operation is subject to the following two conditions: (1) This device may not cause harmful interference, and (2) this device must accept any interference received, including interference that may cause undesired operation. Do not make any changes or modifications to the equipment unless otherwise specified in the instructions. If such changes or modifications should be made, you could be required to stop operation of the equipment. This equipment has been tested and found to comply with the limits for a class B digital device, pursuant to part 15 of the FCC Rules. These limits are designed to provide reasonable protection against harmful interference in a residential installation. This equipment generates, uses and can radiate radio frequency energy and, if not installed and used in accordance with the instructions, may cause harmful interference to radio communications. However, there is no guarantee that interference will not occur in a particular installation. If this equipment does cause harmful interference to radio or television reception, which can be determined by turning the equipment off and on, the user is encouraged to try to correct the interference by one or more of the following measures:
- Reorient or relocate the receiving antenna.
- Increase the separation between the equipment and receiver.
- Connect the equipment into an outlet on a circuit different from that to which the receiver is connected.
- Consult the dealer or an experienced radio/TV technician for help.
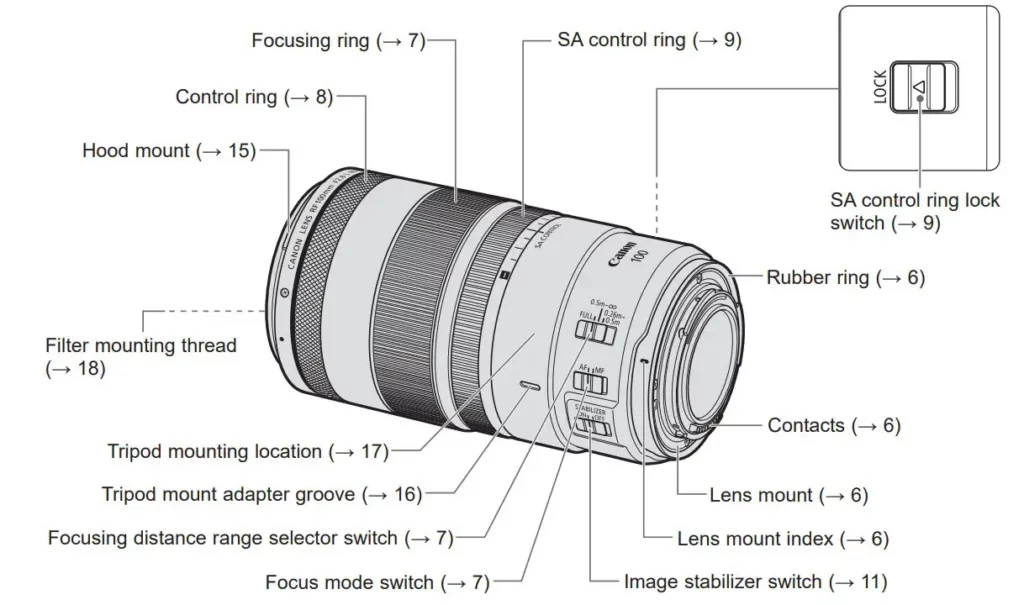
Nomenclature
1. Attaching and Detaching the Lens
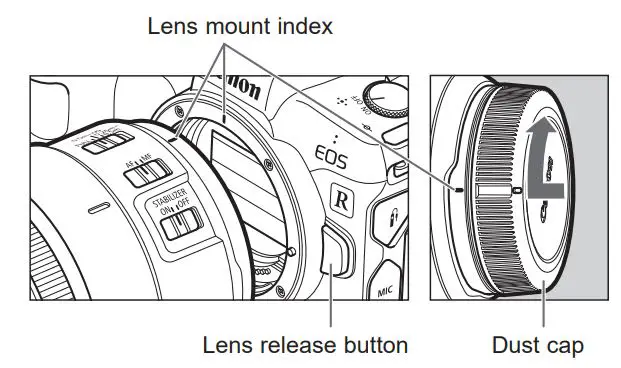
Attaching the Lens
Align the lens mount indexes of the lens and camera, and turn the lens clockwise until you hear a click.
Detaching the Lens
Turn the lens counterclockwise while pressing the camera’s lens release button. Detach the lens once it has stopped turning.
Please refer to the camera’s instructions for details.
 Set the camera’s power switch to OFF when attaching or detaching the lens.
- Attach the lens cap before detaching the lens from the camera.
- After detaching the lens, place the lens with the rear end up and attach the dust cap to prevent the lens surface and contacts from getting scratched. Make sure the lens and dust cap mount indexes are aligned when attaching the dust cap.
- Contacts that are scratched, soiled, or have fingerprints on them may result in faulty connections or corrosion, which may lead to malfunctions. If the contacts get soiled, clean them with a soft cloth.
- The lens mount has a rubber ring to improve dust-resistance and water-resistance performance. This rubber ring may cause friction marks to appear around the camera’s lens mount, although this will have no effect on usage.
 Rubber rings can be replaced at Canon Service Center. (chargeable)
2. Setting the Focus Mode
Focus mode switch To shoot in autofocus (AF) mode, set the focus mode switch to AF. To use only manual focusing (MF), set the focus mode switch to MF, and focus by turning the focusing ring.
- Quickly turning the focusing ring may result in delayed focus.
- The lens’ focusing ring is electronic.
- When AF operation is set to [ONE SHOT], manual focus is possible after autofocusing has been completed by continuing to press the shutter button halfway. (Full-time manual focus) However, the camera settings need to be changed. Please refer to the camera’s instructions for details.
3. Setting the Focusing Distance Range

Focusing distance range selector switch You can set the focusing distance range with a switch. Setting the focusing distance range prevents the lens from focusing on unintentional subjects at different distances.
Focusing distance range
- FULL (0.26 m/0.86 ft. – )
- 0.5 m/1.64 ft. –
- 0.26 m – 0.5 m/0.86 ft. – 1.64 ft.
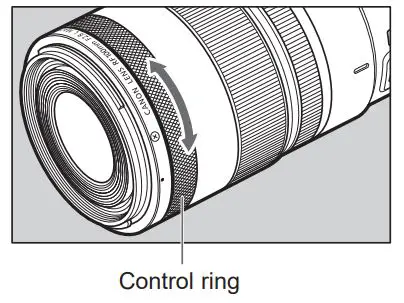
4. Control Ring
The control ring can be assigned the functions that are commonly used with cameras, such as shutter speed and aperture settings.
The click action of the control ring allows you to have a sense of how much it is being turned. Please refer to the camera’s instructions for details on how to use the control ring.
- There are cases in which the sound of control ring operations may be recorded when shooting movies.
- The clicking sensation of the control ring can be removed by the Canon Service Center. (chargeable)
5. SA Control Ring
The SA control ring can be used to adjust bokeh style (background blur) and get a soft focus effect (where the subject is made to look softer).
- SA stands for Spherical Aberration.
Using the SA Control Ring

1 Slide the SA control ring lock switch in the direction indicated by the arrow.
2 Turn the SA control ring from the central position towards either the + or – direction.
- Turning the SA control ring in the + direction will soften the bokeh outlines in front of the focus point, and strengthen the bokeh outlines behind the focus point.
- Turning the SA control ring in the – direction will soften the bokeh outlines behind the focus point, and strengthen the bokeh outlines in front of the focus point.
- When not using the SA control ring, return it to the central position (where it clicks) then slide the SA control ring lock switch to the LOCK position.
- Using the SA control ring will change the angle of view and the exposure. So, after using the SA control ring, you will need to adjust your composition.
- The SA control ring effect will differ depending on what you are shooting (focusing distance, distances between subject and background or foreground, etc.). The effect increases as the focusing distance gets shorter than infinity (), and is at its maximum at 0.50 m/1.64 ft. The effect diminishes as you get closer than 0.50 m/1.64 ft., and vanishes at 0.26 m/0.86 ft.
- The SA control ring effect will change according to aperture setting. The lower the f/number (larger aperture hole), the greater the effect, reaching its maximum when the lens is wide open. Conversely, the higher the f/number (smaller aperture hole), the less the effect. For that reason, shooting in aperture-priority AE mode is recommended.
- Quickly turning the SA control ring may result in delayed focus. z Autofocus (AF) can be used when the SA control ring is being used, but focus may be hard to achieve with
certain subjects. If that happens, switch to manual focus (MF). Note that you may have to manually adjust focus by enlarging the image, as the guide frame for the focus guide may not display properly. z Some subjects may cause focus to be lost when the SA control ring is used. If that happens, refocus the subject. - This lens reaches its maximum resolving power when the SA control ring is in the central position.
6. Image Stabilizer
This function provides image stabilization appropriate for shooting conditions (such as shooting still subjects, panning shots, and closeup (macro) shooting).
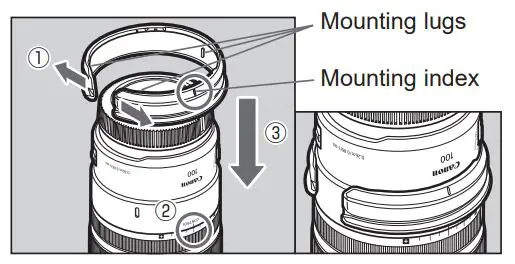
Set the image stabilizer switch to ON when you want to use the Image Stabilizer.
- Set the image stabilizer switch to OFF when you are not going to use the Image Stabilizer.
- The shorter the focusing distance is, the less the image stabilizer effect.
- The Image Stabilizer cannot compensate for a blurred shot caused by a subject that moved.
- The Image Stabilizer may not be fully effective if you shoot from a violently shaking vehicle or other transportation.
- When using a tripod, it is recommended that you set the image stabilizer switch to OFF.
- Even with a monopod, the Image Stabilizer will be as effective as during hand-held shooting. However, depending on the shooting conditions, there are cases in which the Image Stabilizer effect may be less effective.
- When shooting a still subject, it compensates for camera shake in all directions.
- It compensates for vertical camera shake during panning shots in a horizontal direction, and compensates for horizontal camera shake during panning shots in a vertical direction.
The Image Stabilizer for this lens is suited to hand-held shots in the following conditions.
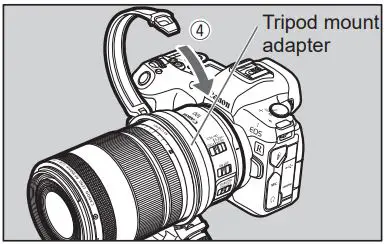
- Panning shots of vehicles, trains, etc.
- In semi-darkened areas such as indoors or outdoors at night.
- In locations where the flash cannot be used, such as art museums and theater stages.
- In situations where your footing is uncertain.
- In situations where fast shutter speed settings cannot be used.
7. Hand-held Close-up (Macro) Shooting
This lens allows users to focus from infinity to a magnification of 1.4x for close-up (macro) shooting.
Hold the camera steadily
Hold the camera steadily as shown in the illustration on the right when taking hand-held close-ups (macro), and shoot carefully to minimize camera shake and prevent focus blurring.
Taking photographs using servo AF
It is recommended that the camera AF operation is set to [Servo AF] when taking close-up (macro) shots. Refer to the camera’s instructions for further details.
- It is necessary to be careful with the following during close-up (macro) shooting.
• Camera shake creates more impact than on normal shots, and the effects of the image stabilizing function are reduced.
• Depth of field becomes extremely shallow when taking close-up (macros) shots, and the focus may blur if the camera is moved forward or backward. - The minimum focusing distance (minimum distance between the subject and the imaging area) is 0.26 m / 0.86 ft. The working distance (distance between the front end of the lens and the subject) is 8.6 cm / 0.28 ft.
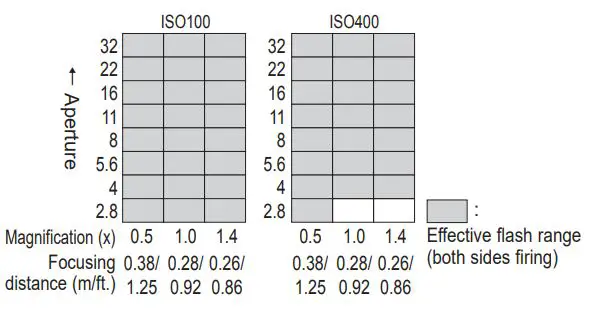
Place both elbows on a steady surface such as a table.
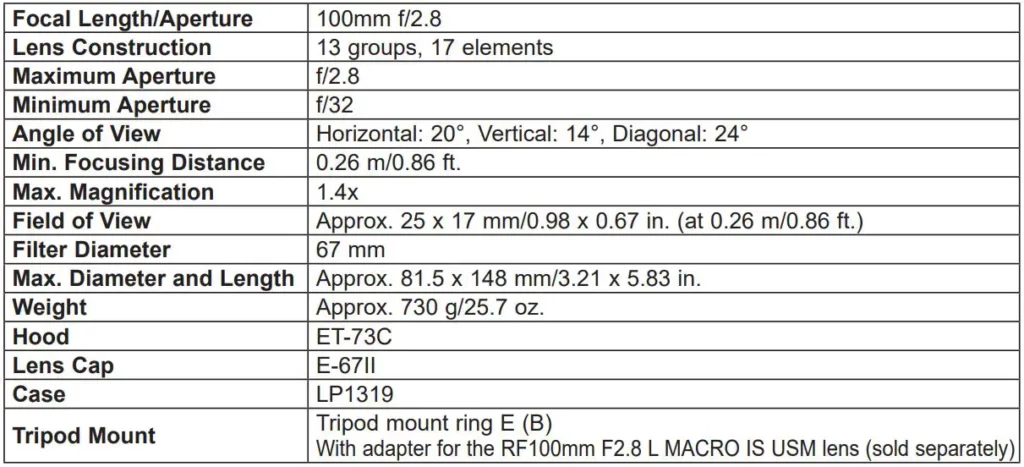
Use your knee to support the elbow of the arm holding the camera or lens.

Lean against a steady object like a wall to support your body and arm.
8. Exposure When Taking Close-up (Macro) Shots
Setting the Exposure
When taking photographs using TTL metering, no exposure compensation is necessary because the light coming through the lens is measured. With TTL metering, photographing with AE (auto exposure) is possible at all focusing distances. Just select the desired picture-taking mode, then check the shutter speed and aperture before taking a picture.
Magnification and Effective f-number
The aperture displayed on the camera assumes that the focus is set to infinity (). The actual aperture (effective f-number) becomes darker (effective f-number increases) at closer focusing distances (magnification increases). This has almost no influence on the exposure for normal picture taking. However, for close-up (macro) shooting, the change in the effective f-number is more than negligible.
When deciding the exposure using a hand-held exposure meter, apply the following exposure factor.
* Upper values: 1/3 stops. Lower values: 1/2 stops.
- Conditions of the subject are very important when deciding on the correct level of exposure for close-up (macro) shooting. It is therefore recommended that you change the exposure level as much as possible during shooting, or that you take pictures while checking the images on the camera’s LCD monitor.
- During close-up (macro) shooting, it is recommended that you use either the aperture priority AE (Av) mode or manual exposure (M) mode, in which adjustment of the depth of field and exposure is easier.
9. Hood
The custom lens hood reduces unwanted light that causes flare and ghosting and protects the front of the lens from rain, snow, and dust.
Attaching the Hood
Align the red attachment position mark on the hood with the red dot on the front of the lens, and then turn the hood in the direction of the arrow until you hear a click.
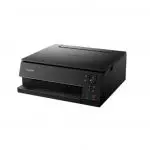
Detaching the Hood
Keep your finger pressed down on the button located on the side of the hood, and then turn the hood in the direction of the arrow until the attachment position mark on the hood is aligned with the red dot on the front of the lens to detach it. The hood can be reverse-mounted on the lens for storage.
- If the hood is not attached properly, igniting (darkening of the perimeter of the picture) may occur. z Grasp and turn the base of the hood when attaching and detaching it. There are cases in which it may become deformed if the hood is turned with it grasped near to the rim.
10. Tripod Mount (Sold separately)
This lens can be used with the tripod mount ring E (B) with adapter for the RF100mm F2.8 L MACRO IS USM lens, sold separately. Attach the lens to the tripod mount adapter before attaching the tripod mount.
Attaching the Tripod Mount Adapter

While spreading the tripod mount adapter opening (1), match the mounting index on the adapter with the SA control ring index on the lens (2), and slide the adapter along from the lens mount side (3).
- The tripod mount adapter’s inner lugs should slide into the grooves on the lens barrel. The adapter should not be able to rotate around the lens barrel.
Removing The Tripod Mount Adapter

Grip both sides of the tripod mount adapter opening with the fingers of both hands (1), spread it open (2) with a slight downward motion toward the front of the lens, and then slide it upwards over the lens mount to remove it (3).
- If a white powder-like substance is apparent on the surface of the lens after the tripod mount adapter has been removed, wipe it clean with a cloth or similar item.
- When attaching or removing the the tripod mount adapter, ensure that the lens cap and dust cap are both on and set the lens so that the lens mount side faces up.
Attaching the Tripod Mount

1 Open the collar of the tripod mount
- Turn the lock knob counterclockwise until it becomes loose (about 3 turns) (1).
- Pull the knob in the direction of the arrow (2) to release the collar (3).

2 Attach tripod mount to lens
- With the collar open, insert the tripod mount onto the adapter and close the collar (4).

3 Fix tripod mount to lens
- While pulling the lock knob (5), insert the end of the open collar until it reaches its original position (6).
- While depressing the lock knob, turn and tighten it, thus fixing the mount securely to the lens (7).
When removing the tripod mount, hold the camera and lens and remove the mount following the above procedure in reverse.
Switching the Orientation of the Image
By loosening the lock knob on the tripod mount you can rotate the camera and the lens to switch the image in any orientation (vertical, horizontal, etc.). Make sure that the lock knob is tightened after setting the camera in place.
11. Filters (Sold separately)
- When photographing from a tripod attached to the tripod mount, using [Elec. 1st-curtain] or [Electronic] settings is recommended* with cameras with interchangeable shutter mode settings.
* When using an EOS R camera, select either [Mode 1] (default factory setting) or [Mode 2] in the [Silent LV shoot.] settings, or select [Enable] in the [Silent shutter] settings. - When carrying the lens with the tripod mount attached, ensure that the tripod mount lock knob is securely tightened, and take care when carrying. Not doing so may result in the product falling off, leading to damage or injury.
You can attach filters to the filter mounting thread on the front of the lens.
- Filters and the Canon macro flash cannot be used on this lens at the same time.
- If you need a polarizing filter, use the Canon Circular Polarizing Filter PL-C B.
- Detach the hood when adjusting the polarizing filter.
12. Macro Flash (Sold separately)
The Macro Ring Lite MR-14EX II or Macro Twin Lite MT-26EX-RT enables macro flash photography up to 1.4x magnification in E-TTL II autoflows mode. Attach the Macro Lite Adapter 67 (sold separately) on the filter mounting thread on the front of the lens for macro flash photography.

When the MR-14EX II is in use
• Effective Flash Range (Reference) (With the SA control ring in the central position) Aperture

- For information on operating the Canon Macro Ring Lite MR-14EX II or the Macro Twin Lite MT-26EX-RT, refer to the individual instruction booklets.
- Using the SA control ring will change the effective flash range, so please take a test shot beforehand to check exposure.
When the MT-26EX-RT is in use
The MT-26EX-RT’s flash range largely depends on the flash head’s position.
- In the event of over-exposure, use a diffuser adapter, lower the ISO sensitivity setting, or reduce the aperture size.
Specifications

- The lens length is measured from the lens mount surface to the front end of the lens. Add 24.2 mm/0.95 in. when including the lens cap and dust cap.
- The maximum diameter, length and weight listed are for the lens itself only.
- Close-up Lens 250D/500D cannot be attached because there is no size that fits the lens.
- You cannot use extenders.
- All data listed is measured according to Canon standards. z Product specifications and appearance are subject to change without notice.
Holding the Printer
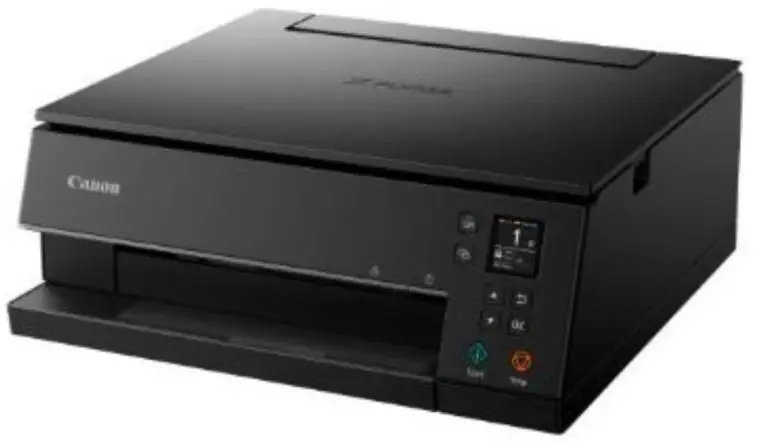
Instructional Videos
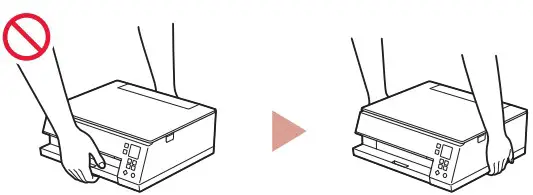

Setting Up the Printer
Box Contents
- Ink tanks for setup
- Power cord
- Setup CD-ROM for Windows
- Safety and Important Information
- Getting Started (this manual)
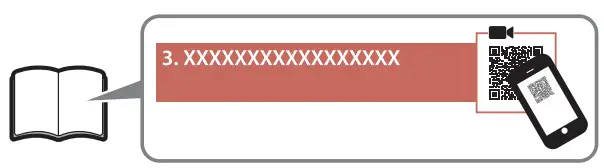
Removing Packing Materials
Important
When printing starts, the paper output tray extends out automatically. Do not place anything in front of the printer.
- Remove and dispose of any packing materials and orange tape.
- Open the scanning unit / cover and remove the orange tape.

- Close the scanning unit / cover.
- Open the scanning unit / cover fully and then close it.

Caution Watch your fingers.
- Open the scanning unit / cover fully and then close it.
Turning on the Printer
- Connect the power cord.
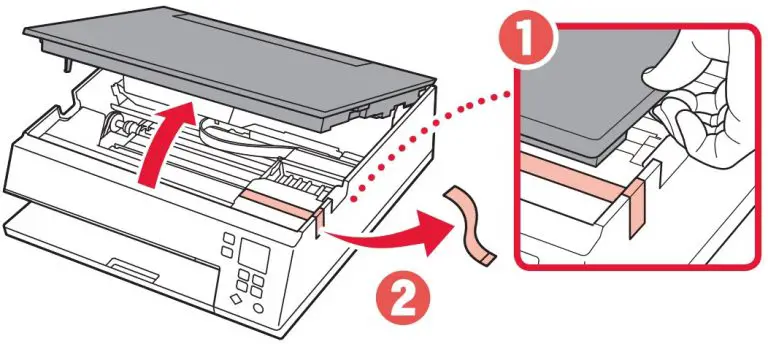
Important:At this time, do not connect any other cables. - Press the ON button.
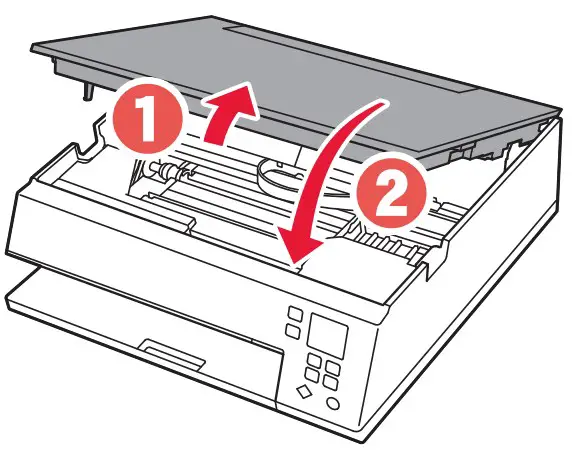
- Use the
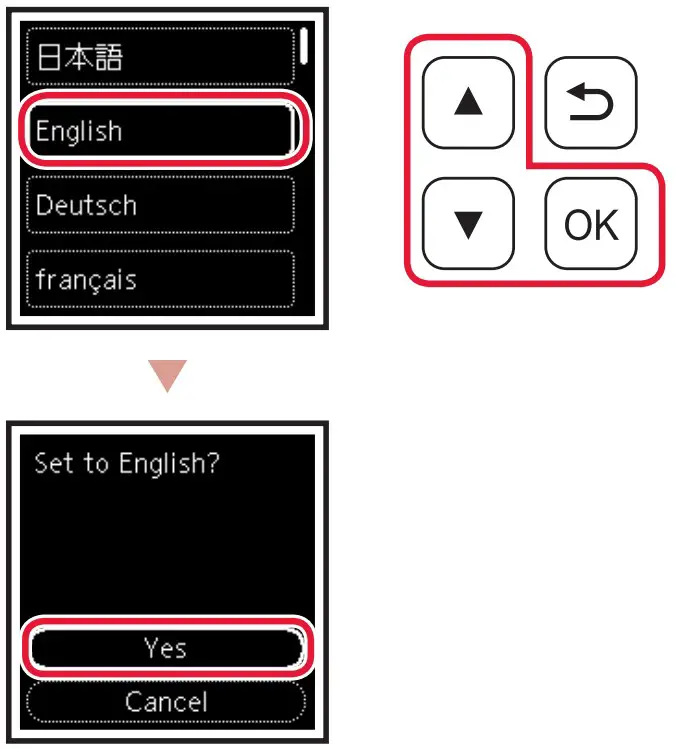 ,
,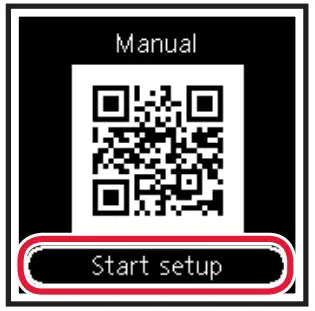 and OK buttons to select a language.

- Press the OK button.

Important: Scan the QR code for a video tutorial of the setup procedure. - Use the and buttons to check the onscreen content, and then press the OK button.
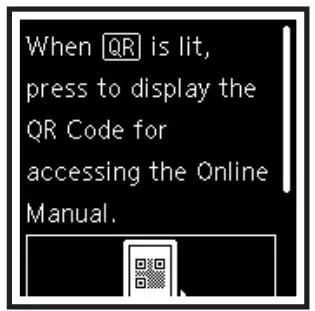
Installing the Ink Tanks
- Open the scanning unit / cover.
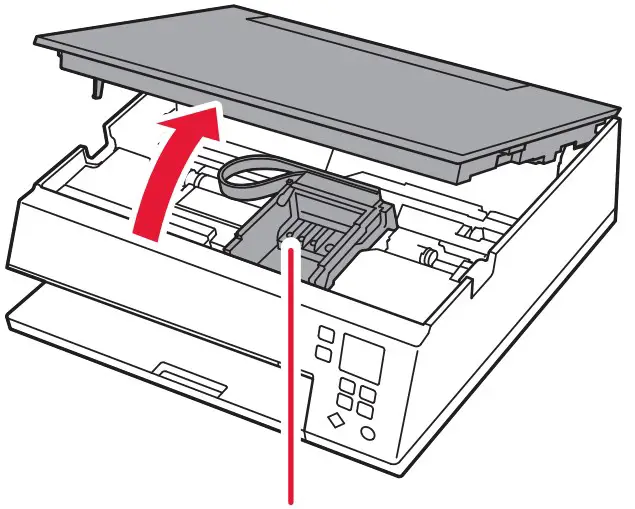
Caution: Do not touch the print head holder until it stops moving. - Remove the tape and film on the ink tank.
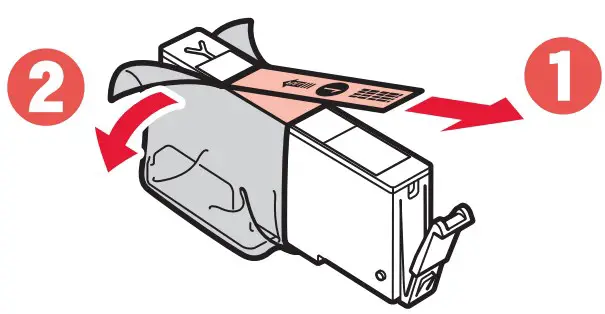
Check that no tape is left over. - Slowly remove the orange cap.
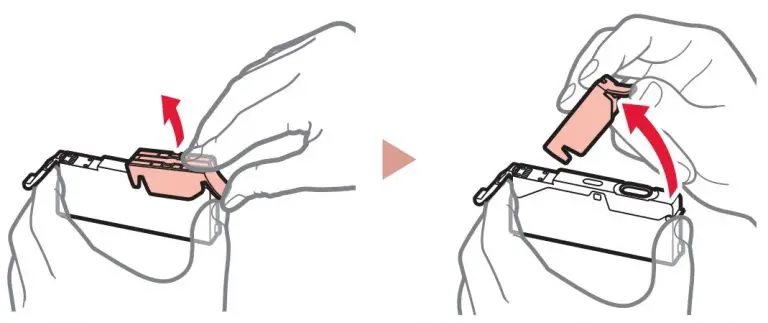
Important:- Do not squeeze the ink tank with the Y-shaped air hole blocked.
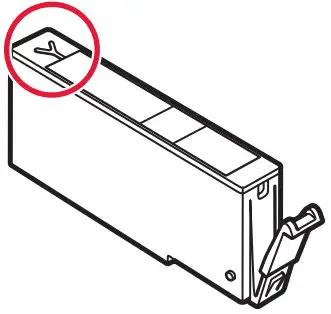
- Do not touch the areas shown in red.
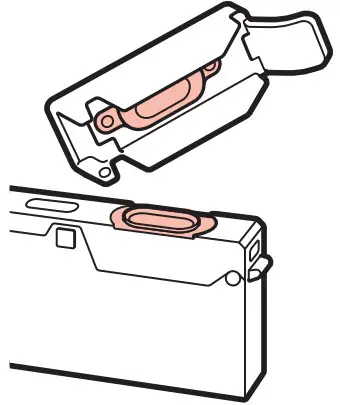
- Do not squeeze the ink tank with the Y-shaped air hole blocked.
- Install the ink tank.
- Insert the ink tank into the print head and press down until it clicks.
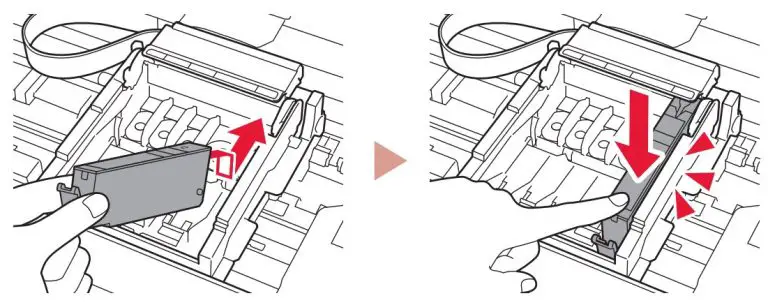
- Insert the ink tank into the print head and press down until it clicks.
- Check that the
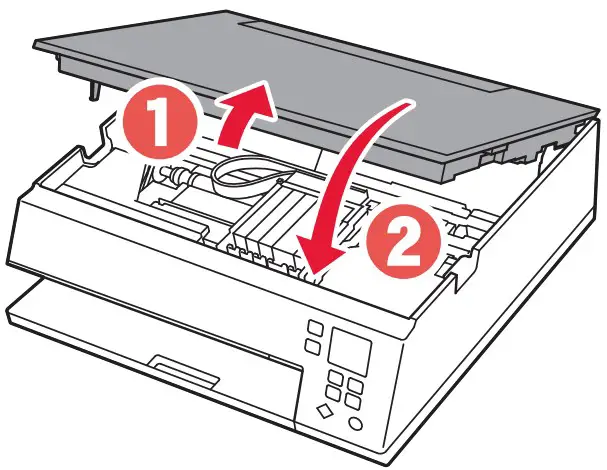 mark appears on the screen.
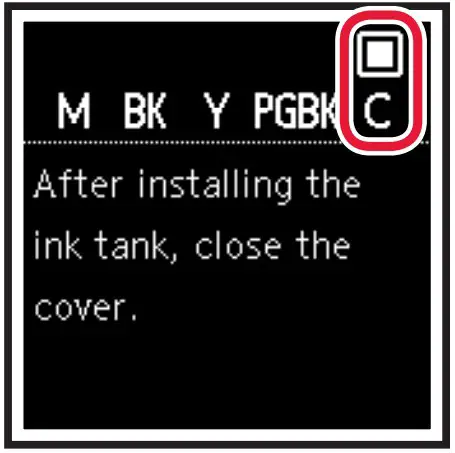
Important: If themark is not displayed on the screen even though you have installed the ink tank, the color of the ink tank may be wrong or you may have installed an ink tank, such as one with a different model number, that is not supported by this printer. Either install an ink tank for the correct color or use the provided ink tank for setup. - Repeat steps 2 through 5 to install all the ink tanks.
- Check that a mark is displayed on the screen for each color.
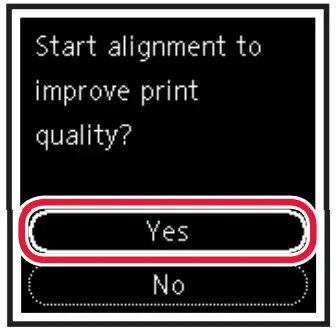
- Check that a
- Close the scanning unit / cover.
- The printer will start initializing.
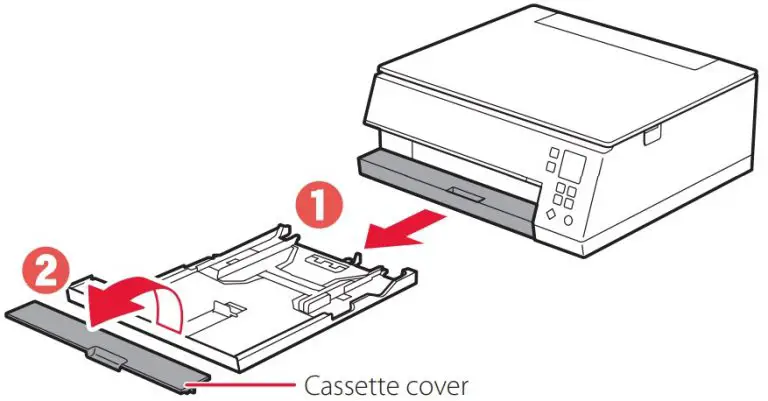
Caution: Watch your fingers.
- The printer will start initializing.
Loading Paper
- Press the OK button.
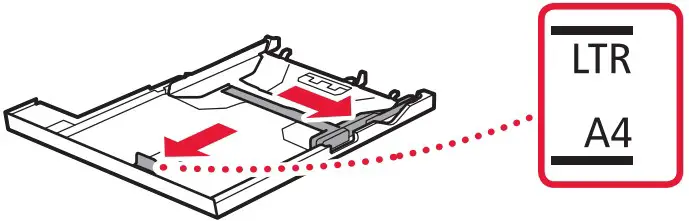
- Remove the cassette from the printer and remove the cassette cover.
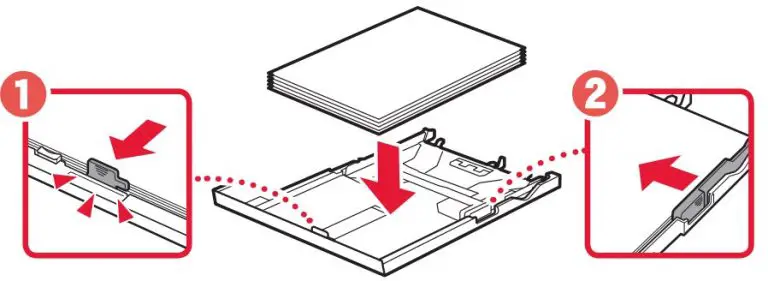
- Slide apart the paper guides.
- Slide the right paper guide to the right edge. Align the front paper guide with the Letter or A4 mark.
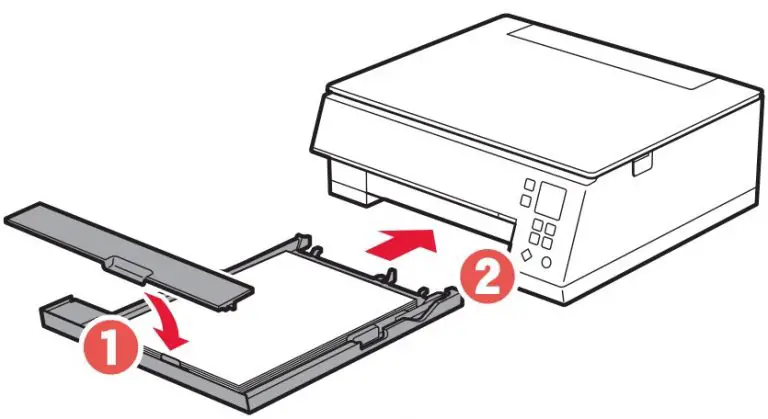
- Slide the right paper guide to the right edge. Align the front paper guide with the Letter or A4 mark.
- Load paper.
- Load 2 or more sheets of Letter or A4 sized plain paper with the print side facing down.
- Place the paper against the front paper guide, and align the right paper guide to the width of the paper.
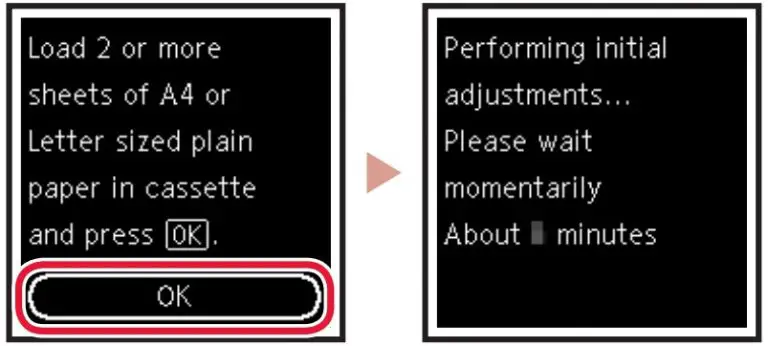
- Attach the cassette cover and replace the cassette.
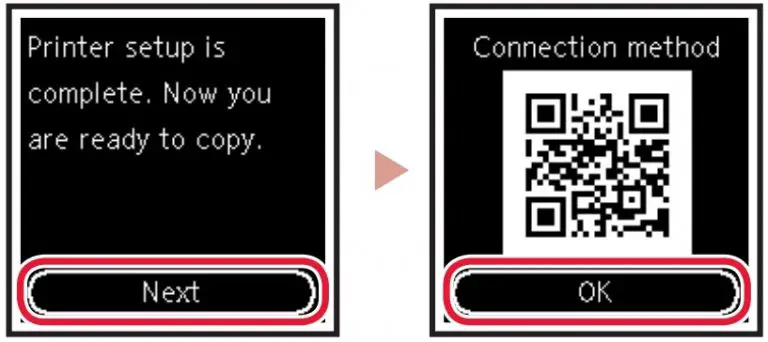
- Press the OK button.

- Press the OK button.
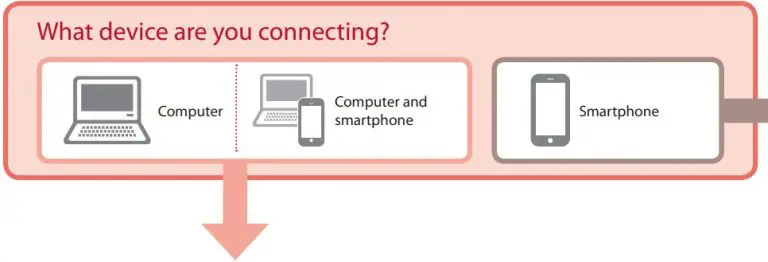
Important: Scan the QR code for a video tutorial of the setup procedure. - Check that the following screen appears.

Note: If you will use the printer without connecting any other devices, setup is now complete.
What device are you connecting?

Connecting to a Computer
If you are using multiple computers, perform these steps on each computer.
- Access the Canon website from a computer.
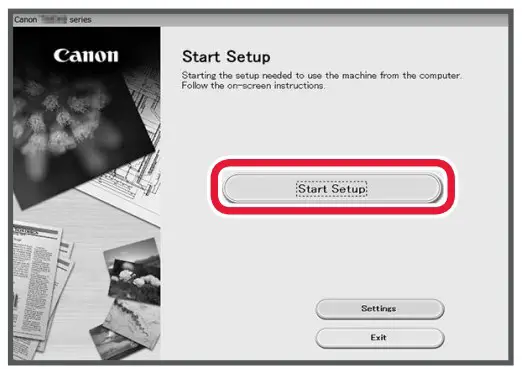
- Select
 Set Up.
 - Enter your printer’s model name and click Go.
- Click Start.
- Click If you have already prepared your printer, go to Connect.
Note: The following steps are for Windows (except Windows 10 in S mode) and macOS users. For other operating systems, continue setup by following the on-screen instructions instead. - Click Download.
- Run the downloaded file.
- Click Start Setup.
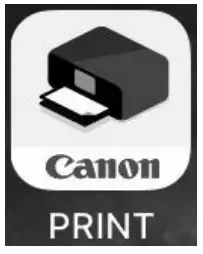
- Follow the on-screen instructions.
- These operations may take some time.
- To connect to a smartphone as well, see “6-b. Connecting to a Smartphone” on page 5
Using the Setup CD-ROM for Windows
Double click EasySetup.exe in the CD-ROM, and then continue from step 3. If you do not have an internet connection, open the win folder in the CD-ROM and double click SETUP.exe. This will install the printer driver.
Connecting to a Smartphone
If you are using multiple smartphones, perform these steps on each smartphone
Prepare the following before starting.
- Enable the Wi-Fi setting on your smartphone.
- Connect your smartphone to the wireless router (if you have a wireless router)
Refer to your smartphone and wireless router manuals for more details.
- Install the “Canon PRINT Inkjet/SELPHY” app on your smartphone.
- Scan the QR code shown on the right to access the Canon website, and then download the app.
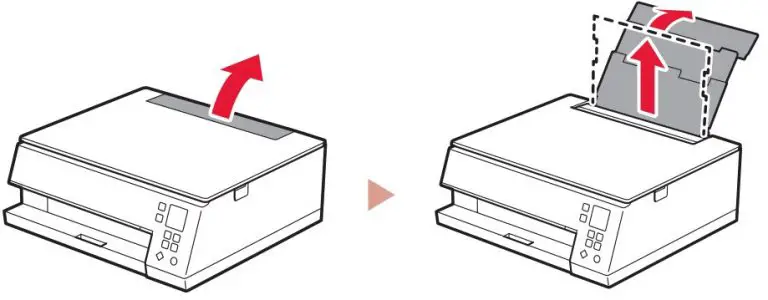
- Scan the QR code shown on the right to access the Canon website, and then download the app.
- Open the installed app.
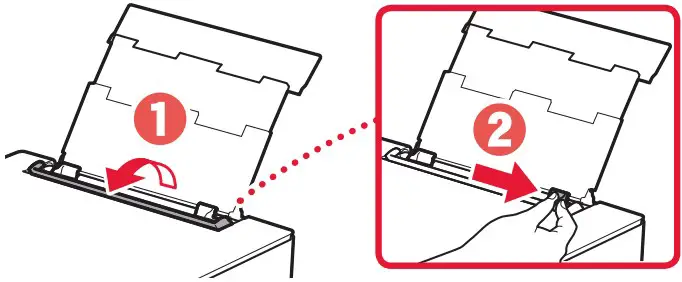
- Follow the on-screen instructions in the app to add your printer.
Note: Once you have added your printer, you can print from your smartphone. To print photos, see “Loading Photo Paper” on page 6.
Loading Photo Paper
Photo paper can only be loaded in the rear tray
- Open the rear tray cover and extend the paper support.
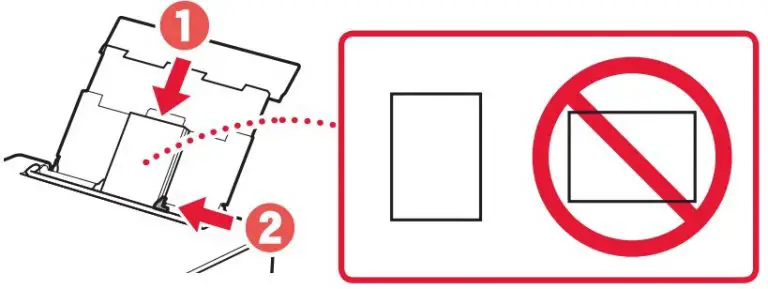
- Open the feed slot cover and slide the right hand side paper guide to the far right.
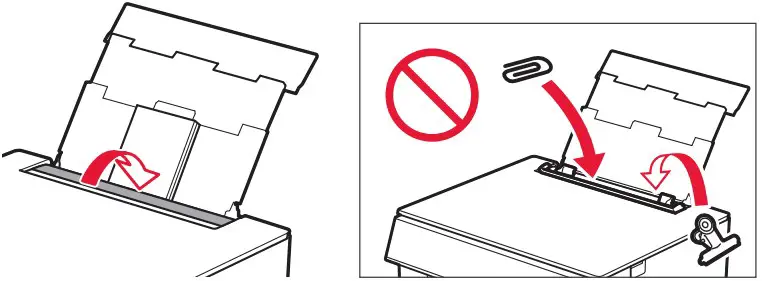
- Load several sheets of photo paper with the print side facing up and slide the side paper guide against the edge of the paper stack.

- Close the feed slot cover.
- Follow the on-screen instructions to set information for the loaded paper.
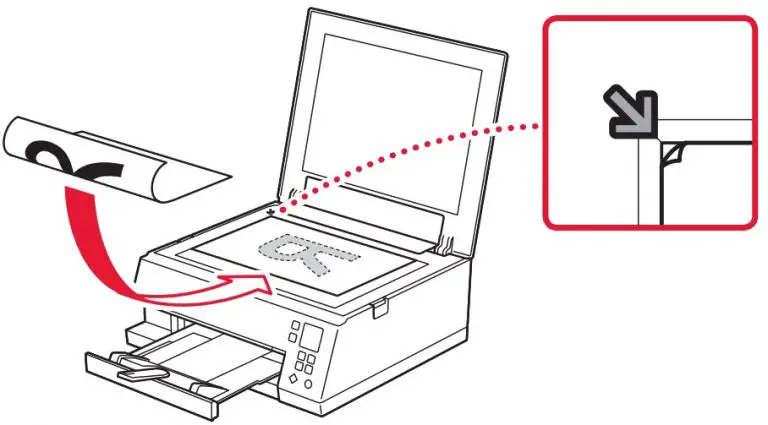
- Follow the on-screen instructions to set information for the loaded paper.
Copying
- Turn on the printer.
- Load Letter or A4 sized plain paper.
- Open the document cover and place the document face down on the platen. Align the document with the alignment mark (
 ).
).

- Close the document cover.
- Press the OK button.
- Select Copy settings, and then press the OK button.
- Specify print settings using the
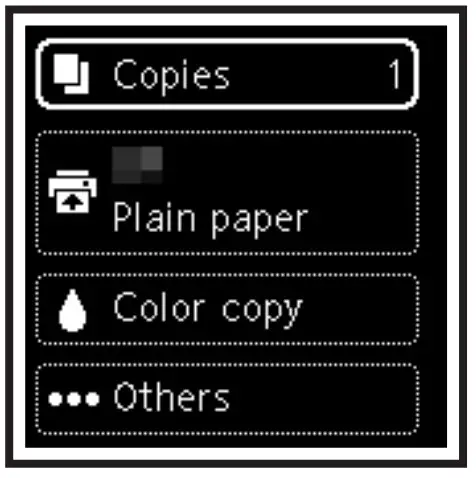 ,
,  and OK buttons.
- Press the Start button.

PIXMA G5020
Wireless MegaTank Single Function Printer
Version 1.0
DISCLAIMERS
SPECIFICATIONS ARE SUBJECT TO CHANGE WITHOUT NOTICE. ALL VIEWSCREEN AND OUTPUT IMAGES ARE SIMULATED.
- 30 ink cartridge sets is based on print yield of the included black and color Ink bottles as compared to the following standard-capacity cartridge sets: PG-245 Black Ink Cartridge and CL-246 Color Ink Cartridge as of April 2019. Ink value based on MSRP (USD) of equivalent cartridge sets.
- Page yield of included ink bottles used for initial setup is lower than the replacement ink bottles, as a certain amount of ink is consumed to fill into the print head during setup (charging the print head initially). Page yield is the estimated value based on Canon’s individual test method using the ISO/IEC 24712 chart and continuous printing simulation with the replacement ink bottles after initial setup. Page yield of color inks is an average yield of cyan, magenta, and yellow inks combined. Page yield varies significantly depending on content printed, ink levels maintained in all four reservoirs, and other factors. Up to 6,000 (black),/7700 (color) printed page yields are approximate, based on document pages printed.
- Wireless printing and seaming require a working network with wireless 802.11b/g/n capability, operating at 2.4GHz. Wireless performance may vary based on terrain and distance between the printer and wireless network clients.
- Requires an Internet connection and the Canon PRINT Inkjet/SELPHY app, available for free on the App Store and at Google Play. Compatible with iPad, iPhone 3GS or later, and iPod touch 3rd generation or later devices running iOS 7.0 or later, and Android mobile devices running Android 2.3.3 or later. Your device must be connected to the same working network with wireless 802.11 big/Wm/ad capability as your printer. Requires a compatible social media account and is subject to that social media account’s Terms of Service. Certain exceptions may apply.
- Paper types NOT supported for borderless printing are as follows: Envelope. High-Resolution Paper. T-Shirt Transfer and Photo Stickers. The maximum borderless printing size is 8.5″xlr.
- AirPrint functionality requires a compatible le Pad, iPhone, or iPod Touch device ruining iOS 7.0 or later, and an AirPrint-enabled printer connected to the same network as your iOS device. A printer connected to Mac running MacOS X 10.9 or later supports AirPrint via USB connection. A printer connected to the USB port of your PC, AirPort Base station. or Time Capsule is not supported.
- Requires Android mobile device with Android 4.4 operating system or later with the Mopria Print Service pre-loaded with that device and the compatible PIXMA printer on the same wireless network. The Mopria experience is also available on Android 4.4 mobile devices with a download of the Mopria Print Service from Google Play.
- Requires a smart device with the Canon PRINT Inkjet/SELPHY app installed and connected to the desired active wireless network to complete cableless setup.
- The Easy-PhotoPrint Editor software requires an Internet connection and is compatible with the following operating systems; Microsoft Windows 10 (64-bit/32-bit), Microsoft Windows 8.1(64-bit/32-bit), Microsoft Windows 7 PI (64-bit/32-bit), macOS High Sierra v10.13, macOS Sierra v10.12, Mac OS X El Capitan v10.II and Mac 05 X El Capitan v10.10.5. Minimum Windows and macOS/Mac OS X requirements are 2GB of RAM and a monitor with IO24x768 resolution. The Easy-PhotoPrint Editor mobile application requires an Internet connection and the Easy-PhotoPrint Editor app v1.1.0, available for free on the App Store and at Google Play. Compatible with iPad Air2 (2nd Generation), Pad Mini 4 and iPhone 6s or later devices running iOS 10 or later, and Android mobile devices running Android Sx or later. Certain exceptions may apply. The following file formats are supported: _PEG. PNG, HEIF (devices running iOS 11 and Mac OS v10.13 or later), DLP save data. Poster Artist export data, EasyPhoto+ export data, Easy-PhotoPrint Editor export data.
- Requires an Internet connection and Google account. Subject to Google Terms of Service. Certain exceptions may apply.
- Requires an Internet connection and the Message In Print app (Version 1.1), available for free on the App Store and at Google Play Compatible with Pad and iPhone 6 or later devices running iOS 10 or later, and Android mobile devices running Android 5.1 or later. Your device must be connected to the same working network with wireless 802.11 b/g/n/ac/ad capability as your printer. Requires original content to be created using the Message In Print app/service, then printed on a compatible Canon Printer released in August 2009 or later and delivered to the recipient. who views images and content through the compatible Message In Print app on their compatible device. Compatible paper sizes include 3.55( x15′, 4Th 4′ Square, 4- x 6- and 5′ x 5- Square only, and compatible media types include Genuine Canon Photo Paper Glossy, Photo Paper Semi-Gloss, Photo Paper Luster and Photo Paper Matte only. Certain exceptions may apply.
- Document print speeds are the averages of ESAT in Office Category Test for the default simplex mode. ISO/IEC 24734. Photo print speed is based on the default setting using IS0/11S-SCID N2 on Photo Paper Plus Glossy 11 and does not take into account data processing time on host computer. Print speed may vary depending on system configuration, interface, software, document complexity, print mode, page coverage, type of paper used etc.
- Resolution may vary based on printer driver setting. Color ink droplets can be placed with a horizontal pitch of 1/4800 inch at minimum.
- Duty Cycle is defined as the maximum number of printed pages for a single peak month.
- DPS over IP compatible device required.
- Canon Print Service is a print plug-in for Android smart devices, which enables printing from Android v4.4 – v5.0 devices to many Carbon printers via a Wi-Fi network. The plug-in does not work as a standalone app. Available for free at Google Play.
- Requires an active smart assistant account linked and accompanying app-enabled, the smart device and printer to be actively connected with permission to the Canon Inkjet Cloud Printing Center, and the required action(s), skill(s), or applet(s) available/enabled to the compatible printer. Voice commands can not be displayed as text on Amazon smart devices with screens.
- Requires an active IFTTT account, the printer to be actively connected with permission to the Canon Inkjet Cloud Printing Center, and an IFTTT ‘applet’ installed/enabled and required active account/service linked to the printer
- The operation can only be guaranteed on a PC with pre-installed Windows 10, Windows 8.1, Windows 7 SPI.
- Internet Connections are required during software installation. For full compatibility macOS, v10.12.1 or later is recommended.
- Some functions may not be available with these Operating Systems. Please refer to the manual or website for details.
- Requires “Canon Print Plug-in’ available for free from the Amazon Appstore and an Amazon Fire Phone, Amazon Kindle Fire HD6 or HDX7 device or later running Fire OS 4.0 or later.
- PosterArtist Lite software v2.60.00 is compatible with 64/32 bit versions of Microsoft Windows 10, Windows 8.1, Windows 8, Windows 7, and Windows Vista, and only compatible with Canon PIXMA (released after July 2015), MAXIFY, imagePROGRAF, and Oct printers. Minimum computer system requirements: Pentium4 2.4Ghz CPU or higher with 1GB RAM, 1024×768 pixel display, and 5GB of system hard drive space.
- Warranty programs are subject to certain conditions and restrictions. See www.usa.canon.com/support for details.
- Product box dimensions measured in a vertical box configuration.

©2019 Canon USA Inc Canon and PIXMA are registered trademarks of Canon Inc. in the U.S. and may be registered trademarks or trademarks in other countries. Microsoft Windows, the Windows logo, and Internet Explorer are trademarks or registered trademarks of the Microsoft group of companies in the US and other countries. Apple, iPad, ‘Phone, iPod touch, and Time Capsule are registered trademarks of Apple Inc. Android, Google Assistant, and Google Play are trademarks of Google Inc. The Mopria logo is a trademark of Mopria Alliance. Inc. Amazon, Alexa, Fire, and all related logos are trademarks of Amazon.com, Inc. or its affiliates. The USB-IF logo is a trademark of Universal Serial Bus Implementers Forum, Inc Wi-Fi is a registered trademark of the Wi-Fi Alliance. The aWi-Fi CERTIFIED’ logo is a certification mark of the Wi-Fi Alliance. The Wi-Fi Protected Setup Mark is a mark of the Wi-Fi Alliance. All other product and brand names are trademarks of their respective owners. As an ENERGY STAR partner, Canon U.S.A., Inc has certified this product as meeting the ENERGY STAR energy efficiency criteria through an EPA-recognized certification body.
MAY 2019
]]>