PRODUCT SAFETY
READ CAREFULLY AND KEEP FOR FUTURE REFERENCE
- This appliance can be used by children aged from 8 years and above and persons with reduced physical, sensory or mental capabilities or lack of experience and knowledge if they have been given supervision or instruction concerning use of the appliance in a safe way and understand the hazards involved. Children shall not play with the appliance. Cleaning and user maintenance shall not be made by children unless they are older than 8 and supervised.
- Keep the appliance and its cord out of reach of children less than 8 years old.
- Bread can burn therefore do not use the appliance near or below combustible materials such as curtains. Never use the appliance below wall cupboards or shelves.
- Never operate the appliance by means of an external timer or separate remote-control system.
- Do not touch the metal parts of the appliance during use as they may become very hot.
- If the supply cord is damaged, it must be replaced by the manufacturer, its service agent or similarly qualified persons in order to avoid a hazard.
 Never use this appliance for anything other than its intended use. This appliance is for household use only. Do not use this appliance outdoors.
Always ensure that hands are dry before handling the plug or switching on the appliance.
Always use the appliance on a stable, secure, dry and level surface.
This appliance must not be placed on or near any potentially hot surfaces (such as a gas or electric hob).
The power cord is not replaceable by the user.
Always return the appliance if the power cord is damaged to avoid any hazard.
Do not use the appliance if it has been dropped or if there are any visible signs of damage.
Ensure the appliance is switched off and unplugged from the supply socket after use and before cleaning.
Always allow the appliance to cool before cleaning or storing.
Never immerse any part of the appliance or power cord and plug in water or any other liquid.
Never let the power cord hang over the edge of a worktop, touch hot surfaces or become knotted, trapped or pinched.
Never leave the appliance unattended when in use.
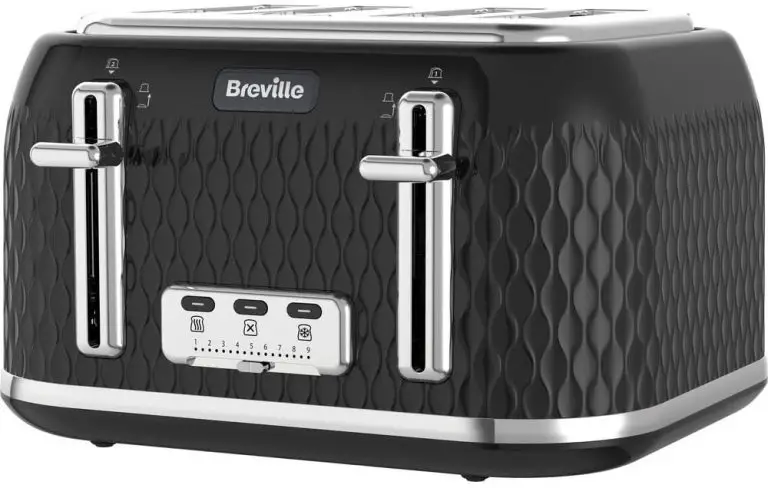
PRODUCT OVERVIEW

1, 2, 3, 4. Bread slots
A. Loading handle for slots 1 and 2 with high lift feature
B. Crumb tray (at rear)
C. Frozen bread button
D. Cancel button
E. Browning control
F. Reheat button
G. Loading handle for slots 3 and 4 with high lift feature
BROWNING CONTROL
The browning control regulates how much the bread is toasted—in other words, the colour of the toast.
Lower settings produce lighter toast and higher settings produce darker toast.
When setting the browning control, remember that dry or thin slices of bread will toast quicker and require a lower setting. Moist or thick slices of bread will require a higher setting
CANCEL BUTTON
The toasting process can be stopped at any time by pressing the cancel button.
HIGH LIFT FEATURE
The high lift feature uses the loading handle to help you to remove the toast. When toasting has finished, simply lift the loading handle upwards from its rest position to raise the toast and make it easier to remove.
FROZEN BREAD FUNCTION
The frozen bread function allows you to toast bread straight from the freezer. Insert the bread into your toaster, press the loading handle down and then press the frozen bread button. Your toaster will extend the toasting time to allow the bread time to defrost. Watch the toast to ensure that it doesn’t burn.
REHEAT FUNCTION
The reheat function will heat up toast that has cooled or gone cold. Press the loading handle down then press the reheat button. Keep a careful eye on the toast to ensure that it doesn’t burn. Don’t use the reheat function on buttered toast.
BREAD SLOTS 1 AND 2
Always use bread slots 1 and 2 when toasting one or two slices of bread. The  symbol above the loading handle indicates that this should be the first handle to be engaged.
BREAD SLOTS 3 AND 4
When toasting more than two slices of bread, use slots 3 and 4 in addition to slots 1 and 2. Lower the handle marked first, then lower the handle marked  . Loading handle will not latch unless loading handle is already in the latched position.
BEFORE FIRST USE
 Never force bread into the toasting slots. Bread should fit easily into the toasting slots. Never toast slices of bread that have been buttered. Take extra care when toasting items that contain sugar, jam or preserves, as there is a risk of the ingredients leaking into the toaster, causing overheating. Don’t use bent, damaged or broken bread in your toaster as it may cause it to jam.
Carefully remove your toaster from its box. Remove all packaging from inside the toasting slots.
Position your toaster on a stable, secure, dry and level work surface away from the edge. Bread may burn therefore do not use the appliance near or below combustible materials such as curtains. Never use the toaster below wall cupboards or shelves.
Before connecting to a power source, make sure your mains supply voltage is the same as the one indicated on the appliance. Connect the plug to a suitable power outlet and make sure that the power cord does not overhang the work surface.
When you first use your toaster, there may be a slight odour as the heating elements warm up for the first time. This is quite normal and not a cause for concern. To remove the odour, simply operate your toaster for the first time without any bread in it.
USING YOUR TOASTER
- Set the level of toasting using the browning control. The higher the number selected, the darker the toast will be.
- Place the bread into the toasting slots. You can toast one, two, three or four slices of bread.
If you are toasting one or two slices, place them into the right hand pair of slots. Press the loading handle down until it latches. The bread will be lowered into the toaster and toasting will begin.
The loading handle will not latch if you are toasting one or two slices of bread and they are placed in the left hand slots or if your toaster is not connected to the mains supply. - When toasting has finished, the loading handle will rise and the toasted bread can be removed.
You can lift the loading handle upwards beyond its rest position to help you remove the toast. - If the toast is not done enough it can be toasted again. Turn the browning control to a lower setting and watch the toast to ensure that it doesn’t burn.
- Toasting can be stopped at any time by pressing the cancel button.
TOASTING TIPS
- Toasting is a combination of drying and cooking the bread and, because moisture levels differ from one bread to another, toasting times can vary.
- For slightly dry bread, use a lower setting than normal.
- For fresh bread or whole wheat bread, use a higher setting than normal.
- Bread which has a very uneven surface will require a higher setting.
- Thicker cut pieces of bread (including crumpets) will take longer to toast—sometimes significantly longer. This is because more moisture must be evaporated from the bread before toasting can occur. Very thick pieces of bread may require two toasting cycles.
- When toasting raisin or other fruit breads, remove any loose raisins or fruit from the surface of the bread before putting it into your toaster. This will help prevent fruit pieces from falling into your toaster or sticking to the guard wires in the toasting slot.
SINGLE SLICE TOASTING
If you are toasting a single slice of bread, set the browning control to a lower setting than normal. By using a lower setting when toasting a single slice of bread, it will not be over toasted.
IF YOUR TOASTER JAMS
![]() Never use a knife or any other utensil or implement to remove jammed bread. Never insert your fingers into the bread slots.
Never use a knife or any other utensil or implement to remove jammed bread. Never insert your fingers into the bread slots.
- Switch the toaster off at the mains supply socket and unplug it.
- Allow the toaster to completely cool down.
- Carefully ease the bread out of the toaster being careful not to damage the heating element.
CLEANING
![]() Always switch off, unplug and allow the toaster to cool down before moving, cleaning or storing. Never immerse the toaster or power cord and plug in water or any other liquid.
Always switch off, unplug and allow the toaster to cool down before moving, cleaning or storing. Never immerse the toaster or power cord and plug in water or any other liquid.
- Clean the outside of your toaster with a damp cloth then dry thoroughly.
- Never use harsh, abrasive or caustic cleaners.
CRUMB REMOVAL
It is important that crumbs are not allowed to build up inside your toaster. Excess crumbs are unhygienic and could catch fire.
Crumbs can be removed by sliding the crumb tray out from the bottom of your toaster. You can then tip the crumbs out. Always make sure that your toaster has completely cooled down and is disconnected from the mains supply before removing crumbs.
Never use your toaster without the crumb tray fitted. Always replace the crumb tray before using your toaster.
AFTER SALES SERVICE
These appliances are built to the very highest of standards. There are no user serviceable parts.
Follow these steps if the unit fails to operate:
- Check the instructions have been followed correctly.
- Check that the fuse has not blown.
- Check that the mains supply is functional.
If the appliance will still not operate, return the appliance to the place it was purchased for a replacement. To return the appliance to the Customer Service Department, follow the steps below:
- Pack it carefully (preferably in the original carton). Ensure the unit is clean.
- Enclose your name and address and quote the model number (located on the rating label) on all correspondence.
- Give the reason why you’re returning it.
- If within the guarantee period, state when and where it was purchased and include proof of purchase (e.g. till receipt).
- Send it to our Customer Service Department at the address below:
Customer Service Department
Jarden Consumer Solutions (Europe) Limited
Middleton Road, Royton, Oldham OL2 5LN, UK.
Telephone: 0161 621 6900 Fax: 0161 626 0391
e-mail: [email protected]
REPLACEMENT PARTS
For additional or replacement parts, please visit www.breville.co.uk or call us on 0161 621 6900.
TROUBLESHOOTING
For troubleshooting and FAQs visit: www.breville.co.uk/faqs
TURN ON YOUR CREATIVITY™
Let the Breville® team help you turn on your creativity with a gateway to a world of food and drinks without limits. You don’t have to travel far—just to your computer, tablet or mobile—where you will discover our FREE website with top tips and recipes to inspire your imagination. Join us now at: www.turnonyourcreativity.com

ELECTRICAL SAFETY
![]() This appliance must be earthed.
This appliance must be earthed.
If the plug is not suitable for the socket outlets in your home, it can be removed and replaced by a plug of the correct type.
If the fuse in a moulded plug needs to be changed, the fuse cover must be refitted. The appliance must not be used without the fuse cover fitted.
If the plug is unsuitable, it should be dismantled and removed from the supply cord and an appropriate plug fitted as detailed. If you remove the plug it must not be connected to a 13 amp socket and the plug must be disposed of immediately.
If the terminals in the plug are not marked or if you are unsure about the installation of the plug please contact a qualified electrician.

GUARANTEE
Please keep your receipt as this will be required for any claims under this guarantee.
This appliance is guaranteed for 1 year after your purchase as described in this document.
During this guaranteed period, if in the unlikely event the appliance no longer functions due to a design or manufacturing fault, please take it back to the place of purchase, with your till receipt and a copy of this guarantee.
The rights and benefits under this guarantee are additional to your statutory rights, which are not affected by this guarantee. Only Jarden Consumer Solutions (Europe) Limited (“JCS (Europe)”) has the right to change these terms.
JCS (Europe) undertakes within the guarantee period to repair or replace the appliance, or any part of appliance found to be not working properly free of charge provided that:
- you promptly notify the place of purchase or JCS (Europe) of the problem; and
- the appliance has not been altered in any way or subjected to damage, misuse, abuse, repair or alteration by a person other than a person authorised by JCS (Europe).
Faults that occur through, improper use, damage, abuse, use with incorrect voltage, acts of nature, events beyond the control of JCS (Europe), repair or alteration by a person other than a person authorised by JCS (Europe) or failure to follow instructions for use are not covered by this guarantee. Additionally, normal wear and tear, including, but not limited to, minor discoloration and scratches are not covered by this guarantee. The rights under this guarantee shall only apply to the original purchaser and shall not extend to commercial or communal use.
If your appliance includes a country-specific guarantee or warranty insert please refer to the terms and conditions of such guarantee or warranty in place of this guarantee or contact your local authorized dealer for more information.
Waste electrical products should not be disposed of with household waste. Please recycle where facilities exist. E-mail us at [email protected] for further recycling and WEEE information.

Jarden Consumer Solutions (Europe) Limited
5400 Lakeside
Cheadle Royal Business Park
Cheadle
SK8 3GQ
UK

Jarden Consumer Solutions (Europe) Limited
Cheadle Royal Business Park, Cheadle, SK8 3GQ, United Kingdom
e-mail: [email protected]
Telephone: 0161 621 6900

For Customer Service details, please see the website.
www.breville.co.uk
© 2016 Jarden Consumer Solutions (Europe) Limited
All rights reserved. Imported and distributed by Jarden Consumer Solutions (Europe) Limited,
Cheadle Royal Business Park, Cheadle, SK8 3GQ, United Kingdom.
The product supplied may differ slightly from the one illustrated due to continuing product development.
Breville 2 slice deep fill sandwich toaster
product safety
- This appliance can be used by children aged from 8 years and above and persons with reduced physical, sensory or mental capabilities or lack of experience and knowledge if they have been given supervision or instruction concerning use of the
appliance in a safe way and understand the hazards involved. - Children shall not play with the appliance. Cleaning and user maintenance shall not be made by children unless they are older than 8 and supervised.
- Keep the appliance and its cord out of reach of children less than 8 years old.
- Never operate the appliance by means of an external timer or separate remote-control system.
- Do not touch the metal parts of the appliance during use as they may become very hot.
- If the supply cord is damaged, it must be replaced by the manufacturer, its service agent or similarly qualified persons in order to avoid a hazard.
- Never use this appliance for anything other than its intended use. This appliance is for household use only. Do not use this appliance outdoors.
- Always ensure that hands are dry before handling the plug or switching on the appliance.
- Always use the appliance on a stable, secure, dry and level surface.
- Care is required when using the appliance on surfaces that may be damaged by heat. The use of an insulated pad is recommended.
- This appliance must not be placed on or near any potentially hot surfaces (such as a gas or electric hob).
- Never let the power cord hang over the edge of a worktop, touch hot surfaces or become knotted, trapped or pinched.
- Do not use the appliance if it has been dropped or if there are any visible signs of damage.
- Ensure the appliance is switched off and unplugged from the supply socket after use and before cleaning.
- Always allow the appliance to cool before cleaning or storing.
- Never immerse any part of the appliance or power cord and plug in water or any other liquid.
- Never leave the appliance unattended when in use.
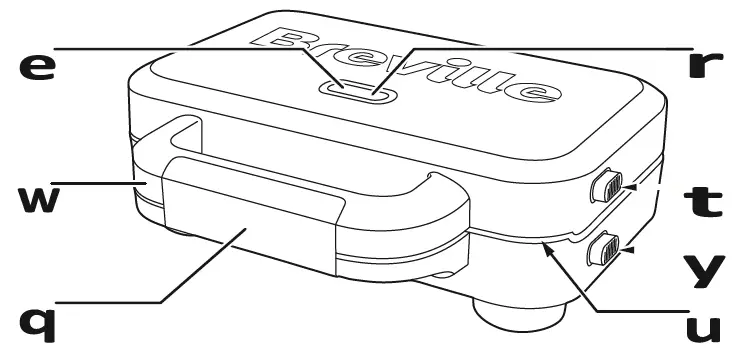
Features
- Latch – holds the lid firmly closed during cooking
- Handle
- Green power light
- Amber ready-to-cook light
- Top cooking plate release button
- Bottom cooking plate release button
- Removable, non-stick cooking plates with cut-and-seal action..
Before first use
- Unpack your sandwich toaster. You may wish to keep the packaging for future use.
- Wipe the cooking plates with absorbent paper or a soft damp cloth.
- Clean the outside of your sandwich toaster with a soft damp cloth which has been wrung almost dry in warm soapy water. The cover can be polished with a soft dry cloth.
Note that the first time you use your sandwich toaster, you may notice a slight burning smell and a little smoke. This is completely normal and will soon disappear.
Using your sandwich toaster
Recipe ideas
Making toasties is easy and fun, they can be as creative or as simple as you like and make great snacks whether eaten at home or on the go.
Using basic ingredients delicious sweet or savoury meals can be made in minutes, perfect for any time of the day. Here are some classic toasted sandwich recipes that you may wish to try.
- Tuna Melt (tuna, onion, mayonnaise and cheese)
- Cheese and tomato
- Cheese, beans and ham
- Turkey, stuffing and cranberry
- Ham, Brie, mushrooms and rocket
- Steak and mushrooms
- BLT (bacon, lettuce and tomato)
- Bacon and cheese
- Chicken, red pepper and Brie
- Sweet chilli chicken
- Sausage and scrambled eggs
- Camembert and cranberry
- Chocolate and banana
- Banana and plum
- Toffee and apple
Breads
For best results, use a supermarket own-label, medium, white sliced bread. For variety, why not try using wholemeal bread, Danish-style bread, seeded breads, sour dough and fruit breads.
Cheeses
Classic cheeses that melt easily like Cheddar, Gruyere and Emmental make excellent toasties. We’ve included some different cheeses in our recipes but why not experiment and get creative with your own favourite cheeses!
The perfect toastie
Even if you are already familiar with using a sandwich toaster, it’s worth following the guidelines below.
- Plug your sandwich toaster in to the mains supply socket and switch the socket on if required. The green power light will come on and your sandwich toaster will start heating up.
- When your sandwich toaster is fully heated the amber ready-to-cook light will come on. This light will come on and go out during cooking.
- Spread the OUTSIDE of the bread with butter or a spread suitable for cooking. Don’t use a low fat spread or one which has a high water content.
- Place the two lower slices of bread onto the bottom plate ‘buttered’ side down. Face the crusts of the bread to the left and right as shown below.
- Add the filling. The deeper cooking plates allow you to use more of your favourite ingredients but always allow a 2cm gap around the filling as shown below. This will allow your sandwich toaster to form a good seal and prevent the filling from leaking out.

For best results, the maximum amount of cheese, when used as a single ingredient, should not exceed 60g. If you add other ingredients, reduce the amount of cheese to compensate for them. - Place the remaining bread on top with the buttered side on the outside (this will give your toastie a lovely golden colour during cooking).
- Close and latch the lid and allow to cook for approx. 4-5 minutes until golden and cooked. Leave the sandwich in the toaster for more or less time according to taste.
- Release the latch and open the lid. Watch out for escaping steam—use a tea towel or wear oven gloves. Remove the cooked sandwich with a non-metallic spatula. Don’t use a metal blade as this can damage the non-stick surface of the plates.
- Once cooked, take care when eating as fillings, especially fruit or tomato, can be very hot.
Important Points:
- Always allow a 2cm gap around the filling.
- Never overfill your toastie.
- Too much filling can leak out and also make the latch difficult to close.
Recipes
THE BASIC 3: CHEESE AND HAM, CHEESE AND TOMATO, CHEESE AND ONION –
Makes 2
Cheese and ham
4 slices of bread
Sliced medium cheddar
2 slices of ham
Cheese and tomato
4 slices of bread
Sliced medium cheddar
2 medium tomatoes.
Cheese and onion
4 slices of bread
Sliced medium cheddar
Finely sliced onion rings
To make, follow the directions on page 4 The perfect toastie.
Other great flavours include cheese and pickle, cheese and Marmite, mature cheese and chutney.
LIGHTER LUNCH TOASTIE
4 slices of Danish-style lower fat bread
Finely sliced red onion
3 tbsp reduced fat cottage cheese
Ground black pepper 2 tbsp
finely chopped red pepper
Low fat spread
This toastie is a lower fat/healthier option which replaces the cheddar cheese with a low fat cottage cheese. Alternatively replace the standard cheddar with a half fat alternative widely available from larger supermarkets.
To make, combine the filling ingredients in a small dish then add to the bread. Cook for about 4 minutes until crispy and golden.
PIZZA POCKETS –
Makes 2
4 slices of bread 2 tbsp pizza topping
40g mozzarella cheese
Pizza topping ideas:
Sliced olives, finely chopped mixed peppers, chilies, pepperoni, tuna, cooked shredded chicken, cooked sliced mushrooms, sliced tomatoes etc.
To make, assemble your sandwiches, spreading the pizza topping on the bottom of the bread, then add the mozzarella and your chosen toppings. Cook for approx 4 minutes until crispy and golden. Serve with a rocket and parmesan salad drizzled with olive oil and balsamic vinegar.
STEAK PASTIES
– Makes 2
Ready rolled shortcrust pastry or a small 2 tbsp tinned stewed steak quantity of homemade shortcrust pastry Melted butter
- Dust your work surface with flour and roll out half of the shortcrust pastry, this should be large enough for 2 sandwich plates. Repeat again so that you have 4 squares. You can remove the top plate from your sandwich toaster and use it as a template (rather than pressing the plate onto the pastry).
- Place some of the steak filling in the centre of each of the pastry triangles (don’t overfill). Place the remaining pastry triangles over the pastie and seal all the edges.
- If removed, refit the sandwich plate and switch on, allow the machine to heat. Brush the plates sparingly with some vegetable oil or butter if you prefer.
- Carefully place each pasty onto the bottom plate and close and latch the lid.
- Cook for approx. 6-7 minutes until golden brown and piping hot.
- Switch off your sandwich toaster and carefully remove the pasties. Allow the pasties to cool for a few minutes. Remember that the filling inside will be very hot!
OMELETTE –
Serves 2
3 medium eggs Freshly ground black pepper Pinch sea salt Melted butter or oil
- Beat together the egg and seasoning
- Brush the top and bottom cooking plates with a little melted butter.
- Carefully pour in the egg dividing it between the two lower plates.
- Close the lid and cook for 1½ minutes
- Open the lid and using a silicone spatula, carefully lift the omelets out. Eat them hot with some Caesar salad or a salad of your choice.
Why not try adding a teaspoon of grated mature cheese and a pinch of chives to the egg for a cheesy omelette alternative.
CAKE BITES –
Makes 4 triangles
50g softened butter
50g castor sugar
1 medium egg
50g self-raising flour
Vanilla extract (optional)
- Using a hand mixer, cream together the butter and sugar until light and fluffy. Add a few drops of vanilla (if using) and mix well.
- Add the egg and beat until smooth. Fold in the flour.
- Preheat your sandwich toaster.
- Add a heaped tablespoon of the mixture into each ‘triangle’ and close the lid.
- Cook for 3-4 minutes until golden brown.
- Dust with castor sugar and serve warm, with ice cream and fruit.
CHOCOLATE, HAZELNUT AND BRIE
– Makes 2
4 slices of brioche bread 1 tbsp dark chocolate, chopped
1 tbsp chopped toasted hazelnuts Honey (optional) 60g brie, sliced
Brioche (although smaller than supermarket bread) will seal and toast beautifully.
- Butter one side of each bread slice. Place two slices on the bottom plate.
- Assemble by placing the cheese on the bottom slices of brioche. Scatter over the nuts and chocolate and drizzle with a little honey if desired.
- Top with the other two slices of brioche and cook for 3-4 minutes. The rich brioche will toast quickly.
- Remove from your sandwich maker using care because they will be extremely hot.
Care and cleaning
Unplug and switch off your sandwich toaster and allow it to fully cool down before cleaning it. Do not immerse the main body, cord set or plug in water or liquid of any kind.
Never use steel wool, scouring pads, abrasive cleaners or metallic utensils to clean your sandwich toaster.
- Before cleaning your sandwich toaster, switch it off and unplug it from the mains supply. Allow it to cool down fully.
- Wipe the cooking plates with an absorbent paper or soft damp cloth.
- Clean the outside of your sandwich toaster with a soft damp cloth which has been wrung almost dry in warm soapy water. The cover can be polished with a soft dry cloth.
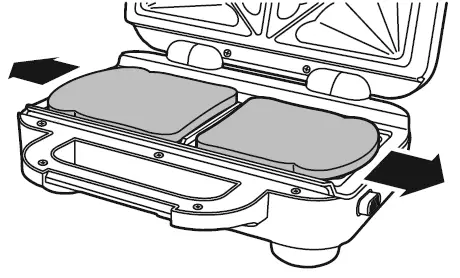
- Press the cooking plate release buttons and remove the plates from your sandwich toaster. Immerse the plates in warm, soapy water. Rinse with clean water. Wipe dry with a soft cloth. To avoid oxide forming on the uncoated surfaces of the plate, insert the plate back into your sandwich toaster and heat for one minute with the lid closed. The cooking plates can also be washed in a dishwasher.
- Clean the outside of your sandwich toaster with a soft damp cloth which has been wrung almost dry in warm soapy water. The cover can be polished with a soft dry cloth.
Connection to the mains supply
This appliance is fitted with either a moulded or rewirable BS1363, 13 amp plug. The fuse should be rated at 13 amps and be ASTA approved to BS1362.
If the fuse in a moulded plug needs to be changed, the fuse cover must be refitted. The appliance must not be used without the fuse cover fitted.
If the plug is unsuitable, it should be dismantled and removed from the supply cord and an appropriate plug fitted as detailed below. If you remove the plug it must not be connected to a 13 amp socket and the plug must be disposed of immediately. The wires of the mains lead are coloured in accordance with the following code:
GREEN/YELLOW = EARTH
BLUE = NEUTRAL
BROWN = LIVE
The wire which is coloured GREEN/YELLOW must be connected to the terminal in your plug which is marked with an E or by the earth symbol ( ) or coloured GREEN or GREEN /YELLOW.
The wire which is coloured BLUE must be connected to the terminal in your plug which is marked with the letter N or coloured BLACK.
The wire which is coloured BROWN must be connected to the terminal in your plug which is marked with the letter L or coloured RED.
If any other plug is used, a 13 amp fuse must be fitted either in the plug or adaptor or at the distributor board.
After sales service
These appliances are built to the very highest of standards. There are no user serviceable parts. Follow these steps if the unit fails to operate:
- Check the instructions have been followed correctly.
- Check that the fuse has not blown.
- Check that the mains supply is functional.
If the appliance will still not operate, return the appliance to the place it was purchased for a replacement. To return the appliance to the Customer Service Department, follow the steps below:
- Pack it carefully (preferably in the original carton). Ensure the unit is clean.
- Enclose your name and address and quote the model number on all correspondence.
- Give the reason why you are returning it.
- If within the guarantee period, state when and where it was purchased and include proof of purchase (e.g. till receipt).
- Send it to our Customer Service Department at the address below:
Customer Service Department
Jarden Consumer Solutions
(Europe) Limited
Middleton Road
Replacement parts
For additional or replacement parts, please visit www.breville.co.uk or call us on
Troubleshooting
For troubleshooting and FAQs visit breville.co.uk/faqs
Turn on your Creativity™
Let Breville® help you turn on your creativity with a gateway to a world of food and drinks without limits. You don’t have to travel far – just to your computer, tablet or mobile – where you will discover our FREE website with top tips and recipes to inspire your imagination.
Guarantee
Please keep your receipt as this will be required for any claims under this guarantee.
This appliance is guaranteed for 1 year after your purchase as described in this document.
During this guaranteed period, if in the unlikely event the appliance no longer functions due to a design or manufacturing fault, please take it back to the place of purchase, with your till receipt and a copy of this guarantee.
The rights and benefits under this guarantee are additional to your statutory rights, which are not affected by this guarantee. Only Jarden Consumer Solutions (Europe) Limited (“JCS (Europe)”) has the right to change these terms.
JCS (Europe) undertakes within the guarantee period to repair or replace the appliance, or any part of appliance found to be not working properly free of charge provided that:
- you promptly notify the place of purchase or JCS (Europe) of the problem; and
- the appliance has not been altered in any way or subjected to damage, misuse, abuse, repair or alteration by a person other than a person authorised by JCS (Europe).
Faults that occur through, improper use, damage, abuse, use with incorrect voltage, acts of nature, events beyond the control of JCS (Europe), repair or alteration by a person other than a person authorised by JCS (Europe) or failure to follow instructions for use are not covered by this guarantee. Additionally, normal wear and tear, including, but not limited to, minor discoloration and scratches are not covered by this guarantee.
The rights under this guarantee shall only apply to the original purchaser and shall not extend to commercial or communal use.
If your appliance includes a country-specific guarantee or warranty insert please refer to the terms and conditions of such guarantee or warranty in place of this guarantee or contact your local authorized dealer for more information.
Waste electrical products should not be disposed of with Household waste. Please recycle where facilities exist. E-mail us at [email protected] for further recycling and WEEE information.
![]()
View Fullscreen
the Easy AirTM Connect Purifier
Instruction Book – LAP158
Contents
2 Breville Recommends Safety First 6 Components 7 Control Panel 8 Features 8 Assembly 9 Functions 10 Wi-Fi Connectivity
& Voice Assistants 14 Care, Cleaning & Storage 16 Troubleshooting
BREVILLE RECOMMENDS SAFETY FIRST
At Breville we are very safety conscious. We design and manufacture consumer products with the safety of you, our valued customer, foremost in mind. In addition, we ask that you exercise a degree of care and adhere to the following precautions.
SPECIFICATIONS
Filter Life
Approx. 6 months
Microbe ShieldTM Life
Approx. 10,000 hours
Product Dimension
194 x 321mm
For Room Size
15 to 25m²
Noise Level
30~60dB
Power Consumption
15W
Weight
2kg
OS Compatibility
Android® 5.0 or later and iOS 9.0 or later
IMPORTANT SAFEGUARDS
READ ALL INSTRUCTIONS BEFORE USE AND SAVE FOR FUTURE REFERENCE
· Remove and safely discard any packaging material and promotional labels before using the air purifier and filter for the first time. · To eliminate a choking hazard for young children, remove and safely discard the protective cover fitted to the power plug of this air purifier. · When unpacking the air purifier, check to see you have received all the items listed in the parts list, before discarding the packaging. · This air purifier is intended for household use only and not for commercial or industrial use. · Do not use outdoors. · Always ensure the air purifier is properly assembled before use. Follow the instructions provided in this book. · Do not place the air purifier near the edge of a bench or table during operation. Ensure the surface is level, clean and free of water.
2
· Keep the power cord out of · Do not route power cord heavy traffic areas. To avoid under furniture or appliances.
fire hazard, never put the cord · Do not operate the air purifier
under rugs, near heat registers, with a damaged power cord
radiator, stoves or heaters.
or plug, or if the air purifier
· To protect against electrical has been dropped or
hazards, do not immerse in
damaged in any manner.
water or other liquids. Do not use the air purifier in the immediate surroundings of a bath, a shower or a swimming pool.
Take the air purifier to your nearest Breville service centre for examination, electrical or mechanical adjustment or repair.
· Children should be supervised to ensure they do not play with the air purifier. · Always turn off and unplug the air purifier before moving, opening the grill, changing filters, cleaning or whenever the air purifier is not in use. · Do not unplug the air purifier
· Do not use the air purifier with an external timer, programmer or any other device that switches the air purifier on automatically since a fire risk may exist if the air purifier is covered or positioned incorrectly. · Do not place anything on top of the air purifier when
by pulling on the power cord. assembled, when in use and
Always unplug using the
when stored.
power plug.
· Never block the air openings,
· Never insert fingers, pencils or grills/outlets or place on a soft
any other objects through the surface such as a bed or sofa,
guards whenever the power as this could cause the unit to
plug is connected, in particular, tip over, blocking the air inlet
while the air purifier is
or outlet opening.
switched on.
· Do not run the power cord under carpeting or cover the power cord with rugs, runners
or the like. Arrange the power
cord away from traffic areas and where it will not be tripped over.
3
· Do not attempt to repair or adjust any electrical or mechanical functions on this unit. Doing so will void your warranty. Other than the filter, the inside of the unit contains no user serviceable parts. All servicing should be performed by qualified personnel only. · This air purifier contains a UV-C emitter. · Unintended use of the appliance or damage to the housing may result in the escape of dangerous UV-C light radiation. UV-C light radiation may, even in little doses, cause harm to the eyes and skin. · Keep the air purifier and dust filters clean. Follow the cleaning instructions provided in this book.
IMPORTANT SAFEGUARDS FOR ALL ELECTRICAL APPLIANCES
· Fully unwind the power cord before use. · Connect only to a 230V or 240V power outlet.
· Do not let the power cord hang over the edge of a bench or table, touch hot surfaces or become knotted. · To protect against electric shock, do not immerse the power cord, power plug or appliance in water or any other liquid or allow moisture to come in contact with the part, unless it is recommended in the cleaning instructions. · The appliance is not intended for use by persons (including children) with reduced physical, sensory or mental capabilities, or lack of experience and knowledge, unless they have been given supervision or instruction concerning use of the appliance by a person responsible for their safety. · Children should be supervised to ensure that they do not play with the appliance. · It is recommended to regularly inspect the appliance. To avoid a hazard, do not use the appliance if power cord, power plug or appliance becomes damaged in any way. Return the entire appliance to the nearest authorised
4
Breville Service Centre for examination and/or repair. · Any maintenance other than cleaning should be performed at an authorised Breville Service Centre. · This appliance is for household use only. Do not use this appliance for anything other than its intended use. Do not use in moving vehicles or boats. Do not use outdoors. Misuse may cause injury. · The installation of a residual current device (safety switch) is recommended to provide additional safety protection when using electrical appliances. It is advisable that a safety switch with a rated residual operating current not exceeding 30mA be installed in the electrical circuit supplying the appliance. See your electrician for professional advice. · During electrical storms, the appliance should be disconnected from the power
source at the wall socket to prevent any electrical surges that may arise during the storm and which may inadvertently cause damage to the appliance and its electronic componentry. · Always turn the appliance to the off position, switch off at the power outlet and unplug at the power outlet when the appliance is not in use. · Before cleaning, always turn the appliance to the off position, switch off at the power outlet, unplug at the power outlet and remove the power cord, if detachable, from the appliance and allow all parts to cool. · Do not place this appliance on or near a heat source, such as hot plate, oven or heaters. · Position the appliance at a minimum distance of 20cm away from walls, curtains and other heat or steam sensitive materials and provide adequate space above and on all sides for air circulation.
FOR HOUSEHOLD USE ONLY SAVE THESE INSTRUCTIONS
5
Components
A
B C D E
F
G
A. Control Panel B. Main Housing Body C. Air Inlet D. Microbe ShieldTM UV-C Light and Light Guard E. 3-Layer Filter F. Base Plate
6
G. Locking Knob
NOT PICTURED Air Outlet Adaptor Inlet Socket Adaptor Plug
Control Panel
2H 4H 8H
TURBO NIGHT LOW MED HIGH
C
D
B
TIMER
MICROBE SHIEL
D
SPEED
FILTER RESET
A
A. Power On/Off/Wi-Fi and Filter Reset Button
B. Microbe ShieldTM/Night Mode
C. Timer
(up to 8 hours)
D. Fan Speed
(includes 4 speed modes; Low, Medium, High and Turbo)
7
Features
Assembly
YOUR BREVILLE AIR PURIFIER
Your Breville Easy AirTM Connect Purifier improves your indoor air quality using 4 distinct levels of protection.
3-LAYER, HEAVY-DUTY FILTER:
1. A Pre-Filter Captures larger airborne particles such as human hair, pet dander and dust particles.
2. A True HEPA Filter Traps up to 99.97% of allergens and airborne contaminants down to 0.3 microns in size. These include dust, mould spores, plant spores, and pollen.
3. An Activated Carbon Membrane Along with assisting in the capture of dust, smoke, pollen and other airborne allergens, the activated carbon membrane helps to neutralise odours in the home and to eliminate fumes emitted by household products as well as other volatile organic compounds (VOC’s) that might be found in the air.
4. Microbe ShieldTM Technology Microbe ShieldTM technology uses a shortwave UV-C light specially designed to target germs and bacteria from the incoming air as it passes through the air purifier before releasing the air back into the surrounding area. The Microbe ShieldTM function can be turned on and off according to preference.
BEFORE FIRST USE
· Remove and safely discard any packaging material or promotional labels attached to your air purifier and filter.
· Remove the filter from the air purifier (see REPLACING THE FILTER on page 12) and take it out of the plastic bag. Then re-insert the filter into the air purifier.
· Select a flat and level location for the air purifier.
· For proper air flow, locate the unit at least 20cm from any wall or furniture.
· Ensure the air inlet and outlets are not blocked before use.
· Ensure the filter has been fitted correctly as per the instructions in this book.
· Plug the adaptor into a 230V240V power outlet and connect to the adaptor inlet of the air purifier. Turn on the power outlet.
IMPORTANT
When moving the air purifier, always lift the unit using two hands and set down gently on a flat and level surface.
IMPORTANT
Do not use any other AC adapter other than the one provided with the unit.
8
Functions
OPERATING YOUR AIR PURIFIER
1. Press the POWER button to turn on and the POWER symbol light will illuminate.
2. The air purifier will begin operation.
3. The air purifier will begin operation in the last setting selected, including Night mode and Timer.
4. To adjust how the air purifier operates, follow the directions below.
· If the Wi-Fi has been activated prior to resetting the filter, press and hold the POWER button for 5 seconds again and the Wi-Fi light will illuminate to indicate that WiFi has been re-activated.
Microbe ShieldTM/NIGHT MODE
The Microbe ShieldTM and Night Modes utilise the same button on the control panel. Pressing the Microbe ShieldTM/NIGHT MODE button will cycle through these two settings.
Microbe ShieldTM
· Press the Microbe ShieldTM/NIGHT MODE button until the Microbe ShieldTM indicator light illuminates to turn it on.
· Press the button repeatedly until the light extinguishes to turn off this function.
Night Mode
· To turn on Night Mode, press the Microbe ShieldTM/NIGHT MODE button until the Night indicator light starts to blink.
· After 10 blinks, all indicator lights on the control panel will turn off as the unit enters night mode and the fan speed will automatically change to Low.
· Press any button on the control panel to re-engage the control panel and turn off night mode. The Night indicator light will extinguish.
FAN SPEED/TURBO MODE
NOTE
The air purifier will resume in the last programmed setting once it has been turned off, even if turned off at the power outlet. If the last programmed setting was Night mode, once turned on, the control panel will illuminate with the Night indicator light blinking as a reminder that Night mode has been set.
· Press the FAN SPEED button repeatedly until the desired speed is illuminated on the control panel.
· There are 4 fan speeds: Low, Medium, High and Turbo.
· The purifier has reached Turbo mode when all three lights are illuminated on the control panel at the same time.
NOTE
When changing the fan speed, the unit may take a few seconds to adjust.
9
TIMER · The air purifier can be set to operate for
timed intervals of 2 hours, 4 hours and 8 hours, stopping automatically when the selected operating time has elapsed. · If no timer is set, the air purifier will continuously operate until the unit is manually switched off. · Press the TIMER button repeatedly until the desired interval hours are illuminated on the control panel. · For continuous operation, press the TIMER button repeatedly until there are no lights illuminated under the timer intervals.
FILTER RESET · The filter reset light will illuminate red
indicating that the filter needs to be replaced. · Replace the filter according to the directions
found under Replacing the Filter in this book. · Once the filter is replaced, press and hold the
POWER button for 5 seconds to reset the Filter Reset light. · The built-in timer for the filter reset is 4,320 operating hours. · If the Wi-Fi is connected, while the reset filter light is reset, the Wi-Fi will need to be re-activated. Press and hold the POWER button until the light illuminates on the Wi-Fi icon.
NOTE For best performance, the filter should be cleaned at least monthly as per the instructions found in the Care, Cleaning & Storage section of this book.
10
Wi-Fi
Connectivity
The Breville Easy AirTM Connect Purifier can offer remote operation by using a home Wi-Fi connection and the Breville Home ConnectTM app downloaded to a compatible mobile phone through the Google Play store or Apple App store.
To go straight to the appropriate app store, scan the QR code below.
CONNECT YOUR PURIFIER TO WI-FI
1. Ensure the mobile device is connected to a home Wi-Fi network.
2. The purifier must be turned on via the control panel. Once on, the symbol will flash fast on the display panel. The air purifier is now ready to connect.
3. Log into your Breville Home ConnectTM app account and stay on the “Home” page. To add the purifier to the list, touch `Add Device’ or the symbol found in the top right-hand corner of the screen. Follow the prompts in the app.
For instructions on how to use the app, scan the QR code below, refer to the Quick Start Guide that can be found in the box or go to tinyurl.com/HomeConnectQuickStart.
NOTE
The Breville Home ConnectTM app is compatible with mobile phones running Android® 5.0 or later and iOS devices 9.0 or later.
NOTE
To control the purifier using the app, the purifier must be plugged into an active power outlet.
4. If the connection is successful, the purifier will appear in the main page of the app and the symbol on the purifier will illuminate.
5. If connection is unsuccessful, touch and hold the button for 5 seconds until the light is flashing slowly. Follow the prompts in the app to connect in a different mode.
11
Voice Assistants
The Breville Easy AirTM Connect comes with the added feature of voice assistance, allowing you to control your purifier using your voice by linking your Breville Home ConnectTM app with Amazon Alexa and Google Home/Assistant. To link your Breville Home ConnectTM app account with either Google Home/Assistant or Amazon Alexa, refer to the instructions on www.Breville.com or follow instructions found in the Breville Home ConnectTM app under Me > Third-Party Voice Services > View more ways to link.
IMPORTANT NOTE
The recommended voice commands to operate the appliance’s functions differ between Amazon Alexa and Google Home/Assistant as listed. Variations of these commands may also be recognised, however, if a command fails, check against the recommended voice command.
NOTE To control the purifier using the Amazon Alexa or Google Home/Assistant app, the purifier must be plugged in to an active power outlet and turned on.
VOICE CONTROL WITH AMAZON ALEXA Before you can voice control your Breville Easy AirTM Connect with Amazon Alexa, you need to link the Breville Home ConnectTM account to the Amazon Alexa app as per the instructions.
Amazon Alexa Recommended Voice Commands for the Breville Easy AirTM Connect
Supported Settings
Power Fan Speed
UV-light Night mode Night Mode
Amazon Alexa Voice Commands
Turn ON DEVICENAME Turn OFF DEVICENAME Set DEVICENAME fan speed to low Set DEVICENAME fan speed to mid Set DEVICENAME fan speed to high Set DEVICENAME fan speed to TURBO Turn ON the disinfection on DEVICENAME Turn OFF the disinfection on DEVICENAME Turn ON the light on DEVICENAME Turn OFF the light on DEVICENAME Turn OFF the light on DEVICENAME (Night Mode ON) Turn ON the light on DEVICENAME (Night Mode OFF)
NOTE Currently, Amazon Alexa does not support the following settings: · Timer and Filter Reset.
12
VOICE CONTROL WITH GOOGLE HOME/ASSISTANT Before you can voice control your Breville Easy AirTM Connect with Google Home/Assistant, you need to link the Breville Home ConnectTM account to the Google Home/Assistant app as per the instructions.
Google Home/Assistant Recommended Voice Commands for the Breville Easy AirTM Connect
Supported Settings
Power Fan Speed
UV-light Night Mode
Google Home/Assistant Voice Commands
Turn ON DEVICENAME Turn OFF DEVICENAME Set fan speed to low on DEVICENAME Set fan speed to mid on DEVICENAME Set fan speed to high on DEVICENAME Set fan speed to TURBO on DEVICENAME Turn ON UV on DEVICENAME Turn OFF UV on DEVICENAME Turn OFF the light on DEVICENAME (Night Mode ON) Turn ON the light on DEVICENAME (Night Mode OFF)
NOTE Currently, Google Home/Assistant does not support the following settings: · Timer, and Filter Reset.
TIPS for Amazon Alexa and Google Home/Assistants
· Configure your Amazon Alexa or Google Home/Assistant compatible devices with the “Alexa” or “Google Home/Assistant” app if using, or simply download onto your phone.
· You will find your device listed as the Breville product name in your Breville Home ConnectTM app account. Tap on the device in the app to rename your device for more convenient voice commands, e.g. “Purifier Living Room” or give it a name, e.g. “Kenny”.
· Training your voice assistant – Voice Match – Teach your assistant to recognise your voice. This isn’t training it to understand English, but rather to recognise your voice as belonging to you. You can do this by going to the Settings menu in the voice assistant app on your phone.
· Routines – Amazon Alexa and Google Home/Assistant allow you to combine multiple actions in one voice command, to create a Routine, tap on the `Routines’ option via settings and follow the steps.
· Ensure the primary language is set to English (United States) for all apps.
13
Care, Cleaning & Storage
The air purifier and filter should be cleaned at least once every month. Ensure the air purifier is switched off and disconnected from the power outlet and allow all parts to cool before cleaning or storing. · Use a clean, dry cloth to clean all external
surfaces of the air purifier.
NOTE
More frequent cleaning may be required depending on environmental conditions.
BREVILLE RECOMMENDS
· Always ensure the air purifier is turned off, switched off at the power outlet and unplugged and allow the unit to cool before performing any cleaning or filter replacement.
8 DO NOT stick any foreign objects or your fingers inside the air inlet/outlet of this unit.
8 DO NOT use gasoline, benzine, thinner, harsh cleaners, etc. on and/or in the unit while cleaning as they will damage the unit.
8 NEVER use alcohol or other solvents on this unit.
FILTER CLEANING AND REPLACING
WARNING
The filter is not washable. Do not immerse any part of the air purifier in water as it will cause damage.
· The Pre-filter should be cleaned at least once every month using a vacuum cleaner. Gently vacuum using a hand-tool attachment such as a brush or upholstery tool. Clean more often if required.
· Do not use any solutions, hard bristle brushes or sharp objects to clean as this can cause damage.
· Replace the filter as indicated using the instructions following.
REPLACING THE FILTER
Your Easy AirTM Connect Purifier filter should be replaced in the time frames indicated below.
· The filter life is approximately 6 months if used 24 hours daily, or 12 months if used 12 hours daily.
· The filter life may vary to this timing, depending on environmental conditions.
· Remove all packaging from the replacement filter and place the filter into the unit as described below.
1. Carefully turn your air purifier upside down and remove the locking knob from the base of the unit.
2. Remove the base plate.
3. Remove the used filter, being careful that any residue or debris that may fall from the filter will not cause damage.
4. Insert the replacement filter into the unit, ensuring that it is correctly fitted and centred.
5. Replace the base plate and refasten the locking knob.
6. Return the air purifier to an upright position.
7. Turn on the air purifier then press and hold the POWER button for 5 seconds to reset the Filter Reset light.
8. If the Wi-Fi is connected, while the reset filter light is reset, the Wi-Fi will need to be re-activated. Press and hold the again until the light illuminates on the Wi-Fi icon.
14
NOTE
There is no top or bottom on the filter. The filter can be placed into the unit either way.
NOTE
If the filter is not in place or not fitted correctly, the air purifier will not operate.
WARNING
Unintended use of the air purifier or damage to the housing may result in the escape of dangerous UV-C radiation which is dangerous to the eyes and skin. Never operate the UV-C light outside of the air purifier.
UV-C LIGHT CARE
The replacement of the UV-C light must be undertaken at an authorised Breville service centre. Please contact Breville Customer Service Centre for further support.
REPLACEMENT FILTERS
Replacement filters must be purchased from the Breville website^ or at participating retail outlets.
See the table below for the replacement product code to suit this Breville Air Purifier.
Breville Air Purifier Model No.
the Easy AirTM Connect LAP158WHT
Filter Replacement Product Code
LAP015WHT
the Smart AirTM Connect LAP308WHT
LAP030WHT
the Smart Air PlusTM Connect LAP508WHT
^Delivery charges may apply.
LAP050WHT
Please contact Breville Customer Service Centre for further support.
Only use the original Breville filter specially intended for this appliance. Do not use any other filters.
15
Troubleshooting
MINI TROUBLESHOOTING GUIDE Before carrying out any of the following service checks, unplug the unit from the mains.
PROBLEM Unit will not start.
Insufficient air flow. Excessive noise.
UV-C Light not illuminating
WHAT TO DO
· Check that the power plug is connected to a power outlet and the outlet is turned on.
· Check that air purifier is assembled correctly. · Check that the filter is fitted correctly in place. · Check that the filters are clean. · Check for any obstructions in the air inlet and/or outlet. · Check for any foreign objects that may be in contact with the fan. · Check if the filter is clogged and ready for replacement. · Check that the air purifier has been assembled correctly
and the locking knob has been tightened.
· Check that the unit is on a level surface. · Contact Breville service centre for UV-C light replacement.
16
TROUBLESHOOTING GUIDE FOR AMAZON ALEXA AND GOOGLE HOME/ASSISTANT
PROBLEM
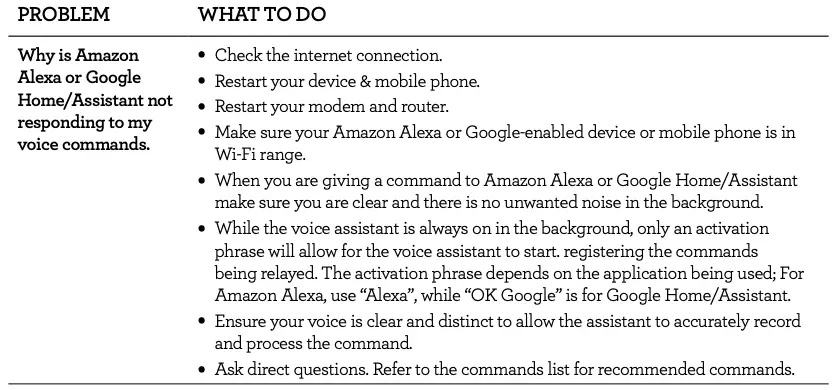
Why is Amazon Alexa or Google Home/Assistant not responding to my voice commands.
WHAT TO DO
· Check the internet connection. · Restart your device & mobile phone. · Restart your modem and router. · Make sure your Amazon Alexa or Google-enabled device or mobile phone is in
Wi-Fi range.
· When you are giving a command to Amazon Alexa or Google Home/Assistant make sure you are clear and there is no unwanted noise in the background.
· While the voice assistant is always on in the background, only an activation phrase will allow for the voice assistant to start. registering the commands being relayed. The activation phrase depends on the application being used; For Amazon Alexa, use “Alexa”, while “OK Google” is for Google Home/Assistant.
· Ensure your voice is clear and distinct to allow the assistant to accurately record and process the command.
· Ask direct questions. Refer to the commands list for recommended commands.
If the problem is not listed, please contact Breville Customer Service Centre (see back cover for contact details)
17
Notes
18
Notes
19
Breville Customer Service Centre
Australian Customers Phone: 1300 139 798 Web: www.breville.com
New Zealand Customers Phone: 0800 273 845 Web: www.breville.com
Breville, the Breville logo, Master Every Moment, Easy Air, the Breville Home Connect and the Microbe Shield logo are trademarks of Breville Pty. Ltd. A.B.N. 98 000 092 928. Copyright Breville Pty. Ltd. 2021. All other brands may be trademarks of their respective owners.
Due to continued product improvement, the products illustrated/photographed in this booklet may vary slightly from the actual product.
LAP158 ANZ D21
LAP508
Breville Recommends Safety First
At Breville we are very safety conscious. We design and manufacture consumer products with the safety of you, our valued customer, foremost in mind. In addition, we ask that you exercise a degree of care and adhere to the following precautions.
SPECIFICATIONS
| Filter Life | Approx. 6 months |
| Microbe Shield™ Life | Approx. 10,000 hours |
| Product Dimension | 270 x 531.5mm |
| For Room Size | 50 to 80m² |
| Noise Level | 30~62dB |
| Power Consumption | 65W |
| Weight | 5kg |
| OS Compatibility | Android® 5.0 or later and iOS 9.0 or later |
IMPORTANT SAFEGUARDS
READ ALL INSTRUCTIONS BEFORE USE AND SAVE FOR FUTURE REFERENCE
- Remove and safely discard any packaging material and promotional labels before using the air purifier and filter for the first time.
- To eliminate a choking hazard for young children, remove and safely discard the protective cover fitted to the power plug of this air purifier.
- When unpacking the air purifier, check to see you have received all the items listed in the parts list, before discarding the packaging.
- This air purifier is intended for household use only and not for commercial or industrial use.
- Do not use outdoors.
- Always ensure the air purifier is properly assembled before use. Follow the instructions provided in this book.
- Do not place the air purifier near the edge of a bench or table during operation. Ensure the surface is level, clean and free of water.
- Keep the power cord out of heavy traffic areas. To avoid fire hazard, never put the power cord under rugs, near heat registers, radiator, stoves or heaters.
- To protect against electrical hazards, do not immerse in water or other liquids. Do not use the air purifier in the immediate surroundings of a bath, a shower or a swimming pool.
- Children should be supervised to ensure they do not play with the air purifier.
- Always turn off and unplug the air purifier before moving, opening the grill, changing filters and cleaning or whenever the air purifier is not in use.
- Do not unplug the air purifier by pulling on the power cord. Always unplug using the power plug.
- Never insert fingers, pencils or any other objects through the guards whenever the power plug is connected, in particular, while the air purifier is switched on.
- Do not run the power cord under carpeting or cover the power cord with rugs, runners or the like. Arrange the power cord away from traffic areas and where it will not be tripped over.
- Do not route power cord under furniture or appliances.
- Do not operate the air purifier with a damaged power cord or plug, or if the air purifier has been dropped or damaged in any manner, return the air purifier to your nearest Breville service centre for examination, electrical or mechanical adjustment or repair.
- Do not use the air purifier with an external timer, programmer or any other device that switches the air purifier on automatically since a fire risk may exist if the air purifier is covered or positioned incorrectly.
- Do not place anything on top of air purifier when assembled, when in use and when stored.
- Never block the air openings, grills/outlets or place on a soft surface such as a bed or sofa, as this could cause the unit to tip over, blocking the air inlet or outlet opening.
- Do not attempt to repair or adjust any electrical or mechanical functions on this unit. Doing so will void your warranty. The inside of the unit contains no user serviceable parts. All servicing should be performed by qualified personnel only.
- This air purifier contains a UV-C emitter.
- Unintended use of the appliance or damage to the housing may result in the escape of dangerous. UV-C light radiation. UV-C light radiation may, even in little doses, cause harm to the eyes and skin.
- Keep the air purifier and dust filters clean. Follow the cleaning instructions provided in this book.
IMPORTANT SAFEGUARDS FOR ALL ELECTRICAL APPLIANCES
- Fully unwind the power cord before use.
- Connect only to a 230V or 240V power outlet.
- Do not let the power cord hang over the edge of a bench or table, touch hot surfaces or become knotted.
- To protect against electric shock, do not immerse the power cord, power plug or appliance in water or any other liquid or allow moisture to come in contact with the part, unless it is recommended in the cleaning instructions.
- The appliance is not intended for use by persons (including children) with reduced physical, sensory or mental capabilities, or lack of experience and knowledge, unless they have been given supervision or instruction concerning use of the appliance by a person responsible for their safety.
- Children should be supervised to ensure that they do not play with the appliance.
- It is recommended to regularly inspect the appliance. To avoid a hazard, do not use the appliance if power cord, power plug or appliance becomes damaged in any way. Return the entire appliance to the nearest authorized Breville Service Centre for examination and/or repair.
- Any maintenance other than cleaning should be performed at an authorised Breville Service Centre.
- This appliance is for household use only. Do not use this appliance for anything other than its intended use. Do not use in moving vehicles or boats. Do not use outdoors.
Misuse may cause injury. - The installation of a residual current device (safety switch) is recommended to provide additional safety protection when using electrical appliances. It is advisable that a safety switch with a rated residual operating current not exceeding 30mA be installed in the electrical circuit supplying the appliance. See your electrician for professional advice.
- During electrical storms, the appliance should be disconnected from the power source at the wall socket to prevent any electrical surges that may arise during the storm and which may inadvertently cause damage to the appliance and its electronic componentry.
- Always turn the appliance to the off position, switch off at the power outlet and unplug at the power outlet when the appliance is not in use.
- Before cleaning, always turn the appliance to the off position, switch off at the power outlet, unplug at the power outlet and remove the power cord, if detachable, from the appliance and allow all parts to cool.
- Do not place this appliance on or near a heat source, such as hot plate, oven or heaters.
- Position the appliance at a minimum distance of 20cm away from walls, curtains and other heat or steam sensitive materials and provide adequate space above and on all sides for air circulation.
FOR HOUSEHOLD USE ONLY SAVE THESE INSTRUCTIONS


A. Air Outlet
B. Control Panel
C. Main Housing Body
D. Air Quality Sensor
E. Air Inlet
F. Microbe Shield™ Light and Holder
G. 3-Layer Filter
H. Base Plate
I. Locking Knob
NOT PICTURED
Power Cord

A. LED Screen
B. Power On/Off and Filter Reset Button
C. Microbe Shield™/Night Mode
D. Wi-Fi
E. Fan Speed (includes 4 speed modes; Low, Medium, High and Turbo)
F. Auto Mode
G. Timer (up to 12 hours)
H. Air Quality Sensor Light
YOUR BREVILLE AIR PURIFIER
Your Breville Smart Air Plus™ Connect Purifier improves your indoor air quality using 4 distinct levels of protection.
- A Pre-Filter
Captures larger airborne particles such as human hair, pet dander and dust particles. - A True HEPA Filter
Traps up to 99.97% of allergens and airborne contaminants down to 0.3 microns in size. These include dust, mould spores, plant spores, and pollen. - An Activated Carbon Membrane
Along with assisting in the capture of dust, smoke, pollen and other airborne allergens, the activated carbon membrane helps to neutralise odours in the home and to eliminate fumes emitted by household products as well as other volatile organic compounds (VOC’s) that might be found in the air. - Microbe Shield™ Technology
Microbe Shied technology uses a shortwave UV-C light specially designed to target germs and bacteria from the incoming air as it passes through the air purifier before releasing the air back into the surrounding area. The Microbe Shield™ function can be turned on and off according to preference.
BEFORE FIRST USE
- Remove and safely discard any packaging material or promotional labels attached to your air purifier and filter.
- Remove the filter from the air purifier (see REPLACING THE FILTER on page 11) and take it out of the plastic bag. Then re-insert the filter into the air purifier.
- Select a flat and level location for the air purifier.
- For proper air flow, locate the unit at least 20cm from any wall or furniture.
- Ensure the air inlet and outlets are not blocked before use.
- Ensure the filter has been fitted correctly as per the instructions in this book.
- Plug the power plug into a 230V OR 240V power outlet and turn on the power outlet.
![]()
IMPORTANT
When moving the air purifier, always lift the unit using two hands and set down gently on a flat and level surface.
OPERATING YOUR AIR PURIFIER
- Press the POWER button to turn on and the control panel will illuminate.
- The air quality sensor light will illuminate, usually starting with a blue light until it has time to sense the air quality and then it may change to an alternate colour.
- The air purifier will begin operation in the last mode selected (excluding Night mode and timer).
- To adjust how the air purifier operates, follow the directions below.
SensAir™ LIVE PURITY CONTROL
- Your Breville Smart Air Plus™ Connect Purifier has a built-in air quality sensor to detect changes to air quality in the surrounding area.
- The SensAir™ indicator light around the control panel will change colours according to the quality of the surrounding air.
- The LED screen provides real-time indication of fine particles PM2.5 concentration.

Microbe Shield™/NIGHT MODE
The Microbe Shield™ and Night Modes utilise the same button on the control panel. Pressing the  Microbe Shield™/NIGHT MODE button will cycle through these two settings.
Microbe Shield™
- Press the Microbe Shield™/NIGHT MODE button until the
 Microbe Shield™ icon illuminates to turn it on.
 - Press the button repeatedly until the light extinguishes to turn off this function.
Night Mode
- To turn on Night mode, press the Microbe Shield™/NIGHT MODE button repeatedly until the
 icon starts to blink.
 - Press again until the light extinguishes to turn off this function.
- After 10 blinks, all indicator lights on the control panel will turn off as the unit enters night mode and the fan speed will automatically change to Low.
- Press any button on the control panel to re-engage the control panel and turn off night mode. The icon will extinguish.
![]() NOTE
NOTE
The Night mode function does not save for next use when the air purifier is switched off. This function will need to be reset.
FAN SPEED/TURBO MODE
![]() NOTE
NOTE
The air purifier will resume in the last programmed setting once it has been turned off, excluding Night mode, even if turned off at the power outlet.
- Press the
 FAN SPEED button repeatedly until the desired speed is illuminated on the control panel.
 - There are 4 fan speeds: Low, Medium, High and Turbo.
- The icons will illuminate showing the selected fan speed.
![]() NOTE
NOTE
When changing the fan speed, the unit may take a few seconds to adjust.
TIMER
- The air purifier can be set to operate for timed intervals of 2 hours, 4 hours and 12 hours, stopping automatically when the selected operating time has elapsed. If no timer is set, the air purifier will continuously operate until it is manually switched off.
- Press the
 TIMER button repeatedly until the desired interval hours are illuminated on the control panel.
 - For continuous operation, press the TIMER button repeatedly until there are no lights illuminated under the timer intervals.
AUTO MODE
- When in Auto mode, the air purifier will automatically adjust the speed to help filter the air based on the sensor reading.
- To set to Auto, press the AUTO button until the Auto icon illuminates.
- Press the AUTO button again, to turn Auto off and Auto icon will extinguish.
![]() IMPORTANT
IMPORTANT
Turning the unit On and Off will require cycling through the Auto mode.
FILTER RESET
- The replace filter icon will illuminate indicating that the filter needs to be replaced.
- Replace the filter according to the directions found under Replacing the Filter in this book.
- Once the filter is replaced, press and hold the POWER button for 5 seconds to reset the Filter Reset light.
- The built-in timer for the filter reset is 4,320 operating hours.
![]() NOTE
NOTE
For best performance, the filter should be cleaned at least monthly as per the instructions found in the Care, Cleaning & Storage section of this book.
The Breville Smart Air Plus™ Connect Purifier can offer remote operation by using a home Wi-Fi connection and the Breville Home Connect™ app downloaded to a compatible mobile phone through the Google Play store or Apple App store.
To go straight to the appropriate app store, scan the QR code below.

For instructions on how to use the app, scan the QR code below, refer to the Quick Start Guide that can be found in the box or go to tinyurl.com/HomeConnectQuickStart.

![]() NOTE
NOTE
The Breville Home Connect™ app is compatible with mobile phones running Android® 5.0 or later and iOS devices 9.0 or later.
![]() NOTE
NOTE
To control the purifier using the app, the purifier must be plugged into an active power outlet.
CONNECT YOUR PURIFIER TO WI-FI
- Ensure the mobile device is connected to a home Wi-Fi network.
- The purifier must be turned on via the control panel. Once on, the
 symbol will flash fast on the display panel. The air purifier is now ready to connect.
 - Log into your Breville Home Connect™ app account and stay on the “Home” page. To add the purifier to the list, touch ‘Add Device’ or the
 symbol found in the top right-hand corner of the screen. Follow the prompts in the app.

- If the connection is successful, the purifier will appear in the main page of the app and the symbol on the purifier will illuminate.
- If connection is unsuccessful, touch and hold the button for 5 seconds until the light is flashing slowly. Follow the prompts in the app to connect in a different mode.
The Breville Smart Air Plus™ Connect comes with the added feature of voice assistance, allowing you to control your purifier using your voice by linking your Breville Home Connect™ app with Amazon Alexa and Google Home/Assistant.
To link your Breville Home Connect™ app account with either Google Home/Assistant or Amazon Alexa, refer to the instructions on www.Breville.com or follow instructions found in the Breville Home Connect™ app under Me > Third-Party Voice Services > View more ways to link.
![]() IMPORTANT NOTE
IMPORTANT NOTE
The recommended voice commands to operate the appliance’s functions differ between Amazon Alexa and Google Home/Assistant as listed. Variations of these commands may also be recognised, however, if a command fails, check against the recommended voice command.
![]() NOTE
NOTE
To control the purifier using the Amazon Alexa or Google Home/Assistant app, the purifier must be plugged in to an active power outlet and turned on.
VOICE CONTROL WITH AMAZON ALEXA
Before you can voice control your Breville Smart Air Plus™ Connect with Amazon Alexa, you need to link the Breville Home Connect™ account to the Amazon Alexa app as per the instructions.
Amazon Alexa Recommended Voice Commands for the Breville Smart Air Plus™ Connect
![]() NOTE
NOTE
Currently, Amazon Alexa does not support the following settings:
- Timer and Filter Reset.
VOICE CONTROL WITH GOOGLE HOME/ASSISTANT
Before you can voice control your Breville Smart Air Plus™ Connect with Google Home/Assistant, you need to link the Breville Home Connect™ account to the Google Home/Assistant app as per the instructions.
Google Recommended Voice Commands for the Breville Breville Smart Air™ Plus Connect

![]() NOTE
NOTE
Currently, Google Home/Assistant does not support the following settings:
- Timer and Filter Reset.
![]() TIPS for Amazon Alexa and Google Home/Assistants
TIPS for Amazon Alexa and Google Home/Assistants
- Configure your Amazon Alexa or Google Home/Assistant compatible devices with the “Alexa” or “Google Home/Assistant” app if using, or simply download onto your phone.
- You will find your device listed as the Breville product name in your Breville Home Connect™ app account. Tap on the device in the app to rename your device for more convenient voice commands, e.g. “Purifier Living Room” or give it a name, e.g. “Kenny”.
- Training your voice assistant – Voice Match – Teach your assistant to recognise your voice. This isn’t training it to understand English, but rather to recognise your voice as belonging to you. You can do this by going to the Settings menu in the voice assistant app on your phone.
- Routines – Amazon Alexa and Google Home/Assistant allow you to combine multiple actions in one voice command, to create a Routine, tap on the ‘Routines’ option via settings and follow the steps.
- Ensure the primary language is set to English (United States) for all apps.
The air purifier and filter should be cleaned at least once every month. Ensure the air purifier is switched off and disconnected from the power outlet and allow all parts to cool before cleaning or storing.
- Use a clean, dry cloth to clean all external surfaces of the air purifier.
![]() NOTE
NOTE
More frequent cleaning may be required depending on environmental conditions.
BREVILLE RECOMMENDS
- Always ensure the air purifier is turned off, switched off at the power outlet and unplugged and allow the unit to cool before performing any cleaning or filter replacement.
- DO NOT stick any foreign objects or your fingers inside the air inlet/outlet of this unit.
- DO NOT use gasoline, benzine, thinner, harsh cleaners, etc. on and/or in the unit while cleaning as they will damage the unit.
- NEVER use alcohol or other solvents on this unit.
CLEANING THE SENSOR
- It is important to keep the air quality sensor clean for best performance.
- The air quality sensor is situated behind a grill at the rear of the unit.
- Gently vacuum the air quality sensor grill using a small hand brush tool. Cleaning should occur regularly, at least once a month.
- For more thorough cleaning, remove the cover by using the raised tab on the edge of the cover. Push inwards and outwards simultaneously to open the cover, noting that it will be tight.
- Gently vacuum the mesh filter and metal shield of the air quality sensor using the hand brush tool. Thorough cleaning should occur at least once every six months.
- Replace the mesh filter and cover when clean, ensuring it clicks into place.
![]() WARNING
WARNING
The air quality sensor is fragile and can be damaged if excessive force is used during cleaning. Please use extra care when cleaning.
FILTER CARE & CLEANING
![]() WARNING
WARNING
The filter is not washable. Do not immerse any part of the air purifier in water as it will cause damage.
- The Pre-filter should be cleaned at least once every month using a vacuum cleaner. Gently vacuum using a hand-tool attachment such as a brush or upholstery tool. Clean more often if required.
- Do not attempt to clean the carbon filter with a vacuum as this can cause damage.
- Do not use any solutions, hard bristle brushes or sharp objects to clean as this can cause damage.
- Replace the filter as indicated using the following instructions.
REPLACING THE FILTER
Your Smart Air Plus™ ConnectPurifier filter should be replaced in the time frames indicated below.
- The filter life is approximately 6 months if used 24 hours daily, or 12 months if used 12 hours daily.
- The filter life may vary to this timing depending on environmental conditions.
- Remove all packaging from the replacement filter and place the filter into the unit as described below.
6. Carefully, turn your air purifier upside down and remove the locking knob from the base of the unit.
7. Remove the base plate.
8. Remove the used filter, being careful that any residue or debris that may fall from the filter will not cause damage.
9. Insert the replacement filter into the unit, ensuring that it is correctly fitted and centred.
10.Replace the base plate and refasten the locking knob.
11. Return the air purifier to an upright position.
12. Turn on the air purifier then press and hold the ![]() POWER button for 5 seconds to reset the Filter Reset light.
POWER button for 5 seconds to reset the Filter Reset light.
![]() NOTE
NOTE
There is no top or bottom on the filter. The filter can be placed into the unit either way.
![]() NOTE
NOTE
If the filter is not in place or not fitted correctly, the air purifier will not operate.
![]() WARNING
WARNING
Unintended use of the air purifier or damage to the housing may result in the escape of dangerous UV-C radiation which is dangerous to the eyes and skin. Never operate the UV-C light outside of the air purifier.
![]() CARE OF UV-C LIGHT
CARE OF UV-C LIGHT
The replacement of the UV-C light must be undertaken at an authorised Breville service centre. Please contact Breville Customer Service Centre for further support.
REPLACEMENT FILTERS
Replacement filters must be purchased from the Breville website^ or at participating retail outlets.
See the table below for the replacement product code to suit this Breville AirPurifier.

Please contact Breville Customer Service Centre for further support.
Only use the original Breville filter specially intended for this appliance. Do not use any other filters.
MINI TROUBLESHOOTING GUIDE
Before carrying out any of the following service checks, unplug the unit from the mains.

TROUBLESHOOTING GUIDE FOR AMAZON ALEXA AND GOOGLE HOME/ASSISTANT

If the problem is not listed, please contact Breville Customer Service Centre (see back cover for contact details)
Breville Customer Service Centre
Australian Customers
Phone: 1300 139 798
Web: www.breville.com
New Zealand Customers
Phone: 0800 273 845
Web: www.breville.com

Breville, the Breville logo, Master Every Moment, Smart Air Plus, Breville Home Connect, SensAir and the Microbe Shield logo are trademarks of Breville Pty. Ltd. A.B.N. 98 000 092 928.
Copyright Breville Pty. Ltd. 2021.
All other brands may be trademarks of their respective owners.
Due to continued product improvement, the products illustrated/photographed in this booklet may vary slightly from the actual product.
LAP508 ANZ C21
]]>Instruction Booklet
 BCG200
CONGRATULATIONS
on the purchase of your new
Breville product
BREVILLE RECOMMENDS SAFETY FIRST
At Breville, we are very safety conscious. We design and manufacture consumer products with the safety of you, our valued customer, foremost in mind. In addition, we ask that you exercise a degree of care when using any electrical appliance and adhere to the following precautions.
IMPORTANT SAFEGUARDS
READ ALL INSTRUCTIONS
BEFORE USE AND SAVE FOR
FUTURE REFERENCE
- Do not immerse the motor base, plug or cord in water or any other liquid.
- Always use the appliance on a dry, level surface.
- Always switch the appliance to ‘OFF’, switch the power off at the power outlet and then remove the plug when the appliance is not being used and before cleaning.
- Care should be taken when cleaning the grinding container as the grinding blades are sharp.
- The appliance is not intended for use by young children or infirm persons without supervision.
- Do not leave the appliance unattended when in use. Young children should be supervised to ensure that they do not play with the appliance.
- Fully unwind the power cord before use.
- Do not let the cord hang over the edge of a table or counter, touch hot surfaces or become knotted.
- Do not place this appliance on or near a hot gas or electric burner, or where it could touch a heated oven.
- This appliance is for household use only. Do not use this appliance for anything other than its intended use. Do not use outdoors.
- Do not operate this appliance for longer than 60 seconds as this could cause overheating. Allow the appliance to cool down for 10-15 minutes after a long operation.
- Regularly inspect the supply cord, plug and actual appliance for any damage. If found damaged in any way, immediately cease use of the appliance and return the entire appliance to the nearest authorized Breville service centre for examination, replacement or repair.
- The installation of a residual current device (safety switch) is recommended to provide additional safety protection when using electrical appliances. It is advisable that a safety switch with a rated residual operating current not exceeding 30mA be installed in the electrical circuit supplying the appliance. See your electrician for professional advice.
- The maximum quantity of coffee beans is 70g.
- This appliance is not intended for use by persons (including children) with reduced physical, sensory or mental capabilities, or lack of experience and knowledge unless they have been given supervision or instruction concerning the use of the appliance by a person responsible for their safety.
- Switch off the appliance and disconnect from the power supply before removing the bowl or approaching parts that move in use.
SAVE THESE INSTRUCTIONS
KNOW YOUR BREVILLE PRODUCT
A. On/Off switch: touch activation
B. Easy clean removable bowl
C. Transparent cover
D. Stainless steel blade system
E. Brushed stainless steel finish
F. 200 Watt motor
G. Cord storage
OPERATING YOUR BREVILLE PRODUCT
BEFORE FIRST USE
Remove any packaging material or promotional labels before first use. Wash the transparent grinder cover with warm, soapy water. Dry thoroughly. Wipe the stainless steel grinding container with a slightly damp cloth and dry well. Care should be taken when cleaning the grinding container as the grinding blades are sharp.
OPERATION OF YOUR GRINDER
- Remove the transparent cover and ensure the grinding container is clean and empty and locked securely into the drive base.
- Measure the desired quantity of coffee beans or spices in the cover. Carefully tip the coffee or spices into the grinding container.
- Place the cover onto the grinder.
- Plug the grinder into a 230/240V power outlet and switch on.
- Start the grinder by pressing down on the transparent cover and hold for the duration of grinding.
- When you have reached the desired grind, lift off the cover, rotate, and release the removable bowl. Invert and tap the base of the bowl to remove the ground ingredients.
- Clean according to instructions on page 9.
HANDY TIPS
- To ensure optimal grinding performance, allow your grinder to cool for at least one minute between uses.
- The grinder will not grind anything that is sticky or extremely hard i.e. chocolate, whole nutmeg, candied fruits, etc.
- The grinder will not make pastes of any fruits, seeds or herbs i.e. curry pastes, nut butter (peanut butter), or tahini (ground sesame paste).
- Do not overfill the grinding bowl.
GRINDING COFFEE:
We recommend quality 100% Arabica beans with a ‘Roasted On’ date stamped on the bag, not a ‘Best Before’ or “Use By’ date.
Coffee beans are best consumed between 5-20 days after the ‘Roasted On’ date. Store coffee beans in an airtight container and grind immediately before brewing.
PLUNGER COFFEE:
For Plunger style coffee, start with a ‘brew ratio’ of approx. 60g of ground coffee per liter of water. For an 8 cup plunger that’s approx. 50g of coffee. Adjust the amount of coffee to suit the strength you prefer. Operating the grinder for approximately 10-15 seconds will yield grinds of the correct size for the plunger.
Follow these easy steps for a great cup:
- Weigh your coffee beans.
- Place coffee beans into a grinding container and grind for 10-15 seconds using a timer.
- Using a variable temperature kettle, heat the appropriate volume of water to 95˚C. This is an ideal temperature for brewing coffee. Never using boiling water.
- Place the ground coffee in the plunger vessel.
- Pour the heated water into the plunger in a swirling manner to ensure all the ground coffee is soaked and the plunger vessel is full. The ‘bloom’ (expanding coffee and gases) should reach the top of the plunger.
- Using a timer, wait 4 minutes.
- Using a spoon, break the ‘crust’(the bloom becomes dense and a bit hard) and smell the aroma.
- Insert the plunger and carefully press down.
- Do not press too hard. Gently release pressure by pulling up slightly and press down again if you have pressed too hard.
PERCOLATOR COFFEE:
For Percolator-style coffee, use the same ‘brew ratio’ as a plunger. The grind size should be slightly finer than for the plunger, so grind for 5 seconds longer to achieve the correct fineness.
- Weigh your coffee beans.
- Place coffee beans into the grinder bowl and grind for 15-20 seconds using a timer.
- Fill the percolator with fresh cold water.
- ill the grind container of the percolator with the ground coffee. Do not overfill.
- Place the grinds container into the percolator ensuring it is seated properly in the base of the percolator.
- Replace the percolator lid and switch on.
- For best flavor, drink as soon as the percolator has switched off. Brewed coffee left in the percolator will continue to brew and create a stewed flavor.
GRINDING SPICES:
- Spices produce the best flavor when they are fresh.
- When purchasing spices, buy in small quantities.
- Try to avoid buying spices that are in cellophane as the packs allow the volatile oils to escape and allow oxygen to get in.
- Buy spices in glass jars or good-quality plastic pouches.
- Keep in a cool place and avoid spice racks that are in direct sunlight.
- Don’t keep spices past their Use By or Best Before date as the flavors and aromas will have deteriorated.
Some recipes will suggest drying roast spices first. This changes the flavor of the spice which is ideal for foods such as curries. To dry roast, place whole spices in a small frying pan and cook over medium heat until the spices start to change color and become fragrant. Some spices will start to pop which is a good indication that they are toasted well. Don’t over roast as spices may become bitter. Allow spices to cool completely before grinding. Spices should be ground for 10 seconds at a time until the desired consistency is achieved. Wait until the blade has stopped completely before removing the lid.
NOTE
Grinding some spices may cause the lid to “cloud” due to the abrasion caused by hard spices. This will not affect the performance of the grinder. After grinding spices use a clean pastry brush to brush out spices. Raw white rice can be ground after grinding spices to clean the grinder and absorb some of the aromatics.
OPERATING YOUR BREVILLE PRODUCT
| SPICE | MAX RECOMMEND QUANTITY | TIPS |
| Almonds | 1/a cup (55g) | Process only to a meal; not suitable to make nut butters |
| Cardamom seeds | 1 1/2 tablespoons (10g) | The older the pods the harder it will be to grind down. |
| Cassia Bark | 3 sticks (10g), broken into pieces | Only grind cassia bark that you can break easily with your hands beforehand. |
| Cinnamon Quills | 3 sticks broken in pieces | Cassia can often be packaged as cinnamon. Cinnamon quills are recognized as several layers and break easily.
Only grind cinnamon that you can break easily with your hands beforehand. |
| Coriander seeds | 1/2 cup (approx. 22g) | Coriander seeds can be ground roasted or unroasted but are better roasted for cooking |
| Cumin seeds | Y3 cup (approx. 32g) | Cumin seeds can be ground roasted or unroasted but are better roasted for cooking |
| Dried chilli flakes | IA cup (20g) | Allow chili to settle for 30 seconds before removing the lid to reduce the risk of inhaling chili fumes. |
| Linseed | 1/2 cup (85g) | Combine with almonds and sunflowers seeds to make LSA meal. |
| Peppercorns | ‘/3 cup (40g) | The older the cloves the harder it will be to grind down. |
| Star anise | 8-9 pieces (15g) | The older the star anise the harder it will be to grind down. |
| Sunflower seeds | ‘/3 cup (55g) | Combine with almonds and linseed to make LSA meal. |
| Szechwan peppercorns | 1/3 cup | Toast 1 tablespoon with 3 tablespoons of salt flakes and grind for salt and pepper mix |
| Whole cloves | 3 1/2 tablespoons (30g) | The older the cloves the harder it will be to grind down. |
CARE & CLEANING
Switch off at the power outlet and unplug. Wipe the grinding container with a slightly damp cloth and dry well. Care should be taken when cleaning the grinding container as the grinding blades are sharp.
To thoroughly clean the blades, place the lid in position and operate for 30 seconds to dislodge particles under the blades. Switch off and unplug before continuing to clean. Empty the grinding container and wipe it clean with a damp cloth. Dry thoroughly. Switch off and unplug before continuing to clean.
Wipe the exterior of the grinder with a slightly damp cloth. Polish with a soft, dry cloth. Do not use abrasive cleaners.
NOTE
Do not immerse the motor base or cord in water or any other liquid. Do not operate this product if the container is filled with liquid ingredients. Do not place the transparent cover or the grinding bowl in the dishwasher.
NOTE
Raw white rice can be ground after grinding spices to clean the grinder and absorb aromatics.
STORAGE
Always switch off the power and remove the plug from the power outlet. Follow directions for cleaning and store in an upright position on a flat surface.
Breville Customer Service Centre
| Australian Customers Mail: PO Box 22 Botany, NSW, 2019 AUSTRALIA Phone: 1300 139 798 Fax: (02) 9384 9601 Email: Customer Service: [email protected] |
New Zealand Customers Mail: Private Bag 94411 Botany Manukau 2163 Auckland NEW ZEALAND Phone: 0800 273 845 Fax: 0800 288 513 Email: Customer Service: [email protected] |
![]()
www.breville.com.au
Breville is a registered trademark of Breville Pty. Ltd. A.B.N. 98 000 092 928.
Copyright Breville Pty. Ltd. 2014.
Due to continued product improvement, the products illustrated/photographed
in this booklet may vary slightly from the actual product.
BCG200 Issue – D14
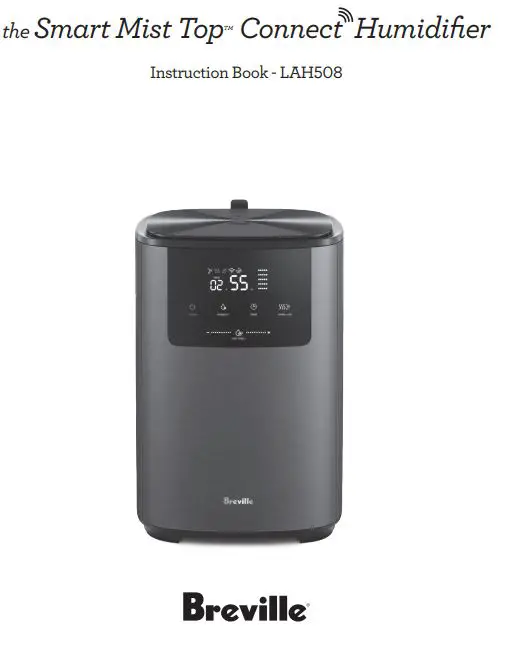
BREVILLE RECOMMENDS SAFETY FIRST
At Breville we are very safety conscious. We design and manufacture consumer products with the safety of you, our valued customer, foremost in mind. In addition, we ask that you exercise a degree of care and adhere to the following precautions.
SPECIFICATIONS

![]() NOTE
NOTE
Not compatible with Google Home, Amazon Alexa or other similar voice-assisted appliances.
IMPORTANT SAFEGUARDS
READ ALL INSTRUCTIONS BEFORE USE AND SAVE FOR FUTURE REFERENCE
- Carefully read all instructions before operating the humidifier for the first time and save for future reference.
- Remove and safely discard any packaging material and promotional labels before using the humidifier for the first time.
- To eliminate a choking hazard for young children, remove and safely discard the protective cover fitted to the power plug of this humidifier.
- When unpacking the humidifier, check to see you have received all the items listed in the parts list before discarding the packaging.
- Always ensure the humidifier is properly assembled before use. Follow the instructions provided in this book.
- Always operate the humidifier on a stable surface. Ensure that the surface is level, clean and free of water and other substances.
- Do not operate the humidifier on an incline plane. Do not move while the humidifier is switched on.
- Do not place the humidifier near the edge of a bench or table during operation.
- Do not place the humidifier on a rug, carpet, wooden flooring, or any other surface that may be damaged by exposure to water or moisture. It is recommended that a waterproof mat or pad is placed under the humidifier.
- Do not operate the humidifier on a sink drain board.
- Do not locate the humidifier directly below or close to a mains electricity supply socket.
- Do not use the humidifier without water in the water tank.
- Do not use the humidifier unless it has been cleaned according to instructions.
- Mist may not be visible in certain conditions (impacted by light, background color, etc.) or at lowest setting.
- Suitable for use in dry locations only. Do not use outdoors or on wet surfaces. Do not use in bathrooms, laundry areas or similar indoor locations.
- Room ventilation is required if condensation becomes visible on windows, walls or floor.
- Never place the humidifier where it may fall into a bath or other water container. Do not use or store where it may get wet or in the immediate surroundings of a bath, a shower, or a swimming pool.
- Do not use in areas where petrol, paint, or flammable liquids are used or stored or where there are vapors present. Do not use in conjunction with or directly next to an air freshener or similar products.
- Do not spray any flammable materials such as insecticides or fragrance around the humidifier.
- Do not use this humidifier when you have used indoor smoke-type repellents or in places with oily residue, burning incense or chemical fumes.
- Do not pour water into any openings except for the water tank. Do not allow water to enter the air outlets on top of the humidifier.
- When filling or refilling, only fill the water tank with cold tap water or distilled water. Do not use ground water or hot water.
- Always switch the humidifier off and then unplug from the power outlet:
– Before filling or emptying
– Before cleaning and maintenance, unless otherwise specified in
– Immediately after use. - Always use clean tap or distilled water to prevent clogging and damage to the transducer
- Do not put any substance other than water in the water tank. Do not add fragrance or any chemical substance into the water. Use only water (tap, purified, mineral, any sort of portable water). If other additives are used, the plastic material and the membrane may become discolored and/or damaged.
- Water in the water tank is not suitable for drinking. Do not drink this water, and do not use it to feed animals or water the plants. When you empty the water tank, pour the water in the water tank down a drain.
- Do not use the humidifier in a water or distilled water. Do not room with major temperature use ground water or hot water. changes as this may cause condensation inside the humidifier.
- If not using the humidifier for a long time, clean and dry the the water tank. water tank before storage.
- Clean the water tank every week.
- Always disconnect the humidifier from the power supply and empty the water tank before moving. Always carry the humidifier upright.
- It is important to check the humidity of your ambient air regularly. Intensive continuous operation can cause the ambient air to become excessively humid.
- A comfortable humidity level is considered to be between 40%RH to 60%RH.
- Never use the humidifier underneath a cover such as a blanket, pillow, etc.
- Never plug in or switch on the humidifier without filling the removable water tank with water and correctly replacing the tank onto the base of the humidifier.
- Do not remove the mist nozzle during operation.
- Position the humidifier so that the mist nozzle is not directed towards objects or a wall as the immediate vicinity of the air humidifier may become damp.
- The humidifier is not intended to be operated by means of an external timer or separate remote-control system or any other device that switches the humidifier on automatically.
- Do not use chemicals, steel wool, metal scouring pad or abrasive cleaners to clean the outside of the humidifier housing as these can damaged the housing of the humidifier.
- Cleaning procedures must be routinely followed to ensure that the humidifier continues to operate efficiently.
- Empty any remaining water from the water tank and water inlet basin when the humidifier is not in use.
- You may optionally add drops of essential/scented oils to the aroma tray. This will emit a pleasant Odour into the surrounding area.
- The air humidifier transducer is highly sensitive. Do not touch the transducer with bare fingers or scrape it with any metal tools, as it may reduce the mist output permanently.
- Keep the humidifier clean. Follow the cleaning instructions provided in this book.
IMPORTANT SAFEGUARDS FOR ALL ELECTRICAL APPLIANCES - Fully unwind the power cord before use.
- Connect only to a 230V or 240V power outlet.
- Do not let the power cord hang over the edge of a bench or table, touch hot surfaces or become knotted.
- To protect against electric shock, do not immerse the power cord, power plug or appliance in water or any other liquid or allow moisture to come in contact with the part, unless it is
- recommended in the cleaning instructions.
- The appliance is not intended for use by persons (including children) with reduced physical, sensory or mental capabilities, or lack of experience and knowledge, unless they have been given supervision or instruction concerning use of the appliance by a person responsible for their safety.
- Children should be supervised to ensure that they do not play with the appliance.
- It is recommended to regularly inspect the appliance. To avoid a hazard, do not use the appliance if power cord, power plug or appliance becomes damaged in any way. Return the entire appliance to the nearest authorized Breville Service Centre for examination and/or repair.
- Any maintenance other than cleaning should be performed at an authorized Breville Service Centre.
- This appliance is for household use only. Do not use this appliance for anything other than its intended use. Do not use in moving vehicles or boats. Do not use outdoors. Misuse may cause injury.
- The installation of a residual current device (safety switch) is recommended to provide additional safety protection when using electrical appliances. It is advisable that a safety switch with a rated residual operating current not exceeding 30mA be installed in the electrical circuit supplying the appliance. See your electrician for professional advice.
- During electrical storms, the appliance should be disconnected from the power source at the wall socket to prevent any electrical surges that may arise during the storm and which may inadvertently cause damage to the appliance and its electronic componentry.
- Always turn the appliance to the off position, switch off at the power outlet and unplug at the power outlet when the appliance is not in use.
- Before cleaning, always turn the appliance to the off position, switch off at the power outlet, unplug at the power outlet and remove the power cord, if detachable, from the appliance and allow all parts to cool.
- Do not place this appliance on or near a heat source, such as hot plate, oven or heaters.
- Position the appliance at a minimum distance of 20cm away from walls, curtains and other heat or steam sensitive materials and provide adequate space above and on all sides for air circulation.
![]() WARNING
WARNING
To avoid electric shock, do not connect the plug to the power outlet when hands are wet.
FOR HOUSEHOLD USE ONLY SAVE THESE INSTRUCTIONS


- A. Top Cover
- B. Water Tank Handle
- C. Mist Nozzle
- D. Mist Guide
- E. Removable Water Tank
- F. Control Panel
- G. Body
- H. Sensor
- I. Non-slip Feet
- J. Remote Control
- K. Water Buoy
- L. Water Inlet Basin
- M. Heating Plate
- N. Transducer
- O. Mood Light
NOT PICTURED
Aroma Tray & Felt Pad
Water Purification Filter
Power Cord and Plug
Control Panel
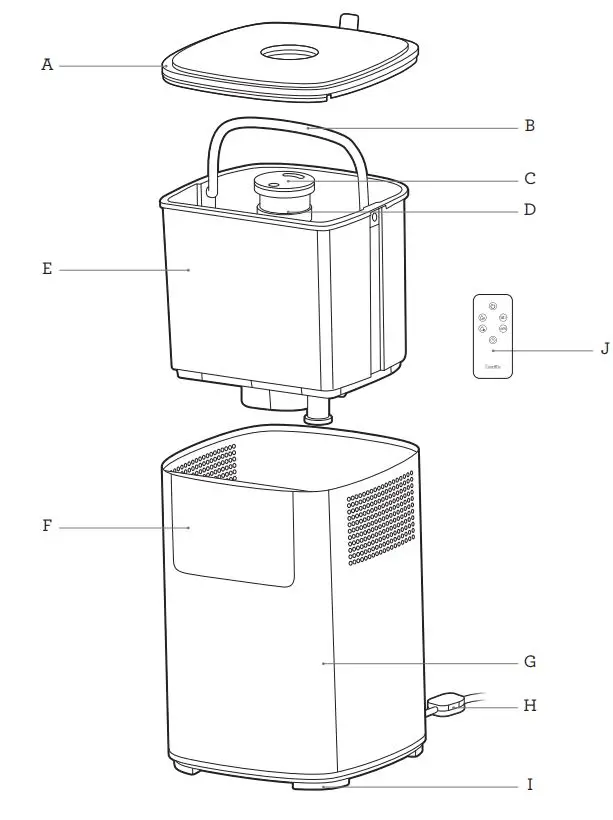
- A. Power On/Off and Wi-Fi
- B. Humidity and Night Mode
- C. Timer
- D. Warm/Ion and Mood Light
- E. Mist Level Control Scroll left or right to change the mist level.
DISPLAY SCREEN ICONS
![]()
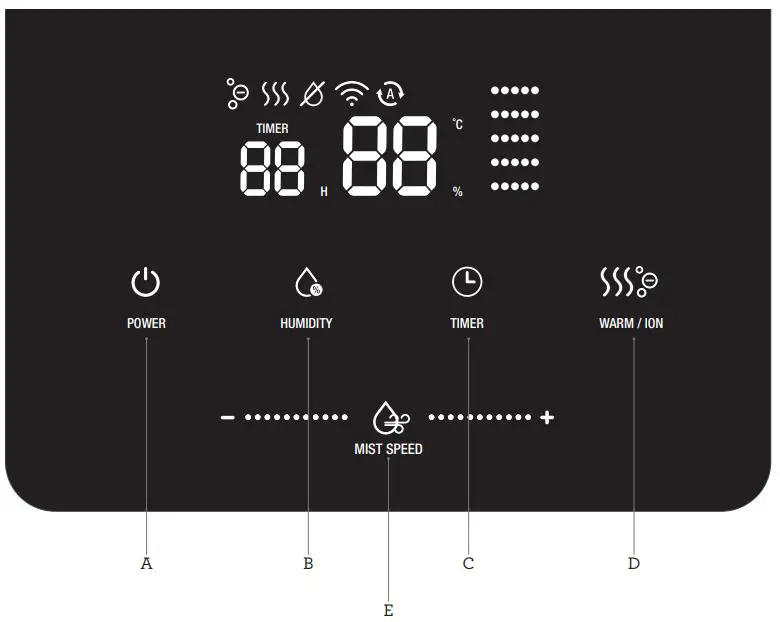
WHAT IS A HUMIDIFIER?
Your Breville humidifier will assist in keeping a comfortable and healthy environment at home by artificially adding water vapor (moisture) to the surrounding atmosphere. It may assist with common winter symptoms such as dry skin, dry throat, cracked or dry lips, dry nasal cavity, and itchy eyes, as well as some sinus and respiratory issues.
HOW DOES A HUMIDIFIER WORK?
Your Breville humidifier uses a high-frequency oscillator to break water into tiny water particles. The ventilation system then blows these water particles into the dry air in the form of a mist where it evaporates to increase the relative humidity.
WHAT IS RELATIVE HUMIDITY?
Relative humidity (RH) is the amount of water vapor in the air and it is commonly expressed as a percentage of the maximum amount of water vapor that the air can hold at a given temperature. Every environment has a different humidity level. A standard comfortable level is considered to be between 40-60%RH.
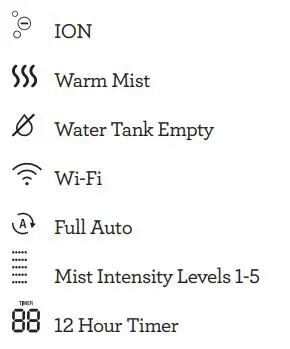
BEFORE FIRST USE
- Before using your humidifier for the first time, remove all packaging material and promotional labels.
- Check for any missing or damaged parts as per the components list.
- Clean all parts according to the Care, Cleaning & Storage section.
- Place the humidifier on a flat surface that will not be damaged by exposure to water or moisture.
IMPORTANT
It is recommended that a waterproof mat or pad is placed under the humidifier when in use. - Remove the cover from the top of the humidifier and set aside.
- Using the water tank handle, lift and remove the water tank from the humidifier body.
- Ensure the water purification filter is fitted properly to the water tank.
 NOTE
NOTE
The water purification filter is attached to the water tank. Ensure both are properly fitted before using the humidifier. - Fill the water tank up to the `MAX’ text outlined inside the water tank.
IMPORTANT
Only fill the water tank with cold tap or distilled water. Do not use ground water or hot water. - Use the water tank handle to gently lower the water tank back into the humidifier body
- Ensure the mist nozzle is fitted correctly on the mist guide of the water tank. If tilted, lightly push the mist nozzle back onto the mist guide
- Replace the top cover back on the water tank, ensuring the tab sits in the top back of the humidifier. The top cover should sit flat and the mist nozzle should be flat to
the top cover when correctly positioned on the humidifier
IMPORTANT
Ensure the top cover sits flat on the top of the humidifier. If the mist nozzle sits higher or lower than the top cover when in operation, condensation will build on the top cover and around the humidifier. - Connect the power plug to a 230V or 240V power outlet and switch the outlet on. The
 POWER symbol will illuminate red and the
  WI-FI icon will flash. The humidifier is now in Standby mode.
 - Touch the POWER symbol to activate the control panel and display screen. The humidifier is now switched on and will automatically begin operation in
 FULL AUTO mode.
![]() IMPORTANT
IMPORTANT
Water may remain in the water inlet basin even though the water tank may be empty. However, once the water in the tank and/or basin is too low to keep the humidifier running,
the humidifier will stop working. Refill the tank with water. Do not use the humidifier without water in the water tank.
![]() NOTE
NOTE
Take care when removing the water tank from the body after use as residual water may drip.

YOUR BREVILLE HUMIDIFIER
- The humidifier comes with a memory feature. When turned on from Standby mode, it will start on the settings used previously.
- The control panel lights will dim after approximately 30 seconds if not touched. Touch the POWER symbol once, where the control symbols are located to wake up the screen, then select any function.
- The Timer, Night mode, Warm mist and ION features can be used in any mode.
- The humidifier will check the humidity level once every minute.
- The room temperature and humidity will alternate on the display screen approximately every 10 seconds when in operation on all modes except adjustable humidity mode.
- Manual adjustment of the Mist intensity control bar will exit any programmed settings, except ADJUSTABLE SPEED and manual setting.
- Touch and hold the WARM MIST symbol to turn off the mood light in the water tank. Repeat to turn back on.
- When empty, the
 WATER TANK EMPTY icon will illuminate and the humidifier will automatically turn off.
SENSAIR SYSTEM™ LIVE COMFORT CONTROL - Your Breville Smart Mist Top™ Connect Humidifier has a sensor to detect changes to humidity and temperature in the surrounding area.
- On FULL AUTO and ADJUSTABLE SPEED modes, the SensAir System™ will automatically keep the humidity in the “Comfort Zone” by setting the appropriate level of relative humidity, depending on ambient air temperature for maximum comfort.
- To override the RH level touch the
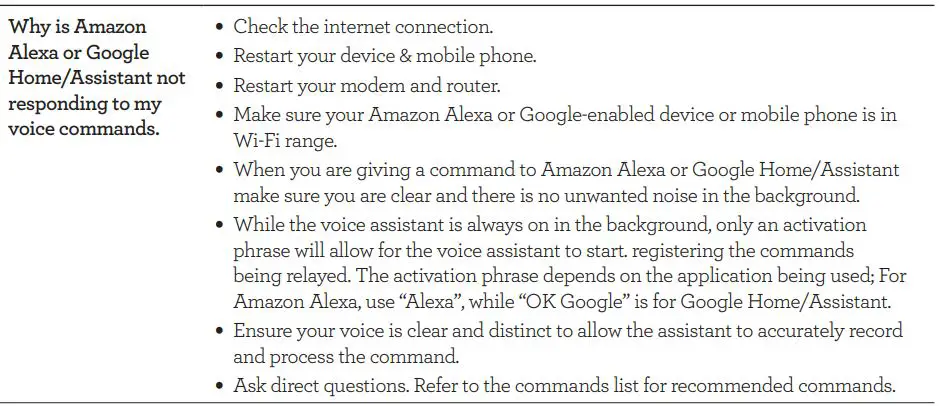 HUMIDITY/NIGHT symbol. This will switch the mode to ADJUSTABLE HUMIDITY.
OPERATING YOUR HUMIDIFIER
![]() NOTE
NOTE
When connected to the power outlet and turned on for the first time, the humidifier will operate for one minute in order to sense the ambient conditions, and then will enter FULL AUTO mode.
FULL AUTO MODE
- FULL AUTO mode is the default setting for the humidifier when the unit is turned on from the power outlet. FULL AUTO mode can also be manually selected.
- The Timer, Night mode, Warm Mist and ION features can be used with this setting. You do not need to adjust Humidity and Mist Intensity level in FULL AUTO mode.
- Touch the HUMIDITY/NIGHT symbol on the control panel until `AU’ illuminates. Once FULL AUTO mode is set, the FULL AUTO icon, will illuminate on the display screen.
- FULL AUTO mode automatically adjusts the mist intensity to regulate the humidity level between 30-65%RH based on the temperature within the room.
![]() NOTE
NOTE
- FULL AUTO mode is not recommended where room temperatures reach above 30°C.
- The mist intensity level will not illuminate as it will automatically modulate to achieve the desired humidity level.
3. The humidifier will continue to monitor and regulate as required to maintain the comfort zone, adjusting the mist intensity. Once the comfort zone has been achieved, the humidifier will stop the mist intensity automatically and will then operate again if the humidity level falls below the comfort zone.
4. If the Timer has not been programmed, the humidifier will continue to operate in FULL AUTO mode until turned off manually, programmed to another mode or when the water tank is empty.
![]() NOTE
NOTE
The room temperature shown on the display screen is taken only within the vicinity of the sensor and may be influenced by positioning, airflow and other environmental factors. Actual room temperature may vary slightly.
SEMI-AUTO MODES
This humidifier can achieve 2 semiauto modes: ADJUSTABLE SPEED and ADJUSTABLE HUMIDITY modes.
- In ADJUSTABLE SPEED mode, the humidifier automatically keeps the humidity in the comfort zone with the SensAir System™ while the mist intensity can be manually selected.
- In ADJUSTABLE HUMIDITY mode, the humidifier automatically adjusts the mist intensity to maintain a pre-selected relative humidity level.
- ADJUSTABLE SPEED and ADJUSTABLE HUMIDITY can only be accessed when the humidifier is on FULL AUTO mode.
- The Timer, Night mode, Warm Mist and ION features can be used with these modes.
ADJUSTABLE HUMIDITY
To program ADJUSTABLE HUMIDITY, touch the HUMIDITY/NIGHT symbol on the control panel repeatedly to cycle through until the desired RH flashes on the display screen. The RH number will flash 3 times then illuminate. The ![]() FULL AUTO icon will illuminate and the % icon will flash continuously during this setting. The humidifier will start automatically if the room humidity is lower than the selected humidity. If the room humidity is higher than the selected humidity, `HI’ will display on the display screen, and mist will not be released.
FULL AUTO icon will illuminate and the % icon will flash continuously during this setting. The humidifier will start automatically if the room humidity is lower than the selected humidity. If the room humidity is higher than the selected humidity, `HI’ will display on the display screen, and mist will not be released.
![]() NOTE
NOTE
The humidity level can be selected in 5% increments between 30% and 90%.
The mist intensity level will not illuminate as it will automatically modulate to achieve the desired humidity level.
Once the chosen relative humidity has been reached, the mist will stop releasing and will automatically restart once the humidity level falls below the set humidity.
ADJUSTABLE SPEED
To program ADJUSTABLE SPEED, touch or slide your finger along the MIST LEVEL CONTROL bar on the control panel to change the mist intensity as desired. The mist intensity level will display and the on the right-hand side of the display screen, the mist intensity level will illuminate. The humidifier will start automatically if the room humidity is lower than the comfort zone.
If the ideal relative humidity is higher than the ideal humidity in the “Comfort Zone” , `HI’ will display on the display screen and adjustable speed cannot be programmed.
![]() NOTE
NOTE
The mist intensity level can be selected from LOW (1) to HIGH (5).
The room temperature and relative humidity will alternate on the display screen every 10 seconds when in operation.
Once the ideal relative humidity has been reached, the mist release will stop operating automatically and will restart once the humidity level falls below the set humidity for the room temperature.
![]() IMPORTANT
IMPORTANT
All operating modes will be cancelled if the water tank runs empty. The humidifier will automatically shut off when there is insufficient water to operate.
MANUAL MODE
The humidity level and mist intensity can be manually set in a number of ways.
To set MANUAL mode
- From ADJUSTABLE HUMIDITY, touch or slide your finger along the MIST LEVEL CONTROL bar on the control panel to change the mist intensity as desired.
- From ADJUSTABLE SPEED, touch the HUMIDITY/NIGHT symbol on the control panel repeatedly to cycle through until the desired RH flashes on the display screen.
![]() NOTE
NOTE
Both mist intensity and the humidity can be set together on Manual mode.
The mist intensity levels can be manually selected between Low (1) to High (5).
The humidity level can be manually selected between 30% and 90%RH.
The Timer, Night mode, Warm Mist and ION features can be used with this setting.
The mist intensity will stop when the humidity level has been reached. The display will alternate between the word `Hi’, the current temperature and the current humidity level.
If the humidity in the room is higher than the selected humidity, `HI’ will display on the display screen and the user cannot enter Manual mode. To enter Manual mode, the user must select a humidity level that is higher than the room humidity.
NIGHT MODE
- In NIGHT mode, the humidifier turns off the lights, except the blue mood light found in the water tank.
- Night mode can be selected in all modes.
- The Timer feature and Warm Mist feature can be used with this setting.
1. Touch and hold the HUMIDITY/NIGHT symbol on the control panel. All the lights will turn off, except the mood light in the water tank, and the![]() POWER symbol will flash slowly.
POWER symbol will flash slowly.
![]() NOTE
NOTE
Turn off the mood light manually before setting Night mode if not needed. Touch and hold the ![]() WARM MIST/ION symbol to turn off the mood light in the water tank.
WARM MIST/ION symbol to turn off the mood light in the water tank.
To reactivate the mood light, touch and hold the![]() WARM MIST/ION symbol. The mood light will illuminate.
WARM MIST/ION symbol. The mood light will illuminate.
2. Touch the ![]() POWER symbol to reactivate the control panel. The control panel lights will illuminate and the humidifier is ready to be adjusted. Once the mode is adjusted, the control panel will dim back into Night mode.
POWER symbol to reactivate the control panel. The control panel lights will illuminate and the humidifier is ready to be adjusted. Once the mode is adjusted, the control panel will dim back into Night mode.
3. To cancel night mode, touch and hold the HUMIDITY/NIGHT symbol again for
3 seconds. The control panel lights will illuminate and the humidifier will continue to operate in the chosen mode.
TIMER
This humidifier has a Timer feature that will turn the humidifier off after a chosen number of hours.
- Touch the
 TIMER symbol on the control panel repeatedly to cycle through 1 to 12 hours. The set time, current relative humidity and the temperature will alternate on the display screen.
 - When the desired number of hours is displayed, it will flash 3 times before starting the countdown.
- The Timer will begin to count down in 1-hour increments. The humidifier will automatically turn off once the chosen time has elapsed.
- To cancel this feature, touch and hold the TIMER symbol until `TIMER’ and the number of hours disappear from the display screen.
WARM MIST AND ION
WARM MIST
- This humidifier has a WARM MIST feature. A small internal heating plate will heat the water to create a warm vapor.
- WARM MIST can be activated on its own, or together with ION, in all modes.
- WARM MIST can operate automatically in all modes.
ION
- This humidifier has an ION feature. ION is generated and released in the mist. The ION will then catch and hold DUST particles in the air, helping to purify the air in the process.
- ION can be activated on its own, or together with WARM MIST, in all modes.
- ION can operate automatically in all modes.
- Touch the
 WARM MIST/ION symbol on the control panel to turn on warm mist. The WARM MIST icon will illuminate on the display screen and warm mist will emit from the mist nozzle gradually within 10-15 minutes.NOTE
Warm mist will start after the water has time to heat. The time will vary depending on factors such as the temperature of the water in the tank. - Touch the WARM MIST/ION symbol again. The
 ION icon will illuminate on the display screen and ION will emit from the mist nozzle through the mist.
 - To turn WARM MIST off, but keep ION on, touch the WARM MIST/ION symbol again. The <Insert WARM MIST icon here> WARM MIST icon will stop illuminating on the display screen, while the ION icon will remain illuminated. ION will continue to emit from the mist nozzle.
- To turn ION off, touch the symbol again. The ION icon will stop illuminating on the display screen. Both WARM MIST and ION are now off.
AROMA TRAY
- Press the aroma tray on the side of the humidifier and it will click out of the unit.
- Add 23 drops of essential oil (not included) directly to the pad in the aroma tray.
- Push the aroma tray back into the humidifier until it clicks into place.
- Turn the humidifier on and the aroma will start emitting automatically with the mist. Increase the mist intensity as desired.
![]() WARNING
WARNING
Never add essential oil directly to the water tank, the water inlet basin or any other part of the humidifier except the aroma tray felt pad. Do not use more than 23 drops of oil on the aroma tray felt pad at any one time. Only add more oil when the aroma in the surrounding air has dissipated.
AUTO SHUT-OFF
- Once the water in the water tank and water inlet basin is too low to keep the machine running, the WATER TANK EMPTY icon will illuminate red on the display, 3 beeps will sound and the humidifier will stop working. The POWER symbol will turn red and stay illuminated.
- Fill the water tank, turn the humidifier on and program the desired mode.
- To recommence, turn the humidifier off at the power outlet, fill the tank and reprogram. The WATER TANK EMPTY icon will stop illuminating and the humidifier will start.
- If night mode is activated, the humidifier will not beep when the WATER TANK EMPTY icon illuminates.
![]() IMPORTANT
IMPORTANT
All operating modes will be cancelled if the water tank runs empty. The humidifier will automatically shut off when there is insufficient water to operate.
USING THE REMOTE CONTROL
The humidifier comes equipped with a remote control which can be used to operate many functions on the humidifier.
![]() NOTE
NOTE
On first use, remove the transparent plastic protector that separates the Lithium battery from the connectors.
- A CR2025 3V Lithium battery is provided with the remote. When it is time to replace the battery, open the battery compartment at the back of the remote, pushing the small arched groove to the right and simultaneously pulling out the battery compartment cover by pushing the rectangular groove.

- Insert the battery, paying attention to the polarity (+ and -). Reinsert the battery compartment into the remote control ensuring that the + symbol is facing upwards when inserted. Make sure the battery compartment is correctly secured.

- To use the remote control, point it at the display screen on the humidifier and used within five meters.
![]() HINT
HINT
When correctly inserted, the text on the battery will be facing the bottom of the remote and the compartment is fitted correctly when it slides in all the way.
WARNING FOR BUTTON BATTERIES KEEP OUT OF REACH OF CHILDREN
- Swallowing may lead to serious injury in as little as 2 hours or death, due to chemical burns and potential perforation of the esophagus.
- If you suspect your child has swallowed or inserted a button battery immediately call the 24-hour Poisons information Centre on 13 11 26 for fast, expert advice.
- Examine devices and make sure the battery compartment is correctly secured, e.g. that the screw or other mechanical fastener is tightened. Do not use if compartment is not secure.
- Dispose of used button batteries immediately and safely. Flat batteries can still be dangerous.
- Tell others about the risks associated with button batteries and how to keep their children safe.

The Smart Mist Top™ Connect Humidifier can offer remote operation by using a home Wi-Fi connection and the Breville Home Connect™ app downloaded to a compatible mobile phone. through the Google Play store or Apple App store.
To go straight to the appropriate app store, scan the QR code below.

https://smartapp.tuya.com/brevilleconnect
For instructions on how to use the app, scan the QR code below, refer to the Quick Start Guide that can be found in the box or go to tinyurl.com/HomeConnectQuickStart.
![]() NOTE
NOTE
The Breville Home Connect™ app is compatible with mobile phones running Android® 5.0 or later and iOS devices 9.0 or later.
![]() NOTE
NOTE
To control the humidifier using the app, the humidifier must be plugged into an active power outlet and switched on at the power outlet. If the humidifier is switched OFF at the power outlet or disconnected from the power outlet, then the app cannot connect to the humidifier via the network.
CONNECT YOUR HUMIDIFIER TO WI-FI
- Ensure the mobile device is connected to a home Wi-Fi network.
- The humidifier must be on standby mode. Once the
 icon flashes rapidly on the display screen, the humidifier is ready to connect.
 - Log into your Breville Home Connect™ app account and stay on the “Home” page. To add the humidifier to the list, touch `Add Device’ or the symbol found in the top right-hand corner of the screen. Follow the prompts in the app to scan the device (recommended) or connect in manual EZ mode (default).
- If the connection is successful, the humidifier will appear in the main page of the app and the icon on the humidifier will illuminate.
- If the connection is not successful, the icon will flash slowly. Touch and hold for 3 seconds until 1 beep sounds. The icon will flash rapidly, and the humidifier is ready to connect to the app through EZ Mode again.
- If EZ mode failed to connect, follow the prompts in the app to automatically begin AP mode (manual mode). To connect through AP mode, touch and hold for 5 seconds until 2 beeps sound. The icon will flash slowly. Follow the prompts in the app to connect in manual AP mode.
![]() NOTE
NOTE
To return to EZ mode from AP mode, touch and hold![]() for 3 seconds.
for 3 seconds.
The Breville Smart Mist Top™ Connect comes with the added feature of voice assistance, allowing you to control your humidifier using your voice by linking your Breville Home Connect™ app with Amazon Alexa and Google Home/Assistant.
For instructions on how to link your Breville Home Connect™ app account with either Amazon Alexa or Google Home/Assistant refer to the instructions on www.Breville.com or follow instructions found in the Breville Home Connect™ app under Me > Third-Party Voice Services > View more ways to link.
![]() IMPORTANT NOTE
IMPORTANT NOTE
The recommended voice commands to operate the appliance’s functions differ between Amazon Alexa and Google Home/Assistant as listed. Variations of these commands may also be recognized, however, if a command fails, check against the recommended voice command.
![]() NOTE
NOTE
To control the humidifier using the Amazon Alexa or Google Home/Assistant app, the humidifier must be plugged in to an active power outlet and on standby mode.
VOICE CONTROL WITH AMAZON ALEXA
Before you can voice control your Breville Smart Mist Top™ Connect with Amazon Alexa, you need to link the Breville Home Connect™ account to the Amazon Alexa app as per the instructions.
Amazon Alexa Recommended Voice Commands for the Breville Smart Mist Top™ Connect

![]() NOTE
NOTE
Currently, Amazon Alexa does not support the following settings:
• Timer.
VOICE CONTROL WITH GOOGLE HOME/ASSISTANT:
Before you can voice control your Breville Smart Mist Top™ Connect with Google Home/Assistant, you need to link the Breville Home Connect™ account to the Google Home/Assistant app as per instructions.
Google Home/Assistant Recommended Voice Commands for the Breville Smart Mist Top™ Connect


![]() NOTE
NOTE
Currently, Google Home/Assistant does not support the following settings:
• Timer.
![]() TIPS for Amazon Alexa and Google Home/Assistant
TIPS for Amazon Alexa and Google Home/Assistant
- Configure your Amazon Alexa or Google Home/Assistant compatible devices with the “Amazon Alexa” or “Google Home/Assistant” app if using, or simply download onto your phone.
- You will find your device listed as the Breville product name in your Breville Home Connect™ app account. Tap on the device in the app to rename your device for more convenient voice commands, e.g. “Humidifier Living Room” or give it a name, e.g. “Kenny”.
- Training your voice assistant – Voice Match- Teach your assistant to recognize your voice. This isn’t training it to understand English, but rather to recognize your voice as belonging to you. You can do this by going to the Settings menu in the voice assistant app on your mobile device.
- Routines – Amazon Alexa and Google Home/Assistant allow you to combine multiple actions in one voice command, to create a Routine, tap on the `Routines’ option via settings and follow the steps.
- Ensure the primary language is set to English (United States) for all apps.

Before cleaning, ensure the power is switched off and then remove the power plug from the power outlet.
BREVILLE RECOMMENDS
- Only use cold water or distilled water in the water tank.
- Change the water often to keep it fresh.
- Clean the transducer, water tank and water basin at a minimum of once every week when in constant use.
- Use a small brush or a cotton swab to assist with cleaning the transducer and basin. Never use metal or sharp objects.
- After cleaning, ensure all parts are completely dry before using the humidifier.
![]() NOTE
NOTE
Clean the whole humidifier and make sure that all parts are dried completely. Do not immerse the unit in water. Clean the transducer, water tank and basin at least once a week.
![]() IMPORTANT
IMPORTANT
If you do not use the humidifier for a long time, clean and dry the water tank and the water purification filter, and all parts before storage.
![]() WARNING
WARNING
Do not use chemicals, steel wool, metal scouring pad or abrasive cleaners to clean the outside of the humidifier housing as these may damage the humidifier.
![]() IMPORTANT
IMPORTANT
Cleaning procedures must be routinely followed to ensure that the humidifier continues to operate efficiently. Do not use the humidifier unless it has been cleaned according to instructions.
TO CLEAN EXTERNAL PARTS
- Use a clean, dry cloth to clean all external surfaces of the humidifier.
- A soft, slightly-damp cloth may be used to wipe the external housing of the humidifier if more thorough cleaning is required. Never use chemical substances or scourers as this could damage the housing and the control panel.
- Dry thoroughly before storing or using the humidifier.
TO CLEAN INTERNAL PARTS
In cases when the water is hard (where water contains too much calcium and magnesium), leave heavy scale on the surface of the water basin, transducer and inner surface of the water tank. Scale, or calcification, on the surface of transducer will reduce the reliability of the unit. To clean internal parts of the humidifier, create a cleaning solution of 1-part vinegar to 1-part water.
WATER TANK
- It is important to clean the water tank regularly and ensure it is dry before reassembling and using the humidifier.
- To clean, create a vinegar and water solution enough to fill the tank about half way. Swish the solution around for a minute, then fill the rest of the tank up with tap water. Leave to sit for 12 hours, or even overnight.
- Empty and rinse well with clean water.
![]() NOTE
NOTE
To assist with emptying all the water from the water tank, it may help to slightly shake the tank over a sink or drain.
MIST NOZZLE
- If the mist output is reducing due to calcification, turn the top cover over and immerse the nozzle in a vessel filled with vinegar and water solution and soak for at least 10 minutes.
- Rinse with clean or distilled water and allow to dry.
WATER INLET BASIN
- The water inlet basin includes the water reservoir in the base of the unit that also houses the transducer and the heating plate.
- Clean the water basin with a soft cloth. If there is excess film or calcification on the surface, then soak the cloth with the vinegar and water solution and repeat the process.
- If there is film or calcification in any of the depressions along the basin, drop a bit of vinegar and water solution into the depression and lightly clean it with a brush or a cotton swab.
- Rinse with clean or distilled water and allow to dry.
OPTIONAL CLEANING SOLUTION FOR CALCIFICATION ISSUES
- If a build-up of calcification on the transducer or heating plate occurs and cannot be removed with a simple vinegar and water solution, use a de-calcifying agent or citric acid.
STRICTLY FOLLOW THE INSTRUCTIONS ON THE PACKAGING FOR THESE CLEANING PRODUCTS.
- Brush off any scale deposits from the transducer and heating plate surfaces using the brush or a cotton swab.
- Rinse with clean or distilled water and allow to dry.
![]() WARNING
WARNING
Never use sharp or solid objects to clean the transducer and heating plate. Avoid touching the transducer and heating plate with your fingers.
![]() NOTE
NOTE
The heating plate in the base of the humidifier will lose its stainless steel finish over time this is normal. It is still recommended to de-calcify as per instructions noting that cleaning may not bring it back to its original shine.
WATER PURIFICATION FILTER
It is recommended that you clean the water purification filter every time you clean the humidifier, especially if in frequent use. If the filter is cleaned regularly and as per instructions, it should last for the life of the humidifier.
- Remove the cover from the top of the humidifier and set aside.
- Using the handle, remove the water tank from the humidifier.
- The water purification filter is connected to the water tank base. Unscrew the filter from the base to clean.

- Dip the filter cartridge in a vinegar and water solution for about 10 minutes before thoroughly rinsing with clean water. Alternatively, rinse the filter under running tap water for a minute.
- Once clean, place the filter in direct sunlight and allow to dry for at least an hour.
- Reconnect the filter to the base of the water tank, then screw the filter onto the water tank.

- Use the water tank handle to carefully lower the tank into the humidifier.
- Place the top cover on top of the water tank.
STORAGE
- Never store the humidifier with water in the unit.
- Clean as per instructions and make sure that all parts are dry before storing.
- Allow the water tank and water inlet basin time to dry thoroughly before storing the humidifier.
- Keep the humidifier in a dry cool place.
- Do not place anything on top of the humidifier.

TROUBLESHOOTING GUIDE
Before carrying out any of the following service checks, unplug the unit from the mains.


TROUBLESHOOTING GUIDE FOR AMAZON ALEXA AND GOOGLE HOME/ASSISTANT

If the problem is not listed, please contact Breville Customer Service Centre (see back cover for contact details)
Breville Customer Service Centre
Australian Customers
Phone: 1300 139 798
Web: www.breville.com
New Zealand Customers
Phone: 0800 273 845
Web: www.breville.com

Breville, the Breville logo, Master Every Moment, SensAir System, Smart Mist Top and Breville Home Connect are trademarks of Breville Pty. Ltd. A.B.N. 98 000 092 928.
Copyright Breville Pty. Ltd. 2021
All other brands may be trademarks of their respective owners. Due to continued product improvement, the products illustrated/photographed in this booklet
may vary slightly from the actual product.
LAH508 ANZ D21
]]>Instruction Book – BMO234
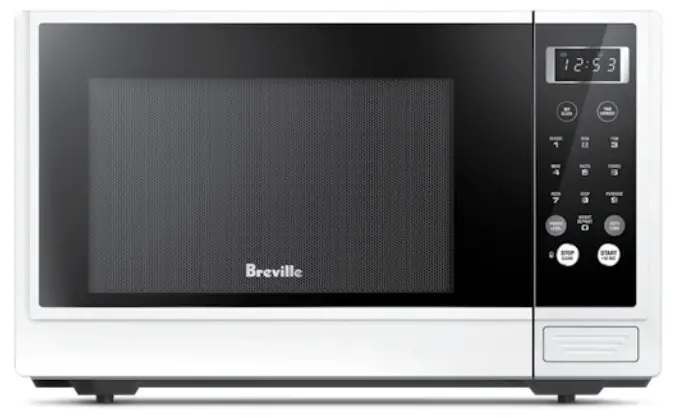
IMPORTANT SAFEGUARDS
At Breville, we are very safety conscious. We design and manufacture consumer products with the safety of you, our valued customer, foremost in mind. In addition, we ask that you exercise a degree of care when using any electrical appliance and adhere to the following precautions.
BREVILLE RECOMMENDS SAFETY FIRST
READ ALL INSTRUCTIONS BEFORE USE AND SAVE FOR FUTURE REFERENCE
- Remove and safely discard any packaging material and promotional labels before using the Breville Microwave for the first time.
- To eliminate a choking hazard for young children, remove and safely discard the protective cover that is fitted to the power plug of the Breville Microwave.
- Do not place the Microwave Oven near the edge of a bench or table during operation. Ensure all surfaces are level, clean and free of water or any other substances.
- Do not place the Microwave Oven on or near a hot gas or electric burner, or where it could touch a heated oven.
- When using the Microwave Oven, provide adequate air space above and on all sides for air circulation (see page 11 Installation, point 2).
- Always operate the Microwave Oven on a heat-resistant surface. Do not use on a cloth-covered surface, near curtains or other flammable materials.
- Do not use the Microwave Oven on a metal surface, for example a sink drainboard.
- Always ensure the Microwave Oven is properly assembled before connecting to the power outlet and operating. Do not use the oven without the roller ring and glass turntable tray in place. Ensure the turntable tray is positioned correctly into the indents on the rotating shaft.
- The Microwave Oven is not intended to be operated by means of an external timer or separate remote control system.
- Never use the Microwave Oven without food or water in the oven cavity. Operating the Microwave Oven when empty could cause damage to the appliance.
- Do not leave the Microwave Oven unattended when in use.
- Do not touch hot surfaces. Allow the Microwave Oven to cool before moving or cleaning any parts.
- Do not place or store anything on top of the Microwave Oven.
- Always ensure the Microwave Oven is turned off at the power outlet and the cord is unplugged from the power outlet before attempting to move the appliance, when not in use, if left unattended and before disassembling, cleaning or storing.
- Keep the appliance clean. Follow the cleaning instructions provided in this book (page 25).
- Always turn the Microwave Oven off by pressing the STOP/CLEAR button, switch off at the power outlet and unplug at the power outlet when it is not in use.
- Before cleaning, always press STOP/CLEAR position, switch off at the power outlet, unplug at the power outlet and remove the power cord.
IMPORTANT SAFEGUARDS FOR ALL ELECTRICAL APPLIANCES
- Fully unwind the power cord before use.
- Do not let the power cord hang over the edge of a bench or table, touch hot surfaces or become knotted.
- To protect against electric shock do not immerse the power cord, power plug or appliance in water or any other liquid.
- The appliance is not intended for use by persons (including children) with reduced physical, sensory or mental capabilities, or lack of experience and knowledge, unless they have been given supervision or instruction concerning use of the appliance by a person responsible for their safety.
- Children should be supervised to ensure that they do not play with the appliance.
- It is recommended to regularly inspect the appliance. To avoid a hazard do not use the appliance if power cord, power plug or appliance becomes damaged in any way. Return the entire appliance to the nearest authorised Breville Service Centre for examination and/or repair.
- Any maintenance other than cleaning should be performed at an authorised Breville Service Centre.
- This appliance is for household use only. Do not use this appliance for anything other than its intended use. Do not use in moving vehicles or boats. Do not use outdoors. Misuse may cause injury.
- The installation of a residual current device (safety switch is recommended to provide additional safety protection when using electrical appliances. It is advisable that a safety switch with a rated residual operating current not exceeding 30mA be installed in the electrical circuit supplying the appliance. See your electrician for professional advice.
- Always turn the appliance to the OFF position, switch off at the power outlet and unplug at the power outlet when the appliance is not in use.
- Before cleaning, always turn the appliance to the OFF position, switch off at the power outlet, unplug at the power outlet and remove the power cord, if detachable, from the appliance and allow all parts to cool.
- Do not place this appliance on or near a heat source, such as hot plate, oven or heaters.
- Position the appliance away from walls, curtains and other heat or steam sensitive materials and provide adequate space above and on all sides for air circulation.
SPECIAL SAFETY INSTRUCTIONS FOR YOUR MICROWAVE OVEN
- Wipe the oven cavity with a soft, damp cloth after each use. Leaving food residue, grease or fat in the cavity could cause the Microwave Oven cavity to overheat and may cause the Microwave Oven to smoke or catch fire.
- The Microwave Oven should be cleaned regularly and any food splattering inside the cavity should be removed. Failure to maintain the Microwave Oven in a clean condition could lead to deterioration of the surface, adversely affecting the life of the Microwave Oven and possibly resulting in a hazardous situation.
- If the door seals or any of the Microwave Oven is damaged, the Microwave Oven must not be operated until it has been inspected and/or repaired at an authorised Breville Service Centre.
- The Microwave Oven is intended for heating food and beverages. Drying of food or clothing and heating or warming pads, slippers, sponges, damp cloth and similar may lead to risk of injury, ignition or fire.
- Ensure all food containers and/or plates are suitable for use in the Microwave Oven. This should be done prior to preparing food for heating or cooking in the Microwave Oven. Monitor foods and liquids heating or cooking in the Microwave Oven at all times due to the possibility of containers igniting.
- Containers or plates suitable for use in the Microwave Oven should not exceed the width of the glass turntable as this may impede the rotation of the turntable and result in food being unevenly cooked.
- Liquids or other foods must not be heated in sealed containers since they are liable to explode.
- Some containers and/or plates may appear suitable for use in the Microwave Oven but may be coated in a glaze that will absorb the microwave energy, overheat and cause the container to crack. The glaze may also prevent the food from heating/cooking.
- Food and/or liquids should not be heated or cooked directly on the turntable. Food and/ or liquids must be placed into a suitable microwave-proof container before placing onto the glass turntable.
- Food and/or liquids should not be heated or cooked in plastic or paper containers or bags, unless specified as suitable for use by the manufacturer, due to the possibility of containers exploding or igniting.
- Metal clips or twist ties should be removed from the packaging as these could cause sparking and/or fire.
- Do not use recycled paper or kitchen paper towelling when cooking. Recycled paper may contain small metal or other impurities which could cause sparking and/or fire.
- Do not use metal containers or utensils in the Microwave Oven as these could cause sparking and/or fire.
- Only use utensils that are suitable for use in Microwave Ovens.
- Food grade foil should not be used in the Microwave Oven as this could cause sparking and/ or fire.
- Ensure that lids and caps covering containers are removed prior to placing liquids and/or foods into the Microwave Oven.
- Feeding bottles and baby food jars should have lids and caps removed before warming or heating in the Microwave Oven. To avoid burns or scalding after heating, the contents should be stirred or shaken and the temperature checked before serving.
- Always ensure the temperature of food or drink which has been heated or cooked in the Microwave Oven has been tested before eating, drinking or serving to others, especially children, disabled or elderly people.
- The heating of liquids and beverages in the Microwave Oven can result in delayed eruptive boiling. Care must be taken when handling any containers containing hot liquids or beverages.
- Do not heat popcorn in the Microwave Oven unless it has been commercially packaged for microwave use. There may be a number of un-popped kernels that may overcook and burn when popping popcorn. Do not use oil unless recommended by the manufacturer. Do not pop popcorn longer than the manufacturer’s instructions (popping time should not exceed 3 minutes). Longer cooking could cause scorching or fire.
- Do not cook any food surrounded by a membrane (such as potatoes, chicken liver, egg yolks, oysters, etc) without first piercing the membrane several times with a fork or similar utensils.
- Fresh eggs in the shell and whole hard-boiled eggs should not be cooked or heated in the Microwave Oven as they may explode during cooking, at the end of cooking or after removing from the Microwave Oven.
- Do not heat oil or fat for shallow or deep frying in the Microwave Oven. Doing so may cause the Microwave Oven and/or the oil to overheat and/or ignite.
- If any smoke is observed, switch off and unplug the Microwave Oven at the power outlet. Keep the door closed to stifle any flames.
- Do not attempt to operate the Microwave Oven by any method other than those described in this instruction book.
- Do not disconnect the Microwave Oven from the power supply by pulling on the cord to unplug from the power outlet.
- When storing the Microwave Oven loosely wind the cord. Do not wrap the cord around the Microwave Oven.
- Only use the temperature probe recommended or supplied together with this Microwave Oven. This is only applicable if the appliance has the facility to use a temperature-sensing probe.
- Do not attempt to operate the oven with the door open since an open-door operation can result in harmful exposure to microwave energy. It is important not to defeat or tamper with the safety interlocks.
- Do not place any object between the oven front face and the door or allow soil or cleaner residue to accumulate on sealing surfaces.
- Liquids and other foods must not be heated in sealed containers since they are liable to explode.
- If the door or door seals are damaged, the oven must not be operated until it has been repaired by a Breville Service Centre. It is particularly important that the oven door closes properly and that there is no damage to the:
(1)Door (bent), (2) Hinges and latches(broken or loosened), (3) Door seals and sealing surfaces. - Do not put any foreign material between the door and door jam of the microwave oven as this could cause excessive leakage of microwave energy.
- It is hazardous for anyone other than a Breville Service Centre to carry out any service or repair operation that involves the removal of a cover which gives protection against exposure to microwave energy.
- Only allow children to use the oven without supervision when adequate instructions have been given so that the child is able to use the oven in a safe way and understands the hazards of improper use.
- When the appliance is operated in the combination mode, children should only use the oven under adult supervision due to the temperature generated.
- Surfaces may be hot during and after use.
- If the apparatus is not maintained in a good state of cleanliness, its surface could lifespan of the product and lead to a dangerous situation.
SPECIFICATION
| Power Consumption | 220-240V, ~50Hz, 1500W |
| Turntable Diameter | 315mm |
| Output | 1100W |
| Outside Dimensions | 314mm (H) 519mm (W) 420mm (D) |
| Net Weight | Approx. 15.3kg |
| Oven Capacity | 34 Litres |
These specifications may change protection against exposure to without notice.
SAVE THESE INSTRUCTIONS
A. LED Display
Shows time, cooking progress and preset functions.
B. Control panel Numeric keypad and cooking functions.
C. Door release (push button)
D. Viewing window
E. Turntable assembly & installation
a. Glass turntable
b. Hub (under glass)
c. Turntable shaft
d. Turntable roller

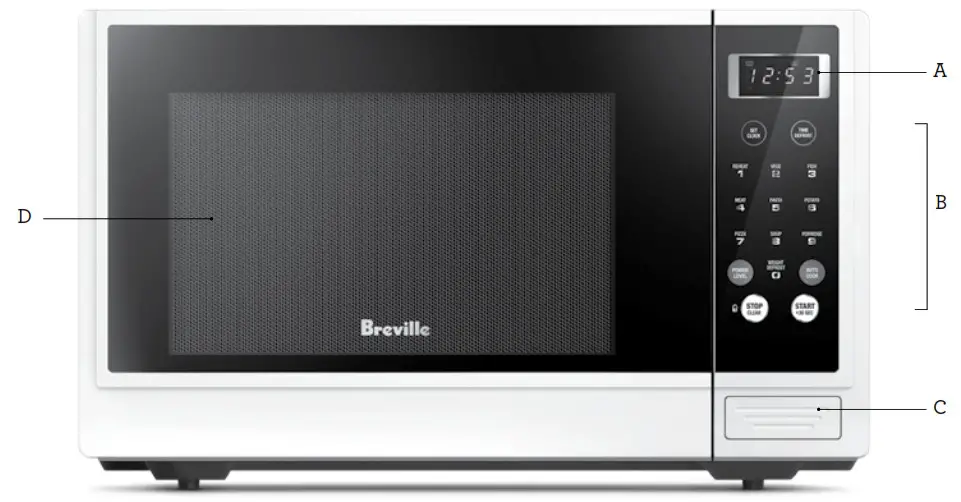
A. LED display screen
Shows selected cooking time, power, symbols and time of the day.
B. SET CLOCK
Press to set the time of the day or recall the time of the day display. The time of the day will be displayed at all times except when the oven is operating.
C. NUMBER PAD/AUTO MENUS (19)
Press to input the desired microwave operating time. The number pad can also be used to select the desired auto cook menus.
D. POWER LEVEL
Use to set the microwave oven power levels.
E. STOP/CLEAR
Press to cancel the selected power level, cook or defrost times that are previously programmed. The time of the day clock cannot be cancelled by pressing the CANCEL button. Child lock can also be initiated by holding down the STOP/CLEAR button for 3 seconds.
F. TIME DEFROST
Press to set defrosting time. The oven automatically divides the defrosting time into periods of alternating defrosting and standing times by cycling on and off.
G. AUTO COOK
Press to initiate Auto menu functions (number pad 19).
H. START/+30 SEC INSTANT START Press to start the cooking or defrosting functions. The cooking symbol will appear on the display and the interior of oven light will turn on, the interior fan will operate and the turntable will rotate. Each additional press of the button will add 30 seconds to the cooking time.
I. WEIGHT DEFROST Use to defrost frozen meat, poultry and seafood by weight. The defrosting time and power level are automatically set once the weight is chosen.
BEFORE FIRST USE
Remove and safely discard any packaging material and labels before using the microwave oven for the first time. Carefully unpack the microwave oven and keep all the packing material until all the parts of the microwave oven have been found and the appliance has been assembled.
To remove any dust that may have accumulated during packing, wash the roller ring and glass turntable tray in warm soapy water, rinse in clean water then dry thoroughly. Wipe the interior and exterior of the microwave oven with a soft, damp cloth then dry thoroughly.
ASSEMBLING THE GLASS TURNTABLE AND TURNING ON THE MICROWAVE OVEN
- Place the roller ring into position in the indented space in the oven cavity base.
- Insert the glass turntable into position, matching the indents (hub) on the base of the glass turntable with the indents in the shaft located in the centre of the oven cavity base.
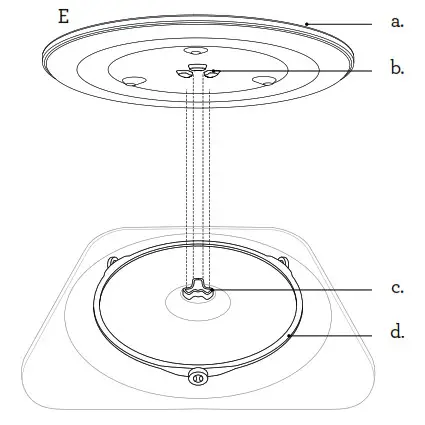
- Plug the power cord into a 230V or 240V power outlet. Switch on at the power outlet. The microwave oven is now on.
INSTALLATION
- Select a level surface that provide enough open space for the intake and/or outlet vents.
- A minimum clearance of 7.5cm is required between the oven and any adjacent walls. One side must be open.
• Leave a minimum clearance of 30cm above the oven.
• Do not remove the legs from the bottom of the oven. - Blocking the intake and/or outlet openings can damage the oven.
- Place the oven as far away from radios and TV as possible.
- Operation of microwave oven may cause interference to your radio or TV reception.
- Plug your oven into a standard household outlet. Be sure the voltage and the frequency is the same as the voltage and the frequency on the rating label.
- The microwave must not be placed in a cabinet.
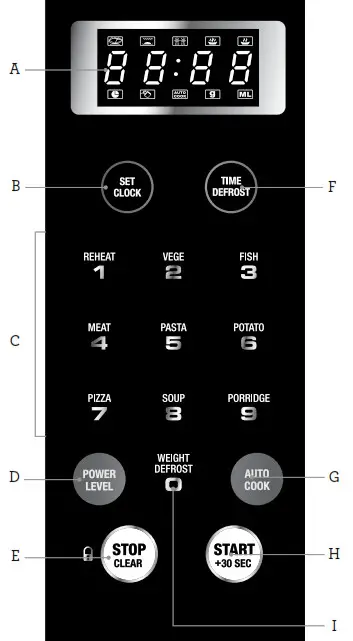
![]() WARNING
WARNING
- Do not install oven over a range cooktop or other heat-producing appliance. If installed near or over a heat source, the oven could be damaged and the warranty would be void.
- Check the oven for any damage, such as misaligned or bent door, damaged door seals and sealing surface, broken or loose door hinges and latches and dents inside the cavity or on the door. If there is any damage, do not operate the oven and contact a Breville service centre.
- Do not immerse the microwave oven, power cord or plug in water or any other liquid.
INTRODUCTION TO MICROWAVE COOKING
- Microwaves are invisible waves of electromagnetic energy similar to radio waves. Instead of being converted to sound as in a radio or mobile phones, it is converted into a heat source which heats food from the inside.
- Microwaves cook because food molecules of water, fat and sugar react to the energy provided by the microwaves. That energy is absorbed by the food causing the molecules to vibrate quickly. This movement creates friction which causes the food to heat up and therefore cook.
- The energy in a microwave is not distributed evenly throughout the cavity. The turntable rotates constantly while cooking which prevents uneven cooking.
- Microwave cooking is considered the “cool” cooking method as only the food gets hot and surrounding air stays cool.
- Microwaves are safe and can be economical.
- Ovens need no preheating therefore the kitchen stays cooler. Cooking is cleaner with less odours and washing up is reduced.
- Microwave ovens cook foods rapidly, Some foods are better cooked in a microwave oven as they retain more flavour, texture and goodness, such plain fish fillets, soft fruit, vegetables and fat free cakes.
- In a microwave the heat is produced INSIDE the food. In all other conventional cooking methods, heat is applied from OUTSIDE through transference of heat by convection or radiation.
- Microwave energy penetrates the food to a depth of about 25mm. Small foods under 5cm in diameter such as eggs are penetrated to the centre from all sides. In larger foods, energy creates heat in the outer layer; this then moves to the centre by conduction, as it does with conventional cooking.
SETTING THE CLOCK
When power is activated, the LED will display 00:00. The input time should be within 1:0012:59. Example: To set 12:12.
- Press the SET CLOCK button, the hour figures will flash, and the indicator for clock will light.
- Press the number buttons of 1, 2, 1, 2 in order.
- Press SET CLOCK to finish clock setting. The indicator for clock will go out, `:’ will flash, and the time will illuminate.
![]() NOTE
NOTE
In the process of clock setting, if STOP/CLEAR is pressed or if there is no operation within 1 minute, the oven will go back to the previous status automatically.
MICROWAVE COOKING
- Using the number pad, input the cooking time; maximum cooking time is 99 minutes and 99 seconds.
- Press “START / +30 SEC” button to commence operation.
![]() NOTE
NOTE
Number “0” cannot be input first so when the “0” is pressed before any other numbers, “WEIGHT DEFROST” function will be initiated.
![]() NOTE
NOTE
This mode will have microwave oven working at 100% power level.
MICROWAVE COOKING WITH POWER LEVELS
Select different microwave power levels and set cooking time as desired.
Option 1
- Using the number pad, input the cooking time; maximum cooking time is 99 minutes and 99 seconds.
- Press the POWER LEVEL (continue to press) until desired power level is selected.
- Press “START / +30 SEC” button to commence operation.
Example: Microwave oven cooking with 50% power for 15 minutes:
i. Press 1, 5, 0, 0 respectively.

ii. Press the POWER LEVEL button once: 100%
iii. Press the POWER LEVEL button twice: 80%
iv. Press the POWER LEVEL button three times: 50%
v. Press “START / +30 SEC” button to commence operation.
Option 2
- Press the POWER LEVEL (continue to press) until desired power level is selected.
- Using the number pad, input the desired cooking time.
- Press “START / +30 SEC” button to commence operation.
Example: Microwave oven cooking with 50% power for 15 minutes:
i. Press the POWER LEVEL button once: 100%
ii. Press the POWER LEVEL button twice: 80%
iii. Press the POWER LEVEL button three times: 50%
iv. Press 1, 5, 0, 0 respectively.
v. Press “START / +30 SEC” button to commence operation.
MICROWAVE POWER LEVELS
| POWER LEVEL UTTON | MICROWAVE POWER | DISPLAY |
| 1 time | 100% | P100 |
| 2 time | 80% | P80 |
| 3 time | 50% | P50 |
| 4 time | 30% | P30 |
| 5 time | 10% | P10 |
INSTANT START
When the unit is in waiting state, press START/+30 SEC instantly to start cooking at 30 seconds with 100% microwave power. Each additional press will increase the cooking time by 30 seconds until the accrued time reaches 1 minute 30 seconds or less. By then, each press will increase cooking time by 1 minute, the maximum cooking time is 12 minutes.
Example: Set 3 minutes instant start:
Press START/+30 SEC once to start cooking, LED will display 0:30.
Press START/+30 SEC again for 5 times, and the cooking time will be 3 minutes.
TIPS ON DEFROSTING
- Before defrosting meat, remove the freezer bag or wrap to prevent meat sitting in `drip’, which will otherwise boil as the meat defrosts causing meat to go grey and begin to stew. ” To remove frozen meat from freezer wrappings, defrost for a few minutes so the wrap is easy to remove.
- Remove meat from Styrofoam tray, as they do not microwave safe.
- Place meat onto a rack with a drip tray to catch juices. Alternatively, place onto a microwave-safe plate that is lined with absorbent paper and elevate on an upturned bowl or cup.
- Refer to your user manual for its preferred setting and timing.
- Check the meat throughout the defrosting time. As outer portions of meat thaw, remove them from the microwave. If the edges of meat feel warm, stop microwaving and allow meat to stand for a few minutes or until edges are cold again.
- After defrosting the meat it must be cooked right away. Don’t leave it to stand for any length of time at room temperature or in the fridge.
- The energy required for defrosting is much less than for cooking, the microwave causes the ice formed in the food to melt rather than heat.
WEIGHT DEFROST
Example: Defrost beef of 500g:
1. Press WEIGHT DEFROST, LED will display dEF1.
2. Press 5, 0, 0 in order, `g’ will light, the range of defrosting weight is 100g2000g.
3. Press START/+30 SEC to start defrosting, `g’ will go out, time will be displayed and countdown will start.
TIME DEFROST
Example: To defrost piece of beef in 10 minutes:
- Press TIME DEFROST, LED will display dEF2.
- Press 1, 0, 0, 0 to set defrost time.
- Press START / +30 SEC to start defrosting. Time will be displayed and countdown will start.
AUTO COOK
To enable pre-programmed automatic functions, press the “AUTO COOK” button first and then select the corresponding number pad for the desired auto cook function.
To confirm the desired auto cook function, the corresponding number pad will need to be pressed twice.
Example: To select Auto Cook Meat function, input the following steps:
- Press “AUTO COOK” button
- Press corresponding number pad “4” to display “A4”
- Press number “4” again to confirm the selection and default weight “150” will be displayed.
- Press number “4” until desired weight of the food item is selected (150, 300, 450 and 600 g)
- Press START / +30 SEC button to commence operation
| NUMBER PAD | DISPLAY | AUTO FUNCTION |
| 1 REHEAT | A1 | REHEAT |
| 2 VEGE | A2 | VEGETABLES |
| 3 FISH | A3 | FISH |
| 4 MEAT | A4 | MEAT |
| 5 PASTA | A5 | PASTA |
| 6 POTATO | A6 | POTATOES |
| 7 PIZZA | A7 | PIZZA |
| 8 SOUP | A8 | SOUP |
| 9 PORRIDGE | A9 | PORRIDGE |
![]() NOTE
NOTE
After pressing the AUTO COOK button, auto cook functions can be scrolled by pressing the corresponding number pads until the same function is pressed twice.
Example:
- Press AUTO COOK button
- Press number pad “1” display “A1”
- Press number pad “5” display “A5”
- Press number pad “8” display “A8”
- Press number pad “3” display “A3”
- Press number pad “3” display “150” (this step has confirmed to proceed with Auto Cook Fish function).
- Continue to press number pad “3” until desired weight is chosen.
- Press START / +30 SEC button to commence operation.
| AUTO-MENU | WEIGHT (G) | PRESS | DISPLAY |
| A–1 Reheat | 150 | 1 time | 150 |
| 250 | 2 times | 250 | |
| 350 | 3 times | 350 | |
| 400 | 4 times | 400 | |
| A–2 Vegetables | 150 | 1 time | 150 |
| 350 | 2 times | 350 | |
| 500 | 3 times | 500 | |
| A–3 Fish | 150 | 1 time | 150 |
| 250 | 2 times | 250 | |
| 350 | 3 times | 350 | |
| 400 | 4 times | 400 | |
| 450 | 5 times | 450 | |
| A–4 Meat | 150 | 1 time | 150 |
| 300 | 2 times | 300 | |
| 450 | 3 times | 450 | |
| 600 | 4 times | 600 | |
| A–5 Pasta | 50 (with cold water 450ml) | 1 time | 50 |
| 100 (with cold water 800ml) | 2 times | 100 | |
| 150 (with cold water 1200ml) | 3 times | 150 | |
| A–6 Potatoes | 1 (approx. 200g) | 1 time | 1 |
| 2 (approx. 400g) | 2 times | 2 | |
| 3 (approx. 600g) | 3 times | 3 | |
| A–7 Pizza | 1 (approx. 80g) | 1 time | 1 |
| 2 (approx. 160g) | 2 times | 2 | |
| 3 (approx. 250g) | 3 times | 3 | |
| A–8 Soup | 500 | 1 time | 500 |
| 750 | 2 times | 750 | |
| 1000 | 3 times | 1000 | |
| A–9 Porridge | 550 | 1 time | 550 |
| 1100 | 2 times | 1100 |
TIPS ON AUTO MENU SETTINGS
Auto Reheat
Will calculate the time required to reheat food above 60 C. Place food in/on microwave-safe containers and cover with microwave-safe lid, vented cling film or absorbent paper.
Vegetables
When cooking vegetables, always cook them covered with a vented lid, cling wrap or absorbent paper. Wash vegetables and shake lightly, leaving some water clinging to it. Place into microwave-safe bowl and cover.
Fish
Place fish fillets into a microwave-safe dish, evenly spaced. Place dish onto a rack or inverted bowl. Cover with a microwave-safe lid or vented cling film.
Meat
Place meat on a rack that sits inside a shallow dish or on a rack that contains its own run off rim around the edge. Cook fat-side up first and turn over halfway through cooking. If cooking mince or diced meat, place into a microwave-safe round casserole dish and stir halfway through cooking.
Pasta
Choose a microwave-safe bowl large enough to hold the corresponding amount of water. Make sure that the water comes up no higher than ¾ of the bowl. This prevents spillage or scolding from boiling water. Note that pasta will swell and double in size.
Potatoes
Prick each potato 34 times with a fork and arrange around the outer edges of turn table.
Pizza
Line turn table with absorbent paper. Place pizza slices directly on top. This will prevent crust from becoming soggy.
Soup
Choose a microwave-safe bowl large enough to hold the corresponding amount of soup. Make sure that the soup comes up no higher than ¾ of the bowl. This prevents spillage or scolding from boiling liquid. Always stir soup halfway through cooking time.
Porridge
Choose a microwave-safe bowl large enough to hold the correct quantity. Make sure that the porridge comes up no higher than ¾ of the bowl. Note that porridge will swell and double in size.
MULTI-STAGE MICROWAVE COOKING
At most, 2 stages can be selected for cooking. In multi-stage cooking, if one stage is defrosting, then defrosting shall be placed in the first stage.
Example: If you want to cook the food with 100% power level for 10 minutes plus 80% microwave power for 15 minutes, Do it as following.
- Press the POWER LEVEL button once to show “P100”.
- Press 1, 0, 0, 0, to set the cooking time.
- Press the POWER LEVEL button twice to show “P 80”.
- Press 1, 5, 0, 0, to set the cooking time.
- Press the START / +30 SEC button to start cooking.
SETTING THE DOOR SAFETY LOCK
The safety lock prevents unsupervised operation by young children. While in lock mode, the door can be opened, however the microwave cannot be turned on.
- To set, press and hold STOP/CLEAR pad for 3 seconds. There will be a long `beep’ denoting unit is entering the children-lock state and a `
 ‘ will be displayed.
 - To unlock, press and hold STOP/CLEAR pad for 3 seconds, and there will be a long `beep’ denoting that the lock is released
COOKING END REMINDING FUNCTION
When cooking ends, there will be 5 `beeps’ which denotes completion of cooking.
DISPLAY SPECIFICATION
- In waiting state, LED will display clock and `:’ will flash.
- In function setting state, LED will display the related setting.
- In the operation and suspending state, LED will display the residual cooking time.
![]() WARNING
WARNING
- Do not immerse the microwave oven, power cord or plug in water or any other liquid.
- Check the microwave oven for any damage, such as misaligned or bent door, damaged door seals and sealing surface, broken or loose door hinges and latches and dents inside the cavity on the door. If there is any damage, do not operate the microwave oven and contact a Breville Service Centre.
SOME IMPORTANT TIPS FOR MICROWAVING COOKING
To help equalize energy in the food so that it cooks evenly follow these helpful tips.
- Arrange foods with varying size ends, such as chicken drumsticks and broccoli with the thicker or tougher part positioned to the outside of the dish. This ensures the parts that require more cooking will receive more energy, so the food will cook evenly.
- Covering the dish during cooking holds in the heat and steam to speed up cooking time. Use a microwave safe lid or plastic wrap that has been vented by turning back one edge at the side of the dish to form a narrow vent to release excess steam.
- Choose cooking dishes that are shallow and preferably have straight sides. Shallow dishes enable the food to cook faster and straight edges prevent the edges from being overcooked.
- Arrange individual items such as ramekins or whole potatoes around the outside of the turntable. Making sure to leave space between items so the energy can penetrate from all sides.
- Use round-shaped microwave dishes. Round shapes cook more evenly than square or rectangular dishes which absorb most of the energy in the corners causing food to overcook and toughen.
- Shield areas that attract the most energy such as wing tips of chickens and corners of square dishes by covering them with small pieces of foil. This will reflect microwaves and prevent overcooking and food drying out.
- Heat breads, biscuits or oily food on paper towel. This prevents the build-up of steam between food and turntable, keeping surfaces crisp and dry. Cover foods with paper towel to prevent splatters.
- Stir foods from the outside to centre of the dish once or twice during cooking to equalize heat and speed microwaving.
- Turn medium to large food items over once during microwaving. This enables even exposure to microwaves.
- Elevating some types of food such as cakes, roast vegetables and dough products can be advantageous. It allows more energy to penetrate the food from all sides, base and top. Use a microwave-safe plastic or ceramic rack. If a rack is unavailable, use an upturned bowl or cup may be used to elevate plates of food.
- Do not elevate any special browning dishes, jugs of sauce or custard, small quantities of food or mugs of beverages.
- Internal temperatures of foods continue to rise so that they continue cooking even after they have been removed from the microwave oven. It is better to undercook food as it will continue to cook once removed from the microwave.
MICROWAVE UTENSILS
- Containers, plates, dishes, etc. used in the microwave oven should always be microwavesafe. Check if stated on the underside of the utensil or contact the manufacturer.
- To test if a container, plate or dish is microwave-safe, place it into the microwave oven with 1 cup of cold water (in a microwavesafe cup) and heat on High (100%) Power for 1 minute. If the container is hot and the water is cold, the container is not suitable for microwave oven use. If the container is cold and the water is hot, then the container is suitable for microwave oven use.
- Metal containers and utensils should not be used in the microwave oven.
- Switch off the microwave oven at the power outlet and remove the plug from the power outlet before cleaning.
- Keep the inside of the microwave oven clean. When food splatters or spilled liquids adhere to the microwave oven internal walls, wipe with a damp cloth. Mild detergent may be used if the cavity gets very dirty. Avoid the use of spray and other harsh cleaners as they may stain, streak or dull the door surface.
- The outside surfaces should be cleaned with a damp cloth. To prevent damage to the operating parts inside the microwave oven cavity, water should not be allowed to seep into the ventilation openings.
- Wipe the door and window on both sides of the door seals and adjacent parts frequently with a damp cloth to remove any spills or spatters. Do not use an abrasive cleaner.
- Do not allow the control panel to become wet. Clean with a soft, damp cloth. When cleaning the control panel, leave the microwave oven door open to prevent it from accidentally turning on.
- If steam accumulates inside or around the outside of the oven door, wipe with a soft dry cloth. This may occur when cooking foods high in moisture or if the microwave oven is operated under high humidity conditions, this is normal.
- It is occasionally necessary to remove the glass turntable for cleaning. Wash the turntable in warm soapy water, rinse in clean water and dry thoroughly.
- The roller ring and microwave oven floor should be cleaned regularly to ensure the glass turntable rotates correctly and avoids making excessive noise. Simply wipe the bottom surface of the microwave with a soft damp cloth. The roller ring may be washed in mild soapy water, rinse in clean water and dry thoroughly. When removing the roller ring from the cavity floor for cleaning, be sure to replace in the proper position.
- Remove odours from your microwave oven by combining a cup of water with the juice of one lemon in a deep microwave-safe bowl, microwave on High PL10 for 5 minutes. Wipe the microwave oven cavity thoroughly and dry with a soft cloth.
- When it becomes necessary to replace the oven light, please consult your Breville Service Centre to have it replaced.
- Please do not dispose this appliance with domestic rubbish; it should be taken to the appropriate disposal centre provided by the local council municipalities.
- If storing the microwave oven, press the STOP/CANCEL button, switch off at the power outlet then unplug the power cord. Ensure the microwave oven is completely cool, clean and dry. Secure the roller ring and glass turntable and close the door. Do not place heavy objects on top. Store the microwave oven upright.
BEFORE YOU CALL FOR SERVICE
- Check to ensure that the oven is plugged in securely. If it is not, remove the plug from the power outlet, wait 10 seconds and plug it in again securely.
- Check for a blown circuit fuse or a tripped main circuit breaker. If these seem to be operating properly, test the power outlet with another appliance.
- Check to ensure that the control panel is programmed correctly and the timer is set.
- Check to ensure that the door is securely closed engaging the door safety lock system. Otherwise, the microwave energy will not flow into the oven.
![]() NOTE
NOTE
If none of the above rectify the situation, then contact your Breville Service Centre. Do NOT try to adjust or repair the oven yourself.
| POSSIBLE PROBLEM | EASY SOLUTION |
| Microwave oven interfering with television reception. | • WiFi, radio and TV reception may be interfered with during operation. This is similar to the interference that is sometimes caused by vacuums, blenders etc. |
| Dim microwave oven light. | • When operating on low power levels, the microwave oven light may be dimmer. |
| Steam accumulating on door and hot air coming out from vents. | • During operation, steam may be produced. Most will exit through the vents, however, some may accumulate around the oven door. |
| POSSIBLE PROBLEM | POSSIBLE REASON | EASY SOLUTION |
| Microwave oven will not start. | • Power cord not plugged in properly or switched on. • Fuse blown or circuit breaker problem. • Trouble with outlet. |
• Unplug put the plug in again and switch on. • Replace the fuse or reset circuit breaker. • Have a professional check that the outlet is not faulty. |
| Microwave oven does not heat. | • Door not closed properly. | • Ensure door is shut properly. |
| Glass turntable makes noise during operation. | • Roller not assembled properly or needs to be cleaned. | • Reset and clean if necessary. |
INDIAN SPICED TOMATO CHUTNEY
Makes 2 Cups
INGREDIENTS
| ½ cup vegetable oil |
| 2cm piece ginger, finely shredded |
| 4 cloves garlic, crushed |
| 2 long red chillies, chopped |
| 1 large red onion, chopped |
| 1 tablespoon black mustard seeds |
| 1 tablespoon ground turmeric |
| 1 tablespoon ground cumin |
| 2 sprigs fresh curry leaves, leaves only |
| 3 teaspoons salt |
| 1 cup white sugar |
| L cup malt vinegar |
| 1kg chopped ripe tomatoes |
- Place oil, ginger, garlic, chilli and onion into a large heat-proof microwave-safe bowl and Press POWER/TIME button once for 100% and select 2 minutes cook time. Press START/+30 SEC button.
- Remove from microwave and stir in remaining ingredients. Press POWER/ TIME button once for 100% and select 40 50 minutes cook time. Press START/+30 SEC button, stirring every 10 minutes until chutney has reduced and thickened.
- Spoon into sterilized jars and cool completely before storing in the refrigerator.
- Serve with BBQ meats or cold on sandwiches.
CHUNKY MINESTRONE
Serves 6
INGREDIENTS
| 1 onion, chopped |
| 2 cloves garlic, crushed |
| 3 bacon rasher, chopped |
| 1 carrots, diced |
| 1 stick celery, diced |
| ¼ small cabbage, shredded |
| 750ml tomato passata |
| 3 cups water or stock |
| 400g can three bean mixed, drained and rinsed |
| ½ cup small pasta such as penne, macaroni or fusili |
| Salt and freshly ground white pepper |
| ¼ cup chopped fresh basil |
- Place onion, garlic and bacon into a large 3 litre heat proof microwave-safe bowl. Press POWER/TIME button once for 100% and select 2 minutes cook time. Press START/+30 SEC button.
- Add carrots, celery, cabbage, passata, stock, beans and pasta and Press POWER/ TIME button once for 100% and select 15 minutes cook time. Press START/+30 SEC button. Cook stirring every 10 minutes until vegetables and pasta are tender.
- Season with salt and pepper and stir through chopped basil. Ladle into large bowls and serve with crusty bread.
FETTUCCINE BOSCAIOLA
Serves 4
INGREDIENTS
| 500g fettuccine |
| 40g butter |
| 1 clove garlic, crushed |
| 200g button mushrooms, trimmed and sliced |
| 150g middle cut bacon, rind removed and chopped |
| 1 cup cream |
| ¾ cup freshly grated Parmesan |
| Salt and freshly ground black pepper |
- Cook fettuccine in a large saucepan of boiling salted water according to packet instructions. Drain and set aside.
- Place butter, garlic, mushrooms and bacon into a large heat-proof microwave-safe bowl and Press POWER/TIME button once for 100% and select 2 minutes cook time. Press START/+30 SEC button.
- Stir and add cream; return to microwave and Press POWER/TIME button twice for 80% and select 5 minutes cook time. Press START/+30 SEC button. Stir in half the Parmesan and toss through hot fettuccine. Season to taste with salt and pepper.
- Serve topped with extra Parmesan.
FAMILY MICROWAVE MEATLOAF
Serves 4 6
INGREDIENTS
| 800g beef mince |
| 100g middle bacon, finely chopped |
| 2 tablespoons tomato sauce |
| 1 tablespoon Worcestershire sauce |
| 1 carrot, grated |
| 2 cloves garlic, crushed |
| ½ cup dry breadcrumbs |
| 1 egg, beaten |
| L cup BBQ sauce |
- Combine beef, bacon, sauces, carrot, garlic, breadcrumbs and egg together in a large bowl until thoroughly mixed.
- Spoon BBQ sauce into the base of a heatproof microwave-safe loaf dish and pack meat into dish, pushing down gently to compact the meatloaf. Place meatloaf in microwave elevated on a microwave-safe rack.
- Press POWER/TIME button once for 100% and select 10 minutes cook time. Press START/+30 SEC button.
- Reduce power level by pressing Press POWER/TIME button three times for 50% and select 710 minutes cook time. Press START/+30 SEC button.
- Allow meatloaf to stand for 10 minutes in loaf dish before unmolding and slicing.
- Serve either warm with hot potatoes or cold in wraps or sandwiches.
CARROT CAKE
Serves 10 12
INGREDIENTS
| 2 eggs |
| ½ cup light olive oil |
| ½ cup milk |
| 1L cups caster sugar |
| 1½ cups self raising flour |
| 1 teaspoons grand cinnamon |
| ½ teaspoon bicarbonate soda |
| ½ cup canned crushed pineapple in natural juice, drained well |
| 1L cups (approx 2 medium) carrots, grated |
| 2⁄3 cup chopped walnuts |
CREAM CHEESE FROSTING
| 30g butter, softened |
| 125g cream cheese, softened |
| ½ teaspoon vanilla extract |
| 1½ cups icing sugar, sifted |
- Whisk together eggs, oil, milk and sugar and set aside.
- Add the flour, cinnamon, soda and fold through until mixture is just combined.
- Add carrots, drained pineapple and walnuts. Pour mixture into a greased heat-proof microwave-safe 22cm ring pan.
- Elevate cake pan by placing dish on a microwave-safe rack.
- Press POWER/TIME button three times for 50% and select 1520 minutes cook time. Press START/+30 SEC button.
- Stand cake for 10 minutes and check that cake is cooked with a skewer. Remove from pan and cool completely on a cake rack. If cake has moist spots on the surface; place absorbent paper on top during standing time.
- To make frosting: Using an electric mixer beat butter, cheese and vanilla on a medium speed for about 12 minutes or until well combined.
- Reduce speed and add sugar; once added increase speed again until mixed well.
- Spread on cooled cake.
CHICKEN CACCIATORE
Serves 4
INGREDIENTS
| 8 small chicken drumsticks |
| 1 tablespoon olive oil |
| ¼ cup drained sundried tomatoes |
| 1 tablespoon chopped fresh herbs such as oregano, basil and thyme |
| L cup drained slice black olives |
| 700ml tomato passata |
- Place chicken drumstick into a shallow heatproof microwave-safe casserole dish making sure to position the thick end to the outside of the dish. Add remaining ingredients and toss to coat.
- Place a sheet of baking paper over the top and cover with 2 layers of cling film, making sure to leave a 5cm vent for steam to escape.
- Elevate baking dish by placing dish on a microwave-safe rack.
- Press POWER/TIME button twice for 80% and select 15 minutes cook time. Press START/+30 SEC button.
- Stand 10 minutes and check drumsticks to make sure they are cooked through. If still a little pink, return to microwave and cook a further 5 minutes.
- Serve hot with rice or pasta.
CHOCOLATE WALNUT BROWNIES
Serves 6 8
INGREDIENTS
| 200g dark 70% cooking chocolate, chopped |
| 125g butter, diced |
| 1 teaspoon vanilla extract |
| 2 eggs, lightly beaten |
| ½ cup caster sugar |
| ½ cup light muscovado sugar or light brown sugar |
| ¾ cup plain flour |
| ¼ cup self-raising flour |
| ½ teaspoon baking powder |
| ¼ cup cocoa powder |
| 1 cup chopped walnuts |
- Place chocolate and butter into a large heat-proof microwave-safe bowl and press START/=+30 button once. Stir and repeat until butter has melted and chocolate has softened but not completely melted. Stir mixture until smooth and well combined.
- Beat in vanilla, eggs and sugars until well mixed.
- Sift flours, baking powder and cocoa together and fold through chocolate mixture. Pour into a square 20cm x 20cm heat-proof microwave safe Pyrex dish lined with baking paper.
- Smooth the surface with a spatula and sprinkle over the walnuts. Lightly push down walnuts into brownie. Elevate baking dish by placing dish on a microwave-safe rack.
- Press POWER/TIME button three times for 80% and select 810 minutes cook time. Press START/+30 SEC button.
- Cook until just cooked through; centre will still be soft. Remove and cool in dish completely before refrigerating until cold.
HOME MADE CITRUS CURD
Makes 2 Cups
INGREDIENTS
| 3 eggs |
| 2 egg yolks |
| ¾ cup caster sugar |
| 2 lemons, zest of 1 |
| 1 lime |
| 1 navel orange |
| 125g butter, diced |
- Combine eggs, egg yolks, sugar and lemon zest in a large heat-proof microwave-safe bowl. Whisk until well combined.
- Juice lemons, lime and orange to make up ¾ cup of combined juice and add to egg and sugar mixture.
- Press POWER/TIME button three times for 50% and select 8 minutes cook time. Press START/+30 SEC button.
- Cook, stirring every 12 minutes until thickened and just boiling. Remove from heat and cool, then pour into sterilized jars and seal.
FIG AND PEACH JAM
Makes 2 Cups
INGREDIENTS
| 700g ripe peaches |
| 300g fresh figs, peeled and chopped |
| 1½ cups caster sugar |
| 2 lemons, juiced |
- Cut a small cross into the base of each peach. Place into a large bowl and pour over boiling water; stand 5 minutes or unit skin begins to lift off. Peel, remove seed and chop flesh.
- Place chopped peach into a 3 litre heatproof microwave-safe bowl along with figs, sugar and lemon juice and mix well.
- Press POWER/TIME button once for 100% and select 5 minutes cook time. Press START/+30 SEC button.
- Stir well until sugar has dissolved and return to microwave. Press POWER/TIME button once for 100% and select 40 minutes cook time. Press START/+30 SEC button.
- Stir jam every 810 minutes until fruit has reduced and jam consistency. Spoon into sterilized jars and seal. Cool completely.
![]() Notes
Notes
Breville Customer Service Centre
Australian Customers
Phone: 1300 139 798
Web: www.breville.com.au
New Zealand Customers
Phone: 0800 273 845 Web:
www.breville.co.nz
![]() Breville, the Breville logo and the Big Easy are registered trademarks of Breville Pty. Ltd. A.B.N. 98 000 092 928.
Breville, the Breville logo and the Big Easy are registered trademarks of Breville Pty. Ltd. A.B.N. 98 000 092 928.
Copyright Breville Pty. Ltd. 2018.
Due to continued product improvement, the products illustrated/photographed in this brochure may vary slightly from the actual product.
BMO234 ANZ I18
IMPORTANT SAFEGUARDS
At Breville we are very safety conscious. We design and manufacture consumer products with the safety of you, our valued customer, foremost in mind. In addition we ask that you exercise a degree of care when using any electrical appliance and adhere to the following precautions.
BREVILLE RECOMMENDS SAFETY FIRST
READ ALL INSTRUCTIONS BEFORE USE AND SAVE FOR FUTURE REFERENCE
- Remove and safely discard any packaging material and promotional labels before using the Breville microwave oven for the first time.
- To eliminate a choking hazard for young children, remove and safely discard the protective cover that is fitted to the power plug of the Breville microwave oven.
- Do not place the microwave oven near the edge of a bench or table during operation. Ensure all surfaces are level, clean and free of water or any other substances.
- Do not place the microwave oven on or near a hot gas or electric burner, or where it could touch a heated oven.
- Microwave Oven to be installed as freestanding unit only.
- When using the microwave oven, provide adequate air space above and on all sides for air circulation. (see page 13 Installation, point 2).
- Always operate the microwave oven on a heat-resistant surface. Do not use on a cloth covered surface, near curtains or other flammable materials.
- Do not use the microwave oven on a metal surface, for example a sink drain board.
- Always ensure the microwave oven is properly assembled before connecting to the power outlet and operating. Do not use the oven without the turntable roller and glass turntable in place. Ensure the glass turntable is positioned correctly into the indents on the turntable roller.
- The microwave oven is not intended to be operated by means of an external timer or separate remote control system.
- Never use the microwave oven without food or water in the oven cavity. Operating the microwave oven when empty could cause damage to the appliance.
- Do not leave the microwave oven unattended when in use.
- Do not place cardboard, plastic, paper or other flammable materials in the microwave oven.
- Do not clean interior of the oven with metal scouring pads as pieces can break off the pad and touch electrical parts create a risk of electric shock.
- Use of any accessory attachments not recommended by Breville may cause injuries.
- Do not touch hot surfaces. Allow the microwave oven to cool before moving or cleaning any parts.
- Do not place or store anything on top of the microwave oven.
- Always ensure the microwave oven is turned off at the power outlet and the cord is unplugged from the power outlet before attempting to move the appliance, when not in use, if left unattended and before disassembling, cleaning or storing.
- Keep the appliance clean. Follow the cleaning instructions provided in this book (page 17)
- Always turn the microwave oven off by pressing the STOP/CLEAR button, switch off at the power outlet and unplug at the power outlet when it is not in use.
- Before cleaning, always press STOP/CLEAR position, switch off at the power outlet and unplug at the power outlet.
- Do not insert oversized foods into the oven as they create risk of fire or electric shock.
- It is recommended to use only the Breville provided accessories with this oven. Do not store any materials other than the Breville oven accessories in the oven when not in use.
- Do not attempt to operate the oven by any methods other than those described in this book.
IMPORTANT SAFEGUARDS FOR ALL ELECTRICAL APPLIANCES - Fully unwind the power cord before use.
- Do not let the power cord hang over the edge of a bench or table, touch hot surfaces or become knotted.
- To protect against electric shock do not immerse the power cord, power plug or appliance in water or any other liquid.
- The appliance is not intended for use by persons (including children) with reduced physical, sensory or mental capabilities, or lack of experience and knowledge, unless they have been given supervision or instruction concerning use of the appliance by a person responsible for their safety.
- Children should be supervised to ensure that they do not play with the appliance.
- It is recommended to regularly inspect the appliance. To avoid a hazard do not use the appliance if power cord, power plug or appliance becomes damaged in any way. Return the entire appliance to the nearest authorized Breville Service Centre for examination and/or repair.
- Any maintenance other than cleaning should be performed at an authorized Breville Service Centre.
- This appliance is for household use only. Do not use this appliance for anything other than its intended use. Do not use in moving vehicles or boats. Do not use outdoors. Misuse may cause injury.
- The installation of a residual current device (safety switch is recommended to provide additional safety protection when using electrical appliances. It is advisable that a safety switch with a rated residual operating current not exceeding 30mA be installed in the electrical circuit supplying the appliance. See your electrician for professional advice.
- Always turn the appliance to the OFF position, switch off at the power outlet and unplug at the power outlet when the appliance is not in use.
- Before cleaning, always turn the appliance to the OFF position, switch off at the power outlet, unplug at the power outlet and remove the power cord, if detachable, from the appliance and allow all parts to cool.
- Do not place this appliance on or near a heat source, such as hot plate, oven or heaters.
- Position the appliance away from walls, curtains and other heat or steam sensitive materials and provide adequate space above and on all sides for air circulation.
SPECIAL SAFETY INSTRUCTIONS FOR YOUR MICROWAVE OVEN - Wipe the oven cavity with a soft, damp cloth after each use. Leaving food residue, grease or fat in the cavity could cause the microwave oven cavity to overheat and may cause the microwave oven to smoke or catch fire.
- The microwave oven should be cleaned regularly and any food splattering inside the cavity should be removed. Failure to maintain the microwave oven in a clean condition could lead to deterioration of the surface, adversely affecting the life of the microwave oven and possibly resulting in a hazardous situation.
- If the door seals or any of the microwave oven is damaged, the microwave oven must not be operated until it has been inspected and/or repaired at an authorized Breville Service Centre.
- The microwave oven is intended for heating food and beverages. Drying of food or clothing and heating or warming pads, slippers, sponges, damp cloth and similar may lead to risk of injury, ignition or fire.
- Ensure all food containers and/or plates are suitable for use in the microwave oven. This should be done prior to preparing food for heating or cooking in the microwave oven. Monitor foods and liquids heating or cooking in the microwave oven at all times due to the possibility of containers igniting.
- Containers or plates suitable for use in the microwave oven should not exceed the width of the glass turntable as this may impede the rotation of the turntable and result in food being unevenly cooked.
- Liquids or other foods must not be heated in sealed containers since they are liable to explode.
- The microwave is intended to be used freestanding.
- The appliance shall not be cleaned with a steam cleaner.
- Some containers and/or plates may appear suitable for use in the microwave oven but may be coated in a glaze that will absorb the microwave energy, overheat and cause the container to crack. The glaze may also prevent the food from heating/cooking.
- Food and/or liquids should not be heated or cooked directly on the glass turntable. Food and/ or liquids must be placed into a suitable microwave-proof container before placing onto the glass turntable.
- Food and/or liquids should not be heated or cooked in plastic or paper containers or bags, unless specified a suitable for use by the manufacturer, due to the possibility of containers exploding or igniting.
- When heating food in plastic or paper containers, keep an eye on the oven due to the possibility of ignition.
- Metal clips or twist ties should be removed from the packaging as these could cause sparking and/or fire.
- Do not use recycled paper or kitchen paper toweling when cooking. Recycled paper may contain small metal or other impurities which could cause sparking and/or fire.
- Do not use metal containers or utensils in the microwave oven as these could cause sparking and/or fire.
- Only use utensils that are suitable for use in microwave ovens.
- Food grade foil should not be used in the microwave oven as this could cause sparking and/ or fire.
- Ensure that lids and caps covering containers are removed prior to placing liquids and/or foods into the microwave oven.
- Feeding bottles and baby food jars should have lids and caps removed before warming or heating in the microwave oven. To avoid burns or scalding after heating, the contents should be stirred or shaken and the temperature checked before serving.
- Always ensure the temperature of food or drink which has been heated or cooked in the microwave oven has been tested before eating, drinking or serving to others, especially children, disabled or elderly people.
- The heating of liquids and beverages in the microwave oven can result in delayed eruptive boiling. Care must be taken when handling any containers containing hot liquids or beverages.
- Do not heat popcorn in the microwave oven unless it has been commercially packaged for microwave use. There may be a number of un-popped kernels that may overcook and burn when popping popcorn. Do not use oil unless recommended by the manufacturer. Do not pop popcorn longer than the manufacturer’s instructions (popping time should not exceed 3 minutes). Longer cooking could cause scorching or fire.
- Do not cook any food surrounded by a membrane (such as potatoes, chicken liver, egg yolks, oysters, etc.) without first piercing the membrane several times with a fork or similar utensils.
- Eggs in the shell and whole hard boiled eggs should not be cooked or heated in the microwave oven as they may explode during cooking, at the end of cooking or after removing from the microwave oven.
- Do not heat oil or fat in the microwave oven. Doing so may cause the microwave oven and/ or the oil to overheat and/or ignite.
- If any smoke is observed, switch off and unplug the microwave oven at the power outlet. Keep the door closed to stifle any flames.
- Do not attempt to operate the microwave oven by any method other than those described in this instruction book.
- Do not disconnect the microwave oven from the power supply by pulling on the cord to unplug from the power outlet.
- When storing the microwave oven loosely wind the cord. Do not wrap the cord around the microwave oven.
- When heating food in plastic or paper containers, keep an eye on the oven due to the possibility of ignition.
- The glass window has been specially treated to make it stronger, more durable and safer than ordinary glass, however it is not unbreakable. If dropped or struck extremely hard, it may break or weaken, and could at a later time shatter into many small pieces without apparent cause.
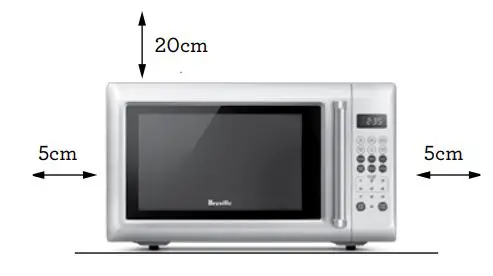 WARNING
 - Do not attempt to operate the oven with the door open since open-door operation can result in harmful exposure to microwave energy. It is important not to defeat or tamper with the safety interlocks.
- Do not place any object between the oven front face and the door or allow soil or cleaner residue to accumulate on sealing surfaces.
- Liquids and other foods must not be heated in sealed containers since they are liable to explode.
- If the door or door seals are damaged, the oven must not be operated until it has been repaired by a Breville Service Centre. It is particularly important that the oven door closes properly and that there is no damage to the: (1) Door (bent), (2) Hinges and latches(broken or loosened), (3) Door seals and sealing surfaces.
- Do not put any foreign material between the door and door jam of the microwave oven as this could cause excessive leakage of microwave energy.
- It is hazardous for anyone other than a Breville Service Centre to carry out any service or repair operation that involves the removal of a cover which gives protection against exposure to microwave energy.
- When the appliance is operated in the combination mode, children should only use the oven under adult supervision due to the temperature generated.
- Surfaces may be hot during and after use.
- If the apparatus is not maintained in a good state of cleanliness, its surface could be degraded and affect the lifespan of the product and lead to a dangerous situation.
SPECIFICATION
Power Consumption — 230240V, ~50Hz, 1450W
Output — 900W
Outside Dimensions — 306mm (H)
513mm (W)
443mm (D)with handle
397mm (D) without handle
Glass turntable diameter — 315mm
Net Weight — Approx. 15kg
Oven Capacity — 25 Liters
These specifications may change without notice.
SAVE THESE INSTRUCTIONS

A. LED Display
Shows time, cooking progress and preset functions.
B. Control panel
Numeric keypad and cooking functions.
C. Door handle
D. Viewing window
E. Turntable assembly & installation
a. Glass turntable
b. Hub (under glass)
c. Turntable shaft
d. Turntable roller
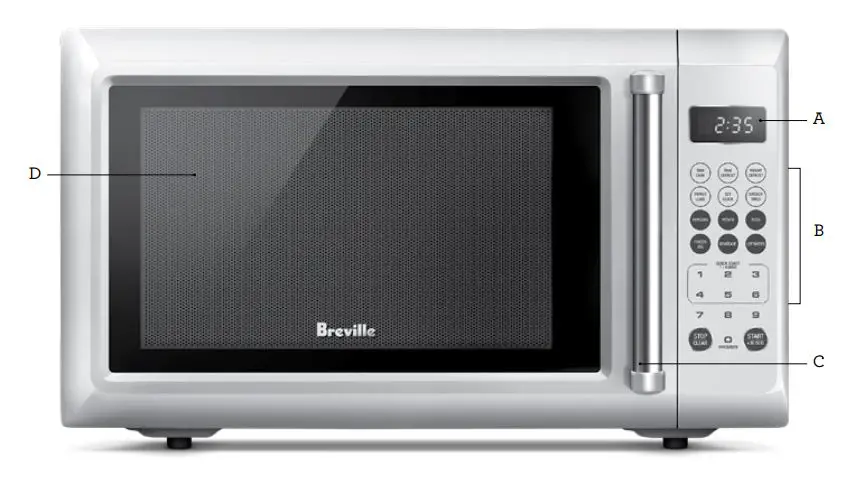
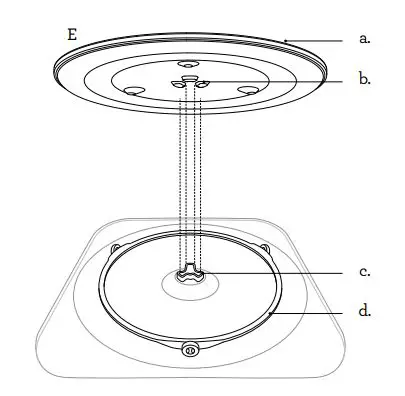
A. LED Display
Shows time, cooking progress and preset functions.
B. TIME COOK
Press to program cooking time up to 99 minutes and 99 seconds. The Default power level is “PL10” (100% power).
C. TIME DEFROST
Press to set defrosting time. The oven automatically divides the defrosting time into periods of alternating defrosting and
D. WEIGHT DEFROST
Use to defrost frozen meat, poultry and seafood by weight. The defrosting time and power level are automatically set once the weight is chosen.
E. POWER LEVEL
Use to set the microwave oven power levels.
F. SET CLOCK
Press to set the clock or recall the clock display. The clock will be displayed at all times except when the microwave is operating.
G. KITCHEN TIMER
Stand-alone, countdown timer that can be used to monitor cooking times of other kitchen tasks.
H. AUTO MENUS
6 auto menus have pre-set weight and time settings to suit the food you are cooking.
I. QUICK START MINS/ NUMBER PAD
Pressing 16 minutes instantly starts the cooking process for the selected amount of time. The number pad can also be used to input desired cooking time.
J. STOP/CLEAR
Press to cancel the selected power level, cook or defrost times that are previously programmed. Child lock can also be initiated by holding down the STOP/CLEAR button for 3 seconds.
K. START/+30 SEC INSTANT START
Press to start the cooking or defrosting functions. The interior of oven light will turn on, the interior fan will operate and the turntable will rotate. Each additional press of the button will add 30 seconds to the cooking time.
BEFORE FIRST USE
Before first use remove all promotional stickers and packaging material. Carefully unpack the microwave oven and keep all the packing material until all the parts of the microwave oven have been found and the appliance has been assembled. It is recommended to keep all the packing material in a safe place in case you wish to repack the product for shipping purposes.
To remove any dust that may have accumulated during packing, wash the turntable roller and glass turntable in warm soapy water, rinse in clean water then dry thoroughly. Wipe the interior and exterior of the microwave oven with a soft, damp cloth then dry thoroughly.
INSTALLATION AND TURNING ON THE MICROWAVE OVEN
- Select a level surface that provides enough open space for the intake and/or outlet vents.
- The rear surface of the appliance should not be placed against a wall. A minimum clearance of 5cm from sidewalls is required between the microwave and any adjacent walls.
• Leave a minimum clearance 20cm above the microwave.
• Do not remove the legs from the bottom of the microwave. - Blocking the intake and/or outlet openings can damage the microwave.
- Place the microwave as far away from radios and TV as possible.
- Operation of microwave may cause interference to your WIFI, radio or TV reception.
- Plug your microwave into a standard household outlet. Be sure the voltage and the frequency is the same as the voltage and the frequency on the rating label.
- The microwave must not be placed in a cabinet.

![]() WARNING
WARNING
- To avoid an electrical circuit overload, it is recommended that no other appliances are plugged into the same circuit as your microwave oven (or other products) when it is in use.
- Do not install oven over a range cooktop or other heat-producing appliances. If installed near or over a heat source, the oven could be damaged and the warranty would be void.
- Check the oven for any damage, such as misaligned or bent door, damaged door seals and sealing surface, broken or loose door hinges and latches and dents inside the cavity or on the door. If there is any damage, do not operate the oven and contact a Breville service center.
- Do not immerse the microwave oven, power cord or plug in water or any other liquid.

The microwave oven features a 12 hour clock. To set the time, a valid time between 1:00 and 12:59 needs to be entered.
- Press the SET CLOCK button, “00:00″will be displayed on the LED Screen.
- Using the number pad, enter the current time. For example, if the time is 12:10 now, press 1, 2, 1, 0 in that order.
- Press the SET CLOCK button again to finish setting. “:” will now flash indicating that the time has successfully been set.
 NOTE
NOTE
In the process of clock setting, if the STOP/CLEAR button is pressed or if there is no operation within 1 minute, the oven will automatically go back to standby.
KITCHEN TIMER
The kitchen timer is a stand-alone, countdown timer that can be used to monitor cooking times of other kitchen tasks.
- Press the KITCHEN TIMER button, the LED screen will flash”00:00″.
- Using the number pad, enter the required countdown timer time. The maximum time is 99 minutes and 99 seconds.
- Press the START/+30SEC button to confirm the time and commence the countdown.
- When the timer has counted down to “0”, it will beep 5 times. The LED screen will revert back to standby.
MICROWAVE COOKING
- Press the TIME COOK button, the LED screen will display”00:00″.
- Using the number pad, enter the required cooking time. The maximum time is 99 minutes and 99 seconds.
- Press the POWER LEVEL button, the LED screen will display “PL10”. The default power level is “PL10” (100% power). To adjust the power level, enter desired power level using the number pad. See Microwave Power Levels table on this page.
- Press START/+30SEC to begin cooking. The cooking time will appear and begin to countdown.
- At the end of the cooking cycle, the microwave will beep 5 times.
MICROWAVE POWER LEVELS
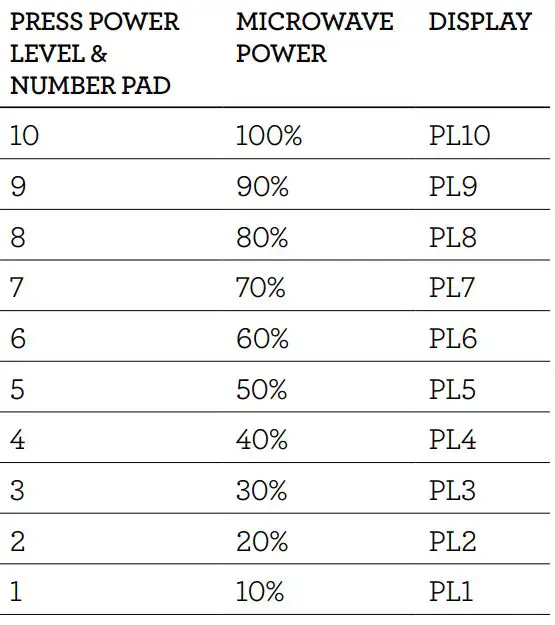
ADJUSTMENT OF POWER LEVEL DURING COOKING
Power level can be adjusted at any time during the cooking cycle.
- Press the POWER LEVEL button, the LED screen will display the current power level. For example “PL10”.
- Press desired power level following the Microwave Power Levels table. For example, press 8 to select “PL8” (80% power).
- The selected power level will be used for the remainder of the cooking time.
TIME DEFROST
- Press the TIME DEFROST button, the LED screen will display “dEF2”.
- Using the number pad, enter the required defrosting time. The maximum time is 99 minutes and 99 seconds.
- The default power level is “PL3” (30% power). To adjust the power level, enter desired power level using the number pad. See Microwave Power Levels table on previous page.
- Press START/+30SEC to begin cooking. The defrosting time will appear and begin to countdown.
WEIGHT DEFROST
- Press the WEIGHT DEFROST button, the LED screen will display “dEF1”.
- Using the number pad, enter the weight of the food to be defrosted. Weight can be entered from 100g to 2000g.
- Press START/+30SEC to begin cooking. The defrosting time will appear and begin to countdown.
POPCORN
- Press the POPCORN button to select between “50” or “100” gram weights.
- Press START/+30SEC to begin cooking. The cooking time will appear and begin to countdown.
POTATO
- Press the POTATO button to select between “1”, “2”, or “3” potatoes. · “1”: 1 potato (approx. 230g) · “2”: 2 potatoes (approx. 460g) · “3”: 3 potatoes (approx. 690g)
- Press START/+30SEC to begin cooking. The cooking time will appear and begin to countdown.
NOTE
Always pierce potatoes with a fork several times before cooking in the microwave.
PIZZA
- Press the PIZZA button to select between “100”, “200”, or “400” gram weights.
- Press START/+30SEC to begin cooking. The cooking time will appear and begin to countdown.
FROZEN VEG
- Press the FROZEN VEG button to select between “150”, “350”, or “500” gram weights.
- Press START/+30SEC to begin cooking. The cooking time will appear and begin to countdown.
BEVERAGE
- Press the BEVERAGE button to select between “1”, “2”, or “3” cups. 1 cup is approximately 120ml.
- Press START/+30SEC to begin cooking. The cooking time will appear and begin to countdown.
LEFTOVERS
- Press the LEFTOVERS button to select between “250”, “350”, or “500” gram weights.
- Press START/+30SEC to begin cooking. The cooking time will appear and begin to countdown.
FAVOURITE
The favorite setting records up to 3 of your most used and favorite microwave settings.
Example: 80% power for 3 minutes and 20 seconds saved on Favorite setting 2.
- Press the 0/ FAVOURITE button twice, the LED screen will display”2″.
- Press the TIME COOK button and using the number pad enter 3, 2, 0 in that order.
- Press the POWER LEVEL button, the LED screen will display “PL10”. Press 8 to select “PL8” (80% power).
- Press START/+30SEC to save the setting as Favorite setting 2. The microwave will beep and display “2”, indicating the setting has successfully been saved.
- To recall your favorite setting, Press the 0/ FAVOURITE button twice. The LED screen will display”2″.
- Press START/+30SEC to begin cooking. The cooking time will appear and begin to countdown.
CHILD LOCK
- To activate child lock, press and hold the STOP/CLEAR button for 3 seconds. The microwave will beep and the LED screen will display
 .
. - To deactivate child lock, press and hold the STOP/CLEAR button for 3 seconds. The microwave will beep and the icon will disappear from the LED screen.
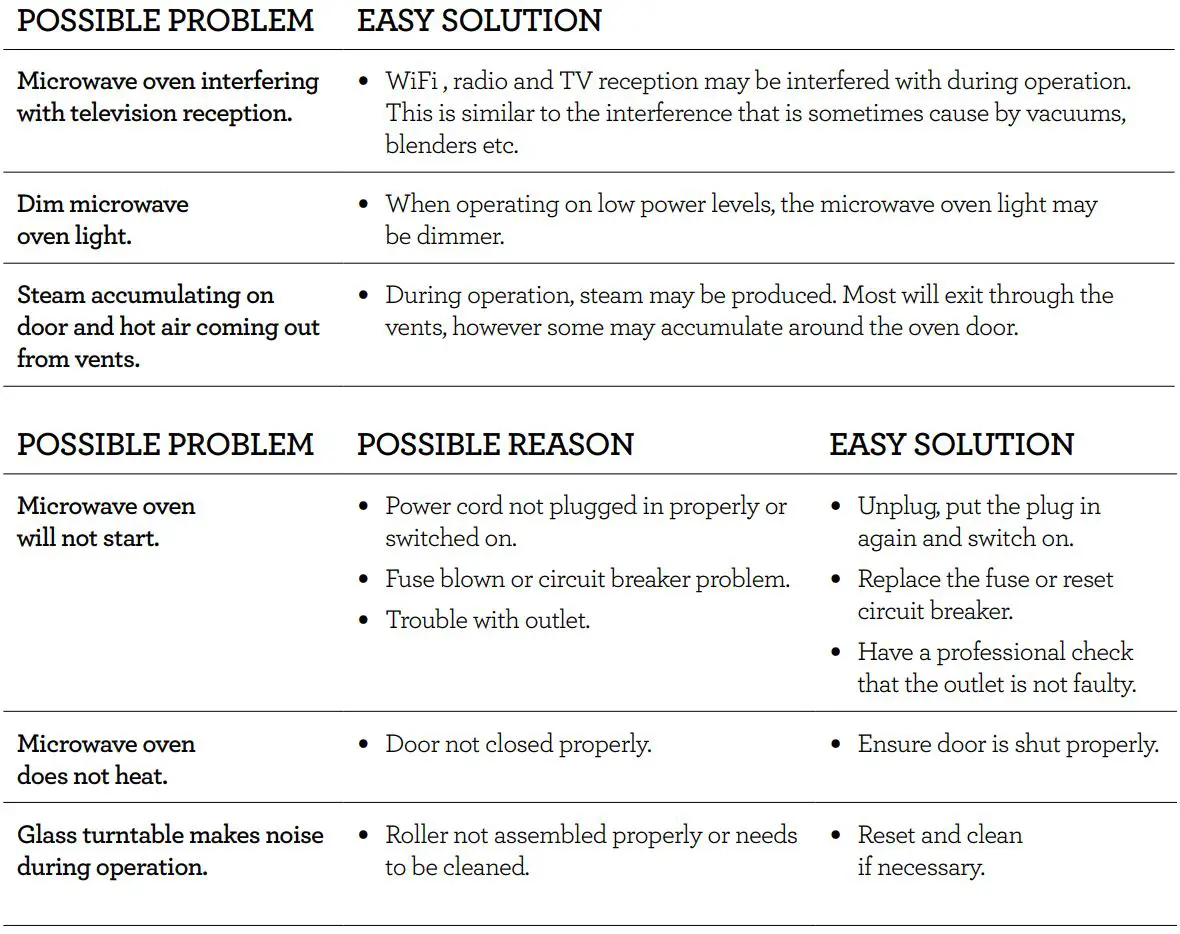
- Switch off the microwave oven at the power outlet and remove the plug from the power outlet before cleaning.
- Keep the inside of the microwave oven clean. When food splatters or spilled liquids adhere to the microwave oven internal walls, wipe with a damp cloth. Mild detergent may be used if the cavity gets very dirty. Avoid the use of spray and other harsh cleaners as they may stain, streak or dull the door surface.
- The outside surfaces should be cleaned with a damp cloth. To prevent damage to the operating parts inside the microwave oven cavity, water should not be allowed to seep into the ventilation openings.
- Wipe the door and window on both sides of the door seals and adjacent parts frequently with a damp cloth to remove any spills or spatters. Do not use an abrasive cleaner.
- Do not allow the control panel to become wet. Clean with a soft, damp cloth. When cleaning the control panel, leave the microwave oven door open to prevent it from accidentally turning on.
- If steam accumulates inside or around the outside of the oven door, wipe with a soft dry cloth. This may occur when cooking foods high in moisture or if the microwave oven is operated under high humidity conditions, this is normal.
- It is occasionally necessary to remove the glass turntable for cleaning. Wash the glass turntable in warm soapy water, rinse in clean water and dry thoroughly.
NOTE
If none of the above rectify the situation, then contact your Breville Service Centre. Do not try to adjust or repair the oven yourself. - The turntable roller and microwave oven floor should be cleaned regularly to ensure the glass turntable rotates correctly and avoids making excessive noise. Simply wipe the bottom surface of the microwave with a soft damp cloth. The turntable roller may be washed in mild soapy water, rinse in clean water and dry thoroughly. When removing the turntable roller from the cavity floor for cleaning, be sure to replace in the proper position.
- Remove odors from your microwave oven by combining a cup of water with the juice of one lemon in a deep microwave-safe bowl, microwave on High for 5 minutes. Wipe the microwave oven cavity thoroughly and dry with a soft cloth.
- When it becomes necessary to replace the oven light, please consult your Breville Service Centre to have it replaced.
- Please do not dispose this appliance with domestic rubbish; it should be taken to the appropriate disposal center provided by the local council municipalities.
- If storing the microwave oven, press the STOP/CLEAR button, switch off at the power outlet then unplug the power cord. Ensure the microwave oven is completely cool, clean and dry. Secure the roller ring and glass turntable and close the door. Do not place heavy objects on top. Store the microwave oven upright.
BEFORE YOU CALL FOR SERVICE - Check to ensure that the oven is plugged in securely. If it is not, remove the plug from the power outlet, wait 10 seconds and plug it in again securely.
- Check for a blown circuit fuse or a tripped main circuit breaker. If these seem to be operating properly, test the power outlet with another appliance.
- Check to ensure that the control panel is programmed correctly and the timer is set.
- Check to ensure that the door is securely closed engaging the door safety lock system. Otherwise, the door safety lock system will prevent the microwave from switching on.

Breville Customer Service Centre
Australian Customers
Phone: 1300 139 798
Web: www.breville.com.au
New Zealand Customers
Phone: 0800 273 845
Web: www.breville.co.nz
![]()
Breville is a registered trademark of Breville Pty. Ltd. A.B.N. 98 000 092 928. Copyright Breville Pty. Ltd. 2018.
Due to continued product improvement, the products illustrated/photographed in this brochure may vary slightly from the actual product.
BMO125 ANZ D20
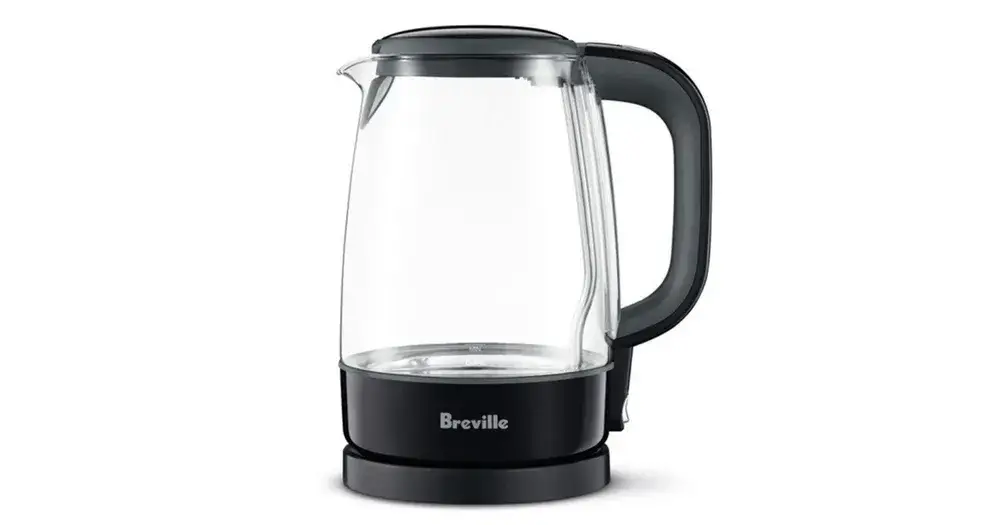
Suits all BKE480 models
BREVILLE RECOMMENDS SAFETY FIRST
At Breville we are very safety conscious. We design and manufacture consumer products with the safety of you, our valued customer, foremost in mind. In addition we ask that you exercise a degree of care when using any electrical appliance and adhere to the following precautions. Misuse can cause potential injuries.
IMPORTANT SAFEGUARDS
READ ALL INSTRUCTIONS BEFORE USE AND SAVE FOR FUTURE REFERENCE
- Appliances can be used by persons with reduced physical, sensory or mental capabilities or lack of experience and knowledge if they have been given supervision or instruction concerning the use of the appliance in a safe way and understand the hazards involved.
- Children shall not play with the appliance.
- Remove and safely discard any packaging material and promotional labels before using the kettle for the first time.
- To eliminate a choking hazard for young children, remove and safely discard the protective cover fitted to the power plug of this appliance.
- This kettle has been designed specifically for the purpose of boiling drinking quality water only. Under no circumstances should this product be used to boil any other liquids or foodstuffs.
- Do not place the kettle near the edge of a bench or table during operation. Ensure that the surface is level, clean and free of water and other substances.
- Do not operate the kettle on a sink drain board.
- Do not place the kettle on or near a hot gas burner, electric element or where it could touch a heated oven.
- Keep the kettle clear of walls, curtains and other heat or steam sensitive materials. Minimum 20cm distance.
- Always ensure the kettle is properly assembled before use. Follow the instructions provided in this book.
- The kettle must be used only with the power base supplied.
- This kettle is not intended to be operated by means of an external timer or separate remote control system.
- Do not touch hot surfaces. Use the handle for lifting and carrying the kettle.
- Do not place anything on top of the lid.
- Always ensure the kettle switch is in the ‘off’ position, then turn the power off at the power outlet and remove the plug from the power outlet before attempting to move the appliance, when the appliance is not in use and before cleaning and storing.
- Use caution when pouring water from the kettle, as boiling water and steam will scald. Do not pour water too quickly.
- To protect against electric shock, do not immerse the kettle base, power base, power cord or power plug in water or allow moisture to come in contact with these parts.
- Do not remove the kettle from the power base during operation. Ensure the kettle is switched to ‘off’ position after the water has boiled before removing the kettle from the power base.
- Do not move the kettle while it is switched on.
- Do not open the lid during operation.
- Do not overfill the kettle past the maximum water level mark. If the kettle is overfilled, boiling water may be ejected.
- Keep the kettle clean. Follow the cleaning instructions provided in this book.
IMPORTANT SAFEGUARDS FOR ALL ELECTRICAL APPLIANCES
- Fully unwind the power cord before use.
- Do not let the power cord hang over the edge of a bench or table, touch hot surfaces or become knotted.
- To protect against electric shock do not immerse the power cord, power plug or appliance in water or any other liquid.
- This appliance can be used by children aged from 8 years and above if they have been given supervision or instruction concerning the use of the appliance in a safe way and if they understand the hazards involved. Cleaning and user maintenance shall not be made by children unless they are 8 years or above and are under supervision. Keep the appliance and its cord out of reach of children aged less than 8 years.
- It is recommended to regularly inspect the appliance.
- To avoid a hazard do not use the appliance if power cord, power plug or appliance becomes damaged in any way. Return the entire appliance to the nearest authorised Breville Service Centre for examination and/ or repair.
- Any maintenance other than cleaning should be performed at an authorised Breville Service Centre.
- This appliance is for household use only. Do not use this appliance for anything other than its intended use. Do not use in moving vehicles or boats. Do not use outdoors. Misuse may cause injury.
- The installation of a residual current device (safety switch is recommended to provide additional safety protection when using electrical appliances. It is advisable that a safety switch with a rated residual operating current not exceeding 30mA be installed in the electrical circuit supplying the appliance. See your electrician for professional advice.
- For safety reasons it is recommended you plug your Breville appliance directly into its own electrical outlet on a dedicated circuit separate from other appliances. If the electrical circuit is overloaded with other appliances, your appliance may not function properly. Using in conjunction with a power strip or extension cord is not recommended.
- Do not spill water onto the connector.
 WARNING
- Do not operate the kettle on an inclined surface. Do not move the kettle while it is switched on.
- The heating element surface is subjected to residual heat after use.
- The appliance is designed for boiling of drinking quality water only. Never use to heat or boil any other liquids or foodstuffs. The lid should always be firmly in place and locked into the closed position before use.
- Do not press the lid release button to open the lid during and after operation. This may result in boiling water splashing from the kettle. Pour out all the hot water from the kettle before opening the lid to refill.
- Never immerse the kettle base, switch area, power base, power cord or power plug in water, or allow moisture to come into contact with these parts.
- To prevent damage to the kettle do not use chemicals, alkaline cleaning agents, steel wool or abrasive cleaners to clean the inside or outside of the kettle. Use a mild cleaning agent with a soft damp cloth.
KNOW YOUR BREVILLE PRODUCT

A. Soft Opening Lid BPA Free*
B. Removable Scale Filter
C. 7 Cup / 1.7 Litre Capacity
D. Auto Shut-Off & Boil Dry Protection
E. Rapid Boil 2400W Concealed Element
F. Multi-Directional Base with Cord Storage
G. Lid Release Button
H. Ergonomic Handle
I. Illuminated Power ON/OFF Switch
NOT SHOWN
Breville Assist® Plug
* Breville makes its BPA free claim for this product based on independent laboratory testing performed for all the food contact plastic materials of the product per EU Commission regulation No. 10/2011.
CARE & CLEANING
Always switch Off at the power outlet and unplug the appliance from the power outlet before cleaning.
REMOVABLE FILTER
The kettle features a removable mesh filter to remove scale deposits for cleaner water. To clean the scale deposits from the filter, open the lid and slide the filter out from the slot behind the spout of the kettle.
The filter can be cleaned by placing under running water and rubbing with a cleaning cloth or brush.
To replace the filter, simply slide the filter into the slot behind the spout of the kettle and push back into position.
NOTE
The filter could become damaged with time. Please check regularly and replace if found damaged.
NOTE
The concealed element in the base of the kettle is made from high quality stainless steel. Any brown stains appearing are the result of mineral deposits and are not rust.
REMOVAL OF MINERAL DEPOSITS
Mineral deposits in tap water may cause the kettle interior and water gauge to discolour over time. This may be removed by using Breville Kettle Cleaner (BKC250) or a proprietary kettle descaler which is available from most leading supermarkets, department stores and hardware stores.
BREVILLE KETTLE CLEANER
Directions for use:
- Add 125ml of Breville Kettle Cleaner to 2 litres of water.
- Fill kettle to MAX mark with mixture on a protected surface.
- Bring kettle to boil and let stand for 30 minutes.
- Clean spout by using a cloth dampened with Breville Kettle Cleaner, rub well. Then wipe off.
- Bring the kettle to boil for a second time, then empty solution.
- Fill kettle with fresh water and bring to the boil, discard boiled water. Now your kettle is ready to make your next cup of tea or coffee.
Alternatively:
- Fill the kettle until 2/3 full with 1 part vinegar and 2 parts water. Boil and allow to stand overnight.
- Empty the solution from the kettle. Fill the kettle with clean water, bring to boil and discard the water.
- Repeat and the kettle will be ready for use.
TO CLEAN THE EXTERIOR
The outside of the kettle may be wiped over with a damp cloth and polished with a soft dry cloth.
For a full version of this Instruction Booklet, download via www.breville.com
Breville Customer Service Centre
Australian Customers
Mail: PO Box 22 Botany NSW 2019 AUSTRALIA
Phone: 1300 139 798
Fax: (02) 9384 9601
New Zealand Customers
Mail: Private Bag 94411 Botany Manukau 2163 Auckland NEW ZEALAND
Phone: 0800 273 845
Fax: 0800 288 513
Breville is a registered trademark of Breville Pty. Ltd. A.B.N. 98 000 092 928.
Copyright Breville Pty. Ltd. 2017.
Due to continued product improvement, the products illustrated/photographed in this brochure may vary slightly from the actual product.
BKE480 Issue – C17
]]>
BREVILLE RECOMMENDS SAFETY FIRST
At Breville we are very safety conscious. We design and manufacture consumer products with the safety of you, our valued customer, foremost in mind. In addition we ask that you exercise a degree of care when using any electrical appliance and adhere to the following precautions.
IMPORTANT SAFEGUARDS
READ ALL INSTRUCTIONS BEFORE USE AND SAVE FOR FUTURE REFERENCE
- Carefully read all instructions before operating the sandwich press for the first time and save for future reference.
- Remove and safely discard any packaging material and promotional stickers before using the sandwich press for the first time.
- To eliminate a choking hazard for young children, remove and safely discard the protective cover fitted to the power plug of this appliance.
- Do not place the sandwich press near the edge of a bench or table during operation. Ensure that the surface is level, clean and free of water.
- Keep the sandwich press clear of walls, curtains and other heat or steam sensitive materials.
- The sandwich press must be used on a properly grounded outlet. If you are not sure if the power outlets are properly grounded, please consult your electricians.
- Do not, under any circumstances, modify the power plug or use an adapter.
- Do not place the sandwich press on or near a hot gas or electric burner, or where it could touch a heated oven. Use the sandwich press well away from walls.
- Provide adequate space above and on all sides for air circulation around the sandwich press.
- Do not place the sandwich press on any surface that may be affected by heat. The use of a heat resistant matt is recommended on these surfaces.
- Do not use on a sink drain board.
- Always use the sandwich press on a dry, level surface.
- Do not touch hot surfaces. Use the handles to lift and open the top plate. Take care when using the Adjustable Grilling Height Control.
- Do not leave the sandwich press unattended when in use.
- The outer housing of the sandwich press may be hot during and after use. Please do not touch hot surfaces. Always keep the power cord of this products, and those of other appliances nearby, clear from the housing.
- The sandwich press is not suitable to be used in a small appliance enclosure. Ensure to leave adequate space all around the sandwich press. Minimum space of 10cm is recommended.
- Do not place anything on top of the sandwich press when the lid is closed, when in use and when stored.
- Always switch the sandwich press off at the power outlet, then unplug the power cord and to allow to cool, if appliance is not in use, before cleaning, before attempting to move the appliance, disassembling, assembling and when storing the appliance.
- Do not use harsh abrasives, caustic cleaners or oven cleaners when cleaning the sandwich press.
- Keep the exterior housing and the non-stick cooking plates clean. Follow the cleaning instructions provided in this book. Refer to Care, Cleaning and Storage (Page 9).
- This appliance is not intended to be operated by means of an external timer or separate remote control system.
IMPORTANT SAFEGUARDS FOR ALL ELECTRICAL APPLIANCES
- Fully unwind the power cord before use.
- Connect only to a 230V or 240V power outlet.
- Do not let the power cord hang over the edge of a bench or table, touch hot surfaces or become knotted.
- To protect against electric shock, do not immerse the power cord, power plug or appliance in water or any other liquid or allow moisture to come in contact with the part, unless it is recommended in the cleaning instructions.
- Children should be supervised to ensure that they do not play with the appliance.
- It is recommended to regularly inspect the appliance. To avoid a hazard do not use the
appliance if power cord, power plug or appliance becomes damaged in any way. Return the entire appliance to the nearest authorized Breville Service Centre for examination
and/or repair.is recommended in the - The appliance is not intended for use by persons (including children) with reduced physical, sensory or mental capabilities, or lack of experience and knowledge, unless they have been given supervision or instruction concerning use of the appliance by a person responsible for their safety.
- Any maintenance other than cleaning should be performed at an authorized Breville Service Centre.
- This appliance is for household use only. Do not use this appliance for anything other than its intended use. Do not use in moving vehicles or boats. Do not use outdoors. Misuse may cause injury.
 IMPORTANT
Fully unwind the power cord from the cord storage facility before use.
- The installation of a residual current device (safety switch) is recommended to provide additional safety protection when using electrical appliances. It is advisable that a safety switch with a rated residual operating current not exceeding 30mA be installed in the electrical circuit supplying the appliance. See your electrician for professional advice.
- During electrical storms, the appliance should be disconnected from the power source at the wall socket to prevent any electrical surges that may arise during the storm and which may inadvertently cause damage to the appliance and its electronic componentry.
- Always turn the appliance to the off position, switch off at the power outlet and unplug at the power outlet when the appliance is not in use.
- Before cleaning, always turn the appliance to the off position, switch off at the power outlet, unplug at the power outlet and remove the power cord, if detachable, from the appliance and allow all parts to cool.
- Do not place this appliance on or near a heat source, such as hot plate, oven or heaters.
- Position the appliance at a minimum distance of 20cm away from walls, curtains and other heat or steam sensitive materials and provide adequate space above and on all sides for air circulation.
FOR HOUSEHOLD USE ONLY SAVE THESE INSTRUCTIONS
- A. 2200W of power (BSG540)
2000W of power (BSG520)
For fast heat up and quick toasting. - B. Heavy duty die-cast arms
For durability and strength. - C. Floating top plate
Automatically adjusts to thick or thin sandwiches. - D. Flat non-stick cooking plates
For extra crispy toasted results. - E. `Power’ and `Ready’ lights
Indicate when the sandwich press is heating or ready to use. - F. Adjustable height control clip
With 4 settings for making open sandwich melts, toasted sandwiches and everything in between. - G. Safety locking storage clip
To lock plates closed for upright storage. - H. Non-slip feet
- I. Convenient cord wrap in base
BEFORE FIRST USE
Remove any promotional materials and packaging materials before use. Check that the cooking plates are clean and free of dust. If necessary, wipe over with a damp cloth. When using the sandwich press for the first time you may notice a fine smoke haze. This is caused by the heating of some of the components. There is no need for concern.
TOASTED SANDWICH
- Insert the power plug into a 230V or 240V power outlet and then turn the power ON. The red `POWER’ light will illuminate.
- Allow the sandwich press to pre-heat with the top cooking plate in the closed position until the green `READY’ light illuminates.
- During this time, prepare the sandwich. When the sandwich press has pre-heated, place the sandwich onto the bottom cooking plate. Always place sandwiches towards the rear of the bottom cooking plate.
- Close the top cooking plate. The top cooking plate has a floating hinge that is designed to evenly press down on the sandwich (see Fig 1).
- Toasting should take approximately 58 minutes. Exact toasting time will be a matter of taste. It will also depend on the type of bread and type of filling used.
- When the sandwich is cooked, use the handle to open the sandwich press and raise the top cooking plate. Remove sandwich with the help of a plastic or wooden spatula. Never use metal tongs or a knife as these can cause damage to the non-stick coating.
NOTE
- Always allow the sandwich press to pre-heat until the green `READY’ light illuminates.
- The safety locking storage clip should not be used to clamp down the top cooking plate when the sandwiches are in the sandwich press. The weight of the top cooking plate will gradually press down the sandwich during the cooking process.
- When using the sandwich press for the first time you may notice a fine smoke haze. This is caused by the heating of some of the components. There is no need for concern.
CAUTION
HOT SURFACE – The temperature of accessible surfaces may be high when the appliance is operating and for some time after use.
Fully unwind the cord from the cord storage facility before use.
Your sandwich press features an Adjustable Height Control feature which allows you to fix the top plate to a range of positions above the bottom plate. This allows your sandwich press to be used as an open toaster ideal for toasting open sandwich melts. It can also be used for toasting sandwiches where you don’t need to apply the weight of the top plate.
OPEN SANDWICH MELTS
- Allow the sandwich press to pre-heat until the green `READY’ light illuminates.
- Place sandwich to be melted on bottom plate.
- Move the Adjustable Height Control clip on the right hand side of the sandwich press to the desired height (see Fig 2).
- Slowly lower the top plate until it rests on the Adjustable Height Control clip.
- The top plate will radiate the desired heat to melt ingredients such as cheese.
- Toasting melts should take approximately 34 minutes. However exact toasting time will be a matter of taste. It will also depend on the height of the top plate.
Adjustable Height Control
Toasts or melts any bread thickness in minutes.

NOTE
The Adjustable Height Control can be moved to accommodate thick or thin melts by sliding the clip forwards or backwards along the arm.
BREAD
Most types of bread can be used; white, whole meal, kibbled wheat, wholegrain, raisin loaf and so on. The sandwich press is ideal for toasting focaccia, Turkish bread, baguettes as well as bread rolls. Raisin bread, brioche or other sweet breads which contain a high sugar content will tend to brown quicker.
FILLINGS
Try to use canned or pre-cooked fruit as fresh fruit may give off excessive juices when heated. Be careful when biting into sandwiches containing fillings such as cheese and tomato or jam as they retain heat and can burn if eaten too quickly.
TOASTING BREAD
The unique flat plate design makes the sandwich press ideal for toasting plain breads, and Turkish bread, without any fillings or spreads. Try toasting Turkish Bread with jams for a great alternative to standard breads at breakfast.
FAT FREE SNACKS
Due to the non-stick flat plate design, it is not necessary to use any butter or margarine on the outside of your toasted snacks.
Before cleaning, switch the power off at the power outlet and then remove the power plug. Allow your sandwich press to cool before cleaning. The appliance is easier to clean when slightly warm.
Always clean your sandwich press after each use to prevent a build up of baked-on foods. Wipe cooking plates with a soft cloth. If cooked on food is not removed by this method reheat the unit for 12 minutes, then brush with a little oil or melted butter. Allow to stand for five minutes then wipe with a damp cloth.
NOTE
- The cooking plates are coated with a non-stick surface, do not use abrasives.
- Do not use spray-on non-stick coatings as this will affect the performance of the non-stick surface on the cooking plates.
STORAGE
To store your sandwich press:
- Switch off at power outlet and unplug power cord from the wall.
- Allow the sandwich press to fully cool.
- Slide the Adjustable Height Control towards the front handle to the `LOCK’ position so that the top and bottom cooking plates are locked together (see Fig 4).
- Wrap the power cord in the cord storage area below the appliance (see Fig 5).

- Store on a flat, dry, level surface.
NOTE
The storage clip should not be used to clamp down the top plate when sandwiches are in the sandwich press.
WARNING
Do not immerse any part of the sandwich press in water or any other liquid.
Notes
Notes
Breville Customer Service Centre
Australian Customers
Phone: 1300 139 798
Web: www.breville.com
New Zealand Customers
Phone: 0800 273 845
Web: www.breville.com
![]()
Breville, the Breville logo, Master Every Moment and the Toast & Melt are registered trademarks of Breville Pty. Ltd. A.B.N. 98 000 092 928. Copyright Breville Pty. Ltd. 2019.
Due to continued product improvement, the products illustrated/photographed in this brochure may vary slightly from the actual product.
BSG520/BSG540 ANZ G19