 R50 12 Volt RV Refrigerator
User Manual
Brand: BODEGAModel: R50
DC 12V/24V
RV Refrigerator
R50 12 Volt RV Refrigerator
Please read this operating manual carefully before starting the device.
Keep it in a safe place for future reference.
SAFETY INSTRUCTIONS
W ARNING!
- Do not operate the appliance if it is visibly damaged.
- Do not block the gaps of the fridge with things like pin, wire, etc.
- Do not expose the appliance to rain or soak it in water.
- Do not place the appliance near naked flames or other heat sources (heaters, direct sunlight, gas ovens etc.)
- Do not store any explosive substances like spray cans with a flammable propellant.
- Ensure the supply cord is dry and not trapped or damaged. Do not locate multiple portable socket-outlets or portable power supplies at the rear of the appliance.
- Check the voltage specification on the type plate corresponds to that of the energy supply.
The appliance is only to be used with the power supply unit provided with the appliance. - Do not use electrical appliances inside the food storage compartments of the appliance, unless they are of the type recommended by the manufacturer.
- Once unpacked and before turning on, the appliance must be placed on a level surface for more than 6 hours.
- Make sure that the appliance stays horizontally when it is running. The tilt angle must be less than 5° for long time running and be less than 45° for short time running.
- Keep the ventilation openings in the unit casing or in the built-in structure free of obstacles.
- Keep the appliance stable on the ground or in the car; Do not drain upside down.
![]() CAUTION!
CAUTION!
- Repairs may only be carried out by qualified personnel. Incorrect repair may cause danger. The lamp and supply cord must be replaced by the manufacturer or qualified persons.
- The installation of DC power in the boat must be handled by qualified electricians.
- Children shall not play with the appliance. Cleaning and user maintenance shall not be made by children without supervision.
- The appliance can be used by children aged from 8 years and above and persons with reduced physical, sensory or mental capabilities or lack of experience and knowledge if they’ve been given supervision or instruction concerning use of the device in a safe way and understand the hazards.
![]() Notice!
Notice!
- Disconnect the power supply before each cleaning and maintenance and after every use.
- Do not use sharp tools to defrost; Do not damage the refrigerant circuit.
- Risk of child entrapment. Before you throw away your old refrigerator or freezer: take off the doors: leave the shelves in place so that children may not easily climb inside.
- Check if the cooling capacity of the appliance is suitable for storing the food or medicine.
Food may only be stored in its original packaging or in suitable containers. - If the appliance is left empty for long periods, switch off, defrost, clean, dry, and leave the door open to prevent mould developing within the appliance.
The appliance is intended to be used in household and similar applications such as:
– Staff kitchen areas in shops, offices and other working environments;
– Camping, Farm houses and by clients i n hotels, motels and other residential environments;
– Bed and breakfast type environments;
– Catering and similar non-retail applications.
 Please according to local regulations regarding disposal o f the appliance for its flammable refrigerant a n d blowing gas.
PRODUCT FEATURES
- High-efficiency DC compressor and conversion module.
- CFC free and great heat insulation.
- Intelligent battery protection system prevents your vehicle from running out of battery.
- Dual temperature with single controller, LED display control panel for temperature setting.
- Easy to install, fridge/freezer compartments can be combined, reversible door.
- Detailed designs: removable door bins, crisper drawer, coating shelves, interior light, etc.
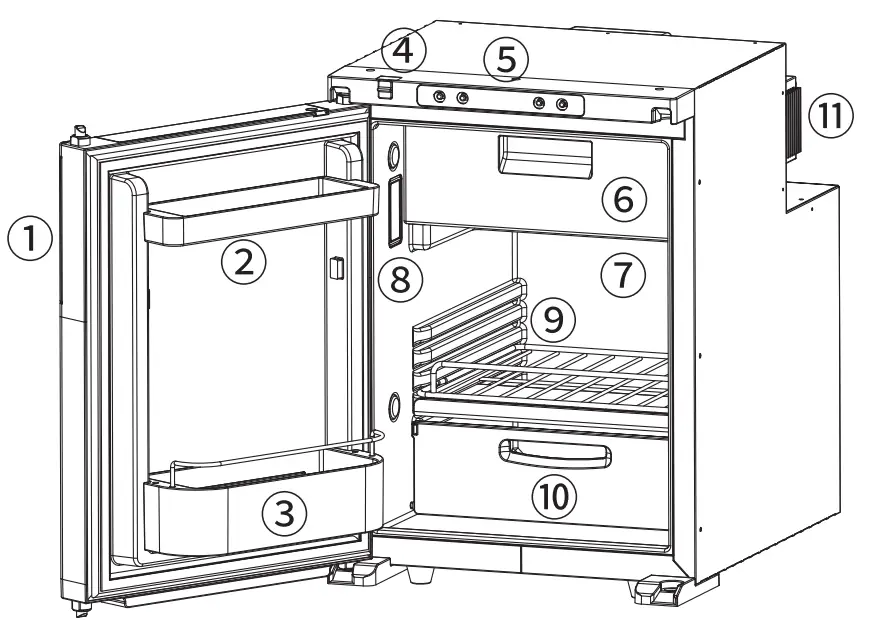
PRODUCT STRUCTURE
 1.Door latch
2.3 Door bins
4. Storage lock
5 .Control panel
6 .Freezer Compartment
7 . Fridge Compartment
8. Interior light
9 .Shelve
10. Crisper drawer
11. Compressor.
INSTALLATION
STEP 1 : Ensure that the fridge is not damaged when opening the package after receiving the product. Any transportation damage could be reported to the place of purchase. Handle the product with the utmost care and attention.
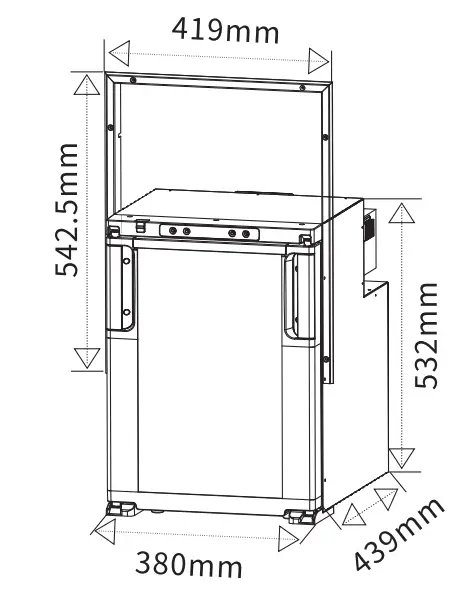
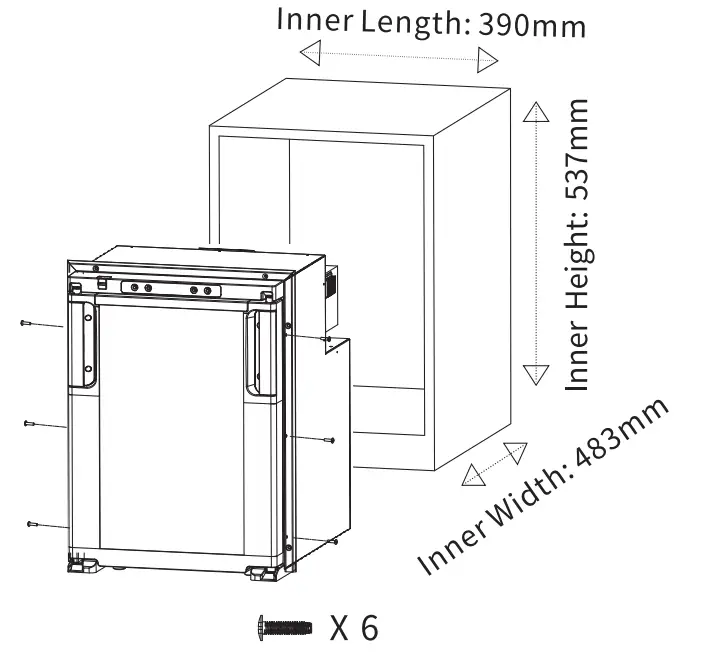
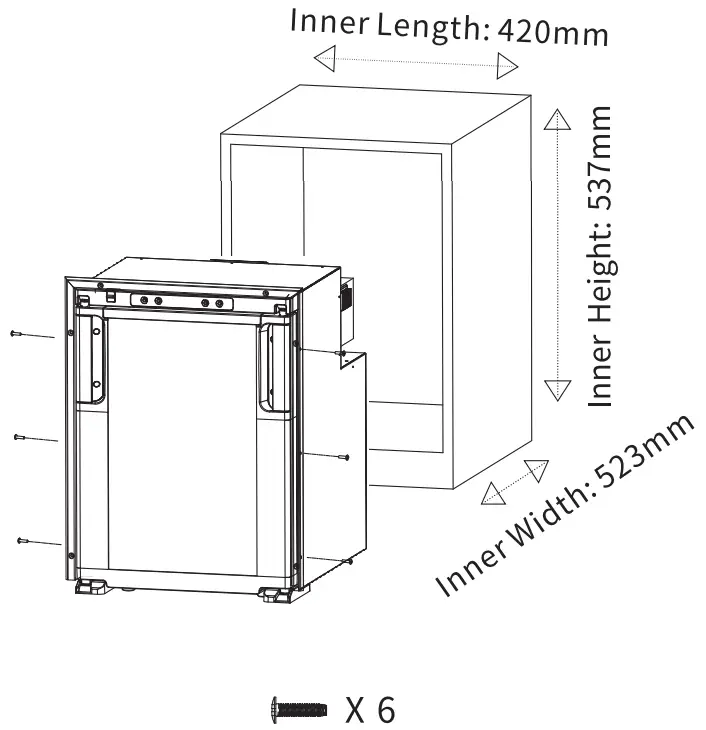
STEP 2 : Prepare the cabinet. Leave space around the refrigerator to keep good ventilation. (the back and top>50mm, the side 220mm). Always keep the fridge on a horizontal surface a n d away from heat sources.
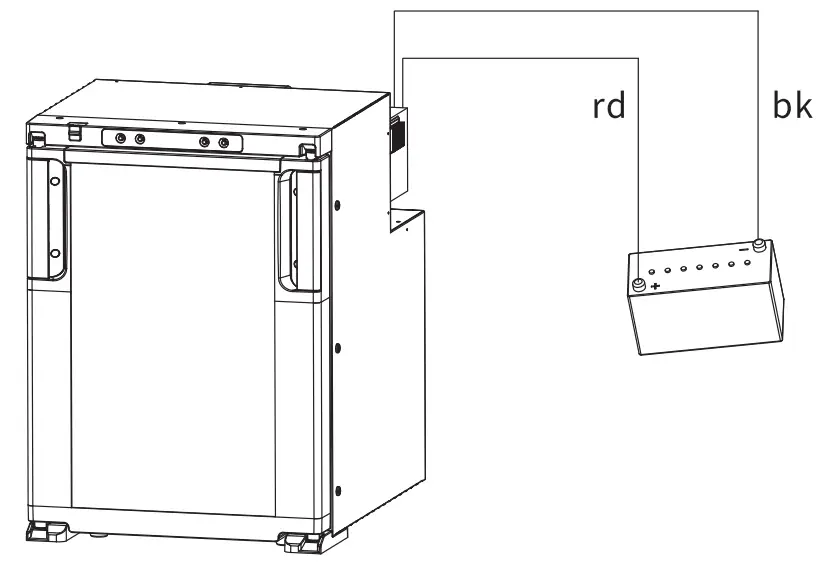
STEP 3 : Connect to a power supply. Connect the refrigerator to the vehicle 12/24V DC system directly, the minimal cable cross-section as per the below table based on the overall length of wire between the refrigerator and the battery.
Connect the red cable to the positive terminal of the battery.
Connect the black cable to the negative terminal of the battery. 
| Wire Length t o Refrigerator | Wire Gauge |
| Maximum 6m | 14AWG |
| Maximum 11m | 12AWG |
| Maximum 17m | 10AWG |
It is highly recommended that the installation fridge is carried out by a qualified person.
Enough free wire needed to be kept for moving the fridge in to the cabinet.
STEP 4 : Push the fridge into the cabinet carefully to avoid scratching the floor, and the power cable should be kept loosen.
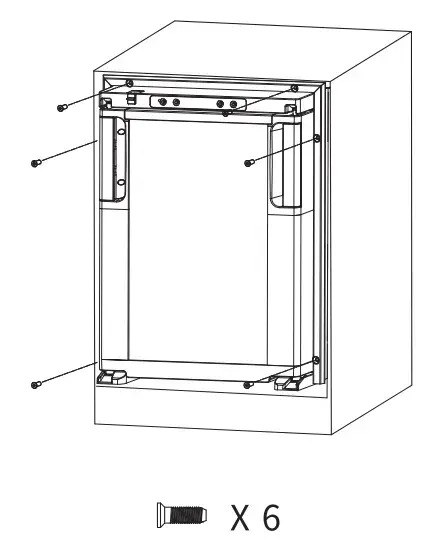
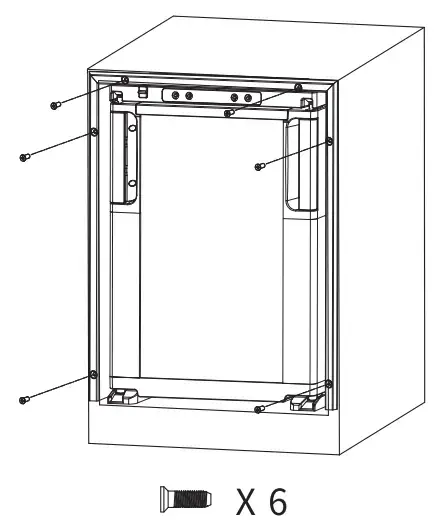
STEP 5 : Fix the refrigerator. There are three methods you can choose:
—Method 1 : Mount the fridge with the cabinet wall. The screw holders O1.2.3.4 is built in the side wall of the refrigerator, a hole needs to be drilled through the screw holders into the side metal panel with screws (M5, 15mm minimal) and fix it on the wall; after that, use the screw cover to cover the hole. (If the refrigerator needs to be drilled through, it should be confirmed before leaving the factory. The screws are not included with the refrigerator.)
 —Method 2: Optional installation frame (standard frame or flush-mount frame) for a secure fit and a smart finish (as shown below).
- Unscrew the screws Place the fame behind the door to fix it.
- Fix the frame to the refrigerator with screws and then push the refrigerator into the cabinet.

- Fix the refrigerator to the cabinet through the frame.
EXAMPLE-2 Optional standard frame
- Unscrew the screws on the refrigerator and fix the frame flush with the door.
- Fix the frame to the refrigerator with screws and then push the refrigerator into the cabinet.
- Fix the refrigerator to the cabinet through the frame.
EXAMPLE-3 Optional flush-mount frame
STEP 6: Verify the installation. Once the installation had been finished, check the continuity of the earth circuit and carry out all electrical safety testing provided for by current regulations.
Protect and fix the cables in order to prevent accidental pulling of the cable from disconnecting it from the connections or coming into contact with hot parts with a temperature above 50° C or with sharp parts.
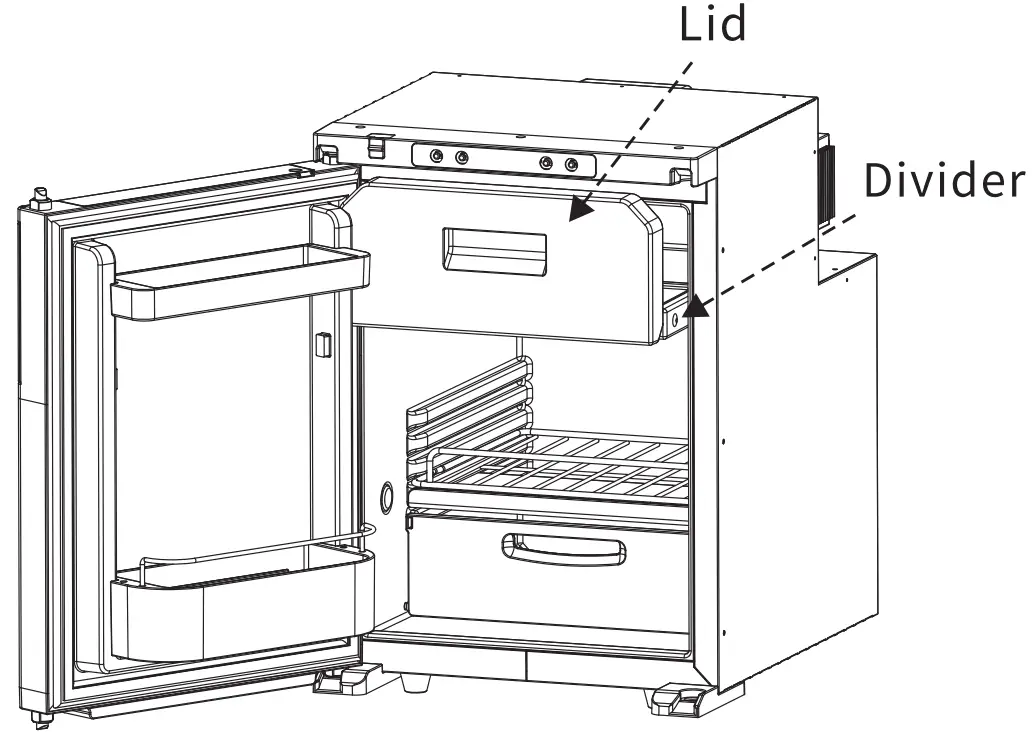
COMBINING FRIDGE/FREEZER COMPARTMENTS
Open the lid and pull out the divider horizontally.
REVERSE DOOR OPEN DIRECTION
Reversible door that can be opened from left to right or from right to left.
FUNCTION AND OPERATION
 » Power Supply: DC 12V/24V o r AC 100-240V power (using dedicated adapter).
« Display Screen Initialization: when the fridge is powered on, the buzzer will make a long beep, and the display will be on for two seconds then enter the normal operation.
+ Power ON/OFF: press to switch ON/OFF.
+ Night mode: under running state, long press for 3 seconds to enter the night mode, the screen will turn off and the night light will light in blue.
* Temperature Setting: press ![]() to switch Freezer/Refrigeration, when the left screen flashes, press + or — to adjust the freezer temperature, when the right screen flashes, press + or — to adjust the refrigeration temperature. The setting will be saved automatically after stopping operating for 4 seconds
to switch Freezer/Refrigeration, when the left screen flashes, press + or — to adjust the freezer temperature, when the right screen flashes, press + or — to adjust the refrigeration temperature. The setting will be saved automatically after stopping operating for 4 seconds
Note: the temperature displayed is the current temperature o f the compartment, it’ ll take a while to reach the set temperature.)
+ Battery Protection Mode: under the running state, long press ![]() for 3 seconds until the left screen flashes , then press
for 3 seconds until the left screen flashes , then press ![]() again to switch High, Medium and Low (*Factory setting is High).
again to switch High, Medium and Low (*Factory setting is High).
![]() From left to right: High/Medium/Low.
From left to right: High/Medium/Low.
Voltage reference:
| INPUT MODE | DC 12V | DC 12V | DC 24V | DC 24V |
| CUT OUT | CUT IN | CUT OUT | CUT IN | |
| L | 8.5V | 10.9V | 21.3V | 22.7V |
| M | 10.1V | 11.4V | 22.3V | 23.7V |
| H | 11.1V | 12.4V | 24.3V | 25.7V |
* the voltage is theoretical value, there may be a deviation in different sceneries.
* H should be set when the product is connected to car power, and M or L should be set when it is connected to a portable battery or other back-up battery.
Temperature Unit Setting: switch off the fridge, long press ![]() for 3 seconds until displays E1, and switch to E5 by pressing again, then press
for 3 seconds until displays E1, and switch to E5 by pressing again, then press ![]() or
or ![]() to switch Celsius or Fahrenheit. (*Factory setting i s °C.)
to switch Celsius or Fahrenheit. (*Factory setting i s °C.)
Reset: switch off the fridge, long press![]() for 3 seconds until displays E1, under E1 mode, long press
for 3 seconds until displays E1, under E1 mode, long press ![]()
![]() a t the same time for seconds to reset the settings.
a t the same time for seconds to reset the settings.
* Recommended temperature for common food:
| Drinks | 5°C/41°F | |
| Fruits | 5~8°C/41~46°F | |
| Vegetable | 3~10°C/37~50°F) | |
| Delicatessen | + 4°C/39°F | |
| Wine | 10°C /50°F | |
| Ice cream | -10°C/14°F | |
| Meat | -18°C/0°F |
CARE AND MAINTENANCE
Cleaning:
- Unplug the device first to avoid electric shock.
- Use wet cloth to clean the device and dry it.
- Remove the cover and drain from the hole at the bottom of the device.
- Do not soak the device in water and do not wash it directly.
- Do not use abrasive cleaning agents as these can damage the device.
Storage:
If the device will not be in use for a long time, please follow the steps:

- Turn off the power and remove the plug.
- Remove all the items stored in the device.
- Remove the cover and drain from the hole, wipe off excess water with a soft rag.
- Put the device in a cool and dry place.
- Press the storage lock into the lock holder, to keep the fridge door ajar , preventing the formation of unpleasant odors and moulid when not in use.
MDefrosting:
Humidity can form frost in the interior of the cooling device or on the evaporator, which will affect the cooling performance. Defrost the device regularly to avoid this.
- Switch off the device.
- Take out the contents of the device.
- Remove the cover and drain from the hole.
- Keep the door open.
- Wipe off the defrosted water.
Never use hard or sharp tools to remove ice or to loosen objects which have frozen in place.
APP Connection
 Scan the QR Code with your smartphone or search it in the APP Store or Google Play to download the “QZsmart” app.
- Make sure your car fridge is on and ensure that your smartphone is connected to 2.4 GHz Wi-Fi network.
NOTE: This device works only on 2.4 GHz Wi-Fi® network. - Ensure that the Bluetooth function of the mobile phone is enabled at the same time; otherwise, the device cannot be automatically searched.
- Download the QZsmart app from the App Store or Google Play™.
NOTE: Authorize the app to access network and location services. - If you are using the app for the first time, click the “Sign up” button and register. If you already have an account, click the “Log in” button.
- For better WIFI connection, please reset the product WIFI before using it for the first time-You can disconnect the connection by turning off the switch of the refrigerator and simultaneously long pressing ” + “and ” — “on the control panel of the refrigerator for 3 seconds and hearing one beep.
Add Device
1,From the Home Page, press “Add Device” or press “![]() ” in the top right corner of the screen. (If you already have a device added to your account, the “Add Device” button will not appear.)
” in the top right corner of the screen. (If you already have a device added to your account, the “Add Device” button will not appear.)
2. Connecting
Auto-connect: (Featured First)
The app will automatically search when Wi-Fi and Bluetooth are switched on, so you can add the corresponding product directly from the automatic search.
Step 1: Press “Add Device” or press “![]() “.
“.
Step 2: When the device is found, press Add . The Bluetooth function must be enabled during this process.
Step 3: Select your Wi-Fi network . (Be sure to use a 2.4G network )
Step 4: Enter your router password.
Step 5: Wait for connection and click “NEXT”.
Step 6: Once the device i s added, you can use the menu to change the name and location of the device.
Step 7: When you are finished , click “Done”.
Manual connection:
Select your model from the device menu.
Step 1: Press “Add Device” or press “![]() “,
“,
Step 2: Select the corresponding product type and click the product diagram of the corresponding model
Step 3: After the product is shut down, press “Next”.
Step 4: long pressing ” + “and” — “on the control panel of the refrigerator for 3 seconds and hearing one beep, Press “Next”.
Step 5: Select your Wi-Fi network . (Be sure to use a 2.4G network)
Step 6: Enter your router password.
Step 7:Click “Confirm.” The next screen will say “Connect your mobile phone to the device’s hotspot”.
Step 8: Click “Go t o connect.” This will take you to your phone’s settings (or Wi-Fi list for Android).
Step 9: Select “SmartLife-XXXX”.
Step 10: Navigate back t o the QZsmart App .
Step 11: Click “Next.” Your smartphone will automatically connect.
Step 12: Once the device is added, you can use the menu of the app to change the name of the device.
Step 13: When you are finished , press “Done”.
HiFollow the APP interface, there are detailed operation reminders in the APP interface, you need to follow the steps one by one;
NOTE: Connection may take up to 60 seconds .
*Once the device is added, you can use the menu of the app to change the name of the device.
*When you finished, press “Done”.
NOTE: Your mobile device is connected to a 2.4GHz Wi-Fi network when pairing with the app.Please select the 2.4GHz network when selecting a Wi-Fi network on the app during setup.
Using the My App
The main interface allows you to adjust the temperature of the freezer section, set the child lock, turn on the sleep mode and control the fridge on/off. When the sleep function is on, the compressor will run at a low speed to save power.
Click on “More functions” to change the temperature unit, change the temperature control bar i n the freezer section in the main screen and set the battery protection mode.
 How to unbind
Acar refrigerator can only be connected to one mobile phone.
First method :You can disconnect the connection by turning off the switch of the refrigerator and simultaneously long pressing “+ “and ” — “on the control panel of the refrigerator for 3 seconds and hearing one beep.
Second method : Removing connection with the app: Open the app and go to the device page. Click “![]() ” in the upper right corner, and then click “Remove Device” at the bottom.
” in the upper right corner, and then click “Remove Device” at the bottom.
Cautions
*There will be a delay in operating the machine on the mobile phone, about 1-3 minutes, please be patient.
*The language of the APP automatically switches with the language of the mobile system.
*You can lock o r unlock the control panel on the refrigerator by operating the APP lock icon. Please note that if you want to lock the refrigerator, please control it through the APP, the operation panel of the refrigerator does not have the function of locking and unlocking.
*This product includes WIFI plus Bluetooth function. Bluetooth function can be used in non-wifi environment. If you need to use Bluetooth function , please be sure to connect WIFI successfully for the first time. (Again, you must connect to WIFI first, otherwise you will not be able to use Bluetooth in non-wifi environments.)
TOUBLESHOOTING
| Issues | Cause/Suggestions |
| Refrigerator does not work | •Check if the switch is on. •Check if the plug and socket are connected well. •Check if the fuse has been burnt. •Check if the power supply is malfunctioned. •Switch on/off the fridge frequently may cause start delay of the compressor |
| Refrigerator compartments are too warm | •The door is opened frequently. •A large amount of warm or hot food was stored recently. •The refrigerator has been disconnected for a long time. |
| Food is frozen | •The temperature was set too low. |
| There is “water flow” noise from inside the refrigerator | •It’s a normal phenomenon, caused by the flow of refrigerant. |
| There are waterdrops around the refrigerator casing or doorgap | •Its a normal phenomenon, the moisture will condense to water when it touches a cold surface of the refrigerator. |
| The compressor is slightly noisy when starting | •its a normal phenomenon, the noise will be reduced after the compressor works stably. |
| Code Fl displayed | •Possible cause: low voltage to fridge. Adjust the battery protection from High to Medium or from Medium to Low. |
| Code F2 displayed | •Possible cause: condenser fan is overloaded. Disconnect power to fridge for 5 minutes & re-start. If the code shows again, contact manufacturer for service. |
| Code F3 displayed | •Possible cause: the compressor starts too frequently. Disconnect power to fridge for 5 minutes & re-start. If the code shows again, contact manufacturer for service. |
| Code F4 displayed | •Possible cause: compressor not kicking in. Disconnect power to fridge for 5 minutes & re-start. If the code shows again, contact manufacturer for service. |
| Code F5 displayed | •Possible cause: overheating of the compressor & electronics. Disconnect power to fridge for 5 minutes & re-start. If the code shows again, contact manufacturer for service. |
| Code F6 displayed | •Possible cause: no parameter can be detected by the controller. Disconnect power to fridge for 5 minutes & re-start. If the code shows again, contact manufacturer for service. |
| Code F7 or F8 displayed | •Possible cause: temperature sensor is faulty. Contact manufacturer for service. |
Warranty
If the device gets malfunctional, limited warranty will b e provided for 1 year from the date of purchase, except following situations:
- Contrived damage.
- Damage caused by force majeure such as earthquake, conflagration, etc.
- Damage from inappropriate use or violating this instruction.
- Damage or malfunction caused by disassembling.
TECHNICAL INFORMATION
| MODEL | R50 |
| RATED VOLTAGE | DC12/24V |
| RATED POWER | 60W |
| CAPACITY | Refrigeration: 34L/1.2cu.ft. Freezer: SL/0.28cu.ft. |
| NOISE | S-45dB |
| TEMPERATURE SETTING RANGE | Refrigeration: 0-8°C (32-46*F) Freezer: -12-20°C(10-4°F) |
| CLIMATE CATEGORY | T/ST/N/SN |
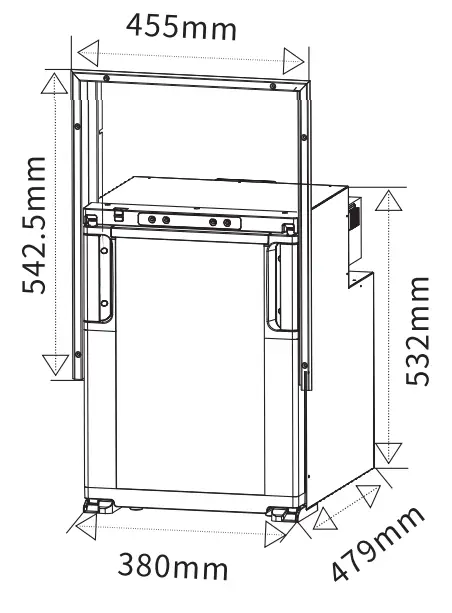
| DIM ENSIONS(L*W*H) | 380*479*532mm 14 15/16*18 7/8 *2015/16 inch |
| NET WEIGHT | 16.2kg/35.71b |
*Due to product improvement, the technical information might be different from actual information, please refer to the rating label on the product.
Manufacturer: Foshan Alpicool Electric Appliance Co., LTD.
Address: 13A Xinlong Road Shiongliyue industrial Zone, Xintang Village, Lunjiao Town,Shunde
District, Foshan City, Guangdong, China
Contact: Mickey
Tel : +1 ( 3 1 3 ) 913-7585
E-Mail: [email protected]
 Thank you for purchasing BODEGA COOLER product. We sincerely hope that you are satisfied with the product.
We’d like to offer you 12—month warranty for free.
Once activated the warranty, you will be ensured that if anything goes wrong with your product. Replacement unit / parts will be warranted during the warranty period.
What you need to do
Any help or questions during use , please contact us via website www.bodegacooler.com, send email to [email protected], we will service you within 24 hours.
When contacting us, we suggest to send Order ID, problem and a photo or a video for helping us much more clearer about the problem and offer you the best solution.