beurer EM 49 Digital Tens Unit
Read these instructions for use carefully and keep them for later use, be sure to make them accessible to other users and observe the information they contain.
Signs and symbols
 WARNING
Warning instruction indicating a risk of injury or damage to health
IMPORTANT
Safety note indicating possible damage to the device/accessory
Note
Note on important information
Observe the instructions for use
Protected against ingress of solid foreign objects greater than 12.5 mm in diameter.
Protected against drops of water falling at up to 15° from vertical.
Serial number
Application part, type BF
Disposal in accordance with the Waste Electrical and Electronic Equipment EC Directive – WEEE
This product satisfies the requirements of the applicable European and national directives.
 Manufacturer
The device can emit effective output values above 10 mA, averaged over every five-second interval
Authorized representative in the European Community
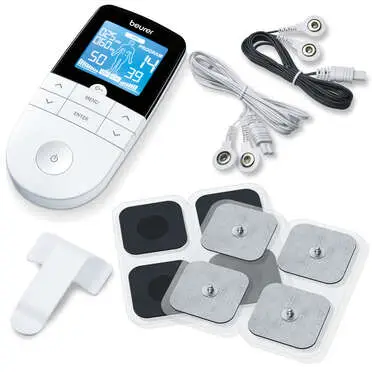
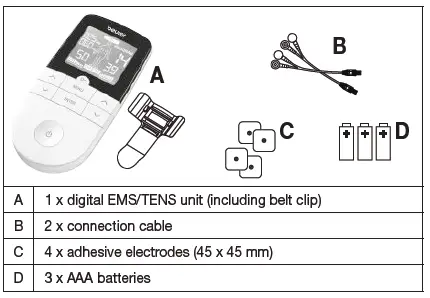
Delivery scope and accessories
Check that the set packaging has not been tampered with and make sure that all components are present. Before use, ensure that there is no visible damage to the device or accessories and that all packaging material has been removed. If you have any doubts, do not use the device and contact your retailer or the specified Customer Services address.
Getting to know your device
What is a digital EMS/TENS unit and what can it do?
Digital EMS/TENS units fall into the electrostimulation device category. They provide three basic functions suitable for combined operation:
- Electrical stimulation of nerve tracts (TENS)
- Electrical stimulation of muscle tissue (EMS)
- A massage effect triggered by electrical signals
The unit also features two independent stimulation channels and four self-adhesive electrodes. It offers a wide range of functions for increasing general well-being, pain relief, maintaining physical fitness, relaxation, muscle revitalization and combating tiredness. For these purposes, you can either choose from pre-set programs or specify your own to suit your individual needs.
The principle of electrostimulation devices is based on the imitation of impulses in our bodies that are transferred to nerve and muscle fibres using electrodes via our skin. The electrodes can be applied to many parts of the body; the electrical impulses are completely harmless and virtually painless. In certain applications you will merely notice a slight tingling or vibrating sensation. The electrical impulses that are sent into the tissue influence the transmission
of stimulation into nerves, nerve centers and muscle groups in the application area.
Electrostimulation usually only has an effect after regular applications. With regard to muscles, electrostimulation does not replace regular training. However, it is a sensible, supplementary training element.
TENS, or transcutaneous electrical nerve stimulation, relates to the electrical stimulation of the nerves via the skin. TENS is an effective non-pharmacological method of treating different types of pain that have a variety of causes. It has no side effects if administered correctly. The method has been clinically tested and approved and can be used for simple self-treatment. The pain-relieving or pain-suppressing effect is achieved by inhibiting the transference of pain to nerve fibres (caused mainly by high-frequency impulses) and by increasing the secretion of endorphins in the body. Their effect on the central nervous system reduces the sensation of pain. The method is scientifically substantiated and approved as a form of medical treatment.
Any symptoms that could be relieved using TENS must be checked by your GP. Your doctor will also give you instructions on how to carry out a TENS self-treatment regime.
TENS is clinically tested and approved to treat the following complaints:
- Back pain, particularly in the lumbar/cervical spine area
- Sore joints (e.g. knee, hip and shoulder joints)
- Neuralgia
- Menstrual cramps in women
- Pain resulting from injury to the musculoskeletal system
- Pain caused by circulatory disorders
- Chronic pain with various causes.
Electrical muscle stimulation (EMS) is a widespread and generally recognized method and has been used in sports medicine and rehabilitation for years. In sports and fitness, EMS is used to complement conventional muscle training, to increase the performance of muscle groups and to adjust physical proportions to achieve the desired aesthetic results. There are two different types of EMS application: one is for targeted strengthening of the muscles (activating application), and the other is to achieve a relaxing, restful effect (relaxing application).
The activating application involves:
- Muscle training to increase endurance and/or
- Muscle training to support the strengthening of specific muscles or muscle groups, and to achieve the desired changes to physical proportions
The relaxing application involves:
- Muscle relaxation for easing muscle tension
- Improving symptoms of muscular fatigue
- Acceleration of muscle regeneration after high muscle performance (e.g. after a marathon)
Thanks to integrated massage technology, digital EMS/TENS units are also able to relieve muscle tension and combat fatigue with a program based on the sensation and effects of a real massage.
The positioning suggestions and program tables in these instructions for use allow you to quickly and simply determine the corresponding application (depending on the affected area of the body) and set the unit to achieve the desired effects.
Thanks to the two separately adjustable channels, the digital EMS/TENS unit offers you the advantage of being able to set the intensity of the impulses independently from each other for two treatment areas on the body, for example to cover both sides of your body or to evenly stimulate larger areas of tissue. The option to individually set the intensity of each channel also enables you to treat two separate areas of the body simultaneously instead of having to treat the individual areas in turn, which saves you time.
Important notes
The device is not a substitute for medical consultation and treatment. Consult your doctor first if you are experiencing any pain or are suffering from an illness.
WARNING!
To avoid damage to health, we strongly advise against using the digital EMS/TENS unit in the following situations:
- With implanted electrical devices (such as a pacemaker)
- In the case of metal implants
- If you use an insulin pump
- If you have a high temperature (e.g. > 39°C)
- If you have a known or acute cardiac arrhythmia, or disorders of the heart’s impulse and conduction system
- If you suffer from a seizure disorder (e.g. epilepsy)
- If you are pregnant
- If you have cancer
- After an operation, if strong muscle contractions could affect the healing process
- The device must never be used near to the heart.
- The stimulation electrodes must not be placed on any part of the front ribcage (where the ribs and breastbone are located), especially not on the two large pectorals. this can increase the risk of ventricular fibrillation and induce cardiac arrest.
- On the skeletal skull structure, or around the mouth, throat or larynx
- In the neck/carotid artery area
- In the genital area
- On acutely or chronically diseased (injured or irritated) skin (e.g. inflamed skin – whether painful or not, reddened skin, rashes,
e. g. allergies, burns, bruises, swellings, both open and healing wounds, and post-operative scars where the healing process could be affected) - In humid environments (e.g. in the bathroom) or when bathing or showering
- Do not use after consuming alcohol
- If connected to a high-frequency surgical device
- In the case of acute or chronic diseases of the gastrointestinal tract
- The stimulation should not be applied above or through the head, directly onto the eyes, covering the mouth, to the front of the neck (especially not to the carotid artery), or with the electrode surfaces placed on the chest and upper back or across the heart.
Before using the device, consult your doctor if any of the following applies to you:
- Serious illnesses, in particular if you suspect or have been diagnosed with high blood pressure, a blood coagulation disorder, propensity to thrombo-embolic conditions or recurrent malignant growths
- Any skin conditions
- Unexplained chronic pain in any part of the body
- Diabetes
- Any sensory impairment that reduces the feeling of pain (e.g. metabolic disorders)
- If you are receiving medical treatment In the event of complaints linked to stimulation treatment
- If you suffer from persistently irritated skin due to long-term stimulation at the same electrode site
IMPORTANT!
Only use digital EMS/TENS units:
- On adults
- For the intended purpose and as specified in these instructions for use. Improper use can be dangerous.
- For external use
- With the original accessories supplied, which can be re-ordered. Failure to do so invalidates the warranty.
PRECAUTIONS:
- Always pull firmly on electrodes to remove them from the skin to prevent injuries in the unusual case of highly sensitive skin.
- Keep the device away from sources of heat and do not use it in close proximity (approx. 1 m) to shortwave or microwave devices (e.g. mobile phones), as doing so can result in unpleasant current peaks.
- Do not expose the device to direct sunlight or high temperatures.
- Protect the device from dust, dirt and humidity.
- Never immerse the device in water or other liquids.
- The device is suitable for self-treatment.
- For hygiene reasons, the electrodes may only be used on one person.
- If the device does not work properly, or you feel unwell or experience pain, stop using it immediately.
- Switch off the unit or the respective channel first before removing or relocating electrodes to prevent unintentional stimulation.
- Do not modify electrodes (e.g. by cutting them). This increases the current intensity, which is potentially hazardous (max. recommended output value for the electrodes is 9 mA/cm², an effective current intensity beyond 2 mA/cm² requires increased awareness).
- Do not use the device whilst asleep, driving a vehicle or operating machinery.
- Do not use whilst undertaking any activity where an unexpected reaction (e.g. strong muscle contractions even at low intensity) could be dangerous.
- Ensure that no metallic objects (e.g. belt buckles or necklaces) come into contact with the electrodes during stimulation. If you are wearing jewellery or have piercings in the area to be treated (e.g. a navel piercing), these must be removed before using the device. Failure to do so could result in spot burns.
- Keep the device away from children.
- Make sure not to confuse the electrode cables including contacts with your headphones or other devices and do not connect the electrodes to other devices.
- Do not use the device whilst using other devices that transmit electrical impulses into your body.
- Do not use in the vicinity of highly flammable substances, gases or explosives.
- Do not use rechargeable batteries and always use the same battery types.
- During the initial few minutes, use the device while sitting or lying down to minimise the risk of injuries as a consequence of isolated cases of vagal responses (feeling of faintness). If you feel faint, immediately switch off the device, lie down and support the legs in an elevated position (approx. 5 – 10 min).
- Treatment of the skin with moisturising lotions or ointments beforehand is not recommended as this considerably increases the electrode wear and may cause unpleasant current peaks.
- This device is not intended for use by children or people with restricted physical, sensory (e.g. reduced sensitivity to pain) or mental skills or a lack of experience and/or lack of knowledge, unless they are supervised by a person who is responsible for their safety or are instructed by such a person in how to use the device.
- If the adhesive capability of the adhesive electrodes decreases, please replace them immediately. Only use the device again with new adhesive electrodes. Otherwise the unequal adhesion of the adhesive electrodes may lead to skin injuries. Replace the electrodes with new ones after having used them 20 times at the latest.
Damage
- If the device is damaged, do not use it and contact your retailer or the specified Customer Services address.
- In order to perform the effectiveness of function by the device, do not drop the device or disassemble the device.
- Check the device for signs of wear and tear or damage. If there are such signs of wear and tear or damage or if the device was used improperly, it must be returned to the manufacturer or retailer before further use.
- Switch the device off immediately if it is faulty or not working properly.
- Do not attempt to open and/or repair the device yourself. Repairs may only be carried out by Customer Services or authorized retailers. Failure to comply will result in voiding of the warranty.
- The manufacturer is not liable for damage resulting from improper or careless use.
Notes on handling batteries
- WARNING: If your skin or eyes come into contact with battery fluid, rinse the affected areas with water and seek medical assistance.
- WARNING: Choking hazard! Small children may swallow and choke on batteries. Store the batteries out of the reach of small children.
- Observe the plus (+) and minus (-) polarity signs.
- If a battery has leaked, put on protective gloves and clean the battery compartment with a dry cloth.
- Protect batteries from excessive heat.
- Risk of explosion! Never throw batteries into a fire.
- Do not charge or short-circuit batteries.
- If the device is not to be used for a relatively long period, take the batteries out of the battery compartment.
- Use identical or equivalent battery types only.
- Always replace all batteries at the same time.
- Do not use rechargeable batteries.
- Do not disassemble, open or crush the batteries.
Device description
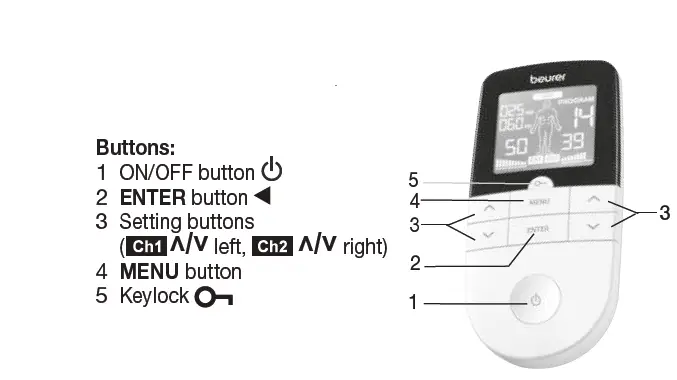
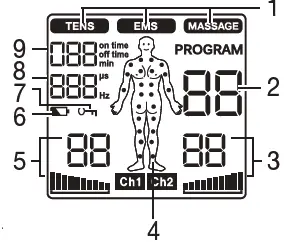
Display (full screen):
- Menu TENS /EMS /MASAGE
- Program number
- Impulse intensity channel 2 ( CH 2)
- Electrode positioning indicator
- Impulse intensity channel 1 ( CH 1)
- Low battery
- Keylock
- Display for frequency (Hz) and pulse width (µs)
- Timer function (remaining time display) or working time
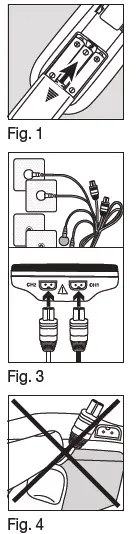
Initial use
- Remove the belt clip from the unit (if attached).
- Press the battery compartment cover on the rear of the device and slide it downwards.
- Insert the three alkaline AAA 1.5 V batteries. Make sure that the batteries are inserted the correct way round.
- Close the battery compartment lid again carefully (Fig. 1).
- Reattach the belt clip, if required.
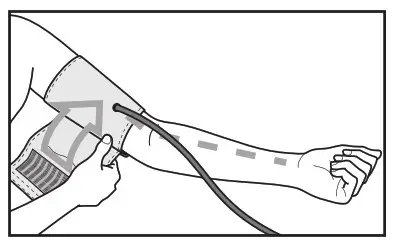
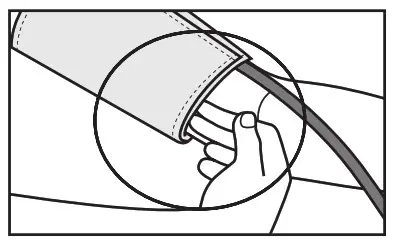
- Connect the connection cables with the electrodes (Fig. 2).
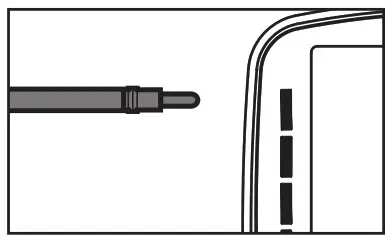
NOTE: The electrodes feature clip closures to make connection particularly easy. - Guide the connection cable plugs into the socket on the top of the device (Fig. 3).
- Do not pull, twist or make sharp bends in the cables (Fig. 4).
NOTE: Please note that when the battery is replaced or removed, all settings are restored to the factory default settings.
Use
Notes on use
- The device switches itself off automatically if it is not used for one minute (automatic switch-off). When the unit is switched on again, the LCD screen displays the menu selection and the most recently used menu flashes.
- A brief acoustic signal is output when a valid button is pressed. Two brief acoustic signals are output when an invalid button is pressed.
- You can pause the stimulation at any time by briefly pressing the ON/OFF button . To continue the stimulation, briefly press the ON/OFF button again and set the desired impulse intensity again.
Starting application
- Step 1: Look for a suitable program from the program tables (see section „6. Program overview“).
- Step 2: Place the electrodes on the desired area for treatment (for positioning suggestions see section „6.4 Information regarding the positioning of electrodes“) and connect them to the device.
- Step 3: Press the ON/OFF button to switch on the device.
- Step 4: Press the MENU button to navigate through the TENS/EMS/MASSAGE menus and press the ENTER button to confirm your selection.
- Step 5: Use the ˄/˅ setting buttons to select the program number you want and press the ENTER button to confirm your selection. At the start of the stimulation treatment, the impulse intensity of and is set to 00 by default. No impulses are sent to the electrodes yet.
- Step 6: Use the left and right ˄/˅ setting buttons for CH 1 and CH 2 to select the impulse intensity you want. The indicator for impulse intensity in the display changes accordingly. If the program is in a pause phase, the intensity cannot be increased.
General information
If you wish to return to the previous selection menu, press the MENU button. By holding down the ENTER button, you can skip individual setting steps and start directly with the stimulation treatment.
Keylock
Locks the buttons to avoid them being pressed unintentionally.
- To activate the keylock, hold down the
 button until the symbol is visible in the display (approx. 3 seconds).
 - To deactivate the keylock, hold down the button until the symbol disappears from the display (approx. 3 seconds).
Pausing application
- You can pause the stimulation at any time by briefly pressing the
- ON/OFF button . To continue the stimulation, briefly press the
- ON/OFF button again and set the desired impulse intensity again.
Program overview
The digital EMS/TENS unit features a total of over 70 programs:
- 15 TENS programs
- 35 EMS programs
- 20 MASSAGE programs
In all programs you can set the impulse intensity of both channels individually.
You can also set various parameters in the TENS programs 13 – 15 and the EMS programs 33 – 35 to adjust the stimulating effect to the application area.
TENS program table
| Progr. no. | Area of application, indications | Running time (min) | Possible
electrode positions |
| 1 | Pain in upper limbs 1 | 30 | 12-17 |
| 2 | Pain in upper limbs 2 | 30 | 12-17 |
| 3 | Pain in lower limbs | 30 | 23-27 |
| 4 | Ankle pain | 30 | 28 |
| 5 | Shoulder pain | 30 | 1-4 |
| 6 | Pain in the back | 30 | 4-11 |
| 7 | Pain in bottom and back of thighs | 30 | 22, 23 |
| 8 | Pain relief 1 | 30 | 1-28 |
| 9 | Pain relief 2 | 30 | 1-28 |
| 10 | Endorphin effect (burst) | 30 | 1-28 |
| 11 | Pain relief 3 | 30 | 1-28 |
| 12 | Pain relief – chronic pain | 30 | 1-28 |
NOTE:
TENS programs 13 – 15 can be set individually (see section „7. Customisable programs“).
Note: See section 6.4 for the correct electrode position.
EMS program table
| Progr. no. | Area of application, indications | Running time (min) | Possible electrode positions |
| 1 | Warming up | 30 | 1-27 |
| 2 | Capillarisation | 30 | 1-27 |
| 3 | Strengthening the upper arm muscles | 30 | 12-15 |
| 4 | Maximising the strength of the upper arm muscles | 30 | 12-15 |
| 5 | Explosive force of the upper arm muscles | 30 | 12-15 |
| 6 | Tightening the upper arm muscles | 30 | 12-15 |
| 7 | Shaping the upper arm muscles | 30 | 12-15 |
| 8 | Tightening the lower arm muscles | 30 | 16-17 |
| 9 | Maximising the strength of the lower arm muscles | 30 | 16-17 |
| 10 | Shaping the lower arm muscles | 30 | 16-17 |
| 11 | Tightening the abdominal muscles | 30 | 18-20 |
| 12 | Maximising the strength of the abdominal muscles | 30 | 18-20 |
| 13 | Shaping the abdominal muscles | 30 | 18-20 |
| 14 | Toning the abdominal muscles | 30 | 18-20 |
| 15 | Strengthening the thigh muscles | 30 | 23, 24 |
| 16 | Maximising the strength of the thigh muscles | 30 | 23, 24 |
| 17 | Explosive force of the thigh muscles | 30 | 23, 24 |
| 18 | Shaping the thigh muscles | 30 | 23, 24 |
| 19 | Toning the thigh muscles | 30 | 23, 24 |
| 20 | Strengthening the lower leg muscles | 30 | 26, 27 |
| 21 | Maximising the strength of the lower leg muscles | 30 | 26, 27 |
| 22 | Explosive force of the lower leg muscles | 30 | 26, 27 |
| 23 | Shaping the lower leg muscles | 30 | 26, 27 |
| 24 | Toning the lower leg muscles | 30 | 26, 27 |
| 25 | Strengthening the shoulder muscles | 30 | 1-4 |
| 26 | Maximising the strength of the shoulder muscles | 30 | 1-4 |
| Progr. no. | Area of application, indications | Running time (min) | Possible electrode positions |
| 27 | Tightening the shoulder muscles | 30 | 1-4 |
| 28 | Strengthening the lower back muscles | 30 | 4-11 |
| 29 | Maximising the strength of the lower back muscles | 30 | 4-11 |
| 30 | Tightening the gluteal muscles | 30 | 22 |
| 31 | Strengthening the gluteal muscles | 30 | 22 |
| 32 | Maximising the strength of the gluteal muscles | 30 | 22 |
EMS programs 33 – 35 can be set individually (see section „7. Customisable programs“).
Note: See section 6.4 for the correct electrode position.
MASSAGE program table
| Progr. no. | Area of application, indications | Running time (min) | Possible electrode positions |
| 1 | Tapping massage 1 | 20 | 1-28 |
| 2 | Tapping massage 2 | ||
| 3 | Tapping massage 3 | ||
| 4 | Kneading massage 1 | ||
| 5 | Kneading massage 2 | ||
| 6 | Pressure massage | ||
| 7 | Relaxing massage 1 | ||
| 8 | Relaxing massage 2 | ||
| 9 | Relaxing massage 3 | ||
| 10 | Relaxing massage 4 | ||
| 11 | Spa massage 1 | ||
| 12 | Spa massage 2 | ||
| 13 | Spa massage 3 | ||
| 14 | Spa massage 4 | ||
| 15 | Spa massage 5 | ||
| 16 | Spa massage 6 | ||
| 17 | Spa massage 7 | ||
| 18 | Relaxing massage 1 | ||
| 19 | Relaxing massage 2 | ||
| 20 | Relaxing massage 3 |
Note: See section 6.4 for the correct electrode position.
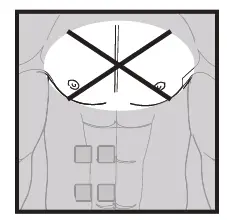
WARNING!
Do not apply the electrodes to the front wall of the chest, i.e. do not massage the large left and right pectoral muscles.
Information regarding the positioning of electrodes
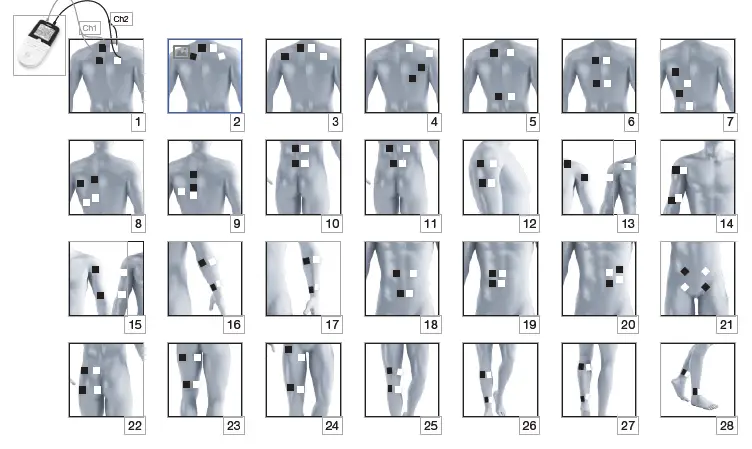
It is fundamental to the intended success of electrostimulation applications that electrodes are positioned sensibly.
We recommend that you consult your doctor to establish the ideal electrode positions for your intended application area.
The figure on the display is intended as an initial aid to help you position the electrodes.
The following applies to the selection of electrode positions:
Electrode distance
The larger the distance between electrodes, the larger the stimulated tissue volume. This applies to the area and depth of the tissue volume. At the same time, however, the stimulation intensity of the tissue falls the further the electrodes are apart. As a result, greater distances between electrodes mean a larger tissue volume is stimulated, but less intensively. Consequently, you must increase the impulse intensity to boost stimulation.
The following guideline applies to selection of the electrode distance:
- Sensible distance: approx. 5 – 15 cm
- At distances below 5 cm, the unit primarily stimulates surface structures intensively
- At distances in excess of 15 cm, large areas and deep structures are stimulated very weakly
Relationship between electrodes and muscle fiber structures
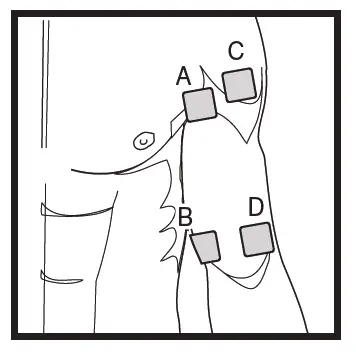
Adapt the current flow direction to the fiber C structure of the muscle according to the muscle A layer you would like to treat. If you are targeting superficial muscles, position the electrodes in BBB DDD parallel to the fiber structure (A – B / C – D) and if you are targeting deeper layers of tissue, position the electrodes across the fiber structure. You can do this by positioning electrodes as crosses (i.e. diagonally), such as A – D / B – C.
 NOTE:
NOTE:
As part of pain relief treatment (TENS) using the digital EMS/TENS unit and its 2 separately adjustable channels and 2 adhesive electrodes each, it is advisable either to position the electrodes of a channel so that the area affected by the pain is between the electrodes or to position one electrode directly on the area affected by the pain and the other electrode at a minimum distance of 2 – 3 cm.
You may use the electrodes of the second channel to simultaneously treat additional areas affected by pain or use them in conjunction with the electrodes of the first channel to restrict the area affected by pain (position electrodes opposite). In this case, we once again recommend positioning electrodes as crosses.
Tip for the massage function: always use all four electrodes for optimum treatment.
Use the electrodes on skin that is clean and preferably free from hair and grease in order to prolong the life of the electrodes. If required, clean the skin with water and remove hair prior to treatment.
If an electrode should come loose during use, the impulse intensity of both channels is reduced to the lowest level. Apply the electrode again and reset the desired impulse intensity.
Customizable programs
(Applies for TENS 13-15, EMS 33-35)
The programs TENS 13-15 and EMS 33-35 can be customized according to your needs.
TENS 13 program
TENS 13 is a program that you can also customize. In this program, you can set the impulse frequency to between 1 and 150 Hz and the impulse width to between 80 and 250 µs.
- Place the electrodes on the desired area for treatment (for positioning suggestions see section “6.4 Information regarding the positioning of electrodes”) and connect them to the device.
- Select the TENS 13 program as described in section “5.2 Starting application” (step 3 to step 5).
- Use the ˄/˅ setting buttons to select the impulse frequency you want and use the ENTER button to confirm.
- Use the ˄/˅ setting buttons to select the impulse width you want and use the ENTER button to confirm.
- Use the ˄/˅ setting buttons to select the treatment time you want and use the ENTER button to confirm.
- Use the left and right ˄/˅ setting buttons for CH 1 and CH 2 to select the impulse intensity you want.
TENS 14 program
The TENS 14 program is a burst program that you can also customize. Various impulse sequences run in this program. Burst programs are suitable for all areas of application to be treated with changing signal patterns (to minimize the level of accustoming to the treatment). In this program you can set an impulse width of between 80 and 250 µs.
- Place the electrodes on the desired area for treatment (for positioning suggestions see electrode positions in section 6.4) and connect them to the device.
- Select the TENS 14 program as described in section “5.2 Starting application” (step 3 to step 5).
- Use the ˄/˅ setting buttons to select the impulse width you want and use the ENTER button to confirm.
- Use the ˄/˅ setting buttons to select the treatment time you want and use the ENTER button to confirm.
TENS 15 program
TENS 15 is a program that you can also customize. In this program, you can set the impulse frequency to between 1 and 150 Hz.
The impulse width changes automatically during the stimulation treatment.
- 1Place the electrodes on the desired area for treatment (for positioning suggestions see electrode positions in section 6.4) and connect them to the device.
- Select the TENS 15 program as described in section “5.2 Starting application” (step 3 to step 5).
- Use the ˄/˅ setting buttons to select the impulse frequency you want and use the ENTER button to confirm.
- Use the ˄/˅ setting buttons to select the treatment time you want and use the ENTER button to confirm.
- Use the left and right ˄/˅ setting buttons for CH 1 and CH 2 to select the impulse intensity you want.
EMS 33 program
EMS 33 is a program that you can also customize. In this program, you can set the impulse frequency to between 1 and 150 Hz and the impulse width to between 80 and 320 µs.
- Place the electrodes on the desired area for treatment (for positioning suggestions see electrode positions in section 6.4) and connect them to the device.
- Select the EMS 33 program as described in section “5.2 Starting application” (step 3 to step 5).
- Use the ˄/˅ setting buttons to select the impulse frequency you want and use the ENTER button to confirm.
- Use the ˄/˅ setting buttons to select the impulse width you want and use the ENTER button to confirm.
- Use the ˄/˅ setting buttons to select the treatment time you want and use the ENTER button to confirm.
- Use the left and right ˄/˅ setting buttons for CH 1 and CH 2 to select the impulse intensity you want.
EMS 34 program
EMS 34 is a program that you can also customize. In this program, you can set the impulse frequency to between 1 and 150 Hz and the impulse width to between 80 and 450 μs. You can also set the working time and pause time for this program to between 1 and 30 seconds each.
- Place the electrodes on the desired area for treatment (for positioning suggestions see electrode positions in section 6.4) and connect them to the device.
- Select the EMS 34 program as described in section “5.2 Starting application” (step 3 to step 5).
- Use the ˄/˅ setting buttons to select the working time (“on time”) you want and use the ENTER button to confirm.
- Use the ˄/˅ setting buttons to select the pause time (“off time”) you want and use the ENTER button to confirm.
- Use the ˄/˅ setting buttons to select the impulse frequency you want and use the ENTER button to confirm.
- Use the ˄/˅ setting buttons to select the impulse width you want and use the ENTER button to confirm.
- Use the ˄/˅ setting buttons to select the treatment time you want and use the ENTER button to confirm.
- Use the left and right ˄/˅ setting buttons for CH 1 and CH 2 to select the impulse intensity you want.
EMS 35 program
EMS 35 is a burst program that you can also customize. Various impulse sequences run in this program. Burst programs are suitable for all areas of application to be treated with changing signal patterns (to minimize the level of accustoming to the treatment). In this program, you can set the impulse frequency to between 1 and 150 Hz and the impulse width to between 80 and 450 μs. You can also set the working time and pause time for this program to between 1 and 30 seconds each.
- Place the electrodes on the desired area for treatment (for positioning suggestions see electrode positions in section 6.4) and connect them to the device.
- Select the EMS 35 program as described in section “5.2 Starting application” (step 3 to step 5).
- Use the ˄/˅ setting buttons to select the working time (“on time”) you want and use the ENTER button to confirm.
- Use the ˄/˅ setting buttons to select the pause time (“off time”) you want and use the ENTER button to confirm.
- Use the ˄/˅ setting buttons to select the impulse frequency you want and use the ENTER button to confirm.
- Use the ˄/˅ setting buttons to select the impulse width you want and use the ENTER button to confirm.
- Use the ˄/˅ setting buttons to select the treatment time you want and use the ENTER button to confirm.
Doctor’s function
The Doctor’s function is a special setting to allow you to access your personal program even more easily and directly.
Your individual program settings are instantly recalled and activated when the device is switched on.
You may wish to adjust this individual program following advice from your doctor.
Setting the Doctor’s function
- Select your program and the corresponding settings as described in section “5.2 Starting application”.
- At the start of the stimulation treatment, the impulse intensity of CH1 and CH3 is set to 00 by default. No impulses are sent to the electrodes yet. Before setting the desired impulse intensity using the intensity setting buttons, press and hold the ˅-button for 5 seconds. Storage in the Doctor’s function is confirmed with a long acoustic signal.
If you switch on the device again, the program you saved using the Doctor’s function is automatically opened directly.
Deleting the Doctor’s function
To clear the device again and to re-allow access to other programs, press and hold the CH2 ˅-button again for approx. 5 seconds. To do this, the impulse intensity of CH 1and CH2 must be set to 00.
Deletion of the Doctor’s function is confirmed with a long acoustic signal.
Therapy memory
The EM49 records the treatment time. To reach the therapy memory, switch the device on using the ON/OFF button and press and hold the button ˄ for 5 seconds. The treatment time lapsed appears in the display. The top two numbers stand for minutes; the hours are shown below. To reset the treatment time, press and hold the button ˅ for 5 seconds. When replacing the battery, the therapy memory is automatically reset. Press the „Menu“ button to return to selecting a program, or switch the device off. Info: Therapy memory cannot be accessed if the Doctor‘s function is activated.
Current parameters
Electrostimulation units operate with the following current settings, which may affect stimulation effects differently, depending on the setting:
Impulse shape
This describes the time function of the electrical impulse.
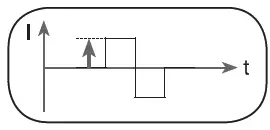
 Time It distinguishes between monophasic and biphasic pulse currents. In monophasic pulse currents, the current flows in one direction and in biphasic pulse currents the electrical impulse alternates its direction.
The digital EMS/TENS unit only provides biphasic pulse currents as these relieve muscles, cause little muscle fatigue and provide safer application.
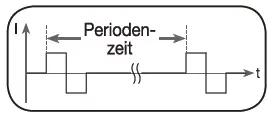
Impulse frequency
The frequency indicates the number of individual impulses each second and is given in Hz (Hertz).
It can be calculated by determining the cyclic value for the time period. The relevant frequency determines which types of muscle fibres react favourably. Slow-reacting fibres react more easily to lower impulse frequencies up to 15 Hz, whereas fast-reacting fibres only respond from approximately 35 Hz onwards. Impulses of approx. 45 – 70 Hz are linked with constant tension in the muscles and quicker fatigue. Higher impulse frequencies are therefore favourable in strength and maximum power training.
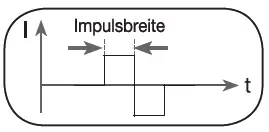
Impulse width
This indicates the duration of an individual impulse in microseconds. The impulse width therefore determines, among other things, the penetration of the electricity, where usually: larger muscle masses require larger impulse widths.
Impulse intensity
Setting the intensity levels depends on the individual sensitivity of each user and is determined by a variety of variables, such as site of application, blood circulation to the skin, skin thickness and the quality of the electrode contact. The setting used should be effective but should never cause an unpleasant sensation, such as pain, at the site of application. While a gentle tingling indicates sufficient stimulation energy levels, any setting that causes pain should be avoided.
During longer applications it may be necessary to make readjustments due to the adjustment processes over time at the site of application.
Cycled impulse parameter variation
In many cases it is necessary to cover the overall tissue structure at the site of application by applying several impulse parameters. In the digital EMS/TENS unit, this is achieved by the provided programs, which automatically make a cyclical impulse parameter change. This also prevents individual muscle groups at the site of application being affected by fatigue.
The digital EMS/TENS unit provides sensible default current parameter settings. With this, you can change the impulse intensity at any time during use. For 6 programs you can also set various parameters for stimulation yourself.
Cleaning and storage Adhesive electrodes
- To ensure that the adhesive electrodes remain adhesive for as long as possible, clean them carefully with a damp, lint-free cloth or clean the underside of the electrodes under lukewarm, running water and pat dry with a lint-free cloth.
- Reapply the electrodes to the carrier foil following treatment. Cleaning the device
- Remove the batteries from the device before cleaning.
- Clean the device after use with a soft, slightly damp cloth. If it is very dirty, you can also moisten the cloth with a mild soapy solution.
- Do not use any chemical or abrasive cleaning agents. Ensure that no water enters the device.
Reuse of the device
Once it has been properly prepared, the device can be used again. Preparation includes replacement of the treatment electrodes as well as cleaning of the surface of the device using a cloth moistened with a mild soapy solution.
Storage
- Remove the batteries from the device if you will not be using it for a prolonged period of time. Leaking batteries may damage the device.
- Do not make sharp bends in the connection cables and electrodes.
- Disconnect the connection cables from the electrodes.
- Reapply the electrodes to the carrier foil after use.
- Store the device and accessories in a cool, well-ventilated space.
- Never place any heavy objects on the device.
Disposal
The empty, completely flat batteries should be disposed of through specially designated collection boxes, recycling points or electronics retailers. You are legally required to dispose of the batteries.
Note: The codes below are printed on batteries containing harmful substances:
Pb = Battery contains lead, Cd = Battery contains cadmium, Hg = Battery contains mercury.
For environmental reasons, do not dispose of the device in the household waste at the end of its useful life. Dispose of the unit at a suitable local collection or recycling point. Dispose of the device in accordance with EC Directive – WEEE (Waste Electrical and Electronic Equipment). If you have any questions, please contact the local authorities responsible for waste disposal.
Problems/solutions
The device does not switch when the ON/OFF button is pressed. How to proceed:
- Ensure batteries have been inserted correctly and are in contact with the terminals.
- Replace batteries, if applicable.
- Contact Customer Services.
Electrodes do not adhere to the body. How to proceed:
(1) Clean the adhesive surface of the electrodes using a damp, lint-free cloth. Replace the electrodes if they still do not adhere securely.
(2) Clean the skin prior to any application; do not use skincare lotions or oils prior to treatment. Shaving may increase the life of electrodes.
There is no noticeable stimulation. How to proceed:
- Press the ON/OFF button to interrupt the program. Check the connection cables are correctly connected to the electrodes. Ensure the electrodes are in firm contact with the treatment area.
- Ensure the connection plug is firmly connected to the device.
- Press the ON/OFF button to restart the program
- Check electrode positions and ensure that adhesive electrodes do not overlap.
- Gradually increase the impulse intensity.
- The batteries are almost empty. Replace the batteries.
The battery symbol is shown. How to proceed:
Replace all batteries.
You have an unpleasant sensation at the electrodes. How to proceed:
- The electrodes are not positioned correctly. Check their positions and re-position, if necessary.
- The electrodes are worn. This may cause irritated skin as even distribution of the current across the entire area is no longer guaranteed. For this reason, replace the electrodes.
Skin in the treatment area turns red. How to proceed: Immediately stop treatment and wait until your skin has returned to its normal condition. If the redness is under the electrode and disappears quickly, there is no risk – this is caused by the locally stimulated, increased blood flow.
However, consult your doctor before you continue treatment if the skin irritation persists and this is accompanied by an itchy sensation or inflammation. This may be caused by an allergic reaction to the adhesive surface.
Replacement parts and wearing parts
You can obtain the following replacement parts directly from Customer Services:
| Designation | Item number and/or order number |
| 8 x adhesive electrodes (45 x 45 mm) | Item 661.02 |
| 4 x adhesive electrodes (50 x 100 mm) | Item 661.01 |
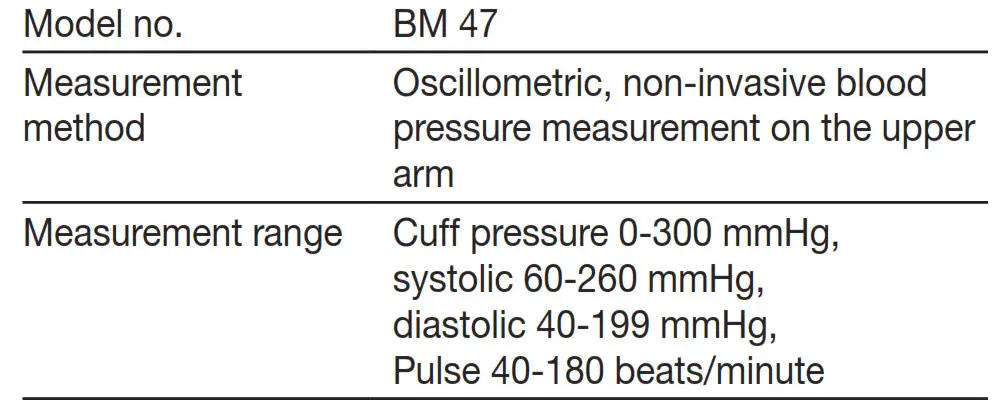
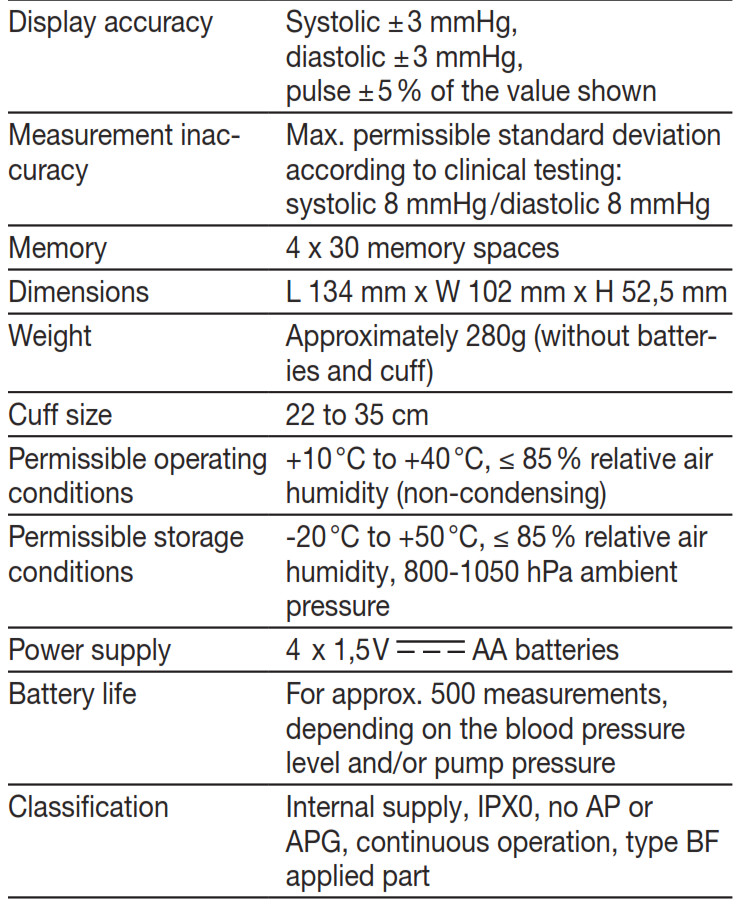
Technical specifications
- Name and model EM 49
- Type EM 49
- Output waveform Biphasic rectangular pulse
- Pulse length 50 – 450 μs
- Pulse frequency 1 – 150 Hz
- Output voltage max. 100 Vpp (500 ohm)
- Output current max. 200 mApp (500 ohm)
- Voltage supply 3 x AAA batteries
- Treatment time Adjustable from 5 to 100 minutes
- Intensity Adjustable from 0 to 50
- Operating conditions 5°C – 40°C (41°F – 104°F) at a relative
- humidity of 15 – 90%
- Storage conditions 0°C – 40°C (32°F – 104°F) at a relative
- humidity of 0– 90%
- Transport conditions -25°C- 70°C (-13°F-158°F) at a relative
- humidity of 0– 90%
- Dimensions 132 x 63 x 29.5 mm (including belt clip)
- Weight 83 g (including belt clip, without batteries),
- 117 g (including belt clip and batteries)
- Use Altitude Limit 3000 m
- Use Range Atmospheric Pressure 700 – 1060 hPa
The serial number is located on the device or in the battery compartment.
Note: If the device is not used acording to the instructions specified, perfect functionality cannot be guaranteed!
We reserve the right to make technical changes to improve and develop the product.
This device complies with European standards EN60601-1 and EN60601-1-2 (In accordance with IEC 61000-4-2, IEC 61000-4-3, IEC 61000-4-4, IEC 61000-4-5,
IEC 61000-4-6, IEC 610004-8 and IEC 610004-11) and is subject to special precautionary measures with regard to electromagnetic compatibility. Please note that portable and mobile HF communication systems may interfere with this unit.
More details can be requested from the stated Customer Services address or found at the end of the instructions for use.
This device meets the requirements of European Directive 93/42/EEC for medical products, as well as those of the Medizinproduktegesetz (German Medical Devices Act).
Notes on electromagnetic compatibility
WARNING!
- The device is suitable for use in all environments listed in these instructions for use, including domestic environments.
- The use of the device may be limited in the presence of electromagnetic disturbances. This could result in issues such as error messages or the failure of the display/device.
- Avoid using this device directly next to other devices or stacked on top of other devices, as this could lead to faulty operation. If, however, it is necessary to use the device in the manner stated, this device as well as the other devices must be monitored to ensure they are working properly.
- The use of accessories other than those specified or provided by the manufacturer of this device can lead to an increase in electromagnetic emissions or a decrease in the device’s electromagnetic immunity; this can result in faulty operation.
- Keep portable RF communication devices (including peripheral equipment, such as antenna cables or external antennas) at least 30 cm away from all device parts, including all cables included in delivery. Failure to comply with the above can impair the performance of the device.
- Failure to comply with the above can impair the performance of the device.
Warranty/service
Further information on the warranty and warranty conditions can be found in the warranty leaflet supplied.
![]()
BM 47
 0483
0483
Included in delivery
- Blood pressure monitor
- Upper arm cuff
- 4 x LR6 AA batteries
- Storage bag
- Instructions for use
Dear Customer,
thank you for choosing a product from our range. Our name stands for high-quality, thoroughly tested products for applications in the areas of heat, weight, blood pressure, body temperature, pulse, gentle therapy, massage, beauty and air. Please read these instructions for use carefully and keep them for later use, be sure to make them accessible to other users and observe the information they contain.
Best regards,
Your Beurer Team
1. Getting to know your instrument
Check that the device packaging has not been tampered with and make sure that all contents are present. Before use, ensure that there is no visible damage to the device or accessories and that all packaging material has been removed. If you have any doubts, do not use the device and contact your retailer or the specified Customer Services address.
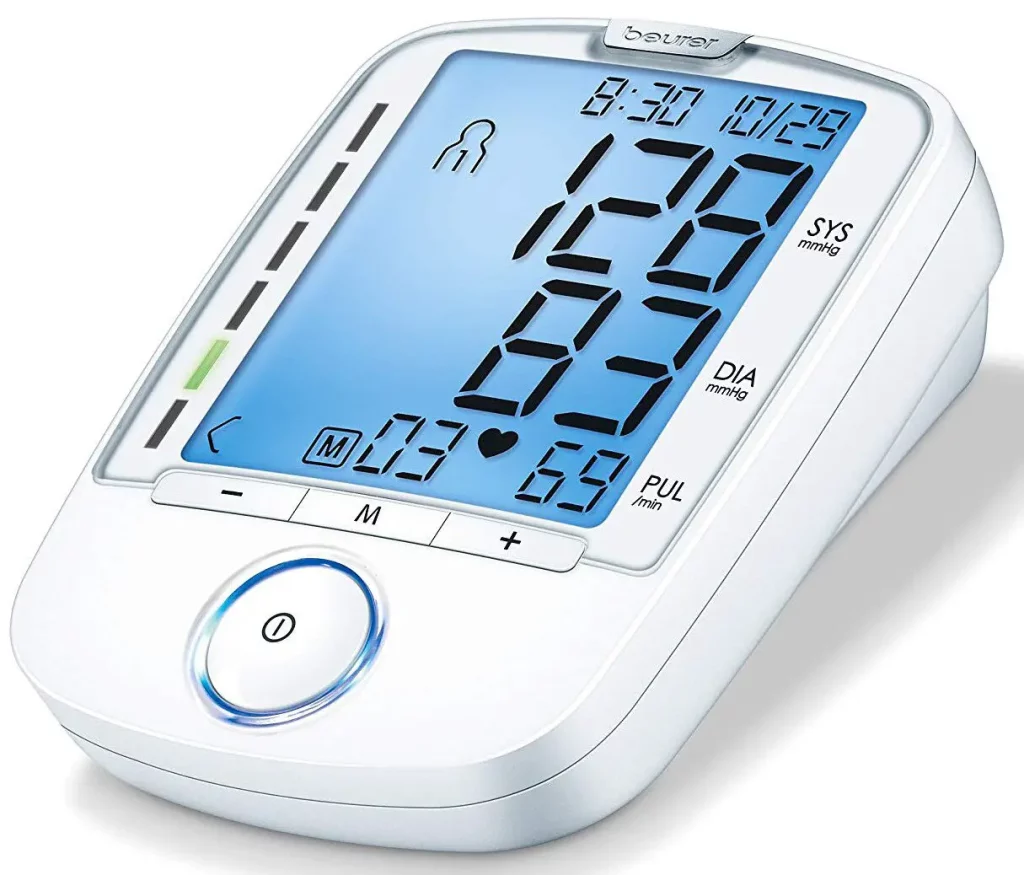
The upper arm blood pressure monitor is used for noninvasive measurement and monitoring of adults’ arterial blood pressure.
You can use it to measure your blood pressure quickly and easily, storing the results and displaying the progression of readings together with the average.
A warning is issued for anyone suffering from cardiac arrhythmia.
The recorded values are classified and evaluated graphically. Store these instructions for use for future reference and make them accessible to other users.
2. Important information
 Signs and symbols
The following symbols are used in these instructions for use, on the packaging and on the type plate for the device and accessories:


Advice on use
- In order to ensure comparable values, always measure your blood pressure at the same time of day.
- Before every measurement, relax for about five minutes.
- If you want to perform several measurements on the same person, wait five minutes between each measurement.
- Do not take a measurement within 30 minutes after eating, drinking, smoking, or exercising.
- Repeat the measurement if you are unsure of the measured value.
- The measurements taken by you are for your information only – they are not a substitute for a medical examination! Discuss the measurements with your doctor, and never base any medical decisions on them (e.g. medicines and their administration)!
- Using the blood pressure monitor outside your home environment or whilst on the move (e.g. whilst traveling in a car, ambulance or helicopter, or whilst undertaking physical activity such as playing sport) can influence the measurement accuracy and cause incorrect measurements.
- Do not use the blood pressure monitor on newborns, pregnant women, or patients with preeclampsia.
- Cardiovascular diseases may lead to incorrect measurements or have a detrimental effect on measurement accuracy. The same also applies to very low blood pressure, diabetes, circulatory disorders, and arrhythmias as well as chills or shaking.
- This device is not intended for use by people (including children) with restricted physical, sensory or mental skills or a lack of experience and/or a lack of knowledge unless they are supervised by a person who is responsible for their safety or is instructed by such a person in how to use the device. Supervise children around the device to ensure they do not play with it.
- The blood pressure monitor must not be used in connection with a high-frequency surgical unit.
- Only use the device on people who have the specified upper arm measurement for the device.
- Please note that when inflating, the functions of the limb in question may be impaired.
- During the blood pressure measurement, blood circulation must not be stopped for an unnecessarily long time. If the device malfunctions, remove the cuff from the arm.
- Avoid any mechanical restriction, compression, or bending of the cuff line.
- Do not allow sustained pressure in the cuff or frequent measurements. The resulting restriction of the blood flow may cause injury.
- Ensure that the cuff is not placed on an arm in which the arteries or veins are undergoing medical treatment, e.g. intravascular access or therapy, or an arteriovenous (AV) shunt.
- Do not use the cuff on people who have undergone a mastectomy.
- Do not place the cuff over wounds as this may cause further injury.
- The blood pressure monitor can only be operated with batteries. Please note that data transfer and data storage is only possible when your blood pressure monitor is supplied with power. As soon as the batteries are empty, the blood pressure monitor loses the date and time.
- To conserve the batteries, the monitor switches off auto- matically if no buttons are pressed for one minute.
- The device is only intended for the purpose described in these instructions for use. The manufacturer is not liable for damage resulting from improper or careless use.
Storage and Care
- The blood pressure monitor is made up of precision electronic components. Accuracy of readings and the instrument’s service life depend on careful handling.
– You should protect the device from impact, moisture, dirt, major temperature fluctuations, and direct exposure to the sun’s rays.
– Never drop the device.
– Do not use near strong electromagnetic fields, i.e. keep it away from any radio systems and mobile phones.
– Only ever use the cuffs provided with the monitor or original replacement cuffs. Otherwise erroneous results will be recorded. - Do not press any buttons until the cuff is in position.
- If the instrument is not used for any length of time, we recommend removing the batteries.
Notes on handling batteries
- If your skin or eyes come into contact with battery fluid, rinse the affected areas with water and seek medical assistance.
Choking hazard! Small children may swallow and choke on batteries. Store the batteries out of the reach of small children.
- Observe the plus (+) and minus (-) polarity signs.
- If a battery has leaked, put on protective gloves and clean the battery compartment with a dry cloth.
- Protect batteries from excessive heat.
- Risk of explosion! Never throw batteries into a fire.
- Do not charge or short-circuit batteries.
- If the device is not to be used for a relatively long period, take the batteries out of the battery compartment.
- Use identical or equivalent battery types only.
- Always replace all batteries at the same time.
- Do not use rechargeable batteries.
- Do not disassemble, split or crush the batteries.
 Repair and disposal
 - Batteries do not belong in domestic refuse. Used batteries should be disposed of at the collection points provided.
- Never open the instrument. If these instructions are not heeded, the warranty will be null and void.
- Never attempt to repair the instrument or adjust it your- self. We can no longer guarantee perfect functioning if you do.
- Repairs may only be performed by Customer Service or authorized dealers. However, always check the batteries and replace them if necessary prior to making any complaint.
- For environmental reasons, do not dispose of the device in the household waste at the end of its useful life. Dispose of the unit at a suitable local collection or recycling point. Dispose of the device in accordance with EC Directive – WEEE (Waste Electrical and Electronic Equipment). If you have any questions, please contact the local authorities responsible for waste disposal.
Notes on electromagnetic compatibility
- The device is suitable for use in all environments listed in these instructions for use, including domestic environments.
- The use of the device may be limited in the presence of electromagnetic disturbances. This could result in issues such as error messages or the failure of the display/device.
- Avoid using this device directly next to other devices or stacked on top of other devices, as this could lead to faulty operation. If, however, it is necessary to use the device in the manner stated, this device as well as the other devices must be monitored to ensure they are working properly.
- The use of accessories other than those specified or pro-vided by the manufacturer of this device can lead to an increase in electromagnetic emissions or a decrease in the device’s electromagnetic immunity; this can result in faulty operation.
- Failure to comply with the above can impair the performance of the device.
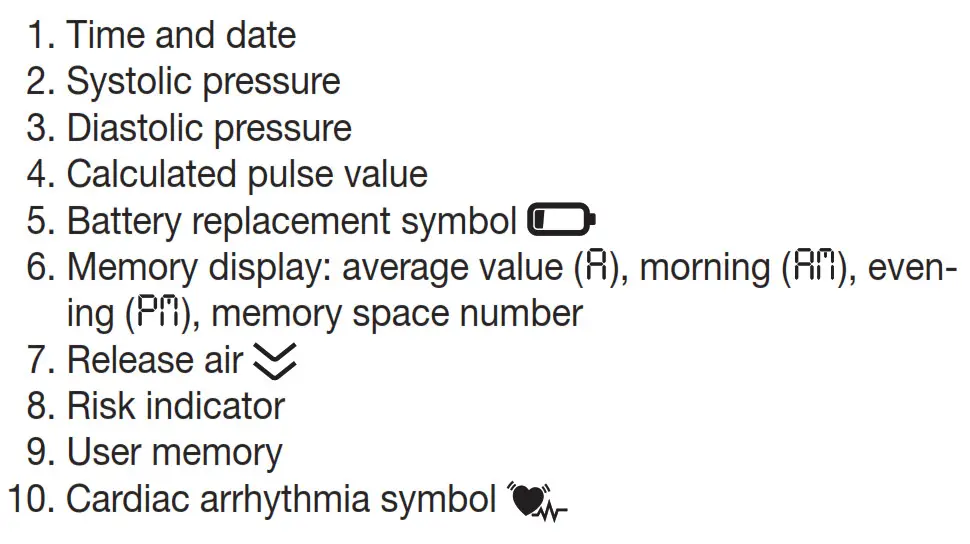
3. Unit description
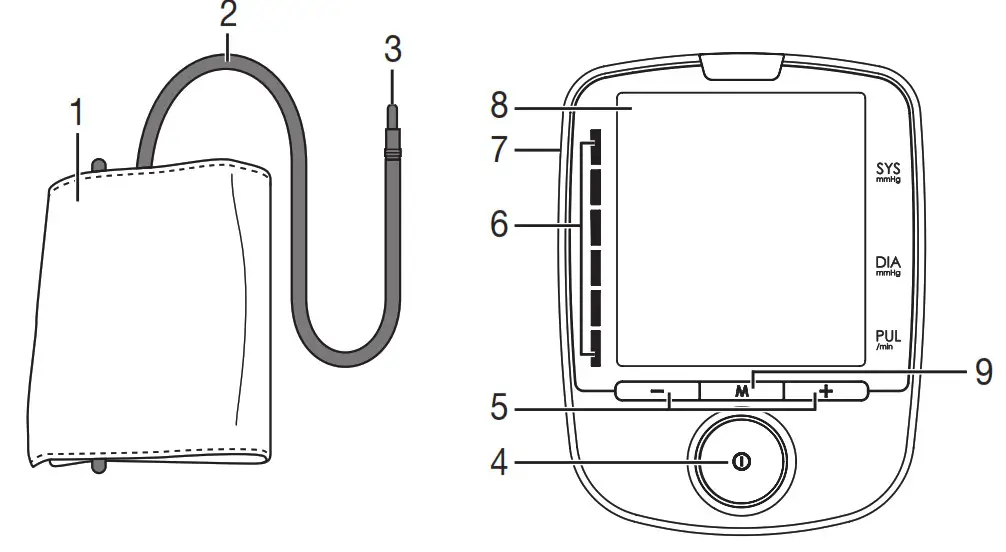
1. Cuff
2. Cuff line
3. Cuff connector
4. START/STOP button
5. function buttons -/+
6. Risk indicator
7. Connection for cuff connector
8. Display
9. Memory button M
Information on the display:

4. Preparing the measurement
Insert the batteries
- Open the battery compartment lid.
- Insert four 1.5 V AA (alkaline type LR6) batteries. Make sure that the batteries are inserted with the correct polarity, according to the label. Do not use rechargeable batteries.
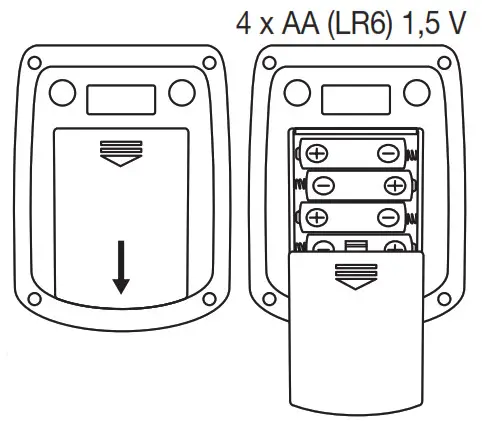
- Close the battery compartment lid again carefully.
- With inserted batteries, the unit permanently displays the time, date and selected user memory.
If the low battery indicator  is permanently displayed, you can no longer perform any measurements and must replace the batteries. Once the batteries have been removed from the unit, the time must be set again.
Used batteries should not be disposed of in normal household waste. Dispose of them via your electronics retailer or your local recycling point. You are legally obligated to do so.
Battery disposal
- The empty, completely flat batteries must be disposed of through specially designated collection boxes, recycling points or electronics retailers. You are legally required to dispose of the batteries.
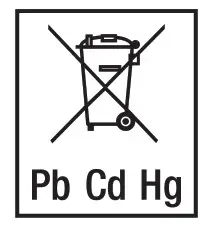
- The codes below are printed on batteries containing harmful substances:
Pb = Battery contains lead,
Cd = Battery contains cadmium,
Hg = Battery contains mercury
Setting the date and time
It is essential to set the date and time. Otherwise, you will not be able to save your measured values correctly with a date and time and to access them again later.
The time is displayed in the 24-hour format.
To set the date and time, proceed as follows:
- Press the memory button M for at least three seconds.
- The year display will start to flash. Set the year with the function buttons -/+ and confirm with the memory button M.
- Set the month, day, hour and minutes and confirm each setting with the memory button M.
5. Measuring blood pressure
Ensure the device is at room temperature before measuring. The measurement can be performed on the left or right arm.
Attach the cuff
Place the cuff onto the bare upper arm. The circulation of the arm must not be hindered by tight clothing or similar.
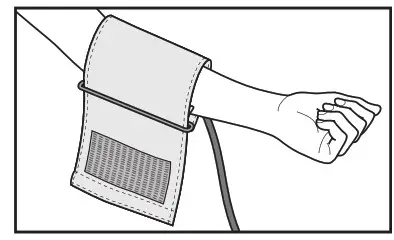
The cuff must be placed on the upper arm so that the bottom edge is positioned 2 – 3 cm above the elbow and over the artery. The line should point to the centre of the palm.
Now tighten the free end of the cuff, but make sure that it is not too tight around the arm and close the hook-and-loop fastener. The cuff should be fastened so that two fingers can fit under the cuff.
Now insert the cuff line into the connection for the cuff connector.
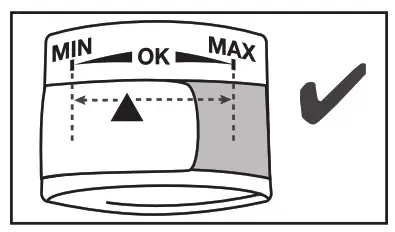
This cuff is suitable for you if the index mark (  ) is within the OK range after fitting the cuff on the upper arm.
If the measurement is performed on the right upper arm, the line should be located on the inside of your elbow. Ensure that your arm is not pressing on the line.
Blood pressure may vary between the right and left arm, which may mean that the measured blood pressure values are different. Always perform the measurement on the same arm.
If the values between the two arms are significantly different, please consult your doctor to determine which arm should be used for the measurement.
Now insert the cuff line into the connection for the cuff connector.
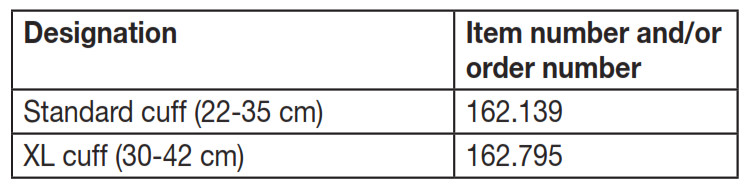
Caution: The unit may only be operated with the original cuff. The cuff is suitable for an arm circumference of 22 to 35 cm.
A larger cuff for upper arm circumferences from 30 to 42 cm is available from retailers or the service address under order no. 162.795.
Adopt the correct posture
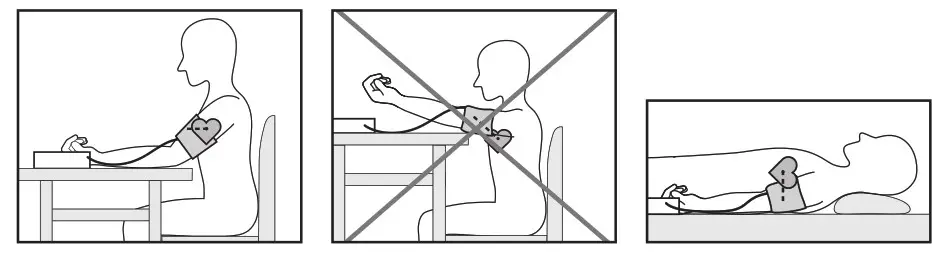
- Before every measurement, relax for about five minutes. Otherwise deviations can occur.
- You can perform the measurement while sitting or lying. Make sure that the cuff is at heart level.
- To carry out a blood pressure measurement, make sure you are sitting comfortably with your arms and back leaning on something. Do not cross your legs. Place your feet flat on the ground.
- To avoid falsifying the measuring result, it is important to remain still during the measurement and not to speak!
Selecting memory
Press the – or + function button. Select the desired user memory (  ) by pressing the -/+ function button. You have 4 memories with 30 spaces each to store the measurements of 4 different people separately. Confirm your selection with the START/STOP button
 .
.
Performing the blood pressure measurement
- As described before, attach the cuff and adopt the posture in which you want to perform the measurement.
- Start the blood pressure monitor with the START/STOP button . After the full-screen display, the most recently stored measurement appears. If there is no measurement in the memory, the unit displays the value “0”.
- The cuff automatically inflates. The cuff’s air pressure is slowly released. If the device already recognise a ten-dency for high blood pressure, it will reinflate and increase the cuff pressure again. As soon as a pulse is found, the pulse symbol
 is displayed.
 - Systolic pressure, diastolic pressure and pulse readings are displayed.
- Measuring can be cancelled at any time by pressing the START/STOP button.
_ appears if the measurement has not been performed properly. Take note of the chapter on error messages/trouble-shooting in these instructions for use and repeat the measurement.- The measurement is automatically stored.
- To switch off, press the START/STOP button .
If you forget to turn off the unit, it will switch off automatically after approx. 1 minute.
Wait at least 5 minutes before taking another measurement.
6. Evaluating results
Cardiac arrhythmia:
This unit can identify potential disruption of the heart rhythm when measuring and if necessary, indicates this after the measurement with the  symbol . This can be an indicator for arrhythmia. Arrhythmia is an illness in which the heart rhythm is abnormal because of flaws in the bioelectrical system that regulates the heartbeat. The symptoms (skipped or premature heart beats, pulse being slow or too fast) can be caused by factors such as heart disease, age, physical make-up, excess stimulants, stress or lack of sleep. Arrhythmia can only be determined through an examination by your doctor. If the symbol is shown on the display after the measurement has been taken, it should be repeated. Please ensure that you rest for 5 minutes beforehand and do not speak or move during the measurement. If the symbol appears frequently, please consult your doctor. Selfdiagnosis and treatment based on the measurements can be dangerous. Always follow your GP’s instructions.
Risk indicator:
The measurements can be classified and evaluated in accordance with the following table. However, these standard values serve only as a general guideline, as the individual blood pressure varies in different people and different age groups etc.
It is important to consult your doctor regularly for advice. Your doctor will tell you your individual values for normal blood pressure as well as the value above which your blood pressure is classified as dangerous.
The bar chart on the display and the scale on the unit show which category the recorded blood pressure values fall into. If the values of systole and diastole fall into two different categories (e.g. systole in the High normal category and diastole in the Normal category), the graphical classification on the device always shows the higher category; for the example given this would be High normal.

Source: WHO, 1999 (World Health Organization)
7. Saving, displaying and deleting measurements
- The results of every successful measurement are stored together with the date and time. If there are more than 30 measurements, the oldest measurements are lost.
- Press the – or + function button. Select the desired user memory ( ) by pressing the -/+ function button. Confirm your selection with the START/STOP button.
- If you press the memory button M, the average value of all the stored measured values in the user memory will be displayed. If you press the memory button M again, the average value of the morning measurements for the last 7 days will be displayed. (morning: 5.00 – 9.00, display
). If you press the memory button M again, the average value of the evening measurements for the last 7 days will be displayed. (evening: 18.00 – 20.00, display ). If you continue to press the memory button M, the most recent individual measured values are displayed in turn with the date and time. - You can delete the memory by pressing and holding the memory button M for 3 seconds.
- To switch off, press the START/STOP button .
- If you forget to switch off the unit, it will switch off automatically after 1 minute.
8. Error message/trouble shooting
In the event of errors, the error message _ appears on the display.
Error messages may appear if:
- systolic or diastolic pressure could not be measured (
or - systolic or diastolic pressure was outside the measurement range (
orLo appears on the display) - the cuff is fastened too or loosely (
orappears on the display) - the pump pressure is higher than 300 mmHg (
appears on the display) - pumping up takes longer than 160 seconds (
appears on the display) - there is a system or device error (
appears on the display) - the batteries are almost empty .
In the above cases, you must repeat the measurement. Make sure that the cuff tube is properly inserted and that you do not move or talk.
Re-insert the batteries if necessary, or else replace them.
Technical alarm – description
Should the recorded blood pressure (systolic or diastolic) lie outside the limits specified in the section “Technical specifications”, the technical alarm will appear on the display indicating either “ ” or “”. In such cases, you should seek medical assistance and check the accuracy of your procedure.
The limit values for the technical alarm are factory set and cannot be adjusted or deactivated. These alarm limit val-ues are accorded second priority under the standard IEC 60601-1-8.
The technical alarm is a non-locking alarm and must not be reset. The signal shown on the display will disappear automatically after about 8 seconds.
9. Cleaning and storing the device and cuff
- Clean the device and cuff carefully using a slightly damp cloth only.
- Do not use any cleaning agents or solvents.
- Under no circumstances hold the device and cuff under water, as this can cause liquid to enter and damage the device and cuff.
- If you store the device and cuff, do not place heavy objects on the device and cuff. Remove the batteries. The cuff line should not be bent sharply.
10. Technical specifications
The serial number is located on the device or in the battery compartment.
Technical information is subject to change without notification to allow for updates.
- This unit is in line with European Standard EN 60601-1-2 (In accordance with IEC 61000-4-2, IEC 61000-4-3, IEC 61000-4-4, IEC 61000-4-5, IEC 61000-4-6, IEC 610004-8 and IEC 610004-11) and is subject to particular precautions with regard to electromagnetic compatibility (EMC). Please note that portable and mobile HF communication systems may interfere with this unit.
- This device is in line with the EU Medical Devices Directive 93/42/EEC, the „Medizinproduktegesetz“ (German Medical Devices Act) and the standards EN 1060-1 (noninvasive sphygmomanometer, Part 1: General requirements), EN 1060-3 (non-invasive sphygmomanometer, Part 3: Supplementary requirements for electro-mechanical blood pressure measuring systems) and IEC 80601-230 (Medical electrical equipment – Part 2 – 30: Particular requirements for the safety and essential performance of automated non-invasive blood pressure monitors).
- The accuracy of this blood pressure monitor has been carefully checked and developed with regard to a long useful life. If using the device for commercial medical purposes, it must be regularly tested for accuracy by appro-priate means. Precise instructions for checking accuracy may be requested from the service address.
11. Replacement parts and wearing parts
Replacement parts and wearing parts are available from the corresponding listed service address under the stated material number.
12. Warranty / service
In case of a claim under the warranty please contact your local dealer or the local representation which is mentioned in the list “service international”.
In case of returning the unit please add a copy of your receipt and a short report of the defect.
The following warranty terms shall apply:
- The warranty period for BEURER products is either 5 years or- if longer- the country specific warranty period from date of Purchase.
In case of a warranty claim, the date of purchase has to be proven by means of the sales receipt or invoice. - Repairs (complete unit or parts of the unit) do not extend the warranty period.
- The warranty shall not be valid for damages because of
a. improper treatment, e.g. nonobservance of the user instructions.
b. repairs or tampering by the customer or unauthorised third parties.
c. transport from the manufacturer to the consumer or during transport to the service centre.
d. The warranty shall not be valid for accessories which are subject to normal wear and tear (cuff, batteries etc.). - Liability for direct or indirect consequential losses caused by the unit are excluded even if the damage to the unit is accepted as a warranty claim.
INSTRUCTION MANUAL
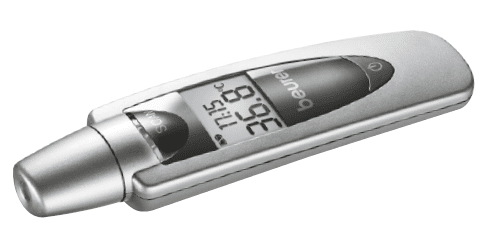
Beurer Thermometer
Model: FT 60
3 in 1 Forehead thermometer
Dear customer,
We are happy that you have decided on a product from our range. Our name stands for high-quality and exhaustively tested products from the areas of warmth, gentle therapy, blood pressure, body temperature, weight, massage and air.
Please read these instructions for use carefully and follow the directions.
Yours faithfully,
The Beurer Team
1.Important notes
- This device is a sensitive electronic device. Please treat it carefully and do not expose it to any mechanical impacts.
- Do not expose the thermometer to direct sunlight.
- The FT60 thermometer is only designed for the measuring area on the human body stated in the instructions for use.
- The device should be in the room in which the measurement is made for at least 30 minutes before use.
- The thermometer is NOT waterproof. For this reason, direct contact with water or other liquids should be avoided.
- Clean the measuring tip after each use with a soft cloth moistened with disinfectant.
- Check before each use that the lens is intact. If it is damaged, please contact the dealer or service address.
- The thermometer was constructed for practical use but cannot replace a visit to the doctor.
- This device is not intended for commercial or clinical use.
- The device is intended only for the purpose given in these directions for use.
- Repairs must be carried out only by authorised service agents. Otherwise the guarantee becomes void.
- This device complies with EU Directive 93/42 EEC.
- This device complies with ASTM E 1965-98.
- This unit is in line with European Standard EN60601-1-2 and is subject to particular precautions with regard to electromagnetic compatibility (EMC). Please note that portable and mobile HF communication systems may interfere with this unit. For more details, please contact customer service at the address indicated.
- If you have further questions about using our devices, please contact your dealer or Customer Service.
- Please read these instructions for use carefully and keep them for later use, be sure to make them accessible to other users and observe the information they contain.
2. What you should know about using this thermometer
Before using a forehead thermometer, an ear thermometer or a conventional rod thermometer, the following should be noted: The different thermometers listed above are suitable for measuring body temperature in different parts of the body: forehead thermometer: measurement only on the forehead, ear thermometer: measurement only in the ear, rod thermometer: rectal (in the back passage), axillary (under the arm) or oral measurement (in the mouth). The temperature varies depending on the part of the body where the measurement is taken. The difference in healthy persons between different parts of the body can be between 0.2 – 1°C. The approximate normal temperature ranges are as follows:
- forehead temperature – measured with a forehead thermometer: 35.8 °C to 37.6 °C.
- Ear temperature, measured with an ear thermometer: 36.0 °C to 37.8 °C.
- Rectal temperature, measured with a conventional thermometer: 36.3 °C to 37.8 °C.
- orally measured temperature – measured with a conventional thermometer: 36.0 °C to 37.4 °C.
Beurer-Tip:
Temperatures measured with different thermometers cannot be compared with one another. You should therefore tell your doctor or bear in mind if you are diagnosing yourself what thermometer you used to take your temperature and in what part of the body.
The temperature of a healthy person is also influenced by the following factors:
- The person’s individual metabolism.
- Age (body temperature is higher in babies and small children and falls with increasing age. Greater temperature fluctuations occur faster and more often in children).
- Clothing.
- The outside temperature.
- The time of day (body temperature is lower in the morning and increases during the day towards evening).
- Preceding physical and, to a lesser extent, mental activity.
Beurer-Tip:
Taking the temperature gives a measurement that provides information about a person’s current body temperature. If you are uncertain about interpreting the results or if the result is abnormal (e.g. fever), you should consult your doctor.
This also applies in the case of slight temperature changes if there are other symptoms of illness such as agitation, severe sweating, flushed skin, fast pulse rate, tendency to collapse etc.
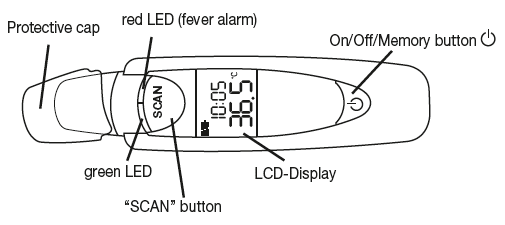
3. Description of device
4. Functions
This infrared thermometer is for measuring
– temperature at a person’s forehead,
– surface temperature of objects and liquids,
– ambient temperatures.
The thermometer also offers additional functionalities:
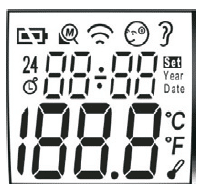
– 9 memory locations for simple plotting of changes in temperature,
– date and time, also with all stored temperatures measured,
– Optical and acoustic fever alarm at temperatures over 37.5 °C,
– switchable to °C and °F.
5. Operation
Remove the protective cap and switch on the thermometer with the “ ” button. After a short self-test and two short beep tones, the thermometer is ready for forehead temperature measurement.
5.1 Setting time and date
With the thermometer switched on, hold the “ ” button depressed for 5 seconds. As soon as the “SET” symbol appears in the display, you can use the “SCAN” button to set in turn the 12 or 24 hour mode, hour, minute, year, month and day (‚24‘ appears in the display for the 24-hour mode). Confi rm the values set in each case with the “ ” button.
5.2 Batteries
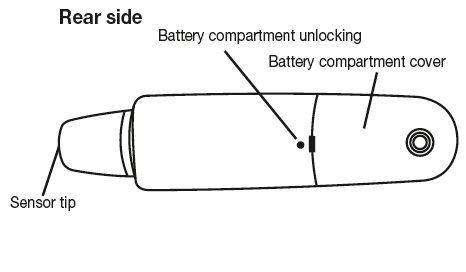
The Type 3V CR2032 battery is already fi tted and depending on usage has a life of around 3000 measurements. When the battery gets weak, the battery warning symbol appears . It is still possible to measure the temperature. Battery must be replaced. When the battery symbol fl ashes , the battery must be exchanged by sliding the battery compartment cover off to the rear. Switch off the device, press the batttery compartment lock with a sharp object and slide the battery compartment cover downwards at the same time.
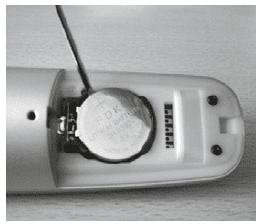
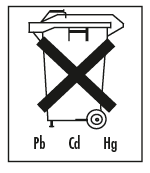
Insert a new battery of the same type with the positive pole at the top. Close the battery compartment cover again. Used batteries should not go into domestic refuse. You are legally obliged to dispose of the batteries correctly. Dispose of them through your electrical dealer or local recycling centre.
Note: you will fi nd these symbols on batteries containing toxic substances: Pb = battery contains lead, Cd = battery contains cadmium, Hg = battery contains mercury. The battery in this device does not contain toxic substances.
6. During use
Always ensure that the sensor is clean and undamaged. Switch on the thermometer with the “ ” button.
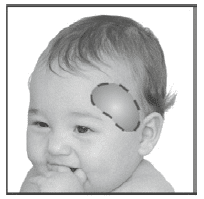
6.1 Forehead measurement
After a short self-test and two short beeps, the thermometer is ready for measuring the temperature at the forehead/temple. The infrared thermometer is in ‘Forehead thermometer’ mode. This is indicated by the symbol .
Note that
– the thermometer must have been at least 30 minutes in the room in which the measurement is made,
– the measuring result may be falsifi ed by physical activity, fundamentally increased sweat formation on the forehead,
consumption of vasoconstrictive medications and skin irritations,
– the forehead or temple must be free of sweat and cosmetics.
Apply the thermometer to the left or right temple and press the “SCAN” button. Move the thermometer to and over the temple. During the measurement you can hear short beeps signalling that the thermometer has found a new maximum temperature. The end of the measuring time is signalled with a long beep. Release the “SCAN” button. You can now read off the temperature measured. The LED is also illuminated according to the test result: a green LED indicates that body temperature is within the normal range, but a red LED lights up with measured values over 37.5 °C, i.e. it is a fever alarm. The measurement normally takes from 5 to 8 seconds, but can take up to 30 seconds.
The thermometer signals with two short beeps and a no longer flashing forehead symbol that the thermometer is ready for a new measurement.
6.2 Saving the temperatures measured
The temperature last measured, i.e. only the last temperature of a series measured, is saved automatically as soon as the thermometer is switched off. There are 9 memory locations available for this.
You can call up the last temperature measured with the “POWER ” button. The date and time are also shown. The LED does not support any requests for stored measured values. If you continue to hold down the “ POWER ” , you will enter a special measuring mode, in which the thermometer will not make a correct measurement. In this event, allow the thermometer to switch off automatically after about 1 minute and then switch it on again.
6.3 Surface temperatures
When you want to measure surface temperatures with this infrared thermometer, you must change to the “SCAN” mode.
With the thermometer switched on (standard forehead thermometer mode) keep the “ ” button depressed and at the same time press the “SCAN” button. This mode is indicated with the symbol. If you keep the “SCAN” button depressed, the surface temperature measured is continuously displayed. You can apply the sensor tip directly to the surface to be measured or measure at close range (do not immerse in liquids).
Note that the temperature displayed is the surface temperature measured but not adjusted. It cannot be compared with the forehead temperature.
6.4 Ambient temperature
After the measurement, the thermometer automatically switches to standby mode after about 1 minute, but only if the time has been set. This mode is identified by the symbol and the ambient temperature is shown continuously.
If you want to use the thermometer to measure the ambient temperature, it should be positioned so that the measurement is not influenced by solar radiation or other influences such as cold draughts from air-conditioning systems. In addition to the ambient temperature, which is updated once every minute, the date and time are displayed alternately.
6.5 Changing the temperature unit
You can display the temperature in degrees Celsius (°C) or degrees Fahrenheit (°F). With the thermometer switched off or in standby mode, select the unit by holding down the “SCAN” button and at the same time pressing the “ ” button.
Keep the two buttons depressed until the temperature unit changes. All stored temperatures are displayed in the new temperature unit.
7. Trouble shooting
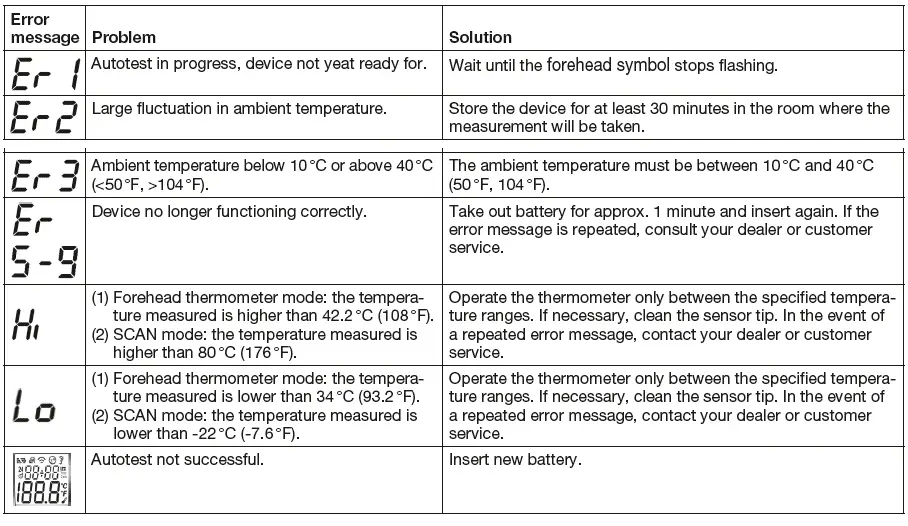
8. Cleaning, storage, disposal
Clean the sensor tip after every use. Use a clean cloth or cotton bud that can be moistened with disinfectant, alcohol or warm water.
To clean the entire device, use a soft cloth slightly moistened with a mild soapy solution. Water must never get into the device. If water gets into the device, remove the battery immediately. Only use the device again when it is completely dry.
Do not use any harsh cleaning agents.
Never immerse the device in water.
Always store the thermometer with the cap on in order to protect the sensor. The device must not be stored or used at too high or low a temperature or humidity (see 9. technical data), in sunlight, in association with an electrical current or in dusty locations. Otherwise, inaccuracies can occur.
If prolonged storage is intended, you should remove the battery.
Please dispose of the device in accordance with the directive 2002/96/EG – WEEE (Waste Electrical and Electronic Equipment). If you have any queries, please refer to the local authorities responsible for waste disposal.
Technical data
Note: When the device is used outside the specifications, perfect functioning cannot be guaranteed. We reserve the right to make technical changes to improve and develop the product.
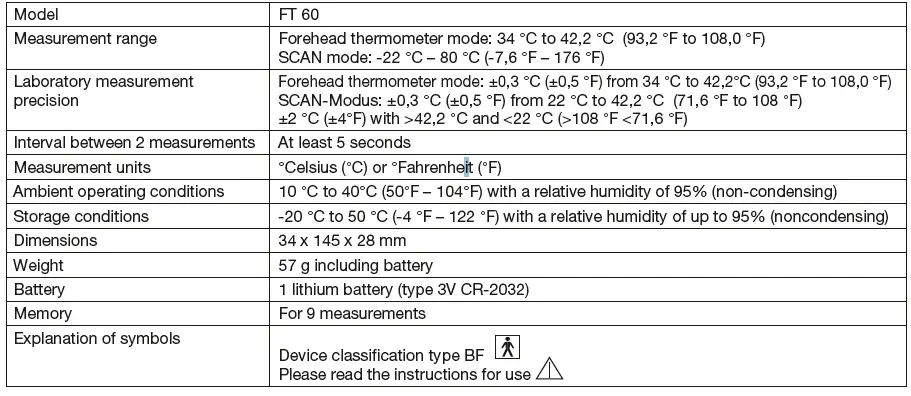
Beurer FT65 Non Contact Clinical Thermometer
Included in delivery
- Thermometer
- 2x 1.5V AAA batteries (LRO3)
- These instructions for use
Please read these instructions for use carefully and keep them for later use, be sure to make them accessible to other users
and observe the information they contain.
Signs and symbols
| Lh | WARNING
Warning notice indicating a risk of injury or damage to health. |
| Lh | IMPORTANT
Safety note indicating possible damage to the uniVaccessory. |
| CD | Note
Note on important information. |
| () | Observe the instructions for use |
| [!]
:-a |
Application part, type BF |
| Disposal in accordance with the Waste Electrical and Electronic Equipment EC Directive – WEEE | |
| C E:04a3 | The CE labelling certifies that the product complies with the essential requirements of Directive 93/42/EEC on medical products. |
| Staraga!Transport
% |
Permissible storage and transport temperature and humidity |
| Operating
% |
Permissible operating temperature and humidity |
| MIi | Manufacturer |
| &
PAP |
Dispose of packaging in an environmentally friendly manner |
| + | Protect from moisture |
Notes
- I your skin or eyes come into contact witn battery Tluia, TIush out tne affected areas with water and seek medical assistance.
- choking hazard! Small children may swallow and choke on batteries. Store the batteries out of the reach of smal children.
- Observe the plus (+) and minus – polarity signs.
- If fa battery has leaked, put on protective gloves and clean the battery compartment with a dry cloth. Protect the batteries from excessive heat.
- A Risk of explosion! Never throw batteries intoa fire.
- Do not charge or short-circuit batteries.
- F the device is not to be used for a long period, take the batteries out of the battery compartment.
- Use identical or equivalent battery types only.
- Always replace all batteries at the same time.
- Do not use rechargeable batteries.
- Do not disassemble, split or crush the batteries.
General notes
- Please read these instuctions for use carefully and keep them for later use, be sure to make them accessible to other users and observe the information they contain.
- This thermometer is a sensitive electronic device. Handle it with care and do not subject it to any mechanical impacts.
- Do not expose the device to direct sunlight.
- Check before each use that the lens is intact. If it is damaged, please contact your retailer or the service address.
- Ihe thermometer Is NOT waterproof. For this reason, direct contact with water or other liquids should be avoIded.
- Ihe l 65 thermometer is only designed tor the measuring area on the human body stated in the instructions for use.
- The device is only intended for the purpose stated in these instructions for use.
- After each use, clean the measuring tip with a soft cloth moistened with disinfectant.
- The thermometer has been designed for practical use, but is not a substitute for a visit to the doctor.
- Before each repair query, first check the batteries and replace them if necessary.
- Repairs must only be carried out by authorized service centres, otherwise, the guarantee is invalidated.
- This device complies with the EU Directive 93/42/EEC concerning medical products, the Medizinproduktegesetz (German Medical Devices Act), the ASIM AMerican Society tor lesting and Materials) E 19b-98 and the European standard EN 124/0-5: Clinical thermometers- Part 5: Requirements for intrared ear thermometers (with maximum cdevice) Iso 80601-2-66 and the European Standard EN 60601-1-2 (n accordance With CiSPR 11, IEC 61000-4-2, EC 61000-4-3, IEC 61000-4-8), and is subject to particular precautions with regard to electromagnetic compatibil- ity. Please note that portable and mobile HF communication systems may interfere with this unit.
- I you should have any questions about using our devices, please contact either your retaler or customer VIces.
Notes on electromagnetic compatibility
- The device is suitable for use in all environments listed in these instructions for use, including domestic environments.
- The use of the device may be limited in the presence of electromagnetic disturbances. This could resuft in issues Such as error messages or the failure of the display/device.
- Avoid using this device directly next to other devices or stacked on top of other devices, as this could lead to taulty operation. If, however, it is necessary to use the device in the manner stated, this device as well as the other devices must be monitored to ensure they are working properly.
- The use of accessories other than those specified or provided by the manufacturer of this device can lead to an increase in electromagnetic emissions or a decrease in the device’s electromagnetic immunity; this can result in taulty operation.
- Failure to comply with the above can impair the performance of the device.
Unit description
- Forehead/cover cap
- Forehead thermometer mode button 9 Forehead
- Ear thermometer mode/on button Ear/O
- LED (red) (high-temperature alarm)
- LED (green)
- Date
- LCD
- Sensor tip with lens (cover cap removed)
- Memory button (M
- Set button
- Battery compartment lid
- Time
- Measurement mode (“Ear”, “Forehead”, “Object”)
- Battery warning symbol
- Measurement display
- “Memory” symbol and storage space number
- “Measurement in progress” symbol
- Unit of measurement (°C or °F)

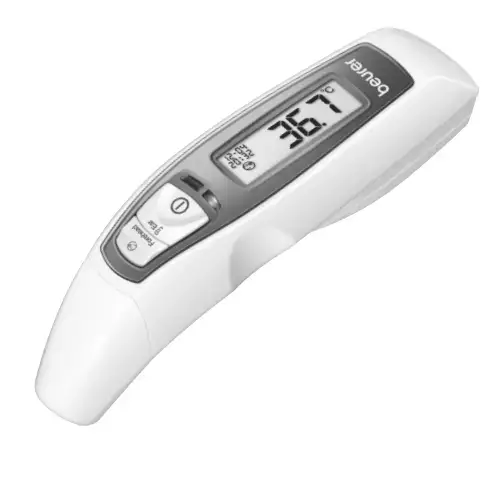
Initial use
The batteries are already inserted in all new devices. Before first use, remove the protruding plastic insulating strip from the battery compartment, Ihe thermometer ill then switches on automatically. Further information and FAQs available at: http://www.beurer.com
Setting the device
Set the unit for the temperature display as well as the date and the time Press the O button for 1 second to switch the thermometer on. The device performs a brief self test: all elements of the display are shown for approx. 1 second. Following a successful self test, the device emits two short beeps. In Standby mode, the date and time are shownand”–” is displayed. When the thermometer is used for the first time and each time the batteries are changed, the date and time are displayed (after the self test) in the basic setting (- i 8Ut0). Now set the unit in which the temperature will be displayed, the date and the time. To set the device, proceed in stages: Unit – year – month – day – hours -minutes,
- Press the button for approx. three seconds in order to reach Set mode.
- The setting to be changed will lash each time.
- Press the button again to save the setting or press the button to change the setting.
- Then press the button to save the setting.
- After this process, the thermometer shows the word ik in the display and switches off automatically,
What you should know about using this thermometer
There are different thermometers for taking temperature measurements in different parts of the body: Ear/forehead thermometer (this thermometer, for measuring in the ear or on the forehead area) Rod thermometer (for rectal fin the back passage), axillary [under the arm] or oral measurement [fin the mouth]) Taking the temperature gives a measurement that provides information about a person’s current body temperature. If you are uncertain about interpreting the results or if the value is abnormal, please consult your doctor. This also applies in the case of slight temperature changes if there are other symptoms of illness such as agitation, severe sweating, flushed skin, fast pulse rate, tendency to collapse, etc. Temperatures measured with different thermometers cannot be compared with one another. You should therefore tell your doctor (or bear in mind if you are diagnosing yourself) what thermometer you used to take your temperature and in what part of the body. The temperature of a healthy person is influenced by various factors: individual metabolic rate, which depends on the person, age (body temperature of infants and small children is higher and decreases as they age). Greater tem perature fluctuations occur faster and more often in children, e.g. due to growth spurts), their clothing, the ambient temperature, the time of day (body temperature is lower in the morning and increases throughout the day towards evening), the preceding physical and, to a lesser extent, mental activity. The temperature varies depending on the part of the body where the measurement is taken. The difference can be between 0,4°F(0,2C) and 1.8 (1C) for a healthy person, Ihe normal temperature ranges are as follows:
- on the forehead: 96.4°F- 99.7°F (35.8’C-37.6°C), with a forehead thermometer,
- in the ear 96.8°F- 100°F (36.0°C-37.8°C), with an ear thermometer,
- in the back passage: 97.3°F -100°F (36.3°C- 37.8°C), with a conventional thermometer,
- in the mouth: 96.8°F-99.3°F (36.0°C-37.4°C). with a conventional thermometer,
Measuring
- Before each use, please check that the lens is intact. If it is damaged, please contact your retailer or the service address. Bear in mind that the thermometer needs to have been in the room in which the measurement is taken for at least 30 minutes before use.
- Some people produce different readings in their left and right ear. In order to record temperature changes, always measure a person’s temperature in the same ear,
The ear thermometer may be used by children only under adult supervision. Measurement is usually possible over the age of 6 months. In infants under 6 months, the ear canal is still very narrow so the temperature of the eardrum often cannot be recorded and the result displayed is often too low. - The measurement must not be taken in an ear affected by inflammatory diseases (e.g. discharging pus or secre- tion), after possible ear injuries (e.g. eardrum damage) or in the healing period after operative procedures. In all of these cases, please consult your doctor.
- Use of the thermometer on different persons can be inappropriate in the event of certain acute infectious dis- eases because of the possible spread of germs despite cleaning and disinfection. If you have any doubts, please consult your doctor.
- This thermometer may only be used without a disposable protective cover.
- lf you have been lying on one ear for some time, the temperature is slightly raised. Wait a little while or measure in the other ear.
- As ear wax can affect the measurement, vou should clean the ear before measuring if necessarv.
Make sure that the sensor tip and also the ear canal are clean. As the ear canal is slightly curved, you have to pull the ear slightly up and backwards before inserting the sensor tip. This is important so that the sensor tip can be pointed directly at the eardrum. Insert the sensor tip carefully and press the O button for 1 second. Release the O button. The end of the measuring time is signalled with a short beep and the measured value appears on the display. If the measured value is within the normal range (< 100.4F/38°C), the green LED lights up for 3 seconds. If the measured value is higher ( 100.4°F/38°C, high temperature), the red LED is illuminated.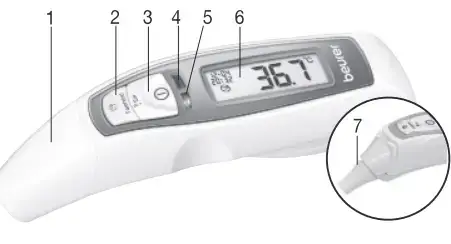
Measuring body temperature on the forehead
Please note that the forehead/temples must be free from sweat and cosmetics and that taking vasoconstrictive medication and skin irritations can distot the result when measuring tempera- Ture on the forehead. Press the O button for 1 second to switch the thermometer on. Following a successful self test, the device emits two short beeps. Place the measuring head with the forehead/cover cap fitted on the temples, hold down the Forehead button and move the thermometer smoothly over the forehead to the other temple Then release the Forehead button. The end of the measuring time is signalled with a short beep and the measured value appears on the display. If the measured value is within the normal range (< 100.4°F/38°C), the green LED lights up for 3 seconds. If the measured value is higher (e 100.4°F/38°C, high temperature), the red LED is illuminated.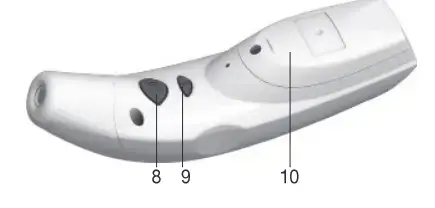 Measuring surface temperature
Press the O button for 1 second to switch the thermometer on. Following a successful self test, the device emits two short beeps. Then press the and O buttons simultaneously for 3 seconds to switch to the Object temperature mode.The symbol appears in the display. Press and hold the O button or Forehead and point the sensor tip towards the object or liquid to be measured (never immerse in liquids), maintaining a distance of 3 cm. Release the O button or Forehead. The end of the measuring time is signalled with a short beep and the measured value appears on the display. Please note that the displayed temperature is the measured and not the adapted surface temperature. It is not the same as the forehead/ear temperature, To switch back to the Ear/Forehead thermometer mode, press the and O buttons simultaneously for 3 seconds unti the symbol disappears and there is a short beep. By switching the thermometer off and on again, it automatically exits the Object temperature mode. The temperature last measured, i.e. only the last value of a series of measurements, is automatically stored as soon as the thermometer switches itself off or is switched off. There are 10 storage spaces available for this. If you do not take any further measurements, the thermometer switches itself off automatically after approx. one minute after the measured values have been displayed,
Changing the batteries
When the batteries get weak, the battery warning symbol appears t is still possible to measure temperature. The batteries must be replaced. When the battery symbol flashes and Lo appears in the display, the batteries must be replaced. f the batteries are too flat, then the thermometer will switch off automatically.
- Loosen the screw on the battery compartment lid and pull the lid off downwards,
- Remove the used batteries and insert two new batteries in the direction indicated.
- Close the battery compartment lid and screw it back on, Dispose of used batteries in accordance with the applicable legal regula- tions. Never dispose of batteries in the normal household waste.
Storage and maintenance
- Clean the sensor tip after each use, Use a clean cloth or cotton bud that can be moistened with disinfectant, alcohol or warm water.
- To clean the entire device, please use a soft cloth slightly moistened with a mild soapy solution.
- Do not use any harsh cleaning products.
- Always store the thermometer with the forehead/cover cap on.
- If prolonged storage is intended, you should remove the battery.
- The device must not be stored or used at an excessively high or low temperature or humidity (see technical data), in sun- light, in association with an electrical current or in dusty locations. Otherwise, inaccuracies can occur.
Disposal
The empty, completely flat batteries must be disposed of through specially designated collection boxes, recycling points or electronics retailers, You are legally required to dispose of the batteries. The codes below are printed on batteries containing harmful substances: Pb = Battery contains lead, Cd = Battery contains cadmium, Hg = Battery contains mercury. For environmental reasons, do not dispose of the device in the household waste at the end of its useful life. Dispose of the unit at a suitable local collection or recycling point. Dispose of the device in accordance with EC Directive-WEEE (Waste Electrical and Electronic Equipment). If you have any questions, please contact the local authorities responsible for waste disposal.
Technical data
Note: If the device is used other than in accordance with the specifications, perfect functioning cannot be guaranteed! We re- serve the right to make technical changes to improve and develop the product. The accuracy of this thermometer has been carefully checked and developed with regard to a long useful life. f using the device for commercial medical purposes, it must be regularly tested for accuracy by appropriate means. Precise instructions for checking accuracy may be requested from the service address.
| Name and model | FT65 |
| Measurement range | Ear/Forehead thermometer mode: 93.2 °F -109.4 °F (34°C – 43°C) Object temperature mode: 32°F – 212°F (0°C -100°C) |
| Laboratory measurement precision | Ear thermometer mode: ±0.4°F (±0.2°C) from 95.0°F -107.6°F (35°C – 42°C), outside this measurement range ±0.5°F (±0.3°C),
Forehead thermometer mode: ±0.4°F (±0.2°C) from 95.0°F -107.6°F (35°C – 42°C), outside this measurement range ±0.5°F (±0.3°C), Objecttemperature mode: ±2.7°F (±1.5°C) at <86 °F (30°C); ±5% at ::.86 °F (30°C) |
| Interval between 2 measurements | At least 5 seconds |
| Clinical repeat precision | Ear: Children, 1 – 5 years: ±0.14°F (±0.08 ‘C)
Adults: ±0.13 °F (±0.07 ‘C) Forehead: Children, 1 -5 years: ±0.13°F (±0.07’C) Adults: ±0.14°F (±0.08°C) |
| Measurement units | °Celsius (0C)or °Fahrenheit (0F) |
| Ambient operating conditions | 59°F – 95°F (15°C – 35°C) with a relative humidity of up to 85% (non-condensing) |
| Storage conditions | -13°F -131’F (-25°C – 55°C) with a relative humidity of up to 85% (non-condensing) |
| Dimensions | 38.2 x 138 x 46.5 mm |
| Weight | 90 g including battery |
| Battery | 2 x 1.5V AAA (LR03) |
| Memory | For 10 measurements |
Warranty/service
- Beurer GmbH, Söflinger Straße 218, 89077 Ulm, Germany (hereinafter referred to as “Beurer”) provides a warranty for this product, subject to the requirements below and to the extent described as follows.
- The warranty conditions below shall not affect the seller’s statutory warranty obligations which ensue from the sales agreement with the buyer.
- The warranty shall apply without prejudice to any mandatory statutory provisions on liability. Beurer guarantees the perfect functionality and completeness of this product.
- The worldwide warranty period is 5 years, commencing from the purchase of the new, unused product from the seller. The warranty only applies to products purchased by the buyer as a consumer and used exclusively for personal purposes in the context of domestic use. German law shall apply.
- During the warranty period, should this product prove to be incomplete or defective in functionality in accordance with the following provisions, Beurer shall carry out a repair or a replacement delivery free of charge, in accordance with these warranty conditions.
The buyer will then receive further information about the processing of the warranty claim, e.g. where they Can send the product and what documentation is required. A warranty claim shall only be considered if the buyer can provide Beurer, or an authorised Beurer partner, with
- a copy of the invoice/purchase receipt, and
- the original product.
The following are explicitly excluded from this warranty
- deterioration due to normal use or consumption of the product;
- accessories supplied with this product which are worn out or used up through proper use (e.g. batteries, rechargeable batteries, cuffs, seals, electrodes, light sources, attachments and nebuliser accessories);
- products that are used, cleaned, stored or maintained improperly and/or contrary to the provisions of the instructions for use, as well as products that have been opened, repaired or modified by the buyer or by a service centre not authorised by Beurer;
- damage that arises during transport between manufacturer and customer, or between the service centre and customer;
- products purchased as seconds or as used goods;
- consequential damage arising from a fault in this product (however, in this case, claims may exist arising from product li- ability or other compulsory statutory liability provisions).
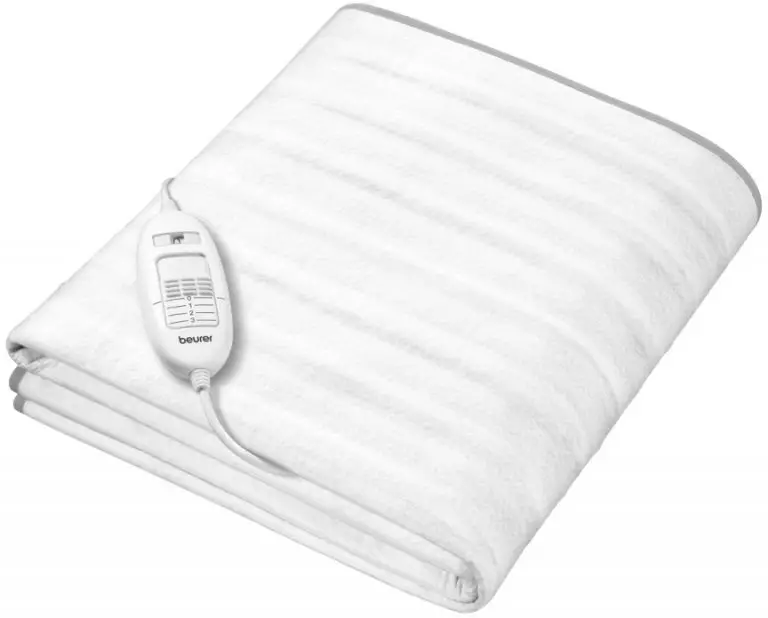
Dear customer,
Thank you for choosing a product from our range. Our name stands for high-quality, thoroughly tested products for applications in the areas of heat, weight, blood pressure, body temperature, pulse, gentle therapy,
massage, beauty, air and baby.
With kind regards
Your Beurer team
Explanation of symbols
The following symbols are used on the device, in these instructions for use, on the packaging and on the type plate for the device:
-
 Read the instructions!
  Do not insert pins!
 Do not use folded or rucked!
 Not to be used by very young children (0 – 3 years).
 Dispose of packaging in an environmentally friendly manner.
 Wash at a maximum temperature of 30 °C, Very gentle wash
 Do not bleach
 Do not dry in a tumble dryer
 Do not iron
 Do not dry-clean
 Manufacturer
 This product satisfies the requirements of the applicable European and national directives.
 The device has double protective insulation and therefore complies with protection class 2.
 The products demonstrably meet the requirements of the Technical Regulations of the EAEU.
 Please dispose of the device in accordance with EC Directive – WEEE (Waste Electrical and Electronic Equipment).
 WARNING: Warning of risks of injury or health hazards
CAUTION: Safety information about possible damage to appliance/accessories.
 NOTE: Important information.
Items included in the package
Check that the exterior of the cardboard delivery packaging is intact and make sure that all contents are present. Before use, ensure that there is no visible damage to the device or accessories and that all packaging material has been removed. If you have any doubts, do not use the device and contact your retailer or the specified Customer Service address.
- 1 Heated underblanket
- 1 Control
- 1 Instructions for use
Description
- Power plug
- Power cord
- Control
- Illuminated temperature settings
- Slider for ON/OFF and temperature settings
- Plug-in coupling
Important instructions Retain for future use
![]() WARNING
WARNING
- Failure to observe the information provided below can lead to personal injury or material damage (electric shock, skin burns, fire).
The following safety and hazard information not only serves to protect your health and the health of others, it also protects the product from damage. Therefore, observe this safety information and pass on these instructions together with the product. - This heated underblanket must not be used by people who are not sensitive to heat or by vulnerable people who may not be able to react to overheating (e.g. diabetics, persons with skin changes related to illness or persons with scarred skin in the area where the pad is to be applied, after taking any pain-relieving medication or alcohol).
- This heated underblanket may not be used for very young children under the age of three (0-3) due to their inability to react to overheating.
- This heated underblanket may not be used for young children over the age of three (3-8) unless the control has been pre-set by a parent or guardian and unless the child has been adequately instructed how to operate the heated underblanket safely.
- This heated underblanket can be used by older children aged from 8 years and above and persons with reduced physical, sensory or mental capabilities or lack of experience and knowledge if they have been given supervision or instruction concerning use of the appliance in a safe way and understand the hazards involved.
- Children must not play with the heated underblanket.
- Cleaning and user maintenance must not be performed by childrenunless supervised.
- This heated underblanket is not intended for use in hospitals.
- The device is only intended for domestic/private use, not for commercial use.
- Do not insert pins.
- Do not use folded or rucked.
- Do not use if wet.
- If the heated underblanket is used on an adjustable bed, check that the underblanket and cord do not become trapped or rucked, for example in hinges.
- This heated underblanket may only be used in conjunction with the control specified on the rating label.
- The electrical and magnetic fields emitted by this heated underblanket may interfere with the function of a pacemaker. However, they are still well within the limits: electrical field strength: max. 5000 V/m, magnetic field strength: max. 80 A/m, magnetic flux density: max. 0.1 millitesla. Please consult your doctor and the manufacturer of your pacemaker before using this heated underblanket.
- Do not pull, twist or make any sharp kinks in the cables.
- This heated underblanket must be examined frequently for signs of wear or damage. If there are such signs, if the heated underblanket has been misused or does not work, return it to the supplier before switching it on again.
- Under no circumstances should you open or repair the device yourself, as faultless functionality can no longer be guaranteed thereafter. Failure to adhere to this instruction will void the warranty.
- If the mains connection cable of this device is damaged, it must be disposed of. If it cannot be removed, the device must be disposed of
- When this heated underblanket is switched on:
- Do not place any sharp objects on it
- Do not place any heat sources, such as hot water bottles, heat pads or similar, on it.
- The electronic components in the control warm up when the heated underblanket is in use. For this reason, the controller must never b covered or placed on the heated underblanket when it is in use.
- It is essential to observe the information relating to the following chapters: Operation, Cleaning and maintenance, Storage.
- Should you still have questions on using our appliances, please contact our customer service.
Intended use
![]() CAUTION
CAUTION
This heated underblanket is designed for warming beds, only.
Operation
Safety
![]() CAUTION
CAUTION
- This heated underblanket is equipped with a SAFETY SYSTEM. This sensor technology prevents the entire surface of the heated underblanket from overheating by automatically switching off the heated underblanket in the event of a fault. If the safety system has switched off the heated underblanket, the temperature setting is not illuminated any more even when the heated underblanket is switched on.
- Please note that the heated underblanket is not operable any more due to safety reasons in this case and has to be sent to the service address indicated.
- Do not connect the defective heated underblanket with another control of the same type. This would trigger a permanent switch-off via the control’s safety system.
Putting into operation
This heated underblanket must be fixed onto the mattress.

- Leave space for the pillow and place the heated underblanket on the mattress with the plug-in connector facing the pillow. Here, the plug-in connector is located on the underside of the heated underblanket.
- Stretch all of the elastic straps over the corners of the mattress. All 4 corners of the heated underblanket are then fixed onto the mattress.
![]() CAUTION
CAUTION
![]() CAUTION
CAUTION
Regularly check the position of the heated underblanket on the mattress. The heated underblanket must never be used if it is folded.
After you have fixed the heated underblanket to the mattress, simply put your bed sheet on top as usual so that the heated underblanket is between the mattress and the bed sheet.
![]() CAUTION
CAUTION
Make sure that the heated underblanket is spread out entirely flat and that it will not rumple up or crease when in use.
- To operate the heated underblanket connect the control to the heated underblanket by plugging in the connector.
- Then plug in the power plug into the mains outlet.
Switching on
To switch on the heated underblanket, set the slider for ON/OFF and temperature settings to setting 1, 2 or 3.
The temperature settings are illuminated when switched on.
Setting the temperature
- Setting 0: OFF
- Setting 1: minimum heat
- Setting 2: medium heat
- Setting 3: maximum heat
 NOTE:
NOTE:
- The fastest way to warm up the heatd underblanket is to initially set the highest temperature setting.
- We strongly recommend switching on the heated underblanket approx. 30 minutes before going to bed and covering it with the quilt to prevent the warmth from escaping.
![]() WARNING
WARNING
If the heated underblanket is used continuously (for several hours) it is recommended to use the lowest setting of the control to avoid overheating of the user.
Switching off
To switch off the heated underblanket, set the slider for ON/OFF and temperature settings to the “0” (OFF) position. The temperature settings are then no longer illuminated.
NOTE:
If the heated underblanket is not used for several days, set the slider for ON/OFF and temperature settings to the “0” (OFF) position and remove the power plug from the socket. Then remove the control from the heated underblanket by disconnecting it at the connector.
Cleaning and care
![]() WARNING
WARNING
Always remove the power plug from the mains outlet and remove the control from the heated underblanket by disconnecting it at the connector. Otherwise there is a risk of electric shock.
![]() CAUTION
CAUTION
The control must never get in contact to water or other liquids. Otherwise the control may be damaged.
- To clean the control, use a dry, lint-free cloth. Do not use any chemical or abrasive cleaning agents.
- The textile cover can be cleaned in accordance with the symbols on the label and must be removed from the heating pad prior to cleaning.
![]() CAUTION
CAUTION
Note that the heated underblanket must not be dry-cleaned, wrung out, machine dried or ironed.
- The heated underblanket is machine washable.
- Set the washing machine to a particularly gentle, 30 °C cycle (woolens programme). Use a mild detergent with dosage according to the manufacturer’s instructions.
![]() CAUTION
CAUTION
Note that the heated underblanket will suffer from too frequent washing. For its entire life, therefore, the heated underblanket should be washed not more than 5 times in a washing machine.
- While the heated underblanket is still damp after washing, shape it to its original form and size and place it flat over a clothes drying rack to dry.
![]() CAUTION
CAUTION
- Do not attach the heated underblanket to washing lines with washing pegs or the like. Otherwise the heated underblanket may be damaged.
- Only reconnect the control to the heated underblanket after the connector and the heated underblanket are completely dry. Otherwise the heated underblanket may be damaged.
![]() WARNING
WARNING
Under no circumstances switch on the heated underblanket to dry it. Otherwise there is a risk of an electric shock.
Storage
When not in use we recommend to store the heated underblanket in its original packaging. For this purpose, disconnect the control from the heated underblanket by unplugging the plug-in coupling.
![]() CAUTION
CAUTION
- Allow the heated underblanket to cool down before folding. Otherwise
the heated underblanket may be damaged. - Do not crease the heated underblanket by placing items on top of it
during storage.
Disposal
 For environmental reasons, do not dispose of the device in the household waste at the end of its useful life. Dispose of the unit at a suitable local collection or recycling point. Dispose of the device in accordance with EC Directive – WEEE (Waste Electrical and Electronic Equipment). If you have any questions, please contact the local authorities responsible for waste disposal.
In the event of problems
| Problem | Cause | Solution |
The temperature settings are not illuminated while
|
The safety system has switched the heating underblanket off permanently | Send the heating underblanket and the control for servicing. |
Technical data
For technical data, see the rating label on the heated underblanket.
Warranty/service
Beurer GmbH, Söflinger Straße 218, 89077 Ulm, Germany (hereinafter referred to as “Beurer”) provides a warranty for this product, subject to the requirements below and to the extent described as follows.
The warranty conditions below shall not affect the seller’s statutory warranty obligations which ensue from the sales agreement with the buyer.
The warranty shall apply without prejudice to any mandatory statutory provisions on liability.
Beurer guarantees the perfect functionality and completeness of this product.
The worldwide warranty period is 5 years, commencing from the purchase of the new, unused product from the seller.
The warranty only applies to products purchased by the buyer as a consumer and used exclusively for personal purposes in the context of domestic use. German law shall apply.
During the warranty period, should this product prove to be incomplete or defective in functionality in accordance with the following provisions, Beurer shall carry out a repair or a replacement delivery free of charge, in accordance with these warranty conditions.
If the buyer wishes to make a warranty claim, they should approach their local retailer in the first instance: see the attached “International Service” list of service addresses.
The buyer will then receive further information about the processing of the warranty claim, e.g. where they can send the product and what documentation is required.
A warranty claim shall only be considered if the buyer can provide Beurer, or an authorised Beurer partner, with
- a copy of the invoice/purchase receipt, and
- the original product.
The following are explicitly excluded from this warranty:
- deterioration due to normal use or consumption of the product;
- accessories supplied with this product which are worn out or used up through proper use (e.g. batteries, rechargeable batteries, cuffs, seals, electrodes, light sources, attachments and nebuliser accessories);
- products that are used, cleaned, stored or maintained improperly and/or contrary to the provisions of the instructions for use, as well as products that have been opened, repaired or modified by the buyer or by a service centre not authorised by Beurer;
- damage that arises during transport between manufacturer and customer, or between service centre and customer;
- products purchased as seconds or as used goods;
- consequential damage arising from a fault in this product (however, in this case, claims may exist arising from product liability or other compulsory statutory liability provisions).
Repairs or an exchange in full do not extend the warranty period under any circumstances.
 BEURER GmbH Söflinger Str. 218 89077 Ulm (Germany)
www.beurer.com
www.beurer-gesundheitsratgeber.com
www.beurer-healthguide.com

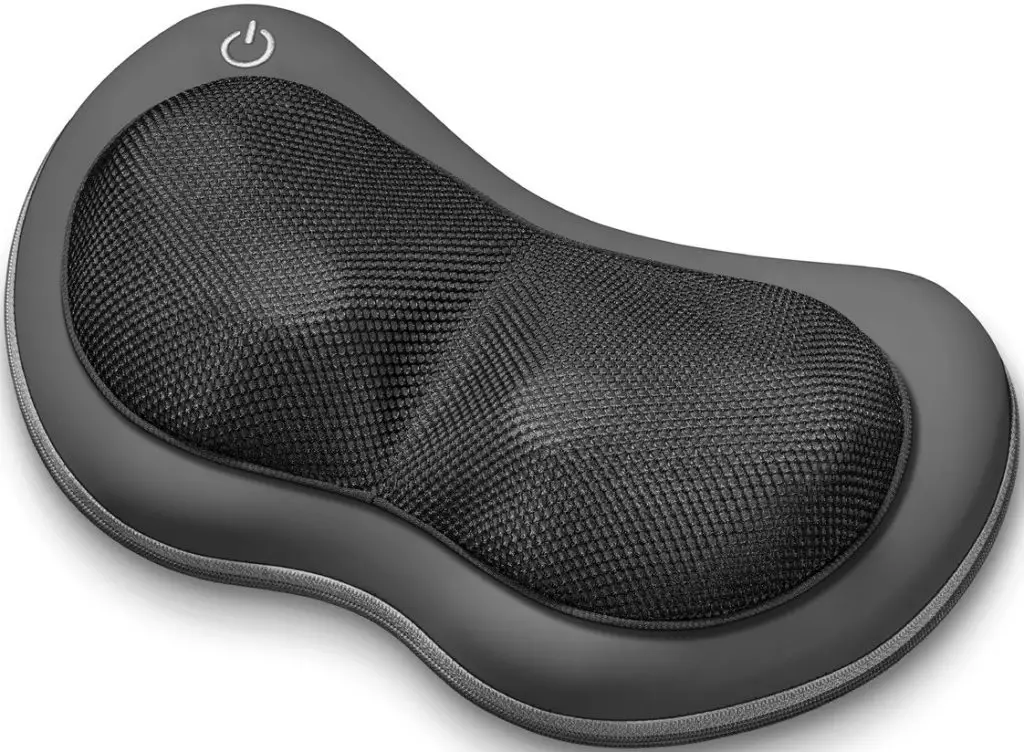
 Read these instructions for use carefully and keep them for later use, be sure to make them accessible to other users and observe the information they contain.
 WARNING
- The unit is only intended for domestic/private use, not for commercial use.
- This device may be used by children over the age of 8 and by people with reduced physical, sensory or mental skills or a lack of experience or knowledge, provided that they are supervised or have been instructed on how to use the device safely, and are fully aware of the consequent risks of use.
- Children must not play with the device.
- Cleaning and user maintenance must not be performed by children unless supervised.
- If the mains connection cable of this device is damaged, it must be disposed of. If it cannot be removed, the device must be disposed of.
- The device has a hot surface. Persons who are sensitive to heat must be careful when using the device.
- Under no circumstances should you open or repair the device yourself, as faultless functionality can no longer be guaranteed thereafter. Failure to adhere to this instruction will void the warranty.
Dear Customer,
Thank you for choosing one of our products. Our name stands for high-quality, thoroughly tested products for applications in the areas of heat, weight, blood pressure, body temperature, pulse, gentle therapy, massage and air.
Please read these instructions for use carefully and keep them for later use, be sure to make them accessible to other users and observe the information they contain.
Best regards,
Your Beurer Team
Items included in the package
1 x Shiatsu massage cushion
1 x Power supply unit
1 x These operating instructions
Explanation of symbols
The following symbols are used in the operating instructions and on the type plate:
 |
WARNING | Warning of risks of injury or health hazards. |
|
CAUTION | Safety information about possible damage to appliance/accessories. |
 |
Note | Important information. |
 |
The device has double protective insulation and therefore complies with protection class 2. | |
 |
Only use indoors. | |
 |
Dispose of packaging in an environmentally friendly manner. | |
 |
Disposal in accordance with the Waste Electrical and Electronic Equipment EC Directive — WEEE | |
 |
Manufacturer | |
 |
This product satisfies the requirements of the applicable European and national directives. | |
 |
Protected against solid foreign objects 12.5 mm in diameter and larger | |
 |
Short-circuit-proof safety isolating transformer | |
 |
The products demonstrably
meet the requirements of the Technical Regulations of the EAEU |
|
 |
Direct current
The device is suitable for use with direct current only |
|
 |
Switching mains part | |
 |
Energy efficiency level 6 | |
| Polarity | ||
About Shiatsu massage
Shiatsu is a form of body massage which was originally developed in Japan around 100 years ago. It is based on ideas anchored in traditional Chinese medicine, in particular the meridian system, i.e. the paths in the human body along which energy is conveyed.
The aim of any Shiatsu massage is to promote the physical, emotional and mental wellbeing the person being treated. To do this, energy blocks and bottlenecks in the meridians need to be dissolved and the self-regulating ability of the body needs to be stimulated. Shiatsu therapists achieve this by exercising pressure in flowing movements along the meridians. Although Shiatsu can be literally translated as “finger pressure”, practitioners also use the heels of their hands, their elbows, and knees as well as their fingers. In the process, the therapist will use his or her full body weight in order to generate the required pressure.
Getting to know your appliance
Your Shiatsu massage device has rotating massage heads which imitate the pressure and kneading motions of a Shiatsu massage. With the aid of this electrical Shiatsu massage device, you can give yourself or somebody else an effective and pleasant massage. Massages can be both relaxing and stimulating and are popular for the treatment of stiff or tense muscles, pains, and fatigue. The device delivers powerful and intensive massages for the neck, legs, arms, and back.
The device is for private use only and is not intended for medical or commercial purposes. In addition, the Shiatsu massage device offers the following advantages:
- simple operation,
- heat and lighting function,
- 2 massage directions,
- Clip buckles for attachment.
Warnings and safety notes
Please read these operating instructions carefully. Failure to observe the information provided below can lead to personal injury or material damage. Keep these instructions in a safe place where they can also be read by other persons using the device. Always pass on these instructions together with the appliance if you sell it or pass it on.
WARNING
Keep children away from the packaging materials. Risk of suffocation.
Electric shock
WARNING
Just like any other electrical appliance, this massage device must be handled with due care and attention in order to prevent the risk of electric shock.
For this reason, the device must only be operated as follows:
- only with the supplied power supply unit at the mains voltage indicated on the power supply unit,
- do not use the device if damage to the device itself or any of its accessories is evident,
- never use the appliance during a thunderstorm.
In the event of a defect or malfunction, switch the device off immediately and disconnect it from the power supply. Never pull on the power cable or on the appliance in order to disconnect the power supply from the mains outlet. Never hold or carry the device by the power cable. Keep the cables away from hot surfaces. Do not pinch, kink or twist the cables. Do not stick in any pins, needles or sharp objects.
Make sure that the massage device, the switch, the power supply unit, and the cable do not come into contact with water, damp or other liquids. Therefore, use the device only in dry interior rooms (e.g. never in the bath, sauna).
Never try to retrieve the device if it falls into the water. Disconnect the plug immediately from the mains outlet.
Do not use the device if damage to the device itself or any of its accessories is evident.
Do not subject the device to any impact and do not drop it.
Repairs
WARNING
- Repairs to electrical appliances must only be carried out by qualified persons. Incorrect repairs can lead to considerable danger for the user. In the event of repairs, please contact our customer service or an authorized dealer.
- The zip fastener on the Shiatsu massage device must not be opened. It is only fitted for reasons relating to the manufacturing of the device.
Fire hazard
WARNING
There is a risk of fire if the device is used incorrectly or if it is not used according to these operating instructions.
For this reason, the massage device must only be operated as follows:
- Never use the device under covers, such as blankets or pillows.
- Never use the device in the vicinity of petrol or other easily flammable materials.
Handling
CAUTION
Switch the device off and disconnect the power supply after every use and before every cleaning.
- Never insert any objects into openings on the device, and never insert anything into the rotating parts. Make sure that all moving parts can move freely at all times.
- Never sit or stand on the moving parts of the device with all your weight and do not place objects on the device.
- Keep the device away from high temperatures.
Proper use
This device is intended only for the massaging of individual parts of the human body. It cannot replace medical treatment. Do not use the massage device if any of the following warnings apply to you. Please consult your doctor if you are unsure whether or not the massage device is suitable for you.
WARNING
Use of the massage device is prohibited in the following cases:
- On animals.
- if you suffer from a medical abnormality or injury in the area to be massaged (e.g. herniated disc, open wounds),
- Never use the massage device to massage the heart region of persons fitted with a pacemaker.
Always consult a doctor before using the massage device on other parts of the body of a person fitted with a pacemaker. - Never use the massage device on swollen, burned, inflamed or damaged skin or body parts.
- The massage device must not be used on lacerated wounds, capillaries, varicose veins, acne, coupe rose, herpes or other skin diseases.
- The massage device must not be used during pregnancy.
- Do not use the massage device on the face (eyes), on the larynx or on other particularly sensitive parts of the body.
- Do not use the device for foot massage.
- Never use the device while you are asleep.
- Never use the device after taking medication or consuming alcohol (reduced levels of awareness).
- Not in the car.
You should consult your doctor before using the massage device if: - you suffer from a serious illness or are recovering from an operation on the upper body,
- you are fitted with a cardiac pacemaker, implant or other aid,
- Thromboses,
- Diabetes,
- in case of pains of unclarified origin.
The device is only intended for the purpose described in these operating instructions. The manufacturer cannot be held liable for damage occurring as a result of inappropriate or careless use.
Appliance description
Shiatsu massage pillow (front)

- 4 massage heads (4 heated and illuminated massage heads), rotating in pairs
- -Button
- Mains part
- Clip buckles for attachment
Shiatsu massage cushion (rear)

• Remove the packaging
• Check the device, mains part and cable for damage.
• Connect the power supply plug to the massage device.
• Route the cable safely so that there is no risk of anyone tripping over it.
Use
To start with, gently press the part of your body you wish to massage against the massage device. Then make sure that you are in a comfortable position before gradually shifting your weight onto the massage device.The message must be pleasant and relaxing at all times. Stop the massage or change your position or the contact pressure if you find it is painful or unpleasant.
- Do not trap or squeeze any part of your body, especially feet, hands and fingers, between the rotating massage heads and their mountings in the device.
- Switch on the massager using the -button. The massage heads start to rotate and automatically change the massage direction. Press the -button again to activate the light and heat function.
- Press and hold the button to turn off the massager.
 Note
Note - Do not use the massage device for longer than 20 minutes. Otherwise, using the device for longer can over-stimulate the muscles and cause tension instead of relaxation.
- The device features an automatic switch-off function, which is set to the maximum operating duration of 20 minutes.
 |
 |
 |
| Back massage: upper back area |
Back massage: lower back area (lumbar vertebrae) |
Leg massage |
Cleaning and maintenance
CLEANING
WARNING
- Before cleaning disconnect the power supply unit from the mains socket and disconnect it from the device.
- Only clean the appliance in the manner specified. Fluid must never be allowed to enter into the device or accessories.
- Small marks can be removed using a cloth or damp sponge, and some liquid delicate laundry detergent where necessary. Do not use any solvent-based cleaning products.
- Do not use the device again until it is completely dry.
Storage
If you do not use the device for longer periods, we recommend storing it in the original packaging in a dry a place without weighing it down.
In the event of problems
| Problem | Cause | Remedy |
| Massage heads rotating at reduced speed. | The load on the massage heads is too great. | Release the massage heads. |
| Massage heads not moving. | Appliance not connected to the power supply. | Connect the mains part and switch on the device. |
Disposal
CAUTION
 For environmental reasons, do not dispose of the device in the household waste at the end of its useful life. Dispose of the unit at a suitable local collection or recycling point. Dispose of the device in accordance with EC Directive – WEEE (Waste Electrical and Electronic Equipment). If you have any questions, please contact the local authorities responsible for waste disposal.
Technical data
| Technical data: Input Output | 100-240 V∼50/60 Hz; 0.5 A 12.0 V  1.5 A; 18.0 W 1.5 A; 18.0 W |
| Average active efficiency: | ≥86.30% |
| Efficiency at low load (10 %): | ≥ 84.95 % |
| No-load power consumption: | ≥0.05 W |
| Dimensions: | 33 x 20 x 11.5 cm |
| Weight: | approx. 1.41 kg |
Warranty/service
Beurer GmbH, Söflinger Straße 218, 89077 Ulm, Germany (hereinafter referred to as “Beurer”) provides a warranty for this product, subject to the requirements below and to the extent described as follows.
The warranty conditions below shall not affect the seller’s statutory warranty obligations which ensue from the sales agreement with the buyer.
The warranty shall apply without prejudice to any mandatory statutory provisions on liability.
Beurer guarantees the perfect functionality and completeness of this product.
The worldwide warranty period is 3 years, commencing from the purchase of the new, unused product from the seller.
The warranty only applies to products purchased by the buyer as a consumer and used exclusively for personal purposes in the context of domestic use.
German law shall apply.
During the warranty period, should this product prove to be incomplete or defective in functionality in accordance with the following provisions, Beurer shall carry out a repair or a replacement delivery free of charge, in accordance with these warranty conditions.
If the buyer wishes to make a warranty claim, they should approach their local retailer in the first instance: see the attached “International Service” list of service addresses.
The buyer will then receive further information about the processing of the warranty claim, e.g. where they can send the product and what documentation is required.
A warranty claim shall only be considered if the buyer can provide Beurer or an authorized Beurer partner, with
– a copy of the invoice/purchase receipt, and
– the original product.
The following are explicitly excluded from this warranty:
– deterioration due to normal use or consumption of the product;
– accessories supplied with this product which are worn out or used up through proper use (e.g. batteries,
rechargeable batteries, cuffs, seals, electrodes, light sources, attachments and nebulizer accessories);
– products that are used, cleaned, stored or maintained improperly and/or contrary to the provisions of the instructions for use, as well as products that have been opened, repaired or modified by the buyer or by a service center not authorized by Beurer;
– damage that arises during transport between manufacturer and customer, or between the service center and customer;
– products purchased as seconds or as used goods;
– consequential damage arising from a fault in this product (however, in this case, claims may exist arising from product liability or other compulsory statutory liability provisions).
Repairs or exchanges in full do not extend the warranty period under any circumstances.
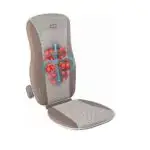 Beurer GmbH • Söflinger Str. 218 • 89077 Ulm, Germany
www.beurer.com • www.beurer-healthguide.com
www.beurer-gesundheitsratgeber.com
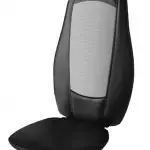
HR 6000
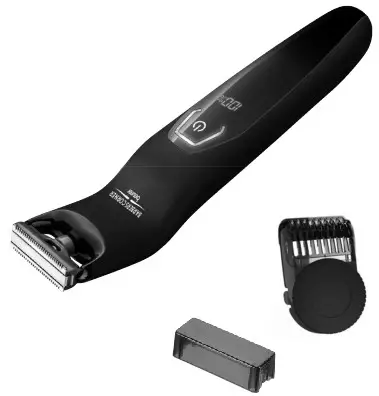

Read these instructions for use carefully and keep them for later use. Make them accessible to other users and note the information they contain.
![]() WARNING
WARNING
- The device is intended only for domestic/ private use, not for commercial use.
- This device can be used by children over the age of 8 and by people with reduced physical, sensory or mental skills or people lacking experience or knowledge, provided that they are supervised or have been instructed on how to use the device safely and are aware of the consequent risks of use. Children must not play with the device.
- Cleaning and user maintenance must not be performed by children unless supervised.
- Under no circumstances should you open or repair the device yourself, as faultless functionality can no longer be guaranteed thereafter. Failure to comply will invalidate the warranty.
- The hand-held part must be disconnected from the connection cable before it is cleaned in water.
- When using the device in the bathroom, disconnect it from the power outlet after charging, as water in the vicinity constitutes a danger even when the device is switched off.
- Never use the device with the mains adapt-er near baths, washbasins, showers, or other objects containing water or other liquids due to the risk of electric shock.
- If the mains connection cable of this device is damaged, it must be replaced by the manufacturer, its customer service department, or a similarly qualified person to avoid any risk.
- The device may only be operated with the supplied mains adapter.
- As an additional safety measure, we recommend the installation of a residual-cur-rent-operated protective device (RCD) with a rated operational current not exceeding 30 mm in the bathroom circuit. Your local electrical specialist can provide you with the relevant information.
Dear customer,
Thank you for choosing a product from our range. Our name is synonymous with high-quality, thoroughly tested products for applications in the areas of heat, weight, blood pressure, body temperature, pulse, gentle therapy, massage, beauty, and air. Please read these instructions for use carefully and keep them for later use, make them accessible to other users, and observe the information they contain.
With kind regards,
Your Beurer team
Included in delivery
Check that the device packaging has not been tampered with and make sure that all contents are present. Before use, ensure that there is no visible damage to the device or accessories and that all packaging material has been removed. If you have any doubts, do not use the device and contact your retailer or the specified Customer Services address.
1 x HR 6000 Body groomer
1 x length-adjustable comb attachment
1 x Protective cap
1 x mains adapter
1 x cleaning brush
1 x storage bag
Signs and symbols
The following symbols are used in these instructions for use, on the packaging, and on the type plate for the device:
| Warning notice indicating a risk of injury or damage to health. | |
| Safety note indicating possible damage to the device/accessory. | |
 Note Note |
Note on important information |
 |
Observe the instructions for use |
 |
Disposal in accordance with the EC Directive on Waste Electrical and Electronic Equipment (WEEE) |
| IPX6 | Protection against strong water jets |
 |
Suitable for cleaning under running water |
 |
Manufacturer |
| This product satisfies the requirements of the applicable European and national directives | |
 |
Only use the mains adapter indoors |
 |
The adapter corresponds to devise protection class II |
 |
Short-circuit-proof safety isolating transformer |
 |
SMPS (switch mode power supply unit) switching mains part |
 |
The polarity of the output terminal |
 |
Energy efficiency class 6 |
 |
Dispose of packaging in an environmentally friendly manner |
 |
The products demonstrably meet the requirements of the Technical Regulations of the EAEU. |
Getting to know your device
With the HR 6000 Body groomer, you can remove body hair easily and precisely. Its high-quality stainless steel razor blade is coated with titanium, which ensures optimum skin compatibility.
The length-adjustable comb attachment allows you to effortlessly adjust the cutting length to suit your needs. The Body groomer can be powered by the battery as well as the supplied mains adapter. A high-performance lithium battery means that you can use the Body groomer for up to 60 minutes after just one battery charge.
The Body groomer is water-resistant (IPX6). The Body groomer is suitable for wet and dry shaving.
Intended use
The HR 6000 Body groomer is exclusively intended to cut human body hair. Do not use the Body groomer on animals or objects. The Body groomer is intended for private use only. The Body groomer may only be used for the purpose for which it was designed and in the manner specified in the instructions for use Any form of improper use can be dangerous. The manufacturer is not liable for damage resulting from improper or careless use.
Warnings and safety notes
![]() DANGER To avoid damage to health, we strongly advise against using the device in the following situations:
DANGER To avoid damage to health, we strongly advise against using the device in the following situations:
- The danger of suffocation by packaging material. Keep packaging material away from children.
- Before use, inspect the device and accessories for visible damage. If you have any doubts, do not use the device and contact your retailer or the specified Customer Service address.
- Keep the mains adapter away from water.
- Never submerge the device in water or other liquid! Risk of electric shock!
- If the device should fall into the water while charging, despite following all safety precautions, immediately pull the mains adapter from the socket! Do not reach into the water! Risk of electric shock!
- Have the device checked by an authorized specialist workshop before using
- If the device has been dropped or has suffered any other damage, it must no longer be used. Risk of electric shock and injury!
- If there is visible damage to the device or the mains cable/plug. If you have any doubts, do not use the device and contact your retailer or the specified Customer Service address. Risk of electric shock!
- Do not use the device if the stainless steel blade is damaged as it may have sharp edges — the risk of injury!
- The edges of the stainless steel blade and the attachments are sharp. Take care when using the device.
- Store the device out of the reach of children.
- Do not use extension cables in the bathroom to ensure the mains adapter can be accessed quickly in an emergency.
- Never use the device with wet or moist hands when it is connected to the power supply.
- Only use the original comb attachments.
![]() WARNING
WARNING
To avoid damage to health, please note the following:
- Do not use the device if you have sunburn, open wounds, eczema or cuts.
- Switch off the device before attaching or switching the comb attachment
- Ensure that no highly flammable liquids are located near the device. Risk of fire!
- Ensure that the mains cable does not pose a trip hazard.
- Remove all packaging material before using the device.
- Only connect the device to a socket that has the correct voltage as indicated on the type plate.
- Only operate the device according to the specifications on the type plate
- The device may only be operated with the supplied mains adapter.
- Only pull on the mains adapter to remove the mains cable from the socket.
- Under no circumstances should you open or repair the device yourself, as faultless functionality can no longer be guaranteed thereafter. Failure to comply with this instruction will void the warranty.
- In the event of a fault or damage, have the device repaired by a certified specialist workshop?
- Never leave the device unattended while in use.
- Do not use the device outside.
- If you pass on the device to someone else, make sure to also pass on these instructions for use
- Switch off the device after every use.
- Pull the mains adapter out of the socket after each completed charging process.
![]() CAUTION
CAUTION
- Protect the device and its accessories from impacts, humidity, dirt, marked temperature fluctuations, and direct sunlight.
- Only operate, charge or store the device at temperatures from -10°C to 40°C.
Notes on handling batteries:
- If your skin or eyes come into contact with fluid from the battery cell, flush out the affected areas with plenty of water and seek medical assistance.
- Risk of explosion! Never throw batteries into a fire.
- Do not disassemble, split or crush the batteries.
- Only use chargers specified in the instructions for use.
- Batteries must be charged correctly prior to use. The instructions from the manufacturer and the specifications in these instructions for use regarding correct charging must be observed at all times.
- Fully charge the battery prior to initial use (see Chapter 7)
- In order to achieve as long a battery service life as possible, fully charge the battery at least 2 times a year.
Device description
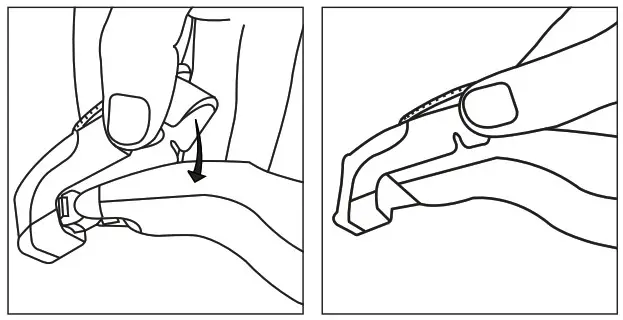
| 1. Stainless steel razor blade | 8. Maintenance indicator |
| 2. Operating display | 9. Micro USB connection |
3. ON/OFF switch |
10. Protective cap |
| 4. LED display | 11. Length-adjustable comb attachment |
| 5. Battery indicator | 12. Cleaning brush |
| 6. Travel lock indicator | 13. Mains adapter |
| 7. Charging indicator | 14. Storage bag |
Initial use
You can operate the device with the battery as well as the supplied mains adapter.
Charging the battery
You must fully charge the battery for 60 minutes before the first use. The operating period of the device is approx. 60 minutes when it is fully charged.
To charge the battery, proceed as follows:
- Ensure that the device is switched off before charging the battery.
- Connect the mains adapter to a suitable socket.
- Plug the other end of the mains adapter into the connection socket on the underside of the device. The charge indicator now begins to flash. The battery indicator shows you the current battery state in percent
- Once the charging process is complete, pull the mains adapter out of the socket and the device.
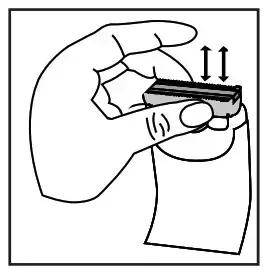
Quick charging
If you have forgotten to charge the shaver before use, the quick-charge function helps. Connect the device to the power supply for this purpose. The device will be ready for a complete shave using battery operation within 5 minutes.
Mains operation
To operate the device with the supplied mains adapter, proceed as follows:
- Connect the mains adapter to a suitable socket.
- Plug the other end of the mains adapter into the connection socket on the underside of the device. The battery indicator shows you the current battery state in percent and the charge indicator begins to flash. The mains adapter supplies enough energy to charge the battery and operate the device at the same time.
- After use, pull the mains adapter from the socket and the device.
![]() WARNING
WARNING
Never use the device in the shower when it is being operated via the mains. The hand-held part of the Body groomer must be disconnected from the connection cable before use in a damp environment.
Usage
Travel lock
The device has a travel lock. If the travel lock is activated, it is not possible to switch on the device. The travel lock prevents the device from switching on by accident (e.g. when transporting it in a suitcase). To activate the travel lock, press and hold the ON/OFF switch for 3 seconds. The travel lock indicator begins to flash. The device is now locked. If the ON/OFF switch is briefly pressed when the device is locked, the travel lock indicator will light up in the display to indicate that the device is locked. To deactivate the travel lock, press and hold the ON/OFF switch again for 3 seconds.
Direct drive function
If the battery is completely flat, you can continue using the device immediately via mains operation
before cutting/trimming hair
- Be particularly careful when using the device in areas with thin skin or skin creases (e g. armpits or pubic area) in order to avoid injuries. Try to stretch the skin using your fingers.
Cutting/trimming hair
You can either trim body hair with the length-adjustable comb attachment or remove it entirely without the length-adjustable comb attachment-

- If you want to use the length-adjustable comb attachment, attach it to the device as shown.
Here, slide the front part of the length-adjustable comb attachment onto the stainless steel razor blade and press the tabs on the back of the length-adjustable comb attachment onto the device until you can hear and feel it click into place. When selecting the trimming length with the length-adjustable comb attachment, we recommend you initially start with the longest cutting length so that you can slowly work your way to your desired length. Turn the selection dial on the length-adjustable comb attachment to select the required trim-ming length. The settings on the dial correspond to hair length in millimeters. - Press the ON/OFF switch
 to switch on the device. The operating display begins to light up.
 - Guide the device slowly through the body hair. Ensure that the stainless steel razor blade sits as flat against the body as possible.
- Always only trim small areas.
- Cut the hair against the direction of growth. if the hair grows in different directions, use the device in multiple directions.
- Press the ON/OFF switch again to switch off the device after use. The operating display turns off.
Cleaning and maintenance
Cleaning the device
![]() WARNING
WARNING
- Always pull the mains adapter out of the socket before cleaning the device. Risk of electric shock
- Remove the length-adjustable comb attachment before cleaning
- Only clean the housing of the device with a soft cloth dampened with warm water.
- Do not clean the device with highly flammable liquids. Risk of fire!
- Do not clean the device in the dishwasher.
- Clean the stainless steel razor blade and the length-adjustable comb attachment after each use to prevent lots of hair from getting jammed inside, which could otherwise impede flawless operation.
- Leave the length-adjustable comb attachment to dry completely before you re-attach it to the device.
- If you do not use the device for a long period of time, place the protective cap over the stainless steel razor blade and store the device and the length-adjustable comb attachment in the storage bag supplied.
Cleaning the stainless steel razor blade
After use, blow on the length-adjustable comb attachment and the stainless steel razor blade to remove any hair from them. You can also carefully remove wet hair with your fingers.
![]() WARNING
WARNING
When cleaning using your fingers, ensure that you do not injure yourself on the sharp edges of the stainless steel razor blade.
To clean the stainless steel razor blade particularly thoroughly, you can also rinse it under running water. To do so, proceed as follows:
1. Carefully grasp the stainless steel razor blade from below using your thumb and index finger. Pul the stainless steel razor blade up and off. When removing the stainless steel razor blade, ensure you do not injure yourself on the sharp edges. 2. Hold the stainless steel razor blade under running water so that the jet of water runs through the stainless steel razor blade from the inside out.
3. Leave the stainless steel razor blade to dry completely before reattaching it to the device.
Clean the device regularly, at the latest once the maintenance indicator symbol (see chapter 6 on device description) lights up in the display.
Accessories and replacement parts
The stainless steel razor blade of the HR 6000 is self-sharpening. For hygienic reasons, the stainless steel razor blade can be reordered from the webshop at: www.beurer-shop.de.
Disposal
For environmental reasons, do not dispose of the device in the household waste at the end of its service life. Dispose of the device at a suitable local collection or recycling point in your country. Dispose of the device in accordance with the EC Directive on Waste Electrical and Electronic Equipment (WEEE). If you have any questions, please contact the local authorities responsible for waste disposal.
![]() WARNING
WARNING
The integrated battery cannot be removed for disposal. Risk of explosion and injury. The lithium-ion battery used in this device must not be deposed of in household waste but must be disposed of correctly. For intonation on disposal, please contact the authorized seller or a municipal collection point. During disposal, it must be pointed out that the device contains a battery. Discharge the battery before disposal. Take the device and switch the Body groomer on until the battery is flat.
![]() NOTE
NOTE
If it is not possible to discharge the battery due to a fault or damage, please consult your waste collection point.
Technical specifications
| Model | HR 6000 |
| Weigh | 103 g |
| Device dimensions | 17.1 x 3.8 x 3.3 cm |
| Device protection type | IPX6 |
| Device input | 5V=1A |
| Adapter protection type | IP20 |
| Adapter protection class | II |
| Voltage supply (TPA-97050100BU) | Input: 100-240 V-; 50/60 Hz; 0.15 A Output: 5.0 V —1.0 A; 5.0 W |
| Average efficiency &ring operation | ≥ 73.98 % |
| No-load power consumption | ≤0.07 W |
| Battery: Capacity Nominal voltage Type designation |
600 mAh 3.2 V Li-Ion |
Warranty/service
Beurer GmbH. Solinger StraBe 218, 89077 Ulm, Germany (hereinafter referred to as -Beurer”) provides a warranty for this product, subject to the requirements below and to the extent described as follows.
The warranty conditions below shall not affect the seller’s statutory warranty obligations which ensue from the sales agreement with the buyer. The warranty shall apply without prejudice to any mandatory statutory provisions on liability.
Beurer guarantees the perfect functionality and completeness of this product.
The worldwide warranty period is 3 years, commencing from the purchase of the new, unused product from the seller
The warranty only applies to products purchased by the buyer as a consumer and used exclusively for personal purposes in the context of domestic use. German law shall apply.
During the warranty period, should this product prove to be incomplete or de ineffective in functionality in accordance with the following provisions, Beurer shall carry out a repair or a replacement delivery free of charge, in accordance with these warranty conditions.
If the buyer wishes to make a warranty claim, they should approach their local retailer in the first instance: see the attached “International Service” list of service addresses.
The buyer will then receive further information about the processing of the warranty claim, e.g. where they can send the product and what documentation is required.
A warranty claim shall only be considered if the buyer can provide Beurer, or an authorized Beurer partner, with
- a copy of the invoice/purchase receipt, and
- the original product. The following are explicitly excluded from this warranty:
- deterioration due to normal use or consumption of the product;
- accessories supplied with this product which are worn out or used up through proper use (e.g. batteries, rechargeable batteries, cuffs, seals, electrodes, light sources, attachments, and nebulizer accessories);
- products that are used, cleaned, stored or maintained improperly and/or contrary to the provisions of the instructions for use, as well as products that have been opened, repaired or modified by the buyer or by a service center not authorized by Beurer;
- damage that arises during transport between manufacturer and customer, or between the service center and customer;
- products purchased as seconds or as used goods;
- consequential damage arising from a fault in this product (however, in this case, claims may exist arising from product liability or other compulsory statutory liability provisions).
Repairs or exchanges in full do not extend the warranty period under any circumstances.

https://www.beurer.com/verwaltung/redirect.php?hash=5a2401564041033
![]()
beurer Facial Sauna
Included in delivery
Check that the device packaging has not been tampered with and make sure that all contents are present. Before use, ensure that there is no visible damage to the device or accessories and that all packaging material has been removed. If you have any doubts, do not use the device and contact your retailer or the specified Customer Services address.
1 x Facial sauna
2 x Attachments
1 x Measuring jug
1 x Instructions for use
Signs and symbols
The following symbols are used in these instructions for use, on the packaging and on the type plate for the device:
| WARNING
Warning of risks of injury or health hazards. |
|
| CAUTION
Safety information about possible damage to appliance/accessories. |
|
| CE labelling
This product satisfies the requirements of the applicable European and national directives. |
|
| Please dispose of the device in accordance with EC Directive – WEEE (Waste Electrical and Electronic Equipment). | |
| Manufacturer | |
| The device has double protective insulation and therefore complies with protection class 2. | |
| Do not keep your face too close to the mask as otherwise burns can occur
Warning! Hot Steam! because of the hot steam. |
|
| Read the instructions for use | |
| The products demonstrably meet the requirements of the Technical Regulations of the EAEU. | |
| 21 PAP | Dispose of packaging in an environmentally friendly manner |
Warnings and safety notes
Warning
- The device is intended only for the purpose described in the instructions for use. The manufacturer cannot be held responsible for damage arising from incorrect or careless use. This device is not suitable for commercial or medical use, but is only intended for private domestic use.
- Repairs must be carried out only by authorised service agents as special tools and special parts are required for repair. Otherwise the guarantee is void.
- Do not use the device if you suffer from heart disease, skin flushing, inflammation, swelling, sensitive areas, diabetes, wounds, burns, eczema or psoriasis.
- During pregnancy or if you have health problems, consult your doctor before using the device.
- Children do not recognise the dangers that can arise in conjunction with electrical devices. Ensure that the device cannot be used by children unsupervised.
- Check before you plug the device into the mains that the local voltage is the same as the voltage given on the device.
- Do not use the device in the vicinity of water (e.g. bath tub, wash basin, etc.).
- Do not use the device in the bath or shower or when you are asleep.
- Do not put it in water or other liquids. Keep the device in a safe place.
- Do not place the device on water-sensitive surfaces.
- Use the device only with the facial sauna steam mask attached.
- Keep the device and mains cable away from hot surfaces.
Intended use
Important instructions during use
Warning
- Switch off the device immediately if a fault occurs during use and unplug it from the socket.
- Do not keep your face too close to the mask as otherwise burns can occur because of the hot steam. Close your eyes during use and protect heat-sensitive areas.
- Do not use the device for longer than 20 minutes.
- Stop using it with oils and herbs if skin irritation or anything else unusual occurs in the skin.
- You should also stop using it if you develop pain or feel unwell and you should consult your doctor.
- Do not use the device under covers, towels etc.
- Do not change the accessories while in use as there is a risk of burns if hot liquids spill.
- Caution: The overheating protection switches the device off after approx. 2 minute if the water in the water container has run dry. The device can be started again as normal after a cooling down period of approx. 4 minutes.
- If the device falls into water by accident, unplug it immediately. Have the device checked by a qualified electrician before using it again.
Important instructions for after use
Important
- After use, switch off the device and unplug it.
- Never unplug it with wet hands or by pulling on the cable.
- Empty any remaining liquid from the side of the vaporizer. Ensure that no liquids can get into the device through the switch, the cable or the bottom of the device.
- The device should be cleaned after use to avoid the collection of grease and other residues. This ensures optimal operation and prolongs the working life of the device.
- Let the device cool down fully before operating it again.
- If you have any further questions about using our devices, please consult your dealer or the Customer Service department.
Device description
- Facial sauna steam mask for the entire face
- Water container
- Basic unit
- Maximum filling level
- Rotary switch
- Indicator light
- Aroma attachment
- Facial sauna steam mask for nose and mouth
- Steam valve (reverse)
- Steam disc
- Measuring cup

Initial use
Uncoil the cable fully. Place the device on a flat, firm, level and water-insensitive surface or on a table.
Use the measuring cup to fill the device‘s water container with water. Do not exceed the maximum filling level.
You should never fill the container directly under running water but only use the measuring cup that comes with it. The water volume at maximum filling level is enough for about 20 minutes use.
Do not use oils, herbs or other aromatic substances as a substitute for water but only added to adequate water filling.
As well as the facial mask, there is also a special attachment for the nose.
Fix the desired steam mask onto the basic unit by turning it.
Ensure that the mask engages firmly with the knobs.
Use
This device is intended only for use on the human face.
Using the facial sauna provides an ideal basis for cosmetic facial care. The skin of your face is prepared optimally for further treatments such as deep cleansing, moisturising, face masks etc.
Beauty salons very often begin facial treatments with a steam treatment. The invigorating steam increases the skin circulation, the pores are opened and impurities are removed more easily.
You can thus provide the perfect basis for every kind of facial care. The skincare products penetrate deep into the skin through the opened pores, thus optimising their action.
Using the facial sauna
Uncoil the cable fully. Plug into the socket. Then turn the switch clockwise until the red indicator lights up. Turn the switch first to position “2“ in order to speed up heating. After about 5 minutes, steam begins to rise. Turn the switch back to position “1“ to reduce the steam output.
Adjustable steam outlet:
You can also regulate the strength of the steam outlet by turning the steam disc.
When the steam outlet is closed, the steam comes out of the steam valve which is located on the nback of the device or mask. The water heating phase can also be shortened by closing the steam disc.
To avoid burns, never touch the steam outlet directly and ensure that the steam can come out of the valve freely.
Now sit down in front of the device. Bend forward until your face is above the mask.
Warning
- Do not hold the device in your hand and do not adjust it during operation until it has cooled down.
- You could sustain burn injuries from hot water.
- If the steam effect is perceived as too hot, increase the distance to avoid burns.
Warning
- The exiting steam is hot!
- During the treatment, you should always turn the switch back to position “1“.
- Do not position your face too close to the mask, as otherwise the high intensity of the steam can cause burns or redness.
- When you want to stop using the device or the water has evaporated, turn the switch back to position “0“. The device‘s indicator goes out.
- Rinse your face with cold water after use. Then apply a face cream or mask. The opened pores let the active ingredients penetrate deep into the skin.
- Do not use the facial sauna for more than 20 minutes per day. Using it 2–3 times a week is recommended.
Use of medicinal herbs, oils and other aromatic substances
The aroma attachment enables you to use medicinal herbs, oils and other aromatic substances as part of an aromatherapy treatment. This is the best way for medicinal herbs, oils and other aromatic substances that mix with the steam to exert their effect. However, no solutions containing salt should be used.
Only use medicinal herbs, oils and other aromatic substances that are intended and suitable for use with a steam mask and are licensed for this by the producer of these substances.
Use:
Open the lid of the aroma attachment. Put a few drops of the oil on a cotton wool ball. Put in the cotton wool ball and then close the aroma attachment.
Important: Please do not fill fragrances directly in the water containers; this may cause a fault in the device. Failure to comply will result in voiding of the warranty.
Using the nose/mouth steam mask
As the mucous membrane of the human nose is very sensitive, never use the device on position “2“ when using with the nose/mouth steam mask. Do not keep your nose too close to the mask during use.
The treatment should not last more than 10 minutes per day and should be done 2–3 times a week at the most.
Use as described under 7.2.
Cleaning and maintenance
Unplug the device. Let it cool for about 10–15 minutes before taking the steam mask off the basic unit by turning it anticlockwise. Empty the water container by holding it upside down.
Clean grease and chalk deposits after each use with a commercially available decalcification agent suitable for aluminium.
Use a soft and slightly moistened cloth to clean the surface of the device and the steam mask and then wipe the surface dry.
- Do not use harsh agents (e.g. alcohol, acetone, benzine or abrasives) to clean the plastic parts.
- Unplug before cleaning.
- Do not use any sharp or pointed objects for cleaning.
- Do not immerse the device in water.
Disposal
For environmental reasons, do not dispose of the device in the household waste at the end of its useful life. Dispose of the unit at a suitable local collection or recycling point. Dispose of the device in accordance with EC Directive – WEEE (Waste Electrical and Electronic Equipment). If you have any questions, please contact the local authorities responsible for waste disposal.
Technical data
| Mains connection | 220 – 240 V~; 50/60 Hz; 120 W |
| Dimensions | 20 x 20 x 30 cm |
| Weight | ca. 61 g |
Warranty / service
Beurer GmbH, Söflinger Straße 218, 89077 Ulm, Germany (hereinafter referred to as “Beurer”) provides a warranty for this product, subject to the requirements below and to the extent described as follows.
The warranty conditions below shall not affect the seller’s statutory warranty obligations which ensue from the sales agreement with the buyer. The warranty shall apply without prejudice to any mandatory statutory provisions on liability.
Beurer guarantees the perfect functionality and completeness of this product.
The worldwide warranty period is 3 years, commencing from the purchase of the new, unused product from the seller.
The warranty only applies to products purchased by the buyer as a consumer and used exclusively for personal purposes in the context of domestic use. German law shall apply.
During the warranty period, should this product prove to be incomplete or defective in functionality in accordance with the following provisions, Beurer shall carry out a repair or a replacement delivery free of charge, in accordance with these warranty conditions.
If the buyer wishes to make a warranty claim, they should approach their local retailer in the first instance: see the attached “International Service” list of service addresses.
The buyer will then receive further information about the processing of the warranty claim, e.g. where they can send the product and what documentation is required.
A warranty claim shall only be considered if the buyer can provide Beurer, or an authorised Beurer partner, with
- a copy of the invoice/purchase receipt, and
- the original product.
The following are explicitly excluded from this warranty:
- deterioration due to normal use or consumption of the product;
- accessories supplied with this product which are worn out or used up through proper use (e.g. batteries, rechargeable batteries, cuffs, seals, electrodes, light sources, attachments and nebuliser accessories);
- products that are used, cleaned, stored or maintained improperly and/or contrary to the provisions of the instructions for use, as well as products that have been opened, repaired or modified by the buyer or by a service centre not authorised by Beurer;
- damage that arises during transport between manufacturer and customer, or between service centre and customer;
- products purchased as seconds or as used goods;
- consequential damage arising from a fault in this product (however, in this case, claims may exist arising from product liability or other compulsory statutory liability provisions).
Repairs or an exchange in full do not extend the warranty period under any circumstances.
![]()
beurer Infrared Heat Lamp
SAVE THESE INSTRUCTIONS FOR FUTURE REFERENCE
If the instruction manual is damaged or if you no longer have the instruction manual in your possession, please contact Beurer customer service. Please see warranty for service contact.
The manufacturer shall not be held liable for damage or injuries caused by improper or incorrect use. Dear Valued Customer,
Thank you for choosing one of our products. Our name stands for high-quality, thoroughly tested products for application in the areas of heating, weight management, blood pressure, body temperature, pulse, gentle therapy, massage, and beauty. Register your product today to receive further benefits:
- added protection for your purchase
- health and wellness tips
- new product information
- continual outstanding customer service and support.
Visit www.registerbeurer.com or contact customer service at 1-800-536-0366.
Please read these instructions for use carefully and keep them for later use. Make them accessible to other users and observe the information they contain.
With kind regards,
Your Beurer Team
Important safety notes
Signs and symbols
Whenever used, the following signs identify safety and property damage messages and designate a level of hazard or seriousness.
READ AND UNDERSTAND THIS ENTIRE MANUAL, INCLUDING THE SAFETY SECTION AND ALL INSTRUCTIONS AND WARNINGS, COMPLETELY AND CAREFULLY BEFORE USING THIS PRODUCT. FOLLOW ALL SAFETY INSTRUCTIONS AND WARNINGS TO AVOID HAZARDOUS SITUATIONS AND TO MAKE CORRECT USE OF THIS PRODUCT.
DANGER AND WARNING:
- indicates a hazardous situation which, if not avoided, will result in death or serious injury.
- indicates a hazardous situation which, if not avoided, could result in death or serious injury.
- addresses practices not related to personal injury, such as product and/or property damage. > 30 cm Distance
- Observe the instructions for use
- hot surface
- Infrared radiation
- Protective insulation class 2
- Protected against solid foreign objects 0.49 in (12.5 mm) in diameter and larger, and against vertically falling drops of water.
DANGER:
Electric shock: Do not place or store product where it can fall or be pulled into a bathtub, sink, water, or other liquid.
Risk of electric shock.
• Do not use this product while bathing, showering, washing dishes, or close to water sources of any kind. Risk of electric shock.
• Do not place device in or drop into water or other liquid. Do not allow any water to be sprayed onto the unit. The unit must be operated only when it is completely dry. Risk of electric shock.
• Open the unit only to change the light bulb. Do not attempt to repair the unit in case of malfunctions. Risk of electric shock. If you need to have the unit repaired, please contact our customer service. Please see warranty for service contact.
• Do not pinch or bend the power cord or pull it over sharp objects. This can cause an electric shock.
• Do not touch the plug with wet hands – risk of electric shock!
• Do not operate this device outdoors. Risk of electric shock.
• Contact Customer Service or your dealer if the cord or housing are damaged, otherwise you risk an electric shock.
• DANGER OF AN ELECTRIC SHOCK! Do not attempt to repair the unit, otherwise problem-free operation cannot be guaranteed. Failure to observe this condition will void the warranty.
Safety advice for your health
• The power cord presents a strangulation hazard. NEVER LEAVE CHILDREN OR THOSE WHO REQUIRE CLOSE SUPERVISION UNATTENDED WITH THIS DEVICE.
• DO NOT USE INFRARED HEAT AFTER RECENT USE OF ACCUTANE OR IF YOU ARE PRESENTLY USING PHOTOSENSITIZING DRUGS OR COSMETICS!
• Do not touch the unit with wet hands if it is plugged in.
• Route the power cord so that it does not pose a trip hazard.
• Keep children away from packaging materials (risk of suffocation).
• Do not use on babies and small children.
• This device is not intended for use on changing units, cots or similar.
• Children do not understand the risks associated with electrical appliances.
• Make sure that the unit cannot be used unsupervised by children.
Operation / proper use:
• Packaging materials are a deadly hazard for children and can cause suffocation. Remove all packaging materials immediately and keep them away from children at all times.
• Remove all packaging materials before using the unit.
• Before use, ensure that there is no visible damage to the unit or accessories. Never operate the unit if it
– has any damaged parts, e.g. housing,
– has been exposed to extreme humidity or to any
– liquids inside the housing,
– has been dropped,
– is not working properly.
• If the unit does not function correctly or if you notice any abnormalities, e.g. an unusual noise or smell, stop using the unit immediately. When in doubt, do not use the unit and contact Beurer customer service. (Please see warranty for service contact).
• This product should never be left unattended when in operation.
• Before you clean the unit, always switch it off, unplug it and let it cool off completely.
• Do not carry this appliance by supply cord or use cord as handle.
• The unit must be protected and stored away from sources of heat. (e.g. stoves, heating radiators)
• Connect the unit only to the voltage listed on the data plate.
• Do not allow water to spray onto the unit.
• The unit must be operated only when it is completely dry.
• Please make sure the unit is not placed on flammable materials such as table cloths or carpets.
• Do not leave any easily flammable or melt able items close to the unit.
• The manufacturer is not liable for damage caused by improper or incorrect use.
WARNING:
Contraindications
• It is strongly recommended NOT to use the unit in the following cases in order to prevent health injuries:
– for persons insensitive to heat. Heat sensitivity can be reduced or increased in the following cases:
– in diabetic patients
– in people suffering from drowsiness, dementia or a lack of concentration
– in people with skin changes caused by illness
– in people with scarred skin in the treatment area
– in people with allergies
– in children and elderly people
– after taking medicine or consuming alcohol.
• Using the unit is not a substitute for consultation with or treatment from a physician. Whenever you have any pain, illness or discomfort, always contact your physician first. If you have an emergency please call 911 immediately.
• If you start feeling any discomfort, pain, drowsiness or other change in your condition, stop using the unit immediately. For medical advice please contact a licensed physician. If you have an emergency please call 911 immediately.
• This device is not intended to be used by persons (including children) with restricted physical (e.g. activity limitations, disabilities), sensory (e.g. insensitivity to pain) or mental disabilities (e.g. mental disorders) or persons lacking the required experience or knowledge for safe operation of the device, unless closely supervised by a person responsible for their safety. NEVER LEAVE THOSE WHO REQUIRE CLOSE SUPERVISION UNATTENDED WITH THIS DEVICE.
Safety advice:
• Never use this product while in bed.
• Use the unit only on human beings and for its intended purpose and in the manner described in these instructions for use. Any improper use can be dangerous!
• Do not operate the unit in the presence of flammable gases, oxygen and aerosol spray products. Non-compliance may result in e.g. fire, burns, explosions, etc.
• Do not use this unit while operating a vehicle or a machine.
• The glass screen and unit housing become very hot during operation. You could be burned by touching it!
• Switch the unit off immediately if it becomes faulty or malfunctions.
• Do not pull on the power cord to remove the plug from the outlet.
• Do not touch the hot glass when operating the buttons (On/Off and timer). Risk of burns.
• Do not use infrared heat directly on your face, do not look directly at the infrared light; close or cover the eyes. Infrared heat does not tan your skin!
• Some circumstances, like medicines, cosmetics and food can lead to oversensitive or allergic skin reactions. Treatment should be discontinued immediately in these cases.
• When in doubt use only after consultation with your doctor.
• Do not use the unit if there is the risk of you falling asleep!
• Excessive exposure can result in skin burns.
• Maintain a distance of at least 3 feet from other objects, both to protect the unit itself from overheating and to prevent the risk of fire.
Operation / proper use:
• This unit is not intended for commercial or clinical use, but only for private household use!
• Place the unit on a solid and even surface.
• Unwind the power cord fully.
• Do not bump the unit while it is operating or cooling down or you could damage the lamp.
• The infrared heat lamp must only be used with suitable Beurer accessories. The use of other accessories may damage the device and can impair its usage.
• Never drop or insert any object into any opening.
• Always remove the plug from the outlet when the unit is not being used, when cleaning it or in the event of a malfunction, smoke or unusual smell.
• An appropriate distance between the infrared lamp and the desired treatment area must be maintained during treatment so that no skin irritation, such as tingling, itching, burning or too high heat sensitivity occurs. Stop the treatment if this occurs. Alternatively, increase the radiation distance and reduce the radiation duration.
• This device is not intended for radiation from above.
• The unit should not be used if it has been dropped, exposed to extreme humidity or damaged in any other way.
• Special care and caution is necessary if using the unit for a long period.
• Do not hang the unit on the wall or from the ceiling.
• Disconnection from the power supply is only guaranteed if the plug has been removed from the wall outlet.
• For repairs, contact Customer Service or an authorized dealer (please see warranty for service contact).
NOTICE
General advice:
• Before use, make sure the unit has no visible damage. If in doubt, do not use the unit and contact your dealer or the customer service. This applies especially to scratches and cracks in the glass or cracks in the housing.
• Use an easily accessible power supply so that you can disconnect the plug quickly in an emergency.
• Protect the unit or the parts from strong impacts such as dropping the unit on the floor.
• Protect the unit against dust, dirt and moisture. This may damage the device.
• Portable and mobile RF communication devices can disrupt electrical medical equipment. Technical electromagnetic compatibility data is available on request from Beurer customer service. (Please see warranty for service contact)
• NOTE: The manufacturer is not responsible for any radio or TV interference caused by unauthorized modifications to this equipment. Such modifications could void the user authority to operate the equipment.
• The distance to the infrared heat lamp depends largely on personal heat sensitivity and the treatment concerned. Make sure the distance between the infrared heat lamp and the body part being treated is not less than 12 inches (30 cm).
• The eye-protection cover included must be worn for treatment distances under 80 cm. The protective eyewear corresponds to the requirements of EN 171:2002 and serves to protect the eyes.
• The material of the eye-protection cover may initially smell. This smell will dissipate after a few uses.
• The eye-protection cover must only be used in combination with this infrared device.
• Always limit the length of use and check for skin reactions.
Cleaning and Storage:
• Never immerse the unit in water or any other liquid. Never hold the complete device under running water to clean it. Otherwise liquid can enter it and cause damage.
• Ensure that no water penetrates inside the unit!
• Before cleaning the unit, switch it off, unplug it and allow it to cool down completely before you touch it or pack it away.
• Do not put the device or accessories in a dishwasher, washing machine or tumble dryer.
• Do not use any aggressive solvents, cleaning agents, detergents or any other strong chemicals to clean the device.
• Store the device and accessories in a location protected against environmental influences, i.e. in a safe and dry location. Do not expose the device and accessories to direct sunlight, extreme hot or cold temperatures or humidity (e.g. in the bathroom).
• Dispose of the device, components and optional accessories according to applicable local regulations. Unlawful disposal may cause environmental pollution.
Package contents
For details of the delivery scope, see description of the device and accessories on page 5.
• Infrared heat lamp
• These instructions for use
• Eye-protection cover
Important information on the device
Electrical safety
The unit is protected against overheating by an automatic thermal cut-off Protective insulation.
Proper use
The unit is intended for directing infrared radiation at the human body.
Any other use is regarded as improper. This unit is not designed for commercial use, but for use in the private home!
Description of device and accessories
1 Swivelling body with handles
2 Disc
3 On/Off switch
4 Remaining time display
5 Time selector
6 Foot with integrated cable channel for coiling the power cable.
Initial use
• Place the unit on a solid and even surface. The unit must not be set up on a slope or laying down.
• The minimum distance between flammable items and the infrared lamp must not be less than 40 inches (1 m).
Operation
Unpacking and setup
• The timer switches off automatically at the end of the set time.
• The swiveling body allows you to adjust the infrared heat lamp to suit your needs.
• Insert the plug into a wall outlet.
• Switch on the unit at the On/Off switch (3). The remaining time display (4) shows 15 minutes.
• Set the desired treatment time (1 to 15 minutes) by pressing the time selector (5) several times.
• The set time will appear on the display (4).
Preparing for treatment
• Arrange yourself in front of the unit so you can relax and enjoy the treatment of the part of the body concerned.
• Tilt the lamp so the unit is angled directly at the part of the body being treated.
• The distance to the infrared heat lamp depends largely on personal heat sensitivity and the treatment concerned.
• Make sure the distance between the infrared heat lamp and the part of the body being treated is not less than 12 inches (30 cm) and not more than 16 inches (40 cm)!
Do not use the unit for more than 15 minutes at a time (risk of overheating). Allow the unit to cool down before you use it again.
Treatment duration
Important
Risk of burns: Remove any metal items, e.g. belt buckles, necklaces, bras, jewellery or piercings, from the treatment area before switching on the device as they can become very hot.
We recommend short treatment times at the beginning.
However, even when the unit is used correctly, the skin of some people can have an oversensitive or allergic reaction to the heat treatment (e.g. intense redness, blisters, itching, heavy sweating).
Starting the unit
Important
• Always close or cover your eyes when radiating the face.
• Press the On/Off switch (3)
• The unit will turn on automatically after a short time.
• The Time Display (4) will show 15 minutes (Recommended treatment time).
• You can press the time selector (5) to reduce the treatment time. Each push reduces the time by 1 minute.
• The infrared heat lamp switches off automatically after the set time.
• To end the treatment before the timer runs out, use the On/Off switch (3) and disconnect the power plug.
Important: Do not touch the hot glass
During treatment
• Examine the part of the body treated frequently and check for skin reactions. Cease exposure immediately if there are any signs of oversensitivity or an allergic reaction, and consult a doctor.
• The unit can be switched off at any time using the On/Off switch (3).
• Do not cover up or pack the unit away while it is still warm.
After treatment
• The fan will continue running for 5 minutes after you have finished using the device in order to cool it down. Please do not unplug the device during this period.
• Once the cooling period has finished, the fan will switch itself off. Switch off the device and remove the mains plug from the socket.
Note: The bulb is fragile when hot. After operation, let the device cool down before you move it.
Cleaning
Before cleaning the unit, switch it off, unplug it and allow it to cool down completely before you touch it or pack it away.
The unit can be cleaned with a damp cloth. Do not use cleaning agents.
Ensure that no water enters the unit.
Changing the infrared lamp
NOTICE:
Remember that a faulty lamp should only be replaced with a lamp of the same type.
WARNING:
Danger of electric shock!
• Before changing the lamp, switch the device off, unplug it and allow it to cool down completely.
• Light bulbs are not covered by warranty.
• Risk of burning on hot surfaces!
NOTICE:
Always hold the bulb by the end, do not touch the bulb.
Procedure
- Place the cool unit with the glass ceramic plate down on a flat surface.
- Using a suitable crosshead screwdriver, undo the 8 screws in the back panel.
- Place the body so that the front ofthe glass ceramic plate is lying on the flat surface.
- Take the cool lamp by the left or right end and press it carefully to the right or left.
- Now lift it forwards and out of the socket.
NOTE
Use a cloth to hold the new lamp when inserting it, not bare fingers, as the grease on your skin could damage the coating on the lamp. - Insert the new lamp in the socket. The new lamp is inserted in the reverse order to removal.
- Close the unit again. The unit is closed in the reverse order to opening it.
Make sure that no foreign objects are left in the body of the unit and that nocables become trapped.
Replacement lamp
Type: Halogen lamp 110 V – 130 V / 300 W 118 mm long for R7S socket
Original Order no. 162.783
The service life of the lamp should be approximately 2000 hours
Storage
Remove the plug from the wall outlet and let the unit cool down completely before you move it or pack it away.
If possible, store the infrared heat lamp in its original packaging in a dry place.
Disposal
Dispose of the device, components and optional accessories according to applicable local regulations.
Unlawful disposal may cause environmental pollution.
In the interests of environmental protection the infrared lamp should not be discarded with household garbage at the end of its service life. Dispose of the unit at a suitable local collection or recycling point.
Follow the local regulations for disposal of materials. Dispose of the unit in accordance with the local Directive for waste electrical and electronic equipment. If you have any questions, please contact the local authorities responsible for waste disposal.
This equipment complies with European and US Standards EN 60601-1-2 and is subject to specific safety provisions for electromagnetic compatibility. Please note, however, that portable and mobile HF communication equipment may influence this unit. Further details may be obtained from our Customer Service Department.
Technical specifications
| Voltage | AC 110V – 120V / 60 Hz |
| Power consumption | 300 W |
| Timer | Adjustable from 1 to 15 minutes in one-minute steps. |
| Dimensions (W x H x D) | 10.6 x 11.2 x 7.7 in
(270 x 285 x 195 mm) |
| Weight | Approx. 3.5 lbs (1.6 kg) |
| Operating conditions | Temperature: 50 – 95°F (10°C to 35°C)
Relative humidity: ≤ 90% |
| Storage and transport | Temperature: 14 –122°F (-10°C to 50°C)
Relative humidity: ≤ 90% |
| Protection class | II |
| Radiation intensity | max. radiation intensity at a dis- tance of 11.8 in (30 cm)
490 W/sq m |
| IR type | A + B |
We retain the right to make technical modifications to improve and further develop the product. For manufacturing reasons, the color of the glass may change during operation but this does not affect the performance or quality of the unit.
Note:
If the device is used outside of the specifications, proper function is no longer guaranteed! We reserve the right to make technical changes to improve and further develop the product.
Note:
This device and its accessories comply with US standards and are subject to special safety measures in terms of electromagnetic tolerance. Note that portable and mobile RF communication equipment can affect this device. For detailed information, contact customer service at the address provided.
ELECTROMAGNETIC COMPATIBILITY
• The device complies with current specifications with regard to electromagnetic compatibility and is suitable for use in all premises, including those designated for private residential purposes. The radio frequency emissions of the device are extremely low and in all probability do not cause any interference with other devices in the proximity.
• It is recommended that you do not place the device on top of or close to other electronic devices. Should you notice any interference with other electrical devices, move the device or connect it to a different socket.
• Radio equipment and TV interference may affect the operation of this device.
FCC Compliance Information
Infrared heat lamp IL 50
Responsible Party – U.S. Contact Information:
Beurer North America LP
1 Oakwood Blvd, Suite 255
Hollywood, FL 33020
United States
1-800-536-0366
[email protected]
FCC Compliance Statement
This device complies with Part 18 of the FCC Rules. Changes or modifications not expressly approved by the party responsible for compliance could void the user’s authority to operate the equipment.
NOTE: This equipment has been tested and found to comply with the limits for a Consumer ISM equipment, pursuant to Part 18 of the FCC Rules. These limits are designed to provide reasonable protection against harmful interference in a residential installation. This equipment generates, uses and can radiate radio fre quency energy and, if not installed and used in accor dance with the instructions, may cause harmful inter ference to radio communications.
However, there is no guarantee that interference will not occur in a particu lar installation. If this equipment does cause harmful interference to radio or television reception, which can be determined by turning the equipment off and on, the user is encouraged to try to correct the interference by one or more of the following measures:
– Reorient or relocate the receiving antenna.
– Increase the separation between the equipment and receiver.
– Connect the equipment into an outlet on a circuit different from that to which the receiver is connected.
– Consult the dealer or an experienced radio/TV technician for help.
Warranty and Service
Limited Lifetime Warranty For Original Purchaser
Your Beurer Infrared heat lamp, Model IL 50, excluding all enclosed accessories as these require routine maintenance, is warranted to be free from defects in materials and workmanship for the life of the product under normal
conditions of intended use and service. This warranty extends only to the original retail purchaser and does not extend to retailers or subsequent owners.
We will, at our option, repair or replace the Beurer Product, Model IL 50, without charge, for any part or parts covered by these written warranties. No refunds will be given. Repair or replacement is our only responsibility and your only remedy under this written warranty. If replacement parts for defective materials are not available, Beurer reserves the right to make product substitutions in lieu of repair or replacement.
For warranty service contact our customer service department at 1-800-536-0366 or at [email protected] to provide a description of the problem. If the problem is deemed to be within the scope of the limited lifetime warranty, you will be asked to mail the product at your costs in its original package with proof of purchase, your name, address and phone number. If the problem is not deemed to be within the scope of the limited lifetime warranty, we will provide quotation for repair, respectively, replacement and return shipping fee.
This warranty does not cover damage caused by misuse or abuse; accident; failures of the Infrared heat lamp, tubing, or accessories; parts or cleaning solutions; the attachment of unauthorized accessories; alteration to the product; improper installation; misapplication; lack of reasonable care with respect to the product; unauthorized repairs or modifications; improper use of electrical/ power supply; normal wear; loss of power; dropped product; malfunction or damage of an operating part as a result of failure to comply with instructions for use or to provide manufacturer’s recommended maintenance; transit damage; theft; neglect; vandalism; or environmental conditions; loss of use during the period the product is at a repair facility or otherwise awaiting parts or repair; or any other conditions whatsoever that are beyond the control of Beurer. This warranty is void if the product is ever used in a commercial or business
environment. The maximum liability of Beurer under this warranty is limited to the purchase price actually paid by the customer for the product covered by the warranty, as confirmed by proof of purchase, regardless of the amount of any other direct or indirect damage suffered by the customer.
This warranty is effective only if the product is purchased and operated in the country in which the product is purchased. A product that requires modifications or adaptation to enable it to operate in any other country than the country for which it was designed, manufactured, approved and/or authorized, or repair of products damaged by these modifications is not covered under this warranty.
THE WARRANTY PROVIDED HEREIN SHALL BE THE SOLE AND EXCLUSIVE WARRANTY. ANY IMPLIED WARRANTIES, OBLIGATIONS, OR LIABILITES, INCLUDING BUT NOT LIMITED TO THE IMPLIED WARRANTY OF MERCHANTABILITY AND FITNESS FOR A PARTICULAR PURPOSE, ARE LIMITED IN DURATION TO THE DURATION OF THIS APPLICABLE WRITTEN WARRANTY. Some states do not allow limitations on how long an implied warranty lasts, so the above limitations may not apply to you.
IN NO EVENT SHALL BEURER BE LIABLE FOR ANY SPECIAL, INCIDENTAL, INDIRECT OR CONSEQUENTIAL DAMAGES FOR BREACH OF THIS OR ANY OTHER WARRANTY, EXPRESS, IMPLIED OR
ANY OTHER THEORY OF LIABILITY, WHATSOEVER. Some states do not allow the exclusion or limitation of special, incidental, or consequential damages, so the above limitation may not apply to you.
Beurer does not authorize anyone, including, but not limited to, retailers, the subsequent consumer purchaser of the product from a retailer or remote purchaser, to obligate Beurer in any way beyond the terms set forth herein.
This warranty does not extend to the purchase of opened, used, repaired, repackaged and/or resealed products, including but not limited to sale of such products on Internet auction sites and/or products by surplus or bulk resellers. Any and all warranties or guarantees shall immediately cease and terminate in connection with any products or parts thereof which are repaired, replaced, altered, or modified, without the prior explicitly written consent of Beurer.
This warranty gives you specific legal rights, and you may also have other rights which may vary from state to state.
For more information regarding our product line in the USA, please visit: www.beurer.com Distributed by:
Beurer North America LP
1 Oakwood Blvd, Suite 255
Hollywood, FL 33020
www.beurer.com
![]()