![]()

Visit www.bestwaycorp.com/support for help
WE SUGGEST NOT TO RETURN THE PRODUCT TO THE STORE
QUESTIONS? PROBLEMS?
MISSING PARTS? For FAQ, Manuals, Videos, Or Spare Parts,
Please Visit bestwaycorp.com/support
FILTER PUMP
OWNER’S MANUAL
Visit the Bestway YouTube channel
WARNING
IMPORTANT SAFETY INSTRUCTIONS
When installing and using this electrical equipment, basic safety precautions should always be followed, including the following:
READ AND FOLLOW ALL INSTRUCTIONS
- WARNING-RISK OF ELECTRIC SHOCK- The pump cannot be used while people are inside the pool.
- WARNING-TO REDUCE THE RISK OF INJURY, do not permit children to use this product unless they are closely supervised at all times.
- WARNING-RISK OF ELECTRIC SHOCK- Connect only to a grounding-type receptacle protected by a ground-fault circuit interrupter (GFCI). Contact a qualified electrician if you cannot verify that the receptacle is protected by a GFCI.
CAUTION – To reduce the risk of electric shock the pool must be installed no closer than 6 feet (1.8 m) from any electrical outlet. Do not place portable appliances closer than 5 feet (1.5 m) from the pool. - DO NOT BURY THE CORD. Locate cord to minimize abuse from lawnmowers, hedge trimmers, and other equipment.
- WARNING – To reduce the risk of electric shock, the supply cord cannot be replaced. If the cord is damaged the appliance should be scrapped.
- WARNING- To reduce the risk of electric shock, do not use an extension cord to connect the unit to the electric supply; provide a properly located outlet.
CAUTION: - This pump is for use with storable pools only. Do not use with permanently-installed pools. A storable pool is constructed so that it is capable of being readily disassembled for storage and reassembled to its original integrity. A permanently-installed pool is constructed in or on the ground or in a building such that it cannot be readily disassembled for storage.
CAUTION- For continued protection against possible electric shock this unit is to be mounted to the base in accordance with the installation instructions.
IMPORTANT- Using the pump with an unmatched electrical supply is dangerous and will result in catastrophic failure of the pump. - RISK OF ELECTRIC SHOCK- When working with electricity, turn the electrical power off at the circuit breaker and lock the breaker door. Failure to do so will result in an increased risk of shock, injury, and possibly death.
- DO NOT REMOVE THE GROUNDING PRONG OR MODIFY THE PLUG IN ANY WAY. DO NOT USE ADAPTOR PLUGS. Consult a qualified electrician for any questions related to the validity of your plugs grounding.
Handle the pump with care. Do not pull or carry the pump by the power cord.
Never pull a plug from the outlet by yanking the power cord. Keep cord free from abrasions.
Sharp objects, oil, moving parts, and heat should never be exposed to the filter pump.
NOTE: Please examine equipment before use. Notify Bestway at the customer service address listed on this manual for any manufacturing defect or missing parts at the time of purchase. Verify that the equipment components represent the filter pump model that you had intended to purchase.
NOTE: Place the pump on solid and level ground. Pay attention to the position of the pool and pump so adequate ventilation, drainage, and access for cleaning are available. Never place a pump in an area that may accumulate water, or in an area where foot traffic will flow around the pool.
NOTE: Atmospheric conditions may affect the performance and life span of your filter pump. Unnecessary wear and tear may occur during periods of cold, heat, and exposure to the sun. Whenever possible shelter pump from these conditions.
NOTE: Do not add chemicals to the filter pump.
NOTE: Assembly and disassembly by adults only.
The pump is to be supplied by an isolating transformer or supplied through a residual current device (RCD) having a rated residual operating current not exceeding 30mA. WARNING-This appliance is not intended for use by persons (including children) with reduced physical, sensory or mental capabilities, or lack of experience and knowledge unless they have been given supervision or instruction concerning the use of the appliance by a person responsible for their safety. Children should be supervised to ensure that they do not play with the appliance.
Electric installations should follow national wiring rules, consult a qualified electrician with any questions. - THERMALLY PROTECTED MOTOR CSA ENCLOSURE 3
- FOR USE WITH SWIMMING POOLS ONLY.
- CAUTION: TO ENSURE CONTINUED PROTECTION AGAINST SHOCK HAZARDS, USE ONLY IDENTICAL REPLACEMENT PARTS WHEN SERVICING.
- WARNING: RISK OF ELECTRIC SHOCK. CONNECT ONLY TO A GROUNDING-TYPE RECEPTACLE PROTECTED BY A GROUND-FAULT CIRCUIT INTERRUPTER (GFCI).
- CAUTION: THIS PUMP IS FOR USE WITH STORABLE POOLS ONLY – DO NOT USE WITH PERMANENTLY-INSTALLED POOLS.
- CAUTION: CONNECT ONLY TO GROUNDING TYPE RECEPTACLE PROTECTED BY A CLASS A GROUND FAULT CIRCUIT INTERRUPTER.
- CAUTION: FOR CONTINUED PROTECTION AGAINST POSSIBLE ELECTRIC SHOCK THIS UNIT IS TO BE MOUNTED TO THE BASE IN ACCORDANCE WITH THE INSTALLATION INSTRUCTIONS.
SAVE THESE INSTRUCTIONS.
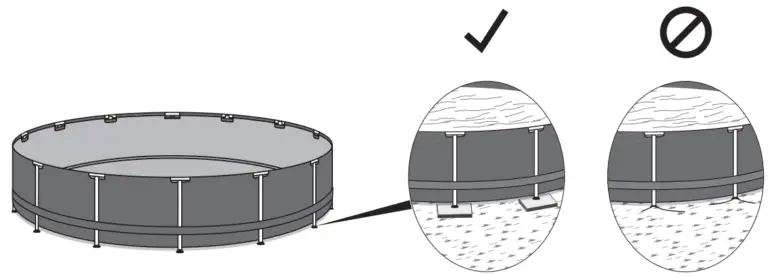
PEDESTAL FIXING Fig.1
EN60335-2-41 TEST standard requires the filter pump must be vertically fixed on the ground or a certain pedestal made of wood or concrete before use. There should be two holes 9mm in diameter on the pedestal, the space between which should be 163mm. Put the filter pump on the pedestal and fix them together by fastening the bolts and nuts. All the pedestal parts should weigh over 18kgs at least to prevent the pump from accidentally falling.
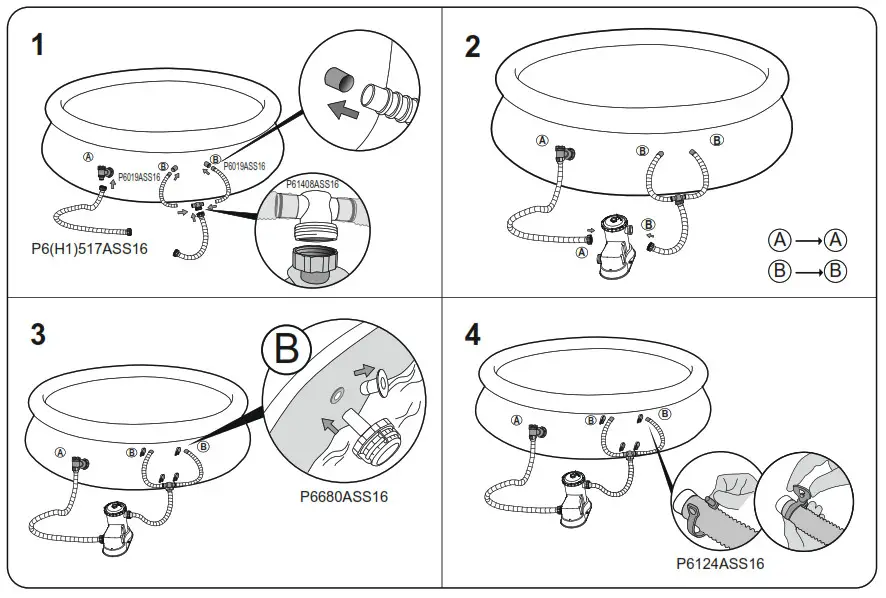
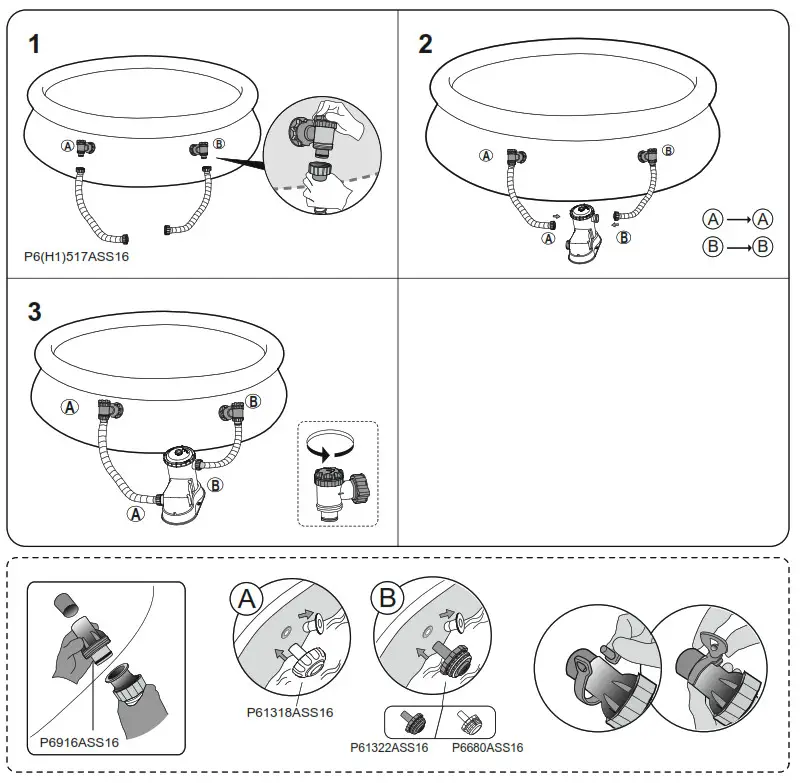
OPERATION
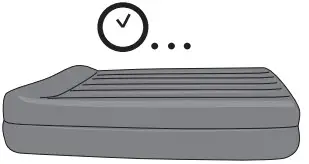
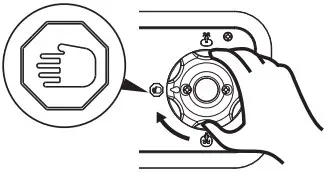
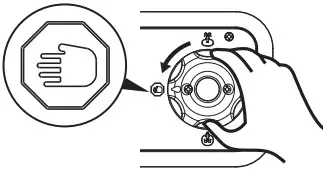
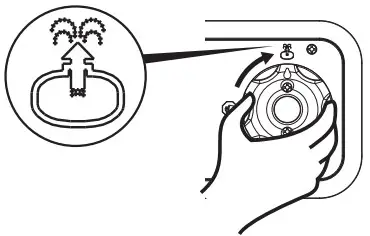
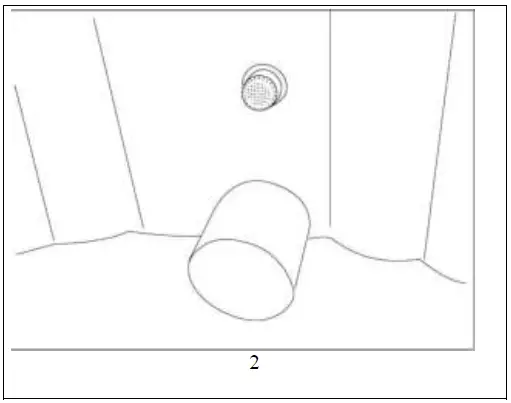
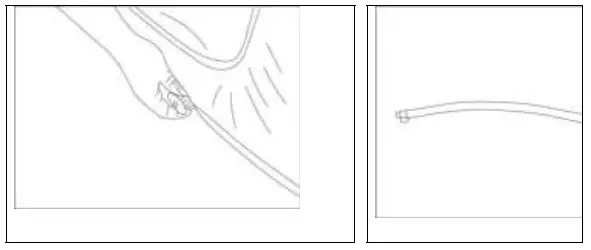
1) Open/unscrew the Air Purge Valve on the top of the Filter Pump; the air is released as water fills the Filter Pump.
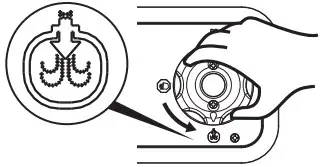
2) When water comes out of the Air Purge Valve screw it closed and wipe away any water.
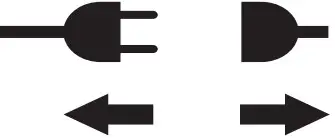
3) To start the Filter Pump, insert the plug.
NOTE: To prevent the risk of electrical shock, ensure your hands are completely dry when plugging in the Filter Pump.
IMPORTANT: DO NOT DRY RUN THE FILTER PUMP –
Make sure both the pool’s Inlet and Outlet valves are fully covered by water before operating the filter pump
PUMP MAINTENANCE
CAUTION: YOU MUST ENSURE THE FILTER PUMP IS UNPLUGGED BEFORE ANY MAINTENANCE BEGINS OR SEVERE RISK OF INJURY OR DEATH EXISTS.
1) Unplug the Filter Pump.
2) Stop water flowing to the Filter Pump refer to the pool’s manual.
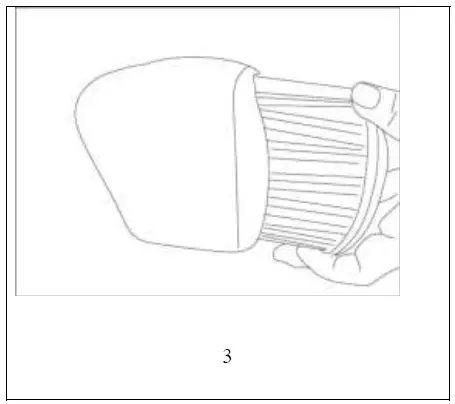
3) Unscrew the Filter Cap Retainer and remove the Filter Cap.
4) Clean the Filter Cartridge with a garden hose. If the filter cartridge remains soiled or discolored, it is necessary to replace it with a new one.
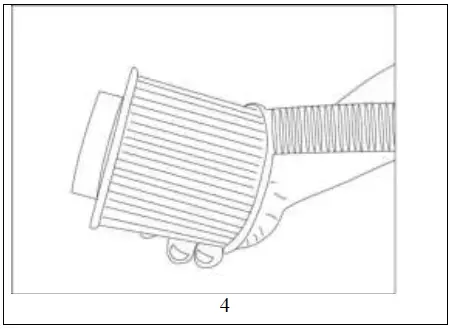
5) Insert the cleaned (or new) Filter Cartridge; ensure it is centered in the Filter Pump.
6) Check that the Filter Cap Seal is in place.
7) Replace the Filter Cap and screw the Filter Cap Retainer into position.
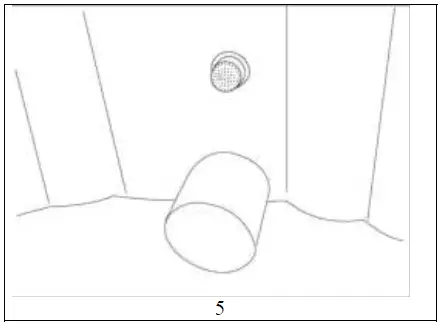
8) Open Valve A and B.
9) Follow the PUMP INSTALLATION DIRECTIONS section to prepare the system for use.
IMPORTANT: To ensure pool water stays clean, please clean the filter cartridge every day. For sanitary reasons we suggest replacing the Filter Cartridge with a new one every
two weeks.
PUMP STORAGE
1) Unplug the Filter Pump.
2) Stop water flowing into the Filter Pump and remove the Filter Cartridge.
3) Discard the Filter Cartridge.
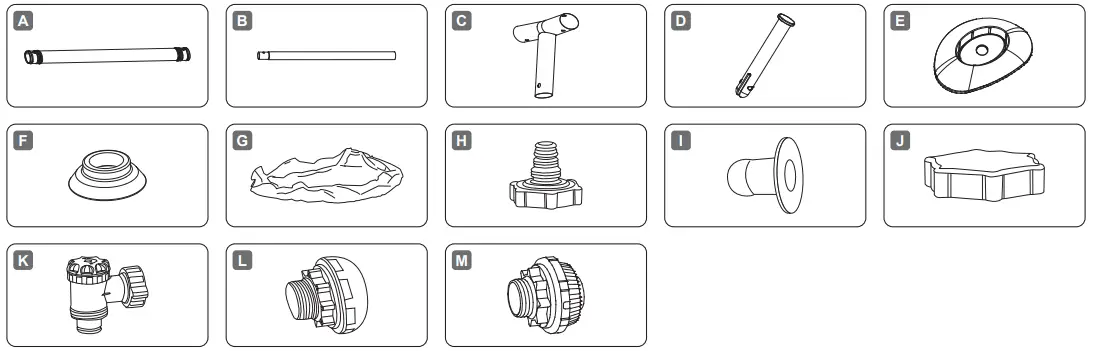
4) Detach all Hoses.
5) Dry all components thoroughly.
6) Store the filter pump in a dry location out of the reach of children.
Storage temperature: 4-40°C (39.2-104°F)
7) Drain the pool according to the Pool Owner’s Manual.

PUMP WARRANTY
For information concerning pump warranty please visit our website at: www.bestwaycorp.com
![]() For support please visit us at:
For support please visit us at:
bestwaycorp.com/support
©2021 Bestway Inflatables & Material Corp.
All rights reserved
Trademarks used in some countries under license from
Bestway Inflatables & Material Corp., Shanghai, China
Manufactured, distributed, and represented in the European Union by
Bestway (Europe) S.r.l., Via Resistenza, 5, 20098 San Giuliano Milanese (Milano), Italy
Distributed in North America by
Bestway (USA) Inc., 3411 E. Harbour Drive, Phoenix, Arizona 85034, United States of America
Tel: +86 21 69135588 (For U.S. and Canada)
Distributed in Latin America by
Bestway Central & South America Ltda, Salar Ascotan 1282, Parque Enea, Pudahuel, Santiago, Chile
Distributed in Australia & New Zealand by Bestway Australia Pty Ltd, Unit 2/98-104 Carnarvon St Silverwater, NSW 2128, Australia
Tel: Australia: (+61) 29 0371 388; New Zealand: 0800 142 101
Distributed in the United Kingdom by Bestway Corp UK Ltd. 8 Wentworth Road, Heathfield Industrial Estate, Newton Abbot, Devon, TQ12 6TL
Exported by
Bestway (Hong Kong) International Ltd./Bestway Enterprise Company Limited
Suite 713, 7/Floor, East Wing, Tsim Sha Tsui Centre, 66 Mody Road, Kowloon, Hong Kong
www.bestwaycorp.com
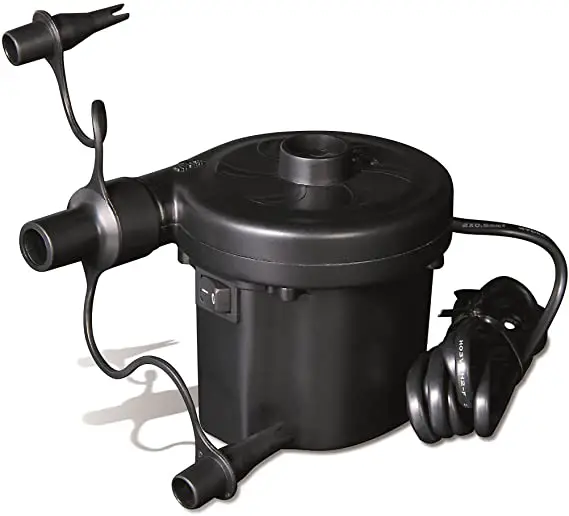
OPERATING INSTRUCTIONS
Product Overview
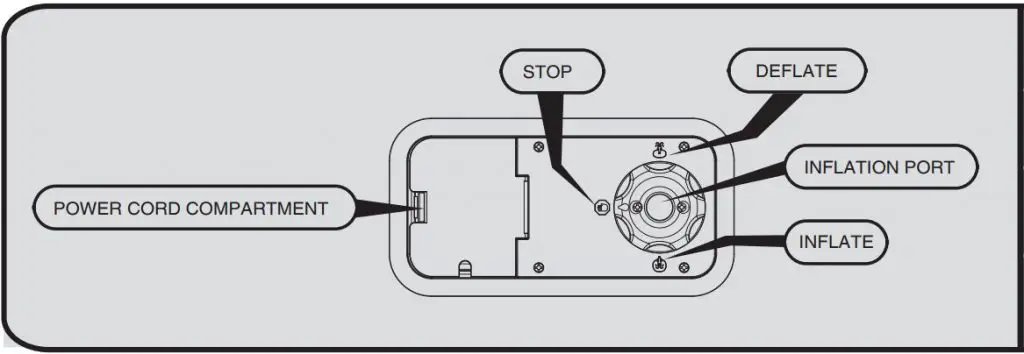
- 220-240V~ 50Hz 90W
- DUAL FUNCTION: INFLATION & DEFLATION
- EXCLUSIVELY DESIGNED FOR AIR BEDS
- Max. Load: 200kg.
NOTICE: READ CAREFULLY BEFORE OPERATING AND SAVE THESE INSTRUCTIONS.
CAUTION: TO AVOID THE RISK OF ELECTRIC SHOCK, DO NOT EXPOSE TO WATER OR RAIN, FOR INDOOR USE ONLY.
WARNING:
- Unplug or disconnect the appliance from the power supply before servicing.
- If the supply cord is damaged, it must be replaced by the manufacturer, its service agent or similarly qualified persons in order to avoid a hazard.
- Motor run time should not exceed 5 minutes. Operator should allow motor to cool down for 10 minutes between uses.
- Children are strictly prohibited from operating pump.
- The air vent on the cover should be kept away from debris during use.
- Product must be stored in a dry location.
- After use, airbeds may require additional air to increase firmness. Refill air for the proper firmness in necessary.
- This product is not intended for use by persons (including children) with reduced physical, sensory or mental capabilities, or lack of experience and knowledge,unless they have been given supervision or instruction concerning use of the product by a person responsible for their safety. Children should be supervised to ensure that they do not play with this product.
NOTE: This product is not intended for commercial use.
INFLATION

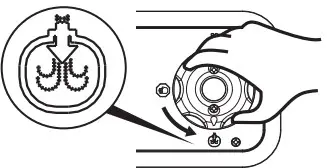
INFLATE WITH HAND PUMP (not included)
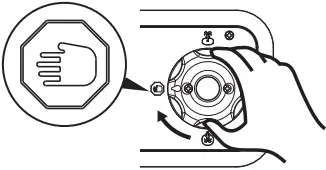
DEFLATION

MANUAL-DEFLATION

CLEANING & STORAGE:
- If product gets dirty, use a clean damp cloth and wipe gently on the flocked and PVC surface. Do not use harsh detergents to clean.Fold and store after product is dried.
- Before storing the product, release all the air. Store in a cool and dry place.
- Do not place sharp or heavy objects near or on top of the mattress. Doing so will cause damage and tears.
- If product is damaged, please use the provided repair patch.
AUSTRALIA
Tel: 61 2 9037 1388
Fax: 61 2 9737 9423
E-mail: [email protected]
Bestway Global Holding Inc.
No.3065 Cao An Road, Shanghai, 201812, China.
Tel: 86 21 6913 5588
Fax: 86 21 5913 8383
E-mail: [email protected]
![]() WARNING
WARNING
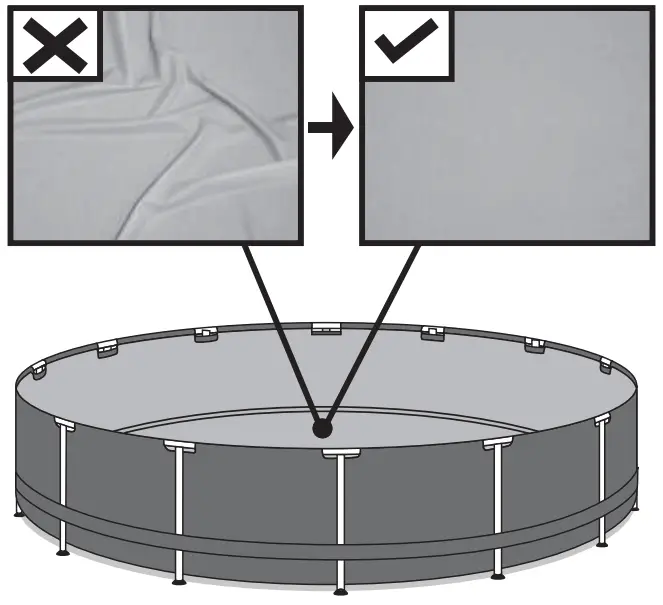
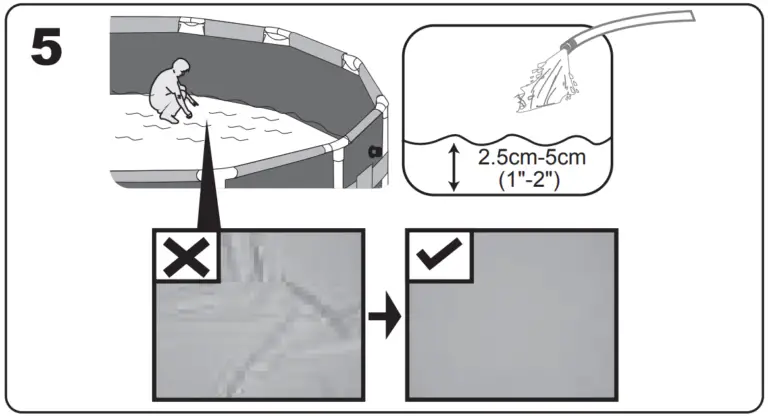
smooth out the bottom
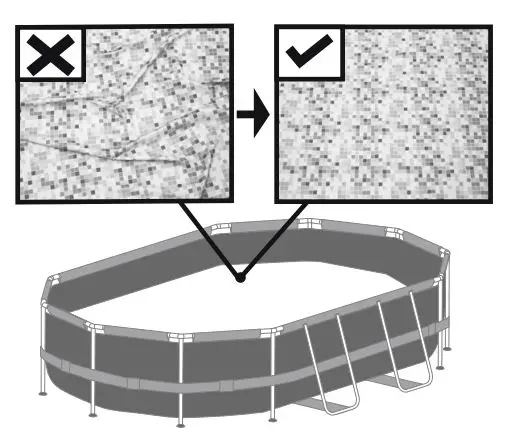
Put 1in. to 2in. water in the pool to cover the floor. Once pool floor is slightly covered, gently smooth out all wrinkles. Start in the center of the pool and work your way clockwise to the outside.

Do not assemble on soft lawn. If you must assemble the pool on a soft surface, timber boards (not included) must be placed under the feet of the vertical supports to spread the load.
WARNING
IMPORTANT SAFETY INSTRUCTIONS Read and Follow All Safety Information and Instructions. Keep for future reference. Failure to follow these warnings and instructions can result in serious injury or death to users, especially children.
![]() WARNING
WARNING
Prevent Drowning
Children under 5 are at highest risk for drowning. Closely watch children who are in or near this pool.
![]() WARNING
WARNING
No Diving
You can break your neck and be paralyzed!
![]() WARNING
WARNING
Electrocution Risk
![]()
Keep all electrical lines, radios, speakers, and other electrical devices away from pool. Do not place pool near or under overhead electrical lines
![]() WARNING
WARNING
Stay away from drains & suction fittings
Prevent Young Children From Drowning:
Install fencing or approved barrier around all sides of pool. State or local laws or codes may require fencing or other approved barriers.
Check state or local laws and codes before setting up pool. Drowning occurs silently and quickly. Assign an adult to supervise pool and wear provided water watcher tag.
Keep children in your direct sight when they are in or near pool and when you are filling and emptying pool.
When searching for a missing child, check pool first, even if you think your child is in the house.
Pool presents a drowning hazard even during filling and draining of the pool. Maintain constant supervision of children and do not remove any safety barriers until the pool is completely empty and stowed away. Refer to the list of barrier recommendations and guidelines as described in CPSC Publication No.362.
Assign an adult to be responsible for watching children in the pool. Give this person a “water watcher” tag and ask that they wear it the entire time they are in charge of supervising children in the pool. If they need to leave for any reason, ask this person to pass the “water watcher” tag and the supervision responsibility to another adult. Locate pumps and filters in such a way that children cannot climb on them to gain access to pool.
If you have a ladder, refer to the ladder’s manual for instructions.
If you have a pump, refer to the pump’s manual for instructions.
Prevent Young Children From Gaining Access to Pool:
Remove pool ladders before leaving pool. Toddlers can climb ladder and get into pool. Position furniture away from pool so that children cannot climb and gain access to pool. When leaving pool, remove floats and toys from pool that might attract a child.
Be Prepared to Respond to an Emergency:
Keep a working phone and list of emergency numbers near pool. Become certified in cardiopulmonary resuscitation (CPR) so you can respond to an emergency.
Electrocution Risk:
Keep all electrical lines, radios, speakers, and other electrical devices away from pool. Do not place pool near or under overhead electrical lines.
Suction Risk:
Replacement pump should never exceed the maximum flow rate marked on the suction fitting.
For further safety tips check out the following websites: www.homesafetycouncil.org http://www.safety-council.org/info/child/water.html
www.safekids.org
www.nspi.org
Safety Barrier Guidelines for Residential Swimming Pool
Section I: Outdoor swimming pool
An outdoor swimming pool, including an inground, aboveground, or on ground pool, hot tub, or spa, should be provided with a barrier which complies with the following:
- The top of the barrier should be at least 48 inches above grade measured on the side of the barrier which faces away from the swimming pool. The maximum vertical clearance between grade and the bottom of the barrier should be 4 inches measured on the side of the barrier which faces away from the swimming pool. Where the top of the pool structure is above grade, such as an aboveground pool, the barrier may be at ground level, such as the pool structure, or mounted on top of the pool structure. Where the You can break your neck and be paralyzed! Keep all electrical lines, radios, speakers, and other electrical devices away from pool. Do not place pool near or under overhead electrical lines. barrier is mounted on top of the pool structure, the maximum vertical clearance between the top of the pool structure and the bottom of the barrier should be 4 inches.
- Openings in the barrier should not allow passage of a 4-inch diameter sphere.
- Solid barriers, which do not have openings, such as a masonry or stone wall, should not contain indentations or protrusions except for normal construction tolerances and tooled masonry joints. Stay away from drains & suction fittings
- Where the barrier is composed of horizontal and vertical members and the distance between the tops of the horizontal members is less than 45 inches, the horizontal members should be located on the swimming pool side of the fence. Spacing between vertical members should not exceed 1-3/4 inches in width. Where there are If drain or suction outlet cover is missing or broken, your hair, body, and jewelry can get sucked into drain. You could be held under water & drown! Do not use pool if drain or suction outlet cover is missing or broken. decorative cutouts, spacing within the cutouts should not exceed 1-3/4 inches in width.
- Where the barrier is composed of horizontal and vertical members and the distance between the tops of the horizontal members is 45 inches or more, spacing between vertical members should not exceed 4 inches. Where there are decorative cutouts, spacing within the cutouts should not exceed 1-3/4 inches in width.
- Maximum mesh size for chain link fences should not exceed 1-3/4 inch square unless the fence is provided with slats fastened at the top or the bottom which reduce the openings to no more than 1-3/4 inches.
- Where the barrier is composed of diagonal members, such as a lattice fence, the maximum opening formed by the diagonal members should be no more than 1-3/4 inches.
- Access gates to the pool should comply with Section I, Paragraphs 1 through 7,and should be equipped to accommodate a locking device. Pedestrian access gates should open outward, away from the pool, and should be self-closing and have a self-latching device. Gates other than pedestrian access gates should have a self-latching device. Where the release mechanism of the self-latching device is located less than 54 inches from the bottom of the gate, (a) the release mechanism should be located on the pool side of the gate at least 3 inches below the top of the gate and (b) the gate and barrier should have no opening greater than 1/2 inch within18 inches of the release mechanism.
- Where a wall of a dwelling serves as part of the barrier, one of the following should apply: (a) All doors with direct access to the pool through that wall should be equipped with an alarm which produces an audible warning when the door and its screen, if present, are opened. The alarm should sound continuously for a minimum of 30 seconds within 7 seconds after the door is opened. Alarms should meet there querulents of UL2017 General-Purpose Signaling Devices and Systems, Section 77. The alarm should have a minimum sound pressure rating of 85 dB at 10 feet and the sound of the alarm should be distinctive from other household sounds, such as smoke alarms, telephones, and door bells. The alarm should automatically reset under all conditions. The alarm should be equipped with manual means, such as touchpads or switches, to temporarily deactivate the alarm for a single opening of the door from either direction. Such deactivation should last for no more than 15 seconds. The deactivation touchpads or switches should be located at least 54 inches above the threshold of the door. (b) The pool should be equipped with a power safety cover which complies with ASTM F1346-91 listed below. (c) Other means of protection, such as self-closing doors with self-latching devices, are acceptable so long as the degree of protection afforded is not less than the protection afforded by (a) or (b) described above.
- Where an aboveground pool structure is used as a barrier or where the barrier is mounted on top of the pool structure, and the means of access is a ladder or steps, then (a) the ladder to the pool or steps should be capable of being secured, locked or removed to prevent access, or (b) the ladder or steps should be surrounded by a barrier which meets Section I, Paragraphs 1 through 9. When the ladder or steps are secured, locked, or removed, any opening created should not allow the passage of a 4-inch diameter sphere.
Section II: Barrier Locations
Barriers should be located so as to prohibit permanent structures, equipment or similar objects from being used to climb the barriers.
![]() WARNING
WARNING
NO DIVING!
Shallow water.
You can be permanently injured.
PREVENT DROWNING
Watch children at all times.
Only for outdoor use.
Teach your children to swim.
Never dive, jump, or slide into the pool.
Adult supervision is always required.
Parents should learn CPR.
Never swim alone.
Keep all electrical radios, speakers and other appliances away from the swimming pool.
When you touch the filter, pump, or electrical parts, be sure the ground under your feet is “Bone Dry.”
All electrical outlets should have a GFCI and connections should be a minimum of 5 feet (1.52 m) from the outside perimeter of the wall of the pool. From 510 feet (1.523.05 m), there should be either a fixed connection (outlet box) or twist lock connection with a GFCI. Connect power cords to a 3-wire grounding-type outlet only. Keep all breakable objects out of the pool area.
Alcohol consumption and pool activities do not mix. Never allow anyone to swim, dive or slide under the influence of alcohol or drugs. Severe electrical shock could result if you install your pump or filter on a deck. The pump or filter could fall into the water, causing severe shock or electrocution.
Do not install on a deck or other surface at, above, or slightly below the top rail of the pool.
Do not use the pool during severe weather conditions, i.e. electrical storms, tornadoes, etc. Be aware of overhead power lines when vacuuming your pool or using a telescoping pole.
Do not allow diving, climbing, sitting, or standing on the top rails of the pools.
Do not allow roughhousing and horseplay.
Do not engage in extended breath holding activities underwater; you may black out and drown. Install a pool ladder(s) or staircase for entry and exit from the pool. Keep deck clean and clear of objects that may create a tripping hazard. Check regularly for signs of wear or loose bolts that could make the deck unsafe. Instruct pool users about the proper use of all pool ladder(s) and staircases.
Face ladder going up or down.
Allow only one person at a time on the ladder.
Check all nuts and bolts regularly to ensure that the ladder stays sturdy.
Remove or secure the ladder to prevent entry to pool when not in use.
Please contact pool site dealer or manufacturer for additional safety signs if deemed necessary.
For pool service, select a certified pool professional.
Any equipment connected to the circulation systems shall be positioned so as to prevent their being used as a means of access to the pool by young children.
The installation must comply with the codes of the authority having jurisdiction and may require permits for building, plumbing electrical, zoning, etc.
The pool shall be located a minimum distance of 6 ft. (1.83 m) from any electrical receptacle. All 125 volt, 15 and 20 ampere receptacles located within 20 ft. (6.0 m) of the pool shall be protected by a ground fault circuit interrupter (GFCI). The 20 ft. (6 m) distance is measured via the shortest straight line distance the supply cord would follow without piercing a floor, wall, ceiling, doorway, window, or other permanent barrier. Prior to use of the pool, the installer shall affix all no diving signs and safety signs in accordance with installation instructions so they can be easily visible.
A barrier is necessary to provide protection against potential drowning and near drowning and that barriers are not a substitute for the constant supervision of children. A list of emergency telephone numbers shall be posted, such as the nearest available police, fire, ambulance, and/or rescue unit. These numbers are to be kept near the telephone that is closest to the pool.
Toys, chairs, tables, or similar objects that a young child could climb shall be at least 4 feet (1219 mm) from the pool. If deck is used by the installer, it will need to comply with APSP-8. Basic lifesaving equipment, including one of the following, shall be on hand at all times: a. A light, strong, rigid pole (shepherd’s crook) not less than 12 ft. (3.66 m) long. b. A minimum ¼ in. (6 mm) diameter rope as long as 1½ times the maximum width of the pool or 50 feet (15.24 m), whichever is less, which has been firmly attached to a Coast
Guard-approved ring buoy, or a similarly approved flotation devices. The swimming pool cover is not designated as a safety barrier. Please use artificial lighting during nighttime pool use, to illuminate all safety signs, ladders, steps, deck surfaces and walks.
The pool is subject to wear and deterioration. If not maintained properly, certain types of excessive or accelerated deterioration can lead to failure of the pool structure that might release large quantities of water that could cause bodily harm and property damage. The bottom of the pool shall be visible at all times from the outside perimeter of the pool.
The installer of the vinyl liner shall affix on the original or replacement liner, or on the pool structure, all safety signs in accordance with the manufacturer’s instructions. If you have a filter pump, refer to the pump’s manual for instructions.
The ladder shall be located on a solid base and the ladder shall be installed per the ladder’s instructions. Publications are available that describe the risk of drowning, entrapment, and diving accidents.
Available publications related to pool safety include the Association of Pool and Spa Professionals’ (APSP) booklets entitled: The Sensible Way to Enjoy Your Aboveground/Unground Swimming Pool, Children Aren’t Waterproof, Pool and Spa Emergency Procedures for Infants and Children, Layers of Protection, and the latest published edition of ANSI/APSP-8 Model Barrier Code for Residential Swimming Pools, Spas, and Hot Tubs.
For additional safety information, see www.APSP.org.
THIS PRODUCT IS COMPLIANT TO ANSI/ APSP 4 AMERICAN NATIONAL STANDARD FOR ABOVEGROUND POOLS / ONGROUND RESIDENTIAL SWIMMING POOLS & INTERNATIONAL SWIMMING POOL & SPA CODE (ISPSC)
(Only for USA & only for pools with a water depth of more than 36in.(914mm))
Please read carefully and keep for future reference
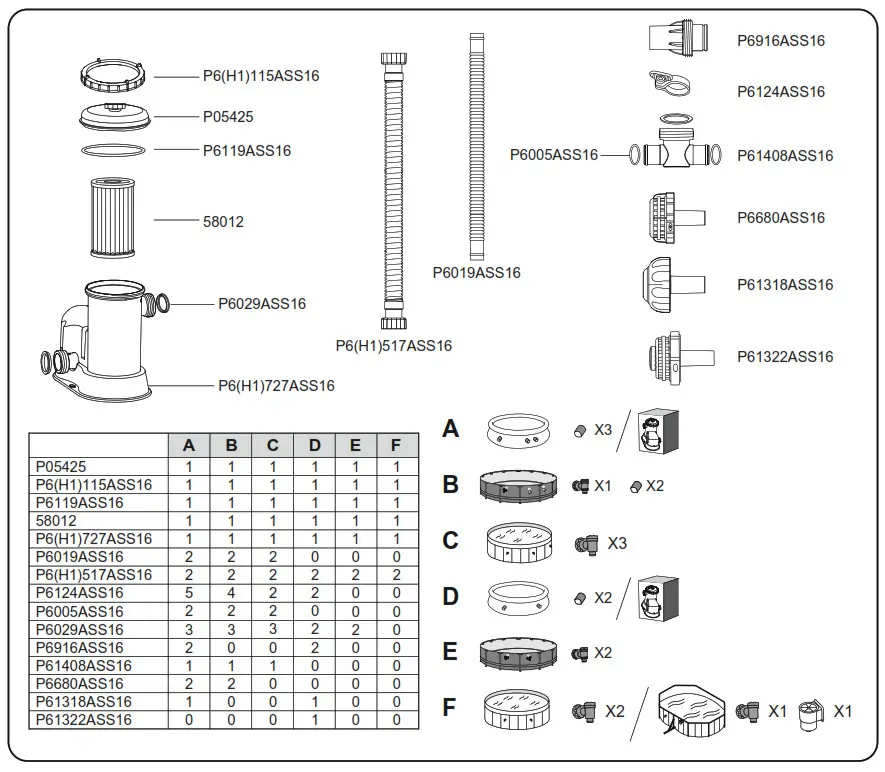
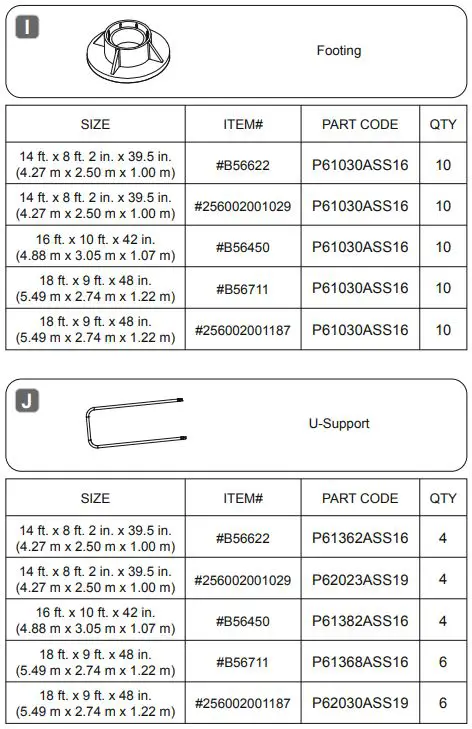
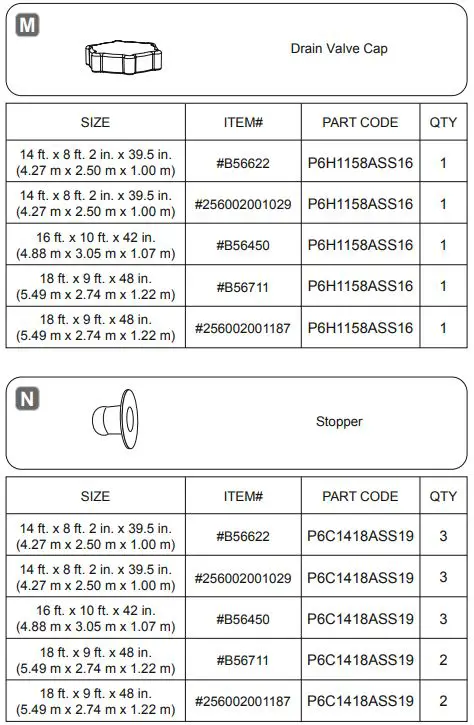
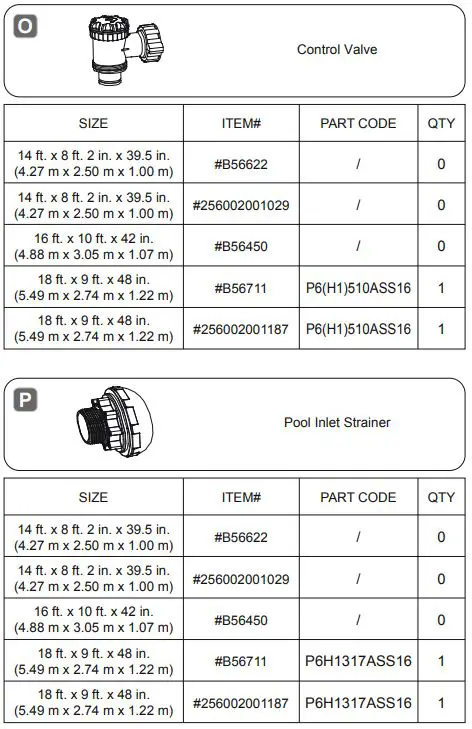
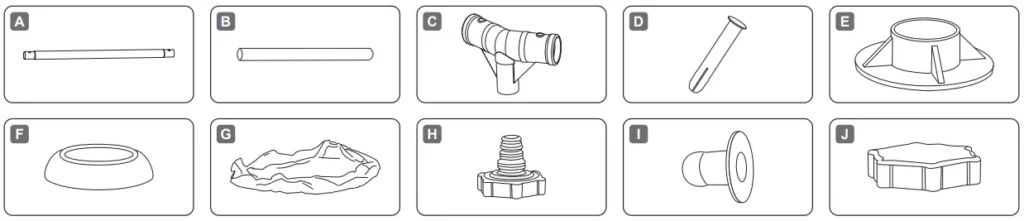
Before assembling your pool, please take a few minutes to check all the parts and become familiar with their position.
Components list
NOTE: Some parts already have been installed on the pool.


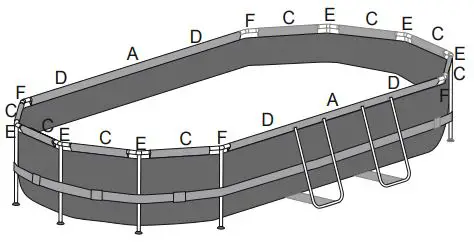
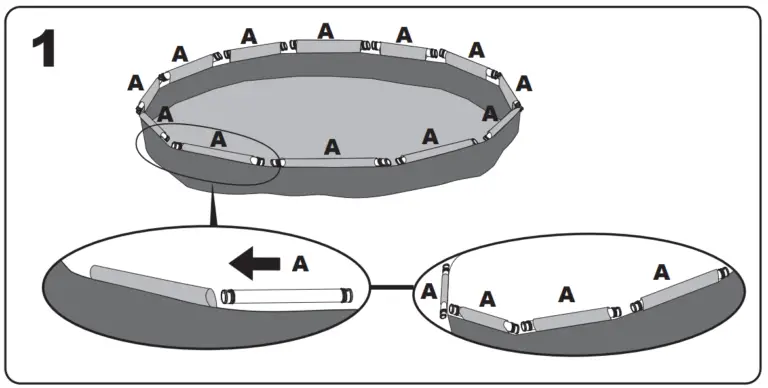
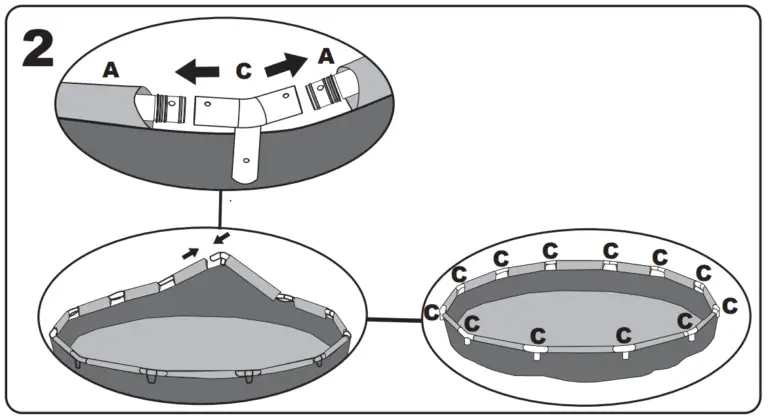
Note: The installation drawing for the Top Rail and the T-Connector of 18 ft. x 9 ft. x 48 in. (5.49 m x 2.74 m x 1.22 m).
Note: The installation drawing for the Top Rail and the T-Connector of 16 ft. x 10 ft x 42 in. (4.88 m x 3.05 m x 1.07 m).
Note: The installation drawing for the Top Rail and the T-Connector of 13 ft. 11 in. x 8 ft. 2 in. x 39.5 in. (4.24 m x 2.50 m x 1.00 m).
CHOOSE THE CORRECT LOCATION
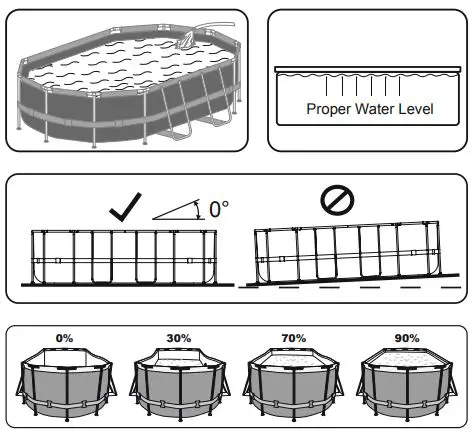
NOTE: The pool must be set up on a completely flat and level surface. Please do not install the pool if the surface is inclined or sloped.
- The selected location has to be capable of uniformly supporting the weight for the entire time the pool is installed, moreover the location must be flat and must be cleared of all objects and debris including stones and twigs.
- We recommend positioning the pool away from any objects children could use to climb into the pool.
NOTE: Position the pool near an adequate drainage system to deal with overflow or to discharge the pool.
- On uneven ground the pool may collapse causing serious personal injury and/or damage to personal property and will void the warranty and prevent any service claims.
- Sand should not be used to create a level base; the ground must be dug out if necessary.
- Directly under overhead power lines or trees. Be sure the location does not contain underground utility pipes, lines or cables of any kind.
- Do not set up the pool on driveways, decks, platforms, gravel or asphalt surfaces. The selected location should be firm enough to withstand the pressure of the water; mud, sand, soft / loose soil or tar are not suitable.
- Grass or other vegetation under the pool will die and may cause odors and slime to develop, therefore we recommend removing all grass from the selected pool location.
- Avoid areas prone to aggressive plant and weed species that may grow through the ground cloth or liner.
NOTE: Check with your local city council for by-laws relating to fencing, barriers, lighting and safety requirements and ensure you comply with all laws.
NOTE: If have a filter pump, refer to the pump’s manual for
instructions.
NOTE: The ladder must match the pool size and should be used only for entering and exiting the pool. It is forbidden to exceed the permitted payload of the ladder. Check regularly if the ladder is properly assembled.
Installation


Connection Valve Assembly
For pool with connection valve
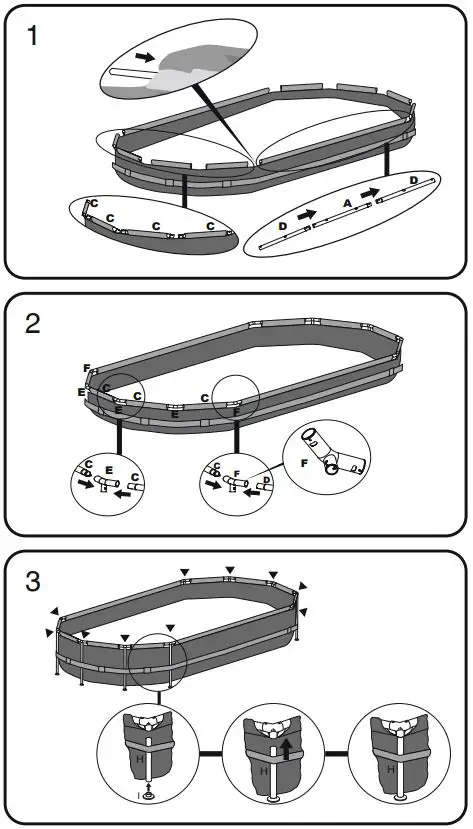
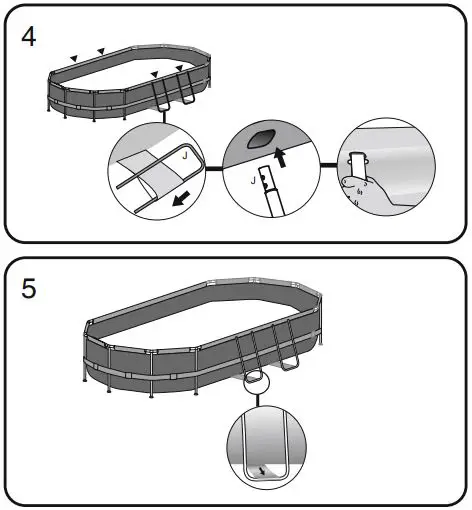
Assembly of the Frame pool can be completed without tools.
IMPORTANT: Best way Inflatables will not be responsible for damage caused to the pool due to mishandling or failure to follow these instructions.
- Lay out all parts and check that you have the correct quantities as listed in the components list. If you are missing any parts do not assemble the pool and contact Best way Customers Service.
- Spread out the pool and make sure the pool is right side up; let it sit exposed to direct sunlight for 1 hour or more so that the pool is more flexible during set up.
- Place the pool near an adequate drainage system to deal with overflow water and ensure the pool’s inlet A and outlet B are correctly positioned to allow your filter pump to connect to a power source.
NOTE: Do not use extension power cords to power your pump.
ATTENTION: Do not drag the pool on the ground, this can damage the pool.
Filling Pool with Water
ATTENTION: Do not leave pool unattended while filling with water
- Fill pool until water capacity is 90%, DO NOT OVERFILL as this could cause the pool to collapse. In times of heavy rainfall you may need to empty some of the water to ensure the level is correct.
- When filling the pool is completed, check that the water is not collecting on any side to ensure the pool is level.
IMPORTANT: If pool is not level, drain water and re-level ground by digging out. Never attempt to move the pool with water in it, serious personal injury or damage to the pool may result.
WARNING: Your pool may contain a great deal of pressure. If your pool has any bulge or uneven side then the pool is not level, the sides may burst and the water may discharge suddenly causing serious personal injury and/or damage to property. - Check pool for any leaks at valves or seams, check ground cloth for any evident water loss. Do not add chemicals until this has been done.
NOTE: In the event of a leak, patch your pool using the underwater adhesive repair patch included provided. Refer to the FAQ’s for further information.

NOTE: Drawings for illustration purposes only. May not reflect
actual product. Not to scale.
Pool Maintenance
If you do not adhere to the maintenance guidelines below, your health might be at risk, especially that of your children.
IMPORTANT: If you don’t respect the ideal values of the water chemicals the PVC can be damaged and become discolor. The following table lists the sequence of the tests that should be carried out for the ideal values and possible actions. Regularly check the pH value and chlorine concentration weekly and adjust to the ideal values.
TEST
pH value
Cyanuric acid
Free chlorine
Chlorine compound
Algae
Calcium hardness
IDEAL VALUES
7.4 – 7.6
30 -50 ppm
2 – 4 ppm
0
None visible
200 - 400 ppm
To keep your pool clean:
- Contact your local pool supply shop for advice and purchase of chemicals and pH kits. One of the most important factors to increase the life of the liner is to keep continuously clean and healthy water. Please strictly follow the instructions from professional technicians for the water treatment through the use of chemicals.
- Locate a bucket of water next to pool to clean users’ feet before entering pool.
- Cover the pool when not in use.
- Skim pool regularly to avoid settled dirt.
- Check and wash the filter cartridge regularly.
- Gently clean any scum from below the top ring with a clean cloth.
- Please be careful in case of rain water, kindly check that the water level is not higher than the expected. If so, YOU HAVE TO DISCHARGE THE EXCESS WATER.
Proper maintenance can maximize the life of your pool.
During the season of use of the swimming pool, the filtration system must be necessarily put into service every day, enough time to assure at least a complete renewal of the volume of water.
Repair
Check pool for any leaks from valves or seams, check the ground cloth for any evident water loss. Do not add chemicals until this has been done.
NOTE: In the event of a leak, patch your pool using the underwater adhesive repair patch included provided.
Dismantling
- Unscrew the drain valve cap on the outside of the pool counter clockwise and remove.
- Connect the adaptor to the hose and put the other end of the hose in the area where you are going to drain your pool. (Check local regulations for drainage by-laws).
- Screw the control ring of the hose adaptor clockwise onto the drain valve. The drain valve will be open and water will start to drain automatically.
ATTENTION: Water flow can be controlled with the control ring. - When draining is finished, unscrew the control ring to close the valve.
- Disconnect the hose.
- Screw the cap back onto the drain valve.
- Air dry pool.
ATTENTION: Do not leave the drained pool outside.
Storage and Winterization
- Please remove all the accessories and spare parts of the pool and store them clean and dry.
- Once pool is completely dry, sprinkle with talcum powder to prevent pool from sticking together, fold pool carefully. If pool is not completely dry, mold may result and will damage the pool liner.
- Store liner and accessories in a dry place with a moderate temperature between 5ºC / 41ºF and 38ºC / 100ºF.
- During the rainy season, pool and accessories should be stored as per above instructions also.
- Improper draining of the pool might cause serious personal injury and/or damage to personal property.
- We strongly recommend the pool is disassembled during the off season (winter months). Store in a dry location out of children’s reach.
![]()
For support please visit us at:
bestwaycorp.com/support
©2019 Best way Inflatables & Material Corp.
All rights reserved/
®™ Trademarks used in some countries under license to
Best way Inflatables & Material Corp., No.3065 Cao An Road, Shanghai, 201812, China.
Manufactured, distributed and represented in the European Union by
Best way (Europe) S.r.o., Via Resistenza, 5, 20098 San Giuliano Milanese (Milano), Italy Distributed in North America by
Best way (USA) Inc., 3411 E. Harbor Drive, Phoenix, Arizona 85034, United States of America
Tel: +86 21 69135588 (For U.S. and Canada)
Best way Central & South America 1282, Parque Santiago, Chile Distributed in Australia & New Zealand by Best way Australia Pty Ltd, 98-104 Carnarvon Street, Silverware, NSW 2128, Australia
Tel: Australia: (+61) 29 0371 388; New Zealand: 0800 142 101
Best way (Hong Kong) International Ltd./Best way Enterprise Company Limited
Suite 713, 7/Floor, East Wing, Tsum Sha Tsoi Centre, 66 Moody Road, Kowloon, Hong Kong
www.bestwaycorp.com
Made in China/
INSTRUCTION FOR USE
THE PICTURE IS ONLY FOR REFERENCE,PLEASE MAKE THE OBJECT AS THE STANDARD.
PH0500(R1e0a/dPthHis m0a5n0ua0l b1e1f/oPreHope0ra5t0ion0)12/PH050013 PH050014/PH050015/PH050017/PH050018
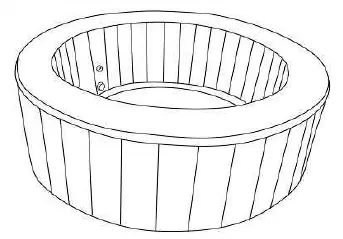
INFLATABLE SPA
IMPORTANT SAFETY INSTRUCTIONS
WARNING 1: The appliance should be supplied through a residual current device (RCD) with a rated tripping current not exceeding 30 mA.
WARNING 2: Electric installations should fulfill the requirements of local standards. Earthed appliances must be permanently connected to fixed wiring
WARNING 3: If the supply cord is damaged, it must be replaced by the manufacturer or its service agent or a similarly qualified person in order to avoid a hazard. Replace damage cord immediately.
WARNING 4: Parts containing live parts, except parts supplied with safety extra-low voltage not exceeding 12 V, must be inaccessible to a person in the bath.
WARNING 5: To reduce the risk of electric shock, do not use extension cord to connect unit to electric supply; provide a properly located receptacle.
WARNING 6: Parts incorporating electrical components, except for remote control devices, must be located or fixed so that they cannot fall into the bath.
WARNING 7: To avoid electric shock, do not use the spa when it is raining.
WARNING 8: Never operate the spa if the suction fittings are broken or missing. Never replace a suction fitting with one rated less than the flow rate marked on the original suction fitting.
WARNING 9: To reduce the risk of injury, do not permit children to use this product unless they are closely supervised at all times.
WARNING 10: Water attracts children. Always have the spa locked with its cover after each use.
WARNING 11: When the jet function is going to be used, make sure the cover of spa is opened first.
WARNING 12: Do not switch on if there is any possibility that the water in the spa is frozen.
WARNING 13: Risk of electric shock. Never operate any electrical appliance when in the spa or when your body is wet. Never place any electric appliance, such as a light, telephone, radio, or television, within 5 feet (1.5m)of a spa.
WARNING 14: Pets should be kept away from spa to avoid damage.
WARNING 15: Risk of electric shock. Install at least 5 feet (1.5m) from all metal surfaces. As an alternative, a spa may be installed within 5 feet of metal surfaces if each metal surface is permanently connected by a minimum 1.0 mm2 solid copper conductor to the wire connector on the terminal box that is provided for this purpose.
WARNING 16: Risk of accidental drowning. Extreme caution must be exercised to prevent unauthorized access by children. To avoid accidents, ensure that children cannot use this spa unless they are supervised at all times. WARNING 17: During pregnancy, soaking in hot water may cause damage to the unborn fetus. Limit use to 10 minutes at a time.
WARNING 18: The use of alcohol, drugs, or medication before or during the spa use may lead to unconsciousness with the possibility of drowning.
WARNING 19: Obese persons and persons with a history of heart disease, low or high blood pressure, circulatory system problems, or diabetes should consult a physician before use a spa …
WARNING 20: Persons using medication should consult a physician before using a spa since some medication may induce drowsiness while other medication may affect heart rate, blood pressure, and circulation. The water in a spa should never exceed 40°C (104°F). Water temperature between 38°C (100°F) and 40°C (104°F). Are considered safe for a healthy adult. Lower water temperatures are recommended for young children and when spa use exceeds 10 minutes. Since high water temperature has a high potential for causing fatal damage during the early months of pregnancy, pregnant or possibly pregnant women should limit spa water temperature to38°C (100°F).
WARNING 21: To reduce the risk of injury, never use water higher than 40°C (104°F) into the spa directly.
WARNING 22: The use of alcohol, drugs, or medication can greatly increase the risk of fatal hyperthermia. Hypothermia occurs when the internal temperature of the body reaches a level several degrees above the normal body temperature of 37°C (98.6°F). The symptoms of hyperthermia include an increase in the internal temperature of the body, dizziness, lethargy, drowsiness, and fainting, The effects of hyperthermia include failure to perceive heat; failure to recognize the need to exit the spa; unawareness of impending hazard; fatal damage in pregnant women; physical inability to exit the spa; and unconsciousness resulting in the danger of drowning. WARNING 23: Prolonged immersion in a spa may be injurious to your health. To avoid damage to the pump, the spa must never be operated unless the spa is filled with water. Immediately leave spa if uncomfortable or sleepy.
CAUTION 1: To avoid damage to the pump, the spa must never be operated unless the spa is filled with water.
CAUTION 2: Immediately leave spa if uncomfortable or sleepy.
CAUTION 3: Place only on surface that can withstand the floor loading requirement of your spa.
CAUTION 4: The spa should not be setup or left out in temperature lower than 4°C (40°F).
CAUTION 5: Never add water to chemicals. Always adding chemicals to water may result in a hazardous chemical spray.
CAUTION 6: In order to avoid a hazard due to inadvertent resetting of the thermal cutout, this appliance must not be supplied through an external switching device, such as a timer, or connected to a circuit that is regularly switched on and off by the utility.
CAUTION 7 : THIS APPLIANCE CAN BE USED BY CHILDREN AGED FROM 8 YEARS AND ABOVE AND PERSONS WITH REDUCED PHYSICAL, SENSORY OR MENTAL CAPABILITIES OR LACK OF
EXPERIENCE AND KNOWLEDGE IF THEY HAVE BEEN GIVEN SUPERVISION OR
INSTRUCTION CONCERNING USE OF THE APPLIANCE IN A SAFE WAY AND UNDERSTAND
THE HAZARDS INVOLVED. CHILDREN SHALL NOT PLAY WITH THE APPLIANCE.
CLEANING AND USER MAINTENANCE SHALL NOT BE MADE BY CHILDREN WITHOUT
SUPERVISION.
CAUTION 8: The spa should not be setup or left out in temperatures lower than 4°C (40°F)
SAVE THESE INSTRUCTIONS
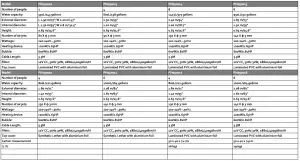
SPECIFICATIONS

INSTALLATION INSTRUCTION
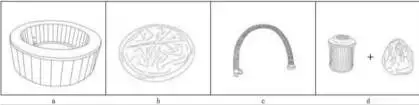
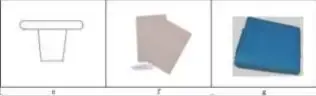
A Ensure to check all parts are present:
a. Spa pool
b. PU cover with foil and zipper
c. Inflation hose
d. Filter cartridge and fabric cover
e. Drain plug
f. Repair kit
g. Ground cloth
B Site requirements:
WARNING 1: The floor has to be capable of supporting the expected load.
WARNING 2: An adequate drainage system has to be provided to deal with overflow water.
IMPORTANT: Because of the combined weight of the spa, water, and users, it is extremely important that the base where the spa is installed is smooth, flat, level and capable of uniformly supporting this weight for the entire time the spa is installed. If the spa is placed on a surface, which does not meet these requirements, any damage caused by improper support will void the warranty. It is the responsibility of the spa owner to assure the integrity of the site at all times.
c) Indoors installation:
Be aware of special requirements if you install the spa indoors.
- The floor must be able to withstand the capacity of the spa. The floor should be a non-slip, level surface.
- Proper drainage is essential for indoor spa installation. When building a new room for the spa it is recommended that a floor drain be installed.
- Humidity is a natural side effect of spa installation. Determine the effects of airborne moisture on exposed wood, paper, etc. in the proposed location. To minimize these effects it is best to provide plenty of ventilation to the selected area. An architect can help determine if more ventilation is needed.
NOTE: Do not install the spa on carpet or other material that can be damaged by moisture. d) Outdoors installation:
- No matter where you install the spa, it is important you have a solid support foundation. If you are installing the spa outdoors, ensure there are no sharp objects that could damage it and that the location is level so the spa sits stably and properly.
- During filling, emptying or when in use, water may spill out of the spa. The spa should be installed near a ground drain.
- Do not leave the spa’s surface exposed to direct sunlight for long periods of time.
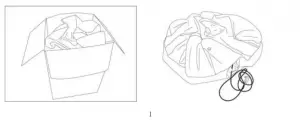
C Assembly
- Unfold the spa from the packaging. Spread the spa and cover. Make sure both are right side up.
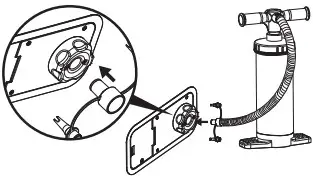
- Open the air outlet on the spa. Screw one end of the inflation hose onto it.
- Open the air valve on the spa. Connect the other end of inflation hose into the valve.
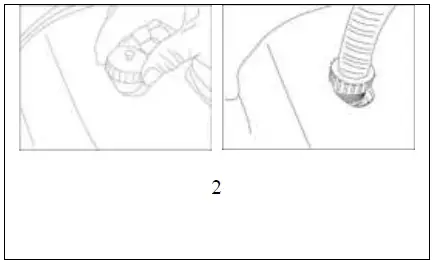
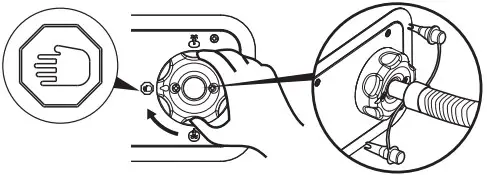
- Inflate the spa tub by pressing the “bubble” button.
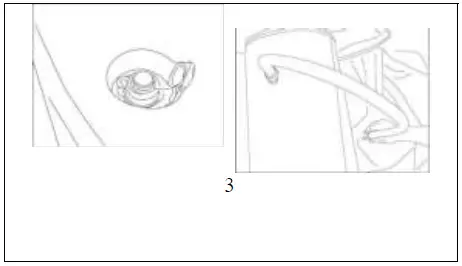
When the spa is properly inflated, press the “bubble” button to shut off the bubbles.
Attention 1: Do not over inflate.
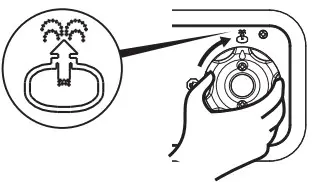
Insert the measuring end of pressure gauge inside the air valve of your spa, The pressure gauge pointer will indicates the inflation pressure of the spa. Please always check the air pressure to keep it in GREEN RANGE. [YELLOW RANGE]– Lower pressure [GREEN RANGE]– Normal pressure [RED RANGE]– Too much pressure
Attention 2: If you want inflation when the spa has filled water, you must put on the Jets 2-3 minutes by pressing the “bubble” button first, and then operate according to step 2-5 above.
Attention 3: Make sure the bottom spray pipe is flat before you use bubble function, the air bubble cannot come out from the bottom pipe if the pipe stuck together.
5. Remove the inflation hose and screw the valve tight.
6. Remove the inflation hose from the air outlet and screw the nut tight.
7. Screw the filter cartridge onto the water inlet on the spa wall by turning it clockwise.
Attention : To prevent the small parts entering the control box caused by blocking. Please always install the filter
cartridge when using spa.
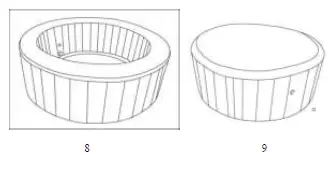
8. Fill the spa using a garden hose to fill to the water level printed on the spa wall.
9. Place the cover onto the spa, fasten the zipper.
OPERATION
A You must ensure the water in the spa matches the water line printed on the spa wall. Never dry-run the power pack as such type of operation will void the warranty.
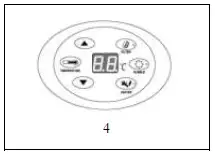
B Control panel
 FILTER Key – On-off key for the filtration system. Press this key, and the filter pump will start working and the red indicator lamp will be on. Press again the pump will stop working and the lamp will be off.
When the FILTER PUMP has worked for 168 hours, the letters `FC’ will appear on the display screen, accompanied by a warning tone. At that time, the indicator lamp for the key of filtration system will be on but the filter pump will actually not work. The indicator lamp for the key of heating system will be off and the heating system will not work. Only by pressing the key `FILTER’ again can the indicator lamp for the key of filtration system be off. At that time, the letters `FC’ on the display screen will disappear and so will the warning tone. Actual water temperature will be displayed. All keys return to normal working status.

`FC’ and the warning tone are to remind the user to clean or replace the filter element.
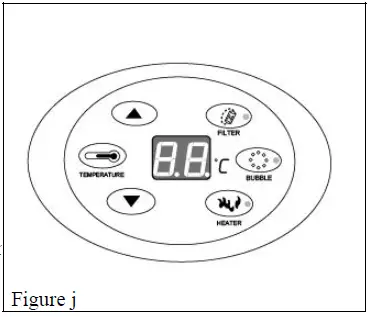 BUBBLE Key – On-off key for the jet system. Press this key and the air pump will start working and the red indicator lamp will be on. Press again and the jet system will stop working and the lamp will be off. The jet system will stop automatically after working for 20 minutes. If there is still need, you have to wait for 10 minutes and then press the “bubble” key again.
During the time period which the bubbling function has been started and worked for 15 minutes, bubbling can be stopped or started. During the time period that the jets have been worked for 15 minutes and stopped, bubbling can be stopped but not be started. The re-starting of jets should wait for 10 minutes. When the jets have been on for 20 minutes and stopped, the function cannot be started again within 10 minutes.
 HEATER Key – On-off key for the heating system. Press this key the heating system will start working and the red indicator lamp will be on. Press again and the heating system will stop working and the lamp will be off. When pressing down the key `HEATER’, the heating system will start working and the red indicator lamp will be on. At the same time, the red indicator lamp of the key FILTER will also be on and the filter pump will start working, too. This is a normal phenomenon required by the design. When the preset temperature has been reached, the heating system will stop working while the heating indicator lamp will not turn off. The filter pump will stop working and the filtration indicator lamp will be off. When the water temperature falls to 2 below the preset temperature, the heating system will start working automatically and so will the filter pump. The filtration indicator lamp will be on.
 TEMPERATURE Key Key for setting temperature. Press this key and the numbers on the display screen will start flashing, and the keys for increasing or decreasing temperatures can be pressed to set the temperature. When settings are finished, press the TEMPERATURE Key again to confirm. Default temperature is 40°C, and temperature can be set in the range of 20-42°C.
 —— Key for increasing temperature
 —— Key for decreasing temperature

Base of the controller is made of environmental-friendly PU material that is soft and comfortable. Surface of the base can be washed. The controller is chrome-plated, which meets ROHS standards. Surface films are glued to the controller by marine glue.
Body of spa:
- Water filling of water tank body: water should be filled to a position 20mm higher than the water line. If lower, heating may not be realized. If higher, water may spill over the tank in use.
- Maintenance of water in the water tank body
2.1 Water in the water tank body should be filtered at fixed time regularly. It is not suggested to filter the water at all times.
2.2 Water in the water tank body should be treated with chemical agents periodically. However, chemical agents with calcium ions must not be used. If chemical agents with calcium ions are used for water treatment, there will be very likely to form scales on the walls of water tank and inner heating pipes. Water scales will directly damage the inner electrical components inside the control cabinet and further affect the service life of control cabinet.
2.3 If the filtration system has worked for 168 hours, the system will emit a warning tone to remind the user to clean or replace the filter element. - Conservation of SPA Drain off the water inside the water tank completely and wipe off droplets of water on the walls. After that, lay aside the SPA for 24 hours, exhaust the air and fold. If it is Winter, please fold the SPA indoors. Because outside temperature in Winter is very low and materials may become hard. In that case, folding the materials may result in breakage. Put the SPA inside the packing case after folding it well and then put the case in a shaded place to avoid direct sunlight.
MAINTAINING
A Maintaining water
- Clean your filter cartridge at least once a time after it worked continuously for 72- 120 hours. The filter cartridge should be replaced at least once a month depending on use.
- Change water every few days or use appropriate pool chemicals. All spas require the use of pool chemicals.
Please consult your local pool supply retailer for more information about chemical maintenance. Pay close attention to the chemical manufacturer’s instructions. Spa damage resulting from misuse of chemicals and mismanagement of spa water is not covered by the warranty.
c. Water balance; we recommend maintain your water PH between 7.2 and 7.8, total alkalinity between 80
and 120ppm and free chlorine between 3 to 5ppm. Purchase a test kit to test your water chemistry before each use of the spa, no less than once per week. Low PH will damage to the spa and pump. Damaged resulting from chemical imbalance is not covered by the warranty.
d. Water sanitation is the responsibility of the spa owner, achieved through the regular and periodic (daily, if necessary) addition of an approved sanitizer. The sanitizer will chemically control bacteria and viruses present in the fill water or introduced during use of the spa.
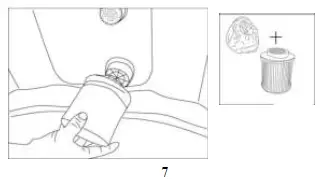
B Cleaning the filter cartridge
- Make sure to unplug the power pack from the electrical receptacle before the following actions.
- Unscrew the filter cartridge by turning counterclockwise.
- Remove the filter cartridge cover.
- The filter cartridge can be rinsed off with a garden hose and reused. However, if the filter cartridge remains soiled and discolored the filter cartridge should be replaced.
- Put on the filter cartridge cover and place the filter cartridge to water inlet by turning it clockwise.
C Drainage
- Make sure to unplug the power pack from the electrical receptacle.
- Put the plastic plug into the outlet in the inner wall of the spa.
- Open the outlet in the outer wall of the spa. Screw one end of inflation hose into it.
- Pull the plastic plug off from the outlet in the inner wall of the spa, then the water will flow out.
- When there is no water in the spa, you must put on the jet function 2-3minutes by press the “Jet” button to drain the water in the air pipeline.
- When drainage is finished, remove the inflation hose and screw the nut tight.
D Cleaning the spa
Detergent residues and dissolved solids from bathing suits and chemicals will gradually accumulate in the spa’s water. To clean the spa, use soap and water then rinse. Note: do not use hard brushes or abrasive cleaners.
REPAIR AND STORAGE
3. Spa repair If the spa is torn or punctured, use the provided repair patch. Dry the area to be repaired. Apply the glue in the accessory bag to the repair patch and then attach it onto the damaged area. Smooth the surface to remove any air bubbles. A secure unnoticeable repair can usually be made.
4. Spa storage Make sure all water is drained from the spa and control box. This is essential to extend the life of the spa. We recommend the use of a wet/dry vacuum to blow out or suck up water from the spa pipes and pump lines. Remove the filter cartridge. It is recommended you store the spa in its original package in a warm dry place. Note: Plastic becomes brittle and susceptible to breakage when exposed to subzero temperatures. Freezing can severely damage the spa. Improper winterization of your spa may void your warranty.
TROUBLE SHOOTING
Here are some helpful tips to help you to diagnose and rectify some common sources of trouble.
WATER PROTECTION LEVEL Warning: Water protection levels of appliance at different product zones are different. See the below scheme:
| Problems | Probable causes | Solutions |
| Jet system does not operate |
|
|
| Heating system does not operate |
|
|
| Filtering system does not operate |
|
|
| Spa leakage |
|
|
| Water not clean |
|
|
| Display temperature is higher than 42 degrees, after stopping heating function |
|
|
Zone 1 Note: The measured zone dimensions are limited by walls and fixed partitions. Above figure–Zone dimensions of swimming pools and padding pools.
SAFETY & ANNOUNCEMENTS
1. A local supplementary equipotent bonding shall connect all extraneous conductive parts in Zones 0, 1 and 2
with protective conductors of all exposed conductive parts situated in these zones.
10.The measures of protection by non-conducting location and by earth-free equipotent bonding are not
permitted.
11.Electrical equipment shall have at least the following degrees of protection:
12.Junction boxes shall not be installed in Zones 0 and 1 except in zone 1, where permitted for SELV circuits.
13.In Zone 0: IPX8
14.In Zone 1: IPX5
15.In Zones 0 and 1, no switchgear and accessories shall be installed.
16.The transformer must be located outside zone 1.
We decline liability for any damage or accident derived from any use of this product which is not in conformity with the instructions contained in this booklet.
CORRECT DISPOSAL OF THIS PRODUCT
This marking indicates that this product should not be disposed with other household wastes throughout the EU. To prevent possible harm to the environment or human health from uncontrolled waste disposal, recycle it responsibly to promote the sustainable reuse of material resources. To return your used device, please use the return and collection systems or contact the retailer where the product was purchased. They can take this product for environmental safe recycling.
]]> WARNING
smooth out the bottom
Put 1″ to 2″ water in the pool to cover the floor. Once pool floor is slightly covered, gently smooth out all wrinkles. Start in the center of the pool and work your way clockwise to the outside.

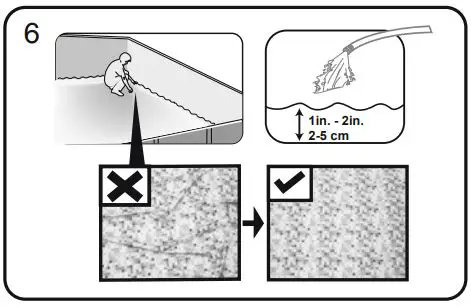
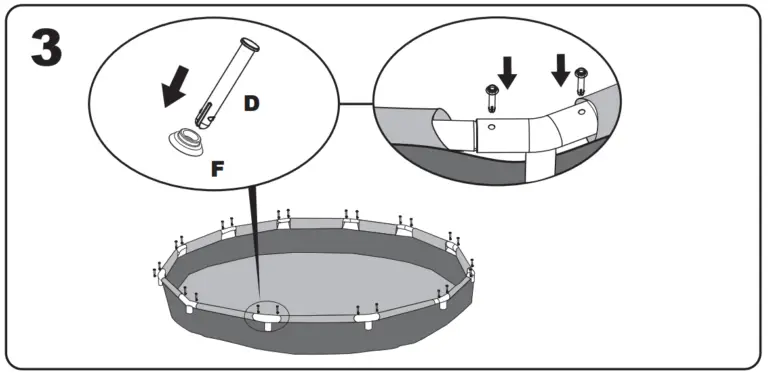
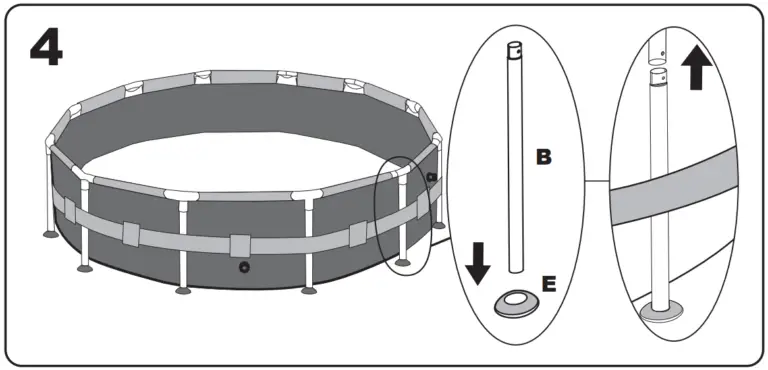
After the installation of the pool’s steel frame is completed, ensure that the verticals are perpendicular to the ground. If they aren’t, the verticals could be bent or deformed.
Do not assemble with pool legs on soft lawn. If you must assemble the pool on a soft surface, timber boards (not included) must be placed under the feet of the vertical support rods for even weight distribution.
The timber board must meet two conditions:
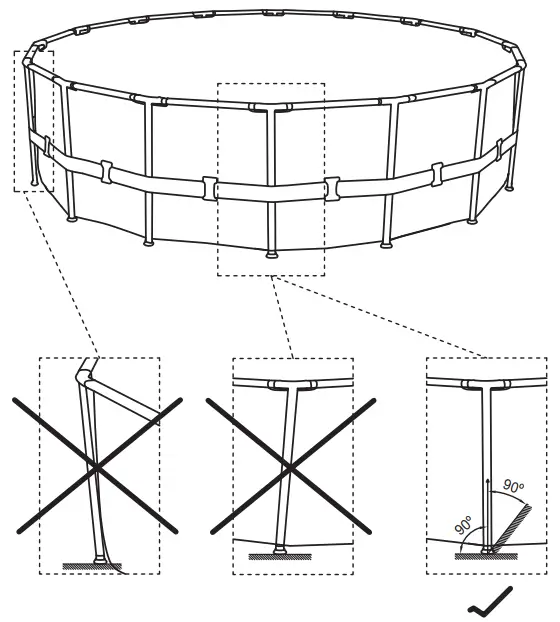
- The thickness is less than 1cm.
- The board should not touch the pool liner.
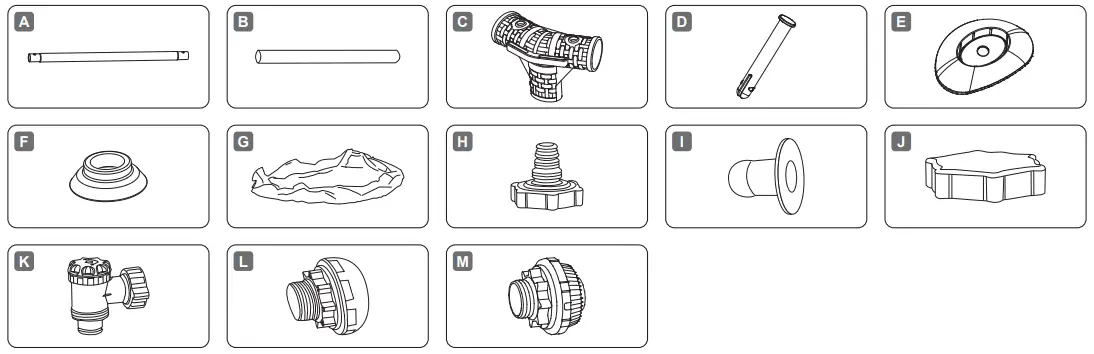
COMPONENTS LIST
NOTE: Some parts already have been installed on the pool.
| STEEL PRO™ | 2.74 m x 66 cm (9′ x 26″) | 3.05 m x 66 cm (10′ x 26″) | 3.05 m x 76 cm (10′ x 30″) | 3.66 m x 76 cm (12′ x 30″) | 3.96 m x 84 cm (13′ x 33″) |
| 5612F | 56985 | 56677 / 56678 / 56679 | 56681 / 56680 / 56706 | 5612D / 5612E | |
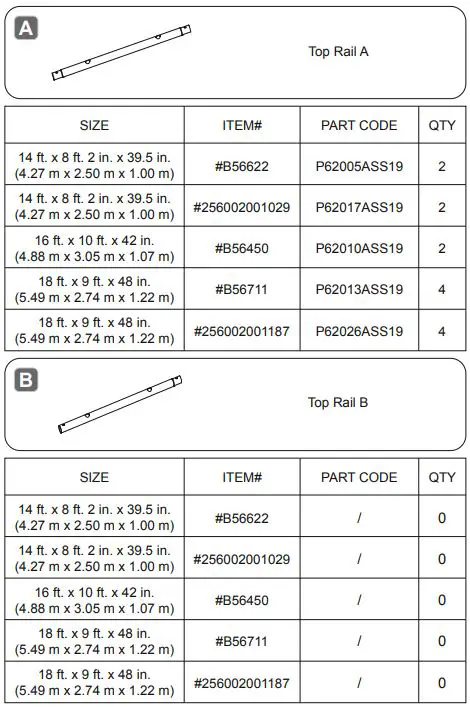
| A | x9 | x10 | x10 | x12 | x13 |
| B | x9 | x10 | x10 | x12 | x13 |
| C | x9 | x10 | x10 | x12 | x13 |
| D | x20 | x22 | x22 | x26 | x28 |
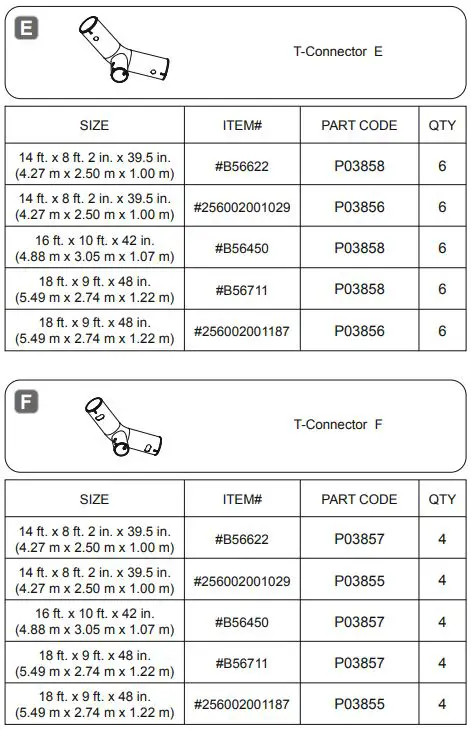
| E | x9 | x10 | x10 | x12 | x13 |
| F | x20 | x22 | x22 | x26 | x28 |
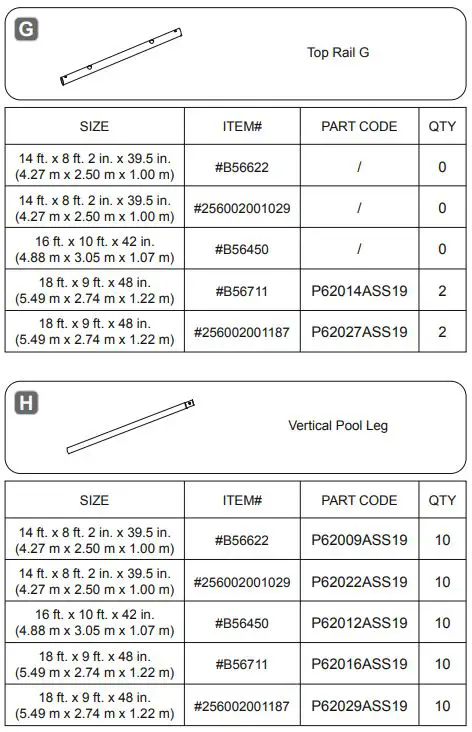
| G | x1 | x1 | x1 | x1 | x1 |
| H | x1 | x1 | x1 | x1 | x1 |
| I | x2 | x2 | x2 | x2 | x2 |
| J | x1 | x1 | x1 | x1 | x1 |
| STEEL PRO | 3.05 m x 76 cm (10′ x 30″) | 3.66 m x 76 cm (12′ x 30″) | 3.66 m x 1.00 m (12′ x 39.5″) | 3.66 m x 1.22 m (12′ x 48″) | 3.96 m x 1.22 m (13′ x 48″) | 4.27 m x 84 cm (14′ x 33″) |
| MAX™ | 56406 / 56407 56408 | 56416 / 56417 | 56260 / 56418 / 56419 5614W / 5614X 56709 / 56731 | 56420 / 56421 | 5618V / 5618W | 56595 / 56597 |
| A | x10 | x12 | x12 | x12 | x13 | x14 |
| B | x10 | x12 | x12 | x12 | x13 | x14 |
| C | x10 | x12 | x12 | x12 | x13 | x14 |
| D | x22 | x26 | x26 | x26 | x28 | x30 |
| E | x10 | x12 | x12 | x12 | x13 | x14 |
| F | x22 | x26 | x26 | x26 | x28 | x30 |
| G | x1 | x1 | x1 | x1 | x1 | x1 |
| H | x1 | x1 | x1 | x1 | x1 | x1 |
| I | x2 | x2 | x2 | x2 | x2 | x2 |
| J | x1 | x1 | x1 | x1 | x1 | x1 |
| K | x0 | x0 | x0 | x0 | x0 | x0 |
| L | x0 | x0 | x0 | x0 | x0 | x0 |
| M | x0 | x0 | x0 | x0 | x0 | x0 |
| 4.27 m x 1.07 m | 4.27 m x 1.22 m | 4.57 m x 1.07 m | 4.57 m x 1.22 m | 4.88 m x 1.22 m | 5.49 m x 1.22 m | |
| STEEL PRO | (14′ x 42″) | (14′ x 48″) | (15′ x 42″) | (15′ x 48″) | (16′ x 48″) | (18′ x 48″) |
| MAX™ | 56949 / 56950 | 5612X / 5612Y | 56488 / 56686 | 56438 / 56439 | 5612Z / 5613A | 56462 / 56463 |
| 5614Y / 5614Z | 5619D / 5619G | 5619E / 5619H | 5618X / 5618Y | |||
| A | x14 | x14 | x15 | x15 | x16 | x18 |
| B | x14 | x14 | x15 | x15 | x16 | x18 |
| C | x14 | x14 | x15 | x15 | x16 | x18 |
| D | x30 | x30 | x32 | x32 | x34 | x38 |
| E | x14 | x14 | x15 | x15 | x16 | x18 |
| F | x30 | x30 | x32 | x32 | x34 | x38 |
| G | x1 | x1 | x1 | x1 | x1 | x1 |
| H | x1 | x1 | x1 | x1 | x1 | x1 |
| I | x2 | x2 | x2 | x2 | x0 | x0 |
| J | x1 | x1 | x1 | x1 | x1 | x1 |
| K | x0 | x0 | x0 | x0 | x2 | x2 |
| L | x0 | x0 | x0 | x0 | x1 | x1 |
| M | x0 | x0 | x0 | x0 | x1 | x1 |
| POWER STEEL™ | 3.96 m x 1.07 m (13′ x 42″) | 4.88 m x 1.22 m (16′ x 48″) | 5.49 m x 1.22 m (18′ x 48″) |
| 5614U / 5614V | 56725 / 56726 | 56976 / 56977 | |
| A | x13 | x16 | x18 |
| B | x13 | x16 | x18 |
| C | x13 | x16 | x18 |
| D | x28 | x34 | x38 |
| E | x13 | x16 | x18 |
| F | x28 | x34 | x38 |
| G | x1 | x1 | x1 |
| H | x1 | x1 | x1 |
| I | x2 | x0 | x0 |
| J | x1 | x1 | x1 |
| K | x0 | x2 | x2 |
| L | x0 | x1 | x1 |
| M | x0 | x1 | x1 |
WARNING
Carefully read, understand, and follow all information in this user manual before installing and using the swimming pool. These warnings, instructions, and safety guidelines address some common risks of water recreation, but they cannot cover all risks and dangers in all cases. Always use caution, common sense, and good judgment when enjoying any water activity. Retain this information for future use.
Non Swimmers safety
- Continuous, active, and vigilant supervision of weak swimmers and non-swimmers by a competent adult is required at all times (remembering that children under five are at the highest risk of drowning).
- Designate a competent adult to supervise the pool each time it is being used.
- Weak swimmers or non-swimmers should wear personal protection equipment when using the pool.
- When the pool is not in use, or unsupervised, remove all toys from the swimming pool and its surrounding to avoid attracting children to the pool.
Safety devices
- In order to prevent children from drowning, it is recommended to secure the access to the pool with a protection device. In order to prevent children climbing from the inlet and outlet valve, it is recommended to install a barrier (and secure all doors and windows, where applicable) to prevent unauthorized access to the swimming pool.
- Barriers, pool covers, pool alarms, or similar safety devices are helpful aids, but they are not substitutes for continuous and competent adult supervision.
Safety equipment
- It is recommended to keep rescue equipment (e.g. a ring buoy) by the pool.
- Keep a working phone and a list of emergency phone numbers near the pool.
Safe use of the pool
- Encourage all users especially children to learn how to swim.
- Learn Basic Life Support (Cardiopulmonary Resuscitation – CPR) and refresh this knowledge regularly. This can make a life-saving difference in the event of an emergency.
- Instruct all pool users, including children, what to do in case of an emergency.
- Never dive into any shallow body of water. This can lead to serious injury or death.
- Do not use the swimming pool when using alcohol or medication that may impair your ability to safely use the pool.
- When pool covers are used, remove them completely from the water surface before entering the pool.
- Protect pool occupants from water related illnesses by keeping the pool water treated and practicing good hygiene. Consult the water treatment guidelines in the user’s manual.
- Store chemicals (e.g. water treatment, cleaning or disinfection products) out of the reach of children.
- Use the signage as outlined below. Signage is to be displayed in a prominent position within 2m of the pool.
Keep children under supervision in the aquatic environment. No diving.

- Removable ladders shall be placed on a horizontal surface.
- Irrespective of materials used for swimming pool construction, accessible surfaces have to be checked regularly to avoid injuries.
- Regularly monitor bolts and screws. Remove splinters or any sharp edges to avoid injuries.
- ATTENTION: Do not leave the drained pool outside. The empty pool is liable to become deformed and/or displaced due to wind.
- If you have a filter pump, refer to the pump’s manual for instructions.
WARNING! The pump cannot be used while people are inside the pool! - If you have a ladder, refer to the ladder’s manual for instructions.
WARNING! The use of a swimming pool implies compliance with the safety instructions described in the operating and maintenance guide. In order to prevent drowning or other serious injuries, pay particular attention to the possibility of unexpected access to the swimming pool by children under 5 years by securing the access to it, and, during the bathing period, keep them under constant adult supervision.
Please read carefully and keep for future reference
CHOOSE THE CORRECT LOCATION
The surface chosen to install the pool must respect the following technical characteristics:
- Because of the combined weight of the water inside the pool and the pool users, it is extremely important that the surface chosen to install the pool is capable of uniformly supporting the total weight for the entire time the pool is installed. When choosing the surface, take into consideration that water may come out of the pool when in use or in the rain. If the water softens the surface, it may lose its capability to support the pool weight.
- Check regularly the position of the vertical legs and the
U-supports. They must be on the same level as the bottom of the pool at all times. If the vertical leg or the U-support starts to sink into the ground, drain the water immediately to avoid the pool collapsing due to the uneven loading on the frame structure. Change the location of the pool or modify the surface material. - We recommend positioning the pool away from any objects children could use to climb into the pool.
- Position the pool near an adequate drainage system to deal with overflow or to discharge the pool.
- The surface must be flat and smooth. If the surface is inclined or uneven, it can create an unbalanced loading on the structure of the pool. This situation can damage the welding point of the liner and bend the frame. In the worst cases, the pool can collapse, causing serious personal injury and/or damage to personal property.
- The selected surface must be clear of any type of object.
Due to the weight of the water, any object under the pool could damage or perforate the bottom of the pool. - The selected surface must be clear of aggressive plants and weed species. Those types of strong vegetation could grow through the liner and create water leakage. The grass or other vegetation that may cause odor or slime to develop have to be eliminated from the set-up location.
- The selected location must not have overhead power lines or trees. Be sure the location does not contain underground utility pipes, lines or cables of any kind.
- The selected position must be far from house entrance. Do not position any equipment or other furniture around the pool.
The water that comes out of the pool during the use or due to a faulty product can damage the furniture inside the house or surrounding the pool. - The selected surface must be flat and without holes that can damage the material of the liner.
Follow the important instructions above to choose the correct surface and location to set up your pool. Damaged parts of the pool, due to the fact that the set-up surface and location does not match the instructions, will not be considered as manufacture defect and will avoid the warranty and any service claims.
Suggested set-up surfaces: grass, ground, concrete, and all other surfaces that respect the above set-up conditions.
Not suggested surfaces: mud, sand, gravel, deck, balcony, driveway, platform, soft/loose soil or other surface that does not meet the above set-up conditions.
NOTE: Check with your local city council for by-laws relating to fencing, barriers, lighting and safety requirements and ensure you comply with all laws.
NOTE: If have a filter pump, refer to the pump’s manual for instructions.
NOTE: The ladder must match the pool size and should be used only for entering and exiting the pool. It is forbidden to exceed the permitted payload of the ladder. Check regularly if the ladder is properly assembled.
POOL MAINTENANCE
If you do not adhere to the maintenance guidelines below, your health might be at risk, especially that of your children.
Using chemical tablets (not included):
NOTE: Chemconnect or Chemical Floater must be used when you perform chemical maintenance with tablets. Your purchased item may not include any of those dispensers, in this case you can purchase it by visiting our website www.bestwaycorp.com or at the nearest pool dealer.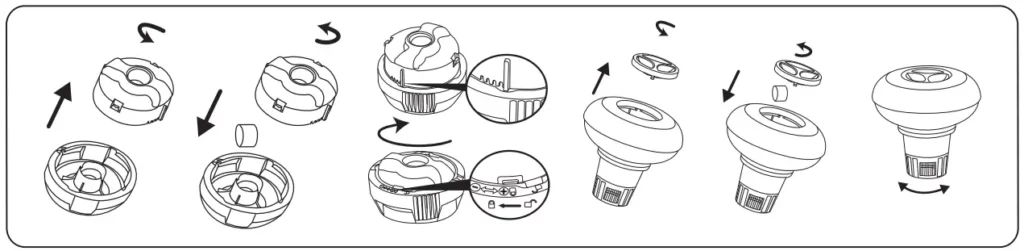
IMPORTANT: Don’t use granulate tablets or throw the tablet directly in the water. The chemicals can deposit on the bottom, damage the material and discolor the PVC.
Using chemical liquid (not included):
IMPORTANT: Add chemical liquid in small doses and in the center of the pool to avoid direct contact between the chemicals and the PVC surface. Direct contact can damage the material and discolor the surface.
NOTE: Remove the chemical dispenser from pool when the pool is in use.
IMPORTANT: After performing chemical maintenance and before using the pool, use a test kit (not included) to test the water chemistry. We recommend maintaining your water according to the following table.
| Parameters | Values |
| Water clarity | clear view of the pool bottom |
| Colour of the water | no colour should be observed |
| Turbidity in FNU/NTU | max. 1,5 (preferably less than 0,5) |
| Nitrate concentration above that of fill water in mg/l | max. 20 |
| Total organic carbon (TOC) in mg/l | max. 4,0 |
| Redox potential against Ag/AgCI 3,5 m KCl in mV | min. 650 |
| pH value | 6,8 to 7,6 |
| Free active chlorine (without cyanuric acid) in mg/l | 0,3 to 1,5 |
| Free chlorine used in combination with cyanuric acid in mg/l | 1,0 to 3,0 |
| Cyanuric acid in mg/l | max. 100 |
| Combined chlorine in mg/l | max. 0,5 (preferably close to 0,0 mg/l) |
NOTE: Damage resulting from chemical imbalance is not covered by the warranty. Pool chemicals are potentially toxic and should be handled with care. There are serious health risks from chemical vapors and the incorrect labeling and storage of chemical containers. Please consult your local pool supply retailer for more information about chemical maintenance. Pay close attention to the chemical manufacturer’s instructions. Pool damage resulting from misuse of chemicals and mismanagement of pool water is not covered by the warranty.
Important: Over usage of chemicals can discolor the printing and all points of the pool material. It can also damage the structure of the pool liner.
To keep your pool clean:
- Contact your local pool supply shop for advice and purchase of chemicals and pH kits. One of the most important factors to increase the life of the liner is to keep continuously clean and healthy water. Please strictly follow the instructions from professional technicians for the water treatment through the use of chemicals.
- Locate a bucket of water next to pool to clean users’ feet before entering pool.
- Cover the pool when not in use.
- Skim pool regularly to avoid settled dirt.
- Check and wash the filter cartridge regularly.
- Gently clean any scum from below the top ring with a clean cloth.
- Please be careful in case of rain water, kindly check that the water level is not higher than the expected. If so, YOU HAVE TO DISCHARGE THE EXCESS WATER.
- If it rains, check that the water level is not higher than the specified level. If water exceeds the specified levels, drain the pool to the specified level.
Proper maintenance can maximize the life of your pool.
During the season of use of the swimming pool, the filtration system must be necessarily put into service every day, enough time to assure at least a complete renewal of the volume of water.
NOTE: The pump is used to circulate the water and to filter small particles. In order to keep your pool water clean and hygienic, you must also add chemicals.
REPAIR
In the event of a leak, patch your pool using the underwater adhesive repair patch provided. You can find the instructions in FAQs on the support section of our website, www.bestwaycorp.com.
DISMANTLING
- Unscrew the drain valve cap on the outside of the pool counter clockwise and remove.
- Connect the adaptor to the hose and put the other end of the hose in the area where you are going to drain your pool. (Check local regulations for drainage by-laws).
- Screw control ring of the hose adaptor onto the drain valve clockwise. The drain valve will be open and water will start to drain automatically.
ATTENTION: Water flow can be controlled with the control ring. - When draining is finished, unscrew the control ring to close the valve.
- Disconnect the hose.
- Screw the cap back onto the drain valve.
- Air dry pool.
ATTENTION: Do not leave the drained pool outside.
STORAGE
- Please remove all the accessories and spare parts of the pool and store them clean and dry.
- Once pool is completely dry, sprinkle with talcum powder to prevent pool from sticking together, fold pool carefully. If pool is not completely dry, mold may result and will damage the pool liner.
- Store liner and accessories in a dry place with a moderate temperature between 5ºC / 41ºF and 38ºC / 100ºF.
- During the rainy season, pool and accessories should be stored as per above instructions also.
- Improper draining of the pool might cause serious personal injury and/or damage to personal property.
- We strongly recommend the pool is disassembled during the off season (winter months). Store in a dry location out of children’s reach.
INSTALLATION
Installation usually takes approximately 20-30 minutes with 2-3 people excluding earthworks and filling.
Assembly of the Frame Pool can be completed without tools. To lengthen the life of your pool, it is important to sprinkle the top rail with the Talcum Powder before assembly. Talcum Powder is not included and easily available in the market.
Bestway will not be responsible for damage caused to the pool due to mishandling or failure to follow these instructions.
- Lay out all parts and check that you have the correct quantities as listed in the components list. For assistance or FAQs, please visit the support section on our website, www.bestwaycorp.com.
- Spread out the pool and make sure the pool is right side up; let it sit exposed to direct sunlight for 1 hour or more so that the pool is more flexible during set up.
- Place the pool near an adequate drainage system to deal with overflow water and ensure the pool’s inlet A and outlet B are correctly positioned to allow your filter pump to connect to a power source.
NOTE: Do not use extension power cords to power your pump.
ATTENTION: Do not drag the pool on the ground, this can damage the pool.
NOTE: Drawings for illustration purpose only. May not reflect actual product. Not to scale.
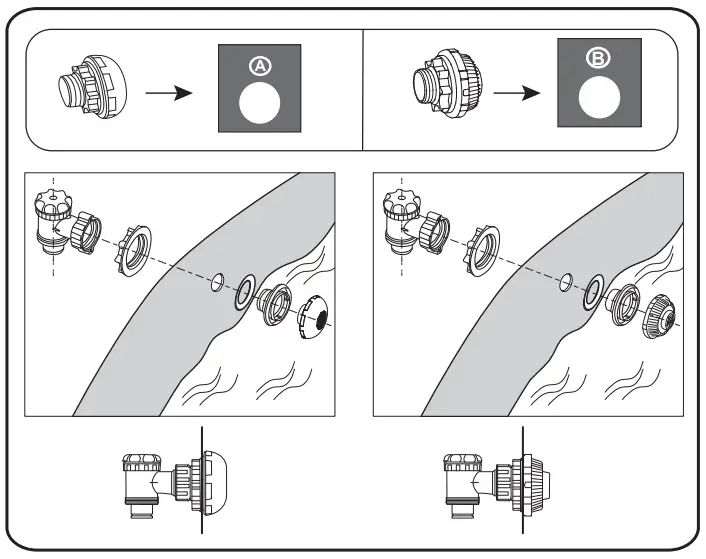
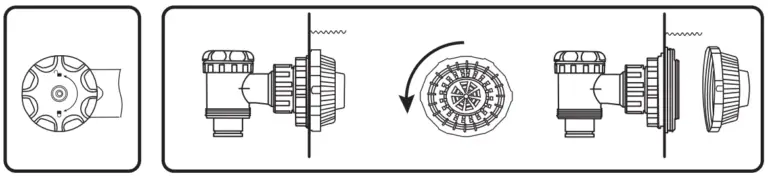
CONNECTION VALVE ASSEMBLY
For pool with connection valve.
NOTE: If you want to connect other pool cleaning kits to the pool through the connection valve, disassemble the Debris Screen from the Connector.
FILLING POOL WITH WATER
ATTENTION: Do not leave pool unattended while filling with water.
- Fill the pool until the water reaches the welding line located 5cm-20cm (2.0”-7.9”) from the top of the pool.
DO NOT OVERFILL as this could cause the pool to collapse. In times of heavy rainfall you may need to empty some of the water to ensure the level is correct. - When filling the pool is completed, check that the water is not collecting on any side to ensure the pool is level.
IMPORTANT: If pool is not level, drain water and re-level ground by digging out. Never attempt to move the pool with water in it, serious personal injury or damage to the pool may result.
WARNING: Your pool may contain a great deal of pressure. If your pool has any bulge or uneven side then the pool is not level, the sides may burst and the water may discharge suddenly causing serious personal injury and/or damage to property. - Check pool for any leaks at valves or seams, check any evident water loss. Do not add chemicals until this has been done.
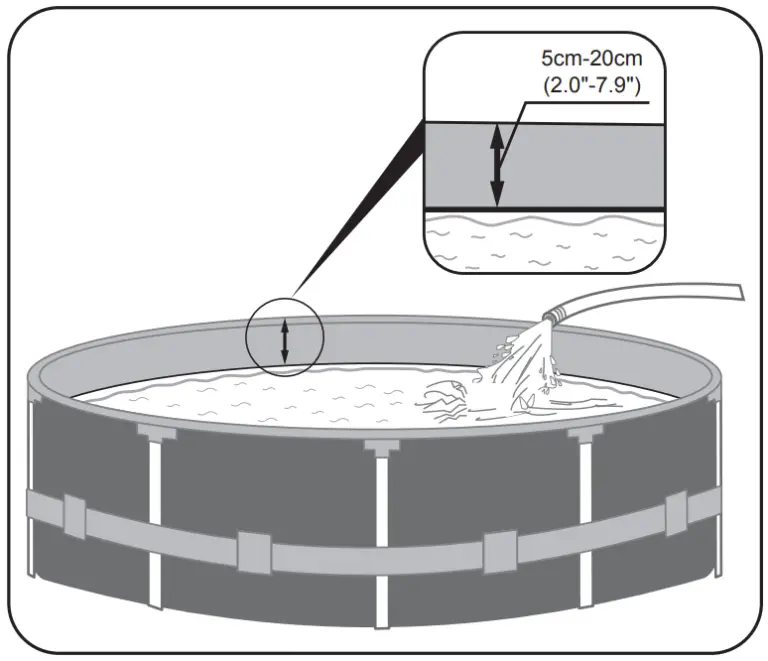
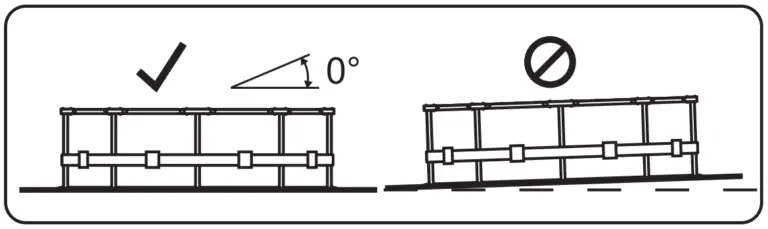
©2021 Bestway Inflatables & Material Corp.
All rights reserved/Tous droits réservés/Todos los derechos reservados/Alle Rechte vorbehalten/Tutti i diritti riservati
Trademarks used in some countries under license from/ Marques utilisées dans certains pays sous la licence de/ Marcas comerciales utilizadas en algunos países bajo la licencia de/ Die Warenzeichen werden in einigen Ländern verwendet unter Lizenz der/ Marchi utilizzati in alcuni paesi concessi in licenza a Bestway Inflatables & Material Corp., Shanghai, China
Manufactured, distributed and represented in the European Union by/
Fabriqués, distribués et représentés dans l’Union Européenne par/Fabricado, distribuido y representado en la Unión Europea por/
Hergestellt, vertrieben und in der Europäischen Union vertreten von/Prodotto, distribuito e rappresentato nell’Unione Europea da
Bestway (Europe) S.r.l., Via Resistenza, 5, 20098 San Giuliano Milanese (Milano), Italy
Distributed in Latin America by/Distribué en Amérique latine par/Distribuido en Latinoamérica por/Distribuído na América Latina por
Bestway Central & South America Ltda, Salar Ascotan 1282, Parque Enea, Pudahuel, Santiago, Chile
Distributed in Australia & New Zealand by Bestway Australia Pty Ltd, Unit 2/98-104 Carnarvon St Silverwater, NSW 2128, Australia
Tel: Australia: (+61) 29 0371 388; New Zealand: 0800 142 101
Distributed in United Kingdom by Bestway Corp UK Ltd. 8 Wentworth Road, Heathfield Industrial Estate, Newton Abbot, Devon, TQ12 6TL
Exported by/Exporté par/Exportado por/Exportiert von/Esportato da
Bestway (Hong Kong) International Ltd./Bestway Enterprise Company Limited
Suite 713, 7/Floor, East Wing, Tsim Sha Tsui Centre, 66 Mody Road, Kowloon, Hong Kong
Tel: +86 21 69135588 (For U.S. and Canada)
www.bestwaycorp.com
For support please visit us at:
bestwaycorp.com/support

bestwaycorp.com/support
Visit Bestway YouTube channel 

Visit www.bestwaycorp.com/support for help

WE SUGGEST NOT TO RETURN THE PRODUCT TO THE STORE
QUESTIONS? PROBLEMS?
MISSING PARTS?
For FAQ, Manuals, Videos Or Spare Parts, Please Visit bestwaycorp.com/support
Bestway 58383 Flowclear Filter Pump User Manual
![]()
WE SUGGEST NOT RETURNING THE PRODUCT TO THE STORE QUESTIONS? PROBLEMS? MISSING PARTS?
For FAQs, Manuals, Videos, Or For spare Parts, Please Visit bestwaycorp.com/support
IMPORTANT SAFETY INSTRUCTIONS
READ AND FOLLOW ALL INSTRUCTIONS
Carefully read, understand, and follow all information in this user manual before installing and using the Filter Pump. These warnings, instructions, and safety guidelines address some common risks of water filtration systems, but they cannot cover all risks and dangers in all cases. Always use caution, common sense, and good judgment when enjoying any water activity. Retain this information for future use. In addition, the following information can be supplied depending on the Filter Pump type. Keep the instructions in a safe place. If the instruction is missing, search for it on the website www.bestwaycorp.com/support.
WARNING
- The pump is to be supplied by an isolating transformer or supplied through a residual current device (RCD) having a rated residual operating current not exceeding 30 mA.
- The plug of the pump shall be at least 3.50 m away from the pool.
- The pump cannot be used while people are inside the pool.
- The supply cord cannot be replaced. If the cord is damaged the appliance should be scrapped.
- This appliance can be used by children aged 8 years and above and persons with reduced physical, sensory, or mental capabilities or lack of experience and knowledge if they have been given supervision or instruction concerning the use of the appliance in a safe way and understand the hazards involved. Children shall not play with the appliance. Cleaning and user maintenance shall not be made by children without supervision.
- When the appliance will be not used for a long time, such as in the winter, the pool set should be disassembled and stored indoors.
- The appliance must be placed more than 2 m away from the pool. Electric installations should follow national wiring rules.
- Only the media provided or specified by the manufacturer is to be used with product installation.
- It is essential to check that the suction openings are not obstructed.
- It is advisable to stop the filtration during maintenance operations on the filtration system.
- Regularly monitor the filter clogging level.
- A weekly check is recommended for cleaning.
- A minimum daily filtration operating time of 8 hours is recommended to ensure clear pool water.
- It is essential to change any damaged element or set of elements as soon as possible. Use only parts approved by the person responsible for placing the product on the market.
- All filters and filter media shall be inspected regularly to ensure that there is not a build-up of detritus thus preventing good filtration. The disposal of any used filter media should also be in accordance with applicable regulations/legislation.
- The water circulation installation shall comply with European as well as national/local regulations, especially when dealing with electrical issues. Any change in valve position, pump size, or grille size can cause a change in the flow and the suction velocity can be increased.
- It is necessary to have the plug accessible after the installation of the pool.
- Please read the instruction manual carefully and keep it for future reference.
- If the instruction is missed, please contact Bestway or search for it on the website: www.bestwaycorp.com.
DISPOSAL
Electrical products should not be disposed of with household waste. Please recycle where facilities exist. Check with your local authority or retailer for recycling advice.
SAFETY TECHNICAL INSTRUCTIONS
- The appliance must be supplied by a grounded power source.
- Extension cords can’t be used.
- In case of damage to the filter pump, do not use the pool.
- Do not bury the cord. Locate cord to minimize abuse from lawnmowers, hedge trimmers, and other equipment.
- This pump is for use with storable pools only. Do not use permanently-installed pools. A storable pool is constructed so that it is capable of being readily disassembled for storage and reassembled to its original integrity. A permanently-installed pool is constructed in or on the ground or in a building such that it cannot be readily disassembled for storage.
- Using the pump with an unmatched electrical supply is dangerous and will result in catastrophic failure of the pump.
- When working with electricity, turn the electrical power off at the circuit breaker and lock the breaker door. Failure to do so will result in an increased risk of shock, injury, and possibly death.
- Do not remove the grounding prong or modify the plug in any way. Do not use adapter plugs. Consult a qualified electrician for any questions related to the validity of your plug’s grounding.
- Handle the pump with care. Do not pull or carry the pump by the power cord. Never pull a plug from the outlet by yanking the power cord. Keep cord free from abrasions. Sharp objects, oil, moving parts, and heat should never be exposed to the filter pump.
- Cleaning and user maintenance must be performed by an adult above 18 years old who is familiar with the risk of electric shock.
- Consult a qualified electrician for any questions.
- In case of doubt on the pump or any circulation devices, contact a qualified installer, or the manufacturer/importer/distributor.
- Mind all the safety requirements and recommendations described in the manual.
- Please examine the equipment before use. Notify Bestway at the customer service address listed on this manual for any manufacturing defect or missing parts at the time of purchase. Verify that the equipment components represent the filter pump model that you had intended to purchase.
- Atmospheric conditions may affect the performance and life span of your filter pump. Unnecessary wear and tear may occur during periods of cold, heat, and exposure to the sun. Whenever possible, shelter the pump from these conditions.
- It is important to ensure the factory-equipped stopper plugs for the inlet and outlet ports replace the screens before removal or maintenance on the pump is attempted.
- Do not add chemicals to the filter pump.
- Don’t plug or unplug the appliance if your hand is wet.
- Always unplug the appliance: on rainy days, before cleaning or other maintenance, and when leaving it unattended on holidays.
- This product is not intended for commercial use.
ATTACHING A BASE
![]()
FOR 330GAL
EN60335-2-41 TEST standard requires the filter pump to be vertically fixed on the ground or a base made of wood or concrete before use. There should be two holes 9 mm in diameter on the base, the space between which should be 127 mm. Put the filter pump on the base and attach them together by fastening the bolts and nuts. All the base parts should weigh at least over 18 kg to prevent the pump from accidentally falling.
FOR 530GAL
EN60335-2-41 TEST standard requires the filter pump to be vertically fixed on the ground or a base made of wood or concrete before use. There should be two holes 9 mm in diameter on the base, the space between which should be 159 mm. Put the filter pump on the base and attach them together by fastening the bolts and nuts. All the base parts should weigh at least over 18 kg to prevent the pump from accidentally falling.
FOR 800GAL
EN60335-2-41 TEST standard requires the filter pump to be vertically fixed on the ground or a base made of wood or concrete before use. There should be two holes 9 mm in diameter on the base, the space between which should be 166 mm. Put the filter pump on the base and attach them together by fastening the bolts and nuts. All the base parts should weigh at least over 18 kg to prevent the pump from accidentally falling.
SETUP
What’s In The Box
![]()
Setting
![]()
Flame
![]()
CHECKLIST
To check the parts included in the box, consult the part list inside this manual. Verify that the equipment components represent the model that you had intended to purchase. In case of any damaged or missing parts at the time of purchase, visit our website bestwaycorp.com/support.
CHOOSE THE CORRECT LOCATION
Place the Filter Pump on a solid and level ground; it must be positioned on the same level as the base of the pool. If the Filter Pump is in an upper or lower position than the base of the pool, the performance and life span of the Filter Pump can be compromised. The pool and the Filter Pump have to be positioned in an area with adequate drainage and easy access for maintenance operations. Never place the Filter Pump in an area that may accumulate water.
INSTALLATION
- For the installation instructions, refer to the illustration steps. Drawings are for illustration purposes only. May not reflect the actual product. Not to scale.
- Bestway will not be responsible for any damage caused to the Filter Pump due to mishandling or failure to follow these instructions.
- It is imperative to check that the hydraulic connectors are not obstructed.
- Do not dry run the Filter Pump. Make sure both the pool’s inlet and outlet valves are fully covered by water before operating the Filter Pump.
MAINTENANCE
- Make sure that the Filter Pump is unplugged before any maintenance.
- For the maintenance instructions, refer to the illustration steps inside this manual. Drawings are for illustration purposes only. May not reflect the actual product. Not to scale.
- To optimize the Filter Pump performance and for sanitary reasons, we suggest replacing the filter cartridge with a new one every two weeks.
STORAGE
- Remove all accessories; be sure that Filter Pump, hoses, and debris screens are completely clean and dry before storage. If all the parts are not completely dry, mold may result.
- Before storage, remove and dispose of the filter cartridge.
- We strongly recommend disassembling the Filter Pump when the environment temperature is below 10ºC / 50ºF.
- Store the Filter Pump in a dry place with a moderate temperature between 10ºC / 50ºF and 38ºC / 100ºF.
WARRANTY TERMS
For information concerning warranty terms, visit our website at: www.bestwaycorp.com.©2022 Bestway Inflatables & Material Corp. All rights reserved Trademarks used in some countries under license from/ Bestway Inflatables & Material Corp., Shanghai, China Manufactured, distributed, and represented in the European Union by/ Distributed in Australia & New Zealand by Bestway Australia Pty Ltd, Unit 2/98-104 Carnarvon St Silverwater, NSW 2128, Australia
Tel: Australia: (+61) 2 9037 1388; New Zealand: 0800 142 101 Distributed in the United Kingdom by Bestway Corp UK Ltd. 8 Wentworth Road, Heathfield Industrial Estate, Newton Abbot, Devon, TQ12 6TL Exported Bestway (Hong Kong) International Ltd./Bestway Enterprise Company Limited Suite 713, 7/Floor, East Wing, Tsim Sha Tsui Centre, 66 Mody Road, Kowloon, Hong Kong www.bestwaycorp.com
]]>
Safety Instructions
WARNING
When installing and using this electrical appliance, basic safety precautions should always be followed, including the following: IMPORTANT SAFETY INSTRUCTIONS READ AND FOLLOW ALL INSTRUCTIONS WARNING:
- The Pool Heater must be tested before each use. To test, follow the instructions in the Operation section of this manual.
- The Pool Heater must be supplied through a residual current device (RCD) having a rated residual operating current not exceeding 30mA.
- The power source on the wall of building should keep more than 4m away from pool and at a height of 1.2m at least.
- Parts containing live parts, except parts supplied with safety extra-low voltage not exceeding 12V, must be inaccessible to a person in the pool; Parts incorporating electrical components, except remote control devices, must be located or fixed so that they cannot fall into the swimming pool.
- RISK OF ELECTRIC SHOCK – The Pool Heater can not be used while people are inside the pool.
- If the supply cord is damaged, it must be replaced by the manufacturer, its service agent or similarly qualified persons in order to avoid a hazard.
- Extension cords can’t be used.
- Do not bury cord. Locate cord to minimize abuse from lawn mowers, hedge trimmers, and other equipment.
- The Pool Heater should not be setup or left out in temperature lower than 4°C (40°F).
- It is necessary to have the plug accessible after installation of the pool.
- Before using the Pool Heater, make sure the pool has been filled with water.
- Pool Heaters are designed for used with specific water volume; ensure your Pool Heater matches your pool’s water volume along with your Filter Pump or Sand Filter’s designated water flow rate.
- RISK OF ELECTRIC SHOCK – Install at least 2m from all metal surfaces.
- The heater must be supplied by earthed power source.
- Warning: Always keep plug dry, plug in with wet plug is definitely forbidden!
- This appliance can be used by children aged from 8 years and above and persons with reduced physical, sensory or mental capabilities or lack of experience and knowledge if they have been given supervision or instruction concerning use of the appliance in a safe way and understand the hazards involved. Children shall not play with the appliance. Cleaning and user maintenance shall not be made by children without supervision. (For EU market)
- WARNING – This appliance is not intended for use by persons (including children) with reduced physical, sensory or mental capabilities, or lack of experience and knowledge, unless they have been given supervision or instruction concerning use of the appliance by a person responsible for their safety. Children should be supervised to ensure that they do not play with the appliance. (For market other than EU) Cleaning and user maintenance must be performed by an adult above 18 years old who is familiar with the risk of electric shock.
Caution: Read the instruction before using the appliance and installation/reassemble each time.
Warning: For electric safety, a PRCD device is incorporated in the power cord, if the leakage current is detected more than 10mA, the device will operate and cut-off the power supply, in such case, please unplug and stop using the product at once. Don’t reset the product by yourself. And you must contact the local service agent to check and repair the product. - Don’t plug or unplug the appliance if hand is wet.
- Always unplug the appliance:
– on raining days
– before cleaning or other maintenance
– Leave it unattended on holidays When the appliance will be not used for long time, such as in the winter, the pool set should be disassembled and stored indoor. - Safekeeping the instruction. For reconstruction the pool set every time, please always refer to the instructions.
- If instruction is missed, please contact with Best way or search it in website: www.bestwaycorp.com
CAUTION:
- Pool Heater is for use with storable pools only. Do not use with permanently-installed pools. A storable pool is constructed so that it is capable of being readily disassembled for storage and reassembled to its original integrity. A permanently-installed pool is constructed in or on the ground or in a building such that it cannot be readily disassembled for storage.
- Never add water to chemicals. Always add chemicals to water to avoid strong fumes or violent reactions that may result in hazardous chemical spray. Electric installations should follow national wiring rules, consult a qualified electrician with any questions. After using your heater for 3-5 years, you should contact your local qualified maintenance technician to ensure the safety and performance. The main components, such as heating element, within the electric unit should be checked and replaced(if necessary) by professional persons.
NOTE: - Handle the Pool Heater with care. Do not pull or carry the Pool Heater by the power cord. Keep cords free from abrasions. Sharp objects, oil, moving parts, and heat should never be exposed to the Pool Heater.
- Please examine all equipment before use. Notify Bestway through our customer service address listed on this manual for any damaged or missing parts at the time of purchase. Verify all components represent the model that you purchased.
- This product is not intended for commercial use. IMPORTANT: Using the Pool Heater with an unmatched electrical supply is dangerous and will result in catastrophic failure of the Pool Heater.
SAVE THESE INSTRUCTIONS
Disposal
![]() Meaning of crossed out wheeled dustbin: Do not dispose of electrical appliances as unsorted municipal waste, use separate collection facilities. Contact your local government for information regarding the collection systems available. If electrical appliances are disposed of in landfills or dumps, hazardous substances can leak into the groundwater and get into the food chain, damaging your health and well-being. When replacing old appliances with new ones, the retailer is legally obligated to take back your old appliance for disposals at least free of charge.
Meaning of crossed out wheeled dustbin: Do not dispose of electrical appliances as unsorted municipal waste, use separate collection facilities. Contact your local government for information regarding the collection systems available. If electrical appliances are disposed of in landfills or dumps, hazardous substances can leak into the groundwater and get into the food chain, damaging your health and well-being. When replacing old appliances with new ones, the retailer is legally obligated to take back your old appliance for disposals at least free of charge.
Parts Reference Overview
Before assembling the Pool Heater become familiar with all parts.

Specifications
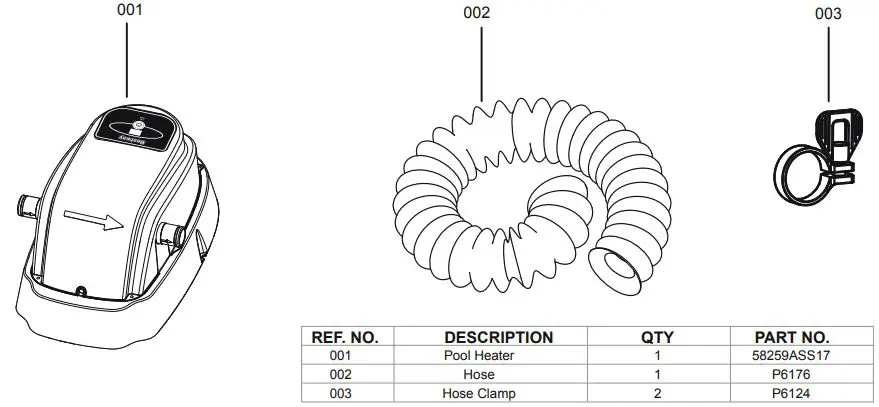
NOTE: The increased Heat Rate is just for reference. The actual heating time may vary according to the pool’s water volume, environmental temperatures, desired temperatures and other conditions. Usually, if the pool has a large water volume or if environment temperatures are low and the desired temperature is high, longer heating time is required. However, if the temperature increase is less than 0.2°C after one heating hour, the water temperature can be thought to have reached the highest balance temperature.
Alarms
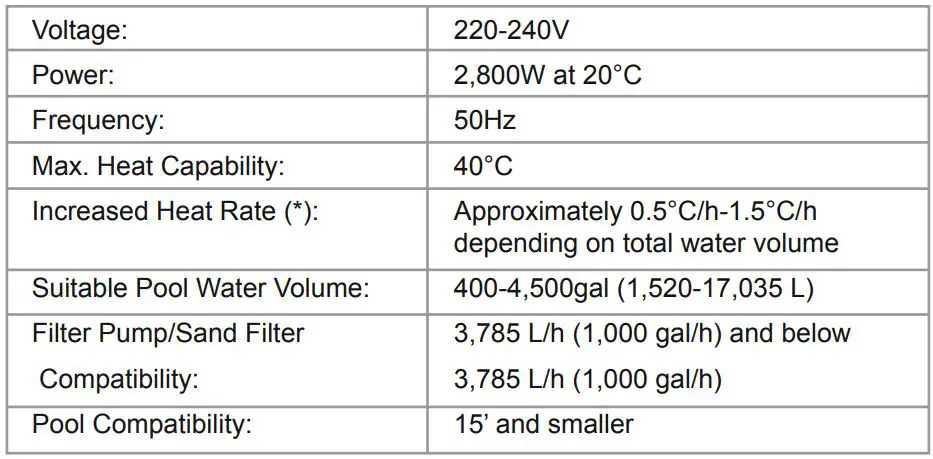
Troubleshooting
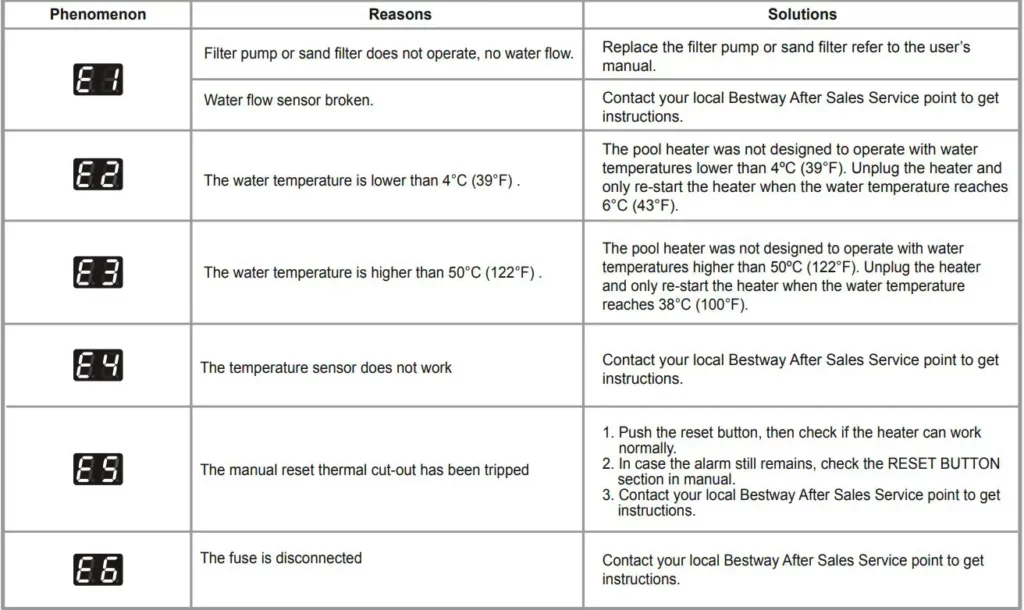
Pedestal Fixing
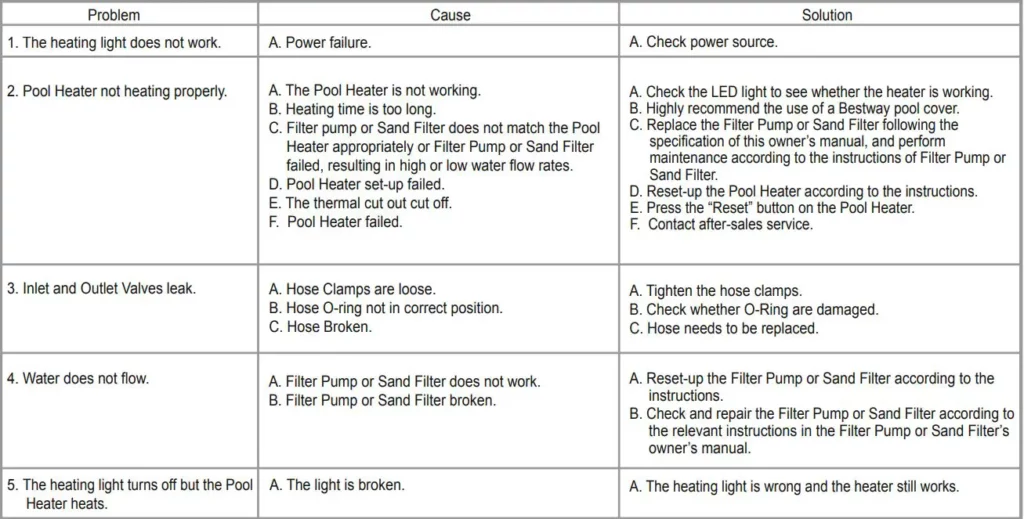 The pool heater must be vertically fixed on ground or a certain pedestal made of wood or concrete before it can be used. There should be two holes, 8mm in diameter on the pedestal, the space between which should be 254mm. Put the pool heater on the pedestal and fix them together with bolts and nuts. The pedestal should weigh over 18kgs in order to prevent the pool heater from accidentally falling.
Assembly
- Set-up and fill the pool with water to the required level according to the pool’s owner’s manual.
- Attach the Filter Pump or Sand Filter’s Inlet Valve to the Pool: a) Place the loose Hose Clamps on both ends of a Filter Pump or Sand Filter Hose.
b) Attach the hose to Filter Pump or Sand Filter’s Inlet Valve and the Pool’s Outlet Valve B.
c) Tighten the Hose Clamps. - Connect the Filter Pump or Sand Filter to the Pool Heater:
a) Place the loose Hose Clamps on both ends of the Pool Heater Hose.
b) Attach the hose to the Filter Pump or Sand Filter’s Outlet Valve and the Pool Heater’s `INLET’ Valve and tighten the Hose Clamps. - Attach the Pool Heater to the Pool’s Inlet Valve A.
- Loosen the Hose Clamps on the Pool’s Inlet and Outlet Valves; replace the Stopper Plugs with Debris Screens. Water now flows to the Filter Pump or Sand Filter and the Pool Heater. With the Hoses and the Debris Screens in position, tighten the Hose Clamps.
- Check that every port and valve is connected correctly.
PRCD Test
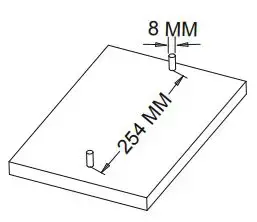
NOTE: Drawings for illustration purpose only. May not reflect actual product. Not to scale.
- Insert the plug.
- Press the “RESET” button, the indicator light turns green.
- Press the “TEST” button, the indicator light turns off.
- Press the “RESET” button, the indicator light turns green.
WARNING: The PRCD plug must be tested before each use to avoid risk of electric shock.
WARNING: Before inserting plug into a power outlet, make sure the current rate of the power outlet is suitable for the pump. WARNING: Do not use the heater if this test fails and contact our After Sales Service.
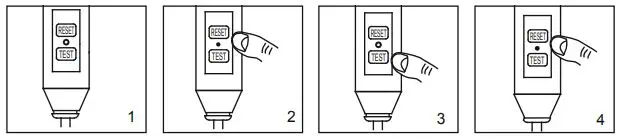 POOL HEATER EQUIPOTENTIAL BONDING TERMINAL
It is recommended to arrange for a qualified electrician to connect the Pool Heater to a equipotential bonding terminal using a (minimum) 2.5mm2 solid copper conductor.
NOTE: To order spare parts for the Pool Heater, please provide us with part no. and part name. Drawings for illustration purposes only. May not reflect actual product. Not to scale.
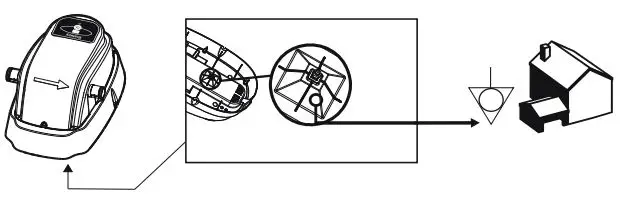
RESET BUTTON IMPORTANT INSTRUCTION FOR USING
If the water temperature has not changed 4-5 hours after activation of the heating system, use a thin object to press the RESET BUTTON, and restart the heating system.
IMPORTANT: The heating system will not operate if the outside temperature is above 40°C (104°F) or if the Pool Heater is under direct sunlight. Under these conditions, please wait until a cooler time of day before pressing the RESET BUTTON with a thin object and restart the heating system.
Operation
NOTE: Check the pool for correct installation and make sure both the pool’s
Inlet and Outlet Valves are fully covered with water before operating the Filter Pump or Sand Filter with the Pool Heater. Make sure that the Pool Heater and Filter Pump or Sand Filter are correctly connected.
- Start the Filter Pump or Sand Filter according to the owner’s manual.
- With the pump operating, insert the plug of the Pool Heater into a socket, after test PRCD . The LED will light up for 0.5 seconds with a “beep” sound, and the LED displays
- Press the “POWER” button for 2 seconds, the LED turns on and the heater starts to work, the LED display.
- Press the “POWER” button for 2 seconds again, the Pool Heater will turn off.
NOTE: When the water temperature reaches the maximum temperature 40°C (104°F), the LED turns green.
NOTE: Never plug in the Pool Heater until the Filter Pump or Sand Filter has been plugged in.
WARNING: To prevent the risk of electrical shock, ensure your hands are completely dry when plugging-in the Filter Pump or Sand Filter and the Pool Heater.
NOTE: To prevent the risk of electrical shock, never run the Filter Pump or Sand Filter and the Pool Heater when people are in the pool.
NOTE: Do not dry run the Pool Heater. Damage caused by dry running the Pool Heater is not covered by the manufacturer’s warranty. - Remember to disconnect the Pool Heater first. Never unplug the Filter Pump or Sand Filter when the Pool Heater is running.
- Unplug the Filter Pump or Sand Filter and enjoy warm pool water!
Maintenance
CAUTION: YOU MUST UNPLUG THE POOL HEATER FIRST, THEN UNPLUG THE FILTER PUMP OR SAND FILTER BEFORE PREFORMING MAINTENANCE OR SEVERE RISK OF INJURY OR DEATH EXISTS.
- Stop Water Flowing to the Filter Pump or Sand Filter and the Pool Heater:
a) Disconnect the Pool Heater and THEN the Filter Pump or Sand Filter.
b) Loosen the Hose Clamps on the pool’s Inlet and Outlet Hoses.
c) Replace the Debris Screens with the Stopper Plugs in the pool’s Inlet and Outlet Valves.
d) Refer to the Filter Pump or Sand Filter ‘s Owner’s Manual for information on Filter Pump or Sand Filter maintenance. - After Filter Pump or Sand Filter maintenance, replace the Stopper Plugs with the Debris Screens in the pool’s Inlet and Outlet Valves. Water will now flow to the Filter Pump or Sand Filter and the Pool Heater.
- Operate as outlined in the Operation section of this manual.
Storage and Winterization
CAUTION: YOU MUST UNPLUG THE POOL HEATER AND THE FILTER PUMP OR SAND FILTER BEFORE MAINTENANCE BEGINS OR SEVERE RISK OF INJURY OR DEATH EXISTS. To avoid damage, pool equipment must be winterized when temperatures are lower than 4°C (40°F). Allowing water to freeze will damage the Pool Heater and void the warranty. NOTE: Do not leave the heater out in the open air for long periods of time. When it is not in use, please clean and dry it and then store it in a cool, dry place.
- Follow the instructions previously outline to stop water flowing to the Filter Pump or Sand Filter and the Pool Heater.
- Detach all hoses.
- Drain any water in the Pool Heater and clean all components thoroughly.
- Put the Pool Heater in a cool, dry place, out of children’s reach.
OPERATING TIME TABLE
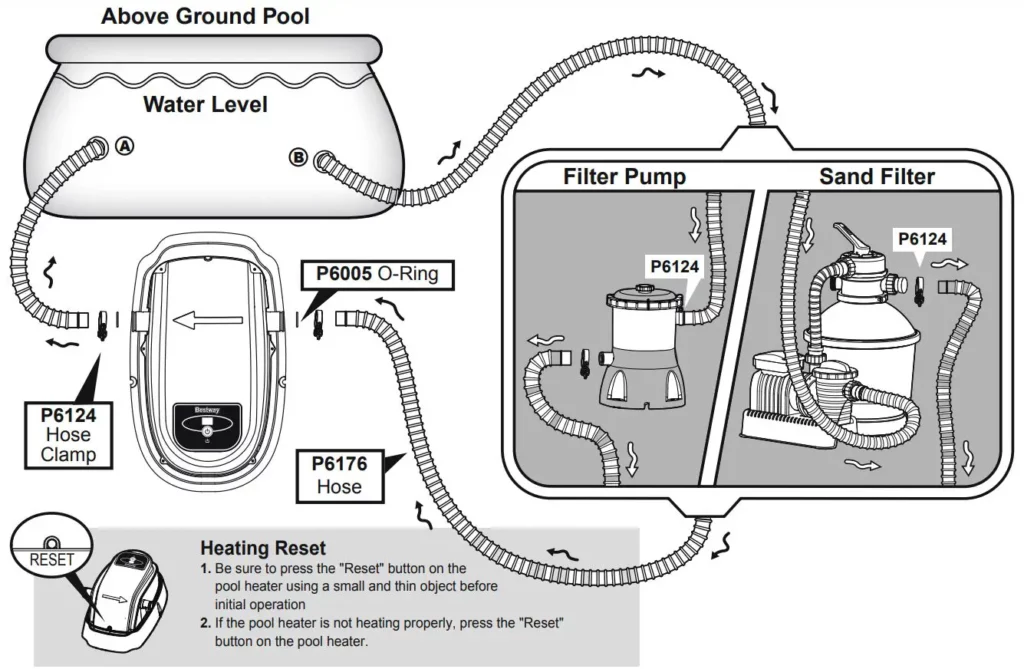
Notice:
- The table above is for reference only. Data are relevant for a covered pool with water at 25 degrees Celsius on a clear day.
- Ambient air and water temperature has an effect on water heating efficiency.
For support please visit us at: bestwaycorp.com/support
©2020 Bestway Inflatables & Material Corp.
All rights reserved
®™ Trademarks used in some countries under license to/ Marques ®™
Bestway Inflatables & Material Corp., No.3065 Cao An Road, Shanghai, 201812, China.
Manufactured, distributed and represented in the European Union by Distributed in North America by
Bestway (USA) Inc., 3411 E. Harbour Drive, Phoenix, Arizona 85034, United States of America
Tel: +86 21 69135588 (For U.S. and Canada)
Distributed in Latin America by
Bestway Central & South America Ltda, Salar Ascotan 1282, Parque Enea, Pudahuel, Santiago, Chile
Distributed in Australia & New Zealand by Bestway Australia Pty Ltd, Unit 2/98-104 Carnarvon St Silverwater, NSW 2128, Australia
Tel: Australia: (+61) 29 0371 388; New Zealand: 0800 142 101
Exported by Bestway (Hong Kong) International Ltd./Bestway Enterprise Company Limited
Suite 713, 7/Floor, East Wing, Tsim Sha Tsui Centre, 66 Mody Road, Kowloon, Hong Kong www.bestwaycorp.com
![]()
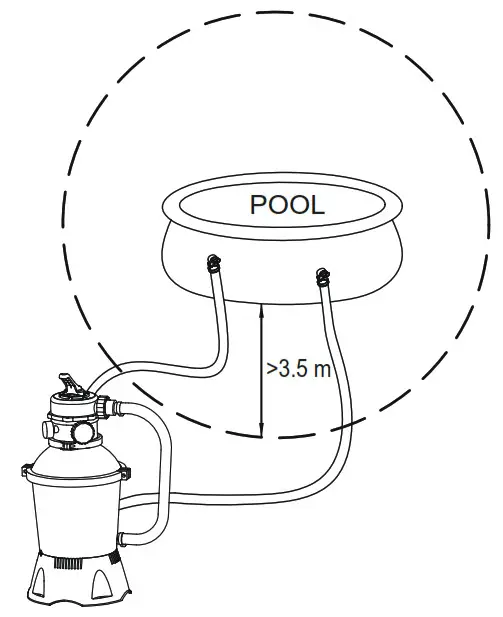 Visit www.bestwaycrop.com/support for help
WE SUGGEST NOT TO RETURN
THE PRODUCT TO THE STORE
QUESTIONS? PROBLEMS?
MISSING PARTS?
For FAQ, Manuals, Videos Or Spare Parts, Please Visit bestwaycorp.com/support
SAND FILTER
OWNER’S MANUAL
Visit the Bestway YouTube channel
SAFETY INSTRUCTIONS
WARNING
IMPORTANT SAFETY INSTRUCTIONS – READ AND FOLLOW ALL SAFETY INSTRUCTIONS – SAVE THESE
INSTRUCTIONS
When installing and using this electrical equipment, basic safety precautions should always be followed, including the following:
- The pump is to be supplied by an isolating transformer or supplied through a residual current device (RCD)having a rated residual operating current not exceeding 30 mA.
- The power source on the wall of the building should keep more than 4 m away from the pool.
- The appliance must be supplied by the earthed power source.
- RISK OF ELECTRIC SHOCK – The pump cannot be used while people are inside the pool. Forbid the access of the pool in case of damage of the sand filter.
- DO NOT BURY THE CORD. Locate cord to minimize abuse from lawn mowers, hedge trimmers, and other equipment.
- To reduce the risk of electric shock, replace the damaged cord immediately.
- If the supply cord is d similarly qualified persons in order to avoid a hazard.
- Extension cords can’t be used.
- Risk of electric shock. Using the sand filter with an unmatched electrical supply is dangerous and will permanently damage the sand filter.
- Do not remove the grounding prong or modify the plug in any way. Do not use adaptor plugs. Consult a qualified electrician for any questions relating to validity of your plugs or grounding.
- Handle the sand filter with care. Do not pull or carry the sand filter by the power cord. Never pull a plug from the outlet by yanking the power cord. Keep cord free from abrasions. Sharp objects, oil, moving parts, and heat should never be exposed to the sand filter.
- Always unplug this product from the electrical outlet before removing, cleaning, servicing or making any adjustment to the product.
- Don’t plug or unplug the appliance if hand is wet
- Always unplug the appliance:
- On raining days
- Before cleaning or other maintenance
- Leave it unattended on holidays
- When the appliance will be not used for long time, such as in the winter, the pool set should be disassembled and stored indoor.
- CAUTION: Read the instruction before using the appliance and installation/reassembly every time.
- Safekeeping the instruction. For reconstruction the pool set every time, please always refer to the instructions.
- If the instruction is missed, please contact with Bestway or search it in website: www.bestwaycorp.com
- Electric installations should follow national wiring rules.
Consult a qualified electrician for any questions.
CAUTION: This sand filter is for use with storable pools only.
Do not use with permanently-installed pools. A storable pool is constructed so that it is capable of being readily disassembled for storage and reassembled to its original
integrity. A permanently-installed pool is constructed in or on the ground or in a building such that it cannot be readily disassembled for storage.
- This appliance can be used by children aged from 8 years and above and persons with reduced physical, sensory or mental capabilities or lack of experience and
knowledge if they have been given supervision or instruction concerning use of the appliance in a safe way and understand the hazards involved. Children shall not play with the appliance. Cleaning and user maintenance shall not be made by children without supervision. - Cleaning and user maintenance must be performed by an adult above18 years old who is familiar with the risk of electric shock.
NOTES:
- Place the sand filter on solid, level ground. Ensure the sand filter is at least 3.5 meters away from the poolside. Keep distance as far as possible.
- Pay attention to the position pool and sand filter so adequate ventilation, drainage, and access for maintenance is available. Never place the sand filter in an area that may accumulate water, or on a walking path with lots of foot traffic.
- It is necessary to have the plug accessible after the installation of the pool. The plug of the sand filter shall be at least 3.5 m away from the pool.
- Atmospheric conditions may affect the performance and life span of the sand filter; take adequate precautions to protect the sand filter from unnecessary wear and tear that may occur during periods of cold or hot weather and/or exposure to sun.
- Please examine and verify all sand filter components are present before use. Notify Bestway at the customer service address listed on this manual for any damaged or missing parts at the time of purchase.
- It is imperative to change as soon as possible all deteriorated parts. Only use parts approved by the manufacturer.
- Do not allow children or adults to lean or sit on the apparatus.
- Do not add chemicals to the sand filter.
- When chemical products are used to clean the pool water, it is recommended to respect a minimum filtration time to preserve the health of swimmers which depends on the compliance of health regulations.
- Only the media provided or specified by the manufacturer is to be used with product installation.
- It is essential to check that the suction openings are not obstructed.
- It is advisable to stop the filtration during maintenance operations on the filtration system.
- Regularly monitor the filter clogging level.
- A weekly check is recommended for backwashing or cleaning. Minimum daily filtration operating time of 8 hours is recommended to ensure clear pool water.
- It is essential to change any damaged element or set of elements as soon as possible. Use only parts approved by person responsible for placing the product on the market.
- All filters and filter media shall be inspected regularly to ensure that there is not a build-up of detritus thus preventing good filtration. The disposal of any used filter media should also be in accordance with applicable regulations/legislation.
- Mind all the safety requirements and recommendations described in the manual. In case of doubt on the pump or any circulation devices, contact a qualified installer, or the manufacturer/importer/distributor. The water circulation installation shall comply with the European as well as national/local regulations, especially when dealing with electrical issues. Any change of valve position, pump size, grille size can cause a change of the flow and the suction velocity can be increased.
- This product is not intended for commercial use.
PLEASE READ THE INSTRUCTION MANUAL CAREFULLY AND KEEP IT FOR FUTURE REFERENCE. SAVE THESE INSTRUCTIONS
RCD WARNING
WARNING: Before inserting plug into a power outlet, make sure the current rate of the power outlet is suitable for the sand filter.
WARNING: Risk of electric shock. The RCD plug must be tested before each use.
WARNING: Insert the RCD plug into a residual current device (RCD) having a rated residual operating not exceeding 30 mA.
WARNING: Do not use the sand filter if this test fails. For assistance, please visit the support section on our website, www.bestwaycorp.com.
PUMP DISPOSAL
Meaning of crossed-out wheeled dustbin: Waste electrical products should not be disposed of with household waste. Please recycle where facilities exist. Check with your local authority or retailer for recycling advice.
SPECIFICATIONS
| Filter Diameter: | 270 mm |
| Effective Fiter Area: | 0.059 m 2 (0.635 ft 2) |
| Max. Operating Pressure: | 0.42 Bar(6 PSI) |
| Working sand filter pressure: | <0.25 Bar(3.5 PSI) |
| Max. Water Temperature: | 35°C |
| Sand: | Not included |
| Sand Size: | #20 silica sand,0.45-0.85 mm |
| Sand Capacity: | Approximately 8.5 kg |
PARTS REFERENCE OVERVIEW
Before assembling the sand filter, take a few minutes to become familiar with all the sand filter parts.
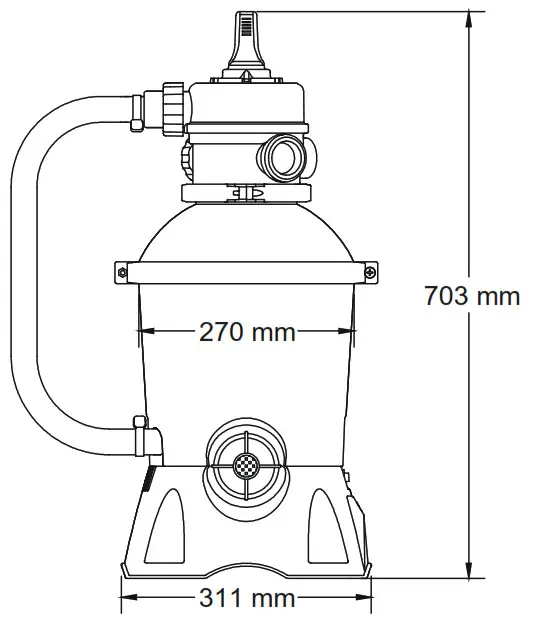 |
 |
| REF.NO | SPARE PART NO. | A | B |
| 1 | P61138ASS16 | 1 | 1 |
| 2 | P03822 | 1 | 1 |
| 3 | P03830 | 1 | 1 |
| 4 | P03823 | 2 | 2 |
| 5 | P03825 | 1 | 1 |
| 6 | P03829 | 3 | 3 |
| 7 | P03824 | 2 | 2 |
| 8 | P6005ASS16 | 4 | 4 |
| 9 | P6124ASS16 | 6 | 4 |
| 10 | P6132ASS16 | 1 | 1 |
| 11 | P03828 | 2 | 2 |
| 12 | P05884 | 1 | 1 |
| 13 | P6614ASS16 | 1 | 1 |
| 14 | P6029ASS16 | 3 | 3 |
| 15 | P6149ASS16 | 1 | 1 |
| 16 | P6660ASS16 | 1 | 1 |
| 17 | P6661ASS16 | 1 | 1 |
| 18 | P6662ASS16 | 1 | 1 |
| 19 | P6663ASS16 | 1 | 1 |
| 20 | P6664ASS16 | 1 | 1 |
| 21 | P6665ASS16 | 1 | 1 |
| 22 | P6042ASS16 | 2 | 2 |
| 23 | P61322ASS16 | 1 | 0 |
| P61318ASS16 | 1 | 0 | |
| 24 | P6643ASS16 | 1 | 1 |
ASSEMBLY
(You will need a screwdriver.)
- Carefully remove all components from the package and check to ensure nothing is damaged. If equipment is damaged, immediately notify the retailer from where the equipment was purchased.
- The sand filter should be placed on solid, level ground, preferably a concrete slab. Position the sand filter so the Ports and Control Valve are accessible for operation, servicing and winterizing.

- EN60335-2-41 TEST standard requires the sand filter to be vertically fixed on the ground or a certain pedestal made of wood or concrete before use to prevent the sand filter from accidentally falling. Fully assembled sand filter will exceed 18 kg. The mounting holes should be 8 mm in diameter and spaced 285 mm apart. Use two bolts and
nuts with a maximum of 8 mm in diameter to fasten the sand filter to the pedestal.
LOAD POOL-GRADE FILTER SAND/FLOWCLEAR™ POLY SPHERE.
NOTE: Use only special pool-grade filter sand, free of all limestone or clay: #20 Silica sand 0.45-0.85 mm, approximately one 8.5 kg bag should suffice. If you do not use the recommended size filter sand, filtering performance will be reduced and the sand filter may be damaged, thereby voiding the warranty.
NOTE: To avoid damaging the Skimmer when adding sand, pour some water into the Bottom Tank to submerse the Skimmer on the Collector Hub.
NOTE: Sand/Flowclear™ Polysphere not included.
NOTE: Use 28 g (0.06 lbs) Flowclear™ Polysphere to replace 1 kg (2.20 lbs) sand. 
CONNECT TO THE POOL
For 38 mm(1.5 in) connection 

 STOP Before switching on, please read the manual carefully.
OPERATION
CONTROL VALVE OVERVIEW
WARNING: To prevent equipment damage and possible injury, always switch off sand filter before changing the Control Valve function. Changing valve positions while
the pump is running can damage the Control Valve, which may cause personal injury or property damage. How to Use the Control Valve: Press down on the Control Valve handle and rotate to the desired function.
CONTROL VALVE FUNCTIONS
The control valve is used to select 6 different filter functions: Filter, Closed, Backwash, Rinse, Drain and Circulate.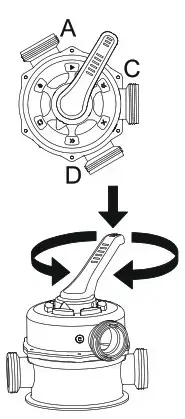
![]() Backwash: This function is used to clean the sand bed; water is pumped down through the Collector Hub, upwards through the sand bed, and deposited out of Port D.
Backwash: This function is used to clean the sand bed; water is pumped down through the Collector Hub, upwards through the sand bed, and deposited out of Port D.
![]() Drain: This function drains water from the pool; another filter bypass setting, water is pumped and deposited out ofPort D, instead of returning it to the pool.
Drain: This function drains water from the pool; another filter bypass setting, water is pumped and deposited out ofPort D, instead of returning it to the pool.
![]() Rinse: This function for initial startup, cleaning, and sand bed leveling after Backwash; water is pumped downwards through the sand bed, up through the Collector Hub and deposited out of the valve Port D.
Rinse: This function for initial startup, cleaning, and sand bed leveling after Backwash; water is pumped downwards through the sand bed, up through the Collector Hub and deposited out of the valve Port D.
![]() Circulate: This function circulates pool water bypassing the sand filter; use this function if the filter is broken to collect debris in the Debris Screens.
Circulate: This function circulates pool water bypassing the sand filter; use this function if the filter is broken to collect debris in the Debris Screens.
NOTE:
- Be sure all provisions for wastewater disposal meet applicable local, state or national codes. Do not discharge water where it will cause flooding or damage.
- When the Control Valve is set to the Backwash, Rinse, or Drain position, water will discharge from Port D on the Control Valve.
- Do not switch on or operate the sand filter with the Control Valve set to the Closed function or it will seriously damage the sand filter.
- Do not set the Control Valve between two functions, or it will lead to leaking.
- To avoid water leakage, screw the Port D Cap onto the Control Valve Port D before operating the sand filter.
RCD TEST

AIR RELEASE
Press down the control valve handle and wait untill the water flow from Port D to release the air.
NOTE: It is important to repeat this operation every time you start the pump after winterizing, maintenance and backwashing the sand bed.
FIRST TIME USE INSTRUCTIONS
Backwash and Rinsing must be performed to prepare the pump for its first use and to wash the sand.
CAUTION: DO NOT DRY RUN THE SAND FILTER
- Press down on the Control Valve handle and rotate to the Backwash function.
- Plug in and run the sand filter for 3-5 minutes, or until the water runs clear.

- Switch off the sand filter and set the Control Valve to the Rinse function.
- Switch on the sand filter and run the sand filter for 1 min. This circulates water backward through the sand filter and drains water out of Port D.
- Switch off the sand filter. Set the Control Valve to the Closed function.
- Top up pool water if required.
IMPORTANT: This procedure removes water from the pool, which you’ll need to replace.
Switch off the sand filter immediately if water levels near the pool’s Inlet and Outlet valves.
- Now the sand filter is ready for use. Set the Control Valve to the Filter function.
NOTE: To prevent the risk of electrical shock dry any excess water from yourself and the sand filter.

- Switch on the sand filter to run it.
NOTE: The sand filter has now started its filtering cycle. Check that water is returning to the pool and take note of the filter pressure on the Pressure Gauge. Generally, the recommended sand filter pressure is less than 0.25 Bar (3.5 PSI) when it is running.
SAND FILTER MAINTENANCE
CAUTION: You must ensure the sand filter is switched off and unplugged before any maintenance begins or a severe risk of injury or death exists. As dirt builds up in the sand filter, the pressure reading on the Pressure Gauge will increase. When the Pressure Gauge is 0.25 Bar (3.5 PSI) or higher, or the water flow to the pool is too low, it is time to clean the sand. To clean the sand bed, follow all instructions outlined previously in: Backwash and Rinsing. NOTE: The pressure gauge is for maintenance purposes only, and the pressure gauge value is just for reference, it should not be used as a precision instrument.
NOTE: We recommend you clean the sand bed once a month or less regularly depending on how often the pool is used. Do not clean the sand too frequently.
CLEANING THE STRAINER
- Switch off the sand filter and set the Control Valve to the Closed function.
- Replace the Debris Screens with Stopper Plugs to prevent water from escaping.
- Remove the Strainer Cover by unscrewing it.
- Take out the Strainer, remove any debris.
- Put the Strainer back into position. Ensure the hole in the strainer is aligned.
- Ensure the Seal Ring is in place. Secure the Strainer Cover back.
- Remove the Stopper Plugs and insert the Debris Screens.
NOTE: The Strainer must be emptied and cleaned periodically. A dirty or blocked strainer will reduce the performance of the sand filter.
LOWERING OR DRAINING POOL WATER
- Switch off the sand filter and set Control Valve to the Drain function.
- Detach the Hose from the pool’s Port A and sand filter Port A and attach to Port D.
NOTE: Remember to replace the Debris Screen with Stopper Plug to prevent water from escaping. - Switch on the sand filter and press the “RESET” button to run the filter and remove the pool water.
WARNING: DO NOT DRY RUN THE SAND FILTER.
STORAGE
In areas that have freezing winter temperatures, pool equipment must be winterized to protect against damage. Allowing water to freeze will damage the sand filter and void the warranty.
- Backwash the sand filter.
- Drain the pool according to the pool owner’s manual.
- Disconnect the two Hoses from the pool and the sand filter.
- Completely pour the sand out of the tank and dry all components.
- Store the sand filter in a dry location out of child’s reach.
TROUBLESHOOTING
| Problems | Probable Causes | Solutions |
| Sand is flowing to the pool | – Sand is too small – Move the control valve from the backwash to the filter function without stopping the sand filter – The level of the sand is too high – The skimmer is broken |
– Recommend 0.45 mm to 0.85 mm #20 silica sand – Stop the sand filter every time set the control valve – Check if the level of the sand is between the marked “MAX” and ” MIN” on the collector hub – Replace the skimmer |
| No water flow | – Stopper plugs were not removed – Air was not released – The control valve is set to Closed – The strainer is blocked – Sand filter broken | – Remove the stopper plugs and insert the debris screens – Release the air – Set to filter function – Clean the strainer – Call for service |
| Excessive filter pressure | – Dirty filter – Calcified sand bed _ Insufficient backwashing – The pressure gauge is broken |
– Backwash- Inspect sand and change if necessary – Backwash until water runs clear – Replace the pressure gauge |
| Control Valve leaks from the port D | – Control Valve is set between two functions – The gasket is broken | – Set to one function – Replace the gasket |
| Connectors leak | – Washer of the connectors not in place – Washer of the connectors broken – 0-ring on the hose connection is broken – Loose Hoses | – Reposition the washer – Replace the washer – Replace the 0-ring – Tighten them |
©2021 Bestway Inflatables & Material Corp.
All rights reserved
Trademarks used in some countries under license from
Bestway Inflatables & Material Corp., Shanghai, China
Manufactured, distributed and represented in the European Union by/
Bestway (Europe) S.r.l., Via Resistenza, 5, 20098 San Giuliano Milanese (Milano), Italy
Distributed in North America by Bestway (USA) Inc., 3411 E. Harbour Drive, Phoenix, Arizona 85034, United States of America
Tel: +86 21 69135588 (For U.S. and Canada)
Distributed in Latin America by
Bestway Central & South America Ltda, Salar Ascotan 1282, Parque Enea, Pudahuel, Santiago, Chile Distributed in Australia & New Zealand by Bestway Australia Pty Ltd, Unit 2 Tel: Australia: (+61) 29 0371 388; New Zealand: 0800 142 101
Distributed in United Kingdom by Bestway Corp UK Ltd. 8 Wentworth Road, Heathfield Industrial Estate, Newton Abbot, Devon, TQ12 6TL
Exported by Bestway (Hong Kong) International Ltd./Bestway Enterprise Company Limited
Suite 713, 7/Floor, East Wing, Tsim Sha Tsui Centre, 66 Mody Road, Kowloon, Hong Kong
For support please visit us at:
bestwaycorp.com/support
www.bestwaycorp.com
Bestway 58381 Flowclear Filter Pump
![]() #58381
#58381
220-240V~50Hz, 16W IPX7 Hmin 0.19m
![]() www.bestwaycorp.com
www.bestwaycorp.com
Visit Bestway YouTube channel
WARNING
IMPORTANT SAFETY INSTRUCTIONS
READ AND FOLLOW ALL INSTRUCTIONS
- WARNING-RISK OF ELECTRIC SHOCK-The pump is to be supplied by an isolating transformer or supplied through a residual current device (RCD) having a rated residual operating current not exceeding 30 mA. The appliance must be supplied by earthed power source.
Extension cords can’t be used. - WARNING- RISK OF ELECTRIC SHOCK- The pump cannot be using while people are inside the pool.
- DO NOT BURY CORD. Locate cord to minimize abuse from lawn mowers, hedge trimmers, and other equipment.
- WARNING- The supply cord cannot be replaced. If the cord is damaged the appliance should be scrapped.
- CAUTION- This pump is for use with storable pools only. Do not use with permanently-installed pools. A storable pool is constructed so that it is capable of being readily disassembled for storage and reassembled to its original integrity. A permanently-installed pool is constructed in or on the ground or in a building such that it cannot be readily disassembled for storage.
- IMPORTANT – Using the pump with an unmatched electrical supply is dangerous and will result in catastrophic failure of pump.
- RISK OF ELECTRICAL SHOCK- When working with electricity, turn the electrical power off at the circuit breaker and lock breaker door. Failure to do so will result in increased risk of shock, injury and possibly death. DO NOT REMOVE THE GROUNDING PRONG OR MODIFY THE PLUG IN ANY WAY. DO NOT USE ADAPTOR PLUGS. Consult a qualified electrician for any questions related to the validity of your plugs grounding.
- Handle the pump with care. Do not pull or carry the pump by the power cord. Never pull a plug from the outlet by yanking the power cord. Keep cord free from abrasions. Sharp objects, oil, moving parts, and heat should never be exposed to the filter pump.
- WARNING – This appliance is not intended for use by persons (including children) with reduced physical, sensory or mental capabilities, or lack of experience and knowledge, unless they have been given supervision or instruction concerning use of the appliance by a person responsible for their safety. Children should be supervised to ensure that they do not play with this product.
- CAUTION: Read the instruction before using the appliance and installation/reassemble each time.
Cleaning and user maintenance must be performed by an adult above 18 years old who is familiar with the risk of electric shock. NOTE:
Please examine equipment before use. Notify Bestway at the customer service address listed on this manual for any manufacturing defect or missing parts at the time of purchase. Verify that the equipment components represent the filter pump model that you had intended to purchase.
NOTE:
Place pump on a solid and level ground. Pay attention to position of pool and pump so adequate ventilation, drainage, and access for cleaning is available. Never place pump in an area that may accumulate water, or in an area where foot traffic will flow around the pool.
It is necessary to have the plug accessible after installation of the pool.
NOTE:
Atmospheric conditions may affect the performance and life span of your filter pump. Unnecessary wear and tear may occur during periods of cold, heat and exposure to sun. Whenever possible shelter pump from these conditions.
It is important to ensure the factory equipped stopper plugs for the inlet and outlet ports replace the screens before removal or maintenance on the pump is attempted.
NOTE:
Do not add chemicals in the filter pump.
Don’t plug or unplug the appliance if hand is wet.
Always unplug the appliance:
- On raining days
- Before cleaning or other maintenance
- Leave it unattended on holidays
When the appliance will be not used for long time, such as in the winter, the pool set should be disassembled and stored indoor. Safekeeping the instruction. For reconstruction the pool set every time, please always refer to the instructions.
-If instruction is missed, please contact with Bestway or search it in website: www.bestwaycorp.com
NOTE: This product is not intended for commercial use.
SAVE THESE INSTRUCTIONS.
![]()
![]()
![]()
![]() PEDESTAL FIXING
PEDESTAL FIXING
IEC60335-2-41 TEST standard requires the filter pump to be vertically fixed on ground or a certain pedestal made of wood or concrete before use. There should be two holes 9mm in diameter on the pedestal, the space between which should be 127mm. Put filter pump on the pedestal and fix them together by fasten the bolts and nuts. All the pedestal parts should weigh over 18kgs at least to prevent the pump from accidentally falling.
![]() NOTE: It is imperative to check that the hydraulic connectors are not closed.
NOTE: It is imperative to check that the hydraulic connectors are not closed.
Operation
- Open/unscrew the Air Purge Valve (P6112) on the top of the Filter Pump; air is released as water fills the Filter Pump.
- When water comes out of the Air Purge Valve (P6112) screw it closed and wipe away any water.
- To start the Filter Pump, insert the plug into a residual current device (RCD).
IMPORTANT: DO NOT DRY RUN THE FILTER PUMP – Make sure both the pool’s Inlet and Outlet valves are fully covered by water before operating the Filter Pump.
Maintenance
CAUTION: YOU MUST ENSURE THE FILTER PUMP IS UNPLUGGED BEFORE ANY MAINTENANCE OR STORAGE BEGINS OR SEVERE RISK OF INJURY OR DEATH EXISTS.
- Unplug the Filter Pump.
- Loosen the Hose Clamps on the pool’s Inlet and Outlet Hoses by unscrewing the fly nut counter-clockwise
- Remove Debris Screens from inside of pool.
- Replace the Debris Screens with the Stopper Plugs in the pool’s Inlet and Outlet Valves.
- Unscrew the Filter Cap Retainer and remove the Filter Cap.
- Clean the Filter Cartridge with a garden hose, if filter cartridge remains soiled or discolored, it is necessary to replace it with a new one.
- Insert the cleaned (or new) Filter Cartridge; ensure it is centered in the Filter Pump.
- Check that the Filter Cap Seal is in place.
- Replace the Filter Cap and screw the Filter Cap Retainer into position.
- Replace the Stopper Plugs with the Debris Screens in the pool’s Inlet and Outlet Valves. Tighten the Hose Clamps. Water will now flow to the pump.
- Follow PUMP INSTALLATION DIRECTIONS section to prepare the system for use.
IMPORTANT: For sanitary reasons we suggest replacing the Filter Cartridge with a new one every two weeks.
STORAGE
- Unplug the Filter Pump.
- Follow the instructions as previously outline to stop water flowing to the Filter Pump and to remove the Filter Cartridge.
- Discard the Filter Cartridge.
- Detach all Hoses.
- Dry all components thoroughly.
- Store the filter pump in a dry location out of child’s reach. Storage temperature: 4-40°C (39.2-104°F)
Pump Warranty
For information concerning pump warranty please visit our website at: www.bestwaycorp.com
Limited BESTWAY® Manufacturer’s Warranty
The product you have purchased comes with a limited warranty. Bestway® stands behind our quality guarantee and assures, through a replacement warranty, your product will be free from manufacturer’s defects.
To enact a warranty claim, this form must be completed and submitted with a copy of your purchase receipt to your local Bestway After Sales Center. Please contact your local Bestway After Sales Center before sending any documents. They will provide full instructions of what is needed for your claim. Bestway® will not replace any products deemed to damaged due to negligence or having been used outside of the owner’s manual guidelines.
Bestway’s warranty covers manufacturing defects discovered while unpacking the product or during use as recommended within the user manual. This warranty applies only to products which have not been modified by any 3rd parties. The product must be stored and handled in accordance with the technical recommendations.
The warranty does not cover damages caused by misuse, abuse, neglect, including, but not limited to collision, fire, use of incorrect voltage, excessive heat exposure, improper installation, improper wiring or testing, or improper storage.
Replacements and repairs don’t extend the duration of the warranty. The warranty start date is the date of sale shown on the original receipt/purchase invoice. Our goods come with guarantees that cannot be excluded under the Australian Consumer Law. You are entitled to a replacement or refund for a major failure and compensation for any other reasonably foreseeable loss or damage. You are also entitled to have the goods repaired or replaced if the goods fail to be of acceptable quality and the failure does not amount to a major failure.
Please copy the Batch Number found on the body of the filter pump.
![]()
![]() IMPORTANT: ONLY THE DAMAGED PART WILL BE REPLACED, NOT THE C OMPLETE SET.
IMPORTANT: ONLY THE DAMAGED PART WILL BE REPLACED, NOT THE C OMPLETE SET.
Bestway reserves the right to request photographic evidence of defective parts, or to require sending the item for additional testing. In order to best assist you, we request all information you provide to be complete.
FOR FAQ, MANUALS, VIDEOS OR SPARE PARTS, PLEASE VISIT OUR WEBSITE: www.bestwaycorp.com
VIDEOS ARE ALSO AVAILABLE ON OUR BESTWAY CHANNEL ON YOU TUBE:
![]() POWER STEEL™ RECTANGULAR POOLS
POWER STEEL™ RECTANGULAR POOLS
OWNER’S MANUAL

bestwaycorp.com/support
Visit Bestway YouTube channel 
 WARNING
smooth out the bottom
Put 1″ to 2″ water in the pool to cover the floor. Once the pool floor is slightly covered, gently smooth out all wrinkles. Start in the center of the pool and work your way clockwise to the outside.

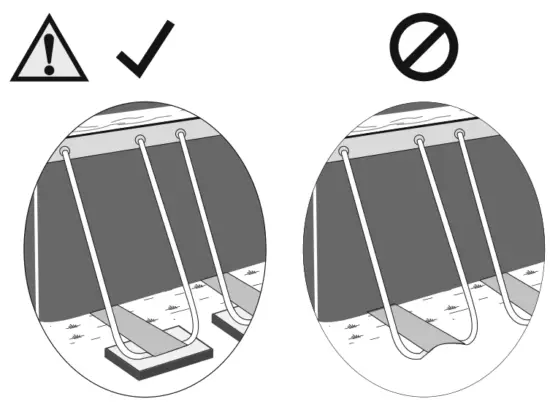
Do not assemble on a soft lawn. If you must assemble the pool on a soft surface, timber boards must be placed under the feet of the vertical supports to spread the load. The thickness of the timber boards must not exceed 2 cm.
COMPONENTS LIST
NOTE: Some parts already have been installed on the pool.
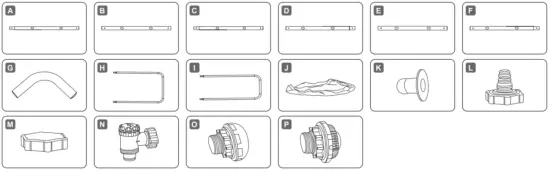
| POWER STEELN |
2.82 m x 1.96 m x 84 cm (9’3″ x 6’5″ x 33″) | 4.04 m x 2.01 m x 1.00 m (13’3″ x 6’7″ x 39.5″) | 4.12 m x 2.01 m x 1.22 m (13’6″ x 6’7″ x 48″) | 4.88 m x 2.44 m x 1.22 m (16′ x 8′ x 48″) | 5.49 m x 2.74 m x 1.22 m (18′ x 9′ x 48″) | 6.40 m x 2.74 m x 1.32 m (21′ x 9′ x 52″) | 7.32 m x 3.66 m x 1.32 m (24′ x 12′ x 52″) | 9.56 m x 4.88 m x 1.32 m (31’4″ x 16′ x 52″) |
| 56629 / 56631 | 56441 / 56426 56442 / 56660 56721 / 56727 |
56456 / 56457 56458 / 56661 56722 / 56728 |
56670 / 56671 56672 / 56673 56995 / 56996 |
56465 / 56466 56467 / 56468 56997 / 56998 |
5611Y/ 5611Z 5612A / 5612B |
56474 / 56475 56476 / 56477 |
56623 / 56625 | |
| A | x2 | x2 | x2 | x2 | x4 | x6 | x8 | x12 |
| B | x2 | x2 | x2 | x2 | x2 | x2 | x2 | x2 |
| C | x2 | x2 | x2 | x0 | x2 | x2 | x2 | x2 |
| D | x2 | x2 | x2 | x2 | x2 | x2 | x2 | x2 |
| E | x0 | x2 | x2 | x2 | x2 | x2 | x2 | x2 |
| F | x0 | x0 | x0 | x4 | x0 | x0 | x2 | x4 |
| G | x4 | x4 | x4 | x4 | x4 | x4 | x4 | x4 |
| I | x4 | x6 | x6 | x12 | x12 | x14 | x18 | x24 |
| J | x4 | x4 | x4 | x0 | x0 | x0 | x0 | x0 |
| K | x1 | x1 | x1 | x1 | x1 | x1 | x1 | x1 |
| L | x2 | x2 | x2 | x2 | x0 | x0 | x0 | x0 |
| M | x1 | x1 | x1 | x1 | x1 | x1 | x1 | x1 |
| N | x1 | x1 | x1 | x1 | x1 | x1 | x1 | x1 |
| O | x0 | x0 | x0 | x0 | x2 | x2 | x2 | x2 |
| P | x0 | x0 | x0 | x0 | x1 | x1 | x1 | x1 |
| Q | xo | xo | xo | xo | x1 | x1 | x1 | x1 |
STRUCTURE
Before assembling your pool, please take a few minutes to check all the parts and become familiar with their position.
NOTE: Drawing for illustration purposes only. May not reflect the actual product. Not to scale.
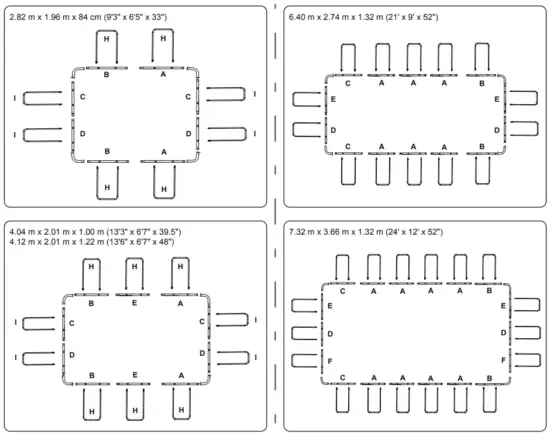
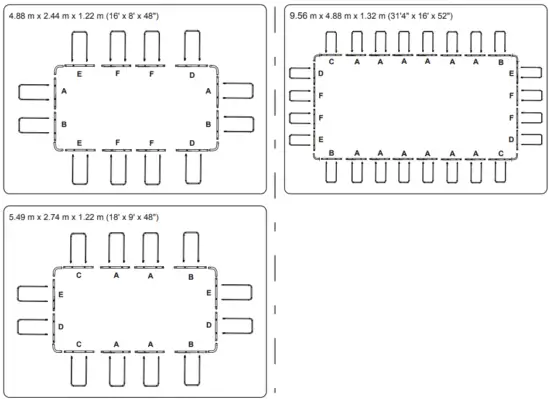
![]() WARNING
WARNING
Carefully read, understand, and follow all information in this user manual before installing and using the swimming pool. These warnings, instructions, and safety guidelines address some common risks of water recreation, but they cannot cover all risks and dangers in all cases. Always use caution, common sense, and good judgment when enjoying any water activity. Retain this information for future use.
Non Swimmers safety
– Continuous, active, and vigilant supervision of weak swimmers and non-swimmers by a competent adult is required at all times (remembering that children under five are at the highest risk of drowning).
– Designate a competent adult to supervise the pool each time it is being used.
– Weak swimmers or non-swimmers should wear personal protection equipment when using the pool.
– When the pool is not in use or unsupervised, remove all toys from the swimming pool and its surroundings to avoid attracting children to the pool.
Safety devices
– In order to prevent children from drowning, it is recommended to secure access to the pool with a protection device. In order to prevent children from climbing from the inlet and outlet valve, it is recommended to install a barrier (and secure all doors and windows, where applicable) to prevent unauthorized access to the swimming pool.
– Barriers, pool covers, pool alarms, or similar safety devices are helpful aids, but they are not substitutes for continuous and competent adult supervision.
Safety equipment
– It is recommended to keep rescue equipment (e.g. a ring buoy) by the pool.
– Keep a working phone and a list of emergency phone numbers near the pool.
Safe use of the pool
– Encourage all users especially children to learn how to swim.
– Learn Basic Life Support (Cardiopulmonary Resuscitation – CPR) and refresh this knowledge regularly. This can make a life-saving difference in the event of an emergency.
– Instruct all pool users, including children, what to do in case of an emergency.
– Never dive into any shallow body of water. This can lead to serious injury or death.
– Do not use the swimming pool when using alcohol or medication that may impair your ability to safely use the pool.
– When pool covers are used, remove them completely from the water surface before entering the pool.
– Protect pool occupants from water-related illnesses by keeping the pool water treated and practicing good hygiene.
Consult the water treatment guidelines in the user’s manual.
– Store chemicals (e.g. water treatment, cleaning, or disinfection products) out of the reach of children.
– Use the signage as outlined below. Signage is to be displayed in a prominent position within 2m of the pool.
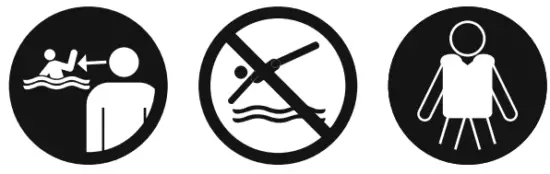
– Keep children under supervision in the aquatic environment. No diving.
– Removable ladders shall be placed on a horizontal surface.
– Irrespective of materials used for swimming pool construction, accessible surfaces have to be checked regularly to avoid injuries.
– Regularly monitor bolts and screws. Remove splinters or any sharp edges to avoid injuries.
– ATTENTION: Do not leave the drained pool outside. The empty pool is liable to become deformed and/or displaced due to wind.
– If you have a filter pump, refer to the pump’s manual for instructions.
WARNING! The pump cannot be used while people are inside the pool!
– If you have a ladder, refer to the ladder’s manual for instructions.
WARNING! The use of a swimming pool implies compliance with the safety instructions described in the operating and maintenance guide.
In order to prevent drowning or other serious injuries, pay particular attention to the possibility of unexpected access to the swimming pool by children under 5 years by securing the access to it, and, during the bathing period, keep them under constant adult supervision.
Please read it carefully and keep it for future reference
CHOOSE THE CORRECT LOCATION
The surface chosen to install the pool must respect the following technical characteristics:
- Because of the combined weight of the water inside the pool and the pool users, it is extremely important that the surface chosen to install the pool is capable of uniformly supporting the total weight for the entire time the pool is installed. When choosing the surface, take into consideration that water may come out of the pool when in use or in the rain. If the water softens the surface, it may lose its capability to support the pool weight.
- Check regularly the position of the vertical legs and the U-supports.
They must be on the same level as the bottom of the pool at all times. If the vertical leg or the U-support starts to sink into the ground, drain the water immediately to avoid the pool collapsing due to the uneven loading on the frame structure. Change the location of the pool or modify the surface material. - We recommend positioning the pool away from any objects children could use to climb into the pool.
- Position the pool near an adequate drainage system to deal with overflow or to discharge the pool.
- The surface must be flat and smooth. If the surface is inclined or uneven, it can create an unbalanced loading on the structure of the pool. This situation can damage the welding point of the liner and bend the frame. In the worst cases, the pool can collapse, causing serious personal injury and/or damage to personal property.
- The selected surface must be clear of any type of object. Due to the weight of the water, any object under the pool could damage or perforate the bottom of the pool.
- The selected surface must be clear of aggressive plants and weed species. Those types of strong vegetation could grow through the liner and create water leakage. The grass or other vegetation that may cause odor or slime to develop have to be eliminated from the set-up location.
- The selected location must not have overhead power lines or trees.
Be sure the location does not contain underground utility pipes, lines or cables of any kind. - The selected position must be far from the house entrance. Do not position any equipment or other furniture around the pool. The water that comes out of the pool during the use or due to a faulty product can damage the furniture inside the house or surrounding the pool.
- The selected surface must be flat and without holes that can damage the material of the liner.
Follow the important instructions above to choose the correct surface and location to set up your pool. Damaged parts of the pool, due to the fact that the set-up surface and location do not match the instructions, will not be considered a manufacturing defect and will avoid the warranty and any service claims.
Suggested set-up surfaces: grass, ground, concrete, and all other surfaces that respect the above set-up conditions.
Not suggested surfaces: mud, sand, gravel, deck, balcony, driveway, platform, soft/loose soil, or another surface that does not meet the above set-up conditions.
NOTE: Check with your local city council for by-laws relating to fencing, barriers, lighting, and safety requirements, and ensure you comply with all laws.
NOTE: If have a filter pump, refer to the pump’s manual for instructions.
NOTE: The ladder must match the pool size and should be used only for entering and exiting the pool. It is forbidden to exceed the permitted payload of the ladder. Check regularly if the ladder is properly assembled.
POOL MAINTENANCE
If you do not adhere to the maintenance guidelines below, your health might be at risk, especially that of your children.
Using chemical tablets (not included):
NOTE: Chemconnect or Chemical Floater must be used when you perform chemical maintenance with tablets. Your purchased item may not include any of those dispensers, in this case, you can purchase it by visiting our website www.bestwaycorp.com or at the nearest pool dealer.
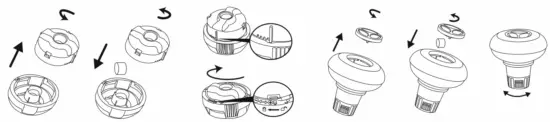
IMPORTANT: Don’t use granulate tablets or throw the tablet directly in the water. The chemicals can deposit on the bottom, damage the material and discolor the PVC.
Using chemical liquid (not included):
IMPORTANT: Add chemical liquid in small doses and in the center of the pool to avoid direct contact between the chemicals and the PVC surface.
Direct contact can damage the material and discolor the surface.
NOTE: Remove the chemical dispenser from the pool when the pool is in use.
IMPORTANT: After performing chemical maintenance and before using the pool, use a test kit (not included) to test the water chemistry. We recommend maintaining your water according to the following table.
| Parameters | Values |
| Water clarity | a clear view of the pool bottom |
| Colour of the water | no color should be observed |
| Turbidity in FNU/NTU | max. 1,5 (preferably less than 0,5) |
| Nitrate concentration above that of fill water in mg/l | max. 20 |
| Total organic carbon (TOC) in mg/l | max. 4,0 |
| Redox potential against Ag/ACI 3,5 m KCl in mV | min. 650 |
| pH value | 6,8 to 7,6 |
| Free active chlorine (without cyanuric acid) in mg/l | 0,3 to 1,5 |
| Free chlorine used in combination with cyanuric acid in mg/l | 1,0 to 3,0 |
| Cyanuric acid in mg/l | max. 100 |
| Combined chlorine in mg/l | max. 0,5 (preferably close to 0,0 mg/l) |
NOTE: Damage resulting from chemical imbalance is not covered by the warranty. Pool chemicals are potentially toxic and should be handled with care. There are serious health risks from chemical vapors and the incorrect labeling and storage of chemical containers. Please consult your local pool supply retailer for more information about chemical maintenance. Pay close attention to the chemical manufacturer’s instructions. Pool damage resulting from the misuse of chemicals and mismanagement of pool water is not covered by the warranty.
IMPORTANT: Over usage of chemicals can discolor the printing and all points of the pool material. It can also damage the structure of the pool liner.
To keep your pool clean:
- Contact your local pool supply shop for advice and purchase of chemicals and pH kits. One of the most important factors to increase the life of the liner is to keep continuously clean and healthy water. Please strictly follow the instructions from professional technicians for the water treatment through the use of chemicals.
- Locate a bucket of water next to the pool to clean users’ feet before entering the pool.
- Cover the pool when not in use.
- Skim the pool regularly to avoid settled dirt.
- Check and wash the filter cartridge regularly.
- Gently clean any scum from below the top ring with a clean cloth.
- Please be careful in case of rainwater, kindly check that the water level is not higher than expected. If so, YOU HAVE TO DISCHARGE THE EXCESS WATER.
- If it rains, check that the water level is not higher than the specified level. If water exceeds the specified levels, drain the pool to the specified level.
Proper maintenance can maximize the life of your pool.
During the season of the use of the swimming pool, the filtration system must be necessarily put into service every day, enough time to assure at least a complete renewal of the volume of water.
NOTE: The pump is used to circulate the water and filter small particles. In order to keep your pool water clean and hygienic, you must also add chemicals.
REPAIR
In the event of a leak, patch your pool using the underwater adhesive repair patch provided. You can find the instructions in FAQs on the support section of our website, www.bestwaycorp.com.
DISMANTLING
- Unscrew the drain valve cap on the outside of the pool counterclockwise and remove it.
- Connect the adaptor to the hose and put the other end of the hose in the area where you are going to drain your pool. (Check local regulations for drainage by-laws).
- Screw the control ring of the hose adaptor onto the drain valve clockwise. The drain valve will be open and water will start to drain automatically.
ATTENTION: Water flow can be controlled with the control ring. - When draining is finished, unscrew the control ring to close the valve.
- Disconnect the hose.
- Screw the cap back onto the drain valve.
- Air dry pool.
ATTENTION: Do not leave the drained pool outside.
STORAGE
- Please remove all the accessories and spare parts of the pool and store them clean and dry.
- Once the pool is completely dry, sprinkle with talcum powder to prevent the pool from sticking together, and fold the pool carefully. If the pool is not completely dry, mold may result and will damage the pool liner.
- Store liner and accessories in a dry place with a moderate temperature between 5ºC / 41ºF and 38ºC / 100ºF.
- During the rainy season, pools and accessories should be stored as per the above instructions also.
- Improper draining of the pool might cause serious personal injury and/or damage to personal property.
- We strongly recommend the pool be disassembled during the off-season (winter months). Store in a dry location out of children’s reach.
INSTALLATION
Installation usually takes approximately 20-30 minutes with 2-3 people excluding earthworks and filling.
Assembly of the Frame Pool can be completed without tools.
To lengthen the life of your pool, it is important to sprinkle the top rail with the Talcum Powder before assembly. Talcum Powder is not included and is easily available in the market.
Bestway will not be responsible for damage caused to the pool due to mishandling or failure to follow these instructions.
- Layout all parts and check that you have the correct quantities as listed in the components list. For assistance or FAQs, please visit the support section on our website, www.bestwaycorp.com.
- Spread out the pool and make sure the pool is right side up; let it sit exposed to direct sunlight for 1 hour or more so that the pool is more flexible during setup.
- Place the pool near an adequate drainage system to deal with overflow water and ensure the pool’s inlet A and outlet B are correctly positioned to allow your filter pump to
connect to a power source.
NOTE: Do not use extension power cords to power your pump.
ATTENTION: Do not drag the pool on the ground, this can damage the pool.
NOTE: Drawings for illustration purposes only. May not reflect the actual product. Not to scale.
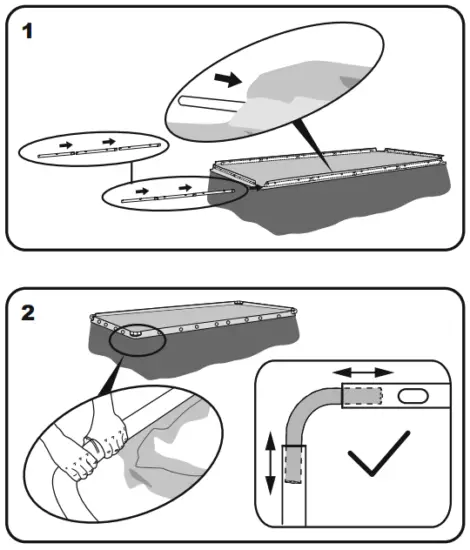
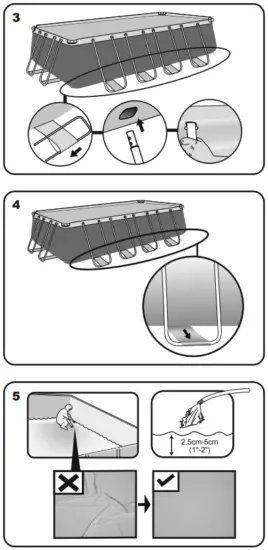
CONNECTION VALVE ASSEMBLY
For a pool with a connection valve.
NOTE: If you want to connect other pool cleaning kits to the pool through the connection valve, disassemble the Debris Screen from the Connector.
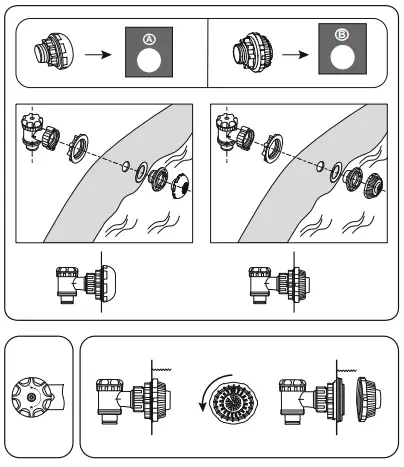
FILLING POOL WITH WATER
ATTENTION: Do not leave the pool unattended while filling with water.
- Fill the pool until the water reaches the welding line located 12cm-20cm (4.7”-7.9”) from the top of the pool. DO NOT OVERFILL as this could cause the pool to collapse. In times of heavy rainfall, you may need to empty some of the water to ensure the level is correct.
- When filling the pool is completed, check that the water is not collecting on any side to ensure the pool is level.
IMPORTANT: If the pool is not level, drain water and re-level the ground by digging out. Never attempt to move the pool with water in it, serious personal injury or damage to the pool may result.
WARNING: Your pool may contain a great deal of pressure. If your pool has any bulge or uneven side then the pool is not level, the sides may burst and the water may discharge suddenly causing serious personal injury and/or damage to property. - Check the pool for any leaks at valves or seams, and check for any evident water loss. Do not add chemicals until this has been done.
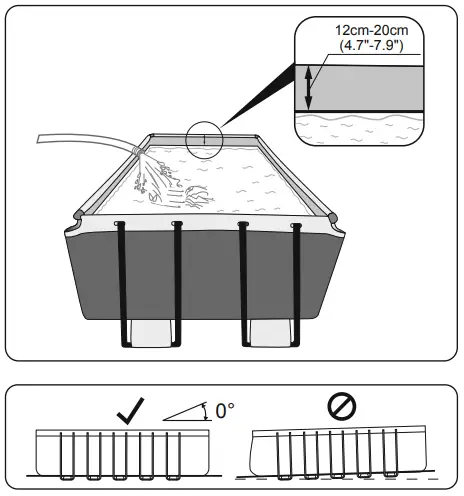
For support please visit us at: bestwaycorp.com/support
©2021 Bestway Inflatables & Material Corp.
All rights reserved
Bestway Inflatables & Material Corp., Shanghai, China
Manufactured, distributed, and represented in the European Union by
Bestway (Hong Kong) International Ltd./Bestway Enterprise Company Limited
Suite 713, 7/Floor, East Wing, Tsim Sha Tsui Centre, 66 Mody Road, Kowloon, Hong Kong
Tel: +86 21 69135588 (For U.S. and Canada)
www.bestwaycorp.com

WE SUGGEST NOT TO RETURN
THE PRODUCT TO THE STORE
QUESTIONS? PROBLEMS?
MISSING PARTS?
For FAQ, Manuals, Videos Or
Spare Parts, Please Visit
bestwaycorp.com/support