BTH01 Quick User Guide
Wireless Headphones &Transmitter Set U
nits auto-reconnect each time they’re turned on
Warranty & Customer Support
For questions, assistance, support, or warranty claims please contact us with
E-mail address as follows: [email protected] www.besign-tech.com

Package Contents
| ● BTH01 Headphones | ● 3.5mm Audio Cable | ● 6.35mm to 3.5mm adapter(for AV receiver) |
| ● BTH01 Transmitter/Charging dock | ● 3.5mm Female to RCA Male Cable | ● User Manual |
| ● Micro USB Power Cable | ● Optical Cable | ● Power Adapter |
Overview
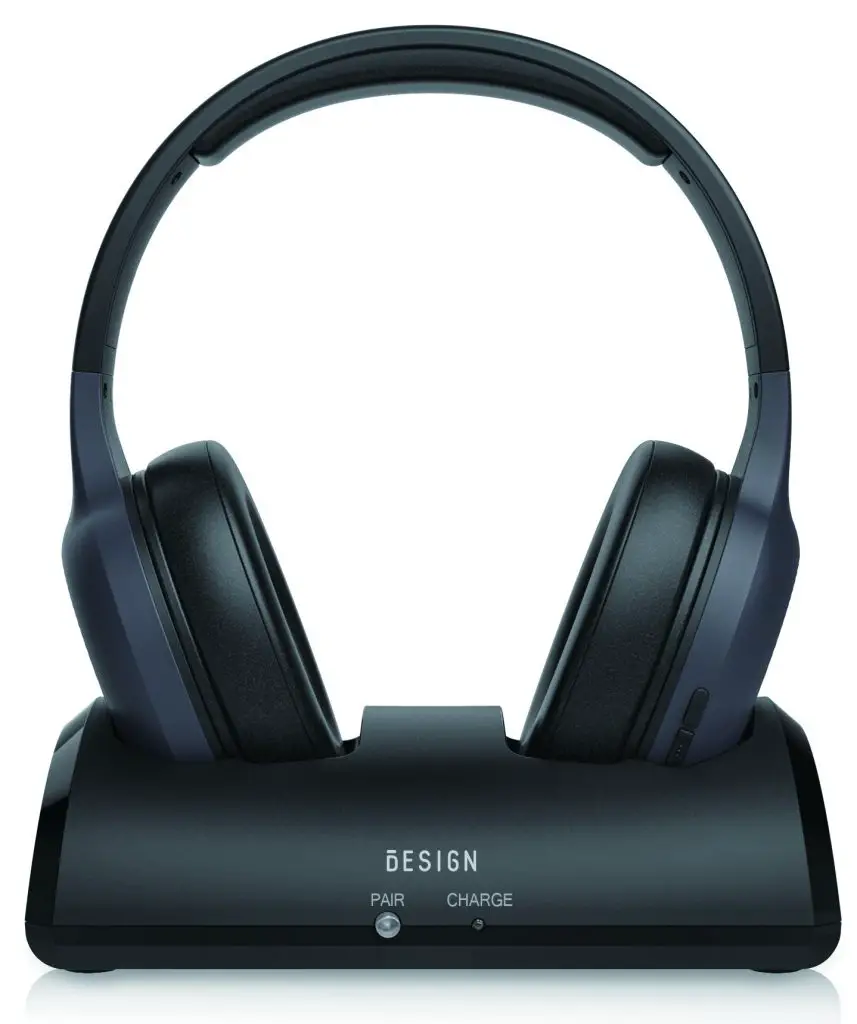
Headphones:

Transmitter:
![]()
![]()
![]()
LED Indicators of the transmitter
| LED Indicator | Status |
| Flashing Red and Blue alternately | Pairing mode |
| Solid Blue LED | Connected |
| Blue LED flashes once per second | Power on and not connected |
| Red LED on/off | Headphone Charging/ Charging complete |
LED Indicators of the headphones
| LED Indicator | Status |
| Flashing Red and Blue alternately | Pairing mode |
| Blue LED flashes once in 8 seconds | Connected |
| Blue LED flashes twice in 5 seconds | Power on andnot connected |
| Red LED on/off | Charging/charging complete |
| Red LED flashes twice in 7 seconds with reminding voice | Low battery |
Turn on BTH01
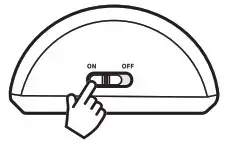
Power up the transmitter/charging dock
Connect the transmitter/charging dock to a compatible power source using AC adapter. Slide ON/OFF switch to “ON” position, POWER LED indicator lights up BLUE.
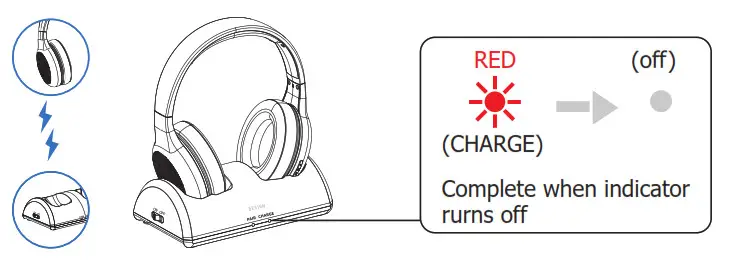
 Charge and turn on the headphone
Charge headphone for 2.5 hours prior to the initial use: Place the headphone on transmitter/charging dock, the charging begins automatically, the CHARGE LED on the transmitter/charging dock lights up RED. When the charging is complete, the CHARGE LED on the transmitter/charging dock will turn off.
Turn on the headphone:
The headphones turn on automatically when you take it away from the transmitter/charging dock or wear them on your ears. You could also press and hold the multifunction button for 3 seconds to turn on the headphones manually.
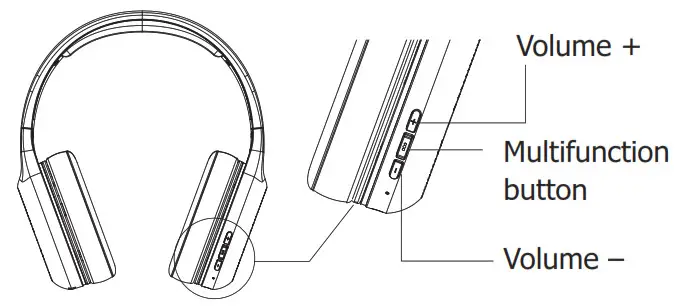
Then the headphones will auto connect to the transmitter and the transmitter LED indicator will turn SOLID blue. The auto-connection will take around 1-2 minutes. If the headphones volume is too low, please insure both Headphones & TV volume and make them both at the right level. Adjust Volume on Headphone: Short press “+”or “-” to raise or lower the volume. One will hear “beep” when the volume reaches maximum.
Note: when using the transmitter connection, the headphones play, pause, and previous/next track button operation functions are not workable.
Pair and connect the transmitter with the headphones again after auto-connection failed.
Option 1: A.Put the headphones back on the charging dock. B.Switch off the transmitter with ON/OFF switch button, then switch it on again. C.Take the headphones away from the charging dock or wear on your head, then the auto-connection will be completed in minutes. If it is not workable, you could try it again as above solution later.
Option 2: Clear the pair history/Restore factory default settings
Transmitter:
When the transmitter is powered on and the headphone has been taken out, press and hold the “PAIR” button for 8 seconds, you will see the red LED on for 1 seconds, then the blue LED on 1 seconds. Make the transmitter power on again, now the factory re-set is completed.
Headphones:
When the headphones are powered on, press and hold both Volume + and Volume button for 5 seconds. Then switch off the headphones and power on again.
After the Factory defalt settings, you need to make both transmitter and headphones into pairing mode for the re-connection. Transmitter Pairing mode: blue and red LED light flashing alternately. When the transmitter is powered on and the headphone has been taken out, press and hold the “Blue LED Pair” button for 2 seconds.
Headphones Pairing mode: blue and red led light flashing alternately. When the headphones is powered on, it will enter into pairing mode automatically. When the headphones is powered off, press and hold the multifunction button for 3 seconds.
Auto-connection: keep the transmitter and headphones close to each other and wait. Once connected, the transmitter LED light will turn SOLID Blue.
Use BTH01 with your TV
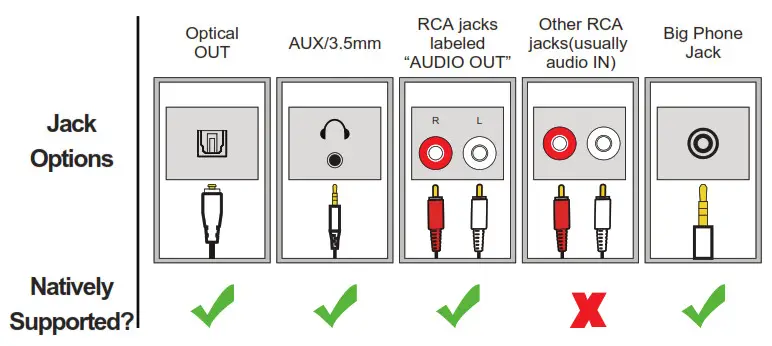
Check your TVs output options before the set up
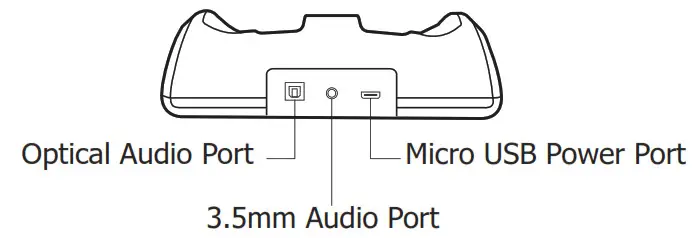
BTH01 works with optical output, AUX 3.5mm output, and RCA (labeled “Audio OUT”) output.
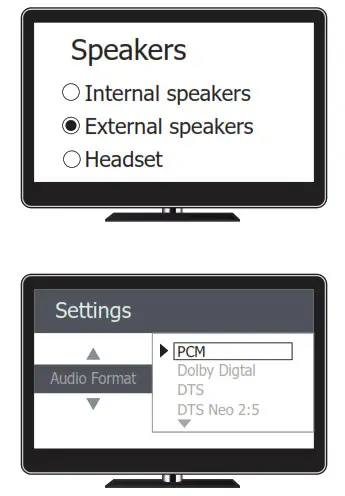
TVs with OPTICAL audio out
After turning on BTH01 and connecting cables, you should be able to hear sound from your headphones; if not,
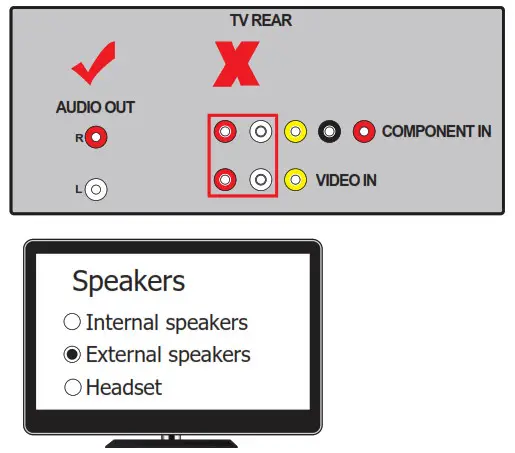
- Ensure your TV Speaker is set to “External Speaker”.
- Ensure TV Audio Format is set to “PCM” or “DOLBY/DTS” is off (This is IMPORTANT).
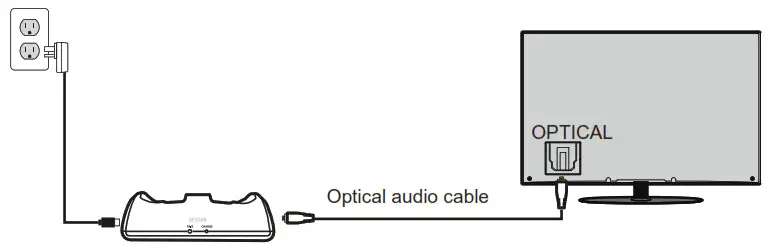
Note: Setting menu may be different depending on different TV brands and model.
To ensure the TV audio out signal is valid, you can contact TV manufacture support with your TV model number and ask
1) how to set TV audio out to Optical;
2) how to set Audio Out Format to PCM.
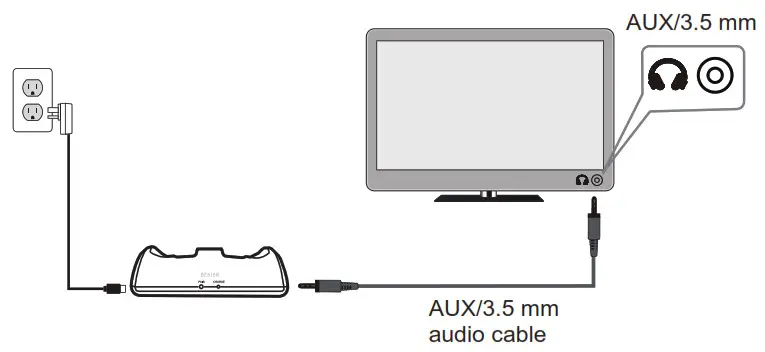
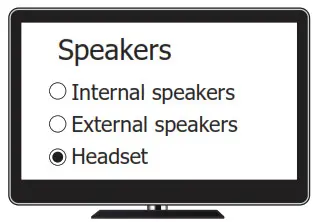
TVs with AUX 3.5mm Audio out
After turning on BTH01 and connecting cables, you should be able to hear sound from your headphones; if not, ensure your TV speaker is set to “Headset”.
TVs with RCA audio out(Red/White ports labeled “AUDIO OUT”)
After turning on BTH01 and connecting cables, you should be able to hear sound from your headphones; if not, · Ensure use TV Red/White ports labeled “AUDIO OUT”, other Red/White ports are incorrect (This is IMPORTANT). · Ensure your TV Speaker is set to “External Speaker”.
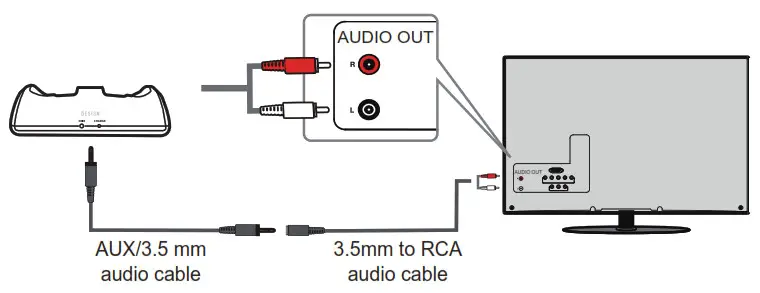
For AUX and RCA out, you can test the signal with the headphone by insert the audio wire directly into the headphone and see whether you can hear sound. If not, and need help for audio signal, you may contact TV manufacture support and ask how to set your TV audio out to the port you are using.
How to set up with AV Receiver:
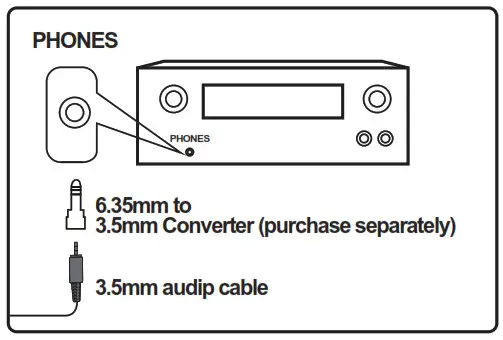
For most AV Receiver (e.g. Yamaha, Denon, etc.), please use the big headphone jack in the front. You need to get a 6.35mm to 3.5mm audio adapter.
Please use a wired headphone to test the PHONES jack, make sure you can hear sound.
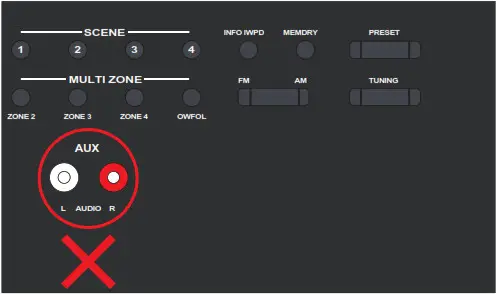
 NOTE: Do NOT use the RCA ports on the back of an AV receiver. These are not suitable and will not work or could even permanently damage your BTH01 transmitter!
 Use the headphones independently with cellphone
BTH01 headphones can be separately used with cellphone, please follow the step-by step instruction below:
- Ensure the transmitter is off.
- Enter the headphones into PAIRING MODE:
The BTH01 headphones will enter into pairing mode automatically after it is powered on or disconnected. Turn on: when it is powered off, press and hold the multifunction button for 3 seonds until you see the the first sight of the BLUE light. Pairing mode: Blue and Red light flashing alternately. - Turn on bluetooth on your smart phone/tablet. Find & select “BTH01” to pair and connect. The next time, you want to use your headphones in this way, you will need to select “BTH01” on your smart phone/tablet to reconnect.
BTH01 Headphones operation instruction when you use with cellphone.
Power on: when it is powered off, press and hold the multifunction button for 3 seconds until you see the first sight of the BLUE light.
Power off: Press and hold the multifunction button for 3 seconds until you see the first of the RED light. To
Answer the call: Short press the Multifunction button once.
To Hang up the call: Short press the Multifunction button once.
To reject a call: Hold the Multifunction button for 2 seconds to reject an incoming call.
Pause/Resume: Press the multi-function button once.
Volume Control: Press the volume +/- button once.
Next / Previous Track: Press and hold the volume + / button for 2 seconds.
Important Note: when using the transmitter connection, the headphones play, pause, and previous/next track button operation functions are not workable.
Use BTH01 Headphones as a wired headphones
You could also use the BTH01 headphones as a wired headphones with 3.5mm Aux cable. First, switch off the BTH01 headphones. Second, connect the BTH01 headphones with audio sources via 3.5mm AUX cable. NOTE: The buttons and microphone on your BTH01 headphones will not work when connected as wired headphones.
Tips
Adjust Volume on Headphone
Short press “+”or “-” to raise or lower the volume. One will hear “beep” when the volume reaches maximum.
After use
Place headphones on the transmitter/charging dock to recharge. The headphones will switch off automatically in this way.
Pair and connect the transmitter with the headphones again after auto-connection failed.
- Put the headphones back on the charging dock.
- Switch off the transmitter with ON/OFF switch button, then switch it on again.
- Take the headphones away from the charging dock or wear on your head, then the auto-connection will be completed in minutes. If it is not workable, you could try it again as above solution later.
The sound is cut off
This is due to signal interference with the transmitter or low battery. Adjust the transmitter position to allow for a good connection between the transmitter and the headphones, and charge the headphones sufficiently.
The Headphones is already connected to the transmitter, No sound from the Headphones while watching TV.
- Please ensure your TV audio is set to “External Speaker”
- If you select Optical audio input, please ensure:
a) Ensure your TV audio format is set to “PCM”, the transmitter can decode PCM, but can’t decode Dolby/DTS.
b) Ensure the 3.5mm audio cable is NOT plugged in, or the transmitter will prioritize the AUX input. - If you select AUX audio input, please ensure the transmitter is connected to the correct analog audio port on the audio sources–Plug in a pair of wired headphones/earbuds into your audio source’ audio output to check if it works.
Headphone charging
When headphone battery is low, headphone indicator will flash RED. You will also hear an “beep” from headphone once every 5 minutes. This means it’s time to place headphone on the transmitter/charging dock for charging. When headphone are properly seated on the transmitter/charging dock, the CHARGE indicator will light up Red. This means headphones are recharging properly. If headphone are not properly placed, the CHARGE indicator will not light up. Once the charging is complete, the Red CHARGE LED on transmitter/charging dock will turn off. There is no need to remove headphone from transmitter/charging dock.
Better reception
BTH01 work range reaches up to 100 feet, it may varies due to the environment. If your headphones are picking up noise or interference, move closer to the transmitter. Even within the work range, there may be some “dead spots” where the RF signal cannot be received. This issue is inherent with RF signals and does notindicate a faulty product. Just slightly move the transmitter and the “dead spot” can be corrected.
Suggested care & Maintenance
- Please power off when not in use or before storing.
- Please keep away from excessive heat and humidity.
- Do not use chemicals or detergents to clean this product.
- Extreme temperatures can shorten lifespan of internal components.
Warranty & Customer Support
For questions, assistance, support, or warranty claims, please contact us with E-mail address as follows: [email protected]
NOTE: This equipment has been tested and found to comply with the limits for a Class B digital device, pursuant to part 15 of the FCC Rules. These limits are designed to provide reasonable protection against harmful interference in a residential installation. This quipment generates uses and can radiate radio frequency energy and, if not installed and used in accordance with the instructions, may cause harmful interference to radio communications. However, there is no guarantee that interference will not occur in a particular installation. If this equipment does cause harmful interference to radio or television reception, which can be determined by turning the equipment off and on, the user is encouraged to try to correct the interference by one or more of the following measures:
– Reorient or relocate the receiving antenna.
– Increase the separation between the equipment andreceiver.
– Connect the equipment into an outlet on a circuit differ ent from that to which thereceiver is connected.
– Consult the dealer or an experienced radio/TV technician for help
Changes or modifications not expressly approved by the party responsible for compliance could void the user’s authority to operate the equipment.
This device complies with Part 15 of the FCC Rules. Operation is subject to the following two conditions:
- this device may not cause harmful interference, and
- this device must accept any interference received, including interference that may cause undesired operation.
Product Support:
E-mail: [email protected]
Know more about us, you could visit our website: www.besign-tech.com