![]()
the serviced apartment compani
Operating Instructions – Oven BEKO BRIFF 22300X
Control Panel
- Function knob
- Digital timer
- Thermostat knob
- Thermostat lamp
Operating Modes
 |
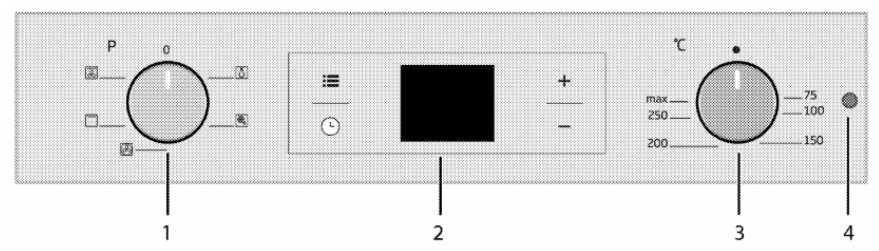
Oven Lamp – The oven is not heated, only the oven lamp is turned on. |
 |
Operating with fan – The oven is not heated, only the fan is in operation. |
 |
Fan heating – Warm air heated which is evenly distributed throughout the oven. |
 |
Full grill – Grill is in operation. |
 |
Full grill & Fan – Grill and fan are in operation |
Using the oven
- Select the operating mode using the function knob.
- Select the temperature using the thermostat knob.
- The oven heats up to the required temperature and maintains is. During heating, the temperature lamp stays on.
- To switch off the oven turn the function knob and temperature knob to the off (upper) position.
DS7439CSSX Tumble Dryer User Manual

2960312933_CZ/260121.1424
Please read this user manual first!
Dear Customer,
Thank you for preferring a Beko product. We hope that your product which has been manufactured with high quality and technology will give you the best results. We advise you to read through this manual and the other accompanying documentation carefully before using your product and keep it for future reference. If you transfer the product
to someone else, give it a manual as well. Pay attention to all details and warnings specified in the user manual and follow the instructions given therein. Use this user manual for the model indicated on the cover page.
| • Read the instructions. |
Explanation of symbols
Throughout this user manual the following symbols are used:
 DANGER! DANGER! |
| • Warning against electric shock. |
 DANGER! DANGER! |
| • Warning against fire hazards. |
| • Warning for hazardous situations with regard to life and property. |
| • Warning against hot surfaces. |
 WARNING! WARNING! |
| • Warning against the scalding hazard. |
 NOTE NOTE |
| • Important information or useful hints about usage. |
 Packaging materials of the product are manufactured from recyclable materials in accordance with our National Environment Regulations.
Do not dispose of the packaging wastes with the domestic waste or other wastes, discard them to the dedicated collection points designated by the local authorities.
![]()
This product was manufactured using the latest technology in environmentally friendly conditions.
Important instructions for safety and environment
![]() NOTE
NOTE
- This section contains safety instructions that will help protect you from the risk of personal injury or property damage. Failure to follow these instructions shall void any warranty.
1.1 General safety
- This appliance can be used by children aged 8 years and above and persons with reduced physical, sensory or mental capabilities or lack of experience and knowledge if they have been given supervision or instruction concerning the use of the appliance in a safe way and understand the hazards involved. Children shall not play with the appliance. Cleaning and user maintenance shall not be made by children without supervision.
Children of less than 3 years should be kept away unless continuously supervised. - Adjustable feet should not be removed. The gap between the dryer and the floor should not be reduced with materials such as carpet, wood, and tape. This will cause problems with the dryer.
- Always have the installation and repairing procedures carried out by the Authorized Service. Manufacturers shall not be held liable for damages that may arise from procedures carried out by unauthorized persons.
- Never wash the dryer by spraying or pouring water onto it! There is the risk of electric shock!
For the products with a steam function:
- Use only distilled water or water condensed in the water tank of the machine in steam programs. Do not use mains water or additives. When using condensed water in the water tank, it should be filtered and cleared of fibers.
- Do not open the door when steam programs are running. Hot water may be expelled.
- Before putting laundry in a steam program, stains on it should be removed.
- You may only put laundry that is not dirty or stained but permeated with unpleasant odor in the steam (odor removal) program.
- Do not use any dry cleaning sets or additional materials in a steam program or in any program.
1.1.1 Electrical safety
DANGER!
- Electrical safety instructions should be followed while the electrical connection is made during the installation.
- Connect the dryer to a grounded outlet protected by a fuse at the value specified on the type label. Have the grounding installation performed by a qualified electrician. Our company shall not be liable for any damages that will arise when the dryer is used without grounding in accordance with the local regulations.
- The voltage and allowed fuse protection are stated on the type label plate.
- The voltage specified on the type label must be equal to your mains voltage.
- Unplug the dryer when it is not in use.
- Unplug the dryer from the mains during installation, maintenance, cleaning, and repair work.
- Do not touch the plug with wet hands! Never unplug by pulling on the cable, always pull out by grabbing the plug.
- The appliance must not be supplied through an external switching device, such as a timer, or connected to a circuit that is regularly switched on and off by the utility.
DANGER!
- Do not use extension cords, multi-plugs, or adaptors to connect the dryer to the power supply in order to decrease the risk of fire and electric shock.
- The power cable plug must be easily accessible after installation.
- Damaged mains cable should be changed notifying the Authorized Service.
- If the dryer is faulty, it must not be operated unless it is repaired by an authorized service agent! There is the risk of electric shock!
1.1.2 Product safety
DANGER!
- Superheating of the clothes inside of the dryer can occur if you cancel the program or in the event of a power failure whilst the dryer is running, this concentration of heat can cause self-combustion and fire so always activate the ventilation program to cool down or quickly remove all laundry from the dryer in order to hang them up and dissipate the heat.
- Ensure that the air inlet of the dryer is open and it is well-ventilated.
- The product contains R290 refrigerant.
- R290 is an environment-friendly, but flammable refrigerant.
- Keep the product away from potential heat sources that may cause it to ignite.
DANGER!
Points to be taken into consideration for fire hazards:
Below specified laundry or items must not be dried in the dryer considering fire hazards.
- Unwashed laundry items
- Items soiled with oil, acetone, alcohol, fuel oil, kerosene, stain removers, turpentine, paraffin, paraffin removers, petrol, wax, or wax removers must be washed in hot water with plenty of detergents before being dried in the dryer.
For this reason, especially the items containing the above-specified stains must be washed very well, to do this use adequate detergent and choose a high washing temperature.
Below specified laundry or items must not be dried in the dryer due to the fire hazard: - Garments or pillows bolstered with rubber foam (latex foam), shower bonnets, water resistant textiles, materials with rubber reinforcement, and rubber foam pads.
Clothing cleaned with industrial chemicals.
Items such as lighter, match, coins, metal parts, needles,s, etc. may damage the drum set or may lead to functional problems. Therefore check all the laundry that you will load into your dryer.
Never stop your dryer before the program completes. If you must do this, remove all laundry quickly and lay them out to dissipate the heat.
DANGER!
- Clothes that are washed inadequately may ignite on their own and even may ignite after drying ends.
- You must provide enough ventilation in order to prevent gases exiting from devices operating with other types of fuels including the naked flame from accumulating in the
room due to the backfire effect.
- Underwear that contains metal reinforcements should not be dried in the dryer. The dryer may be damaged if metal reinforcements come loose and break off during drying.
![]() NOTE
NOTE
- Use softeners and similar products in accordance with the instructions of their manufacturers.
Always clean the lint filter before or after each loading. Never operate the dryer without the lint filter installed.
- Never attempt to repair the dryer by yourself. Do not perform any repair or replacement procedures on the product even if you know or have the ability to perform the required procedure unless it is clearly suggested in the operating instructions or the published service manual. Otherwise, you will be putting your life and others’ lives in
danger. - There must not be a lockable, sliding, or hinged door that may block the opening of the loading door in the place where your dryer is to be installed.
- Install your dryer at places suitable for home use. (Bathroom, closed balcony, garage, etc.)
- Make sure that pets do not enter the dryer. Check the inside of the dryer before operating it.
- Do not lean on the loading door of your dryer when it is open, otherwise, it may fall over.
- The lint must not be allowed to accumulate around the tumble dryer
- The tumble dryer is not to be used if industrial chemicals have been used for cleaning.
- Fabric softeners, or similar products. should be used as specified by the fabric softener instructions.
- Exhaust air must not be discharged into a flue which is used for exhausting fumes from appliances burning gas or other fuels.
1.2 Mounting over a washing machine
- A fixing device should be used between the two machines when installing the dryer above a washing machine. The fitting device must be installed by the authorized service agent.
- Total weight of the washing machine and the dryer -with a full load- when they are placed on top of each other reaches approx. 180 kilograms. Place the products on a solid floor that has sufficient load carrying capacity!
- The washing machine cannot be placed on the dryer. Pay attention to the above warnings during the installation of your washing machine.
| Installation Table for Washing Machine and Dryer | ||||
| Dryer Depth | Washing Machine Depth | |||
| 62 cm | 60 cm | 54 cm | < 50 cm | |
| 54 cm | Can be installed | Cannot be installed | ||
| 60 cm | Can be installed | Cannot be installed | ||
1.3 Intended use
- The dryer has been designed for domestic use. It is not suitable for commercial use and it must not be used out of its intended use.
- Use the dryer only for drying laundry that is marked accordingly.
- The manufacturer waives any responsibility arising from incorrect usage or transportation.
- The service life of the dryer that you purchased is 10 years. During this period, original spare parts will be available to operate the dryer properly.
1.4 Child safety
- Packaging materials are dangerous for children. Keep packaging materials away from children.
- Electrical products are dangerous for children. Keep children away from the product when it is operating. Do not let them tamper with the dryer. Use the childproof lock in order to prevent the children to tamper with the dryer.
![]() NOTE
NOTE
A child-proof lock is on the control panel. (See Child lock
- Keep the loading door closed even when the dryer is not in use.
1.5 Compliance with the WEEE regulation and disposing of the waste product
 This product complies with EU WEEE Directive (2012/19/EU). This product bears a classification symbol for waste electrical and electronic equipment (WEEE).
This product has been manufactured with high-quality parts and materials which can be reused and are suitable for recycling. Do not dispose of the waste product with normal domestic and other wastes at the end of its service life. Take it to the collection center for the recycling of electrical and electronic equipment. Please consult your local authorities to learn about these collection centers.
DANGER!
- R290 is a flammable refrigerant. Thus, ensure that the system and the pipes are not harmed during operation and handling.
- Keep the product away from potential heat sources that may cause it to ignite in case of damage.
- Do not dispose of the product by putting it on the fire.
1.6 Compliance with RoHS Directive:
The product you have purchased complies with the EU RoHS Directive (2011/65/EU). It does not contain harmful and prohibited materials specified in the Directive.
1.7 Package information
Packaging materials of the product are manufactured from recyclable materials in accordance with our National Environment Regulations. Do not dispose of the packaging materials together with the domestic or other wastes. Take them to the packaging material collection points designated by the local authorities.
1.8 Technical Specifications
| Height (Min. / Max.) | 84,6 cm / 86,6 cm* |
| Width | 59,7 cm |
| Depth | 58,9 cm |
| Capacity (max.) | 7 kg** |
| Net weight (± %10) | 44 kg |
| Voltage | See type label*** |
| Rated power input | |
| Model code |
* Min. height: Height with adjustable feet are closed.
Max. height: Height with adjustable feet are opened maximum.
** Dry laundry weight before washing.
*** Type label is located behind the loading door.
![]() NOTE
NOTE
- Technical specifications of the dryer are subject to specification without notice to improve the quality of the product.
- Figures in this manual are schematic and may not match the product exactly.
- Values stated on markers on the dryer or in the other published documentation accompanying the dryer are obtained in the laboratory in accordance with the relevant standards. Depending on the operational and environmental conditions of the dryer, these values may vary.
Your Dryer
2.1 Overview
- Top panel
- Control panel
- Loading door
- Kick plate opening button
- Ventilation grids
- Adjustable legs
- In models where the tank is placed below, the water tank is inside the toe board
- Type label
- Lint filter
- Water tank drawer (in models where the tank is placed above)
- Power cord
2.2 Package Contents
 |
1. Water drain hose * |  |
6. Water Filling Container* |
 |
2. Filter drawer spare sponge* |  |
7. Pure Water* |
 |
3. User Manual |  |
8. Fragrance Capsules Group* |
 |
4. Drying basket* |  |
9. Brush* |
|
5. Drying basket user manual* |  |
10. Filter cloth* |
*Optional – may not be included, depending on the model.
Installation
Before calling the nearest Authorized Service for the installation of the dryer, ensure that electrical installation and water drain are appropriate referring to the user’s manual.
If they are not suitable, contact a qualified electrician and technician to make necessary arrangements.
![]() NOTE
NOTE
- Preparation of the dryer’s location, as well as the electrical and wastewater installations, is under the customer’s responsibility.
- Prior to installation, visually check if the dryer has any defects on it. If the drier is damaged, do not have it installed. Damaged products cause risks for your safety.
- Let your dryer wait for 12 hours before starting to use it.
3.1 Appropriate installation location
Install the dryer on a stable and level surface.
The dryer is heavy. Do not move it by yourself.
- Operate your dryer in a well-ventilated, dust-free environment.
- The gap between the dryer and the surface should not be reduced by the materials such as carpet, wood, and tape.
- Do not cover the ventilation grills of the dryer.
- There must not be a lockable, sliding, or hinged door that may block the opening of the loading door in the place where your dryer is to be installed.
- Once the dryer is installed, it should stay at the same place where its connections have been made. When installing the dryer, make sure that it’s rear wall does not touch anywhere (tap, socket, etc.).
- Place the dryer at least 1 cm away from the edges of other furniture.
- Your dryer can be operated at temperatures between +5°C and +35°C. If the operating conditions fall outside of this range, the operation of the dryer will be adversely affected and it can get damaged.
- The rear surface of the tumble dryer shall be placed against a wall.
DANGER!
Do not place the dryer on the power cable.
* Ignore the following warning if your product’s system does not contain R290.
DANGER!
- The dryer contains R290 refrigerant.*
- R290 is an environment-friendly, but flammable refrigerant.*
- Ensure that the air inlet of the dryer is open and it is well-ventilated.*
- Keep potential flame sources away from the dryer.*
3.2 Removing the transportation safety assembly
- Remove the transportation safety assembly before using the dryer for the first time.
- Operate your dryer in a well-ventilated, dust-free environment.
- The gap between the dryer and the surface should not be reduced by the materials such as carpet, wood, and tape.
- If the door swing side of your appliance can be modified, see the reversible door mounting instructions.
3.3 Connecting to the drain
You can directly drain accumulated water through the water drain hose supplied with the product instead of periodically draining the water collected in the water tank.
Connecting the water drain hose
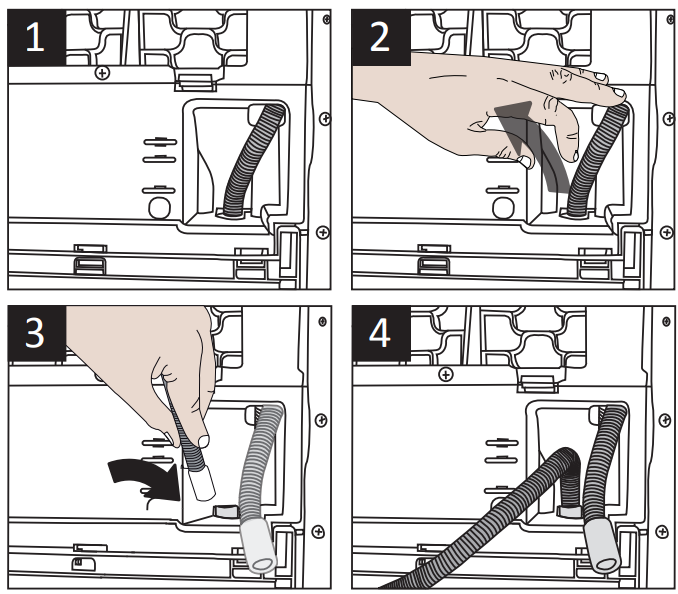
1-2 Pull the hose at the behind of the dryer by hand in order to disconnect it from where it is connected. Do not use any tools to remove the hose.
3 Connect one end of the drain hose supplied with the dryer to the connection point from where you removed the hose of the product in the previous step.
4 Connect the other end of the drain hose directly to the wastewater drain or to the washbasin.
![]() NOTE
NOTE
- The water drain hose should be attached to a height of a maximum of 80 cm.
- Make sure that the water drain hose is not stepped on and it is not folded between the drain and the machine.
- If there is an accessories pack supplied with your product, please see the detailed description.
3.4 Adjusting the feet
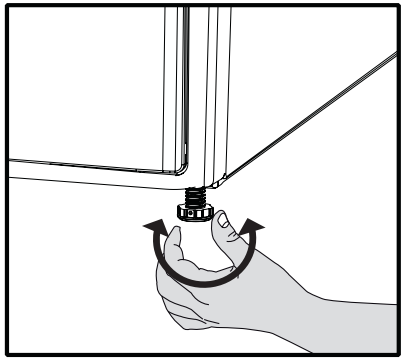
- Turn the feet to left or right until the dryer stands level and firmly.
3.5 Transportation of the dryer
Drain all water that has remained in the dryer. If a direct water drain connection is made, then remove the hose connections.
- We recommend carrying the dryer in an upright position. If it is not possible to carry the machine in the upright position, we recommend carrying it by tilting towards the right side when looking from the front.
3.6 Warnings about sounds
![]() NOTE
NOTE
 It is normal to hear a metallic noise from the compressor sometimes during operation.
- Water collected during operation is pumped to the water tank. It is normal to hear pumping noise during this process.
3.7 Changing the illumination lamp
In case an illumination lamp is used in your laundry dryer. To change the Bulb/LED used for illumination of your tumble dryer, call your Authorized Service. The lamp(s) used in his appliance is not suitable for household room illumination. The intended purpose of this lamp is to assist the user to place laundry in the tumble dryer in a comfortable way. The lamps used in this appliance have to withstand extreme physical conditions such as vibrations and temperatures above 50 °C
Preparation
4.1 Laundry suitable for drying in the dryer
Always obey the instructions given on the garment tags. Dry only the laundry having a label stating that they are suitable for drying in a dryer.
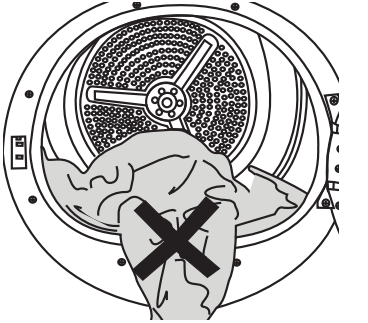
4.2 Laundry not suitable for drying in the dryer
Items with this symbol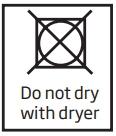 should not be dried in the dryer.
![]() NOTE
NOTE
- Delicate embroidered fabrics, woolen, silk garments, delicate and valuable fabrics, airtight items, and tulle curtains are not suitable for machine drying.
4.3 Preparing laundry for drying
- Laundry may be tangled with each other after washing. Separate the laundry items before placing them into the dryer.
- Dry garments have metal accessories such as zippers, inside out.
- Fasten the zippers, hooks buckles, and button sheets.
4.4 Things to be done for energy saving
- Spin your laundry at the highest speed possible when washing them. Thus, the drying time is shortened and the energy consumption is reduced.
- Sort out the laundry depending on their type and thickness. Dry the same type of laundry together. For example, thin kitchen towels and tablecloths dry quicker than thick bathroom towels.
- Follow the instructions in the user manual for program selection.
- Do not open the loading door of the machine during drying unless necessary. If you must open the loading door, do not keep it open for a long time.
- Do not add wet laundry while the dryer is in operation
- For models with a condenser unit: clean the condenser once a month or after every 30 operations regularly.
- Clean the filter periodically. Read the maintenance and cleaning of filters for detailed information.
- For models with flue unit: comply with the flue connection instructions and clean the flue.
- During the drying process, air the room well where your tumble dryer is operating.
4.5 Correct load capacity
Follow the instructions in the “Programme selection and consumption table”. Do not load more than the capacity values stated in the table.
Following weights are given as examples.
| Laundry | Approximate weights (g)* | Laundry | Approximate weights (g)* |
| Cotton quilt covers (double) | 1500 | Blouses | 150 |
| Cotton quilt covers (single) | 1000 | Cotton shirts | 300 |
| Bedsheets (double) | 500 | Shirts | 250 |
| Bedsheets (single) | 350 | Cotton dresses | 500 |
| Large tablecloths | 700 | Dresses | 350 |
| Small tablecloths | 250 | Jeans | 700 |
| Tea towels | 100 | Handkerchiefs (10 pieces) | 100 |
| Bath towels | 700 | T-Shirts | 125 |
| Hand towels | 350 |
*Dry laundry weight before washing.
Running the product
5.1 Control Panel
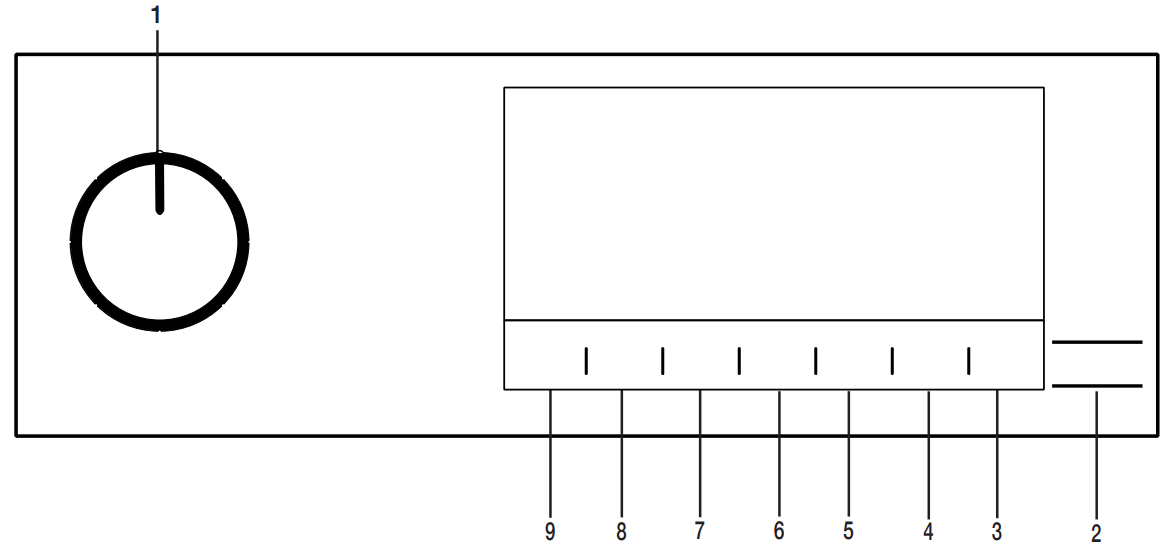 On/Off/Program Selection button.
- Start / Stand-by button.
- Drum light button.
- End time selection button.
- Time program selection button
- Low-temperature selection button.
- Audible warning and child lock selection button.
- Wrinkle prevention selection button.
- Dryness level selection button.
5.2 Symbols

5.3. Preparation of drying machine
- Plug the drying machine.
- Open the loading door.
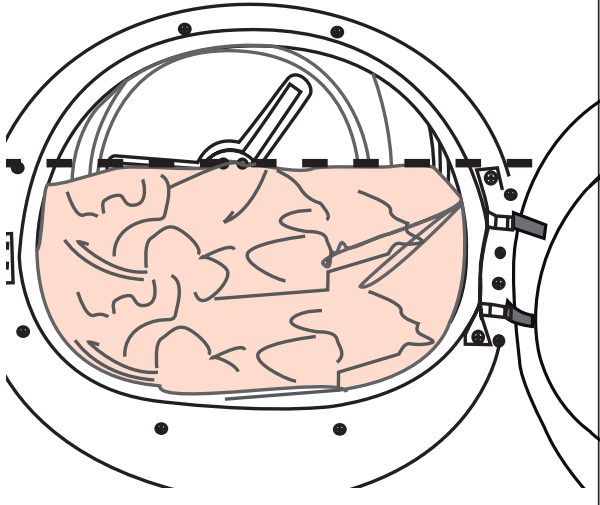
- Place the laundry in the drying machine without jamming them.
- Push and close the loading door.
 Ensure that no laundry is jammed into the loading door.
- Select the desired program by using the On/Off/Program Selection button, the machine will turn on.
![]() NOTE
NOTE
- Selecting the program with the On/Off/ Program Selection button does not mean that the program started. Press Start / Stand-by button to start the program.
5.4 Program selection and consumption chart
| Programs | Program Description | Capacity (kg) | Spin speed in the washing machine (rpm) | Drying Time (minutes) |
| Cotton | You can dry your heat-resistant cotton textiles with this program. A drying setting suitable for the thickness of the products to be dried and the desired level of dryness should be selected. | 7 | 1000 | 184 |
| Cotton Eco | It dries single-layer, casual cotton textiles in the most economical way. | 7 | 1000 | 174 |
| Cottons Iron dry | You may dry your cotton laundry to be ironed in this program to have them slightly damp for ease of ironing. (Shirt, T-shirt, tablecloth, etc.) | 7 | 1000 | 139 |
| Synthetics | You can dry all your synthetic textiles with this program. A drying setting suitable for the level of dryness you desire should be selected. | 4 | 800 | 65 |
| Mix | Use this program to dry non-pigmenting synthetic and cotton laundry items together. Sports and fitness clothes may be dried with this program. | 4 | 1000 | 115 |
| Towel | Drying towels such as kitchen towels, bath towels,s and hand towels. | 5 | 1000 | 175 |
| gentle care | You may dry your delicate laundry or laundry with a hand wash symbol (silk blouses, thin underwear, etc.) at low temperature in this program. | 2 | 1200 | 55 |
| Daily | You can dry both cotton and synthetic laundry with this program. Sports and fitness clothes may be dried with this program. | 4 | 1000 | 110 |
| Drying Rack/ TimeDry | You may select from time programs between 10 and 160 minutes to achieve the desired drying level at a low temperature. In this program, the tumble drier’s operation lasts for the set time independently from the dryness of laundry. This product is available to be used with a drying basket as an option. For products that are sold without a basket, you can obtain a basket from an authorized service and use the drying programs specified above. For details of use, see the drying basket user guide. | – | – | – |
| Jeans | You may dry denim pants, skirts, shirts, or jackets in this program. | 4 | 1200 | 125 |
| Outdoor/Sports (Goretex) | Use it to dry your clothes made of synthetics, cotton or mixed fabrics, or waterproof products such as functional jackets, raincoats, etc. Turn them inside out prior to drying. | 2 | 1000 | 135 |
| Duvet/Downwear | You can dry your feather or fiber-filled textile that bears can be dried in the drier label as a single piece of laundry. You can dry a double duvet, pillow, or coat as a single piece of laundry. Dry your clothes such as coats and jackets turned inside out. | – | 800 | 165 |
| Shirts | It dries the shirts in a more sensitive manner and causes less creasing and easier ironing. | 1,5 | 1200 | 50 |
| Express Super Short | Use this program to have 2 shirts ready for ironing. | 0,5 | 1200 | 30 |
|
Hygienic Drying |
It is the program that you can dry your washed products you want to provide with extra hygiene (baby clothes, underwear, towels, etc.). It provides high hygiene for your textiles via heat effect. | 5 | 800 | 200 |
| Hygienic Refresh | You can use this program for your dry clothes and laundry that you want to provide with hygiene without washing them. It provides high hygiene for your dry textiles via heat effect. | 1,5 | – | 120 |
| Energy consumption values | ||||
| Programs | Capacity (kg) | Spin speed in the washing machine (rpm) | Approximate amount of remaining humidity | Energy consumption value kWh |
| Cotton Eco * | 7 | 1000 | 60% | 1,71 |
| Cottons Iron dry | 7 | 1000 | 60% | 1,35 |
| Synthetics cupboard dry | 4 | 800 | 40% | 0,65 |
 |
“Cotton Eco program” used at full and partial load is the standard drying program to which the information in the label and the fiche relates, that this program is suitable for drying normal wet cotton laundry and that it is the most efficient program in terms of energy consumption for Cotton. | |||
*: Energy Label standard program (EN 61121:2012) The values in the table are determined according to the EN 61121:2012 standard. Consumption values may vary from the value in the chart depending on laundry type, wringing speed, ambient conditions, and voltage levels.

Allergy UK is the trademark of the British Allergy Foundation. The Seal of Approval has been created to guide people requesting advice that the product significantly reduces the amount of the allergens in an environment where allergic people are present or the product restricts/reduces/ eliminates the allergens. The purpose is to provide evidence that the products have been scientifically tested or analyzed to yield measurable results.
5.5 Auxiliary functions
Dryness level
The dryness level button is used for adjusting to desired dryness. Program time may change depending on the selection.
![]() NOTE
NOTE
- You can activate this function only prior to the start of the program.
Wrinkle prevention
You can turn on and off the wrinkle prevention function by pressing the wrinkle prevention selection button. If you will not take the laundry out immediately after the program is completed, you may use the Wrinkle prevention function to prevent wrinkling of your laundry.
Audible warning
The drying machine makes an audible warning when the program is completed. Press the “Audible Warning” button if you do not want an audible warning. When you press the audible warning button, the light goes off and it does not sound when the program is completed.
![]() NOTE
NOTE
- You can select this function before the program starts or after the program starts.
Low temperature
You can activate this function only prior to the start of a program. You can activate this function if you want to dry your laundry at a lower temperature. The program duration will be long after it becomes activated.
End time
You can delay the end time of the program up to 24 hours with the end time function.
- Open the loading door and place the laundry.
- Select the drying program.
- Press the End Time selection button and set the delay time you wish. End Time LED turns on. (When pressed and hold the button, End-Time proceeds non-stop).
- Press the Start / Stand-by button. End Time countdown begins. The “:” sign in the middle of displayed delay time flashes.
![]() NOTE
NOTE
- You can add or remove laundry within the end time. Displayed time is the sum of normal drying time and end time. End Time LED turns off at the end of the countdown, the drying starts and the drying LED turns on.
Changing the end time
If you want to change the duration during the countdown:
Pause the program Turn the On/Off/Program Selection button and cancel the program. Select the desired program and repeat the End Time selection.
Canceling the end time function If you want to cancel the end time countdown and start the program immediately:
Pause the program Turn the On/Off/Program Selection button and cancel the program. Select the desired program and press the “Start/Pause” button.
Drum Light
You can turn on and off the drum light by pressing this button. The light turns on when the button is pressed and turns off after a certain time.
5.6 Warning indicators
![]() NOTE
NOTE
- Warning indicators may vary depending on the model of your drying machine.
Filter cleaning
When the program is completed, the warning indicator for filter cleaning turns on.
Water tank
If the water tank fills up while the program continues, the warning indicator starts flashing and the machine goes into standby. In this case, empty the water tank and start the program by pressing the Start / Stand-by button. The warning indicator turns off and programs resume.
Cleaning of filter drawer/heat exchanger
The warning symbol flashes periodically to remind that the filter drawer must be cleaned.
5.7 Starting the program
Press the Start/Stand-by button to start the program.
Start/Stand-by and Drying indicators turn on to show that the program started.
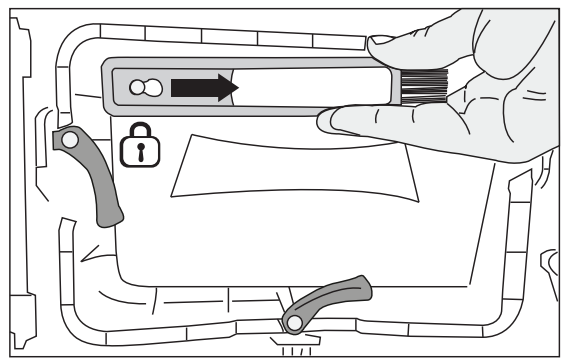
5.8 Child Lock
The drying machine has a child lock which prevents the program flow from being interrupted when the buttons are pressed during a program. When the Child Lock is activated, all buttons on the panel except the On/Off/Program Selection button are deactivated.
Press the Audible Warning button for 3 seconds in order to activate the child lock. The child lock has to be deactivated to be able to start a new program after the current program is finished or to be able to interfere with the program. To deactivate the child lock, keep the same buttons pressed for 3 seconds.
![]() NOTE
NOTE
- When the child lock is activated, the child lock warning indicator on the screen turns on.
When the child lock is active:
The drying machine runs, or in the standby state, the indicator symbols will not change upon changing the position of the program selection button.
![]() NOTE
NOTE
- When the drying machine is operating and the child lock is activated, a double beep sound is heard when the program selector switch is turned. If the child lock is canceled without turning the program selector button back to its original position, the program is terminated since the program selector button is turned.
5.9 Changing the program after it is started
You can change the program you selected to dry your laundry with a different program after the drying machine starts running.
- For example, Pause the program and turn the On/Off/Program Selection button to select the Extra Dry program in order to select the Extra Dry program instead of Ironing Dryness.
- Press the Start/Stand-by button to start the program.
Adding and removing clothes during standby If you want to add or remove clothes to/from the drying machine after the drying program starts: - Press the Start/Stand-by button to put the drying machine in a Stand-by state. The drying operation stops.
- Open the loading door while in Standby state, and close the door after you remove or add laundry.
- Press the Start/Stand-by button to start the program.
![]() NOTE
NOTE
- Adding laundry after the drying operation starts may cause the dried laundry inside the drying machine to mix with wet laundry and leave the laundry damp at the end of the operation.
- Adding or removing laundry during drying may be repeated as many times as you wish. But this operation continuously interrupts the drying operation, and thus increases program duration and energy consumption. So, it is recommended to add laundry before the program starts.
- If a new program is selected by turning the program selection button while the drying machine is on stand-by, the running program terminates.
![]() WARNING!
WARNING!
- Do not touch the inner surface of the drum while adding or removing clothes during a continuing program. The drum surface is hot.
5.10 Cancelling the program
IIf you want to cancel the program and terminate the drying operation for any reason after the drying machine starts running, Pause the program and turn the On/Off/Program Selection button; the program terminates.
- The inside of the drying machine shall be extremely hot when you cancel the program during machine operation, so run the refreshing program to allow it to cool down.
5.11 End of program
When the program ends, the LEDs of End/Wrinkle Prevention and Fibre Filter Cleaning Warning on the program follow-up indicator turn on. The loading door can be opened and the drying machine is ready for another operation. Turn the On/Off/Program Selection button to the On/Off position in order to turn off the drying machine.
![]() NOTE
NOTE
- If the Wrinkle Prevention mode is active and the laundry is not removed after the program is completed, the wrinkle prevention function activates for 2 hours to prevent the laundry inside the machine to get wrinkled. The program tumbles the laundry with 10-minute intervals to prevent them from wrinkling.
5.12 Odour feature
If your drying machine has an odor feature, read the ProScent manual to use this feature.
Maintenance and cleaning
6.1 Loading Door Inner Surface
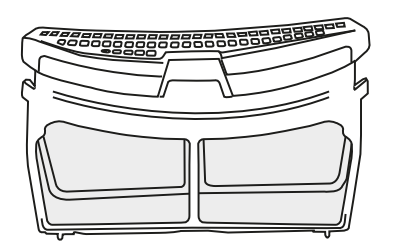
The hair and fibers that are separated from the laundry during the drying process are collected by the Fibre Filter.
![]() NOTE
NOTE
- Fibers are formed during wearing and washing clothes.
- You can clean the filter slot with a vacuum cleaner.
- After each drying cycle, clean the fiber filter and the inner surface of the loading door.
To clean the fiber filter:
- Open the loading door.
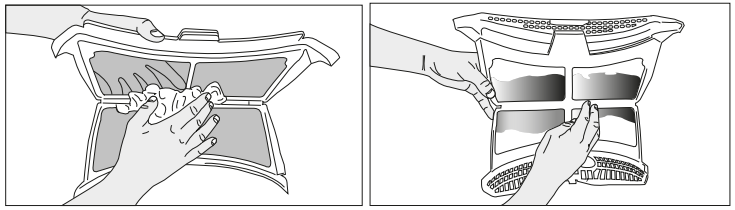
- Hold the first part (inner filter) of the two-part fiber filter and remove it by pulling it upwards.
- Collect the hair, fibers, and cotton balls by hand or with a soft cloth.
- Remove the second part (outer filter) by pulling it upwards.
![]() NOTE
NOTE
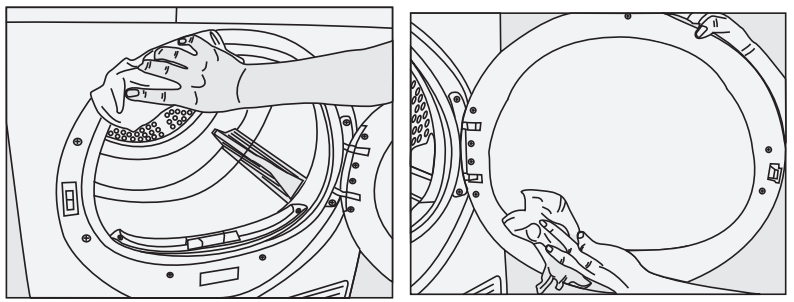
- Ensure that hair, fiber, and cotton balls do not fall into the slot where the filters are installed.
- Open both filters (top and bottom filters) and remove the lint with your hand, or use a cleaning brush at the air routing cover. And if necessary, use a vacuum cleaner to clean filters.
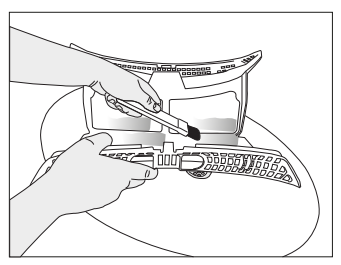
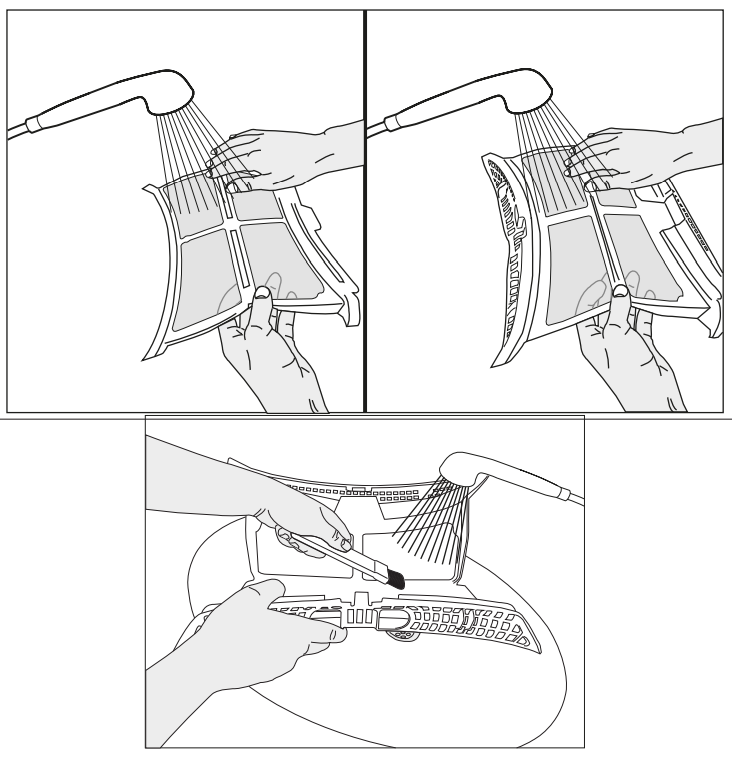
- Clean both filters underwater running in the reverse direction of fiber accumulation or with a soft brush. Dry the filter before placing it back.
- Insert the fiber filters on one another and place them back in their place.
- Clean the front door interior surface and its gaskets with a soft damp cloth or with the brush on-air routing cover.
6.2 Cleaning the sensor
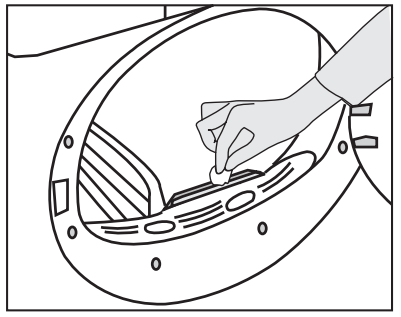
There are dampness sensors in the dryer that detect whether the laundry is dry or not. To clean the sensors:
- Open the loading door of the dryer.
- Allow the machine to cool down if it is still hot due to the drying process.
- Wipe the metal surfaces of the sensor with a soft cloth, dampened with vinegar, and dry them.
![]() NOTE
NOTE
- Clean metal surfaces of the sensors 4 times a year.
- Do not use metal tools when cleaning metal surfaces of the sensors.
- Never use solvents, cleaning agents, or similar substances for cleaning due to the risk of fire and explosion!
6.3 Draining the water tank
The dampness of the laundry is removed and condensed during the drying process and the water that arises accumulates in the water tank. Drain the water tank after each drying cycle.
- The condensed water is not drinkable!
- Never remove the water tank when the program is running!
If you forget to drain the water tank, the machine will stop during the subsequent drying cycles when the water tank is full and the Water Tank warning symbol will flash. If this is the case, drain the water tank and press the Start / Pause button to resume the drying cycle. To drain the water tank:
- Remove the water tank in the drawer or container carefully.
- Drain the water in the tank.
- If there is lint accumulation in the funnel of the water tank, clean it under running water.
- Place the water tank into its seat.
![]() NOTE
NOTE
- If direct water draining is used as an option, there is no need to empty the water tank.
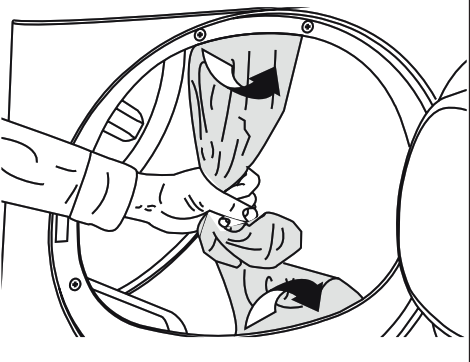
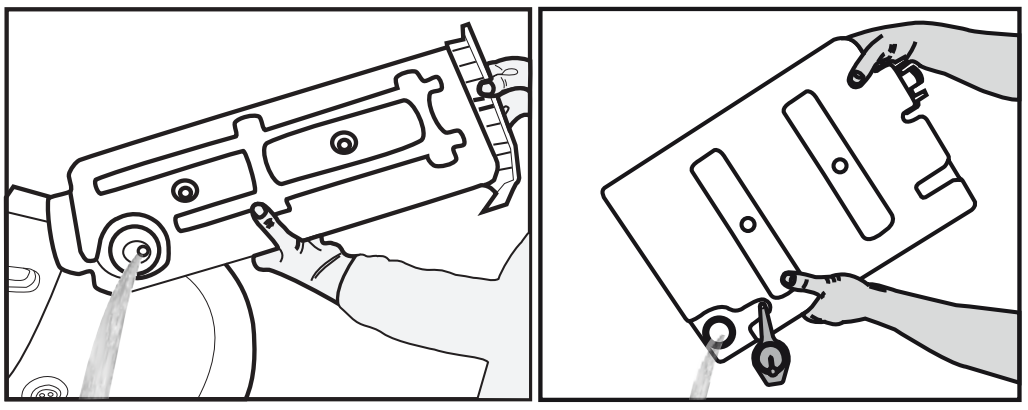
6.4 Cleaning the Condenser
A small amount of lint may pass through the lint filter and be collected on the metal surface of the condenser.
The condenser metal surface needs to be cleaned regularly.
If the evaporator icon is flashing on the display, please inspect the metal surface of the condenser. If it is dirty, clean it. This part should be checked at least once every 6 months.
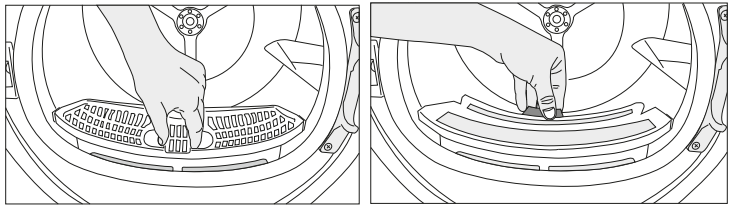
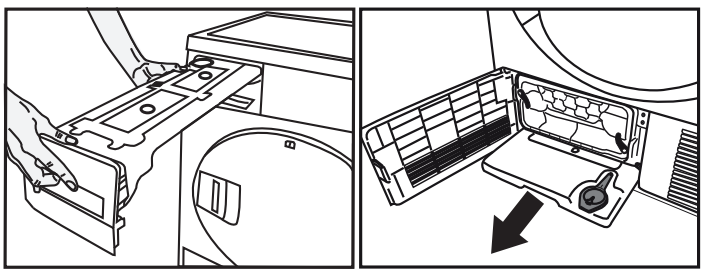
 Open the toe board by pressing on it.
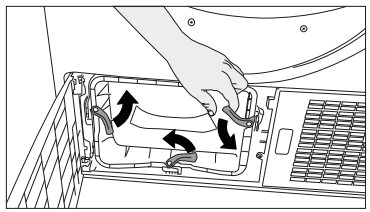
- To open the air routing door, move the release latch.
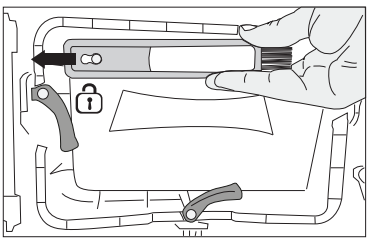
- Pull the brush to the left side and remove it. You can use the cleaning brush for removing collected fluff on the metal surface of the condenser.
![]() NOTE
NOTE
- The brush is inside the printing materials bag.
You can place it in its housing on the air routing cover after the first usage. 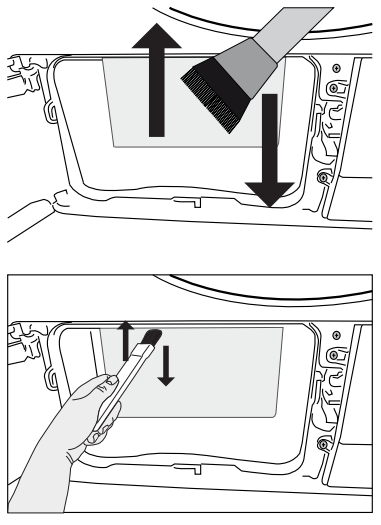 Collected fluff on the condenser surface should be removed by a damp cloth or rubbing the brush placed on the air routing cover up and down on the condenser.
- Please do not clean condenser fins in the right-left direction to avoid damage.
- You can also use a vacuum cleaner with a brush for cleaning. Condenser cleaning is not recommended with a brushless vacuum cleaner.
- Insert the brush into its slot pushing to the right, after cleaning the condenser, front cover, and lint filter.
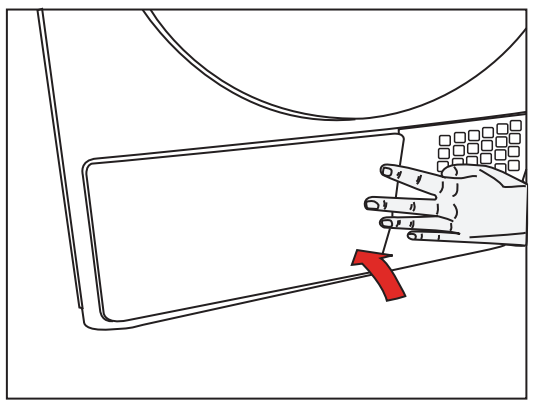 After the cleaning process is completed, place the air router door to its place, move the latches to close it, and close the toe board.
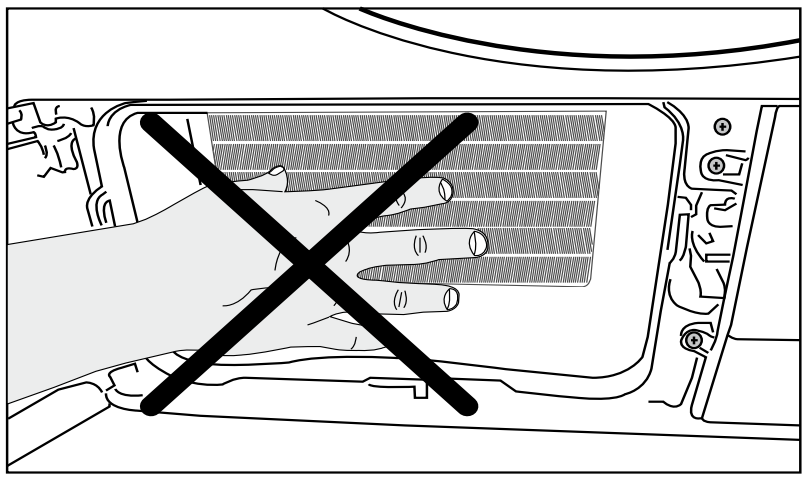
- You can clean by hand, provided you wear protective gloves. Do not try to clean with bare hands. Condenser fins may damage your hands. Cleaning by the left to right movements may damage the condenser fins. This may lead to drying issues.
- It is normal to see some water on the plastic surface in front of the condenser when you open the air routing cover.
Troubleshooting
| The drying operation takes too long. |
| Fiber filter (interior and exterior filter) pores may be clogged. >>> Wash the fiber filters with warm water and dry. Evaporator’s front side may be clogged. >>> Clean the front side of the evaporator. The ventilation grills in front of the machine may be closed. >>> Remove any object in front of the ventilation grills that blocks air. Ventilation may be inadequate because they are the machine is installed is too small. >>> Open the door or windows to prevent the room temperature from rising very high. A lime layer may have accumulated on the humidity sensor. >>> Clean the humidity sensor. An excessive amount of laundry might be loaded. >>> Do not load the drying machine excessively. The laundry might not have been wrung adequately. >>> Perform a higher speed wringing on the washing machine. |
| Clothes come out damp after drying. |
| A program not suitable for the laundry type may have been used.>>> Check the maintenance labels on the clothes and select a program suitable for the clothes’ type or use time programs as extra. Fiber filter (interior and exterior filter) pores may be clogged. >>> Wash the filters with warm water and dry. Evaporator’s front side may be clogged. >>> Clean the front side of the evaporator. An excessive amount of laundry might be loaded. >>> Do not load the drying machine excessively. The laundry might not have been wrung adequately. >>> Perform a higher speed wringing on the washing machine. |
| The drying machine does not turn on or the program cannot be started. The drying machine does not run after it is configured. |
| The power plug might be unplugged. >>> Make sure the power cord is plugged in. The loading door might be open. >>> Ensure that the loading door is properly closed. A program might not be set or Start / Pause /Cancel button might not be pressed. >>> Check that the program is set and it is not in Pause position.. Child lock may be activated. >>> Turn off the child lock. |
| The program terminated prematurely for no reason. |
| The loading door might be closed completely. >>> Ensure that the loading door is properly closed. There might be a power outage. >>> Press the Start / Pause / Cancel button to start the program. The water tank may be full. >>> Empty the water tank. |
| Clothes have shrunk, hardened, or spoiled. |
| A program not suitable for the laundry type might have been used. >>> Check the maintenance labels on the clothes and select a program suitable for the clothes. |
| Water drips from the loading door. |
| Fibers might have gathered on the inner sides of the loading door and the loading door gasket. >>> Clean the inner surfaces of the loading door and the loading door gasket surfaces. |
| The loading door opens by itself. |
| The loading door might be closed completely. >>> Push the loading door until the closing sound is heard. |
| The water tank warning symbol is on/flashing. |
| The water tank may be full. >>> Empty the water tank. The water discharge hose might have collapsed. >>> If the product is connected directly to the water drain check the water discharge hose. |
| The lighting inside the drying machine does not turn on. (In models with lamp) |
| The drying machine might not have been turned on using the On/Off button. >>> Check that the drying machine is turned on. The lamp might be malfunctioning. >>> Contact Authorized Service to replace the lamp. |
| The anti-crease icon is lit. |
| Anti-Crease mode that prevents the laundry in the drier to crease may be activated. >>> Turn the drier off and remove the laundry. |
| The fiber filter cleaning icon is lit. |
| The fiber filter (interior and exterior filter) may be unclean. >>> Wash the filters with warm water and dry.. A layer may be formed on the fiber filter pores that lead to clogging. >>> Wash the filters with warm water and dry. Fiber filters may not be inserted. >>> Insert the interior and exterior filters to their places. |
| An audible warning is heard from the machine |
| Fiber filters may not be inserted. >>> Insert the interior and exterior filters to their places. |
| The evaporator warning icon is flashing. |
| Evaporator’s front side may be clogged with fibers. >>> Clean the front side of the evaporator. Fiber filters may not be inserted. >>> Insert the interior and exterior filters to their places. |
| The lighting inside the drying machine turns on. (In models with lamp) |
| If the drying machine is plugged into the power outlet, the On/Off button is pressed and the door is open; the light turns on. >>> Unplug the drying machine or bring the On/Off button to the Off position. |
- If the problem persists after following the instructions in this section, contact your vendor or an Authorized Service. Never try to repair your product yourself.
![]() NOTE
NOTE
- In an event that you encounter an issue on any part of your appliance, you can ask for a replacement by contacting the authorized service with the appliance model number.
- Operating the appliance with non-authentic parts may lead the appliance to malfunction.
- The manufacturer and distributor are not liable for malfunctions resulting from using non-authentic parts.
| PRODUCT FICHE | ||
| Complying Commission Delegated Regulation (EU) No 392/2012 | ||
| Supplier name or trademark | BEKO | |
| Model name | DS7439CSSX 7188235720 |
|
| Rated capacity (kg) | 7.0 | |
| Type of Tumble Dryer | Air Vented | – |
| Condenser | • | |
| Energy efficiency class (1) | A++ | |
| Annual Energy Consumption (kWh) (2) | 210,6 | |
| Type of Control | Automatic | • |
| Non-automatic | – | |
| Energy consumption of the standard cotton program at full load (kWh) | 1,71 | |
| Energy consumption of the standard cotton program at partial load (kWh) | 0,98 | |
| Power consumption of the off-mode for the standard cotton program at full load, PO (W) | 0,50 | |
| Power consumption of the left-on mode for the standard cotton program at full load, PL (W) | 1,00 | |
| The duration of the left-on mode (min) | 30 | |
| Standard cotton program (3) | • | |
| Program time of the standard cotton program at full load, Try (min) | 174 | |
| Program time of the standard cotton program at partial load, Tdry1/2 (min) | 107 | |
| Weighted program time of the standard cotton program at full and partial load (T t) | 136 | |
| Condensation efficiency class (4) | B | |
| Average condensation efficiency of the standard cotton program at full load, Cry | 81% | |
| Average condensation efficiency of the standard cotton program at partial load, Cdry1/2 | 81% | |
| Weighted condensation efficiency of the standard cotton program at full load and partial load, Ct | 81% | |
| The sound power level for the standard cotton program at full load (5) | 65 | |
| Built-in | – | |
: Yes -: No
(1) Scale from A+++ (most efficient) to D (least efficient)
(2) Energy consumption based on 160 drying cycles of the standard cotton program at full and partial load, and the consumption of the low-power modes. Actual energy consumption per cycle will depend on how the appliance is used.
(3) “Cotton cupboard dry program” used at full and partial load is the standard drying program to which the information in the label and the fiche relates, that this program is suitable for drying normal wet cotton laundry and that it is the most efficient program in terms of energy consumption for cotton
(4) Scale from G (least efficient) to A (most efficient)
(5) Weighted average value — L WA expressed in dB(A) re 1 pm
Product Overview

Please read this user manual first!
Dear Customers,
Thank you for selecting an Beko product. We hope that you get the best results from your product which has been manufactured with high quality and state-of-the-art technology. Therefore, please read this entire user manual and all other accompanying documents carefully before using the product and keep it as a reference for future use. If you handover the product to someone else, give the user manual as well. Follow all warnings and information in the user manual.
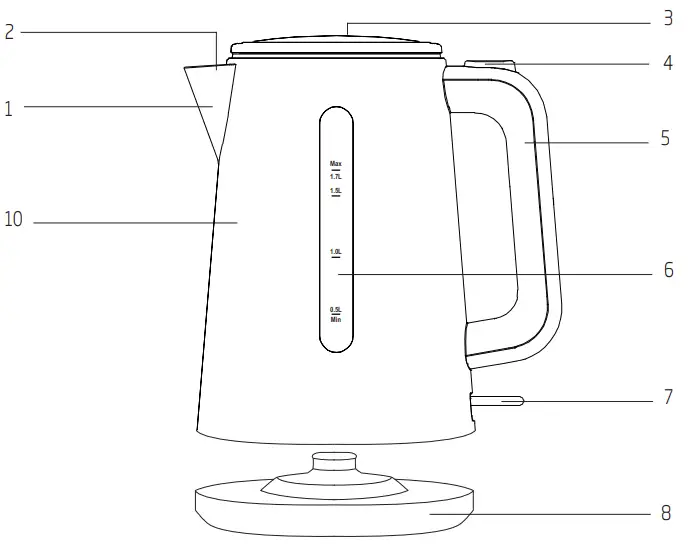
Overview
- Spout
- Water filter (inside)
- Lid
- Lid release button
- Handle
- Water level indicator
- On/Off switch
- Base
- Cable coil
- Water tank
Meanings of the symbols
Following symbols are used in the various section of this manual:
![]() WARNING: Warnings for dangerous situations concerning the safety of life and property.
WARNING: Warnings for dangerous situations concerning the safety of life and property.
![]() WARNING: Warning for hot surfaces.
WARNING: Warning for hot surfaces.
 Important information and useful hints about usage.
![]() Materials are intended to be in contact with food.
Materials are intended to be in contact with food.
 Do not immerse the appliance, power cord or power plug in water or in other liquids.
Technical data
Power supply: 220-240 V~, 50-60 Hz
Power: 2550-3000 W
Technical and design modifications reserved.
 This product has been produced in environmentally-friendly, state-of-the-art facilities
Important instructions for safety and environment
This section contains safety instructions that will help protect from risk of personal injury or property damage. Failure to follow these instructions invalidates the granted warranty.
General safety
- This appliance complies with the international safety standards.
- This appliance can be used by children aged from 8 years and above and persons with reduced physical, sensory or mental capabilities or lack of experience and knowledge if they have been given supervision or instruction concerning use of the appliance in a safe way and understand the hazards involved.
- Children shall not play with the appliance. leaning and user maintenance shall not be made by children unless they are older than 8 and supervised.
- Do not use the appliance outdoors or in the bathroom.
- Do not use it if the power cable or the appliance itself is damaged. Contact an authorized service.
- This appliance is intended to be used in household only. It is not designed for professional use in.
- Your mains power supply should comply with the information supplied on the rating plate of the appliance.
- For additional protection, this appliance should be connected to a household faulty current protection switch with no more than 30 mA.
- Use the appliance with a grounded outlet only.
- Do not use the appliance with an extension cord.
- Do not squeeze or bend the power cord and do not rub it on sharp edges in order to prevent any damage.
- Do not touch the appliance or its plug with wet or damp hands when the appliance is plugged in.
- Do not pull the power cable when unplugging the appliance.
- Never fill the appliance above the maximum level indicator, boiling water may splash out.
- Do not fill the kettle below the minimum level indicator.
- Do not open the lid while the water is boiling.
- Position the lid so that the hot steam is directed away from you.
- Hold the appliance by the handle only.
- Never operate the appliance without any water inside it.
- Do not fill the kettle when it is fitted on its base.
- Operate the appliance with its original base.
- Always use the appliance on a stable and flat surface.
- Do not attempt to dismantle the appliance.
- Only use the original parts or parts recommended by the manufacturer.
- Unplug the appliance before cleaning. After cleaning, dry the appliance and all parts before connecting it to mains supply.
- Do not immerse the appliance, or power plug in water or any other liquids.
- Never use the appliance in or near to combustible or inflammable places and materials.
- If you keep the packaging materials, store them out of the reach of children.
- Children should be supervised to ensure that they do not play with the appliance.
- Only use the kettle for heating water. It is dangerous to misuse.
- Keep the appliance and its cord out of reach of children aged less than 8 years
- Do not touch the surfaces or heating plate of the kettle before it gets cool.
- This appliance is intended to be used in household and similar applications such as: -Staff kitchen areas in shops, offices and other working environments.
- Farm houses;
- By clients in hotels, motels and other residential type environments;
- Bed and breakfast type environments.
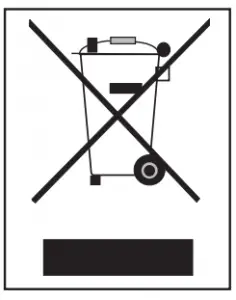
Compliance with the WEEE Directive and Disposing of the Waste Product:
This product complies with EU WEEE Directive 2012/19/EU). This product bears a classification symbol for waste electrical and electronic equipment (WEEE).
 This product has been manufactured with high quality parts and materials which can be reused and are suitable for recycling. Do not dispose of the waste product with normal domestic and other wastes at the end of its service life. Take it to the collection center for the recycling of electrical and electronic equipment. Please consult your local authorities to learn about these collection centers.
Compliance with RoHS Directive
The product you have purchased complies with EU RoHS Directive (2011/65/EU). It does not contain harmful and prohibited materials specified in the Directive.
Package information
 Packaging materials of the product are manufactured from recyclable materials in accordance with our National Environment Regulations. Do not dispose of the packaging materials together with the domestic or other wastes. Take them to the packaging material collection points designated by the local authorities.
Plug Wiring
The moulded plug on this appliance incorporates a 13 A fuse. Should the fuse need to be replaced an ASTA approved BS1362 fuse of the same rating must be used. Do not forget to refit the fuse cover. In the event of losing the fuse cover, the plug must not to be used until a replacement fuse cover has been fitted. Color of the replacement fuse cover must be the same color as that visible on the pin face of the plug Fuse covers are available from any good electrical store.
Fitting a different plug
- As the colors of the wires in the mains lead of this appliance may not correspond with the colored markings identifying the terminals on your plug, proceed as follows:
- Brown cable = L (Live)
- Blue cable = N (Neutral)
- Green/yellow cable must be connected to ground (E)
 line
line - With the alternative plugs a 13 A fuse must be fitted either in the plug or adaptor or in the main fuse box. If in doubt contact a qualified electrician.

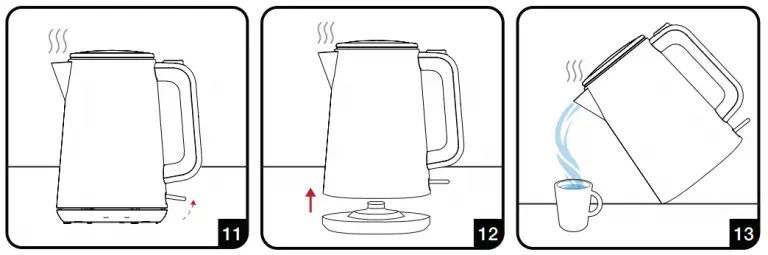
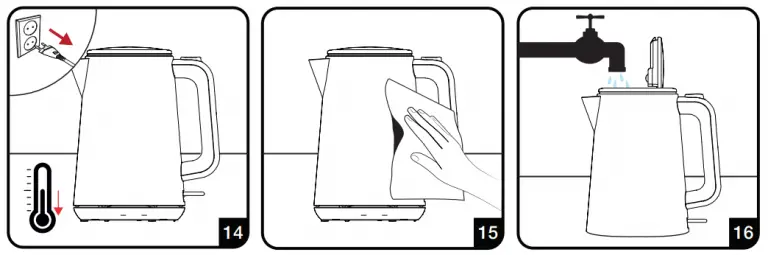
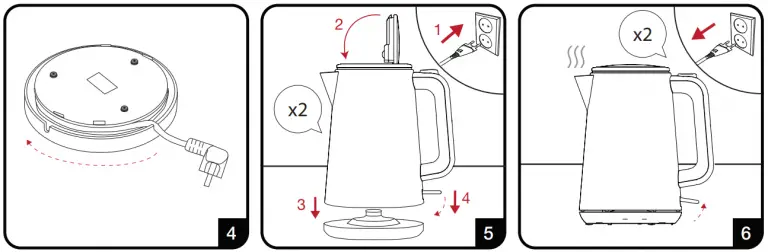 Do not place the water tank (10) on the base (8) while filling it with water
Lid (3) should always be closed during the boiling process; otherwise the kettle will not switch off automatically.
![]() WARNING: Do not open the lid (3) as hot water could splash out. Make sure that no water plashes onto the base (8).
WARNING: Do not open the lid (3) as hot water could splash out. Make sure that no water plashes onto the base (8).
Let the kettle cool down between each heating process.
![]() WARNING: Never use petrol solvents, abrasive cleaners, metal objects or hard brushes to clean the appliance
WARNING: Never use petrol solvents, abrasive cleaners, metal objects or hard brushes to clean the appliance
![]() WARNING: Never put the appliance, base (8) or power cord in water or any other liquid.
WARNING: Never put the appliance, base (8) or power cord in water or any other liquid.
Descaling the kettle
Descaling extends the life of your kettle. Descaling period depends on the water hardness of your area.
- Fill the heater with water up to the maximum level and boil.
- After the heater is switched off, unplug the appliance.
- Add 2 cups of white vinegar or 1 tablespoon of citric acid into the boiled water.
- Keep the solution in the heater for a few hours.
- Then pour it and rinse the inner part of the heater thoroughly.
- Fill the heater with clean water and boil it.
- Then empty the heater and rinse with water again
Product Instruction


Warranty
Product Guarantee
12 months breakdown and repair guarantee
Guarantor: Beko plc, 1 Greenhill Crescent, Watford, Hertfordshire. WD18 8UFThe guarantee does not in any way diminish your statutory or legal rights.
Your appliance has the benefit of our manufacturer’s guarantee which covers the product for 12 months
from the date of original purchase.
This gives you reassurance that if within that time, your appliance is proven to be defective because of
either workmanship or materials, we will at our discretion either repair or replace your appliance.
The appliance must be correctly installed, located and operated in accordance with the instructions
contained in the user manual. ! The guarantor disclaims any liability for accidental or consequential damage.
The Guarantee is subject to the following conditions
- Documentary proof of the original purchase date is provided.
- The appliance has been installed and operated correctly and in accordance with our operating and maintenance instructions.
- The appliance is used only on the electricity supply on the rating plate.
- The appliance has only been used for normal domestic purposes.
- The appliance has not been altered, serviced, dismantled or otherwise interfered with by any person.
- The appliance is used in the United Kingdom or Republic of Ireland.
- Any parts removed during repair work or any product that has been replaced becomes our property.
- The guarantee is not transferrable if the product is resold
The Guarantee does not cover:
- Transit, installation or delivery damage.
- Accidental damage.
- Misuse or abuse.
- Replacement of any consumable item or accessories. These include but are not limited to: plugs, cables, light bulbs, knobs, filters and flaps.
- Repairs or replacements required as a result of unauthorized repairs or inexpert installation that fails to meet the requirements contained in the user guide or instruction book.
- Repairs to products used in commercial or non-residential household premises.
How to obtain after sales service, help or general advice
Please keep your purchase receipt or other proof of purchase in a safe place as you will need to show us this document if your product requires attention within the guarantee period.
Please also record your product details below, which will allow you to access our services more quickly and help us identify your product. The model number is printed on the front of the user guide and the serial and model number is shown on your products rating plate.
| Model number | Serial number | Purchased from | Date of purchase |
Please call our UK based Customer Service department if you need help or advice from us:
United Kingdom and Northern Ireland:03332079710
Republic of Ireland: 01 862 3411
You can also contact us through our website: www.beko.co.uk
beko Refrigerator User Manual
BCNA306E2S
Please read this user manual first!
Dear Customer,
We hope that your product, which has been produced in modern plants and checked under the most meticulous quality control procedures, will provide you an effective service.
Therefore, read this entire user manual carefully before using the product and keep it as a reference. If you handover the product to someone else, give the user manual as well.
The user manual will help you use the product in a fast and safe way.
- Read the manual before installing and operating the product.
- Make sure you read the safety instructions.
- Keep the manual in an easily accessible place as you may need it later.
- Read the other documents given with the product.
Remember that this user manual is also applicable for several other models. Differences between models will be identified in the manual.
Explanation of symbols
Throughout this user manual the following symbols are used:

Recycling
![]() This product is supplied with the selective sorting symbol for waste electrical
This product is supplied with the selective sorting symbol for waste electrical
and electronic equipment (WEEE). This means that this product must be handled pursuant to European Directive 2002/96/EC in order to be recycled or dismantled to minimise its impact on the environment. For further information, please contact your local or regional authorities.
Electronic products not included in the selective sorting process are potentially dangerous for the environment and human health due to the presence of hazardous substances.
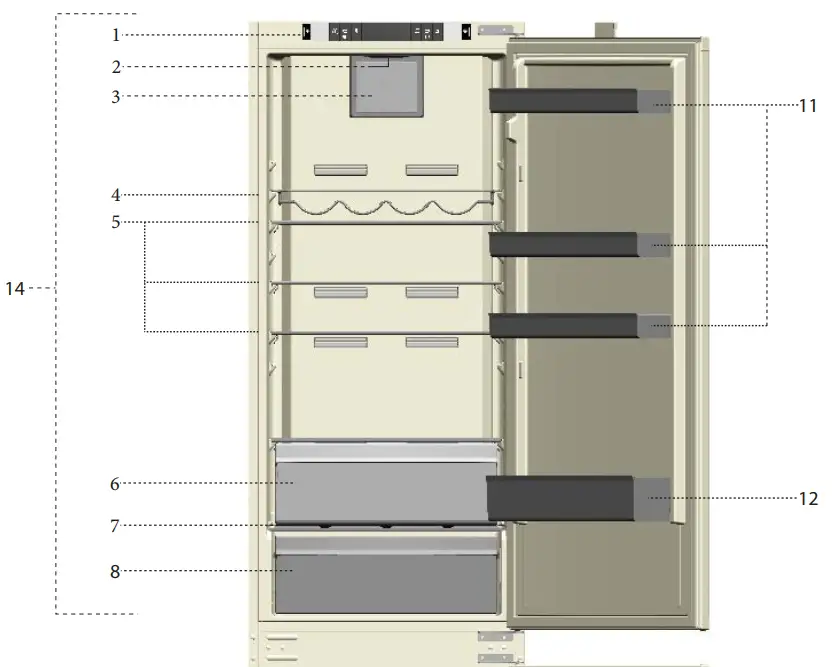
Your refrigerator


- Control panel
- Interior light
- Fresh food fan
- Wine rack
- Adjustable shelves
- 0 °C Compartment
- Crisper cover
- Crisper
- Compartment for quickly freezing
- Freezer compartment drawers
- Adjustable door shelves
- Bottle shelf
- Freezer fan
- Fridge compartment
- Freezer compartment
![]() Figures that take place in this instruction manual are schematic and may not correspond exactly with your product. If the subject parts are not included in the product you have purchased, then it is valid for other models.
Figures that take place in this instruction manual are schematic and may not correspond exactly with your product. If the subject parts are not included in the product you have purchased, then it is valid for other models.
Important Safety Warnings
Please review the following information. Failure to observe this information may cause injuries or material damage. Otherwise, all warranty and reliability commitments will become invalid.
Original Spare parts will be provided for 10 years, following the product purchasing date.
Intended use
This product is intended to be used
- indoors and in closed areas such as homes;
- in closed working environments such as stores and offices;
- in closed accommodation areas such as farm houses, hotels, pensions.
- It should not be used outdoors.
General safety
- When you want to dispose/scrap the product, we recommend you to consult the authorized service in order to learn the required information and authorized bodies.
- Consult your authorized service for all your questions and problems related to the refrigerator. Do not intervene or let someone intervene to the refrigerator without notifying the authorised services.
- For products with a freezer compartment; Do not eat cone ice cream and ice cubes immediately after you take them out of the freezer compartment! (This may cause frostbite in your mouth.)
- For products with a freezer compartment; Do not put bottled and canned liquid beverages in the freezer compartment. Otherwise, these may burst.
- Do not touch frozen food by hand; they may stick to your hand.
- Unplug your refrigerator before cleaning or defrosting.
- Vapor and vaporized cleaning materials should never be used in cleaning and defrosting processes of your refrigerator. In such cases, the vapor may get in contact with the electrical parts and cause short circuit or electric shock.
- Never use the parts on your refrigerator such as the door as a means of support or step.
- Do not use electrical devices inside the refrigerator.
- Do not damage the parts, where the refrigerant is circulating, with drilling or cutting tools. The refrigerant that might blow out when the gas channels of the evaporator, pipe extensions or surface coatings are punctured causes skin irritations and eye injuries.
- Do not cover or block the ventilation holes on your refrigerator with any material.
- Electrical devices must be repaired by only authorised persons. Repairs performed by incompetent persons create a risk for the user.
- In case of any failure or during a maintenance or repair work, disconnect your refrigerator’s mains supply by either turning off the relevant fuse or unplugging your appliance.
- Do not pull by the cable when pulling off the plug.
- Place the beverage with higher proofs tightly closed and vertically.
- Never store spray cans containing flammable and explosive substances in the refrigerator.
- Do not use mechanical devices or other means to accelerate the defrosting process, other than those recommended by the manufacturer.
- This product is not intended to be used by persons with physical, sensory or mental disorders or unlearned or inexperienced people (including children) unless they are attended by a person who will be responsible for their safety or who will instruct them accordingly for use of the product.
- Do not operate a damaged refrigerator. Consult with the service agent if you have any concerns.
- Electrical safety of your refrigerator shall be guaranteed only if the earth system in your house complies with standards.
- Exposing the product to rain, snow, sun and wind is dangerous with respect to electrical safety.
- Contact authorized service when there is a power cable damage to avoid danger.
- Never plug the refrigerator into the wall outlet during installation. Otherwise, risk of death or serious injury may arise.
- This refrigerator is intended for only storing food items. It must not be used for any other purpose.
- Label of technical specifications is located on the left wall inside the refrigerator.
- Never connect your refrigerator to electricity-saving systems; they may damage the refrigerator.
- If there is a blue light on the refrigerator, do not look at the blue light with optical tools.
- For manually controlled refrigerators, wait for at least 5 minutes to start the refrigerator after power failure.
- This operation manual should be handed in to the new owner of the product when it is given to others.
- Avoid causing damage on power cable when transporting the refrigerator. Bending cable may cause fire. Never place heavy objects on power cable.
- Do not touch the plug with wet hands when plugging the product.
- Do not plug the refrigerator if the wall outlet is loose.
- Water should not be sprayed on inner or outer parts of the product for safety purposes.
- Do not spray substances containing inflammable gases such as propane gas near the refrigerator to avoid fire and explosion risk.
- Never place containers filled with water on top of the refrigerator; in the event of spillages, this may cause electric shock or fire.
- Do not overload the refrigerator with food. If overloaded, the food items may fall down and hurt you and damage refrigerator when you open the door.
- Never place objects on top of the refrigerator; otherwise, these objects may fall down when you open or close the refrigerator’s door.
- As they require a precise temperature, vaccines, heatsensitive medicine and scientific materials and etc. should not be kept in the refrigerator.
- If not to be used for a long time, refrigerator should be unplugged. A possible problem in power cable may cause fire.
- The plug’s tip should be cleaned regularly with a dry cloth; otherwise, it may cause fire.
- Refrigerator may move if adjustable legs are not properly secured on the floor. Properly securing adjustable legs on the floor can prevent the refrigerator to move.
- When carrying the refrigerator, do not hold it from door handle. Otherwise, it may be snapped.
- When you have to place your product next to another refrigerator or freezer, the distance between devices should be at least 8 cm. Otherwise, adjacent side walls may be humidified.
For products with a water dispenser
Pressure of water mains should be minimum 1 bar. Pressure of water mains should be maximum 8 bars.
- Use only potable water.
HCA warning
If your product’s cooling system contains R600a:
This gas is flammable. Therefore, pay attention to not damaging the cooling system and piping during usage and transportation. In the event of damage, keep your product away from potential fire sources that can cause the product catch a fire and ventilate the room in which the unit is placed.
Ignore this warning if your product’s cooling system contains R134a.
Type of gas used in the product is stated in the type label which is on the left wall inside the refrigerator. Never throw the product in fire for disposal.
Things to be done for energy saving
- Do not leave the doors of your refrigerator open for a long time.
- Do not put hot food or drinks in your refrigerator.
- Do not overload your refrigerator so that the air circulation inside of it is not prevented.
- Do not install your refrigerator under direct sunlight or near heat emitting appliances such as ovens, dishwashers or radiators. Keep your refrigerator at least 30 cm away from heat emitting sources and at least 5 cm from electrical ovens.
- Pay attention to keep your food in closed containers.
- For products with a freezer compartment; You can store maximum amount of food items in the freezer when you remove the shelf or drawer of the freezer. Energy consumption value stated for your refrigerator has been determined by removing freezer shelf or drawer and under maximum load. There is no harm to use a shelf or drawer according to the shapes and size of food to be frozen.
- Thawing frozen food in fridge compartment will both provide energy saving and preserve the food quality.
Installation
 In case the information which are given in the user manual are not taken into account, manufacturer will not assume any liability for this.
Points to be paid attention to when the relocation of the refrigerator
- Your refrigerator should be unplugged. Before transportation of your refrigerator, it should be emptied and cleaned.
- Before it is re-packaged, shelves, accessories, crisper, etc. inside your refrigerator should be fixed with adhesive tape and secured against impacts. Package should be bound with a thick tape or sound ropes and the transportation rules on the package should be strictly observed.
- Original packaging and foam materials should be kept for future transportations or moving.
Before you start the refrigerator
Check the following before you start to use your refrigerator:
- Is the interior of the refrigerator dry and can the air circulate freely in the rear of it?
- Clean the interior of the refrigerator as recommended in the “Maintenance and cleaning” section.
- Connect the plug of the refrigerator to the wall socket. When the fridge door is opened, fridge internal lamp will turn on.
- When the compressor starts to operate, a sound will be heard. The liquid and gases sealed within the refrigeration system may also give rise to noise, even if the compressor is not running and this is quite normal.
- Front edges of the refrigerator may feel warm. This is normal. These areas are designed to be warm to avoid condensation.
Electrical connection
Connect your product to a grounded socket which is being protected by a fuse with the appropriate capacity.
Important:
The connection must be in compliance with national regulations.
- The power plug must be easily accessible after installation.
- Electrical safety of your refrigerator shall be guaranteed only if the earth system in your house complies with standards.
- The voltage stated on the label located at left inner side of your product should be equal to your network voltage.
- Extension cables and multi plugs must not be used for connection.
A damaged power cable must be replaced by a qualified electrician.
Product must not be operated before it is repaired! There is the risk of electric shock!
Disposing of the packaging
The packing materials may be dangerous for children. Keep the packing materials out of the reach of children or dispose of them by classifying them in accordance with the waste instructions stated by your local authorities. Do not throw away with regular house waste, throw away on packaging pick up spots designated by the local authorities. The packing of your refrigerator is produced from recyclable materials.
Disposing of your old refrigerator
Dispose of your old refrigerator without giving any harm to the environment.
- You may consult your authorized dealer or waste collection center of your municipality about the disposal of your refrigerator.
Be ore disposing of your refrigerator, cut out the electric plug and, if there are any locks on the door, make them inoperable in order to protect children against any danger.
Placing and Installation
If the entrance door of the room where the refrigerator will be installed is not wide enough for the refrigerator to pass through, then call the authorized service to have them remove the doors of your refrigerator and pass it sideways through the door.
- Install your refrigerator to a place that allows ease of use.
- Keep your refrigerator away from heat sources, humid places and direct sunlight.
- There must be appropriate air ventilation around your refrigerator in order to achieve an efficient operation. If the refrigerator is to be placed in a recess in the wall, there must be at least 5 cm distance with the ceiling and at least 5 cm with the wall. Do not place your product on the materials such as rug or carpet.
- Place your refrigerator on an even floor surface to prevent jolts.
- Do not keep your refrigerator in ambient temperatures under 10°C.
Replacing the interior lamp
To change the Bulb/LED used for illumination of your refrigerator, call your Authorised Service. The lamp(s) used in this appliance is not suitable for household room illumination. The intended purpose of this lamp is to assist the user to place foodstuffs in the refrigerator/freezer in a safe and comfortable way. The lamps used in this appliance have to withstand extreme physical conditions such as temperatures below -20°C.
Reversing the doors
Proceed in numerical order.
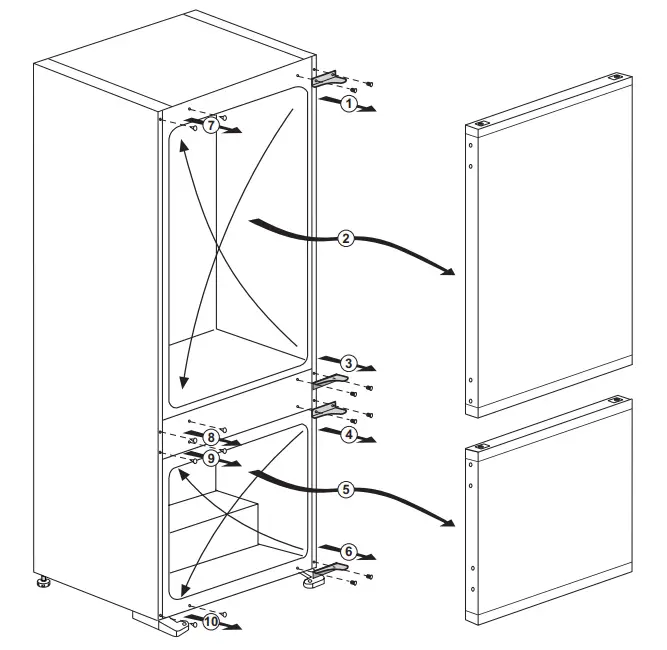
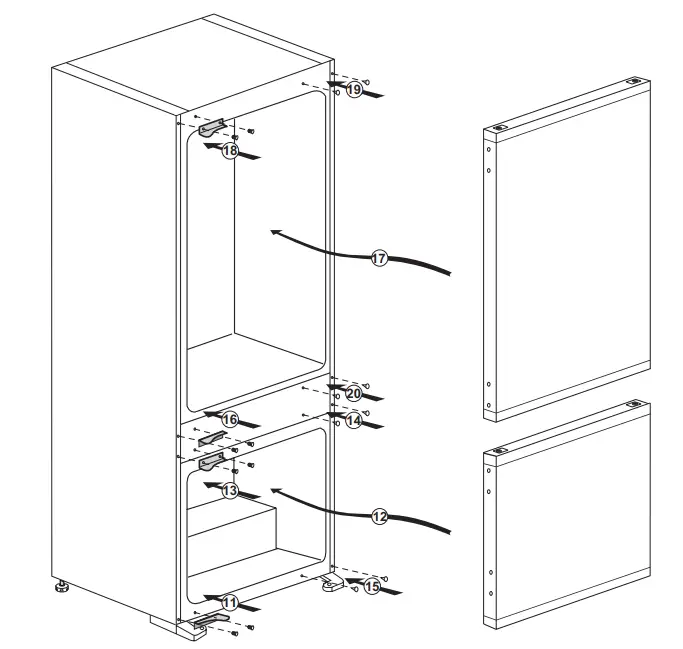
Preparation
- Your refrigerator should be installed at least 30 cm away from heat sources such as hobs, ovens, central heater and stoves and at least 5 cm away from electrical ovens and should not be located under direct sunlight.
- The ambient temperature of the room where you install your refrigerator should at least be 10°C. Operating your refrigerator under cooler conditions is not recommended with regard to its efficiency.
- Please make sure that the interior of your refrigerator is cleaned thoroughly.
- If two refrigerators are to be installed side by side, there should be at least 2 cm distance between them.
- When you operate your refrigerator for the first time, please observe the following instructions during the initial six hours.
- The door should not be opened frequently.
- It must be operated empty without any food in it.
- Do not unplug your refrigerator. If a power failure occurs out of your control, please see the warnings in the “Recommended solutions for the problems” section.
- Original packaging and foam materials should be kept for future transportations or moving.
Using your refrigerator
Control Panel
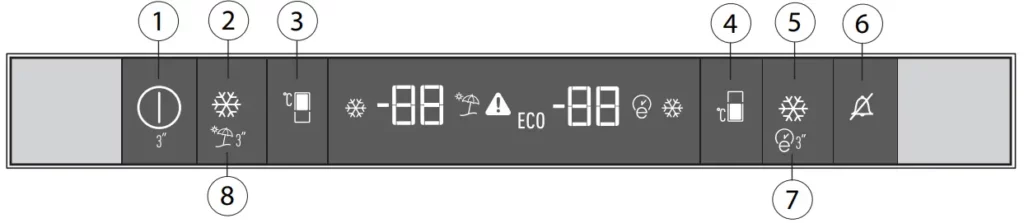
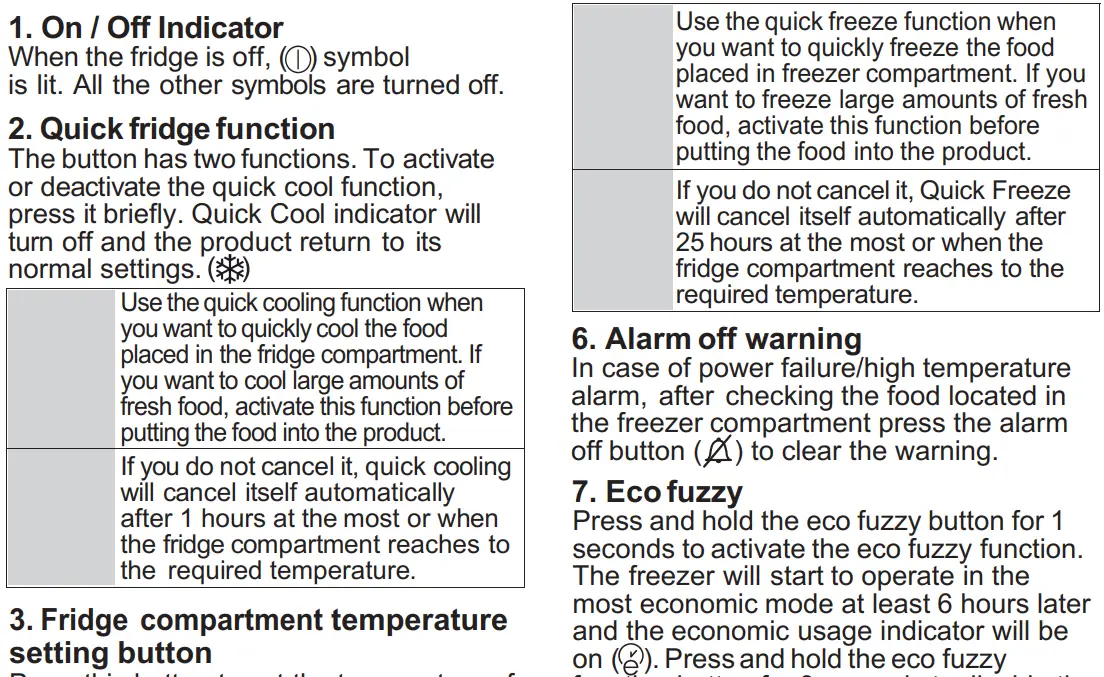
Dual cooling system
Your refrigerator is equipped with two separate cooling systems to cool the fresh food compartment and freezer compartment. Thus, air in the fresh food compartment and freezer compartment do not get mixed. Thanks to these two separate cooling systems, cooling speed is much higher than other refrigerators. Odors in the compartments do not get mixed. Also additional power saving is provided since the defrosting is performed individually.
Defrost
A) Fridge compartment
Fridge compartment performs full automatic defrosting. The defrost water runs to the drain tube via a collection container at the back of the appliance. Check that the tube is permanently placed with its end in the collecting tray on the compressor to prevent the water spilling on the electric installation or on the floor.
B) Freezer compartment
The NO FROST type defrost is completely automatic. No intervention from your side is required. The water is collected on the compressor tray. Due the heat of the compressor the water is evaporated.
Warnings!
The fans inside the freezer and fresh food compartments circulates cold air. Never insert any object through the guard.
Do not allow children to play with the fresh food and freezer fan.
Never store products that contain inflammable propellant gas (e.g. dispensers, spray cans etc.) or explosive substances.
Don’t cover the shelves with any protective materials, which may obstruct air circulation.
Do not allow children to play with the appliance or tamper with the controls. Do not obstruct the fan guards to ensure that you obtain the best possible performance from your appliance.
Please ensure the fans are not blocked (stopped) or impaired by food or packaging. Blocking (stopping) or impairing the fan can result in an increase of the internal freezer temperature (Thawing).
Zero temperature compartment
This compartment has been designed to store frozen food which would be thawed slowly (meat, fish, chicken, etc.) as required. Zero temperature compartment is the coldest place of your refrigerator in which dairy products (cheese, butter), meat, fish or chicken may be kept at ideal storage conditions. Vegetables and/or fruits must not be placed in this compartment.
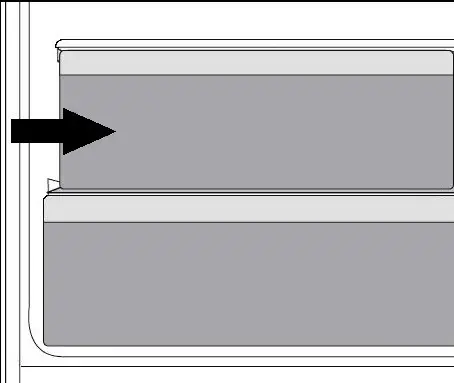
Maintenance and cleaning
![]() Never use gasoline, benzene or similar substances for cleaning purposes.
Never use gasoline, benzene or similar substances for cleaning purposes.
![]() We recommend that you unplug the appliance before cleaning.
We recommend that you unplug the appliance before cleaning.
![]() Never use any sharp abrasive instrument, soap, household cleaner, detergent and wax polish for cleaning.
Never use any sharp abrasive instrument, soap, household cleaner, detergent and wax polish for cleaning.
![]() Use lukewarm water to clean the cabinet of your refrigerator and wipe it dry.
Use lukewarm water to clean the cabinet of your refrigerator and wipe it dry.
![]() Use a damp cloth wrung out in a solution of one teaspoon of bicarbonate of soda to one pint of water to clean the interior and wipe it dry.
Use a damp cloth wrung out in a solution of one teaspoon of bicarbonate of soda to one pint of water to clean the interior and wipe it dry.
![]() Make sure that no water enters the lamp housing and other electrical items.
Make sure that no water enters the lamp housing and other electrical items.
![]() If your refrigerator is not going to be used for a long period of time, unplug the power cable, remove all food, clean it and leave the door ajar.
If your refrigerator is not going to be used for a long period of time, unplug the power cable, remove all food, clean it and leave the door ajar.
![]() Check door seals regularly to ensure they are clean and free from food particles.
Check door seals regularly to ensure they are clean and free from food particles.
![]() To remove door racks, remove all the contents and then simply push the door rack upwards from the base.
To remove door racks, remove all the contents and then simply push the door rack upwards from the base.
![]() Never use cleaning agents or water that contain chlorine to clean the outer surfaces and chromium coated parts of the product. Chlorine causes corrosion on such metal surfaces.
Never use cleaning agents or water that contain chlorine to clean the outer surfaces and chromium coated parts of the product. Chlorine causes corrosion on such metal surfaces.
Protection of plastic surfaces
![]() Do not put the liquid oils or oil-cooked meals in your refrigerator in unsealed containers as they damage the plastic surfaces of your refrigerator. In case of spilling or smearing oil on the plastic surfaces, clean and rinse the relevant part of the surface at once with warm water.
Do not put the liquid oils or oil-cooked meals in your refrigerator in unsealed containers as they damage the plastic surfaces of your refrigerator. In case of spilling or smearing oil on the plastic surfaces, clean and rinse the relevant part of the surface at once with warm water.
Troubleshooting
Please review this list before calling the service. It will save your time and money. This list includes frequent complaints that are not arising from defective workmanship or material usage. Some of the features described here may not exist in your product.
The refrigerator does not operate.
- The plug is not inserted into the socket correctly. >>>Insert the plug into the socket securely.
- The fuse of the socket which your refrigerator is connected to or the main fuse have blown out. >>>Check the fuse.
Condensation on the side wall of the fridge compartment (MULTIZONE, COOL CONTROL and FLEXI ZONE).
- Ambient is very cold. >>>Do not install the refrigerator in places where the temperature falls below 10 °C.
- Door has been opened frequently. >>>Do not open and close the door of refrigerator frequently.
- Ambient is very humid. >>>Do not install your refrigerator into highly humid places.
- Food containing liquid is stored in open containers. >>>Do not store food with liquid content in open containers.
- Door of the refrigerator is left ajar. >>>Close the door of the refrigerator.
- Thermostat is set to a very cold level. >>>Set the thermostat to a suitable level.
Compressor is not running.
- Protective thermic of the compressor will blow out during sudden power failures or plug-out plug-ins as the refrigerant pressure in the cooling system of the refrigerator has not been balanced yet. The refrigerator will start running approximately after 6 minutes. Please call the service if the refrigerator does not startup at the end of this period.
- The fridge is in defrost cycle. >>>This is normal for a full-automatically defrosting refrigerator. Defrosting cycle occurs periodically.
- The refrigerator is not plugged into the socket. >>>Make sure that the plug is fit into the socket.
- Temperature settings are not made correctly. >>>Select the suitable temperature value.
- There is a power outage. >>>Refrigerator returns to normal operation when the power restores.
The operation noise increases when the refrigerator is running.
- The operating performance of the refrigerator may change due to the changes in the ambient temperature. It is normal and not a fault.
The refrigerator is running frequently or for a long time.
- New product may be wider than the previous one. Larger refrigerators operate for a longer period of time.
- The room temperature may be high. >>>It is normal that the product operates for longer periods in hot ambient.
- The refrigerator might be plugged in recently or might be loaded with food. >>>When the refrigerator is plugged in or loaded with food recently, it will take longer for it to attain the set temperature. This is normal.
- Large amounts of hot food might be put in the refrigerator recently. >>>Do not
put hot food into the refrigerator. - Doors might be opened frequently or left ajar for a long time. >>>The warm air that has entered into the refrigerator causes the refrigerator to run for longer periods. Do not open the doors frequently.
- Freezer or fridge compartment door might be left ajar. >>>Check if the doors are
closed completely. - The refrigerator is adjusted to a very low temperature. >>>Adjust the refrigerator temperature to a warmer degree and wait until the temperature is achieved.
- Door seal of the fridge or freezer may be soiled, worn out, broken or not properly seated. >>>Clean or replace the seal. Damaged/broken seal causes the refrigerator to run for a longer period of time in order to maintain the current temperature.
Freezer temperature is very low while the fridge temperature is sufficient.
- The freezer temperature is adjusted to a very low value. >>>Adjust the freezer temperature to a warmer degree and check.
Fridge temperature is very low while the freezer temperature is sufficient.
- The fridge temperature is adjusted to a very low value. >>>Adjust the fridge temperature to a warmer degree and check.
Food kept in the fridge compartment drawers is frozen.
- The fridge temperature is adjusted to a very high value. >>>Adjust the fridge temperature to a lower value and check.
Temperature in the fridge or freezer is very high.
- The fridge temperature is adjusted to a very high value. >>>Fridge compartment temperature setting has an effect on the temperature of the freezer. Change the temperatures of the fridge or freezer and wait until the relevant compartments attain a sufficient temperature.
- Doors are opened frequently or left ajar for a long time. >>>Do not open the doors frequently.
- Door is ajar. >>>Close the door completely.
- The refrigerator is plugged in or loaded with food recently. >>>This is normal. When the
refrigerator is plugged in or loaded with food recently, it will take longer for it to attain the set temperature. - Large amounts of hot food might be put in the refrigerator recently. >>>Do not put hot food into the refrigerator.
Vibrations or noise.
- The floor is not level or stable. >>> If the refrigerator rocks when moved slowly, balance it by adjusting its feet. Also make sure that the floor is strong enough to carry the refrigerator, and level.
- The items put onto the refrigerator may cause noise. >>>Remove the items on top of the
refrigerator.
There are noises coming from the refrigerator like liquid flowing, spraying, etc.
- Liquid and gas flows occur in accordance with the operating principles of your refrigerator. It is normal and not a fault.
Whistle comes from the refrigerator.
- Fans are used in order to cool the refrigerator. It is normal and not a fault.
Condensation on the inner walls of refrigerator.
- Hot and humid weather increases icing and condensation. It is normal and not a
fault. - Doors are opened frequently or left ajar for a long time. >>>Do not open the doors frequently. Close them if they are open.
- Door is ajar. >>>Close the door completely.
Humidity occurs on the outside of the refrigerator or between the doors.
- There might be humidity in the air; this is quite normal in humid weather. When the humidity is less, condensation will disappear.
Bad odour inside the refrigerator.
- No regular cleaning is performed. >>>Clean the inside of the refrigerator regularly with a sponge, lukewarm water or carbonate dissolved in water.
- Some containers or package materials may cause the smell. >>>Use a different container or
different brand packaging material. - Food is put into the refrigerator in uncovered containers. >>>Keep the food in closed containers. Microorganisms spreading out from uncovered containers can cause unpleasant odours.
- Remove the foods that have expired best before dates and spoiled from the refrigerator.
The door is not closing.
- Food packages are preventing the door from closing. >>>Replace the packages that are
obstructing the door. - The refrigerator is not completely even on the floor. >>>Adjust the feet to balance the
refrigerator. - The floor is not level or strong. >>>Make sure that the floor is level and capable to carry the refrigerator.
Crispers are stuck.
- The food is touching the ceiling of the drawer. >>>Rearrange food in the drawer
WARNING!
- DO NOT USE ANY COPPER POT, DISH INSIDE THE CABINET!
- DO NOT LOAD ANY FOOD WITHOUT PACKAGE!
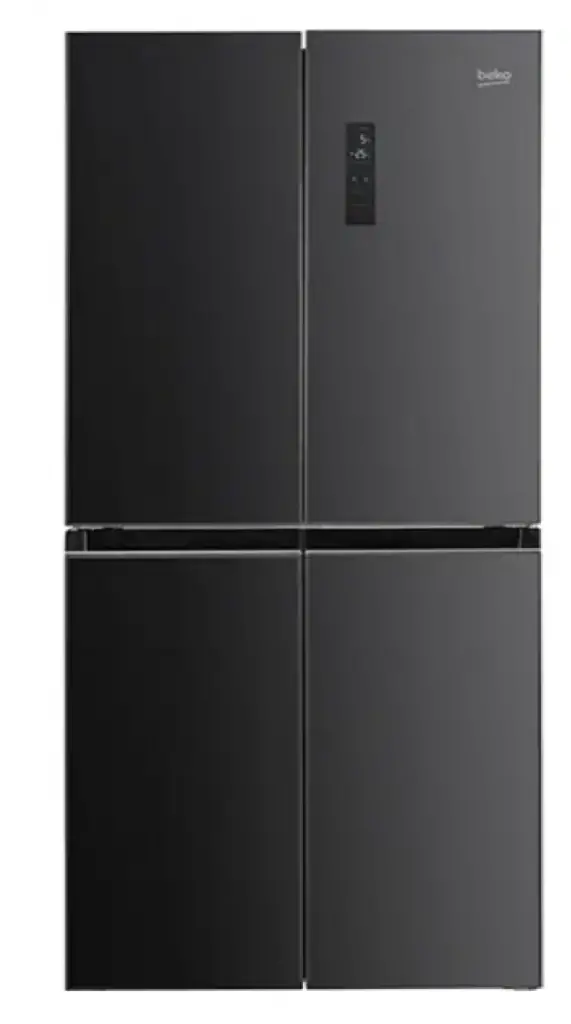
GNO4031GS
 Safety information
In the interest of your safety and to ensure the correct use, before installing and first using the appliance, read this user manual carefully, including its hints and warnings. To avoid unnecessary mistakes and accidents, it is important to ensure that all people using the appliance are thoroughly familiar with its operation and safety features. Save these instructions and make sure that they remain with the appliance if it is moved or sold, so that everyone using it through its life will be properly informed on appliance use and safety.
For the safety of life and property keep the precautions of these user’s instructions as the manufacturer is not responsible for damages caused by omission.
Children and vulnerable people safety
- This appliance can be used by children aged from 8 years and above and persons with reduced physical, sensory or mental capabilities or lack of experience and knowledge if they have been given super vision or instruction concerning use of the appliance in a safe way and understand the hazards
- Children aged from 3 to 8 years are allowed to lead and unload this appliance.
- Children should be supervised to ensure allowed to load and unload this that they do not play with the appliance.
- Cleaning and user maintenance shall not be made by children unless they are aged from 8 years and above and
- Keep all packaging well away from There is risk of suffocation.
- If you are discarding the appliance pull the plug out of the socket, cut the connection cable (as close to the appliance as you can) and remove the door to prevent play ng children from suffer ng a electr c shock or closing themselves in it.
- If this appliance featuring magnetic door seals is to replace an older appliance having a spring lock (latch) on the door or lid, be sure to make that spring lock unusable before you discard the old appliance This will prevent it from becoming dangerous for a child.
General safety
WARN I NG! Keep ventilation openings, in the appliance enclosure or in the built-in structure, clear of obstruction.
WARN I NG! Do not use mechanical devices or other means to accelerate the defrosting process, other than those recommended by the manufacturer.
WARNING! Do not damage the refrigerant circuit.
WARNI NG! Do not use other electrical appliances (such as ice cream makers) inside of refrigerating appliances, unless they are approved for this purpose by the manufacture.
WARNI NG! Do not touch the light bulb if it has been on for a long period of time because it could be very hot.’!
WARNI NG! When positioning the appliance, ensure the supply cord is not trapped or damaged.
WARNI NG! Do not locate multiple portable socket-outlets or portable power supplies at the rear of the appliance.
- Do not store explosive substances such as aerosol cans with a flammable propellant in this
- The refrigerant isobutane (R-600a) is contained within the refrigerant circuit of the appliance, a natural gas with a high level of environmental compatibility, which is nevertheless
- During transportation and installation of the appliance, be certain that none of the components of the refrigerant circuit become
- avoid open flames and sources of ignition
- thoroughly ventilate the room in which the appliance is situated
- It is dangerous to alter the specifications or modify this product in any Any damage to the cord may cause a short circuit, fire and/or electric shock.
- This appliance is intended to be used in household and similar applications such as
- staff kitchen areas in shops, offices and other working environments;
- farm houses and by clients in hotels, motels and other residential type environments;
- bed and breakfast type environments;
- catering and similar non-retail
WARNING! Any electrical components(plug, power cord, compressor and etc.) must be replaced by a certified service agent or qualified service personnel.
WARNING! The light bulb supplied with this appliance is a “special use lamp bulb” usable only with the appliance supplied. This “special use lamp” is not usable for domestic lighting.1’
- Power cord must not be
- Make sure that the power plug is not squashed or damaged by the back of the A squashed or damaged power plug may overheat and cause a fire.
- Make sure that the mains plug of the appliance is
- Do not pull the mains
- If the power plug socket is loose, do not insert the power There is a risk of electric shock or fire.
- You must not operate the appliance without the
- This appliance is Care should be taken when moving it.
- Do not remove nor touch items from the freezer compartment if you hands are damp/wet, as this could cause skin abrasions or frost/freezer
- Avoid prolonged exposure of the appliance to direct
Daily use
- Do not put hot objects on the plastic parts in the
- Do not place food products directly against the rear
- Frozen food must not be re-frozen once it has been thawed ’
- Store pre-packed frozen food in accordance with the frozen food manufacturer’s instructions”
- Manufacturer’s storage recommendations should be strictly adhered Refer to relevant instructions.
- Do not place carbonated of fizzy drinks in the freezer compartment as it creates pressure on the container, which may cause it to explode, resulting in damage to the
- Ice lollies can cause frost burns if consumed straight from the appliance.
To avoid contamination of food, please respect the following instructions
- Opening the door for long periods can cause a significant increase of the temperature in the compartments of the
- Clean regularly surfaces that can come in contact with food and accessible drainage systems.
- Clean water tanks if they have not been used for 48h; flush the water system connected to a water supply if water has not been drawn for 5
- Store raw meat and fish in suitable containers in the refrigerator, so that it is not in contact with other food.
- Two-star frozen-food compartments(if they are presented in the appliance) are suitable for storing pre-frozen food, storing or making ice-cream and making ice cubes.
- one, two and three star compartments &if they are presented in the appliance’ are not suitable for the freezing of fresh
- lf the appliance is left empty for long periods, switch off, defrost, clean, dry and leave the door open to prevent mount developing within the
Care and cleaning
- Before maintenance, switch off the appliance and disconnect the mains plug from the mains socket.
- Do not clean the appliance with metal object
- Do not use sharp objects to remove frost from the appliance. plastic scraper.’
Regularly examine the drain in the refrigerator for defrosted water. lf necessary, clean the drain. lf the drain is blocked, water will collect in te bottom of the appliance.2 ‘
Installation
important! For electrical connection carefully follow the instructions given in specific paragraphs.
- Unpack the appliance and check if there are damages on )o not connect the appliance if it is damaged. Report possible damages immediately to the place you bought it. ln that case retain packing.
- It is advisable to wait at least four hours before connecting the appliance to allow the oil to flow back in the
- Ade1uate air circulation should be around the appliance, lacking this leads to To achieve sufficient ventilation follow the instructions relevant to installation.
- Wherever possible the spacers of the product should be against a wall to avoid touching or catching warm parts &compressor, con( denser’ to prevent possible
- The appliance must not be located close to radiators or
- Make sure that the mains plug is accessible after the installation of the
Service
- Any electrical work re1uired to do the servicing of the appliance should be carried out by a 1ualified electrician or competent
- This product must be serviced by an authorized Service Center, and only genuine spare parts must be
Energy saving
- Don’t put hot food in the appliance0
- Don’t pack food close together as this prevents air circulating
- Make sure food don’t touch the back of the compartments
- If electricity goes off, don’t open the door(s);
- Don’t open the door(s) frequently;
- Don’t keep the door(s) open for too long time;
- Don’t set the thermostat on exceeding cold temperatures;
- All accessories, such as drawers, shelves balconies, should be kept there for lower energy consumption
Environment Protection
 This appliance does not contain gasses which could damage the ozone Layer, in either its refrigerant circuit or insulation materials. The appliance shall not be discarded together with the urban refuse and rubbish. The insulation foam contains flammable gases: the appliance shall be disposed according to the appliance regulations to obtain from your local authorities. Avoid damaging the cooling unit, especially the heat exchanger. The materials used on this appliance marked by the symbol are recyclable.
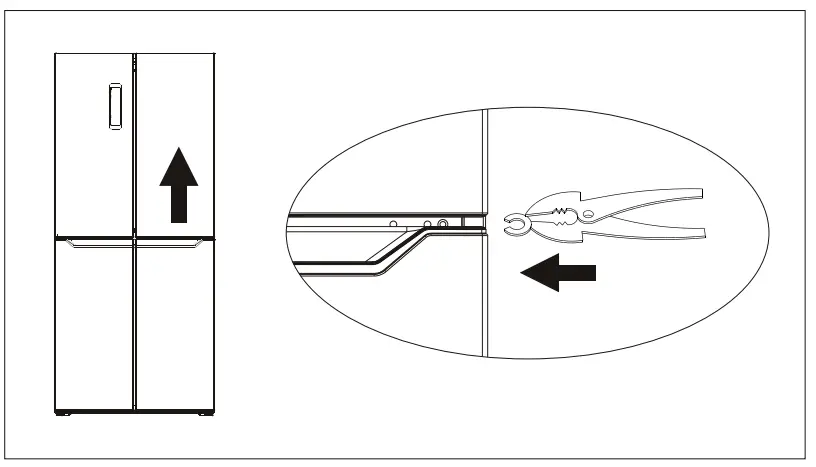 The symbol on the product or on its packaging indicates that this product may not be treated as household waste. Instead it should be taken to the appropriate collection point for the recycling of electrical and electronic equipment. By ensuring this product is disposed of correctly, you will help prevent potential negative consequences for the environment and human health, which could otherwise be caused by inappropriate waste handling of this product. For more detailed information about recycling of this product, please contact your local council, your house h old waste disposal service or the shop where you purchased the product.
Packaging materials
The materials with the symbol are recyclable. Dispose the packaging in a suitable collection containers to recycle it.
Disposal of the appliance
- Disconnect the mains plug from the mains
- Cut off the mains cable and discard
WARN ING! During using, service and disposal the appliance, please pay attention to symbol as left side, which is located on rear of appliance (rear panel or compressor.
It’s risk of fire warning symbol. There are flammable materials in refrigerant pipes an d compressor.
Please be far away fire source durin g using, service and disposal.
Overview
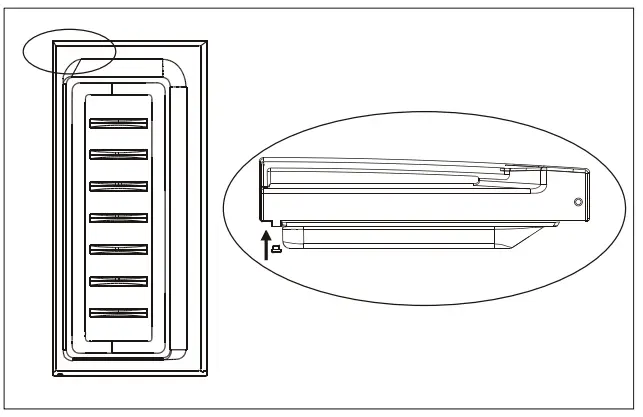
Note: Above picture is for reference only. Real appliance probably is different.
Installation
Space Requirement
- Select a location without exposure to sunlight;
- Select a location with enough space for the refrigerator doors to open easily;
- Select a location with level (or nearly level) flooring;
- Allow sufficient space to install the refrigerator on a flat surface;
- Allow clearance to the right, left, back and top when installing. this will help reduce power consumption and keep your energy bills lower
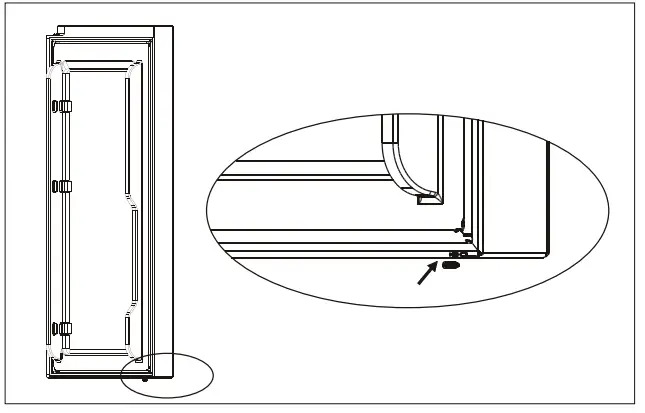
Levelling and anchor the refrigerator
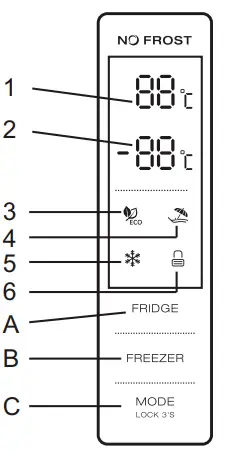
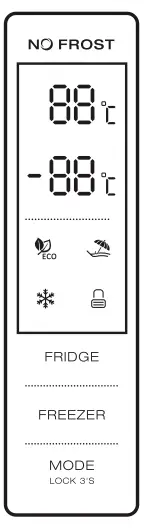
Level doors
After transportation or door balconies are loaded by food or beverage, upper two doors may not be aligned. There are 3 C type washers which are used to adjust doors. Please follow below process to level doors.
- Before check alignment of doors, please make sure appliance stand levelly .
- If top of upper two doors looks not in a line, please slightly lift lower door and insert a pieces of C type was her by a clip between bottom of door and middle hinge.

WARNING! Please be careful to avoid fingers are clipped by door. Please use tool.
WARNING! Please keep C type washers far away children to avoid them are swallowed by children. They are small parts.
Rubber blocks
There is one rubber block on each door. they fuction as spring to relieve impact when door closes.

Please not pull the rubber blocks. if they absent from the door, please take one from accessory bag and insert it to the hole of door.


WARNING! Please keep rubber blocks far away children to aboid them are swallowed by children. they are small parts.
Positioning
Install this appliance at a location where the ambient temperature corresponds to the climate class indicated on the rating plate of the appliance: for refrigerating appliances with climate class:
- extended temperate: this refrigerating appliance is intended to be used at ambient temperatures ranging from 10 °C to 32 °C; (SN)
- temperate: this refrigerating appliance is intended to be used at ambient temperatures ranging from 16 °C to 32 °C;(N)
- subtropical: this refrigerating appliance is intended to be used at ambient temperatures ranging from 16 °C to 38 °C;(ST)
- tropical: this refrigerating appliance is intended to be used at ambient temperatures ranging from 16 °C to 43
Location
The appliance should be installed well away from sources of heat such as radiators, boilers, direct sunlight etc. Ensure that air can circulate freely around the back of the cabinet. To ensure best performance, if the appliance is positioned below an overhanging wall unit, the minimum distance between the top of the cabi-net and the wall unit must be at least 100 mm. Ideally, however, the appliance should not be positioned below overhanging wall units. Accurate leveling is ensured by one or more adjustable feet at the base of the cabinet.
This refrigerating appliance is not intended to be used as a built-in appliance;
Warning! It must be possible to disconnect the appliance from the mains power supply; the plug must therefore be easily accessible after installation.
Electrical connection
Before plugging in, ensure that the voltage and frequency shown on the rating plate correspond to your domestic power supply. The appliance must be earthed. The power supply cable plug is provided with a contact for this purpose. If the domestic power supply socket is not earthed, connect the appliance to a separate earth in compliance with current regulations, consulting a qualified electrician. The manufacturer declines all responsibility if the above safety precautions are not observed. This appliance complies with the E.E.C. Directives.
Daily Use
Using the control Panel

- KEY OPERATION
A.Temperature Control of Fridge Compartment B.Temperature Control of Freezer Compartment C.Mode/ Locking / Unlocking - LED DISPLAY
1.Temperature of Fridge Comparment 2.Temperature of Freezer Comparment 3.ECO Mode 4.Holiday Mode 5.Super Mode 6.Locking / Unlocking
OPERATING CONDITION
- The control panel is 100% lit up for 3 seconds, which operates exactly as per the setting (mode and temperature) before the poweroff. The system will be automatically locked 25 seconds after the last key operation. After locking, the light of the panel would be out 120 seconds after the last key operation.
- Both preset temperatures of fridge compartment and freezer compartment would be shown on the display
- DISPLAY
- The panel will be lit up for 2 minutes once the door of fridge compartment or freezer compartment is opened. (one door signal is sensed at a time)
- The panel will be lit up by any key operation whereas the light would be out 2 minutes after the last operation.
- Display during normal operation Temperature Display of the Fridge Compartment: Indicating the temperature of the current setting. Temperature Display of the Freezer Compartment: Indicating the temperature of the current setting.
ILLUSTION OF THE KEY
Temperature Control of the Fridge Compartment
-
- Temperature Control of the Fridge Compartment: This key is workable both in User Defined Mode as well as Super Mode. After entering the temperature control of the fridge compartment, this key flashes. By touching the key consecutively, the temperature would change in a circle of “2C, 3C, 4C, 5C, 6C, 7C, 8C, OFF”, after which 5-second flashing means the selection of temperature is settled.
- Shutoff of the Fridge Compartment: Press the key of “Temperature Control of Fridge Compartment”, choose “OFF”, a 5-second flashing means the selection of temperature is made, namely the fridge compartment would stop refrigeration.
Temperature Control of the Freezer Compartment
Temperature Control of the Freezer Compartment: This key is workable both in User Defined Mode as well as Holiday Mode. After entering the temperature control of the freezer compartment, the key flashes. By touching the key consecutively, the temperature would change in a circle from -14 C to -22C, after which a 5-second flashing means the selection of temperature is settled.
Model Locking / Unlocking
- By touching this key consecutively, the operation mode of the refrigerator will change in a circle of “ECO Mode-Holiday Mode-Super Mode-User Defined Mode. a 5-second flashing means the selection of temperature is settled.
- Long Press to Enter / Exit Locking Mode Unlocking: Press for 3 seconds in the mode of locking, all the keys would be unlocked after the a beep. Locking: Press for 3 seconds in the mode of unlocking, all the keys would be locked after the a beep.
Press Button
Short beep after per press button All buttons will only valid under unlock mode.
Lock Function
No operation in 25 sec will lock the display automatically.
ECO mode
Press mode to choose ECO mode, ECO icon keeps bright after 5 sec flashing. 5°in fridge compartment and -18°in freezer compartment under eco mode, “Freezer”&”Fridge” button in vain while eco icon will flash three times in alarm. Exit eco mode Press mode again to exit eco mode after 5 sec, entering the selected mode.
Holiday Mode
Press mode to choose Holiday Mode, the icon keeps bright after 5 sec flashing, entering holiday mode. Temperature fix 17°in fridge compartment, “fridge” button in vain, while holiday icon will flash three times in alarm. Exit holiday mode: choose mode, exit holiday mode after 5 sec, entering the selected mode.
Super Freezing mode Choose mode, icon keeps bright after 5 sec flashing, entering freezing mode. Freezing mode: Temperature nonadjustable in freezing compartment, “freezer” button in vain, while freezing icon will flash three times in alarm. Exit freezing mode: meeting below conditions. -manually exit freezing mode -freezing period more than 50 hours
Mode remains the same before entering super freezing mode.
First use
Cleaning the interior
Before using the appliance for the first time, wash the interior and all internal accessories with lukewarm water and some neutral soap so as to remove the typical smell of a brand new product, then dry thoroughly.
Important! Do not use detergents or abrasive powders, as these will damage the finish.
Daily use
| Food | Location |
| Eggs | Door rack |
| Dairy products (butter, cheese) | If available, biofresh or chiller compartment Lowest shelves |
| Fruits, vegetables and salad | Fruit and vegetable box, crisper or EverFresh+ compartment (if available) |
| Fresh meat, poultry, fresh fish, sausages, cooked foods | If available, biofresh or chiller compartment Lowest shelf |
| Ready to eat foods, packaged products, canned foods, pickled products | Upper shelves or door rack |
| Drinks, bottles, condiments, snacks | Door rack |
| Leftovers | Middle shelves |
Storing fresh food
Storing into the fresh food compartment:
- Keep your fridge at recommended temperature level as 4°C.
- Food to be stored should be properly sealed to avoid odour or taste
- Do not store excessive quantities of food inside your Leave spaces between foods to allow cold air flowing around them to achieve a better and more homogeneous cooling.
- To allow shorter door openings, foods eaten daily should be stored at the front of the front of the shelf.
- Leave a gap between foods and the inner walls, allowing air to flow. If you store foods against the rear wall foods could freeze against rear wall.
- Hot, cooked food must be cooled down at room temperature before storing in the appliance. Then, warm food can be stored in the lower shelves of your fridge. Please do not put warm food nearby highly perishable foods. Thaw your frozen food in the fresh food This way, you can use the frozen food to cool down the fresh food compartment and save energy.
- If unripe tropical fruits (mango, melons, papaya, banana, pineapple) are stored in refrigerator, ageing process can be accelerated and it is not advisable since it causes shorter storage times. However, the ripening of strongly green fruits (apple, pear) can be promoted for a certain period in fridge compartment.
- Onions, garlic, ginger and other root vegetables should be stored at dark and cool room conditions, not in the fridge.
- When a spoiled food inside refrigerator is realized, it should be disposed. When rotten food is noticed, please clean inner liner or accessories which were in contact to prevent contamination.
- Large pots of food, such as soups or stews can be divided into shallow containers to quickly cool in the Large pieces of cooked meat and whole poultry should be divided into smaller pieces for the same purpose.
- Do not store unpacked foods near by eggs
- Keep fruits and vegetables separate and store like with like: apples with apples, carrots with Fruits and vegetables give off different gases that can cause others to deteriorate.
- Take leafy greens out of plastic bags, wrap them in a paper towel or tea towel before stored in Do not forget to dry them if they are rinsed or wet before storing.
- Store fruits and vegetables susceptible to drying out in perforated or unsealed plastic bags to maintain a moist environment yet still allow air to circulate
- Different foods should be placed in different areas according to their properties:
“Please check appropriate Climate Class of your appliance rated on the rating plate. One of below information is valid for your appliance according to rated Climate Class.”
- SN: Extended Temperate: This refrigerating appliance is intended to be used at ambient temperatures ranging from 10°C to 32°C
- N: Temperate: This refrigerating appliance is intended to be used at ambient temperatures ranging from 16°C to 32°C
- ST: Subtropical: This refrigerating appliance is intended to be used at ambient temperatures ranging from 16°C to 38°C
- T: Tropical: This refrigerating appliance is intended to be used at ambient temperatures ranging from 16°C to 43°C
Storing into the freezer compartment:
- It is recommended to keep freezer setting at -20°C except extreme ambient conditions.
- 4-6 hours before freezing switch on the Fast Freeze function to provide faster
- Hot food must be cooled to room temperature before storing in the freezer
- Food cut into small portions will freeze faster and be easier to defrost and be easier to defrost and cook
- It is better to pack food before putting it into the freezer
- In order to avoid expiry of storage periods, please note the freezing date, time limit and name of the food on the packaging according to the storage periods of different
- Do not exceed the food storage times recommended by the food Only take the required amount of food out of the freezer.
- Consume defrosted food Defrosted food cannot be re-frozen unless it is cooked. It is not safe to consume uncooked re-frozen fresh food.
- When freezing fresh food, avoid bringing it in contact with already frozen It may cause thawing of already frozen pieces.
When storing commercially frozen foods, please follow these guidelines:
Always follow manufacturers’ guidelines for the length of time you should store the food for. Do not exceed these guidelines!
- Try to keep the length of time between purchase and storage as short as possible to preserve food quality.
- Buy frozen foods, which have been stored at a temperature of –18 °C or
- Avoid buying food which has ice or frost on the packaging – This indicates that the products might have been partially defrosted and refrozen at some point – temperature rises affect the quality of food.
- We recommend a temperature setting of 4°C for fresh food compartment and -20°C for freezer compartment to achieve better food
preservation. - With the exception of extreme conditions in ambient, if temperature is set to recommended values as +4°C/-20°C, overall freshness will be prolonged within fresh food and freezer compartments. If temperature of fresh food compartment is set to cooler, fresh fruits and vegetables may be partially frozen or exposed to cold injury, while warmer temperature level may cause faster spoilage of highly perishable foods (dairy products, meat products).
Temperature setting recommendation
| Temperature Setting Recommendation | ||
| Environment Temperature | Temperature Setting | |
|
Summer ( Above 38°C ) |
 |
Fridge set on 4°C |
|
Freezer set on -18°C |
||
|
Normal |
Fridge set on 4°C |
|
|
Freezer set on -18°C |
||
|
Winter ( Below 16°C) |
Fridge set on 4°C |
|
|
Freezer set on -18°C |
||
- Information above give users recommendation of temperature
Impact on Food Storage
- Under Recommended setting, the best storage time of fridge is no more than 3
- Under Recommended setting, the best storage time of freezer is no more than 1 month.
- The best storage time may reduce under other settings.
Fresh Zone Temperature Control
- Temperature of the fresh zone can be adjusted according to the type of storage food.
- Push the knob upward from the bottom, temperature in the fresh zone will be gradually decreased.
- When the knob is placed at the “CRISPER” position, the fresh zone can be functioned as a crisper zone and maintain the appropriate temperature and humidity for fruits and vegetable.
- When the knob is placed at the ” CHILLER” position, it is suitable for short-term storage of fish or other fresh food. The food will keep fresh but not frozen which makes it the best choice for storing fresh food.
- Tips: When you choose ” CHILLER” function, it is recommended to set the refrigerator temperature below 4°C . and preserved lead-time no more than 3 days , in order to keep the best freshness.

Humidity Adjustment for Crisper Zone
- When the knob is placed at the “HIGH” position, the crisper humidity is high, which is suitable for
- When the key is placed at the “LOW” position, humidity in the crisper is lower with is suitable for fruits.

Freezing fresh food
- The freezer compartment is suitable for freezing fresh food and storing frozen and deep-frozen food for a long
- Place the fresh food to be frozen in the bottom
- The maximum amount of food that can be frozen in 24 hours is specified on the rating
- The freezing process lasts 24 hours: during this period do not add other food to be
Storing frozen food
When first starting-up or after a period out of use. Before putting the product in the compartment let the appliance run at least 2 hours on the higher settings.
Important! In the event of accidental defrosting, for example the power has been off for longer than the value shown in the technical characteristics chart under “rising time”, the defrosted food must be consumed quickly or cooked immediately and then re-frozen (after cooked).
Thawing
Deep-frozen or frozen food, prior to be used, can be thawed in the freezer compartment or at room temperature, depending on the time available for this operation.
Small pieces may even be cooked still frozen, directly from the freezer. In this case, cooking will take longer.
Accessories Available shelves
The walls of the refrigerator are e/uipped with a series of runners so that the shelves can be positioned as desired.
Positioning the door balconies
To permit storage of food packages of various sizes, the door balconies can be placed at different heights. To make these ad4ustments proceed as follows) gradually pull the balcony in the direction of the arrows until it comes free, then reposition as re/uired.

Helpful hints and tips
Hints for freezing
To help you make the most of the freezing process, here are some important hints:
- the maximum quantity of food which can be frozen in 24 is shown on the rating plate;
- the freezing process takes 24 No further food to be frozen should be added during this period;
- only freeze top quality, fresh and thoroughly cleaned, foodstuffs;
- prepare food in small portions to enable it to be rapidly and completely frozen and to make it possible subsequently to thaw only the quantity required;
- wrap up the food in aluminium foil or polythene and make sure that the packages are airtight;
- do not allow fresh, unfrozen food to touch food which is already frozen, thus avoiding a rise in temperature of the latter;
- lean foods store better and longer than fatty ones; salt reduces the storage life of food;
- water ices, if consumed immediately after removal from the freezer compartment, can possibly cause the skin to be freeze burnt;
- it is advisable to show the freezing in date on each individual pack to enable you removal from the freezer compartment, can possibly cause the skin to be freeze burnt;
- it is advisable to show the freezing in date on each individual pack to enable you to keep tab of the storage
Hints for storage of frozen food
To obtain the best performance from this appliance, you should:
make sure that the commercially frozen foodstuffs were adequately stored by the retailer; be sure that frozen foodstuffs are transferred from the food store to the freezer in the shortest possible time;
not open the door frequently or leave it open longer than absolutely necessary. Once defrosted, food deteriorates rapidly and cannot be refrozen.
Do not exceed the storage period indicated by the food manufacture.
Hints for fresh food refrigeration
To obtain the best performance:
- Do not store warm food or evaporating liquids in the refrigerator
- Do cover or wrap the food, particularly if it has a strong flavour
Hints for refrigeration
Useful hints:
- Make (all types): wrap in polythene bags and place on the glass shelves above the vegetable drawer.
- For safety, store in this way only one or two days at the most.
- Cooked foods, cold dishes, etc…: these should be covered and may be placed on any shelf.
- Fruit and vegetables: these should be thoroughly cleaned and placed in the special drawer(s) provided.
- Butter and cheese: these should be placed in special airtight containers or wrapped in aluminum foil or polythene bags to exclude as much air as possible.
- Milk bottle: these should have a cap and should be stored in the balconies on the door. Bananas, potatoes, onions and garlic, if not packed, must not be kept in the fridge.
Cleaning
For hygienic reasons the appliance interior, including interior accessories, should be cleaned regularly.
Caution! The appliance may not be connected to the mains during cleaning. Danger of electrical shock! Before cleaning switch the appliance off and remove the plug from the mains, or switch off or turn out the circuit breaker or fuse. Never clean the appliance with a steam cleaner. Moisture could accumulate in electrical components, danger of electrical shock! Hot vapors can lead to the damage of plastic parts. The appliance must be dry before it is placed back into service.
Important!
Ethereal oils and organic solvents can damage plastic parts. e.g. lemon juice or the juice form orange peel. butyric acid, cleanser that contain acetic acid.
- Do not allow such substances to come into contact the appliance parts.
- Do not use any abrasive cleaners
- Remove the food from the freezer. Store them in a cool place, well covered.
- Switch the appliance off and remove the plug from the mains, or switch off or turn out the circuit breaker of fuse.
- Clean the appliance and the interior accessories with a cloth and lukewarm water. After cleaning wipe with fresh water and rub dry.
- After everything is dry place appliance back into service.
Troubleshooting
Caution! Before troubleshooting, disconnect the power supply. Only a qualified electrician or competent person must do the troubleshooting that is not in this manual.
Important! There are some sounds during normal use (compressor, refrigerant circulation).
| Problem | Possible cause | Solution |
| Appliance does not work | Mains plug is not plugged In or is loose | Insert mains plug. |
| Fuse has blown or is defective | Check fuse, replace if necessary. | |
| Socket is defective | Mains malfunctions are to be corrected by an electrician. | |
| Appliance freezes or cools too much | Temperature is set too cold or the appliance runs at SUPER modes. | Turn the temperature regulation to a warmer setting temporarily. |
| The food is not frozen enough. | Temperature Is not properly adjusted. | Please look in the initial Temperature Setting section. |
| Door was open for an extended period. | Open the door only as long as necessary. | |
| A large quantity of warm food was placed in the appliance within the last 24 hours. | Turn the temperature regulation to a colder setting temporarily. | |
| The appliance is near a heat source. | Please look in the installation location section. | |
| Heavy build up of frost on the door seal. | Door seal is not air tight. | Carefully warm the leaking sections of the door seal with a hair dryer (on a cool setting). At the same time shape the warmed door seal by hand such that it sits correctly |
| Unusual noises | Appliance Is not level | Re-adjust the feet |
| The appliance is touching the wall or other objects. | Move the appliance slightly. | |
| A component, e.g. a pipe, on the rear of the appliance Is touching another part of the appliance or the wall. | If necessary, carefully bend the component out of the way. | |
| Water on the floor | Water drain hole is blocked. | See the Cleaning and Care section. |
If the malfunction shows again, contact the Service Center.
These data are necessary to help you quickly and correctly. Write the necessary data here, refer to the rating plate.
WARNING
Some (simple) failures can be adequately handled by the end-user without any safety issue or unsafe use arising, provided that they are carried out within the limits and in accordance with the following instructions (see the “Self-Repair” section).
Therefore, unless otherwise authorized in the “Self-Repair” section below, repairs shall be addressed to registered professional repairers in order to avoid safety issues. A registered professional repairer is a professional repairer that has been granted access to the instructions and spare parts list of this product by the manufacturer according to the methods described in legislative acts pursuant to Directive 2009/125/EC. However, only the service agent (i.e. authorized professional repairers) that you can reach through the phone number given in the user manual/warranty card or through your authorized dealer may provide service under the guarantee terms. Therefore, please be advised that repairs by professional repairers (who are not authorized by Beko) shall void the guarantee.
Self-Repair
Self-repair can be done by the end-user with regard to the following spare parts: door handles, door hinges, trays, baskets and door gaskets (an updated list is also available in support.beko.com as of 1st March 2021) Moreover, to ensure product safety and to prevent risk of serious injury, the mentioned selfrepair shall be done following the instructions in the user manual for self-repair or which are available in support.beko.com. For your safety, unplug the product before attempting any selfrepair. Repair and repair attempts by end-users for parts not included in such list and/or not following the instructions in the user manuals for self-repair or which are available in support.beko.com, might give raise to safety issues not attributable to Beko, and will void the warranty of the product.
Therefore, it is highly recommended that end users refrain from the attempt to carry out repairs falling outside the mentioned list of spare parts, contacting in such cases authorized professional repairers or registered professional repairers. On the contrary, such attempts by end-users may cause safety issues and damage the product and subsequently cause fire, flood, electrocution and serious personal injury to occur.
By way of example, but not limited to, the following repairs must be addressed to authorized professional repairers or registered professional repairers: compressor, cooling circuit, main board, inverter board, display board, etc.
The manufacturer/seller cannot be held liable in any case where end-users do not comply with the above.
The spare part availability of the refrigerator that you purchased is 10 years. During this period, original spare parts will be available to operate the refrigerator properly.
The minimum duration of guarantee of the refrigerator that you purchased is 24 months.
Please read these instructions first before using your appliance
Thank you for choosing a Beko appliance.
Please take some time to read this user manual before using your appliance, to ensure you know how to safely operate the controls and functions. Carefully follow all unpacking and installation instructions to ensure the appliance is correctly connected and fitted prior to use. Please write your product model and serial number on the last page of this user manual, and store in a safe location close to the appliance for easy future reference. This user manual may also be applicable for several other models. Differences between models will be listed. If you have any questions or concerns, please call our contact centre or find help and information online at www.beko.co.uk.
Explanation of symbols used throughout this User Manual
 The terminal in the plug is marked with the symbol.
 Important information or useful usage tips.
 Symbol for waste electrical and electronic equipment.
WARNING!
In order to ensure a normal operation of your refrigerating appliance, which uses a completely environmentally friendly refrigerant the R600a (flammable only under certain conditions) you must observe the following rules:
- Do not hinder the free circulation of the air around the appliance.
- Do not use mechanical devices in order to accelerate the defrosting,others than the ones recommended by the manufacturer.
- Do not destroy the refrigerating circuit.
- Do not use electric appliances inside the food keeping compartment, other than those that might have been recommended by the manufacturer.
Your refrigerator
Congratulations on your choice of a Beko quality Appliance which has been designed to give you service for many years.

- Thermostat control and interior light
- Movable shelves
- Wine rack
- Vegetable drawers
- Defrost water collection channel – drain tube
- Crisper cover
- Front feet
- Adjustable door shelves
- Bottle shelf
Warnings
- Do not connect your appliance to the electricity supply until all packing and transit protectors have been removed.
- If transported horizontally leave to stand upright for at least 4
hours before switching on to allow compressor oil to settle. - If you are discarding an old refrigerator with a lock or latch fitted
to the door, disable the lock/latch,ensure that it is left in a safe condition
to prevent the entrapment of young children. - This fridge must only be used for its intended purpose i.e. the storing and cooling of edible foodstuff.
- Do not dispose of the appliance on a fire. At Beko, the care and protection of our environment is an ongoing commitment. This appliance which is among the latest range introduced is particularly environment friendly. Your appliance contains non CFC / HFC natural substances in the cooling system (called R600a) and in the insulation (called cyclopentane) which are potentially flammable if exposed to fire. Therefore, take care not to damage, the cooling circuit / pipes of the appliance in transportation and in use. In case of damage do not expose the appliance to fire or potential ignition source and immediately ventilate the room where the appliance is situated.
- We suggest you contact your local authority for disposal information and facilities available.
- See ‘Installation instructions’ on page9 for information on suitable location.
- To obtain the best possible performance and trouble free operation from your appliance it is very important to carefully read these instructions.
- On delivery, check to make sure that the product is not damaged and that all the parts and accessories are in perfect condition.
- Ensure that the plug remains readily accessible. Do not use multiple adapter or extension cable.
- Failure to observe these instructions may invalidate your right to free service during the guarantee period.
- Keep ventilation openings, in the appliance enclosure or in the built-in structure, clear of obstruction.
- Do not use mechanical devices or other means to accelerate the defrosting process, other than those recommended by the manufacturer.
- Do not damage the refrigerant circuit.
- Do not use electrical appliances inside the food storage compartments of the appliance, unless they are of the type recommended by the manufacturer.
- We suggest you keep these instructions in a safe place for easy reference.
- This appliance can be used by children aged from 8 years and above and persons with reduced physical, sensory or mental capabilities or lack of experience and knowledge if they have been given supervision or instruction concerning use of the appliance in a safe way and understand the hazards involved. Children shall not play with the appliance. Cleaning and user maintenance shall not be made by children without supervision.
- Children should be supervised to ensure that they do not play with the
appliance.
Electrical requirements
Before you insert the plug into the wall socket make sure that the voltage and the frequency shown on the rating plate inside the appliance corresponds to your electricity supply. Rating label is on the left hand side of fridge inner liner. We recommend that this appliance be connected to the mains supply via a suitable switched and fused socket. The appliance must be positioned so that the plug is accessible.
WARNING: When positioning the appliance ensure the supply cord is not trapped or damaged. Should the mains lead of the appliance become damaged or should it need replacing at any time, it must be replaced by a special purpose made mains lead which can only be obtained from a Beko authorised service agen
Warning! This appliance must be earthed
If the fitted moulded plug is not suitable for your socket, then the plug should be cut off and an appropriate plug fitted. Destroy the old plug which is cut off as a plug with bared cord could cause a shock hazard if inserted into a socket elsewhere in the house. The moulded plug on this appliance incorporates a 13 A fuse. Should the fuse need to be replaced an ASTABEAB approved BS 1362 fuse of the same rating must be used. Do not forget to refit the fuse cover. In the event of losing the fuse cover the plug must not be used until a replacement fuse cover has been fitted. Colour of the replacement fuse cover must be the same colour as that visible on the pin face of the plug. Fuse covers are available from any good electrical store.
Important! Fitting A Different Plug
As the colours of the wires in the mains lead of this appliance may not correspond with the coloured markings identifying the terminals in your plug proceed as follows: (see diagram).
- Connect the green-yellow or green (Earth) wire to the terminal in the plug marked ‘E’ or with the symbol or coloured green and yellow or green.
- Connect the blue (Neutral) wire to the terminal in the plug marked ‘N’ or coloured black.
- Connect the brown (Live) wire to the terminal in the plug marked ‘L’ or coloured red.
With alternative plugs a 13 A fuse must be fitted either in the plug or adaptor or in the main fuse box. If in doubt contact a qualified electrician.
Energy saving tips
- Ensure your appliance is installed in a well ventilated area.
- Ensure the time between buying chilled/frozen food and placing them in your appliance is kept at minimum, particularly in summer. We recommend you use a cool bag or a special carrier bag to carry perishable food.
- Do not leave the door of your appliance open longer than necessary and ensure they are closed properly after each opening.
- Defrost frozen food in the fridge, so that frozen food acts as an ice pack to assist cooling in the fridge.
Compliance with WEEE Directive and Disposing of the Waste Product:
 This product complies with EU WEEE Directive (2012/19/EU). This product bears a classification symbol for waste electrical and electronic equipment WEEE). This product has been manufactured with high quality parts and materials which can be reused and are suitable for recycling. Do not dispose of the waste
product with normal domestic and other wastes at the end of its service life. Take it to the collection center for the recycling of electrical and electronic equipment. Please consult your local authorities to learn about these collection centers.
Compliance with RoHS directive:
The product you have purchased complies with EU RoHS Directive (2011/65/EU). It does not contain harmful and prohibited materials specified in the Directive.
Package information
Packaging materials of the product are manufactured from recyclable materials in accordance with our National Environment Regulations. Do not dispose of the packaging materials together with the domestic or other wastes. Take them to the packaging material collection points designated by the local authorities.
Installation
Disposing of the packaging
The packing materials may be dangerous for children. Keep the packing materials out of the reach of children or dispose of them by classifying them in accordance with the waste instructions. Do not dispose of them along with the normal household waste. The packing of your refrigerator is produced from recyclable materials.
Disposing of your old refrigerator
Dispose of your old refrigerator without giving any harm to the environment.
- You may consult your authorised dealer or waste collection center of your municipality about the disposal of your refrigerator.
Before disposing of your refrigerator, cut off the electric plug and, if there are any locks on the door, make them inoperable in order to protect children against any danger.
Placing and Installation
- Install your refrigerator to a place that allows ease of use.
- Keep your refrigerator away from heat sources, humid places and direct sunlight.
- There must be appropriate air ventilation around your refrigerator in order to achieve an efficient operation.
- Place your refrigerator on an evenfloor surface to prevent jolts.
- Do not keep your refrigerator inambient temperatures under 10°C.
WARNING: Do not locate extension sockets or charging transformers/ power supplies or Lithium-Iron battery operated products adjacent to the compressor as they could overheat.
Transportation instructions
- The appliance should be transported only in a vertical upright position. The packing as supplied must be intact during transportation.
- If during the course of transport, the appliance has to be transported horizontally, it must only be laid on its right hand side when standing in the front of the appliance. After bringing it to upright position, it must not be
operated for at least 4 hours to allow the system to settle. - Failure to comply with the above instructions could result in damage occurring to the appliance. The manufacturer will not be held responsible if these instructions are disregarded.
- The appliance must be protected against rain, moisture and other atmospheric influences.
- When positioning your appliance take care not to damage your flooring, pipes, wall coverings etc. Do not move the appliance by pulling by the door or handle.
- Empty any water in the drain tray before moving. See section ‘Defrosting’ and ‘Maintenance and cleaning’ for further information.
- Make sure that the defrost water pipe at the back of the product is fixed to the plastic evaporating pan on the top of the compressor, to avoid defrost water spillage on the floor.
IMPORTANT: Care must be taken while cleaning / carrying the appliance to avoid touching the bottom of the condenser metal wires at the back of the appliance as you might injure your fingers and hands.
Do not attempt to sit or stand on top of your appliance as it is not designed for such use. You could injure yourself or damage the appliance.
IMPORTANT: Make sure that mains cable is not caught under the appliance during and after carrying / moving the appliance, to avoid the mains cable becoming cut or damaged.” Do not allow children to play with the appliance or tamper with the controls. Beko declines to accept any liability should the instructions not be followed.
Replacing the interior light bulb
To change the Bulb/LED used for illumination of your refrigerator, call your Authorised Service. The lamp(s) used in this appliance is not suitable for household room illumination. The intended purpose of this lamp is to assist the user to place foodstuffs in the refrigerator in a safe and comfortable way. The lamps used in this appliance have to withstand extreme physical conditions such as temperatures below -20°C (only chest and upright freezer)
Installation instructions
- The space in the room where the appliance is installed must not be smaller than 10 cubic metres.
If the ambient temperature is below 0°C, the food in the fridge will freeze. So, we recommend you don’t use the appliance in such low ambient conditions.
- Do not place the appliance near cookers, radiators or in direct sunlight as this will cause your appliance to work harder. If installed next to a source of heat or freezer, maintain the following minimum side clearances:
- From Cookers 50 mm (2”)
- From Radiators 300 mm (12”)
- From Freezers 25 mm (1”)
- Refer to “Maintenance and cleaning” section to prepare your appliance for use.
- Attach 2 plastic wedges as illustrated below. Plastic wedges are intended to keep the distance which will ensure the air circulation between your refrigerator and the wall.
(The picture is drawn up as a representation and it is not identical with your product).
- A special receptacle is supplied to store the mains plug during transit. The receptacle is fixed at the back of the cabinet, on the side of the compressor (see diagram). Gently remove the plug from the receptacle. Never pull the mains cord, you may damage the appliance. In the case of transportation, ensure you locate the plug in the receptacle provided to avoid transit damage.
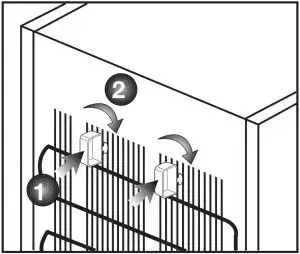
- The appliance should be located on a smooth surface. The two front feet can be adjusted as required. To ensure that, your appliance is standing upright adjust the two front feet by turning clockwise or anti-clockwise,
until the product is in firm contact with the floor. Correct adjustment of feet avoids excessive vibration and noise.
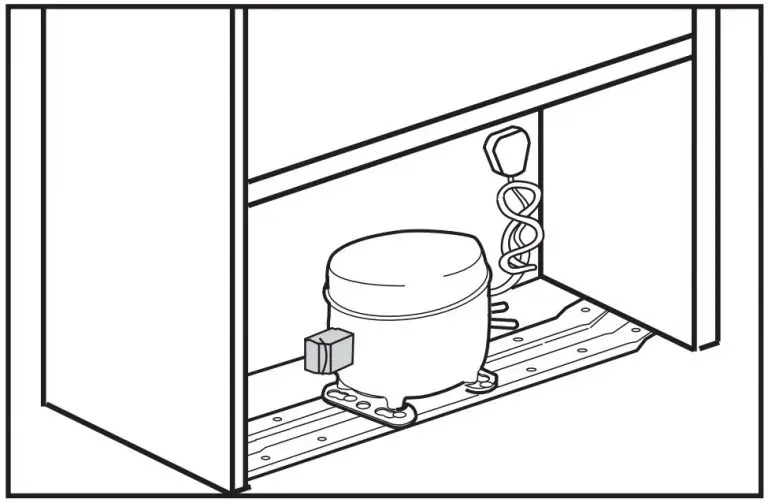
Reversing the door
Proceed in numerical order.
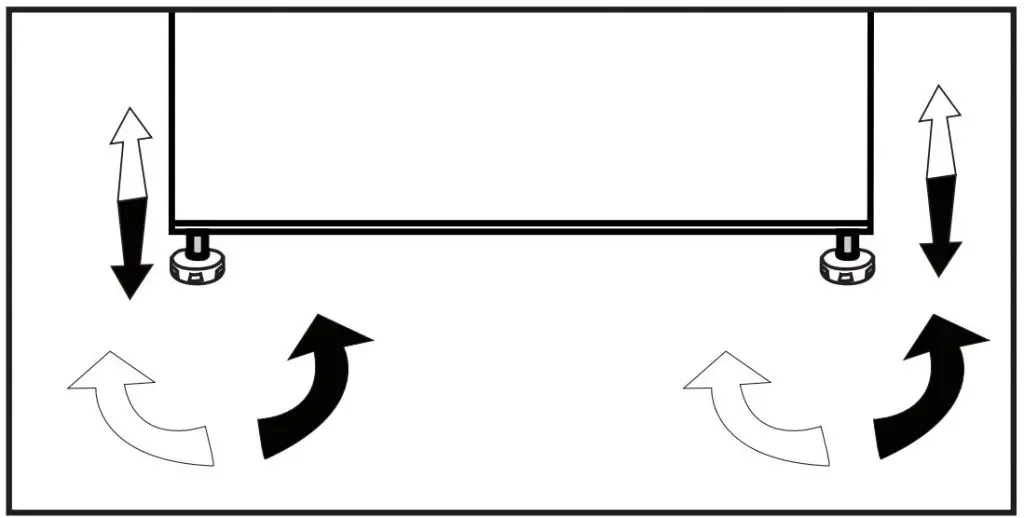

- Remove the plastic cover of the top hinge
- Unscrew the bolts and remove the top hinge while holding the doo.
- Remove door carefully off the bottom hinge and stand door upright a safe place.
- Reposition the hinge bushing and the tap on the door.
- Unscrew and reposition the hinge bushing from door.
- Carefully tilt the appliance on its back. You may need somebody to help you.
- Take off lower hinge.
- Unscrew the screw level.
- Screw the screw level.
- Reposition the lower hinge pin.
- Take on lower hinge.
- Locate the door to the bottom hinge and attach to the cabinet.
- Remove and reposition the plastic cover on top of the cabinet.
- Locate the top hinge on the door, fit on top of the cabinet and screw the bolts.
- Fit the plastic cover of the top hinge.
- Unscrew and reposition the handle from the door.
Before operating
Final Check
Before you start using the appliance check that:
- The feet have been adjusted for perfect levelling.
- The interior is dry and air can circulate freely at the rear of the cabinet.
- Clean the interior as recommended under “Maintenance and cleaning”.
- Insert the plug into the wall socket and switch on the electricity supply.
- When the door is open the fridge interior light will come on.
- You will hear a noise as the compressor starts up. The liquid and gases sealed within the refrigeration system may also give rise to noise, whether the compressor is running or not which is quite normal.
- Front edges of the cabinet may feel warm. This is normal. These areas are designed to be warm to avoid condensation.
- Do not load the appliance immediately it is switched on. Wait until the correct storage temperature has been reached. We recommend that you check the temperature with an accurate thermometer.
Using your refrigerator
Setting the operating temperature
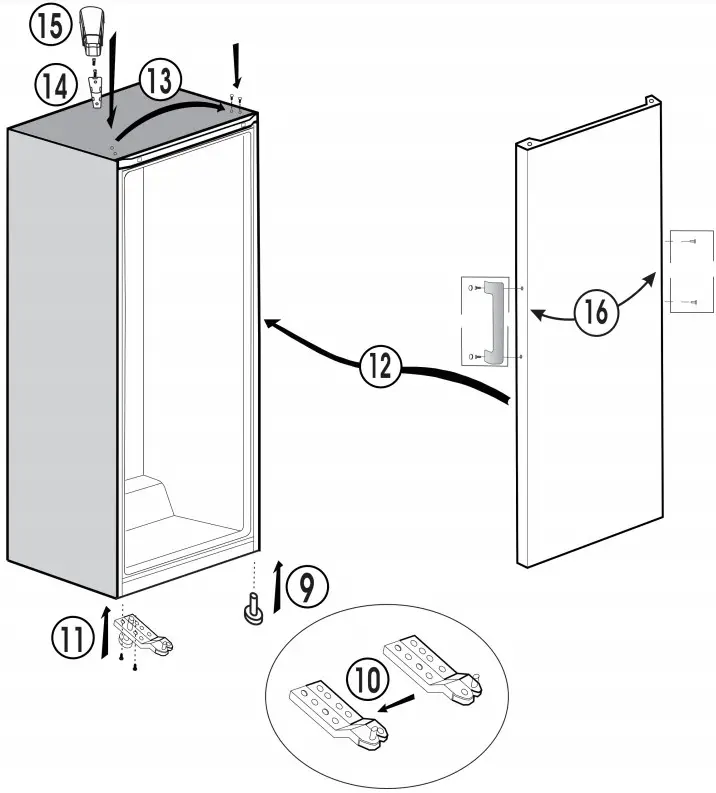
The operating temperature is regulated by the temperature control.
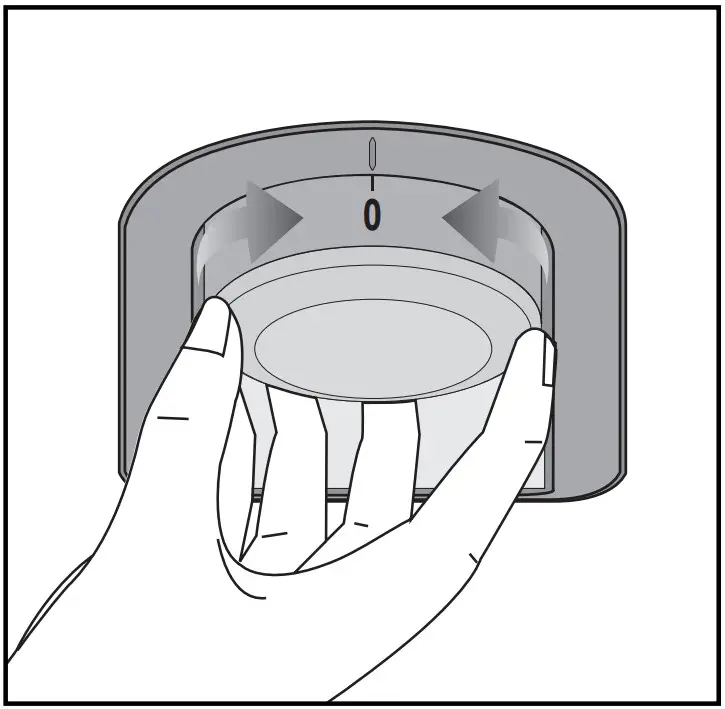
1 = Lowest cooling setting (Warmest setting) 5 = Highest cooling setting(Coldest setting)
(Or)
Min. = Lowest cooling setting (Warmest setting) Max. = Highest cooling setting (Coldest setting)
The average temperature inside the fridge should be around +5°C.
Please choose the setting according to the desired temperature. Please note that there will be different temperatures in the cooling area. The coldest region is immediately above the vegetable compartment.The interior temperature also depend son ambient temperature, the frequency with which the door is opened and the amount of foods kept inside. Frequently opening the door causes the interior temperature to rise. For this reason, it is recommended to close the door again as soon as possible after use.
Defrosting
The appliance defrosts automatically.
The defrosting water runs to the drain tube via a collection container at the back of the appliance (1) (see diagram). During defrosting water droplets may form at the back of the fridge where concealed evaporator is located. Some droplets may remain on the liner and refreeze when defrosting is completed. Do not use pointed or sharp edged objects such as knives, forks to remove the droplets which have frozen. If at any time the defrost water does not drain from the collection channel, check to ensure that no food particles have blocked the drain tube. The drain tube
can be cleared by pushing the special plastic plunger provided down the drain tube (2).

Suggested arrangement of food in the appliance
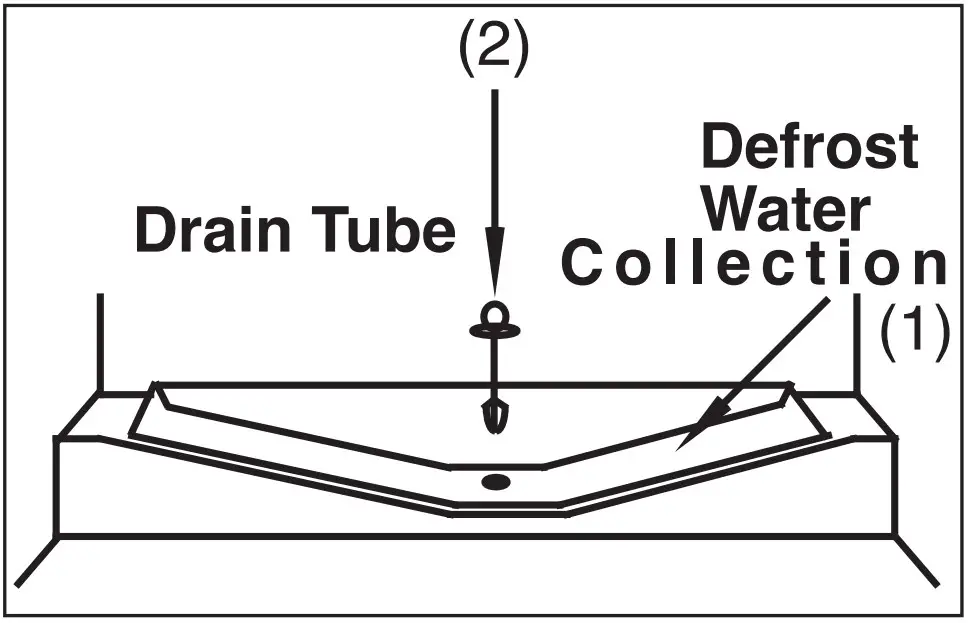
Arrangement examples (see diagram)
- Baked, chilled cooked food, dairy products, cans.
- Wine bottles
- Meat, sausages, cold cuts, cans.
- Fruit, vegetables, salads.
- Butter, cheese, eggs.
- Small bottles, cans, tubes.
- Tall, large bottles, beverages.
The following guidelines and recommendations are suggested to obtain the best results and storage hygiene.
- Appliance is for the short term storage of fresh food and drinks.
- Cooked dishes must be stored in airtight covered containers.
- Fresh wrapped produce can be placed on the shelf. Fresh fruit and vegetables should be cleaned and stored in the crisper bins.
- Bottles can be placed in the door section.
- To store raw meat, wrap in polythene bags and place on the lowest shelf. Do not allow to come into contact with cooked food to avoid contamination.
For safety, only store raw meat for two to three days. - Keep the food packed wrapped or covered. Allow hot food and beverages to cool before placing them in the fridge. Do not store explosive substances. High proof alcohol must be stored upright in sealed containers. Left over canned food should not be stored in the can.
- Some fruit and vegetables suffer damage if kept at temperatures near 0°C. Therefore, wrap pineapples, melons, cucumbers, tomatoes and similar produce in polythene bags.
- Place chilled cooked food and similar food near the rear of the fridge inner liner where the cold wall is located.
- Shelves, racks, crisper bins, drawers, flaps, bottle grippers are all removable.
- Do not leave frozen food at room temperature to thaw; the best way to defrost food is to put it in the fridge to thaw slowly. Make sure you avoid defrosting food or food juices drip on to other food.
- For hygiene reasons, always wrap food using a suitable packaging material before storing in your appliance to avoid contact with the appliance surface.
Do not use any copper pot, dish inside the cabinet! Do not load any food without package!
Maintenance and cleaning
- We recommend that you switch off the appliance at the socket outlet and pull out the mains plug before cleaning
- Never use any sharp abrasive instrument, soap, household cleaner, detergent and wax polish for cleaning.
- Use lukewarm water to clean the cabinet of the appliance and wipe it dry.
- Use a damp cloth wrung out in a solution of one teaspoon of bicarbonate of soda to one pint of water to clean the interior and wipe it dry.
- Make sure that no water enters the lamp housing.
- If the appliance is not going to be used for a long period of time switch it off, remove all food, clean it and leave the door ajar.
- Any dust that gathers on the
condenser, which is located at the back of the appliance, should be removed once a year with a vacuum cleaner. - Check door seals regularly to ensure they are clean and free from food particles.
- Removal of door tray.
- To remove door racks, remove all the contents and then simply push the door rack upwards from the base.
- Make sure that the special plastic container (drain tray) at the back of the appliance which collects defrost water is clean at all times. If you want to remove the tray to clean it follow the instructions below:
- Switch off at the socket outlet an pull out the mains plug.
- Push the lug down with the tip of a screw driver & pull out with a jer movement.
- Clean the drain tray and wipe it dry.
- Reassemble reversing the sequence and operations.
Do’s and Don’ts
- Do- Clean your appliance regularly (see “Maintenance and cleaning”).
- Do- Keep raw meat and poultry below cooked food and dairy products.
- Do- Take off any unusable leaves on vegetables and wipe off any soil.
- Do- Leave lettuce, cabbage, parsley and cauliflower on the stem.
- Do- Wrap cheese firstly in grease proof paper and then in a polythene bag excluding as much air as possible. For best results take out of the appliance an hour before eating.Do- Wrap raw meat and poultry
loosely in polythene or aluminium foil. This prevents drying. - Do- Wrap fish and offal in polythene bags.
- Do- Wrap food which have a strong odour or can dry out in polythene bags, aluminium foil or place in an airtight container.
- Do- Wrap bread well to keep it fresh.
- Do- Chill white wines, beer, lager and mineral water before serving.
- Do- Keep food for as short a time as possible and adhere to “Best
- Before”, “Use by” etc. dates.
- Do- Defrost food in the fridge compartment.
- Don’t- Store bananas in your fridge.
- Don’t- Store melon in your fridge. It can be chilled for short periods as long as it is wrapped to avoid it flavouring other food.
- Don’t- Store poisonous or any dangerous substances in your appliance. It has been designed for the storage of edible foodstuffs only.Don’t- Consume food which has been stored for an excessive time in the appliance.
- Don’t- Store cooked and fresh food together in the same container. They should be packaged and stored separately.
- Don’t- Let defrosting food or food juices drip onto food.
- Don’t- Leave the door open for long periods as this will make the appliance more costly to run and cause excessive ice formation.
- Don’t- Put hot food into the appliance.Let it cool down first.
- Don’t- Try to keep frozen food which has thawed, it should be eaten within 24 hours or cooked and refrozen.
- Don’t- Leave frozen food at room temperature to thaw; the best way to defrost food is to put it in the fridge to thaw slowly. Make sure you avoid defrosting food or food juices drip onto other food.
Problem solving
If the appliance does not operate when switched on, check whether:
- The plug is inserted properly in the socket and that the power supply is on. (To check the power supply to the socket,plug in another appliance).
- The fuse has blown/circuit breaker has tripped/main distribution switch has been turned off.
- The temperature control has been set correctly.
- New plug is wired correctly if you have changed the fitted moulded plug If the appliance is still not operating after the above checks, please refer to the section on “HOW TO OBTAIN SERVICE”.
- Please ensure that above checks have been made as a charge will be made if no fault is found.
BEKO UK AND IRELAND STANDARD MANUFACTURER GUARANTEE TERMS AND CONDITIONS
Your new Beko product is guaranteed against faulty materials, defective components or manufacturing defects
The standard guarantee starts from the date of original purchase of the product, and lasts for a period of twelve (12) months unless Beko plc (the “Manufacturer”) agrees to extend the guarantee for the product in writing. If you have purchased an American style Fridge freezer, the standard guarantee starts from the date of original purchase of the product, and lasts for a period of twenty four (24) months unless Beko plc (the “Manufacturer”) agrees to extend the guarantee for the product in writing.
If you have any questions about the guarantee on your product (including how long it is valid), please contact your retailer or our contact centre on 0333 207 9710 (UK and Northern Ireland) or 01 862 3411 (Republic of Ireland).
This guarantee does not in any way diminish or affect your statutory rights in connection with the product.
This guarantee is in addition to your statutory rights as a consumer. If you have any questions about these rights, please contact the retailer from which you purchased the product. In certain circumstances, it is possible that your statutory rights may offer additional or higher levels of protection than those offered under the terms of this guarantee.
What is covered by this guarantee?
- Repairs to the product required as a result of faulty materials, defective components or manufacturing defects.
- Functional replacement parts to repair a product.
- The costs of a Beko Approved Engineer to carry out the repair.
What is not covered?
- Transit and delivery damage.
- Cabinet or appearance parts, including but not limited to control knobs, flaps and handles.
- Accessories and/or consumable items including but not limited to ice trays, scrapers, cutlery baskets, filters and light bulbs.
- Repairs necessary as a direct or indirect result of:
- Accidental damage, misuse or abuse of a product.
- An attempted repair of a product by anyone other than a Beko Approved Engineer (the “Engineer”).
- Installation or use of a product where such installation or use fails to meet the requirements contained in this guarantee or the User Instructions Booklet.
- Repairs to a product operated at any time on commercial or non-residential household premises (unless we have previously agreed to the installation environment.
This guarantee is limited to the cost of repairing the product. To the extent permitted by law, the Manufacturer does not accept and will not be held liable for any financial loss incurred in connection with the failure of any product to operate in accordance with the expected standards. Such financial loss includes but is not limited to loss arising from:
- Time taken off work.
- Damaged food, clothing or other items.
- Meals taken at restaurants or from takeaways.
- General compensation for inconvenience.
Important Notes
- Your product is designed and built for domestic household use only.
- The guarantee will automatically be void if the product is installed or is used in commercial or nonresidential domestic household premises, unless we have previously agreed to the installation environment.
- The product must be correctly installed, located and operated in accordance with the instructions contained in the User Instructions Booklet provided with your product.
- Professional installation by a qualified Electrical Domestic Appliance Installeris recommended for all Washing Machines, Dishwashers and Electric Cookers (as incorrect installation may result in you having to pay for the cost of repairing the product).
- Gas Cookers must be professionally installed by a Gas Safe (or Gas Networks Ireland for Republic of Ireland) registered gas installer.
- This guarantee is given in respect of products purchased and used within the United Kingdom and the Republic of Ireland.
- This guarantee is effective from the initial date of purchase of a new product from an authorised retailer and will be void if the product is resold.
- This guarantee does not apply to graded sales (where the product is purchased as a “second”)
- Possession of a copy of these terms and conditions does not necessarily mean that a product has the benefit of this guarantee. If you have any questions, please call our Call Centre on the number set out above.
- he Manufacturer reserves the right to terminate the guarantee if its staff or representatives are subjected to physical or verbal abuse in the course of carrying out their duties.
- Optional extras, where available (i.e. extendable feet) are supplied on a chargeable basis only.
Does Beko offer replacements?
This is a repair-only guarantee. On occasion, the Manufacturer may at its sole discretion, replace your product with a new product instead of carrying out a repair. Where a replacement is offered, this would normally be an identical model but when this is not possible, a model of similar specification will be provided. The Manufacturer will cover the costs and arrange for the delivery of the new product and for the return of the old product. Any costs related to disconnecting the faulty product and installing the replacement product will not be borne by the Manufacturer unless previously agreed to in writing. The original guarantee will continue to apply to the replacement product; the new product will not come with a new guarantee.
When will the repair take place?
Our Engineers work Monday to Friday 9.00am to 5.00pm. Appointments outside these hours may be possible at the sole discretion of the Manufacturer but cannot be guaranteed. Whilst our Engineers will endeavour to minimize inconvenience and to meet requests for specific timed appointments, this cannot be guaranteed. We will not be liable for delays or if it is unable to carry out a repair because a convenient appointment cannot be arranged.
Will there be any charge for the repairs?
It is your responsibility to provide evidence to the Engineer that your product is covered by this guarantee with a proof of purchase. The Manufacturer reserves the right to charge for the reasonable cost of any service call if:
- You cannot provide evidence that your product is covered by this guarantee.
- Where a service call has been made and the engineer finds that there is no fault with your product.
- That your product has not been installed or operated in accordance with the User Instructions Booklet.
- That the fault was caused by something other than faulty materials, defective components or manufacturing defects.
- For missed appointments
Payment of these costs are due immediately upon the Engineer providing you with an invoice. The Manufacturer reserves the right to terminate the guarantee if you fail to pay the costs for the service call in
a timely manner.
If you are a resident of the United Kingdom, this guarantee will be governed by English law and subject to the English Courts, save where you live in another part of the United Kingdom, in which case the law and courts of that location will apply.
If you are resident in the Republic of Ireland, this guarantee will be governed by Irish law and the Irish courts will have jurisdiction.
This guarantee is provided by Beko plc. Beko House, 1 Greenhill Crescent, Watford, Hertfordshire. WD18 8QU. Beko plc is registered in England and Wales with company registration number 02415578.
BEKO UK AND IRELAND BUILT-IN APPLIANCES GUARANTEE TERMS AND CONDITIONS
If you have purchased a built-in or integrated appliance, and registered it within 90 days of purchase by completing the online registration form, then the standard 12 month guarantee will be extended to 24 months, under the same terms and conditions as detailed in our Standard Guarantee Terms and Conditions.
HOW TO OBTAIN SERVICE FOR YOUR APPLIANCE
Please keep your purchase receipt or other proof of purchase details in a safe place; you will need to have this documentation available should the product require attention under guarantee.
Please take a few moments to complete the details below, as you will need this information when you call us, or to use our online services. When you call us you may be required to input your serial number into your telephone keypad. For help please visit beko.co.uk/support/model-finder.
- The product model number is printed on the Operating Instruction Booklet / User guide.
- The product model and serial number is printed on the Rating Label affixed to the appliance.
- The Retailer (Purchased from) and Date of purchase will be printed on your purchase receipt or other proof of purchase paperwork.
Recording of these details alone will not count as proof of purchase. A valid proof of purchase is required for requesting service under guarantee.
| Model number | Serial number | Purchased from | Date of purchase |
For service under guarantee or for product advice please call our Contact centre
Before requesting service please check the troubleshooting guide in the Operating Instructions booklet, as a charge may be levied where no fault is found, and even though your product may still be under guarantee.
After arranging service the area around the product must be easily accessible to the Engineer, without the need for cabinets or furniture to be removed or moved.
It is your responsibility to ensure our Engineers have a clean and safe environment to carry out any repairs.
Please have your Model number and Serial number available when you call us, as you may be required to input your serial number into your telephone keypad during your call.
UK Mainland & Northern Ireland:
0333 207 9710
Landline or mobile calls to 0333 numbers cost no more than calls to geographic numbers 01 or 02, and are charged at the basic rate. Calls from landlines and mobiles are included in free call packages but please check with your telephone service provider for exact call charges.
Republic of Ireland:
01 862 3411
Service once the manufacturers guarantee has expired
If you have purchased an extended guarantee please refer to the instructions contained within the extended guarantee agreement document, otherwise please call us using the appropriate number above, where service can be obtained at a charge. Should you experience any difficulty in obtaining service please call us on 0333 207 9710 or 01 862 3411.
Contact us though our website
Send us a secure message through our online contact us form. Please visit our website, click Contact Us and choose a product support topic from the list of options. Complete the required details and click send message.
Product registrations
For UK registrations please visit beko.co.uk/register and for the Republic of Ireland visit beko.ie/register.
Beko plc
Beko House
1 Greenhill Crescent
Watford, Hertfordshire
WD18 8QU
Tel: 0845 6004911
Fax: 0845 6004922
e-mail: [email protected]
website: www.beko.co.uk
Refrigerator
Instruction of use
 BCNA275E4SN
Please read this user manual first!
Dear Customer,
We hope that your product, which has been produced in modern plants and checked under the most meticulous quality control procedures, will provide you an effective service.
Therefore, read this entire user manual carefully before using the product and keep it as a reference. If you hand over the product to someone else, give the user manual as well.
The user manual will help you use the product in a fast and safe way.
- Read the manual before installing and operating the product.
- Make sure you read the safety instructions.
- Keep the manual in an easily accessible place as you may need it later.
- Read the other documents given with the product.
- Remember that this user manual is also applicable for several other models.
- Differences between models will be identified in the manual.
Explanation of symbols
Throughout this user manual the following symbols are used:
 Important information or useful tips.
 Warning against dangerous conditions for life and property.
Warning against electric voltage.
WARNING!
In order to ensure a normal operation of your refrigerating appliance, which uses a completely environmentally friendly refrigerant the R600a (flammable only under certain conditions) you must observe the following rules:
- Do not hinder the free circulation of the air around the appliance.
- Do not use mechanical devices in order to accelerate the defrosting, other than the ones recommended by the manufacturer.
- Do not destroy the refrigerating circuit.
- Do not use electrical appliances inside the food-keeping compartment, other than those that might have been recommended by the manufacturer.
 This product is supplied with the selective sorting symbol for waste electrical and electronic equipment (WEEE).
This means that this product must be handled pursuant to European Directive 2002/96/EC in order to be recycled or dismantled to minimize its impact on the environment. For further information, please contact your local or regional authorities.
Electronic products not included in the selective sorting process are potentially dangerous for the environment and human health due to the presence of hazardous substances.
Your refrigerator
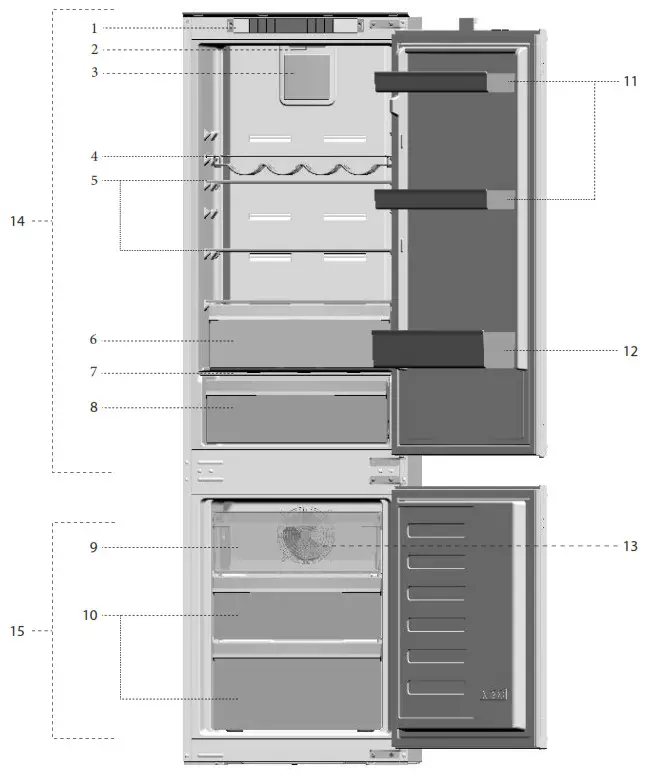
| 1. Control panel 2. Interior light 3. Fresh food fan 4. Wine rack 5. Adjustable shelves 6. 0°C Compartment 7. Crisper cover 8. Crisper |
9. Compartment for quickly freezing 10. Freezer compartment drawers 11. Adjustable door shelves 12. Bottle shelf 13. Freezer fan 14. Fridge compartment 15. Freezer compartment |
 Figures that take place in this instruction manual are schematic and may not correspond exactly with your product. If the subject parts are not included in the product you have purchased, then it is valid for other models.
Important Safety Warnings
Please review the following information. Failure to observe this information may cause injuries or material damage. Otherwise, all warranty and reliability commitments will become invalid. Original Spare parts will be provided for 10 years, following the product purchasing date.
Intended use
This product is intended to be used:
- indoors and in closed areas such as homes;
- in closed working environments such as stores and offices;
- in closed accommodation areas such as farmhouses, hotels, pensions.
- It should not be used outdoors.
General safety
- When you want to dispose of/scrap the product, we recommend you to consult the authorized service in order to learn the required information and authorized bodies.
- Consult your authorized service for all your questions and problems related to the refrigerator. Do not intervene or let someone intervene to the refrigerator without notifying the authorized services.
- For products with a freezer compartment; Do not eat cone ice cream and ice cubes immediately after you take them out of the freezer compartment! (This may cause frostbite in your mouth.)
- For products with a freezer compartment; Do not put bottled and canned liquid beverages in the freezer compartment. Otherwise, these may burst.
- Do not touch frozen food by hand; it may stick to your hand.
- Unplug your refrigerator before cleaning or defrosting.
- Vapor and vaporized cleaning materials should never be used in the cleaning and defrosting processes of your refrigerator. In such cases, the vapor may get in contact with the electrical parts and cause a short circuit or electric shock.
- Never use the parts on your refrigerator such as the door as a means of support or step.
- Do not use electrical devices inside the refrigerator.
- Do not damage the parts, where the refrigerant is circulating, with drilling or cutting tools. The refrigerant that might blow out when the gas channels of the evaporator, pipe extensions or surface coatings are punctured causes skin irritations and eye injuries.
- Do not cover or block the ventilation holes on your refrigerator with any material.
- Electrical devices must be repaired by only authorized persons. Repairs performed by incompetent persons create a risk for the user.
- In case of any failure or during maintenance or repair work, disconnect your refrigerator’s mains supply by either turning off the relevant fuse or unplugging your appliance.
- Do not pull by the cable when pulling off the plug.
- Place the beverage with higher proof stightly closed and vertically.
- Never store spray cans containing flammable and explosive substances in the refrigerator.
- Do not use mechanical devices or other means to accelerate the defrosting process, other than those recommended by the manufacturer.
- This product is not intended to be used by persons with physical, sensory or mental disorders or unlearned or inexperienced people (including children) unless they are attended by a person who will be responsible for their safety or who will instruct them accordingly for use of the product.
- Do not operate a damaged refrigerator. Consult with the service agent if you have any concerns.
- The electrical safety of your refrigerator shall be guaranteed only if the earth system in your house complies with standards.
- Exposing the product to rain, snow, sun and wind is dangerous with respect to electrical safety.
- Contact authorized service when there is power cable damage to avoid danger.
- Never plug the refrigerator into the wall outlet during installation. Otherwise, the risk of death or serious injury may arise. This refrigerator is intended for only storing food items. It must not be used for any other purpose.
- Label of technical specifications is located on the left wall inside the refrigerator.
- Never connect your refrigerator to electricity-saving systems; they may damage the refrigerator.
- If there is a blue light on the refrigerator, do not look at the blue light with optical tools.
- For manually controlled refrigerators, wait for at least 5 minutes to start the refrigerator after power failure.
- This operation manual should be handed into the new owner of the product when it is given to others.
- Avoid causing damage on the power cable when transporting the refrigerator. Bending cable may cause fire. Never place heavy objects on the power cables.
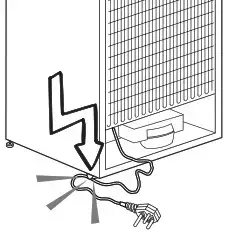
- Do not touch the plug with wet hands when plugging the product.
- Do not plug the refrigerator if the wall outlet is loose.
- Water should not be sprayed on the inner or outer parts of the product for safety purposes.
- Do not spray substances containing inflammable gases such as propane gas near the refrigerator to avoid fire and explosion risk.
- Never place containers filled with water on top of the refrigerator; in the event of spillages, this may cause electric shock or fire.
- Do not overload the refrigerator with food. If overloaded, the food items may fall down and hurt you and damage the refrigerator when you open the door.
- Never place objects on top of the refrigerator; otherwise, these objects may fall down when you open or close the refrigerator’s door.
- As they require a precise temperature, vaccines, heat-sensitive medicine and scientific materials and etc. should not be kept in the refrigerator.
- If not to be used for a long time, the refrigerator should be unplugged. A possible problem in power cable may cause a fire.
- The plug’s tip should be cleaned regularly with a dry cloth; otherwise, it may cause a fire.
- The refrigerator may move if adjustable legs are not properly secured on the floor. Properly securing adjustable legs on the floor can prevent the refrigerator to move.
- When carrying the refrigerator, do not hold it from the door handle. Otherwise, it may be snapped.
- When you have to place your product next to another refrigerator or freezer, the distance between devices should be at least 8 cm. Otherwise, adjacent sidewalls may be humidified.
For products with a water dispenser
The pressure of water mains should be a minimum of 1 bar. The pressure of water mains should be maximum of 8 bars.
- Use only potable water.
Child safety
- If the door has a lock, the key should be kept away from the reach of children.
- Children must be supervised to prevent them from tampering with the product.
HCA warning
If your product’s cooling system contains R600a:
This gas is flammable. Therefore, pay attention to not damaging the cooling system and piping during usage and transportation. In the event of damage, keep your product away from potential fire sources that can cause the product to catch a fire and ventilate the room in which the unit is placed.
Ignore this warning if your product’s cooling system contains R134a.
The type of gas used in the product is stated in the type label which is on the left wall inside the refrigerator.
Never throw the product in the fire for disposal.
Things to be done for energy saving
- Do not leave the doors of your refrigerator open for a long time.
- Do not put hot food or drinks in your refrigerator.
- Do not overload your refrigerator so that the air circulation inside of it is not prevented.
- Do not install your refrigerator under direct sunlight or near heat-emitting appliances such as ovens, dishwashers, or radiators. Keep your refrigerator at least 30 cm away from heat emitting sources and at least 5 cm from electrical ovens.
- Pay attention to keep your food in closed containers.
- For products with a freezer compartment; You can store the maximum amount of food items in the freezer when you remove the shelf or drawer of the freezer. The energy consumption value stated for your refrigerator has been determined by removing the freezer shelf or drawer and under maximum load. There is no harm to use a shelf or drawer according to the shapes and size of food to be frozen.
- Thawing frozen food in the fridge compartment will both provide energy savings and preserve the food quality.
Installation
 In case the information which is given in the user manual is not taken into account, the manufacturer will not assume any liability for this.
Points to be paid attention to when the relocation of the refrigerator
- Your refrigerator should be unplugged. Before transportation of your refrigerator, it should be emptied and cleaned.
- Before it is re-packaged, shelves, accessories, crisper, etc. inside your refrigerator should be fixed with adhesive tape and secured against impacts. The package should be bound with thick tape or sound ropes and the transportation rules on the package should be strictly observed.
- Original packaging and foam materials should be kept for future transportations or moving.
Before you start the refrigerator
Check the following before you start to use your refrigerator:
- Is the interior of the refrigerator dry and can the air circulate freely in the rear of it?
- Clean the interior of the refrigerator as recommended in the “Maintenance and cleaning” section.
- Connect the plug of the refrigerator o the wall socket. When the fridge door is opened, the fridge internal lamp will turn on
- When the compressor starts to operate, a sound will be heard. The liquid and gases sealed within the refrigeration system may also give rise to noise, even if the compressor s not running and this is quite normal. The front edges of the refrigerator may feel warm. This is normal. These areas are designed to be warm to avoid condensation.
Electrical connection
Connect your product to a grounded socket that is being protected by a fuse with the appropriate capacity. Important: The connection must be in compliance with national regulations.
- The power plug must be easily accessible after installation.
- The electrical safety of your refrigerator shall be guaranteed only if the earth system in your house complies with standards.
- The voltage stated on the label located on the left inner side of your product should be equal to your network voltage.
Extension cables and multi-plugs must not be used for the connection.
 A damaged power cable must be replaced by a qualified electrician.
 The product must not be operated before it is repaired! There is the risk of electric shock!
Disposing of the packaging
The packing materials may be dangerous for children. Keep the packing materials out of the reach of children or dispose of them by classifying them in accordance with the waste instructions stated by your local authorities. Do not throw away with regular house waste, throw away on packaging pick-up spots designated by the local authorities.
The packing of your refrigerator is produced from recyclable materials. Disposing of your old refrigerator Dispose of your old refrigerator without giving any harm to the environment.
- You may consult your authorized dealer or waste collection center of your municipality about the disposal of your refrigerator. Before disposing of your refrigerator, cut out the electric plug and, if there are any locks on the door, make them inoperable in order to protect children against any danger.
Placing and Installation
If the entrance door of the room where the refrigerator will be installed is not wide enough for the refrigerator to pass through, then call the authorized service to have them remove the doors of your refrigerator and pass it sideways through the door.
- Install your refrigerator to a place that allows ease of use.
- Keep your refrigerator away from heat sources, humid places, and direct sunlight.
- There must be appropriate air ventilation around your refrigerator in order to achieve an efficient operation. If the refrigerator is to be placed in a recess in the wall, there must be at least 5 cm distance with the ceiling and at least 5 cm from the wall. Do not place your product on the materials such as a rug or carpet.
- Place your refrigerator on an even floor surface to prevent jolts.
- Do not keep your refrigerator in ambient temperatures under 10°C.
Replacing the interior lamp
To change the Bulb/LED used for illumination of your refrigerator, call your Authorised Service. The lamp(s) used in this appliance is not suitable for household room illumination. The intended purpose of this lamp is to assist the user to place foodstuffs in the refrigerator/freezer in a safe and comfortable way. The lamps used in this appliance have to withstand extreme physical conditions such as temperatures below -20°C.
Reversing the doors
Proceed in numerical order.
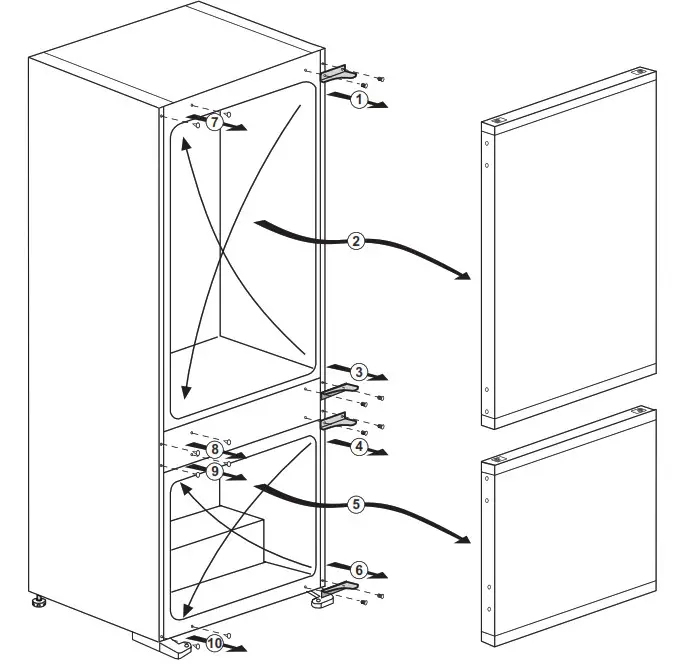 |
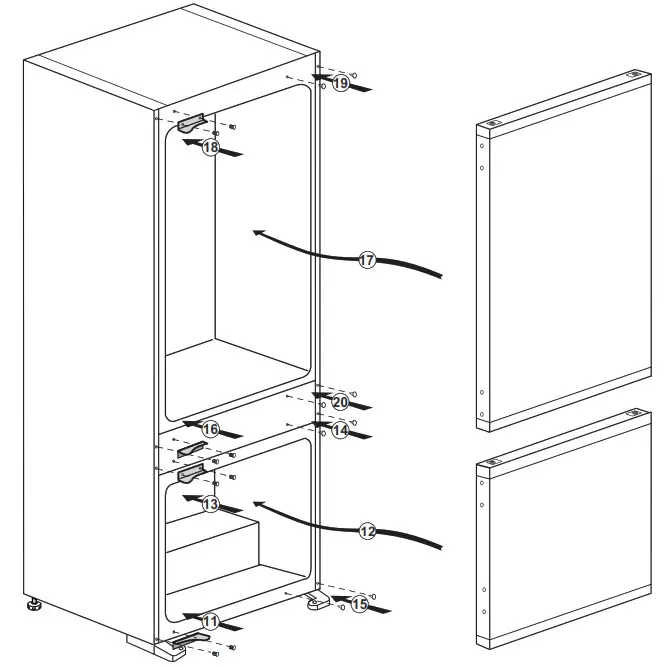 |
Preparation
- Your refrigerator should be installed at least 30 cm away from heat sources such as hobs, ovens, central heater, and stoves and at least 5 cm away from electrical ovens and should not be located under direct sunlight.
- The ambient temperature of the room where you install your refrigerator should at least be 10°C. Operating your refrigerator under cooler conditions is not recommended with regard to its efficiency.
- Please make sure that the interior of your refrigerator is cleaned thoroughly.
- If two refrigerators are to be installed side by side, there should be at least 2 cm distance between them.
- When you operate your refrigerator for the first time, please observe the following instructions during the initial six hours.
- The door should not be opened frequently.
- It must be operated empty without any food in it.
- Do not unplug your refrigerator. If a power failure occurs out of your control, please see the warnings in the “Troubleshooting” section.
- Original packaging and foam materials should be kept for future transportations or moving.
Using your refrigerator
Control Panel
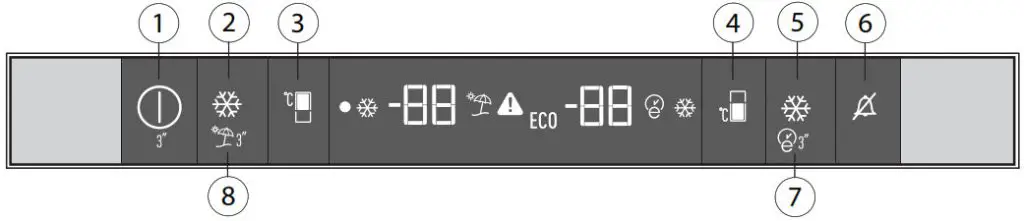
- On / Off Indicator
Press the On / Off button for 3 seconds to turn off or turn on the fridge. When the fridge is off, the symbol ( ) is lit. All the other symbols are turned off.
 - Quick fridge function button
The button ( ) has two functions. To activate or deactivate the Quick Cool function, press it briefly. Quick Cool indicator will turn off and
the product return to its normal settings.
Use the Quick Cooling function when you want to quickly cool the food placed in the fridge compartment. If you want to cool large amounts of fresh food, activate this function before putting the food into the product.
If you do not cancel it, Quick Cooling will cancel itself automatically after 1 hour at the most, or when the fridge compartment reaches the required temperature. This function is not recalled when power restores after a power failure. - Fridge compartment temperature setting button
Press this button ( ) to set the temperature of the fridge compartment to 8, 7, 6, 5, 4, 3, 2, 8… respectively. Press this button to set the fridge compartment temperature to the desired value.
 - Freezer compartment temperature setting button
Press this button ( ) to set the temperature of the freezer compartment to -18, -19, -20, -21, -22, -23, -24, -18… respectively. Press this button to set the freezer compartment temperature to the desired value. - Quick freeze function button
Press this button ( ) to activate or deactivate the Quick freeze function. When you activate the function, the freezer compartment will be cooled to a temperature lower than the set value.
Use the Quick Freeze function when you want to quickly freeze the food placed in the freezer compartment. If you want to freeze large amounts of fresh food, activate this function before putting the food into the product.
If you do not cancel it, Quick Freeze will cancel itself automatically after 25 hours at the most or when the freezer compartment reaches the required temperature. This function is not recalled when power restores after a power failure. - Alarm off warning
In case of power failure / high-temperature alarm, after checking the food located in the freezer compartment press the alarm off button ( ) to clear the warning.
 - Eco fuzzy
Press and hold the eco fuzzy button ( ) for 3 seconds to activate the Eco fuzzy function. The refrigerator will start to operate in the most economic mode at least 6 hours later and the economic usage indicator will be on (
 ). Press and hold the eco fuzzy function button for 3 seconds to disable the eco fuzzy function. This indicator will be on after 6 hours when eco fuzzy is activated, provided the doors are not opened.
ECO indicator will be active if the freezer compartment temperature is set to -18°C. - Vacation Function
In order to activate the Vacation function, press this button ( ) for 3 seconds, and the vacation mode indicator (
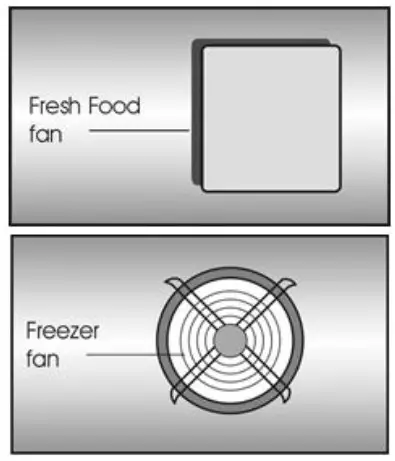 ) will be activated. When the vacation function is activated, “- -” is displayed on the fridge compartment temperature indicator, and no active cooling is performed in the fridge compartment. It is not suitable to keep the food in the fridge compartment in this function. Other compartments will continue to be cooled according to their set temperatures. To cancel this function press the Vacation function button again.
Dual cooling system
Your refrigerator is equipped with two separate cooling systems to cool the fresh food compartment and freezer compartment. Thus, air in the fresh food compartment and freezer compartment do not get mixed. Thanks to these two separate cooling systems, the cooling speed is much higher than other refrigerators. Odors in the compartments do not get mixed. Also, additional power saving is provided since the defrosting is performed individually.
Defrost
A) Fridge compartment
Fridge compartment performs full-automatic defrosting. The defrost water runs to the drain tube via a collection container at the back of the appliance. Check that the tube is
permanently placed with its end in the collecting tray on the compressor to prevent the water spilling on the electric installation or on the floor.
B) Freezer compartment
The NO FROST type defrost is completely automatic. No intervention from your side is required. The water is collected on the compressor tray. Due the heat of the compressor, the water is evaporated.
Warnings!
The fans inside the freezer and fresh food compartments circulate cold air. Never insert any object through the guard. Do not allow children to play with the fresh food and freezer fan. Never store products that contain inflammable propellant gas (e.g. dispensers, spray cans, etc.) or explosive substances.
Don’t cover the shelves with any protective materials, which may obstruct air circulation.
Do not allow children to play with the appliance or tamper with the controls. Do not obstruct the fan guards to ensure that you obtain the best possible performance from your appliance.Please ensure the fans are not blocked (stopped) or impaired by food or packaging. Blocking (stopping) or impairing the fan can result in an increase of the internal freezer temperature (Thawing).
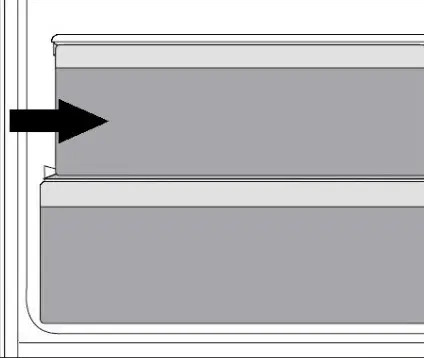
This compartment has been designed to store frozen food which would be thawed slowly (meat, fish, chicken, etc.) as required. Zero temperature the compartment is the coldest place of your refrigerator in which dairy products (cheese, butter), meat, fish, or chicken may be kept at ideal storage conditions. Vegetables and/or fruits must not be placed in this compartment.
HarvestFresh
Fruits and vegetables stored in crisper illuminated with the HarvestFresh technology preserve their vitamins content (vitamin A and C) for a longer time thanks to the blue, green, red lights, and dark cycles, which simulate a day cycle. If you open the door of the refrigerator during the dark period of the HarvestFresh technology, the refrigerator will automatically detect this and enable the blue, green or red light to illuminate the crisper for your convenience. After you have closed the door of the refrigerator, the dark period will continue, representing the nighttime in a day cycle.
Maintenance and cleaning
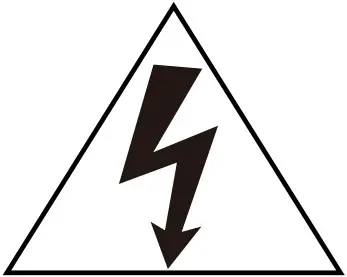 Never use gasoline, benzene or similar substances for cleaning purposes.
 We recommend that you unplug the appliance before cleaning.
Never use any sharp abrasive instrument, soap, household cleaner, detergent and wax polish for cleaning.
![]() Use lukewarm water to clean the cabinet of your refrigerator and wipe it dry.
Use lukewarm water to clean the cabinet of your refrigerator and wipe it dry.
![]() Use a damp cloth wrung out in a solution of one teaspoon of bicarbonate of soda to one pint of water to clean the interior and wipe it dry.
Use a damp cloth wrung out in a solution of one teaspoon of bicarbonate of soda to one pint of water to clean the interior and wipe it dry.
Make sure that no water enters the lamp housing and other electrical items.
If your refrigerator is not going to be used for a long period of time, unplug the power cable, remove all food, clean it and leave the door ajar.
![]() Check door seals regularly to ensure they are clean and free from food particles.
Check door seals regularly to ensure they are clean and free from food particles.
 To removes, door racks, remove all the contents and then simply push the door rack upwards from the base.
Never uses cleaning agents or water that contain chlorine to clean the outer surfaces and chromium-coated parts of the product. Chlorine causes corrosion on such metal surfaces.
Protection of plastic surfaces
![]() Do not put the liquid oils or oil-cooked meals in your refrigerator in unsealed containers as they damage the plastic surfaces of your refrigerator. In case of spilling or smearing oil on the plastic surfaces, clean and rinse the relevant part of the surface at once with warm water.
Do not put the liquid oils or oil-cooked meals in your refrigerator in unsealed containers as they damage the plastic surfaces of your refrigerator. In case of spilling or smearing oil on the plastic surfaces, clean and rinse the relevant part of the surface at once with warm water.
Troubleshooting
Please review this list before calling the service. It will save you time and money. This list includes frequent complaints that are not arising from defective workmanship or material usage. Some of the features described here may not exist in your product.
The refrigerator does not operate.
- The plug is not inserted into the socket correctly. >>>Insert the plug into the socket securely.
- The fuse of the socket to which your refrigerator is connected to or the main fuse have blown out. >>>Check the fuse.
Condensation on the sidewall of the fridge compartment (MULTIZONE, COOL CONTROL and FLEXI ZONE).
- Ambient is very cold. >>>Do not install the refrigerator in places where the temperature falls below 10°C.
- Door has been opened frequently. >>>Do not open and close the door of the refrigerator frequently.
- The ambient is very humid. >>>Do not install your refrigerator into highly humid places.
- Food containing liquid is stored in open containers. >>>Do not store food with liquid content in open containers.
- Door of the refrigerator is left ajar. >>>Close the door of the refrigerator.
- Thermostat is set to a very cold level. >>>Set the thermostat to a suitable level.
Compressor is not running.
- Protective thermic of the compressor will blow out during sudden power failures or plug-out plug-ins as the refrigerant pressure in the cooling system of the refrigerator has not been balanced yet. The refrigerator will start running approximately after 6 minutes. Please call the service if the refrigerator does not startup at the end of this period.
- The fridge is in defrost cycle. >>>This is normal for a full-automatically defrosting refrigerator. Defrosting cycle occurs periodically.
- The refrigerator is not plugged into the socket. >>>Make sure that the plug is fit into the socket.
- Temperature settings are not made correctly. >>>Select the suitable temperature value.
- There is a power outage. >>>Refrigerator returns to normal operation when the power restores.
The operation noise increases when the refrigerator is running.
- The operating performance of the refrigerator may change due to the changes in the ambient temperature. It is normal and not a fault.
The refrigerator is running frequently or for a long time.
- New product may be wider than the previous one. Larger refrigerators operate for a longer period of time.
- The room temperature may be high. >>>It is normal that the product operates for longer periods in hot ambient.
- The refrigerator might be plugged in recently or might be loaded with food.
>When the refrigerator is plugged in or loaded with food recently, it will take longer for it to attain the set temperature. This is normal.
- Large amounts of hot food might be put in the refrigerator recently. >>>Do not put hot food into the refrigerator.
- Doors might be opened frequently or left ajar for a long time. >>>The warm air that has entered into the refrigerator causes the refrigerator to run for longer periods. Do not open the doors frequently.
- Freezer or fridge compartment door might be left ajar. >>>Check if the doors are closed completely.
- The refrigerator is adjusted to a very low temperature. >>>Adjust the refrigerator temperature to a warmer degree and wait until the temperature is achieved.
- Door seal of the fridge or freezer may be soiled, worn out, broken or not properly seated. >>>Clean or replace the seal. Damaged/broken seal causes the refrigerator to run for a longer period of time in order to maintain the current temperature.
The freezer temperature is very low while the fridge temperature is sufficient.
- The freezer temperature is adjusted to a very low value. >>>Adjust the freezer temperature to a warmer degree and check.
Fridge temperature is very low while the freezer temperature is sufficient.
- The fridge temperature is adjusted to a very low value. >>>Adjust the fridge temperature to a warmer degree and check.
Food kept in the fridge compartment drawers is frozen.
- The fridge temperature is adjusted to a very high value. >>>Adjust the fridge temperature to a lower value and check.
The temperature in the fridge or freezer is very high.
- The fridge temperature is adjusted to a very high value. >>>Fridge compartment temperature setting has an effect on the temperature of the freezer. Change the temperatures of the fridge or freezer and wait until the relevant compartments attain a sufficient temperature.
- Doors are opened frequently or left ajar for a long time. >>>Do not open the doors frequently.
- Door is ajar .>>>Close the door completely.
- The refrigerator is plugged in or loaded with food recently. >>>This is normal. When the refrigerator is plugged in or loaded with food recently, it will take longer for it to attain the set temperature.
- Large amounts of hot food might be put in the refrigerator recently. >>>Do not put hot food into the refrigerator.
Vibrations or noise.
- The floor is not level or stable. >>> If the refrigerator rocks when moved slowly, balance it by adjusting its feet. Also make sure that the floor is strong enough to carry the refrigerator, and level.
- The items put onto the refrigerator may cause noise. >>>Remove the items on top of the refrigerator.
There are noises coming from the refrigerator like liquid flowing, spraying, etc.
- Liquid and gas flows occur in accordance with the operating principles of your refrigerator. It is normal and not a fault.
Whistle comes from the refrigerator.
Fans are used in order to cool the refrigerator. It is normal and not a fault.
Condensation on the inner walls of the refrigerator.
- Hot and humid weather increases icing and condensation. It is normal and not a fault.
- Doors are opened frequently or left ajar for a long time. >>>Do not open the doors frequently.
- Close them if they are open.
- Door is ajar. >>>Close the door completely.
Humidity occurs on the outside of the refrigerator or between the doors.
- There might be humidity in the air; this is quite normal in humid weather. When the humidity is less, condensation will disappear.
Bad odour inside the refrigerator.
- No regular cleaning is performed. >>>Clean the inside of the refrigerator regularly with a sponge, lukewarm water or carbonate dissolved in water.
- Some containers or package materials may cause the smell. >>>Use a different container or different brand packaging material.
- Food is put into the refrigerator in uncovered containers. >>>Keep the food in closed containers. Microorganisms spreading out from uncovered containers can cause unpleasant odors.
- Remove the foods that have expired best before dates and spoiled from the refrigerator.
The door is not closing.
- Food packages are preventing the door from closing. >>>Replace the packages that are obstructing the door.
- The refrigerator is not completely even on the floor. >>>Adjust the feet to balance the refrigerator.
- The floor is not level or strong. >>>Make sure that the floor is level and capable to carry the refrigerator.
Crispers are stuck.
- The food is touching the ceiling of the drawer. >>>Rearrange food in the drawer.
www.beko.com
4578339108_AA
EN-CZ-SK-PL-UKR-ET-LV
User Manual
MOB 17131 X
01M-8850393200-5115-04 ![]()
Please read this manual first!
Dear Customer,
Thank you for purchasing a Beko product. We hope that you get the best results from your product which has been manufactured with high quality and state-of-the-art technology. Therefore, please read this entire user manual and all other accompanying documents carefully before using the product and keep it as a reference for future use. If you handover the product to someone else, give the user manual as well. Follow all warnings and information in the user manual.
Meanings of the symbols
Following symbols are used in the various section of this user manual:
 Important information and useful hints about usage.
![]() Warnings for dangerous situations concerning the safety of life and property.
Warnings for dangerous situations concerning the safety of life and property.
 Warning for hot surfaces.

This product has been manufactured in environmental friendly modern plants without giving any harm to the nature.
This appliance conforms to the WEEE regulation. ![]() It does not contain PCB.
It does not contain PCB.
1 Important safety and environmental instructions
Important Safety Instructions Read Carefully And Keep For Future Reference
This section contains safety instructions that will help protect from risk of fire, electric shock, exposure to leak microwave energy, personal injury or property damage. Failure to follow these instructions shall void any warranty.
1.1 General safety
- The microwave oven is intended for heating food and beverages. Drying of food or clothing and heating of warming pads, slippers, sponges, damp cloth and similar may lead to risk of injury, ignition or fire.
This appliance is intended to be used in household and similar applications such as: - Staff kitchen areas in shops, offices and other working environments; Farm houses
- By clients in hotels, motels and other residential type environments;
- Bed and Breakfast type environments.
- Do not attempt to start the oven when its door is open; otherwise you may be exposed to harmful microwave energy. Safety locks should not be disabled or tampered with.
- Do not place any object between the front side and the door of the oven. Do not allow dirt or cleaning agent remnants built-up on the closure surfaces.
- Any service works involving removal of the cover that provides protection against exposure to microwave energy must be per formed by authorized persons/ service. Any other approach is dangerous.
- Your product is intended for cooking, heating and defrost food at home. It must not be used for commercial purposes. Manufacturer shall not be held liable for damages that have arisen from misuse.
- Do not use this appliance out-doors, bathrooms, humid environments or in places where the it can get wet.
- No responsibility or warranty claim shall be assumed for damages arising from misuse or improper handling of the appliance.
- Never attempt to dismantle the appliance. No warranty claims are accepted for damage caused by improper handling.
- Only use the original parts or parts recommended by the manufacturer.
- Do not leave this appliance unattended while it is in use.
- Always use the appliance on a stable, flat, clean dry, and non-slip surface.
- The appliance should not be operated with an external clock timer or separate remote control system.
- Before using the appliance for the first time, clean all parts. Please see the details given in the “Cleaning and Maintenance” section.
- Operate the appliance for its intended purpose only as described in this manual. Do not use abrasive chemicals or steam on this appliance. This oven is particularly intended for heating and cooking the food. It is not intended for industrial or laboratory use.
- Do not use your appliance to dry clothes or kitchen towels.
- Appliance becomes very hot while it is in use. Pay attention not to touch the hot parts inside the oven.
- Your oven is not designed to dry any living being.
- Do not operate the oven empty.
- Only use utensils that are suitable for use in microwave ovens.
- Cooking utensil may get hot due to the heat transferred from the heated food to the utensil. You may need oven gloves to hold the utensil.
- Utensils shall be checked to ensure that they are suitable for use in microwave ovens.
- Do not place the oven on stoves or other heat generating appliances. Otherwise, it may be damaged and the warranty becomes void.
- Microwave oven must not be placed in a cabinet that is not in compliance with the installation instructions.
- Steam may come out while opening the covers or the foil after cooking the food.
- Use gloves while taking any kind of heated food out.
- The appliance and its accessible surfaces may be very hot when the appliance is in use.
- Door and outer glass may be very hot when the appliance is in use.
1.1.1 Electrical safety
- If the supply cord is damaged, it must be replaced by the manufacturer or its service agent or a similarly qualified person in order to avoid a hazard.
- Beko Microwave Ovens comply with the applicable safety standards; therefore, in case of any damage on the appliance or power cable, it should be repaired or replaced by the dealer, service center or a specialist and authorized service alike to avoid any danger. Faulty or unqualified re pair work may be dangerous and cause risk to the user.
- Make sure that your mains power supply complies with the information supplied on the rating plate of the appliance.
The only way to disconnect the appliance from the power supply is to remove the power plug from the power outlet. - Use the appliance with a grounded outlet only.
- Never use the appliance if the power cable or the appliance itself is damaged.
- Do not use this appliance with an extension cord.
- Never touch the appliance or its plug with damp or wet hands.
- Place the appliance in a way so that the plug is always accessible.
- Prevent damage to the power cable by not squeezing, bending, or rubbing it on sharp edges. Keep the power cable away from hot surfaces and naked flame.
- Make sure that there is no danger that the power cable could be accidentally pulled or that someone could trip over it when the appliance is in use.
- Unplug the appliance before each cleaning and when the appliance is not in use.
- Do not pull the power cable of the appliance to disconnect it from its power supply and never wrap its power cable around the appliance.
- Do not immerse the appliance, power cable, or power plug in water or any other liquids. Do not hold it under running water.
- When heating food in plastic or paper containers, keep an eye on the oven due to the possibility of ignition.
- Remove the wire strings and/or metal handles of paper or plastic bags before placing bags suitable for use in microwave oven to the oven.
- If smoke is observed, switch off or unplug the appliance and keep the door closed in order to stifle any flames.
- Do not use inside of the oven to store something. Do not leave paper items, cooking material or food inside the oven when it is not being used.
- The contents of feeding bottles and baby food jars shall be stirred or shaken and the temperature shall be checked before consumption, in order to avoid burns.
- This appliance is a Group 2 Class B ISM equipment. Group 2 contains all ISM (Industrial, Scientific and Medical) equipment in which radio-frequency energy is intentionally generated and/or used in the form of electromagnetic radiation for the treatment of material, and spark erosion equipment.
- Class B equipment is suitable for use in domestic establishments and establishments directly connected to a low voltage power supply network.
- Door or outer surface of the appliance may become hot when it is in use.
1.1.2 Product safety
- Heating the beverages with microwave may cause them to boil by splashing around after they have been taken out of the oven; so be careful when you are holding the containers.
- Do not roast anything in the oven. Hot oil may damage the components and materials of the oven, and it may even cause skin burns.
- Pierce food with thick crust such as potatoes, zucchinis, apples and chestnuts.
- Appliance must be placed so that the rear side is facing the wall.
- Before moving the appliance, please secure the turntable to prevent damage to it.
- Eggs in their shell and whole hard boiled eggs must not be heated in microwave ovens since they may explode, even after microwave heating has ended.
- Never remove the parts at the rear and sides of the appliance, which protect the minimum distances between the cabinet walls and the appliance in order to allow for the required air circulation.
1.2 Intended use
- Failure to maintain the oven in a clean condition could lead to deterioration of the surface that could adversely affect the life of the appliance and possibly result in a hazardous situation.
- Cleaning the door seals and adjacent parts: Use hot soapy water. Clean with a dish cloth, do not scour. Do not use a metal or glass scraper for cleaning.
- WARNING: If the door or door seals are damaged, the oven must not be operated until it has been repaired by a competent person.
- WARNING: It is hazardous for anyone other than a competent person to carry out any service or repair operation which involves the removal of a cover which gives protection against exposure to microwave energy.
- WARNING: Liquids and other foods must not be heated in sea led containers since they are liable to explode.
- The oven should be cleaned regularly and any food deposits removed.
- There should be min 20 cm free space above the top surface of the oven.
- Do not use the appliance for anything other than its intended use.
- Do not use the appliance as a heat source.
- Microwave oven is intended to thaw, cook and stew food only.
- Do not over-cook foods; otherwise, you may cause a fire.
- Do not use steam assisted cleaners to clean the appliance.
1.3 Children’s safety
- Extreme caution is advised when being used near children and per sons who are restricted in their physical, sensory or mental abilities.
- This appliance can be used by the children who are at the age of 8 or over and by the people who have limited physical, sensory or mental capacity or who do not have knowledge and experience, as long as they are supervised with regard to safe use of the product or they are instructed accordingly or understand the risks of using the product. Children should not play with the appliance. Cleaning and user maintenance procedures should not be performed by children unless they are controlled by their elders.
- Danger of choking! Keep all the packaging materials away from children.
- Only allow children to use the oven without supervision when adequate instructions have been given so that the child is able to use the microwave oven in a safe way and understands the hazards of improper use.
- Due to excessive heat that arises in grill and combination modes, children should only be allowed to use these modes under supervision of an adult.
- Keep the product and its power cable so that they are inaccessible by children under 8 years old.
- The appliance and its accessible surfaces may be very hot when the appliance is in use. Keep children away.
- The appliance is not intended for use by persons (including children) with reduced physical, sensory or mental capabilities, or lack of experience and knowledge, unless they have been given supervised or instruction concerning use of the appliance by a responsible person for their safely.
- Young children should be supervised to ensure that they do not play with the appliance.
- WARNING: Only allow children to use the oven without supervision when adequate instructions have been given so that the child is able to use the oven in a safe way and understands the hazards of improper use.
1.4 Compliance with the WEEE Directive and disposal of waste products
 This product does not include harmful and prohibited materials specified in the “Regulation for Supervision of the Waste Electric and Electronic Appliances” issued by the Ministry of Environment and Urban Planning. Complies with the WEEE Directive. This product has been manufactured with high quality parts and materials which can be reused and are suitable for recycling.
Therefore, do not dispose the product with normal domestic waste at the end of its service life. Take it to a collection point for the recycling of electrical and electronic equipment. Ask the local authority in your area for these collection points. Help protect the environment and natural resources by recycling used products.
1.5 Package information
 Package of the product is made of recyclable materials in accordance with our National Legislation. Do not dispose of the packaging materials together with the domestic or other wastes. Take them to the packaging material collection points designated by the local authorities.
2 Technical Specifications of the Product
2.1 Overview
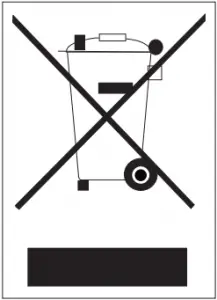
- Control panel
- Turntable shaft
- Turntable support
- Glass tray
- Oven window
- Door group
- Door safety interlock system
2.2 Technical data
![]()
This appliance complies with the European Directives 2004/108/EC, 2006/95/EC, 2009/125/EC and 2011/65/EU.
| Rated voltage: | 230 V~50 Hz, |
| Operation Frequency | 2450 MHz |
| Rated Input Power (Microwave) | 1050 W |
| Rated Output Power (Microwave) | 700 W |
| Oven Capacity | 17 L |
| Turntable Diameter | Ø 245 mm |
| Timer | 0-95’ |
| External Dimensions | 595x336x382 mm |
| Net Weight | Approx 14.5 kg |
Markings on the appliance or the values stated in other documents supplied with the product are values obtained under laboratory conditions as per relevant standards. These values may vary according to the usage of the appliance and ambient conditions.
2.3 Installing the turntable
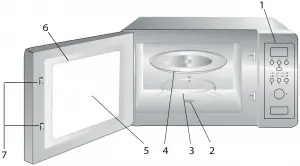
- Never place the glass tray upside down. The glass tray should never be restricted.
- Both glass tray and turntable support must always be used during cooking.
- All food and containers of food must always place on the glass tray for cooking.
- If glass tray or turntable support crack or break, contact your nearest authorized service center.
3 Description of the product

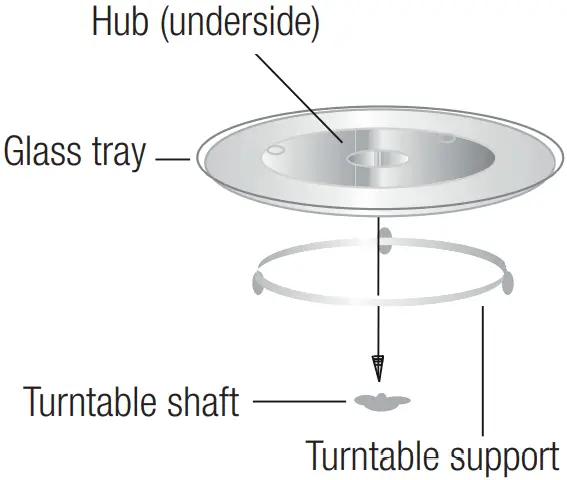 Defrost By Weight
-
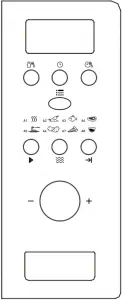 Clock/ Pre-Set
  Defrost By Time
-
 Menu
Menu -
 Quick Start/Start
 -
 Microwave
  Cancel/Stop
-
 A-1 Auto Reheat
  A-2 Vegetable
 A-3 Fish
 A-4 Meat
 A-5 Pasta
 A-6 Potato
 A-7 Reheat Pizza
 A-8 Soup
4 Installation and connection
4.1 Built-in furniture
The built-in cabinet shall not have a rear wall behind the appliance.
Minimum installation height is 85 cm.
Do not cover ventilation slots and air intake points.
1.


2.

4.2 Install the Oven
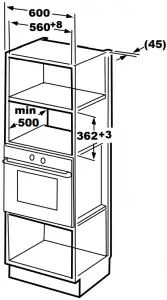
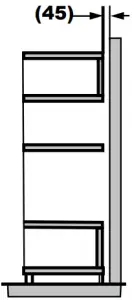
1. Install the oven into the cabinet.
- Do not trap or kink the power cord.
- Make sure that the oven is installed in the center of the cabinet.
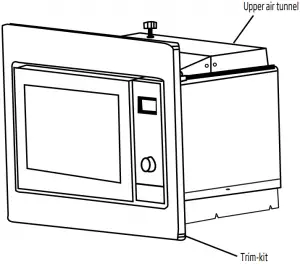
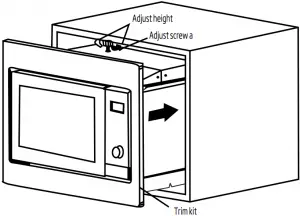
2. Open the door; fix the oven to the cabinet with SCREW B at the INSTALLATION HOLE of TRIM KIT. Then fix the TRIM-KIT PLASTIC COVER to the INSTALLATION HOLE.
5 Operating your product
5.1 Clock Setting
When the microwave oven is electrified, the oven will display “0:00”, buzzer will rings once.
1. Press “![]() ”, the hour figures will flash, and the indicator for clock “
”, the hour figures will flash, and the indicator for clock “ ” will light.
2. Turn “![]() ” to adjust the hour figures, the input time should b e within 0–23.
” to adjust the hour figures, the input time should b e within 0–23.
3. Press “![]() ”, the minute figures will flash.
”, the minute figures will flash.
4. Turn “![]() ” to adjust the minute figures, the input time should be within 0–59.
” to adjust the minute figures, the input time should be within 0–59.
5. Press “![]() ” to finish clock setting. The indicator for clock “” will go out, “:” will flash, and the time will light.
” to finish clock setting. The indicator for clock “” will go out, “:” will flash, and the time will light.
5.2 Cooking food
Press “” , “P100” will flash. Then turn “![]() ” to select the power , “P100”, “P80”… and “P10” will display in order. Press “” to confirm, and then turn “
” to select the power , “P100”, “P80”… and “P10” will display in order. Press “” to confirm, and then turn “![]() ” to select the cooking time.
” to select the cooking time.
Press “ ” to start cooking.
Example: If you want to use 80% microwave to cook food for 20 minutes, you can operate the oven as the following steps.
1. Press “”, the screen display “P100”.
2. Turn “![]() ” to adjust 80% microwave power until the oven displays “P 80”.
” to adjust 80% microwave power until the oven displays “P 80”.
3. Press “” to confirm, the screen displays “P 80”.
4. Turn “![]() ” to adjust the cooking time untill the oven displays “20:00”.
” to adjust the cooking time untill the oven displays “20:00”.
5. Press “” to start cooking or press “ ” to cancel the settings.
Note: the step quantities for the adjustment time of the coding switch are as follow:
0 —1 min : 5 seconds
1 —5 min : 10 seconds
5 —10 min : 30 seconds
10 —30 min : 1 minute
30 —95 min : 5 minutes
“Microwave” Pad instructions
| Order | Display | Microwave Power |
| 1 | P 100 | 100% |
| 2 | P 80 | 80% |
| 3 | P 50 | 50% |
| 4 | P 30 | 30% |
| 5 | P 10 | 10% |
5.3 Pre-Set Cooking
1. Set the clock first. (Consult the instruction of clock setting.)
Example: If you want to use 80% microwave to cook food for 15minutes, you can operate the oven as the following steps.
• Press “”, the screen display “P100”.
• Turn “![]() ” to adjust 80% microwave power until the oven displays “P 80”.
” to adjust 80% microwave power until the oven displays “P 80”.
• Press “” to confirm, the screen displays “P 80”.
• Turn “![]() ” to adjust the cooking time untill the oven displays “15:00”.
” to adjust the cooking time untill the oven displays “15:00”.
• Be careful! Please do not press “ ” to start cooking.
2. Press “ ”, the hour figures will flash, and the indicator “
 ” will light.
3. Turn “![]() ” to adjust the hour figures, the input time should be within 0 — 23.
” to adjust the hour figures, the input time should be within 0 — 23.
4. Press “”, the minute figures will flash.
5. Turn “![]() ” to adjust the minute figures, the input time should be within 0–59.
” to adjust the minute figures, the input time should be within 0–59.
6. Press “![]() ” to finish setting. The indicator for clock “
” to finish setting. The indicator for clock “ ” will flash. If the door is closed, buzzer will ring twice when the time start automatically and the indicator for clock “” will go out.
5.4 Defrost By Weight
1. Press “ ” button. The screen will display “dEF1”, “
![]() ” and “
” and “![]() ” will light.
” will light.
2. Turn “![]() ” to select the weight of food. The weight is from 100 to 2000g.
” to select the weight of food. The weight is from 100 to 2000g.
3. Press “![]() ” to start defrosting food. “
” to start defrosting food. “![]() ” and “
” and “![]() ” will flash.
” will flash.
5.5 Defrost By Time
1. Press “ ” button. The screen will display “dEF2”, “
![]() ” and “
” and “![]() ” will light.
” will light.
2. Turn “![]() ” to select the cooking time. The MAX. time is 95 minutes.
” to select the cooking time. The MAX. time is 95 minutes.
3. Press “![]() ” to start defrosting food. “
” to start defrosting food. “![]() ” and “
” and “![]() ” will flash.
” will flash.
5.6 Multi-section cooking
At most 3 sections can be input for cooking. In multi-section cooking, if one section is defrosting, then defrosting shall be placed in the first section.
Example: If you want to use “20 minutes of 100% microwave power + 5 minutes of 80% microwave power” to cook food.
1. Press “![]() ” pad , the screen display “P100”.
” pad , the screen display “P100”.
2. Press “![]() ” to confirm the microwave power.
” to confirm the microwave power.
3. Turn “![]() ” to select cooking time.
” to select cooking time.
4. Press “![]() ” pad , the screen display “P100”.
” pad , the screen display “P100”.
5. Turn “![]() ” to select 80% microwave power.
” to select 80% microwave power.
6. Press “![]() ” pad, then turn “
” pad, then turn “![]() ” to select cooking time of 80% microwave power.
” to select cooking time of 80% microwave power.
7. Press “![]() ” to start cooking or press “
” to start cooking or press “![]() ” to cancel the setting.
” to cancel the setting.
5.7 Start/Quick Start
When the oven is in the waiting state, Press “![]() ” to start cooking food with full microwave power for 1 minute. Each press will increase one minute. The maximum cooking time is 95 minutes.
” to start cooking food with full microwave power for 1 minute. Each press will increase one minute. The maximum cooking time is 95 minutes.
5.8 Auto Menu
Example: If you want to use “Auto Menu” to cook fish of 250g.
1. Press “![]() ” , “
” , “![]() ” and “
” and “![]() ” will light.
” will light.
2. Turn “![]() ” to select the function you want.
” to select the function you want.
3. Press “![]() ” button to confirm.
” button to confirm.
4. Turn “![]() ” to select the weight of fish. “g” will light.
” to select the weight of fish. “g” will light.
5. Press “![]() ” to start. “g” will go out, “
” to start. “g” will go out, “![]() ” and “
” and “![]() ” will flash.
” will flash.
5.9 Child Lock Function
Lock: In waiting state, press “![]() ” for 3 seconds, there will be a long beep denoting entering the children-lock state and oven will display “
” for 3 seconds, there will be a long beep denoting entering the children-lock state and oven will display “![]() ”.
”.
Lock quitting: In locked state, press “![]() ” for 3 seconds, there will be a long “beep” denoting that the lock is released.
” for 3 seconds, there will be a long “beep” denoting that the lock is released.
5.10 Inquiring Function
1. In microwave state, press “![]() ” , the current power will be displayed for 4 seconds. After 4 seconds, the oven will turn back to th e former state;
” , the current power will be displayed for 4 seconds. After 4 seconds, the oven will turn back to th e former state;
2. In cooking state, press “![]() ” to inquire the present time and the time will flash for 4 seconds.
” to inquire the present time and the time will flash for 4 seconds.
3. In preset state, press “![]() ” to inquire the preset time and it will flash for 4 seconds.
” to inquire the preset time and it will flash for 4 seconds.
The automatic menu procedure:
| Menu | Order | Weight | Display |
| A-1 Auto Reheat |
1 | 200 g | 200 g |
| 400 g | 400 g | ||
| 600 g | 600 g | ||
| A-2 Vegetable |
2 | 200 g | 200 g |
| 300 g | 300 g | ||
| 400 g | 400 g | ||
| A-3 Fish |
3 | 250 g | 250 g |
| 350 g | 350 g | ||
| 450 g | 450 g | ||
| A-4 Meat |
4 | 250 g | 250 g |
| 350 g | 350 g | ||
| 450 g | 450 g | ||
| A-5 Pasta |
5 | 50 g (with water 450ml) | 50 g |
| 100 g (with water 800ml) | 100 g | ||
| A-6 Potato |
6 | 200 g | 200 g |
| 400 g | 400 g | ||
| 600 g | 600 g | ||
| A-7 Reheat Pizza |
7 | 200 g | 200 g |
| 400 g | 400 g | ||
| A-8 Soup |
8 | 200 g | 200 g |
| 400 g | 400 g |
6 Cleaning and Care
6.1 Cleaning
![]() WARNING: Never use gasoline, solvent, abrasive cleaning agents, metal objects or hard brushes to clean the appliance.
WARNING: Never use gasoline, solvent, abrasive cleaning agents, metal objects or hard brushes to clean the appliance.
![]() WARNING: Never immerse the appliance or its power cable in water or in any other liquid.
WARNING: Never immerse the appliance or its power cable in water or in any other liquid.
- Turn the appliance off and disconnect it from wall socket.
- Wait for the appliance to completely cool down.
- Keep the inside of the oven clean. Wipe with a damp cloth when splashed food or spilled liquids stick on the walls of the oven. A mild detergent may be used if the oven gets very dirty. Avoid using sprays and other harsh cleaning agents as they may cause stains, marks, and opaqueness on the door surface.
- Outer surfaces of the oven must be cleaned with a damp cloth. Do not allow water ingress from ventilation openings to prevent damage to the operating parts in the oven.
- Wipe both sides of the door and the glass, door gaskets and parts near the gaskets frequently with a damp cloth in order to remove the overflowing and splashing stains. Do not use abrasive cleaning agents.
- Do not allow control panel to get wet. Clean with a soft damp cloth. Leave the door of the oven open to prevent inadvertent operation while cleaning the control panel.
- If steam accumulates inside or around the oven door, wipe with a soft cloth. This may occur when the microwave oven is operated under high humidity conditions. It is normal.
- In some cases, you may need to remove the glass tray for cleaning. Wash the tray in warm soapy water or in a dishwasher.
- The roller ring and oven floor should be cleaned regularly to avoid excessive noise. It would be sufficient to wipe the lower surface of the oven with a mild detergent. Roller ring may be washed in warm soapy water or in a dishwasher. When you remove the roller ring from oven internal floor for cleaning, ensure that you install it in the correct position while replacing it.
- In order to remove bad odors in your oven, put a glass of water and juice and peel of a lemon to a deep bowl suitable for use in microwave and operate the oven for 5 minutes in microwave mode. Wipe thoroughly and dry with a soft cloth.
- Please contact the authorized service when the oven lamp needs to be replaced.
- The oven should be cleaned regularly and any food deposits should be removed. If the oven is not kept clean, this may cause surface defects that would affect the lifecycle of the appliance negatively and that would possibly cause risks.
- Please do not dispose this appliance with household waste; old ovens shall be disposed to special waste centers provided by the municipalities.
- When the microwave oven is used in grill function, a small amount of smoke and odor may occur which will disappear after a certain time of usage.
6.2 Storage
- If you do not intend to use the appliance for a long time, please store it carefully.
- Please make sure that the appliance is unplugged, cooled down and totally dry.
- Store the appliance in a cool and dry place.
- Keep the appliance out of the reach of children.
7 Trouble shooting
| Normal | |
| Microwave oven interferes with TV reception | Radio and TV reception may be interfered when microwave oven is operating. It is similar to the interference caused by small electrical appliances, like mixer, vacuum cleaner, and electric fan. It is normal. |
| Oven light is dimmed | In low power microwave cooking, oven light may be dimmed. It is normal. |
| Steam accumulating on door, hot air coming out of vents | During cooking, steam may arise from the food. Most of this steam will get out from vents. But some may accumulate on a cool place like oven door. It is normal. |
| Oven started accidentally with no food in it. | It is not allowed to run the appliance without any food inside. It is very dangerous. |
| Problem | Possible Reason | Solution |
| Oven cannot be started. | (1) Power cable is not plugged in properly. | Unplug. Then plug again after 10 seconds. |
| (2) Fuse is blown or circuit breaker is activated. | Replace fuse or reset circuit breaker (repaired by professional personnel of our company). | |
| (3) Trouble with outlet. | Test the outlet with other electrical appliances. | |
| Oven does not heat. | (4) Door is not closed properly. | Close the door properly. |
| Glass turntable makes noise when microwave oven operates | (5) Turntable and bottom of the oven is dirty. | Refer to “Cleaning and Maintenance” section to clean dirty parts. |
8 Guarantee and Service
]]>

Refrigerator – Freezer
RCNA386E30ZXB
Please read this user manual first!
Dear Customer,
We hope that your product, which has been produced in modern plants and checked under the most meticulous quality control procedures, will provide you an effective service.
Therefore, read this entire user manual carefully before using the product and keep it as a reference. If you handover the product to someone else, give the user manual as well.
The user manual will help you use the product in a fast and safe way.
- Read the manual before installing and operating the product.
- Make sure you read the safety instructions.
- Keep the manual in an easily accessible place as you may need it later.
- Read the other documents given with the product.
Remember that this user manual is also applicable for several other models. Differences between models will be identified in the manual.
Explanation of symbols
Throughout this user manual the following symbols are used:
![]() Important information or useful tips.
Important information or useful tips.
![]() Warning against dangerous conditions for life and property.
Warning against dangerous conditions for life and property.

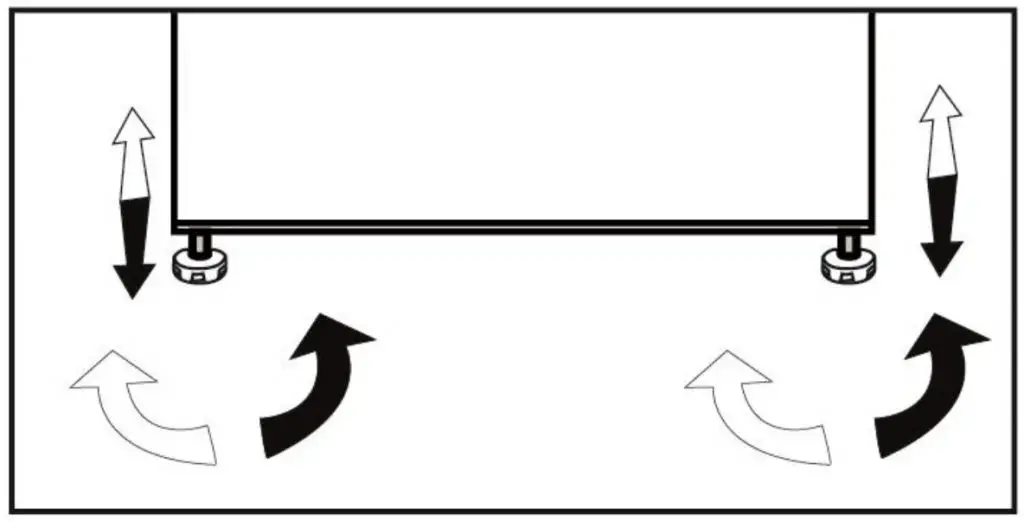 Warning against electric voltage.
WARNING!
In order to ensure a normal operation of your refrigerating appliance, which uses a completely environmentally friendly refrigerant the R600a (flammable only under certain conditions) you must observe the following rules:
- Do not hinder the free circulation of the air around the appliance.
- Do not use mechanical devices in order to accelerate the defrosting, other than the ones recommended by the manufacturer.
- Do not destroy the refrigerating circuit.
- Do not use electrical appliances inside the food-keeping compartment, other than those that might have been recommended by the manufacturer.
Your refrigerator
| 1. Control panel | 8. Ice tray |
| 2. Interior light | 9. Compartment for quickly freezing |
| 3. Fresh Food fan | 10. Compartments for frozen froods keeping |
| 4. Adjustable Cabinet shelves | 11. Adjustable front feet |
| 5. Zero degree compartment | 12. Shelf for jars |
| 6. Cover glass | 13. Shelf for bottles |
| 7. Salad crispers | 14. Freezer fan |
![]() Figures that take place in this instruction manual are schematic and may not correspond exactly with your product. If the subject parts are not included in the product you have purchased, then it is valid for other models.
Figures that take place in this instruction manual are schematic and may not correspond exactly with your product. If the subject parts are not included in the product you have purchased, then it is valid for other models.
Important Safety Warnings
Please review the following information. Failure to observe this information may cause injuries or material damage. Otherwise, all warranty and reliability commitments will become invalid. Original Spare parts will be provided for 10 years, following the product purchasing date.
Intended use
This product is intended to be used
- indoors and in closed areas such as homes;
- in closed working environments such as stores and offices;
- in closed accommodation areas such as farmhouses, hotels, pensions.
- It should not be used outdoors.
General safety
- When you want to dispose of/scrap the product, we recommend you consult the authorized service in order to learn the required information and authorized bodies.
- Consult your authorized service for all your questions and problems related to the refrigerator. Do not intervene or let someone intervene in the refrigerator without notifying the authorized services.
- For products with a freezer compartment; Do not eat cone ice cream and ice cubes immediately after you take them out of the freezer compartment! (This may cause frostbite in your mouth.)
- For products with a freezer compartment; Do not put bottled and canned liquid beverages in the freezer compartment. Otherwise, these may burst.
- Do not touch frozen food by hand; it may stick to your hand.
- Unplug your refrigerator before cleaning or defrosting.
- Vapor and vaporized cleaning materials should never be used in the cleaning and defrosting processes of your refrigerator. In such cases, the vapor may get in contact with the electrical parts and cause a short circuit or electric shock.
- Never use the parts on your refrigerator such as the door as a means of support or step.
- Do not use electrical devices inside the refrigerator.
- Do not damage the parts, where the refrigerant is circulating, with drilling or cutting tools. The refrigerant that might blow out when the gas channels of the evaporator, pipe extensions, or surface coatings are punctured causes skin irritations and eye injuries.
- Do not cover or block the ventilation holes on your refrigerator with any material.
- Electrical devices must be repaired by only authorized persons. Repairs performed by incompetent persons create a risk for the user.
- In case of any failure or during maintenance or repair work, disconnect your refrigerator’s mains supply by either turning off the relevant fuse or unplugging your appliance.
- Do not pull by the cable when pulling off the plug.
- Place the beverage with higher proofs tightly closed and vertically.
- Never store spray cans containing flammable and explosive substances in the refrigerator.
- Do not use mechanical devices or other means to accelerate the defrosting process, other than those recommended by the manufacturer.
- This product is not intended to be used by persons with physical, sensory, or mental disorders or unlearned or inexperienced people (including children) unless they are attended by a person who will be responsible for their safety or who will instruct them accordingly for use of the product.
- Do not operate a damaged refrigerator. Consult with the service agent if you have any concerns.
- The electrical safety of your refrigerator shall be guaranteed only if the earth system in your house complies with standards.
- Exposing the product to rain, snow, sun, and wind is dangerous with respect to electrical safety.
- Contact authorized service when there is power cable damage to avoid danger.
- Never plug the refrigerator into the wall outlet during installation. Otherwise, the risk of death or serious injury may arise.
- This refrigerator is intended for only storing food items. It must not be used for any other purpose.
- Label of technical specifications is located on the left wall inside the refrigerator.
- Never connect your refrigerator to electricity-saving systems; they may damage the refrigerator.
- If there is a blue light on the refrigerator, do not look at the blue light with optical tools.
- For manually controlled refrigerators, wait for at least 5 minutes to start the refrigerator after power failure.
- This operation manual should be handed to the new owner of the product when it is given to others.
- Avoid causing damage to the power cable when transporting the refrigerator. Bending cable may cause a fire. Never place heavy objects on the power cables.
- Do not touch the plug with wet hands when plugging the product.

- Do not plug the refrigerator if the wall outlet is loose.
- Water should not be sprayed on the inner or outer parts of the product for safety purposes.
- Do not spray substances containing inflammable gases such as propane gas near the refrigerator to avoid fire and explosion risk.
- Never place containers filled with water on top of the refrigerator; in the event of spillages, this may cause electric shock or fire.
- Do not overload the refrigerator with food. If overloaded, the food items may fall down and hurt you and damage the refrigerator when you open the door.
- Never place objects on top of the refrigerator; otherwise, these objects may fall down when you open or close the refrigerator’s door.
- As they require a precise temperature, vaccines, heat-sensitive medicine and scientific materials and etc. should not be kept in the refrigerator.
- If not to be used for a long time, the refrigerator should be unplugged. A possible problem in power cable may cause a fire.
- The plug’s tip should be cleaned regularly with a dry cloth; otherwise, it may cause a fire.
- The refrigerator may move if adjustable legs are not properly secured on the floor. Properly securing adjustable legs on the floor can prevent the refrigerator to move.
- When carrying the refrigerator, do not hold it from the door handle. Otherwise, it may be snapped.
- When you have to place your product next to another refrigerator or freezer, the distance between devices should be at least 8cm. Otherwise, adjacent sidewalls may be humidified.
For products with a water dispenser;
The pressure of water mains should be a minimum of 1 bar. The pressure of water mains should be maximum of 8 bars.
- Use only potable water.
Child safety
- If the door has a lock, the key should be kept away from the reach of children.
- Children must be supervised to prevent them from tampering with the product.
Compliance with the WEEE Regulation and Disposing of the Waste Product
The symbol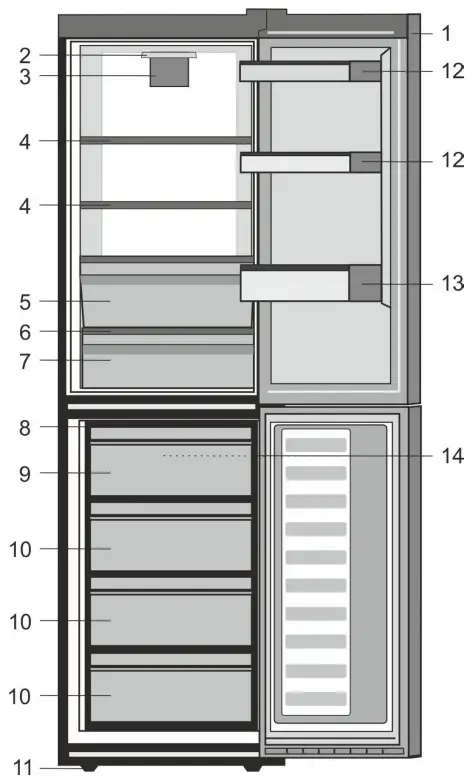 on the product or on the packaging indicates that this product may not be treated as household waste. Instead, it shall be handed over to the applicable collection point for the recycling of electrical and electronic equipment. By ensuring this product is disposed of correctly, you will help prevent potential negative consequences for the environment and human health, which could otherwise be caused by inappropriate waste handling of this product. For more detailed information about the recycling of this product, please contact your local city office, your household waste disposal service, or the shop where you purchased the product.
Package information
Packaging materials of the product are manufactured from recyclable materials in accordance with our National Environment Regulations. Do not dispose of the packaging materials together with the domestic or other wastes. Take them to the packaging material collection points designated by the local authorities.
Do not forget…
Any recycled substance is an indispensable matter for nature and our national asset wealth. If you want to contribute to the reevaluation of the packaging materials, you can consult to your environmentalist organizations or the municipalities where you are located.
HCA warning
If your product’s cooling system contains R600a:
This gas is flammable. Therefore, pay attention to not damaging the cooling system and piping during usage and transportation. In the event of damage, keep your product away from potential fire sources that can cause the product to catch a fire and ventilate the room in which the unit is placed. The type of gas used in the product is stated in the type label which is on the left wall inside the refrigerator. Never throw the product on the fire for disposal.
Things to be done for energy Saving
- Do not leave the doors of your refrigerator open for a long time.
- Do not put hot food or drinks in your refrigerator.
- Do not overload your refrigerator so that the air circulation inside of it is not prevented.
- Do not install your refrigerator under direct sunlight or near heat-emitting appliances such as ovens, dishwashers, or radiators. Keep your refrigerator at least 30 cm away from heat emitting sources and at least 5 cm from electrical ovens.
- Pay attention to keep your food in closed containers.
- For products with a freezer compartment; You can store the maximum amount of food items in the freezer when you remove the shelf or drawer of the freezer. The energy consumption value stated for your refrigerator has been determined by removing the freezer shelf or drawer and under maximum load. There is no harm to use a shelf or drawer according to the shapes and size of food to be frozen.
- Thawing frozen food in the fridge compartment will both provide energy savings and preserve the food quality.
In case the information which is given in the user manual is not taken into account, the manufacturer will not assume any liability for this.
Installation
Points to be paid attention to when the relocation of the refrigerator
- Your refrigerator should be unplugged. Before transportation of your refrigerator, it should be emptied and cleaned.
- Before it is re-packaged, shelves, accessories, crisper, etc. inside your refrigerator should be fixed with adhesive tape and secured against impacts. The package should be bound with thick tape or sound ropes and the transportation rules on the package should be strictly observed.
- Original packaging and foam materials should be kept for future transportations or moving.
Before you start the refrigerator,
Check the following before you start to use your refrigerator:
- Clean the interior of the refrigerator as recommended in the “Maintenance and cleaning” section.
- Connect the plug of the refrigerator to the wall socket. When the fridge door is opened, the fridge internal lamp will turn on.
- When the compressor starts to operate, a sound will be heard. The liquid and gases sealed within the refrigeration system may also give rise to noise, even if the compressor is not running and this is quite normal.
- Front edges of the refrigerator may feel warm. This is normal. These areas are designed to be warm to avoid condensation.
Electrical connection
Connect your product to a grounded socket that is being protected by a fuse with the appropriate capacity. Important: The connection must be in compliance with national regulations.
- The power plug must be easily accessible after installation.
- The electrical safety of your refrigerator shall be guaranteed only if the earth system in your house complies with standards.
- The voltage stated on the label located at the left inner side of your product should be equal to your network voltage.
- Extension cables and multi-plugs must not be used for the connection.
A damaged power cable must be replaced by a qualified electrician.
The product must not be operated before it is repaired! There is the risk of electric shock!
Disposing of the packaging
The packing materials may be dangerous for children. Keep the packing materials out of the reach of children or dispose of them by classifying them in accordance with the waste instructions stated by your local authorities. Do not throw away with regular house waste, throw away on packaging pick-up spots designated by the local authorities. The packing of your refrigerator is produced from recyclable materials.
Disposing of your old Refrigerator
Dispose of your old refrigerator without giving any harm to the environment.
- You may consult your authorized dealer or waste collection center of your municipality about the disposal of your refrigerator. Before disposing of your refrigerator, cut out the electric plug and, if there are any locks on the door, make them inoperable in order to protect children against any danger.
Placing and Installation
![]() If the entrance door of the room where the refrigerator will be installed is not wide enough for the refrigerator to pass through, then call the authorized service to have them remove the doors of your refrigerator and pass it sideways through the door.
If the entrance door of the room where the refrigerator will be installed is not wide enough for the refrigerator to pass through, then call the authorized service to have them remove the doors of your refrigerator and pass it sideways through the door.
- Install your refrigerator to a place that allows ease of use.
- Keep your refrigerator away from heat sources, humid places, and direct sunlight.
- There must be appropriate air ventilation around your refrigerator in order to achieve an efficient operation. If the refrigerator is to be placed in a recess in the wall, there must be at least 5 cm distance from the ceiling and at least 5 cm from the wall. Do not place your product on the materials such as a rug or carpet.
- Place your refrigerator on an even floor surface to prevent jolts.
Changing the illumination Lamp
To change the Bulb/LED used for illumination of your refrigerator, call your Authorized Service. The lamp(s) used in this appliance is not suitable for household room illumination. The intended purpose of this lamp is to assist the user to place foodstuffs in the refrigerator/freezer in a safe and comfortable way. The lamps used in this appliance have to withstand extreme physical conditions such as temperatures below -20°C.
Changing the door opening
The direction of your refrigerator can be changed according to the place you are using it. If this is necessary, please call your nearest Authorized Service.
Adjusting the legs
If your refrigerator is unbalanced; You can balance your refrigerator by turning its front legs as illustrated in the figure. The corner where the leg exists is lowered when you turn in the direction of the black arrow and raised when you turn in the opposite direction. Taking help from someone to slightly lift the refrigerator will facilitate this process.

Preparation
- Your refrigerator should be installed at least 30 cm away from heat sources such as hobs, ovens, central heater, and stoves and at least 5 cm away from electrical ovens and should not be located under direct sunlight.
- The ambient temperature of the room where you install your refrigerator should at least be 10°C. Operating your refrigerator under cooler conditions is not recommended with regard to its efficiency.
- Please make sure that the interior of your refrigerator is cleaned thoroughly.
- If two refrigerators are to be installed side by side, there should be at least a 2 cm distance between them.
- When you operate your refrigerator for the first time, please observe the following instructions during the initial six hours.
- The door should not be opened frequently.
- It must be operated empty without any food in it.
- Do not unplug your refrigerator. If a power failure occurs out of your control, please see the warnings in the “Recommended solutions for the problems” section.
- Original packaging and foam materials should be kept for future transportations or moving.
Using your refrigerator

Indicator Panel
The indicator panel allows you to set the temperature and control the other functions related to the product without opening the door of the product. Just press the inscriptions on relevant buttons for function settings.
- Power failure/High temperature/error warning indicator
This indicator (!) illuminates during a power failure, high-temperature failures, and error warnings. During sustained power failures, the highest temperature that the freezer compartment reaches will flash on the digital display. After checking the food located in the freezer compartment press the alarm off button to clear the warning.
Please refer to the “remedies advised for troubleshooting” section on your manual if you observe that this indicator is illuminated. - Energy-saving function (display off):
If the product doors are kept closed for a long time energy-saving function is automatically activated after 1 minute and the energy-saving symbol is illuminated.

When the energy-saving function is activated, all symbols on the display other than the energy-saving symbol will turn off. When the Energy Saving function is activated, if any button is pressed or the door is opened, the energy-saving function will be canceled and the symbols on display will return to normal. The energy-saving function is activated during delivery from the factory and cannot be canceled.
 *Optional: The figures in this user guide are intended as drafts and may not perfectly match your product. If your product does not comprise the relevant parts, the information pertains to other models.
 - Quick fridge function
Press this button to activate or deactivate the quick cool function
 Use quick cooling function when you want to quickly cool the food placed in the fridge compartment. If you want to cool large amounts of fresh food, activate this function before putting the food into the product.
If you do not cancel it, quick cooling will cancel itself automatically after 1 hours or when the fridge compartment reaches to the required temperature.
This function is not recalled when power restores after a power failure. - Fridge compartment temperature setting button
Press this button to set the temperature of the fridge compartment to 8, 7,6, 5,4,3, 2,1, 8… respectively. Press this button to set the fridge compartment temperature to the desired value. - Vacation Function
In order to activate the vacation function, press this button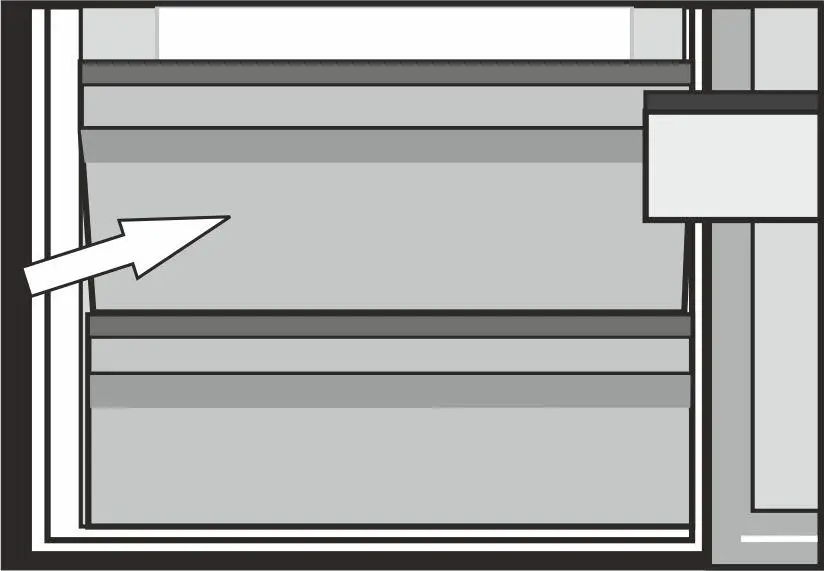 for 3 seconds, and the vacation mode indicator
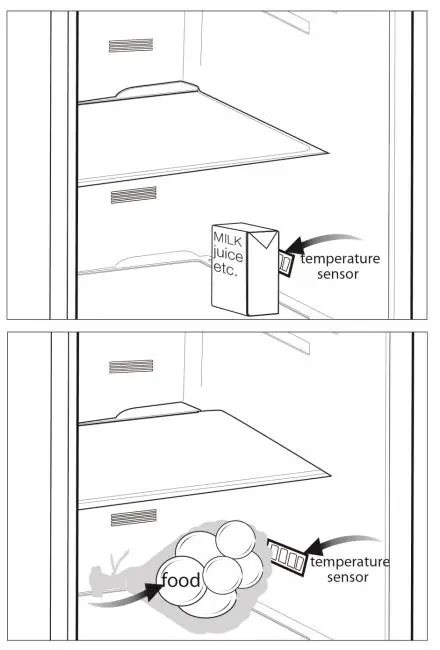 will be activated.
When the vacation function is activated, “- -” is displayed on the fridge compartment temperature indicator, and no active cooling is performed on the fridge compartment. It is not suitable to keep the food in the fridge compartment when this function is activated. Other compartments shall be continued to be cooled as per their set temperature. To cancel this function press the Vacation function button again. - Alarm off warning:
In case of power failure/high-temperature alarm, after checking the food located in the freezer compartment press the alarm off button to clear the warning.
 - Key lock
Press key lock button ( 3’’) simultaneously for 3 seconds. Key lock symbol will light up and key lock mode will be activated. Buttons will not function if the Key lock mode is active.
Press the key lock button simultaneously for 3 seconds again. Key lock symbol will turn off and the key lock mode will be exited. Press the key lock button if you want to prevent changing of the temperature setting of the refrigerator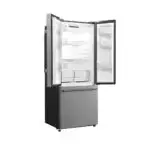
- Eco fuzzy
Press and hold eco fuzzy button one times to activate eco fuzzy function. The refrigerator will start operating in the most economic mode at least 6 hours later and the economic usage indicator will turn on when the function is active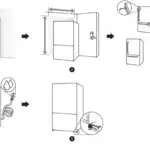 . Press and hold the eco fuzzy function button for 3 seconds to deactivate the eco fuzzy function. This indicator is illuminated after 6 hours when eco fuzzy is activated.
 - Freezer compartment temperature setting button Press this button to set the temperature of the freezer compartment to -18,-19,20,-21, -22, -23,-24, -18… respectively. Press this button to set the freezer compartment temperature to the desired value.
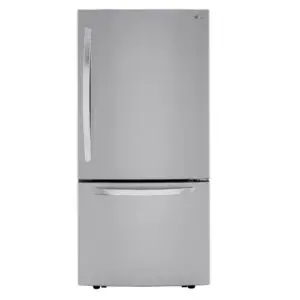
- 11.* These features are not active on your device (only on products with cinematic machines).
Dual cooling system:
Your refrigerator is equipped with two separate cooling systems to cool the fresh food compartment and freezer compartment. Thus, air in the fresh food compartment and freezer compartment do not get mixed. Thanks to these two separate cooling systems, cooling speed is much higher than other refrigerators. Odors in the compartments do not get mixed. Also additional power saving is provided since the defrosting is performed individually.
Moisture controlled vegetable bin
*optional
With the moisture control feature, moisture rates of vegetables and fruits are kept under control and ensures a longer freshness period for foods. It is recommended to store leafed vegetables such as lettuce and spinach and similar vegetables prone to moisture loss not on their roots but in horizontal position into the vegetable bin as much as possible. When placing the vegetables, place heavy and hard vegetables at the bottom and light and soft ones on the top, taking into account the specific weights of vegetables.
Do not leave vegetables in the vegetablebin in plastic bags. Leaving them in plastic bags causes vegetables to rot in ashort time. In situations where contact with other vegetables is not preferred, use packaging materials such as paper that has a certain porosity in terms of hygiene.
Do not put fruits that have a high ethylene gas production such as pear, apricot, peach and particularly apple in the same vegetable bin with other vegetables and fruits. The ethylene gas coming out of these fruits might cause other vegetables and fruits to mature faster and rot in a shorter period of time.
Freezing fresh food
- Wrap or cover the food before placing them in the refrigerator
- Hot food must cool down to room temperature before putting them in the refrigerator.
- The foodstuff that you want to freeze must be fresh and of good quality.
- Foodstuff must be divided into portions according to the family’s daily or meal-based consumption needs.
- Foodstuff must be packaged in an airtight manner to prevent them from drying even if they are going to be kept for a short time.
- Materials to be used for packaging must be resistant to cold and humidity and must be airtight. The packaging material of the food must be at sufficient thickness and durability. Otherwise, the food hardened due to freezing may puncture the packaging. It is important for the packaging to be closed securely for the safe storage of the food.
- Frozen food must be used immediately after they are thawed and it should never be re-frozen.
- Placing warm food into the freezer compartment causes the cooling system to operate continuously until the food is frozen solid.
- Please observe the following instructions to obtain the best results.
1. Do not freeze too large quantities of food at one time. The quality of the food is best preserved when it is frozen right through to the core as quickly as possible.
2. Take special care not to mix already frozen food and fresh food.
3. Make sure raw foods are not in contact with cooked foods in the fridge.
4. Maximum frozen food storage volume is achieved without using the drawers provided in the freezer compartment. Energy consumption of your appliance is declared while the freezer compartment is fully loaded on shelves without the use of the drawers.
5. It is recommended that you place foodstuffs on the top shelf of the freezer for initial freezing.
Compartment for keeping perishable food (low temperature /-2 0 C – +3 0 C).
This compartment was designed to store frozen food, which can be defrosted slowly (meat, fish, chicken, etc) as needed. The low-temperature compartment is the coldest place in the refrigerator where dairy products (cheese, butter), meat fish, or chicken can be kept in ideal conditions storage.
Vegetables and/or fruits should not be placed in this compartment.
Deep-freeze information
Food must be frozen as rapidly as possible when they are put in the freezer in order to keep them in good quality. The TSE norm requires (according to certain measurement conditions) the refrigerator to freeze at least 4.5 kg of foodstuff at 32°C ambient temperature to -18°C or lower within 24 hours for every 100-liters of freezer volume. It is possible to preserve the food for a long time only at -18°C or lower temperatures.
You can keep the freshness of food for many months (at -18°C or lower temperatures in the deep freeze).
WARNING! ![]()
- Foodstuff must be divided into portions according to the family’s daily or meal-based consumption needs.
- Foodstuff must be packaged in an airtight manner to prevent them from drying even if they are going to be kept for a short time. Materials necessary for packaging:
- Cold-resistant adhesive tape
- Self-adhesive label
- Rubber rings
- Pen Materials to be used for packaging the foodstuff must be tear-proof and resistant to cold, humidity, dour, oils, and acids. Foodstuff to be frozen should not be allowed to come in contact with the previously frozen items to prevent their partial thawing. Thawed out food must be consumed and must not be frozen again.
Recommendations for the fresh food compartment
*optional
- Do not allow the food to touch the temperature sensor in fresh food compartment. To allow the fresh food compartment keep its ideal storage temperature, sensor must not be hindered by food.
- Do not place hot foods in the product.

| Freezer Compartment Setting | Fridge Compartment Setting | Explanations |
| -18°C | 4°C | This is the normal recommended setting. |
| -20, -22 or -24°C | 4°C | These settings are recommended when the ambient temperature exceeds 30°C. |
| Quick Freeze | 4°C | Use when you wish to freeze your food in a short time. If is recommended to be used to maintain the quality of meat and fish products. |
| -18°C or colder | 2°C | If you think that your fridge compartment is not cold enough because of the hot conditions or frequent opening and closing of the door. |
| -18°C or colder | Quick Fridge | You can use it when your fridge compartment is overloaded or if you wish to cool down your food rapidly. It is recommended that you activate quick fridge function 4-8 hours before placing the food. |
Recommendations for the preservation of frozen food
- Pre-packed commercially frozen food should be stored in accordance with the frozen food manufacturer’s instructions in a frozen food storage compartment.
- To ensure that the high quality supplied by the frozen food manufacturer and the food retailer is maintained, the following points should be noted:
1. Put packages in the freezer as quickly as possible after purchase.
2. Ensure that contents of the package are labeled and dated.
3. Do not exceed “Use By”, “Best Before” dates on the packaging.
Defrosting
The freezer compartment defrosts automatically.
Placing the food
| Freezer compartment shelves | Various frozen food such as meat, fish, ice cream, vegetables and etc. |
| Egg holder | Egg |
| Fridge compartment shelves | Food in pans, covered plates and closed containers |
| Fridge compartment door shelves | Small and packaged food or drinks (such as milk, fruit juice and beer) |
| Crisper | Vegetables and fruits |
| Fresh zone compartment | Delicatessen products (cheese, butter, salami and etc.) |
Maintenance and cleaning
![]() Never use gasoline, benzene, or similar substances for cleaning purposes.
Never use gasoline, benzene, or similar substances for cleaning purposes.
![]() We recommend that you unplug the appliance before cleaning.
We recommend that you unplug the appliance before cleaning.
![]() Never use any sharp abrasive instrument, soap, household cleaner, detergent, and wax polish for cleaning.
Never use any sharp abrasive instrument, soap, household cleaner, detergent, and wax polish for cleaning.
![]() Use lukewarm water to clean the cabinet of your refrigerator and wipe it dry.
Use lukewarm water to clean the cabinet of your refrigerator and wipe it dry.
![]() Use a damp cloth wrung out in a solution of one teaspoon of bicarbonate of soda to one pint of water to clean the interior and wipe it dry.
Use a damp cloth wrung out in a solution of one teaspoon of bicarbonate of soda to one pint of water to clean the interior and wipe it dry.
![]() Make sure that no water enters the lamp housing and other electrical items.
Make sure that no water enters the lamp housing and other electrical items.
![]() If your refrigerator is not going to be used for a long period of time, unplug the power cable, remove all food, clean it and leave the door ajar.
If your refrigerator is not going to be used for a long period of time, unplug the power cable, remove all food, clean it and leave the door ajar.
![]() Check door seals regularly to ensure they are clean and free from food particles.
Check door seals regularly to ensure they are clean and free from food particles.
![]() To remove door racks, remove all the contents and then simply push the door rack upwards from the base.
To remove door racks, remove all the contents and then simply push the door rack upwards from the base.
![]() Never use cleaning agents or water that contains chlorine to clean the outer surfaces and chromium-coated parts of the product. Chlorine causes corrosion on such metal surfaces.
Never use cleaning agents or water that contains chlorine to clean the outer surfaces and chromium-coated parts of the product. Chlorine causes corrosion on such metal surfaces.
Protection of plastic surfaces
![]() Do not put the liquid oils or oil-cooked meals in your refrigerator in unsealed containers as they damage the plastic surfaces of your refrigerator. In case of spilling or smearing oil on the plastic surfaces, clean and rinse the relevant part of the surface at once with warm water.
Do not put the liquid oils or oil-cooked meals in your refrigerator in unsealed containers as they damage the plastic surfaces of your refrigerator. In case of spilling or smearing oil on the plastic surfaces, clean and rinse the relevant part of the surface at once with warm water.
Troubleshooting
Please review this list before calling the service. It will save you time and money. This list includes frequent complaints that are not arising from defective workmanship or material usage. Some of the features described here may not exist in your product.
The refrigerator does not operate.
• The plug is not inserted into the socket correctly. >>>Insert the plug into the socket securely.
• The fuse of the socket which your refrigerator is connected to or the main fuse has blown out. >>>Check the fuse.
Condensation on the sidewall of the fridge compartment (MULTIZONE, COOL CONTROL and FLEXI ZONE).
• Ambient is very cold. >>>Do not install the refrigerator in places where the temperature falls below 10°C.
• Door has been opened frequently. >>>Do not open and close the door of the refrigerator frequently.
• Ambient is very humid. >>>Do not install your refrigerator in highly humid places.
• Food containing liquid is stored in open containers. >>>Do not store food with liquid content in open containers.
• Door of the refrigerator is left ajar. >>>Close the door of the refrigerator.
• Thermostat is set to a very cold level. >>>Set the thermostat to a suitable level.
The compressor is not running
• Protective thermic of the compressor will blow out during sudden power failures or plug-out plug-ins as the refrigerant pressure in the cooling system of the refrigerator has not been balanced yet. The refrigerator will start running approximately after 6 minutes. Please call the service if the refrigerator does not startup at the end of this period.
• The fridge is in defrost cycle. >>>This is normal for a full-automatically defrosting refrigerator. Defrosting cycle occurs periodically.
• The refrigerator is not plugged into the socket. >>>Make sure that the plug is fit into the socket.
• Temperature settings are not made correctly. >>>Select the suitable temperature value.
• There is a power outage. >>>Refrigerator returns to normal operation when the power restores.
The operation noise increases when the refrigerator is running.
• The operating performance of the refrigerator may change due to the changes in the ambient temperature. It is normal and not a fault.
The refrigerator is running frequently or for a long time.
• New product may be wider than the previous one. Larger refrigerators operate for a longer period of time.
• The room temperature may be high. >>>It is normal that the product operates for longer periods in hot ambient.
• The refrigerator might be plugged in recently or might be loaded with food. >>>When the refrigerator is plugged in or loaded with food recently, it will take longer for it to attain the set temperature. This is normal.
• Large amounts of hot food might be put in the refrigerator recently. >>>Do not put hot food into the refrigerator.
• Doors might be opened frequently or left ajar for a long time. >>>The warm air that has entered into the refrigerator causes the refrigerator to run for longer periods. Do not open the doors frequently.
• Freezer or fridge compartment door might be left ajar. >>>Check if the doors are closed completely.
• The refrigerator is adjusted to a very low temperature. >>>Adjust the refrigerator temperature to a warmer degree and wait until the temperature is achieved.
• Door seal of the fridge or freezer may be soiled, worn out, broken, or not properly seated. >>>Clean or replace the seal. Damaged/broken seal causes the refrigerator to run for a longer period of time in order to maintain the current temperature.
The freezer temperature is very low while the fridge temperature is sufficient.
• The freezer temperature is adjusted to a very low value. >>>Adjust the freezer temperature to a warmer degree and check.
The fridge temperature is very low while the freezer temperature is sufficient.
• The fridge temperature is adjusted to a very low value. >>>Adjust the fridge temperature to a warmer degree and check.
Food kept in the fridge compartment drawers is frozen.
• The fridge temperature is adjusted to a very high value. >>>Adjust the fridge temperature to a lower value and check.
The temperature in the fridge or freezer is very high.
• The fridge temperature is adjusted to a very high value. >>>Fridge compartment temperature setting has an effect on the temperature of the freezer. Change the temperatures of the fridge or freezer and wait until the relevant compartments attain a sufficient temperature.
• Doors are opened frequently or left ajar for a long time. >>>Do not open the doors frequently.
• Door is ajar. >>>Close the door completely.
• The refrigerator is plugged in or loaded with food recently. >>>This is normal.
When the refrigerator is plugged in or loaded with food recently, it will take longer for it to attain the set temperature.
• Large amounts of hot food might be put in the refrigerator recently. >>>Do not put hot food into the refrigerator.
Vibrations or noise.
• The floor is not level or stable. >>> If the refrigerator rocks when moved slowly, balance it by adjusting its feet. Also make sure that the floor is strong enough to carry the refrigerator and level.
• The items put onto the refrigerator may cause noise. >>>Remove the items on top of the refrigerator.
There are noises coming from the refrigerator like liquid flowing, spraying, etc.
• Liquid and gas flows occur in accordance with the operating principles of your refrigerator. It is normal and not a fault.
The whistle comes from the refrigerator.
• Fans are used in order to cool the refrigerator. It is normal and not a fault.
Condensation on the inner walls of the refrigerator.
• Hot and humid weather increases icing and condensation. It is normal and not a fault.
• Doors are opened frequently or left ajar for a long time. >>>Do not open the doors frequently. Close them if they are open.
• Door is ajar. >>>Close the door completely.
Humidity occurs on the outside of the refrigerator or between the doors.
• There might be humidity in the air; this is quite normal in humid weather. When the humidity is less, condensation will disappear.
Bad odor inside the refrigerator.
• No regular cleaning is performed. >>>Clean the inside of the refrigerator regularly with a sponge, lukewarm water, or carbonate dissolved in water.
• Some containers or package materials may cause the smell. >>>Use a different container or different brand packaging material.
• Food is put into the refrigerator in uncovered containers. >>>Keep the food in closed containers. Microorganisms spreading out from uncovered containers can cause unpleasant odors.
• Remove the foods that have expired best before dates and spoiled from the refrigerator.
The door is not closing.
• Food packages are preventing the door from closing. >>>Replace the packages that are obstructing the door.
• The refrigerator is not completely even on the floor. >>>Adjust the feet to balance the refrigerator.
• The floor is not level or strong. >>>Make sure that the floor is level and capable to carry the refrigerator.
Crispers are stuck.
• The food is touching the ceiling of the drawer. >>>Rearrange food in the drawer.