AUKEY 20000mAh Universal Power Bank
Thank you for purchasing the AUKEY PB-Y23 20000mAh Universal Power Bank with Power Delivery 2.0 and Qualcomm® Quick ChargeTM 3.0. Please read this user manual carefully and keep it for future reference. If you need any assistance, please contact our support team with your product model number and Amazon order number.
Package Contents
20000mAh Universal Power Bank
USB-A to C Cable
User Manual
Warranty Card
Product Diagram
Specifications
| Model | PB-Y23 |
| Technology | USB Power Delivery 2.0 Qualcomm® Quick ChargeTM 3.0 AiPower |
| Capacity | 20000mAh / 74Wh |
| Battery Type | Lithium polymer |
| Micro-USB Input | DC 5V 2A |
| Lightning Input | DC 5V 2A, 9V 2A |
| USB-C Input
(Power Delivery 2.0) |
DC 5V 3A, 9V 2A |
| USB-C Output (Power Delivery 2.0) | DC 5V 3A, 9V 2A, 12V 1.5A |
| USB Output
(Quick Charge 3.0) |
DC 5V–6.5V 3A, 6.5V–9V 2A, 9V–12V 1.5A |
| Total Power Output | 18W |
| Dimensions | 177 x 69 x 25mm / 6.98” x 2.71” x 0.97” |
| Weight | 382g / 13.47oz |
What is USB Power Delivery (PD)?
USB Power Delivery is a new, universal multi-voltage charging standard that dynamically negotiates power output over a USB Type-C connection to safely and efficiently recharge a wide range of compatible devices.
To get USB PD, the following are required:
- Device (phone, tablet, laptop) that supports USB PD
- USB-C charger with USB PD
- USB-C to C cable
What is Quick Charge 3.0?
Charge compatible devices up to four times faster than conventional charging. Quick Charge 3.0 is engineered to refuel devices twice as fast as Quick Charge 1.0 and is up to 38% more efficient than Quick Charge 2.0. Backward-compatible with Quick Charge 2.0/1.0 devices
Getting Started
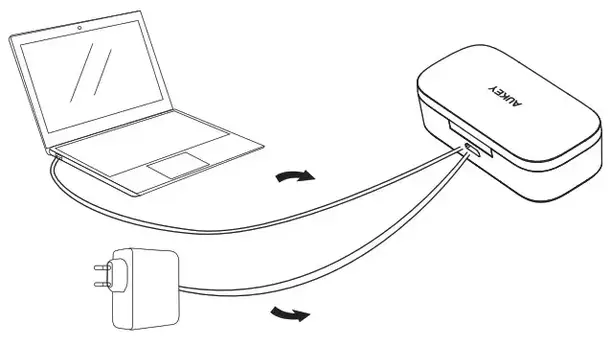
Charging the Power Bank
Fully charge your power bank before first use.
- Connect the included USB-A to C cable / a Micro-USB cable / Lightning cable to a USB charger or charging port
- Connect the other end to the USB-C / Micro-USB / Lightning input port on the power bank
- Unplug the power bank when fully charged
Charging Your Device
- Connect the charging cable to your device’s charging port
- Connect the other end to a USB output port on PB-Y23
- Unplug your device when fully charged
- To check the remaining battery level, press the power button
Low-Current Charging Mode
This mode is customized to charge low-current devices (below 60mA). Try switching to this mode if a low-powered device (such as a fitness tracker or wireless headphones) isn’t charged in the standard charging mode.
- Double-press the power button to enter or exit low-current charging mode. The LED indicator lights will flash sequentially while
charging in this mode and display battery level when exiting it - After 2 hours of charging in this mode, power bank automatically switches back to standard charging mode and turns off
- To end charging early, exit low-current charging mode. However, extra charging in this mode won’t harm your device battery
Product Care & Use
- Keep away from liquids and extreme heat
- Don’t charge your devices while recharging the power bank Recharge the PB-Y23 at least once every 3 months
- Dispose of battery according to local environmental law
- The PB-Y23 doesn’t accept simultaneous Micro-USB, Lightning, and USB-C power input
Warranty & Customer Support
For questions, support, or warranty claims, contact us at the address below that corresponds with your region. Please include your Amazon order number and product model number.
Amazon US orders: [email protected]
Amazon EU orders: [email protected]
Amazon CA orders: [email protected]
Amazon JP orders: [email protected]
Please note: AUKEY can only provide after sales service for products purchased directly from AUKEY. If you have purchased from a different seller, please contact them directly for service or warranty issues.
Thank you for purchasing the AUKEY EP – T1 True Wireless Earbuds. Please read this user manual carefully
and keep it for future reference. If you need any assistance, please contact our support team with your
product model number and Amazon order number.
Package Contents
True Wireless Earbuds
Charging Case
Micro – USB Cable
Three Pairs of Ear – Tipsand Ear – Fins (S/M/L)
User Manual
Warranty Card
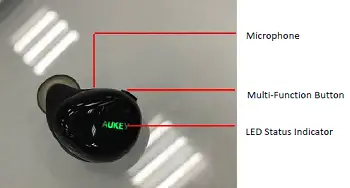
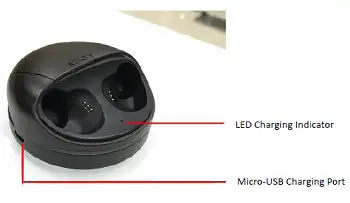
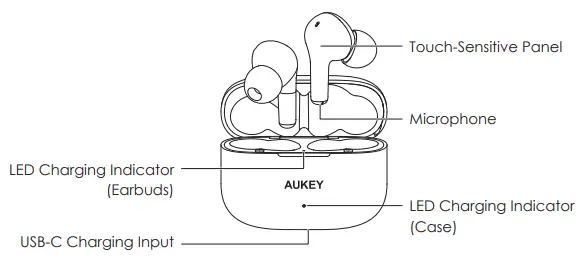
Product Diagram
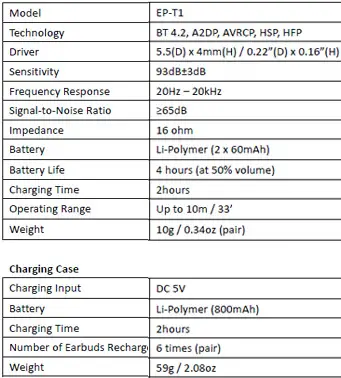
Specifications
Earbuds
Getting Started
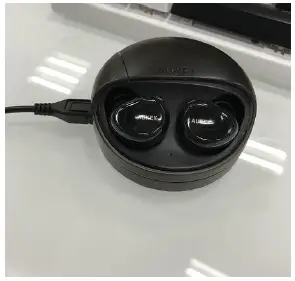
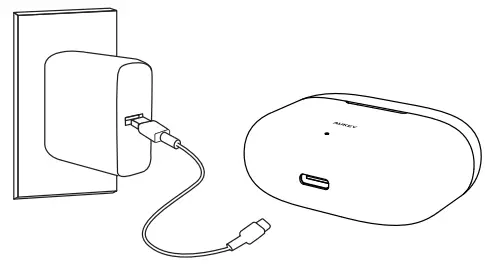
Fully charge the charging case before first use. Connect the charging case to a USB charger or charging port with the included micro-USB cable. When the red charging indicator stops flashing and stays on, the charging caseis fully charged. Charging takes around 2 hours. Charge and store the earbuds in the charging case. After being fully charged, the case can fully charge the earbuds 6 times. When charging the earbuds (with power disconnected), the charging indicator will besolid blue. It will flashing blue when the charging case has low power.
Pairing
Starting with the earbuds powered off:
1. Press and hold the multi-function button on the left earbud (‘host’– the master earbud) for 5 seconds or until the LED indicator flashes red and green alternately (not just lights up green)
2. Turn on the pairing function of the device you want to pair with the earbuds
3. In the list of available devices, find and select “AUKEY EP-T1.” When connected, the LED status indicator will flash green steadily
4. If a code or PIN is required for pairing, enter “0000”
5. After pairing with the left earbud (‘host’), turn on the right earbud (‘device’– the earbud that connects to the ‘host’ earbud; not your phone or other device) and wait 5 seconds. The right earbud will automatically connect with the left one via BT
Regular Use After Pairing
Once the earbuds are successfully paired with your device, each time you want to use them simply switch on (with automatic connection) and switch off as follows.
• To power on, press and hold the multi-function buttons on both earbudsfor 2 seconds, and the LED indicators will begin to flash green steadily
•To power off, press and hold the multi-function button on either earbud for 3 seconds or until the LED status indicator lights up red for a moment and then switches off. If you put the earbuds into the charging case, the earbuds will automatically turn off and begin charging
Simultaneous Connection with Two Devices
1. Follow the instructions in the “Pairing” section to pair the earbuds with Device A
2.Once paired, disable wireless function on Device A
3. Follow the instructions in the “Pairing” section to pair with Device B
4. Once paired with Device B, reactivatewireless function on Device A and select “AUKEY EP-T1” in the list of paired devices
5. You can now make and receive calls from either of the two paired devices
Notes
• Use the left earbud to pair with your phone first. If you pair the right earbud with your phone first, when you turn on the left earbud, the right earbud will automatically disconnect. The left earbud will then automatically enter pairing mode after 5 seconds
• If you put the left earbud (host) into the charging case or turn off either of the two earbuds, your device will disconnect
• To reset the earbuds (clear pairing list), start with both earbuds off and simultaneously press and hold the multi-function buttons on both earbuds for 5 seconds until they both flash red and green alternately
• When you turn on the earbuds, they will automatically reconnect to the last-paired device after 5 seconds or enter pairing mode if no paired device is found
•The earbuds will automatically shut down after 5 minutes if left in pairing mode with no devices paired or if your paired device is turned off or disconnected and no other device is paired
•If the earbuds exceed the wireless operating range of 10m / 33feet, they will disconnect. The connection to the last successfully connected device will be re-established once you re-enter wireless range within 2 minutes. After 2 minutes, the earbuds will enter pairing mode and will switch off after a further 5 minutes if no device is paired. To connect to other devices, please repeat the previous“Pairing” steps
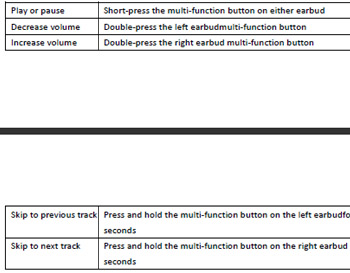
Controls &LED Indicators
Streaming Audio
Once paired, you can wirelessly stream audio from your device to the earbuds. Music willautomatically pausewhen you receive an incoming phone call and resume once the call is ended.

Notes
•A single soft beep indicates volume adjustment and two high-pitched beeps indicate the upper limit (wider adjustment is possible on your device). One high-pitched beep indicates track skipping
•You can only use the multi-function button on the left earbud (host) to take calls. The microphone is also in the left earbud
FAQ
The earbudsare on but not connecting to my device
For the earbuds and your device to establish a connection, you need to put them both in pairing mode.Please follow the instructions in the “Pairing” section of this manual.
My device can’t find “AUKEY EP-T1” on the pairing list when trying to pair
Make sure the left earbud is on and in pairing mode (flashing red and green alternately; see the “Pairing” section of this manual). Otherwise, restart your device and the earbuds; then try pairing again.
I’ve established a connection with my smartphone, but I’m not hearing any sound
Please double-check the volume level on your smartphone and the earbuds. Some smartphones require you toset up the earbuds as an audio output device before audio can be transmitted. If you are using a music player orother device, please make sure it supports the A2DP profile.
The sound isn’t very clear or the caller can’t hear my voice clearly
Please adjust the volume on your smartphone and the earbuds. Try getting closer to your smartphone to rule outthe possibility of interference or wirelessrange-related issues.
Product Care & Use
• Keep away fromextreme heatand strong magnetic fields
• Don’t use earbuds at high volume for extended periods, as this may cause permanent hearing damage or loss Warranty & Customer Support
For questions, support, or warranty claims, contact us at the address below that corresponds with your region. Please include your Amazon order number and product model number.
Amazon US orders: [email protected]
Amazon EU orders: [email protected]
Amazon CA orders: [email protected]
Amazon JP orders: [email protected]
*Please note, AUKEY can only provide after sales service for products purchased directly from AUKEY. If you have purchased from a different seller, please contact them directly for service or warranty issues.
Notice for US
Changes or modifications not expressly approved by the party responsible for compliance could void the user’s authority to operate the equipment. This device complies with Part 15 of the FCC Rules. Operation is subject to the following two conditions:
1. This device may not cause harmful interference, and
2. This device must accept any interference received, including interference that may cause undesired operation
FCC Rules
This equipment has been tested and found to comply with the limits for a Class B digital device, pursuant to part 15 of the FCC Rules. These limits are designed to provide reasonable protection against harmful interference in a residential installation. This equipment generates, uses, and can radiate radio frequency energy and, if not installed and used in accordance with the instructions, may cause harmful interference to radio communications. However, there is no guarantee that interference will not occur in a particular installation. If this equipment does cause harmful interference to radio or television reception, which can be determined by turning the equipment off and on, the user is encouraged to try to correct the interference by one or more of the following measures:
● Reorient or relocate the receiving antenna
● Increase the separation between the equipment and receiver
● Connect the equipment into an outlet on a circuit different from that to which the receiver is connected
● Consult the dealer or an experienced radio/TV technician for help Caution
Changes or modifications made to this device that are not expressly approved by AUKEY may void the user’s authority to operate this equipment.
https://fccid.io/2AFHPEP-T1/User-Manual/User-Manual-3579268/pdf
References
]]>
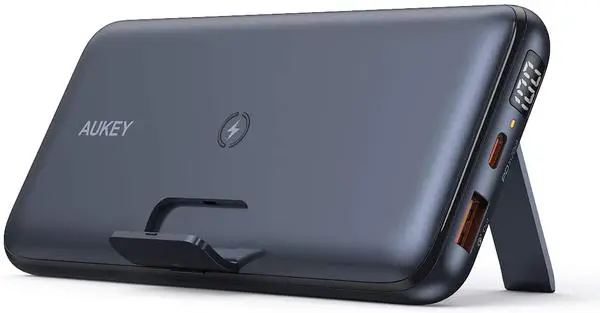
AUKEY 10000mAh Wireless Charging Power Bank
Thank you for purchasing AUKEY products. Please read this user manual carefully and keep it for future reference.
Package Contents
- Basix Pro Wireless Charging Power Bank
- USB-C to A Cable
- User Manual
- Warranty Card
Getting Started
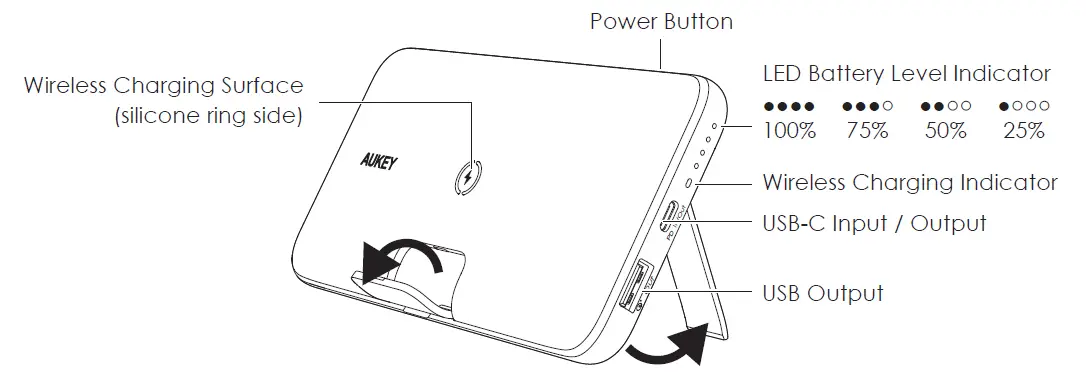
Place your phone or tablet on the center of your Basix Pro Wireless Charging Power Bank

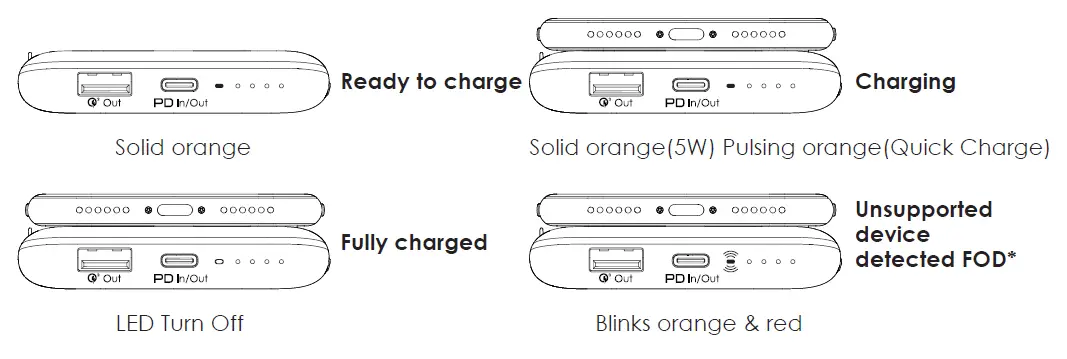
Wireless Charging LED status indicators

This means that with a Qi-certified product, the transmitter of the wireless charging system can detect if a foreign object, such as coins, metal, is on its surface. In this event, the wireless charger either stops charging or does not start charging at all.
Specifications
| Model | PB-WL02 |
| Technology | Qi, USB Power Delivery 3.0, Qualcomm® Quick Charge 3.0 |
| Capacity | 10000mAh / 37Wh |
| Battery Type | Lithium polymer |
| USB-C Input | (Power Delivery 3.0) DC 5V 3A / 9V 2A |
| USB-C Output | (Power Delivery 3.0) DC 5V 3A / 9V 2A / 12V 1.5A |
| USB-A Output | (Quick Charge 3.0) DC 5V 2.4A / 9V 2A / 12V 1.5A |
| Wireless Output | 5W, 7.5W, 10W |
| Max Power Output | 18W |
| Dimensions | 155 x 75 x 15.5mm / 6.10″ x 2.95″ x 0.61″ |
| Weight | 242g / 8.54oz |
What is USB Power Delivery (PD)?
USB Power Delivery is a universal multi-voltage charging standard that dynamically negotiates power output over a USB Type-C connection to safely and efficiently recharge a wide range of compatible devices.
To get USB PD, the following are required:
- Device (phone, tablet, laptop) that supports USB PD above the top surface of the device must be respected.
- USB-C charger with USB PD
- USB-C to C cable or Apple USB-C to Lightning Cable
What is Quick Charge 3.0?
Charge compatible devices up to four times faster than conventional charging. Quick Charge 3.0 is engineered to refuel devices twice as fast as Quick Charge 1.0 and is up to 38% more efficient than Quick Charge 2.0. Backward-compatible with Quick Charge 2.0/1.0 devices.
Wireless Charging
Place your phone or tablet on the center of your Basix Pro Wireless Charging Power Bank
Notes
- When the wireless charging mode is turned on, wireless charging will begin at 5W. If no devices are connected to the USB-A or USB-C port, output will automatically increase to 7.5W or 10W for compatible wireless fast charging devices after 15 seconds
- If you press the power button to enter wireless charging mode while the USB-A or USB-C port is fast-charging your device, the output on that port will be limited to 5V. The power bank automatically exits wireless charging mode after 15 seconds if no Qi device is detected, and the USB-A or USB-C port will resume fast charging
Wired Charging
- Connect the included USB-C to A cable to your device charging port
- Connect the other end to the USB-C or USB-A output port on the PB-WL02
- Unplug your device when fully charged
Notes
- When any two ports (including wireless charging) are output at the same time, the output will automatically turn off the fast charging mode (9V / 12V), Enter 5V voltage output mode (wireless automatic switching 5W)
- The product supports simultaneous output of more than two devices
(Note: If the total output power exceeds 18W, the product will activate over-current protection to turn off discharging of any output, it is normal situation) - The product supports charging and discharging at the same time
(Note: the charging and discharging function is only 5V, and there is no fast charge output)
Special note: the function of charging and discharging at the same time, the adapter gives priority to the device first, the PB-WL02 is charged with a small current, The PB-WL02 charge will rise slowly. If the output power of the adapter cannot meet the output device, there is a shutdown output situation)
Product Care & Use
- Keep away from liquids and extreme heat
- Recharge the PB-WL02 at least once every 3 months
- Dispose of battery according to local environmental law
Warranty & Customer Support
For questions, support, or warranty claims, contact us at the address below that corresponds with your region. Please include your Amazon order number and product model number.
Amazon US orders: [email protected]
Amazon EU orders: [email protected]
Amazon CA orders: [email protected]
Amazon JP orders: [email protected]
*Please note, AUKEY can only provide after sales service for products purchased directly from AUKEY. If you have purchased from a different seller, please contact them directly for service or warranty issues.
FCC Warning
This device complies with part 15 of the FCC Rules. Operation is subject to the following two conditions:(1) This device may not cause harmful interference, and (2) this device must accept any interference received, including interference that may cause undesired operation.
Any Changes or modifications not expressly approved by the party responsible for compliance could void the user’s authority to operate the equipment.
This equipment has been tested and found to comply with the limits for a Class B digital device, pursuant to part 15 of the FCC Rules. These limits are designed to provide reasonable protection against harmful interference in a residential installation. This equipment generates uses and can radiate radio frequency energy and, if not installed and used in accordance with the instructions, may cause harmful interference to radio communications. However, there is no guarantee that interference will not occur in a particular installation. If this equipment does cause harmful interference to radio or television reception, which can be determined by turning the equipment off and on, the user is encouraged to try to correct the interference by one or
more of the following measures:
- Reorient or relocate the receiving antenna.
- Increase the separation between the equipment and receiver.
- Connect the equipment into an outlet on a circuit different from that to which the receiver is connected.
- Consult the dealer or an experienced radio/TV technician for help.
The device has been evaluated to meet general RF exposure requirement. The device can be used in portable exposure condition without restriction.
FCC RF exposure statement:
The equipment complies with FCC radiation exposure limits set forth for an uncontrolled environment.
During the operation of device a distance of 15 cm surrounding the device and 20 cm
Device (phone, tablet, laptop) that supports USB PD above the top surface of the device must be respected.
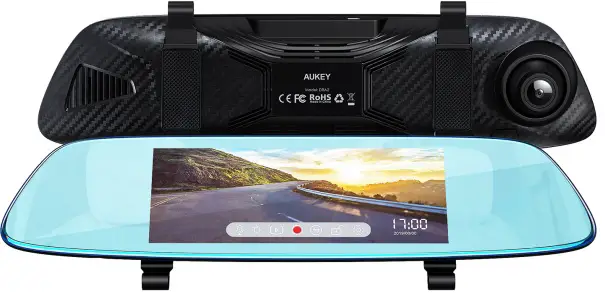
Thank you for purchasing the AUKEY DRA2 Mirror Dash Camera. Please read this user manual carefully and keep it for future reference. If you need any assistance, please contact our support team with your product model number and Amazon order number.
Package Contents
- Mirror Dash Camera
- Rear Camera with 7m / 23ft Cable
- Car Charger with 3.5m / 11.5ft USB Mini-B Cable
- Four Mounting Straps (2 + 2 spare)
- Two Screws
- Two 3M Stickers
- Six Cable Clips
- Trim Removal Tool
- User Manual
- Warranty Card
Product Diagram

Specifications
| Model | DRA2 |
| Image Sensor |
|
| CPU | MSC8336 |
| Screen | 6.8” LCD |
| Screen Resolution | 1280 x 480p |
| Angle of View |
|
| Aperture |
|
| Recording Resolutions |
|
| Video Format | MOV |
| Video Recording Modes | Loop, Motion Detection, Parking, Time-Lapse, and Emergency Recording |
| Sound Recording | On / Off |
| MicroSD Card | Class 10 or higher, 256GB Max |
| Input | DC 5V 2.5A via mini USB |
| Battery | 500mAh |
| Operating Temperature | -20°C – 70°C (-4°F – 158°F) |
| Materials | ABS, PC, glass |
| Dimensions |
|
Using a MicroSD Card
The dash camera doesn’t include internal storage and requires a microSD card (Class 10+ recommended and 256GB Max supported) to function. Use a high-quality, branded card for maximum reliability. Insert a microSD card into the mirror dash camera microSD card slot. Later, when the camera is powered on, format it (‘Format SD Card’ in dash camera ‘General Settings’) to prepare the card for first use in the dash camera. Formatting will permanently erase any data on the microSD card. For best performance, format periodically (after backing up any important files).
Testing the Dash Camera System
You may wish to connect and test the dash camera system before proper, long-term installation in your car (or other vehicle). Connect the two cables to the mirror dash camera and plug the car charger into your car 12V/24V outlet (see ‘Installing the Dash Camera System’ steps 2 & 3 below); then switch on the car ignition to power the 12V/24V outlet. The dash camera system will power on automatically. Check that both cameras are operating correctly. See ‘Using the Touchscreen Buttons’ and other sections for information on operation.
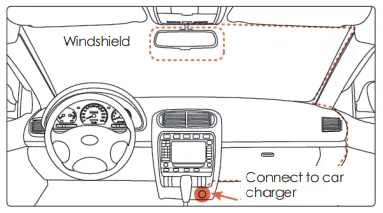
Installing the Dash Camera System
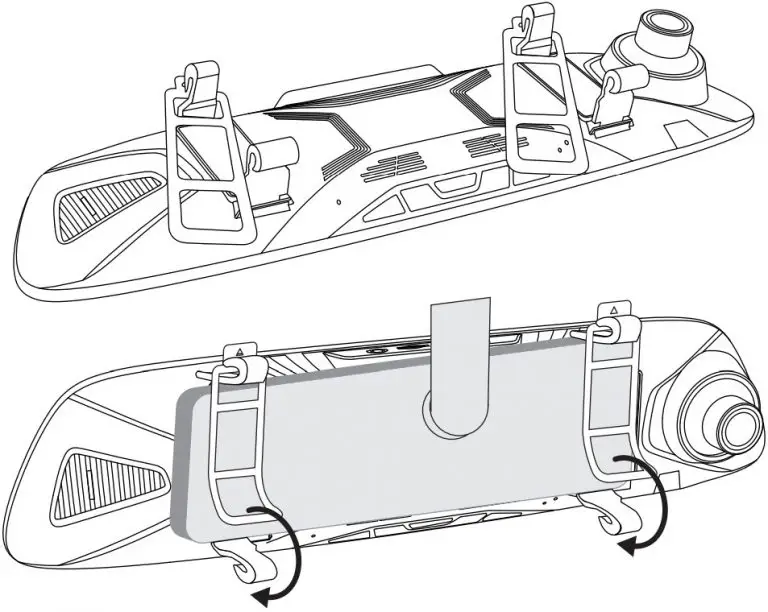
- Use two of the included mounting straps to attach the mirror dash camera to your car rear-view mirror. It should be attached with the widest part of the mirror dash camera at the bottom and the input ports on the top edge.
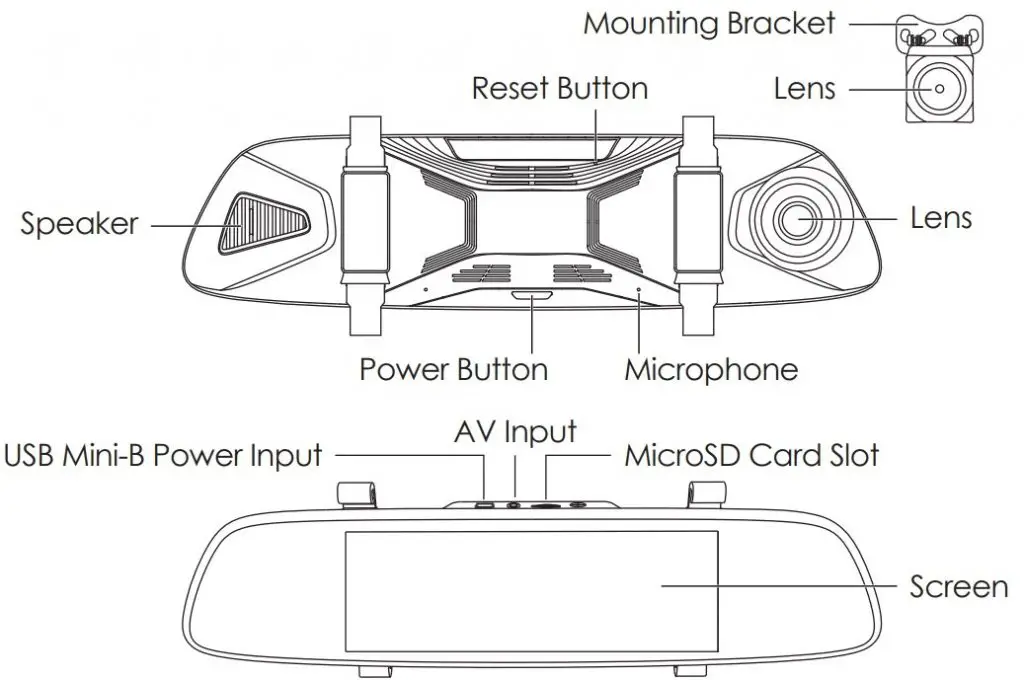
- Plug the car charger into your car 12V/24V outlet and connect the other end to the USB mini-B power input of the mirror dash camera.
- Plug the 7m/23ft rear camera cable into the AV input of the mirror dash camera.
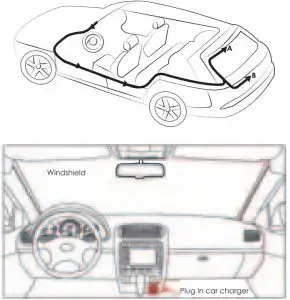
- Cable routing should be as shown in the following two diagrams. Use the cable clips to help fix the two cables conveniently and safely. A trim removal tool is included for concealment of cables behind trim and carpeting for a tidier finish. Removed trim can be left off until the cables are well-arranged in their final position and the dash camera system is operational.
- You can mount the rear camera internally or externally. External mounting generally offers a clearer image and better view point for reversing. However, it requires three small holes to be drilled in your car bodywork (two for camera mounting and one for cable routing).
External Camera Mounting:
- Detach the rear camera from the rest of the cable at the connection point on the cable 155mm/6.1” from the rear camera. Note that this slim rear camera connector defines the size of the hole you’ll need to drill later for the camera cable.
- Find a suitable camera mounting position above your license plate (central and tucked under an edge is most effective and discreet).
- Remove trim on the inside of the car behind that mounting position to check there are no obstructions for drilling and also get access for cable routing (leave the trim off for step 6).
- Confirm your rear camera mounting position. Ensure the camera is the right way up for correct picture orientation (note that the bracket is fixed to the camera back top edge). Drill the two holes for the camera bracket screws and one hole for the camera cable (use a metal drill bit for drilling through metal).
- Insert the rear camera connector & cable into the car through the hole and fix the camera securely onto the car using the camera bracket screws. Reconnect the two sections of the rear camera cable inside the car.
Internal Camera Mounting: - Install the camera inside your car next to the rear window using the 3M sticker. Ensure the camera is the right way up for correct picture orientation (note that the bracket is fixed to the camera back top edge).
- You need to hardwire the red wire of the rear camera cable to the positive wire of your reversing lights (ask a skilled person for help if you aren’t confident about doing this). This enables the screen to automatically switch to the rear camera full view when you go into reverse. If you don’t complete this step, you’ll need to switch views manually and the reversing guide lines won’t appear on-screen.
- Ensure your car is safely parked in a flat place.
- Remove trim to get access to the wiring system connections inside the trunk.
- Identify the reversing light wiring. Use a voltmeter to find the wire that’s only live (with about +12V) when your car is in reverse.
- Hardwire to this wire using a soldering or ‘military splice’ method and seal with electrical tape.
- Switch on the car ignition to power the 12V/24V outlet. The dash camera system will power on and start recording automatically. Check that both cameras are operating correctly and are positioned well for the best view. The mirror dash camera has a pivoting lens barrel and the rear camera tilts on its bracket,
Caution AUKEY is not responsible for any damage caused to or by the air bag due to incorrect placement of the device or its cables
Powering On / Off
Press and hold the power button for 3 seconds to turn the dash camera on/off. After the dash camera is turned on, short-press the power button to turn the screen on/off (recording continues). ‘Auto Screen Off’ and ‘Auto Power-Off’ in ‘General Settings’ can be used to turn the screen or the dash camera off automatically after 1 or 3 minutes.
Using the Touchscreen Buttons
![]() Audio Recording: Mute/unmute the microphone. When audio recording is on, in-car audio will be recorded during video recording
Audio Recording: Mute/unmute the microphone. When audio recording is on, in-car audio will be recorded during video recording
![]() Screen Brightness Adjustment: Choose from 5 screen brightness levels
Screen Brightness Adjustment: Choose from 5 screen brightness levels
Playback: Preview, lock/unlock, or delete recorded videos
![]() Recording: Start/stop recording. There will be a short delay to begin and end writing videos to storage
Recording: Start/stop recording. There will be a short delay to begin and end writing videos to storage
![]() Screen View Switch: Switch between 3 screen view options– dual view, front camera, and rear camera (in that order). Touch the icon or swipe horizontally across the screen
Screen View Switch: Switch between 3 screen view options– dual view, front camera, and rear camera (in that order). Touch the icon or swipe horizontally across the screen
![]() Video Protection: Lock/unlock a video in video recording mode. Protected videos won’t be overwritten by loop recording and can only be deleted if you unlock them first
Video Protection: Lock/unlock a video in video recording mode. Protected videos won’t be overwritten by loop recording and can only be deleted if you unlock them first
![]() Settings: Change video and general settings. Touch the up & down arrows to see more settings and settings options
Settings: Change video and general settings. Touch the up & down arrows to see more settings and settings options
Video Recording
- Loop Recording: Recording will begin automatically after powering on with a microSD card in the device. Each recorded file is up to 3 minutes long, with old footage being replaced when microSD card storage is full. The videos will be saved in the ‘Normal’ folder (or ‘Emergency’ folder if Emergency Recording is activated)
- Motion Detection Recording: Switch on motion detection in ‘General Settings.’ This function will start recording video when the dash camera optically detects motion in front and stop recording when motion is no longer detected. The videos will be saved in the ‘Motion Detection’ folder.
- Parking Mode: Switch on parking mode in ‘General Settings.’ The dash camera will use its internal rechargeable battery to operate even when the car ignition is turned off and power is disconnected. If any motion or vibration is physically detected by the G-sensor when parked, it will record automatically (screen off) for 10 seconds and then turn off. The videos will be saved in the ‘Emergency’ folder.
- Time-Lapse Recording: Switch on time-lapse recording in ‘Video Settings.’ This function will capture a picture per second to make a video played at 30fps. The videos will be saved in the ‘Normal’ folder.
Notes
- Motion detection recording keeps the cameras active to detect motion and start recording. It’s necessary to use a dash camera hardwire kit with output current greater than 2A for this mode
- Time-lapse recording has 12 or 24-hour recording durations. It’s necessary to use a dash camera hardwire kit with output current greater than 2A for this mode. This mode is for creating activity and time progression entertainment videos while your car is parked. It isn’t suitable for monitoring purposes while driving.
Emergency Recording
Manual File Backup
Click the lock icon to protect the current video so that it won’t be overwritten. The red recording indicator in the top left of the LCD screen will turn yellow to indicate a protected emergency recording is in progress. The videos will be saved in the ‘Emergency’ folder.
Auto File Backup
Once the G-sensor is activated by a sudden impact, the device will automatically make a recording and protect it from being overwritten. The red recording indicator in the top left of the LCD screen will turn yellow to indicate a protected emergency recording is in progress. Adjust G-sensor sensitivity in the ‘General Settings’ menu. The videos will be saved in the ‘Emergency’ folder.
File Transfer
USB File Transfer
- Connect the mirror dash camera (with card inside) to your computer using your own USB mini-B data cable. It should be recognized as a removable device.
- Find the video recording files located in the Normal, Motion Detection, and Emergency folders.
- Copy the files to your computer.
MicroSD Card File Transfer
- Shut down the device and eject the microSD card.
- Insert the microSD card into a computer microSD card slot or reader and your computer will automatically detect the microSD card.
- Find the video recording files located in the Normal, Motion Detection, and Emergency folders.
- Copy the files to your computer.
Product Care & Use
- Ensure mirror dash camera and rear camera are firmly attached before use to avoid falls.
- Keep away from liquids, extreme heat, and strong magnetic fields.
- Avoid touching the lens surfaces. They may be cleaned with a cotton swab or lens cleaning paper. If any dirt is difficult to remove, a non-abrasive glasses lens cleaner may be used. Don’t use corrosive solutions.
- Keep important videos backed up elsewhere to protect against file corruption or loss caused by any SD card issues.
- If the dash camera stops working, press and hold the reset button for 7 seconds to restart it (this won’t affect saved files).
Warranty & Customer Support
For questions, support, or warranty claims, please contact us at the address below that corresponds with your region. Please include your Amazon order number and product model number.
Amazon US orders: [email protected]
Amazon EU orders: [email protected]
Amazon CA orders: [email protected]
Amazon JP orders: [email protected]
- Please note, AUKEY can only provide after sales service for products purchased directly from AUKEY. If you have purchased from a different seller, please contact them directly for service or warranty issues.
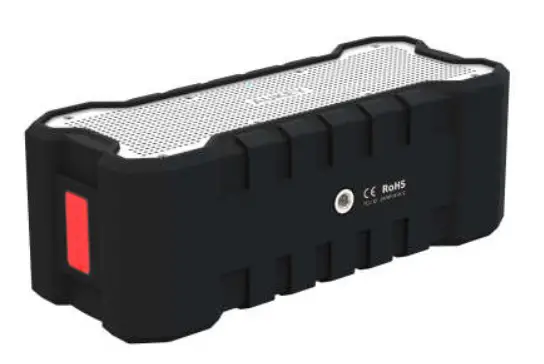
Thank you for purchasing the AUKEY SK-M12 SoundTank Wireless Speaker. Please read this user manual carefully and keep it for future reference. If you need any
assistance, please contact our support team with your product model number and Amazon order number.
Package Contents
SoundTank Wireless Speaker Micro-USB Cable 3.5mm Audio Cable Reset Pin
User Manual Warranty Card
Product Diagram
Specifications
| Model | SK-M12 |
| Technology | BT 4.0, A2DP, AVRCP, HSP, HFP |
| Audio Output Power | 2 x 5W |
| Frequency Response | 150Hz – 16kHz |
| Signal-to-Noise Ratio | ≥75dB |
| Input | DC 5V |
| Charging Time | 6 hours |
| Battery Life | Up to 30 hours |
| Battery Type | Li-ion (2 x 2600mAh) |
| Operating Range | Up to 10m / 33ft |
| Dimensions | 200 × 83 × 73mm / 7.87” × 3.26” × 2.87” |
| Weight | 650g / 22.93oz |
Charging
Fully charge this speaker before first use. Connect it to a USB charger or charging port with the included micro-USB cable to charge. When the red LED indicator turns
off, your speaker is fully charged and ready for use. Charging takes around 6 hours.
Powering On / Off
- Press and hold the power button for 3 seconds, and the LED indicator will light up blue / turn off
Pairing
- When you turn on the speaker, it will automatically enter pairing mode and the LED indicator will start to flash blue rapidly
- Activate the pairing function on your phone or other compatible device and select “AUKEY SK-M12”
- If a code or pin is required for pairing, enter “0000”
- When successfully paired, you will hear a tone and the LED indicator will stay blue
Notes
- To reset the speaker (to clear program errors), use the included pin to carefully short-press the reset button
- The speaker will automatically shut down after 10 minutes in pairing mode if no devices are paired
- If your paired device is switched off or manually disconnected, the speaker will enter pairing mode and automatically shut down after 10 minutes
- If the speaker or connected device exceeds the operating range, the speaker will disconnect. The connection to the last successfully connected device will be
re-established once you re-enter wireless range within 10 minutes. To connect to other devices, repeat the previous “Pairing” steps
Playing Audio via Audio Input Connection
Connect the SK-M12 to your PC, laptop, or other device with audio output port using the included 3.5mm audio cable. Press the power button to turn on, and the
LED indicator will light up blue.
Notes
- The speaker will disconnect from your phone or other paired devices when an audio cable is plugged into the audio input jack. Short-press the mode button to
switch back to BT mode - When playing audio using the audio input jack, press the volume + / – to adjust the volume and short-press multi-function button to pause or resume. Next / previous
track control on the speaker is disabled in audio input mode - For some computers, you may need to access the audio control panel to manually set the speaker as the default audio device
EQ Modes
The speaker has 2 EQ (equalization) sound modes – indoor mode (enhanced bass) and outdoor mode (boosted treble).
- Long-press mode button to toggle between modes
Controls & LED Indicator
Functions |
Instructions |
| Play or Pause | Short-press multi-function button |
| Adjust volume | Short-press volume + / – |
| Skip to next / previous track | Long-press volume + / – |
|
Cancel pairing |
When connected, press and hold multi-function button for more than two seconds |
|
Switch modes |
Long-press mode button to toggle between indoor and outdoor modes |
| Answer or end a call | Short-press multi-function button |
|
Reject an incoming call |
Press and hold multi-function button for more than 3 seconds |
| Redial last-called number | Double-press multi-function button in standby |
| LED Indicator | Status |
| Blue flashing rapidly | Pairing mode |
| Solid blue | Connected |
| Blue flashing steadily | Playing music / In call /Audio input mode |
| Red on | Charging |
| Red off (after charging) | Fully charged |
Product Care & Use
- Keep away from extreme heat and strong magnetic fields
- Do not use this speaker at high volume for extended periods, as this may cause
permanent hearing damage or loss
Warranty & Customer Support
For questions, support, or warranty claims, contact us at the address below that corresponds with your region. Please include your Amazon order number and
product model number.
Amazon US orders: [email protected]
Amazon EU orders: [email protected]
Amazon CA orders: [email protected]
Amazon JP orders: [email protected]
*Please note, AUKEY can only provide after sales service for products purchased directly from AUKEY. If you have purchased from a different seller, please contact them directly for service or warranty issues
Notice for US
Changes or modifications not expressly approved by the party responsible for compliance could void the user’s authority to operate the equipment. This device
complies with Part 15 of the FCC Rules. Operation is subject to the following two conditions:
- This device may not cause harmful interference, and
- This device must accept any interference received, including interference that may cause undesired operation
FCC Rules
This equipment has been tested and found to comply with the limits for a Class B digital device, pursuant to part 15 of the FCC Rules. These limits are designed to provide
reasonable protection against harmful interference in a residential installation. This equipment generates, uses, and can radiate radio frequency energy and, if not installed and used in accordance with the instructions, may cause harmful interference to radio communications. However, there is no guarantee that interference will not occur in a particular installation. If this equipment does cause harmful interference to radio or television reception, which can be determined by turning the equipment off and on, the user is encouraged to try to correct the interference by one or more of the following measures:
- Reorient or relocate the receiving antenna
- Increase the separation between the equipment and receiver
- Connect the equipment into an outlet on a circuit different from that to which the receiver is connected
- Consult the dealer or an experienced radio/TV technician for help
Caution
Changes or modifications made to this device that are not expressly approved by
AUKEY may void the user’s authority to operate this equipment.
PC-W1
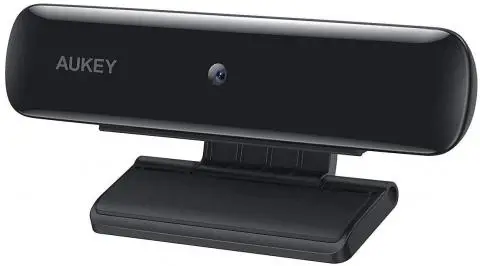
Thank you for purchasing the AUKEY PC-W1 1080p Webcam. Please read this user manual carefully and keep it for future reference. If you need any assistance, please contact our support team with your product model number and Amazon order number.
Package Contents
- 1080p Webcam
- User Manual
- Warranty Card
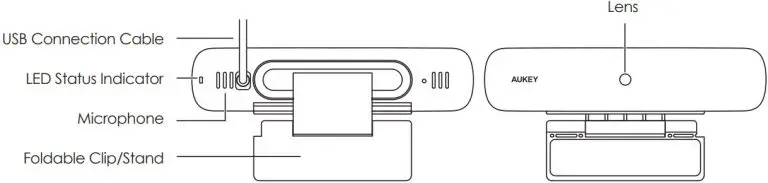
Product Diagram
Specifications
| Model | PC-W1 |
| Sensor | 1/2.7” CMOS image sensor |
| Recording Resolutions | 1080p (30fps), 720p (30fps), 480p (30fps), 240p (30fps) |
| Video Format | MJPEG |
| Effective Pixels | 2.0 megapixels |
| Focus Distance | 0.5 – 3m (fixed focus) |
| Angle of View | ≥75° |
| Minimum Illumination | ≤5 lux |
| Microphone | Built-in microphone |
| Input | DC 5V |
| System Requirements | Windows XP / Mac OS 10.7 / Android 4.0 or above |
| Material | ABS, PC |
| Operating Temperature | -10°C – 50°C / 14°F – 122°F |
| USB Cable Length | 170mm / 6.69” |
| Dimensions | 106 x 50 x 35mm / 4.17” x 1.97” x 1.38” |
| Weight | 80g / 2.82oz |
Getting Started
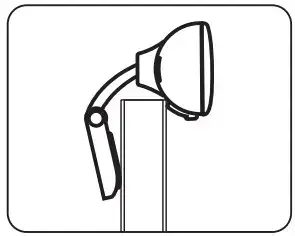
Positioning the Webcam
On a flat-screen computer monitor or laptop screen: Rest the rubber-padded bottom of the webcam on the top edge of the screen. The rubber pad of the clip/stand should be touching the back of the screen. The camera can be tilted up or down (ensure that both rubber pads are still in contact for a secure fit).

On a desk or other flat surface: The plain plastic side of the attached clip/stand should be on the surface (below the camera). Angle the two clip/stand hinges for the most stable position, with the webcam tilted up or down for the best view.
Connecting the Webcam
- Connect the webcam USB cable to your computer USB port (the camera will then appear in the ‘Devices and Printers’ section of the ‘Control Panel’). The LED status indicator will light up red.
- Open the video chat or recording software you want to use and begin a video call or video recording. While the camera is active, the LED status indicator will be purple.
- Adjust the clip/stand or pivot the camera to fine-tune the angle and view.
Product Care & Use
- Ensure camera and mount are firmly fixed in place or stable before use to avoid falls
- Keep away from liquids, extreme heat, and strong magnetic fields
- Avoid touching the lens surface. It may be cleaned with a cotton swab or lens cleaning cloth. If any dirt is difficult to remove, a non-abrasive glasses lens cleaner may be used. Don’t use corrosive solutions
Warranty & Customer Support
For questions, support, or warranty claims, contact us at the address below that corresponds with your region. Please include your Amazon order number and product model number.
- Amazon US orders: [email protected]
- Amazon EU orders: [email protected]
- Amazon CA orders: [email protected]
- Amazon JP orders: [email protected]
*Please note, AUKEY can only provide after sales service for products purchased directly from AUKEY. If you have purchased from a different seller, please contact them directly for service or warranty issues.
Support
AUKEY International Ltd.
www.aukey.com | [email protected]
No.102, Building P09, Electronics Trade Center
Huanan City, Pinghu Town, Longgang District
Shenzhen, Guangdong, 518111, CN

]]>
Aukey TWS EP-T21 Earbuds Manual and Pairing
Aukey TWS EP-T21 Earbuds Manual and Pairing
FCC ID: RDR-IN1933
Aukey Technology Co., Ltd.
www.aukey.com | [email protected]
Building P07, South China City Electronics Trading Center,
Longgang District, Shenzhen, Guangdong, 518111, China

Thank you for purchasing the AUKEY EP-T21 True Wireless Earbuds. Please read this user manual carefully and keep it for future reference. If you need any assistance, please contact our support team with your product model number and Amazon order number.
Package Contents
True Wireless Earbuds Charging Case Three Pairs of Ear-Tips (S/M/L) Micro-USB Cable Quick Start Guide User Manual Warranty Card
Product Diagram

Specifications

Getting Started
Charging
Fully charge the charging case before first use. To charge, connect the case to a USB charger or charging port with the included Micro-USB cable. When the LED charging indicator turns off, the case is fully charged. Charging takes around 2 hours, and after being fully charged, the case can fully charge the earbuds 7 times. The earbuds should be stored in the case when not in use. When the earbuds are charging in the case (with the case itself not charging), the LED indicators on the earbuds will turn solid red. When the indicators turn green for 1 minute and then turn off, the earbuds are fully charged.
Turning On / Off
Pairing
Starting with the earbuds in the case:
- Take the left and right earbuds out of the case. They will turn on automatically and connect with each other within 5 seconds
- After the earbuds have connected successfully, the LED indicators on the earbuds will flash green and red. This indicates they are ready to pair
- Turn on the pairing function on the device you want to pair with the earbuds
- From the list of available devices, find and select “AUKEY EP-T21”
- If a code or PIN is required for pairing, enter “0000”
Regular Use After Pairing
Once the earbuds are successfully paired with your device, they can be switched on and off as follows:
- Take the earbuds out from the charging case and they will turn on automatically
- To power off, put the earbuds back into the charging case and they will begin charging
Using the Left/Right Earbud Only
Starting with the earbuds in the case:
- Take the left/right earbud out
- Turn on the pairing function on the device you want to pair with the earbud
- From the list of available devices, find and select “AUKEY EP-T21”
Notes
- When you turn on the earbuds, they will automatically reconnect to the last-paired device or enter pairing mode if no paired device is found
- To clear the pairing list, remove both earbuds from the charging case, tap and hold the touch-sensitive panel on both earbuds for 10 seconds
- In pairing mode, the earbuds will automatically turn off after 5 minutes if no devices are paired
- If one of the earbuds has no sound output, put both earbuds back into the charging case and take them out again
- The maximum wireless operating range is 10m (33ft). If you exceed this range, the earbuds will disconnect from your paired device. The connection will be re-established if you re-enter the wireless range within 5 minutes. The earbuds will automatically reconnect to the last paired device. To connect with other devices, refer to the previous pairing steps
Controls & LED Indicators
Streaming Audio
Once paired, you can wirelessly stream audio from your device to the earbuds. Music will automatically pause when you receive an incoming phone call and resume once the call has ended.
Product Care & Use
- Keep away from liquids and extreme heat
- Don’t use the earbuds at high volume for extended periods, as this may cause permanent hearing damage or loss
Warranty & Customer Support
For questions, support, or warranty claims, contact us at the address below that corresponds with your region. Please include your Amazon order number and product model number.
Amazon US orders: [email protected]
Amazon EU orders: [email protected]
Amazon CA orders: [email protected]
Amazon JP orders: [email protected]
*Please note, AUKEY can only provide after-sales service for products purchased directly from AUKEY. If you have purchased from a different seller, please contact them directly for service or warranty issues.
FCC Information for Users
Changes or modifications not expressly approved by the party responsible for compliance could void the user’s authority to operate the equipment.
This device complies with Part 15 of the FCC Rules. Operation is subject to the following two conditions:
- This device may not cause harmful interference.
- This device must accept any interference received, including interference that may cause undesired operation.
NOTE: This equipment has been tested and found to comply with the limits for a Class B digital device, pursuant to Part 15 of the FCC Rules. These limits are designed to provide reasonable protection against harmful interference in a residential installation.
This equipment generates, uses, and can radiate radio frequency energy and, if not installed and used in accordance with the instructions, may cause harmful interference to radio communications. However, there is no guarantee that interference will not occur in a particular installation. If this equipment does cause harmful interference to radio or television reception, which can be determined by turning the equipment off and on, the user is encouraged to try to correct the interference by one or more of the following measures:
- Reorient or relocate the receiving antenna.
- Increase the separation between the equipment and receiver.
- Connect the equipment into an outlet on a circuit different from that to which the receiver is connected.
- Consult the dealer or an experienced radio/TV technician for help.
This equipment complies with FCC RF radiation exposure limits set forth for an uncontrolled environment.
CE Statement
Max RF power level:
BT classic (2402–2480MHz): 2.1dBm
RF exposure assessment has been performed to prove that this unit will not generate the harmful EM emission above the reference level as specified in EC Council Recommendation (1999/519/EC).
CAUTION: RISK OF EXPLOSION IF BATTERY IS REPLACED BY AN INCORRECT TYPE. DISPOSE OF USED BATTERIES ACCORDING TO THE INSTRUCTIONS.
Excessive sound pressure from earphones and headphones can cause hearing loss.
Hereby, Aukey Technology Co., Ltd. declares that the radio equipment type (True Wireless Earbuds, EP-T21) is in compliance with Directive 2014/53/EU.
Notice: This device may be used in each member state of the EU.
Aukey TWS EP-T21 Earbuds Manual and Pairing Instructions – Download [optimized]
Aukey TWS EP-T21 Earbuds Manual and Pairing Instructions – Download
SPECIFICATIONS
| Model Number | AUKEY EP-T21 |
| Package Contents | True Wireless Earbuds, Charging Case, Three Pairs of Ear-Tips (S/M/L), Micro-USB Cable, Quick Start Guide, User Manual, Warranty Card |
| Charging Time | 2 hours (for charging case), earbuds can be fully charged 7 times with fully charged case |
| Wireless Operating Range | 10m (33ft) |
| Controls | Touch-sensitive panel on earbuds |
| LED Indicators | Earbuds: solid red (when charging), green for 1 minute then off (when fully charged); Charging Case: LED charging indicator turns off when fully charged, blue and red alternately (when pairing mode is on) |
| Product Care | Keep away from liquids and extreme heat, don’t use at high volume for extended periods |
| Warranty | Contact support team with product model number and Amazon order number |
FAQ’S
I put the earbuds back in the charging case, but the earbuds are still connected
In this case, the charging case is likely to be out of power. You will need to charge the case.
The earbuds won’t turn on
Try charging the earbuds for a while. If the earbuds still won’t power on, please contact our support team at the email address given in Warranty & Customer Support.
How do I pair the earbuds with the charging case?
Press the power button on the charging case for 3 seconds to turn it on. The LED indicator will flash blue and red alternately. Place the earbuds into the charging case, and they will automatically pair. The LED indicator will flash blue and red alternately while the earbuds are pairing. When pairing is complete, the LED indicator will flash blue continuously.
How do I change the language of voice prompts?
Press and hold the power button for 3 seconds to enter Bluetooth pairing mode. Then connect your earbuds to any Bluetooth device (e.g., smartphone, tablet) and open “Settings” in your device’s system menu. Go to “Language & Input” or “System Preferences” and select “Chinese (Simplified)”. The voice prompts on your earbuds will now be in Chinese (Simplified).
How do I connect my earbuds to my smartphone?
When you turn on your earbuds for the first time, they will automatically enter Bluetooth pairing mode after 30 seconds of inactivity. To connect your earbuds to a device, go to “Settings” in your phone’s system menu, select “Bluetooth”, and then select “AUKEY EP-T21”. The LED indicator will flash blue while connecting. When connected, the LED indicator will flash blue continuously.
How do I disconnect my earbuds from my smartphone?
Go to “Settings” in your phone’s system menu, select “Bluetooth”, and then select “AUKEY EP-T21”. The LED indicator will flash blue while disconnecting. When disconnected, the LED indicator will stop flashing.
How do I use Siri or Google Now?
Activate Siri or Google Now by pressing and holding either volume button for 2 seconds until you hear a voice prompt saying that it has been activated. Then say a command such as “Call John Doe”.
How do I adjust volume levels?
Double-tap either volume button to increase volume by 1 level or triple-tap either volume button to decrease volume by 1 level. You can also adjust volume levels using Siri or Google Now commands such as “Increase/decrease volume 5 levels”.
What is noise cancellation?
Noise cancellation is a feature that allows you to focus on what you want to hear by reducing unwanted background noise when listening through your earbuds. Noise cancellation is enabled automatically when listening through your earbuds with no music playing on your phone or other device (e.g., tablet). If you want to enable noise cancellation manually when listening through your earbuds with music playing on your phone or other device (e.g., tablet), press and hold either volume button for 2 seconds until you hear a voice prompt saying that it has been activated.
How do I reset my Aukey Bluetooth?
Reset the earbuds
Take both earbuds out of the charging case, and the earbuds will turn on. …
Touch and hold on the touch-sensitive panels on both earbuds for 15 seconds. …
Put both earbuds back in the charging case and close the lid to reset.
Open the lid again, and both earbuds will turn on and enter pairing mode.
How do I pair my Aukey headphones to my Iphone?
Turn on the Bluetooth mode on your mobile device. It will automatically search for other Bluetooth enabled devices nearby. Choose the “AUKEY EP-B40” device from the list. Once the pairing has been successful, the headphone’s LED will flash blue every 8 seconds.
Why is only one headphone working on my Bluetooth headphones?
Check the settings
Headsets may play only in one ear depending on your audio settings. So check your audio properties and make sure that the mono option is turned off. In addition, make sure that voice levels are balanced on both earbuds.
User Manual
Dashboard Camera
Thank you for purchasing the AUKEY DRS1 4K Dash Camera. Please read this user manual carefully and keep it for future reference. If you need any assistance, please contact our support team with your product model number and Amazon order number.
Package Contents
4K Dash Camera
Dual-Port USB Car Charger
4m / 13ft USB Mini-B Cable
Sticker Mount
Two 3M Stickers
Suction Mount
Six Cable Clips
Trim Removal Tool
User Manual
Warranty Card
Product Diagram

Specifications
| Model | DRSI |
| Image Sensor | IMX415 |
| CPU | NT96670 |
| Screen | 2″ LCD |
| Angle of View | 170° |
| Aperture | f/1.8 |
| Exposure Value | -1.0. -2/3. -1/3. +0.0, +1/3, +2/3, +1.0 |
| Recording Resolutions | 4K 130(ps), 1600p 130(ps). 1440p (30fps)•
1296P 130114. 1060P (120fPs). 1080P 160flps6 720p (1201p). 720p (60f psi, 720p paps) |
| Recording Modes | Loop, Motion Defection, Time-lapse-and Emergency Recording |
| Video Format | MOV |
| Recording Modes | Loop, Motion Defection, Time-Lapse, and Emergency Recording |
| Image Format | JPEG |
| Sound Recording | On / Off |
| Gravity Sensor Sensitivity | Low / Medium / High / Off |
| RAM | 2GB DDR3 |
| Internal Storage | 8MB SPI Flash |
| MicroSD Card | Class 10 or higher, 128GB Max |
| Input | DC 5V 1.5A |
| Operating Temperature | 0°C – 65°C / 32°F – 149°F |
| Materials | ABS, PC. glass |
| Dimensions | 63.2 x 63.5 x 33.4mm / 2.49″ x 2.5″ x 1.32″ |
| Weight | 70g |
System LED Indicators
| LED Status Indicator | Meaning |
| Solid Green | On; not recording |
| Flashing Green | On; recording |
Control Buttons
| Button | Recording Mode | Playlist & Setup Menu | Playback Mode |
 |
Enter Emergency Recording mode |
Return to previous menu | Return to playlist / Stop |
 |
View playlist (short press) Turn on/off Audio Recording (long press) | Move up | Delete/Rewind |
| Open Setup menu (short press)
Take a snapshot (long press) |
Move down | Lock & Unlock / Fast-forward | |
| OK | Turn on/off the screen (short press)
Turn on/off dash camera Wi-H (long press) |
Enter/Confirm | Play/Pause |
 |
Long-press to turn off the dash camera when connected to car power. Long-press again to turn it back on | ||
| Reset Button | Press and hold for 7 seconds to restart the dash camera (this won’t affect saved files) | ||
Installing the Dash Camera
For optimal performance, install the AUKEY DRS1 in the top center of your windshield, facing directly ahead. Use the cable clips to help fix the power cable conveniently and safely like in the picture below.

Caution: AUKEY is not responsible for any damage caused to or by the airbag due to the incorrect placement of the device or its cables. To power on, insert the car charger into your car’s 12V socket, then connect the included cable to the car charger and to the mini-B port of the DRS1. Insert a microSD card into the microSD card slot and format it using the ‘Format’ option in Dash Camera ‘Setup.’ After powering on each time, the system will start recording automatically. To power off, long-press the power button or disconnect the USB mini-B cable.
Note: Use the included cable to ensure the optimum performance of AUKEY DRS1.
Setting Up the AukeyDash App
Install and use the ‘AukeyDash’ dash camera app to download, view, and share your footage, and to conveniently change dash camera settings with a smartphone or tablet.
- Download the ‘AukeyDash’ app from the Apple App Store / Google Play and install it
- Open the app. Tap ‘Get Started’ and then ‘Add a dash cam’
- Power on the dash camera and then tap ‘Next’ in the app
- Long-press the dash camera ‘OK’ button to turn on dash camera Wi-Fi (an icon will appear in the top-left of the screen)
- Tap ‘Next’ and then ‘WiFi settings in the app
- Find and connect to the dash camera Wi-Fi on your phone. The Wi-Fi name and password is displayed at the bottom of the dash camera screen. Tap the ‘Connect succeeded’ confirmation
- To watch the dash camera videos on your phone, tap ‘View’
Video Recording
- Loop Recording: Recording will begin automatically after powering on with a microSD card in the dash camera. Each recorded file is up to ten minutes long, with old footage being replaced when microSD card storage is full
- Motion Detection Recording: Switch on motion detection in ‘Setup.’ This function is designed to monitor when you’ve parked and left your vehicle but requires a continuous power supply. It will record video each time motion is detected
- Time-Lapse Recording: Switch on time-lapse recording in ‘Setup.’ This function will capture a picture per second to make a video played at 30fps. The videos will be saved in the ‘Video File’ folder
Note: Time-Lapse Recording isn’t suitable for monitoring purposes while driving.
Emergency Recording
- Manual File Backup
Pressto back up the current file so that it won’t be overwritten. A an  icon will appear in the top left of the LCD screen to indicate a protected emergency recording is in progress
 - Auto File Backup
Once the G-sensor is activated by a sudden impact, the dash camera will automatically make a recording and protect it from being overwritten. Adjust G-sensor sensitivity in the ‘Setup’ menu
Note: Enter the playlist or setup menu (or disconnect power) to end emergency recording mode
Snapshot
- Hold down
 for 3 seconds to take a snapshot while in recording mode
 - The snapshot files are located in the AUKEYPHOTO folder on the microSD card
- The
 icon will be shown after you take a snapshot. This won’t interrupt the video recording
Audio Recording
Turn on/off audio recording by long-pressing when in recording mode (or by adjusting in the ‘Setup’ menu). Voicing details of possible hazards that may develop, especially when off-camera, may provide useful information. You can even use it to record car license plate numbers that may not be captured on the video.
Viewing Photos and Videos
Viewing Photos and Videos
- Press to enter the playlist
- View photos or videos by choosing either Photo File’ or ‘Video File’
- Select the file you want to view and press OK
- For videos, press OK again to begin playback
Deleting and Locking/Unlocking Photos and Videos
- Pressto delete or lock/unlock a photo or video file after selecting it from the playlist. If a video is being played, pressto stop it and then press to delete orto lock/unlock
- Once deleted, photos and videos can’t be recovered
- If you lock a photo or video, it will be protected and not overwritten
MicroSD Card File Transfer
- Shut down the dash camera and eject the microSD card
- Insert the microSD card Into a computer microSD card slot or reader and your computer will automatically detect the microSD card
- Find the video recording files located in the AUKEYWOVIE folder for AUKEY PHOTO for snapshots)
- Copy the files to your computer
Product Care & Use
- Keep away from liquids, extreme heat, and strong magnetic fields
- Avoid touching the lens surface. It may be cleaned with a cotton swab or lens cleaning paper. If any dirt is difficult to remove, a non-abrasive glasses lens cleaner may be used. Don’t use corrosive solutions
- Keep important videos and photos backed up elsewhere to protect against file corruption or loss caused by any SD card issues
- If the dash camera stops working, press and hold the reset button for 7 seconds to restart it (this won’t affect saved files)
Warranty & Customer Support
For questions. support, or warranty claims, contact us at the address below that corresponds with your region. Please include your Amazon order number and product model number.
Amazon US orders: [email protected]
Amazon EU orders: [email protected]
Amazon CA orders: [email protected]
*Please note. AUKEY con only provide offer sales service for products purchased Madly from AUKEY. If you have purchased from o different seller. please contact them directly for service or warranty issues.
FCC Statement
Any changes or modifications not expressly approved by the party responsible for compliance could void the user’s authority to operate the equipment. This equipment has been tested and found to comply with the knits for a Coss B digital device, pursuant to Part 15 of the FCC Rules. These limits are designed to provide reasonable protection against harmful interference in a residential installation. This equipment generates uses and can radiate radio frequency energy and, if not installed and used in accordance with the instructions, may cause harmful interference to radio communications. However, there is no guarantee that interference wit did not occur in a particular installation. If this equipment does cause harmful interference to radio or television reception, which can be determined by turning the equipment off and on, the user is encouraged to try to correct the interference by one or more of the following measures:
— Reorient or relocate the receiving antenna.
— Increase the separation between the equipment and receiver.
— Connect the equipment into an outlet on a circuit different from that to which the receiver is connected.
— Consult the dealer or an experienced radio/TV technician for help. This device complies with part 15 of the FCC Rules. Operation is subject to the following Iwo conditions:(I) This device may not cause harmful interference, and (2) this device must accept any interference received, including interference that may cause undesired operation. Changes or modifications not expressly approved by the party responsible for compliance could void the user’s authority to operate the equipment. This equipment complies with FCC radiation exposure limits set forth for an uncontrolled environment. This equipment should be installed and operated with a minimum distance of 20cm between the radiator & your body.
Aukey Technology Co., Ltd
www.aukey.com | [email protected]
Room 102, Building P09, South China City
Electronic trading center, Longgang District,
Shenzhen, Guangdong, 518111, CN
FCC ID: 2ATIH-DRS1
]]>User Manual
Bluetooth Wireless Headset
EP-T27
FCC ID:2ATIHEP-T27
NOTE: This equipment has been tested and found to comply with the limits for a Class B digital device, pursuant to part 15 of the FCC Rules. These limits are designed to provide reasonable protection against harmful interference in a residential installation. This equipment generates uses and can radiate radio frequency energy and, if not installed and used in accordance with the instructions, may cause harmful interference to radio communications. However, there is no guarantee that interference will not occur in a particular installation. If this equipment does cause harmful interference to radio or television reception, which can be determined by turning the equipment off and on, the user is encouraged to try to correct the interference by one or more of the following measures:
– Reorient or relocate the receiving antenna.
– Increase the separation between the equipment and receiver.
-Connect the equipment into an outlet on a circuit different from that to which the receiver is connected.
-Consult the dealer or an experienced radio/TV technician for help
Changes or modifications not expressly approved by the party responsible for compliance could void the user’s authority to operate the equipment.
This device complies with Part 15 of the FCC Rules. Operation is subject to the following two conditions:
- this device may not cause harmful interference, and
- this device must accept any interference received, including interference that may cause undesired operation.
Thank you for purchasing the AUKEY EP-T27 True Wireless Earbuds. Please read this user manual carefully and keep it for future reference. If you need any assistance, please contact our support team with your product model number and Amazon order number.
Package Contents
True Wireless Earbuds
Charging Case
Three Pairs of Ear-Tips (S/M/L)
USB-A to C Cable
User Manual
Quick Start Guide
Warranty Card
Product Diagram

Specifications
Earbuds
| Model | EP-T27 |
| Technology | HSP, HFP, A2DP, AVRCP, aptX, AAC |
| Driver (each channel) | 1 x 6mm / 0.24″ speaker driver |
| Sensitivity | 90dB ±3dB SPL (at lkHz/lmW) |
| Frequency Range | 20Hz – 20kHz |
| Impedance | 16 ohm ±15% |
| Microphone Type | MEMS (microphone chip) |
| Microphone Sensitivity | -42dB ±3dB (at 1 kHz ref 1 V/Pa) |
| Microphone Frequency Range | 100Hz – 10kHz |
| Charging Time | ..C.40 minutes |
| Battery Life | 5 hours |
| Battery Type | Li-polymer (2 x 50mAh) |
| Operating Range | 10m / 33ft |
| IP Rating | IPX7 |
| Weight | 7g / 0.25oz (pair) |
Charging Case
| Charging Input | DC 5V |
| Charging Time | 2 hours |
| Battery Type | Li-polymer (380mAh) |
| Number of Earbuds Recharges | 4 times (pair) |
| Weight | 28g / 0.99oz |
Getting Started
Charging
Fully charge the charging case before first use. To charge, connect the case to a USB charger or charging port with the included USB-A to C cable. When the charging indicator light on the outside of the case is blue, the case is fully charged. Charging takes around 2 hours, and after being fully charged, the case can fully charge the earbuds 4 times. The earbuds should be stored in the case when not in use.
Turning On / Off
| Turn On | Remove both earbuds from the charging case or touch and hold on the touch-sensitive panels on both earbuds for 4 seconds when they are turned off |
| Turn Off | Return both earbuds to the charging case or touch and hold on the touch-sensitive panels on both earbuds for 6 seconds when they are turned on |
Pairing
Starting with the earbuds in the case:
- Open the lid of the charging case and take the right earbud out
- Turn on the pairing function on the device you want to pair with the earbuds
- From the list of available devices, find and select “AUKEY EP-T27 R”
- Take the left earbud out. If there is a pop-up asking you to confirm the connection, tap “Pair”
Note
Some devices don’t follow the Qualcomm True Wireless Master–Slave pairing protocol and may display a message that “The connection was not successful.”
However, this won’t affect the use
Regular Use After Pairing
Once the earbuds are successfully paired with your device, they can be switched on and off as follows:
- Open the lid of the charging case, and both earbuds will turn on and connect with each other automatically
- To power off, put the earbuds back in the charging case and close the lid, and they will begin charging
Using the Left/Right Earbud Only
Starting with the earbuds in the case:
- Take the left/right earbud out
- Turn on the pairing function on the device you want to pair with the earbud
- From the list of available devices, find and select “AUKEY EP-T27 L” or “AUKEY EP-T27 R”
Notes
- When you turn on the earbuds, they will automatically reconnect to the last-paired device or enter pairing mode if no paired device is found
- To clear the pairing list, touch and hold on the touch-sensitive panels on both earbuds for 6 seconds to power off them, and then touch and hold touch-sensitive panels for 10 seconds again. You will hear three beep sounds, then the pairing list is cleared
- In pairing mode, the earbuds will automatically turn off after 5 minutes if no devices are paired
- If one of the earbuds has no sound output, put both earbuds back into the charging case and take them out again
- The wireless operating range is 10m (33ft). If you exceed this range, the earbuds will disconnect from your paired device. The connection will be re-established if you re-enter the wireless range within 2 minutes
Controls & LED Indicators
Streaming Audio
Once paired, you can wirelessly stream audio from your device to the earbuds.
Music will automatically pause when you receive an incoming phone call and resume once the call has ended.
| Play or pause | Tap the touch-sensitive panel on either earbud |
| Skip to the next track | Double-tap the touch-sensitive panel on the right earbud |
| Skip to the previous track | Double-tap the touch-sensitive panel on the left earbud |
Taking Calls
| Answer or end a call | Touch and hold on the touch-sensitive panel on either earbud for 2 seconds |
| Reject an incoming call | Touch and hold on the touch-sensitive panel on either earbud for 2 seconds |
| Use Siri or other voice assistants |
While your device is connected, triple-tap the touch-sensitive panel on either earbud |
| LED Charging Indicator (Earbuds) | Status |
| Red | Earbuds charging |
| Blue | Earbuds fully charged |
| LED Charging Indicator (Case) | Status |
| Red | Case charging |
| Blue | Case fully charged |
FAQ
The earbuds are on, but not connecting to my device
For the earbuds and your device to establish a connection, you need to put them both in pairing mode. Please follow the instructions in the Pairing section of this manual.
I’ve connected the earbuds with my smartphone but can’t hear any sound
Double-check the volume level on your smartphone and the earbuds. Some smartphones require you to set up the earbuds as an audio output device before the audio can be transmitted. If you’re using a music player or other device, please make sure it supports the A2DP profile.
The sound isn’t very clear or the caller can’t hear my voice clearly
Adjust the volume on your smartphone and the earbuds. Try moving closer to your smartphone to rule out the possibility of interference or wireless range-related issues.
What’s the wireless range of the earbuds?
The maximum range is 10m (33ft). However, the actual range depends on environmental factors. For optimal performance, keep your device connected within a range of roughly 4m to 8m and make sure that there are no major obstacles (like reinforced steel walls) between the earbuds and your device.
The earbuds won’t turn on
Try charging the earbuds for a while. If the earbuds still won’t power on, please contact our support team at the email address given in Warranty & Customer Support.
TI put the earbuds back in the charging case, but the earbuds are still connected
The charging case is probably out of power. Try charging it.
Product Care & Use
- Keep away from liquids and extreme heat
- Don’t use the earbuds at high volume for extended periods, as this may cause permanent hearing damage or loss
Warranty & Customer Support
For questions, support, or warranty claims, contact us at the address below that corresponds with your region. Please include your Amazon order number and product model number.
Amazon US orders: [email protected]
Amazon EU orders: [email protected]
Amazon CA orders: s[email protected]
Amazon JP orders: [email protected]
*Please note, AUKEY can only provide after-sales service for products purchased directly from AUKEY. If you have purchased from a different seller, please contact them directly for service or warranty issues.
CE Statement
Max RF power level:
BT classic (2402–2480MHz): 2.1dBm
RF exposure assessment has been performed to prove that this unit will not generate the harmful EM emission above the reference level s specified in EC
Council Recommendation (1999/519/EC).
CAUTION: RISK OF EXPLOSION IF BATTERY IS REPLACED BY AN INCORRECT TYPE. DISPOSE OF USED BATTERIES ACCORDING TO THE INSTRUCTIONS.
Excessive sound pressure from earphones and headphones can cause hearing loss.
 Hereby, Aukey Technology Co., Ltd. declares that the radio equipment type (True Wireless Earbuds, EP-T27) is in compliance with Directive 2014/53/EU.
 Notice: This device may be used in each member state of the EU.
 Model: EP-N5C
Thank you for purchasing the AUKEY EP-N5 True Wireless Earbuds. Please read this user manual carefully and keep it for future reference. If you need any assistance, please contact our support team with your product model number and Amazon order number.
Package Contents
True Wireless Earbuds
Charging Case
Three Pairs of Ear Tips (S/M/L)
USB-A to C Cable
Quick Start Guide
User Manual
Warranty Card
Product Diagram
Specifications
Earbuds
| Model | EP-N5 |
| Technology | BT 5, A2DP, HFP, HSP, AVRCP |
| Driver (each channel) | 1 × lO mm / 0.3″ speaker driver |
| Sensitivity | 101dB ±3dB |
| Frequency Range | 20Hz – 20kHz |
| Impedance | 32 ohm |
| Microphone Type | MEMS mic (microphone chip) |
| Microphone Sensitivity | -42dB ±1 dB |
| Microphone Frequency Range | 200Hz – 5kHz |
| Charging Time | 1.5 hours |
| Battery Life | Up to 7 hours |
| Battery Type | Li-polymer (2 x 60mAh) |
| Operating Range | Up to 10m / 33ft |
| Weight | 10g / 0.35oz |
Charging Case
| Charging Input | DC 5V |
| Charging Time | 2 hours |
| Battery Type | Li-polymer (500mAh) |
| Number of Earbuds Recharges | 4 times (pair) |
| Weight | 37.8g / 1.33oz |
Getting Started
Charging
Fully charge the charging case before first use. Connect the charging case to a USB charger or charging port with the included USB-A to C cable. When all 4 LED charging indicator lights are green, the case is fully charged. Charging takes around 2 hours, and after being fully charged, the case can fully charge the earbuds 4 times. The earbuds should be stored in the case when not in use. When the earbuds are charging in the case (with the case itself not charging), the LED indicators on the earbuds will turn solid red. When the indicators turn off, the earbuds are fully charged.
Turning On / Off
| Turn On | Open the lid of the charging case |
| Turn Off | Put the earbuds back in the charging case and close the lid |
Pairing
Starting with the earbuds in the case:
- Open the lid of the charging case. Both earbuds will turn on automatically and connect with each other
- Turn on the pairing function on the device you want to pair with the earbuds
- From the list of available devices, find and select “AUKEY EP-N5”
- If a code or PIN is required for pairing, enter “0000”
Regular Use After Pairing
Once the earbuds are successfully paired with your device, they can be switched on and off as follows:
- Open the lid of the charging case, then both earbuds will turn on and connect with each other automatically
- To turn off, put the earbuds back in the charging case and close the lid. They will begin charging
Using the Left/Right Earbud Only
Starting with the earbuds in the case:
- Take the left/right earbud out
- Turn on the pairing function on the device you want to pair with the earbud
- From the list of available devices, find and select “AUKEY EP-N5”
Notes
- When you turn on the earbuds, they will automatically reconnect to the last-paired device or enter pairing mode if no paired device is found
- In pairing mode, the earbuds will automatically turn off after 5 minutes if no devices are paired
- If one of the earbuds has no sound output, put both earbuds back into the charging case and take them out again
- The maximum wireless operating range is 10m (33ft). If you exceed this range, the earbuds will disconnect from your paired device. The connection will be re-established if you re-enter the wireless range within 5 minutes. The earbuds will automatically reconnect to the last paired device. To connect with other devices, repeat the previous pairing steps
Clearing the Pairing List
- Make sure both earbuds are off and in the charging case. Take one of the earbuds out
- Tap the touch-sensitive panel 5 times, and then the earbud will enter pairing mode (note: keep one earbud in the charging case, and the lid is closed when you operate the other one)
- Tap the touch-sensitive panel 7 times to clear the previous pairing list, and the earbud will turn off
- Take the other earbud out of the charging case and repeat the previous steps 2 & 3
- After that, put both earbuds back in the charging case and close the lid. Open the lid again, and both earbuds will turn on automatically and are ready to pair
Controls
Streaming Audio
Once paired, you can wirelessly stream audio from your device to the earbuds. Music will automatically pause when you receive an incoming phone call and resume once the call has ended.
| Play or pause | Tap the touch-sensitive panel on either earbud |
| Skip to next track | Double-tap the touch-sensitive panel on the right earbud |
| Skip to previous track | Double-tap the touch-sensitive panel on the left earbud |
Active Noise Canceling
Active noise canceling functionality requires the use of both earbuds.
| Turn on / off | Touch and hold the touch-sensitive panel on the left or right earbud for 2 seconds to turn on/off the noise canceling function |
Taking Calls
| Answer or end a call | Tap the touch-sensitive panel on either earbud to answer a call, and touch and hold for 2 seconds to end the call. |
| Reject an incoming call | Touch and hold either earbud for 2 seconds |
| Use Ski or other voice assistants | While your device is connected, triple-tap either earbud |
| LED Indicator (Earbuds) | Status |
| Flashing green and red | Pairing mode |
| Flashing green | Reconnecting |
| Solid red | Charging |
| Off (after charging) | Fully charged |
| LED Charging Indicator (Charging case) | Status |
| Flashing green | Charging |
| Solid green | Fully charged |
FAQ
The earbuds are on, but not connecting to my device
For the earbuds and your device to establish a connection, you need to put them both in pairing mode. Please follow the instructions in the Pairing section of this manual.
I’ve connected the earbuds with my smartphone but can’t hear any sound
Double-check the volume level on your smartphone and the earbuds. Some smartphones require you to set up the earbuds as an audio output device before the audio can be transmitted. If you’re using a music player or other device, please make sure it supports the A2DP profile.
The sound isn’t very clear or the caller can’t hear my voice clearly
Adjust the volume on your smartphone and the earbuds. Try moving closer to your smartphone to rule out the possibility of interference or wireless range-related issues.
What’s the wireless range of the earbuds?
The maximum range is 10m (33ft). However, the actual range depends on environmental factors. For optimal performance, keep your device connected within a range of roughly 4m to 8m and make sure that there are no major obstacles (like reinforced steel walls) between the earbuds and your device.
The earbuds won’t turn on
Try charging the earbuds for a while. If the earbuds still won’t power on, please contact our support team at the email address given in ‘Warranty & Customer Support ‘
I put the earbuds back in the charging case, but the earbuds are still connected
The charging case is probably out of power. Try charging it.
Product Care & Use
- Keep away from liquids and extreme heat
- Don’t use the earbuds at high volume for extended periods, as this may cause permanent hearing damage or loss
Warranty & Customer Support
For questions, support, or warranty claims, contact us at the address below that corresponds with your region. Please include your Amazon order number and product model number.
Amazon US orders: [email protected]
Amazon EU orders: [email protected]
Amazon CA orders: [email protected]
Amazon JP orders: [email protected]
*’Please note, AUKEY can only provide after-sales service for products purchased directly from AUKEY. If you have purchased from a different seller, please contact them directly for service or warranty issues.
FCC Information for Users
Changes or modifications not expressly approved by the party responsible for compliance could void the user’s authority to operate the equipment.
This device complies with Part 15 of the FCC Rules. Operation is subject to the following two conditions:
- This device may not cause harmful interference.
- This device must accept any interference received, including interference that may cause undesired operation.
NOTE: This equipment has been tested and found to comply with the limits for a Class B digital device, pursuant to Part 15 of the FCC Rules. These limits are
designed to provide reasonable protection against harmful interference in a residential installation.
This equipment generates, uses, and can radiate radio frequency energy and, if not installed and used in accordance with the instructions, may cause harmful interference to radio communications. However, there is no guarantee that interference will not occur in a particular installation. If this equipment does cause harmful interference to radio or television reception, which can be determined by turning the equipment off and on, the user is encouraged to try to correct the interference by one or more of the following measures:
- Reorient or relocate the receiving antenna.
- Increase the separation between the equipment and receiver.
- Connect the equipment into an outlet on a circuit different from that to which the receiver is connected.
- Consult the dealer or an experienced radio/TV technician for help.
This equipment complies with FCC RF radiation exposure limits set forth for an uncontrolled environment.
CE Statement
Max RF power level:
BT classic (2402–2480MHz): 2.1dBm
RF exposure assessment has been performed to prove that this unit will not generate the harmful EM emission above the reference level as specified in EC
Council Recommendation (1999/519/EC).
CAUTION: RISK OF EXPLOSION IF BATTERY IS REPLACED BY AN INCORRECT TYPE.
DISPOSE OF USED BATTERIES ACCORDING TO THE INSTRUCTIONS.
Excessive sound pressure from earphones and headphones can cause hearing loss to lead.
Hereby, Aukey Technology Co.,Ltd. hereby declares that the radio equipment type (genuine Wireless Headphones, EP-N5) complies with EU Directive 2014/53/EU.
Note: This device may be used in any EU member state.
Does this device contain license-exempt transmitter(s)/receiver(s) that comply with it? Innovation, Science, and Economic Development?
Canada’s license-exempt RSS(s). Operation is subject to the following two conditions:
(1) This device may not cause interference.
(2) This device must accept any interference, including interference that may cause undesired operation of the device.
Model: EP-N5
User Manual
Wireless Earbuds
Aukey Technology Co., Ltd.
www.aukey.com
[email protected]
Building P09, South China City Electronics Trading Center,
Longgang District, Shenzhen, Guangdong, 518111, China
FCC ID: 2ATIH-EP-N5
IC: 24100-EPN5
210-149903
![]()