ASUS 802.11n Network Adapter

Setting up a Home Network
- Insert the support CD into the optical drive and follow the onscreen instructions to complete the installation.
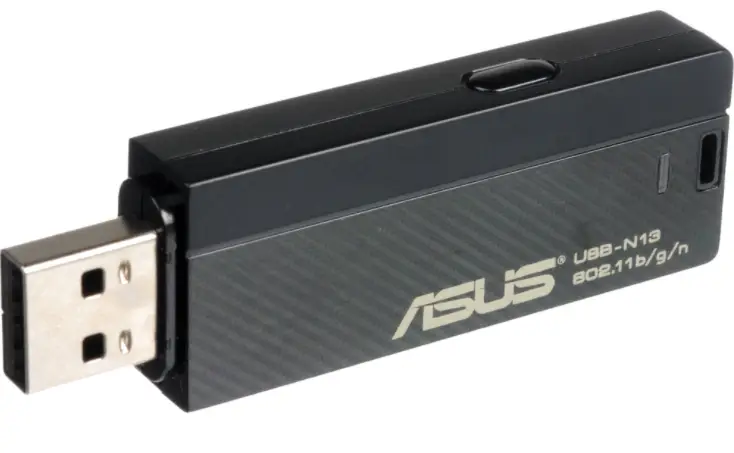
- Configure USB-N13 using ASUS driver.
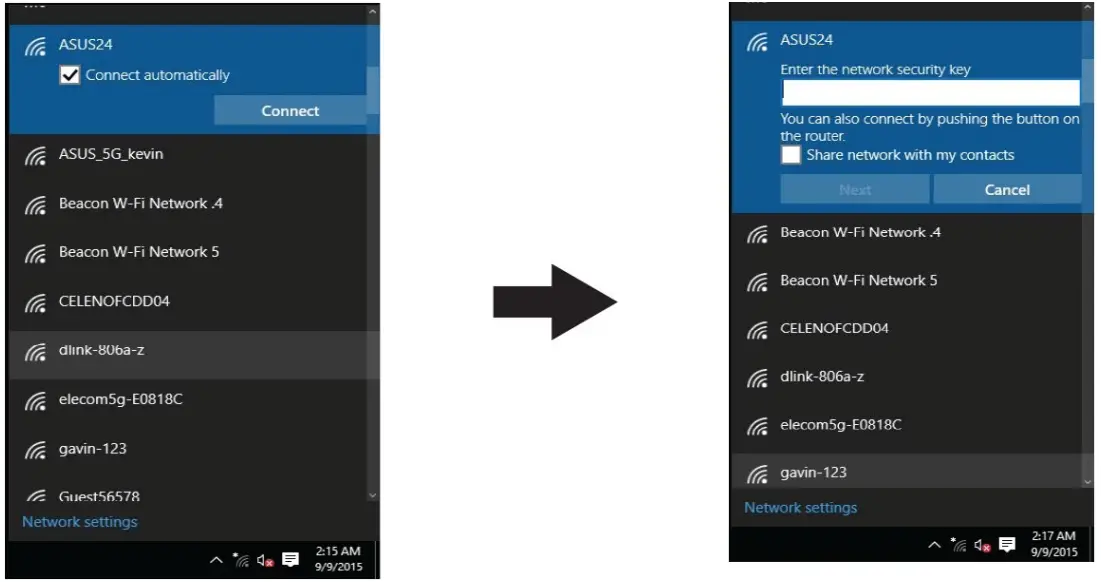
Connect to a wireless network on Windows 10.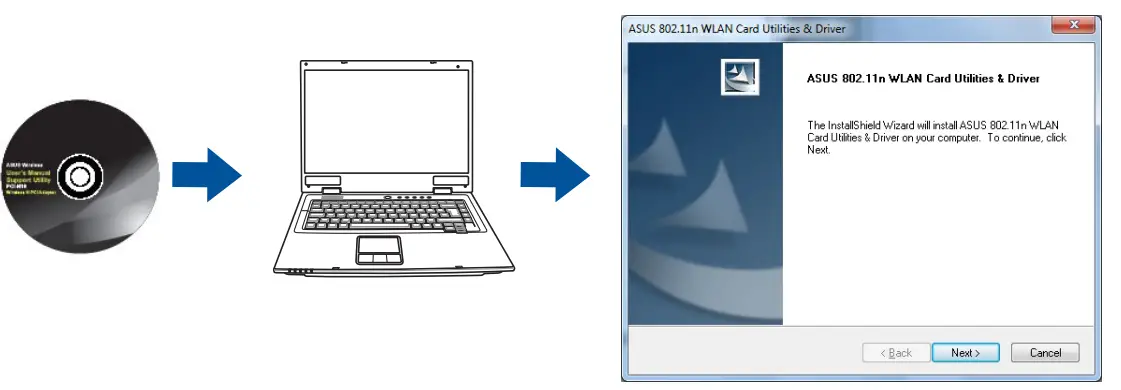
- Setup is completed.
ASUS Recycling/Takeback Services
ASUS recycling and takeback programs come from our commitment to the highest standards for protecting our environment. We believe in providing solutions for you to be able to responsibly recycle our products, batteries, other components, as well as the packaging materials. Please go to http://csr.asus.com/english/Takeback.htm for the detailed recycling information in different regions.
REACH
Complying with the REACH (Registration, Evaluation, Authorization, and Restriction of Chemicals) regulatory framework, we published the chemical substances in our products at ASUS REACH website at http://csr.asus.com/english/REACH.htm
Federal Communications Commission Statement
This device complies with Part 15 of the FCC Rules. Operation is subject to the following two conditions:
- This device may not cause harmful interference.
- This device must accept any interference received, including interference that may cause undesired operation.
This equipment has been tested and found to comply with the limits for a class B digital device, pursuant to part 15 of the FCC Rules. These limits are designed to provide reasonable protection against harmful interference in a residential installation. This equipment generates, uses and can radiate radio frequency energy and, if not installed and used in accordance with the instructions, may cause harmful interference to radio communications. However, there is no guarantee that interference will not occur in a particular installation. If this equipment does cause harmful interference to radio or television reception, which can be determined by turning the equipment o and on, the user is encouraged to try to correct the interference by one or more of the following measures:
- Reorient or relocate the receiving antenna.
- Increase the separation between the equipment and receiver.
- Connect the equipment into an outlet on a circuit different from that to which the receiver is connected.
- Consult the dealer or an experienced radio/TV technician for help
WARNING! Any changes or modifications not expressly approved by the party responsible for compliance could void the user’s authority to operate the equipment.
Prohibition of Co-location
This device and its antenna(s) must not be co-located or operating in conjunction with any other antenna or transmitter.
IMPORTANT NOTE: Radiation Exposure Statement: This equipment complies with FCC radiation exposure limits set forth for an uncontrolled environment. End users must follow the specific operating instructions for satisfying RF exposure compliance. To maintain compliance with FCC exposure compliance requirement, please follow operation instruction as documented in this manual.
WARNING! This equipment must be installed and operated in accordance with provided instructions and the antenna(s) used for this transmitter must be installed to provide a separation distance of at least 0.5 cm from all persons and must not be co-located or operating in conjunction with any other antenna or transmitter.
Compliance Statement of Innovation, Science and Economic Development Canada (ISED)
This device complies with Innovation, Science and Economic Development Canada license exempt RSS standard(s). Operation is subject to the following two conditions: (1) this device may not cause interference, and (2) this device must accept any interference, including interference that may cause undesired operation of the device.
Radio Frequency (RF) Exposure Information
The radiated output power of the ASUS Wireless Device is below the Innovation, Science and Economic Development Canada radio frequency exposure limits. The ASUS Wireless Device should be used in such a manner such that the potential for human contact during normal operation is minimized.
This equipment should be installed and operated with a minimum distance of 0.5 cm between the radiator any part of your body.
This device has been certified for use in Canada. Status of the listing in the Innovation, Science and Economic Development Canada’s REL (Radio Equipment List) can be found at the following web address:
http://www.ic.gc.ca/eic/site/ceb-bhst.nsf/eng/h_tt00020.html
Additional Canadian information on RF exposure also can be found at the following web: https://www.ic.gc.ca/eic/site/smt-gst.nsf/eng/sf08792.html
Precautions for the use of the device
- Pay particular attention to the personal safety when use this device in airports, hospitals, gas stations and professional garages.
- Medical device interference: Maintain a minimum distance of at least 15 cm (6 inches) between implanted medical devices and ASUS products in order to reduce the risk of interference.
- Kindly use ASUS products in good reception conditions in order to minimize the radiation’s level.
- Keep the device away from pregnant women and the lower abdomen of the teenager.
RF Exposure Information
This Asus product has been tested and meets applicable European SAR limits. The SAR limit is 2.0 W/kg in countries that set the limit averaged over 10 grams of tissue. The specific maximum SAR values for this device are as follows: Body: 0.161 W/Kg
When you carry this device or use it, either use an approved accessory such as a holster or otherwise maintain a distance of 0.5 cm from the body to ensure compliance with RF exposure requirements.
CE statement
Simplified EU Declaration of Conformity
ASUSTek Computer Inc. hereby declares that this device is in compliance with the essential requirements and other relevant provisions of Directive 2014/53/EU. Full text of EU declaration of conformity is available at https://www.asus.com/support/.
This equipment complies with EU radiation exposure limits set forth for an uncontrolled environment. This equipment should be installed and operated with minimum distance 0.5 cm between the radiator & your body.
All operational modes:
2.4GHz: 802.11b, 802.11g, 802.11n (HT20), 802.11n (HT40)
The frequency, mode and the maximum transmitted power in EU are listed below:
2412-2472MHz (802.11n HT40): 19.87 dBm 

Quick Start Guide
WEU15297 / Revised Edition V6 / March 2019
WEU15065_RT-AC66U_B1_QSG_V5.indb 1 2019/3/5 14:59:32
 RT-AC66U B1
  AC adapter
 RJ-45 cable
  Quick Start Guide
 Warranty card

NOTE: If any of the items is damaged or missing, contact your retailer.
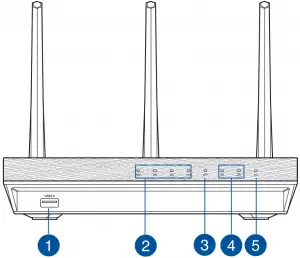
- USB 3.0 port
- LAN LED
- WAN LED
- 2.4GHz/5GHZ LED
- Power LED
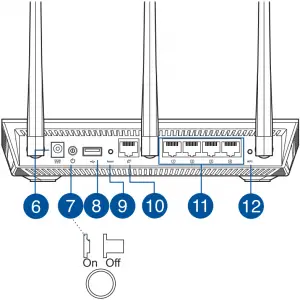
- Power (DC-IN) port
- Power switch
- USB 2.0 port
- Reset button
- WAN port
- LAN ports
- WPS button
3

NOTES:
- USB External HDD/Flash disk:
• The wireless router works with most USB HDDs/Flash disks up to 2TB and supports read-write access for FAT16, FAT32, EXT2, EXT3, and NTFS.
• To safely remove the USB disk, launch the web GUI (http://router.asus.com), then in the Network Map page’s upper right corner, click the USB icon and click Eject USB 1.
• Incorrect removal of the USB disk may cause data corruption.
• For the list of file system and hard disk partitions that the wireless router supports, visit http://event.asus.com/networks/disksupport
- For the list of printers that the wireless router supports, visit http://event.asus.com/networks/printersupport
4
For the best wireless signal transmission between the wireless router and the network devices connected to it, ensure that you:
- Place the wireless router in a centralized area for a maximum wireless coverage for the network devices.
- Keep the device away from metal obstructions and away from direct sunlight.
- Keep the device away from 802.11g or 20MHz only Wi-Fi devices, 2.4GHz computer peripherals, Bluetooth devices, cordless phones, transformers, heavy-duty motors, fluorescent lights, microwave ovens, refrigerators, and other industrial equipment to prevent signal interference or loss.
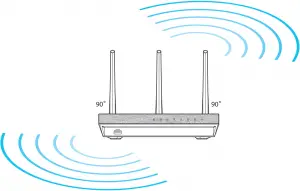
- To ensure the best wireless signal, orient the three detachable antennas as shown in the drawing below.
- For optimum performance, adjust the internal cooling system. Refer to the user manual for details.
- Always update to the latest firmware. Visit the ASUS website at http://www.asus.com to get the latest firmware updates.
5
-
Unplug and disconnect the wires/cables from your existing modem setup and release your computer’s outmoded IP address.
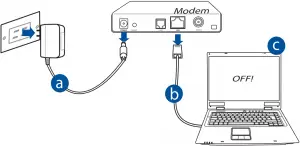
a: Unplug the AC adapter from the power outlet and disconnect it from your cable/ADSL modem.
b: Disconnect the network cable from your cable/ADSL modem.
c: Reboot your computer (recommended).

WARNING! Before disconnecting the wires/cables, ensure that your cable/ADSL modem has been turned off for at least two minutes. If your modem has a backup battery, remove it as well.
6
2. Set up your wireless environment.
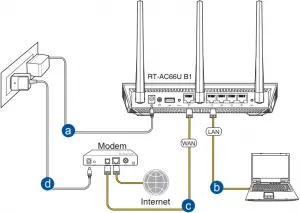
a: Insert your wireless router’s AC adapter to the DC-IN port and plug it to a power outlet.
b: Using the bundled network cable, connect your computer to your wireless router’s LAN port.

IMPORTANT! Ensure that the WAN and LAN LEDs are blinking.
c: Using another network cable, connect your modem to your wireless router’s WAN port.
d: Insert your modem’s AC adapter to the DC-IN port and plug it to a power outlet.
3. Disable some settings on your computer.

NOTE: For more details on disabling your computer settings, refer to Frequently Asked Questions (FAQs).
7
-
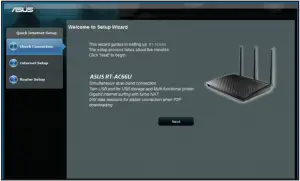
Configure your wireless settings via the wireless router’s web graphics user interface (web GUI).
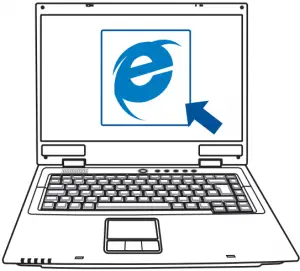
a: Launch your web browser such as Internet Explorer, Firefox, Google Chrome, or Safari.
 ⇒
⇒ 
a b

NOTE: If QIS does not launch automatically, follow these steps to manually launch QIS:
• On your web browser, key in http://router.asus.com and run the Quick Internet Setup (QIS) Wizard again.
• Disable the proxy settings, dial-up connection, and set your TCP/IP settings to automatically obtain an IP address. For more details, refer to the FAQs section for auto-diagnosis.
8
b: The wireless router’s Quick Internet Setup (QIS) feature automatically detects if your ISP connection type is Dynamic IP, PPPoE, PPTP, L2TP, and Static IP. Key in the necessary information for your connection type.

NOTE: The auto-detection of your ISP connection type takes place when you configure the wireless router for the first time or when your wireless router is reset to its default settings.

IMPORTANT! Obtain the necessary information about your Internet connection type from your Internet Service Provider (ISP).
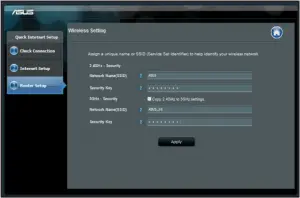
c: Assign the network name (SSID) and security key for your 2.4GHz and 5GHz wireless connection. Click Apply when done.
d: Your Internet and wireless settings are displayed. Click Next to continue.
e: Read the wireless network connection tutorial. When done, click Finish.

NOTE: You can assign a network name with up to 32 characters.
9
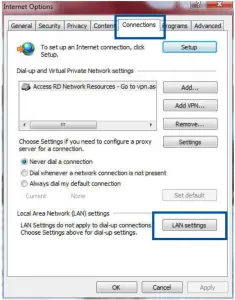
1. Click Start > Internet Explorer to launch the web browser.
2. Click Tools > Internet options > Connections tab > LAN settings.
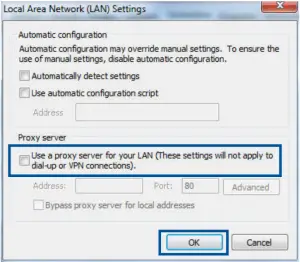
3. From the Local Area Network (LAN) Settings screen, untick Use a proxy server for your LAN.
4. Click OK when done.
10
MAC OS
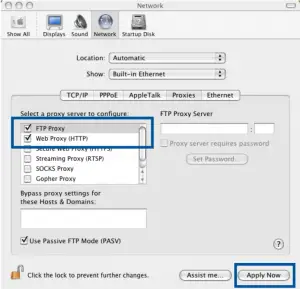
1. From your Safari browser, click Safari > Preferences > Advanced > Change Settings…
2. From the Network screen, deselect FTP Proxy and Web Proxy (HTTP).
3. Click Apply Now when done.

NOTE: Refer to your browser’s help feature for details on disabling the proxy server.
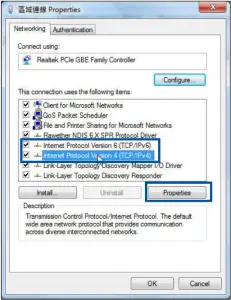
Windows® 7
1. Click Start > Control Panel > Network and Internet > Network and Sharing Center > Manage network connections.
2. Select Internet Protocol Version 4 (TCP/IPv4), then click Properties.
11
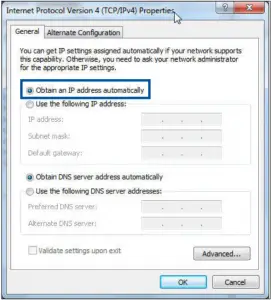
3. To obtain the iPv4 IP settings automatically, tick Obtain an IP address automatically.
4. Click OK when done.
MAC OS
1. Click the Apple icon ![]() located on the top left of your screen.
located on the top left of your screen.
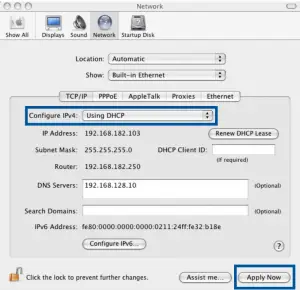
2. Click System Preferences > Network > Configure…
3. From the TCP/IP tab, select Using DHCP in the Configure IPv4 dropdown list.
4. Click Apply Now when done.

NOTE: Refer to your operating system’s help and support feature for details on configuring your computer’s TCP/IP settings.
12
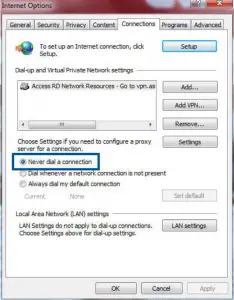
Windows® 7
1. Click Start > Internet Explorer to launch the browser.
2. Click Tools > Internet options > Connections tab.
3. Tick Never dial a connection.
4. Click OK when done.

NOTE: Refer to your browser’s help feature for details on disabling the dial-up connection settings.
Out of Range:
- Put the router closer to the wireless client.
- Try to change the channel settings.
Authentication:
- Use wired connection to connect to the router.
- Check the wireless security settings.
- Press the Reset button at the rear panel for more than five seconds.
13
Cannot find the router:
- Press the Reset button at the rear panel for more than five seconds.
- Check the setting in the wireless adapter such as SSID and encryption settings.
- Move the router closer to the wireless client.
- Check whether the wireless adapter is connected to the correct wireless router.
- Check whether the wireless channel in use conforms to the channels available in your country/area.
- Check the encryption settings.
- Check if the ADSL or Cable connection is correct.
- Retry using another Ethernet cable.
- Ensure that all your cables are all properly connected.
- Disconnect the power cord from the ADSL or cable modem, wait a few minutes, then reconnect the cord.
- If the ADSL light continues to blink or stays OFF, contact your ADSL service provider.
- Try setting up the wired connection and configuring the wireless encryption again.
- Press the Reset button of the wireless router for more than five seconds.
- Factory default settings:
| User name / Password:
admin / admin |
IP address: | SSID:
Check the rating label on the back side of your router |
14
- Online FAQ site:
- Technical Support site:
- Customer Hotline: Refer to the Support Hotline in this Quick Start Guide
15
ASUS recycling and takeback programs come from our commitment to the highest standards for protecting our environment. We believe in providing solutions for you to be able to responsibly recycle our products, batteries, other components, as well as the packaging materials. Please go to http://csr.asus.com/english/Takeback.htm for the detailed recycling information in different regions.
Complying with the REACH (Registration, Evaluation, Authorisation, and Restriction of Chemicals) regulatory framework, we published the chemical substances in our products at ASUS REACH website at http://csr.asus.com/english/REACH.htm
This device complies with Part 15 of the FCC Rules. Operation is subject to the following two conditions:
- This device may not cause harmful interference.
- This device must accept any interference received, including interference that may cause undesired operation.
This equipment has been tested and found to comply with the limits for a class B digital device, pursuant to part 15 of the FCC Rules. These limits are designed to provide reasonable protection against harmful interference in a residential installation.
This equipment generates, uses and can radiate radio frequency energy and, if not installed and used in accordance with the instructions, may cause harmful interference to radio communications. However, there is no guarantee that interference will not occur in a particular installation. If this equipment does cause harmful interference to radio or television reception, which can be determined by turning the equipment off and on, the user is encouraged to try to correct the interference by one or more of the following measures:
- Reorient or relocate the receiving antenna.
- Increase the separation between the equipment and receiver.
- Connect the equipment into an outlet on a circuit different from that to which the receiver is connected.
- Consult the dealer or an experienced radio/TV technician for help.

WARNING! Any changes or modifications not expressly approved by the party responsible for compliance could void the user’s authority to operate the equipment.
159
This device and its antenna(s) must not be co-located or operating in conjunction with any other antenna or transmitter.
Radiation Exposure Statement: This equipment complies with FCC radiation exposure limits set forth for an uncontrolled environment. End users must follow the specific operating instructions for satisfying RF exposure compliance. To maintain compliance with FCC exposure compliance requirement, please follow operation instruction as documented in this manual.

WARNING! This equipment must be installed and operated in accordance with provided instructions and the antenna(s) used for this transmitter must be installed to provide a separation distance of at least 20 cm from all persons and must not be co-located or operating in conjunction with any other antenna or transmitter.
This device complies with Innovation, Science and Economic Development Canada licence exempt RSS standard(s). Operation is subject to the following two conditions: (1) this device may not cause interference, and (2) this device must accept any interference, including interference that may cause undesired operation of the device.
Operation in the band 5150–5250 MHz is only for indoor use to reduce the potential for harmful interference to co-channel mobile satellite systems.
CAN ICES-3(B)/NMB-3(B)
The radiated output power of the ASUS Wireless Device is below the Innovation, Science and Economic Development Canada radio frequency exposure limits. The ASUS Wireless Device should be used in such a manner such that the potential for human contact during normal operation is minimized.
This equipment should be installed and operated with a minimum distance of 20 cm between the radiator any part of your body.
This device has been certified for use in Canada. Status of the listing in the Innovation, Science and Economic Development Canada’s REL (Radio Equipment List) can be found at the following web address:
http://www.ic.gc.ca/eic/site/ceb-bhst.nsf/eng/h_tt00020.html
Additional Canadian information on RF exposure also can be found at the following web:
https://www.ic.gc.ca/eic/site/smt-gst.nsf/eng/sf08792.html
160
| Manufacturer | ASUSTeK Computer Inc. Tel: +886-2-2894-3447 Address: 4F, No. 150, LI-TE RD., PEITOU, TAIPEI 112, TAIWAN |
| Authorised representative in Europe | ASUS Computer GmbH Address: |
| Authorised distributors in Turkey | BOGAZICI BILGISAYAR TICARET VE SANAYI A.S. Tel./FAX No.: +90 212 331 10 00 / +90 212 332 28 90 Address: ESENTEPE MAH. BUYUKDERE CAD. ERCAN HAN B BLOK NO.121 SISLI, ISTANBUL 34394 |
| CIZGI Elektronik San. Tic. Ltd. Sti. Tel./FAX No.: +90 212 356 70 70 / +90 212 356 70 69 Address: GURSEL MAH. AKMAN SK.47B 1 KAGITHANE/ISTANBUL |
|
| KOYUNCU ELEKTRONiK BiLGi iSLEM SiST. SAN. VE DIS TIC. A.S. Tel. No.: +90 216 5288888 Address: EMEK MAH.ORDU CAD. NO:18, SARIGAZi, SANCAKTEPE ISTANBUL |
|
| ENDEKS BİLİŞİM SAN VE DIŞ TİC LTD ŞTİ Tel./FAX No.: +90 216 523 35 70 / +90 216 523 35 71 Address: |
|
| PENTA TEKNOLOJI URUNLERI DAGITIM TICARET A.S Tel./FAX No.: +90 216 528 0000 Address: |
163
| Region | Country/ Area | Hotline Number | Service Hours |
| Europe | Cyprus | 800-92491 | 09:00-13:00 ; 14:00-18:00 Mon-Fri |
| France | 0033-170949400 | 09:00-18:00 Mon-Fri | |
| Germany | 0049-1805010920
0049-1805010923 (component support) 0049-2102959911 (Fax) |
09:00-18:00 Mon-Fri
10:00-17:00 Mon-Fri |
|
| Hungary | 0036-15054561 | 09:00-17:30 Mon-Fri | |
| Italy | 199-400089 | 09:00-13:00 ; 14:00-18:00 Mon-Fri | |
| Greece | 00800-44142044 | 09:00-13:00 ; 14:00-18:00 Mon-Fri | |
| Austria | 0043-820240513 | 09:00-18:00 Mon-Fri | |
| Netherlands/ Luxembourg | 0031-591570290 | 09:00-17:00 Mon-Fri | |
| Belgium | 0032-78150231 | 09:00-17:00 Mon-Fri | |
| Norway | 0047-2316-2682 | 09:00-18:00 Mon-Fri | |
| Sweden | 0046-858769407 | 09:00-18:00 Mon-Fri | |
| Finland | 00358-969379690 | 10:00-19:00 Mon-Fri | |
| Denmark | 0045-38322943 | 09:00-18:00 Mon-Fri | |
| Poland | 0048-225718040 | 08:30-17:30 Mon-Fri | |
| Spain | 0034-902889688 | 09:00-18:00 Mon-Fri | |
| Portugal | 00351-707500310 | 09:00-18:00 Mon-Fri | |
| Slovak Republic | 00421-232162621 | 08:00-17:00 Mon-Fri | |
| Czech Republic | 00420-596766888 | 08:00-17:00 Mon-Fri | |
| Switzerland-German | 0041-848111010 | 09:00-18:00 Mon-Fri | |
| Switzerland-French | 0041-848111014 | 09:00-18:00 Mon-Fri | |
| Switzerland-Italian | 0041-848111012 | 09:00-18:00 Mon-Fri | |
| United Kingdom | 0044-1442265548 | 09:00-17:00 Mon-Fri | |
| Ireland | 0035-31890719918 | 09:00-17:00 Mon-Fri | |
| Russia and CIS | 008-800-100-ASUS | 09:00-18:00 Mon-Fri | |
| Ukraine | 0038-0445457727 | 09:00-18:00 Mon-Fri |
164
| Region | Country/ Area | Hotline Number | Service Hours |
| Asia-Pacific | Australia | 1300-278788 | 09:00-18:00 Mon-Fri |
| New Zealand | 0800-278788 | 09:00-18:00 Mon-Fri | |
| Japan | 0800-1232787 | 09:00-18:00 Mon-Fri 09:00-17:00 Sat-Sun | |
| 0081-570783886 ( Non-Toll Free ) | 09:00-18:00 Mon-Fri 09:00-17:00 Sat-Sun | ||
| Korea | 0082-215666868 | 09:30-17:00 Mon-Fri | |
| Thailand | 0066-24011717
1800-8525201 |
09:00-18:00 Mon-Fri | |
| Singapore | 0065-64157917 | 11:00-19:00 Mon-Fri | |
| 0065-67203835
( Repair Status Only ) |
11:00-19:00 Mon-Fri
11:00-13:00 Sat |
||
| Malaysia | 1300-88-3495 | 9:00-18:00 Mon-Fri | |
| Philippine | 1800-18550163 | 09:00-18:00 Mon-Fri | |
| India
India(WL/NW) |
1800-2090365 | 09:00-18:00 Mon-Sat
09:00-21:00 Mon-Sun |
|
| Indonesia | 0062-2129495000 | 09:30-17:00 Mon-Fri | |
| 500128 (Local Only) | 9:30 – 12:00 Sat | ||
| Vietnam | 1900-555581 | 08:00-12:00
13:30-17:30 Mon-Sat |
|
| Hong Kong | 00852-35824770 | 10:00-19:00 Mon-Sat | |
| Taiwan | 0800-093-456;
02-81439000 |
9:00-12:00 Mon-Fri; 13:30-18:00 Mon-Fri | |
| Americas | USA
Canada |
1-812-282-2787 | 8:30-12:00 EST Mon-Fri
9:00-18:00 EST Sat-Sun |
| Mexico | 001-8008367847 | 08:00-20:00 CST Mon-Fri
08:00-15:00 CST Sat |
|
| Brazil | 4003 0988 (Capital) 0800 880 0988 (demais localidades) | 9:00am-18:00 Mon-Fri |
165
| Region | Country/ Area | Hotline Number | Service Hours |
| Middle East + Africa | Egypt | 800-2787349 | 09:00-18:00 Sun-Thu |
| Saudi Arabia | 800-1212787 | 09:00-18:00 Sat-Wed | |
| UAE | 00971-42958941 | 09:00-18:00 Sun-Thu | |
| Turkey | 0090-2165243000 | 09:00-18:00 Mon-Fri | |
| South Africa | 0861-278772 | 08:00-17:00 Mon-Fri | |
| Israel | *6557/00972-39142800
*9770/00972-35598555 |
08:00-17:00 Sun-Thu
08:30-17:30 Sun-Thu |
|
| Balkan Countries | Romania | 0040-213301786 | 09:00-18:30 Mon-Fri |
| Bosnia
Herzegovina |
00387-33773163 | 09:00-17:00 Mon-Fri | |
| Bulgaria | 00359-70014411
00359-29889170 |
09:30-18:30 Mon-Fri
09:30-18:00 Mon-Fri |
|
| Croatia | 00385-16401111 | 09:00-17:00 Mon-Fri | |
| Montenegro | 00382-20608251 | 09:00-17:00 Mon-Fr | |
| Serbia | 00381-112070677 | 09:00-17:00 Mon-Fr | |
| Slovenia | 00368-59045400
00368-59045401 |
08:00-16:00 Mon-Fr | |
| Baltic Countries | Estonia | 00372-6671796 | 09:00-18:00 Mon-Fri |
| Latvia | 00371-67408838 | 09:00-18:00 Mon-Fri | |
| Lithuania-Kaunas | 00370-37329000 | 09:00-18:00 Mon-Fri | |
| Lithuania-Vilnius | 00370-522101160 | 09:00-18:00 Mon-Fri |

NOTES:
• UK support e-mail: [email protected]
• For more information, visit the ASUS support site at: https://www.asus.com/support/
166
Simplified EU Declaration of Conformity
ASUSTek Computer Inc. hereby declares that this device is in compliance with the essential requirements and other relevant provisions of Directive 2014/53/EU. Full text of EU declaration of conformity is available at https://www.asus.com/Networking/RT-AC66U-B1/HelpDesk_Declaration/.
Declaration of Conformity for Ecodesign directive 2009/125/EC
Testing for eco-design requirements according to (EC) No 1275/2008 and (EU) No 801/2013 has been conducted. When the device is in Networked Standby Mode, its I/O and network interface are in sleep mode and may not work properly. To wake up the device, press the Wi-Fi on/off, LED on/off, reset, or WPS button.
This equipment complies with EU radiation exposure limits set forth for an uncontrolled environment. This equipment should be installed and operated with minimum distance 20 cm between the radiator & your body.
All operational modes:
2.4GHz: 802.11b, 802.11g, 802.11n (HT20), 802.11n (HT40), 802.11ac (VHT20), 802.11ac (VHT40)
5GHz: 802.11a, 802.11n (HT20), 802.11n (HT40), 802.11ac (VHT20), 802.11ac (VHT40), 802.11ac (VHT80)
The frequency, mode and the maximum transmitted power in EU are listed below:
2400-2483.5MHz (802.11ac VHT40 NCS0/Nss1): 19.81 dBm
5150-5250MHz (802.11ac VHT80 NCS0/Nss1): 22.07 dBm
5250-5350MHz (802.11ac VHT80 NCS0/Nss1): 22.1 dBm
5470-5725MHz (802.11ac VHT40 NCS0/Nss1): 29.21 dBm
The device is restricted to indoor use only when operating in the 5150 to 5350 MHz frequency range.
The adapter shall be installed near the equipment and shall be easily accessible.
 |
AT | BE | BG | CZ | DK | EE | FR |
| DE | IS | IE | IT | EL | ES | CY | |
| LV | LI | LT | LU | HU | MT | NL | |
| NO | PL | PT | RO | SI | SK | TR | |
| FI | SE | CH | UK | HR | UA |
- Use this product in environments with ambient temperatures between 0°C(32°F) and 40°C(104°F).
- Refer to the rating label on the bottom of your product and ensure your power adapter complies with this rating.
- DO NOT place on uneven or unstable work surfaces. Seek servicing if the casing has been damaged.
- DO NOT place or drop objects on top and do not shove any foreign objects into the product.
- DO NOT expose to or use near liquids, rain, or moisture. DO NOT use the modem during electrical storms.
- DO NOT cover the vents on the product to prevent the system from getting overheated.
- DO NOT use damaged power cords, accessories, or other peripherals.
- If the Adapter is broken, do not try to fix it by yourself. Contact a qualified service technician or your retailer.
- To prevent electrical shock hazard, disconnect the power cable from the electrical outlet before relocating the system.
167
]]>ASUS GPU Tweak II Graphic Card
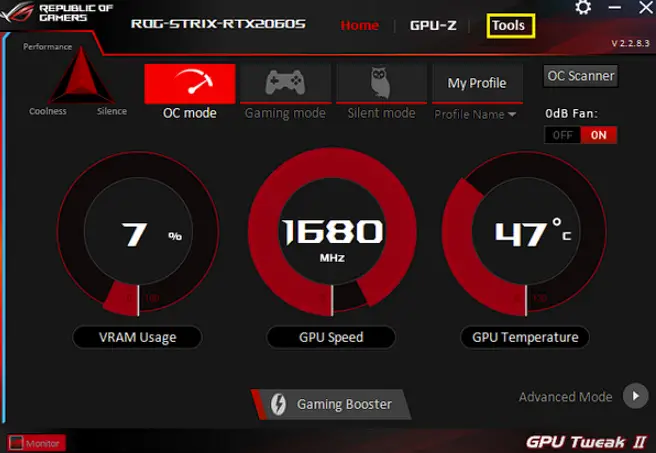
Knowing GPU Tweak II
ASUS GPU Tweak II utility allows you to monitor and tweak the settings of your ASUS graphics card for optimal performance. It has two user interfaces, the Simple Mode and Professional Mode, that allow you to quickly monitor your preset and customized profiles, boost the GPU settings for your game-changing enjoyment, or do some advanced tweaking on the GPU settings for optimal performance.
ASUS GPU Tweak II includes these ASUS-exclusive preset power-saving and gaming profiles:
- OC Mode
- Silent Mode
- Gaming Mode
- My Profile
System requirements
- AMD 7000 Series GPU or higher
- NVIDIA 600 Series GPU or higher
- 32-/64-bit Microsoft® Windows® 10 / 8 / 8.1 / 7
Installing GPU Tweak II
- Ensure that you have installed the ASUS graphics card and its driver. Refer to the ASUS graphics card user manual for details on installing its driver.
- Locate the ASUS GPU TweakII driver folder and double-click the setup.exe file to start the installation.
- Follow the onscreen instructions to finish the installation.
Launching GPU Tweak II
- Double-click the GPU Tweak icon on the desktop.
- Click Start > All Programs > ASUS > GPU Tweak II to launch the program.
Simple Mode
Simple Mode provides you with a quick way to monitor your GPU settings in real-time, and tweak some system settings via Gaming Booster for your game-changing enjoyment.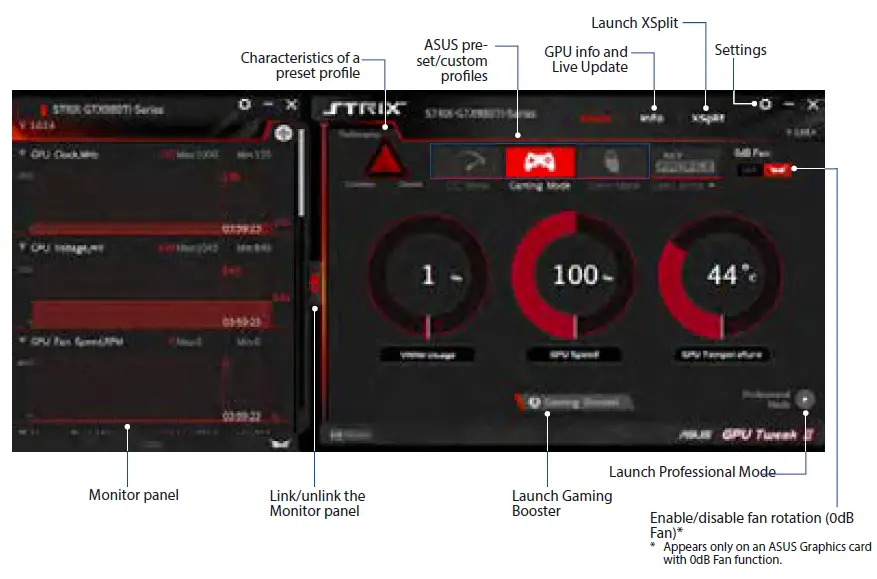
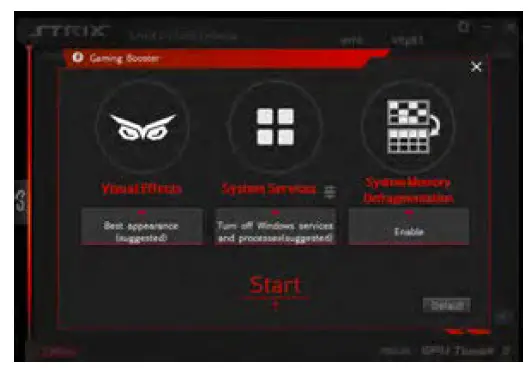
Gaming Booster
Get that game-changing performance edge with Gaming Booster, which helps optimize your system for a seamless and faster game play in your computer games.
Gaming Booster offers you these three (3) functions:
- Visual Effects: Lets you turn off the Windows® visual effects to intensify the processor performance.
- System Services: Lets you to automatically or manually turn off Windows® services or processes.
- System Services setting: Lets you to manually choose the services or processes that you want to stop.
- System Memory defragmentation: Lets you rearrange and clean your system memory without closing any processes.
Professional Mode
Configure the GPU settings like a pro, and get the optimal performance from your ASUS Graphics card.
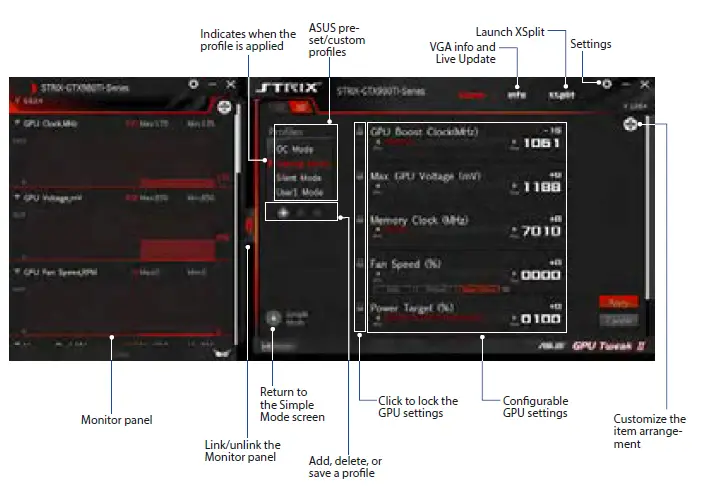
Configuring a profile
- Select the profile that you want to configure.
- Select the GPU setting, then key in your preferred value.
- When done, click .
Adding a profile
- Click then assign the profile name.
- Set your preferred values.
- When done, click to save the profile.
Applying a profile
- Select the profile, then click to apply the profile.
Deleting a profile
- Select the profile, then click to delete the profile.
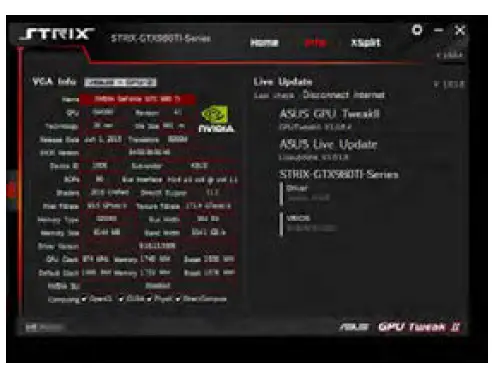
Getting the VGA info and Live Update
The Info screen provides you with information and live updates about your ASUS VGA card.
NOTE: Ensure that your computer is connected to the Internet to get the Live Update.
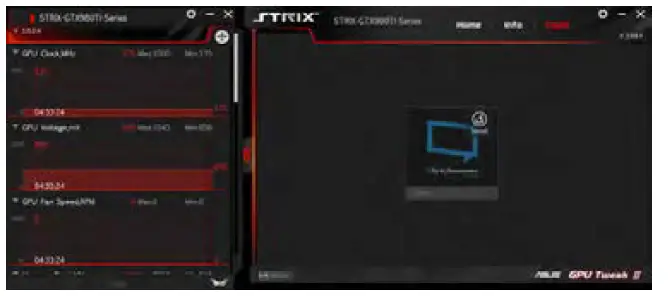
Launching XSplit
Install and launch XSplit Gamecaster from GPU Tweak II.
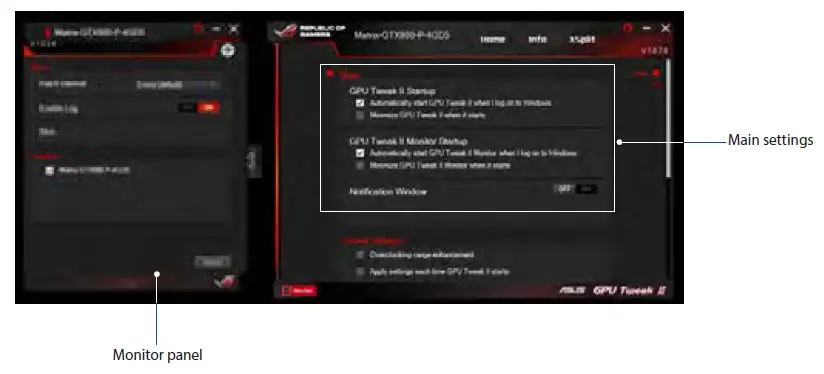
Using the Settings screen
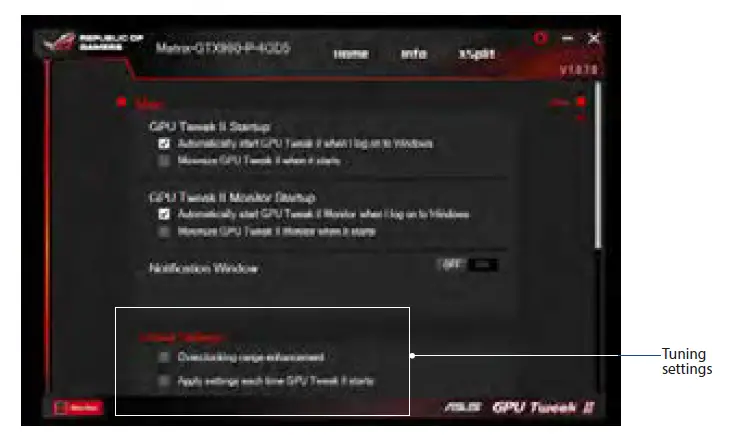
The Settings screen allows you to configure the GPU Tweak II settings such as Main, Tuning Settings,
Live Update, and Keyboard Shortcuts.
Main
From the Main settings, you can select any of these options on launching GPU Tweak II:
- Automatically launch GPU Tweak II or its Monitor panel on Windows® startup.
- Minimize GPU Tweak II or its Monitor panel once launched.
- Turn the notification window on/off.
Tuning Settings
From the Tuning Settings, you can select any of these options on applying the GPU Tweak II settings:
- Enhance the overclocking range.
- Apply the settings on GPU Tweak startup.
Live Update
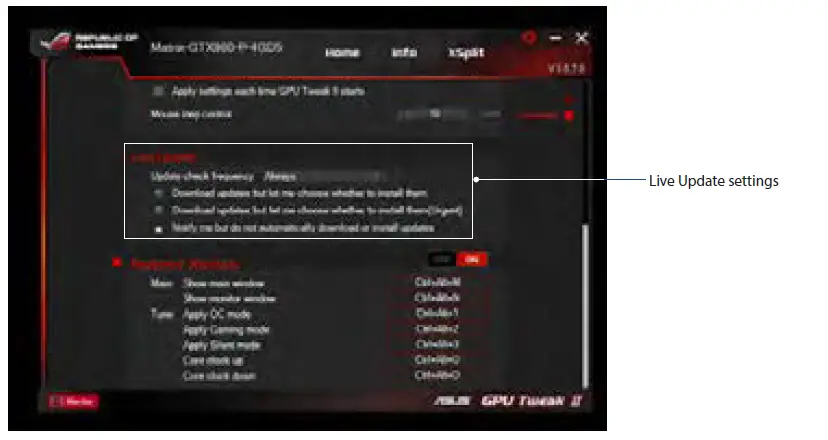
Receive notifications on the latest VBIOS and driver updates from Live Update. Configure and select the following Live Update options:
- Select any of the Live Update options:
- Download updates but let me choose whether to install them: Select this option to automatically download updates, and decide whether to manually install them.
- Download important updates but let me choose whether to install them: Select this option to automatically download critical updates, and decide whether to manually install them.
- Notify me but do not automatically download or install updates: Select this option to receive notifications only, and decide whether to manually download and install the updates.
Keyboard Shortcuts
Turn on/off the Keyboard Shortcuts to quickly show the main screen or apply some quick adjustments.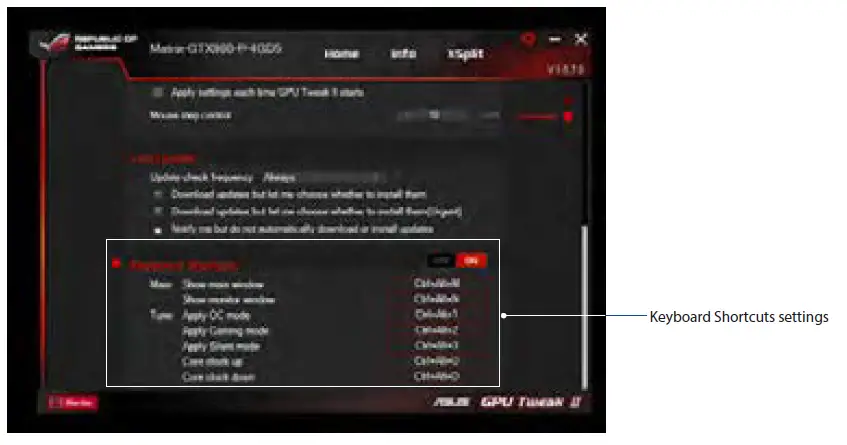
Overview
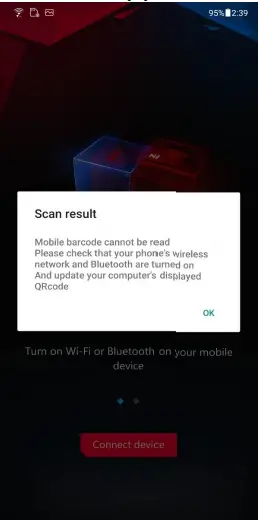
Armoury Crate uses Wi-Fi and Bluetooth/BLE for connection between laptop and mobile device. But on some specific situations, system may occur Wi-Fi firewall compatibility issue that failed to connect with mobile device Therefore, some users may meet the connection problem and then your mobile device shows “Mobile barcode cannot be read. …” while trying to connect, this document can help you troubleshoot this connection problem.
Failure symptom (Connect via QR Code)
Laptop (a)
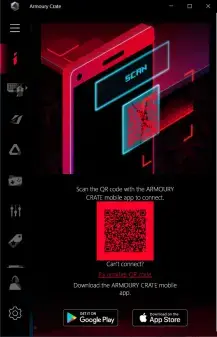


Mobile device (b)
- Laptop (a):
When user clicks connection button to establish Wi-Fi broadcast, it should show QR Code that means this laptop is ready to be connected. - Mobile device (b):
Connecting to the laptop via mobile device but the app shows “Mobile barcode cannot be read. …”
ASUSTek Computer Inc.,
Failure symptom (Connect via ROG ID)
Laptop User Center (c) Mobile User Center (d)
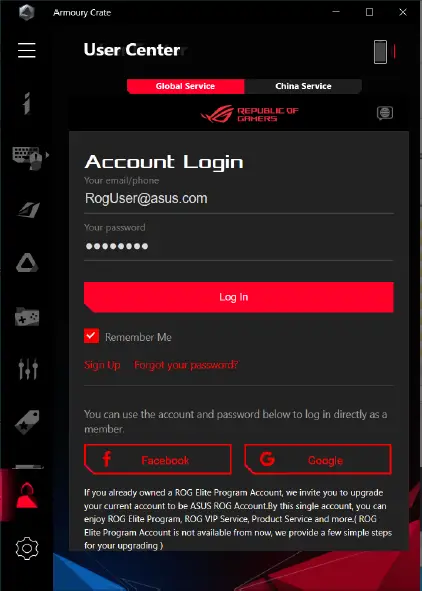
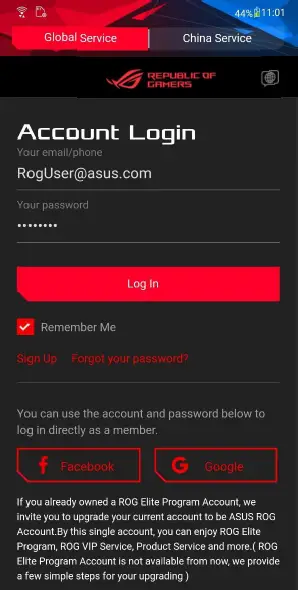
When laptop and mobile device are in the same Wi-Fi environment. “Connect via ROG ID” can help user automatically establish connection between laptop and mobile device when login with same account.
- Laptop User Center (c): Armoury Crate User Center login page.
- Mobile User Center (d): iOS/Android Armoury Crate login page.
Mobile device connection fail (e)
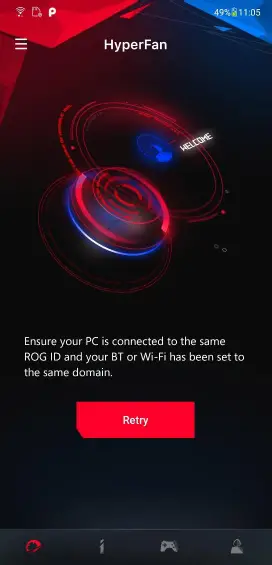
- Mobile device connection fail (e): User may encounter connection fail even laptop and mobile device are logged in with same account.
Procedures of workaround
To reduce the complex Wi-Fi environment causing mobile connection fail, we recommend to use laptop’s mobile hotspot for mobile device to be connected. Follow the below steps to use laptop’s mobile hotspot for connection.
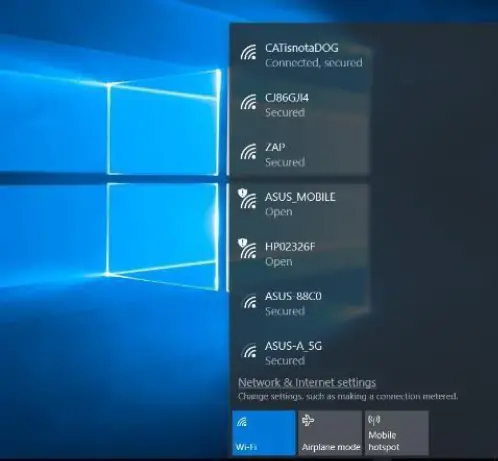
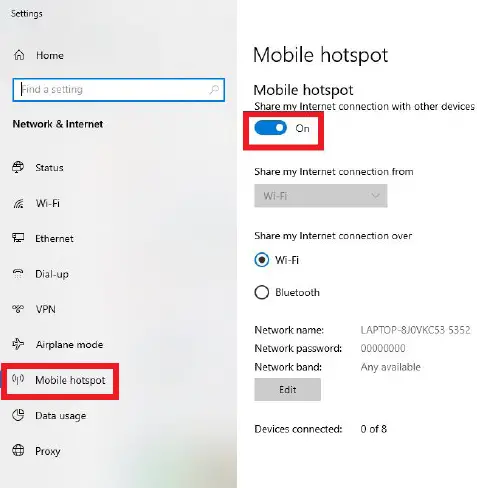
- Make sure Wi-Fi is turned on and laptop is connected to Wi-Fi.
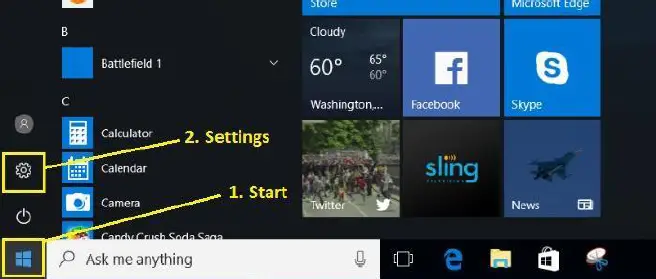
- Click “Start” -> “Settings” to launch Windows Settings page.
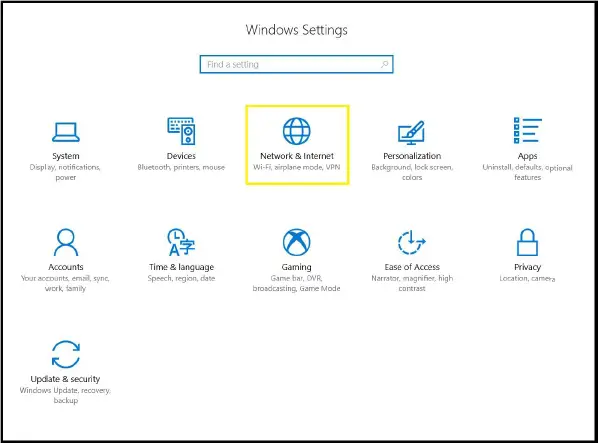
- Click “Network & Internet” to the next settings page.
- Click “Mobile hotspot”.
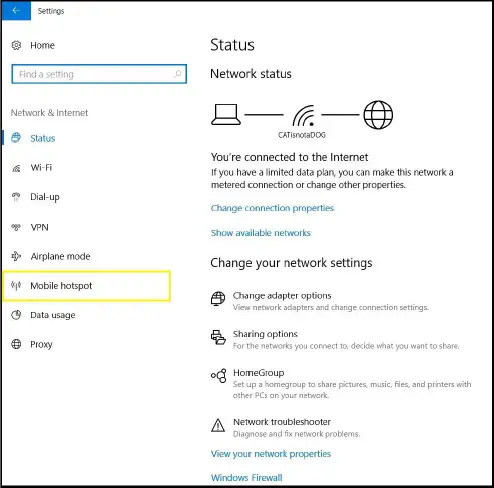
- In Mobile hotspot page, turn on “Mobile hotspot”.
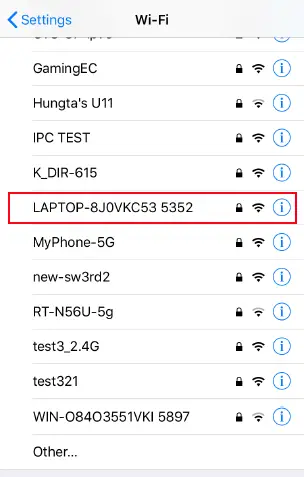
- Mobile device is connected to Laptop’s “Mobile hotspot”.
- Launch Armoury Crate by ROG key or shortcut in “All apps” from your laptop, and also prepare your mobile device for the connection.
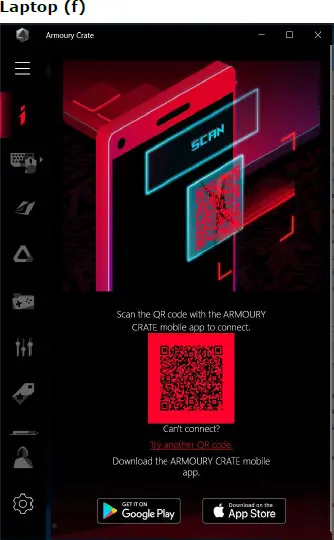
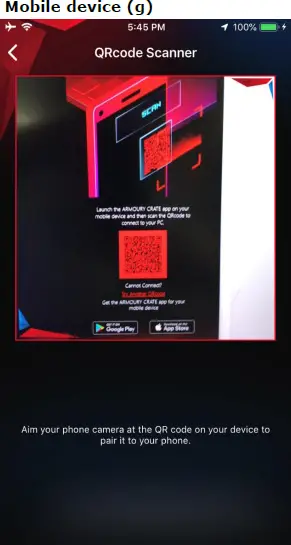
1. Laptop (f): Clicking the mobile page’s connection button to establish Wi-Fi broadcast, and the QR Code means this laptop is ready to be connected.
2. Mobile device (g): Connecting to the laptop via mobile device and this time should connect to the laptop.

AX1800 Dual Band USB WiFi 6 Adapter
- Compact sized USB WiFi 6 adapter – Super-fast WiFi in a nano-sized package.
- Upgrade your WiFi to the latest standard – Boost your PC to 802.11ax standard via USB.
- Ultra-high efficiency – Enable faster transmission in high density environments with OFDMA, MU-MIMO and BSS Coloring.
- Supports WPA3 security – For enhanced WiFi security and more robust authentication.
- Perfect for streaming and gaming – Dual-band support gives you the 5GHz frequency band for smooth 4K UHD streaming and low latency gaming.
Compact sized USB Wifi 6 Adapter
The size is very small that users can leave it in the PC all the time, leaving no chances of losing, forgetting or breaking it when moving from place to place.

Upgrade Your Wifi to the Latest Standard
USB-AX55 Nano upgrades your laptop to 802.11ax standard instantly. With WiFi 6 (802.11ax)technology and combination of OFDMA and MU-MIMO support, USB-AX55 Nano provides faster speed and more stable connection which is also backward compatible to previous WiFi standard (802.11n and 802.11ac).

Support WPA3 Security
The successor to the well-established WPA2 protocol, WPA3 adds new features that simplify WiFi security, while making your connections much more secure.

What’s Inside the Box
- USB-AX55 Nano Wireless USB Adapter
- Warranty card
- Quick start guide
Dimension
USB-AX55 Nano
- USB-AX55 Nano: 25.5 x 16 x 9 mm
- Weight: 4.0g/ 0.14 oz
Color Box
- Color Box: 90*90*25mm(US Sku) / 128*95*32mm(Others)
- Weight: 36.7g(US Sku) / 55.6g(Others)
Specifications
| Model Name | USB-AX55 Nano |
| Chipset Solution | RTL8832BU |
| Network Standard | IEEE 802.11 a/g/n/ac/ax |
| Interface | 1 x USB 2.0 |
| Antenna | 2 x Internal antenna |
| Operation Frequency | Dual band 2.4GHz & 5GHz |
| 1024-QAM Modulation | Supported |
| Data Rate | 802.11a: up to 54 Mbps 802.11g: up to 54 Mbps 802.11n: up to 400Mbps 802.11ac: up to 867 Mbps 802.11ax (2.4GHz): up to 574 Mbps 802.11ax (5GHz): up to 1201 Mbps |
| Transmit Beamforming | Supported |
| Encryption | 64/128 bit WEP, WPA, TKIP, AES, WPA/WPA2/WPA3- Personal/WPA3-Enterprise |
| OS Support | Windows® 10/11 |
| Dimensions | 25.5 x 16 x 9 mm/ 1.00 x 0.63 x 0.35 inch |
| Weight (device only) | 4.0g/ 0.14 oz |
| Scan for full features and specs |  |
© 2016 ASUSTeK Computer Inc. All rights reserved.
Specifications, content and product availability are all subject to change without notice and may differ from country to country. Actual performance may vary depending on applications, usage, environment and other factors. Full specifications are available at http://www.asus.com
ASUS Lyra Voice (AC2200) WiFi Tri-Band Router

Colors of Lyra
 Light Cyan: Everything is good!
 Red: Loss of connection to the primary Lyra. Move it closer.
 Orange: Loss of connection to the Internet. Please check the cable connected to your modem.
 Solid White: Lyra is ready for setup. It will start blinking when setting up the app.
 Random Breathing: Lyra is booting up or applying settings.
Connect Primary Lyra to Modem
- Unplug your cable / DSL modem*. Remove the battery if it has one.
- If you are using DSL for the internet, you will need a username/password from your Internet service provider (ISP) to properly configure your router.

- If you are using DSL for the internet, you will need a username/password from your Internet service provider (ISP) to properly configure your router.
- Connect your modem to Lyra with the network cable provided.
- Power on your cable / DSL modem, and check your cable / DSL modem LED lights to ensure the connection is active.
- Plug in the power adapter to Lyra and wait until the LEDs turn to solid white to ensure that your Lyra is ready for setup.

Setup your Lyra WiFi system
METHOD 1: Through the App
- Download the free ASUS Lyra app.
- Launch the ASUS Lyra app on your mobile device, and follow the instructions in just a few moments.

Make sure your device supports BLE, Bluetooth 4.0, or above.
METHOD 2: Through Web GUI
Connect PC/NB to your Lyra via WiFi “ASUS_XX_ AMAPS”. Open a web browser. You will be redirected to the ASUS Setup Wizard. If not, navigate to http://router.asus.com
Adding other Lyra to the current network
METHOD 1: Through the App
- Launch the Lyra app and click the “+” icon on the upper right corner, then choose Add Lyra to current network and follow the instructions to complete.

METHOD 2: Through Web GUI
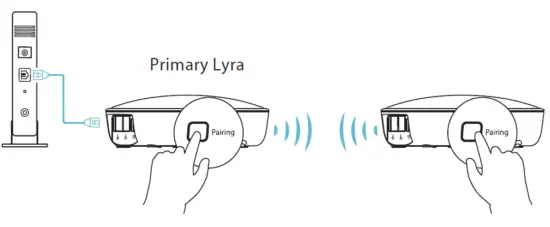
- Press the Pairing button on the Primary Lyra until the LED starts to blink green light.
- Press the Pairing button on the second Lyra until the LED starts to blink green light, then turns solid light cyan, indicating the pairing process is completed.

The pairing feature only works with the Primary Lyra device connecting to the modem.
CE statement
Simplified EU Declaration of Conformity
ASUSTek Computer Inc. hereby declares that this device is in compliance with the essential requirements and other relevant provisions of Directive 2014/53/EU. The full text of the EU Declaration of Conformity is available at https://www.asus.com/support/
Declaration of Conformity for Ecodesign directive 2009/125/EC
Testing for eco-design requirements according to (EC) No 1275/2008 and (EU) No 801/2013 has been conducted. When the device is in Networked Standby Mode, its I/O and network interface are in sleep mode and may not work correctly. Press the Wi-Fi on/off, LED on/off, reset, or WPS button to wake up the device. This equipment complies with EU radiation exposure limits set forth for an uncontrolled environment. This equipment should be installed and operated with a minimum distance of 20 cm between the radiator & your body.
All operational modes:
- 2.4G: 802.11b, 802.11g, 802.11n (HT20), 802.11n (HT40)
- 5G: 802.11a, 802.11n (HT20), 802.11n (HT40), 802.11ac (VHT20), 802.11ac (VHT40), 802.11ac (VHT80)
The frequency, mode, and maximum transmitted power in the EU are listed below:
- 2412-2472MHz (802.11n HT40 MCS 8): 19.71 dBm
- 5180-5240MHz (802.11n HT40 MCS 8): 22.81 dBm
- 5260-5320MHz (802.11n HT40 MCS 8): 22.71 dBm
- 5500-5700MHz (802.11n HT20 MCS 8): 28.91 dBm
The device is restricted to indoor use only when operating in the 5150 to 5350 MHz frequency range.
 |
AT | BE | BG | CZ | DK | EE | FR |
| DE | IS | IE | IT | EL | ES | CY | |
| LV | LI | LT | LU | HU | MT | NL | |
| NO | PL | PT | RO | SI | SK | TR | |
| FI | SE | CH | UK | HR |
RF Exposure information
This device meets the EU requirements (2014/53/EU) on the limitation of exposure of the general public to electromagnetic fields by way of health protection.
REACH
Complying with the REACH (Registration, Evaluation, Authorisation, and Restriction of Chemicals) regulatory framework, we published the chemical substances in our products at ASUS REACH website at http://csr.asus.com/english/reach.aspx
NOTES:
- Use only the adapter that came with your package. Using other adapters may damage the device.
Specifications:
| DC Power adapter | DC Output: +12V with max 2A current | ||
| Operating Temperature | 0~40oC | Storage | 0~70oC |
| Operating Humidity | 50~90% | Storage | 20~90% |
ASUS Contact information
ASUSTeK
Address: 15 Li-Te Road, Peitou, Taipei, Taiwan 11259
Website: www.asus.com.tw
Technical Support
Telephone: +886228943447
Support Fax: +886228907698
Online support: support.asus.com
ASUS COMPUTER INTERNATIONAL (America)
Address: 800 Corporate Way, Fremont, CA 94539, USA
Telephone: +15107393777
Fax: +15106084555
Website: usa.asus.com
Online support: support.asus.com
ASUS COMPUTER GmbH (Germany and Austria)
Address: Harkort Str. 21-23, D-40880 Ratingen, Germany
Support Fax:+49-2102-959931
Website: asus.com/de
Online contact: eu-rma.asus.com/sales
Technical
Telephone (Component): +49-2102-5789555 Telephone Germany
(System/Notebook/Eee/LCD): +49-2102-5789557 Telephone Austria
(System/Notebook/Eee/LCD): +43-820-240513
Support Fax: +49-2102-959911
Online support: support.asus.com
| Manufacturer: | ASUSTeK Computer Inc. | |
| Tel: | +886-2-2894-3447 | |
| Address: | 4F, No. 150, LI-TE RD., PEITOU, TAIPEI 112, TAIWAN | |
| Authorised representative in Europe: | ASUS Computer GmbH | |
| Address: | HARKORT STR. 21-23, 40880 RATINGEN, GERMANY | |
Networks Global Hotline Information
| Region | Country | Hotline Number | Service | Hours | |||||
| Cyprus | 800-92491 | 09:00-13:00 ;
14:00-18:00 Mon-Fri |
|||||||
| France | 0033-170949400 | 09:00-18:00 Mon-Fri | |||||||
| 0049-1805010920 | |||||||||
| Germany | 0049-1805010923 | 09:00-18:00 Mon-Fri
10:00-17:00 Mon-Fri |
|||||||
| (component support) | |||||||||
| 0049-2102959911 ( Fax ) | |||||||||
| Hungary | 0036-15054561 | 09:00-17:30 Mon-Fri | |||||||
| Italy | 199-400089 | 09:00-13:00 ;
14:00-18:00 Mon-Fri |
|||||||
| Greece | 00800-44142044 | 09:00-13:00 ;
14:00-18:00 Mon-Fri |
|||||||
| Austria | 0043-820240513 | 09:00-18:00 Mon-Fri | |||||||
| Netherlands/ Luxembourg | 0031-591570290 | 09:00-17:00 Mon-Fri | |||||||
| Belgium | 0032-78150231 | 09:00-17:00 Mon-Fri | |||||||
| Europe | Norway | 0047-2316-2682 | 09:00-18:00 Mon-Fri | ||||||
| Sweden | 0046-858769407 | 09:00-18:00 Mon-Fri | |||||||
| Finland | 00358-969379690 | 10:00-19:00 Mon-Fri | |||||||
| Denmark | 0045-38322943 | 09:00-18:00 Mon-Fri | |||||||
| Poland | 0048-225718040 | 08:30-17:30 Mon-Fri | |||||||
| Spain | 0034-902889688 | 09:00-18:00 Mon-Fri | |||||||
| Portugal | 00351-707500310 | 09:00-18:00 Mon-Fri | |||||||
| Slovak Republic | 00421-232162621 | 08:00-17:00 Mon-Fri | |||||||
| Czech Republic | 00420-596766888 | 08:00-17:00 Mon-Fri | |||||||
| Switzerland-German | 0041-848111010 | 09:00-18:00 Mon-Fri | |||||||
| Switzerland-French | 0041-848111014 | 09:00-18:00 Mon-Fri | |||||||
| Switzerland-Italian | 0041-848111012 | 09:00-18:00 Mon-Fri | |||||||
| United Kingdom | 0044-1442265548 | 09:00-17:00 Mon-Fri | |||||||
| Ireland | 0035-31890719918 | 09:00-17:00 Mon-Fri | |||||||
| Russia and CIS | 008-800-100-ASUS | 09:00-18:00 Mon-Fri | |||||||
| Ukraine | 0038-0445457727 | 09:00-18:00 Mon-Fri | |||||||
| Australia | 1300-278788 | 09:00-18:00 Mon-Fri | |||||||
| New Zealand | 0800-278788 | 09:00-18:00 Mon-Fri | |||||||
| Japan | 0800-1232787 | 09:00-18:00 Mon-Fri | |||||||
| 09:00-17:00 Sat-Sun | |||||||||
| Asia-Pacific | 0081-570783886
( Non-Toll Free ) |
09:00-18:00 Mon-Fri | |||||||
| 09:00-17:00 Sat-Sun | |||||||||
| Korea | 0082-215666868 | 09:30-17:00 Mon-Fri | |||||||
| Thailand | 0066-24011717 | 09:00-18:00 Mon-Fri | |||||||
| 1800-8525201 | |||||||||
| Region | Country | Hotline Numbers | Service Hours |
|
Asia-Pacific |
Singapore | 0065-64157917 | 11:00-19:00 Mon-Fri |
| 0065-67203835 | 11:00-19:00 Mon-Fri | ||
| ( Repair Status Only ) | 11:00-13:00 Sat | ||
| Malaysia | 1300-88-3495 | 9:00-18:00 Mon-Fri | |
| Philippine | 1800-18550163 | 09:00-18:00 Mon-Fri | |
| India | 1800-2090365 | 09:00-18:00 Mon-Sat | |
| India(WL/NW) | 09:00-21:00 Mon-Sun | ||
| Indonesia | 0062-2129495000 | 09:30-17:00 Mon-Fri | |
| 500128 (Local Only) | 9:30 – 12:00 Sat | ||
| Vietnam | 1900-555581 | 08:00-12:00
13:30-17:30 Mon-Sat |
|
| Hong Kong | 00852-35824770 | 10:00-19:00 Mon-Sat | |
| USA | 1-812-282-2787 | 8:30-12:00 EST Mon-Fri | |
| Americas | Canada | 9:00-18:00 EST Sat-Sun | |
| Mexico | 001-8008367847 | 08:00-20:00 CST Mon-Fri | |
| Egypt | 800-2787349 | 09:00-18:00 Sun-Thu | |
| Saudi Arabia | 800-1212787 | 09:00-18:00 Sat-Wed | |
| Middle East + Africa | UAE | 00971-42958941 | 09:00-18:00 Sun-Thu |
| Turkey | 0090-2165243000 | 09:00-18:00 Mon-Fri | |
| South Africa | 0861-278772 | 08:00-17:00 Mon-Fri | |
| Israel | *6557/00972-39142800 | 08:00-17:00 Sun-Thu | |
| *9770/00972-35598555 | 08:30-17:30 Sun-Thu | ||
|
Balkan Countries |
Romania | 0040-213301786 | 09:00-18:30 Mon-Fri |
| Bosnia Herzegovina | 00387-33773163 | 09:00-17:00 Mon-Fri | |
| Bulgaria | 00359-70014411 | 09:30-18:30 Mon-Fri | |
| 00359-29889170 | 09:30-18:00 Mon-Fri | ||
| Croatia | 00385-16401111 | 09:00-17:00 Mon-Fri | |
| Montenegro | 00382-20608251 | 09:00-17:00 Mon-Fri | |
| Serbia | 00381-112070677 | 09:00-17:00 Mon-Fri | |
| Slovenia | 00368-59045400 | 08:00-16:00 Mon-Fri | |
| 00368-59045401 | |||
|
Baltic Countries |
Estonia | 00372-6671796 | 09:00-18:00 Mon-Fri |
| Latvia | 00371-67408838 | 09:00-18:00 Mon-Fri | |
| Lithuania-Kaunas | 00370-37329000 | 09:00-18:00 Mon-Fri | |
| Lithuania-Vilnius | 00370-522101160 | 09:00-18:00 Mon-Fri |
NOTES:
- For more information, visit the ASUS support site at: https://www.asus.com/support
- UK support email: [email protected]
FREQUENTLY ASKED QUESTIONS
The ASUS Lyra Voice (AC2200) is a wireless router that combines the functions of a high-speed router, a wireless extender, and a smart speaker in a single device.
Some key features of the ASUS Lyra Voice (AC2200) router include tri-band Wi-Fi, smart speaker capabilities with built-in Amazon Alexa, a range extender, and robust parental controls.
The ASUS Lyra Voice (AC2200) router supports three bands: one 2.4GHz band and two 5GHz bands.
Yes, the ASUS Lyra Voice (AC2200) can be used as a standalone router to provide Wi-Fi connectivity and network management.
Yes, the ASUS Lyra Voice (AC2200) supports mesh networking, allowing you to create a seamless and extended Wi-Fi network by connecting multiple Lyra devices.
The ASUS Lyra Voice (AC2200) is designed to provide coverage for a typical home, with a maximum coverage area of around 6,000 square feet.
Yes, the ASUS Lyra Voice (AC2200) has built-in Amazon Alexa capabilities, allowing you to control compatible smart home devices using voice commands.
Yes, the ASUS Lyra Voice (AC2200) has built-in stereo speakers that provide high-quality sound for music playback and voice responses.
The ASUS Lyra Voice (AC2200) router includes comprehensive security features such as AiProtection Pro, which provides commercial-grade security and advanced parental controls.
Yes, the ASUS Lyra Voice (AC2200) router allows you to prioritize specific devices or applications to ensure they receive maximum bandwidth.
Yes, the ASUS Lyra Voice (AC2200) supports guest networks, allowing you to create separate Wi-Fi networks for visitors without sharing your main network credentials.
To set up the ASUS Lyra Voice (AC2200), you can use the ASUS Lyra mobile app, which provides step-by-step instructions for the installation process.
Yes, the ASUS Lyra Voice (AC2200) has two USB ports that allow you to connect USB storage devices or printers for sharing files or printing over the network.
The ASUS Lyra Voice (AC2200) supports maximum Wi-Fi speeds of up to 2200Mbps, with
Yes, you can manage and monitor your network remotely using the ASUS Lyra mobile app, which provides access to various network settings and real-time information.
]]>
Product Structure Diagram
- Full HD 1080P
- Microphone Hole
- Trestle
- USB port
Installation Steps
| 1. Turn on the Camera Mount and point the camera toward the front of the display. | 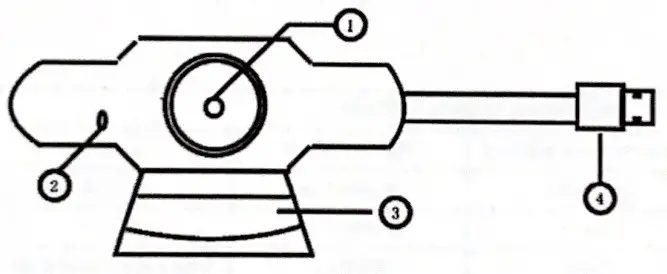 |
| 2. Press down on the Camera Mount and snap the rear end of the screen mount; to the back of the screen. | 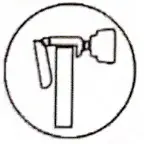 |
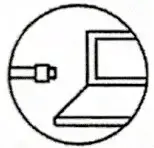
| 3. Webcam USB port plug-in the computer | 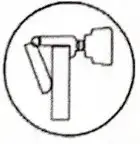 |
Detail Parameter
| Webcam parameters | |||
| Driver Type | Drive free(plug and play) | USB Line Length | 150 cm |
| Scintillation Frequency | 50Hz,60Hz | Display Size | 1920’1080 |
| Photo Format | MJPEG | Interface Type | USB 2.0 |
| Sensor Type | CMOS | Mk Type | Noise reduction digital mic |
| Use Case | Online meetings, Online courses, and so on | ||
| Operating System Support | Support Vista, Win7, Win8, Win10 operating system | ||
Product Accessories
 Note: If two Webcam
Example: SKYPE
- Settings
- Audio&Video- UVCamera
- Capture Input terminal(Hisilicon HD Audio)


Safety Precautions
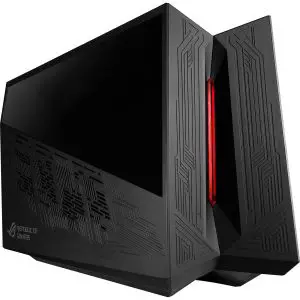
The following safety precautions will increase the life of the ROG XG-Station 2. Follow all precautions and instructions. Except as described in this manual, refer all servicing to qualified personnel. Do not use damaged power cords, accessories, or other peripherals. Do not use strong solvents such as thinners, benzene, or other chemicals on or near the surface.
 Disconnect the AC power before cleaning. Wipe the ROG XG-Station 2 using a clean cellulose sponge or chamois cloth dampened with a solution of nonabrasive detergent and a few drops of warm water and remove any extra moisture with a dry cloth.
- DO NOT place on uneven or unstable work surfaces. Seek servicing if the casing has been damaged.
- DO NOT place or drop objects on top and do not shove any foreign objects into the ROG XG-Station 2.
- DO NOT expose to dirty or dusty environments. DO NOT operate during a gas leak.
- DO NOT expose to strong magnetic or electrical fields.
- DO NOT leave the ROG XG-Station 2 on your lap or any part of the body to prevent discomfort or injury from heat exposure. DO NOT expose to or use near liquids, rain, or moisture. DO NOT use the modem during electrical storms.
- DO NOT carry or cover a ROG XG-Station 2 that is powered ON with any materials that will reduce air circulation such as a carrying bag.
- SAFE TEMP: This ROG XG-Station 2 should only be used in environments with ambient temperatures between 5°C (41°F) and 40°C (104°F)
- Never attempt to disassemble and reassemble ROG XG-Station 2. Only ASUS-authorized technicians should repair the device.
 This symbol of the crossed out wheeled bin indicates that the product (electrical and electronic equipment) should not be placed in municipal waste. Check local regulations for disposal of electronic products.
Installation requirements
To ensure a successful installation of the ROG XG-Station 2, your computer must meet the following requirements:
- A Notebook PC with Thunderbolt’ 3 (updated to the latest firmware)
- Microsoft Windows’ 10 (64 bit)
- Refer to www.asus.com for the complete Notebook PC QVL (Qualified Vendors List)
Specifications Summary
| Model | ROG XG STATION 2 |
| Connection to PC | Thunderbolt’ 3 |
| Ethernet connection Input / Output | Gigabit Lan 10/100/1000 Mbps |
| 4 x USB 3.0 ports | |
| Additional USB | 1 x USB 3.0 Type B port |
| RGB Lighting Control | ASUS ROG AURA supported |
| Power Supply | 600W 80 Plus Gold Power Supply |
| Dimension | Length: 456mm; Width: 158mm; Height 278mm |
| Weight | 5.1KG |
| Graphics Card Support | Provides support for a single full-length, 2.5 slot, PCI-Express x16 graphics card: – NVIDIA*GeForce GTX 900 series and newer – AMD Radeon R9 series and newer |
| Graphics output | Defined by the graphics card installed |
| Accessories | 1x USB 3.0 Type-B cable ‘I x Thunderbolr 3 Type-C cable lx Power cord Important product information guides |
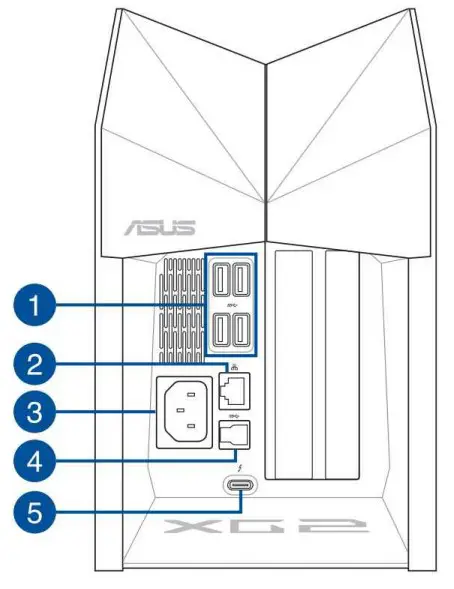
Hardware Introduction
- USB 3.0 port
- LAN port
- Power (DC) input port
- USB 3.0 Type-B port
- Thunderbolt™ type-C port

Hardware installation
To install the ROG XG-Station 2:
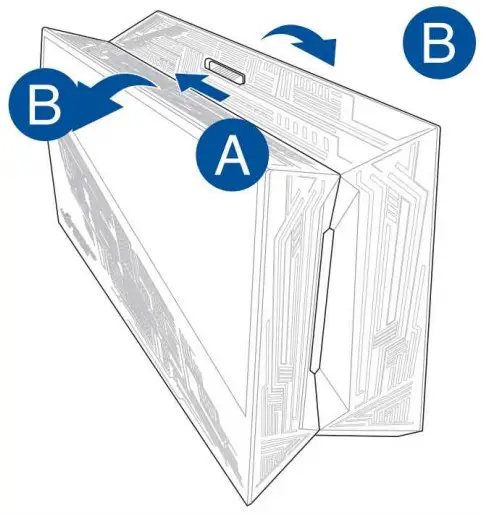
- Slide the spring lock to an unlocked position, then open the ROG XG-Station 2.
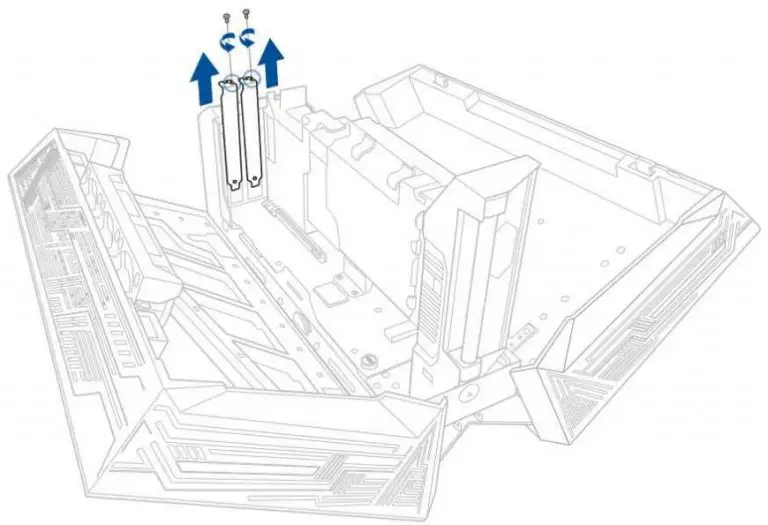
- Remove the screw that secures the metal bracket to the ROG XG Station 2, then remove metal bracket.
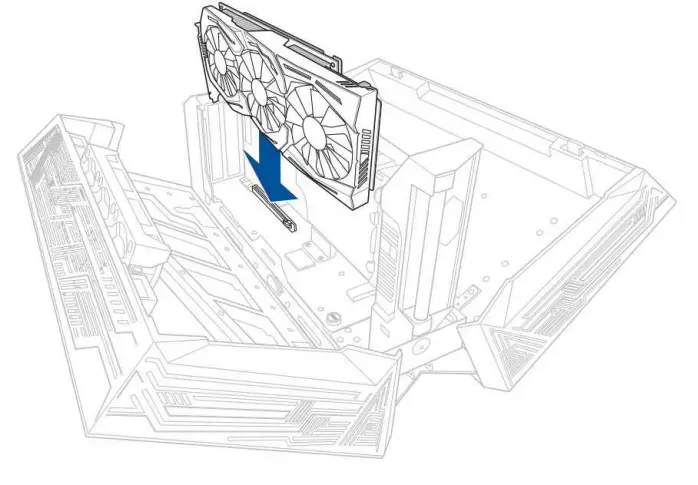
- Align and insert the graphics card into the PCI-E slot.
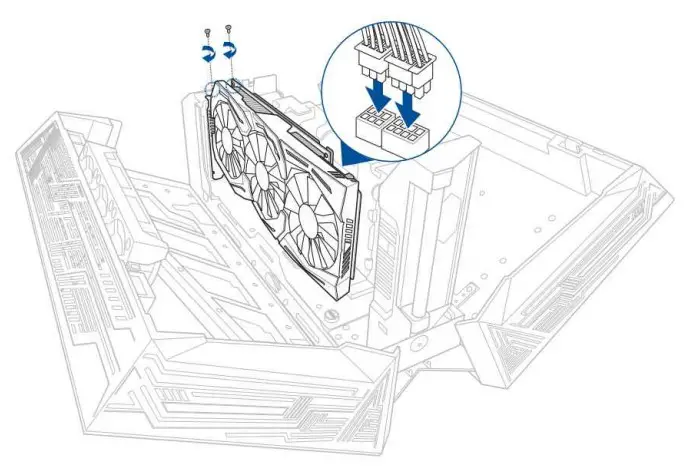
- Secure the metal bracket with the screw you remove earlier, then connect the power cables to the graphics Card.
- Connect the AC power cord to the ROG XG-Station 2 and into a 100V-240V power source, then press the power button to turn on the ROG XG-Station 2.The plasma tube will light up.
 Never attempt to replace the plasma tube by yourself. Only ASUS-authorized technicians should repair the device.
 - Close the ROG XG-Station 2, then connect the bundled Thunderbolt”‘ 3 Type-C cable to your Notebook PC and the ROG XG-Station 2.
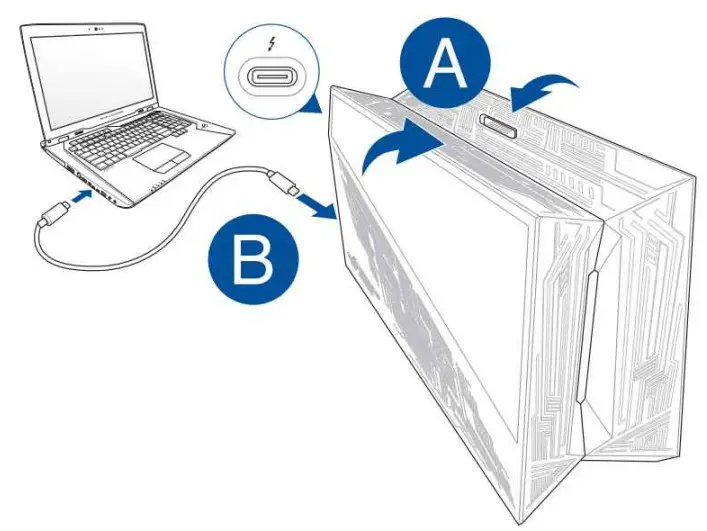
 You can also connect a USB keyboard, USB mouse, external monitor, and other peripherals to your ROG XG-Station 2.
 - Power on your Notebook PC and the LEDs in the ROG XG-Station 2 will light up.
- Install the corresponding drivers for your graphics card. to remove the graphics card, press the release tab on the side of the PCI-E slot, then remove the graphics card.
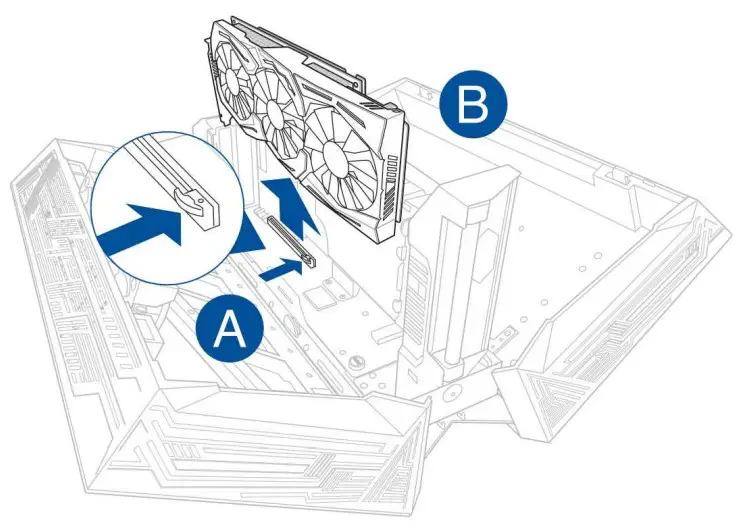
 Disconnect the AC power before removing the graphics card.
- Your graphics card may become extremely hot after operating for a period of time, please be careful when removing the graphics card.
Hardware customization
To customize the lighting effects of your ROG XG-Station 2, visit www.asus.com and download the ASUS ROG AURA software.
]]>
Details
| Modem Information
DOCSIS 3.0 Cable Modem 16×4 channel bonding To achieve Gigablast or Ultimate Classic speeds, a DOCSIS 3.1 modem is required |
Highest Service LevelPreferred 150 |
Front View
|
After the cable modem is successfully registered on the network, the Power, Upstream, Downstream, and Online indicators illuminate continuously to indicate that the cable modem is online and fully operational. For more details, refer to the Modem Lights section. | |
Back View
|
The Asus CM16 has the following ports available on the back of the modem.
|
|
MAC Address
|
MAC addresses are written as 12 digits containing both letters and numbers (0-9, A-F). A MAC address is unique. The first six characters of the MAC address are unique to the manufacturer of the device. |
Modem Lights
The modem lights indicate the current status of your cable modem. To troubleshoot any connection problems, use the table below.
| Modem Light | Status | Problem |
|---|---|---|
| POWER
|
Off | No power. Verify all cable connections and try resetting the modem. |
| Solid Green | None | |
| RECEIVE
|
Flashing | Scanning for downstream channel. Verify all cable connections and try resetting the modem. |
| Solid Green | None. The downstream channel is connected in DOCSIS 3.0 mode. | |
| Solid Blue | None. High speed Internet connection with downstream channels in DOCSIS 3.1 mode. | |
| SEND
|
Off | Upstream channel inactive. Verify all cable connections and try resetting the modem. |
| Flashing | Scanning for upstream channel. Verify all cable connections and try resetting the modem. | |
| Solid Green | None. The downstream channel is connected in DOCSIS 3.0 mode. | |
| Solid Blue | None. High speed Internet connection with downstream channels in DOCSIS 3.1 mode. | |
| ONLINE
|
Off | No connection. Verify all cable connections and try resetting the modem. |
| Flashing | None. Scanning for configuration parameters. | |
| Solid Green | None. Operational. |
ASUS RP-N12 Wireless-N300 Range Extender
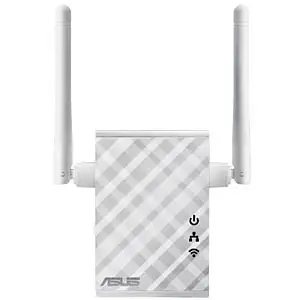
Important
- Power LED
On: RP-N12 is on
Off: RP-N12 is off - Ethernet LED
On: Device is connected to the Ethernet port.
Off: Device is not connected to the Ethernet port. - Wi-Fi LED
Green: RP-N12 provides the best Wi-Fi extender performance. Red: RP-N12 provides poor Wi-Fi extender performance.
Off: RP-N12 is not connected to a router/AP.
NOTE: Please refer to step 3 in Method One for the best Wi-Fi performance.
Installation Method 1
Quick Setup with WPS (Wi-Fi Protected Setup) For router/Access Point(AP) with WPS support
- Power On
Place your RP-N12 near your router/AP and plug it to a power outlet.
Wait until the Wi-Fi LED starts to blink green.
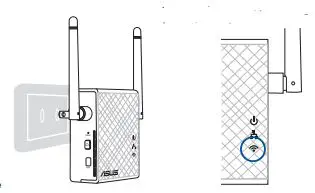
- Connect via WPS (Wi-Fi Protected Setup)
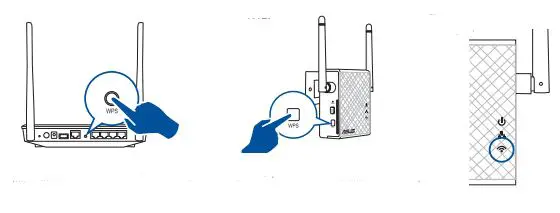
- 1. Press the WPS button on your Router/AP.
- Press the WPS button on your RP-
- The Wi-Fi LED flashs for about two (2) minutes and then turns solid green or red. The color of the LED indicates the Wi-Fi signal strength.
NOTE: Ensure that your router/AP supports WPS. Otherwise, use Method TWO.
- Place in an ideal location
After placing your RP-N12 in an ideal location, RP-N12 connects to your router/AP in about one (1) minute.
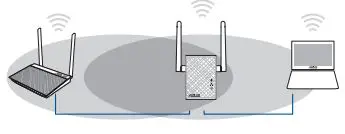 NOTES:
• Place your RP-N12 between your router/AP and wireless device to get the best extender performance.
• Place your RP-N12 in a location where you can get green Wi-Fi LED.
IMPORTANT!
• To minimize interference, keep RP-N12 away from devices like cordless phones, Bluetooth devices and microwave ovens.
• We recommend that you place your RP-N12 in open or spacious location.
Enjoy!
Your RP-N12’s wireless network name (SSID) changes to your existing Wi-Fi network name, ending with
_RPT and shares your router/AP’s Wireless Password.
Frequently Asked Questions (FAQ)
Q1: What should I do if my router does not support WPS?
A1: You can use Method Two to set up RP-N12.
Q2: Why is that the Wi-Fi LED does not light up after completing Method Two?
A2: You may have entered the wrong router SSID and password. Reset your RP-N12, double check your router SSID/password, and set up RP-N12 again.
Q3: Why is it that I cannot see the login page after entering http://repeater.asus.com in the browser?
A3: Ensure that your computer is connected to the extender network only, and
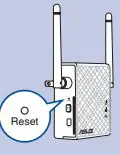
Q4: How do I reset RP-N12?
A4: Using a pin, press the RESET button for about two (2) seconds. Wait for about five (5) seconds until the Wi-Fi LED flashs red.
Method Two
- Power On
Place your RP-N12 near your router/AP and plug it to a power outlet. Wait until the Wi-Fi LED starts to blink green.

- Login
Disconnect your Ethernet connection. On your Wi-Fi enabled device, such as your desktop PC/notebook/tablet, find the default network name of your RP-N12 and click or tap Connect.
NOTE: The screenshot below is from a desktopPC.
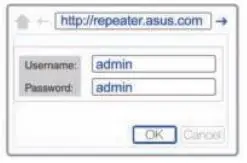
 On a web browser, enter http://repeater.asus. com to access RP-N12 web GUI (graphical user interface). Enter admin as the username and password.
- Configure RP-N12
IMPORTANT! For the best Wi-Fi extender performance, place your RP-N12 in an ideal location. Refer to Step 3 in Method One
- On a web browser, enter http://repeater.asus.com.
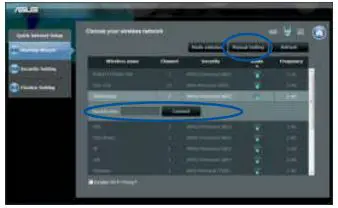
- Connect to a Wi-Fi network and when prompted, enter the security key. If your Wi-Fi network is hidden, click Manual setting.
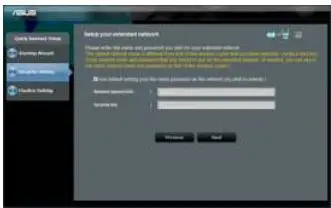
- You can either tick “Use default setting” or enter the SSID and security key/password for your extended network. When done, click Next.
- NOTE: Your RP-N12’s wireless network name (SSID) changes to your existing Wi-Fi network name, ending with _RPT and shares your router/AP’s Wireless Password.
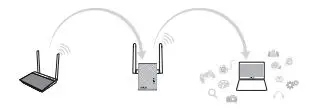
- Connect your wireless devices to the new Extender network.
- Place in an ideal location
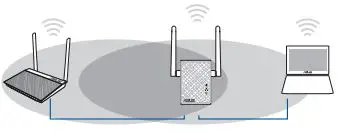 After placing your RP-N12 in an ideal location, RP-N12 connects to your router/AP in about one (1) minute.
NOTES:
• Place your RP-N12 between your router/AP and wireless device to get the best extender performance.
• Place your RP-N12 in a location where you can get green Wi-Fi LED.
IMPORTANT!
• To minimize interference, keep RP-N12 away from devices like cordless phones, Bluetooth devices and micro-wave ovens.
• We recommend that you place your RP-N12 in open or spacious location.
Enjoy!
Your RP-N12’s wireless network name (SSID) changes to your existing Wi-Fi network name, ending with _RPT and shares your router/AP’s Wireless Password.
Media Bridge (Ethernet Adapter)
Set up RP-N12 via Method One or Method Two, then you can use it as a wireless adapter to connect Ethernet devices such as Bluray player, game console, DVR, or smart TV.

