ACURITE Wireless Indoor/Outdoor Thermometer Instructions
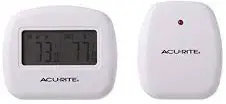
Battery Installation
Batteries not incuded
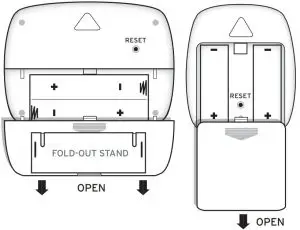
Insert 2 fresh alkaline “AAA” batteries into the main unit first, then the remote unit next. Do not mix old and new batteries. Do not mix alkaline, standard (carbonzinc), or rechargeable (nickelcadmium) batteries.
Slide off the battery compartment cover on the back of each unit. Be sure to insert the batteries in the correct manner according to the polarity symbols indicated in the battery compartment. After the batteries are installed in the main unit, “IN” will display the main unit temperature. The “OUT” temperature will display “” due to the remote unit not being powered on at this point.
Once batteries are installed, the remote unit will transmit the wireless signal to the main unit about once every minute. If the temperature does not display under the “OUT” on the main unit after a few minutes, refer to the troubleshooting section of this manual.
Placement:
The main unit may be wall mounted using the builtin hanger, or it can be placed on a desk or table using the foldout stand. The remote sensor can be wallmounted.
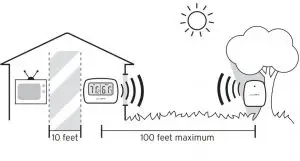
The remote unit is weather resistant. Keep out of direct sunlight and direct weather elements to extend the life of the unit. Also, when selecting a location for the base unit, make sure it is within 100 feet of the wireless remote sensor. The range may be affected by electronic interference from devices such as televisions and computers. For the best results, keep both units at least 10 feet away from any electrical equipment or devices that may cause electronic interference.
Troubleshooting:
If the main unit displays “” in the “OUT” display area for more than a few minutes:
- The batteries may be low in the wireless remote sensor unit.
- The wireless remote sensor unit may be out of range.
- Electronic devices or equipment may be causing interference relocate both units.
- Both units may need to be reset to reestablish wireless communications.
If this problem persists, remove and replace the batteries on both units and place both units in close proximity to each other for awhile. This may help reestablish communications and avoid any electronic interference in the area.
Specifications:
- Temperature measurement range:
- MAIN UNIT: 32ºF 122ºF
- WIRELESS REMOTE: 0ºF 130ºF
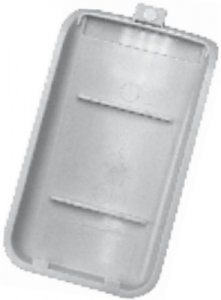
Battery Compartment Access (back)
BATTERY SAFETY:
Follow the polarity(+/-) diagram in the battery compartment. Promptly remove dead batteries from the device. Dispose of used batteries properly. Only batteries of the same or equivalent type as recommended are to be used. DO NOT incinerate used batteries. DO NOT dispose of batteries in fire, as batteries may explode or leak. DO NOT mix old and new batteries or types of batteries (alkaline/standard).DO NOT use rechargeable batteries. DO NOT recharge non-rechargeable batteries. DO NOT short-circuit the supply terminals.
 This device complies with Part 15 of the FCC Rules. Operation is subject to the following two conditions:
- this device may not cause harmful interference, and
- This device must accept any interference received, including interference that may cause undesired operation.
Warning: Changes or modifications to this unit not expressly approved by the party responsible for compliance could void the user’s authority to operate the equipment. Note: This equipment has been tested and found to comply with the limits for a Class B digital device, pursuant to Part 15 of the FCC Rules. These limits are designed to provide reasonable protection against harmful interference in a residential installation. This equipment generates, uses and can radiate radio frequency energy and, if not installed and used in accordance with the instructions, may cause harmful interference to radio communications.
However, there is no guarantee that interference will not occur in a particular installation. If this equipment does cause harmful interference to radio or television reception, which can be determined by turning the equipment off and on, the user is encouraged to try to correct the interference by one or more of the following measures:- Reorient or relocate the receiving antenna.
- Increase the separation between the equipment and receiver.
- Connect the equipment into an outlet on a circuit different from that to which the receiver is connected.
- Consult the dealer or an experienced radio/TV technician for help.
Do not return product to retail store. For Technical Assistance and product return information,
please call Chaney Instrument Co. direct at:
877-221-1252
LIMITED WARRANTY – INTERNATIONAL
Conswner may have more remedies at law than follows. Chaney Instrument Company warrants to the owner, this product to be free from defect in material and workmanship
for one year from date of purchase. CHANEY INSTRUM:ENT SHALL NOT BE LIABLE FOR ANY INCIDENTAL, INDIRECT OR CONSEQUENTIAL DAMAGES,
WHETHER ARISING IN CONTRACT OR TORT. Chaney Instrument’s obligation (at its option) is limited to repair or replace this product. For in-warranty repair, send
clock, accompanied by Guarantee, bearing Dealer’s name and date of purchase, with $5.00 to cover handling and postage, to:
www.chaneyinstrument.com
Tel: 877-221-1252 Made in China
Chaney Instrument Company
965 Wells Street Lake Geneva, Wisconsin 53147

AcuRite® Atlas™ and AcuRite® Atlas Elite™
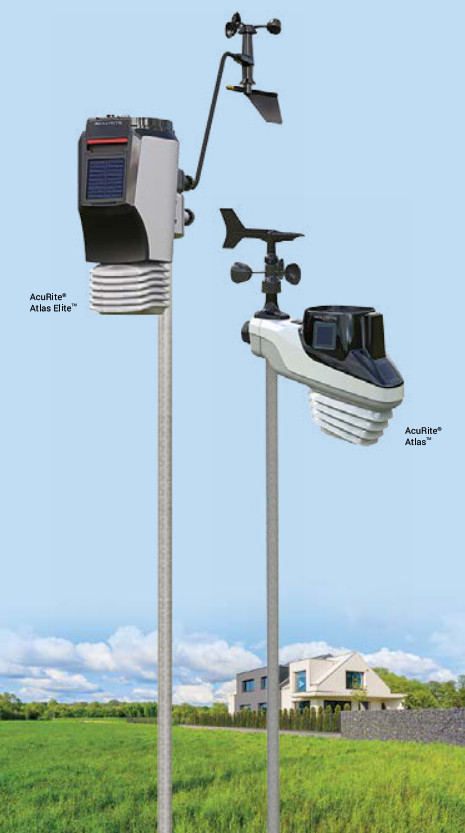
Plan Your Day with Confidence™
The AcuRite® Atlas™ family of environmental monitoring solutions delivers accurate, reliable information about the outdoor conditions at your exact location, as well as access to intuitively presented data, trends, and insights through the My AcuRite™ platform.
With AcuRite® Atlas™ sensors, you are empowered to make more informed decisions when planning your day-to-day activities.
► Maintain Your Property
- Know when to water your lawn during periods of varying rainfall
- Be alerted about frost conditions in time to cover flower beds and protect your garden
- Take action when high winds threaten your home, patio furniture, and hanging plants
►Enjoy The Outdoors
- Confidently plan for what the weather has in store throughout the day
- Know when sunscreen is essential to protect against harmful UV levels
- Be alerted to approaching lightning storms
► Protect Your Family
- Receive advanced notice of potentially dangerous weather conditions, giving you time to get loved ones safely indoors
- Better understand the impact weather has on the people you care about
AcuRite® Atlas Elite™
The best AcuRite® Environmental Monitoring System ever made.
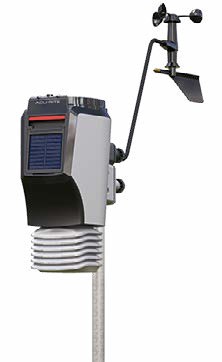
Make every decision with authority and confidence using our most accurate and reliable monitoring solution. Experience your environment like never before, harnessing the power of comprehensive, intuitively displayed information delivered to you in real-time. Everything about the AcuRite® Atlas Elite™, from the componentry to the materials, to the innovative modular housing design, to the tool-free installation, has been thoughtfully examined, improved, optimized, and then improved again…and again. The end result is a weather station that delivers unprecedented accuracy, durability, reliability, and ease of use.
►Monitor a full array of environmental conditions including real-time wind speed and direction, lightning strikes, and UV and light conditions
►Beyond consumers, AcuRite® Atlas Elite™ and My AcuRite™ offer actionable insights to conditions that affect many businesses, including golf course management, construction, agriculture, and more
► Optimized sensor design delivers maximum performance and accuracy while remaining easy to install and maintain
- Robust design and high-grade components ensure durability and longevity
- 24-hour aspirating fan helps ensure reliable temperature readings, even when exposed to direct sunlight
- Solar-powered to extend battery life • Rain collector is designed to meet World Meteorological Organization (WMO) standards for accuracy
- Meets wind accuracy standards of the National Weather Service (NWS) using the detachable wind cups and wind vane, which includes 30-feet of cable for optimal anemometer placement
- The innovative modular housing design allows for easy setup, maintenance, and access to internal components
► Using My AcuRite™, share your current environmental conditions with online weather communities over a standard wireless internet network
- Choose to be part of the AcuRite Neighborhood Network™, a community of weather enthusiasts who share weather with each other, and are even picked up by nearby TV stations to share hyper-local weather conditions
- Share weather data with friends and family
- Participate in weather communities like Weather Underground
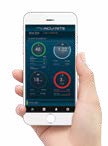
►View your data at home using the Atlas Elite™ digital display, or from anywhere by using the My AcuRite™ platform through any web browser or mobile device
- Data can be viewed using your iPhone, iPad, Android phone and tablet, as well as a web browser
- Analyze historical data and trends, identify patterns, and learn about your environment
- Receive calculated alerts that draw from multiple environments readings to help you better know and understand risk conditions around your home
- Export and archive weather history data as detailed spreadsheets
AcuRite® Atlas™
Atlas 7
Atlas 8
Be the neighborhood weather expert, protect your family from risk, and more
Provides insights and vital environmental information, helping you make intelligent, informed decisions when protecting your home, caring for your family, planning outdoor activities, growing a garden, and more.
Monitor, a full array of environmental conditions including UV radiation, light intensity, and lightning strikes* *Lightning is standard on Atlas™ 8, optional on Atlas™ 7
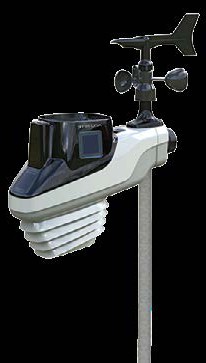
►Optimized all-in-one design delivers more accurate measurements with easy installation and maintenance
- Daytime aspirating fan helps ensure reliable temperature readings, even when exposed to direct sunlight in extremely hot climates
- Compact, all-in-one sensor design allows for easy mounting and setup
- Enhance the accuracy of wind readings by adding on the optional extension kit, which includes 30-feet of cable for optimal anemometer placement

► Using My AcuRite™, share your current environmental conditions with online weather communities over a standard wireless internet network
- Choose to be part of the My AcuRite™ Neighborhood Network™, a community of weather enthusiasts who share weather with each other, and are even picked up by nearby TV stations to share hyper-local weather conditions
- Share weather data with friends and family
- Participate in weather communities like Weather Underground

Instruction Manual
Thermometer

Questions? Contact Customer Support at (877) 221-1252 or visit www.AcuRite.com.
SAVE THIS MANUAL FOR FUTURE REFERENCE.

Congratulations on your new AcuRite product. To ensure the best possible product performance, please read this manual in its entirety and retain it for future reference.
Unpacking Instructions
Remove the protective film that is applied to the LCD screen prior to using this product. Locate the tab and peel off to remove.
Package Contents
- Display with Tabletop Stand
- Outdoor Sensor
- Power Adapter
- Instruction Manual
IMPORTANT PRODUCT MUST BE REGISTERED TO RECEIVE WARRANTY SERVICE
PRODUCT REGISTRATION
Register online to receive 1 year warranty protection
www.AcuRite.com
Features & Benefits
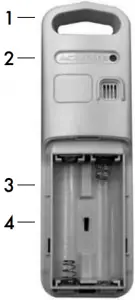
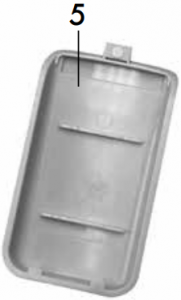
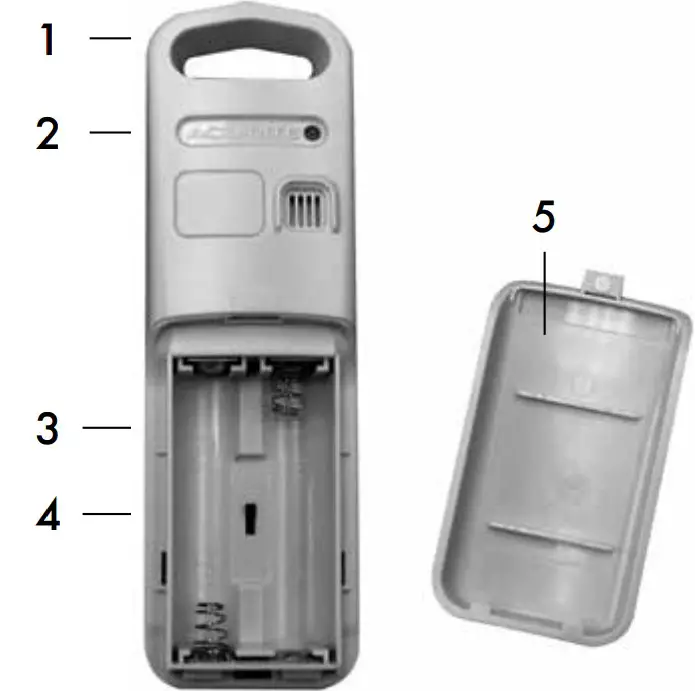
OUTDOOR SENSOR
- Integrated Hanger
For easy placement. - Wireless Signal Indicator
Flashes when data is being sent to the display. - Battery Compartment
- A-B-C Switch
ID code that must match display’s A-B-C switch to ensure units synchronize. - Battery Compartment Cover
2
Features & Benefits
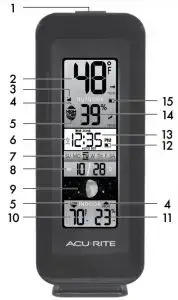
- Backlight Button
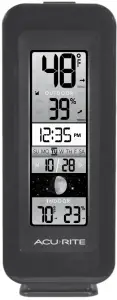
For momentary backlight and dimmer settings. - Current Outdoor Temperature
Arrow icon indicates direction temperature is trending. - Sensor Signal Strength
- HIGH Indicator
Indicates today’s HIGH records are being viewed. - LOW Indicator
Indicates today’s LOW records are being viewed.  Icon
Icon
Indicates display is in auto-dimming brightness mode. (see page 6)- Day of the Week
- Date
- Moon Phase
- Current Indoor Temperature
Arrow icon indicates direction temperature is trending. - Current Indoor Humidity
Arrow icon indicates direction humidity is trending. - Display Low Battery Indicator
- Intelli-Time® Clock
Automatically updates itself for Daylight Saving Time. - Current Outdoor Humidity
Arrow icon indicates direction humidity is trending. - Sensor Low Battery Indicator
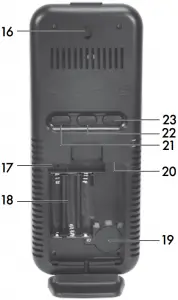
DISPLAY BACK
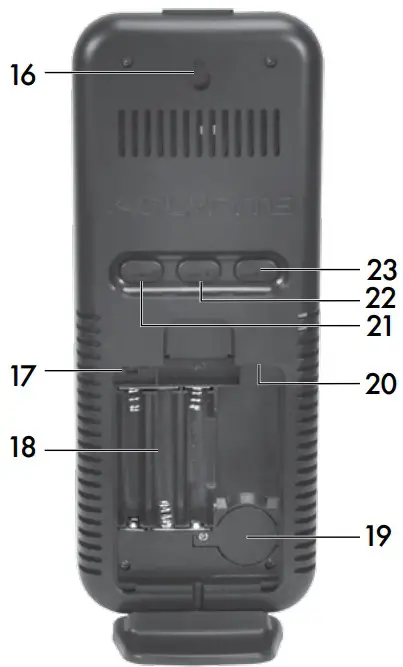
16. Integrated Hang Hole
For easy wall mounting.
17. A-B-C Switch
ID code that must match sensor’s A-B-C switch to ensure units synchronize.
18. Battery Compartment
19. Intelli-Time Battery Compartment Cover
20. Plug-in for Power Adapter
21.  Button
For setup preferences and viewing HIGH records.
22. SET Button
For setup preferences.
23.  Button
For setup preferences and viewing LOW records.
24. Battery Compartment Cover
(not shown)
3
SETUP
Sensor Setup
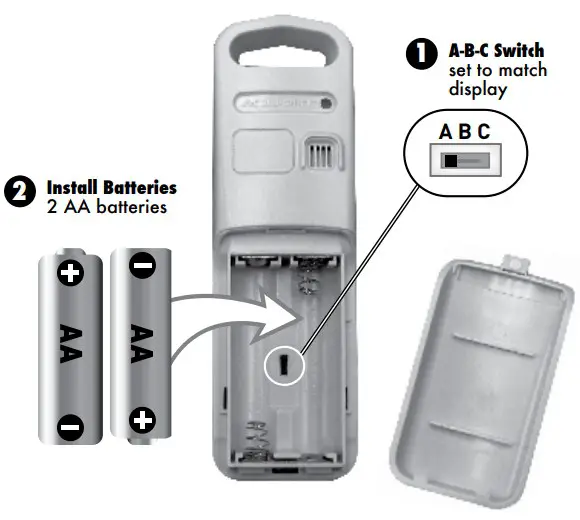
- Set the A-B-C Switch
The A-B-C switch is located inside the battery compartment. It can be set to A, B or C. However, you must select the same letter choices for both the sensor and the display in order for the units to synchronize. - Install or Replace Batteries
AcuRite recommends high quality alkaline or lithium batteries in the outdoor sensor for the best product performance. Heavy duty or rechargeable batteries are not recommended.
The sensor requires lithium batteries in low temperature conditions. Cold temperatures can cause alkaline batteries to function improperly. Use lithium batteries in the sensor for temperatures below -4°F / -20°C.
- Slide off the battery compartment cover. Take note of the A-B-C switch setting inside the battery compartment for display setup.
- Insert 2 x AA batteries into the battery compartment, as shown. Follow the polarity (+/-) diagram in the battery compartment.
- Replace the battery cover.
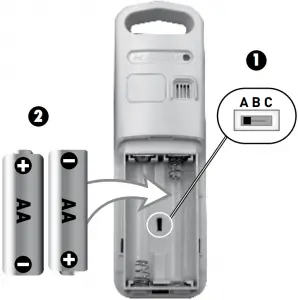
- A-B-C Switch
set to match display - Install Batteries
2 AA batteries
 LITHIUM
BATTERIES

ALKALINE
BATTERIES
4
Display Setup
- Set the A-B-C Switch
Locate the A-B-C switch inside the battery compartment. Set the A-B-C switch to A, B or C. You must select the same letter choices for both the display and the sensor in order for the units to synchronize. - Install or Replace Backup Batteries (optional)
1. Remove the battery compartment cover.
2. Insert 3 x AAA alkaline batteries into the battery compartment, as shown.
Follow the polarity (+/-) diagram in the battery compartment.
3. Replace the battery cover. - Plug in Power Adapter
For the best performance, plug in the power adapter as the main power source for this product.
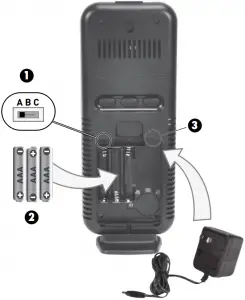
- A-B-C Switch
Set to match sensor. - Install Batteries
3 AAA batteries
(optional) - Plug in Power Adapter
IMPORTANT: Batteries are a backup power source to preserve records in the event of a power outage. Power adapter is recommended as the primary power source to enjoy the full functionality of this product.
PLEASE DISPOSE OF OLD OR DEFECTIVE BATTERIES IN AN ENVIRONMENTALLY SAFE WAY AND IN ACCORDANCE WITH YOUR LOCAL LAWS AND REGULATIONS.
BATTERY SAFETY: Clean the battery contacts and also those of the device prior to battery installation. Remove batteries from equipment which is not to be used for an extended period of time. Follow the polarity (+/-) diagram in the battery compartment. Promptly remove dead batteries from the device. Dispose of used batteries properly. Only batteries of the same or equivalent type as recommended are to be used. DO NOT incinerate used batteries. DO NOT dispose of batteries in fire, as batteries may explode or leak. DO NOT mix old and new batteries or types of batteries (alkaline/standard). DO NOT use rechargeable batteries. DO NOT recharge non-rechargeable batteries. DO NOT short-circuit the supply terminals.
5
Intelli-Time® Clock
Intelli-Time products are pre-programmed with the correct time and date. Intelli-Time technology instructs the time and date to set themselves. All you need to do is select your Time Zone and Daylight Saving Time preferences. The clock will then automatically set itself and change for Daylight Saving Time.
Set the Time, Date & Units
Press and release the “SET” button, located on the back of the display, to enter SET MODE. Once in SET MODE, the preference you are currently setting will blink on the display.
To adjust the currently selected (flashing) item, press and release the “ ” or “
 ” buttons (press and HOLD to fast adjust).
To save your adjustments, press and release the “SET” button again to adjust the next preference. The preference set order is as follows:
DST (Daylight Saving Time ON or OFF)*
TIME ZONE (CST MST PST AKT HAT NST AST EST)
CLOCK HOUR
CLOCK MINUTE
CALENDAR MONTH
CALENDAR DATE
CALENDAR YEAR
TEMPERATURE UNITS (°F or °C)
*If you live in an area that observes DST, DST should be set to ON, even if it is not currently Daylight Saving Time.
You will automatically exit SET MODE if no buttons are pressed for 8 seconds. Enter SET MODE at any time by pressing the “SET” button.
Display Backlight Settings
This weather station’s color display features three different lighting settings: High (100%) brightness, Medium (60%) brightness and Low (30%) brightness.
Using battery power alone, the backlight is available momentarily for 10 seconds by pressing the backlight button.
When display is powered with the power adapter, backlight remains on at 100% brightness. Press backlight button once to dim to 60% brightness; press again to dim to 30%, press a 3rd time to enter “AUTO DIM” mode.
| AUTO DIM MODE: Automatically adjusts display brightness based on time of day & year. | |
| MARCH 11- NOVEMBER 4 | 6:00 a.m. – 9:00 p.m. = 100% brightness |
| 9:01 p.m. – 5:59 a.m.= 30% brightness | |
| NOVEMBER 5 – MARCH 10 | 7:30 a.m. – 7:00 p.m.= 100% brightness |
| 7:01 p.m. – 7:29 a.m. = 30% brightness | |
6
Placement for Maximum Accuracy
AcuRite sensors are sensitive to surrounding environmental conditions. Proper placement of both the display and outdoor sensor are critical to the accuracy and performance of this product.

Display Placement
Place the display in a dry area free of dirt and dust. Display stands upright for tabletop use or is wall-mountable
Outdoor Sensor Placement
Sensor must be placed outside to observe outdoor conditions. Sensor is water resistant and is designed for general outdoor use, however, to extend its life place the sensor in an area protected from direct weather elements.
Hang the sensor using the integrated hang hole or hanger, or by using string (not included) to hang it from a suitable location, like a well covered tree branch. The best location is 4 to 8 feet above the ground with permanent shade and plenty of fresh air to circulate around the sensor.
Important Placement Guidelines
- To ensure accurate temperature measurement, place units out of direct sunlight and away from any heat sources or vents.
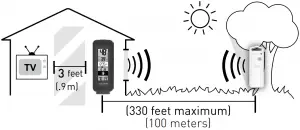
- Display and outdoor sensor must be within 330 ft (100 m) of each other.
- To maximize wireless range, place units away from large metallic items, thick walls, metal surfaces, or other objects that may limit wireless communication.
- To prevent wireless interference, place both units at least 3 ft (.9 m) away from electronic devices (TV, computer, microwave, radio, etc.).
Setup is Complete
The sensor will now synchronize with the display. It may take a few minutes for synchronization to complete. Please refer to the troubleshooting section of this manual if anything appears to be functioning improperly.
7
OPERATION
Using the Thermometer
High & Low Records
Today’s high and low records are displayed for indoor and outdoor temperature and humidity. Today’s records automatically clear at 12:00am midnight every day. View today’s high or low records by pressing the “ ” or “
 ” buttons. Press and release again to view current readings.
To manually clear all of today’s LOW recorded values, press and release the “ ” button to view low records, then press and HOLD the”
 ” button for 2 seconds. Dashes will display to confirm you have cleared the LOW records.
To manually clear all of today’s HIGH recorded values, press and release the “ ” button to view high records, then press and HOLD the “
 ” button for 2 seconds. Dashes will display to confirm you have cleared the HIGH records.
Moon Phase
Track the phases of the moon, conveyed through simple lunar phase icons:

8
Troubleshooting
| No outdoor sensor reception
|
If the wireless signal indicator shows no bars: • Relocate the display and/or the outdoor sensor. The units must be within 330 ft (100 m) of each other. • Make sure both units are placed at least 3 feet (.9 m) away from electronics that may interfere with the wireless communication (such as TVs, microwaves, computers, etc). • Use standard alkaline batteries (or lithium batteries in sensor when temperature is below -4°F/-20°C). Do not use heavy duty or rechargeable batteries. NOTE: It may take up to a few minutes for display and sensor to synchronize after batteries are replaced. |
| Display screen not working | • Check that the batteries are installed correctly. Batteries may need to be replaced. |
| Outdoor temperature is flashing or showing dashes | Flashing of the outdoor temperature is generally an indication of wireless interference. 1. Bring both the sensor and display indoors and remove at least one battery from each. 2. Make sure the A-B-C switch on both units match. 3. Reinstall the batteries in the outdoor sensor. 4. Reinstall the batteries in the display. 5. Let the units sit within a couple feet of each other for a few minutes to gain a strong connection. |
| Inaccurate temperature or humidity | • Make sure both the display and sensor are placed out of direct sunlight and away from any heat sources or vents (see page 7). • Make sure both units are positioned away from moisture sources (see page 7). |
If your AcuRite product does not operate properly after trying the troubleshooting steps, visit www.AcuRite.com or call (877) 221-1252 for assistance.
9
Care & Maintenance
Display Care – Clean with a soft, damp cloth. Do not use caustic cleaners or abrasives. Keep away from dust, dirt and moisture. Clean ventilation ports regularly with a gentle puff of air.
Outdoor Sensor Care – Clean with a soft damp cloth. Do not use caustic cleaners or abrasives.
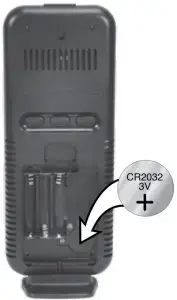
Replace Intelli-Time Battery
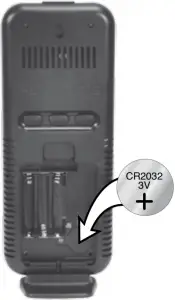
Intelli-Time technology is powered by a pre-installed coin-cell battery that stores the time and date settings. The battery has a shelf life of several years. Time and date will need to be entered after replacing Intelli-Time battery.
To replace the Intelli-Time battery:
- Locate the coin cell battery compartment door in the battery compartment of the display. Unscrew and remove the compartment cover.
- Insert 1 x CR2032 coin cell battery into the battery compartment, as shown. Install battery with “+” positive terminal facing OUT.
- Screw in the battery cover.
Specifications
| TEMPERATURE RANGE | Outdoor: -40°F to 158°F; -40°C to 70°C |
| Indoor: 32°F to 122°F; 0°C to 50°C | |
| HUMIDITY RANGE | Outdoor: 1% to 99% |
| Indoor: 1% to 99% | |
| WIRELESS RANGE | 330ft / 100m depending on home construction materials |
| POWER | Display: 5V, 300mA power adapter 3 x AAA alkaline batteries (optional) 1 x CR2032 coin cell battery |
| Sensor: 2 x AA alkaline or lithium batteries | |
| DATA REPORTING | Outdoor: 16 seconds |
| Indoor: 60 seconds |
FCC Information
This device complies with part 15 of FCC rules. Operation is subject to the following two conditions:
1- This device may NOT cause harmful interference, and
2- This device must accept any interference received, including interference that may cause undesired operation.
WARNING: Changes or modifications to this unit not expressly approved by the party responsible for compliance could void the user’s authority to operate the equipment.
NOTE: This equipment has been tested and found to comply with the limits for a Class B digital device, pursuant to Part 15 of the FCC rules. These limits are designed to provide reasonable protection against harmful interference in a residential installation. This equipment generates, uses and can radiate radio frequency energy and, if not installed and used in accordance with the instructions, may cause harmful interference to radio communications. However, there is no guarantee that interference will not occur in a particular installation. If this equipment does cause harmful interference to radio or television reception, which can be determined by turning the equipment off and on, the user is encouraged to try to correct the interference by one or more of the following measures:
• Reorient or relocate the receiving antenna.
• Increase the separation between the equipment and the receiver.
• Connect the equipment into an outlet on a circuit different from that to which the receiver is connected.
• Consult the dealer or an experienced radio/TV technician for help.
NOTE: The manufacturer is not responsible for any radio or TV interference caused by unauthorized modifications to this equipment. Such modifications could void the user authority to operate the equipment.
10
Customer Support
AcuRite customer support is committed to providing you with best-in-class service. For assistance, please have the model number of this product available and contact us in any of the following ways:
 (877) 221-1252
Visit us at www.AcuRite.com
 Installation Videos
  Register your Product
 Instruction Manuals
  Support User Forum
 Replacement Parts
  Submit Feedback & Ideas
IMPORTANT PRODUCT MUST BE REGISTERED TO RECEIVE WARRANTY SERVICE
PRODUCT REGISTRATION
Register online to receive 1 year warranty protection
www.AcuRite.com
Limited 1 Year Warranty
AcuRite is a wholly owned subsidiary of Chaney Instrument Company. For purchases of AcuRite products, AcuRite provides the benefits and services set forth herein. For purchases of Chaney products, Chaney provides the benefits and services set forth herein.
We warrant that all products we manufacture under this warranty are of good material and workmanship and, when properly installed and operated, will be free of defects for a period of one year from the date of purchase.
Any product which, under normal use and service, is proven to breach the warranty contained herein within ONE YEAR from date of sale will, upon examination by us, and at our sole option, be repaired or replaced by us. Transportation costs and charges for returned goods shall be paid for by the purchaser. We hereby disclaim all responsibility for such transportation costs and charges. This warranty will not be breached, and we will give no credit for products which have received normal wear and tear not affecting the functionality of the product, been damaged (including by acts of nature), tampered, abused, improperly installed, or repaired or altered by others than our authorized representatives.
Remedy for breach of this warranty is limited to repair or replacement of the defective item(s). If we determine that repair or replacement is not feasible, we may, at our option, refund the amount of the original purchase price
THE ABOVE-DESCRIBED WARRANTY IS THE SOLE WARRANTY FOR THE PRODUCTS AND IS EXPRESSLY IN LIEU OF ALL OTHER WARRANTIES, EXPRESS OR IMPLIED. ALL OTHER WARRANTIES OTHER THAN THE EXPRESS WARRANTY SET FORTH HEREIN ARE HEREBY EXPRESSLY DISCLAIMED, INCLUDING WITHOUT LIMITATION THE IMPLIED WARRANTY OF MERCHANTABILITY AND THE IMPLIED WARRANTY OF FITNESS FOR A PARTICULAR PURPOSE.
We expressly disclaim all liability for special, consequential, or incidental damages, whether arising in tort or by contract from any breach of this warranty. Some states do not allow the exclusion or limitation of incidental or consequential damages, so the above limitation or exclusion may not apply to you.
We further disclaim liability from personal injury relating to its products to the extent permitted by law. By acceptance of any of our products, the purchaser assumes all liability for the consequences arising from their use or misuse. No person, firm or corporation is authorized to bind us to any other obligation or liability in connection with the sale of our products.
Furthermore, no person, firm or corporation is authorized to modify or waive the terms of this warranty unless done in writing and signed by a duly authorized agent of ours.
In no case shall our liability for any claim relating to our products, your purchase or your use thereof, exceed the original purchase price paid for the product.
Applicability of Policy
This Return, Refund, and Warranty Policy applies only to purchases made in the United States and Canada. For purchases made in a country other than the United States or Canada, please consult the policies applicable to the country in which you made your purchase.
Additionally, this Policy applies only to the original purchaser of our products. We do cannot and do not offer any return, refund, or warranty services if you buy products used or from resale sites such as eBay or Craigslist.
Governing Law
This Return, Refund, and Warranty Policy is governed by the laws of the United States and the State of Wisconsin. Any dispute relating to this Policy shall be brought exclusively in the federal or State courts having jurisdiction in Walworth County, Wisconsin; and purchaser consents to jurisdiction within the State of Wisconsin.
11

Weather Stations Temperature & Humidity Weather Alert Radio
Kitchen Thermometers & Timers Clocks
It’s more than accurate, it’s 
AcuRite offers an extensive assortment of precision instruments, designed to provide you with information you can depend on to Plan your day with confidence™.
Printed in China
00384 INST 061316
©Chaney Instrument Co. All rights reserved. AcuRite is a registered trademark of the Chaney Instrument Co., Lake Geneva, WI 53147. All other trademarks and copyrights are the property of their respective owners. AcuRite uses patented technology.
Visit www.AcuRite.com/patents for details.
Instruction Manual
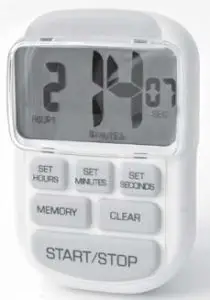
ACURITE Digital Timer
Button Clip-on back is also a stand Magnet back 23 Hours / 59 Minutes / 59 Seconds Large, easy-to-read numbers.
Thank You for purchasing this ACURITE® product. Please read this manual in it’s entirety to fully enjoy the benefits and features of this product. Please keep this manual for future reference.
NOTE: A clear film is applied to the display at the factory that must be removed prior to using this product. Locate the clear tab and simply peel to remove.
OVERVIEW OF FEATURES
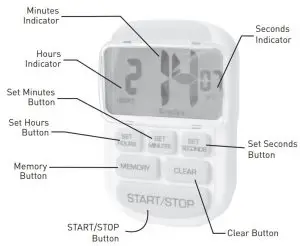
General timer description:
It’s a countdown/up timer. The max count range is 23 hour 59min 59sec., then the timer counts down to 00:00:00 the unit will start to alarm and count up (this will tell the user how much additional time has elapsed since the timer started sounding). The alarm will continuously sound (at 75db) for 1 minute or until the user presses the “START/STOP” button.
SETUP
Requires 1 “AAA” Battery (not included). Install the battery.
INSTRUCTIONS FOR USE:
- The timer is “always on”.
- In sleep mode LCD will display 00:00:00. This will not drain battery.
- HOURS: Press the “SET HOURS” button until desired number reached.
- MINUTES: Press the “SET MINUTES” button until desired number reached.
- SECONDS: Press the “SET SECONDS” button until desired number reached.
- Press and hold any of these buttons (hours, minutes or seconds) to activate rapid scroll.
- Press the “START/STOP” button to begin counting down from entered time.
- Press the “CLEAR” button to clear the numbers displayed.
- Press the “MEMORY” button to bring back the last time entered.
OPERATION
When timer is set but not running:
- Press the “START/STOP” button to begin counting down from time entered.
- Press the “CLEAR” button to clear all numbers.
When timer is running:
- Press the “START/STOP” button to stop (pause) countdown. Push again to resume countdown.
MEMORY button:
The user can press the “SET HOURS”, “SET MINUTES” and “SET SECONDS” buttons to set a value that can be kept in MEMORY. Once a value is entered, press the “MEMORY” button to keep it in MEMORY. To display this number press the “MEMORY” button. To reset the number kept in MEMORY, press the “MEMORY” button to display the number and then press the “CLEAR” button.
WARNING
WARNING: Do not place on or near hot surfaces. Do not immerse unit in water.
Product Registration
To receive product information, register your product online. It’s quick and easy!
Log on to http://www.chaneyinstrument.com/product_reg.htm
 Please DO NOT return product to the retail store. For technical assistance and product return information, please call Customer Care: 877-221-1252 Mon. – Fri. 8:00 A.M. to 4:45 P.M. (CST)
LIMITED ONE YEAR WARRANTY
Haney Instrument Company warrants that all products it manufactures to be of good material and workmanship and to be free of defects if properly installed and operated for a period of one year from date of purchase. REMEDY FOR BREACH OF THIS WARRANTY IS EXPRESSLY LIMITED TO REPAIR OR REPLACEMENT OF DEFECTIVE ITEMS. Any product which, under normal use and service, is proven to breach the warranty contained herein within ONE YEAR from date of sale will, upon examination by Chaney, and at its sole option, be repaired or replaced by Chaney. In all cases, transportation costs and charges for returned goods shall be paid for by the purchaser. Chaney hereby disclaims all responsibility for such transportation costs and charges. This warranty will not be breached, and Chaney will give no credit for products it manufactures which shall have received normal wear and tear, been damaged, tampered, abused, improperly installed, damaged in shipping, or repaired or altered by others than authorized representatives of Chaney.
THE ABOVE-DESCRIBED WARRANTY IS EXPRESSLY IN LIEU OF ALL OTHER WARRANTIES, EXPRESS OR IMPLIED, AND ALL OTHER WARRANTIES ARE HEREBY EXPRESSLY DISCLAIMED, INCLUDING WITHOUT LIMITATION THE IMPLIED WARRANTY OF MERCHANTABILITY AND THE IMPLIED WARRANTY OF FITNESS FOR A PARTICULAR PURPOSE. CHANEY EXPRESSLY DISCLAIMS ALL LIABILITY FOR SPECIAL, CONSEQUENTIAL OR INCIDENTAL DAMAGES, WHETHER ARISING IN TORT OR BY CONTRACT FROM ANY BREACH OF THIS WARRANTY. SOME STATES DO NOT ALLOW THE EXCLUSION OR LIMITATION OF INCIDENTAL OR CONSEQUENTIAL DAMAGES, SO THE ABOVE LIMITATION OR EXCLUSION MAY NOT APPLY TO YOU. CHANEY FURTHER DISCLAIMS ALL LIABILITY FROM PERSONAL INJURY RELATING TO ITS PRODUCTS TO THE EXTENT PERMITTED BY LAW. BY ACCEPTANCE OF ANY OF CHANEY’S EQUIPMENT OR PRODUCTS, THE PURCHASER ASSUMES ALL LIABILITY FOR THE CONSEQUENCES ARISING FROM THEIR USE OR MISUSE. NO PERSON, FIRM OR CORPORATION IS AUTHORIZED TO ASSUME FOR CHANEY ANY OTHER LIABILITY IN CONNECTION WITH THE SALE OF ITS PRODUCTS. FURTHERMORE, NO PERSON, FIRM OR CORPORATION IS AUTHORIZED TO MODIFY OR WAIVE THE TERMS OF THIS PARAGRAPH, AND THE PRECEDING PARAGRAPH, UNLESS DONE IN WRITING AND SIGNED BY A DULY AUTHORIZED AGENT OF CHANEY. THIS WARRANTY GIVES YOU SPECIFIC LEGAL RIGHTS, AND YOU MAY ALSO HAVE OTHER RIGHTS WHICH VARY FROM STATE TO STATE.
For in-warranty repair, please contact: Customer Care Department Chaney Instrument Company 965 Wells Street Lake Geneva, WI 53147
Chaney Customer Care 877-221-1252 Mon-Fri 8:00 a.m. to 4:45 p.m. CST www.chaneyinstrument.com
 If at any time in the future you need to dispose of this product please note that:
Waste electrical products should not be disposed together with household waste.
Please recycle where facilities exist. Check with your local Authority or retailer
for recycling advice
ACURITE Alarm Clock Instruction Manual
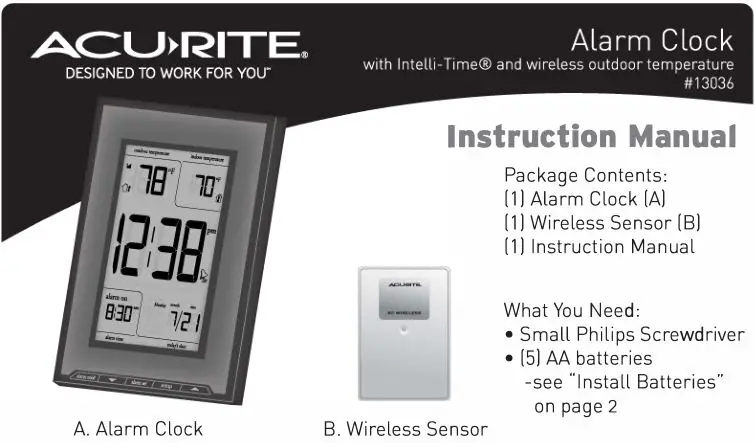
Thank You for purchasing this ACURITE® product. This alarm clock features indoor and outdoor temperature, a calendar and a clock which instantly sets itself once batteries are installed. Please read this manual in it’s entirety to fully enjoy the benefits and features of this product. Please keep this manual for future reference.
NOTE: A clear film is applied to the LCD at the factory that must be removed prior to using this product. Locate the clear tab and simply peel to remove.
OVERVIEW OF FEATURES
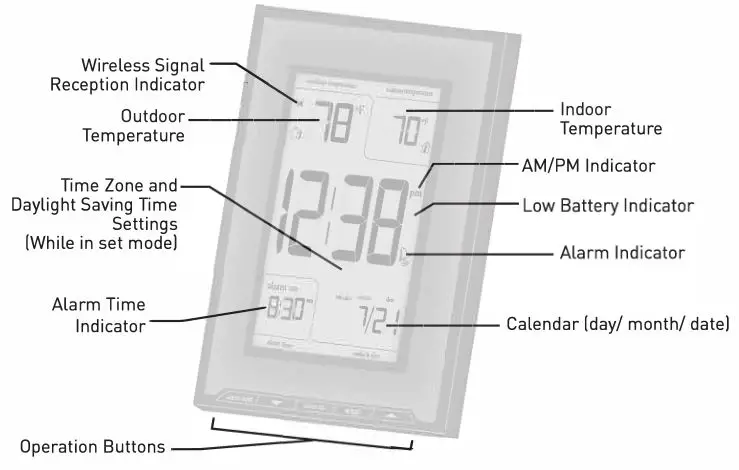
About lntelli-Time®
Your new alarm clock is equipped with lntelli-Time technology which is pre-programmed with the correct time and date. lntellitime instructs the clock to self set itself once batteries are installed. The lntelli-Time feature requires an internal backup battery to operate correctly. This battery is located beneath the AA battery compartment and is pre-installed at the factory. We suggest replacement of the backup battery every 5 years. We recommend the replacement of the backup battery in 1-2 years if the unit is not powered on for a long period of time.
INSTALL BATTERIES
Installing Batteries
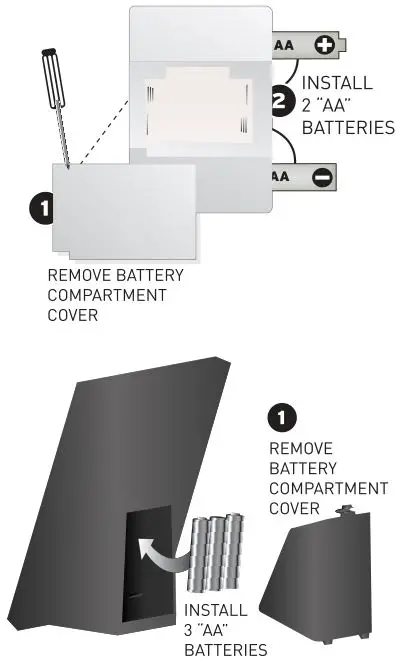
NOTE: Install all batteries in both units within a 6 minute period to ensure proper wireless functionality. NOTE: Do not use rechargeable or heavy duty batteries.
A. Wireless Sensor Always install batteries into the wireless sensor FIRST to ensure proper wireless synchronization with the alarm clock.
- Remove the 4 battery compartment screws.
- Remove the battery compartment cover and install 2 fresh “‘AA” batteries as shown here.
B. Alarm Clock
Remove the battery compartment cover and install 3 fresh “AA” batteries as shown.
Operating Range of Batteries
 Extended periods of cold temperatures ( below -4°F / -20°c ) can cause alkaline batteries to function improperly. This will cause the outdoor wireless sensor to stop transmitting temperature readings. Use lithium batteries in these low temperature conditions to ensure continued operation for wireless sensors placed outdoors.
 PLEASE DISPOSE OF OLD OR DEFECTIVE BATTERIES IN AN ENVIRONMENTALLY SAFE WAY AND IN ACCORDANCE WITH YOUR LOCAL LAWS AND REGULATIONS.
BATTERY SAFETY: Follow the polarity(+/·) diagram in the battery compartment. Promptly dead batteries from the device. Dispose of used batteries Only batteries or equivalent are to be used. incinerate used properly. of the same type as recommended DO NOT batteries. DONOT dispose of batteries in fire, as batteries may explode or leak. DO NOT mix old and new batteries or types of batteries (alkaline/standard). DO NOT use rechargeable DO NOT batteries. short-circuit the supply terminals.
SETUP
Basic Clock Setup
After installing batteries, the alarm clock will set itself to the proper time and date. Eastern Standard Time (EST] is the preset default timezone. If you live in a different time zone, you will need to select your time zone for the clock to display your correct time. This procedure is outlined below.
Another preference which may need to be set depending on your location is Daylight Saving Time (DST]. Certain areas do not observe DST, and you may need to disable the DST setting (OFF].
The following outlines the setup procedure as it relates to timezone and DST settings:
- Push the “time set” button, the currently selected timezone will flash.
- Push the “Down or Up arrow” buttons to cycle through and select your time zone.
- Push the “time set” button again to confirm your timezone selection and move on to select your Daylight Saving Time (DST] preference.
- Push the “Down or Up arrow” buttons to cycle through and select your DST preference.
- Push the “time set” button again to confirm your DST preference and exit setup.
Custom Time Setting
If you wish to set the clock slightly ahead or slightly behind, or if the lntelli-Time internal memory battery is allowed to go dead, you may set the time and date simply by following the the custom setup procedure below:
- Press AND HOLD the “time set” button for 3 seconds, the HOUR will blink.
- Push the “Down or Up arrow” buttons to adjust the HOUR.
- Push the “time set” button again to confirm your selection and move on to setting the MINUTES.
- Push the “Down or Up arrow” buttons to adjust the MINUTES.
- Push the “time set” button again to confirm your time setting and move on to setting the calendar.
- Set the Year, Day, Month and Date in the same manner the time was set.
- Push the “time set” button to exit custom time setting mode.
OPERATION
Alarm Clock Setting
- To set the alarm time, press AND HOLD the “alarm set” button for 3 seconds to enter into alarm time set mode. The hour will flash.
- Push the “Down or Up Arrow” A buttons to adjust the hour, note the AM and PM indicators.
- Push the “alarm set” button to confirm hour selection and move on.
- Push the “Down or Up Arrow” buttons to adjust the minutes.
- Push the “alarm set” button to confirm and exit alarm time set mode.
Alarm Clock ON or OFF
To turn alarm on or off, push the “Alarm on/off” button.
ALARM ON INDICATION: The display will indicate “alarm on·· and a bell icon will show next to the current time when the alarm is set to “ON.”
ALARM OFF INDICATION: The display will indicate “alarm off” and a bell icon will NOT be present next to the current time when the alarm is set to “OFF.”
WHEN ALARM IS SOUNDING: Press the “alarm on/off” button to turn the alarm off.
Alarm Clock SNOOZE function
When the alarm is sounding, you may activate the 8 minute SNOOZE function by firmly pressing down on the backlight/snooze area at the top of the alarm clock. The SNOOZE function may be activated up to 10 times. NOTE that the activation switches for the snooze/backlight function are located on the bottom of the alarm clock. Make certain the alarm clock is on a stable flat surface for proper operation.
Backlight
You may activate the backlight for 5 seconds at any time by firmly pressing down on the backlight/snooze area at the top of the alarm clock. NOTE that the activation switches for the snooze/backlight function are located on the bottom of the alarm clock. Make certain the alarm clock is on a stable flat surface for proper operation.
°F/°C Temperature Display
You may select °For °C temperature display by pressing the Up button during normal operation [not in any setup model.
Low Battery Indicator
When the low battery indicator appears to the right of the current time area, the batteries will need replacement soon. follow the battery installation procedure outlined in this manual exactly to ensure proper operation.
Wireless Reception
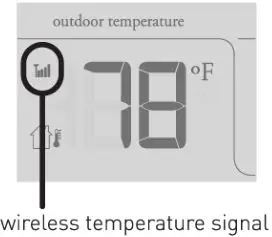
The main unit has a wireless signal reception icon in the outdoor temperature display area. If there are a low number of “bars” present, you
may experience no temperature display [“–“] or inaccuracy. In either case, you may need to relocate one or both of the units. If most or all 4 of the bars are present, wireless reception is good and no action is required.
PLACEMENT
Now that setup is complete, you must choose a location to place the wireless sensor and the alarm clock. The wireless sensor MUST be placed less than 100 feet away from the alarm clock for the wireless temperature to function properly.
This wireless thermometer uses radio frequency for communication, which is susceptible to interference from other electronic devices and large metallic items or thick walls. Always place both units at least 3 feet away from appliances I TV, microwave, radios, etc.] or objects I large metal surfaces, thick stone walls, etc. I that may interfere with the wireless communication.

 Placement of Alarm Clock
Place the alarm clock in a dry area free of dirt and dust. To help ensure an accurate indoor temperature measurement, be sure to place the main unit out of direct sunlight, and away from any heat sources or vents in your home.
 Placement of Sensor
The wireless sensor MUST BE PLACED OUTDOORSto observe outdoor temperatures and relay the outdoor temperature to the main unit display. The wireless sensor must be placed less than 100 feet from the main unit. The wireless sensor is water resistant and is designed for outdoor use. However, to extend the life of the product, place the wireless sensor in an area protected from direct weather elements. To ensure an accurate outdoor temperature measurement, be sure the wireless sensor is placed out of direct sunlight and away from any heat sources.
Troubleshooting
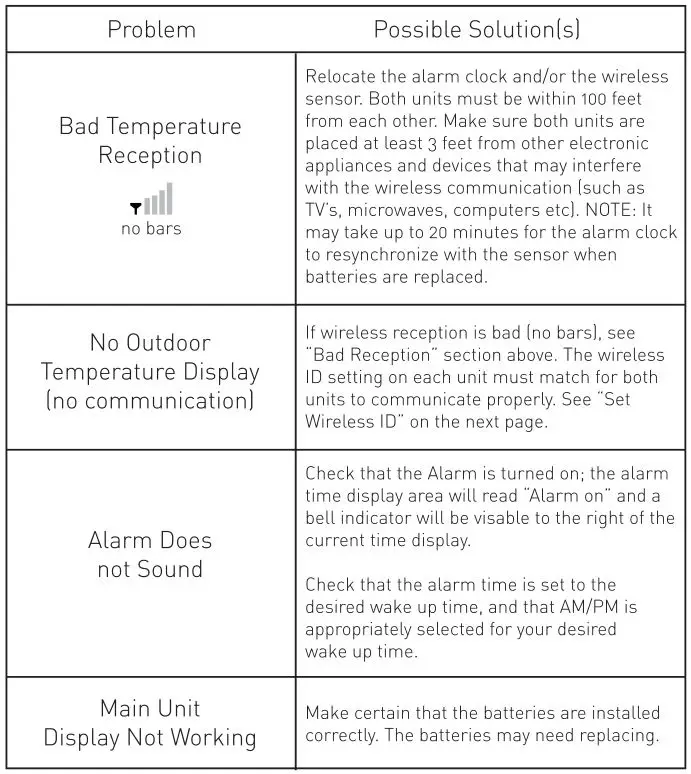

Set Wireless ID
This wireless thermometer uses long range 433mhz radio frequency for communication.
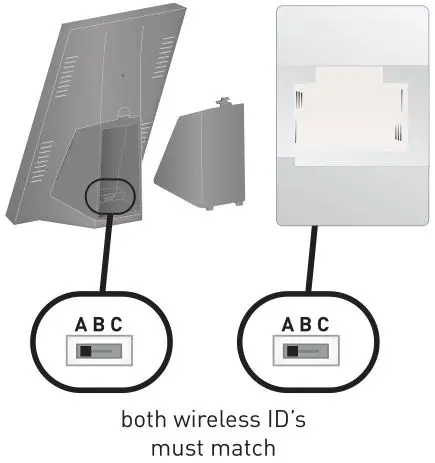
In the event that you have reception problems due to interference, both the alarm clock and the wireless sensor have a selectable wireless ID. The ID switches are located within the battery compartments of the alarm clock and the wireless sensor.
You may choose A, B or C; but both the alarm clocks’ and the wireless sensors’ IDs must match for successful synchronization.
PRODUCT SPECIFICATIONS
Measurement Ranges
Temperature
Main Unit: 32°F to 122°F / o°C to 50°C
Wireless Sensor: -40°F to 158°F / -40°C to 70°C
Specifications
Power Requirements
Main Unit: 3 x “”AA” alkaline or lithium batteries [not included)
Wireless Sensor: 2 x “”AA” alkaline or lithium batteries [not included)
Wireless Communication
Rdio Frequency: 433 mhz
Transmission Intervals: every 16 seconds
Please DO NOT return product to the retail store.
For technical assistance and product return information, please call Customer Care: 877-221-1252 Mon. – Fri. 8:00 A.M. to 4:45 P.M. [CST]
www.chaneyinstrument.com
LIMITED ONE YEAR WARRANTY
Chaney Instrument Company warrants that all products it manufactures to be of good material and workmanship and to be free of defects if properly installed and operated for a period of one year from date of purchase. REMEOY FOR BREACH OF THIS WARRANTY IS EXPRESSLY LIMITED TO REPAIR OR REPLACEMENT OF DEFECTIVE ITEMS. Any product which, under normal use and service, is proven to breach the warranty contained herein within ONE YEAR from date of sale will, upon examination by Chaney, and at its sole option, be repaired or replaced by Chaney. In all cases, transportation costs and charges for returned goods shall be paid for by the purchaser. Chaney hereby disclaims all responsibility for such transportation costs and charges. This warranty will not be breached, and Chaney will give no credit for products it manufactures which shall have received normal wear and tear, been damaged, tampered, abused, improperly installed, damaged in shipping, or repaired or altered by others than authorized representatives of Chaney.
THE ABOVE-DESCRIBED WARRANTY IS EXPRESSLY IN LIEU OF ALL OTHER WARRANTIES, EXPRESS OR IMPLIED, AND ALL OTHER WARRANTIES ARE HEREBY EXPRESSLY DISCLAIMED, INCLUDING WITHOUT LIMITATION THE IMPLIED WARRANTY OF MERCHANTABILITY AND THE IMPLIED WARRANTY OF FITNESS FOR A PARTICULAR PURPOSE. CHANEY EXPRESSLY DISCLAIMS ALL LIBILITY FOR SPECIAL, CONSEQUENTIAL OR INCIDENTAL DAMAGES, WHETHER ARISING IN TORT OR BY CONTRACT FROM ANY BREACH OF THIS WARRANTY. SOME STATES DO NOT ALLOW THE EXCLUSION OR LIMITATION OF INCIDENTAL OR CONSEQUENTIAL DAMAGES, SO THE ABOVE LIMITATION OR EXCLUSION MAY NOT APPLY TO YOU. CHANEY FURTHER DISCLAIMS ALL LIABILITY FROM PERSONAL INJURY RELATING TO ITS PRODUCTS TO THE EXTENT PERMITTED BY LAW. BY ACCEPTANCE OF ANY OF CHANEY’S EQUIPMENT OR PRODUCTS, THE PURCHASER ASSUMES ALL LIABILITY FOR THE CONSEQUENCES ARISING FROM THEIR USE OR MISUSE. NO PERSON, FIRM OR CORPORATION IS AUTHORIZED TO ASSUME FOR CHANEY ANY OTHER LIABILITY IN CONNECTION WITH THE SALE OF ITS PRODUCTS. FURTHERMORE, NO PERSON, FIRM OR CORPORATION IS AUTHORIZED TO MODIFY OR WAIVE THE TERMS OF THIS PARAGRAPH, AND THE PRECEDING PARAGRAPH, UNLESS DONE IN WRITING AND SIGNED BY A DULY AUTHORIZED AGENT OF CHANEY. THIS WARRANTY GIVES YOU SPECIFIC LEGAL RIGHTS, AND YOU MAY ALSO HAVE OTHER RIGHTS WHICH VARY FROM STATE TO STATE.
For in-warranty repair, please contact:
Customer Care Department
Chaney Instrument Company
965 Wells Street
Lake Geneva, WI 53147
Chaney Customer Care
877-221-1252
Mon-Fri 8:00 a.m. to 4:45 p.m. CST
www.chaneyinstrument.com
 This device complies with part 15 of the FCC rules. Operation is subject to the following two conditions:
1- This device may NOT cause harmful interference, and
2- This device must accept any interference received, including interference that may cause undesired operation.
NOTE: This equipment has been tested and found to comply with the limits for a Class B digital dvice, pursuant to Part 15 of the FCC rules. These limits are designed to provide reasonable protection against harmful interference in a residential installation. This equipment generates, uses and can radiate radio frequency energy and, if not installed and used in accordance with the instructions, may cause harmful interference to radio communications. However, There is no guarantee that interference will not occur in a particular installation. If this equipment does cause harmful interference to radio or television reception, which can be determined by turning the equipment off and on, the user is encouraged to try to correct the interference by one or more of the following measures:
- Reorient or relocate the receiving antenna.
- Increase the separation between the equipment and the receiver.
- Cornet the equipment into an outlet on a circuit different from that to which the receiver Is connected.
- Consult the dealer or an experienced radio/TV technician for help.
NOTE: The manufacturer is not responsible for any radio or TV interference caused by unauthorized modifications to this equipment. Such modifications could void the user authority to operate the equipment.
Patent numbers: 5,978,738; 6,076,044; 6,597,990
]]>Environment Systems
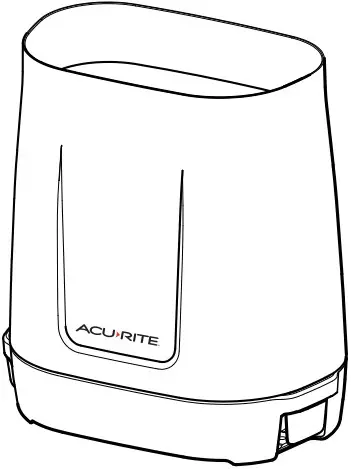
Package Contents
Rain Gauge
Model 06034RM

Rain Gauge Setup
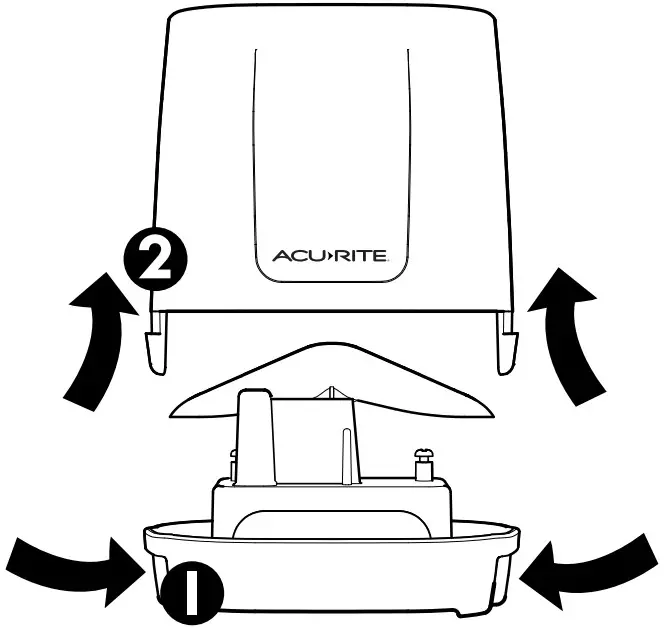
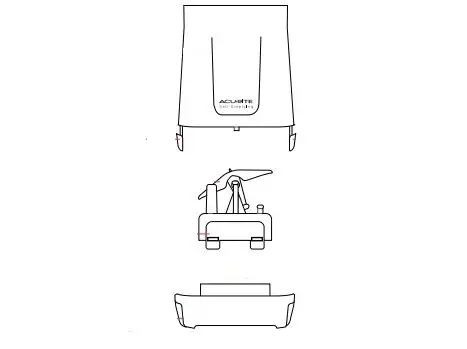
- Separate rain gauge cover from the base by squeezing tabs.
- Remove rain gauge cover by lifting upwards.
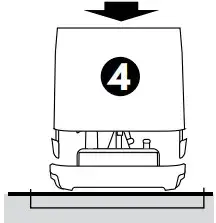
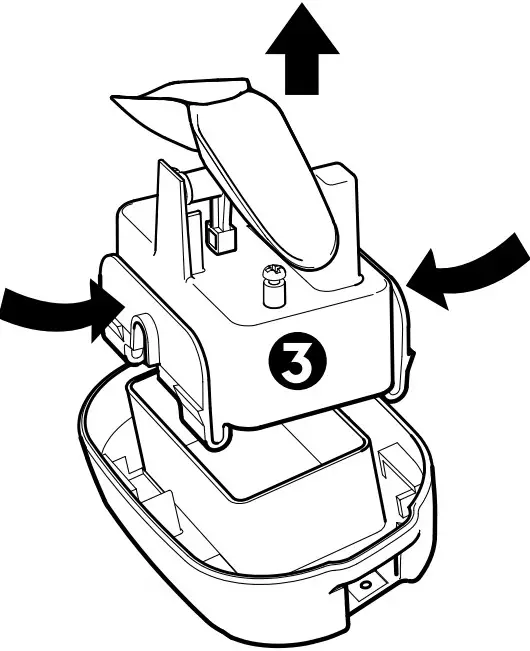
- Remove battery box by squeezing the two tabs on each end together.
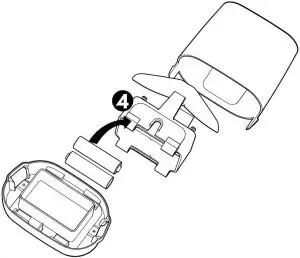
- nstall 2 AA batteries into battery compartment.
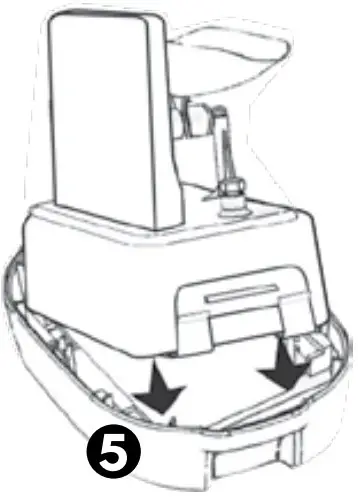
Note: If you are syncing sensor with a display (not included), ensure that the A-B-C switch, located in the battery compartment, matches on both units. - Securely place the battery box back into the rain gauge base and re-attach cover onto rain gauge base.
Installation Rain Gauge
- Placement for Maximum Accuracy Proper placement is critical to the accuracy and performance of this product.
- Important Placement Guidelines
- Rain gauge transmits wireless signal up to 100 ft (30 m).
Locate away from objects that may limit wireless communication, like thick walls or metal surfaces. - Mount at least 3 ft (0.9 m) or higher above the ground for optimal wireless range.

- Rain gauge transmits wireless signal up to 100 ft (30 m).
Rain Gauge Installation
- To ensure accurate rain measurement, the rain gauge MUST be placed on a fat, level surface.
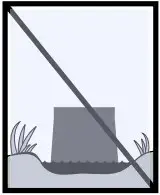
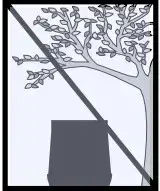
- Ensure the rain gauge is not placed in a low spot that could become fooded or in an area where there are obstructions above it.
- Separate the rain gauge cover from the rain gauge base.
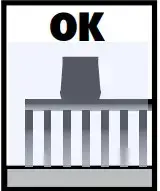
- Locate the two holes on the rain gauge base.
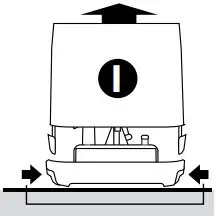
- Fasten the rain gauge base to a sturdy surface, like a deck railing or a fence post, with screws (not included) using hand tools.
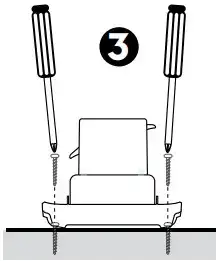
- Re-attach cover onto rain gauge base.
- Separate the rain gauge cover from the rain gauge base.
Congratulations!
You’re ready to start using the Rain Gauge!

need help?
1-844-228-5465
[email protected]
Learn More at AcuRite.com
For more information about AcuRite Environment Systems, to view installation videos, and to purchase additional
compatible AcuRite sensors,
visit www.AcuRite.com
Features
- Rain Gauge Cover
- Squeeze Tab
- Rain Gauge Tipping Cups
- Squeeze Tab
- Rain Gauge Base
- Squeeze Tab
- Battery Compartment & Electronics Box
Care & Maintenance
Rain Gauge Care
- Clean with a soft damp cloth. Do not use caustic cleaners that could mar polished surface of rain gauge or tipping cups.
- Clear debris from rain guage funnel. When dirty, rain may not fow correctly through the rain gauge.
- After a cleaning, apply a small amount of liquid water repellent to the tipping cups and gauge funnel for optimal rain collection.
- Bring rain gauge indoors during freezing temperatures. Rain gauge could be damaged if residual water freezes within unit.
 This device complies with part 15 of FCC rules. Operation is subject to the following two conditions:1- This device may NOT cause harmful interference, and 2- This device must accept any interference received, including interference that may cause undesired operation.This equipment has been tested and found to comply with the limits for a Class B digital device, pursuant to Part 15 of the FCC rules. These limits are designed to provide reasonable protection against harmful interference in a residential installation. This equipment generates, uses and can radiate radio frequency energy and, if not installed and used in accordance with the instructions, may cause harmful interference to radio communications. However, there is no guarantee that interference will not occur in a particular installation. If this equipment does cause harmful interference to radio or television reception, which can be determined by turning the equipment off and on, the user is encouraged to try to correct the interference by one or more of the following measures:
- Reorient or relocate the receiving antenna.
- Increase the separation between the equipment and the receiver.
- Connect the equipment into an outlet on a circuit different from that to which the receiver is connected.
- Consult the dealer or an experienced radio/TV technician for help.
NOTE: The manufacturer is not responsible for any radio or TV interference caused by unauthorized modifications to this equipment. Such modifications could void the user authority to operate the equipment. This device complies with Industry Canada licence-exempt RSS standard(s). Operation is subject to the following two conditions: (1) This device may not cause interference, and (2) This device must accept any interference received, including interference that may cause undesired operation of the device.
Specifcations
| POWER | 2 x AA alkaline batteries |
| WIRELESS RANGE | 100 ft / 30 m depending on home construction materials |
| OPERATING FREQUENCY | 433 MHz |
| RAINFALL | RAINFALL |
Limited One Year Warranty
IMPORTANT:
Product must be registered to receive warranty service. Register online at www.AcuRite.com to receive 1 year
warranty protection.
At AcuRite, we proudly uphold our commitment to quality technology. Chaney Instrument Co. warrants that all products it manufactures to be of good material and workmanship, and to be free of defects when properly installed and operated for a period of one year from the date of purchase.
We recommend that you visit us at www.AcuRite.com for the fastest way to register your product. However, product registration does not eliminate the need to retain your original proof of purchase in order to obtain warranty benefts.
Chaney Instrument Co. warrants that all products it manufactures to be of good material and workmanship, and to be free of defects when properly installed and operated for a period of one year from the date of purchase. Remedy for breach of this warranty is limited to repair or replacement of the defective item(s). Any product which, under normal use and service, is proven to breach the warranty contained herein within ONE YEAR from date of sale will, upon examination by Chaney, and at its sole option, be repaired or replaced by Chaney. Transportation costs and charges for returned goods shall be paid for by the purchaser. Chaney hereby disclaims all responsibility for such transportation costs and charges. This warranty will not be breached, and Chaney will give no credit for products it manufactures which have received normal wear and tear, been damaged (including by acts of nature), tampered, abused, improperly installed, damaged in shipping, or repaired or altered by others than authorized representatives of Chaney.
The above-described warranty is expressly in lieu of all other warranties, express or implied, and all other warranties are hereby expressly disclaimed, including without limitation the implied warranty of merchantability and the implied warranty of ftness for a particular purpose. Chaney expressly disclaims all liability for special, consequential or incidental damages, whether arising in tort or by contract from any breach of this warranty. Some states do not allow the exclusion or limitation of incidental or consequential damages, so the above limitation or exclusion may not apply to you. Chaney further disclaims all liability from personal injury relating to its products to the extent permitted by law. By acceptance of any of Chaney’s products, the purchaser assumes all liability for the consequences arising from their use or misuse. No person, frm or corporation is authorized to assume for Chaney any other liability in connection with the sale of its products. Furthermore, no person, frm or corporation is authorized to modify or waive the terms of this paragraph, and the preceding paragraph, unless done in writing and signed by a duly authorized agent of Chaney. This warranty gives you specifc legal rights, and you may also have other rights which vary from state to state.
For in-warranty claims: Chaney Instrument Co. 965 Wells St., Lake Geneva, WI 53147
]]>
Instruction Manual
Thermometer
model 00307
Features & Benefits
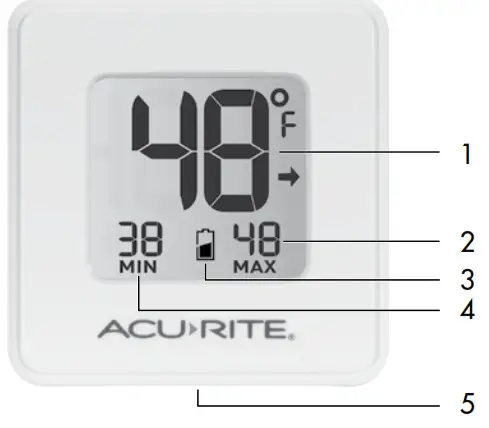
1. Current Temperature
The arrow icon indicates the direction temperature is trending.
2. High-Temperature Record
The highest temperature was recorded over the past 24 hours.
3. Low Battery Indicator
4. Low-Temperature Record
The lowest temperature was recorded over the past 24 hours.
5. Battery Access
Install or Replace Battery
The thermometer includes a pre-installed CR-2032 battery. Remove the plastic insulator tab to activate the battery and thermometer display.
- To replace the battery, insert a coin into the slot located on the bottom of the thermometer, and gently twist the coin to open the battery compartment.
- Remove and safely discard the old battery. Insert 1 x CR-2032 coin cell battery into the battery compartment with the “+” positive terminal facing OUT.
- Align the battery compartment cover with the thermometer and gently press together until the cover snaps into place.
Select Temperature Units
To select between degrees Fahrenheit (°F) or Celsius (°C) temperature units, slide the “°C/°F” switch located inside the battery compartment. Follow the “Replace Battery” steps above to gain access to the battery compartment.
High & Low Records
Daily high and low records are displayed for indoor temperature. The records automatically clear every 24 hours since the battery was installed.
Placement for Maximum Accuracy
AcuRite products are sensitive to surrounding environmental conditions. Placement in a proper location is critical to the accuracy and performance of this product. Place the thermometer in a dry area, free of dirt and dust. To ensure accurate temperature measurement, place the thermometer out of direct sunlight and away from any heat sources or vents. The thermometer features a magnetic backing for placement on magnetic surfaces.
Specifications
| TEMPERATURE RANGE | 32°F to 122°F; 0°C to 50°C |
| POWER | 1 x CR-2032 battery (included) |
 PLEASE DISPOSE OF OLD OR DEFECTIVE BATTERIES IN AN ENVIRONMENTALLY SAFE WAY AND IN ACCORDANCE WITH YOUR LOCAL LAWS AND REGULATIONS.
BATTERY SAFETY: Clean the battery contacts and also those of the device prior to battery installation. Remove batteries from equipment that is not to be used for an extended period of time. Follow the polarity (+/-) diagram in the battery compartment. Promptly remove dead batteries from the device. Dispose of used batteries properly. Only batteries of the same or equivalent type as recommended are to be used. DO NOT incinerate used batteries. DO NOT dispose of batteries in free, as batteries may explode or leak. DO NOT mix old and new batteries or types of batteries (alkaline/standard). DO NOT use rechargeable batteries. DO NOT recharge non-rechargeable batteries. DO NOT short-circuit the supply terminals.
Questions? Contact Customer Support at (877) 221-1252 or visit www.AcuRite.com.
IMPORTANT
PRODUCT MUST BE REGISTERED
TO RECEIVE WARRANTY SERVICE
PRODUCT REGISTRATION
Register online to receive 1-year warranty protection www.AcuRite.com
Limited 1-Year Warranty
AcuRite is a wholly-owned subsidiary of Chaney Instrument Company. For purchases of AcuRite products, AcuRite provides the benefits and services set forth herein. For purchases of Chaney products, Chaney provides the benefits and services set forth herein. We warrant that all products we manufacture under this warranty are of good material and workmanship and, when properly installed and operated, will be free of defects for a period of one year from the date of purchase. Any product which, under normal use and service, is proven to breach the warranty contained herein within ONE YEAR from the date of sale will, upon examination by us, and at our sole option, be repaired or replaced by us. Transportation costs and charges for returned goods shall be paid for by the purchaser. We hereby disclaim all responsibility for such transportation costs and charges. This warranty will not be breached, and we will give no credit for products that have received normal wear and tear not affecting the functionality of the product, been damaged (including by acts of nature), tampered, abused, improperly installed, or repaired or altered by others than our authorized representatives. Remedy for breach of this warranty is limited to repair or replacement of the defective item(s). If we determine that repair or replacement is not feasible, we may, at our option, refund the amount of the original purchase price.
THE ABOVE-DESCRIBED WARRANTY IS THE SOLE WARRANTY FOR THE PRODUCTS AND IS EXPRESSLY IN LIEU OF ALL OTHER WARRANTIES, EXPRESS OR IMPLIED. ALL OTHER WARRANTIES OTHER THAN THE EXPRESS WARRANTY SET FORTH HEREIN ARE HEREBY EXPRESSLY DISCLAIMED, INCLUDING WITHOUT LIMITATION THE IMPLIED WARRANTY OF MERCHANTABILITY AND THE IMPLIED WARRANTY OF FITNESS FOR A PARTICULAR PURPOSE.
We expressly disclaim all liability for special, consequential, or incidental damages, whether arising in tort or by contract from any breach of this warranty. Some states do not allow the exclusion or limitation of incidental or consequential damages, so the above limitation or exclusion may not apply to you. We further disclaim liability from personal injury relating to our products to the extent permitted by law. By acceptance of any of our products, the purchaser assumes all liability for the consequences arising from their use or misuse. No person, firm or corporation is authorized to bind us to any other obligation or liability in connection with the sale of our products. Furthermore, no person, firm or corporation is authorized to modify or waive the terms of this warranty unless done in writing and signed by a duly authorized agent of ours.
In no case shall our liability for any claim relating to our products, your purchase or your use thereof, exceed the original purchase price paid for the product.
Applicability of Policy
This Return, Refund, and Warranty Policy apply only to purchases made in the United States and Canada. For purchases made in a country other than the United States or Canada, please consult the policies applicable to the country in which you made your purchase. Additionally, this Policy applies only to the original purchaser of our products. We cannot and do not offer any return, refund, or warranty services if you buy products used or from resale sites such as eBay or Craigslist.
Governing Law
This Return, Refund, and Warranty Policy is governed by the laws of the United States and the State of Wisconsin. Any dispute relating to this Policy shall be brought exclusively in the federal or state courts having jurisdiction in Walworth County, Wisconsin; and purchaser consents to jurisdiction within The state of Wisconsin.
©Chaney Instrument Co. All rights reserved. AcuRite is a registered trademark of the Chaney Instrument Co., Lake Geneva, WI 53147. All other trademarks and copyrights are the property of their respective owners. AcuRite uses patented technology. Visit www.AcuRite.com/patents for details.
Printed in China
00307 INST 111016
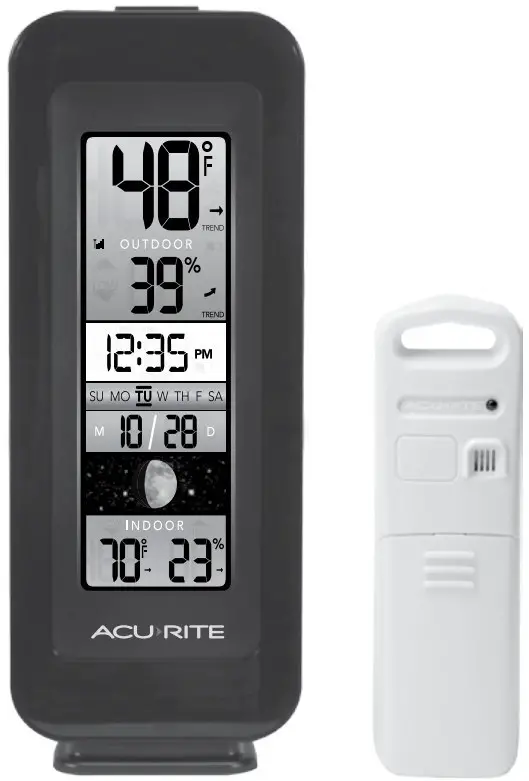
Congratulations on your new AcuRite product. To ensure the best possible product performance, please read this manual in its entirety and retain it for future reference.
Unpacking Instructions
Remove the protective film that is applied to the LCD screen prior to using this product. Locate the tab and peel off to remove.
Package Contents
- Display with Tabletop Stand
- Outdoor Sensor
- Power Adapter
- Instruction Manual
IMPORTANT
PRODUCT MUST BE REGISTERED TO RECEIVE WARRANTY SERVICE
PRODUCT REGISTRATION
Register online to receive 1 year warranty protection www.AcuRite.com
Features & Benefits

OUTDOOR SENSOR
- Integrated Hanger
For easy placement. - Wireless Signal Indicator
Flashes when data is being sent to the display. - Battery Compartment
- A-B-C Switch
ID code that must match display’s A-B-C switch to ensure units synchronize. - Battery Compartment Cover
DISPLAY FRONT
- Backlight Button
For momentary backlight and dimmer settings. - Current Outdoor Temperature
Arrow icon indicates direction temperature is trending. - Sensor Signal Strength
- HIGH Indicator
Indicates today’s HIGH records are being viewed. - LOW Indicator
Indicates today’s LOW records are being viewed. - AUTO DIM Icon
Indicates display is in auto-dimming brightness mode. (see page 6) - Day of the Week
- Date
- Moon Phase
- Current Indoor Temperature
Arrow icon indicates direction temperature is trending. - Current Indoor Humidity
Arrow icon indicates direction humidity is trending. - . Display Low Battery Indicator
- Intelli-Time® Clock
Automatically updates itself for Daylight Saving Time. - Current Outdoor Humidity
Arrow icon indicates direction humidity is trending. - Sensor Low Battery Indicator
DISPLAY BACK
- Integrated Hang Hole
For easy wall mounting. - A-B-C Switch
ID code that must match sensor’s A-B-C switch to ensure units synchronize. - Battery Compartment
- .Intelli-Time Battery Compartment Cover
- Plug-in for Power Adapter
 Button
For setup preferences and viewing HIGH records.- SET Button
For setup preferences.  Button
For setup preferences and viewing LOW records.- Battery Compartment Cover
(not shown)
Sensor Setup

- Set the A-B-C Switch
The A-B-C switch is located inside the battery compartment. It can be set to A, B or C. However, you must select the same letter choices for both the sensor and the display in order for the units to synchronize. - Install or Replace Batteries
AcuRite recommends high quality alkaline or lithium batteries in the outdoor sensor for the best product performance. Heavy duty or rechargeable batteries are not recommended.
The sensor requires lithium batteries in low temperature conditions. Cold temperatures can cause alkaline batteries to function improperly. Use lithium batteries in the sensor for temperatures below -4ºF / -20ºC.
- Slide off the battery compartment cover. Take note of the A-B-C switch setting inside the battery compartment for display setup.
- Insert 2 x AA batteries into the battery compartment, as shown. Follow the polarity (+/-) diagram in the battery compartment.
- Replace the battery cover.
- LIHIUM BATTERIES
- ALKALINE BATTERIES

Display Setup
- Set the A-B-C Switch
Locate the A-B-C switch inside the battery compartment. Set the A-B-C switch to A, B or C. You must select the same letter choices for both the display and the sensor in order for the units to synchronize. - Install or Replace Backup Batteries
- Remove the battery compartment cover.
- Insert 3 x AAA alkaline batteries into the battery compartment, as shown.
- Plug in Power Adapter
For the best performance, plug in the power adapter as the main power source for this product.

- A-B-C Switch
Set to match sensor. - Install Batteries
3 AAA batteries
IMPORTANT: Batteries are a backup power source to preserve records in the event of a power outage. Power adapter is recommended as the primary
power source to enjoy the full functionality of this product.
PLEASE DISPOSE OF OLD OR DEFECTIVE BATTERIES IN AN ENVIRONMENTALLY SAFE WAY AND IN ACCORDANCE WITH YOUR LOCAL LAWS AND REGULATIONS.
BATTERY SAFETY: Clean the battery contacts and also those of the device prior to battery installation. Remove batteries from equipment which is not to be used for an extended period of time. Follow the polarity (+/-) diagram in the battery compartment. Promptly remove dead batteries from the device. Dispose of used batteries properly. Only batteries of the same or equivalent type as recommended are to be used. DO NOT incinerate used batteries. DO NOT dispose of batteries in free, as batteries may explode or leak. DO NOT mix old and new batteries or types of batteries (alkaline/standard). DO NOT use rechargeable batteries. DO NOT recharge non-rechargeable batteries. DO NOT short-circuit the supply terminals.
Intelli-Time® Clock
Intelli-Time products are pre-programmed with the correct time and date. Intelli-Time technology instructs the time and date to set themselves. All you need to do is select your Time Zone and Daylight Saving Time preferences. The clock will then automatically set itself and change for Daylight Saving Time.
Set the Time, Date & Units
Press and release the “SET” button, located on the back of the display, to enter SET MODE. Once in SET MODE, the preference you are currently setting will blink on the display.
To adjust the currently selected (flashing) item, press and release the “ 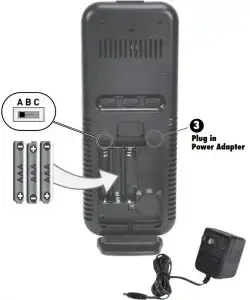 “ or “
  “ buttons (press and HOLD to fast adjust).
To save your adjustments, press and release the “SET” button again to adjust the next preference. The preference set order is as follows:
- DST (Daylight Saving Time ON or OFF)* TIME ZONE (CST MST PST
- AKT HAT NST AST EST)
- CLOCK HOUR
- CLOCK MINUTE
- CALENDAR MONTH
- CALENDAR DATE
- CALENDAR YEAR
- TEMPERATURE UNITS (ºF or ºC)
*If you live in an area that observes DST, DST should be set to ON, even if it is
not currently Daylight Saving Time.
You will automatically exit SET MODE if no buttons are pressed for 8 seconds. Enter SET MODE at any time by pressing the “SET” button.
Display Backlight Settings
This weather station’s color display features three different lighting settings: High (100%) brightness, Medium (60%) brightness and Low (30%) brightness.
Using battery power alone, the backlight is available momentarily for 10 seconds by pressing the “BACKLIGHT” button.
When display is powered with the power adapter, backlight remains on at 100% brightness. Press “BACKLIGHT” button once to dim to 60% brightness; press again to dim to 30%, press a 3rd time to enter “AUTO DIM” mode.
| AUTO DIM MODE: Automatically adjusts display brightness based on time of day & year. | |
| MARCH 11- NOVEMBER 4 | 6:00 a.m. – 9:00 p.m. = 100% brightness |
| 9:01 p.m. – 5:59 a.m.= 30% brightness | |
| NOVEMBER 5 – MARCH 10 | 7:30 a.m. – 7:00 p.m.= 100% brightness |
| 7:01 p.m. – 7:29 a.m. = 30% brightness | |
Placement for Maximum Accuracy
AcuRite sensors are sensitive to surrounding environmental conditions. Proper placement of both the display and outdoor sensor are critical to the accuracy and performance of this product.

Display Placement
Place the display in a dry area free of dirt and dust. Display stands upright for tabletop use or is wall-mountable.
Outdoor Sensor Placement
Sensor must be placed outside to observe outdoor conditions. Sensor is water resistant and is designed for general outdoor use, however, to extend its life place the sensor in an area protected from direct weather elements.
Hang the sensor using the integrated hang hole or hanger, or by using string (not included) to hang it from a suitable location, like a well covered tree branch. The best location is 4 to 8 feet above the ground with permanent shade and plenty of fresh air to circulate around the sensor.
Important Placement Guidelines
- To ensure accurate temperature measurement, place units out of direct sunlight and away from any heat sources or vents.
- Display and outdoor sensor must be within 330 ft (100 m) of each other.
- To maximize wireless range, place units away from large metallic items, thick walls, metal surfaces, or other objects that may limit wireless communication
- To prevent wireless interference, place both units at least 3 ft (.9 m) away
from electronic devices (TV, computer, microwave, radio, etc.).

Setup is Complete
The sensor will now synchronize with the display. It may take a few minutes for synchronization to complete. Please refer to the troubleshooting section of this manual if anything appears to be functioning improperly.
Using the Thermometer
High & Low Records
Today’s high and low records are displayed for indoor and outdoor temperature and humidity. Today’s records automatically clear at 12:00am midnight every day. View today’s high or low records by pressing the “  “ or “
  “ buttons. Press and release again to view current readings.
To manually clear all of today’s LOW recorded values, press and release the “ “ button to view low records, then press and HOLD the “
 “ button for 2 seconds. Dashes will display to confirm you have cleared the LOW records.
Moon Phase
Track the phases of the moon, conveyed through simple lunar phase icons:
Troubleshooting
| No outdoor sensor reception no bars |
If the wireless signal indicator shows no bars:
|
| Display screen not working |
|
| Outdoor temperature is flashing or showing dashes |
Flashing of the outdoor temperature is generally an indication of wireless interference.
|
| Ina«urate temperature or humidity |
|
If your AcuRite product does not operate properly after trying the troubleshooting steps, visit www.AcuRite.com or call (877) 221-1252 for assistance.
Care & Maintenance
Display Care – Clean with a soft, damp cloth. Do not use caustic cleaners or abrasives. Keep away from dust, dirt and moisture. Clean ventilation ports regularly with a gentle puff of air.
Outdoor Sensor Care – Clean with a soft damp cloth. Do not use caustic cleaners or abrasives.
Replace Intelli-Time Battery
Intelli-Time technology is powered by a pre-installed coincell battery that stores the time and date settings. The battery has a shelf life of several years. Time and date will need to be entered after replacing Intelli-Time battery.
To replace the Intelli-Time battery:
- Locate the coin cell battery compartment door in the battery compartment of the display. Unscrew and remove the compartment cover.
- Insert 1 x CR2032 coin cell battery into the batterycompartment, as shown. Install battery with “+” positive terminal facing OUT.
- Screw in the battery cover.

Specifications
| TEMPERATURE RANGE | Outdoor: -40°F to 158°F; -40°C to 70°C |
| Indoor. 32°F to 122°F; 0°C to 50°C | |
| HUMIDITY RANGE | Outdoor: 1% to 99% |
| Indoor. 1% to 99% | |
| WIRELESS RANGE | 330Ft / 100m depending on home construction materials |
| POWER | Display: 5V, 300mA power adapter
3 x AAA alkaline batteries (optional) |
| Sensor: 2 x AA alkaline or lithium batteries | |
| DATA REPORTING | Outdoor: 16 seconds |
| Indoor: 60 seconds |
FCC Information
This device complies with part 15 of FCC rules. Operation is subject to the following two conditions:
- This device may NOT cause harmful interference, and
- This device must accept any interference received, including interference that may cause undesired operation.
WARNING: Changes or modifications to this unit not expressly approved by the party responsible for compliance could void the user’s authority to operate the equipment.
NOTE: This equipment has been tested and found to comply with the limits for a Class B digital device, pursuant to Part 15 of the
FCC rules. These limits are designed to provide reasonable protection against harmful interference in a residential installation. This equipment generates, uses and can radiate radio frequency energy and, if not installed and used in accordance with the instructions, may cause harmful interference to radio communications. However, there is no guarantee that interference will not occur in a particular installation. If this equipment does cause harmful interference to radio or television reception, which can be determined by turning the equipment off and on, the user is encouraged to try to correct the interference by one or more of the following measures:
- Reorient or relocate the receiving antenna. Increase the separation between the equipment and the receiver.
- Connect the equipment into an outlet on a circuit different from that to which the receiver is connected.
- Consult the dealer or an experienced radio/TV technician for help.
NOTE: The manufacturer is not responsible for any radio or TV interference caused by unauthorized modifications to this equipment. Such modifications could void the user authority to operate the equipment.
Customer Support
AcuRite customer support is committed to providing you with best-inclass service. For assistance, please have the model number of this product available and contact us in any of the following ways:
 (877) 221-1252
- Visit us at : www.AcuRite.com
- Installation Videos
- Register your Product
- Instruction Manuals
- Support User Forum
- Replacement Part
- Submit Feedback & Ideas
Limited 1 Year Warranty
AcuRite is a wholly owned subsidiary of Chaney Instrument Company. For purchases of AcuRite products, AcuRite provides the benefits and services set forth herein. For purchases of Chaney products, Chaney provides the benefits and services set forth herein.
We warrant that all products we manufacture under this warranty are of good material and workmanship and, when properly installed and operated, will be free of defects for a period of one year from the date of purchase.
Any product which, under normal use and service, is proven to breach the warranty contained herein within ONE YEAR from date of sale will, upon examination by us, and at our sole option, be repaired or replaced by us. Transportation costs and charges for returned goods shall be paid for by the purchaser. We hereby disclaim all responsibility for such transportation costs and charges. This warranty will not be breached, and we will give no credit for products which have received normal wear and tear not affecting the functionality of the product, been damaged (including by acts of nature), tampered, abused, improperly installed, or repaired or altered by others than our authorized representatives.
Remedy for breach of this warranty is limited to repair or replacement of the defective item(s). If we determine that repair or replacement is not feasible, we may, at our option, refund the amount of the original purchase price
THE ABOVE-DESCRIBED WARRANTY IS THE SOLE WARRANTY FOR THE PRODUCTS AND IS EXPRESSLY IN LIEU OF ALL OTHER WARRANTIES, EXPRESS OR IMPLIED. ALL OTHER WARRANTIES OTHER THAN THE EXPRESS WARRANTY SET FORTH HEREIN ARE HEREBY EXPRESSLY DISCLAIMED, INCLUDING WITHOUT LIMITATION THE IMPLIED WARRANTY OF MERCHANT ABILITY AND THE IMPLIED WARRANTY OF FITNESS FOR A PARTICULAR PURPOSE.
We expressly disclaim all liability for special, consequential, or incidental damages, whether arising in tort or by contract from any breach of this warranty. Some states do not allow the exclusion or limitation of incidental or consequential damages, so the above limitation or exclusion may not apply to you.
its products to the extent permitted by law. By acceptance of any of our products, the purchaser assumes all liability for the consequences arising from their use or misuse. No person, firm or corporation is authorized to bind us to any other obligation or liability in connection with the sale of our products. Furthermore, no person, firm or corporation is authorized to modify or waive the terms of this warranty unless done in writing and signed by a duly authorized agent of ours.
In no case shall our liability for any claim relating to our products, your purchase or your use thereof, exceed the original purchase price paid for the product.
Applicability of Policy
This Return, Refund, and Warranty Policy applies only to purchases made in the United States and Canada. For purchases made in a country other than the United States or Canada, please consult the policies applicable to the country in which you made your purchase.
Additionally, this Policy applies only to the original purchaser of our products. We do cannot and do not offer any return refund, or warranty services if you buy products used or from resale sites such as eBay or Craigslist.
Governing Law
This Return, Refund, and Warranty Policy is governed by the laws of the United States and the State of Wisconsin. Any dispute relating to this Policy shall be brought exclusively in the federal or State courts having jurisdiction in Walworth County, Wisconsin; and purchaser consents to jurisdiction within the State of Wisconsin.
- Weather Stations
- Temperature & Humidity
- Weather Alert Radio
- Kitchen Thermometers & Timers
- Clocks
It’s more than accurate, it’s 
AcuRite offers an extensive assortment of precision instruments,
designed to provide you with information you can depend on to
Plan your day with confidence™.


Instruction Manual
Thermometer
model 00381
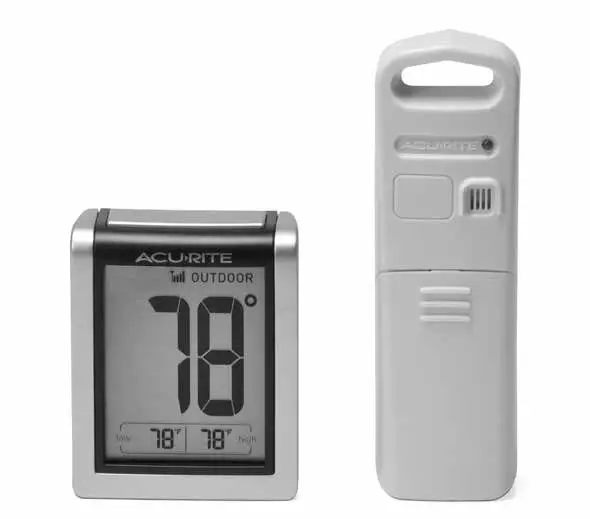
Questions? Contact Customer Support at (877) 221-1252 or visit www.AcuRite.com
SAVE THIS MANUAL FOR FUTURE REFERENCE.

Congratulations on your new AcuRite product. To ensure the best possible product performance, please read this manual in its entirety and retain it for future reference.
Unpacking Instructions
Remove the protective film that is applied to the LCD screen prior to using this product. Locate the tab and peel off to remove.
Package Contents
- Display
- Outdoor Sensor
- Instruction Manual
IMPORTANT
PRODUCT MUST BE REGISTERED TO RECEIVE WARRANTY SERVICE
PRODUCT REGISTRATION Register online to receive 1 year warranty protection www.AcuRite.com
Features & Benefits
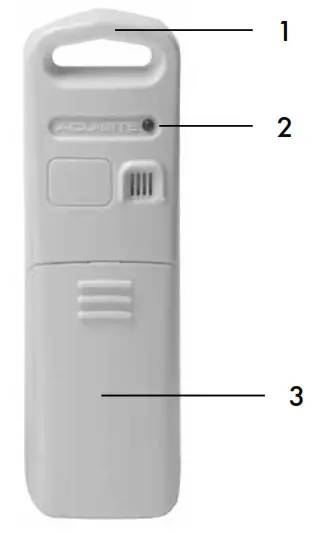
OUTDOOR SENSOR
- Integrated Hanger
For easy placement. - Wireless Signal Indicator
Flashes when data is being sent to the display. - Battery Compartment Cover
Features & Benefits
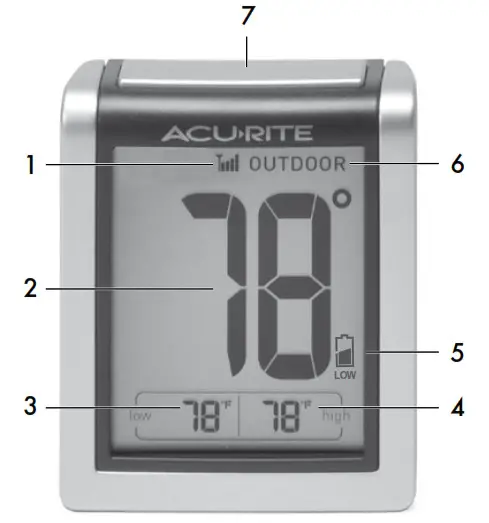 DISPLAY FRONT
- Outdoor Sensor Signal Strength
- Indoor or Outdoor Temperature
- Low-Temperature Record
The lowest temperature recorded over the past 24 hours. - High-Temperature Record Highest temperature recorded over the past 24 hours.
- Display Low Battery Indicator
- Indoor or Outdoor Temperature Indicator
Indicates which temperature is currently being viewed. - Indoor or Outdoor Button Press to toggle between indoor and outdoor temperature.
SETUP
Install or Replace Batteries
AcuRite recommends high-quality alkaline batteries for the best product performance. Heavy duty or rechargeable batteries are not recommended.
The outdoor sensor requires lithium batteries in low-temperature conditions. Cold temperatures can cause alkaline batteries to function improperly. Use lithium batteries in the outdoor sensor for temperatures below -4ºF / -20ºC.
Outdoor Sensor
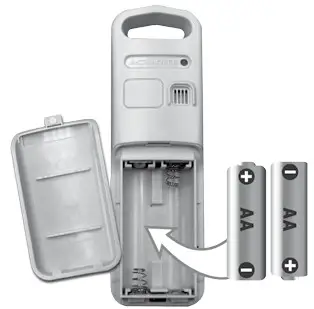
- Slide off the battery compartment cover.
- Insert 2 x AA batteries into the battery compartment, as shown. Follow the polarity (+/-) diagram in the battery compartment.
- Replace the battery cover.
LITHIUM BATTERIES

ALKALINE BATTERIES

Display
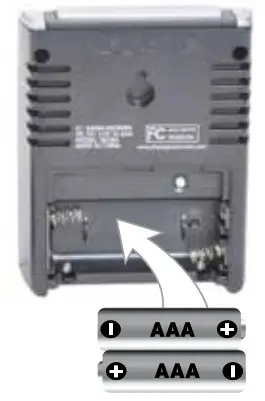
- Slide off the battery compartment cover.
- Insert 2 x AAA batteries into the battery compartment, as shown. Follow the polarity (+/-) diagram in the battery compartment.
- Replace the battery cover.
Select Degrees Fahrenheit or Celsius
To select between degrees Fahrenheit (ºF) or Celsius (ºC) temperature units, press the “ºC/ºF” button located inside the battery compartment of the display.
![]() PLEASE DISPOSE OF OLD OR DEFECTIVE BATTERIES IN AN ENVIRONMENTALLY SAFE WAY AND IN ACCORDANCE WITH YOUR LOCAL LAWS AND REGULATIONS.
PLEASE DISPOSE OF OLD OR DEFECTIVE BATTERIES IN AN ENVIRONMENTALLY SAFE WAY AND IN ACCORDANCE WITH YOUR LOCAL LAWS AND REGULATIONS.
BATTERY SAFETY: Clean the battery contacts and also those of the device prior to battery installation. Remove batteries from equipment which is not to be used for an extended period of time. Follow the polarity (+/-) diagram in the battery compartment. Promptly remove dead batteries from the device. Dispose of used batteries properly. Only batteries of the same or equivalent type as recommended are to be used. DO NOT incinerate used batteries. DO NOT dispose of batteries in fire, as batteries may explode or leak. DO NOT mix old and new batteries or types of batteries (alkaline/standard). DO NOT use rechargeable batteries. DO NOT recharge non-rechargeable batteries. DO NOT short-circuit the supply terminals.
Placement for Maximum Accuracy
AcuRite sensors are sensitive to surrounding environmental conditions. Proper placement of both the display and outdoor sensor are critical to the accuracy and performance of this product.
Display Placement
 Place the display in a dry area free of dirt and dust. Display stands upright for tabletop use or is wall-mountable.
Outdoor Sensor Placement
 Sensors must be placed outside to observe outdoor conditions. The sensor is water resistant and is designed for general outdoor use, however, to extend its life place the sensor in an area protected from direct weather elements.
Hang the sensor using the integrated hang holes or hanger, or by using string (not included) to hang it from a suitable location, like a well-covered tree branch. The best location is 4 to 8 feet above the ground with permanent shade and plenty of fresh air to circulate around the sensor.
Important Placement Guidelines
- To ensure accurate temperature measurement, place units out of direct sunlight and away from heat sources or vents.
- Display and outdoor sensor must be within 165 ft (50 m) of each other.
- To maximize wireless range, place units away from large metallic items, thick walls, metal surfaces, or other objects that may limit wireless communication.
- To prevent wireless interference, place both units at least 3 ft (.9 m) away from electronic devices (TV, computer, microwave, radio, etc.)
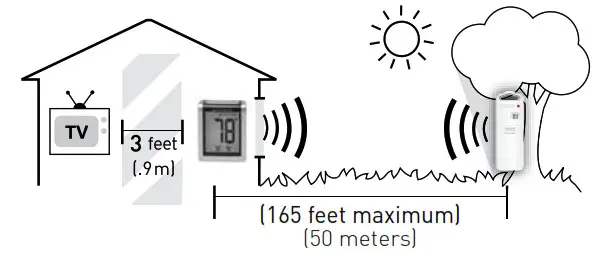
Setup is Complete
The sensor will now synchronize with the display. It may take a few minutes for synchronization to complete. Please refer to the troubleshooting section of this manual if anything appears to be functioning improperly.
Troubleshooting
| Problem | Possible Solution |
| No outdoor sensor Reception |
If the wireless signal indicator shows no bars: • Relocate the display and/or the outdoor sensor. The units must be within 165 ft (50 m) of each other. • Make sure both units are placed at least 3 feet (.9 m) away from electronics that may interfere with the wireless communication (such as TVs, microwaves, computers, etc). • Use standard alkaline batteries (or lithium batteries in sensor when temperature is below -4ºF/-20ºC). Do not use heavy duty or rechargeable batteries. NOTE: It may take a few minutes for display and sensor to synchronize after batteries are replaced. |
| Outdoor emperature is flashing or showing dashes | Flashing of the outdoor temperature is generally an indication of wireless interference. 1. Bring both the sensor and display indoors and remove at least one battery from each. 2. Reinstall the battery in the outdoor sensor. 3. Reinstall the battery in the display. 4. Let the units sit within a couple feet of each other for a few minutes to gain a strong connection. |
| Inaccurate temperature | • Make sure both the display and sensor are placed out of direct sunlight and away from any heat sources or vents (see page 4). |
| Display screen not working | • Check that the batteries are installed correctly. Batteries may need to be replaced. |
If your AcuRite product does not operate properly after trying the troubleshooting steps, visit www.AcuRite.com or call (877) 221-1252 for assistance.
Care & Maintenance
Display Care
Clean with a soft, damp cloth. Do not use caustic cleaners or abrasives. Keep away from dust, dirt and moisture. Clean ventilation ports regularly with a gentle puff of air.
Outdoor Sensor Care
Clean with a soft damp cloth. Do not use caustic cleaners or abrasives.
Specifications
| TEMPERATURE RANGE | Outdoor: -40ºF to 158ºF; -40ºC to 70ºC |
| Indoor: 32ºF to 122ºF; 0ºC to 50ºC | |
| WIRELESS RANGE | 165 ft / 50 m depending on home construction materials |
| WIRELESS FREQUENCY | 433 MHz |
| POWER | Display: 2 x AAA alkaline batteries Sensor: 2 x AA alkaline or lithium batteries |
| DATA REPORTING | 30-second updates |
FCC Information
This device complies with part 15 of FCC rules. Operation is subject to the following two conditions:
- This device may NOT cause harmful interference, and
- This device must accept any interference received, including interference that may cause undesired operation. WARNING: Changes or modifications to this unit not expressly approved by the party responsible for compliance could void the user’s authority to operate the equipment. NOTE: This equipment has been tested and found to comply with the limits for a Class B digital device, pursuant to Part 15 of the FCC rules. These limits are designed to provide reasonable protection against harmful interference in a residential installation. This equipment generates, uses and can radiate radio frequency energy and, if not installed and used in accordance with the instructions, may cause harmful interference to radio communications. However, there is no guarantee that interference will not occur in a particular installation. If this equipment does cause harmful interference to radio or television reception, which can be determined by turning the equipment off and on, the user is encouraged to try to correct the interference by one or more of the following measures:
- Reorient or relocate the receiving antenna.
- Increase the separation between the equipment and the receiver.
- Connect the equipment into an outlet on a circuit different from that to which the receiver is connected.
- Consult the dealer or an experienced radio/TV technician for help.
NOTE: The manufacturer is not responsible for any radio or TV interference caused by unauthorized modifications to this equipment. Such modifications could void the user authority to operate the equipment. This device complies with Industry Canada licence-exempt RSS standard(s). Operation is subject to the following two conditions: (1) This device may not cause interference, and (2) This device must accept any interference received, including interference that may cause undesired operation of the device.
Customer Support
AcuRite customer support is committed to providing you with best-in-class service. For assistance, please have the model number of this product available and contact us in any of the following ways:
![]() (877) 221-1252
(877) 221-1252
Visit us at www.AcuRite.com
| ► Installation Videos | ► |
| ► Instruction Manuals | ► |
| ► | ► |
IMPORTANT
PRODUCT MUST BE REGISTERED TO RECEIVE WARRANTY SERVICE
PRODUCT REGISTRATION Register online to receive 1 year warranty protection www.AcuRite.com


It’s More than Accurate, it’s
AcuRite offers an extensive assortment of precision instruments, designed to provide you with information you can depend on to Plan your day with confidence™. www.AcuRite.com
©Chaney Instrument Co. All rights reserved. AcuRite is a registered trademark of the Chaney Instrument Co., Lake Geneva, WI 53147. All other trademarks and copyrights are the property of their respective owners. AcuRite uses patented technology. Visit www.AcuRite.com/patents for details.
]]>
Wireless Thermometer
models 00424/0052
Instruction Manual
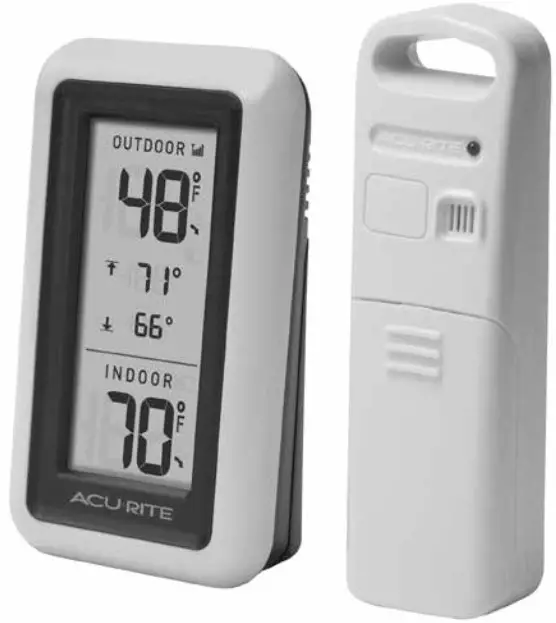
Questions? Contact Customer Support at
(877) 221-1252 or visit www.AcuRite.com
SAVE THIS MANUAL FOR FUTURE REFERENCE.

Congratulations on your new AcuRite product. To ensure the best possible product performance, please read this manual in its entirety and retain it for future reference.
Unpacking Instructions
Remove the protective film that is applied to the LCD screen prior to using this product. Locate the tab and peel it off to remove it.
Package Contents
- Display unit
- Outdoor sensor
- Instruction Manual
| IMPORTANT | PRODUCT MUST BE REGISTERED TO RECEIVE WARRANTY SERVICE |
| IMPORTANT PRODUCT REGISTRATION Register online to receive 1-year warranty protection www.AcuRite.co |
 |
Features & Benefits
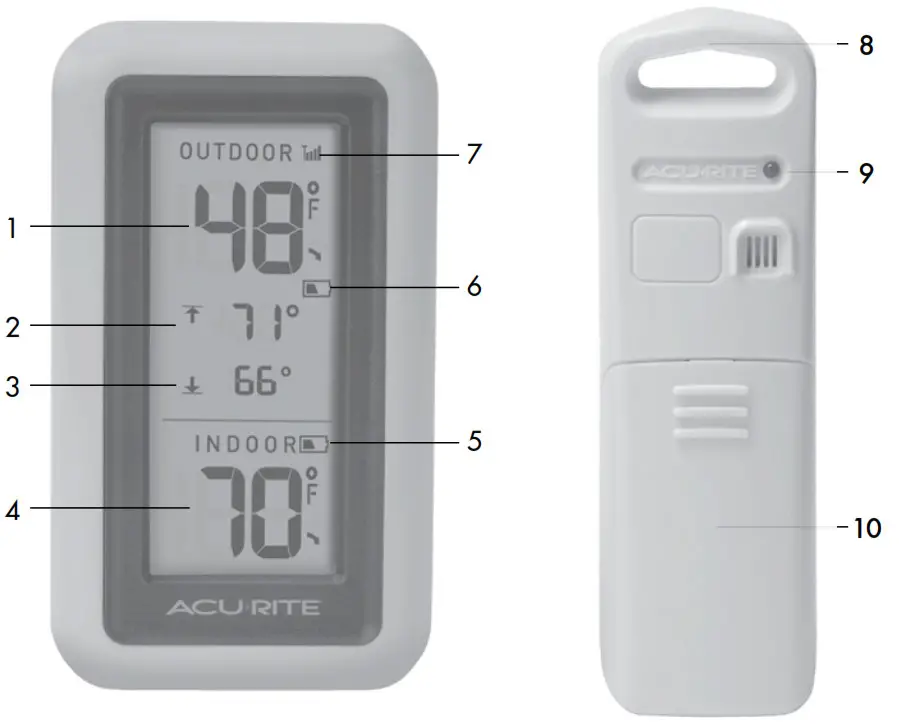
DISPLAY UNIT
- Current Outdoor Temperature
The arrow icon indicates the direction the temperature is trending. - High (
 )Temperature Record
The highest temperature was recorded over the past 24 hours. - Low (
 ) Temperature Record
The lowest temperature was recorded over the past 24 hours. - Current Indoor Temperature
The arrow icon indicates the direction the temperature is trending. - Display Low Battery Indicator
- Outdoor Sensor Low Battery Indicator
- Outdoor Sensor Signal Strength
OUTDOOR SENSOR - Integrated Hanger For easy placement.
- Wireless Signal Indicator
Flashes when data is being sent to the display unit. - Battery Compartment Cover
SETUP
Install or Replace Batteries
AcuRite recommends high-quality alkaline batteries for the best product performance. Heavy duty or rechargeable batteries are not recommended.
The outdoor sensor requires lithium batteries in low-temperature conditions. Cold temperatures can cause alkaline batteries to function improperly. Use lithium batteries in the outdoor sensor for temperatures below -4ºF / -20ºC.
Outdoor Sensor
- Slide off the battery compartment cover.
- Insert 2 x AA batteries into the battery compartment, as shown. Follow the polarity (+/-) diagram in the battery compartment.
- Replace the battery cover.
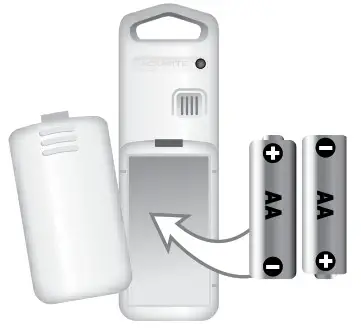

Display Unit
- Slide off the battery compartment cover.
- Insert 2 x AA batteries into the battery compartment, as shown. Follow the polarity (+/-) diagram in the battery compartment.
- Replace the battery cover.
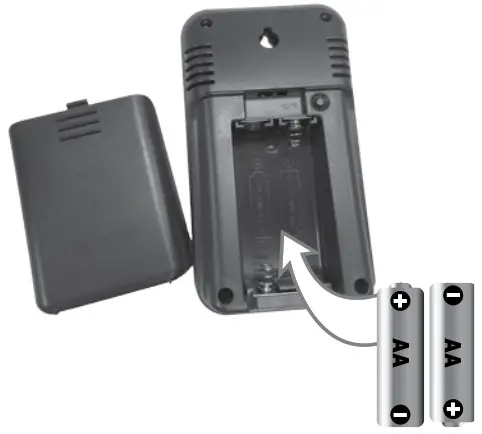
Select Degrees Fahrenheit or Celsius
To select between degrees Fahrenheit (ºF) or Celsius (ºC) temperature units, press the “ºC/ºF” button located inside the battery compartment of the display.
![]() PLEASE DISPOSE OF OLD OR DEFECTIVE BATTERIES IN AN ENVIRONMENTALLY SAFE WAY AND IN ACCORDANCE WITH YOUR LOCAL LAWS AND REGULATIONS.
PLEASE DISPOSE OF OLD OR DEFECTIVE BATTERIES IN AN ENVIRONMENTALLY SAFE WAY AND IN ACCORDANCE WITH YOUR LOCAL LAWS AND REGULATIONS.
BATTERY SAFETY: Clean the battery contacts and also those of the device prior to battery installation. Remove batteries from equipment that is not to be used for an extended period of time. Follow the polarity (+/-) diagram in the battery compartment. Promptly remove dead batteries from the device. Dispose of used batteries properly. Only batteries of the same or equivalent type as recommended are to be used. DO NOT incinerate used batteries. DO NOT dispose of batteries in fire, as batteries may explode or leak. DO NOT mix old and new batteries or types of batteries alkaline/standard). DO NOT use rechargeable batteries. DO NOT recharge non-rechargeable batteries. DO NOT short-circuit the supply terminals.
Placement for Maximum Accuracy
AcuRite sensors are sensitive to surrounding environmental conditions. Proper placement of both the display unit and outdoor sensor is critical to the accuracy and performance of this product.
Display Unit Placement
Place the display unit in a dry area free of dirt and dust. The display unit stands upright for tabletop use or is wall-mountable.
 Outdoor Sensor Placement
The sensor must be placed outside to observe outdoor conditions. The sensor is water-resistant and is designed for general outdoor use, however, to extend its life place the sensor and are protected from direct weather elements. Hang the sensor using the integrated hang holes or hanger, or by using string (not included) to hang it from a suitable location, like a well-covered tree branch. The best location is 4 to 8 feet above the ground with permanent shade and plenty of fresh air to circulate around the sensor.

Important Placement Guidelines
- To ensure accurate temperature measurement, place units out of direct sunlight and away from heat sources or vents.
- The display unit and outdoor sensor must be within 165 ft (50 m) of each other.
- To maximize wireless range, place units away from large metallic items, thick walls, metal surfaces, or other objects that may limit wireless communication.
- To prevent wireless interference, place both units at least 3 ft (.9 m) away from electronic devices (TV, computer, microwave, radio, etc.)
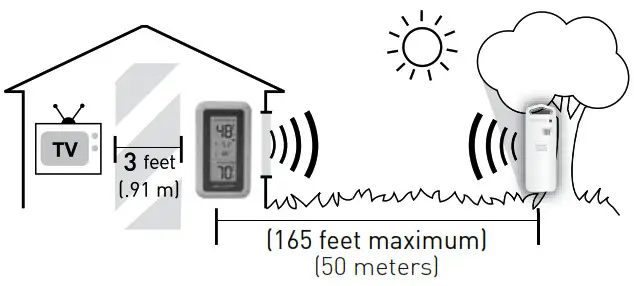
Setup is Complete
The sensor will now synchronize with the display unit. It may take a few minutes for synchronization to complete. Please refer to the troubleshooting section of this manual if anything appears to be functioning improperly.
OPERATION
Using the Thermometer
High/Low Records
The “ “ and “
 “ records are reset every 24 hours. The time records are cleared is determined by the time the unit was powered on. For example, if the unit was powered on at 6:00 pm, then high/low records reset at 6:00 pm daily.
Troubleshooting
| No outdoor sensor reception |
If the wireless signal indicator shows no bars:
|
| Outdoor temperature is flashing or showing dashes | Flashing of the outdoor temperature is generally an indication of wireless interference.
|
| Inaccurate temperature |
|
| Display screen not working |
|
If your AcuRite product does not operate properly after trying the troubleshooting steps, visit www.AcuRite.com or call (877) 221-1252 for assistance.
Care & Maintenance
Display Unit Care
Clean with a soft, damp cloth. Do not use caustic cleaners or abrasives. Keep away from dust, dirt, and moisture. Clean ventilation ports regularly with a
a gentle puff of air.
Outdoor Sensor Care
Clean with a soft damp cloth. Do not use caustic cleaners or abrasives.
Specifications
| TEMPERATURE RANGE | Outdoor: -40ºF to 158ºF; -40ºC to 70ºC |
| Indoor: 32ºF to 122ºF; 0ºC to 50ºC | |
| WIRELESS RANGE | 165 ft / 50 m depending on home construction materials |
| WIRELESS FREQUENCY | 433 MHz |
| POWER | Display: 2 x AA alkaline batteries Sensor: 2 x AA alkaline or lithium batteries |
| DATA REPORTING | 30-second updates |
FCC Information
This device complies with part 15 of FCC rules. Operation is subject to the following two conditions:
1- This device may NOT cause harmful interference, and
2- This device must accept any interference received, including interference that may cause undesired operation.
WARNING: Changes or modifications to this unit not expressly approved by the party responsible for compliance could void the user’s authority to operate the equipment.
NOTE: This equipment has been tested and found to comply with the limits for a Class B digital device, pursuant to Part 15 of the FCC rules. These limits are designed to provide reasonable protection against harmful interference in a residential installation. This equipment generates, uses, and can radiate radio frequency energy and, if not installed and used in accordance with the instructions, may cause harmful interference to radio communications. However, there is no guarantee that interference will not occur in a particular installation. If this equipment does cause harmful interference to radio or television reception, which can be determined by turning the equipment off and on, the user is encouraged to try to correct the interference by one or more of the following measures:
- Reorient or relocate the receiving antenna.
- Increase the separation between the equipment and the receiver.
- Connect the equipment into an outlet on a circuit different from that to which the receiver disconnected.
- Consult the dealer or an experienced radio/tv technician for help.
NOTE: The manufacturer is not responsible for any radio or TV interference caused by unauthorized modifications to this equipment. Such modifications would void the user’s authority to operate the equipment. This device complies with Industry Canada licence-exempt RSS standard(s). Operation is subject to the following two conditions:
- This device may not cause interference, and
- This device must accept any interference received, including interference that may cause undesired operation of the device.
Customer Support
AcuRite customer support is committed to providing you with best-in-class service. For assistance, please have the model number of this product available and contact us in any of the following ways:
![]() (877) 221-1252
(877) 221-1252 ![]() [email protected]
[email protected]
24/7 support at www.AcuRite.com
- Installation Videos
- Instruction Manuals
- Replacement Parts
- Register your Product
- Support User Forum
- Submit Feedback & Ideas
| IMPORTANT | PRODUCT MUST BE REGISTERED TO RECEIVE WARRANTY SERVICE |
| PRODUCT REGISTRATION Register online to receive 1 year warranty protection www.AcuRite.com |
 |
Limited One Year Warranty
At AcuRite, we proudly uphold our commitment to quality technology. Chaney Instrument Co. warrants that all products it manufactures to be of good material and workmanship and to be free of defects when properly installed and operated for a period of one year from the date
of purchase.
We recommend that you visit us at www.AcuRite.com for the fastest way to register your product. However, product registration does not eliminate the need to retain your original proof of purchase in order to obtain warranty benefits.
Chaney Instrument Co. warrants that all products it manufactures to be of good material and workmanship and to be free of defects when properly installed and operated for a period of one year from the date of purchase. Remedy for breach of this warranty is limited to repair or replacement of the defective item(s). Any product which, under normal use and service, is proven to breach the warranty contained herein within ONE YEAR from the date of sale will, upon examination by Chaney, and at its sole option, be repaired or replaced by Chaney. Transportation costs and charges for returned goods shall be paid for by the purchaser. Chaney hereby disclaims all responsibility for such transportation costs and charges. This warranty will not be breached, and Chaney will give no credit for products it manufactures which have received normal wear and tear, been damaged (including by acts of nature), tampered, abused, improperly installed, damaged in shipping, or repaired or altered by others than authorized representatives of Chaney.
The above-described warranty is expressly in lieu of all other warranties, express or implied, and all other warranties are hereby expressly disclaimed, including without limitation the implied warranty of merchantability and the implied warranty of fitness for a particular purpose. Chaney expressly disclaims all liability for special, consequential or incidental damages, whether arising in tort or by contract from any breach of this warranty. Some states do not allow the exclusion or limitation of incidental or consequential damages, so the above limitation or exclusion may not apply to you. Chaney further disclaims all liability from personal injury relating to its products to the extent permitted by law. By acceptance of any of Chaney’s products, the purchaser assumes all liability for the consequences arising from their use or misuse. No person, firm or corporation is authorized to assume for Chaney any other liability in connection with the sale of its products. Furthermore, no person, firm or corporation is authorized to modify or waive the terms of this paragraph, and the preceding paragraph, unless done in writing band signed by a duly authorized agent of Chaney. This warranty gives you specific legal rights, and you may also have other rights which vary from state to state.
For in-warranty claims: Chaney Instrument Co.
965 Wells St., Lake Geneva, WI 53147

 |
 |
 |
 |
 |
| Weather Stations | Temperature & Humidity | Weather Alert Radio | Kitchen Thermometers & Timers | Clocks |
It’s more than accurate, it’s 
AcuRite offers an extensive assortment of precision instruments, designed to provide you with information you can depend on to Plan your day with confidence™.
©Chaney Instrument Co. All rights reserved. AcuRite is a registered trademark of the Chaney Instrument Co., Lake Geneva, WI 53147. All other trademarks and copyrights are the property of their respective owners. AcuRite uses patented technology. Visit www.AcuRite.com/patents for details.
Printed in China
00424 INST 032714

 no bars